neat video alternative modes of image viewer ... differences between neat ... select the sample clip...
TRANSCRIPT
Neat Videonoise reduction plug-in for Premiere (Win)
To make video cleaner.
User guideDocument version 4.7, 30-Dec-2017
Neat Video © 1999-2017 Neat Video team, ABSoft. All rights reserved.
User Guide Neat Video v4 plug-in for Premiere (Win)
Table of contents
1 Introduction 31.1 Overview . . . . . . . . . . . . . . . . . . . . . . . . . . . . . . . . . . . . . . . . . . . 31.2 Features . . . . . . . . . . . . . . . . . . . . . . . . . . . . . . . . . . . . . . . . . . . . 31.3 Requirements . . . . . . . . . . . . . . . . . . . . . . . . . . . . . . . . . . . . . . . . . 3
2 Key concepts 5
3 Installing the plug-in 6
4 Running Neat Video on a sample video clip 74.1 Add the sample clip to the project . . . . . . . . . . . . . . . . . . . . . . . . . . . . . . 74.2 Add Neat Video effect . . . . . . . . . . . . . . . . . . . . . . . . . . . . . . . . . . . . 74.3 Configure Neat Video . . . . . . . . . . . . . . . . . . . . . . . . . . . . . . . . . . . . . 74.4 Render the clip . . . . . . . . . . . . . . . . . . . . . . . . . . . . . . . . . . . . . . . . 9
5 Filtration process details 105.1 Stage I. Add Reduce Noise effect . . . . . . . . . . . . . . . . . . . . . . . . . . . . . . . 105.2 Stage II. Select a frame for noise analysis . . . . . . . . . . . . . . . . . . . . . . . . . . 105.3 Stage III. Open Neat Video plug-in window . . . . . . . . . . . . . . . . . . . . . . . . . 105.4 Stage IV. Check input frame . . . . . . . . . . . . . . . . . . . . . . . . . . . . . . . . . 115.5 Stage V. Prepare a device noise profile . . . . . . . . . . . . . . . . . . . . . . . . . . . . 115.6 Stage VI. Adjust filter settings . . . . . . . . . . . . . . . . . . . . . . . . . . . . . . . . 145.7 Stage VI (a). Beginner Mode . . . . . . . . . . . . . . . . . . . . . . . . . . . . . . . . . 155.8 Stage VI (b). Advanced Mode . . . . . . . . . . . . . . . . . . . . . . . . . . . . . . . . 185.9 Stage VII. Save and apply . . . . . . . . . . . . . . . . . . . . . . . . . . . . . . . . . . . 295.10 Stage VIII. Render the clip . . . . . . . . . . . . . . . . . . . . . . . . . . . . . . . . . . 30
6 Additional tools 316.1 Variants of filtration . . . . . . . . . . . . . . . . . . . . . . . . . . . . . . . . . . . . . . 316.2 Skip Neat Video processing . . . . . . . . . . . . . . . . . . . . . . . . . . . . . . . . . . 326.3 Alternative modes of image viewer . . . . . . . . . . . . . . . . . . . . . . . . . . . . . . 32
7 Device noise profiles 337.1 Building a profile for a device mode (standard profiling procedure) . . . . . . . . . . . . . 337.2 Using noise profiles . . . . . . . . . . . . . . . . . . . . . . . . . . . . . . . . . . . . . . 39
8 Preferences 408.1 General preferences . . . . . . . . . . . . . . . . . . . . . . . . . . . . . . . . . . . . . . 408.2 Defaults . . . . . . . . . . . . . . . . . . . . . . . . . . . . . . . . . . . . . . . . . . . . 418.3 Profiling preferences . . . . . . . . . . . . . . . . . . . . . . . . . . . . . . . . . . . . . 418.4 Performance preferences . . . . . . . . . . . . . . . . . . . . . . . . . . . . . . . . . . . 428.5 Folders preferences . . . . . . . . . . . . . . . . . . . . . . . . . . . . . . . . . . . . . . 43
9 Examples 449.1 Building a noise profile . . . . . . . . . . . . . . . . . . . . . . . . . . . . . . . . . . . . 449.2 Filtration results . . . . . . . . . . . . . . . . . . . . . . . . . . . . . . . . . . . . . . . . 45
10 Questions and answers 4610.1 General questions . . . . . . . . . . . . . . . . . . . . . . . . . . . . . . . . . . . . . . . 4610.2 Filtration-related questions . . . . . . . . . . . . . . . . . . . . . . . . . . . . . . . . . . 46
11 Information 4811.1 Issues and bugs . . . . . . . . . . . . . . . . . . . . . . . . . . . . . . . . . . . . . . . . 4811.2 Plans . . . . . . . . . . . . . . . . . . . . . . . . . . . . . . . . . . . . . . . . . . . . . . 4811.3 Detailed feature map . . . . . . . . . . . . . . . . . . . . . . . . . . . . . . . . . . . . . 4811.4 Contacts . . . . . . . . . . . . . . . . . . . . . . . . . . . . . . . . . . . . . . . . . . . . 4811.5 Legal information . . . . . . . . . . . . . . . . . . . . . . . . . . . . . . . . . . . . . . . 4911.6 Registration . . . . . . . . . . . . . . . . . . . . . . . . . . . . . . . . . . . . . . . . . . 5011.7 Acknowledgments . . . . . . . . . . . . . . . . . . . . . . . . . . . . . . . . . . . . . . 51
Index 52
30-Dec-2017 Neat Video © 1999-2017 Neat Video team, ABSoft. All rights reserved. 2
User Guide Neat Video v4 plug-in for Premiere (Win)
1. Introduction
1.1. OverviewNeat Video is a filter designed to reduce noise and grain in digital video.
Neat Video detects, analyzes and reduces noise. The quality of noise reduction provided by Neat Videois higher than that of other methods because Neat Video incorporates the most advanced noise reductionalgorithms in the industry and takes into account specific characteristics of particular video capturingdevices – video camera, camcorder, computer TV-tuner, etc., – making the filtration customized and moreaccurate.
In addition, Neat Video can make video look sharper without any degradation of quality. The combinationof the sharpening and noise filter makes such effect possible.
Neat Video plug-in for Premiere (Win) is available in three editions: Demo, Home, Pro.
• Demo plug-in is a free edition of the software with limited functionality
• Home plug-in works with up to 1920x1080 pixel large frames; for non-commercial use only
• Pro plug-in has no frame size limitations
1.2. Features
Noise Reduction and Smart Sharpening
• Advanced noise filters to reduce noise and grain in digital footage
Temporal filter to reduce noise, dust, scratches, etc. using data from consecutive frames
Spatial filter to further reduce noise and artifacts within each single frame
• Complete control over the noise filter to achieve the desired level of noise reduction
• Smart sharpening filter to make video look sharper without amplification of noise
• High-bitdepth rendering to fully support professional applications
• CUDA and OpenCL acceleration to speed up processing using computation-capable GPUs
Device Noise Profiles
• Custom noise profiles to make noise reduction device-specific and more accurate
• Auto Profile function to build noise profiles for custom video-capturing devices
Some features are only available in the Home or Pro plug-in. Detailed feature map (page 48) explains thedifferences between Neat Video Demo, Home and Pro plug-ins in details.
1.3. RequirementsRecommended system configuration is:
• Intel i7 / i5 / Xeon / compatible; single or multi-processor
• Windows 10, 8, 7, Vista, XP; 64-bit
Optional CUDA acceleration requires:
• CUDA-capable NVIDIA GPU with compute capability 2.0 or higher;
• Recent video driver supporting CUDA 8 or newer(you can download the latest versions of the video drivers from http://www.nvidia.com)
30-Dec-2017 Neat Video © 1999-2017 Neat Video team, ABSoft. All rights reserved. 3
User Guide Neat Video v4 plug-in for Premiere (Win)
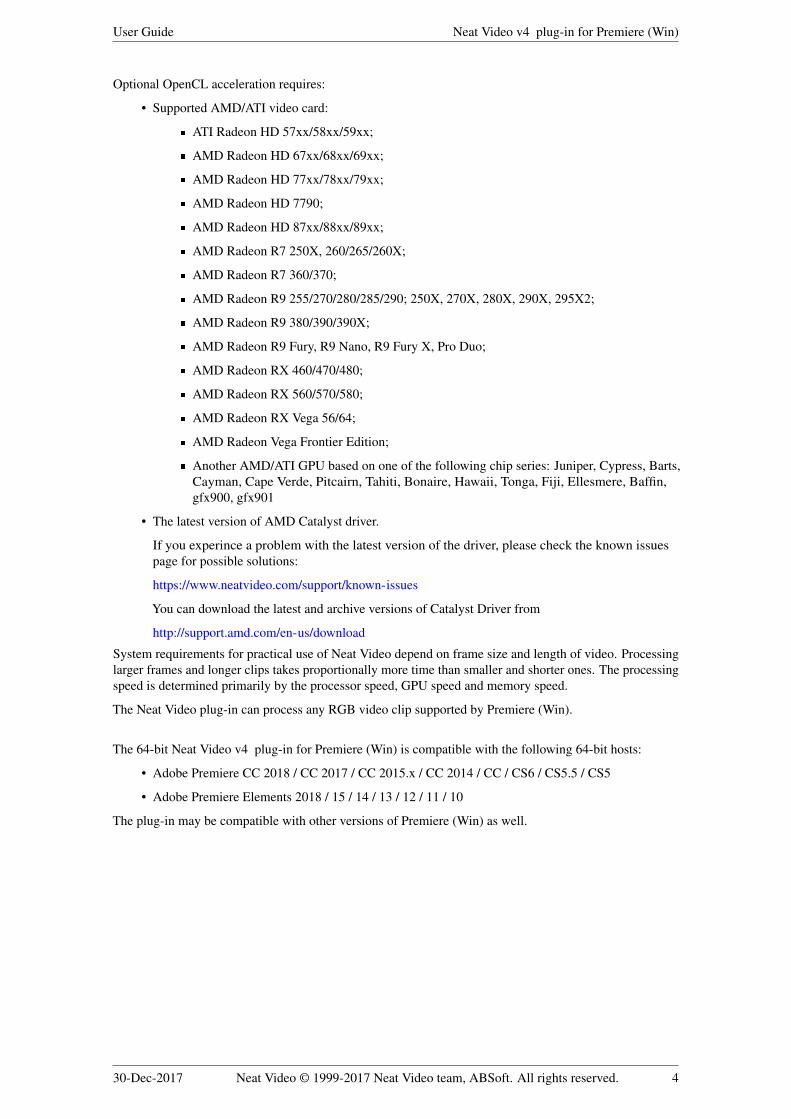
Optional OpenCL acceleration requires:
• Supported AMD/ATI video card:
ATI Radeon HD 57xx/58xx/59xx;
AMD Radeon HD 67xx/68xx/69xx;
AMD Radeon HD 77xx/78xx/79xx;
AMD Radeon HD 7790;
AMD Radeon HD 87xx/88xx/89xx;
AMD Radeon R7 250X, 260/265/260X;
AMD Radeon R7 360/370;
AMD Radeon R9 255/270/280/285/290; 250X, 270X, 280X, 290X, 295X2;
AMD Radeon R9 380/390/390X;
AMD Radeon R9 Fury, R9 Nano, R9 Fury X, Pro Duo;
AMD Radeon RX 460/470/480;
AMD Radeon RX 560/570/580;
AMD Radeon RX Vega 56/64;
AMD Radeon Vega Frontier Edition;
Another AMD/ATI GPU based on one of the following chip series: Juniper, Cypress, Barts,Cayman, Cape Verde, Pitcairn, Tahiti, Bonaire, Hawaii, Tonga, Fiji, Ellesmere, Baffin,gfx900, gfx901
• The latest version of AMD Catalyst driver.
If you experince a problem with the latest version of the driver, please check the known issuespage for possible solutions:
https://www.neatvideo.com/support/known-issues
You can download the latest and archive versions of Catalyst Driver from
http://support.amd.com/en-us/download
System requirements for practical use of Neat Video depend on frame size and length of video. Processinglarger frames and longer clips takes proportionally more time than smaller and shorter ones. The processingspeed is determined primarily by the processor speed, GPU speed and memory speed.
The Neat Video plug-in can process any RGB video clip supported by Premiere (Win).
The 64-bit Neat Video v4 plug-in for Premiere (Win) is compatible with the following 64-bit hosts:
• Adobe Premiere CC 2018 / CC 2017 / CC 2015.x / CC 2014 / CC / CS6 / CS5.5 / CS5
• Adobe Premiere Elements 2018 / 15 / 14 / 13 / 12 / 11 / 10
The plug-in may be compatible with other versions of Premiere (Win) as well.
30-Dec-2017 Neat Video © 1999-2017 Neat Video team, ABSoft. All rights reserved. 4
User Guide Neat Video v4 plug-in for Premiere (Win)
2. Key concepts
Neat Video is a digital video filter. Its main function is to reduce noise in digital video.
Neat Video can work with video clips produced by any video recording devices – video cameras, camcorders,computer TV-tuners, film digitizers, etc. The software can be adjusted to a particular device by means of adevice noise profile, which describes the noise characteristics of the device working in a certain mode.
A device noise profile is built by analyzing those areas of a video frame that contain no visible or importantdetails. Usually, Neat Video can find such featureless areas completely automatically. In a difficult case,you can assist it and select a featureless area manually. Finding such areas is very easy for human eyes butmay sometimes be a bit difficult for software.
By analyzing featureless areas in a frame, Neat Video’s noise analyzer builds a profile which describesthe noise in these areas. With this profile, Neat Video can efficiently reduce noise in the frame and in thewhole video clip.
The noise filter processes video data in several spatial frequency ranges. This makes possible reducingnoise in one frequency range even if details are present in other ranges. The filter can also selectivelyprocess any of the color channels.
Besides spatial filtration, Neat Video also applies temporal (inter-frame) filtration to video data. Neat Videouses several consecutive frames to better reduce noise and preserve more true details in each frame. Thisimproves the overall quality of noise reduction.
Neat Video also offers specialized tools to deal with dust, scratches, artifacts, damages to details caused byin-camera noise reduction and sharpening, repeated frames, etc.
In addition to that, Neat Video includes a smart sharpening filter, which only sharpens important detailswithout increasing the level of noise. This filter also uses the noise profile to tell noise from details, soapplying the noise and sharpening filters together saves time and produces better overall results.
30-Dec-2017 Neat Video © 1999-2017 Neat Video team, ABSoft. All rights reserved. 5
User Guide Neat Video v4 plug-in for Premiere (Win)
3. Installing the plug-in
To install the Neat Video v4 plug-in for Premiere (Win)
1. Make sure you have started Premiere at least once before installing the plug-in. If you have not done ityet, start Premiere and exit it;
2. Close Premiere;
3. Download the EXE installer of Neat Video ;
• if you already purchased the product and have a current license for the Home or Pro plug-in,please use the download instruction supplied with the license to download the correspondingplug-in from the download area specified in that instruction;
• if you want to try Neat Video before purchase please download the installer of the Demoversion from this page: https://www.neatvideo.com/download
4. Double-click the downloaded EXE file to start the installer;
5. Follow the steps of the installer wizard to complete the installation process.Make sure the installer finds the location of your version of Premiere in the Additional tasks step ofthe installation process. If necessary, manually specify the location of Premiere’s Plug-ins folder there.For example Premiere CC’s plug-in folder is:C:∖Program Files∖Adobe∖Common∖Plug-ins∖7.0∖MediaCore∖
6. Start Premiere and find Neat Video | Reduce Noise v4 in the Premiere’s Video Effects list.
If Neat Video has not become available in Premiere, please contact Neat Video support for assistance.
30-Dec-2017 Neat Video © 1999-2017 Neat Video team, ABSoft. All rights reserved. 6
User Guide Neat Video v4 plug-in for Premiere (Win)
4. Running Neat Video on a sample video clip
There is a test-kit prepared to help you start using Neat Video. You can download the test-kit via thisdirect link: https://www.neatvideo.com/project/resources/testkit.zip.
Having downloaded, please unzip it to a new folder on the hard disk.
The test-kit includes a sample video clip: SampleClip.mpg. This is a typical video clip captured by adigital video camera in high-gain mode. Some technical information about the sample clip is available inthe SampleClipInfo.txt file.
Please start Premiere and go through the steps below to clean the clip using Neat Video:
4.1. Add the sample clip to the project
1. Configure a new project in Premiere
è 1. Create a new project in Premiere.
2. In New Project | General window click OK.
3. In New Sequence, select AVCHD > AVCHD 1080p25 and click OK.
Premiere will open the Project, Effects, Effect Controls, Timeline and Program Monitor windowsfor the newly created project with a new sequence.
2. Add the sample clip file to the project
è Use the File | Import. . . menu in Premiere to import the SampleClip.mpg file into the project.
3. Add the sample clip to a sequence
Select the sample clip in the Project window and drag-n-drop the clip into Sequence 01 | Video 1 in theTimeline window. Then select Sequence 01 | Video 1.
You will then see that there is strong noise in the sample clip (see the Monitor window). The task ofNeat Video is to reduce this noise.
4.2. Add Neat Video effectè In the Effects window, select Video Effects | Neat Video | Reduce Noise v4. . . and drag-n-drop it
intoSequence 01 | Video 1 in the Timeline window.This will add the Reduce Noise v4 effect to the Video Effects list in the Effects Controls window.
4.3. Configure Neat Video
1. Open Neat Video plug-in window
è Make sure Program Monitor is set to Highest Quality: right-click frame in Premiere’s preview and inthe popup menu select:– Playback Resolution > Full– Paused Resolution > Full
è In the video clip in the Timeline window, use the Current Time Indicator to select a frame withlarge flat featureless areas; the selected frame will be used for noise analysis in the next stages.
è Open the Neat Video plug-in window using the effect’s Setup. . . button (to the right of Reduce Noise v4effect name) in the Effect Controls window in Premiere.
30-Dec-2017 Neat Video © 1999-2017 Neat Video team, ABSoft. All rights reserved. 7
User Guide Neat Video v4 plug-in for Premiere (Win)
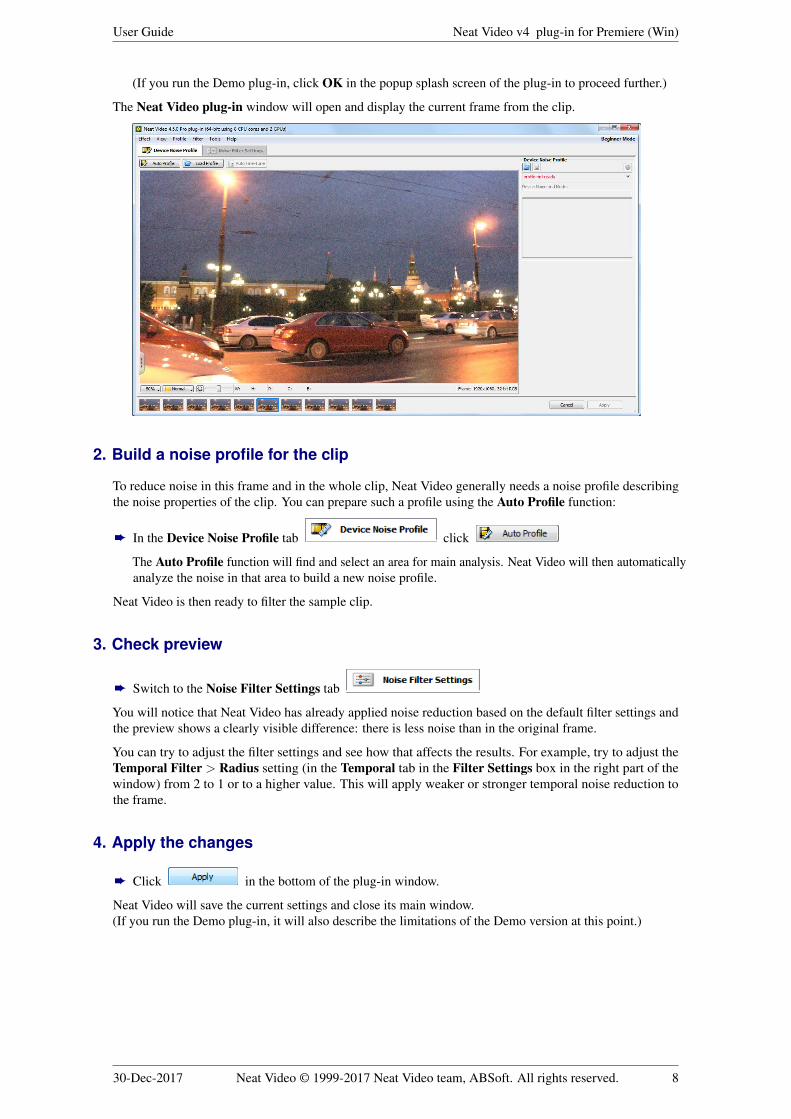
(If you run the Demo plug-in, click OK in the popup splash screen of the plug-in to proceed further.)
The Neat Video plug-in window will open and display the current frame from the clip.
2. Build a noise profile for the clip
To reduce noise in this frame and in the whole clip, Neat Video generally needs a noise profile describingthe noise properties of the clip. You can prepare such a profile using the Auto Profile function:
è In the Device Noise Profile tab click
The Auto Profile function will find and select an area for main analysis. Neat Video will then automaticallyanalyze the noise in that area to build a new noise profile.
Neat Video is then ready to filter the sample clip.
3. Check preview
è Switch to the Noise Filter Settings tab
You will notice that Neat Video has already applied noise reduction based on the default filter settings andthe preview shows a clearly visible difference: there is less noise than in the original frame.
You can try to adjust the filter settings and see how that affects the results. For example, try to adjust theTemporal Filter > Radius setting (in the Temporal tab in the Filter Settings box in the right part of thewindow) from 2 to 1 or to a higher value. This will apply weaker or stronger temporal noise reduction tothe frame.
4. Apply the changes
è Click in the bottom of the plug-in window.
Neat Video will save the current settings and close its main window.(If you run the Demo plug-in, it will also describe the limitations of the Demo version at this point.)
30-Dec-2017 Neat Video © 1999-2017 Neat Video team, ABSoft. All rights reserved. 8
User Guide Neat Video v4 plug-in for Premiere (Win)
4.4. Render the clip
è Use the Sequence | Render Effects in Work Area menu item in Premiere.
Premiere will then apply Neat Video noise reduction to the whole sample clip to help you evaluate thefiltration results (and adjust the filter settings if necessary). You will see that the noise in the resulting clipis significantly reduced while the true details are preserved.
You can also find that the resulting noise-free clip can be compressed better (the file size is smaller) thanthe original noisy clip (this depends on Premiere’s compression settings).
The next sections – Filtration process details, page 10, and Device noise profiles, page 33, – describe theNeat Video workflow and filter settings in more details.
30-Dec-2017 Neat Video © 1999-2017 Neat Video team, ABSoft. All rights reserved. 9
User Guide Neat Video v4 plug-in for Premiere (Win)
5. Filtration process details
This section explains in more details how to apply the Neat Video noise reduction to a video clip includedin a layer of a Premiere project.
5.1. Stage I. Add Reduce Noise effectTo add the Neat Video noise reduction to a video clip in a Premiere project:
è Select Video Effects | Neat Video | Reduce Noise v4. . . and drag-n-drop it into Sequence | Video 1in the Timeline window.
5.2. Stage II. Select a frame for noise analysis
Neat Video filter uses a frame (or a field1) from the video clip to analyze noise and build a noise profilenecessary to reduce noise in the clip. This frame should include flat featureless areas that contain novisible details, but do contain noise. To build a noise profile you need to manually find such a frame inthe video clip using the Premiere controls. If there are many frames that contain flat featureless areas thenselect one with larger and most noisy flat featureless areas without visible details.
è In the video clip in the Timeline window, use the Current Time Indicator to select a frame withlarge flat featureless areas; the selected frame will be used for noise analysis in the next stages.
è Make sure Program Monitor is set to Highest Quality: right-click frame in Premiere’s preview and inthe popup menu select:– Playback Resolution > Full– Paused Resolution > Full
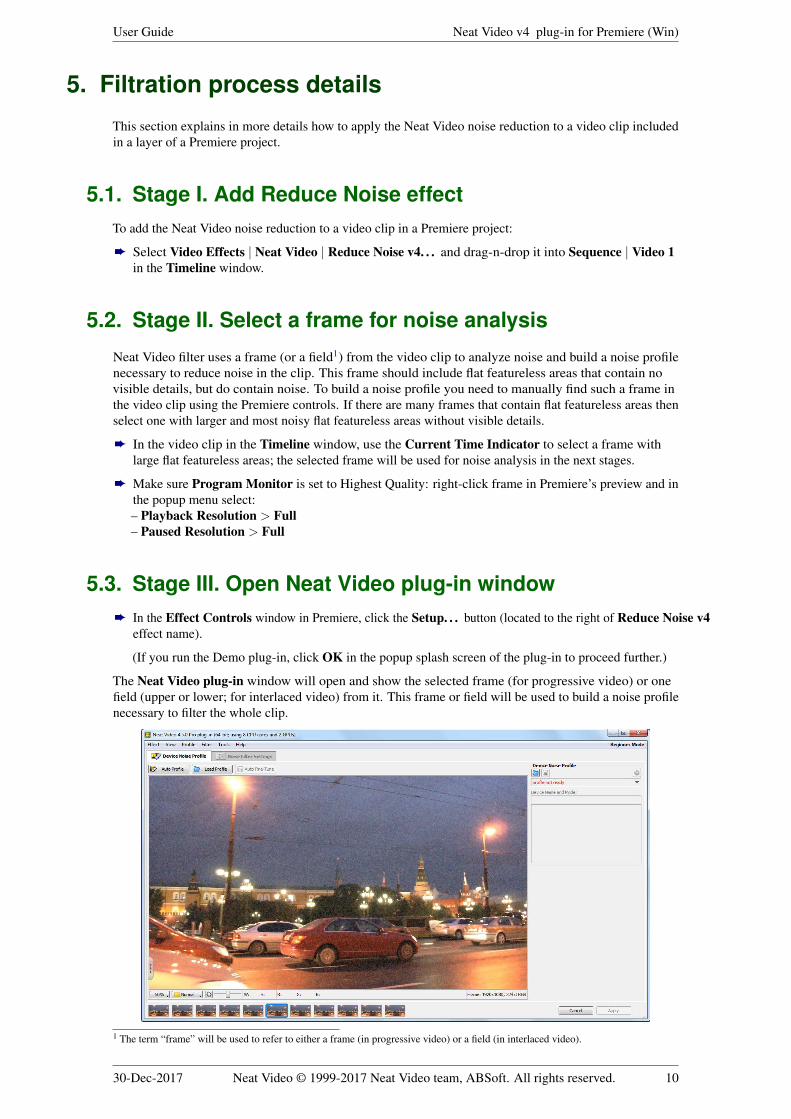
5.3. Stage III. Open Neat Video plug-in windowè In the Effect Controls window in Premiere, click the Setup. . . button (located to the right of Reduce Noise v4
effect name).
(If you run the Demo plug-in, click OK in the popup splash screen of the plug-in to proceed further.)
The Neat Video plug-in window will open and show the selected frame (for progressive video) or onefield (upper or lower; for interlaced video) from it. This frame or field will be used to build a noise profilenecessary to filter the whole clip.
1 The term “frame” will be used to refer to either a frame (in progressive video) or a field (in interlaced video).
30-Dec-2017 Neat Video © 1999-2017 Neat Video team, ABSoft. All rights reserved. 10
User Guide Neat Video v4 plug-in for Premiere (Win)
5.4. Stage IV. Check input frame
Frame size
Premiere may in certain cases serve reduced-resolution versions of the input frames to Neat Video.Premiere can do that to speed up processing and to update its preview faster. However, Neat Video needsto work with full-resolution frames when preparing a noise profile because the noise properties of thevideo data do significantly depend on the resolution of the frame.
To ensure accurate profiling please check the frame size reported in the right lower corner of the plug-in’swindow. The frame size reported there should correspond to the frame size of the current project as set inPremiere. If you see that the frame size reported by Neat Video is smaller than the frame size specified inthe project settings, please close the Neat Video window, return to the section Stage II. Select a frame fornoise analysis, page 10, and adjust the preview settings of Premiere to allow full-resolution processing.
Proceed further along this guide only after the above correspondence of frame sizes has been ensured andverified.
Viewer controls
To inspect the content of the frame (this will be used a lot in the next sections) you can use the controlsand shortcuts described below.
è To change zoom level
• use the mouse wheel when the mouse pointer is over the viewer;
• use the zoom control under the viewer;
• use the Ctrl-Plus, Ctrl-Minus, Ctrl-0, Ctrl-Alt-0 keyboard shortcuts.
è To scroll and pan the frame
• press the spacebar and the left mouse button and then drag the frame using the mouse;
• press the middle mouse button and then drag the frame using the mouse.
5.5. Stage V. Prepare a device noise profileTo filter the noise in the clip, Neat Video needs to know the characteristics of noise produced by the inputdevice (video camera, TV-tuner, etc.) the video comes from. The noise characteristics of a device workingin a certain mode constitute a device noise profile.
There are two ways to prepare a device noise profile for the clip:
• To build a new profile using a suitable frame from the clip;
• To select a suitable profile from a pre-built set of profiles (when you already have such a set).
The first option is often the easiest one provided the selected frame contains sufficiently-large uniformfeatureless areas that include noise and no visible or important details. Neat Video can try to automaticallyfind such areas in the frame and analyze noise in them to build a noise profile. When the selected framecontains featureless areas suitable for analysis, this way of preparing a noise profile is the most accurateand therefore recommended.
The second option is available once you have already built and saved several profiles for various modes ofyour video capturing device. You can then re-load the profile corresponding to the current clip (the currentclip must show the same noise as that used to build that profile) and use it to process the clip.
To build a new profile using the selected frame from the clip
è Make sure you use the Device Noise Profile tab:
è Click (the Auto Profile button).
30-Dec-2017 Neat Video © 1999-2017 Neat Video team, ABSoft. All rights reserved. 11
User Guide Neat Video v4 plug-in for Premiere (Win)
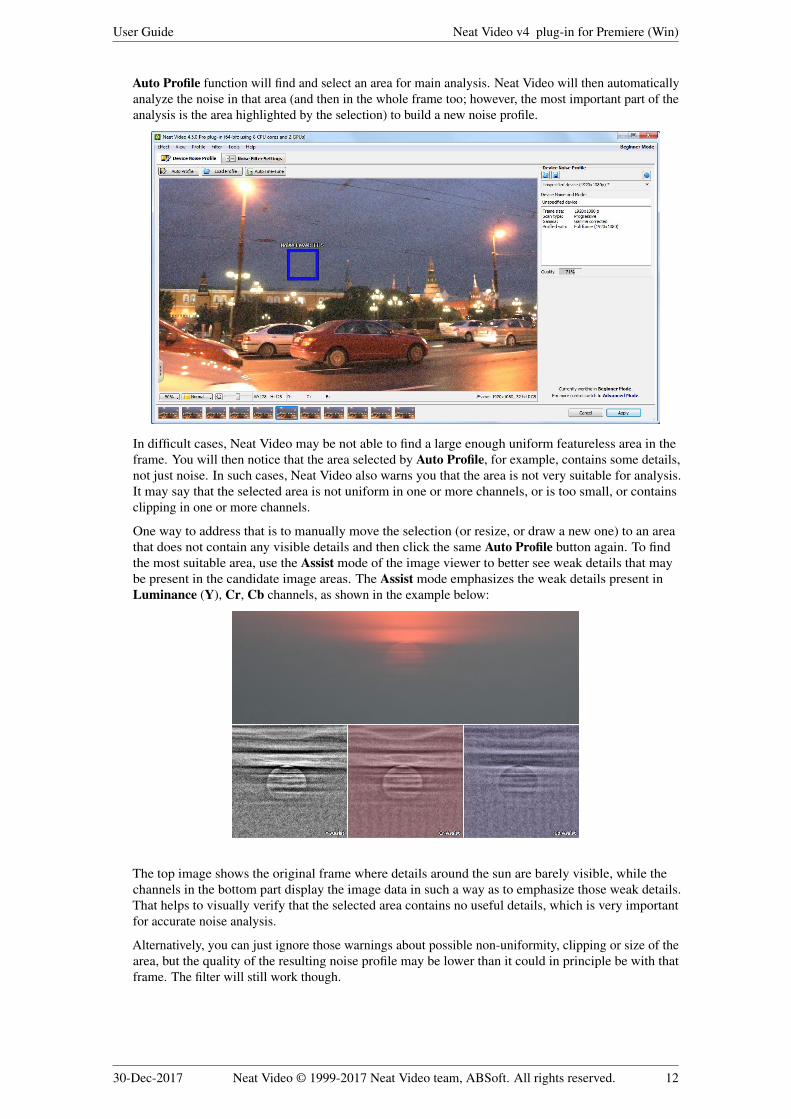
Auto Profile function will find and select an area for main analysis. Neat Video will then automaticallyanalyze the noise in that area (and then in the whole frame too; however, the most important part of theanalysis is the area highlighted by the selection) to build a new noise profile.
In difficult cases, Neat Video may be not able to find a large enough uniform featureless area in theframe. You will then notice that the area selected by Auto Profile, for example, contains some details,not just noise. In such cases, Neat Video also warns you that the area is not very suitable for analysis.It may say that the selected area is not uniform in one or more channels, or is too small, or containsclipping in one or more channels.
One way to address that is to manually move the selection (or resize, or draw a new one) to an areathat does not contain any visible details and then click the same Auto Profile button again. To findthe most suitable area, use the Assist mode of the image viewer to better see weak details that maybe present in the candidate image areas. The Assist mode emphasizes the weak details present inLuminance (Y), Cr, Cb channels, as shown in the example below:
The top image shows the original frame where details around the sun are barely visible, while thechannels in the bottom part display the image data in such a way as to emphasize those weak details.That helps to visually verify that the selected area contains no useful details, which is very importantfor accurate noise analysis.
Alternatively, you can just ignore those warnings about possible non-uniformity, clipping or size of thearea, but the quality of the resulting noise profile may be lower than it could in principle be with thatframe. The filter will still work though.
30-Dec-2017 Neat Video © 1999-2017 Neat Video team, ABSoft. All rights reserved. 12
User Guide Neat Video v4 plug-in for Premiere (Win)
After the profile is built, check the Quality indicator in the Device NoiseProfile box. A profile built using a uniform and featureless area will usuallyshow a high value in this indicator. If the profile quality is high (for example,higher than 60%), then you can be sure that the noise profile is accurate. In this case, proceed toStage VI. Adjust filter settings, page 14.
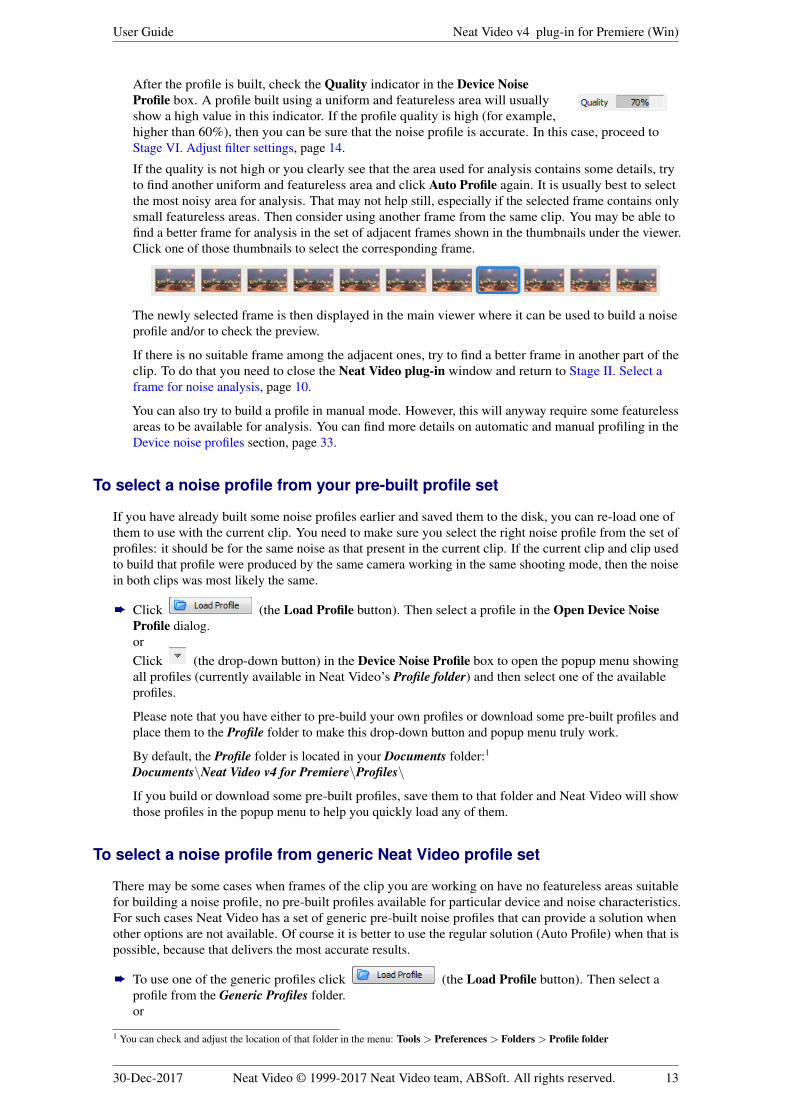
If the quality is not high or you clearly see that the area used for analysis contains some details, tryto find another uniform and featureless area and click Auto Profile again. It is usually best to selectthe most noisy area for analysis. That may not help still, especially if the selected frame contains onlysmall featureless areas. Then consider using another frame from the same clip. You may be able tofind a better frame for analysis in the set of adjacent frames shown in the thumbnails under the viewer.Click one of those thumbnails to select the corresponding frame.
The newly selected frame is then displayed in the main viewer where it can be used to build a noiseprofile and/or to check the preview.
If there is no suitable frame among the adjacent ones, try to find a better frame in another part of theclip. To do that you need to close the Neat Video plug-in window and return to Stage II. Select aframe for noise analysis, page 10.
You can also try to build a profile in manual mode. However, this will anyway require some featurelessareas to be available for analysis. You can find more details on automatic and manual profiling in theDevice noise profiles section, page 33.
To select a noise profile from your pre-built profile set
If you have already built some noise profiles earlier and saved them to the disk, you can re-load one ofthem to use with the current clip. You need to make sure you select the right noise profile from the set ofprofiles: it should be for the same noise as that present in the current clip. If the current clip and clip usedto build that profile were produced by the same camera working in the same shooting mode, then the noisein both clips was most likely the same.
è Click (the Load Profile button). Then select a profile in the Open Device NoiseProfile dialog.orClick (the drop-down button) in the Device Noise Profile box to open the popup menu showingall profiles (currently available in Neat Video’s Profile folder) and then select one of the availableprofiles.
Please note that you have either to pre-build your own profiles or download some pre-built profiles andplace them to the Profile folder to make this drop-down button and popup menu truly work.
By default, the Profile folder is located in your Documents folder:1
Documents∖Neat Video v4 for Premiere∖Profiles∖
If you build or download some pre-built profiles, save them to that folder and Neat Video will showthose profiles in the popup menu to help you quickly load any of them.
To select a noise profile from generic Neat Video profile set
There may be some cases when frames of the clip you are working on have no featureless areas suitablefor building a noise profile, no pre-built profiles available for particular device and noise characteristics.For such cases Neat Video has a set of generic pre-built noise profiles that can provide a solution whenother options are not available. Of course it is better to use the regular solution (Auto Profile) when that ispossible, because that delivers the most accurate results.
è To use one of the generic profiles click (the Load Profile button). Then select aprofile from the Generic Profiles folder.or
1 You can check and adjust the location of that folder in the menu: Tools > Preferences > Folders > Profile folder
30-Dec-2017 Neat Video © 1999-2017 Neat Video team, ABSoft. All rights reserved. 13
User Guide Neat Video v4 plug-in for Premiere (Win)
Click (the drop-down button) in the Device Noise Profile box to open the popup menu showingall profiles (currently available in Neat Video’s Profile folder), click on Generic Profiles and selectone of the available profiles.
By default, Generic Profiles are located in your Documents folder:Documents∖Neat Video v4 for Premiere∖Profiles∖Generic Profiles∖
There are seven profiles available in the Generic Profiles folder: Generic-1 (weak noise), Generic-2(weak noise), Generic-3 (medium noise) . . . . . . and Generic-7 (strong noise). They have been rankedaccording to the noise level they have been designed to deal with. Generic-1 (weak noise) noise profiledesigned to work with video clips that do not have much noise, while Generic-7 (strong noise) noiseprofile has been created for very noisy videos.
Try different generic profiles to find one that delivers the best results in preview in the Noise Filter
Settings tab:
To additionally fine-tune the loaded profile
You may want to additionally fine-tune the pre-built profile you have just loaded. Fine-tuning the profile insuch a situation usually makes it more accurate and better matching the noise in the current clip.
è Click (the Auto Fine-Tune button) to fine-tune the loaded profile to the current clip.
There is no need to select any area in the frame because the Auto Fine-Tune automatically analyzesthe whole frame.
Please note that you do not need to fine-tune a profile if you have just built it using Auto Profile. AutoProfile automatically applies fine-tuning so you do not need to repeat it.
5.6. Stage VI. Adjust filter settings
è Make sure you use the Noise Filter Settings tab:
The Neat Video filters have several adjustable settings. The default settings usually produce good filtrationresults (provided the noise profile is accurate). You may want to additionally vary the settings to achievethe filtration results that look best to your eyes.
5.6.1. Use preview when adjusting filter settings
The viewer in the Noise Filter Settings tab shows a part or whole frame processed by the filters currentlyenabled in Neat Video. When you change any filter settings, the preview is automatically updated. Youcan zoom in and out, drag, scroll and pan the frame in the viewer to see how the Neat Video processingaffects different parts of the frame. If you manually select an area in the frame, then only the selected areawill be processed for preview.
When the preview is ready (the preview area shows ”Filtered” in the top right corner), you can clickinside the preview area to temporarily switch back to the original frame for comparison.
You can also select one of the adjacent frames from the same clip to see how it is processed by the filter.To do that click one of the available thumbnails shown under the viewer.
The selected frame (highlighted with a blue border) will then be displayed in the main viewer.
The orange border highlights the thumbnails of adjacent frames used by the temporal filter.
30-Dec-2017 Neat Video © 1999-2017 Neat Video team, ABSoft. All rights reserved. 14
User Guide Neat Video v4 plug-in for Premiere (Win)
5.6.2. Beginner Mode and Advanced Mode
Neat Video has two sets of controls available in Beginner Mode and Advanced Mode. You can selectthe mode using the Tools > Beginner Mode and Advanced Mode menu items or using the dedicatedBeginner Mode / Advanced Mode menu in the top right corner of the plug-in’s window.
The Beginner Mode provides a simple control set recommended for beginners who have just started usingNeat Video. The Advanced Mode provides the most complete control set with maximum manual controlover the noise profiling and filtration processes. The Advanced Mode is recommended for power users.
Adjusting filter settings in Beginner Mode and Advanced Mode is described below in two separatesub-sections.
For the Beginner Mode please follow the sub-section Stage VI (a). Beginner Mode below.
If you want to use the most complete control set in Advanced Mode then please instead follow thesub-section Stage VI (b). Advanced Mode, page 18.
5.7. Stage VI (a). Beginner Mode
5.7.1. Beginner Mode: Temporal filter settings
Neat Video can apply both temporal and spatial noise reduction to video data. Neat Video’s temporal filteruses information from several consecutive frames to reduce noise and better preserve details in each frame.In this sub-section, the available settings of the temporal filter are described.
You can adjust the temporal filter using the controls in the Temporal tab in the Filter Settings panel.
Temporal Filter
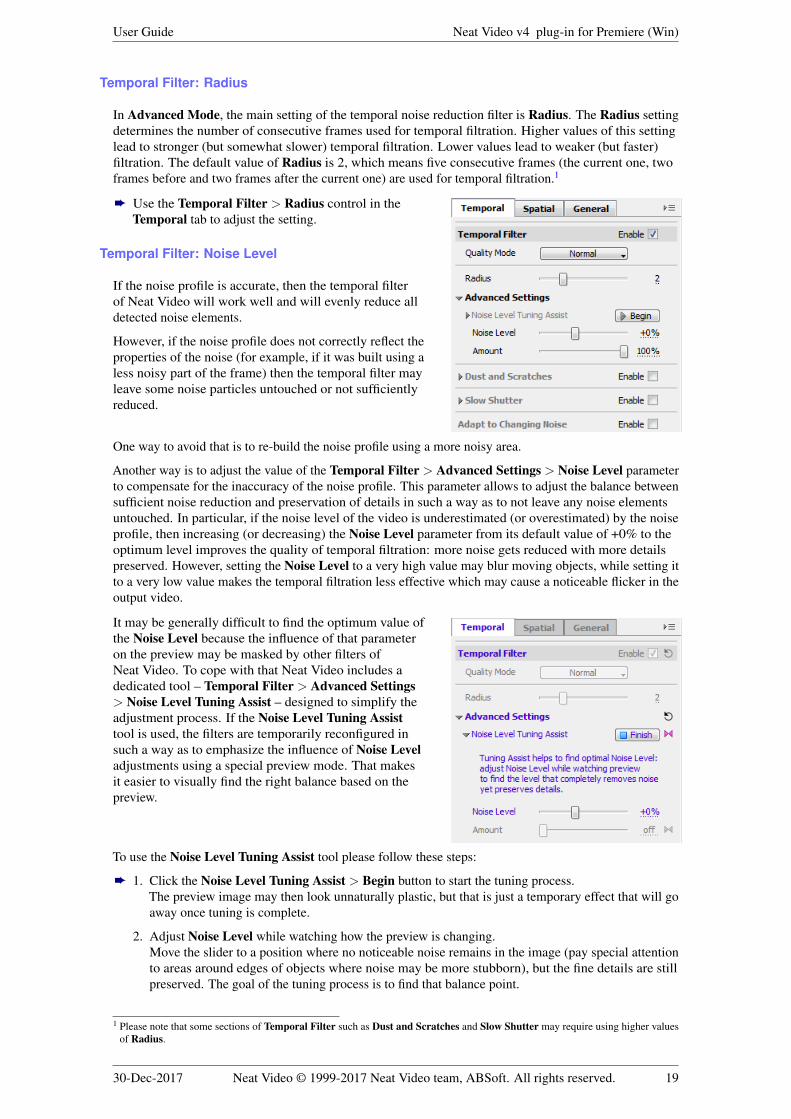
In Beginner Mode, the temporal noise reduction filter itselfhas one main setting: Radius.
The Radius setting determines the number of consecutiveframes used for temporal filtration. Higher values of thissetting lead to stronger (but somewhat slower) temporalfiltration based on a larger number of consecutive frames.Lower values lead to weaker (but faster) filtration. The default value of Radius is 2, which means fiveconsecutive frames (the current one, two frames before and two frames after the current one) are used fortemporal filtration.
è Use the Temporal Filter > Radius control in the Temporal tab.
Dust and Scratches
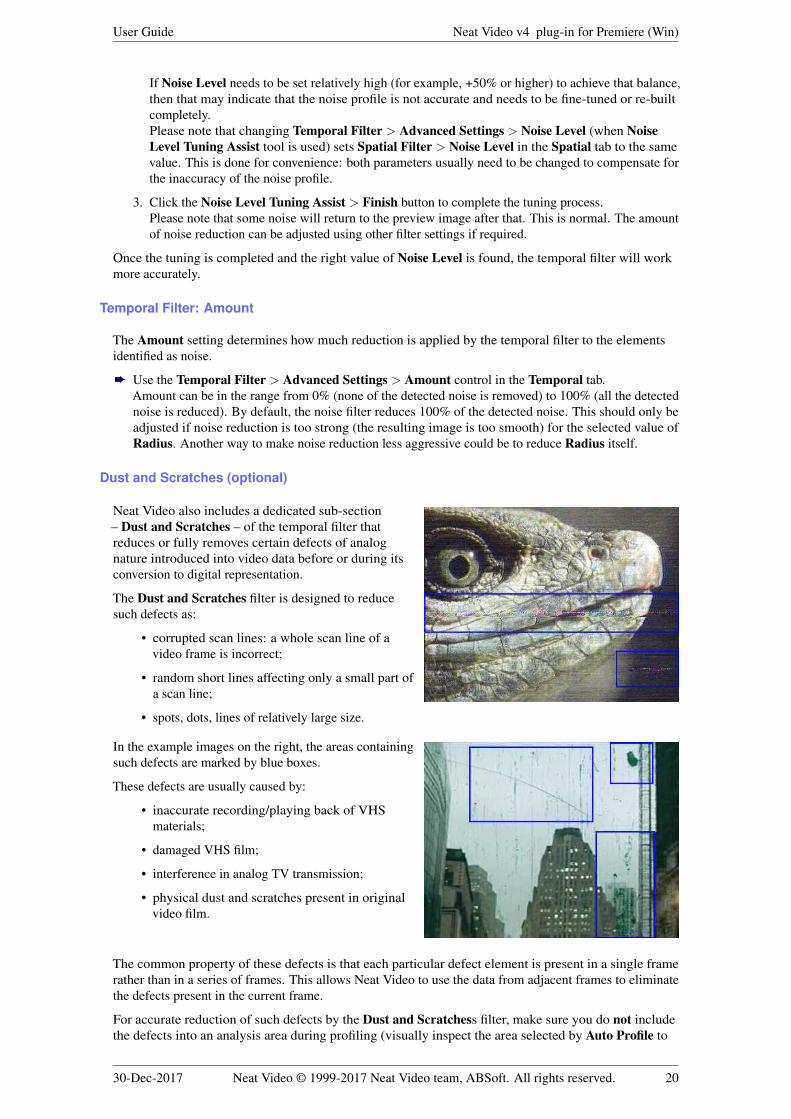
Neat Video also includes a dedicated sub-section - Dust and Scratches - of the temporal filter thatreduces or fully removes certain defects of analog nature introduced into video data before or duringits conversion to the digital representation.
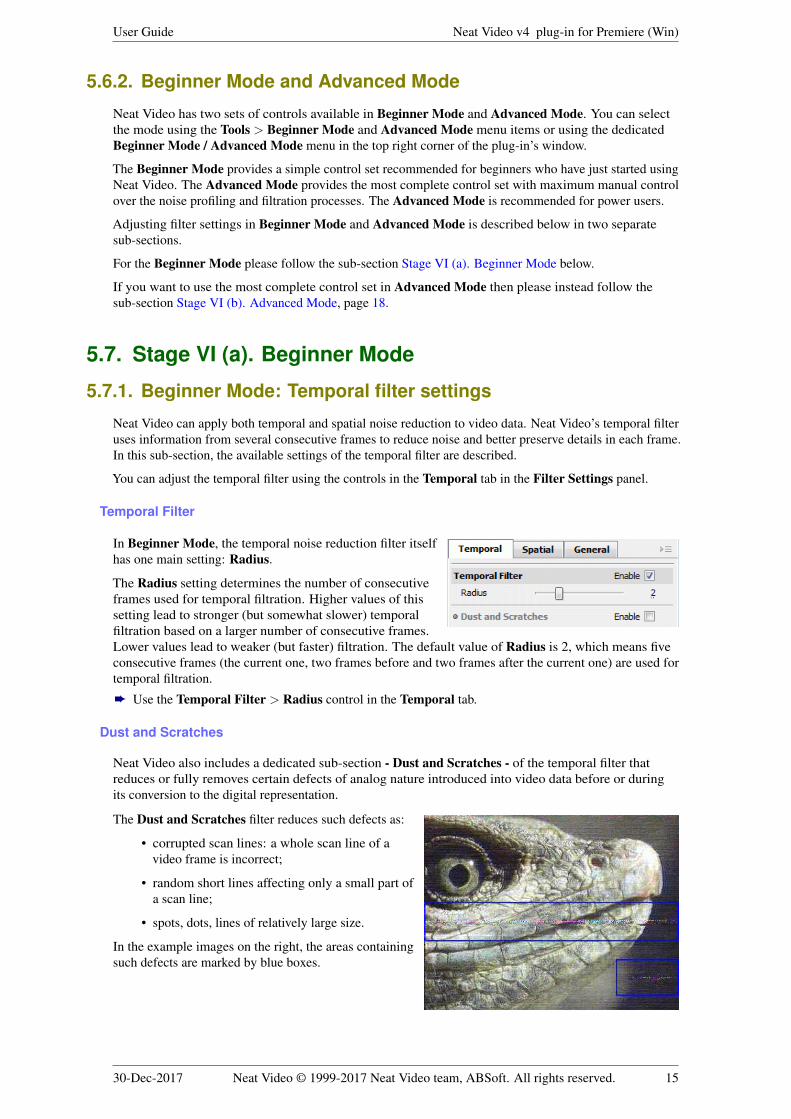
The Dust and Scratches filter reduces such defects as:
• corrupted scan lines: a whole scan line of avideo frame is incorrect;
• random short lines affecting only a small part ofa scan line;
• spots, dots, lines of relatively large size.
In the example images on the right, the areas containingsuch defects are marked by blue boxes.
30-Dec-2017 Neat Video © 1999-2017 Neat Video team, ABSoft. All rights reserved. 15
User Guide Neat Video v4 plug-in for Premiere (Win)
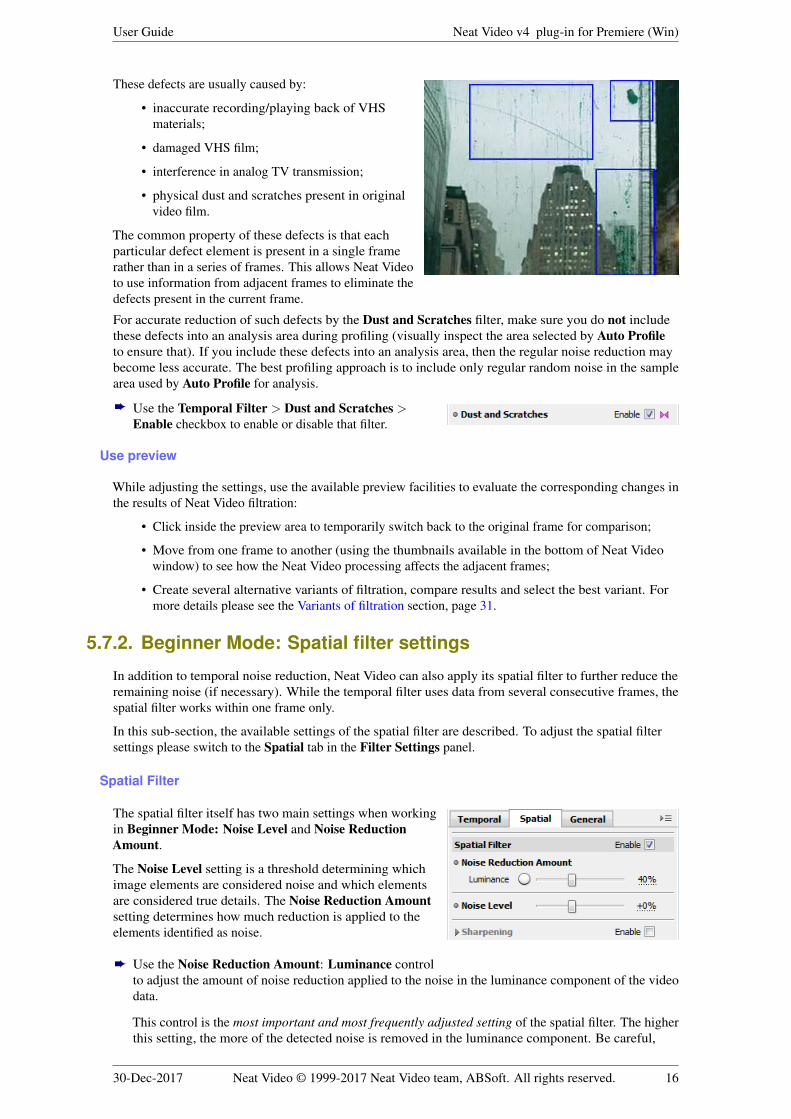
These defects are usually caused by:
• inaccurate recording/playing back of VHSmaterials;
• damaged VHS film;
• interference in analog TV transmission;
• physical dust and scratches present in originalvideo film.
The common property of these defects is that eachparticular defect element is present in a single framerather than in a series of frames. This allows Neat Videoto use information from adjacent frames to eliminate thedefects present in the current frame.
For accurate reduction of such defects by the Dust and Scratches filter, make sure you do not includethese defects into an analysis area during profiling (visually inspect the area selected by Auto Profileto ensure that). If you include these defects into an analysis area, then the regular noise reduction maybecome less accurate. The best profiling approach is to include only regular random noise in the samplearea used by Auto Profile for analysis.
è Use the Temporal Filter > Dust and Scratches >Enable checkbox to enable or disable that filter.
Use preview
While adjusting the settings, use the available preview facilities to evaluate the corresponding changes inthe results of Neat Video filtration:
• Click inside the preview area to temporarily switch back to the original frame for comparison;
• Move from one frame to another (using the thumbnails available in the bottom of Neat Videowindow) to see how the Neat Video processing affects the adjacent frames;
• Create several alternative variants of filtration, compare results and select the best variant. Formore details please see the Variants of filtration section, page 31.
5.7.2. Beginner Mode: Spatial filter settings
In addition to temporal noise reduction, Neat Video can also apply its spatial filter to further reduce theremaining noise (if necessary). While the temporal filter uses data from several consecutive frames, thespatial filter works within one frame only.
In this sub-section, the available settings of the spatial filter are described. To adjust the spatial filtersettings please switch to the Spatial tab in the Filter Settings panel.
Spatial Filter
The spatial filter itself has two main settings when workingin Beginner Mode: Noise Level and Noise ReductionAmount.
The Noise Level setting is a threshold determining whichimage elements are considered noise and which elementsare considered true details. The Noise Reduction Amountsetting determines how much reduction is applied to theelements identified as noise.
è Use the Noise Reduction Amount: Luminance controlto adjust the amount of noise reduction applied to the noise in the luminance component of the videodata.
This control is the most important and most frequently adjusted setting of the spatial filter. The higherthis setting, the more of the detected noise is removed in the luminance component. Be careful,
30-Dec-2017 Neat Video © 1999-2017 Neat Video team, ABSoft. All rights reserved. 16
User Guide Neat Video v4 plug-in for Premiere (Win)
setting the noise reduction amount too high may lead to loss of fine details and unnaturally looking(over-smooth, plastic-like) results. Too low amounts may be not enough to sufficiently reduce theobjectionable part of the noise. The default value of 40% usually provides a good balance betweennoise removal and preserving natural (not over-processed) appearance of filtered footage. Try to adjustthe setting to get the result that looks best to your eyes.
è Use the Noise Level control to adjust the setting (only when necessary).
Please note that if the noise profile is accurate,1 then it is not necessary to adjust this setting. However,if the noise profile is not accurate, then the noise filter may need an adjusted estimation of the actualnoise level to be able to deliver good results. By adjusting the Noise Level setting, you provide thefilter with such an adjusted estimation. Use the preview to visually guide yourself when making suchadjustments. The right adjustment will leave no noise elements in the image yet will not destroy theactual details.
Sharpening (optional)
The sharpening filter in Neat Video increases sharpness of the details in the video clip without increasingthe noise strength.
The sharpening filter is disabled by default. You can enable it and adjust the sharpening amounts separatelyfor three typical scales of details: fine, medium-sized and large.
Like any sharpening method, try to balance the sharpening amounts to avoid over-sharpening.
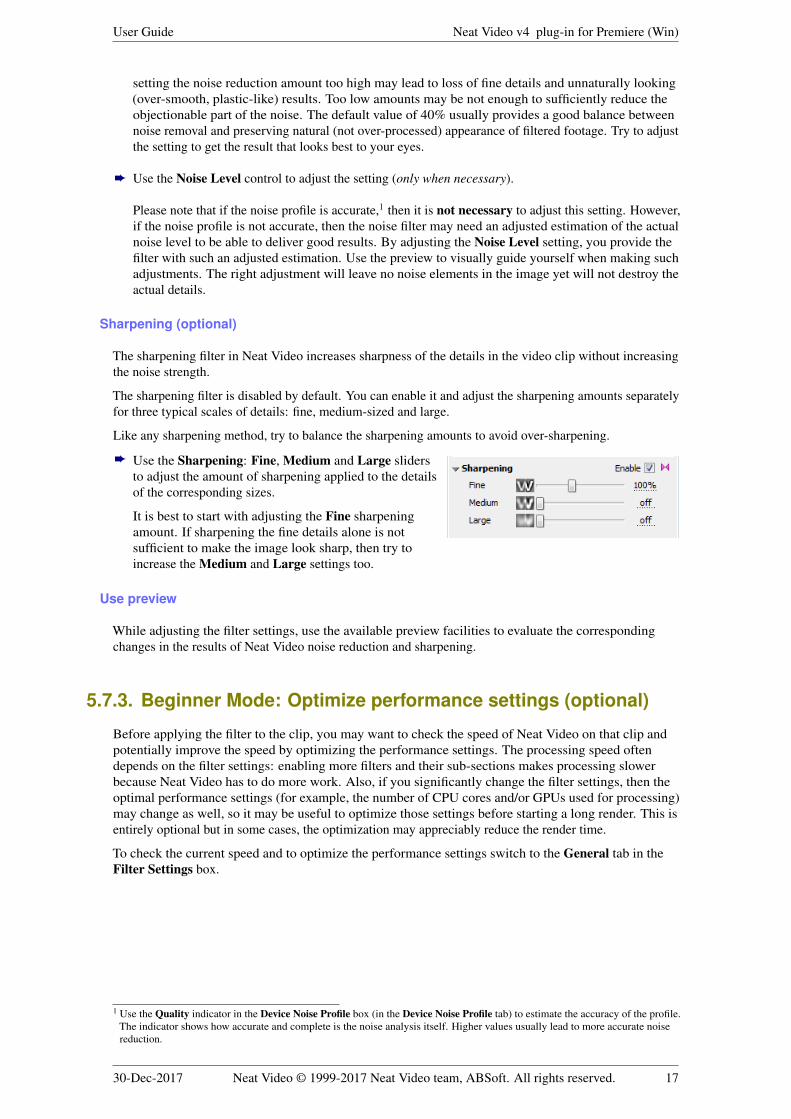
è Use the Sharpening: Fine, Medium and Large slidersto adjust the amount of sharpening applied to the detailsof the corresponding sizes.
It is best to start with adjusting the Fine sharpeningamount. If sharpening the fine details alone is notsufficient to make the image look sharp, then try toincrease the Medium and Large settings too.
Use preview
While adjusting the filter settings, use the available preview facilities to evaluate the correspondingchanges in the results of Neat Video noise reduction and sharpening.
5.7.3. Beginner Mode: Optimize performance settings (optional)
Before applying the filter to the clip, you may want to check the speed of Neat Video on that clip andpotentially improve the speed by optimizing the performance settings. The processing speed oftendepends on the filter settings: enabling more filters and their sub-sections makes processing slowerbecause Neat Video has to do more work. Also, if you significantly change the filter settings, then theoptimal performance settings (for example, the number of CPU cores and/or GPUs used for processing)may change as well, so it may be useful to optimize those settings before starting a long render. This isentirely optional but in some cases, the optimization may appreciably reduce the render time.
To check the current speed and to optimize the performance settings switch to the General tab in theFilter Settings box.
1 Use the Quality indicator in the Device Noise Profile box (in the Device Noise Profile tab) to estimate the accuracy of the profile.The indicator shows how accurate and complete is the noise analysis itself. Higher values usually lead to more accurate noisereduction.
30-Dec-2017 Neat Video © 1999-2017 Neat Video team, ABSoft. All rights reserved. 17

User Guide Neat Video v4 plug-in for Premiere (Win)
è To measure the filter speed click in thebottom of the General tab.
Neat Video will run a speed test and will then display themeasured processing speed based on the current filtersettings and frame size (as shown in the box above in thesame General tab).
Please note that it is the speed of Neat Video alone,without any other effects that may be used in yourproject and without any Premiere processing overhead.The speed of the final render in Premiere is going to belower because of that overhead.
è To optimize the performance settings click to open the Performance tab in Neat VideoPreferences. In that tab, you can inspect the available and current CPU and GPU settings.
Then use to open a specialized dialog designed to measure video processingspeeds achieved with different combinations of the CPU and GPU settings. It allows to automaticallybenchmark all possible combinations of settings and to identify the best combination (for the current
frame size and current filter settings). You can then just click to apply the foundoptimal combination achieving the best performance.
Once you have completed this step, please proceed to the sub-section Stage VII. Save and apply, page 29.
Or if you want to switch to the Advanced Mode and adjust the filters using the most complete set ofcontrols please proceed to the next sub-section dedicated to the Advanced Mode.
5.8. Stage VI (b). Advanced ModeIf you want to use the full set of filter settings offered by Neat Video, you can switch to Advanced Modevia the Tools > Advanced Mode menu item or the dedicated Beginner Mode / Advanced Mode menu inthe top right corner of the plug-in’s window.
5.8.1. Advanced Mode: Temporal filter settings
Neat Video can apply both temporal and spatial noise reduction to video data. Neat Video’s temporal filteruses information from several consecutive frames to reduce noise and better preserve details.
You can adjust the temporal filter using the controls in the Temporal tab in the Filter Settings panel.
Temporal Filter: Quality Mode
The first setting available in the Temporal tab is the Quality Mode. This setting determines whetherNeat Video’s temporal filter should work faster (but slightly less accurately) or slower (but somewhatmore accurately).
By default, Quality Mode is set to Normal, which provides the best processing speed and good visualquality of results. There is also High (slower) mode, which can produce somewhat better results withmore details being preserved at expense of longer processing time (could take about x2 longer to render).
è Use the Quality Mode control to select the preferred processing mode.
30-Dec-2017 Neat Video © 1999-2017 Neat Video team, ABSoft. All rights reserved. 18
User Guide Neat Video v4 plug-in for Premiere (Win)
Temporal Filter: Radius
In Advanced Mode, the main setting of the temporal noise reduction filter is Radius. The Radius settingdetermines the number of consecutive frames used for temporal filtration. Higher values of this settinglead to stronger (but somewhat slower) temporal filtration. Lower values lead to weaker (but faster)filtration. The default value of Radius is 2, which means five consecutive frames (the current one, twoframes before and two frames after the current one) are used for temporal filtration.1
è Use the Temporal Filter > Radius control in theTemporal tab to adjust the setting.
Temporal Filter: Noise Level
If the noise profile is accurate, then the temporal filterof Neat Video will work well and will evenly reduce alldetected noise elements.
However, if the noise profile does not correctly reflect theproperties of the noise (for example, if it was built using aless noisy part of the frame) then the temporal filter mayleave some noise particles untouched or not sufficientlyreduced.
One way to avoid that is to re-build the noise profile using a more noisy area.
Another way is to adjust the value of the Temporal Filter > Advanced Settings > Noise Level parameterto compensate for the inaccuracy of the noise profile. This parameter allows to adjust the balance betweensufficient noise reduction and preservation of details in such a way as to not leave any noise elementsuntouched. In particular, if the noise level of the video is underestimated (or overestimated) by the noiseprofile, then increasing (or decreasing) the Noise Level parameter from its default value of +0% to theoptimum level improves the quality of temporal filtration: more noise gets reduced with more detailspreserved. However, setting the Noise Level to a very high value may blur moving objects, while setting itto a very low value makes the temporal filtration less effective which may cause a noticeable flicker in theoutput video.
It may be generally difficult to find the optimum value ofthe Noise Level because the influence of that parameteron the preview may be masked by other filters ofNeat Video. To cope with that Neat Video includes adedicated tool – Temporal Filter > Advanced Settings> Noise Level Tuning Assist – designed to simplify theadjustment process. If the Noise Level Tuning Assisttool is used, the filters are temporarily reconfigured insuch a way as to emphasize the influence of Noise Leveladjustments using a special preview mode. That makesit easier to visually find the right balance based on thepreview.
To use the Noise Level Tuning Assist tool please follow these steps:
è 1. Click the Noise Level Tuning Assist > Begin button to start the tuning process.The preview image may then look unnaturally plastic, but that is just a temporary effect that will goaway once tuning is complete.
2. Adjust Noise Level while watching how the preview is changing.Move the slider to a position where no noticeable noise remains in the image (pay special attentionto areas around edges of objects where noise may be more stubborn), but the fine details are stillpreserved. The goal of the tuning process is to find that balance point.
1 Please note that some sections of Temporal Filter such as Dust and Scratches and Slow Shutter may require using higher valuesof Radius.
30-Dec-2017 Neat Video © 1999-2017 Neat Video team, ABSoft. All rights reserved. 19
User Guide Neat Video v4 plug-in for Premiere (Win)
If Noise Level needs to be set relatively high (for example, +50% or higher) to achieve that balance,then that may indicate that the noise profile is not accurate and needs to be fine-tuned or re-builtcompletely.Please note that changing Temporal Filter > Advanced Settings > Noise Level (when NoiseLevel Tuning Assist tool is used) sets Spatial Filter > Noise Level in the Spatial tab to the samevalue. This is done for convenience: both parameters usually need to be changed to compensate forthe inaccuracy of the noise profile.
3. Click the Noise Level Tuning Assist > Finish button to complete the tuning process.Please note that some noise will return to the preview image after that. This is normal. The amountof noise reduction can be adjusted using other filter settings if required.
Once the tuning is completed and the right value of Noise Level is found, the temporal filter will workmore accurately.
Temporal Filter: Amount
The Amount setting determines how much reduction is applied by the temporal filter to the elementsidentified as noise.
è Use the Temporal Filter > Advanced Settings > Amount control in the Temporal tab.Amount can be in the range from 0% (none of the detected noise is removed) to 100% (all the detectednoise is reduced). By default, the noise filter reduces 100% of the detected noise. This should only beadjusted if noise reduction is too strong (the resulting image is too smooth) for the selected value ofRadius. Another way to make noise reduction less aggressive could be to reduce Radius itself.
Dust and Scratches (optional)
Neat Video also includes a dedicated sub-section– Dust and Scratches – of the temporal filter thatreduces or fully removes certain defects of analognature introduced into video data before or during itsconversion to digital representation.
The Dust and Scratches filter is designed to reducesuch defects as:
• corrupted scan lines: a whole scan line of avideo frame is incorrect;
• random short lines affecting only a small part ofa scan line;
• spots, dots, lines of relatively large size.
In the example images on the right, the areas containingsuch defects are marked by blue boxes.
These defects are usually caused by:
• inaccurate recording/playing back of VHSmaterials;
• damaged VHS film;
• interference in analog TV transmission;
• physical dust and scratches present in originalvideo film.
The common property of these defects is that each particular defect element is present in a single framerather than in a series of frames. This allows Neat Video to use the data from adjacent frames to eliminatethe defects present in the current frame.
For accurate reduction of such defects by the Dust and Scratchess filter, make sure you do not includethe defects into an analysis area during profiling (visually inspect the area selected by Auto Profile to
30-Dec-2017 Neat Video © 1999-2017 Neat Video team, ABSoft. All rights reserved. 20
User Guide Neat Video v4 plug-in for Premiere (Win)
ensure that). If you include the defects into an analysis area, then the regular noise reduction may becomeless accurate. The best profiling approach is to include only regular random noise in the sample area andexclude any scratches and dust particles.
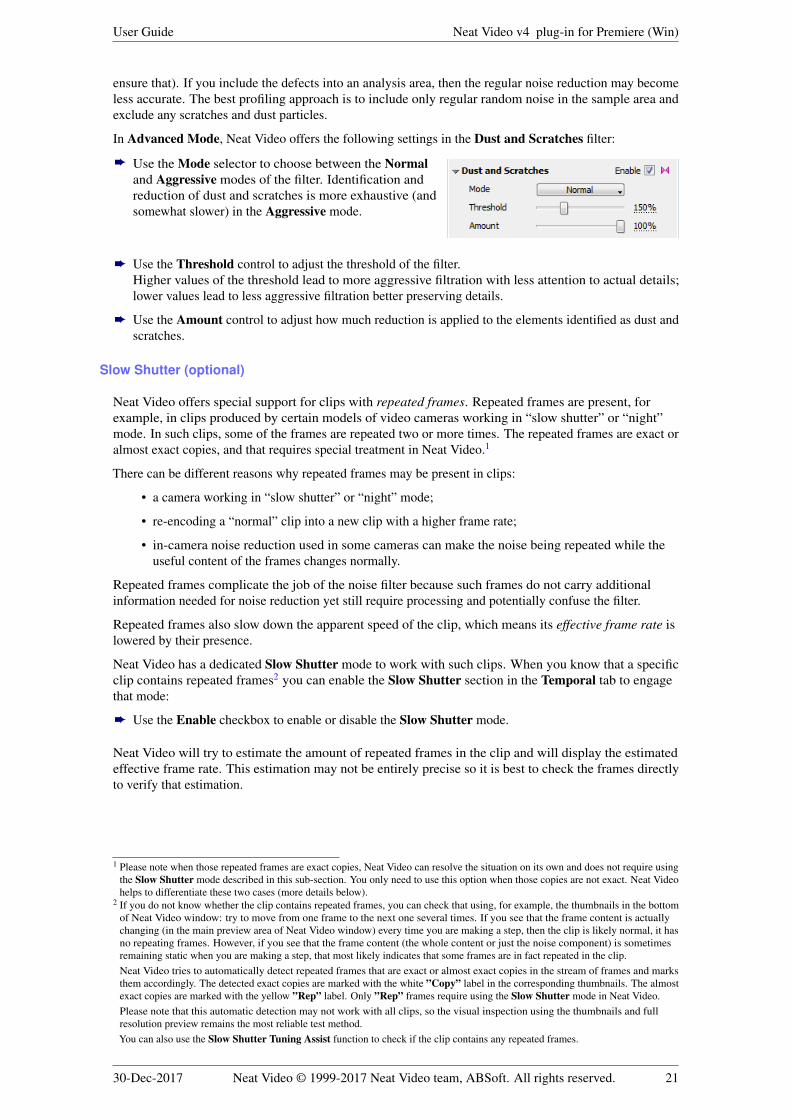
In Advanced Mode, Neat Video offers the following settings in the Dust and Scratches filter:
è Use the Mode selector to choose between the Normaland Aggressive modes of the filter. Identification andreduction of dust and scratches is more exhaustive (andsomewhat slower) in the Aggressive mode.
è Use the Threshold control to adjust the threshold of the filter.Higher values of the threshold lead to more aggressive filtration with less attention to actual details;lower values lead to less aggressive filtration better preserving details.
è Use the Amount control to adjust how much reduction is applied to the elements identified as dust andscratches.
Slow Shutter (optional)
Neat Video offers special support for clips with repeated frames. Repeated frames are present, forexample, in clips produced by certain models of video cameras working in “slow shutter” or “night”mode. In such clips, some of the frames are repeated two or more times. The repeated frames are exact oralmost exact copies, and that requires special treatment in Neat Video.1
There can be different reasons why repeated frames may be present in clips:
• a camera working in “slow shutter” or “night” mode;
• re-encoding a “normal” clip into a new clip with a higher frame rate;
• in-camera noise reduction used in some cameras can make the noise being repeated while theuseful content of the frames changes normally.
Repeated frames complicate the job of the noise filter because such frames do not carry additionalinformation needed for noise reduction yet still require processing and potentially confuse the filter.
Repeated frames also slow down the apparent speed of the clip, which means its effective frame rate islowered by their presence.
Neat Video has a dedicated Slow Shutter mode to work with such clips. When you know that a specificclip contains repeated frames2 you can enable the Slow Shutter section in the Temporal tab to engagethat mode:
è Use the Enable checkbox to enable or disable the Slow Shutter mode.
Neat Video will try to estimate the amount of repeated frames in the clip and will display the estimatedeffective frame rate. This estimation may not be entirely precise so it is best to check the frames directlyto verify that estimation.
1 Please note when those repeated frames are exact copies, Neat Video can resolve the situation on its own and does not require usingthe Slow Shutter mode described in this sub-section. You only need to use this option when those copies are not exact. Neat Videohelps to differentiate these two cases (more details below).
2 If you do not know whether the clip contains repeated frames, you can check that using, for example, the thumbnails in the bottomof Neat Video window: try to move from one frame to the next one several times. If you see that the frame content is actuallychanging (in the main preview area of Neat Video window) every time you are making a step, then the clip is likely normal, it hasno repeating frames. However, if you see that the frame content (the whole content or just the noise component) is sometimesremaining static when you are making a step, that most likely indicates that some frames are in fact repeated in the clip.Neat Video tries to automatically detect repeated frames that are exact or almost exact copies in the stream of frames and marksthem accordingly. The detected exact copies are marked with the white ”Copy” label in the corresponding thumbnails. The almostexact copies are marked with the yellow ”Rep” label. Only ”Rep” frames require using the Slow Shutter mode in Neat Video.Please note that this automatic detection may not work with all clips, so the visual inspection using the thumbnails and fullresolution preview remains the most reliable test method.You can also use the Slow Shutter Tuning Assist function to check if the clip contains any repeated frames.
30-Dec-2017 Neat Video © 1999-2017 Neat Video team, ABSoft. All rights reserved. 21
User Guide Neat Video v4 plug-in for Premiere (Win)
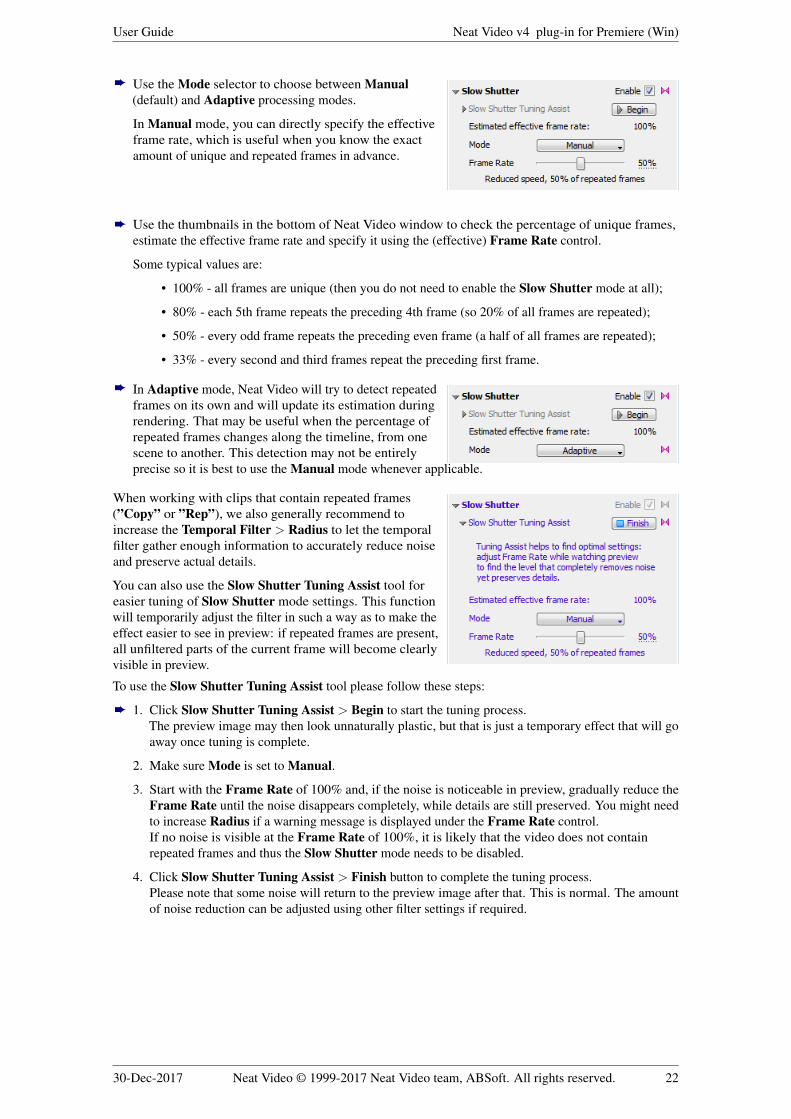
è Use the Mode selector to choose between Manual(default) and Adaptive processing modes.
In Manual mode, you can directly specify the effectiveframe rate, which is useful when you know the exactamount of unique and repeated frames in advance.
è Use the thumbnails in the bottom of Neat Video window to check the percentage of unique frames,estimate the effective frame rate and specify it using the (effective) Frame Rate control.
Some typical values are:
• 100% - all frames are unique (then you do not need to enable the Slow Shutter mode at all);
• 80% - each 5th frame repeats the preceding 4th frame (so 20% of all frames are repeated);
• 50% - every odd frame repeats the preceding even frame (a half of all frames are repeated);
• 33% - every second and third frames repeat the preceding first frame.
è In Adaptive mode, Neat Video will try to detect repeatedframes on its own and will update its estimation duringrendering. That may be useful when the percentage ofrepeated frames changes along the timeline, from onescene to another. This detection may not be entirelyprecise so it is best to use the Manual mode whenever applicable.
When working with clips that contain repeated frames(”Copy” or ”Rep”), we also generally recommend toincrease the Temporal Filter > Radius to let the temporalfilter gather enough information to accurately reduce noiseand preserve actual details.
You can also use the Slow Shutter Tuning Assist tool foreasier tuning of Slow Shutter mode settings. This functionwill temporarily adjust the filter in such a way as to make theeffect easier to see in preview: if repeated frames are present,all unfiltered parts of the current frame will become clearlyvisible in preview.
To use the Slow Shutter Tuning Assist tool please follow these steps:
è 1. Click Slow Shutter Tuning Assist > Begin to start the tuning process.The preview image may then look unnaturally plastic, but that is just a temporary effect that will goaway once tuning is complete.
2. Make sure Mode is set to Manual.
3. Start with the Frame Rate of 100% and, if the noise is noticeable in preview, gradually reduce theFrame Rate until the noise disappears completely, while details are still preserved. You might needto increase Radius if a warning message is displayed under the Frame Rate control.If no noise is visible at the Frame Rate of 100%, it is likely that the video does not containrepeated frames and thus the Slow Shutter mode needs to be disabled.
4. Click Slow Shutter Tuning Assist > Finish button to complete the tuning process.Please note that some noise will return to the preview image after that. This is normal. The amountof noise reduction can be adjusted using other filter settings if required.
30-Dec-2017 Neat Video © 1999-2017 Neat Video team, ABSoft. All rights reserved. 22
User Guide Neat Video v4 plug-in for Premiere (Win)
Adapt to Changing Noise (optional)
The noise properties of the video data may slightly vary in different parts of the clip, for example if thelighting conditions change during shooting. Neat Video can automatically adjust its processing to thechanging noise.
è Enable the Adapt to Changing Noise option to letNeat Video automatically adjust its processing to thetemporal changes in the clip’s noise.
Please note that if the noise is not changing its properties in different parts of the clip, then this optionshould better be left disabled. Use it only when it is actually needed.
Use preview
While adjusting the settings, use the available preview facilities to evaluate the corresponding changes inthe results of Neat Video filtration:
• Click inside the preview area to temporarily switch back to the original frame for comparison;
• Move from one frame to another (using the thumbnails available in the bottom of Neat Videowindow) to see how the noise reduction affects adjacent frames;
• Create several alternative variants of filtration, compare results and select the best variant. Formore details please see the Variants of filtration section, page 31.
5.8.2. Advanced Mode: Spatial filter settings
In addition to temporal processing, Neat Video can also apply spatial noise reduction to further reducethe remaining noise (if necessary). While the temporal filter uses information from several consecutiveframes, the spatial filter works within one frame only.
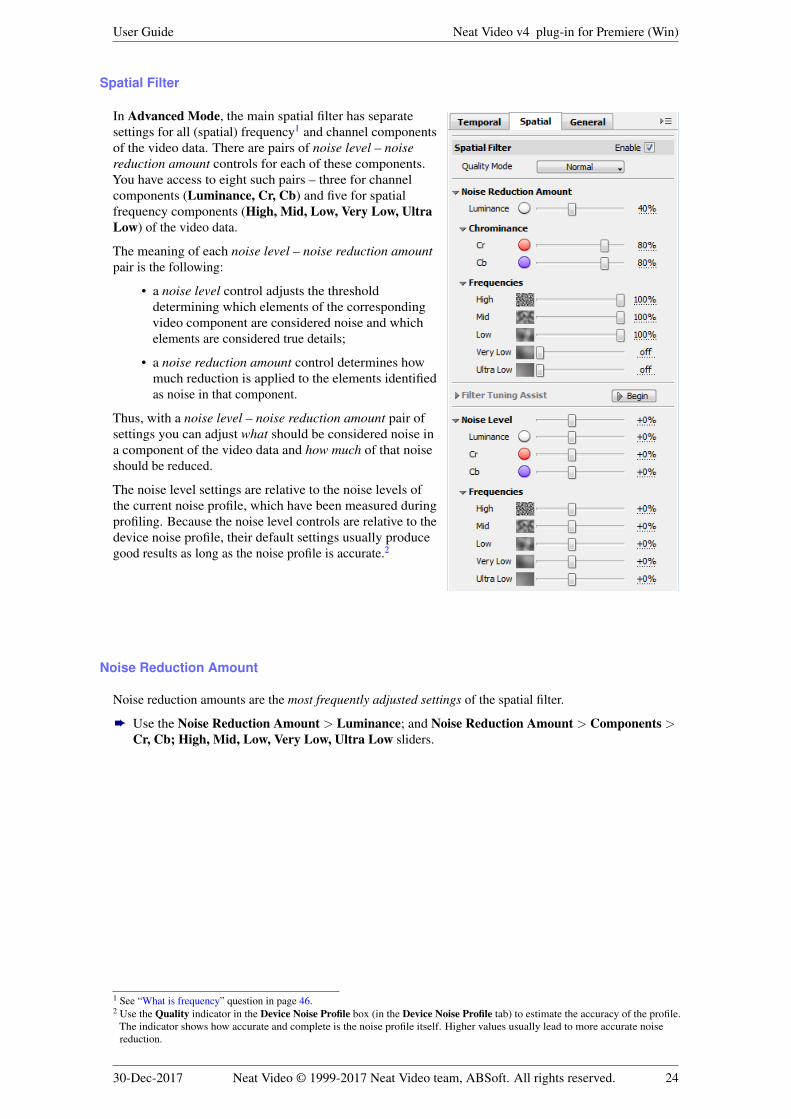
To adjust the spatial filter settings please switch to the Spatial tab in the Filter Settings panel.
Spatial Filter: Quality Mode
The first setting available in the Spatial tab is the Quality Mode. This setting selects whether Neat Video’sspatial filter should generally work faster (but slightly less accurately) or slower (but somewhat moreaccurately).
By default, Quality Mode is set to Normal, which provides the best processing speed and good visualquality of results. There is also High (slower) mode, which can produce somewhat better results withmore details being preserved at expense of longer processing time (could take about x2-x3 longer torender).
è Use the Quality Mode control to select the preferred processing mode.
30-Dec-2017 Neat Video © 1999-2017 Neat Video team, ABSoft. All rights reserved. 23
User Guide Neat Video v4 plug-in for Premiere (Win)
Spatial Filter
In Advanced Mode, the main spatial filter has separatesettings for all (spatial) frequency1 and channel componentsof the video data. There are pairs of noise level – noisereduction amount controls for each of these components.You have access to eight such pairs – three for channelcomponents (Luminance, Cr, Cb) and five for spatialfrequency components (High, Mid, Low, Very Low, UltraLow) of the video data.
The meaning of each noise level – noise reduction amountpair is the following:
• a noise level control adjusts the thresholddetermining which elements of the correspondingvideo component are considered noise and whichelements are considered true details;
• a noise reduction amount control determines howmuch reduction is applied to the elements identifiedas noise in that component.
Thus, with a noise level – noise reduction amount pair ofsettings you can adjust what should be considered noise ina component of the video data and how much of that noiseshould be reduced.
The noise level settings are relative to the noise levels ofthe current noise profile, which have been measured duringprofiling. Because the noise level controls are relative to thedevice noise profile, their default settings usually producegood results as long as the noise profile is accurate.2
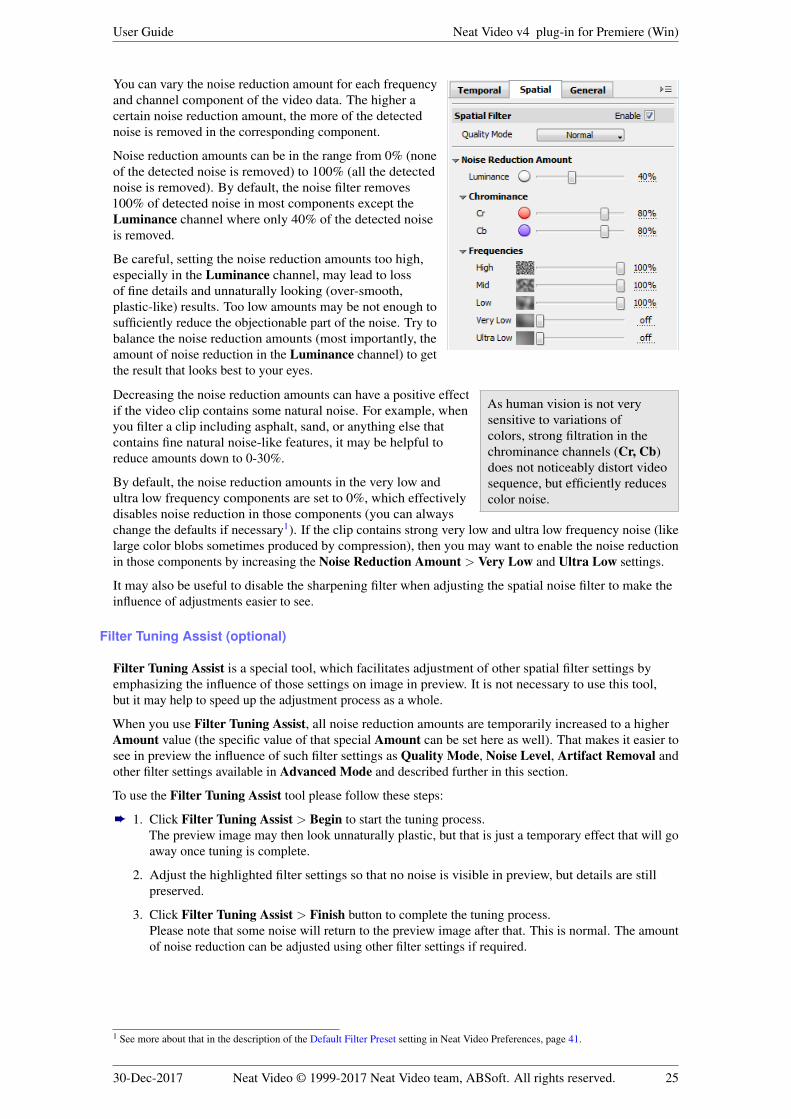
Noise Reduction Amount
Noise reduction amounts are the most frequently adjusted settings of the spatial filter.
è Use the Noise Reduction Amount > Luminance; and Noise Reduction Amount > Components >Cr, Cb; High, Mid, Low, Very Low, Ultra Low sliders.
1 See “What is frequency” question in page 46.2 Use the Quality indicator in the Device Noise Profile box (in the Device Noise Profile tab) to estimate the accuracy of the profile.
The indicator shows how accurate and complete is the noise profile itself. Higher values usually lead to more accurate noisereduction.
30-Dec-2017 Neat Video © 1999-2017 Neat Video team, ABSoft. All rights reserved. 24
User Guide Neat Video v4 plug-in for Premiere (Win)
You can vary the noise reduction amount for each frequencyand channel component of the video data. The higher acertain noise reduction amount, the more of the detectednoise is removed in the corresponding component.
Noise reduction amounts can be in the range from 0% (noneof the detected noise is removed) to 100% (all the detectednoise is removed). By default, the noise filter removes100% of detected noise in most components except theLuminance channel where only 40% of the detected noiseis removed.
Be careful, setting the noise reduction amounts too high,especially in the Luminance channel, may lead to lossof fine details and unnaturally looking (over-smooth,plastic-like) results. Too low amounts may be not enough tosufficiently reduce the objectionable part of the noise. Try tobalance the noise reduction amounts (most importantly, theamount of noise reduction in the Luminance channel) to getthe result that looks best to your eyes.
As human vision is not verysensitive to variations ofcolors, strong filtration in thechrominance channels (Cr, Cb)does not noticeably distort videosequence, but efficiently reducescolor noise.
Decreasing the noise reduction amounts can have a positive effectif the video clip contains some natural noise. For example, whenyou filter a clip including asphalt, sand, or anything else thatcontains fine natural noise-like features, it may be helpful toreduce amounts down to 0-30%.
By default, the noise reduction amounts in the very low andultra low frequency components are set to 0%, which effectivelydisables noise reduction in those components (you can alwayschange the defaults if necessary1). If the clip contains strong very low and ultra low frequency noise (likelarge color blobs sometimes produced by compression), then you may want to enable the noise reductionin those components by increasing the Noise Reduction Amount > Very Low and Ultra Low settings.
It may also be useful to disable the sharpening filter when adjusting the spatial noise filter to make theinfluence of adjustments easier to see.
Filter Tuning Assist (optional)
Filter Tuning Assist is a special tool, which facilitates adjustment of other spatial filter settings byemphasizing the influence of those settings on image in preview. It is not necessary to use this tool,but it may help to speed up the adjustment process as a whole.
When you use Filter Tuning Assist, all noise reduction amounts are temporarily increased to a higherAmount value (the specific value of that special Amount can be set here as well). That makes it easier tosee in preview the influence of such filter settings as Quality Mode, Noise Level, Artifact Removal andother filter settings available in Advanced Mode and described further in this section.
To use the Filter Tuning Assist tool please follow these steps:
è 1. Click Filter Tuning Assist > Begin to start the tuning process.The preview image may then look unnaturally plastic, but that is just a temporary effect that will goaway once tuning is complete.
2. Adjust the highlighted filter settings so that no noise is visible in preview, but details are stillpreserved.
3. Click Filter Tuning Assist > Finish button to complete the tuning process.Please note that some noise will return to the preview image after that. This is normal. The amountof noise reduction can be adjusted using other filter settings if required.
1 See more about that in the description of the Default Filter Preset setting in Neat Video Preferences, page 41.
30-Dec-2017 Neat Video © 1999-2017 Neat Video team, ABSoft. All rights reserved. 25
User Guide Neat Video v4 plug-in for Premiere (Win)
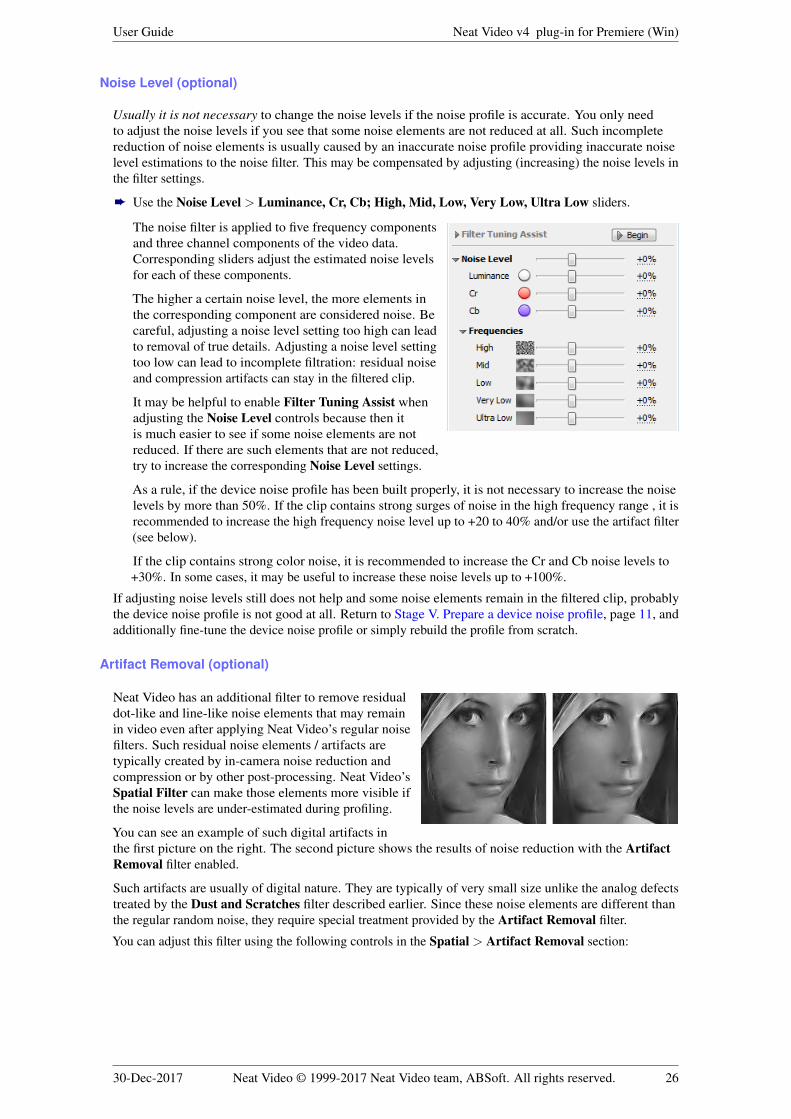
Noise Level (optional)
Usually it is not necessary to change the noise levels if the noise profile is accurate. You only needto adjust the noise levels if you see that some noise elements are not reduced at all. Such incompletereduction of noise elements is usually caused by an inaccurate noise profile providing inaccurate noiselevel estimations to the noise filter. This may be compensated by adjusting (increasing) the noise levels inthe filter settings.
è Use the Noise Level > Luminance, Cr, Cb; High, Mid, Low, Very Low, Ultra Low sliders.
The noise filter is applied to five frequency componentsand three channel components of the video data.Corresponding sliders adjust the estimated noise levelsfor each of these components.
The higher a certain noise level, the more elements inthe corresponding component are considered noise. Becareful, adjusting a noise level setting too high can leadto removal of true details. Adjusting a noise level settingtoo low can lead to incomplete filtration: residual noiseand compression artifacts can stay in the filtered clip.
It may be helpful to enable Filter Tuning Assist whenadjusting the Noise Level controls because then itis much easier to see if some noise elements are notreduced. If there are such elements that are not reduced,try to increase the corresponding Noise Level settings.
As a rule, if the device noise profile has been built properly, it is not necessary to increase the noiselevels by more than 50%. If the clip contains strong surges of noise in the high frequency range , it isrecommended to increase the high frequency noise level up to +20 to 40% and/or use the artifact filter(see below).
If the clip contains strong color noise, it is recommended to increase the Cr and Cb noise levels to+30%. In some cases, it may be useful to increase these noise levels up to +100%.
If adjusting noise levels still does not help and some noise elements remain in the filtered clip, probablythe device noise profile is not good at all. Return to Stage V. Prepare a device noise profile, page 11, andadditionally fine-tune the device noise profile or simply rebuild the profile from scratch.
Artifact Removal (optional)
Neat Video has an additional filter to remove residualdot-like and line-like noise elements that may remainin video even after applying Neat Video’s regular noisefilters. Such residual noise elements / artifacts aretypically created by in-camera noise reduction andcompression or by other post-processing. Neat Video’sSpatial Filter can make those elements more visible ifthe noise levels are under-estimated during profiling.
You can see an example of such digital artifacts inthe first picture on the right. The second picture shows the results of noise reduction with the ArtifactRemoval filter enabled.
Such artifacts are usually of digital nature. They are typically of very small size unlike the analog defectstreated by the Dust and Scratches filter described earlier. Since these noise elements are different thanthe regular random noise, they require special treatment provided by the Artifact Removal filter.
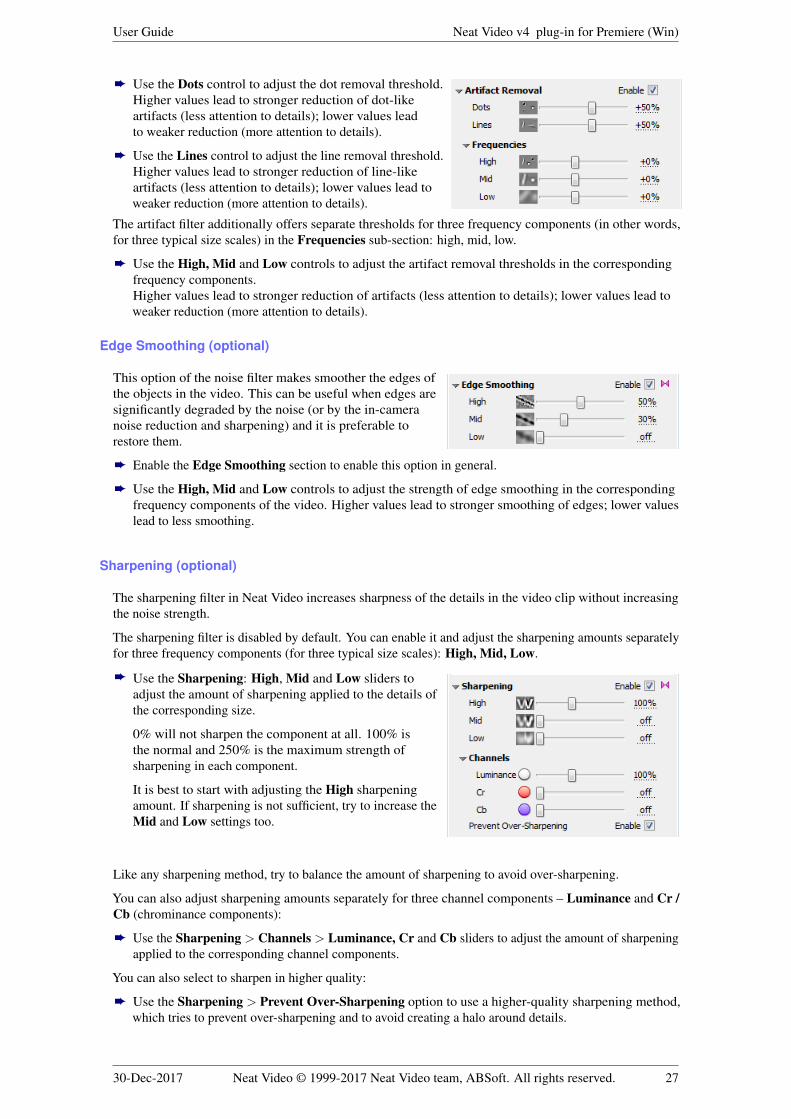
You can adjust this filter using the following controls in the Spatial > Artifact Removal section:
30-Dec-2017 Neat Video © 1999-2017 Neat Video team, ABSoft. All rights reserved. 26
User Guide Neat Video v4 plug-in for Premiere (Win)
è Use the Dots control to adjust the dot removal threshold.Higher values lead to stronger reduction of dot-likeartifacts (less attention to details); lower values leadto weaker reduction (more attention to details).
è Use the Lines control to adjust the line removal threshold.Higher values lead to stronger reduction of line-likeartifacts (less attention to details); lower values lead toweaker reduction (more attention to details).
The artifact filter additionally offers separate thresholds for three frequency components (in other words,for three typical size scales) in the Frequencies sub-section: high, mid, low.
è Use the High, Mid and Low controls to adjust the artifact removal thresholds in the correspondingfrequency components.Higher values lead to stronger reduction of artifacts (less attention to details); lower values lead toweaker reduction (more attention to details).
Edge Smoothing (optional)
This option of the noise filter makes smoother the edges ofthe objects in the video. This can be useful when edges aresignificantly degraded by the noise (or by the in-cameranoise reduction and sharpening) and it is preferable torestore them.
è Enable the Edge Smoothing section to enable this option in general.
è Use the High, Mid and Low controls to adjust the strength of edge smoothing in the correspondingfrequency components of the video. Higher values lead to stronger smoothing of edges; lower valueslead to less smoothing.
Sharpening (optional)
The sharpening filter in Neat Video increases sharpness of the details in the video clip without increasingthe noise strength.
The sharpening filter is disabled by default. You can enable it and adjust the sharpening amounts separatelyfor three frequency components (for three typical size scales): High, Mid, Low.
è Use the Sharpening: High, Mid and Low sliders toadjust the amount of sharpening applied to the details ofthe corresponding size.
0% will not sharpen the component at all. 100% isthe normal and 250% is the maximum strength ofsharpening in each component.
It is best to start with adjusting the High sharpeningamount. If sharpening is not sufficient, try to increase theMid and Low settings too.
Like any sharpening method, try to balance the amount of sharpening to avoid over-sharpening.
You can also adjust sharpening amounts separately for three channel components – Luminance and Cr /Cb (chrominance components):
è Use the Sharpening > Channels > Luminance, Cr and Cb sliders to adjust the amount of sharpeningapplied to the corresponding channel components.
You can also select to sharpen in higher quality:
è Use the Sharpening > Prevent Over-Sharpening option to use a higher-quality sharpening method,which tries to prevent over-sharpening and to avoid creating a halo around details.
30-Dec-2017 Neat Video © 1999-2017 Neat Video team, ABSoft. All rights reserved. 27
User Guide Neat Video v4 plug-in for Premiere (Win)
Use preview
è While adjusting the filter settings, use the available preview facilities to evaluate the correspondingchanges in the results of Neat Video noise reduction and sharpening.
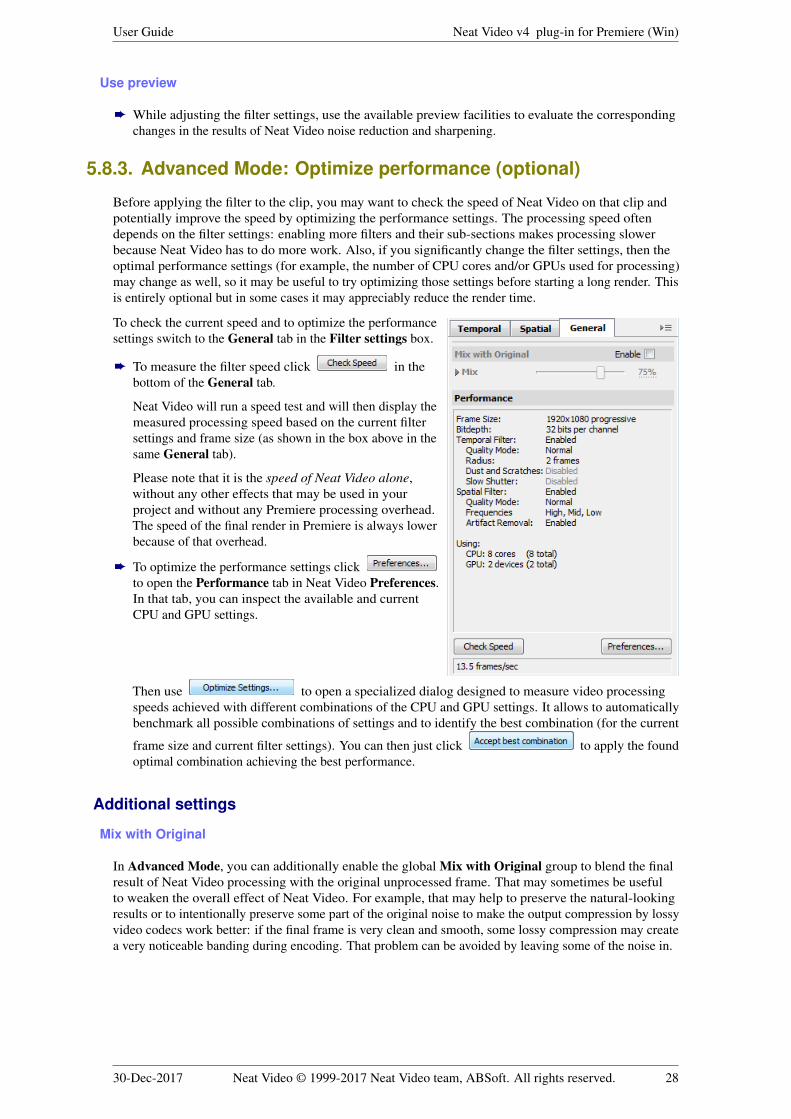
5.8.3. Advanced Mode: Optimize performance (optional)
Before applying the filter to the clip, you may want to check the speed of Neat Video on that clip andpotentially improve the speed by optimizing the performance settings. The processing speed oftendepends on the filter settings: enabling more filters and their sub-sections makes processing slowerbecause Neat Video has to do more work. Also, if you significantly change the filter settings, then theoptimal performance settings (for example, the number of CPU cores and/or GPUs used for processing)may change as well, so it may be useful to try optimizing those settings before starting a long render. Thisis entirely optional but in some cases it may appreciably reduce the render time.
To check the current speed and to optimize the performancesettings switch to the General tab in the Filter settings box.
è To measure the filter speed click in thebottom of the General tab.
Neat Video will run a speed test and will then display themeasured processing speed based on the current filtersettings and frame size (as shown in the box above in thesame General tab).
Please note that it is the speed of Neat Video alone,without any other effects that may be used in yourproject and without any Premiere processing overhead.The speed of the final render in Premiere is always lowerbecause of that overhead.
è To optimize the performance settings clickto open the Performance tab in Neat Video Preferences.In that tab, you can inspect the available and currentCPU and GPU settings.
Then use to open a specialized dialog designed to measure video processingspeeds achieved with different combinations of the CPU and GPU settings. It allows to automaticallybenchmark all possible combinations of settings and to identify the best combination (for the current
frame size and current filter settings). You can then just click to apply the foundoptimal combination achieving the best performance.
Additional settings
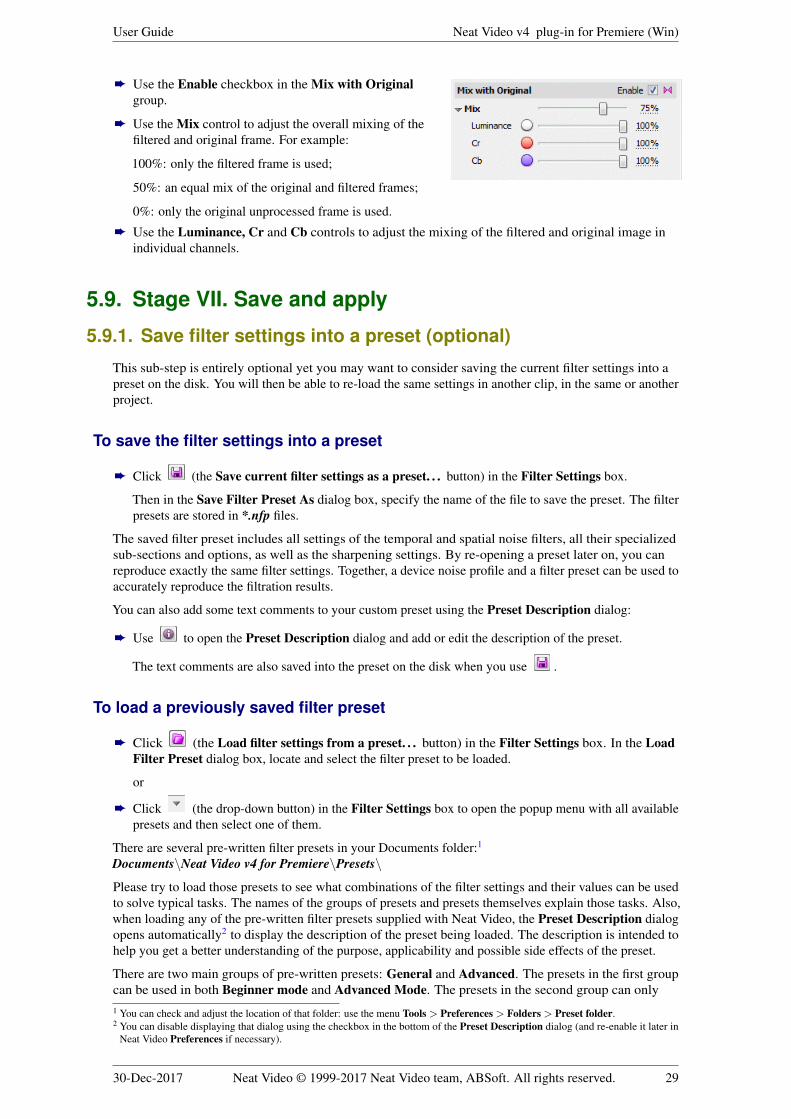
Mix with Original
In Advanced Mode, you can additionally enable the global Mix with Original group to blend the finalresult of Neat Video processing with the original unprocessed frame. That may sometimes be usefulto weaken the overall effect of Neat Video. For example, that may help to preserve the natural-lookingresults or to intentionally preserve some part of the original noise to make the output compression by lossyvideo codecs work better: if the final frame is very clean and smooth, some lossy compression may createa very noticeable banding during encoding. That problem can be avoided by leaving some of the noise in.
30-Dec-2017 Neat Video © 1999-2017 Neat Video team, ABSoft. All rights reserved. 28
User Guide Neat Video v4 plug-in for Premiere (Win)
è Use the Enable checkbox in the Mix with Originalgroup.
è Use the Mix control to adjust the overall mixing of thefiltered and original frame. For example:
100%: only the filtered frame is used;
50%: an equal mix of the original and filtered frames;
0%: only the original unprocessed frame is used.
è Use the Luminance, Cr and Cb controls to adjust the mixing of the filtered and original image inindividual channels.
5.9. Stage VII. Save and apply
5.9.1. Save filter settings into a preset (optional)
This sub-step is entirely optional yet you may want to consider saving the current filter settings into apreset on the disk. You will then be able to re-load the same settings in another clip, in the same or anotherproject.
To save the filter settings into a preset
è Click (the Save current filter settings as a preset. . . button) in the Filter Settings box.
Then in the Save Filter Preset As dialog box, specify the name of the file to save the preset. The filterpresets are stored in *.nfp files.
The saved filter preset includes all settings of the temporal and spatial noise filters, all their specializedsub-sections and options, as well as the sharpening settings. By re-opening a preset later on, you canreproduce exactly the same filter settings. Together, a device noise profile and a filter preset can be used toaccurately reproduce the filtration results.
You can also add some text comments to your custom preset using the Preset Description dialog:
è Use to open the Preset Description dialog and add or edit the description of the preset.
The text comments are also saved into the preset on the disk when you use .
To load a previously saved filter preset
è Click (the Load filter settings from a preset. . . button) in the Filter Settings box. In the LoadFilter Preset dialog box, locate and select the filter preset to be loaded.
or
è Click (the drop-down button) in the Filter Settings box to open the popup menu with all availablepresets and then select one of them.
There are several pre-written filter presets in your Documents folder:1
Documents∖Neat Video v4 for Premiere∖Presets∖
Please try to load those presets to see what combinations of the filter settings and their values can be usedto solve typical tasks. The names of the groups of presets and presets themselves explain those tasks. Also,when loading any of the pre-written filter presets supplied with Neat Video, the Preset Description dialogopens automatically2 to display the description of the preset being loaded. The description is intended tohelp you get a better understanding of the purpose, applicability and possible side effects of the preset.
There are two main groups of pre-written presets: General and Advanced. The presets in the first groupcan be used in both Beginner mode and Advanced Mode. The presets in the second group can only1 You can check and adjust the location of that folder: use the menu Tools > Preferences > Folders > Preset folder.2 You can disable displaying that dialog using the checkbox in the bottom of the Preset Description dialog (and re-enable it later in
Neat Video Preferences if necessary).
30-Dec-2017 Neat Video © 1999-2017 Neat Video team, ABSoft. All rights reserved. 29
User Guide Neat Video v4 plug-in for Premiere (Win)
be used when Neat Video is in Advanced Mode, so loading such a preset will switch Neat Video toAdvanced Mode (if you work in Beginner Mode).
5.9.2. Apply filter settings
After you have prepared a noise profile and adjusted the filter settings in the previous stages, you are nowready to apply those changes to the clip.
To apply filter settings
è Click (the Apply button in the bottom of the plug-in window).
The Neat Video plug-in window will be closed and the plug-in will automatically save the devicenoise profile and filter preset in the Premiere project you work with. You can later re-open theNeat Video plug-in window in that clip to further adjust the noise profile and/or filter settings.
5.10. Stage VIII. Render the clip
To apply Neat Video noise reduction
èNeat Video is a very processor-intensive filter,so it may take significant amount of time torender the clip. Using fast hardware (a fast CPUand/or GPU) is recommended.
Render the clip in the regular Premiere way.This will automatically apply Neat Video noisereduction to the clip.
30-Dec-2017 Neat Video © 1999-2017 Neat Video team, ABSoft. All rights reserved. 30
User Guide Neat Video v4 plug-in for Premiere (Win)
6. Additional tools
6.1. Variants of filtrationWhen adjusting the Neat Video filter settings, you may want to compare different adjustments andselect one that delivers the best visual results. You can of course manually make the adjustments andcheck preview after each adjustment, but it would be easier if you could prepare several variants of suchadjustments and then quickly switch between their corresponding previews. Then it would be muchsimpler to visually evaluate and compare the results.
That is exactly what variants of filtration do in Neat Video. You can create up to four variants, each withits own set of filters settings, and quickly switch between them to evaluate their previews.
Here is how you can use variants of filtration (make sure the Noise Filter Settings tab is open):
1 To create a new variant press the button in the toolbar and select one of the available choices:
a Duplicatea new variant will be a copy of the current variant (the current filter settings);you can then modify this new variant by adjusting the filter settings however you like, potentiallymaking the new variant very different than the original one;
b Default Preseta new variant will be based on the filter settings obtained via the Default Filter Preset setting inNeat Video Preferences;
c Select Preset >a new variant will be based on the filter preset you select from the presets available on the disk (youselect one of them using the context menu);
d Load Preset. . .a new variant will be based on the filter preset you select from the presets available on the disk (youselect one of them using the regular preset loading dialog).
The new variant is added to the toolbar as a new button with the corresponding name, for example
.
The new variant automatically becomes current: it receives a special shading on its button.
When you make any adjustments to the filter settings, they are applied and kept within the currentvariant. So if you want to change filter settings in any other variant, then you need to select that variantfirst and only then make any adjustments of the filters.
2 To select one of the existing variants (to make it current) click the corresponding variant’s button inthe toolbar. This will change the filter settings and preview to the selected variant.
If you now change any filter settings, then the changes will be applied to the current variant.
3 To compare two variants (their previews) you can simply click their buttons to select them alternatively.
There is also an easier and quicker way. If you right-click another (not the current) variant’s buttoninstead of doing a regular left-click, then the clicked variant is only temporarily selected and theselection returns to the previous variant once you release the right mouse button. This can be usedto quickly switch between any two variants (the current one and an alternative one) for comparisonpurposes: the preview will change from one variant to another and you can easily compare them todecide which one is better.
4 To delete an unneeded variant use its corresponding remove button ( ).
5 When you are happy with one specific variant simply keep it current and it will then be used byNeat Video for actual processing.
30-Dec-2017 Neat Video © 1999-2017 Neat Video team, ABSoft. All rights reserved. 31
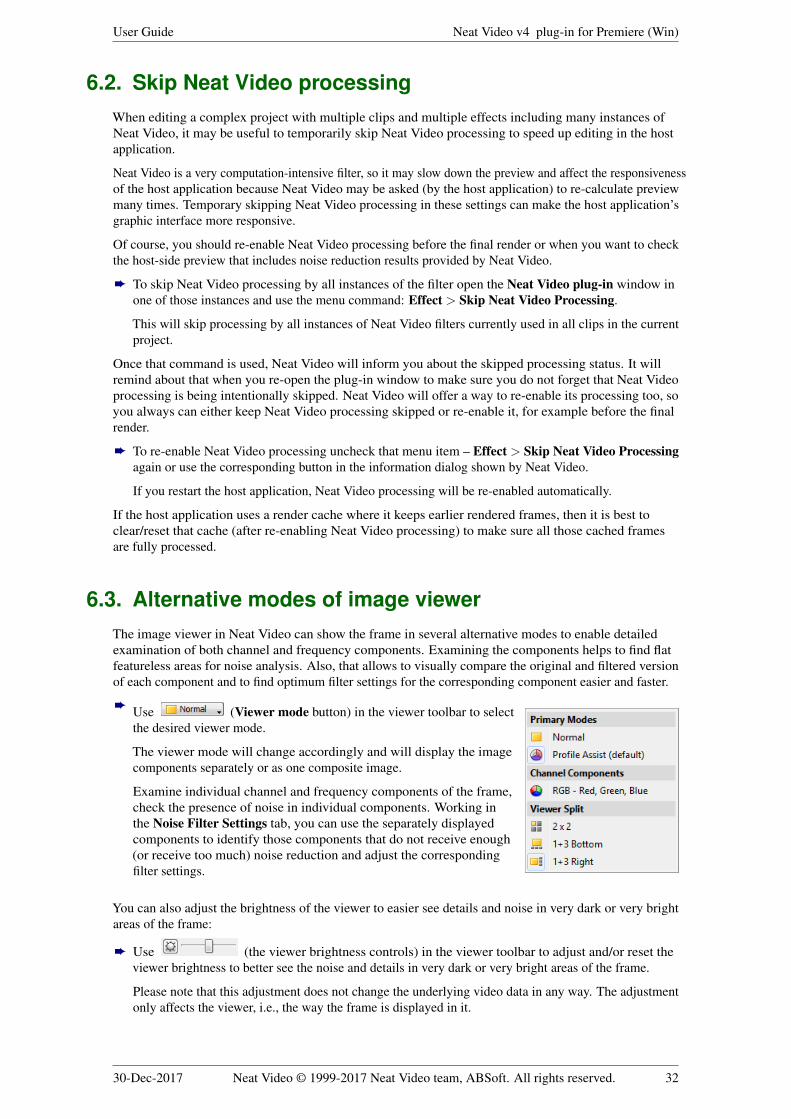
User Guide Neat Video v4 plug-in for Premiere (Win)
6.2. Skip Neat Video processingWhen editing a complex project with multiple clips and multiple effects including many instances ofNeat Video, it may be useful to temporarily skip Neat Video processing to speed up editing in the hostapplication.
Neat Video is a very computation-intensive filter, so it may slow down the preview and affect the responsivenessof the host application because Neat Video may be asked (by the host application) to re-calculate previewmany times. Temporary skipping Neat Video processing in these settings can make the host application’sgraphic interface more responsive.
Of course, you should re-enable Neat Video processing before the final render or when you want to checkthe host-side preview that includes noise reduction results provided by Neat Video.
è To skip Neat Video processing by all instances of the filter open the Neat Video plug-in window inone of those instances and use the menu command: Effect > Skip Neat Video Processing.
This will skip processing by all instances of Neat Video filters currently used in all clips in the currentproject.
Once that command is used, Neat Video will inform you about the skipped processing status. It willremind about that when you re-open the plug-in window to make sure you do not forget that Neat Videoprocessing is being intentionally skipped. Neat Video will offer a way to re-enable its processing too, soyou always can either keep Neat Video processing skipped or re-enable it, for example before the finalrender.
è To re-enable Neat Video processing uncheck that menu item – Effect > Skip Neat Video Processingagain or use the corresponding button in the information dialog shown by Neat Video.
If you restart the host application, Neat Video processing will be re-enabled automatically.
If the host application uses a render cache where it keeps earlier rendered frames, then it is best toclear/reset that cache (after re-enabling Neat Video processing) to make sure all those cached framesare fully processed.
6.3. Alternative modes of image viewerThe image viewer in Neat Video can show the frame in several alternative modes to enable detailedexamination of both channel and frequency components. Examining the components helps to find flatfeatureless areas for noise analysis. Also, that allows to visually compare the original and filtered versionof each component and to find optimum filter settings for the corresponding component easier and faster.
è Use (Viewer mode button) in the viewer toolbar to selectthe desired viewer mode.
The viewer mode will change accordingly and will display the imagecomponents separately or as one composite image.
Examine individual channel and frequency components of the frame,check the presence of noise in individual components. Working inthe Noise Filter Settings tab, you can use the separately displayedcomponents to identify those components that do not receive enough(or receive too much) noise reduction and adjust the correspondingfilter settings.
You can also adjust the brightness of the viewer to easier see details and noise in very dark or very brightareas of the frame:
è Use (the viewer brightness controls) in the viewer toolbar to adjust and/or reset theviewer brightness to better see the noise and details in very dark or very bright areas of the frame.
Please note that this adjustment does not change the underlying video data in any way. The adjustmentonly affects the viewer, i.e., the way the frame is displayed in it.
30-Dec-2017 Neat Video © 1999-2017 Neat Video team, ABSoft. All rights reserved. 32
User Guide Neat Video v4 plug-in for Premiere (Win)
7. Device noise profilesA device noise profile (or noise profile, or simply profile) describes the properties of visible noise producedby a video capturing device (e.g., a video camera, camcorder, computer TV-tuner, film digitizer, etc.)working in a certain mode. Several noise profiles corresponding to different modes of a device constitute aprofile set for this device. Neat Video can use a profile from a profile set to process a video clip producedby a device working in the corresponding device mode.
Earlier in Stage V. Prepare a device noise profile, it was briefly explained how to build noise profilesautomatically, using Auto Profile. This chapter describes that process in more details and also introducessemi-automatic and manual profiling procedures. In addition, techniques for documenting and re-usingprofiles are explained.
7.1. Building a profile for a device mode(standard profiling procedure)
This subsection explains how to build a single noise profile for a video clip produced in a certain devicemode.
Building a new noise profile generally includes three stages:
Stage I. Building a profile;Stage II. Documenting the profile;Stage III. Saving the profile.
7.1.1. Stage I. Building a profileTo build a noise profile for a video clip you need to make these steps:
Step 1. Selecting a frame suitable for noise analysis;Step 2. Analyzing the noise.
Step 1. Selecting a frame suitable for noise analysis
To build an accurate noise profile, Neat Video needs to analyze a specific frame from the video clip. Thisframe should include uniform featureless areas containing only noise without real details.
A uniform area (with minor variation in all color channels) may be overcast sky, clear sky (without cloudsand birds), or any other part of a suitable frame, where there are no visually perceptible details (exceptthe noise, which should still be visible). Neat Video needs to analyze a uniform featureless area of around128x128 pixels (the minimum size is 32x32 pixels). If noise strength is different from frame to frame thenit is better to select a frame with the strongest noise.
Use Premiere preview to find a frame that contains such flat featureless areas. Then use this frame to builda noise profile:
è 1. In the Timeline window, use the Current Time Indicator to find a frame with large flat featurelessareas; selected frame will be used for noise analysis in the next steps.
2. In the Effect Controls window in Premiere, click Setup. . . (to the right of the Reduce Noise v4effect name).
(If you run the Demo plug-in, click OK in the popup splash screen of the plug-in to proceed further.)
The Neat Video plug-in window will open and display the selected frame.
Step 2. Analyzing the noise (profiling)
Analyzing noise (profiling) is the main part of building a noise profile. This version of Neat Video offersthree ways of conducting the noise analysis: automatic, semi-automatic and manual one. Using automaticprofiling is easier and therefore recommended for beginners. In difficult cases (for example if Neat Videois unable to automatically find a uniform featureless area in the analyzed frame), automatic profiling maynot work or produce less than optimal results. You can always override automatics and use semi-automaticor manual profiling.
30-Dec-2017 Neat Video © 1999-2017 Neat Video team, ABSoft. All rights reserved. 33

User Guide Neat Video v4 plug-in for Premiere (Win)
è Make sure you use the Device Noise Profile tab:
Case of automatic profiling
To analyze the noise properties of the video clip, Neat Video uses uniform areas of the frame. Such areasshould contain noise but no visible or important details. With automatic profiling, Neat Video tries to findone such area automatically and then it analyzes the noise in that area as well as in the rest of the frame.
è Click (the Auto Profile button).
Neat Video will automatically find and show the frame area selected for analysis and will analyzeit automatically. If the selected area shown in viewer indeed contains no visible details, then theresulting noise profile will be accurate.
In difficult cases, Neat Video may be unable to find a sufficiently-large uniform featureless area in theframe. You will notice that the selected area, for example, contains some important details. In such acase, use the semi-automatic profiling instead (see below).
If you see that the area automatically selected for analysis is indeed uniform and featureless, thenthe resulting noise analysis is accurate. To be sure, check the Quality indicator in the Device NoiseProfile box. A profile built using a uniform and featureless area will usually show a high value in thisindicator.
If the profile quality is high (for example, higher than 60%), then you can be sure that the noise profileis accurate. In this case, proceed to Stage II. Documenting the noise profile, page 37.
If the quality is not high, try to use the semi-automatic profiling instead (see below).
30-Dec-2017 Neat Video © 1999-2017 Neat Video team, ABSoft. All rights reserved. 34
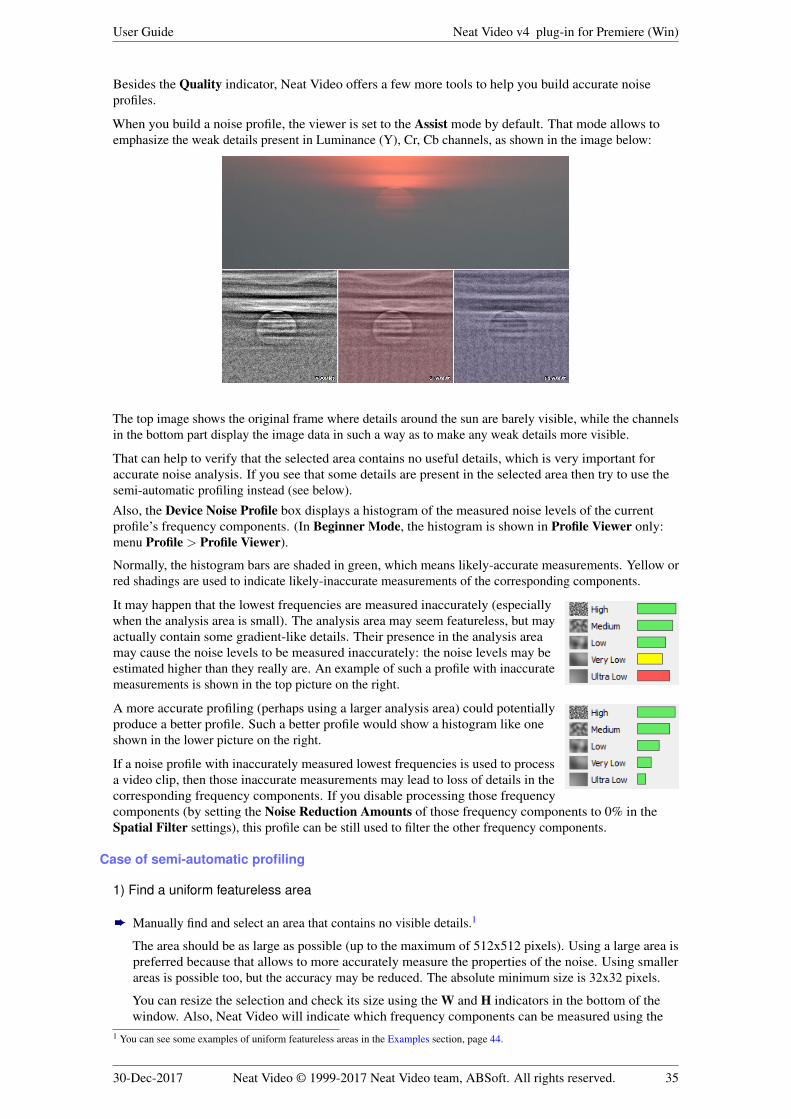
User Guide Neat Video v4 plug-in for Premiere (Win)
Besides the Quality indicator, Neat Video offers a few more tools to help you build accurate noiseprofiles.
When you build a noise profile, the viewer is set to the Assist mode by default. That mode allows toemphasize the weak details present in Luminance (Y), Cr, Cb channels, as shown in the image below:
The top image shows the original frame where details around the sun are barely visible, while the channelsin the bottom part display the image data in such a way as to make any weak details more visible.
That can help to verify that the selected area contains no useful details, which is very important foraccurate noise analysis. If you see that some details are present in the selected area then try to use thesemi-automatic profiling instead (see below).
Also, the Device Noise Profile box displays a histogram of the measured noise levels of the currentprofile’s frequency components. (In Beginner Mode, the histogram is shown in Profile Viewer only:menu Profile > Profile Viewer).
Normally, the histogram bars are shaded in green, which means likely-accurate measurements. Yellow orred shadings are used to indicate likely-inaccurate measurements of the corresponding components.
It may happen that the lowest frequencies are measured inaccurately (especiallywhen the analysis area is small). The analysis area may seem featureless, but mayactually contain some gradient-like details. Their presence in the analysis areamay cause the noise levels to be measured inaccurately: the noise levels may beestimated higher than they really are. An example of such a profile with inaccuratemeasurements is shown in the top picture on the right.
A more accurate profiling (perhaps using a larger analysis area) could potentiallyproduce a better profile. Such a better profile would show a histogram like oneshown in the lower picture on the right.
If a noise profile with inaccurately measured lowest frequencies is used to processa video clip, then those inaccurate measurements may lead to loss of details in thecorresponding frequency components. If you disable processing those frequencycomponents (by setting the Noise Reduction Amounts of those frequency components to 0% in theSpatial Filter settings), this profile can be still used to filter the other frequency components.
Case of semi-automatic profiling
1) Find a uniform featureless area
è Manually find and select an area that contains no visible details.1
The area should be as large as possible (up to the maximum of 512x512 pixels). Using a large area ispreferred because that allows to more accurately measure the properties of the noise. Using smallerareas is possible too, but the accuracy may be reduced. The absolute minimum size is 32x32 pixels.
You can resize the selection and check its size using the W and H indicators in the bottom of thewindow. Also, Neat Video will indicate which frequency components can be measured using the
1 You can see some examples of uniform featureless areas in the Examples section, page 44.
30-Dec-2017 Neat Video © 1999-2017 Neat Video team, ABSoft. All rights reserved. 35
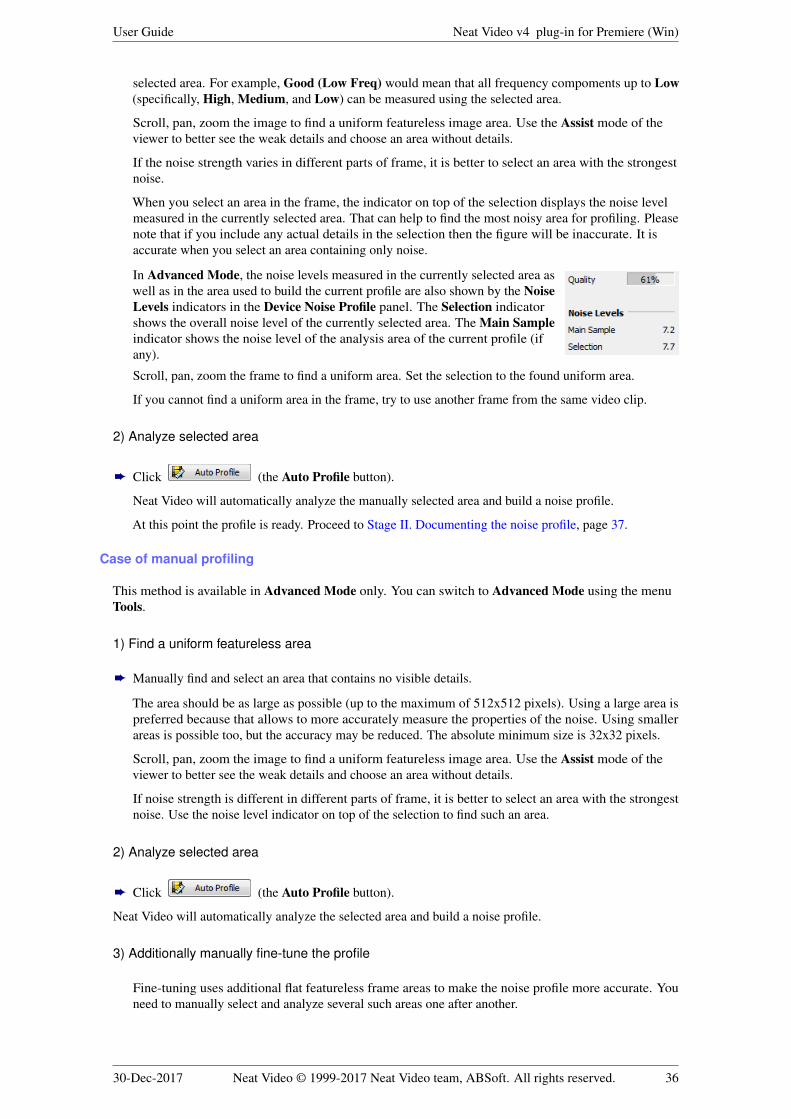
User Guide Neat Video v4 plug-in for Premiere (Win)
selected area. For example, Good (Low Freq) would mean that all frequency compoments up to Low(specifically, High, Medium, and Low) can be measured using the selected area.
Scroll, pan, zoom the image to find a uniform featureless image area. Use the Assist mode of theviewer to better see the weak details and choose an area without details.
If the noise strength varies in different parts of frame, it is better to select an area with the strongestnoise.
When you select an area in the frame, the indicator on top of the selection displays the noise levelmeasured in the currently selected area. That can help to find the most noisy area for profiling. Pleasenote that if you include any actual details in the selection then the figure will be inaccurate. It isaccurate when you select an area containing only noise.
In Advanced Mode, the noise levels measured in the currently selected area aswell as in the area used to build the current profile are also shown by the NoiseLevels indicators in the Device Noise Profile panel. The Selection indicatorshows the overall noise level of the currently selected area. The Main Sampleindicator shows the noise level of the analysis area of the current profile (ifany).
Scroll, pan, zoom the frame to find a uniform area. Set the selection to the found uniform area.
If you cannot find a uniform area in the frame, try to use another frame from the same video clip.
2) Analyze selected area
è Click (the Auto Profile button).
Neat Video will automatically analyze the manually selected area and build a noise profile.
At this point the profile is ready. Proceed to Stage II. Documenting the noise profile, page 37.
Case of manual profiling
This method is available in Advanced Mode only. You can switch to Advanced Mode using the menuTools.
1) Find a uniform featureless area
è Manually find and select an area that contains no visible details.
The area should be as large as possible (up to the maximum of 512x512 pixels). Using a large area ispreferred because that allows to more accurately measure the properties of the noise. Using smallerareas is possible too, but the accuracy may be reduced. The absolute minimum size is 32x32 pixels.
Scroll, pan, zoom the image to find a uniform featureless image area. Use the Assist mode of theviewer to better see the weak details and choose an area without details.
If noise strength is different in different parts of frame, it is better to select an area with the strongestnoise. Use the noise level indicator on top of the selection to find such an area.
2) Analyze selected area
è Click (the Auto Profile button).
Neat Video will automatically analyze the selected area and build a noise profile.
3) Additionally manually fine-tune the profile
Fine-tuning uses additional flat featureless frame areas to make the noise profile more accurate. Youneed to manually select and analyze several such areas one after another.
30-Dec-2017 Neat Video © 1999-2017 Neat Video team, ABSoft. All rights reserved. 36
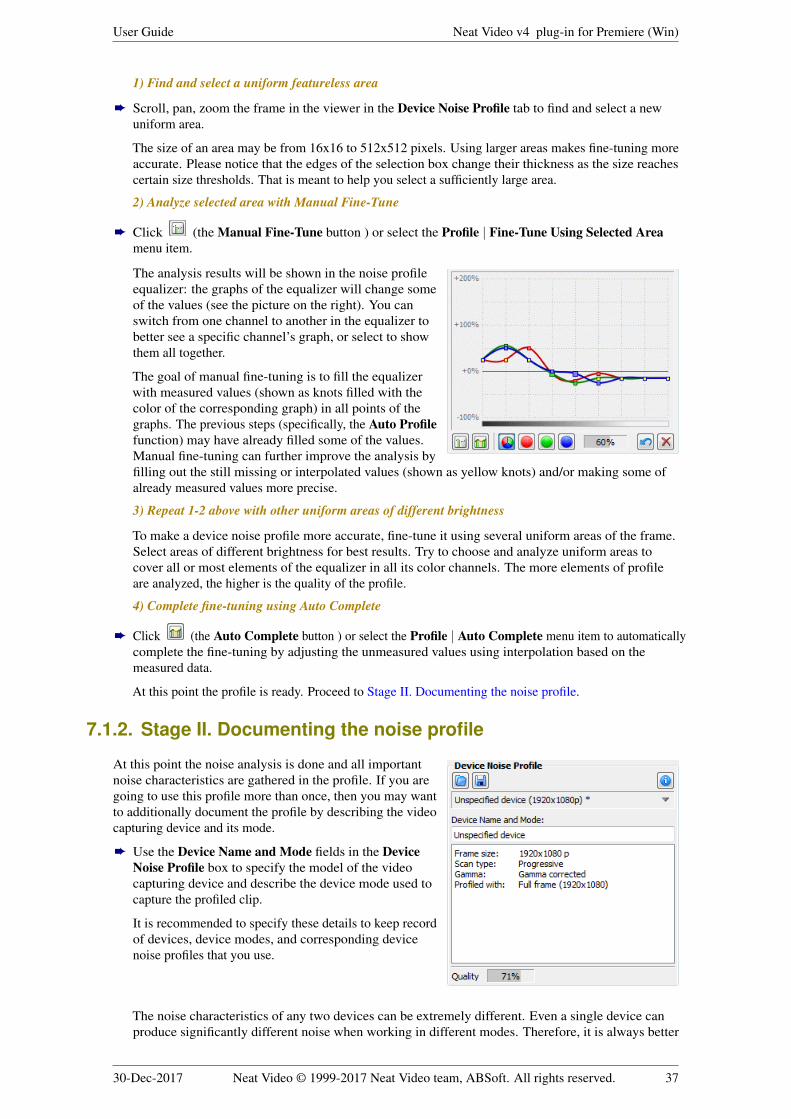
User Guide Neat Video v4 plug-in for Premiere (Win)
1) Find and select a uniform featureless area
è Scroll, pan, zoom the frame in the viewer in the Device Noise Profile tab to find and select a newuniform area.
The size of an area may be from 16x16 to 512x512 pixels. Using larger areas makes fine-tuning moreaccurate. Please notice that the edges of the selection box change their thickness as the size reachescertain size thresholds. That is meant to help you select a sufficiently large area.
2) Analyze selected area with Manual Fine-Tune
è Click (the Manual Fine-Tune button ) or select the Profile | Fine-Tune Using Selected Areamenu item.
The analysis results will be shown in the noise profileequalizer: the graphs of the equalizer will change someof the values (see the picture on the right). You canswitch from one channel to another in the equalizer tobetter see a specific channel’s graph, or select to showthem all together.
The goal of manual fine-tuning is to fill the equalizerwith measured values (shown as knots filled with thecolor of the corresponding graph) in all points of thegraphs. The previous steps (specifically, the Auto Profilefunction) may have already filled some of the values.Manual fine-tuning can further improve the analysis byfilling out the still missing or interpolated values (shown as yellow knots) and/or making some ofalready measured values more precise.
3) Repeat 1-2 above with other uniform areas of different brightness
To make a device noise profile more accurate, fine-tune it using several uniform areas of the frame.Select areas of different brightness for best results. Try to choose and analyze uniform areas tocover all or most elements of the equalizer in all its color channels. The more elements of profileare analyzed, the higher is the quality of the profile.
4) Complete fine-tuning using Auto Complete
è Click (the Auto Complete button ) or select the Profile | Auto Complete menu item to automaticallycomplete the fine-tuning by adjusting the unmeasured values using interpolation based on themeasured data.
At this point the profile is ready. Proceed to Stage II. Documenting the noise profile.
7.1.2. Stage II. Documenting the noise profile
At this point the noise analysis is done and all importantnoise characteristics are gathered in the profile. If you aregoing to use this profile more than once, then you may wantto additionally document the profile by describing the videocapturing device and its mode.
è Use the Device Name and Mode fields in the DeviceNoise Profile box to specify the model of the videocapturing device and describe the device mode used tocapture the profiled clip.
It is recommended to specify these details to keep recordof devices, device modes, and corresponding devicenoise profiles that you use.
The noise characteristics of any two devices can be extremely different. Even a single device canproduce significantly different noise when working in different modes. Therefore, it is always better
30-Dec-2017 Neat Video © 1999-2017 Neat Video team, ABSoft. All rights reserved. 37
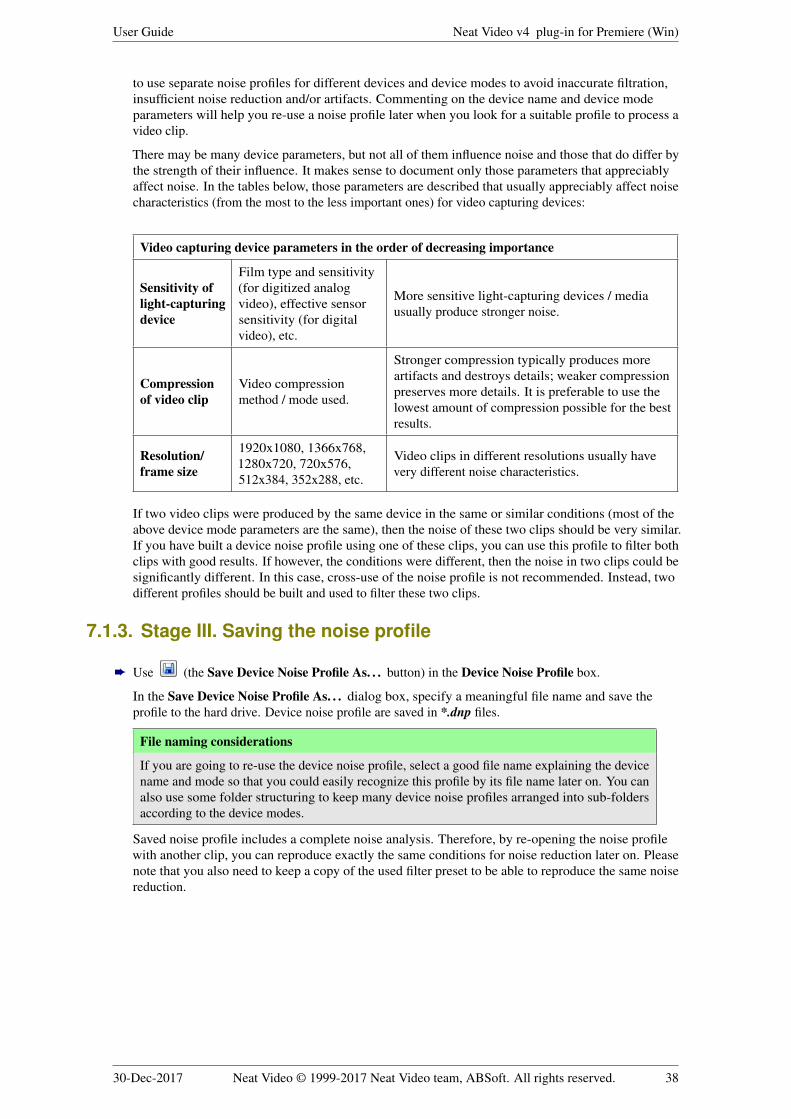
User Guide Neat Video v4 plug-in for Premiere (Win)
to use separate noise profiles for different devices and device modes to avoid inaccurate filtration,insufficient noise reduction and/or artifacts. Commenting on the device name and device modeparameters will help you re-use a noise profile later when you look for a suitable profile to process avideo clip.
There may be many device parameters, but not all of them influence noise and those that do differ bythe strength of their influence. It makes sense to document only those parameters that appreciablyaffect noise. In the tables below, those parameters are described that usually appreciably affect noisecharacteristics (from the most to the less important ones) for video capturing devices:
Video capturing device parameters in the order of decreasing importance
Sensitivity oflight-capturingdevice
Film type and sensitivity(for digitized analogvideo), effective sensorsensitivity (for digitalvideo), etc.
More sensitive light-capturing devices / mediausually produce stronger noise.
Compressionof video clip
Video compressionmethod / mode used.
Stronger compression typically produces moreartifacts and destroys details; weaker compressionpreserves more details. It is preferable to use thelowest amount of compression possible for the bestresults.
Resolution/frame size
1920x1080, 1366x768,1280x720, 720x576,512x384, 352x288, etc.
Video clips in different resolutions usually havevery different noise characteristics.
If two video clips were produced by the same device in the same or similar conditions (most of theabove device mode parameters are the same), then the noise of these two clips should be very similar.If you have built a device noise profile using one of these clips, you can use this profile to filter bothclips with good results. If however, the conditions were different, then the noise in two clips could besignificantly different. In this case, cross-use of the noise profile is not recommended. Instead, twodifferent profiles should be built and used to filter these two clips.
7.1.3. Stage III. Saving the noise profile
è Use (the Save Device Noise Profile As. . . button) in the Device Noise Profile box.
In the Save Device Noise Profile As. . . dialog box, specify a meaningful file name and save theprofile to the hard drive. Device noise profile are saved in *.dnp files.
File naming considerations
If you are going to re-use the device noise profile, select a good file name explaining the devicename and mode so that you could easily recognize this profile by its file name later on. You canalso use some folder structuring to keep many device noise profiles arranged into sub-foldersaccording to the device modes.
Saved noise profile includes a complete noise analysis. Therefore, by re-opening the noise profilewith another clip, you can reproduce exactly the same conditions for noise reduction later on. Pleasenote that you also need to keep a copy of the used filter preset to be able to reproduce the same noisereduction.
30-Dec-2017 Neat Video © 1999-2017 Neat Video team, ABSoft. All rights reserved. 38
User Guide Neat Video v4 plug-in for Premiere (Win)
7.2. Using noise profilesWhen you have a set of profiles for different modes of your video capturing device, you can directly usethose profiles to process clips using Neat Video. Usually such a set contains only one profile that is mostsuitable to process a given clip. Therefore it is very important to select the right profile, which wouldprovide the closest match between the profile and the clip. To achieve such a match, the device mode ofthe chosen profile should be the same or very close to the device mode used to capture the clip. So youneed to manually select a device noise profile that matches the video clip based on profile descriptions andfile names.
Obviously it is preferable to build a new noise profile for each clip, because such a profile would perfectlymatch the noise of that clip. Nevertheless, any noise profile can, with some degree of accuracy, be used toprocess other clips captured by the same device working in the same or similar mode. This is less accuratethan building a profile for each clip but saves time because building a new profile usually takes more timethan re-using a ready-made one. Also, re-using an existing profile may be the only solution in a situationwhen the current clip contains absolutely no uniform areas suitable for analysis.
30-Dec-2017 Neat Video © 1999-2017 Neat Video team, ABSoft. All rights reserved. 39
User Guide Neat Video v4 plug-in for Premiere (Win)
8. Preferences
There are several preferences that adjust the behavior of the Neat Video plug-in.
Use the Tools > Preferences. . . menu item to open the Preferences dialog box.
8.1. General preferences
On opening plug-in window
Do not change viewer zoom and window size
Select this option to make Neat Video do nothing (like adjusting the window size and zoom level) whenopening the plug-in window. The Neat Video window will remember its size from the last time and willnot try to adjust its size and viewer zoom to show the whole frame. The initial zoom level will be 100%.
Adjust viewer zoom to fit frame to window
Use this option to make the Neat Video viewer automatically adjust the zoom level to fit the whole frameinto the viewer window, without modifying the window size. The Neat Video window will remember itssize from the last time.
Adjust window size to accommodate whole frame
Use this option to make the Neat Video windows automatically adjust its window size (and if necessary,the viewer zoom level as well) to accommodate the whole frame when opening the Neat Video plug-in.
Color theme
Normal brightness
Neat Video will display its interface elements using the current color theme of the OS.
Reduced brightness
Select this option to switch Neat Video to a custom color theme with reduced brightness.
Updates
Periodically check for software updates
Neat Video can automatically access the Internet to check whether an updated version of the plug-in isavailable on the webpage of Neat Video.
Unless this option is disabled, Neat Video will automatically look for updates every few days.
You can also manually run such a check using the Check Now button available there.
Neat Video will display the currently installed version of the software as well as the latest availableversion of the product that can be downloaded. When a newer version is available you can use theprovided download link to visit the download area to download and install the updated version.
Show hints over interface controls
This option switches on/off the hints explaining the purpose of Neat Video controls (like a button, slider,etc.). The hints are displayed when the mouse pointer is placed over controls in the Neat Video interface.
30-Dec-2017 Neat Video © 1999-2017 Neat Video team, ABSoft. All rights reserved. 40
User Guide Neat Video v4 plug-in for Premiere (Win)
8.2. Defaults
Default Device Noise Profile
This setting selects how a noise profile should be prepared by Neat Video when a new instance of the filteris created (for example, when you add Neat Video to a clip). There are two possible ways:
Do not prepare noise profile automatically
When this option is selected, Neat Video does not automatically prepare a new noise profile. You thenshould prepare a noise profile manually, for example, by building it using Auto Profile.
Use specified default profile
When this option is selected, Neat Video automatically loads the specified noise profile from the disk.
This may be useful when you work with many clips shot by the same camera in the same shooting modewhen the noise is the same in all clips. In such a situation, you can simply build a quality noise profile forone of those clips, save it to the disk, specify it here in this option and then add Neat Video to all otherclips. All the newly created instances of Neat Video will automatically load and use the profile.
Default Filter Preset
This setting selects the filter preset to be used when a new instance of the filter is created (for example,when you add Neat Video to a clip) or when you reset the filter settings (in the Noise Filter Settings tab).
Program’s default settings
When this option is selected, Neat Video will use the defaults pre-programmed in the plug-in.
Specified custom preset
When this option is selected, Neat Video automatically loads the specified filter preset from the disk.
Using this option, you can make any existing filter preset to work as default in Neat Video.
You can also save you own preset and make it default.
8.3. Profiling preferences
Save noise samples in profiles
Enable this option to make Neat Video save a noise sample from the analyzed frame area into device noiseprofile (*.dnp file). This will increase the size of the *.dnp file but will also improve the compatibilitywith the future versions of the software (Neat Video will be able to re-build the profile using the savednoise sample).
Show warnings about selected frame areas
Enable this option to let Neat Video display warnings about selected frame areas during profiling. Forexample, Neat Video may warn you about clipping or non-uniformity detected in the selected area, thushelping you select a better area for profiling. If you do not need such kind of assistance you can alwaysdisable this option.
30-Dec-2017 Neat Video © 1999-2017 Neat Video team, ABSoft. All rights reserved. 41
User Guide Neat Video v4 plug-in for Premiere (Win)
8.4. Performance preferencesThe first group of settings in this tab selects the computing devices to be used for video processing. Thisgroup of settings is optional: it is shown only if at least one supported GPU (graphic processing unit)is available along with the regular CPU (central processing unit, or processor). This group includes thefollowing items:
Use CPU only
This option makes Neat Video perform all video processing using the CPU only.
Use GPU only
This option makes Neat Video perform all video processing using the GPU only.
Use CPU and GPU
If you select this option, then Neat Video will process video data using the CPU and GPU.
Depending on individual performance of each computing device (CPU and GPU), each of the aboveoptions may be the most efficient. You can try different settings and measure the resulting speed using theCheck Speed tool below.
CPU
Number of used cores
This option adjusts the number of CPU cores used by Neat Video for processing. The number of usedcores can go up to the total number of cores in all CPUs in your computer (like 2 cores in Core Duo, 4cores in Core Quad, 8 cores in a desktop version of i7 with enabled hyperthreading, etc.). If the computerincludes two physical CPUs, then the number of cores is correspondingly higher. Ideally, using all coresshould provide the best overall performance. In some cases however, processing speed may be even higherif only some of cores are used (especially on CPUs with hyperthreading). For example, using fewer thanall 8 virtual cores of some i7 CPUs is in some cases faster. You may want to test different values of thissetting. Use the Optimize tool described below to find the best number of cores.
GPU
In this box, yon can specify which of the available computation-capable GPU devices (CUDA-capableNVIDIA cards and/or OpenCL-capable AMD/ATI cards) should be used (in addition to the CPU orinstead of the CPU) for video processing. When you have one or more GPUs, you can let Neat Video usethem and specify how much of the available GPU memory may be used by Neat Video for its processing.If another application or another filter also uses the GPU at the same time, you may want to reserve only apart of the GPU memory for Neat Video and leave the rest free for other purposes. In any case, you can trydifferent values and see which setting gives the best results.
Check Speed
Use the Check Speed button to measure the speed of Neat Video processing with the current filter settingsand current performance settings specified in the CPU and GPU boxes.
Optimize
Use the Optimize. . . button to open a specialized dialog designed to measure Neat Video’s processingspeeds achieved with different combinations of the CPU and GPU settings. This tool allows to automaticallybenchmark all possible combinations of settings and to identify the best combination. This is the easiestway to optimize the performance of Neat Video for specific CPU and GPU hardware.
30-Dec-2017 Neat Video © 1999-2017 Neat Video team, ABSoft. All rights reserved. 42
User Guide Neat Video v4 plug-in for Premiere (Win)
8.5. Folders preferences
Profile Folder
Select the folder where Neat Video must store and look for its device noise profiles. This should be thetopmost folder of all the (sub)folders with device noise profiles. Neat Video will display all profiles(stored in all subfolders of the specified folder) in the popup menu in the Device Noise Profile panel of theplug-in window to help you quickly load those profiles.
By default, the Profile Folder is located in your Documents folder:Documents∖Neat Video v4 for Premiere∖Profiles∖
You can select another location to store and use noise profiles if you like.
Preset Folder
Select the folder where Neat Video will look for filter presets. This should be the topmost folder of all the(sub)folders with filter presets. Neat Video will display all presets (stored in all subfolders of the specifiedfolder) in the popup menu in the Filter Settings panel of the plug-in window to help you quickly loadthose presets.
By default, the Preset Folder is located in your Documents folder:Documents∖Neat Video v4 for Premiere∖Presets∖
You can select another location to store and use filter presets if you like.
Show preset description on load
When you manually load a filter preset from the disk, Neat Video automatically opens the Preset Descriptiondialog to display the description of the preset being loaded.
This is very useful with the pre-written presets supplied with Neat Video: their descriptions are shownto help you get a better understanding of the purpose, applicability and side effects of the correspondingpreset.
You can disable displaying that dialog if you want. In that case, you can still access the Preset Descriptiondialog using in the Filter Settings box.
Folder History
You can adjust the way the file dialogs work in Neat Video using the settings available in this subsection:
Use independent folders for profiles and presets
When this option is enabled (default), Neat Video will use separate current folders for the file dialogs thatwork with noise profiles and with filter presets.
If you disable this option (it is enabled by default), then Neat Video will use the same common folders forthe file dialogs working with both profiles and presets.
Use independent load and save folders
If you enable this option (it is disabled by default), Neat Video will use separate current folders for theload and save dialogs (for example, the profile loading and profile saving dialogs).
When this option is disabled (default), Neat Video will use only one current folder for the load and savedialogs.
30-Dec-2017 Neat Video © 1999-2017 Neat Video team, ABSoft. All rights reserved. 43
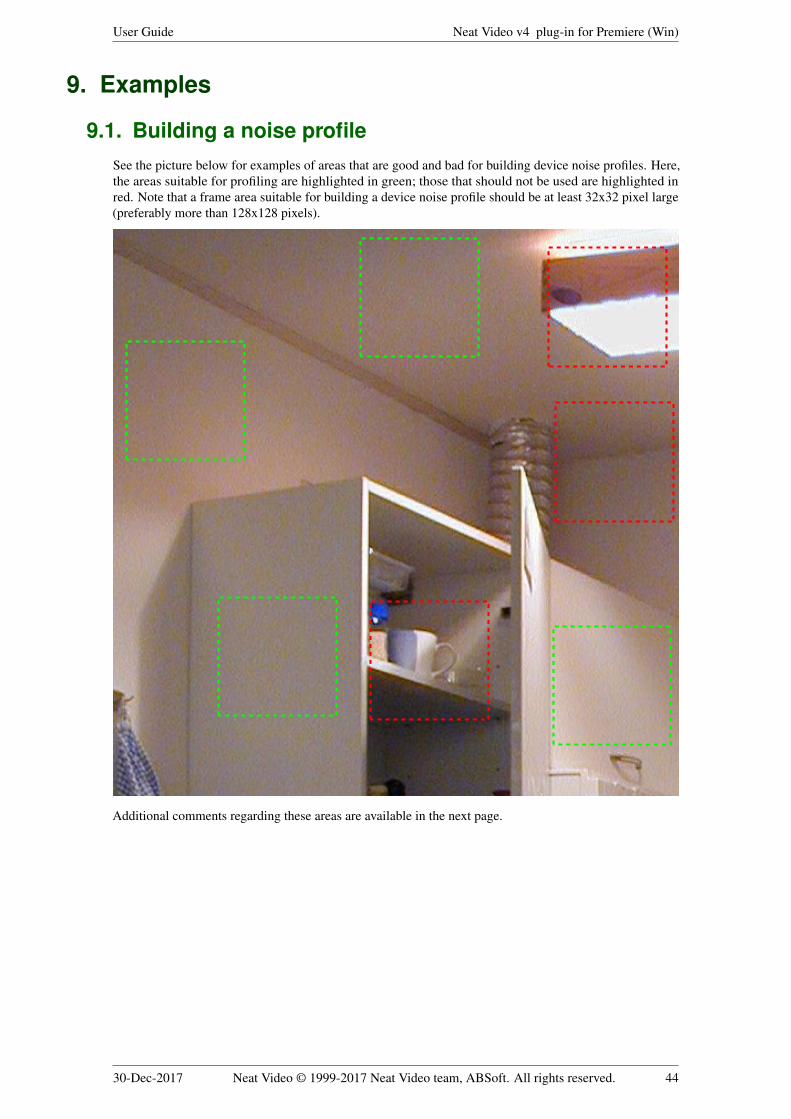
User Guide Neat Video v4 plug-in for Premiere (Win)
9. Examples
9.1. Building a noise profileSee the picture below for examples of areas that are good and bad for building device noise profiles. Here,the areas suitable for profiling are highlighted in green; those that should not be used are highlighted inred. Note that a frame area suitable for building a device noise profile should be at least 32x32 pixel large(preferably more than 128x128 pixels).
Additional comments regarding these areas are available in the next page.
30-Dec-2017 Neat Video © 1999-2017 Neat Video team, ABSoft. All rights reserved. 44
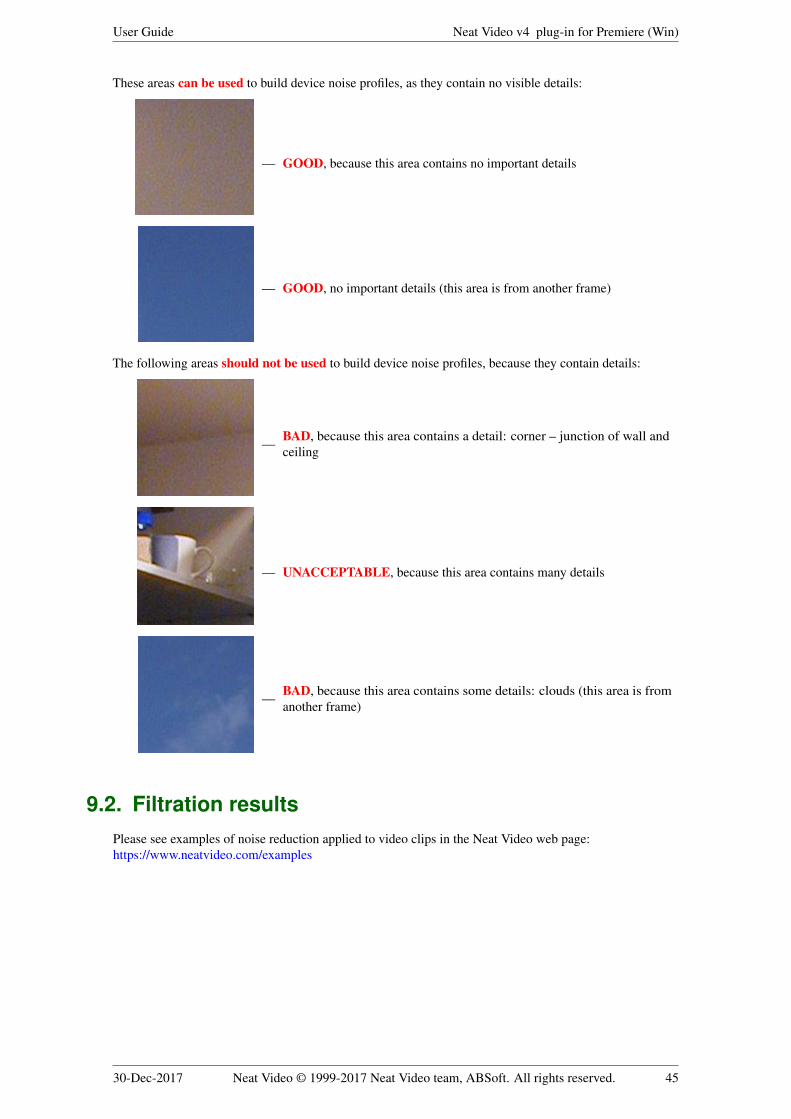
User Guide Neat Video v4 plug-in for Premiere (Win)
These areas can be used to build device noise profiles, as they contain no visible details:
— GOOD, because this area contains no important details
— GOOD, no important details (this area is from another frame)
The following areas should not be used to build device noise profiles, because they contain details:
— BAD, because this area contains a detail: corner – junction of wall andceiling
— UNACCEPTABLE, because this area contains many details
— BAD, because this area contains some details: clouds (this area is fromanother frame)
9.2. Filtration resultsPlease see examples of noise reduction applied to video clips in the Neat Video web page:https://www.neatvideo.com/examples
30-Dec-2017 Neat Video © 1999-2017 Neat Video team, ABSoft. All rights reserved. 45
User Guide Neat Video v4 plug-in for Premiere (Win)
10. Questions and answers
10.1. General questionsQ What is the difference between Neat Video Demo, Home and Pro plug-in?
A The Demo plug-in has some functional limitations. For example, it can only process short video clipsand it will filter only a limited area inside the frame. Please see the Detailed feature map, page 48 , formore details.
Q Should I uninstall Demo plug-in prior to installing the Home / Pro plug-in?
A This is not necessary. You can install the Home / Pro plug-in over the Demo plug-in. Please make surethe host application is completely closed when you install the Home / Pro plug-in.
Q Should I uninstall the older version of Neat Video prior to installing a newer one?
A This is not necessary. You can simply install a newer version of Neat Video. It will either replace theold one or will be available along with the old one (depending on the version).
Q I think I have found a bug. How can I submit a bug report?
A Please use the online bug report form: https://www.neatvideo.com/support/report-bugPlease fill it out to let us know all the details necessary to reproduce the problem.
See more information about bugs in the Known issues section in Neat Video webpage(https://www.neatvideo.com/support/known-issues) and about bug fixes in the WhatsNew.txt filesupplied with the software (also see the history section on the web page for the most up to dateinformation: https://www.neatvideo.com/features/version-history).
10.2. Filtration-related questionsQ Why do I receive some crystal-like artifacts in the filtered frame?
A The crystal-like artifacts (usually these are the residual compression artifacts or residual noise) looklike thin lines in the filtered frame. They can be eliminated by increasing the high frequency noiselevel in the filter settings or by using the dedicated Artifact Removal filter described in page 26.
Note: presence of many residual artifacts may be caused by using a poorly built, inaccurate noiseprofile or a profile built for another device and/or device mode.
Q Filtered frame looks ‘plastic’. Why?
A The reason is that too much filtration was applied. Let Neat Video keep some noise to havenatural-looking results. Adjust the noise reduction amounts; for example, reduce the noise reductionamount in the Luminance channel to 10-30% or even to 0% (in the Spatial section). Also, make surethe device noise profile does match the video clip processed. Using an incorrectly chosen or poorlybuilt profile can either produce plastic-looking results or leave residual artifacts (see the previousquestion).
Q What is frequency?
A The term (spatial) frequency is used in Neat Video to denote elements of a video clip (both importantdetails and noise/grain) of certain size.
High frequency corresponds to elements of smallest size. Medium (mid) frequencycorresponds to elements of medium size. Low, Very Low and Ultra Low frequencycorrespond to elements of correspondingly larger sizes.
For reference, see the noise samples of different frequencies in the Noise FilterSettings tab of the Neat Video plug-in window.
Q The filtration process is not very fast, is this normal?
A This is normal, because the Neat Video noise reduction algorithms are quite complex. We work onfurther optimization to provide better performance.
30-Dec-2017 Neat Video © 1999-2017 Neat Video team, ABSoft. All rights reserved. 46
User Guide Neat Video v4 plug-in for Premiere (Win)
Q How to filter only the color noise (not the brightness noise)?
A Set the value of the Luminance channel noise reduction amount to 0%. This will disable the spatialfilter in the luminance (brightness) channel.
Q What is YCrCb?
A YCrCb is the name of a family of color spaces widely used in digital imaging, television, video, etc. In‘YCrCb’ , ‘Y’ corresponds to the luminance channel , ‘Cr’ - to the Cr chrominance channel coveringthe red to blue-green color range, ‘Cb’ - to the Cb chrominance channel covering the blue to yellowcolor range. Because this space separates the luminance and chrominance information, it is used fornoise reduction where different processing is required in the luminance and chrominance channels.
Q Is processing via Neat Video best done before or after any other processing (i.e. tonal/colorcorrection)?
A Such operations as tonal/color correction are quite conservative from the standpoint of noise, i.e.,they do not significantly change the noise characteristics of the video clip. Therefore, filtering beforeor after makes little difference – as long as the noise profile is built and applied at the same stage ofyour workflow. For example, do not use a device noise profile built with an unprocessed (the colorcorrection is not yet applied) clip to filter the same clip with the color correction already applied.
On the other hand, certain effects, like sharpening or resampling, applied to a noisy video clip mayconsiderably change its noise properties. In this sense, it is generally better to use Neat Video filtrationbefore applying such effects.
30-Dec-2017 Neat Video © 1999-2017 Neat Video team, ABSoft. All rights reserved. 47
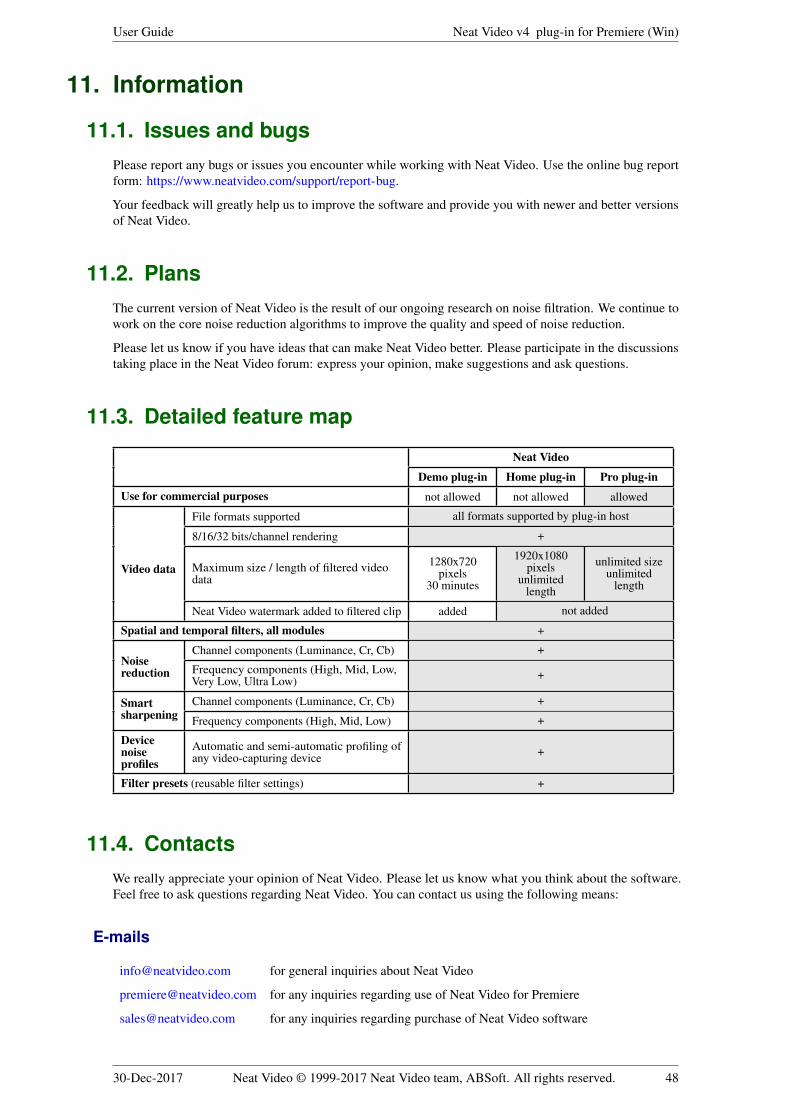
User Guide Neat Video v4 plug-in for Premiere (Win)
11. Information
11.1. Issues and bugsPlease report any bugs or issues you encounter while working with Neat Video. Use the online bug reportform: https://www.neatvideo.com/support/report-bug.
Your feedback will greatly help us to improve the software and provide you with newer and better versionsof Neat Video.
11.2. PlansThe current version of Neat Video is the result of our ongoing research on noise filtration. We continue towork on the core noise reduction algorithms to improve the quality and speed of noise reduction.
Please let us know if you have ideas that can make Neat Video better. Please participate in the discussionstaking place in the Neat Video forum: express your opinion, make suggestions and ask questions.
11.3. Detailed feature map
Neat Video
Demo plug-in Home plug-in Pro plug-inUse for commercial purposes not allowed not allowed allowed
Video data
File formats supported all formats supported by plug-in host
8/16/32 bits/channel rendering +
Maximum size / length of filtered videodata
1280x720pixels
30 minutes
1920x1080pixels
unlimitedlength
unlimited sizeunlimited
length
Neat Video watermark added to filtered clip added not added
Spatial and temporal filters, all modules +
Noisereduction
Channel components (Luminance, Cr, Cb) +
Frequency components (High, Mid, Low,Very Low, Ultra Low) +
Smartsharpening
Channel components (Luminance, Cr, Cb) +
Frequency components (High, Mid, Low) +
Devicenoiseprofiles
Automatic and semi-automatic profiling ofany video-capturing device +
Filter presets (reusable filter settings) +
11.4. ContactsWe really appreciate your opinion of Neat Video. Please let us know what you think about the software.Feel free to ask questions regarding Neat Video. You can contact us using the following means:
E-mails
[email protected] for general inquiries about Neat Video
[email protected] for any inquiries regarding use of Neat Video for Premiere
[email protected] for any inquiries regarding purchase of Neat Video software
30-Dec-2017 Neat Video © 1999-2017 Neat Video team, ABSoft. All rights reserved. 48
User Guide Neat Video v4 plug-in for Premiere (Win)
Forum
Register in the Neat Video community forum (https://www.neatvideo.com/nvforum/) and participate indiscussions related to the use and development of Neat Video. Such topics are covered in the forum as:
• announcements of new and updated version of the software;
• questions about use of Neat Video;
• examples of using Neat Video with comments and suggestions;
• feedback from the users: suggestions of new features and improvements;
• general comments;
• backup contacts.
Web page
https://www.neatvideo.com/
11.5. Legal information
Copyright
Neat Video © 1999-2017 Neat Video team, ABSoft. All rights reserved.
License agreement
By downloading and/or in any way using the Neat Video v4 plug-in for Premiere (Win) (called “Neat Video”hereunder in this agreement) software you indicate that you do accept this license agreement. If you areunable or unwilling to accept this license agreement, then you may not use the Neat Video software andmust return and/or destroy all copies of Neat Video in your possession.
You may
Use the Demo edition of Neat Video free of charge for non-commercial purposes only.
Copy and distribute the Demo edition of Neat Video.
Run the Home edition of Neat Video on one (or more, up to the number specified in your license)computer (computers) at a time only for non-commercial purposes provided you are a registered user andyou have a valid license for the Home edition of Neat Video.
Run the Pro edition of Neat Video on one (or more, up to the number specified in your license) computer(computers) at a time for commercial and other purposes provided you are a registered user and you havea valid license for the Pro edition of Neat Video.
You may not
Sublicense, rent, lease and sell any version of Neat Video or any portion of it including the license datawithout the explicit written permission from the Neat Video team, ABSoft.
Copy, share and distribute the Home and Pro edition of Neat Video or any portion of it including thelicense data without the explicit written permission from the Neat Video team, ABSoft.
Decompile, disassemble, reverse engineer, modify, clone and emulate any version of the Neat Videosoftware or any portion of it including the license data.
Use the Home and Pro edition of Neat Video if you are not registered user.
30-Dec-2017 Neat Video © 1999-2017 Neat Video team, ABSoft. All rights reserved. 49
User Guide Neat Video v4 plug-in for Premiere (Win)
Term and termination
If you are a registered user of the Home or Pro edition of Neat Video and you have purchased a license fora specific major of Neat Video, then you may use this major version (including all minor updates of thesame major version) and edition of the software without time limitations provided you observe this licenseagreement.
A license for a certain major version of Neat Video may be extended to a higher major version. Bydecision of the Neat Video team, ABSoft, this extension may be automatic and free or may involve anupgrade fee.
You may terminate this license agreement at any time by returning or destroying all copies of Neat Videoin your possession and notifying the Neat Video team.
Your rights derived from this license agreement will terminate immediately if you infringe upon theNeat Video team, ABSoft’s copyrights or breach the terms of this agreement. Copyright infringement orbreaching this agreement may also result in criminal or civil prosecution.
Disclaimer of warranty
The authors make no warranty or representation, either express or implied, with respect to this software,its quality, accuracy, merchantability, or fitness for a particular purpose. This software is provided “as is”,and you, its user, assume the entire risk as to its quality and accuracy.
Distribution
The Demo edition of Neat Video may be distributed unmodified provided any charge is to cover distributioncosts only.
The Demo edition of Neat Video may be placed on magazine CDs/DVDs as long as the Neat Video teamis informed.
11.6. RegistrationTo become a registered user and to get a fully functional copy of Neat Video Home or Pro plug-in forPremiere (Win) you need to purchase a license (a single- or multi-user license). Please find the detailedinformation in the Purchase section of the Neat Video web page:https://www.neatvideo.com/purchase
After purchasing a license, you receive an e-mail from the Neat Video team with detailed download andregistration instructions. Using those you will be able to download, install and register the software onyour computer.
By becoming a registered user of Neat Video Home or Pro plug-in for Premiere (Win) you will:
• Encourage the authors to further develop and improve the software;
• Get access to all functions of Neat Video Home or Pro plug-in for Premiere (Win)(see the Detailed feature map, page 48);
• Pro plug-in only: be able to use Neat Video for Premiere (Win) for commercial purposes;
• Get free updates of the software (minor modifications with the same major version number, forexample, updates from the version v4.0 to any v4.x);
• Enjoy reduced upgrade prices for new major future modifications of Neat Video Home or Pro plug-infor Premiere (Win);
• Receive the primary attention of Neat Video support group;
• Receive the primary attention of Neat Video development group(tell us what you want to see in the next version).
Message from Neat Video team
By purchasing our product you are helping us to further develop and improve the software.
Become a registered user and we will make Neat Video better for YOU!
30-Dec-2017 Neat Video © 1999-2017 Neat Video team, ABSoft. All rights reserved. 50

User Guide Neat Video v4 plug-in for Premiere (Win)
11.7. AcknowledgmentsThank you very much to all the people who contribute by proposing improvements and new features.
Thank you very much to all the people who help us to find bugs in Neat Video.
Thank you very much to those who stimulate the development of Neat Video by word and deed.
Neat Video team, ABSoft
30-Dec-2017 Neat Video © 1999-2017 Neat Video team, ABSoft. All rights reserved. 51
User Guide Neat Video v4 plug-in for Premiere (Win)
Index
Adapt to Changing Noise,23
Apply filter, 30Artifact Removal, 26Auto Complete, 37Auto Fine-Tune, 14Auto Profile, 11, 34, 36Check Speed, 18, 28Dust and Scratches, 15, 20Edge Smoothing, 27Filter Tuning Assist, 25Load Profile, 13Manual Fine-Tune, 37Mix with Original, 28Mode
Advanced Mode, 15,18
Beginner Mode, 15Noise Level, 16, 24, 26Noise Reduction Amount,
16, 24Optimize, 18, 28Quality Mode, 18, 23Sharpening, 17, 27Slow Shutter, 21Spatial Filter, 16, 24Temporal Filter, 15, 19
adapt to changing noise, 23apply filter, 30artifact removal, 26
color noise, 26, 47color space
chrominance, 47luminance, 47YCrCb, 47
compatibilityPremiere, 4
componet viewer, 32contacts, 48
e-mails, 48forum, 49web page, 49
device noise profile, 11building, 33
automatic, 11, 34manual, 36semi-automatic, 35standard procedure,
33documenting, 37parameters, 38quality indicator, 13, 34saving, 38using, 39
dust and scratches, 15, 20amount, 21mode, 21threshold, 21
edge smoothing, 27examples, 44
feature map, 48features, 3filter preset, 29, 30
description, 29load, 29save, 29
frequency, 46high, 26, 46low, 46mid, medium, 46ultra low, 25very low, 25
frequency range, 5, 45
globally disable, 32GPU acceleration
CUDA, 3OpenCL, 4
license agreement, 49
mix with original, 28
night mode, 21noise filter, 5
noise levelspatial filter, 24, 26temporal filter, 19
noise reduction amount, 24,25
performance settingsoptimize, 17, 28
plug-ininstallation, 6installer, 6main window, 10
preferences, 40preview, 16, 23
quality modespatial filter, 23temporal filter, 18
registration, 50repeated frames, 21
sharpening, 17, 27skip processing, 32slow shutter, 21
effective frame rate, 21mode, 22
spatial filter, 16, 24noise level, 16, 24noise reduction amount,
16, 24quality mode, 23
spatial filter settings, 16, 23spatial filter tuning, 25system requirements, 3
temporal filter, 19amount, 20noise level, 19quality mode, 18radius, 15, 19
test-kit, 7
variants of filtration, 31
30-Dec-2017 Neat Video © 1999-2017 Neat Video team, ABSoft. All rights reserved. 52