neoconnex server manual version 10 - neoterra … neoconnex server training... · ® server manual...
TRANSCRIPT
neoConneX® Server v10.x - by neoterra® Systems
Page 1 of 38
48 Centennial Road, Unit #8 Orangeville, Ontario. L9W 3T4
CDN-Tel: 1-519-940-0088 / U.S.-Tel: 1-872-216-8953 / Fax: 1-519-940-8813 – Email: [email protected] www.neoterra.ca
neoConneX® Server Manual Version 10.0
neoConneX® Server v10.x - by neoterra® Systems
Page 2 of 38
48 Centennial Road, Unit #8 Orangeville, Ontario. L9W 3T4
CDN-Tel: 1-519-940-0088 / U.S.-Tel: 1-872-216-8953 / Fax: 1-519-940-8813 – Email: [email protected] www.neoterra.ca
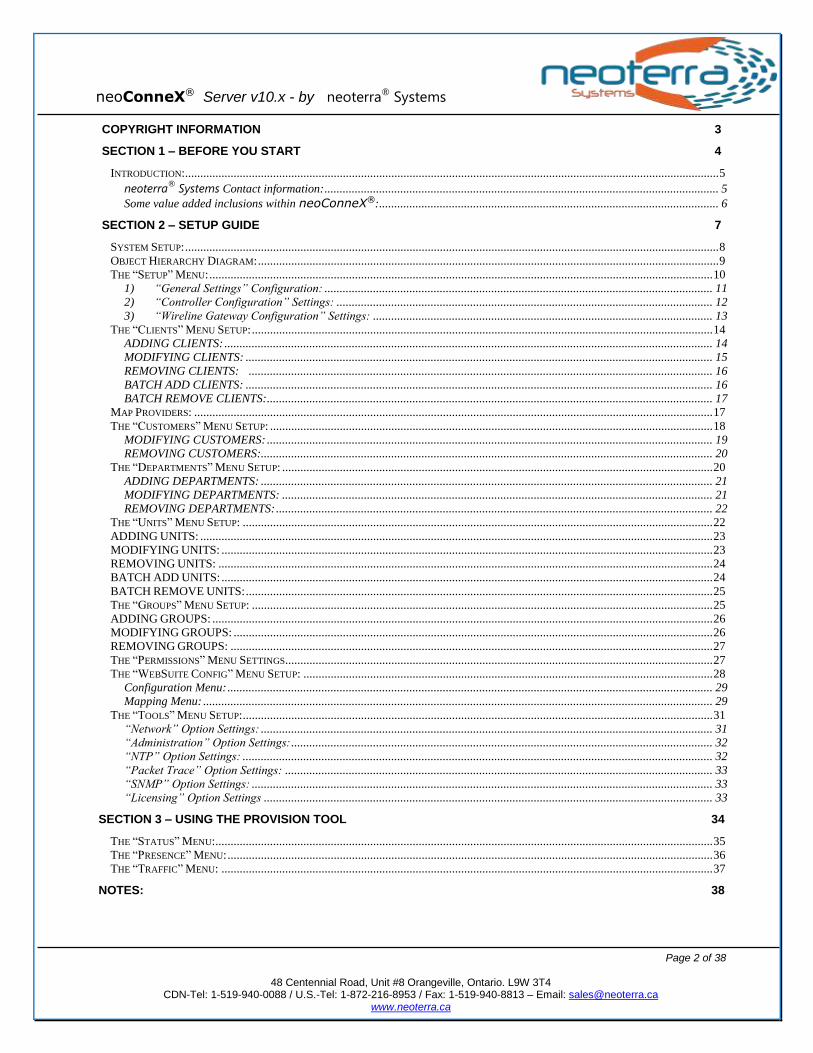
COPYRIGHT INFORMATION 3
SECTION 1 – BEFORE YOU START 4
INTRODUCTION:................................................................................................................................................................................ 5
neoterra®
Systems Contact information: .................................................................................................................................. 5 Some value added inclusions within neoConneX®: ................................................................................................................ 6
SECTION 2 – SETUP GUIDE 7
SYSTEM SETUP: ................................................................................................................................................................................ 8 OBJECT HIERARCHY DIAGRAM: ........................................................................................................................................................ 9 THE “SETUP” MENU: ...................................................................................................................................................................... 10
1) “General Settings” Configuration: ................................................................................................................................ 11 2) “Controller Configuration” Settings: ............................................................................................................................ 12 3) “Wireline Gateway Configuration” Settings: ................................................................................................................ 13
THE “CLIENTS” MENU SETUP: ........................................................................................................................................................ 14 ADDING CLIENTS: ................................................................................................................................................................. 14 MODIFYING CLIENTS: .......................................................................................................................................................... 15 REMOVING CLIENTS: ......................................................................................................................................................... 16 BATCH ADD CLIENTS: .......................................................................................................................................................... 16 BATCH REMOVE CLIENTS: ................................................................................................................................................... 17
MAP PROVIDERS: ........................................................................................................................................................................... 17 THE “CUSTOMERS” MENU SETUP: .................................................................................................................................................. 18
MODIFYING CUSTOMERS: ................................................................................................................................................... 19 REMOVING CUSTOMERS:..................................................................................................................................................... 20
THE “DEPARTMENTS” MENU SETUP: .............................................................................................................................................. 20 ADDING DEPARTMENTS: ..................................................................................................................................................... 21 MODIFYING DEPARTMENTS: .............................................................................................................................................. 21 REMOVING DEPARTMENTS: ................................................................................................................................................ 22
THE “UNITS” MENU SETUP: ........................................................................................................................................................... 22 ADDING UNITS: ......................................................................................................................................................................... 23 MODIFYING UNITS: .................................................................................................................................................................. 23 REMOVING UNITS: ................................................................................................................................................................... 24 BATCH ADD UNITS: .................................................................................................................................................................. 24 BATCH REMOVE UNITS: .......................................................................................................................................................... 25 THE “GROUPS” MENU SETUP: ........................................................................................................................................................ 25 ADDING GROUPS: ..................................................................................................................................................................... 26 MODIFYING GROUPS: .............................................................................................................................................................. 26 REMOVING GROUPS: ............................................................................................................................................................... 27 THE “PERMISSIONS” MENU SETTINGS............................................................................................................................................. 27 THE “WEBSUITE CONFIG” MENU SETUP: ....................................................................................................................................... 28
Configuration Menu: ................................................................................................................................................................ 29 Mapping Menu: ........................................................................................................................................................................ 29
THE “TOOLS” MENU SETUP: ........................................................................................................................................................... 31 “Network” Option Settings: ..................................................................................................................................................... 31 “Administration” Option Settings: ........................................................................................................................................... 32 “NTP” Option Settings: ........................................................................................................................................................... 32 “Packet Trace” Option Settings: ............................................................................................................................................. 33 “SNMP” Option Settings: ........................................................................................................................................................ 33 “Licensing” Option Settings .................................................................................................................................................... 33
SECTION 3 – USING THE PROVISION TOOL 34
THE “STATUS” MENU: .................................................................................................................................................................... 35 THE “PRESENCE” MENU: ................................................................................................................................................................ 36 THE “TRAFFIC” MENU: .................................................................................................................................................................. 37
NOTES: 38
neoConneX® Server v10.x - by neoterra® Systems
Page 3 of 38
48 Centennial Road, Unit #8 Orangeville, Ontario. L9W 3T4
CDN-Tel: 1-519-940-0088 / U.S.-Tel: 1-872-216-8953 / Fax: 1-519-940-8813 – Email: [email protected] www.neoterra.ca
Copyright Information
Copyright Information:
© 2013 neoterra®
Systems Inc. All rights reserved. This document is provided “as-is”. Information and views expressed in this document, including URL and other Internet website references, may change without notice. You bear the risk of using it. Some examples are for illustration only and are fictitious. No real association is intended or inferred. This document does not
provide you with any legal rights to any intellectual property in any neoterra®
Systems product. You may copy and use this document for your internal, reference purposes.
neoConneX® Server v10.x - by neoterra® Systems
Page 4 of 38
48 Centennial Road, Unit #8 Orangeville, Ontario. L9W 3T4
CDN-Tel: 1-519-940-0088 / U.S.-Tel: 1-872-216-8953 / Fax: 1-519-940-8813 – Email: [email protected] www.neoterra.ca
SECTION 1 – Before You Start
neoConneX® Server v10.x - by neoterra® Systems
Page 5 of 38
48 Centennial Road, Unit #8 Orangeville, Ontario. L9W 3T4
CDN-Tel: 1-519-940-0088 / U.S.-Tel: 1-872-216-8953 / Fax: 1-519-940-8813 – Email: [email protected] www.neoterra.ca
Introduction:
Thank you for purchasing neoConneX®, an application designed by neoterra® Systems for the
Motorola MOTOTRBO™ Professional Digital Two-Way Radio System, to permit the user enhanced control capabilities. The application has been designed to accommodate the safe tracking of fleet and similar fixed locations that use the MOTOTRBO™ product. The application has an archiving reporting feature that reports on activity captured by various parts of the application.
neoterra® Systems has worked with the end users to streamline the application and make it
simple to install, easy to use and understand.
neoterra® Systems Contact information:
neoterra® Systems Inc.:
48 Centennial Road, Unit #8 Orangeville, Ontario. Canada. L9W3T4 Business Numbers:
U.S. Access: +1-872-216-8953 Canadian Access: +1-519-940-0088 Facsimile Number: +1-519-940-8813
Sales Numbers: U.S. Access: +1-872-216-8953 Option 1 Canadian Access: +1-519-940-0088 Option 1
Support Numbers: U.S. Access: +1-872-216-8953 Option 2 Canadian Access: +1-519-940-0088 Option 2
(Please use the process within your Country to allow for direct dialling.) For your convenience you may wish to try: www.countrycallingcodes.com
For more information on neoterra® Systems please visit: www.neoterra.ca

neoConneX® Server v10.x - by neoterra® Systems
Page 6 of 38
48 Centennial Road, Unit #8 Orangeville, Ontario. L9W 3T4
CDN-Tel: 1-519-940-0088 / U.S.-Tel: 1-872-216-8953 / Fax: 1-519-940-8813 – Email: [email protected] www.neoterra.ca
OUR VISION STATEMENT Here at neoTerra Systems Inc. we intend on becoming the leading Motorola mobile radio
application solution provider, globally. With innovative solutions, ethical practices and superior customer service.
OUR MISSION STATEMENT neoTerra Systems Inc. continually strives to provide superior mobile radio application
solutions to aid our clients. Ensuring and encouraging innovation and creativity in our solutions and providing unmatched customer service.
Some value added inclusions within neoConneX®:
neoConneX® has some embedded assistance within the application:
a) Web-based archive reporting tool.
b) Unit based telematics software - connexBOX®.
c) Web-based AVL services. d) Customer GIS allows customers to use their own mapping system. e) SCADA (supervisory control and data acquisition.) for autonomy within your
company.
Protocols that neoConneX® uses with MOTOTRBO™ devices:
a) Text Messaging – Can isolate a unit and send a unit-specific message to the device in
question.
b) ARS (Automatic Registration Service) – Advises of devices that come on-line and go off-
line.
c) GPS Tracking (F.A.S.T.) – neoConneX® integrates F.A.S.T. (fast adaptive
structured tracking) providing clear and accurate streams of GPS information
with 5 seconds of granularity without increasing the use of OTA bandwidth.
neoConneX® Server v10.x - by neoterra® Systems
Page 7 of 38
48 Centennial Road, Unit #8 Orangeville, Ontario. L9W 3T4
CDN-Tel: 1-519-940-0088 / U.S.-Tel: 1-872-216-8953 / Fax: 1-519-940-8813 – Email: [email protected] www.neoterra.ca
SECTION 2 – Setup Guide
neoConneX® Server v10.x - by neoterra® Systems
Page 8 of 38
48 Centennial Road, Unit #8 Orangeville, Ontario. L9W 3T4
CDN-Tel: 1-519-940-0088 / U.S.-Tel: 1-872-216-8953 / Fax: 1-519-940-8813 – Email: [email protected] www.neoterra.ca
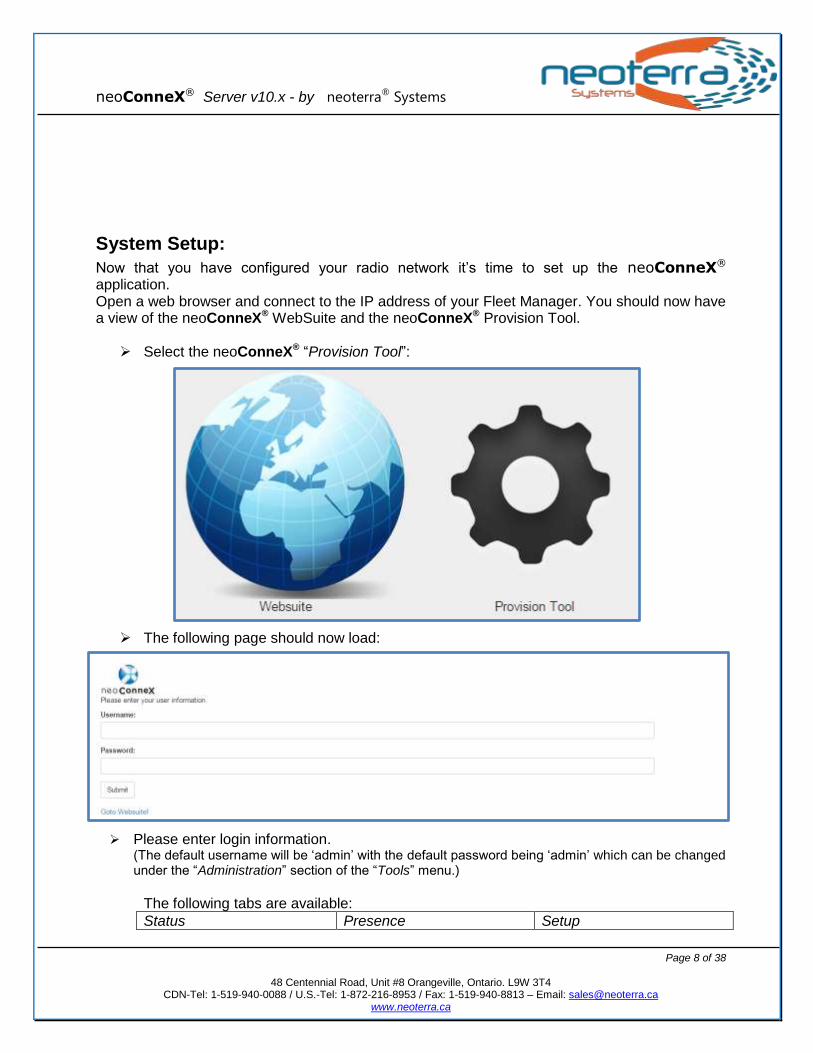
System Setup:
Now that you have configured your radio network it’s time to set up the neoConneX®
application. Open a web browser and connect to the IP address of your Fleet Manager. You should now have a view of the neoConneX® WebSuite and the neoConneX® Provision Tool.
Select the neoConneX® “Provision Tool”:
The following page should now load:
Please enter login information.
(The default username will be ‘admin’ with the default password being ‘admin’ which can be changed under the “Administration” section of the “Tools” menu.)
The following tabs are available:
Status Presence Setup
neoConneX® Server v10.x - by neoterra® Systems
Page 9 of 38
48 Centennial Road, Unit #8 Orangeville, Ontario. L9W 3T4
CDN-Tel: 1-519-940-0088 / U.S.-Tel: 1-872-216-8953 / Fax: 1-519-940-8813 – Email: [email protected] www.neoterra.ca
Traffic Clients Customers
Departments Units Groups
Permissions Signed in as Websuite Config
Tools Visit Website Logout
On successful log in, go through each tab in the “Setup” window and configure the required parameters.
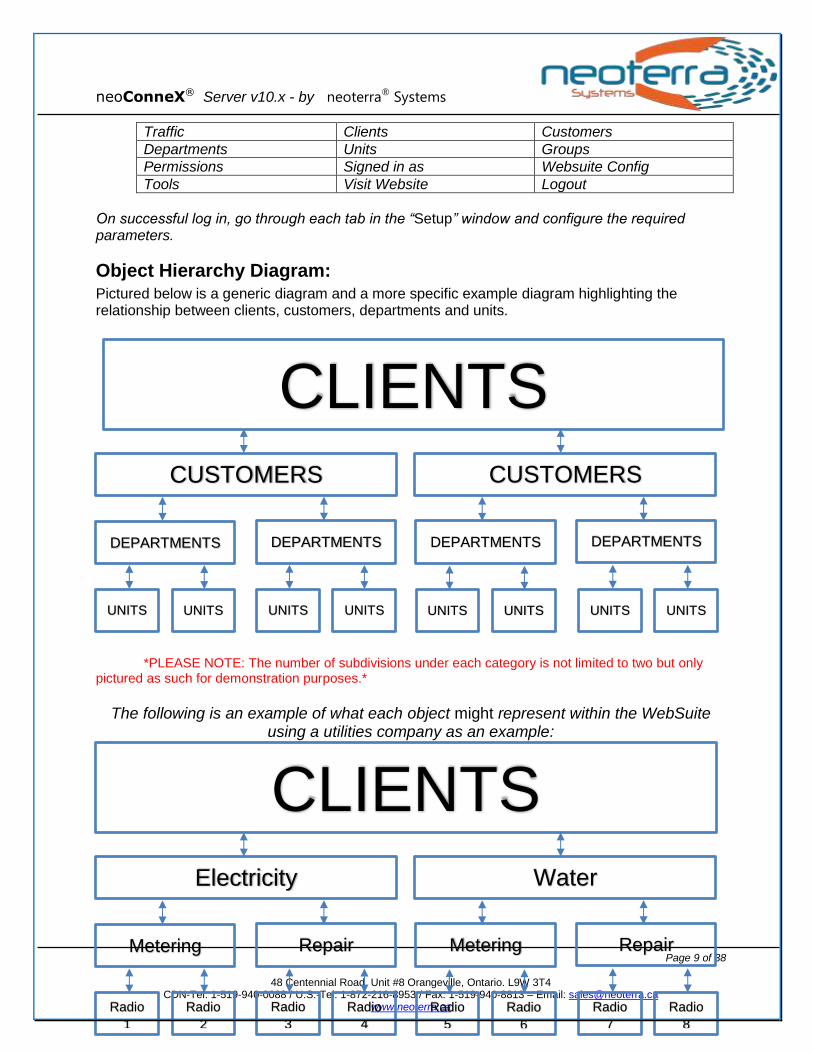
Object Hierarchy Diagram: Pictured below is a generic diagram and a more specific example diagram highlighting the relationship between clients, customers, departments and units.
*PLEASE NOTE: The number of subdivisions under each category is not limited to two but only pictured as such for demonstration purposes.*
The following is an example of what each object might represent within the WebSuite
using a utilities company as an example:
DEPARTMENTS
CUSTOMERS
CLIENTS CUSTOMERS
DEPARTMENTS DEPARTMENTS DEPARTMENTS
UNITS UNITS UNITS UNITS UNITS UNITS UNITS UNITS
Repair
Water
CLIENTS Electricity
Metering Repair Metering
Radio
1
Radio
2
Radio
3
Radio
4
Radio
5
Radio
6
Radio
7
Radio
8
neoConneX® Server v10.x - by neoterra® Systems
Page 10 of 38
48 Centennial Road, Unit #8 Orangeville, Ontario. L9W 3T4
CDN-Tel: 1-519-940-0088 / U.S.-Tel: 1-872-216-8953 / Fax: 1-519-940-8813 – Email: [email protected] www.neoterra.ca
*PLEASE NOTE: The number of subdivisions under each category is not limited to two but only pictured as such for demonstration purposes.*
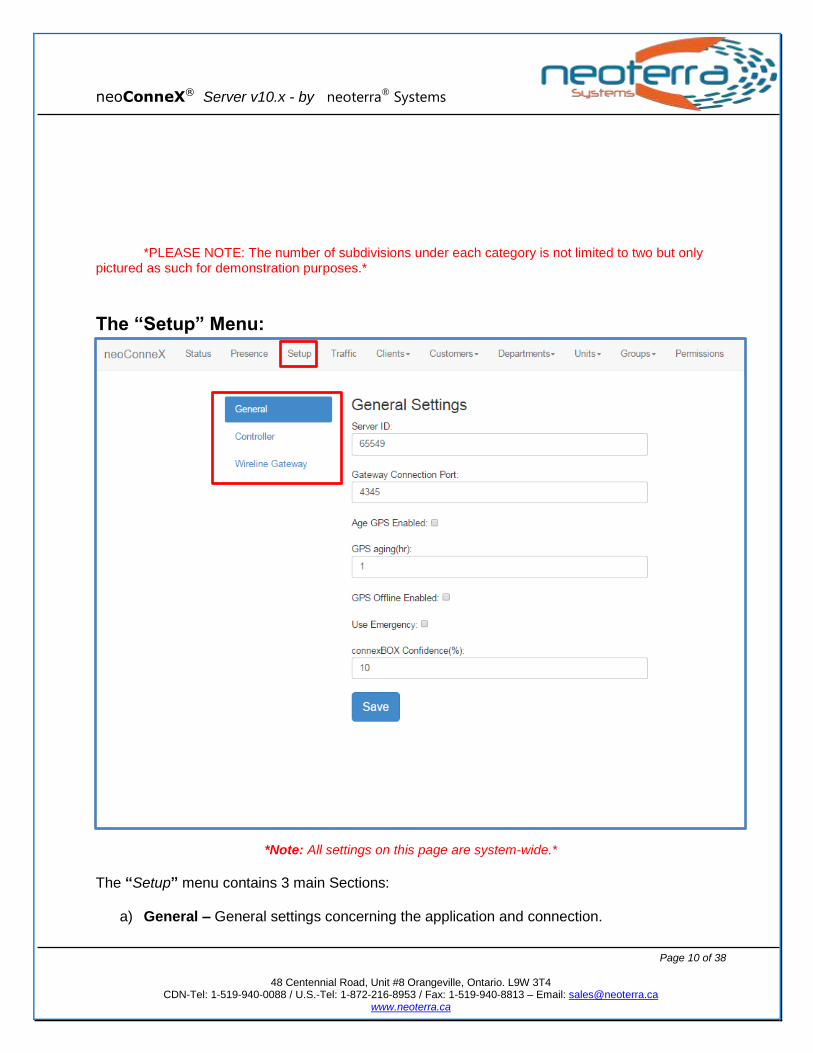
The “Setup” Menu:
*Note: All settings on this page are system-wide.*
The “Setup” menu contains 3 main Sections:
a) General – General settings concerning the application and connection.

neoConneX® Server v10.x - by neoterra® Systems
Page 11 of 38
48 Centennial Road, Unit #8 Orangeville, Ontario. L9W 3T4
CDN-Tel: 1-519-940-0088 / U.S.-Tel: 1-872-216-8953 / Fax: 1-519-940-8813 – Email: [email protected] www.neoterra.ca
b) Controller – Settings for Connect Plus.
c) Wireline Gateway – Settings for MNIS.
*Please note: In order for changes to take effect after being saved the server must be
restarted from the “Service State” options menu found in the “Status” tab.*
1) “General Settings” Configuration:
*Note: All settings on this page are system-wide.*
a) Server ID – For Connect Plus, this must match a user in the XRC manager. This user also needs to be defined in the XRT manager if using telematics (raw data). Further, under settings > XRT user configuration menu options, the console user ID (under private talk paths) should match the ID in this field and at least one talk path needs to be defined for the user.
b) Gateway Connection Port – The port used by a client application to connect to the server.
c) Age GPS Enabled – When this is enabled radios that don’t respond after a set period of time will be set offline and removed.
d) GPS Aging – This is the maximum time that GPS positions will be allowed to stay on a map in the neoConneX
® web AVL solution. This setting will only take effect if the “Age GPS Enabled” check
neoConneX® Server v10.x - by neoterra® Systems
Page 12 of 38
48 Centennial Road, Unit #8 Orangeville, Ontario. L9W 3T4
CDN-Tel: 1-519-940-0088 / U.S.-Tel: 1-872-216-8953 / Fax: 1-519-940-8813 – Email: [email protected] www.neoterra.ca
box is active
e) GPS Offline Enabled – When checked units that go offline will be immediately removed from the map.
f) Use Emergency – Enables/Disables use of the emergency alerts from units out in the field.
g) connexBOX Confidence – Sets the minimum GPS confidence level required for GPS reports to be accepted from connexBOX
®. Reports with a confidence value lower than this will be logged but
not saved in the database.
*Note: In order for the information entered into the above fields to become active you must click the “Save” button.*
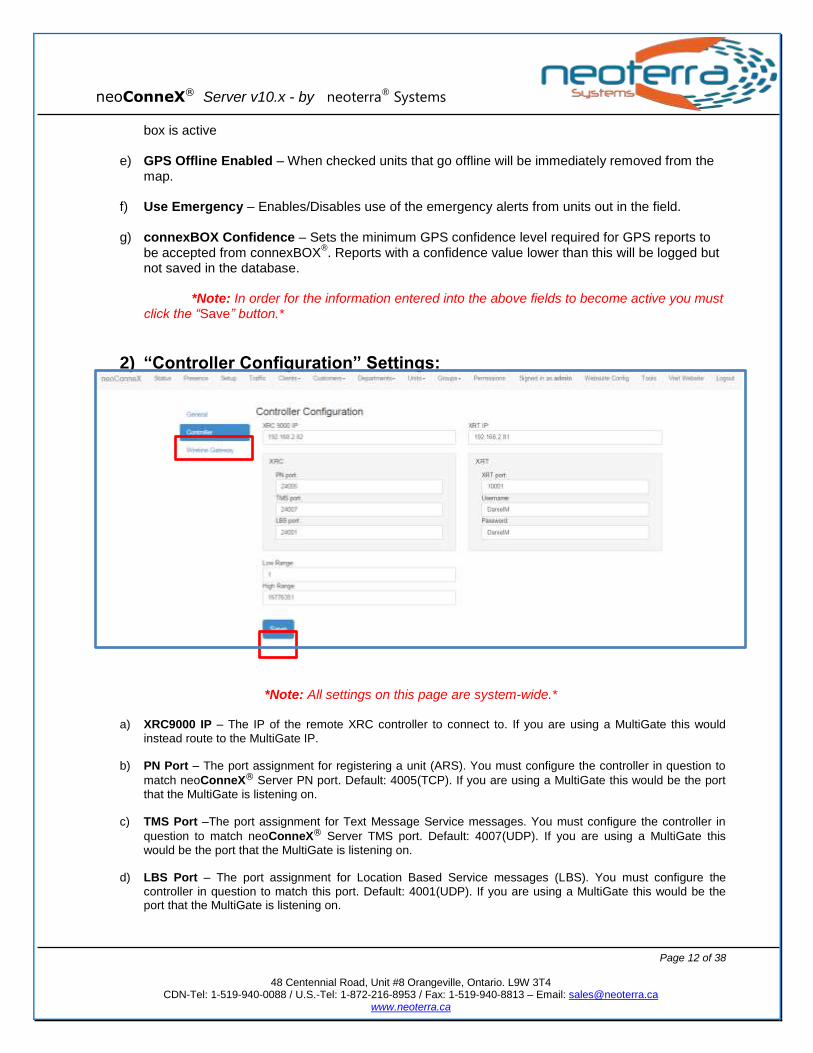
2) “Controller Configuration” Settings:
*Note: All settings on this page are system-wide.*
a) XRC9000 IP – The IP of the remote XRC controller to connect to. If you are using a MultiGate this would
instead route to the MultiGate IP.
b) PN Port – The port assignment for registering a unit (ARS). You must configure the controller in question to
match neoConneX® Server PN port. Default: 4005(TCP). If you are using a MultiGate this would be the port
that the MultiGate is listening on.
c) TMS Port –The port assignment for Text Message Service messages. You must configure the controller in
question to match neoConneX® Server TMS port. Default: 4007(UDP). If you are using a MultiGate this
would be the port that the MultiGate is listening on.
d) LBS Port – The port assignment for Location Based Service messages (LBS). You must configure the
controller in question to match this port. Default: 4001(UDP). If you are using a MultiGate this would be the port that the MultiGate is listening on.
neoConneX® Server v10.x - by neoterra® Systems
Page 13 of 38
48 Centennial Road, Unit #8 Orangeville, Ontario. L9W 3T4
CDN-Tel: 1-519-940-0088 / U.S.-Tel: 1-872-216-8953 / Fax: 1-519-940-8813 – Email: [email protected] www.neoterra.ca
e) Low Range & High Range (Watcher Range) – This would be the range of unit ID’s for which you would be
collecting data (GPS & Text messages). If using a MultiGate leave the default maximum range. (1-16776351).
Low- the lowest radio ID the server will listen for.
High- the highest radio ID the server will listen for.
f) XRT IP – The IP used to connect to the XRT.
g) XRT Port – The port (TCP) the server uses to communicate with the XRT.
h) Username/ Password- The username/password used to connect to the XRT. This user is defined under the “XRT User Configuration” menu in the XRT manager. This user is created in the XRT manager under the
Menu Structure Settings > User Configuration. The server ID (as seen on page 11 point 1a) must be populated under Private Talk Path ID
*Note: In order for the information entered into the above fields to become active you must click the “Save” button.*
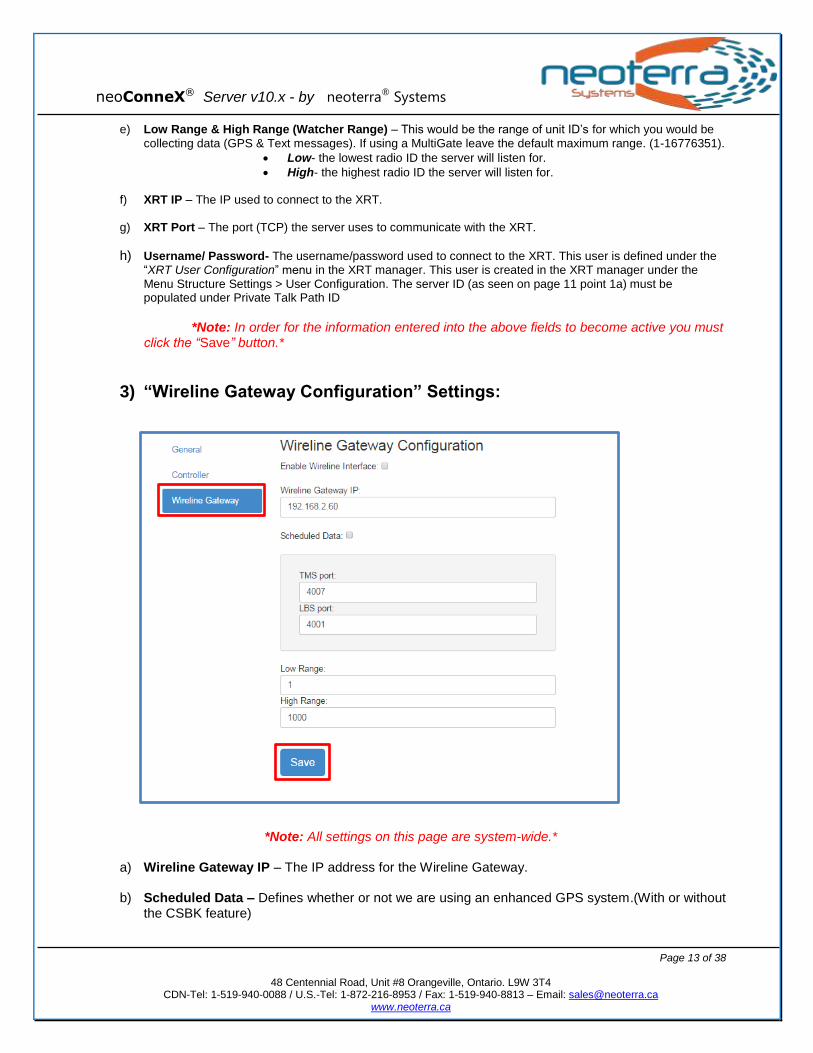
3) “Wireline Gateway Configuration” Settings:
*Note: All settings on this page are system-wide.*
a) Wireline Gateway IP – The IP address for the Wireline Gateway.
b) Scheduled Data – Defines whether or not we are using an enhanced GPS system.(With or without the CSBK feature)
neoConneX® Server v10.x - by neoterra® Systems
Page 14 of 38
48 Centennial Road, Unit #8 Orangeville, Ontario. L9W 3T4
CDN-Tel: 1-519-940-0088 / U.S.-Tel: 1-872-216-8953 / Fax: 1-519-940-8813 – Email: [email protected] www.neoterra.ca
c) TMS Port –The port assignment for Text Message Service messages. You must configure this setting to match the port that MNIS is listening on. Default: 4007.
d) LBS Port – The port assignment for Location Based Service messages (LRRP). You must configure this setting to match the port that MNIS is listening on. Default: 4001.
e) Low Range & High Range (Watcher Range) – This would be the range of unit ID’s for which you would be collecting data (GPS & Text messages). It is a good idea to narrow the range to encompass only those radios that are within your fleet.
Low- the lowest radio ID the server will listen for.
High- the highest radio ID the server will listen for.
*Note: In order for the information entered into the above fields to become active you must click the “Save” button.*
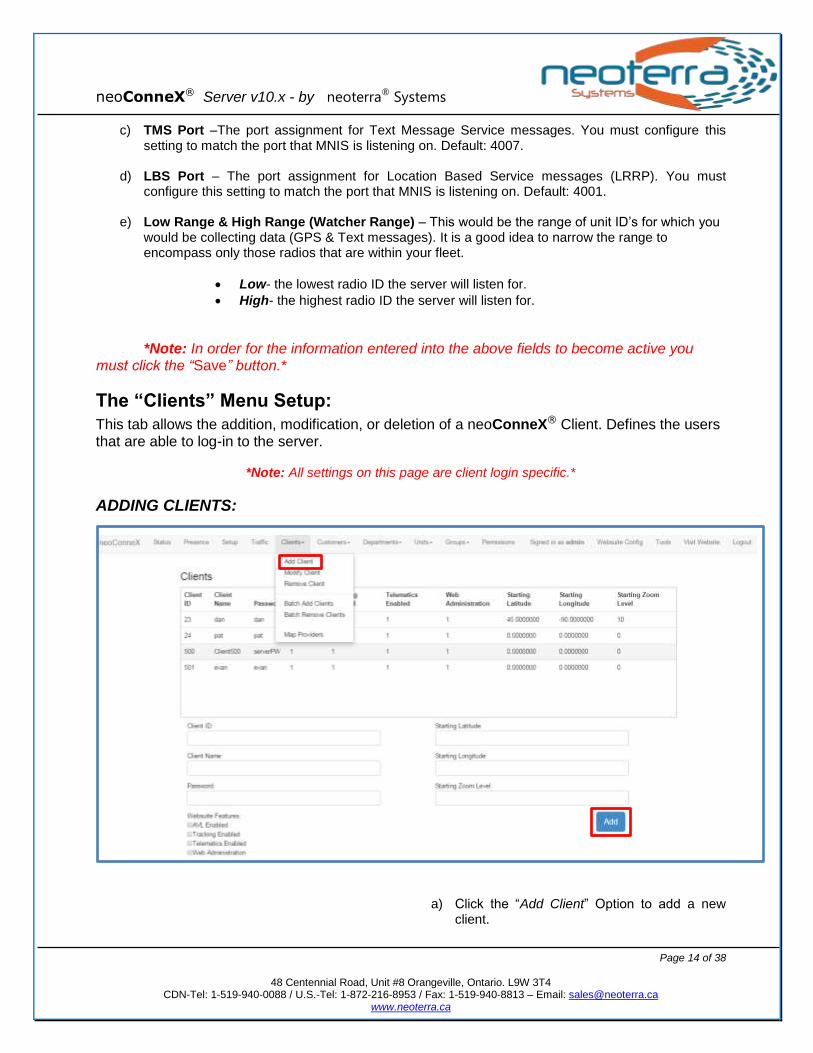
The “Clients” Menu Setup:
This tab allows the addition, modification, or deletion of a neoConneX® Client. Defines the users that are able to log-in to the server.
*Note: All settings on this page are client login specific.*
ADDING CLIENTS:
a) Click the “Add Client” Option to add a new client.
neoConneX® Server v10.x - by neoterra® Systems
Page 15 of 38
48 Centennial Road, Unit #8 Orangeville, Ontario. L9W 3T4
CDN-Tel: 1-519-940-0088 / U.S.-Tel: 1-872-216-8953 / Fax: 1-519-940-8813 – Email: [email protected] www.neoterra.ca
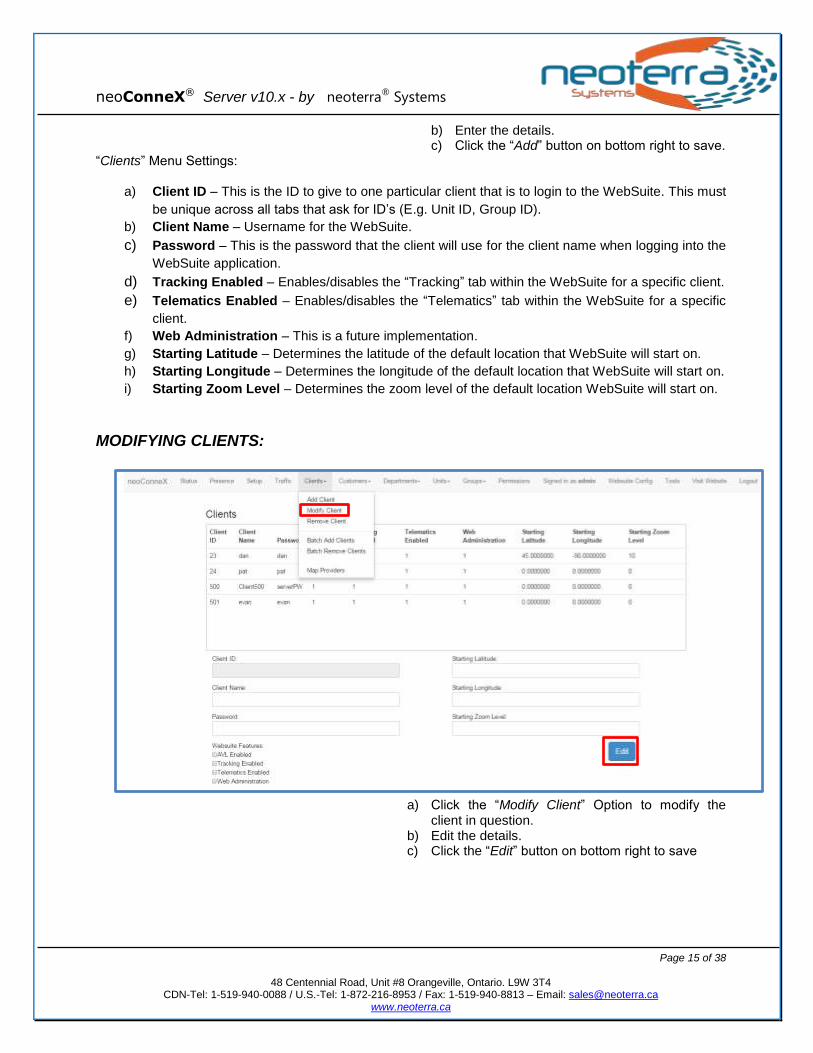
b) Enter the details. c) Click the “Add” button on bottom right to save.
“Clients” Menu Settings:
a) Client ID – This is the ID to give to one particular client that is to login to the WebSuite. This must
be unique across all tabs that ask for ID’s (E.g. Unit ID, Group ID).
b) Client Name – Username for the WebSuite.
c) Password – This is the password that the client will use for the client name when logging into the
WebSuite application.
d) Tracking Enabled – Enables/disables the “Tracking” tab within the WebSuite for a specific client.
e) Telematics Enabled – Enables/disables the “Telematics” tab within the WebSuite for a specific
client.
f) Web Administration – This is a future implementation.
g) Starting Latitude – Determines the latitude of the default location that WebSuite will start on.
h) Starting Longitude – Determines the longitude of the default location that WebSuite will start on.
i) Starting Zoom Level – Determines the zoom level of the default location WebSuite will start on.
MODIFYING CLIENTS:
a) Click the “Modify Client” Option to modify the
client in question. b) Edit the details. c) Click the “Edit” button on bottom right to save
neoConneX® Server v10.x - by neoterra® Systems
Page 16 of 38
48 Centennial Road, Unit #8 Orangeville, Ontario. L9W 3T4
CDN-Tel: 1-519-940-0088 / U.S.-Tel: 1-872-216-8953 / Fax: 1-519-940-8813 – Email: [email protected] www.neoterra.ca
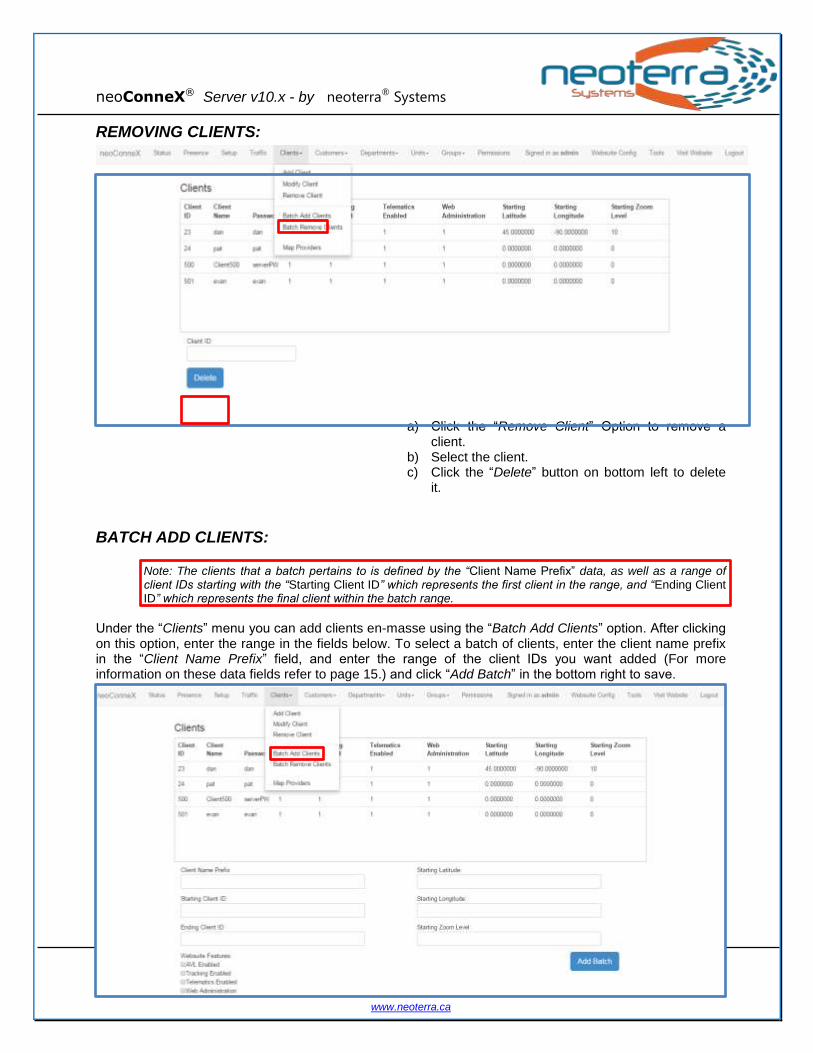
REMOVING CLIENTS:
a) Click the “Remove Client” Option to remove a
client. b) Select the client. c) Click the “Delete” button on bottom left to delete
it.
BATCH ADD CLIENTS: Note: The clients that a batch pertains to is defined by the “Client Name Prefix” data, as well as a range of client IDs starting with the “Starting Client ID” which represents the first client in the range, and “Ending Client ID” which represents the final client within the batch range.
Under the “Clients” menu you can add clients en-masse using the “Batch Add Clients” option. After clicking on this option, enter the range in the fields below. To select a batch of clients, enter the client name prefix in the “Client Name Prefix” field, and enter the range of the client IDs you want added (For more information on these data fields refer to page 15.) and click “Add Batch” in the bottom right to save.

neoConneX® Server v10.x - by neoterra® Systems
Page 17 of 38
48 Centennial Road, Unit #8 Orangeville, Ontario. L9W 3T4
CDN-Tel: 1-519-940-0088 / U.S.-Tel: 1-872-216-8953 / Fax: 1-519-940-8813 – Email: [email protected] www.neoterra.ca
BATCH REMOVE CLIENTS:
There is also a “Batch Remove Clients” option which allows you to remove clients en-masse. Simply click on the option, enter the range of the batch (see top of the page) and click on “Delete Batch”.
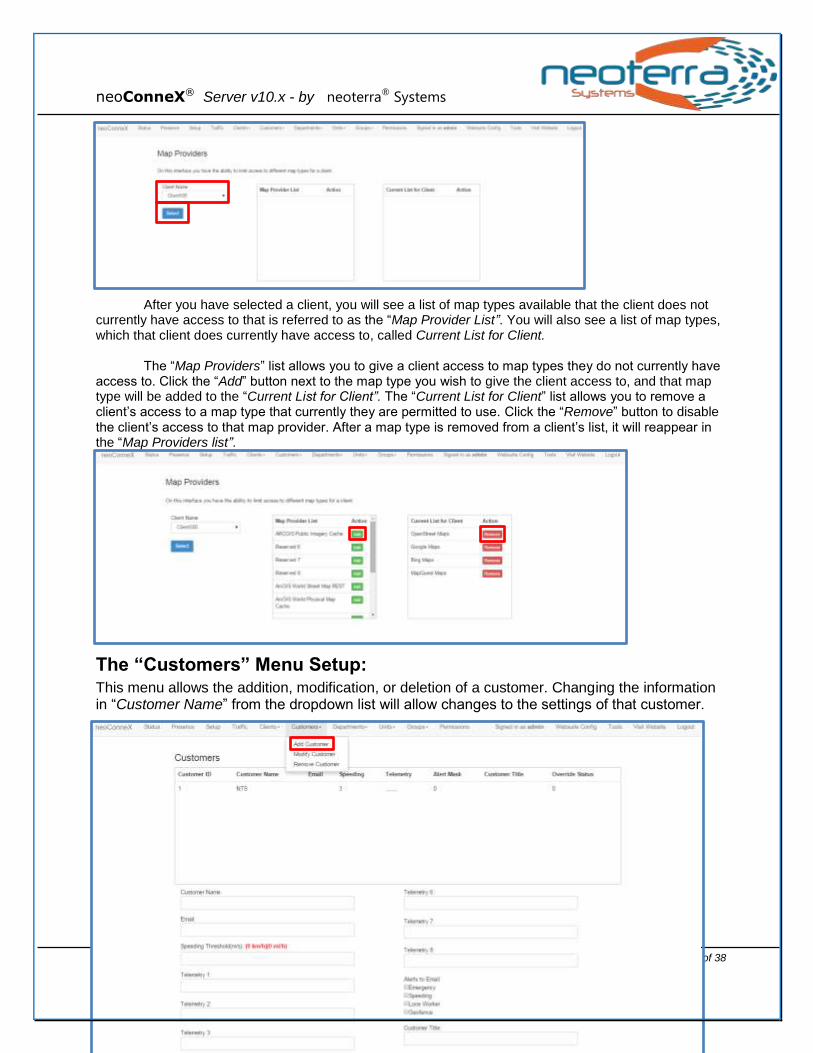
Map Providers: This feature allows you to make adjustments to the types of maps that a client has access to. To
access this feature, simply select the “Map Providers” menu from the “Clients” drop-down menu.
You now have access to the list of map providers and the map types available to specific clients. To choose a client, access the “Client Name” drop down menu and select from the available clients. When you have selected a client, you must click “Select” to show the list of map providers available and the list of map providers the client currently has access to.
neoConneX® Server v10.x - by neoterra® Systems
Page 18 of 38
48 Centennial Road, Unit #8 Orangeville, Ontario. L9W 3T4
CDN-Tel: 1-519-940-0088 / U.S.-Tel: 1-872-216-8953 / Fax: 1-519-940-8813 – Email: [email protected] www.neoterra.ca
After you have selected a client, you will see a list of map types available that the client does not
currently have access to that is referred to as the “Map Provider List”. You will also see a list of map types, which that client does currently have access to, called Current List for Client.
The “Map Providers” list allows you to give a client access to map types they do not currently have access to. Click the “Add” button next to the map type you wish to give the client access to, and that map type will be added to the “Current List for Client”. The “Current List for Client” list allows you to remove a client’s access to a map type that currently they are permitted to use. Click the “Remove” button to disable the client’s access to that map provider. After a map type is removed from a client’s list, it will reappear in the “Map Providers list”.
The “Customers” Menu Setup: This menu allows the addition, modification, or deletion of a customer. Changing the information in “Customer Name” from the dropdown list will allow changes to the settings of that customer.
neoConneX® Server v10.x - by neoterra® Systems
Page 19 of 38
48 Centennial Road, Unit #8 Orangeville, Ontario. L9W 3T4
CDN-Tel: 1-519-940-0088 / U.S.-Tel: 1-872-216-8953 / Fax: 1-519-940-8813 – Email: [email protected] www.neoterra.ca
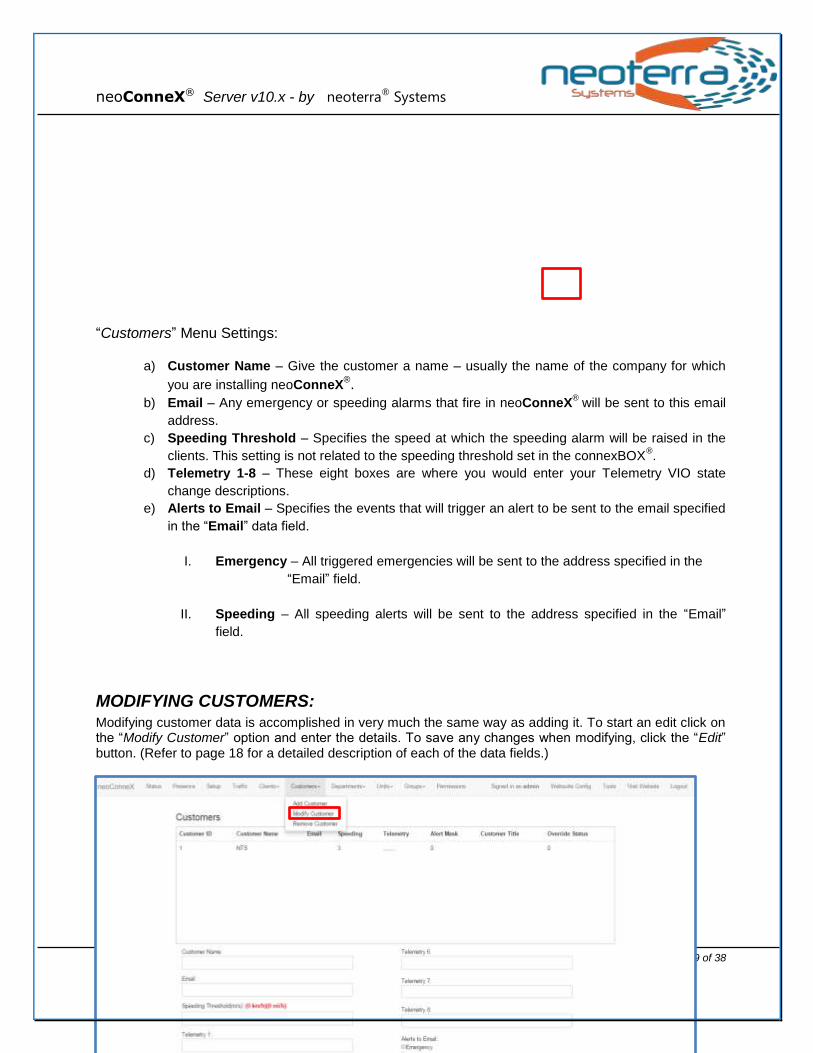
“Customers” Menu Settings:
a) Customer Name – Give the customer a name – usually the name of the company for which
you are installing neoConneX®.
b) Email – Any emergency or speeding alarms that fire in neoConneX®
will be sent to this email
address.
c) Speeding Threshold – Specifies the speed at which the speeding alarm will be raised in the
clients. This setting is not related to the speeding threshold set in the connexBOX®.
d) Telemetry 1-8 – These eight boxes are where you would enter your Telemetry VIO state
change descriptions.
e) Alerts to Email – Specifies the events that will trigger an alert to be sent to the email specified
in the “Email” data field.
I. Emergency – All triggered emergencies will be sent to the address specified in the
“Email” field.
II. Speeding – All speeding alerts will be sent to the address specified in the “Email”
field.
MODIFYING CUSTOMERS: Modifying customer data is accomplished in very much the same way as adding it. To start an edit click on the “Modify Customer” option and enter the details. To save any changes when modifying, click the “Edit” button. (Refer to page 18 for a detailed description of each of the data fields.)
neoConneX® Server v10.x - by neoterra® Systems
Page 20 of 38
48 Centennial Road, Unit #8 Orangeville, Ontario. L9W 3T4
CDN-Tel: 1-519-940-0088 / U.S.-Tel: 1-872-216-8953 / Fax: 1-519-940-8813 – Email: [email protected] www.neoterra.ca
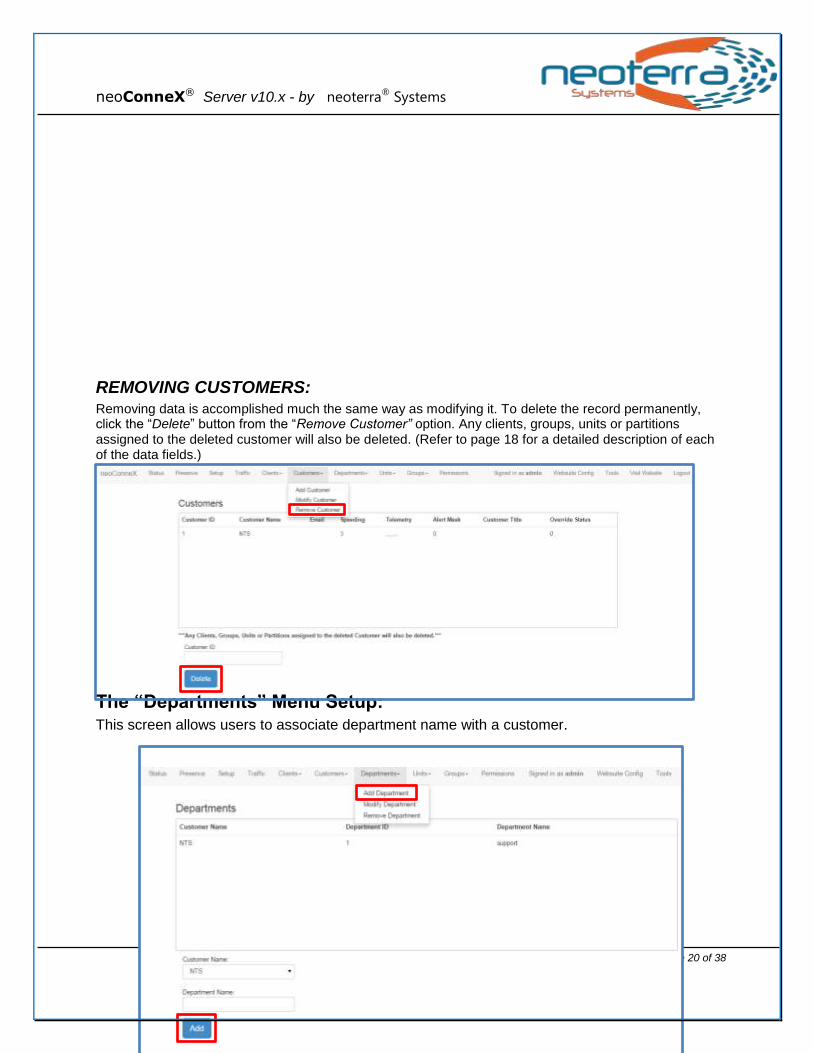
REMOVING CUSTOMERS:
Removing data is accomplished much the same way as modifying it. To delete the record permanently, click the “Delete” button from the “Remove Customer” option. Any clients, groups, units or partitions assigned to the deleted customer will also be deleted. (Refer to page 18 for a detailed description of each of the data fields.)
The “Departments” Menu Setup: This screen allows users to associate department name with a customer.
neoConneX® Server v10.x - by neoterra® Systems
Page 21 of 38
48 Centennial Road, Unit #8 Orangeville, Ontario. L9W 3T4
CDN-Tel: 1-519-940-0088 / U.S.-Tel: 1-872-216-8953 / Fax: 1-519-940-8813 – Email: [email protected] www.neoterra.ca
ADDING DEPARTMENTS: Click on the “Departments” menu, and select the “Add Department” option from the drop-down menu. After entering the details of the customer and department you would like to add to this list click on the “Add” button to save the information.
Department ID is an automatically assigned number used for grouping a department.
“Departments” Menu Settings:
a) Customer Name – Name of customer.
b) Department Name – The friendly name to associate with the Department ID.
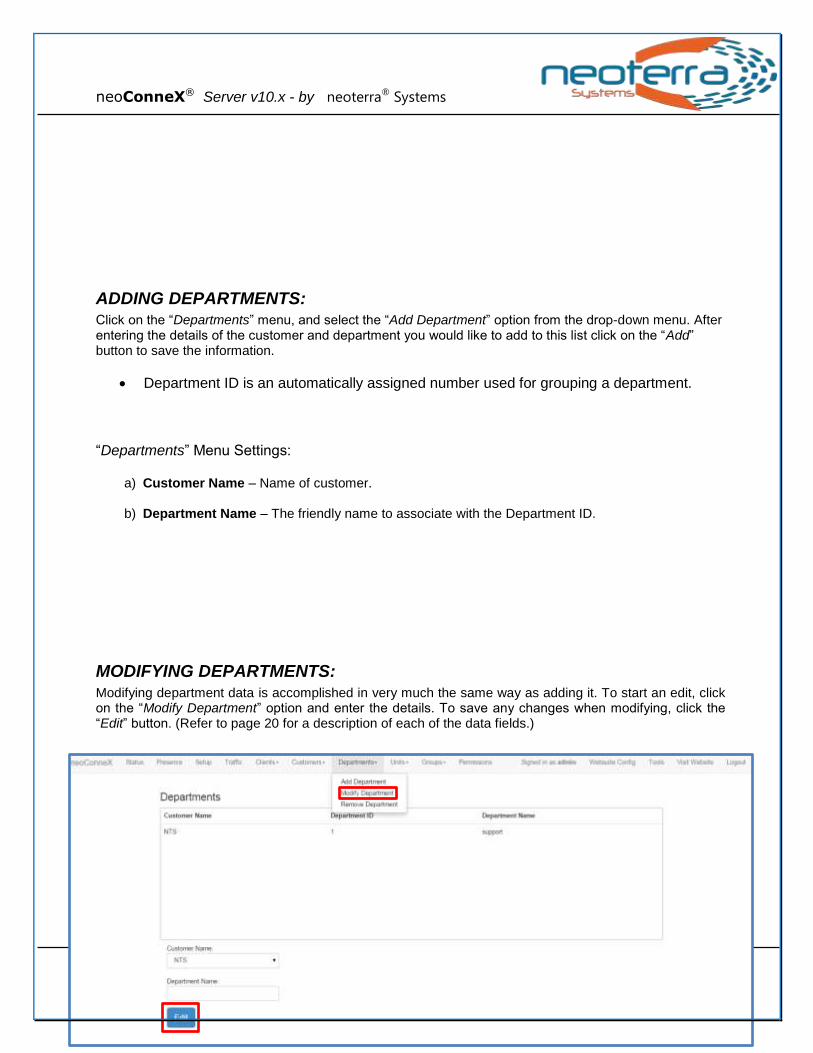
MODIFYING DEPARTMENTS:
Modifying department data is accomplished in very much the same way as adding it. To start an edit, click on the “Modify Department” option and enter the details. To save any changes when modifying, click the “Edit” button. (Refer to page 20 for a description of each of the data fields.)

neoConneX® Server v10.x - by neoterra® Systems
Page 22 of 38
48 Centennial Road, Unit #8 Orangeville, Ontario. L9W 3T4
CDN-Tel: 1-519-940-0088 / U.S.-Tel: 1-872-216-8953 / Fax: 1-519-940-8813 – Email: [email protected] www.neoterra.ca
REMOVING DEPARTMENTS: Removing data is accomplished in very much the same way as adding it. To start an edit or remove, click on the “Remove Department” option and select the department you would like to remove either by entering in the department ID or clicking on the department in the list. To permanently remove a department click the “Delete” button. (Refer to page 20 for a detailed description of each of the data fields.)
The “Units” Menu Setup: This screen defines the valid units that are able to send/receive digital data in neoConneX®. This menu allows the addition, modification, or removal of a unit as well as adding or removing a batch of units.
neoConneX® Server v10.x - by neoterra® Systems
Page 23 of 38
48 Centennial Road, Unit #8 Orangeville, Ontario. L9W 3T4
CDN-Tel: 1-519-940-0088 / U.S.-Tel: 1-872-216-8953 / Fax: 1-519-940-8813 – Email: [email protected] www.neoterra.ca
“Units” Menu Settings:
a) Department Name – Defines the department that the selected units are assigned to. b) Unit ID – This ID must match up with a Radio ID out in the field. c) Unit Name – The friendly name to associate with the Unit ID. d) Icon Path – This is the icon that will be associated with the unit when being displayed on
GIS maps as well as internet based maps (Google Maps, Bing Maps, and MapQuest).
e) Polling Interval – This tells neoConneX® how often a controller polls a radio (in the case
of a Connect Plus system) for the GPS location of this unit and update its position or, in the case of a non-Connect Plus system, how often the radio autonomously reports a GPS location.
f) Radio Type – Indicates whether hardware or firmware is being used as the radio type. At this point only ‘Hardware’ will need to be selected.
ADDING UNITS:
To add a unit select the “Add Unit” option from the “Units” menu. Simply fill in all of the fields above with the correct information relating to the unit and click on the “Add” button in the bottom of the screen to save the information and add the unit.
MODIFYING UNITS:
Modifying a unit is done in much the same way that a unit is added. Access the “Modify Units” menu. To select a unit to modify, simply click it as it appears in the table below. Simply fill in the changes you would like to make to the unit in each respective field. (For more information about these fields please refer to page 22.) When all changes are correctly recorded, click the “Edit” button in the bottom right corner of the page to save your changes.

neoConneX® Server v10.x - by neoterra® Systems
Page 24 of 38
48 Centennial Road, Unit #8 Orangeville, Ontario. L9W 3T4
CDN-Tel: 1-519-940-0088 / U.S.-Tel: 1-872-216-8953 / Fax: 1-519-940-8813 – Email: [email protected] www.neoterra.ca
REMOVING UNITS:
To remove a unit access the “Remove Unit
s” menu. To select a unit to remove click on the unit it as it appears in the table above to select it. Once selected, to remove the unit, simply click on the “Delete” button at the bottom of the page.
BATCH ADD UNITS:
Note: The units that a batch pertains to is defined by the “Unit Name Prefix” data, as well as a range of unit IDs starting with the “Starting Unit ID” which represents the first unit in the range, and “Ending Unit ID” which represents the final unit within the batch range.
neoConneX® Server v10.x - by neoterra® Systems
Page 25 of 38
48 Centennial Road, Unit #8 Orangeville, Ontario. L9W 3T4
CDN-Tel: 1-519-940-0088 / U.S.-Tel: 1-872-216-8953 / Fax: 1-519-940-8813 – Email: [email protected] www.neoterra.ca
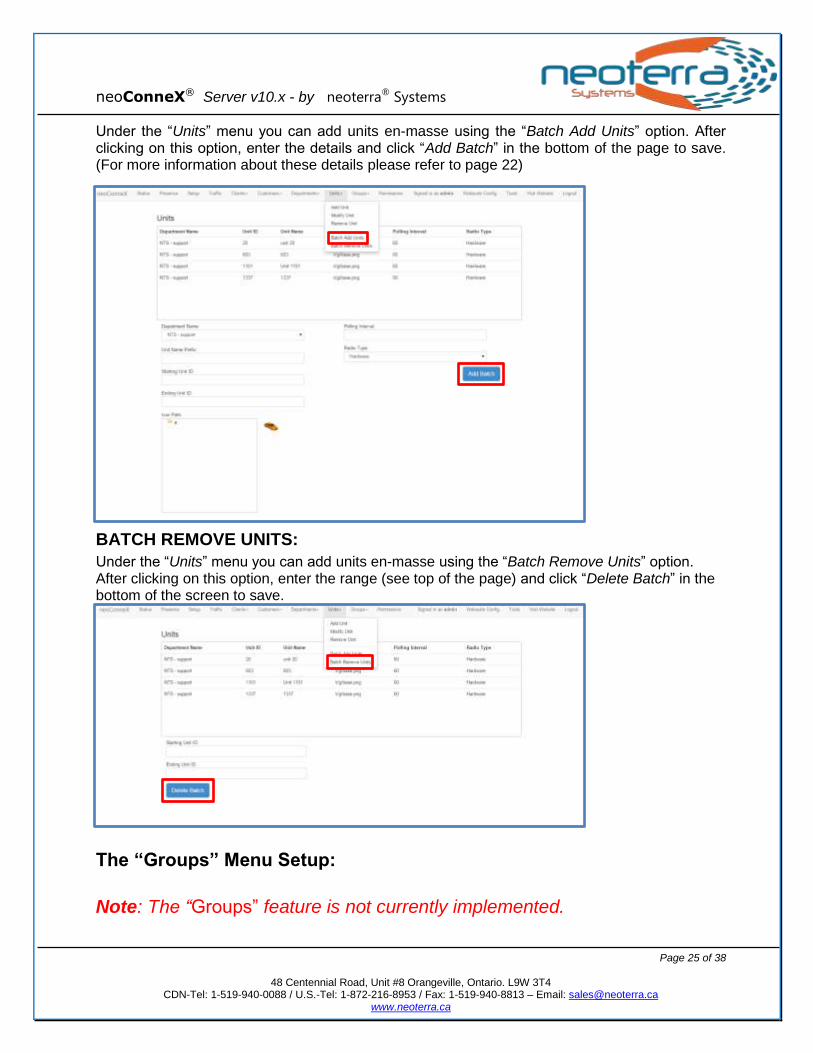
Under the “Units” menu you can add units en-masse using the “Batch Add Units” option. After clicking on this option, enter the details and click “Add Batch” in the bottom of the page to save. (For more information about these details please refer to page 22)
BATCH REMOVE UNITS:
Under the “Units” menu you can add units en-masse using the “Batch Remove Units” option. After clicking on this option, enter the range (see top of the page) and click “Delete Batch” in the bottom of the screen to save.
The “Groups” Menu Setup:
Note: The “Groups” feature is not currently implemented.
neoConneX® Server v10.x - by neoterra® Systems
Page 26 of 38
48 Centennial Road, Unit #8 Orangeville, Ontario. L9W 3T4
CDN-Tel: 1-519-940-0088 / U.S.-Tel: 1-872-216-8953 / Fax: 1-519-940-8813 – Email: [email protected] www.neoterra.ca
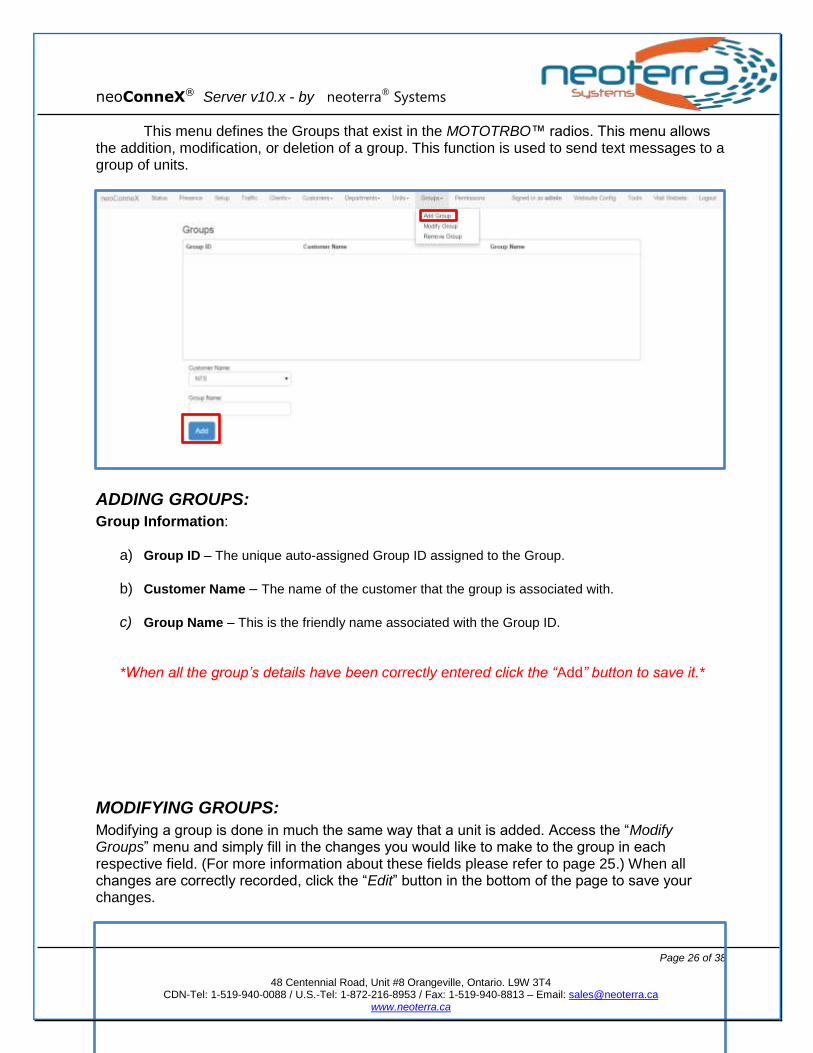
This menu defines the Groups that exist in the MOTOTRBO™ radios. This menu allows the addition, modification, or deletion of a group. This function is used to send text messages to a group of units.
ADDING GROUPS:
Group Information:
a) Group ID – The unique auto-assigned Group ID assigned to the Group.
b) Customer Name – The name of the customer that the group is associated with.
c) Group Name – This is the friendly name associated with the Group ID.
*When all the group’s details have been correctly entered click the “Add” button to save it.*
MODIFYING GROUPS:
Modifying a group is done in much the same way that a unit is added. Access the “Modify Groups” menu and simply fill in the changes you would like to make to the group in each respective field. (For more information about these fields please refer to page 25.) When all changes are correctly recorded, click the “Edit” button in the bottom of the page to save your changes.
neoConneX® Server v10.x - by neoterra® Systems
Page 27 of 38
48 Centennial Road, Unit #8 Orangeville, Ontario. L9W 3T4
CDN-Tel: 1-519-940-0088 / U.S.-Tel: 1-872-216-8953 / Fax: 1-519-940-8813 – Email: [email protected] www.neoterra.ca
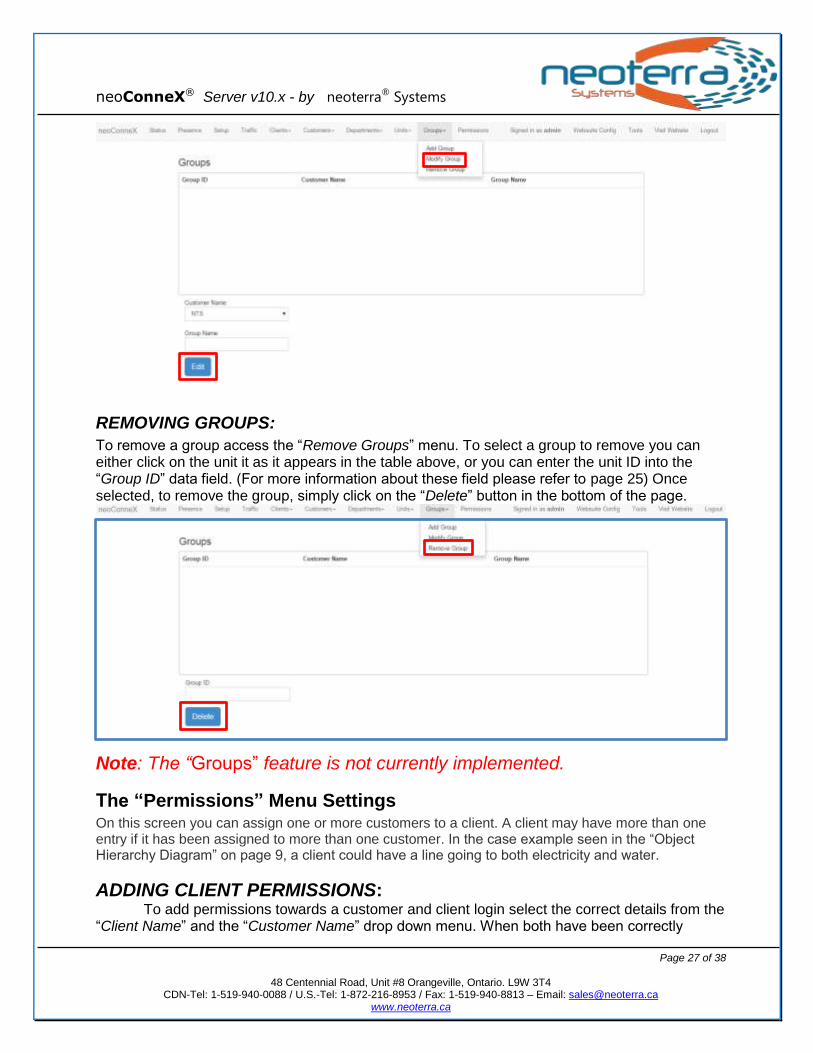
REMOVING GROUPS:
To remove a group access the “Remove Groups” menu. To select a group to remove you can either click on the unit it as it appears in the table above, or you can enter the unit ID into the “Group ID” data field. (For more information about these field please refer to page 25) Once selected, to remove the group, simply click on the “Delete” button in the bottom of the page.
Note: The “Groups” feature is not currently implemented.
The “Permissions” Menu Settings
On this screen you can assign one or more customers to a client. A client may have more than one entry if it has been assigned to more than one customer. In the case example seen in the “Object Hierarchy Diagram” on page 9, a client could have a line going to both electricity and water.
ADDING CLIENT PERMISSIONS: To add permissions towards a customer and client login select the correct details from the “Client Name” and the “Customer Name” drop down menu. When both have been correctly
neoConneX® Server v10.x - by neoterra® Systems
Page 28 of 38
48 Centennial Road, Unit #8 Orangeville, Ontario. L9W 3T4
CDN-Tel: 1-519-940-0088 / U.S.-Tel: 1-872-216-8953 / Fax: 1-519-940-8813 – Email: [email protected] www.neoterra.ca
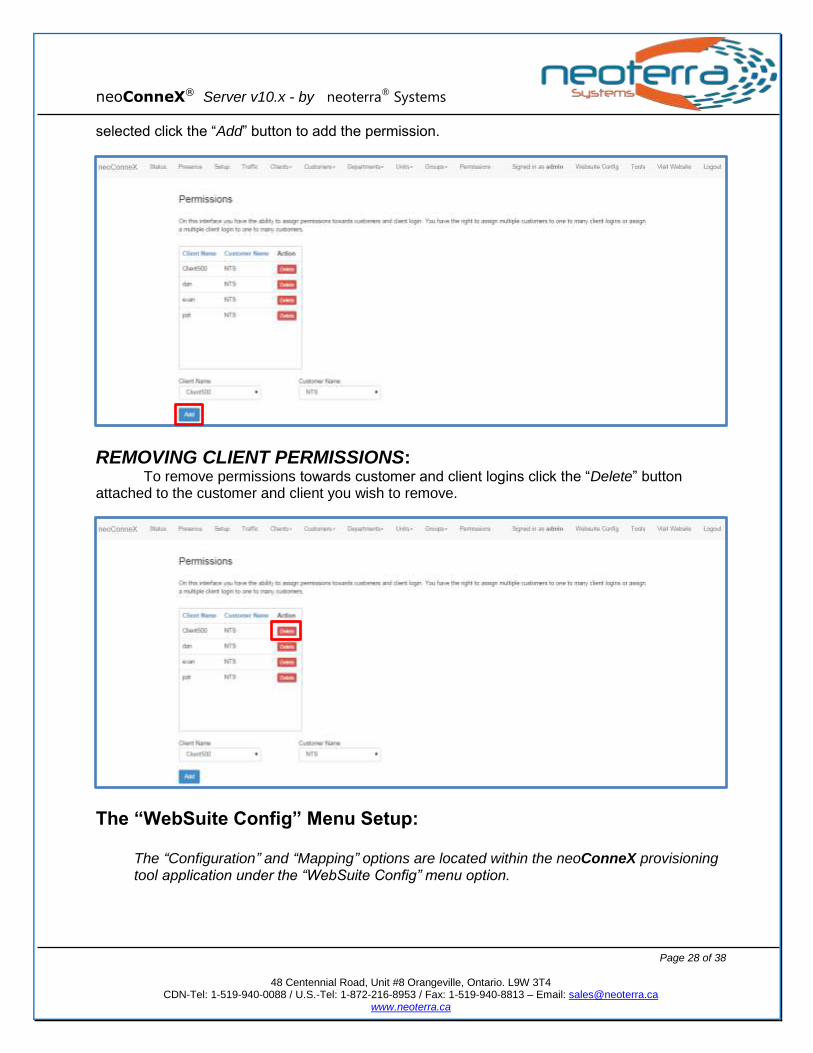
selected click the “Add” button to add the permission.
REMOVING CLIENT PERMISSIONS: To remove permissions towards customer and client logins click the “Delete” button attached to the customer and client you wish to remove.
The “WebSuite Config” Menu Setup:
The “Configuration” and “Mapping” options are located within the neoConneX provisioning tool application under the “WebSuite Config” menu option.
neoConneX® Server v10.x - by neoterra® Systems
Page 29 of 38
48 Centennial Road, Unit #8 Orangeville, Ontario. L9W 3T4
CDN-Tel: 1-519-940-0088 / U.S.-Tel: 1-872-216-8953 / Fax: 1-519-940-8813 – Email: [email protected] www.neoterra.ca
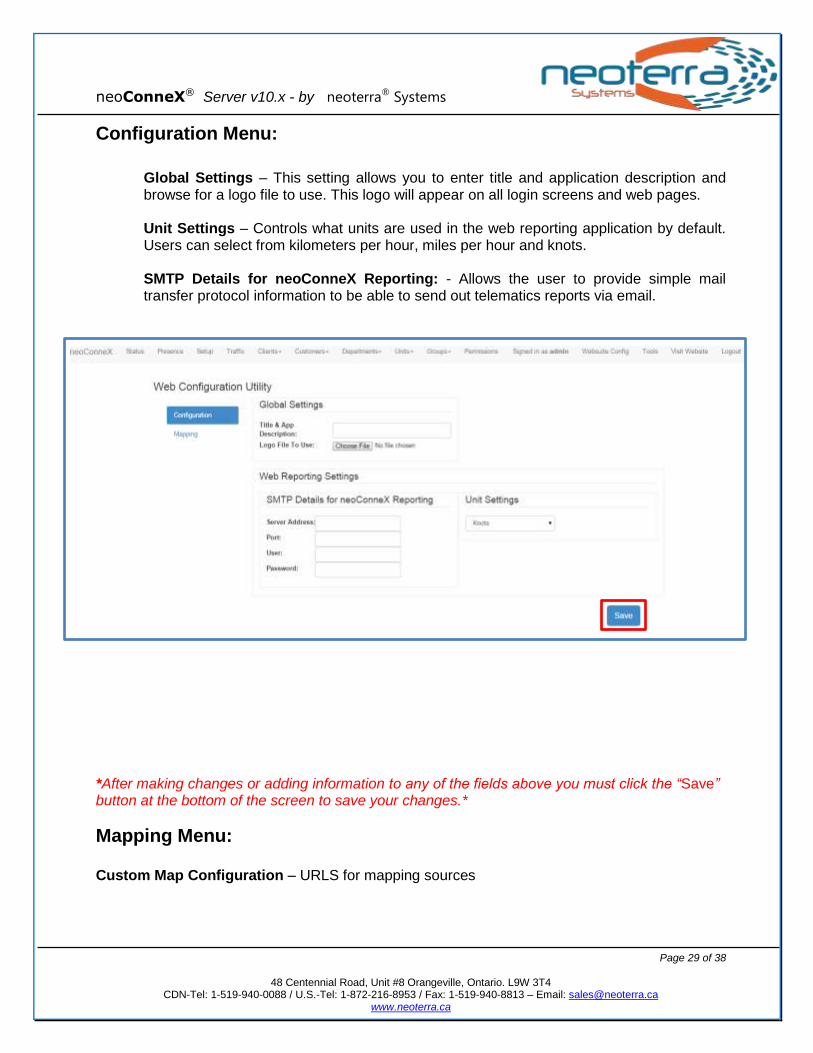
Configuration Menu:
Global Settings – This setting allows you to enter title and application description and browse for a logo file to use. This logo will appear on all login screens and web pages. Unit Settings – Controls what units are used in the web reporting application by default. Users can select from kilometers per hour, miles per hour and knots.
SMTP Details for neoConneX Reporting: - Allows the user to provide simple mail transfer protocol information to be able to send out telematics reports via email.
*After making changes or adding information to any of the fields above you must click the “Save” button at the bottom of the screen to save your changes.*
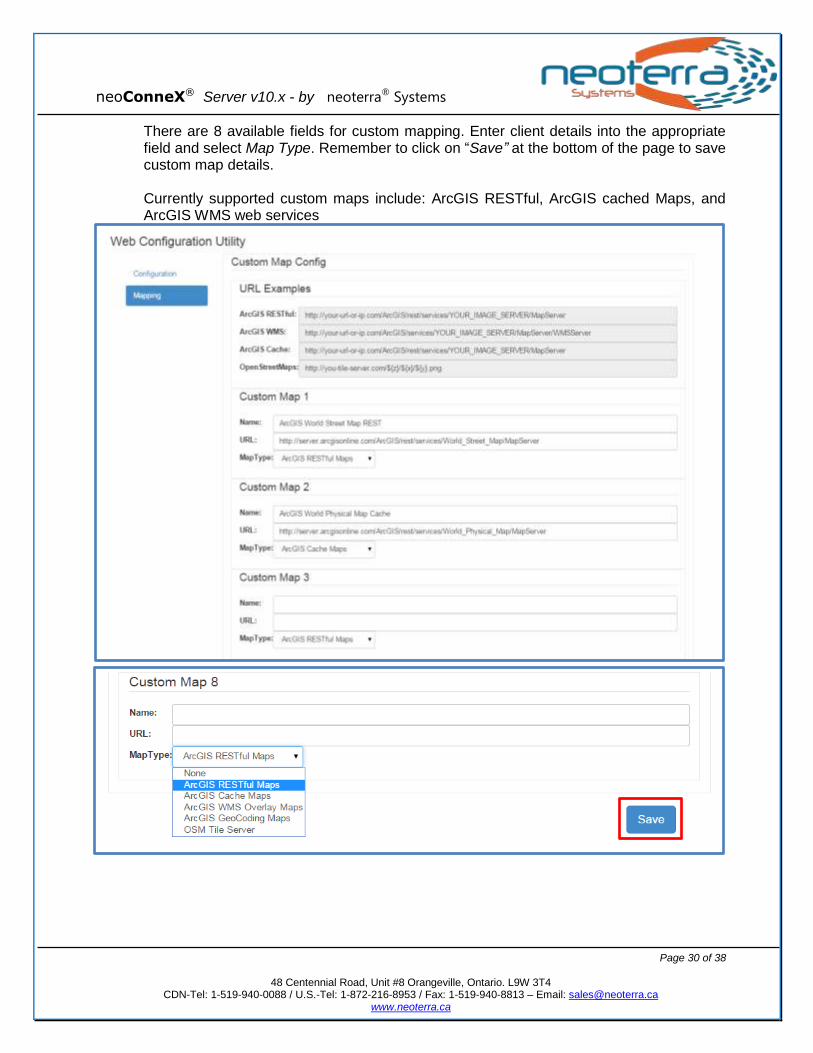
Mapping Menu: Custom Map Configuration – URLS for mapping sources
neoConneX® Server v10.x - by neoterra® Systems
Page 30 of 38
48 Centennial Road, Unit #8 Orangeville, Ontario. L9W 3T4
CDN-Tel: 1-519-940-0088 / U.S.-Tel: 1-872-216-8953 / Fax: 1-519-940-8813 – Email: [email protected] www.neoterra.ca
There are 8 available fields for custom mapping. Enter client details into the appropriate field and select Map Type. Remember to click on “Save” at the bottom of the page to save custom map details. Currently supported custom maps include: ArcGIS RESTful, ArcGIS cached Maps, and ArcGIS WMS web services
neoConneX® Server v10.x - by neoterra® Systems
Page 31 of 38
48 Centennial Road, Unit #8 Orangeville, Ontario. L9W 3T4
CDN-Tel: 1-519-940-0088 / U.S.-Tel: 1-872-216-8953 / Fax: 1-519-940-8813 – Email: [email protected] www.neoterra.ca
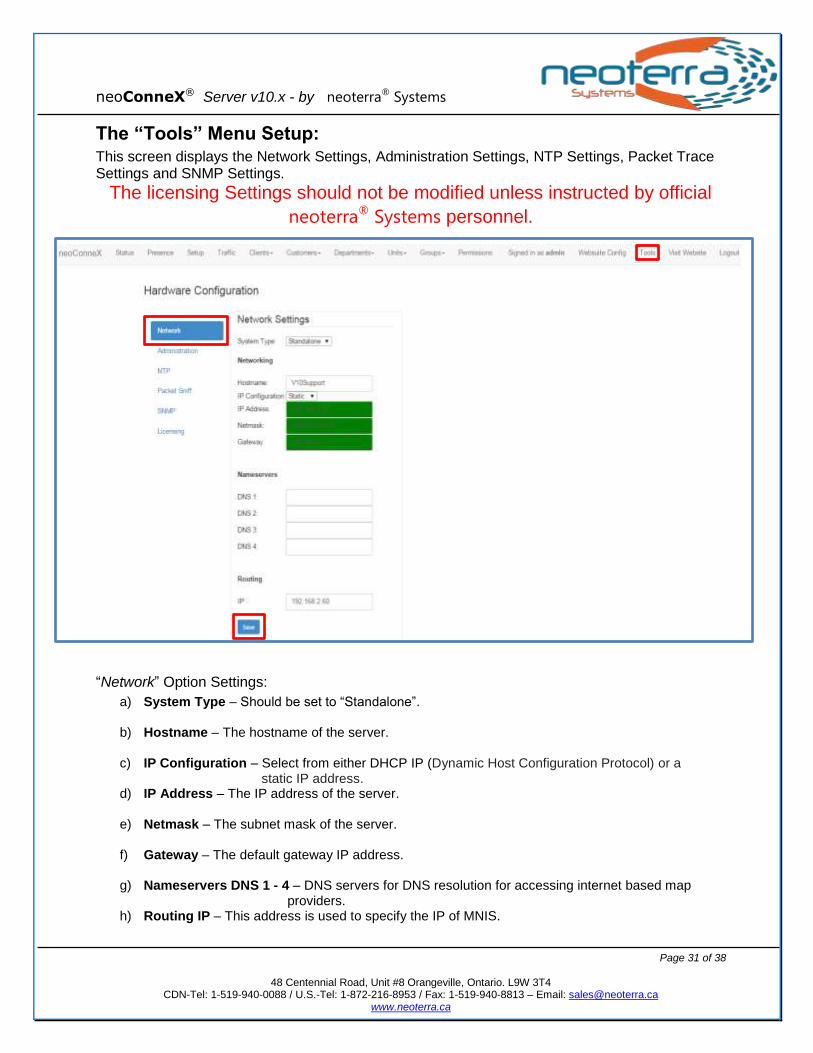
The “Tools” Menu Setup: This screen displays the Network Settings, Administration Settings, NTP Settings, Packet Trace Settings and SNMP Settings.
The licensing Settings should not be modified unless instructed by official
neoterra® Systems personnel.
“Network” Option Settings:
a) System Type – Should be set to “Standalone”.
b) Hostname – The hostname of the server.
c) IP Configuration – Select from either DHCP IP (Dynamic Host Configuration Protocol) or a static IP address.
d) IP Address – The IP address of the server.
e) Netmask – The subnet mask of the server.
f) Gateway – The default gateway IP address.
g) Nameservers DNS 1 - 4 – DNS servers for DNS resolution for accessing internet based map providers.
h) Routing IP – This address is used to specify the IP of MNIS.
neoConneX® Server v10.x - by neoterra® Systems
Page 32 of 38
48 Centennial Road, Unit #8 Orangeville, Ontario. L9W 3T4
CDN-Tel: 1-519-940-0088 / U.S.-Tel: 1-872-216-8953 / Fax: 1-519-940-8813 – Email: [email protected] www.neoterra.ca
*When all of the network settings have been correctly entered click the “Save” button to save them.*
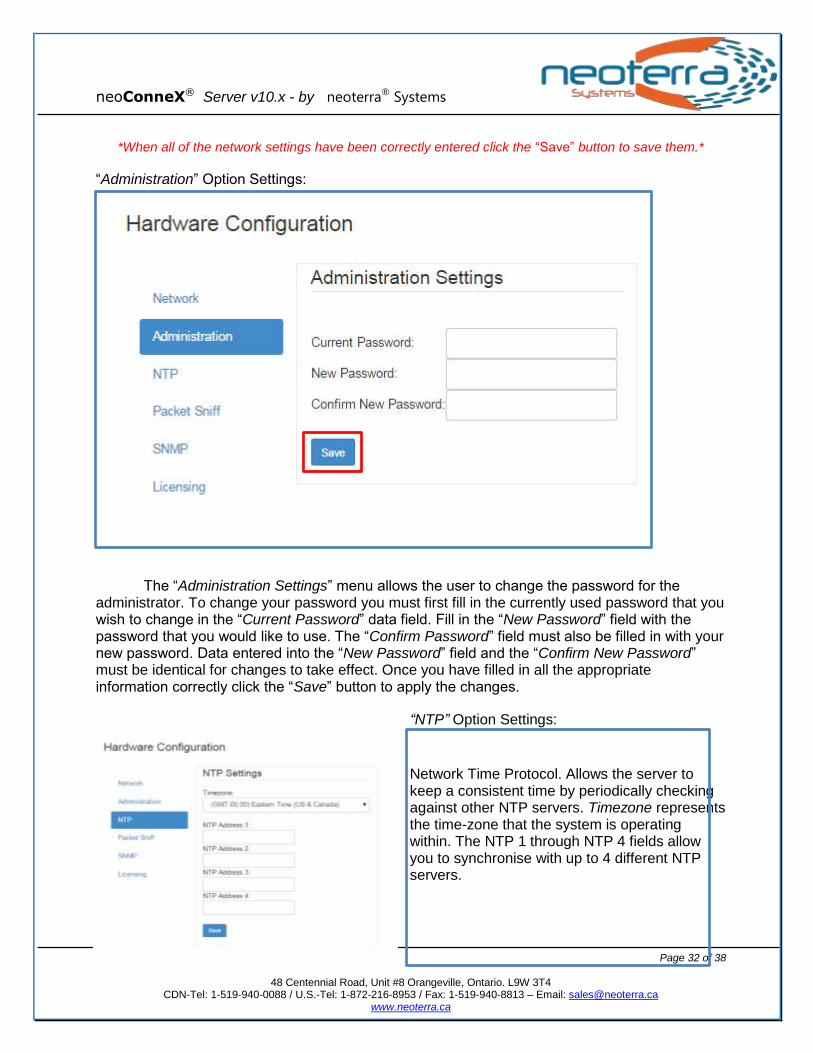
“Administration” Option Settings:
The “Administration Settings” menu allows the user to change the password for the administrator. To change your password you must first fill in the currently used password that you wish to change in the “Current Password” data field. Fill in the “New Password” field with the password that you would like to use. The “Confirm Password” field must also be filled in with your new password. Data entered into the “New Password” field and the “Confirm New Password” must be identical for changes to take effect. Once you have filled in all the appropriate information correctly click the “Save” button to apply the changes.
“NTP” Option Settings:
Network Time Protocol. Allows the server to keep a consistent time by periodically checking against other NTP servers. Timezone represents the time-zone that the system is operating within. The NTP 1 through NTP 4 fields allow you to synchronise with up to 4 different NTP servers.
neoConneX® Server v10.x - by neoterra® Systems
Page 33 of 38
48 Centennial Road, Unit #8 Orangeville, Ontario. L9W 3T4
CDN-Tel: 1-519-940-0088 / U.S.-Tel: 1-872-216-8953 / Fax: 1-519-940-8813 – Email: [email protected] www.neoterra.ca
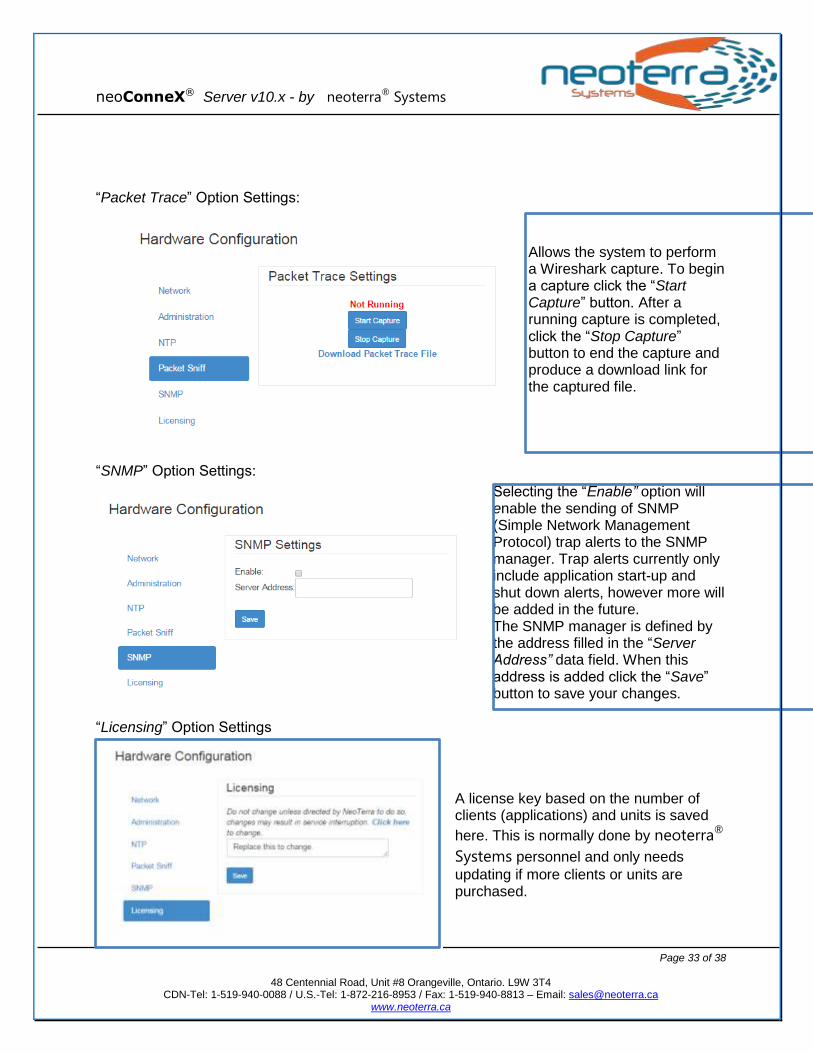
“Packet Trace” Option Settings:
Allows the system to perform a Wireshark capture. To begin a capture click the “Start Capture” button. After a running capture is completed, click the “Stop Capture” button to end the capture and produce a download link for the captured file.
“SNMP” Option Settings:
Selecting the “Enable” option will enable the sending of SNMP (Simple Network Management Protocol) trap alerts to the SNMP manager. Trap alerts currently only include application start-up and shut down alerts, however more will be added in the future. The SNMP manager is defined by the address filled in the “Server Address” data field. When this address is added click the “Save” button to save your changes.
“Licensing” Option Settings
A license key based on the number of clients (applications) and units is saved
here. This is normally done by neoterra®
Systems personnel and only needs
updating if more clients or units are purchased.
neoConneX® Server v10.x - by neoterra® Systems
Page 34 of 38
48 Centennial Road, Unit #8 Orangeville, Ontario. L9W 3T4
CDN-Tel: 1-519-940-0088 / U.S.-Tel: 1-872-216-8953 / Fax: 1-519-940-8813 – Email: [email protected] www.neoterra.ca
SECTION 3 – Using the Provision Tool
neoConneX® Server v10.x - by neoterra® Systems
Page 35 of 38
48 Centennial Road, Unit #8 Orangeville, Ontario. L9W 3T4
CDN-Tel: 1-519-940-0088 / U.S.-Tel: 1-872-216-8953 / Fax: 1-519-940-8813 – Email: [email protected] www.neoterra.ca
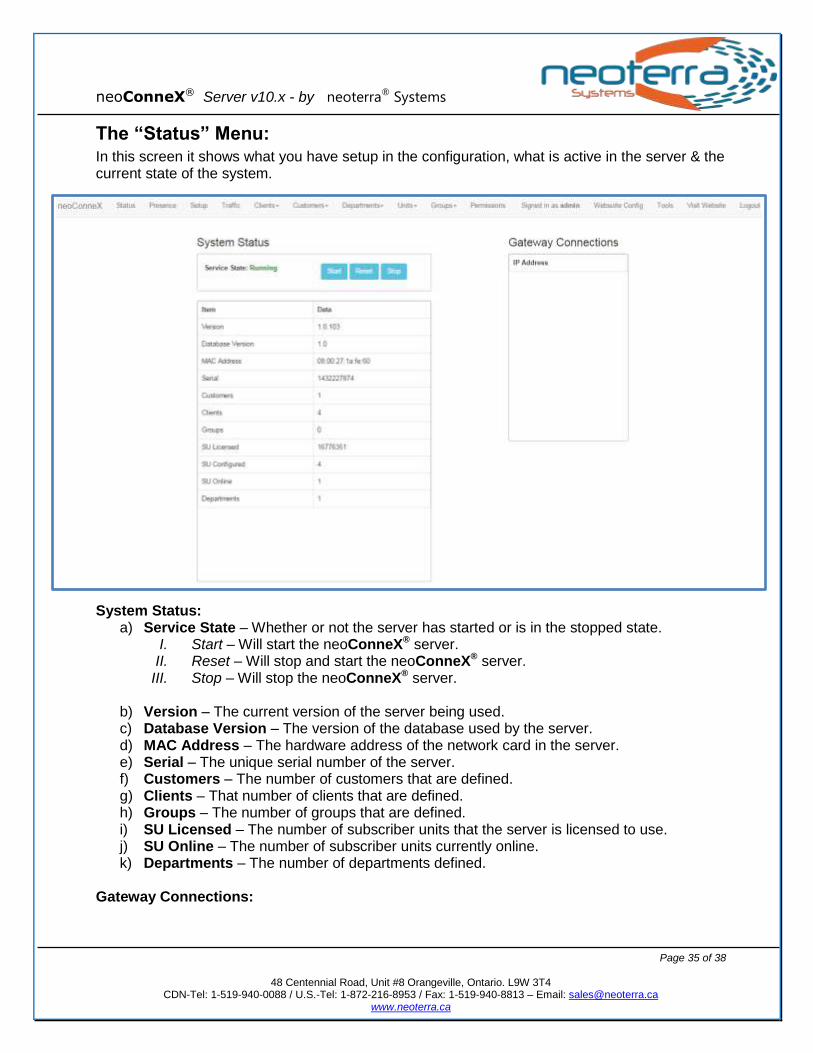
The “Status” Menu: In this screen it shows what you have setup in the configuration, what is active in the server & the current state of the system. System Status:
a) Service State – Whether or not the server has started or is in the stopped state. I. Start – Will start the neoConneX® server. II. Reset – Will stop and start the neoConneX® server.
III. Stop – Will stop the neoConneX® server.
b) Version – The current version of the server being used. c) Database Version – The version of the database used by the server. d) MAC Address – The hardware address of the network card in the server. e) Serial – The unique serial number of the server. f) Customers – The number of customers that are defined. g) Clients – That number of clients that are defined. h) Groups – The number of groups that are defined. i) SU Licensed – The number of subscriber units that the server is licensed to use. j) SU Online – The number of subscriber units currently online. k) Departments – The number of departments defined.
Gateway Connections:
neoConneX® Server v10.x - by neoterra® Systems
Page 36 of 38
48 Centennial Road, Unit #8 Orangeville, Ontario. L9W 3T4
CDN-Tel: 1-519-940-0088 / U.S.-Tel: 1-872-216-8953 / Fax: 1-519-940-8813 – Email: [email protected] www.neoterra.ca
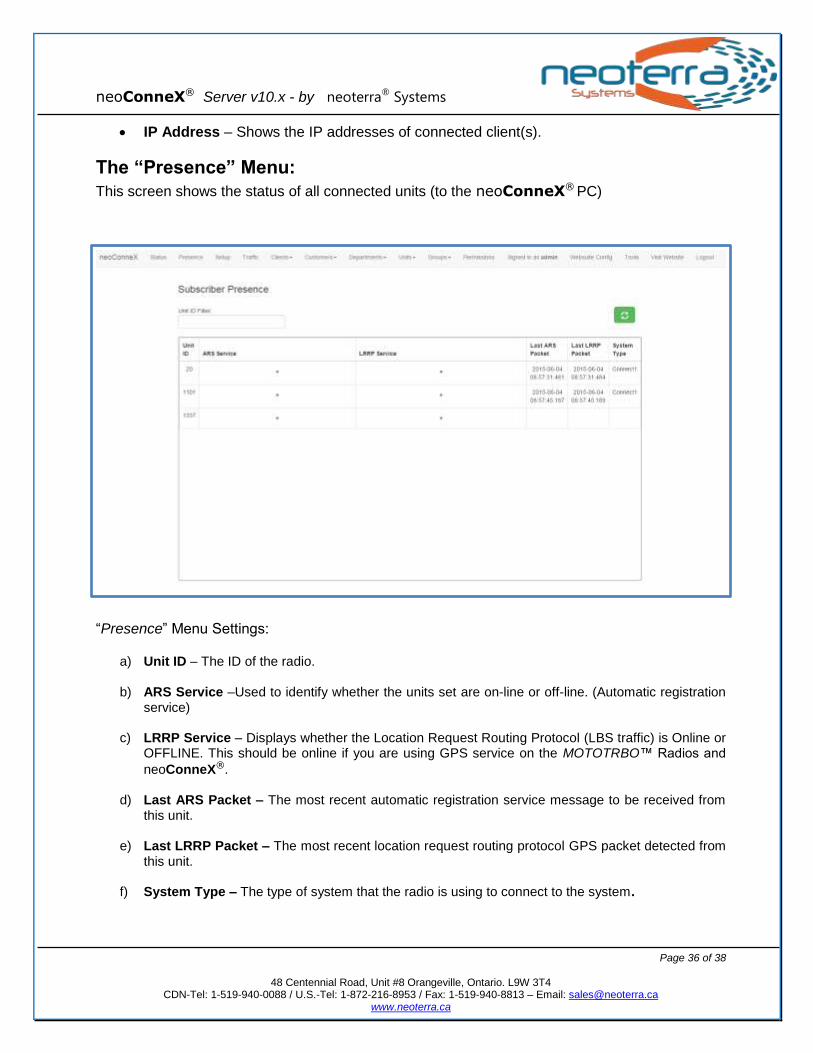
IP Address – Shows the IP addresses of connected client(s).
The “Presence” Menu:
This screen shows the status of all connected units (to the neoConneX® PC)
“Presence” Menu Settings:
a) Unit ID – The ID of the radio.
b) ARS Service –Used to identify whether the units set are on-line or off-line. (Automatic registration service)
c) LRRP Service – Displays whether the Location Request Routing Protocol (LBS traffic) is Online or
OFFLINE. This should be online if you are using GPS service on the MOTOTRBO™ Radios and
neoConneX®.
d) Last ARS Packet – The most recent automatic registration service message to be received from this unit.
e) Last LRRP Packet – The most recent location request routing protocol GPS packet detected from this unit.
f) System Type – The type of system that the radio is using to connect to the system.

neoConneX® Server v10.x - by neoterra® Systems
Page 37 of 38
48 Centennial Road, Unit #8 Orangeville, Ontario. L9W 3T4
CDN-Tel: 1-519-940-0088 / U.S.-Tel: 1-872-216-8953 / Fax: 1-519-940-8813 – Email: [email protected] www.neoterra.ca
The “Traffic” Menu:
This screen displays any traffic that neoConneX® is handling, connection activity, as well as any client connections. There is also a feature that allows users to find a specific unit.
a) Find Unit – Allows the user to perform an immediate location request to poll the unit. User must fill in the unit ID and select the type of poll. This will be LRRP Immediate if the unit is using a MOTOTRBO® system, or XL Immediate if using the connexBOX® XL. When the unit has been specified click the “Find” button to perform an immediate location request.
b) Pause output – When enabled pauses all traffic window output.
c) Timestamp – The date and time associated with the event.
d) IP Address – The source IP address for the report.
e) Unit ID – The ID of the unit that the report concerns.
f) Notes – A description of the event.
neoConneX® Server v10.x - by neoterra® Systems
Page 38 of 38
48 Centennial Road, Unit #8 Orangeville, Ontario. L9W 3T4
CDN-Tel: 1-519-940-0088 / U.S.-Tel: 1-872-216-8953 / Fax: 1-519-940-8813 – Email: [email protected] www.neoterra.ca
Notes: