nero vision manualftp6.nero.com/user_guides/nero8/vision/nerovision_enu.pdf · contents page 3...
TRANSCRIPT

Nero Vision Manual
Nero AG

Copyright and Trademark Information
The Nero Vision Manual and all its contents are protected by copyright and are the property of Nero AG. All rights reserved. This manual contains materials which are protected by internationally recognized copyright laws. This manual may not - in whole or in part - be copied, transmitted, or otherwise reproduced without the express written permission of Nero AG.
Nero AG rejects any claims that transcend the clauses of the guarantee rights. Nero AG does not accept any liability for the correctness of the content of the Nero Vision manual. The contents of the supplied software, as well as of the Nero Vision manual, may be changed without prior notice.
All trade names and trademarks are the property of their respective owners.
The trademarks mentioned here are named for information purposes only.
Copyright © 2007 Nero AG and its licensors. All rights reserved.
SW – 5.0.100.3

Contents
Page 3
Contents
1 Start Successfully! 6 1.1 About Nero Vision 6 1.2 Working with Nero Vision 6 1.3 About the manual 9
2 Launching the program 10
3 User interface 11 3.1 Main window 11 3.2 Extended area 12 3.2.1 Buttons 13 3.2.2 Check boxes 13 3.2.3 Combo Boxes 14
4 Creating a disc project 15 4.1 Contents screen 15 4.2 Creating a disc project 17
5 Capturing videos from video cameras and other external capture devices 19 5.1 Capturing 19 5.2 DV/HDV cameras, digital and analog videos 19 5.3 Video Capture screen 19 5.3.1 Video Device Properties 21 5.3.2 Audio Device Properties Window 22 5.4 Setting a TV card 22 5.5 Capturing video on the hard drive 25 5.6 Capturing to disc directly 27 5.7 Import from the Web 28
6 Video editing 30 6.1 Movie screen 30 6.2 Make Movie 32 6.2.1 Creating storage groups 33 6.2.2 Inserting transitions 34 6.2.3 Adding an effect 35 6.2.4 Adding a text effect 36 6.2.5 Inserting an audio file 37

Contents
Page 4
6.2.6 Cutting video titles 38 6.3 Create Chapters screen 39 6.4 Creating chapters manually 41 6.5 Creating chapters automatically 41 6.6 Editing chapters 42 6.7 Export Video screen 43 6.8 Export video to file 45 6.9 Export video to camera 46 6.10 Export video and send as e-mail attachment 47 6.11 Export audio to file 48 6.12 Export to Internet 48
7 Slide show 50 7.1 Slide Show screen 50 7.2 Creating a slide show 52 7.2.1 Slide Show: Inserting transitions 54 7.2.2 Slide Show: Editing images 54 7.2.3 Slide Show: Fitting the display duration 56
8 Menu 58 8.1 Levels 58 8.2 Editing the menu screen 58 8.2.1 Templates tab 60 8.2.2 Customize tab 60 8.2.3 Select Start Position window 67 8.2.4 Edit Background Audio window 68 8.2.5 Select Poster Frame window 69 8.2.6 Shadow Settings window 69 8.2.7 Transition window 70 8.2.8 Save Template As window 70 8.3 Create Menu 70
9 Preview 73 9.1 Preview screen 73 9.2 Showing a preview 74
10 Burning a disc 75 10.1 Burn Options screen 75 10.2 Burning a disc 77 10.3 Burning an image file 78 10.4 Writing hard drive folders 79

Contents
Page 5
11 Disc Tools 81 11.1 Erasing a rewritable disc 81 11.2 Displaying disc info 81 11.3 Finalizing a disc 82
12 Project management 83 12.1 Saving a project 83 12.2 Opening a project 83 12.3 Opening a disc image 83 12.4 Creating covers and labels 84
13 Configuration 85 13.1 Opening a configuration 85 13.2 Application Settings window 85 13.2.1 General tab 85 13.2.2 Folders tab 86 13.2.3 Messages tab 86
14 Video options 88 14.1 Displaying video options 88 14.2 (Default) Video Options window 88 14.2.1 General tab 88 14.2.2 <Disc Format> tab 89 14.3 Nero Digital™ Encoder Configuration 90
15 Technical information 92 15.1 System requirements 92 15.2 Disc formats supported 92 15.2.1 Overview of compatibility between disc formats and discs 93 15.2.2 Overview of compatibility between DVD discs and editable disc formats 94 15.3 Key combinations 94
16 Versions of Nero Vision 95
17 Glossary 96
18 Index 103
19 Contact Information 105

Start Successfully!
Page 6
1 Start Successfully!
1.1 About Nero Vision Nero Vision is software with an extremely friendly user interface for capturing, editing and burning movies and slide shows. Nero Vision can be used to play your videos from DV video cameras or other external video devices on your PC and to burn them as DVD video, DVD-VR/-VFR (video mode)/+VR, Video CD (VCD), Super Video CD (SVCD), miniDVD, HD-BURN, AVCHD or BD-AV or to save them to a hard drive folder. With the numerous features that this powerful multimedia software offers, you have a variety of options for creating and archiving discs of your most cherished memories. Even users new to the world of video find it easy to use Nero Vision. Nero Vision can be used to quickly and easily shorten and add effects to your videos, to create chapters using automatic scene recognition and to manually label chapters, to create your own menus with animated buttons from pre-defined menu templates, to add your own background images and text, to use the preview screen with the handy virtual remote control for viewing your project and much more!
With your DV video camera, a FireWire® card and the appropriate software, you can import your own videos. If you have a DirectShow®-compatible video capture card, Nero Vision can be used to capture your videos from the video capture card directly. If you do not have the required video hardware, you can edit video files from your PC or downloaded from the Internet.
1.2 Working with Nero Vision Basically, the user interface consists of the selection of a task from the Start screen.You then complete the task by navigating through the different steps, with a separate window being displayed for each individual step.
A project consists essentially of four steps:
1. Picking a task. Select what you would like to do by moving the cursor over the menu item. As you move your cursor over an item, an explanatory text will pop up next to it.
Fig. 1: Start screen
Start Successfully!
Page 7
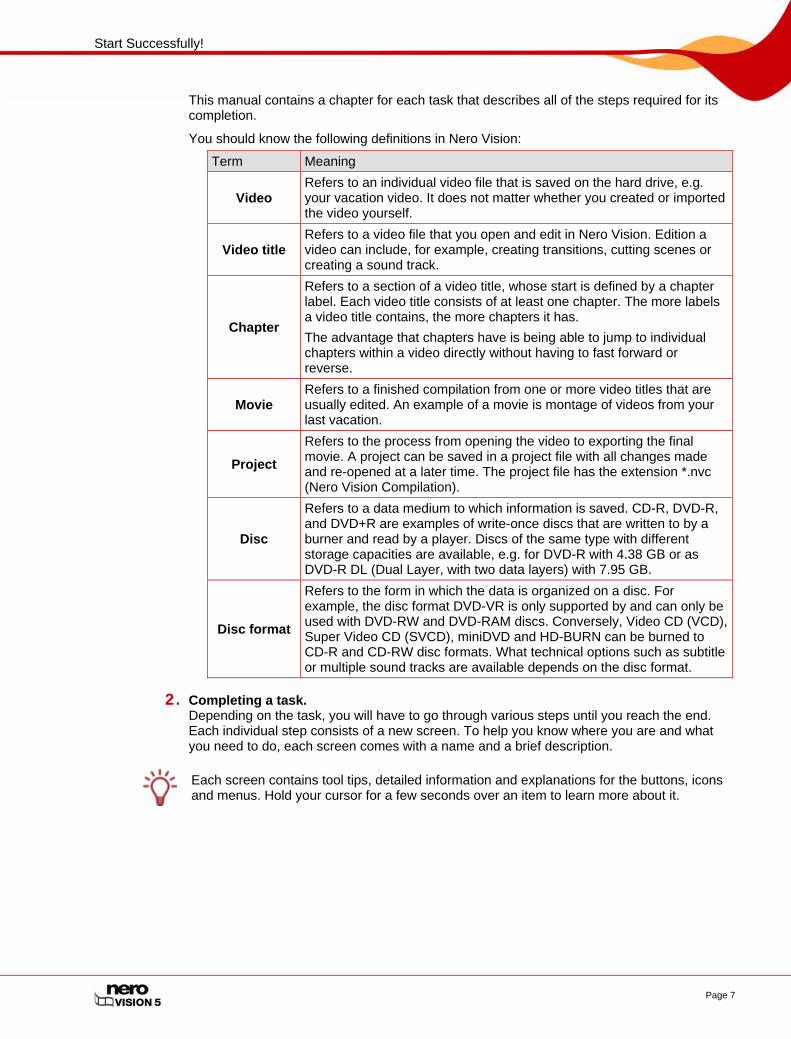
This manual contains a chapter for each task that describes all of the steps required for its completion.
You should know the following definitions in Nero Vision:
Term Meaning
Video Refers to an individual video file that is saved on the hard drive, e.g. your vacation video. It does not matter whether you created or imported the video yourself.
Video title Refers to a video file that you open and edit in Nero Vision. Edition a video can include, for example, creating transitions, cutting scenes or creating a sound track.
Chapter
Refers to a section of a video title, whose start is defined by a chapter label. Each video title consists of at least one chapter. The more labels a video title contains, the more chapters it has. The advantage that chapters have is being able to jump to individual chapters within a video directly without having to fast forward or reverse.
Movie Refers to a finished compilation from one or more video titles that are usually edited. An example of a movie is montage of videos from your last vacation.
Project
Refers to the process from opening the video to exporting the final movie. A project can be saved in a project file with all changes made and re-opened at a later time. The project file has the extension *.nvc (Nero Vision Compilation).
Disc
Refers to a data medium to which information is saved. CD-R, DVD-R, and DVD+R are examples of write-once discs that are written to by a burner and read by a player. Discs of the same type with different storage capacities are available, e.g. for DVD-R with 4.38 GB or as DVD-R DL (Dual Layer, with two data layers) with 7.95 GB.
Disc format
Refers to the form in which the data is organized on a disc. For example, the disc format DVD-VR is only supported by and can only be used with DVD-RW and DVD-RAM discs. Conversely, Video CD (VCD), Super Video CD (SVCD), miniDVD and HD-BURN can be burned to CD-R and CD-RW disc formats. What technical options such as subtitle or multiple sound tracks are available depends on the disc format.
2. Completing a task. Depending on the task, you will have to go through various steps until you reach the end. Each individual step consists of a new screen. To help you know where you are and what you need to do, each screen comes with a name and a brief description.
Each screen contains tool tips, detailed information and explanations for the buttons, icons and menus. Hold your cursor for a few seconds over an item to learn more about it.

Start Successfully!
Page 8
Fig. 2: Contents screen
For each screen, the manual contains a chapter in which all areas are described in detail.
To go to the next or previous screen, click the Next or Back button in the navigation bar.
Both Undo and Redo buttons are available on screens in which you can execute different actions. These buttons allow you to quickly undo or redo the action last performed. In this way, you can try out a number of functions in Nero Vision risk free without having to discard the entire project if you do not like the change.
3. Burning. Burning marks the end of a project. For this you should define the burning parameters and click the Burn button. Depending on the type of project you are working on and the burner connected to the system, a number of different entries are available for selection.
Fig. 3: Burn Options screen

Start Successfully!
Page 9
4. Following the burning process. Once you have finished burning you can decide what you would like to do next: launch Nero ShowTime and view your project or create covers and labels for the disc using Nero CoverDesigner. Of course, you can also save the project or start a new one.
1.3 About the manual This manual is intended for all users who wish to learn how to use Nero Vision. It is process-based and explains how to reach a particular objective on a step-by-basis.
To make the best use of this manual, please note the following conventions:
Symbol Meaning
Indicates warnings or instructions that have to be followed strictly.
Indicates additional information or advice.
1. Start … A number at the beginning of a line indicates a request for action. Carry out these actions in the order specified.
Indicates an intermediate result.
Indicates a result.
OK Indicates text passages or buttons that appear in the program interface of Nero Vision. They are shown in bold face.
Chapters Indicates references to other chapters. They are executed as links and are shown in red and underlined.
[…] Indicates keyboard shortcuts for entering commands.

Launching the program
Page 10
2 Launching the program To launch Nero Vision via Nero StartSmart, proceed as follows:
1. Click the Nero StartSmart icon.
The Nero StartSmart window opens.
2. Click the button.
The list of Nero applications appears.
Fig. 4: Nero StartSmart
3. Select Nero Vision in the Applications selection list.
The Nero Vision window opens.
You have launched Nero Vision via Nero StartSmart.

User interface
Page 11
3 User interface
3.1 Main window The user interface for Nero Vision consists of a main window and an expandable area. After selecting a task in the Start screen, complete the task by navigating through the various steps with a new screen displayed for each.
The Start screen always displays only those entries that are technically possible for the drives installed on the computer and devices connected to the computer.
If you have installed a DVD-RW/+RW burner and insert a DVD-RW or DVD+RW disc, you can use Nero Vision to create editable DVD disc formats: DVD-VR, DVD-VFR (video mode) and DVD+VR. In comparison to DVD-Video, the advantage of these disc formats is that the content can be changed later on. This means that you can edit the films, insert new passages, delete scenes that you do not want to see, or overwrite the disc. The DVD-VFR (video mode) and DVD+VR disc formats are compatible with DVD-Video and can be played on nearly any commercial DVD player. Although the DVD-VR disc format, which is available for DVD-RW and DVD-RAM discs, can only be played on appropriate VR-compatible burners. It has the advantage that it is specially designed for direct recording on disc. You can find an overview of which disc format is supported by which disc under Disc formats supported.
The following buttons are available in the main window:
Help for Nero Vision: opens online help. Enter new serial number: allows you to enter a new serial number. The Welcome to Nero window opens. Nero Vision on the Web: opens the Nero Vision Web page. Tips: opens the Tips window. You can configure Nero Vision in such a way that useful tips are displayed when you open each screen. Key Definitions: displays assigned key combinations and their functions. The Key Definitions window opens. Info: displays the version and registration data. The About Nero Vision window opens.
More Displays the extended area (see Extended area).
Export
Exports the movie or video sound track to a file or camera. The Export Movie screen appears. In this screen, you can configure the export settings and then export the project (see Export Video screen). Only available if you have added at least one video to a project.
Save
Saves the project with all changes made. The Save As dialog appears. The project is saved to an administration file with the extension .nvc (NeroVision Compilation). This function is useful for times when you are not able to finish your project and would like to continue at a later time (see Saving a project).

User interface
Page 12
This undoes the last action. With Nero Vision you can undo many actions so that you can restore the desired condition even after having made a large number of changes.
Restores the last action that you have undone. With Nero Vision you can restore many actions that have been undone so that you can restore the desired condition even after having made a large number of changes.
Go Back Returns to the previous screen. If necessary, you will be prompted to save the project, as the changes you have made will otherwise be lost.
Next Displays the next screen.
Burn Starts the burn process. The button is only displayed in the Burn screen.
Exit Exits Nero Vison. Only available in the Start screen.
3.2 Extended area The user interface for Nero Vision consists of a main window and an expandable area. After selecting a task in the Start screen, complete the task by navigating through the various steps with a new screen displayed for each.
Clicking on the More button displays an extended area.
The extended area is closed again in normal mode when you switch to the next screen. In so-called 'sticky mode', the extended area will be displayed until it is closed once more by clicking on the More button again.
The icon in the extended area displays the current mode. Clicking on the icon changes the mode.
The extended area is in the normal mode.
The extended area is in the sticky mode.
The user interface for Nero Vision displays the pop-up menus required at the time depending on the screen you are in. This makes the interface easy to use.
User interface
Page 13
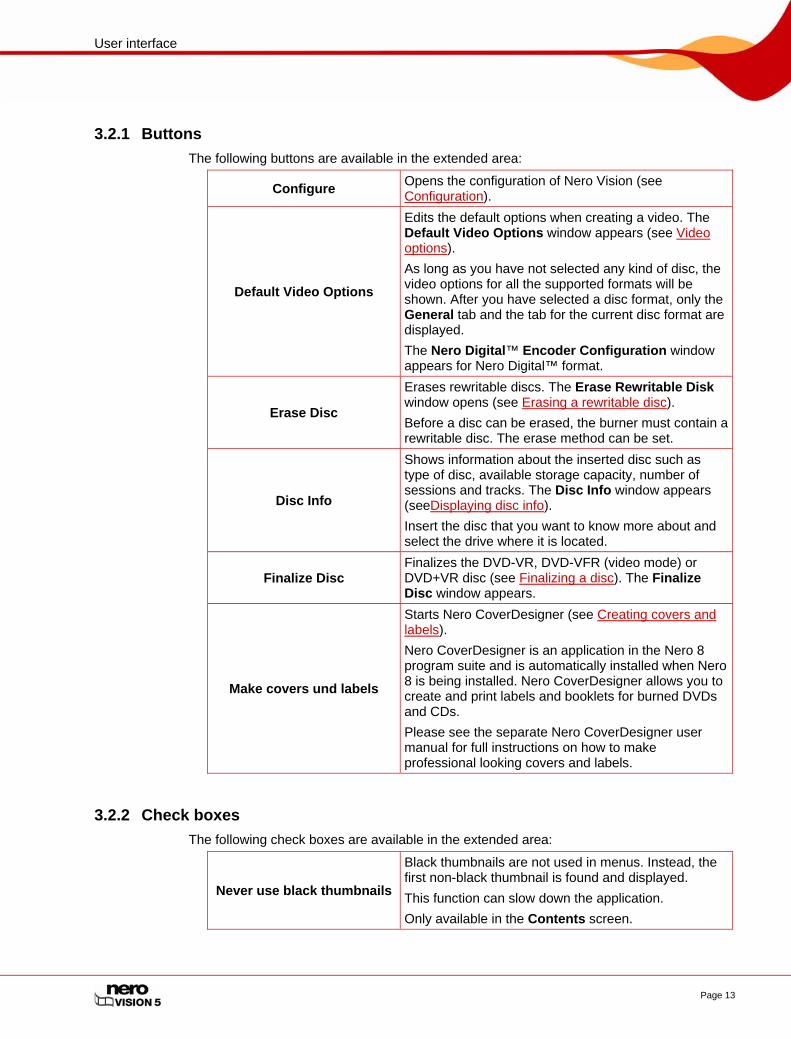
3.2.1 Buttons The following buttons are available in the extended area:
Configure Opens the configuration of Nero Vision (see Configuration).
Default Video Options
Edits the default options when creating a video. The Default Video Options window appears (see Video options). As long as you have not selected any kind of disc, the video options for all the supported formats will be shown. After you have selected a disc format, only the General tab and the tab for the current disc format are displayed. The Nero Digital™ Encoder Configuration window appears for Nero Digital™ format.
Erase Disc
Erases rewritable discs. The Erase Rewritable Disk window opens (see Erasing a rewritable disc). Before a disc can be erased, the burner must contain a rewritable disc. The erase method can be set.
Disc Info
Shows information about the inserted disc such as type of disc, available storage capacity, number of sessions and tracks. The Disc Info window appears (seeDisplaying disc info). Insert the disc that you want to know more about and select the drive where it is located.
Finalize Disc Finalizes the DVD-VR, DVD-VFR (video mode) or DVD+VR disc (see Finalizing a disc). The Finalize Disc window appears.
Make covers und labels
Starts Nero CoverDesigner (see Creating covers and labels). Nero CoverDesigner is an application in the Nero 8 program suite and is automatically installed when Nero 8 is being installed. Nero CoverDesigner allows you to create and print labels and booklets for burned DVDs and CDs. Please see the separate Nero CoverDesigner user manual for full instructions on how to make professional looking covers and labels.
3.2.2 Check boxes The following check boxes are available in the extended area:
Never use black thumbnails
Black thumbnails are not used in menus. Instead, the first non-black thumbnail is found and displayed. This function can slow down the application. Only available in the Contents screen.

User interface
Page 14
Create chapters automatically
Creates chapters automatically that can be selected individually later when playing the movie. Only available in the Contents screen.
Link timeline elements
Connects the elements in the Timeline tab to one another as with a magnet. Consequently, text, audio, and effects begin at the same time. Only available in the Movie screen.
Use time-code based chapter detection for DV
files
This automatically identifies individual scenes in DV (Digital Video) files using the time stamp and incorporates them.
Enable capture device audio playback
Enables playback on the capture device. This setting does not affect playback of captured video files. Only available in the Video Capture screen.
Detect scenes while capturing (DV)
Automatically searches for scene changes when capturing from a DV capture device. Only available in the Video Capture screen.
Display Microsoft(R) 'Video for Windows'(R) devices
Displays Microsoft® Video for Windows® devices in the list of capture devices. Only available in the Video Capture screen.
Fit slide show duration to audio duration
The duration of the slide show is adapted to the length of the background music. The check box is only available if the slide show has been given background music. Only available in the Slide Show screen.
3.2.3 Combo Boxes The following options are available in the Adding effects to timeline combo box (only available in the Movie screen):
Move next objects
When inserting an effect, moves the next effect to the back.
Fit to available space
When inserting a new effect, adjusts the effect so that it only takes up the available space up to the beginning of the next effect.
In the Capture to File combo box (only available in the Video Capture screen), you can select the storage location for the imported video.

Creating a disc project
Page 15
4 Creating a disc project
4.1 Contents screen In the Contents screen, you can create a project to your requirements and arrange titles of a compilation. The screen is divided into the Contents area, in which added titls are listed, and the What do you want to do? selection area.
Fig. 5: Contents screen
The following options are available in the What do you want to do? selection list:
Capture Video Captures a video. The Video Capture screen appears (see Video Capture screen).
Add Video Files Addes video files to the project. The Open window appears.
Make Movie Creates a movie. The Movie screen appears (see Movie screen).
Make Slide Show Creates a slide show. The Slide Show screen appears (see Slide Show screen).
Import Disc Imports elements from an existing disc. Import AVCHD from Hard
Drive Imports videos that are saved in an AVCHD project (on DVD, storage card or hard drive).
Edit Movie Edits a selected video title. The Movie screen appears (see Video editing).
Create Chapters Creates chapters in the selected video title. The Create Chapters screen appears (see Create Chapters screen).
Import from the Web Imports files from Internet communities and adds them to the project as new titles (see Import from the Web).

Creating a disc project
Page 16
Each video title is shown in the Contents area with a thumbnail and information on the file name, length of the video and number of chapters.
Depending on the disc type, a different number of titles can be created for a slide show. No titles are created in DVD-VR projects.
VCD/SVCD – up to 98 titles
DVD-Video/MiniDVD, HD-Burn, DVD-VFR – up to 99 titles
DVD-VR – up to 64 titles
Editable Blu-ray™ disc (BD-AV) – up to 200 titles Chapters cannot be created in slide shows.
The following buttons are available:
Moves selected media titles up.
Moves selected media titles down.
Deletes selected media titles.
Combines several video titles to form a single title.
Changes the name of the selected medial title. The Rename Title window appears.
You can change the disc type next to the capacity bar of the Overall Memory Used in the lower area. The display of available space is adjusted accordingly. The total available space depends on which project you are editing.
If the disc you are using is not a DVD with 4.38 GB storage capacity, but a DVD-1 or DVD-9 (with 7.95 GB capacity), select the disc type from the combo box in the bottom right-hand section of the screen. If the disc you are using is a CD, select from the menu whether the CD has a capacity of 74 or 80 minutes.
If you have added a slide show to your project, the Add combo box appears under the Contents area. The following options are available:
Nothing Only saves the pictures in the slide show.
Original pictures Saves the pictures in the original format as well. Original pictures are saved on the disc in the ORIGPICS folder.
HTML browser gallery
Additionally creates a HTML version of the slide show on the disc; this can be displayed on any PC using a browser. You can display the HTML browser gallery by opening the INDEX.HTM file on the disc.
PC slide show
Additionally creates an executable file on the disc; this can be opened on any Windows PC. The executable file for the PC slide show is called slideshw.exe.

Creating a disc project
Page 17
4.2 Creating a disc project To create a disc project, proceed as follows:
1. In the Start screen, select the Create DVD or Create CD selection entry and the required disc type (Video-CD / Super Video CD / miniDVD / HD-BURN / DVD-Video / AVCHD).
If your burner supports an editable disc format, the Editable DVD format is also displayed under the Make DVD option. If a Blu-ray burner is connected to your PC, the Editable Blu-ray™ Disc option is also displayed.
If an HD-DVD burner is connected to your PC, the Make HD-DVD > HD-DVD Video option is also displayed. To make a disc in HD-DVD-Video format, you need the Blu-ray / HD-DVD-Video plug-in, which is not included in the full version of Nero Vision. You can obtain it at www.nero.com.
There may be differences when editing titles and movies due to the differences in the DVD-VR, DVD-VFR (video mode) and DVD+VR specifications. However, the process is essentially identical to the process described in this chapter.
The Contents screen appears.
2. To capture a video for your project: 1. Select the Capture Video option.
The Capture Video window opens. 2. Repeat the steps under Capturing video on the hard drive.
3. If you have already captured a video or want to add a video saved on the hard drive: 1. Select the Add Video Files option.
The Open window appears. 2. Select the required files and click the Open button.
The required files are added to the project.
4. If you want to add videos that are stored on a disc: 1. Insert the disc in a drive. 2. Select the Import Disc option. 3. If more than one drive has been installed, select the drive in which the disc is inserted
from the combo box. The Import Title from Disc window appears.
4. Select the required videos and click the OK button. The video files are added.
5. If you want to import files from an Internet community: 1. Select the Import from the Web option.
The Import from the Web window appears. 2. Selec the desired file (see Import from the Web). 3. Click the Download button.
The imported media file is added to the contets area.
6. If you want to make a movie or slide show: 1. Click the Make Movie or Make Slide Show button.
Creating a disc project
Page 18
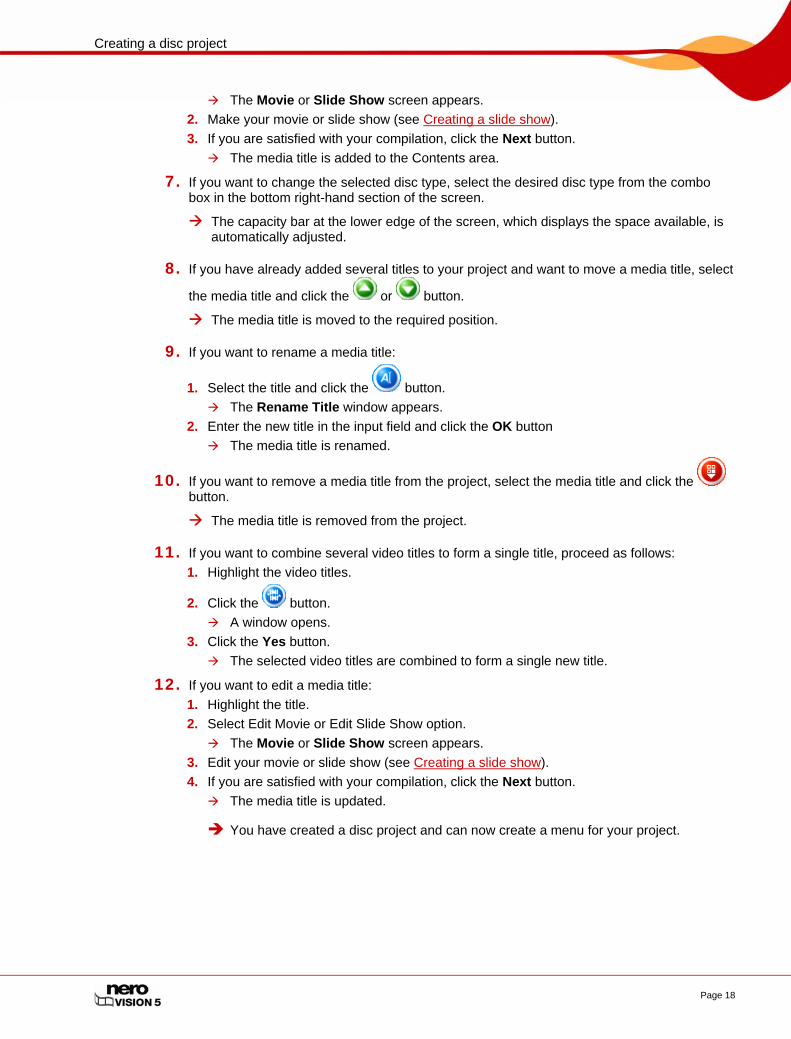
The Movie or Slide Show screen appears. 2. Make your movie or slide show (see Creating a slide show). 3. If you are satisfied with your compilation, click the Next button.
The media title is added to the Contents area.
7. If you want to change the selected disc type, select the desired disc type from the combo box in the bottom right-hand section of the screen.
The capacity bar at the lower edge of the screen, which displays the space available, is automatically adjusted.
8. If you have already added several titles to your project and want to move a media title, select
the media title and click the or button.
The media title is moved to the required position.
9. If you want to rename a media title:
1. Select the title and click the button. The Rename Title window appears.
2. Enter the new title in the input field and click the OK button The media title is renamed.
10. If you want to remove a media title from the project, select the media title and click the button.
The media title is removed from the project.
11. If you want to combine several video titles to form a single title, proceed as follows: 1. Highlight the video titles.
2. Click the button. A window opens.
3. Click the Yes button. The selected video titles are combined to form a single new title.
12. If you want to edit a media title: 1. Highlight the title. 2. Select Edit Movie or Edit Slide Show option.
The Movie or Slide Show screen appears. 3. Edit your movie or slide show (see Creating a slide show). 4. If you are satisfied with your compilation, click the Next button.
The media title is updated.
You have created a disc project and can now create a menu for your project.

Capturing videos from video cameras and other external capture devices
Page 19
5 Capturing videos from video cameras and other external capture devices
5.1 Capturing Capturing is a way of taking the video from a DV video camera or another video capture device connected to the video capture card and placing it on your PC. The capture device is the device that transmits the video signals to be captured, e.g. a DV video camera, video capture card or TV card.
You will find a list of supported devices on our web page under: http://www.nero.com/link.php?topic_id=117&language=eng&gen_id=8
If you want to transfer the video from an external capture device to your PC to use it in a project at a later time, proceed as described under Capturing video on the hard drive.
If you want to create a disc and also capture a video for this special project, you should select the relevant option Make DVD (or VCD, SVCD, miniDVD, HD-BURN) from the Start screen and then select the option Capture Video from the Content screen. That way, you can capture the video and work on your project simultaneously.
5.2 DV/HDV cameras, digital and analog videos There are three types of capture device: digital, analog and DV-/HDV cameras. All three have different hardware requirements.
DV/HDV cameras: In the case of a DV or HDV camera, the video signal is sent to the PC in digital format. All you need to transfer video to your PC is a connecting cable and a corresponding socket on your PC.
Analog Video: Video signals from an analog source need to be converted to a digital format for your PC to be able to work with them. Examples of analog capture devices include VHS video recorders, TV, VHS-C, 8 mm, and Hi-8 video cameras. Unlike DV capture devices where the device itself delivers digital video signals to your PC, you need to have a video capture card installed in the PC in the case of analog video signals. The analog signals are converted into digital signals by the video capture card.
Digital Video (ATSC, DVB-T/S/C): Video signals from digital capture devices are sent to the PC in digital format and exist in MPEG-2 format after transfer. TV cards are typical examples of digital devices. In order to transfer digital video, a corresponding device must be connected to your PC.
5.3 Video Capture screen All connected devices are displayed in the Capture Device combo box of the Video Capture screen.

Capturing videos from video cameras and other external capture devices
Page 20
Fig. 6: Video Capture screen
The following radio buttons are available:
Native Capturing
Optimizes all parameters based on the selected capture device and captures the video in the format specified by the capture device. The Native Capturing radio button is selected in the default settings. We recommend using Native Capturing.
Custom Capturing Adjusts the detail settings of the parameters. You can select the required target format.
For detail settings and capture procedure, the screen is divided into two areas, the preview area on the left and the information area that shows the most important settings of the target file.
Clicking on the Configure button opens the window for adjusting the detail settings of the video options.
Clicking on the button opens the Video Device Properties window. Clicking on the button opens the Audio Device Properties window. You can change the detail settings in both windows, if the connected capture device offers configuration options.
The following buttons are available in the preview area:
Starts playback.
Stops playback.
Starts capture.
Rewinds the video.
Fast forwards the video.

Capturing videos from video cameras and other external capture devices
Page 21
Switches to full-screen mode. You can return to window mode by pressing the Esc key.
Sets the capture timer which allows you to define the start time, end time, and capture time for capturing a video.
Switches to the next channel.
Switches to the previous channel.
Displays the played position in the format hours:minutes:seconds:hundredths of a second. Jumps to a specific position by clicking on the (next) and (back) buttons.
5.3.1 Video Device Properties
Fig. 7: Video Device Properties window
The following tabs are available in the Video Devices Properties window:
Format
Sets the frame rate, color compression process and output format to correspond to the way the video is to be burned onto the disc. In the case of analog capture devices, clicking on the Configure button starts the device test. You can select the video source here (video, composite or S-video)
General Sets values such as brightness, sharpness or contrast using the sliders.
Channels
All available channels of the selected device are displayed. You can select the required channel for your recording here. Clicking on the Manage TV Channel Groups button displays the last screen of the TV wizard again, and you can edit, add or remove groups and assigned channels. The TV wizard screen displays the available channels and groups of all installed capture devices. If you click the Channel Setting button, you can once again configure a TV card on a step-by-step basis using the TV wizard (see Setting a TV card).

Capturing videos from video cameras and other external capture devices
Page 22
5.3.2 Audio Device Properties Window The following areas are available in the Audio Device Properties window.
Device Settings Defines the required audio source.
Audio Input Defines the required audio inputs (e.g. CD player, line, microphone).
Click the icon to display the available options:
5.4 Setting a TV card If you have connected a TV card to your PC and call the Video Capture screen for the first time, all connected devices are displayed in the Capture Device combo box.
To set up a capture device for digital or analog video, a recording card that meets the requirements of the manufacturer must be installed or must be already integrated in the PC on the factory side.
Nero Vision provides simultaneous support for a number of TV cards, TV cards with dual tuner, and/or hybrid tuner cards. A list of supported TV cards is available on our website at http://www.nero.com/link.php?topic_id=115&language=eng&gen_id=8
The following requirement has to be fulfilled:
A TV card is connected to your PC and switched on.
To configure a TV card using the TV wizard, proceed as follows:
1. Select the Capture Video to Hard Drive option from the Start screen.
The Video Capture screen appears.
2. If you have several devices connected to your PC, select the required device in the Capture Device combo box.
3. Click the button.
The Video Device Properties window opens.
4. Click the Channels tab.
5. Click the Channel Setting button.
The first screen of the TV wizard, Analog TV Channel Search, appears. This wizard prompts you to make all the necessary entries step by step.
Capturing videos from video cameras and other external capture devices
Page 23
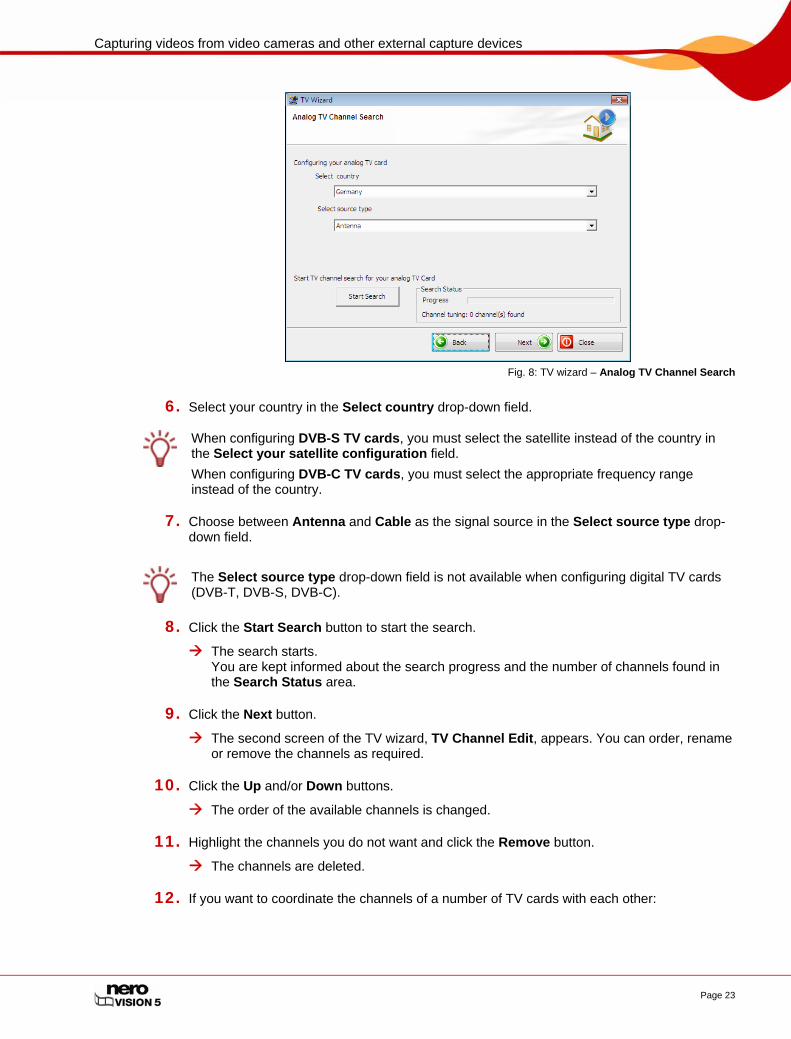
Fig. 8: TV wizard – Analog TV Channel Search
6. Select your country in the Select country drop-down field.
When configuring DVB-S TV cards, you must select the satellite instead of the country in the Select your satellite configuration field. When configuring DVB-C TV cards, you must select the appropriate frequency range instead of the country.
7. Choose between Antenna and Cable as the signal source in the Select source type drop-down field.
The Select source type drop-down field is not available when configuring digital TV cards (DVB-T, DVB-S, DVB-C).
8. Click the Start Search button to start the search.
The search starts. You are kept informed about the search progress and the number of channels found in the Search Status area.
9. Click the Next button.
The second screen of the TV wizard, TV Channel Edit, appears. You can order, rename or remove the channels as required.
10. Click the Up and/or Down buttons.
The order of the available channels is changed.
11. Highlight the channels you do not want and click the Remove button.
The channels are deleted.
12. If you want to coordinate the channels of a number of TV cards with each other:

Capturing videos from video cameras and other external capture devices
Page 24
Nero Vision regards TV channels with the same name – so-called "physical" channels – on different tuner cards as the same "logical" channel. This means that a logical channel can contain one or more physical channels. The channels are automatically coordinated with each other during the channel search. Only the logical channels will be displayed in Nero Vision following configuration in the TV wizard.
1. Highligh a required channel and click the Rename button. The Rename Channel window opens.
2. Enter the name you want on the Rename Channel text field and click the OK button. The channel is renamed.
13. Click the Next button.
The third screen of the TV wizard, Manage TV Channel Groups, appears. You can sort the channels in existing topic groups or in groups according to your requirements.
Fig. 9: TV wizard – Manage TV Channel Groups
14. Click the Add button on the TV Channel Groups tab.
The Add Group window appears.
15. Enter the required name of the group in the Add Group text field and click the OK button.
The group is created.
16. Click the TV Channels in Groups tab.
17. Select the group you want to edit in the Modify groups drop-down menu.
18. Highlight the channels you want to assign to this group in the Available Channels area and click the >> button.
The highlighted channels are shown in the Modify groups/Name area.
19. Click the Up and/or Down buttons.
The order of the channels within the group is adjusted.
20. Click the Click the Finish button.
The TV wizard is closed and the Video Capture screen appears.
You have configured the TV card.

Capturing videos from video cameras and other external capture devices
Page 25
5.5 Capturing video on the hard drive The following requirements have to be fulfilled:
No applications are running that place a high demand on the processor.
There are no applications running in full-screen mode.
The workstation is not blocked during the entire capture process.
There is sufficient space on your hard drive.
To capture a video on the hard drive, proceed as follows:
1. Connect the digital or analog capture device to the PC using the corresponding cables and switch it on.
To set up a capture device for digital or analog video, a recording card that meets the requirements of the manufacturer must be installed or must be already integrated in the PC on the factory side.
2. Select the Capture Video to Hard Drive option from the Start screen.
The Video Capture screen and a window are displayed. The window recommends the Native Capturing choice.
3. Select the capture device in the Capture Device combo box.
The capture device may be in camera mode or in VCR mode. In camera mode, the video signals are continuously transferred from the capture device to the PC, and you can view the current video signal in the preview area. In the case of a DV video camera, everything in the picture area frame of the video camera appears in the preview area. A TV card is always in camera mode as there is a constant video signal coming in and there is no way of pausing, rewinding/fast forwarding or restarting the video signal. In VCR mode, the video already exists on tape (or another medium). To capture this video you need to insert the tape into your video device and play it back. You can also rewind/fast forward through the whole tape to play back specific scenes. Digital video cameras can be set to either "camera" mode or "VCR" mode. Please check the manufacturer's instructions on how to do this. Analog video cameras are automatically in VCR mode. Depending on whether the capture device is in "camera" or "VCR" mode, some buttons are not available.
4. Choose between the Native Capturing and Custom Capturing radio buttons in the upper right of the window.
Native Capturing transfers the video without lossy conversion in the format specified by the capture device. The Native Capturing radio button is selected in the default settings. Capturing with Native Capturing is recommended.
5. If the Custom Capturing radio button is selected: 1. Select the required format in the combo box (see Video Capture screen).
The Profile combo box appears in the Details area.

Capturing videos from video cameras and other external capture devices
Page 26
2. Select the required profile (see Video Capture screen). The output file settings are displayed in the Details area under Output File.
3. If you want to adjust the detail settings, click the Configure button. A window appears (see (Default) Video Options window).
4. Make the required detail settings and click the OK button (see Video options). The output file settings are adjusted.
6. If you use an analog capture device, start the playback on the capture device. If you use a digital capture device and it is in VCR mode, use the buttons to control the tape.
You will see the current scene in the preview area.
7. Check playback from the capture device in the preview area.
8. If you want to change the video settings:
1. Click the button. The Video Device Properties window appears (see Video Device Properties).
If a digital capture device was selected in the Capture Device selection list, only the Channels tab is available in the Video Devices Properties window.
2. Make the required settings and click the button. The video settings are adjusted.
9. If you want to select an external audio source for capture:
1. Click the button. The Audio Device Properties window appears (see Audio Device Properties
Window). 2. Make the required settings and click the button.
The audio settings are adjusted.
10. If you want to save the video file to a folder other than My Documents/NeroVision/-CapturedVideo: 1. Click the More button.
The extended area opens. 2. Enter the path and the file name in the Capture to File input field.
Capturing video requires a lot of drive space. Please make sure that you have enough drive space to capture all your video. Capturing video from a capture card requires about 3-30 MB of hard drive space per second depending on the resolution and the data format of your video. A DV capture via a FireWire® card (IEEE 1394) uses up to 3.6 MB of hard drive space per second.
11. Click the button.
Capturing starts and the picture currently captured in Nero Vision appears.
12. Click the button to stop capturing.
A selection list appears, which contains captured files that have not yet been assigned to a project.
13. If you want to capture other videos from the same source, repeat the previous two steps.
14. If you want to view the captured video:

Capturing videos from video cameras and other external capture devices
Page 27
1. Select the required video in the selection list.
2. Click the button. The captured video appears in the preview area.
15. Click the Next button.
The screen with the menu What would you like to do next? appears.
You have captured a video on the hard drive and can now edit it.
5.6 Capturing to disc directly
If you have installed a DVD-RW/+RW burner and insert a DVD-RW or DVD+RW disc, you can use Nero Vision to create editable DVD disc formats: DVD-VR, DVD-VFR (video mode) and DVD+VR. In comparison to DVD-Video, the advantage of these disc formats is that the content can be changed later on. This means that you can edit the movies, insert new passages, delete scenes that you no longer want or overwrite the disc. The DVD-VFR (video mode) and DVD+VR disc formats are compatible with DVD-Video and can be played on nearly any commercial DVD player. Although the DVD-VR disc format, which is available for DVD-RW and DVD-RAM discs, can only be played on appropriate VR-compatible burners. It has the advantage that it is specially designed for direct recording on disc. You can find an overview of which disc format is supported by which disc under Disc formats supported.
In Nero Vision Essentials SE, you cannot capture video directly to Blu-ray Disc or DVD-VR.
If you create an editable DVD by means of a capture device, you can transfer the required data (e.g. camera recordings) directly to disc, i.e. without buffering.
The following requirements have to be fulfilled:
A capture device for digital or analog video is installed and connected to the PC.
No applications are running that place a high demand on the processor.
There are no applications running in full-screen mode.
The workstation is not blocked during the entire capture process.
To create an editable DVD directly via a capture device, proceed as follows:
1. Insert a rewritable disc in the DVD burner.
2. Turn the capture device on and launch Nero Vision (see Launching the program).
To install a capture device for digital or analog video, a recording card that meets the requirements of the manufacturer must be installed or must be already integrated in the PC on the factory side.
3. Select the Capture to Disk Directly option in the Start screen. If more than one burner is installed on your PC, select the burner in the combo box, in which you have inserted the rewritable disc.
The Video Capture screen appears.

Capturing videos from video cameras and other external capture devices
Page 28
If you have not captured your TV card yet, repeat the steps under Setting a TV card.
4. Proceed as described under Capturing video on the hard drive.
You have created an editable DVD directly via a capture device.
5.7 Import from the Web You can download a video or image file from the Internet or Internet communities and add it to your project as a title or as a component in the timeline (content area of your compilation).
You can import files in all capture formats supported by Nero Vision. Only one file can be downloaded at a time.
The following requirement has to be fulfilled:
The Contents screen appears.
To download a file from the Internet, proceed as follows:
1. Click the Import from the Internet button in the Contents window.
When starting the import function, Nero checks whether new configuration files are available. A window informs you if there are any recommended or required updates.
The Import from the Web window appears. Internet communities that are available to downloading media files are listed in the combo box at the top left.
2. Select the desired community.
A window for entering your user data appears.
3. If you have a user account for the selected community, enter your Username and Password in the text boxes and click the OK button.
Check the Save account information box to save your access data for later visits.
The navigation tree of the community appears on the left side of the window. You have the option of accessing the freely-accessible folders of the community and your own videos.
4. If you do not have a user account for the selected community, click the Cancel button.
The navigation tree of the community appears on the left side of the window. You have the option of accessing the freely-accessible folders of the community.
5. Look for and highlight the required media file on the right side of the window.
You can enter a search word in the text box at the top right of the window and click the Search button to look through the community for keywords. Any files found are listed in the area below.

Capturing videos from video cameras and other external capture devices
Page 29
If a selected file type does not fit the current project, e.g. you try to import a video into a slide show, a window appears with the appropriate message.
6. Click the Download button.
The import is started, the file is downloaded in its original format and saved to your hard drive. Progress while importing appears in a separate window. Nero Vision lists the file as a new title in the project.
If you have imported the file into one of the Movie or Slide Show compilation screens, Nero Vision lists the file in the media areaes.
You have imported a file from the Internet and can now work it into our project.

Video editing
Page 30
6 Video editing
6.1 Movie screen
You cannot edit videos or make your own movies in Nero Vision Essentials SE.
In the Movie screen, you can compile media files into a movie, cut videos that you have added and/or work with effects and transitions according to your requirements. You can add video and image files, as well as background music to your movie.
Fig. 10: Movie screen
In the upper right area in the media area, you can search on your computer for the required media files and import files to then add them to the compilation. In addition, all transitions, as well as video and text effects are listed in groups.
The following tabs are available in the media area:
Displays the media files.
Displays video effects.
Displays text effects.
Displays transitions.

Video editing
Page 31
The following buttons are available in the media area:
Browse: Searches for media files and adds them to your own medial files. The Open window appears. Browse and Add to Project: Searches for media files, adds them to your own media files and to the movie. The Open window opens.
Starts video capture. The Video Capture screen appears (see Video Capture screen).
Import: Imports media files from a TWAIN-compatible device such as a scanner. A window opens. Select source: Selects a source for the TWAIN import. The Select source window opens.
Imports media files from Internet communities. A window is opoened (see Import from the Web).
Removes the selected element from the group.
Removes all elements from a group. A window opens.
Starts automatic scene cut detection. The Scene Cut Detection window opens.
Opens the marked media file with an associated program. This element is only displayed if an executable action has been assigned to the marked media file. Otherwise a gray button appears.
Adds selected elements to the movie.
In the lower area of the screen, the Contents area, all file that you are adding to the
compilation are displayed on the Storyboard or Timeline tabs. The Timeline tab opens automatically when you add an audio file, video or text effect to your movie.
Images are indicated on both tabs with the icon in the top left corner.
Fig. 11: Timeline tab
The Timeline tab consists of the following areas:
Text Contains the text effects. Effects Contains the video effects.
Video Track Contains the video titles.

Video editing
Page 32
Audio 1 Contains the audio files on the first track. Audio 2 Contains the audio files on the second track.
The following buttons are available on the Timeline tab:
Zooms out of the Timeline tab so that the entire movie appears.
Zooms into the Timeline tab.
Zooms out of the Timeline tab.
You can test your compilation in the preview area in the upper left. The folllowing buttons are available:
Begins playback of the movie.
Pauses the movie.
Stops playback.
Switches to the full-screen mode. You can return to window mode by pressing the Esc key.
Creates a still of the displayed position in the video title.
Records an audio commentary for the video title. The Audio Recording Settings opens.
Splits the video title at the selected position. Both titles exist independently of each other after splitting and can be added separately. However, the original file is not modified. This element is only displayed if an executable action has been assigned to the marked media file. Otherwise a gray button appears.
Cuts scenes from the video title (see Cutting video titles). This element is only displayed if an executable action has been assigned to the marked media file. Otherwise a gray button appears.
Edits the properties of the selected elements. The Properties window opens.
Displays the played position in the format hours:minutes:seconds:hundredths of a second. Jumps to a specific position by clicking on the (next) and (back) buttons.
6.2 Make Movie
You cannot edit videos or make your own movies in Nero Vision Essentials SE.
To make a movie, proceed as follows:
1. In the Start screen, select the Make Movie option.
The Make Movie button is also available in the Movie and Slide Show compilation screens.
If you are in the Contents screen and want to make a movie for your project, select the Make Movie option in the selection area.

Video editing
Page 33
The Movie screen appears. If media files are already available, they are displayed in the media area at the top right.
The entry displayed in the default setting is My Media Files.
2. If you want to add media files that are on your PC to the movie, click the button > Browse.
The Open window appears.
3. Select the required media files and click the Open button.
The files are added to the media area.
The files are displayed under My Media Files in the default setting. You can also load your files into a new folder (e.g. Videos, Summer Vacation, Videos, Ski Vacation, etc.) for a better overview (see Creating storage groups).
4. Highlight the files that you want to add to your movie.
5. Click the button.
Media files are added to the Contents area on the Storyboard tab and shown with thumbnails.
6. Add transitions between the individual media files according to your requirements (see Inserting transitions).
7. Add the required media and/or text effects (see Adding an effect and Adding a text effect).
8. Add audio files to the movie as desired (see Inserting an audio file).
9. Click the button and view the movie in the preview area.
10. If you are happy with the movie, click the Next button.
The Contents screen appears.
You have made a movie and can now add additional titles to your project or create a menu.
6.2.1 Creating storage groups You can load the required media files in the media area in various folders you create according to your requirements, e.g. in groups sorted by topic.
The following requirement has to be fulfilled:
The Movie or Slide Show screen appears.
To create a new group, proceed as follows:
1. Select the <Create New Group> option in the media area in the combo box.
The Create Element Group opens.

Video editing
Page 34
Fig. 12: Create Element Group window
2. Enter the required name in the input field and click the OK button
The new group appears in the combo box and opens automatically.
You have created a new storage group and can now load media files to the group.
6.2.2 Inserting transitions Transitions can be used to connect the video titles added to a compilation.
The following requirement has to be fulfilled:
The required video title appears in the Movie screen.
To insert a transition, proceed as follows:
1. Click the Storyboard tab in the Contents area.
2. Highlight the media file, to which you want to assign the transition.
3. Click the tab in the media area.
Fig. 13: Transitions tab
4. Select your desired transition group in the combo box.
5. Highlight the desired transition.
6. Click the button.

Video editing
Page 35
The media file is identified in the Contents area by the colorful icon of the respective transition.
Media files without a transition are indicated in the Contents area by a gray icon.
You have inserted a transition.
6.2.3 Adding an effect You can overlay the added video titles of a compilation with effects. Depending on the effect selected, you can customize properties such as intensity and speed.
The following requirement has to be fulfilled:
The required video title appears in the Movie screen.
To add an effect to a media file, proceed as follows:
1. Click the Timeline tab in the Contents area.
2. Click the tab in the media area.
Fig. 14: Video Effects tab
3. Select the required effect group in the combo box.
4. Select the required effect.
5. While holding down the left mouse button, move the effect to the required place in the Effects area on the Timeline tab.
The effect is added in the Contents area.
Media files with video effects are indicated by a icon on the Storyboard tab.
6. Drag the left end of the blue effect bar to the required starting position.
7. Drag the right end of the blue effect bar to the required end position.

Video editing
Page 36
The duration of the effect is automatically adjusted when you drag the start and end position independently. To adjust the position without having to shorten the length or lengthen the effect, highlight the blue effect bar in the Effects area, hold down the left mouse button and move the effect to the required position.
8. If you want to customize the specific properties of the selected effect: 1. Double-click the blue effect bar.
The corresponding window opens. 2. Make the required settings and click the button.
The effect is customized.
You have added an effect to a media file.
6.2.4 Adding a text effect You can overlay the added video titles of a compilation with text effects. Depending on the effect selected, you can customize the various detail settings.
The following requirement has to be fulfilled:
The required video title appears in the Movie screen. To add a text effect to a media file, proceed as follows:
1. Click the Timeline tab in the Contents area.
2. Click the tab in the media area.
Fig. 15: Text Effects tab
3. Highlight the required text effect.
4. While holding down the left mouse button, move the text effect to the required place in the Text area on the Timeline tab.
The Properties dialog appears.

Video editing
Page 37
Fig. 16: Properties dialog
5. Enter the required display time in the input field.
The input field displays the duration in the format hours:minutes:seconds:hundredths of a second. To do this, click the group of digits that you would like to change and then click the or button.
6. Enter the required text in the Text input field.
7. Make the rest of the settings as required.
8. Click the button.
The text effect is added in the Contents area.
Media files with text effects are indicated by a icon on the Storyboard tab.
9. Drag the left end of the blue effect bar to the required starting position.
10. Drag the right end of the blue effect bar to the required end position.
The duration of the text effect is automatically adjusted when you drag the start and end position independently. To adjust the position without having to shorten the length or lengthen the effect, highlight the blue effect bar in the Text area, hold down the left mouse button and move the text effect to the required position.
You have added an text effect to a media file.
6.2.5 Inserting an audio file With two sound tracks, you can also place several audio files on top of one another in Nero Vision. For example, a commentary can be provided on the Audio 2 track while music plays simultaneously on the Audio 1 track.

Video editing
Page 38
The following requirement has to be fulfilled:
The Movie screen appears.
To insert an audio file, proceed as follows:
1. Click the tab in the media area.
2. Highlight the required audio file.
3. While holding down the left mouse button, move the audio file to the required position in the Audio 1 or Audio 2 area.
The audio file appears on the Timeline tab on the selected sound track.
4. Drag the left end of the blue effect bar to the required start position.
5. Drag the right end of the blue effect bar to the required end position.
The audio file is automatically cut at the front and back when you drag the start and end position independently. To adjust the position of the entire file without having to shorten the length, highlight the blue efeect bar in the Audio 1 or Audio 2 area, hold down the left mouse button and move the bar to the required position.
You have inserted an audio file.
6.2.6 Cutting video titles When cutting video titles in Nero Vision, the original video file is not changed; instead the cut information is stored in the project.
You can use the cut function to remove the required length at the beginning or end of a title and to also cut out a middle section.
The following requirement has to be fulfilled:
The required video title appears in the Movie screen.
To cut video titles, proceed as follows:
1. Click the button in the preview area.
The first time the function is invoked, a window opens.
Video editing
Page 39
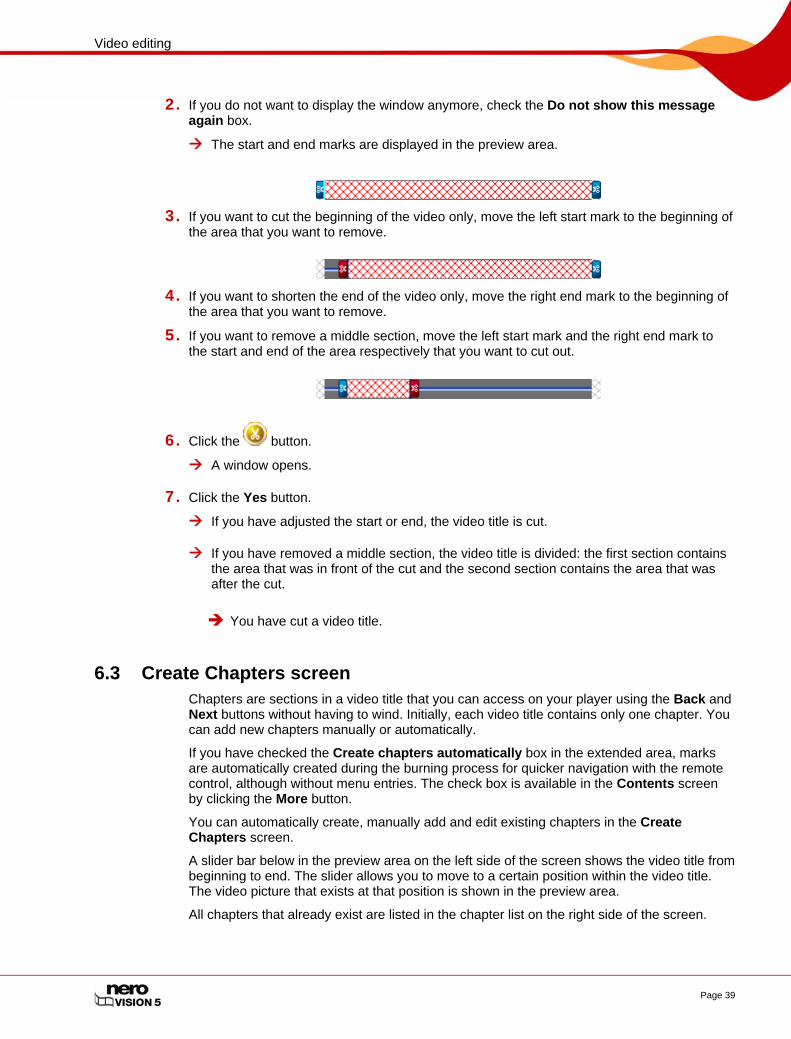
2. If you do not want to display the window anymore, check the Do not show this message again box.
The start and end marks are displayed in the preview area.
3. If you want to cut the beginning of the video only, move the left start mark to the beginning of the area that you want to remove.
4. If you want to shorten the end of the video only, move the right end mark to the beginning of the area that you want to remove.
5. If you want to remove a middle section, move the left start mark and the right end mark to the start and end of the area respectively that you want to cut out.
6. Click the button.
A window opens.
7. Click the Yes button.
If you have adjusted the start or end, the video title is cut.
If you have removed a middle section, the video title is divided: the first section contains the area that was in front of the cut and the second section contains the area that was after the cut.
You have cut a video title.
6.3 Create Chapters screen Chapters are sections in a video title that you can access on your player using the Back and Next buttons without having to wind. Initially, each video title contains only one chapter. You can add new chapters manually or automatically.
If you have checked the Create chapters automatically box in the extended area, marks are automatically created during the burning process for quicker navigation with the remote control, although without menu entries. The check box is available in the Contents screen by clicking the More button.
You can automatically create, manually add and edit existing chapters in the Create Chapters screen.
A slider bar below in the preview area on the left side of the screen shows the video title from beginning to end. The slider allows you to move to a certain position within the video title. The video picture that exists at that position is shown in the preview area.
All chapters that already exist are listed in the chapter list on the right side of the screen.

Video editing
Page 40
Fig. 17: Create Chapters screen
The individual chapters are separated from one another by chapter marks which define the end of one chapter and the beginning of the next. The beginning of each chapter is indicated by the chapter mark below the preview area on the scrollbar; an exception to this is the first chapter, the beginning of which is the beginning of the video title.
The following buttons are available:
Starts playback.
Stops playback.
Switches to the full-screen mode. You can return to window mode by pressing the Esc key.
Renames the chapter. The Rename Chapter window opens.
Deletes the current chapter mark.
Deletes all chapter marks.
Starts automatic scene cut detection. The Scene Cut Detection window opens.
Inserts a new chapter mark at the current position of the slider.
Displays the played position in the format hours:minutes:seconds:hundredths of a second. Jumps to a specific position by clicking on the (next) and (back) buttons.

Video editing
Page 41
6.4 Creating chapters manually You can manually add chapters to a video title of your compilation.
The following requirement has to be fulfilled:
The Contents screen appears.
To create a chapter manually, proceed as follows:
1. Highlight the required video title in the Contents screen.
2. Click the Create Chapter option.
The Create Chapters screen appears.
3. Move the slider bar on the scrollbar to the position at which a new chapter should begin and
click the button.
The chapter is created, a chapter mark is set on the scrollbar in the preview area and the chapter is added to the chapter list.
4. Repeat the last step to add more chapters.
5. Click the Next button.
The Contents screen appears.
You have manually created new chapters.
6.5 Creating chapters automatically Chapters can be automatically created for a video title in your compilation.
The following requirement has to be fulfilled:
The Contents screen appears.
To create chapters automatically, proceed as follows:
1. Highlight the required video title in the Contents screen.
2. Click the Create Chapter option.
The Create Chapters screen appears.
3. Click the button.
The Scene Cut Detection window opens. Automatic scene cut detection is performed. This may take some time. The window shows how many chapters were detected using these settings.

Video editing
Page 42
Fig. 18: Scene Cut Detection window
4. If you want to reduce the minimum length of a chapter, move the Minimum chapter length slider to the left. If you want to increase the minimum length of a chapter, move the Minimum chapter length slider to the right.
5. If you want to look for chapter marks with with a high sensitivity, move the Sensitivity slider to the right. Move the Sensitivity slider to the right if you want to use less sensitivity when loooking for chapter marks.
The window shows how many chapters were detected using these settings.
6. If you want to keep existing chapters, check the Keep previous chapter marks box.
7. Click the Generate button.
The chapters are created, chapter marks are set on the scrollbar in the preview area and the chapters are added to the chapter list.
8. Click the Next button.
The Contents screen appears.
You have created chapters automatically.
6.6 Editing chapters You can edit and rename chapters, reposition or remove individual chapters markings, as well as delte existing chapter marks.
The following requirement has to be fulfilled:
The Contents screen appears.
To edit a chapter, proceed as follows:
1. Highlight the required video title in the Contents screen.
2. Click the Generate Chapter option.
The Create Chapters screen appears.
3. If you want to move an existing chapter mark, click the respective mark on the scrollbar and drag it to the required position.

Video editing
Page 43
You can move the position of the individual chapter marks within the start and end positions of the video title up to the next chapter mark.
4. If you want to change the title of a chapter:
1. Highlight the chapter in the chapter list and click the button. The Rename Chapter window opens.
2. Enter the new chapter name in the input field and click the OK button The title is changed.
5. If you want to delete a chapter:
1. Highlight the respective chapter in the chapter list and click the button. The chapter is deleted.
6. If you want to delete all chapters:
1. Click the button. A window opens.
2. Click the OK button. All chapter marks are deleted.
7. Click the Next button.
The Contents screen appears.
You have edited the chapters.
6.7 Export Video screen
Nero Vision Essentials SE cannot be used to export a video to the hard drive or a DV video camera.
The Export Video screen can be divided into three areas: the preview area for playing the movie back, a selection area to the right of that, which lists the export options, and the combo boxes for format and profile below that.
All data that results for the output file is displayed in the Output File area. You can click the Browse button to select the storage location for the output file.
The format and profile combo boxes are available for each export option. Open the Video Options window by clicking on the button to adjust the detail settings (see (Default) Video Options window).
Depending on the export template chosen, the following will change: output format, aspect ratio, quality settings, bit rate, resolution, encoding mode and/or audio quality.

Video editing
Page 44
Fig. 19: Export Video screen
The following export options are available in the selection area:
Export video to file Exports a movie to a video file.
Export video to camera Exports a movie to a tape in the camera. Only available if a camera is connected to your PC and on.
Export video and send as e-mail attachment
Exports a movie adjusted to an appropriate file size to send as an e-mail attacment. The export file can be attached to a new e-mail from the default e-mail application or saved to the hard drive.
Export audio to file
Exports the audio track from a video to an audio file. The exported audio file can be edited externally (e.g. in Nero WaveEditor) and re-imported into Nero Vision.
Export to Internet
Exports a movie to the Internet in a file size adjusted accordingly. Communities normally limit the maximum length of a video file to 10 minutes with a maximum file size of 100 MB. If the movie is too long, an error message is displayed and Nero Vision cancels the procedure.
If you have selected the Export to camera export option, Nero Vision automatically sets all parameters according to the attached camera and the Format and Profile combo boxes are not available.
The Export to camera export option is only available if a DV camera is connected to your PC and on.

Video editing
Page 45
If you have selected the Export to audio file export option, the WAV and MP3 formats are available.
If you have selected the Export video to file export option, the following export templates are available:
Format Profile AVI Offers all codecs installed on your computer.
AVI-DV AVI-DV type 1 and 2
MPEG-1
VCD-compatible: All parameters in the video options are predefined and cannot be changed with the exception of the frame rate. User-defined: All parameters are predefined in accordance with VCD, but can be customized within the framework of the MPEG-1 scope.
MPEG-2
DVD-Video and SVCD-compatible HDV HD1 (720p); HDV HD2 (1440x1080i); HDTV (1920x1080i) HD-DVD Video and Editierbare Blu-ray™ Disc-compatible User-defined: All parameters are predefined in accordance with DVD-Video. The parameters of all profiles are predefined and can be customized in the framework of the MPEG-2 scope. To make a disc in HD-DVD-Video disc format, a supported DVD burner must be connected to the PC. You also need the Blu-ray / HD-DVD-Video plug-in. It is not included in the full version of Nero Vision. You can obtain the plug-in at www.nero.com.
Nero Digital; Nero Digital AVC
Mobile; Portable; iPod; Memory Stick; Standard; Cinema and High Definition TV The parameters of all profiles are predefined and can be customized in the framework of the scope of the respective profile.
AVCHD
AVCHD and HD-DVD-Video compatible To make a disc in HD-DVD-Video disc format, a supported DVD burner must be connected to the PC. You also need the Blu-ray / HD-DVD-Video plug-in. It is not included in the full version of Nero Vision. You can obtain the plug-in at www.nero.com.
If you have selected Export video and send as e-mail export option, the MPEG-1 and Nero Digital formats are only available.
There is also a combo box that specifies the maximum size of the file created. You can choose between 1MB, 2MB, 5MB or user-defined.
6.8 Export video to file In the Export Video screen, you have various options for exporting a movie that you created in Nero Vision in addition to burning it to disc.
The following requirement has to be fulfilled:
The Contents or Movie screen appears.
To export a movie as a file to the hard drive, proceed as follows:
1. Click the Export button.
Video editing
Page 46
In the What would you like to do next? selection, choose the Export Movie option.
The Export Video screen appears.
2. Select the Export video to file export option in the selection list.
The combo boxes output format and profile are displayed accordingly.
3. Select the required format in the Format combo box and the required profile in the Profile combo box.
The selected export template primarily specifies the output type and playback quality.
4. If you want to make changes to the export settings: 1. Click the Configure button.
A window appears (see (Default) Video Options window). 2. Make the required changes and click the OK button.
5. If you want to save the video to another folder and/or under a name other than the name displayed in the Output File display panel: 1. Click the Browse button.
The Select a storage location for the video file window opens. 2. Select the desired folder in the Location combo box. 3. Enter the desired file name in the File Name input field and click the Save button.
6. Click the Export button.
The export starts. Progress while exporting is displayed in the same window. Once the export is complete, a window opens.
7. Click the OK button.
Nero Vision automatically returns to the screen that was open before the export.
You have exported a movie to the hard drive.
6.9 Export video to camera In the Export Video screen, you have various options for exporting a movie that you created in Nero Vision in addition to burning it to disc.
The following requirements have to be fulfilled:
The Contents or Movie screen appears.
This function is only available if a camera is connected to your PC and on. The camera must be in VCR mode.
To export a movie to camera, proceed as follows:
1. Click the Export button.
In the What would you like to do next? selection, choose the Export Movie option.

Video editing
Page 47
The Export Video screen appears.
2. Select the Export video to camera export option in the selection list.
The format is automatically adjusted to the camera connected.
3. Click the Export button.
The export starts. Progress while exporting is displayed in the same window. Once the export is complete, a window opens.
4. Click the OK button.
Nero Vision automatically returns to the screen that was open before the export.
You have exported a movie to the camera.
6.10 Export video and send as e-mail attachment In the Export Video screen, you have various options for exporting a movie that you created in Nero Vision in addition to burning it to disc.
The following requirement has to be fulfilled:
The Contents or Movie screen appears.
To export a movie to send via e-mail, proceed as follows:
1. Click the Export button.
The Export Video screen appears.
2. Select the Export video and send as e-mail attachment export option in the selection list.
The combo boxes are displayed accordingly.
3. In the upper combo box, select the required format.
4. In the bottom combo box, select the required maximum file size.
5. If you want to make changes to the export settings: 1. Click the Configure button.
A window appears (see (Default) Video Options window). 2. Make the required changes and click the OK button.
6. If you want to save the video to another folder and/or under a name other than the name displayed in the Output File display panel: 1. Click the Browse button.
The Select a storage location for the video file window opens. 2. Select the desired folder from the Location combo box. 3. Enter the desired file name in the File Name input field and click the Save button.
7. Click the Export button.
The export starts. Progress while exporting is displayed in the same window. Once the export is complete, a window opens.
8. Click the OK button.

Video editing
Page 48
Nero Vision automatically returns to the screen that was open before the export.
You have exported a movie to send via e-mail.
6.11 Export audio to file In the Export Video screen, you have various options for exporting a movie that you created in Nero Vision in addition to burning it to disc.
The following requirement has to be fulfilled:
The Contents or Movie screen appears.
To export a movie's audio track, proceed as follows:
1. Click the Export button.
The Export Video screen appears.
2. Select the Export audio to file export option in the selection list.
The combo boxes for output format and profile are displayed accordingly.
3. If you want to make changes to the export settings: 1. Click the Configure button.
A window appears (see (Default) Video Options window). 2. Make the required changes and click the OK button.
4. If you want to save the video to another folder and/or under a name other than the name displayed in the Output File display panel: 1. Click the Browse button.
The Select a storage location for the video file window opens. 2. Select the desired folder from the Location combo box. 3. Enter the desired file name in the File Name input field and click the Save button.
5. Click the Export button.
The export starts. Progress while exporting is displayed in the same window. Once the export is complete, a window opens.
6. Click the OK button.
Nero Vision automatically returns to the screen that was open before the export.
You have exported a movie's audio track. The exported audio file can be edited externally (e.g. in Nero WaveEditor) and re-imported into Nero Vision.
6.12 Export to Internet In the Export Video screen, you have various options for exporting a movie that you created in Nero Vision in addition to burning it to disc.

Video editing
Page 49
Communities normally limit the maximum length of a video file to 10 minutes with a maximum file size of 100 MB. If the movie is too long, an error message is displayed and Nero Vision cancels the procedure.
The following requirement has to be fulfilled:
The Contents or Movie screen appears.
To export a movie to the Internet, proceed as follows:
1. Click the Export button.
The Export Video screen appears.
2. Select the Export to Internet export option in the selection list.
When starting the export function, Nero checks whether new configuration files are available. A window informs you if there are any recommended or required updates.
The Export to Internet window opens. You can specify all information about the selected export file.
3. Choose the community in the Select another community combo box.
4. Enter the required title of your video, a brief description and keywords in the respective input fields.
5. Select an appropriate option field in the Video Category area.
6. Select the required language of your video in the Language combo box.
7. If you want to make your video publically accessible, select the Public option field in the Publication area. If you want to make your video private, select the Private option field in the Publication area.
The Export button is enabled after you have made all your entries.
8. Click the Export button.
The export starts. Progress while exporting is displayed in the same window. Once the export is complete, a window opens.
9. Click the OK button.
Nero Vision automatically returns to the screen that was open before the export.
You have exported a movie to the Internet.

Slide show
Page 50
7 Slide show
7.1 Slide Show screen In the Slide Show screen, you can compile pictures into a slide show and add transitions and background music. You can add comments to individual pictures on a second audio track.
Fig. 20: Slide Show screen
In the upper right area in the media area, you can search on your computer for the required media files and import files to then add them to the compilation. In addition, all transitions are listed in groups.
The following tabs are available in the media menu:
Displays the media files.
Displays transitions.
The following buttons are available in the media area:
Browse: Searches for media files and adds them to your own medial files. The Open window appears. Browse and Add to Project: Searches for media files, adds them to your own media files and to the slide show. The Open window appears.
Import: Imports media files from a TWAIN-compatible device such as a scanner. A window opens. Select source: Selects a source for the TWAIN import. The Select source window opens.
Imports media files from Internet communities. A window opens.

Slide show
Page 51
Removes the selected element from the group.
Removes all elements from a group. A window opens.
Opens the marked media file with an associated program. This element is only displayed if an executable action has been assigned to the marked media file. Otherwise a gray button appears.
Adds marked elements to the slide show.
In the Contents area at the bottom, all picture files and transitions that you add to the
compilation are displayed on the Tab. The tab opens automatically when you add an audio file to the slide show.
The following buttons are available in the Contents area:
Removes the highlighted element from the slide show.
Removes all elements from the slide show. A window opens.
Removes an audio commentary that has been assigned to an individual image. The context menu also contains the Delete All Commentary function, which removes all audio commentary from the slide show. The audio files
on the tab (audio files in background) are not affected by this.
Cuts the highlighted picture to the desired size. The Cut Graphic window opens.
Assigns effects to the highlighted graphic. A context menu with the available effects opens. These effects are not stored in the original file, but only for the slide show.
Rotates the highlighted pictures 90 degrees to the left.
Rotates the highlighted pictures 90 degrees to the right.
Saves the highlighted picture with all the effects. A window opens.
Records an audio file that can be assigned to the background of the slide who or an image. You can add audio comments to each image. The Audio Recording Settings window opens. If a picture is highlighted in the Contents area, the audio file is directly assigned to the picture, otherwise the recording is added to the media area.
Defines the picture display time and the transition periods. The Default Duration Values window opens.
Edits the properties of the marked elements, such as display duration, header and footer, as well as playback duration for stored audio files (audio commentaries). The Properties window opens.

Slide show
Page 52
You can test your compilation in the preview area in the upper left. The folllowing buttons are available:
Starts the slide show.
Pauses the slide show.
Ends the slide show.
Switches to the full-screen mode. You can return to window mode by pressing the Esc key.
Displays the played position in the format hours:minutes:seconds:hundredths of a second. Jumps to a specific position by clicking on the (next) and (back) buttons.
7.2 Creating a slide show
Please note that when creating a slide show, the picture files (e.g. *.jpg, *.bmp, *.gif) are not saved in the original format. If you want to save the picture in the original picture format as well, proceed as described at the end of this section.
The following requirement has to be fulfilled:
For slide shows on DVD-Video, Super Video CD, miniDVD, AVCHD and HD-BURN: the DVD-Video plug-in with which MPEG-2 is encoded. The plug-in is already available in the full version.
To create a slide show, proceed as follows:
1. In the Start screen, select the Make Slide Show... option and choose the format in which you want to make the slide show.
If you are in the Contents screen and want to make a slide show for your project, select the Make Slide Show... option in the selection area.
The Slide Show screen appears. If media files are already available, they are displayed in the media dialog box at the top right.
The entry displayed in the default setting is My Media Files.
2. If you want to add media files (pictures or audio files) that are on your PC to the slide show,
click the button > Browse.
The Open window appears.
3. Select the files you want and click the Open button.
The files are added to the media area.
The files are displayed under My Media Files in the default setting. You can also load your files into a new folder (e.g. birthday photos, Christmas photos, etc.) for a better overview (see Creating storage groups).

Slide show
Page 53
4. Select the required images that you want to add to your slide show and click the button.
Up to 2000 images can be added to a slide show.
The images are added to the tab in the Contents area.
5. If you want to add audio files (background music) to the slide show, highlight the required
audio files and click the button.
The audio files are added to the tab in the Contents area.
6. If you want to adjust the length of the slide show to the playback duration of the audio files (background music): 1. Click the More button.
The extended area opens. 2. Check the Fit slide show duration to audio duration box.
The overall duration of the slide show will be adapted to the overall length of the inserted audio files.
If the Fit slide show duration to audio duration box has been checked, the display time for the images cannot be changed.
7. If you want to add audio commentary to individual pictures in your slide show, drag & drap the required audio file from the media area to the required image in the Contents area.
The image underlaid with the audio file is identified by an additional icon on the
tab.
8. Add flowing transitions between the images as desired (see Slide Show: Inserting transitions).
9. If you want to change how long an image is displayed, make the required changes (see Slide Show: Fitting the display duration).
10. If you want to change the settings of an individual image, make the required changes (see Slide Show: Editing images).
11. Click the button and view the slide show in the preview area.
12. If you are happy with your slide show, click the Next button.
The Contents screen appears (see Contents screen Creating a disc project).
13. If you also want to save your slide show images to disc in a format readable by your PC, select the required option in the Add combo box.
You have made a slide show and can now add additional titles to your project or create a menu in the Select Menu screen.

Slide show
Page 54
7.2.1 Slide Show: Inserting transitions Transitions can be used to connect the images added to a slide show.
The following requirement has to be fulfilled:
The required compilation appears in the Slide Show screen. To insert transitions, proceed as follows:
1. Click the tab in the contents area.
2. If you want to assign the same transition to all pictures, click the film strip until it is highlighted in blue. If you want to insert different transitions in the pictures, highlight the picture to which you would like to assign the transition effect.
3. Click the tab in the media area.
Fig. 21: Transitions tab
4. Select your desired transition group in the combo box.
5. Highlight the required transition and click the button.
An image with transition is identified in the contents area by the colorful icon of the respective transition.
Images without a transition are indicated in the contents area by a gray icon.
You have inserted transitions.
7.2.2 Slide Show: Editing images You can edit the individual images of a slide show as desired.
The following requirement has to be fulfilled:
The required compilation appears in the Slide Show screen. To customize an image, proceed as follows:

Slide show
Page 55
1. Highlight the required image in the Contents area and click the button.
The Properties window opens and displays the Image Properties area and the Images and Comments tabs.
The Comments tab is only available if an audio comment has been assigned to the required image.
If you want to change the settings for several pictures at once, click the icon. The Properties window then remains open and displays the settings for a picture when that picture is highlighted.
Fig. 22: : Properties window
2. Enter the required display time in the Duration input field in the Image Properties area.
The input field displays the duration in the format hours:minutes:seconds:hundredths of a second. To do this, click the group of digits that you would like to change and then click the or button.
3. If you have assigned an audio file to the image and if you want the duration of the display to reflect the length of the audio file, check the Fit Display Duration to Commentary Duration box.
The check box is only available if an audio file has been assigned to the image.
4. If you want to display text at the top of the picture, enter the desired text in the Header text input field.
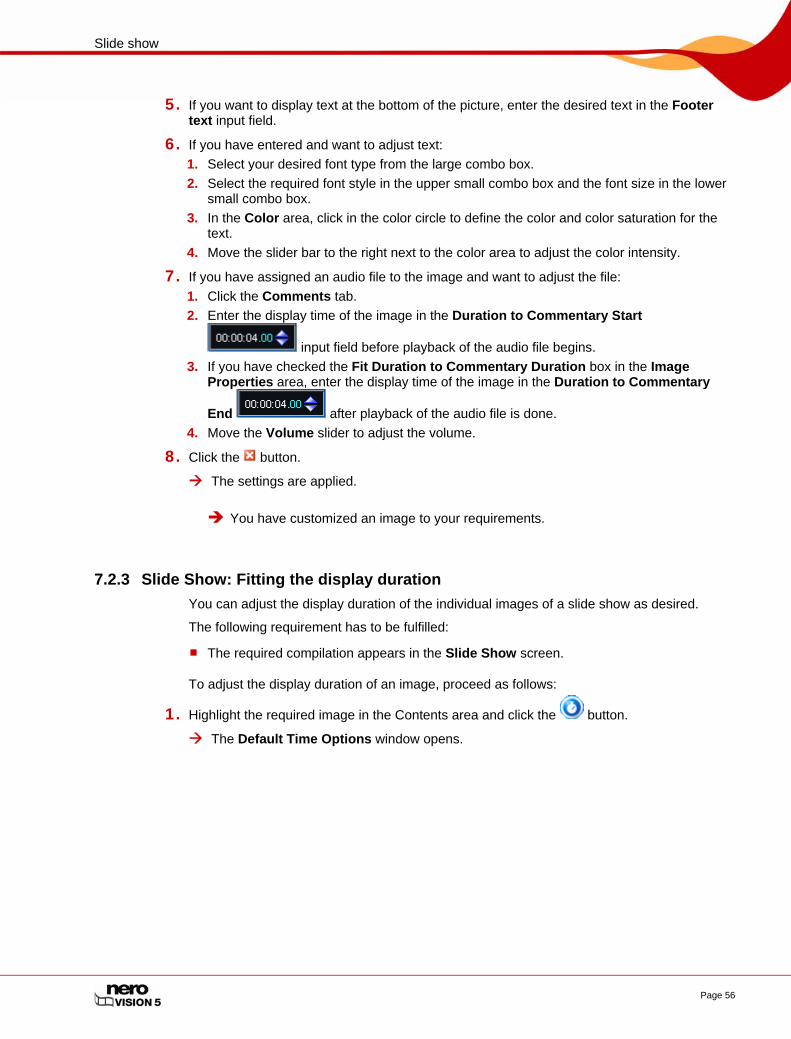
Slide show
Page 56
5. If you want to display text at the bottom of the picture, enter the desired text in the Footer text input field.
6. If you have entered and want to adjust text: 1. Select your desired font type from the large combo box. 2. Select the required font style in the upper small combo box and the font size in the lower
small combo box. 3. In the Color area, click in the color circle to define the color and color saturation for the
text. 4. Move the slider bar to the right next to the color area to adjust the color intensity.
7. If you have assigned an audio file to the image and want to adjust the file: 1. Click the Comments tab. 2. Enter the display time of the image in the Duration to Commentary Start
input field before playback of the audio file begins. 3. If you have checked the Fit Duration to Commentary Duration box in the Image
Properties area, enter the display time of the image in the Duration to Commentary
End after playback of the audio file is done. 4. Move the Volume slider to adjust the volume.
8. Click the button.
The settings are applied.
You have customized an image to your requirements.
7.2.3 Slide Show: Fitting the display duration You can adjust the display duration of the individual images of a slide show as desired.
The following requirement has to be fulfilled:
The required compilation appears in the Slide Show screen.
To adjust the display duration of an image, proceed as follows:
1. Highlight the required image in the Contents area and click the button.
The Default Time Options window opens.

Slide show
Page 57
Fig. 23: Default Time Options window
2. Enter the required duration in seconds in the Display duration for images input field.
3. If you want the same display duration for all images in the compilation, check the Apply to existing images box.
4. If you have inserted transitions and want to change the required duration of a transition: 1. Enter the desired time in the Duration of transitions input field. 2. Check the Apply to existing transitions box.
5. If you have added commentary: 1. Check the Fit image duration to commentary box to adjust the display duration of the
image to the duration of the commentary. 2. If you want to display the image before the commentary plays back, enter the required
time in the Duration to commentary start input field. 3. If you want to display the image longer than the commentary plays back, enter the
required time in the Duration to commentary end input field.
6. Click the OK button.
You have adjusted the display time of an image.

Menu
Page 58
8 Menu
8.1 Levels A menu can have up to two levels in addition to the intro video. The main or title menu consists of all the video titles in the project. Each video title is represented by a button consisting of a thumbnail and a button text. If a video title has more than one chapter, a video title submenu is generated. Each chapter of the respective video title is represented by a button in the chapter menu.
When making changes, you can adjust the levels of the menu independently. You can select the layout of each menu from existing menu templates. Menu templates are subdivided into individuel menu template groups for a better overview.
8.2 Editing the menu screen
The number of Smart3D and animated 2D templates is limited in Nero Vision Essentials SE. Advanced editing is not available.
You can select menu templates and/or templates that meet your requirements in the Edit Menu screen. Editing remains limited to the most important functions, while additional customization options are available in the Advanced Editing.
You can layout the individual form and design of the menu in the advanced editing mode. You can place and edit your own graphical elements and text on the menu, modify, delete and create various button options, as well as make links between any buttons, menus and videos.
Fig. 24: Edit Menu screen
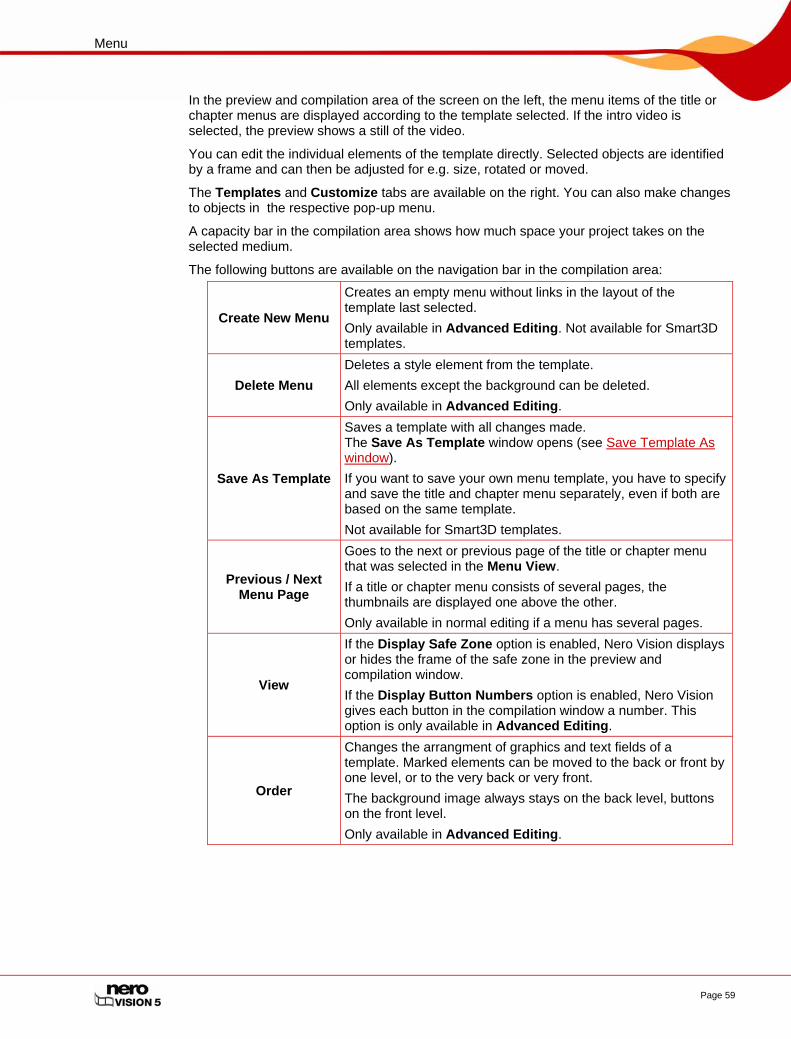
Menu
Page 59
In the preview and compilation area of the screen on the left, the menu items of the title or chapter menus are displayed according to the template selected. If the intro video is selected, the preview shows a still of the video.
You can edit the individual elements of the template directly. Selected objects are identified by a frame and can then be adjusted for e.g. size, rotated or moved.
The Templates and Customize tabs are available on the right. You can also make changes to objects in the respective pop-up menu.
A capacity bar in the compilation area shows how much space your project takes on the selected medium.
The following buttons are available on the navigation bar in the compilation area:
Create New Menu
Creates an empty menu without links in the layout of the template last selected. Only available in Advanced Editing. Not available for Smart3D templates.
Delete Menu Deletes a style element from the template. All elements except the background can be deleted. Only available in Advanced Editing.
Save As Template
Saves a template with all changes made. The Save As Template window opens (see Save Template As window). If you want to save your own menu template, you have to specify and save the title and chapter menu separately, even if both are based on the same template. Not available for Smart3D templates.
Previous / Next Menu Page
Goes to the next or previous page of the title or chapter menu that was selected in the Menu View. If a title or chapter menu consists of several pages, the thumbnails are displayed one above the other. Only available in normal editing if a menu has several pages.
View
If the Display Safe Zone option is enabled, Nero Vision displays or hides the frame of the safe zone in the preview and compilation window. If the Display Button Numbers option is enabled, Nero Vision gives each button in the compilation window a number. This option is only available in Advanced Editing.
Order
Changes the arrangment of graphics and text fields of a template. Marked elements can be moved to the back or front by one level, or to the very back or very front. The background image always stays on the back level, buttons on the front level. Only available in Advanced Editing.

Menu
Page 60
8.2.1 Templates tab
The number of Smart3D and animated 2D templates is limited in Nero Vision Essentials and Nero Vision Essentials SE.
Select a desired template from the Standard2D, Animated2D and Smart3D categories on the Templates tab. In addition, you can save your own templates in the My Menu Templates category.
The following combo boxes are available:
Menus to be used
Defines whether the menu should be created as a title or chapter menu or simple title menu. You can also create no menu.
Category
Defines the category, from which the template should be selected. The My Menu Templates shows saved templates. You can give your videos an appropriate graphic background using a menu template from the Standard2D group. The menu contains a layout for the title and chapter menu. You can give your videos predefined background animations using a menu template from the Animated2D group - including matching intro video and scoring. The menu contains a layout for the title and chapter menu, as well as background music for the intro video and menu pages. You can give your videos a starting animation and three-dimensional menus using a menu template from the Smart3D group. The menu templates are based on dynamic 3D scenes with animated menu transitions and predefined scorings.
If you select a Smart3D menu, please note:
Your PC must have a graphics card with 3D acceleration.
Advanced Editing is not available. If problems arise when editing the menu, make sure that you have installed the current version of the graphics driver.
If you want to save your own menu template, you have to specify and save the title and chapter menu separately, even if both are based on the same template. Not available for Smart3D menus.
8.2.2 Customize tab More or fewer pop-up menus are displayed on the Customize tab depending on the mode selected. Clicking the title bar of the menu closes or opens the menu.
Nero Vision automatically starts in normal editing mode with the Compact Menu View. A thumbnail is displayed for the intro video and title, as well as each chapter menu. Components not used are greyed out. If a title or chapter menu consists of several pages, the thumbnails are displayed one above the other.
Check the Advanced Editing box to go to Advanced Editing with Advanced Menu View. The intro video and each page of the individual menus are displayed as thumbnails.
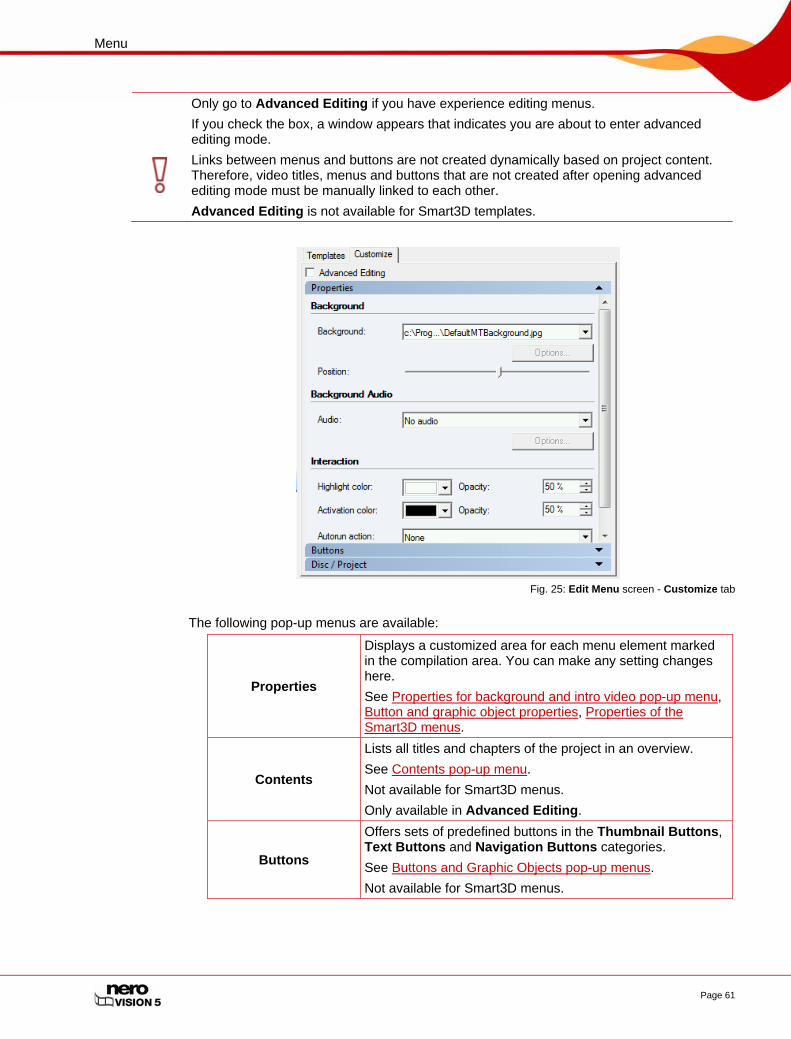
Menu
Page 61
Only go to Advanced Editing if you have experience editing menus. If you check the box, a window appears that indicates you are about to enter advanced editing mode. Links between menus and buttons are not created dynamically based on project content. Therefore, video titles, menus and buttons that are not created after opening advanced editing mode must be manually linked to each other. Advanced Editing is not available for Smart3D templates.
Fig. 25: Edit Menu screen - Customize tab
The following pop-up menus are available:
Properties
Displays a customized area for each menu element marked in the compilation area. You can make any setting changes here. See Properties for background and intro video pop-up menu, Button and graphic object properties, Properties of the Smart3D menus.
Contents
Lists all titles and chapters of the project in an overview. See Contents pop-up menu. Not available for Smart3D menus. Only available in Advanced Editing.
Buttons
Offers sets of predefined buttons in the Thumbnail Buttons, Text Buttons and Navigation Buttons categories. See Buttons and Graphic Objects pop-up menus. Not available for Smart3D menus.
Menu
Page 62
Graphic Objects
Offers a selection of predefined graphic objects, as well as an empty text box in the Default Objects category. You can import your own graphic files into the My Objects folder. See Buttons and Graphic Objects pop-up menus. Not available for Smart3D menus. Only available in Advanced Editing.
Disc/Project Offer settings that customize the playback of the disc according to your requirements. See Disc/Project pop-up menu.
Template Settings
Offers a number of theme-related versions for Smart3D menus. See Template Settings pop-up menu. Only available for Smart3D menus.
8.2.2.1 Properties for background and intro video pop-up menu If the background is enabled in the compilation area, the Properties pop-up menu is divided into the Background, Background Audio and Interaction areas.
If the Intro Video is displayed in the compilation area, the Background and Background Audio areas are also. The Links area is also dispalyed in Advanced Editing mode.
The following options are available in the Background area:
Background combo box
Defines whether an image or video should be imported into the background of the template, or whether the background should be a solid color. Defines whether an image or video should be imported into the background of the template, or whether the background should be a solid color. If you select the Image File or Video File option, a window opens for selecting the required file. The path to the selected file is then displayed in the selection area. Depending on the option selected, more or fewer combo boxes are displaed for detailed settings.
Position navigation bar
Moves the selected image or video to the correct position. Background images are fitted to the screen without black borders. Only available for background images and videos.
Options button
Defines the detail settings of the background video. The Select Start Position window opens (see Select Start Position window). Only available for background videos.
Color combo box
Defines the desired color as the background color. Only available for background color.
The following options are available in the Background Audio area:
Audio combo box
Defines an audio file as background music or disables the background music. If you select the User-defined option, a path appears for selecting the required file.

Menu
Page 63
Options button
Defines the detail settings of the background music. The Background Audio window opens (see Edit Background Audio window).
In the Interaction area, you can specify whether the menu responds to input when playing back the disc. The following combo boxes are available:
Highlight Color Defines the color used to highlight marked buttons. You can also specify the Opacity in percent.
Activation Color Defines the color used to highlight enabled buttons. You can also specify the Opacity in percent.
Autostart
If desired, specifies a video title or chapter to automatically start after a timeout. As an alternative, you can also rotate through the pages of the menu. No automation is selected in the default settings, i.e. the none option is enabled.
Delay Defines the timeout duration after which the selected automation begins.
The following options are available in the Links area:
Link to combo box Defines which page of the menu the intro video should link to.
Transition combo box Defines a transition for the link, if desired.
Options button
Opens the Transitions window (see Transition window). You can specify here the detail settings depending on the transition selected. In addition, you can also specify the duration of the transition. A duration of one second is selected in the default settings.
8.2.2.2 Buttons and Graphic Objects pop-up menus First, you can select the category of the available elements in the Buttons or Graphic Objects pop-up menu. For the Buttons, the Thumbnail Buttons, Text Buttons and Navigation Buttons are available. For the Graphic Objects, the Default Objects option and My Objects option with all the images you have imported are available.
The available buttons or graphics from the category selected are listed in the preview area of both pop-up menus. You can use the Add button to customize the view of your menu template in the compilation screen.
The graphic objects are only available in Advanced Editing.
You can select and combine individual buttons in Advanced Editing only. You can also customize existings template buttons and add new ones. Links must be manually assigned to buttons that you add.
The sets of Navigation Buttons always consist of three buttons (one each for Back, Next and Back to Main Menu).

Menu
Page 64
8.2.2.3 Button and graphic object properties If a graphic object or button is enabled in the compilation area, the Properties pop-up menu is divided into the Links, Display, Transformation, Font and Text areas.
The Links, Font and Text areas are only available for buttons. The Links area is only available in Advanced Editing.
To edit a required element, enable it in the preview window. The highlighted area is identified by a red frame and sizing handles.
You have three options when editing a thumbnail button to to set focus. If the focus lies on the entire button, it can be moved or adjusted proportionally in size. If the focus lies on the text element of the button, the length of the text field can be adjusted and moved within the button. If the focus lies on the text in the text element, the input can be edited.
The following options are available in the Links area:
Link to combo box
Defines where the button should link to. All available destinations of the project (video title, all chapters and slide shows) are displayed in the combo box.
Transition combo box Defines a transition for the link, if desired.
Options button
Opens the Transitions window (see Transition window). Depending on the transition selected, you can specify the detail settings here. You can also specify the duration of the transition. A period of two seconds is selected in the default settings.
Combo box Button number
Manually specifies the numbering of the buttons. Nero Vision automatically numbers all the buttons of a template. The number is not diplayed in the editable text field of a button. When you edit the menu and reposition buttons, Nero Vision maintains the numbering. Any adjustments to the text, e.g. font, are automatically taken over. If a button is assigned a different number (A), Nero Vision automatically assigns the number now available (B) to the button, whose number (A) has been selected for the new assignment.
The following options are available in the Display area:
Combo box Display
Defines what is displayed on the thumbnail of the button: video title, still of a video or picture. If the Video File or Image File option has been selected, clicking on the Options button opens the Select Start Position or Select Poster Frame window opens (see Select Start Position window or Select Poster Frame window). If you select the Image File option, a window automatically opens for selecting the required image. Only available if the focus lies on a button.

Menu
Page 65
Combo box Text Numbering
Defines the numbering of the buttons displayed on the template. Only the numbering, text of the button or number and text can be displayed. Nero Vision automatically numbers all the buttons of a template. The number is not diplayed in the editable text field of a button. When you edit the menu and reposition buttons, Nero Vision maintains the numbering. Any adjustments to the text, e.g. font, are automatically taken over.Nero Vision automatically numbers all he buttons of a template. Only available if the focus lies on a button.
Combo box Format
Defines the style of numbering. Only available if the focus lies on a button.
Combo box Fill Color
Defines the fill color of a graphic element. Only available if the focus lies on a predefined graphic object.
Combo box Margin Color
Defines the color of the margin/frame of a graphic object. Only available if the focus lies on a predefined graphic object.
Combo box Line Weight
Defines the thickness of the margin/frame of a graphic object.Only available if the focus lies on a predefined graphic object.
Apply Shadows check box
This button is only available if the Burn box is checked. Clicking on the Options button opens the Shadow Settings (see Shadow Settings window) button. You can customize the shading according to your requirements.
The following input fields are available in the Transformation area:
Pos. X Defines the horizontal position of the selected object in the compilation window.
Pos. Y Defines the vertical position of the selected object in the compilation window.
Scale X Defines the width in percent. Scale Y Defines the height in percent. Opacity Defines the opacity of the button or graphic object. Rotation Rotates the selected element.
You can customize the font and size of the text in the Font area.
The folowing combo boxes are available in the Text area:
Text Color Defines the color of the text.
Horizontal Alignment Defines the horizontal alignment of the text: centered, left or right.
Vertical Alignment Defines the vertical alignment of the text: top, middle or bottom.
8.2.2.4 Template Settings pop-up menu
Only available for Smart3D menus.

Menu
Page 66
You can customize the menu transitions according to your requirements in the Template Settings pop-up menu and depending on the menu template selected, choose between different them versions.
The following options are available:
Default Transitions option field Enables all transitions of the selected template.
User-defined Transitions option field
Enables the Options button. Clicking on the Options button opens the Transition Settings window that displays all the transitions of the selected template. You can disable individual transitions and/or the background audio of the transitions.
[Theme] combo box
Defines the required theme version of the selected menu template. The combo box and number of options depends on the template selected.
Options button
Opens a window in which you can customize individual properties of the menu independent of a theme or combine theme elements. Not available for all Smart3D menus. The combo box and number of options depends on the template selected.
8.2.2.5 Properties of the Smart3D menus If you have selected a Smart3D template on the Templates tab, the Properties pop-up menu is adjusted accordingly. It is divided into the Background Audio and Interaction areas.
The following combo box is available in the Background Audio area:
Audio
Defines an audio file as background music or disables the background music. If you select the User-defined option, a path appears for selecting the required file.
The following combo boxes are available in the Interaction area:
Highlight Color Defines the color used to highlight marked buttons. You can also specify the Opacity in percent.
Activation Color Defines the color used to highlight buttons selected for starting. You can also specify the Opacity in percent.
8.2.2.6 Disc/Project pop-up menu The Disc/Project pop-up menu is diviced into the Disc Settings and Project Settings areas.
The Do not use black thumbnails check box is available in the Project Settings area. Enable this option to ensure that button thumbnails do not display black images, rather the first frame of the linked video title.
The following combo boxes are available in the Disc Settings area:

Menu
Page 67
First
Defined the title that is played first after inserting the disc into a player. Only available in Advanced Editing. In normal editing mode, the intro video is automatically played or the titel menu displayed.
Title Menu
Defines the menu that is displayed when the Title button is pressed on the remote control. Only available in Advanced Editing. In normal editing mode, the title menu is automatically displayed.
End Action
Defines whether the menu is displayed again after playback of a title is complete (enabled in the default settings) or whether the next title (by number) is played automatically.
8.2.2.7 Contents pop-up menu
Only available in Advanced Editing. Not available for Smart3D menus.
In the Contents pop-up menu, all the titles and chapters of the project that you have compiled in the Contents screen are listed in a navigation tree.
Using drag & drop, you can link any title in the list to a desired button and thereby define the target of a link.
If the title is dragged into the compilation for the first time or again without a specific button marked, Nero Vision automatically creates a default button and links it to the video.
Note that all menu items on the template remain linked when you make changes! If a new link is assigned to a button, the old link is lost, i.e. it is not automatically assigned to another button. The same menu item can be linked via multiple buttons.
8.2.3 Select Start Position window In the Select Start Position window, you can define which section of a linked video is displayed in the background or in the thumbnail view of the Thumbnail Button.

Menu
Page 68
Fig. 26: Select Start Position screen
The controller on the navigation bar shows the start position in the video. The duration of the video is automatically adjusted to the duration of the menu. You can define the required start position by moving the controller on the navigation bar.
The following buttons are available:
Plays the video back in the preview area of the window.
Stops the preview.
8.2.4 Edit Background Audio window In the Edit Background Audio window, you can define which section of the selected audio file is played as the menu's background music.
Fig. 27: Edit Background Audio screen
The controller on the navigation bar shows the start position in the audio file. The duration of the background music is automatically adjusted to the duration of the menu. You can define the required start position by moving the controller on the navigation bar.

Menu
Page 69
The following buttons are available:
Plays the audio file.
Stops playback.
Fades the audio in or out during playback in the menu (each one second).
Defines the playback volume.
8.2.5 Select Poster Frame window In the Select Poster Frame window, you can define which image of a linked video is displayed in the thumbnail view of the Thumbnail Button.
Fig. 28: Select Poster Frame screen
The controller on the navigation bar shows the position of the image in the video. You can specify the image to be used by moving the controller.
The following buttons are available:
Plays the video back in the preview area of the window.
Stops the preview.
8.2.6 Shadow Settings window You can adjust the detail settings of the shading at the top of the Shadow Settings window. A preview appears at the bottom of the window by enabling the Preview check box. You can preview immediately what effect changing the settings has.
The following options are available:
Light Source combo box
Defines the desired angle of the virtual light source in relation to the object.

Menu
Page 70
Opacity controller Defines the required shadow transparency in percent.
Distance controller
Defines the distance between the object and the shadow (in pixels).
Color combo box Defines the desired color of the shadow.
8.2.7 Transition window You can select the category of available transitions in the top combo box of the Select Transition window. The Fade In/Fade Out, 3D, Wipe and Other categories are available. All the transitions of the selected category are displayed in the selection area below that. Apply a selected transition to the template by clicking the OK button.
Depending on the transition selected, you can define the detail settings in the Properties window. You can also specify the duration of the transition. A period of one second is selected in the default settings.
8.2.8 Save Template As window The following combo boxes are available in the Save Template As window:
Intro Video Displays the name of the intro video or No Intro Video, if no video has been added to the menu template.
Main Menu Defines which menu from the arranged template is saved as the title menu. All menus available in the template are available in the combo box.
Chapter Menu Defines which menu from the arranged template is saved as the chapter menu. All menus available in the template are available in the combo box.
Template Name Defines the name that you want to save the new template under.
Add to subcategory
Defines where the template is saved. Nero Vision automatically saves created menu templates in the My Menu Templates folder itself. If you want to sort your templates in topic groups, select an existing group or the Create new subcategory option to create a new category.
New Group Name Defines the name of a new category. Only available if you have selected the Create New Subcategory option in the Add to Subcategory combo box.
If the Save media files together with template box is checked, Nero Vision saves the media files used in the template with the new template.
8.3 Create Menu
The number of Smart3D and animated 2D templates is limited in Nero Vision Essentials and Nero Vision Essentials SE. Advanced Editing is not available in Nero Vision Essentials SE.
Requirements:

Menu
Page 71
The Create Menu screen is displayed.
To create the menu for a project, proceed as follows:
1. Choose in the Menu to use combo box on the Templates tab whether your disc should have title and chapter menus, title menus only or no menu at all.
If your disc consists of video titles with multiple chapters, i.e. if your menu has title and (multiple) chapter menus, repeat the following steps for each menu you want to edit.
2. Select the desired menu template group in the Category combo box.
The menu templates of the selected category appear.
3. Select the required menu template.
In the preview and compilation area, the menu items of the selected title or chapter menus are displayed according to the template selected.
4. Click the Customize tab.
The Customize tab opens. You can edit the selected menu template here (see Customize tab).
5. If you want to go to Advanced Editing to make changes:
Only go to Advanced Editing if you have experience editing menus.
1. Check the Advanced Editing box.
You opens notifying you that you are entering Advanced Editing. 2. Click the Yes button.
The additional functions appear.
6. Highlight the menu you want to edit in the Menu View.
7. If you want to make changes: 1. Highlight the style element you want to edit in the preview and compilation window.
Additional pop-up menus may appear or disappear on the Customize tab.
Click the title bar of a pop-up menu to display all areas.
2. Adjust the required settings on the pop-up menus (see Customize tab). Any changes made are displayed in the preview and compilation window.
8. If you want to save the adjusted menu as a menu template: 1. Click the Save As Template button.
The Save As Template window opens.
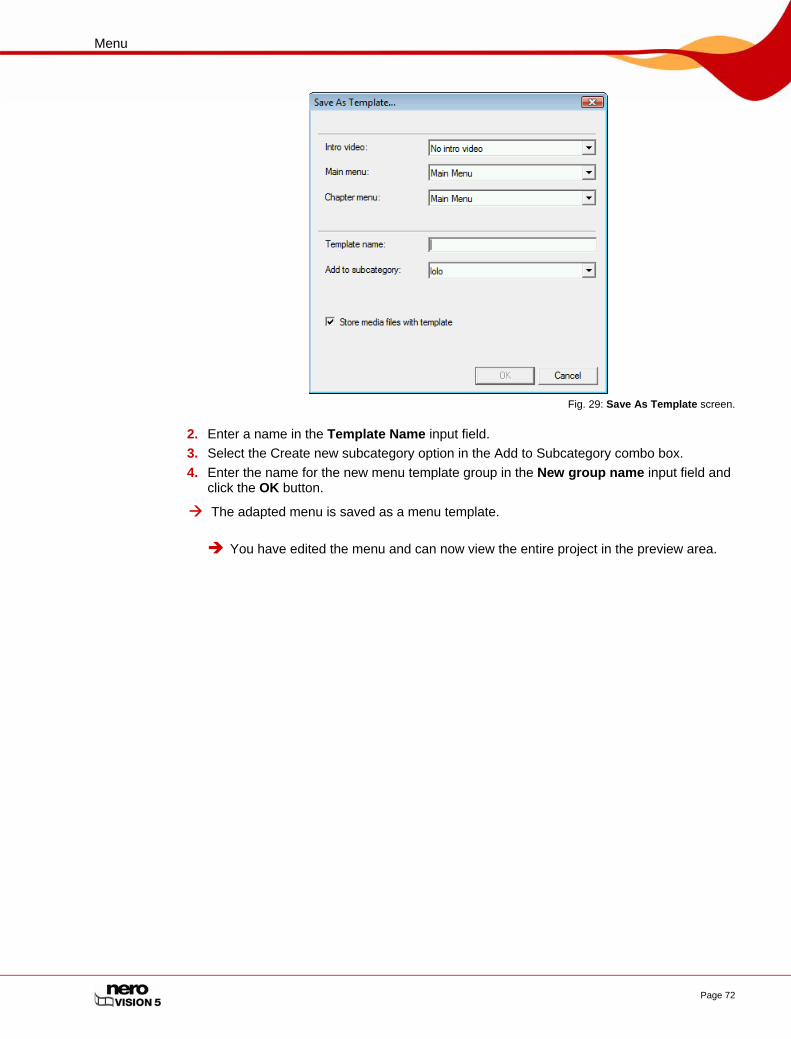
Menu
Page 72
Fig. 29: Save As Template screen.
2. Enter a name in the Template Name input field. 3. Select the Create new subcategory option in the Add to Subcategory combo box. 4. Enter the name for the new menu template group in the New group name input field and
click the OK button.
The adapted menu is saved as a menu template.
You have edited the menu and can now view the entire project in the preview area.

Preview
Page 73
9 Preview
9.1 Preview screen In the Preview screen, you can play back a disc to test it before actually burning it. Using the cursor or the remote control, you can test how the disc behaves when played back on a compatible player. In the menu, all of the buttons can be used quite normally so that you can view your finished work.
Fig. 30: Preview screen
The following buttons are available on the virtual remote control:
Moves the mark up.
Moves the mark to the right.
Moves the mark down.
Moves the mark to the left.
Confirms the mark and starts the marked element.
Displays the title menu.
Displays the last menu used.
Displays the current media title.

Preview
Page 74
Stops the playback.
Switches to the previous chapter.
Switches to the next chapter.
If a menu contains animated elements, the Preview Menu Animation button also appears. Clicking the button plays the background animations. Otherwise, the video background is displayed as a still.
9.2 Showing a preview The following requirement has to be fulfilled:
The Preview screen appears.
To display the preview for a project, proceed as follows:
1. Click the buttons for the desired actions in the virtual remote control.
If the menu contains animated elements, the Preview Menu Animation button appears.
1. Click the Preview Menu Animation button. The Preview Menu Animation window opens.
While the menu animation is being calculated, the current status appears in the progress bar.
2. Click the Close button.
2. If you are happy with the preview, click the Next button.
The Burn Options screen appears (see Burning a disc).
You have displayed the preview and can now burn your project.

Burning a disc
Page 75
10 Burning a disc
10.1 Burn Options screen
Even if you do not have a burner capable of burning DVDs or CDs, you can still use the Image Recorder to burn a disc image and save it for future use.on your hard drive. Once you have connected the appropriate burner to the system, you can burn disc images on real discs at any time using Nero Vision, Nero Burning ROM or Nero Express.
You can burn a project as a disc image or write it to the hard drive as a folder in the Burn Options screen.
Depending on the type of project you are working on and the burner connected to the system, a number of different options are available in the Set the parameters for burning selection list on the right side of the screen.
The Project summary area on the lift side displays information about the settings and content of the project.
Fig. 31: Burn Options screen
A project file (*.nvc) saves the project data – information about file paths and layout – after you have started work on your project. This means that you can interrupt your work at any time and resume the project at a later point or burn it on disc. The contents of a project file can only be opened with Nero Vision. The file size of a saved compilation is significantly smaller than a disc image. A disc image (image file) is the precise image of the project data to be burned. You can burn the finished image as often as you like at a later stage, but it requires just as much space on the hard drive as the compilation to be burned. As well as being burned to disc or as a disc image, some projects can also be recorded in hard drive folders, provided there is enough space. You can open files in the hard drive folder using Nero ShowTime and play them back like a real disc.

Burning a disc
Page 76
The following options are available in the Set the parameters for burning selection list:
Burn To...
Defines the desired burner. All burners available in the system are displayed. If you want to burn the project as a disc image, select the Image Recorder option.
Write to Hard Disk Folder
Opens the Choose a location for the project window. If you want to write the project to your hard drive, define the required storage path or folder.
Volume Name Displays a dialog box. You can specify a name for the disc.
Recording Settings Displays a dialog box. You can change the required Settings for recording here.
The following options are available in the dialog box of the Recording Settings:
Speed combo box Only available when burning to a burner.
Check boxes Determine maximum speed
Before burning, the program verifies whether the burner is capable of burning the session with the selected write speed.
Check boxes Burn
If this box is checked, Nero Vision carries out the burn immediately after the speed test. When writing to an image file, this box is automatically checked.
Book Type Settings combo box
Defines the book type. The Automatic option is selected by default. The combo box is only displayed for supported burners.
Use Burn-at-once check box
If this box is checked, Nero Vision the files directly to the disc without temporarily storing the disc structure on the hard drive first. This check box is automatically disabled if the burner does not support Burn-at-once.
The book type of a DVD helps DVD players to identify the inserted disc and determines the DVD’s level of compatibility. With some DVD burners, Nero can change the book type setting if a DVD is burned. The combo box is only displayed for supported burners.
The following options are available in the Book Type Settings combo box:
Automatic Automatically defines the most compatible book type for this disc.
DVD-ROM Sets the book type to DVD-ROM.
Physical disc type Leaves the book type unchanged as specified on the DVD disc.
Current recorder setting Applies the book type setting from the burner.
Burning a disc
Page 77
10.2 Burning a disc The following requirement has to be fulfilled:
The Burn Options screen appears.
To burn a project to a disc, proceed as follows:
1. Insert a writable disc in the desired burner.
2. Select the Burn To... option and the desired burner.
The Burn button appears in the window in the lower right corner.
3. Select the Volume Name option.
A group box appears.
4. Enter the desired name for the disc in the input field.
Characters that are not permitted in the disc name are automatically converted to underscores (_).
5. Select the Recording Settings option.
The Settings for recording group box appears.
6. In the Speed combo box, select the speed that the burner should use to write to the disc.
7. If you want to perform a speed test, check the Determine maximum speed box.
Before burning, the program verfies whether the burner is capable of burning the session with the selected writing speed. In addition, it also verifies if all files selected for burning are actually available.
8. If you still want to burn the disc on positive verification, check the Burn box.
9. If Nero Vision is capable of changing the Book Type Settings with your burner and you want to make the changes to the Book Type, select the required option in the Book Type combo box.
10. If you want to burn the project directly to the disc without temporarily storing the disc structure on the hard drive first, check the Use Burn-at-once box.
11. Click the Burn button.
The Burn screen appears. The project files are converted into the appropriate format and then burned to the disc.
The priority determines how much computing power is assigned to the burn process. Normally, you should not change this setting.
12. If you want to change the priority of the recording process, select the relevant entry from the Priority combo box.
13. If you would like your PC to shut down automatically after successfully burning a disc, check the Shut down computer when finished box.
As soon as the burning process has finished, a window opens.

Burning a disc
Page 78
14. If you do not want to save a log file for the burning process, click the No button. If you want to save a log file: 1. Click the Yes button.
A window opens. 2. Select the desired folder in the Location combo box. 3. Enter the desired file name in the File Name input field and click the Save button.
You have burned a disc and can now burn the project again or save it, start new project or create covers and labels.
10.3 Burning an image file
Even if you do not have a burner capable of burning DVDs or CDs, you can still use the Image Recorder to burn a disc image and save it for future use.on your hard drive. Once you have connected the appropriate burner to the system, you can burn disc images on real discs at any time using Nero Vision, Nero Burning ROM or Nero Express.
The following requirement has to be fulfilled:
The Burn Options screen appears.
To burn a project as a disc image, preceed as follows:
1. Select the Burn To > Image Recorder option.
The Burn button appears in the window in the lower right corner.
2. Select the Volume Name option.
A group box appears.
3. Enter the desired name for the disc in the input field.
Characters that are not permitted in the disc name are automatically converted to underscores (_).
4. Select the Recording Settings option.
The Settings for recording group box appears.
5. If you want to burn the project directly to the disc without temporarily storing the disc structure on the hard drive first, check the Use Burn-at-once box.
6. Click the Burn button.
A window opens.
7. Select the desired folder for the image file in the Location combo box.
8. Enter the desired file name in the File Name input field and click the Save button.
The Burn screen appears. The project files are converted into the appropriate format and then burned as a disc image.
The priority determines how much computing power is assigned to the burn process. Normally, you should not change this setting.

Burning a disc
Page 79
9. If you want to change the priority of the recording process, select the relevant entry from the Priority combo box.
10. If you would like your PC to shut down automatically after successfully burning a disc, check the Shut down computer when finished box.
As soon as the burning process has finished, a window opens.
11. If you do not want to save a log file for the burning process, click the No button. 1. Click the Yes button.
A window opens. 2. Select the desired folder in the Location combo box. 3. Enter the desired file name in the File Name input field and click the Save button.
You have written a disc image and can now burn the project again or save it, start new project or create covers and labels.
10.4 Writing hard drive folders The following requirement has to be fulfilled:
The Burn Options screen appears.
To write a project as a folder to the hard drive, proceed as follows:
1. Select the Write to Hard Disk Folder option.
The Choose a location for the project window opens.
2. In the directory tree, click the folder where the files are to be saved and then click the OK button.
The Write button appears in the window in the lower right corner.
3. Select the Volume Name option.
A group box appears.
4. Enter the desired name for the disc in the input field.
Characters that are not permitted in the disc name are automatically converted to underscores (_).
5. Click the Write button.
The Burn screen appears. The project files are converted into the appropriate format and then written as a folder to the hard drive.
The priority determines how much computing power is assigned to the process. Normally, you should not change this setting.
6. If you want to change the priority of the write process, select the relevant entry from the Priority combo box.

Burning a disc
Page 80
7. If you would like your PC to shut down automatically after successfully writing to the hard drive, check the Shut down computer when finished box.
As soon as the write process has finished, a window opens.
8. If you do not want to save a log file for the write process, click the No button. If you want to save a log file: 1. Click the Yes button.
A window opens. 2. Select the desired folder in the Location combo box. 3. Enter the desired file name in the File Name input field and click the Save button.
You have written a hard drive folder and can now burn the project again or save it, start new project or create covers and labels.
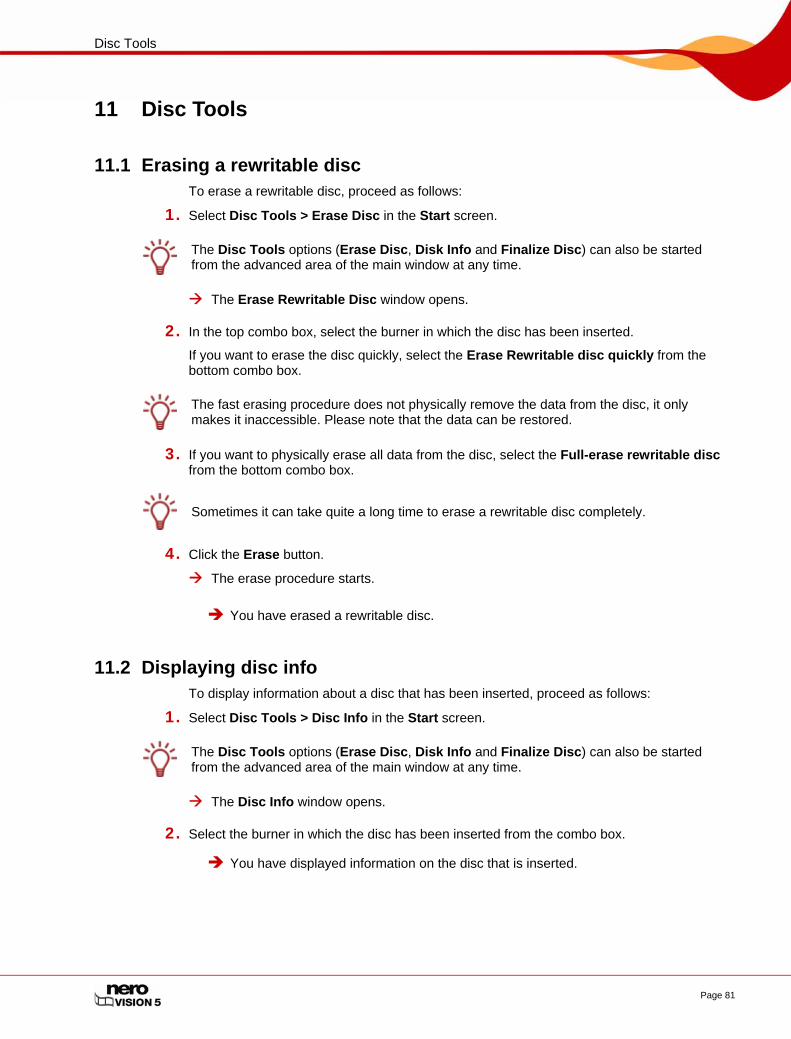
Disc Tools
Page 81
11 Disc Tools
11.1 Erasing a rewritable disc To erase a rewritable disc, proceed as follows:
1. Select Disc Tools > Erase Disc in the Start screen.
The Disc Tools options (Erase Disc, Disk Info and Finalize Disc) can also be started from the advanced area of the main window at any time.
The Erase Rewritable Disc window opens.
2. In the top combo box, select the burner in which the disc has been inserted.
If you want to erase the disc quickly, select the Erase Rewritable disc quickly from the bottom combo box.
The fast erasing procedure does not physically remove the data from the disc, it only makes it inaccessible. Please note that the data can be restored.
3. If you want to physically erase all data from the disc, select the Full-erase rewritable disc from the bottom combo box.
Sometimes it can take quite a long time to erase a rewritable disc completely.
4. Click the Erase button.
The erase procedure starts.
You have erased a rewritable disc.
11.2 Displaying disc info To display information about a disc that has been inserted, proceed as follows:
1. Select Disc Tools > Disc Info in the Start screen.
The Disc Tools options (Erase Disc, Disk Info and Finalize Disc) can also be started from the advanced area of the main window at any time.
The Disc Info window opens.
2. Select the burner in which the disc has been inserted from the combo box.
You have displayed information on the disc that is inserted.

Disc Tools
Page 82
11.3 Finalizing a disc
Nero Vision Essentials SE cannot be used to finalize a DVD-VR/-VFR (video mode)/+VR.
To finalize a DVD-VR/-VFR (video mode)/+VR/+R or DVD+RW disc with videos and to preven further processing, proceed as follows:
1. Select Disc Tools > Finalize Disc in the Start screen.
The Disc Tools options (Erase Disc, Disk Info and Finalize Disc) can also be started from the advanced area of the main window at any time.
The Finalize Disc window opens.
2. Insert the disc you want to finalize and select the drive where the disc is located in the Select Recorder menu.
3. Click the Update button to display information about the disc you have inserted.
4. In the Menus to be created on the disc combo box, choose whether you want to create a new menu on your disc, keep an existing menu or do not create a menu at all.
5. Click the Start button.
You have now finalized a DVD.

Project management
Page 83
12 Project management
12.1 Saving a project Once you have started working with your project, occasionally you may want to interrupt your work, resume it at a later date, or burn it.
A project file (*.nvc) saves the project data – information about file paths and layout. The contents of a project file can only be opened with Nero Vision. The file size of a saved compilation is significantly smaller than a disc image.
A disc image (image file) is the precise image of the project data to be burned. You can burn the finished image as often as you like at a later stage, but it requires just as much space on the hard drive as the compilation to be burned. As well as being burned on disc, some projects can also be recorded in hard disk folders, provided there is enough space. You can open files in the hard drive folder using Nero ShowTime and play them back like a real disc.
To save a project, proceed as follows:
1. Click the Save button.
The Save As window opens.
2. Enter the desired file name in the File Name input field and click the Save button.
You have saved the project and can open it again later to continue working on it or burn it.
12.2 Opening a project To open a saved project, proceed as follows:
1. In the Start screen, select the Open Saved Project or Disc Image option.
The Open window appears.
2. In the File Type combo box, select the Nero Vision Projects (*.nvc) option.
3. Highlight the project file of the required video project and click the Open button.
The project opens in the Contents screen.
You have opened an existing project and can now continue to edit it or burn it.
12.3 Opening a disc image To open a disc image, proceed as follows:
1. In the Start screen, select the Open Saved Project or Disc Image option.
The Open window appears.
2. In the File Type combo box, select the Nero Image Files (*.nrg) option.
3. Highlight the desired image file and click the Open button.

Project management
Page 84
The image opens in the Burn Options screen.
You have opened a disc image and can now burn it.
12.4 Creating covers and labels To create covers and a lable for your disc project, you can start Nero CoverDesigner from Nero Vision.
Nero CoverDesigner is an application in the Nero 8 program suite and is automatically installed when Nero 8 is being installed. Nero CoverDesigner allows you to create and print covers, labels and booklets for burned DVDs and CDs. Please see the separate Nero CoverDesigner user manual for full instructions on how to make professional looking covers and labels.
Proceed as follows:
1. Click the More button.
The extended area opens.
2. Click the Make covers and labels button.
Nero CoverDesigner opens.

Configuration
Page 85
13 Configuration
13.1 Opening a configuration To open the configuration, proceed as follows:
1. Click the More button.
The extended area opens.
2. Click the Configure button.
The Application Settings window opens.
You have called the configuration and can now make the required settings.
13.2 Application Settings window The Application Settings window contains the General, Folders and Messages tabs. You can adapt Nero Vision to your own personal requirements here.
Fig. 32: Application Settings window
13.2.1 General tab The General tab is divided into the Format of saved media files and Options areas.
The Grapics combo box is available in the Format of saved media files area. Here you can define the graphics format in which Nero Vision saves media files from external devices and snapshots of videos. Portable Network Graphics is selected by default.
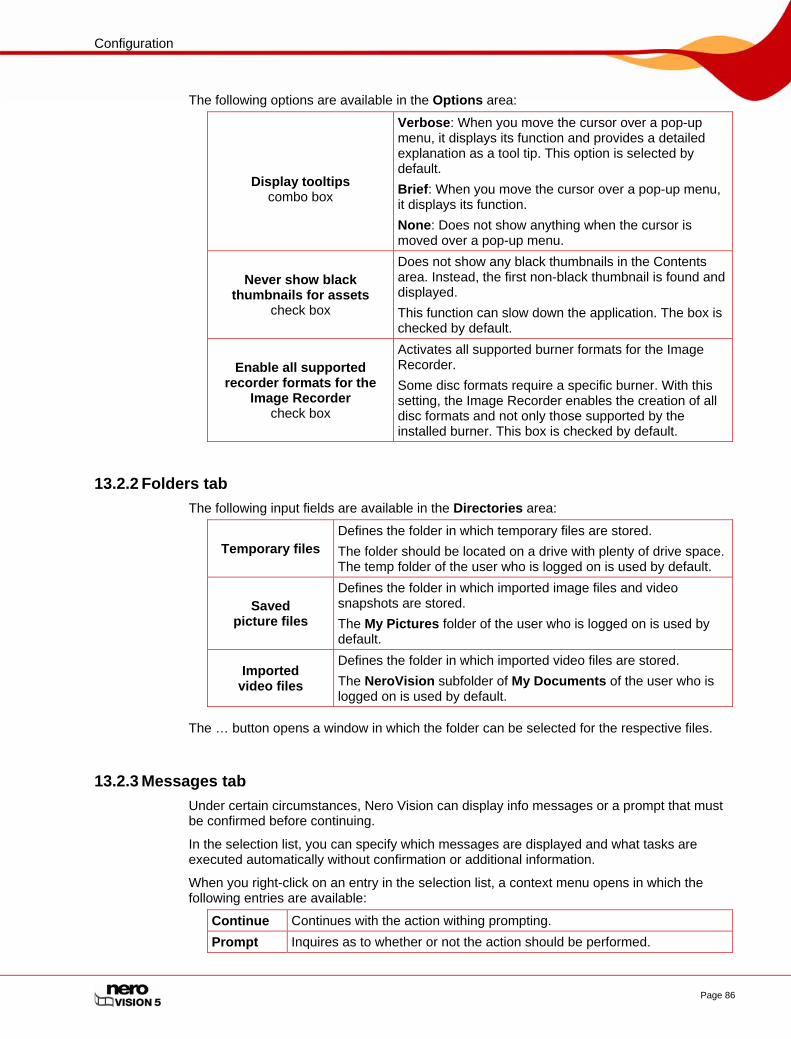
Configuration
Page 86
The following options are available in the Options area:
Display tooltips
combo box
Verbose: When you move the cursor over a pop-up menu, it displays its function and provides a detailed explanation as a tool tip. This option is selected by default. Brief: When you move the cursor over a pop-up menu, it displays its function. None: Does not show anything when the cursor is moved over a pop-up menu.
Never show black thumbnails for assets
check box
Does not show any black thumbnails in the Contents area. Instead, the first non-black thumbnail is found and displayed. This function can slow down the application. The box is checked by default.
Enable all supported recorder formats for the
Image Recorder check box
Activates all supported burner formats for the Image Recorder. Some disc formats require a specific burner. With this setting, the Image Recorder enables the creation of all disc formats and not only those supported by the installed burner. This box is checked by default.
13.2.2 Folders tab The following input fields are available in the Directories area:
Temporary files Defines the folder in which temporary files are stored. The folder should be located on a drive with plenty of drive space. The temp folder of the user who is logged on is used by default.
Saved picture files
Defines the folder in which imported image files and video snapshots are stored. The My Pictures folder of the user who is logged on is used by default.
Imported video files
Defines the folder in which imported video files are stored. The NeroVision subfolder of My Documents of the user who is logged on is used by default.
The … button opens a window in which the folder can be selected for the respective files.
13.2.3 Messages tab Under certain circumstances, Nero Vision can display info messages or a prompt that must be confirmed before continuing.
In the selection list, you can specify which messages are displayed and what tasks are executed automatically without confirmation or additional information.
When you right-click on an entry in the selection list, a context menu opens in which the following entries are available:
Continue Continues with the action withing prompting. Prompt Inquires as to whether or not the action should be performed.

Configuration
Page 87
The following buttons are available in the selection list:
Disable Info Messages Sets all info messages to Continue. Messages about alternative options continue to be displayed.
Set default values Resets the settings for all messages to the default values.

Video options
Page 88
14 Video options
14.1 Displaying video options To call up the video options, proceed as follows:
1. Click the More button.
The extended area opens.
2. If the Start screen appears, click the Default Video Options button. If a different screen appears, click the Video Options button.
The (Default) Video Options window opens.
You have called the video options and can now make the required settings.
14.2 (Default) Video Options window You can change the settings that effects the encoding of future projects in the (Default) Video Options window.
You can call up video options at any time from the extended area. The window also appears if you select Custom Capturing and customize the video settings when recording a video. The Nero Digital™ Encoder Configuration window appears for Nero Digital™ format.
The tabs for all supported formats are displayed until you have selected a disc format. After selecting a disc format, only the General tab and the respective formats appear.
14.2.1 General tab The General tab is divided into the Video Mode and Nero SmartEncoding areas.
In the Video Mode area, the color transmission system is defined specifically. This guarantees that videos can be displayed on the existing playback devices.
The following options are available in the combo box:
PAL Selects the video mode PAL (Phase Alternating Line), which is used in Europe, but also in Australia, South America and many African and Asian countries.
NTSC Selects the video mode NTSC (National Television System Committee), which is used in extensive parts of America and some East Asian countries.
[Country] Automatically sets the correct video mode for the selected country. If you are unsure about the video mode that is used in your country, select your country from the country list.
The following options are available in the combo box in the Nero SmartEncoding area:
Deactivate Deactivates SmartEncoding. Video and audio material which is already compatible with the target format is still re-encoded.

Video options
Page 89
Automatic
Determines automatically whether video and audio material is re-encoded. Nero Vision checks, among other things, how much space is available for the project and then determines which compatible segments are re-encoded. This option is selected by default.
Activate
Activates SmartEncoding. Video and audio material which is compatible with the target format is not re-encoded. This saves a lot of time for large-scale projects, so that you achieve your goal much faster.
14.2.2 <Disc Format> tab You can adjust the video options in terms of profile aspect ratio on the tab of the respective disc format.
The Video Format display panel shows the video format used. A selection is greyed out here. Each tab is divided into the Transcoding Quality, Aspect Ratio and Audio areas.
The following combo boxes are available in the Transcoding Quality area:
Quality settings
Automatic (fit to disc): uses the best possible encoding quality in relation to the available storage capacity. Other settings for bit rate and resolution are not available. This entry is selected by default. High Quality, Standard Play, Standard Play Plus, Long Play, Extended Play, Super Long Play: sets the respective preset quality profile with defined bit rate and resolution. Custom: enables user-defined settings. Manual setting of the bit rate and resolution is only available for this entry.
Sample format
Please note that only experienced users should change this setting. Progressive: uses the progressive or full-screen procedure in which actual full pictures are used for building the picture. Interlaced (top field first): uses the interlaced procedure in which a picture is made up of two separate fields, and transmits the top field first. Interlaced (bottom field first): uses the interlaced procedure in which a picture is made up of two separate fields, and transmits the bottom field first. Automatic: encodes the file in the sample format in which the original exists. This entry is selected by default.
Bit rate Defines the bit rate. The bit rate affects the quality of the video. The input field is only activated if the Custom entry has been selected in the Quality settings combo box.
Resolution
Selects the resolution from a list of resolutions possible for the disc type. The combo box is only activated if the Custom entry has been selected from the Quality settings combo box.
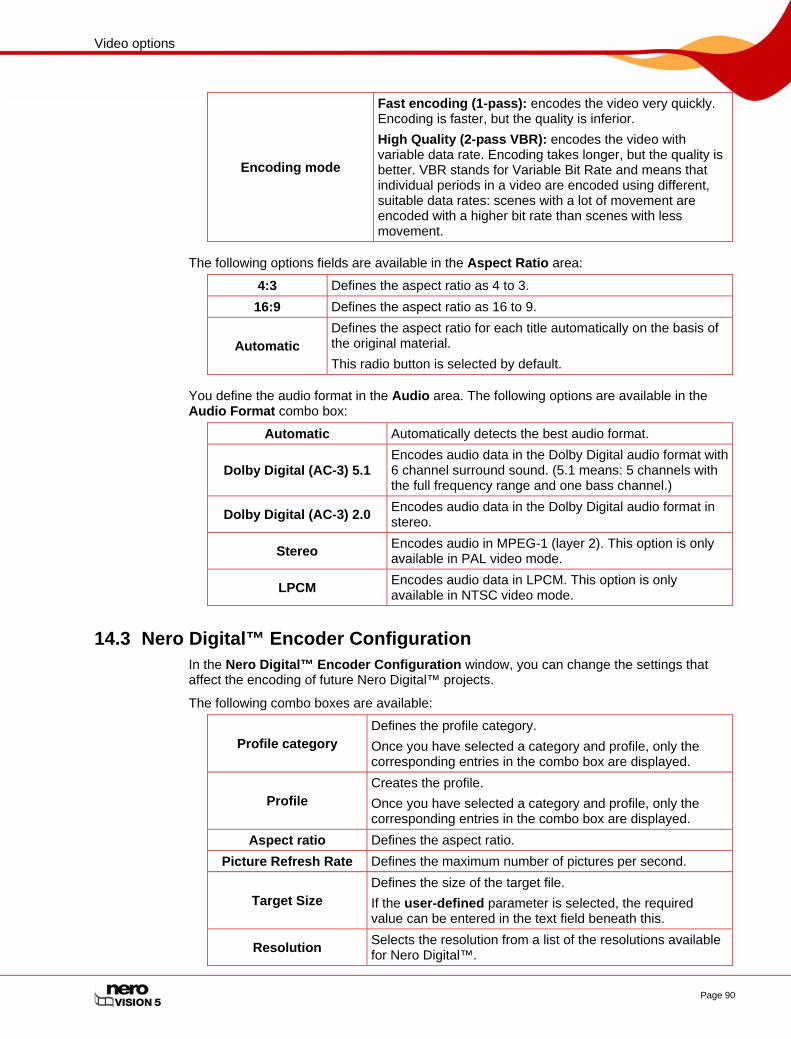
Video options
Page 90
Encoding mode
Fast encoding (1-pass): encodes the video very quickly. Encoding is faster, but the quality is inferior. High Quality (2-pass VBR): encodes the video with variable data rate. Encoding takes longer, but the quality is better. VBR stands for Variable Bit Rate and means that individual periods in a video are encoded using different, suitable data rates: scenes with a lot of movement are encoded with a higher bit rate than scenes with less movement.
The following options fields are available in the Aspect Ratio area:
4:3 Defines the aspect ratio as 4 to 3. 16:9 Defines the aspect ratio as 16 to 9.
Automatic Defines the aspect ratio for each title automatically on the basis of the original material. This radio button is selected by default.
You define the audio format in the Audio area. The following options are available in the Audio Format combo box:
Automatic Automatically detects the best audio format.
Dolby Digital (AC-3) 5.1 Encodes audio data in the Dolby Digital audio format with 6 channel surround sound. (5.1 means: 5 channels with the full frequency range and one bass channel.)
Dolby Digital (AC-3) 2.0 Encodes audio data in the Dolby Digital audio format in stereo.
Stereo Encodes audio in MPEG-1 (layer 2). This option is only available in PAL video mode.
LPCM Encodes audio data in LPCM. This option is only available in NTSC video mode.
14.3 Nero Digital™ Encoder Configuration In the Nero Digital™ Encoder Configuration window, you can change the settings that affect the encoding of future Nero Digital™ projects.
The following combo boxes are available:
Profile category Defines the profile category. Once you have selected a category and profile, only the corresponding entries in the combo box are displayed.
Profile Creates the profile. Once you have selected a category and profile, only the corresponding entries in the combo box are displayed.
Aspect ratio Defines the aspect ratio. Picture Refresh Rate Defines the maximum number of pictures per second.
Target Size Defines the size of the target file. If the user-defined parameter is selected, the required value can be entered in the text field beneath this.
Resolution Selects the resolution from a list of the resolutions available for Nero Digital™.

Video options
Page 91
Coding Method
Fast encoding (1-pass): encodes the video very quickly. Encoding is faster, but the quality is inferior. High Quality (2-pass VBR): encodes the video in two passes with variable data rate. Encoding takes longer, but the quality is better. VBR stands for Variable Bit Rate and means that individual periods in a video are encoded using different, suitable data rates: scenes with a lot of movement are encoded with a higher bit rate than scenes with less movement.
You define the audio format in the Nero Digital Audio area. The following radio buttons are available:
Stereo Encodes audio in MPEG-1 (layer 2).
5.1 Channel Surround Encodes audio data in Dolby Digital audio format in 6-channel-Surround, i.e. 5 channels with the full frequency range and one bass channel.

Technical information
Page 92
15 Technical information
15.1 System requirements In addition to the general system requirements for the Nero program package, the following individual system requirements apply to Nero Vision:
Optional:
FireWire® (IEEE 1394) Controller for DV capturing
USB capture device (webcam)
Analog or digital TV card (analog, DVB-T, DVB-S, DVB-C, and ATSC) to the BDA driver standard
DirectShow® compatible video capture card
Graphics card with 3D acceleration and minimum 64 MB of video memory for Smard3D templates
Blu-ray/HD DVD-Video plug-in for playback of Blu-ray- and/or HD-DVD media
Installation of the latest WHQL-certified device drivers is recommended. WHQL stands for Windows Hardware Quality Labs and means that the device driver certified by Microsoft® is compatible with Microsoft® Windows® and the relevant hardware.
To make a disc in DVD-Video, SVCD, miniDVD or HD-BURN disc format, the video source files must be encoded in MPEG-2 video format. The discs can then be played back on compatible DVD players. If the original data is not available in compatible format, you will need the DVD-Video plug-in to create it; the DVD-Video plug-in is already included in the full version of Nero Vision.
Nero Vision supports various disc formats. For details on which disc format is available on which discs, refer to Overview of compatibility between disc formats and discs. For details on which disc format for "editable DVD" is available on which discs, refer to Overview of compatibility between DVD discs and editable disc formats.
15.2 Disc formats supported Nero Vision supports various disc formats.
Nero Vision supports various disc formats. For details on which disc format is available on which discs, refer to Overview of compatibility between disc formats and discs. For details on which disc format for "editable DVD" is available on which discs, refer to Overview of compatibility between DVD discs and editable disc formats.
To burn a DVD-Video, DVD+VR/-VFR (video mode) r ACVHD disc, a supported DVD burner must be connected to the PC. To burn DVD-VR discs, a DVD burner must be connected that supports rewritable media. To burn VCD/SVCD/miniDVD/HD-BURN discs, you need to have a supported CD and/or DVD recorder connected to your system. Please visit www.nero.com for the list of currently supported burners.
Even if you do not have a burner capable of burning DVDs and/or VCDs/SVCDs/miniDVDs/HD-BURNs, you can still burn a disc image and save it for future use on your hard drive. Once you have connected an appropriate burner to the PC, you can use Nero Vision, Nero Burning ROM or Nero Express at any time to burn disc images on real discs.
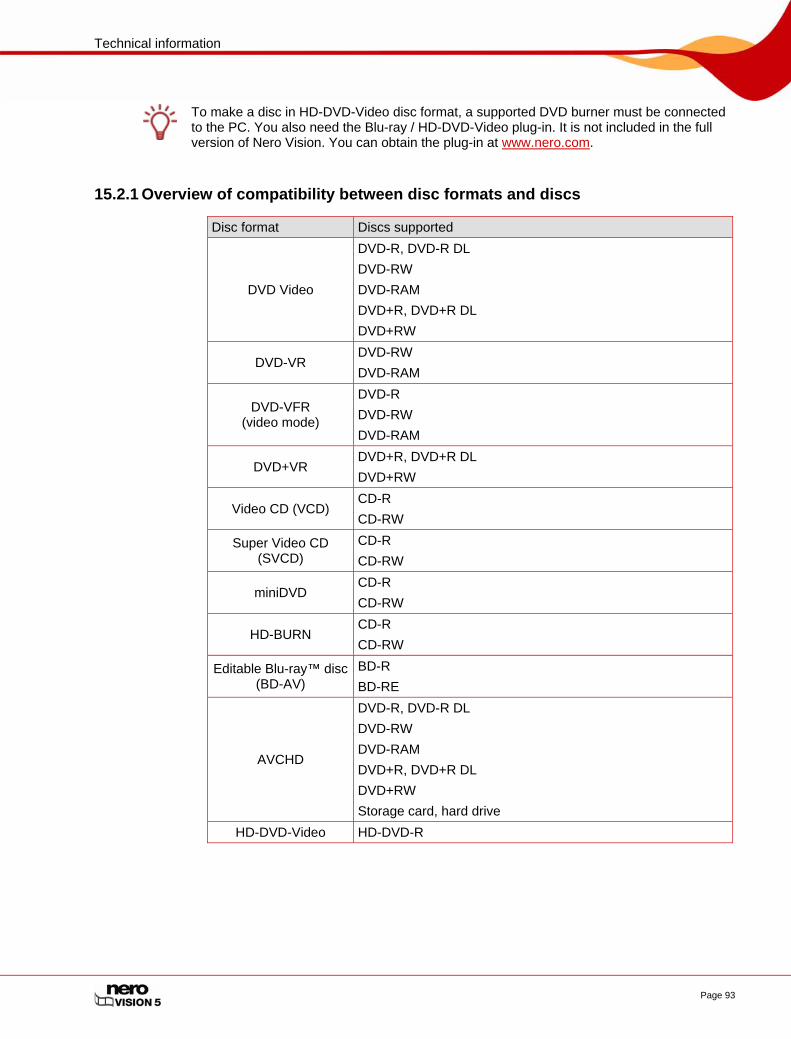
Technical information
Page 93
To make a disc in HD-DVD-Video disc format, a supported DVD burner must be connected to the PC. You also need the Blu-ray / HD-DVD-Video plug-in. It is not included in the full version of Nero Vision. You can obtain the plug-in at www.nero.com.
15.2.1 Overview of compatibility between disc formats and discs
Disc format Discs supported
DVD Video
DVD-R, DVD-R DL DVD-RW DVD-RAM DVD+R, DVD+R DL DVD+RW
DVD-VR DVD-RW DVD-RAM
DVD-VFR (video mode)
DVD-R DVD-RW DVD-RAM
DVD+VR DVD+R, DVD+R DL DVD+RW
Video CD (VCD) CD-R CD-RW
Super Video CD (SVCD)
CD-R CD-RW
miniDVD CD-R CD-RW
HD-BURN CD-R CD-RW
Editable Blu-ray™ disc (BD-AV)
BD-R BD-RE
AVCHD
DVD-R, DVD-R DL DVD-RW DVD-RAM DVD+R, DVD+R DL DVD+RW Storage card, hard drive
HD-DVD-Video HD-DVD-R

Technical information
Page 94
15.2.2 Overview of compatibility between DVD discs and editable disc formats Disc Supported disc formats for "editable DVDs"
DVD-R DVD-VFR (video mode) DVD-RW DVD-VR, DVD-VFR (video mode) DVD-RAM DVD-VR, DVD-VFR (video mode)
DVD+R DVD+VR DVD+R DL DVD+VR DVD+RW DVD+VR
15.3 Key combinations The following key combinations for entering commands are available in Nero Vision:
General F1 Displays the help file. Ctrl+S Saves the project. Alt+D Displays disc info. Alt+E Erases the disc. Alt+F Finalizes the disc.
Alt+K Opens the Key Definitions window that lists an overview of the key combinations.
Alt+P Opens the Application Settings window. Alt+T Displays tips for the respective screen. Make slide show / video
Del Deletes selected elements in a compilatioin (in the media and/or contents area).
Ctrl+A Selects all elements in the media area. Ctrl+C Copies selected elements from the contents area to the clipboard.
Ctrl+X Cuts selected elements from the contents area and adds them to the clipboard.
Ctrl+V Pastes elements from the clipboard to the desired position in the contents area.

Versions of Nero Vision
Page 95
16 Versions of Nero Vision Nero Vision is available in versions with different functionalities. In addition to the full Nero Vision version there are other versions with restricted functionality.
The following functions are not available in Nero Vision Essentials:
The number of Smart3D and animated 2D templates is limited. The following functions are not available in Nero Vision Essentials SE:
Make New Movie...
Make Blu-ray™ Discs / Make Editable Blu-ray™ Discs
Edit Movie
Export Movie to File
Export Movie to DV Video Camera
Record Directly to DVD-VR
Record Directly to Blu-ray™ Disc
Make and finalized editable DVD (DVD-VR/DVD-VFR (video mode)/+VR)
Edit menu in the Advanced Editing
The number of Smart3D and animated 2D templates is limited.
To make a disc in DVD-Video, SVCD, miniDVD or HD-BURN disc format, the video source files must be encoded in MPEG-2 video format. The discs can then be played back on compatible DVD players. If the original data is not available in compatible format, you will need the DVD-Video plug-in to create it; this is not included in the Nero Vision Essentials or Nero Vision Essentials SE versions. You can obtain it from www.nero.com.
To make a disc in HD-DVD-Video disc format, a supported DVD burner must be connected to the PC. You also need the Blu-ray / HD-DVD-Video plug-in. It is not included in the full version of Nero Vision. You can obtain the plug-in at www.nero.com.

Glossary
Page 96
17 Glossary
Capture card This is a card that fits inside your PC and connects to your DV/analog capture device via a cable. It captures video from your device, through the card, and onto your hard drive.
Capturing This is a procedure for transferring a video from a DV video camera or a DV/analog capture device to your PC.
AVCHD AVCHD (Advanced Video Codec High Definition) is a new format for HD recordings on DVD, memory card or hard drive. New camera models use this high-resolution format. The video material is compressed with the MPEG-4 AVC/H.264 codec. Audio is saved in Dolby® Digital (AC3) format or for the standard NTSC and PAL formats in Linear PCM format. AVCHD discs can be played back using Nero ShowTime or a Blu-ray™ player.
AVI An acronym for Audio Video Interleave. A Microsoft® standard container format.
BD-AV And editable Blu-ray™ disc (BD-AV) is a special variant of the Blu-ray™ disc that can record videos encoded in the DV or MPEG-2 format. The data on the disc can be edited, modified or supplemented by other video titles later.
The creation of a Blu-ray™ disc is only supported by specific burners. Blu-ray™ discs are written with a blue laser. The shorter wave length (405 nm) of this laser makes it possible to adjust the laser beam with greater precision. Data can be packed more tightly and takes up less space on the disc.
Editable Blu-ray™ discs can be played back using Nero ShowTime or a Blu-ray™ player.
Bit rate The amount of data, calculated in bits over time.
Buffer underrun Buffer underruns are caused when there is an interruption in the flow of data to the internal buffer of the burner. This can be the fault of the software or the hardware itself. When recording, data is fed continuously to the burners’s buffer in order to keep a steady flow of data which is required when recording. When something interrupts that steady flow, it can cause a buffer underrun and your disc is no longer useable.
CD-R Compact Disc – Recordable. Write-once disc.
CD-RW Decoding
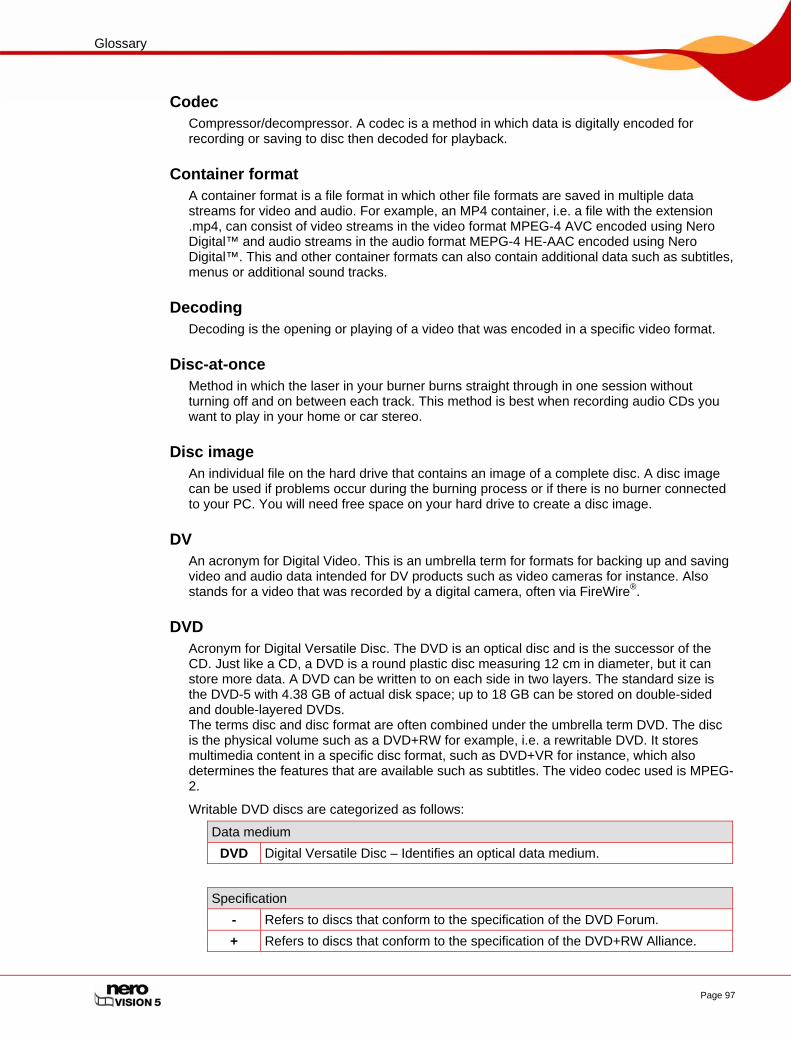
Glossary
Page 97
Codec Compressor/decompressor. A codec is a method in which data is digitally encoded for recording or saving to disc then decoded for playback.
Container format A container format is a file format in which other file formats are saved in multiple data streams for video and audio. For example, an MP4 container, i.e. a file with the extension .mp4, can consist of video streams in the video format MPEG-4 AVC encoded using Nero Digital™ and audio streams in the audio format MEPG-4 HE-AAC encoded using Nero Digital™. This and other container formats can also contain additional data such as subtitles, menus or additional sound tracks.
Decoding Decoding is the opening or playing of a video that was encoded in a specific video format.
Disc-at-once Method in which the laser in your burner burns straight through in one session without turning off and on between each track. This method is best when recording audio CDs you want to play in your home or car stereo.
Disc image An individual file on the hard drive that contains an image of a complete disc. A disc image can be used if problems occur during the burning process or if there is no burner connected to your PC. You will need free space on your hard drive to create a disc image.
DV An acronym for Digital Video. This is an umbrella term for formats for backing up and saving video and audio data intended for DV products such as video cameras for instance. Also stands for a video that was recorded by a digital camera, often via FireWire®.
DVD Acronym for Digital Versatile Disc. The DVD is an optical disc and is the successor of the CD. Just like a CD, a DVD is a round plastic disc measuring 12 cm in diameter, but it can store more data. A DVD can be written to on each side in two layers. The standard size is the DVD-5 with 4.38 GB of actual disk space; up to 18 GB can be stored on double-sided and double-layered DVDs. The terms disc and disc format are often combined under the umbrella term DVD. The disc is the physical volume such as a DVD+RW for example, i.e. a rewritable DVD. It stores multimedia content in a specific disc format, such as DVD+VR for instance, which also determines the features that are available such as subtitles. The video codec used is MPEG-2.
Writable DVD discs are categorized as follows:
Data medium DVD Digital Versatile Disc – Identifies an optical data medium.
Specification - Refers to discs that conform to the specification of the DVD Forum. + Refers to discs that conform to the specification of the DVD+RW Alliance.
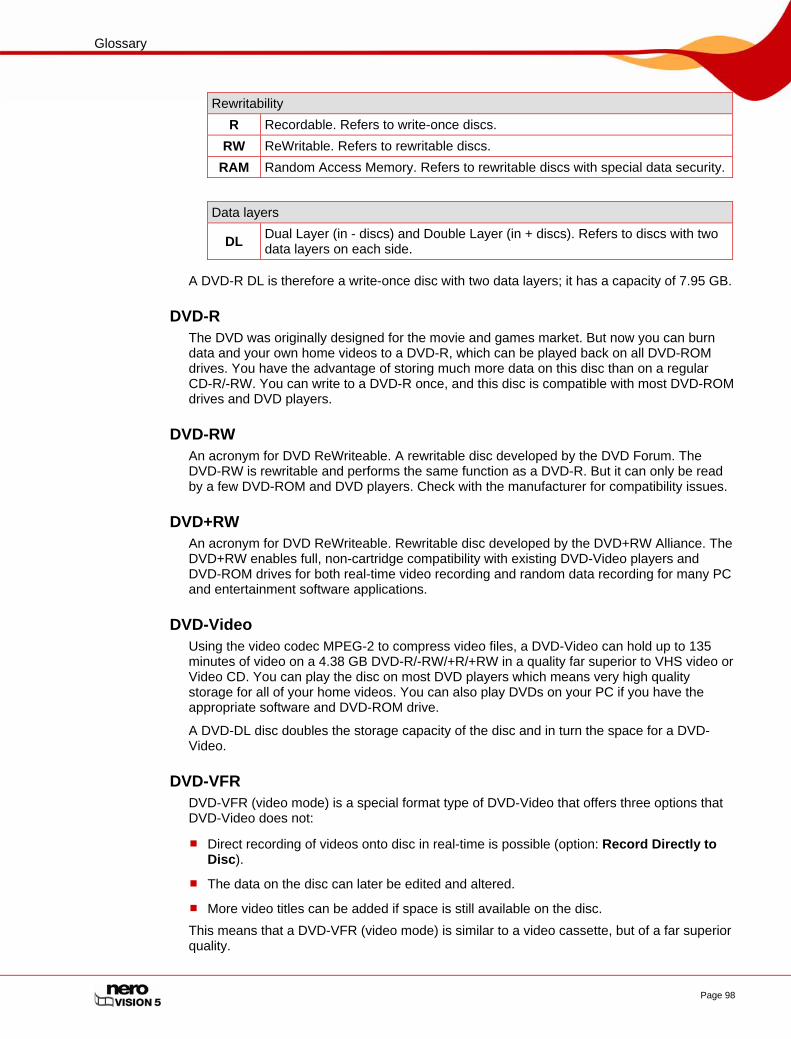
Glossary
Page 98
Rewritability R Recordable. Refers to write-once discs.
RW ReWritable. Refers to rewritable discs. RAM Random Access Memory. Refers to rewritable discs with special data security.
Data layers
DL Dual Layer (in - discs) and Double Layer (in + discs). Refers to discs with two data layers on each side.
A DVD-R DL is therefore a write-once disc with two data layers; it has a capacity of 7.95 GB.
DVD-R The DVD was originally designed for the movie and games market. But now you can burn data and your own home videos to a DVD-R, which can be played back on all DVD-ROM drives. You have the advantage of storing much more data on this disc than on a regular CD-R/-RW. You can write to a DVD-R once, and this disc is compatible with most DVD-ROM drives and DVD players.
DVD-RW An acronym for DVD ReWriteable. A rewritable disc developed by the DVD Forum. The DVD-RW is rewritable and performs the same function as a DVD-R. But it can only be read by a few DVD-ROM and DVD players. Check with the manufacturer for compatibility issues.
DVD+RW An acronym for DVD ReWriteable. Rewritable disc developed by the DVD+RW Alliance. The DVD+RW enables full, non-cartridge compatibility with existing DVD-Video players and DVD-ROM drives for both real-time video recording and random data recording for many PC and entertainment software applications.
DVD-Video Using the video codec MPEG-2 to compress video files, a DVD-Video can hold up to 135 minutes of video on a 4.38 GB DVD-R/-RW/+R/+RW in a quality far superior to VHS video or Video CD. You can play the disc on most DVD players which means very high quality storage for all of your home videos. You can also play DVDs on your PC if you have the appropriate software and DVD-ROM drive.
A DVD-DL disc doubles the storage capacity of the disc and in turn the space for a DVD-Video.
DVD-VFR DVD-VFR (video mode) is a special format type of DVD-Video that offers three options that DVD-Video does not:
Direct recording of videos onto disc in real-time is possible (option: Record Directly to Disc).
The data on the disc can later be edited and altered.
More video titles can be added if space is still available on the disc. This means that a DVD-VFR (video mode) is similar to a video cassette, but of a far superior quality.

Glossary
Page 99
DVD-VFR (video mode) allows you to create menus like DVD-Video, although without chapter menus and play lists. A DVD-VFR is compatible with DVD-Video as far as possible after finalizing the disc and can be played back on most DVD players.
DVD-VR DVD-VR (video mode) is a special format type of DVD-Video that offers three options that DVD-Video does not:
Direct recording of videos onto disc in real-time is possible (option: Record Directly to Disc).
The data on the disc can later be edited and altered.
More video titles can be added if space is still available on the disc. This means that a DVD-VR is similar to a video cassette, but of a far superior quality.
The DVD-VR is specifically designed for recording directly to disc. Although a graphics menu is not supported, playlists are created instead. Furthermore, the sound track cannot be changed, i.e. it is not possible to edit or add to the existing track. DVD-VR is not compatible with DVD-Video and can only be played on special DVD players.
DVD+VR DVD+VR (video mode) is a special format type of DVD-Video that offers three options that DVD-Video does not:
Direct recording of videos onto disc in real-time is possible (option: Record Directly to Disc).
The data on the disc can later be edited and altered.
More video titles can be added if space is still available on the disc. This means that a DVD+VR is similar to a video cassette, but of a far superior quality.
Once the disc has been finalized, the DVD+VFR format is essentially compatible with DVD-Video and can be played in most DVD players. The storage capacity doubles for burning to a DVD+R DL disc as does the space for the DVD+VR.
Encoding Encoding is the generation of a video in a specific video format, e.g. MPEG-2 or Nero Digital™ (MPEG-4). An appropriate encoder is required for each video format.
Finalizing Finalizing writes additional data to a disc and so completes it; it is not possible to write anymore to a finalized disc. An exception to this are finalized rewritable discs that can be erased. Some disc formats such as DVD-VFR and DVD+VR can only be played with normal DVD players after they have been finalized.
Firmware The firmware in burner's functions as the operating system of the drive and contains instructions that determine how the drive reacts to commands from the PC. Generally, the firmware in modern burners can be updated, which improves the support for discs from other manufacturers, for instance.

Glossary
Page 100
Frame A single still picture in a sequence of pictures, which give the impression of movement when played fast enough.
Frames per second The number of pictures per second in a video title.
HD-BURN The creation of a disc in the HD-BURN format is only supported by specific burners. An HD-BURN CD is nothing more than a CD-R or CD-RW for which the storage capacity has been doubled using a special procedure and that has been written in UDF format with a DVD-Video structure. It has the same technical options and quality as a DVD-Video, be it creating chapters and menus or supporting sub-titles and mutliple sound tracks (even in true digital multi-channel sound).
Table of contents The table of contents (TOC) is stored in the lead-in. This is where the content of every session is managed.
Interlaced Video This method involves displaying a video in two parts: each part contains a line in every second row and displays it (first field). The second part fills in the other rows up until the screen is fully displayed (second field). This method is faster than progressive scan (or non-interlaced scanning) in which all rows are displayed simultaneously.
JPEG An acronym for Joint Photographic Experts Group. This is an international group which approved a standard for the compression of pictures.
Chapter marks These are marks set in the video title that identify a scene change or position. A video title can be subdivided into several chapters that are separated from one another by chapter marks.
Lead-in The initial area of every session is known as the lead-in. This is where the table of contents for your disc and additional information concerning the CD is stored.
Lead-out The final area in a session. This area is located at the end of the disc. If the disc has not yet been finalized, the reference to the next session is stored here.
MiniDV This is a type of cassette that a DV video camera uses. It is known to have finer quality.
miniDVD A miniDVD in principle is nothing more than a CD-R or CD-RW that has been written in UDF format with a DVD-Video structure. It has the same technical options and quality as a DVD-Video, be it creating chapters and menus or supporting sub-titles and mutliple sound tracks

Glossary
Page 101
(even in true digital multi-channel sound). This format can easily be played on a PC whereas there is no guarantee that it can be played on all DVD players.
MPEG Acronym for Moving Picture Experts Group that approves industry standards for audio and video codecs.
MPEG-1 This format is part of the MPEG compression family.
MPEG-2 There is very little difference between MPEG-1 and MPEG-2, with the exception that MPEG-2 works better with televisions that are interlaced and is the broadcast standard. MPEG-2 is used as a video format on DVDs.
MPEG-4 MPEG-4 is the most recent MPEG standard for video and audio, which was adopted in 1999. MPEG-4 combines many functions from MPEG-1, MPEG-2, and other standards. Nero Digital™ video and Nero Digital™ audio are based on this industry standard.
Nero Digital™ Nero Digital™ is a suite of MPEG-4 compatible video and audio codecs. The codecs are fully compatible with the MPEG-4 standard and have been further developed by Nero to achieve a considerably higher quality and to make available additional functions, such as subtitles.
NTSC An acronym for National Television System Committee and the standard for video and television in extensive parts of America and in some East Asian countries. Other parts of the world use different standards. NTSC has more frames per second than PAL, but fewer horizontal lines.
PAL PAL stands for Phase Alternating Line and is the video and television standard in use in many parts of Europe, but also in South America and Australia. PAL has more horizontal lines than NTSC, however fewer frames per second.
Recoding Recoding is the conversion of an existing video with specific properties (e.g. bit rate 2500 kb/s) to the same video format with different properties (e.g. bit rate 1990 kb/s).
Session Discs such as CDs and DVDs are divided into tracks and sessions. A session is a self-contained data area that is burned using a single process, and consists of a lead-in, one or more tracks, and a lead-out. In principle, a session is comparable to the partition on a hard drive. A multisession disc can contain multiple sessions.
Simulated recording Simulation of the burn process in order to test whether there is a constant writing. The procedure is the same as that for writing to a disc, the only difference being that the laser writer is switched off.

Glossary
Page 102
SVCD A Super Video CD (SVCD) is very similar to a Video CD (VCD), but uses the MPEG-2 video code to record video. As a result, this disc format saves video files in a quality similar to an S-VHS video and can save up to 30 or 40 minutes of video with stereo sound on a 650 or 700 MB CD. SVCDs can be played back on an increasing number of DVD players and on the PC, if your PC has the appropriate software and a drive that can read CD-R/RW discs.
Track Data unit that joins successive sectors on a disc. On an audio CD, a track corresponds to a piece of music. Several tracks together with the lead-in and lead-out constitute a session.
Track-at-once Method in which the laser in the burner turns off and on between each track.
Transcoding Transcoding is the conversion of an existing video from one video format to another, e.g. from Xvid to MPEG-2.
UDF Acronym for Universal Disk Format. File system used for DVDs, Blu-ray™ discs and HD-DVDs.
VBR Acronym which stands for Variable Bit Rate. In contrast to normal storage of audio or video data with a constant bit rate (CBR), individual periods are encoded with different bit rates that have been adjusted accordingly. Scenes with lots of movement are stored with a higher bit rate than stills; they therefore require more storage capacity, which is not required for scenes with less movement. The quality of the video is better overall.
VCD The Video Compact Disc format. Movies and audio/video data are saved on a Video CD in MPEG-1 format. By using the MPEG-1 video codec to copmress video files, a VCD offers quality similar to a VHS video and can save up to 74 or 80 minutes of video with stereo sound on one 650 or 700 MB CD. A Video CD can be played on most CD-ROM players, DVD players and DVD-ROM drives.
VHS The old cassette/tape format that was generally used to play back videos.

Index
Page 103
18 Index
B Burning .........................................................................8
Button
Video Capture screen..........................................................20
Buttons
General................................................................................11
Main screen.........................................................................11
Movie Screen ......................................................................31
Preview Screen ...................................................................73
Slide Show screen...............................................................51
C Capture device ........................................................... 19
Capturing.................................................................... 19
Chapter.........................................................................7
Delete ..................................................................................43
Rename...............................................................................43
Chapters
Creating Automatically ........................................................41
Creating Manually ...............................................................41
Editing .................................................................................42
Compatibility overview.................................... 92, 93, 94
Configuration .............................................................. 85
Opening...............................................................................85
Contact information .................................................. 107
Conventions.............................................................. 7, 9
Covers and Labels
Creating.........................................................................13, 84
D Decoding .................................................................... 97
Disc
Burn.....................................................................................77
Burning ..........................................................................74, 75
Displaying Info...............................................................13, 81
Erasing ................................................................................13
Finalizing .............................................................................13
Disc format ...................................................................7
Compatibility overview...................................................92, 93
Disc image............................................................ 75, 83
Disc Image
Burning ............................................................................... 78
Opening .............................................................................. 83
Disc Info......................................................................13
DVD+VR ...............................................................11, 27
DVD-VFR..............................................................11, 27
DVD-Video Plug-in................................................92, 95
DVD-VR................................................................11, 27
E Editable disc formats ............................................92, 94
Encoding.....................................................................99
Export ...................................................................11, 43
Extended Area ......................................................11, 12
L Launching the program.........................................10, 27
M Main screen ................................................................11
Menu
Edit 70
Menu Hierarchies........................................................58
Menu Template.....................................................58, 71
Menu Template Group................................................71
Smart3D.............................................................................. 60
Menu Template Groups ..............................................58
Movie
Add Transition..................................................................... 33
Export ................................................................................. 43
make................................................................................... 32
N Nero CoverDesigner .............................................13, 84
Nero Digital(TM) encoder configuration ......................90
Nero Scout..................................................................21
Nero Vision
About .................................................................................... 6
Essentials ........................................................................... 95
Essentials SE...................................................................... 95
Versions.............................................................................. 95
P Preview
Index
Page 104
Display.................................................................................73
Project
Opening...............................................................................83
Saving ...........................................................................11, 83
R Recoding .................................................................. 101
Requirements ............................................................. 92
Rewritable Disc
Erasing ..........................................................................13, 81
S Scope of functions ...................................................... 95
Screen
Burn Options .........................................................................8
Contents ..........................................................................8, 17
Create Chapters ..................................................................41
Export Video........................................................................44
Movie.............................................................................33, 52
Preview................................................................................73
start .......................................................................................6
Video Capture .....................................................................22
Slide show
Original pictures ..................................................................16
Slide Show
Add Audio Commentary ......................................................53
Add Transition .....................................................................53
Background Music...............................................................53
Chapters..............................................................................16
Creating.........................................................................18, 52
Sound Track
add 33
Steps ............................................................................6
Symbols........................................................................9
System requirements
Soundcard ...........................................................................92
System Requirements ................................................ 92
Capture Devices..................................................................22
System requirementsn
Capture devices ..................................................................19
T Tab
<Disc Format> .................................................................... 90
General ............................................................................... 88
Target group .................................................................9
Tasks ................................................................6, 11, 12
Tool Tips .......................................................................7
Tooltips .......................................................................86
Transcoding ..............................................................102
Transition
add 33
Add 53
TV Card ......................................................................25
TV cards
Editing TV channels............................................................ 23
TV channel search.............................................................. 22
TV Cards
Manage TV Channel Groups.............................................. 24
Select source type .............................................................. 23
V VCD ................................................................ Video-CD
Versions......................................................................95
Video
Analog................................................................................. 19
Capture to hard drive........................................ 17, 19, 25, 28
Digital.................................................................................. 19
Video Camera.............................................................25
Video caoture..............................................................19
Video Capture...........................................17, 19, 25, 28
Video capture card......................................................19
Video Editing.........................................................15, 30
Video Options
Displaying ........................................................................... 88
Video Title
Add Transition..................................................................... 33
Add Video Effects ............................................................... 33
Cutting .......................................................................... 32, 38
Video-CD ..................................................................102
W WHQL-certified driver .................................................92

Contact Information
Page 105
19 Contact Information
Nero Vision is a product from Nero AG.
Nero AG Im Stöckmädle 13-15 76307 Karlsbad Germany
Web: www.nero.com Help: http://support.nero.com Fax: +49 7248 928 499
Copyright © 2007 Nero AG and its licensors. All rights reserved.