net vx session border controller ......net vx as a session border controller for office 365 unified...
TRANSCRIPT
NET VX as a Session Border Controller for Office 365 Unified Messaging
Page 1 of 30
NET VX SESSION BORDER CONTROLLER CONFIGURATION NOTES FOR OFFICE 365 UNIFIED MESSAGING (UM)
Issue date: Sep 1, 2011
Introduction This document describes how to configure NET’s Voice Exchange (VX) devices to work as Session Border Controllers for connecting to Office 365 Exchange Unified Messaging.
About NET VX Series NET's Voice Exchange (VX) Series is a fully-integrated multi-service voice switch with Any-to-Any gateway functionality, creating a next-generation solution for enterprise VoIP enablement. The VX Series features:
• Enterprise VoIP and telephony integration for Microsoft Exchange Unified Messaging (UM) and Microsoft Lync Server 2010
• Integrated, multi-function voice switch
• Intelligent IP to IP Mediation
• Vendor Independent Remote Survivability
• Extensive call system interoperability
• True telecom traffic management
• Advanced call security
• Expandable platform with optional software modules
• Enables intelligent, flexible, lower cost VoIP and Mobility The NET VX can function as both a Gateway for Microsoft Exchange UM (On-premises) as well as a Session Border Controller (SBC) for Microsoft Exchange UM (Online).
Before you Begin To complete this checklist, you will need the following software and hardware:
From NET:
• NET VX 1200 4.7.2v47 (or later) – Before ordering, determine the capacity (the maximum number of concurrent calls) required by your organization, and then specify the required capacity when ordering. For assistance in determining required capacity, see Plan for UM.
• NET VXbuilder 4.7.2v47 (or later)
• SRTP (Secure Real Time Protocol) Hardware Support From Microsoft:
• Office 365 for Enterprises, with a service plan that includes UM.

NET VX as a Session Border Controller for Office 365 Unified Messaging
Page 2 of 30
Compatibilities and Limitations NET VX Series can be used as a gateway or a Session Border Controller to connect the time-division multiplexed (TDM) PBXs and IP-PBXs listed below with Microsoft Exchange UM (on-premise and online). Details on how to configure the PBXs to work with the VX can be obtained from NET (http://support.net.com).
PBX PBX Model Protocol(s) Aastra Aastra 6540 QSIG
BP250 QSIG Alcatel Lucent OXE R8.0 QSIG, SIP Asterisk Asterisk SIP Avaya Definity G3 QSIG
S8300 QSIG S8400 QSIG S8500 QSIG S8700 QSIG IP Office 4.0 SIP IP Office 5.0 SIP
Broadsoft Broadworks R16 SIP Cisco Call Manager 5.x QSIG, SIP
Call Manager 6.x QSIG, SIP Call Manager Express 4.x QSIG, SIP
Ericsson MD110 QSIG Interactive Intelligence CIC SIP IPFX IPFX SIP Mitel 3300 ICP CX QSIG NEC APEX 3600i QSIG
APEX 7600 QSIG NEAX 2400 QSIG Univerge SV7000 QSIG
Nortel Meridian 11C QSIG Meridian 51C QSIG Meridian 61C QSIG Meridian 81C QSIG CS-1000 Rel 5.x SIP CS-1000 Rel 6.x SIP
Shoretel IP Telephony system SIP 3COM VCX SIP Siemens Rolm Series QSIG
Hicom 150E QSIG Hicom 300 QSIG HiPath 4000 QSIG OpenScape SIP

NET VX as a Session Border Controller for Office 365 Unified Messaging
Page 3 of 30
Configuration Checklist You will need to complete the following steps in order to configure an NET VX session border controller (SBC) and Office 365 UM to work together. You need to configure DNS and UM first, and then configure the SBC to route traffic to and from Office 365 UM.
1. Configure Office 365 Unified Messaging to work with a Session Border Controller 2. Set Up and Connect the SBC 3. Do Initial Configuration on the SBC 4. Set SBC Options to work with Office 365 UM
5. Verify SBC Configuration
This document describes the simplest NET VX configuration that will work with Office 365 UM. If you have more complex requirements (e.g. multiple SBCs for high availability), please consult the NET documentation (https://support.net.com/display/ALLDOC/NET+Product+Documentation) for further details.
Step 1: Configure Office 365 UM to work with an SBC Detailed information for this step is available here: Configuration Checklist: Configure Office 365 Unified Messaging to work with a Session Border Controller.
Step 2: Set Up and Connect the SBC The SBC has an internal network interface and an external network interface. The internal network interface must be connected to a network which is also connected to the IP PBX or VoIP gateway that provides telephony support for Exchange UM. Refer the Telephony Advisor for Exchange 2010 for a list of supported IP PBXs and VoIP gateways.
In what follows, it is assumed that VoIP communications on the internal interface are not secured (i.e. SIP/TCP is used for signaling, RTP/UDP is used for media). If you require these communications to be secured, please refer to the NET product documentation.
The external network interface must be connected to the public IP network (Internet), and through that to Office 365 UM.
Signaling and media must be secured for communication on the external network interface. This document describes how to configure the use of SIP/TLS and SRTP for this purpose.
Step 3: Do the initial configuration on the SBC Even though Office 365 UM is not acting as a telephony provider (dial tone is provided by your PBX or IP-PBX), there are configuration options that you need to set for your SBC to work with Office 365 UM.

NET VX as a Session Border Controller for Office 365 Unified Messaging
Page 4 of 30
Connecting to the SBC with VXbuilder to Prepare for Configuration Install VXbuilder, and run it on a machine that is connected to a network that can reach the internal interface of the SBC.
Figure 1. VXbuilder user interface
You will use the VXbuilder tool to download, modify and upload the SBC’s configuration.
Click on the button marked Receive.
VXbuilder will display a dialog titled Connect (Figure 2).
Figure 2. VXbuilder Connection Dialog
Enter the IP address of the SBC’s internal interface and click OK.
VXbuilder will display a dialog titled Login (Figure 3).
Figure 3. VXbuilder SBC Credentials Dialog
Enter the credentials (username and password) required to administer your SBC.
VXbuilder will download the SBC configuration and display it for inspection (Figure 4).

NET VX as a Session Border Controller for Office 365 Unified Messaging
Page 5 of 30
Figure 4. VXbuilder: Initial SBC Configuration
Step 4: Set SBC options to work with Office 365 UM
Create a SIP Inbound Call Route to represent your IP PBX or VoIP Gateway 1. In the configuration tree control on the left, under the Telephony node, select SIP Inbound Call
Routing.
2. Press the Insert key twice, inserting two new items.
3. Double-click the first new item to edit it. See Figure 5.
4. In the Enabled field, select Enabled.
5. In the Desc field, put a descriptive label (e.g. gateway).
6. In Address/FQDN, enter the IP address or fully qualified domain name of the IP PBX or VoIP Gateway
7. In Mask, enter 255.255.255.255 (or an IP mask suitable for your network configuration)
8. Ensure that the first Trunk Group (#1) is selected in the Trunk Group drop down list. This will represent the IP PBX or VoIP Gateway.
9. Click OK to save the changes.

NET VX as a Session Border Controller for Office 365 Unified Messaging
Page 6 of 30
Figure 5. Creating a SIP Inbound Call Route for the IP PBX or VoIP Gateway
Create a SIP Inbound Call Route to represent Office 365 UM 1. Double-click the second new item to edit it. See Figure 6. 2. In the Enabled field, select Enabled. 3. In the Desc field, put a descriptive label (e.g. UM server).
4. In Address/FQDN, enter the forwarding address that was assigned to your UM IP Gateway object in Office 365 (see Step 1: Configure Office 365 UM to work with an SBC and footnote 1 on page 13).
5. In Mask, enter 255.255.255.255
6. Ensure that the second Trunk Group (#2) is selected in the Trunk Group drop down list. This will represent Office 365 UM.
7. Click OK to save the changes.

NET VX as a Session Border Controller for Office 365 Unified Messaging
Page 7 of 30
Figure 6. Creating a SIP Inbound Call Route for Office 365 UM
Configure Trunk Groups and Media Classes for the Call Routes 1. Under the Telephony node, select Trunk Groups.
2. The VX device, as shipped, should contain two preconfigured Trunk Groups (#1 and #2).
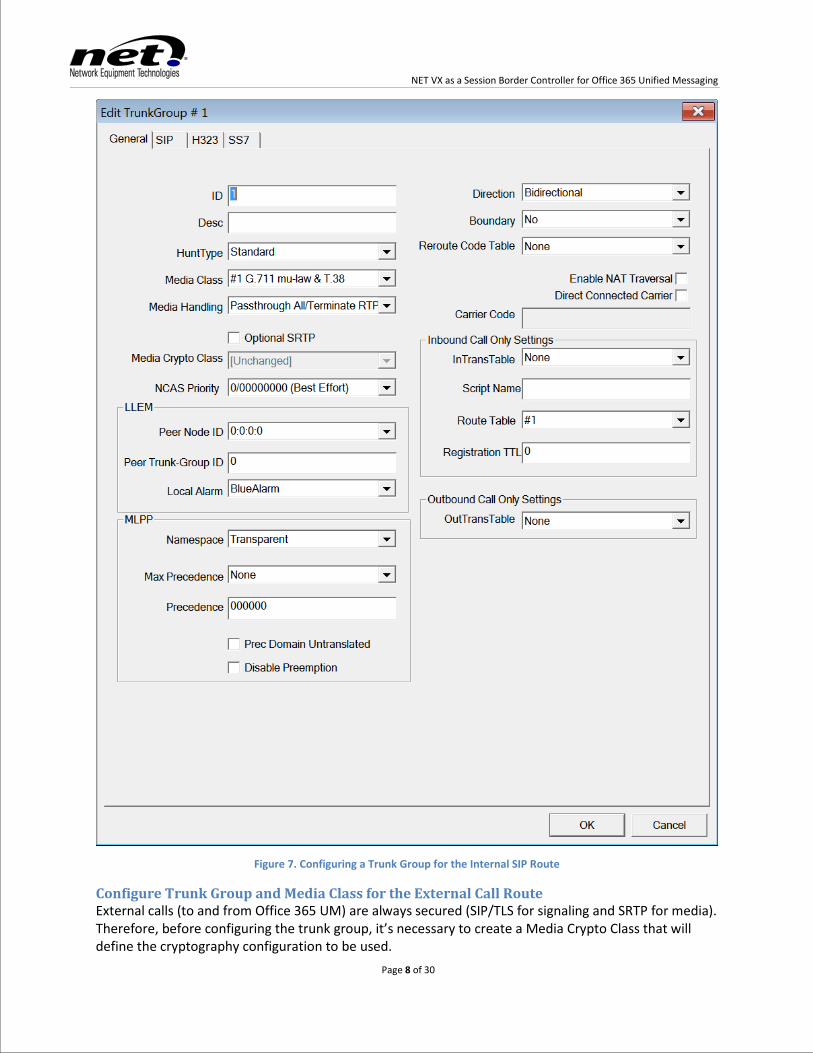
Configure Trunk Group and Media Class for the Internal Call Route 1. Double-click the first Trunk Group to edit it. Go to the General tab. See Figure 7. 2. Ensure that Media Class is set to #1 G.711 mu-law & T.38. 3. Ensure that Media Handling is set to Passthrough All/Terminate RTP.
4. Set the Route Table to #1 (the call route to your IP PBX or VoIP Gateway: see Figure 5). 5. Click OK to save the changes.
NET VX as a Session Border Controller for Office 365 Unified Messaging
Page 8 of 30
Figure 7. Configuring a Trunk Group for the Internal SIP Route
Configure Trunk Group and Media Class for the External Call Route External calls (to and from Office 365 UM) are always secured (SIP/TLS for signaling and SRTP for media). Therefore, before configuring the trunk group, it’s necessary to create a Media Crypto Class that will define the cryptography configuration to be used.
NET VX as a Session Border Controller for Office 365 Unified Messaging
Page 9 of 30
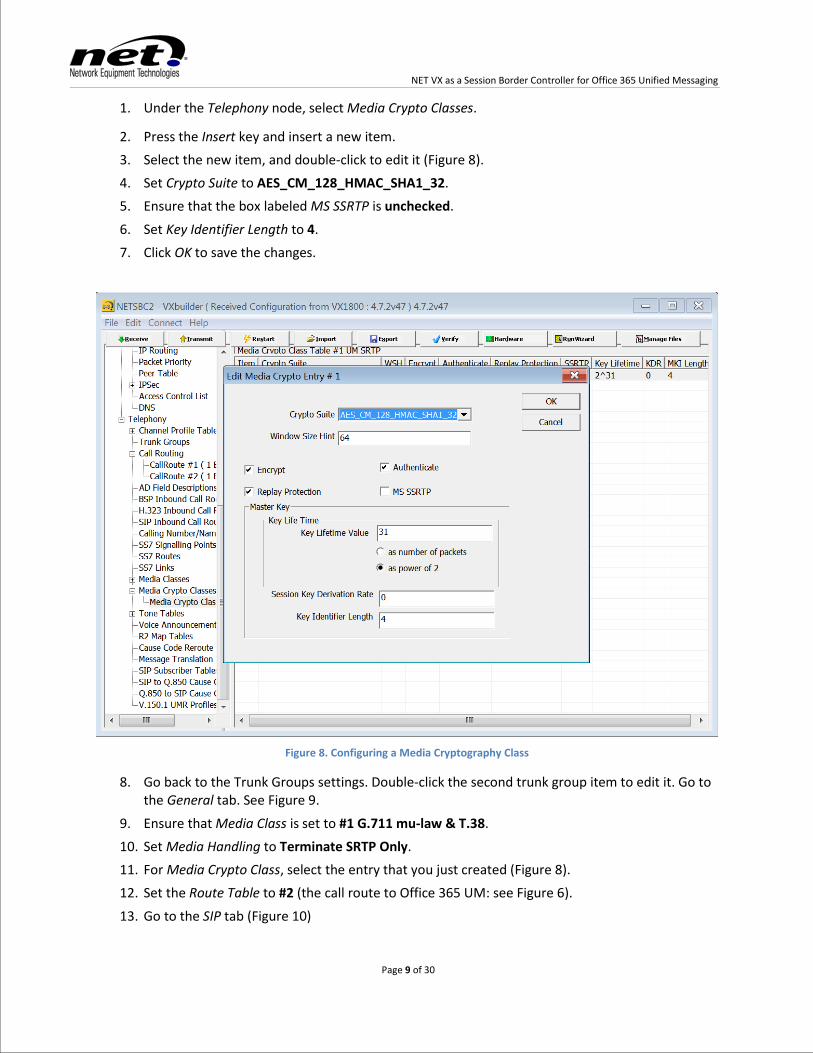
1. Under the Telephony node, select Media Crypto Classes.
2. Press the Insert key and insert a new item. 3. Select the new item, and double-click to edit it (Figure 8). 4. Set Crypto Suite to AES_CM_128_HMAC_SHA1_32. 5. Ensure that the box labeled MS SSRTP is unchecked.
6. Set Key Identifier Length to 4. 7. Click OK to save the changes.
Figure 8. Configuring a Media Cryptography Class
8. Go back to the Trunk Groups settings. Double-click the second trunk group item to edit it. Go to the General tab. See Figure 9.
9. Ensure that Media Class is set to #1 G.711 mu-law & T.38. 10. Set Media Handling to Terminate SRTP Only. 11. For Media Crypto Class, select the entry that you just created (Figure 8). 12. Set the Route Table to #2 (the call route to Office 365 UM: see Figure 6).
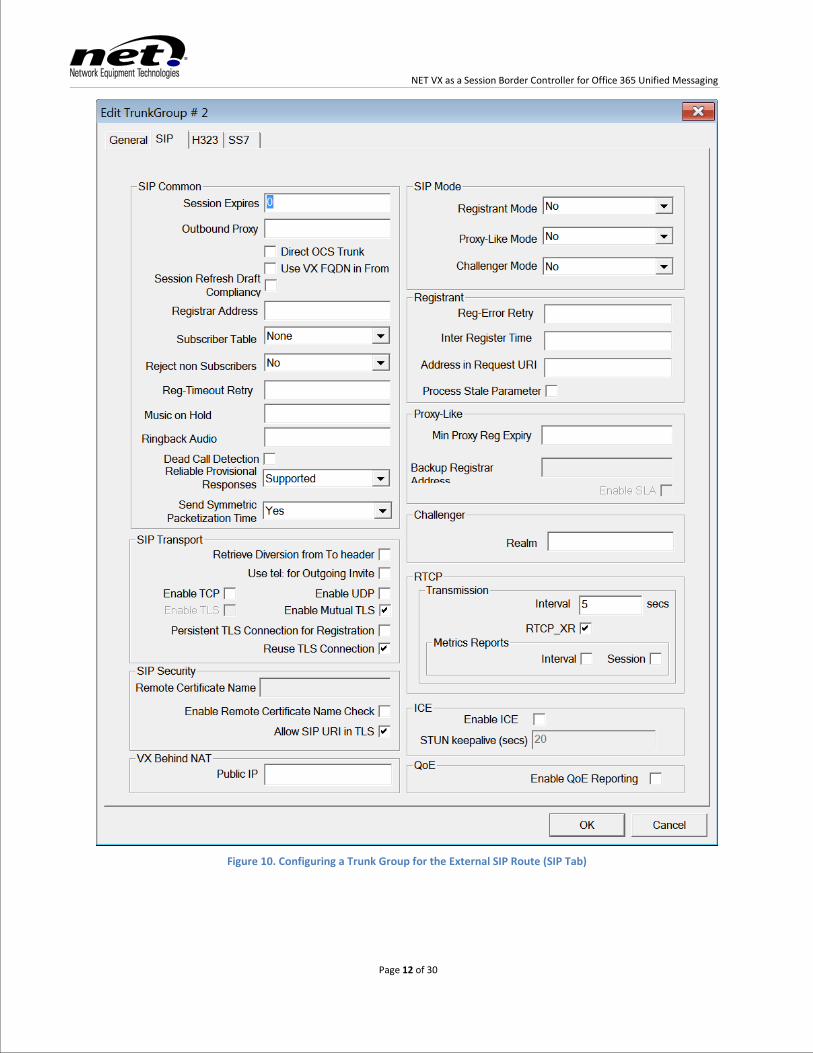
13. Go to the SIP tab (Figure 10)

NET VX as a Session Border Controller for Office 365 Unified Messaging
Page 10 of 30
Figure 9. Configuring a Trunk Group for the External SIP Route (General Tab)
14. In the SIP Transport group, ensure that Enable TCP is unchecked. 15. Ensure that Enable UDP is unchecked.
16. Ensure that Enable Mutual TLS is checked.

NET VX as a Session Border Controller for Office 365 Unified Messaging
Page 11 of 30
17. Ensure that Reuse TLS Connection is checked. 18. In the SIP Security group, ensure that Allow SIP URI in TLS is checked.
19. Click OK to save the changes.
NET VX as a Session Border Controller for Office 365 Unified Messaging
Page 12 of 30
Figure 10. Configuring a Trunk Group for the External SIP Route (SIP Tab)

NET VX as a Session Border Controller for Office 365 Unified Messaging
Page 13 of 30
Configure the Call Routes The next stage of the configuration configures the Call Routes so that:
• Traffic arriving at the SBC’s internal interface from the IP PBX or VoIP Gateway will be forwarded to Office 365 UM
• Traffic arriving at the SBC’s external interface from Office 365 UM will be forwarded to the IP PBX or VoIP Gateway
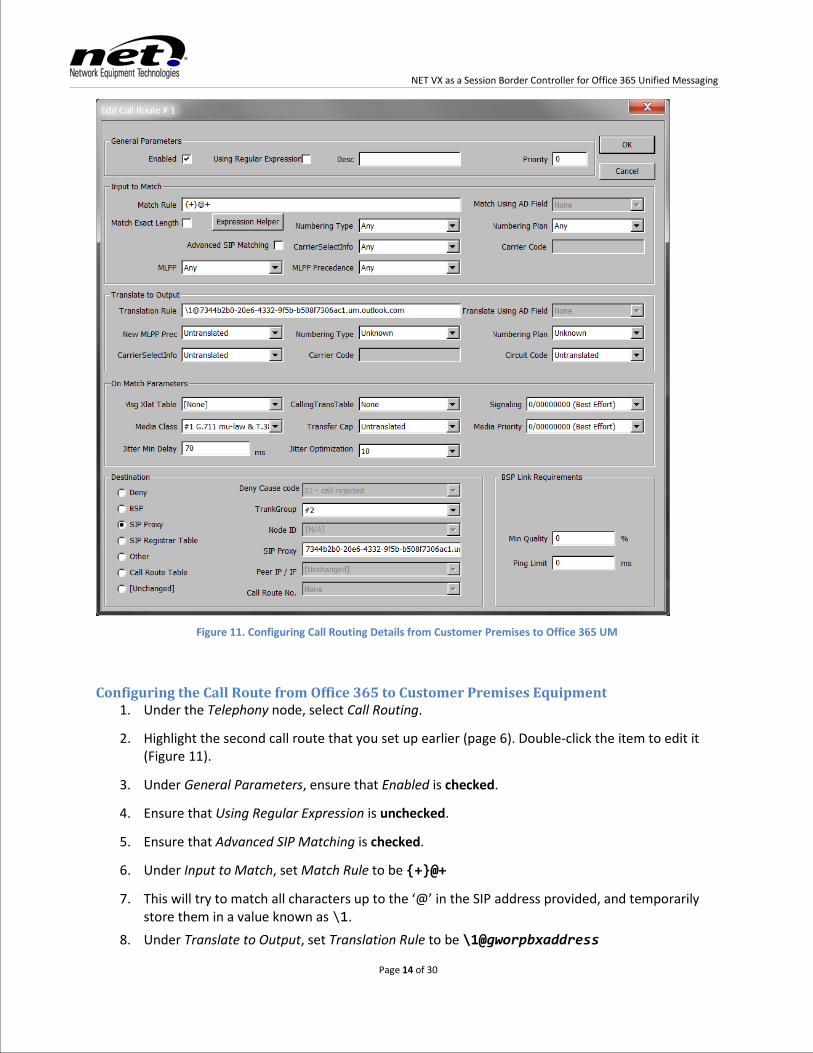
Configuring the Call Route from Customer Premises Equipment to Office 365 UM 1. Under the Telephony node, select Call Routing.
2. Highlight the first call route that you set up earlier (page 5). Double-click to edit it (Figure 11).
3. Under General Parameters, ensure that Enabled is checked.
4. Ensure that Using Regular Expression is unchecked.
5. Ensure that Advanced SIP Matching is unchecked.
6. Under Input to Match, set Match Rule to be {+}@+
• This will try to match all characters up to the ‘@’ in the SIP address provided, and temporarily store them in a value known as \1.
7. Under Translate to Output, set Translation Rule to be \[email protected]
• Here, guid must be replaced with the first part of the forwarding address1
Step 1: Configure Office 365 UM to work with an SBC
assigned to the UM IP Gateway object that you created when you configured Office 365 UM through the Exchange Control Panel (see ). Note that the first part of the SIP address (stored as \1 – see notes on step 5) is placed at the beginning of the new SIP address.
8. Under On Match Parameters, set Media Class to #1 G.711 mu-law & T.38. 9. Under Destination, select SIP Proxy.
10. For TrunkGroup, select #2 (the Trunk Group for external calls: see page 8) 11. For SIP Proxy, enter the forwarding address assigned to your UM IP Gateway object in Office 365
(see footnote 1). 12. Click OK to save the changes.
1 An example of a forwarding address is 7344b2b0-20e6-4332-9f5b-b508f7306ac1.um.outlook.com – yours will be different.
For that example, guid in step 7 above would be replaced by 7344b2b0-20e6-4332-9f5b-b508f7306ac1
NET VX as a Session Border Controller for Office 365 Unified Messaging
Page 14 of 30
Figure 11. Configuring Call Routing Details from Customer Premises to Office 365 UM
Configuring the Call Route from Office 365 to Customer Premises Equipment 1. Under the Telephony node, select Call Routing.
2. Highlight the second call route that you set up earlier (page 6). Double-click the item to edit it (Figure 11).
3. Under General Parameters, ensure that Enabled is checked.
4. Ensure that Using Regular Expression is unchecked.
5. Ensure that Advanced SIP Matching is checked.
6. Under Input to Match, set Match Rule to be {+}@+
7. This will try to match all characters up to the ‘@’ in the SIP address provided, and temporarily store them in a value known as \1.
8. Under Translate to Output, set Translation Rule to be \1@gworpbxaddress

NET VX as a Session Border Controller for Office 365 Unified Messaging
Page 15 of 30
• Replace gworpbxaddress with the actual IP address or FQDN of your IP PBX or VoIP gateway. The example shown in Figure 12 uses an IP address.
9. Under On Match Parameters, set Media Class to #2 Any. 10. Under Destination, select SIP Proxy. 11. For TrunkGroup, select #1 (the Trunk Group for internal calls: see page 7) 12. For SIP Proxy, enter the address of your IP PBX or VoIP Gateway (referred to as
gworpbxaddress in step 8). 13. Click OK to save the changes.
Figure 12. Configuring Call Routing Details from Office 365 UM to Customer Premises
Connecting Trunk Groups and Call Routes 1. Under the Chassis node, select Slot 15: Virtual.

NET VX as a Session Border Controller for Office 365 Unified Messaging
Page 16 of 30
2. Right-click on the row labeled Port 1 (Figure 13).
Figure 13. Context menu for Chassis Slot 15, Port 1
3. A dialog labeled Edit Slot 15 Port 1 will appear (Figure 14). 4. In the Desc field, enter a helpful description (e.g. Gateway sessions). 5. Ensure that Port Type is set to SIP.
6. For the TrunkGroup value, select #1 (the Trunk Group for internal calls: see page 7) 7. The NumChannels value indicates the number of simultaneous calls that will pass through this
port. Because this configuration note assumes that the SBC is being used only for Office 365 UM traffic, NumChannels should be the same as the number of SIP licenses that you have purchased for the device. The more simultaneous calls that an SBC can process, the higher the number of UM-enabled mailboxes that it can support. Further details can be found in the documentation titled Plan for UM.
8. Ensure that Channel Profile is set to #7 Default SIP.
9. Click OK to save the changes.
NET VX as a Session Border Controller for Office 365 Unified Messaging
Page 17 of 30
Figure 14. Editing the Configuration of Slot 15, Port 1
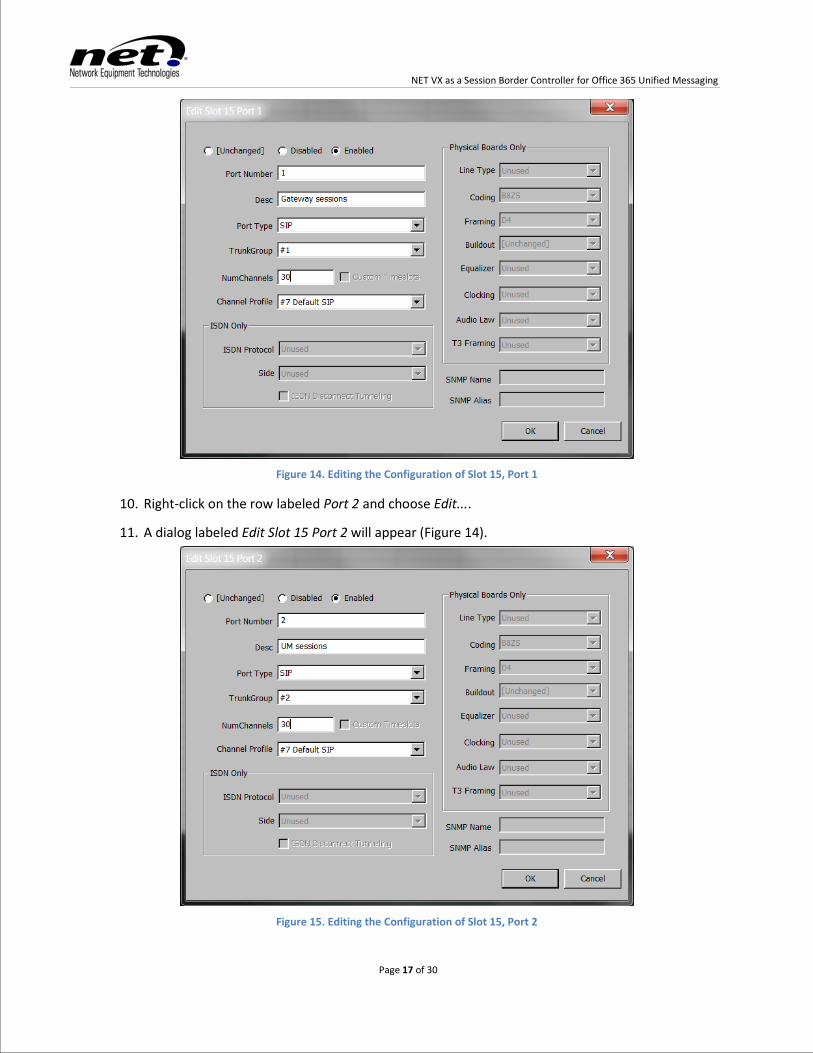
10. Right-click on the row labeled Port 2 and choose Edit....
11. A dialog labeled Edit Slot 15 Port 2 will appear (Figure 14).
Figure 15. Editing the Configuration of Slot 15, Port 2
NET VX as a Session Border Controller for Office 365 Unified Messaging
Page 18 of 30
12. In the Desc field, enter a helpful description (e.g. UM sessions). 13. Ensure that Port Type is set to SIP.
14. For the TrunkGroup value, select #2 (the Trunk Group for external calls: see page 8) 15. The NumChannels value indicates the number of simultaneous calls that will pass through this
port. (See step 7 on page 16 for more detail). 16. Ensure that Channel Profile is set to #7 Default SIP. 17. Click OK to save the changes.
Uploading the New Configuration to the SBC 1. On the VXbuilder main interface (Figure 4), click the button labeled Transmit.
• (If you do not currently have a session open with the SBC, you will be prompted for it address and your credentials, as in Figure 2 and Figure 3).
2. Click the button labeled Restart. This will reboot the SBC, with the new configuration.
Configuring Certificates You must obtain a digital certificate, signed by a supported Certification Authority (CA), which contains the FQDN of the SBC in the certificate’s name (CN) field. The list of supported CAs, and more information on the process, can be found at Get a Certificate for Exchange Online UM.
This certificate, and associated data (intermediate certificates), must then be loaded into the SBC.
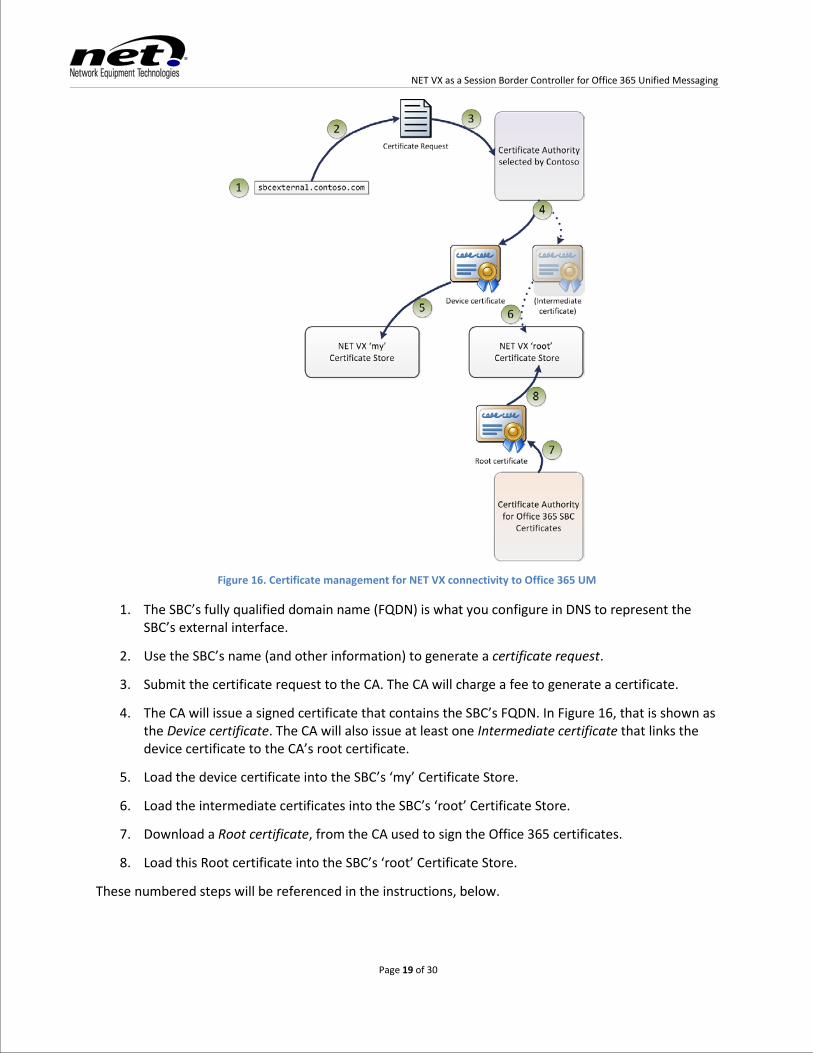
Figure 16 represents the various steps in the process. These are described below the figure.
NET VX as a Session Border Controller for Office 365 Unified Messaging
Page 19 of 30
Figure 16. Certificate management for NET VX connectivity to Office 365 UM
1. The SBC’s fully qualified domain name (FQDN) is what you configure in DNS to represent the SBC’s external interface.
2. Use the SBC’s name (and other information) to generate a certificate request.
3. Submit the certificate request to the CA. The CA will charge a fee to generate a certificate.
4. The CA will issue a signed certificate that contains the SBC’s FQDN. In Figure 16, that is shown as the Device certificate. The CA will also issue at least one Intermediate certificate that links the device certificate to the CA’s root certificate.
5. Load the device certificate into the SBC’s ‘my’ Certificate Store.
6. Load the intermediate certificates into the SBC’s ‘root’ Certificate Store.
7. Download a Root certificate, from the CA used to sign the Office 365 certificates.
8. Load this Root certificate into the SBC’s ‘root’ Certificate Store.
These numbered steps will be referenced in the instructions, below.
NET VX as a Session Border Controller for Office 365 Unified Messaging
Page 20 of 30
Create a Certificate Request To generate the certificate request, you will need to connect to the SBC’s command line interface (CLI) with a Telnet client.
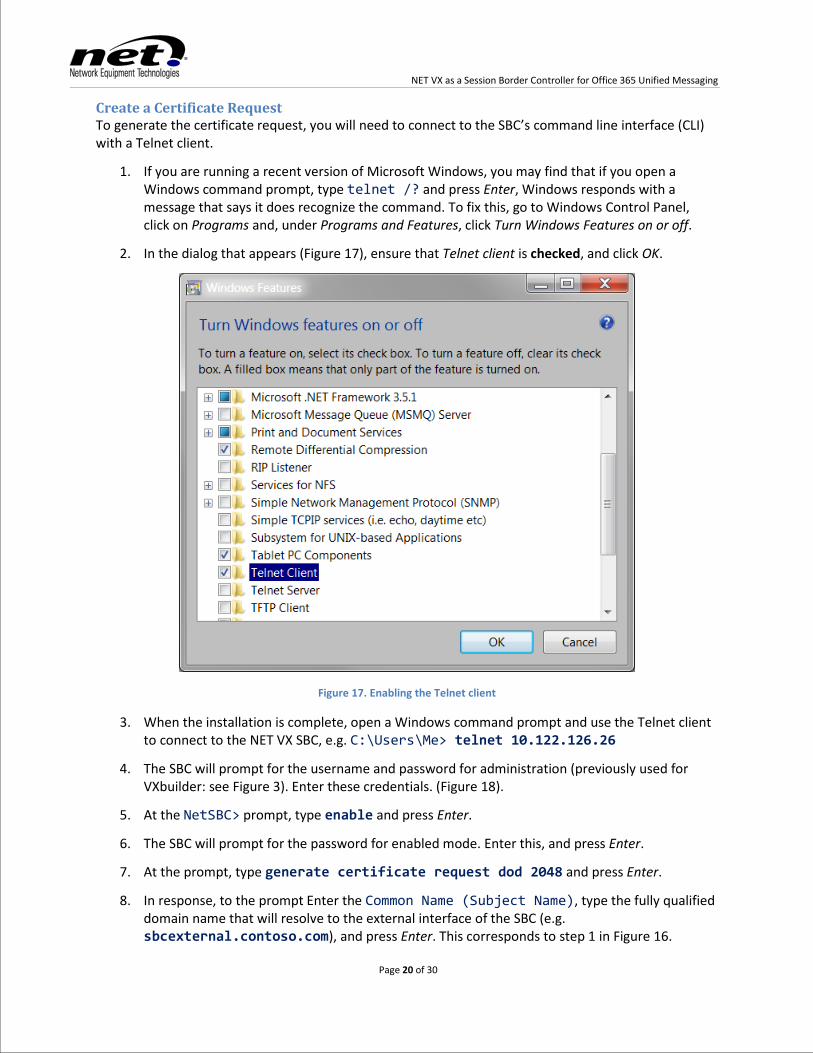
1. If you are running a recent version of Microsoft Windows, you may find that if you open a Windows command prompt, type telnet /? and press Enter, Windows responds with a message that says it does recognize the command. To fix this, go to Windows Control Panel, click on Programs and, under Programs and Features, click Turn Windows Features on or off.
2. In the dialog that appears (Figure 17), ensure that Telnet client is checked, and click OK.
Figure 17. Enabling the Telnet client
3. When the installation is complete, open a Windows command prompt and use the Telnet client to connect to the NET VX SBC, e.g. C:\Users\Me> telnet 10.122.126.26
4. The SBC will prompt for the username and password for administration (previously used for VXbuilder: see Figure 3). Enter these credentials. (Figure 18).
5. At the NetSBC> prompt, type enable and press Enter.
6. The SBC will prompt for the password for enabled mode. Enter this, and press Enter.
7. At the prompt, type generate certificate request dod 2048 and press Enter.
8. In response, to the prompt Enter the Common Name (Subject Name), type the fully qualified domain name that will resolve to the external interface of the SBC (e.g. sbcexternal.contoso.com), and press Enter. This corresponds to step 1 in Figure 16.

NET VX as a Session Border Controller for Office 365 Unified Messaging
Page 21 of 30
9. Optionally, enter values for other fields in the certificate (e.g. organization name, country).
10. Optionally, enter a file name or accept the default (request.cer) by just pressing Enter. The SBC will create a certificate request, and store it in the named file. This corresponds to step 2 in Figure 16.
Figure 18. Telnet Session to Generate Certificate Request (User Input Highlighted)
11. The certificate request file must be retrieved from the SBC. Connect to the SBC with VXbuilder.
12. Click the Manage Files button.

NET VX as a Session Border Controller for Office 365 Unified Messaging
Page 22 of 30
Figure 19. VXbuilder Manage Files Tool
13. Ensure that the Download Files from VX option is checked (Figure 20).
14. Click OK.
Figure 20. File Management Dialog
15. Navigate to the Certificates folder, click the box next to the certificate file created at step 10, and then click Select. (Figure 21)

NET VX as a Session Border Controller for Office 365 Unified Messaging
Page 23 of 30
Figure 21. File Picker Dialog
16. Select a destination, and copy the file to the local computer (Figure 22).
Figure 22. Selecting a Download Destination
17. Use this certificate request as the input to your chosen Certificate Authority’s process for generating and signing the certificate that you will use for this SBC with Office 365. This corresponds to step 3 in Figure 16.
The process of generating and downloading a certificate varies from one CA to another: please consult the chosen CA’s web site for details.
18. When downloading the certificate, specify base-64 encoding, and download the certificate chain (device certificate and one or more intermediate certificates).
Note. In what follows, it is assumed that the device certificate is downloaded to a file called devicecert.cer, and that the intermediate certificate chain is downloaded to a file called intercert.cer. See, for example, steps 5 - 7 in the section titled Import the CA-Signed Device
NET VX as a Session Border Controller for Office 365 Unified Messaging
Page 24 of 30
Certificate and Certificate Chain into the SBC’s Certificate Stores (page 26). If you choose different names for these files, be sure to modify the instructions accordingly.
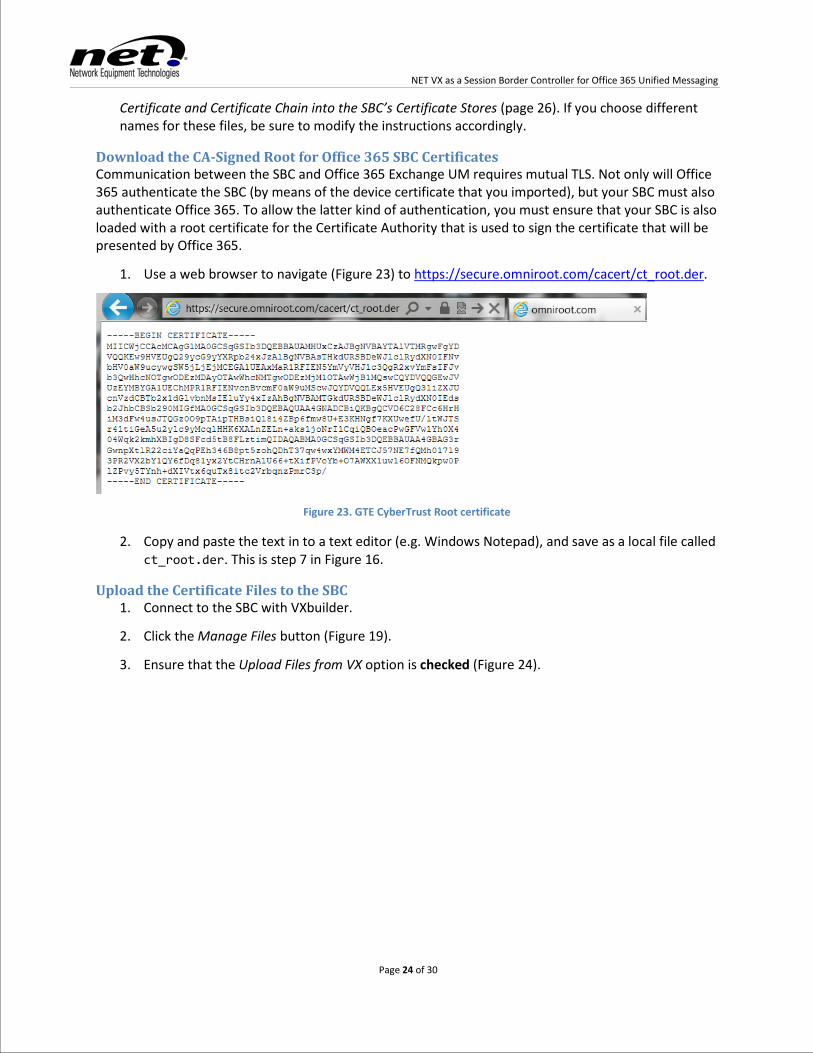
Download the CA-Signed Root for Office 365 SBC Certificates Communication between the SBC and Office 365 Exchange UM requires mutual TLS. Not only will Office 365 authenticate the SBC (by means of the device certificate that you imported), but your SBC must also authenticate Office 365. To allow the latter kind of authentication, you must ensure that your SBC is also loaded with a root certificate for the Certificate Authority that is used to sign the certificate that will be presented by Office 365.
1. Use a web browser to navigate (Figure 23) to https://secure.omniroot.com/cacert/ct_root.der.
Figure 23. GTE CyberTrust Root certificate
2. Copy and paste the text in to a text editor (e.g. Windows Notepad), and save as a local file called ct_root.der. This is step 7 in Figure 16.
Upload the Certificate Files to the SBC 1. Connect to the SBC with VXbuilder.
2. Click the Manage Files button (Figure 19).
3. Ensure that the Upload Files from VX option is checked (Figure 24).

NET VX as a Session Border Controller for Office 365 Unified Messaging
Page 25 of 30
Figure 24. File Management Dialog (Upload)
4. Click OK.
5. In the file management dialog that appears (Figure 25), select the certificate files that you want to upload to the SBC, then click Open.
Figure 25. Selecting Certificate Files to Upload to the SBC
NET VX as a Session Border Controller for Office 365 Unified Messaging
Page 26 of 30
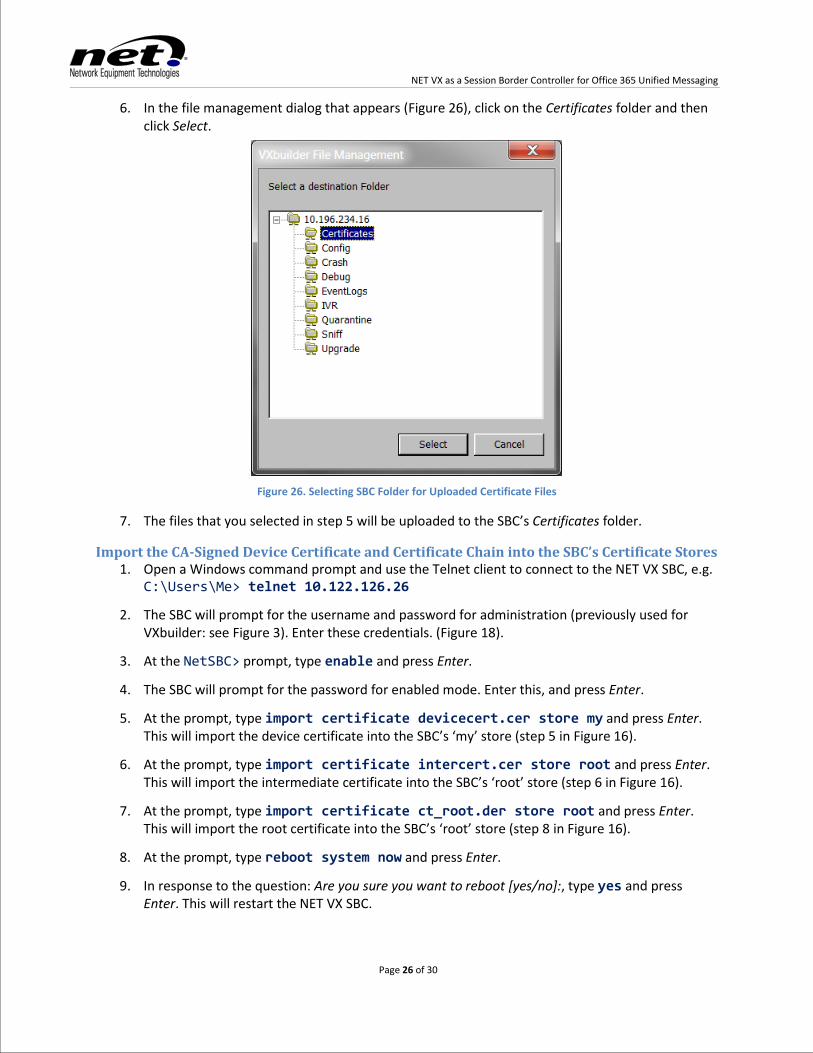
6. In the file management dialog that appears (Figure 26), click on the Certificates folder and then click Select.
Figure 26. Selecting SBC Folder for Uploaded Certificate Files
7. The files that you selected in step 5 will be uploaded to the SBC’s Certificates folder.
Import the CA-Signed Device Certificate and Certificate Chain into the SBC’s Certificate Stores 1. Open a Windows command prompt and use the Telnet client to connect to the NET VX SBC, e.g.
C:\Users\Me> telnet 10.122.126.26
2. The SBC will prompt for the username and password for administration (previously used for VXbuilder: see Figure 3). Enter these credentials. (Figure 18).
3. At the NetSBC> prompt, type enable and press Enter.
4. The SBC will prompt for the password for enabled mode. Enter this, and press Enter.
5. At the prompt, type import certificate devicecert.cer store my and press Enter. This will import the device certificate into the SBC’s ‘my’ store (step 5 in Figure 16).
6. At the prompt, type import certificate intercert.cer store root and press Enter. This will import the intermediate certificate into the SBC’s ‘root’ store (step 6 in Figure 16).
7. At the prompt, type import certificate ct_root.der store root and press Enter. This will import the root certificate into the SBC’s ‘root’ store (step 8 in Figure 16).
8. At the prompt, type reboot system now and press Enter.
9. In response to the question: Are you sure you want to reboot [yes/no]:, type yes and press Enter. This will restart the NET VX SBC.

NET VX as a Session Border Controller for Office 365 Unified Messaging
Page 27 of 30
Configure the SBC to Use the Certificates for Transport Layer Security (TLS) 1. Connect to the SBC with VXbuilder.
2. Click the General node, and open the General Settings dialog (Figure 27).
3. In the Certificate group, edit the Certificate Name field to contain the name that appears in the device certificate: this is the fully qualified domain name of the SBC’s external interface, which you specified when creating the certificate request (Figure 18).
4. Ensure that Allow untrusted root certificate is checked.
5. Click OK to save the changes.
Figure 27. General Settings
6. Click the Transmit button to upload this configuration to the SBC. 7. Follow the directions to restart the SBC, to apply these TLS settings.

NET VX as a Session Border Controller for Office 365 Unified Messaging
Page 28 of 30
Step 5: Verify SBC Configuration The UM Troubleshooting Tool is intended for Exchange Unified Messaging customers and systems integrators who wish to verify that their system is connected to Office 365 UM. (It also works if Exchange UM is installed on the customer’s premises). There is associated documentation, and an Exchange Team Blog posting.
The manual, functional tests below are not intended to provide complete coverage, but they should give you a simple way to check that major Office 365 UM scenarios and features are working as expected, through your SBC.
Direct Call to Office 365 UM 1. Choose an extension phone on the PBX that is not associated with a UM-enabled mailbox. 2. From this extension, place a call to the pilot number of the UM Dial Plan that you created earlier
(Step 1: Configure Office 365 UM to work with an SBC). 3. Ensure that you hear the Exchange UM welcome prompt for the Dial Plan. If you have not
uploaded a custom prompt, this will be: <Tones> “TO ACCESS YOUR MAILBOX, ENTER YOUR EXTENSION. TO CONTACT SOMEONE, PRESS THE # KEY.”
4. Hang up.
Call Answering For these tests, you will need at least one UM-enabled Office 365 mailbox.
Ensure that your PBX is configured to forward calls to this extension, on no-answer or busy, to the hunt group that is mapped to the SBC’s internal interface (and, through there, to the user’s Office 365 UM Dial Plan).
Missed Call 1. From the extension that you used for the Direct Call to Office 365 UM test, place a call to the
extension of the UM-enabled user. Ensure that the call is not answered. 2. Ensure that you hear Exchange UM begin to play the greeting for the user’s mailbox. If the user
has not recorded a greeting, this will be: “PLEASE LEAVE A MESSAGE FOR <USER NAME>. WHEN YOU HAVE FINISHED RECORDING, HANG UP, OR PRESS THE # KEY FOR MORE OPTIONS.”
3. Hang up immediately, without recording a message. 4. Ensure that a missed call message is delivered to the user’s Inbox.
Voice message 1. From the extension that you used for the previous test, place a call to the extension of the UM-
enabled user. Ensure that the call is not answered. 2. Ensure that you hear Exchange UM play the greeting for the user’s mailbox. If the user has not
recorded a greeting, this will be: “PLEASE LEAVE A MESSAGE FOR <USER NAME>. WHEN YOU HAVE FINISHED RECORDING, HANG UP, OR PRESS THE # KEY FOR MORE OPTIONS.” <Tone>
3. After the tone, record a message. 4. Hang up. 5. Ensure that a voice message is delivered to the user’s Inbox.

NET VX as a Session Border Controller for Office 365 Unified Messaging
Page 29 of 30
• If Voice Mail Preview is supported for the language configured on the UM Dial Plan and it has not been disabled by the administrator or user, you should observe preview text, derived from the recording, in the voice message.
Outlook Voice Access
Basic Usage 1. From an extension that is associated with a UM-enabled user, call the UM pilot number for the
user’s UM Dial Plan. 2. Ensure that you hear Exchange UM play the subscriber extension login prompt: <Tones> <USER
NAME> “PLEASE ENTER YOUR PIN, THEN PRESS THE # KEY. IF THIS IS NOT YOUR MAILBOX, PRESS THE * KEY.”
• If UM does not prompt for an extension number, this shows that it has correctly received the caller ID, and recognized that it belongs to a UM-enabled user.
3. Enter the user’s PIN and press #. 4. Ensure that you hear UM’s mailbox summary (“YOU HAVE X NEW VOICE MESSAGES…” etc.), followed
by the Main Menu prompt: “PLEASE SAY ‘VOICE MAIL’, ‘E-MAIL’, ‘CALENDAR’, ‘PERSONAL CONTACTS’, ‘DIRECTORY’ OR ‘PERSONAL OPTIONS’”.
5. Verify that speech recognition is working by saying: GOODBYE. UM should respond: “I HEARD YOU SAY ‘GOODBYE’. DO YOU WANT TO END THIS PHONE CALL?” Say: YES. UM should respond: “THANK YOU FOR CALLING. GOODBYE.”, and UM should then hang up.
Advanced Usage 1. Create a Personal Contact in the UM-enabled user’s mailbox and give it a name that is likely to
be recognized by speech recognition (hint: ensure that the name is displayed as, for example, “John Smith” rather than “Smith, John”).
2. Add a business telephone number for the contact that is the extension number of another extension on the PBX.
3. Add a mobile telephone number for the contact that corresponds to a mobile phone that (a) is accessible to the person carrying out the tests, and (b) is receiving mobile network service.
4. Save the contact details.
5. Call into Outlook Voice Access and log into the user’s mailbox (see Basic Usage). 6. From the Main Menu prompt, say PERSONAL CONTACTS. UM should respond: “OPENING PERSONAL
CONTACTS. WHAT NAME ARE YOU LOOKING FOR?” Say the name of the contact you created in steps 1.. 4 (e.g. JOHN SMITH). UM should respond: “IS THIS THE NAME? <Name of contact>”. If the name is correct, say YES. UM should respond: “OK. YOU CAN SAY: ‘CALL THE OFFICE’, ‘CALL THE CELL’…” etc. Say: CALL THE OFFICE. UM should respond “CALLING THE OFFICE…”. Stay on the line. Shortly afterwards, you should hear the other extension number ring. Pick up the other extension and verify that the call has indeed been connected. This demonstrates that call transfer by UM is working to other numbers on the PBX.
7. Repeat step 6, except that this time, say CALL THE CELL (rather than CALL THE OFFICE). UM should respond: “CALLING THE CELL…”. Stay on the line. Shortly afterwards, you should hear the cell phone ring. Answer the call, and verify that you have indeed been connected. This demonstrates that call transfer by UM is working to numbers outside the PBX.

NET VX as a Session Border Controller for Office 365 Unified Messaging
Page 30 of 30
• You may have to adjust the Dialing Rules on the UM Dial Plan or UM Mailbox Policy to permit transfers to external numbers.