netapp altavault cloud integrated storage 4
TRANSCRIPT

NetApp® AltaVault® Cloud Integrated Storage 4.1
Installation and Service Guide for Virtual Appliances
NetApp, Inc.495 East Java DriveSunnyvale, CA 94089U.S.
Telephone: +1 (408) 822-6000Fax: + 1 (408) 822-4501Support telephone: +1(888) 463-8277Web: www.netapp.comFeedback: [email protected]
Part number: 215-10478_A0November 2015

Contents
Contents
Contents ......................................................................................................................................................3
Chapter 1 - Installing and configuring AltaVault on Microsoft Hyper-V ................................................5
Supported AltaVault virtual appliance models .................................................................................................5
Hardware requirements.....................................................................................................................................5
Managing licenses ............................................................................................................................................7
Deployment guidelines .....................................................................................................................................7
Installing AltaVault virtual appliance on Microsoft Hyper-V ..........................................................................8
Downloading the VM package and running the AltaVault script..............................................................8Configuring the VM using the Hyper-V Manager ..................................................................................10Configuring virtual switches ...................................................................................................................17Starting a virtual machine........................................................................................................................19
Running the AltaVault appliance CLI configuration wizard ..........................................................................20
Next steps .......................................................................................................................................................21
Chapter 2 - Installing and configuring AltaVault virtual appliance on VMware ESXi .........................23
Supported AltaVault virtual appliance models ...............................................................................................23
Hardware requirements...................................................................................................................................23
About hardware requirements .................................................................................................................24
Managing licenses ..........................................................................................................................................25
Deployment guidelines ...................................................................................................................................25
Installing AltaVault virtual appliance on VMware ESXi ...............................................................................26
Adding a new datastore disk to the virtual machine................................................................................33Logging in to AltaVault virtual appliance ...............................................................................................36
Running the AltaVault appliance CLI configuration wizard ..........................................................................37
Next steps .......................................................................................................................................................38
Chapter 3 - Using RDM volumes in AltaVault virtual appliance for ESXi ............................................41
Overview of RDM volumes ...........................................................................................................................41
Reviewing system prerequisites ..............................................................................................................41
Configuring VMware storage .........................................................................................................................42
Creating raw device mapping..................................................................................................................44
Next Steps.......................................................................................................................................................47
NetApp AltaVault Cloud Integrated Storage Installation and Service Guide for Virtual Appliances 3
Contents
Appendix A - Migrating or upgrading AltaVault virtual appliances .....................................................49
Migrating from virtual SteelStore 3.x to AltaVault virtual appliance 4.1.x....................................................49
Upgrading AltaVault virtual appliance models ..............................................................................................52
Upgrading to a higher model for licensed installations...........................................................................52Upgrading to a higher model during the 90-day trial period...................................................................53
Copyright information..............................................................................................................................55
Trademark information.............................................................................................................................57
How to send your comments...................................................................................................................59
Index ..........................................................................................................................................................61
4 NetApp AltaVault Cloud Integrated Storage Installation and Service Guide for Virtual Appliances
CHAPTER 1 Installing and configuring AltaVault on Microsoft Hyper-V
This chapter describes how to install and configure an AltaVault virtual appliance on Microsoft Hyper-V. It includes the following sections:
“Supported AltaVault virtual appliance models” on page 5
“Hardware requirements” on page 5
“Managing licenses” on page 7
“Deployment guidelines” on page 7
“Installing AltaVault virtual appliance on Microsoft Hyper-V” on page 8
“Configuring virtual switches” on page 17
“Next steps” on page 21
Supported AltaVault virtual appliance models
AltaVault virtual appliance is available in the following models:
AVA-v8
AVA-v16
AVA-v32
Hardware requirements
Microsoft Hyper-V is a role service in Windows Servers that provides tools and services to create and manage a virtualized server computing environment. You must be running Microsoft Windows Server 2012 R2. Hyper-V requires an x64-based processor, hardware-assisted virtualization, and hardware Data Execution Prevention (DEP).
NetApp AltaVault Cloud Integrated Storage Installation and Service Guide for Virtual Appliances 5

Installing and configuring AltaVault on Microsoft Hyper-V Hardware requirements
The following table displays the minimum mandatory hardware requirements supported for the AltaVault virtual appliance.
About hardware requirements
If, for example, you would like to configure an AVA-v8 with 8 TB of usable cache, the virtual machine should have a disk LUN mapped that provides extra capacity to store the meta data that the system generates. In order to get the maximum of 8 TB usable, provision a disk LUN of 10 TB (10,000,000,000,000 bytes or 10 TB base 10). Provisioning a LUN larger than 10 TB will cause the optimization service to fail to start when using an 8 TB license.
It is possible to create a smaller LUN when using for proof-of-concept, test environments or if there is a constraint on provisioning a LUN of the required size. The disk needs to be large enough to hold the backup data being written to the appliance and is recommended to be large enough to hold several weeks of backup data. The minimum size in the case of a test lab should be no smaller than 100 GB. As large of a disk as possible is recommended. The LUN can be either iSCSI or FC depending on what the Hyper-V host and storage system support.
Component Description
Virtual CPUs 4 minimum for AVA-v8
8 minimum for AVA-v16
12 minimum for AVA-v32
Physical CPUs Intel® E5-2680v2™ or similar
Memory AVA-v8: requires 24GB of RAM
AVA-v16: requires of 48GB of RAM
AVA-v32: requires of 96GB of RAM
If the memory is more than the minimum required amount, the system does not use the extra memory.
Networking 10 GigE network adapters are supported on all models
Disk AVA-v8: 10 TB (recommended):
• 8 TB for data cache
• 2 TB for system metadata
AVA-v16: 20 TB (recommended):
• 16 TB for data cache
• 4 TB for system metadata
AVA-v32: 40 TB (recommended):
• 32 TB for data cache
• 8TB for system metadata
In addition:
• Minimum 150 GB for the AltaVault OS disk.
• Use RAID-6 high throughput disk subsystem. Use separate disk subsystems from the one used for backed-up servers.
• Use only the recommended disk size. The system will not accept a disk that is greater than the recommended size for the model.
6 NetApp AltaVault Cloud Integrated Storage Installation and Service Guide for Virtual Appliances

Managing licenses Installing and configuring AltaVault on Microsoft Hyper-V
Managing licenses
For details on licensing, see the section on Managing licenses in Chapter 5 of the NetApp AltaVault Cloud Integrated Storage User’s Guide.
Note: Moving or cloning Virtual Machines (VMs) is disallowed; doing so may invalidate the Secure Vault.
Deployment guidelines
NetApp recommends the following guidelines when deploying the AltaVault virtual appliance package.
Use at least a Gigabit link for interfaces: For optimal performance, connect the virtual interfaces to the physical interfaces that are capable of at least 1 Gbps.
Do not share virtual switches: For optimal performance, use one or more dedicated Hyper-V virtual switches for AltaVault virtual appliance Data Interfaces. Do not share virtual switches that are attached to AltaVault virtual appliance with other VMs running on a Hyper-V host.
Always reserve virtual CPUs: To ensure AltaVault virtual appliance performance, it is important that AltaVault virtual appliance receives a fair share of CPU cycles. To allocate CPU cycles:
– Reserve the number of virtual CPUs for the AltaVault virtual appliance and also reserve the number of clock cycles (in terms of CPU MHz).
– Reserve the number of virtual CPUs for the AltaVault virtual appliance and the percentage of allocated CPU for VM.
Do not over-provision the physical CPUs: Do not configure more vCPU within a VM than there are physical CPUs. For example, if a Hyper-V host is running off a four-core CPU, all the VMs on the host should use not more than four vCPUs.
Use a server-grade CPU for the hyper-v host: For example, use an Intel Ivy Bridge™ or Sandy Bridge™ CPU instead of an Intel Atom™.
Always reserve RAM: Memory is another very important factor in determining the AltaVault virtual appliance performance. Reserve the RAM that is needed by the AltaVault virtual appliance model plus 5% more for the Hyper-V overhead. Do not enable Dynamic Memory for the AltaVault virtual appliance. Use high memory weight for the Memory attached to the VM.
Do not over-provision physical RAM: The total virtual RAM needed by all running VMs should not be greater than the physical RAM on the system.
Do not use low-quality storage for the data store disk: Make sure that the AltaVault virtual appliance disk used for the data store VHDX uses a disk medium that supports a high number of Input/Output Operations Per Second (IOPS). For example, use high performance storage such as NAS, SAN (Storage Area Network), or DAS (Direct Attached Storage).
Use a dedicated physical drive for the Virtual AltaVault data store: This device deduplicates and stores segments from the AltaVault virtual appliance. Sharing this drive with other VMs can impact the overall performance of the AltaVault virtual appliance.
NetApp AltaVault Cloud Integrated Storage Installation and Service Guide for Virtual Appliances 7
Installing and configuring AltaVault on Microsoft Hyper-V Installing AltaVault virtual appliance on Microsoft Hyper-V
Installing AltaVault virtual appliance on Microsoft Hyper-V
Before you install the Virtual AltaVault virtual appliance, verify that your system meets the hardware and software requirements listed under “Supported AltaVault virtual appliance models” on page 5 and “Hardware requirements” on page 5.
Virtual AltaVault provides the following interfaces:
Primary
Data interfaces
– e0a
– e0b
– e0c
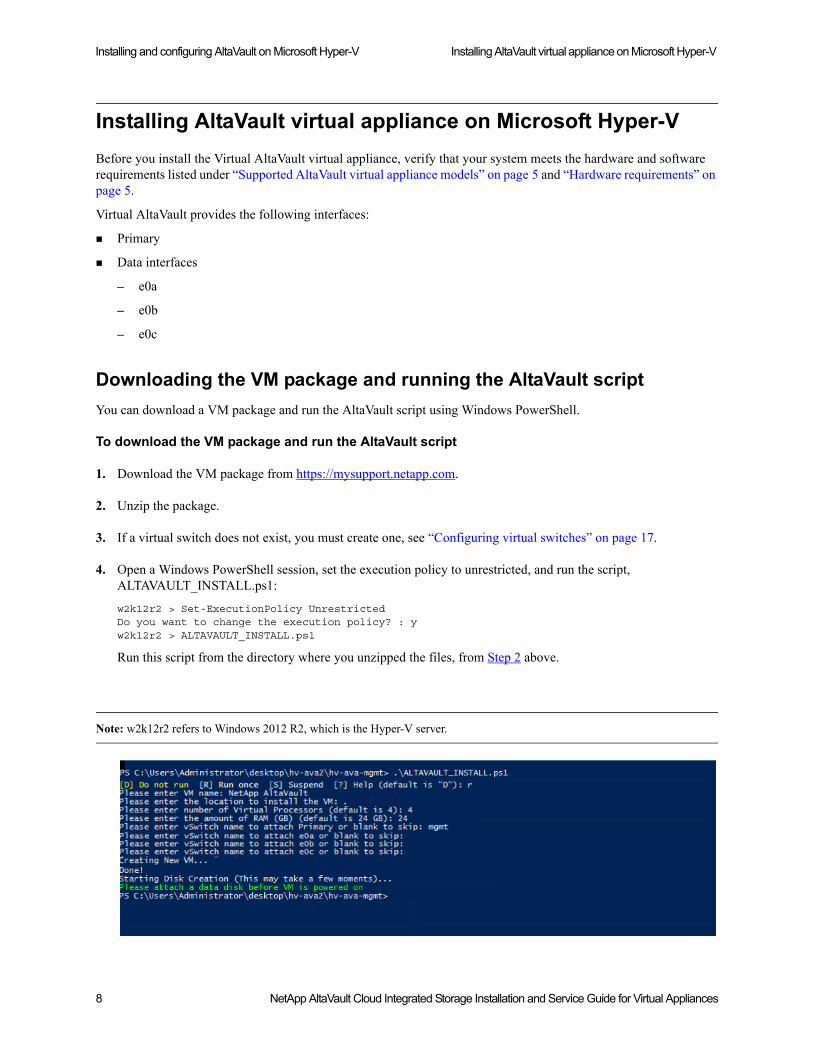
Downloading the VM package and running the AltaVault script
You can download a VM package and run the AltaVault script using Windows PowerShell.
To download the VM package and run the AltaVault script
1. Download the VM package from https://mysupport.netapp.com.
2. Unzip the package.
3. If a virtual switch does not exist, you must create one, see “Configuring virtual switches” on page 17.
4. Open a Windows PowerShell session, set the execution policy to unrestricted, and run the script, ALTAVAULT_INSTALL.ps1:
w2k12r2 > Set-ExecutionPolicy UnrestrictedDo you want to change the execution policy? : yw2k12r2 > ALTAVAULT_INSTALL.ps1
Run this script from the directory where you unzipped the files, from Step 2 above.
Note: w2k12r2 refers to Windows 2012 R2, which is the Hyper-V server.
8 NetApp AltaVault Cloud Integrated Storage Installation and Service Guide for Virtual Appliances

Installing AltaVault virtual appliance on Microsoft Hyper-V Installing and configuring AltaVault on Microsoft Hyper-V
5. Complete the configuration as described in the table below.
Question Response
Do you want to run ? r
Please enter the VM name: Provide a name for the VM
Please enter the location to install the VM: Enter the location where you want to install the VM.
Please enter number of Virtual Processors: Specify the number of virtual CPUs as required by the VM being deployed.
Please enter the amount of RAM (GB): Specify the amount of RAM as required by the VM being deployed.
Please enter vSwitch name to attach Primary or blank to skip: Specify the virtual switch created for use with the primary interface of the VM.
Please enter vSwitch name to attach e0a or blank to skip: Specify the virtual switch created for use with the e0a interface of the VM or <enter>.
Please enter vSwitch name to attach e0b or blank to skip: Specify the virtual switch created for use with the e0b interface of the VM or <enter>.
Please enter vSwitch name to attach e0c or blank to skip: Specify the virtual switch created for use with the e0c interface of the VM or <enter>.
NetApp AltaVault Cloud Integrated Storage Installation and Service Guide for Virtual Appliances 9
Installing and configuring AltaVault on Microsoft Hyper-V Installing AltaVault virtual appliance on Microsoft Hyper-V
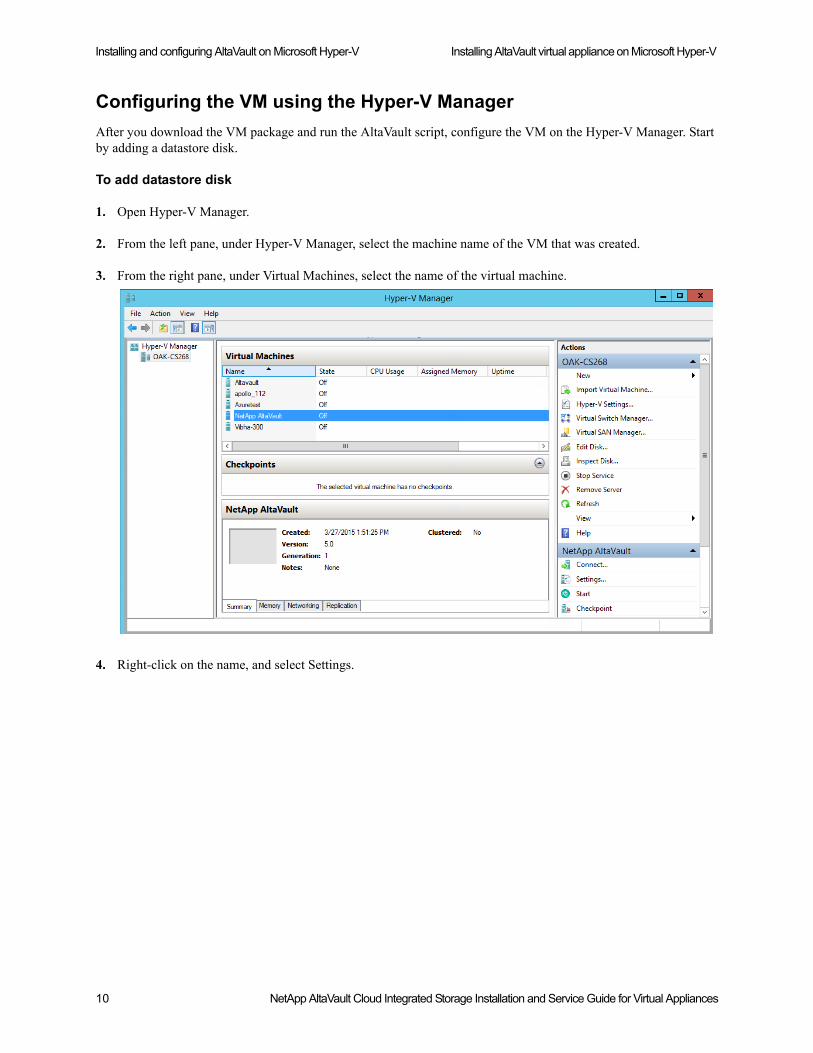
Configuring the VM using the Hyper-V Manager
After you download the VM package and run the AltaVault script, configure the VM on the Hyper-V Manager. Start by adding a datastore disk.
To add datastore disk
1. Open Hyper-V Manager.
2. From the left pane, under Hyper-V Manager, select the machine name of the VM that was created.
3. From the right pane, under Virtual Machines, select the name of the virtual machine.
4. Right-click on the name, and select Settings.
10 NetApp AltaVault Cloud Integrated Storage Installation and Service Guide for Virtual Appliances
Installing AltaVault virtual appliance on Microsoft Hyper-V Installing and configuring AltaVault on Microsoft Hyper-V
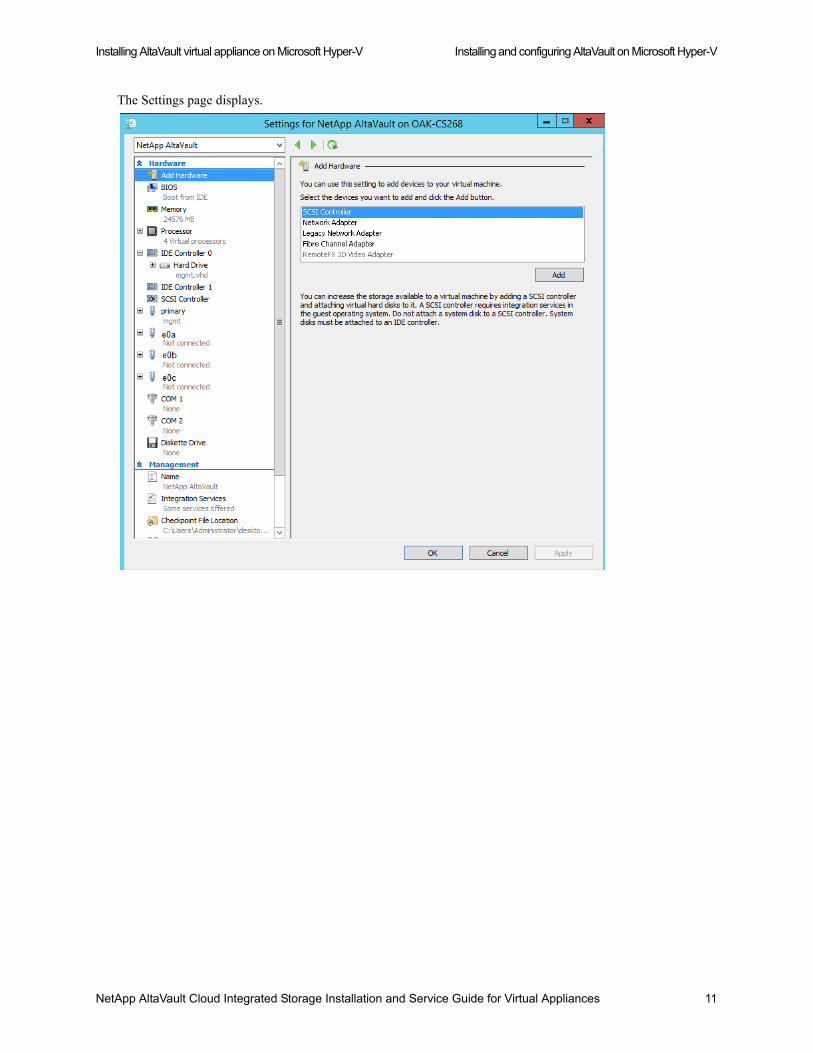
The Settings page displays.
NetApp AltaVault Cloud Integrated Storage Installation and Service Guide for Virtual Appliances 11
Installing and configuring AltaVault on Microsoft Hyper-V Installing AltaVault virtual appliance on Microsoft Hyper-V
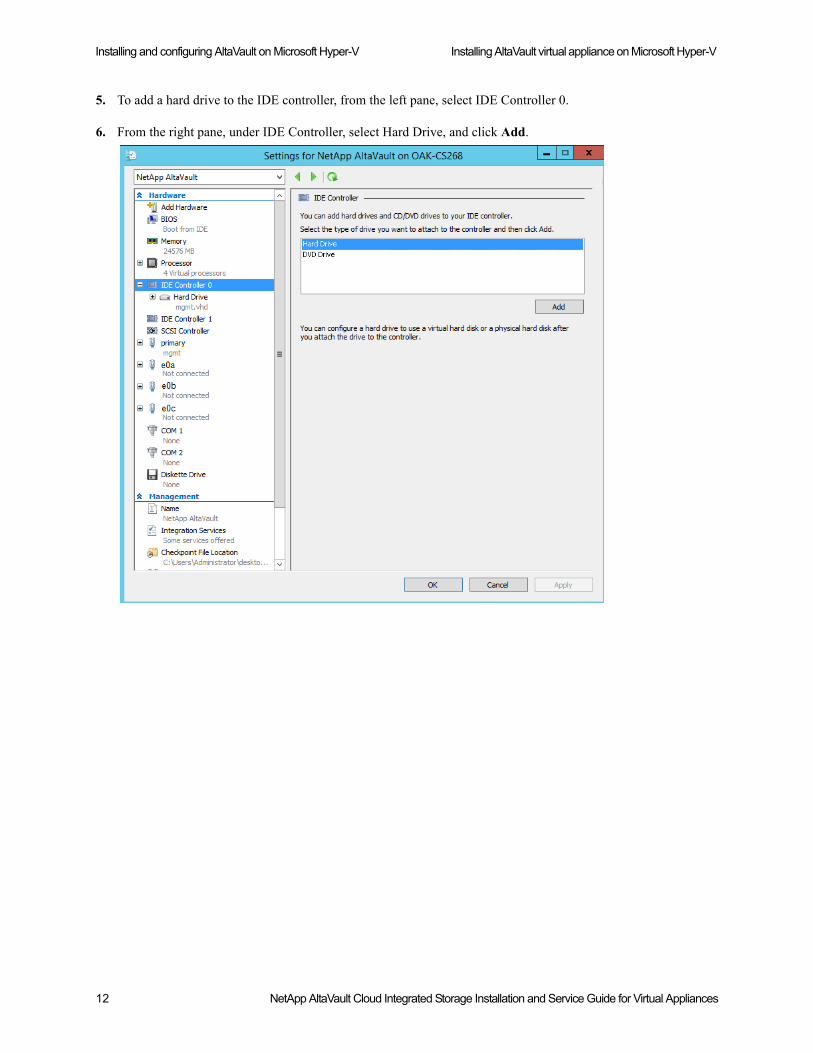
5. To add a hard drive to the IDE controller, from the left pane, select IDE Controller 0.
6. From the right pane, under IDE Controller, select Hard Drive, and click Add.
12 NetApp AltaVault Cloud Integrated Storage Installation and Service Guide for Virtual Appliances
Installing AltaVault virtual appliance on Microsoft Hyper-V Installing and configuring AltaVault on Microsoft Hyper-V
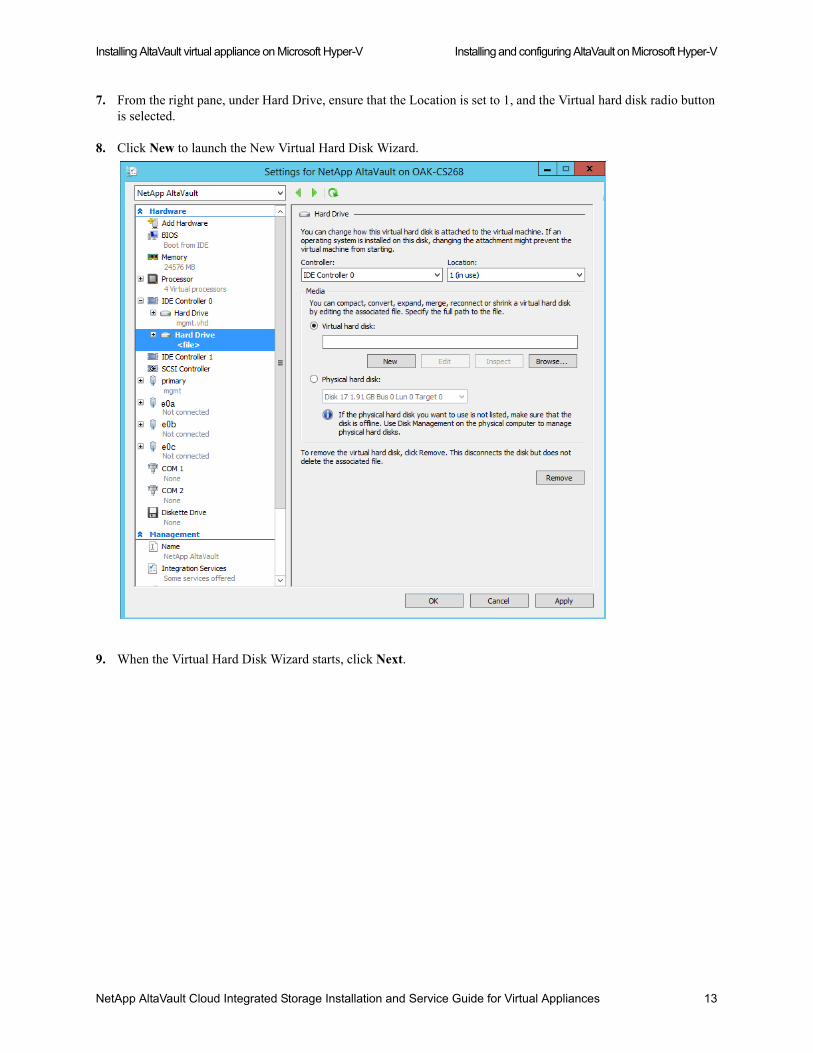
7. From the right pane, under Hard Drive, ensure that the Location is set to 1, and the Virtual hard disk radio button is selected.
8. Click New to launch the New Virtual Hard Disk Wizard.
9. When the Virtual Hard Disk Wizard starts, click Next.
NetApp AltaVault Cloud Integrated Storage Installation and Service Guide for Virtual Appliances 13
Installing and configuring AltaVault on Microsoft Hyper-V Installing AltaVault virtual appliance on Microsoft Hyper-V
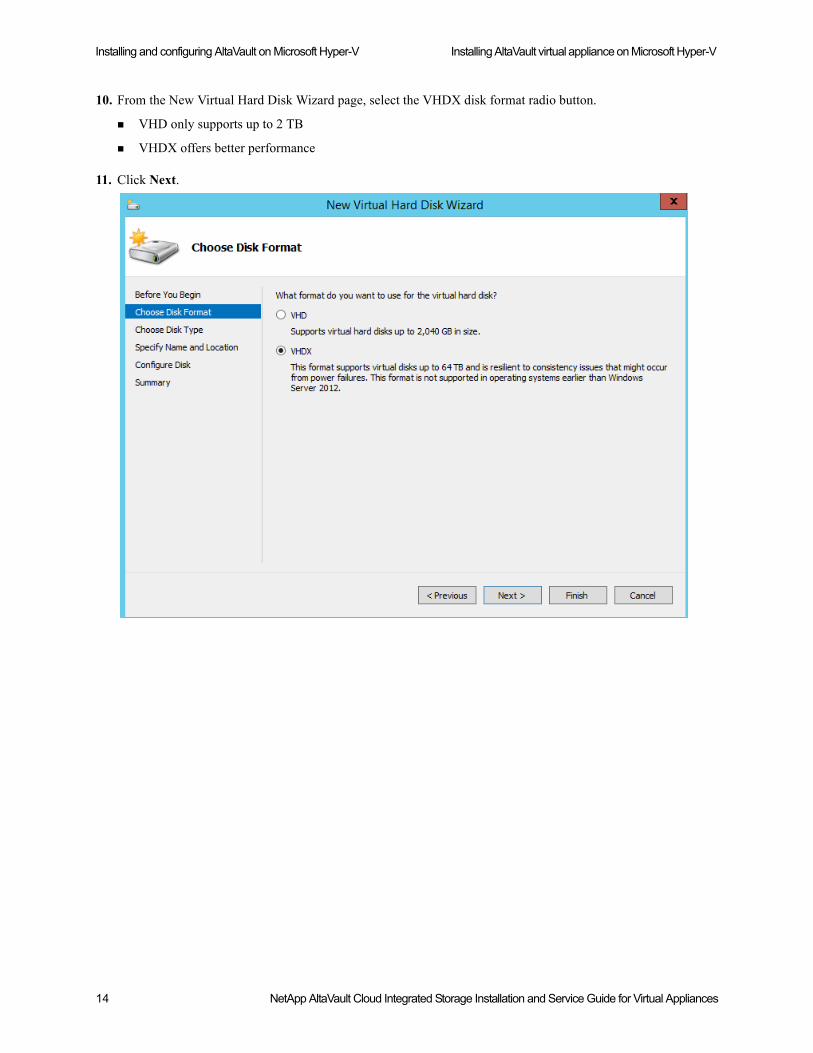
10. From the New Virtual Hard Disk Wizard page, select the VHDX disk format radio button.
VHD only supports up to 2 TB
VHDX offers better performance
11. Click Next.
14 NetApp AltaVault Cloud Integrated Storage Installation and Service Guide for Virtual Appliances
Installing AltaVault virtual appliance on Microsoft Hyper-V Installing and configuring AltaVault on Microsoft Hyper-V
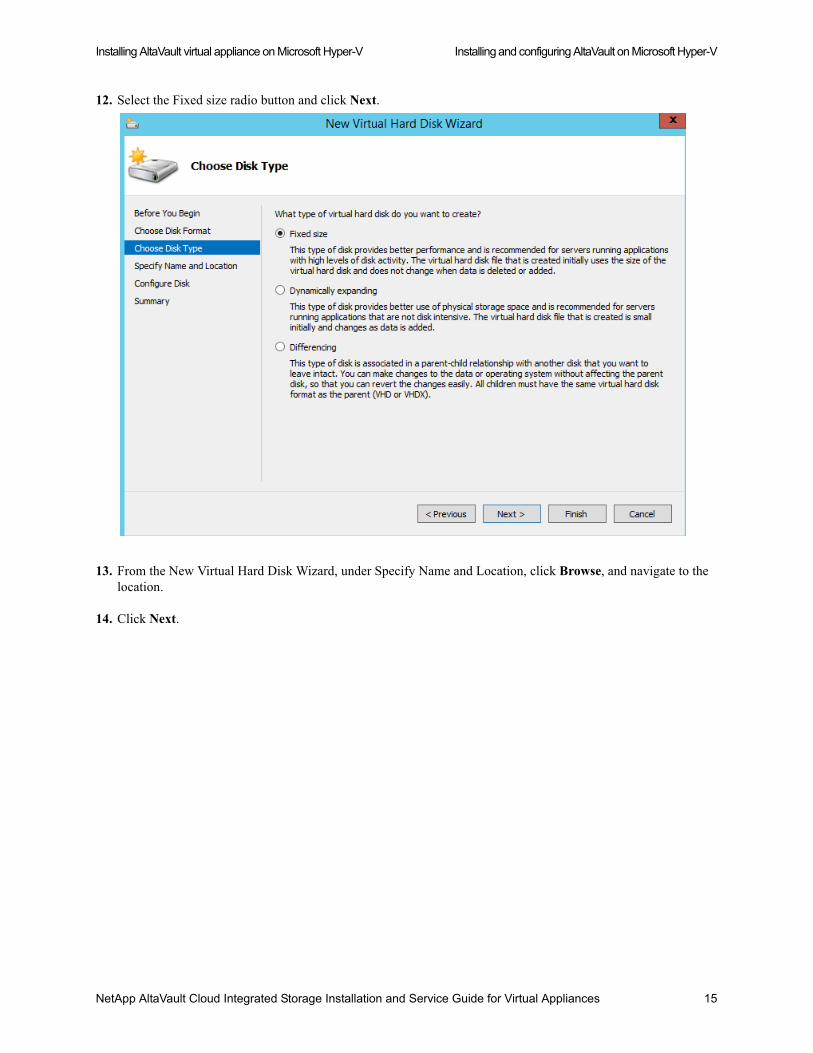
12. Select the Fixed size radio button and click Next.
13. From the New Virtual Hard Disk Wizard, under Specify Name and Location, click Browse, and navigate to the location.
14. Click Next.
NetApp AltaVault Cloud Integrated Storage Installation and Service Guide for Virtual Appliances 15

Installing and configuring AltaVault on Microsoft Hyper-V Installing AltaVault virtual appliance on Microsoft Hyper-V
15. Select the Create a new blank virtual hard disk radio button and specify the size.
The maximum size is 32 TB (32,768 GB). For details on requirements, see the “Hardware requirements” on page 5.
16. Click Next.
16 NetApp AltaVault Cloud Integrated Storage Installation and Service Guide for Virtual Appliances

Installing AltaVault virtual appliance on Microsoft Hyper-V Installing and configuring AltaVault on Microsoft Hyper-V
17. Select Summary to review your configuration settings and then click Finish.
18. Click Apply to save your configuration changes in the AltaVault GUI and then click Save.
Configuring virtual switches
Virtual switches allow the VM to talk to network interfaces attached to the Hyper-V host. You must create at least one virtual switch to connect to the primary interface. Additional virtual switches can be created for the three data interfaces. For more details about Hyper-V virtual switches, see http://technet.microsoft.com/en-us/library/hh831823.aspx.
To create and configure an additional virtual switch
1. Open the Virtual Switch Manager.
2. Under Virtual Switches, select New virtual network switch.
NetApp AltaVault Cloud Integrated Storage Installation and Service Guide for Virtual Appliances 17

Installing and configuring AltaVault on Microsoft Hyper-V Installing AltaVault virtual appliance on Microsoft Hyper-V
3. Under Create virtual switch, select the type of virtual switch that you want to create, and click Create Virtual Switch.
The new virtual switch displays on the left under Virtual Switches.
18 NetApp AltaVault Cloud Integrated Storage Installation and Service Guide for Virtual Appliances

Installing AltaVault virtual appliance on Microsoft Hyper-V Installing and configuring AltaVault on Microsoft Hyper-V
4. Complete the configuration as described in this table.
5. Click Apply.
6. To confirm your changes, click Yes.
Starting a virtual machine
After you start the virtual machine you can log in.
To start a virtual machine
1. From the Hyper-V Manager, select the Hyper-V machine name.
2. To start VM, right-click the machine name, and select Connect.
3. Under Virtual Machine, right-click the name of the machine, and select Start.
Upon a successful start, the VM login screen displays.
Control Description
Name Specify the name of the virtual switch.
Notes Optionally, specify notes that apply to the virtual switch.
Connection type Select the switch type of the virtual switch configuration that was not provided during the installation script. Use the Hyper-V switch manager to configure the v-switch that need to be connected to the interface.
VLAN ID Identifies the V host to use with this virtual switch.
Leave the box unchecked for Enable virtual LAN identification for the management operating system.
NetApp AltaVault Cloud Integrated Storage Installation and Service Guide for Virtual Appliances 19
Installing and configuring AltaVault on Microsoft Hyper-V Running the AltaVault appliance CLI configuration wizard
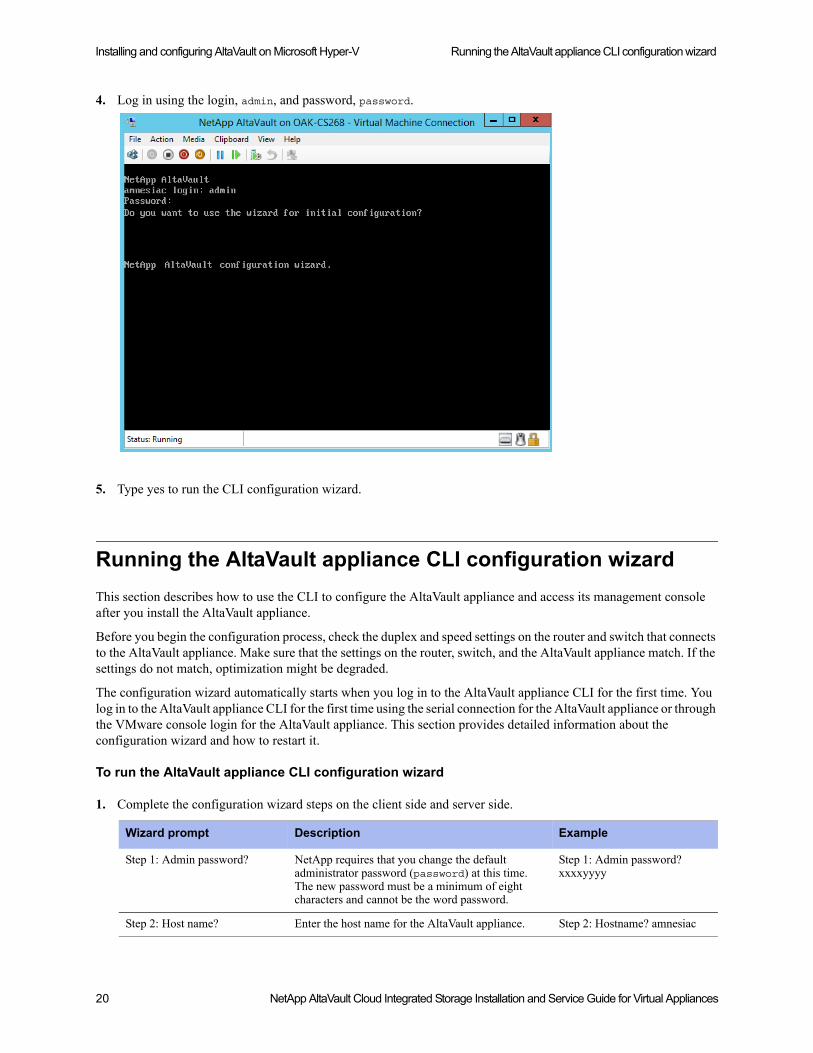
4. Log in using the login, admin, and password, password.
5. Type yes to run the CLI configuration wizard.
Running the AltaVault appliance CLI configuration wizard
This section describes how to use the CLI to configure the AltaVault appliance and access its management console after you install the AltaVault appliance.
Before you begin the configuration process, check the duplex and speed settings on the router and switch that connects to the AltaVault appliance. Make sure that the settings on the router, switch, and the AltaVault appliance match. If the settings do not match, optimization might be degraded.
The configuration wizard automatically starts when you log in to the AltaVault appliance CLI for the first time. You log in to the AltaVault appliance CLI for the first time using the serial connection for the AltaVault appliance or through the VMware console login for the AltaVault appliance. This section provides detailed information about the configuration wizard and how to restart it.
To run the AltaVault appliance CLI configuration wizard
1. Complete the configuration wizard steps on the client side and server side.
Wizard prompt Description Example
Step 1: Admin password? NetApp requires that you change the default administrator password (password) at this time. The new password must be a minimum of eight characters and cannot be the word password.
Step 1: Admin password? xxxxyyyy
Step 2: Host name? Enter the host name for the AltaVault appliance. Step 2: Hostname? amnesiac
20 NetApp AltaVault Cloud Integrated Storage Installation and Service Guide for Virtual Appliances
Next steps Installing and configuring AltaVault on Microsoft Hyper-V
The system confirms your settings.
2. To change an answer, enter the step number to return to. Otherwise press <enter> to save changes and exit. The AltaVault appliance configuration wizard automatically saves your configuration settings.
3. To log out of the system, enter the following command at the system prompt:
amnesiac> exit
Next steps
After you log in to AltaVault virtual appliance, the configuration wizard displays and allows you to do the following:
Specify system settings, including time zone and DNS.
Configure cloud settings, including cloud credentials, licenses, and data encryption.
Configure data interfaces that are used to receive data from the backup application.
Configure CIFS shares or NFS exports that the backup application can access.
Optionally, configure peer monitoring, email alerts, SNMP, and additional login security.
Export the Virtual AltaVault configuration for safe keeping in the event of a disaster.
To manage Virtual AltaVault using the command-line interface, see the NetApp AltaVault Cloud Integrated Storage Command-Line Interface Reference Guide.
To complete configurations, go to the NetApp AltaVault Cloud Integrated Storage Deployment Guide.
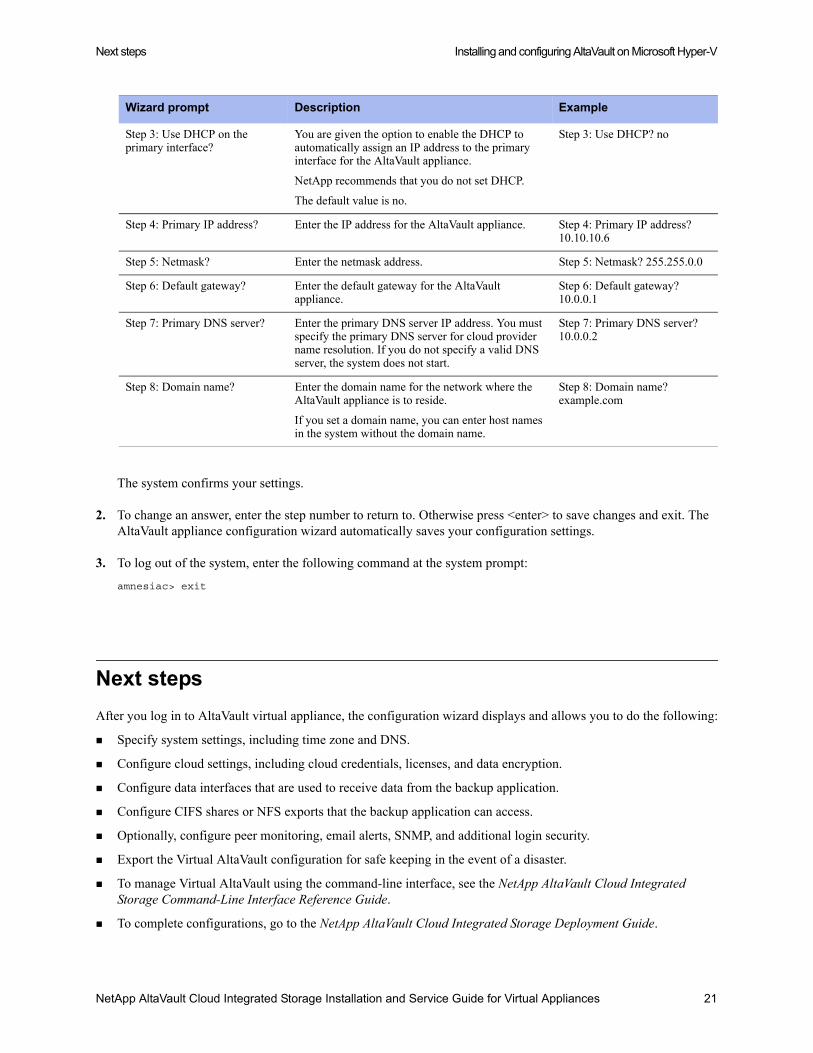
Step 3: Use DHCP on the primary interface?
You are given the option to enable the DHCP to automatically assign an IP address to the primary interface for the AltaVault appliance.
NetApp recommends that you do not set DHCP.
The default value is no.
Step 3: Use DHCP? no
Step 4: Primary IP address? Enter the IP address for the AltaVault appliance. Step 4: Primary IP address? 10.10.10.6
Step 5: Netmask? Enter the netmask address. Step 5: Netmask? 255.255.0.0
Step 6: Default gateway? Enter the default gateway for the AltaVault appliance.
Step 6: Default gateway? 10.0.0.1
Step 7: Primary DNS server? Enter the primary DNS server IP address. You must specify the primary DNS server for cloud provider name resolution. If you do not specify a valid DNS server, the system does not start.
Step 7: Primary DNS server? 10.0.0.2
Step 8: Domain name? Enter the domain name for the network where the AltaVault appliance is to reside.
If you set a domain name, you can enter host names in the system without the domain name.
Step 8: Domain name? example.com
Wizard prompt Description Example
NetApp AltaVault Cloud Integrated Storage Installation and Service Guide for Virtual Appliances 21

Installing and configuring AltaVault on Microsoft Hyper-V Next steps
22 NetApp AltaVault Cloud Integrated Storage Installation and Service Guide for Virtual Appliances

CHAPTER 2 Installing and configuring AltaVault virtual appliance on VMware ESXi
This chapter describes how to install and configure the AltaVault virtual appliance on VMware ESXi. It includes the following sections:
“Supported AltaVault virtual appliance models” on page 23
“Hardware requirements” on page 23
“Managing licenses” on page 25
“Deployment guidelines” on page 25
“Installing AltaVault virtual appliance on VMware ESXi” on page 26
“Logging in to AltaVault virtual appliance” on page 36
“Next steps” on page 38
Supported AltaVault virtual appliance models
AltaVault virtual appliance is available in the following models for VMware ESXi:
AVA-v8
AVA-v16
AVA-v32
Hardware requirements
Before installing the AltaVault virtual appliance, you must be running ESXi 5.5 or later.
NetApp AltaVault Cloud Integrated Storage Installation and Service Guide for Virtual Appliances 23

Installing and configuring AltaVault virtual appliance on VMware ESXi Hardware requirements
The following table displays the minimum mandatory hardware requirements supported for the AltaVault virtual appliance.
About hardware requirements
If, for example, you would like to configure an AVA-v8 with 8 TB of usable cache, the virtual machine should have a disk LUN mapped that provides extra capacity to store the meta data that the system generates. In order to get the maximum of 8 TB usable, provision a disk LUN of 10 TB (10,000,000,000,000 bytes or 10 TB base 10). Provisioning a LUN larger than 10 TB will cause the optimization service to fail to start when using an 8 TB license.
It is possible to create a smaller LUN when using for proof-of-concept, test environments or if there is a constraint on provisioning a LUN of the required size. The disk needs to be large enough to hold the backup data being written to the appliance and is recommended to be large enough to hold several weeks of backup data. The minimum size in the case of a test lab should be no smaller than 100 GB. As large of a disk as possible is recommended.
Component Description
Virtual CPUs 4 minimum for AVA-v8
8 minimum for AVA-v16
12 minimum for AVA-v32
Physical CPUs Intel E5-2680v2™ or similar
Memory AVA-v8: requires 24GB of RAM
AVA-v16: requires of 48GB of RAM
AVA-v32: requires of 96GB of RAM
If the memory is more than the minimum required amount, the system does not use the extra memory.
Networking For 10GigE, use VMXNET3 adapters
Disk AVA-v8: 10 TB (recommended):
• 8 TB for data cache
• 2 TB for system metadata
AVA-v16: 20 TB (recommended):
• 16 TB for data cache
• 4 TB for system metadata
AVA-v32: 38 TB (recommended):
• 32 TB for data cache
• 6 TB for system metadata
In addition:
• Minimum 150 GB for the AltaVault OS disk.
• Use RAID-6 high throughput disk subsystem. Use separate disk subsystems from the one used for backed-up servers.
• Use only the recommended disk size. The system will not accept a disk that is greater than the recommended size for the model.
24 NetApp AltaVault Cloud Integrated Storage Installation and Service Guide for Virtual Appliances
Managing licenses Installing and configuring AltaVault virtual appliance on VMware ESXi
Managing licenses
For details on licensing, see the section on Managing licenses in Chapter 5 of the NetApp AltaVault Cloud Integrated Storage User’s Guide.
Note: Moving or cloning VMs is disallowed; doing so may invalidate the Secure Vault.
Deployment guidelines
NetApp recommends the following guidelines while deploying the AltaVault package on an ESX or ESX(i) host:
Use at least a gigabit link for interfaces: For optimal performance, connect the virtual interfaces to physical interfaces that are capable of at least 1 Gbps.
Do not share physical NICs: For optimal performance, assign a physical NIC to a single interface. Do not share physical NICs destined for virtual interfaces with other VMs running on the ESX or ESXi host. Doing so might create performance bottlenecks.
Always reserve virtual CPUs: To ensure good performance, it is important that the AltaVault virtual appliance receives a fair share of CPU cycles. To allocate CPU cycles, reserve the number of virtual CPUs for the AltaVault virtual appliance and also reserve the number of clock cycles (in terms of CPU MHz).
Do not over-provision the physical CPUs: Do not run more VMs than there are CPUs. For example, if an ESX host is running off a four-core CPU, all the VMs on the host should use not more than four vCPUs.
Use a server-grade CPU for the ESX host: For example, use an Intel Ivy Bridge™ or Sandy Bridge™ CPU instead of an Intel Atom™.
Always reserve RAM: Memory is another very important factor in determining the AltaVault virtual appliance performance. Reserve the RAM that is needed by the AltaVault virtual appliance model plus 5% more for the VMware overhead—this provides a significant performance boost.
Do not over-provision physical RAM: The total virtual RAM needed by all running VMs should not be greater than the physical RAM on the system.
Do not use low-quality storage for the datastore disk: Make sure that the AltaVault virtual appliance disk used for the data store VMDK uses a disk medium that supports a high number of Input/Output Operations Per Second (IOPS). For example, use high performance storage such as NAS, SAN (Storage Area Network), or DAS (Direct Attached Storage).
Do not share host physical disks: VMware recommends that to achieve near-native disk I/O performance, you do not share host physical disks (such as SCSI or SATA disks) between VMs. While deploying a AltaVault virtual appliance, allocate an unshared disk for the datastore disk.
Configure the AltaVault virtual appliance on a 64-bit CPU that has virtualization enabled: On supported CPUs, virtualization is enabled in the BIOS of the motherboard. Go to www.intel.com for information about VT enabled CPUs, and www.amd.com for information about AMD-V enabled CPUs.
Use VMFS-5 with ESXi 5.5 to create VMDK files that are larger than 2TB. Otherwise, the largest VMDK file that can be provisioned on VMFS-3 is 2TB. If you are using VMFS-3, use Raw Device Mapping (RDM) to provision disks larger than 2TB.
NetApp AltaVault Cloud Integrated Storage Installation and Service Guide for Virtual Appliances 25
Installing and configuring AltaVault virtual appliance on VMware ESXi Installing AltaVault virtual appliance on VMware ESXi
Use a dedicated physical drive for the AltaVault virtual appliance datastore: This is the device that deduplicates and stores segments from the AltaVault virtual appliance, sharing this drive with other VMs can impact the overall performance of the AltaVault virtual appliance.
Installing AltaVault virtual appliance on VMware ESXi
Before you install the Virtual AltaVault virtual appliance, verify that your system meets the hardware and software requirements listed under “Supported AltaVault virtual appliance models” on page 23 and “Hardware requirements” on page 23.
Virtual AltaVault provides the following interfaces:
Primary
Data interfaces
– e0a
– e0b
– e0c
For ESX, the AltaVault image contains the VMX and VMDK files necessary to create the virtual machine.
The AltaVault virtual appliance image is an installable Open Virtual Appliance (OVA) package. OVA is a platform-independent, efficient, extensible, and open packaging distribution format. The OVA package provides a complete specification of the AltaVault virtual appliance, including its required virtual disks, CPU, memory, networking, and storage.
The OVA is a compressed package that quickly creates a virtual machine with predefined settings.
To obtain the OVA package, log in to your customer account at https://mysupport.netapp.com.
After you obtain the virtual machine OVA package from NetApp, install the package using VMware management tools: OVFTool or VMware vSphere client. This section describes how to install and configure the default AltaVault virtual appliance on a VMware ESX or ESXi host using the vSphere client.
Go to www.vmware.com for documentation on OVFTool and vSphere client.
Each package contains predefined hardware requirements and configuration for the AltaVault virtual appliance. Do not open or modify any of the files in the package. The package files take up several gigabytes of disk space (the package itself is less than 1 GB).
After installation prerequisites are met, begin the installation process.
26 NetApp AltaVault Cloud Integrated Storage Installation and Service Guide for Virtual Appliances

Installing AltaVault virtual appliance on VMware ESXi Installing and configuring AltaVault virtual appliance on VMware ESXi
To install the AltaVault virtual appliance
1. After downloading the VM package from https://mysupport.netapp.com, open VMware vSphere.
2. Type the IP address or host Name (or select it from the drop-down list), your user name, and password.
3. Click Login.
4. From the vSphere client GUI menu, select File, and then select Deploy OVF Template.
5. Select Deploy from a file or URL and click Browse to locate the OVA file that you want to use.
6. Click Open to select the OVA file.
NetApp AltaVault Cloud Integrated Storage Installation and Service Guide for Virtual Appliances 27
Installing and configuring AltaVault virtual appliance on VMware ESXi Installing AltaVault virtual appliance on VMware ESXi
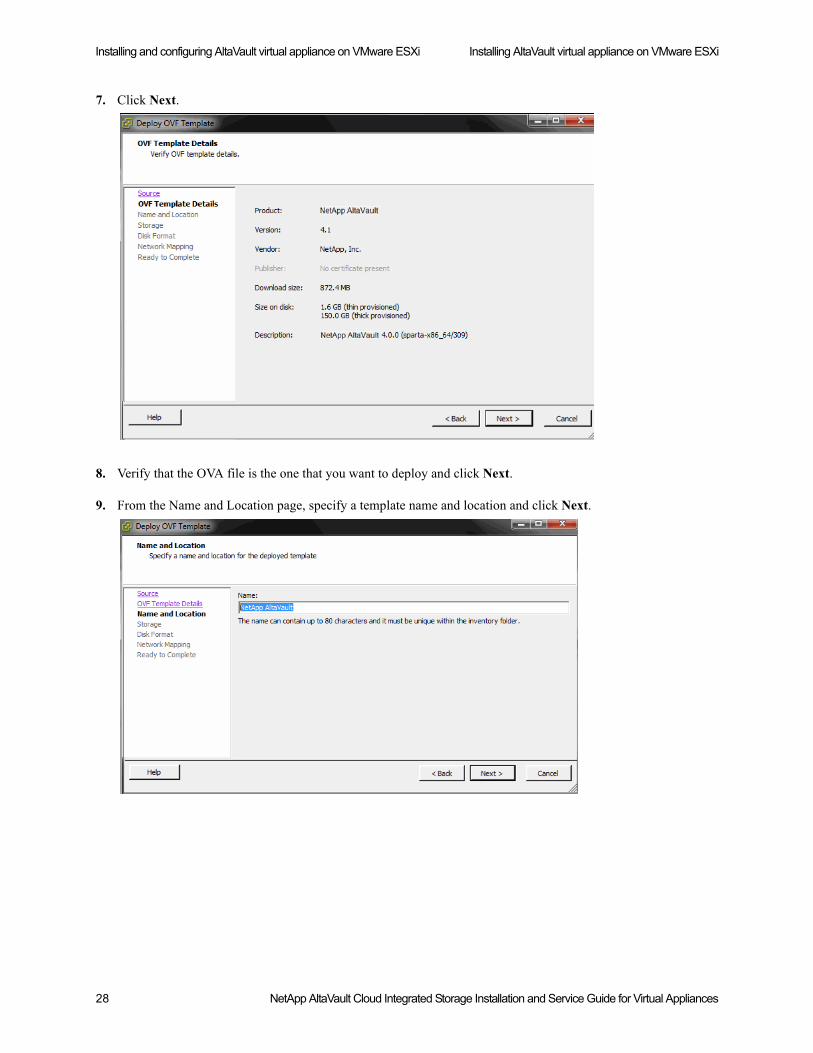
7. Click Next.
8. Verify that the OVA file is the one that you want to deploy and click Next.
9. From the Name and Location page, specify a template name and location and click Next.
28 NetApp AltaVault Cloud Integrated Storage Installation and Service Guide for Virtual Appliances

Installing AltaVault virtual appliance on VMware ESXi Installing and configuring AltaVault virtual appliance on VMware ESXi
10. Type a name for the virtual machine and click Next.
NetApp AltaVault Cloud Integrated Storage Installation and Service Guide for Virtual Appliances 29
Installing and configuring AltaVault virtual appliance on VMware ESXi Installing AltaVault virtual appliance on VMware ESXi
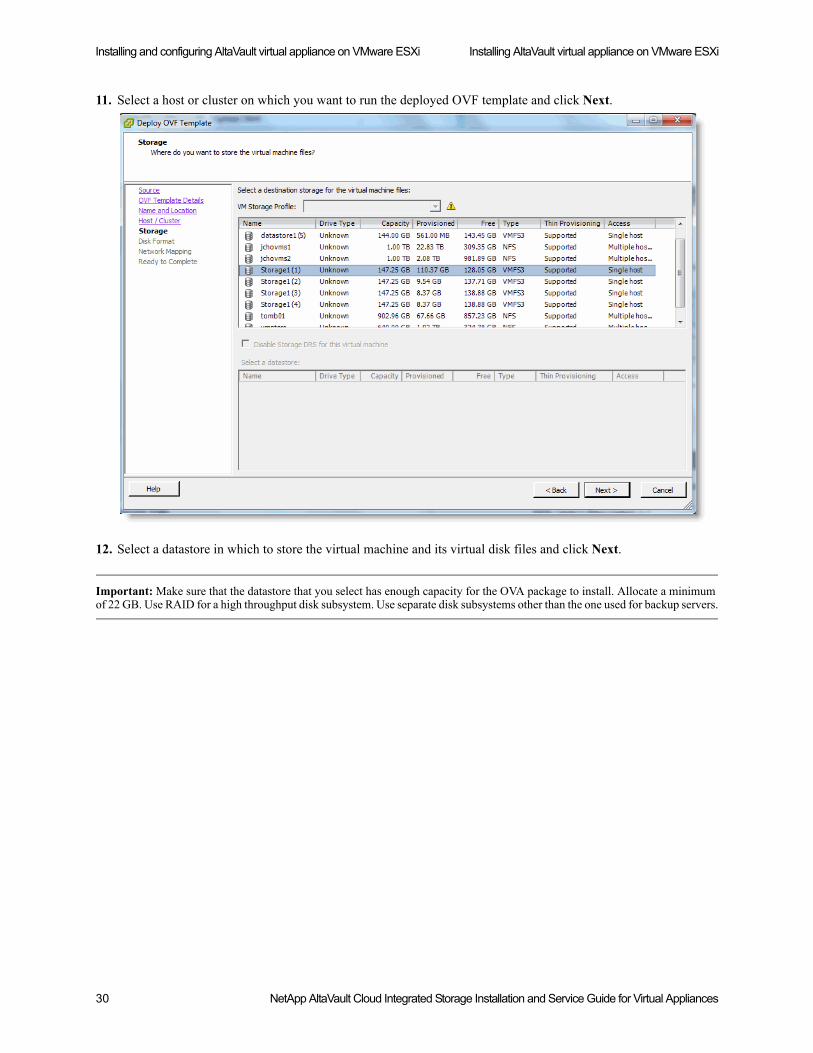
11. Select a host or cluster on which you want to run the deployed OVF template and click Next.
12. Select a datastore in which to store the virtual machine and its virtual disk files and click Next.
Important: Make sure that the datastore that you select has enough capacity for the OVA package to install. Allocate a minimum of 22 GB. Use RAID for a high throughput disk subsystem. Use separate disk subsystems other than the one used for backup servers.
30 NetApp AltaVault Cloud Integrated Storage Installation and Service Guide for Virtual Appliances
Installing AltaVault virtual appliance on VMware ESXi Installing and configuring AltaVault virtual appliance on VMware ESXi
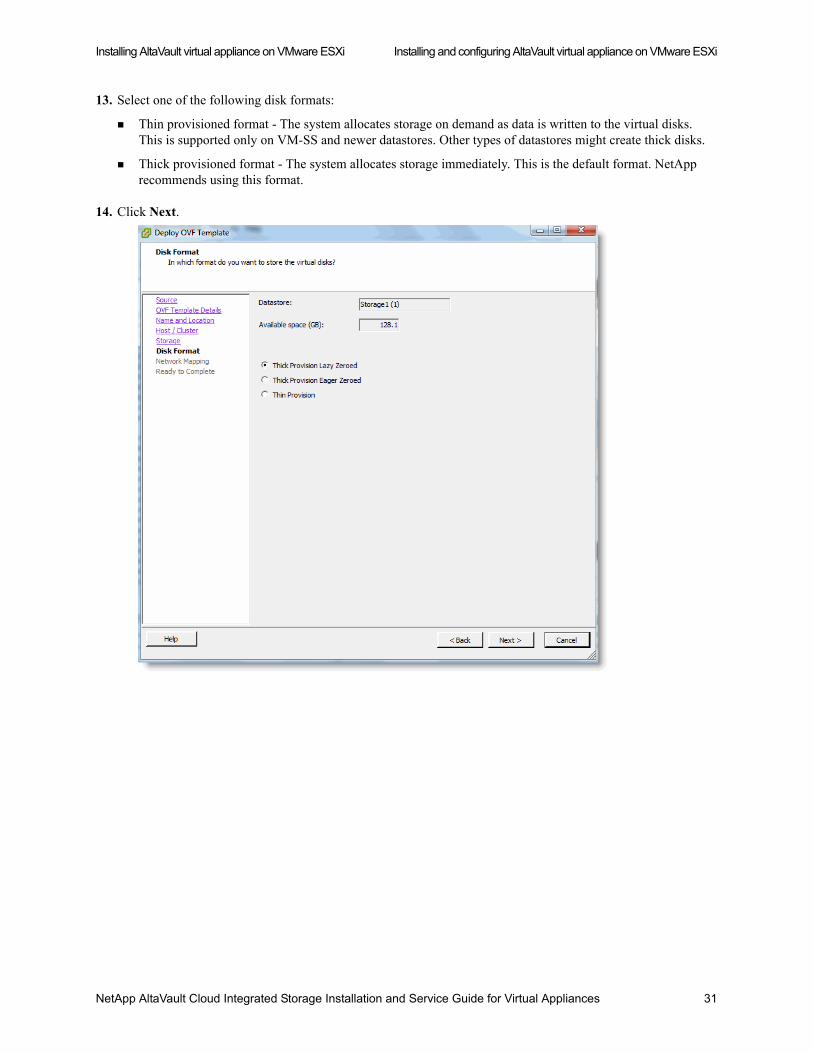
13. Select one of the following disk formats:
Thin provisioned format - The system allocates storage on demand as data is written to the virtual disks. This is supported only on VM-SS and newer datastores. Other types of datastores might create thick disks.
Thick provisioned format - The system allocates storage immediately. This is the default format. NetApp recommends using this format.
14. Click Next.
NetApp AltaVault Cloud Integrated Storage Installation and Service Guide for Virtual Appliances 31

Installing and configuring AltaVault virtual appliance on VMware ESXi Installing AltaVault virtual appliance on VMware ESXi
15. Select the destination network name and choose a network from the drop-down list to map the source network to a destination network.
Make sure that you map each source network to a unique destination network. If a source network is mapped to the same destination as another source, an error message displays. Mapping source networks to the same destination network can create a loop in the system and might make your ESX or ESXi host unreachable.
16. Click Next.
17. Verify the deployment settings and click Finish.
A dialog box displays the amount of time it takes for the deployment to finish. When the deployment finishes, a dialog box informs you that the deployment was successful.
18. Click Close.
The new virtual machine displays under the hostname or host IP address in the virtual machine inventory.
32 NetApp AltaVault Cloud Integrated Storage Installation and Service Guide for Virtual Appliances
Installing AltaVault virtual appliance on VMware ESXi Installing and configuring AltaVault virtual appliance on VMware ESXi
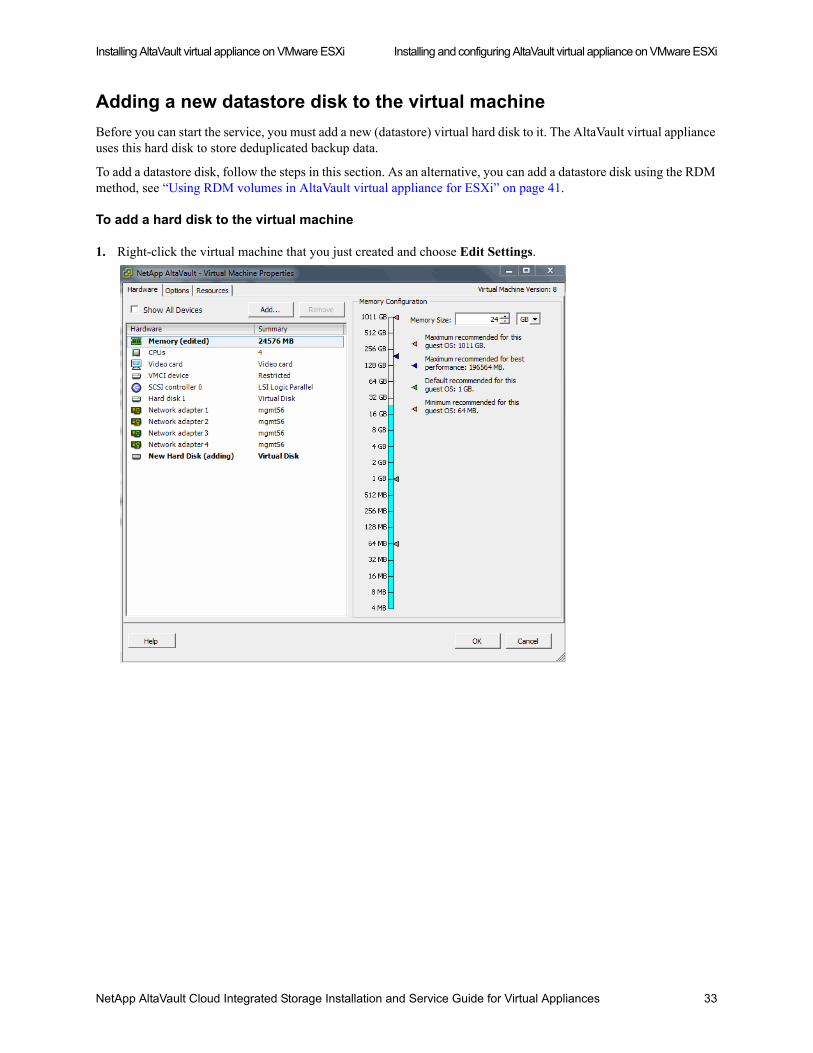
Adding a new datastore disk to the virtual machine
Before you can start the service, you must add a new (datastore) virtual hard disk to it. The AltaVault virtual appliance uses this hard disk to store deduplicated backup data.
To add a datastore disk, follow the steps in this section. As an alternative, you can add a datastore disk using the RDM method, see “Using RDM volumes in AltaVault virtual appliance for ESXi” on page 41.
To add a hard disk to the virtual machine
1. Right-click the virtual machine that you just created and choose Edit Settings.
NetApp AltaVault Cloud Integrated Storage Installation and Service Guide for Virtual Appliances 33
Installing and configuring AltaVault virtual appliance on VMware ESXi Installing AltaVault virtual appliance on VMware ESXi
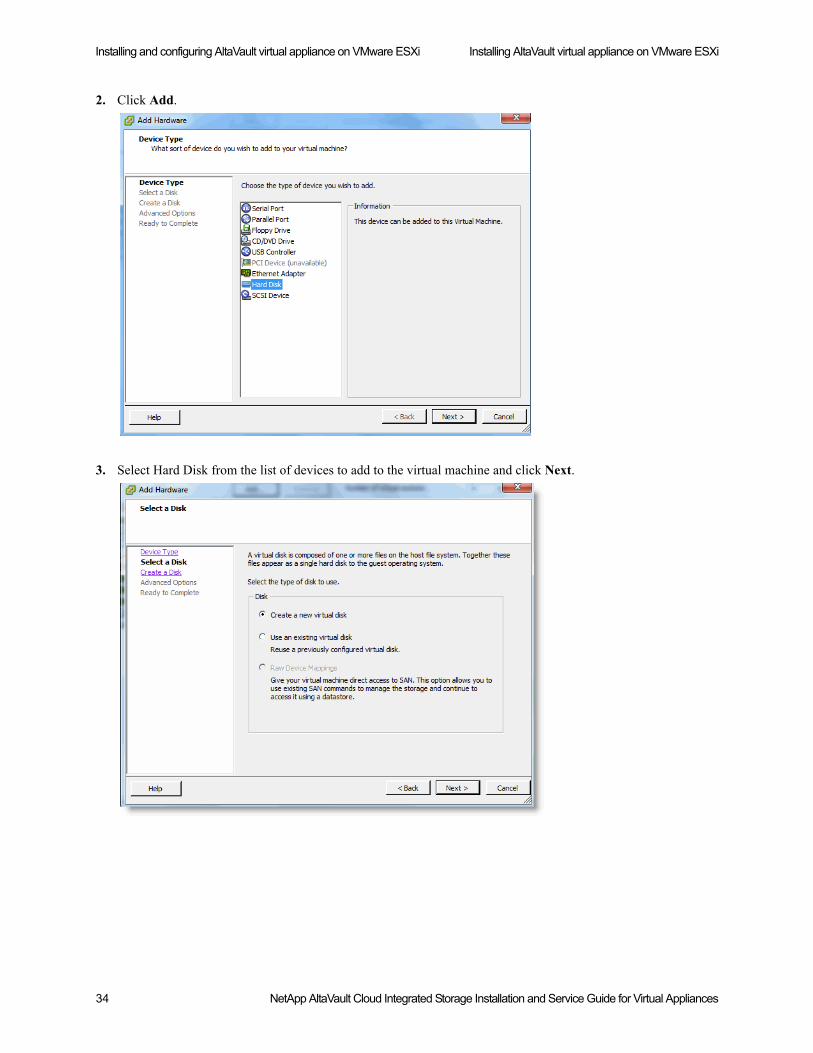
2. Click Add.
3. Select Hard Disk from the list of devices to add to the virtual machine and click Next.
34 NetApp AltaVault Cloud Integrated Storage Installation and Service Guide for Virtual Appliances
Installing AltaVault virtual appliance on VMware ESXi Installing and configuring AltaVault virtual appliance on VMware ESXi
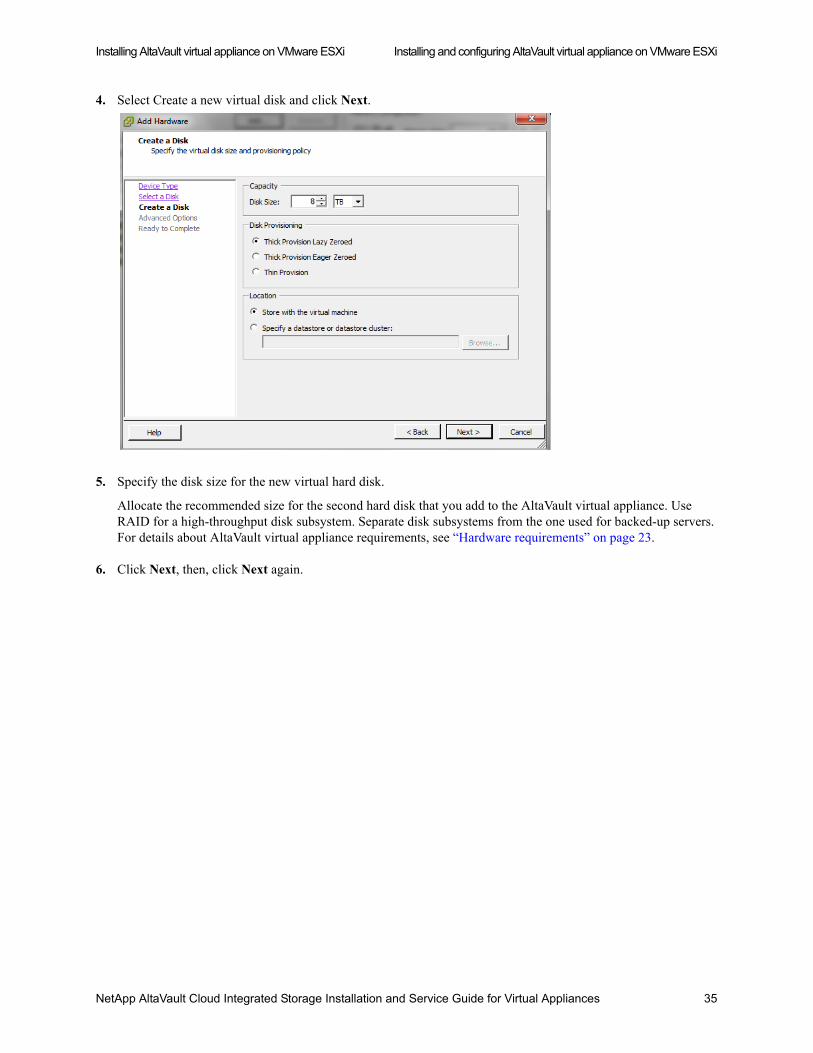
4. Select Create a new virtual disk and click Next.
5. Specify the disk size for the new virtual hard disk.
Allocate the recommended size for the second hard disk that you add to the AltaVault virtual appliance. Use RAID for a high-throughput disk subsystem. Separate disk subsystems from the one used for backed-up servers. For details about AltaVault virtual appliance requirements, see “Hardware requirements” on page 23.
6. Click Next, then, click Next again.
NetApp AltaVault Cloud Integrated Storage Installation and Service Guide for Virtual Appliances 35

Installing and configuring AltaVault virtual appliance on VMware ESXi Installing AltaVault virtual appliance on VMware ESXi
7. Verify the settings and click Finish.
8. Click OK.
The new hard disk displays in the virtual machine properties.
After you add the new disk, when you start the AltaVault virtual appliance for the first time, it creates a new file system for the newly added disk. Depending on the size of this disk, creating a new file system can take a long time (in the order of tens of minutes). During this time, the system does not display any debugging message on the console, and you might incorrectly interpret that the system has stopped responding. If you perform a hard power reset at this stage, to force a reboot, the reboot corrupts the file system on the second disk and the logs the followings error in the system logs:
Jul 21 15:55:40 localhost rbtinit: mount: can't find /data in /etc/fstab or /etc/mtabJul 21 15:55:50 altavault statsd[3083]: [statsd.NOTICE]: Alarm triggered for rising error for event datastore_disk
Note: If you inadvertently interrupted the AltaVault virtual appliance boot process (described above), delete and then add the second disk again and wait until the system completes its boot process.
Logging in to AltaVault virtual appliance
You can log in to AltaVault virtual appliance from the vSphere Client.
To log in to Virtual AltaVault
1. In the vSphere Client, right-click the virtual machine that you created.
36 NetApp AltaVault Cloud Integrated Storage Installation and Service Guide for Virtual Appliances
Running the AltaVault appliance CLI configuration wizard Installing and configuring AltaVault virtual appliance on VMware ESXi
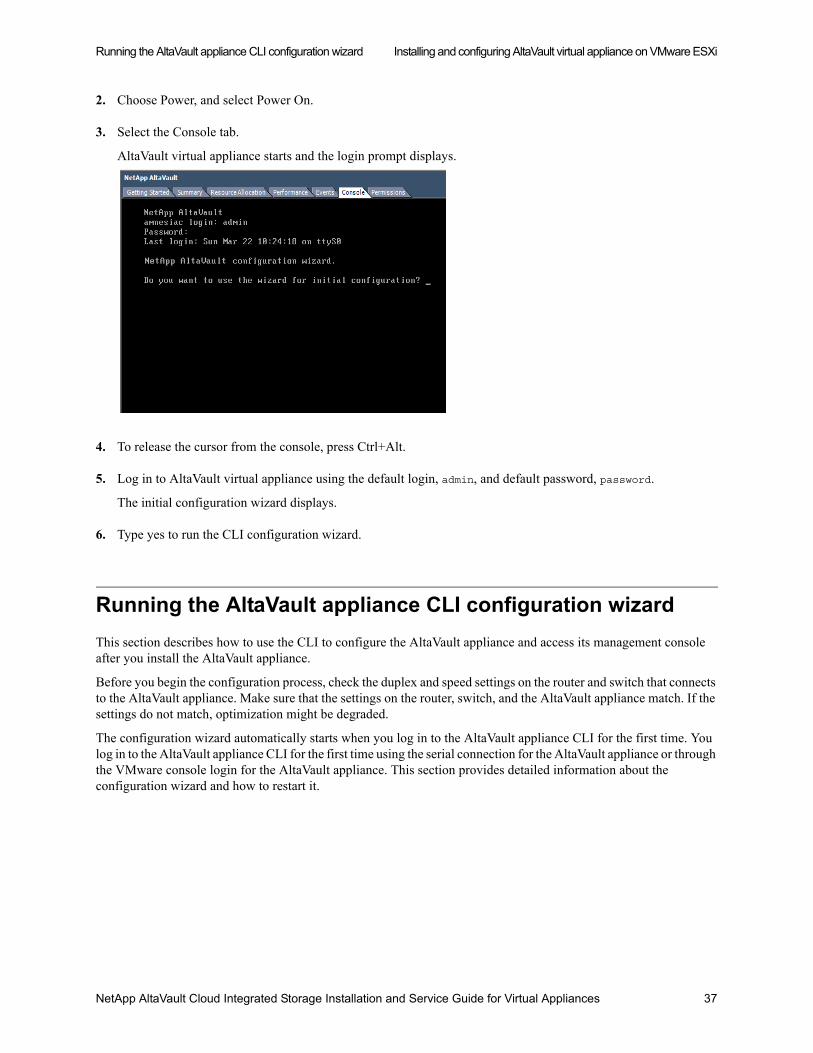
2. Choose Power, and select Power On.
3. Select the Console tab.
AltaVault virtual appliance starts and the login prompt displays.
4. To release the cursor from the console, press Ctrl+Alt.
5. Log in to AltaVault virtual appliance using the default login, admin, and default password, password.
The initial configuration wizard displays.
6. Type yes to run the CLI configuration wizard.
Running the AltaVault appliance CLI configuration wizard
This section describes how to use the CLI to configure the AltaVault appliance and access its management console after you install the AltaVault appliance.
Before you begin the configuration process, check the duplex and speed settings on the router and switch that connects to the AltaVault appliance. Make sure that the settings on the router, switch, and the AltaVault appliance match. If the settings do not match, optimization might be degraded.
The configuration wizard automatically starts when you log in to the AltaVault appliance CLI for the first time. You log in to the AltaVault appliance CLI for the first time using the serial connection for the AltaVault appliance or through the VMware console login for the AltaVault appliance. This section provides detailed information about the configuration wizard and how to restart it.
NetApp AltaVault Cloud Integrated Storage Installation and Service Guide for Virtual Appliances 37

Installing and configuring AltaVault virtual appliance on VMware ESXi Next steps
To run the AltaVault appliance CLI configuration wizard
1. Complete the configuration wizard steps on the client side and server side.
The system confirms your settings.
2. To change an answer, enter the step number to return to. Otherwise press <enter> to save changes and exit. The AltaVault appliance configuration wizard automatically saves your configuration settings.
3. To log out of the system, enter the following command at the system prompt:
amnesiac> exit
Next steps
After you log in to AltaVault virtual appliance, the configuration wizard displays and allows you to do the following:
Specify system settings, including time zone and DNS.
Configure cloud settings, including cloud credentials, licenses, and data encryption.
Configure data interfaces that are used to receive data from the backup application.
Configure CIFS shares or NFS exports that the backup application can access.
Wizard prompt Description Example
Step 1: Admin password? AltaVault strongly recommends that you change the default administrator password (password) at this time. The new password must be a minimum of eight characters.
Step 1: Admin password? xxxxyyyy
Step 2: Host name? Enter the host name for the AltaVault appliance. Step 2: Hostname? amnesiac
Step 3: Use DHCP on the primary interface?
You are given the option to enable the DHCP to automatically assign an IP address to the primary interface for the AltaVault appliance.
NetApp recommends that you do not set DHCP.
The default value is no.
Step 3: Use DHCP? no
Step 4: Primary IP address? Enter the IP address for the AltaVault appliance. Step 4: Primary IP address? 10.10.10.6
Step 5: Netmask? Enter the netmask address. Step 5: Netmask? 255.255.0.0
Step 6: Default gateway? Enter the default gateway for the AltaVault appliance. Step 6: Default gateway? 10.0.0.1
Step 7: Primary DNS server? Enter the primary DNS server IP address. You must specify the primary DNS server for cloud provider name resolution. If you do not specify a valid DNS server, the system does not start.
Step 7: Primary DNS server? 10.0.0.2
Step 8: Domain name? Enter the domain name for the network where the AltaVault appliance is to reside.
If you set a domain name, you can enter host names in the system without the domain name.
Step 8: Domain name? example.com
38 NetApp AltaVault Cloud Integrated Storage Installation and Service Guide for Virtual Appliances
Next steps Installing and configuring AltaVault virtual appliance on VMware ESXi
Optionally, configure peer monitoring, email alerts, SNMP, and additional login security.
Export the Virtual AltaVault configuration for safe keeping in the event of a disaster.
To manage Virtual AltaVault using the command-line interface, see the NetApp AltaVault Cloud Integrated Storage Command-Line Interface Reference Guide.
To complete configurations, go to the NetApp AltaVault Cloud Integrated Storage Deployment Guide.
NetApp AltaVault Cloud Integrated Storage Installation and Service Guide for Virtual Appliances 39
Installing and configuring AltaVault virtual appliance on VMware ESXi Next steps
40 NetApp AltaVault Cloud Integrated Storage Installation and Service Guide for Virtual Appliances
CHAPTER 3 Using RDM volumes in AltaVault virtual appliance for ESXi
This chapter describes how to set up the AltaVault virtual appliance with a VMware raw device mapped volume. It includes the following sections:
“Overview of RDM volumes” on page 41
“Reviewing system prerequisites” on page 41
“Configuring VMware storage” on page 42
Overview of RDM volumes
AltaVault virtual appliance with Raw Device Mapping (RDM) of volumes can achieve much larger configurations than VMFS-based VMDK volumes. VMware ESXi5 and higher provides a powerful set of new storage features. Among these storage feature enhancements, ESXi5 supports pass-through RDM of volumes up to roughly 60TB in size. This greatly enhances the storage ability for very large VMs that require single large volumes that are greater than 2TB in size.
Reviewing system prerequisites
Before you configure a VMware RDM volume, ensure that your system meets the following requirements:
VMware ESXi 5.5 installed and licensed; iSCSI Software Adapter installed (see VMware ESXi5 documentation for details on setting this up).
The storage array configured with RAID-5 or RAID-6 and an iSCSI target volume (LUN) available for VMware.
There is the minimum gigabit Ethernet connectivity between the VMware ESXi5 server and the storage array. NetApp recommends that you use a dedicated gigabit LAN between the storage array and VMware ESXi5 server for best performance.
Minimum CPU, memory, and storage space for the AltaVault virtual appliance deployment. For details, see “Supported AltaVault virtual appliance models” on page 23.
NetApp AltaVault Cloud Integrated Storage Installation and Service Guide for Virtual Appliances 41

Using RDM volumes in AltaVault virtual appliance for ESXi Configuring VMware storage
Configuring VMware storage
This section describes how to configure VMware storage using VMware vSphere client software.
To configure VMware storage for the AltaVault virtual appliance installation
1. Open the VMware vSphere client.
2. Select the Configuration tab.
3. From the left panel, select Storage Adapters from the Hardware list.
4. Select the iSCSI Software Adapter name from the right panel.
5. In the bottom half of the screen, select the Properties button.
42 NetApp AltaVault Cloud Integrated Storage Installation and Service Guide for Virtual Appliances
Configuring VMware storage Using RDM volumes in AltaVault virtual appliance for ESXi
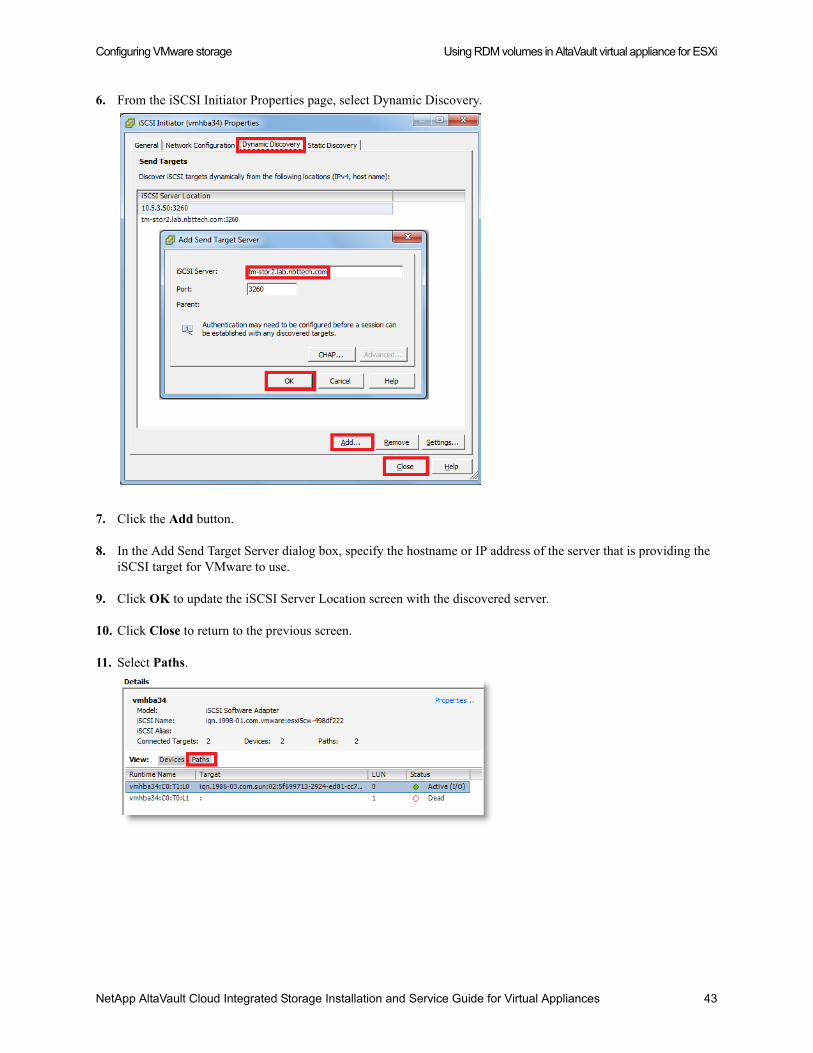
6. From the iSCSI Initiator Properties page, select Dynamic Discovery.
7. Click the Add button.
8. In the Add Send Target Server dialog box, specify the hostname or IP address of the server that is providing the iSCSI target for VMware to use.
9. Click OK to update the iSCSI Server Location screen with the discovered server.
10. Click Close to return to the previous screen.
11. Select Paths.
NetApp AltaVault Cloud Integrated Storage Installation and Service Guide for Virtual Appliances 43

Using RDM volumes in AltaVault virtual appliance for ESXi Configuring VMware storage
12. Select Devices to display the iSCSI logical volumes found on the server.
Creating raw device mapping
This section describes how to create the raw device mapping (RDM) between the AltaVault virtual appliance and the discovered volume.
To create RDM
1. Install the AltaVault virtual appliance using the steps described in “Installing AltaVault virtual appliance on VMware ESXi” on page 26.
2. Select the option and select a Disk.
3. Select the Raw Device Mappings radio button.
4. Click Next.
5. Select the target volume that you want to add to the AltaVault virtual appliance from the list.
44 NetApp AltaVault Cloud Integrated Storage Installation and Service Guide for Virtual Appliances

Configuring VMware storage Using RDM volumes in AltaVault virtual appliance for ESXi
6. Click Next.
The volume size for the selected volume displays in the Capacity column.
VMware stores a file to represent the relationship between AltaVault virtual appliance instance and the RDM volume.
7. Select Store with Virtual Machine to keep the mapping with the AltaVault virtual appliance files as is.
8. Click Next.
NetApp AltaVault Cloud Integrated Storage Installation and Service Guide for Virtual Appliances 45

Using RDM volumes in AltaVault virtual appliance for ESXi Configuring VMware storage
9. Under Compatibility, select the Physical radio button to allow VMware to access the RDM volume directly.
10. Click Next.
11. Leave the default SCSI ID assigned by VMware as is.
12. Click Next.
13. Click Finish to add the volume.
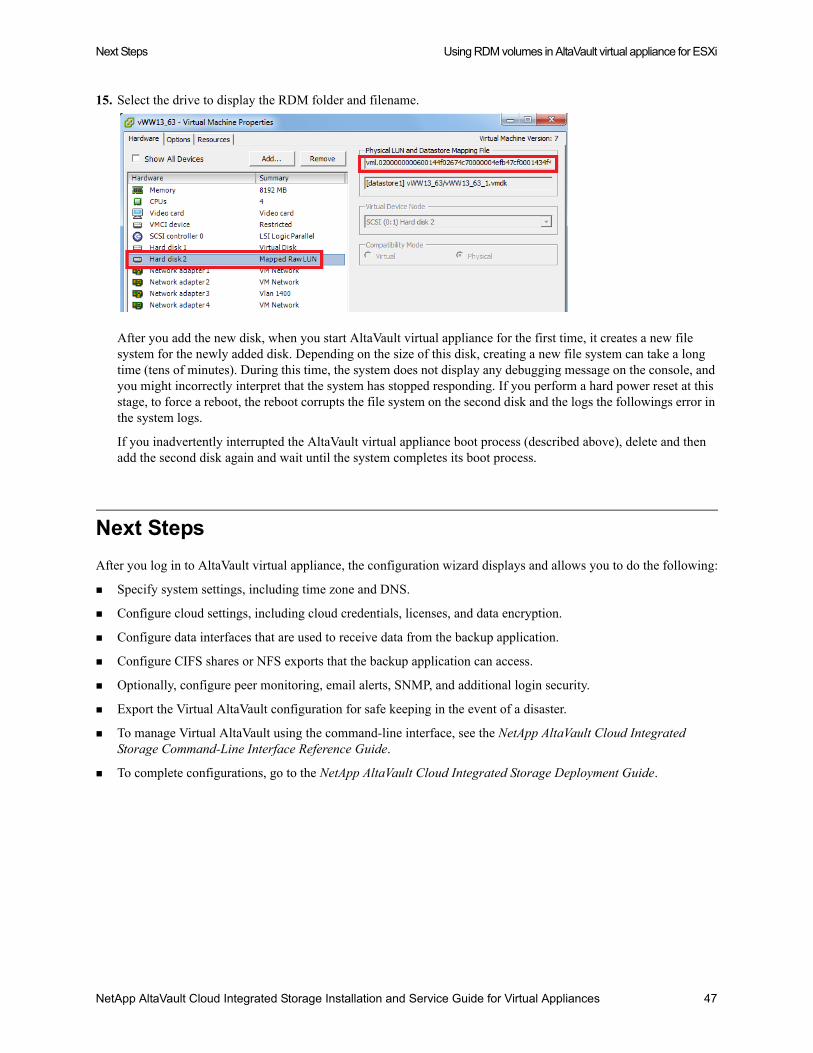
14. Select the Hardware tab on the Virtual Machine Properties page to display the volume you added.
46 NetApp AltaVault Cloud Integrated Storage Installation and Service Guide for Virtual Appliances
Next Steps Using RDM volumes in AltaVault virtual appliance for ESXi
15. Select the drive to display the RDM folder and filename.
After you add the new disk, when you start AltaVault virtual appliance for the first time, it creates a new file system for the newly added disk. Depending on the size of this disk, creating a new file system can take a long time (tens of minutes). During this time, the system does not display any debugging message on the console, and you might incorrectly interpret that the system has stopped responding. If you perform a hard power reset at this stage, to force a reboot, the reboot corrupts the file system on the second disk and the logs the followings error in the system logs.
If you inadvertently interrupted the AltaVault virtual appliance boot process (described above), delete and then add the second disk again and wait until the system completes its boot process.
Next Steps
After you log in to AltaVault virtual appliance, the configuration wizard displays and allows you to do the following:
Specify system settings, including time zone and DNS.
Configure cloud settings, including cloud credentials, licenses, and data encryption.
Configure data interfaces that are used to receive data from the backup application.
Configure CIFS shares or NFS exports that the backup application can access.
Optionally, configure peer monitoring, email alerts, SNMP, and additional login security.
Export the Virtual AltaVault configuration for safe keeping in the event of a disaster.
To manage Virtual AltaVault using the command-line interface, see the NetApp AltaVault Cloud Integrated Storage Command-Line Interface Reference Guide.
To complete configurations, go to the NetApp AltaVault Cloud Integrated Storage Deployment Guide.
NetApp AltaVault Cloud Integrated Storage Installation and Service Guide for Virtual Appliances 47
Using RDM volumes in AltaVault virtual appliance for ESXi Next Steps
48 NetApp AltaVault Cloud Integrated Storage Installation and Service Guide for Virtual Appliances
Beta Draft
APPENDIX A Migrating or upgrading AltaVault virtual appliances
This appendix includes the following sections:
“Migrating from virtual SteelStore 3.x to AltaVault virtual appliance 4.1.x” on page 49
“Upgrading AltaVault virtual appliance models” on page 52
Migrating from virtual SteelStore 3.x to AltaVault virtual appliance 4.1.x
Migrating from Virtual SteelStore 3.x to AltaVault virtual appliance (AVA) 4.1 involves exporting the configuration archive from the SteelStore, deploying a new AVA virtual machine, importing the configuration archive, and moving the data disk from the SteelStore to the AVA.
Note: There is no support for directly migrating or upgrading from 3.x to 4.1 appliances. You must first migrate to 4.0,4.0.0.1,or 4.0.1 and then upgrade to 4.1. This applies to both physical and virtual appliances.
AVA requires VMware ESXi 5.5, and the hardware requirements for AltaVault VMs might be greater than for the SteelStore virtual machine that it is replacing.
Component Description
Virtual CPUs 4 minimum for AVA-v8
8 minimum for AVA-v16
12 minimum for AVA-v32
Physical CPUs Intel E5-2680v2™ or similar
Memory AVA-v8: requires 24GB of RAM
AVA-v16: requires of 48GB of RAM
AVA-v32: requires of 96GB of RAM
If the memory is more than the minimum required amount, the system does not use the extra memory.
NetApp AltaVault Cloud Integrated Storage Installation and Service Guide for Virtual Appliances 49

Beta Draft
Migrating or upgrading AltaVault virtual appliances Migrating from virtual SteelStore 3.x to AltaVault virtual appliance 4.1.x
Note: All references to 3.x refer to SteelStore 3.x and 4.0.x refer to AltaVault 4.1. Only virtual appliances can be upgraded from 3.x to 4.1. Upgrades to AltaVault 4.1 software are not supported on physical SteelStore appliances running older software versions.
The following procedure assumes a vSphere Web Client; however, the steps are similar to a stand-alone vSphere client.
To migrate a SteelStore virtual machine to an AltaVault virtual machine
1. Ensure the 3.x virtual appliance is upgraded to the latest 3.x software version.
2. Export the configuration from 3.x and store it in a safe location.
3. Shut down the 3.x virtual appliance:
a. Enter the CLI commands:
CLI > enable
CLI # reload halt
b. Wait for the VM to get powered off in the vCenter UI.
4. Disassociate the datastore disk from the 3.x virtual machine through the vCenter UI:
a. Navigate to the VM in vCenter.
b. Right-click on the VM.
c. Select Edit Settings.
d. Select the Hardware tab.
Networking For 10GigE, use VMXNET3 adapters
Disk AVA-v8: 10 TB (recommended):
• 8 TB for data cache
• 2 TB for system metadata
AVA-v16: 20 TB (recommended):
• 16 TB for data cache
• 4 TB for system metadata
AVA-v32: 38 TB (recommended):
• 32 TB for data cache
• 6 TB for system metadata
In addition:
• Minimum 150 GB for the AltaVault OS disk.
• Use RAID-6 high throughput disk subsystem. Use separate disk subsystems from the one used for backed-up servers.
• Use only the recommended disk size. The system will not accept a disk that is greater than the recommended size for the model.
Component Description
50 NetApp AltaVault Cloud Integrated Storage Installation and Service Guide for Virtual Appliances

Beta Draft
Migrating from virtual SteelStore 3.x to AltaVault virtual appliance 4.1.x Migrating or upgrading AltaVault virtual appliances
e. Expand the entry for hard disk 2 and make note of the path for the disk file. For example, [datastore01] example-vm/example-vm.vmdk.
f. Remove hard disk 2, ensuring that you do not delete the disk image and click OK.
5. Deploy a new 4.1 AltaVault virtual appliance from the OVA file.
Do not configure a second disk for the AltaVault appliance datastore, as you will import the original SteelStore appliance datastore instead. Start the VM after it has been deployed.
6. Run the CLI wizard to IP the primary interface.
For more information, see “Starting a virtual machine” on page 19
7. Import a shared-only configuration on a 4.1 VM:
a. Go to the UI and select Settings > Setup Wizard.
b. Select Import Configuration.
c. Select the Import Shared Data Only option, while specifying the configuration file to import.
8. Reset the Megastore GUID on the 4.1 AltaVault virtual appliance by using the CLI commands:
CLI > enable
CLI # config t
CLI (config) # megastore guid reset
9. Shut down the AltaVault appliance from the Settings > Reboot/Shutdown page.
NetApp AltaVault Cloud Integrated Storage Installation and Service Guide for Virtual Appliances 51

Beta Draft
Migrating or upgrading AltaVault virtual appliances Upgrading AltaVault virtual appliance models
10. Associate the 3.x datastore disk noted in Step 4 above with the 4.1 VM in the vCenter:
a. Navigate to the VM in the vCenter UI.
b. Right-click on the VM and select Edit Settings.
c. Select the Virtual Hardware tab.
d. Select New device > Existing Hard Disk, and click Add.
e. Select the path of the disk file that you noted in Step 4e.
f. Click OK.
11. Power on the 4.1 VM and start the optimization service if its not already running.
Note: The cloud configuration cannot be modified unless the local datastore is empty, therefore, it is important to import the configuration archive before attaching the disk from the SteelStore in Step 4e.
Upgrading AltaVault virtual appliance models
When you deploy a new AltaVault virtual appliance, the default model is the AVA-v8. You can upgrade to either the AVA-v16 or AVA-v32 if the upgrade falls within one of the following categories:
Licensed installations
90 day trial period installations
Upgrading to a higher model for licensed installations
When you install the AltaVault virtual appliance, the default AVA-v8 model is deployed. To upgrade to a higher model, you must install a valid license key for the appropriate model.
To upgrade the model
1. Install a new valid license key for the appropriate model. See Managing Licenses in the NetApp AltaVault Cloud Integrated Storage User’s Guide.
2. Stop the service and power off the virtual appliance.
3. Edit the virtual machine settings for the appliance and provision the required memory and disk space for the model that you want to install.
4. Power on the appliance. The appliance starts as an AVA-16/AVA-32 depending on the license key entered.
52 NetApp AltaVault Cloud Integrated Storage Installation and Service Guide for Virtual Appliances

Beta Draft
Upgrading AltaVault virtual appliance models Migrating or upgrading AltaVault virtual appliances
Upgrading to a higher model during the 90-day trial period
When you install the AltaVault virtual appliance, the default AVA-v8 model is deployed.
To upgrade the model
1. Run the following CLI command:
license virtual-model <v16/v32>
2. Stop the service and power off the virtual appliance.
3. Edit the virtual machine settings for the appliance and provision the required memory and disk space for the model that you want to install.
4. Power on the appliance. The appliance starts as an AVA-16/AVA-32 depending on the model selected in Step 1.
NetApp AltaVault Cloud Integrated Storage Installation and Service Guide for Virtual Appliances 53
Beta Draft
Migrating or upgrading AltaVault virtual appliances Upgrading AltaVault virtual appliance models
54 NetApp AltaVault Cloud Integrated Storage Installation and Service Guide for Virtual Appliances
Copyright information
Copyright © 1994-2015 NetApp, Inc. All rights reserved. Printed in the U.S.
No part of this document covered by copyright may be reproduced in any form or by any means—graphic, electronic, or mechanical, including photocopying, recording, taping, or storage in an electronic retrieval system—without prior written permission of the copyright owner.
Software derived from copyrighted NetApp material is subject to the following license and disclaimer:
THIS SOFTWARE IS PROVIDED BY NETAPP “AS IS” AND WITHOUT ANY EXPRESS OR IMPLIED WARRANTIES, INCLUDING, BUT NOT LIMITED TO, THE IMPLIED WARRANTIES OF MERCHANTABILITY AND FITNESS FOR A PARTICULAR PURPOSE, WHICH ARE HEREBY DISCLAIMED. IN NO EVENT SHALL NETAPP BE LIABLE FOR ANY DIRECT, INDIRECT, INCIDENTAL, SPECIAL, EXEMPLARY, OR CONSEQUENTIAL DAMAGES (INCLUDING, BUT NOT LIMITED TO, PROCUREMENT OF SUBSTITUTE GOODS OR SERVICES; LOSS OF USE, DATA, OR PROFITS; OR BUSINESS INTERRUPTION) HOWEVER CAUSED AND ON ANY THEORY OF LIABILITY, WHETHER IN CONTRACT, STRICT LIABILITY, OR TORT (INCLUDING NEGLIGENCE OR OTHERWISE) ARISING IN ANY WAY OUT OF THE USE OF THIS SOFTWARE, EVEN IF ADVISED OF THE POSSIBILITY OF SUCH DAMAGE.
NetApp reserves the right to change any products described herein at any time, and without notice. NetApp assumes no responsibility or liability arising from the use of products described herein, except as expressly agreed to in writing by NetApp. The use or purchase of this product does not convey a license under any patent rights, trademark rights, or any other intellectual property rights of NetApp.
The product described in this manual may be protected by one or more U.S. patents, foreign patents, or pending applications.
RESTRICTED RIGHTS LEGEND: Use, duplication, or disclosure by the government is subject to restrictions as set forth in subparagraph (c)(1)(ii) of the Rights in Technical Data and Computer Software clause at DFARS 252.277-7103 (October 1988) and FAR 52-227-19 (June 1987).
NetApp AltaVault Cloud Integrated Storage Installation and Service Guide for Virtual Appliances 55

Copyright information
56 NetApp AltaVault Cloud Integrated Storage Installation and Service Guide for Virtual Appliances

Trademark information
NetApp, the NetApp logo, Go Further, Faster, AltaVault, ASUP, AutoSupport, Campaign Express, Cloud ONTAP, Clustered Data ONTAP, Customer Fitness, Data ONTAP, DataMotion, Fitness, Flash Accel, Flash Cache, Flash Pool, FlashRay, FlexArray, FlexCache, FlexClone, FlexPod, FlexScale, FlexShare, FlexVol, FPolicy, GetSuccessful, LockVault, Manage ONTAP, Mars, MetroCluster, MultiStore, NetApp Insight, OnCommand, ONTAP, ONTAPI, RAID DP, RAID-TEC, SANtricity, SecureShare, Simplicity, Simulate ONTAP, Snap Creator, SnapCenter, SnapCopy, SnapDrive, SnapIntegrator, SnapLock, SnapManager, SnapMirror, SnapMover, SnapProtect, SnapRestore, Snapshot, SnapValidator, SnapVault, StorageGRID, Tech OnTap, Unbound Cloud, and WAFL and other names are trademarks or registered trademarks of NetApp, Inc., in the United States, and/or other countries. All other brands or products are trademarks or registered trademarks of their respective holders and should be treated as such. A current list of NetApp trademarks is available on the web at http://www.netapp.com/us/legal/netapptmlist.aspx.
NetApp AltaVault Cloud Integrated Storage Installation and Service Guide for Virtual Appliances 57

Trademark information
58 NetApp AltaVault Cloud Integrated Storage Installation and Service Guide for Virtual Appliances

How to send your comments
You can help us to improve the quality of our documentation by sending us your feedback.
Your feedback is important in helping us to provide the most accurate and high-quality information. If you have suggestions for improving this document, send us your comments by email to [email protected]. To help us direct your comments to the correct division, include in the subject line the product name, version, and operating system.
You can also contact us in the following ways:
NetApp, Inc., 495 East Java Drive, Sunnyvale, CA 94089 U.S.
Telephone: +1 (408) 822-6000
Fax: +1 (408) 822-4501
Support telephone: +1 (888) 463-8277
NetApp AltaVault Cloud Integrated Storage Installation and Service Guide for Virtual Appliances 59

How to send your comments
60 NetApp AltaVault Cloud Integrated Storage Installation and Service Guide for Virtual Appliances

Index
AAltaVault
deployment guidelines 25AltaVault virtual appliance
90-day trial upgrade 53hardware requirements 6Hyper-V installation 8license 52upgrades 52
Cconfiguration
virtual switches 17CPU
allocating cycles 25physical 25virtual 25
Ddatastore disk
adding 10Deploy OVF 27deployment
guidelines 7guidelines for ESXi 25
Deployment guidelines 25disk
requirements 6Downloading the OVA package 26
EEdit VM settings 33ESX host server 25ESX/ESXi deployment guidelines 25
GGuidelines for deployment and performance 25
HHard disk, adding 34
Llicensing 7, 25
Mmemory
requirements 6Microsoft Hyper-V
model AVA-v16 5model AVA-v32 5
NetApp AltaVault Cloud Integrated Storage Installation and Se
model AVA-v8 5supported models 5
NNetworking 6next steps 21, 38, 47NIC
assignment 25physical 25
OOVFTool 26
PPhysical CPU
requirements 6
RRAM 25raw device mapping 44RDM volume 41
before configuring 41
SSteelStore 3.x
migration to 4.0.1 49
TThick provisioned format 31Thin provisioned format 31
VVirtual AltaVault
requirements 24Virtual CPU
requirements 6Virtual disk, creating 35Virtual Machine
edit settings 33naming 29
virtual machineconfiguration 10start 19
Virtual RAM 25virtual switches
configuration 17VM package
download 8VMware storage, configuring 42VMware vSphere client 26
rvice Guide for Virtual Appliances 61

Index
logging in 27
WWindows PowerShell 8
62
Index