netbackup 7.5 replication director a hands on …vox.veritas.com/legacyfs/online/veritasdata/im...
TRANSCRIPT

NetBackup 7.5 Replication Director A Hands On Experience
Hands-On Lab
Description Through this hands on lab you can test drive Replication Director and experience for yourself this easy to use, powerful feature.
Once finished with this lab you will have a much better understanding of the power of Replication Director and how it can augment your backup and restore options in NetApp environments.
For successful completion of this lab it is assumed that you have a basic knowledge of backup and NetApp storage array concepts.
At the end of this lab, you should be able to
Configure NetApp based snapshots using Replication Director wizards
Backup array-based data using NetApp’s snapshot technologies including SnapVault and SnapMirror
Implement NetBackup Storage Lifecycle Policies across multiple backup destinations
Restore single files from multiple backup destinations
Use OpsCenter’s New Operational Restore feature to better understand every restore option.
Notes This lab guide will provide you with a step-by-step walk-through of key NetBackup Replication Director features.
Carefully follow the instructions outlined in this document. Skipping steps can prevent you from successfully completing this lab.
Be sure to ask your instructor any questions you may have.
Thank you for coming to our lab session.
Symantec Vision 2012
NetBackup 7.5 Replication Director Hands On Lab Student Guide
2 of 45
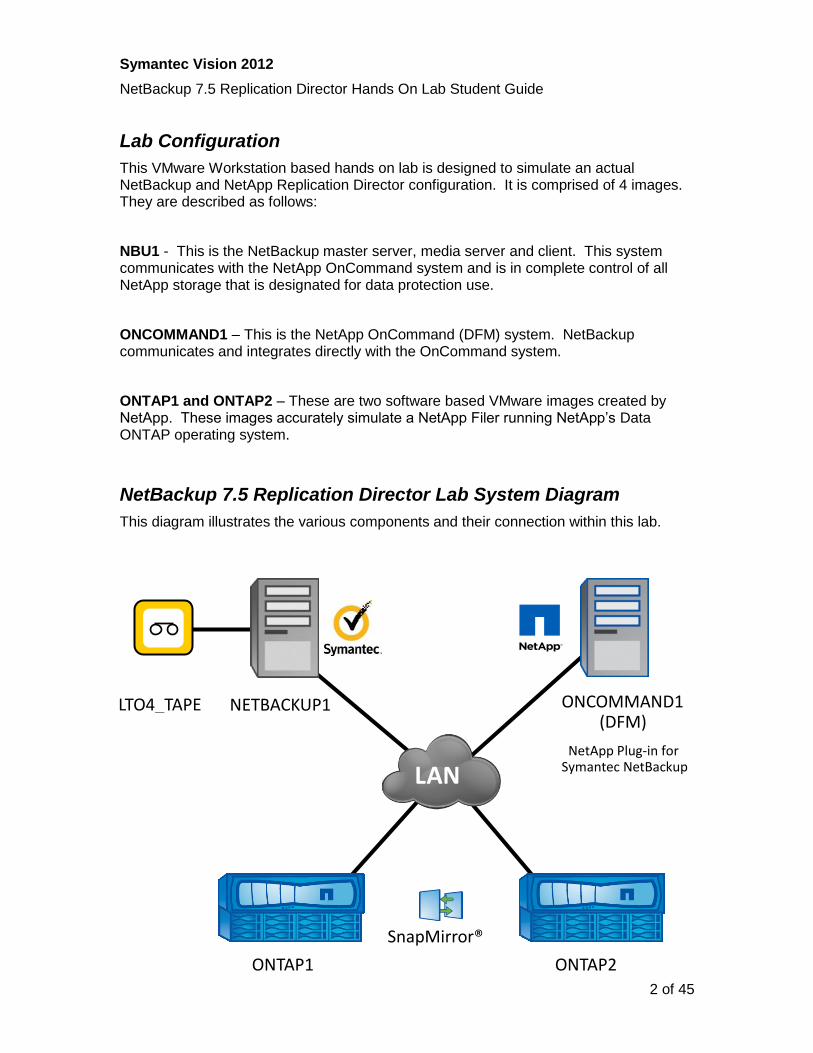
Lab Configuration
This VMware Workstation based hands on lab is designed to simulate an actual NetBackup and NetApp Replication Director configuration. It is comprised of 4 images. They are described as follows:
NBU1 - This is the NetBackup master server, media server and client. This system communicates with the NetApp OnCommand system and is in complete control of all NetApp storage that is designated for data protection use.
ONCOMMAND1 – This is the NetApp OnCommand (DFM) system. NetBackup communicates and integrates directly with the OnCommand system.
ONTAP1 and ONTAP2 – These are two software based VMware images created by NetApp. These images accurately simulate a NetApp Filer running NetApp’s Data ONTAP operating system.
NetBackup 7.5 Replication Director Lab System Diagram
This diagram illustrates the various components and their connection within this lab.
NETBACKUP1 ONCOMMAND1 (DFM)
NetApp Plug-in for Symantec NetBackup
SnapMirror®
LAN
ONTAP1 ONTAP2
LTO4_TAPE
Symantec Vision 2012
NetBackup 7.5 Replication Director Hands On Lab Student Guide
3 of 45
Lab Overview
The purpose of this lab is to introduce you to the powerful capabilities that the combination of NetBackup and NetApp technologies provide in the data protection space.
The lab will walk you through the following steps:
1. Exploring the NetApp configuration
2. Defining NetApp OnCommand system as storage server and creating a disk pool for primary storage
3. Configure a NetApp SnapMirror-based disk pool and storage unit
4. Creating the NetBackup Storage Lifecycle Policy (SLP)
5. Protecting our data – creating a NetBackup Policy
6. Backing up and restoring using Replication Director and NetApp
7. Exploring the NetApp Snapshot Environment
Help Windows
Throughout this lab document you will see special “help” windows that can assist you with the lab or provide additional information. These icons are described as follows:
Did you know….
It is not necessary to read these yellow boxes but it is highly recommend. Useful additional information can be found in these boxes.
IMPORTANT !!!
These red windows provide important information about the lab. We strongly recommend that you pay special attention to these windows.
Symantec Vision 2012
NetBackup 7.5 Replication Director Hands On Lab Student Guide
4 of 45
Lab Exercise 1: Exploring the NetApp configuration
Before protecting data that is hosted on the NetApp filer, the storage administrator needs to perform a few simple tasks as follows:
1. Define the storage to be protected
2. Define the storage location and space to be used for snapshots
3. Place the storage location to be used for snapshots within the proper NetApp Group and Resource Pool
All of the tasks listed above have already been configured for you. We will log into the NetApp Management Console and verify that these tasks have been completed.
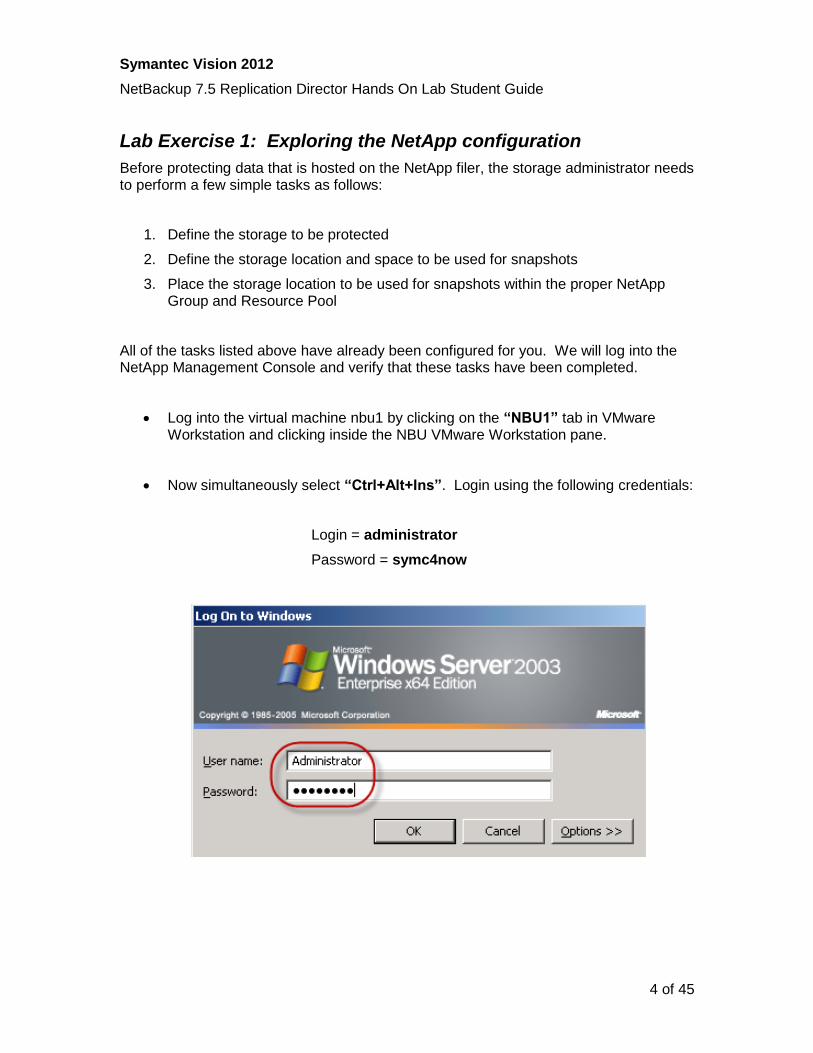
Log into the virtual machine nbu1 by clicking on the “NBU1” tab in VMware Workstation and clicking inside the NBU VMware Workstation pane.
Now simultaneously select “Ctrl+Alt+Ins”. Login using the following credentials:
Login = administrator
Password = symc4now
Symantec Vision 2012
NetBackup 7.5 Replication Director Hands On Lab Student Guide
5 of 45
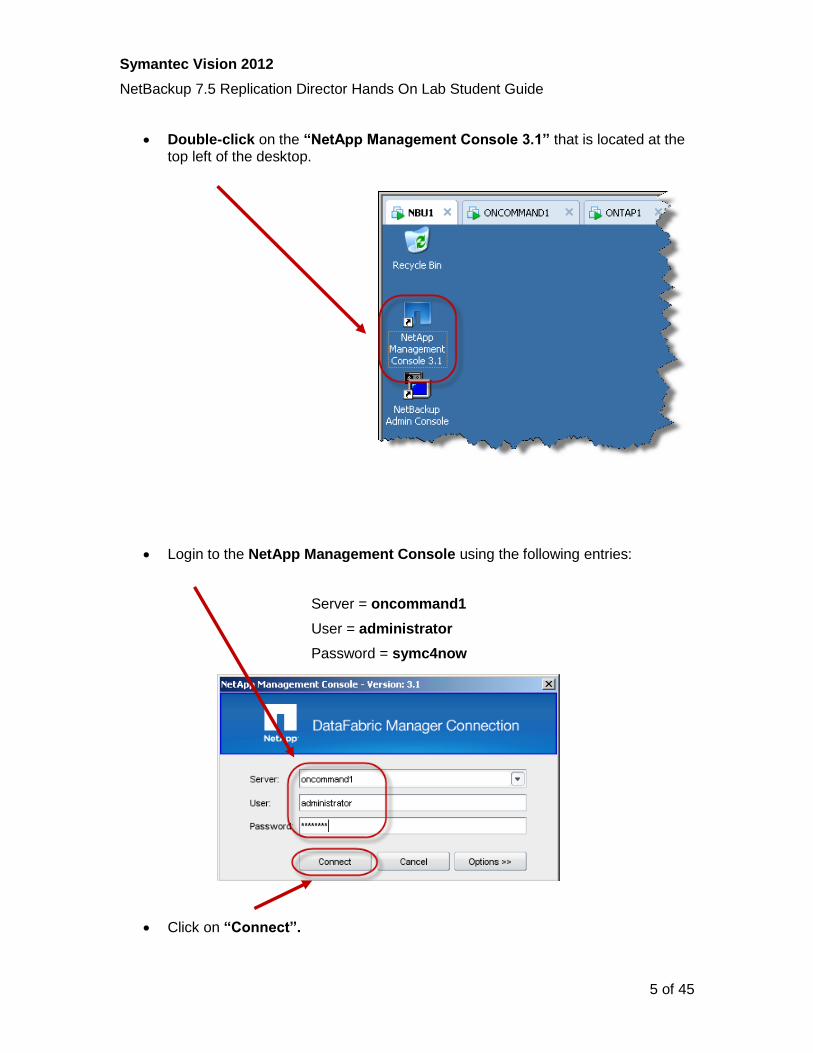
Double-click on the “NetApp Management Console 3.1” that is located at the top left of the desktop.
Login to the NetApp Management Console using the following entries:
Server = oncommand1
User = administrator
Password = symc4now
Click on “Connect”.
Symantec Vision 2012
NetBackup 7.5 Replication Director Hands On Lab Student Guide
6 of 45
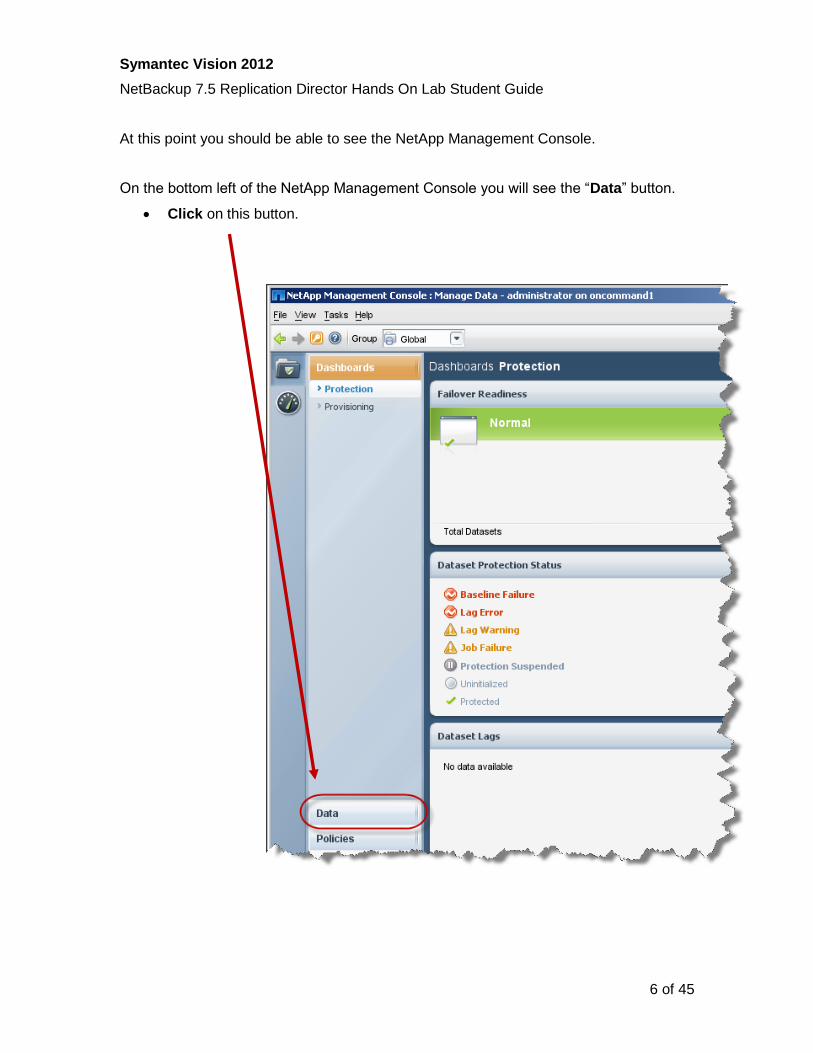
At this point you should be able to see the NetApp Management Console.
On the bottom left of the NetApp Management Console you will see the “Data” button.
Click on this button.
Symantec Vision 2012
NetBackup 7.5 Replication Director Hands On Lab Student Guide
7 of 45
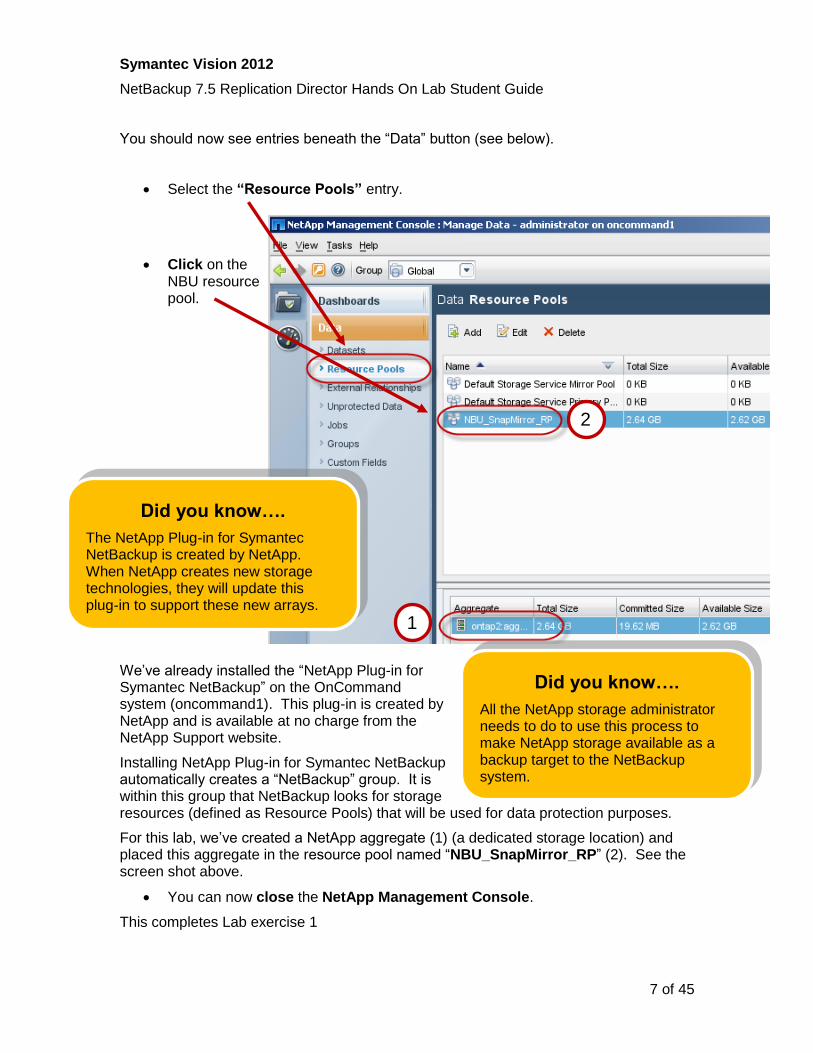
You should now see entries beneath the “Data” button (see below).
Select the “Resource Pools” entry.
Click on the NBU resource pool.
We’ve already installed the “NetApp Plug-in for Symantec NetBackup” on the OnCommand system (oncommand1). This plug-in is created by NetApp and is available at no charge from the NetApp Support website.
Installing NetApp Plug-in for Symantec NetBackup automatically creates a “NetBackup” group. It is within this group that NetBackup looks for storage resources (defined as Resource Pools) that will be used for data protection purposes.
For this lab, we’ve created a NetApp aggregate (1) (a dedicated storage location) and placed this aggregate in the resource pool named “NBU_SnapMirror_RP” (2). See the screen shot above.
You can now close the NetApp Management Console.
This completes Lab exercise 1
1
Did you know….
All the NetApp storage administrator needs to do to use this process to make NetApp storage available as a backup target to the NetBackup system.
2
Did you know….
The NetApp Plug-in for Symantec NetBackup is created by NetApp. When NetApp creates new storage technologies, they will update this plug-in to support these new arrays.
Symantec Vision 2012
NetBackup 7.5 Replication Director Hands On Lab Student Guide
8 of 45
Lab Exercise 2: Defining NetApp OnCommand system as storage server and creating a disk pool for primary storage
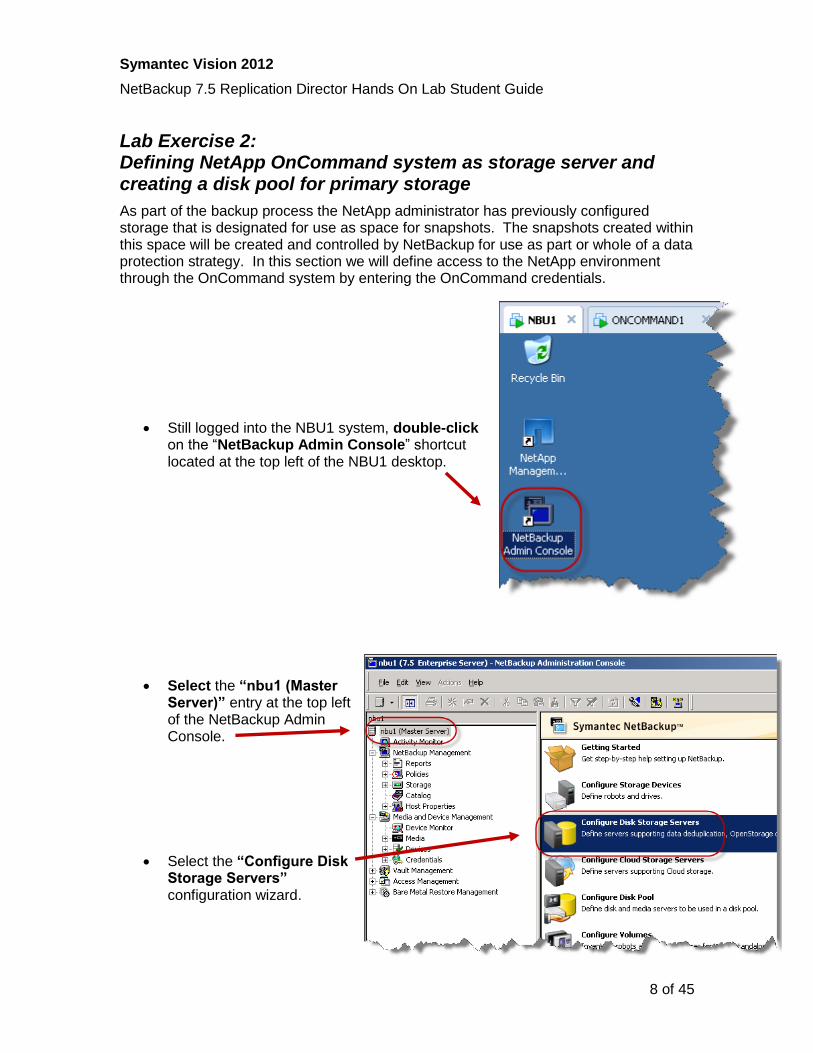
As part of the backup process the NetApp administrator has previously configured storage that is designated for use as space for snapshots. The snapshots created within this space will be created and controlled by NetBackup for use as part or whole of a data protection strategy. In this section we will define access to the NetApp environment through the OnCommand system by entering the OnCommand credentials.
Still logged into the NBU1 system, double-click on the “NetBackup Admin Console” shortcut located at the top left of the NBU1 desktop.
Select the “nbu1 (Master Server)” entry at the top left of the NetBackup Admin Console.
Select the “Configure Disk Storage Servers” configuration wizard.
Symantec Vision 2012
NetBackup 7.5 Replication Director Hands On Lab Student Guide
9 of 45
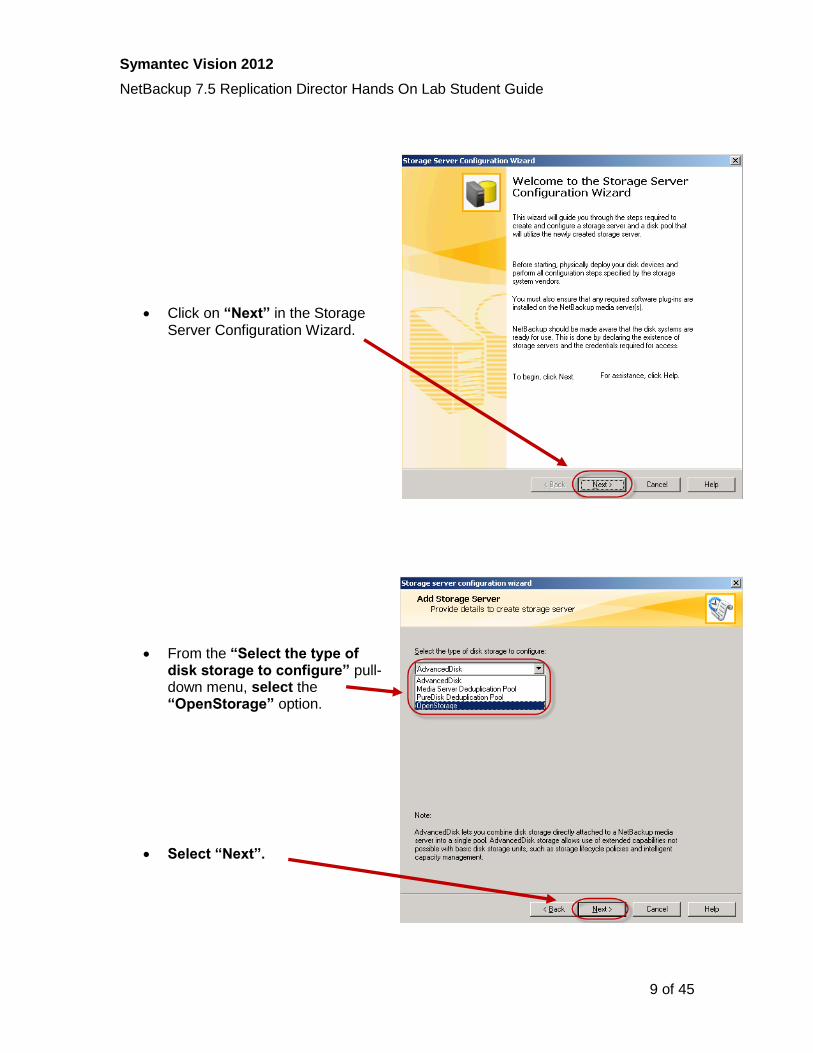
Click on “Next” in the Storage Server Configuration Wizard.
From the “Select the type of disk storage to configure” pull-down menu, select the “OpenStorage” option.
Select “Next”.
Symantec Vision 2012
NetBackup 7.5 Replication Director Hands On Lab Student Guide
10 of 45
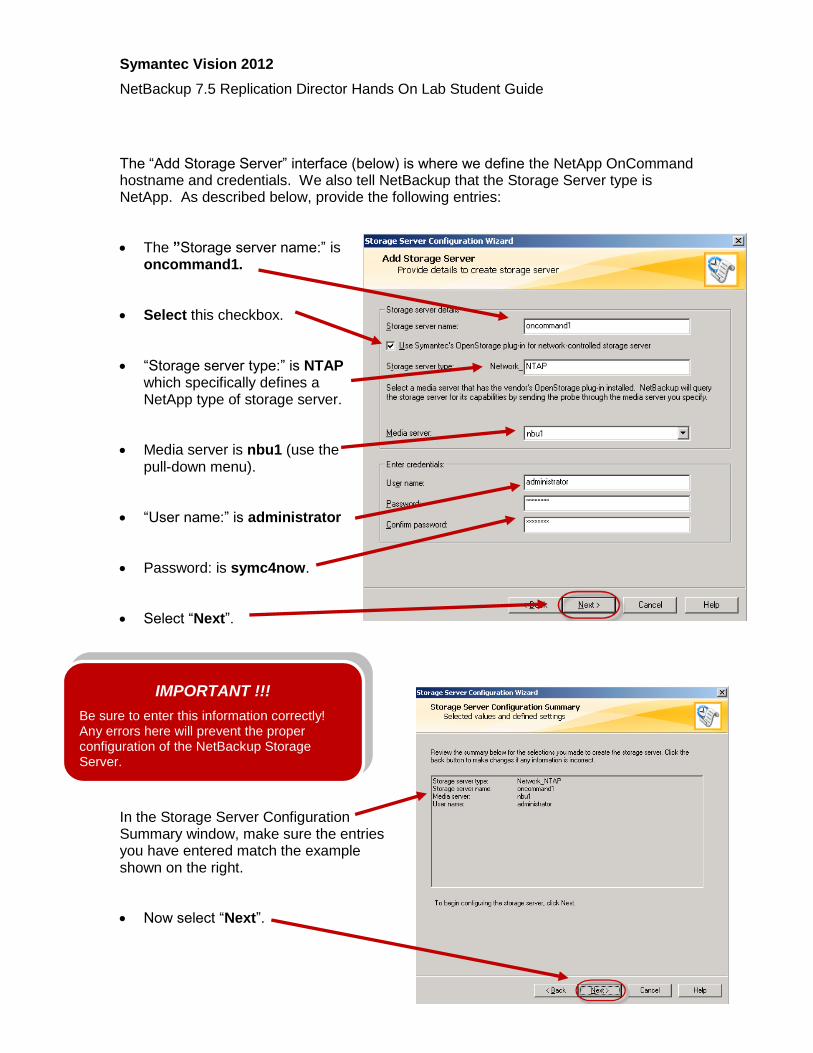
The “Add Storage Server” interface (below) is where we define the NetApp OnCommand hostname and credentials. We also tell NetBackup that the Storage Server type is NetApp. As described below, provide the following entries:
The ”Storage server name:” is oncommand1.
Select this checkbox.
“Storage server type:” is NTAP which specifically defines a NetApp type of storage server.
Media server is nbu1 (use the pull-down menu).
“User name:” is administrator
Password: is symc4now.
Select “Next”.
In the Storage Server Configuration Summary window, make sure the entries you have entered match the example shown on the right.
Now select “Next”.
IMPORTANT !!!
Be sure to enter this information correctly! Any errors here will prevent the proper configuration of the NetBackup Storage Server.
Symantec Vision 2012
NetBackup 7.5 Replication Director Hands On Lab Student Guide
11 of 45
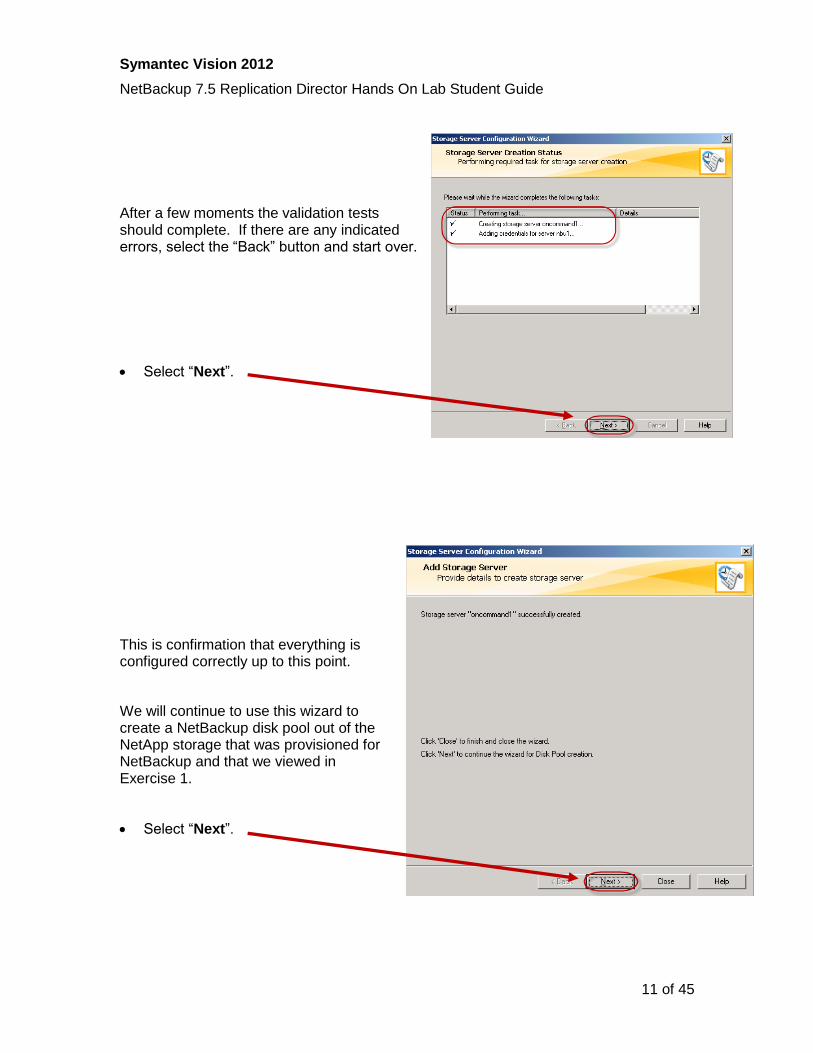
After a few moments the validation tests should complete. If there are any indicated errors, select the “Back” button and start over.
Select “Next”.
This is confirmation that everything is configured correctly up to this point.
We will continue to use this wizard to create a NetBackup disk pool out of the NetApp storage that was provisioned for NetBackup and that we viewed in Exercise 1.
Select “Next”.
Symantec Vision 2012
NetBackup 7.5 Replication Director Hands On Lab Student Guide
12 of 45
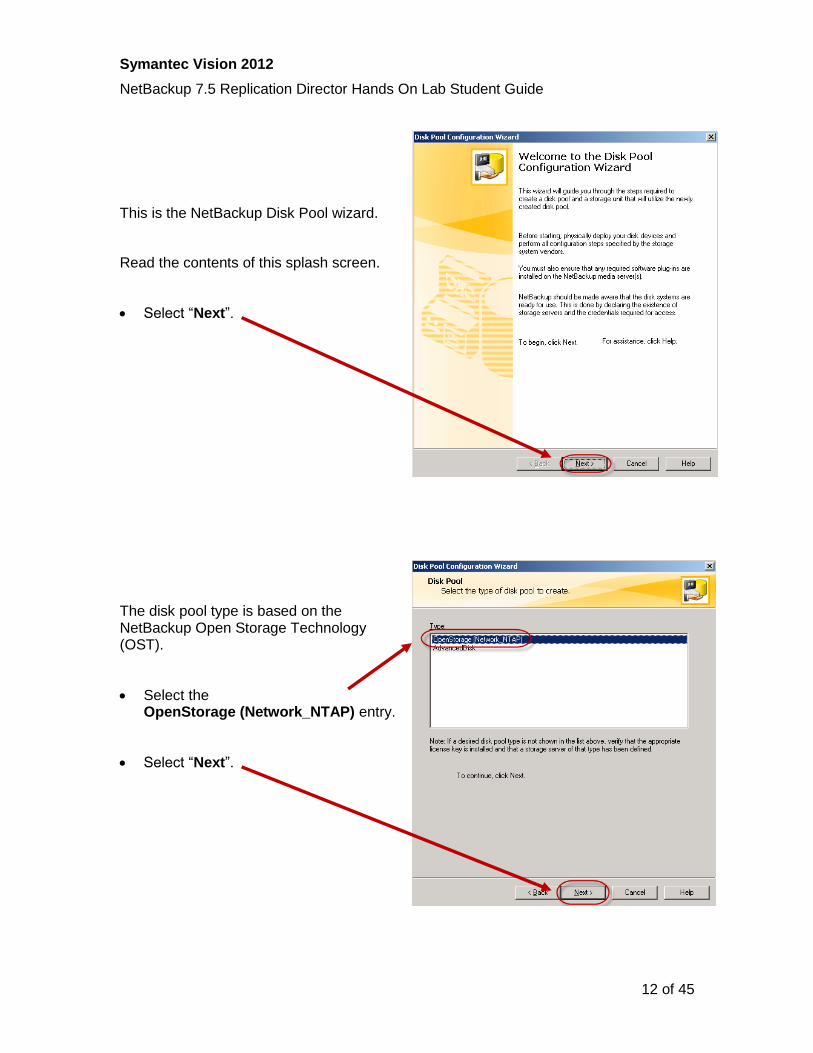
This is the NetBackup Disk Pool wizard.
Read the contents of this splash screen.
Select “Next”.
The disk pool type is based on the NetBackup Open Storage Technology (OST).
Select the OpenStorage (Network_NTAP) entry.
Select “Next”.
Symantec Vision 2012
NetBackup 7.5 Replication Director Hands On Lab Student Guide
13 of 45
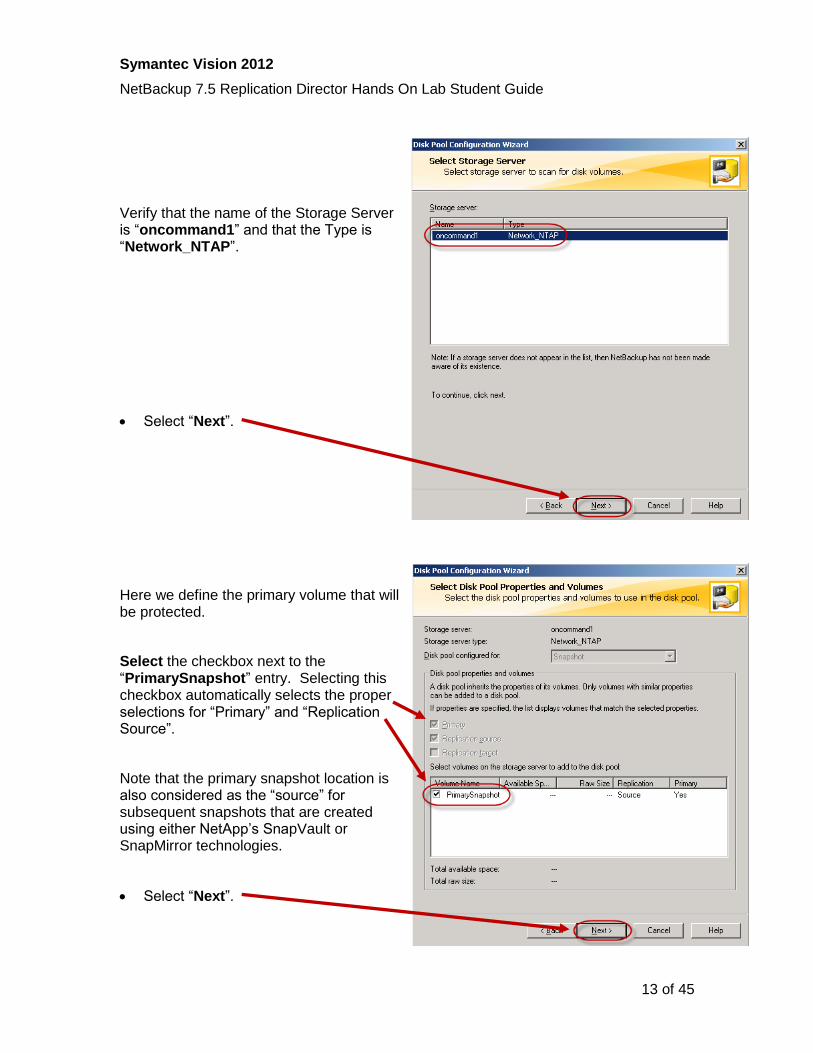
Verify that the name of the Storage Server is “oncommand1” and that the Type is “Network_NTAP”.
Select “Next”.
Here we define the primary volume that will be protected.
Select the checkbox next to the “PrimarySnapshot” entry. Selecting this checkbox automatically selects the proper selections for “Primary” and “Replication Source”.
Note that the primary snapshot location is also considered as the “source” for subsequent snapshots that are created using either NetApp’s SnapVault or SnapMirror technologies.
Select “Next”.
Symantec Vision 2012
NetBackup 7.5 Replication Director Hands On Lab Student Guide
14 of 45
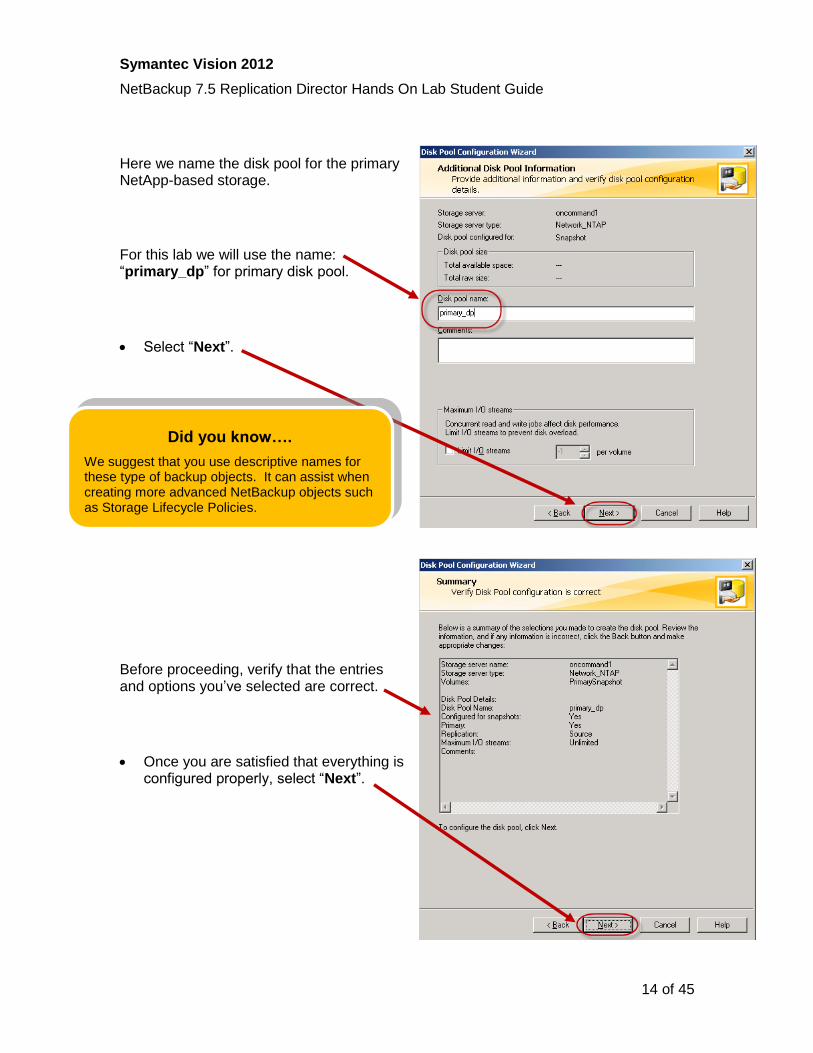
Here we name the disk pool for the primary NetApp-based storage.
For this lab we will use the name: “primary_dp” for primary disk pool.
Select “Next”.
Before proceeding, verify that the entries and options you’ve selected are correct.
Once you are satisfied that everything is configured properly, select “Next”.
Did you know….
We suggest that you use descriptive names for these type of backup objects. It can assist when creating more advanced NetBackup objects such as Storage Lifecycle Policies.
Symantec Vision 2012
NetBackup 7.5 Replication Director Hands On Lab Student Guide
15 of 45
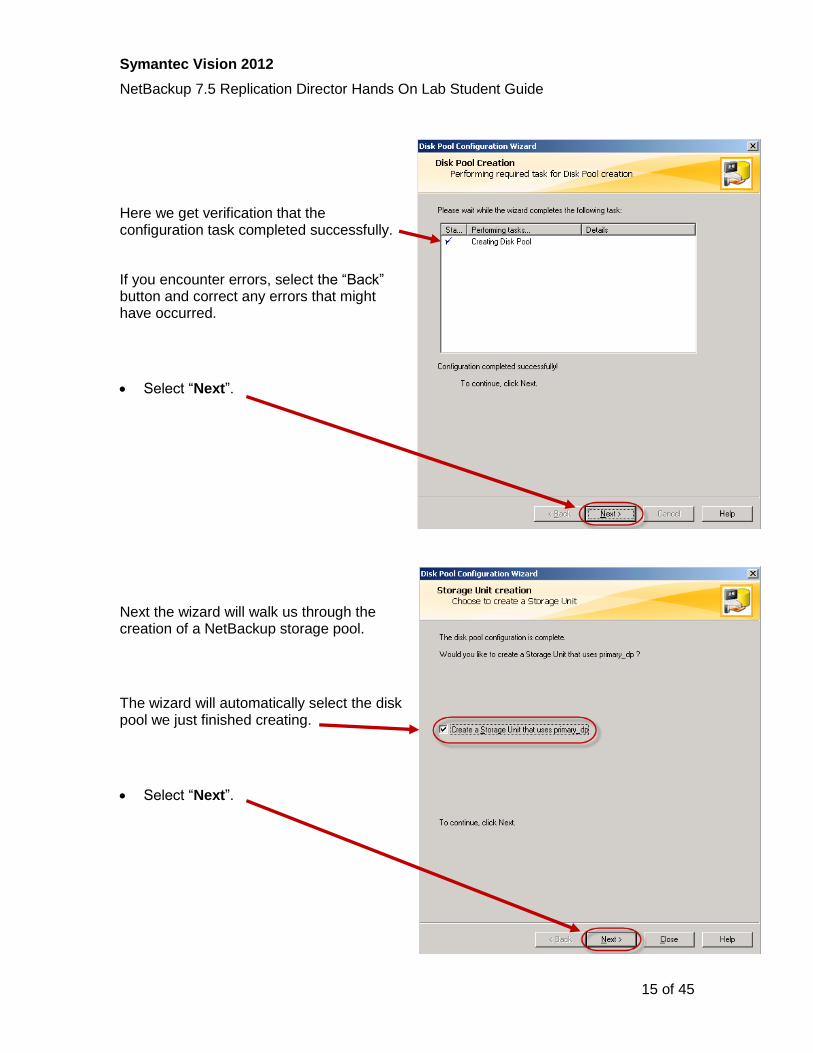
Here we get verification that the configuration task completed successfully.
If you encounter errors, select the “Back” button and correct any errors that might have occurred.
Select “Next”.
Next the wizard will walk us through the creation of a NetBackup storage pool.
The wizard will automatically select the disk pool we just finished creating.
Select “Next”.
Symantec Vision 2012
NetBackup 7.5 Replication Director Hands On Lab Student Guide
16 of 45
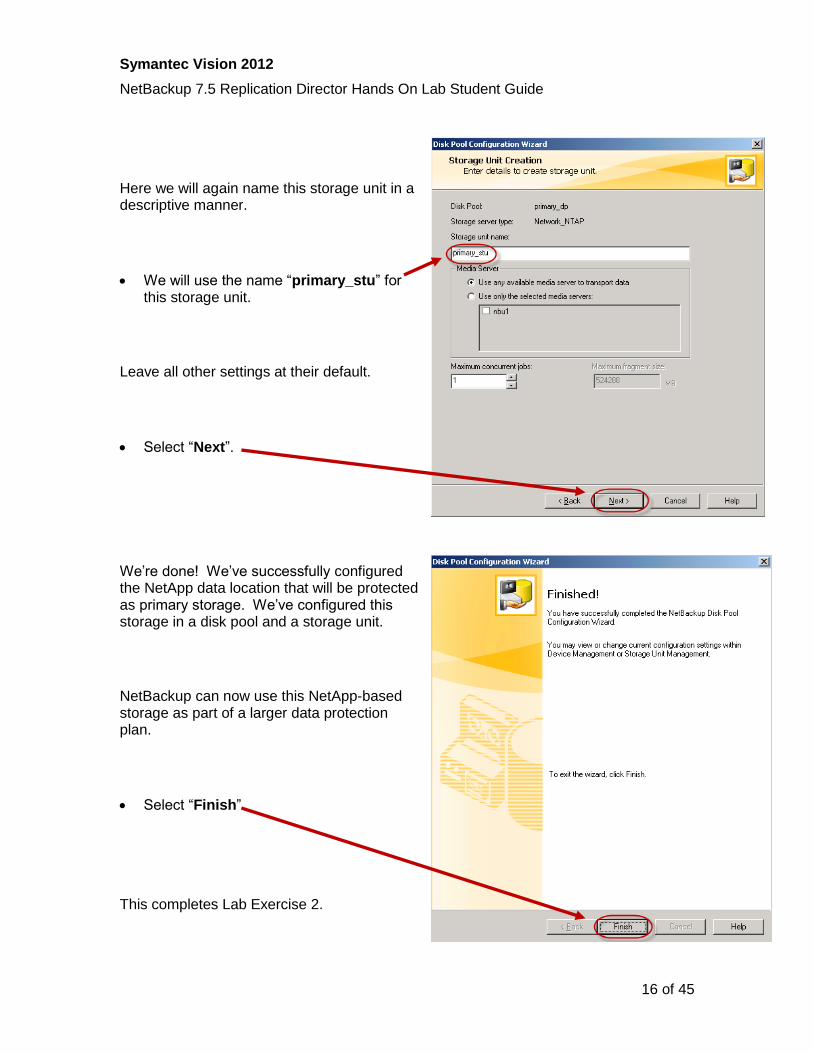
Here we will again name this storage unit in a descriptive manner.
We will use the name “primary_stu” for this storage unit.
Leave all other settings at their default.
Select “Next”.
We’re done! We’ve successfully configured the NetApp data location that will be protected as primary storage. We’ve configured this storage in a disk pool and a storage unit.
NetBackup can now use this NetApp-based storage as part of a larger data protection plan.
Select “Finish”.
This completes Lab Exercise 2.
Symantec Vision 2012
NetBackup 7.5 Replication Director Hands On Lab Student Guide
17 of 45
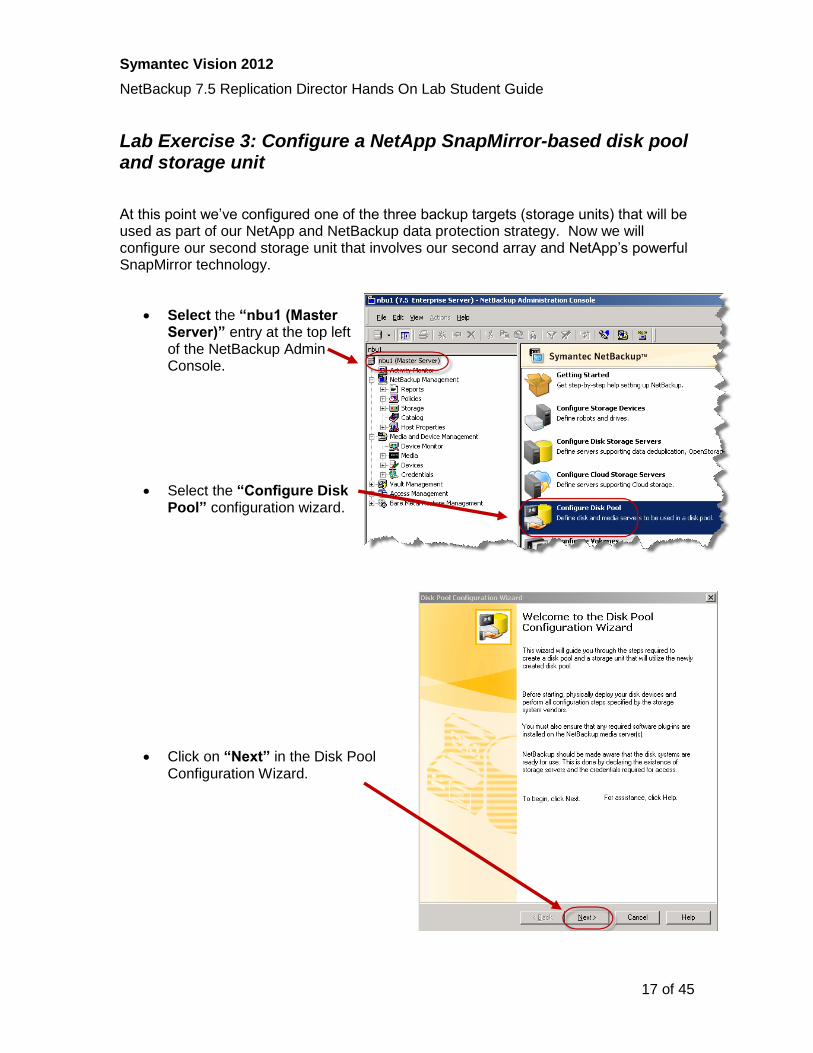
Lab Exercise 3: Configure a NetApp SnapMirror-based disk pool and storage unit
At this point we’ve configured one of the three backup targets (storage units) that will be used as part of our NetApp and NetBackup data protection strategy. Now we will configure our second storage unit that involves our second array and NetApp’s powerful SnapMirror technology.
Select the “nbu1 (Master Server)” entry at the top left of the NetBackup Admin Console.
Select the “Configure Disk Pool” configuration wizard.
Click on “Next” in the Disk Pool Configuration Wizard.
Symantec Vision 2012
NetBackup 7.5 Replication Director Hands On Lab Student Guide
18 of 45
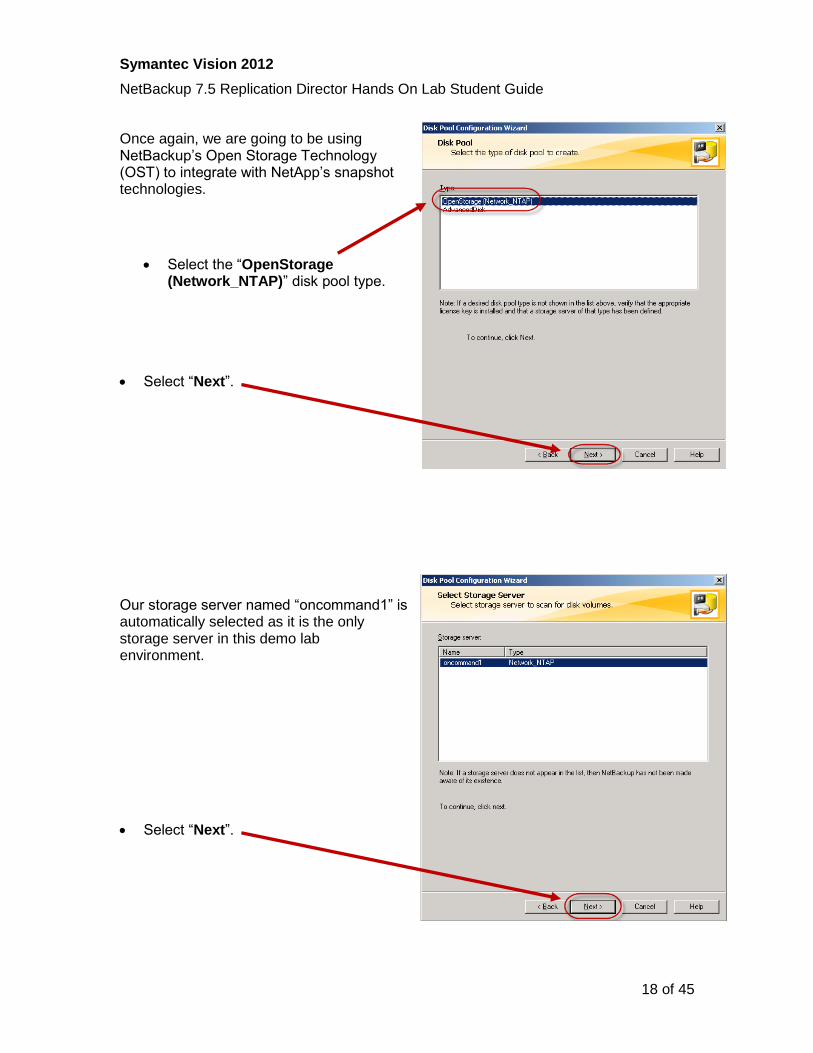
Once again, we are going to be using NetBackup’s Open Storage Technology (OST) to integrate with NetApp’s snapshot technologies.
Select the “OpenStorage (Network_NTAP)” disk pool type.
Select “Next”.
Our storage server named “oncommand1” is automatically selected as it is the only storage server in this demo lab environment.
Select “Next”.
Symantec Vision 2012
NetBackup 7.5 Replication Director Hands On Lab Student Guide
19 of 45
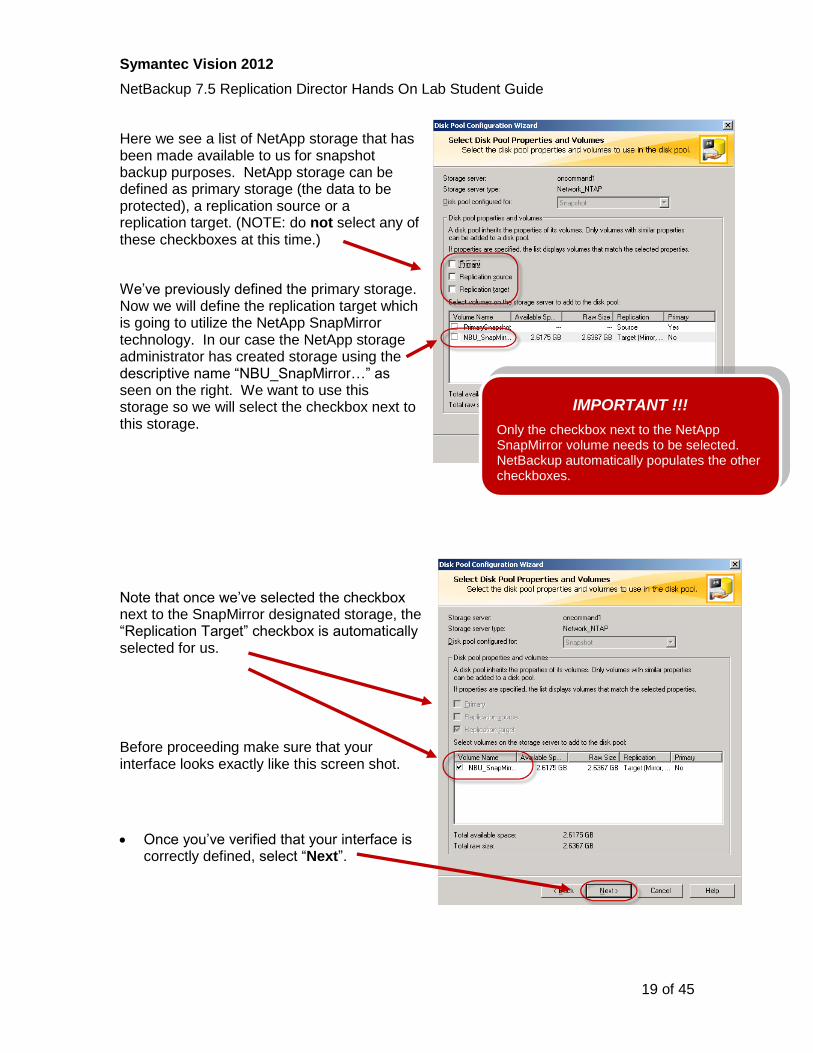
Here we see a list of NetApp storage that has been made available to us for snapshot backup purposes. NetApp storage can be defined as primary storage (the data to be protected), a replication source or a replication target. (NOTE: do not select any of these checkboxes at this time.)
We’ve previously defined the primary storage. Now we will define the replication target which is going to utilize the NetApp SnapMirror technology. In our case the NetApp storage administrator has created storage using the descriptive name “NBU_SnapMirror…” as seen on the right. We want to use this storage so we will select the checkbox next to this storage.
Note that once we’ve selected the checkbox next to the SnapMirror designated storage, the “Replication Target” checkbox is automatically selected for us.
Before proceeding make sure that your interface looks exactly like this screen shot.
Once you’ve verified that your interface is correctly defined, select “Next”.
IMPORTANT !!!
Only the checkbox next to the NetApp SnapMirror volume needs to be selected. NetBackup automatically populates the other checkboxes.
Symantec Vision 2012
NetBackup 7.5 Replication Director Hands On Lab Student Guide
20 of 45
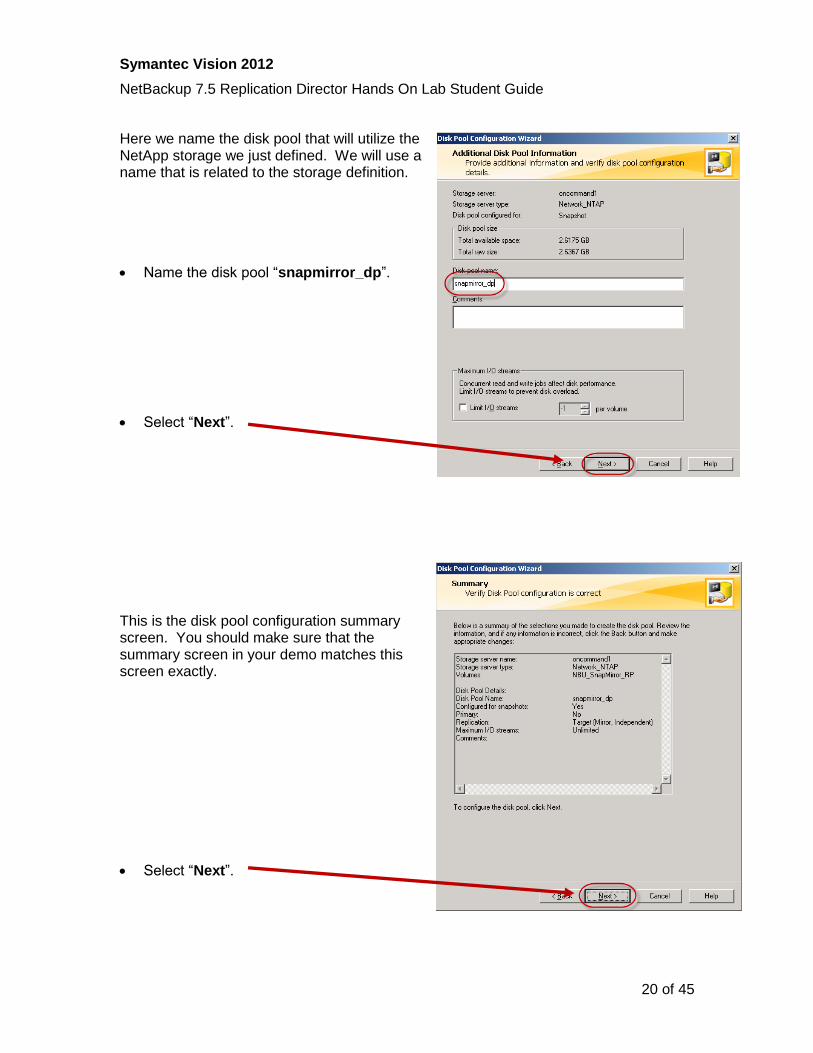
Here we name the disk pool that will utilize the NetApp storage we just defined. We will use a name that is related to the storage definition.
Name the disk pool “snapmirror_dp”.
Select “Next”.
This is the disk pool configuration summary screen. You should make sure that the summary screen in your demo matches this screen exactly.
Select “Next”.
Symantec Vision 2012
NetBackup 7.5 Replication Director Hands On Lab Student Guide
21 of 45
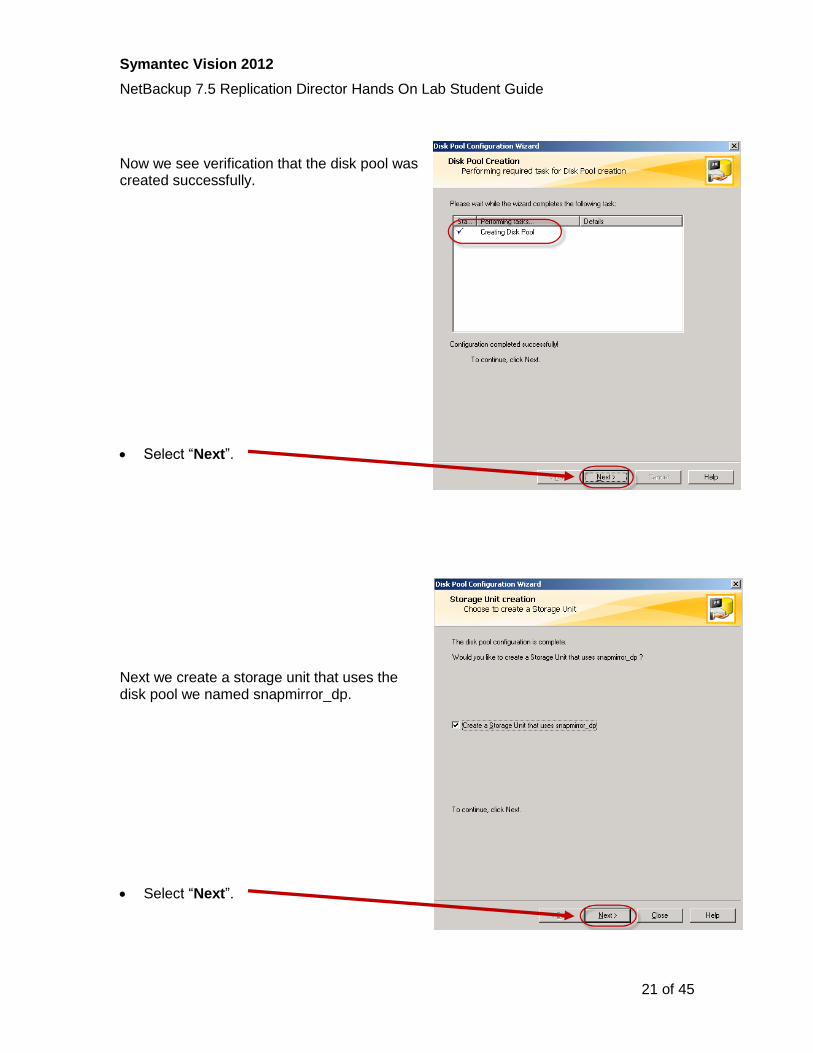
Now we see verification that the disk pool was created successfully.
Select “Next”.
Next we create a storage unit that uses the disk pool we named snapmirror_dp.
Select “Next”.
Symantec Vision 2012
NetBackup 7.5 Replication Director Hands On Lab Student Guide
22 of 45
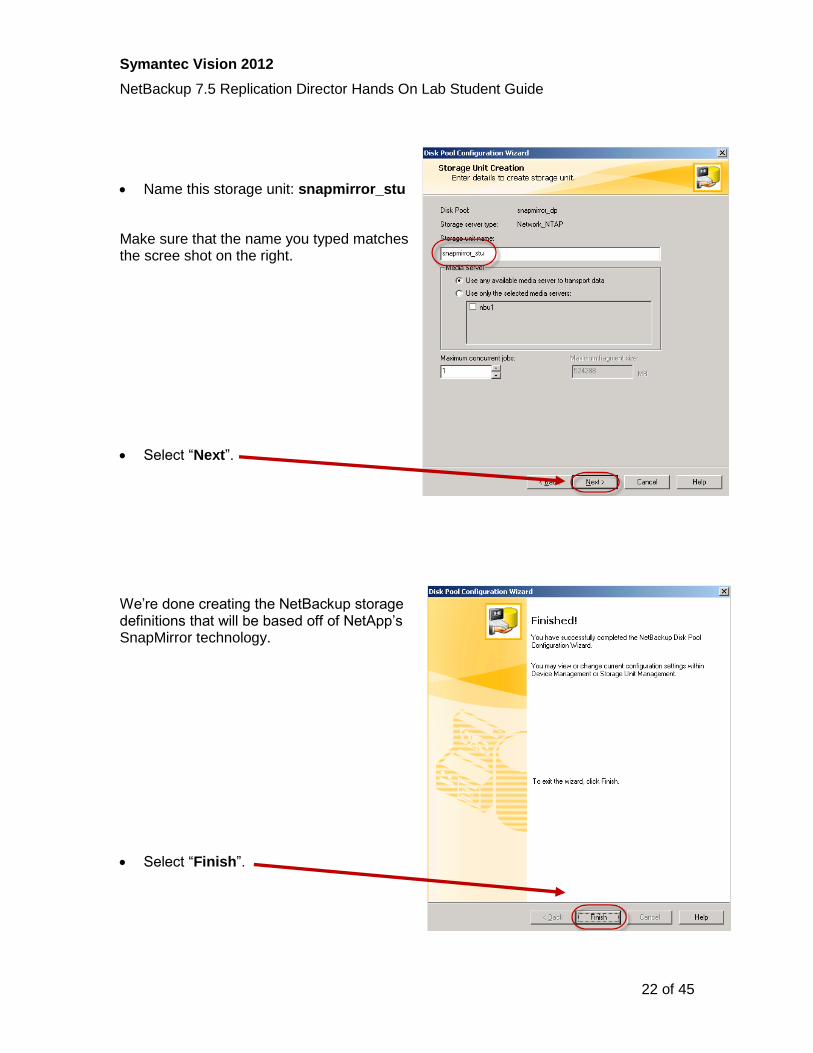
Name this storage unit: snapmirror_stu
Make sure that the name you typed matches the scree shot on the right.
Select “Next”.
We’re done creating the NetBackup storage definitions that will be based off of NetApp’s SnapMirror technology.
Select “Finish”.
Symantec Vision 2012
NetBackup 7.5 Replication Director Hands On Lab Student Guide
23 of 45
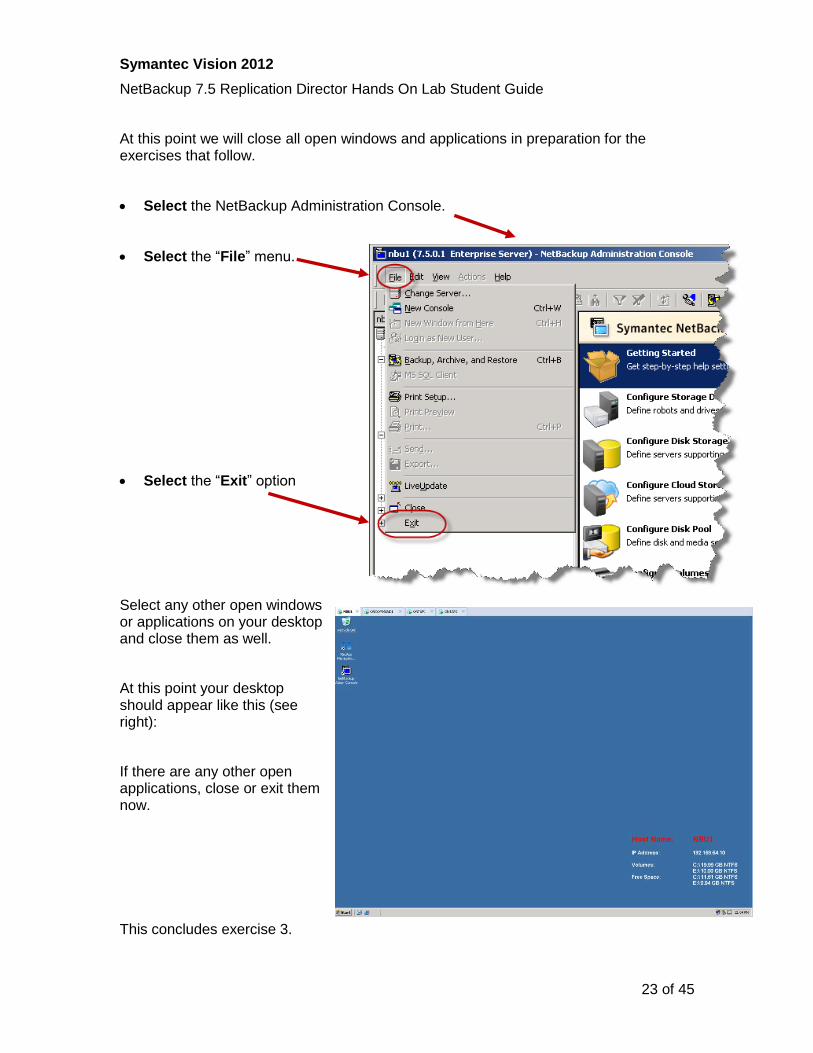
At this point we will close all open windows and applications in preparation for the exercises that follow.
Select the NetBackup Administration Console.
Select the “File” menu.
Select the “Exit” option
Select any other open windows or applications on your desktop and close them as well.
At this point your desktop should appear like this (see right):
If there are any other open applications, close or exit them now.
This concludes exercise 3.
Symantec Vision 2012
NetBackup 7.5 Replication Director Hands On Lab Student Guide
24 of 45
Lab Exercise 4: Creating the NetBackup Storage Lifecycle Policy (SLP)
The NetBackup Storage Lifecycle Policy feature is used to automate the movement of backed up data from one storage area to another. Replication Director uses Storage Lifecycle Policies to automatically move data between NetApp SnapVault or SnapMirror array based snapshots to traditional backup targets including (but not limited to) tape libraries or deduplication targets. Once configured, Storage Lifecycle Policies can automatically control the entire lifecycle of backed up data including the automatic expiration of NetApp snapshots or data placed on tape.
At this point we have three storage units that can be used for backup:
1) Storage unit based on the NetApp snapshot of the primary data volume
2) Storage unit based on a NetApp SnapMirror of the primary data volume
3) Storage unit named “LTO4_Tape”. This storage unit was preconfigured for you and is actually disk based. For the purposed of this demo, this storage unit simulates a tape drive.
In this exercise we will create a NetBackup Storage Lifecycle Policy that uses all three of these storage units in a cascade of automatic transfers. The end result will be three separate copies of the primary data where any one of these copies can be used for restores. If any of these copies has been destroyed or is otherwise unavailable, any one of the remaining copies can easily be used to restore your data. Each of these copies will also have their own retention period that is also automatically administered by NetBackup.
So, let’s create a Storage Lifecycle Policy!
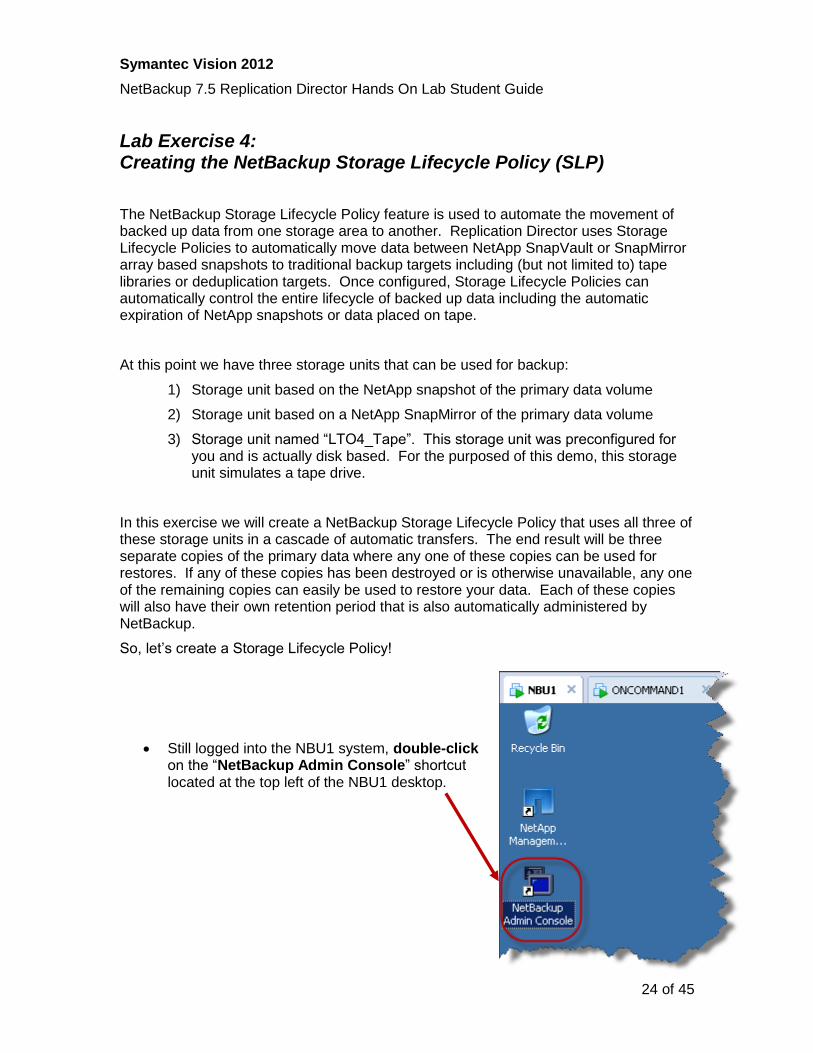
Still logged into the NBU1 system, double-click on the “NetBackup Admin Console” shortcut located at the top left of the NBU1 desktop.
Symantec Vision 2012
NetBackup 7.5 Replication Director Hands On Lab Student Guide
25 of 45
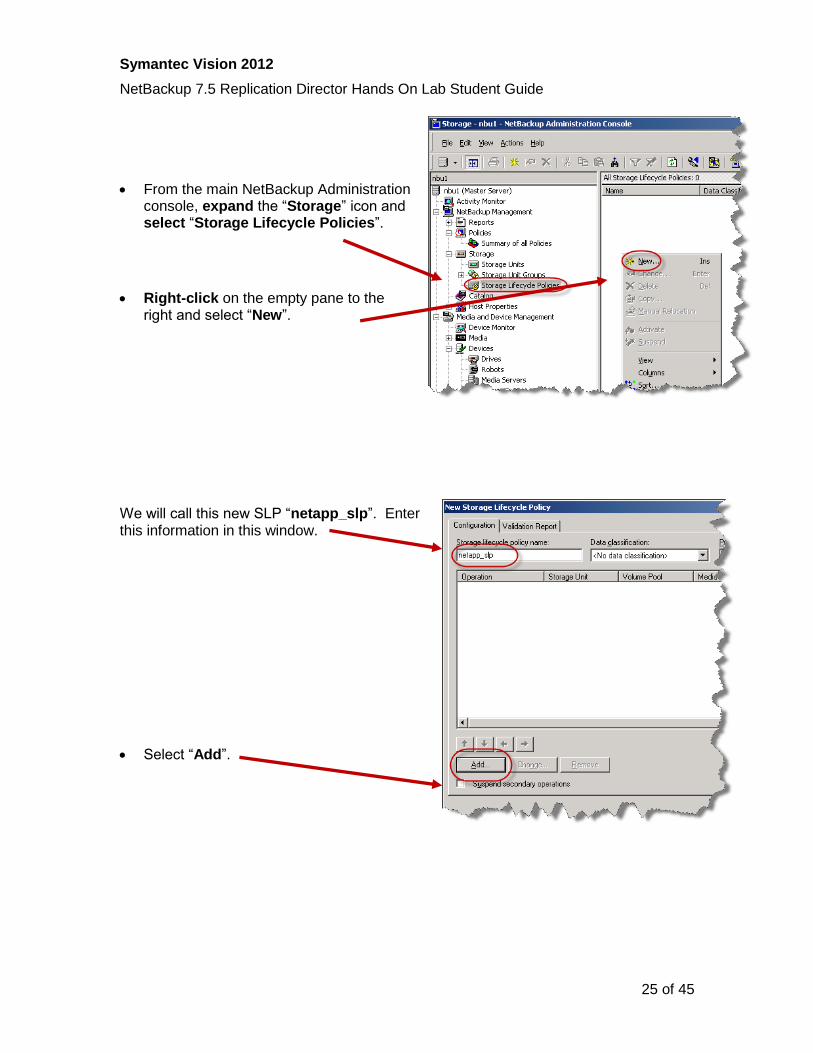
From the main NetBackup Administration console, expand the “Storage” icon and select “Storage Lifecycle Policies”.
Right-click on the empty pane to the right and select “New”.
We will call this new SLP “netapp_slp”. Enter this information in this window.
Select “Add”.
Symantec Vision 2012
NetBackup 7.5 Replication Director Hands On Lab Student Guide
26 of 45
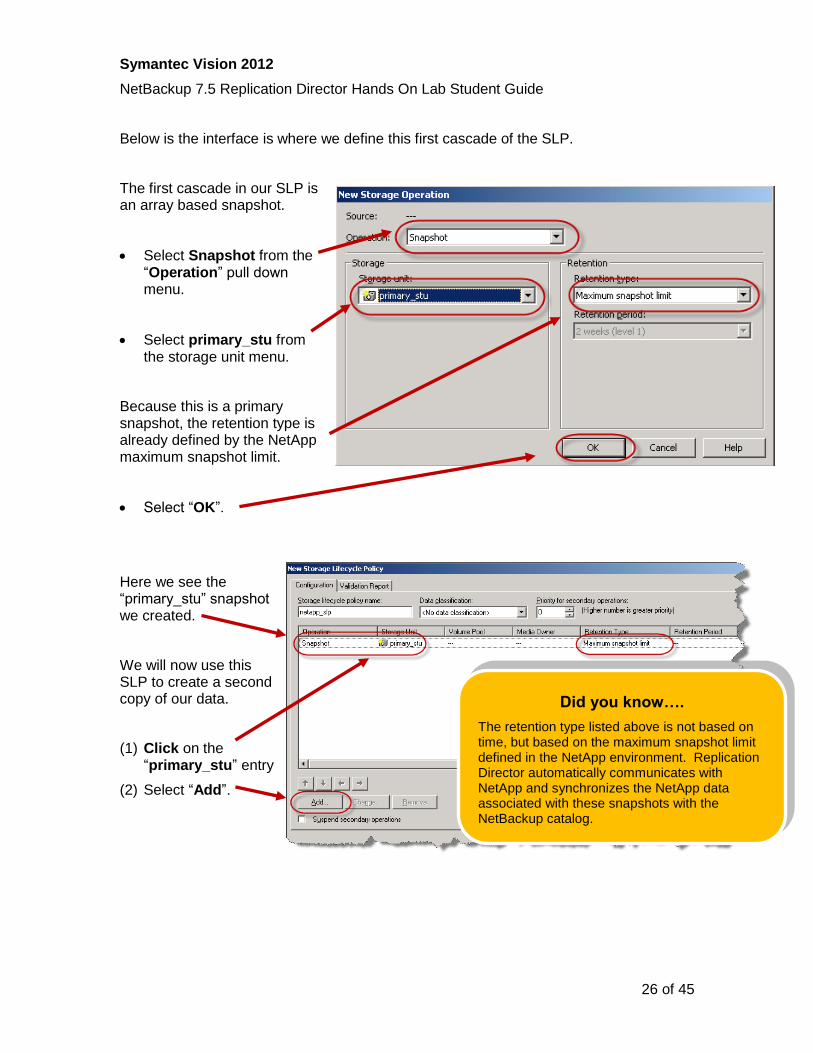
Below is the interface is where we define this first cascade of the SLP.
The first cascade in our SLP is an array based snapshot.
Select Snapshot from the “Operation” pull down menu.
Select primary_stu from the storage unit menu.
Because this is a primary snapshot, the retention type is already defined by the NetApp maximum snapshot limit.
Select “OK”.
Here we see the “primary_stu” snapshot we created.
We will now use this SLP to create a second copy of our data.
(1) Click on the “primary_stu” entry
(2) Select “Add”.
Did you know….
The retention type listed above is not based on time, but based on the maximum snapshot limit defined in the NetApp environment. Replication Director automatically communicates with NetApp and synchronizes the NetApp data associated with these snapshots with the NetBackup catalog.
Symantec Vision 2012
NetBackup 7.5 Replication Director Hands On Lab Student Guide
27 of 45
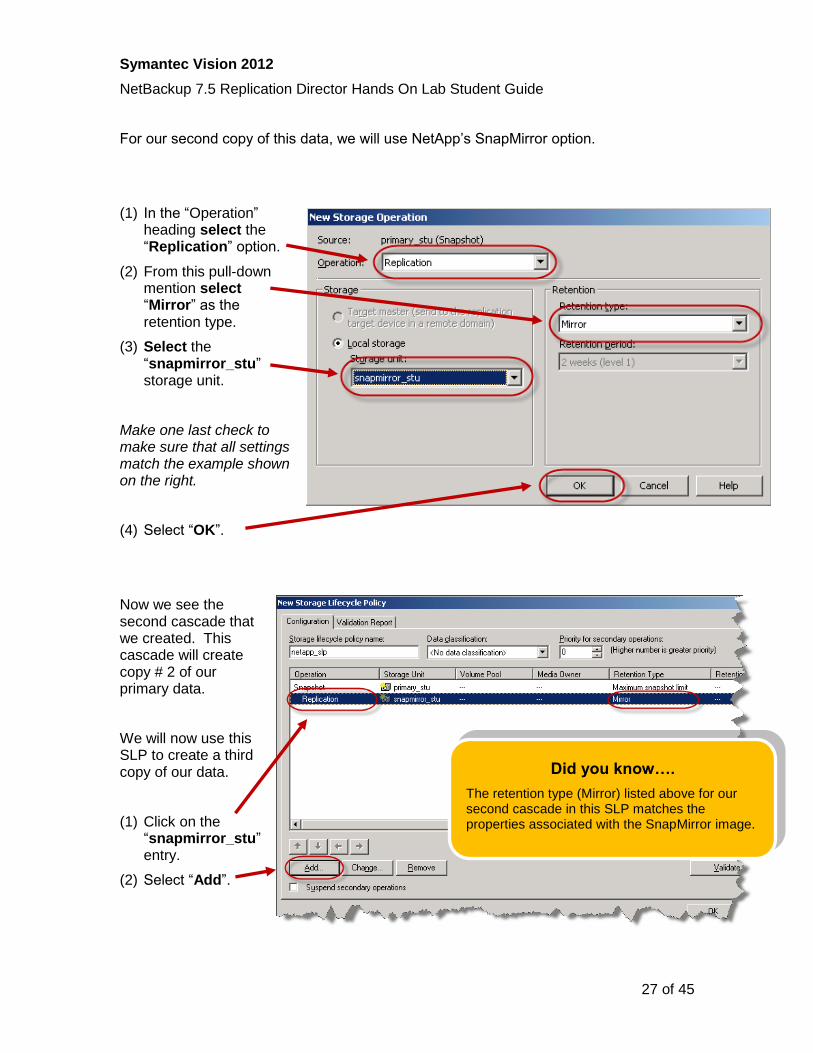
For our second copy of this data, we will use NetApp’s SnapMirror option.
(1) In the “Operation” heading select the “Replication” option.
(2) From this pull-down mention select “Mirror” as the retention type.
(3) Select the “snapmirror_stu” storage unit.
Make one last check to make sure that all settings match the example shown on the right.
(4) Select “OK”.
Now we see the second cascade that we created. This cascade will create copy # 2 of our primary data.
We will now use this SLP to create a third copy of our data.
(1) Click on the “snapmirror_stu” entry.
(2) Select “Add”.
Did you know….
The retention type (Mirror) listed above for our second cascade in this SLP matches the properties associated with the SnapMirror image.
Symantec Vision 2012
NetBackup 7.5 Replication Director Hands On Lab Student Guide
28 of 45
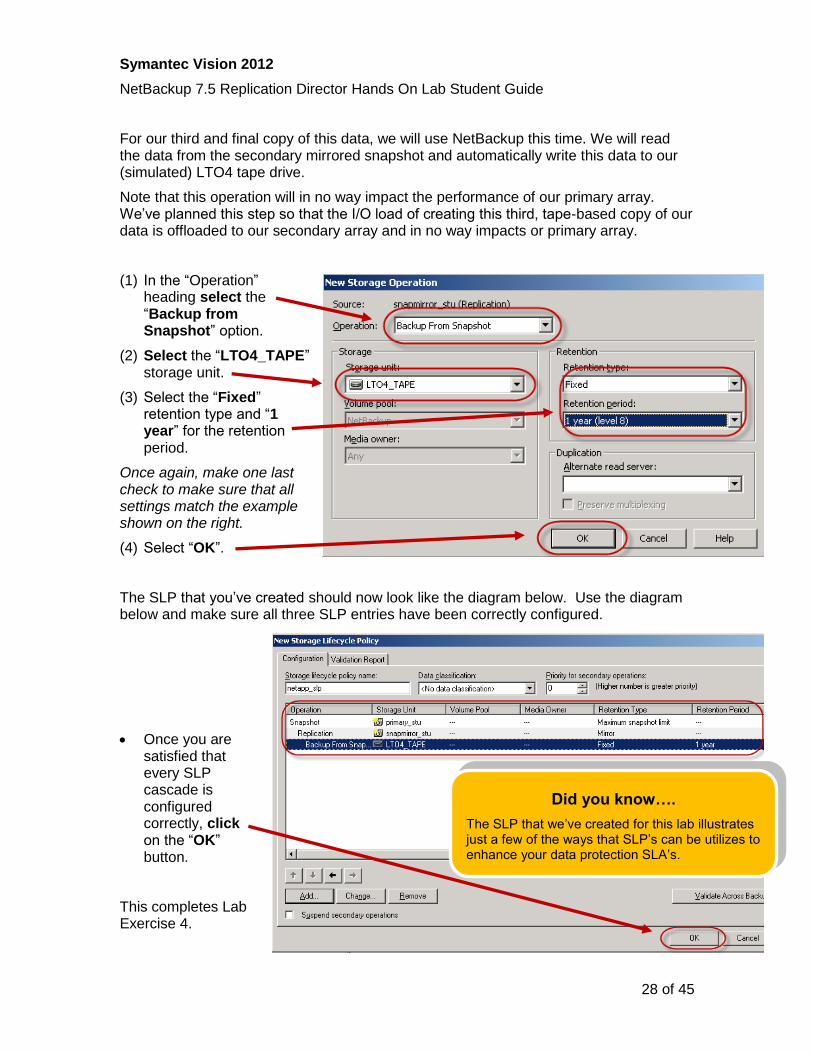
For our third and final copy of this data, we will use NetBackup this time. We will read the data from the secondary mirrored snapshot and automatically write this data to our (simulated) LTO4 tape drive.
Note that this operation will in no way impact the performance of our primary array. We’ve planned this step so that the I/O load of creating this third, tape-based copy of our data is offloaded to our secondary array and in no way impacts or primary array.
(1) In the “Operation” heading select the “Backup from Snapshot” option.
(2) Select the “LTO4_TAPE” storage unit.
(3) Select the “Fixed” retention type and “1 year” for the retention period.
Once again, make one last check to make sure that all settings match the example shown on the right.
(4) Select “OK”.
The SLP that you’ve created should now look like the diagram below. Use the diagram below and make sure all three SLP entries have been correctly configured.
Once you are satisfied that every SLP cascade is configured correctly, click on the “OK” button.
This completes Lab Exercise 4.
Did you know….
The SLP that we’ve created for this lab illustrates just a few of the ways that SLP’s can be utilizes to enhance your data protection SLA’s.
Symantec Vision 2012
NetBackup 7.5 Replication Director Hands On Lab Student Guide
29 of 45
Exercise 5: Protecting our data – creating a NetBackup Policy
At this point we’ve created all of the components we need to backup our important data. We will put all of these components together by creating and using a NetBackup policy.
We will now use the NetBackup policy creation wizard to create a basic policy and then modify that policy to use the Storage Lifecycle Policy (SLP) that we just created.
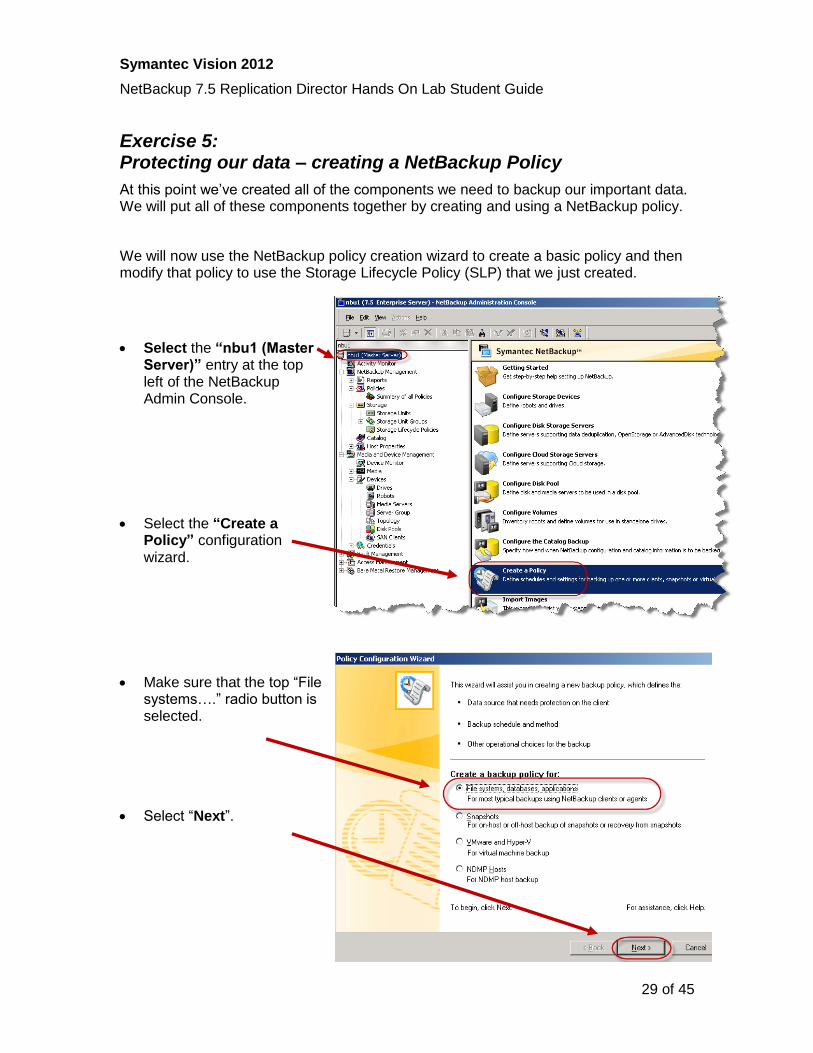
Select the “nbu1 (Master Server)” entry at the top left of the NetBackup Admin Console.
Select the “Create a Policy” configuration wizard.
Make sure that the top “File systems….” radio button is selected.
Select “Next”.
Symantec Vision 2012
NetBackup 7.5 Replication Director Hands On Lab Student Guide
30 of 45
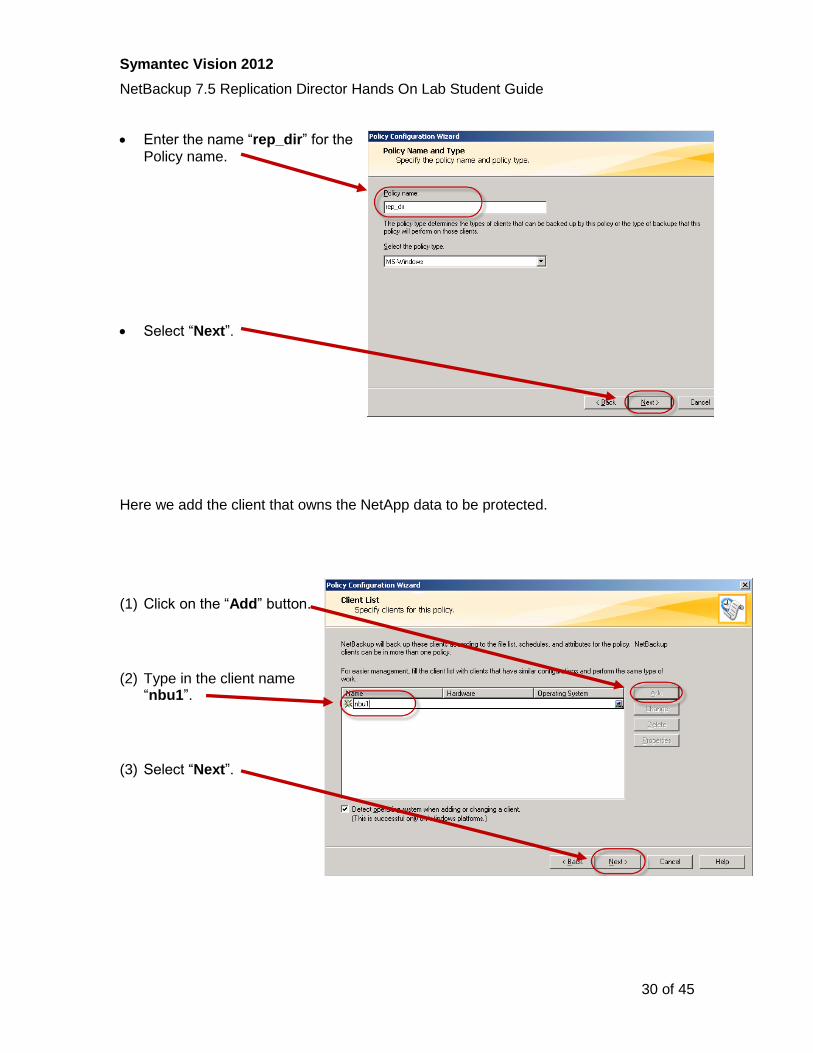
Enter the name “rep_dir” for the Policy name.
Select “Next”.
Here we add the client that owns the NetApp data to be protected.
(1) Click on the “Add” button.
(2) Type in the client name “nbu1”.
(3) Select “Next”.
Symantec Vision 2012
NetBackup 7.5 Replication Director Hands On Lab Student Guide
31 of 45
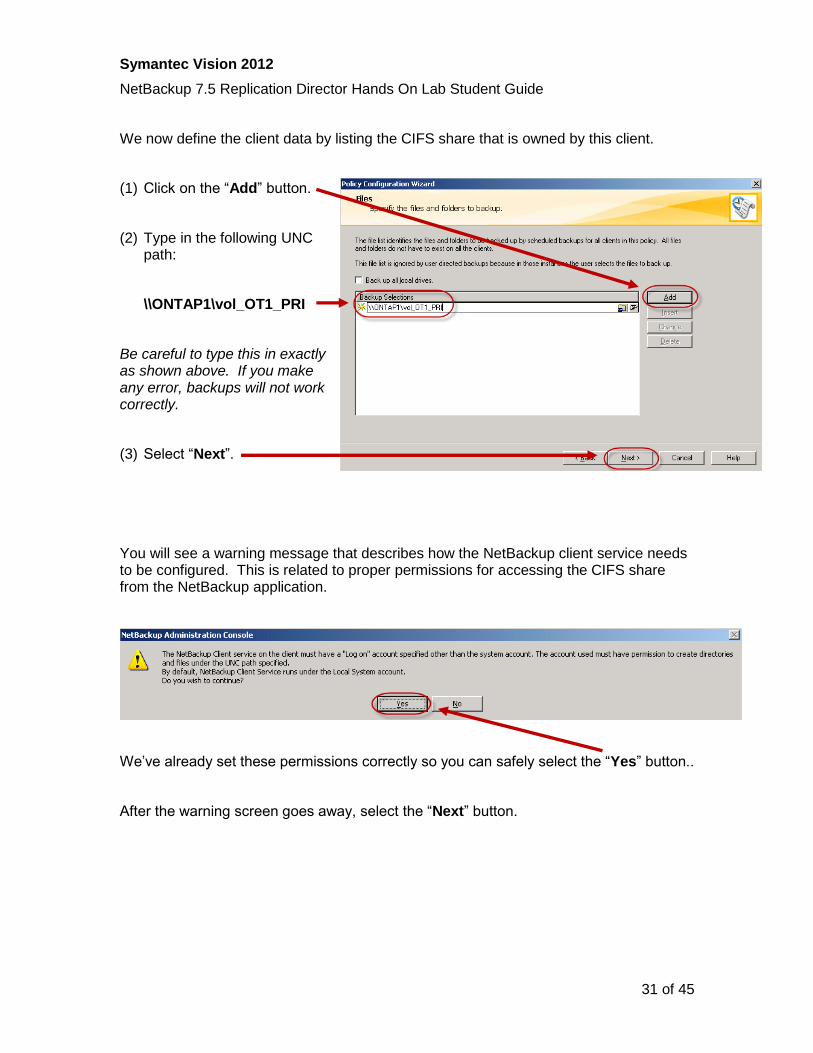
We now define the client data by listing the CIFS share that is owned by this client.
(1) Click on the “Add” button.
(2) Type in the following UNC path:
\\ONTAP1\vol_OT1_PRI
Be careful to type this in exactly as shown above. If you make any error, backups will not work correctly.
(3) Select “Next”.
You will see a warning message that describes how the NetBackup client service needs to be configured. This is related to proper permissions for accessing the CIFS share from the NetBackup application.
We’ve already set these permissions correctly so you can safely select the “Yes” button..
After the warning screen goes away, select the “Next” button.
Symantec Vision 2012
NetBackup 7.5 Replication Director Hands On Lab Student Guide
32 of 45
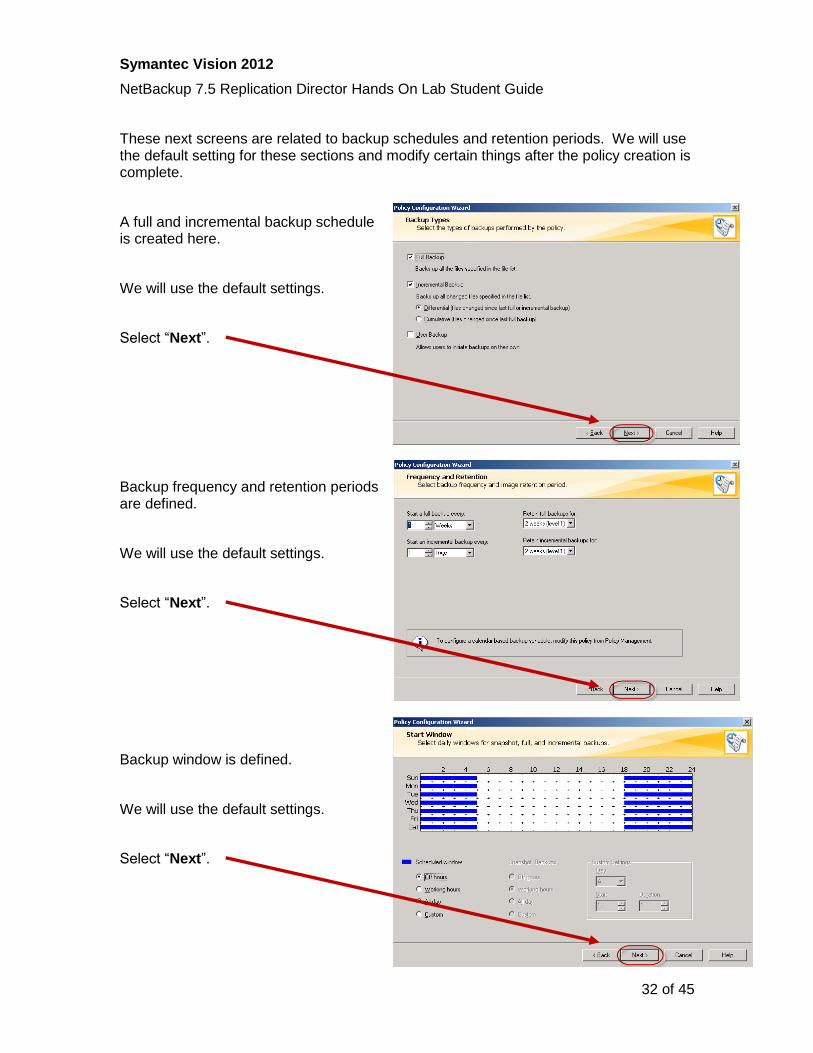
These next screens are related to backup schedules and retention periods. We will use the default setting for these sections and modify certain things after the policy creation is complete.
A full and incremental backup schedule is created here.
We will use the default settings.
Select “Next”.
Backup frequency and retention periods are defined.
We will use the default settings.
Select “Next”.
Backup window is defined.
We will use the default settings.
Select “Next”.

Symantec Vision 2012
NetBackup 7.5 Replication Director Hands On Lab Student Guide
33 of 45
We’re done configuring the policy.
Select “Finish”.
We need to make a few modifications to our new policy and customize it for our Replication Director backups. We will open the policy and make some adjustments.
From the main NetBackup Administration Console, expand the “Policies” tab and then right-click on the “rep_dir” policy we just created.
From the sub-menu, select “Change…”
Symantec Vision 2012
NetBackup 7.5 Replication Director Hands On Lab Student Guide
34 of 45
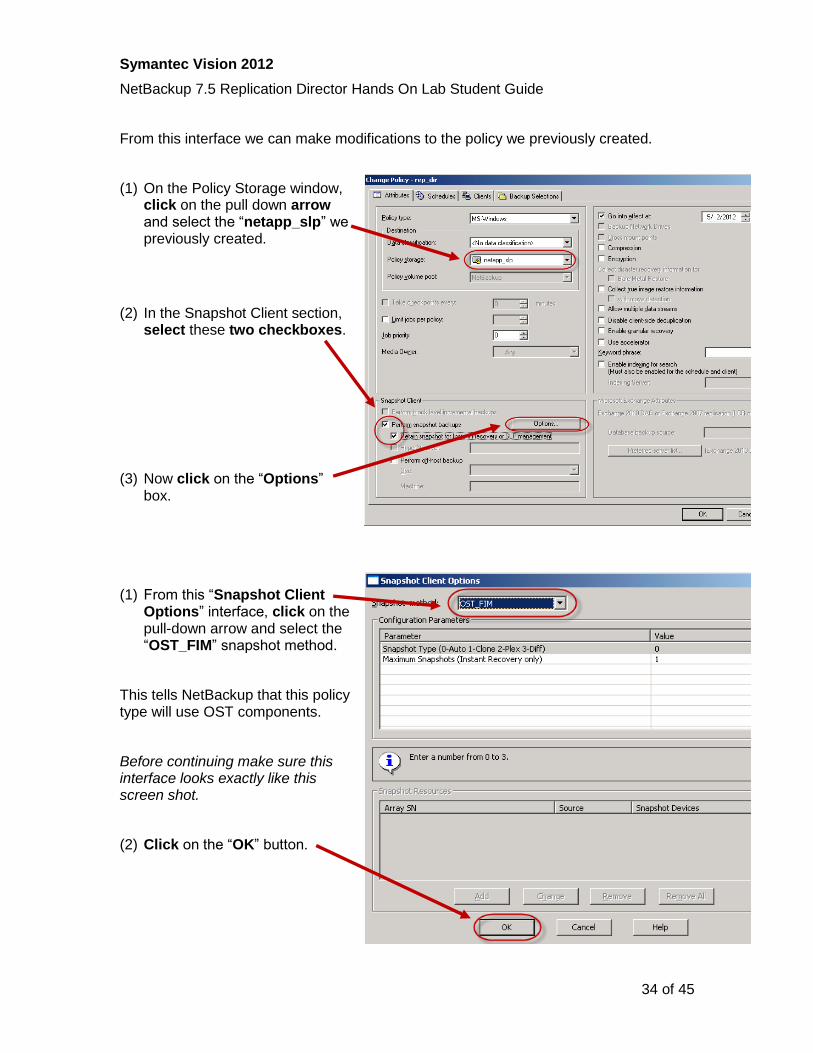
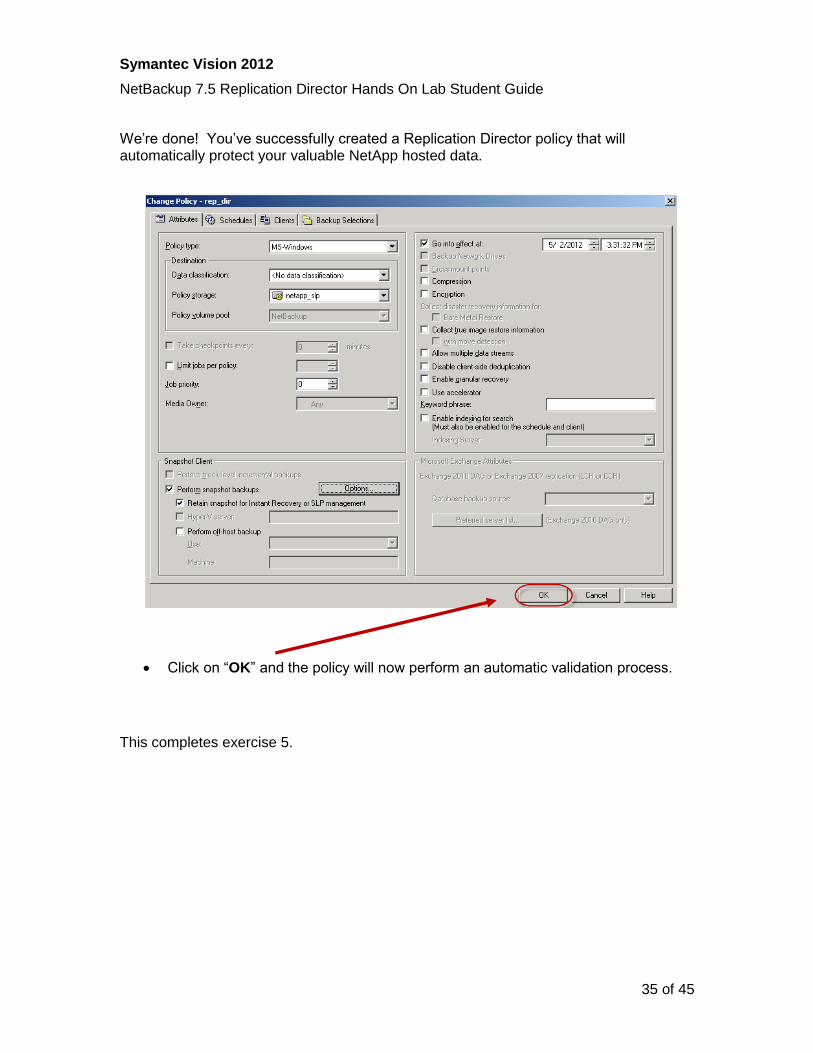
From this interface we can make modifications to the policy we previously created.
(1) On the Policy Storage window, click on the pull down arrow and select the “netapp_slp” we previously created.
(2) In the Snapshot Client section, select these two checkboxes.
(3) Now click on the “Options” box.
(1) From this “Snapshot Client Options” interface, click on the pull-down arrow and select the “OST_FIM” snapshot method.
This tells NetBackup that this policy type will use OST components.
Before continuing make sure this interface looks exactly like this screen shot.
(2) Click on the “OK” button.
Symantec Vision 2012
NetBackup 7.5 Replication Director Hands On Lab Student Guide
35 of 45
We’re done! You’ve successfully created a Replication Director policy that will automatically protect your valuable NetApp hosted data.
Click on “OK” and the policy will now perform an automatic validation process.
This completes exercise 5.
Symantec Vision 2012
NetBackup 7.5 Replication Director Hands On Lab Student Guide
36 of 45
Lab Exercise 6: Backing up and restoring using Replication Director and NetApp
We’ve configured everything we need to protect our data host on NetApp storage. Now we will backup our data and test restores of this data.
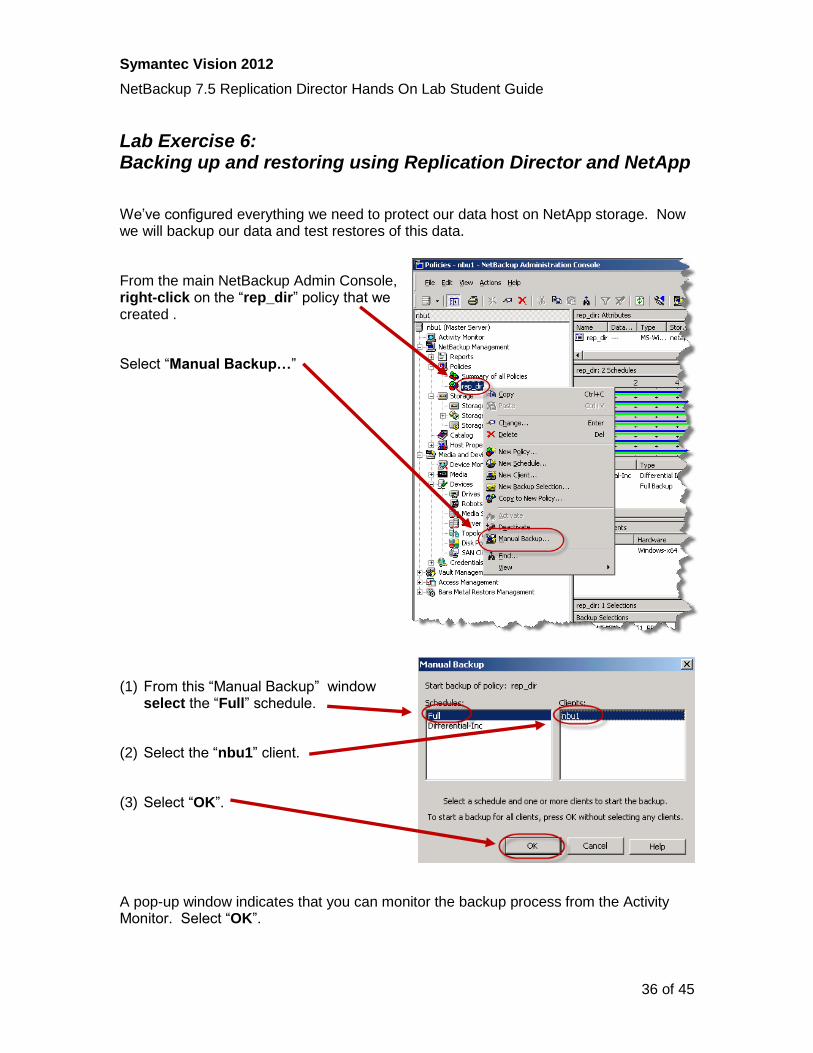
From the main NetBackup Admin Console, right-click on the “rep_dir” policy that we created .
Select “Manual Backup…”
(1) From this “Manual Backup” window select the “Full” schedule.
(2) Select the “nbu1” client.
(3) Select “OK”.
A pop-up window indicates that you can monitor the backup process from the Activity Monitor. Select “OK”.
Symantec Vision 2012
NetBackup 7.5 Replication Director Hands On Lab Student Guide
37 of 45
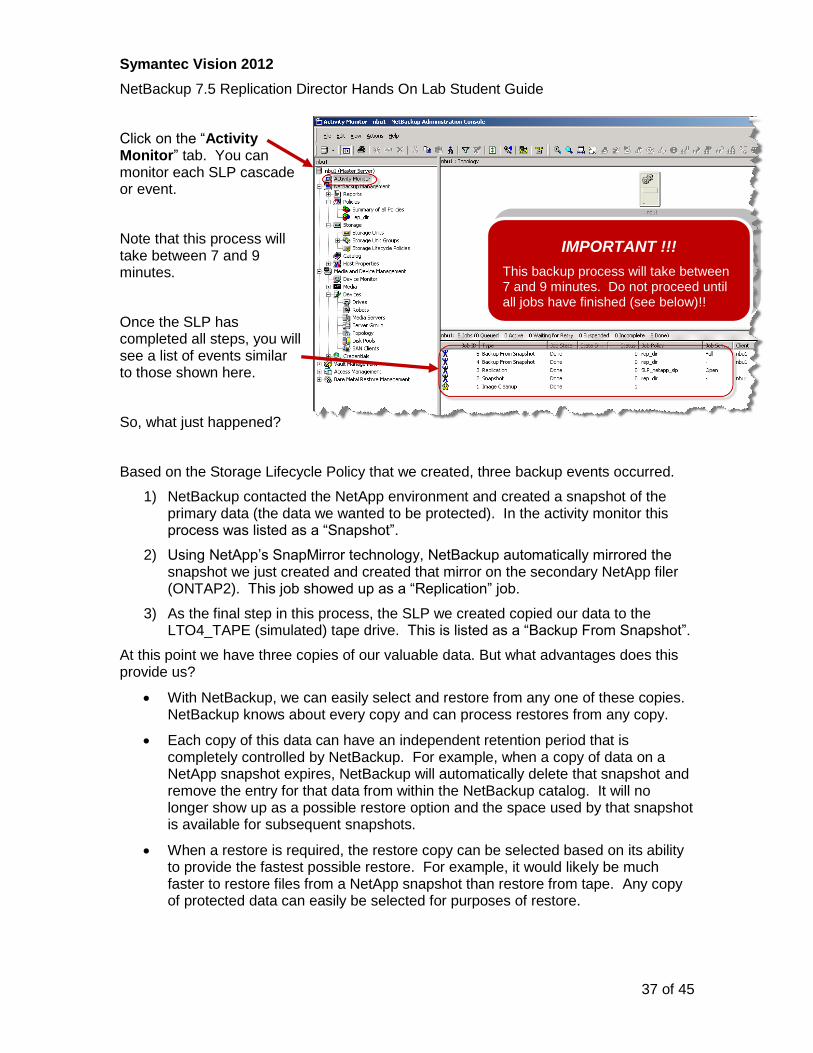
Click on the “Activity Monitor” tab. You can monitor each SLP cascade or event.
Note that this process will take between 7 and 9 minutes.
Once the SLP has completed all steps, you will see a list of events similar to those shown here.
So, what just happened?
Based on the Storage Lifecycle Policy that we created, three backup events occurred.
1) NetBackup contacted the NetApp environment and created a snapshot of the primary data (the data we wanted to be protected). In the activity monitor this process was listed as a “Snapshot”.
2) Using NetApp’s SnapMirror technology, NetBackup automatically mirrored the snapshot we just created and created that mirror on the secondary NetApp filer (ONTAP2). This job showed up as a “Replication” job.
3) As the final step in this process, the SLP we created copied our data to the LTO4_TAPE (simulated) tape drive. This is listed as a “Backup From Snapshot”.
At this point we have three copies of our valuable data. But what advantages does this provide us?
With NetBackup, we can easily select and restore from any one of these copies. NetBackup knows about every copy and can process restores from any copy.
Each copy of this data can have an independent retention period that is completely controlled by NetBackup. For example, when a copy of data on a NetApp snapshot expires, NetBackup will automatically delete that snapshot and remove the entry for that data from within the NetBackup catalog. It will no longer show up as a possible restore option and the space used by that snapshot is available for subsequent snapshots.
When a restore is required, the restore copy can be selected based on its ability to provide the fastest possible restore. For example, it would likely be much faster to restore files from a NetApp snapshot than restore from tape. Any copy of protected data can easily be selected for purposes of restore.
IMPORTANT !!!
This backup process will take between 7 and 9 minutes. Do not proceed until all jobs have finished (see below)!!

Symantec Vision 2012
NetBackup 7.5 Replication Director Hands On Lab Student Guide
38 of 45
So let’s how we can restore data from a NetApp snapshot!
Before we perform a restore, let’s look at the data we protected and delete a file.
Click on the Windows “Start” menu and select the “Run…” entry.
In the “Run” dialogue box, type in the following UNC path:
\\ONTAP1\vol_OT1_PRI
(Note that this entry may be listed in this window).
Click on the “OK” button.
Symantec Vision 2012
NetBackup 7.5 Replication Director Hands On Lab Student Guide
39 of 45
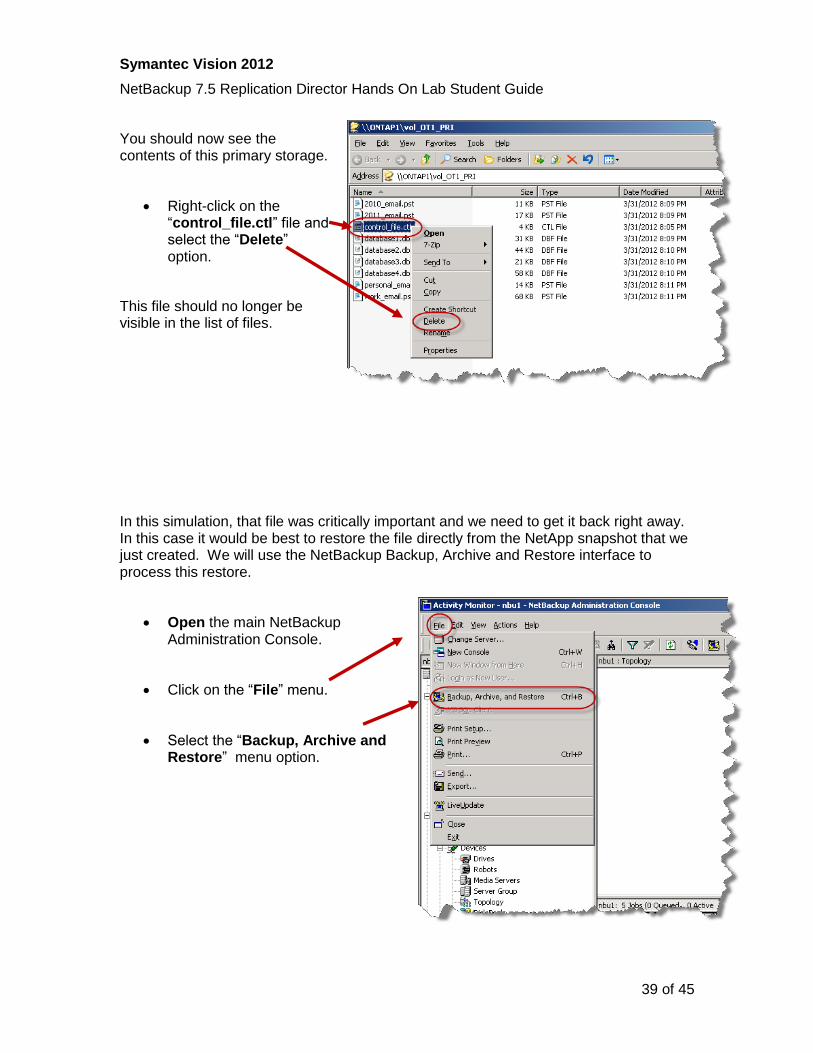
You should now see the contents of this primary storage.
Right-click on the “control_file.ctl” file and select the “Delete” option.
This file should no longer be visible in the list of files.
In this simulation, that file was critically important and we need to get it back right away. In this case it would be best to restore the file directly from the NetApp snapshot that we just created. We will use the NetBackup Backup, Archive and Restore interface to process this restore.
Open the main NetBackup Administration Console.
Click on the “File” menu.
Select the “Backup, Archive and Restore” menu option.
Symantec Vision 2012
NetBackup 7.5 Replication Director Hands On Lab Student Guide
40 of 45
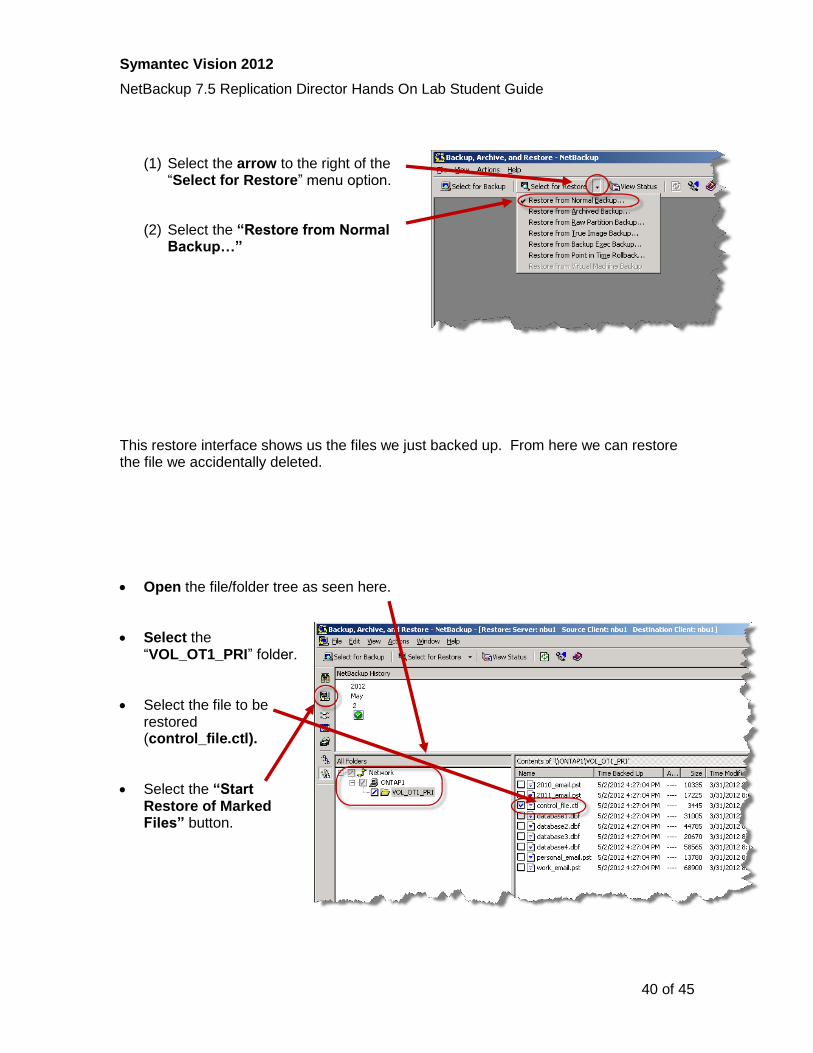
(1) Select the arrow to the right of the “Select for Restore” menu option.
(2) Select the “Restore from Normal Backup…”
This restore interface shows us the files we just backed up. From here we can restore the file we accidentally deleted.
Open the file/folder tree as seen here.
Select the “VOL_OT1_PRI” folder.
Select the file to be restored (control_file.ctl).
Select the “Start Restore of Marked Files” button.
Symantec Vision 2012
NetBackup 7.5 Replication Director Hands On Lab Student Guide
41 of 45
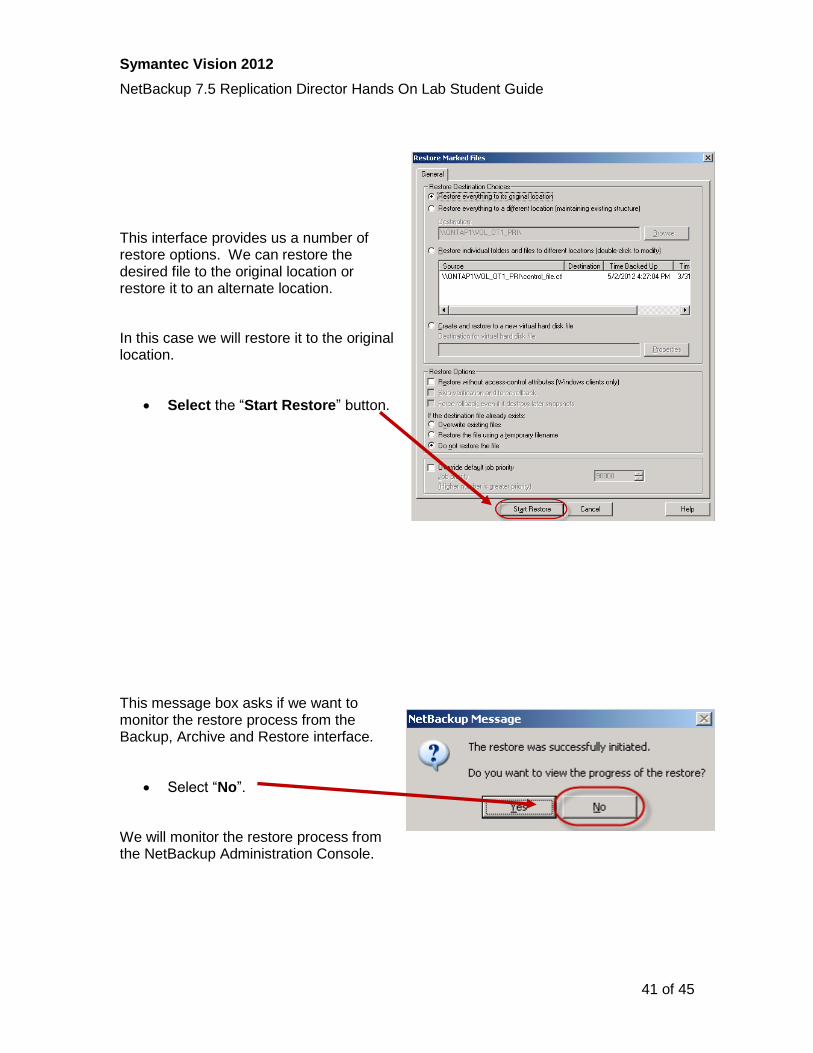
This interface provides us a number of restore options. We can restore the desired file to the original location or restore it to an alternate location.
In this case we will restore it to the original location.
Select the “Start Restore” button.
This message box asks if we want to monitor the restore process from the Backup, Archive and Restore interface.
Select “No”.
We will monitor the restore process from the NetBackup Administration Console.
Symantec Vision 2012
NetBackup 7.5 Replication Director Hands On Lab Student Guide
42 of 45
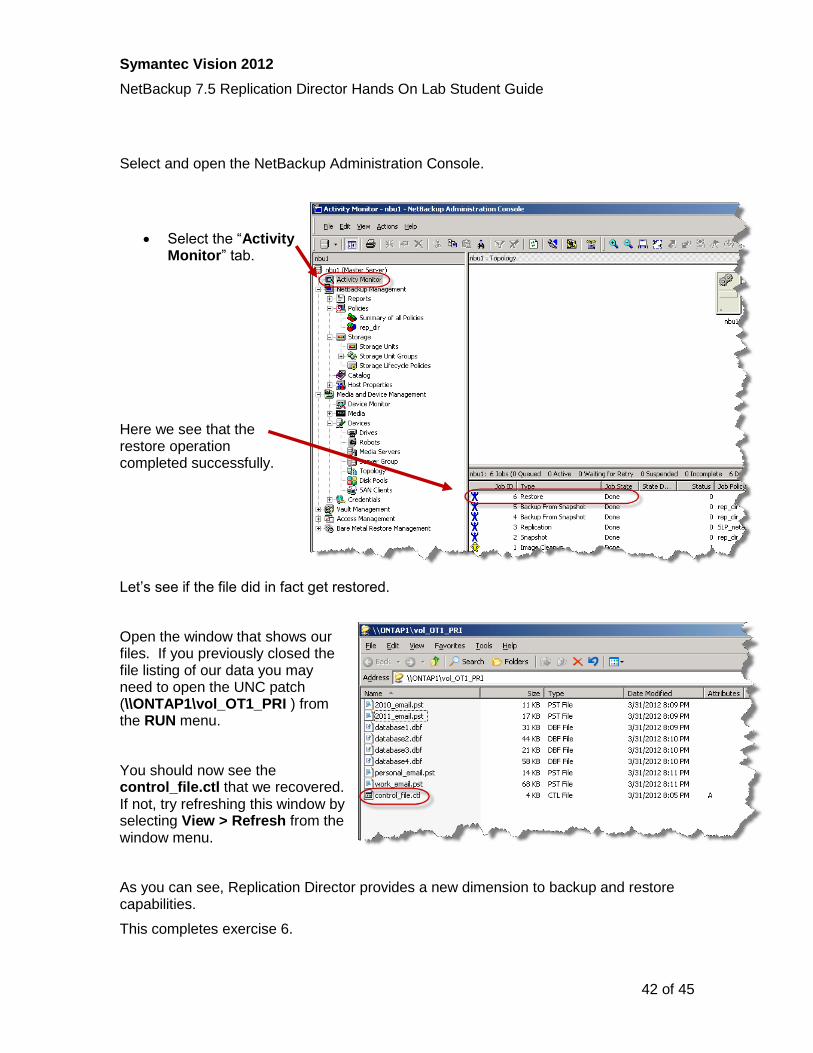
Select and open the NetBackup Administration Console.
Select the “Activity Monitor” tab.
Here we see that the restore operation completed successfully.
Let’s see if the file did in fact get restored.
Open the window that shows our files. If you previously closed the file listing of our data you may need to open the UNC patch (\\ONTAP1\vol_OT1_PRI ) from the RUN menu.
You should now see the control_file.ctl that we recovered. If not, try refreshing this window by selecting View > Refresh from the window menu.
As you can see, Replication Director provides a new dimension to backup and restore capabilities.
This completes exercise 6.
Symantec Vision 2012
NetBackup 7.5 Replication Director Hands On Lab Student Guide
43 of 45
Lab Exercise 7 (OPTIONAL): Exploring the NetApp Snapshot Environment
We’ve seen how the snapshot process works within NetBackup. Let’s take a brief look into the NetApp environment and see what snapshots were created and their relationships to each other.
Once again, on the NBU1 system, close all windows and applications that have been opened.
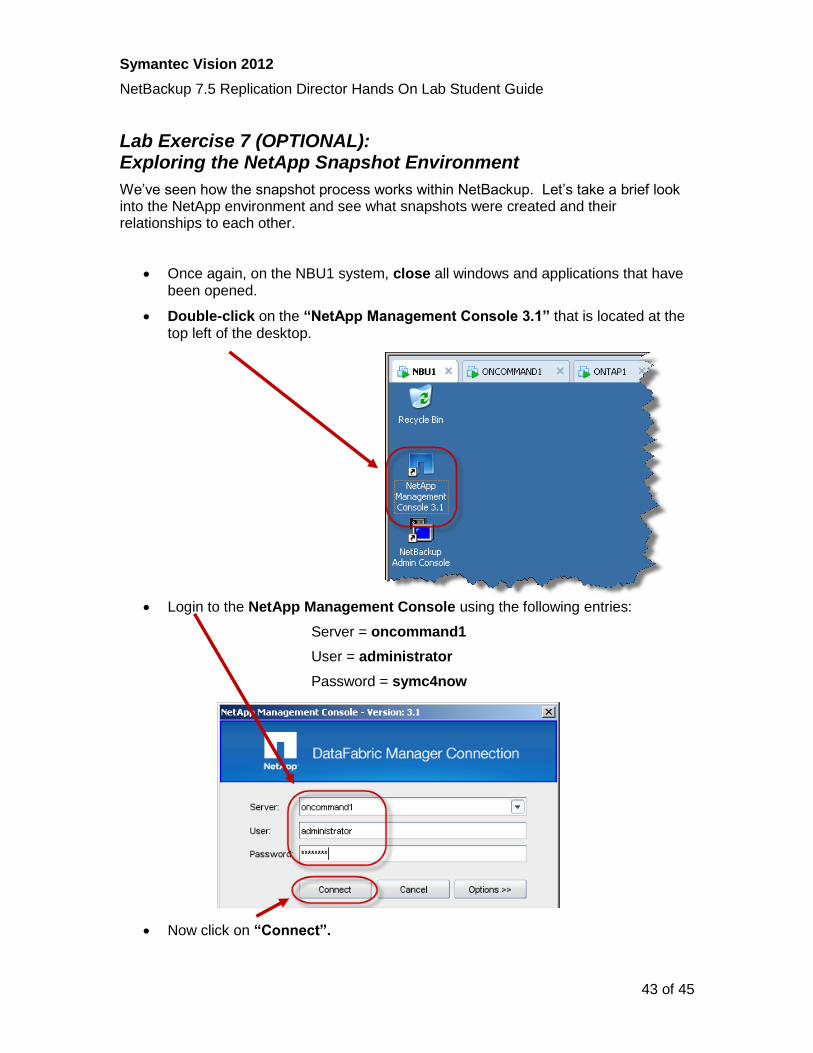
Double-click on the “NetApp Management Console 3.1” that is located at the top left of the desktop.
Login to the NetApp Management Console using the following entries:
Server = oncommand1
User = administrator
Password = symc4now
Now click on “Connect”.
Symantec Vision 2012
NetBackup 7.5 Replication Director Hands On Lab Student Guide
44 of 45
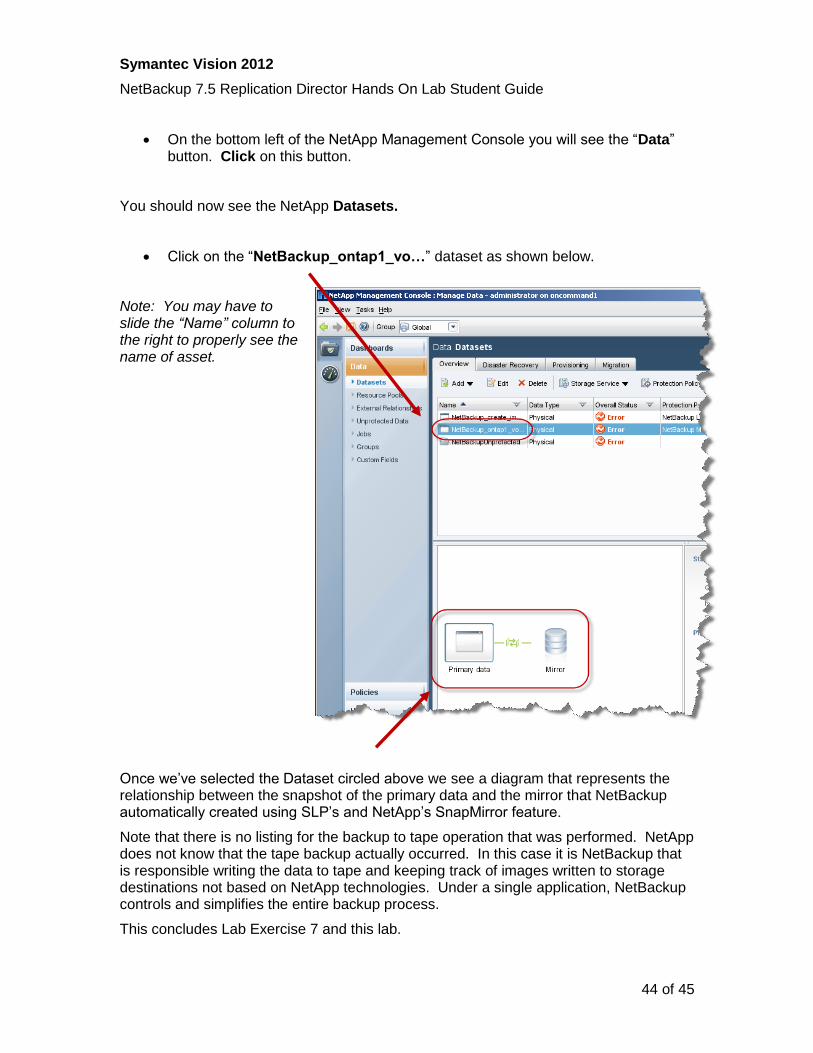
On the bottom left of the NetApp Management Console you will see the “Data” button. Click on this button.
You should now see the NetApp Datasets.
Click on the “NetBackup_ontap1_vo…” dataset as shown below.
Note: You may have to slide the “Name” column to the right to properly see the name of asset.
Once we’ve selected the Dataset circled above we see a diagram that represents the relationship between the snapshot of the primary data and the mirror that NetBackup automatically created using SLP’s and NetApp’s SnapMirror feature.
Note that there is no listing for the backup to tape operation that was performed. NetApp does not know that the tape backup actually occurred. In this case it is NetBackup that is responsible writing the data to tape and keeping track of images written to storage destinations not based on NetApp technologies. Under a single application, NetBackup controls and simplifies the entire backup process.
This concludes Lab Exercise 7 and this lab.
Symantec Vision 2012
NetBackup 7.5 Replication Director Hands On Lab Student Guide
45 of 45
Thank you for joining us today! We appreciate you attending this lab. If you have any additional questions regarding this technology, feel free to come by the NetBackup booth and visit us.