netbackup installation guide for windows - oracle · pdf fileupgrade netbackup one server at a...
TRANSCRIPT

N152568
September 2005
VERITAS NetBackup™ 6.0
Installation Guide
for Windows

Disclaimer
The information contained in this publication is subject to change without notice. VERITAS Software Corporation makes no warranty of any kind with regard to this manual, including, but not limited to, the implied warranties of merchantability and fitness for a particular purpose. VERITAS Software Corporation shall not be liable for errors contained herein or for incidental or consequential damages in connection with the furnishing, performance, or use of this manual.
VERITAS Legal Notice
Copyright © 1998-2005 VERITAS Software Corporation. All rights reserved. VERITAS, the VERITAS Logo, and NetBackup are trademarks or registered trademarks of VERITAS Software Corporation or its affiliates in the U.S. and other countries. Other names may be trademarks of their respective owners.
Portions of this software are derived from the RSA Data Security, Inc. MD5 Message-Digest Algorithm. Copyright 1991-92, RSA Data Security, Inc. Created 1991. All rights reserved.
VERITAS Software Corporation350 Ellis StreetMountain View, CA 94043USAPhone 650-527-8000Fax 650-527-2908www.veritas.com
Third-Party Copyrights
For a list of third-party copyrights, see the NetBackup Release Notes appendix.
ii NetBackup Installation Guide for Windows

Contents
Preface . . . . . . . . . . . . . . . . . . . . . . . . . . . . . . . . . . . . . . . . . . . . . . . . . . . . . . . . . . . . . .vii
Getting Help . . . . . . . . . . . . . . . . . . . . . . . . . . . . . . . . . . . . . . . . . . . . . . . . . . . . . . . . . . . . . .vii
Accessibility Features . . . . . . . . . . . . . . . . . . . . . . . . . . . . . . . . . . . . . . . . . . . . . . . . . . . . . . ix
Comment on the Documentation . . . . . . . . . . . . . . . . . . . . . . . . . . . . . . . . . . . . . . . . . . . . . x
Chapter 1. Before You Begin Installing NetBackup . . . . . . . . . . . . . . . . . . . . . . . . . . .1
Pre-Installation Software Requirements . . . . . . . . . . . . . . . . . . . . . . . . . . . . . . . . . . . . . . . . 1
NetBackup License Key Requirements . . . . . . . . . . . . . . . . . . . . . . . . . . . . . . . . . . . . . . 1
NetBackup Supportability . . . . . . . . . . . . . . . . . . . . . . . . . . . . . . . . . . . . . . . . . . . . . . . . 2
Understanding the Contents of Your NetBackup Media Kit . . . . . . . . . . . . . . . . . . . . 3
NetBackup Server Installation Requirements . . . . . . . . . . . . . . . . . . . . . . . . . . . . . . . . . . . 5
Requirements for Local Installations . . . . . . . . . . . . . . . . . . . . . . . . . . . . . . . . . . . . . . . . 5
Additional Requirements for Remote and Cluster Installations . . . . . . . . . . . . . . . . . 7
Additional Requirements for Access Controlled Environments . . . . . . . . . . . . . . . . . 8
NetBackup Server Upgrade Requirements . . . . . . . . . . . . . . . . . . . . . . . . . . . . . . . . . . . . . 8
Chapter 2. Installation and Initial Configuration . . . . . . . . . . . . . . . . . . . . . . . . . . . . .13
Configuring Storage Devices for Windows . . . . . . . . . . . . . . . . . . . . . . . . . . . . . . . . . . . 14
Supported Robot Types . . . . . . . . . . . . . . . . . . . . . . . . . . . . . . . . . . . . . . . . . . . . . . . . . 14
Storage Device Configuration . . . . . . . . . . . . . . . . . . . . . . . . . . . . . . . . . . . . . . . . . . . . 15
Special Requirements for Upgrading to NetBackup 6.0 . . . . . . . . . . . . . . . . . . . . . . . . . 16
Examples of Populating the NetBackup EMM Database . . . . . . . . . . . . . . . . . . . . . 16
Scenario 1: Global Device Database Host and Volume Database Host on One Master Server . . . . . . . . . . . . . . . . . . . . . . . . . . . . . . . . . . . . . . . . . . . . . . . . . . . . . . . 17
iii
Scenario 2: Global Device Database Host and Volume Database Host on Different Master Servers . . . . . . . . . . . . . . . . . . . . . . . . . . . . . . . . . . . . . . . . . . . . . . . . . . . . . . 20
Scenario 3: Global Device Database Host Is on a Media Server . . . . . . . . . . . . . 24
Installing or Upgrading NetBackup . . . . . . . . . . . . . . . . . . . . . . . . . . . . . . . . . . . . . . . . . . 28
Installing NetBackup Server Software . . . . . . . . . . . . . . . . . . . . . . . . . . . . . . . . . . . . 29
Upgrading from NetBackup Server to NetBackup Enterprise Server . . . . . . . . . . . 29
Server Installation: A Local, Typical Installation or Upgrade . . . . . . . . . . . . . . . . . 31
Server Installation: A Local, Custom Installation or Upgrade . . . . . . . . . . . . . . . . . 37
Server Installation: A Remote, Typical Installation or Upgrade . . . . . . . . . . . . . . . 46
Server Installation: A Remote, Custom Installation or Upgrade . . . . . . . . . . . . . . . 55
Installing or Upgrading NetBackup in Clustered Environments . . . . . . . . . . . . . . 66
Cluster Installation Requirements . . . . . . . . . . . . . . . . . . . . . . . . . . . . . . . . . . . . . . 66
Before You Perform a New Installation in Clustered Environments . . . . . . . . . 67
Before You Perform an Upgrade in Clustered Environments . . . . . . . . . . . . . . 67
Server Installation in a Cluster: A Typical Installation or Upgrade . . . . . . . . . . 68
Server Installation in a Cluster: A Custom Installation or Upgrade . . . . . . . . . 81
Populating the NetBackup EMM Database . . . . . . . . . . . . . . . . . . . . . . . . . . . . . . . . . 96
Installing NetBackup Server Software Silently . . . . . . . . . . . . . . . . . . . . . . . . . . . . . 101
Installing Access Control in New Installations . . . . . . . . . . . . . . . . . . . . . . . . . . . . . 103
Upgrading NetBackup with Access Control . . . . . . . . . . . . . . . . . . . . . . . . . . . . . . . 104
Chapter 3. Installing Alternative Administration Interfaces . . . . . . . . . . . . . . . . . . 107
NetBackup Remote Administration Console for Windows . . . . . . . . . . . . . . . . . . 107
NetBackup-Java Administration Console . . . . . . . . . . . . . . . . . . . . . . . . . . . . . . . . . 110
Java Windows Administration Console . . . . . . . . . . . . . . . . . . . . . . . . . . . . . . . . . . 110
Installing or Removing Multiple Versions of the NetBackup-Java Administration Console on Windows . . . . . . . . . . . . . . . . . . . . . . . . . . . . . . . . . . . . . . . . . . . . . . . . . . 111
Administering Backlevel NetBackup Servers . . . . . . . . . . . . . . . . . . . . . . . . . . . . . . 113
Chapter 4. Uninstalling and Reinstalling NetBackup . . . . . . . . . . . . . . . . . . . . . . 115
Uninstalling NetBackup Server Software . . . . . . . . . . . . . . . . . . . . . . . . . . . . . . . . . . . . 115
iv NetBackup Installation Guide for Windows
Uninstalling NetBackup from a Clustered Environment . . . . . . . . . . . . . . . . . . . . . . . 117
Notes on Reinstalling NetBackup Server Software . . . . . . . . . . . . . . . . . . . . . . . . . . . . 117
Chapter 5. Installing NetBackup Client Software . . . . . . . . . . . . . . . . . . . . . . . . . . .119
Installing NetBackup on Microsoft Windows Clients . . . . . . . . . . . . . . . . . . . . . . . . . . 119
Windows Client Installation Overview . . . . . . . . . . . . . . . . . . . . . . . . . . . . . . . . . . . 119
VERITAS Volume Snapshot Provider on Windows . . . . . . . . . . . . . . . . . . . . . . 120
User-Directed Operations for Windows Systems . . . . . . . . . . . . . . . . . . . . . . . . 120
Local and Remote Installations for Windows Systems . . . . . . . . . . . . . . . . . . . . 120
Silent Installations for Windows Systems . . . . . . . . . . . . . . . . . . . . . . . . . . . . . . . 121
New and Upgrade Installations for Windows Clients . . . . . . . . . . . . . . . . . . . . 121
Windows Client System Requirements . . . . . . . . . . . . . . . . . . . . . . . . . . . . . . . . . . . 122
Windows Client Installation Requirements . . . . . . . . . . . . . . . . . . . . . . . . . . . . . 122
Remote Windows Client Installation Requirements . . . . . . . . . . . . . . . . . . . . . . 122
NetBackup Server Requirements . . . . . . . . . . . . . . . . . . . . . . . . . . . . . . . . . . . . . . 123
Windows Client Local Installation Instructions . . . . . . . . . . . . . . . . . . . . . . . . . . . . 123
Windows Client Remote Installation Instructions . . . . . . . . . . . . . . . . . . . . . . . . . . 124
Notes on Windows Client Remote Installations . . . . . . . . . . . . . . . . . . . . . . . . . 124
Silent Installation Instructions for Windows Clients . . . . . . . . . . . . . . . . . . . . . . . . 126
Uninstalling Windows Client Software . . . . . . . . . . . . . . . . . . . . . . . . . . . . . . . . . . . 128
Installing NetBackup Clients on UNIX Systems . . . . . . . . . . . . . . . . . . . . . . . . . . . . . . . 128
Installing UNIX Clients Locally . . . . . . . . . . . . . . . . . . . . . . . . . . . . . . . . . . . . . . . . . . 129
Installing UNIX Client Software Remotely . . . . . . . . . . . . . . . . . . . . . . . . . . . . . . . . 130
Adding a UNIX Client after Initial Server Installation . . . . . . . . . . . . . . . . . . . . . . . 134
Removing UNIX NetBackup Client Software . . . . . . . . . . . . . . . . . . . . . . . . . . . . . . 135
Chapter 6. NetBackup License Keys . . . . . . . . . . . . . . . . . . . . . . . . . . . . . . . . . . . . .139
NetBackup License Compatibility . . . . . . . . . . . . . . . . . . . . . . . . . . . . . . . . . . . . . . . . . . . 139
Entering License Keys . . . . . . . . . . . . . . . . . . . . . . . . . . . . . . . . . . . . . . . . . . . . . . . . . . . . 139
Frequently Asked Questions . . . . . . . . . . . . . . . . . . . . . . . . . . . . . . . . . . . . . . . . . . . . . . . 140
Contents v
Chapter 7. Configuring NetBackup Server Software . . . . . . . . . . . . . . . . . . . . . . . 145
Recommendations for Configuring NetBackup . . . . . . . . . . . . . . . . . . . . . . . . . . . . . . . 145
Configuring NetBackup . . . . . . . . . . . . . . . . . . . . . . . . . . . . . . . . . . . . . . . . . . . . . . . . . . . 146
Configuring Storage Devices for NetBackup . . . . . . . . . . . . . . . . . . . . . . . . . . . . . . 147
Configuring Volumes . . . . . . . . . . . . . . . . . . . . . . . . . . . . . . . . . . . . . . . . . . . . . . . . . 148
Configure the Catalog Backup . . . . . . . . . . . . . . . . . . . . . . . . . . . . . . . . . . . . . . . . . . 149
Create a Backup Policy . . . . . . . . . . . . . . . . . . . . . . . . . . . . . . . . . . . . . . . . . . . . . . . . 149
Testing the NetBackup Installation . . . . . . . . . . . . . . . . . . . . . . . . . . . . . . . . . . . . . . 150
Chapter 8. Accessibility Features . . . . . . . . . . . . . . . . . . . . . . . . . . . . . . . . . . . . . . . 151
Using the Keyboard to Navigate in NetBackup . . . . . . . . . . . . . . . . . . . . . . . . . . . . 151
Navigating in a NetBackup Tree View . . . . . . . . . . . . . . . . . . . . . . . . . . . . . . . . . 151
Using Accelerator Keys . . . . . . . . . . . . . . . . . . . . . . . . . . . . . . . . . . . . . . . . . . . . . . 153
Using Mnemonic Keys . . . . . . . . . . . . . . . . . . . . . . . . . . . . . . . . . . . . . . . . . . . . . . 153
Using the Keyboard in Dialogs . . . . . . . . . . . . . . . . . . . . . . . . . . . . . . . . . . . . . . . 153
Accessing Online Documentation . . . . . . . . . . . . . . . . . . . . . . . . . . . . . . . . . . . . . . . . 154
Index . . . . . . . . . . . . . . . . . . . . . . . . . . . . . . . . . . . . . . . . . . . . . . . . . . . . . . . . . . . . . . 155
vi NetBackup Installation Guide for Windows
Preface
The purpose of this guide is to help NetBackup system administrators install NetBackup™. The NetBackup system administrator is responsible for maintaining backups and disaster recovery plans using NetBackup.
This guide assumes the following:
◆ The NetBackup System Administrator possesses a basic understanding of Microsoft Windows system administration.
◆ The NetBackup System Administrator has had experience with the system on which NetBackup is to be installed.
◆ That all SCSI devices are properly attached and configured for the operating system.
Caution If a device is not properly configured for the operating system, backups made to that device may lead to backup failure and/or data loss.
Getting HelpYou can find answers to questions and get help from the NetBackup documentation and from the VERITAS technical support web site.
Finding NetBackup DocumentationA list of the entire NetBackup documentation set appears as an appendix in the NetBackup Release Notes. All NetBackup documents are included in PDF format on the NetBackup Documentation CD.
For definitions of NetBackup terms, consult the online glossary.
vii
Getting Help
▼ To access the NetBackup online glossary
1. In the NetBackup Administration Console, click Help > Help Topics.
2. Click the Contents tab.
3. Click Glossary of NetBackup Terms.
Use the scroll function to navigate through the glossary.
Accessing the VERITAS Technical Support Web SiteThe address for the VERITAS Technical Support Web site is http://support.veritas.com.
The VERITAS Support Web site lets you do any of the following:
◆ Obtain updated information about NetBackup, including system requirements, supported platforms, and supported peripherals
◆ Contact the VERITAS Technical Support staff and post questions to them
◆ Get the latest patches, upgrades, and utilities
◆ View the NetBackup Frequently Asked Questions (FAQ) page
◆ Search the knowledge base for answers to technical support questions
◆ Receive automatic notice of product updates
◆ Find out about NetBackup training
◆ Read current white papers related to NetBackup
From http://support.veritas.com, you can complete various tasks to obtain specific types of support for NetBackup:
1. Subscribe to the VERITAS Email notification service to be informed of software alerts, newly published documentation, Beta programs, and other services.
a. From the main http://support.veritas.com page, select a product family and a product.
b. Under Support Resources, click Email Notifications.
Your customer profile ensures you receive the latest VERITAS technical information pertaining to your specific interests.
2. Locate the telephone support directory at http://support.veritas.com by clicking the Phone Support icon. A page appears that contains VERITAS support numbers from around the world.
viii NetBackup Installation Guide for Windows

Accessibility Features
Note Telephone support for NetBackup is only available with a valid support contract. To contact VERITAS for technical support, dial the appropriate phone number listed on the Technical Support Guide included in the product box and have your product license information ready for quick navigation to the proper support group.
3. Contact technical support using e-mail.
a. From the main http://support.veritas.com page, click the E-mail Support icon.
A wizard guides you to do the following:
◆ Select a language of your preference
◆ Select a product and a platform
◆ Provide additional contact and product information, and your message
◆ Associate your message with an existing technical support case
b. After providing the required information, click Send Message.
Contacting VERITAS LicensingFor license information, you can contact us as follows:
◆ Call 1-800-634-4747 and select option 3
◆ Fax questions to 1-650-527-0952
◆ In the Americas, send e-mail to [email protected].
In the Asia and Pacific areas, send email to [email protected].
In all other areas, send email to [email protected].
Accessibility FeaturesNetBackup contains features that make the user interface easier to use by people who are visually impaired and by people who have limited dexterity. Accessibility features include:
◆ Support for assistive technologies such as screen readers and voice input (Windows servers only)
◆ Support for keyboard (mouseless) navigation using accelerator keys and mnemonic keys
Preface ix
Comment on the Documentation
For more information, see the “Accessibility Features” on page 151.
Comment on the DocumentationLet us know what you like and dislike about the documentation. Were you able to find the information you needed quickly? Was the information clearly presented? You can report errors and omissions or tell us what you would find useful in future versions of our manuals and online help.
Please include the following information with your comment:
◆ The title and product version of the manual on which you are commenting
◆ The topic (if relevant) on which you are commenting
◆ Your comment
◆ Your name
Email your comment to [email protected].
Please only use this address to comment on product documentation. See “Getting Help” in this preface for information on how to contact Technical Support about our software.
We appreciate your feedback.
x NetBackup Installation Guide for Windows

Before You Begin Installing NetBackup
1 Installing NetBackup servers and clients is the first step in providing an easy-to-use, reliable solution for backing up and restoring data. However, before you start the installation, it is important that you take a few minutes to look through your NetBackup software package and become familiar with its contents.It is important to read the requirements in this chapter, because they list information about the installation and the hardware, cluster, and upgrade requirements that are new to this release.
Pre-Installation Software RequirementsThis release of NetBackup contains many changes and enhancements that have caused the software to become larger. You can read a brief description of these enhancements in the NetBackup Release Notes.
Depending on the type of platform you are installing, the growth in the software may require you to mount more CDs than in earlier releases.
Note To determine how much memory you need before you begin installing NetBackup, refer to “NetBackup Server Installation Requirements” on page 5. To view the different binary sizes, refer to “NetBackup Binary Sizes” in the NetBackup Release Notes.
NetBackup License Key RequirementsWhen installing a NetBackup master or media server, you must enter a NetBackup base product license key. Check your release package to make sure that you have license keys for all the NetBackup servers, clients, options, and agents that you requested.
Enter all product license keys on the master server when prompted during the installation.
1
Pre-Installation Software Requirements
For more information about license keys, refer to “NetBackup License Keys” on page 139. For detailed information on how to administer NetBackup license keys, refer to the NetBackup System Administrator’s Guide, Volume 1.
NetBackup Supportability
Note The “Supported Platforms and Operating Systems” table in the NetBackup Release Notes provides a Client Selection column that identifies which clients to install with which operating systems.
NetBackup supports mixed versions between master and media servers, enabling you to upgrade NetBackup one server at a time, which minimizes impact on overall system performance.
Caution VERITAS supports upgrading NetBackup 5.0MP4 or later servers to NetBackup 6.0. However, VERITAS does not support a server upgrade directly from NetBackup 4.5 GA, FPx, or MPx to NetBackup 6.0. If you currently have NetBackup 4.5 installed on a server that you want to upgrade, you must perform an intermediate upgrade to NetBackup 5.x and then upgrade to NetBackup 6.0.
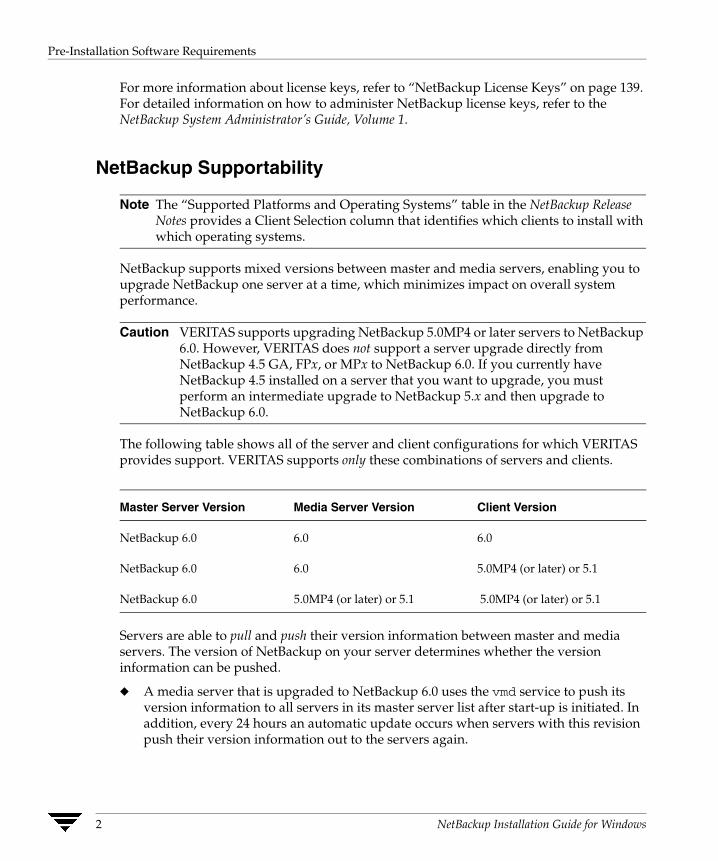
The following table shows all of the server and client configurations for which VERITAS provides support. VERITAS supports only these combinations of servers and clients.
Servers are able to pull and push their version information between master and media servers. The version of NetBackup on your server determines whether the version information can be pushed.
◆ A media server that is upgraded to NetBackup 6.0 uses the vmd service to push its version information to all servers in its master server list after start-up is initiated. In addition, every 24 hours an automatic update occurs when servers with this revision push their version information out to the servers again.
Master Server Version Media Server Version Client Version
NetBackup 6.0 6.0 6.0
NetBackup 6.0 6.0 5.0MP4 (or later) or 5.1
NetBackup 6.0 5.0MP4 (or later) or 5.1 5.0MP4 (or later) or 5.1
2 NetBackup Installation Guide for Windows

Pre-Installation Software Requirements
◆ Servers running a version of NetBackup that is earlier than NetBackup 5.0MP4 are not supported in a NetBackup 6.0 environment. If a query times out for a particular server, it is classified as a “pre-5.x” version of NetBackup.
Caution Before you upgrade the NetBackup software on a NetBackup master server or Enterprise Media Manager (EMM) server, you must back up your NetBackup catalogs and verify that the catalog backup was successful.
Understanding the Contents of Your NetBackup Media KitYour VERITAS NetBackup media kit includes multiple CDs. The contents of each CD is shown on the CD label.
The following table lists the title of each CD, along with a brief description of its contents.
NetBackup Software CD Contents
VERITAS CD Contents
Documentation CD The documentation CD is provided with each product order and provides documentation for all VERITAS NetBackup Software products included in this release. The documentation on this CD is in PDF format and organized into product groups. You can print selected PDF files using Acrobat Reader.
If you insert the documentation CD in a Microsoft Windows system CD drive with Autorun enabled, you see a web page listing the documents that you can select to view. If Autorun is not enabled, navigate to the CD drive to view the CD contents.
Windows Server CDs
Windows 32-bit Server Contains the Windows 32-bit server and all Windows clients and databases/add-ons for a Windows 32-bit operating system.
Windows IA64-bit Server Contains the Windows 64-bit server and all Windows clients and databases/add-ons for a Windows IA 64-bit operating system.
Chapter 1, Before You Begin Installing NetBackup 3

Pre-Installation Software Requirements
UNIX Server CDs
IBM AIX and HP Tru64 CD ◆ AIX 5.1 RS/6000, AIX 5.2, or AIX 5.3 server types
◆ Alpha Tru64 5.1b and 5.1b2 server types and ALPHA: OSF1_V5 client types
HP CD ◆ HP9000 - PA-RISC: HP-UX 11.0, 11.11 and 11.23
◆ HP - Integrity: HP-UX 11.23
Linux CD ◆ Intel 32-bit Linux: Red Hat 2.4 client types
◆ IA64 Linux: SuSE 2.4 client types
Sun Solaris Solaris 8, 9, and 10 server types and corresponding Solaris: Solaris 8, 9, and 10 client types.
UNIX Clients CD Contains all UNIX clients
UNIX Options CD Contains all Database agents, Advanced Client, BMR, BMR boot, Encryption, NDMP and Vault
NetBackup Storage Migrator CD Contains NetBackup Storage Migrator
Common-Component CDs
Infrastructure Core Services (ICS) for AIX VxSS Security and PBX Installer for AIX
ICS for HP900 PA-RISC VxSS Security and PBX Installer for HP-UX
ICS for HP Integrity VxSS Security and PBX Installer for HP IA-64
ICS for Intel 32-bit Linux VxSS Security and PBX Installer for Linux
ICS for IA64 Linux VxSS Security and PBX Installer for Linux IA-64
ICS for Solaris VxSS Security and PBX Installer for Solaris
ICS for Tru64 VxSS Security and PBX Installer for HP Tru64/Alpha
ICS for Windows 32 VxSS Security and PBX Installer for Windows
NetBackup Software CD Contents (continued)
VERITAS CD Contents
4 NetBackup Installation Guide for Windows
NetBackup Server Installation Requirements
NetBackup Server Installation Requirements Installing the server software takes approximately 10 minutes (additional time may be required to set up the product for your environment).
Caution Before installing your NetBackup product, make sure you have the most current operating system patches and updates applied to your system. If you are not certain of your operating system level, contact your operating system vendor and request the latest patches and upgrades.
Note It is important that you ensure all NetBackup servers have a release level installed that is at least equal to the newest version level installed on the clients. (Older versions of server software can encounter problems with newer clients.)
Requirements for Local InstallationsEnsure that the following requirements are met before installing:
◆ Remove any other vendor’s backup software currently configured on your system before installing NetBackup. The backup software of another vendor can negatively affect how NetBackup installs and functions.
◆ System configuration necessary to install NetBackup on a Windows-based server:
◆ An Intel Pentium system running Windows 2000 with a minimum of 256 MB of memory and service pack 4 installed, or Windows 2003 server.
◆ Internet Explorer 5.0 or later.
◆ Screen resolution configuration of at least 1024x768, 256 colors.
◆ An Administrator account and password for the server.
◆ Adequate disk space: VERITAS recommends that you have a total of 1 GB of storage space to accommodate the NetBackup server software and NetBackup catalogs. The following items provide a basic itemization of the disk space requirements.
◆ Intel server software requires approximately 512 MB.
ICS for Windows IA64 VxSS Security and PBX Installer for Windows IA-64
NetBackup Software CD Contents (continued)
VERITAS CD Contents
Chapter 1, Before You Begin Installing NetBackup 5
NetBackup Server Installation Requirements
◆ NetBackup catalogs contain information about your backups and become larger as you use the product. The amount of disk space the catalogs require depends primarily on the number of files backed up, the frequency of your backups, and the amount of time you chose to retain your backup data. VERITAS suggests that you allow a minimum of 512 MB.
◆ During an upgrade process, you must have an additional 500 MB of disk space i on the drive where Windows is installed. After the upgrade is complete, this additional space is no longer needed.
◆ VERITAS suggests an NTFS partition.
◆ Peripherals, such as robotic devices and stand-alone tape drives, installed according to the manufacturers’ instructions and recognized by the Windows software.
◆ Network configuration allowing all servers and clients to recognize and communicate with one another. Generally, if you can reach the clients from a server by using the ping command, the setup works with NetBackup.
◆ NetBackup 6.0 contains features that are dependent on a new Common Services Framework (CSF) called, VERITAS Private Branch Exchange (PBX).
PBX helps limit the number of TCP/IP ports used by many new features in NetBackup. In addition, it allows all socket communication to take place while connecting through a single port. The PBX port number is 1556. For more information about PBX and configuring NetBackup ports, refer to the NetBackup System Administrator’s Guide, Volume 1.
Because PBX is required for all NetBackup products, its installation is part of the NetBackup installation procedure unless it is already present on the system.
When you do a typical installation of NetBackup on a Windows server, the NetBackup installation process determines if a version of PBX is already installed on your system. Whether PBX is already installed causes one of the following situations:
◆ If a version of PBX exists, the installation process determines if the current version is newer than the version included in the NetBackup installation. If the version included in the NetBackup installation is newer, it is installed, and the same default conditions that had existed are maintained. If the version included with the NetBackup installation is earlier, no changes are made. The latest version is always the one used.
◆ If no version of PBX exists, one is installed silently with NetBackup. A default port number is used, along with a default configuration.
If you chose to do a custom installation of NetBackup, the installer determines if a version of PBX already exists. The following occurs based on whether a version of PBX already exists:
6 NetBackup Installation Guide for Windows
NetBackup Server Installation Requirements
◆ If a version of PBX already exists, the installation process determines if the current version is newer than the version included in the NetBackup installation. If the version included in the NetBackup installation is newer, it is installed, and the same default conditions that had existed are maintained. If the version included with the NetBackup installation is earlier, no changes are made.
In addition, you cannot change the port number because changing the port number would likely cause other VERITAS products to fail.
◆ If no version of PBX exists, one is installed silently with NetBackup. A default port number is used, along with a default configuration.
In addition, you have the ability to change the port number.
When uninstalling NetBackup, PBX is uninstalled with NetBackup if no other VERITAS product is dependent on it. If there is a dependency from another product, PBX is not uninstalled.
◆ NetBackup services and port numbers must be the same across the network.
VERITAS suggests that you use the default port settings for NetBackup services and Internet service ports. If you modify the port numbers, they must be the same for all NetBackup systems that communicate with each other (that is, all master servers, media servers, and clients). The port entries are in the following file:
%SYSTEMROOT%\system32\drivers\etc\services
To change the default settings, you must perform a Custom Installation of NetBackup or manually edit the services file.
◆ NetBackup client software installation
Installing NetBackup server software also installs client software on the server system. However, installing NetBackup on client systems is done separately. Refer to “Installing NetBackup Client Software”.
◆ Remote Administration Console installation
If you install NetBackup Remote Administration Console(s), the master server must have the system names of all NetBackup Administration Consoles in its server list to allow them access.
Additional Requirements for Remote and Cluster InstallationsIn addition to the local installation requirements, the following points apply to remote and cluster installations:
◆ The source system (or primary node) must have Windows 2000 or Windows 2003 server installed.
Chapter 1, Before You Begin Installing NetBackup 7

NetBackup Server Upgrade Requirements
◆ The destination PC (or clustered nodes) must have Windows 2000 or Windows 2003 server installed.
◆ The account used to perform the remote or clustered installation must have Administrator privileges on all the remote systems or nodes in the cluster. VERITAS recommends that the person performing the installation keeps a record of all nodes included in the cluster. This list may become important when remembering which nodes to upgrade or uninstall.
◆ All clustered nodes must be running the same operating system, service pack level, and version of NetBackup. Mixing server versions is not supported.
Additional Requirements for Access Controlled Environments◆ You must install the VERITAS Security Software (VxSS) either before or after you
install or upgrade NetBackup on your server. The order does not matter, however it is important that you install this software before you use NetBackup, to benefit from an access controlled environment.
◆ The Authorization broker must reside on the master server.
NetBackup Server Upgrade RequirementsWith the many new features included in NetBackup 6.0, some new upgrade requirements have been put in place to make your transition to this version of NetBackup easier.
◆ VERITAS only supports server upgrades from NetBackup 5.0MP4 (or later) or 5.1 to this version of NetBackup. NetBackup does not support an upgrade from any pre-NetBackup 5.0MP4 version to NetBackup 6.0. If you currently have a pre-NetBackup 5.0MP4 version installed, you must perform an intermediate upgrade to NetBackup 5.x first, and then you can upgrade to NetBackup 6.0.
◆ After you install the NetBackup server software as a part of an upgrade installation, you must run the command nbpushdata. This command moves data from your current database files (a subset of the NetBackup catalog) into a newly created EMM database.
This final step in the upgrade process is critical to ensure that your NetBackup environment is functional.
The sequence of when and where you run the nbpushdata command is extremely important. With earlier releases, VERITAS has always suggested that you upgrade your master servers first, followed by the media servers, the volume database host server(s), and finally the clients. However, this is not the recommended order for running
8 NetBackup Installation Guide for Windows
NetBackup Server Upgrade Requirements
nbpushdata and populating the EMM database. For more detail on running nbpushdata and creating the EMM database when you upgrade, refer to “Populating the NetBackup EMM Database” on page 96.
The following list provides the order in which you must run the nbpushdata command in your environment. (You only need to run nbpushdata -add once on a particular host.)
1. 5.x Global Device Database Host - You must run nbpushdata -add on the 5.x server that was configured as the Global Device Database Host. This is usually a master server, but a media server as the Global Device Database Host is also a supported configuration.
2. Master servers - There is no particular order in which you must run nbpushdata -add on your master servers after you have run it on the server that was configured as the Global Device Database Host.
3. Volume Database Hosts - You must next run nbpushdata -add on the server designated as a Volume Database Host. If the Volume Database Host was also the Global Device Database Host, this step does not apply.
4. Media Servers - Any remaining media servers that have been upgraded to NetBackup 6.0. Media servers can be upgraded at a later time.
If you are leaving any media servers at NetBackup 5.x, you must log in to the master server(s) administering those backlevel media servers and run nbpushdata -modify_5x_hosts. See “To configure 5.x media servers for compatibility with 6.0 environments” on page 100 for detailed instructions.
After you have upgraded to NetBackup 6.0 and run the nbpushdata command, once, you do not need to run it again because all of the appropriate data has been moved into the new EMM database.
The following list shows the version 5.x database files that are moved to the EMM database.
◆ volmgr\database\globDB
◆ volmgr\database\ltidevs
◆ volmgr/database\robotic_def
◆ volmgr\database\.namespace.chksum (NDMP)
◆ volmgr\database\ruleDB
◆ volmgr\database\poolDB
◆ volmgr\database\volDB
◆ netbackup\db\media\mediaDB
Chapter 1, Before You Begin Installing NetBackup 9
NetBackup Server Upgrade Requirements
◆ netbackup\db\config\storage_units
◆ netbackup\db\config\stunit_groups
◆ volmgr\vm.conf entries
◆ DISALLOW_NONNDMP_ON_NDMP_DRIVE
◆ DO_NOT_EJECT_STANDALONE
◆ DRIVE_NAME_SEED
◆ RETURN_UNASSIGNED_MEDIA_TO_SCRATCH_POOL
◆ SCRATCH_POOL
◆ SSO_SCAN_ABILITY
◆ VAULT_CLEAR_MEDIA_DESC
◆ netbackup/bp.conf on UNIX or the corresponding Windows registry entries
◆ ALLOW_MULTIPLE_RETENTIONS_PER_MEDIA
◆ DISABLE_STANDALONE_DRIVE_EXTENSIONS
◆ MEDIA_ID_PREFIX
◆ MEDIA_REQUEST_DELAY
◆ MUST_USE_LOCAL_DRIVE
◆ Touch files
◆ netbackup\DONT_USE_SLAVE
◆ netbackup\DRIVE_ERROR_THRESHOLD
◆ netbackup\MEDIA_ERROR_THRESHOLD
◆ netbackup\TIME_WINDOW
◆ volmgr\NO_STANDALONE_UNLOAD
◆ If you are concerned that your current installation of NetBackup is corrupt, contact VERITAS Technical Support for assistance.
◆ You can upgrade to this version of NetBackup only if the NetBackup software that you currently have installed is NetBackup 5.0MP4 or later.
Note VERITAS supports upgrading NetBackup 5.0MP4 or later servers to NetBackup 6.0. However, VERITAS does not support an upgrade directly from NetBackup 4.5 GA, FPx, or MPx to NetBackup 6.0. If you currently have NetBackup 4.5 installed on a server that you want to upgrade, you must perform an intermediate upgrade to NetBackup 5.x and then upgrade to NetBackup 6.0.
10 NetBackup Installation Guide for Windows

NetBackup Server Upgrade Requirements
◆ An upgrade to NetBackup 6.0 requires a minimum of 500MB of disk space.
◆ Changing a master server into a media server is not an allowable upgrade. It is considered a downgrade. The installation wizard does not permit it. To make this change, you must first uninstall the earlier version of NetBackup and perform a new installation.
◆ Make certain that the NetBackup release level on the server is at least equal to that on the clients. Older versions of server software can encounter problems with newer clients.
◆ Add-ons must be at the same level as the NetBackup client or server on which the add-on is installed.
◆ NetBackup Enterprise only: NetBackup does not support converting an existing non-failover server to a highly available failover NetBackup server.
Chapter 1, Before You Begin Installing NetBackup 11

NetBackup Server Upgrade Requirements
12 NetBackup Installation Guide for Windows

Installation and Initial Configuration
2 Each procedure in this chapter is an independent process that you can use to perform the type of installation that best suits your environment. Also included in each of the procedures are the differences between a new installation and an upgrade. Each procedure is written has though you were installing NetBackup for the first time with no earlier versions of NetBackup installed earlier. However, because an upgrade procedure is in most cases identical to a new installation, these procedures have been combined and only differences in the upgrade are identified.The installation and upgrade procedures described are divided as follows:
◆ “Server Installation: A Local, Typical Installation or Upgrade” on page 31
◆ “Server Installation: A Local, Custom Installation or Upgrade” on page 37
◆ “Server Installation: A Remote, Typical Installation or Upgrade” on page 46
◆ “Server Installation: A Remote, Custom Installation or Upgrade” on page 55
Note For upgrade installations, you must follow the procedures in “Populating the NetBackup EMM Database” on page 96 after you have upgraded the Global Device Database Host. If you do not create the EMM database, NetBackup 6.0 will not function properly.
There are additional steps for the following configurations:
◆ “Installing or Upgrading NetBackup in Clustered Environments” on page 66
Caution For Windows 2000 clustered environments: Perform NetBackup initial installations and upgrade installations from the system console, not from a Remote Terminal Services session. Performing a NetBackup installation or upgrade using Remote Terminal Services may result in incomplete installations.
◆ “Installing Access Control in New Installations” on page 103
◆ “Upgrading NetBackup with Access Control” on page 104
From the NetBackup installation CD, you can also install additional products that are associated with NetBackup.
13

Configuring Storage Devices for Windows
Configuring Storage Devices for Windows Reliable use of NetBackup depends on the proper configuration of your storage devices. To ensure reliable backups and restores, you must configure devices for Windows according to the instructions provided by the device vendor and by Microsoft. Storage devices should be installed and configured before you configure NetBackup.
Caution An improperly configured device may lead to loss of data during a restore.
Supported Robot Types A list of the supported robot types, organized by vendor and platform, can be found in the NetBackup Release Notes. This list contains those devices that are supported at the time of this release. However, VERITAS periodically adds new robots to this list. For your convenience, VERITAS updates the supported robots lists on the VERITAS support web site. The following procedure will assist you in locating the most current support information.
▼ To find the latest devices this release supports
1. Open www.support.veritas.com in a web browser.
2. Select NetBackup Products in the Select Product Family list.
3. Select either NetBackup Enterprise Server or NetBackup Server from the Select Product list. A new web page appears.
4. Under the Support Resources section, click the Compatibility & Reference link. A new web page appears.
5. From the appropriate drop-down menus, select Compatibility, NetBackup 6.0, and the language of your choice.
6. The lower section of the screen updates depending on what you select from the drop-down menus. From the links on this section of the screen, select the product level for which you want to check compatibility.
7. From the resulting page you can view device support information by individual vendor, or all support drives, libraries, or robot types.
14 NetBackup Installation Guide for Windows

Configuring Storage Devices for Windows
Storage Device Configuration First, complete all of the configuration steps specified by the storage device vendor and by Microsoft. After you have configured your storage device, you are ready to begin the installation of the NetBackup software.
Note When you install NetBackup for the first time, VERITAS recommends that you install the latest device drivers for your storage device immediately after you install the NetBackup software and before you configure the product.
If you are upgrading NetBackup, you can install the latest device drivers before you upgrade NetBackup.
The VERITAS Tape Device Driver Install wizard (located on the NetBackup installation CD) steps you through the process of installing the latest device drivers. The steps below describe how to initiate this wizard.
If you do not have a CD, you can download the NetBackup Tape Device Driver Install software from the VERITAS Support web site:
http://www.support.veritas.com
▼ To initiate the Tape Device Driver Install wizard
Note Complete this wizard before you configure the NetBackup software.
1. Log on as Administrator to the system from which you are installing NetBackup.
2. Insert the NetBackup CD in the drive.
If Autorun is enabled, the VERITAS NetBackup installation browser starts automatically. If Autorun is disabled, navigate to the CD drive and run Launch.exe.
3. On the VERITAS installation browser, click the link Additional Product Installations > NetBackup Tape Device Driver. The NetBackup Tape Installer wizard appears.
4. Complete the wizard to install the latest device drivers for your storage device.
Note You can download the latest external device mapping files on the Updates and Patches web page on the VERITAS support web site: http://www.support.veritas.com.
Chapter 2, Installation and Initial Configuration 15

Special Requirements for Upgrading to NetBackup 6.0
Special Requirements for Upgrading to NetBackup 6.0After you insert the NetBackup CD into your computer, the setup process begins searching your computer to determine if an earlier NetBackup version already exists on your system. This dictates whether you will be upgrading or doing a new installation. If you are performing an upgrade installation, there are two distinctive procedures that you need to follow to properly upgrade NetBackup. You must first upgrade your NetBackup server software and then create a new NetBackup EMM database on your server.
Caution NetBackup processes must be running on the master server and its associated media servers before you upgrade and run the nbpushdata -add command. This is true no matter where you are running the command.
The EMM database creation process establishes that it can communicate with any additional servers in your configuration, and it does not include servers in the database if it cannot establish a connection and determine that NetBackup processes are running on the server.
However, you must ensure that no NetBackup policies are active, no jobs are running, and that media servers do attempt to connect to the master server until after all upgrades are complete and nbpushdata has been run on all servers. You can use the NetBackup Administration Console to deactivate all policies and all media servers. Command-line equivalents are also available.
Examples of Populating the NetBackup EMM Database The nbpushdata command enables NetBackup to get copies of the existing database files (a subset of the NetBackup catalogs) from each host and places this data in a new EMM database.
Data is copied to the EMM database only when nbpushdata is run on a server that has been upgraded to NetBackup 6.0. No data is moved to the EMM database from any other server except the server where nbpushdata is being run. It is because of these requirements that an upgrade of NetBackup is not complete until you have successfully updated the EMM database.
This section contains various scenarios of NetBackup configurations. These scenarios are only guidelines on how to upgrade NetBackup and run nbpushdata in a NetBackup environment. Choose the scenario that closely resembles your configuration, and use it as a guide when you perform the actual procedure outlined in “Populating the NetBackup EMM Database” on page 96.
16 NetBackup Installation Guide for Windows

Special Requirements for Upgrading to NetBackup 6.0
Note You use nbpushdata to upgrade an existing supported NetBackup 5.x environment that contains a single Global Device Database host. It is not a tool for merging multiple NetBackup environments.
Scenario 1: Global Device Database Host and Volume Database Host on One Master Server
In many environments, a master server also is designated as the NetBackup 5.0MP4 (or later) or 5.1 Global Device Database Host and the Volume Database Host.
If this is true for you, upgrade your NetBackup software on all of your master servers first, making sure that you do not run the nbpushdata -add command on any of these servers until you complete the upgrade of all the master servers.
After the upgrade of the master servers is complete and nbpushdata is run on those servers, you can upgrade your media servers as you like. You can upgrade some of your media servers to NetBackup 6.0 and leave some at version 5.x.
Your environment would look something like the following diagram.
Global Device Database HostVolume Database HostMaster Server
Master Servers
Media Servers being upgraded to 6.0
Media Servers staying at 5.x
Chapter 2, Installation and Initial Configuration 17

Special Requirements for Upgrading to NetBackup 6.0
In such an environment, your first step is to upgrade all master servers from 5.0MP4 (or later) or 5.1 to 6.0. Do not upgrade the media servers in your environment at this time.
The next step is to ensure that the NetBackup and Media Manager daemons are running on the master server that is also the Global Device Database Host and the Volume Database Host. Then you run nbpushdata -add.
Global Device Database HostVolume Database HostMaster Server
Master servers
Step 1:Upgrade master servers only
Media Servers being upgraded to 6.0
Media Servers staying at 5.x
Global Device Database HostVolume Database HostMaster server
Step 2:Run nbpushdata on this server first
Master servers
18 NetBackup Installation Guide for Windows

Special Requirements for Upgrading to NetBackup 6.0
Next you ensure that the NetBackup and Media Manager daemons are running on all the other master servers. Then run nbpushdata -add on each server.
At this point, you can optionally upgrade media servers to NetBackup 6.0. You are not required to upgrade media servers. NetBackup version 5.x media servers run with NetBackup 6.0.
If you want to upgrade a 5.x media server to NetBackup 6.0, you must first install NetBackup 6.0 server software on the 5.x media server. Next, ensure that the Media Manager daemons are running on the media server, and then run the nbpushdata -add command on the media server.
Master Servers
Step 3:Run nbpushdata on all other master servers
Master server
EMM server and EMM database
Master ServersMaster server
EMM server and EMM database
Media Servers staying at 5.x
Step 4:Upgrade media servers; run nbpushdata -add on media servers after upgrading them
Chapter 2, Installation and Initial Configuration 19
Special Requirements for Upgrading to NetBackup 6.0
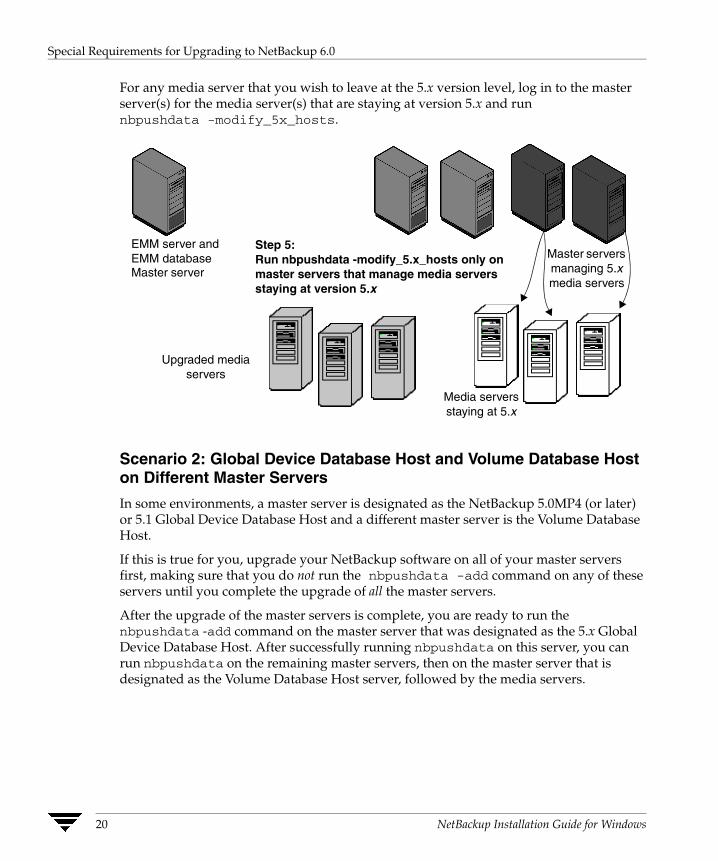
For any media server that you wish to leave at the 5.x version level, log in to the master server(s) for the media server(s) that are staying at version 5.x and run nbpushdata -modify_5x_hosts.
Scenario 2: Global Device Database Host and Volume Database Host on Different Master Servers
In some environments, a master server is designated as the NetBackup 5.0MP4 (or later) or 5.1 Global Device Database Host and a different master server is the Volume Database Host.
If this is true for you, upgrade your NetBackup software on all of your master servers first, making sure that you do not run the nbpushdata -add command on any of these servers until you complete the upgrade of all the master servers.
After the upgrade of the master servers is complete, you are ready to run the nbpushdata -add command on the master server that was designated as the 5.x Global Device Database Host. After successfully running nbpushdata on this server, you can run nbpushdata on the remaining master servers, then on the master server that is designated as the Volume Database Host server, followed by the media servers.
Master server
EMM server and EMM database
Media servers staying at 5.x
Step 5:Run nbpushdata -modify_5.x_hosts only on master servers that manage media servers staying at version 5.x
Upgraded media servers
Master servers managing 5.x media servers
20 NetBackup Installation Guide for Windows
Special Requirements for Upgrading to NetBackup 6.0
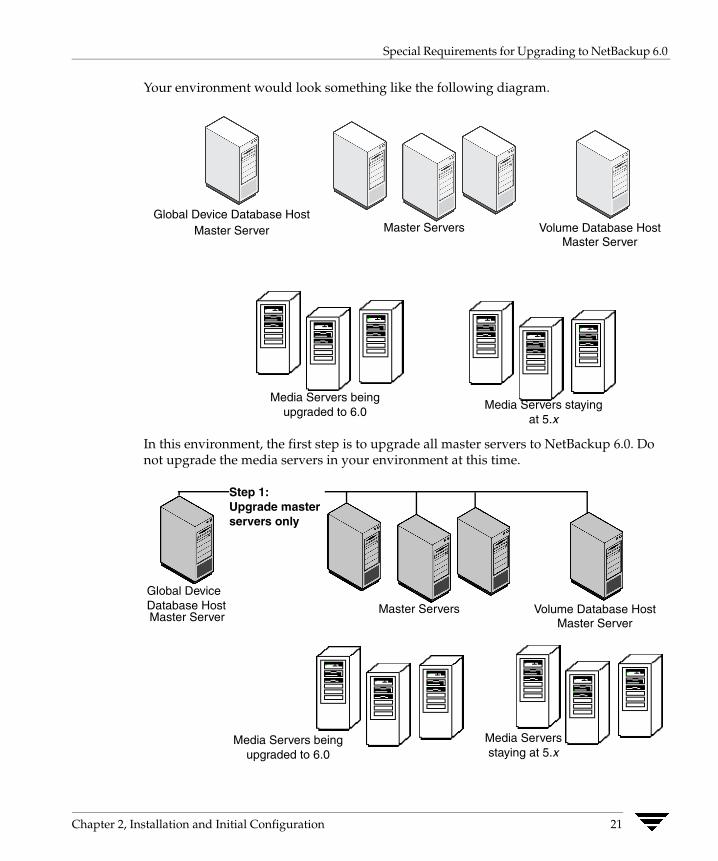
Your environment would look something like the following diagram.
In this environment, the first step is to upgrade all master servers to NetBackup 6.0. Do not upgrade the media servers in your environment at this time.
Global Device Database HostVolume Database HostMaster Server Master Servers
Media Servers being upgraded to 6.0
Media Servers staying at 5.x
Master Server
Step 1:Upgrade master servers only
Media Servers being upgraded to 6.0
Media Servers staying at 5.x
Global Device Database Host Volume Database HostMaster Server
Master ServersMaster Server
Chapter 2, Installation and Initial Configuration 21
Special Requirements for Upgrading to NetBackup 6.0
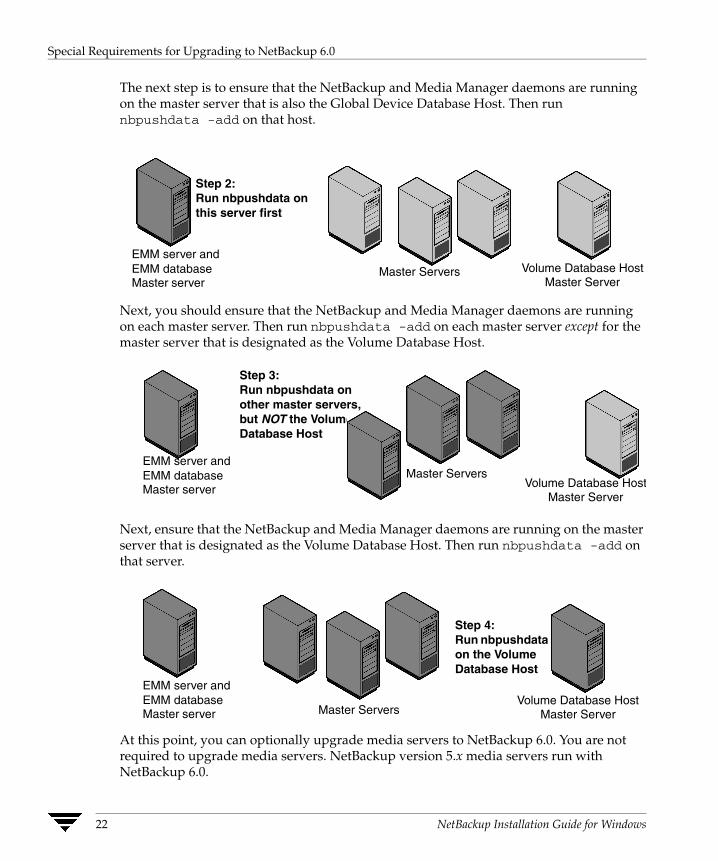
The next step is to ensure that the NetBackup and Media Manager daemons are running on the master server that is also the Global Device Database Host. Then run nbpushdata -add on that host.
Next, you should ensure that the NetBackup and Media Manager daemons are running on each master server. Then run nbpushdata -add on each master server except for the master server that is designated as the Volume Database Host.
Next, ensure that the NetBackup and Media Manager daemons are running on the master server that is designated as the Volume Database Host. Then run nbpushdata -add on that server.
At this point, you can optionally upgrade media servers to NetBackup 6.0. You are not required to upgrade media servers. NetBackup version 5.x media servers run with NetBackup 6.0.
Step 2:Run nbpushdata on this server first
Volume Database HostMaster ServersMaster ServerMaster server
EMM server and EMM database
Master Servers
Step 3:Run nbpushdata on other master servers, but NOT the Volume Database Host
Master server
EMM server and EMM database
Volume Database HostMaster Server
Master Servers
Step 4:Run nbpushdata on the Volume Database Host
Master server
EMM server and EMM database Volume Database Host
Master Server
22 NetBackup Installation Guide for Windows
Special Requirements for Upgrading to NetBackup 6.0
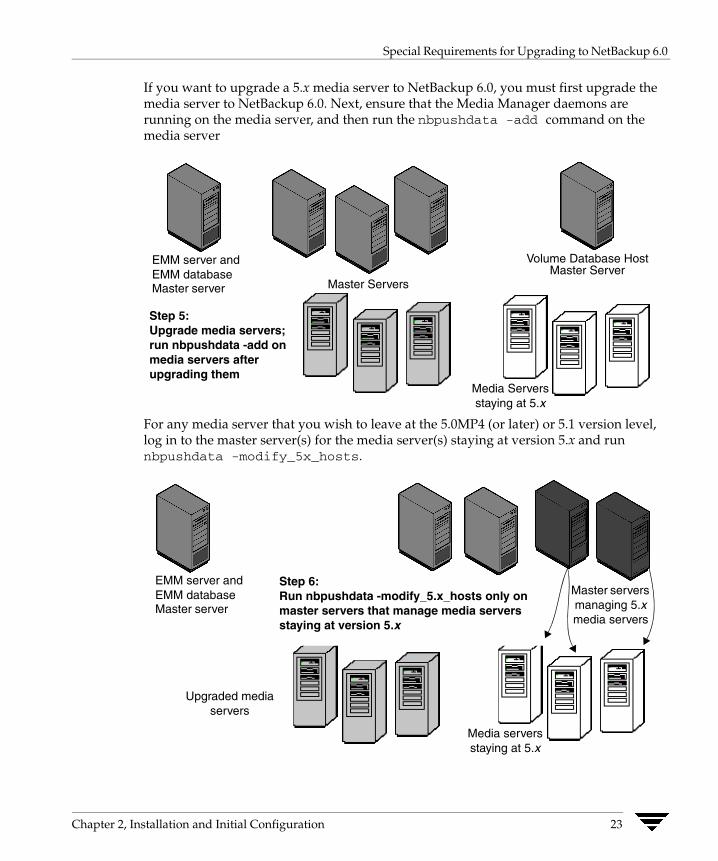
If you want to upgrade a 5.x media server to NetBackup 6.0, you must first upgrade the media server to NetBackup 6.0. Next, ensure that the Media Manager daemons are running on the media server, and then run the nbpushdata -add command on the media server
For any media server that you wish to leave at the 5.0MP4 (or later) or 5.1 version level, log in to the master server(s) for the media server(s) staying at version 5.x and run nbpushdata -modify_5x_hosts.
Media Servers staying at 5.x
Master ServersMaster server
EMM server and EMM database
Volume Database HostMaster Server
Step 5:Upgrade media servers; run nbpushdata -add on media servers after upgrading them
Master server
EMM server and EMM database
Media servers staying at 5.x
Step 6:Run nbpushdata -modify_5.x_hosts only on master servers that manage media servers staying at version 5.x
Upgraded media servers
Master servers managing 5.x media servers
Chapter 2, Installation and Initial Configuration 23

Special Requirements for Upgrading to NetBackup 6.0
Scenario 3: Global Device Database Host Is on a Media Server
In some environments, a media server is designated as the NetBackup 5.0MP4 (or later) or 5.1 Global Device Database Host and a different master server is the Volume Database Host.
If this is true for you, the order in which you upgrade NetBackup and then run the nbpushdata command becomes more complicated.
First upgrade NetBackup on all of your master servers, making sure that you do not run the nbpushdata -add command on any of these servers.
After the upgrade of the master servers is complete, upgrade the media server that is the Global Device Database Host. Next, you run the nbpushdata -add command on that media server. After successfully running nbpushdata -add on that media server, run it on the remaining master servers, making sure that you run this command last on the master server that is designated as the Volume Database Host.
After you have populated the EMM database with the server information from the Global Device Database Host, the master servers, and the Volume Database Host, you can upgrade your remaining media servers as you like. You might upgrade some of your media servers to NetBackup 6.0 and leave some at version 5.x.
Your environment would look something like the following diagram.
Volume Database HostMaster Servers
Media Servers being upgraded to 6.0
Media Servers staying at 5.x
Master Server
Global Device Database HostMedia Server
24 NetBackup Installation Guide for Windows
Special Requirements for Upgrading to NetBackup 6.0
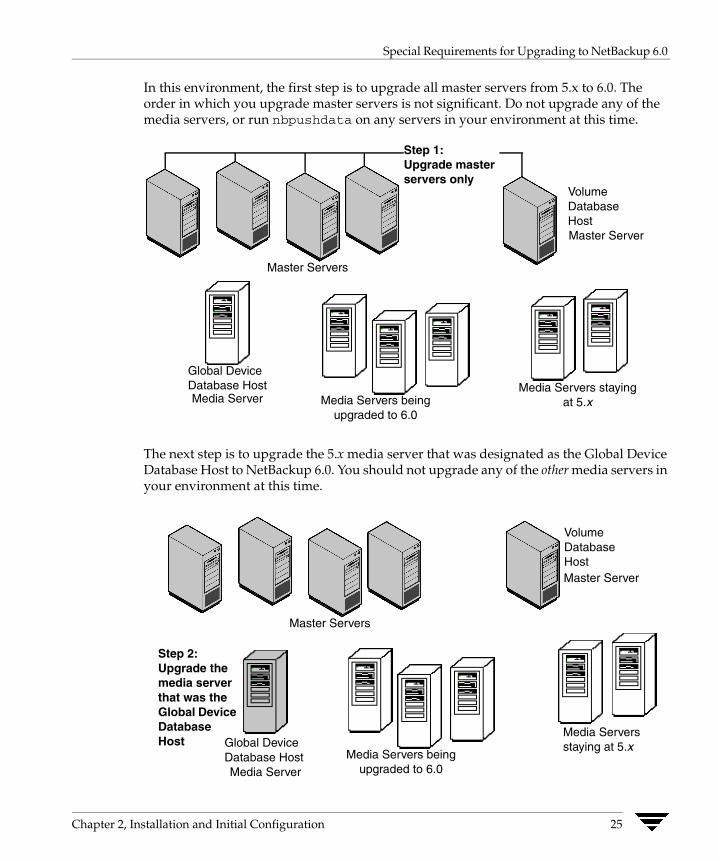
In this environment, the first step is to upgrade all master servers from 5.x to 6.0. The order in which you upgrade master servers is not significant. Do not upgrade any of the media servers, or run nbpushdata on any servers in your environment at this time.
The next step is to upgrade the 5.x media server that was designated as the Global Device Database Host to NetBackup 6.0. You should not upgrade any of the other media servers in your environment at this time.
Step 1:Upgrade master servers only
Media Servers being upgraded to 6.0
Media Servers staying at 5.x
Global Device Database HostMedia Server
Volume Database Host
Master Servers
Master Server
Media Servers being upgraded to 6.0
Media Servers staying at 5.x
Volume Database Host
Master Servers
Master Server
Step 2:Upgrade the media server that was the Global Device Database Host Global Device
Database HostMedia Server
Chapter 2, Installation and Initial Configuration 25

Special Requirements for Upgrading to NetBackup 6.0
Next, ensure that the NetBackup and Media Manager daemons are running on the media server that is also the Global Device Database Host. Then run nbpushdata -add. You should not run the command on any of the master servers yet.
Next you must ensure that the NetBackup and Media Manager daemons are running on each master server. Then run nbpushdata -add on each master server except for the master server that is designated as the Volume Database Host.
Media Servers being upgraded to 6.0
Media Servers staying at 5.x
Volume Database Host
Master Servers
Master Server
Step 3:Run nbpushdata on the media server that was the Global Device Database Host Global Device
Database HostMedia Server
Media Servers being upgraded to 6.0
Media Servers staying at 5.x
Volume Database Host
Master Servers
Master Server
Step 4:Run nbpushdata on master servers, but NOT on the Volume Database Host
Global Device Database HostMedia Server
26 NetBackup Installation Guide for Windows
Special Requirements for Upgrading to NetBackup 6.0
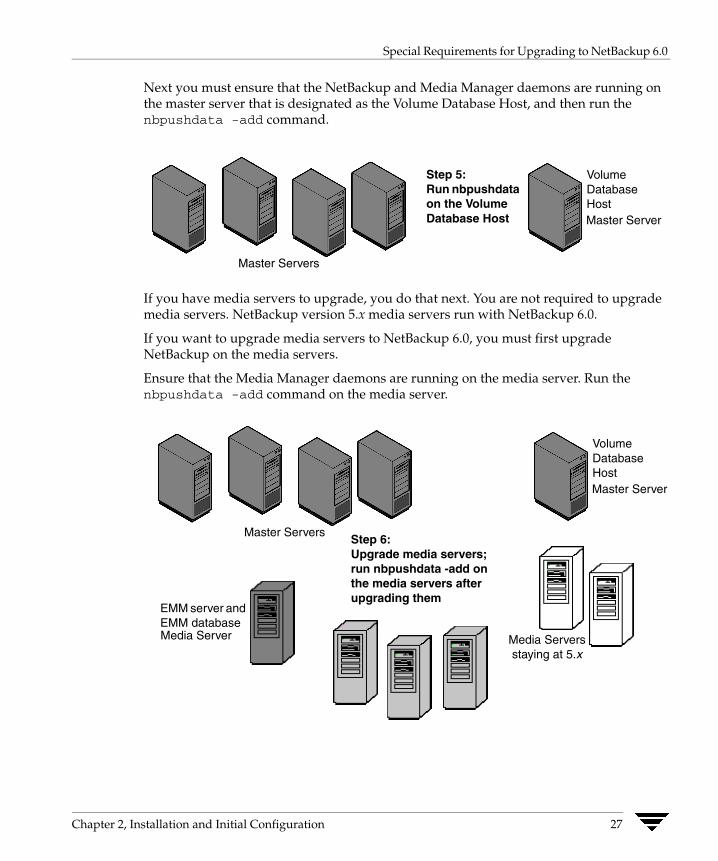
Next you must ensure that the NetBackup and Media Manager daemons are running on the master server that is designated as the Volume Database Host, and then run the nbpushdata -add command.
If you have media servers to upgrade, you do that next. You are not required to upgrade media servers. NetBackup version 5.x media servers run with NetBackup 6.0.
If you want to upgrade media servers to NetBackup 6.0, you must first upgrade NetBackup on the media servers.
Ensure that the Media Manager daemons are running on the media server. Run the nbpushdata -add command on the media server.
Step 5:Run nbpushdata on the Volume Database Host
Volume Database Host
Master Servers
Master Server
Step 6:Upgrade media servers; run nbpushdata -add on the media servers after upgrading them
Media Servers staying at 5.x
Volume Database Host
Master Servers
Master Server
EMM server and EMM database Media Server
Chapter 2, Installation and Initial Configuration 27

Installing or Upgrading NetBackup
Finally, for any media server that you wish to leave at the 5.0MP4 (or later) or 5.1 version level, log in to the master server(s) for the media server(s) staying at version 5.x and run nbpushdata -modify_5x_hosts.
Installing or Upgrading NetBackupEach procedure in this section explains how to install NetBackup on a server. The process that you use to install on a master server is nearly identical for a media server. Because the processes are so close, the procedures in this document are based on a master server installation, and notes are added to explain any differences that you may encounter if you are performing a media server installation.
In addition, each of these install or upgrade procedures can be used to perform new installations (meaning that no earlier versions of NetBackup exist on the system) or upgrades. The primary difference between an upgrade and a new installation is that upgrades require you to run the nbpushdata command.
Media Servers staying at 5.x
Volume Database Host
Master Servers
Master Server
Step 7:Run nbpushdata -modify_5.x_hosts only on master servers that administer media servers staying at version 5.0 or 5.1
Master servers administering 5.x media servers
Upgraded media servers
EMM server and EMM database Media Server
28 NetBackup Installation Guide for Windows
Installing or Upgrading NetBackup
Installing NetBackup Server Software When you install NetBackup server software for the first time, VERITAS recommends that you install NetBackup in the following sequence:
1. Master servers
2. NetBackup Enterprise Server only: Media servers, if any
3. NetBackup Remote Administration Console, if any
4. NetBackup clients
5. Any NetBackup add-on products
Before proceeding with any installation procedure, be sure to review the “NetBackup Server Installation Requirements” on page 5.
Upgrading from NetBackup Server to NetBackup Enterprise Server
The most basic upgrade that you can perform is when you upgrade from NetBackup Server to NetBackup Enterprise Server. This procedure requires you to enter the appropriate license key(s) in your current NetBackup Administration Console.
Note Before upgrading NetBackup, you should review “NetBackup Server Installation Requirements” on page 5 and “NetBackup Server Upgrade Requirements” on page 8.
▼ To upgrade NetBackup Server to NetBackup Enterprise Server
1. Locate your NetBackup Enterprise Server license key.
2. Open the NetBackup Administration Console and choose Help > License Keys. The NetBackup License Key dialog appears.
3. Click the New icon.
4. Enter your license key in the New license key field and click Add. The new license key appears in the field in the lower part of the dialog.
Chapter 2, Installation and Initial Configuration 29

Installing or Upgrading NetBackup
Note When you upgrade from a NetBackup server evaluation license key to a permanent NetBackup Enterprise Server-based product license key on Windows, restart the NetBackup services. Restarting the services ensures that the proper licensing information is displayed when you select Help > About NetBackup Administration Console.
Note If you make and save any license key updates (including adding and deleting license keys), you must restart the NetBackup Administration Console.
5. Reboot the system if you are prompted.
30 NetBackup Installation Guide for Windows

Installing or Upgrading NetBackup
Server Installation: A Local, Typical Installation or Upgrade
▼ To install or upgrade NetBackup locally on a server using a typical installation process.
Note If you are upgrading your environment to NetBackup 6.0 and you intend to install and use NetBackup Access Control, you must perform the procedure in “Upgrading NetBackup with Access Control” on page 104 before you begin upgrading NetBackup. For new installations only, NetBackup Access Control is installed after you complete the NetBackup installation.
VERITAS
New installation = FinishedUpgrade = Continue
VERITAS
Ready to Install >Install Progress
VERITAS
VERITAS
VERITAS
Media Server Installation Differences:
VERITAS
VERITAS
VERITAS
Welcome
License Agreement
Choose Installation
Enter System TypeEnter License KeySelect Server Type
VERITAS
Enter EMM ServerName
The NetBackup Systems Name screen contains the Media Server Name field
Upgrade Differences:
Requires that 5.x Global Database Host is upgraded first
No Enterprise Media Manager Host screen appears
Requires running nbpushdata after upgrade itself is complete
Run nbpushdata command to create EMM databaseUpgrade = Finished
Chapter 2, Installation and Initial Configuration 31

Installing or Upgrading NetBackup
Caution If you are upgrading to NetBackup 6.0, it is critical that you populate the new EMM database after you upgrade server software. See “Populating the NetBackup EMM Database” on page 96 for this procedure.
This step is only required for upgrading NetBackup, not for new installations.
After the EMM database population is complete, you have successfully upgraded your environment to NetBackup 6.0.
1. Log on as Administrator to the system from which you are installing NetBackup.
2. For upgrades only:
a. Deactivate all Policies:
For NetBackup Administration Console users
◆ Open the NetBackup Administration Console on the master server
◆ Select Polices from the tree on the left.
◆ Select all of the policies that appear in the right pane.
◆ Right-click the polices and select Deactivate.
For command-line users
◆ Enter the following command:
install_path\NetBackup\bin\admincmd\bpplinfo policy_name -modify -inactive
b. Deactivate all media servers:
For NetBackup Administration Console users
◆ Open the NetBackup Administration Console on the master server
◆ Select Media and Device Management > Devices > Hosts from the tree on the left.
◆ Select all of the media servers that appear in the right pane.
◆ Right-click the media servers and select Deactivate.
For command-line users
◆ Enter the following command:
install_path\Volmgr\bin\vmoprcmd -deactivate_host -h device_host
32 NetBackup Installation Guide for Windows

Installing or Upgrading NetBackup
3. Insert the NetBackup installation CD in the drive. On systems with Autorun enabled, the VERITAS NetBackup installation browser starts automatically. If Autorun is disabled, navigate to the CD drive and run Launch.exe.
4. On the initial browser screen, click NetBackup Installation.
5. On the following screen, select Install Server Software.
The Welcome to the NetBackup Setup Wizard screen appears.
Click Next.
6. On the License Agreement screen, accept the license agreement and click Next.
7. On the NetBackup Installation Type screen, select Install to this computer only and Typical.
Click Next.
8. On the NetBackup License Key and Server Type screen, perform the following:
◆ Enter the base product license key that you received with your product
Chapter 2, Installation and Initial Configuration 33

Installing or Upgrading NetBackup
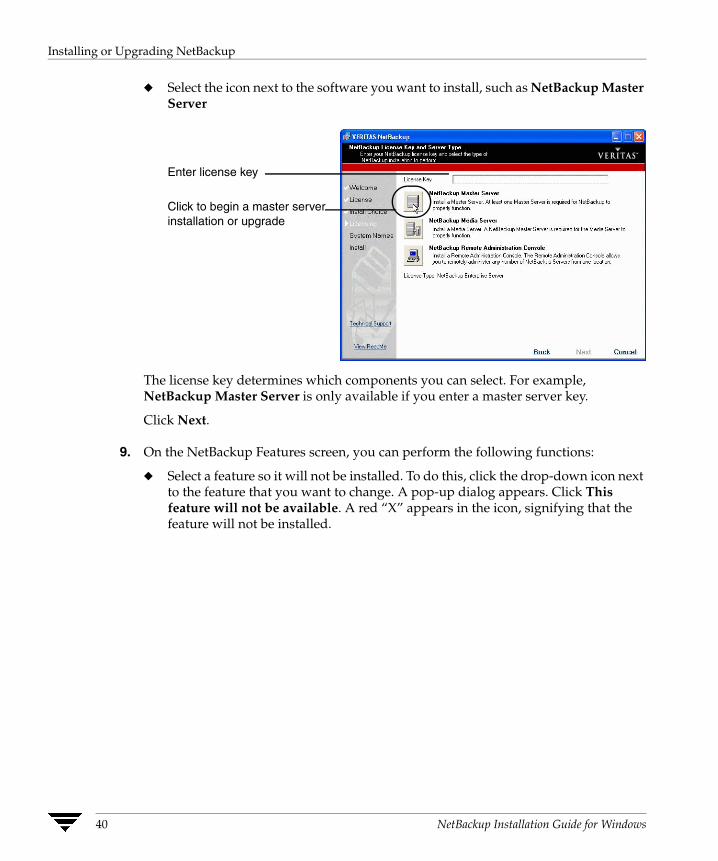
◆ Select the icon next to the software you want to install, such as NetBackup Master Server
The license key determines which components you can select. For example, NetBackup Master Server is only available if you enter a master server key.
Click Next.
9. On the NetBackup System Names screen, enter the name of the master server and any additional systems that are allowed to access this server.
Click to begin a master server installation or upgrade
Enter license key
34 NetBackup Installation Guide for Windows

Installing or Upgrading NetBackup
Note NetBackup Enterprise only: If you are installing a media server, the NetBackup System Names screen has an additional line with the local media server filled in. You must enter the name of the master to which the media server is configured.
Click Next.
10. For new installations of NetBackup Enterprise server and upgrades from client to server:
Note The following screen does not appear if you are upgrading from NetBackup 5.x to NetBackup 6.0.
On the NetBackup Enterprise Media Manager screen, enter the name of the server that you want to use as the repository for global device configuration information stored in the EMM database.
By default, the server that hosts the EMM database is the master server you are installing. You can allow each server to have its own EMM server, or each remote system can use the same server.
Note If the NetBackup system shares drives with the Shared Storage Option (SSO), all NetBackup servers must use the same host for storing device information.
For more information on EMM servers and EMM databases, refer to the NetBackup Media Manager System Administrator’s Guide.
Click Next.
Chapter 2, Installation and Initial Configuration 35

Installing or Upgrading NetBackup
11. If you do not need to make any changes to the installation settings, click Install on the Ready to Install the Program screen.
Note To make changes to the settings, click Back until you reach the screen you want to change. You can also click Cancel if you want to start the wizard again.
After you click Install, the installation process begins and a screen appears that shows you the progress of the installation. This process could take several minutes.
For detailed installation information or to verify the progress of an installation, you can view the log file (called Install.log) in the Windows temporary installation directory:
C:\Documents and Settings\administrator_userid\Local Settings\Temp
If the log file is not in this directory, you can locate it by entering the following command at the command prompt:
> echo %TEMP%
12. On the System Validation Complete screen, you have the following options:
◆ To enter additional license keys, click Add Keys.
◆ To finish the installation but wait to configure NetBackup at another time, remove the check next to Launch NetBackup Administration Console now.
◆ Click Finish to if you are done with this part of the installation.
13. For new installations:
If you want to install NetBackup Access Control after completing a new installation of NetBackup, refer to “Installing Access Control in New Installations” on page 103 and perform that procedure at this time.
14. For upgrades:
NetBackup will not work until you have updated the device and volume 5.x databases.
See “Populating the NetBackup EMM Database” on page 96 for this procedure.
36 NetBackup Installation Guide for Windows

Installing or Upgrading NetBackup
Server Installation: A Local, Custom Installation or Upgrade
VERITAS
VERITAS
VERITAS
VERITAS
Welcome
License Agreement
Choose Installation
Enter License KeySelect Server Type
VERITAS
New installation = FinishedUpgrade = Continue
VERITAS
Begin InstallationMonitor Progress
VERITAS
Media Server Installation Differences:
VERITAS
Enter System Name
VERITAS
Enter EMM ServerName
The NetBackup Systems Name screen contains the Media Server Name field
Upgrade Differences:
Requires that 5.x Global Database Host is upgraded first
No Enterprise Media Manager Host screen appears
Requires running nbpushdata after upgrade itself is complete
VERITAS
Provide Startup Information for NetBackup Services
VERITAS
Select Port Numbers
VERITAS
Select NetBackup Features
Run nbpushdata command to create EMM databaseUpgrade = Finished
Chapter 2, Installation and Initial Configuration 37

Installing or Upgrading NetBackup
▼ To install or upgrade NetBackup locally on a server using a custom installation process.
Caution If you are upgrading to NetBackup 6.0, it is critical that you populate the new EMM database after you upgrade server software. See “Populating the NetBackup EMM Database” on page 96 for this procedure.
This step is only required for upgrading NetBackup, not for new installations.
After the EMM database population is complete, you have successfully upgraded your environment to NetBackup 6.0.
Note If you are upgrading your environment to NetBackup 6.0 and you intend to install and use NetBackup Access Control, you must perform the procedure outline in the section, “Upgrading NetBackup with Access Control” on page 104 before you begin upgrading NetBackup.
1. Log on as Administrator to the system from which you are installing NetBackup.
2. For upgrades only:
a. Deactivate all Policies:
For NetBackup Administration Console users
◆ Open the NetBackup Administration Console on the master server
◆ Select Polices from the tree on the left.
◆ Select all of the policies that appear in the right pane.
◆ Right-click the polices and select Deactivate.
For command-line users
◆ Enter the following command:
install_path\NetBackup\bin\admincmd\bpplinfo policy_name -modify -inactive
b. Deactivate all media servers:
For NetBackup Administration Console users:
◆ Open the NetBackup Administration Console on the master server
◆ Select Media and Device Management > Devices > Hosts from the tree on the left.
◆ Select all of the media servers that appear in the right pane.
38 NetBackup Installation Guide for Windows

Installing or Upgrading NetBackup
◆ Right-click the media servers and select Deactivate.
For command-line users
◆ Enter the following command:
install_path\Volmgr\bin\vmoprcmd -deactivate_host -h device_host
3. Insert the NetBackup installation CD in the drive. On systems with Autorun enabled, the VERITAS NetBackup installation browser starts automatically. If Autorun is disabled, navigate to the CD drive and run Launch.exe.
4. On the initial browser screen, click NetBackup Installation.
5. On the following screen, select Install Server Software.
The Welcome to the NetBackup Setup Wizard screen appears.
Click Next.
6. On the License Agreement screen, accept the license agreement and click Next.
7. On the NetBackup Installation Type screen, choose Install to this computer only and Custom.
Click Next.
8. On the NetBackup License Key and Server Type screen, perform the following:
◆ Enter the base product license key that you received with your product
Chapter 2, Installation and Initial Configuration 39
Installing or Upgrading NetBackup
◆ Select the icon next to the software you want to install, such as NetBackup Master Server
The license key determines which components you can select. For example, NetBackup Master Server is only available if you enter a master server key.
Click Next.
9. On the NetBackup Features screen, you can perform the following functions:
◆ Select a feature so it will not be installed. To do this, click the drop-down icon next to the feature that you want to change. A pop-up dialog appears. Click This feature will not be available. A red “X” appears in the icon, signifying that the feature will not be installed.
Click to begin a master server installation or upgrade
Enter license key
40 NetBackup Installation Guide for Windows

Installing or Upgrading NetBackup
◆ Change the location in which NetBackup is installed. To change the installation location, click Change. The Change Current Destination Folder dialog appears. You can then browse to a new location and designate a new or existing folder to which to install NetBackup.
Click Next.
10. On the On the NetBackup Port Numbers screen, you can change port numbers, if it is necessary in your configuration.
You may want to change a port number in the following circumstances:
◆ NetBackup and another industry product are trying to share the same port.
◆ A port conflict occurs with a company’s firewall, causing security issues.
Chapter 2, Installation and Initial Configuration 41

Installing or Upgrading NetBackup
To change a port number, select the port number you want to replace and type the new number.
11. On the NetBackup Services screen, provide startup account and startup type information for NetBackup services.
◆ Enter a Username, Password, and Domain or check the Use the built-in system account check box.
◆ Choose a startup type to use for the NetBackup services.
◆ Elect to start the services after installation by checking the Start NetBackup Server Services After Install check box.
◆ Choose whether to prevent reboots from occurring during the installation, as follows:
◆ Terminate NetBackup processes - This option terminates any processes that are using the NetBackup executables and DLLs.
Caution For Oracle users: If you use the Terminate NetBackup processes option, you must take down your database before you continue with this procedure.
◆ Terminate Windows processes - This option looks for processes using the Microsoft run-time DLLs and terminates them. If you are upgrading from NetBackup 5.x to NetBackup 6.0, you will not need to execute this option because the Microsoft run-time DLL will already be at the correct level.
Caution Using this option may cause instability with other Windows applications, particularly those applications that use Microsoft run-time DLLs.
42 NetBackup Installation Guide for Windows

Installing or Upgrading NetBackup
◆ Abort install if reboot is required - This option detects if a reboot is absolutely necessary. If a reboot is required, selecting this option cancels the installation and rolls it back to the beginning of the installation process.
For detailed installation information or to verify the progress of an installation, you can view the log file (called Install.log) in the Windows temporary installation directory:
C:\Documents and Settings\administrator_userid\Local Settings\Temp
If the log file is not in this directory, you can locate it by entering the following command at the command prompt:
> echo %TEMP%
Click Next.
12. On the NetBackup System Names screen, enter the name of the master server and any additional systems that are allowed to access this server.
Note For NetBackup Enterprise systems: If you are installing a media server, the NetBackup System Names screen has an additional line with the local media server filled in. You must enter the name of the master to which the media server is configured.
Click Next.
Chapter 2, Installation and Initial Configuration 43

Installing or Upgrading NetBackup
13. For new installations of NetBackup Enterprise server and upgrades from client to server:
Note The following screen does not appear if you are upgrading from NetBackup 5.x to NetBackup 6.0.
On the NetBackup Enterprise Media Manager screen, enter the name of the server that you want to use as the repository for global device configuration information stored in the EMM database.
By default, the server that hosts the EMM database is the master server you are installing. You can allow each server to have its own EMM server or each remote system can use the same server.
Note If the NetBackup system shares drives with the Shared Storage Option (SSO), all NetBackup servers must use the same host for storing device information.
For more information on EMM servers and EMM databases, refer to the NetBackup Media Manager System Administrator’s Guide.
44 NetBackup Installation Guide for Windows

Installing or Upgrading NetBackup
14. If you do not need to make any changes to the installation settings, click Install on the Ready to Install the Program screen.
Note To make changes to the settings, click Back until you reach the page you want to change. You can also click Cancel if you want to start the wizard again.
After you click Install, the installation process begins and a screen appears that shows you the progress of the installation. This process could take several minutes.
For detailed installation information or to verify the progress of an installation, you can view the log file (called Install.log) in the Windows temporary installation directory:
C:\Documents and Settings\administrator_userid\Local Settings\Temp
If the log file is not in this directory, you can locate it by entering the following command at the command prompt:
> echo %TEMP%
15. On the System Validation Complete screen, you have the following options:
◆ To enter additional license keys, click Add Keys.
◆ To finish the installation but wait to configure NetBackup at another time, remove the check next to Launch NetBackup Administration Console now.
◆ Click Finish to if you are done with the installation.
16. For new installations:
If you want to install NetBackup Access Control after completing a new installation of NetBackup, refer to “Installing Access Control in New Installations” on page 103 and perform that procedure at this time.
17. For upgrades:
NetBackup will not work until you have updated the device and volume 5.x databases to EMM.
See “Populating the NetBackup EMM Database” on page 96 for this procedure.
Chapter 2, Installation and Initial Configuration 45

Installing or Upgrading NetBackup
Server Installation: A Remote, Typical Installation or Upgrade ,
VERITAS
VERITAS
VERITAS
VERITAS
Welcome
License Agreement
Choose Installation
Enter License KeySelect Server Type
VERITAS
Enter System Type
VERITAS
Enter EMM ServerName
Run nbpushdata command to create EMM databaseUpgrade = Finished
VERITAS
New installation = FinishedUpgrade = Continue
VERITAS
Begin Installation > Monitor Progress
VERITAS
Available Systems Add Remote Computer
VERITAS
Enter System Type
VERITAS
Enter System Type
VERITAS
Enter Remote System Login Credentials
VERITAS
Select Destination Systems
Media Server Installation Differences:
The NetBackup Systems Name screen contains the Media Server Name field
Upgrade Differences:
Requires that 5.x Global Database Host is upgraded first
No Enterprise Media Manager Host screen appears
Requires running nbpushdata after upgrade itself is complete
Enter Remote System Information
46 NetBackup Installation Guide for Windows

Installing or Upgrading NetBackup
▼ To install NetBackup remotely to other master servers using a typical installation process.
Caution If you are upgrading to NetBackup 6.0, it is critical that you populate the new EMM database after you upgrade server software. See “Populating the NetBackup EMM Database” on page 96 for this procedure.
This step is only required for upgrading NetBackup, not for new installations.
After the EMM database population is complete, you have successfully upgraded your environment to NetBackup 6.0.
Note If you are upgrading your environment to NetBackup 6.0 and you intend to install and use NetBackup Access Control, you must perform the procedure outline in the section, “Upgrading NetBackup with Access Control” on page 104 before you begin upgrading NetBackup.
1. Log on as Administrator to the system from which you are installing NetBackup.
2. For upgrades only:
a. Deactivate all Policies:
For NetBackup Administration Console users:
◆ Open the NetBackup Administration Console on the master server
◆ Select Polices from the tree on the left.
◆ Select all of the policies that appear in the right pane.
◆ Right-click the polices and select Deactivate.
For command-line users
◆ Enter the following command:
install_path\NetBackup\bin\admincmd\bpplinfo policy_name -modify -inactive
b. Deactivate all media servers:
For NetBackup Administration Console users:
◆ Open the NetBackup Administration Console on the master server
◆ Select Media and Device Management > Devices > Hosts from the tree on the left.
◆ Select all of the media servers that appear in the right pane.
Chapter 2, Installation and Initial Configuration 47

Installing or Upgrading NetBackup
◆ Right-click the media servers and select Deactivate.
For command-line users
◆ Enter the following command:
install_path\Volmgr\bin\vmoprcmd -deactivate_host -h device_host
3. Insert the NetBackup installation CD in the drive. On systems with Autorun enabled, the VERITAS NetBackup installation browser starts automatically. If Autorun is disabled, navigate to the CD drive and run Launch.exe.
4. On the initial browser screen, click NetBackup Installation.
5. On the following screen, select Install Server Software.
The Welcome to the NetBackup Setup Wizard screen appears.
Click Next.
6. On the License Agreement screen, accept the license agreement and click Next.
7. On the NetBackup Installation Type screen, choose Select from available computers on the network and Typical.
Click Next.
8. On the NetBackup License Key and Server Type screen, perform the following:
◆ Enter the base product license key that you received with your product
48 NetBackup Installation Guide for Windows
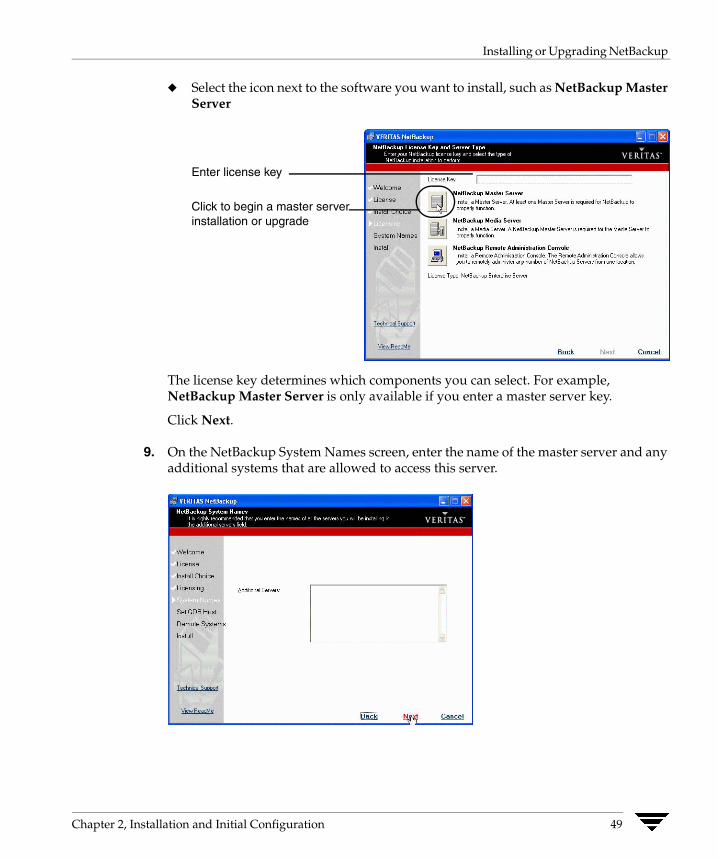
Installing or Upgrading NetBackup
◆ Select the icon next to the software you want to install, such as NetBackup Master Server
The license key determines which components you can select. For example, NetBackup Master Server is only available if you enter a master server key.
Click Next.
9. On the NetBackup System Names screen, enter the name of the master server and any additional systems that are allowed to access this server.
Click to begin a master server installation or upgrade
Enter license key
Chapter 2, Installation and Initial Configuration 49

Installing or Upgrading NetBackup
Note For NetBackup Enterprise systems: If you are installing a media server, the NetBackup System Names screen contains an additional line with the local media server filled in. You must enter the name of the master to which the media server is configured.
During a remote upgrade, the following conditions apply:
◆ You cannot change the installation location during a remote installation. NetBackup uses the existing location of a earlier installation (or the system default location if there was no earlier installation). In addition, you cannot change the installation location on an upgrade or a new installation when you are using the system default settings.
◆ The master server name does not change, even if you are pushing an upgrade to servers with other masters.
10. For new installations of NetBackup Enterprise server and upgrades from client to server:
Note The following screen does not appear if you are upgrading from NetBackup 5.x to NetBackup 6.0.
On the NetBackup Enterprise Media Manager screen, enter the name of the server that you want to use as the repository for global device configuration information stored in the EMM database.
50 NetBackup Installation Guide for Windows

Installing or Upgrading NetBackup
By default, the server that hosts the EMM database is the master server you are installing. You can allow each server to have its own EMM server or each remote system can use the same server.
Note If the NetBackup system shares drives with the Shared Storage Option (SSO), all NetBackup servers must use the same host for storing device information.
For more information on EMM servers and EMM databases, refer to the NetBackup Media Manager System Administrator’s Guide.
Click Next.
11. On the NetBackup Remote Features screen, specify remote system information for installation on those machines.
a. On the initial screen, right-click the Destination System. To install NetBackup on the remote computer, choose Add Remote Computer.
Chapter 2, Installation and Initial Configuration 51

Installing or Upgrading NetBackup
b. On the resulting Available Systems dialog, select the computer that you want to add. Control-click to select multiple computers.
Click Next after you have selected the computer(s).
c. On the Remote Computer Login Credentials dialog that appears next, enter the user name, password, and domain that NetBackup is to use on the remote system(s).
When you choose computers and provide login credentials, you are choosing the remote systems where NetBackup is to be installed. Each time you choose a system, NetBackup performs the following system and license checks:
52 NetBackup Installation Guide for Windows

Installing or Upgrading NetBackup
◆ Verifies the remote system for a server installation that matches the type that you selected.
◆ If the remote system does not have NetBackup installed, it is considered verified.
◆ If the remote system already has NetBackup installed, the installation type on that system is compared to the installation type that you are requesting.
◆ If you are requesting an invalid combination (for example, trying to install a Remote Administration Console on a remote system that already contains master server software) you are notified of the problem and the selection is disallowed.
◆ If the remote system is not at a supported platform level, the installation is disallowed.
◆ Verifies that you have proper Administrator credentials on the remote system that you chose.
If you do not have Administrator credentials, the Enter Network Password dialog appears and prompts you to enter an Administrator user name and password.
Click OK, and continue selecting destination systems.
Note This process repeats for each node that you select. In addition, you can elect to remember the user name and password and only be prompted when the user name or password is not valid on a particular system.
12. If you do not need to make any changes to the installation settings, click Install on the Ready to Install the Program screen.
Note To make changes to the settings, click Back until you reach the page you want to change. You can also click Cancel if you want to start the wizard again.
After you click Install, the installation process begins and a screen appears that shows you the progress of the installation. This process could take several minutes.
For detailed installation information or to verify the progress of an installation, you can view the log file (called Install.log) in the Windows temporary installation directory:
C:\Documents and Settings\administrator_userid\Local Settings\Temp
If the log file is not in this directory, you can locate it by entering the following command at the command prompt:
> echo %TEMP%
13. On the System Validation Complete screen, you have the following options:
Chapter 2, Installation and Initial Configuration 53
Installing or Upgrading NetBackup
◆ To enter additional license keys, click Add Keys.
◆ To finish the installation but wait to configure NetBackup at another time, remove the check next to Launch NetBackup Administration Console now.
◆ Click Finish to if you are done with the installation.
14. For new installations:
If you want to install NetBackup Access Control after completing a new installation of NetBackup, refer to “Installing Access Control in New Installations” on page 103 and perform that procedure at this time.
15. For upgrades:
NetBackup will not work until you have updated the device and volume 5.x databases to EMM.
See “Populating the NetBackup EMM Database” on page 96 for this procedure.
54 NetBackup Installation Guide for Windows
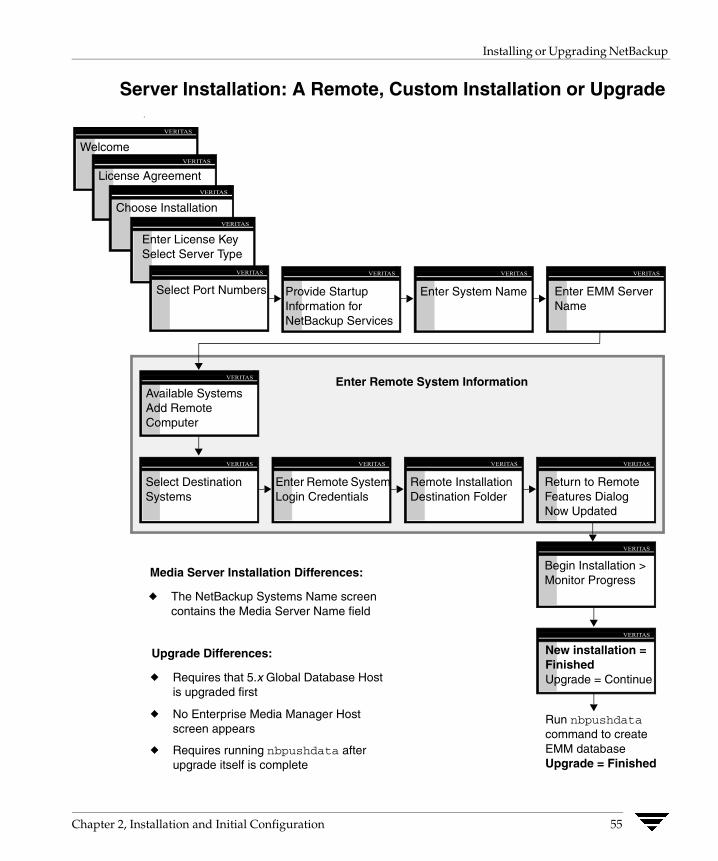
Installing or Upgrading NetBackup
Server Installation: A Remote, Custom Installation or Upgrade ,
Run nbpushdata command to create EMM databaseUpgrade = Finished
VERITAS
New installation = FinishedUpgrade = Continue
VERITAS
Begin Installation > Monitor Progress
VERITAS
Available Systems Add Remote Computer
VERITAS
Remote Installation Destination Folder
VERITAS
Return to Remote Features Dialog Now Updated
VERITAS
Enter Remote System Login Credentials
VERITAS
Select Destination Systems
Media Server Installation Differences:
The NetBackup Systems Name screen contains the Media Server Name field
Upgrade Differences:
Requires that 5.x Global Database Host is upgraded first
No Enterprise Media Manager Host screen appears
Requires running nbpushdata after upgrade itself is complete
Enter Remote System Information
VERITAS
VERITAS
VERITAS
VERITAS
Welcome
License Agreement
Choose Installation
Enter License KeySelect Server Type
VERITAS
Select Port Numbers
VERITAS
Enter System Name
VERITAS
Enter EMM Server Name
VERITAS
Provide Startup Information for NetBackup Services
Chapter 2, Installation and Initial Configuration 55
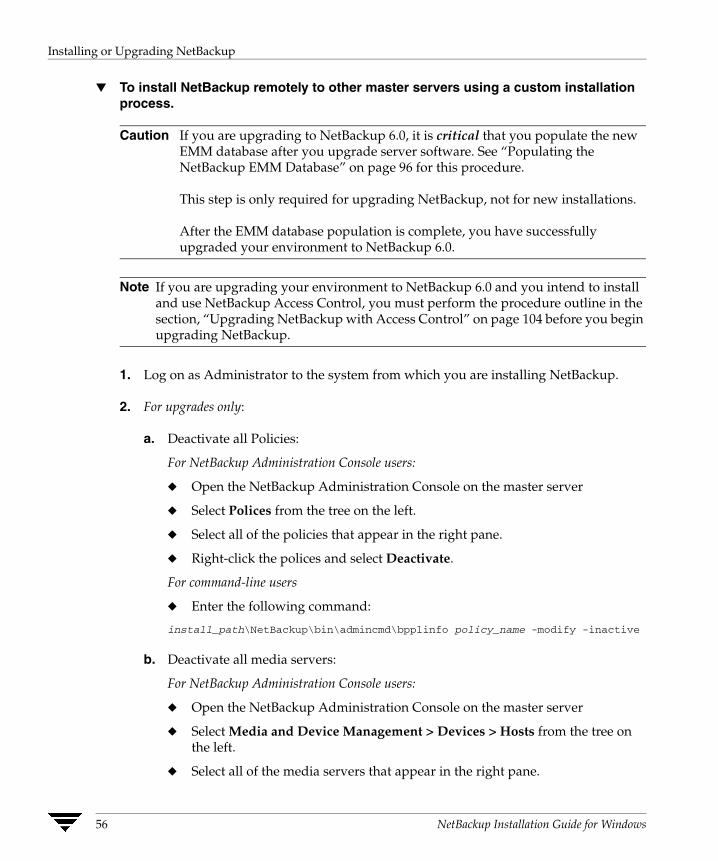
Installing or Upgrading NetBackup
▼ To install NetBackup remotely to other master servers using a custom installation process.
Caution If you are upgrading to NetBackup 6.0, it is critical that you populate the new EMM database after you upgrade server software. See “Populating the NetBackup EMM Database” on page 96 for this procedure.
This step is only required for upgrading NetBackup, not for new installations.
After the EMM database population is complete, you have successfully upgraded your environment to NetBackup 6.0.
Note If you are upgrading your environment to NetBackup 6.0 and you intend to install and use NetBackup Access Control, you must perform the procedure outline in the section, “Upgrading NetBackup with Access Control” on page 104 before you begin upgrading NetBackup.
1. Log on as Administrator to the system from which you are installing NetBackup.
2. For upgrades only:
a. Deactivate all Policies:
For NetBackup Administration Console users:
◆ Open the NetBackup Administration Console on the master server
◆ Select Polices from the tree on the left.
◆ Select all of the policies that appear in the right pane.
◆ Right-click the polices and select Deactivate.
For command-line users
◆ Enter the following command:
install_path\NetBackup\bin\admincmd\bpplinfo policy_name -modify -inactive
b. Deactivate all media servers:
For NetBackup Administration Console users:
◆ Open the NetBackup Administration Console on the master server
◆ Select Media and Device Management > Devices > Hosts from the tree on the left.
◆ Select all of the media servers that appear in the right pane.
56 NetBackup Installation Guide for Windows

Installing or Upgrading NetBackup
◆ Right-click the media servers and select Deactivate.
For command-line users
◆ Enter the following command:
install_path\Volmgr\bin\vmoprcmd -deactivate_host -h device_host
3. Insert the NetBackup installation CD in the drive. On systems with Autorun enabled, the VERITAS NetBackup installation browser starts automatically. If Autorun is disabled, navigate to the CD drive and run Launch.exe.
4. On the initial browser screen, click NetBackup Installation.
5. On the following screen, select Install Server Software.
The Welcome to the NetBackup Setup Wizard screen appears.
Click Next.
6. On the License Agreement screen, accept the license agreement and click Next.
7. On the NetBackup Installation Type screen, select Select from available computers on the network and Custom.
Click Next.
8. On the NetBackup License Key and Server Type screen, perform the following:
◆ Enter the base product license key that you received with your product
Chapter 2, Installation and Initial Configuration 57

Installing or Upgrading NetBackup
◆ Select the icon next to the software you want to install, such as NetBackup Master Server
The license key determines which components you can select. For example, NetBackup Master Server is only available if you enter a master server key.
Click Next.
9. On the NetBackup Port Numbers screen, you can change port numbers, if it is necessary in your configuration.
You may want to change a port number in the following circumstances:
◆ NetBackup and another industry product are trying to share the same port.
Click to begin a master server installation or upgrade
Enter license key
58 NetBackup Installation Guide for Windows
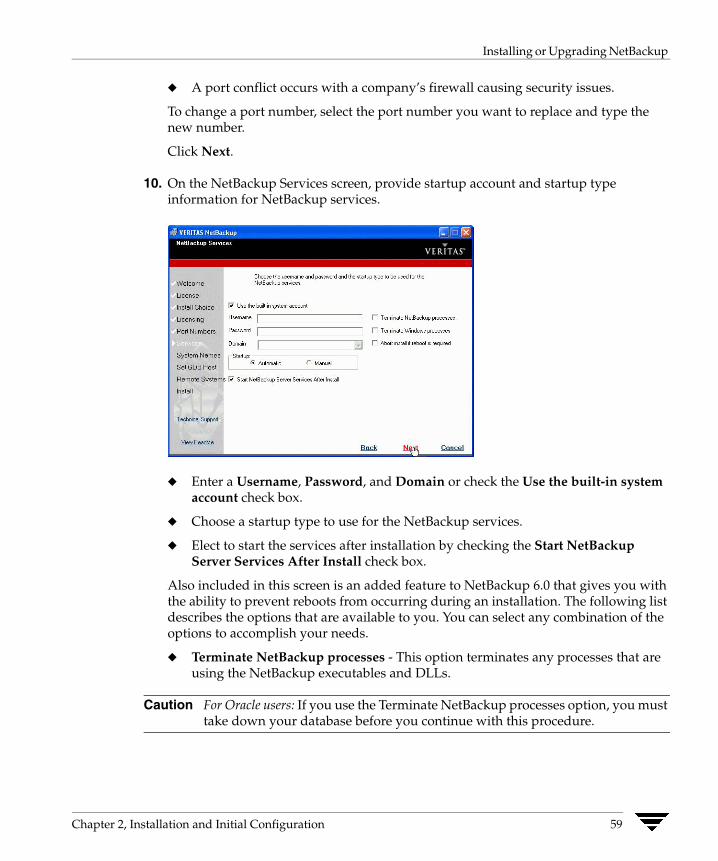
Installing or Upgrading NetBackup
◆ A port conflict occurs with a company’s firewall causing security issues.
To change a port number, select the port number you want to replace and type the new number.
Click Next.
10. On the NetBackup Services screen, provide startup account and startup type information for NetBackup services.
◆ Enter a Username, Password, and Domain or check the Use the built-in system account check box.
◆ Choose a startup type to use for the NetBackup services.
◆ Elect to start the services after installation by checking the Start NetBackup Server Services After Install check box.
Also included in this screen is an added feature to NetBackup 6.0 that gives you with the ability to prevent reboots from occurring during an installation. The following list describes the options that are available to you. You can select any combination of the options to accomplish your needs.
◆ Terminate NetBackup processes - This option terminates any processes that are using the NetBackup executables and DLLs.
Caution For Oracle users: If you use the Terminate NetBackup processes option, you must take down your database before you continue with this procedure.
Chapter 2, Installation and Initial Configuration 59

Installing or Upgrading NetBackup
◆ Terminate Windows processes - This option looks for processes using the Microsoft run-time DLLs and terminates them. If you are upgrading from NetBackup 5.x to NetBackup 6.0, you will not need to execute this option because the Microsoft run-time DLL will already be at the correct level.
Caution Using this option may cause instability with other Windows applications, particularly those applications that use Microsoft run-time DLLs.
◆ Abort install if a reboot is required - This option detects if a reboot is absolutely necessary. If a reboot is required, then this option will abort the installation and roll it back to the beginning of the installation process.
For detailed installation information or to verify the progress of an installation, you can view the log file (called Install.log) in the Windows temporary installation directory:
C:\Documents and Settings\administrator_userid\Local Settings\Temp
If the log file is not in this directory, you can locate it by entering the following command at the command prompt:
> echo %TEMP%
Click Next.
11. On the NetBackup System Names screen, enter the name of the master server and any additional systems that are allowed to access this server.
60 NetBackup Installation Guide for Windows

Installing or Upgrading NetBackup
Note For NetBackup Enterprise systems: If you are installing a media server, the NetBackup System Names screen will have an additional line with the local media server filled in. You must enter the name of the master to which the media server is configured.
Click Next.
12. For new installations of NetBackup Enterprise server and upgrades from client to server:
Note The following screen does not appear if you are upgrading from NetBackup 5.x to NetBackup 6.0.
On the NetBackup Enterprise Media Manager screen, enter the name of the server that you want to use as the repository for global device configuration information stored in the EMM database.
By default, the server that hosts the EMM database is the master server you are installing. You can allow each server to have its own EMM server, or each remote system can use the same server.
Note If the NetBackup system shares drives with the Shared Storage Option (SSO), all NetBackup servers must use the same host for storing device information.
For more information on EMM servers and EMM databases, refer to the NetBackup Media Manager System Administrator’s Guide.
Chapter 2, Installation and Initial Configuration 61

Installing or Upgrading NetBackup
13. On the NetBackup Remote Features screen, specify remote system information for installation on those machines.
a. On the initial screen, right-click the Destination System. To install NetBackup on the remote computer, choose Add Remote Computer.
b. On the resulting Available Systems dialog, select the computer that you want to add. Control-click to select multiple computers.
Click Next after you have selected the computer(s).
62 NetBackup Installation Guide for Windows

Installing or Upgrading NetBackup
c. On the Remote Computer Login Credentials dialog that appears next, enter the user name, password, and domain that NetBackup is to use on the remote system(s).
When you choose computers and provide login credentials, you are choosing the remote systems where NetBackup is to be installed. Each time you choose a system, NetBackup performs the following system and license checks:
◆ Verifies the remote system for a server installation that matches the type that you selected.
◆ If the remote system does not have NetBackup installed, it is considered verified.
◆ If the remote system already has NetBackup installed, the installation type on that system is compared to the installation type that you are requesting.
◆ If you are requesting an invalid combination (for example, trying to install a Remote Administration Console on a remote system that already contains master server software) you are notified of the problem and the selection is disallowed.
◆ If the remote system is not at a supported platform level, the installation is disallowed.
◆ Verifies that you have proper administration credentials on the remote system that you chose.
If you do not have administration credentials, the Enter Network Password dialog appears and prompts you to enter the Administrator user name and password.
Chapter 2, Installation and Initial Configuration 63

Installing or Upgrading NetBackup
d. On the Remote Destination Folder screen, accept the default or change the folder on the remote server where NetBackup is to be installed.
After you have selected the installation folder, click OK.
e. On the NetBackup Remote Features screen, the final step for selecting remote features is to ensure or prevent the installation of a feature on the remote NetBackup server.
64 NetBackup Installation Guide for Windows
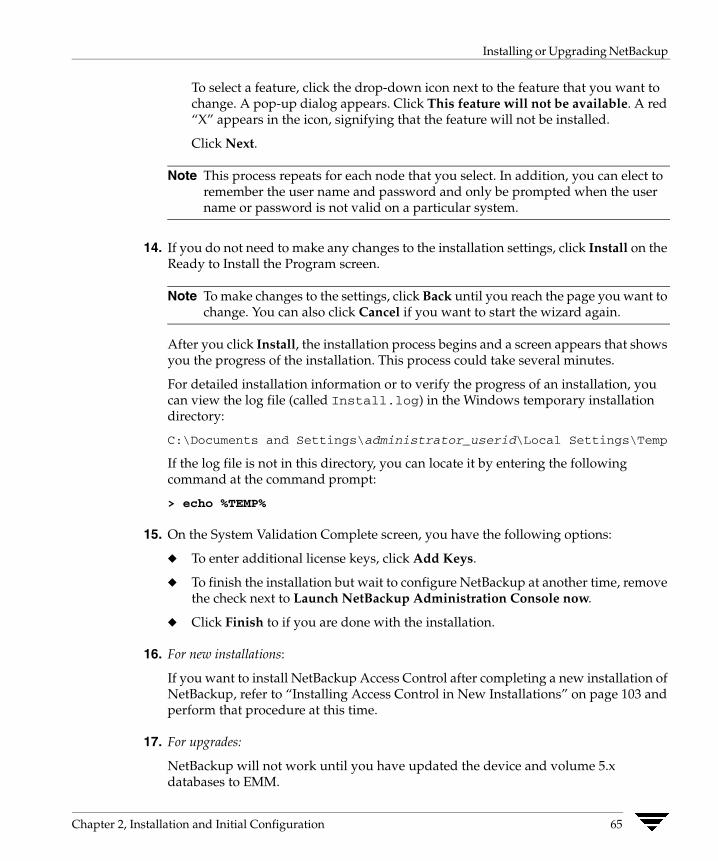
Installing or Upgrading NetBackup
To select a feature, click the drop-down icon next to the feature that you want to change. A pop-up dialog appears. Click This feature will not be available. A red “X” appears in the icon, signifying that the feature will not be installed.
Click Next.
Note This process repeats for each node that you select. In addition, you can elect to remember the user name and password and only be prompted when the user name or password is not valid on a particular system.
14. If you do not need to make any changes to the installation settings, click Install on the Ready to Install the Program screen.
Note To make changes to the settings, click Back until you reach the page you want to change. You can also click Cancel if you want to start the wizard again.
After you click Install, the installation process begins and a screen appears that shows you the progress of the installation. This process could take several minutes.
For detailed installation information or to verify the progress of an installation, you can view the log file (called Install.log) in the Windows temporary installation directory:
C:\Documents and Settings\administrator_userid\Local Settings\Temp
If the log file is not in this directory, you can locate it by entering the following command at the command prompt:
> echo %TEMP%
15. On the System Validation Complete screen, you have the following options:
◆ To enter additional license keys, click Add Keys.
◆ To finish the installation but wait to configure NetBackup at another time, remove the check next to Launch NetBackup Administration Console now.
◆ Click Finish to if you are done with the installation.
16. For new installations:
If you want to install NetBackup Access Control after completing a new installation of NetBackup, refer to “Installing Access Control in New Installations” on page 103 and perform that procedure at this time.
17. For upgrades:
NetBackup will not work until you have updated the device and volume 5.x databases to EMM.
Chapter 2, Installation and Initial Configuration 65
Installing or Upgrading NetBackup
See “Populating the NetBackup EMM Database” on page 96 for this procedure.
Installing or Upgrading NetBackup in Clustered EnvironmentsThe primary change in the upgrade process revolves around the requirement of running the nbpushdata command to populate the new EMM database.
After you have run the installation or upgrade procedure, you must run nbpushdata on the active node. Running nbpushdata pushes the data from the existing shared database files to the EMM database. In addition, nbpushdata pushes data to the EMM database from the local database files on the inactive nodes. To do this, nbpushdata gets a list of all of the nodes in the cluster, uses bpcd to get a copy of each local database file from all inactive nodes, and stages these files on the active node. The data from the staged files is then pushed to the EMM database.
The following procedures explain how to install NetBackup in a clustered environment. There are two scenarios in which you can install a clustered environment.
◆ NetBackup in a clustered environment using a typical installation process
◆ NetBackup in a clustered environment using a custom installation process
Cluster Installation Requirements
Caution For Windows 2000 environments: Perform NetBackup initial installations and upgrade installations from the system console, not from a Remote Terminal Services session. Performing the installation using Remote Terminal Services may result in incomplete installations.
In addition to the local installation requirements mentioned in “NetBackup Server Installation Requirements” on page 5, the following items apply to cluster installations, including remote cluster installations:
Note For VCS clusters (SFW-HA 4.1, SFW-HA 4.2): Make sure that the patch available through VERITAS technical note 278307 is installed prior to installing or upgrading to NetBackup 6.0. The patch is available at the following web page: http://support.veritas.com/docs/278307
◆ The source and destination systems must have Windows 2000 or Windows 2003 server installed.
◆ The person performing the clustered installation must have administrator privileges on all the remote nodes in the cluster. VERITAS recommends that the person performing the installation keeps a record of all nodes included in the cluster and what software exists on which nodes.
66 NetBackup Installation Guide for Windows
Installing or Upgrading NetBackup
◆ Have the virtual name and IP address to be used by NetBackup ready. You will be required to provide this information during installation.
◆ All clustered nodes must be running the same operating system, service pack level, and version of NetBackup. Mixing server versions is not supported in a clustered environment.
◆ For VCS clusters: All disk resources that NetBackup uses must be configured in VERITAS Enterprise Administrator (VEA) prior to installing NetBackup.
◆ For upgrades: With the introduction of the new EMM database in this release, ltid and the robotic daemons will retrieve the device configuration for a particular cluster node from the EMM database. The cluster node name (provided by gethostname) stores and/or retrieves the device configuration in the EMM database. The cluster node name is used when any updates are made to the device configuration, including drive status updates made by ltid. The cluster node name is only used to indicate where a device is connected. The NetBackup virtual name is employed for other uses, such as the robot control host.
Before You Perform a New Installation in Clustered Environments
For MSCS clusters:
◆ The shared disk to be used by the NetBackup Group must already be configured in the cluster and online on the active node.
◆ Install NetBackup from the node with the shared disk (that is, the active node).
Before You Perform an Upgrade in Clustered Environments
When you are upgrading NetBackup in a clustered environment, you must first do the following:
◆ For MSCS clusters: Before you upgrade, you must take all of the NetBackup group resources offline except for the disk. Refer to the Microsoft Cluster Administration documentation to determine how to take the NetBackup group resources offline using the Cluster Administrator interface.
◆ For VCS clusters: Before you upgrade, you must take the NetBackup resource offline and then freeze the NetBackup Group so that migrations do not occur while the inactive nodes are upgraded. If you have a VCS cluster configured, you can freeze the NetBackup Group using the Cluster Manager interface or the command line.
Chapter 2, Installation and Initial Configuration 67

Installing or Upgrading NetBackup
Server Installation in a Cluster: A Typical Installation or Upgrade
VERITAS
VERITAS
VERITAS
VERITAS
Welcome
License Agreement
Choose Installation
Enter License KeySelect Server Type
VERITAS
Cluster Settings
VERITAS
Enter System Names
Run nbpushdata > updates EMM >Upgrade = Finished
VERITAS
New installation = FinishedUpgrade = Continue
VERITAS
Begin Installation > Monitor Progress
VERITAS
Enter EMM ServerName
Media Server Installation Differences:
The NetBackup Systems Name screen contains the Media Server Name field
Upgrade Differences:
Requires that 5.x Global Database Host is upgraded first
No Enterprise Media Manager Host screen appears
Requires running nbpushdata after upgrade itself is complete
Enter Remote System Information
VERITAS
Add Remote Computer
VERITAS
Available Systems
VERITAS
Remote ComputerLogin Credentials
68 NetBackup Installation Guide for Windows

Installing or Upgrading NetBackup
▼ To install or upgrade NetBackup in a clustered environment using a typical installation process
Caution If you are upgrading to NetBackup 6.0, it is critical that you populate the new EMM database after you upgrade server software. See “Populating the NetBackup EMM Database” on page 96 for this procedure.
This step is only required for upgrading NetBackup, not for new installations.
After the EMM database population is complete, you have successfully upgraded your environment to NetBackup 6.0.
Note If you are upgrading your clustered environment to NetBackup 6.0 and you intend to install and use NetBackup Access Control, you must perform the procedure outline in “Upgrading NetBackup with Access Control” on page 104 before you begin upgrading NetBackup.
1. Log on as Administrator on the active node. The active node is the node that owns the disk to be used as the NetBackup shared disk.
Note If the node on which you are installing or upgrading does not own the shared disk, or the shared disk is offline, the disk will not appear in the Cluster Setting screen later in this procedure. If you want to use the shared disk, you must bring the disk online before continuing with this procedure.
2. For upgrades only:
a. Deactivate all Policies:
For NetBackup Administration Console users:
◆ Open the NetBackup Administration Console on the master server
◆ Select Polices from the tree on the left.
◆ Select all of the policies that appear in the right pane.
◆ Right-click the polices and select Deactivate.
For command-line users
◆ Enter the following command:
install_path\NetBackup\bin\admincmd\bpplinfo policy_name -modify -inactive
Chapter 2, Installation and Initial Configuration 69
Installing or Upgrading NetBackup
b. Deactivate all media servers:
For NetBackup Administration Console users
◆ Open the NetBackup Administration Console on the master server
◆ Select Media and Device Management > Devices > Hosts from the tree on the left.
◆ Select all of the media servers that appear in the right pane.
◆ Right-click the media servers and select Deactivate.
For command-line users
◆ Enter the following command:
install_path\Volmgr\bin\vmoprcmd -deactivate_host -h device_host
3. Insert the NetBackup installation CD in the drive. On systems with Autorun enabled, the VERITAS NetBackup installation browser starts automatically. If Autorun is disabled, navigate to the CD drive and run Launch.exe.
4. On the initial browser screen, click NetBackup Installation.
5. On the following screen, select Install Server Software.
The Welcome to the NetBackup Setup Wizard screen appears.
Click Next.
70 NetBackup Installation Guide for Windows

Installing or Upgrading NetBackup
6. On the License Agreement screen, accept the license agreement and click Next.
7. On the NetBackup Installation Type screen, select Perform a clustered install of NetBackup and Typical.
Note The installation process references the registry settings of your system to determine if your system is configured for a Windows MSCS or VCS clustered environment. If it is, you see the option to perform a clustered installation.
Click Next.
Chapter 2, Installation and Initial Configuration 71

Installing or Upgrading NetBackup
8. On the NetBackup License Key and Server Type screen, perform the following:
◆ Enter the base product license key that you received with your product
◆ Select the icon next to the software you want to install, such as NetBackup Master Server
The license key determines which components you can select. For example, NetBackup Master Server is only available if you enter a master server key.
Click Next.
During this installation process, the following occurs to ensure you have proper credentials to perform remote installations:
◆ When you select a clustered system, NetBackup determines if you have proper administration credentials on all nodes in the cluster. If you do not have the proper credentials, the system is not added to the list.
◆ If you have the proper credentials, NetBackup performs a second check to determine if a license key is needed. If a key is needed and one was not entered, the system cannot be added to the list. You must enter a valid license key to install on that node. If you enter an invalid license key, the NetBackup License Key and Server Type screen will remain visible until a valid key is entered.
Note When you are performing an upgrade, a new license key is not required. Your current license key is used.
Click to begin a master server installation or upgrade
Enter license key
72 NetBackup Installation Guide for Windows
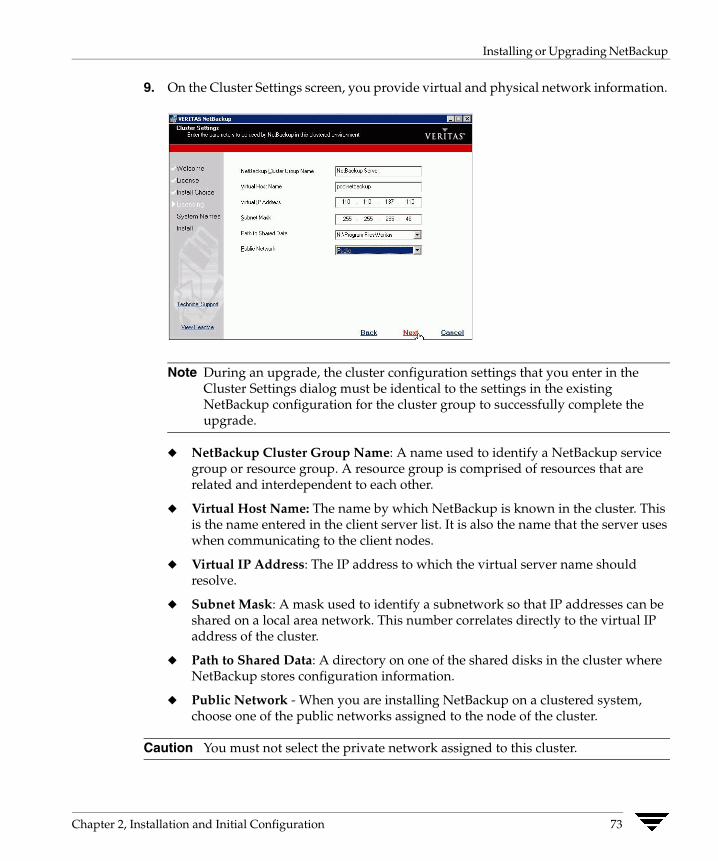
Installing or Upgrading NetBackup
9. On the Cluster Settings screen, you provide virtual and physical network information.
Note During an upgrade, the cluster configuration settings that you enter in the Cluster Settings dialog must be identical to the settings in the existing NetBackup configuration for the cluster group to successfully complete the upgrade.
◆ NetBackup Cluster Group Name: A name used to identify a NetBackup service group or resource group. A resource group is comprised of resources that are related and interdependent to each other.
◆ Virtual Host Name: The name by which NetBackup is known in the cluster. This is the name entered in the client server list. It is also the name that the server uses when communicating to the client nodes.
◆ Virtual IP Address: The IP address to which the virtual server name should resolve.
◆ Subnet Mask: A mask used to identify a subnetwork so that IP addresses can be shared on a local area network. This number correlates directly to the virtual IP address of the cluster.
◆ Path to Shared Data: A directory on one of the shared disks in the cluster where NetBackup stores configuration information.
◆ Public Network - When you are installing NetBackup on a clustered system, choose one of the public networks assigned to the node of the cluster.
Caution You must not select the private network assigned to this cluster.
Chapter 2, Installation and Initial Configuration 73

Installing or Upgrading NetBackup
10. On the NetBackup System Names screen, enter the name of the master server and any additional systems that are allowed to access this server.
Note For NetBackup Enterprise systems: If you are installing a media server, the NetBackup System Names screen contains an additional line with the local media server filled in. You must enter the name of the master to which the media server is configured.
Note The NetBackup Administration Console is not clustered.
Click Next.
74 NetBackup Installation Guide for Windows

Installing or Upgrading NetBackup
11. For new installations of NetBackup Enterprise server and upgrades from client to server:
Note The following screen does not appear if you are upgrading from NetBackup 5.x to NetBackup 6.0.
On the NetBackup Enterprise Media Manager screen, enter the name of the server that you want to use as the repository for global device configuration information stored in the EMM database.
By default, the server that hosts the EMM database is the master server you are installing. You can allow each server to have its own EMM server or each remote system can use the same server.
Note If the NetBackup system shares drives with the Shared Storage Option (SSO), all NetBackup servers must use the same host for storing device information.
For more information on EMM servers and EMM databases, refer to the NetBackup Media Manager System Administrator’s Guide.
Chapter 2, Installation and Initial Configuration 75

Installing or Upgrading NetBackup
12. On the ExecView Remote Features screen, specify remote system information for installation on those machines.
a. On the initial screen, right-click the Destination System. To install NetBackup on the remote computer, choose Add Remote Computer.
b. On the resulting Available Systems dialog, select the computer that you want to add. Control-click to select multiple computers.
Click Next after you have selected the computer(s).
76 NetBackup Installation Guide for Windows

Installing or Upgrading NetBackup
c. On the Remote Computer Login Credentials dialog that appears next, enter the user name, password, and domain that NetBackup is to use on the remote system(s).
When you choose computers and provide login credentials, you are choosing the remote systems where NetBackup is to be installed. Each time you choose a system, NetBackup performs the following system and license checks:
◆ Verifies the remote system for a server installation that matches the type that you selected.
◆ If the remote system does not have NetBackup installed, it is considered verified.
◆ If the remote system already has NetBackup installed, the installation type on that system is compared to the installation type that you are requesting.
◆ If you are requesting an invalid combination (for example, trying to install a Remote Administration Console on a remote system that already contains master server software) you are notified of the problem and the selection is disallowed.
◆ If the remote system is not at a supported platform level, the installation is disallowed.
◆ Verifies that you have proper administration credentials on the remote system that you chose.
If you do not have administration credentials, the Enter Network Password dialog appears and prompts you to enter an Administrator user name and password.
Click OK and continue selecting destination systems.
Chapter 2, Installation and Initial Configuration 77

Installing or Upgrading NetBackup
Note This process repeats for each node that you select. In addition, you can elect to remember the user name and password and only be prompted when the user name or password is not valid on a particular system.
Note following regarding the push-install process in a clustered environment:
◆ There is no limit to the number of nodes on which you can install NetBackup. The only limit to the number of nodes in a cluster is that set by the clustering service and not NetBackup.
◆ NetBackup add-on products cannot push their installs. These add-on products must be installed on each individual node in the cluster group. For instructions on how to install these products, refer to the NetBackup documentation that supports each product.
◆ Only the license key that was entered at the beginning of this procedure is pushed to the other nodes in this cluster. If the license key includes add-on products and the nodes you are pushing NetBackup to already has that add-on product installed, the key enables you to use these products.
13. Click Install. The installation process begins pushing the installation to all of the selected nodes.
Note Under normal circumstances, cluster configuration is one of the final steps in installing NetBackup in a cluster. If this step is not done or does not complete successfully, you can use the bpclusterutil command from the active node to perform this step. See the NetBackup High Availability System Administrator’s Guide for information on running bpclusterutil.
A summary screen appears that shows you the progress of the installation and each of the systems. You can right-click on a system listed in the screen to see a status of the installation. For example, it can show if an installation failed on a particular system. You would then be able to obtain more information about the failure by viewing the remote installation log. The remote installation log is named nbpinst.log and is located in the Windows temporary installation directory.
14. On the System Validation Complete screen, you have the following options:
◆ To enter additional license keys, click Add Keys.
◆ To finish the installation but wait to configure NetBackup at another time, remove the check next to Launch NetBackup Administration Console now.
◆ Click Finish to if you are done with the installation.
Note You may need to reboot each of the cluster nodes after the installation is complete.
78 NetBackup Installation Guide for Windows

Installing or Upgrading NetBackup
15. For new installations:
If you want to install NetBackup Access Control after completing a new installation of NetBackup, refer to “Installing Access Control in New Installations” on page 103 and perform that procedure at this time.
16. For upgrades:
NetBackup will not work until after you have updated the device and volume 5.x databases to EMM.
See “Populating the NetBackup EMM Database” on page 96 for this procedure.
17. After the push-install completes:
◆ For MSCS clusters: The NetBackup resources that you took offline in the beginning of this procedure will come back online automatically.
◆ For VCS clusters: Unfreeze the active node.
▼ To verify a successful cluster installation or upgrade using the Cluster Administrator console
1. During a cluster installation, you can open the Cluster Administrator console to see your current structure.
2. For example, suppose that a new cluster group named NetBackup Server Group was created during the installation. In the following example, Disk Y is in the left pane and no other NetBackup Server Group exists.
Chapter 2, Installation and Initial Configuration 79
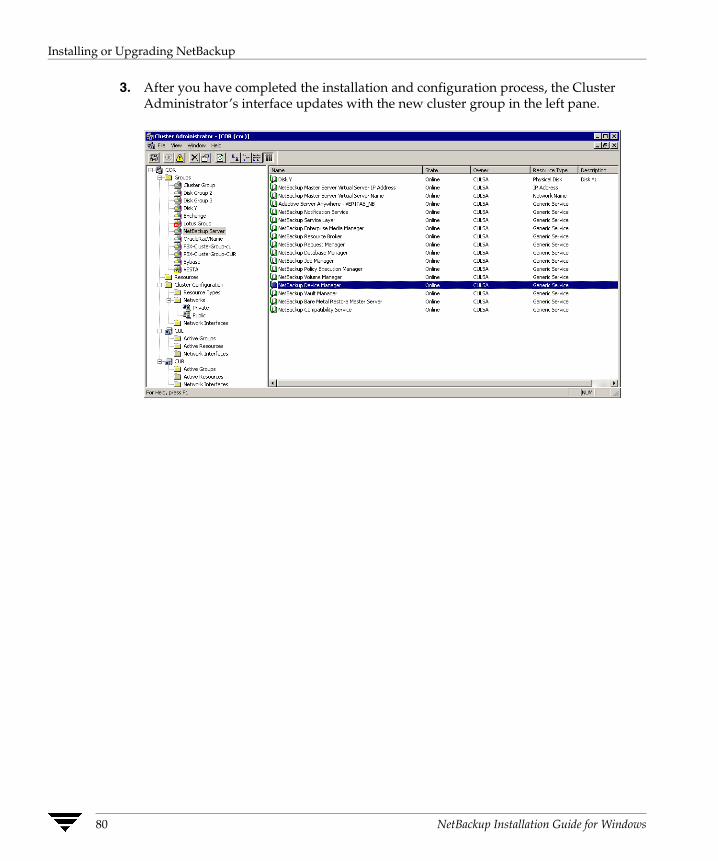
Installing or Upgrading NetBackup
3. After you have completed the installation and configuration process, the Cluster Administrator’s interface updates with the new cluster group in the left pane.
80 NetBackup Installation Guide for Windows
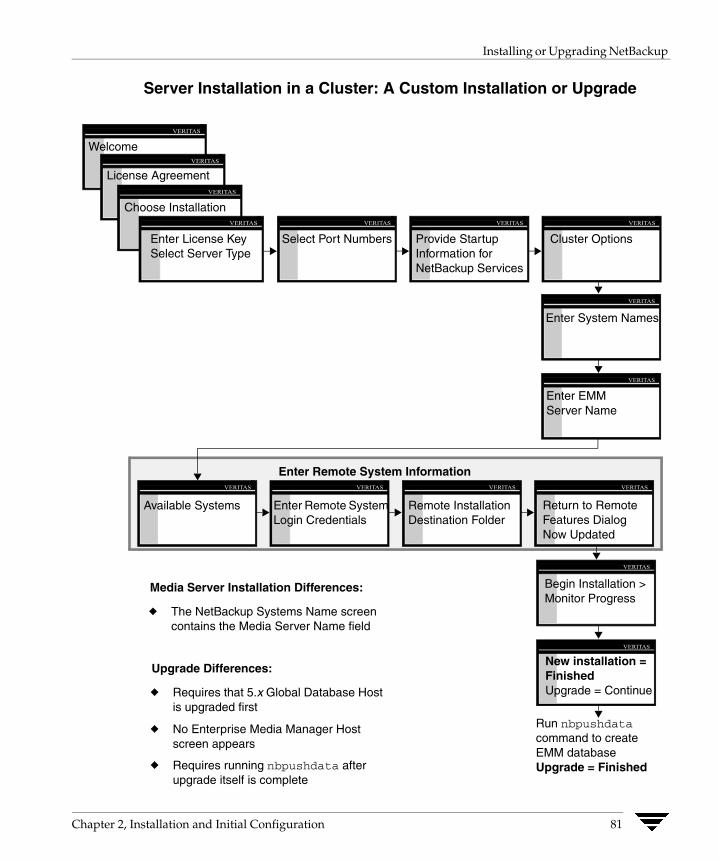
Installing or Upgrading NetBackup
Server Installation in a Cluster: A Custom Installation or Upgrade
VERITAS
Provide Startup Information for NetBackup Services
VERITAS
Cluster Options
VERITAS
Select Port Numbers
Run nbpushdata command to create EMM databaseUpgrade = Finished
VERITAS
New installation = FinishedUpgrade = Continue
VERITAS
Begin Installation > Monitor Progress
VERITAS
Remote Installation Destination Folder
VERITAS
Return to Remote Features Dialog Now Updated
VERITAS
Enter Remote System Login Credentials
VERITAS
Available Systems
Media Server Installation Differences:
The NetBackup Systems Name screen contains the Media Server Name field
Upgrade Differences:
Requires that 5.x Global Database Host is upgraded first
No Enterprise Media Manager Host screen appears
Requires running nbpushdata after upgrade itself is complete
Enter Remote System Information
VERITAS
VERITAS
VERITAS
VERITAS
Welcome
License Agreement
Choose Installation
Enter License KeySelect Server Type
VERITAS
Enter EMM Server Name
VERITAS
Enter System Names
Chapter 2, Installation and Initial Configuration 81
Installing or Upgrading NetBackup
▼ To install or upgrade NetBackup in a clustered environment using a custom installation process
Caution If you are upgrading to NetBackup 6.0, it is critical that you populate the new EMM database after you upgrade server software. See “Populating the NetBackup EMM Database” on page 96 for this procedure.
This step is only required for upgrading NetBackup, not for new installations.
After the EMM database population is complete, you have successfully upgraded your environment to NetBackup 6.0.
Note If you are upgrading your clustered environment to NetBackup 6.0 and you intend to install and use NetBackup Access Control, you must perform the procedure outline in the section, “Upgrading NetBackup with Access Control” on page 104 before you begin upgrading NetBackup.
1. Log on as Administrator on the active node. The active node is the node that owns the disk that will be used as the NetBackup shared disk.
Note If the node on which you are installing or upgrading does not own the shared disk, or the shared disk is offline, the disk will not appear in the Cluster Setting window later in this procedure. If you want to use the shared disk, you must bring the disk online before continuing with this procedure.
2. For upgrades only:
a. Deactivate all Policies:
For NetBackup Administration Console users:
◆ Open the NetBackup Administration Console on the master server
◆ Select Polices from the tree on the left.
◆ Select all of the policies that appear in the right pane.
◆ Right-click the polices and select Deactivate.
For command-line users
◆ Enter the following command:
install_path\NetBackup\bin\admincmd\bpplinfo policy_name -modify -inactive
82 NetBackup Installation Guide for Windows
Installing or Upgrading NetBackup
b. Deactivate all media servers:
For NetBackup Administration Console users
◆ Open the NetBackup Administration Console on the master server
◆ Select Media and Device Management > Devices > Hosts from the tree on the left.
◆ Select all of the media servers that appear in the right pane.
◆ Right-click the media servers and select Deactivate.
For command-line users
◆ Enter the following command:
install_path\Volmgr\bin\vmoprcmd -deactivate_host -h device_host
3. Insert the NetBackup installation CD in the drive. On systems with Autorun enabled, the VERITAS NetBackup installation browser starts automatically. If Autorun is disabled, navigate to the CD drive and run Launch.exe.
4. On the initial browser screen, click NetBackup Installation.
5. On the following screen, select Install Server Software.
The Welcome to the NetBackup Setup Wizard screen appears.
Click Next.
Chapter 2, Installation and Initial Configuration 83
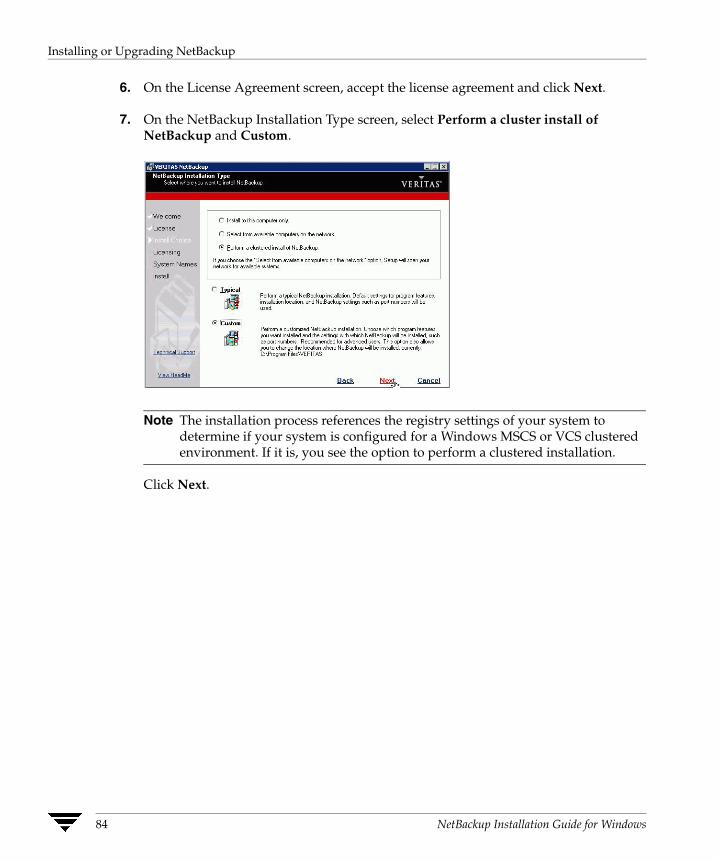
Installing or Upgrading NetBackup
6. On the License Agreement screen, accept the license agreement and click Next.
7. On the NetBackup Installation Type screen, select Perform a cluster install of NetBackup and Custom.
Note The installation process references the registry settings of your system to determine if your system is configured for a Windows MSCS or VCS clustered environment. If it is, you see the option to perform a clustered installation.
Click Next.
84 NetBackup Installation Guide for Windows

Installing or Upgrading NetBackup
8. On the NetBackup License Key and Server Type screen, perform the following:
◆ Enter the base product license key that you received with your product
◆ Select the icon next to the software you want to install, such as NetBackup Master Server
The license key determines which components you can select. For example, NetBackup Master Server is only available if you enter a master server key.
Click Next.
During this installation process, the following occurs to ensure you have proper credentials to perform remote installations:
◆ When you select a clustered system on which to install, NetBackup determines if you have proper Administrator credentials on all nodes in the cluster. If you do not have the proper credentials, the system is not added to the list.
◆ If you have the proper credentials, NetBackup performs a second check to determine if a license key is needed. If a key is needed and one was not entered, the system cannot be added to the list. You must enter a valid license key to install on that node. If you enter an invalid license key, the NetBackup License Key and Server Type screen will remain visible until a valid key is entered.
Note When performing an upgrade, a new license key is not required. Your current license key is used.
Click to begin a master server installation or upgrade
Enter license key
Chapter 2, Installation and Initial Configuration 85

Installing or Upgrading NetBackup
9. On the NetBackup Port Numbers screen, you can change port numbers, if it is necessary in your configuration.
You may want to change a port number in the following circumstances:
◆ NetBackup and another industry product are trying to share the same port.
◆ A port conflict occurs with a company’s firewall, causing security issues.
To change a port number, select the port number you want to replace and type the new number.
10. On the NetBackup Services screen, provide startup account and startup type information for NetBackup services.
86 NetBackup Installation Guide for Windows

Installing or Upgrading NetBackup
◆ Enter a Username, Password, and Domain or check the Use the built-in system account check box.
◆ Choose a startup type to use for the NetBackup services.
◆ Elect to start the services after installation by checking the Start NetBackup Server Services After Install check box.
◆ Choose whether to prevent reboots from occurring during the installation, as follows:
◆ Terminate NetBackup processes - This option terminates any processes that are using the NetBackup executables and DLLs.
Caution For Oracle users: If you use the Terminate NetBackup processes option, you must take down your database before you continue with this procedure.
◆ Terminate Windows processes - This option looks for processes using the Microsoft run-time DLLs and terminates them. If you are upgrading from NetBackup 5.x to NetBackup 6.0, you will not need to execute this option because the Microsoft run-time DLL will already be at the correct level.
Caution Using this option may cause instability with other Windows applications, particularly those applications that use Microsoft run-time DLLs.
◆ Abort install if reboot is required - This option detects if a reboot is absolutely necessary. If a reboot is required, selecting this option cancels the installation and rolls it back to the beginning of the installation process.
For detailed installation information or to verify the progress of an installation, you can view the log file (called Install.log) in the Windows temporary installation directory:
C:\Documents and Settings\administrator_userid\Local Settings\Temp
If the log file is not in this directory, you can locate it by entering the following command at the command prompt:
> echo %TEMP%
Click Next.
Chapter 2, Installation and Initial Configuration 87

Installing or Upgrading NetBackup
11. On the Cluster Settings screen, you provide virtual and physical network information.
Note During an upgrade, the cluster configuration settings that you enter in the Cluster Settings dialog must be identical the existing settings of the NetBackup configuration for the cluster group to successfully complete the upgrade.
◆ NetBackup Cluster Group Name: A name used to identify a NetBackup service group or resource group. A resource group is comprised of resources that are related and interdependent to each other.
◆ Virtual Host Name: The name by which NetBackup is know in the cluster. This is the name that will be entered in the client server list. It is also the name that the server uses when communicating to the client nodes.
◆ Virtual IP Address: The IP address to which the virtual server name should resolve.
◆ Subnet Mask: A mask used to identify a subnetwork so that IP addresses can be shared on a local area network. This number correlates directly to the virtual IP address of the cluster.
◆ Path to Shared Data: A directory on one of the shared disks in the cluster where NetBackup stores configuration information.
◆ Public Network - For NetBackup clustered environments, choose one of the public networks assigned to the node of the cluster.
Caution You must not select a private network assigned to this cluster.
Click Next.
88 NetBackup Installation Guide for Windows
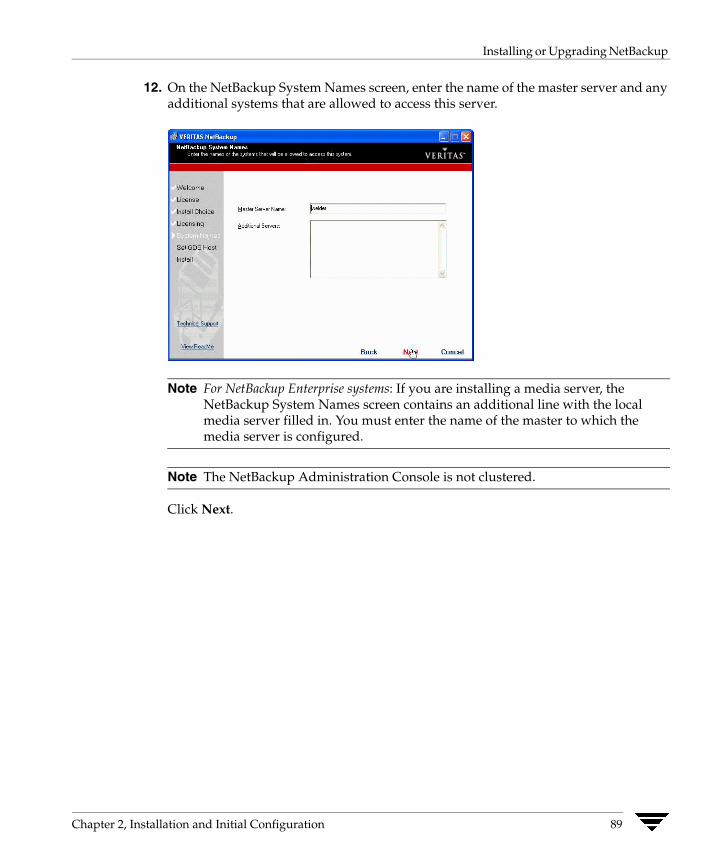
Installing or Upgrading NetBackup
12. On the NetBackup System Names screen, enter the name of the master server and any additional systems that are allowed to access this server.
Note For NetBackup Enterprise systems: If you are installing a media server, the NetBackup System Names screen contains an additional line with the local media server filled in. You must enter the name of the master to which the media server is configured.
Note The NetBackup Administration Console is not clustered.
Click Next.
Chapter 2, Installation and Initial Configuration 89
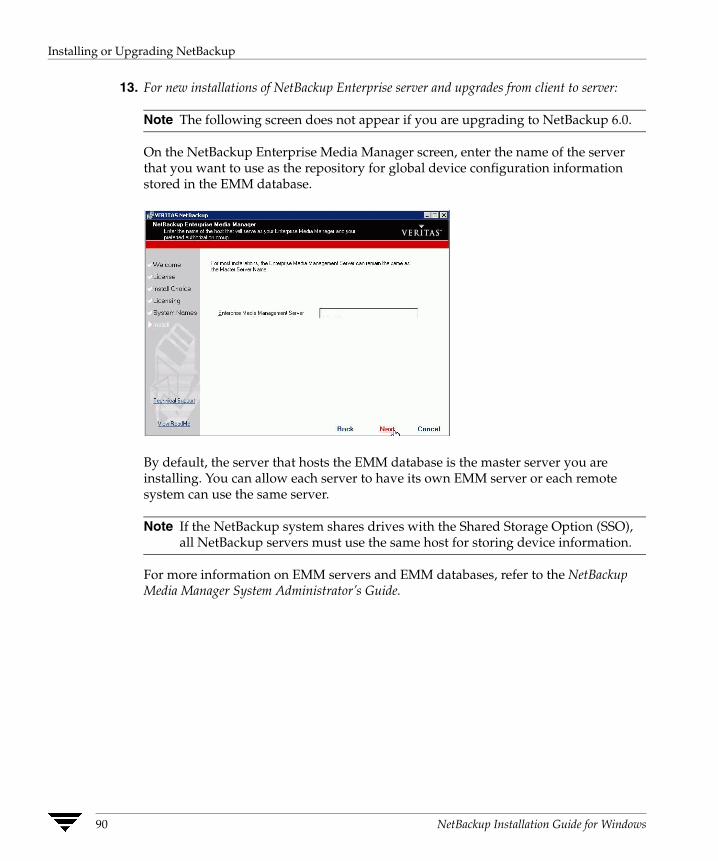
Installing or Upgrading NetBackup
13. For new installations of NetBackup Enterprise server and upgrades from client to server:
Note The following screen does not appear if you are upgrading to NetBackup 6.0.
On the NetBackup Enterprise Media Manager screen, enter the name of the server that you want to use as the repository for global device configuration information stored in the EMM database.
By default, the server that hosts the EMM database is the master server you are installing. You can allow each server to have its own EMM server or each remote system can use the same server.
Note If the NetBackup system shares drives with the Shared Storage Option (SSO), all NetBackup servers must use the same host for storing device information.
For more information on EMM servers and EMM databases, refer to the NetBackup Media Manager System Administrator’s Guide.
90 NetBackup Installation Guide for Windows

Installing or Upgrading NetBackup
14. On the ExecView Remote Features screen, specify remote system information for installation on those machines.
a. On the initial screen, right-click the Destination System. To install NetBackup on the remote computer, choose Add Remote Computer.
b. On the resulting Available Systems dialog, select the computer that you want to add. Control-click to select multiple computers.
Click Next after you have selected the computer(s).
Chapter 2, Installation and Initial Configuration 91
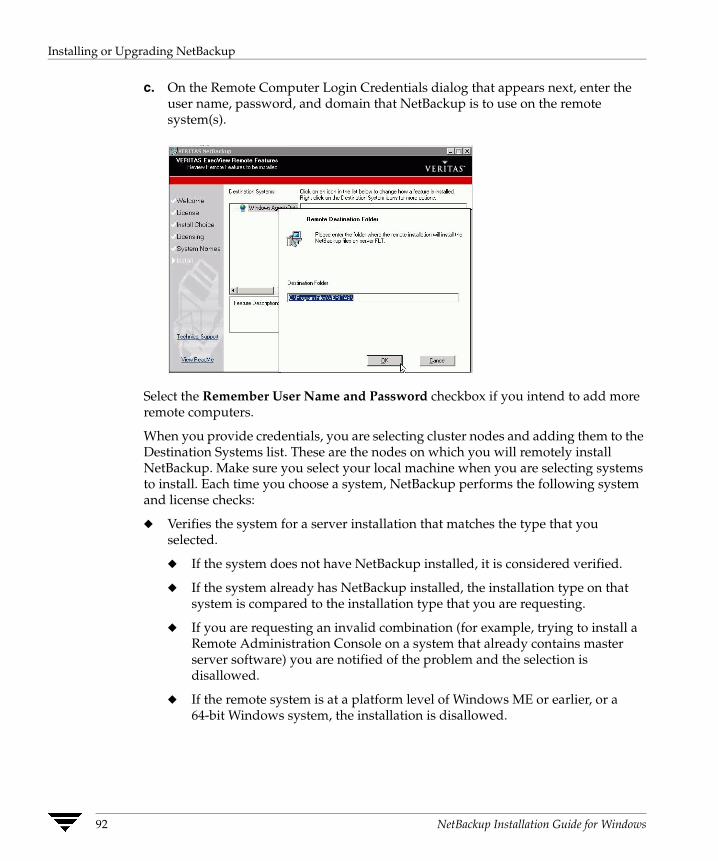
Installing or Upgrading NetBackup
c. On the Remote Computer Login Credentials dialog that appears next, enter the user name, password, and domain that NetBackup is to use on the remote system(s).
Select the Remember User Name and Password checkbox if you intend to add more remote computers.
When you provide credentials, you are selecting cluster nodes and adding them to the Destination Systems list. These are the nodes on which you will remotely install NetBackup. Make sure you select your local machine when you are selecting systems to install. Each time you choose a system, NetBackup performs the following system and license checks:
◆ Verifies the system for a server installation that matches the type that you selected.
◆ If the system does not have NetBackup installed, it is considered verified.
◆ If the system already has NetBackup installed, the installation type on that system is compared to the installation type that you are requesting.
◆ If you are requesting an invalid combination (for example, trying to install a Remote Administration Console on a system that already contains master server software) you are notified of the problem and the selection is disallowed.
◆ If the remote system is at a platform level of Windows ME or earlier, or a 64-bit Windows system, the installation is disallowed.
92 NetBackup Installation Guide for Windows
Installing or Upgrading NetBackup
◆ Verifies that you have proper Administrator credentials on the remote system that you chose.
If you do not have Administrator credentials, the Enter Network Password screen appears and prompts you to enter the administrator’s user name and password.
Click OK, and continue selecting destination systems.
Note This process repeats for each node that you select. In addition, you can elect to remember the user name and password and only be prompted when the user name or password is not valid on a particular system.
Note the following regarding the push-install process in a clustered environment:
◆ There is no limit to the number of nodes on which you can install NetBackup. The only limit to the number of nodes in a cluster is set by the clustering service, not NetBackup.
◆ NetBackup add-on products cannot push their installs. These add-on products must be installed on each individual node in the cluster group. For instructions on how to install these products, refer to the NetBackup documentation that supports each product.
◆ Only the license key that was entered at the beginning of this procedure is pushed to the other nodes in this cluster. If the license key includes add-on products and the nodes you are pushing NetBackup to already have that add-on product installed, the key enables you to use these products.
15. Click Install. The installation process begins pushing the installation to all of the nodes you specified.
A summary screen appears that shows you the progress of the installation and each of the systems. You can right-click on a system listed in the screen to see a status of the installation. For example, it can show if an installation failed on a particular system. You would then be able to obtain more information about the failure by viewing the remote installation log. The remote installation log is named nbpinst.log and is located in the Windows temporary installation directory.
Note For MSCS clusters: Under normal circumstances, cluster configuration is one of the final steps in installing NetBackup in a cluster. If this step is not done or does not complete successfully, you can use the bpclusterutil command from the active node to perform this step. See the NetBackup High Availability System Administrator’s Guide for information on running bpclusterutil.
16. On the System Validation Complete screen, you have the following options:
◆ To enter additional license keys, click Add Keys.
Chapter 2, Installation and Initial Configuration 93

Installing or Upgrading NetBackup
◆ To finish the installation but wait to configure NetBackup at another time, remove the check next to Launch NetBackup Administration Console now.
◆ Click Finish to if you are done with the installation.
Note You may need to reboot each of the cluster nodes after the installation is complete.
17. For new installations:
If you want to install NetBackup Access Control after completing a new installation of NetBackup, refer to “Installing Access Control in New Installations” on page 103 and perform that procedure at this time.
18. For upgrades:
NetBackup will not work until you have updated the device and volume 5.x databases to EMM.
See “Populating the NetBackup EMM Database” on page 96 for this procedure.
19. After the push-install completes:
◆ For MSCS clusters: The NetBackup resources that you took offline in the beginning of this procedure come back online automatically.
◆ For VCS clusters: Unfreeze the active node.
94 NetBackup Installation Guide for Windows

Installing or Upgrading NetBackup
▼ To verify a successful cluster installation or upgrade using the Cluster Administrator console
1. During a cluster installation, you can open the Cluster Administrator console to see your current structure.
2. For example, suppose that a new cluster group named NetBackup Server Group was created during the installation. In the following example, Disk Y is in the left pane and no other NetBackup Server Group exists.
j
3. After you have completed the installation and configuration process, the Cluster Administrator’s interface updates with the new cluster group in the left pane.
Chapter 2, Installation and Initial Configuration 95

Installing or Upgrading NetBackup
Populating the NetBackup EMM DatabaseYour upgrade of NetBackup is not complete until you have successfully populated the EMM database.
Note Use nbpushdata to upgrade an existing supported NetBackup 5.0MP4 (or later) or 5.1 environment that contains a single Global Device Database host. It is not a tool for merging multiple NetBackup environments.
The nbpushdata command enables NetBackup to get copies of the existing database files (a subset of the NetBackup catalogs) from each host and places this data in the EMM database.
Starting with NetBackup 6.0, the terms “Global Device Database Host” and “Volume Database Host” are obsolete. The EMM server takes over the function of the Global Device Database Host and the EMM database takes over the function of the Volume Database Host.
Caution It is imperative that you follow the prescribed sequence when running the nbpushdata command in your NetBackup environment.
Run the nbpushdata command on the following servers in the following order:
1. 5.0MP4 (or later) or 5.1 Global Device Database Host
2. Master servers
3. Volume Database Hosts
4. Any remaining media servers that have been upgraded to NetBackup 6.0
The Global Device Database Host, master server(s), and the Volume Database Host must be upgraded to NetBackup 6.0 and have nbpushdata run on them before the NetBackup environment is functional.
Media servers are not required to be upgraded at the same time as the other servers. They can be upgraded at a later time.
96 NetBackup Installation Guide for Windows
Installing or Upgrading NetBackup
Caution NetBackup processes must be running on the master server and its associated media servers before you upgrade and run the nbpushdata -add command. This is true no matter where you are running the command.
The EMM database creation process establishes that it can communicate with any additional servers in your configuration, and it does not include servers in the database if it cannot establish a connection and determine that NetBackup processes are running on the server.
However, you must ensure that no NetBackup policies are active, no jobs are running, and that media servers do attempt to connect to the master server until after all upgrades are complete and nbpushdata has been run on all servers. You can use the NetBackup Administration Console to deactivate all policies and all media servers. Command-line equivalents are also available.
▼ To populate the EMM database on upgraded servers
Caution Do not perform this procedure if you have not already upgraded the master servers in your NetBackup 6.0 environment.
1. Deactivate all Policies.
For NetBackup Administration Console users
a. Open the NetBackup Administration Console on the master server
b. Select Polices from the tree on the left.
c. Select all of the policies that appear in the right pane.
d. Right-click the polices and select Deactivate.
For command-line users:
e. Enter the following command:
install_path\NetBackup\bin\admincmd\bpplinfo policy_name -modify -inactive
2. Deactivate all media servers.
For NetBackup Administration Console users
a. Open the NetBackup Administration Console on the master server
b. Select Media and Device Management > Devices > Hosts from the tree on the left.
Chapter 2, Installation and Initial Configuration 97

Installing or Upgrading NetBackup
c. Select all of the media servers that appear in the right pane.
d. Right-click the media servers and select Deactivate.
For command-line users:
e. Enter the following command:
install_path\Volmgr\bin\vmoprcmd -deactivate_host -h device_host
3. Populate the database with information from the server that was designated as the Global Device Database Host. This server may be a master or media server, depending on how you have configured your environment.
In a non-clustered environment, perform the following steps:
a. If this is a master server, start the NetBackup bprd daemon:
install_path\netbackup\bin\bprd
b. Run the nbpushdata command:
install_path\netbackup\bin\nbpushdata -add
c. Stop the NetBackup and Media Manager daemons:
install_path\netbackup\bin\bpdown
d. Start the NetBackup and Media Manager daemons.
install_path\netbackup\bin\bpup
In a clustered environment, perform the following on the active node:
a. Run the nbpushdata command.
install_path\netbackup\bin\nbpushdata -add
b. Bring the NetBackup group offline and online.
Refer to the NetBackup High Availability System Administrator’s Guide for instructions on how to bring your cluster offline and then online again after running the nbpushdata command.
4. Populate the EMM database with information from each of the remaining master server(s) in your NetBackup environment.
In a non-clustered environment, perform the following steps:
a. Start the NetBackup bprd daemon.
install_path\netbackup\bin\bprd
98 NetBackup Installation Guide for Windows

Installing or Upgrading NetBackup
b. Run the nbpushdata command.
install_path\netbackup\bin\nbpushdata -add
c. Stop the NetBackup and Media Manager daemons.
install_path\netbackup\bin\bpdown
d. Start the NetBackup and Media Manager daemons.
install_path\netbackup\bin\bpup
In a clustered environment, perform the following on the active node:
a. Run the nbpushdata command.
install_path\netbackup\bin\nbpushdata -add
b. Bring the NetBackup group offline and online.
Refer to the NetBackup High Availability System Administrator’s Guide for instructions on how to bring your cluster offline and then online again after running the nbpushdata command.
5. Populate the EMM database with information from the Volume Database Host(s). (This step is only necessary if you have a Volume Database Host on a media server.)
In a non-clustered environment, perform the following:
a. Run the nbpushdata command.
install_path\netbackup\bin\nbpushdata -add
b. Stop the NetBackup and Media Manager daemons.
install_path\netbackup\bin\bpdown
c. Start the NetBackup and Media Manager daemons.
install_path\netbackup\bin\bpup
In a clustered environment, perform the following on the active node:
a. Run the nbpushdata command.
install_path\netbackup\bin\nbpushdata -add
b. Bring the NetBackup group offline and online.
Refer to the NetBackup High Availability System Administrator’s Guide for instructions on how to bring your cluster offline and then online again after running the nbpushdata command.
Chapter 2, Installation and Initial Configuration 99
Installing or Upgrading NetBackup
6. Populate the EMM database with information from each of the media server(s) in your NetBackup environment that you chose to upgrade to NetBackup 6.0.
In a non-clustered environment, perform the following steps:
a. Run the nbpushdata command on the upgraded media server.
install_path\netbackup\bin\nbpushdata -add
b. Stop the NetBackup and Media Manager daemons.
install_path\netbackup\bin\bpdown
c. Start the NetBackup and Media Manager daemons.
install_path\netbackup\bin\bpup
In a clustered environment, perform the following on the active node:
a. Run the nbpushdata command.
install_path\netbackup\bin\nbpushdata -add
b. Bring the NetBackup group offline and online.
Refer to the NetBackup High Availability System Administrator’s Guide for instructions on how to bring your cluster offline and then online again after running the nbpushdata command.
▼ To configure 5.x media servers for compatibility with 6.0 environments
NetBackup 6.0 provides backlevel support for media servers running NetBackup 5.0MP4 (or later) or 5.1. This enables you to upgrade some or all of your media servers to NetBackup 6.0 at a later time. However, you must modify the configuration slightly so version 5.x media servers work in the NetBackup 6.0 environment.
1. Run the nbpushdata -modify_5x_hosts command on the NetBackup 6.0 master servers that administer the media servers that you want to remain at version 5.x.
Note The command option is literally modify_5x_hosts, and uses the character x rather than a version number. Do not type either modify_50_hosts or modify_51_hosts.
install_path\netbackup\bin\nbpushdata -modify_5x_hosts
2. Repeat step 1 on any additional master servers that administer media server(s) you are not upgrading to version 6.0. You only need to run this command once on each applicable master server.
100 NetBackup Installation Guide for Windows
Installing or Upgrading NetBackup
Installing NetBackup Server Software SilentlyPerforming a silent installation avoids the need for interactive input in the same manner as performing a remote installation. Silent installations of NetBackup are not supported if you want to run the NetBackup services as a user rather than the local system. If you want to install NetBackup under these circumstances, you must use setup.
▼ To install NetBackup server software silently
1. Log on as Administrator to the system from which you are installing NetBackup.
2. Insert the NetBackup installation CD in the drive.
3. Open Windows Explorer and copy the contents of the X86 or IA64 directory (depending on the type of systems you are installing) on the CD to a temporary directory on your hard drive.
Note The files contained on the NetBackup installation CD are read-only. Change the permissions for these files on the hard drive to allow the update.
4. In that temporary directory, modify the appropriate script:
◆ To install a master server, edit: silentmaster.cmd
◆ To install a media server, edit: silentmedia.cmd
◆ To install a NetBackup Remote Administration Console, edit silentadmin.cmd
The contents of these files contain well documented fields that will help you understand how to configure a silent installation. From the file you can do the following:
◆ If only one server is to access the machine, remove the following line from the script:
SET ADDITIONALSERVERS=media1,media2,media3
◆ You can also use these scripts to prevent reboots from occurring during an installation. You can elect to modify the script in any combination of these options to accomplish your needs.
The following options are available:
◆ SET STOP_NBU_PROCESSES=0
This option terminates any processes that are using the NetBackup executables and DLLs.
Chapter 2, Installation and Initial Configuration 101

Installing or Upgrading NetBackup
Caution For Oracle users: If you use the Terminate NetBackup processes option, you must take down your database before you continue with this procedure.
◆ SET STOP_WINDOWS_PROCESSES=0
This option looks for processes using Microsoft run-time DLLs and terminates them. If you are upgrading from NetBackup 5.x to NetBackup 6.0, you do not need to execute this option because the Microsoft run-time DLL is already at the correct level.
Caution Using this option may cause instability with other Windows applications, particularly those applications that use Microsoft run-time DLLs.
◆ SET ABORT_REBOOT_INSTALL=0
This option detects if a reboot is absolutely necessary. If a reboot is required, this option cancels the installation and rolls back to the beginning of the installation process.
For detailed installation information or to verify the progress of an installation, you can view the log file (called Install.log) in the Windows temporary installation directory:
C:\Documents and Settings\administrator_userid\Local Settings\Temp
If the log file is not in this directory, you can locate it by entering the following command at the command prompt:
> echo %TEMP%
5. Save and run the script.
To determine if the installation was successful or to verify the progress of an installation, you can view the NetBackup Install.log file in the Windows temporary installation directory: C:\Documents and Settings\userid\Local Settings\Temp
102 NetBackup Installation Guide for Windows

Installing or Upgrading NetBackup
Note By default, a silent installation does not reboot the system.
VERITAS recommends that when you upgrade or patch a client or server, you ensure that no backup processes are currently running. In rare cases, however, a reboot may be required. To determine if a reboot is necessary after you have run the script, open the NetBackup install.log file in the Windows temporary directory and search for the string in use. If files are listed as in use, a reboot is required.
To force a reboot when required during a silent installation, modify the silent installation command script (silent*.cmd) and remove the following option:
REBOOT="ReallySuppress"
Caution: Removing this option causes a reboot of the server to which you are installing. The reboot happens with no warning to a user on the system.
Installing Access Control in New InstallationsTo use the access control feature, you must also install the VERITAS Security Services (VxSS) component on the NetBackup system. For new installations, you install access control after you have successfully installed NetBackup.
▼ To install access control in new installations
1. After you have installed NetBackup, you can install the VxSS components on your system so that you are then able to use access control.
2. Install the PBX software if a version of it does not exit on your system already.
a. Mount the NetBackup CD that contains the PBX software.
b. Run the following command from the CD’s \bin directory:
installics
3. Install the VERITAS Security Services components on your system so that you are then able to use access control.
Chapter 2, Installation and Initial Configuration 103

Installing or Upgrading NetBackup
The VxSS components reside on a clearly marked ICS CD in your NetBackup package. The following table contains the minimum installation requirements as they apply to each NetBackup system.
Note If you want to perform a cross-platform authentication with Windows platforms, you must install an authentication broker on a Windows system. For instructions on how to install an authentication broker, refer to the VERITAS Security Services Administrator’s Guide.
4. After you have finished installing NetBackup and the VxSS components, you can configure the access control features. For detailed information on how to configure Access Control, refer to the NetBackup System Administrator’s Guide, Volume II.
Upgrading NetBackup with Access ControlTo use the access control feature, you must install the VERITAS Security Services (VxSS) component on the NetBackup system. For upgrades, you install access control before you have install NetBackup.
NetBackup System Required VERITAS Security Services (VxSS) Components
NetBackup master server Authentication client and server components
Authorization client and server components
NetBackup Media server Authentication client components
Authorization client components
NetBackup Client Authentication client components
NetBackup Remote Administration Console
Authentication client components
Authorization client components
104 NetBackup Installation Guide for Windows

Installing or Upgrading NetBackup
▼ To install access control during an upgrade to NetBackup 6.0
1. Shut down all NetBackup services.
2. Install the PBX software if a version of it does not exit on your system already.
a. Mount the NetBackup CD that contains the PBX software.
b. Run the following command from the CD’s \bin directory:
installics
3. Install the VERITAS Security Services components on your system so that you are then able to use access control.
The VxSS components reside on a clearly marked ICS CD in your NetBackup Software package. The following table contains the minimum installation requirements as they apply to each NetBackup system where you have successfully installed NetBackup.
Note If you want to perform a cross-platform authentication between Windows and UNIX platforms, you must install an authentication broker on a Windows system. For instructions on how to install an authentication broker, refer to the VERITAS Security Services Administrator’s Guide.
4. Continue your upgrade by returning to the NetBackup installation procedure.
NetBackup System Required VERITAS Security Services (VxSS) Components
NetBackup master server Authentication client and server components
Authorization client and server components
NetBackup Media server Authentication client components
Authorization client components
NetBackup Client Authentication client components
NetBackup Remote Administration Console
Authentication client components
Authorization client components
Chapter 2, Installation and Initial Configuration 105

Installing or Upgrading NetBackup
106 NetBackup Installation Guide for Windows
Installing Alternative Administration Interfaces
3 This chapter provides instructions on installing a NetBackup administrative interface on a computer other than the master server. Installing an alternative administrative interface is necessary if your NetBackup server has no graphics display capabilities, and it can be desirable for various other configurations, such as mixed Windows and UNIX environments.NetBackup Remote Administration Console for WindowsYou can skip this section if you do not want to administer a NetBackup server remotely from a Windows NetBackup client.
The NetBackup Remote Administration Console is an interface-only version of NetBackup for Windows that can be used to remotely administer one or more UNIX or Windows NetBackup servers. It lets you perform all of the standard NetBackup Administrative Console tasks on a remote server: creating backup policies, managing volumes, viewing job status, monitoring tape drives, and so on. Because it is only an interface, it does not perform backups or any other functions of a NetBackup server.
Note The NetBackup Remote Administration Console is supported on Windows 2000, Windows XP, and Windows 2003 server. For detailed information about the supported platforms for this NetBackup release, refer to the Supported Platforms and Peripherals chapter in the NetBackup Release Notes.
Although the NetBackup Remote Administration Console host is not a master or media server, the host name must be added to the server list on the NetBackup master server in the same way that other NetBackup servers are added to the server list. The NetBackup Remote Administration Console host requires access to the master server just as a NetBackup server does.
The NetBackup manuals and online help do not, in most cases, specifically refer to the NetBackup Remote Administration Console because, for all practical purposes, using the NetBackup Server for Windows interfaces on the NetBackup Remote Administration Console is identical to using them locally on the server that is being administered. The server shown in the NetBackup Remote Administration Console is the name of the server that is being administered rather than a local host name.
107

▼ To install the NetBackup Remote Administration Console for Windows
1. On the computer on which you want to install the NetBackup Remote Administration Console, insert the CD that contains the NetBackup server software for Windows.
◆ On Windows systems with Autorun enabled, the installation browser starts automatically.
◆ On Windows systems that have Autorun disabled, navigate to the CD drive and run Launch.exe.
2. On the initial screen, click NetBackup Installation.
3. On the installation screen, click Install Server Software.
4. On the Welcome screen, click Next.
5. On the License Agreement screen, accept the terms of the license agreement and click Next.
6. On the Installation Type screen, select Install to this computer only and Typical.
Click Next.
7. On the NetBackup License Key and Server Type screen, select NetBackup Remote Administration Console. You do not need a license key to install the Remote Administration Console.
8. On the NetBackup System Names screen, provide the name of the master server you want to administer and any other servers that you may want to administer (such as media servers).
Note The name of the NetBackup Remote Administration Console host should be in the first entry field. In the Master Server field, enter the name of the remote NetBackup you want to administer.
9. On the Ready to Install the Program Screen, click Install.
10. After the installation completes, you can either add license keys (click Add Keys) or click Finish.
If you left the box checked next to Launch NetBackup Administration Console now, the Remote Administration Console appears. If you removed the check, start the console by choosing Start > Programs > VERITAS NetBackup > NetBackup Administration Console.
108 NetBackup Installation Guide for Windows
▼ To add the NetBackup Remote Administration Console host to the server list of the remote server
Note The NetBackup Remote Administration Console host only needs to be added on the master server. After you add the NetBackup Remote Administration Console host, the master server communicates the new host information to clients and media servers as necessary.
Note On a UNIX system, there are two procedures that you can use to add the host to the server list: you can use the NetBackup Administration Console for UNIX (if your system is Java-compatible) or you can edit the bp.conf file. Step 1 describes this process using the NetBackup Administration Console for UNIX and Step 2 describes how to edit the bp.conf file.
1. For adding NetBackup servers using the NetBackup Administration Console:
Use the NetBackup Administration Console for UNIX or Windows to add the NetBackup Remote Administration Console host to the server list.
a. In the left pane of the NetBackup Administration Console, select Host Properties > Master Servers. The master server appears in the main window.
b. Right-click the name of the master server in the right pane.
c. Select Properties. The Master Server Properties screen appears.
d. In the Master Server Properties window, select Servers.
e. In the Servers window, click Add.
f. Type the name of the host that is to run the NetBackup Remote Administration Console.
Click Add. The name of the host appears in the Additional Servers list.
Click Close and OK.
Note Ensure that the master server and any media servers you want to administer from the NetBackup Remote Administration Console host are listed in the Servers list of the NetBackup Remote Administration Console. If any NetBackup servers that you want to administer are not on the Servers list of the NetBackup Remote Administration Console, use steps 1a-1f to add them.
Chapter 3, Installing Alternative Administration Interfaces 109
2. For editing the bp.conf file only:
a. Log in to the UNIX master server as root.
b. Edit /usr/openv/netbackup/bp.conf.
At the end of the SERVER = lines, add the following line:
SERVER = Remote-Administration-Console-machine-name
The Remote-Administration-Console-machine-name is the name of the machine where the NetBackup Remote Administration Console resides.
NetBackup-Java Administration ConsoleThe NetBackup-Java Administration Console can be used to administer one or more UNIX or Windows NetBackup servers. It provides all of the standard NetBackup Server interfaces, and it can be used on a remote NetBackup server to create backup policies, manage volumes, view status, monitor tape drives, and so on.
On Java-capable hosts (servers and clients), the administration console is installed when you install NetBackup on the host. For remote administration of any NetBackup server, specify the server name in the Login dialog.
Java Windows Administration Console The Java Windows Administration Console lets you run the NetBackup-Java Administration Console for UNIX interfaces on supported Windows platforms. This interface provides the same capabilities as the NetBackup Administration Console for Windows or UNIX.
You can skip this section if you do not want to remotely administer UNIX NetBackup servers using the Java Windows Administration Console on a Windows platform.
Note You can install the Java Windows Administration Console from the NetBackup CD for Windows.
Note If you are using NetBackup Access Control, the VxSS At client component must be installed on the Windows host before installing the Java Windows Administration Console. This ensures that the Java Windows Administration Console uses the VxSS component correctly.
110 NetBackup Installation Guide for Windows
Requirements
For the computer on which you want to run the Java Windows Administration Console, VERITAS recommends 512 MB of physical memory.
▼ To install the NetBackup-Java Windows Display Console
1. On the system where you are performing the installation, insert the CD that contains NetBackup server software for Windows.
On Windows systems with Autorun enabled, the installation starts automatically. If Autorun is disabled, navigate to the CD directory and run Launch.exe.
2. On the initial screen, select NetBackup Installation.
3. On the installation screen, select Install Java Windows Administration Console.
4. On the Welcome screen, click Next.
5. On the License Agreement screen, accept the agreement and click Next.
6. On the NetBackup Installation Type screen, select Install to this computer only and Typical.
7. On the Ready to Install the Program screen, click Install.
8. On the System Validation Complete screen, click Finish.
9. You can open the NetBackup-Java Windows Display Console by choosing Start > Programs > VERITAS NetBackup > NetBackup Java version 6.0.
Installing or Removing Multiple Versions of the NetBackup-Java Administration Console on Windows
A NetBackup environment may contain servers of various NetBackup versions. There are a number of methods to administer servers in a mixed-version environment.
One method is to install a relevant version of the NetBackup-Java Administration Console on a Windows desktop, then use that installation to administer all servers of the same version.
Chapter 3, Installing Alternative Administration Interfaces 111

Installation Considerations
There are two things to keep in mind when installing multiple versions of the NetBackup-Java Administration Console in a mixed environment.
During installation:
◆ Provide a unique string for the host name when asked (pre-6.0 versions).
◆ Install each Java console version to a different folder.
▼ To install earlier versions of the NetBackup-Java Administration Console
1. The NetBackup-Java Administration Console for the Windows platform is not installed automatically.
Insert the NetBackup Windows installation CD containing the version of the NetBackup-Java Administration Console you want to install.
2. If you are installing NetBackup 5.0, select NetBackup Installation and click Install Java Administration Console.
If you are installing NetBackup 5.1, select NetBackup Installation and click Java Windows Display Console. Select whether you would like to install the 32-bit or 64-bit console.
3. If a different version of the Java console has already been installed, specify a different folder location. This prevents overwriting the earlier installation (for example, specify C:\Program Files\VERITAS\nbjava50).
4. The wizard asks you to enter the name of the host you want to manage. For ease of use, instead of entering a host name, enter a name that reflects the version of the console being installed (for example, 5.0GA).
After the installation, the host name you enter appears in the following locations:
◆ As the default host name in the login screen of the NetBackup-Java Administration Console dialog.
The descriptive host name displays here only the first time the console is opened. After you change the name to an actual host name in the login dialog, log in to the console, and then exit the console normally, that actual host name becomes the default and appears the next time the console is started.
◆ On the VERITAS NetBackup menu (Start > Programs > VERITAS NetBackup > NetBackup-Java on host_name).
◆ As a desktop shortcut icon.
112 NetBackup Installation Guide for Windows

Notes
◆ Before installing mixed versions of the NetBackup Administration Console, consider that only the most recently installed version can be patched.
◆ Only the most recently installed version can be removed using the standard Windows Add/Remove Programs utility. See the following section for information on uninstalling versions installed prior to the most recently installed version.)
◆ The NetBackup-Java Capabilities Authorization configuration file, auth.conf, must always be located in install_path\java (for example, in C:\Program Files\Veritas\java). The file must exist there regardless of how many versions of the console are installed or in which directories they are installed.
The file is only relevant for administering NetBackup on this Windows host, and there are defaults if the file is not present. The defaults are discussed in the NetBackup System Administrator’s Guide, Volume I in the section on authorizing NetBackup-Java users.
▼ To uninstall earlier versions of the NetBackup-Java Administration Console
1. Remove the folder where the NetBackup-Java Administration Console was installed.
2. Remove the appropriate menu item from the Start > Programs > VERITAS NetBackup menu.
3. Remove any relevant desktop shortcuts.
Administering Backlevel NetBackup ServersThere are five general methods to accomplish backlevel administration tasks in NetBackup 6.0. The methods are listed below, though the ordering does not imply any preference.
Earlier Versions of the NetBackup-Java Administration Console on Supported UNIX Platforms
Use the earlier versions of the NetBackup-Java Administration Console installed on the supported UNIX GUI platforms. The earlier versions available in a release are all of those supported in a mixed version environment with the current release, (all those back to and including the last major release version). In the 6.0 release, the 5.0MP4 (or later) and 5.1 versions of the console are available.
Chapter 3, Installing Alternative Administration Interfaces 113

Earlier Versions of the NetBackup-Java Administration Console on Windows Platforms
Use the earlier versions of the NetBackup-Java Administration Console installed on the supported Windows platforms.
Remote Display-back from UNIX Servers
Use the UNIX remote display-back capabilities for UNIX servers that can run NetBackup-Java, possibly in conjunction with tools such as Exceed or VNC.
Remote Display-back from Windows Servers
Use the NetBackup Administration Console for Windows with the remote display-back capabilities on Windows NetBackup servers with tools like Windows Terminal Services or Remote Desktop.
At the Console of the Backlevel Server
Use the relevant NetBackup-Java Administration Console from the backlevel server’s console.
114 NetBackup Installation Guide for Windows
Uninstalling and Reinstalling NetBackup
4 This chapter provides instructions for uninstalling and reinstalling NetBackup software.Uninstalling NetBackup Server Software
Caution The uninstall process deletes the VERITAS/NetBackup directory from the server. In a typical installation, NetBackup add-ons products and catalogs are installed and contained under this same directory and would also be deleted. If you intend to reinstall NetBackup, save the configuration, catalog, and log file information before proceeding. (See “To uninstall NetBackup server software and save catalog data” on page 115.)
▼ To uninstall NetBackup server software
1. Select Start > Settings >Control Panel. The Control Panel appears.
2. From the Control Panel window, double click the Add/Remove Programs icon. The Add/Remove Programs window appears.
3. Select VERITAS NetBackup from the Currently Installed Programs list.
4. Click Remove.
▼ To uninstall NetBackup server software and save catalog data
Note By default, clicking Remove on the Currently Installed Programs list removes all NetBackup configuration and catalog information. The following procedure explains the necessary steps to retain this information for future reinstalls.
1. Select Start > Settings >Control Panel.
2. From the Control Panel window, double click Add/Remove Programs.
115

Uninstalling NetBackup Server Software
3. Select VERITAS NetBackup from the Currently Installed Programs list.
4. Click Change. This action enables you to modify, repair, or remove NetBackup.
5. Select Remove on the Program Maintenance Dialog.
6. Clear the Remove all NetBackup Configuration, Catalog, and Log files check box to disable this function. (This check box contains a check mark by default.)
7. Click Remove.
8. If NetBackup Access Control is enabled, NetBackup creates several new files on clients and servers.
These files can be divided into two separate categories: individual user files, and NetBackup application temporary files. NetBackup application temporary files were removed with NetBackup in a previous step. Users’ cache files exist in their home directories, for example: <user_id>\Local Settings\Applications Data\VERITAS\NetBackup.
Note Files are generated in the \NetBackup directory by the single sign-on operation of the NetBackup Administration Console on the host where the console is run. The NetBackup Administration Console cleans these files when an exit function is performed. (It is common to have no temporary files in this directory.) If a system crash were to occur, these files may be left behind. With the console shutdown, you can delete these files safely with no data loss.
NetBackup also creates cached certificates for client and server NetBackup applications. These files reside in the \NetBackup directory. These files typically have a name that is consistent with a DNS entry for a network interface that is readable by a human, for example, machine.company.com.
Example directory entries are as follows:
user_id\Local Settings\Applications Data\VERITAS\NetBackup\machine.company.comuser_id\Local Settings\Applications Data\VERITAS\NetBackup\dhcp
These files are created with the command bpnbat -LoginMachine. If considering a reinstallation of NetBackup at a later date on the machine in question, preserve the certificates in the \NetBackup directory or be prepared to provide the machine identity password as originally set on the Root+AB broker. As an alternative, you may reset the password on the Root+AB broker at reinstall time. For more information on Root+AB brokers see the VERITAS Security Subsystem Administrators Guide.
116 NetBackup Installation Guide for Windows

Uninstalling NetBackup from a Clustered Environment
Note For more information on NetBackup access control, see the NetBackup System Administrator’s Guide, Volume II. For information on the VERITAS Security Services, including how to properly uninstall it, see the VERITAS Security Services Administrator’s Guide.
Uninstalling NetBackup from a Clustered Environment
▼ To uninstall NetBackup from a clustered environment
1. Follow the instructions in your cluster documentation for removing a group.
2. Uninstall NetBackup from each node on which it was installed in the cluster, as described in “To uninstall NetBackup server software” on page 115. There is no shortcut for uninstalling NetBackup from multiple nodes at the same time.
Notes on Reinstalling NetBackup Server Software You reinstall NetBackup with the same procedure you would use to complete a new installation.
Caution You must reinstall NetBackup to the exact location as the previous installation. Using the same location ensures that your saved configuration, catalog, and log files will function properly with the new product.
For procedures to install NetBackup servers, refer to “Installation and Initial Configuration” on page 13.
For procedures to install NetBackup clients, refer to “Installing NetBackup Client Software” on page 119.
You can re-install the software locally or from a remote computer.
▼ To locate the NetBackup Installation log file if it is not in the default location
a. Select Start > Programs > Accessories > Command Prompt.
b. Enter echo %TEMP% and press Enter. Windows returns the location of your TEMP directory.
Chapter 4, Uninstalling and Reinstalling NetBackup 117

Notes on Reinstalling NetBackup Server Software
118 NetBackup Installation Guide for Windows
Installing NetBackup Client Software
5 This chapter discusses how to install NetBackup client software for the following NetBackup clients:◆ Microsoft Windows clients
◆ UNIX clients (including MacOS X 10.3.x)
For the NetBackup’s Novell NetWare Client: See the NetBackup Novell NetWare Client System Administrator’s Guide for formation on how to install, configure, and use NetBackup’s Novell NetWare Client to back up and restore data that resides on a NetWare file server.
Note For clustered environments: During the installation, enter the virtual name for the NetBackup server and not the actual local host name.
You can push client software only from the active node.
Note For Macintosh OS X 10.3.x clients: Macintosh clients are considered UNIX-based clients. The instructions for installation are provided in “Installing NetBackup Clients on UNIX Systems” on page 128.
Installing NetBackup on Microsoft Windows ClientsBy definition, your NetBackup server is also a NetBackup client. When you installed the NetBackup server software, you installed both the NetBackup server and NetBackup client software on the server.
Windows Client Installation OverviewThe NetBackup client setup program for Microsoft Windows allows you to select appropriate setup and installation options from a series of wizard screens. Once the options have been selected, the NetBackup client setup program displays a window that enables you to verify your selections before continuing with the actual installation.
119

Installing NetBackup on Microsoft Windows Clients
While the installation is in progress, a dialog provides details of the installation and setup progress. When complete, a final window indicates the results of the installation.
Note You cannot install NetBackup client software on PCs that currently have NetBackup server software installed. In these cases, you must first uninstall the NetBackup server software, as described in “Uninstalling and Reinstalling NetBackup” on page 115.
VERITAS Volume Snapshot Provider on Windows
If you install the software on a Windows client, during the installation process you have the option of installing VERITAS Volume Snapshot Provider (VSP). VSP establishes a point-in-time view, or snapshot, of the data that is selected for backup on the volumes (that is, drives). NetBackup then backs up the selected files as they existed at the time of the snapshot, regardless of file system activity. VSP uses a file system cache to store changes that occur during the backup. Each volume for which a snapshot is created will have a corresponding VSP cache file.
For information on the VSP parameters, please refer to the NetBackup Backup, Archive, and Restore Getting Started Guide. In addition, refer to the NetBackup System Administrator’s Guide, Volume 1.
User-Directed Operations for Windows Systems
By default on Windows 2000, Windows XP, or Windows 2003 Server systems, the Program Files folder is not writable by users other than the administrator.
By default NetBackup writes log files and progress files to the folder Program Files\VERITAS\NetBackup\Logs. Users without write permission to the Logs folder receive an error message when they attempt a backup or restore and the operation is aborted.
If users other than the administrator use the Backup, Archive, and Restore interface to perform backups and restores, make sure they have write permission to the Logs directory.
Local and Remote Installations for Windows Systems
The NetBackup client setup program can be used in either of the following ways:
◆ Local installations: The setup program installs the client software only on the machine where you start the installation.
120 NetBackup Installation Guide for Windows

Installing NetBackup on Microsoft Windows Clients
◆ Remote installations: The setup program scans the network for available clients on which you can install the client software. The source machine (in cluster environments, primary node) must have Windows 2000, Windows XP, or Windows 2003 server installed. In addition, a remote installation requires system administrator privileges and is only available for Windows 2000, 32-bit Windows XP, and 32-bit Windows 2003 machines.
Note You cannot remotely install from UNIX systems to Windows 2000, Windows XP, or Windows 2003 machines.
Local and remote installations can be either new or upgrade installations, depending on whether there is any existing NetBackup client software installed on the client PCs.
Silent Installations for Windows Systems
A silent installation is one in which the installation process does not require interactive input. It does, however, require that the silentclient.cmd file be edited before executing the file.
New and Upgrade Installations for Windows Clients
The NetBackup client setup program recognizes two types of installations:
◆ New installations: The setup program does not detect an existing version of NetBackup client software.
◆ Upgrade installations: Using Windows registry information, the setup program detects an existing version of NetBackup client software.
New Installations
NetBackup setup enables you to specify one set of configuration options to be used for all new installations. These options include the following:
◆ For typical and custom installations, specifying master and media server names
◆ For custom installations only, you have the following options:
◆ Specifying an installation directory (local install only)
◆ Entering bpcd and bprd port numbers
◆ Starting the NetBackup Client Service automatically or manually
◆ Starting the NetBackup Client Service on the client after installation is complete
◆ Starting the NetBackup Client Job Tracker automatically
◆ Installing VSP
Chapter 5, Installing NetBackup Client Software 121
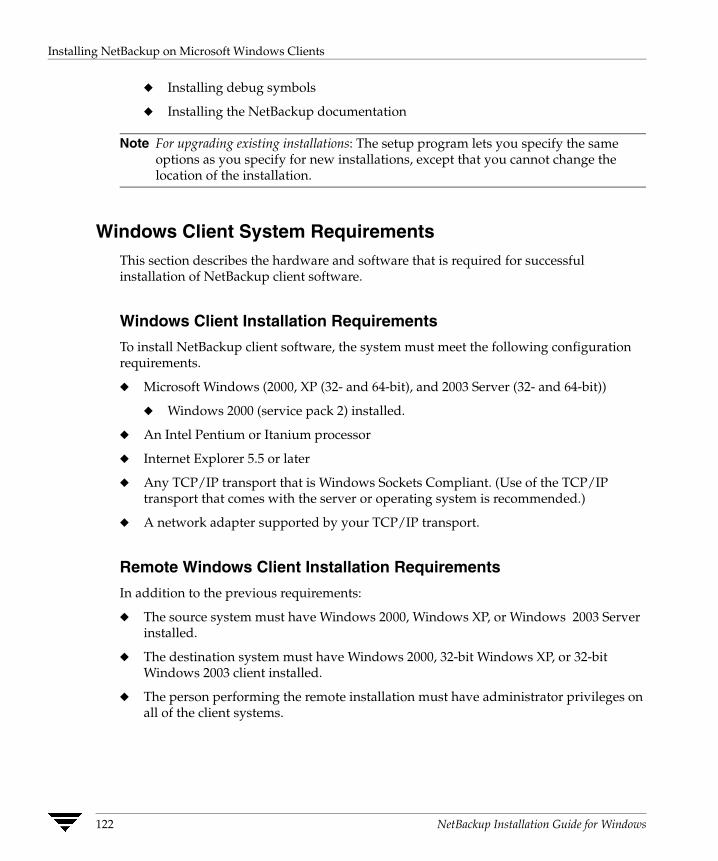
Installing NetBackup on Microsoft Windows Clients
◆ Installing debug symbols
◆ Installing the NetBackup documentation
Note For upgrading existing installations: The setup program lets you specify the same options as you specify for new installations, except that you cannot change the location of the installation.
Windows Client System RequirementsThis section describes the hardware and software that is required for successful installation of NetBackup client software.
Windows Client Installation Requirements
To install NetBackup client software, the system must meet the following configuration requirements.
◆ Microsoft Windows (2000, XP (32- and 64-bit), and 2003 Server (32- and 64-bit))
◆ Windows 2000 (service pack 2) installed.
◆ An Intel Pentium or Itanium processor
◆ Internet Explorer 5.5 or later
◆ Any TCP/IP transport that is Windows Sockets Compliant. (Use of the TCP/IP transport that comes with the server or operating system is recommended.)
◆ A network adapter supported by your TCP/IP transport.
Remote Windows Client Installation Requirements
In addition to the previous requirements:
◆ The source system must have Windows 2000, Windows XP, or Windows 2003 Server installed.
◆ The destination system must have Windows 2000, 32-bit Windows XP, or 32-bit Windows 2003 client installed.
◆ The person performing the remote installation must have administrator privileges on all of the client systems.
122 NetBackup Installation Guide for Windows

Installing NetBackup on Microsoft Windows Clients
NetBackup Server Requirements
The version of the NetBackup server software must be the same or newer than the version you install on the client.
Windows Client Local Installation InstructionsFollow these instructions to install the NetBackup client software on your Windows system. You can stop the installation process at any time by clicking Cancel or clicking Back to return to the previous window.
▼ To install NetBackup client software on Windows systems
1. Log in as Administrator on the Windows server.
2. Insert the NetBackup installation CD in the drive. On systems with Autorun enabled, the installation starts automatically. If Autorun is not enabled, navigate to the CD drive and double-click Launch.exe.
3. On the initial screen, select NetBackup Installation.
4. On the installation screen, select Install Client Software.
The Welcome screen appears. Click Next.
VERITAS
VERITAS
VERITAS
VERITAS
VERITAS
VERITAS
VERITAS VERITAS
Welcome
License Agreement
NetBackup Features Select Port Numbers
NetBackup Services
Enter System Names
Begin Installation > Monitor Progress
Finish Installation
Custom Installation
Typical Installation
VERITAS
Choose Installation Type
Chapter 5, Installing NetBackup Client Software 123

Installing NetBackup on Microsoft Windows Clients
5. On the License Agreement screen, accept the terms of the agreement.
6. On the Installation Type screen, do the following:
a. Select Install to this computer only.
b. Select either a typical or custom installation.
If you choose a typical installation, NetBackup uses the default port numbers and default service startup settings.
If you choose a custom installation, you can select your service startup settings, change port numbers, specify the installation location, and choose whether or not to install NetBackup documentation, debug symbols, and VSP.
Click Next.
7. On the NetBackup System Names screen, provide the name of the client and the master server, and any media servers with which this client should communicate. Provide the media servers in the Additional servers box.
8. On the Ready to Install screen, click Install.
NetBackup installs the client on the local machine.
9. On the System Validation Complete screen, click Finish.
Note You may need to reboot the system for the changes to take effect.
Windows Client Remote Installation Instructions
Note Review the installation “Windows Client System Requirements” on page 122 for remote installations before starting this procedure.
Follow these instructions to install the NetBackup client software on selected Windows 2000, 32-bit Windows XP, or 32-bit Windows 2003 Server clients on your network (one of these clients can be your local PC). You may stop the installation process at any time by clicking Cancel.
Notes on Windows Client Remote Installations
◆ During installation, the client name is written to the registry in lower case. If the policies on the NetBackup server do not specify the client names in lower case, backups will fail because the names do not match.
124 NetBackup Installation Guide for Windows
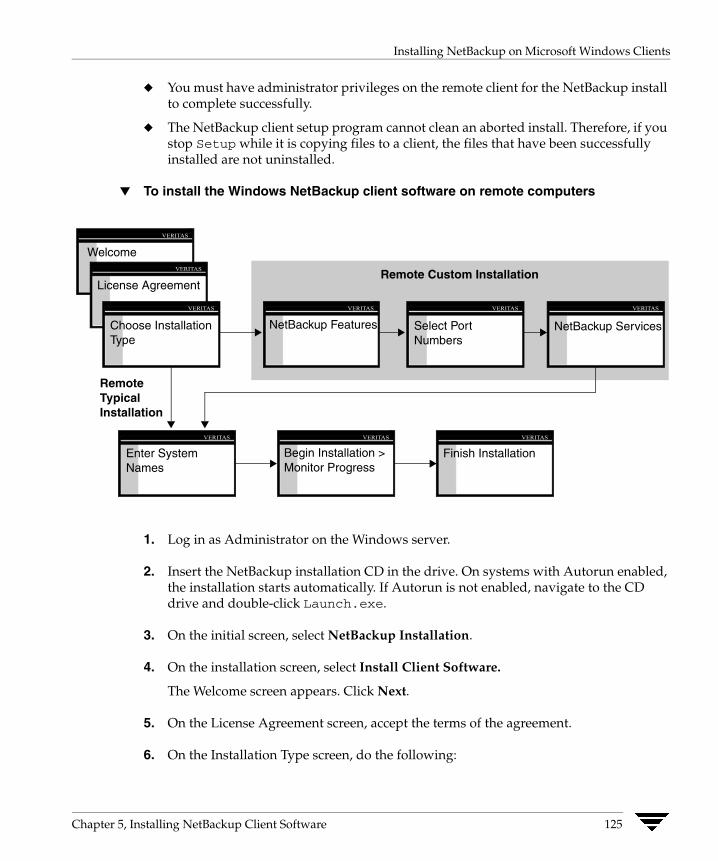
Installing NetBackup on Microsoft Windows Clients
◆ You must have administrator privileges on the remote client for the NetBackup install to complete successfully.
◆ The NetBackup client setup program cannot clean an aborted install. Therefore, if you stop Setup while it is copying files to a client, the files that have been successfully installed are not uninstalled.
▼ To install the Windows NetBackup client software on remote computers
1. Log in as Administrator on the Windows server.
2. Insert the NetBackup installation CD in the drive. On systems with Autorun enabled, the installation starts automatically. If Autorun is not enabled, navigate to the CD drive and double-click Launch.exe.
3. On the initial screen, select NetBackup Installation.
4. On the installation screen, select Install Client Software.
The Welcome screen appears. Click Next.
5. On the License Agreement screen, accept the terms of the agreement.
6. On the Installation Type screen, do the following:
VERITAS
VERITAS
VERITAS
VERITAS
VERITAS
VERITAS
VERITAS
Welcome
License Agreement
NetBackup Features NetBackup Services
Enter System Names
Begin Installation > Monitor Progress
Finish Installation
Remote Custom Installation
RemoteTypical Installation
VERITAS
Choose Installation Type
VERITAS
Select Port Numbers
Chapter 5, Installing NetBackup Client Software 125

Installing NetBackup on Microsoft Windows Clients
a. Select Select from available computers on the network.
Note The client is installed on the local machine unless you add it to the list of systems to which you are going to install.
b. Select either a typical or custom installation.
If you choose a typical installation, NetBackup uses the default port numbers and default service startup settings.
If you choose a custom installation, you can choose not to install debug symbols or VSP, and you can change the port numbers.
Click Next.
7. On the NetBackup System Names screen, provide the name of the client and the master server, and any media servers with which this client should communicate. Provide the media servers in the Additional servers box.
8. On the Ready to Install screen, click Install.
NetBackup installs the client on the specified machines.
Note Clicking the Cancel button anytime after you have clicked the Install button and started the remote install process will not cancel the installation on the remote system that is in progress at the time Cancel is clicked. The installation continues until it is finished. Any remote installations that remain are not performed, and any remote installs that were successful to that point will continue to be successful.
9. On the System Validation Complete screen, click Finish.
Note You may need to reboot your PC or the remote systems for the changes to take effect.
Silent Installation Instructions for Windows Clients
Note Silent installations of NetBackup clients are not supported if you want to run the NetBackup services as a user rather than as a local administrator. If you want to install NetBackup under this circumstance, use the procedures either in “To install NetBackup client software on Windows systems” on page 123 or “To install the Windows NetBackup client software on remote computers” on page 125.
126 NetBackup Installation Guide for Windows

Installing NetBackup on Microsoft Windows Clients
In a silent installation, the installation process does not require interactive input. It does, however, require that the silentclient.cmd file be edited before running the script.
Follow these instructions to perform a silent installation of the NetBackup client software on selected Windows clients on your network (one of these clients can be the system running the silentclient.cmd script).
▼ To perform a silent installation on Windows
1. Insert the NetBackup installation CD in the drive. On systems with AutoPlay enabled, the VERITAS NetBackup installation browser starts automatically.
Note Do not run instmsiw.exe on Windows 2000, Windows XP, or Windows 2003 Server systems.
2. Using Microsoft Windows Explorer, navigate to the CD drive.
3. Copy the contents of the PC_Clnt\ directory to a temp folder on your hard drive (for example, C:\temp).
4. The files contained on the CD are read-only. Change the permissions for these files on the hard drive to allow the update.
5. In the temporary directory, use a text editor to edit the silentclient.cmd file so the script installs the client software as you want installed.
Note Be sure to update the client, master server, and additional servers to the minimum required version level of NetBackup.
6. Run the silentclient.cmd script.
7. Check the NetBackup Install.log log file in the following directory to verify that the installation was successful:
C:\Documents and Settings\userid\Local Settings\temp
You can configure NetBackup clients by performing one of the following actions:
◆ To add servers or media servers, start the Backup, Archive, and Restore interface and from the File menu choose Specify NetBackup Machines.
◆ To display and change the client properties, start the Backup, Archive, and Restore interface and from the File menu, choose NetBackup Client Properties.
◆ To display and change the server properties, start the NetBackup Administration Console. Expand Host Properties and click on Clients. In the right pane, right-click on the client, and choose Properties.
Chapter 5, Installing NetBackup Client Software 127
Installing NetBackup Clients on UNIX Systems
All NetBackup servers that require access to your Windows client must be listed on the Servers tab in the resulting dialog.
For more information, refer to the NetBackup Backup, Archive, and Restore Getting Started Guide.
Uninstalling Windows Client Software
▼ To uninstall the NetBackup client software on Microsoft Windows clients
1. Open the Windows Control Panel (select Start, Settings, and then Control Panel).
2. Select Add/Remove Programs.
3. Select VERITAS NetBackup Client.
4. Click the Remove button.
Installing NetBackup Clients on UNIX Systems
Note Macintosh OS X10.3.x clients are UNIX-based clients. Follow the UNIX client installation procedures in this section.
You can install UNIX clients either locally at the client computer or remotely from your UNIX NetBackup server. To have the ability to include a client in a policy, the software for the client type must first be loaded on the UNIX server.
◆ For local installations: You must install the client software locally if remote installation is not possible. Remote installation is not possible if your NetBackup server is a Windows 2000 or Windows 2003 computer or if there is a firewall that prevents remote installation.
To install NetBackup locally on IBM zSeries Linux clients, you must transfer the contents of the NetBackup CD image to a location that is readable by the virtual Linux environment. This can be done by using FTP or NFS mounting commands.
◆ For remote installations: You can push the client software from your UNIX NetBackup server to your UNIX client computers. This is the preferred method of installing. To push a UNIX client, you must first load the software for that type of UNIX computer onto your UNIX server, and the UNIX client must be a true client and not a media or master server. For instructions on loading the software and the remote client installation, see “Adding a UNIX Client after Initial Server Installation” on page 134.
128 NetBackup Installation Guide for Windows

Installing NetBackup Clients on UNIX Systems
Clients such as the IBM zSeries Linux may not have a locally mounted CD device, making it impossible to perform a standard local install. To install NetBackup to clients with no local CD drive, you must push the NetBackup installation from a UNIX master or media server.
◆ For instructions on how to install NetBackup on a secure client, refer to “To install NetBackup software on secure (non-trusting) UNIX clients from a master server” on page 133.
◆ For instructions on how to install NetBackup on a trusting client, refer to “To install NetBackup software on trusting UNIX clients from a master server” on page 130.
To initiate a backup or a restore from a UNIX client, the following graphical interfaces are available:
◆ Clients that are compatible with NetBackup-Java may use the NetBackup-Java interface (jbpSA). Refer to the NetBackup Release Notes for a list of NetBackup-Java capable hosts.
◆ Clients that are not compatible with NetBackup-Java (Macintosh OS X 10.3.x, IBM zseries Linux, IRIX, and FreeBSD) may use the bp interface or they can login from any NetBackup 6.0 UNIX server’s NetBackup client console using the jbpSA command.
Installing UNIX Clients LocallyThe following procedure will install the NetBackup client software on a local machine.
▼ To install UNIX client software locally
Note The only way to install client software to a different location on the client is to create the directory where you want the software to reside and then create /usr/openv as a link to that directory before you install the software.
1. Insert the NetBackup client CD into the drive on the client computer and mount it.
2. Change your working directory to the CD directory if you have a CD or to the directory that contains the downloaded files:
cd /cd_mount_point
The cd_mount_point is the path to the directory where you can access the CD.
For Macintosh OS X 10.3.x systems only: You can access the CD from the following location:
cd /volumes/cd name
Chapter 5, Installing NetBackup Client Software 129

Installing NetBackup Clients on UNIX Systems
3. Enter the following command to execute the installation script:
./install
Note The binaries provided for the client operating system levels represent the operating system levels on which the binaries were compiled. Often the binaries function perfectly on later versions of the operating system. For example, Solaris 9 binaries also are used on the Solaris 10 level of the operating system. The installation script attempts to load the appropriate binaries for your system. If the script does not recognize the local operating system, it presents choices.
4. Follow the prompts to complete the installation.
5. After the installation is complete, unmount the client CD.
Installing UNIX Client Software RemotelyYou can push the client software from a UNIX master server to either a trusting client or a secure client.
A trusting UNIX client is one that has an entry for the server in its /.rhosts file. The /.rhosts entries enable software installation, but are not necessary for correct operation of NetBackup software.
Note For clustered environments: During the installation, enter the virtual name for the NetBackup server and not the actual local host name. In addition, you can only push client software from the active node.
▼ To install NetBackup software on trusting UNIX clients from a master server
Note The only way to install client software to a different location on the client is to create the directory where you want the software to reside and then create /usr/openv as a link to that directory before you install the software.
Note For Macintosh OS X 10.3.x users: By default, Macintosh OS X 10.3.x does not enable the remote shell daemon (rshd). You must enable this daemon to perform the following procedure successfully. You can enable rshd by executing the following command: /sbin/service shell start.
1. Start the NetBackup Administration Console.
On the Login dialog, provide the name of the NetBackup server that contains the policy configuration with the clients.
130 NetBackup Installation Guide for Windows
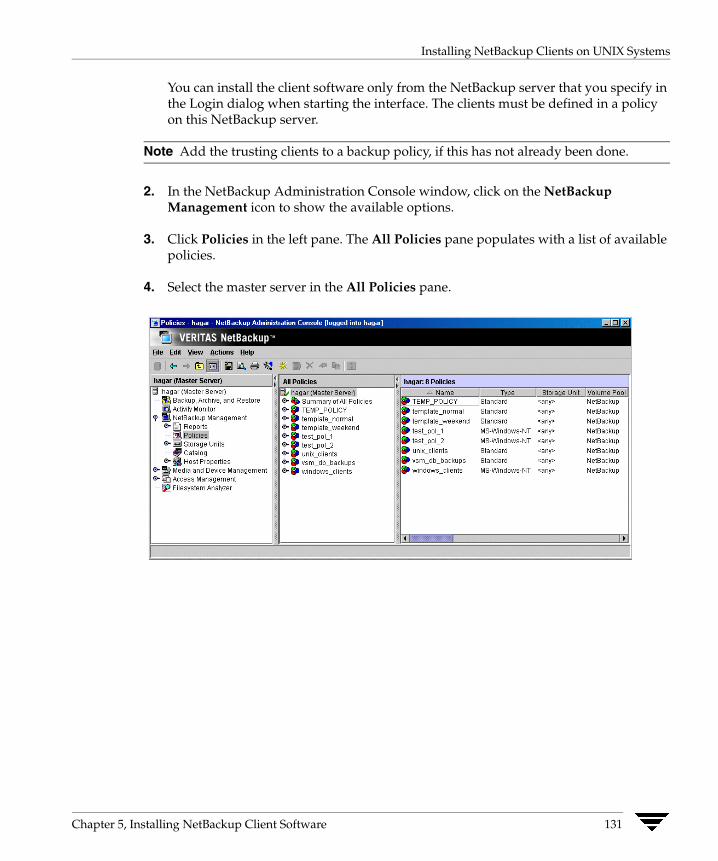
Installing NetBackup Clients on UNIX Systems
You can install the client software only from the NetBackup server that you specify in the Login dialog when starting the interface. The clients must be defined in a policy on this NetBackup server.
Note Add the trusting clients to a backup policy, if this has not already been done.
2. In the NetBackup Administration Console window, click on the NetBackup Management icon to show the available options.
3. Click Policies in the left pane. The All Policies pane populates with a list of available policies.
4. Select the master server in the All Policies pane.
Chapter 5, Installing NetBackup Client Software 131
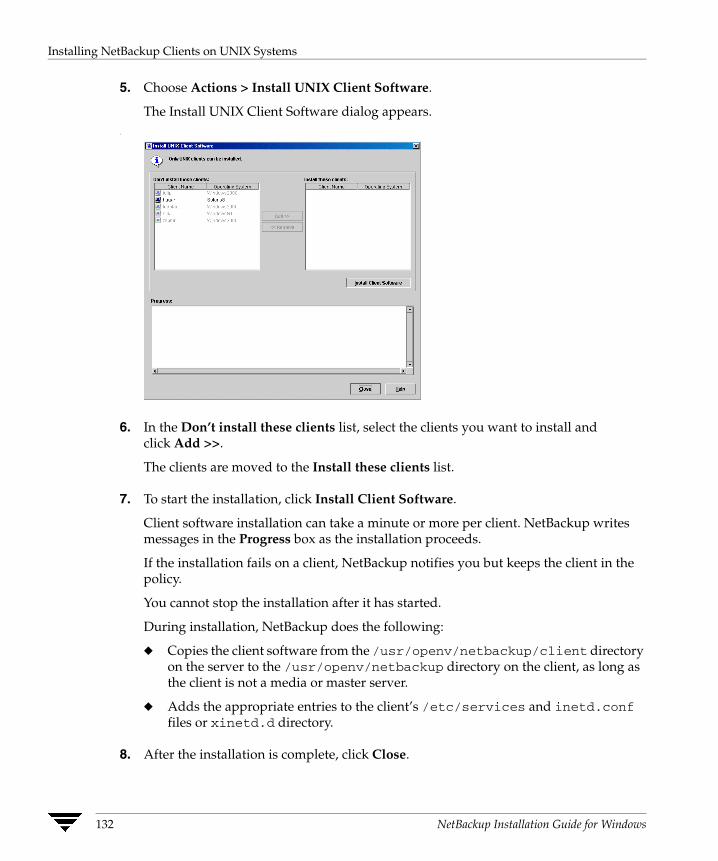
Installing NetBackup Clients on UNIX Systems
5. Choose Actions > Install UNIX Client Software.
The Install UNIX Client Software dialog appears..
6. In the Don’t install these clients list, select the clients you want to install and click Add >>.
The clients are moved to the Install these clients list.
7. To start the installation, click Install Client Software.
Client software installation can take a minute or more per client. NetBackup writes messages in the Progress box as the installation proceeds.
If the installation fails on a client, NetBackup notifies you but keeps the client in the policy.
You cannot stop the installation after it has started.
During installation, NetBackup does the following:
◆ Copies the client software from the /usr/openv/netbackup/client directory on the server to the /usr/openv/netbackup directory on the client, as long as the client is not a media or master server.
◆ Adds the appropriate entries to the client’s /etc/services and inetd.conf files or xinetd.d directory.
8. After the installation is complete, click Close.
132 NetBackup Installation Guide for Windows

Installing NetBackup Clients on UNIX Systems
▼ To install NetBackup software on secure (non-trusting) UNIX clients from a master server
Note The only way to install client software to a different location on the client is to create the directory where you want the software to reside and then create /usr/openv as a link to that directory before you install the software.
A secure UNIX client is one that does not have an entry for the NetBackup server in its /.rhosts file.
Note Add the secure clients to a backup policy, if this has not already been done.
Note For Macintosh OS X 10.3.x users: By default, Macintosh OS X 10.3.x does not enable the FTP daemon (ftpd). You must enable this daemon to perform the following procedure successfully. You can enable ftpd by checking Allow FTP access in the sharing pane of the System Preferences application.
1. Move the client software from the server to temporary space in the /tmp directory on the client by running the install_client_files script from the NetBackup server. To run this script, you must have a login ID and password that you can use to access the clients through FTP.
To move software to only one client at a time, run the following command:
/usr/openv/netbackup/bin/install_client_files ftp client user
To move software to all clients at once, run the following command:
/usr/openv/netbackup/bin/install_client_files ftp ALL user
The options are defined as follows:
◆ The client argument is the host name of the client.
◆ The user argument is the login id required by FTP on the client.
◆ The ALL option specifies that you want to install all clients that are configured in any backup policy on the server.
The install_client_files script prompts you for a password for each client if you do not have a .netrc file set up.
Chapter 5, Installing NetBackup Client Software 133

Installing NetBackup Clients on UNIX Systems
2. After the install_client_files script is complete, the root user on each of the clients must run the client_config script to complete the installation:
sh /tmp/bp.pid/client_config
The pid is the process ID. The client_config script installs the binaries and updates the /etc/services and inetd.conf files or the xinetd.d directory, as appropriate.
Adding a UNIX Client after Initial Server Installation If you add a new UNIX client type to your backup environment or forgot to select a UNIX client platform during your NetBackup installation, you must first load the NetBackup client software onto the NetBackup server.
▼ To add UNIX client types to servers after initial installation
The client CD’s installation script enables you to load the client software on the server for each of the UNIX client types that NetBackup supports. You can then “push” this client software from the server to your UNIX clients.
1. Mount the client CD.
A menu appears that displays the available client types.
2. Change your working directory to the CD directory if you have a CD or to the directory that contains the downloaded files:
cd /cd_mount_point
The cd_mount_point is the path to the directory where you can access the CD.
3. Enter the following command to execute the installation script:
./install
Note The binaries provided for the client operating system levels represent the operating system levels on which the binaries were compiled. Often the binaries function perfectly on later versions of the operating system. For example, Solaris 9 binaries also are used on the Solaris 10 level of the operating system. The installation script attempts to load the appropriate binaries for your system. If the script does not recognize the local operating system, it presents choices.
4. Select the client type that you want to load and follow the prompts to install that client type. Repeat as necessary until all desired client types have been loaded.
134 NetBackup Installation Guide for Windows
Installing NetBackup Clients on UNIX Systems
Note Make sure you load the software for all the UNIX client types you intend to back up onto the server. Otherwise, you cannot add these client types to the NetBackup policy configuration.
5. After the installation is complete, unmount the client CD.
6. Install the NetBackup client on the clients you specified, as described in “Installing UNIX Client Software Remotely” on page 130.
Removing UNIX NetBackup Client Software
Note If you remove NetBackup from a machine on which you have installed the NetBackup-Java Display Console, the console is also removed.
▼ To remove UNIX NetBackup client software
1. Log in to the client system as the root user.
2. Remove the /usr/openv directory.
◆ If /usr/openv is a physical directory, run the following command:
rm -rf /usr/openv
◆ If /usr/openv is a link, run the following commands:
cd /usr/openvpwdls
Caution Make sure you are at the proper location and verify that the subdirectories are what you would expect them to be before continuing. You do not want to remove the wrong directories. This is why the first commands verify your current location and the files in that directory before removing files.
rm -rf *cd /rm -f /usr/openv
Caution The rm -f /usr/openv command also removes any add-on products installed on this machine.
Chapter 5, Installing NetBackup Client Software 135

Installing NetBackup Clients on UNIX Systems
3. Remove NetBackup entries in the client’s /etc/services file by locating the lines marked by the following strings and deleting them:
# NetBackup services#.....# End NetBackup services #
# Media Manager services #....# End Media Manager services #
If you do not see these strings, it may be because you upgraded from an earlier release of NetBackup. You can also remove bpcd, bpjava-msvc, bprd, vnetd, and vopied without searching for the #End...# strings. It is not required that you remove the strings from /etc/services. Any operations that access the file will function with or without the services being listed.
Note For Macintosh OS X 10.3.x systems: The NetBackup installation updates the /etc/services file with these entries. However, earlier NetBackup releases may have updated the /services directory of the NetInfo database. To uninstall NetBackup and its services from one of these clients, you must use the NetManager utility to remove bpcd, bpjava-msvc, bprd, vnetd, and vopied from the /services directory in the Netinfo database.
4. Remove the NetBackup entries in the /etc/inetd.conf file by deleting the lines for bpcd, vnetd, vopied, and bpjava-msvc.
5. Ensure that the inetd daemon reads the updated inetd.conf (or inetd.local) file.
a. Determine the process ID of inetd. The ps command options vary from one UNIX operating system to another. Following are two examples.
For most UNIX clients, run the following command:
ps -ea | grep inetd
For MacOS X 10.3.x and FreeBSD, run the following command:
ps -ax | grep inetd
The process ID is the first number displayed in the ps command output.
b. HUP the inetd daemon, as follows.
kill -1 process_ID
The kill command option may vary from one client platform to another.
136 NetBackup Installation Guide for Windows

Installing NetBackup Clients on UNIX Systems
6. For NetBackup-Java capable clients running the NetBackup Administration Console for UNIX, remove the NetBackup-Java state data, as follows:
/bin/rm -rf /.nbjava/bin/rm -rf /.java/.userPrefs/vrts
Caution There should be no space between the slash “/” and the period “.” of “/.nbjava”. Adding a space between these characters removes all of your files starting from the root level.
7. Inform NetBackup-Java users that they can remove their $HOME/.nbjava and portions of $HOME/.java directories.
The $HOME/.nbjava and $HOME/.java directories contain application state information (for example, table column order and size) that is saved when the user exits NetBackup-Java applications. The process removes this directory for the root user only.
The common subdirectory in $HOME/.java/.userPrefs/vrts can be removed.
8. If you enabled NetBackup Access Control, NetBackup created new files on clients and servers.
These files can be divided into two categories: individual user files, and NetBackup application temporary files. NetBackup temporary files are removed with NetBackup. Users’ cache files exist in their home directories (for example, in $HOME/.vxss).
Inform those users that they can remove their $HOME/.vxss directory.
For more information on NetBackup Access Control, please see the NetBackup System Administrator’s Guide, Volume II. For more information on VERITAS Security Services, including how to properly uninstall, please see the VERITAS Security Services Administrator’s Guide.
Chapter 5, Installing NetBackup Client Software 137

Installing NetBackup Clients on UNIX Systems
138 NetBackup Installation Guide for Windows

NetBackup License Keys
6 This chapter contains basic information for entering license keys and provides answers to some frequent asked questions.For detailed information and procedures on how to administer license keys, refer to the NetBackup System Administrator’s Guide, Volume 1.
NetBackup License CompatibilityNetBackup 6.0 enables all existing permanent license keys to remain valid.
Before NetBackup release 5.0, NetBackup had separate licenses for NetBackup DataCenter, NetBackup BusinesServer, servers, database agents, and options.
The NetBackup Enterprise Server is the next generation of the DataCenter product and the NetBackup Server is the next generation of the BusinesServer product. The DataCenter and BusinesServer keys work for NetBackup Enterprise Server and NetBackup Server, respectively.
Database agents or options do not have separate license keys or separate pricing. For example, there is one Oracle Agent available for purchase to use with either NetBackup Enterprise Server or NetBackup Server.
Entering License Keys During the installation of NetBackup on a master server, it is easiest for you enter all of your license keys when you are prompted by the installation script.
If you did not enter all of your license keys, you can open the NetBackup Administration Console (Windows or UNIX) and select Help > License Keys...
On UNIX servers, you can also run the following command:
/usr/openv/netbackup/bin/admincmd/get_license_key
Note All product license keys must be entered on the master server.
139

Frequently Asked Questions
Some features and products also require the keys to be installed on the media server. The following features require keys to be installed on media servers and master servers:
◆ NetBackup Shared Storage Option (SSO)
◆ Library-based Tape Drives Feature
◆ NDMP
You can log in to a NetBackup server from almost any server within a system to view, enter, and administer licenses. Because of this, if you are attempting to administer license keys remotely, you must be sure you are viewing the licenses of the system you intend to change to avoid adding or changing a license on the wrong server.
Frequently Asked QuestionsVERITAS customers have asked the following questions about managing license keys.
Is NetBackup's licensing the same as the licensing in other VERITAS products?
NetBackup is implementing the common licensing system used by other VERITAS products. This licensing system was developed in-house; it is not from a third party. However, please note that different VERITAS products have different requirements and our common licensing system provides considerable flexibility in what licensing features are implemented in each product. For example, NetBackup does not have a node-locked licensing system, but some other VERITAS products may.
Can I use NetBackup if all I have is a media/doc kit?
No. The media/doc kit by itself does not allow any access to NetBackup. You always need a license key (either permanent or evaluation). License keys should always be delivered with the media/doc kit, so you should never find yourself with a media/doc kit and no key.
What does the license key look like? What information does it contain?
The key is a multi-digit alphanumeric string (for example: 8EPP-ABCD-9XYZ-XYZ9-8881-VCF4-OIUF-AJDC). It contains information on whether the key is for NetBackup Server or NetBackup Enterprise Server, whether it is for a server, client, agent, or option (and which one), whether it is a permanent or evaluation, and information about how and where the key was generated.
Is the license key serialized?
Yes, there is serialization information embedded in the key.
Can I see reports on what keys I have?
Yes. Information about the keys is stored on the master server.
140 NetBackup Installation Guide for Windows

Frequently Asked Questions
To access the information, open the NetBackup Administration Console (Windows or UNIX) and select Help > License Keys....
On UNIX servers, you can also run the following command:
/usr/openv/netbackup/bin/admincmd/get_license_key
If you are currently on a media server, you must enter the master server name when prompted for the host name. For more information on how to view reports, refer to both volumes of the NetBackup System Administrator’s Guide.
How do I enable options and agents?
When you install NetBackup, you are prompted to enter all keys for options and agents.
If you purchase an agent or option at a later date, open the NetBackup Administration Console (Windows or UNIX) and select Help > License Keys....
On UNIX servers, you can also run the following command:
/usr/openv/netbackup/bin/admincmd/get_license_key
If you are running the NetBackup Administration Console on a media server, you must enter the master server name when prompted for the host name in the Login screen.
Many options and agents require you to have your original NetBackup distribution CDs, because additional binaries need to be installed. You should always keep your NetBackup CDs in a safe and accessible place.
Should I save keys after they have been entered?
Yes. Always store copies of the keys in a secure place.
What should I do if I have lost my license key(s)?
VERITAS has a record of all keys issued to VERITAS customers. Customers who lose their license key(s) can call Order Management to get copies of their keys.
For Americas, Japan, PacRim, Australia:Tel: 650.318.4265 FAX: 650.335.8428
For Europe, Middle East and Africa:Tel: 00.353.61.365232 FAX: 00.353.61.365223
If you have purchased NetBackup from a VERITAS partner, you need to contact that partner for information on your key.
How are large volume orders handled?
VERITAS recognizes that many NetBackup installations are very large, and entering long license keys multiple times can be tedious and time-consuming. You can request a single key for each type of NetBackup component purchased. For example, a customer who is
Chapter 6, NetBackup License Keys 141

Frequently Asked Questions
ordering 50 Lotus Notes agents can obtain a single key with a certificate stating that the key may be used for 50 Lotus Notes licenses. Site licenses, that enable unrestricted use for specific NetBackup agents or options can be handled in this manner.
Note You still need a unique key for each type of NetBackup component purchased - NetBackup server, Lotus Notes agent, NDMP option, UNIX client, and so on.
What about license keys for customers with site licenses?
Site licenses are handled the same way that large volume orders are; however, instead of the certificate stating that the license key is good for a specific number of copies, the certificate states that the license key is good for unlimited copies of the NetBackup component.
Do I need a license key to enable NetBackup Remote Administration Consoles?
No. There are no special license keys for NetBackup Remote Administration Consoles. You can install them on any computer with access to the master server.
Can a key be used multiple times?
Yes. The keys may be used multiple times; however, you are legally bound to install and use only the number of NetBackup servers, clients, agents, and options for which you have purchased licenses.
How do existing customers get keys?
All NetBackup customers who have current maintenance contracts with VERITAS automatically receive the latest version of NetBackup. You receive the NetBackup Enterprise Server or NetBackup Server media/doc kit and license keys for every NetBackup component for which VERITAS records indicate you have purchased licenses.
If your maintenance is through a VERITAS partner, you upgrade through the partner. Contact the partner for more details.
What if I do not get the right keys?
If you believe you are entitled to a key that you did not receive, you should contact the Order Management number provided on your license key certificate.
Note VERITAS Technical Support does not issue permanent keys. This can only be done through VERITAS Order Management. However, Technical Support is prepared to provide temporary one-month keys to you while issues regarding permanent license keys are resolved.
142 NetBackup Installation Guide for Windows
Frequently Asked Questions
What does an evaluation key enable?
The evaluation key enables unrestricted use of NetBackup Server or NetBackup Enterprise Server, as well as any of their options and agents, for a predetermined period of time.
Am I notified when an evaluation is about to expire?
You can find information about when a key expires by opening the About box in the NetBackup Administration Console (Windows or UNIX), or you can find it on your system logs.
On UNIX servers, you can also run the following command:
/usr/openv/netbackup/bin/admincmd/get_license_key
If you are running the NetBackup Administration Console on a media server, you must enter the master server name when prompted for the host name in the Login screen.
What happens when an evaluation key expires?
The NetBackup daemons are shut down. When you attempt to use the product you are informed that its evaluation period has expired.
Is backup configuration and catalog information saved when evaluation keys expire?
Yes. Customers who add a permanent license key to an evaluation version of NetBackup have immediate access to their catalog and configuration information.
How do I upgrade from an evaluation license to a permanent license?
It is easy. When you purchase a permanent license, you add that license to NetBackup. All the configuration information and catalog data from your evaluation version is retained.
To enter your permanent key, open the NetBackup Administration Console (Windows or UNIX) and select Help > License Keys....
On UNIX servers, you can also run the following command:
/usr/openv/netbackup/bin/admincmd/get_license_key
If you are running the NetBackup Administration Console on a media server, you must enter the master server name when prompted for the host name in the Login screen.
Chapter 6, NetBackup License Keys 143

Frequently Asked Questions
144 NetBackup Installation Guide for Windows
Configuring NetBackup Server Software
7 By default, the NetBackup Administration Console launches automatically following the installation. From this console you are able to configure NetBackup by using the Getting Started wizard. For detailed information about the NetBackup Administration Console, refer to the NetBackup System Administrator’s Guide, Volumes I and II. For help while running a wizard, click Help in the wizard screen.Recommendations for Configuring NetBackupThe following list outlines some basic tips to follow before you begin the process of configuring NetBackup on your system.
◆ Before configuring NetBackup, make sure you have physically attached the storage devices to the server and performed all configuration steps specified by the device and operating system vendor (including installation of any required device drivers and software patches).
◆ Once the server software and storage devices have been installed, select the Getting Started wizard in the right pane of the NetBackup Administration Console. Then follow the steps of each wizard until you have finished configuring your product.
Note If you elected to not have the console start after the installation by default, you can open the console by selecting, Start Programs > VERITAS NetBackup > NetBackup Administration Console.
◆ If you are configuring NetBackup for the first time, we recommend that you click on the Getting Started icon and use this set of wizards to guide you through the process.
◆ If you have already configured NetBackup and you want to change a particular area, you can click on the any of the wizards.
145

Configuring NetBackup
◆ For NetBackup Enterprise Servers:
Configuring master and media servers
The process of configuring a master or media server is very similar, and the versatility of NetBackup enables you to install either server first. However, VERITAS recommends that you install and configure the master server before you install and configure a media server. You can then configure the media server information (such as storage devices and volumes) on the master to ensure the master server will properly administer the media server. The following list offers some tips when configuring a media server.
◆ The NetBackup Administration Console appears after you install the media server. The name of the master server will appear as the host server name in the left window pane of the NetBackup Administration Console if the master server was installed before the media server.
◆ The name of the media server appears as the host server name in the left window pane of the NetBackup Administration Console if any of the following conditions exist:
◆ The master server has not been installed.
◆ The media server does not have permissions set on the master server.
◆ A network problem exists blocking the media server from communicating with the master server.
Caution If any of these situations exist, you will still be presented with the opportunity to run three of the configuration wizards (Storage Device, Volumes, and Configure a Shared Drive). Do not run these wizards. If you run these wizards, the information that you enter will not be recognized by the master server. VERITAS recommends that you correct the problem (such as installing the master server, correcting the permission settings, or solving the network problem) and run the configuration wizards from the master server.
Configuring NetBackup To begin configuring your product, click on the Getting Started icon in the main window of the NetBackup Administration Console. The Getting Started - Welcome to NetBackup window appears. This will lead you through a series of wizards designed to make it easy for you to configure the following:
◆ Configure Storage Devices
◆ Configure Volumes
◆ Configure the Catalog Backup
146 NetBackup Installation Guide for Windows
Configuring NetBackup
◆ Create a Backup Policy
The following subsections contain helpful tips as you step through the wizard. For detailed information about the NetBackup Administration Console, refer to the NetBackup Administrator’s Guide, Volumes I and II. For help while running a wizard, click Help in the wizard screen.
Configuring Storage Devices for NetBackup Before you can run any backups, you must define your storage devices for NetBackup. You should take the following into consideration while you complete the Device Configuration Wizard:
◆ Make sure that you have correctly configured your storage devices for Windows. NetBackup cannot function reliably unless devices are correctly installed and configured.
◆ As part of the Device Configuration Wizard, in the Device Hosts window, you must specify the hosts on which to auto-discover and configure devices. This step applies to NetBackup Enterprise only.
◆ From the Backup Devices window, confirm the list of devices displayed. If a known backup device does not appear in this list, do the following:
a. Click the Cancel button and close out of this wizard.
b. Verify that the backup device is physically attached to the host.
c. Verify all installation procedures specified by the device and operating system vendor have been performed successfully.
Note The VERITAS Tape Device Driver Install wizard (preloaded on your CD) will step you through the process of installing the latest device drivers. If you do not have a CD, you can download the NetBackup Tape Installer software from the VERITAS support web site.
d. Return to the NetBackup Administration Console and click the Configure Storage Devices link and begin this process again.
◆ After the device configuration update completes, the Configure Storage Units window appears. Use this window to define storage units. When entering a path for a storage unit, the following rules apply:
◆ Use the correct path separators (/ and \).
◆ Use a colon (:) to specify a drive separation on Windows platforms.
Chapter 7, Configuring NetBackup Server Software 147
Configuring NetBackup
◆ Use the following characters only:
◆ Alphabetic characters (ASCII A-X, a-z)
◆ Numeric characters (0-9)
◆ Miscellaneous characters: Plus (+), minus (-), underscore (_), or period (.)
Note When configuring devices for NetBackup in a cluster, ensure that you perform a storage device configuration on each node. First perform a storage device configuration on the active node. Then move the NetBackup active node to another node and perform the storage device configuration on that node. Perform this same procedure on each node of the cluster that NetBackup will run on.
Configuring Volumes The Volume Configuration Wizard enables you to initiate an inventory of each configured robot. NetBackup automatically updates the volume database if it finds new robotic media during the inventory. In addition, you can define new volumes for use in standalone drives. For more detailed information about volumes or configuring volumes for standalone drives, refer the to Media Manager System Administrator’s Guide.
◆ Select a robot to inventory or the drive type that you want to configure.
◆ If you specify a standalone media, you will determine the number of volumes for your device, and complete this process.
◆ If you specify multiple drive types the following is true:
◆ A robot is considered to have more than one type of drive if the media written in any one drive cannot be read or written in any other drive.
◆ If the robot has more than one type of drive, then the wizard cannot inventory the robot.
◆ After the inventory process of your device completes, the software prompts you to identify which slots within your device contain cleaning media.
If you have just upgraded NetBackup and have pre-existing barcode rules, then the barcode reader will automatically detect slots designated for cleaning media. Otherwise, if you do not designate a cleaning slot(s), then NetBackup will consider all media (including cleaning media) as typical media and try to overwrite it.
◆ This wizard does not enable you to configure cleaning tapes for standalone drives.
148 NetBackup Installation Guide for Windows
Configuring NetBackup
Configure the Catalog Backup After you have configured your storage devices and volumes, the Catalog Backup Wizard leads you into configuration of the catalog backup. The NetBackup Catalog contains information about your configuration and about the files and folders that have been backed up. If a disk fails and your catalog is lost, a backup of your catalog makes it much easier to restore your backed-up data and resume your backup schedule. Therefore, you must configure a catalog backup before backing up any other data.
Be aware of the following tips as you complete this wizard.
◆ Specify the media server that will perform the backup.
◆ From the NetBackup Catalog Files window, you will need to verify that the master server's and each media server's catalogs are included in the list. Verify that the absolute path names are correct and are in the correct format.
The path names of the catalogs on the master server are automatically added during installation and generally require no action on your part other than to ensure they are listed. However, if you have moved the location of your catalog on your master server, the new location must be specified. Pathnames to the NetBackup Catalog on the media servers are not automatically added during installation and require that you add them to the file list. For more information on specifying the pathnames, see NetBackup System Administrator’s Guide for Windows, Volume I.
Caution Make sure there are no invalid paths in the list of catalog files to be backed up, especially after moving catalog files, deleting old paths, or adding new paths to the catalog backup configuration as explained in this chapter. If NetBackup cannot find or follow a path, the entire catalog backup fails. If you have installed NetBackup in a MSCS verify that the NetBackup Catalog Backup entries are correct. See the NetBackup System Administrator’s Guide for Windows, Volume I for more information.
◆ The Alternating Destinations window enables you to specify a second location for backing up the Catalog.
Create a Backup Policy After you have configured your catalog backup, the Backup Policy Configuration Wizard leads you into the configuration of a backup policy. In this process you define a backup policy for a group of one or more clients. This means specifying when the backups will take place, the files you want to back up, the clients you want to back up, and other general attributes that define how the backup is performed. For additional information about creating and administering policies, refer to the NetBackup System Administrator’s Guide for Windows.
Chapter 7, Configuring NetBackup Server Software 149

Configuring NetBackup
◆ From the Client List window you can add, change, or delete clients to this policy. NetBackup will back up all clients in this list. In addition, If the Detect operating system when adding or changing a client check box is selected and the operating system of the system named cannot be determined, a drop-down box will appear to help you select the correct operating system.
◆ After you have successfully created a policy, you can elect to create additional policies by checking the Create another NetBackup Policy check box and clicking Next.
Testing the NetBackup Installation After you have finished configuring NetBackup, you have the opportunity to test your NetBackup configuration by initiating an immediate backup based on the configuration process you just completed.
1. Click the Start an immediate backup of NetBackup server to verify the installation check box.
2. Click Next. The Getting Started - Setup is Complete window appears. You have completed a basic installation and configuration of NetBackup.
3. After you click Finish, NetBackup will begin the backup process according to your installation configuration.
In addition, a help window appears and the Activity Monitor in the NetBackup Administration Console updates and monitors the status of this backup. You can view this status by selecting the Activity Monitor in the NetBackup Administration Console.
You can then right-click on the server icon in the Topology window pane and select Job Details. The Job Details window appears and provides a status of the current job.
150 NetBackup Installation Guide for Windows

Accessibility Features
A The NetBackup interface can be used by people who are vision impaired and by people who have limited dexterity. Accessibility features include the following:Note Text that appears in the NetBackup interface is accessible through an application programmer’s interface (API) to assistive technologies such as voice or assistive device input products and to speech output products.
Using the Keyboard to Navigate in NetBackupYou can use your keyboard to navigate in the NetBackup interface:
◆ Press window navigation keys to move from one window element to another. For example, press Tab to move from one pane to another.
◆ Perform common actions quickly using accelerator keys. Accelerator keys let you initiate actions without first accessing a menu. For example, press Ctrl+n to create a new policy.
◆ Press mnemonic keys to select items using only the keyboard. Mnemonic keys are indicated by an underlined letter. For example, press Alt+h to access the Help menu.
◆ You can also use the keyboard to select control options in a dialog.
Navigating in a NetBackup Tree View
Use the following keys or key combinations to navigate through the NetBackup Console window.
Keyboard Input Result
Tab or F6 Moves to the next (right or down) pane in the active NetBackup window.
Shift+Tab or Shift+F6
Moves to the previous (left or up) pane in the active NetBackup window.
151

Ctrl+Tab or Ctrl+F6
Moves to the next (right or down) NetBackup window.
Ctrl+Shift+Tab or Ctrl+Shift+F6
Moves to the previous (left or up) NetBackup window.
Plus Sign (+) on the numeric keypad
Expands the highlighted item.
Minus Sign (-) on the numeric keypad
Collapses the highlighted item.
Asterisk (*) on the numeric keypad
Expands the entire tree below the first item in the active NetBackup window.
Up Arrow Gives focus to the next item up in the pane.
Down Arrow Gives focus to the next item down in the pane.
Shift+Up Arrow Selects the next item up in the pane.
Shift+Down Arrow Selects the next item down in the pane.
Page Up Moves to the top item visible in a pane.
Page Down Moves to the bottom item visible in a pane.
Home Moves to the first item (whether visible or not) in a pane.
End Moves to the last item (whether visible or not) in a pane.
Right Arrow Expands the highlighted item. If the highlighted item does not contain hidden items, using the Right Arrow has the same effect as using the Down Arrow.
Left Arrow Collapses the highlighted item. If the highlighted item does not contain expanded items, using the Left Arrow has the same effect as using the Up Arrow.
Alt+Right Arrow Moves to the next (right or down) option control in the interface.
Alt+Left Arrow Moves to the previous (left or up) option control in the interface.
Alt+Spacebar Displays the NetBackup window menu.
Keyboard Input Result
152 NetBackup Installation Guide for Windows
Using Accelerator Keys
Accelerator keys let you use NetBackup from the keyboard, rather than using the mouse. Accelerator keys are either a single keystroke or two or more keystrokes that can be pressed in succession (rather than holding them simultaneously). If available, accelerator keys are shown to the right of the menu item they perform.
For example, to refresh the information in the window, press F5.
Using Mnemonic Keys
A mnemonic key is a keyboard equivalent for a mouse click that is used to activate a component such as a menu item. To select a menu item, press the Alt key to initiate menu pull-down mode, then press a mnemonic key to open a menu, and another mnemonic key to select a menu item.
Mnemonics are case-insensitive. Keys can be pressed either sequentially or simultaneously.
For example, to change the Master Server, press Alt to initiate menu pull-down mode, press the f key to pull down the File menu, and press the c key to invoke the Change Server menu option.
Using the Keyboard in Dialogs
To select or choose controls that have an underlined letter in their titles, type Alt+underlined_letter at any time when the dialog is active. For example, typing Alt+O is the same as clicking the OK button in a dialog.
To move forward (right or down) from one control to the next, press Tab. To reverse the direction (for example, from moving right to moving left), press Tab and Shift.
To move within a list box, groups of option controls, or groups of page tabs, press the arrow key that points the direction you want to move.
Options that are unavailable appear dimmed and cannot be selected.
The following conventions are typically used in NetBackup dialogs:
◆ Command buttons (also known as push buttons)
Command buttons initiate an immediate action. One command button in each dialog carries out the command you have chosen, using the information supplied in the dialog. This button is generally labeled OK. Other command buttons let you cancel the command or choose from additional options.
◆ Command buttons containing an ellipsis (...)
Appendix A, 153
Command buttons containing an ellipsis (...) open another dialog so you can provide more information or confirm an action. Command buttons marked with an arrow display a menu.
◆ Command buttons outlined by a dark border
A dark border around a button initially indicates the default button. Press Enter or the Spacebar at any time to choose the button with a dark border. If there is a Cancel button, press Esc at any time to cancel immediately. Press Tab to move the keyboard focus to the next control. When you change focus to a command button, it temporarily has the dark border. If the focus is not on a control, the dark border returns to the default command button in the pane.
◆ Check boxes
Check boxes may be selected or cleared to turn an option on or off. Check boxes can have two states (checked and unchecked) or three states (checked, unchecked, and indeterminate).
Press Tab to move from one checkbox to another and the Spacebar to change the check box to the next state. Typing the mnemonic key for a check box also moves the focus to the box and changes its state.
◆ Option controls (also known as radio buttons)
Option controls are used to select only one option from a group of options. (Option buttons may represent two or three states, as checkboxes do.) Press the arrow keys to select the next or previous buttons within the group.Type the mnemonic key for an option control to move the focus to the control and select it.
◆ Tabbed pages
Tabbed pages are used to fit many options into a single dialog. Each page contains separate groups of controls such as check boxes or option controls. Press Tab to move the focus to the page tab for the currently visible page. Type the mnemonic key for a page tab to move the focus to the page tab and display it.
Accessing Online DocumentationIn addition to online help, NetBackup provides copies of related NetBackup manuals in Adobe Portable Document Format (PDF) on the NetBackup documentation CD (or as an option for downloading if the release is available from the Web). For a complete list of NetBackup documents, see the NetBackup Release Notes.
154 NetBackup Installation Guide for Windows

Index
Aaccess control 8accessibility features ix, 151adding UNIX clients 134additional product installations 15administration console
starting 108administrator 5, 69, 82, 123, 125administrator account
installing 15, 32, 38, 47, 56, 101alternative administration interfaces
NetBackup Remote Administration Console 107
Bbacklevel administration
administration consoles 113
Ccatalogs, NetBackup 6client_config script 134clients
adding after initial install 134loading onto server 134pushing software to 134
cluster administrator interface 79, 95cluster group name 73, 88cluster installations 7configuring
NetBackup clientWindows 127
configuring master serversthings to know 146
configuring media serversthings to know 146
configuring NetBackup 145, 146catalog backups 149create a backup policy 149storage devices 147
volumes 148configuring storage devices for Windows
storage device configuration 15supported robot types 14
configuring storage devices, Windows 14
Ddaemons
signalling inetd 136databases
NetBackupupgrading to EMM 9
device configuration 14devices 15
EEMM Database
scenarios for upgrading to 17upgrading to 16, 96
EMM Serverupgrading 16, 96
Ffirewall 128
GGetting Started wizards
Configure Catalog Backup 149Configure Storage Devices 147Configure Volumes 148Create a Backup Policy 149
Global Device Database Hostscenarios for upgrading 17upgrading to EMM 16, 96
Iinetd daemon
signalling 136install NetBackup clients
locally 129install_client_files script 133
155
Installationsilent install
media server software 101server software 101
installationNetBackup Remote Administration Console 108servers
procedure 7UNIX clients 129
secure 133trusting 130
installation log fileWindows 2000 systems 117
installingclient software
Windows 123, 124, 127overview
Macintosh OS X and OS server 119Windows 119
remotelyWindows 121, 122, 124
requirementsWindows 122
installing alternative administration interfaces 107
installing NetBackup 1Internet Explorer 5, 122
Llaunch.exe 108license key 1license keys 33, 39, 48, 57, 72, 85, 139loading client types onto server 134
MMac OS X 119Media server 35, 43, 50, 61, 74, 89media servers
backlevel versions 20, 23, 28Microsoft Windows vii, 119
Nnbpushdata
running to upgrade to EMM 96nbpushdata -modify_5x_hosts
command 20, 23, 28NetBackup
custom installation 7installation 15
installing 7peripherals 6port numbers 7silent installation 101
NetBackup Access Control 110, 117, 137NetBackup Administration Console 145NetBackup client service 121NetBackup client software
add a UNIX client type 134install locally 129install on secure UNIX clients 133
NetBackup databasesupgrading to EMM 9
NetBackup Java Windows Display ConsoleInstall requirements 111installation 110
NetBackup license keys 139NetBackup Remote Administration
Console 7installing 107, 110
NetBackup software 28installation 29installation requirements 5
NetBackup-Java Windows Display Consoleinstalling 111
NTFS partition 6
OOTM
Windows 120
Pping command 6private network 73, 88public network 73, 88pushing client software 134
Rreinstalling NetBackup server software 117remote administration 107remote administration console 110
Sscripts
client_config 134install_client_files 133
serveradministration, backlevel 113
serversinstallation 7order to upgrade to EMM Database 96
156 NetBackup Installation Guide for Windows

Shared Storage Option (SSO) 35, 44, 51, 61, 75, 90
silent installadministration interface 101media server software 101server software 101
Silent Installations 121SSO 35, 44, 51, 61, 75, 90subnet mask 73, 88supported platforms
Windows 122system administrator
task requires privileges 124, 126system administrators vii
TTape Device Driver Install wizard 147tape device driver install wizard 15TCP/IP 122testing NetBackup installation 150
Uuninstall
NetBackup and clients 115NetBackup clients 135NetBackup server software 115
uninstallingclient software
Windows 128UNIX clients
installing locally 129, 134upgrade
nbpushdataoverview 8
upgradingservers 10
Upgrading NetBackupnbpushdata 16, 96
upgrading NetBackupEMM database 16, 96
VVERITAS Security Services 110, 117, 137virtual host name 73, 88virtual IP address 73, 88Volume Database Host
scenarios for upgrading 17upgrading to EMM 16, 96
Volume Snapshot Provider 120VSP 120VxSS 110, 117, 137VxSS At client
NBAC 110
WWindows
client requirements 122Windows 2000 5Windows Terminal Services 114
Index 157

158 NetBackup Installation Guide for Windows