netbrain integrated edition system setup guide...note: it is highly recommended to install numactl...
TRANSCRIPT
Version 8.02 | Last Updated 2020-02-13 Copyright ©2004-2020 NetBrain Technologies, Inc. All rights reserved.
NetBrain® Integrated Edition 8.0 System Setup Guide Distributed Deployment

Contents
1. System Overview ......................................................................................................................................................................... 4
2. System Requirements ................................................................................................................................................................ 7
3. Deploying and Installing System............................................................................................................................................ 12
3.1. Installing MongoDB on Linux ......................................................................................................................................... 12
3.2. Installing Elasticsearch on Linux .................................................................................................................................... 18
3.3. Installing License Agent on Linux .................................................................................................................................. 23
3.4. Installing Redis on Linux .................................................................................................................................................. 27
3.5. Installing RabbitMQ on Linux ......................................................................................................................................... 31
3.6. Installing Web/Web API Server on Windows ............................................................................................................... 36
3.7. Installing Worker Server on Windows .......................................................................................................................... 46
3.8. Installing Task Engine on Windows ............................................................................................................................... 54
3.9. Installing Front Server Controller on Windows .......................................................................................................... 58
3.10. Installing Front Server .................................................................................................................................................. 63
3.10.1. Installing Front Server on Linux ........................................................................................................................... 63
3.10.2. Installing Front Server on Windows .................................................................................................................... 65
3.11. Installing Service Monitor Agent ................................................................................................................................ 66
3.11.1. Installing Service Monitor Agent on Linux ......................................................................................................... 67
3.11.2. Installing Service Monitor Agent on Windows .................................................................................................. 71
4. Setting Up Your System ........................................................................................................................................................... 75
4.1. Logging in to System Management Page ..................................................................................................................... 76
4.2. Activating a Subscription License .................................................................................................................................. 76
4.3. Creating User Accounts ................................................................................................................................................... 77
4.4. Allocating Tenants to Front Server Controller ............................................................................................................ 78

4.5. Adding a Front Server for a Tenant ............................................................................................................................... 80
4.6. Registering a Front Server ............................................................................................................................................... 80
4.7. Customizing Auto-Update Settings ............................................................................................................................... 84
4.8. Monitoring Server and Service Metrics ........................................................................................................................ 86
Appendix ............................................................................................................................................................................................. 87
Offline Installing Third-party Dependencies ........................................................................................................................... 87
Editing a File with VI Editor.......................................................................................................................................................... 87
SSL Certificate Requirements ..................................................................................................................................................... 88
Third-Party User Authentication ................................................................................................................................................ 89
Configuring NTP Clients on NetBrain Servers......................................................................................................................... 90

4 | NetBrain Integrated Edition 8.0 System Setup Guide (Distributed Deployment)
1. System Overview
NetBrain Integrated Edition is an adaptive automation platform, where you can integrate with your existing Network Management System (NMS) tools and IT workflows to automate documentation, troubleshooting, network change, and defense. It serves as an operating system of your whole network to relieve network
professionals from manual CLI-digging and also empowers team collaboration to elevate productivity.
The browser-based interface of NetBrain Integrated Edition is backed by a full-stack architecture, adopting
advanced distributed technologies to support large-scale networks with more expansion possibilities.
The distributed system architecture is as follows:
Note: The port numbers listed in the above architecture diagram are defaults only. The actual port numbers used during installation might be different.
The system components include:
NetBrain Integrated Edition 8.0 System Setup Guide (Distributed Deployment) | 5
Component Description
Browser-based Thin Client provides a user interface for end users to access the system.
MongoDB serves as a system data repository.
License Agent provides services that validate and activate licenses.
Elasticsearch serves as a full-text search and analytics engine in a distributed multi-user environment.
Redis provides memory cache for the system.
RabbitMQ prioritizes and forwards requested tasks.
Web Server serves static content such as HTML, JavaScript, and CSS resources, which serves as the user interface of the Thin Client.
Web API Server provides the front-end web applications to support the browser-based Thin Clients and serves RESTful API calls from third-party applications for integration.
Worker Server serves as a resource manager to support computing tasks. It relies on both Redis and RabbitMQ to work.
Task Engine coordinates computing tasks.
Front Server Controller serves to coordinate and communicate with Front Servers and other components.
Front Server serves as a polling server to collect and parse live network data. It is the only component required to access the live network.
Service Monitor Agent monitors the health of your NetBrain Servers with operations management of related services.
Ansible Agent (add-on) integrates with Ansible to define, execute playbooks and visualize results in Change Management Runbooks. See Ansible Integration for more details.
Smart CLI (add-on) provides a Telnet/SSH client to connect to devices from Windows and can be integrated with NetBrain workflows. See Smart CLI for more details.
Considerations for System Scalability
The following table introduces the considerations for system scalability:
Server Scalability
Web Server Web API Server
Multiple Web Servers can be installed as per data center locations and load-balanced under your load balancing infrastructure to ensure the response time for accessing web pages of Thin Client.
6 | NetBrain Integrated Edition 8.0 System Setup Guide (Distributed Deployment)
Server Scalability
Multiple Web API Servers can be installed with Web Servers and load-balanced under your load balancing infrastructure when there is a large number of API calls for intensive API triggered diagnosis in large networks.
Worker Server Deploying more Worker Servers is recommended for a large number of back-end network automation tasks, such as network monitoring, path discovery, runbook execution, triggered diagnosis.
Task Engine Supports high availability with active/standby nodes.
RabbitMQ Supports high availability with master/slave nodes.
Redis Supports high availability with master/slave/sentinel nodes.
MongoDB Supports high availability with primary/secondary/arbiter nodes.
Elasticsearch Supports high availability with master/master-only nodes.
Front Server Deploying more Front Servers is recommended for a large number of network nodes. Each Front Server is recommended to manage at most 5,000 nodes.
Front Server Controller Supports high availability with active/standby nodes.
NetBrain Integrated Edition 8.0 System Setup Guide (Distributed Deployment) | 7
2. System Requirements
This section introduces the hardware requirements, network connectivity requirements, and more prerequisites for deploying a distributed system.
Reference Specification
Network Connectivity Requirements
Deployment Prerequisites
Reference Specification
As the number of network devices and concurrent users increase, the system requires a distributed environment, which requires more machines to provide resiliency and scale out flexibly based on your network scale. Both
physical machines and virtual machines are supported.
Select an appropriate deployment way according to your node count:
Distributed deployment for 2001-5000 nodes
Distributed deployment for 5001-10000 nodes
Distributed deployment for 10001-50000 nodes
Distributed deployment for 2001~5000 nodes

8 | NetBrain Integrated Edition 8.0 System Setup Guide (Distributed Deployment)
Environment NetBrain Component Machine Count CPU Memory 1) Hard Disk 2) Operating System
2001~5000 nodes ≤20 users
Web Server Web API Server Task Engine Front Server Controller
1 4 Core/ 8 vCPU
32GB 200GB Windows Server 2012/2012 R2 (Standard/Datacenter Edition), 64-bit
Windows Server 2016/2019 (Standard/Datacenter Edition), 64-bit
Worker Server 1 8 Core/ 16 vCPU
32GB 200GB
Front Server 1 3) 4 Core/ 8 vCPU
8GB 200GB Windows Server 2012/2012 R2 (Standard/Datacenter Edition), 64-bit
Windows Server 2016/2019 (Standard/Datacenter Edition), 64-bit
Red Hat Enterprise Linux Server 7.5/7.6/7.7, 64-bit
CentOS 7.5/7.6/7.7, 64-bit
MongoDB License Agent Elasticsearch Redis RabbitMQ
1 4 Core/ 8 vCPU
32GB 500GB Red Hat Enterprise Linux Server 7.5/7.6/7.7, 64-bit
CentOS 7.5/7.6/7.7, 64-bit
Distributed deployment for 5001~10000 nodes
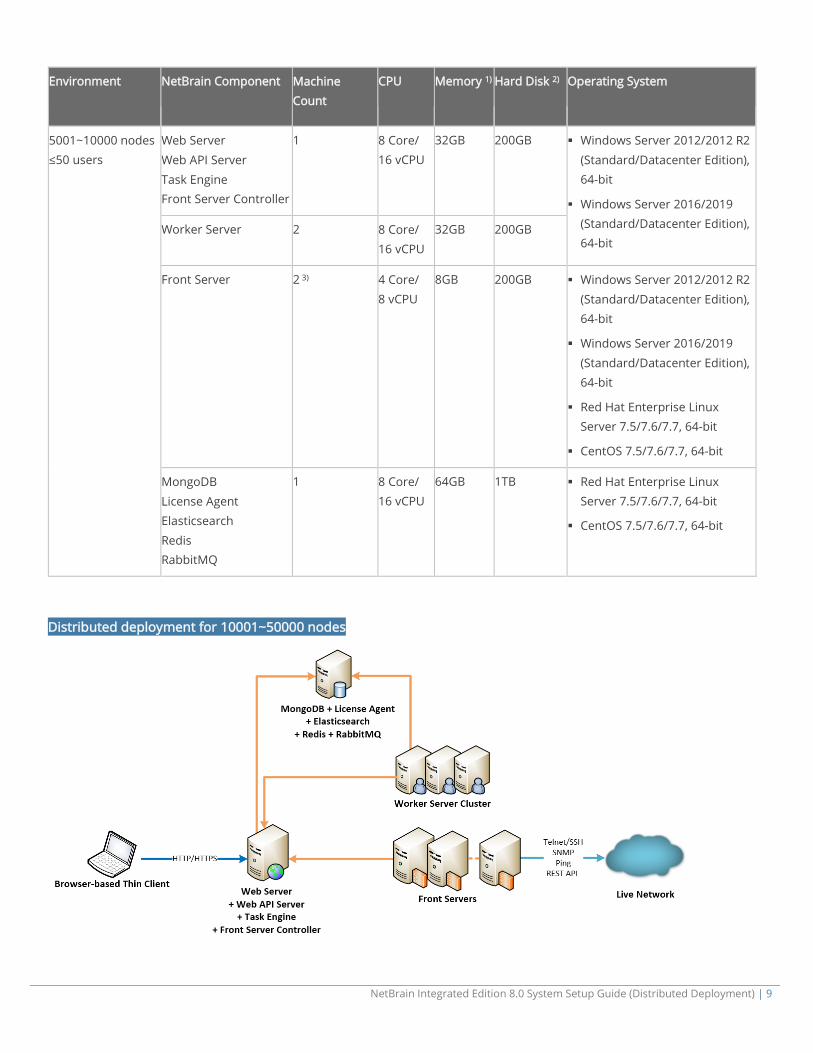
NetBrain Integrated Edition 8.0 System Setup Guide (Distributed Deployment) | 9
Environment NetBrain Component Machine Count
CPU Memory 1) Hard Disk 2) Operating System
5001~10000 nodes ≤50 users
Web Server Web API Server Task Engine Front Server Controller
1 8 Core/ 16 vCPU
32GB 200GB Windows Server 2012/2012 R2 (Standard/Datacenter Edition), 64-bit
Windows Server 2016/2019 (Standard/Datacenter Edition), 64-bit
Worker Server 2 8 Core/ 16 vCPU
32GB 200GB
Front Server 2 3) 4 Core/ 8 vCPU
8GB 200GB Windows Server 2012/2012 R2 (Standard/Datacenter Edition), 64-bit
Windows Server 2016/2019 (Standard/Datacenter Edition), 64-bit
Red Hat Enterprise Linux Server 7.5/7.6/7.7, 64-bit
CentOS 7.5/7.6/7.7, 64-bit
MongoDB License Agent Elasticsearch Redis RabbitMQ
1 8 Core/ 16 vCPU
64GB 1TB Red Hat Enterprise Linux Server 7.5/7.6/7.7, 64-bit
CentOS 7.5/7.6/7.7, 64-bit
Distributed deployment for 10001~50000 nodes
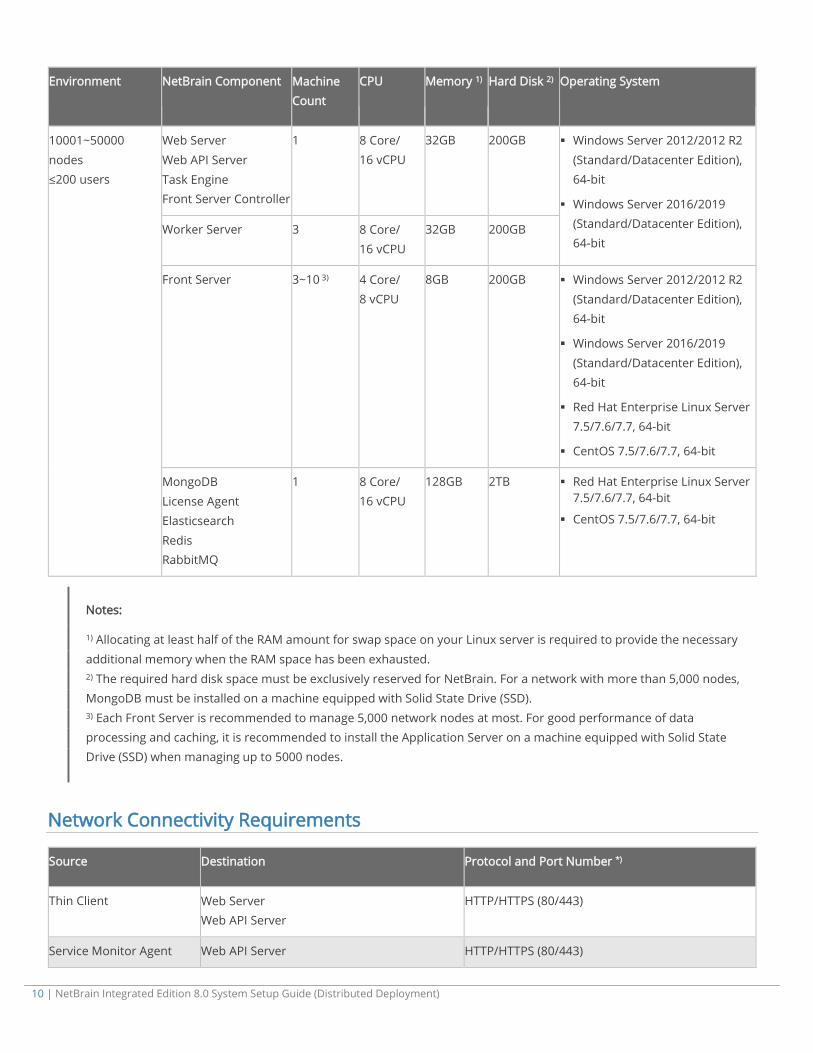
10 | NetBrain Integrated Edition 8.0 System Setup Guide (Distributed Deployment)
Environment NetBrain Component Machine Count
CPU Memory 1) Hard Disk 2) Operating System
10001~50000 nodes ≤200 users
Web Server Web API Server Task Engine Front Server Controller
1 8 Core/ 16 vCPU
32GB 200GB Windows Server 2012/2012 R2 (Standard/Datacenter Edition), 64-bit
Windows Server 2016/2019 (Standard/Datacenter Edition), 64-bit
Worker Server 3 8 Core/ 16 vCPU
32GB 200GB
Front Server 3~10 3) 4 Core/ 8 vCPU
8GB 200GB Windows Server 2012/2012 R2 (Standard/Datacenter Edition), 64-bit
Windows Server 2016/2019 (Standard/Datacenter Edition), 64-bit
Red Hat Enterprise Linux Server 7.5/7.6/7.7, 64-bit
CentOS 7.5/7.6/7.7, 64-bit
MongoDB License Agent Elasticsearch Redis RabbitMQ
1 8 Core/ 16 vCPU
128GB 2TB Red Hat Enterprise Linux Server 7.5/7.6/7.7, 64-bit
CentOS 7.5/7.6/7.7, 64-bit
Notes:
1) Allocating at least half of the RAM amount for swap space on your Linux server is required to provide the necessary additional memory when the RAM space has been exhausted. 2) The required hard disk space must be exclusively reserved for NetBrain. For a network with more than 5,000 nodes, MongoDB must be installed on a machine equipped with Solid State Drive (SSD). 3) Each Front Server is recommended to manage 5,000 network nodes at most. For good performance of data processing and caching, it is recommended to install the Application Server on a machine equipped with Solid State Drive (SSD) when managing up to 5000 nodes.
Network Connectivity Requirements
Source Destination Protocol and Port Number *)
Thin Client Web Server Web API Server
HTTP/HTTPS (80/443)
Service Monitor Agent Web API Server HTTP/HTTPS (80/443)
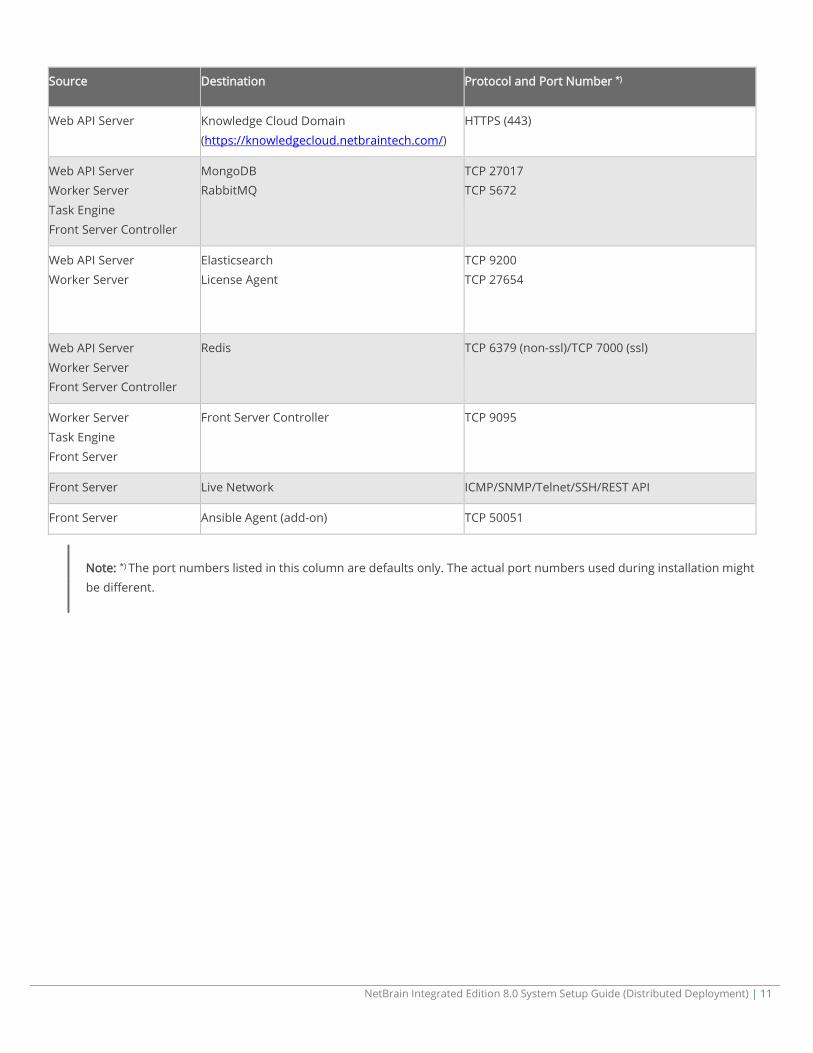
NetBrain Integrated Edition 8.0 System Setup Guide (Distributed Deployment) | 11
Source Destination Protocol and Port Number *)
Web API Server Knowledge Cloud Domain (https://knowledgecloud.netbraintech.com/)
HTTPS (443)
Web API Server Worker Server Task Engine Front Server Controller
MongoDB RabbitMQ
TCP 27017 TCP 5672
Web API Server Worker Server
Elasticsearch License Agent
TCP 9200 TCP 27654
Web API Server Worker Server Front Server Controller
Redis TCP 6379 (non-ssl)/TCP 7000 (ssl)
Worker Server Task Engine Front Server
Front Server Controller TCP 9095
Front Server Live Network ICMP/SNMP/Telnet/SSH/REST API
Front Server Ansible Agent (add-on) TCP 50051
Note: *) The port numbers listed in this column are defaults only. The actual port numbers used during installation might be different.

12 | NetBrain Integrated Edition 8.0 System Setup Guide (Distributed Deployment)
3. Deploying and Installing System
Select an appropriate way to deploy the system based on your network scale and locations. Install the system components in the following order:
1. Install MongoDB on Linux.
2. Install Elasticsearch on Linux.
3. Install License Agent on Linux.
4. Install Redis on Linux.
5. Install RabbitMQ on Linux.
6. Install Web/Web API Server on Windows.
7. Install Worker Server on Windows.
8. Install Task Engine on Windows.
9. Install Front Server Controller on Windows.
10. Install Front Server.
11. Install Service Monitor Agent.
Note: To monitor server status and related service metrics for system management and problem troubleshooting, you can
install NetBrain Service Monitor Agent on each NetBrain server. See Monitoring Server and Service Metrics for more details.
Note: To avoid unexpected clock synchronization issues, it is highly recommended to configure Network Timing Protocol (NTP) client on the machines where NetBrain servers will be installed. See Configuring NTP Client on NetBrain Servers for more details.
3.1. Installing MongoDB on Linux
1. Log in to the Linux server as the root user.
Note: It is highly recommended to install numactl on this Linux Server to optimize MongoDB performance. Run the rpm -qa|grep numactl command to check whether it has already been installed. If it has not been installed yet and the Linux server has access to the Internet, run the yum install numactl command to install it online.
2. Run the mkdir command to create a directory under the /opt directory to place the installation package. For
example, netbraintemp.

NetBrain Integrated Edition 8.0 System Setup Guide (Distributed Deployment) | 13
Note: Don't place the installation package under any personal directories, such as /root.
3. Run the cd /opt/netbraintemp command to navigate to the /opt/netbraintemp directory.
4. Download the installation package.
Option 1: If the Linux server has no access to the Internet, obtain the mongodb-linux-x86_64-rhel7-4.0.6-8.0.2.tar.gz file from NetBrain and upload it to the /opt/netbraintemp directory by using a file transfer tool.
Option 2: If the Linux server has access to the Internet, run the wget http://download.netbraintech.com/mongodb-linux-x86_64-rhel7-4.0.6-8.0.2.tar.gz command under the /opt/netbraintemp directory to directly download the mongodb-linux-x86_64-rhel7-4.0.6-
8.0.2.tar.gz file from NetBrain official download site.
Note: The download link is case-sensitive.
Tip: Run the yum -y install wget command to install the wget command if it has not been installed on the server.
5. Run the tar -zxvf mongodb-linux-x86_64-rhel7-4.0.6-8.0.2.tar.gz command under the /opt/netbraintemp directory to extract installation files.
[root@centos netbraintemp]# tar -zxvf mongodb-linux-x86_64-rhel7-4.0.6-8.0.2.tar.gz MongoDB/ MongoDB/config/ MongoDB/config/setup.conf ... MongoDB/install.sh MongoDB/others/ MongoDB/others/install.conf MongoDB/others/setup.conf.template MongoDB/others/uninstall.sh ...
6. Run the cd MongoDB/config command to navigate to the config directory.
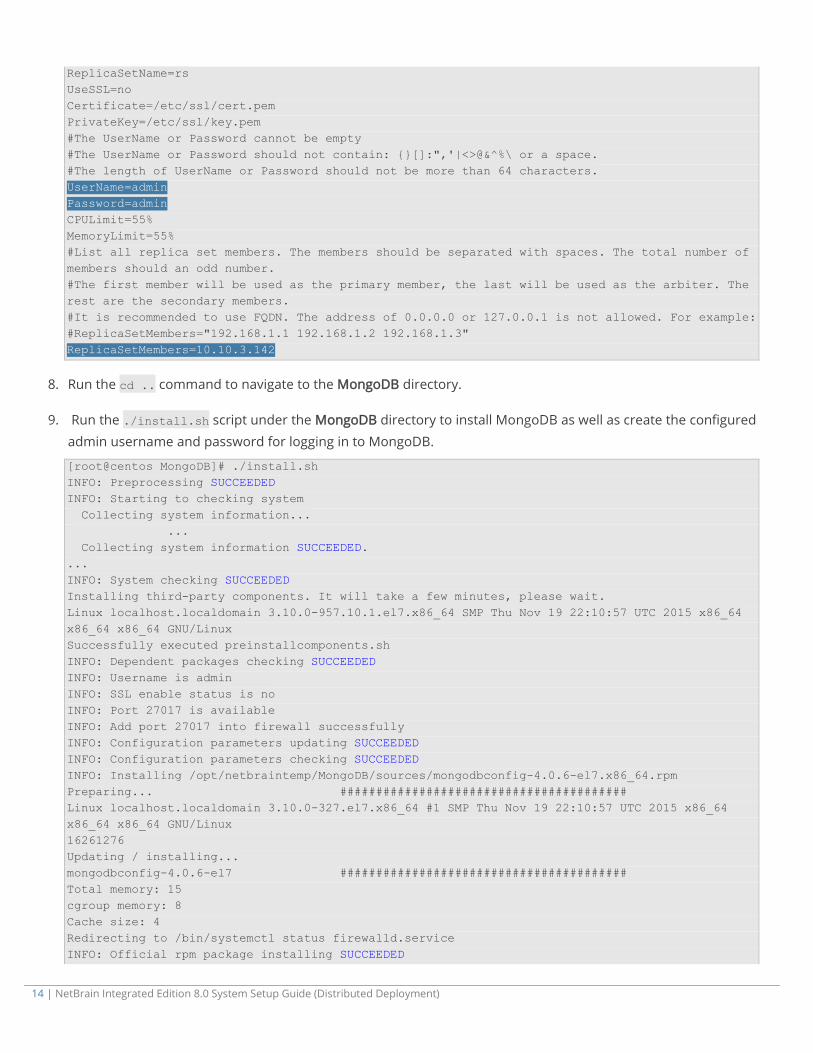
7. Modify the parameters in the setup.conf file located under the config directory according to your environment and save the changes. For how to modify the configuration file, refer to Editing a File with VI Editor.
[root@centos config]# vi setup.conf #NetBrain Database configuration file #Note: other than the database username and password, other entries #can only contain letters and numbers, and should start with a letter. DataPath=/usr/lib/mongodb LogPath=/var/log/mongodb BindIp=10.10.3.142 FQDN=127.0.0.1 #The port must be between 1025 and 65535. Port=27017
14 | NetBrain Integrated Edition 8.0 System Setup Guide (Distributed Deployment)
ReplicaSetName=rs UseSSL=no Certificate=/etc/ssl/cert.pem PrivateKey=/etc/ssl/key.pem #The UserName or Password cannot be empty #The UserName or Password should not contain: {}[]:",'|<>@&^%\ or a space. #The length of UserName or Password should not be more than 64 characters. UserName=admin Password=admin CPULimit=55% MemoryLimit=55% #List all replica set members. The members should be separated with spaces. The total number of members should an odd number. #The first member will be used as the primary member, the last will be used as the arbiter. The rest are the secondary members. #It is recommended to use FQDN. The address of 0.0.0.0 or 127.0.0.1 is not allowed. For example: #ReplicaSetMembers="192.168.1.1 192.168.1.2 192.168.1.3" ReplicaSetMembers=10.10.3.142
8. Run the cd .. command to navigate to the MongoDB directory.
9. Run the ./install.sh script under the MongoDB directory to install MongoDB as well as create the configured admin username and password for logging in to MongoDB.
[root@centos MongoDB]# ./install.sh INFO: Preprocessing SUCCEEDED INFO: Starting to checking system Collecting system information... ... Collecting system information SUCCEEDED. ... INFO: System checking SUCCEEDED Installing third-party components. It will take a few minutes, please wait. Linux localhost.localdomain 3.10.0-957.10.1.el7.x86_64 SMP Thu Nov 19 22:10:57 UTC 2015 x86_64 x86_64 x86_64 GNU/Linux Successfully executed preinstallcomponents.sh INFO: Dependent packages checking SUCCEEDED INFO: Username is admin INFO: SSL enable status is no INFO: Port 27017 is available INFO: Add port 27017 into firewall successfully INFO: Configuration parameters updating SUCCEEDED INFO: Configuration parameters checking SUCCEEDED INFO: Installing /opt/netbraintemp/MongoDB/sources/mongodbconfig-4.0.6-el7.x86_64.rpm Preparing... ######################################## Linux localhost.localdomain 3.10.0-327.el7.x86_64 #1 SMP Thu Nov 19 22:10:57 UTC 2015 x86_64 x86_64 x86_64 GNU/Linux 16261276 Updating / installing... mongodbconfig-4.0.6-el7 ######################################## Total memory: 15 cgroup memory: 8 Cache size: 4 Redirecting to /bin/systemctl status firewalld.service INFO: Official rpm package installing SUCCEEDED

NetBrain Integrated Edition 8.0 System Setup Guide (Distributed Deployment) | 15
INFO: Configuration parameters updating SUCCEEDED Created symlink from /etc/systemd/system/multi-user.target.wants/mongod.service to /usr/lib/systemd/system/mongod.service. mongod.service - MongoDB service Loaded: loaded (/usr/lib/systemd/system/mongod.service; enabled; vendor preset: disabled) Active: active (running) since Tue 2020-01-14 00:43:32 EST; 4min 32s ago Process: 39077 ExecStart=/bin/mongod -f /etc/mongodb/mongod.conf (code=exited, status=0/SUCCESS) Main PID: 39079 (mongod) CGroup: /system.slice/mongod.service 39079 /bin/mongod -f /etc/mongodb/mongod.conf Apr 09 22:42:09 localhost.localdomain systemd[1]: Starting MongoDB service... Apr 09 22:42:09 localhost.localdomain mongod[39077]: about to fork child process, waiting until server is ready for connections. Apr 09 22:42:09 localhost.localdomain mongod[39077]: forked process: 39079 Apr 09 22:42:12 localhost.localdomain mongod[39077]: child process started successfully, parent exiting Apr 09 22:42:12 localhost.localdomain systemd[1]: Started MongoDB service. MongoDB shell version v4.0.6 connecting to: mongodb://10.10.3.142:27017/test?gssapiServiceName=mongodb Implicit session: session { "id" : UUID("52d2a2c4-caaf-4dee-b33b-a8bc3904ce55") } MongoDB server version: 4.0.6 bye Successfully connected MongoDB node 10.10.3.142:27017 MongoDB shell version v4.0.6 connecting to: mongodb://127.0.0.1:27017/admin?gssapiServiceName=mongodb Implicit session: session { "id" : UUID("a62c8af5-abd7-4287-8db3-d7a2c6a7eaca") } MongoDB server version: 4.0.6 { "ok" : 1 } Successfully initialized replica set 10.10.3.142:27017 of MongoDB service mongod. MongoDB shell version v4.0.6 connecting to: mongodb://127.0.0.1:27017/admin?gssapiServiceName=mongodb Implicit session: session { "id" : UUID("bc8966d1-a43d-4526-b294-bc3f6837eb11") } MongoDB server version: 4.0.6 Successfully added user: { "user" : "admin", "roles" : [ { "role" : "root", "db" : "admin" } ], "mechanisms" : [ "SCRAM-SHA-256" ] } Successfully added user: "admin", password: "******" for MongoDB service: mongod MongoDB shell version v4.0.6 connecting to: mongodb://127.0.0.1:27017/?authMechanism=SCRAM-SHA-256&authSource=admin&gssapiServiceName=mongodb Implicit session: session { "id" : UUID("dd2ecad0-cfac-457d-88bd-667d381442d7") } MongoDB server version: 4.0.6 bye Successfully logged in MongoDB with username: "admin", password: "******"
16 | NetBrain Integrated Edition 8.0 System Setup Guide (Distributed Deployment)
INFO: Successfully installed MongoDB INFO: Backup uninstall.sh SUCCEEDED ...
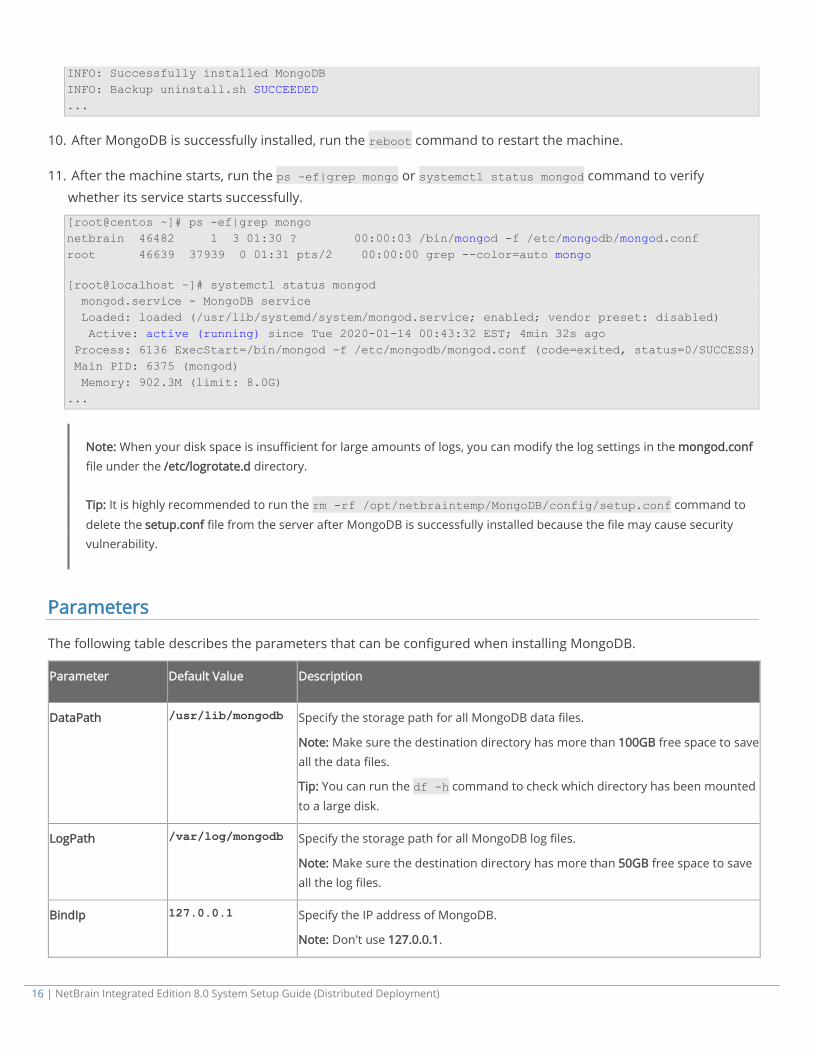
10. After MongoDB is successfully installed, run the reboot command to restart the machine.
11. After the machine starts, run the ps -ef|grep mongo or systemctl status mongod command to verify whether its service starts successfully.
[root@centos ~]# ps -ef|grep mongo netbrain 46482 1 3 01:30 ? 00:00:03 /bin/mongod -f /etc/mongodb/mongod.conf root 46639 37939 0 01:31 pts/2 00:00:00 grep --color=auto mongo
[root@localhost ~]# systemctl status mongod mongod.service - MongoDB service Loaded: loaded (/usr/lib/systemd/system/mongod.service; enabled; vendor preset: disabled) Active: active (running) since Tue 2020-01-14 00:43:32 EST; 4min 32s ago Process: 6136 ExecStart=/bin/mongod -f /etc/mongodb/mongod.conf (code=exited, status=0/SUCCESS) Main PID: 6375 (mongod) Memory: 902.3M (limit: 8.0G) ...
Note: When your disk space is insufficient for large amounts of logs, you can modify the log settings in the mongod.conf file under the /etc/logrotate.d directory.
Tip: It is highly recommended to run the rm -rf /opt/netbraintemp/MongoDB/config/setup.conf command to
delete the setup.conf file from the server after MongoDB is successfully installed because the file may cause security vulnerability.
Parameters
The following table describes the parameters that can be configured when installing MongoDB.
Parameter Default Value Description
DataPath /usr/lib/mongodb Specify the storage path for all MongoDB data files.
Note: Make sure the destination directory has more than 100GB free space to save all the data files.
Tip: You can run the df -h command to check which directory has been mounted
to a large disk.
LogPath /var/log/mongodb Specify the storage path for all MongoDB log files.
Note: Make sure the destination directory has more than 50GB free space to save all the log files.
BindIp 127.0.0.1 Specify the IP address of MongoDB.
Note: Don't use 127.0.0.1.

NetBrain Integrated Edition 8.0 System Setup Guide (Distributed Deployment) | 17
Parameter Default Value Description
Note: If you want to use the fully qualified domain name (FQDN) to connect to MongoDB, you need to set it as 0.0.0.0.
FQDN 127.0.0.1 Specify the fully qualified domain name (FQDN) of MongoDB.
Note: Select either to specify the actual value of BindIp or the FQDN for MongoDB by setting BindIp as 0.0.0.0.
Note: If you select to specify the FQDN for MongoDB, you must specify the FQDN in the ReplicaSetMembers parameter and when installing other components that require to connect to MongoDB.
Port 27017 Specify the port number that the MongoDB service listens to. It is recommended to keep the default value.
ReplicaSetName rs Specify the replica set name used for replication. It is recommended to keep the default value. If you want to modify it, keep notes of your customized one because it is required to connect to MongoDB when you install other components, such as Web API Server, Worker Server, Task Engine, and Front Server Controller.
Note: It can only contain letters and numbers, and must start with a letter.
UseSSL no Specify whether to encrypt the connections to MongoDB with SSL.
To enable SSL, replace no with yes. For detailed requirements of SSL certificates
and keys, refer to SSL Certificate Requirements.
Certificate /etc/ssl/cert.pem Specify the name and storage path of the certificate file that contains the public key.
Note: It is required only if UseSSL is enabled.
PrivateKey /etc/ssl/key.pem Specify the name and storage path of the private key file.
Note: It is required only if UseSSL is enabled.
UserName admin Specify the admin username used to connect with and log in to MongoDB.
Note: The value of the DBUser and DBPassword parameters cannot contain any of the following special characters, and their length cannot exceed 64 characters. { } [ ] : " , ' | < > @ & ^ % \ and spaces
Password admin Specify the admin password used to connect with and log in to MongoDB.
CPULimit 55% Specify the maximum CPU utilization that can be consumed by MongoDB. To make both MongoDB and Elasticsearch reasonably share the CPU resources of the same machine, the recommended value is 55%.
MemoryLimit 55% Specify the maximum memory capacity of the machine that can be consumed by the MongoDB. To make both MongoDB and Elasticsearch utilize the memory resources of the same machine, the recommended value is 55%.
18 | NetBrain Integrated Edition 8.0 System Setup Guide (Distributed Deployment)
Parameter Default Value Description
ReplicaSetMembers 192.168.1.1:27017 Enter the actual IP address to be found or FQDN, and the port number of MongoDB service.
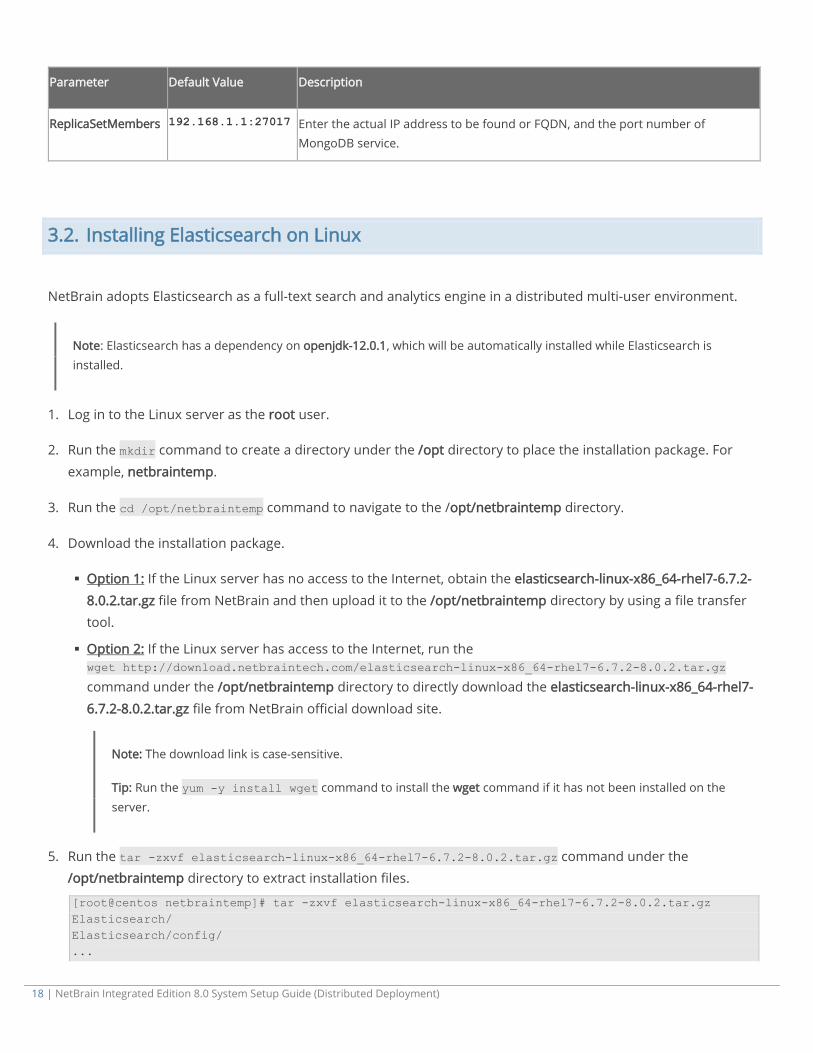
3.2. Installing Elasticsearch on Linux
NetBrain adopts Elasticsearch as a full-text search and analytics engine in a distributed multi-user environment.
Note: Elasticsearch has a dependency on openjdk-12.0.1, which will be automatically installed while Elasticsearch is installed.
1. Log in to the Linux server as the root user.
2. Run the mkdir command to create a directory under the /opt directory to place the installation package. For
example, netbraintemp.
3. Run the cd /opt/netbraintemp command to navigate to the /opt/netbraintemp directory.
4. Download the installation package.
Option 1: If the Linux server has no access to the Internet, obtain the elasticsearch-linux-x86_64-rhel7-6.7.2-
8.0.2.tar.gz file from NetBrain and then upload it to the /opt/netbraintemp directory by using a file transfer tool.
Option 2: If the Linux server has access to the Internet, run the wget http://download.netbraintech.com/elasticsearch-linux-x86_64-rhel7-6.7.2-8.0.2.tar.gz command under the /opt/netbraintemp directory to directly download the elasticsearch-linux-x86_64-rhel7-
6.7.2-8.0.2.tar.gz file from NetBrain official download site.
Note: The download link is case-sensitive.
Tip: Run the yum -y install wget command to install the wget command if it has not been installed on the server.
5. Run the tar -zxvf elasticsearch-linux-x86_64-rhel7-6.7.2-8.0.2.tar.gz command under the /opt/netbraintemp directory to extract installation files.
[root@centos netbraintemp]# tar -zxvf elasticsearch-linux-x86_64-rhel7-6.7.2-8.0.2.tar.gz Elasticsearch/ Elasticsearch/config/ ...
NetBrain Integrated Edition 8.0 System Setup Guide (Distributed Deployment) | 19
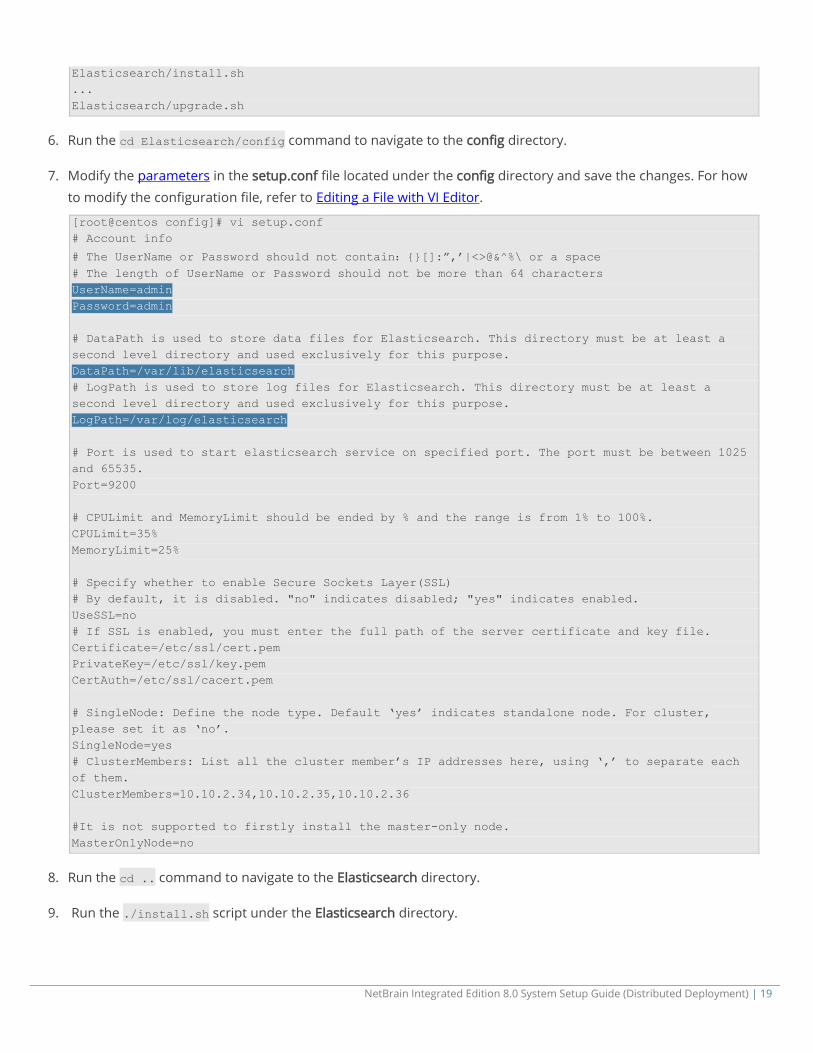
Elasticsearch/install.sh ... Elasticsearch/upgrade.sh
6. Run the cd Elasticsearch/config command to navigate to the config directory.
7. Modify the parameters in the setup.conf file located under the config directory and save the changes. For how to modify the configuration file, refer to Editing a File with VI Editor.
[root@centos config]# vi setup.conf # Account info
# The UserName or Password should not contain:{}[]:”,’|<>@&^%\ or a space # The length of UserName or Password should not be more than 64 characters UserName=admin Password=admin # DataPath is used to store data files for Elasticsearch. This directory must be at least a second level directory and used exclusively for this purpose. DataPath=/var/lib/elasticsearch # LogPath is used to store log files for Elasticsearch. This directory must be at least a second level directory and used exclusively for this purpose. LogPath=/var/log/elasticsearch # Port is used to start elasticsearch service on specified port. The port must be between 1025 and 65535. Port=9200 # CPULimit and MemoryLimit should be ended by % and the range is from 1% to 100%. CPULimit=35% MemoryLimit=25% # Specify whether to enable Secure Sockets Layer(SSL) # By default, it is disabled. "no" indicates disabled; "yes" indicates enabled. UseSSL=no # If SSL is enabled, you must enter the full path of the server certificate and key file. Certificate=/etc/ssl/cert.pem PrivateKey=/etc/ssl/key.pem CertAuth=/etc/ssl/cacert.pem # SingleNode: Define the node type. Default ‘yes’ indicates standalone node. For cluster, please set it as ‘no’. SingleNode=yes # ClusterMembers: List all the cluster member’s IP addresses here, using ‘,’ to separate each of them. ClusterMembers=10.10.2.34,10.10.2.35,10.10.2.36 #It is not supported to firstly install the master-only node. MasterOnlyNode=no
8. Run the cd .. command to navigate to the Elasticsearch directory.
9. Run the ./install.sh script under the Elasticsearch directory.

20 | NetBrain Integrated Edition 8.0 System Setup Guide (Distributed Deployment)
[root@centos Elasticsearch]# ./install.sh Preprocessing SUCCEEDED Starting to install Elasticsearch ... Starting to system checking... Collecting system information... ... Collecting system information SUCCEEDED. System checking SUCCEEDED. Starting to configuration parameters checking... Configuration parameters checking SUCCEEDED. Starting to official rpm package installing... warning: /opt/netbraintemp/Elasticsearch/sources/elasticsearch-oss-6.7.2.rpm: Header V4 RSA/SHA512 Signature, key ID d88e42b4: NOKEY Preparing... ################################# [100%] Creating elasticsearch group... OK Creating elasticsearch user... OK Updating / installing... 1:elasticsearch-oss-0:6.7.2-1 ################################# [100%] ### NOT starting on installation, please execute the following statements to configure elasticsearch service to start automatically using systemd sudo systemctl daemon-reload sudo systemctl enable elasticsearch.service ### You can start elasticsearch service by executing sudo systemctl start elasticsearch.service Created elasticsearch keystore in /etc/elasticsearch Official rpm package installing SUCCEEDED. Starting to configuration parameters updating... Configuration parameters updating SUCCEEDED. Starting to permission setting... Permission setting SUCCEEDED. Starting to deamon setting... Deamon setting SUCCEEDED. Starting to the service of the elasticsearch. Please wait... Starting to verification connection... Successfully initialized the username and password in the elasticsearch. It is the No.1 times to attempt to connect to the elasticsearch, please wait... Successfully connected to the elasticsearch. The setup was finished. elasticsearch.service - Elasticsearch Loaded: loaded (/usr/lib/systemd/system/elasticsearch.service; enabled; vendor preset: disabled) Active: active (running) since Tue 2020-01-14 00:43:41 EST; 27min ago Docs: http://www.elastic.co Main PID: 25040 (java) Memory: 4.1G CGroup: /system.slice/elasticsearch.service 25040 /usr/local/jdk-11.0.1//bin/java -Xms3969m -Xmx3969m -XX:+UseConcMarkSweepGC -XX:CMSInitiatingOccupancyFraction=75 -XX:+UseCMSInitiatingOccupancyOnly -Des.networkaddress.cache.ttl=60 -Des.networkaddress.cache.negative.ttl=10 -XX:+AlwaysPreTouch -Xss... Apr 23 22:56:31 localhost.localdomain systemd[1]: Started Elasticsearch. Apr 23 22:56:32 localhost.localdomain elasticsearch[25040]: OpenJDK 64-Bit Server VM warning: Option UseConcMarkSweepGC was deprecated in version 9.0 and will likely be removed in a future release. Apr 23 22:56:32 localhost.localdomain elasticsearch[25040]: OpenJDK 64-Bit Server VM warning:
NetBrain Integrated Edition 8.0 System Setup Guide (Distributed Deployment) | 21
UseAVX=2 is not supported on this CPU, setting it to UseAVX=1 Successfully installed Elasticsearch. Service is running. INFO: Backing up uninstall.sh SUCCEEDED INFO: Successfully installed Elasticsearch
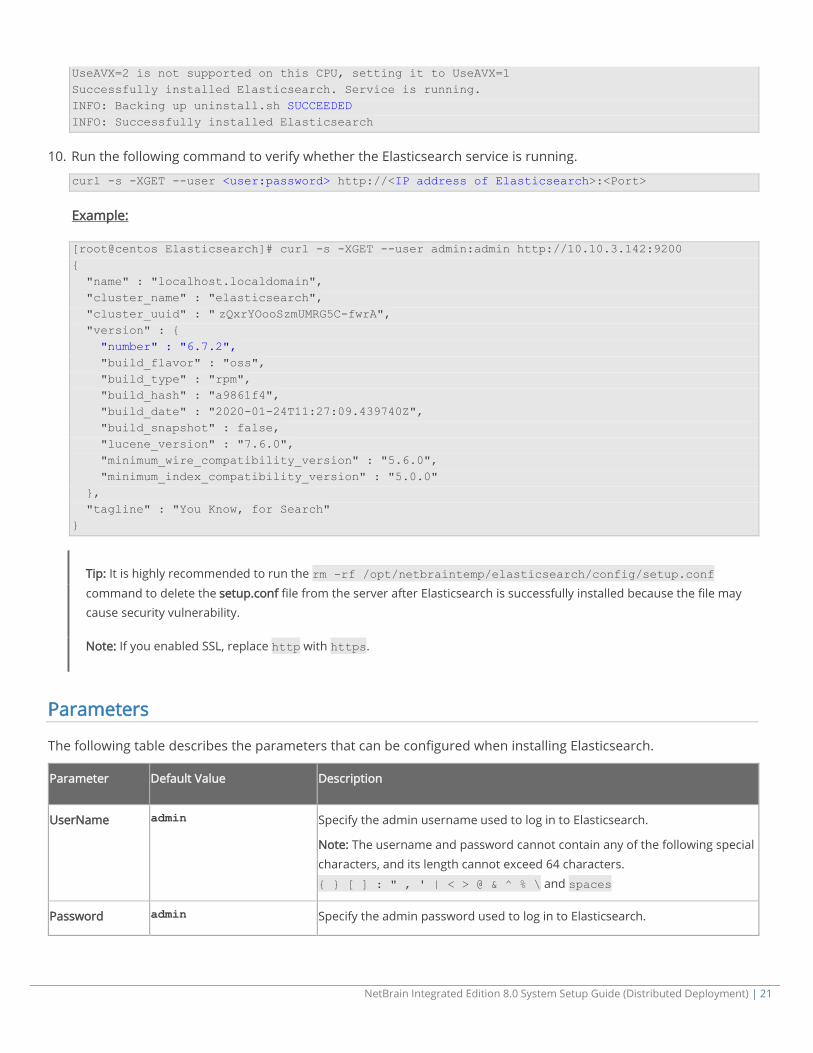
10. Run the following command to verify whether the Elasticsearch service is running.
curl -s -XGET --user <user:password> http://<IP address of Elasticsearch>:<Port>
Example:
[root@centos Elasticsearch]# curl -s -XGET --user admin:admin http://10.10.3.142:9200 { "name" : "localhost.localdomain", "cluster_name" : "elasticsearch", "cluster_uuid" : " zQxrYOooSzmUMRG5C-fwrA", "version" : { "number" : "6.7.2", "build_flavor" : "oss", "build_type" : "rpm", "build_hash" : "a9861f4", "build_date" : "2020-01-24T11:27:09.439740Z", "build_snapshot" : false, "lucene_version" : "7.6.0", "minimum_wire_compatibility_version" : "5.6.0", "minimum_index_compatibility_version" : "5.0.0" }, "tagline" : "You Know, for Search" }
Tip: It is highly recommended to run the rm -rf /opt/netbraintemp/elasticsearch/config/setup.conf
command to delete the setup.conf file from the server after Elasticsearch is successfully installed because the file may cause security vulnerability.
Note: If you enabled SSL, replace http with https.
Parameters
The following table describes the parameters that can be configured when installing Elasticsearch.
Parameter Default Value Description
UserName admin Specify the admin username used to log in to Elasticsearch.
Note: The username and password cannot contain any of the following special characters, and its length cannot exceed 64 characters. { } [ ] : " , ' | < > @ & ^ % \ and spaces
Password admin Specify the admin password used to log in to Elasticsearch.

22 | NetBrain Integrated Edition 8.0 System Setup Guide (Distributed Deployment)
Parameter Default Value Description
Note: The password cannot be empty, and it cannot start with ! or #.
DataPath /var/lib/elasticsearch Specify the storage path for all data files of Elasticsearch. It is recommended to keep the default path.
Note: If you want to modify it, don't use an existing directory.
Note: Make sure the directory has more than 100GB free space to save all the data files.
Tip: You can run the df -h command to check which directory has been mounted to a large disk.
LogPath /var/log/elasticsearch Specify the storage path for all log files of Elasticsearch.
Note: It is recommended to keep the default path as it is. If you want to modify it, don't use an existing directory.
Note: Make sure the directory has more than 50GB free space to save all the log files.
Port 9200 Specify the port number that Elasticsearch service listens to.
CPULimit 35% Specify the maximum CPU utilization that can be consumed by Elasticsearch.
To make both MongoDB and Elasticsearch utilize the CPU resources of the same machine, the recommended value is 35%. And the sum of CPU utilization allocated to the MongoDB and Elasticsearch cannot exceed 90% of the machine's CPU.
MemoryLimit 25% Specify the maximum memory capacity of the machine that can be consumed by Elasticsearch.
To make both MongoDB and Elasticsearch utilize the memory resources of the same machine, the recommended value is in the range of 12.5%~25%.
Note: The maximum memory that Elasticsearch can utilize is 35%. Setting the value of the MemoryLimit parameter to higher than 35% will not increase the performance of Elasticsearch. Instead, it may affect the performance of co-existing servers on this machine.
UseSSL no Set whether to enable the encrypted connections to Elasticsearch by using SSL.
For detailed requirements of SSL certificates and keys, refer to SSL Certificate Requirements.
Certificate /etc/ssl/cert.pem Specify the name of the SSL certificate file containing the public key.
Note: It is required only if UseSSL is enabled.
PrivateKey /etc/ssl/key.pem Specify the name of the SSL private key file.
Note: It is required only if UseSSL is enabled.
NetBrain Integrated Edition 8.0 System Setup Guide (Distributed Deployment) | 23
Parameter Default Value Description
CertAuth /etc/ssl/cacert.pem Specify the name of the SSL certificate chain or intermediate certificate (class 2 or class 3 certificate).
Note: It is required only if UseSSL is enabled.
SingleNode yes Set whether to enable cluster deployments. The default option yes means
cluster deployment is disabled. For a standalone Elasticsearch, keep the default option as it is.
ClusterMembers 10.10.2.34 10.10.2.35 10.10.2.36
This parameter is only required for cluster deployments. For a standalone Elasticsearch, keep the default value as it is.
MasterOnlyNode no Set whether the node is a master-eligible one, which is only dedicated to the master node functionality. For a standalone Elasticsearch, keep the default value as it is.
.
3.3. Installing License Agent on Linux
1. Log in to the Linux server as the root user.
2. Run the mkdir command to create a directory under the /opt directory to place the installation package. For
example, netbraintemp.
3. Run the cd /opt/netbraintemp command to navigate to the /opt/netbraintemp directory.
4. Download the installation package.
Option 1: If the Linux server has no access to the Internet, obtain the netbrain-licenseagent-linux-x86_64-rhel7-8.0.2.tar.gz file from NetBrain and then upload it to the /opt/netbraintemp directory by using a file transfer tool.
Option 2: If the Linux server has access to the Internet, run the wget http://download.netbraintech.com/netbrain-licenseagent-linux-x86_64-rhel7-8.0.2.tar.gz command under the /opt/netbraintemp directory to directly download the file from NetBrain official download site.
Note: The download link is case-sensitive.
Tip: Run the yum -y install wget command to install the wget command if it has not been installed on the server.
24 | NetBrain Integrated Edition 8.0 System Setup Guide (Distributed Deployment)
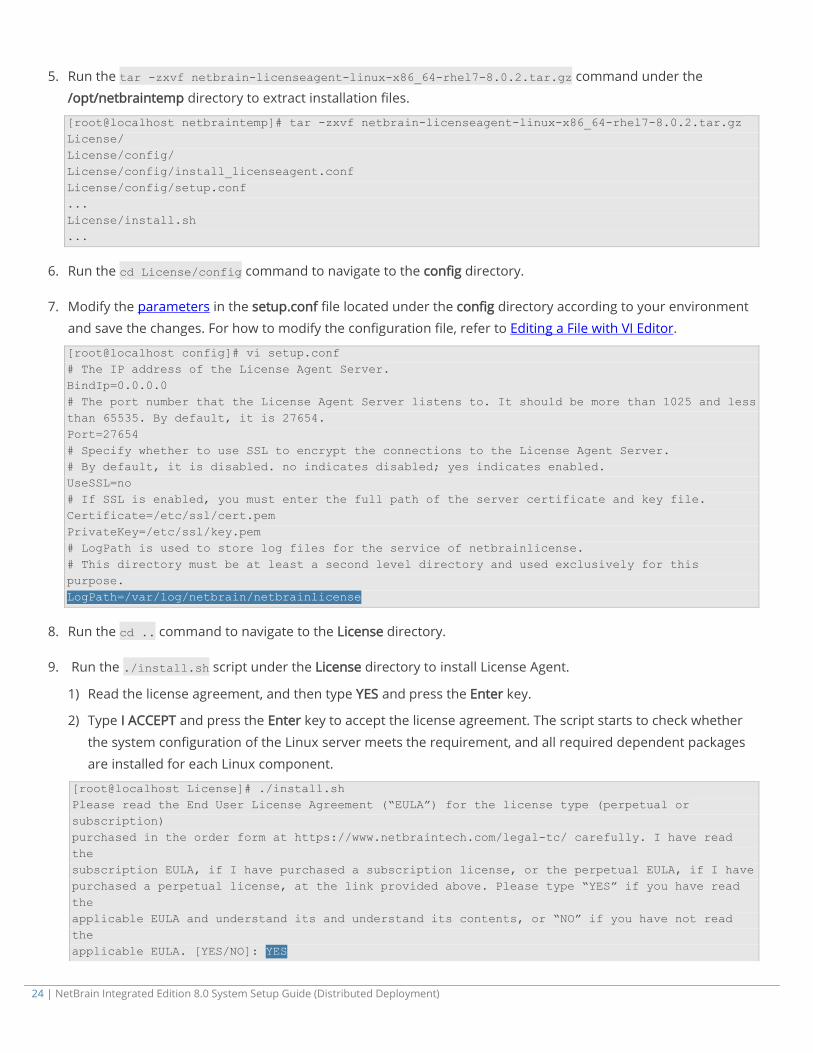
5. Run the tar -zxvf netbrain-licenseagent-linux-x86_64-rhel7-8.0.2.tar.gz command under the /opt/netbraintemp directory to extract installation files.
[root@localhost netbraintemp]# tar -zxvf netbrain-licenseagent-linux-x86_64-rhel7-8.0.2.tar.gz License/ License/config/ License/config/install_licenseagent.conf License/config/setup.conf ... License/install.sh ...
6. Run the cd License/config command to navigate to the config directory.
7. Modify the parameters in the setup.conf file located under the config directory according to your environment and save the changes. For how to modify the configuration file, refer to Editing a File with VI Editor.
[root@localhost config]# vi setup.conf # The IP address of the License Agent Server. BindIp=0.0.0.0 # The port number that the License Agent Server listens to. It should be more than 1025 and less than 65535. By default, it is 27654. Port=27654 # Specify whether to use SSL to encrypt the connections to the License Agent Server. # By default, it is disabled. no indicates disabled; yes indicates enabled. UseSSL=no # If SSL is enabled, you must enter the full path of the server certificate and key file. Certificate=/etc/ssl/cert.pem PrivateKey=/etc/ssl/key.pem # LogPath is used to store log files for the service of netbrainlicense. # This directory must be at least a second level directory and used exclusively for this purpose. LogPath=/var/log/netbrain/netbrainlicense
8. Run the cd .. command to navigate to the License directory.
9. Run the ./install.sh script under the License directory to install License Agent.
1) Read the license agreement, and then type YES and press the Enter key.
2) Type I ACCEPT and press the Enter key to accept the license agreement. The script starts to check whether
the system configuration of the Linux server meets the requirement, and all required dependent packages are installed for each Linux component.
[root@localhost License]# ./install.sh Please read the End User License Agreement (“EULA”) for the license type (perpetual or subscription) purchased in the order form at https://www.netbraintech.com/legal-tc/ carefully. I have read the subscription EULA, if I have purchased a subscription license, or the perpetual EULA, if I have purchased a perpetual license, at the link provided above. Please type “YES” if you have read the applicable EULA and understand its and understand its contents, or “NO” if you have not read the applicable EULA. [YES/NO]: YES

NetBrain Integrated Edition 8.0 System Setup Guide (Distributed Deployment) | 25
Do you accept the terms in the subscription EULA, if you have purchased a subscription license, or the perpetual EULA, if you have purchased a perpetual license? If you accept, and to continue with the installation, please type "I Accept" to continue. If you do not accept, and to quit the installation script, please type "CANCEL" to stop. [I ACCEPT/CANCEL]: I ACCEPT INFO: Creating installation log file... INFO: Dependent Package: INFO: Component Name: LicenseAgent INFO: RPM name: netbrainlicense ... INFO: Collecting system information SUCCEEDED. INFO: Starting to check Linux OS info... INFO: Starting to check rpm existence... INFO: Starting to check systemd service... INFO: System checking SUCCEEDED INFO: Dependent packages checking SUCCEEDED INFO: Configuration parameters checking SUCCEEDED INFO: Installing /opt/netbraintemp/License/sources/netbrainlicense-8.0.2-el7.x86_64.rpm Preparing... ######################################## Find configuration file /var/log/netbrain/installationlog/licenseagent/install_licenseagent.conf. Bind IP: 0.0.0.0 License Agent port: 27654 The NetBrain License Agent will not use SSL to communicate. Updating / installing... 1:netbrainlicense-8.0.2-el7 ######################################## Bind IP: 0.0.0.0 License Agent port: 27654 The NetBrain License Agent will not use SSL to communicate. User name: netbrain User group: netbrain NetBrain License Agent Server has been started. Redirecting to /bin/systemctl status firewalld.service Successfully installed NetBrain License Agent. INFO: 2020-01-13 00-26-30.295: Rpm package installing SUCCEEDED. INFO: 2020-01-13 00-26-30.304: Starting permission assigning... INFO: 2020-01-13 00-26-30.359: Permission assigning SUCCEEDED. Created symlink from /etc/systemd/system/multi-user.target.wants/netbrainlicense.service to /usr/lib/systemd/system/netbrainlicense.service. ?netbrainlicense.service - NetBrain license agent service Loaded: loaded (/usr/lib/systemd/system/netbrainlicense.service; enabled; vendor preset: disabled) Active: active (running) since Mon 2020-01-13 00:26:30 EST; 18ms ago Process: 15534 ExecStop=/usr/bin/pkill licensed (code=exited, status=0/SUCCESS) Process: 15540 ExecStart=/usr/bin/netbrainlicense/licensed -f /etc/netbrainlicense/licensed.conf (code=exited, status=0/SUCCESS) Process: 15536 ExecStartPre=/bin/chmod o+r /sys/class/dmi/id/product_uuid (code=exited, status=0/SUCCESS) Main PID: 15541 (licensed) Memory: 1.0M CGroup: /system.slice/netbrainlicense.service 15541 /usr/bin/netbrainlicense/licensed -f /etc/netbrainlicense/licensed.conf
26 | NetBrain Integrated Edition 8.0 System Setup Guide (Distributed Deployment)
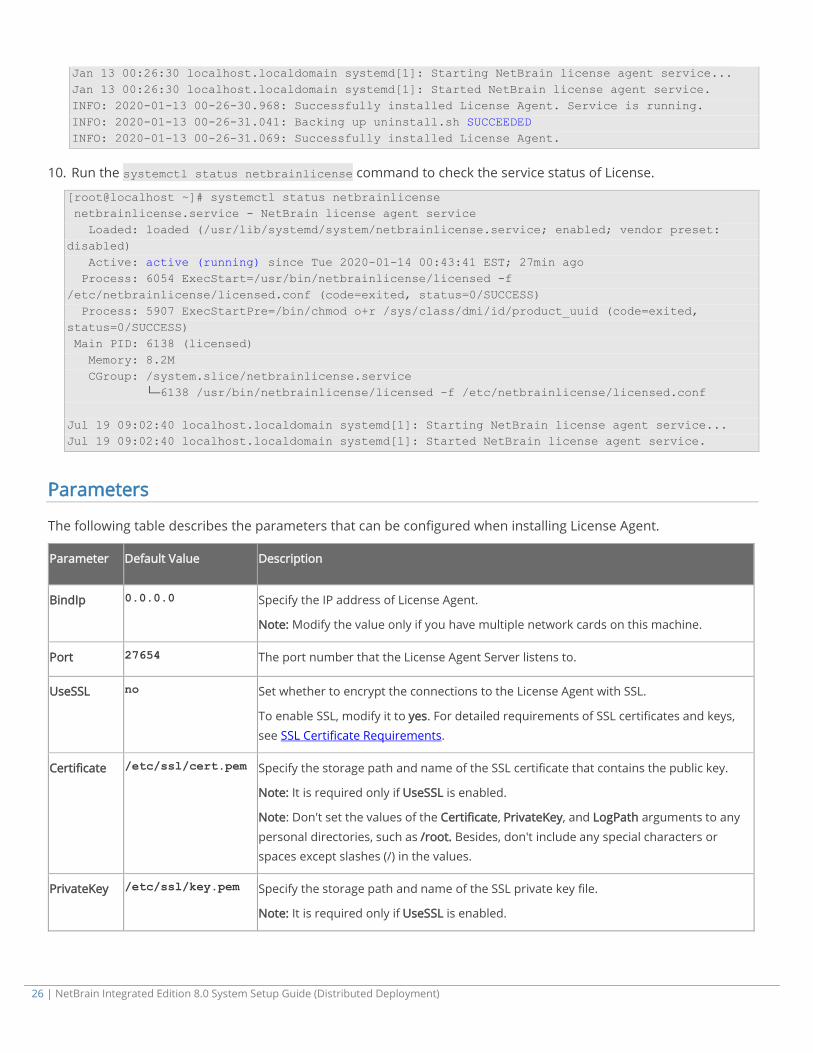
Jan 13 00:26:30 localhost.localdomain systemd[1]: Starting NetBrain license agent service... Jan 13 00:26:30 localhost.localdomain systemd[1]: Started NetBrain license agent service. INFO: 2020-01-13 00-26-30.968: Successfully installed License Agent. Service is running. INFO: 2020-01-13 00-26-31.041: Backing up uninstall.sh SUCCEEDED INFO: 2020-01-13 00-26-31.069: Successfully installed License Agent.
10. Run the systemctl status netbrainlicense command to check the service status of License.
[root@localhost ~]# systemctl status netbrainlicense netbrainlicense.service - NetBrain license agent service Loaded: loaded (/usr/lib/systemd/system/netbrainlicense.service; enabled; vendor preset: disabled) Active: active (running) since Tue 2020-01-14 00:43:41 EST; 27min ago Process: 6054 ExecStart=/usr/bin/netbrainlicense/licensed -f /etc/netbrainlicense/licensed.conf (code=exited, status=0/SUCCESS) Process: 5907 ExecStartPre=/bin/chmod o+r /sys/class/dmi/id/product_uuid (code=exited, status=0/SUCCESS) Main PID: 6138 (licensed) Memory: 8.2M CGroup: /system.slice/netbrainlicense.service └─6138 /usr/bin/netbrainlicense/licensed -f /etc/netbrainlicense/licensed.conf Jul 19 09:02:40 localhost.localdomain systemd[1]: Starting NetBrain license agent service... Jul 19 09:02:40 localhost.localdomain systemd[1]: Started NetBrain license agent service.
Parameters
The following table describes the parameters that can be configured when installing License Agent.
Parameter Default Value Description
BindIp 0.0.0.0 Specify the IP address of License Agent.
Note: Modify the value only if you have multiple network cards on this machine.
Port 27654 The port number that the License Agent Server listens to.
UseSSL no Set whether to encrypt the connections to the License Agent with SSL.
To enable SSL, modify it to yes. For detailed requirements of SSL certificates and keys, see SSL Certificate Requirements.
Certificate /etc/ssl/cert.pem Specify the storage path and name of the SSL certificate that contains the public key.
Note: It is required only if UseSSL is enabled.
Note: Don't set the values of the Certificate, PrivateKey, and LogPath arguments to any personal directories, such as /root. Besides, don't include any special characters or spaces except slashes (/) in the values.
PrivateKey /etc/ssl/key.pem Specify the storage path and name of the SSL private key file.
Note: It is required only if UseSSL is enabled.
NetBrain Integrated Edition 8.0 System Setup Guide (Distributed Deployment) | 27
Parameter Default Value Description
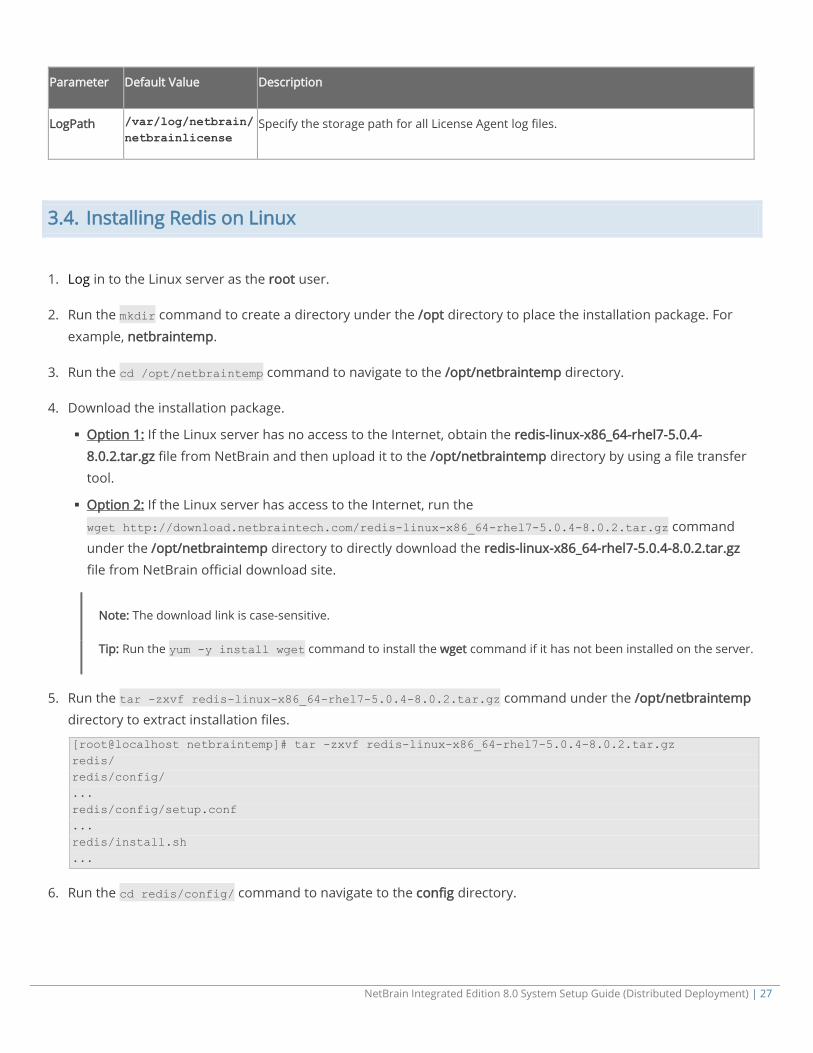
LogPath /var/log/netbrain/netbrainlicense
Specify the storage path for all License Agent log files.
3.4. Installing Redis on Linux
1. Log in to the Linux server as the root user.
2. Run the mkdir command to create a directory under the /opt directory to place the installation package. For
example, netbraintemp.
3. Run the cd /opt/netbraintemp command to navigate to the /opt/netbraintemp directory.
4. Download the installation package.
Option 1: If the Linux server has no access to the Internet, obtain the redis-linux-x86_64-rhel7-5.0.4-8.0.2.tar.gz file from NetBrain and then upload it to the /opt/netbraintemp directory by using a file transfer tool.
Option 2: If the Linux server has access to the Internet, run the wget http://download.netbraintech.com/redis-linux-x86_64-rhel7-5.0.4-8.0.2.tar.gz command under the /opt/netbraintemp directory to directly download the redis-linux-x86_64-rhel7-5.0.4-8.0.2.tar.gz file from NetBrain official download site.
Note: The download link is case-sensitive.
Tip: Run the yum -y install wget command to install the wget command if it has not been installed on the server.
5. Run the tar -zxvf redis-linux-x86_64-rhel7-5.0.4-8.0.2.tar.gz command under the /opt/netbraintemp directory to extract installation files.
[root@localhost netbraintemp]# tar -zxvf redis-linux-x86_64-rhel7-5.0.4-8.0.2.tar.gz redis/ redis/config/ ... redis/config/setup.conf ... redis/install.sh ...
6. Run the cd redis/config/ command to navigate to the config directory.
28 | NetBrain Integrated Edition 8.0 System Setup Guide (Distributed Deployment)
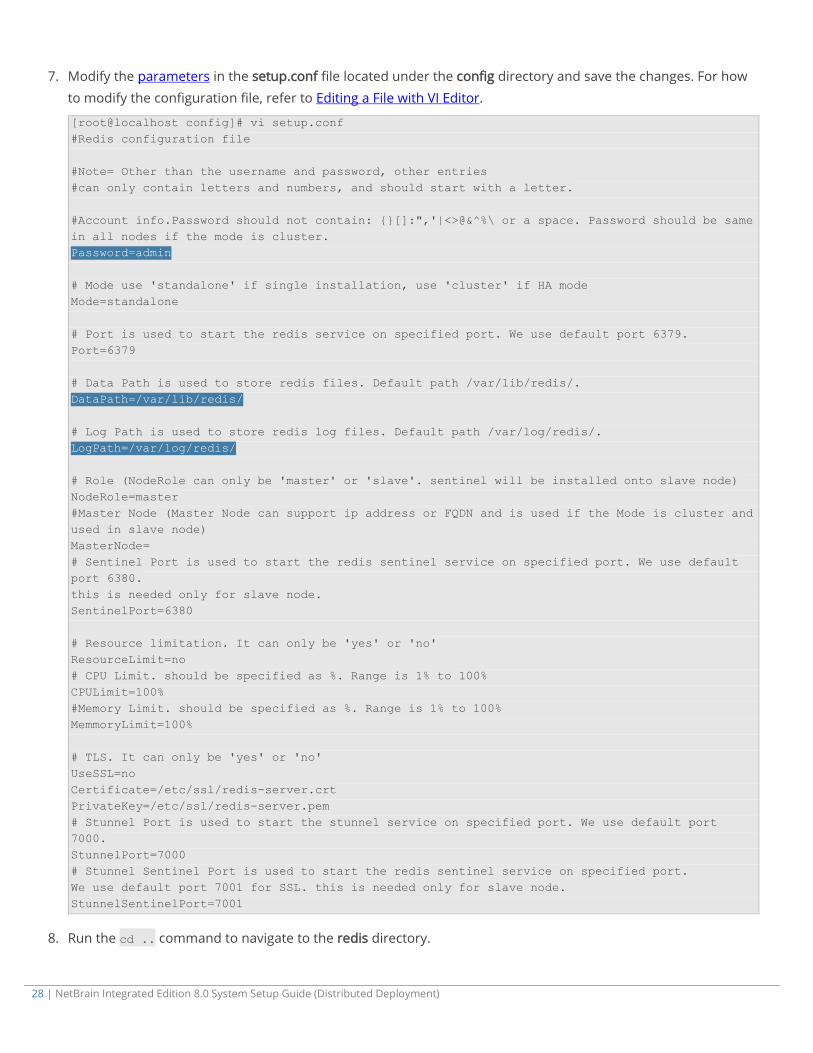
7. Modify the parameters in the setup.conf file located under the config directory and save the changes. For how to modify the configuration file, refer to Editing a File with VI Editor.
[root@localhost config]# vi setup.conf #Redis configuration file #Note= Other than the username and password, other entries #can only contain letters and numbers, and should start with a letter. #Account info.Password should not contain: {}[]:",'|<>@&^%\ or a space. Password should be same in all nodes if the mode is cluster. Password=admin # Mode use 'standalone' if single installation, use 'cluster' if HA mode Mode=standalone # Port is used to start the redis service on specified port. We use default port 6379. Port=6379 # Data Path is used to store redis files. Default path /var/lib/redis/. DataPath=/var/lib/redis/ # Log Path is used to store redis log files. Default path /var/log/redis/. LogPath=/var/log/redis/ # Role (NodeRole can only be 'master' or 'slave'. sentinel will be installed onto slave node) NodeRole=master #Master Node (Master Node can support ip address or FQDN and is used if the Mode is cluster and used in slave node) MasterNode= # Sentinel Port is used to start the redis sentinel service on specified port. We use default port 6380. this is needed only for slave node. SentinelPort=6380 # Resource limitation. It can only be 'yes' or 'no' ResourceLimit=no # CPU Limit. should be specified as %. Range is 1% to 100% CPULimit=100% #Memory Limit. should be specified as %. Range is 1% to 100% MemmoryLimit=100% # TLS. It can only be 'yes' or 'no' UseSSL=no Certificate=/etc/ssl/redis-server.crt PrivateKey=/etc/ssl/redis-server.pem # Stunnel Port is used to start the stunnel service on specified port. We use default port 7000. StunnelPort=7000 # Stunnel Sentinel Port is used to start the redis sentinel service on specified port. We use default port 7001 for SSL. this is needed only for slave node. StunnelSentinelPort=7001
8. Run the cd .. command to navigate to the redis directory.
NetBrain Integrated Edition 8.0 System Setup Guide (Distributed Deployment) | 29
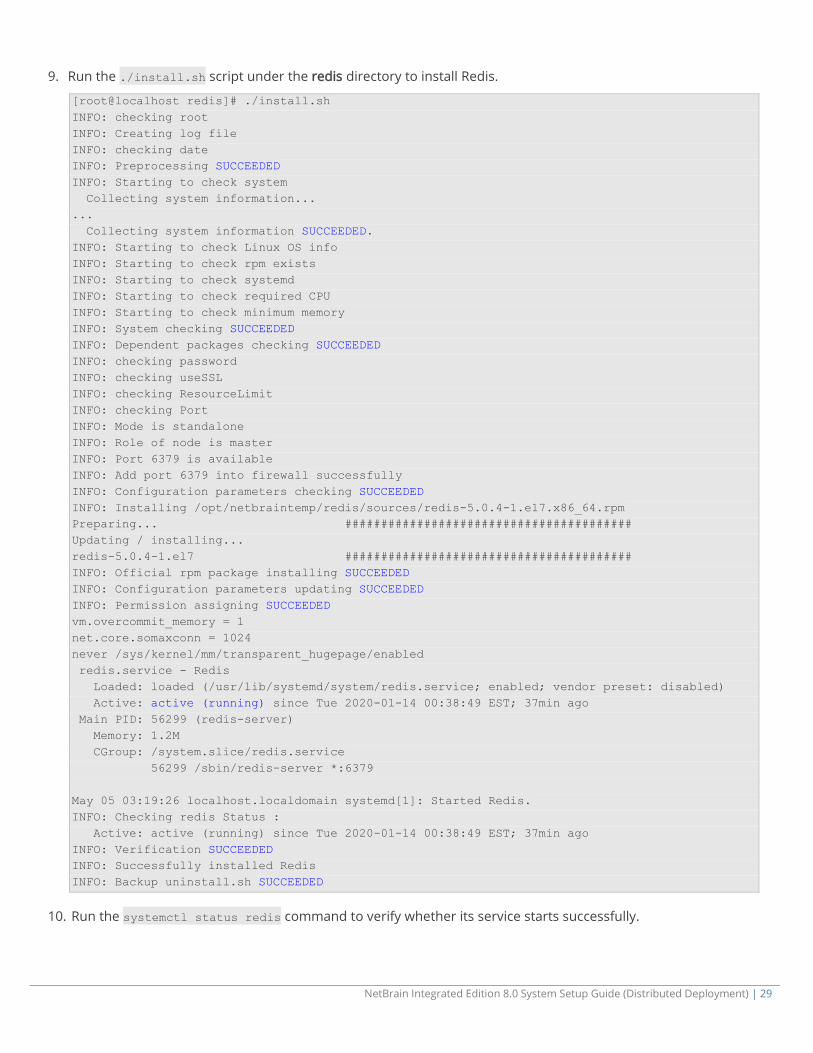
9. Run the ./install.sh script under the redis directory to install Redis.
[root@localhost redis]# ./install.sh INFO: checking root INFO: Creating log file INFO: checking date INFO: Preprocessing SUCCEEDED INFO: Starting to check system Collecting system information... ... Collecting system information SUCCEEDED. INFO: Starting to check Linux OS info INFO: Starting to check rpm exists INFO: Starting to check systemd INFO: Starting to check required CPU INFO: Starting to check minimum memory INFO: System checking SUCCEEDED INFO: Dependent packages checking SUCCEEDED INFO: checking password INFO: checking useSSL INFO: checking ResourceLimit INFO: checking Port INFO: Mode is standalone INFO: Role of node is master INFO: Port 6379 is available INFO: Add port 6379 into firewall successfully INFO: Configuration parameters checking SUCCEEDED INFO: Installing /opt/netbraintemp/redis/sources/redis-5.0.4-1.e17.x86_64.rpm Preparing... ######################################## Updating / installing... redis-5.0.4-1.el7 ######################################## INFO: Official rpm package installing SUCCEEDED INFO: Configuration parameters updating SUCCEEDED INFO: Permission assigning SUCCEEDED vm.overcommit_memory = 1 net.core.somaxconn = 1024 never /sys/kernel/mm/transparent_hugepage/enabled redis.service - Redis Loaded: loaded (/usr/lib/systemd/system/redis.service; enabled; vendor preset: disabled) Active: active (running) since Tue 2020-01-14 00:38:49 EST; 37min ago Main PID: 56299 (redis-server) Memory: 1.2M CGroup: /system.slice/redis.service 56299 /sbin/redis-server *:6379 May 05 03:19:26 localhost.localdomain systemd[1]: Started Redis. INFO: Checking redis Status : Active: active (running) since Tue 2020-01-14 00:38:49 EST; 37min ago INFO: Verification SUCCEEDED INFO: Successfully installed Redis INFO: Backup uninstall.sh SUCCEEDED
10. Run the systemctl status redis command to verify whether its service starts successfully.

30 | NetBrain Integrated Edition 8.0 System Setup Guide (Distributed Deployment)
[root@localhost ~]# systemctl status redis redis.service - Redis Loaded: loaded (/usr/lib/systemd/system/redis.service; enabled; vendor preset: disabled) Active: active (running) since Tue 2020-01-14 00:38:49 EST; 37min ago Main PID: 52318 (redis-server) Memory: 7.7M ...
Note: When your disk space is insufficient for large amounts of logs, you can modify the log settings in the redis.conf file under the /etc/logrotate directory.
Tip: It is highly recommended to run the rm -rf /opt/netbraintemp/redis/config/setup.conf command to
delete the setup.conf file from the server after Redis is successfully installed because the file may cause security vulnerability.
Parameters
The following table describes the parameters that can be configured when installing Redis.
Parameter Default Value Description
Password admin Specify the admin password used to connect to Redis.
Note: The password cannot contain any of the following special characters, and its length cannot exceed 64 characters. { } [ ] : " , ' | < > @ & ^ % \ and spaces
Mode standalone Set whether to enable cluster deployment. Keep the default value for a standalone deployment.
Port 6379 Specify the port number that the master Redis node listens to.
DataPath /var/lib/redis/ Specify the storage path for all data files of Redis.
LogPath /var/log/redis/ Specify the storage path for all log files of Redis.
NodeRole master Set the role for the current node. Available options are master, slave, and sentinel. Keep the default value for a standalone deployment.
MasterNode This parameter is only required for cluster deployments.
SentinelPort 6380 The port number that the slave or sentinel Redis node listens to.
ResourceLimit no Set whether to limit the system resource usage for Redis.
CPULimit 100% The maximum CPU utilization of the machine that can be consumed by Redis.
MemoryLimit 100% The maximum memory capacity of the machine that can be consumed by Redis.

NetBrain Integrated Edition 8.0 System Setup Guide (Distributed Deployment) | 31
Parameter Default Value Description
UseSSL no Set whether to enable the encrypted connections to Redis by using SSL.
Note: Redis itself does not support SSL. It uses stunnel as an SSL service agent. Stunnel will be automatically installed together with Redis. For detailed requirements of SSL certificates and keys, refer to SSL Certificate Requirements.
Certificate /etc/ssl/redis-server.crt
Specify the storage path for all the certificates and key files used for SSL authentication.
Note: It is required only if UseSSL is enabled.
PrivateKey /etc/ssl/redis-server.pem
Specify the name of SSL private key file.
Note: It is required only if UseSSL is enabled.
StunnelPort 7000 Specify the port number for stunnel to establish an SSL encrypted tunnel on the master and slave Redis node.
Note: It is required only if UseSSL is enabled.
StunnelSentinelPort
7001 Specify the port number for stunnel to establish an SSL encrypted tunnel on the sentinel Redis node.
Note: It is required only if UseSSL is enabled.
3.5. Installing RabbitMQ on Linux
Pre-installation Tasks
Ensure the hostname of the Linux server must be resolvable by DNS or configured in /etc/hosts because
RabbitMQ needs a resolvable hostname no matter whether it is a standalone server or a cluster.
RabbitMQ has dependencies on the third-party package socat and logrotate. Before you install the RabbitMQ,
run the rpm -qa|grep socat and rpm -qa|grep logrotate commands to check whether they have been installed on the server. If they have not been installed yet, you can choose either option below to install the dependencies.
o Online Install: run the yum -y install socat and yum -y install logrotate commands to install them
online.
o Offline Install: refer to Offline Installing Third-party Dependencies for more details.
Installing RabbitMQ on Linux
1. Log in to the Linux server as the root user.
32 | NetBrain Integrated Edition 8.0 System Setup Guide (Distributed Deployment)
2. Run the mkdir command to create a directory under the /opt directory to place the installation package. For
example, netbraintemp.
3. Run the cd /opt/netbraintemp command to navigate to the /opt/netbraintemp directory.
4. Download the installation package.
Option 1: If the Linux server has no access to the Internet, obtain the rabbitmq-linux-x86_64-rhel7-3.8.1-8.0.2.tar.gz file from NetBrain and then upload it to the /opt/netbraintemp directory by using a file transfer tool.
Option 2: If the Linux server has access to the Internet, run the wget http://download.netbraintech.com/rabbitmq-linux-x86_64-rhel7-3.8.1-8.0.2.tar.gz command under the /opt/netbraintemp directory to directly download the rabbitmq-linux-x86_64-rhel7-3.8.1-8.0.2.tar.gz file from NetBrain official download site.
Note: The download link is case-sensitive.
Tip: Run the yum -y install wget command to install the wget command if it has not been installed on the server.
5. Run the tar -zxvf rabbitmq-linux-x86_64-rhel7-3.8.1-8.0.2.tar.gz command under the /opt/netbraintemp directory to extract installation files.
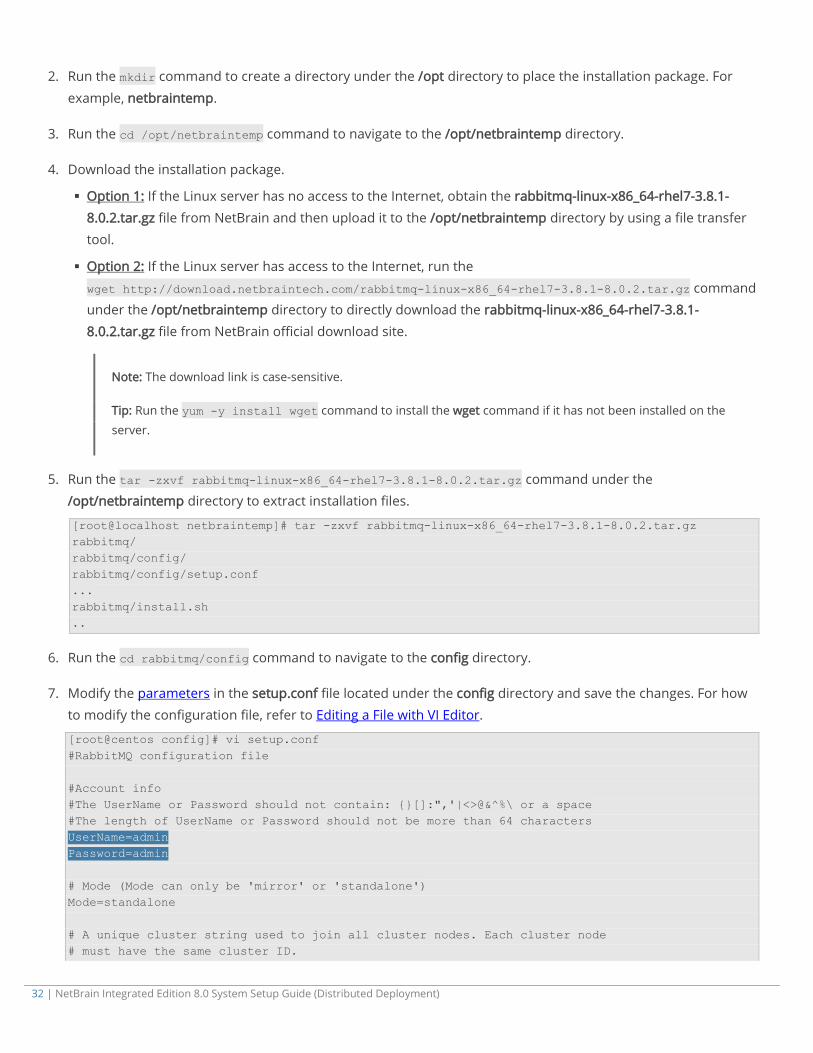
[root@localhost netbraintemp]# tar -zxvf rabbitmq-linux-x86_64-rhel7-3.8.1-8.0.2.tar.gz rabbitmq/ rabbitmq/config/ rabbitmq/config/setup.conf ... rabbitmq/install.sh ..
6. Run the cd rabbitmq/config command to navigate to the config directory.
7. Modify the parameters in the setup.conf file located under the config directory and save the changes. For how to modify the configuration file, refer to Editing a File with VI Editor.
[root@centos config]# vi setup.conf #RabbitMQ configuration file #Account info #The UserName or Password should not contain: {}[]:",'|<>@&^%\ or a space #The length of UserName or Password should not be more than 64 characters UserName=admin Password=admin # Mode (Mode can only be 'mirror' or 'standalone') Mode=standalone # A unique cluster string used to join all cluster nodes. Each cluster node # must have the same cluster ID.

NetBrain Integrated Edition 8.0 System Setup Guide (Distributed Deployment) | 33
ClusterId=rabbitmqcluster # The role of the current node in the cluster. Two roles can be configured: # master or slave. If the role of the current node is slave, you must specify # the hostname of the master node in MasterNode. NodeRole=master MasterNode=localhost # Resource limitation ResourceLimit=no # CPULimit and MemoryLimit should be ended by % and the range is from 1% to 100% CPULimit=100% MemLimit=100% # TLS UseSSL=no CertFile=/etc/ssl/rabbitmq/cert.pem KeyFile=/etc/ssl/rabbitmq/key.pem # Port TcpPort=5672 # Log path LogPath=/var/log/rabbitmq
8. Run the cd .. command to navigate to the rabbitmq directory.
9. Run the ./install.sh script under the rabbitmq directory to install RabbitMQ.
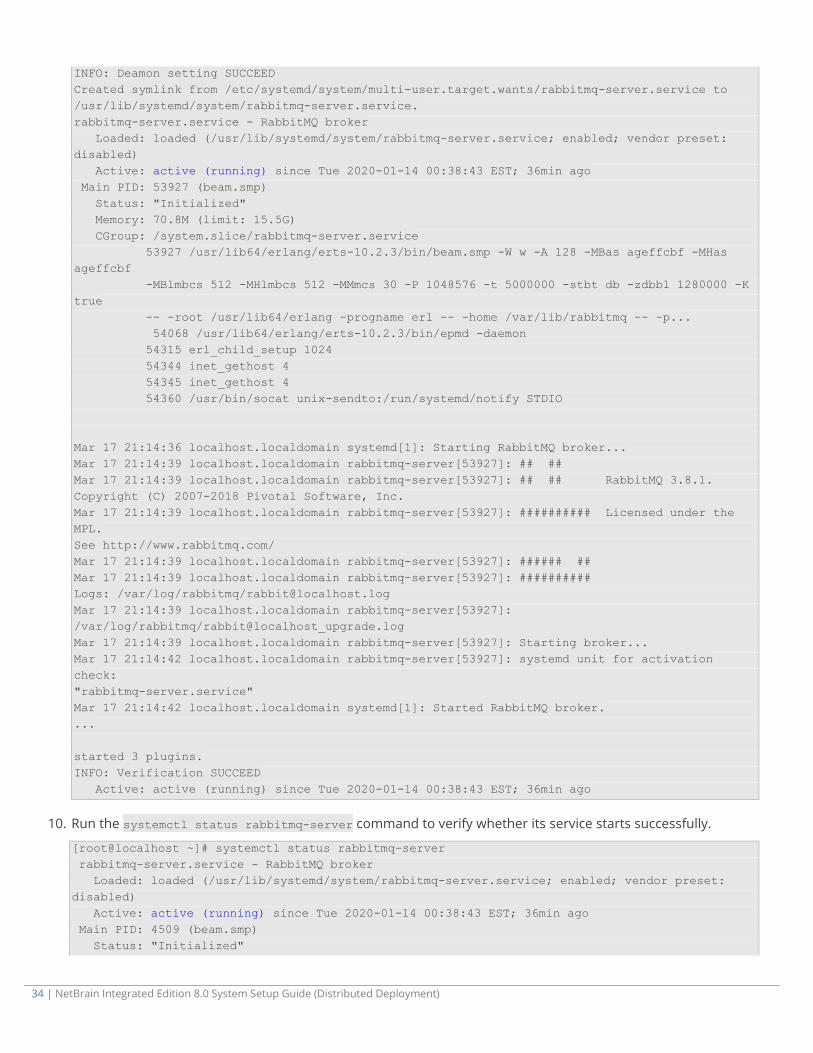
[root@localhost rabbitmq]# ./install.sh INFO: Creating installation log file INFO: Preprocessing SUCCEED INFO: Start checking system Collecting system information... ... Collecting system information SUCCEEDED. ... warning: /opt/netbraintemp/rabbitmq/sources/erlang-21.2.4-1.el7.centos.x86_64.rpm: Header V4 RSA/SHA1 Signature, key ID 6026dfca: NOKEY Preparing... ######################################## Updating / installing... erlang-21.2.4-1.el7.centos ######################################## INFO: Installing /opt/netbraintemp/rabbitmq/sources/rabbitmq-server-3.8.1-1.el7.noarch.rpm warning: /opt/netbraintemp/rabbitmq/sources/rabbitmq-server-3.8.1-1.el7.noarch.rpm: Header V4 RSA/SHA1 Signature, key ID 6026dfca: NOKEY Preparing... ######################################## Updating / installing... rabbitmq-server-3.8.1-1.el7 ######################################## INFO: Official rpm package installing SUCCEEDED INFO: Configuration parameters updating SUCCEEDED INFO: Permission setting SUCCEED
34 | NetBrain Integrated Edition 8.0 System Setup Guide (Distributed Deployment)
INFO: Deamon setting SUCCEED Created symlink from /etc/systemd/system/multi-user.target.wants/rabbitmq-server.service to /usr/lib/systemd/system/rabbitmq-server.service. rabbitmq-server.service - RabbitMQ broker Loaded: loaded (/usr/lib/systemd/system/rabbitmq-server.service; enabled; vendor preset: disabled) Active: active (running) since Tue 2020-01-14 00:38:43 EST; 36min ago Main PID: 53927 (beam.smp) Status: "Initialized" Memory: 70.8M (limit: 15.5G) CGroup: /system.slice/rabbitmq-server.service 53927 /usr/lib64/erlang/erts-10.2.3/bin/beam.smp -W w -A 128 -MBas ageffcbf -MHas ageffcbf -MBlmbcs 512 -MHlmbcs 512 -MMmcs 30 -P 1048576 -t 5000000 -stbt db -zdbbl 1280000 -K true -- -root /usr/lib64/erlang -progname erl -- -home /var/lib/rabbitmq -- -p... 54068 /usr/lib64/erlang/erts-10.2.3/bin/epmd -daemon 54315 erl_child_setup 1024 54344 inet_gethost 4 54345 inet_gethost 4 54360 /usr/bin/socat unix-sendto:/run/systemd/notify STDIO Mar 17 21:14:36 localhost.localdomain systemd[1]: Starting RabbitMQ broker... Mar 17 21:14:39 localhost.localdomain rabbitmq-server[53927]: ## ## Mar 17 21:14:39 localhost.localdomain rabbitmq-server[53927]: ## ## RabbitMQ 3.8.1. Copyright (C) 2007-2018 Pivotal Software, Inc. Mar 17 21:14:39 localhost.localdomain rabbitmq-server[53927]: ########## Licensed under the MPL. See http://www.rabbitmq.com/ Mar 17 21:14:39 localhost.localdomain rabbitmq-server[53927]: ###### ## Mar 17 21:14:39 localhost.localdomain rabbitmq-server[53927]: ########## Logs: /var/log/rabbitmq/[email protected] Mar 17 21:14:39 localhost.localdomain rabbitmq-server[53927]: /var/log/rabbitmq/rabbit@localhost_upgrade.log Mar 17 21:14:39 localhost.localdomain rabbitmq-server[53927]: Starting broker... Mar 17 21:14:42 localhost.localdomain rabbitmq-server[53927]: systemd unit for activation check: "rabbitmq-server.service" Mar 17 21:14:42 localhost.localdomain systemd[1]: Started RabbitMQ broker. ... started 3 plugins. INFO: Verification SUCCEED Active: active (running) since Tue 2020-01-14 00:38:43 EST; 36min ago
10. Run the systemctl status rabbitmq-server command to verify whether its service starts successfully.
[root@localhost ~]# systemctl status rabbitmq-server rabbitmq-server.service - RabbitMQ broker Loaded: loaded (/usr/lib/systemd/system/rabbitmq-server.service; enabled; vendor preset: disabled) Active: active (running) since Tue 2020-01-14 00:38:43 EST; 36min ago Main PID: 4509 (beam.smp) Status: "Initialized"

NetBrain Integrated Edition 8.0 System Setup Guide (Distributed Deployment) | 35
Memory: 96.5M ...
Tip: It is highly recommended to run the rm -rf /opt/netbraintemp/rabbitmq/config/setup.conf command to delete the setup.conf file from the server after RabbitMQ is successfully installed because the file may cause security vulnerability.
Parameters
The following table describes the parameters that can be configured when installing RabbitMQ.
Parameter Default Value Description
Username admin Specify the admin username used to connect to RabbitMQ.
Note: The username and password cannot contain any of the following special characters, and its length cannot exceed 64 characters. { } [ ] : " , ' | < > @ & ^ % \ and spaces
Password admin Specify the admin password used to connect to RabbitMQ.
Mode standalone Set whether to enable cluster deployment.
Modify it to standalone for a standalone deployment.
ClusterId rabbitmqcluster Specify the cluster id used by all nodes to join the cluster. This parameter is required only for cluster deployments.
NodeRole master Set the role for the current node. Available options are master and slave.
Keep the default value for a standalone deployment.
MasterNode localhost This parameter is only required for cluster deployments.
Keep the default value as it is for a standalone deployment.
ResourceLimit no Set whether to limit the system resource usage for RabbitMQ.
CPULimit 100% Specify the maximum CPU utilization of the machine that can be consumed by RabbitMQ.
MemoryLimit 100% Specify the maximum memory capacity of the machine that can be consumed by RabbitMQ.
UseSSL no Set whether to enable the encrypted connections to RabbitMQ by using SSL.
Tip: If UseSSL is set to yes, you can follow the steps below to modify the RabbitMQ Plugin config file after the service monitor is installed.

36 | NetBrain Integrated Edition 8.0 System Setup Guide (Distributed Deployment)
Parameter Default Value Description
1) Run the vi /etc/netbrain/nbagent/check/rabbitmq.yaml command to open the RabbitMQ Plugin config file.
2) Set the ssl value to true and save the changes. For how to modify the configuration file, see Editing a File with VI Editor for more details. [root@localhost check]# vi rabbitmq.yaml init_config: instances: - name: default managementPort: 15672, checkAvailableIntervalSeconds: 300 ssl: true collectQueues: equal: [] startWith: ['FullTextSearch','TaskManager','event_callback','RMClientCallback','ETL_Task'] endWith: ['IndexDriver']
Certificate /etc/ssl/cert.pem Specify the storage path for all the certificates and key files used for SSL authentication.
Note: It is required only if UseSSL is enabled.
PrivateKey /etc/ssl/key.pem Specify the name of SSL private key file.
Note: It is required only if UseSSL is enabled.
TcpPort 5672 Specify the port number that RabbitMQ service listens to.
LogPath /var/log/rabbitmq Specify the directory to save logs of RabbitMQ.
3.6. Installing Web/Web API Server on Windows
Note: Web/Web API Servers are integrated into one installation package with Worker Server. It is highly recommended to
install Worker Server on a standalone machine after the installation of Web/Web API Server. See Installing Worker Server on Windows for more details.
Note: It is highly recommended that the extended memory of your machine is larger than 16GB.
Note: Existing Internet Information Services (IIS) must be removed, and the FIPS setting must be disabled by modifying the Enabled value to 0 under the HKEY_LOCAL_MACHINE\SYSTEM\CurrentControlSet\Control\Lsa\FipsAlgorithmPolicy
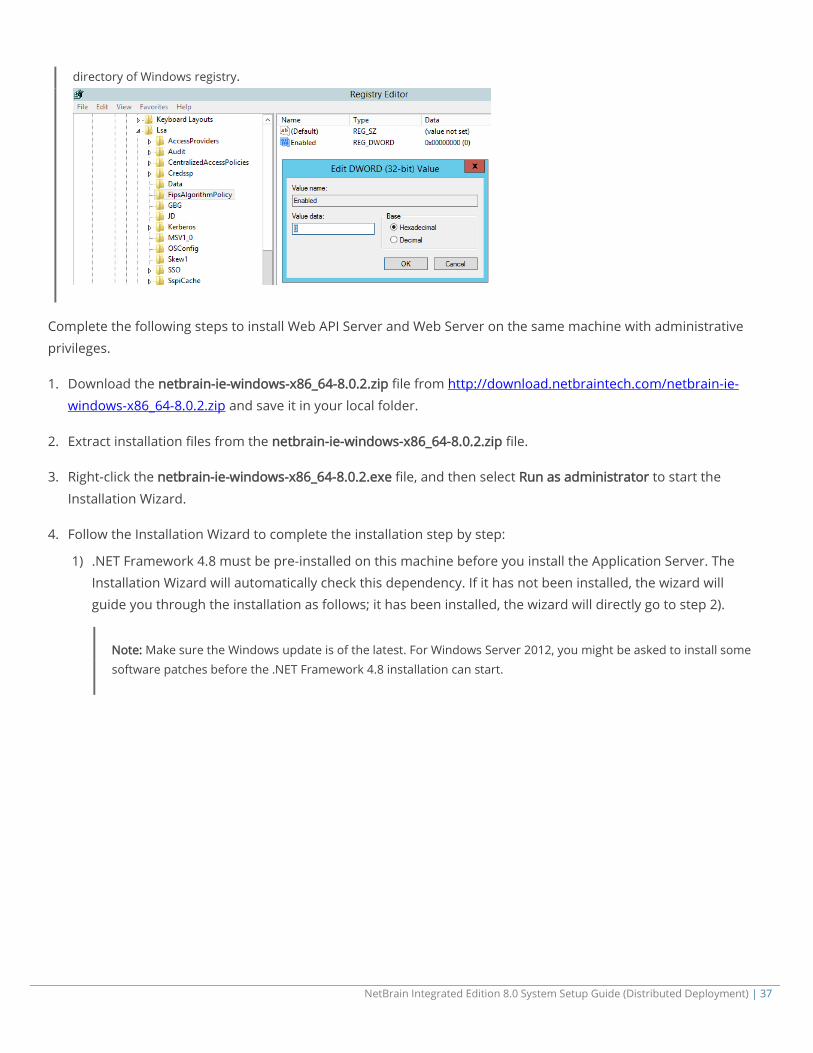
NetBrain Integrated Edition 8.0 System Setup Guide (Distributed Deployment) | 37
directory of Windows registry.
Complete the following steps to install Web API Server and Web Server on the same machine with administrative
privileges.
1. Download the netbrain-ie-windows-x86_64-8.0.2.zip file from http://download.netbraintech.com/netbrain-ie-
windows-x86_64-8.0.2.zip and save it in your local folder.
2. Extract installation files from the netbrain-ie-windows-x86_64-8.0.2.zip file.
3. Right-click the netbrain-ie-windows-x86_64-8.0.2.exe file, and then select Run as administrator to start the
Installation Wizard.
4. Follow the Installation Wizard to complete the installation step by step:
1) .NET Framework 4.8 must be pre-installed on this machine before you install the Application Server. The Installation Wizard will automatically check this dependency. If it has not been installed, the wizard will guide you through the installation as follows; it has been installed, the wizard will directly go to step 2).
Note: Make sure the Windows update is of the latest. For Windows Server 2012, you might be asked to install some software patches before the .NET Framework 4.8 installation can start.

38 | NetBrain Integrated Edition 8.0 System Setup Guide (Distributed Deployment)
a) Click Install.
b) Read the license agreement of Microsoft .NET Framework 4.8, select the I have read and accept the
license terms check box and click Install. It might take a few minutes for the installation to be completed.
Note: Some running applications must be closed during the installation of .NET Framework 4.8, such as Server Manager.
NetBrain Integrated Edition 8.0 System Setup Guide (Distributed Deployment) | 39
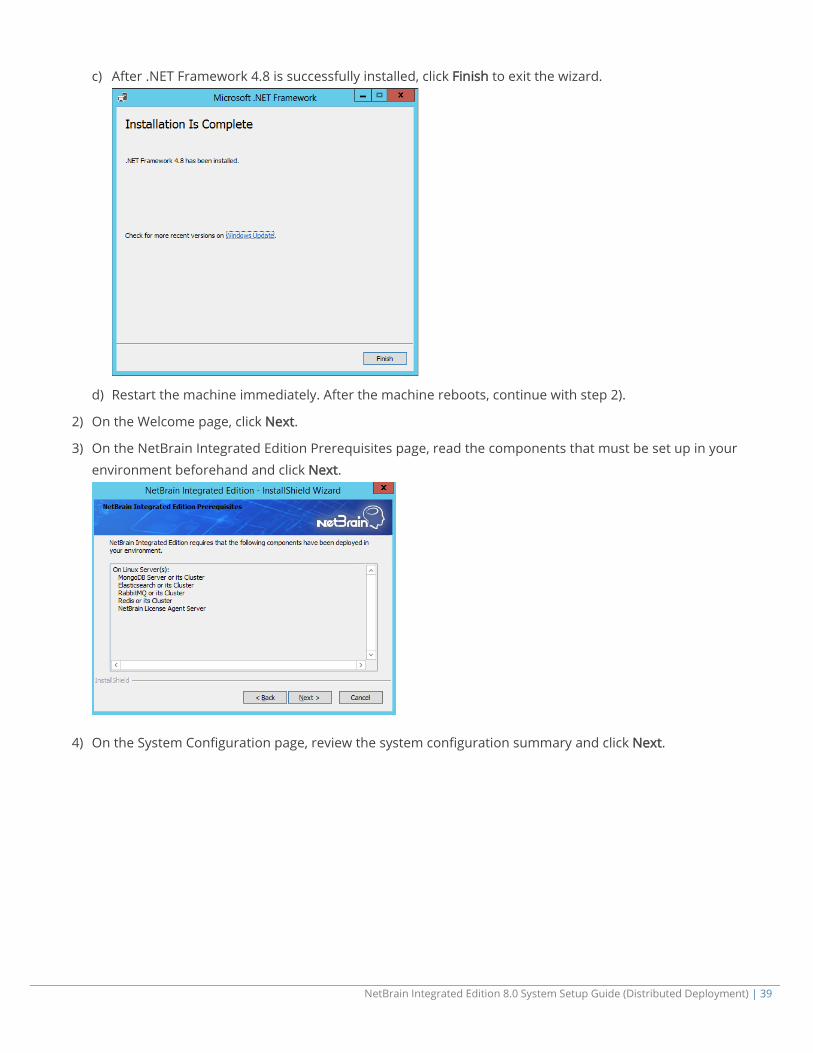
c) After .NET Framework 4.8 is successfully installed, click Finish to exit the wizard.
d) Restart the machine immediately. After the machine reboots, continue with step 2).
2) On the Welcome page, click Next.
3) On the NetBrain Integrated Edition Prerequisites page, read the components that must be set up in your environment beforehand and click Next.
4) On the System Configuration page, review the system configuration summary and click Next.

40 | NetBrain Integrated Edition 8.0 System Setup Guide (Distributed Deployment)
5) On the License Agreement page, read the license agreements, select the I have read and accept the license terms check box and then click I ACCEPT.
6) On the Customer Information page, enter your company name, and then click Next.
7) On the Destination Location page, click Next to install the Web Server and Web API Server under the
default directory C:\Program Files\NetBrain\. If you want to install them under another location, click Change.
8) Select both the Web API Service and Web Server check boxes, and then click Next.

NetBrain Integrated Edition 8.0 System Setup Guide (Distributed Deployment) | 41
9) On the MongoDB Server Connection page, enter the following information to connect to MongoDB and then click Next.
Address — enter the IP address of MongoDB and the corresponding port number. By default, the port number is 27017.
Tip: You can enter the fully qualified domain name (FQDN) of MongoDB if all NetBrain servers are managed in the same domain. For example, test.netbraintech.com:27017.
User Name — enter the username that you created when installing MongoDB.
Password — enter the password that you created when installing MongoDB.
Replica Set Name — enter the replica set name of MongoDB. Keep the default value rs as it is.
Use SSL — used to encrypt the connections to MongoDB with SSL. If SSL is enabled on MongoDB, select this check box; otherwise, leave it unchecked.
10) On the License Agent Server Information page, enter the following information to connect to License
Agent, and then click Next.
License Agent port — the port number that the service of License Agent Server listens to. By default, it is 27654.

42 | NetBrain Integrated Edition 8.0 System Setup Guide (Distributed Deployment)
Use SSL — used to encrypt the connections to License Agent Server with SSL. If SSL is enabled on License Agent Server, select it; otherwise, leave it unchecked.
11) On the Elasticsearch Connection page, enter the following information to connect to Elasticsearch, and then click Next.
Address — enter the IP address of Elasticsearch and the corresponding port number. For example,
10.10.3.142:9200.
Note: If a proxy server is configured on this machine to access the Internet, you must add the IP address and port number of Elasticsearch into the proxy exception list of the web browser, to ensure this NetBrain server can communicate with Elasticsearch.
Tip: You can enter the FQDN of Elasticsearch if all NetBrain servers are managed in the same domain. For example, test.netbraintech.com:9200.
User Name — enter the username that you created when installing Elasticsearch.
Password — enter the password that you created when installing Elasticsearch.
Use SSL — used to encrypt the connections to Elasticsearch with SSL. If SSL is enabled on Elasticsearch,
select it; otherwise, leave it unchecked.

NetBrain Integrated Edition 8.0 System Setup Guide (Distributed Deployment) | 43
12) On the RabbitMQ Connection page, enter the following information to connect to RabbitMQ, and then click Next.
Address — enter the IP address of RabbitMQ.
Tip: You can enter the FQDN of RabbitMQ if all NetBrain servers are managed in the same domain.
User Name — enter the admin username that you created when installing RabbitMQ.
Password — enter the admin password corresponding to the username that you created when installing RabbitMQ.
Port Number — enter the port number used by RabbitMQ to communicate with Web API Server, Worker Server, and Task Engine. By default, it is 5672.
Use SSL — used to encrypt the connections to RabbitMQ with SSL. If SSL is enabled on RabbitMQ, select it; otherwise, leave it unchecked.
13) On the Redis Connection page. enter the following information to connect to Redis, and then click Next.
Master Address — enter the IP address of Redis.

44 | NetBrain Integrated Edition 8.0 System Setup Guide (Distributed Deployment)
Tip: You can enter the FQDN of Redis if all NetBrain servers are managed in the same domain.
Password — enter the admin password that you created when installing Redis.
Use SSL — used to encrypt the connections to Redis with SSL. If SSL is enabled on Redis, select it; otherwise, leave it unchecked.
Redis Port — enter the port number used by Redis to communicate with Web API Server, Worker Server,
and Front Server Controller. By default, it is 6379.
Stunnel Port — required only if Use SSL is enabled. Enter the port number of the secure stunnel used to forward all traffics on Redis. By default, it is 7000.
Use Sentinel — required only if you set up a Redis Cluster. Leave it unchecked.
14) (Required only if the Use SSL check box is selected when configuring the connections to MongoDB, License Agent, Elasticsearch, RabbitMQ, or Redis.) Configure whether to authenticate the Certificate Authority (CA) of the SSL certificates used on these servers, and then click Next.
To authenticate CA:
a) Select the Conduct Certificate Authority verification check box.
b) If the CA has not been installed on this machine, click Browse to import the CA certificate file, for
example, ca.pem; otherwise, select I have already installed the Certificate Authority on this machine.
Note: Only the certificate in Base-64 encoded X.509 PEM format is supported.
Note: The following conditions must be met if you select I have already installed the Certificate Authority on this machine: - The CA certificate must contain CRL Distribution Points property with valid CRL HTTP distribution point URL. (CRL stands for Certificate Revocation List.) - The CRL Distribution Points URL must be accessible to Web Server/Worker Server. - Internet access must be ensured if the certificate is signed by third-party CA.

NetBrain Integrated Edition 8.0 System Setup Guide (Distributed Deployment) | 45
15) On the KeyVault Administration Passphrase Settings page, create a passphrase to initialize and manage the system KeyVault which contains all encryption keys to protect data security. Type it twice and click Next.
Tip: The passphrase must contain at least one uppercase letter, one lowercase letter, one number, and one special character, and the minimum permissible length is 8 characters. All special characters except for the quotation mark (") are allowed.
Note: Keep notes of the passphrase because it is required when you scale up or upgrade the Application Server. In case of losing the passphrase, keep the Enable Resetting KVAP check box selected so that NetBrain system admin can reset the passphrase at any time.
16) On the Web API Server Configuration page, create an API key for Web API Server to verify the connection request from Service Monitor Agent. Type it twice and click Next.
17) Review the summary of the installation settings and click Install.
5. After successfully installing the Web Server and Web API Server, click Finish to complete the installation process
and exit the Installation Wizard.
6. Open the IIS Manager to check that the Default Web Site and ServicesAPI service exist.
46 | NetBrain Integrated Edition 8.0 System Setup Guide (Distributed Deployment)
7. Open the Task Manager to check that the NetBrainKCProxy service is running.
Tip: To have the required configurations auto-populated during the installation of other system components, you can copy the NBIEInstall folder from the C:\ drive of this machine directly to the C:\ drive of the machines where Worker Server, Task Engine, and Front Server Controller will be installed.
3.7. Installing Worker Server on Windows
Depending on your network scale, you can deploy either a standalone Worker Server or multiple for load
balancing.
Note: Worker Server is integrated into one installation package with Web/Web API Servers. It is highly recommended to install Worker Server on a standalone machine after the installation of Web/Web API Server.
Note: Don’t install multiple Worker Servers at the same time; install them one after another on separate machines. Otherwise, it will cause the database initialization failure.
Note: It is highly recommended that the extended memory of your machine is larger than 16GB.
Complete the following steps with administrative privileges.
1. Download the netbrain-ie-windows-x86_64-8.0.2.zip file from http://download.netbraintech.com/netbrain-ie-
windows-x86_64-8.0.2.zip and save it in your local folder.
2. Extract installation files from the netbrain-ie-windows-x86_64-8.0.2.zip file.
3. Right-click the netbrain-ie-windows-x86_64-8.0.2.exe file, and then select Run as administrator to launch the
Installation Wizard.
4. Follow the Installation Wizard to complete the installation step by step:
1) .NET Framework 4.8 must be pre-installed on this machine before you install the Application Server. The Installation Wizard will automatically check this dependency. If it has not been installed, the wizard will guide you through the installation as follows; it has been installed, the wizard will directly go to step 2).
Note: Make sure the Windows update is of the latest. For Windows Server 2012, you might be asked to install some software patches before the .NET Framework 4.8 installation can start.
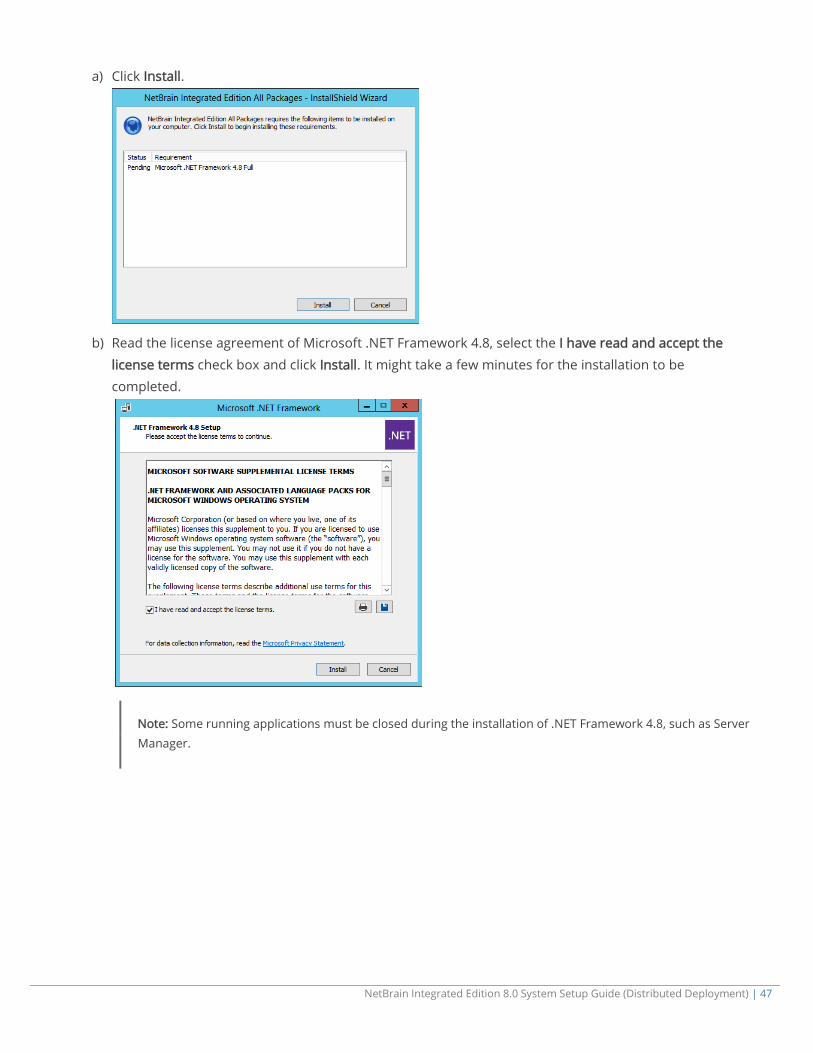
NetBrain Integrated Edition 8.0 System Setup Guide (Distributed Deployment) | 47
a) Click Install.
b) Read the license agreement of Microsoft .NET Framework 4.8, select the I have read and accept the
license terms check box and click Install. It might take a few minutes for the installation to be completed.
Note: Some running applications must be closed during the installation of .NET Framework 4.8, such as Server Manager.

48 | NetBrain Integrated Edition 8.0 System Setup Guide (Distributed Deployment)
c) After .NET Framework 4.8 is successfully installed, click Finish to exit the wizard.
d) Restart the machine immediately. After the machine reboots, continue with step 2).
2) On the Welcome page, click Next.
3) On the NetBrain Integrated Edition Prerequisites page, view the Linux components that must be deployed beforehand in your environment and click Next.
4) On the System Configuration page, review the system configuration summary and click Next.
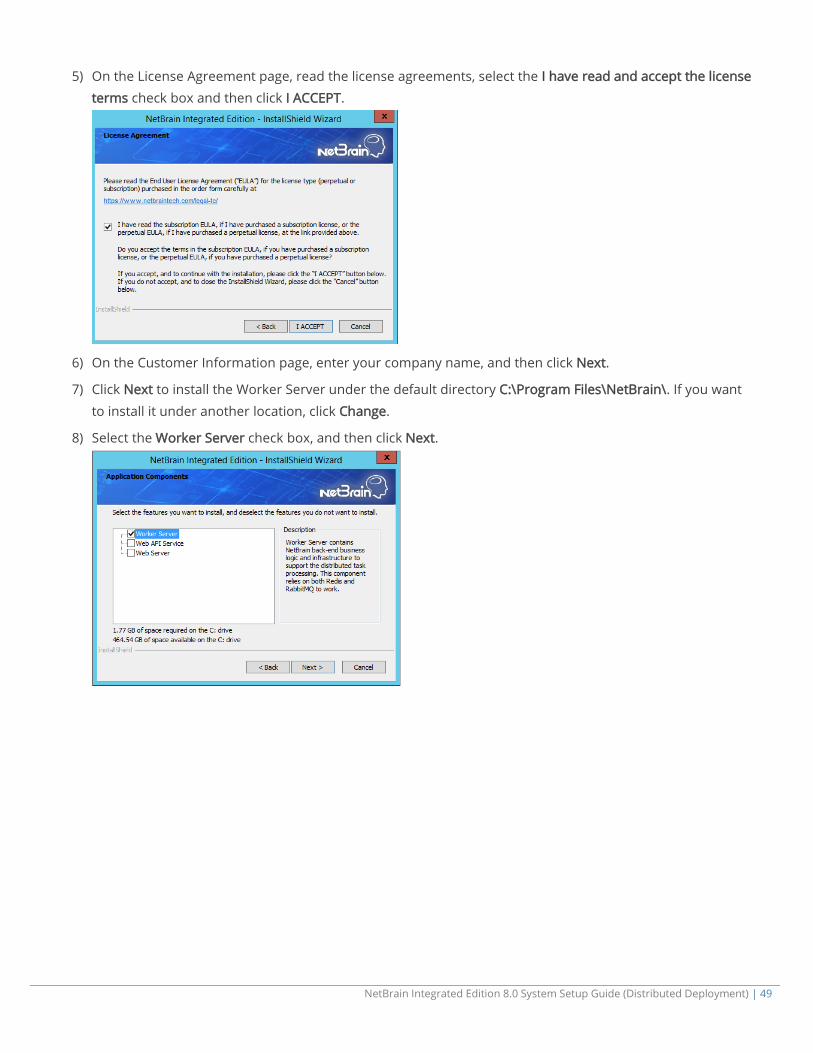
NetBrain Integrated Edition 8.0 System Setup Guide (Distributed Deployment) | 49
5) On the License Agreement page, read the license agreements, select the I have read and accept the license terms check box and then click I ACCEPT.
6) On the Customer Information page, enter your company name, and then click Next.
7) Click Next to install the Worker Server under the default directory C:\Program Files\NetBrain\. If you want
to install it under another location, click Change.
8) Select the Worker Server check box, and then click Next.

50 | NetBrain Integrated Edition 8.0 System Setup Guide (Distributed Deployment)
9) On the MongoDB Server Connection page, enter the following information to connect to MongoDB and then click Next.
Address — enter the IP address of MongoDB and the corresponding port number. By default, the port number is 27017.
Tip: You can enter the fully qualified domain name (FQDN) of MongoDB if all NetBrain servers are managed in the same domain. For example, test.netbraintech.com:27017.
User Name — enter the username that you created when installing MongoDB.
Password — enter the password that you created when installing MongoDB.
Replica Set Name — enter the replica set name of MongoDB. Keep the default value rs as it is.
Use SSL — used to encrypt the connections to MongoDB with SSL. If SSL is enabled on MongoDB, select this check box; otherwise, leave it unchecked.
10) On the Elasticsearch Connection page, enter the following information to connect to Elasticsearch, and
then click Next.
Address — enter the IP address of Elasticsearch and the corresponding port number. For example, 10.10.3.142:9200.

NetBrain Integrated Edition 8.0 System Setup Guide (Distributed Deployment) | 51
Note: If a proxy server is configured on this machine to access the Internet, you must add the IP address and port number of Elasticsearch into the proxy exception list of the web browser, to ensure this NetBrain server can communicate with Elasticsearch.
Tip: You can enter the FQDN of Elasticsearch if all NetBrain servers are managed in the same domain. For example, test.netbraintech.com:9200.
User Name — enter the username that you created when installing Elasticsearch.
Password — enter the password that you created when installing Elasticsearch.
Use SSL — used to encrypt the connections to Elasticsearch with SSL. If SSL is enabled on Elasticsearch, select it; otherwise, leave it unchecked.
11) On the RabbitMQ Connection page, enter the following information to connect to RabbitMQ, and then click Next.
Address — enter the IP address of RabbitMQ.
Tip: You can enter the FQDN of RabbitMQ if all NetBrain servers are managed in the same domain.
User Name — enter the admin username that you created when installing RabbitMQ.
Password — enter the admin password corresponding to the username that you created when installing RabbitMQ.
Port Number — enter the port number used by RabbitMQ to communicate with Web API Server, Worker
Server, and Task Engine. By default, it is 5672.
Use SSL — used to encrypt the connections to RabbitMQ with SSL. If SSL is enabled on RabbitMQ, select it; otherwise, leave it unchecked.

52 | NetBrain Integrated Edition 8.0 System Setup Guide (Distributed Deployment)
12) On the Redis Connection page, enter the following information to connect to Redis, and then click Next.
Master Address — enter the IP address of Redis.
Tip: You can enter the FQDN of Redis if all NetBrain servers are managed in the same domain.
Password — enter the admin password that you created when installing Redis.
Use SSL — used to encrypt the connections to Redis with SSL. If SSL is enabled on Redis, select it; otherwise, leave it unchecked.
Redis Port — enter the port number used by Redis to communicate with Web API Server, Worker Server, and Front Server Controller. By default, it is 6379.
Stunnel Port — required only if Use SSL is enabled. Enter the port number of the secure stunnel used to forward all traffics on Redis. By default, it is 7000.
Use Sentinel — required only if you set up a Redis Cluster. Leave it unchecked.
13) (Required only if the Use SSL check box is selected when configuring the connections to MongoDB, License Agent, Elasticsearch, RabbitMQ, or Redis.) Configure whether to authenticate Certificate Authority (CA) of the SSL certificates used on these servers, and then click Next.
To authenticate CA:
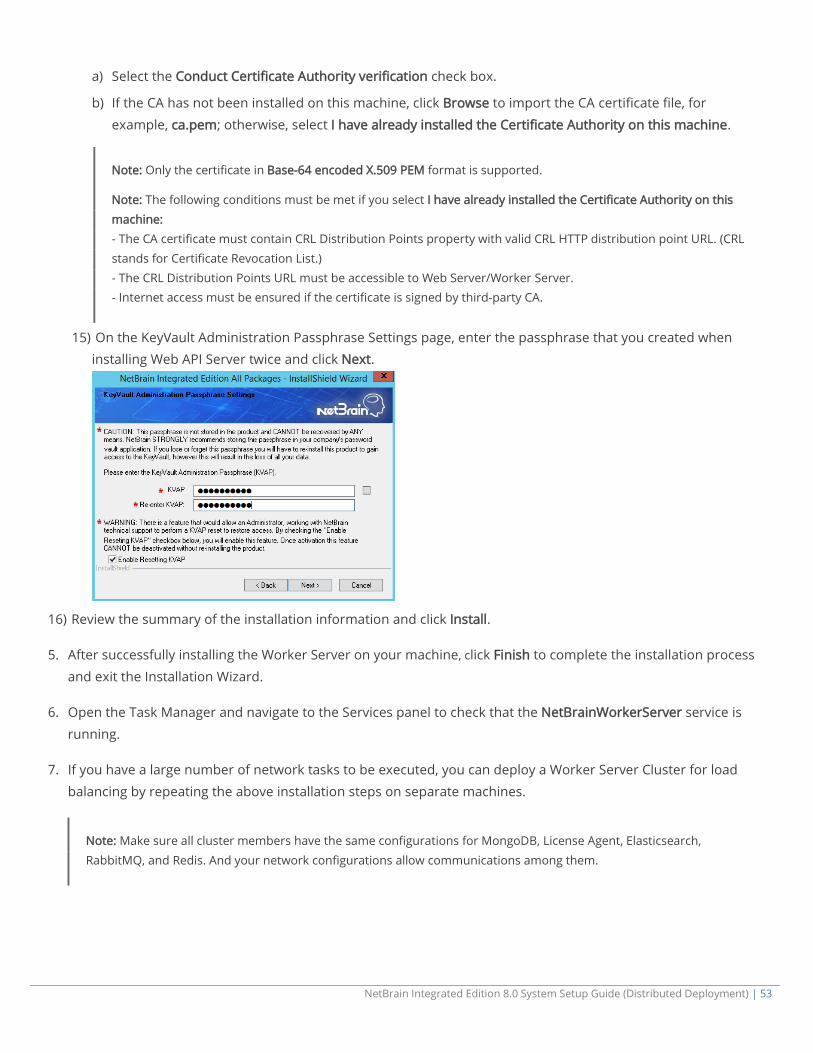
NetBrain Integrated Edition 8.0 System Setup Guide (Distributed Deployment) | 53
a) Select the Conduct Certificate Authority verification check box.
b) If the CA has not been installed on this machine, click Browse to import the CA certificate file, for
example, ca.pem; otherwise, select I have already installed the Certificate Authority on this machine.
Note: Only the certificate in Base-64 encoded X.509 PEM format is supported.
Note: The following conditions must be met if you select I have already installed the Certificate Authority on this machine: - The CA certificate must contain CRL Distribution Points property with valid CRL HTTP distribution point URL. (CRL stands for Certificate Revocation List.) - The CRL Distribution Points URL must be accessible to Web Server/Worker Server. - Internet access must be ensured if the certificate is signed by third-party CA.
15) On the KeyVault Administration Passphrase Settings page, enter the passphrase that you created when installing Web API Server twice and click Next.
16) Review the summary of the installation information and click Install.
5. After successfully installing the Worker Server on your machine, click Finish to complete the installation process
and exit the Installation Wizard.
6. Open the Task Manager and navigate to the Services panel to check that the NetBrainWorkerServer service is
running.
7. If you have a large number of network tasks to be executed, you can deploy a Worker Server Cluster for load
balancing by repeating the above installation steps on separate machines.
Note: Make sure all cluster members have the same configurations for MongoDB, License Agent, Elasticsearch, RabbitMQ, and Redis. And your network configurations allow communications among them.
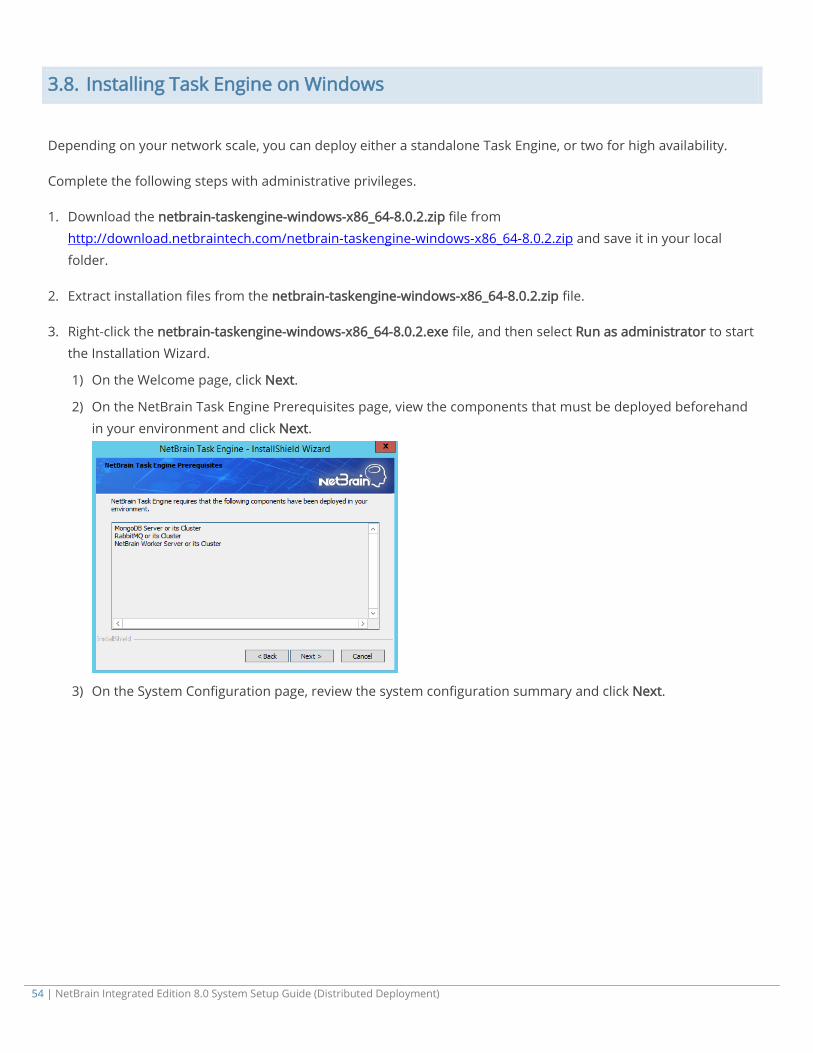
54 | NetBrain Integrated Edition 8.0 System Setup Guide (Distributed Deployment)
3.8. Installing Task Engine on Windows
Depending on your network scale, you can deploy either a standalone Task Engine, or two for high availability.
Complete the following steps with administrative privileges.
1. Download the netbrain-taskengine-windows-x86_64-8.0.2.zip file from http://download.netbraintech.com/netbrain-taskengine-windows-x86_64-8.0.2.zip and save it in your local
folder.
2. Extract installation files from the netbrain-taskengine-windows-x86_64-8.0.2.zip file.
3. Right-click the netbrain-taskengine-windows-x86_64-8.0.2.exe file, and then select Run as administrator to start the Installation Wizard.
1) On the Welcome page, click Next.
2) On the NetBrain Task Engine Prerequisites page, view the components that must be deployed beforehand in your environment and click Next.
3) On the System Configuration page, review the system configuration summary and click Next.

NetBrain Integrated Edition 8.0 System Setup Guide (Distributed Deployment) | 55
4) On the License Agreement page, read the license agreements, select the I have read and accept the license terms check box and then click I ACCEPT.
5) On the Customer Information page, enter your company name, and then click Next.
6) On the Destination Location page, click Next to install the Task Engine under the default directory C:\Program Files\NetBrain\. If you want to install it under another location, click Change.
7) On the High Availability page, leave Enable High Availability unchecked.
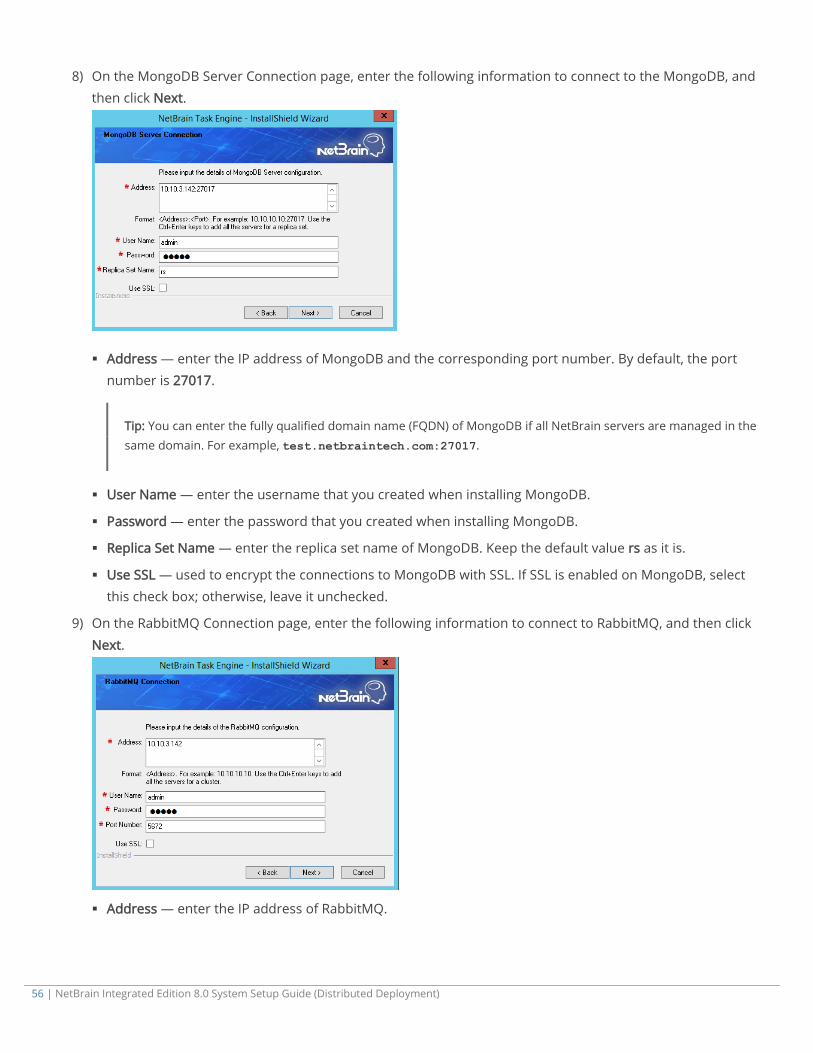
56 | NetBrain Integrated Edition 8.0 System Setup Guide (Distributed Deployment)
8) On the MongoDB Server Connection page, enter the following information to connect to the MongoDB, and then click Next.
Address — enter the IP address of MongoDB and the corresponding port number. By default, the port number is 27017.
Tip: You can enter the fully qualified domain name (FQDN) of MongoDB if all NetBrain servers are managed in the same domain. For example, test.netbraintech.com:27017.
User Name — enter the username that you created when installing MongoDB.
Password — enter the password that you created when installing MongoDB.
Replica Set Name — enter the replica set name of MongoDB. Keep the default value rs as it is.
Use SSL — used to encrypt the connections to MongoDB with SSL. If SSL is enabled on MongoDB, select this check box; otherwise, leave it unchecked.
9) On the RabbitMQ Connection page, enter the following information to connect to RabbitMQ, and then click
Next.
Address — enter the IP address of RabbitMQ.
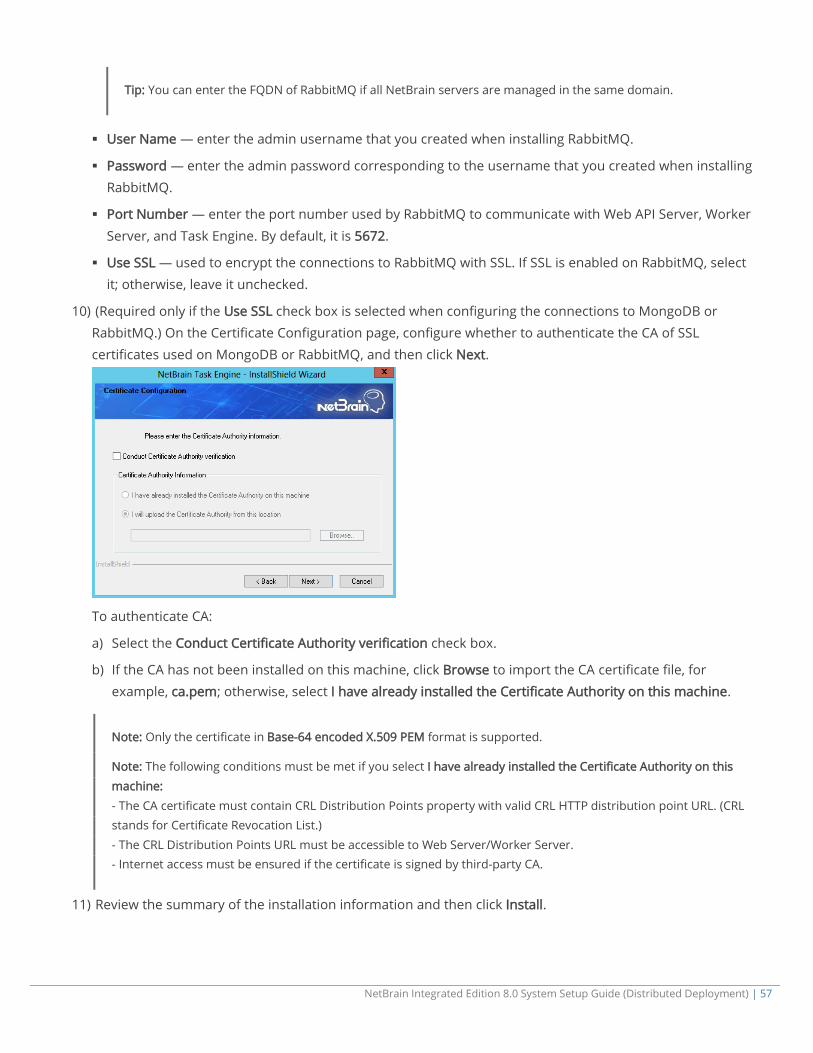
NetBrain Integrated Edition 8.0 System Setup Guide (Distributed Deployment) | 57
Tip: You can enter the FQDN of RabbitMQ if all NetBrain servers are managed in the same domain.
User Name — enter the admin username that you created when installing RabbitMQ.
Password — enter the admin password corresponding to the username that you created when installing RabbitMQ.
Port Number — enter the port number used by RabbitMQ to communicate with Web API Server, Worker
Server, and Task Engine. By default, it is 5672.
Use SSL — used to encrypt the connections to RabbitMQ with SSL. If SSL is enabled on RabbitMQ, select it; otherwise, leave it unchecked.
10) (Required only if the Use SSL check box is selected when configuring the connections to MongoDB or RabbitMQ.) On the Certificate Configuration page, configure whether to authenticate the CA of SSL certificates used on MongoDB or RabbitMQ, and then click Next.
To authenticate CA:
a) Select the Conduct Certificate Authority verification check box.
b) If the CA has not been installed on this machine, click Browse to import the CA certificate file, for example, ca.pem; otherwise, select I have already installed the Certificate Authority on this machine.
Note: Only the certificate in Base-64 encoded X.509 PEM format is supported.
Note: The following conditions must be met if you select I have already installed the Certificate Authority on this machine: - The CA certificate must contain CRL Distribution Points property with valid CRL HTTP distribution point URL. (CRL stands for Certificate Revocation List.) - The CRL Distribution Points URL must be accessible to Web Server/Worker Server. - Internet access must be ensured if the certificate is signed by third-party CA.
11) Review the summary of the installation information and then click Install.

58 | NetBrain Integrated Edition 8.0 System Setup Guide (Distributed Deployment)
4. After successfully installing the Task Engine, click Finish to complete the installation process and exit the
Installation Wizard.
5. Open the Task Manager and navigate to the Services panel to check that the NetBrainTaskEngine service is
running.
3.9. Installing Front Server Controller on Windows
Complete the following steps with administrative privileges.
1. Download the netbrain-frontservercontroller-windows-x86_64-8.0.2.zip file from http://download.netbraintech.com/netbrain-frontservercontroller-windows-x86_64-8.0.2.zip and save it in your
local folder.
2. Extract installation files from the netbrain-frontservercontroller-windows-x86_64-8.0.2.zip file.
3. Right-click the netbrain-frontservercontroller-windows-x86_64-8.0.2.exe file, and then select Run as administrator to start the Installation Wizard.
1) On the Welcome page, click Next.
2) On the System Configuration page, review the system configuration summary and click Next.
3) On the License Agreement page, read the license agreements, select the I have read and accept the license terms check box and then click I ACCEPT.
4) On the Customer Information page, enter your company name, and then click Next.
5) On the Destination Location page, click Next to install the Front Server Controller under the default directory C:\Program Files\NetBrain\. If you want to install it under another location, click Change.
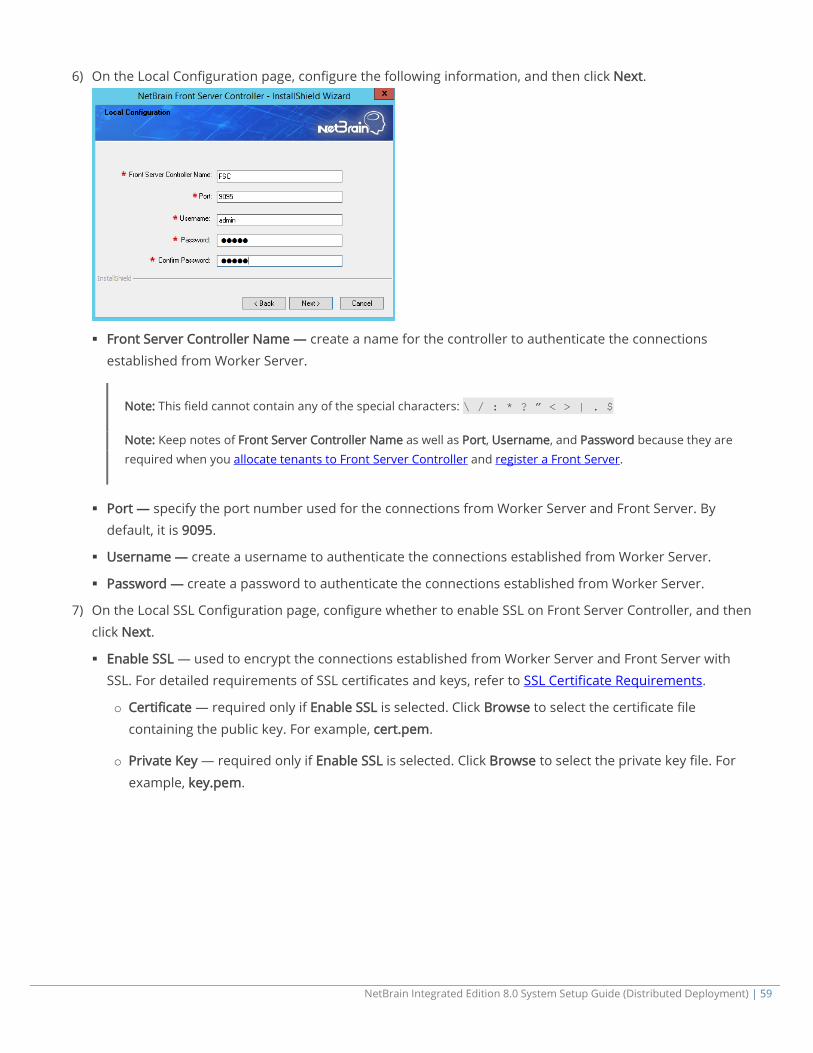
NetBrain Integrated Edition 8.0 System Setup Guide (Distributed Deployment) | 59
6) On the Local Configuration page, configure the following information, and then click Next.
Front Server Controller Name — create a name for the controller to authenticate the connections
established from Worker Server.
Note: This field cannot contain any of the special characters: \ / : * ? ” < > | . $
Note: Keep notes of Front Server Controller Name as well as Port, Username, and Password because they are required when you allocate tenants to Front Server Controller and register a Front Server.
Port — specify the port number used for the connections from Worker Server and Front Server. By default, it is 9095.
Username — create a username to authenticate the connections established from Worker Server.
Password — create a password to authenticate the connections established from Worker Server.
7) On the Local SSL Configuration page, configure whether to enable SSL on Front Server Controller, and then click Next.
Enable SSL — used to encrypt the connections established from Worker Server and Front Server with SSL. For detailed requirements of SSL certificates and keys, refer to SSL Certificate Requirements.
o Certificate — required only if Enable SSL is selected. Click Browse to select the certificate file
containing the public key. For example, cert.pem.
o Private Key — required only if Enable SSL is selected. Click Browse to select the private key file. For
example, key.pem.
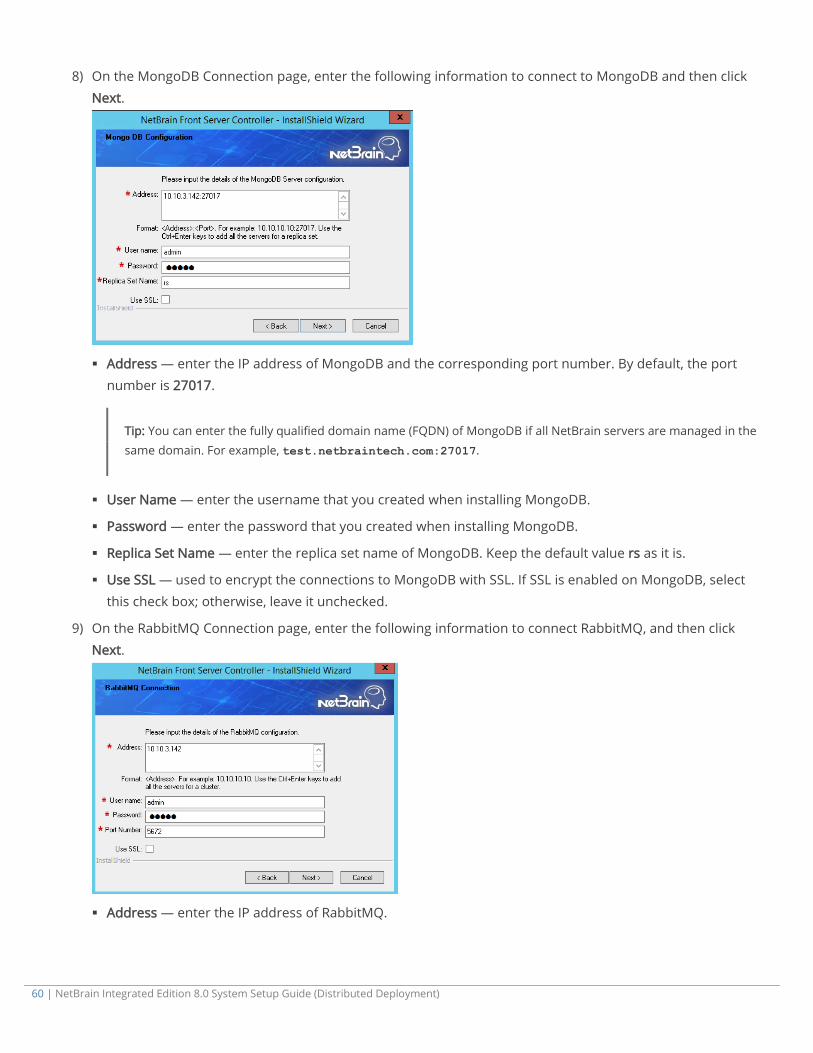
60 | NetBrain Integrated Edition 8.0 System Setup Guide (Distributed Deployment)
8) On the MongoDB Connection page, enter the following information to connect to MongoDB and then click Next.
Address — enter the IP address of MongoDB and the corresponding port number. By default, the port number is 27017.
Tip: You can enter the fully qualified domain name (FQDN) of MongoDB if all NetBrain servers are managed in the same domain. For example, test.netbraintech.com:27017.
User Name — enter the username that you created when installing MongoDB.
Password — enter the password that you created when installing MongoDB.
Replica Set Name — enter the replica set name of MongoDB. Keep the default value rs as it is.
Use SSL — used to encrypt the connections to MongoDB with SSL. If SSL is enabled on MongoDB, select this check box; otherwise, leave it unchecked.
9) On the RabbitMQ Connection page, enter the following information to connect RabbitMQ, and then click Next.
Address — enter the IP address of RabbitMQ.
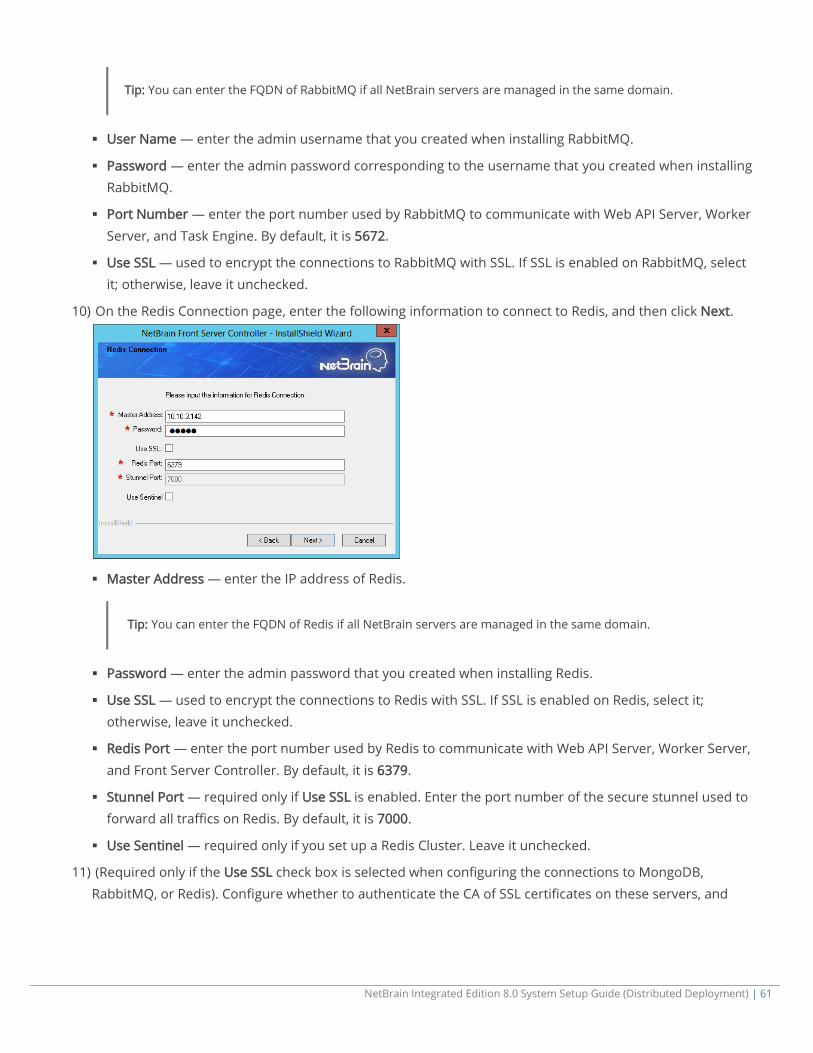
NetBrain Integrated Edition 8.0 System Setup Guide (Distributed Deployment) | 61
Tip: You can enter the FQDN of RabbitMQ if all NetBrain servers are managed in the same domain.
User Name — enter the admin username that you created when installing RabbitMQ.
Password — enter the admin password corresponding to the username that you created when installing RabbitMQ.
Port Number — enter the port number used by RabbitMQ to communicate with Web API Server, Worker
Server, and Task Engine. By default, it is 5672.
Use SSL — used to encrypt the connections to RabbitMQ with SSL. If SSL is enabled on RabbitMQ, select it; otherwise, leave it unchecked.
10) On the Redis Connection page, enter the following information to connect to Redis, and then click Next.
Master Address — enter the IP address of Redis.
Tip: You can enter the FQDN of Redis if all NetBrain servers are managed in the same domain.
Password — enter the admin password that you created when installing Redis.
Use SSL — used to encrypt the connections to Redis with SSL. If SSL is enabled on Redis, select it; otherwise, leave it unchecked.
Redis Port — enter the port number used by Redis to communicate with Web API Server, Worker Server,
and Front Server Controller. By default, it is 6379.
Stunnel Port — required only if Use SSL is enabled. Enter the port number of the secure stunnel used to forward all traffics on Redis. By default, it is 7000.
Use Sentinel — required only if you set up a Redis Cluster. Leave it unchecked.
11) (Required only if the Use SSL check box is selected when configuring the connections to MongoDB, RabbitMQ, or Redis). Configure whether to authenticate the CA of SSL certificates on these servers, and
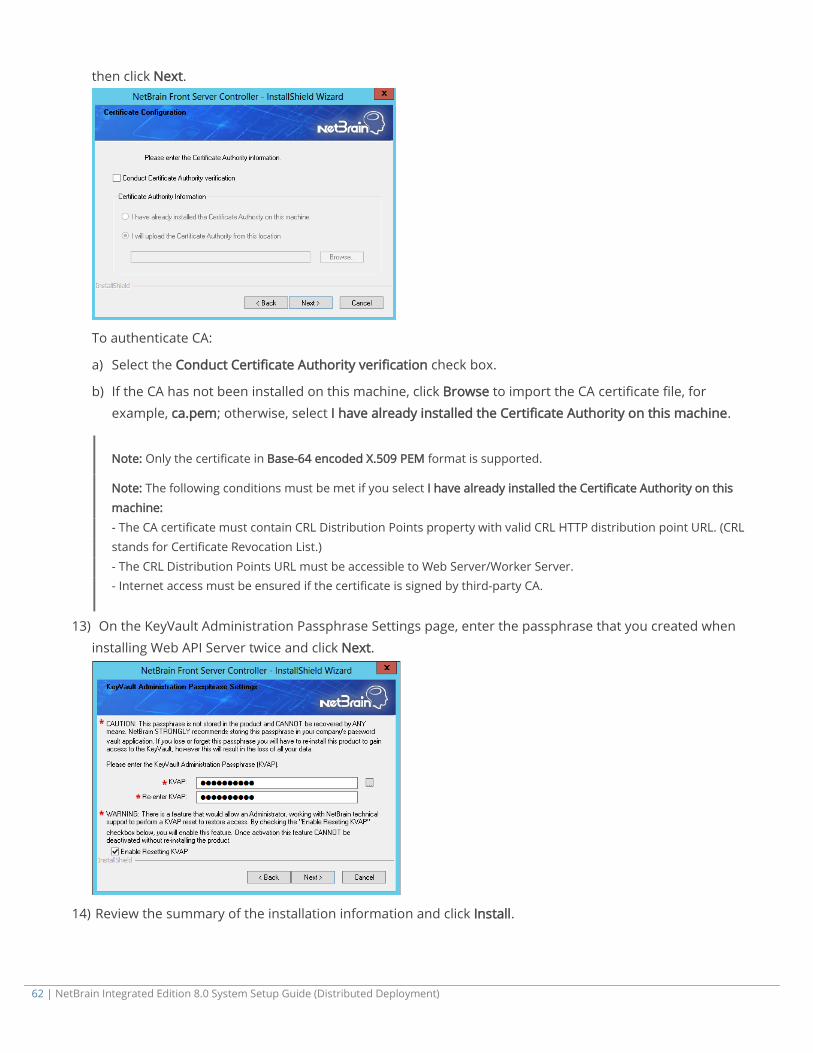
62 | NetBrain Integrated Edition 8.0 System Setup Guide (Distributed Deployment)
then click Next.
To authenticate CA:
a) Select the Conduct Certificate Authority verification check box.
b) If the CA has not been installed on this machine, click Browse to import the CA certificate file, for example, ca.pem; otherwise, select I have already installed the Certificate Authority on this machine.
Note: Only the certificate in Base-64 encoded X.509 PEM format is supported.
Note: The following conditions must be met if you select I have already installed the Certificate Authority on this machine: - The CA certificate must contain CRL Distribution Points property with valid CRL HTTP distribution point URL. (CRL stands for Certificate Revocation List.) - The CRL Distribution Points URL must be accessible to Web Server/Worker Server. - Internet access must be ensured if the certificate is signed by third-party CA.
13) On the KeyVault Administration Passphrase Settings page, enter the passphrase that you created when installing Web API Server twice and click Next.
14) Review the summary of the installation information and click Install.
NetBrain Integrated Edition 8.0 System Setup Guide (Distributed Deployment) | 63
4. After successfully installing the Front Server Controller, click Finish to complete the installation process and exit
the Installation Wizard.
5. Open the Task Manager and navigate to the Services panel to check that the NetBrainFrontServerController
service is running.
3.10. Installing Front Server
Each Front Server is recommended to manage 5,000 network nodes at most. Depending on your network scale, you can deploy either a standalone Front Server, or multiple Front Servers for load balancing.
Note: Ports 7778, 7086, and 29916 must be open for communications.
Select either of the following ways to install Front Server, depending on your operating system:
Installing Front Server on Linux
Installing Front Server on Windows
3.10.1. Installing Front Server on Linux
Pre-installation Tasks
Front Server has dependencies on several third-party packages. Before you install the Front Server, run the rpm -qa|grep -E "glibc|libstdc++|libuuid|pam" command to check whether these dependencies have been
installed. If they have not been installed yet, you can choose either option below to install the dependencies:
o Online Install: run the yum install -y glibc.x86_64 glibc.i686 libstdc++.x86_64 libstdc++.i686 libuuid.x86_64 libuuid.i686 pam.x86_64 pam.i686 command to install these third-party packages online.
o Offline Install: refer to Offline Installing Third-party Dependencies for more details.
Installing Front Server on Linux
1. Log in to the Linux server as the root user.
2. Run the mkdir command to create a directory under the /opt directory to place the Front Server installation
package. For example, netbraintemp.

64 | NetBrain Integrated Edition 8.0 System Setup Guide (Distributed Deployment)
3. Run the cd /opt/netbraintemp command to navigate to the /opt/netbraintemp directory.
4. Download the installation package.
Option 1: If the Linux server has no access to the Internet, obtain the netbrain-frontserver-linux-x86_64-rhel7-8.0.2.tar.gz file from NetBrain and then upload it to the /opt/netbraintemp directory by using a file transfer tool.
Option 2: If the Linux server has access to the Internet, run the wget http://download.netbraintech.com/netbrain-frontserver-linux-x86_64-rhel7-8.0.2.tar.gz command under the /opt/netbraintemp directory to directly download the netbrain-frontserver-linux-x86_64-rhel7-8.0.2.tar.gz file from NetBrain official download site.
Note: The download link is case-sensitive.
Tip: Run the yum -y install wget command to install the wget command if it has not been installed on the server.
5. Run the tar -zxvf netbrain-frontserver-linux-x86_64-rhel7-8.0.2.tar.gz command under the
/opt/netbraintemp directory to extract installation files.
[root@localhost netbraintemp]# tar -zxvf netbrain-frontserver-linux-x86_64-rhel7-8.0.2.tar.gz FrontServer/ FrontServer/config/ FrontServer/install.sh ...
6. Run the cd FrontServer command to navigate to the FrontServer directory.
7. Run the ./install.sh script under the FrontServer directory to install the Front Server.
1) Read the License Agreement, and type YES.
2) Type I ACCEPT to accept the License Agreement. The script starts to install the Front Server.
[root@localhost FrontServer]# ./install.sh Please read the End User License Agreement (“EULA”) for the license type (perpetual or subscription) purchased in the order form at https://www.netbraintech.com/legal-tc/ carefully. I have read the subscription EULA, if I have purchased a subscription license, or the perpetual EULA, if I have purchased a perpetual license, at the link provided above. Please type “YES” if you have read the applicable EULA and understand its contents, or “NO” if you have not read the applicable EULA. [YES/NO]: YES Do you accept the terms in the subscription EULA, if you have purchased a subscription license, or the perpetual EULA, if you have purchased a perpetual license? If you accept, and to continue with the installation, please type "I Accept" to continue. If you do not accept, and to quit the installation script, please type "CANCEL" to stop. [I ACCEPT/CANCEL]: I ACCEPT

NetBrain Integrated Edition 8.0 System Setup Guide (Distributed Deployment) | 65
INFO: Creating installation log file INFO: Preprocessing SUCCEEDED INFO: Starting to check system info... ... INFO: 2020-01-09 22-12-04.730: Collecting system information SUCCEEDED. INFO: Starting to check date... INFO: Starting to check Linux OS info... INFO: Starting to check systemd service... INFO: Starting to check required CPU... INFO: Starting to check minimum memory... INFO: System checking SUCCEEDED. INFO: Dependent packages checking SUCCEEDED. INFO: Configuration parameters checking SUCCEEDED. INFO: Current working directory: /opt/netbraintemp/FrontServer INFO: Extracting files of Front Server SUCCEEDED. usermod: no changes INFO: Configuration parameters updating SUCCEEDED. Created symlink from /etc/systemd/system/multi-user.target.wants/netbrainfrontserver.service to /usr/lib/systemd/system/netbrainfrontserver.service. INFO: Backing up uninstall.sh SUCCEEDED INFO: Successfully installed Front Server.
Note: The Front Server service will not be automatically started until the Front Server is added to a tenant and successfully registered. See Adding the Front Server to a Tenant and Registering the Front Server for more details.
8. To install more Front Servers for load balancing, repeat the above installation steps on separate machines.
3.10.2. Installing Front Server on Windows
Complete the following steps with administrative privileges.
1. Download the netbrain-frontserver-windows-x86_64-8.0.2.zip file from http://download.netbraintech.com/netbrain-frontserver-windows-x86_64-8.0.2.zip and save it in your local
folder.
2. Extract installation files from the netbrain-frontserver-windows-x86_64-8.0.2.zip file.
3. Right-click the netbrain-frontserver-windows-x86_64-8.0.2.exe file, and then select Run as administrator to start the Installation Wizard.
1) On the Welcome page, click Next.
2) On the System Configuration page, review the system configuration summary and click Next.
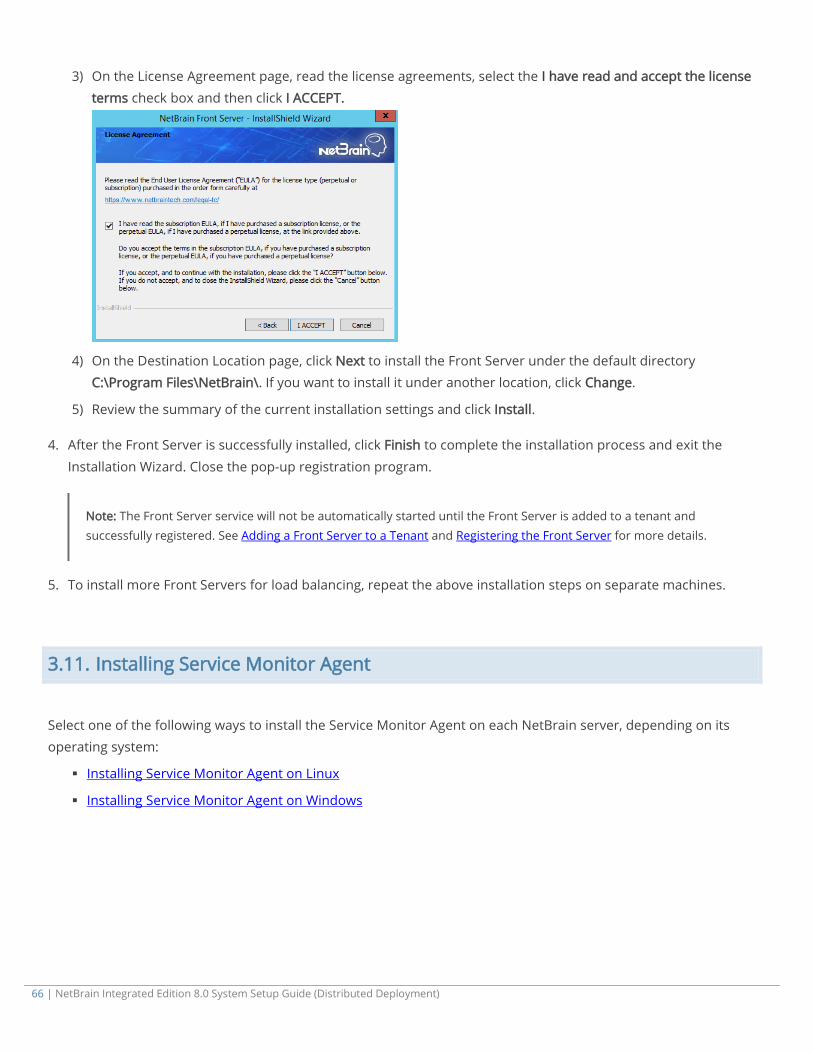
66 | NetBrain Integrated Edition 8.0 System Setup Guide (Distributed Deployment)
3) On the License Agreement page, read the license agreements, select the I have read and accept the license terms check box and then click I ACCEPT.
4) On the Destination Location page, click Next to install the Front Server under the default directory C:\Program Files\NetBrain\. If you want to install it under another location, click Change.
5) Review the summary of the current installation settings and click Install.
4. After the Front Server is successfully installed, click Finish to complete the installation process and exit the
Installation Wizard. Close the pop-up registration program.
Note: The Front Server service will not be automatically started until the Front Server is added to a tenant and successfully registered. See Adding a Front Server to a Tenant and Registering the Front Server for more details.
5. To install more Front Servers for load balancing, repeat the above installation steps on separate machines.
3.11. Installing Service Monitor Agent
Select one of the following ways to install the Service Monitor Agent on each NetBrain server, depending on its operating system:
Installing Service Monitor Agent on Linux
Installing Service Monitor Agent on Windows
NetBrain Integrated Edition 8.0 System Setup Guide (Distributed Deployment) | 67
3.11.1. Installing Service Monitor Agent on Linux
Pre-installation Tasks
Service Monitor Agent has dependencies on the third-party package zlib-devel readline-devel bzip2-devel ncurses-devel gdbm-devel xz-devel tk-devel libffi-devel. Run the rpm -qa|grep -E "zlib-devel|readline-
devel|bzip2-devel|ncurses-devel|gdbm-devel|xz-devel|tk-devel|libffi-devel" command to check whether it has been installed on this Linux server. If it has not been installed yet, you can choose either option
below to install the dependencies:
o Online Install: run the yum -y install zlib-devel readline-devel bzip2-devel ncurses-devel gdbm-
devel xz-devel tk-devel libffi-devel command to install it online.
o Offline Install: refer to Offline Installing Third-party Dependencies for more details.
Installing Service Monitor Agent on Linux
1. Log in to the Linux server as the root user.
2. Run the cd /opt/netbraintemp command to navigate to the /opt/netbraintemp directory.
3. Download the installation package.
Option 1: If the Linux server has no access to the Internet, obtain the netbrain-servicemonitoragent-linux-x86_64-rhel7-8.0.2.tar.gz file from NetBrain and then upload it to the /opt/netbraintemp directory by using a file transfer tool.
Option 2: If the Linux server has access to the Internet, run the wget http://download.netbraintech.com/netbrain-servicemonitoragent-linux-x86_64-rhel7-
8.0.2.tar.gz command under the /opt/netbraintemp directory to directly download the netbrain-servicemonitoragent-linux-x86_64-rhel7-8.0.2.tar.gz file from NetBrain official download site.
Note: The download link is case-sensitive.
Tip: Run the yum -y install wget command to install the wget command if it has not been installed on the server.
4. Run the tar -zxvf netbrain-servicemonitoragent-linux-x86_64-rhel7-8.0.2.tar.gz command under the /opt/netbraintemp directory to extract installation files.
[root@localhost netbraintemp]# tar -zxvf netbrain-servicemonitoragent-linux-x86_64-rhel7-8.0.2.tar.gz ServiceMonitorAgent/ ServiceMonitorAgent/config/ ServiceMonitorAgent/config/setup.conf ...
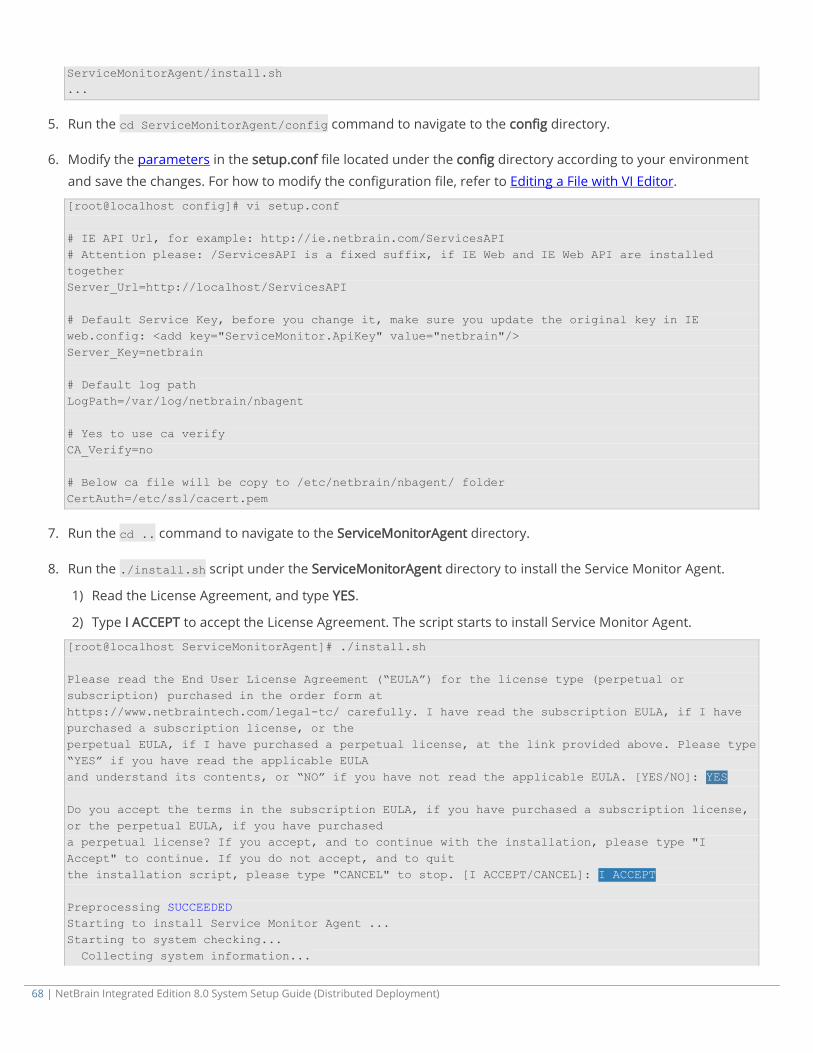
68 | NetBrain Integrated Edition 8.0 System Setup Guide (Distributed Deployment)
ServiceMonitorAgent/install.sh ...
5. Run the cd ServiceMonitorAgent/config command to navigate to the config directory.
6. Modify the parameters in the setup.conf file located under the config directory according to your environment
and save the changes. For how to modify the configuration file, refer to Editing a File with VI Editor.
[root@localhost config]# vi setup.conf # IE API Url, for example: http://ie.netbrain.com/ServicesAPI # Attention please: /ServicesAPI is a fixed suffix, if IE Web and IE Web API are installed together Server_Url=http://localhost/ServicesAPI # Default Service Key, before you change it, make sure you update the original key in IE web.config: <add key="ServiceMonitor.ApiKey" value="netbrain"/> Server_Key=netbrain # Default log path LogPath=/var/log/netbrain/nbagent # Yes to use ca verify CA_Verify=no # Below ca file will be copy to /etc/netbrain/nbagent/ folder CertAuth=/etc/ssl/cacert.pem
7. Run the cd .. command to navigate to the ServiceMonitorAgent directory.
8. Run the ./install.sh script under the ServiceMonitorAgent directory to install the Service Monitor Agent.
1) Read the License Agreement, and type YES.
2) Type I ACCEPT to accept the License Agreement. The script starts to install Service Monitor Agent.
[root@localhost ServiceMonitorAgent]# ./install.sh Please read the End User License Agreement (“EULA”) for the license type (perpetual or subscription) purchased in the order form at https://www.netbraintech.com/legal-tc/ carefully. I have read the subscription EULA, if I have purchased a subscription license, or the perpetual EULA, if I have purchased a perpetual license, at the link provided above. Please type “YES” if you have read the applicable EULA and understand its contents, or “NO” if you have not read the applicable EULA. [YES/NO]: YES Do you accept the terms in the subscription EULA, if you have purchased a subscription license, or the perpetual EULA, if you have purchased a perpetual license? If you accept, and to continue with the installation, please type "I Accept" to continue. If you do not accept, and to quit the installation script, please type "CANCEL" to stop. [I ACCEPT/CANCEL]: I ACCEPT Preprocessing SUCCEEDED Starting to install Service Monitor Agent ... Starting to system checking... Collecting system information...
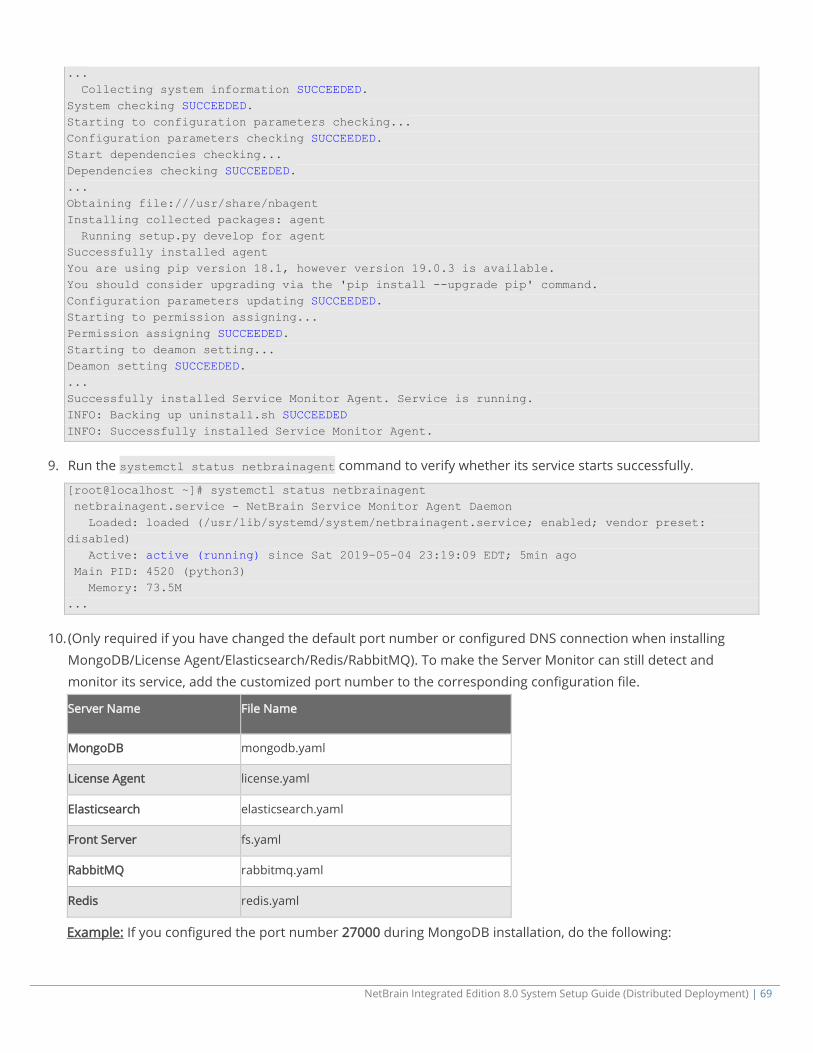
NetBrain Integrated Edition 8.0 System Setup Guide (Distributed Deployment) | 69
... Collecting system information SUCCEEDED. System checking SUCCEEDED. Starting to configuration parameters checking... Configuration parameters checking SUCCEEDED. Start dependencies checking... Dependencies checking SUCCEEDED. ... Obtaining file:///usr/share/nbagent Installing collected packages: agent Running setup.py develop for agent Successfully installed agent You are using pip version 18.1, however version 19.0.3 is available. You should consider upgrading via the 'pip install --upgrade pip' command. Configuration parameters updating SUCCEEDED. Starting to permission assigning... Permission assigning SUCCEEDED. Starting to deamon setting... Deamon setting SUCCEEDED. ... Successfully installed Service Monitor Agent. Service is running. INFO: Backing up uninstall.sh SUCCEEDED INFO: Successfully installed Service Monitor Agent.
9. Run the systemctl status netbrainagent command to verify whether its service starts successfully.
[root@localhost ~]# systemctl status netbrainagent netbrainagent.service - NetBrain Service Monitor Agent Daemon Loaded: loaded (/usr/lib/systemd/system/netbrainagent.service; enabled; vendor preset: disabled) Active: active (running) since Sat 2019-05-04 23:19:09 EDT; 5min ago Main PID: 4520 (python3) Memory: 73.5M ...
10. (Only required if you have changed the default port number or configured DNS connection when installing MongoDB/License Agent/Elasticsearch/Redis/RabbitMQ). To make the Server Monitor can still detect and monitor its service, add the customized port number to the corresponding configuration file.
Server Name File Name
MongoDB mongodb.yaml
License Agent license.yaml
Elasticsearch elasticsearch.yaml
Front Server fs.yaml
RabbitMQ rabbitmq.yaml
Redis redis.yaml
Example: If you configured the port number 27000 during MongoDB installation, do the following:

70 | NetBrain Integrated Edition 8.0 System Setup Guide (Distributed Deployment)
1) Run the cd /etc/netbrain/nbagent/checks command to navigate to the checks directory.
2) Add the customized port number to the mongodb.yaml file, and save the changes. For how to modify the
file, refer to Editing a File with VI Editor.
Note: If fully qualified domain name (FQDN) is used when installing MongoDB on this machine, add dns:<MongoDB FQDN> to the mongodb.yaml file.
Note: Follow the text format in the example strictly, including alignment, punctuations, and spaces.
init_config: instances: - name: default port: 27000
Tip: It is highly recommended to run the rm -rf /opt/netbraintemp/ServiceMonitorAgent/config/setup.conf command to delete the setup.conf file from the server after Service Monitor Agent is successfully installed because the file may cause security vulnerability.
Parameters
Parameter Default Value Description
Server_Url http://localhost/ServicesAPI The URL used to call the Web API service, http://<IP address of NetBrain Web API Server>/ServicesAPI. For example, http://10.10.3.141/ServicesAPI.
Note: If SSL will be enabled with https binding created for the system website in IIS Manager, type https in the URL. Besides, if CA_Verify is enabled, hostname must be specified in the URL.
Server_Key netbrain The key used to authenticate the connections to your NetBrain Web API Server.
Note: The Server_Key must be kept consistent with the key configured when you installed Web API Server and Worker Server.
LogPath /var/log/netbrain/nbagent The storage path for the log files of the Service Monitor Agent.
Note: Don't save the log files under any subfolders of the InstallPath.
CA_Verify no Set whether to authenticate the Certificate Authority (CA) of the certificates, which are used to enable SSL for the system website in IIS Manager.
Note: It is required only if https is used in Server_Url.
CA_Path /opt/netbrain/netbrain.pem The storage path and file name of the root or class 2 CA file used for CA authentication.

NetBrain Integrated Edition 8.0 System Setup Guide (Distributed Deployment) | 71
Parameter Default Value Description
Note: It is required only if CA_Verify is enabled. Only the CA file in the Base-64 encoded X.509 (.CER) format is supported.
3.11.2. Installing Service Monitor Agent on Windows
Complete the following steps with administrative privileges.
1. Download the netbrain-servicemonitoragent-windows-x86_64-8.0.2.zip file from http://download.netbraintech.com/netbrain-servicemonitoragent-windows-x86_64-8.0.2.zip and save it in your
local folder.
2. Extract installation files from the netbrain-servicemonitoragent-windows-x86_64-8.0.2.zip file.
3. Right-click the netbrain-servicemonitoragent-windows-x86_64-8.0.2.exe file, and then select Run as
administrator to start the Installation Wizard.
1) On the Welcome page, click Next.
2) On the System Configuration page, review the system configuration summary and click Next.
3) On the License Agreement page, read the license agreements, select the I have read and accept the license terms check box and then click I ACCEPT.
4) On the Destination Location page, click Next to install the Service Monitor Agent under the default path
C:\Program Files\NetBrain\. If you want to install it under another location, click Change.
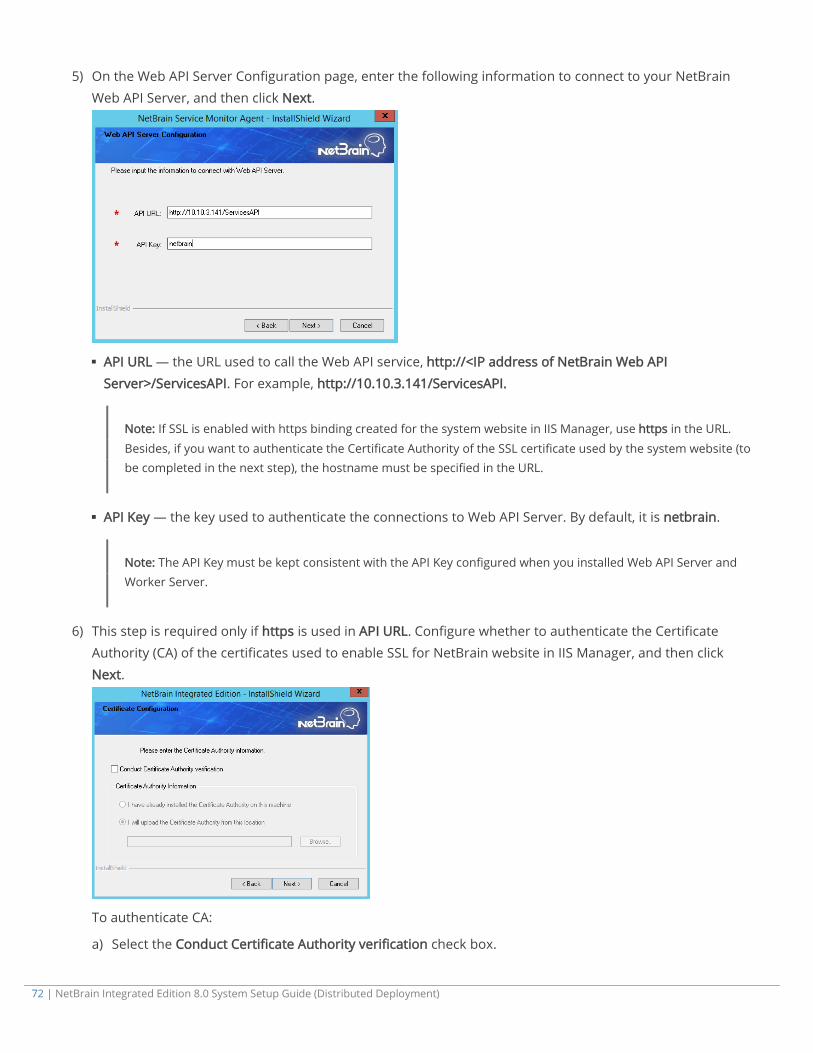
72 | NetBrain Integrated Edition 8.0 System Setup Guide (Distributed Deployment)
5) On the Web API Server Configuration page, enter the following information to connect to your NetBrain Web API Server, and then click Next.
API URL — the URL used to call the Web API service, http://<IP address of NetBrain Web API Server>/ServicesAPI. For example, http://10.10.3.141/ServicesAPI.
Note: If SSL is enabled with https binding created for the system website in IIS Manager, use https in the URL.
Besides, if you want to authenticate the Certificate Authority of the SSL certificate used by the system website (to be completed in the next step), the hostname must be specified in the URL.
API Key — the key used to authenticate the connections to Web API Server. By default, it is netbrain.
Note: The API Key must be kept consistent with the API Key configured when you installed Web API Server and Worker Server.
6) This step is required only if https is used in API URL. Configure whether to authenticate the Certificate Authority (CA) of the certificates used to enable SSL for NetBrain website in IIS Manager, and then click Next.
To authenticate CA:
a) Select the Conduct Certificate Authority verification check box.
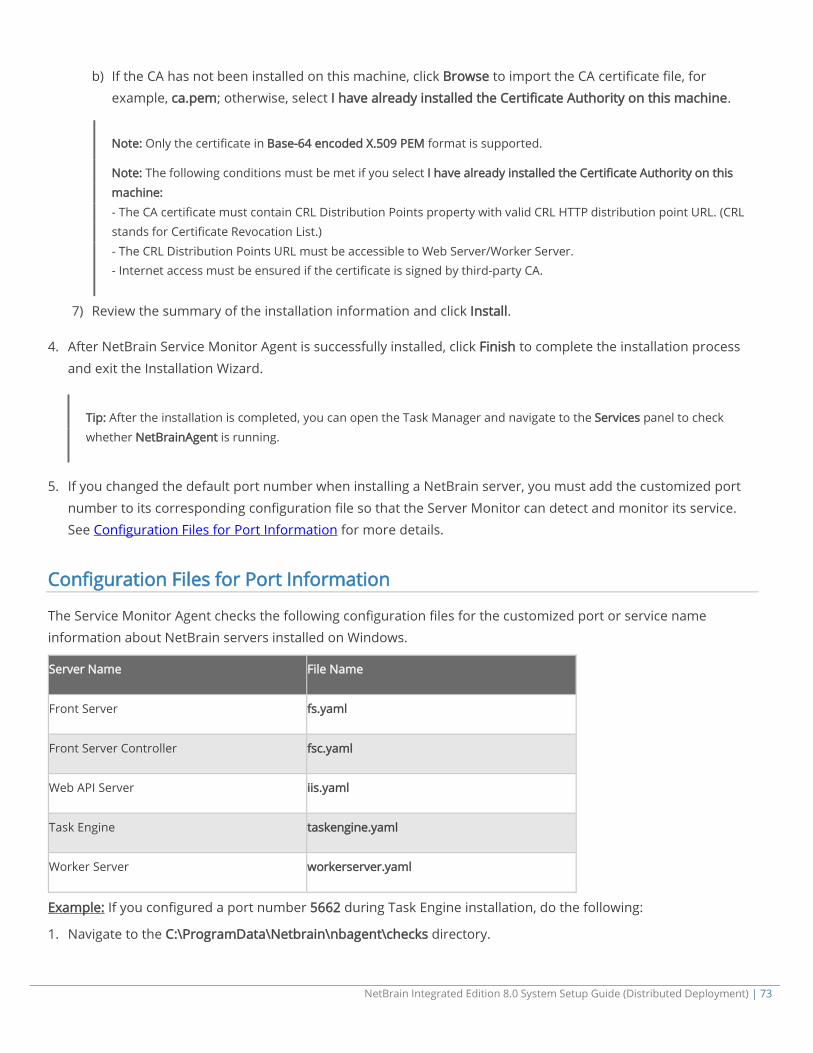
NetBrain Integrated Edition 8.0 System Setup Guide (Distributed Deployment) | 73
b) If the CA has not been installed on this machine, click Browse to import the CA certificate file, for example, ca.pem; otherwise, select I have already installed the Certificate Authority on this machine.
Note: Only the certificate in Base-64 encoded X.509 PEM format is supported.
Note: The following conditions must be met if you select I have already installed the Certificate Authority on this machine: - The CA certificate must contain CRL Distribution Points property with valid CRL HTTP distribution point URL. (CRL stands for Certificate Revocation List.) - The CRL Distribution Points URL must be accessible to Web Server/Worker Server. - Internet access must be ensured if the certificate is signed by third-party CA.
7) Review the summary of the installation information and click Install.
4. After NetBrain Service Monitor Agent is successfully installed, click Finish to complete the installation process
and exit the Installation Wizard.
Tip: After the installation is completed, you can open the Task Manager and navigate to the Services panel to check whether NetBrainAgent is running.
5. If you changed the default port number when installing a NetBrain server, you must add the customized port
number to its corresponding configuration file so that the Server Monitor can detect and monitor its service. See Configuration Files for Port Information for more details.
Configuration Files for Port Information
The Service Monitor Agent checks the following configuration files for the customized port or service name information about NetBrain servers installed on Windows.
Server Name File Name
Front Server fs.yaml
Front Server Controller fsc.yaml
Web API Server iis.yaml
Task Engine taskengine.yaml
Worker Server workerserver.yaml
Example: If you configured a port number 5662 during Task Engine installation, do the following:
1. Navigate to the C:\ProgramData\Netbrain\nbagent\checks directory.

74 | NetBrain Integrated Edition 8.0 System Setup Guide (Distributed Deployment)
Tip: The ProgramData folder is hidden usually. You can copy and paste the directory to navigate to the checks folder directly.
2. Open the taskengine.yaml file with a text editor to modify it.
Note: Follow the text format in the example strictly, including alignment, punctuations, and spaces.
init_config: instances: - name: default port: 5662
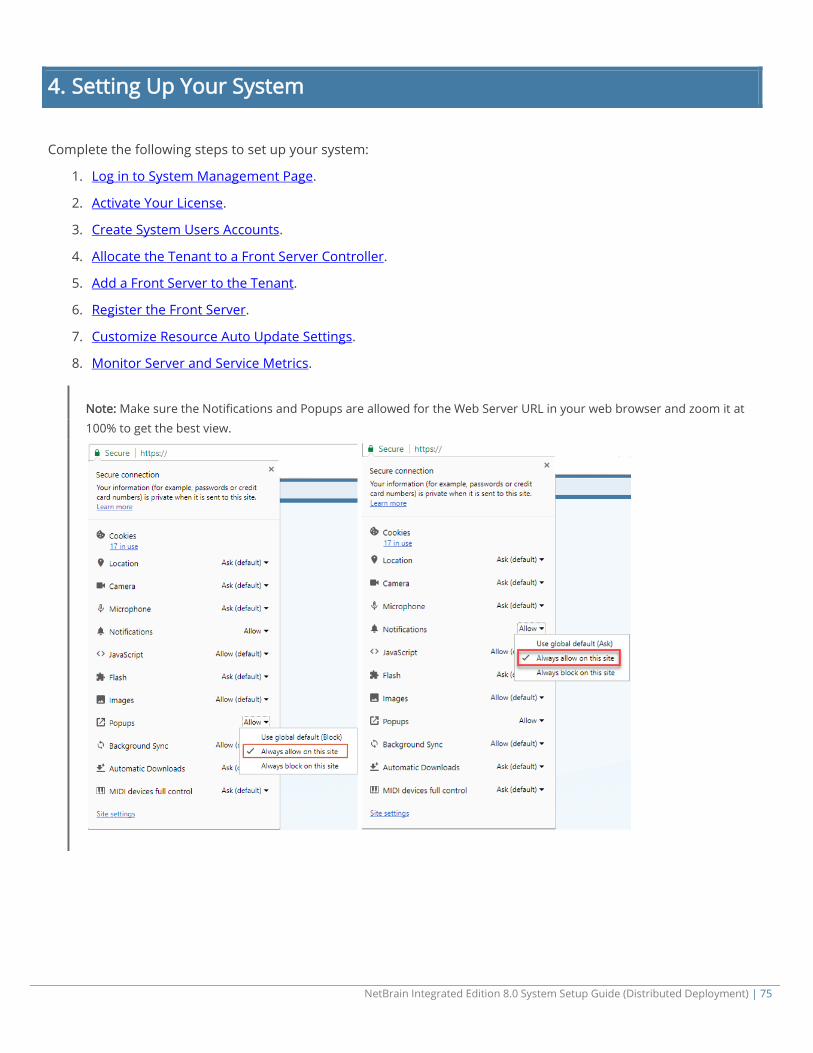
NetBrain Integrated Edition 8.0 System Setup Guide (Distributed Deployment) | 75
4. Setting Up Your System
Complete the following steps to set up your system:
1. Log in to System Management Page.
2. Activate Your License.
3. Create System Users Accounts.
4. Allocate the Tenant to a Front Server Controller.
5. Add a Front Server to the Tenant.
6. Register the Front Server.
7. Customize Resource Auto Update Settings.
8. Monitor Server and Service Metrics.
Note: Make sure the Notifications and Popups are allowed for the Web Server URL in your web browser and zoom it at 100% to get the best view.

76 | NetBrain Integrated Edition 8.0 System Setup Guide (Distributed Deployment)
4.1. Logging in to System Management Page
1. In your web browser, navigate to http(s)://<Hostname or IP address of NetBrain Web Server>/admin.html. For example, https://10.10.3.141/admin.html or http://10.10.3.141/admin.html.
2. In the login page, enter your username or email address, and password. The initial username/password is
admin/admin.
3. Click Log In. Modify your password first and then complete your user profile in the pop-up dialog, by entering
the email address, first name, and last name, and then click Save.
4.2. Activating a Subscription License
1. In the System Management page, click Activate under the License tab. The activation wizard prompts.
2. Activate your subscription license:
1) Select Activate Subscription License and click Next.
2) Enter the license ID and activation key that you received from NetBrain, with your first name, last name, and email address.
3) Select the activation method based on your situation.
Online (recommended) — click Activate to connect to NetBrain License Server and validate your license information immediately.
Via Email — validate your license information by sending an email to NetBrain.
Note: Only use this activation method when your NetBrain Web/Web API Server is not allowed to access the Internet.
a) Follow the instructions to generate your license file. Attach the file to your email and send it to NetBrain Support Team. After receiving your email, the NetBrain team will fill in the license
information on NetBrain License Server and generate the corresponding activation file, and then
send it back to you.
b) Click Browse to select the activation file that you received from NetBrain team, and then click
Activate.
4) A message box will prompt you the subscription license has been activated successfully. Click OK.
3. A confirmation dialog box prompts to ask you whether to generate an initial tenant. Click Yes and the initial
tenant will be created automatically with all purchased nodes assigned.
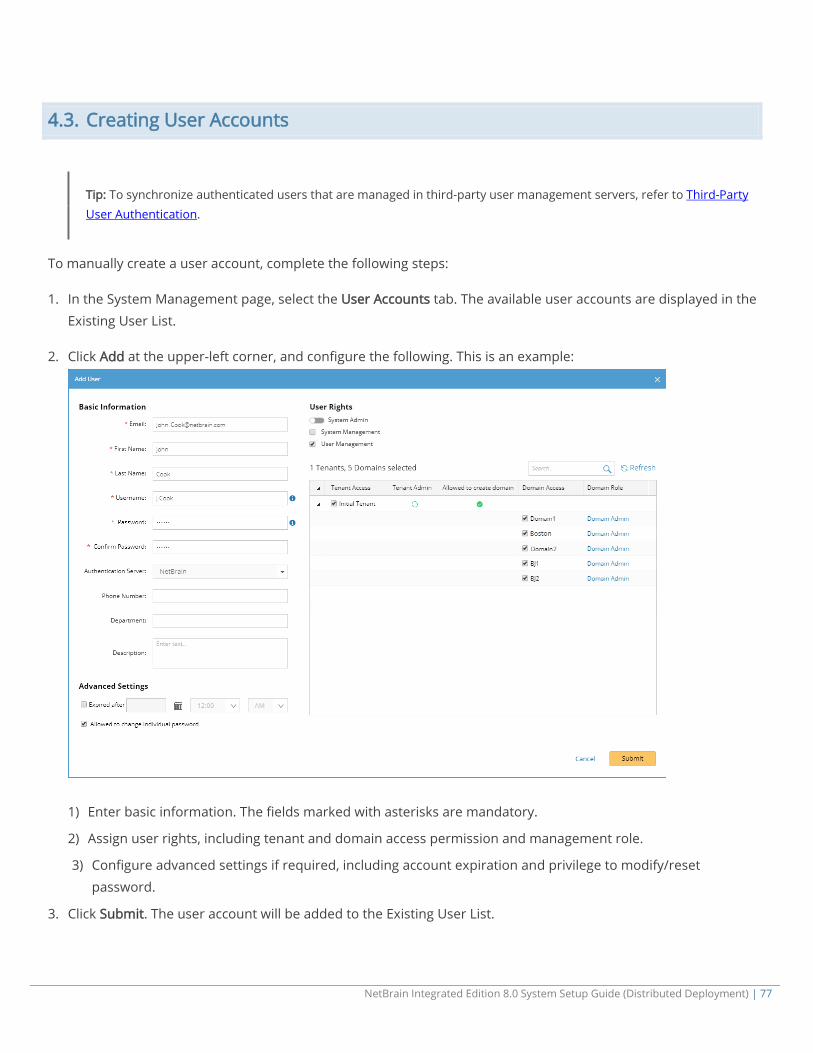
NetBrain Integrated Edition 8.0 System Setup Guide (Distributed Deployment) | 77
4.3. Creating User Accounts
Tip: To synchronize authenticated users that are managed in third-party user management servers, refer to Third-Party User Authentication.
To manually create a user account, complete the following steps:
1. In the System Management page, select the User Accounts tab. The available user accounts are displayed in the
Existing User List.
2. Click Add at the upper-left corner, and configure the following. This is an example:
1) Enter basic information. The fields marked with asterisks are mandatory.
2) Assign user rights, including tenant and domain access permission and management role.
3) Configure advanced settings if required, including account expiration and privilege to modify/reset
password.
3. Click Submit. The user account will be added to the Existing User List.
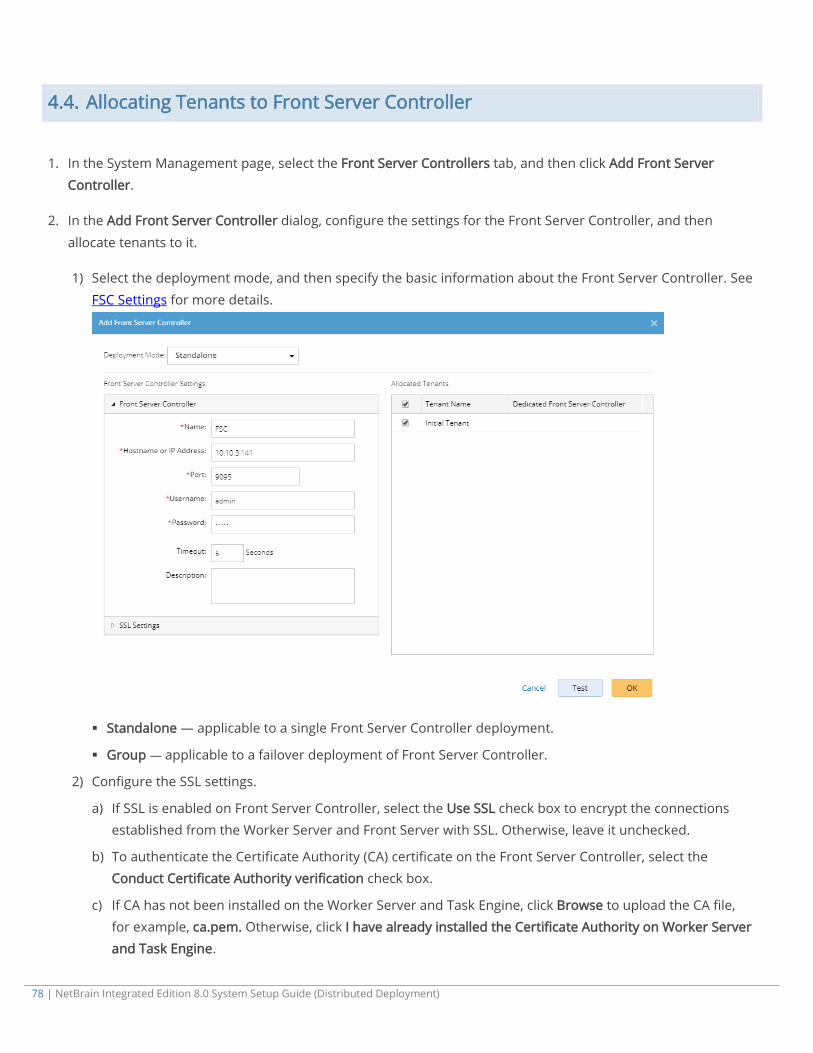
78 | NetBrain Integrated Edition 8.0 System Setup Guide (Distributed Deployment)
4.4. Allocating Tenants to Front Server Controller
1. In the System Management page, select the Front Server Controllers tab, and then click Add Front Server
Controller.
2. In the Add Front Server Controller dialog, configure the settings for the Front Server Controller, and then
allocate tenants to it.
1) Select the deployment mode, and then specify the basic information about the Front Server Controller. See
FSC Settings for more details.
Standalone — applicable to a single Front Server Controller deployment.
Group — applicable to a failover deployment of Front Server Controller.
2) Configure the SSL settings.
a) If SSL is enabled on Front Server Controller, select the Use SSL check box to encrypt the connections established from the Worker Server and Front Server with SSL. Otherwise, leave it unchecked.
b) To authenticate the Certificate Authority (CA) certificate on the Front Server Controller, select the Conduct Certificate Authority verification check box.
c) If CA has not been installed on the Worker Server and Task Engine, click Browse to upload the CA file, for example, ca.pem. Otherwise, click I have already installed the Certificate Authority on Worker Server and Task Engine.

NetBrain Integrated Edition 8.0 System Setup Guide (Distributed Deployment) | 79
Note: Only certificates in the Base-64 encoded X.509 PEM format are supported.
3) Click Test to verify whether the Worker Server can establish a connection to Front Server Controller with
the configurations.
4) In the Allocated Tenants area, select the target tenants to allocate them to the controller.
5) Click OK to save the settings.
The Front Server Controller is added.
Front Server Controller Settings
The following items (except Timeout and Description) are required to be consistent with those configured during the installation of Front Server Controller.
Field Description
Name The name of the Front Server Controller created when you install the Front Server Controller.
Hostname or IP Address Enter the IP address of Front Server Controller.
Port The port number created when you install the Front Server Controller for listening to the connections from Worker Server. By default, it is 9095.
Username The user name created when you install the Front Server Controller to authenticate the connections from Worker Server.
Password The password created on the NetBrain Front Server Controller page when installing the Front Server Controller.
Timeout The maximum waiting time for establishing a connection from Worker Server to this Front Server Controller. By default, it is 5 seconds.
Description The brief description to help you add more information about the Front Server Controller.
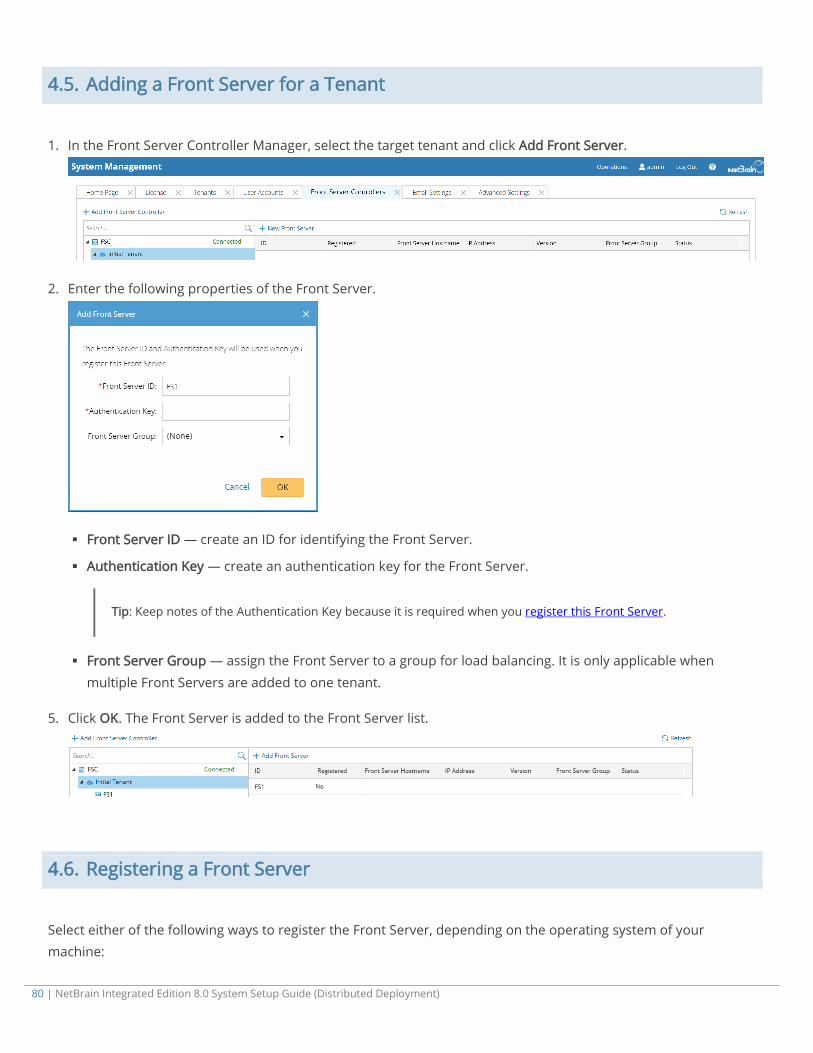
80 | NetBrain Integrated Edition 8.0 System Setup Guide (Distributed Deployment)
4.5. Adding a Front Server for a Tenant
1. In the Front Server Controller Manager, select the target tenant and click Add Front Server.
2. Enter the following properties of the Front Server.
Front Server ID — create an ID for identifying the Front Server.
Authentication Key — create an authentication key for the Front Server.
Tip: Keep notes of the Authentication Key because it is required when you register this Front Server.
Front Server Group — assign the Front Server to a group for load balancing. It is only applicable when
multiple Front Servers are added to one tenant.
5. Click OK. The Front Server is added to the Front Server list.
4.6. Registering a Front Server
Select either of the following ways to register the Front Server, depending on the operating system of your machine:
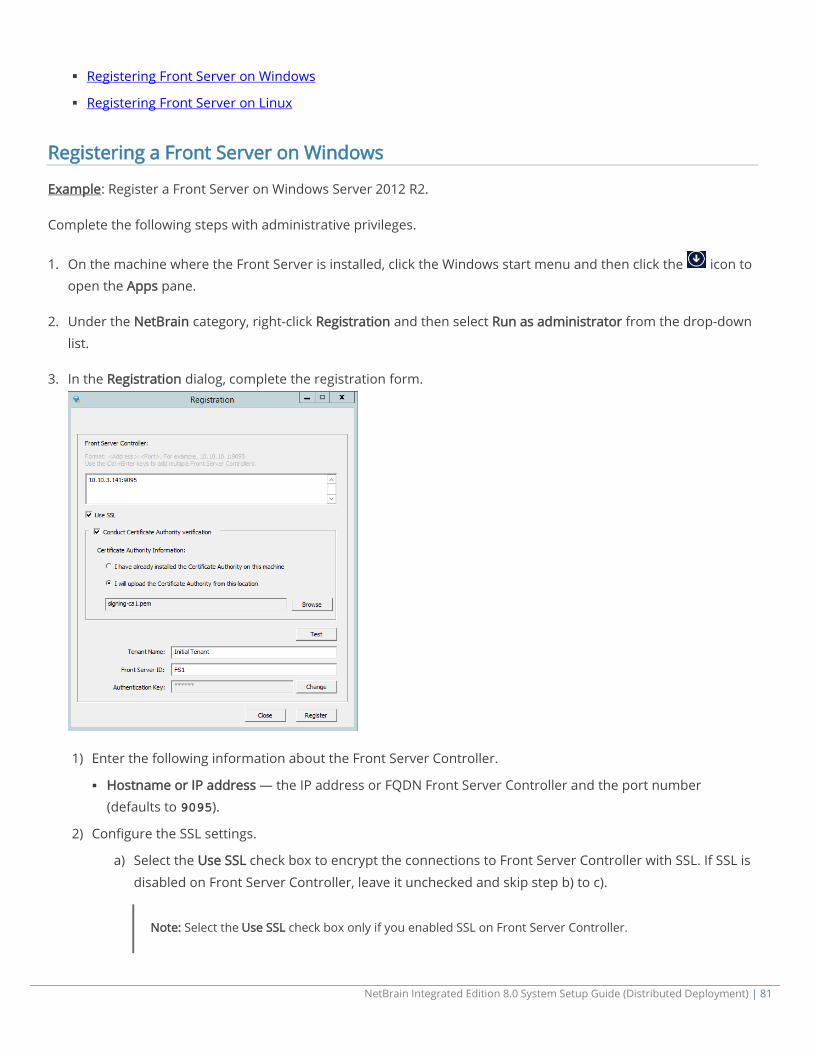
NetBrain Integrated Edition 8.0 System Setup Guide (Distributed Deployment) | 81
Registering Front Server on Windows
Registering Front Server on Linux
Registering a Front Server on Windows
Example: Register a Front Server on Windows Server 2012 R2.
Complete the following steps with administrative privileges.
1. On the machine where the Front Server is installed, click the Windows start menu and then click the icon to open the Apps pane.
2. Under the NetBrain category, right-click Registration and then select Run as administrator from the drop-down
list.
3. In the Registration dialog, complete the registration form.
1) Enter the following information about the Front Server Controller.
Hostname or IP address — the IP address or FQDN Front Server Controller and the port number (defaults to 9095).
2) Configure the SSL settings.
a) Select the Use SSL check box to encrypt the connections to Front Server Controller with SSL. If SSL is
disabled on Front Server Controller, leave it unchecked and skip step b) to c).
Note: Select the Use SSL check box only if you enabled SSL on Front Server Controller.
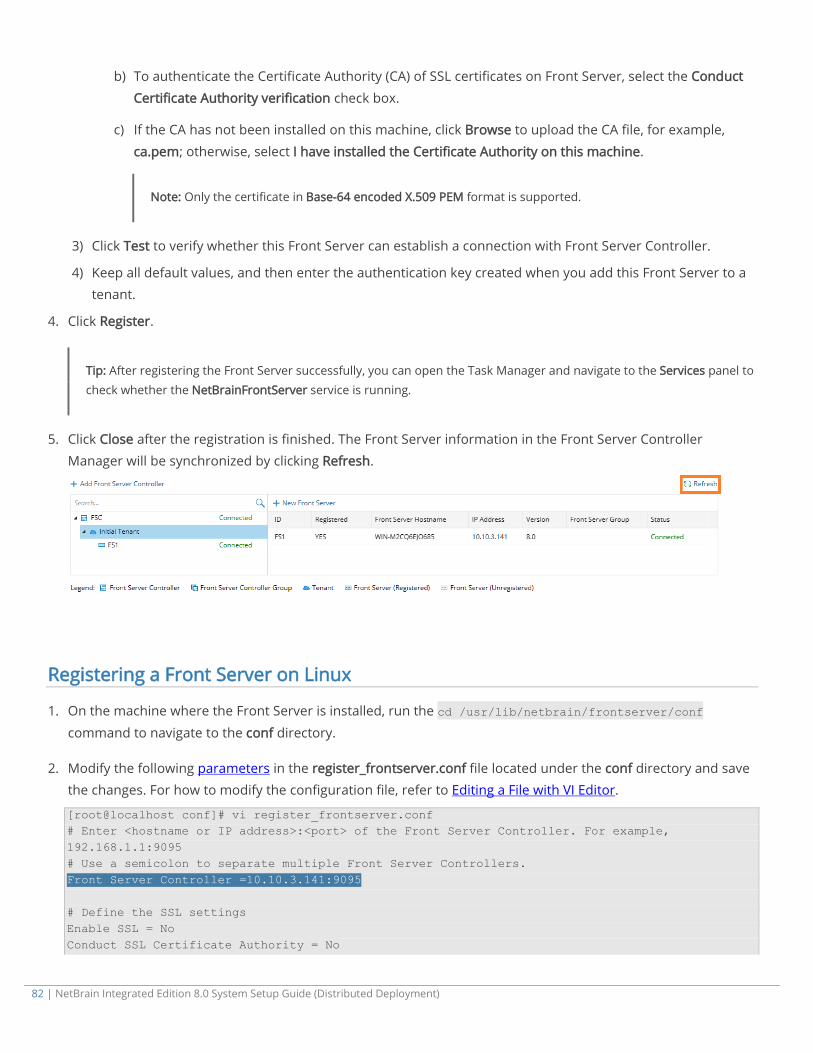
82 | NetBrain Integrated Edition 8.0 System Setup Guide (Distributed Deployment)
b) To authenticate the Certificate Authority (CA) of SSL certificates on Front Server, select the Conduct
Certificate Authority verification check box.
c) If the CA has not been installed on this machine, click Browse to upload the CA file, for example,
ca.pem; otherwise, select I have installed the Certificate Authority on this machine.
Note: Only the certificate in Base-64 encoded X.509 PEM format is supported.
3) Click Test to verify whether this Front Server can establish a connection with Front Server Controller.
4) Keep all default values, and then enter the authentication key created when you add this Front Server to a tenant.
4. Click Register.
Tip: After registering the Front Server successfully, you can open the Task Manager and navigate to the Services panel to check whether the NetBrainFrontServer service is running.
5. Click Close after the registration is finished. The Front Server information in the Front Server Controller Manager will be synchronized by clicking Refresh.
Registering a Front Server on Linux
1. On the machine where the Front Server is installed, run the cd /usr/lib/netbrain/frontserver/conf
command to navigate to the conf directory.
2. Modify the following parameters in the register_frontserver.conf file located under the conf directory and save the changes. For how to modify the configuration file, refer to Editing a File with VI Editor.
[root@localhost conf]# vi register_frontserver.conf # Enter <hostname or IP address>:<port> of the Front Server Controller. For example, 192.168.1.1:9095 # Use a semicolon to separate multiple Front Server Controllers. Front Server Controller =10.10.3.141:9095 # Define the SSL settings Enable SSL = No Conduct SSL Certificate Authority = No

NetBrain Integrated Edition 8.0 System Setup Guide (Distributed Deployment) | 83
SSL Certificate Path = # Define the Front Server register to Tenant Name =Initial Tenant Front Server ID =FS1
3. Run the cd /usr/lib/netbrain/frontserver/bin command to navigate to the bin directory.
4. Run the ./registration command under the bin directory, and input the Authentication Key and press the Enter key.
[root@localhost bin]# ./registration Loading configuration files... Authentication Key: Stopping Front Server Service... Registering Front Server... Successfully registered to the tenant "Initial Tenant". 10.10.3.141: active. Succeeded to start up front server service.
5. Run the service netbrainfrontserver status command to verify whether the service of the Front Server
starts successfully.
[root@localhost FrontServer]# service netbrainfrontserver status Redirecting to /bin/systemctl status NetBrainFrontServer.service NetBrainFrontServer.service - NetBrain Front Server Daemon Loaded: loaded (/usr/lib/systemd/system/NetBrainFrontServer.service) Active: active (running)
Parameters
Parameter Default Value Description
Front Server Controller The hostname, IP address, or FQDN of the Front Server Controller and the port number.
Enable SSL No Set whether to encrypt the connections to Front Server Controller with SSL.
If SSL is enabled on the Front Server Controller, type Yes; otherwise, leave the default value as it is.
Note: Type Yes only if you enabled SSL on MongoDB.
Conduct Certificate Authority Verification
No Set whether to authenticate the Certificate Authority (CA) of SSL certificates on the Front Server.
If you want to authenticate the Certificate Authority, type Yes.
SSL Certificate Path The storage path and certificate name.
Note: Only the certificate in the Base-64 encoded X.509 PEM format is supported.
84 | NetBrain Integrated Edition 8.0 System Setup Guide (Distributed Deployment)
Parameter Default Value Description
Tenant Name Initial Tenant
The name of the tenant that this Front Server will serve.
Front Server ID FS1 The ID created when you add this Front Server to a tenant.
Authentication Key The authentication key created when you add this Front Server to a tenant.
4.7. Customizing Auto-Update Settings
Knowledge Cloud is a centralized resource base housing various types of regular/customized NetBrain resources. NetBrain IE system can download any NetBrain resources (that apply to your specific IE version) from Knowledge
Cloud constantly. These resources, once downloaded, will be deployed automatically in your IE system.
There are three ways to perform a resource update in your IE system.
Auto-update Resources (Recommended) — the system will fetch the latest resources from Knowledge Cloud constantly (twice per day between 12AM and 3AM, 12 PM and 3 PM at local time zone) in a fully automatic manner. See Auto-updating Resources for more details.
Manually Trigger Resource Update — manually initiate the auto-updating process and apply the latest
resources (if any) immediately to the system. See Manually Triggering Resource Update for more details.
Manually Import Resources — manually upload the latest resource package into the system when your
servers are not allowed to access the Internet. See Manually Importing Resources for more details.
Auto-Updating Resources
1. In the System Management page, select Operations > Resource Update.
2. Select the Auto Update from NetBrain check box.
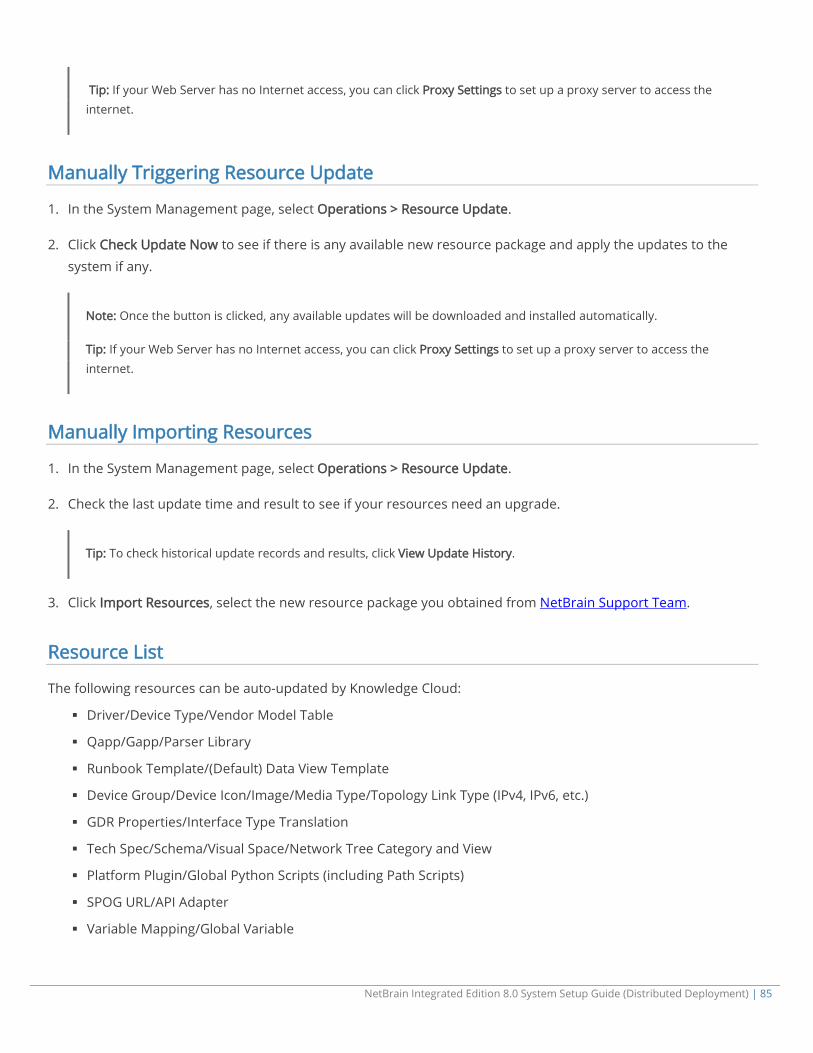
NetBrain Integrated Edition 8.0 System Setup Guide (Distributed Deployment) | 85
Tip: If your Web Server has no Internet access, you can click Proxy Settings to set up a proxy server to access the internet.
Manually Triggering Resource Update
1. In the System Management page, select Operations > Resource Update.
2. Click Check Update Now to see if there is any available new resource package and apply the updates to the
system if any.
Note: Once the button is clicked, any available updates will be downloaded and installed automatically.
Tip: If your Web Server has no Internet access, you can click Proxy Settings to set up a proxy server to access the internet.
Manually Importing Resources
1. In the System Management page, select Operations > Resource Update.
2. Check the last update time and result to see if your resources need an upgrade.
Tip: To check historical update records and results, click View Update History.
3. Click Import Resources, select the new resource package you obtained from NetBrain Support Team.
Resource List
The following resources can be auto-updated by Knowledge Cloud:
Driver/Device Type/Vendor Model Table
Qapp/Gapp/Parser Library
Runbook Template/(Default) Data View Template
Device Group/Device Icon/Image/Media Type/Topology Link Type (IPv4, IPv6, etc.)
GDR Properties/Interface Type Translation
Tech Spec/Schema/Visual Space/Network Tree Category and View
Platform Plugin/Global Python Scripts (including Path Scripts)
SPOG URL/API Adapter
Variable Mapping/Global Variable
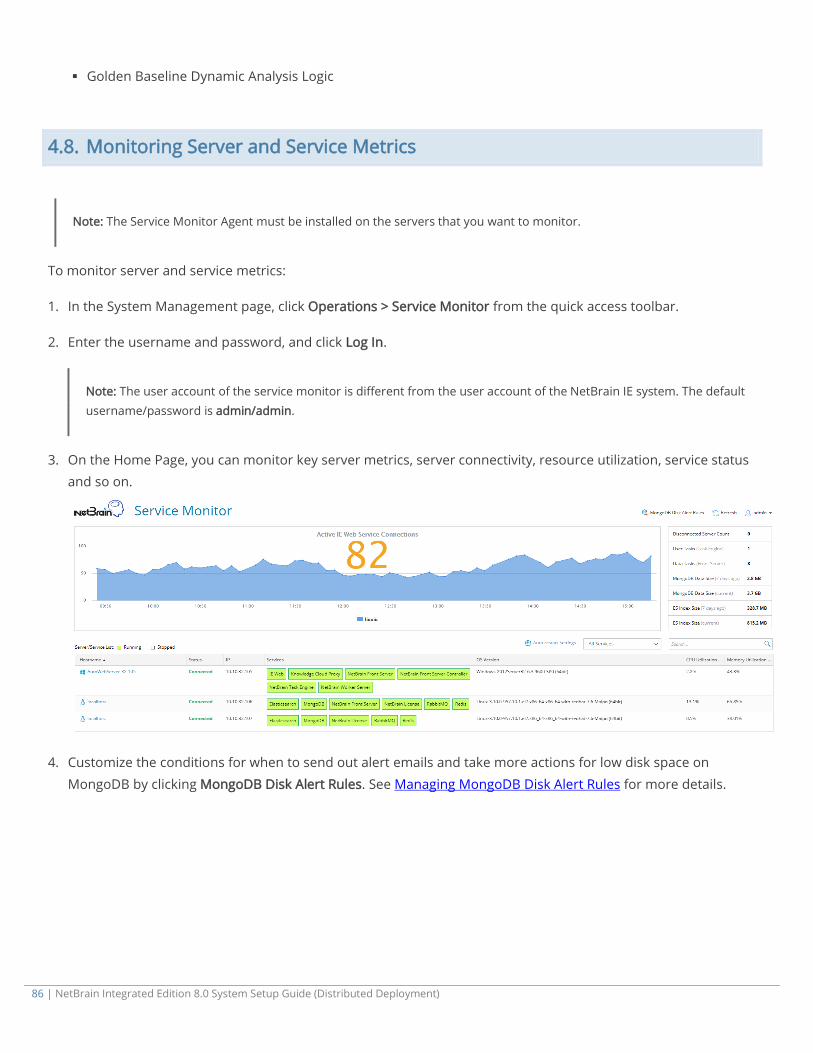
86 | NetBrain Integrated Edition 8.0 System Setup Guide (Distributed Deployment)
Golden Baseline Dynamic Analysis Logic
4.8. Monitoring Server and Service Metrics
Note: The Service Monitor Agent must be installed on the servers that you want to monitor.
To monitor server and service metrics:
1. In the System Management page, click Operations > Service Monitor from the quick access toolbar.
2. Enter the username and password, and click Log In.
Note: The user account of the service monitor is different from the user account of the NetBrain IE system. The default username/password is admin/admin.
3. On the Home Page, you can monitor key server metrics, server connectivity, resource utilization, service status and so on.
4. Customize the conditions for when to send out alert emails and take more actions for low disk space on
MongoDB by clicking MongoDB Disk Alert Rules. See Managing MongoDB Disk Alert Rules for more details.
NetBrain Integrated Edition 8.0 System Setup Guide (Distributed Deployment) | 87
Appendix
Offline Installing Third-party Dependencies
Editing a File with VI Editor
SSL Certificate Requirements
Third-Party User Authentication
Configuring NTP Client on NetBrain Servers
Offline Installing Third-party Dependencies
1. Download the dependency package from a server with the Internet access using one of the following download
links according to the version of your Operating System:
CentOS7.5: http://download.netbraintech.com/dependencies-centos7.5-8.0.tar.gz
CentOS7.6: http://download.netbraintech.com/dependencies-centos7.6-8.0.tar.gz
CentOS7.7: http://download.netbraintech.com/dependencies-centos7.7-8.0.tar.gz
RHEL7.5: http://download.netbraintech.com/dependencies-rhel7.5-8.0.tar.gz
RHEL7.6: http://download.netbraintech.com/dependencies-rhel7.6-8.0.tar.gz
RHEL7.7: http://download.netbraintech.com/dependencies-rhel7.7-8.0.tar.gz.
2. Copy the downloaded dependency package to your Linux server.
3. Run the tar -zxvf dependencies-<OS version>-8.0.tar.gz command to decompress the package.
Tip: Possible values of OS version include: centos7.5; centos7.6; centos7.7; rhel7.5; rhel7.6; rhel7.7.
4. Run the cd dependencies command to navigate to the decompressed directory.
5. Run the offline-install.sh command to install the dependencies.
Editing a File with VI Editor
The following steps illustrate how to edit a configuration file with the vi editor, which is the default text file editing
tool of a Linux operating system.
88 | NetBrain Integrated Edition 8.0 System Setup Guide (Distributed Deployment)
1. Create a terminal and run the cd command at the command line to navigate to the directory where the
configuration file is located.
2. Run the vi <configuration file name> command under the directory to show the configuration file.
3. Press the Insert or I key on your keyboard, and then move the cursor to the location where you want to edit.
4. Modify the file based on your needs, and then press the Esc key to exit the input mode.
5. Enter the :wq! command and press the Enter key to save the changes and exit the vi editor.
SSL Certificate Requirements
The requirements of SSL certificates may vary for different NetBrain servers, depending on their different roles in SSL encrypted connections, SSL-server or SSL-client.
SSL Certificate Requirements for SSL-Server
SSL Certificate Requirements for SSL-Client
Certificate Requirements for SSL-Server
The following table lists the requirements of SSL certificates for NetBrain servers that work as SSL-server in encrypted connections.
NetBrain Server Required SSL Certificate and Key Format
MongoDB
License Agent
Elasticsearch
Redis
RabbitMQ
Front Server Controller
Ansible Agent
Certificate that contains a public key. For example, cert.pem.
CA certificate (only required for Elasticsearch). For example, ca.pem.
Base-64 encoded X.509 PEM
Private key. For example, key.pem. Note: Private keys protected by a password are not supported.
PKCS#8 key
Tip: The certificates in PEM format usually have extensions such as .pem, .crt, .cer, and .key.

NetBrain Integrated Edition 8.0 System Setup Guide (Distributed Deployment) | 89
Certificate Requirements for SSL-Client
Note: By default, NetBrain servers that work as SSL-client don't require any SSL certificates. If you want to authenticate the Certificate Authority of the certificates for SSL-server, then the SSL certificates are required on SSL-client.
The following table lists the certificate requirements for SSL-client, including Web Server, Web API Server, Worker Server, Front Server, Task Engine, and Service Monitor Agent.
Authentication Method Requirements Format
Use the certificates installed on Windows
All the certificates are valid and installed in the certificate store.
The certificate store must be under the Trusted Root Certification Authorities directory instead of the Personal directory.
N/A
Upload certificates when installing NetBrain servers
For Front Server and Worker Server: CA certificate containing root CA certificate and class 2 CA certificate is required.
For other SSL-client: class 2 or class 3 CA certificate is required.
Base-64 encoded X.509 PEM
Third-Party User Authentication
In addition to creating users manually, the system supports integrating with the following third-party user
management systems for authentication.
LDAP Authentication
AD Authentication
TACACS+ Authentication
SSO Authentication
90 | NetBrain Integrated Edition 8.0 System Setup Guide (Distributed Deployment)
Configuring NTP Clients on NetBrain Servers
Note: If all NetBrain servers are joined to a Windows domain, the NTP client service on these servers is automatically started by default. In this case, configuring NTP is not required.
Prerequisite: Before configuring NTP, prepare an internal NTP server or find the FQDN of a reliable external NTP server for usage. UDP port 123 must be open on the internal NTP server and on network firewalls to allow NTP
traffic.
Follow the instructions to configure NetBrain servers as an NTP client:
Configuring NTP on Windows
Configuring NTP on Linux