netburner pc tools reference guide - university of alberta
TRANSCRIPT
NetBurner PC Tools Reference Guide
Disclaimers and Copyrights NetBurner, Inc. makes no representations or warranties with respect to the contents of our manuals and specifically disclaims any implied warranties of merchantability or fitness for any particular purpose. Further, NetBurner, Inc. reserves the right to revise our manuals, make changes, and/or discontinue them without notice. Every effort has been made to ensure that all information is correct, but NetBurner, Inc. is not responsible for inadvertent errors. NetBurner manuals contain links to third-party web sites that are not under the control of NetBurner, and NetBurner is not responsible for the content on any linked site. If you access any third-party sites listed in any of our manuals, then you do so at your own risk. NetBurner provides these links only as a convenience, and the inclusion of the link does not imply that NetBurner endorses or accepts any responsibility for the content on those third-party sites. Under copyright laws, the documentation for the all NetBurner Manuals, PDFs, and Guides may not be copied, photocopied, reproduced, translated or reduced to any electronic medium or machine-readable form, in whole or in part, without prior written consent of NetBurner, Inc. NetBurner and the NetBurner logo are trademarks of NetBurner, Inc. Life Support Disclaimer NetBurner’s products both hardware and software (including tools) are not authorized for use as critical components in life support devices or systems, without the express written approval of NetBurner, Inc. prior to use. As used herein: (1) Life support devices or systems are devices or systems that (a) are intended for surgical implant into the body or (b) support or sustain life, and whose failure to perform, when properly used in accordance with instructions for use provided in the labeling, can be reasonably expected to result in a significant injury to the user. (2) A critical component is any component of a life support device or system whose failure to perform can be reasonably expected to cause the failure of the life support device or system, or to affect its safety or effectiveness.

Table of Contents 1. Introduction............................................................................................................................. 4
1.1. File Locations.................................................................................................................. 4 1.2. Distribution Rights.......................................................................................................... 4
2. MTTTY Serial Terminal......................................................................................................... 5 2.1. MTTTY FAQ.................................................................................................................. 6 2.2. MTTTY Parameters ........................................................................................................ 6 2.3. Enabling Software Flow Control .................................................................................... 7
3. IPSetup Network Configuration Tool..................................................................................... 8 3.1. Using IPSetup ................................................................................................................. 9 3.2. IPSetup Does Not Display Your NetBurner Device....................................................... 9 3.3. IPSetup FAQ................................................................................................................... 9
4. Updating Your NetBurner Device Application .................................................................... 10 4.1. AutoUpdate ................................................................................................................... 11
4.1.1. Running in Auto Mode without User Intervention ............................................... 11 4.1.2. AutoUpdate Cannot Locate Your NetBurner Device ........................................... 12 4.1.3. Using AutoUpdate ................................................................................................ 12 4.1.4. AutoUpdate FAQ.................................................................................................. 12
4.2. TcpUpdate..................................................................................................................... 13 4.2.1. TcpUpdate Cannot Reprogram Your NetBurner Device...................................... 13 4.2.2. Using TcpUpdate .................................................................................................. 14 4.2.3. TcpUpdate FAQ.................................................................................................... 14
5. TaskScan ............................................................................................................................... 15 5.1. TaskScan FAQ.............................................................................................................. 15 5.2. Using TaskScan ............................................................................................................ 16
6. WinAddr2Line ...................................................................................................................... 19 6.1. Using WinAddr2Line.................................................................................................... 19
7. SmartTraps............................................................................................................................ 21 7.1. Example Program: ........................................................................................................ 22 7.2. Running the SmartTraps Example ................................................................................ 24
8. Advanced Utilities ................................................................................................................ 26 8.1. CompCode .................................................................................................................... 26 8.2. CompHtml..................................................................................................................... 27 8.3. GDB .............................................................................................................................. 28
8.3.1. Overview............................................................................................................... 28 8.3.2. GDB Setup ............................................................................................................ 29 8.3.3. Build a Debug Application Image in NBEclipse.................................................. 29 8.3.4. Download the Debug Application Using AutoUpdate ......................................... 29 8.3.5. Starting a Network GDB Session ......................................................................... 30 8.3.6. GDB Commands................................................................................................... 31 8.3.7. GDB Using a Serial Port....................................................................................... 32
9. Revision History ................................................................................................................... 33

1. Introduction
Thank you for purchasing your NetBurner Development Kit, and welcome to the NetBurner family. This reference guide describes the PC Applications and Tools that may be used with your NetBurner Network Development Kit. For questions regarding any of these applications, please register your development kit at http://support.netburner.com.
1.1. File Locations
Executable Versions: The NetBurner Network Development Kit includes the binary executable versions of each utility, located in c:\nburn\pcbin. Source Code: The source code for each utility is located in c:\nburn\pctools.
1.2. Distribution Rights
You may distribute the existing executables, modify the source code, or include the source code in your own custom application, provided the utilities are only run on hardware manufactured by NetBurner.
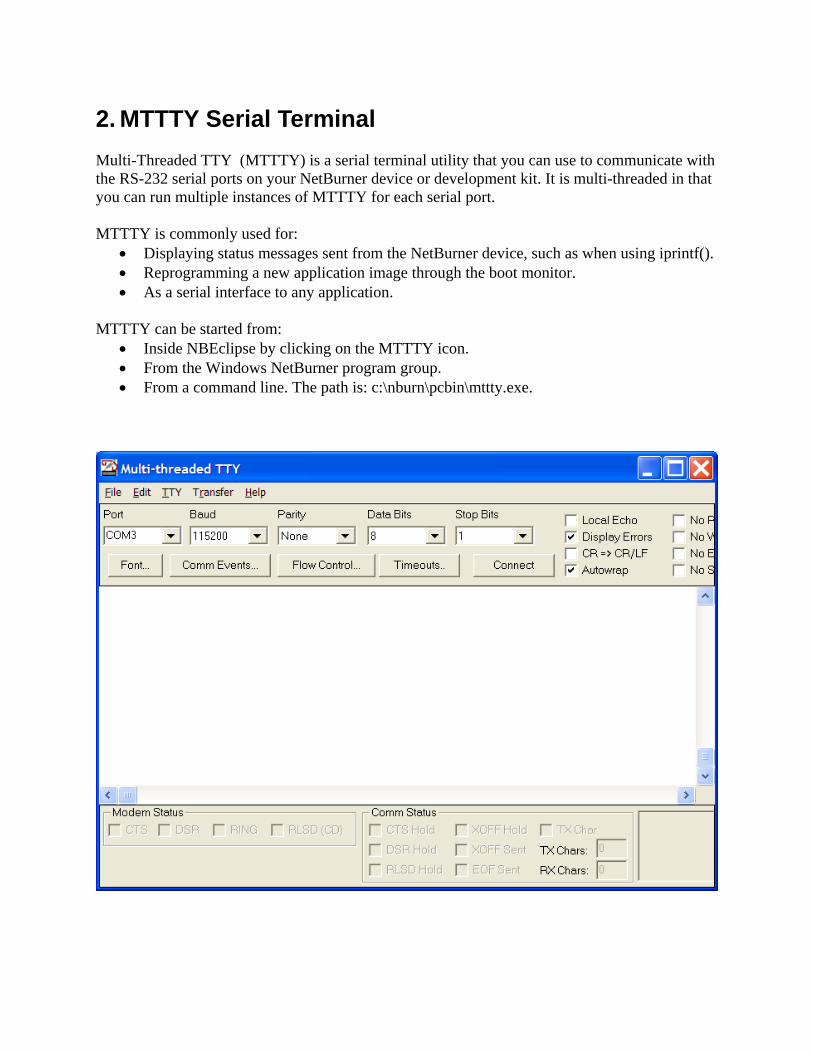
2. MTTTY Serial Terminal
Multi-Threaded TTY (MTTTY) is a serial terminal utility that you can use to communicate with the RS-232 serial ports on your NetBurner device or development kit. It is multi-threaded in that you can run multiple instances of MTTTY for each serial port. MTTTY is commonly used for:
Displaying status messages sent from the NetBurner device, such as when using iprintf(). Reprogramming a new application image through the boot monitor. As a serial interface to any application.
MTTTY can be started from:
Inside NBEclipse by clicking on the MTTTY icon. From the Windows NetBurner program group. From a command line. The path is: c:\nburn\pcbin\mttty.exe.
2.1. MTTTY FAQ
The default serial port used for stdio for NetBurner devices is UART0 by default. The DB9 connector pinout on NetBurner development boards will have the
RS-232 rx and tx signals reversed, so that a null-modem adapter is not required and you can use a straight-through serial cable.
The DB9 connector pinout on NetBurner Serial-To-Ethernet devices, such as the SB72EX and SB700EX, will be identical to a standard PC type pinout, so a null-modem adapter will be required. The serial cable that comes with the NetBurner development kits for these specific devices is a null-modem cable.
If you are using a MOD5213 or SBL2e, you must enable software flow control. The boot monitor will display a sign-on message on reset or power-up, and provide an
opportunity to abort the normal boot sequence and enter the boot monitor program. This is useful for downloading a new application if your custom application running on the NetBurner device is crashing and network connectivity is not possible.
The Quiet Boot option (item Q) will disable the boot message that is normally printed out when the system is booting. However, it is still possible to press an A (uppercase A) to access the nb> prompt during boot.
On all platforms with SDRAM, MTTTY can be used to download your application into your NetBurner device's SDRAM (using the DL command) or FLASH Memory (using the FLA command) via the serial connection from your host computer to your NetBurner device.
While in the boot monitor, network communication is not possible, so utilities like IPSetup will not locate your NetBurner device.
MTTTY Error 5: CreateFile. Access is denied. This error means the currently selected serial communication port (i.e. COM1) is in use by another program or device.
2.2. MTTTY Parameters
Port: The PC’s serial port you wish to use. Baud Rate: The host computer and the attached serial (NetBurner) device must agree on a speed or baud rate to use for the serial connection (the recommended setting for both is 115200). Parity: Checks whether data has been lost or written over when transmitted between your host PC and your NetBurner device (default = None) Data Bits: The number of bits in a transmitted data package ( default = 8) Stop Bits: The stop bit follows the data and parity bits in serial communication. It indicates the end of transmission (default = 1). Connect: Pressing the Connect button will acquire the PC serial port for the MTTTY application. No data can be sent or received unless the connection button has been selected.
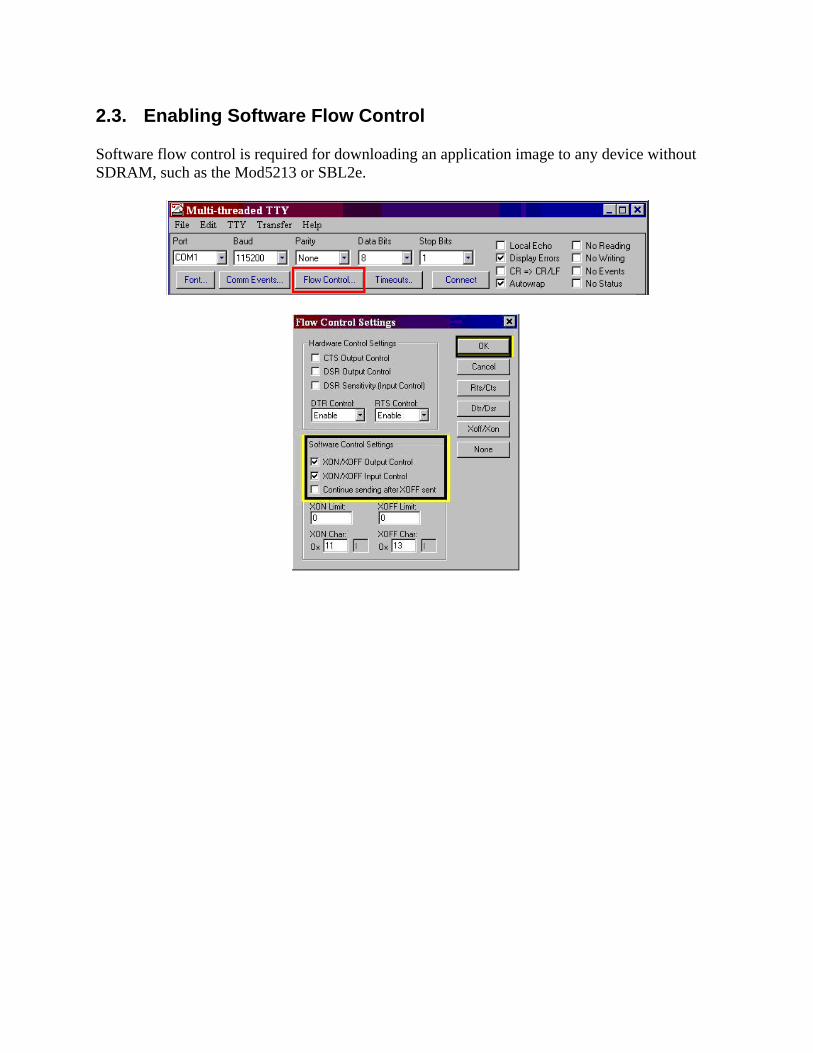
2.3. Enabling Software Flow Control
Software flow control is required for downloading an application image to any device without SDRAM, such as the Mod5213 or SBL2e.
3. IPSetup Network Configuration Tool
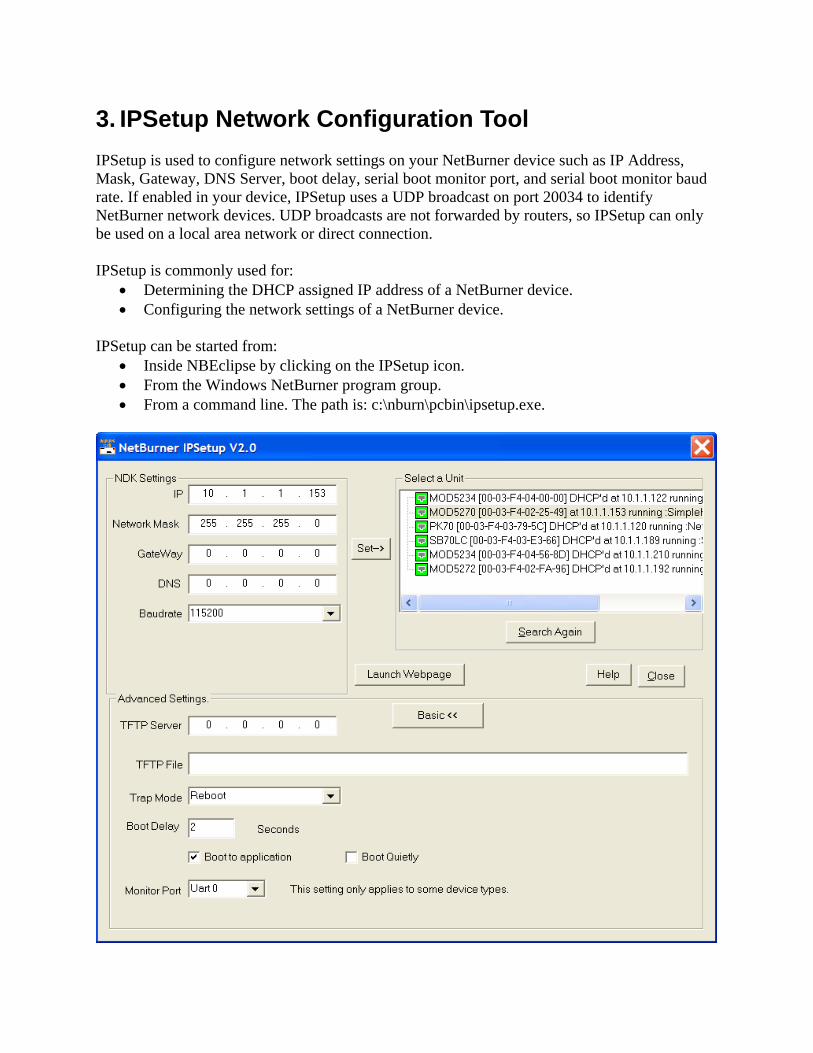
IPSetup is used to configure network settings on your NetBurner device such as IP Address, Mask, Gateway, DNS Server, boot delay, serial boot monitor port, and serial boot monitor baud rate. If enabled in your device, IPSetup uses a UDP broadcast on port 20034 to identify NetBurner network devices. UDP broadcasts are not forwarded by routers, so IPSetup can only be used on a local area network or direct connection. IPSetup is commonly used for:
Determining the DHCP assigned IP address of a NetBurner device. Configuring the network settings of a NetBurner device.
IPSetup can be started from:
Inside NBEclipse by clicking on the IPSetup icon. From the Windows NetBurner program group. From a command line. The path is: c:\nburn\pcbin\ipsetup.exe.
3.1. Using IPSetup
To configure a device with IPSetup: The device must be on the same local area network or be a direct connection to your PC. Your PC’s firewall must allow network traffic on port number 20034. If you do not see
your NetBurner device, the first thing to try is temporarily disabling your firewall to see if that is the cause.
Click on a device in the “Select a Unit” window. Enter your configuration settings in the “NDK Settings” group. In all NetBurner example
programs an IP address of 0.0.0.0 instructs the NetBurner device to use DHCP. Once you have specified all your configuration settings, click on the “Set” button to
transmit them to the NetBurner device. The DHCP assigned address, or static IP address, will appear in the description next to
each NetBurner device in the Select a Unit window.
3.2. IPSetup Does Not Display Your NetBurner Device
If IPSetup does not display your device it is for one of the following reasons: 1. A firewall on your PC is blocking network port number 20034. Try temporarily disabling
your firewall to see if this is the cause. 2. The application in your device is not running. This can happen during development if you
download an application that is crashing. Network communication is only possible if you have a running application. To recover from this situation use MTTTY and download a working application through the serial port using the “FLA” command.
3. You are trying to talk to a device on the other side of a router. The PC and NetBurner device must be on the same LAN.
3.3. IPSetup FAQ
In all NetBurner example applications an IP address of 0.0.0.0 will invoke DHCP. The application name in the Select a Unit window is specified by the assignment of :
const char *AppName variable. For example, const char *AppName = "MOD5270 Factory Demo";
We recommend you do not set the boot delay to 0 seconds, otherwise you may not be able to enter the boot monitor program if you download a bad application that is crashing. We recommend a boot delay no less than 2 seconds.
By default, your NetBurner device boots to the application. If you uncheck Boot to application, your program will boot to the monitor.
If you select Boot Quietly, the boot message prompt that is normally displayed when the system is reset will be disabled. However, you can still type an ‘A’ to abort the application boot and enter the boot monitor.
The default boot monitor port is UART0.
4. Updating Your NetBurner Device Application
There are four methods you can use to update the application running on your NetBurner device. Only two of these methods involve PC utilities, but we will cover all four methods for completeness.
1. Serial Port using the Boot Monitor. This method is used if you have downloaded a bad application to your device that is crashing and preventing network communications.
2. The AutoUpdate Utility. Used when the Windows PC and your NetBurner device are located on the same local area network (LAN). AutoUpdate uses the UDP protocol This is also the method invoked by the NBEclipse development tools.
3. The TCP Update Utility. Similar to AutoUpdate, but uses TCP instead of UDP. This method is useful when the Windows PC and NetBurner device are not located on the same LAN, but instead are connected through the Internet, firewalls or NAT routers. Note that if the NetBurner device is behind a firewall or NAT router, port forwarding must be configured correctly in those devices/software to allow the incoming TCP connection from the Windows PC to the NetBurner device.
4. FTP Update. This is not a Windows PC utility, but is included as an alternative to TcpUpdate. FTP uses TCP as well, but the originating connection originates from the NetBurner device. If your FTP server is on the Internet, no firewall or NAT router port forwarding should be necessary. There is an example of this method in your c:\nburn\examples\FTP directory.
The Windows PC utilities are described in the following sections.

4.1. AutoUpdate
AutoUpdate is used to download a new application image to your NetBurner device flash memory over a network connection using UDP. In order for AutoUpdate to work the PC and NetBurner device must be on the same local area network, and the NetBurner device must have a valid IP address and mask so that it can communicate with the PC. AutoUpdate is commonly used for:
Updating the application over a LAN network. AutoUpdate can be started from:
Inside NBEclipse by clicking on the AutoUpdate icon. From the Windows NetBurner program group. From a command line. The path is: c:\nburn\pcbin\AutoUpdate.exe.
4.1.1. Running in Auto Mode without User Intervention
When run with command line options you can specify a number of options, including the –A option to run in “automatic” mode in which it will not ask for user input. This is useful for batch programming of devices in a production environment. Command line options:
AutoUpdate -I<ipaddr> -F<filename> -R -A Example: AutoUpdate –I10.1.1.2 –FMyProgram_App.s19 –R –A
This example will program the device at 10.1.1.2 with the MyProgram_APP.s19 image, Reboot the device when done, and run in Auto mode in which it does not display the dialog box and ask for user input.
Parameters
-I<ipaddr> IP address of device to update. -F<filename> The _APP.s19 file containing the application image to use. -R Tells the device to reboot after programming. -A Execute without displaying dialog box or user intervention.
4.1.2. AutoUpdate Cannot Locate Your NetBurner Device
If AutoUpdate does not display your device it is for one of the following reasons: 1. A firewall on your PC is blocking network port number 20034. Try temporarily disabling
your firewall to see if this is the cause. 2. The application in your device is not running. This can happen during development if you
download an application that is crashing. Network communication is only possible if you have a running application. To recover from this situation use MTTTY and download a working application through the serial port using the “FLA” command.
3. You are trying to talk to a device on the other side of a router. The PC and NetBurner device must be on the same LAN.
4.1.3. Using AutoUpdate
1. Start AutoUpdate. 2. Click on the “Find” button and select your NetBurner device. 3. Click on the “Browse” button and select the application image, which must end in
“_APP.s19”. 4. Verify the “Reboot when complete” checkbox is checked. 5. Click on the “Update” button to execute the update.
4.1.4. AutoUpdate FAQ
For AutoUpdate to function your application must include #include <AutoUpdate.h>, and must call the function EnableAutoUpdate().
AutoUpdate uses the UDP protocol on port 20034. Before reprogramming flash memory, AutoUpdate will malloc a block of SDRAM large
enough to hold the new application image. If there is not enough free SDRAM the update will be aborted and AutoUpdate will display an insufficient memory error message.
AutoUpdate is invoked by NBEclipse for its normal update procedure.

4.2. TcpUpdate
TcpUpdate is a utility similar to AutoUpdate, but uses TCP instead of UDP to download a new application image to your NetBurner device. The most common reason to use TcpUpdate is if you need to update a NetBurner device behind a firewall or NAT router. TcpUpdate is commonly used for:
Updating the application over the Internet, or when your NetBurner device is behind a firewall or NAT router. Requires access to port 20034.
TcpUpdate can be started from:
From the Windows NetBurner program group. From a command line. The path is: c:\nburn\pcbin\TcpUpdate.exe.
4.2.1. TcpUpdate Cannot Reprogram Your NetBurner Device
If TcpUpdate cannot reprogram or connect to your device: A firewall on your PC may blocking network port number 20034. Try temporarily disabling
your firewall to see if this is the cause. The NetBurner device is behind a firewall or NAT router and is blocking network port
number 20034. You may need to add a rule to the firewall, port forwarding to the NAT router, or both.
The application in your device is not running. This can happen during development if you download an application that is crashing. Network communication is only possible if you have a running application. To recover from this situation use MTTTY and download a working application through the serial port using the “FLA” command.
4.2.2. Using TcpUpdate
1. Start TcpUpdate. 2. Enter the IP address of your NetBurner device. Note that the “Find” feature will only
work for devices on the same LAN. 3. Click on the “Browse” button and select the application image, which must end in
“_APP.s19”. 4. Verify the “Reboot when complete” checkbox is checked. 5. Click on the “Update” button to execute the update.
4.2.3. TcpUpdate FAQ
For TcpUpdate to function your application must include #include <AutoUpdate.h>, and must call the function: StartTcpUpdate( int priority ). The priority should be the highest priority user task you create, but not a higher priority than any system task because it needs those tasks to run in order to perform the update.
You can enable both AutoUpdate and TcpUpdate at the same time. Before reprogramming flash memory, TcpUpdate will malloc a block of SDRAM large
enough to hold the new application image. If there is not enough free SDRAM the update will be aborted.

5. TaskScan
TaskScan is an optional network-debugging tool that can be used during software development to view the RTOS tasks and status of your running NetBurner application. This tool is unique in that it is active in the release build of your code, rather than the debug build which is compiled without optimization. It is very useful to determine such things as why a specific task is not running the way you had anticipated, if it is waiting on other tasks, and its call stack. TaskScan is only active when the PC program generates a request, so it will not impact your release code execution speed otherwise. To use TaskScan in your application you must include taskmon.h and call the EnableTaskMonitor() function. TaskScan is enabled in most NetBurner example applications. TaskScan requires that you have the Executable and Linking Format (ELF) file for the specific application that is running on your NetBurner device. The .elf file is created by the compiler each time you build your application. It contains information TaskScan needs to link the application executable to the source code and task information. TaskScan is commonly used for:
Determining which tasks are running, their state and call stack. Looking for blocked tasks.
TaskScan can be started from:
From the Windows NetBurner program group. From a command line. The path is: c:\nburn\pcbin\taskscan.exe.
5.1. TaskScan FAQ
You must have a valid IP address and mask that can communicate with your PC that is running TaskScan.
TaskScan essentially takes a snapshot picture of what your application is doing at the time your press the “Scan” button. It does not otherwise impact the application.
You must have the exact .elf file used to create the application that is running on your NetBurner device.

5.2. Using TaskScan
1. Start TaskScan 2. Click on the “Find” button and select your NetBurner device.
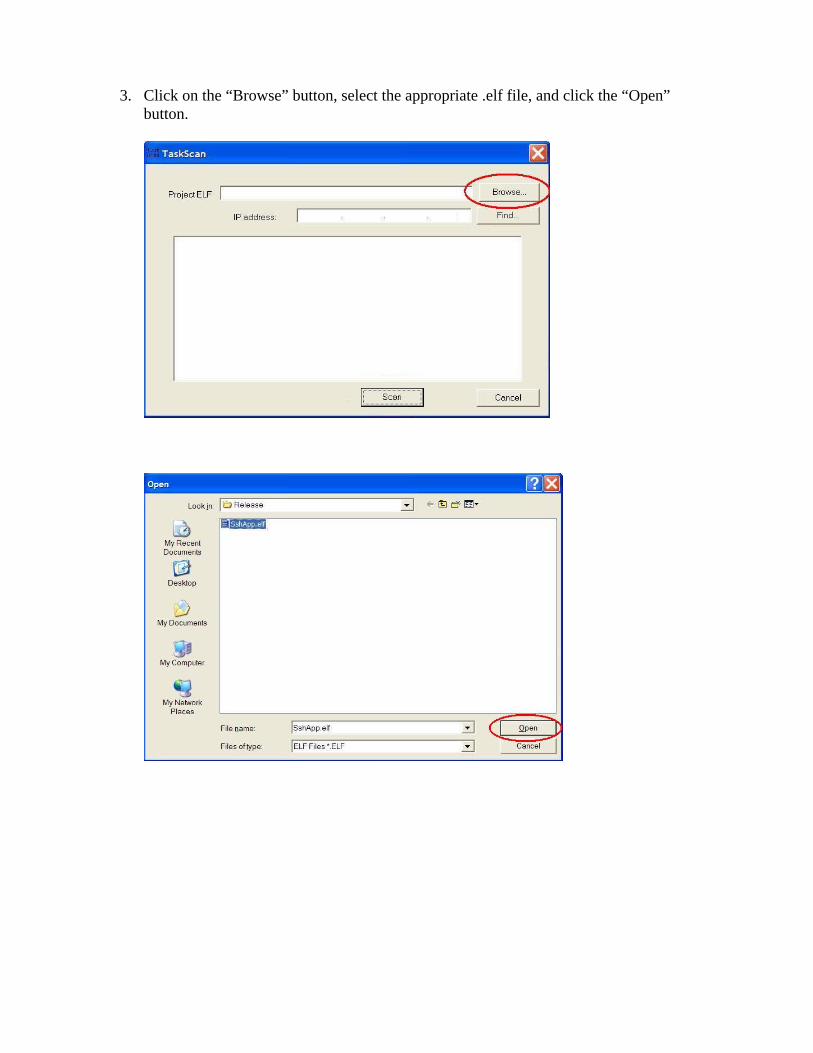
3. Click on the “Browse” button, select the appropriate .elf file, and click the “Open” button.
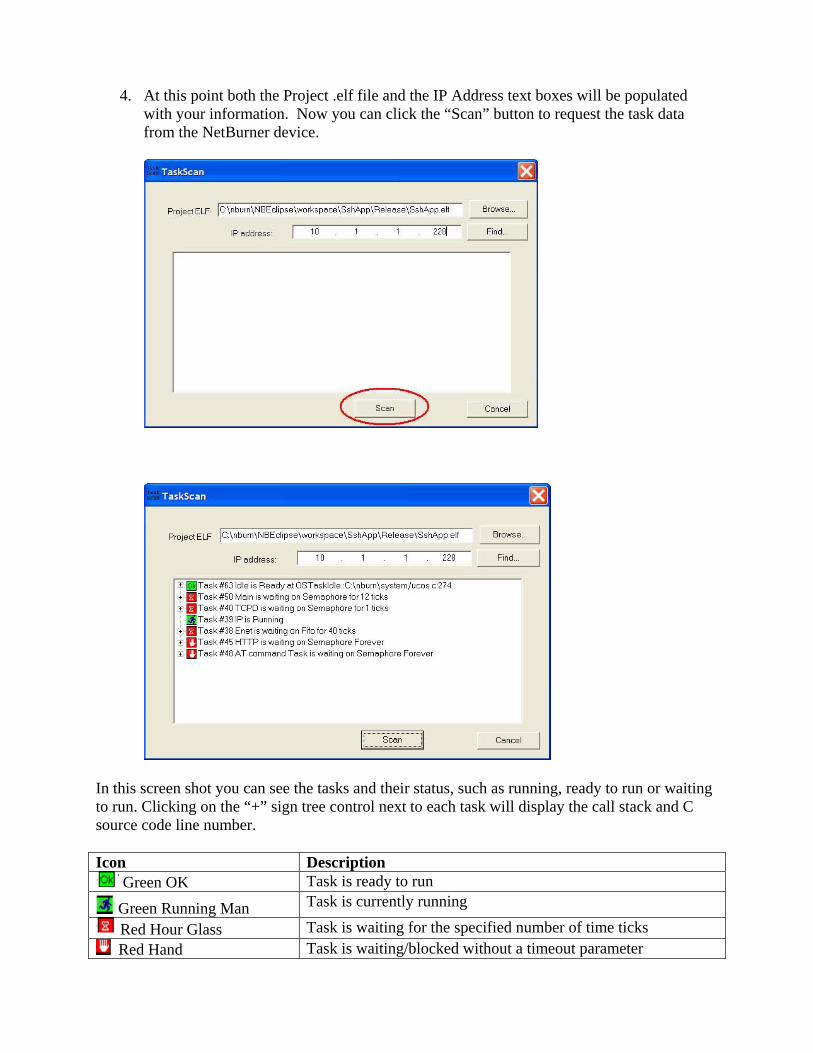
4. At this point both the Project .elf file and the IP Address text boxes will be populated with your information. Now you can click the “Scan” button to request the task data from the NetBurner device.
In this screen shot you can see the tasks and their status, such as running, ready to run or waiting to run. Clicking on the “+” sign tree control next to each task will display the call stack and C source code line number. Icon Description
Green OK Task is ready to run
Green Running Man Task is currently running
Red Hour Glass Task is waiting for the specified number of time ticks
Red Hand Task is waiting/blocked without a timeout parameter
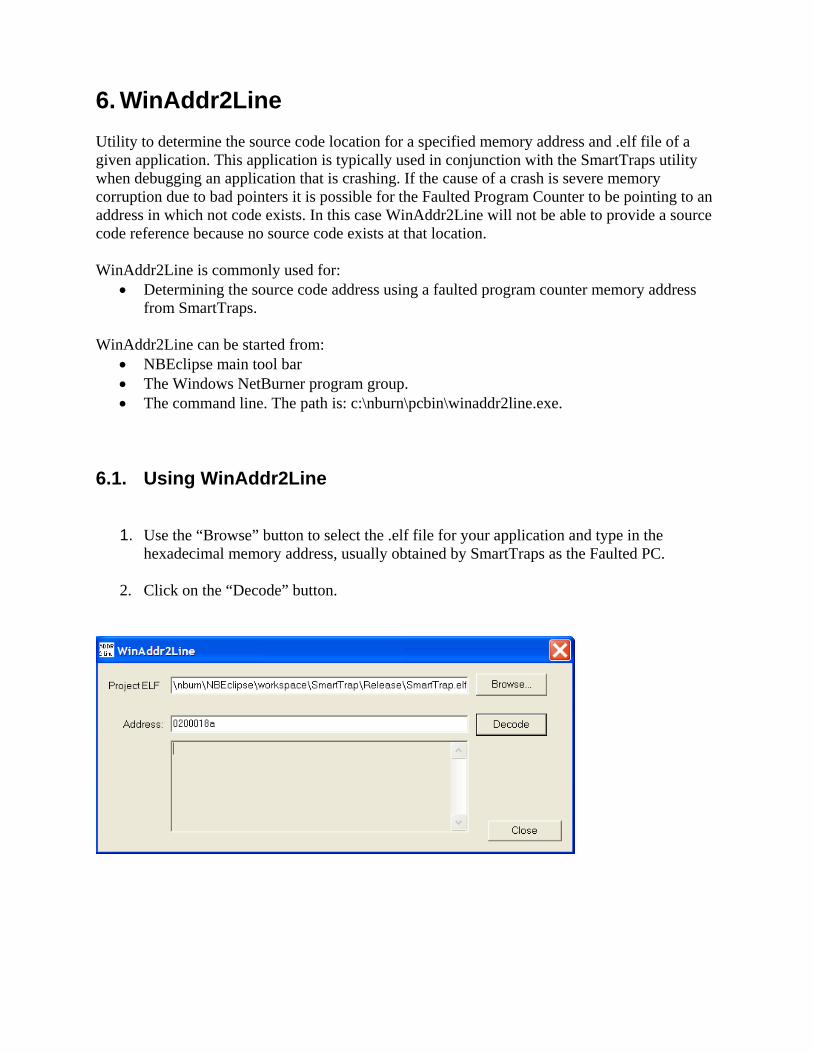
6. WinAddr2Line
Utility to determine the source code location for a specified memory address and .elf file of a given application. This application is typically used in conjunction with the SmartTraps utility when debugging an application that is crashing. If the cause of a crash is severe memory corruption due to bad pointers it is possible for the Faulted Program Counter to be pointing to an address in which not code exists. In this case WinAddr2Line will not be able to provide a source code reference because no source code exists at that location. WinAddr2Line is commonly used for:
Determining the source code address using a faulted program counter memory address from SmartTraps.
WinAddr2Line can be started from:
NBEclipse main tool bar The Windows NetBurner program group. The command line. The path is: c:\nburn\pcbin\winaddr2line.exe.
6.1. Using WinAddr2Line
1. Use the “Browse” button to select the .elf file for your application and type in the
hexadecimal memory address, usually obtained by SmartTraps as the Faulted PC.
2. Click on the “Decode” button.

The function and line number will be displayed as in the screen shots below. In this example the memory address corresponds to a function called “func2()” that takes an integer as a parameter. The source code line number is 45 and is located in the file main.cpp .
7. SmartTraps
During software development it is possible for a software developer to download an application with a coding error severe enough to cause an application to crash. Common causes of a system crash are: task stack overflow, indexing an array out of bounds and bad pointer assignments. When a system crash occurs a device will usually recover by a reboot of the system. The purpose of the SmartTrap utility is to provide more information about the system when the crash occurred to assist with debugging the problem. If SmartTraps is enabled and an application crash occurs, the To enable the SmartTrap feature your application must include smarttrap.h and call the EnableSmartTraps() function. SmartTraps is commonly used for:
Debugging an application crash SmartTraps can be started from:
SmartTraps is used in conjunction with the MTTTY serial terminal program. The SmartTraps information will be displayed on the debug serial port, which is UART0 by default.
Warning: The SmartTrap utility cannot be run at the same time as the network debugger. A simple way to automatically handle this situation is to use the _DEBUG definition used by the compiler as shown below. In the #include section of the application:
// Disable SmartTraps when in debug mode #ifdef _DEBUG #include <NetworkDebug.h> #else #include <smarttrap.h> #endif
In UserMain():
#ifndef _DEBUG EnableSmartTraps(); #endif
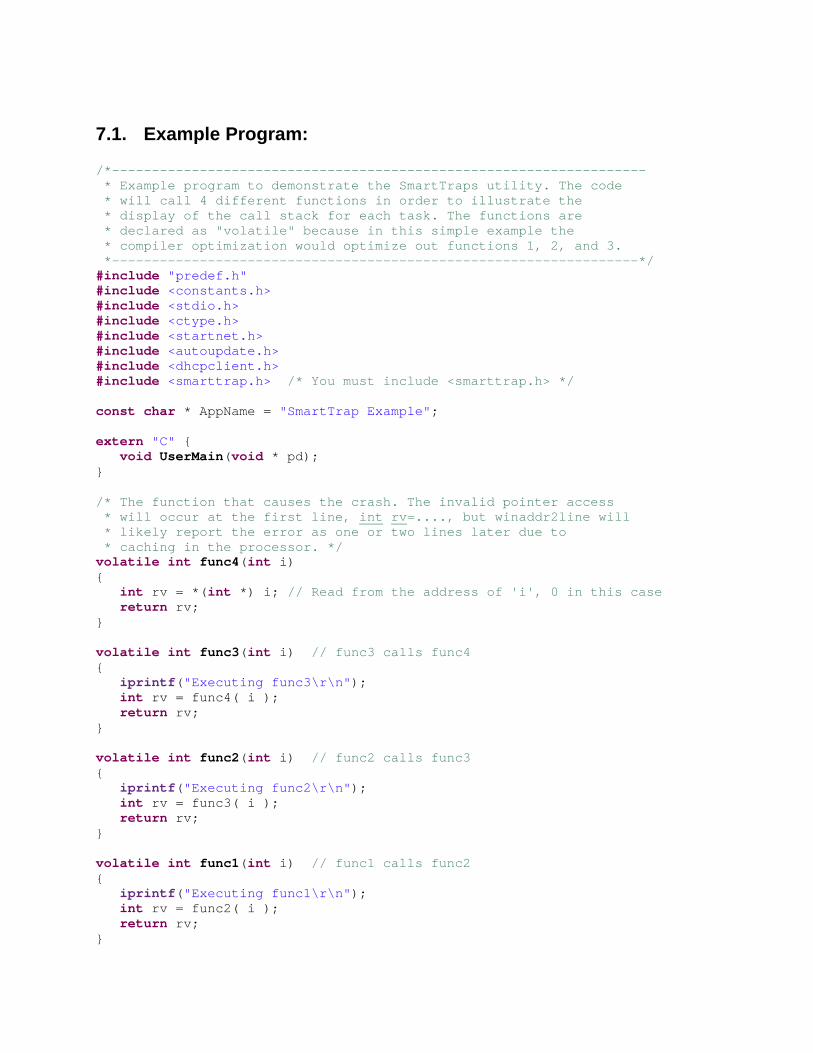
7.1. Example Program:
/*------------------------------------------------------------------- * Example program to demonstrate the SmartTraps utility. The code * will call 4 different functions in order to illustrate the * display of the call stack for each task. The functions are * declared as "volatile" because in this simple example the * compiler optimization would optimize out functions 1, 2, and 3. *------------------------------------------------------------------*/ #include "predef.h" #include <constants.h> #include <stdio.h> #include <ctype.h> #include <startnet.h> #include <autoupdate.h> #include <dhcpclient.h> #include <smarttrap.h> /* You must include <smarttrap.h> */ const char * AppName = "SmartTrap Example"; extern " C" { void UserMain(void * pd); } /* The function that causes the crash. The invalid pointer access * will occur at the first line, int rv=...., but winaddr2line will * likely report the error as one or two lines later due to * caching in the processor. */ volatile int func4(int i) { int rv = *(int *) i; // Read from the address of 'i', 0 in this case return rv; } volatile int func3(int i) // func3 calls func4 { iprintf("Executing func3\r\n"); int rv = func4( i ); return rv; } volatile int func2(int i) // func2 calls func3 { iprintf("Executing func2\r\n"); int = func3( i ); rv return rv; } volatile int func1(int i) // func1 calls func2 { iprintf("Executing func1\r\n"); int rv = func2( i ); return rv; }
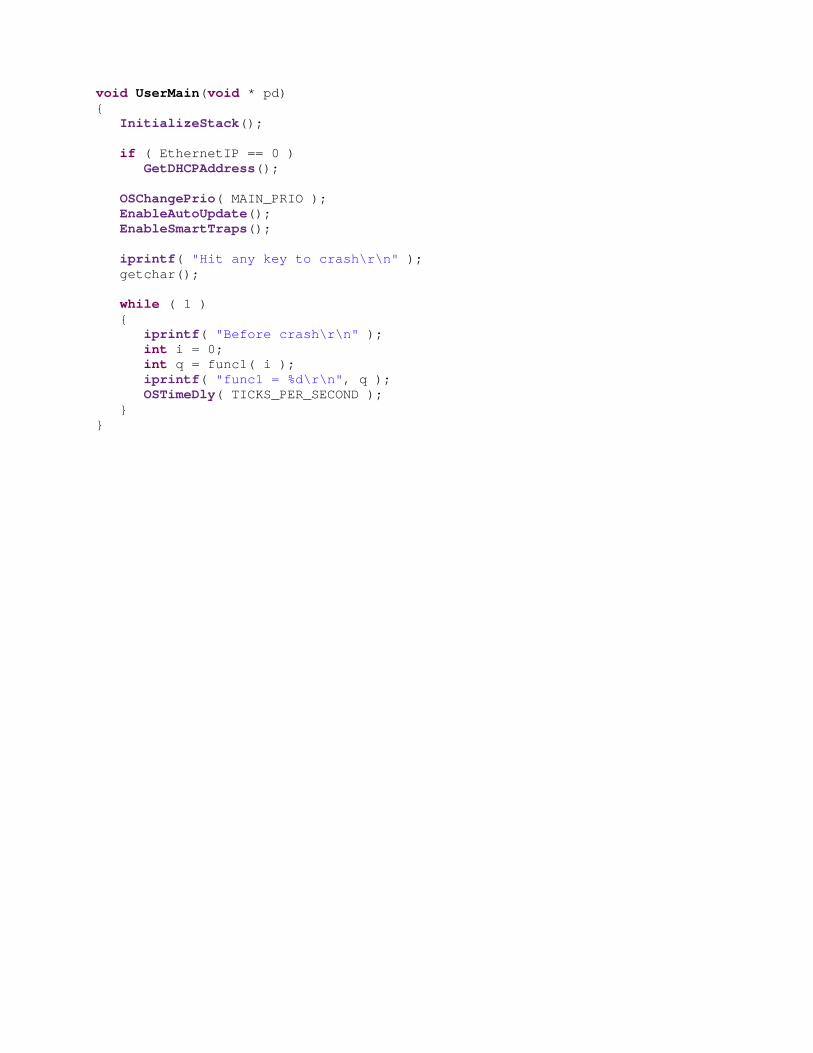
void UserMain(void * pd) { InitializeStack(); if ( EthernetIP == 0 ) GetDHCPAddress(); OSChangePrio( MAIN_PRIO ); EnableAutoUpdate(); EnableSmartTraps(); iprintf( "Hit any key to crash\r\n" ); getchar(); while ( 1 ) { iprintf( "Before crash\r\n" ); int i = 0; int q = func1( i ); iprintf( "func1 = %d\r\n", q ); OSTimeDly( TICKS_PER_SECOND ); } }

7.2. Running the SmartTraps Example
The example in the previous section was compiled and downloaded into a NetBurner device, and MTTTY is connected to UART0. The MTTTY screen shot below was generated once a key was pressed and the trap occurred.

The SmartTraps information has four sections. It is beyond the scope of this document to go into detail on each of the processor registers; please see the Freescale Users Manual for your particular processor for more information. They are located in the \nburn\docs directory of your development tools installation. Trap Information This section displays the processor status and error registers. The most significant is the “Faulted PC”, with is the Program Counter register indicating the area where the fault occurred. In this example the program counter value at the time a trap was detected is 0x02000152. Register Information This section displays the processor’s Address and Data registers. RTOS Information Identifies the RTOS Task Control Block and the current running task. The priority number is in hexadecimal. Traps caused by stack overflows may corrupt this section of the report. Task Information This is a very useful section of the report. It identifies each task, as well as its current state, wait time, and call stack. If you look at the Main task, you can see 6 entries with 0x02000152 (the faulted pc) at the left, and 0 at the right. The value of 0 is the start of the call stack. Each hexadecimal address between those two numbers represents each function that was called. Each address can be related to the corresponding line number in the source code by using the WinAddr2Line utility. By selecting the .elf file location and each address in the call stack you can determine the calling sequence starting from 0 on the right and moving to the left:
iprintf( "func1 = %d\r\n", q ) func1() func2() func3() func4()
The last line signifies the end of the SmartTrap output. Since the boot monitor is configured to “boot to application”, the device reboots after the trap occurs.
8. Advanced Utilities
8.1. CompCode
CompCode is only used on NetBurner devices with external Flash memory. It is usually automatically invoked by either NBEclipse or command line makefiles during the application build process, and is not a utility you should need to call individually. The utility takes an uncompressed S-Record file as an input, creates a compressed binary image, adds NetBurner-specific device information, then outputs the binary image in S-Record format. The resultant S-Record is the application image programmed into your NetBurner device. This utility can only be run from a command prompt, and is located in the c:\nburn\pcbin directory. Synopsis:
CompCode <infile> <outfile> <offset> Parameters :
infile: Uncompressed S-Record input file. outfile: Name to use for the S-Record output file. offset: Optional parameter for offset memory address for the output image.
The default is 0xFF00000.
Examples:
compcode myapp.s19 myapp_APP.s19 0xff00000 compcode -h for command line help.
8.2. CompHtml
The CompHtml utility is used during the application build to process the web server files located in a project’s html directory. It is usually automatically invoked by either NBEclipse or command line makefiles during the application build process, and is not a utility you should need to call individually. Primary functions of CompHtml:
Encode the entire \html directory structure into a *.cpp file. Add function tables and encoding for dynamic HTML. Determines the encoding type for each stored file.
This utility can only be run from a command prompt, and is located in the c:\nburn\pcbin directory. All names are case sensitive. Synopsis
comphtml <directory> <options> Parameters
directory The path to the HTML directory to encode. -o<outputfilename> Output file name (default = htmldata.cpp) -d<defaultpage> Default HTML page for the NetBurner web server to send when
no page is specified in the URL (default = INDEX.HTM). Examples: Process html files and data in c:\myproject\html, create an output file named myhtml.cpp, and make the default page name index.html.
comphtml c:\myproject\html –omyhtml.cpp –dindex.html For command line help comphtml –h
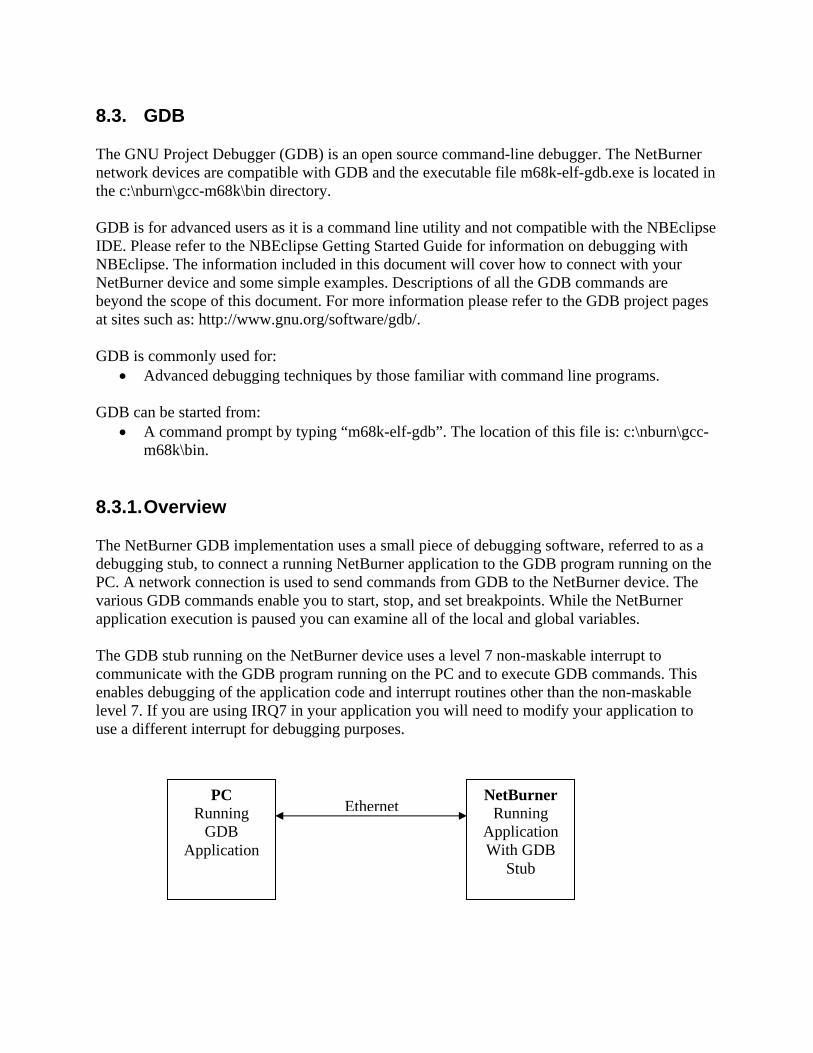
8.3. GDB
The GNU Project Debugger (GDB) is an open source command-line debugger. The NetBurner network devices are compatible with GDB and the executable file m68k-elf-gdb.exe is located in the c:\nburn\gcc-m68k\bin directory. GDB is for advanced users as it is a command line utility and not compatible with the NBEclipse IDE. Please refer to the NBEclipse Getting Started Guide for information on debugging with NBEclipse. The information included in this document will cover how to connect with your NetBurner device and some simple examples. Descriptions of all the GDB commands are beyond the scope of this document. For more information please refer to the GDB project pages at sites such as: http://www.gnu.org/software/gdb/. GDB is commonly used for:
Advanced debugging techniques by those familiar with command line programs. GDB can be started from:
A command prompt by typing “m68k-elf-gdb”. The location of this file is: c:\nburn\gcc-m68k\bin.
8.3.1. Overview
The NetBurner GDB implementation uses a small piece of debugging software, referred to as a debugging stub, to connect a running NetBurner application to the GDB program running on the PC. A network connection is used to send commands from GDB to the NetBurner device. The various GDB commands enable you to start, stop, and set breakpoints. While the NetBurner application execution is paused you can examine all of the local and global variables. The GDB stub running on the NetBurner device uses a level 7 non-maskable interrupt to communicate with the GDB program running on the PC and to execute GDB commands. This enables debugging of the application code and interrupt routines other than the non-maskable level 7. If you are using IRQ7 in your application you will need to modify your application to use a different interrupt for debugging purposes.
EthernetNetBurner
Running Application With GDB
Stub
PC Running
GDB Application
To enable the GDB Stub in the NetBurner device the application must call one of the two InitializeNetwork functions, the same ones as are used by the NBEclipse debugger: #ifdef _DEBUG InitializeNetworkGDB(); //InitializeNetworkGDB_and_Wait(); #endif /* _DEBUG */
8.3.2. GDB Setup
A summary of the GDB connection process is below : Add one of the InitializeNetwork function calls to your application, such as:
InitializenetworkGDB_and_Wait();
Build the application in debug mode using NBEclipse or command line mode. If using NBEclipse be sure not to attempt to update the NetBurner device or it will invoke the NBEclipse debugger. Note the location of the project’s .elf and DBxxxx_APP.s19 files.
Download the DBxxxx_APP.s19 debug application image to the NetBurner device using the AutoUpdate utility.
Start the GDB Program. Open a command prompt on the PC and connect to the NetBurner device by running m68k-elf-gdb.exe and sending the appropriate commands.
8.3.3. Build a Debug Application Image in NBEclipse
Open the project in NBEclipse. Change to the Debug build configuration by right-clicking on your project and selecting:
Build Configurations -> Set Active -> Debug. Rebuild your project. You will now have both “Release” and “Debug” directories under
your project folder.
8.3.4. Download the Debug Application Using AutoUpdate
The Debug build of your application will be in the “Debug” folder under your project directory and will be named in the format: “DBxxxx_APP.s19”, where the “xxxx” is your project name (e.g. DBMyProject_APP.s19). Although you will be editing and compiling your application in NBEclipse, the download of the application to the NetBurner device must be done with the AutoUpdate utility. Downloading the image from within NBEclipse will automatically start the NBEclipse debugger. You can start AutoUpdate from NBEclipse, but it is easier for repetitive downloads to invoke it from the command line with the appropriate command line parameters. For example: “autoupdate -I10.1.1.202 –FDBMyproject_APP.s19 –R –A”

8.3.5. Starting a Network GDB Session
To start a GDB session: Open a command prompt Change to the project’s debug directory. For example,
C:\nburn\NBEclipse\workspace\Mod5282FactoryDemo\Debug. Start GDB by typing: “m68k-elf-gdb”. Load the application’s symbol table into GDB with the command: “sym”. For example:
“sym MyProject.elf”. Make a network connection from GDB to the NetBurner device on port 2159 with the
“target remote” command. For example, if you device was at IP Address 10.1.1.202: “target remote 10.1.1.202:2159”.
A screen shot using the Application Wizard project is shown below. Once the session started GDB stopped execution in the Idle task at line 271. Since the App Wizard project doesn’t do much, it spends most of its time in the Idle task.
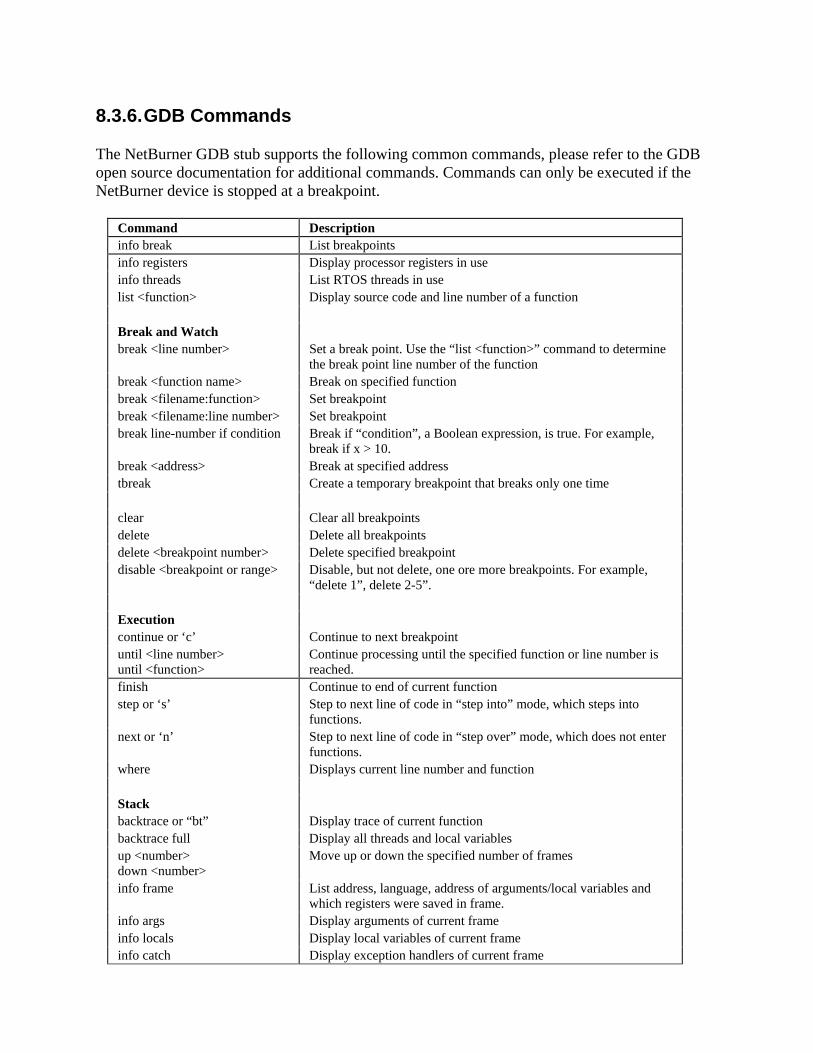
8.3.6. GDB Commands
The NetBurner GDB stub supports the following common commands, please refer to the GDB open source documentation for additional commands. Commands can only be executed if the NetBurner device is stopped at a breakpoint.
Command Description info break List breakpoints info registers Display processor registers in use info threads List RTOS threads in use list <function> Display source code and line number of a function Break and Watch break <line number> Set a break point. Use the “list <function>” command to determine
the break point line number of the function break <function name> Break on specified function break <filename:function> Set breakpoint break <filename:line number> Set breakpoint break line-number if condition Break if “condition”, a Boolean expression, is true. For example,
break if x > 10. break <address> Break at specified address tbreak Create a temporary breakpoint that breaks only one time clear Clear all breakpoints delete Delete all breakpoints delete <breakpoint number> Delete specified breakpoint disable <breakpoint or range> Disable, but not delete, one ore more breakpoints. For example,
“delete 1”, delete 2-5”. Execution continue or ‘c’ Continue to next breakpoint until <line number> until <function>
Continue processing until the specified function or line number is reached.
finish Continue to end of current function step or ‘s’ Step to next line of code in “step into” mode, which steps into
functions. next or ‘n’ Step to next line of code in “step over” mode, which does not enter
functions. where Displays current line number and function Stack backtrace or “bt” Display trace of current function backtrace full Display all threads and local variables up <number> down <number>
Move up or down the specified number of frames
info frame List address, language, address of arguments/local variables and which registers were saved in frame.
info args Display arguments of current frame info locals Display local variables of current frame info catch Display exception handlers of current frame

Source Code Description list or ‘l’ list <line number> list <function> list <file name:function>
List source code. Hit the <enter> key to continue listings.
Examine/Set Variables print or ‘p’ <variable name> p <file name:variable name>
Print variable value
p/x <variable name> Print in hex p/o <variable name> Print in octal p/t <variable name> Print in binary p/c <variable name> Print as a character p/f <variable name> Print as floating point p/a <variable name> Print as hex address set <variable name> Set variable to specified value GDB Execution quit or ‘q’ Quit GDB kill or ‘k’ Kill the program being debugged
8.3.7. GDB Using a Serial Port
You can also run GDB using a NetBurner serial port by changing the GDB stub function call in your applicaton: In your application code use the functions:
void InitGDBStub( int port, int baudrate ); or
void InitGDBStubNoBreak( int port, int baudrate ); where “port” is the serial port number: 0 or 1. After starting GDB on the PC, instead of the “target remote” command you would use the commands below. The baud rate must match the one you specified in InitGDBStub().
set remotebaud <baudrate> target remote < PC comm. port> For example: set remotebaud 57600
target remote /dev/com2

9. Revision History
Revision Date Description 1.0 1/21/2005 Initial release 1.1 5/2/2010 Revised format, improved text descriptions, removed boot monitor
section to separate document. 1.2 5/18/2010 Added GDB Stub section