netscaler analysis and reporting goliath for netscaler...
TRANSCRIPT
1 Goliath for NetScaler Installation Guide for Citrix XenServer Copyright © 2016 Goliath Technologies Version 4.0 – October 2016
NetScaler Analysis and Reporting
Goliath for NetScaler Installation Guide v4.0 For Deployment on Citrix XenServer
(v4.0)
Document Date: October 2016
www.goliathtechnologies.com
2 Goliath for NetScaler Installation Guide for Citrix XenServer Copyright © 2016 Goliath Technologies Version 4.0 – October 2016
Legal Notices
Goliath for NetScaler v4.0 Installation Guide for VMware
Copyright © 2016 Goliath Technologies Inc. All rights reserved. www.goliathtechnologies.com
Goliath Technologies believes the information in this publication is accurate as of its publication date. The information is subject to change without notice.
THE INFORMATION IN THIS PUBLICATION IS PROVIDED “AS IS.” GOLIATH TECHNOLOGIES MAKES NO REPRESENTATIONS OR WARRANTIES OF ANY KIND WITH RESPECT TO THE INFORMATION IN THIS PUBLICATION, AND SPECIFICALLY DISCLAIMS IMPLIED WARRANTIES OF MERCHANTABILITY OR FITNESS FOR A PARTICULAR PURPOSE.
Use, copying, and distribution of any Goliath Technologies software described in this publication requires an applicable software license.
Linux is a registered trademark of Linus Torvalds.
Windows is a registered trademark of Microsoft Corporation.
VMware, ESX, ESXi, vCenter, and vSphere are either trademarks or registered trademarks of VMware
Corporation.
Citrix, XenApp, XenDesktop, XenServer, and XenCenter are either trademarks or registered trademarks of
Citrix Systems Inc.
All other trademarks and copyrights referred to are the property of their respective owners.
Support, Sales, Renewals and Licensing
For information on new sales, licensing and support renewals you can email [email protected]
For additional information about Goliath Technologies products and services, go to http://www.goliathtechnologies.com
To license and register this product, go to http://www.goliathtechnologies.com
For customers and partners with an active support agreement, you can use the support web
board or email [email protected] for information about software patches, technical documentation, and support programs.
Note: A valid support agreement is necessary to receive new release and software updates.
3 Goliath for NetScaler Installation Guide for Citrix XenServer Copyright © 2016 Goliath Technologies Version 4.0 – October 2016
I. Table of Contents
I. System Requirements .......................................................................................................................... 4
II. Goliath for NetScaler Deployment & Configuration: ........................................................................... 6
A. Deploy Goliath for NetScaler ........................................................................................................ 6
B. Configure the IP Settings ............................................................................................................... 7
C. Configuring Goliath for NetScaler Administration ........................................................................ 8
III. Configure NetScaler to Send Data to Goliath via the Setup Wizard.................................................... 9
A. Enable Appflow Collection ............................................................................................................ 9
B. Enable the Nitro API ...................................................................................................................... 9
C. Access the Goliath for NetScaler Console ................................................................................... 10
IV. Configure NetScaler to Send Data to Goliath Manually .................................................................... 11
A. Enable AppFlow on your NetScaler............................................................................................. 11
B. Create an AppFlow Collector ...................................................................................................... 13
C. Create an AppFlow Action .......................................................................................................... 14
D. Create an AppFlow Policy ........................................................................................................... 14
E. Enable Appflow for Web Traffic Analysis .................................................................................... 15
F. Enable AppFlow for XenApp & XenDesktop Session Analysis .................................................... 17
G. Access the Goliath for NetScaler Console ................................................................................... 19
V. Troubleshooting Your Implementation ............................................................................................. 20

4 Goliath for NetScaler Installation Guide for Citrix XenServer Copyright © 2016 Goliath Technologies Version 4.0 – October 2016
I. System Requirements Note: Goliath for NetScaler is packaged as a virtual appliance, and is deployed from an OVA. There is no need to build a VM for this process.
Goliath for NetScaler
Appliance
1 VM Required
Hypervisor: VMware ESX/ESXi 4.0-6.0, Citrix XenServer 5.6-6.5, Microsoft
Hyper-V 2012 R2 - 2016
Network: Static IP Address
vCPU: 4
Memory: Minimum of 4 GB RAM Disk: 60 GB of Disk Space Database: MySQL DB included
Actual database requirement a function of data retention period
Enterprise Architecture
Goliath for NetScaler
Multiple VM’s required
Enterprise architecture requires at least 3 VM’s: One VM for the Goliath
IT for Analytics NetScaler appliance, AppFlow Data Collector(s), and the
database. Each of the VM’s have the following requirements.
Hypervisor: VMware ESX/ESXi 4.0-6.0, Citrix XenServer 5.6-6.5, Microsoft
Hyper-V 2012 R2 - 2016
Network: Static IP Address
vCPU: 4
Memory: Minimum of 4 GB RAM GFN Appliance VM Disk: 10 GB AppFlow Collector VM Disk: 10 GB Database VM Disk: 250-500 GB estimated
Actual database requirement a function of data retention period
NetScaler
Load Balancing & Web Traffic
Platform: All NetScaler versions supported (VPX, SDX, & MPX) License Version: Standard, Enterprise & Platinum
Firmware: 9.3 build 61.2 and later
10.0 build 74.0 and later
10.1 build 112.15 and later
10.5 build 54.9 and later
11.0 all builds
Note: NetScaler Firmware 10.5 minimum required for XenApp & XenDesktop performance.
NetScaler administrator credentials required to access the configuration
interface.
5 Goliath for NetScaler Installation Guide for Citrix XenServer Copyright © 2016 Goliath Technologies Version 4.0 – October 2016
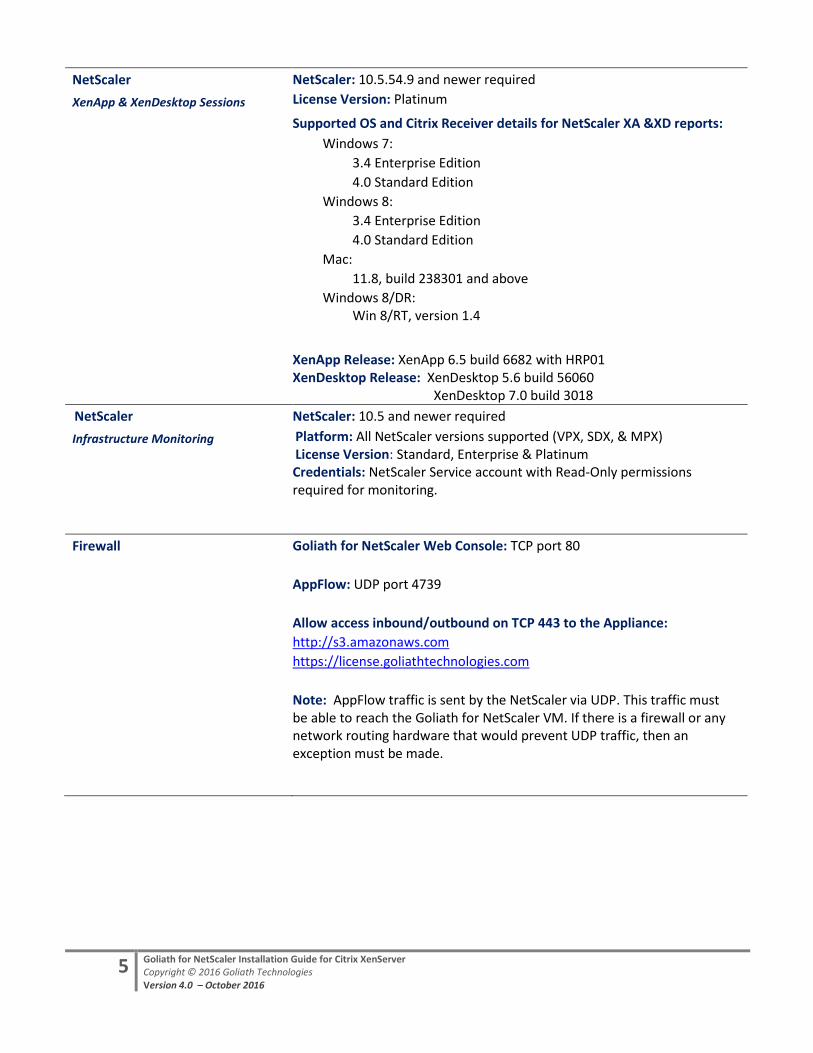
NetScaler
XenApp & XenDesktop Sessions
NetScaler: 10.5.54.9 and newer required
License Version: Platinum
Supported OS and Citrix Receiver details for NetScaler XA &XD reports:
Windows 7:
3.4 Enterprise Edition
4.0 Standard Edition
Windows 8:
3.4 Enterprise Edition
4.0 Standard Edition
Mac:
11.8, build 238301 and above
Windows 8/DR: Win 8/RT, version 1.4
XenApp Release: XenApp 6.5 build 6682 with HRP01 XenDesktop Release: XenDesktop 5.6 build 56060
XenDesktop 7.0 build 3018
NetScaler
Infrastructure Monitoring
NetScaler: 10.5 and newer required
Platform: All NetScaler versions supported (VPX, SDX, & MPX) License Version: Standard, Enterprise & Platinum Credentials: NetScaler Service account with Read-Only permissions required for monitoring.
Firewall Goliath for NetScaler Web Console: TCP port 80
AppFlow: UDP port 4739
Allow access inbound/outbound on TCP 443 to the Appliance:
http://s3.amazonaws.com
https://license.goliathtechnologies.com
Note: AppFlow traffic is sent by the NetScaler via UDP. This traffic must be able to reach the Goliath for NetScaler VM. If there is a firewall or any network routing hardware that would prevent UDP traffic, then an exception must be made.
6 Goliath for NetScaler Installation Guide for Citrix XenServer Copyright © 2016 Goliath Technologies Version 4.0 – October 2016
II. Goliath for NetScaler Deployment & Configuration:
Before you deploy Goliath for NetScaler:
In order to complete the deployment of Goliath for NetScaler (GFN), please ensure you have the following items available and prepared.
1. Static IP reserved for Goliath for NetScaler
2. 60 GB of free space on Storage
3. Access to Citrix XenCenter
4. Download the correct version of the product according to the hypervisor where you will be deploying Goliath for NetScaler (Citrix XenServer)
A. Deploy Goliath for NetScaler
These steps will take you through the process of unpackaging Goliath for NetScaler and deploying Goliath for NetScaler to your hypervisor. And then configuring the IP setting so that it may be accessible on your network.
1. Run the executable to unpackage the appliance’s OVA file. Goliath for NetScaler is downloaded as a self-extracting zip file which contains the virtual appliance and any necessary documentation to assist with configuration.
2. Open XenCenter, select the Host and go to File > ‘Deploy OVF …’ to browse to the OVA file that was just unpackaged.
3. Follow the steps in the wizard to pick the correct Cluster and host to deploy the appliance to. Follow the Wizard’s instructions to complete, but do not have the VM start automatically
4. Following a successful deployment, edit the virtual machine settings and make sure the correct Network is chosen.
5. Start the virtual machine.
7 Goliath for NetScaler Installation Guide for Citrix XenServer Copyright © 2016 Goliath Technologies Version 4.0 – October 2016
B. Configure the IP Settings
In the following section we will configure the IP settings so that you may access Goliath for NetScaler’s
Admin and Console on your network.
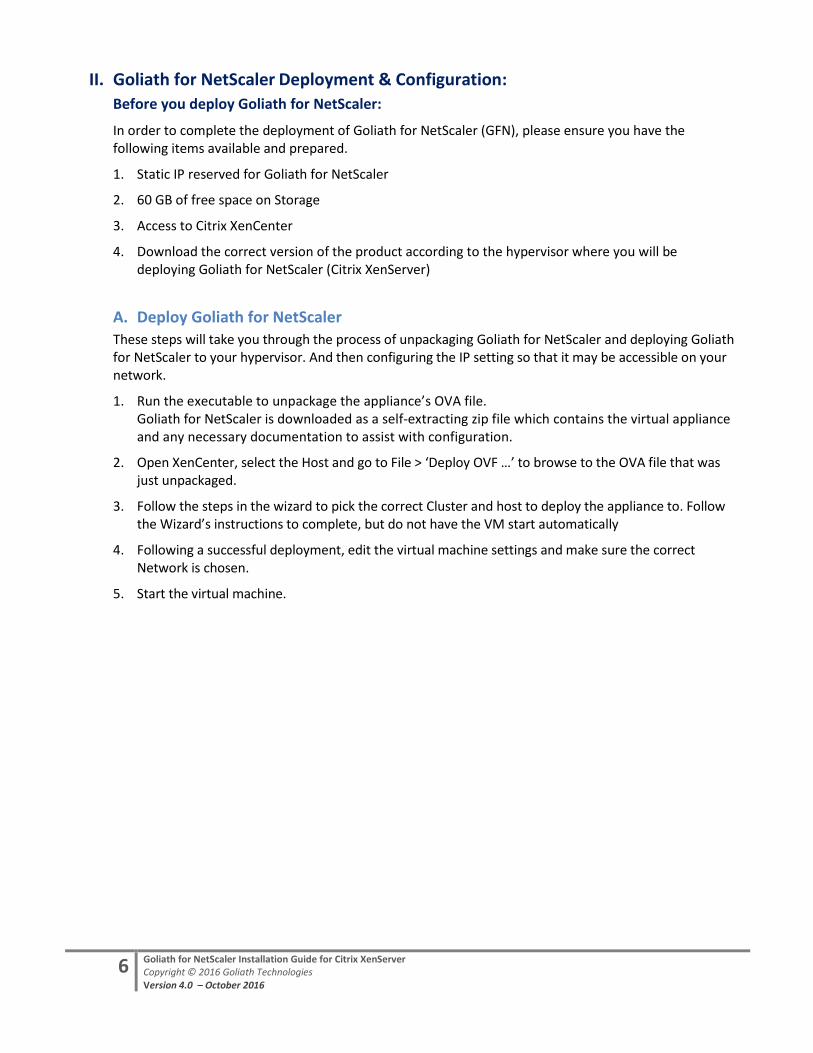
1. Select the ‘Console’ tab for the Goliath for NetScaler appliance that was imported. The screen will look like this:
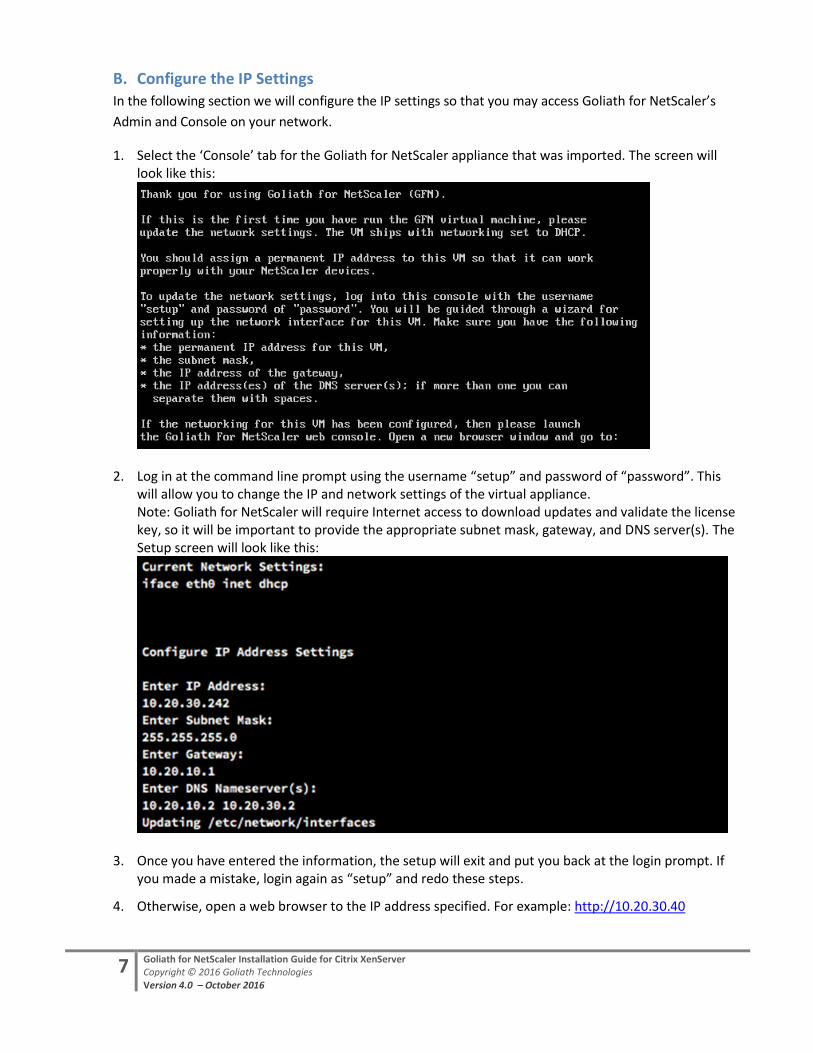
2. Log in at the command line prompt using the username “setup” and password of “password”. This will allow you to change the IP and network settings of the virtual appliance. Note: Goliath for NetScaler will require Internet access to download updates and validate the license key, so it will be important to provide the appropriate subnet mask, gateway, and DNS server(s). The Setup screen will look like this:
3. Once you have entered the information, the setup will exit and put you back at the login prompt. If you made a mistake, login again as “setup” and redo these steps.
4. Otherwise, open a web browser to the IP address specified. For example: http://10.20.30.40
8 Goliath for NetScaler Installation Guide for Citrix XenServer Copyright © 2016 Goliath Technologies Version 4.0 – October 2016
C. Configuring Goliath for NetScaler Administration
Applying the appropriate settings relative to your environment regarding NetScaler Version, Time zone,
and ensuring the most update version is in place is paramount to a proper implementation. The following
steps will guide you through those steps.
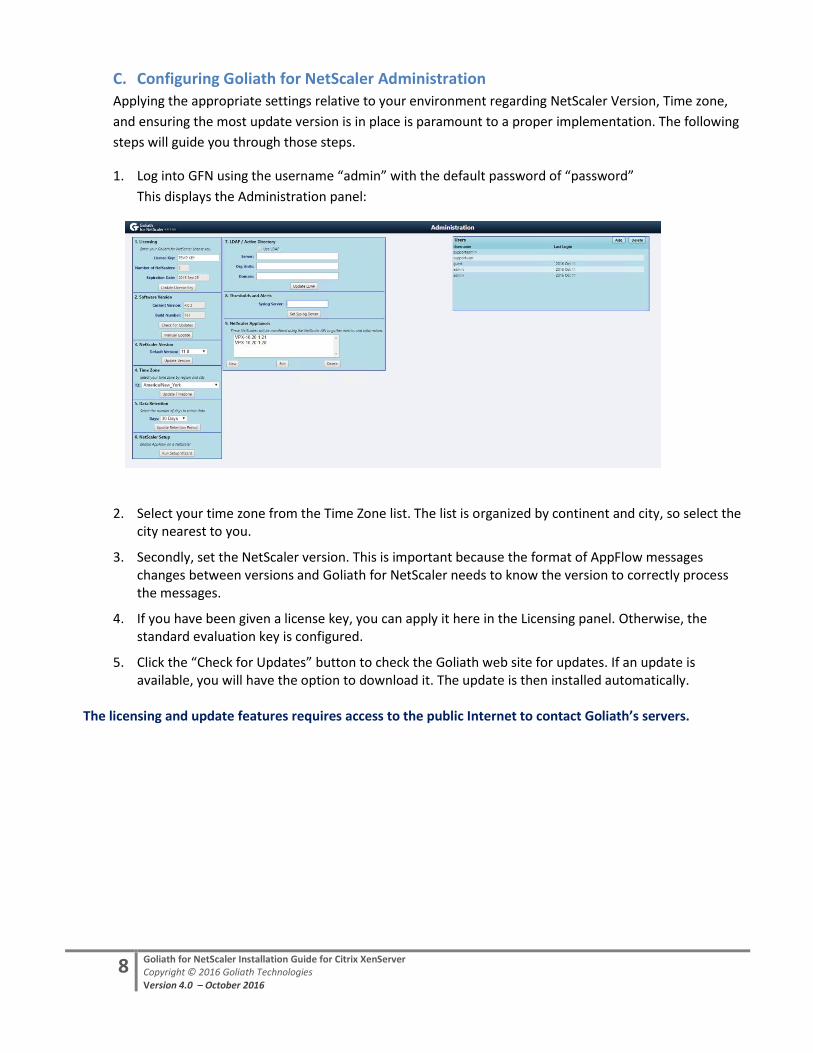
1. Log into GFN using the username “admin” with the default password of “password”
This displays the Administration panel:
2. Select your time zone from the Time Zone list. The list is organized by continent and city, so select the
city nearest to you.
3. Secondly, set the NetScaler version. This is important because the format of AppFlow messages changes between versions and Goliath for NetScaler needs to know the version to correctly process the messages.
4. If you have been given a license key, you can apply it here in the Licensing panel. Otherwise, the standard evaluation key is configured.
5. Click the “Check for Updates” button to check the Goliath web site for updates. If an update is available, you will have the option to download it. The update is then installed automatically.
The licensing and update features requires access to the public Internet to contact Goliath’s servers.

9 Goliath for NetScaler Installation Guide for Citrix XenServer Copyright © 2016 Goliath Technologies Version 4.0 – October 2016
III. Configure NetScaler to Send Data to Goliath via the Setup Wizard Before you configure your NetScaler: Goliath for NetScaler uses a feature built into NetScaler called “AppFlow.” This stage will take you through the steps required to enable AppFlow on your NetScaler, set up Goliath for NetScaler as an AppFlow collector, and create a policy to tell the NetScaler to send AppFlow messages to Goliath for NetScaler. AppFlow messages are short, UDP packets that contain information about network traffic flowing through the NetScaler. Goliath also uses the Nitro APIs to provide visibility into the NetScaler resource utilization and feature performance.
A. Enable Appflow Collection
1. Log into GFN using the username “admin” with the default password of “password”
2. Locate the ‘NetScaler Setup’ pane and click the button for ‘Run Setup Wizard’
3. You will be prompted for access to your NetScaler, enter the appropriate information to connect and
then click ‘Run Setup’.
4. When the setup is completed you will prompted as such. Click “Close” to return to the admin console
B. Enable the Nitro API 1. From the “admin console”, locate the ‘NetScaler Appliances’ pane and click the ‘New” button
2. You will be prompted for access to your NetScaler appliance, enter the appropriate information to
connect and then click ‘Run Setup’.
3. When the setup is completed you will prompted as such. Click “Close” to return to the admin console
4. Repeat this process for all of your NetScalers

10 Goliath for NetScaler Installation Guide for Citrix XenServer Copyright © 2016 Goliath Technologies Version 4.0 – October 2016
C. Access the Goliath for NetScaler Console
To begin analyzing the performance and behavior of connections through your NetScaler login to the
Goliath for NetScaler console using the instructions below:
1. Open a web browser to the IP address of the Goliath for NetScaler appliance. For example: http://10.20.30.40
2. Log into Goliath for NetScaler using the default username to access the console: Username: guest Password: password
3. There will be four tabs at the top of the screen to help you navigate through the product:
Web: Real-Time display breaks down the connection activity coming through the NetScaler to identify performance by NetScaler, VIP, destination server, URL, browser, and error.
ICA/HDX: Real-time display to investigate and troubleshoot XenApp & XenDesktop User Session Performance. Identify a problem in a user’s current or past session, and then analyze performance across multiple sessions
Infrastructure: Real-time detailed performance & health metrics which can only provide user transaction performance.
Reports: Access canned reports which you can share, print, email, and execute to see performance on demand for current performance and historical analysis.

11 Goliath for NetScaler Installation Guide for Citrix XenServer Copyright © 2016 Goliath Technologies Version 4.0 – October 2016
IV. Configure NetScaler to Send Data to Goliath Manually Before you configure your NetScaler: Goliath for NetScaler uses a feature built into NetScaler called “AppFlow.” This stage will take you through the steps required to enable AppFlow on your NetScaler, set up Goliath for NetScaler as an AppFlow collector, and create a policy to tell the NetScaler to send AppFlow messages to Goliath for NetScaler. AppFlow messages are short, UDP packets that contain information about network traffic flowing through the NetScaler.
A. Enable AppFlow on your NetScaler 1. Log into the NetScaler. 2. Go to “System -> Settings” on the left side menu tree. 3. Click on “Configure Advanced Features” and check the checkbox labeled AppFlow:
Note: Alternatively, you can right click on ‘AppFlow’ in the System tree, right click, and choose ‘Enable AppFlow’
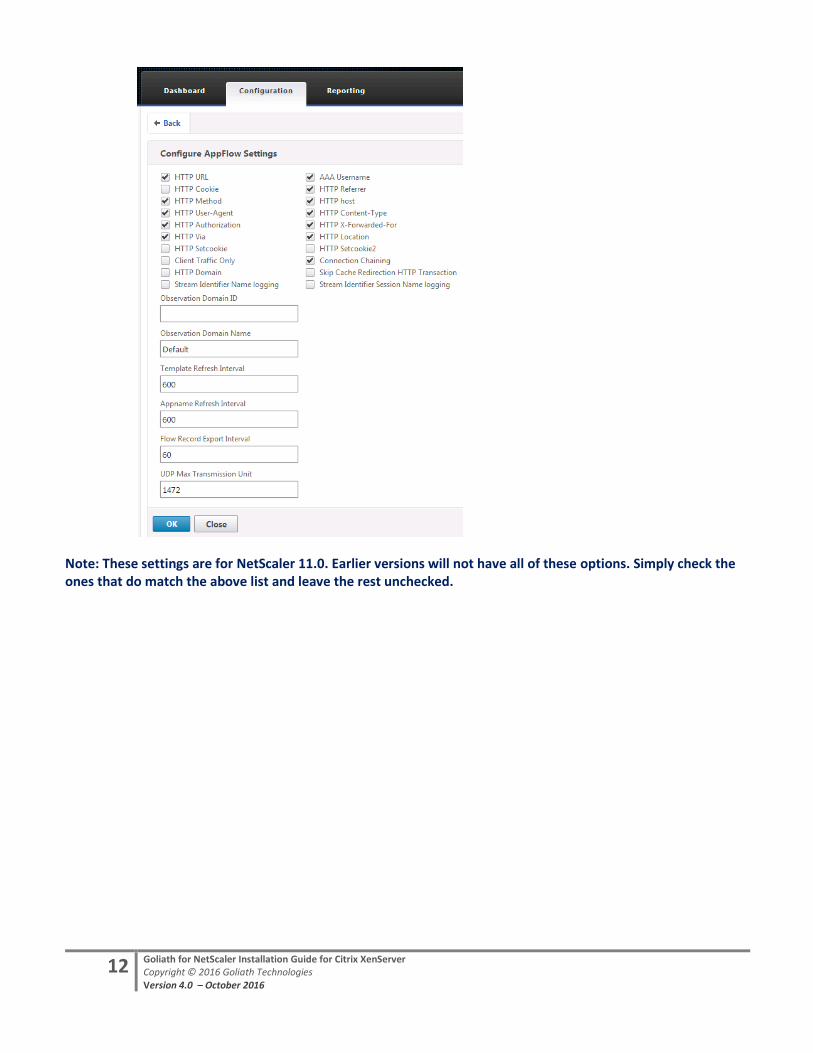
4. Go to the section “System -> AppFlow” on the left side. 5. Click on the selection “Change AppFlow Settings”. In the dialog box, make sure the following items are
checked:
HTTP URL
HTTP Method
HTTP User-Agent
HTTP Authentication
HTTP Via
AAA Username
HTTP Referrer
HTTP Host
HTTP Content-Type
HTTP X-Forward-For
HTTP Location
Connection Chaining Leave all others unchecked. In particular, “Client Traffic Only” must be unchecked. Leave the numeric values set to defaults.
12 Goliath for NetScaler Installation Guide for Citrix XenServer Copyright © 2016 Goliath Technologies Version 4.0 – October 2016
Note: These settings are for NetScaler 11.0. Earlier versions will not have all of these options. Simply check the ones that do match the above list and leave the rest unchecked.
13 Goliath for NetScaler Installation Guide for Citrix XenServer Copyright © 2016 Goliath Technologies Version 4.0 – October 2016
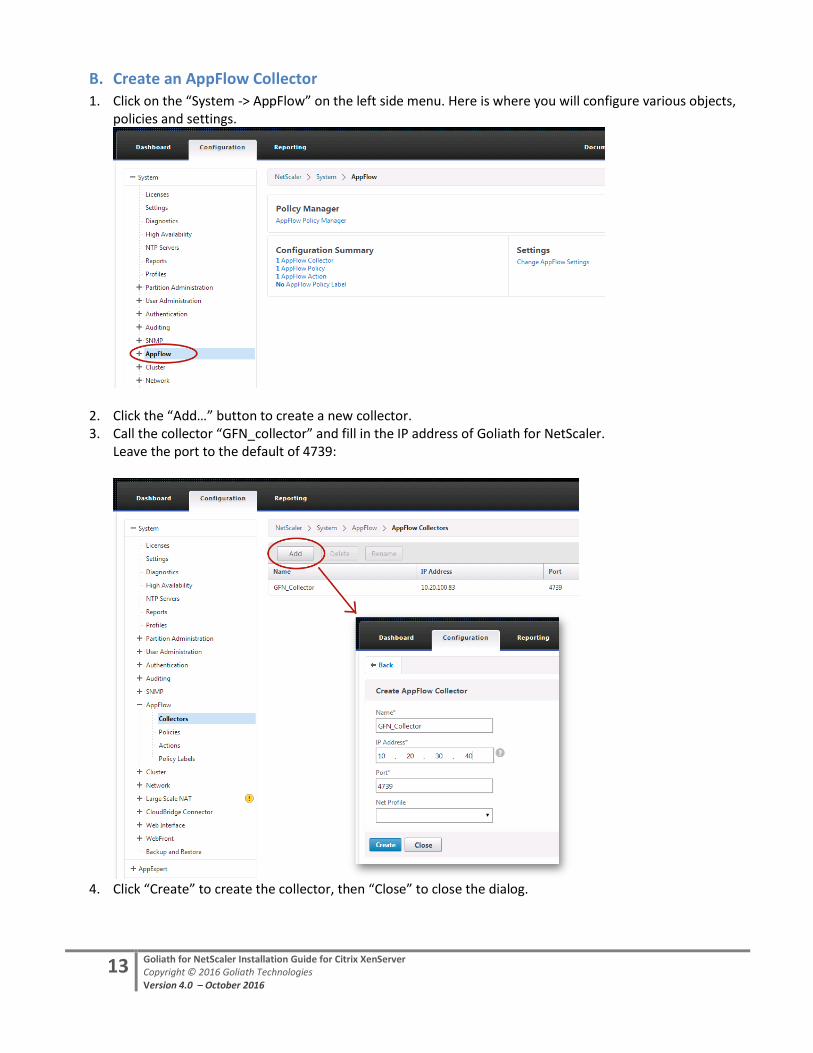
B. Create an AppFlow Collector
1. Click on the “System -> AppFlow” on the left side menu. Here is where you will configure various objects, policies and settings.
2. Click the “Add…” button to create a new collector. 3. Call the collector “GFN_collector” and fill in the IP address of Goliath for NetScaler.
Leave the port to the default of 4739:
4. Click “Create” to create the collector, then “Close” to close the dialog.

14 Goliath for NetScaler Installation Guide for Citrix XenServer Copyright © 2016 Goliath Technologies Version 4.0 – October 2016
C. Create an AppFlow Action
1. Click on “System -> AppFlow -> Actions” on the left side menu. 2. Click the “Add…” button to create a new Action. 3. Call the action “GfN_action” and add the “GfN_collector” using the Add button to insert the collector. 4. Click “OK” and then “Close”
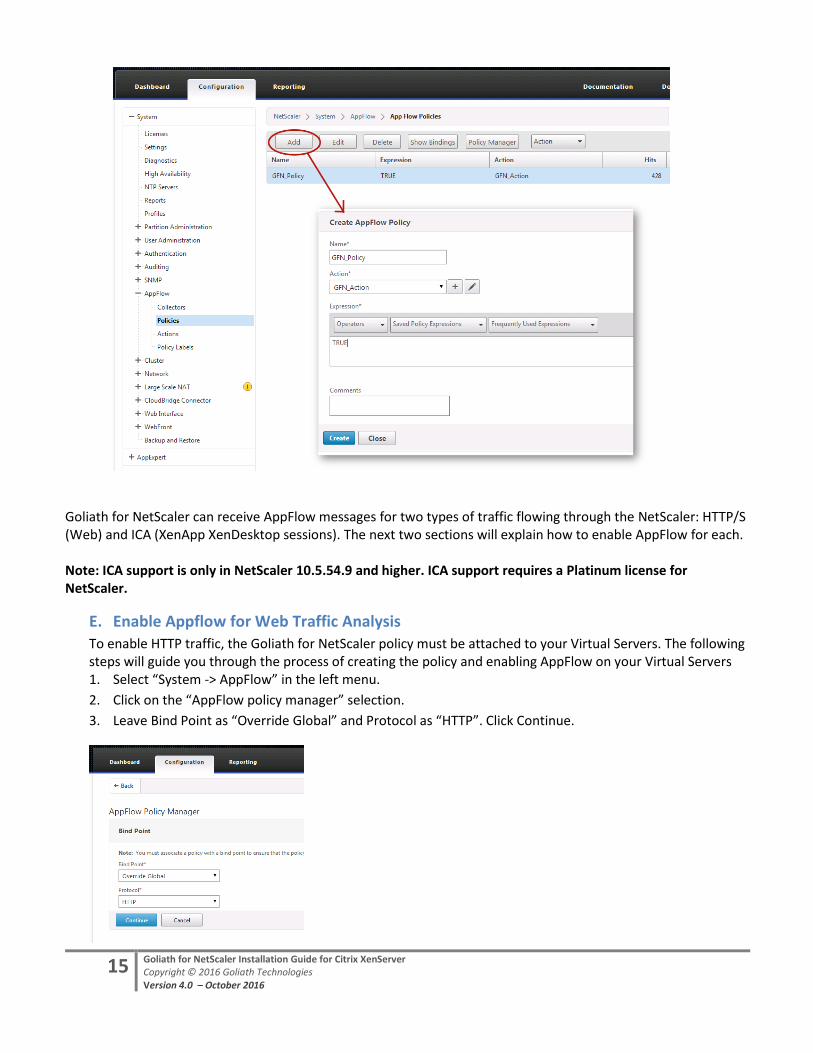
D. Create an AppFlow Policy
1. Next, create a policy to tell the NetScaler to send AppFlow messages. 2. Click on “System -> AppFlow -> Policies” on the left side menu. 3. Click the “Add…” button. 4. Name the policy “GfN_policy”. Make sure that “GfN_action” is in the Action dropdown list. 5. For the expression, enter the word “true”. 6. Click “OK” to create the policy:
15 Goliath for NetScaler Installation Guide for Citrix XenServer Copyright © 2016 Goliath Technologies Version 4.0 – October 2016
Goliath for NetScaler can receive AppFlow messages for two types of traffic flowing through the NetScaler: HTTP/S (Web) and ICA (XenApp XenDesktop sessions). The next two sections will explain how to enable AppFlow for each. Note: ICA support is only in NetScaler 10.5.54.9 and higher. ICA support requires a Platinum license for NetScaler.
E. Enable Appflow for Web Traffic Analysis
To enable HTTP traffic, the Goliath for NetScaler policy must be attached to your Virtual Servers. The following steps will guide you through the process of creating the policy and enabling AppFlow on your Virtual Servers 1. Select “System -> AppFlow” in the left menu.
2. Click on the “AppFlow policy manager” selection.
3. Leave Bind Point as “Override Global” and Protocol as “HTTP”. Click Continue.
16 Goliath for NetScaler Installation Guide for Citrix XenServer Copyright © 2016 Goliath Technologies Version 4.0 – October 2016
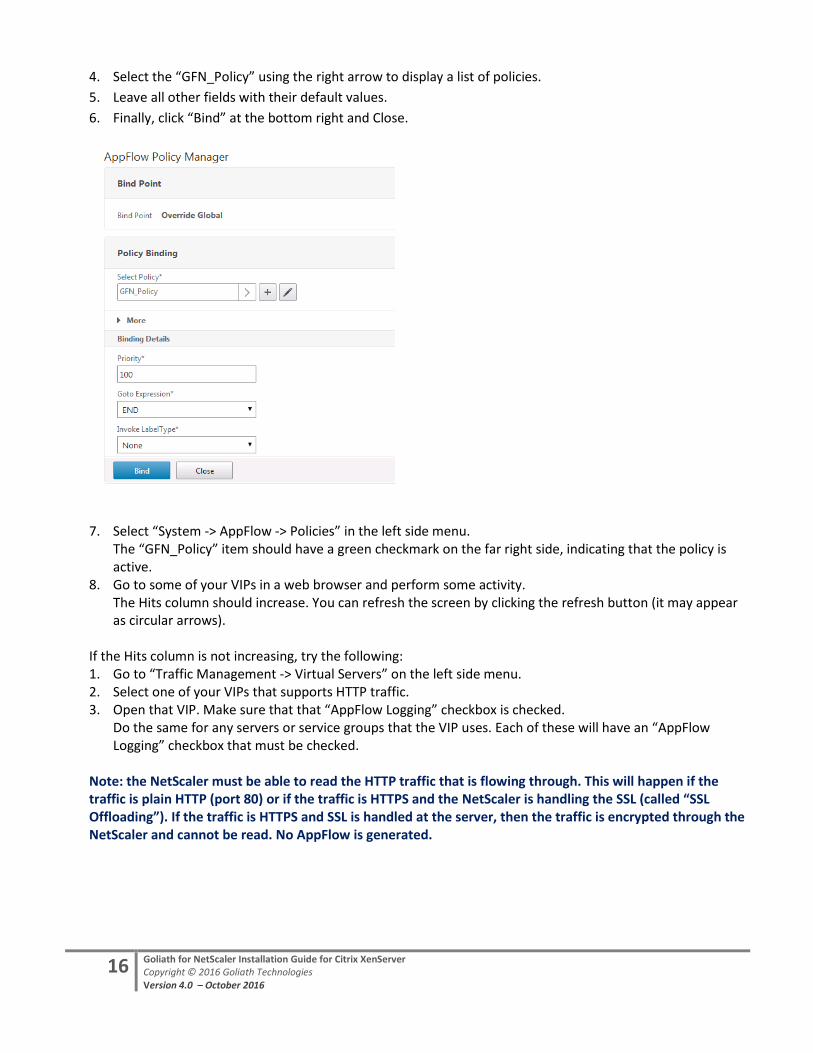
4. Select the “GFN_Policy” using the right arrow to display a list of policies.
5. Leave all other fields with their default values.
6. Finally, click “Bind” at the bottom right and Close.
7. Select “System -> AppFlow -> Policies” in the left side menu. The “GFN_Policy” item should have a green checkmark on the far right side, indicating that the policy is active.
8. Go to some of your VIPs in a web browser and perform some activity. The Hits column should increase. You can refresh the screen by clicking the refresh button (it may appear as circular arrows).
If the Hits column is not increasing, try the following: 1. Go to “Traffic Management -> Virtual Servers” on the left side menu. 2. Select one of your VIPs that supports HTTP traffic. 3. Open that VIP. Make sure that that “AppFlow Logging” checkbox is checked.
Do the same for any servers or service groups that the VIP uses. Each of these will have an “AppFlow Logging” checkbox that must be checked.
Note: the NetScaler must be able to read the HTTP traffic that is flowing through. This will happen if the traffic is plain HTTP (port 80) or if the traffic is HTTPS and the NetScaler is handling the SSL (called “SSL Offloading”). If the traffic is HTTPS and SSL is handled at the server, then the traffic is encrypted through the NetScaler and cannot be read. No AppFlow is generated.
17 Goliath for NetScaler Installation Guide for Citrix XenServer Copyright © 2016 Goliath Technologies Version 4.0 – October 2016
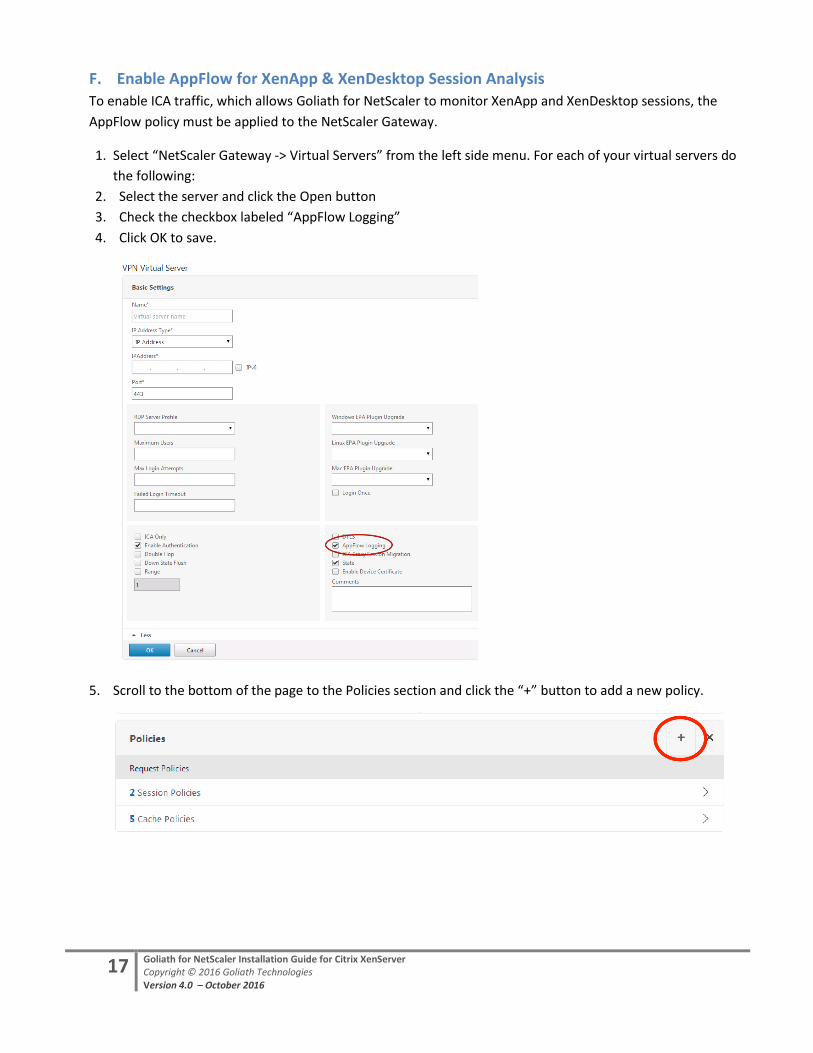
F. Enable AppFlow for XenApp & XenDesktop Session Analysis
To enable ICA traffic, which allows Goliath for NetScaler to monitor XenApp and XenDesktop sessions, the
AppFlow policy must be applied to the NetScaler Gateway.
1. Select “NetScaler Gateway -> Virtual Servers” from the left side menu. For each of your virtual servers do
the following:
2. Select the server and click the Open button
3. Check the checkbox labeled “AppFlow Logging”
4. Click OK to save.
5. Scroll to the bottom of the page to the Policies section and click the “+” button to add a new policy.
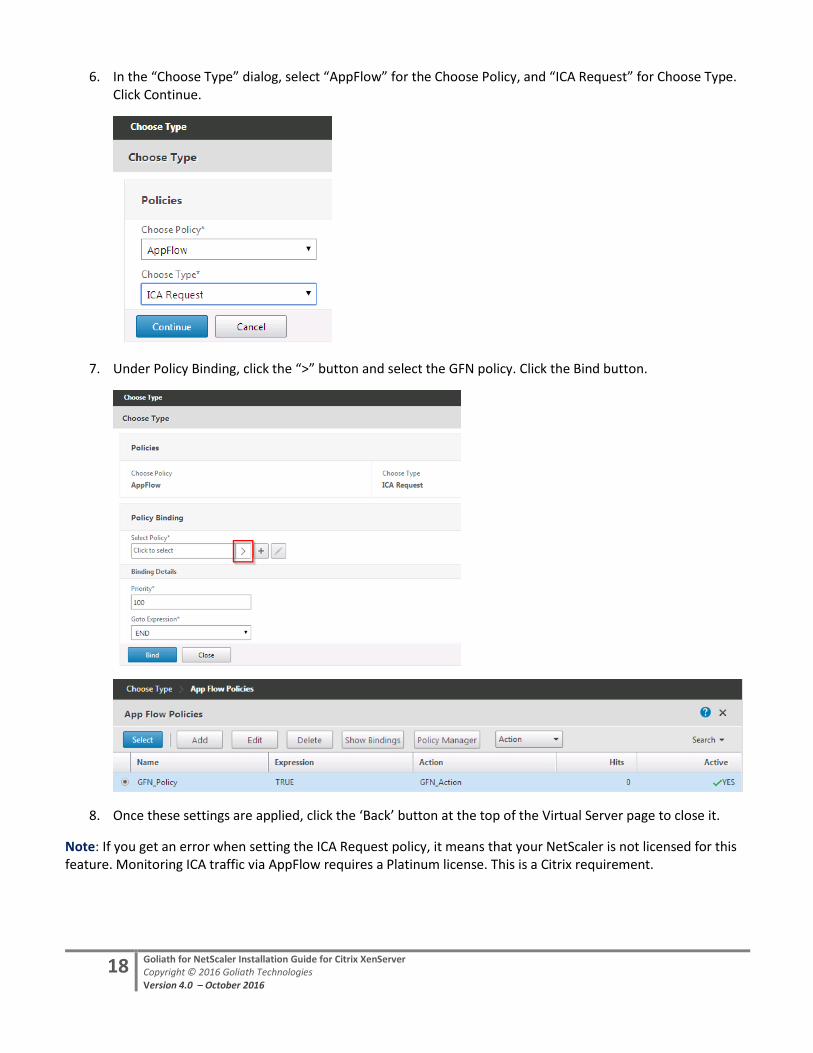
18 Goliath for NetScaler Installation Guide for Citrix XenServer Copyright © 2016 Goliath Technologies Version 4.0 – October 2016
6. In the “Choose Type” dialog, select “AppFlow” for the Choose Policy, and “ICA Request” for Choose Type. Click Continue.
7. Under Policy Binding, click the “>” button and select the GFN policy. Click the Bind button.
8. Once these settings are applied, click the ‘Back’ button at the top of the Virtual Server page to close it.
Note: If you get an error when setting the ICA Request policy, it means that your NetScaler is not licensed for this feature. Monitoring ICA traffic via AppFlow requires a Platinum license. This is a Citrix requirement.
19 Goliath for NetScaler Installation Guide for Citrix XenServer Copyright © 2016 Goliath Technologies Version 4.0 – October 2016
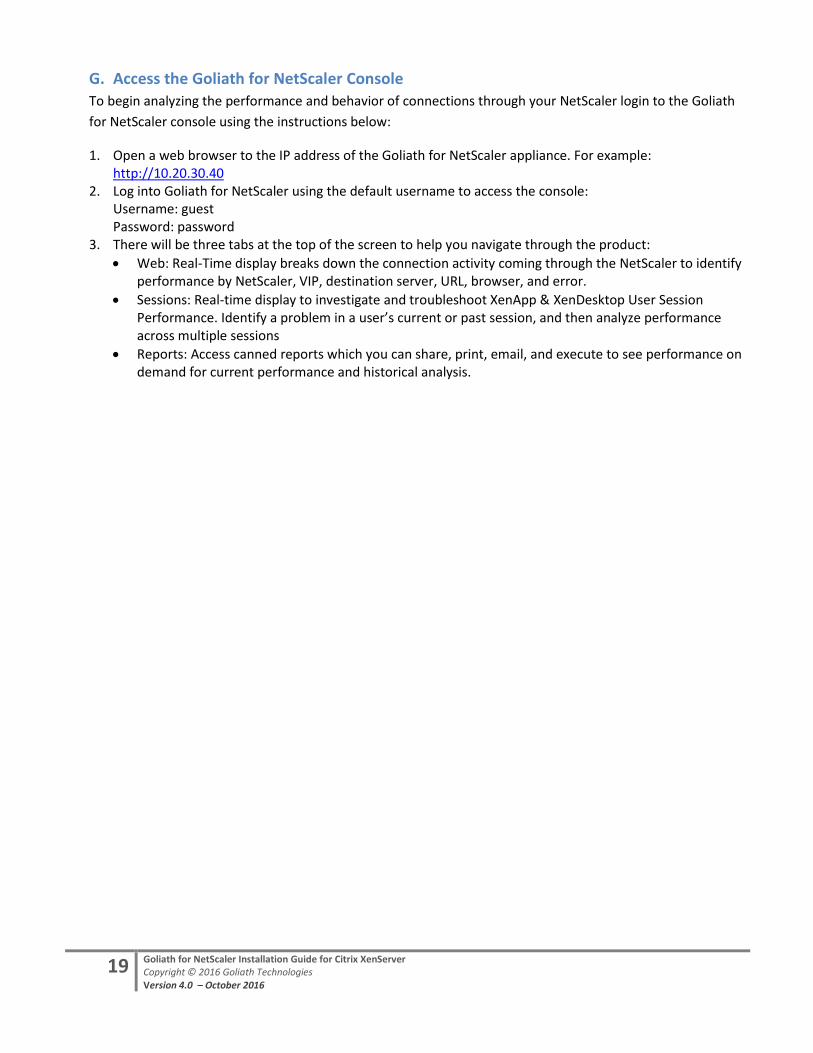
G. Access the Goliath for NetScaler Console
To begin analyzing the performance and behavior of connections through your NetScaler login to the Goliath
for NetScaler console using the instructions below:
1. Open a web browser to the IP address of the Goliath for NetScaler appliance. For example: http://10.20.30.40
2. Log into Goliath for NetScaler using the default username to access the console: Username: guest Password: password
3. There will be three tabs at the top of the screen to help you navigate through the product:
Web: Real-Time display breaks down the connection activity coming through the NetScaler to identify performance by NetScaler, VIP, destination server, URL, browser, and error.
Sessions: Real-time display to investigate and troubleshoot XenApp & XenDesktop User Session Performance. Identify a problem in a user’s current or past session, and then analyze performance across multiple sessions
Reports: Access canned reports which you can share, print, email, and execute to see performance on demand for current performance and historical analysis.
20 Goliath for NetScaler Installation Guide for Citrix XenServer Copyright © 2016 Goliath Technologies Version 4.0 – October 2016
V. Troubleshooting Your Implementation If Goliath for NetScaler is not displaying information about web or ICA traffic, there can be several causes:
1. The first thing to check is that the “AppFlow Logging” checkbox is checked on every server, service group and virtual server used. Often these objects are nested (Virtual Servers use service groups, which are based on actual servers) and the setting must be set for all of them.
2. Make sure that the web traffic is not encrypted through the NetScaler. If SSL is used, then the NetScaler must be the device that is decrypting the traffic. This is handled in the “SSL Offload” section of the NetScaler setup.
3. Make sure that the AppFlow Action has the correct IP address for the Goliath for NetScaler appliance.
4. Make sure that UDP traffic can flow from the NetScaler to Goliath for NetScaler. Network routers and
firewalls often suppress UDP traffic. You may have to open a hole in a firewall for port 4739 to allow the AppFlow messages to be sent.
5. Finally, make sure that the correct NetScaler version is set in the Goliath for NetScaler Admin console. The
format of AppFlow messages changes with each version of NetScaler.