network guide - files.support.epson.com · setting of the printer driver using server / ... server...
TRANSCRIPT

Network GuideNPD5771-01 EN
Contents
Copyrights
Trademarks
About this ManualMarks and Symbols. . . . . . . . . . . . . . . . . . . . . . . . . 6Descriptions Used in this Manual. . . . . . . . . . . . . . 6Operating System References. . . . . . . . . . . . . . . . . . 6
IntroductionManual Component. . . . . . . . . . . . . . . . . . . . . . . . 8Definitions of Terms Used in this Guide. . . . . . . . . 8
PreparationFlow of the Printer Settings. . . . . . . . . . . . . . . . . . 10
Introduction of Printer Connection. . . . . . . . . . 10Server / Client Connection Settings. . . . . . . . . . 11Peer to Peer Connection Settings. . . . . . . . . . . . 11
Preparing Connection to a Network. . . . . . . . . . . . 11Gathering Information on the ConnectionSetting. . . . . . . . . . . . . . . . . . . . . . . . . . . . . . . 11Printer Specifications. . . . . . . . . . . . . . . . . . . . 12Type of IP Address Assignment. . . . . . . . . . . . . 12Method for Setting Network Connection. . . . . . 12Installing EpsonNet Config. . . . . . . . . . . . . . . . 13Running EpsonNet Config. . . . . . . . . . . . . . . . 13
ConnectionConnecting to the Network. . . . . . . . . . . . . . . . . . 14
Connecting to LAN. . . . . . . . . . . . . . . . . . . . . . 14Assigning an IP Address Using EpsonNetConfig. . . . . . . . . . . . . . . . . . . . . . . . . . . . . . . 14Connecting to the Network Using the Installer. . . . . . . . . . . . . . . . . . . . . . . . . . . . . . . . . . . . 18
Function SettingsWeb Config (Web Page for Device). . . . . . . . . . . . 20
About Web Config. . . . . . . . . . . . . . . . . . . . . . 20Accessing Web Config. . . . . . . . . . . . . . . . . . . . 20
Using the Print Functions. . . . . . . . . . . . . . . . . . . 21Requirement for Printing over a Network. . . . . . 21Setting of the Printer Driver Using Server /Client Connection. . . . . . . . . . . . . . . . . . . . . . . 21Printer Driver Settings for Peer to PeerConnection. . . . . . . . . . . . . . . . . . . . . . . . . . . . 26
Security SettingsSecurity Settings and Prevention of Danger. . . . . . 28
Security Feature Settings. . . . . . . . . . . . . . . . . . 29Configuring the Administrator Password. . . . . . . . 29
Configuring the Administrator PasswordUsing Web Config. . . . . . . . . . . . . . . . . . . . . . 29
Controlling Protocols and Services. . . . . . . . . . . . . 30Controlling Protocols. . . . . . . . . . . . . . . . . . . . 30
SSL/TLS Communication with the Printer. . . . . . . 34About Digital Certification. . . . . . . . . . . . . . . . 34Obtaining and Importing a CA-signedCertificate. . . . . . . . . . . . . . . . . . . . . . . . . . . . . 35Deleting a CA-signed Certificate. . . . . . . . . . . . 38Updating a Self-signed Certificate. . . . . . . . . . . 38
Encrypted Communication Using IPsec/IPFiltering. . . . . . . . . . . . . . . . . . . . . . . . . . . . . . . . 39
About IPsec/IP Filtering. . . . . . . . . . . . . . . . . . 39Configuring Default Policy. . . . . . . . . . . . . . . . 40Configuring Group Policy. . . . . . . . . . . . . . . . . 41Configuration Examples of IPsec/IP Filtering. . . . . . . . . . . . . . . . . . . . . . . . . . . . . . . . . . . . 46
Using SNMPv3 Protocol. . . . . . . . . . . . . . . . . . . . 47About SNMPv3. . . . . . . . . . . . . . . . . . . . . . . . . 47Configuring SNMPv3. . . . . . . . . . . . . . . . . . . . 48
Solving ProblemsChecking the Log for Server and Network Device. . . . . . . . . . . . . . . . . . . . . . . . . . . . . . . . . . . . . . 50Printing a Network Status Sheet. . . . . . . . . . . . . . . 50Initializing the Network Settings. . . . . . . . . . . . . . 50
Restoring the Network Settings from thePrinter. . . . . . . . . . . . . . . . . . . . . . . . . . . . . . . 50Restoring the Network Settings usingEpsonNet Config. . . . . . . . . . . . . . . . . . . . . . . 50
Checking the Communication between Devicesand Computers. . . . . . . . . . . . . . . . . . . . . . . . . . . 51
Checking the Connection Using a PingCommand. . . . . . . . . . . . . . . . . . . . . . . . . . . . 51
Network Guide
Contents
2

Problems Using Network Software. . . . . . . . . . . . . 52Cannot Access Web Config. . . . . . . . . . . . . . . . 52Model name and/or IP address are notdisplayed on EpsonNet Config. . . . . . . . . . . . . . 53
Solving Problems for Advanced Security. . . . . . . . 53Restoring the Security Settings. . . . . . . . . . . . . . 53Disabling the Security Function from thePrinter. . . . . . . . . . . . . . . . . . . . . . . . . . . . . . . 53Restoring the Security Function Using WebConfig. . . . . . . . . . . . . . . . . . . . . . . . . . . . . . . 54Problems Using Network Security Features. . . . 54Problems on Using a Digital Certificate. . . . . . . 56
AppendixIntroduction of Network Software. . . . . . . . . . . . . 60
Epson Device Admin. . . . . . . . . . . . . . . . . . . . 60EpsonNet Print. . . . . . . . . . . . . . . . . . . . . . . . . 60EpsonNet SetupManager. . . . . . . . . . . . . . . . . . 60
Network Guide
Contents
3

Copyrights
No part of this publication may be reproduced, stored in a retrieval system, or transmitted in any form or by any means, electronic, mechanical,photocopying, recording, or otherwise, without the prior written permission of Seiko Epson Corporation. No patent liability is assumed with respect to theuse of the information contained herein. Neither is any liability assumed for damages resulting from the use of the information herein. The informationcontained herein is designed only for use with this Epson product. Epson is not responsible for any use of this information as applied to other products.
Neither Seiko Epson Corporation nor its affiliates shall be liable to the purchaser of this product or third parties for damages, losses, costs, or expensesincurred by the purchaser or third parties as a result of accident, misuse, or abuse of this product or unauthorized modifications, repairs, or alterations tothis product, or (excluding the U.S.) failure to strictly comply with Seiko Epson Corporation’s operating and maintenance instructions.
Seiko Epson Corporation and its affiliates shall not be liable for any damages or problems arising from the use of any options or any consumable productsother than those designated as Original Epson Products or Epson Approved Products by Seiko Epson Corporation.
Seiko Epson Corporation shall not be held liable for any damage resulting from electromagnetic interference that occurs from the use of any interface cablesother than those designated as Epson Approved Products by Seiko Epson Corporation.
© 2017 Seiko Epson Corporation
The contents of this manual and the specifications of this product are subject to change without notice.
Network Guide
Copyrights
4
Trademarks
❏ EPSON® is a registered trademark, and EPSON EXCEED YOUR VISION or EXCEED YOUR VISION is atrademark of Seiko Epson Corporation.
❏ Epson Scan 2 software is based in part on the work of the Independent JPEG Group.
❏ Google Cloud Print™, Chrome™, Chrome OS™, and Android™ are trademarks of Google Inc.
❏ Microsoft®, Windows®, Windows Server®, and Windows Vista® are registered trademarks of MicrosoftCorporation.
❏ IBM is a registered trademark of International Business Machines Corporation.
❏ Bonjour is a trademark of Apple Inc., registered in the U.S. and other countries.
❏ General Notice: Other product names used herein are for identification purposes only and may be trademarks oftheir respective owners. Epson disclaims any and all rights in those marks.
Network Guide
Trademarks
5

About this Manual
Marks and Symbols
!Caution:Instructions that must be followed carefully to avoid bodily injury.
c Important:Instructions that must be observed to avoid damage to your equipment.
Note:Instructions containing useful tips and restrictions on printer operation.
Related Information & Clicking this icon takes you to related information.
Descriptions Used in this Manual
Illustrations of the printer used in this manual are examples only. Although there may be slight differences dependingon the model, the method of operation is the same.
Operating System References
Windows
In this manual, terms such as "Windows 10", "Windows 8.1", "Windows 8", "Windows 7", "Windows Vista", "WindowsXP", "Windows Server 2012 R2", "Windows Server 2012", "Windows Server 2008 R2", "Windows Server 2008","Windows Server 2003 R2", and "Windows Server 2003" refer to the following operating systems. Additionally,"Windows" is used to refer to all versions.
❏ Microsoft® Windows® 10 operating system
❏ Microsoft® Windows® 8.1 operating system
❏ Microsoft® Windows® 8 operating system
❏ Microsoft® Windows® 7 operating system
❏ Microsoft® Windows Vista® operating system
❏ Microsoft® Windows® XP operating system
❏ Microsoft® Windows® XP Professional x64 Edition operating system
❏ Microsoft® Windows Server® 2012 R2 operating system
Network Guide
About this Manual
6

❏ Microsoft® Windows Server® 2012 operating system
❏ Microsoft® Windows Server® 2008 R2 operating system
❏ Microsoft® Windows Server® 2008 operating system
❏ Microsoft® Windows Server® 2003 R2 operating system
❏ Microsoft® Windows Server® 2003 operating system
Network Guide
About this Manual
7

Introduction
Manual Component
This manual explains how to connect the printer to the network and it contains information on how to make settings touse the functions.
See the User's Guide for function usage information.
Preparation Explains how to set devices, and the software used for managing.
Connection Explains how to connect a printer to the network.
Function Settings Explains the settings for printing.
Security Settings Explains the security settings, such as administrator password settings and protocol control.
Solving Problems Explains settings initialization and troubleshooting of the network.
Definitions of Terms Used in this Guide
The following terms are used in this guide.
Administrator The person in charge of installing and setting the device or the network at an office or organization. For smallorganizations, this person may be in charge of both device and network administration. For large organizations,administrators have authority over the network or devices on the group unit of a department or division, and networkadministrators are in charge of the communication settings for beyond the organization, such as the Internet.
Network administrator The person in charge of controlling network communication. The person who set up the router, proxy server, DNSserver and mail server to control communication through the Internet or network.
User The person who uses devices such as printers.
Server / client connection (printer sharing using the Windows server) The connection that indicates the printer is connected to the Windows server through the network or by USB cable,and the print queue set on the server can be shared. Communication between the printer and the computer goesthrough the server, and the printer is controlled on the server.
Peer to peer connection (direct printing) The connection that indicates the printer and the computer are connected to the network through the hub or accesspoint, and the print job can be executed directly from the computer.
Network Guide
Introduction
8
Web Config (device's web page) The web server that is built into the device. It is called Web Config. You can check and change the device's status on itusing the browser.
Print queue For Windows, the icon for each port displayed on Device and Printer such as a printer. Two or more icons are createdeven for a single device if the device is connected to the network by two or more ports, such as standard TCP/IP.
Tool A generic term for software to setup or manage a device, such as Epson Device Admin, EpsonNet Config, EpsonNetSetupManager, etc.
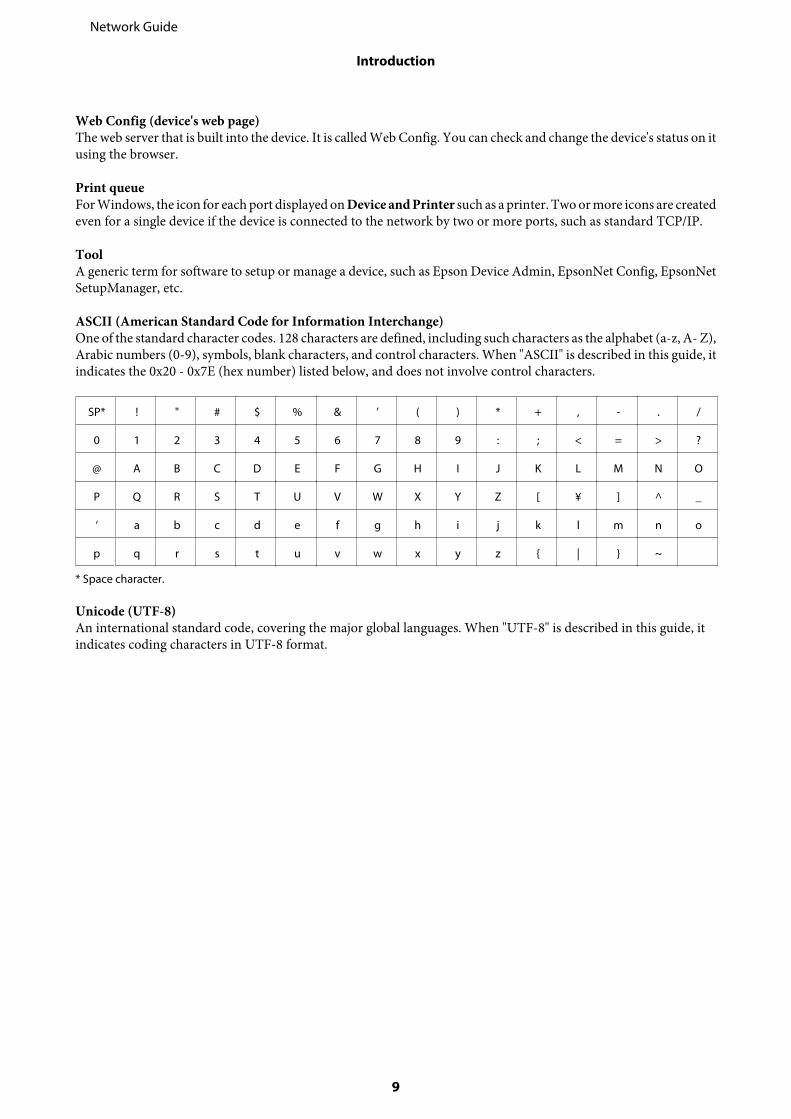
ASCII (American Standard Code for Information Interchange) One of the standard character codes. 128 characters are defined, including such characters as the alphabet (a-z, A- Z),Arabic numbers (0-9), symbols, blank characters, and control characters. When "ASCII" is described in this guide, itindicates the 0x20 - 0x7E (hex number) listed below, and does not involve control characters.
SP* ! " # $ % & ’ ( ) * + , - . /
0 1 2 3 4 5 6 7 8 9 : ; < = > ?
@ A B C D E F G H I J K L M N O
P Q R S T U V W X Y Z [ ¥ ] ^ _
‘ a b c d e f g h i j k l m n o
p q r s t u v w x y z { | } ~
* Space character.
Unicode (UTF-8) An international standard code, covering the major global languages. When "UTF-8" is described in this guide, itindicates coding characters in UTF-8 format.
Network Guide
Introduction
9
Preparation
This chapter explains what you need to prepare before making settings.
Flow of the Printer Settings
You make network connection settings and perform initial setup so that the printer is available to users.
A Preparing
❏ Collecting the connection setting information
❏ Decision on the connection method
B Connecting
❏ Make a network connection using EpsonNet Config
C Setting up printing
❏ Printer driver settings
D Security settings
❏ Administrator settings
❏ SSL/TLS
❏ Protocol control
❏ IPsec/IP firtering
Related Information & “Connection” on page 14 & “Function Settings” on page 20 & “Security Settings” on page 28
Introduction of Printer Connection
The following two methods are available for the printer's network directly by both methods.
❏ Server / client connection (printer sharing using the Windows server)
❏ Peer to peer connection (direct printing)
Related Information & “Server / Client Connection Settings” on page 11 & “Peer to Peer Connection Settings” on page 11
Network Guide
Preparation
10
Server / Client Connection Settings
Connection method:
Connect the printer to the network via hub (L2 switch). You can also connect the printer to the server directly by USBcable.
Printer driver:
Install the printer driver on the Windows server depending on the OS of the client computers. By accessing theWindows server and linking the printer, the printer driver is installed on the client computer and can be used.
Features:
❏ Manage the printer and the printer driver in batch.
❏ Depending on the server spec, it may take time to start the print job because all print jobs go through the printserver.
❏ You cannot print when the Windows server is turned off.
Related Information & “Definitions of Terms Used in this Guide” on page 8
Peer to Peer Connection Settings
Connection method:
Connect the printer to the network via hub (L2 switch).
Printer driver:
Install the printer driver on each client computer. It can be delivered as a package by using EpsonNet SetupManager orautomatically by using the Group Policy of the Windows server.
Features:
❏ The print job starts immediately because the print job is sent to the printer directly.
❏ You can print as long as the printer runs.
Related Information & “Definitions of Terms Used in this Guide” on page 8
Preparing Connection to a Network
Gathering Information on the Connection Setting
You need to have an IP address, gateway address, etc. for network connection. Check the following in advance.
Network Guide
Preparation
11

Divisions Items Note
Device connectionmethod
❏ Ethernet Use a category 5e or higher STP (Shielded Twisted Pair) cable.
LAN connectioninformation
❏ IP address
❏ Subnet mask
❏ Default gateway
If you automatically set the IP address using the DHCP function of the router,it is not required.
DNS serverinformation
❏ IP address forprimary DNS
❏ IP address forsecondary DNS
If you use a static IP address as the IP address, configure the DNS server.
Configure when assigning IP addresses automatically using the DHCPfunction and when the DNS server cannot be assigned automatically.
Printer Specifications
The specification that the printer supports standard or connection mode, see the User's Guide.
Type of IP Address Assignment
There are two types for assigning an IP address to the printer.
Static IP address:
Assign the predetermined unique IP address to the printer.
The IP address is not changed even when turning on the printer or turning off the router, so you can manage the deviceby IP address.
This type is suitable for a network where many printers are managed, such as a large office or school.
Automatic assignment by DHCP function:
The correct IP address is automatically assigned when the communication between the printer and router thatsupports the DHCP function succeeds.
If it is inconvenient to change the IP address for a particular device, reserve the IP address in advance and then assignit.
Note:For the port for the print queue, select the protocol that can automatically detect the IP address, such as EpsonNet PrintPort.
Method for Setting Network Connection
For connection settings for the printer’s IP address, subnet mask, and default gateway, proceed as follows.
Using EpsonNet Config:
Network Guide
Preparation
12

Use EpsonNet Config from the administrator’s computer. You can set many printers, but they need to be connectedphysically by the Ethernet cable before setting. If you can build an Ethernet for the setting, and you set network settingsfor the printer, and then connect printer to regular network, you can keep security risk low.
Using the Installer:
If the installer is used, the printer's network and client computer are set automatically. The setting is available byfollowing the installer's instructions, even if you do not have deep knowledge of the network. This is recommendedwhen setting the printer and a few client computers by using the server/client connection (sharing the printer using theWindows server).
Related Information & “Assigning an IP Address Using EpsonNet Config” on page 14 & “Connecting to the Network Using the Installer” on page 18
Installing EpsonNet Config
Download EpsonNet Config from Epson support website, and then install it by following the on-screen instructions.
Running EpsonNet Config
Select All Programs > EpsonNet > EpsonNet Config SE > EpsonNet Config.
Note:If the firewall alert appears, allow access for EpsonNet Config.
Network Guide
Preparation
13
Connection
This chapter explains the environment or procedure to connect the printer to the network.
Connecting to the Network
Connecting to LAN
Connect the printer to the network by Ethernet.
Related Information & “Connecting to the Network Using the Installer” on page 18
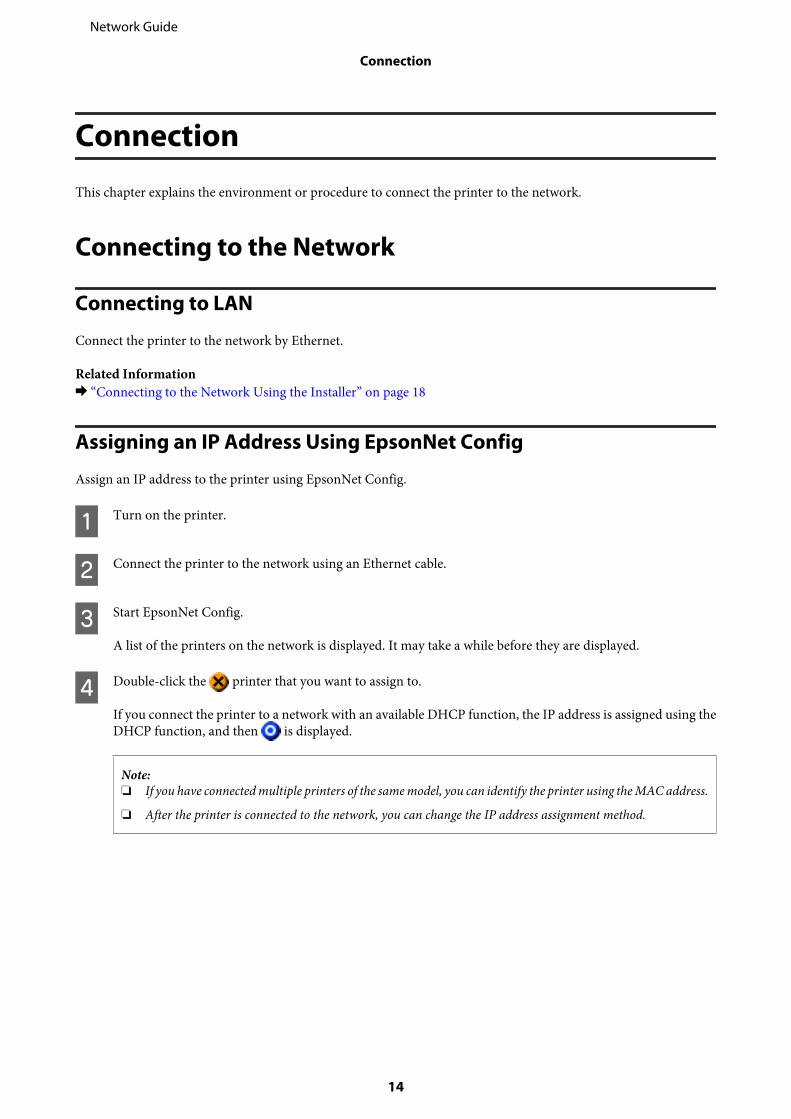
Assigning an IP Address Using EpsonNet Config
Assign an IP address to the printer using EpsonNet Config.
A Turn on the printer.
B Connect the printer to the network using an Ethernet cable.
C Start EpsonNet Config.
A list of the printers on the network is displayed. It may take a while before they are displayed.
D Double-click the printer that you want to assign to.
If you connect the printer to a network with an available DHCP function, the IP address is assigned using theDHCP function, and then is displayed.
Note:❏ If you have connected multiple printers of the same model, you can identify the printer using the MAC address.
❏ After the printer is connected to the network, you can change the IP address assignment method.
Network Guide
Connection
14

E Select Network > TCP/IP > Basic.
Network Guide
Connection
15

F Enter the addresses for IP Address, Subnet Mask, and Default Gateway.
Note:❏ Enter a static address when you connect the printer to a secure network.
❏ In the TCP/IP menu, you can make settings for the DNS on the DNS screen.
G Click Transmit.
H Click OK on the confirmation screen.
Network Guide
Connection
16

I Click OK.
J Click Refresh.
Network Guide
Connection
17
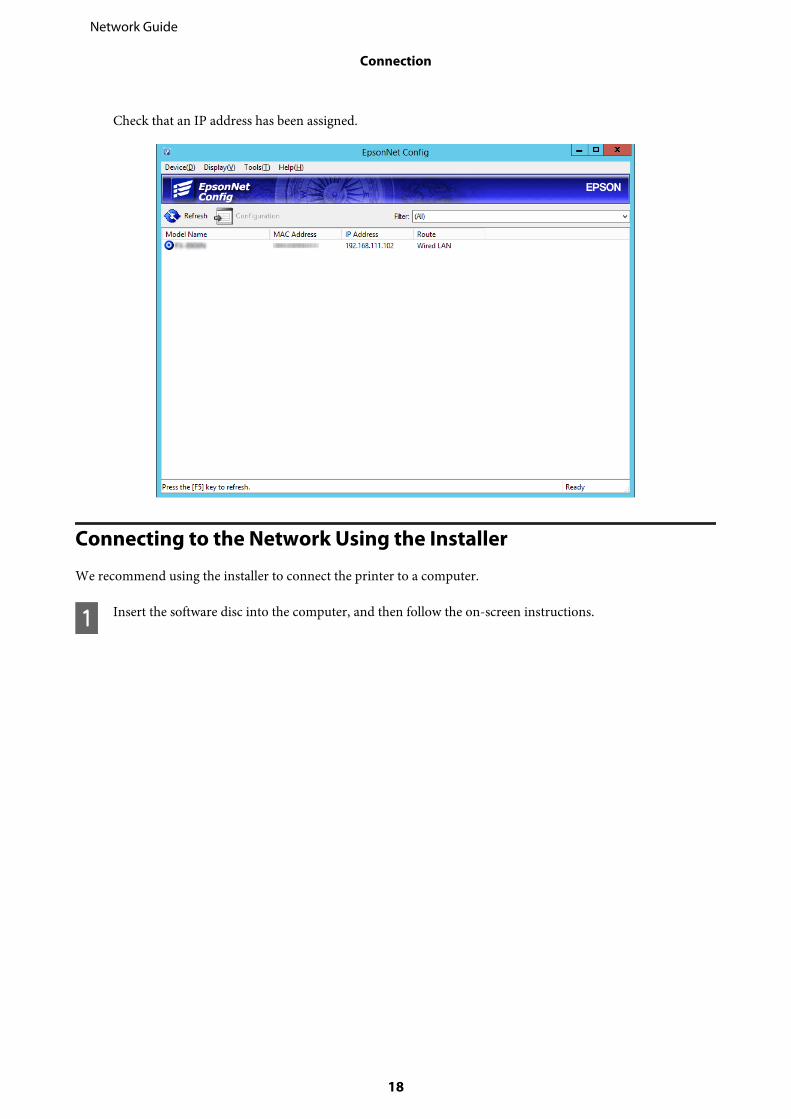
Check that an IP address has been assigned.
Connecting to the Network Using the Installer
We recommend using the installer to connect the printer to a computer.
A Insert the software disc into the computer, and then follow the on-screen instructions.
Network Guide
Connection
18

B Follow the on-screen instructions until the following screen is displayed, select Ethernet Connection, and thenclick Next.
If you connect the printer to the network using an Ethernet cable, the following screen is displayed. Select theprinter, and then click Next.
C Follow the on-screen instructions.
Network Guide
Connection
19

Function Settings
This chapter explains the first settings to make in order to use each function of the device.
In this topic, the procedure for making settings from the administrator’s computer using Web Config is explained.
Web Config (Web Page for Device)
About Web Config
Web Config is a browser-based application for configuring the printer's settings.
To access Web Config, you need to have first assigned an IP address to the printer.
Note:You can lock the settings by configuring the administrator password to the printer.
Accessing Web Config
There are two methods to access Web Config. JavaScript must be enabled in the browser.
Entering IP address
Start EpsonNet Config, and then double-click the printer in the list.
Enter the printer's IP address into a web browser. When accessing Web Config via HTTPS, a warning message willappear in the browser since a self-signed certificate, stored in the printer, is used.
❏ Accessing via HTTPSIPv4: https://<printer IP address> (without the < >)IPv6: https://[printer IP address]/ (with the [ ])
❏ Accessing via HTTPIPv4: http://<printer IP address> (without the < >)IPv6: http://[printer IP address]/ (with the [ ])
Network Guide
Function Settings
20

Note:❏ Examples
IPv4:https://192.0.2.111/http://192.0.2.111/IPv6:https://[2001:db8::1000:1]/http://[2001:db8::1000:1]/
❏ If the printer name is registered with the DNS server, you can use the printer name instead of the printer’s IP address.
❏ Not all menus are displayed when accessing Web Config via HTTP. To see all the menus, access Web Config viaHTTPS.
Related Information & “SSL/TLS Communication with the Printer” on page 34 & “About Digital Certification” on page 34
Using the Print Functions
Enable to use the printer's print function.
Requirement for Printing over a Network
The following is required to print over a network. You can configure these settings using the printer driver andfunctions of the operating system.
❏ Installing the printer driver
❏ Making the print queue to a computer
❏ Setting the port to a network
Setting of the Printer Driver Using Server / Client Connection
Set the printer to enable printing from a computer that was previously set as the print server, and share the printer.Install the printer driver for both the server and the client on the print server. If the installer is used, setting of theprinter’s network or computer, installation of the driver, and making the print queue are performed automatically.
Setting Up Standard TCP/IP Ports - Windows
Set up the Standard TCP/IP port on the print server, and create the print queue for network printing.
A Open the devices and printers screen.
❏ Windows 10/Windows Server 2016Right-click the start button or press and hold it, and then select Control Panel > Hardware and Sound >Devices and Printers.
Network Guide
Function Settings
21

❏ Windows 8.1/Windows 8/Windows Server 2012 R2/Windows Server 2012Desktop > Settings > Control Panel > Hardware and Sound or Hardware > Devices and Printers.
❏ Windows 7/Windows Server 2008 R2Click start > Control Panel > Hardware and Sound (or Hardware) > Devices and Printers.
❏ Windows Vista/Windows Server 2008Click start > Control Panel > Hardware and Sound > Printers.
❏ Windows XP/Windows Server 2003 R2/Windows Server 2003Click start > Control Panel > Printers and Other Hardware > Printers and Faxes.
B Add a printer.
❏ Windows 10/Windows 8.1/Windows 8/Windows Server 2016/Windows Server 2012 R2/Windows Server2012Click Add printer, and then select The printer that I want isn't listed.
❏ Windows 7/Windows Server 2008 R2Click Add printer.
❏ Windows Vista/Windows Server 2008Click Install Printer.
❏ Windows XP/Windows Server 2003 R2/Windows Server 2003Click Install Printer, and then click Next.
C Add a local printer.
❏ Windows 10/Windows 8.1/Windows 8/Windows Server 2012 R2/Windows Server 2012Select Add a local printer or network printer with manual settings, and then click Next.
❏ Windows 7/Windows Server 2008 R2/Windows Vista/Windows Server 2008Click Add a local printer.
❏ Windows XP/Windows Server 2003 R2/Windows Server 2003Select Local printer attached to this computer, and then click Next.
Network Guide
Function Settings
22

D Select Create a new port, select Standard TCP/IP Port as the Port Type, and then click Next.
For Windows XP/Windows Server 2003 R2/Windows Server 2003, click Next on the Add Standard TCP/IPPrinter Port Wizard screen.
E Enter the printer's IP address or printer name in Host Name or IP Address or Printer Name or IP Address,and then click Next.
Do not change Port name.
Click Continue when the User Account Control screen is displayed.
For Windows XP/Windows Server 2003 R2/Windows Server 2003, click Done on the Standard TCP/IPPrinter Port screen.
Note:If you specify the printer name on the network where the name resolution is available, the IP address is tracked even ifprinter's IP address has been changed by DHCP. You can confirm the printer name from the network status screen onthe printer's control panel or network status sheet.
Network Guide
Function Settings
23

F Set the printer driver.
❏ If the printer driver is already installed:Select Manufacturer and Printers. Click Next.
❏ If the printer driver is not installed:Click Have Disc and then insert the software disc supplied with the printer. Click Browse, and then selectthe folder on the disc containing the printer driver. Make sure you select the correct folder. The location ofthe folder may change depending on your operating system.32 bit version of Windows: WINX8664 bit version of Windows: WINX64
G Follow the on-screen instructions.
For Windows XP/Windows Server 2003 R2/Windows Server 2003, setup is complete. For Windows Vista/Windows Server 2008 and later, check the port configuration.
When using the printer under the server / client connection (printer sharing using the Windows server), make thesharing settings hereafter.
Related Information & “Sharing the Printer” on page 25
Checking the Port Configuration - WindowsCheck if the correct port is set for the print queue.
A Open the devices and printers screen.
❏ Windows 10/Windows Server 2016Right-click the start button or press and hold it, and then select Control Panel > Hardware and Sound >Devices and Printers.
❏ Windows 8.1/Windows 8/Windows Server 2012 R2/Windows Server 2012Desktop > Settings > Control Panel > Hardware and Sound or Hardware > Devices and Printers.
❏ Windows 7/Windows Server 2008 R2Click start > Control Panel > Hardware and Sound (or Hardware) > Devices and Printers.
❏ Windows Vista/Windows Server 2008Click start > Control Panel > Hardware and Sound > Printers.
B Open the printer properties screen.
❏ Windows 10/Windows 8.1/Windows 8/Windows 7/Windows Server 2016/Windows Server 2012 R2/Windows Server 2012/ Windows Server 2008 R2Right-click the printer icon, and then click Printer properties.
❏ Windows VistaRight-click the printer icon, and then select Run as administrator > Properties.
❏ Windows Server 2008Right-click the printer icon, and then click Properties.
Network Guide
Function Settings
24

C Click the Ports tab, select Standard TCP/IP Port, and then click Configure Port.
D Check the port configuration.
❏ For RAWCheck that Raw is selected in Protocol, and then click OK.
❏ For LPRCheck that LPR is selected in Protocol. Enter "PASSTHRU" in Queue name from LPR Settings. SelectLPR Byte Counting Enabled, and then click OK.
Sharing the Printer
When using the printer under the server / client connection (printer sharing using the Windows server), set up theprinter sharing from the print server.
A Select Control Panel > View devices and printers on the print server.
B Right-click the printer icon (print queue) that you want to share with, and then select Printer Properties >Sharing tab.
C Select Share this printer and then enter to Share name.
For Windows Server 2012, click Change Sharing Options and then configure the settings.
Installing Additional Drivers
If the Windows versions for a server and clients are different, it is recommended to install additional drivers to theprint server.
A Select Control Panel > View devices and printers on the print server.
B Right-click the printer icon that you want to share with the clients, and then click Printer Properties > Sharingtab.
C Click Additional Drivers.
For Windows Server 2012, click Change Sharing Options and then configure the settings.
D Select versions of Windows for clients, and then click OK.
E Select the information file for the printer driver (*.inf ) and then install the driver.
Related Information & “Using the Shared Printer” on page 26
Network Guide
Function Settings
25

Using the Shared Printer
The administrator needs to inform the clients of the computer name assigned to the print server and how to add it totheir computers. If the additional driver(s) have not been configured yet, inform the clients how to use Devices andPrinters to add the shared printer.
If additional driver(s) have already been configured on the print server, follow these steps:
A Select the name assigned to the print server in Windows Explorer.
B Double-click the printer that you want to use.
Related Information & “Sharing the Printer” on page 25 & “Installing Additional Drivers” on page 25
Printer Driver Settings for Peer to Peer Connection
For peer to peer connection (direct printing), the printer driver must be installed on each client computer.
Related Information & “Setting the Printer Driver” on page 26
Setting the Printer Driver
For small organizations, we recommend installing the printer driver on each client computer.
Note:When the printer is used from many client computers, by using EpsonNet SetupManager and delivering the driver as apackage, install operation time can be reduced dramatically.
A Run the installer.
Network Guide
Function Settings
26
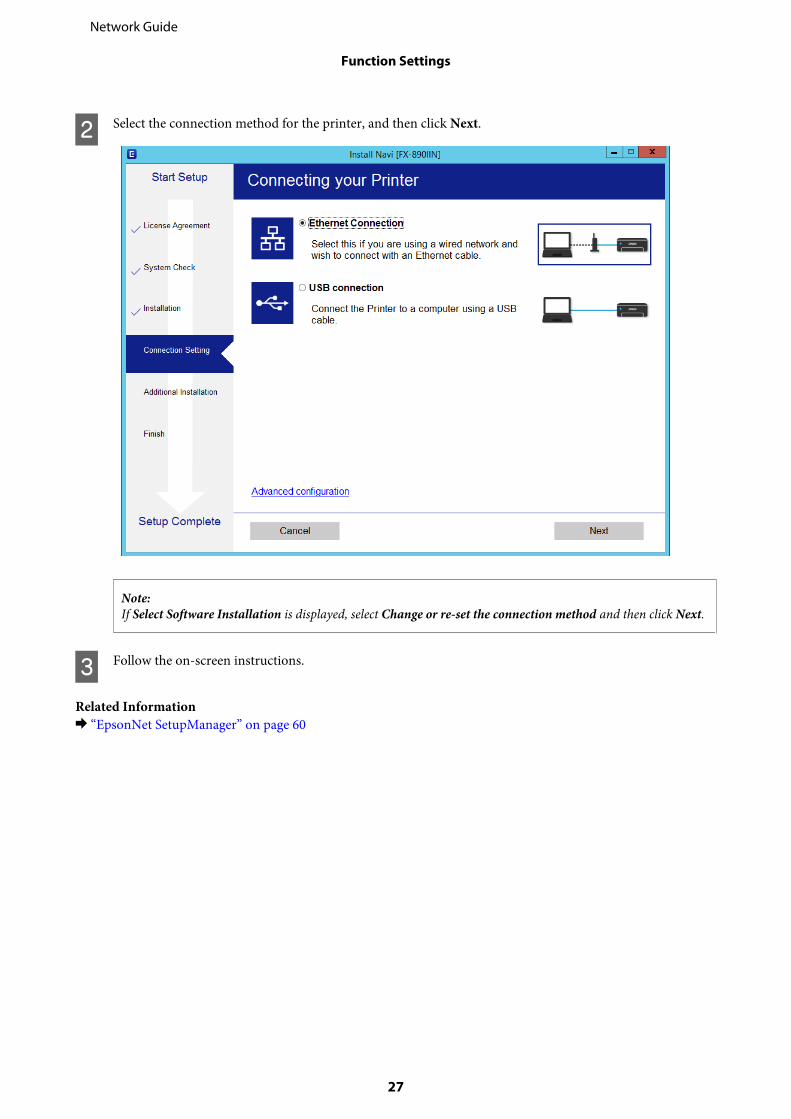
B Select the connection method for the printer, and then click Next.
Note:If Select Software Installation is displayed, select Change or re-set the connection method and then click Next.
C Follow the on-screen instructions.
Related Information & “EpsonNet SetupManager” on page 60
Network Guide
Function Settings
27
Security Settings
This chapter explains the security settings.
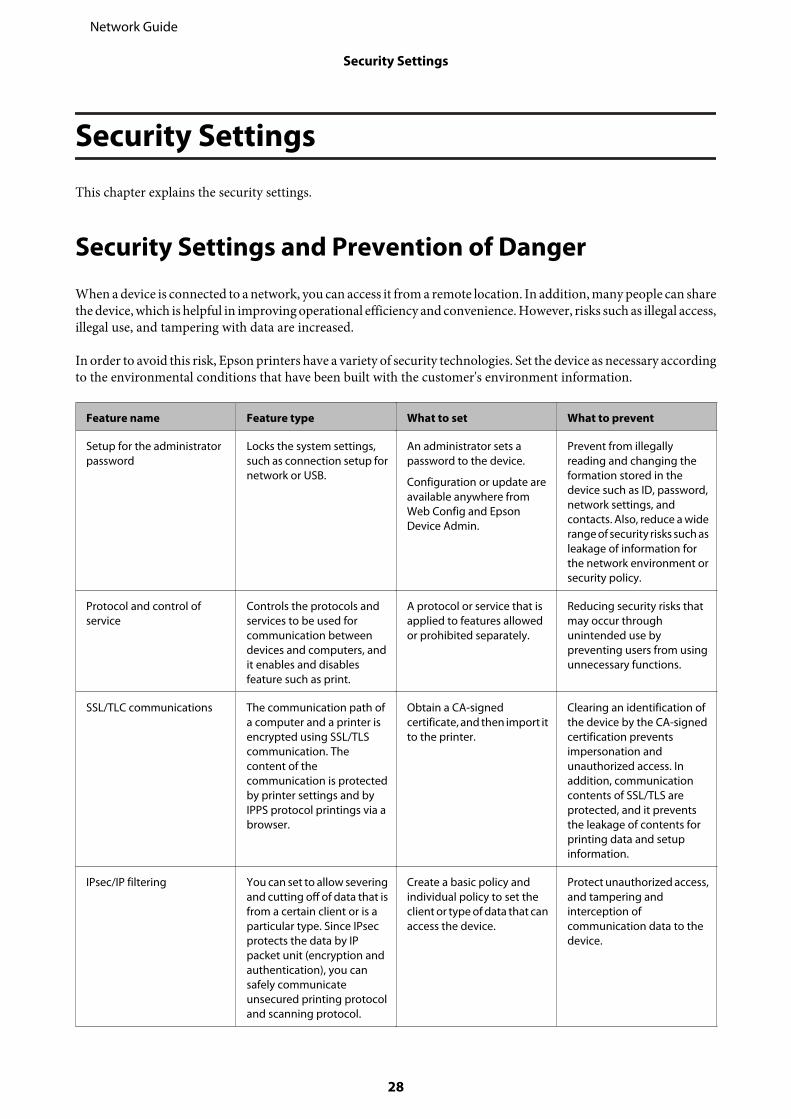
Security Settings and Prevention of Danger
When a device is connected to a network, you can access it from a remote location. In addition, many people can sharethe device, which is helpful in improving operational efficiency and convenience. However, risks such as illegal access,illegal use, and tampering with data are increased.
In order to avoid this risk, Epson printers have a variety of security technologies. Set the device as necessary accordingto the environmental conditions that have been built with the customer's environment information.
Feature name Feature type What to set What to prevent
Setup for the administratorpassword
Locks the system settings,such as connection setup fornetwork or USB.
An administrator sets apassword to the device.
Configuration or update areavailable anywhere fromWeb Config and EpsonDevice Admin.
Prevent from illegallyreading and changing theformation stored in thedevice such as ID, password,network settings, andcontacts. Also, reduce a widerange of security risks such asleakage of information forthe network environment orsecurity policy.
Protocol and control ofservice
Controls the protocols andservices to be used forcommunication betweendevices and computers, andit enables and disablesfeature such as print.
A protocol or service that isapplied to features allowedor prohibited separately.
Reducing security risks thatmay occur throughunintended use bypreventing users from usingunnecessary functions.
SSL/TLC communications The communication path ofa computer and a printer isencrypted using SSL/TLScommunication. Thecontent of thecommunication is protectedby printer settings and byIPPS protocol printings via abrowser.
Obtain a CA-signedcertificate, and then import itto the printer.
Clearing an identification ofthe device by the CA-signedcertification preventsimpersonation andunauthorized access. Inaddition, communicationcontents of SSL/TLS areprotected, and it preventsthe leakage of contents forprinting data and setupinformation.
IPsec/IP filtering You can set to allow severingand cutting off of data that isfrom a certain client or is aparticular type. Since IPsecprotects the data by IPpacket unit (encryption andauthentication), you cansafely communicateunsecured printing protocoland scanning protocol.
Create a basic policy andindividual policy to set theclient or type of data that canaccess the device.
Protect unauthorized access,and tampering andinterception ofcommunication data to thedevice.
Network Guide
Security Settings
28

Feature name Feature type What to set What to prevent
SNMPv3 Features are added, such asmonitoring of connecteddevices in the network,integrity of the data to theSNMP protocol to control,encryption, userauthentication, etc.
Enable SNMPv3, then set theauthentication andencryption method.
Ensure change settings viathe network, confidentialityin state monitoring.
Related Information & “Configuring the Administrator Password” on page 29 & “Controlling Protocols and Services” on page 30 & “SSL/TLS Communication with the Printer” on page 34
Security Feature Settings
When setting IPsec/IP filtering, it is recommended that you access Web Config using SSL/TLS to communicatesettings information in order to reduce security risks such as tampering or interception.
Configuring the Administrator Password
When you set the administrator password, users other than the administrators will not be able to change the settingsfor the system administration. You can set and change the administrator password using Web Config.
Related Information & “Configuring the Administrator Password Using Web Config” on page 29
Configuring the Administrator Password Using Web Config
You can set the administrator password using Web Config.
A Access Web Config and select Administrator Settings > Change Administrator Password.
Network Guide
Security Settings
29
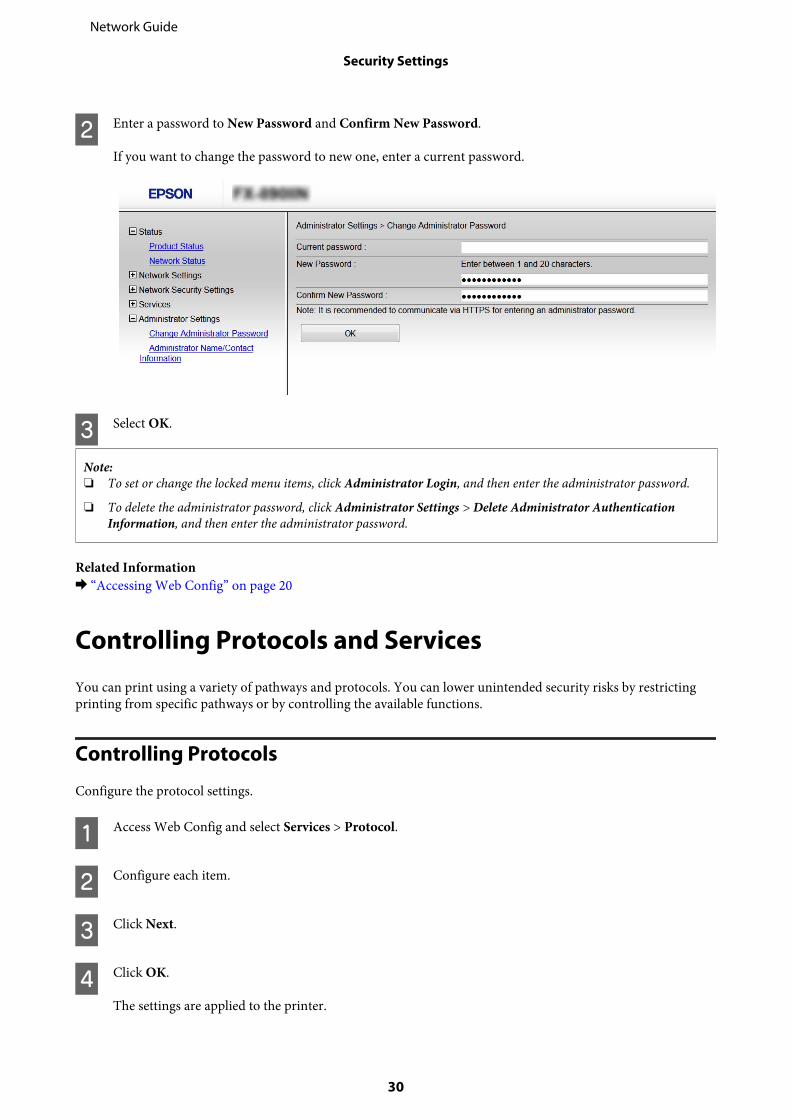
B Enter a password to New Password and Confirm New Password.
If you want to change the password to new one, enter a current password.
C Select OK.
Note:❏ To set or change the locked menu items, click Administrator Login, and then enter the administrator password.
❏ To delete the administrator password, click Administrator Settings > Delete Administrator AuthenticationInformation, and then enter the administrator password.
Related Information & “Accessing Web Config” on page 20
Controlling Protocols and Services
You can print using a variety of pathways and protocols. You can lower unintended security risks by restrictingprinting from specific pathways or by controlling the available functions.
Controlling Protocols
Configure the protocol settings.
A Access Web Config and select Services > Protocol.
B Configure each item.
C Click Next.
D Click OK.
The settings are applied to the printer.
Network Guide
Security Settings
30

Related Information & “Accessing Web Config” on page 20 & “Protocols you can Enable or Disable” on page 31 & “Protocol Setting Items” on page 32
Protocols you can Enable or Disable
Protocol Description
Bonjour Settings You can specify whether to use Bonjour. Bonjour is used to search for devices, print, and so on.
SLP Settings You can enable or disable the SLP function. SLP is used for network searching in EpsonNetConfig.
LLTD Settings You can enable or disable the LLTD function. When this is enabled, it is displayed on theWindows network map.
LLMNR Settings You can enable or disable the LLMNR function. When this is enabled, you can use nameresolution without NetBIOS even if you cannot use DNS.
LPR Settings You can specify whether or not to allow LPR printing. When this is enabled, you can print fromthe LPR port.
RAW(Port9100) Settings You can specify whether or not to allow printing from the RAW port (Port 9100). When this isenabled, you can print from the RAW port (Port 9100).
RAW(Custom Port) Settings You can specify whether or not to allow printing from the RAW port (Custom Port). When this isenabled, you can print from the RAW port (Custom Port).
IPP Settings You can specify whether or not to allow printing from IPP. When this is enabled, you can printover the Internet (including AirPrint).
FTP Settings You can specify whether or not to allow FTP printing. When this is enabled, you can print over anFTP server.
SNMPv1/v2c Settings You can specify whether or not to enable SNMPv1/v2c. This is used to set up devices,monitoring, and so on.
SNMPv3 Settings You can specify whether or not to enable SNMPv3. This is used to set up encrypted devices,monitoring, etc.
Related Information & “Controlling Protocols” on page 30 & “Protocol Setting Items” on page 32
Network Guide
Security Settings
31

Protocol Setting Items
Items Setting value and Description
Bonjour Settings
Use Bonjour Select this to search for or use devices through Bonjour.
Bonjour Name Displays the Bonjour name.
Bonjour Service Name Displays the Bonjour service name.
Location Displays the Bonjour location name.
Top Priority Protocol Select the top priority protocol for Bonjour print.
SLP Settings
Enable SLP Select this to enable the SLP function. This is used with the network searching inEpsonNet Config.
LLTD Settings
Enable LLTD Select this to enable LLTD. The printer is displayed in the Windows network map.
Device Name Displays the LLTD device name.
LLMNR Settings
Network Guide
Security Settings
32
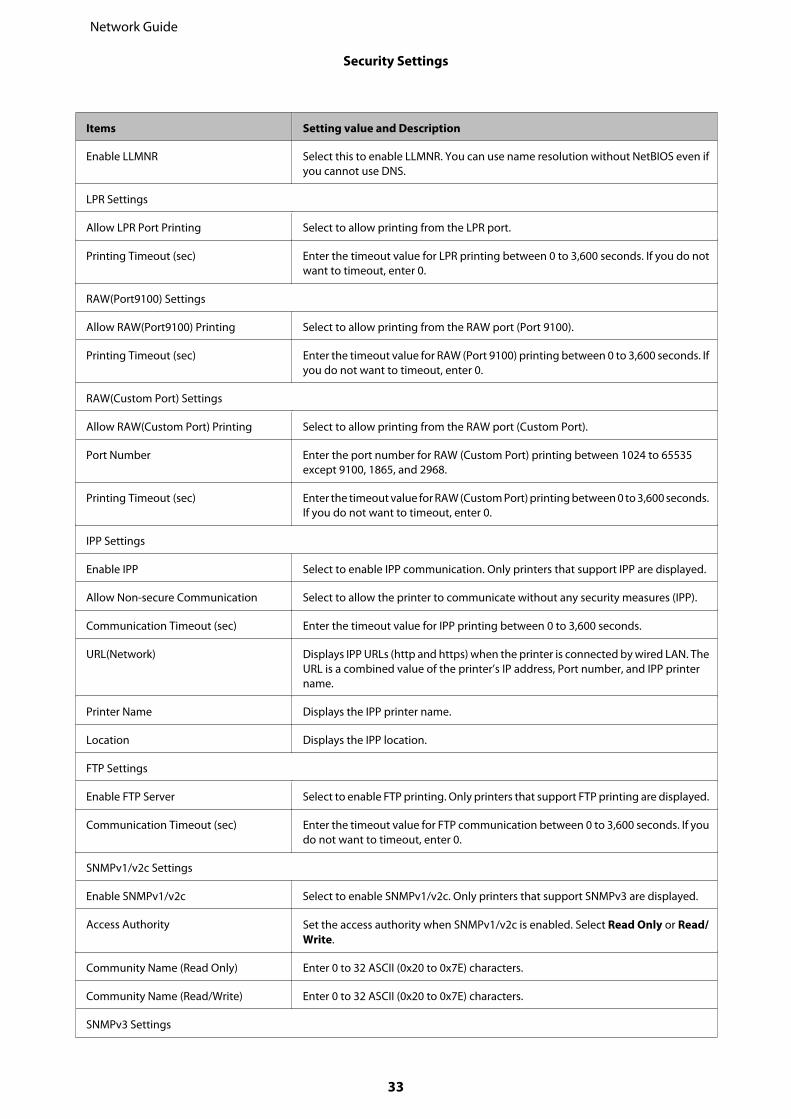
Items Setting value and Description
Enable LLMNR Select this to enable LLMNR. You can use name resolution without NetBIOS even ifyou cannot use DNS.
LPR Settings
Allow LPR Port Printing Select to allow printing from the LPR port.
Printing Timeout (sec) Enter the timeout value for LPR printing between 0 to 3,600 seconds. If you do notwant to timeout, enter 0.
RAW(Port9100) Settings
Allow RAW(Port9100) Printing Select to allow printing from the RAW port (Port 9100).
Printing Timeout (sec) Enter the timeout value for RAW (Port 9100) printing between 0 to 3,600 seconds. Ifyou do not want to timeout, enter 0.
RAW(Custom Port) Settings
Allow RAW(Custom Port) Printing Select to allow printing from the RAW port (Custom Port).
Port Number Enter the port number for RAW (Custom Port) printing between 1024 to 65535except 9100, 1865, and 2968.
Printing Timeout (sec) Enter the timeout value for RAW (Custom Port) printing between 0 to 3,600 seconds.If you do not want to timeout, enter 0.
IPP Settings
Enable IPP Select to enable IPP communication. Only printers that support IPP are displayed.
Allow Non-secure Communication Select to allow the printer to communicate without any security measures (IPP).
Communication Timeout (sec) Enter the timeout value for IPP printing between 0 to 3,600 seconds.
URL(Network) Displays IPP URLs (http and https) when the printer is connected by wired LAN. TheURL is a combined value of the printer’s IP address, Port number, and IPP printername.
Printer Name Displays the IPP printer name.
Location Displays the IPP location.
FTP Settings
Enable FTP Server Select to enable FTP printing. Only printers that support FTP printing are displayed.
Communication Timeout (sec) Enter the timeout value for FTP communication between 0 to 3,600 seconds. If youdo not want to timeout, enter 0.
SNMPv1/v2c Settings
Enable SNMPv1/v2c Select to enable SNMPv1/v2c. Only printers that support SNMPv3 are displayed.
Access Authority Set the access authority when SNMPv1/v2c is enabled. Select Read Only or Read/Write.
Community Name (Read Only) Enter 0 to 32 ASCII (0x20 to 0x7E) characters.
Community Name (Read/Write) Enter 0 to 32 ASCII (0x20 to 0x7E) characters.
SNMPv3 Settings
Network Guide
Security Settings
33
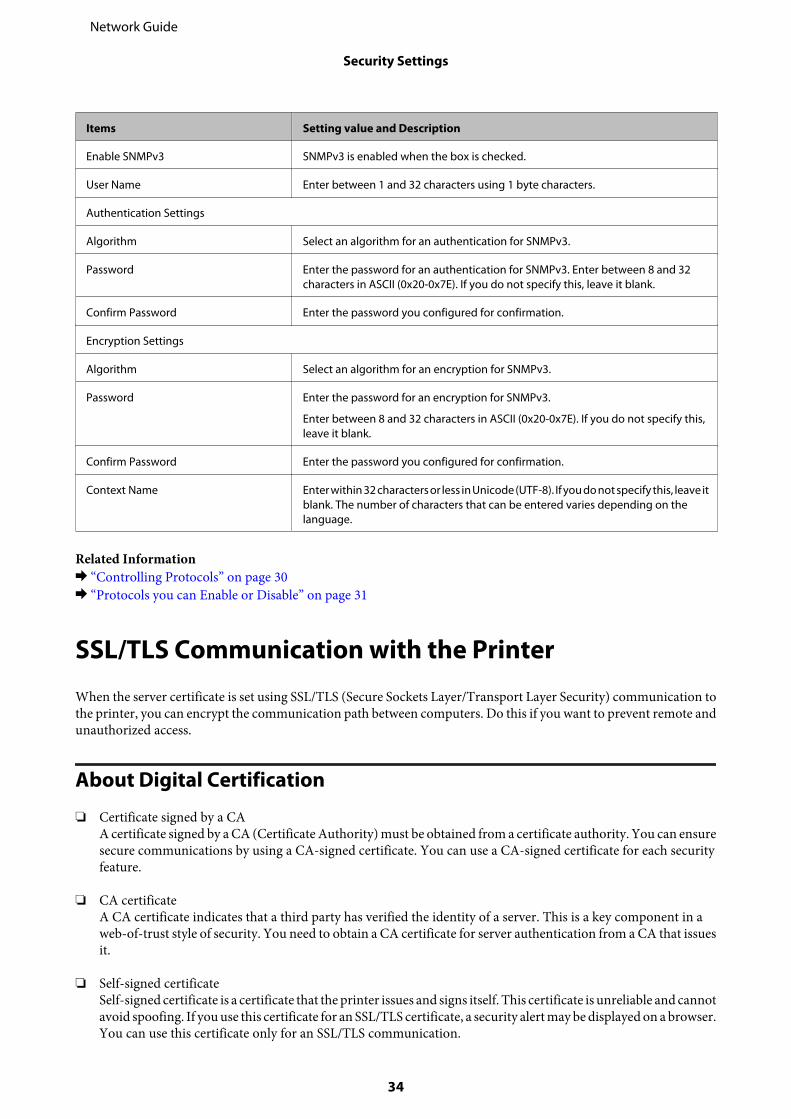
Items Setting value and Description
Enable SNMPv3 SNMPv3 is enabled when the box is checked.
User Name Enter between 1 and 32 characters using 1 byte characters.
Authentication Settings
Algorithm Select an algorithm for an authentication for SNMPv3.
Password Enter the password for an authentication for SNMPv3. Enter between 8 and 32characters in ASCII (0x20-0x7E). If you do not specify this, leave it blank.
Confirm Password Enter the password you configured for confirmation.
Encryption Settings
Algorithm Select an algorithm for an encryption for SNMPv3.
Password Enter the password for an encryption for SNMPv3.
Enter between 8 and 32 characters in ASCII (0x20-0x7E). If you do not specify this,leave it blank.
Confirm Password Enter the password you configured for confirmation.
Context Name Enter within 32 characters or less in Unicode (UTF-8). If you do not specify this, leave itblank. The number of characters that can be entered varies depending on thelanguage.
Related Information & “Controlling Protocols” on page 30 & “Protocols you can Enable or Disable” on page 31
SSL/TLS Communication with the Printer
When the server certificate is set using SSL/TLS (Secure Sockets Layer/Transport Layer Security) communication tothe printer, you can encrypt the communication path between computers. Do this if you want to prevent remote andunauthorized access.
About Digital Certification
❏ Certificate signed by a CAA certificate signed by a CA (Certificate Authority) must be obtained from a certificate authority. You can ensuresecure communications by using a CA-signed certificate. You can use a CA-signed certificate for each securityfeature.
❏ CA certificateA CA certificate indicates that a third party has verified the identity of a server. This is a key component in aweb-of-trust style of security. You need to obtain a CA certificate for server authentication from a CA that issuesit.
❏ Self-signed certificateSelf-signed certificate is a certificate that the printer issues and signs itself. This certificate is unreliable and cannotavoid spoofing. If you use this certificate for an SSL/TLS certificate, a security alert may be displayed on a browser.You can use this certificate only for an SSL/TLS communication.
Network Guide
Security Settings
34

Related Information & “Obtaining and Importing a CA-signed Certificate” on page 35 & “Deleting a CA-signed Certificate” on page 38 & “Updating a Self-signed Certificate” on page 38
Obtaining and Importing a CA-signed Certificate
Obtaining a CA-signed Certificate
To obtain a CA-signed certificate, create a CSR (Certificate Signing Request) and apply it to certificate authority. Youcan create a CSR using Web Config and a computer.
Follow the steps to create a CSR and obtain a CA-signed certificate using Web Config. When creating a CSR using WebConfig, a certificate is the PEM/DER format.
A Access Web Config, and then select Network Security Settings. Next, select SSL/TLS > Certificate.
B Click Generate of CSR.
A CSR creating page is opened.
C Enter a value for each item.
Note:Available key length and abbreviations vary by a certificate authority. Create a request according to rules of eachcertificate authority.
D Click OK.
A completion message is displayed.
E Select Network Security Settings. Next, select SSL/TLS > Certificate.
F Click one of the download buttons of CSR according to a specified format by each certificate authority todownload a CSR to a computer.
c Important:Do not generate a CSR again. If you do so, you may not be able to import an issued CA-signed Certificate.
G Send the CSR to a certificate authority and obtain a CA-signed Certificate.
Follow the rules of each certificate authority on sending method and form.
H Save the issued CA-signed Certificate to a computer connected to the printer.
Obtaining a CA-signed Certificate is complete when you save a certificate to a destination.
Network Guide
Security Settings
35
Related Information & “Accessing Web Config” on page 20 & “CSR Setting Items” on page 36 & “Importing a CA-signed Certificate” on page 36
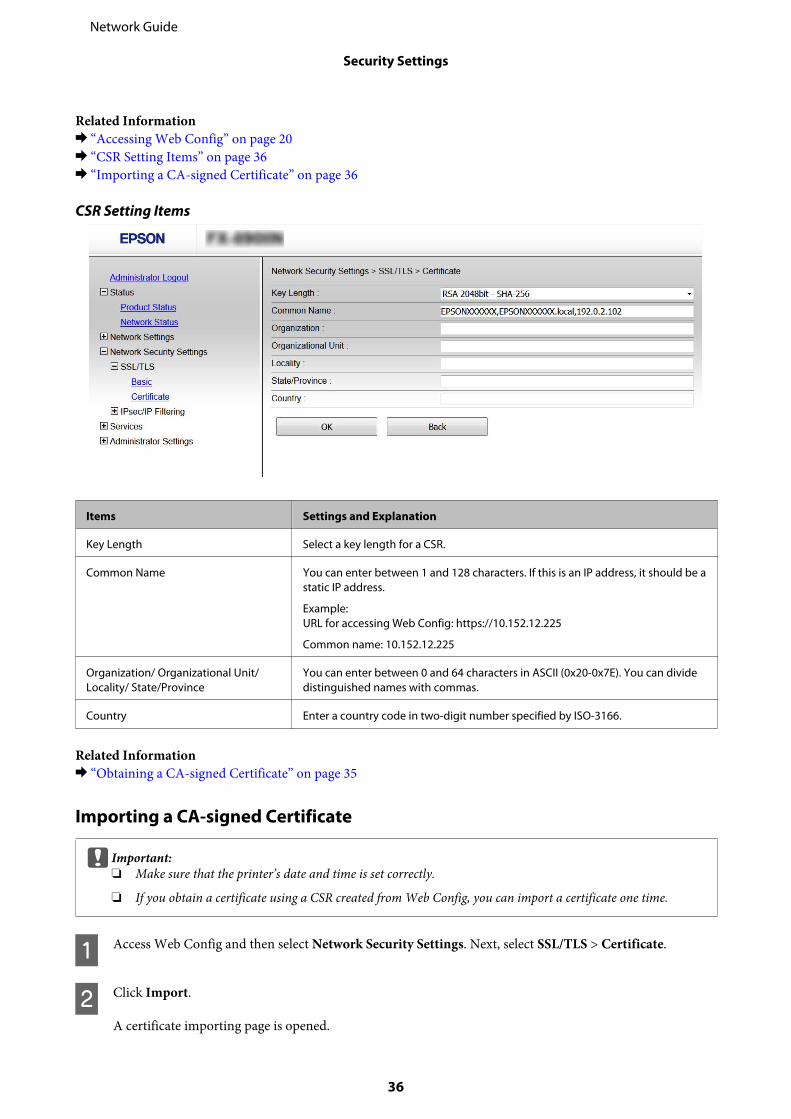
CSR Setting Items
Items Settings and Explanation
Key Length Select a key length for a CSR.
Common Name You can enter between 1 and 128 characters. If this is an IP address, it should be astatic IP address.
Example:URL for accessing Web Config: https://10.152.12.225
Common name: 10.152.12.225
Organization/ Organizational Unit/Locality/ State/Province
You can enter between 0 and 64 characters in ASCII (0x20-0x7E). You can dividedistinguished names with commas.
Country Enter a country code in two-digit number specified by ISO-3166.
Related Information & “Obtaining a CA-signed Certificate” on page 35
Importing a CA-signed Certificate
c Important:❏ Make sure that the printer’s date and time is set correctly.
❏ If you obtain a certificate using a CSR created from Web Config, you can import a certificate one time.
A Access Web Config and then select Network Security Settings. Next, select SSL/TLS > Certificate.
B Click Import.
A certificate importing page is opened.
Network Guide
Security Settings
36
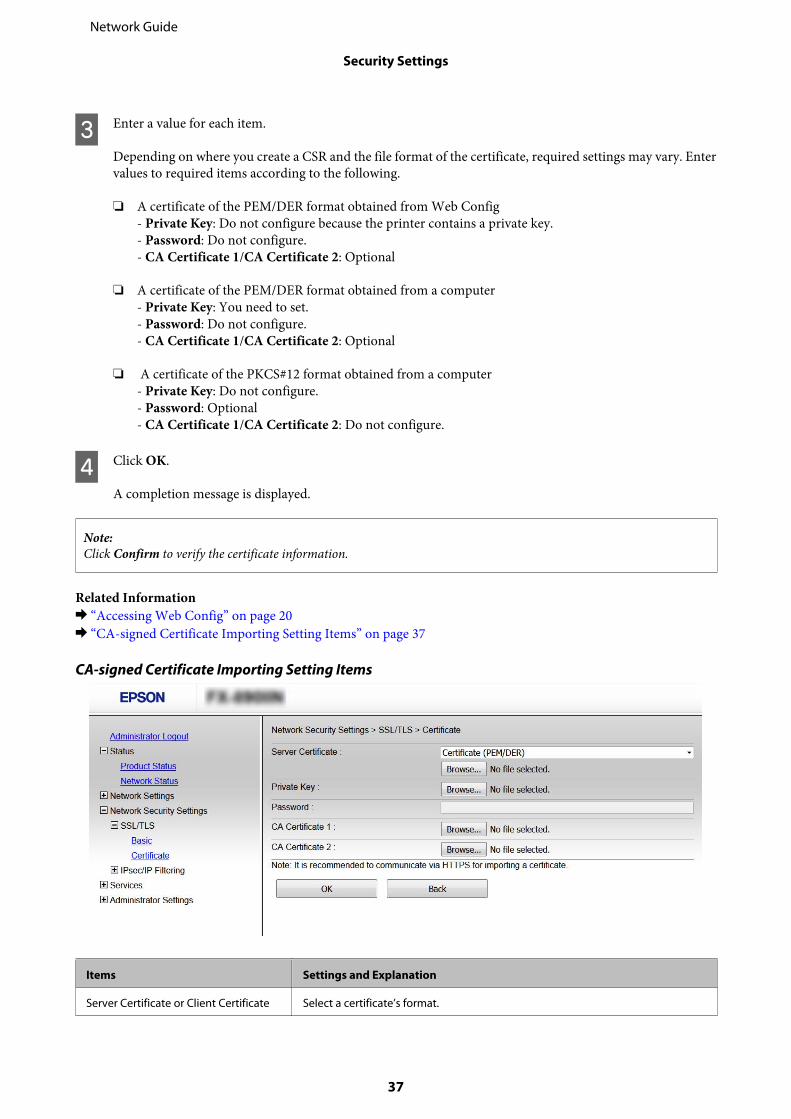
C Enter a value for each item.
Depending on where you create a CSR and the file format of the certificate, required settings may vary. Entervalues to required items according to the following.
❏ A certificate of the PEM/DER format obtained from Web Config- Private Key: Do not configure because the printer contains a private key.- Password: Do not configure.- CA Certificate 1/CA Certificate 2: Optional
❏ A certificate of the PEM/DER format obtained from a computer- Private Key: You need to set.- Password: Do not configure.- CA Certificate 1/CA Certificate 2: Optional
❏ A certificate of the PKCS#12 format obtained from a computer- Private Key: Do not configure.- Password: Optional- CA Certificate 1/CA Certificate 2: Do not configure.
D Click OK.
A completion message is displayed.
Note:Click Confirm to verify the certificate information.
Related Information & “Accessing Web Config” on page 20 & “CA-signed Certificate Importing Setting Items” on page 37
CA-signed Certificate Importing Setting Items
Items Settings and Explanation
Server Certificate or Client Certificate Select a certificate’s format.
Network Guide
Security Settings
37

Items Settings and Explanation
Private Key If you obtain a certificate of the PEM/DER format by using a CSR created from acomputer, specify a private key file that is match a certificate.
Password Enter a password to encrypt a private key.
CA Certificate 1 If your certificate’s format is Certificate (PEM/DER), import a certificate of acertificate authority that issues a server certificate. Specify a file if you need.
CA Certificate 2 If your certificate’s format is Certificate (PEM/DER), import a certificate of acertificate authority that issues CA Certificate 1. Specify a file if you need.
Related Information & “Importing a CA-signed Certificate” on page 36
Deleting a CA-signed Certificate
You can delete an imported certificate when the certificate has expired or when an encrypted connection is no longernecessary.
c Important:If you obtain a certificate using a CSR created from Web Config, you cannot import a deleted certificate again. In thiscase, create a CSR and obtain a certificate again.
A Access Web Config, and then select Network Security Settings. Next, select SSL/TLS > Certificate.
B Click Delete.
C Confirm that you want to delete the certificate in the message displayed.
Related Information & “Accessing Web Config” on page 20
Updating a Self-signed Certificate
If the printer supports the HTTPS server feature, you can update a self-signed certificate. When accessing Web Configusing a self-signed certificate, a warning message appears.
Use a self-signed certificate temporarily until you obtain and import a CA-signed certificate.
A Access Web Config and select Network Security Settings > SSL/TLS > Certificate.
B Click Update.
Network Guide
Security Settings
38
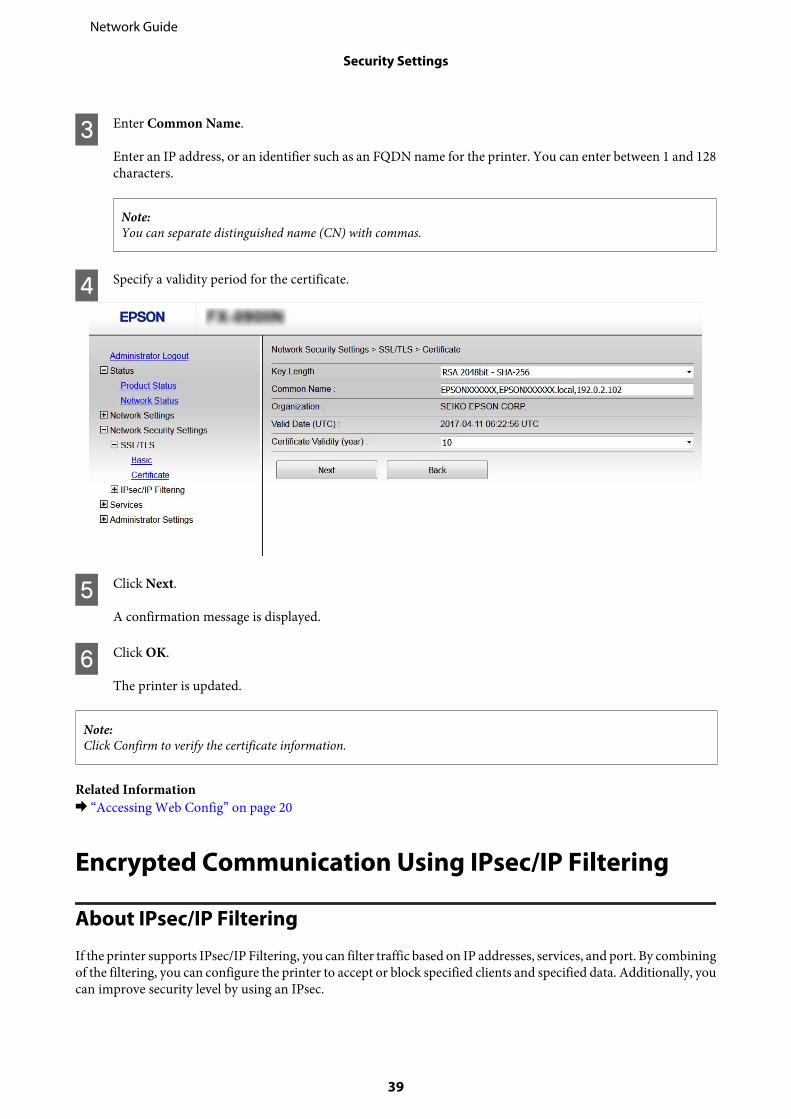
C Enter Common Name.
Enter an IP address, or an identifier such as an FQDN name for the printer. You can enter between 1 and 128characters.
Note:You can separate distinguished name (CN) with commas.
D Specify a validity period for the certificate.
E Click Next.
A confirmation message is displayed.
F Click OK.
The printer is updated.
Note:Click Confirm to verify the certificate information.
Related Information & “Accessing Web Config” on page 20
Encrypted Communication Using IPsec/IP Filtering
About IPsec/IP Filtering
If the printer supports IPsec/IP Filtering, you can filter traffic based on IP addresses, services, and port. By combiningof the filtering, you can configure the printer to accept or block specified clients and specified data. Additionally, youcan improve security level by using an IPsec.
Network Guide
Security Settings
39
To filter traffic, configure the default policy. The default policy applies to every user or group connecting to the printer.For more fine-grained control over users and groups of users, configure group policies. A group policy is one or morerules applied to a user or user group. The printer controls IP packets that match with configured policies. IP packets areauthenticated in the order of a group policy 1 to 10 then a default policy.
Note:Computers that run Windows Vista or later or Windows Server 2008 or later support IPsec.
Configuring Default Policy
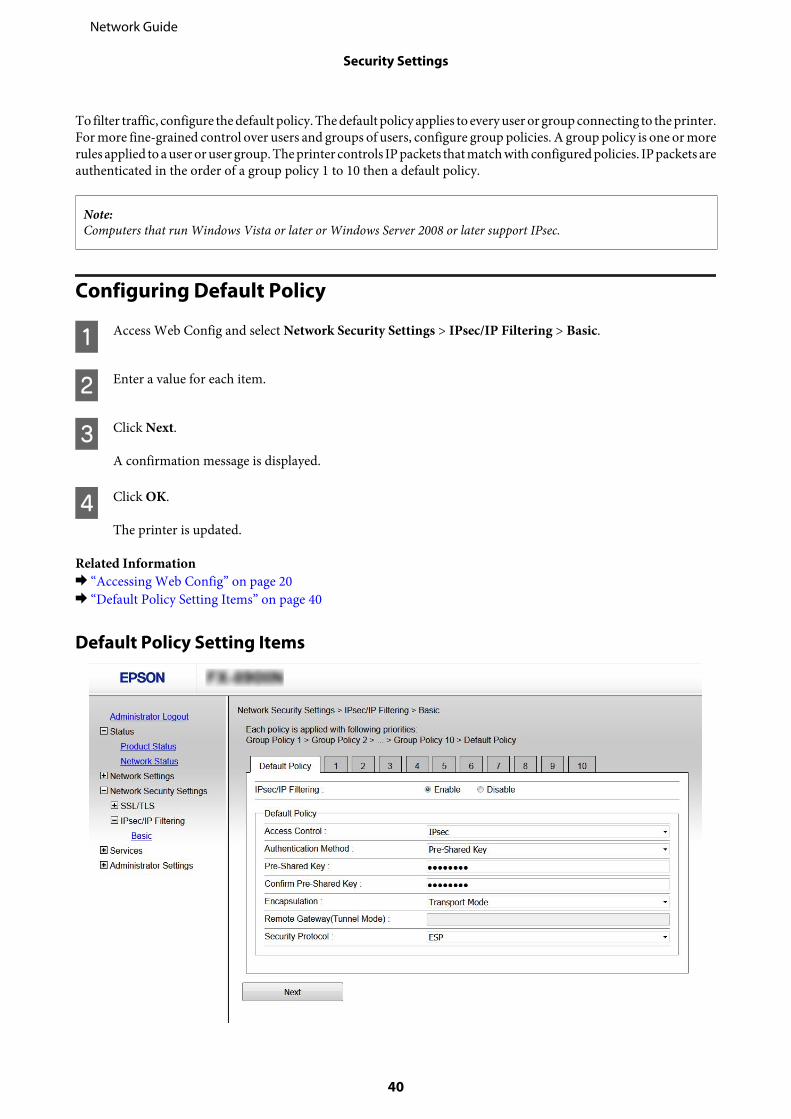
A Access Web Config and select Network Security Settings > IPsec/IP Filtering > Basic.
B Enter a value for each item.
C Click Next.
A confirmation message is displayed.
D Click OK.
The printer is updated.
Related Information & “Accessing Web Config” on page 20 & “Default Policy Setting Items” on page 40
Default Policy Setting Items
Network Guide
Security Settings
40
Items Settings and Explanation
IPsec/IP Filtering You can enable or disable an IPsec/IP Filtering feature.
Access Control Configure a control method for traffic of IP packets.
Permit Access Select this to permit configured IP packets to passthrough.
Refuse Access Select this to refuse configured IP packets to passthrough.
IPsec Select this to permit configured IPsec packets to passthrough.
Authentication Method Displays compatible authentication methods.
Pre-Shared Key Enter a pre-shared key between 1 and 127 characters.
Confirm Pre-Shared Key Enter the key you configured for confirmation.
Encapsulation If you select IPsec for Access Control, you need to configure an encapsulationmode.
Transport Mode If you only use the printer on the same LAN, select this.IP packets of layer 4 or later are encrypted.
Tunnel Mode If you use the printer on the Internet-capable networksuch as IPsec-VPN, select this option. The header anddata of the IP packets are encrypted.
Remote Gateway(Tunnel Mode) If you select Tunnel Mode for Encapsulation, enter a gateway address between 1and 39 characters.
Security Protocol If you select IPsec for Access Control, select an option.
ESP Select this to ensure the integrity of an authenticationand data, and encrypt data.
AH Select this to ensure the integrity of an authenticationand data. Even if encrypting data is prohibited, you canuse IPsec.
Related Information & “Configuring Default Policy” on page 40
Configuring Group Policy
A Access the printer's Web Config and select Network Security Settings > IPsec/IP Filtering > Basic.
B Click a numbered tab you want to configure.
C Enter a value for each item.
Network Guide
Security Settings
41
D Click Next.
A confirmation message is displayed.
E Click OK.
The printer is updated.
Related Information & “Accessing Web Config” on page 20 & “Group Policy Setting Items” on page 42
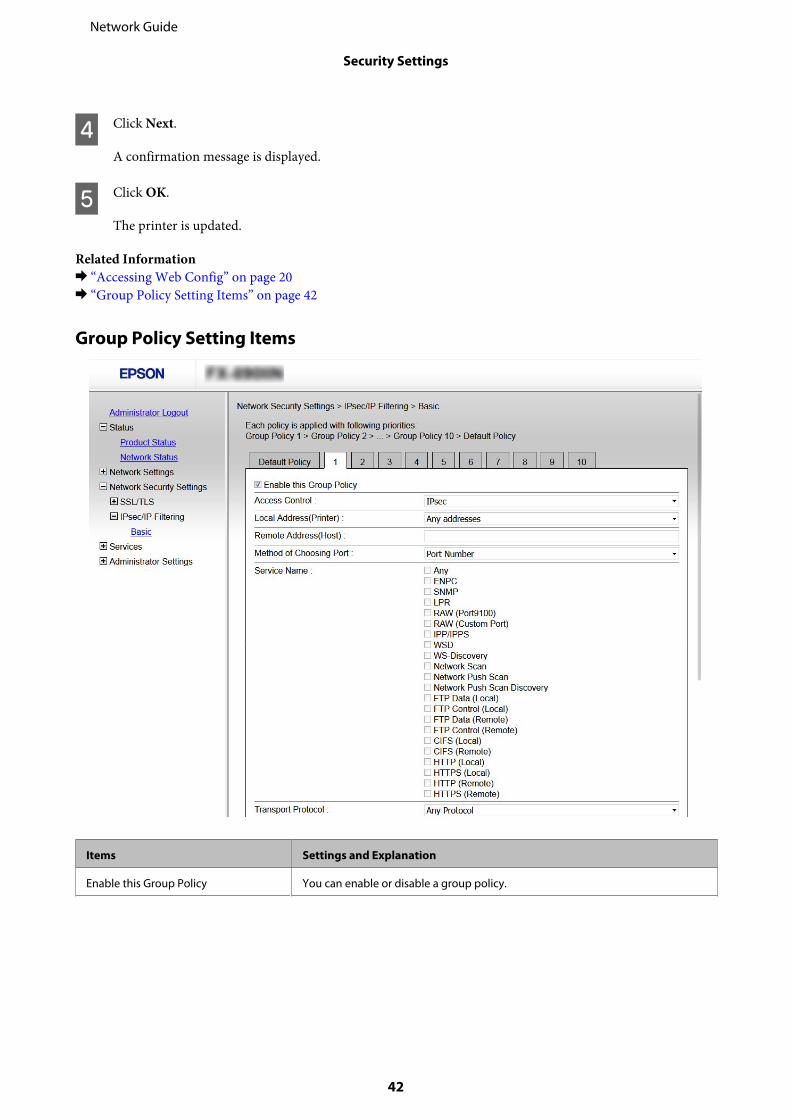
Group Policy Setting Items
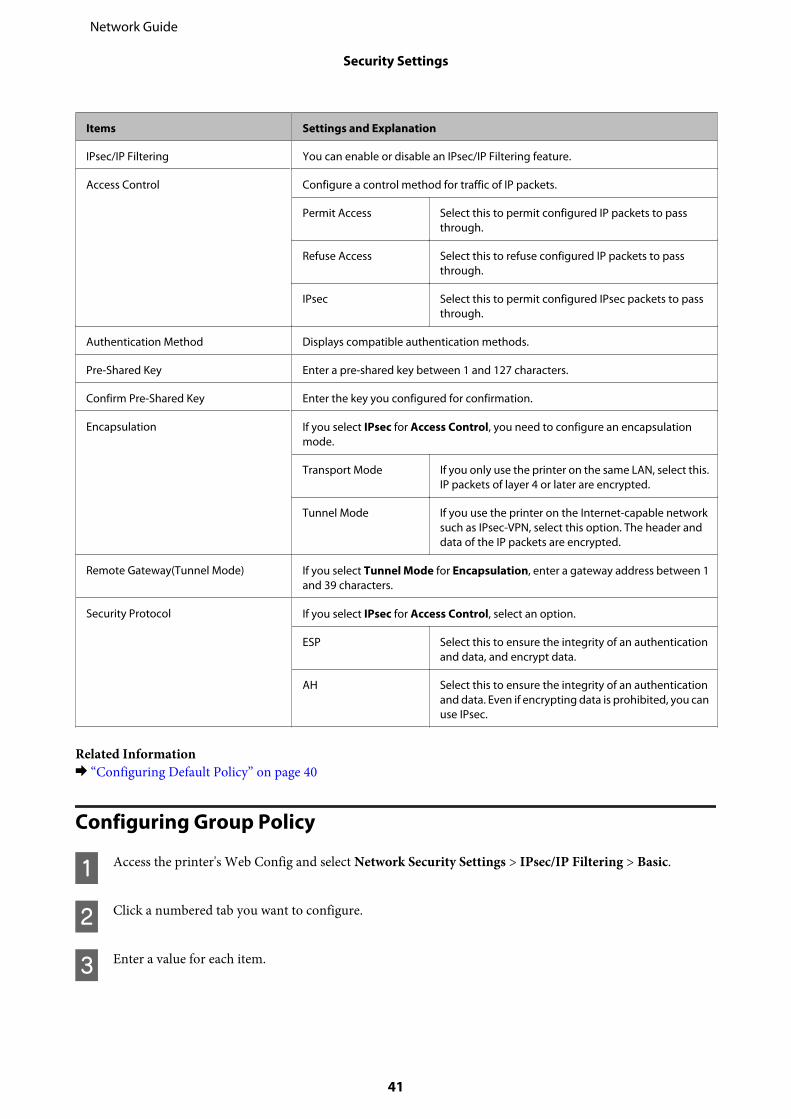
Items Settings and Explanation
Enable this Group Policy You can enable or disable a group policy.
Network Guide
Security Settings
42

Items Settings and Explanation
Access Control Configure a control method for traffic of IP packets.
Permit Access Select this to permit configured IP packets to passthrough.
Refuse Access Select this to refuse configured IP packets to passthrough.
IPsec Select this to permit configured IPsec packets to passthrough.
Local Address(Printer) Select an IPv4 address or IPv6 address that matches your network environment. If anIP address is assigned automatically, you can select Use auto-obtained IPv4 ad-dress.
Remote Address(Host) Enter a device's IP address to control access. The IP address must be between 0 and43 characters. If you do not enter an IP address, all addresses are controlled.
Note:If an IP address is assigned automatically (e.g. assigned by DHCP), the connectionmay be unavailable. Configure a static IP address.
Method of Choosing Port Select a method to specify ports.
Service Name If you select Service Name for Method of Choosing Port, select an option.
Transport Protocol If you select Port Number for Method of Choosing Port, you need to configure anencapsulation mode.
Any Protocol Select this to control all protocol types.
TCP Select this to control data for unicast.
UDP Select this to control data for broadcast and multicast.
ICMPv4 Select this to control ping command.
Local Port If you select Port Number for Method of Choosing Port and if you select TCP orUDP for Transport Protocol, enter port numbers to control receiving packets,separating them with commas. You can enter 10 port numbers at the maximum.
Example: 20,80,119,5220
If you do not enter a port number, all ports are controlled.
Remote Port If you select Port Number for Method of Choosing Port and if you select TCP orUDP for Transport Protocol, enter port numbers to control sending packets, sep-arating them with commas. You can enter 10 port numbers at the maximum.
Example: 25,80,143,5220
If you do not enter a port number, all ports are controlled.
Authentication Method If you select IPsec for Access Control, select an option.
Pre-Shared Key Enter a pre-shared key between 1 and 127 characters.
Confirm Pre-Shared Key Enter the key you configured for confirmation.
Network Guide
Security Settings
43

Items Settings and Explanation
Encapsulation If you select IPsec for Access Control, you need to configure an encapsulationmode.
Transport Mode If you only use the printer on the same LAN, select this.IP packets of layer 4 or later are encrypted.
Tunnel Mode If you use the printer on the Internet-capable networksuch as IPsec-VPN, select this option. The header anddata of the IP packets are encrypted.
Remote Gateway(Tunnel Mode) If you select Tunnel Mode for Encapsulation, enter a gateway address between 1and 39 characters.
Security Protocol If you select IPsec for Access Control, select an option.
ESP Select this to ensure the integrity of an authenticationand data, and encrypt data.
AH Select this to ensure the integrity of an authenticationand data. Even if encrypting data is prohibited, you canuse IPsec.
Related Information & “Configuring Group Policy” on page 41 & “Combination of Local Address(Printer) and Remote Address(Host) on Group Policy” on page 44 & “References of Service Name on Group Policy” on page 44
Combination of Local Address(Printer) and Remote Address(Host) on GroupPolicy
Setting of Local Address(Printer)
IPv4 IPv6*2 Any addresses*3
Setting of RemoteAddress(Host)
IPv4*1 ✓ - ✓
IPv6*1*2 - ✓ ✓
Blank ✓ ✓ ✓
*1: If IPsec is selected for Access Control, you cannot specify in a prefix length.
*2: If IPsec is selected for Access Control, you can select a link-local address (fe80::) but group policy will be disabled.
*3: Except IPv6 link local addresses.
References of Service Name on Group Policy
Note:Unavailable services are displayed but cannot be selected.
Service Name Protocol type Local port number Remote portnumber
Features controlled
Any - - - All services
Network Guide
Security Settings
44

Service Name Protocol type Local port number Remote portnumber
Features controlled
ENPC UDP 3289 Any port Searching for a printerfrom applicationssuch as EpsonNetConfig, a printer driverand the a scannerdriver
SNMP UDP 161 Any port Acquiring andconfiguring of MIBfrom applicationssuch as EpsonNetConfig, the Epsonprinter driver and theEpson scanner driver
LPR TCP 515 Any port Forwarding LPR data
RAW (Port9100) TCP 9100 Any port Forwarding RAW data
RAW (Custom Port) TCP 2501(default) Any port Forwarding RAW data
IPP/IPPS TCP 631 Any port Forwarding AirPrintdata (IPP/IPPSprinting)
WSD TCP Any port 5357 Controlling WSD
WS-Discovery UDP 3702 Any port Searching for a printerfrom WSD
Network Scan TCP 1865 Any port Forwarding scan datafrom DocumentCapture Pro
Network Push Scan TCP Any port 2968 Acquiring jobinformation of pushscanning fromDocument CapturePro
Network Push ScanDiscovery
UDP 2968 Any port Searching for acomputer when pushscanning fromDocument CapturePro is executed
FTP Data (Local) TCP 20 Any port FTP server(forwarding data ofFTP printing)
FTP Control (Local) TCP 21 Any port FTP server(controlling FTPprinting)
Network Guide
Security Settings
45

Service Name Protocol type Local port number Remote portnumber
Features controlled
FTP Data (Remote) TCP Any port 20 FTP client (forwardingscan data andreceived fax data)
However this cancontrol only an FTPserver that usesremote port number20.
FTP Control (Remote) TCP Any port 21 FTP client (controllingto forward scan dataand received fax data)
CIFS (Local) TCP 445 Any port CIFS server (Sharing anetwork folder)
CIFS (Remote) TCP Any port 445 CIFS client(forwarding scan dataand received fax datato a folder)
HTTP (Local) TCP 80 Any port HTTP(S) server(forwarding data ofWeb Config and WSD)HTTPS (Local) TCP 443 Any port
HTTP (Remote) TCP Any port 80 HTTP(S) client(communicatingbetween EpsonConnect or GoogleCloud Print, firmwareupdating and rootcertificate updating)
HTTPS (Remote) TCP Any port 443
Configuration Examples of IPsec/IP Filtering
Receiving IPsec packets only This example is to configure a default policy only.
Default Policy:
❏ IPsec/IP Filtering: Enable
❏ Access Control: IPsec
❏ Authentication Method: Pre-Shared Key
❏ Pre-Shared Key: Enter up to 127 characters.
Group Policy: Do not configure.
Receiving printing data and printer settings This example allows communications of printing data and printer configuration from specified services.
Network Guide
Security Settings
46

Default Policy:
❏ IPsec/IP Filtering: Enable
❏ Access Control: Refuse Access
Group Policy:
❏ Enable this Group Policy: Check the box.
❏ Access Control: Permit Access
❏ Remote Address(Host): IP address of a client
❏ Method of Choosing Port: Service Name
❏ Service Name: Check the box of ENPC, SNMP, HTTP (Local), HTTPS (Local) and RAW (Port9100).
Receiving access from a specified IP address only This example allows a specified IP address to access the printer.
Default Policy:
❏ IPsec/IP Filtering: Enable
❏ Access Control: Refuse Access
Group Policy:
❏ Enable this Group Policy: Check the box.
❏ Access Control: Permit Access
❏ Remote Address(Host): IP address of an administrator’s client
Note:Regardless of policy configuration, the client will be able to access and configure the printer.
Using SNMPv3 Protocol
About SNMPv3
SNMP is a protocol that carries out monitoring and control to collect the information of the devices that are connectedto the network. SNMPv3 is the management security feature version that has been enhanced.
When using SNMPv3, state monitoring and setting changes of the SNMP communication (packet) can beauthenticated and encrypted in order to protect the SNMP communication (packet) from network risks, such aswiretapping, impersonation, and tampering.
Network Guide
Security Settings
47

Configuring SNMPv3
If the printer supports the SNMPv3 protocol, you can monitor and control accesses to the printer.
A Access Web Config and select Services > Protocol.
B Enter a value for each item of SNMPv3 Settings.
C Click Next.
A confirmation message is displayed.
D Click OK.
The printer is updated.
Related Information & “Accessing Web Config” on page 20 & “SNMPv3 Setting Items” on page 48
SNMPv3 Setting Items
Network Guide
Security Settings
48

Items Settings and Explanation
Enable SNMPv3 SNMPv3 is enabled when the box is checked.
User Name Enter between 1 and 32 characters using 1 byte characters.
Authentication Settings
Algorithm Select an algorithm for an authentication.
Password Enter between 8 and 32 characters in ASCII (0x20-0x7E).
Confirm Password Enter the password you configured for confirmation.
Encryption Settings
Algorithm Select an algorithm for an encryption.
Password Enter between 8 and 32 characters in ASCII (0x20-0x7E).
Confirm Password Enter the password you configured for confirmation.
Context Name Enter between 1 and 32 characters using 1 byte characters.
Related Information & “Configuring SNMPv3” on page 48
Network Guide
Security Settings
49
Solving Problems
Checking the Log for Server and Network Device
If trouble occurred in the network connection, you may be able to identify the cause by checking the log for the mailserver or the LDAP server or the status by using the system log for the network device, such as a router, or commands.
Printing a Network Status Sheet
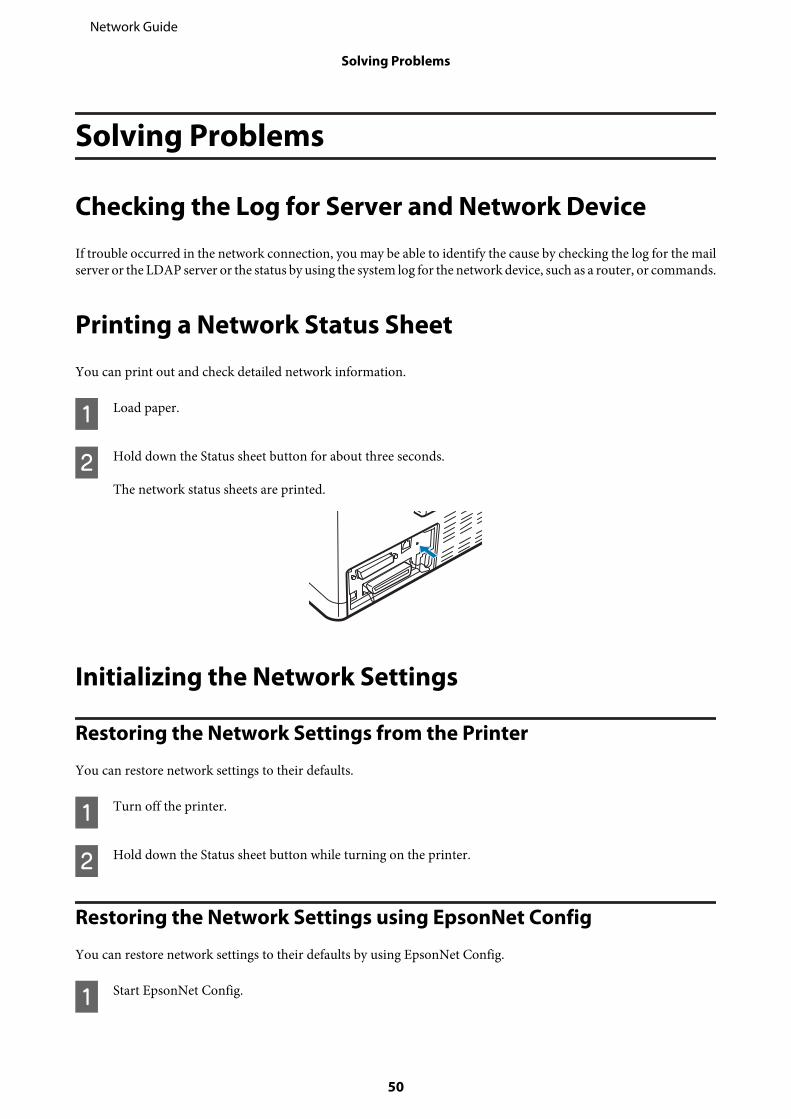
You can print out and check detailed network information.
A Load paper.
B Hold down the Status sheet button for about three seconds.
The network status sheets are printed.
Initializing the Network Settings
Restoring the Network Settings from the Printer
You can restore network settings to their defaults.
A Turn off the printer.
B Hold down the Status sheet button while turning on the printer.
Restoring the Network Settings using EpsonNet Config
You can restore network settings to their defaults by using EpsonNet Config.
A Start EpsonNet Config.
Network Guide
Solving Problems
50

B Select the printer for which you want to restore the network settings.
C Right-click the printer name, and then select Default Settings > Network Interface.
D Click OK on the confirmation screen.
E Click OK.
Checking the Communication between Devices andComputers
Checking the Connection Using a Ping Command
You can use a Ping command to make sure the computer is connected to the printer. Follow the steps below to checkthe connection using a Ping command.
A Check the printer's IP address for the connection that you want to check.
You can check this from the IP Address column of a network status sheet.
B Display the computer's command prompt screen.
❏ Windows 10Right-click the start button or press and hold it, and then select Command Prompt.
❏ Windows 8.1/Windows 8/Windows Server 2012 R2/Windows Server 2012Display the application screen, and then select Command Prompt.
❏ Windows 7/Windows Server 2008 R2/Windows Vista/Windows Server 2008 or earlierClick the start button, select All Programs or Programs > Accessories > Command Prompt.
C Enter the following in the command line, and then press Enter.
ping 192.0.2.111 (If the IP address of the computer you want to check is 192.0.2.111)
D If the following is displayed, confirmation is complete. Close the Command Prompt.
Ping statistics for 192.0.2.111:Packets: Sent = 4, Received = 4, Lost = 0 (0% loss),Round-trip time: (ms):Minimum = 0ms, Maximum = 0ms, Average = 0ms
Network Guide
Solving Problems
51

Problems Using Network Software
Cannot Access Web Config
Is the IP address of the printer properly configured?
Configure the IP address using EpsonNet Config or the printer’s control panel. You can confirm the current settinginformation with a network status sheet or from the printer’s control panel.
Does your browser support the bulk encryptions for the Encryption Strength for SSL/TLS?
The bulk encryptions for the Encryption Strength for SSL/TLS are as follows. Web Config can only be accessed in abrowser supporting the following bulk encryptions. Check your browser's encryption support.
❏ 80bit: AES256/AES128/3DES
❏ 112bit: AES256/AES128/3DES
❏ 128bit: AES256/AES128
❏ 192bit: AES256
❏ 256bit: AES256
The message "Out of date" appears when accessing Web Config using SSL communication (https).
If the certificate is out of date, obtain the certificate again. If the message appears before its expiration date, make surethat the printer's date is configured correctly.
The message "The name of the security certificate does not match···" appears when accessing Web Config usingSSL communication (https).
The printer's IP address entered for Common Name for creating a self-signed certificate or CSR does not match withthe address entered into the browser. Obtain and import a certificate again or change the printer name.
The printer is being accessed via a proxy server.
If you are using a proxy server with your printer, you need to configure your browser's proxy settings.
Select Control Panel > Network and Internet > Internet Options > Connections > LAN settings > Proxy server, andthen configure not to use the proxy server for local addresses.
Example:192.168.1.*: Local address 192.168.1.XXX, subnet mask 255.255.255.0192.168.*.*: Local address 192.168.XXX.XXX, subnet mask 255.255.0.0
Related Information & “Accessing Web Config” on page 20 & “Assigning an IP Address Using EpsonNet Config” on page 14
Network Guide
Solving Problems
52
Model name and/or IP address are not displayed on EpsonNet Config
Did you select Block, Cancel, or Shut down when a Windows security screen or a firewall screen was displayed?
If you select Block, Cancel, or Shut down, the IP address and model name will not display on EpsonNet Config orEpsonNet Setup.
To correct this, register EpsonNet Config as an exception using Windows firewall and commercial security software. Ifyou use an antivirus or security program, close it and then try to use EpsonNet Config.
Is the communication error timeout setting too short?
Run EpsonNet Config and select Tools > Options > Timeout, and then increase the length of time for theCommunication Error setting. Note that doing so can cause EpsonNet Config to run more slowly.
Solving Problems for Advanced Security
Restoring the Security Settings
When you establish a highly secure environment such as IPsec/IP Filtering, you may not be able to communicate withdevices because of incorrect settings or trouble with the device or server. In this case, restore the security settings inorder to make settings for the device again or to allow you temporary use.
Disabling the Security Function from the Printer
You can disable IPsec/IP Filtering from the printer.
A Make sure paper is loaded.
B Press the Menu (Pitch and Tear Off/Bin) buttons until the printer beep once and the Menu lights (both theTear Off/Bin lights) turn on.
The printer enters the default-setting mode and prints a message prompting you to select the language for thedefault-setting menu. The language which is underlined indicates the current setting.
C If the language you want is not selected, press the ItemD (Font) button until the printout indicates the languageyou want.
D Press the Set (Tear Off/Bin) button to select the desired language.
E If you want to print the current settings, press the Set button. If you want to bypass printing of the currentsettings, press the ItemD button or the ItemU button.
The printer prints the first menu and the current value of the menu.
F Press the ItemD button or the ItemU button to select the menu parameters of IPsec/IP Filtering. Press the Setbutton to scroll through the values within the selected parameter until you find Off.
Network Guide
Solving Problems
53

G After you finish settings, press the Menu (Pitch and Tear Off/Bin) buttons.
The Menu lights (both of the Tear Off/Bin lights) turn off and the printer exits the default-setting mode.The settings you made is saved as new value.
Note:If you turn off the printer prior to exiting default-setting mode, any changes you may have made are canceled and notsaved.
Restoring the Security Function Using Web Config
You can disable the function if you can access the device from the computer.
Disabling IPsec/IP Filtering Using Web Config
A Access Web Config and select Network Security Settings > IPsec/IP Filtering > Basic.
B Select Disable for IPsec/IP Filtering in Default Policy.
C Click Next, and then clear Enable this Group Policy for all group policies.
D Click OK.
Related Information & “Accessing Web Config” on page 20
Problems Using Network Security Features
Forgot a Pre–shared Key
Configure the key again using Web Config.
To change the key, access Web Config and select Network Security Settings > IPsec/IP Filtering > Basic > DefaultPolicy or Group Policy.
Related Information & “Accessing Web Config” on page 20
Cannot Communicate with IPsec Communication
Are you using an unsupported algorithm for the computer settings?
The printer supports the following algorithms.
Network Guide
Solving Problems
54

Security Methods Algorithms
Encryption Algorithm AES-CBC 128,AES-CBC 192,AES-CBC 256,3DES-CBC,DES-CBC
Hash Algorithm SHA-1,SHA2-256,SHA2-384,SHA2-512,MD5
Key exchange Algorithm Diffi e-Hellman Group2,Diffi e-Hellman Group1*,Diffi e-Hellman Group14*
Elliptic Curve Diffi e- Hellman P-256*,Elliptic Curve Diffi e-Hellman P-384*
*Available method may vary by models.
Related Information & “Encrypted Communication Using IPsec/IP Filtering” on page 39
Cannot Communicate Suddenly
Is the printer's IP address invalid or has it changed?
Disable IPsec using the printer's control panel.
If the DHCP is out of date, rebooting or the IPv6 address is out of date or has not been obtained, then the IP addressregistered for the printer's Web Config (Network Security Settings > IPsec/IP Filtering > Basic > Group Policy >Local Address(Printer)) may not be found. Use a static IP address.
Is the computer's IP address invalid or has it changed?
Disable IPsec using the printer's control panel.
If the DHCP is out of date, rebooting or the IPv6 address is out of date or has not been obtained, then the IP addressregistered for the printer's Web Config (Network Security Settings > IPsec/IP Filtering > Basic > Group Policy >Remote Address(Host)) may not be found. Use a static IP address.
Related Information & “Accessing Web Config” on page 20 & “Encrypted Communication Using IPsec/IP Filtering” on page 39
Cannot Create the Secure IPP Printing Port
Is the correct certificate specified as the server certificate for SSL/TLS communication?
If the specified certificate is not correct, creating a port may fail. Make sure you are using the correct certificate.
Is a CA certificate imported to the computer accessing the printer?
If a CA certificate is not imported to the computer, creating a port may fail. Make sure a CA certificate is imported.
Related Information & “Accessing Web Config” on page 20
Cannot Connect After Configuring IPsec/IP Filtering
The set value may be incorrect.
Network Guide
Solving Problems
55

Disable IPsec/IP filtering from the printer’s control panel. Connect the printer and computer and make the IPsec/IPFiltering settings again.
Related Information & “Encrypted Communication Using IPsec/IP Filtering” on page 39
Problems on Using a Digital Certificate
Cannot Import a CA-signed Certificate
Does the CA-signed certificate and the information on the CSR match?
If the CA-signed certificate and CSR do not have the same information, the CSR cannot be imported. Check thefollowing:
❏ Are you trying to import the certificate to a device that does not have the same information?
Check the information of the CSR and then import the certificate to a device that has the same information.
❏ Did you overwrite the CSR saved into the printer after sending the CSR to a certificate authority?
Obtain the CA-signed certificate again with the CSR.
Is the CA-signed certificate more than 5KB?
You cannot import a CA-signed certificate that is more than 5KB.
Is the password for importing the certificate correct?
If you forget the password, you cannot import the certificate.
Related Information & “Importing a CA-signed Certificate” on page 36
Cannot Update a Self-Signed Certificate
Has the Common Name been entered?
Common Name must be entered.
Have unsupported characters been entered to Common Name? For example, Japanese is not supported.
Enter between 1 and 128 characters of either IPv4, IPv6, host name, or FQDN format in ASCII (0x20-0x7E).
Is a comma or space included in the Common Name?
If a comma is entered, the Common Name is divided at that point. If only a space is entered before or after a comma, anerror occurs.
Related Information & “Updating a Self-signed Certificate” on page 38
Network Guide
Solving Problems
56

Cannot Create a CSR
Has the Common Name been entered?
The Common Name must be entered.
Have unsupported characters been entered to Common Name, Organization, Organizational Unit, Locality,State/Province? For example, Japanese is not supported.
Enter characters of either IPv4, IPv6, host name, or FQDN format in ASCII (0x20-0x7E).
Is a comma or space included in the Common Name?
If a comma is entered, the Common Name is divided at that point. If only a space is entered before or after a comma, anerror occurs.
Related Information & “Obtaining a CA-signed Certificate” on page 35
Warning Relating to a Digital Certificate Appears
Messages Cause/What to do
Enter a Server Certificate. Cause:
You have not selected a file to import.
What to do:
Select a file and click Import.
CA Certificate 1 is not entered. Cause:
CA certificate 1 is not entered and only CA certificate 2 is entered.
What to do:
Import CA certificate 1 first.
Invalid value below. Cause:
Unsupported characters are contained in the file path and/or password.
What to do:
Make sure that the characters are entered correctly for the item.
Invalid date and time. Cause:
Date and time for the printer have not been set.
What to do:
Set date and time using Web Config, or Epson Device Admin.
Invalid password. Cause:
The password set for CA certificate and entered password do not match.
What to do:
Enter the correct password.
Network Guide
Solving Problems
57
Messages Cause/What to do
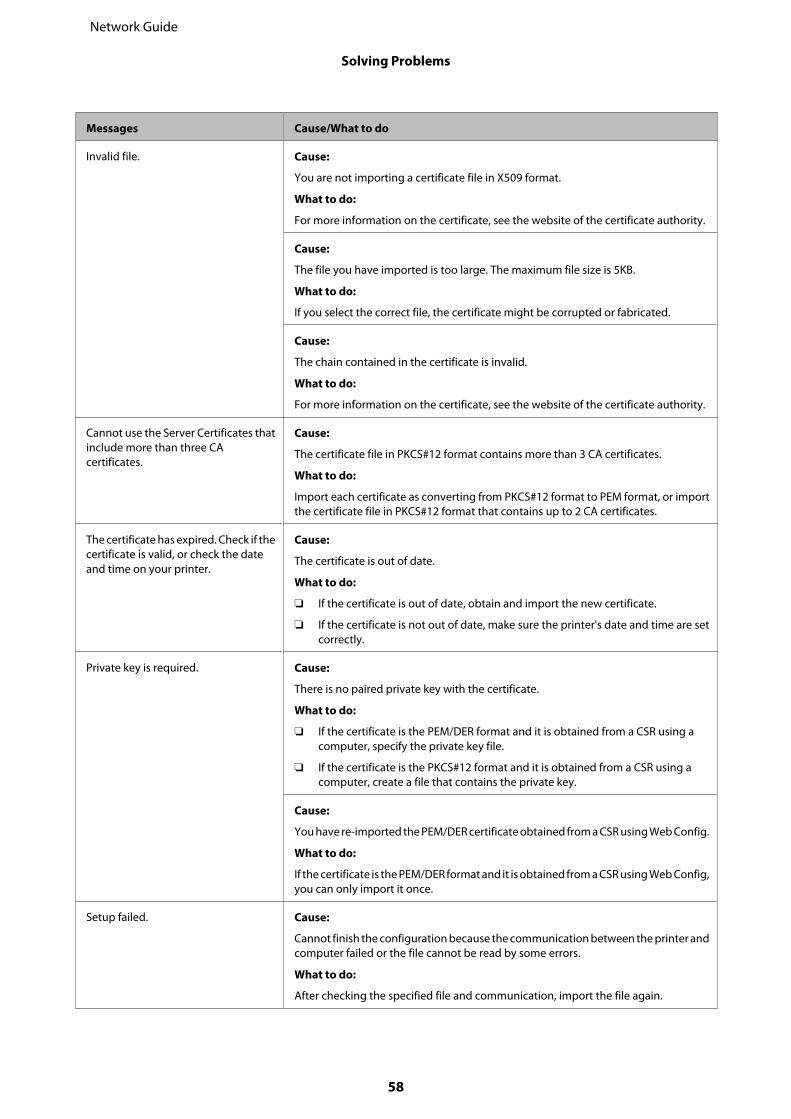
Invalid file. Cause:
You are not importing a certificate file in X509 format.
What to do:
For more information on the certificate, see the website of the certificate authority.
Cause:
The file you have imported is too large. The maximum file size is 5KB.
What to do:
If you select the correct file, the certificate might be corrupted or fabricated.
Cause:
The chain contained in the certificate is invalid.
What to do:
For more information on the certificate, see the website of the certificate authority.
Cannot use the Server Certificates thatinclude more than three CAcertificates.
Cause:
The certificate file in PKCS#12 format contains more than 3 CA certificates.
What to do:
Import each certificate as converting from PKCS#12 format to PEM format, or importthe certificate file in PKCS#12 format that contains up to 2 CA certificates.
The certificate has expired. Check if thecertificate is valid, or check the dateand time on your printer.
Cause:
The certificate is out of date.
What to do:
❏ If the certificate is out of date, obtain and import the new certificate.
❏ If the certificate is not out of date, make sure the printer's date and time are setcorrectly.
Private key is required. Cause:
There is no paired private key with the certificate.
What to do:
❏ If the certificate is the PEM/DER format and it is obtained from a CSR using acomputer, specify the private key file.
❏ If the certificate is the PKCS#12 format and it is obtained from a CSR using acomputer, create a file that contains the private key.
Cause:
You have re-imported the PEM/DER certificate obtained from a CSR using Web Config.
What to do:
If the certificate is the PEM/DER format and it is obtained from a CSR using Web Config,you can only import it once.
Setup failed. Cause:
Cannot finish the configuration because the communication between the printer andcomputer failed or the file cannot be read by some errors.
What to do:
After checking the specified file and communication, import the file again.
Network Guide
Solving Problems
58
Related Information & “About Digital Certification” on page 34
Delete a CA-signed Certificate by Mistake
Is there a backup file for the certificate?
If you have the backup file, import the certificate again.
If you obtain a certificate using a CSR created from Web Config, you cannot import a deleted certificate again. Create aCSR and obtain a new certificate.
Related Information & “Deleting a CA-signed Certificate” on page 38 & “Importing a CA-signed Certificate” on page 36
Network Guide
Solving Problems
59

Appendix
Introduction of Network Software
The following describes the software that configures and manages devices.
Epson Device Admin
Epson Device Admin is an application that allows you to install devices on the network, and then configure andmanage the devices. You can acquire detailed information for devices such as status and consumables, sendnotifications of alerts, and create reports for device usage. You can also make a template containing setting items andapply it to other devices as shared settings. You can download Epson Device Admin from Epson support website. Formore information, see the documentation or help of Epson Device Admin.
Running Epson Device Admin (Windows only)
Select All Programs > EPSON > Epson Device Admin > Epson Device Admin.
Note:If the firewall alert appears, allow access for Epson Device Admin.
EpsonNet Print
EpsonNet Print is a software to print on the TCP/IP network. There are features and restrictions listed below.
❏ The printer's status is displayed on the spooler screen.
❏ If the printer’s IP address is changed by DHCP, the printer is still detected.
❏ You can use a printer located on a different network segment.
❏ You can print using one of the various protocols.
❏ IPv6 address is not supported.
EpsonNet SetupManager
EpsonNet SetupManager is a software to create a package for a simple printer installation, such as installing the printerdriver, installing EPSON Status Monitor and creating a printer port. This software allows the administrator to createunique software packages and distribute them among groups.
For more information, visit your regional Epson website.
Network Guide
Appendix
60