network management software - aeg ps · pdf filenetwork management software for ups page 2 of...
TRANSCRIPT
Operating Instructions ........................................6000004951 BAL, en
Option Network Management Software for UPS UNMS II AEG Power Supply Systems GmbH Department: PSS E1 Name: Brandt/Rogge Revision: 00 Date: 20.05.2006

Network Management Software for UPS
Page 2 of 21
Legal Information This documentation as well as the software described in it is furnished under license and may only be used or copied in accordance with the terms of the license. The information in this document is furnished for informational use only, is subject to change without notice, and should not be construed as a commitment by AEG Power Supply Systems GmbH. AEG Power Supply Systems GmbH assumes no responsibility or liability for any errors or inaccuracies that may appear in this document or any software that may be provided in association with this document. Except as permitted by such license, no part of this document may be reproduced, stored in a retrieval system, or transmitted in any form or by any means without the express written consent of AEG Power Supply Systems GmbH. Information in this document is provided in connection with products from AEG Power Supply Systems GmbH. No license, express or implied, by estoppel or otherwise, to any intellectual property rights is granted by this document. Except as provided in AEG Power Supply Systems GmbH's Terms and Conditions of Sale or License Agreement for such products, AEG Power Supply Systems GmbH assumes no liability whatsoever, and , AEG Power Supply Systems GmbH disclaims any express or implied warranty, relating to sale and/or use of , AEG Power Supply Systems GmbH products including liability or warranties relating to fitness for a particular purpose, merchantability, or infringement of any patent, copyright or other intellectual property right. , AEG Power Supply Systems GmbH products are not intended for use in medical, life saving, or life sustaining applications. , AEG Power Supply Systems GmbH may make changes to specifications and product descriptions at any time, without notice. Third-party marks and brands are the property of their respective owners.

Network Management Software for UPS
Page 3 of 21
Table of Contents
1 General....................................................................................4 1.1 Architecture Overview..............................................................5 1.2 Getting Started with UNMS......................................................5
2 Administrator Console ..........................................................6 2.1 Overview ..................................................................................6 2.1.1 Sites and Services ...................................................................6 2.1.2 Events and Priorities ................................................................6 2.2 Main Screen.............................................................................7 2.3 Basic Operation .......................................................................8 2.3.1 Starting and Stopping UNMS...................................................8 2.3.2 Working with the Site Explorer .................................................8 2.3.3 Changing Service Properties ...................................................9 2.3.4 Working with the Event Explorer ............................................10 2.3.5 Changing Event Properties ....................................................10 2.3.6 Changing Job Properties........................................................11 2.4 Customizing UNMS................................................................12 2.4.1 Working with the Map Editor ..................................................12 2.4.2 System Maintenance..............................................................13 2.4.3 Setting Editor Options ............................................................13 2.4.4 Configure Email Server ..........................................................13 2.4.5 User and Security Management.............................................13
3 Using a Web Console ..........................................................15 3.1 General ..................................................................................15 3.1.1 Requirements.........................................................................15 3.1.2 Connect to UNMS ..................................................................15 3.1.3 Notification Popup..................................................................15 3.2 Main Screen...........................................................................16 3.2.1 Basic Operation .....................................................................17 3.2.2 Viewing a Site ........................................................................17 3.2.3 Viewing a Service...................................................................18 3.2.4 Viewing the Logfile .................................................................19 3.2.5 Getting Technical Support......................................................20
4 Troubleshooting...................................................................21 4.1 Known Problems....................................................................21

Network Management Software for UPS
Page 4 of 21
1 General
An UPS Network Management System (UNMS II) makes monitoring and managing many different emergency power supply systems spread out through the different facilities of organisations easy to manage. This is done by having an automated overview system that monitors and informs the responsible personnel of alarms occurring at the different facilities. This greatly increases the security and reliability of networked systems relying on stable power supplies. The new UNMS II is a Web based solution and offers the following benefits:
• UNMS II monitors the UPS devices over IP networks. • By using multiple Web Consoles, UNMS II encourages
sharing of management information by many people. • UNMS II is cost-effective because all Web Consoles are
served by the Web Server for UNMS II. The benefit is that neither an installation nor administrative maintenance is required for accessing management information from different computers and facilities in your network.
• UNMS II transmits acoustical messages, emails, does logfile entries and requires an acknowledge from the end-user for new alarms to guarantee that the user is alerted and recovery processes may begin.
• UNMS II works with all SNMP Adapter from AEG Power Supply Systems as well as with CompuWatch the Shutdown and Management Software.
• UNMS II is full customisable. Ask your dealer for more information or send an e-mail to [email protected]
• Coming soon! UNMS II is designed also for the use with parallel-redundant UPS installation. Several UPS management devices (maybe formed into groups and a redundancy level will decide how many alarms have to be present for any action is started.
Note: that this manual assumes that the reader has a basic grasp of how to use a server computer and IP networks. Refer to the manuals supplied with your computer for basic information on using the computer. Note: that the screens and menus shown on your computer may differ from those pictured in this document. Only the basic, cost-free version of these Network Management Software for UPS is illustrated with pictures in this document. This manual describes also the possibilities of extensions and configurations.

Network Management Software for UPS
Page 5 of 21
1.1 Architecture Overview UNMS II is a UPS network monitor designed to inform you of emergency power supply systems problems before your clients, end-users or managers do. The UNMS Server Service runs intermittent checks on UPS devices you specify. When problems are encountered, the UNMS Server Service can send notifications out to administrative contacts in a variety of different ways (For example: Email). Current status information, historical logs, and reports can all be accessed via a web browser (Web Console).
No. Name Description
UNMS Server The UNMS Server Service and the related Web-Server
installation.
Site A user defined group of services (For example: UPS
devices).
UPS A single service (e.g. UPS device) that is monitored by
the UNMS Server.
Web Console Web-Consoles provide sharing of management
information by many people.
1.2 Getting Started with UNMS Although the UNMS comes pre-configured, there are some network related issues that you're going to need to edit before you start monitoring anything. Especially you have to define what things you want to monitor and how you want to monitor them. The UNMS Administrator Console simplifies this and other UNMS related administrative tasks.

Network Management Software for UPS
Page 6 of 21
2 Administrator Console
2.1 Overview
Attention: You need Administrator privileges to control UNMS tasks!
UNMS Administrator Console is the UNMS Console that you can use to define what things you want to monitor and how you want to monitor them. The UNMS Administrator Console is launched automatically after installation has completed. To start it again later, go to the Windows Start menu and use the Programs/UPS/UNMS Administrator Console menu. After starting the UNMS Administrator Console for the first time, it opens with the pre-configured project which is intended as a basic framework for helping you to get started with setting up your own Network Management Software for UPS systems "UNMS".
2.1.1 Sites and Services Sites in UNMS represent the structure (topology) of your network or organisation. The UNMS uses topology information, stored as site, to build the most efficient monitoring topology. You use the consoles Site Explorer panel to define sites. A site is a set of well-known services like UPS devices. Services in UNMS represent a “service” that runs on a physical server, workstation, UPS device, etc. that resides on your network. For example, a SNMP Adapter with embedded Web server, the UPSmanager of CompuWatch or any RFC 1628 compliant SNMP device are such services. You also use the consoles Site Explorer panel to define services. A service is always represented as a child of a previously defined site.
2.1.2 Events and Priorities A site always reflects the state of the service with the highest event priority. For example, if one service of the site gets a critical event while another service of this site is still in normal state, then the whole site will be in a critical state. You use the consoles Event Explorer panel to define events and commands.

Network Management Software for UPS
Page 7 of 21
2.2 Main Screen The following diagram and table shows the main elements of the Administrator Console.
No. Name Description
Menu Standard application menu.
Button Bar
Provides shortcut buttons for common tasks and features.
View Selection
You can switch between Web Console, in which the integrated Web Browser is displayed, and Map Editor, which allows you to customize the Web Console.
Web Console
Display area of the integrated Web Browser, if in Web Console mode.
Map Editor
Display area of the Map Editor (not in all Editions), if in editor mode.
Site Explorer
Hierarchical view of all defined sites and their related services (devices like UPS).
Event Explorer
Hierarchical view of all defined events and their related command handlers.
1 2 3
4
5

Network Management Software for UPS
Page 8 of 21
2.3 Basic Operation
2.3.1 Starting and Stopping UNMS At the moment you must restart UNMS before certain configuration changes take effect or when services become unavailable. You can restart UNMS using the start/stop commands in the UNMS Administrator Console button bar:
Restarting or stopping UNMS, or rebooting your UNMS server computer, is a severe action. When you restart the UNMS service, all sessions connected to your monitored devices are dropped. Any status and measurement data held from the monitored services are lost. All Web Console connections are unavailable until UNMS is restarted. For this reason, you should avoid restarting, stopping, or rebooting your UNMS server if at all possible.
2.3.2 Working with the Site Explorer Locate the Explorer panel on the right side of the console. If you can’t see the Explorer panel, use the View/View Site Explorer menu to show it. Select the first tab marked Site Explorer. The displayed Sites and Services tree shows all sites and their related services as defined within your UNMS.
• Single-click on the small box to the left of a site icon (building icon) to expand or collapse that site in the tree.
• Left-click on any object name to select that object.
• Use the Delete key to remove the selected object.
• Right-click on a site (building icon) or service icon (gear icon) or name to see the available context menus.
• Open a site tree and use the Edit/Insert Service menus or Button Bar buttons to add service objects to the site tree.

Network Management Software for UPS
Page 9 of 21
2.3.3 Changing Service Properties Using the Site Explorer tree, expand the site icon (building icon) that contains the service of interest. Then Right-Click on the desired service icon (gear icon) and use the Properties context menu.
• Enter the service name in the Name edit box; the UPS name for example.
• Choose a group for this service. Select ‘DISABLED’ to disable the monitoring of this service.
• Choose the service type from the Type drop-down list. For SNMP devices choose the “SNMP (RFC 1628 compliant)” type.
• Enter the service IP Address in the DNS name or IP address edit box. This can be in dot format or a DNS name.
• For non-SNMP devices: Enter the service IP Port in the Port edit box. The default port is “5769”.
• For SNMP devices: Enter the service community string in the Community edit box. The default community is “public”.

Network Management Software for UPS
Page 10 of 21
2.3.4 Working with the Event Explorer Locate the Explorer panel on the right side of the console. If you can’t see the Explorer panel, use the View/View Event Explorer menu to show it. Select the second tab marked Event Explorer. The displayed Events and Commands tree shows all events and their related alarms and priorities as defined within your UNMS.
• Single-click on the small box to the left of a group icon (file icon) to expand or collapse this event group in the tree.
• Left-click on any object name to select that object.
• Use the Delete key to remove the selected object.
• Right-click on a group (file icon) or event icon (colored box icon) or name to see the available context menus.
• Open an events tree and use the Edit/Insert Event menus or Button Bar buttons to add event objects to the tree.
2.3.5 Changing Event Properties Using the Event Explorer tree, expand the events icon (file icon) that contains the alarm of interest. Then Right-Click on the desired alarm icon (colored box icon) and use the Properties context menu.
• Enter your name for this event in the Event Name edit box.
• Select a specific service group to match this event. Choose ‘ANY’ to match all target services.
• You can customize the message that is printed in the event log. Enter any text and macros in the Message edit box. Macros are substituted with information from the event or target service at runtime,
• Choose the job to execute from the Run job drop-down list.
• Choose the event priority from the Priority drop-down list.
Network Management Software for UPS
Page 11 of 21
Note: To create a new kind of job or change an existing one, choose <New...> or <Edit...> from the Run command drop-down list (see Changing Job Properties).
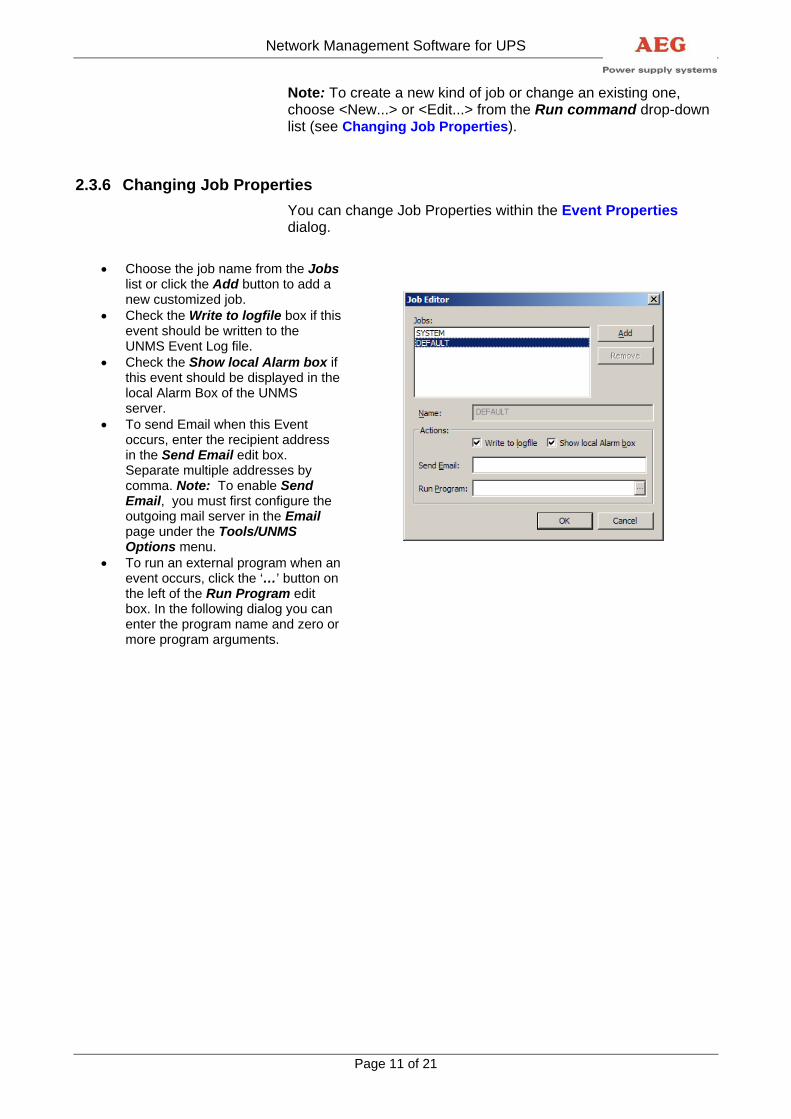
2.3.6 Changing Job Properties You can change Job Properties within the Event Properties dialog.
• Choose the job name from the Jobs list or click the Add button to add a new customized job.
• Check the Write to logfile box if this event should be written to the UNMS Event Log file.
• Check the Show local Alarm box if this event should be displayed in the local Alarm Box of the UNMS server.
• To send Email when this Event occurs, enter the recipient address in the Send Email edit box. Separate multiple addresses by comma. Note: To enable Send Email, you must first configure the outgoing mail server in the Email page under the Tools/UNMS Options menu.
• To run an external program when an event occurs, click the ‘…’ button on the left of the Run Program edit box. In the following dialog you can enter the program name and zero or more program arguments.

Network Management Software for UPS
Page 12 of 21
2.4 Customizing UNMS
2.4.1 Working with the Map Editor Locate the View Selection on the top of the console. Select the second tab marked Map Editor. The displayed editor screen shows the background and the layout of all site icons as they will be displayed later in a Web Console.
No. Name Description
Editor Tab Click on the Map Editor tab to switch to the editor mode.
View Selection Click the Sites button to switch to the main screen.
Click the Services button to switch to the services list.
Screen Designer Here you can layout the site icons by drag-and drop operations, add new
sites and change existing site properties. Left-click on any object icon to select that object. Use the Delete key to remove the selected object. Right-click on a site icon to see the available context menus. Double-click on a site icon to switch to the service list view mode. For how to set Map Editor properties, see Setting Editor Options.
Note that the Map Editor is not available in all Editions. Further note that the Map Editor views are not live views.
1
2
3
Network Management Software for UPS
Page 13 of 21
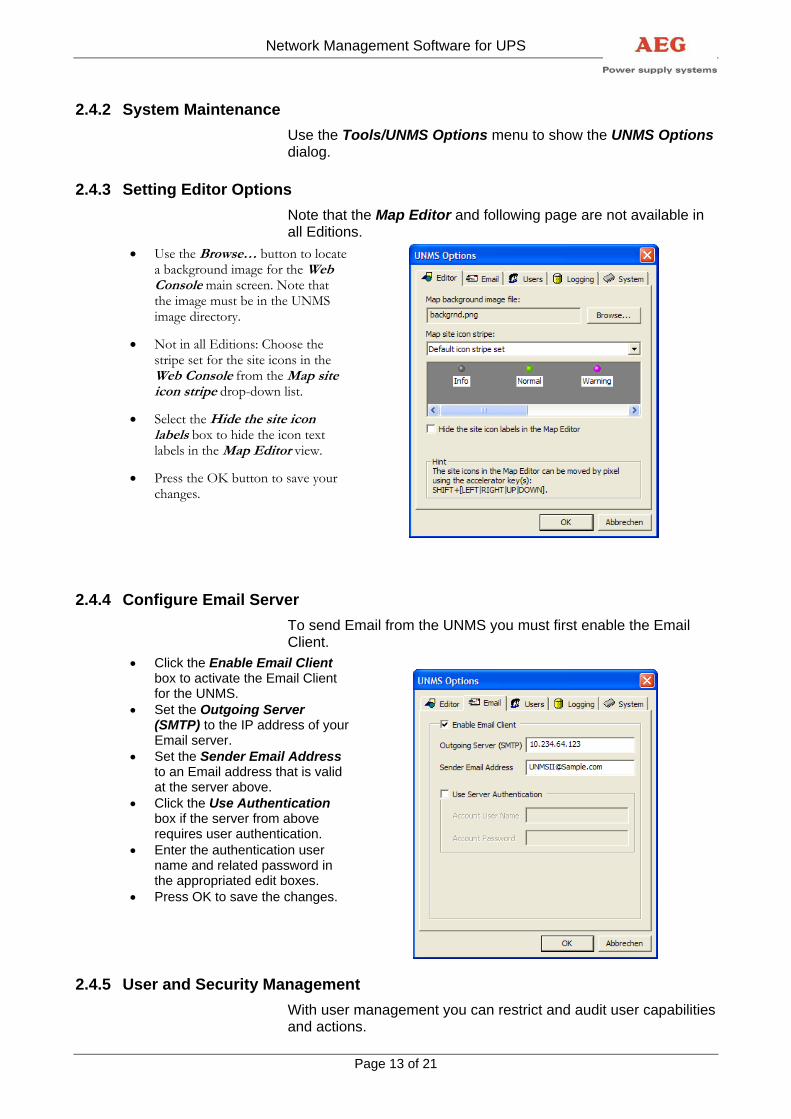
2.4.2 System Maintenance Use the Tools/UNMS Options menu to show the UNMS Options dialog.
2.4.3 Setting Editor Options Note that the Map Editor and following page are not available in all Editions.
• Use the Browse… button to locate a background image for the Web Console main screen. Note that the image must be in the UNMS image directory.
• Not in all Editions: Choose the stripe set for the site icons in the Web Console from the Map site icon stripe drop-down list.
• Select the Hide the site icon labels box to hide the icon text labels in the Map Editor view.
• Press the OK button to save your changes.
2.4.4 Configure Email Server To send Email from the UNMS you must first enable the Email Client.
• Click the Enable Email Client box to activate the Email Client for the UNMS.
• Set the Outgoing Server (SMTP) to the IP address of your Email server.
• Set the Sender Email Address to an Email address that is valid at the server above.
• Click the Use Authentication box if the server from above requires user authentication.
• Enter the authentication user name and related password in the appropriated edit boxes.
• Press OK to save the changes.
2.4.5 User and Security Management With user management you can restrict and audit user capabilities and actions.

Network Management Software for UPS
Page 14 of 21
There are three predefined users: admin, operator and guest. The predefined passwords are equal to the user name, for example ‘admin’ for the admin user.
• To disable access control, click the Anonymous Access box (not recommended).
• Click the New button to add a new user account.
• Click the Properties button to change an existing user account.
• Click the Delete button to delete an existing user account (Note that the predefined user admin can not be deleted).
• Note on groups: The users group defines the access level as follows:
• Administrators: Full access to all UNMS capabilities.
• Operators: Full access from Web-Console, but no access to Administrator Console.
• Users: Read-only access from Web Console.
Network Management Software for UPS
Page 15 of 21
3 Using a Web Console
3.1 General By using a Web Console, current status information, historical logs, and reports can all be accessed via a web browser. This allows you to access your management information from different computers and facilities in your network. By using multiple Web Consoles, you can encourages sharing of management information by many people. You can login from any workstation that is running TCP/IP and is connected to your network in some way (e.g. over the Internet, leased line, LAN, etc.).
3.1.1 Requirements The Web Console has the following requirements:
• You must enable JavaScript in your browser. • Your browser must support the XML standard. • You should allow Cookies from the UNMS server system. • You should allow Popup Windows from the UNMS server. • The Web Console will operate best with recent versions
of the Microsoft Internet Explorer and the Mozilla Firefox browsers.
3.1.2 Connect to UNMS Using your Web browser from any system, enter the address for the UNMS start page as follows: ”http://a.b.c.d/unms” where a.b.c.d is the IP address or DNS name of your UNMS server system. The Web Console will be executed inside your Web browser.
3.1.3 Notification Popup
• Whenever a critical event occurs then the UNMS will bring up a popup window with sound notification on every connected Web Console.
• You can click the Speaker icon to mute the sound for this notification.

Network Management Software for UPS
Page 16 of 21
3.2 Main Screen You can view the Main Screen by using the Monitoring/Overview menu. The following diagram and table shows the main elements of a Web Console.
No. Name Description
Caption Bar The caption of the Web Console window.
Standard Bar For common Web Console options and messages.
Console Menu Displays available operations of the Web Console.
Console View Displays the content of active view of the Web-Console.
Click on a site icon to view the services within this site (see Viewing a site).
1 2
3
4
Network Management Software for UPS
Page 17 of 21
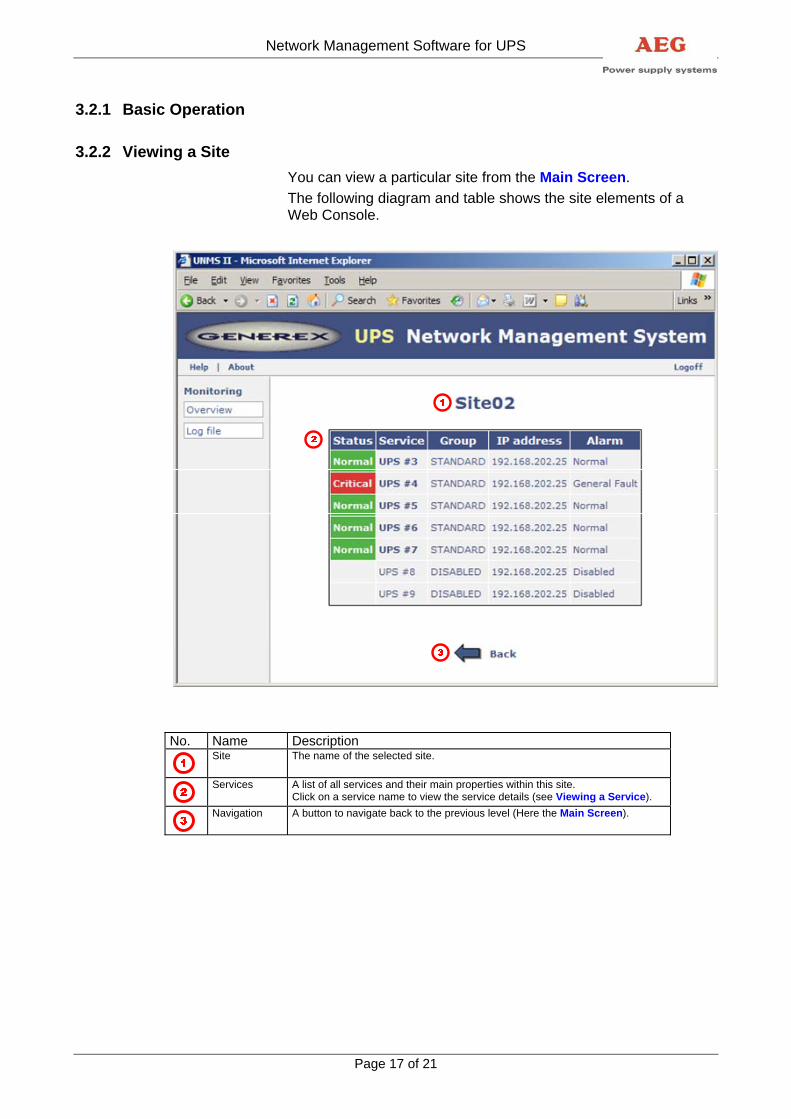
3.2.1 Basic Operation
3.2.2 Viewing a Site You can view a particular site from the Main Screen. The following diagram and table shows the site elements of a Web Console.
No. Name Description
Site The name of the selected site.
Services A list of all services and their main properties within this site.
Click on a service name to view the service details (see Viewing a Service).
Navigation A button to navigate back to the previous level (Here the Main Screen).

Network Management Software for UPS
Page 18 of 21
3.2.3 Viewing a Service You can view a particular service from the Site View or the Logfile View. The following diagram and table shows the service elements of a Web Console.
No. Name Description
Location Bar The location of this service within the UNMS.
Service Panel Schematic view of the service status and values; Protect
3.33 for example.
Back Button A button to navigate back to the previous web view (Here the
Site View).
Service Status
Displays the service status. The LED shows the event priority colour and the event messages text that you have defined for the actual service status. Related to the service type you have defined, you be able to click the LED or the text to navigate to the web-page of this service (e.g. SNMP Adapter).
Acknowledge Click on this button to acknowledge (remove failure status of)
this event.
1
2
3 4 5

Network Management Software for UPS
Page 19 of 21
3.2.4 Viewing the Logfile You can view the Logfile by using the Monitoring/Logfile menu. The following diagram and table shows the logfile elements of a Web Console.
No. Name Description
Menu Click on the Logfile button to view the historical log.
Filter Bar Here you can choose between various filter options to spare you from having to
read through the complete history. Click on the Show button to apply your filter options to the current logfile view.
Historical Log A table that contains all historical event information’s. You can browse the table
by clicking on the Previous, Next or New button above of this table. Click on a service name to view the service data (see Viewing a Service).
1 2
3

Network Management Software for UPS
Page 20 of 21
3.2.5 Getting Technical Support You can view the Support Page by using the Help menu from the status bar. The following diagram and table shows the help elements of a Web Console.
No. Name Description
Menu Click on the Help button to view the help page.
User Manual Click on the View documentation button to open this User Manual.
Note that this manual is delivered in the common Adobe PDF format. If you do not have the Adobe's Acrobat Reader installed yet, you can download a free version from the Adobe website at "http://www.adobe.com".
Support Email Click on the Contact support to send an email to the technical support.
1
23

Network Management Software for UPS
Page 21 of 21
4 Troubleshooting
4.1 Known Problems The service ‘Network lost’ event is notified too fast If the network connection to one or more monitored devices/services is lost periodically due problems with this devices or your network, then you may want to define a grace period for the notification of this event.:
• Open the Administrator Console and choose ‘UNMS Options’ from the ‘Tools’ menu. Then choose the ‘System’ page tab in this dialog.
• Select the ‘Modify service lost delay’ box and enter your delay for the notification of the ‘Network lost’ event in seconds in the edit field (The default value for this delay is ‘0’ seconds).
• Hit the ‘OK’ button and restart the UNMS server. A running Skype program claims the UNMS Web Port The UNMS Web Server may not start correctly if Skype is installed on this computer and has started before the UNMS Web Server (e.g. after the installation of the UNMS). This problem may occur when you allow Skype to claim the standard HTTP-Port (TCP-Port 80) for communication. If you encounter such problem, use the following steps for a solution:
• Open Skype and configure it so that it not uses the standard HTTP-Port (TCP-Port 80) for its communication. Please refer to the Skype manual for how to configure Skype.
• Restart Skype to force that it releases this resource. • In the ‘Control Panel’ open the ‘Administrative Tools and
select the Internet-Information-Server (IIS) and restart it