networker 18.1 snapshot management integration …...networker 18.1 snapshot management integration...
TRANSCRIPT
Dell EMC NetWorkerVersion 18.1
Snapshot Management Integration Guide302-004-426
REV 02
Copyright © 2001-2018 Dell Inc. or its subsidiaries. All rights reserved.
Published July 2018
Dell believes the information in this publication is accurate as of its publication date. The information is subject to change without notice.
THE INFORMATION IN THIS PUBLICATION IS PROVIDED “AS-IS.“ DELL MAKES NO REPRESENTATIONS OR WARRANTIES OF ANY KIND
WITH RESPECT TO THE INFORMATION IN THIS PUBLICATION, AND SPECIFICALLY DISCLAIMS IMPLIED WARRANTIES OF
MERCHANTABILITY OR FITNESS FOR A PARTICULAR PURPOSE. USE, COPYING, AND DISTRIBUTION OF ANY DELL SOFTWARE DESCRIBED
IN THIS PUBLICATION REQUIRES AN APPLICABLE SOFTWARE LICENSE.
Dell, EMC, and other trademarks are trademarks of Dell Inc. or its subsidiaries. Other trademarks may be the property of their respective owners.
Published in the USA.
Dell EMCHopkinton, Massachusetts 01748-91031-508-435-1000 In North America 1-866-464-7381www.DellEMC.com
2 NetWorker 18.1 Snapshot Management Integration Guide
9
11
13
Overview of NetWorker Snapshot Features 19NetWorker Snapshot Management product description.............................20
Snapshot operations......................................................................20Types of snapshot backups............................................................ 21Types of snapshot recoveries........................................................ 22NetWorker clone support.............................................................. 22Backup configuration methods...................................................... 22Restore methods........................................................................... 23Monitoring and reporting snapshot operations.............................. 23Internationalization support........................................................... 23
Components of the snapshot environment................................................. 24Application host.............................................................................24FC and iSCSI environments........................................................... 24Storage arrays............................................................................... 24NetWorker server..........................................................................25NetWorker storage node............................................................... 25Snapshot mount host.................................................................... 25Backup storage media................................................................... 25NetWorker application modules.....................................................25Third-party volume managers........................................................26
NetWorker snapshot licensing requirements.............................................. 26Example NetWorker snapshot environments.............................................. 26
Example of a snapshot and clone to storage media........................27Example of a restore from a snapshot backup............................... 29
Data Protection Policies 31Default data protection policies.................................................................. 32Strategies for storage array snapshot backups...........................................32Overview of configuring a new data protection policy................................ 33Creating a policy.........................................................................................34Create a workflow in a new policy.............................................................. 35Protection groups for snapshot backups.................................................... 37
Creating a basic client group......................................................... 38Creating a dynamic client group.................................................... 38Creating a save set group.............................................................. 39Creating a query group.................................................................. 40
Actions supported in snapshot backups...................................................... 41Supported actions in snapshot workflows.................................................. 42
Creating a check connectivity action.............................................43Creating a probe action................................................................. 46
Figures
Tables
Preface
Chapter 1
Chapter 2
CONTENTS
NetWorker 18.1 Snapshot Management Integration Guide 3
Creating a snapshot backup action................................................ 49Creating a clone action.................................................................. 53
Visual representation of snapshot workflows..............................................58
Software Configuration 59Backup group resource migration...............................................................60Roadmap for snapshot configurations........................................................ 62Snapshot configuration prerequisites......................................................... 63
Storage array specific prerequisites.............................................. 63Application host prerequisites........................................................64Mount host prerequisites...............................................................64Storage node prerequisites............................................................65
Configuring the user privileges................................................................... 65Configuring snapshot backups with the client wizard................................. 66Configuring snapshot backups manually..................................................... 72
Configuring the Client resource manually for the application host....72Configuring the Client resource manually for a mount host............74
Configuring the Application Information variables.......................................74Configuring preprocessing and postprocessing scripts............................... 74
Configuring ProtectPoint on VMAX 77Overview.................................................................................................... 78ProtectPoint on VMAX3 prerequisites........................................................78
Configuring ProtectPoint...............................................................78Enabling vDisk on a Data Domain system....................................................79Provisioning protection devices on Data Domain systems.......................... 79Completing the VMAX system configuration.............................................. 80Considerations for ProtectPoint device and NetWorker ProtectPointenabled pools..............................................................................................83Configuring NetWorker ProtectPoint, RecoverPoint and VMAX devices andpool with the wizard................................................................................... 83VMAX3 SRDF/S support............................................................................85
Rollbacks in the SRDF/S environment...........................................86Configuring Data Domain NsrSnapSG device groups for intelligent pairing....86
Intelligent Pairing vDisk selection decision tree............................. 86Intelligent Pairing allocates vDisk for mount, validate, and restore....87
Configuring ProtectPoint on RecoverPoint with XtremIO 89Overview.................................................................................................... 90Basic backup workflow...............................................................................90Basic restore workflow...............................................................................90ProtectPoint for RecoverPoint on XtremIO prerequisites........................... 91Enabling vdisk on the Data Domain.............................................................92Provisioning protection devices on Data Domain systems.......................... 93Configuring RecoverPoint and XtremIO storage.........................................94Configuring NetWorker ProtectPoint, RecoverPoint and VMAX devices andpool with the wizard................................................................................... 95Considerations for ProtectPoint device and NetWorker ProtectPointenabled pools..............................................................................................97Configuring Data Domain NsrSnapSG device groups for intelligent pairing....97
Chapter 3
Chapter 4
Chapter 5
CONTENTS
4 NetWorker 18.1 Snapshot Management Integration Guide
Intelligent Pairing vDisk selection decision tree............................. 98Intelligent Pairing allocates vDisk for mount, validate, and restore....98
Configuring snapshots on XtremIO arrays 99Snapshot support for XtremIO..................................................................100Snapshot operation with XtremIO REST API............................................ 100Prerequisite for XtremIO configurations................................................... 100Supported XtremIO features.....................................................................100Snapshot management policy with XtremIO............................................. 100Snapshot backups with XtremIO............................................................... 101XtremIO configuration methods.................................................................101
Configuring snapshots on VMAX Storage Arrays 103Snapshot support of VMAX storage arrays............................................... 104
Snapshot operations with TimeFinder software........................... 104Prerequisites and support for VMAX configurations.....................104Types of supported mirror devices............................................... 104
Pairing source LUNs to mirror LUNs......................................................... 105Intelligent pairing..........................................................................105Configuring NsrSnapSG storage groups for intelligent pairing..... 106Manual pairing LUNs with the symm.res file.................................107Configuring the symm.res file.......................................................107
VMAX SRDF/S support............................................................................ 108Rollbacks in the SRDF/S environment......................................... 109
Solutions Enabler Client and Server mode configuration...........................109Configuring the Solutions Enabler in Client/Server mode on a SAPclient............................................................................................ 109Configuring the Solutions Enabler in Client/Server mode on aMount Host.................................................................................. 109
Known limitation for VMAX........................................................................110
Configuring snapshots on VNX Block Storage Arrays 111Snapshot support of VNX Block storage arrays......................................... 112
Snapshot operations with SnapView software.............................. 112Prerequisites and support for VNX configurations........................ 112
Configuring the Navisphere security file.................................................... 112Creating the Navisphere file manually on UNIX systems............... 113Creating the Navisphere file manually on Windows systems......... 113
Configuring Unisphere CLI on VNXe3200.................................................. 114UEMCLI Windows registry setup.................................................. 114
Configuring snapshots on RecoverPoint 117Snapshot support of RecoverPoint............................................................ 118
Snapshot operations with RecoverPoint software........................ 118Prerequisite for RecoverPoint configurations............................... 119Restrictions for RecoverPoint configurations............................... 119
Supported RecoverPoint features............................................................. 119Snapshot management policy....................................................... 119
RecoverPoint configuration methods........................................................ 120RecoverPoint snapshot retention..............................................................120
Chapter 6
Chapter 7
Chapter 8
Chapter 9
CONTENTS
NetWorker 18.1 Snapshot Management Integration Guide 5
Configuring snapshots in a Cluster Environment 123NetWorker support of cluster environments............................................. 124
Failover with snapshots in a cluster environment......................... 124Configuring a cluster environment for snapshots...................................... 124AIX systems in a cluster environment........................................................125ProtectPoint restore and rollback for VCS on Solaris................................126
Performing a ProtectPoint VCS restore....................................... 126Performing a ProtectPoint VCS rollback...................................... 128
Data Management and Recovery 131Snapshot lifecycle management................................................................132Management and recovery of file system snapshot data...........................132
Save set IDs and expiration policies..............................................132Browsing snapshot and clone save sets........................................132
Snapshot recovery support and limitations............................................... 133Raw partitions and raw devices.................................................... 133NetApp restore fails .................................................................... 133
Restoring from a snapshot with the Recovery Wizard...............................134Restoring a snapshot by rollback............................................................... 137
Rollback considerations................................................................ 137Configuring the psrollback.res file........................................140Rollbacks with Veritas Volume Manager....................................... 141Rollbacks with IBM AIX Volume Manager......................................141
Troubleshooting 143NetWorker snapshot backup issues...........................................................144
Snapshot backup on Unity fails.................................................... 144Backup on Windows fails with a Delayed Write Failed error..........144Snapshots fail to mount for AIX managed file systems................. 144Snapshots fail for Linux Volume Manager on VNX with PowerPath...144Linux Logical Volume Manager snapshots fail with an error..........145NetWorker to Media-Clone stops responding and the backup fails....145
NetWorker snapshot restore issues.......................................................... 145File-by-file or saveset restore fails............................................... 145Restore of raw devices fails on Linux with permission issue......... 146Command nsrsnap_recover -I runs but fails to restore a file........ 146Restore fails with disk signature error.......................................... 146Directed restore files and folder permission issue.........................146NSM with XtremIO leaves snapshots mounted ............................147
Application Information Variables 149Using Application Information variables.....................................................150Common Application Information variables............................................... 150Application Information variables for VMAX arrays.................................... 151Application Information variables for VNX Block arrays.............................154Application Information variables for RecoverPoint appliances................. 155Application Information variables for XtremIO arrays................................ 155
Command-Line Operations for Snapshot Management 157Using CLI commands for snapshot operations.......................................... 158Using nsrsnapadmin for snapshot operations............................................ 158
Chapter 10
Chapter 11
Chapter 12
Appendix A
Appendix B
CONTENTS
6 NetWorker 18.1 Snapshot Management Integration Guide
Example nsrsnapadmin operations............................................................ 159Querying snapshot save sets........................................................159File-by-file browsing and restore..................................................159Rollback restore........................................................................... 159Deleting a snapshot save set........................................................ 160Modifying the retention period of a snapshot save set................. 160
Querying with the mminfo command........................................................ 161
Migrating Legacy PowerSnap Configurations 163Migrating legacy PowerSnap configurations to NSM................................ 164
Removing PowerSnap on UNIX systems...................................... 164Removing PowerSnap on Microsoft Windows systems................ 164
Deprecated Client resource attributes...................................................... 165Migrating VMAX (Symmetrix) arrays........................................................ 165Migrating VNX (CLARiiON) arrays............................................................ 165Migrating RecoverPoint appliances...........................................................165Starting the nsrpsd process...................................................................... 166Licensing...................................................................................................166
167
Appendix C
Glossary
CONTENTS
NetWorker 18.1 Snapshot Management Integration Guide 7

CONTENTS
8 NetWorker 18.1 Snapshot Management Integration Guide
Snapshot and clone operation with the storage node as the mount host.................... 27Snapshot and clone operation with the application host as the mount host................ 27Restore from a snapshot with the storage node as the mount host............................29Platinum policy configuration..................................................................................... 32Data protection policy example...................................................................................34All possible workflow actions for a snapshot backup...................................................42Sample snapshot workflow.........................................................................................58Snapshot and clone in a cluster environment............................................................ 124
12345678
FIGURES
NetWorker 18.1 Snapshot Management Integration Guide 9

FIGURES
10 NetWorker 18.1 Snapshot Management Integration Guide
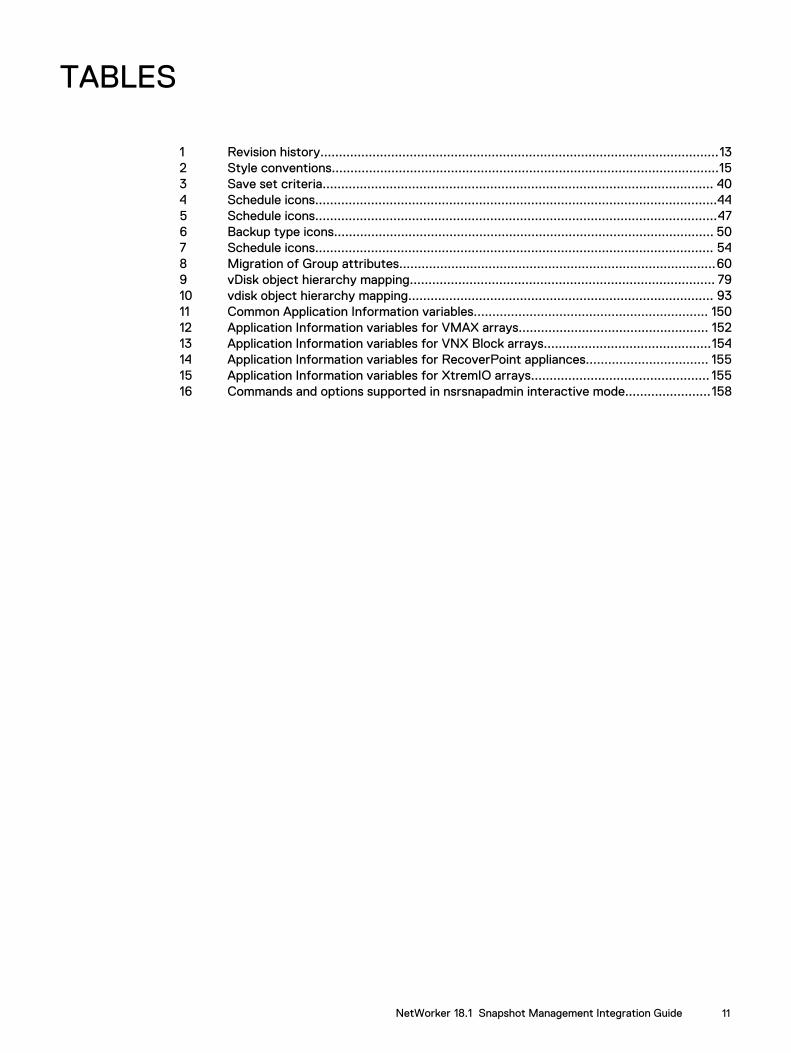
Revision history...........................................................................................................13Style conventions........................................................................................................15Save set criteria......................................................................................................... 40Schedule icons............................................................................................................44Schedule icons............................................................................................................47Backup type icons...................................................................................................... 50Schedule icons........................................................................................................... 54Migration of Group attributes.....................................................................................60vDisk object hierarchy mapping.................................................................................. 79vdisk object hierarchy mapping.................................................................................. 93Common Application Information variables............................................................... 150Application Information variables for VMAX arrays................................................... 152Application Information variables for VNX Block arrays.............................................154Application Information variables for RecoverPoint appliances................................. 155Application Information variables for XtremIO arrays................................................ 155Commands and options supported in nsrsnapadmin interactive mode.......................158
12345678910111213141516
TABLES
NetWorker 18.1 Snapshot Management Integration Guide 11

TABLES
12 NetWorker 18.1 Snapshot Management Integration Guide
Preface
As part of an effort to improve product lines, periodic revisions of software andhardware are released. Therefore, all versions of the software or hardware currently inuse might not support some functions that are described in this document. Theproduct release notes provide the most up-to-date information on product features.
If a product does not function correctly or does not function as described in thisdocument, contact a technical support professional.
Note
This document was accurate at publication time. To ensure that you are using thelatest version of this document, go to the Support website at https://support.emc.com.
PurposeThis document provides planning, practices, and configuration information for the useof the NetWorker Snapshot Management features within a NetWorker backup andstorage management environment.
AudienceThis document is intended for system administrators. Readers of this document mustbe familiar with the following tasks:
l Identifying the different hardware and software components that make up theNetWorker datazone.
l Configuring storage management operations by following procedures.
l Locating problems and implement solutions by following guidelines .
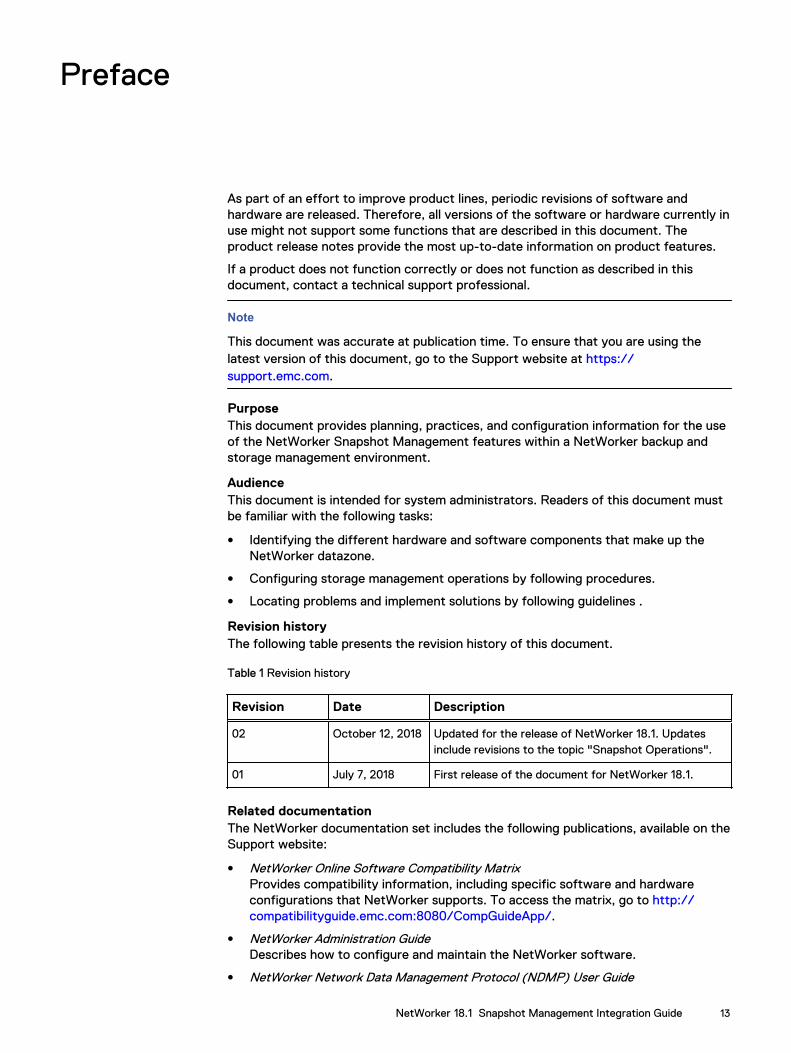
Revision historyThe following table presents the revision history of this document.
Table 1 Revision history
Revision Date Description
02 October 12, 2018 Updated for the release of NetWorker 18.1. Updatesinclude revisions to the topic "Snapshot Operations".
01 July 7, 2018 First release of the document for NetWorker 18.1.
Related documentationThe NetWorker documentation set includes the following publications, available on theSupport website:
l NetWorker Online Software Compatibility MatrixProvides compatibility information, including specific software and hardwareconfigurations that NetWorker supports. To access the matrix, go to http://compatibilityguide.emc.com:8080/CompGuideApp/.
l NetWorker Administration GuideDescribes how to configure and maintain the NetWorker software.
l NetWorker Network Data Management Protocol (NDMP) User Guide
NetWorker 18.1 Snapshot Management Integration Guide 13
Describes how to use the NetWorker software to provide data protection forNDMP filers.
l NetWorker Cluster Integration GuideContains information related to configuring NetWorker software on cluster serversand clients.
l NetWorker Installation GuideProvides information on how to install, uninstall, and update the NetWorkersoftware for clients, storage nodes, and servers on all supported operatingsystems.
l NetWorker Updating from a Previous Release GuideDescribes how to update the NetWorker software from a previously installedrelease.
l NetWorker Release NotesContains information on new features and changes, fixed problems, knownlimitations, environment and system requirements for the latest NetWorkersoftware release.
l NetWorker Command Reference GuideProvides reference information for NetWorker commands and options.
l NetWorker Data Domain Boost Integration GuideProvides planning and configuration information on the use of Data Domaindevices for data deduplication backup and storage in a NetWorker environment.
l NetWorker Performance Optimization Planning GuideContains basic performance tuning information for NetWorker.
l NetWorker Server Disaster Recovery and Availability Best Practices GuideDescribes how to design, plan for, and perform a step-by-step NetWorker disasterrecovery.
l NetWorker Snapshot Management Integration GuideDescribes the ability to catalog and manage snapshot copies of production datathat are created by using mirror technologies on storage arrays.
l NetWorkerSnapshot Management for NAS Devices Integration GuideDescribes how to catalog and manage snapshot copies of production data that arecreated by using replication technologies on NAS devices.
l NetWorker Security Configuration GuideProvides an overview of security configuration settings available in NetWorker,secure deployment, and physical security controls needed to ensure the secureoperation of the product.
l NetWorker VMware Integration GuideProvides planning and configuration information on the use of VMware in aNetWorker environment.
l NetWorker Error Message GuideProvides information on common NetWorker error messages.
l NetWorker Licensing GuideProvides information about licensing NetWorker products and features.
l NetWorker REST API Getting Started GuideDescribes how to configure and use the NetWorker REST API to createprogrammatic interfaces to the NetWorker server.
l NetWorker REST API Reference GuideProvides the NetWorker REST API specification used to create programmaticinterfaces to the NetWorker server.
Preface
14 NetWorker 18.1 Snapshot Management Integration Guide
l NetWorker 18.1 with CloudBoost 18.1 Integration GuideDescribes the integration of NetWorker with CloudBoost.
l NetWorker 18.1 with CloudBoost 18.1 Security Configuration GuideProvides an overview of security configuration settings available in NetWorker andCloud Boost, secure deployment, and physical security controls needed to ensurethe secure operation of the product.
l NetWorker Management Console Online HelpDescribes the day-to-day administration tasks performed in the NetWorkerManagement Console and the NetWorker Administration window. To view theonline help, click Help in the main menu.
l NetWorker User Online HelpDescribes how to use the NetWorker User program, which is the Windows clientinterface, to connect to a NetWorker server to back up, recover, archive, andretrieve files over a network.
Special notice conventions that are used in this documentThe following conventions are used for special notices:
NOTICE
Identifies content that warns of potential business or data loss.
Note
Contains information that is incidental, but not essential, to the topic.
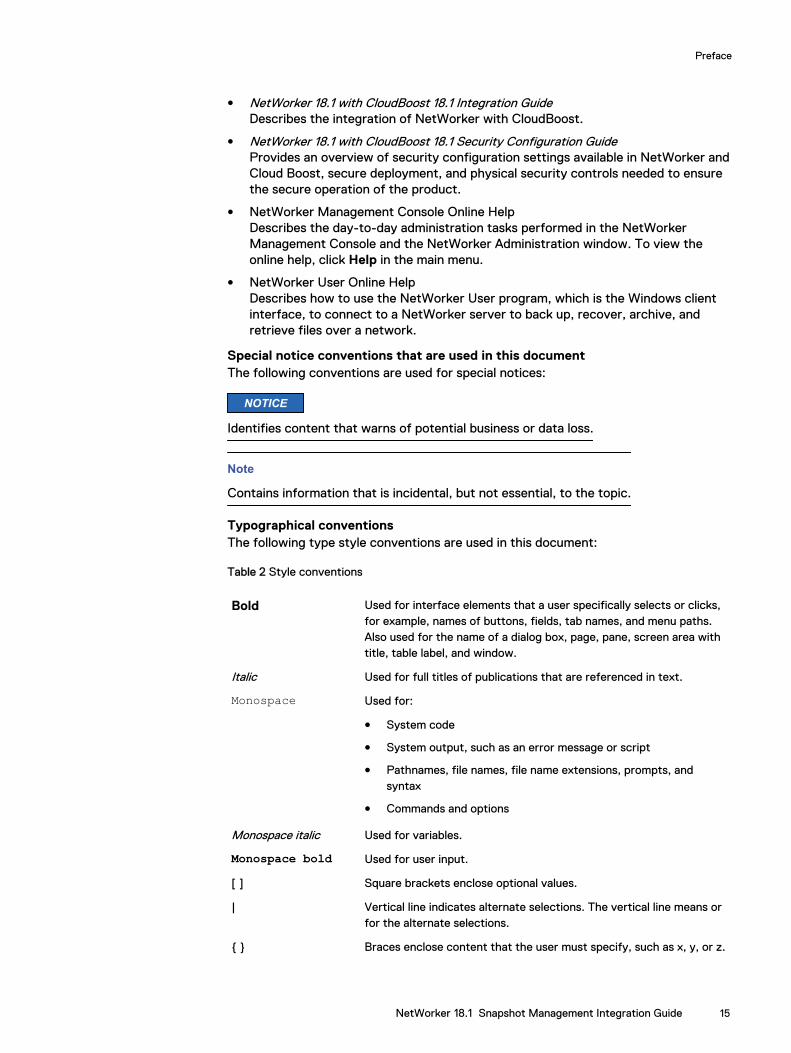
Typographical conventionsThe following type style conventions are used in this document:
Table 2 Style conventions
Bold Used for interface elements that a user specifically selects or clicks,for example, names of buttons, fields, tab names, and menu paths.Also used for the name of a dialog box, page, pane, screen area withtitle, table label, and window.
Italic Used for full titles of publications that are referenced in text.
Monospace Used for:
l System code
l System output, such as an error message or script
l Pathnames, file names, file name extensions, prompts, andsyntax
l Commands and options
Monospace italic Used for variables.
Monospace bold Used for user input.
[ ] Square brackets enclose optional values.
| Vertical line indicates alternate selections. The vertical line means orfor the alternate selections.
{ } Braces enclose content that the user must specify, such as x, y, or z.
Preface
NetWorker 18.1 Snapshot Management Integration Guide 15
Table 2 Style conventions (continued)
... Ellipses indicate non-essential information that is omitted from theexample.
You can use the following resources to find more information about this product,obtain support, and provide feedback.
Where to find product documentation
l https://support.emc.com
l https://community.emc.com
Where to get supportThe Support website at https://support.emc.com provides access to licensinginformation, product documentation, advisories, and downloads, as well as how-to andtroubleshooting information. This information may enable you to resolve a productissue before you contact Support.
To access a product specific Support page:
1. Go to https://support.emc.com/products.
2. In the Find a Product by Name box, type a product name, and then select theproduct from the list that appears.
3. Click .
4. (Optional) To add the product to My Saved Products, in the product specificpage, click Add to My Saved Products.
KnowledgebaseThe Knowledgebase contains applicable solutions that you can search for by solutionnumber, for example, 123456, or by keyword.
To search the Knowledgebase:
1. Go to https://support.emc.com.
2. Click Advanced Search.The screen refreshes and filter options appear.
3. In the Search Support or Find Service Request by Number box, type a solutionnumber or keywords.
4. (Optional) To limit the search to specific products, type a product name in theScope by product box, and then select the product from the list that appears.
5. In the Scope by resource list box, select Knowledgebase.The Knowledgebase Advanced Search panel appears.
6. (Optional) Specify other filters or advanced options.
7. Click .
Live chatTo participate in a live interactive chat with a support agent:
1. Go to https://support.emc.com.
2. Click Chat with Support.
Service requestsTo obtain in-depth help from Licensing, submit a service request. To submit a servicerequest:
Preface
16 NetWorker 18.1 Snapshot Management Integration Guide
1. Go to https://support.emc.com.
2. Click Create a Service Request.
Note
To create a service request, you must have a valid support agreement. Contact a salesrepresentative for details about obtaining a valid support agreement or with questionsabout an account. If you know the service request number, then directly enter theservice request number in the Service Request field to get the valid details.
To review an open service request:
1. Go to https://support.emc.com.
2. Click Manage service requests.
Online communitiesGo to the Community Network at https://community.emc.com for peer contacts,conversations, and content on product support and solutions. Interactively engageonline with customers, partners, and certified professionals for all products.
How to provide feedbackFeedback helps to improve the accuracy, organization, and overall quality ofpublications. You can send feedback to [email protected].
Preface
NetWorker 18.1 Snapshot Management Integration Guide 17

Preface
18 NetWorker 18.1 Snapshot Management Integration Guide
CHAPTER 1
Overview of NetWorker Snapshot Features
This chapter includes the following topics:
l NetWorker Snapshot Management product description.................................... 20l Components of the snapshot environment.........................................................24l NetWorker snapshot licensing requirements......................................................26l Example NetWorker snapshot environments......................................................26
Overview of NetWorker Snapshot Features 19

NetWorker Snapshot Management product descriptionThe NetWorker Snapshot Management (NSM) feature works with replication andmirror technologies on supported storage arrays or storage appliances to create andmanage snapshot and ProtectPoint copies of production data, with minimal disruptionto the production host processes. The NetWorker server catalogs the snapshots,provides snapshot recovery, and clones the snapshots to Data Domain (ProtectPoint),or to conventional storage media, such as disk or tape. The Snapshot Managementfeature is available as part of the NetWorker extended client software package.
The NetWorker extended client installation provides all the functionality that theNetWorker PowerSnap Module previously handled. The NetWorker Installation Guideprovides more details. Migrating Legacy PowerSnap Configurations provides examplesof how to migrate legacy PowerSnap configurations to NetWorker SnapshotManagement.
Before you plan, configure, and administer the snapshot environment, become familiarwith the concepts in this chapter. You should have an advanced working knowledge ofthe storage array technology that you use with NetWorker Snapshot Management.
The NetWorker Online Software Compatibility Matrix provides details on the versionsthat NetWorker supports, including volume managers, NetWorker modules, andcluster environments.
Snapshot operationsNetWorker Snapshot Management supports the application host, which is aNetWorker client that writes production data to volumes on a supported storage arrayor storage appliance. These production volumes consist of one or more logical units(LUNs) of storage, which the array or appliance replicates to a mirror LUN orsnapshot pool. The mirror LUN can be local or a LUN on a remote array or remoteappliance.
NetWorker supports the following storage array and storage appliance configurations:
l ProtectPoint—VMAX3 or XtremIO to Data Domain vdisk snapshot operations.
l VMAX arrays—TimeFinder Clone, VDEV, BCV, VP Snap, SnapVX, and SymmetrixRemote Data Facility (SRDF) operations.
l VNX and VNXe Block arrays—SnapView Copy-on-write (COW/Snapshot), Mirror(clone), and VNX Snap operations.
l Unity arrays— VNXe-SNAP (VNXe/VNXe2 Snapshots) operation.
l RecoverPoint appliances that are configured on supported VMAX, VNX Block,XtremIO, and VPLEX storage arrays—Continuous Local Replication (CLR) andContinuous Remote Replication (CRR).
NetWorker uses the replication and splitting or the cloning capabilities of the array tocreate point-in-time (PIT) copies of specified production data onto a storage arrayvolume. These PIT copies are called snapshots. In the case of ProtectPoint,NetWorker copies the snapshot to the DD vdisk.
To manage the snapshots, NetWorker mounts the snapshot volume on a mount host,which can be the application host, a NetWorker storage node, or a remote NetWorkerclient host. NetWorker uses the mount host for clone operations that save thesnapshot to conventional storage media such as disk or tape, and for restoreoperations from the snapshot or conventional storage media.
NetWorker policies manage the lifecycles of the snapshot backups, and the backupcopies that are cloned to conventional storage volumes from snapshots.
Overview of NetWorker Snapshot Features
20 NetWorker 18.1 Snapshot Management Integration Guide
Example NSM snapshot environments provides illustrations of typical snapshotenvironments and describes the snapshot, clone, and recovery processes.
Types of snapshot backupsThe type of NetWorker snapshot backup that you configure depends on where youintend to create and store the snapshot:
l Snapshot backup—NetWorker creates a snapshot of the specified files on theapplication host and stores the snapshot only on the storage array. The NetWorkerserver catalogs the snapshot as a backup in the media database. The NetWorkerserver can perform a restore from the snapshot.
l ProtectPoint backup—NetWorker creates a snapshot of the specified files on theapplication host and stores the snapshot only on a Data Domain device. TheNetWorker server catalogs the snapshot as a backup in the media database. TheNetWorker server can perform a restore from the snapshot.
Note
Snapshot refers to both storage array only snapshots, and snapshots copied to a DataDomain device with ProtectPoint.
Client file system layout considerations
The following are considerations for nested file systems:
l Taking a snapshot backup of both the parent file system and any file system that ismounted under the parent in the same backup is not supported.
l It is possible to take snapshots of the parent and any file system that is mountedunder the parent in separate backup configurations.
l Support for the rollback workflow in nested file system configurations is limited.
l The rollback of both the parent and the underlying mounted file systemssimultaneously is not supported.
l The rollback of any of the file systems that are mounted under the parentdirectory is supported.
l Rollback is not permitted of the parent file system while underlying file system is inmounted state.
Note
The NetWorker Module for SAP (NMSAP) has configuration parameters that allowyou to exclude the snapshot of specific files. The NetWorker Module for SAPAdministration Guide provides details.
Unsupported backup configurationsNetWorker does not support the following backup configurations:
l Containers (zones) on Solaris operating systems.
l Solaris ZFS file systems.
l Windows GPT, Dynamic volumes, and Windows volume management.
The NetWorker Online Software Compatibility Matrix provides details.
Overview of NetWorker Snapshot Features
Types of snapshot backups 21
Types of snapshot recoveriesThe type of recovery that you can perform for snapshot-based data depends on thelocation of the data and the following factors:
l Restore from a snapshot—NetWorker mounts the snapshots to a mount host,browses, and selects the directories to restore.
l Restore from a clone copy on conventional media—NetWorker performs aconventional restore from the backup storage media.
l Rollback restore—NetWorker restores the snapshots by using the storage arraycapabilities. The process unmounts the original source volumes on the applicationhost and the rollback replaces the entire contents with the contents of a selectedsnapshot.
Note
NetWorker does not support rollback in the VMAX3 ProtectPoint workflow whenrestore devices are exported directly from the Data Domain.
A ProtectPoint RecoverPoint rollback of the clone snapshot that has been copiedusing NetWorker's cloned controlled replication is not supported.
NetWorker does not support rollback on XtremIO storage arrays.
NetWorker does not support rollback on VNXe arrays (Unity).
NetWorker clone supportNetWorker uses cloning to copy snapshots to the following types of media:
l Data Domain Boost, Advanced File Type Device (AFTD), Tape—You can clone anytypes of snapshots to these types of conventional media.
NetWorker cloning supports full and incremental cloning. Cloning can leveragetraditional NetWorker restore methods.
Cloning is also supported to Data Domain CloudTier and CloudBoost.
NetWorker catalogs snapshots and clone copies in the media database as follows:
l File system backups—NetWorker records the contents of the snapshots in theclient file index (CFI) only during a clone operation to conventional media.
The NetWorker Administration Guide provides details.
Note
NetWorker 8.2.x and earlier versions do not support the cloning of snapshot save sets.
Backup configuration methodsYou can configure snapshot backups by using the NetWorker Management Console(NMC) interface. All the supported storage arrays support the following configurationmethods:
l NetWorker Client Configuration Wizard—It is recommended that you use thewizard to create and modify the configurations for snapshots. The wizardaccommodates the most common snapshot workflows by providing the correctsequence of steps and the verification of configuration dependencies.
Overview of NetWorker Snapshot Features
22 NetWorker 18.1 Snapshot Management Integration Guide
l NMC Client Properties windows—Provides a user interface that you can use tomanually create or modify configurations. For example, you can use the ClientProperties Window to specify the uncommon directives or options that the wizardinterface does not support, such as the variables listed in Application InformationVariables.
Note
To create necessary lockbox entries, RecoverPoint and XtremIO require that youtype username and password information. These workflows do not support manualclient configuration.
The NetWorker Module for Databases and Applications Administration Guide and theNetWorker Module for SAP Administration Guide provide details on the supportedapplication backup and recovery interfaces.
Restore methodsYou can use one of the following interfaces to restore snapshot-based data for filesystem backups:
l The NMC Recovery Wizard—It is recommended that you use the wizard torestore data from the snapshots and conventional storage media.
l The nsrsnapadmin command utility—An interactive Command Line Interface(CLI) tool that you can use for various snapshot-related operations, includingrestore from a snapshot. Using nsrsnapadmin for snapshot operations on page158 provides details.
l The nsrsnap_recover command—A CLI method that you can use to restoredata from a snapshot or conventional storage media.
The NetWorker Command Reference Guide provides details of the NetWorkercommands.
The NetWorker Module for Databases and Applications Administration Guide and theNetWorker Module for SAP Administration Guide provide details on the supportedapplication backup and recovery interfaces.
Monitoring and reporting snapshot operationsNetWorker enables you to monitor snapshot operations for each NetWorker client.You can monitor the progress of the snapshot creation, mounting, deletion, andcloning operations.
The NetWorker nwsnap.raw log file, on the application and mount host, providesdetailed information about snapshot operations.
Internationalization supportThe standard NetWorker client support for non-ASCII international character setsapplies to snapshot management.
Overview of NetWorker Snapshot Features
Restore methods 23
Components of the snapshot environmentYou can deploy various required and optional hosts, devices, connectivity, andapplications in a NetWorker datazone for snapshot management.
Example NetWorker snapshot environments on page 26 provides illustrations oftypical snapshot environments and describes the snapshot, NetWorker clone, andrecovery processes.
Application hostAn application host in the snapshot environment is a computer with production datathat resides on storage array volumes and requires snapshot services. The productiondata can consist of file systems and databases.
NSM supports snapshots of a VMware guest OS for raw device mapped volumes on aVMAX and iSCSI volumes on VNX. If you use VNX storage, when a RecoverPointappliance controls the volumes, NSM supports RDM when you use VMAX storage oriSCSI. XtremIO snapshots and RecoverPoint are supported.
Each application host must be configured as a NetWorker host and must have thefollowing software installed:
l NetWorker client 18.1.
l NetWorker extended client 18.1.
l NMDA/NMSAP 18.1 if you are protecting IBM DB2 data, Oracle data, or SAP withOracle data.
l Must be configured as a NetWorker client.
FC and iSCSI environmentsAll hosts that are involved in the movement of production data within the NetWorkersnapshot environment must use Fibre Channel (FC) connectivity, which is deployed asa storage area network (SAN). NetWorker Snapshot Management (NSM) supportsiSCI for VMAX, VNX, and XtremIO. NetWorker snapshots do not support FibreChannel over Ethernet (FCoE) environments.
Note
NSM supports the VMware guest OS for VNX when the VNX volumes are using iSCSI.NSM does not support RDM volumes with VNX. The VMAX VMware, guest OS onlysupports raw device mapped (RDM) volumes.
Storage arraysFor snapshot operations, one or more supported storage arrays must provide logicalunits (LUNs) to store the application host’s production data and the snapshots of thisdata.
NetWorker supports the following storage array and data management technologies:
l VMAX (Symmetrix) storage array
l VNX Block (CLARiiON) storage array
l VNXe Block
l RecoverPoint storage appliance
Overview of NetWorker Snapshot Features
24 NetWorker 18.1 Snapshot Management Integration Guide

l XtremIO native snapshot
The NetWorker Online Software Compatibility Matrix provides details about thesupported storage arrays.
NetWorker serverThe NetWorker server manages the snapshot clients and the configuration settingsthat are required to create the snapshots and perform the cloning operations.
NetWorker storage nodeThe NetWorker storage node manages the devices for backups to conventionalstorage media, such as AFTD, DD Boost devices, Cloud Boost, Cloud Tier, and tape.Snapshot management requires a storage node for all the clone operations and torestore data from clones.
If you plan to create and restore snapshots and do not plan to clone snapshots, thenthe use of a storage node is optional.
Snapshot mount hostNetWorker requires a client host to mount the storage array’s snapshot volumes forsnapshot restore operations, snapshot validation, and for cloning to conventionalstorage media.
The mount host can be the local application host, a NetWorker storage node, or aremote NetWorker client host. The choice of mount host depends on the storagenetwork configuration. A well-planned configuration includes consideration of the dataprocessing speed and the bandwidth load on the different possible hosts.
The mount host must use the same operating system with the same third-partyvolume manager (if any) as the application host. Synchronize the system clocks of themount host and the application host.
Note
Rollback operations do not use a mount host. Rollback is not supported in a nested filesystem environment.
Backup storage mediaNetWorker can clone snapshots to conventional backup storage media, such as AFTD,Data Domain Boost devices, tape, Data Domain CloudTier, and CloudBoost.
NetWorker application modulesNSM supports application hosts integrated protection, with NetWorker Module forDatabases and Applications (NMDA) and NetWorker Module for SAP (NMSAP) onVMAX, VNX, XtremIO storage arrays, and RecoverPoint.
The NetWorker Online Software Compatibility Matrix provides details on supportedversions.
The NetWorker Module for Databases and Applications Administration Guide and theNetWorker Module for SAP Administration Guide provide details on applicationconfigurations.
Overview of NetWorker Snapshot Features
NetWorker server 25
Third-party volume managersNetWorker supports the use of third-party volume managers for managing the storagearray data, such as Veritas Volume Manager (VxVM) and Linux Logical VolumeManager (LVM). However, for VxVM managed volumes, NetWorker does not supportthe following configurations:
l If the production file system and the snapshot file system are simultaneouslyvisible to the same host, then the backups can fail. Some operating systems orLVMs require that the production file system and the snapshot file system must bevisible only on separate hosts, such as the application host and a different mounthost.
l If multiple LUNs with the same disk signature or the same volume ID are visible tothe same host, then the backups can fail. For example, if multiple mirrors or boththe source and mirror LUNs are visible to the same host, then the backups can fail.
l VxVM on Microsoft Windows systems.
The NetWorker Online Software Compatibility Matrix provides support details.
NetWorker snapshot licensing requirementsThe following types of licensing can enable snapshot management:
l NetWorker capacity licenses
l Traditional licenses
For both types of licensing, the NetWorker software reports on capacities that areconsumed for the standard (nonsnapshot) backups and the snapshot backups.
If NetWorker detects valid PowerSnap licenses, then NetWorker honors the licenses.
The NetWorker source capacity enabler enables the use of snapshot managementwithin the datazone up to the purchased total source capacity. The number of clientsthat you can protect within the datazone has not restriction.
For traditional licensing, you need a capacity-based NetWorker license and otherrequired licenses, such as the client connection license, storage node license, andapplication module license for the NetWorker clients under protection.
The NetWorker Licensing Guide and your NetWorker sales representative can providedetails about the types of licensing for NetWorker Snapshot Management.
Example NetWorker snapshot environmentsPlan the NetWorker snapshot environment to manage data efficiently as illustrated bythe following examples. Snapshot operations on page 20 describes basic snapshotconcepts.
Overview of NetWorker Snapshot Features
26 NetWorker 18.1 Snapshot Management Integration Guide
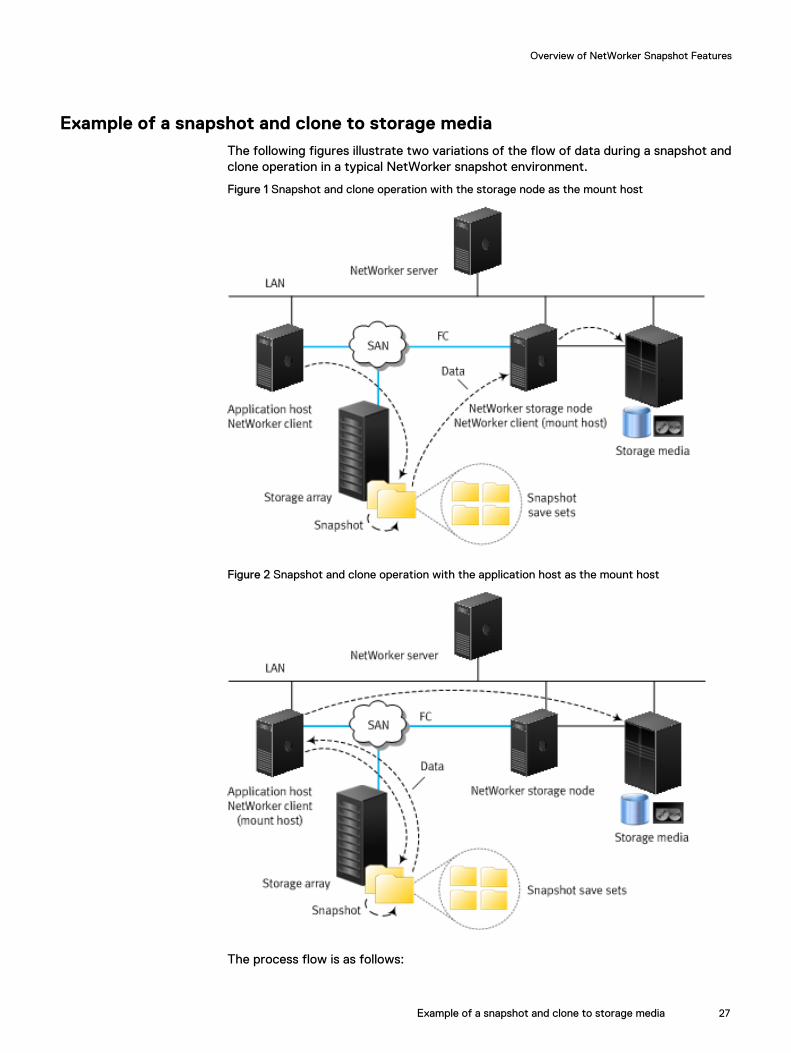
Example of a snapshot and clone to storage mediaThe following figures illustrate two variations of the flow of data during a snapshot andclone operation in a typical NetWorker snapshot environment.
Figure 1 Snapshot and clone operation with the storage node as the mount host
Figure 2 Snapshot and clone operation with the application host as the mount host
The process flow is as follows:
Overview of NetWorker Snapshot Features
Example of a snapshot and clone to storage media 27
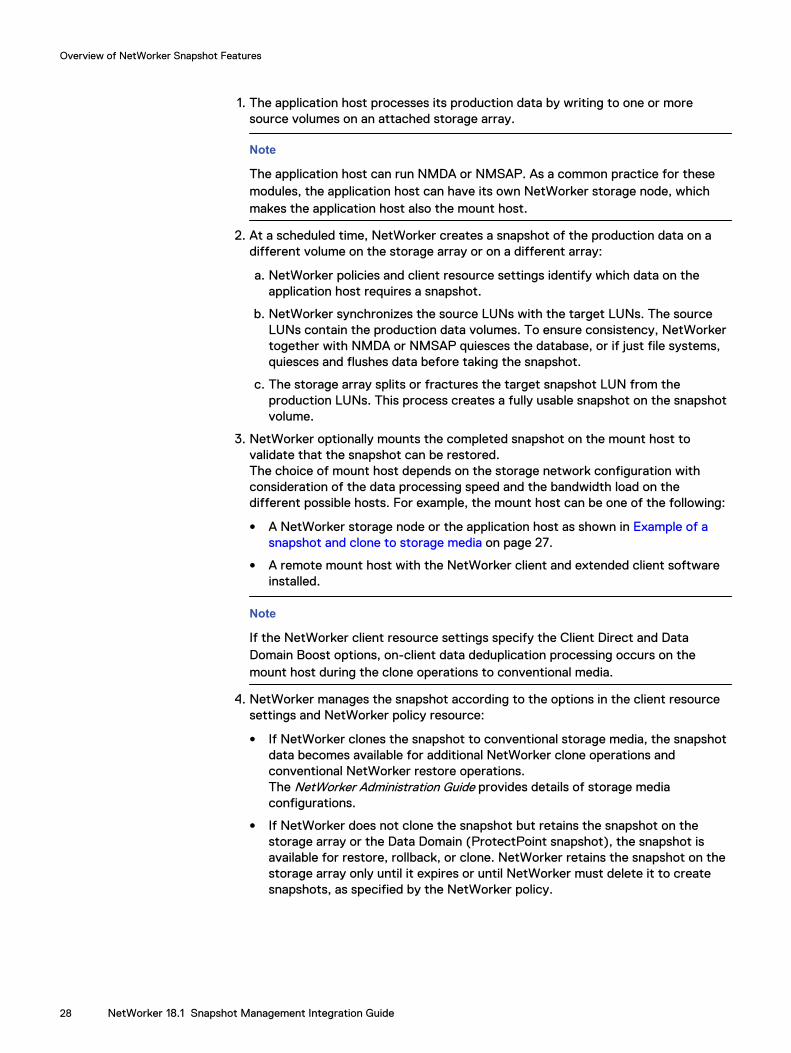
1. The application host processes its production data by writing to one or moresource volumes on an attached storage array.
Note
The application host can run NMDA or NMSAP. As a common practice for thesemodules, the application host can have its own NetWorker storage node, whichmakes the application host also the mount host.
2. At a scheduled time, NetWorker creates a snapshot of the production data on adifferent volume on the storage array or on a different array:
a. NetWorker policies and client resource settings identify which data on theapplication host requires a snapshot.
b. NetWorker synchronizes the source LUNs with the target LUNs. The sourceLUNs contain the production data volumes. To ensure consistency, NetWorkertogether with NMDA or NMSAP quiesces the database, or if just file systems,quiesces and flushes data before taking the snapshot.
c. The storage array splits or fractures the target snapshot LUN from theproduction LUNs. This process creates a fully usable snapshot on the snapshotvolume.
3. NetWorker optionally mounts the completed snapshot on the mount host tovalidate that the snapshot can be restored.The choice of mount host depends on the storage network configuration withconsideration of the data processing speed and the bandwidth load on thedifferent possible hosts. For example, the mount host can be one of the following:
l A NetWorker storage node or the application host as shown in Example of asnapshot and clone to storage media on page 27.
l A remote mount host with the NetWorker client and extended client softwareinstalled.
Note
If the NetWorker client resource settings specify the Client Direct and DataDomain Boost options, on-client data deduplication processing occurs on themount host during the clone operations to conventional media.
4. NetWorker manages the snapshot according to the options in the client resourcesettings and NetWorker policy resource:
l If NetWorker clones the snapshot to conventional storage media, the snapshotdata becomes available for additional NetWorker clone operations andconventional NetWorker restore operations.The NetWorker Administration Guide provides details of storage mediaconfigurations.
l If NetWorker does not clone the snapshot but retains the snapshot on thestorage array or the Data Domain (ProtectPoint snapshot), the snapshot isavailable for restore, rollback, or clone. NetWorker retains the snapshot on thestorage array only until it expires or until NetWorker must delete it to createsnapshots, as specified by the NetWorker policy.
Overview of NetWorker Snapshot Features
28 NetWorker 18.1 Snapshot Management Integration Guide
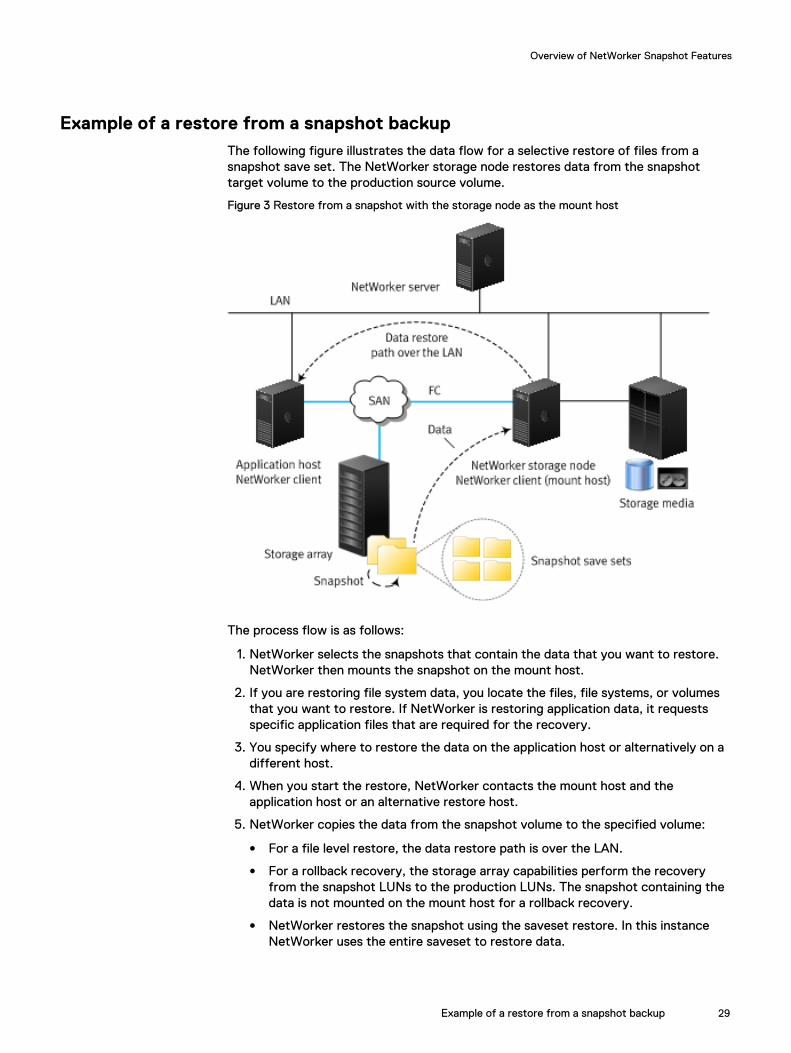
Example of a restore from a snapshot backupThe following figure illustrates the data flow for a selective restore of files from asnapshot save set. The NetWorker storage node restores data from the snapshottarget volume to the production source volume.
Figure 3 Restore from a snapshot with the storage node as the mount host
The process flow is as follows:
1. NetWorker selects the snapshots that contain the data that you want to restore.NetWorker then mounts the snapshot on the mount host.
2. If you are restoring file system data, you locate the files, file systems, or volumesthat you want to restore. If NetWorker is restoring application data, it requestsspecific application files that are required for the recovery.
3. You specify where to restore the data on the application host or alternatively on adifferent host.
4. When you start the restore, NetWorker contacts the mount host and theapplication host or an alternative restore host.
5. NetWorker copies the data from the snapshot volume to the specified volume:
l For a file level restore, the data restore path is over the LAN.
l For a rollback recovery, the storage array capabilities perform the recoveryfrom the snapshot LUNs to the production LUNs. The snapshot containing thedata is not mounted on the mount host for a rollback recovery.
l NetWorker restores the snapshot using the saveset restore. In this instanceNetWorker uses the entire saveset to restore data.
Overview of NetWorker Snapshot Features
Example of a restore from a snapshot backup 29

Overview of NetWorker Snapshot Features
30 NetWorker 18.1 Snapshot Management Integration Guide
CHAPTER 2
Data Protection Policies
This chapter includes the following topics:
l Default data protection policies..........................................................................32l Strategies for storage array snapshot backups.................................................. 32l Overview of configuring a new data protection policy........................................33l Creating a policy................................................................................................ 34l Create a workflow in a new policy......................................................................35l Protection groups for snapshot backups............................................................ 37l Actions supported in snapshot backups.............................................................. 41l Supported actions in snapshot workflows.......................................................... 42l Visual representation of snapshot workflows..................................................... 58
Data Protection Policies 31
Default data protection policiesNetWorker provides you with preconfigured data protection policies that you can useimmediately to protect the environment, modify to suit the environment, or use anexample to create resources and configurations. To use these preconfigured dataprotection policies, you must add clients to the appropriate group resource.
Note
NetWorker also includes a preconfigured Server Protection policy to protect theNetWorker and NMC server databases.
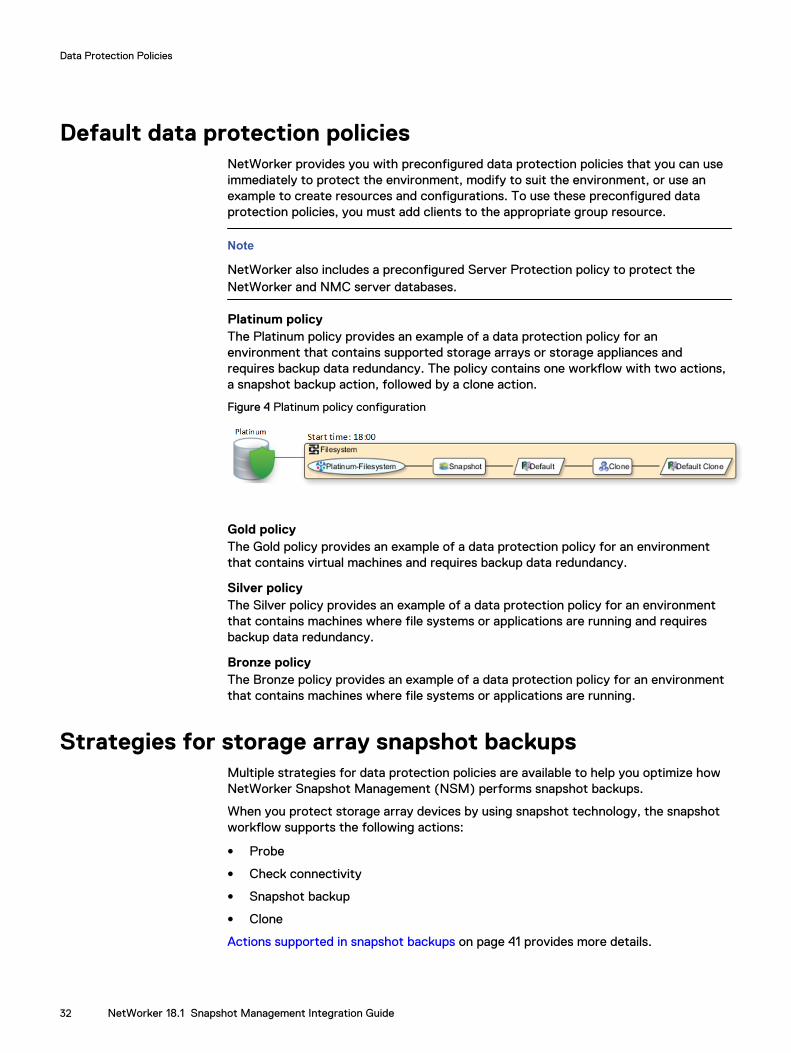
Platinum policyThe Platinum policy provides an example of a data protection policy for anenvironment that contains supported storage arrays or storage appliances andrequires backup data redundancy. The policy contains one workflow with two actions,a snapshot backup action, followed by a clone action.
Figure 4 Platinum policy configuration
Gold policyThe Gold policy provides an example of a data protection policy for an environmentthat contains virtual machines and requires backup data redundancy.
Silver policyThe Silver policy provides an example of a data protection policy for an environmentthat contains machines where file systems or applications are running and requiresbackup data redundancy.
Bronze policyThe Bronze policy provides an example of a data protection policy for an environmentthat contains machines where file systems or applications are running.
Strategies for storage array snapshot backupsMultiple strategies for data protection policies are available to help you optimize howNetWorker Snapshot Management (NSM) performs snapshot backups.
When you protect storage array devices by using snapshot technology, the snapshotworkflow supports the following actions:
l Probe
l Check connectivity
l Snapshot backup
l Clone
Actions supported in snapshot backups on page 41 provides more details.
Data Protection Policies
32 NetWorker 18.1 Snapshot Management Integration Guide
Overview of configuring a new data protection policyThe following steps are an overview of the tasks to complete, to create and configurea data protection policy.
Procedure
1. Create a policy resource.
When you create a policy, you specify the name and notification settings for thepolicy.
2. Within the policy, create a workflow resource for each data type.
For example, create one workflow to protect file system data and one workflowto protect application data. When you create a workflow, you specify the nameof the workflow, the time to start the workflow, notification settings for theworkflow, and the protection group to which the workflow applies.
3. Create a protection group resource.
The type of group that you create depends on the types of clients and data thatyou want to protect. The actions that appear for a group depend on the grouptype.
4. Create one or more action resources for the workflow resource.
5. Configure client resources, to define the backup data that you want to protect,and then assign the client resources to a protection group.
Example 1 Example of a data protection policy with 2 workflows
The following figure illustrates a policy with two different workflows. Workflow 1performs a probe action, then a backup of the client resources in Client group 1, andthen a clone of the save sets from the backups. Workflow 2 performs a backup of theclient resources in Dynamic client group 1, and then a clone of the save sets from thebackup.
Data Protection Policies
Overview of configuring a new data protection policy 33
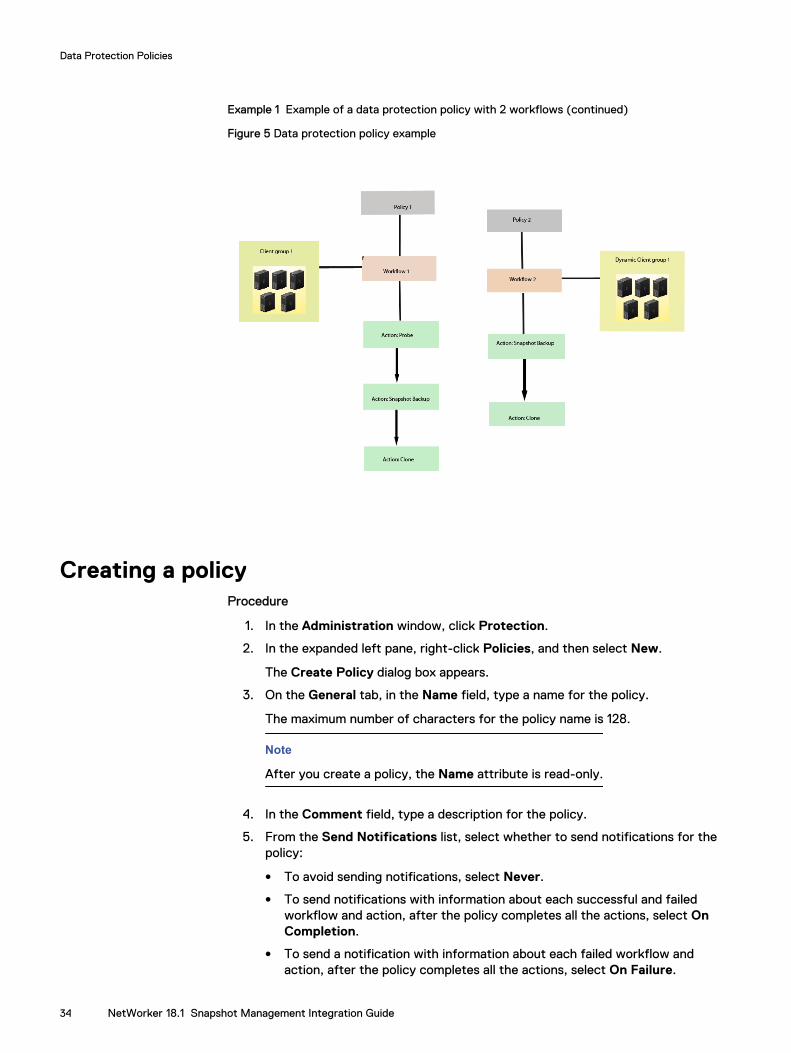
Example 1 Example of a data protection policy with 2 workflows (continued)
Figure 5 Data protection policy example
Creating a policyProcedure
1. In the Administration window, click Protection.
2. In the expanded left pane, right-click Policies, and then select New.
The Create Policy dialog box appears.
3. On the General tab, in the Name field, type a name for the policy.
The maximum number of characters for the policy name is 128.
Note
After you create a policy, the Name attribute is read-only.
4. In the Comment field, type a description for the policy.
5. From the Send Notifications list, select whether to send notifications for thepolicy:
l To avoid sending notifications, select Never.
l To send notifications with information about each successful and failedworkflow and action, after the policy completes all the actions, select OnCompletion.
l To send a notification with information about each failed workflow andaction, after the policy completes all the actions, select On Failure.
Data Protection Policies
34 NetWorker 18.1 Snapshot Management Integration Guide
6. In the Send notification attribute, when you select the On Completion optionor On failure option, the Command box appears. Use this box to configure howNetWorker sends the notifications. You can use the nsrlog command to sendthe notifications to a log file or you can send an email notification.
The default notification action is to send the information to thepolicy_notifications.log file. By default, thepolicy_notifications.log file is located in the /nsr/logs directory onLinux and in the C:\Program Files\EMC NetWorker\nsr\logs folder onWindows.
To send email messages or the smtpmail application on Windows, use thedefault mailer program on Linux:
l To send notifications to a file, type the following command, wherepolicy_notifications.log is the name of the file:
nsrlog -f policy_notifications.logl On Linux, to send an email notification, type the following command:
mail -s subject recipientl For NetWorker Virtual Edition (NVE), to send an email notification, type the
following command:
/usr/sbin/sendmail -v recipient_email "subject_text"l On Windows, to send a notification email, type the following command:
smtpmail -s subject -h mailserver recipient1@mailserverrecipient2@mailserver...
where:
n -s subject—Includes a standard email header with the message andspecifies the subject text for that header. Without this option, thesmtpmail program assumes that the message contains a correctlyformatted email header and nothing is added.
n -h mailserver—Specifies the hostname of the mail server to use torelay the SMTP email message.
n recipient1@mailserver—Is the email address of the recipient of thenotification. Multiple email recipients are separated by a space.
7. To specify the Restricted Data Zone (RDZ) for the policy, select the RestrictedData Zones tab, and then select the RDZ from the list.
8. Click OK.
After you finish
Create the workflows and actions for the policy.
Create a workflow in a new policyProcedure
1. In the Administration window, click Protection.
2. In the left pane, expand Policies, and then select the policy that you created.
3. In the right pane, select Create a new workflow.
Data Protection Policies
Create a workflow in a new policy 35
4. In the Name field, type the name of the workflow.
The maximum number of allowed characters for the Name field is 64. This namecannot contain spaces or special characters such as + or %.
5. In the Comment box, type a description for the workflow.
The maximum number of allowed characters for the Comment field is 128.
6. From the Send Notifications list, select how to send notifications for theworkflow:
l To use the notification configuration that is defined in the policy resource tospecify when to send a notification, select Set at policy level.
l To send notifications with information about each successful and failedworkflow and action, after the workflow completes all the actions, select OnCompletion.
l To send notifications with information about each failed workflow andaction, after the workflow completes all the actions, select On Failure.
7. In the Send notification attribute, when you select the On Completion optionor On failure option, the Command box appears. Use this box to configure howNetWorker sends the notifications. You can use the nsrlog command to sendthe notifications to a log file or you can send an email notification.
The default notification action is to send the information to thepolicy_notifications.log file. By default, thepolicy_notifications.log file is located in the /nsr/logs directory onLinux and in the C:\Program Files\EMC NetWorker\nsr\logs folder onWindows.
Use the default mailer program on Linux to send email messages, or use thesmtpmail application on Windows:
l To send notifications to a file, type the following command, wherepolicy_notifications.log is the name of the file:
nsrlog -f policy_notifications.logl On Linux, to send an email notification, type the following command:
mail -s subject recipientl For NetWorker Virtual Edition (NVE), to send an email notification, type the
following command:
/usr/sbin/sendmail -v recipient_email "subject_text"l On Windows, type the following command:
smtpmail -s subject -h mailserver recipient1@mailserverrecipient2@mailserver...
where:
n -s subject—Includes a standard email header with the message andspecifies the subject text for that header. Without this option, thesmtpmail program assumes that the message contains a correctlyformatted email header and nothing is added.
n -h mailserver—Specifies the hostname of the mail server to use torelay the SMTP email message.
n recipient1@mailserver—Is the email address of the recipient of thenotification. Multiple email recipients are separated by a space.
Data Protection Policies
36 NetWorker 18.1 Snapshot Management Integration Guide
8. In the Running section, perform the following steps to specify when and howoften the workflow runs:
a. To ensure that the actions that are contained in the workflow run when thepolicy or workflow starts, in the Enabled box, leave the option selected. Toprevent the actions in the workflow from running when the policy orworkflow that contains the action starts, clear this option.
b. To start the workflow at the time that is specified in the Start timeattribute, on the days that are defined in the action resource, in theAutoStart Enabled box, leave the option selected. To prevent the workflowfrom starting at the time that is specified in the Start time attribute, clearthis option.
c. To specify the time to start the actions in the workflow, in the Start Timeattribute, use the spin boxes.
The default value is 9:00 PM.
d. To specify how frequently to run the actions that are defined in theworkflow over a 24-hour period, use the Interval attribute spin boxes. If youare performing transaction log backup as part of application-consistentprotection, you must specify a value for this attribute in order forincremental transaction log backup of SQL databases to occur.
The default Interval attribute value is 24 hours, or once a day. When youselect a value that is less than 24 hours, the Interval End attribute appears.To specify the last start time in a defined interval period, use the spin boxes.
e. To specify the duration of time in which NetWorker can manually orautomatically restart a failed or canceled workflow, in the Restart Windowattribute, use the spin boxes.
If the restart window has elapsed, NetWorker considers the restart as a newrun of the workflow. NetWorker calculates the restart window from the startof the last incomplete workflow. The default value is 24 hours.
For example, if the Start Time is 7:00 PM, the Interval is 1 hour, and theInterval End is 11:00 PM., then the workflow automatically starts every hourbeginning at 7:00 PM. and the last start time is 11:00 PM.
9. To create the workflow, click OK.
After you finish
Create the actions that will occur in the workflow, and then assign a group to theworkflow. If a workflow does not contain a group, a policy does not perform anyactions.
Protection groups for snapshot backupsA protection group for a snapshot backup identifies the client resources to back up.
Snapshot backups supports the following types of groups:
l Basic client group—A static list of client resources to back up.
l Dynamic client group—A dynamic list of client resources to back up. A dynamicclient group automatically generates a list of the client resources that use a clienttag which matches the client tag that is specified for the group.
Data Protection Policies
Protection groups for snapshot backups 37
Creating a basic client groupUse basic client groups to specify a static list of client resources for a traditionalbackup, a check connectivity action, or a probe action.
Before you begin
Create the policy and workflow resources in which to add the protection group to.
Procedure
1. In the Administration window, click Protection.
2. In the expanded left pane, right-click Groups and select New from the drop-down, or right-click an existing group and select Edit from the drop-down.
The Create Group or Edit Group dialog box appears, with the General tabselected.
3. In the Name attribute, type a name for the group.
The maximum number of characters for the group name is 64. This name cannotcontain spaces or special characters such as + or %.
Note
After you create a group, the Name attribute is read-only.
4. From the Group Type list, leave the default selection of Clients.
5. In the Comment field, type a description of the group.
6. From the Policy-Workflow list, select the workflow that you want to assign thegroup to.
Note
You can also assign the group to a workflow when you create or edit aworkflow.
7. (Optional) To specify the Restricted Datazone (RDZ) for the group, on theRestricted Datazones tab, select the RDZ from the list.
8. Click OK.
After you finish
Create Client resources. Assign clients to a protection group, by using the ClientConfiguration wizard or the General tab on the Client Properties page.
Creating a dynamic client groupDynamic client groups automatically include group settings when you add clientresources to the NetWorker datazone. You can configure a dynamic group to includeall the clients on the NetWorker server or you can configure the dynamic client groupto perform a query that generates a list of clients that is based on a matching tagvalue.
A tag is a string attribute that you define in a Client resource. When an action starts ina workflow that is a member of a tagged dynamic protection group, the policy enginedynamically generates a list of client resources that match the tag value.
Use dynamic client groups to specify a dynamic list of Client resources for a traditionalbackup, a probe action, a check connectivity action, or a server backup action.
Data Protection Policies
38 NetWorker 18.1 Snapshot Management Integration Guide
Procedure
1. In the Administration window, click Protection.
2. In the expanded left pane, right-click Groups and select New from the drop-down, or right-click an existing group and select Edit from the drop-down.
The Create Group or Edit Group dialog box appears, with the General tabselected.
3. In the Name attribute, type a name for the group.
The maximum number of characters for the group name is 64. This name cannotcontain spaces or special characters such as + or %.
Note
After you create a group, the Name attribute is read-only.
4. From the Group Type list, select Dynamic Clients. For steps 5 to 8, follow theinstructions given in Creating a client group.
Creating a save set groupA save set group defines a static list of save sets for cloning or for snapshot indexgeneration.
Before you begin
Determine the save set ID or clone ID (ssid/clonid) of the save sets for the group byusing the Administration > Media user interface or the mminfo command.
Procedure
1. In the Administration window, click Protection.
2. In the expanded left pane, right-click Groups, and then select New.
The Create Group dialog box appears, starting with the General tab.
3. In the Name field, type a name for the group.
4. From the Group Type list, select Save Set ID List.
5. In the Comment field, type a description of the group.
6. (Optional) To associate the group with a workflow, from the Workflow (Policy)list, select the workflow.
You can also assign the group to a workflow when you create or edit aworkflow.
7. In the Clone specific save sets (save set ID/clone ID) field, type the save setID/clone ID (ssid/clonid) identifiers.
To specify multiple entries, type each value on a separate line.
8. To specify the Restricted Data Zone (RDZ) for the group, select the RestrictedData Zones tab, and then select the RDZ from the list.
9. Click OK.
Data Protection Policies
Creating a save set group 39
Creating a query groupA query group defines a list of save sets for cloning or snapshot index generation,based on a list of save set criteria.
Procedure
1. In the Administration window, click Protection.
2. In the expanded left pane, right-click Groups, and then select New.
The Create Group dialog box appears, starting with the General tab.
3. In the Name field, type a name for the group.
4. From the Group Type list, select Save Set Query.
5. In the Comment field, type a description of the group.
6. (Optional) To associate the group with a workflow, from the Workflow (Policy)list, select the workflow.
You can also assign the group to a workflow when you create or edit aworkflow.
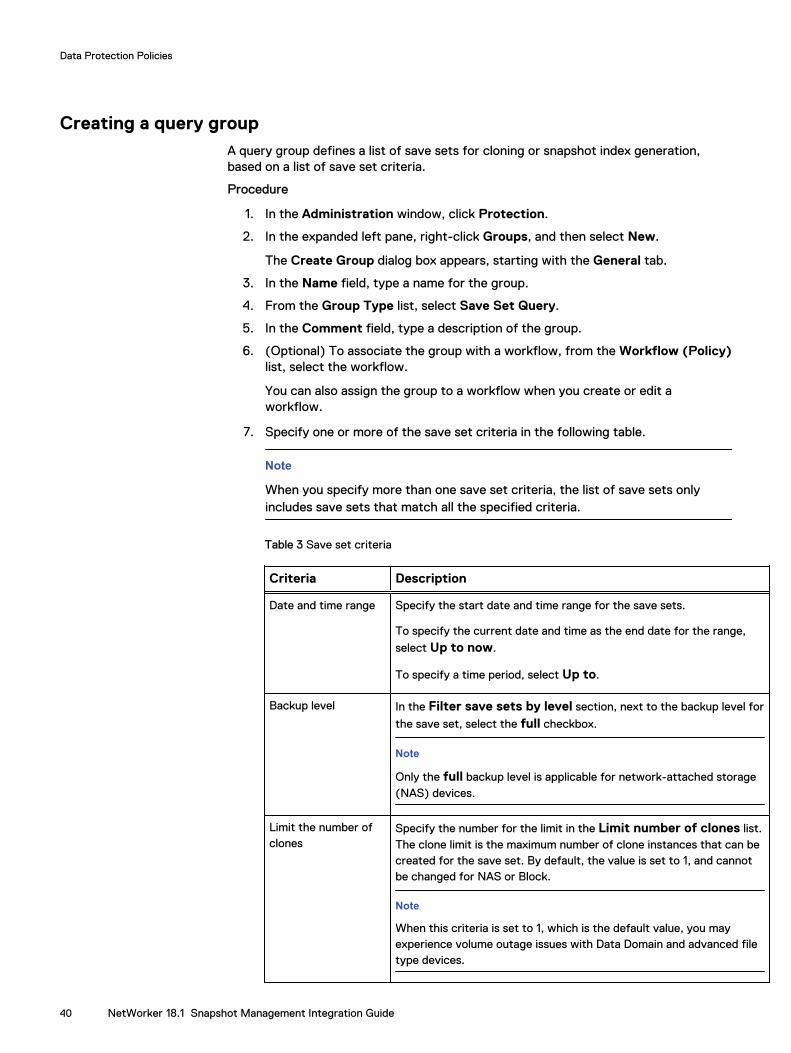
7. Specify one or more of the save set criteria in the following table.
Note
When you specify more than one save set criteria, the list of save sets onlyincludes save sets that match all the specified criteria.
Table 3 Save set criteria
Criteria Description
Date and time range Specify the start date and time range for the save sets.
To specify the current date and time as the end date for the range,
select Up to now.
To specify a time period, select Up to.
Backup level In the Filter save sets by level section, next to the backup level for
the save set, select the full checkbox.
Note
Only the full backup level is applicable for network-attached storage(NAS) devices.
Limit the number ofclones
Specify the number for the limit in the Limit number of clones list.The clone limit is the maximum number of clone instances that can becreated for the save set. By default, the value is set to 1, and cannotbe changed for NAS or Block.
Note
When this criteria is set to 1, which is the default value, you mayexperience volume outage issues with Data Domain and advanced filetype devices.
Data Protection Policies
40 NetWorker 18.1 Snapshot Management Integration Guide
Table 3 Save set criteria (continued)
Criteria Description
Client Next to one or more client resources that are associated with the save
set in the Client list, select the checkbox.
Policy Next to the policy used to generate the save set in the Policy list,select the checkbox.
Workflow Next to the workflow used to generate the save set in the Workflowlist, select the checkbox.
Action Next to the action used to generate the save set in the Action list,select the checkbox.
Group Next to the group associated with the save set in the Group list,select the checkbox.
Pools Next to the media pool on which the save set is stored in the Poolslist, select the checkbox.
Note
You cannot select Pools for NAS.
Name In the Filter save sets by name field, specify the name of the saveset.
Note
You cannot use wildcards to specify the save set name.
If you specify multiple criteria, the save set must match all the criteria to belongto the group.
8. To specify the Restricted Data Zone (RDZ) for the group, select the RestrictedData Zones tab, and then select the RDZ from the list.
9. Click OK.
Actions supported in snapshot backupsThe snapshot workflow supports the following actions:
ProbeA probe action runs a user-defined script on a NetWorker client before the start of abackup. A user-defined script is any program that passes a return code. If the returncode is 0 (zero), then a client backup is required. If the return code is 1, then a clientbackup is not required.
Only a backup action can follow a probe action.
Check connectivityA check connectivity action tests the connectivity between the clients and theNetWorker server before the start of a probe or backup action occurs. If theconnectivity test fails, then the probe action and backup action does not start for theclient.
Data Protection Policies
Actions supported in snapshot backups 41
Snapshot backupA snapshot backup action performs a snapshot of the data on a supported storagedevice.
CloneA clone action creates a copy of one or more save sets. Cloning enables secure offsitestorage, the transfer of data from one location to another, and the verification ofbackups.
You can configure a clone action to occur after a backup in a single workflow, orconcurrently with a backup action in a single workflow. You can use save set andquery groups to define a specific list of save sets to clone, in a separate workflow.
Note
The clone action clones the scheduled backup save sets only, and it does not clone themanual backup save sets. Some NetWorker module backups might appear to bescheduled backups that are initiated by a policy backup action, but they are manualbackups because they are initiated or converted by a database or application. TheNetWorker Module for Databases and Applications Administration Guide and theNetWorker Module for SAP Administration Guide provides more details.
In NetWorker 18.1, you can clone a snapshot backup to a cloud-enabled media pool.
Supported actions in snapshot workflowsWorkflows enable you to chain together multiple actions and run them sequentially orconcurrently.
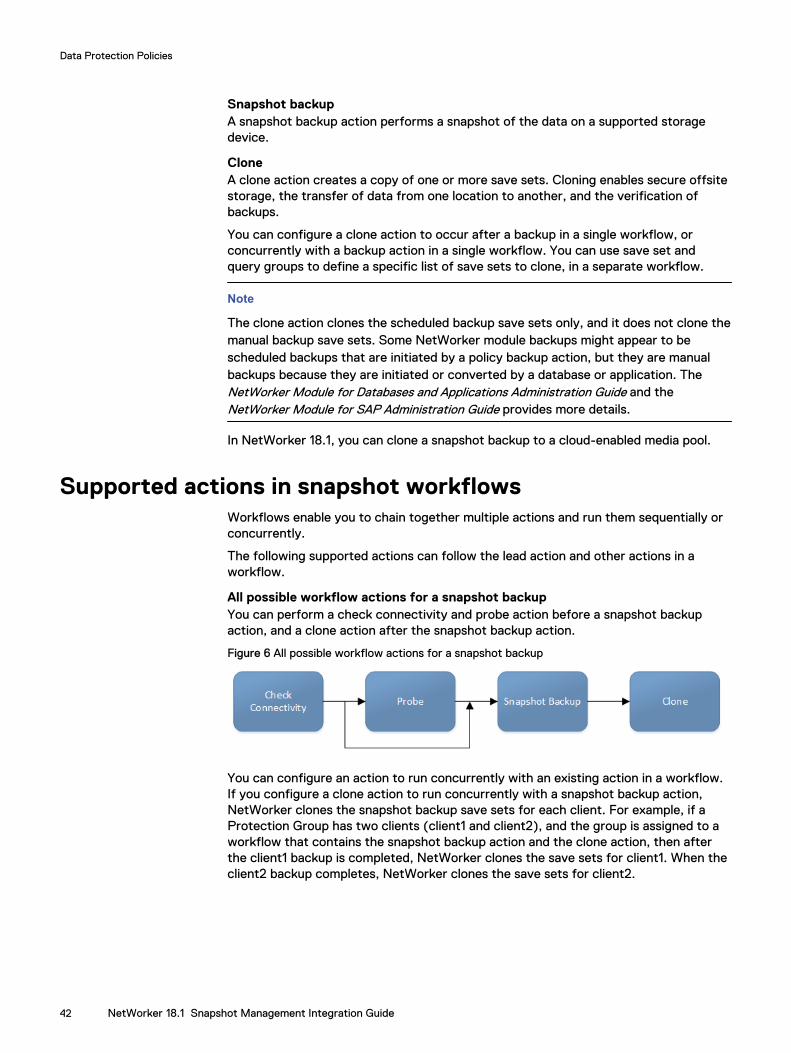
The following supported actions can follow the lead action and other actions in aworkflow.
All possible workflow actions for a snapshot backupYou can perform a check connectivity and probe action before a snapshot backupaction, and a clone action after the snapshot backup action.
Figure 6 All possible workflow actions for a snapshot backup
You can configure an action to run concurrently with an existing action in a workflow.If you configure a clone action to run concurrently with a snapshot backup action,NetWorker clones the snapshot backup save sets for each client. For example, if aProtection Group has two clients (client1 and client2), and the group is assigned to aworkflow that contains the snapshot backup action and the clone action, then afterthe client1 backup is completed, NetWorker clones the save sets for client1. When theclient2 backup completes, NetWorker clones the save sets for client2.
Data Protection Policies
42 NetWorker 18.1 Snapshot Management Integration Guide
Creating a check connectivity actionA check connectivity action tests the connectivity between the clients and theNetWorker server, usually before another action such as a backup occurs.
Before you begin
Create the policy and the workflow that contain the action. The check connectivityaction should be the first action in the workflow.
Procedure
1. In the expanded left pane, select the policy's workflow, and then perform one ofthe following tasks in the right pane to start the Policy Action wizard:
l If the action is the first action in the workflow, select Create a new action.
l If the workflow has other actions, right-click an empty area of the Actionspane, and then select New.
The Policy Action wizard opens on the Specify the Action Information page.
2. In the Name field, type the name of the action.
The maximum number of characters for the action name is 64.
3. In the Comment field, type a description for the action.
4. To ensure that the action runs when the policy or workflow that contains theaction is started, in the Enabled box, select the option. To prevent the actionfrom running when the policy or workflow that contains the action is started,clear this option.
Note
When you clear the Enabled option, actions that occurs after a disabled actiondo not start, even if the subsequent options are enabled.
5. From the Action Type list, select Check Connectivity.
6. If you create the action as part of the workflow configuration, the workflowappears automatically in the Workflow box and the box is dimmed.
7. Specify the order of the action in relation to other actions in the workflow:
l If the action is part of a sequence of actions in a workflow path, in thePrevious box, select the action that should precede this action.
l If the action should run concurrently with an action, in the Previous box,select the concurrent action, and then select the Concurrent checkbox.
8. Specify a weekly or monthly schedule for the action:
l To specify a schedule for each day of the week, select Weekly by day.
l To specify a schedule for each day of the month, select Monthly by day.
9. Specify the days to check connectivity with the client:
l To check connectivity on a specific day, click the Execute icon on the day.
l To skip a connectivity check on a specific day, click the Skip icon on theday.
l To check connectivity every day, select Execute from the list, and then clickMake All.
The following table provides details about the icons.
Data Protection Policies
Creating a check connectivity action 43
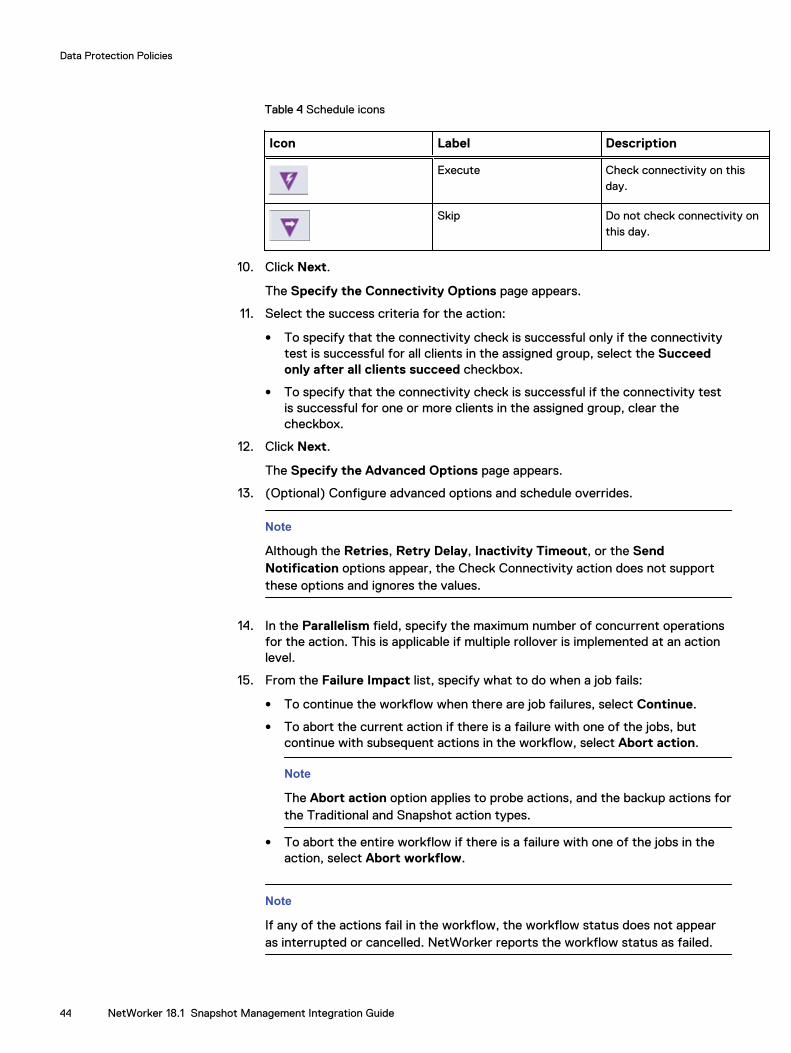
Table 4 Schedule icons
Icon Label Description
Execute Check connectivity on thisday.
Skip Do not check connectivity onthis day.
10. Click Next.
The Specify the Connectivity Options page appears.
11. Select the success criteria for the action:
l To specify that the connectivity check is successful only if the connectivitytest is successful for all clients in the assigned group, select the Succeedonly after all clients succeed checkbox.
l To specify that the connectivity check is successful if the connectivity testis successful for one or more clients in the assigned group, clear thecheckbox.
12. Click Next.
The Specify the Advanced Options page appears.
13. (Optional) Configure advanced options and schedule overrides.
Note
Although the Retries, Retry Delay, Inactivity Timeout, or the SendNotification options appear, the Check Connectivity action does not supportthese options and ignores the values.
14. In the Parallelism field, specify the maximum number of concurrent operationsfor the action. This is applicable if multiple rollover is implemented at an actionlevel.
15. From the Failure Impact list, specify what to do when a job fails:
l To continue the workflow when there are job failures, select Continue.
l To abort the current action if there is a failure with one of the jobs, butcontinue with subsequent actions in the workflow, select Abort action.
Note
The Abort action option applies to probe actions, and the backup actions forthe Traditional and Snapshot action types.
l To abort the entire workflow if there is a failure with one of the jobs in theaction, select Abort workflow.
Note
If any of the actions fail in the workflow, the workflow status does not appearas interrupted or cancelled. NetWorker reports the workflow status as failed.
Data Protection Policies
44 NetWorker 18.1 Snapshot Management Integration Guide
16. From the Soft Limit list, select the amount of time after the action starts tostop the initiation of new activities. The default value of 0 (zero) indicates noamount of time.
17. From the Hard Limit list, select the amount of time after the action starts tobegin terminating activities. The default value of 0 (zero) indicates no amountof time.
18. (Optional) In Start Time specify the time to start the action.
Use the spin boxes to set the hour and minute values, and select one of thefollowing options from the drop-down list:
l Disabled—Do not enforce an action start time. The action will start at thetime defined by the workflow.
l Absolute—Start the action at the time specified by the values in the spinboxes.
l Relative—Start the action after the period of time defined in the spin boxeshas elapsed after the start of the workflow.
19. (Optional) Configure overrides for the task that is scheduled on a specific day.
To specify the month, use the navigation buttons and the month list box. Tospecify the year, use the spin boxes. You can set an override in the followingways:
l Select the day in the calendar, which changes the action task for thespecific day.
l Use the action task list to select the task, and then perform one of thefollowing steps:
n To define an override that occurs on a specific day of the week, everyweek, select Specified day, and then use the lists. Click Add Rulesbased override.
n To define an override that occurs on the last day of the calendar month,select Last day of the month. Click Add Rules based override.
Note
n You can edit or add the rules in the Override field.
n To remove an override, delete the entry from the Override field.
20. Click Next.
The Action Configuration Summary page appears.
21. Review the settings that you specified for the action, and then click Configure.
After you finish
(Optional) Create one of the following actions to automatically occur after the checkconnectivity action:
l Probe
l Traditional backup
Note
This option is not available for NAS snapshot backups.
Data Protection Policies
Creating a check connectivity action 45
l Snapshot backup
Creating a probe actionA probe action runs a user-defined script on a NetWorker client before the start of abackup. A user-defined script is any program that passes a return code. If the returncode is 0 (zero), then a client backup is required. If the return code is 1, then a clientbackup is not required.
Before you begin
l Create the probe resource script on the NetWorker clients that use the probe.Create a client probe resource on the NetWorker server. Associate the clientprobe resource with the client resource on the NetWorker server.
l Create the policy and workflow that contain the action.
l Optional. Create a check connectivity action to precede the probe action in theworkflow. A check connectivity action is the only supported action that canprecede a probe action in a workflow.
Procedure
1. In the expanded left pane, select the policy's workflow, and then perform one ofthe following tasks in the right pane to start the Policy Action wizard:
l If the action is the first action in the workflow, select Create a new action.
l If the workflow has other actions, right-click an empty area of the Actionspane, and then select New.
The Policy Action wizard opens on the Specify the Action Information page.
2. In the Name field, type the name of the action.
The maximum number of characters for the action name is 64.
3. In the Comment field, type a description for the action.
4. To ensure that the action runs when the policy or workflow that contains theaction is started, in the Enabled box, select the option. To prevent the actionfrom running when the policy or workflow that contains the action is started,clear this option.
Note
When you clear the Enabled option, actions that occurs after a disabled actiondo not start, even if the subsequent options are enabled.
5. From the Action Type list, select Probe.
6. If you create the action as part of the workflow configuration, the workflowappears automatically in the Workflow box and the box is dimmed.
7. Specify the order of the action in relation to other actions in the workflow:
l If the action is part of a sequence of actions in a workflow path, in thePrevious box, select the action that should precede this action.
l If the action should run concurrently with an action, in the Previous box,select the concurrent action, and then select the Concurrent checkbox.
8. Specify a weekly or monthly schedule for the action:
l To specify a schedule for each day of the week, select Weekly by day.
Data Protection Policies
46 NetWorker 18.1 Snapshot Management Integration Guide
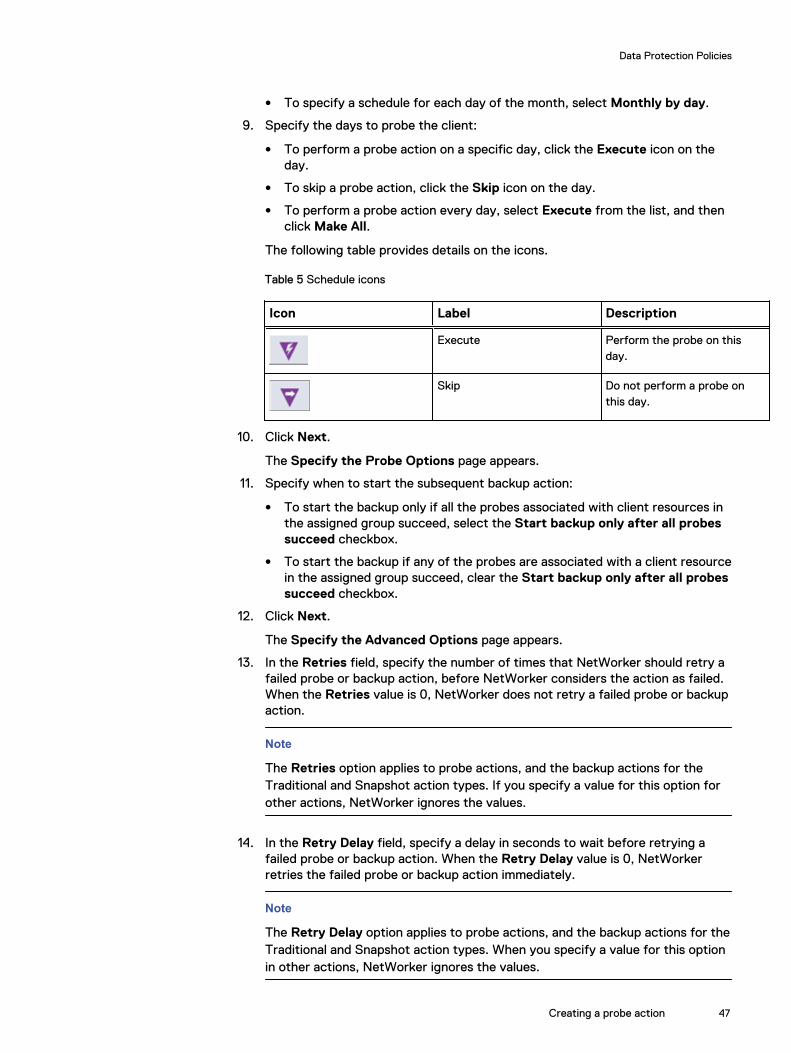
l To specify a schedule for each day of the month, select Monthly by day.
9. Specify the days to probe the client:
l To perform a probe action on a specific day, click the Execute icon on theday.
l To skip a probe action, click the Skip icon on the day.
l To perform a probe action every day, select Execute from the list, and thenclick Make All.
The following table provides details on the icons.
Table 5 Schedule icons
Icon Label Description
Execute Perform the probe on thisday.
Skip Do not perform a probe onthis day.
10. Click Next.
The Specify the Probe Options page appears.
11. Specify when to start the subsequent backup action:
l To start the backup only if all the probes associated with client resources inthe assigned group succeed, select the Start backup only after all probessucceed checkbox.
l To start the backup if any of the probes are associated with a client resourcein the assigned group succeed, clear the Start backup only after all probessucceed checkbox.
12. Click Next.
The Specify the Advanced Options page appears.
13. In the Retries field, specify the number of times that NetWorker should retry afailed probe or backup action, before NetWorker considers the action as failed.When the Retries value is 0, NetWorker does not retry a failed probe or backupaction.
Note
The Retries option applies to probe actions, and the backup actions for theTraditional and Snapshot action types. If you specify a value for this option forother actions, NetWorker ignores the values.
14. In the Retry Delay field, specify a delay in seconds to wait before retrying afailed probe or backup action. When the Retry Delay value is 0, NetWorkerretries the failed probe or backup action immediately.
Note
The Retry Delay option applies to probe actions, and the backup actions for theTraditional and Snapshot action types. When you specify a value for this optionin other actions, NetWorker ignores the values.
Data Protection Policies
Creating a probe action 47
15. In the Inactivity Timeout field, specify the maximum number of minutes that ajob run by an action can try to respond to the server.
If the job does not respond within the specified time, the server considers thejob a failure and NetWorker retries the job immediately to ensures that no timeis lost due to failures.
Increase the timeout value if a backup consistently stops due to inactivity.Inactivity might occur for backups of large save sets, backups of save sets withlarge sparse files, and incremental backups of many small static files.
Note
The Inactivity Timeout option applies to probe actions, and the backup actionsfor the Traditional and Snapshot action types. If you specify a value for thisoption in other actions, NetWorker ignores the value.
16. In the Parallelism field, specify the maximum number of concurrent operationsfor the action. This is applicable if multiple rollover is implemented at an actionlevel.
17. From the Failure Impact list, specify what to do when a job fails:
l To continue the workflow when there are job failures, select Continue.
l To abort the current action if there is a failure with one of the jobs, butcontinue with subsequent actions in the workflow, select Abort action.
Note
The Abort action option applies to probe actions, and the backup actions forthe Traditional and Snapshot action types.
l To abort the entire workflow if there is a failure with one of the jobs in theaction, select Abort workflow.
Note
If any of the actions fail in the workflow, the workflow status does not appearas interrupted or cancelled. NetWorker reports the workflow status as failed.
18. Do not change the default selections for the Notification group box. NetWorkerdoes not support notifications for probe actions and ignores and specifiedvalues.
19. From the Soft Limit list, select the amount of time after the action starts tostop the initiation of new activities. The default value of 0 (zero) indicates noamount of time.
20. From the Hard Limit list, select the amount of time after the action starts tobegin terminating activities. The default value of 0 (zero) indicates no amountof time.
21. (Optional) In Start Time specify the time to start the action.
Use the spin boxes to set the hour and minute values, and select one of thefollowing options from the drop-down list:
l Disabled—Do not enforce an action start time. The action will start at thetime defined by the workflow.
l Absolute—Start the action at the time specified by the values in the spinboxes.
Data Protection Policies
48 NetWorker 18.1 Snapshot Management Integration Guide
l Relative—Start the action after the period of time defined in the spin boxeshas elapsed after the start of the workflow.
22. (Optional) Configure overrides for the task that is scheduled on a specific day.
To specify the month, use the navigation buttons and the month list box. Tospecify the year, use the spin boxes. You can set an override in the followingways:
l Select the day in the calendar, which changes the action task for thespecific day.
l Use the action task list to select the task, and then perform one of thefollowing steps:
n To define an override that occurs on a specific day of the week, everyweek, select Specified day, and then use the lists. Click Add Rulesbased override.
n To define an override that occurs on the last day of the calendar month,select Last day of the month. Click Add Rules based override.
Note
n You can edit or add the rules in the Override field.
n To remove an override, delete the entry from the Override field.
23. Click Next.
The Action Configuration Summary page appears.
24. Review the settings that you specified for the action, and then click Configure.
Creating a snapshot backup actionA snapshot backup action performs a snapshot on a supported storage device, andthen generates a save set entry for the snapshot-based backup in the NetWorkermedia database.
Before you begin
l Create the policy and workflow that contain the action.
l (Optional) Create actions to precede the snapshot backup action. Supportedactions that can precede a snapshot backup include:
n Probe
n Check connectivity
Procedure
1. In the expanded left pane, select the policy's workflow, and then perform one ofthe following tasks in the right pane to start the Policy Action wizard:
l If the action is the first action in the workflow, select Create a new action.
l If the workflow has other actions, right-click an empty area of the Actionspane, and then select New.
The Policy Action wizard opens on the Specify the Action Information page.
2. From the Action Type list, select Backup.
3. From the secondary action list, select Snapshot.
Data Protection Policies
Creating a snapshot backup action 49
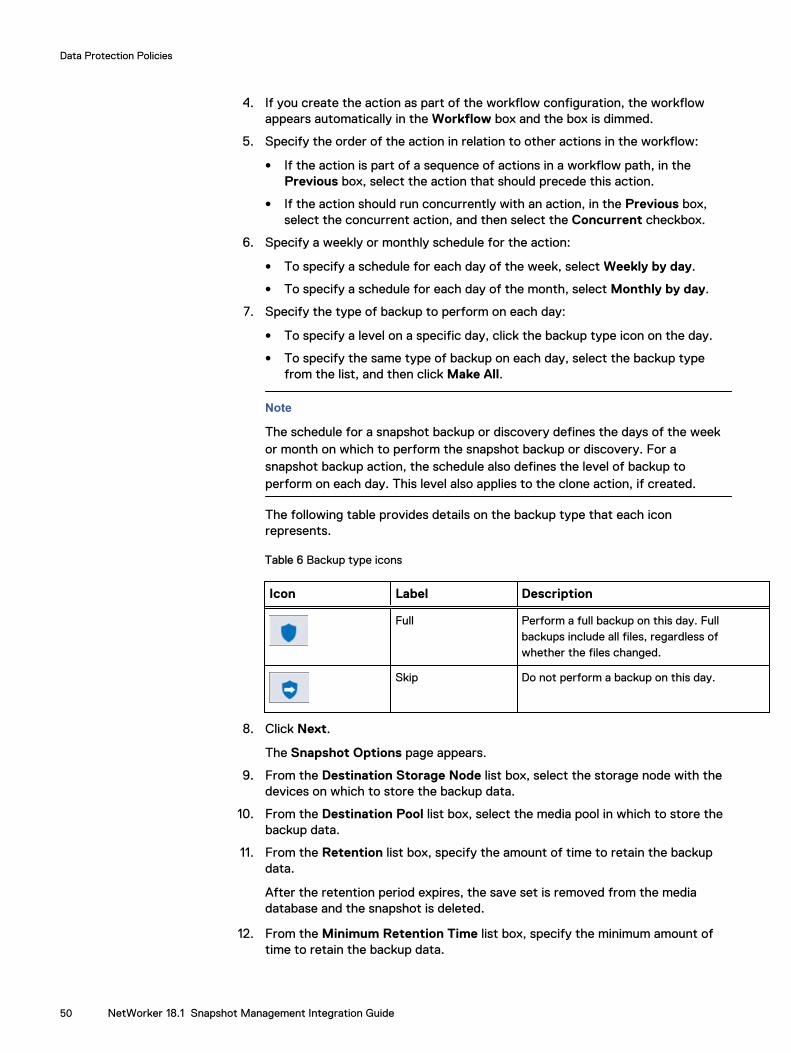
4. If you create the action as part of the workflow configuration, the workflowappears automatically in the Workflow box and the box is dimmed.
5. Specify the order of the action in relation to other actions in the workflow:
l If the action is part of a sequence of actions in a workflow path, in thePrevious box, select the action that should precede this action.
l If the action should run concurrently with an action, in the Previous box,select the concurrent action, and then select the Concurrent checkbox.
6. Specify a weekly or monthly schedule for the action:
l To specify a schedule for each day of the week, select Weekly by day.
l To specify a schedule for each day of the month, select Monthly by day.
7. Specify the type of backup to perform on each day:
l To specify a level on a specific day, click the backup type icon on the day.
l To specify the same type of backup on each day, select the backup typefrom the list, and then click Make All.
Note
The schedule for a snapshot backup or discovery defines the days of the weekor month on which to perform the snapshot backup or discovery. For asnapshot backup action, the schedule also defines the level of backup toperform on each day. This level also applies to the clone action, if created.
The following table provides details on the backup type that each iconrepresents.
Table 6 Backup type icons
Icon Label Description
Full Perform a full backup on this day. Fullbackups include all files, regardless ofwhether the files changed.
Skip Do not perform a backup on this day.
8. Click Next.
The Snapshot Options page appears.
9. From the Destination Storage Node list box, select the storage node with thedevices on which to store the backup data.
10. From the Destination Pool list box, select the media pool in which to store thebackup data.
11. From the Retention list box, specify the amount of time to retain the backupdata.
After the retention period expires, the save set is removed from the mediadatabase and the snapshot is deleted.
12. From the Minimum Retention Time list box, specify the minimum amount oftime to retain the backup data.
Data Protection Policies
50 NetWorker 18.1 Snapshot Management Integration Guide
After the specified amount of time, an in-progress snapshot action can removethe snapshot from the storage device to ensure that there sufficient disk spaceis available for the new snapshot.
13. Click Next.
The Specify the Advanced Options page appears.
14. In the Retries field, specify the number of times that NetWorker should retry afailed probe or backup action, before NetWorker considers the action as failed.When the Retries value is 0, NetWorker does not retry a failed probe or backupaction.
Note
The Retries option applies to probe actions, and the backup actions for theTraditional and Snapshot action types. If you specify a value for this option forother actions, NetWorker ignores the values.
15. In the Retry Delay field, specify a delay in seconds to wait before retrying afailed probe or backup action. When the Retry Delay value is 0, NetWorkerretries the failed probe or backup action immediately.
Note
The Retry Delay option applies to probe actions, and the backup actions for theTraditional and Snapshot action types. When you specify a value for this optionin other actions, NetWorker ignores the values.
16. In the Inactivity Timeout field, specify the maximum number of minutes that ajob run by an action can try to respond to the server.
If the job does not respond within the specified time, the server considers thejob a failure and NetWorker retries the job immediately to ensures that no timeis lost due to failures.
Increase the timeout value if a backup consistently stops due to inactivity.Inactivity might occur for backups of large save sets, backups of save sets withlarge sparse files, and incremental backups of many small static files.
Note
The Inactivity Timeout option applies to probe actions, and the backup actionsfor the Traditional and Snapshot action types. If you specify a value for thisoption in other actions, NetWorker ignores the value.
17. In the Parallelism field, specify the maximum number of concurrent operationsfor the action. This is applicable if multiple rollover is implemented at an actionlevel.
18. From the Failure Impact list, specify what to do when a job fails:
l To continue the workflow when there are job failures, select Continue.
l To abort the current action if there is a failure with one of the jobs, butcontinue with subsequent actions in the workflow, select Abort action.
Data Protection Policies
Creating a snapshot backup action 51
Note
The Abort action option applies to probe actions, and the backup actions forthe Traditional and Snapshot action types.
l To abort the entire workflow if there is a failure with one of the jobs in theaction, select Abort workflow.
Note
If any of the actions fail in the workflow, the workflow status does not appearas interrupted or cancelled. NetWorker reports the workflow status as failed.
19. From the Send Notifications list box, select whether to send notifications forthe action:
l To use the notification configuration that is defined in the Policy resource tosend the notification, select Set at policy level.
l To send a notification on completion of the action, select On Completion.
l To send a notification only if the action fails to complete, select On Failure.
20. In the Send notification attribute, when you select the On Completion optionor On failure option, the Command box appears. Use this box to configure howNetWorker sends the notifications. You can use the nsrlog command to sendthe notifications to a log file or you can send an email notification.
The default notification action is to send the information to thepolicy_notifications.log file. By default, thepolicy_notifications.log file is located in the /nsr/logs directory onLinux and in the C:\Program Files\EMC NetWorker\nsr\logs folder onWindows.
Use the default mailer program on Linux to send email messages or thesmtpmail application on Windows:
l To send notifications to a file, type the following command, wherepolicy_notifications.log is the name of the file:
nsrlog -f policy_notifications.logl On Linux, to send an email notification, type the following command:
mail -s subject recipientl On Window, to send a notification email, type the following command:
smtpmail -s subject -h mailserver recipient1@mailserverrecipient2@mailserver...
where:
n -s subject—Includes a standard email header with the message andspecifies the subject text for that header. Without this option, thesmtpmail program assumes that the message contains a correctlyformatted email header and nothing is added.
n -h mailserver—Specifies the hostname of the mail server to use torelay the SMTP email message.
n recipient1@mailserver—Is the email address of the recipient of thenotification. Multiple email recipients are separated by a space.
Data Protection Policies
52 NetWorker 18.1 Snapshot Management Integration Guide
21. From the Soft Limit list, select the amount of time after the action starts tostop the initiation of new activities. The default value of 0 (zero) indicates noamount of time.
22. From the Hard Limit list, select the amount of time after the action starts tobegin terminating activities. The default value of 0 (zero) indicates no amountof time.
23. Click Next.
The Action Configuration Summary page appears.
24. Review the settings that you specified for the action, and then click Configure.
Creating a clone actionA clone action creates a copy of one or more save sets. Cloning allows for secureoffsite storage, the transfer of data from one location to another, and the verificationof backups.
Procedure
1. In the expanded left pane, select the policy's workflow, and then perform one ofthe following tasks in the right pane to start the Policy Action wizard:
l If the action is the first action in the workflow, select Create a new action.
l If the workflow has other actions, right-click an empty area of the Actionspane, and then select New.
The Policy Action wizard opens on the Specify the Action Information page.
2. In the Name field, type the name of the action.
The maximum number of characters for the action name is 64.
3. In the Comment field, type a description for the action.
4. To ensure that the action runs when the policy or workflow that contains theaction is started, in the Enabled box, select the option. To prevent the actionfrom running when the policy or workflow that contains the action is started,clear this option.
Note
When you clear the Enabled option, actions that occurs after a disabled actiondo not start, even if the subsequent options are enabled.
5. From the Action Type list, select Clone.
6. If you create the action as part of the workflow configuration, the workflowappears automatically in the Workflow box and the box is dimmed.
7. Specify the order of the action in relation to other actions in the workflow:
l If the action is part of a sequence of actions in a workflow path, in thePrevious box, select the action that should precede this action.
l If the action should run concurrently with an action, in the Previous box,select the concurrent action, and then select the Concurrent checkbox.
8. Specify a weekly or monthly schedule for the action:
l To specify a schedule for each day of the week, select Weekly by day.
l To specify a schedule for each day of the month, select Monthly by day.
Data Protection Policies
Creating a clone action 53
9. Specify the days to perform cloning:
l To clone on a specific day, click the Execute icon on the day.
l To skip a clone on a specific day, click the Skip icon on the day.
l To check connectivity every day, select Execute from the list, and then clickMake All.
The following table provides details on the icons.
Table 7 Schedule icons
Icon Label Description
Execute Perform cloning on this day.
Skip Do not perform cloning onthis day.
10. Click Next.
The Specify the Clone Options page appears.
11. In the Data Movement section, define the volumes and devices to whichNetWorker sends the cloned data:
a. From the Destination Storage Node list, select the storage node with thedevices on which to store the cloned save sets.
b. In the Delete source save sets after clone completes box, select theoption to instruct NetWorker to move the data from the source volume tothe destination volume after clone operation completes. This is equivalent tostaging the save sets.
c. From the Destination Pool list, select the target media pool for the clonedsave sets.
d. From the Retention list, specify the amount of time to retain the clonedsave sets.
After the retention period expires, the save sets are marked as recyclableduring an expiration server maintenance task.
12. In the Filters section, define the criteria that NetWorker uses to create the listof eligible save sets to clone. The eligible save sets must match therequirements that are defined in each filter. NetWorker provides the followingfilter options:
a. Time filter—In the Time section, specify the time range in which NetWorkersearches for eligible save sets to clone in the media database. Use the spinboxes to specify the start time and the end time. The Time filter list includesthe following options to define how NetWorker determines save seteligibility, based on the time criteria:
l Do Not Filter—NetWorker inspects the save sets in the media databaseto create a clone save set list that meets the time filter criteria.
l Accept—The clone save set list includes save sets that are saved withinthe time range and meet all the other defined filter criteria.
l Reject—The clone save set list does not include save sets that are savedwithin the time range and meet all the other defined filter criteria.
Data Protection Policies
54 NetWorker 18.1 Snapshot Management Integration Guide
b. Save Set filter—In the Save Set section, specify whether to include orexclude ProtectPoint and Snapshot save sets, when NetWorker searches foreligible save sets to clone in the media database. The Save Set filter listincludes to the following options define how NetWorker determines save seteligibility, based on the save set filter criteria:
l Do Not Filter—NetWorker inspects the save sets in the media databaseto create a clone save set list that meets the save set filter criteria.
l Accept—The clone save set list includes eligible ProtectPoint save setsor Snapshot save sets, when you also enable the ProtectPoint checkboxor Snapshot checkbox.
l Reject—The clone save set list does not include eligible ProtectPointsave sets and Snapshot save sets when you also enable the ProtectPointcheckbox or Snapshot checkbox.
Note
For NAS device, only Snapshot save set is applicable.
c. Clients filter—In the Client section, specify a list of clients to include orexclude, when NetWorker searches for eligible save sets to clone in themedia database. The Client filter list includes the following options, whichdefine how NetWorker determines save set eligibility, based on the clientfilter criteria:
l Do Not Filter—NetWorker inspects the save sets that are associatedwith the clients in the media database, to create a clone save set list thatmeets the client filter criteria.
l Accept—The clone save set list includes eligible save sets for theselected clients.
l Reject—The clone save set list does not include eligible save sets for theselected clients.
d. Levels filter—In the Levels section, specify a list of backup levels to includeor exclude, when NetWorker searches for eligible save sets to clone in themedia database. The Levels filter list includes the following options definehow NetWorker determines save set eligibility, based on the level filtercriteria:
l Do Not Filter—NetWorker inspects the save sets regardless of the levelin the media database, to create a clone save set list that meets all thelevel filter criteria.
l Accept—The clone save set list includes eligible save sets with theselected backup levels.
l Reject—The clone save set list does not include eligible save sets withthe selected backup levels.
Note
For NAS device, only full backup level is applicable.
13. Click Next.
The Specify the Advanced Options page appears.
14. Configure advanced options, including notifications and schedule overrides.
Data Protection Policies
Creating a clone action 55
Note
Although the Retries, Retry Delay, or the Inactivity Timeout options appear,the clone action does not support these options and ignores the values.
15. In the Parallelism field, specify the maximum number of concurrent operationsfor the action. This is applicable if multiple rollover is implemented at an actionlevel.
16. From the Failure Impact list, specify what to do when a job fails:
l To continue the workflow when there are job failures, select Continue.
l To abort the current action if there is a failure with one of the jobs, butcontinue with subsequent actions in the workflow, select Abort action.
Note
The Abort action option applies to probe actions, and the backup actions forthe Traditional and Snapshot action types.
l To abort the entire workflow if there is a failure with one of the jobs in theaction, select Abort workflow.
Note
If any of the actions fail in the workflow, the workflow status does not appearas interrupted or cancelled. NetWorker reports the workflow status as failed.
17. From the Send Notifications list box, select whether to send notifications forthe action:
l To use the notification configuration that is defined in the Policy resource tosend the notification, select Set at policy level.
l To send a notification on completion of the action, select On Completion.
l To send a notification only if the action fails to complete, select On Failure.
18. In the Send notification attribute, when you select the On Completion optionor On failure option, the Command box appears. Use this box to configure howNetWorker sends the notifications. You can use the nsrlog command to sendthe notifications to a log file or you can send an email notification.
The default notification action is to send the information to thepolicy_notifications.log file. By default, thepolicy_notifications.log file is located in the /nsr/logs directory onLinux and in the C:\Program Files\EMC NetWorker\nsr\logs folder onWindows.
Use the default mailer program on Linux to send email messages or thesmtpmail application on Windows:
l To send notifications to a file, type the following command, wherepolicy_notifications.log is the name of the file:
nsrlog -f policy_notifications.logl On Linux, to send an email notification, type the following command:
mail -s subject recipient
Data Protection Policies
56 NetWorker 18.1 Snapshot Management Integration Guide
l For NetWorker Virtual Edition (NVE), to send an email notification, type thefollowing command:
/usr/sbin/sendmail -v recipient_email "subject_text"l On Window, to send a notification email, type the following command:
smtpmail -s subject -h mailserver recipient1@mailserverrecipient2@mailserver...
where:
n -s subject—Includes a standard email header with the message andspecifies the subject text for that header. Without this option, thesmtpmail program assumes that the message contains a correctlyformatted email header and nothing is added.
n -h mailserver—Specifies the hostname of the mail server to use torelay the SMTP email message.
n recipient1@mailserver—Is the email address of the recipient of thenotification. Multiple email recipients are separated by a space.
19. From the Soft Limit list, select the amount of time after the action starts tostop the initiation of new activities. The default value of 0 (zero) indicates noamount of time.
20. From the Hard Limit list, select the amount of time after the action starts tobegin terminating activities. The default value of 0 (zero) indicates no amountof time.
21. (Optional) In the Start Time option, specify the time to start the action.
Use the spin boxes to set the hour and minute values, and select one of thefollowing options from the list box:
l Disabled—Do not enforce an action start time. The action will start at thetime defined by the workflow.
l Absolute—Start the action at the time specified by the values in the spinboxes.
l Relative—Start the action after the period of time defined in the spin boxeshas elapsed after the start of the workflow.
22. (Optional) Configure overrides for the task that is scheduled on a specific day.
To specify the month, use the navigation buttons and the month list box. Tospecify the year, use the spin boxes. You can set an override in the followingways:
l Select the day in the calendar, which changes the action task for thespecific day.
l Use the action task list to select the task, and then perform one of thefollowing steps:
n To define an override that occurs on a specific day of the week, everyweek, select Specified day, and then use the lists. Click Add Rulesbased override.
n To define an override that occurs on the last day of the calendar month,select Last day of the month. Click Add Rules based override.
Data Protection Policies
Creating a clone action 57
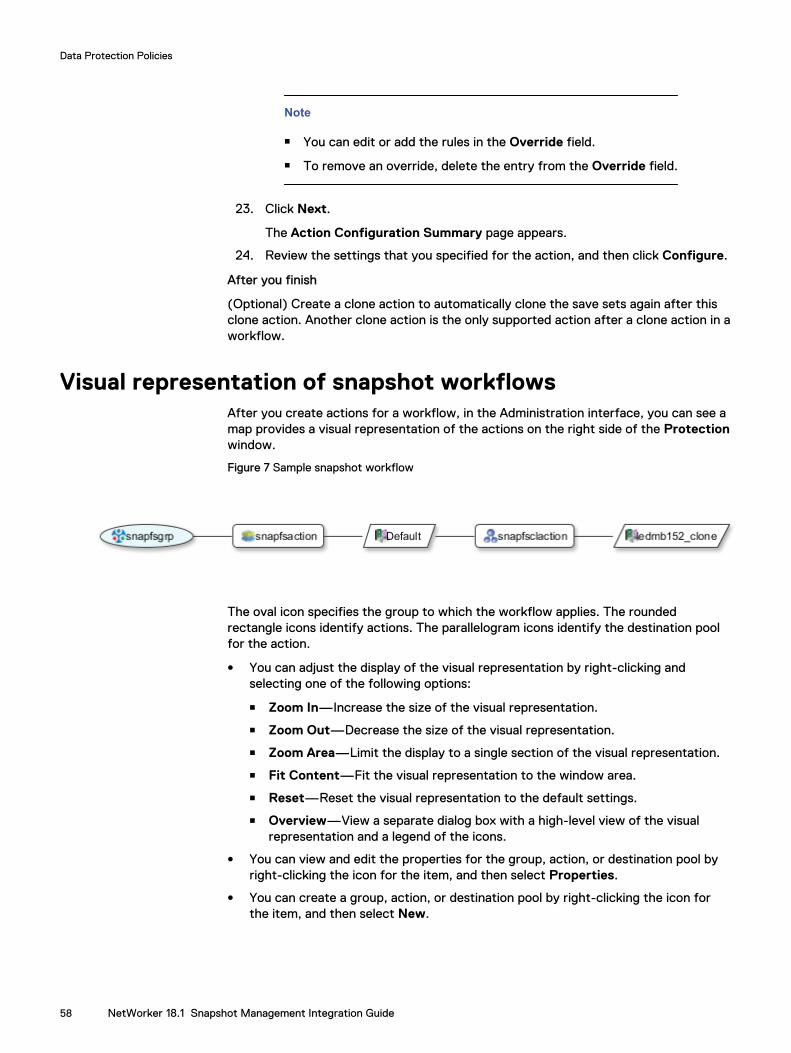
Note
n You can edit or add the rules in the Override field.
n To remove an override, delete the entry from the Override field.
23. Click Next.
The Action Configuration Summary page appears.
24. Review the settings that you specified for the action, and then click Configure.
After you finish
(Optional) Create a clone action to automatically clone the save sets again after thisclone action. Another clone action is the only supported action after a clone action in aworkflow.
Visual representation of snapshot workflowsAfter you create actions for a workflow, in the Administration interface, you can see amap provides a visual representation of the actions on the right side of the Protectionwindow.
Figure 7 Sample snapshot workflow
The oval icon specifies the group to which the workflow applies. The roundedrectangle icons identify actions. The parallelogram icons identify the destination poolfor the action.
l You can adjust the display of the visual representation by right-clicking andselecting one of the following options:
n Zoom In—Increase the size of the visual representation.
n Zoom Out—Decrease the size of the visual representation.
n Zoom Area—Limit the display to a single section of the visual representation.
n Fit Content—Fit the visual representation to the window area.
n Reset—Reset the visual representation to the default settings.
n Overview—View a separate dialog box with a high-level view of the visualrepresentation and a legend of the icons.
l You can view and edit the properties for the group, action, or destination pool byright-clicking the icon for the item, and then select Properties.
l You can create a group, action, or destination pool by right-clicking the icon forthe item, and then select New.
Data Protection Policies
58 NetWorker 18.1 Snapshot Management Integration Guide
CHAPTER 3
Software Configuration
This chapter includes the following topics:
l Backup group resource migration.......................................................................60l Roadmap for snapshot configurations................................................................62l Snapshot configuration prerequisites.................................................................63l Configuring the user privileges...........................................................................65l Configuring snapshot backups with the client wizard.........................................66l Configuring snapshot backups manually.............................................................72l Configuring the Application Information variables.............................................. 74l Configuring preprocessing and postprocessing scripts.......................................74
Software Configuration 59
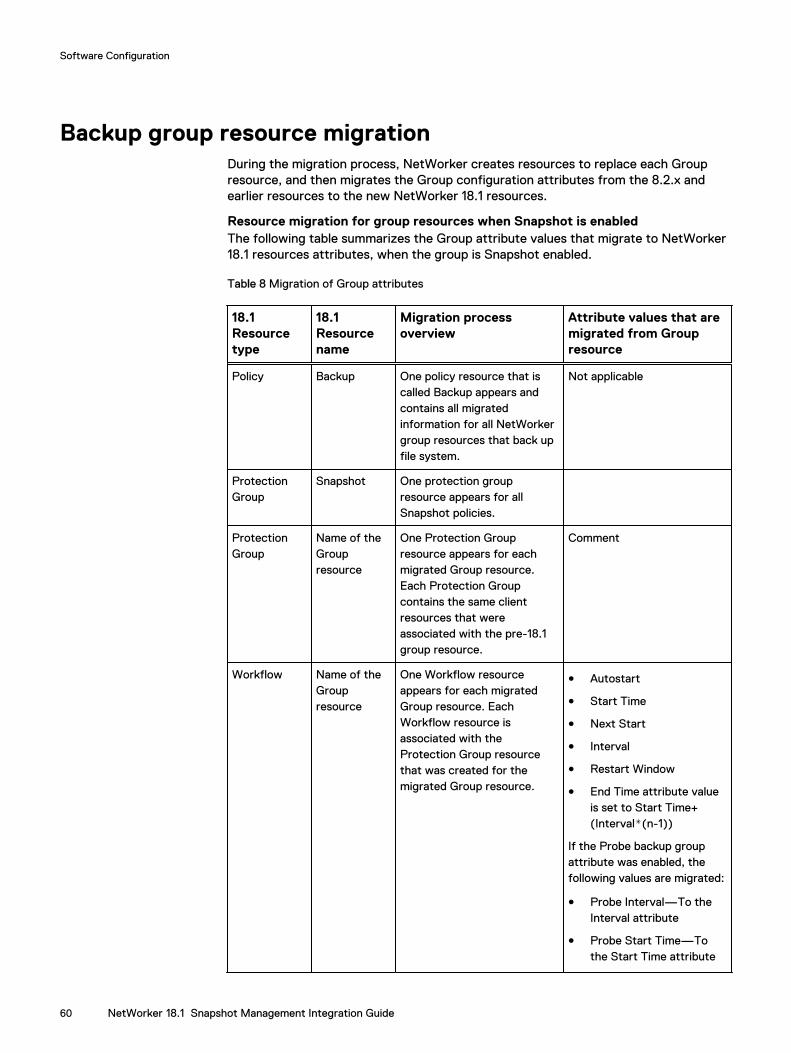
Backup group resource migrationDuring the migration process, NetWorker creates resources to replace each Groupresource, and then migrates the Group configuration attributes from the 8.2.x andearlier resources to the new NetWorker 18.1 resources.
Resource migration for group resources when Snapshot is enabledThe following table summarizes the Group attribute values that migrate to NetWorker18.1 resources attributes, when the group is Snapshot enabled.
Table 8 Migration of Group attributes
18.1Resourcetype
18.1Resourcename
Migration processoverview
Attribute values that aremigrated from Groupresource
Policy Backup One policy resource that iscalled Backup appears andcontains all migratedinformation for all NetWorkergroup resources that back upfile system.
Not applicable
ProtectionGroup
Snapshot One protection groupresource appears for allSnapshot policies.
ProtectionGroup
Name of theGroupresource
One Protection Groupresource appears for eachmigrated Group resource.Each Protection Groupcontains the same clientresources that wereassociated with the pre-18.1group resource.
Comment
Workflow Name of theGroupresource
One Workflow resourceappears for each migratedGroup resource. EachWorkflow resource isassociated with theProtection Group resourcethat was created for themigrated Group resource.
l Autostart
l Start Time
l Next Start
l Interval
l Restart Window
l End Time attribute valueis set to Start Time+(Interval*(n-1))
If the Probe backup groupattribute was enabled, thefollowing values are migrated:
l Probe Interval—To theInterval attribute
l Probe Start Time—Tothe Start Time attribute
Software Configuration
60 NetWorker 18.1 Snapshot Management Integration Guide
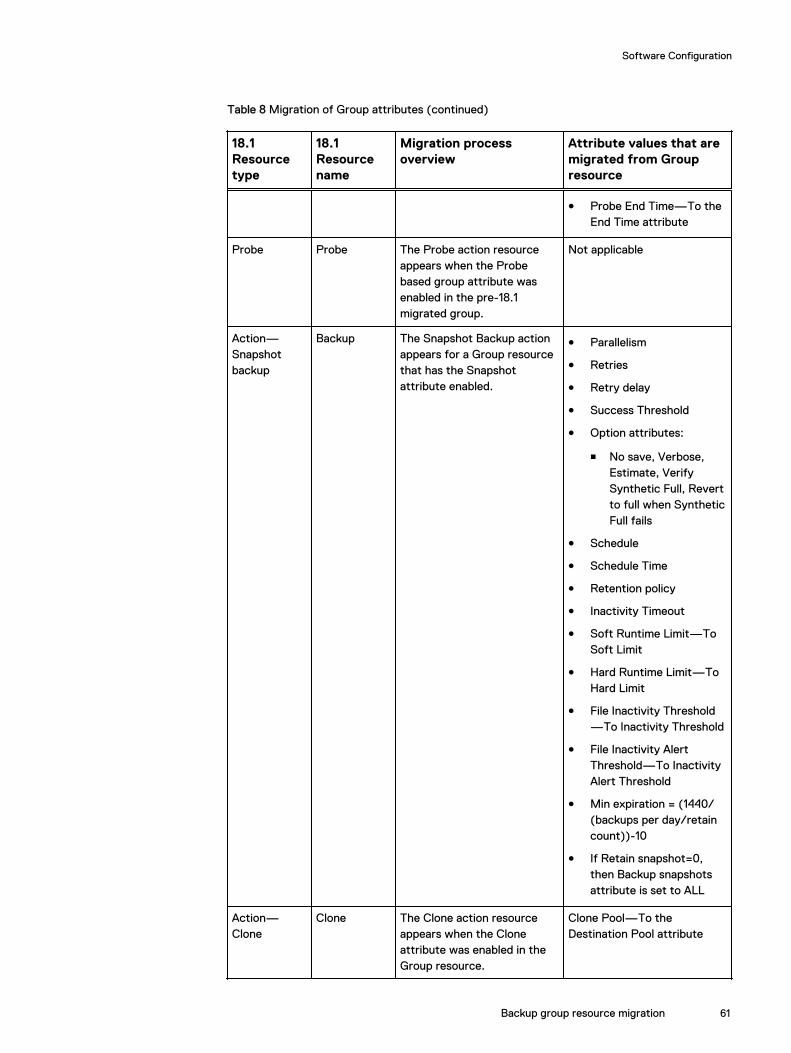
Table 8 Migration of Group attributes (continued)
18.1Resourcetype
18.1Resourcename
Migration processoverview
Attribute values that aremigrated from Groupresource
l Probe End Time—To theEnd Time attribute
Probe Probe The Probe action resourceappears when the Probebased group attribute wasenabled in the pre-18.1migrated group.
Not applicable
Action—Snapshotbackup
Backup The Snapshot Backup actionappears for a Group resourcethat has the Snapshotattribute enabled.
l Parallelism
l Retries
l Retry delay
l Success Threshold
l Option attributes:
n No save, Verbose,Estimate, VerifySynthetic Full, Revertto full when SyntheticFull fails
l Schedule
l Schedule Time
l Retention policy
l Inactivity Timeout
l Soft Runtime Limit—ToSoft Limit
l Hard Runtime Limit—ToHard Limit
l File Inactivity Threshold—To Inactivity Threshold
l File Inactivity AlertThreshold—To InactivityAlert Threshold
l Min expiration = (1440/(backups per day/retaincount))-10
l If Retain snapshot=0,then Backup snapshotsattribute is set to ALL
Action—Clone
Clone The Clone action resourceappears when the Cloneattribute was enabled in theGroup resource.
Clone Pool—To theDestination Pool attribute
Software Configuration
Backup group resource migration 61
Note
The NetWorker Updating from a Previous Release Guide provides details aboutresources that are migrated during the update process.
Considerations about migration
1. A clone action is created for every backup action. The clone action movessnapshot data to media.
2. A NetWorker 8.2.x snapshot policy resource that was configured for nth snapshotis not migrated to NetWorker 18.1, and a clone action is not created.For example, for a NetWorker 8.2.2 snapshot policy of 1-1-day-All resolves to take1 snapshot, retain 1, expire snapshots every day, and rollover the data to therollover device. After the migration a clone action is created to backup everysnapshot. This means the rollover action in 8.2.x translates to a clone action in9.2.x and later.
3. Each backup action within snapshot policy is followed by a clone action. Cloneactions have filtering options. Check whether filtering meets the backuprequirements of NetWorker Snapshot Management.
Roadmap for snapshot configurationsThe following high-level road map outlines the sequence of NetWorker snapshotconfiguration tasks that you must perform.
1. Verify the configuration prerequisites.Snapshot configuration prerequisites on page 63 provides details.
2. Configure the user privileges on the application host and the storage node.Configuring the user privileges on page 65 provides details.
3. Configure the NetWorker client for snapshots by using the Client ConfigurationWizard or the manual method. The following topics provide details:
l Configuring snapshot backups with the client wizard
l Configuring snapshot backups manually
4. Configure any necessary Application Information variables.Configuring the Application Information variables provides details.
5. Configure any necessary preprocessing or postprocessing scripts.Configuring preprocessing and postprocessing scripts provides details.
6. Based on the array or appliance that you use for snapshot backups, follow theappropriate configuration instructions:
l Configuring snapshots on VMAX Storage Arrays
l Configuring NetWorker ProtectPoint, RecoverPoint and VMAX devices andpool with the wizard on page 83
l Configuring snapshots on VNX Block Storage Arrays on page 111
l Configuring snapshots on RecoverPoint on page 117
l Configuring snapshots in a Cluster Environment
7. Test the configuration.
Software Configuration
62 NetWorker 18.1 Snapshot Management Integration Guide

Snapshot configuration prerequisitesVerify the basic compatibility of all systems used for NetWorker snapshot operations. Components of the snapshot environment provides details.
The following sections describe the prerequisites for the hosts involved in NetWorkersnapshot operations.
Storage array specific prerequisitesEnsure that you install the application host and the mount host with the prerequisitesoftware for the storage array that you use for NetWorker snapshot operations:
l VMAX storage array must have the following software installed:
n Solutions Enabler on the application host and (if cloning snapshots) theNetWorker server.
l VNX Block storage array must have the following software installed:
n Unisphere® host agent, also known as Navisphere®, on the application hostand the mount host.—The agent synchronizes the host device with the VNXdevices. NetWorker also uses the agent to determine whether the LUNs arevisible on the application host or the mount host.
n SnapCli on the mount host and optionally on the application host—This CLI isresponsible for making the VNX snapshot LUN visible to the mount host.
n AdmSnap on the mount host and optionally on the application host—This CLI isresponsible for making the SnapView snapshot LUN visible to the mount host.
n AdmHost on the mount host for Microsoft Windows systems only—This CLI isresponsible for activating and mapping the SnapView clone to a specific driveletter on a Microsoft Windows mount host.
n Naviseccli or UEMCLI on the application host and the mount host—This CLI isresponsible for LUN discover and snapshot sync/split operations. TheNetWorker Online Software Compatibility Matrix provides more details.
n UEMCLI on the mount host and application host—This CLI is used for laterVNX releases and replaces other CLI. Check the array specific requirements.
n For snapshot (COW) backups, create the snapshot in advance on the VNX andmount the snapshot to the proxy host. This is a mandatory setting, if you donot perform this requisite, the backup fails.
n For clone (MIRROR) backups, create the clone on the VNX. The clone groupshould be in a synchronized state. The clone must be mounted to the proxyhost. This is a mandatory setting, if you do not perform this requisite, thebackup fails.
n For VNX -snap backups, create the snapshot mount point on the source LUN,mount the snapshot to the proxy host. This is a mandatory setting, if you donot perform this requisite, the backup fails.
l RecoverPoint appliance must have the following software installed:
n For RecoverPoint 4.0 and later, Solutions Enabler is not required.
n RecoverPoint Continuous Data Protection (CDP), Continuous LocalReplication, and RecoverPoint Continuous Remote Replication (CRR)configured on the RecoverPoint appliance.
Software Configuration
Snapshot configuration prerequisites 63
The support matrix for the storage array or appliance that you use, available from theSupport website, provides details on system and software requirements.
Application host prerequisitesVerify the following prerequisites before you configure the application host forsnapshot operations:
l The application host has installed the supported NetWorker client and NetWorkerextended client software.
l The application host has the support NetWorker Module for Databases andApplications (NMDA) and NetWorker Module for SAP (NMSAP) software, if it isprotecting DB2, Oracle, or SAP with Oracle.
l The NetWorker server recognizes the application host as a client.
l The application host has completed at least one successful NetWorker backup.
l Synchronize the application host system clock with the mount host system clock.
l Set up the application host connection to the storage array:
n VMAX, VNX, and XtremIO storage arrays, by themselves or with aRecoverPoint appliance, require a SAN connection. For a VMware guest OS,the source and target LUNs are visible as raw device mapped (RDM). VMAXsupports both iSCSI and traditional device mapping. VNX, VNX2, VNX2e, andXtremIO only support RDM via iSCSI.
n A RecoverPoint, XtremIO, and VNX appliance also require a LAN connection forcommunication with the application host.
l The volume or device pathnames of the production LUNs on the storage array arevisible to the application host.
l If you use a separate mount host, then the volume or device pathnames of themirror (target) LUNs on the array are visible to the mount host.
Mount host prerequisitesA NetWorker client must mount the storage array volumes for the snapshot restore orclone operations to conventional media. You can configure any of the following hostsas a mount host:
l Local application host
l NetWorker storage node
l Remote NetWorker client host
The choice of mount host depends on the storage network configuration. A well-planned configuration considers the data processing speed and the bandwidth load onthe different possible hosts.
Before you configure the mount host for snapshot operations, ensure that youperform the following prerequisites:
l Confirm that the mount host runs the same versions of the operating system andthe volume manager (if any) as the application host.
l Install the NetWorker client and NetWorker extended client software.
l Ensure that a NetWorker server recognizes the mount host as a client.
l Synchronize the system clock of the mount host with the system clock of theapplication host.
Software Configuration
64 NetWorker 18.1 Snapshot Management Integration Guide
l Set up the mount host connection to the storage array:
n VMAX, VNX, and XtremIO storage arrays, by themselves or with aRecoverPoint appliance, require a SAN connection.
n A RecoverPoint, VNX, and XtremIO appliance also require a LAN connection forcommunication with the mount host.
l The volume or device pathnames of the snapshot target LUNs on the storagearray are visible to the mount host.
Note
Windows supports 26 drive letters (A to Z). NetWorker Snapshot Management(NSM) uses a drive letter when it mounts target volumes for restoring or moving datato media. If the mount host does not have enough available drive letters to mount allthe target volumes, then the operations use Windows mount points to mount thetarget volumes.
Storage node prerequisitesIf you plan to clone the snapshot save sets to conventional storage media, then use aNetWorker storage node as the mount host.
Note
If you prefer to perform clones by using the local application host as the mount host,consider upgrading the NetWorker client on the application host to a NetWorkerstorage node.
Ensure that you complete the following prerequisites:
l NetWorker storage node 18.1 or later software is installed.
l Backup storage devices are configured on the storage node for the cloneoperations.
Configuring the user privilegesSpecify the NetWorker User Groups privileges on the application host and the mounthost for snapshot operations.
Procedure
1. Run NMC, and in the Enterprise view, select the NetWorker server thatmanages the snapshots, and then select Enterprise > Launch Application.
2. On the Server tab, in the resources tree, click User Groups.
3. In the User Groups table, right-click the group that you want to modify andselect Properties.
4. In the Users attribute, to specify the user as root, administrator, or system onthe application host and the mount host, type the following information:
l Microsoft Windows systems:
user=administrator,host=application_hostnameuser=administrator,host=mount_hostnameuser=system,host=application_hostnameuser=system,host=mount_hostname
Software Configuration
Storage node prerequisites 65
l UNIX systems:
user=root,host=application_hostnameuser=root,host=mount_hostname
5. In the Privileges attribute, select Operate NetWorker.
Note
The Operate NetWorker privilege can require the selection of additionalprivileges as indicated in a pop-up message.
6. Click OK.
Configuring snapshot backups with the client wizardThe NMC Client Configuration Wizard helps you to configure a client resource forsnapshot, clone, and backup operations.
Before you begin
Ensure that the system meets the necessary prerequisites. Snapshot configurationprerequisites on page 63 provides details.
Note
The following steps are only required for scheduled backups not using theProtectPoint workflow. NetWorker also supports client-initiated ProtectPointbackups, and the following steps are not required if you perform only a client-initiatedor manual backup.
Procedure
1. Run NMC, and in the Enterprise view, select the NetWorker server thatmanages the snapshots, and select Enterprise > Launch Application.
2. In the NetWorker server’s Protection view, in the navigation tree, right-clickClients, and then select New Client Wizard.
3. The wizard displays the Specify Client Information page. Complete thefollowing fields:
a. In the Client Name field, type the hostname of the application host on whichNetWorker captures in the snapshots.
b. (Optional) In the Comment box, add notes for the Client.
c. (Optional) In the Tag box, type one or more tags to identify this Clientresource for the creation of dynamic client groups for data protectionpolicies. The tags are user defined.
Type each tag on a separate line.
d. To add the current client to an existing group of clients that use the sameworkflow for snapshot, clone, or backup actions, from the Group list selectthe group.
Alternatively, you can add the client to one or more groups later, after youcomplete the wizard.
e. In the Type area, select Traditional.
Software Configuration
66 NetWorker 18.1 Snapshot Management Integration Guide
f. Click Next.
4. The Specify Backup Configuration Type page displays. Complete thefollowing fields:
a. In the Available Applications table, you can select Filesystem, SmartSnapor another supported NetWorker application type that is installed on theclient.
The SmartSnap option allows you to specify array LUNs World Wide Names(WWNs).
Note
If you select SmartSnap the Enable NetWorker Snapshot Managementon the selected application is automatically selected. Also, the SmartSnapLUN does not need to be mounted or visible to the host.
b. Select Enable NetWorker Snapshot Management on the selectedapplication.
c. Click Next.
5. The Select the Snapshot Management Options page displays. Complete thefollowing fields:
a. Select the type of storage array or storage appliance that the client uses forprimary storage and where the snapshots are created. Only storage arraysthat are compatible with NetWorker and the client operating system appear.The options are:
l VMAX/Symmetrix
l ProtectPoint for VMAX3
l ProtectPoint for RecoverPoint
l VNX/CLARiiON
l RecoverPoint
l XtremIO
Note
SmartSnap is only supported for VMAX/Symmetrix and ProtectPoint forVMAX3.
b. To use the application host as the snapshot mount host, select Use thecurrent client as the mount host.
If the selected array supports the use of the current client as the mount hostfor the backup type, NetWorker mounts the array’s mirror volume on thecurrent host for snapshot restore operations and for clone actions.Otherwise, the wizard uses the storage node that you select on this page asthe mount host. The mount host must use the same operating system as thecurrent client host.
Software Configuration
Configuring snapshot backups with the client wizard 67
Note
Alternatively, you can manually create a NetWorker Client resource on adifferent host and specify this host as the value ofNSR_DATA_MOVER=hostname. NetWorker uses this host as the mounthost, eliminating the need to have a storage node or the application host asthe mount host. Common Application Information variables provides details.
c. From the drop-down list, select the hostname of the NetWorker storagenode.
d. Click Next.
Note
The storage array that you selected on this page determines the next wizardpage.
6. If you selected the VMAX/Symmetrix storage array option, complete theSelect the VMAX Mirror Policy page that appears:
a. Select the VMAX Mirror Policy:
l If both the source device and the target mirror devices reside on thesame VMAX array, select Local Operation.
l If the source device and the target mirror devices reside on differentVMAX arrays that are connected by a Symmetrix Remote Data Facility(SRDF), select Remote (SRDF) Operation.
b. Select a snapshot Mirror Type:
l To create snapshots using TimeFinder SnapVX functionality, selectSNAPVX. This option is available only on VMAX version 3 and laterstorage arrays.
l To create snapshots by using the TimeFinder clone functionality, selectCLONE.
l To create snapshots by using the TimeFinder/Snap (COW) functionality,select VDEV.
Note
VMAX version 3 and later does not support VDEV functionality.
l To create snapshots by using the TimeFinder VP Snap functionality,select VPSNAP.
l To create snapshots by using the TimeFinder split-mirror functionality,select BCV.
l If you selected Remote (SRDF) Operation, select R2 to create a non-snapshot backup to media directly from the remote R2 device.
Snapshot operations with TimeFinder software on page 104 provides detailson mirror operations.
c. Click Next.
The Select the NetWorker Client Properties page appears. Go to step 12.
Software Configuration
68 NetWorker 18.1 Snapshot Management Integration Guide
7. If you selected the ProtectPoint for VMAX3 storage array option, completethe Select ProtectPoint Destination page that appears:
a. In the ProtectPoint Remote Operation area:
l If both the source device and the target mirror devices reside on thesame ProtectPoint array, select Local Operation.
l If the source device and the target mirror devices reside on differentProtectPoint arrays that are connected by a Symmetrix Remote DataFacility (SRDF), select Remote (SRDF) Operation.
b. Click Next. The Select the NetWorker Client Properties page appears. Goto step 12.
8. If you selected the ProtectPoint for RecoverPoint storage array option,complete the Specify the RecoverPoint Storage Array Options page thatappears:
a. From the drop-down list, select or type the RecoverPoint ApplianceHostname / IP that the client uses for snapshot communications.
b. If required, provide Username and Password credentials for the array thatthe client uses for snapshot operations.
c. Click Next. The Select the NetWorker Client Properties page appears. Goto step 12.
9. If you selected the VNX/CLARiiON storage array option, then complete theSpecify the VNX Mirror Policy and Storage Array Options page that appears:
a. Select the snapshot Mirror Type:
l To create the snapshots by using the SnapView copy-on-writefunctionality, select Copy on Write (COW/Snapshot).
l To create the snapshots by using the SnapView clone functionality,select Mirror (SnapView Clone).
l To create the snapshots by using the Redirect on Write (ROW)functionality, select VNX-SNAP (VNX Snapshot) or VNXe-SNAP(VNXe/VNXe2 Snapshot).Snapshot operations with SnapView software on page 112 providesdetails on mirror operations.
b. Specify the VNX Storage Processor Options:
l If required, provide Username and Password credentials for the arraythat the client uses for snapshot operations.
l Specify the VNX storage array hostname or IP address that the clientuses for snapshot communications.
c. Click Next. The Select the NetWorker Client Properties page appears. Goto step 12.
10. If you selected the RecoverPoint storage array option, complete the Specifythe RecoverPoint replication type and Storage Array Options page thatappears:
a. Select the Replication Type:
l CDP (Continuous Data Protection)
l CRR (Continuous Remote Replication)
Software Configuration
Configuring snapshot backups with the client wizard 69
Snapshot operations with RecoverPoint software provides details on mirroroperations.
b. Specify the RecoverPoint Appliance Credentials:
l Specify the RecoverPoint Appliance Hostname/IP that the client usesfor snapshot operations.
l If the Username and Password credentials do not exist for theRecoverPoint appliance that the client uses for the snapshot operations,provide them.
Note
NetWorker requires a username and password after an upgrade from theRecoverPoint PowerSnap module to NetWorker Snapshot Management. TheNetWorker server stores these credentials in a lockbox.
c. Click Next. The Select the NetWorker Client Properties page appears. Goto step 12.
11. If you selected the XtremIO storage array option, complete the Specify theXtremIO storage process's credentials page that appears:
a. Specify the XtremIO Hostname/IP that the client uses for snapshotoperations.
b. If the Username and Password credentials do not exist for the XtremIOappliance that the client uses for the snapshot operations, provide them.
c. Click Next.
12. If you plan to clone the snapshots to conventional storage media, complete theSelect the NetWorker Client Properties page that appears:
a. (Optional) Change the Client Direct setting based on the workflowpreferences and the data processing bandwidth on the hosts involved.
Client direct enables the NetWorker client on the mount host to bypass thestorage node and directly clone the snapshot data to supported AFTD or DDBoost devices or Cloud devices. If this process is not available on the client,then the storage node performs the clone operation.
b. (Optional) In the Advanced Options area, enter Debug or Extra Optionsfor the client that is separated by commas. For example,NSR_PS_DO_PIT_VALIDATION=FASLE,NSRATTER_DD_VDISK_POOLNAME=Pool ABC, NSR_VERBOSE=Yes.
c. Click Next.
13. If you selected Filesystem in Step 4a, the Select Snapable FilesystemObjects page displays.
Note
If you are using NMDA/NMSAP, the application-specific wizard pages appear.Complete the pages accordingly.
For applications supported, go through application specific pages in the wizardand select the application objects to be restored and recovered:
a. In the browse tree, select the file systems or files that you want to include inthe snapshot.
Software Configuration
70 NetWorker 18.1 Snapshot Management Integration Guide
The tree lists all the file systems that are mounted on the application hostthat are compatible with the previous selections in this wizard. If nocompatible file systems are available, then an error appears.
On UNIX systems, the browse tree displays only the file systems that areadded to the list of mountable file systems on the local application host.
Note
For VMAX arrays on systems with third-party volume managers, avoidselecting file systems or application objects from different volume groups fora single backup. If more than one snapshot is required to complete thebackup and mirrors are unavailable, the backup from multiple volume groupscan fail. However, you can greatly reduce this risk by using intelligent pairingand allocating sufficient devices to the storage group (NSRSnapSG).
b. If you need to update the view of mounted file systems, click Refresh. Thisprocess can take some time.
c. Click Next.
14. If you selected SmartSnap in Step 4a, the Add Snapable Lun WWN's pageappears. Perform the following steps:
a. Type the WWN you want to include, and then click Add. You can addmultiple WWN's.
The system validates the entry. If the validation is successful, the WWNappears in the list. If the WWN entered is invalid, then an error message isdisplayed indicating an invalid WWN.
b. If you want to remove a WWN select it, and then click Delete.
c. Click Next.
15. The Client Configuration Summary page, perform the following steps:
a. Review the attributes and values that are listed in the summary.
To modify a setting, click Back or click the link in the step panel, and thenmake changes.
b. (Optional) Click Snapshot Validation. This choice causes NetWorker toverify the likely, but not guaranteed, success of a backup that uses thisconfiguration, provided the backup runs unimpeded by other backups on thisclient and mount host.
Note
If you selected SmartSnap in Step 4a, the Snapshot Validation do notdisplay.
The validation can take some time. If the validation encounters any errors anNMC pop-up message appears, which displays each problem but does notprevent the wizard from creating the Client resource.
Software Configuration
Configuring snapshot backups with the client wizard 71
Note
To validate the snapshot configuration of a Client resource, on theProtection screen in the Clients area, right-click the Client resource andselect Check Snapshot Configuration.
c. To accept and create the configuration, click Create.
16. In the Check Results page, perform the following steps:
a. Ensure that the client configuration is successfully completed.
b. Click Finish.
Configuring snapshot backups manuallyIt is recommended that you use the NetWorker Management Console (NMC) ClientConfiguration wizard to create and modify NetWorker client backup configurations.
However, in some situations you can use manual methods to modify a configuration.For example, you can modify a client resource if you must specify uncommondirectives or options that the wizard does not support, such as the variables describedin Application Information Variables on page 149.
Configuring the Client resource manually for the application hostYou can manually create or modify a VMAX or VNX Block storage array configurationfor an application host. You can manually modify a RecoverPoint appliance or XtremIOconfiguration, but you cannot create the configuration with the new NetWorkerManagement Console (NMC) Client Properties window, because the wizard is used totype username and password information into the NetWorker server lockbox.
You can manually specify uncommon directives or options that the wizard interfacedoes not support, such as the variables listed in Application Information Variables.
Procedure
1. Ensure that the prerequisites are met.
Application host prerequisites provides details.
2. Run NMC, and in the NMC Enterprise view, select the NetWorker server name,and then click Launch Application.
3. Click Protection and in the browse tree, select Clients, and then specify theapplication client:
l To create a Client resource, click the Clients icon. From the File menu,select New.
l To modify a Client resource from the list in the right panel, select the clientname. From the File menu, select Properties.
Note
The NetWorker Module for Databases and Applications Administration Guide andthe NetWorker Module for SAP Administration Guide provide details onconfiguring the additional attributes that are required for applications.
Software Configuration
72 NetWorker 18.1 Snapshot Management Integration Guide
4. Click the General tab, and then perform the following steps:
a. In the Name field, verify or type the hostname of the application client.
b. For file systems, in the Save sets field, type or browse and select all the filesystems, directories, or individual files that you want to include in thesnapshot.
When you type the file system objects, specify each item on a separate linewith a fully qualified pathname. Pathnames are case sensitive.
Note
Due to operating system limitations, a backup might fail when you specifyfile system pathnames that are longer than 996 characters or 275 directoriesdeep.
The NetWorker Administration Guide provides details on the General tabsettings.
5. Click the Apps & Modules tab. In the Application information field, specifythe snapshot attributes with the values that you want the configuration to use.
Application Information Variables provides details.
Note
NetWorker does not validate these attributes. Type the correct attribute namein uppercase characters with the proper value specified, which depending onthe attribute can also be uppercase.
6. On the View menu, to put NMC in Diagnostic mode, select Diagnostic mode.
7. If you plan to clone snapshots to conventional storage media, click the Globals(2 of 2) tab, and then in the Remote Access field specify the mount host in thefollowing format:
l On Microsoft Windows systems:
system@mount_host
l On UNIX systems:
root@mount_host
The mount host is the host that mounts the storage array volume that containsthe snapshots. Typically, the mount host is the application host or the storagenode.
8. When you have completed the client configuration, click OK.
9. To verify the likely, but not guaranteed, success of the backup configuration,provided the backup runs unimpeded by other backups on this client or themount host, in NMC right-click the Client resource, and then select CheckSnapshot Configuration. The validation can take some time. If the validationencounters any errors an NMC pop-up message appears, which displays eachproblem.
The NetWorker Administration Guide provides details on NetWorker clientconfigurations that are not specific to snapshot management.
Software Configuration
Configuring the Client resource manually for the application host 73
Note
The Check Snapshot Configuration option does not appear when you useNetWorker Snapshot Management (NSM) with NetWorker Module forDatabases and Applications (NMDA) and NetWorker Module for SAP(NMSAP).
Configuring the Client resource manually for a mount hostIf you manually configured the Client resource for the application host, then manuallyconfigure a NetWorker Client resource for the snapshot mount host.
Procedure
1. If one does not exist, create a NetWorker Client resource for the mount host.
2. Ensure that the mount host has completed at least one successful NetWorkerbackup.
3. Ensure that the prerequisites are met.
Mount host prerequisites on page 64 provides details.
4. If you use the mount host only for snapshot restores and clones, clear theselection of its scheduled backups and all its groups as follows:
a. Run NMC, and in the Enterprise view, select the NetWorker server name,and then launch the NetWorker application.
b. From the View menu, select Diagnostic Mode.
c. In the Protection view, in the browse tree, select Clients, In the right panel,right-click the mount host, and select Modify Client Properties to view itsProperties.
d. Click the General tab, and then clear Scheduled Backup checkbox.
e. Click OK.
Configuring the Application Information variablesSpecial Application Information variables provide specific control of snapshotprocesses. The Client Configuration Wizard cannot configure these variables.Manually configure these variables in the NetWorker Client resource for theapplication host using the NetWorker Client Properties windows. ApplicationInformation Variables on page 149 provides details.
Configuring preprocessing and postprocessing scriptsYou can run user-defined preprocessing and postprocessing scripts from theapplication client. You can run these scripts only for file system backups.
Note
Technical Support does not support the contents of the user-defined scripts. Scriptsfor a particular operation must return the correct exit code to NetWorker SnapshotManagement (NSM).
Software Configuration
74 NetWorker 18.1 Snapshot Management Integration Guide
You can use preprocessing scripts and postprocessing scripts for operations such asapplication quiescing, shutdown, or startup. The following steps provide guidelines forconfiguring the scripts.
Procedure
1. The scripts can produce output such as log files, but the scripts must return anexit status of 0, which means that the script did not fail and the backup can run.Any other exit code for a preprocessing script causes the backup to fail.
2. Provide the script files with the following security:
l On Microsoft Windows systems, provide the script files with security thatgrants full control only to the local SYSTEM, local Administrators, or BackupOperators groups. Otherwise, the scripts will not run.
To set this security in Windows Explorer, right-click the script file, selectProperties, click the Security tab, and click Advanced.
l On UNIX systems, the root user must own the script files. The scripts canset only owner access permissions, and the scripts must at least have runaccess. Otherwise, the scripts will not run. The parent directory of thescripts must have at least owner run permissions, and must not have writepermissions for the group and world.
3. Place the scripts in a directory where a user must have administrator/rootprivileges to add, modify, or run the resident scripts. Otherwise, any backupsthat use the scripts fail.
On Microsoft Windows systems, NetWorker searches for relative pathnames inthe NetWorker_install_path/bin directory.
4. Include the pathnames of user-defined scripts in the Application Informationattribute of the property window of the application Client resource by typingthe following variables:
NSR_PRE_SNAPSHOT_SCRIPT=pre-mirror_split-script_pathNSR_POST_SNAPSHOT_SCRIPT=post-mirror_split-script_path
5. After a backup is completed, verify the log files that are generated in the /nsr/logs (UNIX) directory on the application client host. The log file name is in theform of script_name_LOGFILE.txt. The script output appears in the logfile.
Software Configuration
Configuring preprocessing and postprocessing scripts 75

Software Configuration
76 NetWorker 18.1 Snapshot Management Integration Guide
CHAPTER 4
Configuring ProtectPoint on VMAX
Note
This chapter provides basic information for VMAX and RecoverPoint with XtremIOand Data Domain configurations for ProtectPoint operations. The Data Domain, VMAXand RecoverPoint documentation provides details about the corresponding systemconfigurations.
This chapter includes the following topics:
l Overview............................................................................................................78l ProtectPoint on VMAX3 prerequisites............................................................... 78l Enabling vDisk on a Data Domain system........................................................... 79l Provisioning protection devices on Data Domain systems.................................. 79l Completing the VMAX system configuration......................................................80l Considerations for ProtectPoint device and NetWorker ProtectPoint enabled
pools.................................................................................................................. 83l Configuring NetWorker ProtectPoint, RecoverPoint and VMAX devices and pool
with the wizard.................................................................................................. 83l VMAX3 SRDF/S support................................................................................... 85l Configuring Data Domain NsrSnapSG device groups for intelligent pairing........ 86
Configuring ProtectPoint on VMAX 77
OverviewThe ProtectPoint™ solution integrates primary storage on a VMAX3 array, andprotection storage for backups on a Data Domain® system. ProtectPoint providesefficient block movement of the modified tracks containing data on the applicationsource LUNs to encapsulated Data Domain LUNs for deduplicated snapshot backups.
You can create ProtectPoint backups by using one of the following methods:
l To use local storage array as the first line of protection, create a policy workflowwith a snapshot action followed by a clone action that sends the data to aNetWorker pool containing a DD ProtectPoint device. SetNSR_SNAP_TYPE=symm-dmx and SYMM_SNAP_TECH=snapvx in the clientresource settings.
l To use ProtectPoint backup as the first line of protection, create policies with asnapshot action that send data to a destination pool that contains ProtectPointdevice. Optionally, create a clone action that sends data to other ProtectPointdevices or other media devices. Set NSR_SNAP_TYPE=protectpoint in theNetWorker client resource settings.
You can provision Data Domain backup and restore devices, create a NetWorkerProtectPoint device, and label the device for a NetWorker pool. When you create asnapshot backup or clone action in a workflow, you can select the destination poolthat you used when you labeled the device.
ProtectPoint on VMAX3 prerequisitesEnsure that the following prerequisites are met before you use ProtectPoint devices:
l Use a VMAX3 array.
l Ensure that Solutions Enabler 8.2-2153 or later is installed on the application host,mount host, storage node, mount host, and in some configurations on theNetWorker server.
Configuring ProtectPointProcedure
1. On Data Domain, enable vDisk.
2. Provision protection vDisk devices on Data Domain.
3. Configure the protection devices on the VMAX3.
4. (Optional) Create restore vDisk devices on Data Domain, if you are restoringdirectly from Data Domain.
5. Create a NetWorker device, and then label it under a NetWorker pool using thewizard.
6. To create snapshot policies, follow the steps in the Data Protection Policiessection, and then set the destination pool to a pool that contains a ProtectPointdevice.
7. Follow the steps in the Configuring snapshot backups with the client wizard onpage 66 or Configuring snapshot backups manually on page 72 sections, andthen set the options accordingly.
Configuring ProtectPoint on VMAX
78 NetWorker 18.1 Snapshot Management Integration Guide
Enabling vDisk on a Data Domain systemEnable vDisk on a Data Domain system through the vdisk enable command. Usethe Data Domain command line interface to complete the required administrationtasks. The Data Domain Operating System Command Reference Guide provides detailsabout the commands.
Procedure
1. Log in to the Data Domain system, as an administrator.
2. To verify that the vDisk license is enabled, type the following command:
# license show
Feature licenses:## License Key Feature-- -------------------- --------1 ABCD-EFGH-IJKL-MNOP DDBOOST-- -------------------- --------
If the Data Domain vDisk license is disabled, to add the vDisk license by usingthe provided license key, type the following command:
# license add license_key
License “ABCE-BCDA-CDAB-DABC” added.
3. To enable the vDisk service subsystem, type the following command:
# vdisk enable
DD VDISK enabled
4. To verify that the vDisk service is enabled, type the following command:
# vdisk status
VDISK admin state: enabled, process is running, licensed
Provisioning protection devices on Data Domain systemsThe Data Domain administrator must create the required vDisk device pool and devicegroup and configure the backup and restore devices in the vDisk device pool anddevice group. You (DD Administrator) can use the vDisk mappings in the followingtable to plan the configuration.
Table 9 vDisk object hierarchy mapping
vDisk storage object Mapping level
Device pool NetWorker Datazone
Device group Application
Device Source LUN
Configuring ProtectPoint on VMAX
Enabling vDisk on a Data Domain system 79
Note
A NetWorker ProtectPoint device represents a specific vdisk pool.
The Data Domain Operating System Administration Guide provides the latest informationabout the vDisk configuration and any limitations.
Procedure
1. To create the vDisk device pool and device group, type the following vDiskcommands:
vdisk pool create pool_name user username
vdisk device-group create device_group_name pool pool_nameThe Data Domain Operating System Command Reference Guide provides detailsabout the vDisk command and options.
2. For each VMAX3 source LUN that contains data, ensure that you have onebackup device and one restore device. You might need additional restoredevices for each source LUN if you also plan to restore data to different hosts.
3. To create the backup devices and restore devices with the same geometry asthe VMAX source LUNs, and provision the devices accordingly, type thefollowing vDisk command:
vdisk device create [count count] heads head_count cylinderscylinder_count sectors-per-track sector_count pool pool_namedevice-group device_group_name
Note
The heads, cylinders, and sectors-per-track information that defines the devicegeometry must match the VMAX source LUNs.
4. Add the vDisk devices to the access group on the Data Domain system:
a. Create a vDisk access group:
scsitarget group create group_name service vdisk
b. Add all the vDisk devices to the vdisk access group:
vdisk group add group_name pool vdisk_pool_name device-groupdevice_group_name
5. Verify that the VMAX3 DX ports and the Data Domain endpoint ports are zonedtogether.
6. View the list of VMAX3 initiators on the Data Domain system:
scsitarget initiator show list
7. Add the VMAX3 initiators to the access group on the Data Domain system.
8. Add Symm initiators to the group:
vdisk group add group_name initiator initiator_name
Completing the VMAX system configurationThe VMAX storage administrator must complete the required steps to configure andprovision the VMAX storage resources for the ProtectPoint operations.
Configuring ProtectPoint on VMAX
80 NetWorker 18.1 Snapshot Management Integration Guide
Procedure
1. View the back-end ports (DX ports) on the VMAX array, and display the WWNsof the Data Domain devices zoned to the VMAX DX ports being viewed.
2. Display the LUNs that are visible for a specific Data Domain WWN.
3. List the disk groups that are available on the VMAX array.
4. Encapsulate all the Data Domain backup and restore devices to create therequired eLUNs through the Federated Tiered Storage (FTS) software, andprovision the restore LUNs to the restore host.
The Solutions Enabler Symmetrix CLI Command Reference Guide provides detailsabout the commands and options for FTS operations.
5. Mask all the restore devices to the recovery host.
Note
The application host can be the recovery host.
6. You can either create a VMAX storage group named NSRSNAPSG for therestore devices or you can create your own VMAX storage group. You mustthen specify NSM_SNAP_SG attribute in the recovery operation, with value ofVMAX storage group name. This group name is case-insensitive:
# symsg -sid SymmID create NsrSnapSG
# symsg -sid SymmID -sg NsrSnapSG add dev <SymDevName>
7. Create the initial relationship between the source LUNs and the target backupeLUNs through a SnapVX link operation by using the symsnapvx commands.
The latest Solutions Enabler Symmetrix CLI Command Reference Guide providesdetails about the symsnapvx commands and options. The following exampleshows the symsnapvx commands that are used to create an initial relationshipbetween the source devices 28 and 29 and the target backup devices 9D and9E:
a. Create a snapshot name:
# symsnapvx -sid 493 establish -devs 00028:0029 -nameDD_SNAPVX
b. Link the source LUNs and backup device:
# symsnapvx -sid 493 link -devs 00028:00029 -lndevs 009D:009E-snapshot_name DD_SNAPVX -copyExecute Link operation for Device Range (y/[n])? y
c. Wait for the copy operation to finish, and check the status:
ledma114:/software/build147 # symsnapvx list -linked -dev00028 -sid 493 -detail
Configuring ProtectPoint on VMAX
Completing the VMAX system configuration 81
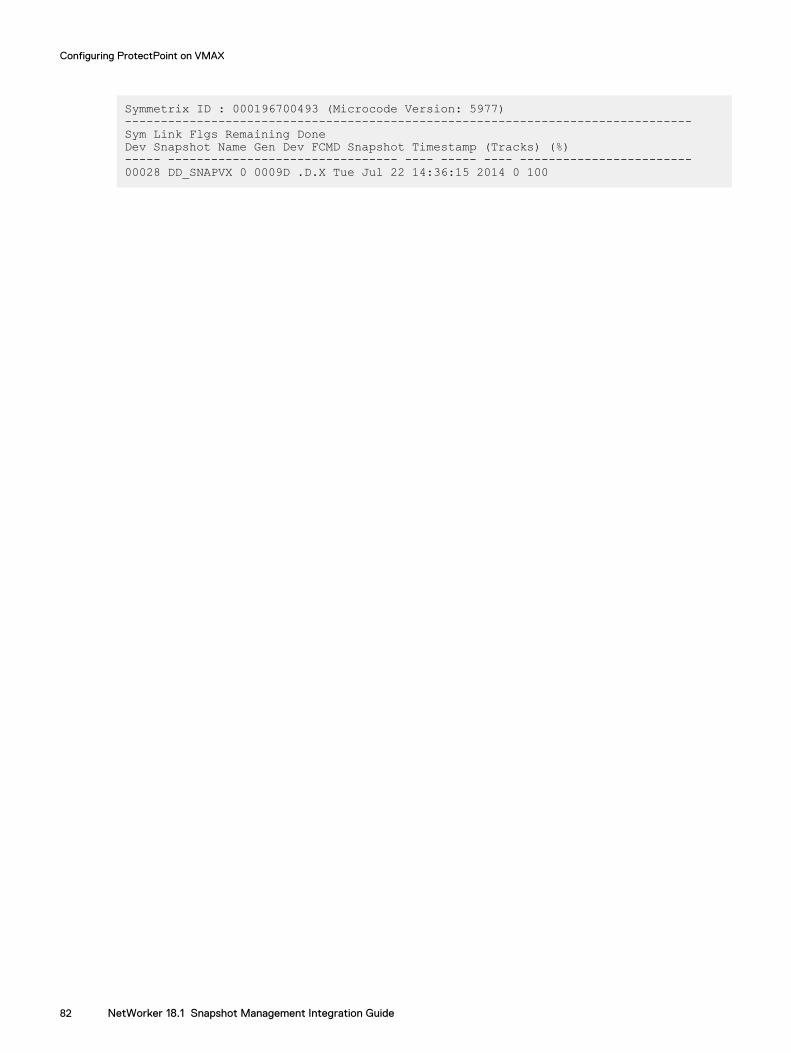
Symmetrix ID : 000196700493 (Microcode Version: 5977)-------------------------------------------------------------------------------Sym Link Flgs Remaining DoneDev Snapshot Name Gen Dev FCMD Snapshot Timestamp (Tracks) (%)----- -------------------------------- ---- ----- ---- ------------------------ 00028 DD_SNAPVX 0 0009D .D.X Tue Jul 22 14:36:15 2014 0 100
Configuring ProtectPoint on VMAX
82 NetWorker 18.1 Snapshot Management Integration Guide
Considerations for ProtectPoint device and NetWorkerProtectPoint enabled pools
Before you configure ProtectPoint devices and pools, review the following points:
l For ProtectPoint operations, the destination pool must contain a singleProtectPoint device, and one or more devices that are not ProtectPoint devices.
l NetWorker preserves the Data Domain credentials (hostname, username, andpassword), which were provided during the completion of the ProtectPoint devicecreation wizard in the device resource. NSM retrieves and uses this informationfor all Data Domain communication.
l NetWorker supports only one mounted Protection Point device in a media pool.
l When the source snapshot is a ProtectPoint snapshot, then one of the listed cloneoperations occurs. The type of clone operation depends on the type of devicesthat are labeled for the destination clone pool:
n Data Domain Replication or clone—This clone operation occurs when thesource snapshot is SnapVX (V3) or RecoverPoint with XtremIO and thedestination clone pool is ProtectPoint enabled. NetWorker clones or replicatesthe snapshot to the (remote) Data Domain that the ProtectPoint device in thedestination clone pool points to. However, if the source snapshot is from a filesystem snapshot backup, then NetWorker clones to an alternate media device.
n Data Domain to Data Domain (CCR/MFR) Replication—This clone operationoccurs when the source snapshot is a ProtectPoint snapshot and thedestination clone pool is ProtectPoint enabled. NetWorker clones or replicatesthe snapshot to the (remote) Data Domain.
n Clone to media—This clone operation occurs when the destination clone pool isnot ProtectPoint enabled. NetWorker clones the source snapshots to analternate destination media. This operation replaces the rollover capabilitiesthat were available in earlier versions of NSM.
Note
When you clone to a ProtectPoint device and perform Data Domain operations,configure the destination vDisk pool to use the same Device Group Name as thesource ProtectPoint device. If the name does not exist, the NetWorker cloneoperation automatically creates the Device Group Name for the destinationProtectPoint device.
Configuring NetWorker ProtectPoint, RecoverPoint andVMAX devices and pool with the wizard
You can create or modify a ProtectPoint, RecoverPoint, and VMAX device by usingthe Device Configuration Wizard.
Procedure
1. In the NMC Enterprise view, select the NetWorker server name, and thendouble-click the NetWorker application to launch it.
2. In the NetWorker Administration window, click the Devices tab.
Configuring ProtectPoint on VMAX
Considerations for ProtectPoint device and NetWorker ProtectPoint enabled pools 83
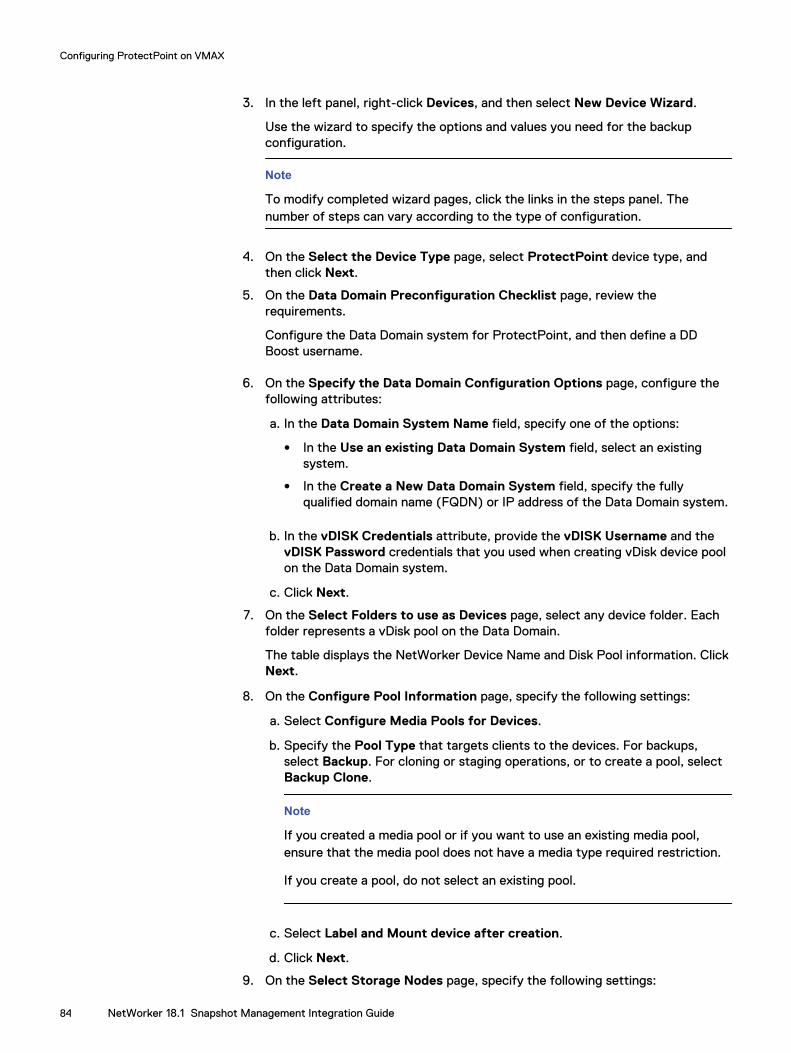
3. In the left panel, right-click Devices, and then select New Device Wizard.
Use the wizard to specify the options and values you need for the backupconfiguration.
Note
To modify completed wizard pages, click the links in the steps panel. Thenumber of steps can vary according to the type of configuration.
4. On the Select the Device Type page, select ProtectPoint device type, andthen click Next.
5. On the Data Domain Preconfiguration Checklist page, review therequirements.
Configure the Data Domain system for ProtectPoint, and then define a DDBoost username.
6. On the Specify the Data Domain Configuration Options page, configure thefollowing attributes:
a. In the Data Domain System Name field, specify one of the options:
l In the Use an existing Data Domain System field, select an existingsystem.
l In the Create a New Data Domain System field, specify the fullyqualified domain name (FQDN) or IP address of the Data Domain system.
b. In the vDISK Credentials attribute, provide the vDISK Username and thevDISK Password credentials that you used when creating vDisk device poolon the Data Domain system.
c. Click Next.
7. On the Select Folders to use as Devices page, select any device folder. Eachfolder represents a vDisk pool on the Data Domain.
The table displays the NetWorker Device Name and Disk Pool information. ClickNext.
8. On the Configure Pool Information page, specify the following settings:
a. Select Configure Media Pools for Devices.
b. Specify the Pool Type that targets clients to the devices. For backups,select Backup. For cloning or staging operations, or to create a pool, selectBackup Clone.
Note
If you created a media pool or if you want to use an existing media pool,ensure that the media pool does not have a media type required restriction.
If you create a pool, do not select an existing pool.
c. Select Label and Mount device after creation.
d. Click Next.
9. On the Select Storage Nodes page, specify the following settings:
Configuring ProtectPoint on VMAX
84 NetWorker 18.1 Snapshot Management Integration Guide
a. Select or create the NetWorker storage node that handles the devices.
If you create a storage node, select Dedicated Storage Node.
b. Click Next.
10. On the SNMP Monitoring Options page, type the name of the Data DomainSNMP community string and specify the events that you want to monitor.
If you do not know the name of the community, then clear Gather UsageInformation.
SNMP monitoring enables NMC to display the Data Domain system status andto list the backup and the recovery events. The monitoring feature also providesa link for launching the Data Domain interface.
11. On the Review the Device Configuration Settings page, review the settings,and then click Configure.
NetWorker configures, mounts, and labels the ProtectPoint device for thespecified pool.
12. The Device Configuration Results page is informational only. To exit thewizard, click Finish.
13. In the NMC Devices view, verify that NetWorker labeled and mounted thedevice, and it is ready for use. This view also lists the volume name for thedevice.
VMAX3 SRDF/S supportSRDF/S is a VMAX feature that maintains a synchronous, realtime copy of data at theLUN level between two VMAX storage arrays, one of which is local and the otherremote.
You can configure ProtectPoint on a remote VMAX array with SRDF/S functionality,by associating a source LUN (referred to as R1) on the local array with a source LUN(R2) on the remote array. The SRDF/S software maintains continuoussynchronization of the two sources by copying all the changes on one LUN device tothe other.
The following SRDF/S requirements and support for snapshot operations apply toSRDF/S configurations:
l At runtime NetWorker automatically determines the state of the SRDF/S link.NetWorker does not require you to manually configure environment variables orapplication variables.
l If no SRDF/S link is available at the beginning of an operation, the backup orrestore operation fails.
l NetWorker does not support any changes to the SRDF/S link mode made duringbackup or restore operations.
l If the SRDF link is in a failed over or failed back state, the snapshot operations fail.
l Mirror replication cannot transition between asynchronous and synchronousmodes during any NSM operation. The mode must remain constant.
l NetWorker does not support the creation of snapshots of file systems or ofvolume groups that cross SRDF/RA groups.
l NetWorker supports only single-hop remote connections.
Configuring ProtectPoint on VMAX
VMAX3 SRDF/S support 85
Rollbacks in the SRDF/S environment on page 86 provides details on rollbackoperations in this environment.
Note
NetWorker does not support SRDF/A.
Rollbacks in the SRDF/S environmentDuring the rollback, NetWorker automatically performs the following operations:
Note
The term link in this rollback process refers to the replication state, not the physicalconnection between the R1 and R2 devices on the separate VMAX arrays.
l Transitions the link to split between the R1 and R2 devices.
l Rolls back the data from the DD restore device to the R2 device.
l Synchronizes the R2 device to the R1 device by using reverse synchronization.
l Transitions the link to the synchronized state.
l Leaves the RDF link in a synchronized state, after the rollback is completed.
Configuring Data Domain NsrSnapSG device groups forintelligent pairing
RecoverPoint/ProtectPoint leverage Data Domain vDisk for PiT validation, mount, andrestore operations. Designate or create a Data Domain device group and populate withan appropriate number of restore vDisk devices. The number of devices depends onthe number of source XtremIO devices that are used by the application, and if thedevice group is to be shared between multiple hosts the number of potentialconcurrent restore or mount operations.
Intelligent Pairing vDisk selection decision treeRecoverPoint/ProtectPoint selects vDisk devices based on a cascading decision treeand is controlled by you.
The following criteria are used:
l Determine whether there is a unique instance of a Data Domain (DD) disk groupname "NsrSnapSG" (or a user-provided name) on the DD, and get its DD poolname as follows:
n If the user provides the Data Domain pool name.
n If the ddvdisk pool contains a single disk group, use it, regardless of its name.
n If the pool contains a NsrSnapSG disk group, use it.
n Otherwise, fail.
l If you provide the Data Domain disk group name:
n Get the list of pools containing this disk group name.
n If there is 0 or > 1 pool, fail, otherwise, use it.
l When neither pool nor disk group name is provided:
Configuring ProtectPoint on VMAX
86 NetWorker 18.1 Snapshot Management Integration Guide
n Get the list of pools containing disk group name "NsrSnapSG.”
n If there is 0 or > 1 pool, fail, otherwise use it.
Intelligent Pairing allocates vDisk for mount, validate, and restoreWhen over subscribing the vDisk devices to multiple hosts a vDisk is locked onceIntelligent Pairing has selected it. This locking prevents the device to allocate to aconcurrent mount/validation or restore operations. The lock is released to the pool forsubsequent operations.
Locking of vDisk LUN for restore/mount operations is done by adding a specific key-value metadata key to the vDisk. Intelligent pairing inspects the vDisk for the presenceof the key-value pair and if absent considers the vDisk "available." It removes the keyat the end of the operation.
Both the Data Domain pool and disk group that is used by IP can optionally bespecified using client resource attributes. These must be typed manually into the clientresource at the end of client configuration:
l NSR_DD_VDISK_RESTORE_POOLNAME=<dd vdisk restore pool>l NSR_DD_VDISK_RESTORE_DEVGRPNAME=<dd vdisk restore devgrp>
Configuring ProtectPoint on VMAX
Intelligent Pairing allocates vDisk for mount, validate, and restore 87

Configuring ProtectPoint on VMAX
88 NetWorker 18.1 Snapshot Management Integration Guide
CHAPTER 5
Configuring ProtectPoint on RecoverPoint withXtremIO
This chapter includes the following topics:
l Overview............................................................................................................90l Basic backup workflow...................................................................................... 90l Basic restore workflow...................................................................................... 90l ProtectPoint for RecoverPoint on XtremIO prerequisites...................................91l Enabling vdisk on the Data Domain.................................................................... 92l Provisioning protection devices on Data Domain systems..................................93l Configuring RecoverPoint and XtremIO storage................................................ 94l Configuring NetWorker ProtectPoint, RecoverPoint and VMAX devices and pool
with the wizard.................................................................................................. 95l Considerations for ProtectPoint device and NetWorker ProtectPoint enabled
pools.................................................................................................................. 97l Configuring Data Domain NsrSnapSG device groups for intelligent pairing........ 97
Configuring ProtectPoint on RecoverPoint with XtremIO 89
OverviewThe ProtectPoint for XtremIO system is an integration of XtremIO, Data Domain, andRecoverPoint technologies. This system consists of all RecoverPoint appliances(RPAs) that are used to replicate and protect data at the production site, an XtremIOjournal at the production site, and a catalog at the Data Domain copy site. The solutionenables an application administrator to leverage the ProtectPoint workflow to protectapplications and application data. The storage administrator configures the underlyingstorage resources on the primary storage system and the Data Domain system. Withthis storage configuration information, RecoverPoint, and the ProtectPoint featurefrom NetWorker, the application administrator can trigger the workflow to protect theapplication or file system using familiar NetWorker NMDA/NMSAP, file systemintegration methods. To use ProtectPoint backup as the first line of protection, createpolicies with a snapshot action that send data to a destination pool that contains aProtectPoint device.
This section explains how to provision Data Domain backup and restore devices,create a NetWorker ProtectPoint device, and label the device for a NetWorker pool.
Basic backup workflowIn the basic backup workflow, data is transferred from the primary storage system tothe Data Domain system. NetWorker NSM integration with ProtectPoint manages thedata flow, but does not modify the data.
After creating the snapshot, RecoverPoint moves the snapshot to the Data Domainsystem. The primary storage system keeps track of the data that has changed sincethe last update to the Data Domain system, and only copies the changed data. Once allthe data that is captured in the snapshot has been moved, the Data Domain systemcreates a static image of the data that reflects the application-consistent copy that isinitially created on the primary storage system. The snapshot is then recorded by theNetWorker server.
The backup workflow consists of the following steps:
1. The file system or application backup is started using a NetWorker snapshotenabled policy or from the application host using NMDA or NMSAP integration.
Note
File system backups cannot be client initiated.
2. On the primary storage system, ProtectPoint creates a snapshot of the primarystorage device.
3. RecoverPoint analyzes the data, and then copies the changed data to a DataDomain storage device.
4. The Data Domain system creates, and then stores a static-image of the snapshot.
5. NetWorker NSM creates a catalog record of the snapshot.
Basic restore workflowProtectPoint with RecoverPoint allows application administrators to start an objectlevel or granular file-by-file restore directly from the restore devices on the DataDomain system to the AR host without involving the primary storage or the
Configuring ProtectPoint on RecoverPoint with XtremIO
90 NetWorker 18.1 Snapshot Management Integration Guide
RecoverPoint cluster. ProtectPoint with RecoverPoint supports object-level restores,and rollback restores.
For an object-level restore, after selecting the backup image on the Data Domainsystem, the application administrator restores the data to a new set of Data Domainblock services for ProtectPoint devices (restore devices) to present to the AR host,then copies individual files back to the production devices.
For a rollback restore, after selecting the backup, NSM passes control to theRecoverPoint appliance to start the XtremIO array level restore.
Note
You cannot perform a ProtectPoint RecoverPoint rollback using a cloned CCR copy(secondary DD copy). A RecoverPoint rollback restore is always performed byRecoverPoint, and it is only aware about the copy on the local Data Domain. The CCR/clone copy is created by NSM, by directly copying from one DDR to the remote DDR.You can use the CCR/clone copy only for an NSM PIT restore or clone to media[rollover].
ProtectPoint for RecoverPoint on XtremIO prerequisitesEnsure that you meet the following prerequisite before you use ProtectPoint devices:
l Use an XtremIO array as the backend to the RecoverPoint appliance.
Ensure that you meet the following prerequisites for all ProtectPoint operations:
Data Domain
l Have a Data Domain system that is supported by ProtectPoint.
l Block services for ProtectPoint must be enabled on the Data Domain system.
l Data Domain Boost must be enabled on the Data Domain system.
RecoverPoint
l RecoverPoint backup (BK) license.
l The RecoverPoint cluster must have Gen5 or later RecoverPoint appliances(RPAs), running RecoverPoint version 4.4.x or later.
l Port 443 must be open between the RecoverPoint appliances, the XtremIOManagement System, and the XtremIO System-wide Management (SYM) moduleon X1-Storage Controller 1 (X1-SC1) and X1-Storage Controller 2 (X1-SC2) IPaddresses.
l Port 11111 must be open between the RPAs and XtremIO SYM module on X1-SC1and X1-SC2.
l IP connectivity must be configured between the RPA and the Data Domainsystem.
l FC zoning must be configured between the RPA and the XtremIO cluster, and isoptional between the RPA and the Data Domain system.
Note
FC zoning between the RPA and the Data Domain system is only required if DDBoost over FC is used for communication between the RPA and the Data Domainsystem.
Configuring ProtectPoint on RecoverPoint with XtremIO
ProtectPoint for RecoverPoint on XtremIO prerequisites 91
l Zone at least two initiators from the RPA to the Data Domain system.
l Create one zone per fabric between the RPA and the XtremIO cluster, and includeall the RPA ports that are intended for XtremIO connectivity and all the XtremIOports that are intended for RPA connectivity in the zone.
l Zone the RecoverPoint initiators to multiple targets on the Data Domain system orXtremIO cluster in accordance with RecoverPoint best practices.
XtremIO
l FC zoning must be configured between the XtremIO cluster and the AR host:
n Use a single-initiator per single-target (1:1) zoning scheme. If the FCswitchzone count limitation has been reached, it is also possible to use singleinitiator per multiple-target (1:many) zoning scheme.
n The optimal number of paths depends on the operating system and serverinformation. To avoid multipathing performance degradation, do not use morethan16 paths per device.
n Enable MPIO if two or more paths are zoned to a Windows AR host.
Configuring ProtectPoint with NetWorker
1. On the Data Domain, enable vDisk.
2. On Data Domain, provision protection of the vDisk devices.
3. On Data Domain, create restore vDisk devices.
4. Create a NetWorker device, and then label it under a NetWorker pool using thewizard.
5. Create snapshot policies, follow the steps in the Data Protection Policies section,and then set the destination pool to a pool containing a ProtectPoint device.
6. Follow the steps in the Configuring snapshot backups with the client wizard onpage 66 or Configuring snapshot backups manually on page 72 sections, and thenset the options accordingly.
Enabling vdisk on the Data DomainEnable vDisk on a Data Domain system through the vDisk enable command. Use theData Domain command line interface to complete the required administration tasks.
The Data Domain Operating System Command Reference Guide provides details aboutthe commands.
Procedure
1. Log in to the Data Domain system as an administrative user.
2. To verify that the vDisk license is enabled, type the following command:
# license show
Feature licenses:## License Key Feature-- -------------------- --------1 ABCD-EFGH-IJKL-MNOP DDBOOST-- -------------------- --------
If the DD vDisk license is disabled, type the following command to add the vDisklicense by using the license key provided:
Configuring ProtectPoint on RecoverPoint with XtremIO
92 NetWorker 18.1 Snapshot Management Integration Guide

# license add license_key
License “ABCE-BCDA-CDAB-DABC” added.
3. To enable the vDisk service subsystem, type the following command:
# vdisk enable
DD vDisk enabled
4. To verify that the vDisk service is enabled, type the following command :
# vdisk status
vDisk admin state: enabled, process is running, licensed
Provisioning protection devices on Data Domain systemsThe Data Domain administrator must create the required vdisk device pool and devicegroup and configure the backup and restore devices in the vdisk device pool anddevice group. You (DD Administrator) can use the vdisk mappings in the followingtable to plan the configuration.
Table 10 vdisk object hierarchy mapping
vdisk storage object Mapping level
Device pool NetWorker Datazone
Device group Application
Device Source LUN
Note
A NetWorker ProtectPoint device represents a specific vdisk pool.
The Data Domain Operating System Administration Guide provides the latest informationabout the vdisk configuration and any limitations.
Procedure
1. To create the vdisk device pool and device group, type the following vdiskcommands:
vdisk pool create pool_name user username
vdisk device-group create device_group_name pool pool_nameThe Data Domain Operating System Command Reference Guide provides detailsabout the vdisk command and options.
2. For each XtremIO source LUN that contains data, ensure that you have onebackup device and one restore device. You might need additional restoredevices for each source LUN if you also plan to restore data to different hosts.
3. To create the backup and restore devices with the same geometry as theXtremIO source LUNs, and provision the devices, type the following vdiskcommand:
Configuring ProtectPoint on RecoverPoint with XtremIO
Provisioning protection devices on Data Domain systems 93
vdisk device create capacity <n> {GiB} pool pool_name device-group device_group_name
Note
By default NSM’s Intelligent Pairing looks for a Data Domain device group ofname NSRSnapSG. It is recommended to create the device group with thisname. Optionally any device group name can be created but the user must thenspecify this name and the value to NSR_DD_VDISK_RESTORE_POOLNAMEand NSR_DD_VIDKS_RESTORE_DEVGRPNAME attributes in the NetWorkerclient resource.
4. On the Data Domain system, add the vdisk devices to the access group:
a. Create a vdisk access group:
scsitarget group create group_name service vdisk
b. Add all the vdisk devices to the vdisk access group:
vdisk group add group_name pool vdisk_pool_name device-groupdevice_group_name
5. Add XtremIO initiators to the group:
vdisk group add group_name initiator initiator_name
Configuring RecoverPoint and XtremIO storageRecoverPoint and XtremIO storage configuration for ProtectPoint consists ofprovisioning storage on the XtremIO cluster, integrating the XtremIO cluster with theRecoverPoint cluster, and creating the backup and restore devices on the DataDomain system. The following tasks are for configuring storage for new installations.Some of these tasks may not be required always.
Procedure
1. Complete the following tasks on the XtremIO cluster:
a. Create an Initiator Group, and register all the RecoverPoint cluster FC portsto the Initiator Group.
b. Provision Volumes on the XtremIO cluster, and then make the Volumesavailable to the AR host.
2. Complete the following tasks on the RecoverPoint cluster:
a. Register the XtremIO Management Server.
b. Register the Data Domain system.
c. Create a RecoverPoint consistency group that contains all the XtremIOVolumes created for the ProtectPoint environment.
3. On the Data Domain system, complete the following tasks:
a. Login to an SSH session.
b. If it is not already enabled, enable block services for ProtectPoint.
c. If it is not already enabled, enable DD Boost.
d. Create a block-services for ProtectPoint pool where the ProtectPointstatic-images will reside.
Configuring ProtectPoint on RecoverPoint with XtremIO
94 NetWorker 18.1 Snapshot Management Integration Guide
e. To function as the destination for restore data from the RecoverPointcluster, on the ProtectPoint MTree, create a storage unit.
f. Create two block services for ProtectPoint device pools, one for backupsand one for restores.
Note
After creating the block services for ProtectPoint device pool, RecoverPointautomatically creates the block services for ProtectPoint device-groups anddevices that are required for ProtectPoint with RecoverPoint backups.
g. Create a block-services for ProtectPoint device-group for restores thatresides in the restore pool that is created in Step 3 e.
h. Populate the restore device-group with restore devices of the same size asthe production LUNs you are backing up.
Configuring NetWorker ProtectPoint, RecoverPoint andVMAX devices and pool with the wizard
You can create or modify a ProtectPoint, RecoverPoint, and VMAX device by usingthe Device Configuration Wizard.
Procedure
1. In the NMC Enterprise view, select the NetWorker server name, and thendouble-click the NetWorker application to launch it.
2. In the NetWorker Administration window, click the Devices tab.
3. In the left panel, right-click Devices, and then select New Device Wizard.
Use the wizard to specify the options and values you need for the backupconfiguration.
Note
To modify completed wizard pages, click the links in the steps panel. Thenumber of steps can vary according to the type of configuration.
4. On the Select the Device Type page, select ProtectPoint device type, andthen click Next.
5. On the Data Domain Preconfiguration Checklist page, review therequirements.
Configure the Data Domain system for ProtectPoint, and then define a DDBoost username.
6. On the Specify the Data Domain Configuration Options page, configure thefollowing attributes:
a. In the Data Domain System Name field, specify one of the options:
l In the Use an existing Data Domain System field, select an existingsystem.
l In the Create a New Data Domain System field, specify the fullyqualified domain name (FQDN) or IP address of the Data Domain system.
Configuring ProtectPoint on RecoverPoint with XtremIO
Configuring NetWorker ProtectPoint, RecoverPoint and VMAX devices and pool with the wizard 95
b. In the vDISK Credentials attribute, provide the vDISK Username and thevDISK Password credentials that you used when creating vDisk device poolon the Data Domain system.
c. Click Next.
7. On the Select Folders to use as Devices page, select any device folder. Eachfolder represents a vDisk pool on the Data Domain.
The table displays the NetWorker Device Name and Disk Pool information. ClickNext.
8. On the Configure Pool Information page, specify the following settings:
a. Select Configure Media Pools for Devices.
b. Specify the Pool Type that targets clients to the devices. For backups,select Backup. For cloning or staging operations, or to create a pool, selectBackup Clone.
Note
If you created a media pool or if you want to use an existing media pool,ensure that the media pool does not have a media type required restriction.
If you create a pool, do not select an existing pool.
c. Select Label and Mount device after creation.
d. Click Next.
9. On the Select Storage Nodes page, specify the following settings:
a. Select or create the NetWorker storage node that handles the devices.
If you create a storage node, select Dedicated Storage Node.
b. Click Next.
10. On the SNMP Monitoring Options page, type the name of the Data DomainSNMP community string and specify the events that you want to monitor.
If you do not know the name of the community, then clear Gather UsageInformation.
SNMP monitoring enables NMC to display the Data Domain system status andto list the backup and the recovery events. The monitoring feature also providesa link for launching the Data Domain interface.
11. On the Review the Device Configuration Settings page, review the settings,and then click Configure.
NetWorker configures, mounts, and labels the ProtectPoint device for thespecified pool.
12. The Device Configuration Results page is informational only. To exit thewizard, click Finish.
13. In the NMC Devices view, verify that NetWorker labeled and mounted thedevice, and it is ready for use. This view also lists the volume name for thedevice.
Configuring ProtectPoint on RecoverPoint with XtremIO
96 NetWorker 18.1 Snapshot Management Integration Guide
Considerations for ProtectPoint device and NetWorkerProtectPoint enabled pools
Before you configure ProtectPoint devices and pools, review the following points:
l For ProtectPoint operations, the destination pool must contain a singleProtectPoint device, and one or more devices that are not ProtectPoint devices.
l NetWorker preserves the Data Domain credentials (hostname, username, andpassword), which were provided during the completion of the ProtectPoint devicecreation wizard in the device resource. NSM retrieves and uses this informationfor all Data Domain communication.
l NetWorker supports only one mounted Protection Point device in a media pool.
l When the source snapshot is a ProtectPoint snapshot, then one of the listed cloneoperations occurs. The type of clone operation depends on the type of devicesthat are labeled for the destination clone pool:
n Data Domain Replication or clone—This clone operation occurs when thesource snapshot is SnapVX (V3) or RecoverPoint with XtremIO and thedestination clone pool is ProtectPoint enabled. NetWorker clones or replicatesthe snapshot to the (remote) Data Domain that the ProtectPoint device in thedestination clone pool points to. However, if the source snapshot is from a filesystem snapshot backup, then NetWorker clones to an alternate media device.
n Data Domain to Data Domain (CCR/MFR) Replication—This clone operationoccurs when the source snapshot is a ProtectPoint snapshot and thedestination clone pool is ProtectPoint enabled. NetWorker clones or replicatesthe snapshot to the (remote) Data Domain.
n Clone to media—This clone operation occurs when the destination clone pool isnot ProtectPoint enabled. NetWorker clones the source snapshots to analternate destination media. This operation replaces the rollover capabilitiesthat were available in earlier versions of NSM.
Note
When you clone to a ProtectPoint device and perform Data Domain operations,configure the destination vDisk pool to use the same Device Group Name as thesource ProtectPoint device. If the name does not exist, the NetWorker cloneoperation automatically creates the Device Group Name for the destinationProtectPoint device.
Configuring Data Domain NsrSnapSG device groups forintelligent pairing
RecoverPoint/ProtectPoint leverage Data Domain vDisk for PiT validation, mount, andrestore operations. Designate or create a Data Domain device group and populate withan appropriate number of restore vDisk devices. The number of devices depends onthe number of source XtremIO devices that are used by the application, and if thedevice group is to be shared between multiple hosts the number of potentialconcurrent restore or mount operations.
Configuring ProtectPoint on RecoverPoint with XtremIO
Considerations for ProtectPoint device and NetWorker ProtectPoint enabled pools 97
Intelligent Pairing vDisk selection decision treeRecoverPoint/ProtectPoint selects vDisk devices based on a cascading decision treeand is controlled by you.
The following criteria are used:
l Determine whether there is a unique instance of a Data Domain (DD) disk groupname "NsrSnapSG" (or a user-provided name) on the DD, and get its DD poolname as follows:
n If the user provides the Data Domain pool name.
n If the ddvdisk pool contains a single disk group, use it, regardless of its name.
n If the pool contains a NsrSnapSG disk group, use it.
n Otherwise, fail.
l If you provide the Data Domain disk group name:
n Get the list of pools containing this disk group name.
n If there is 0 or > 1 pool, fail, otherwise, use it.
l When neither pool nor disk group name is provided:
n Get the list of pools containing disk group name "NsrSnapSG.”
n If there is 0 or > 1 pool, fail, otherwise use it.
Intelligent Pairing allocates vDisk for mount, validate, and restoreWhen over subscribing the vDisk devices to multiple hosts a vDisk is locked onceIntelligent Pairing has selected it. This locking prevents the device to allocate to aconcurrent mount/validation or restore operations. The lock is released to the pool forsubsequent operations.
Locking of vDisk LUN for restore/mount operations is done by adding a specific key-value metadata key to the vDisk. Intelligent pairing inspects the vDisk for the presenceof the key-value pair and if absent considers the vDisk "available." It removes the keyat the end of the operation.
Both the Data Domain pool and disk group that is used by IP can optionally bespecified using client resource attributes. These must be typed manually into the clientresource at the end of client configuration:
l NSR_DD_VDISK_RESTORE_POOLNAME=<dd vdisk restore pool>l NSR_DD_VDISK_RESTORE_DEVGRPNAME=<dd vdisk restore devgrp>
Configuring ProtectPoint on RecoverPoint with XtremIO
98 NetWorker 18.1 Snapshot Management Integration Guide
CHAPTER 6
Configuring snapshots on XtremIO arrays
This chapter includes the following topics:
l Snapshot support for XtremIO......................................................................... 100l Snapshot operation with XtremIO REST API.................................................... 100l Prerequisite for XtremIO configurations........................................................... 100l Supported XtremIO features............................................................................ 100l Snapshot management policy with XtremIO..................................................... 100l Snapshot backups with XtremIO....................................................................... 101l XtremIO configuration methods........................................................................ 101
Configuring snapshots on XtremIO arrays 99
Snapshot support for XtremIOThis section describes NetWorker snapshot support, practices, and configurationsthat are specific to XtremIO arrays.
Note
For NetWorker Snapshot Management (NSM) with native XtremIO, a virtual machinecannot be used as a proxy or storage node.
Snapshot operation with XtremIO REST APIThe XtremIO REST API provides snapshot capability of application volumes.Disposition: / Status:Alex this sentence seems to be incomplete.During production operations, XtremIO consistency groups and non-consistencybased snapshot support. For consistency groups based snapshot, all members of theconsistency group will be snap regardless of what client save set you specified.
Prerequisite for XtremIO configurationsThe NetWorker Snapshot Management (NSM) prerequisites for XtremIO arrays are asfollows:
l XtremIO Storage Array version 4.0.1 or later is required for RESTful API snapshotsupport.
l Create the Proxy/Mount host initiator name on the XtremIO array, and type it intothe client resource as NSR_XTREMIO_PROXY_INITIATOR_NAME attribute.
Supported XtremIO featuresThe NSM integration with XtremIO supports the following backup and restorecapabilities:
l Snapshot backup (PIT)
l Pit mount on mount host
l Clone (backup of PIT)
l Snapshot restore
l Snapshot management
l Rollback is not supported
Snapshot management policy with XtremIONSM XtremIO creates snapshots and makes the snapshot available to NetWorker bysaving them into the media database as snapshot save sets (snapsets). The backupadministrator can use the NMC Client Configuration Wizard to manage volumes thatare protected by XtremIO.
Before you configure a NetWorker client with the configuration wizard, have thefollowing information ready:
Configuring snapshots on XtremIO arrays
100 NetWorker 18.1 Snapshot Management Integration Guide
l The XtremIO Storage array hostname or IP address.
l The username and password for the XtremIO storage array.
l The mount host initiator name created on the XtremIO array.
Snapshot backups with XtremIODuring scheduled backups, NSM for XtremIO creates PIT copies of the productionLUN. During the snapshot process, NSM extracts the XtremIO array credentials fromthe NetWorker Client resource to discover production LUN information to create asnapshot for.
XtremIO configuration methodsThe NMC Client Configuration Wizard supports the creation of NSM XtremIOconfigurations. However, after you have created an XtremIO configuration, modify theconfiguration through the NMC Properties windows to add the proxy host initiatorname, or to make any other changes. You can also add the proxy host initiator name inthe NMC Client Configuration Wizard from Advanced options > Extra Options.
Configuring snapshots on XtremIO arrays
Snapshot backups with XtremIO 101

Configuring snapshots on XtremIO arrays
102 NetWorker 18.1 Snapshot Management Integration Guide

CHAPTER 7
Configuring snapshots on VMAX StorageArrays
This chapter includes the following topics:
l Snapshot support of VMAX storage arrays.......................................................104l Pairing source LUNs to mirror LUNs.................................................................105l VMAX SRDF/S support.................................................................................... 108l Solutions Enabler Client and Server mode configuration.................................. 109l Known limitation for VMAX............................................................................... 110
Configuring snapshots on VMAX Storage Arrays 103
Snapshot support of VMAX storage arraysNetWorker provides snapshot support and configurations that are specific to VMAX(Symmetrix) storage arrays.
Migrating Legacy PowerSnap Configurations provides information on migratingPowerSnap VMAX implementations to NetWorker snapshot management.
Snapshot operations with TimeFinder softwareTo perform snapshot operations on VMAX storage arrays, the TimeFinder SolutionsEnabler package must be installed on both the application host and the mount host (ifseparate from the application host). Solutions Enabler manages all NetWorkerTimeFinder client and server operations.
The TimeFinder software maintains multiple, host-independent copies of productiondata by generating synchronous real-time mirrors of the production data. TimeFindercan use locally mirrored LUNs on the same VMAX array or local LUNs with remotelymirrored LUNs on a separate VMAX array with an SRDF connection.
The NetWorker intelligent pairing feature automatically matches TimeFinder sourceLUNs with appropriate target mirror devices. This feature replaces a manuallyconfigured symm.res file on the application host. However, if a symm.res file ispresent, the file takes priority.
Prerequisites and support for VMAX configurationsThe following prerequisites and support apply to VMAX configurations:
l Ensure that Solutions Enabler is installed on the application host and the mounthost. Storage array prerequisites provides details.
l Mask the mirror devices to the mount host. You can run the symdev showmirror_device command on the mount host to verify that the device has aphysical pathname.
l Create a SYM Access Group which contains the application host and the mounthost.
l To enable snapshots you must add the following privileges to the Access Groups:
n BASE
n BASECTRL
n BCV
l VMAX configurations support all thin-provisioned LUNs.
l Whenever a storage layout change affects the application host or the mount host,run the symcfg discover command on these hosts to rediscover the storagelayout. If snapshots fail, you can run this command on the mount host to findmirror devices that are not visible to the mount host.
l Solutions Enabler Client/Server mode is supported. Solutions Enabler Client andServer mode configuration on page 109 provides more details.
Types of supported mirror devicesNetWorker supports the following types of mirror devices on VMAX storage arrays:
Configuring snapshots on VMAX Storage Arrays
104 NetWorker 18.1 Snapshot Management Integration Guide
l TimeFinder BCV—These devices are full physical copies and appear as mirrors ofthe standard device.
l TimeFinder Snap/VDEV—These devices use the copy-on-write (COW) snapshotcreation method.
l TimeFinder Clone—These devices create high performance, full source copies.The following limitations apply for rollback operations that use TimeFinder Clonecopies:
n Rollback operations fail for a snapshot that is created with the applicationvariable SYMM_CLONE_FULL_COPY=FALSE.
n Rollback operations fail for a source LUN that has another established BCVmirror unless you set SYMM_RB_OVERRIDE_OTHER_TGTS=TRUE.
n Rollback operations fail for a source LUN that has an active relationship withmore than one snapshot or mirror.
Application Information variables for VMAX arrays provides details.
l TimeFinder VP Snap—These devices create space-efficient snapshots for virtualthin pool devices. The following limitations apply:
n All VP Snap target devices that are paired to the same source LUN must bebound to the same thin pool.
n A source device cannot simultaneously run both a VP Snap session and a CloneNo Full Copy session.
l TimeFinder SnapVX—These devices are a fundamentally new TimeFinder, withsnapshots now existing as pointers rather than as physical devices:
n You need not specify a target device and the source and target pairs.
n When you perform a rollback with SnapVX snapshots, the snapshot is notdeleted from the NetWorker media database and is available again forsubsequent rollback operations.
n SnapVX only supports target LUN selection using Intelligent Pairing. If asymm.res is used the selection is ignored.
Pairing source LUNs to mirror LUNsNetWorker snapshot operations require the use of paired source and target mirrorLUNs. NetWorker intelligent pairing can automatically determine these LUN pairs oryou can manually specify the pairs in the symm.res file on the application host.
Intelligent pairingIntelligent pairing is a NetWorker feature that automatically chooses an availablemirror LUN, based on the mirror that is the least expensive to synchronize with thesource LUN.
Intelligent pairing selects only mirrors that are visible and usable by the snapshotmount host, which can be separate from the application host. This feature eliminatesthe potential error in manual configuration, which can have new LUNs masked only tothe application host when they should also be masked to the mount host.
Disposition: / Status:Eric/Christopher please review this statement.Intelligent pairing is now user configurable. Use the NSM_SNAP_SG client resourceattribute. Add this attribute manually to the client resource after you create the client.
Configuring snapshots on VMAX Storage Arrays
Pairing source LUNs to mirror LUNs 105
Using the NSM_SNAP_SG client resource attribute increases performance and thenumber of LUNs are reduced.
Intelligent pairing selects mirror LUNs from a pool of LUNs that you specify in a VMAXstorage group (NsrSnapSG) on each VMAX array that NetWorker uses:
l Each storage group can contain a maximum of 4096 LUNs.
l This storage group can contain any type of LUN, except source LUNs.
l Ensure that you add sufficient numbers, types, and sizes of devices to a storagegroup so that intelligent pairing can find compatible pairs. For example, for Cloneand VP Snap operations, a source LUN requires the use of STD or BCV devices asmirrors.
l If NetWorker cannot find a valid mirror, then the snapshot fails with the followingmessage:
Not enough resources.
NOTICE
Do not use the device LUNs in the NsrSnapSG storage groups for any purpose otherthan as NetWorker snapshot mirror devices. The snapshot operations destroy thecontents of any device selected from an intelligent pairing storage group. Do not addsource LUN devices to a storage group.
The snapshot operations can pair a mirror LUN with only one source LUN at a time. Onrare occasions, more than one application host can simultaneously try to use the samefree mirror LUN for a backup operation. One backup will succeed and the competingbackup will fail. Retry the failed backup and NetWorker will use a different mirror.
Configuring NsrSnapSG storage groups for intelligent pairingYou can create a maximum of 11 intelligent pairing storage groups on a VMAX array.The names of the storage groups can be NsrSnapSG and NsrSnapSG0 throughNsrSnapSG9.Disposition: / Status:Christopher please review this sentence.Using the NSM_SNAP_SG client resource attribute increases performance and thenumber of LUNs are reduced.
Each VMAX storage group can contain up to 4096 devices. If you need to specifymore than 4096 mirrors for intelligent pairing, create more than one storage group.
Note
NsrSnapSG storage groups are created on the VMAX arrays, not on the applicationhost where you run the command. Any application host that can see the VMAX arraycan see its storage groups.
To create a storage group for intelligent pairing, run the following command: symsg -sid vmax_id create NsrSnapSGTo add a device to this group that NetWorker can use as a mirror, run the followingcommand: symsg -sid vmax_id -sg NsrSnapSG add dev device_id
Configuring snapshots on VMAX Storage Arrays
106 NetWorker 18.1 Snapshot Management Integration Guide
Note
These examples use mixed case for clarity. The characters in the storage group namesare not case-sensitive.
Manual pairing LUNs with the symm.res fileYou can use the symm.res file instead of, or also with, intelligent pairing. This fileenables you to manually select mirrors to pair to specific source LUNs. SnapVX doesnot support symm.res. SnapVX requires targets for mounting the snapshot whichyou can select only by using IP.
Note
If you do not correctly configure the symm.res file to mask the mirrors to the mounthost, NetWorker creates snapshots that are not available for restore or for cloneoperations.
Consider the following features of the symm.res file and intelligent pairing:
l If the symm.res file specifies a source LUN, that LUN cannot use intelligentpairing, even if none of its specified mirrors are valid or even if the symm.res fileis incorrect.
l Source LUNs are available to intelligent pairing only if the symm.res file does notspecify them or the symm.res file does not exist.
l You can disable intelligent pairing by specifying the Application Informationvariable NSR_PS_SYMM_IP=FALSE.
Configuring the symm.res fileThe default location of the symm.res file is /nsr/res/symm.res. You can specifyan alternate location by using the Application Information variableSYMM_SNAP_POOL=pathname.
The file consists of one or more lines, each in the following format:
vmax_id:source_dev_id [vmax_id:]mirror_dev_id1[vmax_id:]mirror_dev_id2
When you specify one or more mirror LUNs for a single source LUN, NetWorker pairsthe best mirror LUN with the source LUN. If NetWorker cannot find a pair, the backupfails with the following message:
Not enough resources.
NetWorker ignores blank lines in the symm.res file and lines starting with #.
The vmax_id for the source LUN is mandatory. If the selected mirror LUN does nothave a VMAX-id, the mirror LUN uses the VMAX-id of the source LUN.
For SRDF configurations, the vmax_id of the mirror LUNs is mandatory and must bedifferent from the vmax_id of the source LUN.
Configuring snapshots on VMAX Storage Arrays
Manual pairing LUNs with the symm.res file 107
For example, a simple symm.res file for a source LUN ABC with 3 mirror LUNs 123,456, and 789 can be as follows:
# LUNs for /critical_filesystem000194901248:ABC 123 456 789
For an SRDF configuration, the same symm.res file could be as follows:
000194901248:ABC 0001949017BA:123 0001949017BA:456 0001949017BA:789
VMAX SRDF/S supportSRDF/S is a VMAX feature that maintains a synchronous, real-time copy of data atthe LUN level between two VMAX storage arrays, one of which is local and the otherremote.
To configure snapshots on a remote VMAX array with SRDF/S functionality, you mustassociate a source LUN (referred to as R1) on the local array with a source LUN (R2)on the remote array. The SRDF/S software maintains continuous synchronization ofthe two sources by copying all changes on one LUN device to the other.
For typical snapshot operations, the remote R2 LUN has its own mirror thatNetWorker uses for snapshot creation and snapshot clones. A mirror is optional on thelocal R1 LUN. When NetWorker creates an SRDF/S snapshot, it validates thesynchronization of the R1 and R2 devices and then syncs/splits the mirror of the R2device. This split of the mirror creates the snapshot, which represents a third copy ofthe data. If the NetWorker policy specifies a clone, then NetWorker performs theclone from this mirror.
NetWorker also supports a direct R2 backup, with no snapshot. In this operation,NetWorker ensures the synchronization of the R1 and R2 devices, suspends the linkbetween the R1 and R2 devices, and performs a clone directly from the R2 sourceLUN. After the clone completes, NetWorker reestablishes the link. The snapshotpolicy must have a Retain Snapshots value of 0 or the clone will fail.
SRDF/S requirements and support for snapshot operations are as follows:
l When using a direct R2 backup, R2 mirrors must be visible and available to themount host.Disposition: / Status:Eric is this OK?
l NetWorker automatically determines the state of the SRDF/S link at runtime.There is no requirement for manually configured environment variables orapplication variables.
l If there is no SRDF/S link at the beginning of an operation, then the backup orrestore operation will fail.
l NetWorker does not support any changes to the SRDF/S link mode made duringbackup or restore operations.
l If the RDF link is in a failed over or failed back state, the snapshot operations willfail.
l Mirror replication cannot transition between asynchronous and synchronousmodes during any NSM operation. The mode must remain constant.
l NetWorker does not support the creation of snapshots of file systems or ofvolume groups that cross SRDF/RA groups.
Configuring snapshots on VMAX Storage Arrays
108 NetWorker 18.1 Snapshot Management Integration Guide
l NetWorker supports only single-hop remote connections.
l NetWorker supports only TF/Mirror (RBCV) in asynchronous copy (SRDF/A)environments and does not support concurrent RDF and STAR configurations andmodes.
Rollbacks in the SRDF/S environment on page 86 provides specific details on rollbackoperations in this environment.
Rollbacks in the SRDF/S environmentDuring the rollback, NetWorker automatically performs the following operations:
Note
The term link in this rollback process refers to the replication state, not the physicalconnection between the R1 and R2 devices on the separate VMAX arrays.
l Transitions the link to split between the R1 and R2 devices.
l Rolls back the data from the DD restore device to the R2 device.
l Synchronizes the R2 device to the R1 device by using reverse synchronization.
l Transitions the link to the synchronized state.
l Leaves the RDF link in a synchronized state, after the rollback is completed.
Solutions Enabler Client and Server mode configurationYou can run SYMCLI as a client to a remote SYMAPI server to manage a remotely-controlled Symmetrix array.
The Solutions Enabler Installation Guide provides more information on SYMAPI Client/Server configuration.
Configuring the Solutions Enabler in Client/Server mode on a SAP clientProcedure
l Modify the netcnfg file /usr/emc/API/SYMAPI/config/netcfng. Type thefollowing line:
Proxyservername - TCPIP Proxyservername ProxyserverIP 2707ANYNSM_SERVER - TCPIP Proxyservername ProxyserverIP 2707 ANY
l Type the following lines in the /nsr/nsrrc files:
SYMCLI_CONNECT = Proxyservername (as defined in the netcfng file)
SYMCLI_CONNECT_TYPE = REMOTE
export SYMCLI_CONNECT
export SYMCLI_CONNECT_TYPE
Configuring the Solutions Enabler in Client/Server mode on a Mount HostProcedure
l Modify the netcnfg file /usr/emc/API/SYMAPI/config/netcfng.
NSM_SERVER - TCPIP Proxyservername ProxyserverIP 2707 ANY
Configuring snapshots on VMAX Storage Arrays
Rollbacks in the SRDF/S environment 109
l Enable the Storsrvd service. Type the following command:
stordaemon start storsrvdYou must add the storsrvd service to the statup procedure of the mount host.
During the Zoning and or Masking process, you must grant the mount host accessto the LUNs of the application hosts. However, the LUNs must not be mounted,they must only visible in order for the snapshots to run.
Known limitation for VMAXWhen you use SUSE LINUX server as a mount host, it is known to require specificconfiguration when you add LUNs which can generate extra load on the systemadministrator side.
Configuring snapshots on VMAX Storage Arrays
110 NetWorker 18.1 Snapshot Management Integration Guide
CHAPTER 8
Configuring snapshots on VNX Block StorageArrays
This chapter includes the following topics:
l Snapshot support of VNX Block storage arrays.................................................112l Configuring the Navisphere security file............................................................112l Configuring Unisphere CLI on VNXe3200..........................................................114
Configuring snapshots on VNX Block Storage Arrays 111
Snapshot support of VNX Block storage arraysNetWorker provides snapshot support and configurations that are specific to VNXBlock (CLARiiON) storage arrays.
Migrating Legacy PowerSnap Configurations provides details on migrating PowerSnapVNX implementations to NetWorker Snapshot Management (NSM).
Snapshot operations with SnapView softwareVNX Block storage arrays run SnapView software that enables you to create a copy ofa LUN by using clones or snapshots. You can use a clone or snapshot for databackups. A clone is a complete copy of a LUN and takes time to create. A snapshot isa virtual point-in-time copy of a LUN and takes only seconds to create. A NetWorkersnapshot operation uses SnapView to create an exact point-in-time snapshot of thevolume, creates a clone copy of the entire volume that NetWorker can recover, andclones to conventional storage media.
The VNX Series Command Line Interface Reference for Block documentation providesdetails.
Prerequisites and support for VNX configurationsInstall Unisphere host agent, Navisphere CLI, and Snap CLI on the application host andthe snapshot mount host. Storage array specific prerequisites on page 63 providesdetails.
NetWorker supports the following backup technologies on VNX Block storage arrays:
l Copy on Write (SnapView COW/snapshot)
l MIRROR (SnapView Clone)
l VNX-SNAP (VNX Snapshot)
l VNXe-SNAP (VNXe/VNXe2 Snapshot)
Note
While configuring a Solaris client (with Veritas) for a VNXe Snap backup, you mustdisable the Veritas controller on the proxy host. Use the following command to disablethe Veritas controller:
vxdmpadm -f disable ctlr=c4
Configuring the Navisphere security fileThe Navisphere security file is required on all nodes that participate in snapshotoperations with VNX storage arrays. The security file enables VNX navisecclicommands for cloning and other features. If this file does not exist or does not containthe permissions that are required by NetWorker, then the NetWorker backups andrestores fails.
If a Navisphere security file does not exist, the NetWorker Client Configuration wizardcreates the file under the root user home directory (UNIX) or System account(Windows). The security file can be manually created and modified.
Configuring snapshots on VNX Block Storage Arrays
112 NetWorker 18.1 Snapshot Management Integration Guide
Creating the Navisphere file manually on UNIX systemsTo manually configure the Navisphere security file on UNIX systems, type thefollowing command:
naviseccli -h VNX_server -addusersecurity -user VNX_array_user -password VNX_array_user_password -Scope VNX_ARRAY_ACCESS -AddressVNX_server_frameIPVNX_ARRAY_ACCESS is set by the Storage Admin based on VNX_array_user. Theoptions are as follows:
l 0 - global
l 1 - local
l 2 - LDAP
The VNX_server_frameIP can be 1 or more, and is the IP where the LUNs are visible tothe array.
Creating the Navisphere file manually on Windows systemsTo manually create or modify the Navisphere security file on Microsoft Windowssystems, complete the following steps.
Procedure
1. On the application host, enable the naviseccli pop-up windows by runningthe Interactive Service Detection feature:
a. Select Start > Run > services.mcs.
b. Start the Interactive Service Detection service.
2. Download PSEXEC from Microsoft SysInternals, and then unzip it in atemporary folder.
3. Open a command prompt as an administrator, and then browse to the folderwhere you unzipped PSEXEC.EXE.
4. Type the following command:
PSEXEC -i -s -d CMDA new command prompt appears.
5. To verify that the command prompt belongs to the system user account, typethe following command:
WHOAMI/USER
6. To set the global account for all users on this system, type the followingcommand:
naviseccli -User username -Password password -Scope 0 -AddUserSecurity
7. To set credentials for a specific VNX storage array, type the followingcommand:
naviseccli -h VNX_server -addusersecurity -user VNX_array_user -password VNX_array_user_password -Scope VNX_ARRAY_ACCESS -Address VNX_server_frameIP
VNX_ARRAY_ACCESS is set by the Storage Admin based on VNX_array_user.The options can be as follows:
Configuring snapshots on VNX Block Storage Arrays
Creating the Navisphere file manually on UNIX systems 113
l 0 - global
l 1 - local
l 2 - LDAP
The VNX_server_frame IP can be 1 or more, and is the IP where the LUNs arevisible to the array.
Configuring Unisphere CLI on VNXe3200Follow this procedure to run Unisphere CLI on Windows 2012. Unisphere CLI is theonly binary required for NSM VNXe-Snap Block snapshot to work. CurrentlyUnisphere CLI is only available as a 32-bit binary.
Note
NetWorker now supports snapshots of both a single and LUN Group devices.
Procedure
1. On the production host and the mount host, install Unisphere CLI.
The Unisphere CLI product documentation provides information for OS specificinstallation and requirements.
2. In the Configure Optional Settings pane, to include Unisphere CLI in theenvironment path, do not change the Unisphere CLI in the Environment paththat is selected by default.
3. To avoid runtime backup errors, in the Configure Optional Settings pane,select Low (The certificate will not be verified).
4. On both the client and the proxy or storage node, create a security file bytyping the following command:
uemcli -d <IP address> -u <username> -p <password> -saveUser
5. Test the connection by typing the following command:
uemcli -d <IP address> /prot/snap show
If after running this command the system displays an error, then Unisphere CLIis not setup correctly.
UEMCLI Windows registry setupThe Unisphere CLI might not add the installed path to its registry entry. The full pathto the binary is required and you must specify the Windows registry setting for theUEMCLI system path. To ensure you have a valid path for the Unisphere installlocation, you must manually add a registry entry for NetWorker.
1. From the command prompt or a Windows shell prompt, type regedit.
2. Locate the HKEY_LOCAL_MACHINE\SOFTWARE\Legato\NetWorker folder.
3. Right-click, and then select New > String Value.
4. Name the value UEMCLI_directory, and then press Enter on the keyboard.
5. Right-click the UEMCLI_directory, and then select Modify.
6. In the Value data field, type the full path to the already installed Unisphere CLIlocation.
Configuring snapshots on VNX Block Storage Arrays
114 NetWorker 18.1 Snapshot Management Integration Guide

When you provision a file system from VNXe, indicate which host has access to theLUN, and which host has access to the snapshot. For a single node setup, the sourceor primary host has access to both the LUNs and snapshots. For a multi node setup,the source host has access to LUNs, and the target or secondary host has access tothe snapshot.
Configuring snapshots on VNX Block Storage Arrays
UEMCLI Windows registry setup 115

Configuring snapshots on VNX Block Storage Arrays
116 NetWorker 18.1 Snapshot Management Integration Guide
CHAPTER 9
Configuring snapshots on RecoverPoint
This chapter includes the following topics:
l Snapshot support of RecoverPoint................................................................... 118l Supported RecoverPoint features..................................................................... 119l RecoverPoint configuration methods............................................................... 120l RecoverPoint snapshot retention..................................................................... 120
Configuring snapshots on RecoverPoint 117
Snapshot support of RecoverPointNetWorker snapshot support, practices, and configurations that are specific toRecoverPoint are described.
Migrating Legacy PowerSnap Configurations on page 163 provides information onmigrating PowerSnap RecoverPoint implementations to NetWorker snapshotmanagement.
Note
Recover Point is designed in such a way that it takes a snapshot at CG level wheneverCGs are used. Networker Snapshot Manager provide users the option to operate atthe Individual LUN level inside the CG of Recover Point and take snapshots. It can berecovered by using all the recovery options like file-by-file and Saveset Recovery forboth snapshot and Clone backups and Rollback for snapshot backup.
Recover Point Snapshot Restore by Rollback removes snapshots that are createdafter the snapshot for the LUNs in the same CG, which was used for rollbackoperation. Due to this behavior, if any LUNs in CG that are used to create separatesavesets in Networker and are used in separate policies which are backed up atdifferent time slots, if one of them rollback, there is a chance that the snapshot forother saveset is deleted which are taken after the rollback saveset. Due to thislimitation, it is recommended that Recover Point snapshots from NSM should befollowed by clone backups to avoid accidental deletion of backup copies in case of arollback operation for a different saveset. For example, CG1 has 3 LUNs, A,B, and C.Each time Recover Point takes a snapshot, it would be at a CG1 level and not at aindividual LUN level. Networker, provides the option to create multiple clients withsubsets of these three LUNs (LUN A and B can be part of client 1 and LUN C can bepart of Client 2).
Whenever a Networker Snapshot Manager backup is taken for Client 1, Recover Pointtakes the backup of CG1 and NetWorker would internally use the snapshots of LUNs Aand B only. For Client 2 snapshot Recover Point would take snapshot at CG1 andNetworker would use snapshot of LUN C.
The user has taken backups of Client A and Client B every 6 hrs, one after otherstarting at 00 hours, with Client A, and 0600 hours with Client B. There will be 2snapshots for each client after 24 hours. Now at 1800 hours, there would have been 2snapshot backups of client A and one snapshot backup of client B. If for some reason,client A data is corrupted just after the first snapshot of Client B (at 0600 hours.) anduser chooses to recover using the first snapshot of Client A by means of a rollback, allsnapshots taken after 0600 hours will be lost. This is because Recover point wouldtreat all these as CG1 snapshots.
To mitigate this potential risk, it is recommended to take a clone for all the backups, sothat the data is not lost.
Snapshot operations with RecoverPoint softwareRecoverPoint can provide local replication and remote replication of protectedapplication volumes. During production operations, RecoverPoint tracks every writeactivity on the protected application host’s production volumes and records thisactivity as specific point-in-time (SPIT) bookmarks. By using these SPITs,RecoverPoint can reconstruct any previous state of the volumes within a specifiedperiod, enabling any-point-in-time recovery.
Configuring snapshots on RecoverPoint
118 NetWorker 18.1 Snapshot Management Integration Guide
NetWorker can recover the snapshots or clone them to conventional storage media.For each snapshot operation, RecoverPoint records a SPIT bookmark of the snapshot.
The RecoverPoint Administration Guide provides details.
Prerequisite for RecoverPoint configurationsThe NetWorker Snapshot Management (NSM) prerequisite for a storage appliancerunning RecoverPoint is that you must Configure RecoverPoint on a supported VMAX,VNX, XtremIO, or VPLEX storage array.
The NetWorker Online Software Compatibility Matrix provides details. See Storage arrayspecific prerequisites on page 63 for more details.
Restrictions for RecoverPoint configurationsThe following restrictions apply to NetWorker Snapshot Management (NSM)operations with RecoverPoint:
l NSM backups cannot support consistency groups that are configured with morethan one Remote Replication copy. Trying to back up or restore snapshots byusing RP_CRR might fail. To work around this issue, use RP_CDP, and use amount host that has visibility to the local replica LUNs.
l NSM must back up all protected sources in a consistency group in a single session.For example, a consistency group that protects the file systems - G:\ and L:\must be backed up using NetWorker in one client resource (Save Set: "G:\ L:\"). Otherwise, if backups of G:\ and L:\ begin simultaneously, one backup fails.
Note
Changes that are made to RecoverPoint Consistency Groups outside of NSMoperations, including renaming or modifying the contents of protection sets, can resultin backup and restore failures of NSM snapshots. If a protection set has changed,start a new NSM snapshot.
Supported RecoverPoint featuresThe NetWorker Snapshot Management (NSM) integration with RecoverPointsupports the following capabilities:
l Specific point-in-time (SPIT) snapshot capability, implemented as a RecoverPointbookmark.
l Backup and restore capability through NSM:
n Snapshot backup (PIT)
n PIT mount on mount host
n Clone (backup of PIT)
n Snapshot restore
n Snapshot management
n Rollback
n Clone restore
Snapshot management policyNetWorker Snapshot Management (NSM) for RecoverPoint creates RecoverPointbookmarks and makes the bookmarks available to NetWorker by saving them into the
Configuring snapshots on RecoverPoint
Prerequisite for RecoverPoint configurations 119
media database as snapshot save sets (snapsets). The backup administrator uses theNMC Client Configuration Wizard to manage volumes that are protected byRecoverPoint.
Have the following information ready before you configure a NetWorker client withthe configuration wizard:
l The RecoverPoint appliance hostname or IP address.
l The username and password for the RecoverPoint appliance and permissions tocreate bookmarks.
l The mount host that is attached to the RecoverPoint replication storage.
l The backup option for the backup, which is either continuous data protection(CDP), which informs NSM that the mount host has access to the local replicationstorage, or continuous remote replication (CRR) which informs NSM that themount host has access to the remote replication storage.
Snapshot backupsNSM for RecoverPoint creates PIT copies of the data during scheduled backups byassociating snapshot save sets with RecoverPoint bookmarks.
During the snapshot process, the NSM extracts RecoverPoint appliance credentialsfrom the NetWorker Client resource to discover dependent consistency groups andtheir copies. With this information, NSM requests a bookmark from the RecoverPointappliance and saves the bookmark information as part of the snapshot backup.
RecoverPoint configuration methodsThe NetWorker Management Console (NMC) Client Configuration Wizard supportsthe creation of NetWorker Snapshot Management (NSM) RecoverPointconfigurations, and is the recommended configuration method.
After you create a RecoverPoint configuration, you can modify the configurationthrough the NMC property windows. This modification enables you to use ApplicationInformation variables, as listed in Application Information Variables.
As an alternative to using the wizard, you can manually create an NSM configurationfor RecoverPoint by using the nsrsnapadmin -a -rpcreate command, asfollows:
nsrsnapadmin -a -rpcreate -s networker_server -app recoverpoint_engine-u username -p passwordThe NetWorker man pages and the NetWorker Command Reference Guide providedetails.
RecoverPoint snapshot retentionYou can identify the lifecycle of a RecoverPoint SPIT only by the RecoverPoint CopyPolicy that is configured by the bookmark. When the bookmark reaches the end of itsCopy Policy retention period, the SPIT becomes invalid and a NetWorker recoverycannot use the SPIT.
Occasionally, NSM snapshot save sets that correspond to invalid bookmarks can bepresent in the NetWorker media database. This issue can occur when the daily cleanupprocess has not yet removed the save set references.
When you plan the management of RecoverPoint snapshot operations with NSM,consider the following potential issues:
Configuring snapshots on RecoverPoint
120 NetWorker 18.1 Snapshot Management Integration Guide
l A high storage change rate can force a bookmark out of its Copy Policy retentionperiod before a backup is completed. This issue can cause snapshot clones to fail.For example, RecoverPoint software can track database changes to a productionLUN many times each second with an update to its journal volume for eachchange. When the journal volume reaches its capacity, RecoverPoint automaticallydiscards the oldest journal updates, including bookmarks created for NSM. For alarge NSM clone, the time that is needed to back up a SPIT can exceed theduration of the SPIT’s record in the journal. If RecoverPoint deleted the bookmark,the backup fails.
A possible solution is to increase the amount of journal space in a consistencygroup.
l If the NSM snapshot policy retains a snapshot save set longer than theRecoverPoint Copy Policy retention period for its bookmark, the save set remainsin the NetWorker media database although it is invalid.
l The restore operation can cause RecoverPoint to remove the oldest bookmarksdue to Copy Policy retention periods. Restore from a snapshot or fromconventional storage adds updates to the RecoverPoint data changes and canforce older bookmarks out of the retention period.A possible solution is to increase the amount of journal space in a consistencygroup.
Configuring snapshots on RecoverPoint
RecoverPoint snapshot retention 121

Configuring snapshots on RecoverPoint
122 NetWorker 18.1 Snapshot Management Integration Guide
CHAPTER 10
Configuring snapshots in a Cluster Environment
This chapter includes the following topics:
l NetWorker support of cluster environments.....................................................124l Configuring a cluster environment for snapshots..............................................124l AIX systems in a cluster environment............................................................... 125l ProtectPoint restore and rollback for VCS on Solaris....................................... 126
Configuring snapshots in a Cluster Environment 123
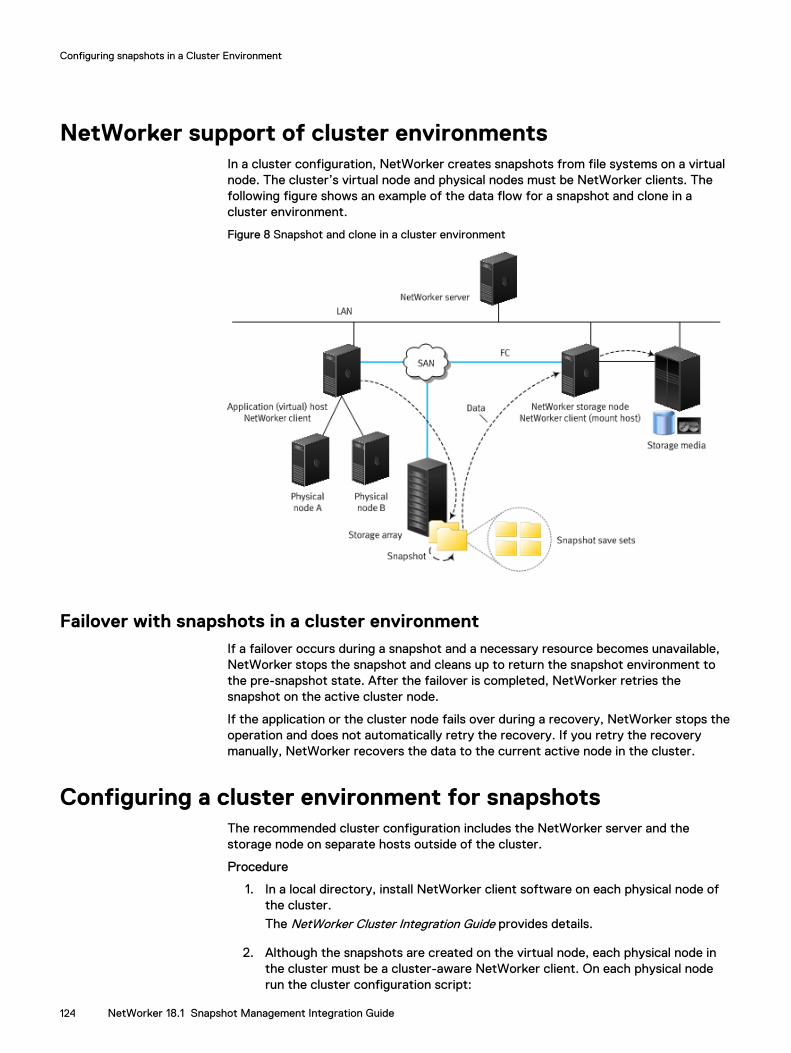
NetWorker support of cluster environmentsIn a cluster configuration, NetWorker creates snapshots from file systems on a virtualnode. The cluster’s virtual node and physical nodes must be NetWorker clients. Thefollowing figure shows an example of the data flow for a snapshot and clone in acluster environment.
Figure 8 Snapshot and clone in a cluster environment
Failover with snapshots in a cluster environmentIf a failover occurs during a snapshot and a necessary resource becomes unavailable,NetWorker stops the snapshot and cleans up to return the snapshot environment tothe pre-snapshot state. After the failover is completed, NetWorker retries thesnapshot on the active cluster node.
If the application or the cluster node fails over during a recovery, NetWorker stops theoperation and does not automatically retry the recovery. If you retry the recoverymanually, NetWorker recovers the data to the current active node in the cluster.
Configuring a cluster environment for snapshotsThe recommended cluster configuration includes the NetWorker server and thestorage node on separate hosts outside of the cluster.
Procedure
1. In a local directory, install NetWorker client software on each physical node ofthe cluster.
The NetWorker Cluster Integration Guide provides details.
2. Although the snapshots are created on the virtual node, each physical node inthe cluster must be a cluster-aware NetWorker client. On each physical noderun the cluster configuration script:
Configuring snapshots in a Cluster Environment
124 NetWorker 18.1 Snapshot Management Integration Guide
l Microsoft Windows:
NetWorker_install_path\lc_configl UNIX:
/NetWorker_install_path/networker.cluster
The NetWorker Cluster Integration Guide provides details.
3. For each virtual node in the cluster that requires NetWorker snapshot services,configure a NetWorker Client resource. Include the following settings:
a. In the Application Information attribute, specify the shared directory pathin the NSR_PS_SHARED_DIR variable.
NetWorker creates the ssres file in this directory. The ssres file containstransaction logs that NetWorker uses to clean up aborted snapshots andreturn the snapshot environment to the pre-snapshot state.
This shared directory can be at one of the following locations:
l Storage that the application resource group manages.
l A global file system that is accessible to all the cluster nodes.Common Application Information variables provides details.
b. In the Remote Access attribute, specify the system (Windows) or root(UNIX) account and the hostname or cluster IP of each physical node withinthe cluster. For example:
l Microsoft Windows:
system@clus_phys1system@clus_phys2
l UNIX:
root@clus_phys1root@clus_phys2
The NetWorker Administration Guide provides details on NetWorker in a clusterenvironment.
AIX systems in a cluster environmentNSM does not support unmanaged file system devices for cluster environments onAIX platforms.
Object Data Manager is not cluster-aware on AIX systems. When you add or removelogical volumes, update each ODM database by using one of the following methods:
l Export and import all modified volume groups on all other nodes.
l Use the synclvodm command as the root user to synchronize the deviceconfiguration database with the LVM information:
synclvodm -v VGName
Configuring snapshots in a Cluster Environment
AIX systems in a cluster environment 125
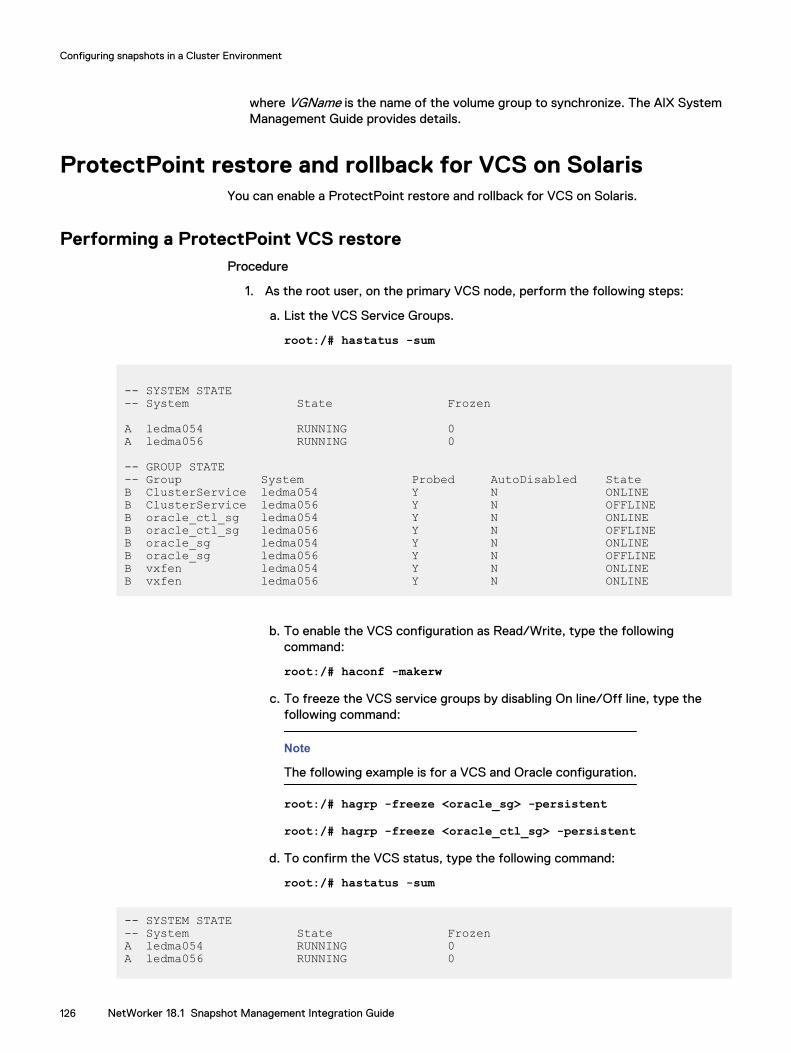
where VGName is the name of the volume group to synchronize. The AIX SystemManagement Guide provides details.
ProtectPoint restore and rollback for VCS on SolarisYou can enable a ProtectPoint restore and rollback for VCS on Solaris.
Performing a ProtectPoint VCS restoreProcedure
1. As the root user, on the primary VCS node, perform the following steps:
a. List the VCS Service Groups.
root:/# hastatus -sum
-- SYSTEM STATE-- System State Frozen
A ledma054 RUNNING 0A ledma056 RUNNING 0
-- GROUP STATE-- Group System Probed AutoDisabled StateB ClusterService ledma054 Y N ONLINEB ClusterService ledma056 Y N OFFLINEB oracle_ctl_sg ledma054 Y N ONLINEB oracle_ctl_sg ledma056 Y N OFFLINEB oracle_sg ledma054 Y N ONLINEB oracle_sg ledma056 Y N OFFLINEB vxfen ledma054 Y N ONLINEB vxfen ledma056 Y N ONLINE
b. To enable the VCS configuration as Read/Write, type the followingcommand:
root:/# haconf -makerw
c. To freeze the VCS service groups by disabling On line/Off line, type thefollowing command:
Note
The following example is for a VCS and Oracle configuration.
root:/# hagrp -freeze <oracle_sg> -persistent
root:/# hagrp -freeze <oracle_ctl_sg> -persistent
d. To confirm the VCS status, type the following command:
root:/# hastatus -sum
-- SYSTEM STATE-- System State FrozenA ledma054 RUNNING 0A ledma056 RUNNING 0
Configuring snapshots in a Cluster Environment
126 NetWorker 18.1 Snapshot Management Integration Guide
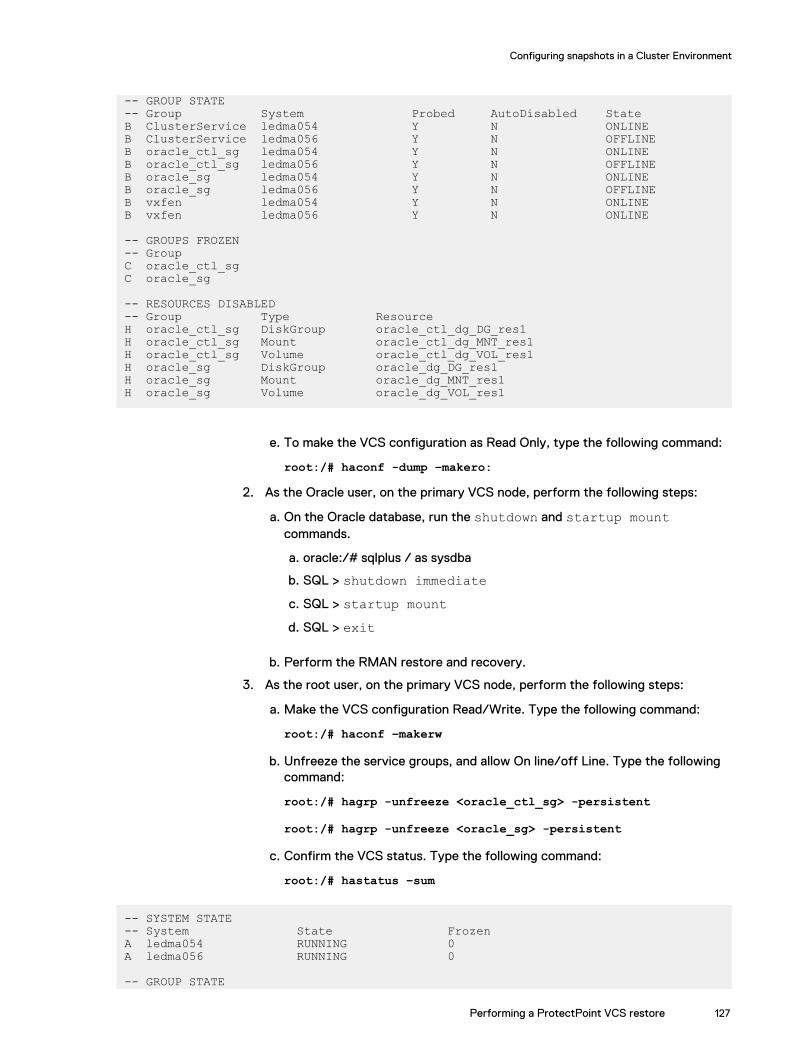
-- GROUP STATE-- Group System Probed AutoDisabled StateB ClusterService ledma054 Y N ONLINEB ClusterService ledma056 Y N OFFLINEB oracle_ctl_sg ledma054 Y N ONLINEB oracle_ctl_sg ledma056 Y N OFFLINEB oracle_sg ledma054 Y N ONLINEB oracle_sg ledma056 Y N OFFLINEB vxfen ledma054 Y N ONLINEB vxfen ledma056 Y N ONLINE
-- GROUPS FROZEN-- GroupC oracle_ctl_sgC oracle_sg
-- RESOURCES DISABLED-- Group Type ResourceH oracle_ctl_sg DiskGroup oracle_ctl_dg_DG_res1H oracle_ctl_sg Mount oracle_ctl_dg_MNT_res1H oracle_ctl_sg Volume oracle_ctl_dg_VOL_res1H oracle_sg DiskGroup oracle_dg_DG_res1H oracle_sg Mount oracle_dg_MNT_res1H oracle_sg Volume oracle_dg_VOL_res1
e. To make the VCS configuration as Read Only, type the following command:
root:/# haconf -dump –makero:
2. As the Oracle user, on the primary VCS node, perform the following steps:
a. On the Oracle database, run the shutdown and startup mountcommands.
a. oracle:/# sqlplus / as sysdba
b. SQL > shutdown immediatec. SQL > startup mountd. SQL > exit
b. Perform the RMAN restore and recovery.
3. As the root user, on the primary VCS node, perform the following steps:
a. Make the VCS configuration Read/Write. Type the following command:
root:/# haconf –makerw
b. Unfreeze the service groups, and allow On line/off Line. Type the followingcommand:
root:/# hagrp -unfreeze <oracle_ctl_sg> -persistent
root:/# hagrp -unfreeze <oracle_sg> -persistent
c. Confirm the VCS status. Type the following command:
root:/# hastatus –sum
-- SYSTEM STATE-- System State FrozenA ledma054 RUNNING 0A ledma056 RUNNING 0
-- GROUP STATE
Configuring snapshots in a Cluster Environment
Performing a ProtectPoint VCS restore 127
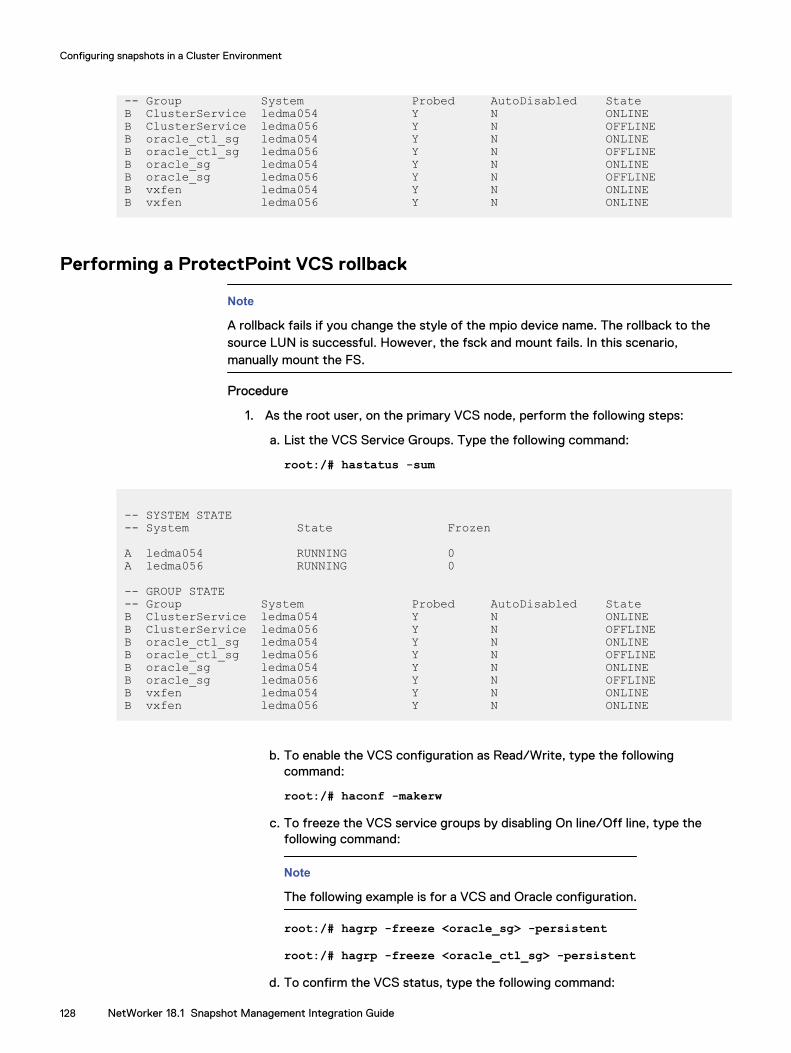
-- Group System Probed AutoDisabled StateB ClusterService ledma054 Y N ONLINEB ClusterService ledma056 Y N OFFLINEB oracle_ctl_sg ledma054 Y N ONLINEB oracle_ctl_sg ledma056 Y N OFFLINEB oracle_sg ledma054 Y N ONLINEB oracle_sg ledma056 Y N OFFLINEB vxfen ledma054 Y N ONLINEB vxfen ledma056 Y N ONLINE
Performing a ProtectPoint VCS rollback
Note
A rollback fails if you change the style of the mpio device name. The rollback to thesource LUN is successful. However, the fsck and mount fails. In this scenario,manually mount the FS.
Procedure
1. As the root user, on the primary VCS node, perform the following steps:
a. List the VCS Service Groups. Type the following command:
root:/# hastatus -sum
-- SYSTEM STATE-- System State Frozen
A ledma054 RUNNING 0A ledma056 RUNNING 0
-- GROUP STATE-- Group System Probed AutoDisabled StateB ClusterService ledma054 Y N ONLINEB ClusterService ledma056 Y N OFFLINEB oracle_ctl_sg ledma054 Y N ONLINEB oracle_ctl_sg ledma056 Y N OFFLINEB oracle_sg ledma054 Y N ONLINEB oracle_sg ledma056 Y N OFFLINEB vxfen ledma054 Y N ONLINEB vxfen ledma056 Y N ONLINE
b. To enable the VCS configuration as Read/Write, type the followingcommand:
root:/# haconf -makerw
c. To freeze the VCS service groups by disabling On line/Off line, type thefollowing command:
Note
The following example is for a VCS and Oracle configuration.
root:/# hagrp -freeze <oracle_sg> -persistent
root:/# hagrp -freeze <oracle_ctl_sg> -persistent
d. To confirm the VCS status, type the following command:
Configuring snapshots in a Cluster Environment
128 NetWorker 18.1 Snapshot Management Integration Guide

root:/# hastatus -sum
-- SYSTEM STATE-- System State FrozenA ledma054 RUNNING 0A ledma056 RUNNING 0
-- GROUP STATE-- Group System Probed AutoDisabled StateB ClusterService ledma054 Y N ONLINEB ClusterService ledma056 Y N OFFLINEB oracle_ctl_sg ledma054 Y N ONLINEB oracle_ctl_sg ledma056 Y N OFFLINEB oracle_sg ledma054 Y N ONLINEB oracle_sg ledma056 Y N OFFLINEB vxfen ledma054 Y N ONLINEB vxfen ledma056 Y N ONLINE
-- GROUPS FROZEN-- GroupC oracle_ctl_sgC oracle_sg
-- RESOURCES DISABLED-- Group Type ResourceH oracle_ctl_sg DiskGroup oracle_ctl_dg_DG_res1H oracle_ctl_sg Mount oracle_ctl_dg_MNT_res1H oracle_ctl_sg Volume oracle_ctl_dg_VOL_res1H oracle_sg DiskGroup oracle_dg_DG_res1H oracle_sg Mount oracle_dg_MNT_res1H oracle_sg Volume oracle_dg_VOL_res1
e. Make the VCS configuration as Read Only. Type the following command:
root:/# haconf -dump –makero:
2. As an Oracle user, on the primary VCS Node, perform the following steps:
a. On the Oracle database, run the shutdown and startup mountcommands:
a. oracle:/# sqlplus / as sysdba
b. SQL > shutdown immediate
c. SQL > startup mount
d. SQL > exit
b. Perform the RMAN rollback and recovery.
3. As the root user, on the primary VCS node, perform the following steps:
a. To make the VCS configuration Read/Write, type the following command:
root:/# haconf –makerw
b. To unfreeze the service groups, and allow On line and or off Line, type thefollowing command:
root:/# hagrp -unfreeze <oracle_ctl_sg> -persistent
root:/# hagrp -unfreeze <oracle_sg> -persistent
c. To confirm the VCS status, type the following command:
Configuring snapshots in a Cluster Environment
Performing a ProtectPoint VCS rollback 129
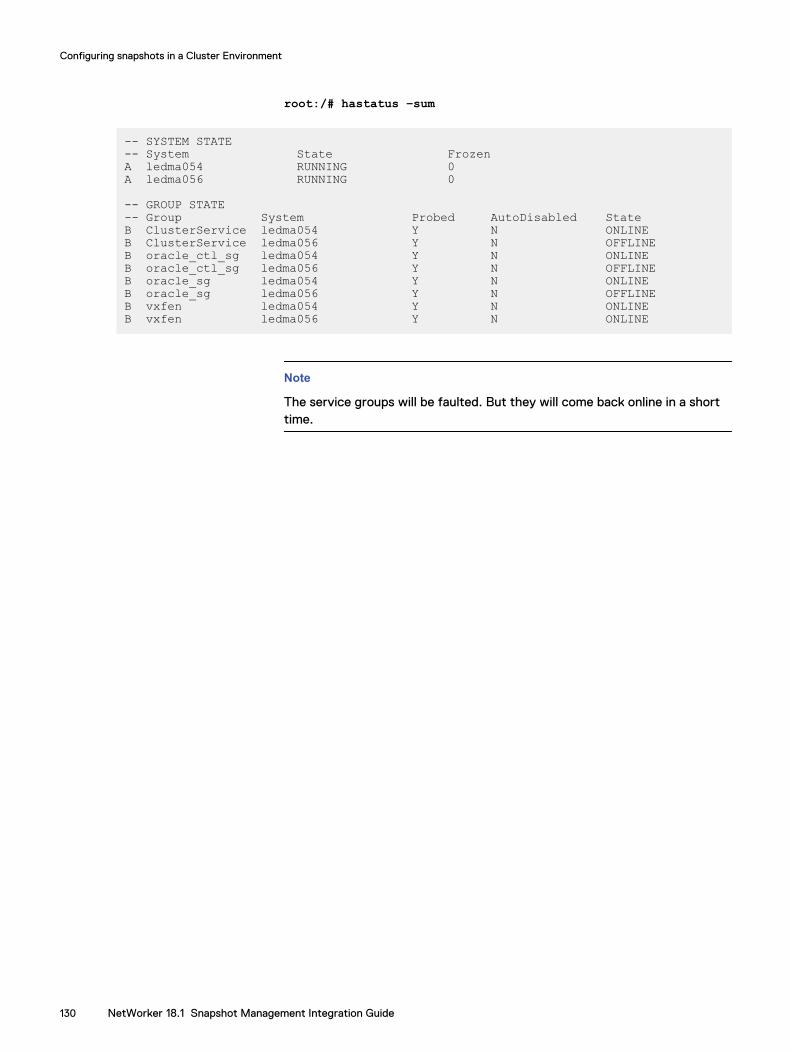
root:/# hastatus –sum
-- SYSTEM STATE-- System State FrozenA ledma054 RUNNING 0A ledma056 RUNNING 0
-- GROUP STATE-- Group System Probed AutoDisabled StateB ClusterService ledma054 Y N ONLINEB ClusterService ledma056 Y N OFFLINEB oracle_ctl_sg ledma054 Y N ONLINEB oracle_ctl_sg ledma056 Y N OFFLINEB oracle_sg ledma054 Y N ONLINEB oracle_sg ledma056 Y N OFFLINEB vxfen ledma054 Y N ONLINEB vxfen ledma056 Y N ONLINE
Note
The service groups will be faulted. But they will come back online in a shorttime.
Configuring snapshots in a Cluster Environment
130 NetWorker 18.1 Snapshot Management Integration Guide

CHAPTER 11
Data Management and Recovery
This chapter includes the following topics:
l Snapshot lifecycle management....................................................................... 132l Management and recovery of file system snapshot data.................................. 132l Snapshot recovery support and limitations....................................................... 133l Restoring from a snapshot with the Recovery Wizard...................................... 134l Restoring a snapshot by rollback...................................................................... 137
Data Management and Recovery 131
Snapshot lifecycle managementSnapshot-based operations are fully integrated into NetWorker policies.
The schedule of the workflow controls the number of snapshots taken each day.
A backup action has a minimum retention time which defines when a snapshot can bedeleted on the storage array and NetWorker media database to take a new snapshot.This deletion is done as part of the new backup operation. The retention time that isspecified in the snapshot backup action controls the snapshot expiration.
An example of how the previous rollover-only (“serverless”) policy can be created inthe new policy framework, is to define a workflow that:
l Contains a snapshot backup action.
l Followed by a clone action with Delete source save sets after clone operationselected.
Management and recovery of file system snapshot dataOnly management and recovery operations for file system data are described. Forinformation on database snapshots, such as NetWorker Module for Databases andApplications (NMDA) or NetWorker Module for SAP (NMSAP) database snapshots,refer to the documentation for the NetWorker application module that you are using.
The NetWorker Management Console (NMC) Recovery Wizard and the NetWorkerCLI commands provide features that enable you to browse, delete, change snapshotexpiration, and recover snapshot data.
Save set IDs and expiration policiesWhen NSM creates a snapshot, NSM generates a separate save set ID for eachsnapshot object specified in the Client resource. For example, a single physicalsnapshot can create save sets for F:\abc and G:\xyz if they both reside on thesame LUN or managed volume. Each save set will have a separate save set ID, even ifboth save sets belong to the same client and both reside on the same LUN. F:\abcand G:\xyz cannot be on the same LUN.
During a clone operation to conventional storage media, NetWorker assigns a differentclone ID to each cloned snapshot object.
By having two save set IDs, NSM manages the snapshot data separately from thecloned data. Each save set has an independent expiration policy, and when one saveset expires, you can still use the other save set to perform a restore.
Browsing snapshot and clone save setsNetWorker records in the client file index only the files that NSM clones toconventional storage media. Because NetWorker indexes clones, you can browse thefiles in NMC.
The NetWorker media database contains entries for snapshot save sets. However,unlike clones, NetWorker does not catalog the snapshot save sets in the client fileindex. To browse snapshot save sets, you must use the NMC Recovery Wizard or thensrsnapadmin command utility. NSM mounts the snapshot file system on the mounthost, which enables you to browse and select files to restore.
Data Management and Recovery
132 NetWorker 18.1 Snapshot Management Integration Guide
Snapshot recovery support and limitationsThe following support and limitations apply to NetWorker snapshot recoveryoperations:
l A snapshot recovery is supported in the following user interfaces:
n NMC Recovery Wizard
n nsrsnapadmin command utility
n nsrsnap_recover command
l You can restore individual files or complete file systems from snapshot save sets.
l You cannot combine individual files from multiple save sets in a single restoresession.
l You can restore data from snapshots that are cloned to conventional storagemedia by using the NMC Recovery Wizard or other NetWorker methods, as youwould for any conventional NetWorker backup. The NetWorker AdministrationGuide provides details.
Note
Recovery from a snapshot that was being rolled over to a secondary media (Disk orTape), is not possible. Both the rollover and the recovery fail.
Note
From Networker 9.2 onwards, for VMAX3 Snapvx/ProtectPoint VMAX3 file systemrecovery, if the recover LUNS are not part of VMAX default storage groupNsrSnapSG, file by file recovery is not possible through recovery wizard. The samecan be done through NetWorker CLI commands, nsrsnap_recover, andnsrsnapadmin because the user defined VMAX3 storage group value has to bepassed with parameter NSM_SNAP_SG. For file by file recovery, currently in recoverywizard, there is no means to provide this parameter before starting the recovery.
Raw partitions and raw devicesThe following considerations apply to NSM restores of raw partitions and raw devices:
l NSM does not support mount points for raw file system backups.
l You can recover raw partitions from Microsoft Windows application hosts only tothe same drive letter from which NSM backed up the raw partitions. You cannotredirect the recovery to another drive letter.
l Before you perform a snapshot restore of a file system that NSM backed up as araw device, you must unmount the source file system. After the restorecompletes, you must run the fsck command before you mount the file system.
NetApp restore failsSnapshot backups with NetWorker fail when you try to restore to a NetApp filer filesystem directly. Specifically, if the file is a directory or a symbolic link, or contains NTstreams, the restore fails for a single file. The NetApp Support site provides additionaldetails: https://library.netapp.com/ecmdocs/ECMP1196991/html
Data Management and Recovery
Snapshot recovery support and limitations 133
Restoring from a snapshot with the Recovery WizardYou can use the NetWorker Management Console (NMC) Recovery Wizard to restorefile system data from a snapshot that is stored on a supported storage array.
Procedure
1. Run NMC, and in the Enterprise view, select the NetWorker server name, andthen select Enterprise > Launch Application.
2. In the NetWorker server’s Recover view, select Recover > New Recover.
The Recovery Wizard appears.
3. On the Select the Recovery Type page, select the Recovery Type, and thenclick Next.
Complete the Select the Recovery Hosts page:
a. In the Source Host field, specify the application host for the productiondata that was the source for the snapshot you want to restore.
b. In the Destination Host field, specify the application host or an alternativeNetWorker client on which you want to restore the snapshot data.
NetWorker now allows you to perform an array level restore (rollback) of asnapshot to an alternate set of devices. Pre-select the device and thedevices should be of same size or larger than the original source devices.The devices should be visible to an alternate host. Create the same Filesystems that were on original source devices. The file systems should bemounted at time of rollback on the alternate host. NSM will unmount the filesystems and perform the rollback to these devices and mount them backafter the rollback.
On the NMC, when the destination host is not source host, the systemautomatically rolls back the Smart snapshot to any LUN in the"NsrSnapSourceSG" storage group.
Note
NetWorker uses the following criteria to match devices on the target hostwith the source devices for VMAXv3 SnapVX rollback to alternate host:
l The device should be of equal or greater size.
l The device should have no clone or BCV relationships.
l The total no of source LUNs should match the total number of targetLUNs.
c. In the Available Recovery Types table, you can either select Filesystem,SmartSnap, or another supported NetWorker application type that isinstalled on the client.
The SmartSnap option allows you to specify array LUNs World Wide Names(WWNs).
d. Click Next.
4. Complete the Select a Snapshot page. You can restore the entire snapshot oryou can select the individual directories and individual files from the snapshot:
Data Management and Recovery
134 NetWorker 18.1 Snapshot Management Integration Guide
a. The Snapshots table lists the snapshots on the storage array that areavailable to the source client. Select the snapshot to restore from, based onthe snapshot time and save set volumes.
b. Select one of the following types of restores to perform:
l Recover save sets
l Rollback snapshot
Note
For SmartSnap, only the Rollback snapshot restore type is supported. If theLUN is a part of a mounted file system or active volume group, you shouldmanually unmount and export it before recovery.
c. If you selected the Recover save sets option, specify the following settings:
l In the Select save set field, select a single save set volume to mount andrestore from. The next wizard page will let you browse the directoriesand files in the mounted save set.
Note
You can select only one save set for this operation. Each additional saveset requires a separate pass through the wizard.
l In the Mount save set on field, select the host on which to mount thesave set, ready for the restore operation. The mount host can be one ofthe following:
n Destination client that you selected earlier in the wizard.
n An existing storage node that you can select from the drop-down list.
Note
If you use a storage node as the mount host, ensure that the storagenode has access to the storage array. For example, you can specify thestorage node as the mount host in the properties of the source client, onthe APPS and MODULES tab, in the NSR_DATA_MOVER ApplicationInformation attribute.
Note
Veritas Volume Manager does not support the configuration ofproduction file systems and snapshot file systems that are mounted onthe same host. The mount host cannot be the application host.
Figure 3 on page 29 shows an example of the data flow in a restoreoperation where the NetWorker storage node is the snapshot mounthost.
l In the Recover mode field, select whether you want to recover individualitems from the save set or the full save set:
n If you select Browse and recover save set, when you click Next, thewizard mounts the snapshot volume for the save set and displays theSelect Data to Recover page. The mount operation can take sometime.
Data Management and Recovery
Restoring from a snapshot with the Recovery Wizard 135
n If you select Recover full save set, when you click Next, the wizarddisplays the Select the Recovery Options page.
d. If you selected Rollback snapshot, a warning is displayed: A rollback isa destructive operation. When you click Next, the wizard displaysthe Perform the Recovery page.
A rollback restores the entire snapshot to the destination client that youselected in the Snapshots table.
Restoring a snapshot by rollback on page 137 provides details.
e. Click Next. The result depends on the recover or rollback selections.
f. You can select Advanced options, and then specify Debug level and otherrecover options.
5. If you selected the Browse and recover save set option, complete the SelectData to Recover page, otherwise, skip this step.
a. Specify the location of the items to restore by using the browse tree ortyping the full path of the location. Indicate the directories or files for NSMto restore by marking them in the table.
Note
The wizard does not list expired save sets. You can restore existing expiredsave sets manually by using the nsrsnapadmin command utility with the Rcommand option or the nsrsnap_recover command. Using nsrsnapadminfor NSM operations and the NetWorker Command Reference Guide providedetails.
b. Click Next.
6. If you selected any of the Recover save sets options, complete the Select theRecovery Options page. If you selected the rollback option, skip this step.
a. In the File Path for Recovery field, select, browse, or type a location whereNSM restores the files:
l Original path
l New destination path
Note
You cannot repeat the same restore operation to the same destination.
b. In the Duplicate file options field, specify how NSM resolves file nameconflicts:
l Rename the restored file—NSM restores the file with a new name thatNSM automatically generates.
l Do not recover the file—NSM will not restore the file.
l Overwrite the existing file—NSM replaces the file with the same name.
c. To specify further options, select Advanced Options, and then specify theattributes.
Data Management and Recovery
136 NetWorker 18.1 Snapshot Management Integration Guide
d. Click Next.
7. Complete the Perform the Recovery page:
a. In the Recovery Name field, type a name for the recovery.
b. In the Recovery Start Time field, specify the following attributes:
l Start recovery now is the only option that NSM supports.
l In Specify a hard stop time, you can specify a time limit that stops anincomplete restore process.
c. In the Recovery Resource Persistence field, select the retain or deleteoption for this recovery resource:
l Persist this resource until deleted by user.
l Automatically remove this resource based on jobs databaseretention.
d. Review the Summary of the restore and make any necessary corrections bygoing to the previous pages in the wizard.
e. Click Run Recover.
Results
The wizard restores the files:
l For a save set restore or file level restore, the data restore path is over the LAN asshown in Figure 3 on page 29.
l For a rollback recovery, the storage array’s capabilities perform the restore. Restoring a snapshot by rollback on page 137 provides details.
The NetWorker Administration Guide provides more details on the NMC RecoveryWizard.
Restoring a snapshot by rollbackNSM uses the native capabilities of the storage array to perform rollbacks. A rollbackis a restore in which a volume on the application host is unmounted and the storagearray replaces the entire contents of the unmounted volume with the entire contentsof the snapshot volume.
Rollback considerationsAlways consider how a rollback can affect any other snapshots or other data on thestorage array.
Consider the following limitations and precautions before you perform a rollback:
l NSM supports rollback operations in a clustered environment when the clustersoftware is disabled on the volumes participating in the operation.
l The file system that you roll back must be the only file system on the applicationvolume.
l The volume must be the only volume in the volume group.
l The file system occupies the entire volume space and no other objects are on thesame volume.
Data Management and Recovery
Restoring a snapshot by rollback 137
l If a rollback fails, the application host’s file system may remain unmounted, andyou must manually mount the file system.
l VNXe Block array does not support the rollback restore feature.
l XtremIO does not support the rollback restore feature.
NOTICE
Rollbacks overwrite the entire contents of the source LUNs and potentially destroythe existing data.
Note
On Linux and Solaris, if a disk is configured with partitions, you can perform a rollbackrestore only if you list the entire disk in the psrollback.res file. The rollbackrestore then overwrites the entire disk.For example, if /fs1 and /fs2 are configured with partitions /dev/sdc1 and /dev/sdc2 respectively, then enable the rollback restore of /fs1 by listing the entiredisk /dev/sdc in the psrollback.res file. The rollback restore overwrites theentire disk /dev/sdc, so /fs2 is also restored.
Configurations that override rollback safety checksBy default, NSM performs safety checks to ensure that there are no datasets on therollback target LUN to the same or alternate locations, other than those for whichNSM has snapshots.
Either of the following conditions can override the safety checks:
l The psrollback.res file includes the rollback target.
l You use the force option -f with the nsrsnapadmin or nsrsnap_recovercommand.
Note
The -f option is not supported for Database modules.
The NetWorker Command Reference Guide and man pages provide details on thensrsnapadmin and nsrsnap_recover commands.
Alternate LUN RollbackThe following considerations apply for rollbacks to an alternate LUN.
File systems
The file system, database, or tablespace name should be the same as the sourcesaveset.
Any additional FS/files/directories must be added to the psrollback.res file.
LUNs
The number of alternate host LUNs should be the same as the number of LUNs atthe time of backup.
Size:
l For SnapVX, the size of LUNs should be equal to or greater than the size ofthe backup LUNs.
Data Management and Recovery
138 NetWorker 18.1 Snapshot Management Integration Guide
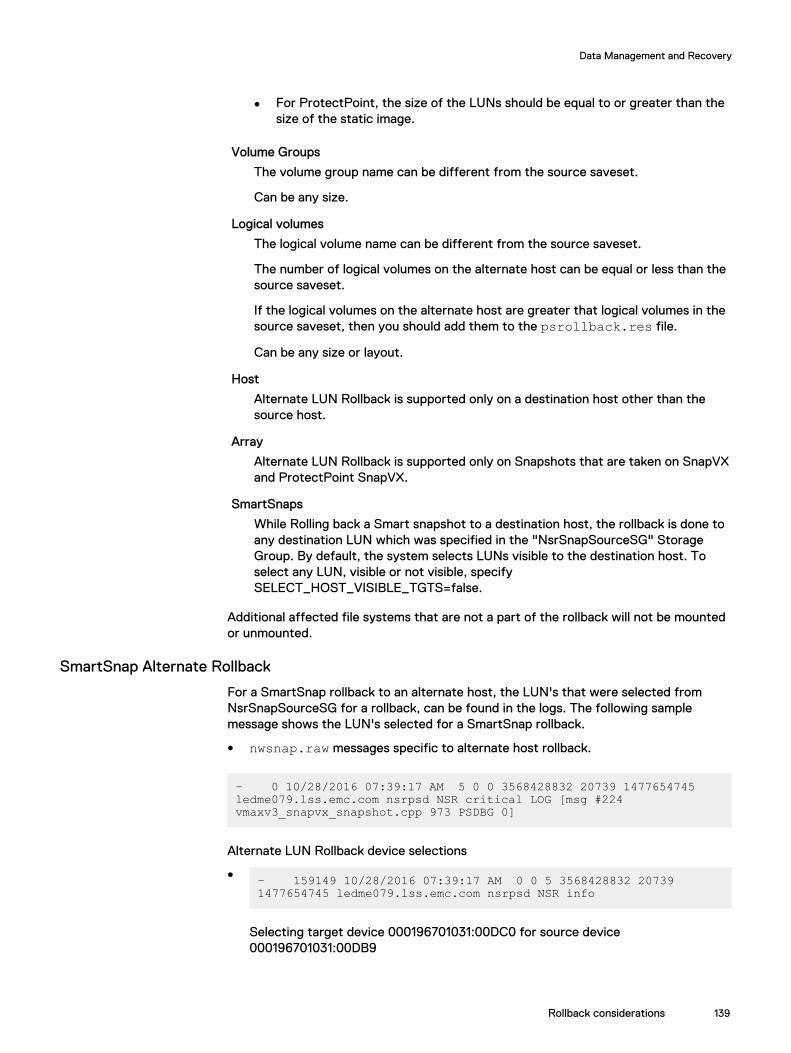
l For ProtectPoint, the size of the LUNs should be equal to or greater than thesize of the static image.
Volume Groups
The volume group name can be different from the source saveset.
Can be any size.
Logical volumes
The logical volume name can be different from the source saveset.
The number of logical volumes on the alternate host can be equal or less than thesource saveset.
If the logical volumes on the alternate host are greater that logical volumes in thesource saveset, then you should add them to the psrollback.res file.
Can be any size or layout.
Host
Alternate LUN Rollback is supported only on a destination host other than thesource host.
Array
Alternate LUN Rollback is supported only on Snapshots that are taken on SnapVXand ProtectPoint SnapVX.
SmartSnaps
While Rolling back a Smart snapshot to a destination host, the rollback is done toany destination LUN which was specified in the "NsrSnapSourceSG" StorageGroup. By default, the system selects LUNs visible to the destination host. Toselect any LUN, visible or not visible, specifySELECT_HOST_VISIBLE_TGTS=false.
Additional affected file systems that are not a part of the rollback will not be mountedor unmounted.
SmartSnap Alternate Rollback
For a SmartSnap rollback to an alternate host, the LUN's that were selected fromNsrSnapSourceSG for a rollback, can be found in the logs. The following samplemessage shows the LUN's selected for a SmartSnap rollback.
l nwsnap.raw messages specific to alternate host rollback.
– 0 10/28/2016 07:39:17 AM 5 0 0 3568428832 20739 1477654745 ledme079.lss.emc.com nsrpsd NSR critical LOG [msg #224 vmaxv3_snapvx_snapshot.cpp 973 PSDBG 0]
Alternate LUN Rollback device selections
l – 159149 10/28/2016 07:39:17 AM 0 0 5 3568428832 20739 1477654745 ledme079.lss.emc.com nsrpsd NSR info
Selecting target device 000196701031:00DC0 for source device000196701031:00DB9
Data Management and Recovery
Rollback considerations 139
The SmartSnap restore to alternate feature supports only SnapVX and ProtectPointwith VMAX.
Example of a destructive rollbackThree file systems, /fs1, /fs2, and /fs3, exist on a LUN, which resides on a storagearray standard device. You create a snapshot for the /fs1 file system. Because /fs2and /fs3 also reside on the LUN, the snapshot includes those file systems. After thesnapshot, you create a fourth file system, /fs4, on the LUN.
If you perform a rollback of /fs1, the snapshot will overwrite the contents of theentire LUN. The rollback will revert the contents of /fs1, /fs2, and /fs3, and it willdestroy the new /fs4 file system. Although NSM safety checks do not normally allowa rollback overwrite such as this, exceptions can occur. The exceptions occur whenyou roll back with the force option or when /fs2, /fs3, and /fs4 are present in thepsrollback.res file. Either exception will destroy /fs4 and roll back /fs2 and /fs3.
Configuring the psrollback.res file
The psrollback.res file is a resource file for NetWorker snapshot rollback with thefollowing pathname:
l On UNIX
/nsr/res/psrollback.resl On Microsoft Windows
C:\Program Files\EMC NetWorker\nsr\resBefore NetWorker performs a rollback it performs safety checks to verify that theoperations will not overwrite any file, directory, partition, or volume that is outside ofthe save set. NetWorker uses the psrollback.res file to provide NetWorker withconfiguration information for the rollback.
This resource file contains the files, directories, partitions, and volumes to excludefrom the rollback safety check. The rollback can overwrite the items that you list inthis file.
The resource file includes the following features:
l You can add more files or directories to this file by using the following syntax rules:
n At least one line per file or directory
n Pathnames starting with a forward slash (/) are absolute pathnames, forexample, /tmp
l The file supports the following items:
n Directory or file pathname
n File system
n Block device of a managed or unmanaged raw device, for example, /dev/vg_01/vol1
n The file does not support character devices
Data Management and Recovery
140 NetWorker 18.1 Snapshot Management Integration Guide
Note
When you perform a rollback of a partitioned disk on Solaris, the safety checkconsiders all defined partitions. To avoid rollback failure, list unused partitions in thepsrollback.res file.
ExamplesYou create the following valid entries in the psrollback.res file before you performa rollback of /fs1/dir (UNIX) or C:\fs1 (Microsoft Windows):
l On UNIX:
/fs1/dir1/fs1/dir2/file1/fs2
l On Microsoft Windows:
D:\dir1C:\dir2\file1C:\fs2
Rollbacks with Veritas Volume ManagerFor rollbacks of Veritas Volume Manager (VxVM) file systems, the application hostmounts every file system that is part of the volume group, including file systems notpreviously mounted.
Rollbacks with IBM AIX Volume ManagerNetWorker Snapshot Management (NSM) supports rollbacks with AIX volumemanager as follows:
l If you set the Auto On setting to No, NSM supports rollbacks in an HACMP sharedvolume group environment. This setting prevents AIX from automaticallyactivating the volume group during a system startup.
l NSM does not support rollbacks in an HACMP concurrent volume groupenvironment. Although a rollback can appear to be successful, the concurrent-capable volume group changes into a nonconcurrent volume group.
l NSM does not support rollbacks of file systems with inline logs.
Configuring the Auto On setting for an HACMP shared volume group
After a rollback on AIX systems, by default AIX places HACMP shared volume groupconfigurations into a nonsynchronized state.
You can enable rollbacks that maintain a synchronized state.
Procedure
1. On the host where the cluster service is online, take the volume group offline bytyping the following command:
varyoffvg vg_name
2. On each HACMP node within the volume group that is offline, perform thefollowing operations:
Data Management and Recovery
Rollbacks with Veritas Volume Manager 141
a. Export the shared volume group.
b. Import the shared volume group.
c. Use the chvg command to set the Auto On setting to No with the -a noption:
chvg -a n -Q y vg_name
3. On the host where the cluster service is online, take the volume group online bytyping the following command:
varyonvg vg_name
4. Test for a successful cluster failover by moving the HACMP resource groupbetween hosts.
Data Management and Recovery
142 NetWorker 18.1 Snapshot Management Integration Guide
CHAPTER 12
Troubleshooting
You can use the sections in this chapter to identify and resolve issues with NSMconfiguration and operation. This chapter includes the following topics:
l NetWorker snapshot backup issues.................................................................. 144l NetWorker snapshot restore issues.................................................................. 145
Troubleshooting 143
NetWorker snapshot backup issues
Snapshot backup on Unity failsWhen you perform a snapshot backup with Unity 4.2 or 4.1, the backup fails displayingthe following error:
"Internal Error: Failed to get status of import operation."
WorkaroundWhen you configure Unity 4.2 or 4.1 LUN's, you must add snapshot access for the newLUN through UEMCLI. Use the format below:
uemcli -d <unity array ip> -u <user name> -p <password> /stor/prov/luns/lun -id <lun id> set -snapHosts <host id>
where Lun ID and Host ID can be retried from the Block and Hosts pages in Unisphere.
Backup on Windows fails with a Delayed Write Failed error
Due to a Microsoft Windows operating system limitation, a snapshot or a rollover canfail with the following message:
Delayed Write Failed
WorkaroundDisable the disk caching feature and perform the backup again.
Snapshots fail to mount for AIX managed file systemsFor AIX managed JFS2 file systems that use inline logs, snapshots can fail to mount ona remote mount host.
WorkaroundUse the application host as the mount host or use external logs.
Snapshots fail for Linux Volume Manager on VNX with PowerPathThe use of PowerPath® software is optional for NSM on VNX arrays. An incorrectlyconfigured Linux Volume Manager (LVM) used with PowerPath can result in snapshotfailures with the following error:
"/dev/sdbd" is not a device that the CLARiiON SCM recognizes as snappable
WorkaroundModify the lvm.conf file to be able to use NSM.
The PowerPath for Linux Installation and Administration Guide provides details.
Troubleshooting
144 NetWorker 18.1 Snapshot Management Integration Guide
Linux Logical Volume Manager snapshots fail with an errorLinux Logical Volume Manager (LVM) snapshots fail with an error as follows:
Failed to get status of import operation. Could not run lvm binary 'lvm'
WorkaroundCreate a soft link ln -s /sbin/lvm /bin/lvm on the proxy or storage node, andthen run the policy.
NetWorker to Media-Clone stops responding and the backup failsNetWorker to Media-Clone stops responding because scan command lvmdiskscanon the host a system stops responding.
WorkaroundFor the backup to succeed, kill the processes, fix the system issue, and then run thebackup.
NetWorker snapshot restore issues
File-by-file or saveset restore failsA File-by-file or saveset restore fails when a wrong storage node or a XtremIO initiatorname is used during a restore operation.
Note
XtremIO always mounts the snapshot on the given initiator name irrespective of thestorage node.
The first time the restore fails the following error message is displayed:
6211 1481325281 0 0 2 2580 2364 0 ledmb071.lss.emc.com nsrsnapagent NSR info 2 %s 1 0 29 Unable to mount the snapshot.
Subsequently, the following error displays in the storage node log:
"decrypted data cached: offset 3340 1479626199 0 0 0 4648 6084 1479626194 ledme040 nsrsnapagent NSRinfo 2 %s 1 0 202 [msg #233 D:/views/nw/18.1/nsr/storage/ssm/emc_xio/xioCommunication.cpp 210PSDBG 5] Command failed with the following error message: {"message": "vol_already_mapped_by_ig_tg", "error_code":400}"
To fix this issue, manually unmount the snapshot from the host using the XtremIOmanagement software or commands.
Troubleshooting
Linux Logical Volume Manager snapshots fail with an error 145

Restore of raw devices fails on Linux with permission issueIf NSM backs up a raw device as a snapshot or clone, and then restores the device,the ownership of the device pathname changes to root. This change prevents nonrootusers from using this device pathname.
WorkaroundLog in as root, and then type the chown command to change the owner of the devicepathname to the correct user.
Command nsrsnap_recover -I runs but fails to restore a file
When the nsrsnap_recover -I command is used with an improper pathname a fileis not restored and the following message appears:
Completed the restore of invalid-path
The NetWorker Console indicates a restored file.
WorkaroundRun the command with the proper pathname.
Restore fails with disk signature errorA restore fails with a disk signature error after one restore from primary or secondaryData Domain is already successful.
WorkaroundRestart the host.
Workaround to eliminate a restart of the host
1. Go to device manager, and then uninstall all Symmetrix disks (not just the affectedones).
2. To rescan all devices, use UI Disk Management .
3. Recycle the Virtual Disk service.
Note
If the above workaround does not work in a Windows environment, then make thedevices that is having issues visible to a Linux host, create a file system on it, and thenuse it on a Windows host.
Directed restore files and folder permission issueFor Isilon, directed restore files and folder have permission issues on a Windowsplatform.
Workaround
1. Create a Common Internet File System (CIFS) access mount on the Isilon device,and then allow the share to have Windows Access Control Lists (ACLs).
2. Mount the CIFS share to a Windows computer.
3. On the mounted share, save the file.
4. Back up the network-attached storage (NAS) device with the CIFS share.
Troubleshooting
146 NetWorker 18.1 Snapshot Management Integration Guide

5. Perform a directed recover of the file on the share to a local disk on the Windowscomputer.
The files and folders are then recovered without any permission issues.
NSM with XtremIO leaves snapshots mountedIf you use the wrong initiator name by mistake, NetWorker Snapshot Management(NSM) fails with a message indicating an import error or unable to mount thesnapshot, and leaves the snapshot mapped and exposed to the hosts configured withthe initiator.
WorkaroundYou must manually unmap the snapshot from the initiator using the XtremIOmanagement software GUI or command.
Troubleshooting
NSM with XtremIO leaves snapshots mounted 147

Troubleshooting
148 NetWorker 18.1 Snapshot Management Integration Guide
APPENDIX A
Application Information Variables
This appendix includes the following topics:
l Using Application Information variables............................................................ 150l Common Application Information variables....................................................... 150l Application Information variables for VMAX arrays............................................151l Application Information variables for VNX Block arrays.................................... 154l Application Information variables for RecoverPoint appliances.........................155l Application Information variables for XtremIO arrays........................................155
Application Information Variables 149
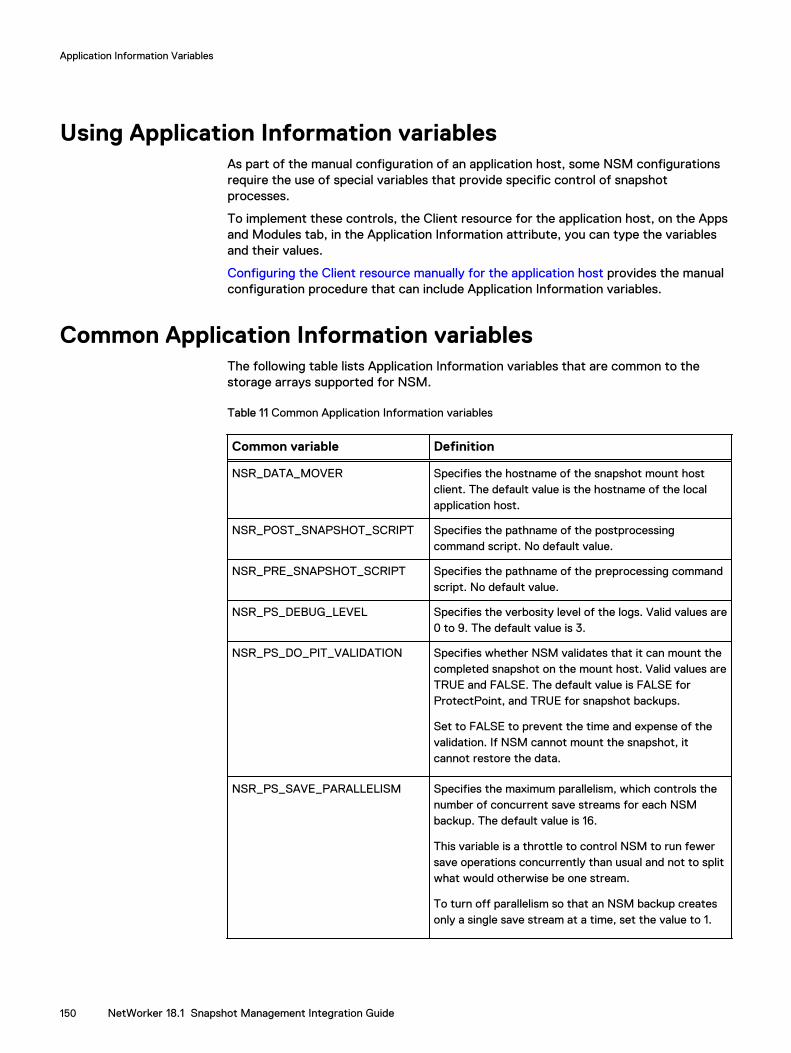
Using Application Information variablesAs part of the manual configuration of an application host, some NSM configurationsrequire the use of special variables that provide specific control of snapshotprocesses.
To implement these controls, the Client resource for the application host, on the Appsand Modules tab, in the Application Information attribute, you can type the variablesand their values.
Configuring the Client resource manually for the application host provides the manualconfiguration procedure that can include Application Information variables.
Common Application Information variablesThe following table lists Application Information variables that are common to thestorage arrays supported for NSM.
Table 11 Common Application Information variables
Common variable Definition
NSR_DATA_MOVER Specifies the hostname of the snapshot mount hostclient. The default value is the hostname of the localapplication host.
NSR_POST_SNAPSHOT_SCRIPT Specifies the pathname of the postprocessingcommand script. No default value.
NSR_PRE_SNAPSHOT_SCRIPT Specifies the pathname of the preprocessing commandscript. No default value.
NSR_PS_DEBUG_LEVEL Specifies the verbosity level of the logs. Valid values are0 to 9. The default value is 3.
NSR_PS_DO_PIT_VALIDATION Specifies whether NSM validates that it can mount thecompleted snapshot on the mount host. Valid values areTRUE and FALSE. The default value is FALSE forProtectPoint, and TRUE for snapshot backups.
Set to FALSE to prevent the time and expense of thevalidation. If NSM cannot mount the snapshot, itcannot restore the data.
NSR_PS_SAVE_PARALLELISM Specifies the maximum parallelism, which controls thenumber of concurrent save streams for each NSMbackup. The default value is 16.
This variable is a throttle to control NSM to run fewersave operations concurrently than usual and not to splitwhat would otherwise be one stream.
To turn off parallelism so that an NSM backup createsonly a single save stream at a time, set the value to 1.
Application Information Variables
150 NetWorker 18.1 Snapshot Management Integration Guide
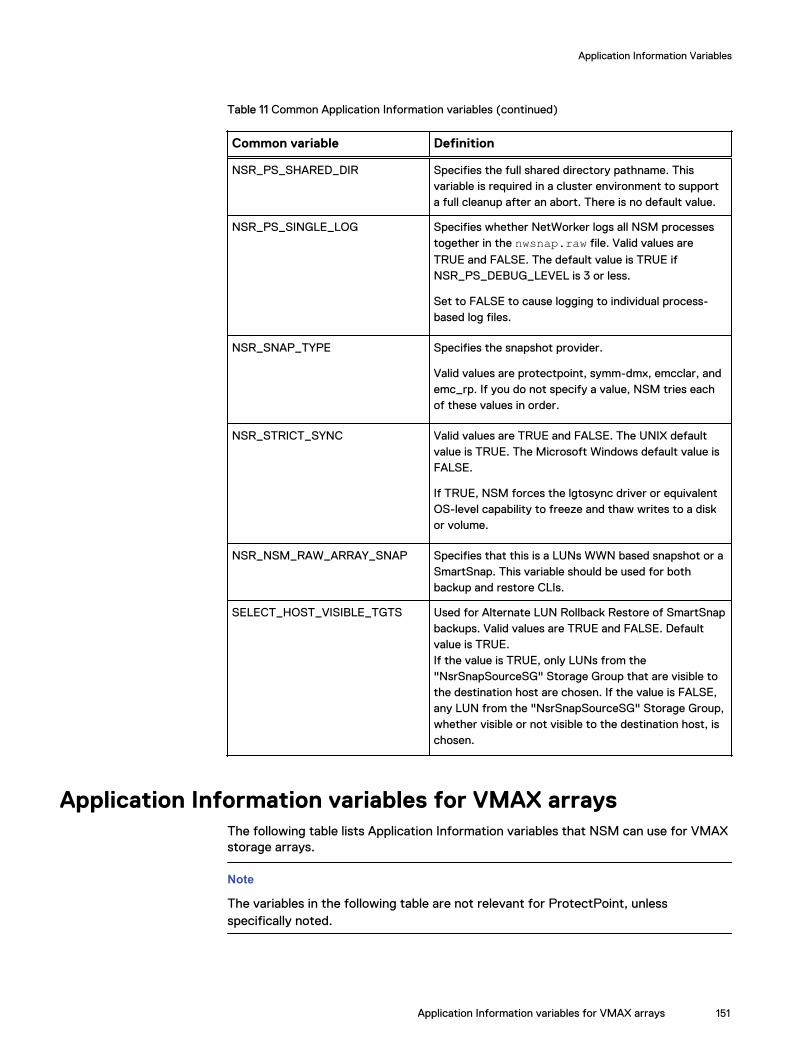
Table 11 Common Application Information variables (continued)
Common variable Definition
NSR_PS_SHARED_DIR Specifies the full shared directory pathname. Thisvariable is required in a cluster environment to supporta full cleanup after an abort. There is no default value.
NSR_PS_SINGLE_LOG Specifies whether NetWorker logs all NSM processestogether in the nwsnap.raw file. Valid values are
TRUE and FALSE. The default value is TRUE ifNSR_PS_DEBUG_LEVEL is 3 or less.
Set to FALSE to cause logging to individual process-based log files.
NSR_SNAP_TYPE Specifies the snapshot provider.
Valid values are protectpoint, symm-dmx, emcclar, andemc_rp. If you do not specify a value, NSM tries eachof these values in order.
NSR_STRICT_SYNC Valid values are TRUE and FALSE. The UNIX defaultvalue is TRUE. The Microsoft Windows default value isFALSE.
If TRUE, NSM forces the lgtosync driver or equivalentOS-level capability to freeze and thaw writes to a diskor volume.
NSR_NSM_RAW_ARRAY_SNAP Specifies that this is a LUNs WWN based snapshot or aSmartSnap. This variable should be used for bothbackup and restore CLIs.
SELECT_HOST_VISIBLE_TGTS Used for Alternate LUN Rollback Restore of SmartSnapbackups. Valid values are TRUE and FALSE. Defaultvalue is TRUE.If the value is TRUE, only LUNs from the"NsrSnapSourceSG" Storage Group that are visible tothe destination host are chosen. If the value is FALSE,any LUN from the "NsrSnapSourceSG" Storage Group,whether visible or not visible to the destination host, ischosen.
Application Information variables for VMAX arraysThe following table lists Application Information variables that NSM can use for VMAXstorage arrays.
Note
The variables in the following table are not relevant for ProtectPoint, unlessspecifically noted.
Application Information Variables
Application Information variables for VMAX arrays 151
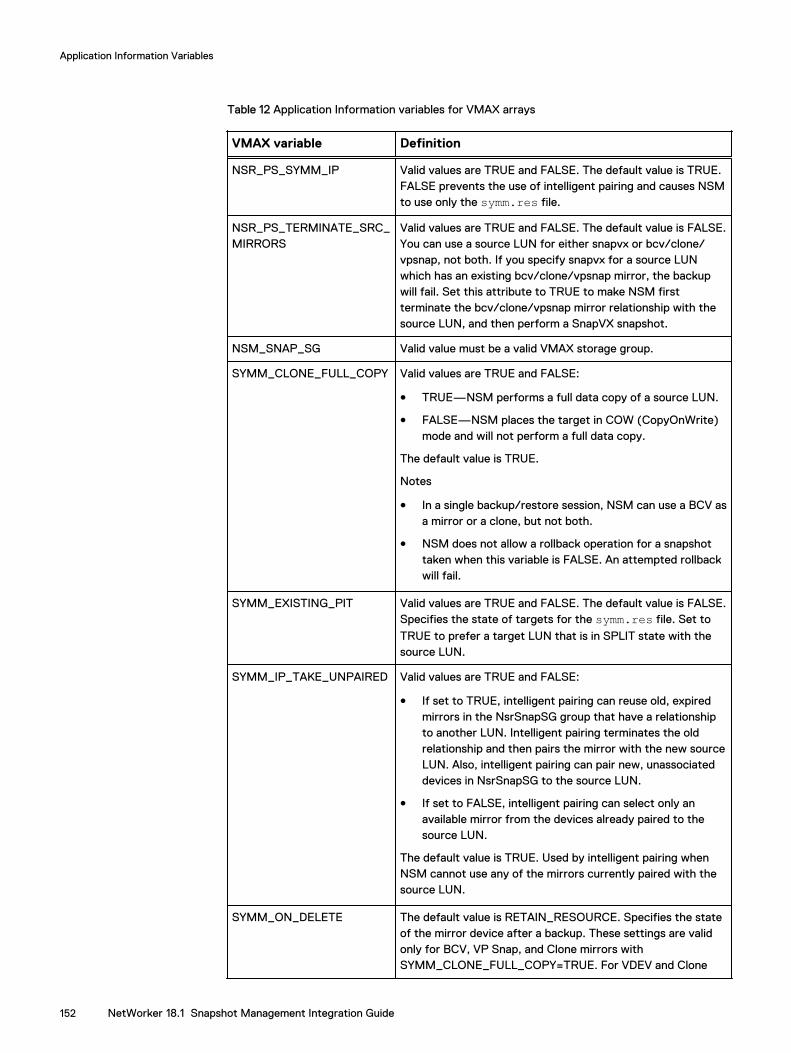
Table 12 Application Information variables for VMAX arrays
VMAX variable Definition
NSR_PS_SYMM_IP Valid values are TRUE and FALSE. The default value is TRUE.FALSE prevents the use of intelligent pairing and causes NSMto use only the symm.res file.
NSR_PS_TERMINATE_SRC_MIRRORS
Valid values are TRUE and FALSE. The default value is FALSE.You can use a source LUN for either snapvx or bcv/clone/vpsnap, not both. If you specify snapvx for a source LUNwhich has an existing bcv/clone/vpsnap mirror, the backupwill fail. Set this attribute to TRUE to make NSM firstterminate the bcv/clone/vpsnap mirror relationship with thesource LUN, and then perform a SnapVX snapshot.
NSM_SNAP_SG Valid value must be a valid VMAX storage group.
SYMM_CLONE_FULL_COPY Valid values are TRUE and FALSE:
l TRUE—NSM performs a full data copy of a source LUN.
l FALSE—NSM places the target in COW (CopyOnWrite)mode and will not perform a full data copy.
The default value is TRUE.
Notes
l In a single backup/restore session, NSM can use a BCV asa mirror or a clone, but not both.
l NSM does not allow a rollback operation for a snapshottaken when this variable is FALSE. An attempted rollbackwill fail.
SYMM_EXISTING_PIT Valid values are TRUE and FALSE. The default value is FALSE.Specifies the state of targets for the symm.res file. Set to
TRUE to prefer a target LUN that is in SPLIT state with thesource LUN.
SYMM_IP_TAKE_UNPAIRED Valid values are TRUE and FALSE:
l If set to TRUE, intelligent pairing can reuse old, expiredmirrors in the NsrSnapSG group that have a relationshipto another LUN. Intelligent pairing terminates the oldrelationship and then pairs the mirror with the new sourceLUN. Also, intelligent pairing can pair new, unassociateddevices in NsrSnapSG to the source LUN.
l If set to FALSE, intelligent pairing can select only anavailable mirror from the devices already paired to thesource LUN.
The default value is TRUE. Used by intelligent pairing whenNSM cannot use any of the mirrors currently paired with thesource LUN.
SYMM_ON_DELETE The default value is RETAIN_RESOURCE. Specifies the stateof the mirror device after a backup. These settings are validonly for BCV, VP Snap, and Clone mirrors withSYMM_CLONE_FULL_COPY=TRUE. For VDEV and Clone
Application Information Variables
152 NetWorker 18.1 Snapshot Management Integration Guide
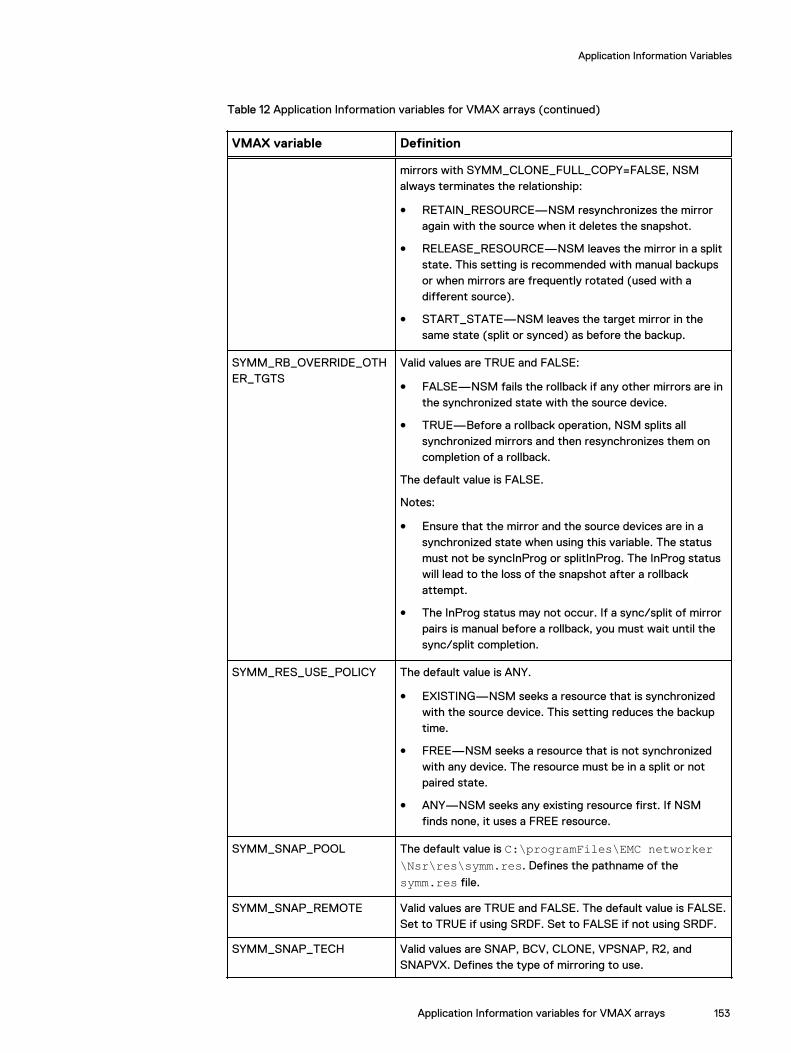
Table 12 Application Information variables for VMAX arrays (continued)
VMAX variable Definition
mirrors with SYMM_CLONE_FULL_COPY=FALSE, NSMalways terminates the relationship:
l RETAIN_RESOURCE—NSM resynchronizes the mirroragain with the source when it deletes the snapshot.
l RELEASE_RESOURCE—NSM leaves the mirror in a splitstate. This setting is recommended with manual backupsor when mirrors are frequently rotated (used with adifferent source).
l START_STATE—NSM leaves the target mirror in thesame state (split or synced) as before the backup.
SYMM_RB_OVERRIDE_OTHER_TGTS
Valid values are TRUE and FALSE:
l FALSE—NSM fails the rollback if any other mirrors are inthe synchronized state with the source device.
l TRUE—Before a rollback operation, NSM splits allsynchronized mirrors and then resynchronizes them oncompletion of a rollback.
The default value is FALSE.
Notes:
l Ensure that the mirror and the source devices are in asynchronized state when using this variable. The statusmust not be syncInProg or splitInProg. The InProg statuswill lead to the loss of the snapshot after a rollbackattempt.
l The InProg status may not occur. If a sync/split of mirrorpairs is manual before a rollback, you must wait until thesync/split completion.
SYMM_RES_USE_POLICY The default value is ANY.
l EXISTING—NSM seeks a resource that is synchronizedwith the source device. This setting reduces the backuptime.
l FREE—NSM seeks a resource that is not synchronizedwith any device. The resource must be in a split or notpaired state.
l ANY—NSM seeks any existing resource first. If NSMfinds none, it uses a FREE resource.
SYMM_SNAP_POOL The default value is C:\programFiles\EMC networker\Nsr\res\symm.res. Defines the pathname of the
symm.res file.
SYMM_SNAP_REMOTE Valid values are TRUE and FALSE. The default value is FALSE.Set to TRUE if using SRDF. Set to FALSE if not using SRDF.
SYMM_SNAP_TECH Valid values are SNAP, BCV, CLONE, VPSNAP, R2, andSNAPVX. Defines the type of mirroring to use.
Application Information Variables
Application Information variables for VMAX arrays 153

Table 12 Application Information variables for VMAX arrays (continued)
VMAX variable Definition
If set to R2, then SYMM_SNAP_REMOTE must be TRUE orthe backup will fail.
Application Information variables for VNX Block arraysThe following table lists Application Information variables that NetWorker SnapshotManagement (NSM) can use for VNX Block storage arrays.
Table 13 Application Information variables for VNX Block arrays
VNX Block variable Definition
CLAR_ON_DELETE Specifies the disposition of the clone LUN when NSM deletesa snapshot:
l RETAIN_RESOURCE—NSM resynchronizes the clonewith its source. This makes the clone LUN available forfuture snapshot requests.
l RELEASE_RESOURCE—NSM does not resynchronizethe clone with its source. This makes the clone LUNavailable for other client operations, if you manuallyremove it from the clone group of the source LUN. Thisclone LUN will not be available for future snapshotrequests unless you manually add it again to the sameclone group.
l START_STATE—NSM resynchronizes the clone with itssource LUN only if it was in a synchronized state when itwas fractured. In this case, its disposition becomes one of the following:
n – RETAIN_RESOURCE workflow
n – RELEASE_RESOURCE workflow
Conventional backups to disk or tape that do not use thissnapshot capability are still possible with the NetWorkersoftware, even after the upgrade to NSM with the NetWorkerclient 8.1 installation. The group configuration determineswhether a backup uses NSM features.
EMCCLAR_SNAP_SUBTYPE Mandatory. The default value is COW for copy-on-writebackup and recovery workflows. The values you can use areas follows:
l MIRROR—Use for clone fracture, clone backup, andclone recovery workflows.
l VNX-SNAP—Use for VNX snap backup and VNX snaprecovery workflows.
l VNXe-SNAP—Use for VNXe3200 backup and VNXe3200snap recovery workflows.
Application Information Variables
154 NetWorker 18.1 Snapshot Management Integration Guide
Table 13 Application Information variables for VNX Block arrays (continued)
VNX Block variable Definition
l COW—Use for copy-on-write backup and recoveryworkflows.
FRAME_IP Specifies the hostname or IP address of the VNX port to use.
Application Information variables for RecoverPointappliances
The following table lists Application Information variables that NetWorker SnapshotManagement (NSM) can use for RecoverPoint appliances.
Table 14 Application Information variables for RecoverPoint appliances
RecoverPoint variable Definition
NSR_SNAP_TECH Specifies the RecoverPoint replication type for a backup orrestore.The following are RecoverPoint commands that you can use:
l RP_CDP—Use to notify NSM that local copies will beused to access a bookmark.
l RP_CRR—Use to notify NSM that remote copies will beused to access a bookmark.
RP_APPLIANCE_NAME Specifies the hostname or IP address of the RecoverPointappliance for NSM to use.
Application Information variables for XtremIO arraysThe following table lists Application Information variables that NSM can use forXtremIO arrays.
Table 15 Application Information variables for XtremIO arrays
XtremIO variable Definition
NSR_SNA_TYPE Specifies the XtremIO replication type for abackup or restore. Use the value emc-xtremio.
NSR_XTREMIO_HOSTNAME Specifies the hostname or IP address of theXtremIO storage array for NSM to use.
NSR_XTREMIO_PROXY_INITIATOR_NAME Specifies the proxy or Mount host initiatorname created on the XtremIO array by theuser.
Application Information Variables
Application Information variables for RecoverPoint appliances 155

Application Information Variables
156 NetWorker 18.1 Snapshot Management Integration Guide
APPENDIX B
Command-Line Operations for SnapshotManagement
This appendix includes the following topics:
l Using CLI commands for snapshot operations.................................................. 158l Using nsrsnapadmin for snapshot operations....................................................158l Example nsrsnapadmin operations.................................................................... 159l Querying with the mminfo command.................................................................161
Command-Line Operations for Snapshot Management 157
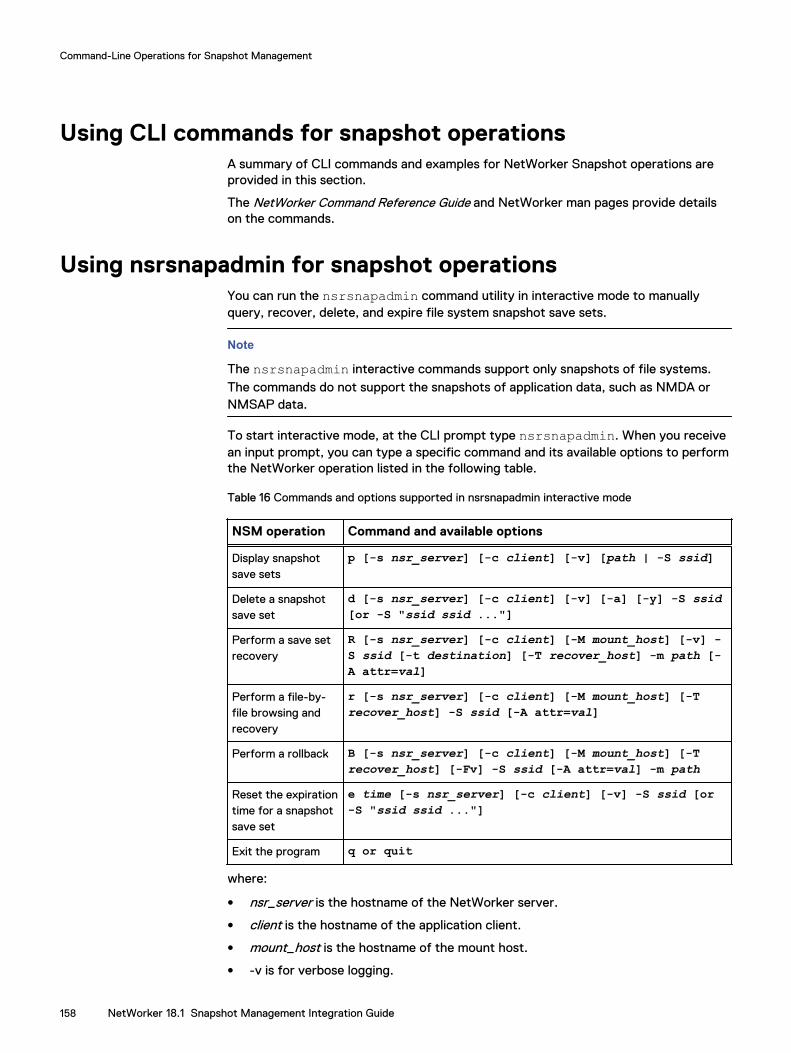
Using CLI commands for snapshot operationsA summary of CLI commands and examples for NetWorker Snapshot operations areprovided in this section.
The NetWorker Command Reference Guide and NetWorker man pages provide detailson the commands.
Using nsrsnapadmin for snapshot operationsYou can run the nsrsnapadmin command utility in interactive mode to manuallyquery, recover, delete, and expire file system snapshot save sets.
Note
The nsrsnapadmin interactive commands support only snapshots of file systems.The commands do not support the snapshots of application data, such as NMDA orNMSAP data.
To start interactive mode, at the CLI prompt type nsrsnapadmin. When you receivean input prompt, you can type a specific command and its available options to performthe NetWorker operation listed in the following table.
Table 16 Commands and options supported in nsrsnapadmin interactive mode
NSM operation Command and available options
Display snapshotsave sets
p [-s nsr_server] [-c client] [-v] [path | -S ssid]
Delete a snapshotsave set
d [-s nsr_server] [-c client] [-v] [-a] [-y] -S ssid[or -S "ssid ssid ..."]
Perform a save setrecovery
R [-s nsr_server] [-c client] [-M mount_host] [-v] -S ssid [-t destination] [-T recover_host] -m path [-A attr=val]
Perform a file-by-file browsing andrecovery
r [-s nsr_server] [-c client] [-M mount_host] [-Trecover_host] -S ssid [-A attr=val]
Perform a rollback B [-s nsr_server] [-c client] [-M mount_host] [-Trecover_host] [-Fv] -S ssid [-A attr=val] -m path
Reset the expirationtime for a snapshotsave set
e time [-s nsr_server] [-c client] [-v] -S ssid [or-S "ssid ssid ..."]
Exit the program q or quit
where:
l nsr_server is the hostname of the NetWorker server.
l client is the hostname of the application client.
l mount_host is the hostname of the mount host.
l -v is for verbose logging.
Command-Line Operations for Snapshot Management
158 NetWorker 18.1 Snapshot Management Integration Guide
The NetWorker Command Reference Guide and the NetWorker man pages providedetails.
Example nsrsnapadmin operationsAfter you start the nsrsnapadmin utility in interactive mode, at the input prompt youcan type a specific command and its options to perform a NetWorker SnapshotManagement (NSM) operation.
Querying snapshot save setsWhen you type the p command and its options at the nsrsnapadmin prompt, theprogram queries the NetWorker server for snapshot save sets for the client. Theprogram lists specific properties of the snapshot save sets, such as the creation timeand the date of each snapshot. For example:
p -s server -c client [-v] path
where:
l server is the hostname of the NetWorker server.
l client is the hostname of the client from which NSM backed up the data.
l path is the pathname of a particular snapshot save set. Type the pathname toquery a single save set only. Otherwise, the output message lists all the save sets.
A message similar to the following appears:
nsrsnapadmin> p -s ledma038 -c ledma218ssid = 3742964283 savetime="February 11, 2013 11:20:10 AM EST" (1360599610) expiretime="February 11, 2014 11:59:58 PM EST" (1392181198) ssname=/symm_403_ufs
File-by-file browsing and restoreWhen you type the r command and its options at the nsrsnapadmin prompt, theprogram lists the file system as it existed at the time of the snapshot backup. Optionsenable you to browse, select, and restore the elements of the file system. Forexample:
r -s server -c client -M mount_host -T recover_host -S ssid
where client can be a single host IP or a cluster IP (virtual, actual, or public IP).
Rollback restoreA rollback is a complete restore of all the application source LUNs involved in thesnapshot backup. The restore includes all the file systems and the volume groups thatreside on these production LUNs. The nsrsnapadmin utility supports forced rollbackand the safety check features.
To perform a rollback restore, type the following command at the prompt:
B –S ssid /source_pathFor example:
Command-Line Operations for Snapshot Management
Example nsrsnapadmin operations 159
B -s server -c client -Fv -M mount_host -S ssid -m source_pathwhere client can be a single host IP or a cluster node (cluster IP or public IP).
Restoring a snapshot by rollback on page 137 provides more information.
Deleting a snapshot save setYou can type the nsrsnapadmin, nsrmm, nsrim, or nsrsnapck command todelete snapshot save sets.
Deleting an NetWorker Snapshot Management (NSM) save set is similar to deleting astandard NetWorker save set. NSM deletes the physical snapshot from the storagearray and then deletes all save sets that refer to that physical snapshot from themedia database.
For example:
command -d -s server -S ssid
where:
l command is nsrmm or nsrsnapck if you do not use nsrsnapadmin.
l server is the hostname of the NetWorker server.
l ssid is the snapshot save set ID.
Modifying the retention period of a snapshot save setYou can type the e command at the nsrsnapadmin prompt to modify the expirationdate of a snapshot. For example:
e time -s server -S ssid -c clientwhere:
l time is the date and time when the snapshot save set expires.Acceptable date formats are as follows:
n mm/dd[/yy]
n month_name dd[/yy]
Acceptable time formats are as follows:
n hh[:mm[:ss]] [meridian] [zone]
n hhmm [meridian] [zone]
l server is the hostname of the NetWorker server.
l ssid is the ID of the snapshot save set that you want to modify.
l client (optional) is the hostname of the client from which NSM backed up thedata.
A message similar to the following appears:
Resetting expire time for ssid : 4090300235
The message indicates that you have successfully changed the expiration time.
Notes:
l If you omit the year, the year defaults to the current year.
Command-Line Operations for Snapshot Management
160 NetWorker 18.1 Snapshot Management Integration Guide
l If you omit the meridian, NSM uses a 24-hour clock.
l If you omit the time zone (for example, GMT), NSM uses the current time zone.
l If you specify a date mm/dd/yy (for example -e 09/04/17), the time defaults to00:00:00. NSM changes the snapshot save set's browse and retention times to09/04/17 00:00:00.
If you specify a time hh:mm:ss (for example -e 20:00:00), the date defaults to thesystem date, for example, 09/03/17. NSM changes the snapshot save set's browseand retention times to 09/03/17 20:00:00.
Querying with the mminfo commandYou can query a client’s snapshot save sets by typing the mminfo command. The -q snap option lists all snapshot save sets for a particular client.
To list the snapshot save sets for a client, at the command prompt type the followingcommand:
mminfo -s server -S -a -q "client=clientname",snap
where:
l server is the hostname of the NetWorker server.
l clientname is the hostname of the client from which NSM backed up the data.
Example output:
mminfo -s ledma038 -S -a -q "client=ledma218,snap" volume client date size level nameledma038.003 ledma218 02/11/13 2 KB full /symm_403_ufs
The NetWorker Command Reference Guide and NetWorker man pages provide detailson the mminfo command.
Command-Line Operations for Snapshot Management
Querying with the mminfo command 161

Command-Line Operations for Snapshot Management
162 NetWorker 18.1 Snapshot Management Integration Guide
APPENDIX C
Migrating Legacy PowerSnap Configurations
This appendix includes the following topics:
l Migrating legacy PowerSnap configurations to NSM........................................164l Deprecated Client resource attributes..............................................................165l Migrating VMAX (Symmetrix) arrays................................................................165l Migrating VNX (CLARiiON) arrays................................................................... 165l Migrating RecoverPoint appliances.................................................................. 165l Starting the nsrpsd process..............................................................................166l Licensing.......................................................................................................... 166
Migrating Legacy PowerSnap Configurations 163
Migrating legacy PowerSnap configurations to NSMYou can migrate legacy NetWorker PowerSnap Module configurations to NetWorkerSnapshot Management. The NetWorker client installation provides all the functionalitythat is previously handled by the PowerSnap Module.
Removing PowerSnap on UNIX systemsBefore you upgrade to NSM on UNIX systems, remove the existing PowerSnappackages by using the native package management utilities of the operating system.
Note
Failure to remove previously installed PowerSnap packages causes the NetWorkerclient installation to fail when performed through a client push installation or the nativepackage management utilities for the operating system.
Remove the PowerSnap packages from all computers that participate in the migration:
l Remove the following packages on Linux:
n lgtopsag-2.5.1.1.x86_64.rpm
n lgtopseg-2.5.1.1.x86_64.rpm
n lgtopssc-2.5.1.x86_64.rpm
l Remove the following PowerSnap packages on Solaris:
n LGTOpsag
n LGTOpseg
n LGTOpssc
l Remove the following packages on AIX:
n LGTOps.psag.rte
n LGTOps.pseg.rte
n LGTOps.pssc.rte
l Remove the PowerSnap.pkg package on HP.
Removing PowerSnap on Microsoft Windows systemsBefore you upgrade to NSM on Windows systems, you do not need to uninstall thePowerSnap Module. The NetWorker client installation wizard for Microsoft Windowswill uninstall the old PowerSnap Module automatically and replace it with the NSMfeature.
Use the upgrade option of the NetWorker client installer.
Note
Upgrading unsupported Microsoft Windows platforms will both uninstall existingPowerSnap packages and not install the NSM feature of the NetWorker client.
Migrating Legacy PowerSnap Configurations
164 NetWorker 18.1 Snapshot Management Integration Guide
Deprecated Client resource attributesThe Client resource Application Information attribute no longer supports the followingvariables. The presence of these variables will cause a backup to fail:
l NSR_IMAGE_SAVE
l SYMM_PROVIDER_DB
l SYMM_PROXY_PROVIDER_DB
Migrating VMAX (Symmetrix) arraysBefore the upgrade to NetWorker Snapshot Management (NSM), remove anysnapshots that were created with the PowerSnap Module from the VMAX array. Youcan delete the snapshots or clone them to conventional storage media.
Ensure that the operating system, versions, and configuration support NSM. Components of the NSM network provide details.
Decide whether you continue to use a Symmetrix/VMAX resource file (symm.res) ortake advantage of NSM intelligent pairing.
Note
The migration procedure does not remove the symm.res resource file. Thesymm.res file is optional for NSM, but NSM uses it if present.
VMAX disk groups are no longer required for NSM to operate. If present, NSM ignoresthem.
Pairing source LUNs to mirror LUNs on page 105 provides details on intelligent pairing.
Migrating VNX (CLARiiON) arraysBefore the upgrade to NetWorker Snapshot Management (NSM), remove anysnapshots that were created with the PowerSnap Module from the VNX array. Youcan delete the snapshots or clone them to conventional storage media.
Ensure that the operating system, versions, and configuration support NSM. Components of the NSM network provides details.
Note
The existing VNX (CLARiiON) security files must continue to exist on all nodes thatparticipate in snapshot operations. If you have removed these security files, you canre-create the files through the command line or with the NetWorker ClientConfiguration wizard. Configuring the Navisphere security file provides details.
Migrating RecoverPoint appliancesBefore the upgrade to NetWorker Snapshot Management (NSM), ensure that theoperating system, versions, and configuration support NSM. Components of the NSMnetwork provides details.
Migrating Legacy PowerSnap Configurations
Deprecated Client resource attributes 165
You must create a NetWorker Client resource by using the NMC Client ConfigurationWizard. RecoverPoint appliances do not support a nonwizard configuration andexisting RecoverPoint Client resources will not work after the upgrade to NSM.
You must configure RecoverPoint credentials in the NetWorker server lockboxbecause the nsr_rp_access_config utility no longer exists, and you cannot use alocal credential file.
Procedure
1. Ensure that you have available the credentials for username and password forthe RecoverPoint appliances that participate in snapshot backups.
2. Open an NMC session to the NetWorker server, and then run the ClientConfiguration Wizard.
3. Create a Client resource for the application host by selecting NSM and theRecoverPoint option.
4. Compare the new resource and old resource, and then add the requiredattributes from the old configuration to the new one.
5. On the Specify the RecoverPoint replication type and Storage ArrayOptions page, add the RecoverPoint username and password to the lockbox onthe NetWorker server.
6. After you finish with the wizard, delete the old configuration.
Starting the nsrpsd processIn NetWorker, the nsrpsd process on the application host starts on demand byNetWorker processes, such as nsrsnap. After 30 minutes of inactivity, the nsrpsdprocess terminates. To prevent nsrpsd from terminating, create the filensrpsd_stay_up in the nsr/res directory.
If you use a version of NMDA or NMSAP on the application host, then the nsrpsdprocess does not automatically start or stop and backups of these applications will fail.You must start or stop the nsrpsd process manually, as done in previous PowerSnapreleases. In these environments, nsrpsd will not terminate after 30 minutes ofinactivity.
LicensingFor the upgrade to NetWorker Snapshot Management (NSM), you do not require anynew licenses. NSM honors existing PowerSnap licenses and the NetWorker capacityand traditional licensing models.
NetWorker snapshot licensing requirements on page 26 provides details.
Migrating Legacy PowerSnap Configurations
166 NetWorker 18.1 Snapshot Management Integration Guide
GLOSSARY
This glossary contains the definitions of terms used in this guide.
A
administrator Person who normally installs, configures, and maintains software on networkcomputers, and who adds users and defines user privileges.
application host Computer that hosts application data to be backed up.
B
backup 1. Duplicate of database or application data, or an entire computer system, storedseparately from the original, which can be used to recover the original if it is lost ordamaged.
2. Operation that saves data to a volume for use as a backup.
backup volume A volume used to store backup data. NetWorker backup data cannot be stored on anarchive volume or a clone volume.
C
client Host on a network, such as a computer, workstation, or application server whose datacan be backed up and restored with the backup server software.
client file index Database maintained by the NetWorker server that tracks every database object, file,or file system backed up. The NetWorker server maintains a single index file for eachclient computer. The tracking information is purged from the index after the browsetime of each backup expires.
client-initiated backup See manual backup.
Client resource NetWorker server resource that identifies the save sets to be backed up on a client.The Client resource also specifies information about the backup, such as the schedule,browse policy, and retention policy for the save sets.
clone 1. Duplicate copy of backed-up data, which is indexed and tracked by the NetWorkerserver. Single save sets or entire volumes can be cloned.
2. Type of mirror that is specific to a storage array.
cluster Group of linked virtual or physical hosts, each of which is identified as a node, withshared storage that work together and represent themselves as a single host.
consistent State of a data set that fully matches an application's active view of the data at anypoint in time.
NetWorker 18.1 Snapshot Management Integration Guide 167
Console server See NetWorker Management Console (NMC).
D
datazone Group of clients, storage devices, and storage nodes that are administered by aNetWorker server.
device 1. Storage folder or storage unit that can contain a backup volume. A device can be atape device, optical drive, autochanger, or disk connected to the server or storagenode.
2. General term that refers to storage hardware.
3. Access path to the physical drive, when dynamic drive sharing (DDS) is enabled.
F
file index See client file index.
file system 1. Software interface used to save, retrieve, and manage files on storage media byproviding directory structures, data transfer methods, and file association.
2. Entire set of all files.
3. Method of storing files.
G
group One or more client computers that are configured to perform a backup together,according to a single designated schedule or set of conditions.
H
host Computer on a network.
hostname Name or address of a physical or virtual host computer that is connected to a network.
L
logical unit (LUN) Logical storage space on a storage array that is addressed by SCSI or Fibre Channelprotocols. Multiple LUNs can be used to represent a storage volume.
logical volume manager(LVM)
Software that controls disk resources by mapping data between a logical view ofstorage space and the actual physical disks.
M
manual backup Backup that a user performs from the client, also known as an unscheduled, on-demand, or ad hoc backup.
Glossary
168 NetWorker 18.1 Snapshot Management Integration Guide
media Physical storage, such as a disk file system or magnetic tape, to which backup data iswritten. See volume.
media database Database that contains indexed entries of storage volume location and the life cyclestatus of all data and volumes managed by the NetWorker server.
mirror 1. Exact duplicate of data or another object, such as a disk.
2. To write duplicate data to more than one device.
mount To make a volume physically available for use, such as the placement of a removabledisk volume or tape into a drive for reading or writing.
mount host Host in a network that is used to mount storage array snapshot volumes to performsnapshot restore and rollover operations.
N
NetWorker ManagementConsole (NMC)
Software program that is used to manage NetWorker servers and clients. The NMCserver also provides reporting and monitoring capabilities for all NetWorker processes.
NetWorker server Computer on a network that runs the NetWorker server software, contains the onlineindexes, and provides backup and restore services to the clients and storage nodes onthe same network.
NetWorker SnapshotManagement (NSM)
Technology that provides point-in-time snapshot copies of data. NetWorker softwarebacks up data from the snapshot. This allows applications to continue to write dataduring the backup operation, and ensures that open files are not omitted.
P
point-in-time copy (PITcopy)
Fully usable copy of a defined collection of data, such as a consistent file system,database, or volume that contains an image of the data as it appeared at a specific pointin time. A PIT copy is also called a snapshot or shadow copy.
policy Set of defined rules for client backups that can be applied to multiple groups. Groupshave dataset, schedule, browse, and retention policies.
pool 1. NetWorker sorting feature that assigns specific backup data to be stored onspecified media volumes.
2. Collection of NetWorker backup volumes to which specific data has been backedup.
Q
quiesce State in which all writes to a disk are stopped and the file system cache is flushed.Quiescing the database prior to creating the snapshot provides a transactionallyconsistent image that can be remounted.
Glossary
NetWorker 18.1 Snapshot Management Integration Guide 169
R
resource Software component whose configurable attributes define the operational properties ofthe NetWorker server or its clients. Clients, devices, schedules, groups, and policies areall NetWorker resources.
restore To retrieve individual data files from backup media and copy the files to a client withoutapplying transaction logs.
retention policy NetWorker setting that determines the minimum period of time that backup data isretained on a storage volume and available for recovery. After this time is exceeded, thedata is eligible to be overwritten.
rollback restore Process by which a snapshot is restored to its source or alternate location by using thecapability of the storage array. A rollback restore destroys existing data on the targetlocation.
S
save set 1. Group of tiles or a file system copied to storage media by a backup or snapshotrollover operation.
2. NetWorker media database record for a specific backup or rollover.
save set ID (ssid) Internal identification number assigned to a save set.
scheduled backup Type of backup that is configured to start automatically at a specified time for a groupof one or more NetWorker clients. A scheduled backup generates a bootstrap save set.
Single node A configuration where the application host and mount host are the same host.
snapshot Point-in-time, read-only copy of specific data files, volumes, or file systems on anapplication host. Operations on the application host are momentarily suspended whilethe snapshot is created on a proxy host. Also called a PiT copy, image, or shadow copy.
snapshot backup Snapshot created on a storage array as a backup. Previously called instant backup.
snapshot mount host See mount host.
snapshot restore Restore from a snapshot backup. Previously called instant restore.
snapshot save set Group of files or other data included in a single snapshot. Previously called a snapset.
source LUN LUN on the application host, whose production data can be copied by snapshot.
specific point-in-time(SPIT) copy
RecoverPoint term for PIT copy. See point-in-time copy (PIT copy).
ssid See save set ID (ssid) .
storage array Integrated collection of subsystem disks, controllers, bus adapters, and software thatprovides storage services to one or more hosts.
Glossary
170 NetWorker 18.1 Snapshot Management Integration Guide
storage node Computer that manages physically attached storage devices or libraries, whose backupoperations are administered from the controlling NetWorker server. Typically a“remote” storage node that resides on a host other than the NetWorker server.
T
target client NetWorker client on which data is to be restored This may be the same as the originalsource client from which the data was backed up, or it may be a different client.
V
volume 1. Unit of physical storage medium, such as a disk or magnetic tape, to which backupdata is written.
2. Identifiable unit of data storage that may reside on one or more computer disks.
volume group Logical group that contains sets of disks, as configured by a volume manager.
Glossary
NetWorker 18.1 Snapshot Management Integration Guide 171

Glossary
172 NetWorker 18.1 Snapshot Management Integration Guide