new methods of testing pcb traces capacity and … methods of testing pcb traces capacity and fusing...
TRANSCRIPT

New Methods of Testing PCB Traces Capacity and Fusing
Norocel Codreanu, Radu Bunea, and Paul Svasta
“Politehnica” University of Bucharest, Center for Technological Electronics and Interconnection
Techniques, UPB-CETTI, Bucharest, Romania, [email protected]
1. Introduction
The article presents virtual and real investigations related to current capacity and fusing of PCB traces in high power applications and is based on a scientific paper delivered by authors at SIITME 2010 (www.siitme.ro) in Romania. The reason of performing the research and related tests is that in real applications the current carrying capacity of PCB traces could be different than the value presented in standards and datasheets or obtained after solving thermal equations. Based on the experimental results, the authors want to offer a new practical resource in the case of traces/tracks fusing, in order to avoid failures of electronic systems during the operation and, why not, to offer a design guide of developing PCB fuses, which could be interesting in some specific or low cost applications. In addition, the contribution introduces finally a few “rules of thumb”, useful to designers, fabricators and hardware engineers, which will deliver practice oriented advices for specialists involved in electronic design and manufacturing.
According to IPC standards, the current carrying capacity of PCB traces represents the maximum electrical current that can be carried continuously by a trace without causing an objectionable degradation of electrical or mechanical properties of the product [1]. When a trace is powered, current flowing through it generates heat, creating a temperature rise between the trace and the surrounding environment (ΔT= Ttrace - Tenv). ΔT is dependent upon the trace cross sectional area and various factors such as PCB thickness, dielectric material, amount and adjacency of copper in the board. Additionally, the environmental factors affect significantly the current capacity and fusing aspects, which are under interest. Usually, equations, graphs and tables present general design concerns that bound normally all the PCB designs (table 1). Unfortunately, the various contributions to the board temperature rise may occur in particular applications and are not detailed in standards. When considering the ambient temperature, with respect to the charts, one must evaluate all the contributions to the overall temperature rise of the board in the worst case conditions in which it is required to operate.
Because the printed circuit boards can be extremely different from one design to another, the paper tries to investigate the fusing aspects based on some important PCB parameters (type of dielectric, trace width (W), copper thickness, etc.) and environment conditions in which the board operates. The demo boards developed and manufactured were tested following IPC-TM-650, the data sets being used with respect to the charts from the new standard IPC-2152.
T= 10C T= 20C T= 30C
W [mm]
t=
18m
t=
35m
t=
70m
t=
18m
t=
35m
t=
70m
t=
18m
t=
35m
t=
70m
0.5 0.65 0.94 1.65 0.90 1.29 2.27 1.08 1.55 2.74
0.7 0.84 1.21 2.13 1.16 1.66 2.94 1.40 2.00 3.54
1 1.11 1.58 2.80 1.52 2.18 3.85 1.84 2.63 4.64
2 1.87 2.68 4.74 2.58 3.69 6.52 3.11 4.45 7.86
5 3.76 5.39 9.51 5.18 7.41 13.09 6.24 8.93 15.77
Table 1. classical current carrying capacity table derived from graphs and equations
2. The Preece’s, Brooks’s and Onderdonk’s equations
The most results found in references are based on formulas and charts, as presented in [2] and [4],
having as background the Preece’s, Brooks’s and Onderdonk’s equations. W. H. Preece has obtained the
formula for fusing a wire which, with some minor transformations, can be applied also to printed circuits
(equation 1).

75.0
sin 12277 AI gfu (1)
where A= cross-sectional area of the PCB trace [inch2] and Ifusing= fusing current of it [A].
D. Brooks has used another way to develop his formula, obtaining finally a very close formula to the
Preece’s one:
69.0
sin 12706 AI gfu (2)
I. M. Onderdonk has developed also two formulas for finding the fusing current, introducing
additionally the melting temperature of copper and the time till fusing:
t
T
TT
AIa
am
gfu
33
]1234
lg[
sin (3’)
t
AI gfu
188.0sin (3”)
where A= cross-sectional area of the PCB trace [mil2], t= time to fusing/melting [s], Tm=
fusing/melting temperature of copper (1083°C), and Ta= ambient temperature [°C] [3]. Unfortunately, all
these formulas offer only theoretical fusing current limits, having no experimental/practical background and
no final matching with measurements performed on demo boards. For this reason, the research of authors
was focused to practical tests of fusing, supervised by infrared termography and matching of results with
finite element simulations.
3. Finite element modelling and simulation
To obtain the thermal solution, for example the temperature map, a coupled-field analysis is required.
For this type of analysis the interaction (coupling) between two or more types of physical phenomena
(fields) is considered. Such an analysis may involve direct or indirect coupling of fields. When performing a
directly coupled analysis, the variables from both fields (e.g., heat generation rate and temperatures) are
computed simultaneously. This method is necessary when the individual field responses of the model are
strongly dependent upon each other. Directly coupled analyses are usually nonlinear since equilibrium must
be satisfied based on multiple criteria. The finite element model requires more computational resources in
this case. An indirectly coupled analysis involves the solution of single-field models in a particular sequence.
The results of one analysis are used as loads for the following analysis. This is also known as the sequential
method of coupled analysis. This method of analysis is applicable when there is one-way interaction between
fields [5]. The authors have used the ANSYSTM software, which supports both types of simulations.
Thermal
model
Electric
model
Heat Generation
Temperature
Temperature dependent resistivities
Source for thermal field, Temperature dependent boundary conditions
Figure 1. Coupled field electric-thermal simulation.
The modelling and simulation flow includes: building the solid model, defining and assigning
material properties and proper finite elements, meshing the model, applying the loads and boundary
conditions, and finally solving and post-processing the results. A characteristic of the model is that the full
3D structure was modelled. In all cases parametric type model was built which allowed to authors realize a
series of runs without re-creating the solid model.

The boundary conditions involve applying of heat transfer coefficients on the external surfaces. For
the convection coefficients we have chosen some results from literature and our previous papers. The board
was hold suspended and there was also convection from the bottom side of the board. We have used
temperature dependent film coefficients. The values were derived from values at room temperature with the
assumption of variation according to ~(T) 0.25 relation [5]. Temperature dependent resistivities were used
for copper and for solder alloy, too. The parameters used in simulations are presented in table 1:
Mat.
nr.
Material Thermal
constant
(W/mK)
Resistivity
(·m)
at 25C
1 Copper 390 1.72e-8
2 FR4 0.3 (approx. 1e9)
Table 2. Material properties used in analysis
The issues for determining the heat convection coefficients are presented in [6]. The source of heat is
the electrical power dissipated in the volume of electrical components, copper traces, solder joints, and
resistors. The loads are applied to the model as volume (body) loads, this meaning a heat generation rate or
other named power density. The Joule heat generation has a specific distribution for certain geometry and is
difficult to be predicted without using software simulation tools. A high current DC power source was used
to supply the probes, operating in constant current mode (current limiting). A low resistance shunt resistor
made from parallel connected wirewound resistors was used in order to permit the operation of the power
supply in a point with convenient voltage level, slightly higher than 0 V.
Figure 2. Simulation result for a 1mm wide trace/track charged at 11A.
4. Fusing of PCB traces and infrared thermo-graphycal measurements
In order to practical investigate the behaviour of PCB traces at high currents, melting times and
fusing currents, six test boards were designed and manufactured in the laboratory, having no solder-mask
applied and no protection finishing (HASL, OPP, ENIG, etc.). This solution was chosen for evaluating the
bare copper PCB traces without any additional deposition and to observe the current capacity of them till the
final failure, the fusing/melting of copper and breaking the electrical circuit. The substrate thickness is in all
cases 1.55mm, the dielectric types are FR2, CEM1 and FR4, the trace widths are 0.5, 1 and 2mm and the
length of the traces is in all cases 110mm.
In the first case the low-cost FR2 board was studied, the picture of it, from top side and bottom side,
being offered in figure 3. The results of charging currents, steady temperatures at the trace level and fusing
currents and times are presented in table III. It can be observed that the 0.5mm trace can be charged without
melting till approx. 5A, the 1mm till approx. 7.5A and the 2mm one till 12.5A (of coarse, with a decreasing
of reliability and life time). The fusing times for 7.5A, 10A and 15A were of 10s, 96s, and 215s, for the three
widths used. Figure 3 shows that the substrate was not totally damaged after burning, even the melting of the
track can be observed on the bottom side in case of 1mm and 2mm structures.

Figure 3. Image after melting of PCB traces in the case of FR2 substrate (left – top, right - bottom).
FR2
H=1.55 mm
W=0.5 mm
I [A] T [◦C] Tamb [◦C] tfusing [min]
2.5 57.5 25 -
5 177 25 -
7.5 - - 0’10’’ (10s)
FR2
H= 1.55 mm
W= 1 mm
I [A] T [◦C] Tamb [◦C] tfusing [min]
2.5 44.5 25 -
5 92 25 -
7.5 191 25 -
10 - - 1’36’’ (96s)
FR2
H= 1.55 mm
W= 2 mm
I [A] T [◦C] Tamb [◦C] tfusing [min]
7.5 90.5 25 -
10 139 25 -
12.5 239 25 -
15 - - 3’35’’ (215s)
Table 3. Charging currents, steady temperatures and fusing currents (FR2 substrate)
In the second case the CEM1 board was investigated, the picture of it (from top and bottom sides)
being shown in figure 4. The results of charging currents, steady temperatures at the trace level and melting
currents and times are presented in table IV, being remarked that the traces can be charged without melting
till approx. the same temperatures, 5A, 7.5A, and 12.5A. The melting times for 7.5A, 10A and 15A were of
10s, 50s, and 80s, for the three widths used. Figure 4 shows that the substrate was not extremely damaged
after burning, the melting of the track being observed on the bottom side only in case of the 2mm trace, the
damage being lower that for FR2.
The last type of board is FR4, the picture of it being presented in figure 5. The results of charging
currents, steady temperatures at the trace level and fusing current intensities and times are offered in table V,
being remarked the same as in previous cases: the traces can be charged without melting till approx. the
same temperatures, 5A, 7.5A, and 12.5A. The fusing times for 7.5A, 10A and 15A were of 7s, 60s, and 60s.
Figure 4. Image after melting of PCB traces in the case of CEM1 substrate(left – top, right - bottom).
CEM1
H= 1.55 mm
W= 0.5 mm
I [A] T [◦C] Tamb [◦C] tfusing [min]
2.5 58 25 -
5 178 25 -
7.5 - - 0’10’’ (10s)
CEM1
H= 1.55 mm
I [A] T [◦C] Tamb [◦C] tfusing [min]
2.5 43.5 25 -
5 97 25 -

W= 1 mm 7.5 207 25 -
10 - - 0’50’’ (50s)
CEM1
H= 1.55 mm
W= 2 mm
I [A] T [◦C] Tamb [◦C] tfusing [min]
7.5 96 25 -
10 157 25 -
12.5 300 25 -
15 - - 1’20’’ (80s)
Table 4. Charging currents, steady temperatures and melting currents
(CEM1 substrate)
Figure 5. Image after melting of PCB traces in the case of FR4 substrate.
FR4
H= 1.55 mm
W= 0.5 mm
I [A] T [◦C] Tamb [◦C] tfusing [min]
2.5 60.5 25 -
5 192 25 -
7.5 - - 0’07’’ (7s)
FR4
H= 1.55 mm
W= 1 mm
I [A] T [◦C] Tamb [◦C] tfusing [min]
2.5 46 25 -
5 95 25 -
7.5 205 25 -
10 - - 1’00’’ (60s)
FR4
H= 1.55 mm
W= 2 mm
I [A] T [◦C] Tamb [◦C] tfusing [min]
7.5 98 25 -
10 160 25 -
12.5 257 25 -
15 - - 1’00’’ (60s)
Table 5. Charging currents, steady temperatures and melting currents (FR4 substrate)
Because the FR4 dielectric is mostly used in electronics applications, from commercial to high-tech,
high-performance products a deeper investigation was oriented more FR4 traces, the limit of non-melting -
melting and the dependence of fusing time vs. track length. All these studies will be published in a future
paper, in this one the authors wanting to present only one graphical result for W= 2mm. After charging the
test structures, one has found that the limit of melting the trace is the value of 13A and the correspondent
fusing time of 1760s.
Figure 6. The general dependence of PCB trace temperature vs. time.
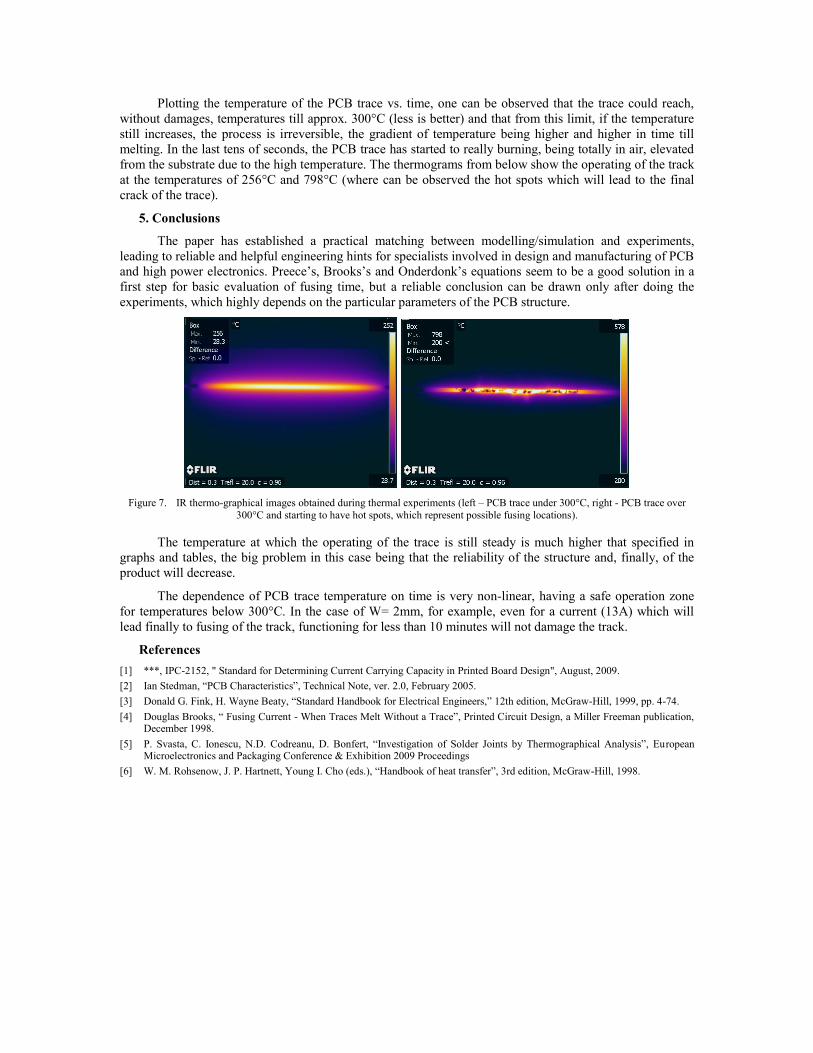
Plotting the temperature of the PCB trace vs. time, one can be observed that the trace could reach,
without damages, temperatures till approx. 300°C (less is better) and that from this limit, if the temperature
still increases, the process is irreversible, the gradient of temperature being higher and higher in time till
melting. In the last tens of seconds, the PCB trace has started to really burning, being totally in air, elevated
from the substrate due to the high temperature. The thermograms from below show the operating of the track
at the temperatures of 256°C and 798°C (where can be observed the hot spots which will lead to the final
crack of the trace).
5. Conclusions
The paper has established a practical matching between modelling/simulation and experiments,
leading to reliable and helpful engineering hints for specialists involved in design and manufacturing of PCB
and high power electronics. Preece’s, Brooks’s and Onderdonk’s equations seem to be a good solution in a
first step for basic evaluation of fusing time, but a reliable conclusion can be drawn only after doing the
experiments, which highly depends on the particular parameters of the PCB structure.
Figure 7. IR thermo-graphical images obtained during thermal experiments (left – PCB trace under 300°C, right - PCB trace over
300°C and starting to have hot spots, which represent possible fusing locations).
The temperature at which the operating of the trace is still steady is much higher that specified in
graphs and tables, the big problem in this case being that the reliability of the structure and, finally, of the
product will decrease.
The dependence of PCB trace temperature on time is very non-linear, having a safe operation zone
for temperatures below 300°C. In the case of W= 2mm, for example, even for a current (13A) which will
lead finally to fusing of the track, functioning for less than 10 minutes will not damage the track.
References
[1] ***, IPC-2152, " Standard for Determining Current Carrying Capacity in Printed Board Design", August, 2009.
[2] Ian Stedman, “PCB Characteristics”, Technical Note, ver. 2.0, February 2005.
[3] Donald G. Fink, H. Wayne Beaty, “Standard Handbook for Electrical Engineers,” 12th edition, McGraw-Hill, 1999, pp. 4-74.
[4] Douglas Brooks, “ Fusing Current - When Traces Melt Without a Trace”, Printed Circuit Design, a Miller Freeman publication, December 1998.
[5] P. Svasta, C. Ionescu, N.D. Codreanu, D. Bonfert, “Investigation of Solder Joints by Thermographical Analysis”, European Microelectronics and Packaging Conference & Exhibition 2009 Proceedings
[6] W. M. Rohsenow, J. P. Hartnett, Young I. Cho (eds.), “Handbook of heat transfer”, 3rd edition, McGraw-Hill, 1998.