ni 177x smart camera user manual and specifications ... 177x smart camera user manual ... equipment...
TRANSCRIPT

NI VisionNI 177x Smart Camera User Manual
NI 177x Smart Camera User Manual
September 2011373491A-01

Support
Worldwide Technical Support and Product Information
ni.com
Worldwide Offices
Visit ni.com/niglobal to access the branch office Web sites, which provide up-to-date contact information, support phone numbers, email addresses, and current events.
National Instruments Corporate Headquarters
11500 North Mopac Expressway Austin, Texas 78759-3504 USA Tel: 512 683 0100
For further support information, refer to the Technical Support and Professional Services appendix. To comment on National Instruments documentation, refer to the National Instruments Web site at ni.com/info and enter the Info Code feedback.
© 2011 National Instruments Corporation. All rights reserved.

Important Information
WarrantyNI 177x Smart Cameras are warranted against defects in materials and workmanship for a period of one year from the date of shipment, as evidenced by receipts or other documentation. National Instruments will, at its option, repair or replace equipment that proves to be defective during the warranty period. This warranty includes parts and labor.
The media on which you receive National Instruments software are warranted not to fail to execute programming instructions, due to defects in materials and workmanship, for a period of 90 days from date of shipment, as evidenced by receipts or other documentation. National Instruments will, at its option, repair or replace software media that do not execute programming instructions if National Instruments receives notice of such defects during the warranty period. National Instruments does not warrant that the operation of the software shall be uninterrupted or error free.
A Return Material Authorization (RMA) number must be obtained from the factory and clearly marked on the outside of the package before any equipment will be accepted for warranty work. National Instruments will pay the shipping costs of returning to the owner parts which are covered by warranty.
National Instruments believes that the information in this document is accurate. The document has been carefully reviewed for technical accuracy. In the event that technical or typographical errors exist, National Instruments reserves the right to make changes to subsequent editions of this document without prior notice to holders of this edition. The reader should consult National Instruments if errors are suspected. In no event shall National Instruments be liable for any damages arising out of or related to this document or the information contained in it.
EXCEPT AS SPECIFIED HEREIN, NATIONAL INSTRUMENTS MAKES NO WARRANTIES, EXPRESS OR IMPLIED, AND SPECIFICALLY DISCLAIMS ANY WARRANTY OF MERCHANTABILITY OR FITNESS FOR A PARTICULAR PURPOSE. CUSTOMER’S RIGHT TO RECOVER DAMAGES CAUSED BY FAULT OR NEGLIGENCE ON THE PART OF NATIONAL INSTRUMENTS SHALL BE LIMITED TO THE AMOUNT THERETOFORE PAID BY THE CUSTOMER. NATIONAL INSTRUMENTS WILL NOT BE LIABLE FOR DAMAGES RESULTING FROM LOSS OF DATA, PROFITS, USE OF PRODUCTS, OR INCIDENTAL OR CONSEQUENTIAL DAMAGES, EVEN IF ADVISED OF THE POSSIBILITY THEREOF. This limitation of the liability of National Instruments will apply regardless of the form of action, whether in contract or tort, including negligence. Any action against National Instruments must be brought within one year after the cause of action accrues. National Instruments shall not be liable for any delay in performance due to causes beyond its reasonable control. The warranty provided herein does not cover damages, defects, malfunctions, or service failures caused by owner’s failure to follow the National Instruments installation, operation, or maintenance instructions; owner’s modification of the product; owner’s abuse, misuse, or negligent acts; and power failure or surges, fire, flood, accident, actions of third parties, or other events outside reasonable control.
CopyrightUnder the copyright laws, this publication may not be reproduced or transmitted in any form, electronic or mechanical, including photocopying, recording, storing in an information retrieval system, or translating, in whole or in part, without the prior written consent of National Instruments Corporation.
National Instruments respects the intellectual property of others, and we ask our users to do the same. NI software is protected by copyright and other intellectual property laws. Where NI software may be used to reproduce software or other materials belonging to others, you may use NI software only to reproduce materials that you may reproduce in accordance with the terms of any applicable license or other legal restriction.
TrademarksLabVIEW, National Instruments, NI, ni.com, the National Instruments corporate logo, and the Eagle logo are trademarks of National Instruments Corporation. Refer to the Trademark Information at ni.com/trademarks for other National Instruments trademarks.
Other product and company names mentioned herein are trademarks or trade names of their respective companies.
Members of the National Instruments Alliance Partner Program are business entities independent from National Instruments and have no agency, partnership, or joint-venture relationship with National Instruments.
PatentsFor patents covering National Instruments products/technology, refer to the appropriate location: Help»Patents in your software, the patents.txt file on your media, or the National Instruments Patent Notice at ni.com/patents.
Export Compliance InformationRefer to the Export Compliance Information at ni.com/legal/export-compliance for the National Instruments global trade compliance policy and how to obtain relevant HTS codes, ECCNs, and other import/export data.
WARNING REGARDING USE OF NATIONAL INSTRUMENTS PRODUCTS(1) NATIONAL INSTRUMENTS PRODUCTS ARE NOT DESIGNED WITH COMPONENTS AND TESTING FOR A LEVEL OF RELIABILITY SUITABLE FOR USE IN OR IN CONNECTION WITH SURGICAL IMPLANTS OR AS CRITICAL COMPONENTS IN ANY LIFE SUPPORT SYSTEMS WHOSE FAILURE TO PERFORM CAN REASONABLY BE EXPECTED TO CAUSE SIGNIFICANT INJURY TO A HUMAN.
(2) IN ANY APPLICATION, INCLUDING THE ABOVE, RELIABILITY OF OPERATION OF THE SOFTWARE PRODUCTS CAN BE IMPAIRED BY ADVERSE FACTORS, INCLUDING BUT NOT LIMITED TO FLUCTUATIONS IN ELECTRICAL POWER SUPPLY, COMPUTER HARDWARE MALFUNCTIONS, COMPUTER OPERATING SYSTEM SOFTWARE FITNESS, FITNESS OF COMPILERS AND DEVELOPMENT SOFTWARE USED TO DEVELOP AN APPLICATION, INSTALLATION ERRORS, SOFTWARE AND HARDWARE COMPATIBILITY PROBLEMS, MALFUNCTIONS OR FAILURES OF ELECTRONIC MONITORING OR CONTROL DEVICES, TRANSIENT FAILURES OF ELECTRONIC SYSTEMS (HARDWARE AND/OR SOFTWARE), UNANTICIPATED USES OR MISUSES, OR ERRORS ON THE PART OF THE USER OR APPLICATIONS DESIGNER (ADVERSE FACTORS SUCH AS THESE ARE HEREAFTER COLLECTIVELY TERMED “SYSTEM FAILURES”). ANY APPLICATION WHERE A SYSTEM FAILURE WOULD CREATE A RISK OF HARM TO PROPERTY OR PERSONS (INCLUDING THE RISK OF BODILY INJURY AND DEATH) SHOULD NOT BE RELIANT SOLELY UPON ONE FORM OF ELECTRONIC SYSTEM DUE TO THE RISK OF SYSTEM FAILURE. TO AVOID DAMAGE, INJURY, OR DEATH, THE USER OR APPLICATION DESIGNER MUST TAKE REASONABLY PRUDENT STEPS TO PROTECT AGAINST SYSTEM FAILURES, INCLUDING BUT NOT LIMITED TO BACK-UP OR SHUT DOWN MECHANISMS. BECAUSE EACH END-USER SYSTEM IS CUSTOMIZED AND DIFFERS FROM NATIONAL INSTRUMENTS' TESTING PLATFORMS AND BECAUSE A USER OR APPLICATION DESIGNER MAY USE NATIONAL INSTRUMENTS PRODUCTS IN COMBINATION WITH OTHER PRODUCTS IN A MANNER NOT EVALUATED OR CONTEMPLATED BY NATIONAL INSTRUMENTS, THE USER OR APPLICATION DESIGNER IS ULTIMATELY RESPONSIBLE FOR VERIFYING AND VALIDATING THE SUITABILITY OF NATIONAL INSTRUMENTS PRODUCTS WHENEVER NATIONAL INSTRUMENTS PRODUCTS ARE INCORPORATED IN A SYSTEM OR APPLICATION, INCLUDING, WITHOUT LIMITATION, THE APPROPRIATE DESIGN, PROCESS AND SAFETY LEVEL OF SUCH SYSTEM OR APPLICATION.

Compliance
Electromagnetic Compatibility InformationThis product was tested and complies with the regulatory requirements and limits for electromagnetic compatibility (EMC) as stated in the product specifications. These requirements and limits are designed to provide reasonable protection against harmful interference when the product is operated in its intended operational electromagnetic environment.
This product is intended for use in industrial locations. There is no guarantee that harmful interference will not occur in a particular installation, when the product is connected to a test object, or if the product is used in residential areas. To minimize the potential for the product to cause interference to radio and television reception or to experience unacceptable performance degradation, install and use this product in strict accordance with the instructions in the product documentation.
Furthermore, any changes or modifications to the product not expressly approved by National Instruments could void your authority to operate it under your local regulatory rules.

© National Instruments Corporation v NI 177x Smart Camera User Manual
Contents
About This ManualConventions ................................................................................................................... ixRelated Documentation..................................................................................................x
Hardware Documents ......................................................................................xNI Vision Builder for Automated Inspection Documents...............................xLabVIEW and NI Vision Development Module Documents..........................xiNI Vision Acquisition Software Documents...................................................xi
PART IGetting Started with the NI 177x Smart Camera
Chapter 1Hardware Overview and Installation
Hardware Overview.......................................................................................................1-2Connect the Power Supply and I/O................................................................................1-3Connect to the Development Computer.........................................................................1-5
Direct Connection............................................................................................1-5Network Connection........................................................................................1-5
Subnet Considerations.......................................................................1-6IP Address Assignment.....................................................................1-6
Firewall Configuration ....................................................................................1-7
Chapter 2Software Overview
Configuring the NI Smart Camera with Vision Builder AI...........................................2-2Configure the IP Address ................................................................................2-2Install Software on the NI Smart Camera........................................................2-3Acquire an Image with Vision Builder AI ......................................................2-3
Configuring the NI Smart Camera with LabVIEW .......................................................2-4Configure the IP Address ................................................................................2-5Install Software on the NI Smart Camera........................................................2-6Acquire an Image ............................................................................................2-6

Contents
NI 177x Smart Camera User Manual vi ni.com
PART IINI 177x Smart Camera Technical Reference
Chapter 3Connectors
I/O Connector ................................................................................................................ 3-2NI Smart Camera Power Requirements ........................................................................ 3-4100/1G Connector ......................................................................................................... 3-4VGA/USB Connector.................................................................................................... 3-5
Chapter 4Connecting Lighting and External Devices
Connecting Lighting Devices ........................................................................................ 4-1Connecting a Light Controller ........................................................................ 4-1
Open Collector Outputs................................................................................................. 4-3Connecting to a NPN Device .......................................................................... 4-3Connecting to a PNP Device........................................................................... 4-4Protecting Against Inductive Loads ................................................................ 4-4
Connecting to a Triggering Device ............................................................................... 4-6Connecting to Serial Devices ........................................................................................ 4-7
Chapter 5Image Sensor
Field of View................................................................................................................. 5-1Image Sensor Spectral Response................................................................................... 5-3Gain ............................................................................................................................... 5-3
Auto White Level (NI 177xC Smart Cameras)............................................... 5-4Black Level (NI 177xC Smart Cameras)....................................................................... 5-5Look-Up Table .............................................................................................................. 5-5Maintenance .................................................................................................................. 5-6
Chapter 6Image Acquisition
Exposure ........................................................................................................................ 6-1Acquiring Images .......................................................................................................... 6-2
Internal Timing ............................................................................................... 6-2External Trigger .............................................................................................. 6-3
Maximum Frame Rate................................................................................................... 6-5Determining the Maximum Frame Rate ......................................................... 6-5Determining the Exposure Time ..................................................................... 6-6

Contents
© National Instruments Corporation vii NI 177x Smart Camera User Manual
Determining the Trigger Delay .......................................................................6-6Calculating the Minimum Frame Period .........................................................6-6
Chapter 7LED Indicators
Understanding the LED Indicators ................................................................................7-1Device Initialization ........................................................................................7-2Power Indicator ...............................................................................................7-2Status Indicator................................................................................................7-2User Indicator ..................................................................................................7-3100/1G Indicator..............................................................................................7-4
Chapter 8Mounting Information
Appendix ASpecifications
Appendix BCamera Attributes
Appendix CAccessories
Appendix DTechnical Support and Professional Services
Glossary
Index
© National Instruments Corporation ix NI 177x Smart Camera User Manual
About This Manual
This manual contains detailed installation instructions and electrical and mechanical information for the National Instruments 177x Smart Camera.
ConventionsThe following conventions appear in this manual:
» The » symbol leads you through nested menu items and dialog box options to a final action. The sequence Options»Settings»General directs you to pull down the Options menu, select the Settings item, and select General from the last dialog box.
This icon denotes a note, which alerts you to important information.
This icon denotes a caution, which advises you of precautions to take to avoid injury, data loss, or a system crash.
When this symbol is marked on a product, it denotes a warning advising you to take precautions to avoid electrical shock.
bold Bold text denotes items that you must select or click in the software, such as menu items and dialog box options. Bold text also denotes parameter names.
italic Italic text denotes variables, emphasis, a cross-reference, or an introduction to a key concept. Italic text also denotes text that is a placeholder for a word or value that you must supply.
monospace Text in this font denotes text or characters that you should enter from the keyboard, sections of code, programming examples, and syntax examples. This font is also used for the proper names of disk drives, paths, directories, programs, subprograms, subroutines, device names, functions, operations, variables, filenames, and extensions.
monospace italic Italic text in this font denotes text that is a placeholder for a word or value that you must supply.

About This Manual
NI 177x Smart Camera User Manual x ni.com
Related DocumentationThe following documents contain information that you may find helpful as you read this manual:
Hardware Documents• NI 177x Series Smart Camera: Using the NI Smart Camera with
LabVIEW—Contains basic installation and configuration instructions for using the NI Smart Camera with LabVIEW.
• NI 177x Series Smart Camera: Using the NI Smart Camera with Vision Builder AI—Contains basic installation and configuration instructions for using the NI Smart Camera with Vision Builder AI.
• Power and I/O Accessory for NI 177x Smart Cameras User Guide—Contains installation and operation instructions, and feature descriptions for the power and I/O accessory (781993-01).
• NI Developer Zone—Contains example programs, tutorials, technical presentations, the Instrument Driver Network, a measurement glossary, an online magazine, a product advisor, and a community area where you can share ideas, questions, and source code with developers around the world. The NI Developer Zone is located on the National Instruments Web site at ni.com/zone.
NI Vision Builder for Automated Inspection Documents• NI Vision Builder for Automated Inspection Tutorial—Describes
Vision Builder for Automated Inspection and provides step-by-step instructions for solving common visual inspection tasks, such as inspection, gauging, part presence, guidance, and counting.
• NI Vision Builder for Automated Inspection: Configuration Help—Contains information about using the Vision Builder for Automated Inspection Configuration Interface to create a machine vision application.
• NI Vision Builder for Automated Inspection: Inspection Help—Contains information about running applications created with Vision Builder for Automated Inspection in the Vision Builder Automated Inspection Interface.

About This Manual
© National Instruments Corporation xi NI 177x Smart Camera User Manual
LabVIEW and NI Vision Development Module Documents• LabVIEW Help—Includes information about LabVIEW programming
concepts, step-by-step instructions for using LabVIEW, and reference information about LabVIEW VIs, functions, palettes, menus, and tools.
• Getting Started with LabVIEW—Use this manual as a tutorial to familiarize yourself with the LabVIEW graphical programming environment and the basic LabVIEW features you use to build data acquisition and instrument control applications.
• Getting Started with the LabVIEW Real-Time Module—Use this manual as a tutorial to familiarize yourself with the LabVIEW Real-Time Module and the basic Real-Time Module features you use to build real-time applications.
• NI Vision Concepts Help—Describes the basic concepts of image analysis, image processing, and machine vision. This document also contains in-depth discussions about imaging functions for advanced users.
• NI Vision for LabVIEW Help—Describes how to create machine vision and image processing applications in LabVIEW using the Vision Development Module. The help file guides you through tasks beginning with setting up your imaging system to taking measurements. It also describes how to create a real-time vision application using NI Vision with the LabVIEW Real-Time Module and contains reference information about NI Vision for LabVIEW palettes and VIs.
NI Vision Acquisition Software Documents• NI-IMAQdx VI Reference Help—Contains reference information
about the LabVIEW VIs and properties for NI-IMAQdx driver software.
• Measurement & Automation Explorer Help for NI-IMAQdx—Describeshow to configure NI-IMAQdx driver software, NI image acquisition devices, and NI Smart Cameras using Measurement & Automation Explorer.

© National Instruments Corporation I-1 NI 177x Smart Camera User Manual
Part I
Getting Started with the NI 177x Smart Camera
This section provides the following information:
• Basic information about the NI 177x Smart Camera hardware
• Instructions for configuring the NI 177x Smart Camera hardware
• Basic information about software options for application development
• Instructions for acquiring your first image with the NI 177x Smart Camera using the selected application development software

© National Instruments Corporation 1-1 NI 177x Smart Camera User Manual
1Hardware Overview and Installation
This chapter provides an overview of the features and components of the NI 177x Smart Camera. Figure 1-1 shows the NI 177x Smart Camera.
Figure 1-1. NI 177x Smart Camera
1 Image Sensor2 C-Mount3 Lens Cover Mount4 LED Indicators
5 I/O Connector6 100/1G Connector7 VGA/USB Connector
I/O 100/1G
Power
Status
User
VGA/USB
100/1G NATIONAL
INSTRUMENTS
NI 177X SMART CAMERA
1
3
2
765
4

Chapter 1 Hardware Overview and Installation
NI 177x Smart Camera User Manual 1-2 ni.com
Hardware OverviewNI 177x Smart Cameras incorporate an Intel® Atom™ Z530 (1.60 GHz) processor, image sensor, and digital I/O M12 connectors in a compact, rugged, IP67 rated housing. Refer to the I/O Connector section of Chapter 3, Connectors, for more information about the digital I/O capabilities of the device.
NI 177x Smart Cameras are available with the following image sensor configurations.
For more information about the image sensors, refer to Chapter 5, Image Sensor. For complete device specifications, refer to Appendix A, Specifications.
NI 177x Smart Cameras use a standard C-mount lens, and include 4 opto-coupled inputs, 4 open collector outputs, an optically isolated trigger input, and a constant current output for connecting to external devices. For complete device specifications, refer to Appendix A, Specifications.
NI 177x Smart Cameras includes 4 LED indicators for communicating system status. Refer to Chapter 7, LED Indicators, for more information about the LED indicators.
Table 1-1. NI 177x Smart Camera Models
Model ResolutionColor
Support
NI 1772 640 × 480 pixels (VGA) No
NI 1774 1,280 × 960 pixels (SXGA) No
NI 1776 1,600 × 1,200 pixels (UXGA) No
NI 1778 2,448 × 2,050 pixels (5 MP) No
NI 1772C 640 × 480 pixels (VGA) Yes
NI 1774C 1,280 × 960 pixels (SXGA) Yes
NI 1776C 1,600 × 1,200 pixels (UXGA) Yes

Chapter 1 Hardware Overview and Installation
© National Instruments Corporation 1-3 NI 177x Smart Camera User Manual
Connect the Power Supply and I/ONational Instruments provides the following two cable options for connecting a power supply (782032-01) and I/O to the NI 177x Smart Camera.
• Power and I/O Accessory (781993-01)—A terminal block that simplifies power and I/O signal configuration for the NI 177x Smart Camera. The accessory uses a 25-pin D-SUB connector and a 17-pin M12 to 25-pin D-SUB cable.
• 17-pin M12 Pigtail Cable (153131-03)—An open-ended cable that you can use to create your own custom cable. Refer to the I/O Connector section of Chapter 3, Connectors for wiring information.
Caution Use the NI 177x Smart Camera only with a 12 W, 24 VDC ±10%, UL listed, limited power source (LPS) supply. The power supply will bear the UL listed mark, LPS. The power supply must also meet any safety and compliance requirements for the country of use.
To connect a power supply to the NI 177x Smart Camera using the Power and I/O Accessory for NI 177x Smart Cameras, refer to Figure 1-2 and complete the following steps.
Chapter 1 Hardware Overview and Installation
NI 177x Smart Camera User Manual 1-4 ni.com
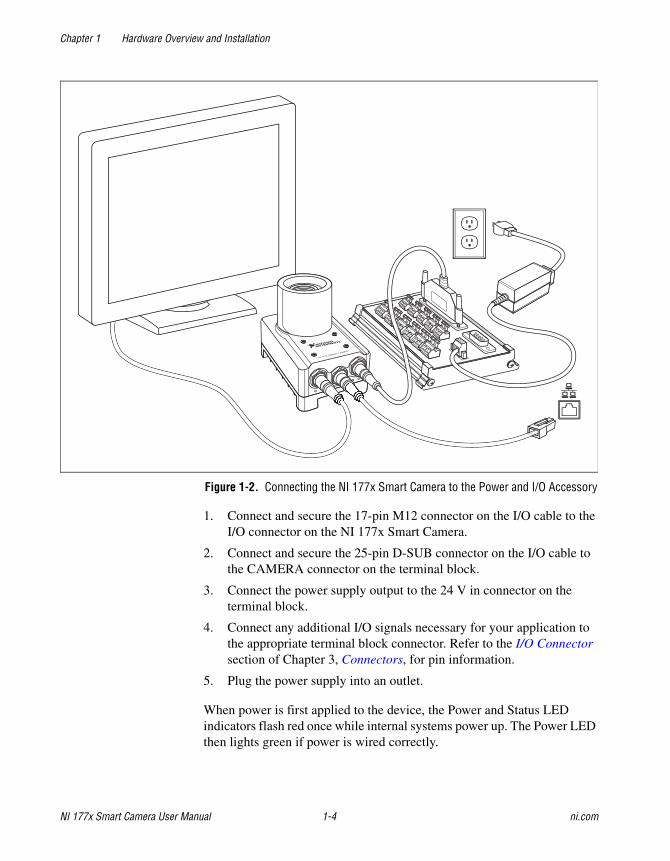
Figure 1-2. Connecting the NI 177x Smart Camera to the Power and I/O Accessory
1. Connect and secure the 17-pin M12 connector on the I/O cable to the I/O connector on the NI 177x Smart Camera.
2. Connect and secure the 25-pin D-SUB connector on the I/O cable to the CAMERA connector on the terminal block.
3. Connect the power supply output to the 24 V in connector on the terminal block.
4. Connect any additional I/O signals necessary for your application to the appropriate terminal block connector. Refer to the I/O Connector section of Chapter 3, Connectors, for pin information.
5. Plug the power supply into an outlet.
When power is first applied to the device, the Power and Status LED indicators flash red once while internal systems power up. The Power LED then lights green if power is wired correctly.

Chapter 1 Hardware Overview and Installation
© National Instruments Corporation 1-5 NI 177x Smart Camera User Manual
Connect to the Development ComputerThe NI 177x Smart Camera can connect to the development computer directly or through a network. To configure the NI 177x Smart Camera through a network, the NI 177x Smart Camera and the development computer must be connected to the same subnet.
Caution To prevent data loss and to maintain the integrity of your Ethernet installation, do not use a cable longer than 100 m. National Instruments recommends using a shielded twisted pair cable for maximum signal integrity.
Direct ConnectionTo connect the NI 177x Smart Camera directly to the development computer, complete the following steps.
1. Connect the 8-pin female M12 connector to the 100/1G connector on the NI 177x Smart Camera.
2. Connect the Ethernet connector to an Ethernet port on the development computer.
The NI 177x Smart Camera is now connected directly to the development computer.
Network ConnectionTo connect the NI 177x Smart Camera to the development computer through a network, complete the following steps.
1. Verify that the development computer is connected to the network and powered on.
2. Connect the 8-pin female M12 connector to the 100/1G connector on the NI 177x Smart Camera.
3. Connect the Ethernet connector to an Ethernet port.
The NI 177x Smart Camera is now connected through a network and is available for additional configuration with the development computer.
Chapter 1 Hardware Overview and Installation
NI 177x Smart Camera User Manual 1-6 ni.com
Subnet ConsiderationsTo use the NI 177x Smart Camera on a subnet other than the one on which the development computer resides, first connect and configure the NI 177x Smart Camera on the same subnet as the development computer. Next, physically move the NI 177x Smart Camera. Contact your network administrator for assistance in determining which network ports reside on the same subnet.
IP Address AssignmentIf the NI 177x Smart Camera is connected directly to the development computer, the device will use a link-local IP address. If the NI 177x Smart Camera is connected to a network that has a DHCP server, the device will automatically obtain an IP address. You can also configure the NI 177x Smart Camera to use a static IP address. If you cannot locate the NI 177x Smart Camera on the network, first refer to the Firewall Configuration section, then assign a static IP address or contact your network administrator.
Note If the NI 177x Smart Camera IP address is 169.254.x.x, the device is only accessible from the local subnet. To access the smart camera from a remote subnet, configure the smart camera to obtain an IP address from a DHCP server or manually assign a static IP address.
DHCP IP AddressesUsing a DHCP server to assign an IP address has the following advantages:
• The DHCP server manages the IP addresses of the network. You do not need to know the IP address of the NI 177x Smart Camera.
• The DHCP server does not allow other devices to use the IP address that is already assigned to your NI 177x Smart Camera.
Although using a DHCP server simplifies IP address configuration, using a static IP address can be more reliable. Consider the following potential issues before using a DHCP server to assign an IP address to the NI 177x Smart Camera:
• If the network has both static IP addresses and IP addresses managed by a DHCP server, the DHCP server must be configured to not use reserved static IP addresses. If the DHCP server is not configured this way, the DHCP server can assign a reserved IP address to another device, causing address conflicts on the network, which results in some devices being unreachable.

Chapter 1 Hardware Overview and Installation
© National Instruments Corporation 1-7 NI 177x Smart Camera User Manual
When a NI 177x Smart Camera configured for DHCP starts, it must be able to connect to the DHCP server. If the NI 177x Smart Camera cannot connect to the DHCP server and is not connected to the same subnet as the development computer, it does not appear in MAX or Vision Builder AI.
Note A NI 177x Smart Camera connected directly to the development computer or to the same subnet as the development computer is always configurable from MAX or Vision Builder AI, regardless of the IP address settings.
Firewall ConfigurationIf you are having difficulty detecting the NI 177x Smart Camera on your network, you must configure the firewall to open the TCP/UDP ports used by the NI 177x Smart Camera and the host machine. The required ports are listed in Table 1-2.
If your firewall is controlled remotely or you are unsure about configuring the firewall, contact your network administrator.
Table 1-2. TCP/UDP Ports Used by the NI 177x Smart Camera
Port Type Details
3580 TCP/UDP Reserved as nati-svrloc (NAT-ServiceLocator). Used by Measurement & Automation Explorer (MAX) to locate remote targets.
7749 TCP Used for remote image display (not reserved).
7750 TCP Used for NI-IMAQdx remote configuration (not reserved).
3363 TCP/UDP Reserved as nati-vi-server (NATI VI Server). Used by Vision Builder for Automated Inspection to configure a remote NI Smart Camera.

© National Instruments Corporation 2-1 NI 177x Smart Camera User Manual
2Software Overview
National Instruments provides two options for developing applications for the NI 177x Smart Camera.
Note Vision Builder for Automated Inspection and NI Vision Acquisition Software are included with the NI 177x Smart Camera. LabVIEW, the LabVIEW Real-Time Module, and the NI Vision Development Module are sold separately.
The following sections describe the installation and configuration process for each development environment:
• Refer to Configuring the NI Smart Camera with Vision Builder AI for information about using the NI 177x Smart Camera with Vision Builder AI.
• Refer to Configuring the NI Smart Camera with LabVIEW for information about using the NI 177x Smart Camera with LabVIEW.
The installation and configuration process for each development environment is different. Complete only the instructions for your chosen development environment.
Caution National Instruments software may require you to update the firmware for this device. Do not remove power from the device until the software indicates that the firmware update is complete. Removing power during a firmware update could cause your device to become unusable.
Vision Builderfor
Automated Inspection
LabVIEWLabVIEW Real-Time Module
NI Vision Development ModuleNI Vision Acquisition Software
or
Chapter 2 Software Overview
NI 177x Smart Camera User Manual 2-2 ni.com
Configuring the NI Smart Camera with Vision Builder AIVision Builder AI is interactive, menu-driven configuration software for developing, benchmarking, and deploying machine vision applications. With Vision Builder AI, you can perform powerful visual inspection tasks and make decisions based on the results of individual tasks. You can also migrate your inspection to LabVIEW to extend the capabilities of your application, if necessary. The latest version of Vision Builder AI is included with the NI 177x Smart Camera.
Complete the following steps to install Vision Builder AI and configure the NI 177x Smart Camera.
1. Install and activate Vision Builder AI on the development computer. Refer to the NI Vision Builder for Automated Inspection Readme for installation instructions.
2. Launch Vision Builder AI.
3. On the Vision Builder AI welcome screen, select the NI 177x Smart Camera in the list of targets.
If the NI 177x Smart Camera does not appear in the list of targets, verify that the device has power and is connected to an Ethernet port on the same subnet as the development computer, then click Refresh Target List. Refer to Chapter 7, LED Indicators for information about LED status messages.
4. Click Install Software. The Remote Target Configuration Wizard launches in a new window.
5. In the Name field, enter a name for the device. Use the Description field to enter any additional information or a brief description of the device.
Device names are limited to 31 characters with no spaces or special characters, except hyphens. The first and last characters must be alphanumeric.
6. Click Next.
Configure the IP AddressComplete the following steps to configure IP address settings for the NI 177x Smart Camera in the The Remote Target Configuration Wizard.
1. If the network is configured to issue IP addresses using DHCP, select Obtain IP address from DHCP server. Otherwise, configure the IP address manually by selecting Edit the IP settings and clicking Suggest Values.

Chapter 2 Software Overview
© National Instruments Corporation 2-3 NI 177x Smart Camera User Manual
2. If you want to prevent other users from configuring the device, select Enable Password and click Set Password to set up password protection.
3. Click Next.
Install Software on the NI Smart CameraComplete the following steps to install software from the development computer to the NI 177x Smart Camera.
1. In the Remote Target Configuration Wizard, enable the Update Target Software checkbox.
2. Click the Browse button next to the Software Image to Install on the Target control.
3. Navigate to the Vision Builder AI software image you want to use, and click OK. Software images provided by National Instruments are installed to the <Vision Builder AI>\RT Images directory, where <Vision Builder AI> is the location where Vision Builder AI is installed.
4. Click OK to apply the IP configuration settings and download software to the device.
5. Click OK to close the Remote Target Configuration Successful dialog box.
Acquire an Image with Vision Builder AIComplete the following steps to acquire an image using Vision Builder AI.
1. On the Vision Builder AI welcome screen, select the NI 177x Smart Camera in the list of targets.
2. Click Acquire Image (Smart Camera) Example. The image acquisition example opens in the Vision Builder AI Configuration Interface.
3. Click the Run Inspection Once button to acquire a single image.
4. In the State Configuration Window, select the Acquire Image (Smart Camera) step.
5. Click the Edit Step button. The property page for the step opens.
6. Use the controls on the Main, Color, Trigger, Lighting, or Advanced tabs to configure additional settings for your application.
7. Click OK to save the step configuration.

Chapter 2 Software Overview
NI 177x Smart Camera User Manual 2-4 ni.com
The NI 177x Smart Camera is now configured and acquiring images. Use Vision Builder AI to add and configure additional inspection steps to create your application. Refer to the Related Documentation section in the introduction to this manual for a list of documentation and other resources to help you set up and use the NI 177x Smart Camera in an application.
Configuring the NI Smart Camera with LabVIEWLabVIEW is a graphical programming environment for developing flexible and scalable applications. The following add-on modules are required for developing machine vision applications:
• LabVIEW Real-Time Module—Programming library for developing distributed, deterministic applications.
• NI Vision Development Module—Programming library for developing machine vision and scientific imaging applications.
• NI Vision Acquisition Software—Includes Measurement & Automation Explorer (MAX), the National Instruments configuration utility, and NI-IMAQdx driver software for acquiring images and controlling I/O using the NI 177x Smart Camera. The latest version of NI Vision Acquisition software is included with the NI 177x Smart Camera.
Install the software in the following order:
1. LabVIEW—Refer to the LabVIEW Release Notes for installation instructions for LabVIEW and system requirements for the LabVIEW software. Refer to the LabVIEW Upgrade Notes for additional information about upgrading to the most recent version of LabVIEW.
Documentation for LabVIEW is available by selecting Start»All Programs»National Instruments»LabVIEW»LabVIEW Manuals.
2. LabVIEW Real-Time Module—Refer to the LabVIEW Real-Time Module Release and Upgrade Notes for installation instructions and information about getting started with the LabVIEW Real-Time Module.
Documentation for the LabVIEW Real-Time Module is available by selecting Start»All Programs»National Instruments»LabVIEW»LabVIEW Manuals.
3. NI-IMAQdx—Refer to the NI Vision Acquisition Software Release Notes on the NI Vision Acquisition Software installation media for system requirements and installation instructions for the NI-IMAQdx driver.

Chapter 2 Software Overview
© National Instruments Corporation 2-5 NI 177x Smart Camera User Manual
Documentation for the NI-IMAQdx driver software is available by selecting Start»All Programs»National Instruments»Vision»Documentation»NI-IMAQdx.
4. NI Vision Development Module—Refer to the NI Vision Development Module Readme on the NI Vision Development Module installation media for system requirements and installation instructions.
Documentation for the NI Vision Development Module is available by selecting Start»All Programs»National Instruments»Vision»Documentation»NI Vision.
Configure the IP AddressComplete the following steps to configure IP address settings for the NI 177x Smart Camera in MAX:
1. Launch MAX by double-clicking the Measurement & Automation icon on the desktop, or selecting Start»All Programs»National Instruments»Measurement & Automation.
2. Expand the Remote Systems branch of the configuration tree, and select the device you want to configure. To uniquely identify multiple unconfigured devices, connect and configure one device at a time.
If the NI 177x Smart Camera does not appear in the list of targets, verify that the device has power and is connected to an Ethernet port on the same subnet as the development computer. Refer to Chapter 7, LED Indicators for information about LED status messages.
3. In the Name field, enter a name for the device. Use the Comment field to enter any additional information or a brief description of the device.
4. Device names are limited to 31 characters with no spaces or special characters, except hyphens. The first and last characters must be alphanumeric.
5. Verify the IP address configuration.
• If the network is configured to issue IP addresses using DHCP, select Obtain IP address from DHCP server.
• Otherwise, configure the IP address manually. Select Edit the IP settings, click Suggest Values, and click OK.
Note If the IP address is 169.254.x.x or 0.0.0.0, the device is only accessible from the local subnet. To access the device from a remote subnet, configure the device to obtain an IP address from a DHCP server or manually assign a static IP address.

Chapter 2 Software Overview
NI 177x Smart Camera User Manual 2-6 ni.com
6. If you want to prevent other users from resetting the NI 177x Smart Camera, click the Lock button on the MAX toolbar to set up password protection. To require users to enter the password before restarting the device, enable the Password-protect Resets checkbox.
7. Click Apply on the MAX toolbar.
8. When prompted, click Yes to restart the NI 177x Smart Camera. The initialization process may take several minutes.
Install Software on the NI Smart CameraComplete the following steps to install software from the development computer to the NI 177x Smart Camera.
1. In the Remote Systems branch of the MAX configuration tree, expand the folder for your device and select Software.
2. Click Add/Remove Software on the MAX toolbar to launch the LabVIEW Real-Time Software Wizard.
3. Select NI Vision RT and NI-IMAQdx RT. The software wizard will automatically select any other required software.
4. Click Next.
5. Verify your software installation choices, and click Next.
6. When the installation is complete, click Finish.
Acquire an ImageComplete the following steps to acquire an image using MAX.
1. In the Remote Systems branch of the MAX configuration tree, expand the folder for your device.
2. Click cam0:NI 177x, where 177x is replaced by the actual model number of your NI 177x Smart Camera.
3. Click Snap to acquire a single image, or click Grab to acquire continuous images. Click Grab again to stop a continuous acquisition.
4. Use the controls on the Sensor, Color, Triggering, Lighting, and Camera Attributes tabs to adjust the acquisition settings.
The NI Smart Camera is now configured and acquiring images. Use LabVIEW to create your application. Refer to the Related Documentation section in the introduction to this manual for a list of documentation and other resources to help you set up and use the NI 177x Smart Camera in an application.

© National Instruments Corporation II-1 NI 177x Smart Camera User Manual
Part II
NI 177x Smart Camera Technical Reference
This section provides the following information:
• Descriptions and pinout information for the M12 connectors
• Wiring diagrams and instructions for connecting the NI 177x Smart Camera to external devices
• Information about acquiring an image with the NI 177x Smart Camera
• Descriptions and blink code explanations for the LED indicators
• Information about mounting the NI 177x Smart Camera

© National Instruments Corporation 3-1 NI 177x Smart Camera User Manual
3Connectors
This chapter provides information about the NI 177x Smart Camera connectors, including pin numbers and signal names.
Figure 3-1 shows the NI 177x Smart Camera connectors.
Figure 3-1. NI 177x Smart Camera Connectors
The following table lists the connectors found on the NI 177x Smart Camera:
1 I/O Connector2 100/1G Connector
3 VGA/USB Connector
Table 3-1. NI 177x Smart Camera Connector Overview
Connector Name Connector Type Description
I/O connector 17-pin male M12 Power and I/O connection
100/1G connector 8-pin female M12 10/100/1000 Mb/s Ethernet connection
VGA/USB connector
12-pin male M12 Analog video and USB connection
I/O 100/1G
Power
Statu
sUse
r
VGA/USB
100/1G
1 2 3

Chapter 3 Connectors
NI 177x Smart Camera User Manual 3-2 ni.com
I/O ConnectorThe I/O connector is a 17-pin male M12 connector that provides power to the camera and transmits digital I/O signals.
Figure 3-2. I/O Connector
The I/O connector includes 4 open collector output connections, including 2 output connections which can be used as strobe signals. An open collector output is not capable of providing voltage to a connected device. Instead, power is provided by the connected device and is either grounded or not grounded by the open collector connection. Each connection is protected by a 100 mA fuse. The I/O connector also includes a controlled current output capable of providing current to a LED light.
The I/O connector includes 4 independent opto-coupled input connections, which share a common ground connection with the NI 177x Smart Camera. Each input can be configured to generate interrupts and reject signals that are shorter than a specified width. The I/O connector also includes an optically isolated trigger input.
1109
8
7
6
54 3
212
1314
1517
1611

Chapter 3 Connectors
© National Instruments Corporation 3-3 NI 177x Smart Camera User Manual
The following table lists pin numbers, signal names, and signal descriptions for the I/O connector.
Table 3-2. I/O Connector Signals
Pin Number Signal Name Function
17-Pin M12 Pigtail Cable Wire Color
1 RxD_RS232 RS-232 receive. Brown
2 OUT3 Open collector output signal 3. Blue
3 OUT1 Open collector output signal 1.
Provides an exposure signal, trigger signal bypass, or programmable unmodulated strobe signal generated using exposure timer 2.
White
4 SAFE_MODE Initializes the camera in safe mode. Safe mode is enabled when the signal is grounded.
Green
5 IN2+ Opto-coupled auxiliary input signal 2, positive.* Pink
6 IN1+ Opto-coupled auxiliary input signal 1, positive.* Yellow
7 TRIG_IN+ Opto-isolated trigger input signal, positive. Black
8 PWR Supplies power to the camera. Use the NI 177x Smart Camera only with a 12 W, 24 VDC ±10%, UL listed, limited power source (LPS) supply.
Gray
9 PWR Red
10 TxD_RS232 RS-232 transmit. Violet
11 OUT2 Open collector ouput signal 2. Gray/Pink
12 OUT0 Open collector ouput signal 0.
Provides an exposure signal generated using exposure timer 1 or trigger signal bypass.
Red/Blue
13 IN3+ Opto-coupled auxiliary input signal 3, positive.* White/Green
14 IN0+ Opto-coupled auxiliary input signal 0, positive.* Brown/Green
15 TRIG_IN– Opto-isolated trigger input signal, negative. White/Yellow
16 GND Power supply ground. Yellow/Brown
17 LED_DRV Controlled-current output, designed to be connected to a LED lighting device (0 to 500 mA, generated using exposure timer 2).
White/Gray
* The negative component of this signal is internally connected to the power supply GND.
Chapter 3 Connectors
NI 177x Smart Camera User Manual 3-4 ni.com
NI Smart Camera Power Requirements
Caution Use the NI 177x Smart Camera only with a 12 W, 24 VDC ±10%, UL listed, limited power source (LPS) supply. The power supply should bear the UL listed mark, LPS. The power supply must meet any safety and compliance requirements for the country of use.
The NI 177x Smart Camera uses a nominal 24 VDC power source. The device accepts power within the range of 24 V ±10% with an additional allowance for an AC peak of +5%. Refer to Appendix A, Specifications, for complete power requirement specifications.
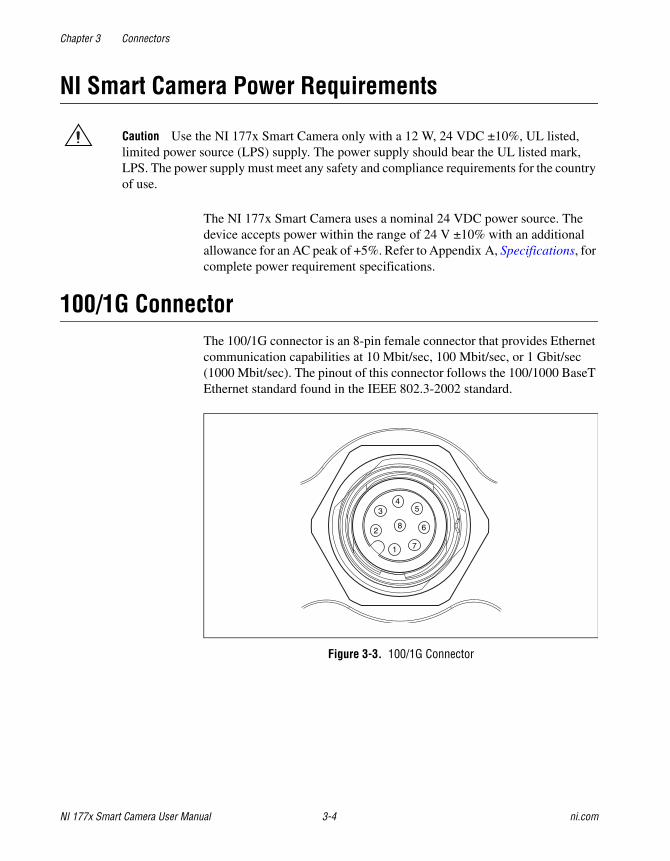
100/1G ConnectorThe 100/1G connector is an 8-pin female connector that provides Ethernet communication capabilities at 10 Mbit/sec, 100 Mbit/sec, or 1 Gbit/sec (1000 Mbit/sec). The pinout of this connector follows the 100/1000 BaseT Ethernet standard found in the IEEE 802.3-2002 standard.
Figure 3-3. 100/1G Connector
1
82
34
5
6
7

Chapter 3 Connectors
© National Instruments Corporation 3-5 NI 177x Smart Camera User Manual
The following table lists pin numbers, signal names, and signal descriptions for the 100/1G connector.
VGA/USB ConnectorThe VGA/USB connector is a 12-pin male connector that transmits RGB analog video output and USB signals.
Figure 3-4. VGA/USB Connector
Table 3-3. 100/1G Connector and Ethernet Connector Signals
100/1G Connector Pin NumberEthernet Connector
Pin Number
1 5
2 7
3 8
4 2
5 3
6 1
7 4
8 6
1110
12
234
5
6
78 9
1

Chapter 3 Connectors
NI 177x Smart Camera User Manual 3-6 ni.com
The following table lists pin numbers, signal names, and signal descriptions for the VGA/USB connector.
Table 3-4. VGA/USB Connector Signals and USB Connector Signals
12-Pn M12 Connector
Pin Number Signal Name FunctionUSB Connector
Pin Number
1 USB_PWR 5 V supplied from camera 1
2 USB_DATA+ USB data, positive 3
3 USB_DATA– USB data, negative 2
4 GND Ground 4/GND
Table 3-5. VGA/USB Connector Signals and 15-Pin DSUB Connector Signals
12-Pn M12 Connector
Pin Number Signal Name Function
15-Pin DSUB Connector
Pin Number
5 RED _VID_OUT Red component of the RGB video signal
1
6 BLUE _VID_OUT Blue component of the RGB video signal
3
7 VSYNC Vertical sync of the RGB video signal
14
8 HSYNC Horizontal synch of the RBG video signal
13
9 GREEN_VID_OUT Green component of the RGB video signal
2
10 GND Ground GND
11 GND Ground GND
12 GND Ground GND

© National Instruments Corporation 4-1 NI 177x Smart Camera User Manual
4Connecting Lighting and External Devices
This chapter provides information about connecting the NI 177x Smart Camera to external devices, including external lighting and triggering devices.
Connecting Lighting DevicesTo connect a light directly to the NI 177x Smart Camera, connect the LED_DRV signal to the positive terminal on the lighting device. Connect the ground of the NI 177x Smart Camera and the lighting device to a common ground.
The controlled current output sources current for a LED lighting device. You can control the amount of current by specifying a value between 0 and 500 mA, in 256 steps.
To configure a light, you can enter the lighting data manually in MAX or Vision Builder AI:
• MAX—Select the Lighting tab of the NI Smart Camera configuration page and click Configure Light. The light must be configured in MAX before you can use it in LabVIEW.
• Vision Builder AI—Select the Lighting tab of the Acquire Image (Smart Camera) step and click Configure Light.
Connecting a Light ControllerYou can connect a light controller to the NI 177x Smart Camera in order to control any connected lighting devices.
Caution The controlled current output is an unregulated output dependent on the range of the power supply provided to the device. If the power provided to the device is ±10% with +5% AC ripple, the controlled current output could be as high as 27.6 V. If the provided power exceeds the input voltage specifications of the third-party lighting controller, do not connect the controlled current output to the controller to prevent damage to the controller. Use a power supply with tolerances that meet the requirements of the controller.

Chapter 4 Connecting Lighting and External Devices
NI 177x Smart Camera User Manual 4-2 ni.com
To connect a lighting controller, connect the OUT1 signal to the digital input signal of the lighting controller. The OUT1 signal is an unmodulated signal that can turn the lighting controller on or off. Connect the ground of the NI 177x Smart Camera and the lighting controller to a common ground. Refer to Figure 4-1 and for wiring examples.
Note Each open collector output can sink up to 100 mA.
Figure 4-1. Connecting to an External Light Controller
OUT0
GND GND
Digital Input
Lighting controllerNI 177x Smart CameraI/O connector
Externalpull-up resistor
+
–
+24 V max
Powersupply
Light
Chapter 4 Connecting Lighting and External Devices
© National Instruments Corporation 4-3 NI 177x Smart Camera User Manual
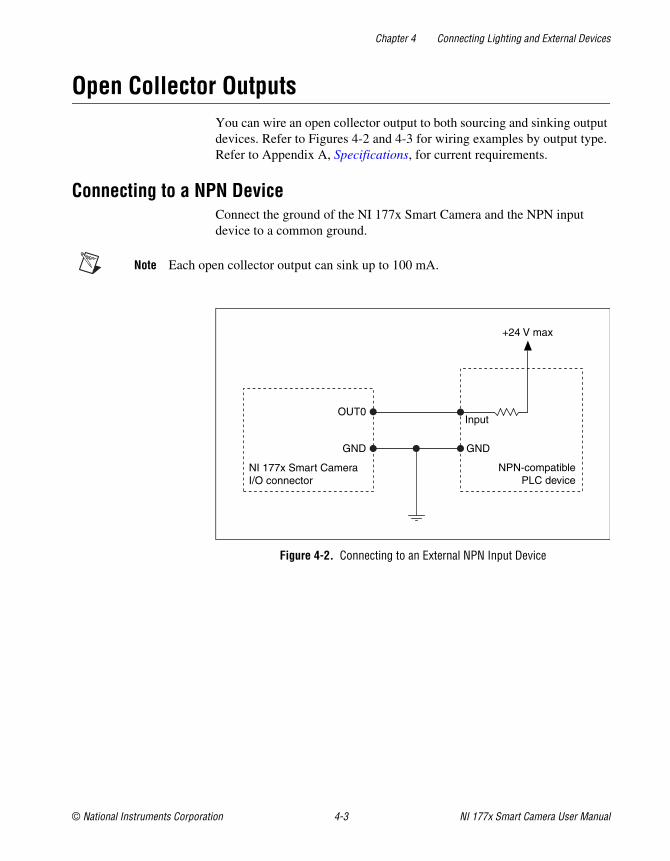
Open Collector OutputsYou can wire an open collector output to both sourcing and sinking output devices. Refer to Figures 4-2 and 4-3 for wiring examples by output type. Refer to Appendix A, Specifications, for current requirements.
Connecting to a NPN DeviceConnect the ground of the NI 177x Smart Camera and the NPN input device to a common ground.
Note Each open collector output can sink up to 100 mA.
Figure 4-2. Connecting to an External NPN Input Device
OUT0
GND GND
Input
NPN-compatiblePLC device
NI 177x Smart CameraI/O connector
+24 V max

Chapter 4 Connecting Lighting and External Devices
NI 177x Smart Camera User Manual 4-4 ni.com
Connecting to a PNP DeviceBecause a PNP input device requires a sourcing input, you must use an external pull-up resistor. Note that the resistor will invert the output signal so that the open collector output disables the PNP input device.
Connect the ground of the NI 177x Smart Camera and the PNP input device to a common ground.
Note Each open collector output can sink up to 100 mA.
Figure 4-3. Connecting to an External PNP Input Device
Protecting Against Inductive LoadsWhen an inductive load, such as a relay or solenoid, is connected to an output, energy stored in the inductor may cause a voltage spike when power is removed. This flyback voltage can damage the outputs and the power supply.
The Power & I/O Accessory for NI 177x Smart Cameras (781993-01) includes integrated flyback diodes so that no additional wiring is required.
If you are not using the Power & I/O Accessory for NI 177x Smart Cameras, you must install a flyback diode to limit flyback voltages at the inductive load. Mount the flyback diode as close to the load as possible.
OUT0
GND GND
Input
PNP-compatiblePLC device
NI 177x Smart CameraI/O connector
+V
Externalpull-up resistor
+24 V max

Chapter 4 Connecting Lighting and External Devices
© National Instruments Corporation 4-5 NI 177x Smart Camera User Manual
Use this protection method if you connect any of the open collector outputs directly to an inductive load.
Connect the NI 177x Smart Camera output and the negative side of the load to the diode anode and connect the positive side of the load to a +24 V power supply and the diode cathode, as illustrated in Figure 4-4.
Connect the ground of the NI 177x Smart Camera and the inductive load device to a common ground.
Note Each open collector output can sink up to 100 mA.
Figure 4-4. Connecting to an External Inductive Load Device
OUT0
GND GND
Sinking input
PNP-compatiblePLC device
NI 177x Smart CameraI/O connector
Externaldiode
+24 V max

Chapter 4 Connecting Lighting and External Devices
NI 177x Smart Camera User Manual 4-6 ni.com
Connecting to a Triggering DeviceTo connect to an external triggering device, connect the ground of the NI 177x Smart Camera to the ground of the triggering device. Connect the triggering device output to the NI 177x Smart Camera TRIG_IN+ input.
Figure 4-5. Connecting to an External Triggering Device
To wire a NI 177x Smart Camera output directly to the TRIG_IN+ input, you must add a pull up resistor to +24 V as illustrated in Figure 4-6. National Instruments recommends a 3 K-ohm, 1/4 W resistor. Wire the TRIG_IN– input to GND.
Figure 4-6. Connecting to an External Triggering Device
TRIG_IN+
TRIG_IN– GND
Trigger out
Trigger generatorNI 177x Smart CameraI/O connector
+24 V max
TRIG_IN+
TRIG_IN–
+24 V max
NI 177x Smart Camera I/O connector
Externalpull-up resistor
OUT0

Chapter 4 Connecting Lighting and External Devices
© National Instruments Corporation 4-7 NI 177x Smart Camera User Manual
The Power & I/O Accessory for NI 177x Smart Cameras includes a +24 V output so that no additional wiring is required.
Connecting to Serial DevicesUse the RxD_RS232 and TxD_RS232 signals on the I/O connector for serial communication. Connect the RxD_RS232 signal on the NI 177x Smart Camera to the Tx signal on your serial device. Connect the TxD_RS232 signal on the NI 177x Smart Camera to the Rx signal on your serial device. Connect COM on the NI 177x Smart Camera to the ground of your serial device.
You must install the NI-Serial software on the NI 177x Smart Camera; it is not installed by default. Refer to the Serial Hardware and Software Help for information about installing the NI-Serial software on LabVIEW Real-Time targets, such as the NI 177x Smart Camera. To open this document, navigate to Start»All Programs»National Instruments»NI-Serial»NI-Serial Help.

© National Instruments Corporation 5-1 NI 177x Smart Camera User Manual
5Image Sensor
This chapter provides an overview of the NI 177x Smart Camera image sensors, field of view, spectral response, and imaging settings. NI 177x Smart Cameras are available with the following image sensor configurations.
Refer to Appendix A, Specifications, for information about each image sensor.
Field of ViewThe field of view is the area under inspection that will be imaged by the NI 177x Smart Camera. It is critical to ensure that the field of view of your system includes the object you want to inspect.
Table 5-1. NI 177x Smart Camera Models
Model ResolutionColor
Support
NI 1772 640 × 480 pixels (VGA) No
NI 1774 1,280 × 960 pixels (SXGA) No
NI 1776 1,600 × 1,200 pixels (UXGA) No
NI 1778 2,448 × 2,050 pixels (5 MP) No
NI 1772C 640 × 480 pixels (VGA) Yes
NI 1774C 1,280 × 960 pixels (SXGA) Yes
NI 1776C 1,600 × 1,200 pixels (UXGA) Yes

Chapter 5 Image Sensor
NI 177x Smart Camera User Manual 5-2 ni.com
To calculate the horizontal and vertical field of view (FOV) of your imaging system, use Equation 5-1 and the specifications for the image sensor of your device, as listed in Appendix A, Specifications.
(5-1)
where FOV is the field of view in either the horizontal or vertical direction,
Pixel Pitch measures the distance between the centers of adjacent pixels in either the horizontal or vertical direction1,
Active Pixels is the number of pixels in either the horizontal or vertical direction,
Working Distance is the distance from the front element (external glass) of the lens to the object under inspection, and
Focal Length measures how strongly a lens converges (focuses) or diverges (diffuses) light.
Figure 5-1 illustrates horizontal field of view and working distance.
Figure 5-1. Parameters of an Imaging System
1 Because NI 177x Smart Camera sensors have square pixels, pixel pitch corresponds to the pixel size for the appropriate sensor.
1 Horizontal Imaging Width2 Working Distance
3 Horizontal Field of View
FOV Pixel Pitch Active Pixels× Working Distance×Focal Length
-----------------------------------------------------------------------------------------------------------------=
2
1
3

Chapter 5 Image Sensor
© National Instruments Corporation 5-3 NI 177x Smart Camera User Manual
For example, if the working distance of your imaging setup is 100 mm, and the focal length of the lens is 8 mm, then the field of view in the horizontal direction of a NI 177x Smart Camera using the VGA sensor is
(5-2)
Similarly, the field of view in the vertical direction is
(5-3)
Based on the result of Equations 5-2 or 5-3, you can see that you might need to adjust the various parameters in the FOV equation until you achieve the right combination of components that match your inspection needs. This might include increasing your working distance, choosing a lens with a shorter focal length, or changing to a high resolution camera.
Image Sensor Spectral ResponseThe spectral response curve describes the relative sensitivity of the sensor to different wavelengths of light. If you are imaging a dim scene, this information can be useful when selecting a light source to use in your application as the camera is most sensitive at its peak responsiveness. It also helps determine if your application might require filters to remove undesired wavelengths of light from the scene.
Refer to Appendix A, Specifications, to find the normalized spectral response curves for each image sensor.
GainGain is a multiplier applied to the analog signal prior to digitization. Increasing the gain increases the amplitude of the signal. Gain allows you to trade off between making smaller signals more visible at the cost of increased noise and no longer being able to differentiate between larger signals. For most applications, the NI 177x Smart Camera default gain setting optimizes the balance between small signals and large signals.
FOVhorizontal0.0074 mm 640× 100 mm×
8 mm--------------------------------------------------------------------- 59.2 mm= =
FOVvertical0.0074 mm 480× 100 mm×
8 mm--------------------------------------------------------------------- 44.4 mm= =
Chapter 5 Image Sensor
NI 177x Smart Camera User Manual 5-4 ni.com
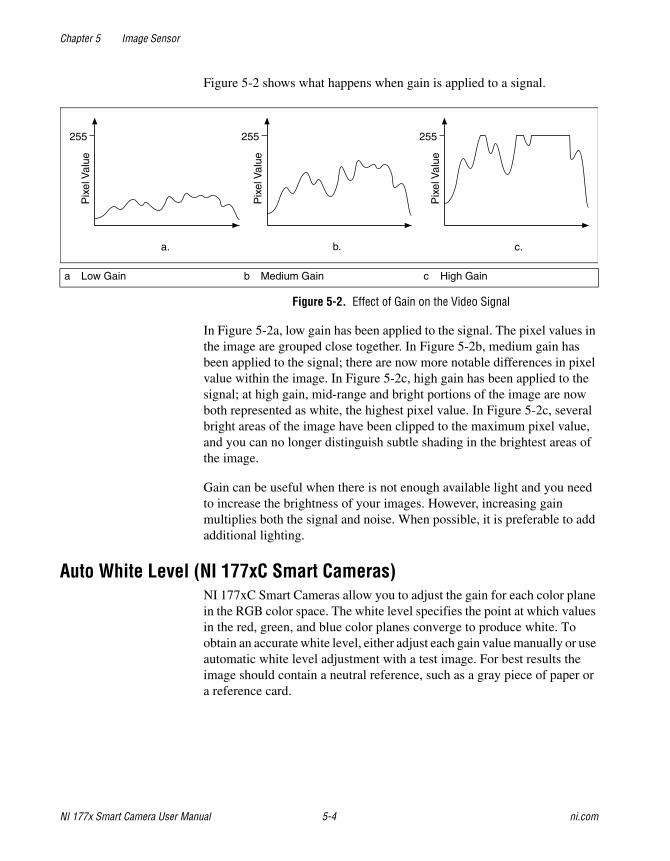
Figure 5-2 shows what happens when gain is applied to a signal.
Figure 5-2. Effect of Gain on the Video Signal
In Figure 5-2a, low gain has been applied to the signal. The pixel values in the image are grouped close together. In Figure 5-2b, medium gain has been applied to the signal; there are now more notable differences in pixel value within the image. In Figure 5-2c, high gain has been applied to the signal; at high gain, mid-range and bright portions of the image are now both represented as white, the highest pixel value. In Figure 5-2c, several bright areas of the image have been clipped to the maximum pixel value, and you can no longer distinguish subtle shading in the brightest areas of the image.
Gain can be useful when there is not enough available light and you need to increase the brightness of your images. However, increasing gain multiplies both the signal and noise. When possible, it is preferable to add additional lighting.
Auto White Level (NI 177xC Smart Cameras)NI 177xC Smart Cameras allow you to adjust the gain for each color plane in the RGB color space. The white level specifies the point at which values in the red, green, and blue color planes converge to produce white. To obtain an accurate white level, either adjust each gain value manually or use automatic white level adjustment with a test image. For best results the image should contain a neutral reference, such as a gray piece of paper or a reference card.
a Low Gain b Medium Gain c High Gain
255
Pix
el V
alue
255
Pix
el V
alue
255
Pix
el V
alue
a. b. c.

Chapter 5 Image Sensor
© National Instruments Corporation 5-5 NI 177x Smart Camera User Manual
There are multiple ways to adjust gain values or enable automatic white balance adjustment:
• MAX—Use the settings on the Color tab of the device configuration page to adjust gain levels or enable automatic white level adjustment.
• Vision Builder AI—Use the settings on the Color tab of the Acquire Image (Smart Camera) step to adjust gain levels or enable automatic white level adjustment.
Black Level (NI 177xC Smart Cameras)The black level specifies the image brightness. Set the black level to the pixel value which corresponds to true black. If the black level is innacurate, near-black pixels may be displayed as black or black objects may appear gray in the output image.
There are multiple ways to adjust gain values or enable automatic white balance adjustment:
• MAX—Use the settings on the Camera Attributes tab of the device configuration page.
• Vision Builder AI—Use the settings on the Advanced tab of the Acquire Image (Smart Camera) step.
Look-Up TableA look-up table (LUT) transformation maps pixel values in the source image into other values in the transformed image. For example, you can use a LUT transformation to improve the contrast and brightness of an image.
Note NI 177xC Smart Cameras allow you to define a LUT for each color plane in the RGB color space.
To enable a LUT in MAX, use the LUT Controls on the Camera Attributes tab of the device configuration page.
Refer to the NI Vision for LabVIEW Basics Help for information about a using a LUT transformation to improve images in LabVIEW. To open this document, navigate to Start»All Programs»National Instruments»Vision»Documentation»NI Vision.
Note Vision Builder AI does not support LUT editing for NI 177x Smart Cameras.

Chapter 5 Image Sensor
NI 177x Smart Camera User Manual 5-6 ni.com
MaintenanceDo not touch the CCD sensor by hand or with other objects. The sensor can be damaged by electrostatic discharge (ESD), body oils, and particulate matter.
Use a lens mount cover whenever a lens is not mounted on the camera to protect the sensor from dust and dirt.
Avoid drastic temperature changes to prevent dew condensation.
When necessary, use the following procedure to clean the sensor at a workstation equipped with anti-ESD facilities. If dust sticks to the CCD, first attempt to blow it off from the side of the sensor using ionized air. If oils are present on the sensor, clean the sensor with a cotton bud and ethyl alcohol. Be careful not to scratch the glass. Use only one pass over the glass per cotton bud to minimize the risk of recontamination and scratching.

© National Instruments Corporation 6-1 NI 177x Smart Camera User Manual
6Image Acquisition
This chapter contains information about acquiring images with the NI 177x Smart Camera and explains the relationships between triggering, lighting, and exposure.
ExposureThe NI 177x Smart Camera provides control of the image sensor exposure time through software. The exposure time is the amount of time that light is allowed to strike the sensor to produce an image. When light strikes the surface of the sensor, it dislodges electrons. As more light strikes the sensor, more electrons are freed, creating a charge on the sensor.
For a given amount of light, the sensor collects more charge during a longer exposure time than a shorter exposure time. Because the charge is what is read out to produce the image, it is important to have an optimal amount of light and exposure time for your application.
Exposing the image sensor for too short of a time relative to the amount of light in the environment results in a dark, low contrast image. Exposing the image sensor for too long of a time relative to the amount of light in the environment results in a bright, low contrast image. When the image sensor is exposed for an appropriate amount of time relative to the light in the environment, acquired images will exhibit appropriate contrast to easily distinguish both dark and light features. Contrast is a key factor in obtaining good results from image processing algorithms.
In applications where the object under inspection is moving, the exposure time must be carefully considered. If the object moves significantly during the exposure, the resulting image is blurry and unsuitable for processing.
The maximum exposure time for imaging a moving object without blurring depends on the per pixel spatial resolution and the rate of motion of the object. The per pixel spatial resolution is the field of view, calculated in the Field of View section of Chapter 5, Image Sensor, divided by the number of pixels in the sensor. Together, this information can be used to calculate the maximum exposure. Assuming the object is moving

Chapter 6 Image Acquisition
NI 177x Smart Camera User Manual 6-2 ni.com
horizontally across the field of view, use Equation 6-1 to calculate the maximum exposure time.
(6-1)
where Emax is the maximum exposure time without blurring,
R is the rate of motion of the object either horizontally or vertically,
FOV is the field of view in the direction of motion, and
N is the number of sensor pixels in the direction of motion
For many applications that include moving objects, additional lighting is necessary to achieve good image contrast due to the short exposure time required to avoid motion blur.
Additionally, in many environments, the ambient light conditions vary too significantly to obtain consistent results without adding dedicated lighting. For example, in a building with windows, the ambient light can vary significantly with weather. Also, standard fluorescent lighting flickers at a rate that is perceivable by the NI 177x Smart Camera. In these situations, the ambient light must be overridden with a dedicated light source to ensure reproducible results.
Acquiring ImagesYou can configure the NI 177x Smart Camera to acquire images based on internal timing or an external trigger signal. In both cases, the NI 177x Smart Camera can acquire images at the camera’s maximum frame rate. Refer to the Maximum Frame Rate section for information about factors that affect the maximum frame rate.
Internal TimingThe NI 177x Smart Camera features two types of internally-timed modes: free-run mode and fixed-frame-rate mode.
In free-run mode, the device acquires images at the maximum frame rate allowed by the configuration.
In fixed-frame-rate mode, you can specify a frame rate that is less than or equal to the maximum frame rate.
EmaxRHorizontal 2×
FOVHorizontal( ) NHorizontal( )⁄------------------------------------------------------------------------=

Chapter 6 Image Acquisition
© National Instruments Corporation 6-3 NI 177x Smart Camera User Manual
External TriggerUse the trigger input to synchronize the NI 177x Smart Camera with an external event, such as the assertion of a signal generated by a proximity sensor. You can trigger the NI 177x Smart Camera at rates up to the maximum frame rate. Refer to the Maximum Frame Rate section for information about factors that affect the maximum frame rate.
To use an external trigger, the trigger signal must be provided on the TRIG_IN+ and TRIG_IN– inputs to the camera and triggering must be enabled in the software. Refer to the Connecting to a Triggering Device section of Chapter 4, Connecting Lighting and External Devices, for information about connecting external signals.
You can enable triggering in the following software programs:
• Vision Builder AI—Select the Enable Trigger checkbox on the Trigger tab of the Acquire Image (Smart Camera) step.
• LabVIEW—Set the value of the TriggerSource attribute to External Trigger and set the value of the TriggerMode attribute to On.
• MAX—Select the Enable Trigger checkbox on the Triggering tab of the device configuration page.
Figure 6-1 illustrates the relationship between an external trigger, a lighting strobe, and the exposure time.
Figure 6-1. Externally Triggered Mode
1 User-Configurable Trigger Delay2 Lighting Turn-On Time
3 Beginning of Image Readout
Trigger
Lighting Strobe
Exposure
Image Readout
32
1

Chapter 6 Image Acquisition
NI 177x Smart Camera User Manual 6-4 ni.com
The trigger shown in Figure 6-1 represents an external trigger, configured to use the rising edge as the active edge. The time between the active edge of the trigger and the assertion of the lighting strobe is a user-configurable trigger delay. The trigger delay can be configured in either milliseconds or edge counts.
The amount of time required from the assertion of a trigger to the start of the light strobe and image exposure varies by application. For example, if a sensor that detects the presence of a part is positioned before the NI 177x Smart Camera on a conveyor belt, a trigger delay is required to ensure that the image is not exposed until the part to be inspected passes in front of the NI 177x Smart Camera. In this case, specifying the trigger delay in terms of edge counts allows the NI 177x Smart Camera to expose the image when the part is in position regardless of changes in conveyor belt speed. For other applications, a delay specified in milliseconds is sufficient.
If you are strobing a light, there is a delay of 500 μs while the lighting controller turns on the light.
After the lighting turn-on time, the exposure begins. The width of the exposure pulse determines how long the sensor is exposed. The exposure time can be adjusted by setting the Exposure Time control in Vision Builder AI, setting the ExposureTime attribute in LabVIEW, or by setting the Exposure Time control in MAX. The lighting strobe deasserts at the end of the exposure pulse. The end of an exposure starts the image readout from the sensor.
The maximum trigger rate is determined by the maximum frame rate for your configuration. Refer to the Maximum Frame Rate section for information about the factors that affect the maximum frame rate.

Chapter 6 Image Acquisition
© National Instruments Corporation 6-5 NI 177x Smart Camera User Manual
Maximum Frame RateFrame rate is the inverse of the frame period. The frame period is the time from the start of exposure on one frame to the start of exposure on the next frame, as shown in Figure 6-2.
Figure 6-2. Frame Period
The frame period is affected by the following factors:
• Exposure time, as described in the Exposure section of this chapter
• Trigger delay, as described in the External Trigger section of this chapter
Determining the Maximum Frame RateYou can determine the maximum frame rate for your configuration in software by reading the Max Frame Rate indicator in Vision Builder AI, reading the AcquisitionFrameRateLimit attribute in LabVIEW, or reading the Max Frame Rate indicator in MAX.
When external triggering is enabled, do not trigger faster than the maximum frame rate. If a trigger occurs faster than the maximum frame rate, the camera exhibits the following behavior. If an incoming trigger is received during exposure, the incoming trigger is ignored. If an incoming trigger is received during readout, the trigger is delayed until readout concludes.
1 Frame Period
Trigger
Exposure
Image Readout
1

Chapter 6 Image Acquisition
NI 177x Smart Camera User Manual 6-6 ni.com
Use Equation 6-2 to understand how software determines the maximum frame rate:
(6-2)
where min frame period is the minimum amount of time for the strobe and trigger mode, as described in the Calculating the Minimum Frame Period section.
Determining the Exposure TimeThe minimum frame period depends on exposure time, lighting mode, and trigger delay.
A longer exposure time results in a longer frame period, and a slower maximum frame rate.
Determining the Trigger DelayIf the trigger delay is set longer than the untriggered minimum frame period, the trigger delay value further limits the min frame period. When the trigger delay is specified in milliseconds, the software includes this in the calculation of the maximum frame rate indicator.
Calculating the Minimum Frame PeriodRefer to Equations 6-3 and 6-4 to calculate the minimum frame period for untriggered acquisitions with and without strobing.
(6-3)
(6-4)
Refer to Equations 6-5 and 6-6 to calculate the minimum frame period for triggered acquisitions with and without strobing.
(6-5)
(6-6)
where T is the trigger synchronization variability,
L is the lighting turn-on time,
E is the exposure time, and
R is the image readout duration.
max frame rate 1min frame period -------------------------------------------=
min frame periodNoStrobeNoTrigger T L E+ +=
min frame periodWithStrobeNoTrigger T L E R+ + +=
min frame periodNoStrobeWithTrigger max T L E+ + Trigger Delay,( )=
min frame periodWithStrobeWithTrigger max T L E R+ + + Trigger Delay,( )=

© National Instruments Corporation 7-1 NI 177x Smart Camera User Manual
7LED Indicators
This chapter provides information about the location and functionality of the LED indicators on the NI 177x Smart Camera.
Understanding the LED IndicatorsThe NI 177x Smart Camera includes four multicolor indicators. The following figure illustrates the location of the LED indicators:
Figure 7-1. NI 177x Smart Camera LED Indicators
1 LED Indicators
I/O 100/1G
Power
Statu
sUse
r
VGA/USB
100/1G
1

Chapter 7 LED Indicators
NI 177x Smart Camera User Manual 7-2 ni.com
Device InitializationWhile the NI 177x Smart Camera initializes, the Power and Status LED indicators exhibit behavior described in the following table:
If both the Power and Status indicators continuously display solid red, your device has experienced a critical error and you should contact NI support.
Power IndicatorThe Power indicator provides information about the power supply. The Power indicator is green while the camera is properly powered on. When no power is being supplied to the NI Smart Camera, the Power indicator is unlit. When power is first applied to the device, the Power indicator flashes red for one second while internal systems power up. If the Power indicator stays red for longer than one second, it indicates that the voltage is out of range.
Status IndicatorThe Status indicator provides information about the status of the camera. The following table describes the behavior of the Status indicator:
Table 7-1. LED Indicator Behavior during Device Initialization
Indicator Name LED Behavior
Power Red for 0.5 seconds then solid green
Status Red for 0.5 seconds then off
Table 7-2. Status LED Indicator Behavior
LED Color Description
Off The camera has no power or software is not installed.
Red The camera is initializing.
Orange Software initialized successfully and is ready for use.
Green The camera is acquiring an image.
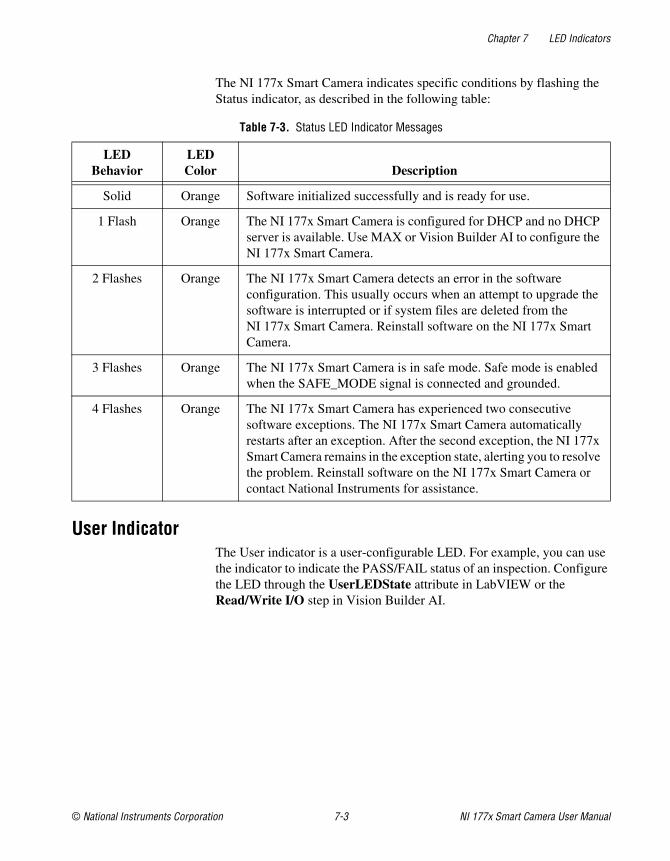
Chapter 7 LED Indicators
© National Instruments Corporation 7-3 NI 177x Smart Camera User Manual
The NI 177x Smart Camera indicates specific conditions by flashing the Status indicator, as described in the following table:
User IndicatorThe User indicator is a user-configurable LED. For example, you can use the indicator to indicate the PASS/FAIL status of an inspection. Configure the LED through the UserLEDState attribute in LabVIEW or the Read/Write I/O step in Vision Builder AI.
Table 7-3. Status LED Indicator Messages
LED Behavior
LED Color Description
Solid Orange Software initialized successfully and is ready for use.
1 Flash Orange The NI 177x Smart Camera is configured for DHCP and no DHCP server is available. Use MAX or Vision Builder AI to configure the NI 177x Smart Camera.
2 Flashes Orange The NI 177x Smart Camera detects an error in the software configuration. This usually occurs when an attempt to upgrade the software is interrupted or if system files are deleted from the NI 177x Smart Camera. Reinstall software on the NI 177x Smart Camera.
3 Flashes Orange The NI 177x Smart Camera is in safe mode. Safe mode is enabled when the SAFE_MODE signal is connected and grounded.
4 Flashes Orange The NI 177x Smart Camera has experienced two consecutive software exceptions. The NI 177x Smart Camera automatically restarts after an exception. After the second exception, the NI 177x Smart Camera remains in the exception state, alerting you to resolve the problem. Reinstall software on the NI 177x Smart Camera or contact National Instruments for assistance.

Chapter 7 LED Indicators
NI 177x Smart Camera User Manual 7-4 ni.com
100/1G IndicatorThe 100/1G indicator is a multicolor LED that indicates the status of any network connection. The following table describes the behavior of the 100/1G indicator:
A blinking LED indicates network activity.
Table 7-4. 100/1G LED Indicator Behavior
LED Color Description
Off No link or a 10 Mbps link is negotiated
Yellow A 100 Mbps link is negotiated
Green A 1,000 Mbps link is negotiated

© National Instruments Corporation 8-1 NI 177x Smart Camera User Manual
8Mounting Information
This chapter provides information about mounting the NI 177x Smart Camera or attaching a light mount.
Caution If you choose not to mount the NI 177x Smart Camera to a thermally conductive structure, do not position the device with the heat sinks resting on any surface. Doing so may violate the thermal requirements of the device and cause the device to overheat. Refer to Appendix A, Specifications, for temperature specifications.
Figures 8-1 through 8-4 provide the dimensional drawings necessary to create a custom mount for the NI 177x Smart Camera.

Chapter 8 Mounting Information
NI 177x Smart Camera User Manual 8-2 ni.com
Figure 8-1. Front View of the NI 177x Smart Camera with Dimensions
NATIONALINSTRUMENTS
NI 177X SMART CAMERA
1.181 in.(30 mm)
1.417 in.(36 mm)
1.299 in.(33 mm)
4.331 in.(110 mm)
1.240 in.(31.5 mm)
2.953 in. (75 mm)
4X M4 × 0.7 0.138 (3.5 mm)

Chapter 8 Mounting Information
© National Instruments Corporation 8-3 NI 177x Smart Camera User Manual
Figure 8-2. Back View of the NI 177x Smart Camera with Dimensions
0.492 in.(12.5 mm)
3.862 in.(98.1 mm)
0.234 in.(5.95 mm)
0.492 in.(12.5 mm)
1.969 in. (50 mm)
4X M4 × 0.7 0.315 (8.0 mm)
2.856 in.(72.55 mm)
1.006 in.(25.25 mm)

Chapter 8 Mounting Information
NI 177x Smart Camera User Manual 8-4 ni.com
Figure 8-3. Bottom View of the NI 177x Smart Camera with Dimensions
2.953 in. (75 mm)
I/O 100/1G
Power
Statu
sUse
r
VGA/USB
100/1G
0.157 in.(4 mm)
1.179 in.(29.95 mm)
0.83 in.(21 mm)
0.83 in.(21 mm)

Chapter 8 Mounting Information
© National Instruments Corporation 8-5 NI 177x Smart Camera User Manual
Figure 8-4. Side View of the NI 177x Smart Camera with Dimensions
1.96 in.(49.78 mm)
4.331 in.(110 mm)
NA
TIO
NA
LIN
STR
UM
ENT
S
3.99 in. (101.35 mm) (REF)

© National Instruments Corporation A-1 NI 177x Smart Camera User Manual
ASpecifications
The following specifications apply to these devices:
• NI 1772/1772C Smart Camera
• NI 1774/1774C Smart Camera
• NI 1776/1776C Smart Camera
• NI 1778 Smart Camera
These specifications are typical at 25 °C, unless otherwise stated.
Power Requirements
Caution Use the NI 177x Smart Camera only with a 12 W, 24 VDC ±10%, UL listed, limited power source (LPS) supply. The power supply should bear the UL listed mark, LPS. The power supply must meet any safety and compliance requirements for the country of use.
Typical power consumption................... 12 W 24 VDC, ±10%
Processing and MemoryCPU........................................................ Intel® Atom™ Z530
(1.60 GHz processor)
DDR2 RAM ........................................... 512 MB
Storage ................................................... 2 GB solid state
Opto-Coupled InputsChannels................................................. 4
Input type ............................................... Opto-coupled
Input current ........................................... 1.6 mA
On voltage level ..................................... Greater than 15 V
Off voltage level..................................... Less than 0.8 V
Appendix A Specifications
NI 177x Smart Camera User Manual A-2 ni.com
On current (minimum)............................0.5 mA
Off to on responsiveness.........................5 μs
On to off responsiveness.........................25 μs
Open Collector OutputsChannels .................................................4
Output type .............................................Open collector
Operating voltage range..........................24 V (max)
Sinking current range..............................0 to 100 mA
Maximum current leakage ......................10 μA
On voltage drop ......................................25 mV
Maximum inrush current ........................4 A for 300 μs (max)
Off to on responsiveness.........................250 ns
On to off responsiveness.........................250 ns
Controlled Current OutputOperating voltage ...................................24 V
Output voltage ........................................2.4 to 21 V
Output current range ...............................0 to 500 mA
NetworkConnector................................................8-pin female M12
Network interface ...................................Ethernet
Speed ......................................................10; 100; 1,000 Mbps
Duplex ....................................................Full, half
Speed autodetection ................................Yes
Duplex autodetection ..............................Yes

Appendix A Specifications
© National Instruments Corporation A-3 NI 177x Smart Camera User Manual
Auto MDI/MDI-X correction................. Yes
DHCP Support ....................................... Yes
SerialBaud rates............................................... Up to 115.2 Kbps
Default baud rate............................. 9,600 bps
Hardware flow control ........................... No
Image SensorAll NI 177x Smart Cameras use a progressive scan CCD sensor. The following table describes sensor characteristics for each camera.
Sensor readout........................................ Progressive scan
Table A-1. NI 177x Smart Camera Sensor Characteristics
Camera Model Sensor
Optical Format
(in.) Active PixelsPixel Size
(µm)
Maximum Usable
Frame Rate (fps)
Minimum Exposure Time (µs)
NI 1772 KodakKAI-0340S
1/3 640 × 480 (VGA)
7.4 × 7.4 110 34
NI 1772C Kodak KAI-0340SCM
65
NI 1774 SonyICX445AL
1,280 × 960 (SXGA)
3.75 × 3.75 22.5 58
NI 1774C SonyICX445AQ
17
NI 1776 SonyICX274AL
1/1.8 1,600 × 1,200 (UXGA)
4.4 × 4.4 15 88
NI 1776C SonyICX274AQ
10
NI 1778 SonyICX625AL
2/3 2,448 × 2,050 (5 MP)
3.45 × 3.45 15 58
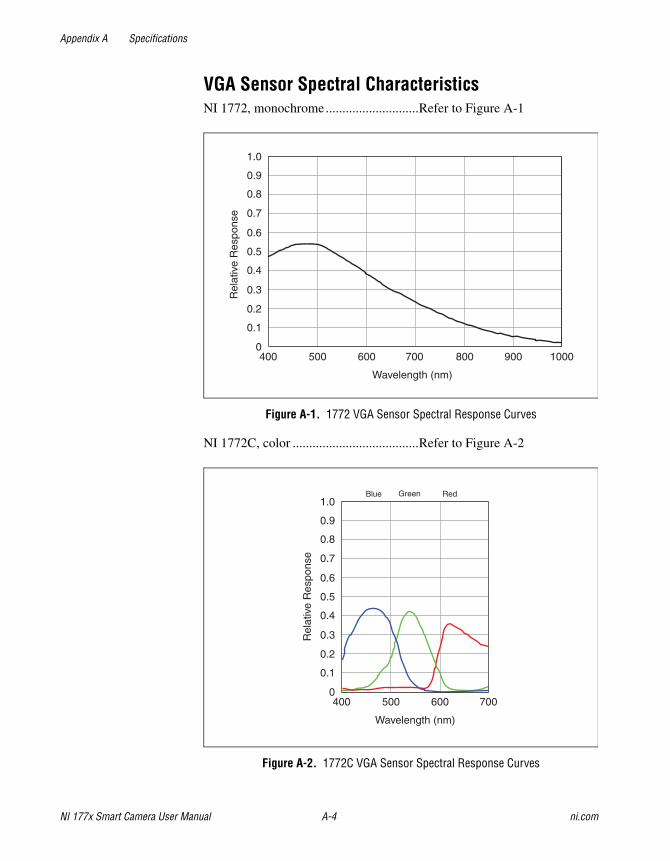
Appendix A Specifications
NI 177x Smart Camera User Manual A-4 ni.com
VGA Sensor Spectral CharacteristicsNI 1772, monochrome............................Refer to Figure A-1
Figure A-1. 1772 VGA Sensor Spectral Response Curves
NI 1772C, color ......................................Refer to Figure A-2
Figure A-2. 1772C VGA Sensor Spectral Response Curves
0.9
0.8
0.7
0.6
0.5
0.4
0.3
0.2
0.1
0
1.0
400 500 600 700 900 800 1000
Wavelength (nm)
Rel
ativ
e R
espo
nse
0.9
0.8
0.7
0.6
0.5
0.4
0.3
0.2
0.1
0 400 500 600
Wavelength (nm)
Rel
ativ
e R
espo
nse
700
Blue RedGreen1.0
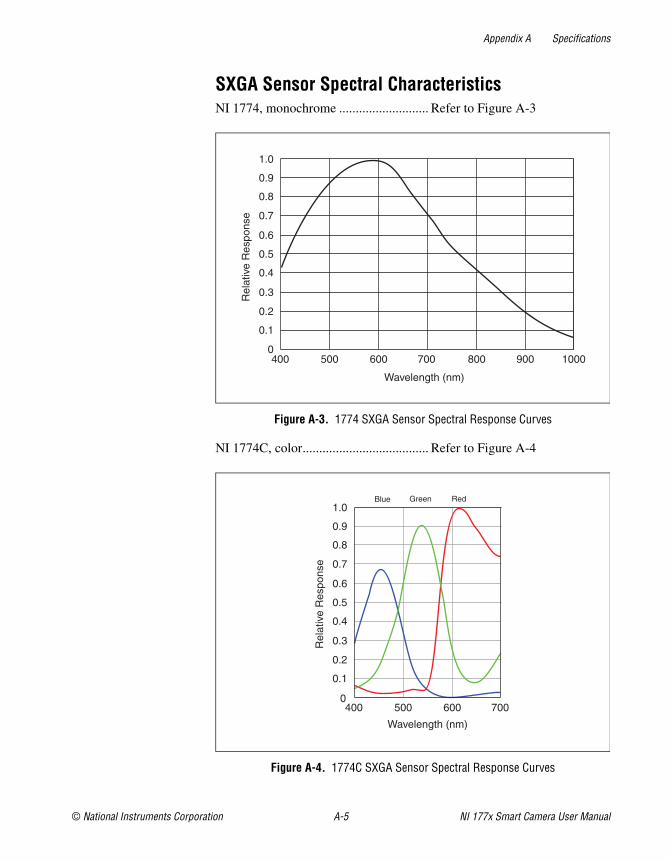
Appendix A Specifications
© National Instruments Corporation A-5 NI 177x Smart Camera User Manual
SXGA Sensor Spectral CharacteristicsNI 1774, monochrome ........................... Refer to Figure A-3
Figure A-3. 1774 SXGA Sensor Spectral Response Curves
NI 1774C, color...................................... Refer to Figure A-4
Figure A-4. 1774C SXGA Sensor Spectral Response Curves
0.9
0.8
0.7
0.6
0.5
0.4
0.3
0.2
0.1
0
1.0
400 500 600 700 900 800 1000
Wavelength (nm)
Rel
ativ
e R
espo
nse
0
0.9
0.8
0.7
0.6
0.5
0.4
0.3
0.2
0.1
1.0
400 500 600 700
Wavelength (nm)
Rel
ativ
e R
espo
nse
Blue RedGreen

Appendix A Specifications
NI 177x Smart Camera User Manual A-6 ni.com
UXGA Sensor Spectral CharacteristicsNI 1776, monochrome............................Refer to Figure A-5
Figure A-5. 1776 UXGA Sensor Spectral Response Curves
NI 1776C, color ......................................Refer to Figure A-6
Figure A-6. 1776C UXGA Sensor Spectral Response Curves
0.9
0.8
0.7
0.6
0.5
0.4
0.3
0.2
0.1
0
1.0
400 500 600 700 900 800 1000
Wavelength (nm)
Rel
ativ
e R
espo
nse
0
0.9
0.8
0.7
0.6
0.5
0.4
0.3
0.2
0.1
1.0
400 500 600 700
Wavelength (nm)
Rel
ativ
e R
espo
nse
Blue RedGreen

Appendix A Specifications
© National Instruments Corporation A-7 NI 177x Smart Camera User Manual
5 MP Sensor Spectral CharacteristicsNI 1778, monochrome ........................... Refer to Figure A-7
Figure A-7. 1778 5 Megapixel Sensor Spectral Response Curves
Physical CharacteristicsLens mount............................................. C-mount
Camera housing...................................... Painted aluminium
Dimensions (without lens cover) ........... 11 cm × 7.5 cm × 4.98 cm(4.33 in. × 2.95 in. × 1.96 in.)
EnvironmentalThe NI Smart Camera is intended for indoor use only.
Operating ambient temperature.............. 0 to 50 °C
Humidity ................................................ 10% to 90% RH, noncondensing
IP rating.................................................. 67
Pollution degree ..................................... 2
0.9
0.8
0.7
0.6
0.5
0.4
0.3
0.2
0.1
0
1.0
400 500 600 700 900 800 1000
Wavelength (nm)
Rel
ativ
e R
espo
nse
Appendix A Specifications
NI 177x Smart Camera User Manual A-8 ni.com
Operating shock (IEC 60068-2-27) ........50 g, 3 ms half sine, 18 shocks at 6 orientations; 30 g, 11 ms half sine, 18 shocks at 6 orientations
Operating vibration
Random (IEC 60068-2-34)..............10 Hz to 500 Hz, 5 Grms
Swept sine (IEC 60068-2-6)............10 Hz to 500 Hz, 5 g
Approved at altitudes up to 2,000 m.
Note For UL and other safety certifications, refer to the product label or visit ni.com/ certification, search by model number or product line, and click the appropriate link in the Certification column.
Electromagnetic CompatibilityNI 177x Smart Cameras meet the following EMC standards for information technology equipment:
• EN 55022 Emissions; Group 1, Class A
• EN 55024 Immunity; Basic Levels
• CE, C-Tick, ICES, and FCC Part 15 Emissions; Class A
CE ComplianceNI 177x Smart Cameras meet the essential requirements of applicable European Directives, as amended for CE marking, as follows:
• 2004/108/EC; Electromagnetic Compatibility Directive (EMC)
Note Refer to the Declaration of Conformity (DoC) for this product for any additional regulatory compliance information. To obtain the DoC for this product, visit ni.com/ certification, search by model number or product line, and click the appropriate link in the Certification column.

Appendix A Specifications
© National Instruments Corporation A-9 NI 177x Smart Camera User Manual
Environmental ManagementNI is committed to designing and manufacturing products in an environmentally responsible manner. NI recognizes that eliminating certain hazardous substances from our products is beneficial to the environment and to NI customers.
For additional environmental information, refer to the NI and the Environment Web page at ni.com/environment. This page contains the environmental regulations and directives with which NI complies, as well as other environmental information not included in this document.
Waste Electrical and Electronic Equipment (WEEE)EU Customers At the end of the product life cycle, all products must be sent to a WEEE recycling center. For more information about WEEE recycling centers, National Instruments WEEE initiatives, and compliance with WEEE Directive 2002/96/EC on Waste and Electronic Equipment, visit ni.com/environment/weee.
RoHSNational Instruments (RoHS)
National Instruments RoHS ni.com/environment/rohs_china(For information about China RoHS compliance, go to ni.com/environment/rohs_china.)

© National Instruments Corporation B-1 NI 177x Smart Camera User Manual
BCamera Attributes
The following table provides a partial list of the available NI 177x Smart Camera attributes for use in LabVIEW applications.
Table B-1. Camera Attributes
Attribute Name Data Type Range Unit Description
AcquisitionFrameRate DBL — — Specifies the maximum frame rate in fixed frame mode. Range depends on the sensor.
AcquisitionFrameRateLimit DBL — — Indicates the maximum frame rate in the current configuration. Range depends on the sensor.
AutoWhiteBalance Command — Initiates an auto white balance. NI 177xC Smart Cameras only.
BalanceRatio DBL 0.000 to 3.999 — Specifies the balance ratio of the selected component. NI 177xC Smart Cameras only.
BalanceRatioSelector Enum Red, Green, Blue — Specifies the balance ration to control. NI 177xC Smart Cameras only.
BlackLevelRaw U32 0 to 255 — Specifies the camera black level.
Coding Enum Raw, Mono, BGRAPacked
— Controls the pixel coding in the image. Raw outputs the data in the native format of the sensor. Color pixel formats are only available for NI 177xC Smart Cameras.
CounterEventSource Enum Input 0, Input 1,Input 2, Input 3
— Indicates the source for the selected counter. Each counter maps to the input line with the same index.
CounterEventActivation Enum Rising Edge, Falling Edge
— Gets or sets the activation for the selected counter.
CounterReset Command — — Resets the selected counter.

Appendix B Camera Attributes
NI 177x Smart Camera User Manual B-2 ni.com
CounterSelector Enum Counter 0, Counter 1, Counter 2, Counter 3
— Specifies the counter to configure.
CounterValue U32 0 to 4294967295 Counts Indicates the value of the selected counter.
DecimationHorizontal U32 1 to 16 — Gets or sets the horizontal decimation of the image. Valid values depend on the sensor.
DecimationVertical U32 1 to 16 — Gets or sets the vertical decimation of the image. Valid values depend on the sensor.
ExposureActivePolarity Enum Active High, Active Low
— Gets or sets the polarity of the Exposure Active output line source.
ExposureMode Enum Timed — Specifies the operation mode of the exposure.
ExposureTime DBL — μs Specifies the camera exposure time. Range depends on the sensor.
Height U32 — Pixels Gets or sets the height of the image. Range depends on the sensor.
Gain U32 0 to 255 — Specifies the input gain level.
Gamma DBL 0 to 1.0 — Specifies the gamma correction level. NI 177xC Smart Cameras only.
LightingCurrent DBL — mA Indicates the lighting current output level.
LightingMaxCurrent DBL 0 to 500 mA Indicates the maximum possible current that can be sourced in the current configuration.
LightingMode Enum Off, Strobe, Continuous
— Specifies the mode for the lighting current output.
LightingStrobePolarity Enum Active High, Active Low
— Gets or sets the polarity of the Light Strobe output light source.
LineMode Enum Input, Output — Indicates the mode of the selected line.
Table B-1. Camera Attributes (Continued)
Attribute Name Data Type Range Unit Description

Appendix B Camera Attributes
© National Instruments Corporation B-3 NI 177x Smart Camera User Manual
LineSelector Enum Input 0, Input 1, Input 2, Input 3, Output 0, Output 1, Output 2, Output 3, External Trigger
— Specifies the digital I/O line to configure.
LineSource Enum User Output, Pulse Generator, Frame Trigger, Exposure Active, Lighting Strobe
— Indicates the source of the selected line. This attribute is only available for output lines. Not all output lines support all signal sources.
LineStatus Bool — — Indicates the status of the selected line.
LineStatusAll U32 0 to 4294967295 — Indicates the status of all available line signals.
LineDebouncerTime DBL 0.25 to 25000.00 — Gets or sets the debounce time for the selected line. The specified value is rounded to the nearest valid hardware value.
LUTEnable Bool — — Specifies or indicates whether the LUT is enabled.
LUTIndex U32 0 to 255 — Specifies a LUT element. The element corresponds to the source pixel value.
LUTSelector Enum Luminance; Red, Green, Blue
— Specifies the LUT to control. The Luminance value is only available for monochrome sensors. The Red, Green, and Blue values are only available for NI 177xC Smart Cameras.
LUTValue U32 0 to 255 — Gets or sets the replacement value of the specified LUT element.
OffsetX U32 — Pixels Gets or sets the vertical offset of the image. Range depends on the specified image width.
OffsetY U32 — Pixels Gets or sets the horizontal offset of the image. Range depends on the specified image height.
Table B-1. Camera Attributes (Continued)
Attribute Name Data Type Range Unit Description

Appendix B Camera Attributes
NI 177x Smart Camera User Manual B-4 ni.com
PixelFormat Enum Mono8, BGRA8Packed
— Gets or sets the pixel format of the source sensor. Color pixel formats are only available for NI 177xC Smart Cameras.
PulseGeneratorDelay DBL — μs Specifies the delay of the selected pulse generator.
PulseGeneratorDelayEdgeCounts U32 0 to 4294967295 Edge Counts
Specifies the delay of the pulse generator.
PulseGeneratorDelaySource Enum Internal Clock, Input 0 Edges, Input 1 Edges, Input 2 Edges, Input 3 Edges,
— Specifies the counter source for the pulse generator delay.
PulseGeneratorDuration DBL 0 to 68719476 μs Specifies the duration of the generated pulse.
PulseGeneratorEdgeActivation Enum Rising Edge, Falling Edge
— Specifies the activation for the pulse generator delay, when configured for a delay.
PulseGeneratorEnable Bool — — Enables the specified pulse generator.
PulseGeneratorMode Enum Single Pulse, Rearmed Pulse, Pulse Train
— Gets or sets the mode of the selected pulse generator.
PulseGeneratorPolarity Enum Active High, Active Low
— Gets or sets the polarity of the sepected pulse generator.
PulseGeneratorSelector Enum Pulse Generator 0, Pulse Generator 1, Pulse Generator 2, Pulse Generator 3
— Specifies the pulse generator to configure. Each pulse generator maps to the output line with the same index.
PulseGeneratorTriggerActivation Enum Rising Edge, Falling Edge
— Gets or sets the trigger activation of the selected pulse generator.
PulseGeneratorTriggerSource Enum Immediate, Software, Input 0, Input 1, Input 2, Input 3
— Gets or sets the trigger source of the selected pulse generator.
PulseGeneratorTriggerSoftware Command — — Sends a software trigger to the pulse generator.
ReverseX Boolean — — Flips the image horizontally, along the Y axis.
Table B-1. Camera Attributes (Continued)
Attribute Name Data Type Range Unit Description

Appendix B Camera Attributes
© National Instruments Corporation B-5 NI 177x Smart Camera User Manual
ReverseY Boolean — — Flips the image vertically, along the horizontal axis.
TestImageSelector Enum Off, Grey Horizontal Ramp, Grey Horizontal Ramp Moving, Frame Counter
— Specifies the type of test image that is generated by the camera.
TriggerActivation Enum Rising Edge, Falling Edge
— Specifies the activation mode of the selected trigger.
TriggerDelay DBL 0 to 4294967280 μs Specifies the delay between trigger reception and activation.
TriggerDelayEdgeCounts U32 0 to 268435455 Edge Counts
Specifies the delay between trigger reception and activation.
TriggerDelaySource Enum Internal Clock, Input 0 Edges, Input 1 Edges, Input 2 Edges, Input 3Edges
— Specifies the counter source for the trigger delay.
TriggerDelayEdgeActivation Enum Rising Edge, Falling Edge
— Specifies the activation for the trigger delay, when configured for a delay.
TriggerMode Enum Off, On — Enables or disables the specified trigger.
TriggerOverlap Enum Readout, Off — Specifies the type of overlap permitted with the previous frame.
TriggerSelector Enum Frame Start — Specifies the trigger to modify.
TriggerSoftware Command — Sends a software trigger.
TriggerSource Enum External Trigger, Fixed Rate, Software
— Specifies the source of the selected trigger.
UserLEDState Enum Off, Green, Red, Orange
— Gets or sets the state of the user LED.
UserOutputSelector Enum User Output 0, User Output 1, User Output 2, User Output 3
— Specifies which bit in the User Output register to set.
UserOutputValue Bool — — Gets or sets the status of the selected user output.
Table B-1. Camera Attributes (Continued)
Attribute Name Data Type Range Unit Description

Appendix B Camera Attributes
NI 177x Smart Camera User Manual B-6 ni.com
UserOutputValueAll U32 0 to 4294967295 — Gets or sets the value of all bits in the User Output register.
Width U32 — Pixels Gets or sets the width of the image. Range depends on the sensor.
Table B-1. Camera Attributes (Continued)
Attribute Name Data Type Range Unit Description

© National Instruments Corporation C-1 NI 177x Smart Camera User Manual
CAccessories
The following sections provide a partial list of the NI 177x Smart Camera accessories available from National Instruments. For a list of all available accessories, visit ni.com/smartcamera.
Power and I/O Cables and AccessoriesNational Instruments offers the following cables and accessories for power or I/O configuration:
National Instruments offers the following accessories for applications that require a custom I/O cable:
Table C-1. Power and I/O Cables and Accessories
DescriptionPart
Number Notes
Starter Kit for NI 177x Smart Cameras 782043-01 Includes all parts listed in table C-1
Power and I/O accessory for NI 177x Smart Cameras
781993-01 Includes M12 to 25-pin D-SUB cable (782032-01)
Power supply for NI 177x Smart Cameras 782032-01 100–240 VAC IN, 24 V, 1.25 A
M12 to 25-pin D-SUB 152919-03 3 m cable; included with the Power and I/O accessory for NI 177x Smart Cameras (781993-01)
M12 to VGA/USB cable 153064-01 1 m cable
M12 to RJ45 cable 153130-05 5 m cable
M12 to pigtail cable 153131-03 3 m cable
Table C-2. Custom Cabling Parts
DescriptionPart
Number Notes
M12 to pigtail cable 153131-03 3 m cable

Appendix C Accessories
NI 177x Smart Camera User Manual C-2 ni.com
Lights, Lenses, and BracketsNational Instruments offers the following lenses and lighting accessories:
Replacement PartsNational Instruments offers the following replacement parts:
Table C-3. Lights, Lenses, and Brackets
DescriptionPart
Number Notes
8 mm lens (Computar M0814-MP) 780024-01 f/1.4, 1 MP
12 mm lens (Computar M1214-MP) 780025-01 f/1.4, 1 MP
16 mm lens (Computar M1614-MP) 780026-01 f/1.4, 1 MP
25 mm lens (Computar M2514-MP) 780027-01 f/1.4, 1 MP
35 mm lens (Computar M3514-MP) 780033-01 f/1.4, 1 MP
Ultra low distortion 16 mm lens(Computar M1620-MPV)
782023-01 f/2.0, 2/3 in., 3 MP
Ultra low distortion 25 mm lens(Computar M2518-MPV)
782024-01 f/1.8, 2/3 in., 3 MP
Ultra low distortion 35 mm lens(Computar M3520-MPV)
782025-01 f/2.0, 2/3 in., 3 MP
Red ring light (Advanced Illuminations RL 127)
782026-01 —
White ring light (Advanced Illuminations RL 127)
782027-01 —
Red ring light (Advanced Illuminations RL 4260)
782028-01 —
White ring light (Advanced Illuminations RL 4260)
782029-01 —
Light bracket for NI 177x Smart Cameras 782031-01 For part numbers 782026-01, 782027-01, 782028-01, and 782029-01
Table C-4. Replacement Parts
Description Part Number Notes
IP67 M12 connector caps and plugs 782021-01 Includes 5 connector caps and 5 plugs

© National Instruments Corporation D-1 NI 177x Smart Camera User Manual
DTechnical Support and Professional Services
Visit the following sections of the award-winning National Instruments Web site at ni.com for technical support and professional services:
• Support—Technical support at ni.com/support includes the following resources:
– Self-Help Technical Resources—For answers and solutions, visit ni.com/support for software drivers and updates, a searchable KnowledgeBase, product manuals, step-by-step troubleshooting wizards, thousands of example programs, tutorials, application notes, instrument drivers, and so on. Registered users also receive access to the NI Discussion Forums at ni.com/forums. NI Applications Engineers make sure every question submitted online receives an answer.
– Standard Service Program Membership—This program entitles members to direct access to NI Applications Engineers via phone and email for one-to-one technical support, as well as exclusive access to eLearning training modules at ni.com/eLearning. NI offers complementary membership for a full year after purchase, after which you may renew to continue your benefits.
For information about other technical support options in your area, visit ni.com/services, or contact your local office at ni.com/contact.
• Training and Certification—Visit ni.com/training for training and certification program information. You can also register for instructor-led, hands-on courses at locations around the world.
• System Integration—If you have time constraints, limited in-house technical resources, or other project challenges, National Instruments Alliance Partner members can help. To learn more, call your local NI office or visit ni.com/alliance.

Appendix D Technical Support and Professional Services
NI 177x Smart Camera User Manual D-2 ni.com
• Declaration of Conformity (DoC)—A DoC is our claim of compliance with the Council of the European Communities using the manufacturer’s declaration of conformity. This system affords the user protection for electromagnetic compatibility (EMC) and product safety. You can obtain the DoC for your product by visiting ni.com/certification.
You also can visit the Worldwide Offices section of ni.com/niglobal to access the branch office Web sites, which provide up-to-date contact information, support phone numbers, email addresses, and current events.

© National Instruments Corporation G-1 NI 177x Smart Camera User Manual
Glossary
Symbol Prefix Value
p pico 10–12
n nano 10–9
μ micro 10– 6
m milli 10–3
k kilo 103
M mega 106
G giga 109
A
active pixels The number of light-sensitive pixels on a CCD sensor.
B
black level The value that corresponds to true black in the image.
C
CCD Charge Coupled Device. A chip that converts light into electronic signals.
E
edge count A specified number of assertions, rising, falling, or both, in a signal.
exposure time The amount of time that light is allowed to strike the imaging sensor to produce an image.

Glossary
NI 177x Smart Camera User Manual G-2 ni.com
F
falling edge The digital signal transition from the high state to the low state.
field of view The area of inspection that the camera can acquire.
fps Frames per second.
G
gain The amount of increase in signal power, voltage, or current expressed as the ratio of output to input.
I
IEC International Electrotechnical Commission. A standard-setting body.
IEEE Institute of Electrical and Electronics Engineers. A standard-setting body.
I/O Input/output. The transfer of data to/from a computer system involving communications channels, operator interface devices, or data acquisition and control interfaces.
L
LED Light-emitting diode.
lookup table Maps pixel values in a source image to other values in a transformed image.
M
MAX Measurement & Automation Explorer. A controlled, centralized configuration environment that allows you to configure all of your NI devices.
megapixel 1 million pixels. NI 177x Smart Cameras with a 5 MP sensor feature a resolution of 2,448 × 2,050.
MP Megapixel.

Glossary
© National Instruments Corporation G-3 NI 177x Smart Camera User Manual
N
NI-IMAQdx Driver software for National Instruments image acquisition devices and NI 177x Smart Cameras. NI-IMAQdx is installed as part of NI Vision Acquisition Software.
O
open collector An output mechanism that grounds or does not ground a connection to a powered device. An open collector output cannot supply voltage.
opto-coupled Optically coupled.
optically coupled An input mechanism that provides current protection by using a light emitter to transmit signals to a light receiver, which then enables a signal current.
P
pixel pitch The distance between the centers of adjacent pixels in either the horizontal or vertical direction.
PLC Programmable Logic Controller. An industrial computer used for factory automation, process control, and manufacturing systems.
pulse train A signal consisting of a series of continuous pulses.
R
reference card An object of a solid, neutral color (typically gray) in the image which functions as a reference during image correction.
rising edge The digital signal transition from the low state to the high state.
RS-232 Standard electrical interface for serial data communications.

Glossary
NI 177x Smart Camera User Manual G-4 ni.com
S
sensor resolution The number of columns and rows of CCD pixels in the camera sensor.
sensor size The size of the active area of an image sensor.
sinking A device that requires a powered signal as an input.
sourcing A device that provides a powered signal.
spectral response The ability of a sensor to detect light expressed as a value between 0 and 1 for a given wavclength.
subnet A set of systems whose IP addresses are configured such that they can communicate directly with one another. Data will not flow through an intermediate router.
SXGA sensor Super eXtended Graphics Array. SXGA may refer to multiple resolutions. SXGA sensors used with NI 177x Smart Cameras feature a resolution of 1,280 × 960 pixels.
syntax Set of rules to which statements must conform in a particular programming language.
T
TCP Transmission Control Protocol. A set of standard protocols for communicating across a single network or interconnected set of networks. TCP is for high-reliability transmissions.
trigger Any event that causes or starts some form of data capture.
trigger delay The time between the active edge of a trigger and the assertion of a lighting strobe.
U
UXGA sensor Video Graphics Array sensor. Image sensor that features a resolution of 1,600 × 1,200 pixels.

Glossary
© National Instruments Corporation G-5 NI 177x Smart Camera User Manual
V
VDC Volts direct current.
VGA sensor Video Graphics Array sensor. Image sensor that features a resolution of 640 × 480 pixels.
VI Virtual Instrument. A combination of hardware and/or software elements, typically used with a PC, that has the functionality of a classic stand-alone instrument.
W
white level The point at which values in the red, green, and blue color planes converge to produce white.
working distance The distance from the front of the camera lens to the object under inspection.

© National Instruments Corporation I-1 NI 177x Smart Camera User Manual
Index
Numerics100/1G connector, 3-4
M12 to Ethernet signal connections, 3-5pin numbers, 3-4
100/1G indicator, 7-4
Aacquiring images, 6-1, 6-2
external trigger, 6-3fixed-frame-rate mode, 6-2free-run mode, 6-2internal timing, 6-2
assigning an IP address, 1-6auto white level, 5-4
Bblack level, 5-5
Cconnecting
external devices, 4-1I/O, 1-3light controller, 4-1lighting devices, 4-1NPN devices, 4-3outputs, 4-3power, 1-3sinking devices, 4-4sourcing devices, 4-3
connectors, 3-1100/1G, 3-4I/O, 3-2
overview, 3-1power, 3-2, 3-4VBA/USB, 3-5
conventions used in the manual, ix
DDeclaration of Conformity (NI resources), D-2DHCP server, 1-6diagnostic tools (NI resources), D-1documentation
conventions used in manual, ixNI resources, D-1related documentation, x
drivers (NI resources), D-1
EEthernet connector, 3-4examples (NI resources), D-1exposure, 6-1, 6-5external trigger, 6-3
Ffirewall configuration, 1-7fixed-frame-rate mode, 6-2frame rate, 6-5
maximum, 6-5free-run mode, 6-2
Ggain, 5-3
Hhelp, technical support, D-1

Index
NI 177x Smart Camera User Manual I-2 ni.com
II/O connector, 3-2
pin numbers, 3-2signal descriptions, 3-3
image sensor, 5-1field of view, 5-1gain, 5-3maintenance, 5-6spectral response, 5-3
image, acquisition, 6-1instrument drivers (NI resources), D-1IP address
assigning, 1-6configuring for LabVIEW, 2-5configuring with Vision Builder AI, 2-2using a DHCP server, 1-6
KKnowledgeBase, D-1
LLabVIEW
acquiring an image, 2-6configuring the IP address, 2-5documents, xiinstalling software on the smart
camera, 2-6smart camera configuration, 2-4
LED indicators, 7-1100/1G, 7-4blink codes, 7-3initialization behavior, 7-2overview, 7-1Power, 7-2Status, 7-2User, 7-3
look-up table, 5-5
Mmounting information, 8-1
NNational Instruments support and
services, D-1network connection, 1-5NI 177x
acquiring images, 6-2assigning an IP address, 1-6black level, 5-5connecting
I/O, 1-3light controller, 4-1lighting devices, 4-1NPN devices, 4-3outputs, 4-3power, 1-3sinking devices, 4-4sourcing devices, 4-3
connectors, 3-1dimensions, 8-1exposure, 6-1gain, 5-3hardware
comparison, 1-2connectors, 3-1overview, 1-2
installation, 1-5look-up table, 5-5maintenance, 5-6mounting, 8-1network connection, 1-5outputs, open collector, 4-3protecting against inductive loads, 4-4
NI 177xC, auto white level, 5-4NI Vision Acquisition Software, documents, xi

Index
© National Instruments Corporation I-3 NI 177x Smart Camera User Manual
NI Vision Builder for Automated Inspectionacquiring an image, 2-3configuring the IP address, 2-2documents, xinstalling on the smart camera, 2-3smart camera configuration, 2-2
NI Vision Development Module, documents, xi
NI-IMAQdx, documents, xi
Ooutputs, open collector, 4-3
PPower indicator, 7-2power requirements, 3-4power, connecting, 1-3programming examples (NI resources), D-1protecting against inductive loads, 4-4
Rrelated documentation, x
Ssoftware
LabVIEW, smart camera configuration, 2-4
NI resources, D-1NI Vision Builder for Automated
Inspectionsmart camera configuration, 2-2
Status indicator, 7-2blink codes, 7-3
support, technical, D-1
Ttechnical support, D-1training and certification (NI resources), D-1troubleshooting (NI resources), D-1
UUSB connector, 3-5User indicator, 7-3
VVGA/USB connector, 3-5
M12 to 15-pin DSUB signal connections, 3-6
M12 to USB signal connections, 3-6pin numbers, 3-5
video connector, 3-5
WWeb resources, D-1