ni 446x calibration procedure - national instruments©national instruments corporation 5 ni 446x...
TRANSCRIPT

NI 446X Calibration ProcedureThis document contains information about calibrating National Instruments PCI/PXI-4461 and PCI/PXI-4462 (NI 446X) devices.
This document does not discuss programming techniques or compiler configuration. The National Instruments DAQmx driver includes help files that have compiler-specific instructions and detailed function explanations. You can install these help files when you install NI-DAQmx on the calibration computer.
NI 446X devices should be externally calibrated at a regular interval as defined by the measurement accuracy requirements of your application. NI recommends that you perform a complete calibration at least once every year. Based on your measurement accuracy needs, you can shorten this interval to 90 days or six months. Self-calibration can be performed as needed or when the temperature varies by 5 °C or more from the last external calibration.
ContentsConventions ............................................................................................ 2Calibration Options ................................................................................. 3
Self-Calibration................................................................................ 3External Calibration ......................................................................... 3
Software and Documentation Requirements........................................... 3Software ........................................................................................... 3Documentation................................................................................. 4
Password and User Information.............................................................. 5Getting Calibration Information.............................................................. 6Test Equipment ....................................................................................... 9Test Conditions ....................................................................................... 9Calibration Process ................................................................................. 10
Calibration Process Overview ......................................................... 10Initial Setup...................................................................................... 10Self-Calibration................................................................................ 11NI 446X Verification Procedure ...................................................... 11
Verifying Analog Input Performance ....................................... 11Verifying Analog Output Performance .................................... 19

NI 446X Calibration Procedure 2 ni.com
Verifying Timebase Frequency Accuracy.................................28NI 446X Adjustment Procedure........................................................32
Adjusting the Analog Input .......................................................32Adjusting the Analog Output ....................................................34Adjusting the Timebase.............................................................40
Where to Go for Support .........................................................................42
ConventionsThe following conventions appear in this document:
» The » symbol leads you through nested menu items and dialog box options to a final action. The sequence File»Page Setup»Options directs you to pull down the File menu, select the Page Setup item, and select Options from the last dialog box.
This icon denotes a note, which alerts you to important information.
bold Bold text denotes items that you must select or click in the software, such as menu items and dialog box options. Bold text also denotes parameter names and hardware labels.
italic Italic text denotes variables, emphasis, a cross-reference, or an introduction to a key concept. Italic text also denotes text that is a placeholder for a word or value that you must supply.
monospace Monospace text denotes text or characters that you should enter from the keyboard, sections of code, programming examples, and syntax examples. This font is also used for the proper names of disk drives, paths, directories, programs, subprograms, subroutines, device names, functions, operations, variables, filenames, and extensions.
ReturnValue A parameter which points to data that is modified by a function call has a variable name in the form <variableTypeReturnValue>, for example, uInt32PointerReturnValue. All function calls return a status integer that you must verify. Because all the functions return this status integer, the function descriptions in this document omit the status integer.
Number Variable Types The integer variable type used in this document is represented as a whole number. Any floating point variable type is represented as a number with a decimal point. For example, the number 1,024 is written as 1024 if it is an integer, and as 1024.0 if it is a floating point value.
NI 446X NI 446X refers to the NI PCI-4461, NI PXI-4461, NI PCI-4462, and NI PXI-4462 unless otherwise noted.

© National Instruments Corporation 3 NI 446X Calibration Procedure
Calibration OptionsNI 446X devices support two types of calibration: self-calibration and external calibration.
Self-CalibrationSelf-calibration, also known as internal calibration, uses a software command and requires no external connections. Self-calibration improves measurement accuracy by compensating for variables such as temperature that might have changed since the last external calibration. Self-calibration retains the traceability of the external calibration.
External CalibrationExternal calibration is generally performed with high-precision instruments at either NI or a metrology lab. This procedure replaces all calibration constants in the EEPROM and is equivalent to a factory calibration at NI. Because the external calibration procedure changes all EEPROM constants, it invalidates the original calibration certificate. If an external calibration is done with traceable instruments, a new calibration certificate can be issued.
Software and Documentation RequirementsThis section describes the software and documentation required for both self-calibration and external calibration.
SoftwareInstall NI-DAQmx 8.1 or later on the calibration computer. You must have the proper device driver installed on the calibration system before calibrating the device.
Note NI recommends that you install the NI-DAQmx driver software before physically installing the NI 446X device. NI-DAQmx, available at ni.com/downloads, configures and controls the NI 446X.
NI-DAQmx supports a number of programming languages, including LabVIEW, LabWindows™/CVI™, Microsoft Visual C++ 6.0, Microsoft Visual Basic 6.0, Microsoft .NET, and Borland C++.
If you want to write the calibration procedure using LabVIEW, NI recommends that you use the Full or Professional Development System or the Developer Suite Professional Edition. These editions include

NI 446X Calibration Procedure 4 ni.com
frequency-domain analysis tools not included in the Base Development System.
You can access the NI-DAQmx header file, DAQmx.h, like any standard library. You can find examples of how to use the NI-DAQmx driver in the Program Files\National Instruments\NI-DAQ\Examples directory.
DocumentationYou might find the following documentation helpful as you write your calibration procedure:
• NI-DAQmx Help—This help file contains general information about measurement concepts, key NI-DAQmx concepts, and common applications that are applicable to all programming environments. Select Start»All Programs»National Instruments»NI-DAQ» NI-DAQmx Help.
• NI-DAQmx C Reference Help—This help file contains C reference and general information about measurement concepts. Select Start»All Programs»National Instruments»NI-DAQmx Base» Documentation»C Function Reference Manual.
• DAQ Getting Started Guide for NI-DAQ 8.1 or later—This guide describes how to install your NI-DAQmx for Windows software, your NI-DAQmx-supported DAQ device, and how to confirm that your device is operating properly. Select Start»All Programs»National Instruments»NI-DAQ»DAQ Getting Started Guide.
• NI 446X Specifications—This document contains information about specific device features. The limits you use to verify the accuracy of the devices are based on the specifications found in this document. Select Start»All Programs»National Instruments» NI-DAQ» Browse Device Documentation to launch the Device Documentation Browser. You then can select the Dynamic Signal Acquisition book to browse the list of DSA devices. Select your device to find a link to the NI 446X Specifications.
These documents are installed with NI-DAQmx. You can also download the latest versions from the NI Web site at ni.com/manuals.

© National Instruments Corporation 5 NI 446X Calibration Procedure
Password and User InformationFor password-protected operations on most NI 446X devices, the default password is NI. On certain devices, however, the default password is NI\0. The password is stored in the device EEPROM. You can change the password using the following NI-DAQmx function.
Note Depending on which programming language you use, you can write the \ character into a string several different ways. Refer to the standard of that language for information about how to write the \ character into a string.
You can write user-defined information into or read from the EEPROM using the following NI-DAQmx functions.
NI-DAQmx Function Call LabVIEW Block Diagram
Call DAQmxChangeExtCalPassword with the following parameters:
Device Name: dev1
Password: NI or NI\0
New Password: myNewPassword (maximum four characters)
NI-DAQmx Function Call
Call DAQmxSetCalUserDefinedInfo with the following parameters:
deviceName: dev1
data: anyUserData
Call DAQmxGetCalUserDefinedInfoMaxSize with the following parameters:
deviceName: dev1
data: uInt32PointerReturnValue

NI 446X Calibration Procedure 6 ni.com
Both password and user-defined information have a maximum of four ASCII-standard characters and are null-terminated strings. The user information is empty by default and can contain any information you find useful.
Getting Calibration InformationThe NI 446X devices contain the current device temperature read directly from the device and the following calibration information stored in the EEPROM:
• Whether the device supports self-calibration
• Date and time of the last self-calibration
• Temperature during the last self-calibration
• Recommended interval for external calibration
• Date and time of the last external calibration
• Temperature during the last external calibration
You can access this information in the Measurement & Automation Explorer (MAX) or by using the following NI-DAQmx functions.
Call DAQmxGetCalUserDefinedInfo with the following parameters:
deviceName: dev1
data: charPointerReturnValue
bufferSize: anyNumberBelowMax
LabVIEW Block Diagraml
NI-DAQmx Function Call (Continued)

© National Instruments Corporation 7 NI 446X Calibration Procedure
NI-DAQmx Function Call
Call DAQmxGetSelfCalSupported with the following parameters:
deviceName: dev1
data: bool32PointerReturnValue
Call DAQmxGetSelfCalLastDateAndTime with the following parameters:
deviceName: dev1
year: uInt32PointerReturnValue
month: uInt32PointerReturnValue
day: uInt32PointerReturnValue
hour: uInt32PointerReturnValue
minute: uInt32PointerReturnValue
Call DAQmxGetSelfCalLastTemp with the following parameters:
deviceName: dev1
data: float64PointerReturnValue
Call DAQmxGetExtCalRecommendedInterval with the following parameters:
deviceName: dev1
data: uInt32PointerReturnValue
Call DAQmxGetExtCalLastDateAndTime with the following parameters:
deviceName: dev1
year: uInt32PointerReturnValue
month: uInt32PointerReturnValue
day: uInt32PointerReturnValue
hour: uInt32PointerReturnValue
minute: uInt32PointerReturnValue

NI 446X Calibration Procedure 8 ni.com
Call DAQmxGetExtCalLastTemp with the following parameters:
deviceName: dev1
data: float64PointerReturnValue
Call DAQmxGetCalDevTemp with the following parameters:
deviceName: dev1
data: float64PointerReturnValue
LabVIEW Block Diagram
NI-DAQmx Function Call (Continued)
© National Instruments Corporation 9 NI 446X Calibration Procedure
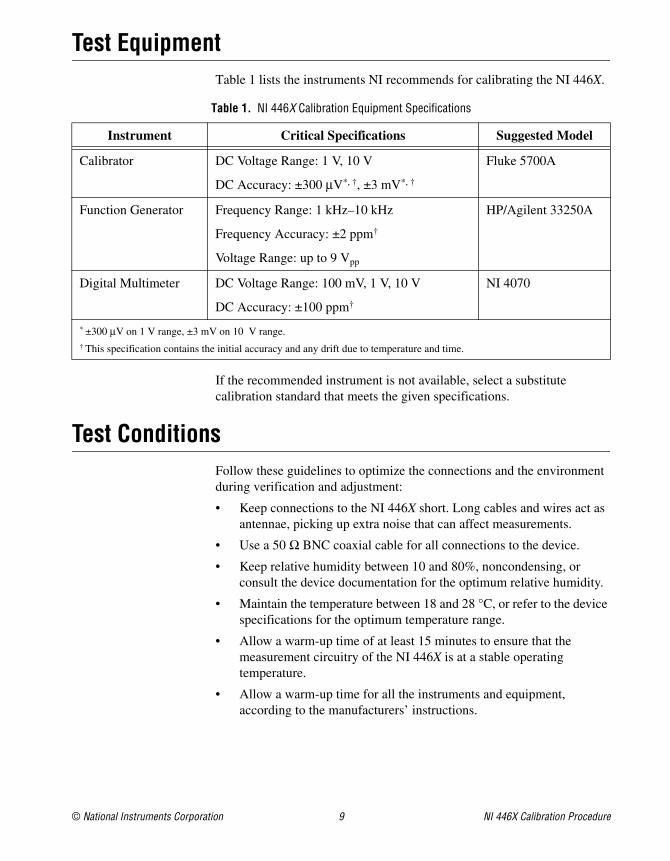
Test EquipmentTable 1 lists the instruments NI recommends for calibrating the NI 446X.
If the recommended instrument is not available, select a substitute calibration standard that meets the given specifications.
Test ConditionsFollow these guidelines to optimize the connections and the environment during verification and adjustment:
• Keep connections to the NI 446X short. Long cables and wires act as antennae, picking up extra noise that can affect measurements.
• Use a 50 Ω BNC coaxial cable for all connections to the device.
• Keep relative humidity between 10 and 80%, noncondensing, or consult the device documentation for the optimum relative humidity.
• Maintain the temperature between 18 and 28 °C, or refer to the device specifications for the optimum temperature range.
• Allow a warm-up time of at least 15 minutes to ensure that the measurement circuitry of the NI 446X is at a stable operating temperature.
• Allow a warm-up time for all the instruments and equipment, according to the manufacturers’ instructions.
Table 1. NI 446X Calibration Equipment Specifications
Instrument Critical Specifications Suggested Model
Calibrator DC Voltage Range: 1 V, 10 V
DC Accuracy: ±300 µV*, †, ±3 mV*, †
Fluke 5700A
Function Generator Frequency Range: 1 kHz–10 kHz
Frequency Accuracy: ±2 ppm†
Voltage Range: up to 9 Vpp
HP/Agilent 33250A
Digital Multimeter DC Voltage Range: 100 mV, 1 V, 10 V
DC Accuracy: ±100 ppm†
NI 4070
* ±300 µV on 1 V range, ±3 mV on 10 V range.† This specification contains the initial accuracy and any drift due to temperature and time.

NI 446X Calibration Procedure 10 ni.com
Calibration ProcessThis section provides instructions for verifying and calibrating the NI 446X device.
Calibration Process OverviewThe calibration process consists of the following steps:
1. Initial Setup—Configure the device in NI-DAQmx.
2. Self-Calibration—Measure the onboard reference voltage of the device and adjust the self-calibration constants.
3. NI 446X Verification Procedure—Verify the accuracy of the device prior to calibration.
4. NI 446X Adjustment Procedure—Perform an external calibration that adjusts the device calibration constants with respect to known voltage and frequency sources.
5. Perform another verification to ensure that the device operates with the specifications after adjustment.
The self-calibration, verification, and adjustment procedures are explained in the following sections.
Note You must compare the verification limits provided in this procedure with the most recent specifications. Refer to the latest NI 446X device specifications at ni.com/manuals.
Initial SetupNI-DAQmx automatically detects all NI 446X devices. However, for the driver to communicate with the device, you must configure the device in NI-DAQmx.
Complete the following steps to configure a device in NI-DAQmx:
1. Install the NI-DAQmx driver software.
2. Power off the computer that will hold the device and install the device in an available slot.
3. Power on the computer and launch MAX.
4. Right-click the device name and select Self-Test to ensure that the device is working properly.
Note When a device is configured with MAX, it is assigned a device name. Each function call uses this device name to determine which DAQ device to calibrate. This document uses dev1 to refer to the device name. In the following procedures, use the device name as it appears in MAX.

© National Instruments Corporation 11 NI 446X Calibration Procedure
Self-CalibrationCall self-calibration before completing the first verification. This function measures the onboard reference voltage of the device and adjusts the self-calibration constants to account for any errors caused by short-term fluctuations in the operating environment. When you self-calibrate a device, no external signal connections are necessary.
NI 446X Verification ProcedureVerification determines how well the NI 446X device is meeting specifications. By completing this procedure, you can see how the device has drifted over time, which helps you determine the appropriate calibration interval for your application.
Verifying Analog Input PerformanceThis section verifies the analog input (AI) performance of all NI 446X devices. Refer to the NI 446X Specifications for the number of channels, gain settings, and performance specifications.
NI-DAQmx Function Call LabVIEW Block Diagram
Call DAQmxSelfCal with the following parameters:
deviceName: dev1

NI 446X Calibration Procedure 12 ni.com
Verifying AI DC OffsetComplete the following steps to verify the AI DC offset:
1. Connect a 50 Ω terminator to the analog input channel 0 of the device. The terminator grounds the input channel when it is in pseudodifferential configuration.
2. If you use C function calls, create a task using the following function. If you use LabVIEW, skip this step. The task is created in step 3 in LabVIEW.
You use the object myTaskHandle in all subsequent NI-DAQmx function calls.
3. Create an AI voltage channel through NI-DAQmx using the following function.
NI-DAQmx Function Call LabVIEW Block Diagram
Call DAQmxCreateTask with the following parameter:
taskHandle: mytaskHandleReturnValue
LabVIEW does not require this step.
NI-DAQmx Function Call LabVIEW Block Diagram
Call DAQmxCreateAIVoltageChan with the following parameters:
taskHandle: myTaskHandle
physicalChannel: dev1/ai0
nameToAssignToChannel: ""
terminalConfig: DAQmx_Val_PseudoDiff
minVal: -10.0
maxVal: 10.0
units: DAQmx_Val_Volts
CustomScaleName: NULL

© National Instruments Corporation 13 NI 446X Calibration Procedure
4. Modify the AI voltage channel property using the following functions.
5. Configure the timing properties of the acquisition using the following function.
6. Start the task using the following function.
NI-DAQmx Function Call LabVIEW Block Diagram
Call DAQmxSetAIGain with the following parameters:
taskHandle: myTaskHandle
channel: dev1/ai0
data: -20.0
Call DAQmxSetAICoupling with the following parameters:
taskHandle: myTaskHandle
channel: dev1/ai0
data: DAQmx_Val_DC
NI-DAQmx Function Call LabVIEW Block Diagram
Call DAQmxCfgSampClkTiming with the following parameters:
taskHandle: myTaskHandle
source: NULL
rate: 204800.0
activeEdge: DAQmx_Val_Rising
sampleMode: DAQmx_Val_FiniteSamps
sampsPerChanToAcquire: 102400
NI-DAQmx Function Call LabVIEW Block Diagram
Call DAQmxStartTask with the following parameters:
taskHandle: myTaskHandle

NI 446X Calibration Procedure 14 ni.com
7. Acquire data using the following function.
8. Stop the task using the following function.
9. Clear the task using the following function.
NI-DAQmx Function Call LabVIEW Block Diagram
Call DAQmxReadAnalogF64 with the following parameters:
taskHandle: myTaskHandle
numSampsPerChan: -1
timeout: 10.0
fillMode: DAQmx_Val_GroupByChannel
arraySizeInSamps: 102400
reserved: NULL
readArray: float64ArrayReturnValue
sampsPerChanRead: int32PointerReturnValue
NI-DAQmx Function Call LabVIEW Block Diagram
Call DAQmxStopTask with the following parameters:
taskHandle: myTaskHandle
NI-DAQmx Function Call LabVIEW Block Diagram
Call DAQmxClearTask with the following parameters:
taskHandle: myTaskHandle

© National Instruments Corporation 15 NI 446X Calibration Procedure
10. Average all the values in the array returned from the acquisition. The average is the resulting offset for AI 0 at –20 dB device gain setting. Compare this value to the limits in Table 2.
11. Repeat steps 2 through 10 for each different gain value that is set in step 4, using the device gain values in Table 2.
12. Repeat steps 1 through 11 for all remaining analog input channels of the device. Replace ai0 with the appropriate channel name in function call parameters physicalChannel and channel.
Verifying AI Gain AccuracyComplete the following steps to verify AI gain accuracy:
1. Connect the output of the calibrator to the analog input channel 0 of the device.
2. Output 9.0 VDC using the calibrator.
3. If you use C function calls, create a task using the following function. If you use LabVIEW, skip this step. The task is created in step 4 in LabVIEW.
You use the object myTaskHandle in all subsequent NI-DAQmx function calls.
Table 2. AI Offset Limits
Device Gain
Device Input Offset
Min (mV) Max (mV)
–20 –7.0 7.0
–10 –5.0 5.0
0 – 0.7 0.7
10 – 0.5 0.5
20 – 0.2 0.2
30 – 0.1 0.1
NI-DAQmx Function Call LabVIEW Block Diagram
Call DAQmxCreateTask with the following parameter:
taskHandle: mytaskHandleReturnValueLabVIEW does not require this step.

NI 446X Calibration Procedure 16 ni.com
4. Create an AI voltage channel through NI-DAQmx using the following function.
5. Modify the AI voltage channel property using the following functions.
NI-DAQmx Function Call LabVIEW Block Diagram
Call DAQmxCreateAIVoltageChan with the following parameters:
taskHandle: myTaskHandle
physicalChannel: dev1/ai0
nameToAssignToChannel: ""
terminalConfig: DAQmx_Val_PseudoDiff
minVal: -10.0
maxVal: 10.0
units: DAQmx_Val_Volts
CustomScaleName: NULL
NI-DAQmx Function Call LabVIEW Block Diagram
Call DAQmxSetAIGain with the following parameters:
taskHandle: myTaskHandle
channel: dev1/ai0
data: -20.0
Call DAQmxSetAICoupling with the following parameters:
taskHandle: myTaskHandle
channel: dev1/ai0
data: DAQmx_Val_DC

© National Instruments Corporation 17 NI 446X Calibration Procedure
6. Configure the timing properties of the acquisition using the following function.
7. Start the task using the following function.
NI-DAQmx Function Call LabVIEW Block Diagram
Call DAQmxCfgSampClkTiming with the following parameters:
taskHandle: myTaskHandle
source: NULL
rate: 204800.0
activeEdge: DAQmx_Val_Rising
sampleMode: DAQmx_Val_FiniteSamps
sampsPerChanToAcquire: 102400
NI-DAQmx Function Call LabVIEW Block Diagram
Call DAQmxStartTask with the following parameters:
taskHandle: myTaskHandle

NI 446X Calibration Procedure 18 ni.com
8. Acquire data using the following function.
9. Stop the task using the following function.
10. Clear the task using the following function.
11. Average all the values in the array returned from the acquisition. This average is used to calculate the gain accuracy for AI 0 at –20 dB device gain setting. Compare this value to the limits (V) in Table 3.
NI-DAQmx Function Call LabVIEW Block Diagram
Call DAQmxReadAnalogF64 with the following parameters:
taskHandle: myTaskHandle
numSampsPerChan: -1
timeout: 10.0
fillMode: DAQmx_Val_GroupByChannel
arraySizeInSamps: 102400
reserved: NULL
readArray: float64ArrayReturnValue
sampsPerChanRead: int32PointerReturnValue
NI-DAQmx Function Call LabVIEW Block Diagram
Call DAQmxStopTask with the following parameters:
taskHandle: myTaskHandle
NI-DAQmx Function Call LabVIEW Block Diagram
Call DAQmxClearTask with the following parameters:
taskHandle: myTaskHandle

© National Instruments Corporation 19 NI 446X Calibration Procedure
12. Repeat steps 2 through 11 for all remaining gain values used in step 5. Modify the calibrator output amplitude in step 2. Refer to Table 3 for the calibrator output amplitude and the device gain value.
13. Repeat steps 1 through 12 for all remaining analog input channels of the device. Replace ai0 with the appropriate channel name in function call parameters physicalChannel and channel.
Verifying Analog Output PerformanceThis section verifies the analog output (AO) performance on the NI 4461 devices. Refer to the NI 446X Specifications for the number of channels, gain settings, and performance specifications.
Verifying AO DC OffsetComplete the following steps to verify AO DC offset:
1. Connect the analog output channel 0 of the device to the input of the multimeter.
2. Create an array of double float of size 1024. Initialize all the values in the array to 0.0. You use this array to output 0 V using the device analog output channel 0.
3. If you use C function calls, create a task using the following function. If you use LabVIEW, skip this step. The task is created in step 4 in LabVIEW.
Table 3. AI Gain Accuracy Limits
Device GainCalibrator Output Amplitude (VDC)
Device Input Amplitude Accuracy
Min (dB) Max (dB) Min (V) Max (V)
–20 9.0 – 0.03 0.03 8.9690 9.0311
–10 9.0 – 0.03 0.03 8.9690 9.0311
0 9.0 – 0.03 0.03 8.9690 9.0311
10 3.0 – 0.03 0.03 2.9897 3.0104
20 0.9 – 0.03 0.03 0.8969 0.9031
30 0.3 – 0.03 0.03 0.2990 0.3010
NI-DAQmx Function Call LabVIEW Block Diagram
Call DAQmxCreateTask with the following parameter:
taskHandle: mytaskHandleReturnValueLabVIEW does not require this step.

NI 446X Calibration Procedure 20 ni.com
You use the object myTaskHandle in all subsequent NI-DAQmx function calls.
4. Create an AO Voltage channel through NI-DAQmx using the following function.
5. Modify the AO voltage channel property using the following functions.
NI-DAQmx Function Call LabVIEW Block Diagram
Call DAQmxCreateAOVoltageChan with the following parameters:
taskHandle: myTaskHandle
physicalChannel: dev1/ao0
nameToAssignToChannel: ""
minVal: -10.0
maxVal: 10.0
units: DAQmx_Val_Volts
customScaleName: NULL
NI-DAQmx Function Call
Call DAQmxSetAOIdleOutputBehavior with the following parameters:
taskHandle: myTaskHandle
channel: dev1/ao0
data: DAQmx_Val_HighImpedance
Call DAQmxSetAOGain with the following parameters:
taskHandle: myTaskHandle
channel: dev1/ao0
data: -40.0
© National Instruments Corporation 21 NI 446X Calibration Procedure
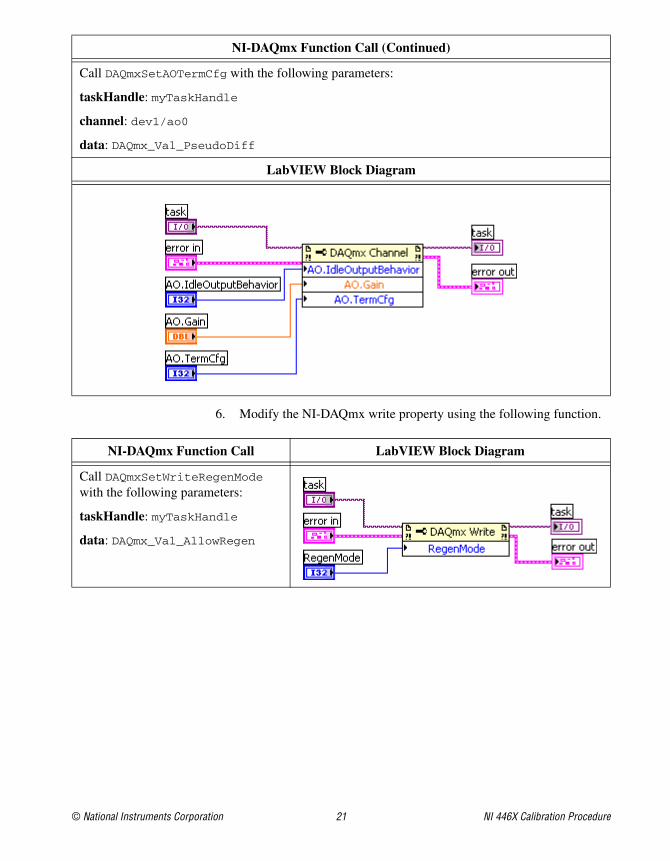
6. Modify the NI-DAQmx write property using the following function.
Call DAQmxSetAOTermCfg with the following parameters:
taskHandle: myTaskHandle
channel: dev1/ao0
data: DAQmx_Val_PseudoDiff
LabVIEW Block Diagram
NI-DAQmx Function Call LabVIEW Block Diagram
Call DAQmxSetWriteRegenMode with the following parameters:
taskHandle: myTaskHandle
data: DAQmx_Val_AllowRegen
NI-DAQmx Function Call (Continued)

NI 446X Calibration Procedure 22 ni.com
7. Configure the timing properties of the generation using the following function.
8. Configure the onboard memory of the device using the following function and the array created in step 2.
NI-DAQmx Function Call LabVIEW Block Diagram
Call DAQmxCfgSampClkTiming with the following parameters:
taskHandle: myTaskHandle
source: NULL
rate: 204800.0
activeEdge: DAQmx_Val_Rising
SampleMode: DAQmx_Val_ContSamps
sampsPerChanToAcquire: 1024
NI-DAQmx Function Call LabVIEW Block Diagram
Call DAQmxWriteAnalogF64 with the following parameters:
taskHandle: myTaskHandle
numSampsPerChan: 1024
autoStart: FALSE
timeout: 10.0
dataLayout: DAQmx_Val_GroupByChannel
writeArray: myDataArray
reserved: NULL
sampsPerChanWritten: int32PointerReturnValue

© National Instruments Corporation 23 NI 446X Calibration Procedure
9. Start the task using the following function.
10. Measure the DC Volts of the analog output channel using the multimeter in its most sensitive range. Compare this value to the limits in Table 4 for – 40 dB device gain.
11. Stop the task using the following function.
12. Clear the task using the following function.
13. Repeat steps 3 through 12 for all remaining gain values used in step 5. Refer to Table 4 for all the device gain values.
NI-DAQmx Function Call LabVIEW Block Diagram
Call DAQmxStartTask with the following parameters:
taskHandle: myTaskHandle
NI-DAQmx Function Call LabVIEW Block Diagram
Call DAQmxStopTask with the following parameters:
taskHandle: myTaskHandle
NI-DAQmx Function Call LabVIEW Block Diagram
Call DAQmxClearTask with the following parameters:
taskHandle: myTaskHandle
Table 4. AO Offset Limits
Device Gain
Multimeter Reading
Min (mV) Max (mV)
– 40 –1.0 1.0
–20 –1.0 1.0
0 –1.0 1.0

NI 446X Calibration Procedure 24 ni.com
14. Repeat steps 1 through 13 for analog output channel 1 of the device. Replace ao0 with ao1 in the function call parameters physicalChannel and channel.
Verifying AO Gain AccuracyComplete the following steps to verify AO gain accuracy:
1. Connect analog output channel 0 to the input of the multimeter.
2. Create an array of double float of size 1024. Initialize this array with the value 1.0.
3. Multiply each value in the array by 0.09. Use this array to output 0.09 VDC using the device AO 0.
4. If you use C function calls, create a task using the following function. If you use LabVIEW, skip this step. The task is created in step 5 in LabVIEW.
You use the object myTaskHandle in all subsequent NI-DAQmx function calls.
5. Create an AO Voltage channel through NI-DAQmx using the following function.
NI-DAQmx Function Call LabVIEW Block Diagram
Call DAQmxCreateTask with the following parameter:
taskHandle: mytaskHandleReturnValue
LabVIEW does not require this step.
NI-DAQmx Function Call LabVIEW Block Diagram
Call DAQmxCreateAOVoltageChan with the following parameters:
taskHandle: myTaskHandle
physicalChannel: dev1/ao0
nameToAssignToChannel: ""
minVal: -10.0
maxVal: 10.0
units: DAQmx_Val_Volts
customScaleName: NULL

© National Instruments Corporation 25 NI 446X Calibration Procedure
6. Modify the AO voltage channel property using the following functions.
NI-DAQmx Function Call
Call DAQmxSetAOIdleOutputBehavior with the following parameters:
taskHandle: myTaskHandle
channel: dev1/ao0
data: DAQmx_Val_HighImpedance
Call DAQmxSetAOGain with the following parameters:
taskHandle: myTaskHandle
channel: dev1/ao0
data: -40.0
Call DAQmxSetAOTermCfg with the following parameters:
taskHandle: myTaskHandle
channel: dev1/ao0
data: DAQmx_Val_PseudoDiff
LabVIEW Block Diagram

NI 446X Calibration Procedure 26 ni.com
7. Modify the NI-DAQmx write property using the following function.
8. Configure the timing properties of the generation using the following function.
NI-DAQmx Function Call LabVIEW Block Diagram
Call DAQmxSetWriteRegenMode with the following parameters:
taskHandle: myTaskHandle
data: DAQmx_Val_AllowRegen
NI-DAQmx Function Call LabVIEW Block Diagram
Call DAQmxCfgSampClkTiming with the following parameters:
taskHandle: myTaskHandle
source: NULL
rate: 204800.0
activeEdge: DAQmx_Val_Rising
SampleMode: DAQmx_Val_ContSamps
sampsPerChanToAcquire: 1024

© National Instruments Corporation 27 NI 446X Calibration Procedure
9. Configure the onboard memory of the device using the following function and the array modified in step 3.
10. Start the task using the following function.
11. Measure the DC voltage of the analog output channel using the multimeter in the appropriate range. Compare this value to the limits (V) in Table 5 for – 40 dB device gain
.
NI-DAQmx Function Call LabVIEW Block Diagram
Call DAQmxWriteAnalogF64 with the following parameters:
taskHandle: myTaskHandle
numSampsPerChan: 1024
autoStart: FALSE
timeout: 10.0
dataLayout: DAQmx_Val_GroupByChannel
writeArray: myDataArray
reserved: NULL
sampsPerChanWritten: int32PointerReturnValue
NI-DAQmx Function Call LabVIEW Block Diagram
Call DAQmxStartTask with the following parameters:
taskHandle: myTaskHandle
Table 5. AO Gain Accuracy Limits
Device Gain
Device Output Amplitude
(VDC)
Output Amplitude Accuracy
Min (dB) Max (dB) Min (V) Max (V)
– 40 0.09 – 0.04 0.04 0.089587 0.090415
–20 0.9 – 0.04 0.04 0.89587 0.90415
0 9.0 – 0.04 0.04 8.9587 9.0415

NI 446X Calibration Procedure 28 ni.com
12. Stop the task using the following function.
13. Clear the task using the following function.
14. Repeat steps 3 through 13 for all remaining gain values used in step 6. Also modify the device output amplitude used in step 3. For all values, refer to Table 5.
15. Repeat steps 1 through 14 for analog output channel 1 of the device. Replace ao0 with ao1 in the function call parameters physicalChannel and channel.
Verifying Timebase Frequency AccuracyThis section describes the verification process for the timebase frequency accuracy on all the NI 446X devices. All analog inputs use a single circuit on each device. The NI 4461 analog output channels also use the same timebase frequency circuit. Therefore, you need to verify only the analog input frequency accuracy on a single channel to verify this circuit accuracy.
Complete the following steps to verify the timebase:
1. Connect the function generator to the analog input channel 0 of the device.
2. Output a sine wave using the function generator. The sine wave should have an amplitude of 9 Vp-p with no DC offset and a frequency of 10,000.00 Hz.
NI-DAQmx Function Call LabVIEW Block Diagram
Call DAQmxStopTask with the following parameters:
taskHandle: myTaskHandle
NI-DAQmx Function Call LabVIEW Block Diagram
Call DAQmxClearTask with the following parameters:
taskHandle: myTaskHandle

© National Instruments Corporation 29 NI 446X Calibration Procedure
3. If you use C function calls, create a task using the following function. If you use LabVIEW, skip this step. The task is created in step 4 in LabVIEW.
You use the object myTaskHandle in all subsequent NI-DAQmx function calls.
4. Create an AI voltage channel through NI-DAQmx using the following function.
NI-DAQmx Function Call LabVIEW Block Diagram
Call DAQmxCreateTask with the following parameter:
taskHandle: mytaskHandleReturnValue
LabVIEW does not require this step.
NI-DAQmx Function Call LabVIEW Block Diagram
Call DAQmxCreateAIVoltageChan with the following parameters:
taskHandle: myTaskHandle
physicalChannel: dev1/ai0
nameToAssignToChannel: ""
terminalConfig: DAQmx_Val_PseudoDiff
minVal: -10.0
maxVal: 10.0
units: DAQmx_Val_Volts
CustomScaleName: NULL

NI 446X Calibration Procedure 30 ni.com
5. Modify the AI voltage channel property using the following functions.
6. Configure the timing properties of the acquisition using the following function.
7. Start the task using the following function.
NI-DAQmx Function Call LabVIEW Block Diagram
Call DAQmxSetAIGain with the following parameters:
taskHandle: myTaskHandle
channel: dev1/ai0
data: 0.0
Call DAQmxSetAICoupling with the following parameters:
taskHandle: myTaskHandle
channel: dev1/ai0
data: DAQmx_Val_DC
NI-DAQmx Function Call LabVIEW Block Diagram
Call DAQmxCfgSampClkTiming with the following parameters:
taskHandle: myTaskHandle
source: NULL
rate: 40000.0
activeEdge: DAQmx_Val_Rising
sampleMode: DAQmx_Val_FiniteSamps
sampsPerChanToAcquire: 2560000
NI-DAQmx Function Call LabVIEW Block Diagram
Call DAQmxStartTask with the following parameters:
taskHandle: myTaskHandle

© National Instruments Corporation 31 NI 446X Calibration Procedure
8. Create an array of double float of size 2560000 that will be filled with data. Acquire data using the following function. The acquisition takes over 1 minute.
9. Stop the task using the following function.
10. Clear the task using the following function.
NI-DAQmx Function Call LabVIEW Block Diagram
Call DAQmxReadAnalogF64 with the following parameters:
taskHandle: myTaskHandle
numSampsPerChan: -1
timeout: 100.0
fillMode: DAQmx_Val_GroupByChannel
arraySizeInSamps: 2560000
reserved: NULL
readArray: float64ArrayReturnValue
sampsPerChanRead: int32PointerReturnValue
NI-DAQmx Function Call LabVIEW Block Diagram
Call DAQmxStopTask with the following parameters:
taskHandle: myTaskHandle
NI-DAQmx Function Call LabVIEW Block Diagram
Call DAQmxClearTask with the following parameters:
taskHandle: myTaskHandle

NI 446X Calibration Procedure 32 ni.com
11. If you use C function calls, perform an FFT on the array of data. If you use LabVIEW, use the Analog 1D Wfm 1chan Nsamp polymorphic VI to acquire data in step 8. Measure the exact frequency of the peak around 10 kHz using the Extract Single Tone Information VI with the following inputs:
• advanced search»approx freq. : 10000
• advanced search»search : 1
• export signals : 0 (none)
12. Compare the detected frequency to the limits in Table 6.
NI 446X Adjustment ProcedureThe NI 446X adjustment procedure adjusts the analog input, analog output, and timebase frequency calibration constants. At the end of each adjustment procedure, the new constants are stored in the external calibration area of the device EEPROM, which ensures that you do not accidentally access or modify any calibration constants adjusted by the metrology laboratory while performing a self-calibration procedure. You can adjust the NI 446X AI, AO, and timebase frequency independently. The following sections describe the AI, AO, and timebase frequency adjustment procedures.
Adjusting the Analog InputComplete the following steps to adjust the analog input:
1. Connect the output of the calibrator to all the analog input channels of the device, using the BNC T-connectors to split the signal in a tree formation to all the inputs.
2. Use the calibrator to output 5.00 VDC.
Table 6. Timebase Frequency Accuracy Limits
Function Generator Output Device Input Frequency
Amplitude (Vp-p) Frequency (Hz) Min (Hz) Max (Hz)
9.0 10,000.00 9,999.8 10,000.2
© National Instruments Corporation 33 NI 446X Calibration Procedure
3. Initialize the AI calibration using the following function.
You use the object myCalHandle in all subsequent NI-DAQmx function calls.
4. Perform the AI calibration using the following function call. The reference voltage parameter is the voltage value output by the calibrator.
5. Finish the AI calibration with the following function call. Use the action cancel if there has been any error during the AI calibration or if you do not want to save the new AI calibration constants in the device EEPROM. Use the action commit if you want to save the new AI calibration constants in the device EEPROM.
NI-DAQmx Function Call LabVIEW Block Diagram
Call DAQmxInitExtCal with the following parameters:
deviceName: dev1
password: userPassword
calHandle: myCalHandle
NI-DAQmx Function Call LabVIEW Block Diagram
Call DAQmxAdjustDSAAICal with the following parameters:
calHandle: myCalHandle
referenceVoltage: 5.0
NI-DAQmx Function Call LabVIEW Block Diagram
Call DAQmxCloseExtCal with the following parameters:
calHandle: myCalHandle
action: DAQmx_Val_Action_Commit or
DAQmx_Val_Action_Cancel

NI 446X Calibration Procedure 34 ni.com
Adjusting the Analog OutputComplete the following steps to adjust the analog output:
1. Connect the input of the multimeter to the analog output channel 0 of the device.
2. Initialize the AO Calibration using the following function call.
You use the object myCalHandle in all subsequent NI-DAQmx calibration function calls.
3. Create an array of double float of size 1024. Initialize all the values in the array to 1.0.
4. Multiply each value in the array by 0.09. This is the Device Output Voltage, Requested High Voltage listed in Table 7 for – 40 dB device gain. Use this array to output a DC voltage using the device analog output channel 0.
5. If you use C function calls, create a task using the following function. If you use LabVIEW, skip this step. The task is created in step 6 in LabVIEW.
You use the object myTaskHandle in all subsequent NI-DAQmx function calls.
NI-DAQmx Function Call LabVIEW Block Diagram
Call DAQmxInitExtCal with the following parameters:
deviceName: dev1
password: userPassword
calHandle: myCalHandle
NI-DAQmx Function Call LabVIEW Block Diagram
Call DAQmxCreateTask with the following parameter:
taskHandle: mytaskHandleReturnValue
LabVIEW does not require this step.
© National Instruments Corporation 35 NI 446X Calibration Procedure
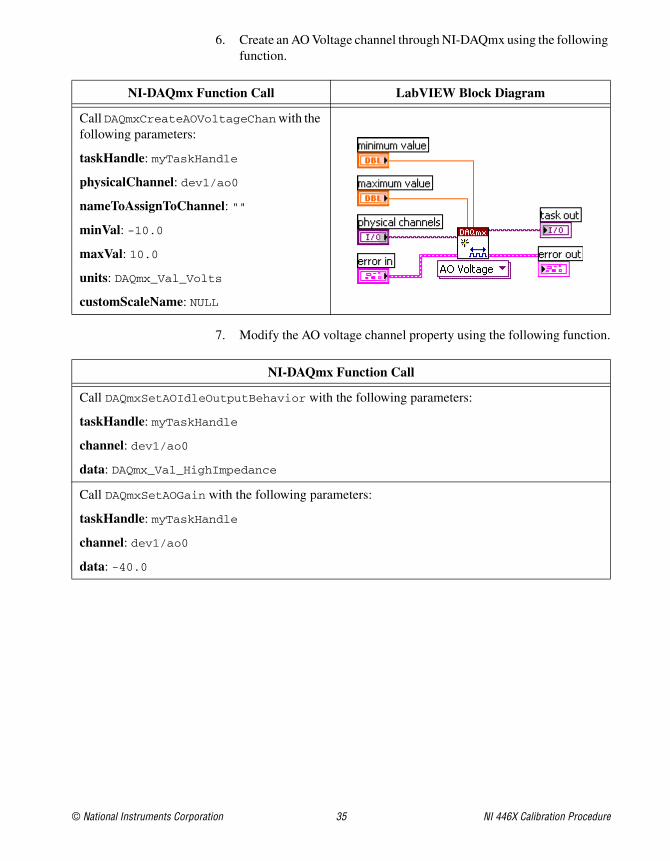
6. Create an AO Voltage channel through NI-DAQmx using the following function.
7. Modify the AO voltage channel property using the following function.
NI-DAQmx Function Call LabVIEW Block Diagram
Call DAQmxCreateAOVoltageChan with the following parameters:
taskHandle: myTaskHandle
physicalChannel: dev1/ao0
nameToAssignToChannel: ""
minVal: -10.0
maxVal: 10.0
units: DAQmx_Val_Volts
customScaleName: NULL
NI-DAQmx Function Call
Call DAQmxSetAOIdleOutputBehavior with the following parameters:
taskHandle: myTaskHandle
channel: dev1/ao0
data: DAQmx_Val_HighImpedance
Call DAQmxSetAOGain with the following parameters:
taskHandle: myTaskHandle
channel: dev1/ao0
data: -40.0
NI 446X Calibration Procedure 36 ni.com
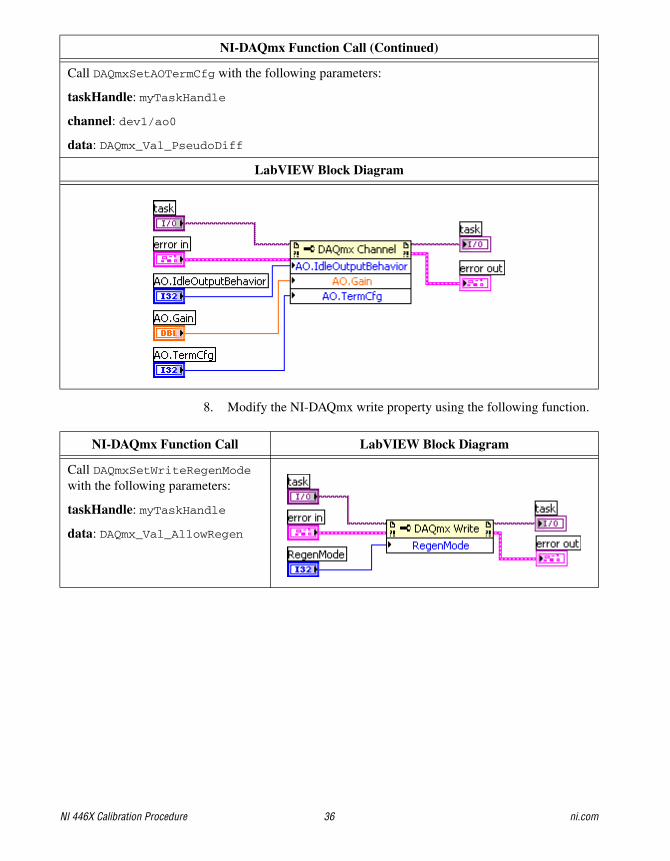
8. Modify the NI-DAQmx write property using the following function.
Call DAQmxSetAOTermCfg with the following parameters:
taskHandle: myTaskHandle
channel: dev1/ao0
data: DAQmx_Val_PseudoDiff
LabVIEW Block Diagram
NI-DAQmx Function Call LabVIEW Block Diagram
Call DAQmxSetWriteRegenMode with the following parameters:
taskHandle: myTaskHandle
data: DAQmx_Val_AllowRegen
NI-DAQmx Function Call (Continued)

© National Instruments Corporation 37 NI 446X Calibration Procedure
9. Configure the timing properties of the generation using the following function.
10. Configure the onboard memory of the device using the following function and the array you modified in step 4.
NI-DAQmx Function Call LabVIEW Block Diagram
Call DAQmxCfgSampClkTiming with the following parameters:
taskHandle: myTaskHandle
source: NULL
rate: 204800.0
activeEdge: DAQmx_Val_Rising
SampleMode: DAQmx_Val_ContSamps
sampsPerChanToAcquire: 1024
NI-DAQmx Function Call LabVIEW Block Diagram
Call DAQmxWriteAnalogF64 with the following parameters:
taskHandle: myTaskHandle
numSampsPerChan: 1024
autoStart: FALSE
timeout: 10.0
dataLayout: DAQmx_Val_GroupByChannel
writeArray: myDataArray
reserved: NULL
sampsPerChanWritten: int32PointerReturnValue

NI 446X Calibration Procedure 38 ni.com
11. Start the task using the following function.
12. Measure the DC voltage of the analog output channel using the multimeter in the appropriate range. Record this value as actualHighVoltage.
13. Stop the task using the following function.
14. Clear the task using the following function.
15. Repeat steps 4 to 14 using the Requested Low Voltage for – 40 dB device gain from Table 7. Record the multimeter DC voltage measurement as actualLowVoltage.
NI-DAQmx Function Call LabVIEW Block Diagram
Call DAQmxStartTask with the following parameters:
taskHandle: myTaskHandle
NI-DAQmx Function Call LabVIEW Block Diagram
Call DAQmxStopTask with the following parameters:
taskHandle: myTaskHandle
NI-DAQmx Function Call LabVIEW Block Diagram
Call DAQmxClearTask with the following parameters:
taskHandle: myTaskHandle

© National Instruments Corporation 39 NI 446X Calibration Procedure
16. Perform the AO calibration for this gain setting using the following function.
17. Repeat steps 4 through 16 for all remaining gain values used in steps 4 and 16. Also modify the device requested high and low voltages used in steps 4 and 16. You can find the values in Table 7.
18. Repeat steps 1 and 4 through 17 for analog output channel 1 of the device. Replace ao0 with ao1 in the function call parameters physicalChannel and channel.
NI-DAQmx Function Call LabVIEW Block Diagram
Call DAQmxAdjustDSAAOCal with the following parameters:
calHandle: myCalHandle
channel: 0
requestLowVoltage: -0.09
actualLowVoltage: actualLowVoltage
requestedHighVoltage: 0.09
actualHighVoltage: actualHighVoltage
gainSetting: -40.0
Table 7. Device Output Voltages for AO Calibration
Device Gain (dB) Device Output Voltage (V)
– 40 0.09 (Requested High Voltage)
– 0.09 (Requested Low Voltage)
–20 0.90 (Requested High Voltage)
– 0.90 (Requested Low Voltage)
0 9.00 (Requested High Voltage)
–9.00 (Requested Low Voltage)

NI 446X Calibration Procedure 40 ni.com
19. Finish the AO calibration with the following function call. Use the action cancel if an error occurs during the AO calibration or if you do not want to save the new AO calibration constants in the device EEPROM. Use the action commit if you want to save the new AO calibration constants in the device EEPROM.
Adjusting the TimebaseComplete the following steps to adjust the timebase:
1. Connect the output of the function generator to the analog input 0 of the device.
2. Output a sine wave using the function generator. The sine wave should have an amplitude of 9 Vp-p, no offset, and a frequency of 1,000.000 Hz.
3. Initialize the timebase calibration using the following function call.
You use the object myCalHandle in all subsequent NI-DAQmx function calls.
NI-DAQmx Function Call LabVIEW Block Diagram
Call DAQmxCloseExtCal with the following parameters:
calHandle: myCalHandle
action: DAQmx_Val_Action_Commit or
DAQmx_Val_Action_Cancel
NI-DAQmx Function Call LabVIEW Block Diagram
Call DAQmxInitExtCal with the following parameters:
deviceName: dev1
password: userPassword
calHandle: myCalHandle

© National Instruments Corporation 41 NI 446X Calibration Procedure
4. Perform the timebase calibration using the following function call. The parameter referenceFrequency is the frequency output by the function generator.
5. Finish the timebase calibration with the following function call. Use the action cancel if an error occurs during the timebase calibration or if you do not want to save the new timebase calibration constants in the device EEPROM. Use the action commit if you want to save the new timebase calibration constants in the device EEPROM.
NI-DAQmx Function Call LabVIEW Block Diagram
Call DAQmxAdjustDSATimebaseCal with the following parameters:
calHandle: myCalHandle
referenceFrequency: 1000.0
NI-DAQmx Function Call LabVIEW Block Diagram
Call DAQmxCloseExtCal with the following parameters:
calHandle: myCalHandle
action: DAQmx_Val_Action_Commit or
DAQmx_Val_Action_Cancel

National Instruments, NI, ni.com, and LabVIEW are trademarks of National Instruments Corporation. Refer to the Terms of Use section on ni.com/legal for more information about National Instruments trademarks. Other product and company names mentioned herein are trademarks or trade names of their respective companies. For patents covering National Instruments products, refer to the appropriate location: Help»Patents in your software, the patents.txt file on your CD, or ni.com/patents.
© 2005–2006 National Instruments Corporation. All rights reserved. 371234B-01 Mar06
Where to Go for SupportThe National Instruments Web site is your complete resource for technical support. At ni.com/support you have access to everything from troubleshooting and application development self-help resources to email and phone assistance from NI Application Engineers.
A Declaration of Conformity (DoC) is our claim of compliance with the Council of the European Communities using the manufacturer’s declaration of conformity. This system affords the user protection for electronic compatibility (EMC) and product safety. You can obtain the DoC for your product by visiting ni.com/certification. If your product supports calibration, you can obtain the calibration certificate for your product at ni.com/calibration.
National Instruments corporate headquarters is located at 11500 North Mopac Expressway, Austin, Texas, 78759-3504. National Instruments also has offices located around the world to help address your support needs. For telephone support in the United States, create your service request at ni.com/support and follow the calling instructions or dial 512 795 8248. For telephone support outside the United States, contact your local branch office:
Australia 1800 300 800, Austria 43 0 662 45 79 90 0, Belgium 32 0 2 757 00 20, Brazil 55 11 3262 3599, Canada 800 433 3488, China 86 21 6555 7838, Czech Republic 420 224 235 774, Denmark 45 45 76 26 00, Finland 385 0 9 725 725 11, France 33 0 1 48 14 24 24, Germany 49 0 89 741 31 30, India 91 80 41190000, Israel 972 0 3 6393737, Italy 39 02 413091, Japan 81 3 5472 2970, Korea 82 02 3451 3400, Lebanon 961 0 1 33 28 28, Malaysia 1800 887710, Mexico 01 800 010 0793, Netherlands 31 0 348 433 466, New Zealand 0800 553 322, Norway 47 0 66 90 76 60, Poland 48 22 3390150, Portugal 351 210 311 210, Russia 7 095 783 68 51, Singapore 1800 226 5886, Slovenia 386 3 425 4200, South Africa 27 0 11 805 8197, Spain 34 91 640 0085, Sweden 46 0 8 587 895 00, Switzerland 41 56 200 51 51, Taiwan 886 02 2377 2222, Thailand 662 278 6777, United Kingdom 44 0 1635 523545