nikon s6400rm en 02
TRANSCRIPT

7/29/2019 Nikon s6400rm en 02
http://slidepdf.com/reader/full/nikon-s6400rm-en-02 1/280
DIGITAL CAMERA
Reference Manual
En
7/29/2019 Nikon s6400rm en 02
http://slidepdf.com/reader/full/nikon-s6400rm-en-02 2/280
Highlight Features of the COOLPIX S6400
Simple touch operations that let you edit images when shooting
pQuick effects ..................................................... A30, 39Create images with effects in three easy steps, simply by shooting, selecting, and saving.
30 effects are available. Just as with a smartphone application, you can preview the results of
each effect on the image and choose your favorite one to suit the scene or your mood.You can also apply effects to images later by tappingY during playback (A33).
Autofocus function that automatically determines the subject
M Target finding AF................................................... A74
The Target finding AF function* allows the camera to determine the main subject of theimage, such as a person, flower, or small object. The camera automatically focuses on thesubject, letting you freely compose the image without worrying about the focus.
In addition, the camera automatically adjusts the focus area to match the size of the subject,ensuring a sharp focus on the intended subject.
The camera is also equipped with various other functions that make it easy to focus, such asTouch shutter (A69), which lets you focus and release the shutter by tapping the intendedsubject in the monitor after you compose the picture.
* Set AF area mode (A70) in the shooting menu to Target finding AF before shooting.

7/29/2019 Nikon s6400rm en 02
http://slidepdf.com/reader/full/nikon-s6400rm-en-02 3/280
i
Introduction
Parts of the Camera
The Basics of Shooting and Playback
Shooting Features
Playback Features
Recording and Playing Back Movies
General Camera Setup
Reference Section
Technical Notes and Index
7/29/2019 Nikon s6400rm en 02
http://slidepdf.com/reader/full/nikon-s6400rm-en-02 4/280
ii
I n t r o d u c t i on
Introduction
Read This First
Thank you for purchasing the Nikon COOLPIX S6400 digital camera. Before using the camera,
please read the information in “For Your Safety” (Aviii-x) and familiarize yourself with theinformation provided in this manual. After reading, please keep this manual handy and referto it to enhance your enjoyment of your new camera.
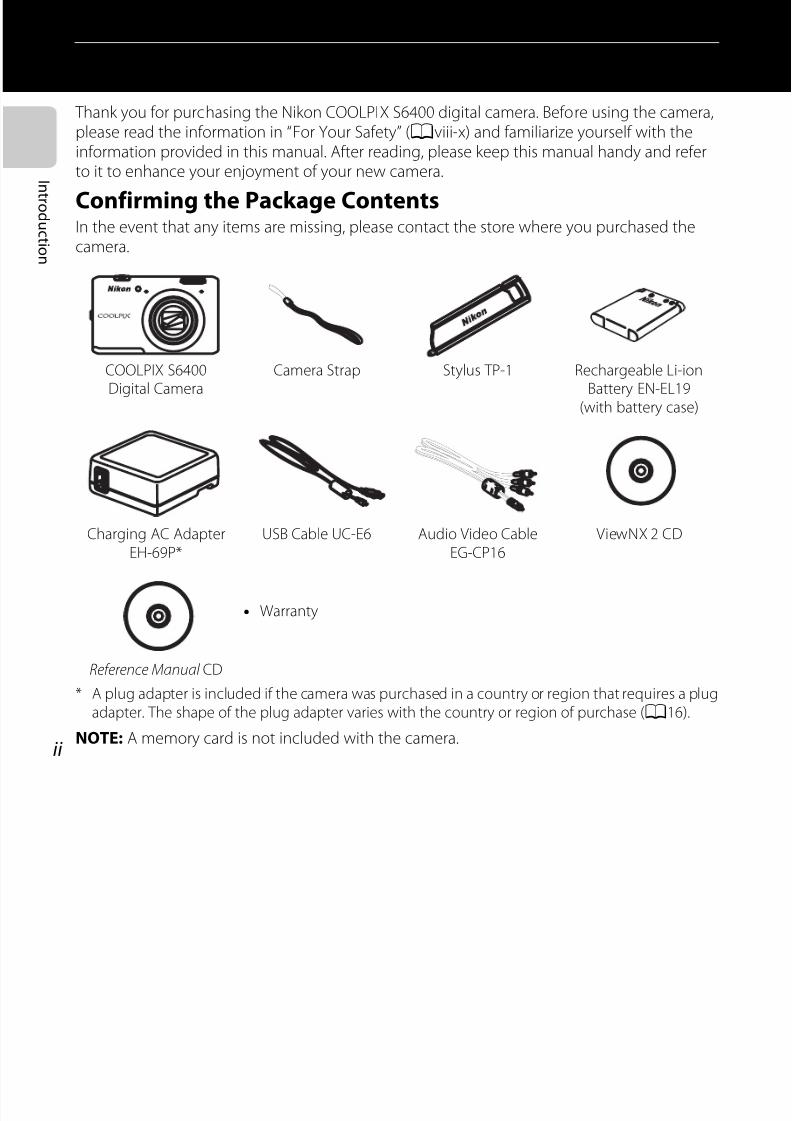
Confirming the Package ContentsIn the event that any items are missing, please contact the store where you purchased thecamera.
* A plug adapter is included if the camera was purchased in a country or region that requires a plugadapter. The shape of the plug adapter varies with the country or region of purchase (A16).
NOTE: A memory card is not included with the camera.
COOLPIX S6400Digital Camera
Camera Strap Stylus TP-1 Rechargeable Li-ionBattery EN-EL19
(with battery case)
Charging AC Adapter
EH-69P*
USB Cable UC-E6 Audio Video Cable
EG-CP16
ViewNX 2 CD
• Warranty
Reference Manual CD

7/29/2019 Nikon s6400rm en 02
http://slidepdf.com/reader/full/nikon-s6400rm-en-02 5/280
iii
I n t r o d u c t i on
About This ManualIf you want to start using the camera right away, see “The Basics of Shooting and Playback”
(A13).
To learn about the parts of the camera and information that is displayed in the monitor, see
“Parts of the Camera” (A1).
7/29/2019 Nikon s6400rm en 02
http://slidepdf.com/reader/full/nikon-s6400rm-en-02 6/280
iv
I n t r o d u c t i on
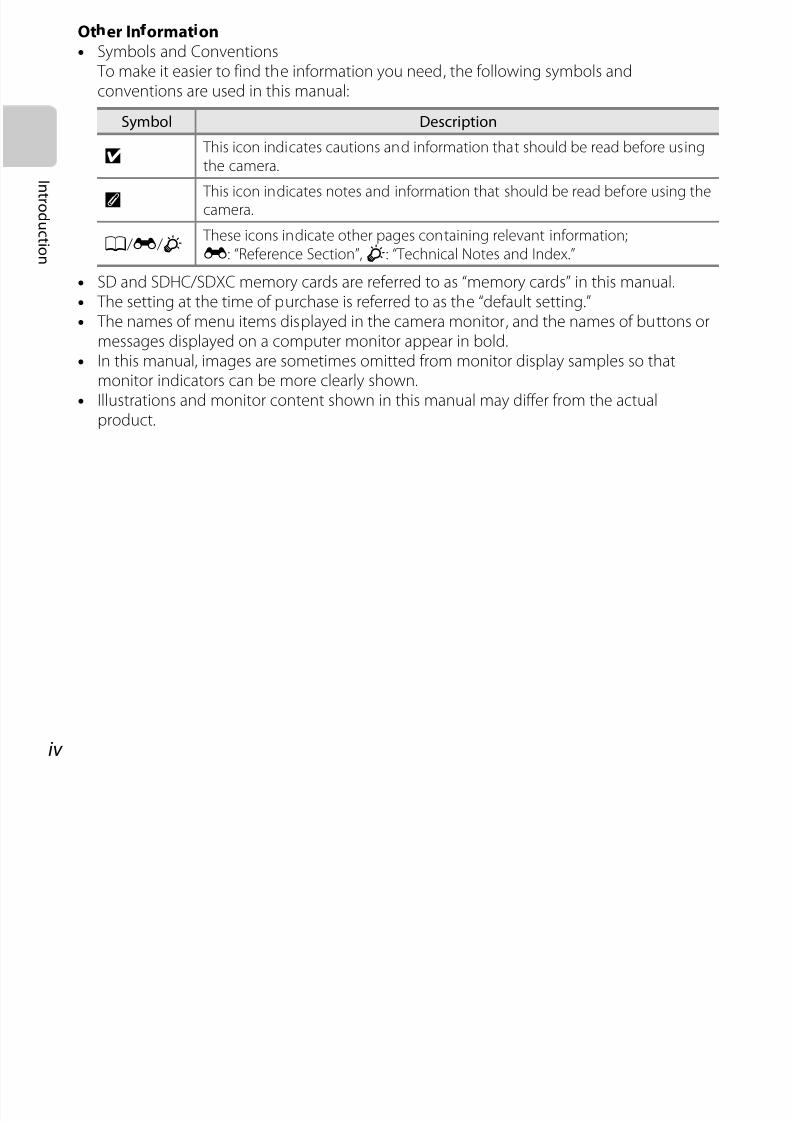
Ot er In ormat on• Symbols and Conventions
To make it easier to find the information you need, the following symbols andconventions are used in this manual:
• SD and SDHC/SDXC memory cards are referred to as “memory cards” in this manual.• The setting at the time of purchase is referred to as the “default setting.”• The names of menu items displayed in the camera monitor, and the names of buttons or
messages displayed on a computer monitor appear in bold.• In this manual, images are sometimes omitted from monitor display samples so that
monitor indicators can be more clearly shown.• Illustrations and monitor content shown in this manual may differ from the actual
product.
Symbol Description
B This icon indicates cautions and information that should be read before usingthe camera.
C This icon indicates notes and information that should be read before using thecamera.
A / E / F These icons indicate other pages containing relevant information;E: “Reference Section”,F: “Technical Notes and Index.”

7/29/2019 Nikon s6400rm en 02
http://slidepdf.com/reader/full/nikon-s6400rm-en-02 7/280
v
I n t r o d u c t i on
Information and Precautions
Life-Long Learning
As part of Nikon’s “Life-Long Learning” commitment to ongoing product support and education,
continually updated information is available online at the following sites:
• For users in the U.S.A.: http://www.nikonusa.com/
• For users in Europe and Africa: http://www.europe-nikon.com/support/
• For users in Asia, Oceania, and the Middle East: http://www.nikon-asia.com/
Visit these sites to keep up-to-date with the latest product information, tips, answers to frequently
asked questions (FAQs), and general advice on digital imaging and photography. Additional
information may be available from the Nikon representative in your area. Visit the site below for
contact information:http://imaging.nikon.com/
Use Only Nikon Brand Electronic Accessories
Nikon COOLPIX cameras are designed to the highest standards and include complex electronic
circuitry. Only Nikon brand electronic accessories (including battery chargers, batteries, Charging AC
adapters, and AC adapters) certified by Nikon specifically for use with this Nikon digital camera are
engineered and proven to operate within the operational and safety requirements of this electroniccircuitry.
T HE USE OF NON-NIKON ELECTRONIC ACCESSORIES COULD DAMAGE THE CAMERA AND MAY
VOID YOUR NIKON WARRANTY.
The use of third-party rechargeable Li-ion batteries not bearing the Nikon holographic seal could
interfere with normal operation of the camera or result in the batteries overheating, igniting,
rupturing, or leaking.For more information about Nikon brand accessories, contact a local authorized Nikon dealer.
Holographic seal: Identifies this
device as an authentic Nikon product.

7/29/2019 Nikon s6400rm en 02
http://slidepdf.com/reader/full/nikon-s6400rm-en-02 8/280
7/29/2019 Nikon s6400rm en 02
http://slidepdf.com/reader/full/nikon-s6400rm-en-02 9/280
vii
I n t r o d u c t i on
• Cautions on certain copies and reproductions
The government has issued cautions on copies or reproductions of securities issued by private
companies (shares, bills, checks, gift certificates, etc.), commuter passes, or coupon tickets, except
when a minimum of necessary copies are to be provided for business use by a company. Also, do
not copy or reproduce passports issued by the government, licenses issued by public agencies and
private groups, ID cards and tickets, such as passes and meal coupons.• Comply with copyright notices
The copying or reproduction of copyrighted creative works such as books, music, paintings,
woodcut prints, maps, drawings, movies, and photographs is governed by national and international
copyright laws. Do not use this product for the purpose of making illegal copies or to infringe
copyright laws.
Disposing of Data Storage DevicesPlease note that deleting images or formatting data storage devices such as memory cards or
built-in camera memory does not completely erase the original image data. Deleted files can
sometimes be recovered from discarded storage devices using commercially available software,
potentially resulting in the malicious use of personal image data. Ensuring the privacy of such data is
the user’s responsibility.
Before discarding a data storage device or transferring ownership to another person, erase all data
using commercial deletion software, or format the device and then completely refill it with images
containing no private information (for example, pictures of empty sky). Be sure to also replace any
pictures selected for the Select an image option in the Welcome screen setting (A104). Care
should be taken to avoid injury or damage to property when physically destroying data storage
devices.
7/29/2019 Nikon s6400rm en 02
http://slidepdf.com/reader/full/nikon-s6400rm-en-02 10/280
viii
I n t r o d u c t i on
For Your Safety
To prevent damage to your Nikon product or injury to yourself or to others, read the followingsafety precautions in their entirety before using this equipment. Keep these safetyinstructions where all those who use the product will read them.
The consequences that could result from failure to observe the precautions listed in thissection are indicated by the following symbol:
WARNINGS
Turn off in the event of malfunction
Should you notice smoke or an unusualsmell coming from the camera or Charging
AC Adapter, unplug the Charging ACAdapter and remove the batteryimmediately, taking care to avoid burns.Continued operation could result in injury.After removing or disconnecting the powersource, take the equipment to a Nikon-authorized service representative for
inspection.Do not disassemble
Touching the internal parts of the camera orCharging AC Adapter could result in injury.Repairs should be performed only byqualified technicians. Should the camera orCharging AC Adapter break open as the
result of a fall or other accident, take theproduct to a Nikon-authorized servicerepresentative for inspection, after
unplugging the product and/or removingthe battery.
Do not use the camera or ChargingAC Adapter in the presence of
flammable gasDo not use electronic equipment in thepresence of flammable gas, as this couldresult in explosion or fire.
Handle the camera strap with care
Never place the strap around the neck of an
infant or child.Keep out of reach of children
Particular care should be taken to preventinfants from putting the battery or othersmall parts into their mouths.
This icon marks warnings, information that should be read before using this Nikonproduct, to prevent possible injury.
7/29/2019 Nikon s6400rm en 02
http://slidepdf.com/reader/full/nikon-s6400rm-en-02 11/280
ix
I n t r o d u c t i on
Do not remain in contact with thecamera, battery charger, or ACadapter for extended periodswhile the devices are on or in use
Parts of the devices become hot. Leaving
the devices in direct contact with the skinfor extended periods may result in low-temperature burns.
Observe caution when handlingthe battery
The battery may leak, overheat, or explode if improperly handled. Observe the following
precautions when handling the battery foruse in this product:• Before replacing the battery, turn the
product off. If you are using the ChargingAC Adapter/AC adapter, be sure it isunplugged.
• Use only a Rechargeable Li-ion Battery
EN-EL19 (included). Charge the batteryby using a camera that supports batterycharging or by using a Battery ChargerMH-66 (available separately). To chargethe battery with the camera, use eitherCharging AC Adapter EH-69P (included)or the Charge by computer function.
• When inserting the battery, do notattempt to insert it upside down orbackwards.
• Do not short or disassemble the battery orattempt to remove or break the batteryinsulation or casing.
• Do not expose the battery to flame or to
excessive heat.• Do not immerse in or expose to water.
• Put the battery in the battery case beforetransporting it. Do not transport or storewith metal objects such as necklaces orhairpins.
• The battery is prone to leakage when fullydischarged. To avoid damage to theproduct, be sure to remove the batterywhen no charge remains.
• Discontinue use immediately should younotice any change in the battery, such asdiscoloration or deformation.
• If liquid from the damaged batterycomes in contact with clothing or skin,rinse immediately with plenty of water.
Observe the following precautionswhen handling the Charging ACAdapter
• Keep dry. Failure to observe thisprecaution could result in fire or electric
shock.• Dust on or near the metal parts of the
plug should be removed with a dry cloth.Continued use could result in fire.
• Do not handle the plug or go near theCharging AC Adapter during lightningstorms. Failure to observe this precaution
could result in electric shock.• Do not damage, modify, forcibly tug or
bend the USB cable, place it under heavyobjects, or expose it to heat or flames.Should the insulation be damaged and thewires become exposed, take it to a Nikon-authorized service representative for
inspection. Failure to observe theseprecautions could result in fire or electricshock.

7/29/2019 Nikon s6400rm en 02
http://slidepdf.com/reader/full/nikon-s6400rm-en-02 12/280
x
I n t r o d u c t i on
• Do not handle the plug or Charging ACAdapter with wet hands. Failure toobserve this precaution could result inelectric shock.
• Do not use with travel converters oradapters designed to convert from onevoltage to another or with DC-to-ACinverters. Failure to observe thisprecaution could damage the product orcause overheating or fire.
Use appropriate cables
When connecting cables to the input and
output jacks, use only the cables providedor sold by Nikon for the purpose, tomaintain compliance with productregulations.
Handle moving parts with care
Be careful that your fingers or other objects
are not pinched by the lens cover or othermoving parts.
CD-ROMs
The CD-ROMs included with this deviceshould not be played back on audio CDequipment. Playing CD-ROMs on an audioCD player could cause hearing loss or
damage the equipment.
Observe caution when using theflash
Using the flash close to your subject’s eyescould cause temporary visual impairment.Particular care should be observed if
photographing infants, when the flashshould be no less than 1 m (3 ft 4 in.) fromthe subject.
Do not operate the flash with theflash window touching a person orobject
Failure to observe this precaution couldresult in burns or fire.
Avoid contact with liquid crystalShould the monitor break, care should betaken to avoid injury caused by broken glassand to prevent liquid crystal from themonitor touching the skin or entering theeyes or mouth.
Turn the power off when usinginside an airplane or the hospital
Turn the power off while inside the airplaneduring take off or landing. Follow theinstructions of the hospital when usingwhile in a hospital. The electromagneticwaves given out by this camera may disrupt
the electronic systems of the airplane or theinstruments of the hospital.
3D Images
Do not continuously view 3D imagesrecorded with this device for extendedperiods, whether on a television, monitor, orother display.
In the case of children whose visual systemsare still maturing, consult a pediatrician orophthalmologist prior to use and followtheir instructions.
Prolonged viewing of 3D images may causeeye strain, nausea, or discomfort. Cease useshould any of these symptoms occur andconsult a physician if necessary.
7/29/2019 Nikon s6400rm en 02
http://slidepdf.com/reader/full/nikon-s6400rm-en-02 13/280
xi
I n t r o d u c t i on
Notices
Notices for Customers in the
U.S.A.
IMPORTANT SAFETY INSTRUCTIONS -
SAVE THESE INSTRUCTIONS.
DANGER - TO REDUCE THE RISK OF FIREOR ELECTRIC SHOCK, CAREFULLYFOLLOW THESE INSTRUCTIONS
For connection to a supply not in the U.S.A.,use an attachment plug adapter of theproper configuration for the power outlet if needed.
The power supply unit is intended to becorrectly orientated in a vertical or floormount position.
Federal Communications
Commission (FCC) Radio
Frequency Interference
Statement
This equipment has been tested and found
to comply with the limits for a Class B digitaldevice, pursuant to Part 15 of the FCC rules.
These limits are designed to providereasonable protection against harmfulinterference in a residential installation. Thisequipment generates, uses, and can radiateradio frequency energy and, if not installed
and used in accordance with theinstructions, may cause harmful interferenceto radio communications. However, there is
no guarantee that interference will notoccur in a particular installation. If thisequipment does cause harmful interference
to radio or television reception, which canbe determined by turning the equipmentoff and on, the user is encouraged to try tocorrect the interference by one or more of the following measures:• Reorient or relocate the receiving
antenna.
• Increase the separation between theequipment and receiver.
• Connect the equipment into an outlet ona circuit different from that to which thereceiver is connected.
• Consult the dealer or an experiencedradio/television technician for help.
CAUTIONS
Modifications
The FCC requires the user to be notified thatany changes or modifications made to thisdevice that are not expressly approved byNikon Corporation may void the user’s
authority to operate the equipment.
7/29/2019 Nikon s6400rm en 02
http://slidepdf.com/reader/full/nikon-s6400rm-en-02 14/280
xii
I n t r o d u c t i on
Interface Cables
Use the interface cables sold or provided byNikon for your equipment. Using otherinterface cables may exceed the limits of Class B Part 15 of the FCC rules.
Notice for customers in the State of California
WARNING
Handling the cord on this product willexpose you to lead, a chemical known tothe State of California to cause birth defectsor other reproductive harm.
Wash hands after handling.Nikon Inc.,
1300 Walt Whitman RoadMelville, New York 11747-3064USA
Tel: 631-547-4200
Notice for customers in Canada
CAUTION
This Class B digital apparatus complies withCanadian ICES-003.
ATTENTION
Cet appareil numérique de la classe B estconforme à la norme NMB-003 du Canada.
Notices for customers in Europe
CAUTIONS
RISK OF EXPLOSION IF BATTERY ISREPLACED BY AN INCORRECT TYPE.
DISPOSE OF USED BATTERIESACCORDING TO THE INSTRUCTIONS.
This symbol indicates that thisproduct is to be collectedseparately.
The following apply only to usersin European countries:• This product is designated for
separate collection at an appropriatecollection point. Do not dispose of ashousehold waste.
• For more information, contact the retaileror the local authorities in charge of wastemanagement.
This symbol on the batteryindicates that the battery is to becollected separately.
The following apply only to usersin European countries:• All batteries, whether marked with this
symbol or not, are designated forseparate collection at an appropriatecollection point. Do not dispose of ashousehold waste.
• For more information, contact the retaileror the local authorities in charge of wastemanagement.
T bl f C
7/29/2019 Nikon s6400rm en 02
http://slidepdf.com/reader/full/nikon-s6400rm-en-02 15/280
xiii
I n t r o d u c t i on
Table of Contents
Introduction ................................................... ii
Read This First .............................. ......................... ii
Confirming the Package Contents................. iiAbout This Manual ............................................. ..... iii
Information and Precautions ............................. v
For Your Safety ................................................. viii
WARNINGS ................................................................ viii
Notices.................................................................... xi
Parts of the Camera ..................................... 1
The Camera Body......................... ........................ 2
Attaching the Camera Strap............................... 4
Operating the Touch Panel ................................ 4
Using the Stylus.......................................................... 5
Indicators of the Monitor/Touch Panel........ 6
Shooting Mode ..................................... ..................... 6Playback Mode ...................................... ..................... 8
Using Menus .................................................. ........... 10
The Basics of Shooting and Playback
........................................................................... 13
Preparation 1 Insert the Battery .................. 14Preparation 2 Charge the Battery ............... 16
Preparation 3 Insert a Memory Card.......... 18
Internal Memory and Memory Cards......... 19
Preparation 4 Setting the Display Language,
Date, and Time........... .................................... .... 20
Step 1 Turn the Camera On........................... 24
Turning the Camera On and Off ................... 25
Step 2 Select a Shooting Mode.................... 26
Available Shooting Modes................................ 27
Step 3 Frame a Picture .................................... 28
Using the Zoom .................................................... .. 29Step 4 Focus and Shoot.................................. 30
The Shutter-release Button .............................. 31
Step 5 Play Back Images................................. 32
Step 6 Delete Unwanted Images ................ 34
Shooting Features ..................................... 37A (Auto) Mode ................................................. 38
Using Quick Effects................................................ 39
Scene Mode (Shooting Suited to Scenes)
................................ .................................... ............. 40
To View a Description (Help Display) of
Each Scene ......................................... ........................ 40
Characteristics of Each Scene......................... 42Special Effects Mode (Applying Effects
When Shooting) ................................................ 52
Smart Portrait Mode (Capturing Images of
Smiling Faces) .................................................... 54
Using Skin Softening............................................ 56
Basic Shooting Settings.................................. 57
Available Features.................................................. 57
Using the Flash (Flash Modes)........................ 58
Using the Self-timer.............................................. 61
Using Macro Mode................................................ 63
Adjusting Brightness (Exposure
Compensation)........................................................ 65
Default Settings....................................................... 66
F t Th t C B S t ithF (Sh ti Pl i B k M i 100
7/29/2019 Nikon s6400rm en 02
http://slidepdf.com/reader/full/nikon-s6400rm-en-02 16/280
xiv
I n t r o d u c t i on
Features That Can Be Set withF (Shooting
Menu).................................................................... 68
Options Available in the Shooting Menu
........................................................................................... 69
Features That Cannot Be Used
Simultaneously.................................................. 71Focusing............................................................... 74
Using Target Finding AF.................................... 74
Using Face Detection ............................... ........... 75
Subjects Not Suitable for Autofocus .......... 77
Focus Lock.................................................................. 78
Playback Features....................................... 79Playback Zoom .................................................. 80
Thumbnail Display ......................... .................. 81
Selecting Certain Types of Images for
Playback ............................................................... 82
Available Playback Modes ................................ 82
Switching Between Playback Modes......... 83Features That Can Be Set withF (Playback
Menu).................................................................... 84
Connecting the Camera to a TV, Computer,
or Printer .............................................................. 86
Using ViewNX 2 ................................................. 88
Installing ViewNX 2 ............................................... 88
Transferring Images to the Computer ...... 91Viewing Images....................................................... 93
Recording and Playing Back Movies.... 95
Recording Movies............................................. 96
Features That Can Be Set withF (Movie
Menu) ........................................... ................................. 99
Playing Back Movies....................................... 100
General Camera Setup ........................... 103
Features That Can Be Set withF (Setup
Menu) .......................... ............................. ........... 104
Reference Section................................. E1
Using the Draw Option.............................. E2
Using Easy Panorama (Shooting and
Playback)......................................................... E3
Shooting with Easy Panorama.................E3
Viewing Images Captured with EasyPanorama ................................................... ...........E6
Favorite Pictures Mode.............................. E7
Adding Images to Albums..........................E7
Playing Back Images in Albums...............E8
Removing Images from Albums.............E9
Changing the Favorites Album Icon
.................................................................................. E10Auto Sort Mode .................................... ......E11
Auto Sort Mode Categories ....................E11
List by Date Mode......................................E13
Viewing and Deleting Images Captured
Continuously (Sequence)........................E14
Viewing Images in a Sequence............. E14
Deleting Images in a Sequence ...........E16
Editing Still Images....................................E17
Editing Features..............................................E17
p Quick Effects ............................... ............... E20
U Paint ................................. .............................. E22
kQuick Retouch: Enhancing Contrast and
Saturation........................................................... E25
I D Lighting: Enhancing Brightness and a Smile Timer E68
7/29/2019 Nikon s6400rm en 02
http://slidepdf.com/reader/full/nikon-s6400rm-en-02 17/280
xv
I n t r o d u c t i on
I D-Lighting: Enhancing Brightness and
Contrast............................................................... E26
P Stretch: Stretching Images............... E27
O Perspective Control: Adjusting a Sense
of Perspective.................................................. E28
jGlamour Retouch: Softening Skin andMaking Faces Looking Smaller with Larger
Eyes........................................................................ E29
g Small Picture: Reducing the Size of an
Image.................................................................... E31
o Crop: Creating a Cropped Copy .... E32
Connecting the Camera to a TV (Viewing
Images on a TV) ........................... ...............E34Connecting the Camera to a Printer (Direct
Print) .............................. ................................. E38
Connecting the Camera to a Printer
.................................................................................. E39
Printing Individual Images....................... E41
Printing Multiple Images .......................... E43
Editing Movies ............................. ...............E47
The Shooting Menu (for A (Auto) Mode)
.......................................................................... E49
A Image Mode (Image Size and Quality)
.................................................................................. E49
q / s / r Touch Shooting..................... E51
E ISO Sensitivity.......................................... E58C Continuous Shooting ......................... E59
wWhite Balance (Adjusting Hue) .... E62
p Quick Effects.............................................. E65
G AF Area Mode ................................. ......... E66
The Smart Portrait Menu......................... E67
e Skin Softening ......................................... E67
y Blink Proof ......................................... ......... E68
a Smile Timer ...............................................E68
The Playback Menu ............................. ......E69
b Slide Show ................................................E69
d Protect......................................................... E71
a Print Order (Creating a DPOF Print
Order).................................................................... E73f Rotate Image............................................. E77
E Voice Memo................................................E78
h Copy (Copy Between Internal Memory
and Memory Card)........................................E80
N Choose Key Picture ............................. E82
The Movie Menu .................................. ......E83
D Movie Options.......................................... E83N Open with HS Footage................. E87
D Movie AF mode....................................... E88
YWind Noise Reduction ...................... E88
The Setup Menu ................................... ......E89
Welcome Screen............................................ E89
Time Zone and Date...... .............................. E90
Monitor Settings .................................... ........ E93
Print Date (Imprinting Date and Time)
.................................................................................. E95
Vibration Reduction..................................... E97
Motion Detection.......................................... E98
AF Assist ....................................... ....................... E99
Digital Zoom ............................................ ..... E100Sound Settings............................................. E101
Auto Off............................................................ E102
Format Memory/Format Card............ E103
Language......................................................... E104
TV Settings .................................. .................... E105
Charge by Computer............................... E106
Blink Warning................................................ E108
Sequence Display Options E110
7/29/2019 Nikon s6400rm en 02
http://slidepdf.com/reader/full/nikon-s6400rm-en-02 18/280
xvi
I n t r o d u c t i on
Sequence Display Options....................E110
Eye-Fi Upload.................................................E111
Reset All.............................................................E112
Firmware Version.........................................E116
File and Folder Names .......................... E117
Optional Accessories ............................. E119Error Messages......................................... E120
Technical Notes and Index.................. F1
Maximizing Camera Life and Performance
.............................................................................. F2
The Camera. ............................................. ..............F2
The Battery ................................ .............................F3
Charging AC Adapter ............................... .......F4
Memory Cards......................................................F5
Cleaning and Storage...................................F6
Cleaning................................................................... F6
Storage ........................................ .............................F6
Troubleshooting ......................... ...................F7Specifications ............................... ................ F17
Supported Standards....................................F22
Approved Memory Cards...........................F23
Index................................................................ F25
7/29/2019 Nikon s6400rm en 02
http://slidepdf.com/reader/full/nikon-s6400rm-en-02 19/280
1
P a r
t s of t h e C a m er a
Parts of the Camera
This chapter describes the parts of the camera and explains information that is displayed inthe monitor.
The Camera Body.................................................................2Attaching the Camera Strap ........................................................................................... 4
Operating the Touch Panel............................................................................................. 4
Using the Stylus .................................................................................................................. 5
Indicators of the Monitor/Touch Panel..............................6Shooting Mode.................................................................................................................... 6
Playback Mode .................................................................................................................... 8
Using Menus...................................................................................................................... 10
If you want to start using the camera right away, see “The Basics of Shooting andPlayback” (A13).
The Camera Body
7/29/2019 Nikon s6400rm en 02
http://slidepdf.com/reader/full/nikon-s6400rm-en-02 20/280
2
P a r
t s of t h e C a m er a
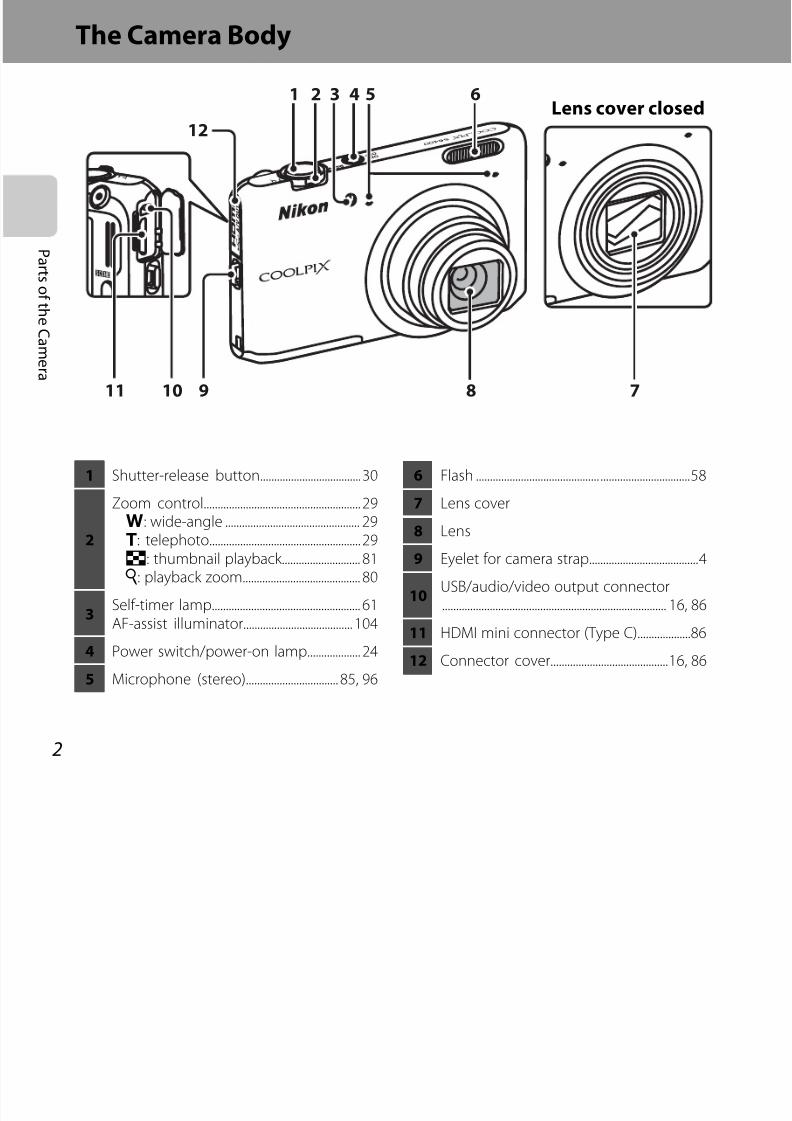
The Camera Body
12
1 2 4 53 6
7891011
Lens cover closed
1 Shutter-release button.................................... 30
2
Zoom control........................................................ 29f: wide-angle ................................................ 29g: telephoto...................................................... 29
h: thumbnail playback............................ 81i: playback zoom.......................................... 80
3Self-timer lamp..................................................... 61AF-assist illuminator....................................... 104
4 Power switch/power-on lamp................... 24
5 Microphone (stereo)................................. 85, 96
6 Flash ............................................ ................................58
7 Lens cover
8 Lens
9 Eyelet for camera strap.......................................4
10USB/audio/video output connector................................................................................ 16, 86
11 HDMI mini connector (Type C)...................86
12 Connector cover..........................................16, 86
7/29/2019 Nikon s6400rm en 02
http://slidepdf.com/reader/full/nikon-s6400rm-en-02 21/280
3
P a r t s of t h e C a m er a
1
2
3
4
568 7910
11
12
1 b (emovie-record) button..................... 96
2Charge lamp.......................................17, E107Flash lamp............................................................... 58
3A (shooting mode) button................................................................. 38, 40, 52, 54
4 c (playback) button............................... 32, 82
5Battery-chamber/ memory card slot cover ......................... 14, 15
6 Tripod socket
7Power connector cover (for connectionwith optional AC Adapter)................E119
8 Battery latch ......................................... ..................14
9 Battery chamber..................................................14
10 Memory card slot................................................18
11 Monitor/touch panel...........................................6
12 Speaker........................................................... 85, 100
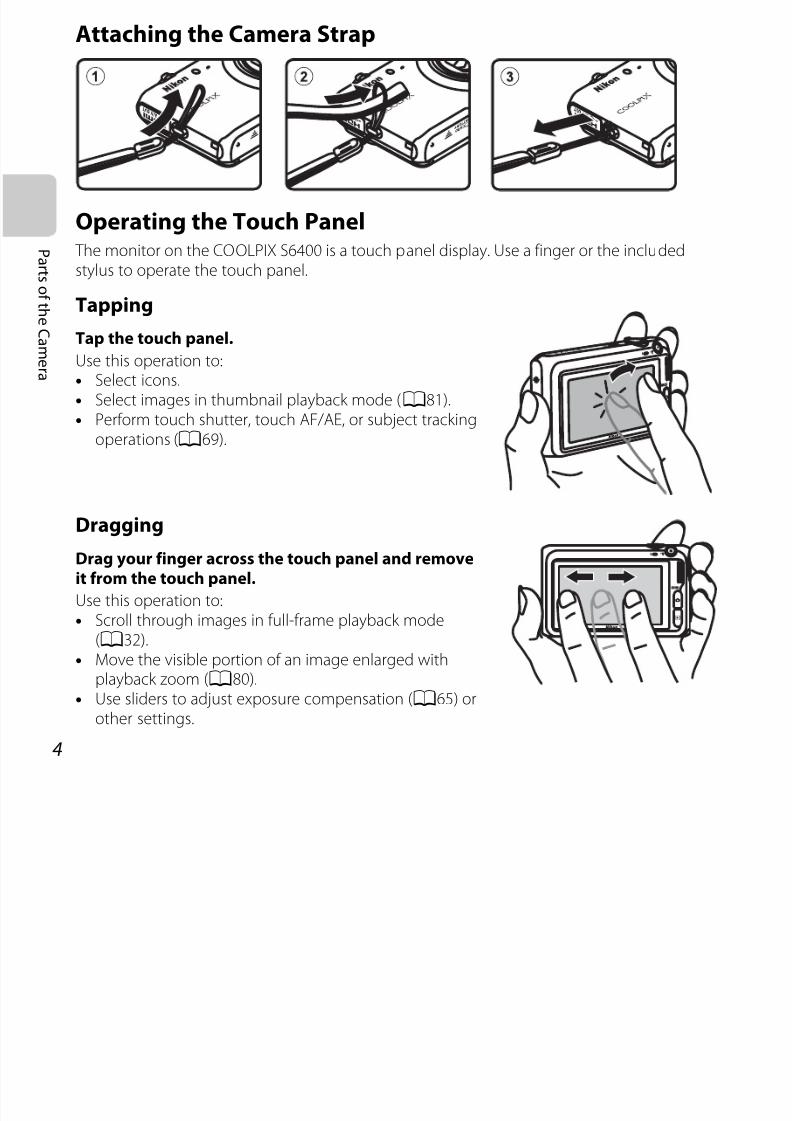
Attaching the Camera Strap
7/29/2019 Nikon s6400rm en 02
http://slidepdf.com/reader/full/nikon-s6400rm-en-02 22/280
4
P a r t s of t h e C a m er a
Attaching the Camera Strap
Operating the Touch Panel The monitor on the COOLPIX S6400 is a touch panel display. Use a finger or the includedstylus to operate the touch panel.
Tapping
Tap the touch panel.
Use this operation to:• Select icons.• Select images in thumbnail playback mode (A81).
• Perform touch shutter, touch AF/AE, or subject trackingoperations (A69).
Dragging
Drag your finger across the touch panel and removeit from the touch panel.
Use this operation to:• Scroll through images in full-frame playback mode
(A32).• Move the visible portion of an image enlarged with
playback zoom (A80).
• Use sliders to adjust exposure compensation (A65) orother settings.
Using the Stylus
7/29/2019 Nikon s6400rm en 02
http://slidepdf.com/reader/full/nikon-s6400rm-en-02 23/280
5
P a r t s of t h e C a m er a
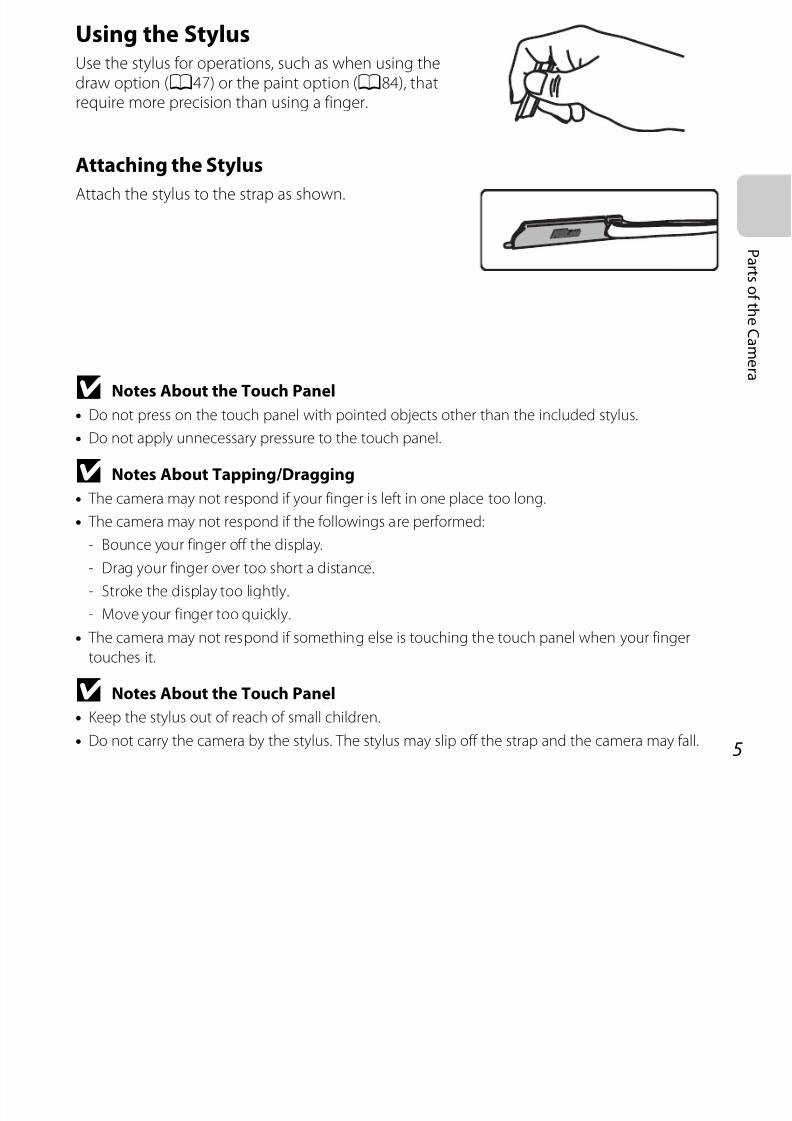
Using the StylusUse the stylus for operations, such as when using thedraw option (A47) or the paint option (A84), thatrequire more precision than using a finger.
Attaching the Stylus
Attach the stylus to the strap as shown.
B Notes About the Touch Panel
• Do not press on the touch panel with pointed objects other than the included stylus.• Do not apply unnecessary pressure to the touch panel.
B Notes About Tapping/Dragging
• The camera may not respond if your finger is left in one place too long.
• The camera may not respond if the followings are performed:
- Bounce your finger off the display.
- Drag your finger over too short a distance.
- Stroke the display too lightly.
- Move your finger too quickly.
• The camera may not respond if something else is touching the touch panel when your finger
touches it.
B Notes About the Touch Panel• Keep the stylus out of reach of small children.
• Do not carry the camera by the stylus. The stylus may slip off the strap and the camera may fall.
Indicators of the Monitor/Touch Panel
7/29/2019 Nikon s6400rm en 02
http://slidepdf.com/reader/full/nikon-s6400rm-en-02 24/280
6
P a r t s of t h e C a m er a
Indicators of the Monitor/Touch Panel
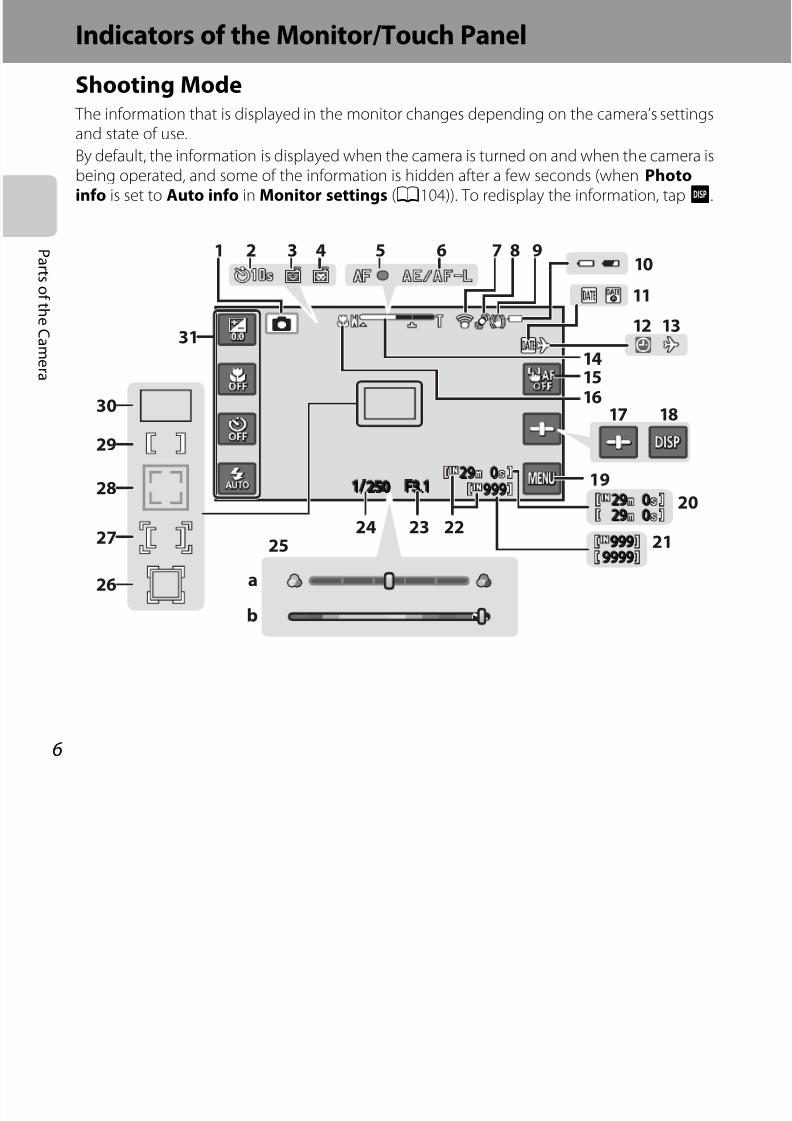
Shooting Mode The information that is displayed in the monitor changes depending on the camera’s settingsand state of use.
By default, the information is displayed when the camera is turned on and when the camera isbeing operated, and some of the information is hidden after a few seconds (when Photoinfo is set to Auto info in Monitor settings (A104)). To redisplay the information, tapA.
2929 00
9999991 //1 / F3.13.1F3.125050250
99999999
999999
2929 00
2929 00
26
28
29
27
30
11
1312
23 2224
25
31
1 8 910
1516
17
18
14
19
a
b
652 3 4
20
21
7
1 Shooting mode 38 40 52 54 19 Menu display control 10 68 99 103
7/29/2019 Nikon s6400rm en 02
http://slidepdf.com/reader/full/nikon-s6400rm-en-02 25/280
7
P a r t s of t h e C a m er a
1 Shooting mode.............................38, 40, 52, 54
2 Self-timer ............................................. .................... 61
3 Smile timer...................................................... 54, 70
4 Pet portrait auto release................................. 49
5 Focus indicator..................................................... 30
6 AE/AF-L indicator................................................ 50
7 Eye-Fi communication indicator ........... 105
8 Motion detection icon ................................. 104
9 Vibration reduction icon............................. 104
10 Battery level indicator...................................... 24
11 Print date ............................................. ................. 104
12“Date not set” indicator.......................................................... 22, 104, E120
13 Travel destination icon ......................... .22, 104
14 Zoom indicator............................................ 29, 63
15 Touch AF/AE cancellation control........................................................................ 69,E57
16 Macro mode ............................................. ............. 6317 Slider display control................................ 41, 53
18 Information redisplay control.................. 104
19 Menu display control ........... 10, 68, 99, 103
20 Movie recording time remaining..............96
21Number of exposures remaining(still images)............................................................24
22 Internal memory indicator....................24, 96
23 Aperture value......................................................30
24 Shutter speed........................................................30
25a Scene effect adjustment slider...............41b Special effects adjustment slider..........53
26Focus area(subject tracking) ............................... 69,E55
27 Focus area (touch AF/AE) ............. 69,E57
28Focus area (face detection,pet detection) ....................................... 49, 54, 75
29 Focus area (center).....................................30, 70
30Focus area (auto, target finding AF)................................................................................ 70, 74
31 Basic shooting settings control..................57
Playback Mode
7/29/2019 Nikon s6400rm en 02
http://slidepdf.com/reader/full/nikon-s6400rm-en-02 26/280
8
P a r t s of t h e C a m er a
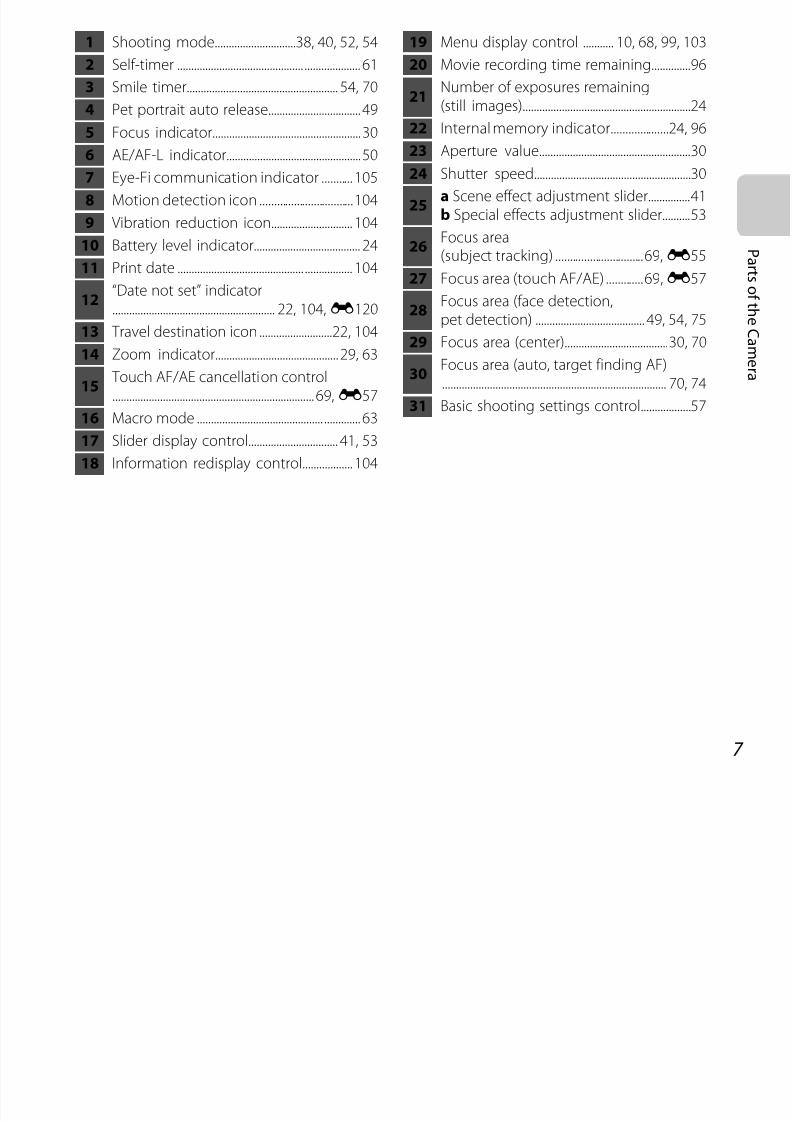
The information that is displayed in the monitor varies depending on the image played back and state of use.
By default, the information is displayed when the camera is turned on and when the camera isbeing operated, and some of the information is hidden after a few seconds (when Photo
info is set to Auto info in Monitor settings (A104)). To redisplay the information, tap themonitor.
155 /111 /2012 15012 15 : 300
99999999999/ /
9999999 . JPGPG9999 . JPG
15 / 11 / 2012 15 : 30
19
18
25 26 27
23
99999999999/ /999999999999999/ /
0 0 929
0 0 929
a
b
12 13
15 16
21 2022
24
2 3 111098541
14
17
6 7
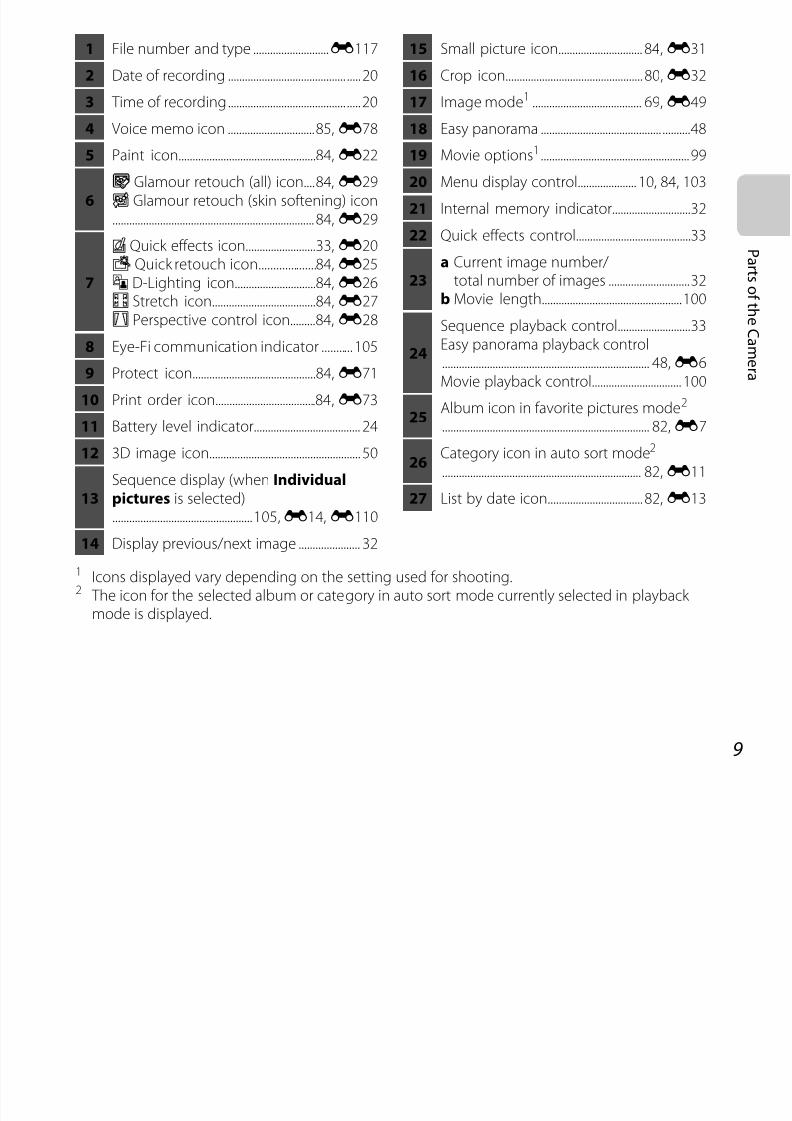
1 File number and type E117 15 Small picture icon 84 E31
7/29/2019 Nikon s6400rm en 02
http://slidepdf.com/reader/full/nikon-s6400rm-en-02 27/280
9
P a r t s of t h e C a m er a
1 Icons displayed vary depending on the setting used for shooting.2 The icon for the selected album or category in auto sort mode currently selected in playback
mode is displayed.
1 File number and type ...........................E117
2 Date of recording .......................................... ..... 20
3 Time of recording.......................................... ..... 20
4 Voice memo icon ...............................85,E78
5 Paint icon.................................................84,E22
6j Glamour retouch (all) icon....84,E29E Glamour retouch (skin softening) icon........................................................................ 84,E29
7
V Quick effects icon.........................33,E20s Quick retouch icon....................84,E25
c D-Lighting icon.............................84,E26r Stretch icon.....................................84,E27q Perspective control icon.........84,E28
8 Eye-Fi communication indicator ........... 105
9 Protect icon............................................84,E71
10 Print order icon....................................84,E73
11 Battery level indicator...................................... 24
12 3D image icon...................................................... 50
13Sequence display (when Individualpictures is selected)..................................................105, E14, E110
14 Display previous/next image ...................... 32
15 Small picture icon.............................. 84,E31
16 Crop icon................................................. 80,E32
17 Image mode1 ....................................... 69,E49
18 Easy panorama ........................................... ..........48
19 Movie options1 ..................................................... 99
20 Menu display control..................... 10, 84, 103
21 Internal memory indicator............................32
22 Quick effects control.........................................33
23
a Current image number/
total number of images .............................32b Movie length..................................................100
24
Sequence playback control..........................33Easy panorama playback control.......................................................................... 48,E6Movie playback control................................ 100
25
Album icon in favorite pictures mode2
.......................................................................... 82,E7
26Category icon in auto sort mode2
....................................................................... 82,E11
27 List by date icon.................................. 82,E13
Using Menus
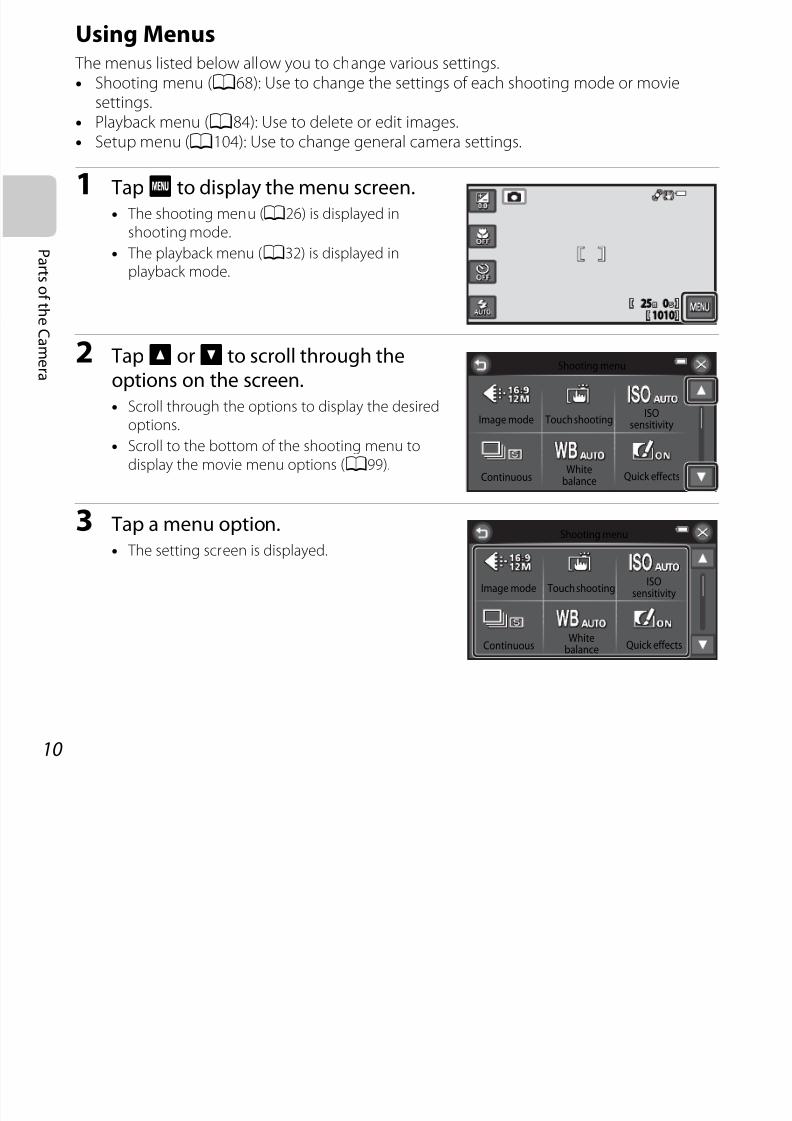
7/29/2019 Nikon s6400rm en 02
http://slidepdf.com/reader/full/nikon-s6400rm-en-02 28/280
10
P a r t s of t h e C a m er a
The menus listed below allow you to change various settings.• Shooting menu (A68): Use to change the settings of each shooting mode or movie
settings.• Playback menu (A84): Use to delete or edit images.
• Setup menu (A104): Use to change general camera settings.
1 TapF to display the menu screen.• The shooting menu (A26) is displayed in
shooting mode.
• The playback menu (A32) is displayed inplayback mode.
2 TapB orC to scroll through theoptions on the screen.• Scroll through the options to display the desired
options.• Scroll to the bottom of the shooting menu to
display the movie menu options (A99).
3 Tap a menu option.• The setting screen is displayed.
2525 00
10101010
Shooting menu
Touch shootingImage mode
ContinuousWhite
balance Quick effects
ISO
sensitivity
Shooting menu
Touch shootingImage mode
Whitebalance Quick effectsContinuous
ISOsensitivity
4 Tap a setting option to apply theI d
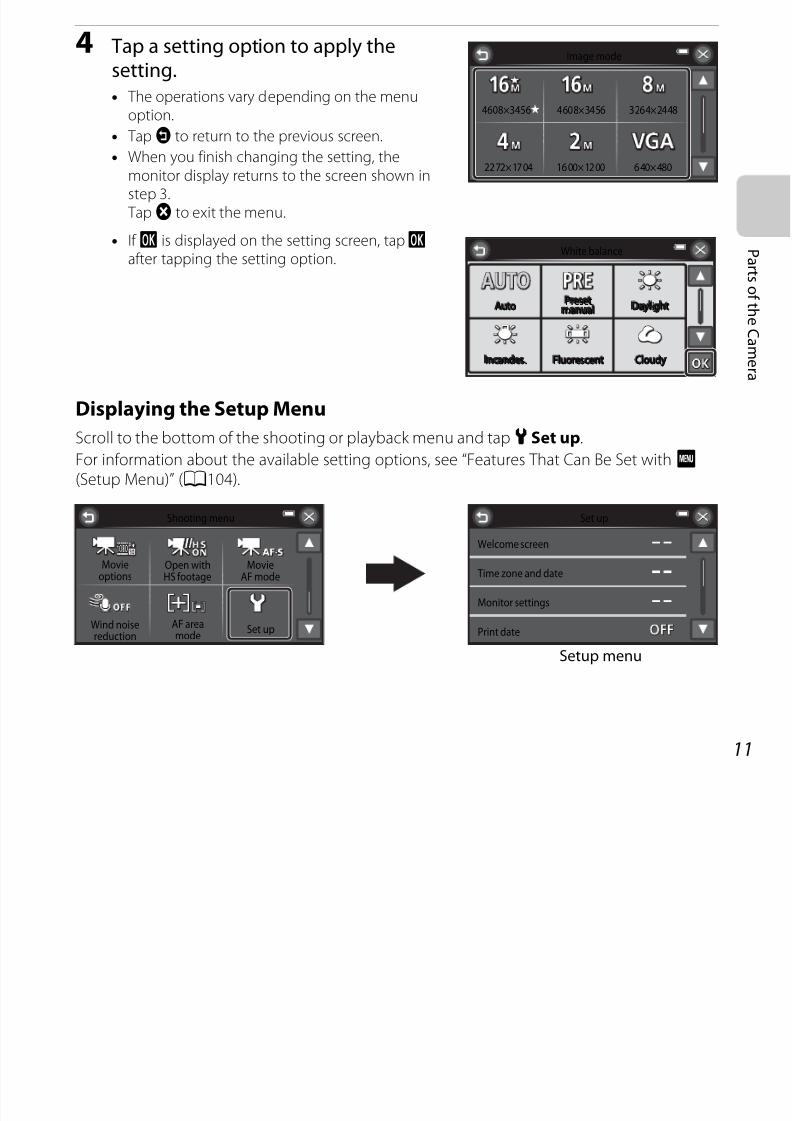
7/29/2019 Nikon s6400rm en 02
http://slidepdf.com/reader/full/nikon-s6400rm-en-02 29/280
11
P a r t s of t h e C a m er a
p g p pp ysetting.
• The operations vary depending on the menuoption.
• TapJ to return to the previous screen.
• When you finish changing the setting, themonitor display returns to the screen shown instep 3. Tapf to exit the menu.
• If I is displayed on the setting screen, tapI after tapping the setting option.
Displaying the Setup Menu
Scroll to the bottom of the shooting or playback menu and tap z Set up.
For information about the available setting options, see “Features That Can Be Set withF (Setup Menu)” (A104).
Image mode
4608×3456 3264×24484608×3456
2272×1704 1600×1200 640×480
White balance
AutoutoAuto
Incandes.ncandes.Incandes. FluorescentluorescentFluorescent
DaylightaylightDaylight
CloudyloudyCloudy
PresetmanualPresetmanualPreset
manual
Shooting menu
Movieoptions
Wind noisereduction
Set up
MovieAF mode
Open withHS footage
AF areamode
Set up
Welcome screen
Time zone and date
Monitor settings
Print date
Setup menu

7/29/2019 Nikon s6400rm en 02
http://slidepdf.com/reader/full/nikon-s6400rm-en-02 30/280
12
7/29/2019 Nikon s6400rm en 02
http://slidepdf.com/reader/full/nikon-s6400rm-en-02 31/280
13
T h e B a s i c s of S
h o o t i n g a n d P l a y b a c
k
The Basics of Shooting andPlayback
Preparation
Preparation 1 Insert the Battery ..................................................................................... 14
Preparation 2 Charge the Battery .................................................................................. 16
Preparation 3 Insert a Memory Card............................................................................. 18
Preparation 4 Setting the Display Language, Date, and Time ............................ 20
Shooting
Step 1 Turn the Camera On.............................................................................................. 24
Step 2 Select a Shooting Mode....................................................................................... 26
Step 3 Frame a Picture ....................................................................................................... 28
Step 4 Focus and Shoot ..................................................................................................... 30
Playback
Step 5 Play Back Images .................................................................................................... 32
Step 6 Delete Unwanted Images ................................................................................... 34
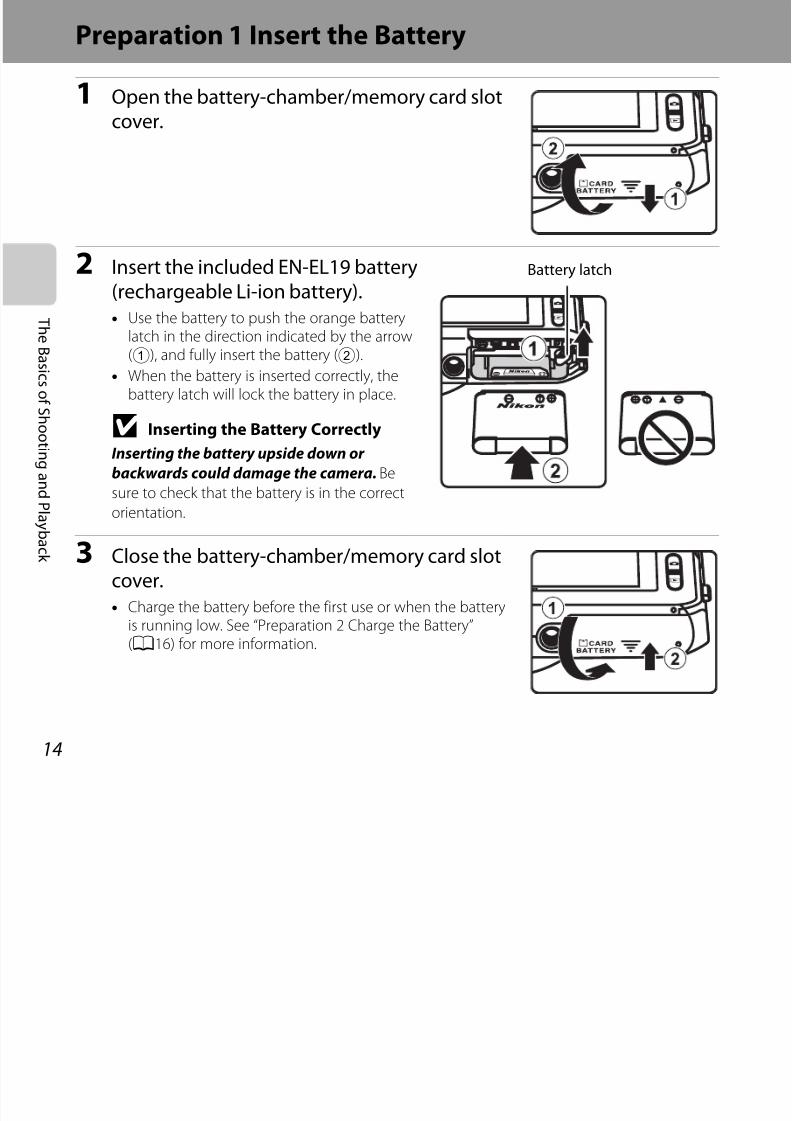
Preparation 1 Insert the Battery
7/29/2019 Nikon s6400rm en 02
http://slidepdf.com/reader/full/nikon-s6400rm-en-02 32/280
14
T h e B a s i c s of S
h o o t i n g a n d P l a y b a c
k
1 Open the battery-chamber/memory card slotcover.
2 Insert the included EN-EL19 battery
(rechargeable Li-ion battery).• Use the battery to push the orange battery
latch in the direction indicated by the arrow(1), and fully insert the battery (2).
• When the battery is inserted correctly, thebattery latch will lock the battery in place.
B Inserting the Battery Correctly
Inserting the battery upside down or
backwards could damage the camera. Be
sure to check that the battery is in the correct
orientation.
3 Close the battery-chamber/memory card slotcover.
• Charge the battery before the first use or when the batteryis running low. See “Preparation 2 Charge the Battery”(A16) for more information.
Battery latch
Removing the Battery
Turn the camera off and be sure that the power on lamp and the
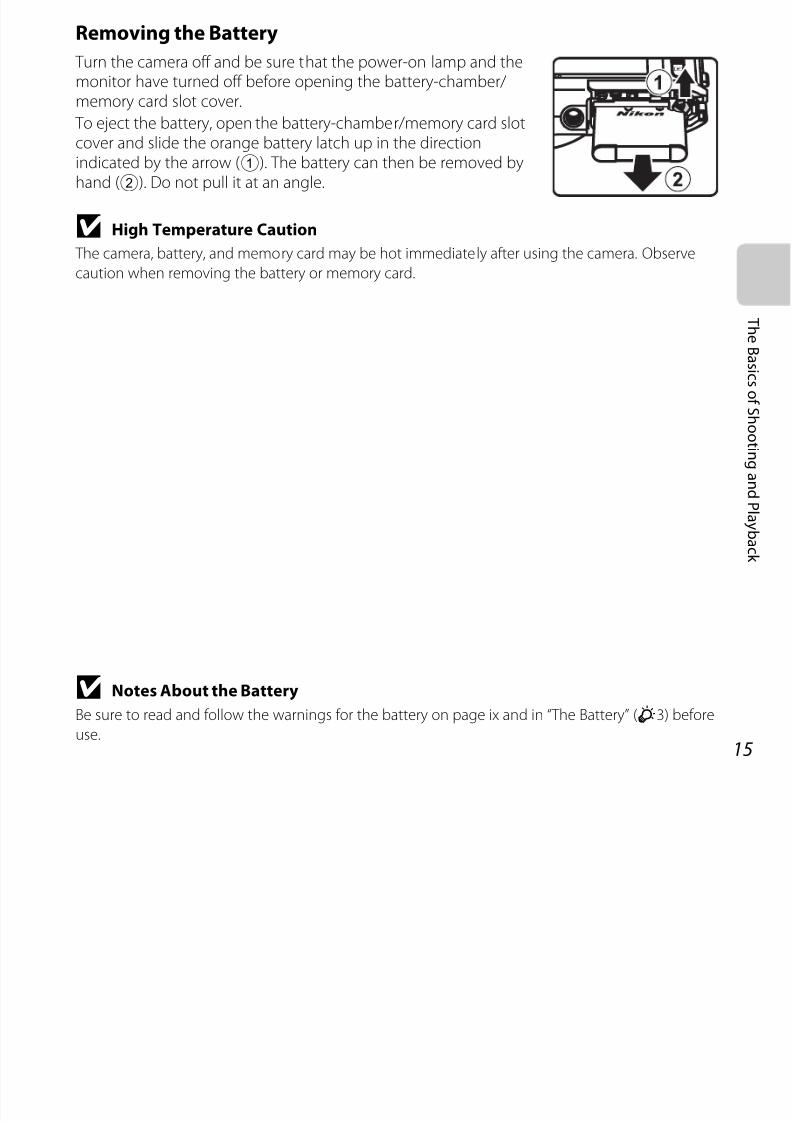
7/29/2019 Nikon s6400rm en 02
http://slidepdf.com/reader/full/nikon-s6400rm-en-02 33/280
15
T h e B a s i c s of S
h o o t i n g a n d P l a y b a c
k
Turn the camera off and be sure that the power-on lamp and themonitor have turned off before opening the battery-chamber/ memory card slot cover.
To eject the battery, open the battery-chamber/memory card slot
cover and slide the orange battery latch up in the directionindicated by the arrow (1). The battery can then be removed byhand (2). Do not pull it at an angle.
B High Temperature Caution
The camera, battery, and memory card may be hot immediately after using the camera. Observe
caution when removing the battery or memory card.
B Notes About the Battery
Be sure to read and follow the warnings for the battery on page ix and in “The Battery” (F3) before
use.
Preparation 2 Charge the Battery
7/29/2019 Nikon s6400rm en 02
http://slidepdf.com/reader/full/nikon-s6400rm-en-02 34/280
16
T h e B a s i c s of S
h o o t i n g a n d P l a y b a c
k
1 Prepare the included Charging AC Adapter EH-69P.
If a plug adapter* is included with your camera, attach the plug adapter to theplug on the Charging AC Adapter. Push the plug adapter firmly until it issecurely held in place. Once the two are connected, attempting to forciblyremove the plug adapter could damage the product.
* The shape of the plug adapter varies according to the country or region inwhich the camera was purchased.
The Charging AC Adapter comes with the plug adapter attached inArgentina and Korea.
2 Make sure the battery is installed in the camera, and then connect thecamera to the Charging AC Adapter in order of 1 to3.
• Keep the camera turned off.
• Be sure that plugs are properly oriented. Do not attempt to insert plugs at an angle, and do
not use force when connecting or disconnecting the plugs.
• The charge lamp slowly flashes green to indicate that the battery is charging.
• About 3 hours are required to charge a fully exhausted battery.• When the battery has been completely charged, the charge lamp turns off.
• See “The Charge Lamp” (A17) for more information.
USB cable (included)
Charge lampElectrical outlet
3 Disconnect the Charging AC Adapter from the electrical outlet andth di t th USB bl
7/29/2019 Nikon s6400rm en 02
http://slidepdf.com/reader/full/nikon-s6400rm-en-02 35/280
17
T h e B a s i c s of S
h o o t i n g a n d P l a y b a c
k
then disconnect the USB cable.
The Charge Lamp
B Notes About the Charging AC Adapter
Be sure to read and follow the warnings for the Charging AC Adapter EH-69P on page ix and in
“Charging AC Adapter” (F4) before use.
C Charging Using a Computer or Battery Charger
• You can also charge the Rechargeable Li-ion Battery EN-EL19 by connecting the camera to a
computer (A86,E106).
• You can use the Battery Charger MH-66 (available separately; E119) to charge the EN-EL19
without using the camera.
C Operating the Camera During Charging
If you press the power switch while using the Charging AC Adapter to charge the battery in thecamera, the camera turns on and you can play back images (except when the camera is connected
via HDMI). Shooting is not possible.
Status Description
Flashes slowly (green) The battery is charging.
Off The battery is not charging. When charging is complete, the charge lampstops flashing green and turns off.
Flashes quickly(green)
• The ambient temperature is not suited to charging. Charge the battery
indoors with an ambient temperature of 5°C to 35°C (41°F to 95°F).• The USB cable or Charging AC Adapter is not properly connected, orthere is a problem with the battery. Disconnect the USB cable orunplug the Charging AC Adapter and correctly connect it again, orchange the battery.
Preparation 3 Insert a Memory Card
7/29/2019 Nikon s6400rm en 02
http://slidepdf.com/reader/full/nikon-s6400rm-en-02 36/280
18
T h e B a s i c s of S
h o o t i n g a n d P l a y b a c
k
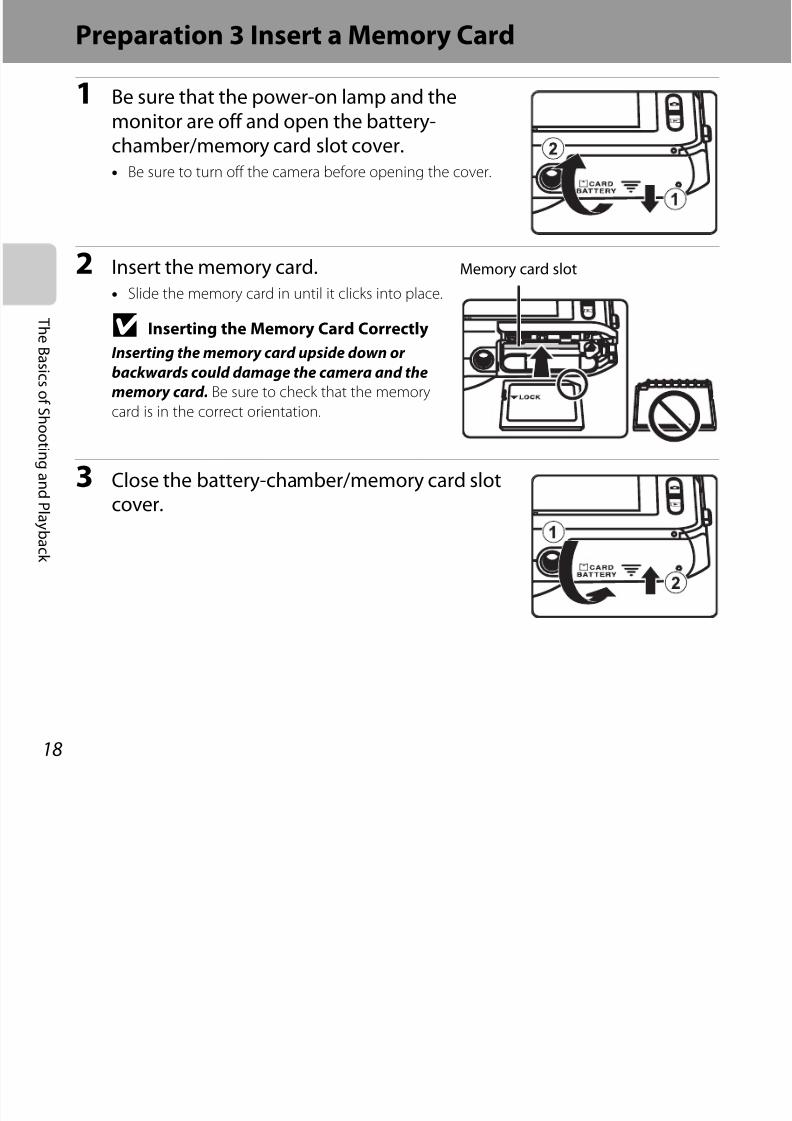
1 Be sure that the power-on lamp and themonitor are off and open the battery-
chamber/memory card slot cover.• Be sure to turn off the camera before opening the cover.
2 Insert the memory card.
• Slide the memory card in until it clicks into place.
B Inserting the Memory Card Correctly
Inserting the memory card upside down or
backwards could damage the camera and the
memory card. Be sure to check that the memory
card is in the correct orientation.
3 Close the battery-chamber/memory card slotcover.
Memory card slot
B Formatting Memory Cards
• The first time you insert a memory card that has been used in another device into this camera, be
f h h
7/29/2019 Nikon s6400rm en 02
http://slidepdf.com/reader/full/nikon-s6400rm-en-02 37/280
19
T h e B a s i c s of S
h o o t i n g a n d P l a y b a c
k
sure to format it with this camera.
• All data stored on a memory card is permanently deleted when the card is formatted.
If there is data saved on the memory card that you wish to keep, copy that data to a computer
before formatting.
• To format a memory card, insert the card into the camera and select Format card in the setup
menu (A104).
B Notes About Memory Cards
See “Memory Cards” (F5) and the documentation included with your memory card for more
information.
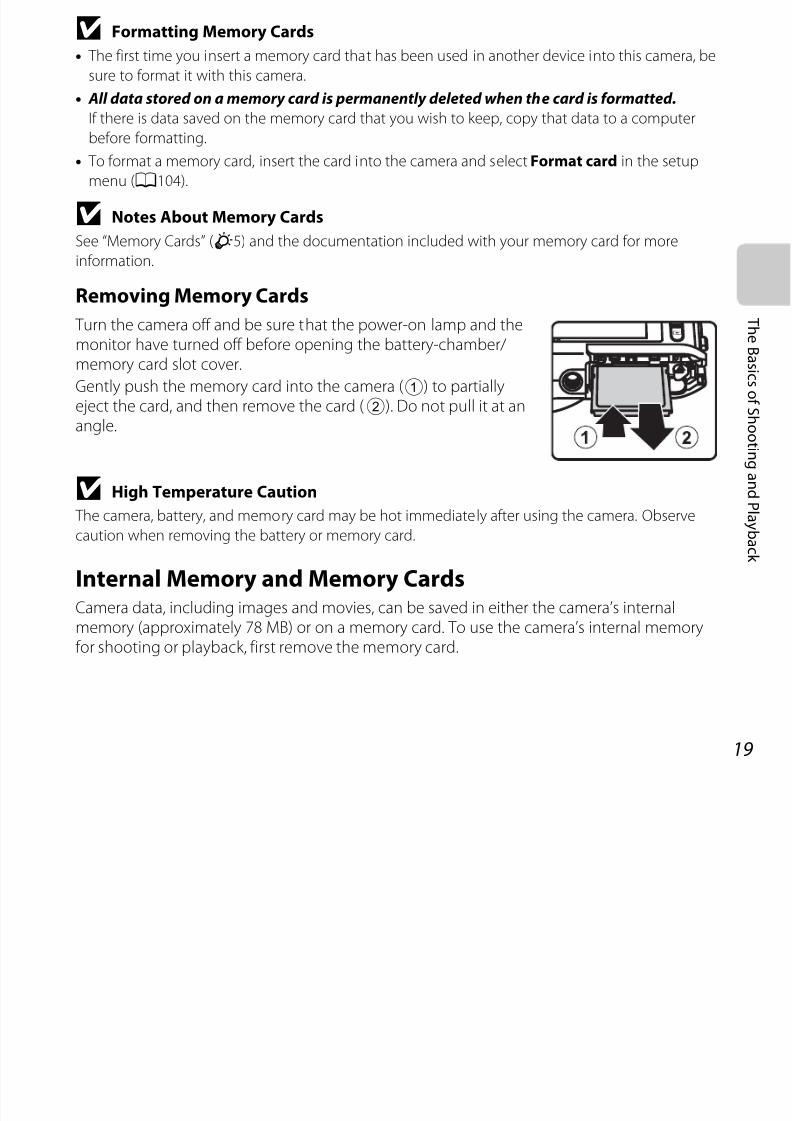
Removing Memory Cards
Turn the camera off and be sure that the power-on lamp and themonitor have turned off before opening the battery-chamber/ memory card slot cover.
Gently push the memory card into the camera (1) to partiallyeject the card, and then remove the card (2). Do not pull it at an
angle.
B High Temperature Caution
The camera, battery, and memory card may be hot immediately after using the camera. Observe
caution when removing the battery or memory card.
Internal Memory and Memory CardsCamera data, including images and movies, can be saved in either the camera’s internalmemory (approximately 78 MB) or on a memory card. To use the camera’s internal memoryfor shooting or playback, first remove the memory card.
Preparation 4 Setting the Display Language, Date, and Time
7/29/2019 Nikon s6400rm en 02
http://slidepdf.com/reader/full/nikon-s6400rm-en-02 38/280
20
T h e B a s i c s of S
h o o t i n g a n d P l a y b a c
k
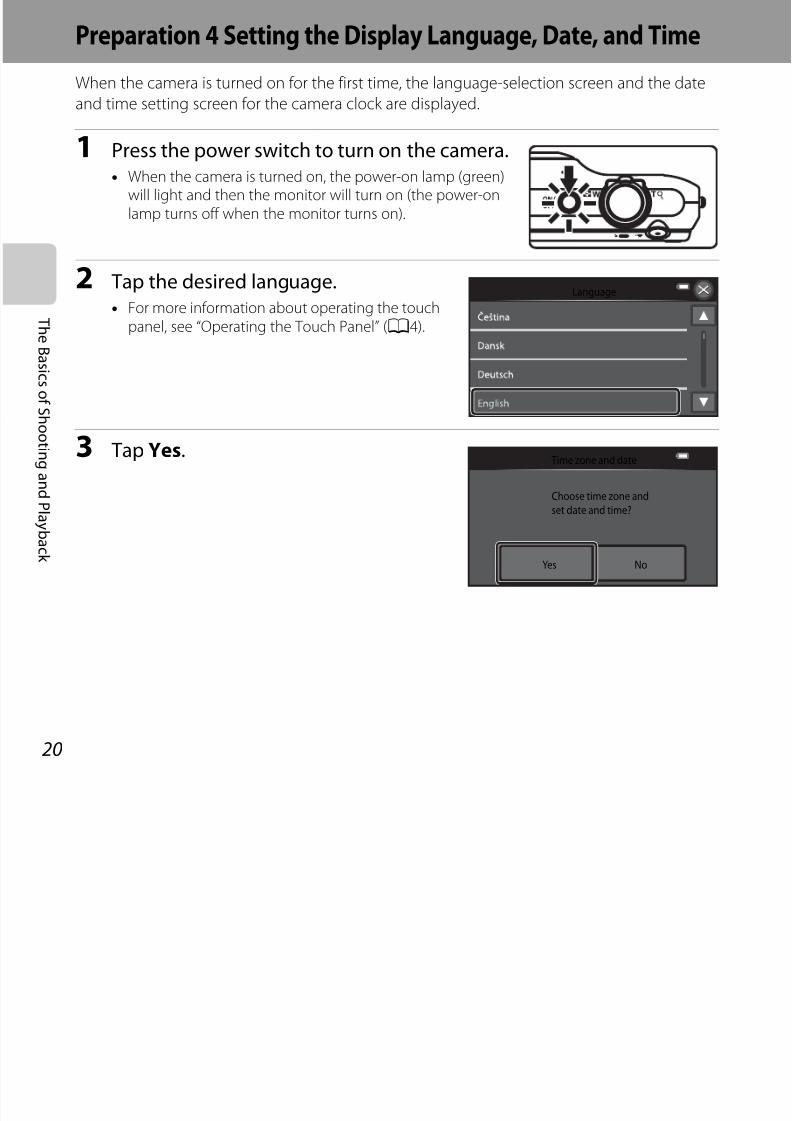
When the camera is turned on for the first time, the language-selection screen and the date
and time setting screen for the camera clock are displayed.
1 Press the power switch to turn on the camera.• When the camera is turned on, the power-on lamp (green)
will light and then the monitor will turn on (the power-onlamp turns off when the monitor turns on).
2 Tap the desired language.• For more information about operating the touch
panel, see “Operating the Touch Panel” (A4).
3 Tap Yes.
Language
Time zone and date
Choose time zone and
set date and time?
Yes No
4 TapG orH to select your home timezone and tapI
Home time zone
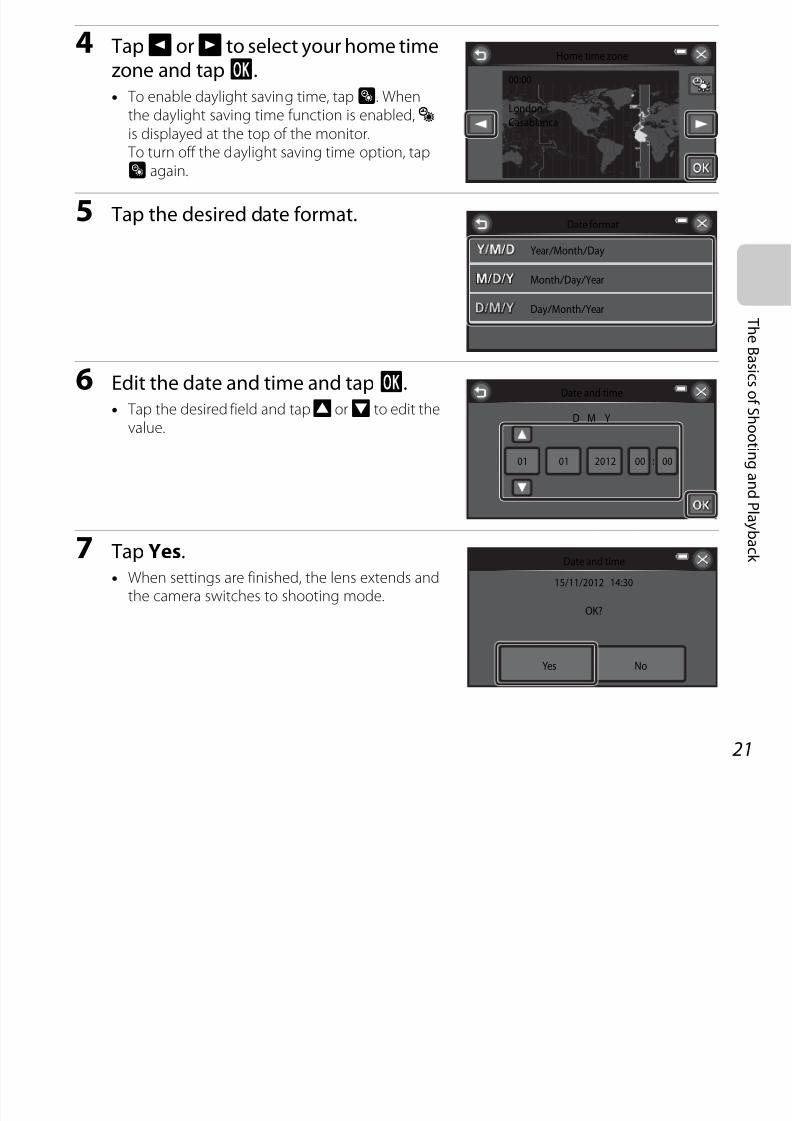
7/29/2019 Nikon s6400rm en 02
http://slidepdf.com/reader/full/nikon-s6400rm-en-02 39/280
21
T h e B a s i c s of S h o o t i n g a n d P l a y b a c
k
zone and tapI.
• To enable daylight saving time, tapp. Whenthe daylight saving time function is enabled,W is displayed at the top of the monitor.
To turn off the daylight saving time option, tapp again.
5 Tap the desired date format.
6 Edit the date and time and tapI.• Tap the desired field and tapA orB to edit the
value.
7 Tap Yes.• When settings are finished, the lens extends and
the camera switches to shooting mode.
London
Casablanca
00:00
Date format
Year / Month / Day
Month / Day / Year
Day / Month / Year
Date and time
01 01 2012 00 : 00
YMD
Date and time
OK?
15/11/2012 14:30
Yes No
C Changing the Language Setting and the Date and Time Setting
• You can change these settings using the Language and Time zone and date settings in the
z setup menu (A104)

7/29/2019 Nikon s6400rm en 02
http://slidepdf.com/reader/full/nikon-s6400rm-en-02 40/280
22
T h e B a s i c s of S h o o t i n g a n d P l a y b a c
k
z setup menu (A104).
• You can enable or disable daylight saving time by going to the z setup menu and selecting Time
zone and date followed by Time zone and theno. When enabled, the clock moves forward
one hour; when disabled, the clock moves back one hour. When the travel destination (x) is
selected, the time difference between the travel destination and the home time zone (w) is
automatically calculated and the date and time in the selected region are saved at the time of
shooting.
• If you exit without setting the date and time,O will flash when the shooting screen is displayed.
Use the Time zone and date setting in the setup menu to set the date and time (A104).
C The Clock Battery
• The camera’s clock is powered by a backup battery that is separate from the camera’s main
battery.
• The backup battery charges when the main battery is inserted into the camera or when the
camera is connected to an optional AC adapter, and can provide several days of backup power
after about ten hours of charging.
• If the camera’s backup battery becomes exhausted, the date and time setting screen is displayed
when the camera is turned on. Set the date and time again. See step 3 (A20) of “Preparation 4Setting the Display Language, Date, and Time” for more information.
C Imprinting the Shooting Date on Printed Images
• Set the date and time before shooting.
• You can permanently imprint the shooting date on images as they are captured by setting Print
date in the setup menu (A104).
• If you want the shooting date to be printed without using the Print date setting, print using theViewNX 2 software (A88).
7/29/2019 Nikon s6400rm en 02
http://slidepdf.com/reader/full/nikon-s6400rm-en-02 41/280
23
Step 1 Turn the Camera On
7/29/2019 Nikon s6400rm en 02
http://slidepdf.com/reader/full/nikon-s6400rm-en-02 42/280
24
T h e B a s i c s of S h o o t i n g a n d P l a y b a c k
1 Press the power switch to turn on the camera.• The lens extends and the monitor turns on.
2 Check the battery level indicator andthe number of exposures remaining.
Battery level indicator
Number of Exposures Remaining
The number of pictures that can be taken is displayed.
• C is displayed when no memory card is inserted in the camera, and images will be saved in
the internal memory (approximately 78 MB).• The number of exposures remaining depends on the amount of available memory in the
internal memory or memory card, and also varies depending on the image quality andimage size (determined by the image mode setting;E50).
Display Description
b The battery level is high.
B The battery level is low. Prepareto charge or replace the battery.
N
Batteryexhausted.
The camera cannot take pictures.
Recharge or replace with a fullycharged battery.
2525 00
10101010
Battery level indicator
Number of exposures remaining
Turning the Camera On and Off • When the camera is turned on, the power-on lamp (green) will light and then the monitor
will turn on (the power-on lamp turns off when the monitor turns on)
7/29/2019 Nikon s6400rm en 02
http://slidepdf.com/reader/full/nikon-s6400rm-en-02 43/280
25
T h e B a s i c s of S h o o t i n g a n d P l a y b a c k
will turn on (the power on lamp turns off when the monitor turns on).• To turn off the camera, press the power switch. When the camera turns off, the power-on
lamp and the display turn off.• To turn the camera on in playback mode, press and hold thec (playback) button. The
lens will not extend.
C Power Saving Function (Auto Off)
If no operations are performed for a while, the monitor will turn off, the camera will enter standbymode, and the power-on lamp will flash. If no operations are performed for approximately anotherthree minutes, the camera will turn off automatically.
While the camera is in standby mode, the monitor turns back on if you perform any of the following
operations:➝ Press the power switch, shutter-release button, A (shooting mode) button,c (playback)button, orb (emovie-record) button
• The time that elapses before the camera enters standby mode can be changed using the Auto off
setting in the setup menu (A104).• By default, the camera enters standby mode in about one minute when you are using shooting
mode or playback mode.
• If you are using the optional AC Adapter EH-62G, the camera enters standby mode after 30 minutes (fixed).
C Notes About an AC Power Source
• You can use the AC Adapter EH-62G (available separately;E119) to supply power to the camera
from an electrical outlet for taking pictures and playing back images.• Do not, under any circumstances, use another make or model of AC adapter other than the EH-62G.
Failure to observe this precaution could result in overheating or in damage to the camera.
00525
101010101010
Flashes
No operations
performed
No operations
performed
3 min
Camera entersstandby mode.
Camera turns off.
Step 2 Select a Shooting Mode
1

7/29/2019 Nikon s6400rm en 02
http://slidepdf.com/reader/full/nikon-s6400rm-en-02 44/280
26
T h e B a s i c s of S h o o t i n g a n d P l a y b a c k
1 Press the A button.• The shooting mode selection menu, which
allows you to select the desired shooting mode,is displayed.
2 Tap the desired shooting mode icon.• A (auto) mode is used in this example.
• The shooting mode setting is saved even afterthe camera is turned off.
Shooting mode
Special effects
SceneAuto mode
Smart portrait
Available Shooting Modes
A Auto mode A38
7/29/2019 Nikon s6400rm en 02
http://slidepdf.com/reader/full/nikon-s6400rm-en-02 45/280
27
T h e B a s i c s of S h o o t i n g a n d P l a y b a c k
C Changing the Shooting Settings
• See “Using the Flash (Flash Modes)” (A58) for more information.
• See “Using the Self-timer” (A61) for more information.
• See “Using Macro Mode” (A63) for more information.
• See “Adjusting Brightness (Exposure Compensation)” (A65) for more information.
• See “Features That Can Be Set withF (Shooting Menu)” (A68) for more information.
Used for general shooting. Settings can be adjusted in the shooting menu (A69) to suitthe shooting conditions and the type of shot you want to capture.
C Scene A40Camera settings are optimized according to the scene that you select. When using sceneauto selector (d), the camera automatically selects the optimum scene mode when youframe a picture, making it even easier to take pictures using settings that suit the scene.• To select a scene, tap the icon of the desired scene mode in the shooting mode
selection menu.
R Special effects A52
Effects can be applied to images during shooting. 11 different effects are available.• To select an effect, tap the icon of the desired effect in the shooting mode selection
menu.
F Smart portrait A54
When the camera detects a smiling face, you can take a picture automatically withoutpressing the shutter-release button (smile timer). You can also use the skin softening
option to smooth the skin tones of human faces.
Step 3 Frame a Picture
1
7/29/2019 Nikon s6400rm en 02
http://slidepdf.com/reader/full/nikon-s6400rm-en-02 46/280
28
T h e B a s i c s of S h o o t i n g a n d P l a y b a c k
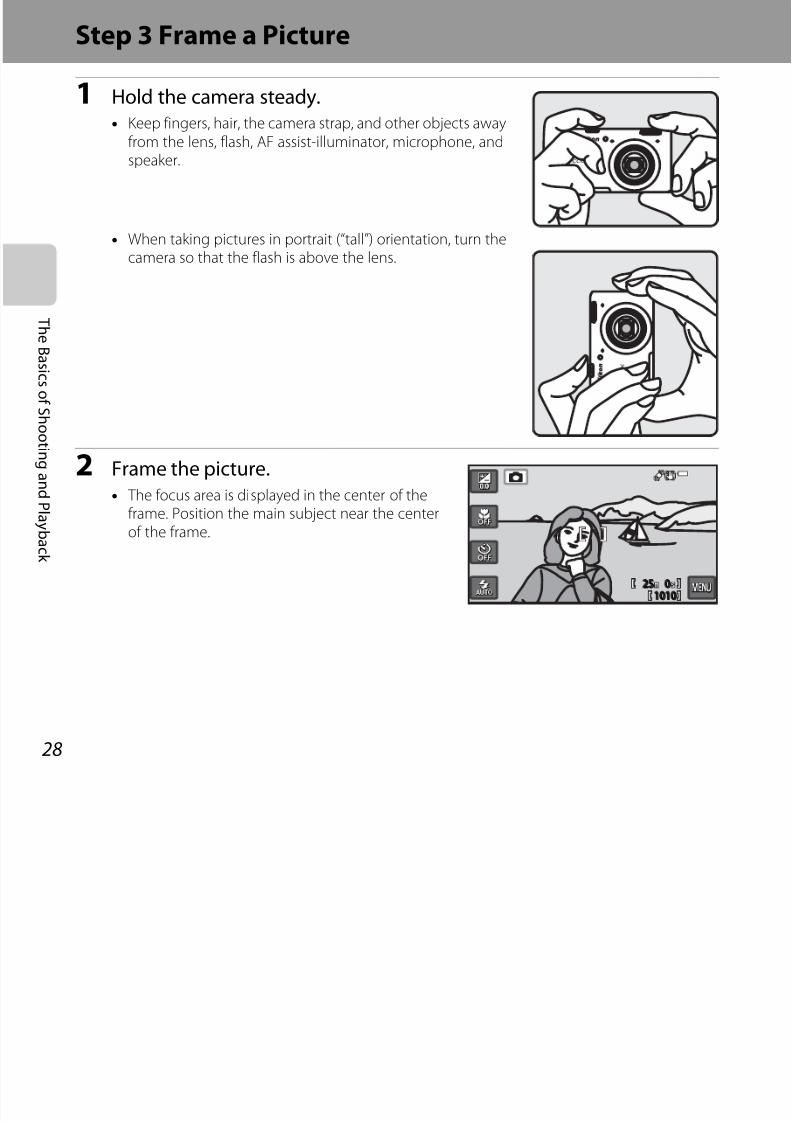
1 Hold the camera steady.• Keep fingers, hair, the camera strap, and other objects away
from the lens, flash, AF assist-illuminator, microphone, andspeaker.
• When taking pictures in portrait (“tall”) orientation, turn thecamera so that the flash is above the lens.
2 Frame the picture.
• The focus area is displayed in the center of theframe. Position the main subject near the centerof the frame.
2525 00
10101010
C When Using a Tripod
• We recommend using a tripod to stabilize the camera in the following situations.
- When shooting in dim lighting or when the flash mode (A59) is set to W (off)
7/29/2019 Nikon s6400rm en 02
http://slidepdf.com/reader/full/nikon-s6400rm-en-02 47/280
29
T h e B a s i c s of S h o o t i n g a n d P l a y b a c k
- When using the telephoto setting
• Set Vibration reduction to Off in the setup menu (A104) when using a tripod to stabilize the
camera during shooting.
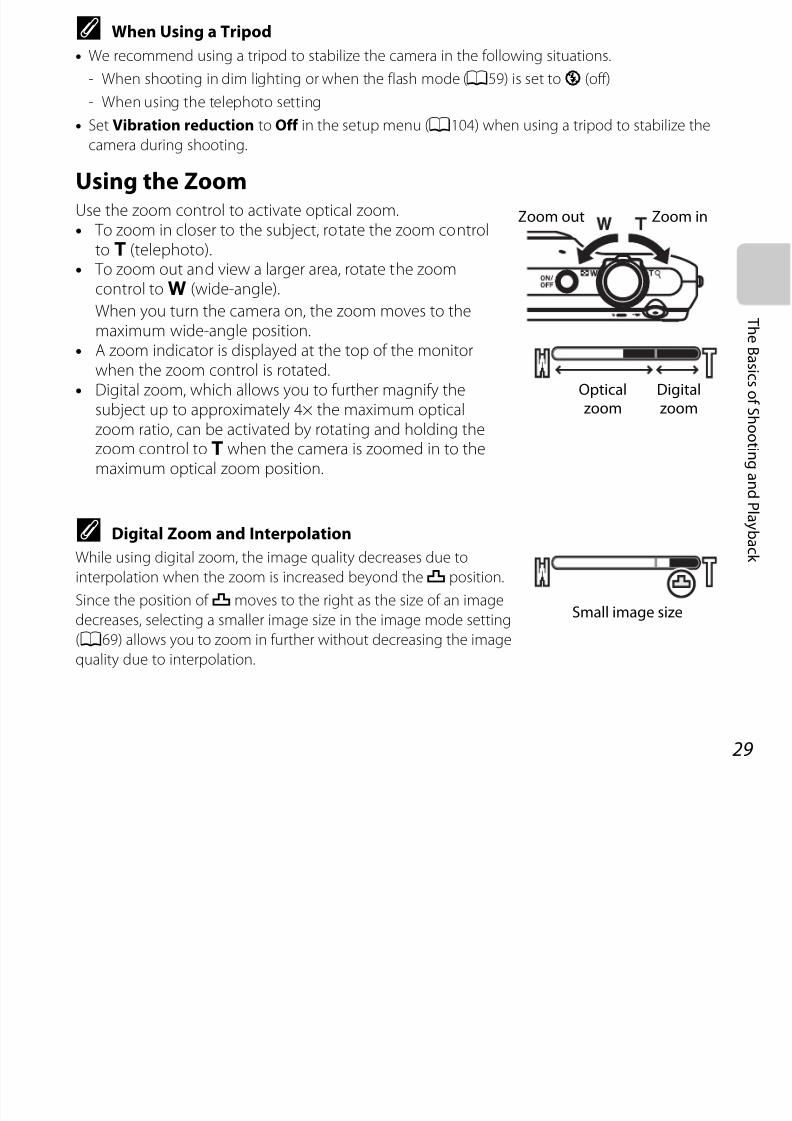
Using the ZoomUse the zoom control to activate optical zoom.• To zoom in closer to the subject, rotate the zoom control
to g (telephoto).• To zoom out and view a larger area, rotate the zoom
control tof (wide-angle).When you turn the camera on, the zoom moves to themaximum wide-angle position.
• A zoom indicator is displayed at the top of the monitorwhen the zoom control is rotated.
• Digital zoom, which allows you to further magnify thesubject up to approximately 4× the maximum optical
zoom ratio, can be activated by rotating and holding thezoom control tog when the camera is zoomed in to themaximum optical zoom position.
C Digital Zoom and Interpolation
While using digital zoom, the image quality decreases due to
interpolation when the zoom is increased beyond theV position.
Since the position of Vmoves to the right as the size of an image
decreases, selecting a smaller image size in the image mode setting
(A69) allows you to zoom in further without decreasing the image
quality due to interpolation.
Zoom out Zoom in
Opticalzoom
Digitalzoom
Small image size
Step 4 Focus and Shoot
1 P th h tt l b tt
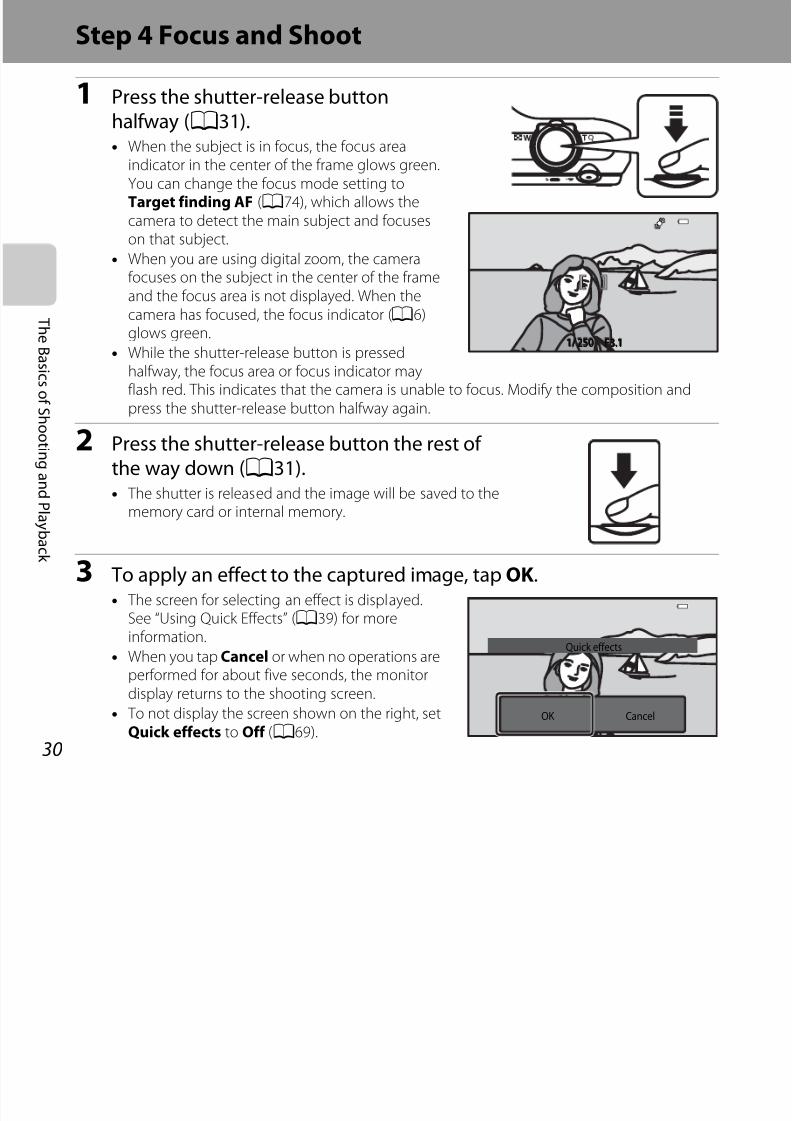
7/29/2019 Nikon s6400rm en 02
http://slidepdf.com/reader/full/nikon-s6400rm-en-02 48/280
30
T h e B a s i c s of S h
o o t i n g a n d P l a y b a c k
1 Press the shutter-release buttonhalfway (A31).
• When the subject is in focus, the focus areaindicator in the center of the frame glows green.You can change the focus mode setting toTarget finding AF (A74), which allows thecamera to detect the main subject and focuseson that subject.
• When you are using digital zoom, the camerafocuses on the subject in the center of the frame
and the focus area is not displayed. When thecamera has focused, the focus indicator (A6)glows green.
• While the shutter-release button is pressedhalfway, the focus area or focus indicator mayflash red. This indicates that the camera is unable to focus. Modify the composition andpress the shutter-release button halfway again.
2 Press the shutter-release button the rest of the way down (A31).• The shutter is released and the image will be saved to the
memory card or internal memory.
3 To apply an effect to the captured image, tap OK.• The screen for selecting an effect is displayed.
See “Using Quick Effects” (A39) for moreinformation.
• When you tap Cancel or when no operations areperformed for about five seconds, the monitordisplay returns to the shooting screen.
• To not display the screen shown on the right, setQuick effects to Off (A69).
1//1/ F3.13.1F3.125050250
OK Cancel
Quick effects
The Shutter-release Button
To set focus and exposure (shutter speed and aperture value),

7/29/2019 Nikon s6400rm en 02
http://slidepdf.com/reader/full/nikon-s6400rm-en-02 49/280
31
T h e B a s i c s of S h
o o t i n g a n d P l a y b a c k
B Notes About Recording Images and Saving Movies
The indicator showing the number of exposures remaining or the indicator showing the maximummovie length flashes while images are being recorded or while a movie is being saved. Do not openthe battery-chamber/memory card slot cover or remove the battery or memory card while anindicator is flashing. Doing this could result in loss of data, or in damage to the camera or the
memory card.
B Notes About Focusing
See “Subjects Not Suitable for Autofocus” (A77) for more information.
C Touch Shutter
By default, the shutter can be released by simply tapping a subject in the monitor without pressing the
shutter-release button. This setting can be changed to the Touch AF/AE option (A69), which allows youto tap a subject on the monitor to set the focus and exposure on it, instead of releasing the shutter.
C AF-assist Illuminator and Flash
If the subject is dimly lit, the AF-assist illuminator (A104) may light when the shutter-release button ispressed halfway, and the flash (A58) may fire when the shutter-release button is pressed all the way down.
C To Make Sure You Do Not Miss a Shot
If you are concerned that you might miss a shot, press the shutter-release button all the way withoutfirst pressing it halfway.
Press halfway
To set focus and exposure (shutter speed and aperture value),press the shutter-release button lightly until you feel a slightresistance. Focus and exposure remain locked while the shutter-release button is pressed halfway.
Press all theway
While pressing the shutter-release button halfway, press theshutter-release button the rest of the way down to release theshutter and take a picture.Do not use force when pressing the shutter-release button, as thismay result in camera shake and blurred images. Press the buttongently.
Step 5 Play Back Images
1 Press thec (playback) button
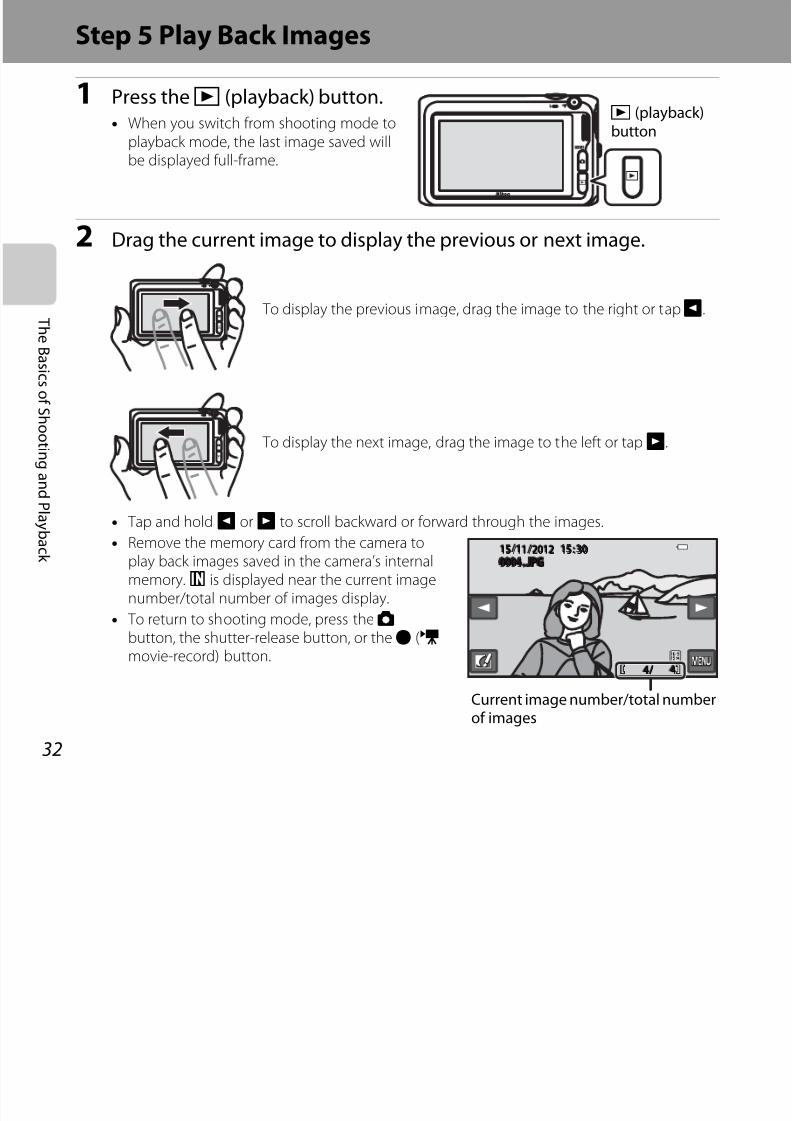
7/29/2019 Nikon s6400rm en 02
http://slidepdf.com/reader/full/nikon-s6400rm-en-02 50/280
32
T h e B a s i c s of S h
o o t i n g a n d P l a y b a c k
1 Press thec (playback) button.• When you switch from shooting mode to
playback mode, the last image saved will
be displayed full-frame.
2 Drag the current image to display the previous or next image.
• Tap and holdG orH to scroll backward or forward through the images.
• Remove the memory card from the camera toplay back images saved in the camera’s internalmemory.C is displayed near the current imagenumber/total number of images display.
• To return to shooting mode, press the A button, the shutter-release button, or theb (e movie-record) button.
c (playback)button
To display the previous image, drag the image to the right or tapG.
To display the next image, drag the image to the left or tapH.
155 /111 /2012 15012 15 : 300
444//
0004004 . JPGPG0004 . JPG15 / 11 / 2012 15 : 30
Current image number/total numberof images
C Viewing Images
• Images may be displayed briefly at low resolution immediately after switching to the next or
previous image.
• When images in which the face of a person (A75) or a pet (A49) was detected at the time of
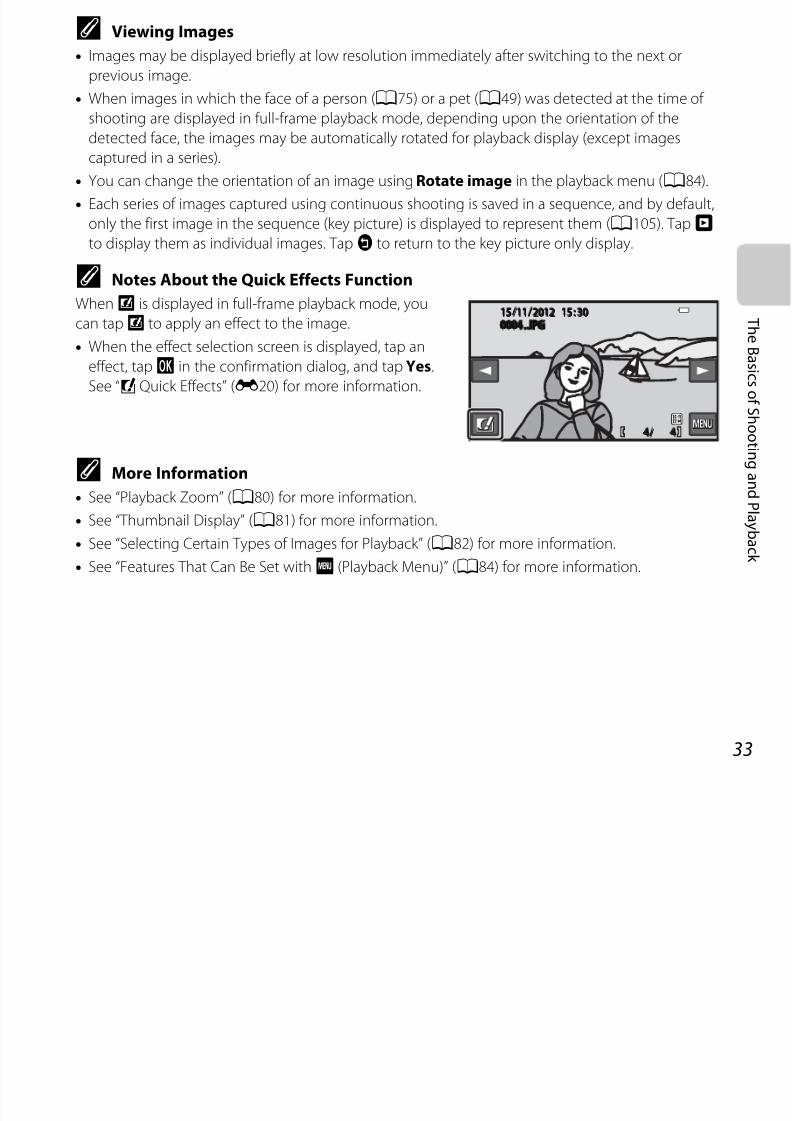
7/29/2019 Nikon s6400rm en 02
http://slidepdf.com/reader/full/nikon-s6400rm-en-02 51/280
33
T h e B a s i c s of S h
o o t i n g a n d P l a y b a c k
• When images in which the face of a person (A75) or a pet (A49) was detected at the time of
shooting are displayed in full-frame playback mode, depending upon the orientation of the
detected face, the images may be automatically rotated for playback display (except images
captured in a series).
• You can change the orientation of an image using Rotate image in the playback menu (A84).
• Each series of images captured using continuous shooting is saved in a sequence, and by default,
only the first image in the sequence (key picture) is displayed to represent them (A105). TapR
to display them as individual images. TapJ to return to the key picture only display.
C Notes About the Quick Effects Function
WhenY is displayed in full-frame playback mode, you
can tapY to apply an effect to the image.
• When the effect selection screen is displayed, tap an
effect, tapI in the confirmation dialog, and tap Yes.
See “p Quick Effects” (E20) for more information.
C More Information
• See “Playback Zoom” (A80) for more information.
• See “Thumbnail Display” (A81) for more information.
• See “Selecting Certain Types of Images for Playback” (A82) for more information.
• See “Features That Can Be Set withF (Playback Menu)” (A84) for more information.
155 /111 /2012 15012 15 : 300
444//
0004004 . JPGPG0004 . JPG15 / 11 / 2012 15 : 30
Step 6 Delete Unwanted Images
1 Play back the image to delete tapF
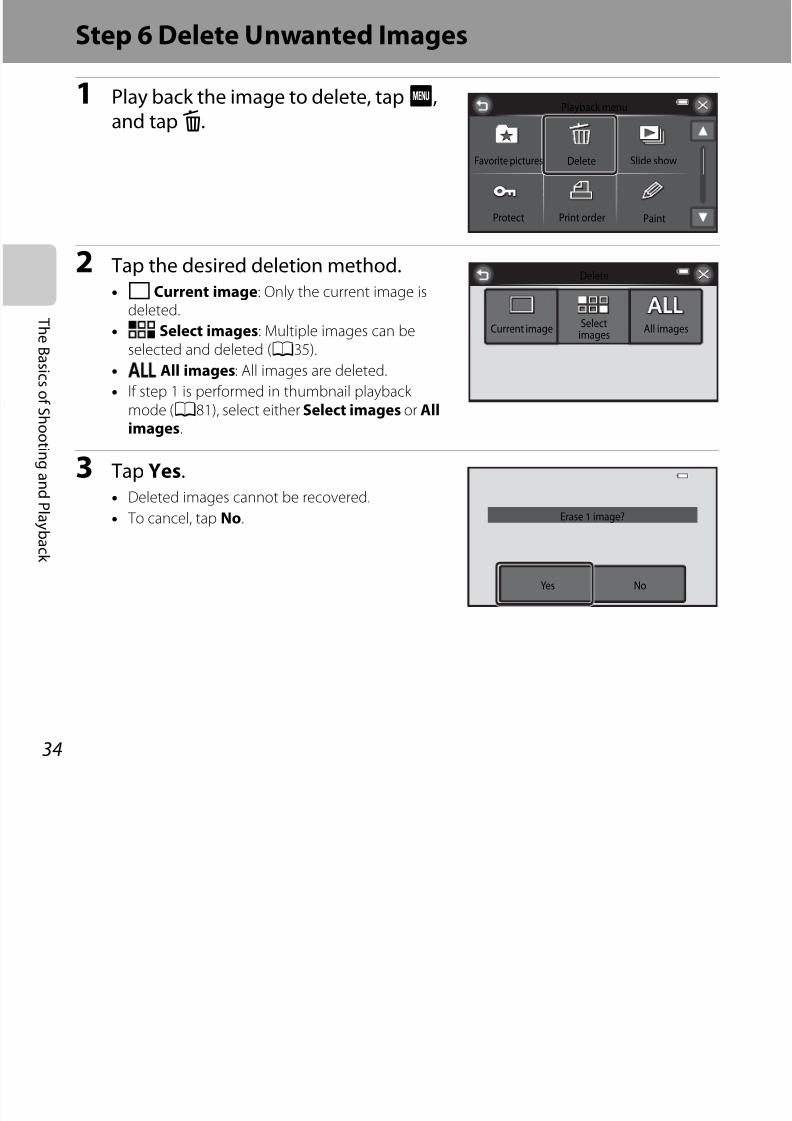
7/29/2019 Nikon s6400rm en 02
http://slidepdf.com/reader/full/nikon-s6400rm-en-02 52/280
34
T h e B a s i c s of S h
o o t i n g a n d P l a y b a c k
1 Play back the image to delete, tapF,and tapl.
2 Tap the desired deletion method.
• G Current image: Only the current image isdeleted.
• F Select images: Multiple images can beselected and deleted (A35).
• H All images: All images are deleted.
• If step 1 is performed in thumbnail playback mode (A81), select either Select images or All
images.
3 Tap Yes.• Deleted images cannot be recovered.
• To cancel, tap No.
Playback menu
Delete
PaintProtect Print order
Favorite pictures Slide show
Delete
Current image Selectimages
All images
Yes No
Erase 1 image?
Operating the Erase Selected Images Screen
1 Tap an image to displayy.Erase selected images

7/29/2019 Nikon s6400rm en 02
http://slidepdf.com/reader/full/nikon-s6400rm-en-02 53/280
35
T h e B a s i c s of S h
o o t i n g a n d P l a y b a c k
• To undo the selection, tap the image again toremovey.
• TapB orC to scroll through the images.• Rotate the zoom control (A2) to g (i) toswitch to full-frame playback orf (h) toswitch back to 12-thumbnail display.
2 Addy to all images that you want to delete and then tapI toconfirm the selection.• A confirmation dialog is displayed. Follow the instructions displayed in the monitor.
B Notes About Deletion
• Deleted images cannot be recovered. Copy important images to a computer or other media
before deleting them from the camera.
• Protected images (A84) cannot be deleted.
B Deleting Images in a Sequence
• If you tapF and delete a key picture while only key pictures are displayed for sequences of images (A33), all images in the sequence, including the key picture, are deleted.
• To delete individual images in a sequence, tapR to display them one at a time, tapF, and tap
l.
C Selecting Certain Types of Images for Deletion
When using favorite pictures mode, auto sort mode, or list by date mode, you can select images
registered as favorites, images in a certain category, or images captured on a specific date for
deletion (A82).
7/29/2019 Nikon s6400rm en 02
http://slidepdf.com/reader/full/nikon-s6400rm-en-02 54/280
36

7/29/2019 Nikon s6400rm en 02
http://slidepdf.com/reader/full/nikon-s6400rm-en-02 55/280
37
S h o o
t i n gF e a t ur e s
Shooting Features
This chapter describes the camera’s shooting modes and the features that are available whenusing each shooting mode.
You can select shooting modes and adjust settings according to the shooting conditions andthe kind of images you want capture.
A (Auto) Mode ................................................................. 38
Scene Mode (Shooting Suited to Scenes) ....................... 40Special Effects Mode (Applying Effects When Shooting)............................................................................................ 52Smart Portrait Mode (Capturing Images of Smiling Faces)............................................................................................ 54Basic Shooting Settings ................................................... 57
Using the Flash (Flash Modes) .................................................................................... 58Using the Self-timer ........................................................................................................ 61
Using Macro Mode.......................................................................................................... 63
Adjusting Brightness (Exposure Compensation)................................................. 65
Features That Can Be Set withF (Shooting Menu) ...... 68
Features That Cannot Be Used Simultaneously ............. 71
Focusing ............................................................................ 74
A (Auto) Mode
Used for general shooting. Settings can be adjusted in the shooting menu (A69) to suit theshooting conditions and the type of shot you want to capture.
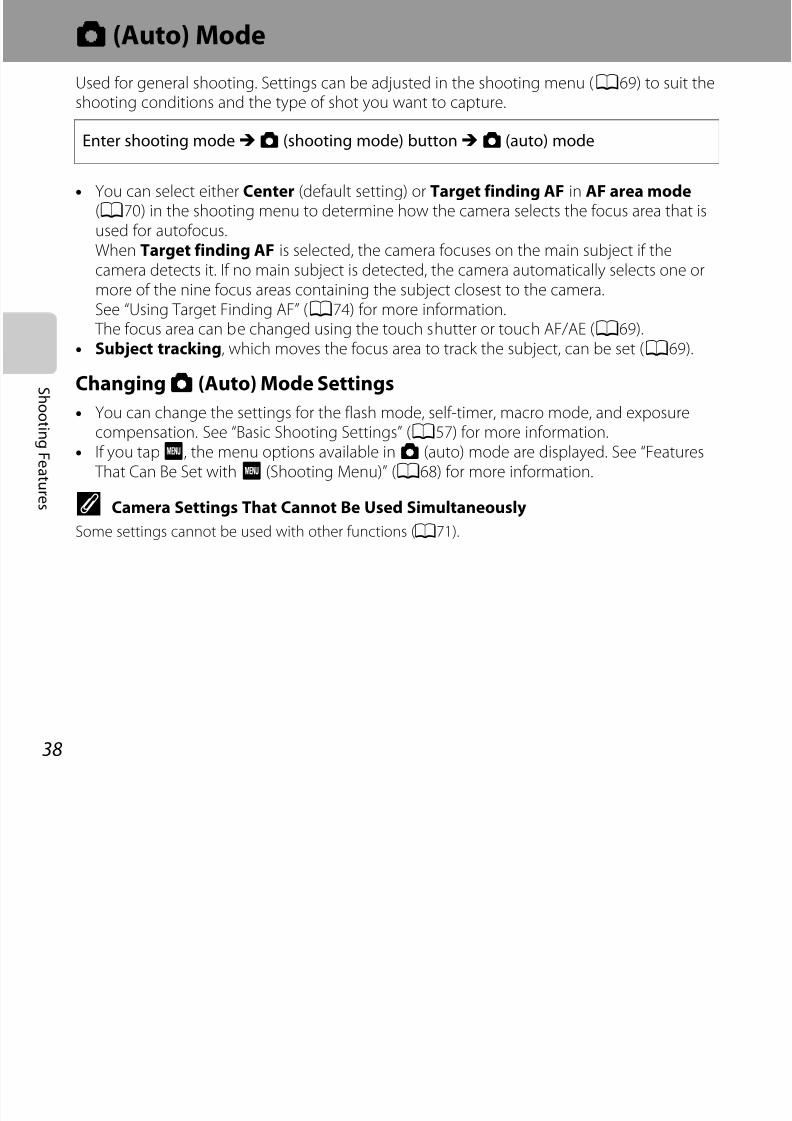
7/29/2019 Nikon s6400rm en 02
http://slidepdf.com/reader/full/nikon-s6400rm-en-02 56/280
38
S h o o
t i n gF e a t ur e s
shooting conditions and the type of shot you want to capture.
• You can select either Center (default setting) or Target finding AF in AF area mode (A70) in the shooting menu to determine how the camera selects the focus area that isused for autofocus.When Target finding AF is selected, the camera focuses on the main subject if thecamera detects it. If no main subject is detected, the camera automatically selects one or
more of the nine focus areas containing the subject closest to the camera.See “Using Target Finding AF” (A74) for more information. The focus area can be changed using the touch shutter or touch AF/AE (A69).
• Subject tracking, which moves the focus area to track the subject, can be set (A69).
Changing A (Auto) Mode Settings
• You can change the settings for the flash mode, self-timer, macro mode, and exposure
compensation. See “Basic Shooting Settings” (A57) for more information.• If you tapF, the menu options available in A (auto) mode are displayed. See “Features
That Can Be Set withF (Shooting Menu)” (A68) for more information.
C Camera Settings That Cannot Be Used Simultaneously
Some settings cannot be used with other functions (A71).
Enter shooting modeM A (shooting mode) buttonM A (auto) mode
Using Quick EffectsWhen in A (auto) mode, you can apply effects to images immediately after releasing theshutter.• The edited image is saved as a separate file with a different name (E117).
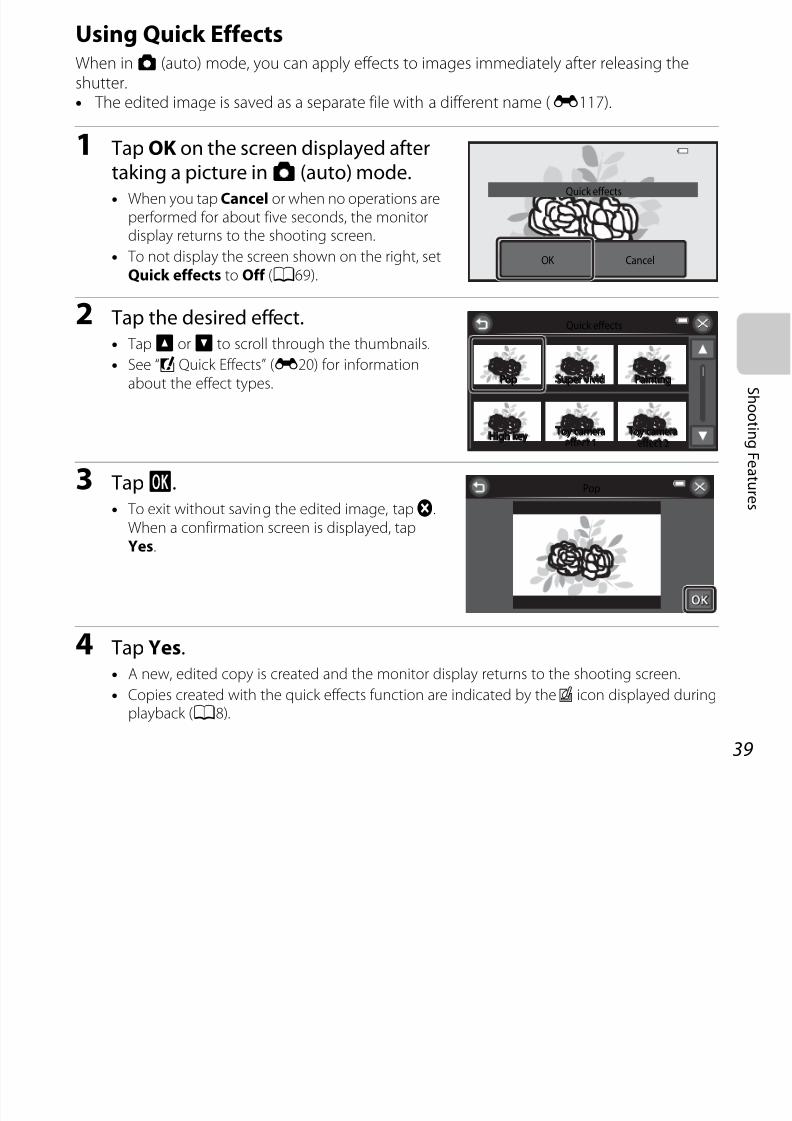
7/29/2019 Nikon s6400rm en 02
http://slidepdf.com/reader/full/nikon-s6400rm-en-02 57/280
39
S h o o t i n gF e a t ur e s
g p ( )
1 Tap OK on the screen displayed aftertaking a picture in A (auto) mode.• When you tap Cancel or when no operations are
performed for about five seconds, the monitordisplay returns to the shooting screen.
• To not display the screen shown on the right, setQuick effects to Off (A69).
2 Tap the desired effect.• TapB orC to scroll through the thumbnails.
• See “p Quick Effects” (E20) for informationabout the effect types.
3 TapI.• To exit without saving the edited image, tapf.
When a confirmation screen is displayed, tapYes.
4 Tap Yes.• A new, edited copy is created and the monitor display returns to the shooting screen.
• Copies created with the quick effects function are indicated by theV icon displayed during
playback (A8).
OK Cancel
Quick effects
Quick effects
PopopPop Super vividuper vividSuper vivid PaintingaintingPainting
High keyigh keyHigh key Toy cameraeffect 1Toy cameraeffect 1Toy cameraeffect 1 Toy cameraeffect 2Toy cameraeffect 2Toy cameraeffect 2
Pop
Scene Mode (Shooting Suited to Scenes)
When one of the following scenes is selected, camera settings are automatically optimized forthe selected scene.
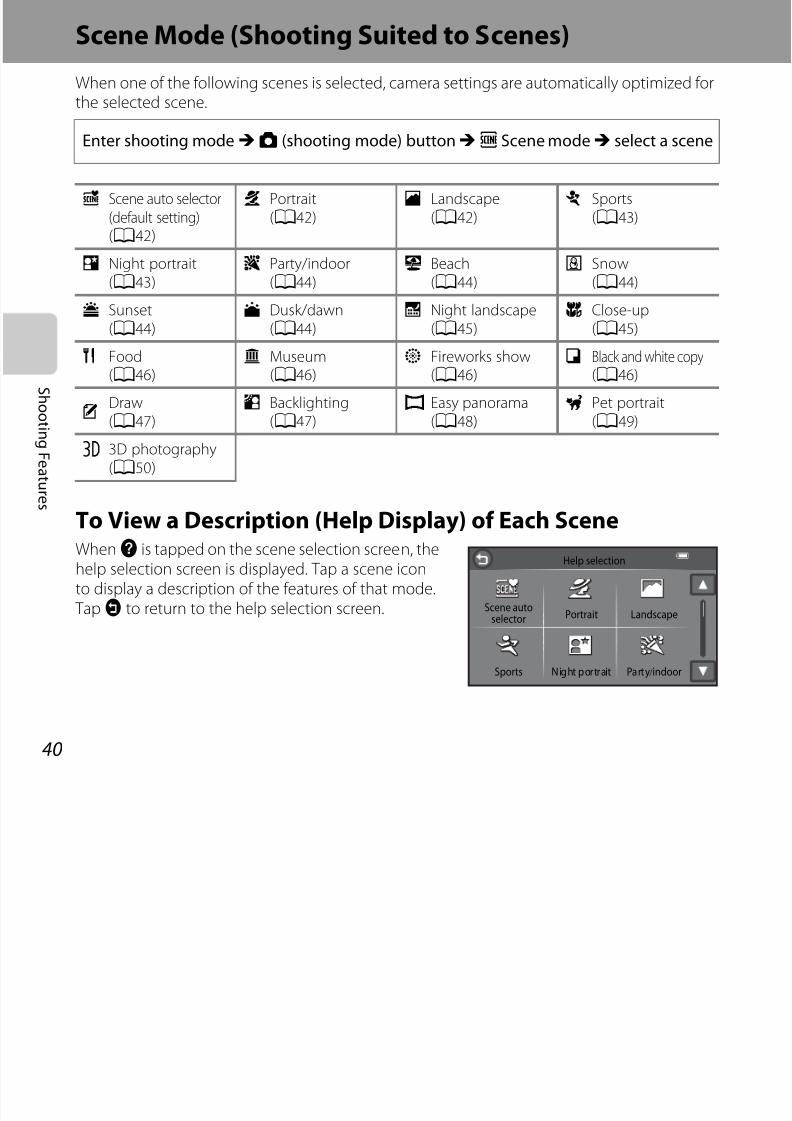
7/29/2019 Nikon s6400rm en 02
http://slidepdf.com/reader/full/nikon-s6400rm-en-02 58/280
40
S h o o t i n gF e a t ur e s
To View a Description (Help Display) of Each SceneWhenp is tapped on the scene selection screen, the
help selection screen is displayed. Tap a scene iconto display a description of the features of that mode.
TapJ to return to the help selection screen.
Enter shooting modeM A (shooting mode) buttonM C Scene modeM select a scene
d Scene auto selector(default setting)(A42)
b Portrait(A42)
c Landscape(A42)
d Sports(A43)
e Night portrait(A43)
f Party/indoor(A44)
Z Beach(A44)
z Snow(A44)
h Sunset(A44)
i Dusk/dawn(A44)
j Night landscape(A45)
k Close-up(A45)
u Food(A46)
l Museum(A46)
m Fireworks show(A46)
n Black and white copy(A46)
ADraw(A47)
o Backlighting(A47)
p Easy panorama(A48)
O Pet portrait(A49)
s 3D photography(A50)
Help selection
PortraitScene auto
selector
Sports
Landscape
Night portrait Party/indoor
Changing Scene Mode Settings
• You can change the settings for the flash mode, self-timer, macro mode, and exposurecompensation for some scenes. See “Basic Shooting Settings” (A57) and “DefaultSettings” (A66) for more information.F
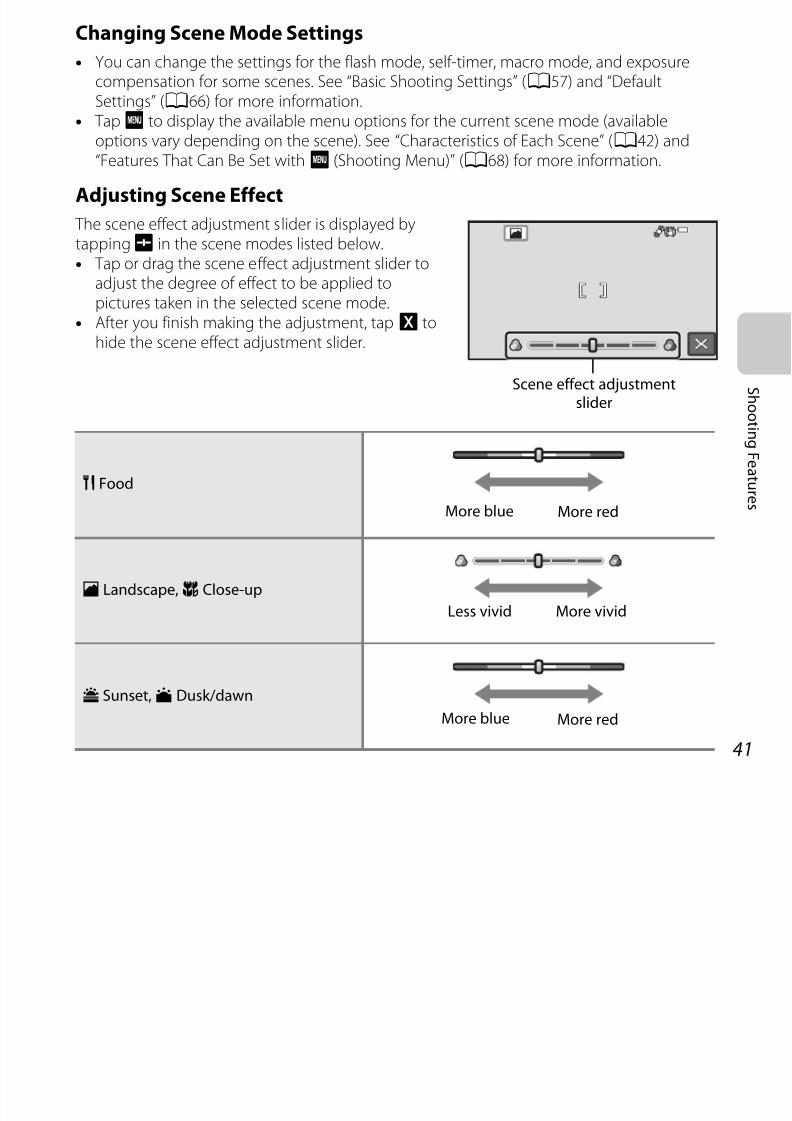
7/29/2019 Nikon s6400rm en 02
http://slidepdf.com/reader/full/nikon-s6400rm-en-02 59/280
41
S h o o t i n gF e a t ur e s
• TapF to display the available menu options for the current scene mode (availableoptions vary depending on the scene). See “Characteristics of Each Scene” (A42) and
“Features That Can Be Set withF (Shooting Menu)” (A68) for more information.
Adjusting Scene Effect
The scene effect adjustment slider is displayed bytappingg in the scene modes listed below.• Tap or drag the scene effect adjustment slider to
adjust the degree of effect to be applied topictures taken in the selected scene mode.
• After you finish making the adjustment, tapH tohide the scene effect adjustment slider.
u Food
c Landscape, k Close-up
h Sunset, i Dusk/dawn
Scene effect adjustmentslider
More redMore blue
More vividLess vivid
More redMore blue
Characteristics of Each Scene
d Scene auto selector
• When you point the camera at the subject, the camera automatically selects the optimumd f th li t b l d dj t th h ti tti di l
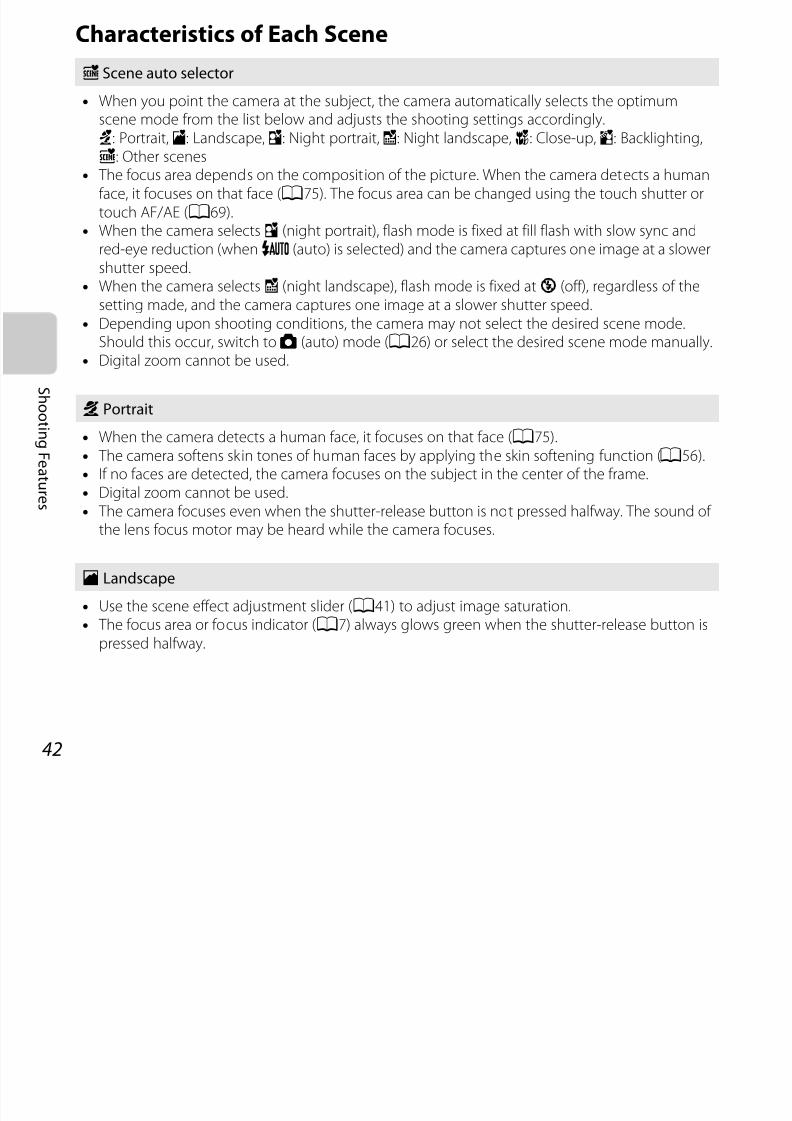
7/29/2019 Nikon s6400rm en 02
http://slidepdf.com/reader/full/nikon-s6400rm-en-02 60/280
42
S h o o t i n gF e a t ur e s
scene mode from the list below and adjusts the shooting settings accordingly.e: Portrait,f: Landscape,h: Night portrait,g: Night landscape,i: Close-up,j: Backlighting,
d: Other scenes• The focus area depends on the composition of the picture. When the camera detects a human
face, it focuses on that face (A75). The focus area can be changed using the touch shutter ortouch AF/AE (A69).
• When the camera selectsh (night portrait), flash mode is fixed at fill flash with slow sync andred-eye reduction (when U (auto) is selected) and the camera captures one image at a slowershutter speed.
• When the camera selectsg (night landscape), flash mode is fixed at W (off), regardless of thesetting made, and the camera captures one image at a slower shutter speed.
• Depending upon shooting conditions, the camera may not select the desired scene mode.Should this occur, switch to A (auto) mode (A26) or select the desired scene mode manually.
• Digital zoom cannot be used.
b Portrait
• When the camera detects a human face, it focuses on that face (A75).• The camera softens skin tones of human faces by applying the skin softening function (A56).• If no faces are detected, the camera focuses on the subject in the center of the frame.• Digital zoom cannot be used.• The camera focuses even when the shutter-release button is not pressed halfway. The sound of
the lens focus motor may be heard while the camera focuses.
c Landscape
• Use the scene effect adjustment slider (A41) to adjust image saturation.• The focus area or focus indicator (A7) always glows green when the shutter-release button is
pressed halfway.
d Sports
• The camera focuses on the area in the center of the frame. The focus area can be changed usingthe touch shutter or touch AF/AE (A69).
• Press and hold the shutter-release button all the way to capture up to 19 images continuouslyl

7/29/2019 Nikon s6400rm en 02
http://slidepdf.com/reader/full/nikon-s6400rm-en-02 61/280
43
S h o o t i n gF e a t ur e s
at a rate of about 2 fps (when image mode is set tol).• The camera focuses even when the shutter-release button is not pressed halfway. You may hear
the sound of the camera focusing.• Focus, exposure, and hue are fixed at the values determined with the first image in each series.• The frame rate with continuous shooting may vary depending upon the current image mode
setting, the memory card used, or shooting condition.• When the shutter is released using the touch shutter function (A69), one image is captured at
a time.
e Night portrait
• The flash always fires.• When the camera detects a human face, it focuses on that face (A75).• The camera softens skin tones of human faces by applying the skin softening function (A56).• If no faces are detected, the camera focuses on the subject in the center of the frame.• TapF and tap e Night portrait to selectu Hand-held orw Tripod.• Hand-held (default setting):
- When the e icon at the top left of the monitor lights in green, press the shutter-release
button all the way to capture a series of images which will be combined into a single imageand saved.- Once the shutter-release button is pressed all the way, hold the camera still until a still image
is displayed. After taking a picture, do not turn the camera off before the monitor switches tothe shooting screen.
- The angle of view (i.e., the area visible in the frame) seen in the saved image will be narrowerthan that seen in the monitor at the time of shooting.
- If the subject moves while the camera is shooting continuously, the image may be distorted,
overlapped, or blurred.• Tripod: Select this option when using a tripod or other means to stabilize the camera duringshooting.- Vibration reduction is disabled even when Vibration reduction (A104) in the setup menu
is set to On.- One image is captured at a slow shutter speed when the shutter-release button is pressed all
the way.• Digital zoom cannot be used.
f Party/indoor
• The camera focuses on the area in the center of the frame. The focus area can be changed usingthe touch shutter or touch AF/AE (A69).
• To avoid the effects of camera shake, hold the camera steady. Set Vibration reduction to Off A
7/29/2019 Nikon s6400rm en 02
http://slidepdf.com/reader/full/nikon-s6400rm-en-02 62/280
44
S h o o t i n gF e a t ur e s
O: Use of a tripod is recommended when using scene modes indicated withO, because theshutter speed is slow. Set Vibration reduction to Off in the setup menu (A104) when usinga tripod to stabilize the camera during shooting.
in the setup menu (A104) when using a tripod to stabilize the camera during shooting.
Z Beach
• The camera focuses on the area in the center of the frame. The focus area can be changed usingthe touch shutter or touch AF/AE (A69).
z Snow
• The camera focuses on the area in the center of the frame. The focus area can be changed usingthe touch shutter or touch AF/AE (A69).
h Sunset
• Use the scene effect adjustment slider (A41) to adjust image saturation.• The camera focuses on the area in the center of the frame.
i Dusk/dawn
• Use the scene effect adjustment slider (A41) to adjust image saturation.• The focus area or focus indicator (A7) always glows green when the shutter-release button is
pressed halfway.
O
O
j Night landscape
• The focus area or focus indicator (A7) always glows green when the shutter-release button ispressed halfway.
• TapF and tap j Night landscape to selectu Hand-held or w Tripod.d h ld (d f l ) l h d h h d d bl d
7/29/2019 Nikon s6400rm en 02
http://slidepdf.com/reader/full/nikon-s6400rm-en-02 63/280
45
S h o o t i n gF e a t ur e s
• Hand-held (default setting): Select this option to produce shots with reduced blurring andnoise even when the camera is hand-held.
- When the j icon at the top left of the monitor lights in green, press the shutter-releasebutton all the way to capture a series of images which will be combined into a single imageand saved.
- Once the shutter-release button is pressed all the way, hold the camera still until a still imageis displayed. After taking a picture, do not turn the camera off before the monitor switches tothe shooting screen.
- The angle of view (i.e., the area visible in the frame) seen in the saved image will be narrower
than that seen in the monitor at the time of shooting.• Tripod: Select this option when using a tripod or other means to stabilize the camera during
shooting.- Vibration reduction is disabled even when Vibration reduction (A104) in the setup menu
is set to On.- One image is captured at a slow shutter speed when the shutter-release button is pressed all
the way.• Digital zoom cannot be used.
k Close-up
• Macro mode (A63) is enabled and the camera automatically zooms to the closest position atwhich it can focus.
• Use the scene effect adjustment slider (A41) to adjust image saturation.• The camera focuses on the area in the center of the frame. The focus area can be changed using
the touch shutter or touch AF/AE (A69).• The camera focuses even when the shutter-release button is not pressed halfway. You may hearthe sound of the camera focusing.
u Food
• Macro mode (A63) is enabled and the camera automatically zooms to the closest position atwhich it can focus.
• Use the scene effect adjustment slider (A41) to adjust the subject’s hue affected by theli hti Th h tti i t d i th ’ ft th i t d ff
7/29/2019 Nikon s6400rm en 02
http://slidepdf.com/reader/full/nikon-s6400rm-en-02 64/280
46
S h o o t i n gF e a t ur e s
O: Use of a tripod is recommended when using scene modes indicated withO, because the
shutter speed is slow. Set Vibration reduction to Off in the setup menu (A104) when usinga tripod to stabilize the camera during shooting.
lighting. The hue setting is stored in the camera’s memory even after the camera is turned off.• The camera focuses on the area in the center of the frame. The focus area can be changed using
the touch shutter or touch AF/AE (A69).• The camera focuses even when the shutter-release button is not pressed halfway. You may hear
the sound of the camera focusing.
l Museum
• The flash does not fire.
• The camera focuses on the area in the center of the frame. The focus area can be changed usingthe touch shutter or touch AF/AE (A69).
• The camera captures a series of up to ten images while the shutter-release button is held all theway down, and the sharpest image in the series is automatically selected and saved (BSS (BestShot Selector)).
• BSS is disabled when using the touch shutter (A69) for shooting.
m Fireworks show
• The shutter speed is fixed at about four seconds.• Camera focuses at infinity.• The focus indicator (A7) always glows green when the shutter-release button is pressed
halfway.
n Black and white copy• The camera focuses on the area in the center of the frame. The focus area can be changed using
the touch shutter or touch AF/AE (A69).• Use together with macro mode (A63) when shooting subjects that are close to the camera.
O
A Draw
• Write a memo or draw a picture on the touch panel display and save it as an image.• The image is saved at an image mode setting of l (640×480).See “Using the Draw Option” (E2) for more information.
7/29/2019 Nikon s6400rm en 02
http://slidepdf.com/reader/full/nikon-s6400rm-en-02 65/280
47
S h o o t i n gF e a t ur e s
o Backlighting• The camera focuses on the area in the center of the frame. The focus area can be changed using
the touch shutter or touch AF/AE (A69).• TapF and tapY HDR to enable or disable the high dynamic range (HDR) function to suit the
type of picture you want to take.• p Off (default setting): The flash fires to prevent the subject from being hidden in shadow.
- When the shutter-release button is pressed all the way down, one image is captured.
• o On: Use when taking pictures with very bright and dark areas in the same frame.- Digital zoom cannot be used.- When the shutter-release button is pressed all the way, the camera shoots images
continuously at high speed, and saves the following two images.- A non-HDR composite image- An HDR composite image in which the loss of details in highlights or shadows is minimized
- The second image saved is an HDR composite image. If there is only enough memory to saveone image, an image processed by D-Lighting (A84) at the time of shooting, in which dark areas of the image are corrected, is the only image saved.
- Once the shutter-release button is pressed all the way, hold the camera still until a still image isdisplayed. After taking a picture, do not turn the camera off before the monitor switches to theshooting screen.
- The angle of view (i.e., the area visible in the frame) seen in the saved image will be narrowerthan that seen in the monitor at the time of shooting.
p Easy panorama
• Allows you to take a panorama picture simply by moving the camera in the desired direction.• Press the shutter-release button all the way down, remove your finger from the button, and
then slowly pan the camera horizontally. Shooting automatically ends when the camerat th ifi d h ti
7/29/2019 Nikon s6400rm en 02
http://slidepdf.com/reader/full/nikon-s6400rm-en-02 66/280
48
S h o o t
i n gF e a t ur e s
B Notes About Printing Panorama Images
When printing panorama images, the entire image may not be able to be printed depending on the
printer’s settings. Additionally, printing may not be possible depending on the printer.
See the documentation provided with the printer or consult the digital photo lab for details.
captures the specified shooting range.• The camera focuses at the center of the frame when shooting starts.• The zoom position is fixed at wide-angle.• TapF and tapW / X Easy panorama to select a shooting range fromW Normal
(180°) (default setting) orX Wide (360°).• If you display an image captured using easy panorama full-frame and tapR, the panorama
image scrolls automatically.See “Using Easy Panorama (Shooting and Playback)” (E3) for more information.
O Pet portrait
• When you point the camera at a dog or cat, the camera detects the pet’s face and focuses on it.By default, the shutter is automatically released when focus is acquired (pet portrait auto release).
• To change the continuous shooting setting, tapF and tapV Continuous.U Single: The camera takes one picture at a time

7/29/2019 Nikon s6400rm en 02
http://slidepdf.com/reader/full/nikon-s6400rm-en-02 67/280
49
S h o o t
i n gF e a t ur e s
B Using Pet Portrait Auto Release
• To change the pet portrait auto release setting, tapF and tapY Pet portrait auto release.- o On (default setting): The shutter is automatically released when focus is acquired on the
detected face.- p Off : The shutter is not automatically released when a pet face is detected. Use the shutter-
release button or touch shutter to release the shutter (A69). The camera also detects humanfaces (A75). If the camera detects a human face and a pet face in the same shot, it focuses onthe pet’s face.
• Pet portrait auto release turns off automatically when:- Five bursts have been taken.- Internal memory or the memory card is full.
To continue taking pictures with Pet portrait auto release, tapF and set Pet portrait autorelease to On again.
B Notes About AF Areas
• When the camera detects a face, a yellow double border(focus area) is displayed around the face, and the doubleborder turns green when the camera has focused.
• When the camera detects more than one dog or cat
face (up to five can be detected), the face displayedlargest in the monitor is framed by a double borderand the others by single borders.
• When no pet or human faces are detected, the camerafocuses on the subject at the center of the frame.
B Notes About Pet Portrait Scene Mode
• Digital zoom cannot be used.• Depending on the distance of the pet from the camera, the speed of the pet’s movement, the
direction the pet is facing, the ambient brightness around its face, etc., the pet face may not bedetected and other subjects may be displayed with a border.
- U Single: The camera takes one picture at a time.- V Continuous (default setting): When focus is acquired on the detected face, the camera
automatically releases the shutter 3 times. When you manually release the shutter, up to 19images can be continuously taken while the shutter-release button is held down. The framerate with continuous shooting is about 2 fps (when Image mode is set tol 4608×2592).
2525 0010101010
s 3D photography
• The camera captures one image for each eye to simulate a three-dimensional image on a 3D-compatible TV or monitor.
• After taking the first picture by pressing the shutter-release button or using the touch shutter, move the

7/29/2019 Nikon s6400rm en 02
http://slidepdf.com/reader/full/nikon-s6400rm-en-02 68/280
50
S h o o t
i n gF e a t ur e s
B Notes About Taking 3D Pictures
• Moving subjects are not suited to 3D photography.
• Images have a less pronounced 3D feel as the distance between the camera and background is
increased.
• Images may have a less pronounced 3D feel when the subject is dark or when the second image is
not aligned precisely.
• Images captured under dim lighting may appear grainy with noise.
• The maximum telephoto zoom position is limited to an angle of view equivalent to that of a 120
mm lens in 35mm [135] format.
• Shooting is canceled after the first shot if f is tapped or the subject is not aligned with the guide
within approximately ten seconds.
• If the camera does not take the second picture and cancels the shooting even when you align the
guide with the subject, try shooting with the shutter-release or touch shutter.• 3D movies cannot be taken.
release button or using the touch shutter, move thecamera horizontally to the right so that the subject is
aligned with the guide on the monitor. The cameraautomatically takes the second picture when itdetects that they are aligned.
• The camera focuses on the area in the center of theframe for the first shot. The focus area can bechanged using the touch shutter or touch AF/AE(A69).
• The focus, exposure, and white balance are lockedafter the first shot, andR is displayed on the monitor.• The angle of view (i.e., the area visible in the frame) seen in the saved image will be narrower
than that seen in the monitor at the time of shooting.• Images captured in this mode are saved at an image size of n (1920 × 1080).• The two captured images are saved as a 3D image (MPO file). The first image (the left eye image)
is also saved as a JPEG file.
Guide
B Playing Back 3D Images
• 3D images cannot be played back in 3D on the camera monitor. Only the left eye image of a 3D
image is displayed during playback.
• To view 3D images in 3D, a 3D-compatible TV or monitor is required. Use a 3D-compatible HDMI
cable to connect the camera and these devices (A86) for 3D viewing.
A
7/29/2019 Nikon s6400rm en 02
http://slidepdf.com/reader/full/nikon-s6400rm-en-02 69/280
51
S h o o t
i n gF e a t ur e s
• When connecting the camera using an HDMI cable, set TV settings in the setup menu (A104)
as follows:- HDMI: Auto (default setting) or 1080i
- HDMI 3D output: On (default setting)
• When the camera is connected via HDMI and images are played back, it may take a while to
display images when switching between 3D images and non-3D images. Playback zoom is not
possible while images are played back in 3D.
• Refer to the documentation included with the TV or monitor for details on how to make thesettings.
B Caution for Viewing 3D Images
When viewing 3D images on a 3D-compatible TV or monitor for an extended period of time, you
may experience discomfort such as eye strain or nausea. Carefully read the documentation included
with your TV or monitor to ensure proper use.
Special Effects Mode (Applying Effects When Shooting)
Effects can be applied to images during shooting.
Enter shooting modeM A (shooting mode) buttonM R Special effects modeM
7/29/2019 Nikon s6400rm en 02
http://slidepdf.com/reader/full/nikon-s6400rm-en-02 70/280
52
S h o o t i
n g F e a t ur e s
The following 11 effects are available.
select an effectM I
Category Description
O Soft(default setting)
Softens the image by adding a slight blur to the entire image.
P Nostalgic sepia
Adds a sepia tone and reduces the contrast to simulate the qualities of
an old photograph.
F High-contrastmonochrome
Changes the image to black and white and gives it sharp contrast.
G High key Gives the entire image a bright tone.
H Low key Gives the entire image a dark tone.
I Selective color
Creates a black and white image in which only the specified color
remains.
l Pop Increases the color saturation of the entire image to create a bright look.
k Super vividIncreases the color saturation of the entire image and sharpens thecontrast.
m Toy camera effect 1Gives the entire image a yellowish hue and darkens the imageperiphery.
n Toy camera effect 2Decreases the color saturation of the entire image and darkens theimage periphery.
o Cross process Gives the image a mysterious appearance based on a specific color.
• The camera focuses on the area in the center of the frame. The focus area can be changedusing the touch shutter or touch AF/AE (A69).
• When Selective color or Cross process isselected, tap or drag the slider to select thedesired color.After you select the desired color, tapH to hide
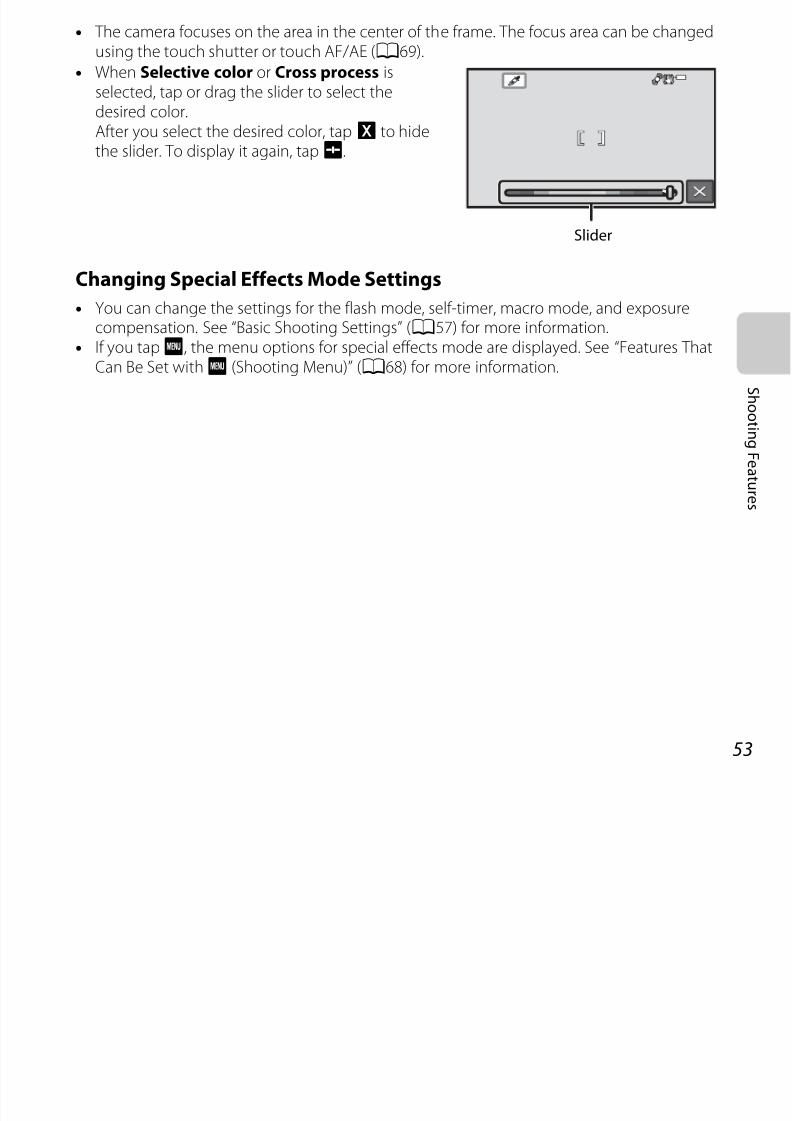
7/29/2019 Nikon s6400rm en 02
http://slidepdf.com/reader/full/nikon-s6400rm-en-02 71/280
53
S h o o t
i n gF e a t ur e s
y , pHthe slider. To display it again, tapg.
Changing Special Effects Mode Settings
• You can change the settings for the flash mode, self-timer, macro mode, and exposurecompensation. See “Basic Shooting Settings” (A57) for more information.
• If you tapF, the menu options for special effects mode are displayed. See “Features ThatCan Be Set withF (Shooting Menu)” (A68) for more information.
Slider
Smart Portrait Mode (Capturing Images of Smiling Faces)
When the camera detects a smiling face, you can take a picture automatically withoutpressing the shutter-release button (smile timer). In addition, the skin softening functionsmoothes the skin tones of human faces.
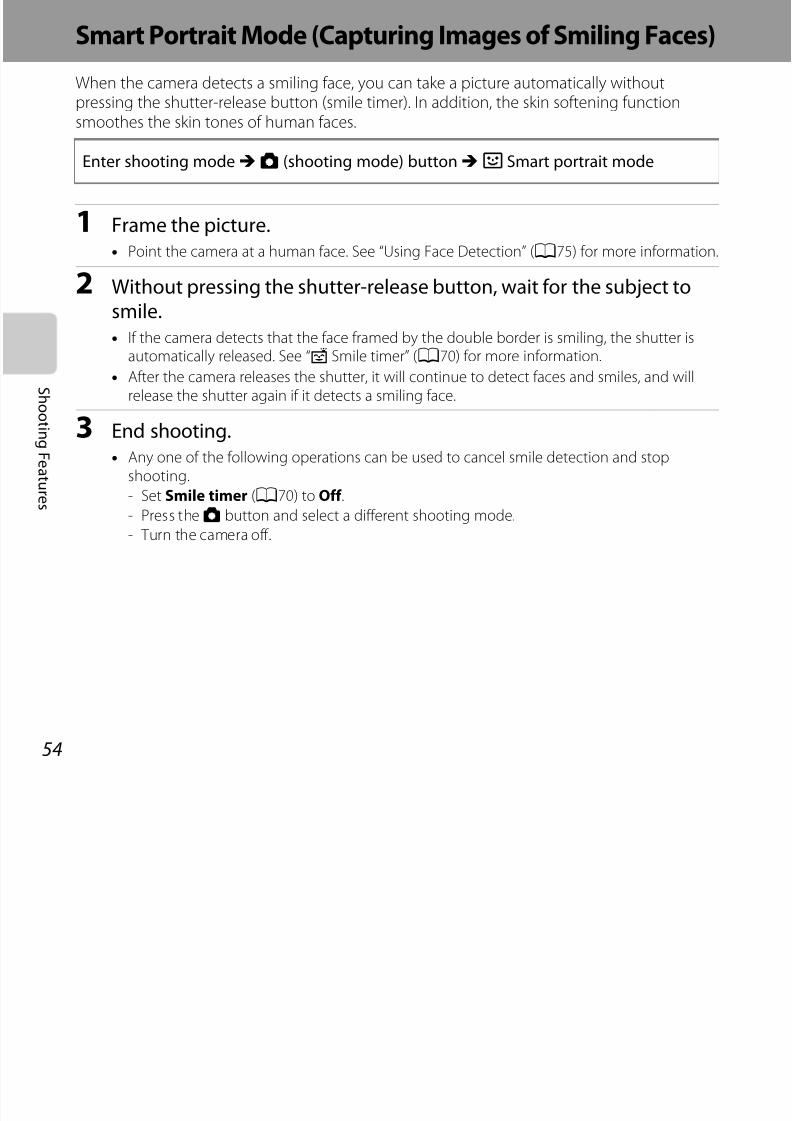
7/29/2019 Nikon s6400rm en 02
http://slidepdf.com/reader/full/nikon-s6400rm-en-02 72/280
54
S h o o t i n gF e a t ur e s
1 Frame the picture.• Point the camera at a human face. See “Using Face Detection” (A75) for more information.
2 Without pressing the shutter-release button, wait for the subject tosmile.
• If the camera detects that the face framed by the double border is smiling, the shutter isautomatically released. See “a Smile timer” (A70) for more information.
• After the camera releases the shutter, it will continue to detect faces and smiles, and willrelease the shutter again if it detects a smiling face.
3 End shooting.• Any one of the following operations can be used to cancel smile detection and stop
shooting.
- Set Smile timer (A70) to Off .
- Press the A button and select a different shooting mode.
- Turn the camera off.
Enter shooting modeM A (shooting mode) buttonM F Smart portrait mode
B Notes About Smart Portrait Mode
• Digital zoom cannot be used.
• Under some shooting conditions, the camera may be unable to detect faces or detect smiles.
• See “Notes About Face Detection” (A76) for more information.
C Auto Power Off in Smile Timer Mode
7/29/2019 Nikon s6400rm en 02
http://slidepdf.com/reader/full/nikon-s6400rm-en-02 73/280
55
S h o o t i n gF e a t ur e s
C Auto Power Off in Smile Timer Mode
When Smile timer is set to On, the auto power off function (A105) is activated and the cameraturns off when either of the situations indicated below persists and no other operations are
performed.
• The camera does not detect any faces.
• The camera detected a face, but cannot detect a smile.
C When the Self-timer Lamp Flashes
When using smile timer, the self-timer lamp flashes when the camera detects a face and flashes
quickly immediately after the shutter is released.
C Releasing the Shutter Manually
• The shutter can also be released by pressing the shutter-release button. If no faces are detected,
the camera focuses on the subject at the center of the frame.
• Touch shutter (A
69) can be used when Smile timer is set to Off .
Changing Smart Portrait Mode Settings
• You can change the settings for the flash mode, self-timer, and exposure compensation.See “Basic Shooting Settings” (A57) for more information.
• If you tapF, the menu options for smart portrait mode are displayed. See “Features ThatCan Be Set withF (Shooting Menu)” (A68) for more information.
C Camera Settings That Cannot Be Used Simultaneously
Some settings cannot be used with other functions (A71).
Using Skin SofteningWhen the shutter is released while using one of the shooting modes listed below, the cameradetects up to three human faces and processes the image to soften facial skin tones beforesaving the image.• Scene auto selector (A42), Portrait (A42), or Night portrait (A43) scene mode is
selected
7/29/2019 Nikon s6400rm en 02
http://slidepdf.com/reader/full/nikon-s6400rm-en-02 74/280
56
S h o o t i n gF e a t ur e s
selected.
• Smart portrait mode (A54)Editing functions such as Skin softening can be applied to saved images by using Glamourretouch (A84).
B Notes About Skin Softening
• It may take more time than usual to save images after shooting.
• Under some shooting conditions, the desired skin softening results may not be achieved, and skin
softening may be applied to areas of the image where there are no faces. If the desired results are
not produced, switch to another shooting mode and then try shooting again.
• The skin softening level cannot be adjusted when shooting in Portrait or Night portrait scenemode, or when the camera selects one of these scenes while in scene auto selector scene mode.
Basic Shooting Settings
When in shooting mode, you can tap the iconson the left side of the monitor to set thefollowing features:
1 Exposure compensation2
1
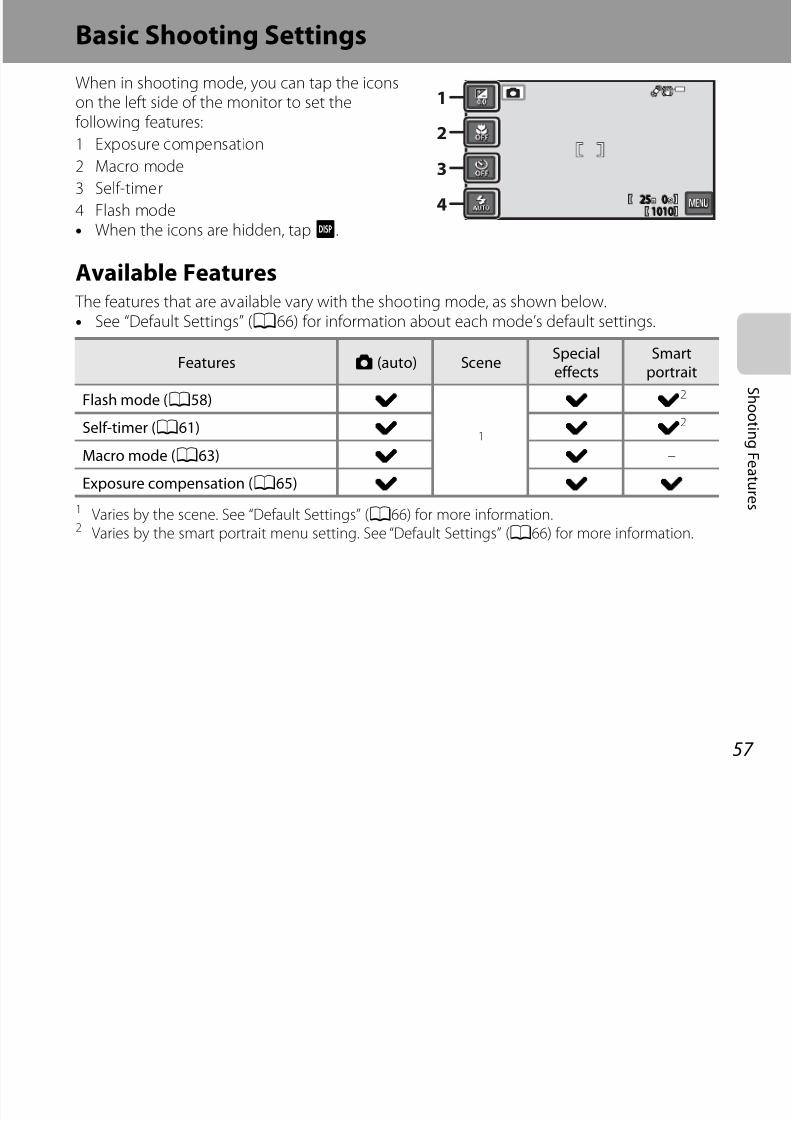
7/29/2019 Nikon s6400rm en 02
http://slidepdf.com/reader/full/nikon-s6400rm-en-02 75/280
57
S h o o t i n gF e a t ur e s
1 Exposure compensation
2 Macro mode3 Self-timer
4 Flash mode• When the icons are hidden, tapA.
Available Features
The features that are available vary with the shooting mode, as shown below.• See “Default Settings” (A66) for information about each mode’s default settings.
1 Varies by the scene. See “Default Settings” (A66) for more information.2 Varies by the smart portrait menu setting. See “Default Settings” (A66) for more information.
Features A (auto) SceneSpecialeffects
Smartportrait
Flash mode (A58) w
1
w w2
Self-timer (A61) w w w2
Macro mode (A63) w w –
Exposure compensation (A65) w w w
2525 00101010104
3
Using the Flash (Flash Modes)You can set the flash mode to match the shooting conditions.
1 Tap the flash mode icon.
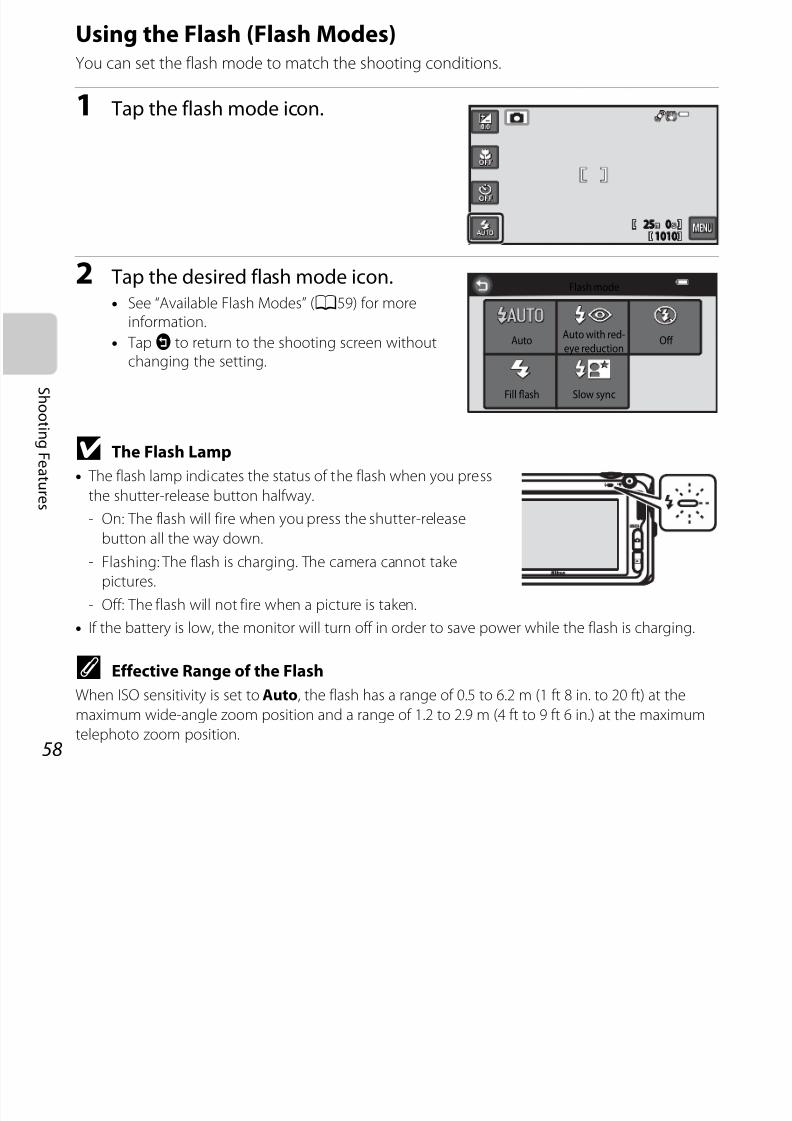
7/29/2019 Nikon s6400rm en 02
http://slidepdf.com/reader/full/nikon-s6400rm-en-02 76/280
58
S h o o t i n gF e a t ur e s
2 Tap the desired flash mode icon.
• See “Available Flash Modes” (A59) for moreinformation.
• TapJ to return to the shooting screen withoutchanging the setting.
B The Flash Lamp
• The flash lamp indicates the status of the flash when you press
the shutter-release button halfway.
- On: The flash will fire when you press the shutter-release
button all the way down.
- Flashing: The flash is charging. The camera cannot take
pictures.
- Off: The flash will not fire when a picture is taken.
• If the battery is low, the monitor will turn off in order to save power while the flash is charging.
C Effective Range of the Flash
When ISO sensitivity is set to Auto, the flash has a range of 0.5 to 6.2 m (1 ft 8 in. to 20 ft) at the
maximum wide-angle zoom position and a range of 1.2 to 2.9 m (4 ft to 9 ft 6 in.) at the maximumtelephoto zoom position.
2525 0010101010
Flash mode
AutoAuto with red-
eye reduction
Fill fash Slow sync
O
Available Flash Modes
U Auto
The flash fires automatically when lighting is dim.
V Auto with red-eye reduction
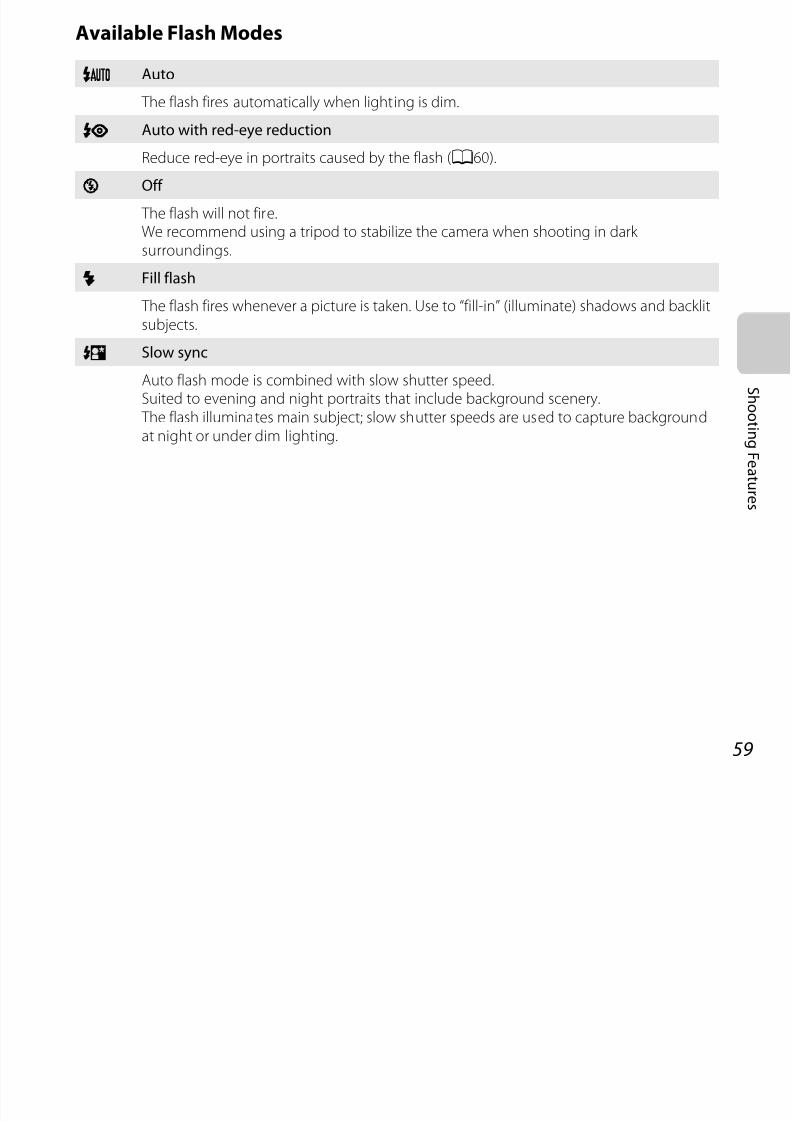
7/29/2019 Nikon s6400rm en 02
http://slidepdf.com/reader/full/nikon-s6400rm-en-02 77/280
59
S h o o t i n gF e a t ur e s
Reduce red-eye in portraits caused by the flash (A60).W Off
The flash will not fire.We recommend using a tripod to stabilize the camera when shooting in dark surroundings.
X Fill flash
The flash fires whenever a picture is taken. Use to “fill-in” (illuminate) shadows and backlitsubjects.
Y Slow sync
Auto flash mode is combined with slow shutter speed.Suited to evening and night portraits that include background scenery. The flash illuminates main subject; slow shutter speeds are used to capture background
at night or under dim lighting.
C The Flash Mode Setting
• The setting varies with the shooting mode. See “Available Features” (A57) and “Default Settings”
(A66) for more information.
• Some settings cannot be used with other functions (A71).
• The flash mode setting applied in A (auto) mode is saved in the camera’s memory even after the
camera is turned off.
7/29/2019 Nikon s6400rm en 02
http://slidepdf.com/reader/full/nikon-s6400rm-en-02 78/280
60
S h o o t i n gF e a t ur e s
C Red-eye Reduction
This camera uses Advanced Red-Eye Reduction (In-Camera Red-Eye Fix).
If the camera detects red-eye while saving an image, the affected area will be processed to reduce
red-eye before the image is saved.
Note the following when shooting:
• More time than usual is required to save images.
• Red-eye reduction may not produce the desired results in all situations.
• In some cases, red-eye correction may be applied to areas of an image unnecessarily. In these
cases, select another flash mode and take the picture again.
Using the Self-timer The camera is equipped with a self-timer that releases the shutter ten seconds or twoseconds after you press the shutter-release button. The self-timer is useful when you want tobe in the picture you are taking, and when you want to avoid the effects of camera shake thatoccur when you press the shutter-release button. When using the self-timer, use of a tripod isrecommended. Set Vibration reduction to Off in the setup menu (A104) when using a
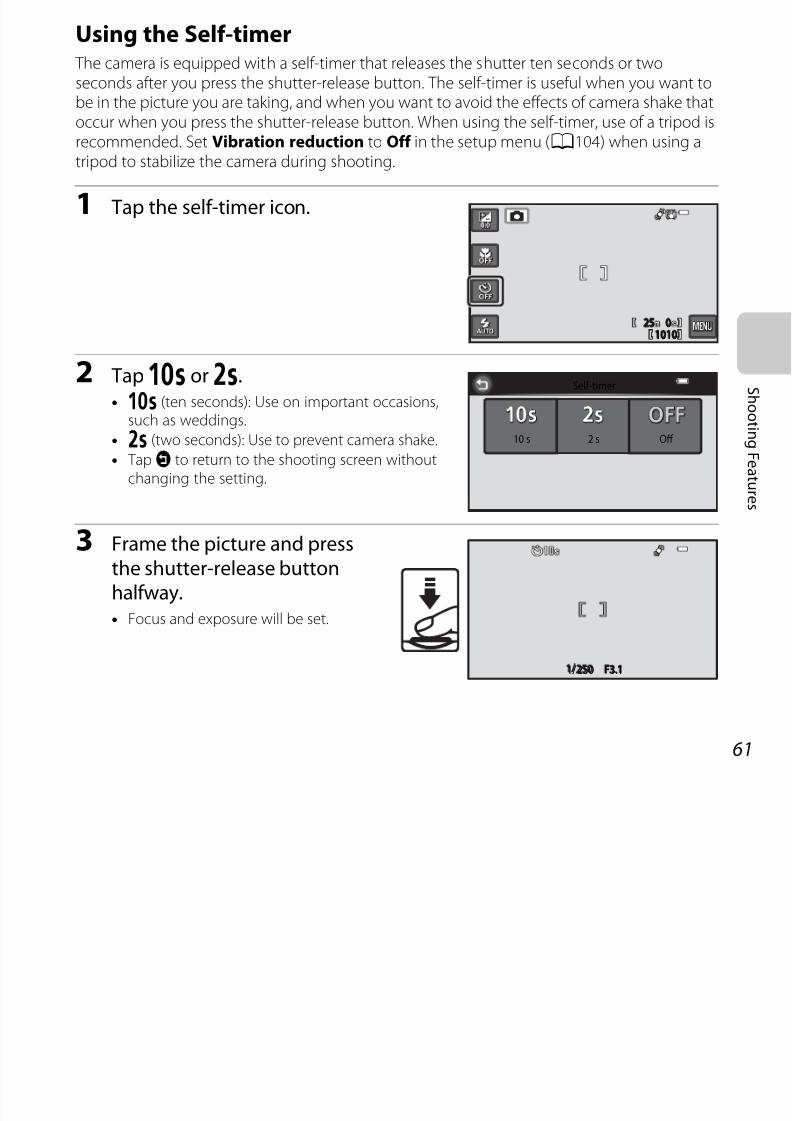
7/29/2019 Nikon s6400rm en 02
http://slidepdf.com/reader/full/nikon-s6400rm-en-02 79/280
61
S h o o t i n gF e a t ur e s
tripod to stabilize the camera during shooting.
1 Tap the self-timer icon.
2 TapY orZ.• Y (ten seconds): Use on important occasions,
such as weddings.
• Z (two seconds): Use to prevent camera shake.• TapJ to return to the shooting screen without
changing the setting.
3 Frame the picture and pressthe shutter-release buttonhalfway.• Focus and exposure will be set.
2525 0010101010
Sel-timer
10 s 2 s O
1//1/ F3.13.1F3.125050250
4 Press the shutter-releasebutton the rest of the waydown.• The self-timer starts, and the number
of seconds remaining before the
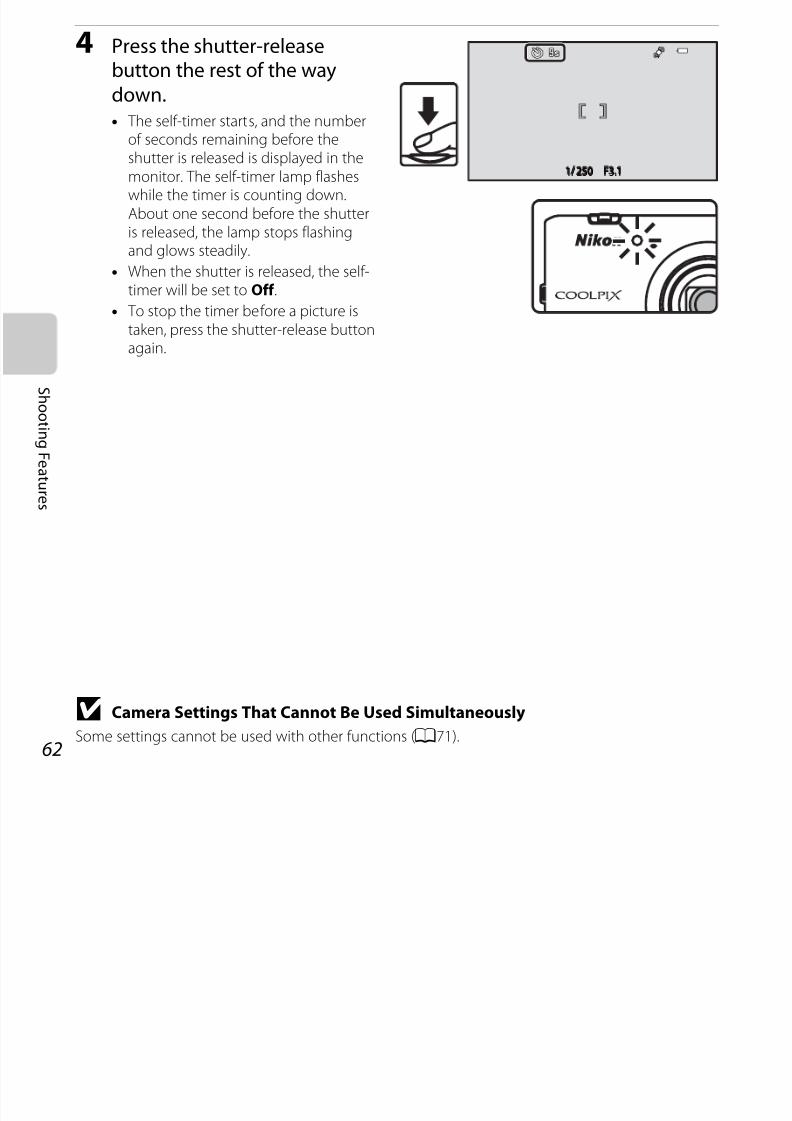
7/29/2019 Nikon s6400rm en 02
http://slidepdf.com/reader/full/nikon-s6400rm-en-02 80/280
62
S h o o t i n gF e a t ur e s
shutter is released is displayed in themonitor. The self-timer lamp flasheswhile the timer is counting down.About one second before the shutteris released, the lamp stops flashingand glows steadily.
• When the shutter is released, the self-timer will be set to Off .
• To stop the timer before a picture istaken, press the shutter-release buttonagain.
B Camera Settings That Cannot Be Used SimultaneouslySome settings cannot be used with other functions (A71).
1//1/ F3.13.1F3.125050250
Using Macro ModeWhen using macro mode, the camera can focus on objects as close as approximately 10 cm(4 in.) from the front of the lens.
This feature is useful when taking close-up pictures of flowers and other small subjects.
1 Tap the macro mode icon.
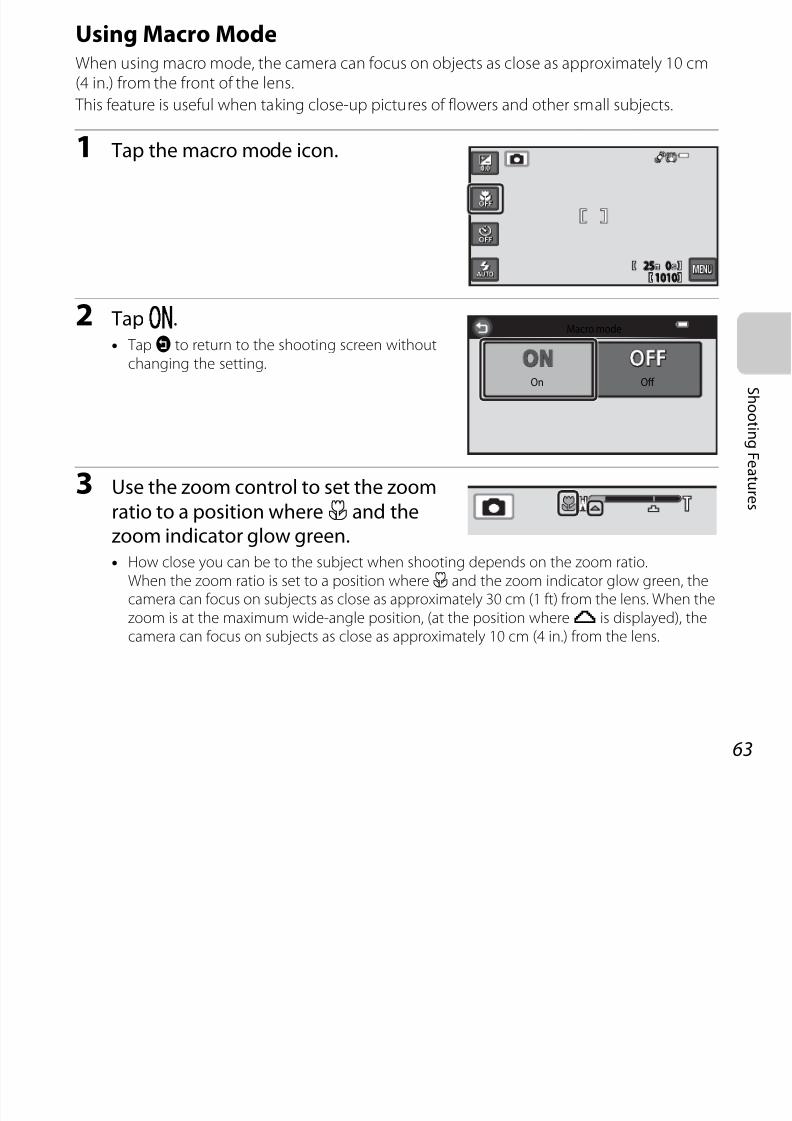
7/29/2019 Nikon s6400rm en 02
http://slidepdf.com/reader/full/nikon-s6400rm-en-02 81/280
63
S h o o t i
n gF e a t ur e s
ap t e ac o ode co .
2 Tapo.• TapJ to return to the shooting screen without
changing the setting.
3 Use the zoom control to set the zoomratio to a position whereF and thezoom indicator glow green.• How close you can be to the subject when shooting depends on the zoom ratio.
When the zoom ratio is set to a position where F and the zoom indicator glow green, thecamera can focus on subjects as close as approximately 30 cm (1 ft) from the lens. When thezoom is at the maximum wide-angle position, (at the position whereG is displayed), thecamera can focus on subjects as close as approximately 10 cm (4 in.) from the lens.
2525 0010101010
Macro mode
On O
B Notes About Using the Flash The flash may be unable to light the entire subject at distances of less than 50 cm (1 ft 8 in.) .
C Autofocus
When taking still pictures in macro mode, the camera continuously adjusts the focus until the
shutter-release button is pressed halfway to lock the focus. Therefore, the sound of lens focus motor
can be heard.
7/29/2019 Nikon s6400rm en 02
http://slidepdf.com/reader/full/nikon-s6400rm-en-02 82/280
64
S h o o t i
n gF e a t ur e s
ca be ea d.
C The Macro Mode Setting
• Macro mode cannot be used when using certain shooting modes. See “Default Settings” (A66)
for more information.
• Some settings cannot be used with other functions (A71).
• The macro mode setting applied in A (auto) mode is saved in the camera’s memory even after
the camera is turned off.
Adjusting Brightness (Exposure Compensation)You can adjust overall image brightness.
1 Tap the exposure compensation icon.
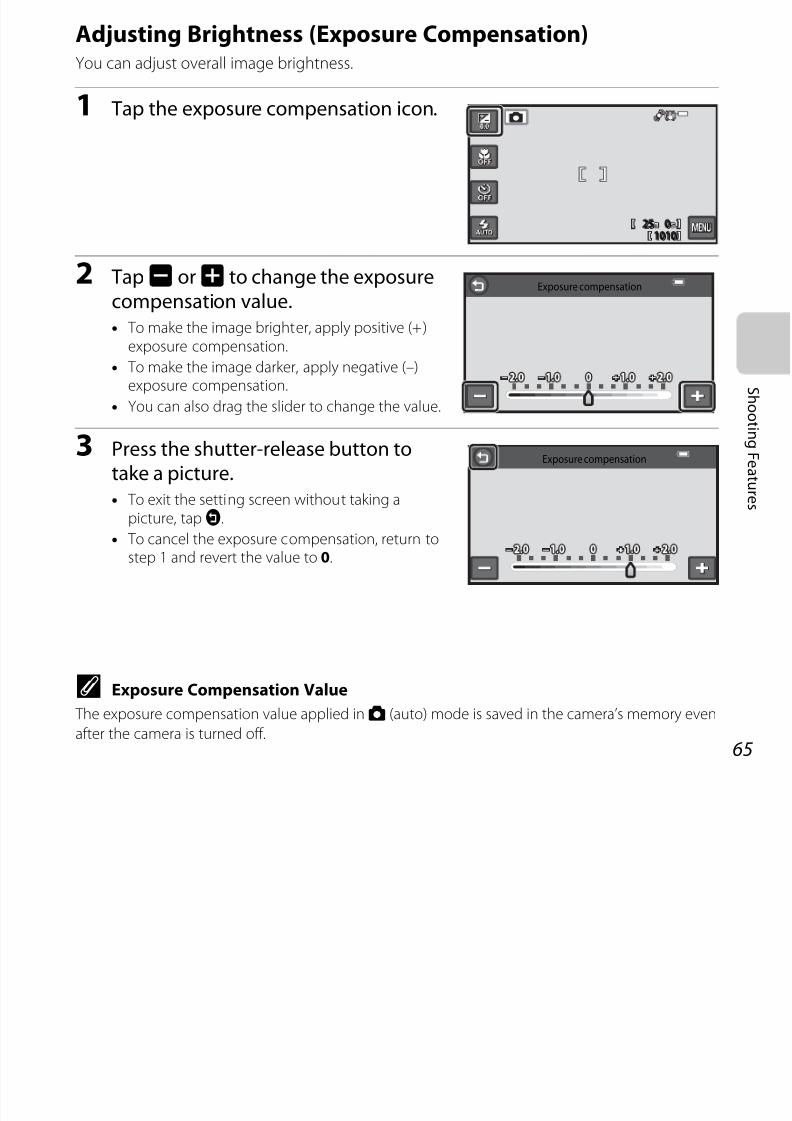
7/29/2019 Nikon s6400rm en 02
http://slidepdf.com/reader/full/nikon-s6400rm-en-02 83/280
65
S h o o t i n gF e a t ur e s
2 TapV orU to change the exposure
compensation value.• To make the image brighter, apply positive (+)
exposure compensation.
• To make the image darker, apply negative (–)exposure compensation.
• You can also drag the slider to change the value.
3 Press the shutter-release button totake a picture.• To exit the setting screen without taking a
picture, tapJ.
• To cancel the exposure compensation, return tostep 1 and revert the value to 0.
C Exposure Compensation Value
The exposure compensation value applied in A (auto) mode is saved in the camera’s memory evenafter the camera is turned off.
2525 0010101010
Exposure compensation
Exposure compensation
Default SettingsDefault settings for each shooting mode are described below.
Flash mode(A58)
Self-timer(A61)
Macro mode(A63)
Exposurecompensation
(A65)
7/29/2019 Nikon s6400rm en 02
http://slidepdf.com/reader/full/nikon-s6400rm-en-02 84/280
66
S h o o t i n gF e a t ur e s
A (auto) (A38) U Off Off 0.0
R (special effects)(A52)
U Off Off 0.0
F (smart portrait)(A54)
U1 Off 2 Off 3 0.0
Scene
d (A42) U4 Off Off 5 0.0
b (A42) V Off Off 3 0.0
c (A42) W3 Off Off 3 0.0
d (A43) W3 Off 3 Off 3 0.0
e (A43) V6 Off Off 3 0.0
f (A44) V7 Off Off 3 0.0
Z (A44) U Off Off 3 0.0
z (A44) U Off Off 3 0.0
h (A44) W3 Off Off 3 0.0
i (A44) W3 Off Off 3 0.0
j (A45) W3 Off Off 3 0.0
k (A45) W Off On3 0.0
u (A46) W3 Off On3 0.0
l (A46) W3 Off Off 0.0
m (A46) W3 Off 3 Off 3 0.03
n (A46) W Off Off 0.0
A (A47) – – – –
o (A47) X8 / W8 Off Off 3 0.0
3 3 3
Flash mode(A58)
Self-timer(A61)
Macro mode(A63)
Exposurecompensation
(A65)
7/29/2019 Nikon s6400rm en 02
http://slidepdf.com/reader/full/nikon-s6400rm-en-02 85/280
67
S h o o t i n gF e a t ur e s
1 Cannot be used when Blink proof is set to On.2 Can be set when Smile timer is set to Off .3 The setting cannot be changed.
4 The camera automatically selects the flash mode appropriate for the scene it has selected. W (off)can be selected manually.
5 Cannot be changed. The camera enters macro mode when i is selected.6 The setting cannot be changed. The flash mode setting is fixed at fill flash with red-eye reduction.7 Slow sync with red-eye reduction flash mode may be used.8 Flash is fixed at X (fill flash) when HDR is set to Off , and is fixed at W (off) when HDR is set to On.
BCamera Settings That Cannot Be Used Simultaneously
Some settings cannot be used with other functions (A71).
p (A48) W Off Off 0.0O (A49) W3 Off 3 Off 0.0
s (A50) W3 Off 3 Off 0.0
Features That Can Be Set withF (Shooting Menu)
The settings listed below can be changed by tappingF during shooting (A10).
Shooting menu
7/29/2019 Nikon s6400rm en 02
http://slidepdf.com/reader/full/nikon-s6400rm-en-02 86/280
68
S h o o t i n gF e a t ur e s
The settings that can be changed vary depending on the shooting mode, as shown below.
1 The setting is also applied to other shooting modes.2 Additional settings are available for some scene modes. See “Characteristics of Each Scene”
(A42) for more information.
Auto mode Scene2 Specialeffects
Smartportrait
Image mode1 w w w w
Touch shooting w w w w
ISO sensitivity w – – –
Continuous w – – –
White balance w – – –
Quick effects w – – –
AF area mode w – – –
Skin softening – – – w
Blink proof – – – w
Smile timer – – – w
2525 00
10101010
Touch shootingImage mode
Whitebalance
Continuous
ISOsensitivity
Quick effects
Options Available in the Shooting Menu
Option Description A
A Image modeAllows you to select the combination of image size and imagequality used when saving images.
E49
q/s/r T h
Allows you to select the touch shooting setting. The available
i T h h (d f l i ) S bj ki
7/29/2019 Nikon s6400rm en 02
http://slidepdf.com/reader/full/nikon-s6400rm-en-02 87/280
69
S h o o t i n gF e a t ur e s
q /s /r Touchshooting
settings are Touch shutter (default setting), Subject tracking,and Touch AF/AE. Subject tracking can be selected only in A (auto) mode.
E51
E ISO sensitivity
Allows you to control the camera’s sensitivity to light. You can setsensitivity to Auto (default setting) or Fixed range auto, or lock the setting at 125, 200, 400, 800, 1600, or 3200. When Auto isselected, the camera sets the ISO sensitivity automatically. When
Fixed range auto is selected, an ISO sensitivity range of eitherISO 125-400 or ISO 125-800 can be selected.
E58
C Continuous
Allows you to capture a series of images. The available settings areSingle (default setting), Continuous H, Continuous L, Pre-shooting cache, Continuous H: 120 fps, Continuous H:60 fps, BSS, and Multi-shot 16.
E59
wWhite balance
Allows you to adjust white balance to suit the light source in orderto make the colors in images match what you see with your eye. The available settings are Auto (default setting), Preset manual,Daylight, Incandes., Fluorescent, Cloudy, and Flash.
E62
pQuick effectsAllows you to enable or disable the quick effects function (A39). The default setting is On.
E65
G AF area modeAllows you to determine how the camera selects the focus areathat is used for autofocus; the available settings are Center (default setting) and Target finding AF (A74).
E66
eSki ft i
Allows you select the degree of the skin softening effect. When asetting other than Off is selected, the camera softens skin tones
b l i th ki ft i f ti b f i i ThE
67
Option Description A
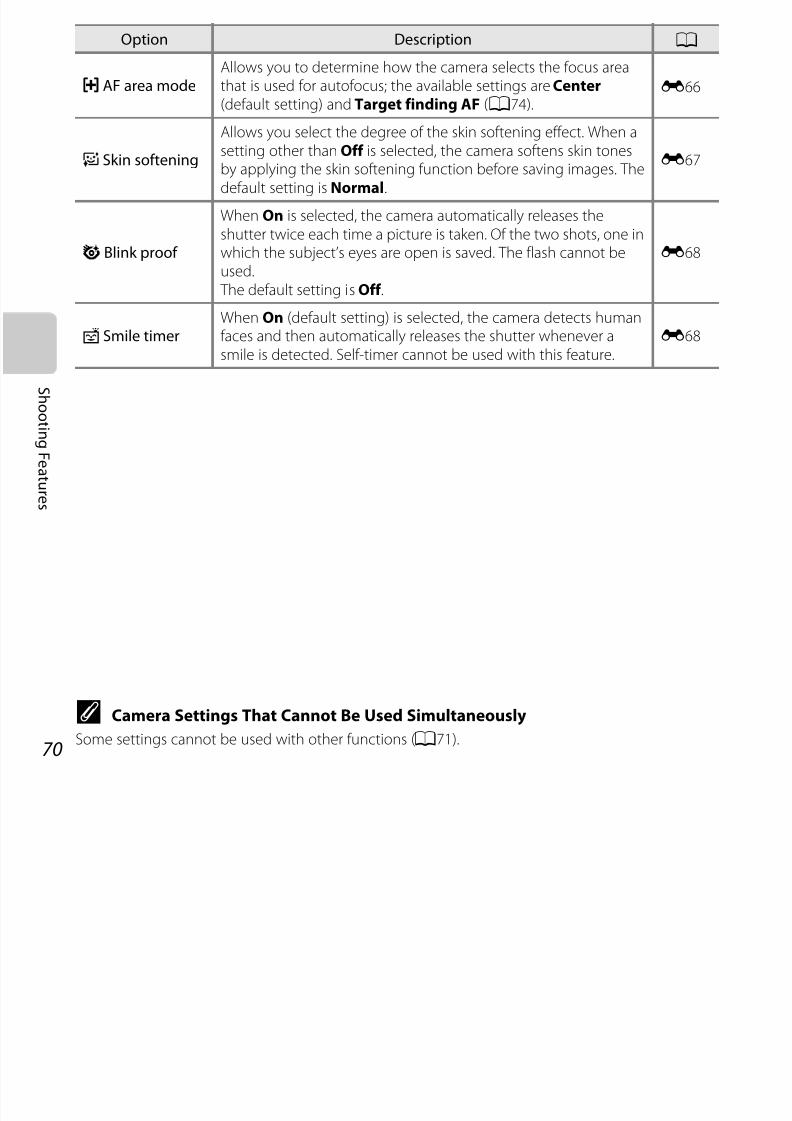
7/29/2019 Nikon s6400rm en 02
http://slidepdf.com/reader/full/nikon-s6400rm-en-02 88/280
70
S h o o t i n gF e a t ur e s
C Camera Settings That Cannot Be Used SimultaneouslySome settings cannot be used with other functions (A71).
Skin softening by applying the skin softening function before saving images. Thedefault setting is Normal.
67
y Blink proof
When On is selected, the camera automatically releases theshutter twice each time a picture is taken. Of the two shots, one inwhich the subject’s eyes are open is saved. The flash cannot beused. The default setting is Off .
E68
a Smile timerWhen On (default setting) is selected, the camera detects humanfaces and then automatically releases the shutter whenever asmile is detected. Self-timer cannot be used with this feature.
E68
Features That Cannot Be Used Simultaneously
Some functions cannot be used with other menu options.
Restricted function Option Description
Flash mode
Continuous (A69)When a setting other than Single is selected,the flash cannot be used.
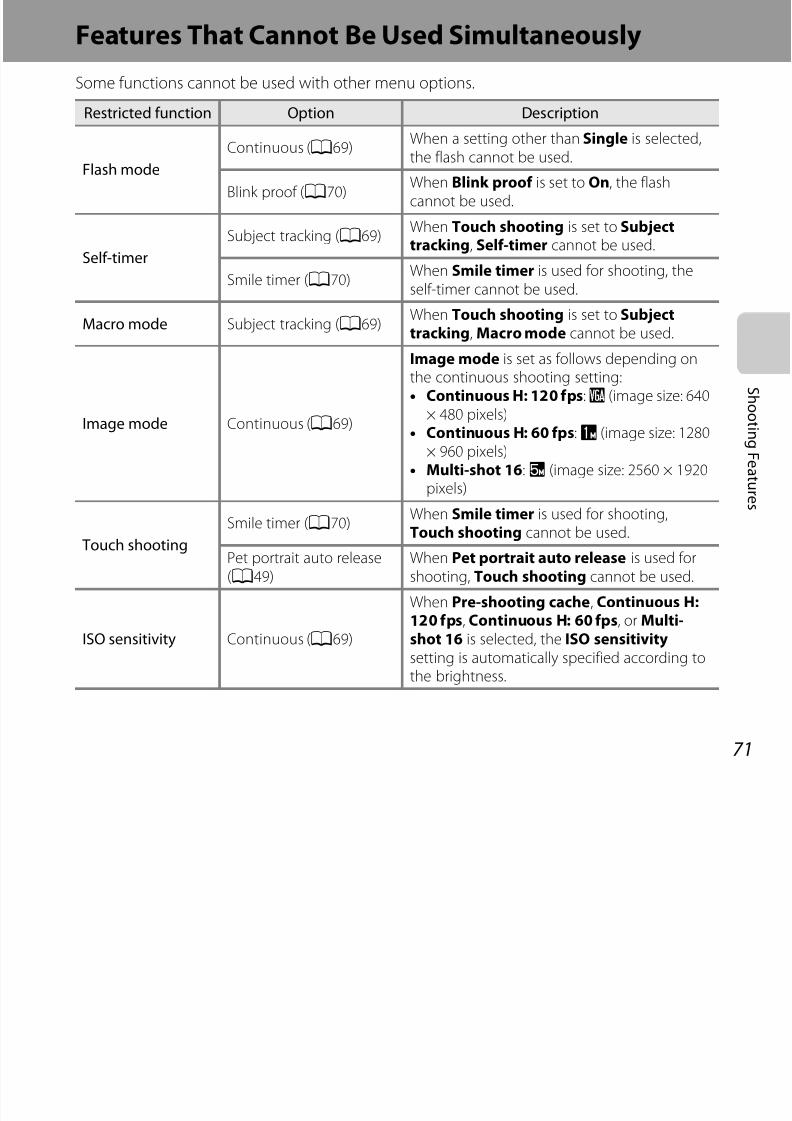
7/29/2019 Nikon s6400rm en 02
http://slidepdf.com/reader/full/nikon-s6400rm-en-02 89/280
71
S h o o t i n gF e a t ur e s
Flash modeBlink proof (A70)
When Blink proof is set to On, the flashcannot be used.
Self-timer
Subject tracking (A69)When Touch shooting is set to Subjecttracking, Self-timer cannot be used.
Smile timer (A70)When Smile timer is used for shooting, theself-timer cannot be used.
Macro mode Subject tracking (A69)When Touch shooting is set to Subjecttracking, Macro mode cannot be used.
Image mode Continuous (A69)
Image mode is set as follows depending onthe continuous shooting setting:• Continuous H: 120 fps:O (image size: 640
× 480 pixels)• Continuous H: 60 fps:M (image size: 1280
× 960 pixels)• Multi-shot 16:L (image size: 2560 × 1920
pixels)
Touch shooting
Smile timer (A70)When Smile timer is used for shooting,Touch shooting cannot be used.
Pet portrait auto release
(A49)
When Pet portrait auto release is used for
shooting, Touch shooting cannot be used.
ISO sensitivity Continuous (A69)
When Pre-shooting cache, Continuous H:120 fps, Continuous H: 60 fps, or Multi-shot 16 is selected, the ISO sensitivity setting is automatically specified according tothe brightness.
Continuous
Self-timer (A61)When Pre-shooting cache is selected orwhen using the self-timer, Continuous is fixedat Single.
Touch shutter (A69)
When Continuous H, Continuous L, Pre-shooting cache, Continuous H: 120 fps,
Continuous H: 60 fps or BSS is selected onek h h
Restricted function Option Description
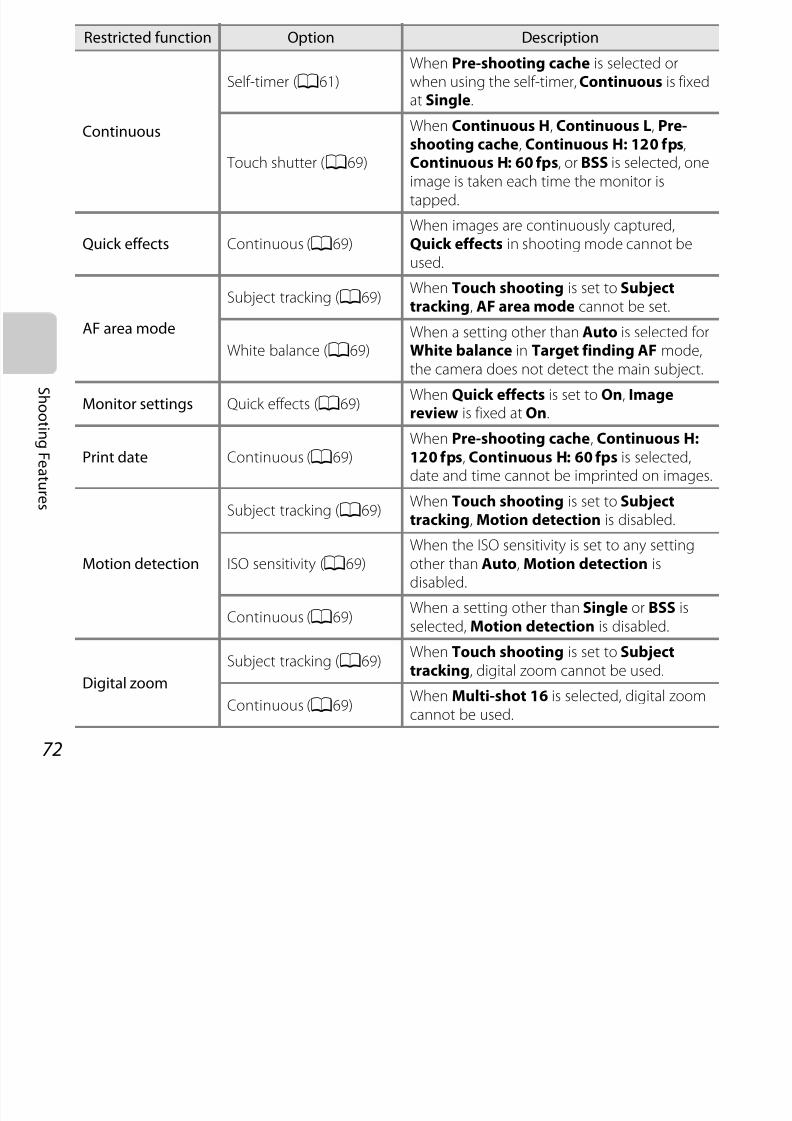
7/29/2019 Nikon s6400rm en 02
http://slidepdf.com/reader/full/nikon-s6400rm-en-02 90/280
72
S h o o t i n gF e a t ur e s
Touch shutter (A69) Continuous H: 60 fps, or BSS is selected, oneimage is taken each time the monitor istapped.
Quick effects Continuous (A69)When images are continuously captured,Quick effects in shooting mode cannot beused.
AF area mode
Subject tracking (A69)When Touch shooting is set to Subject
tracking, AF area mode cannot be set.
White balance (A69)When a setting other than Auto is selected forWhite balance in Target finding AF mode,the camera does not detect the main subject.
Monitor settings Quick effects (A69)When Quick effects is set to On, Imagereview is fixed at On.
Print date Continuous (A69) When Pre-shooting cache, Continuous H:120 fps, Continuous H: 60 fps is selected,date and time cannot be imprinted on images.
Motion detection
Subject tracking (A69)When Touch shooting is set to Subjecttracking, Motion detection is disabled.
ISO sensitivity (A69)When the ISO sensitivity is set to any settingother than Auto, Motion detection is
disabled.
Continuous (A69)When a setting other than Single or BSS isselected, Motion detection is disabled.
Digital zoom
Subject tracking (A69)When Touch shooting is set to Subjecttracking, digital zoom cannot be used.
Continuous (A69)When Multi-shot 16 is selected, digital zoom
cannot be used.
Shutter sound Continuous (A69)When a setting other than Single is selected,the shutter sound is disabled.
Blink warning Continuous (A69)When a setting other than Single is selected,Blink warning is disabled.
Restricted function Option Description
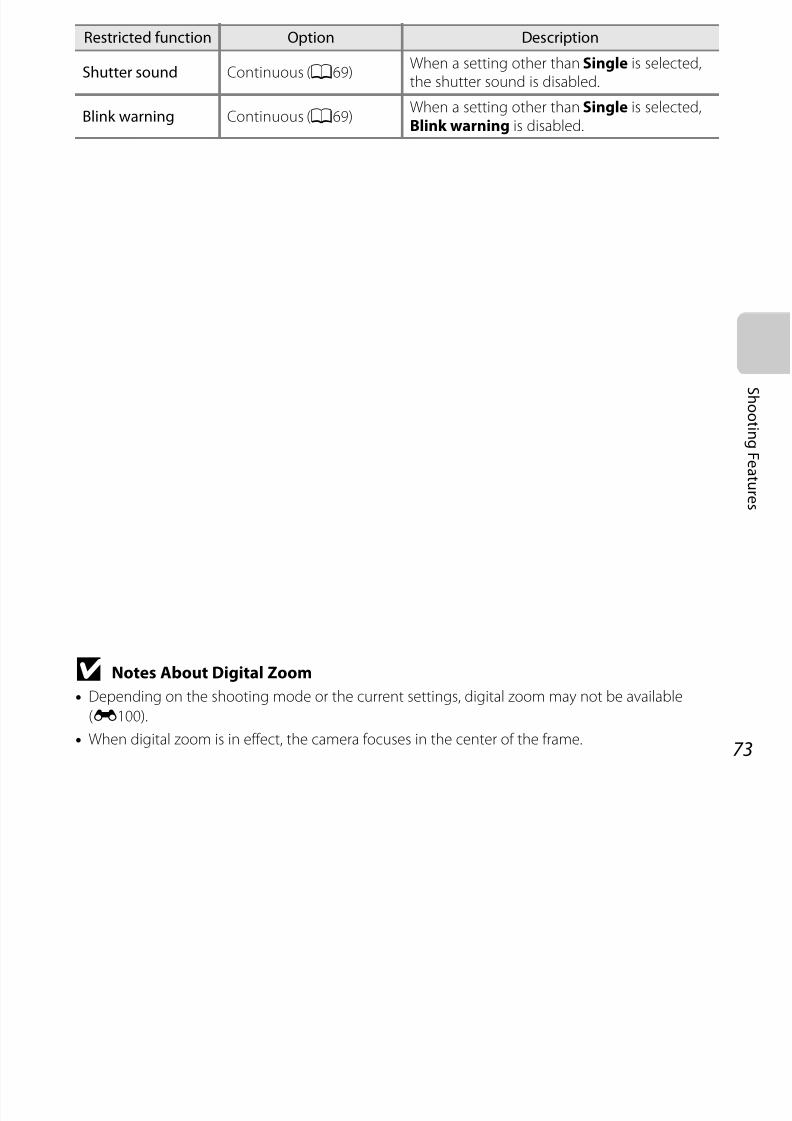
7/29/2019 Nikon s6400rm en 02
http://slidepdf.com/reader/full/nikon-s6400rm-en-02 91/280
73
S h o o t i n gF e a t ur e s
B Notes About Digital Zoom
• Depending on the shooting mode or the current settings, digital zoom may not be available
(E100).• When digital zoom is in effect, the camera focuses in the center of the frame.
Focusing
Using Target Finding AF
The camera focuses in the manner described below when you press the shutter-release button halfway
SelectA (auto) modeM tapF M G AF area modeM M Target finding AF
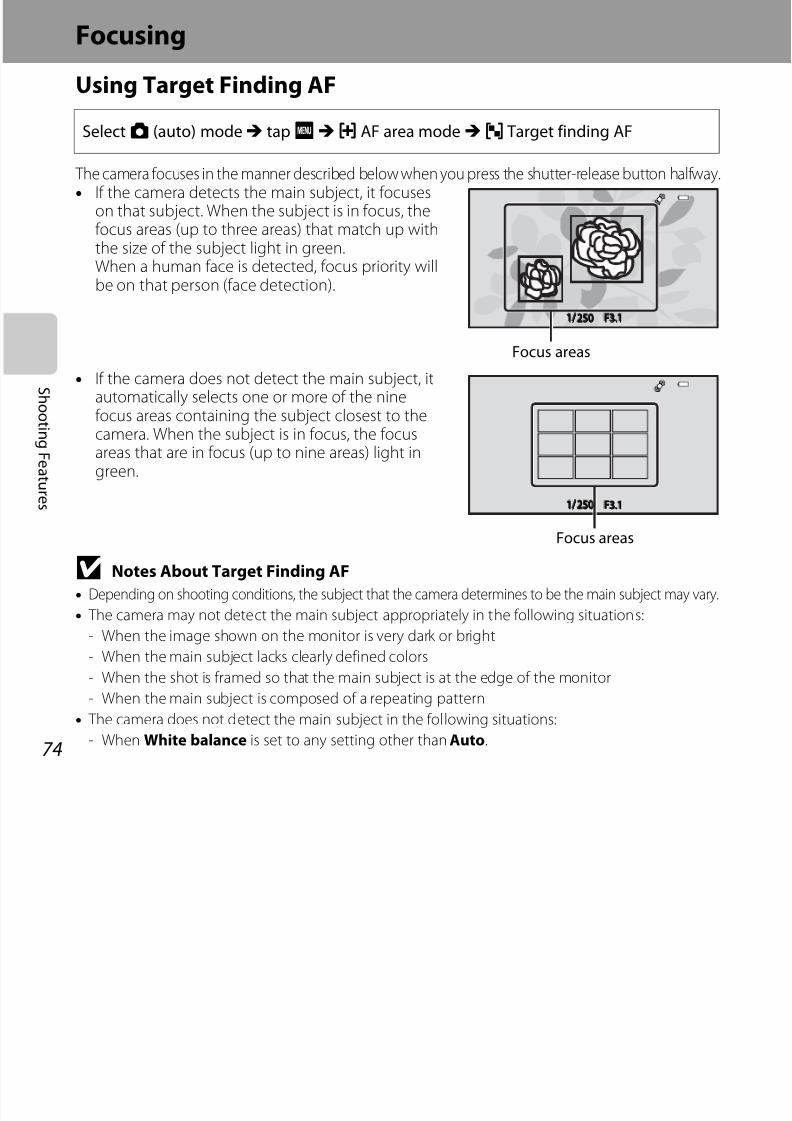
7/29/2019 Nikon s6400rm en 02
http://slidepdf.com/reader/full/nikon-s6400rm-en-02 92/280
74
S h o o t i n
g F e a t ur e s
The camera focuses in the manner described below when you press the shutter release button halfway.• If the camera detects the main subject, it focuses
on that subject. When the subject is in focus, thefocus areas (up to three areas) that match up withthe size of the subject light in green.When a human face is detected, focus priority willbe on that person (face detection).
• If the camera does not detect the main subject, itautomatically selects one or more of the ninefocus areas containing the subject closest to thecamera. When the subject is in focus, the focusareas that are in focus (up to nine areas) light ingreen.
B Notes About Target Finding AF
• Depending on shooting conditions, the subject that the camera determines to be the main subject may vary.
• The camera may not detect the main subject appropriately in the following situations:
- When the image shown on the monitor is very dark or bright
- When the main subject lacks clearly defined colors
- When the shot is framed so that the main subject is at the edge of the monitor
- When the main subject is composed of a repeating pattern
•
The camera does not detect the main subject in the following situations:- When White balance is set to any setting other than Auto.
1//1/ F3.13.1F3.125050250
Focus areas
1//1/ F3.13.1F3.125050250
Focus areas
Using Face DetectionIn the following shooting modes, the camera usesface detection to automatically focus on humanfaces. If the camera detects more than one face, adouble border is displayed around the face that thecamera will focus on, and single borders are
displayed around the other faces. 25 0
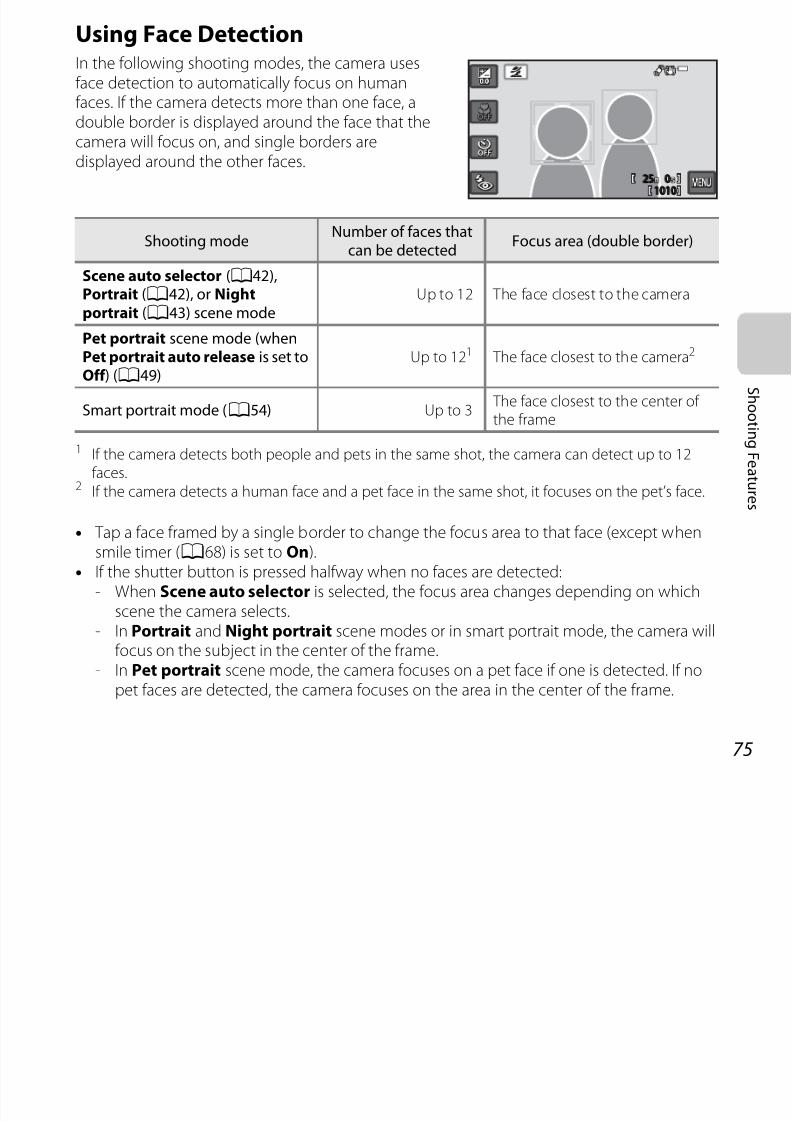
7/29/2019 Nikon s6400rm en 02
http://slidepdf.com/reader/full/nikon-s6400rm-en-02 93/280
75
S h o o t i n
gF e a t ur e s
displayed around the other faces.
1 If the camera detects both people and pets in the same shot, the camera can detect up to 12faces.
2 If the camera detects a human face and a pet face in the same shot, it focuses on the pet’s face.
• Tap a face framed by a single border to change the focus area to that face (except whensmile timer (A68) is set to On).
• If the shutter button is pressed halfway when no faces are detected:- When Scene auto selector is selected, the focus area changes depending on which
scene the camera selects.- In Portrait and Night portrait scene modes or in smart portrait mode, the camera will
focus on the subject in the center of the frame.- In Pet portrait scene mode, the camera focuses on a pet face if one is detected. If no
pet faces are detected, the camera focuses on the area in the center of the frame.
Shooting modeNumber of faces that
can be detectedFocus area (double border)
Scene auto selector (A42),Portrait (A42), or Night
portrait (A43) scene mode
Up to 12 The face closest to the camera
Pet portrait scene mode (whenPet portrait auto release is set toOff ) (A49)
Up to 121 The face closest to the camera2
Smart portrait mode (A54) Up to 3 The face closest to the center of the frame
2525 00
10101010
B Notes About Face Detection• The camera’s ability to detect faces depends on a variety of factors, including the direction in
which the faces are looking. Additionally, the camera may be unable to detect faces in the
following situations:
- When faces are partially hidden by sunglasses or otherwise obstructed
- When faces take up too much or too little of the frame
• When the frame includes more than one face, the faces detected by the camera and the face onwhich the camera focuses depend upon a variety of factors including the direction in which the
7/29/2019 Nikon s6400rm en 02
http://slidepdf.com/reader/full/nikon-s6400rm-en-02 94/280
76
S h o o t i n
gF e a t ur e s
, ywhich the camera focuses depend upon a variety of factors, including the direction in which the
faces are looking.
• In some rare cases, such as those described in “Subjects Not Suitable for Autofocus” (A77), the
subject may not be in focus even though the double border turns green. If the camera does not
focus, try focus lock shooting (A78).
Subjects Not Suitable for Autofocus The camera may not focus as expected in the following situations. In some rare cases, thesubject may not be in focus despite the fact that the focus area or the focus indicator glowsgreen:• Subject is very dark • Objects of sharply differing brightness are included in the scene (e.g. the sun behind the
subject makes that subject appear very dark)• No contrast between the subject and surroundings (e g a portrait subject wearing a white
7/29/2019 Nikon s6400rm en 02
http://slidepdf.com/reader/full/nikon-s6400rm-en-02 95/280
77
S h o o t i n
gF e a t ur e s
j j pp yNo contrast between the subject and surroundings (e.g. a portrait subject wearing a whiteshirt is standing in front of a white wall)
• Several objects are at different distances from the camera (e.g. the subject is inside a cage)• Subjects with repeating patterns (window blinds, buildings with multiple rows of similarly
shaped windows, etc.)• Subject is moving rapidly
In the situations noted above, try pressing the shutter-release button halfway to refocusseveral times, or focus on another subject positioned at the same distance from the camera asthe actual desired subject, and use focus lock (A78).
Focus Lock You can use focus lock to focus on off-center subjects when center is selected for AF areamode.
The following procedure describes how to use focus lock when using A (auto) mode withAF area mode (A70) set to Center.
1 Position the subject in the center of the frame.
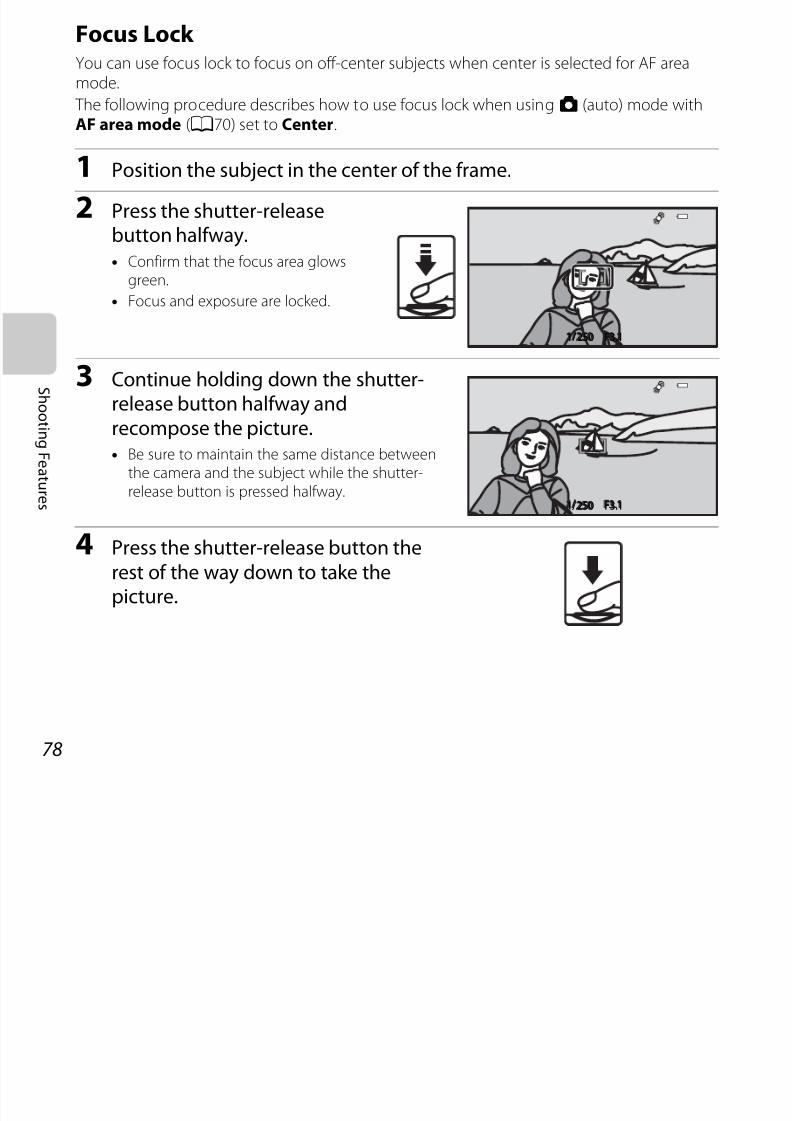
7/29/2019 Nikon s6400rm en 02
http://slidepdf.com/reader/full/nikon-s6400rm-en-02 96/280
78
S h o o t i n
gF e a t ur e s
1 j
2 Press the shutter-releasebutton halfway.
• Confirm that the focus area glowsgreen.
• Focus and exposure are locked.
3 Continue holding down the shutter-release button halfway andrecompose the picture.• Be sure to maintain the same distance between
the camera and the subject while the shutter-release button is pressed halfway.
4 Press the shutter-release button therest of the way down to take thepicture.
1//1/ F3.13.1F3.125050250
1//1/ F3.13.1F3.125050250
7/29/2019 Nikon s6400rm en 02
http://slidepdf.com/reader/full/nikon-s6400rm-en-02 97/280
79
P l a y b a c k F e a t ur e s
Playback Features
This chapter describes how to select certain types of images for playback as well as some of
the features available when playing back images.
Playback Zoom ................................................................. 80
Thumbnail Display ........................................................... 81
Selecting Certain Types of Images for Playback ............ 82
Features That Can Be Set withF
(Playback Menu) ......8
4Connecting the Camera to a TV, Computer, or Printer
............................................................................................ 86
Using ViewNX 2................................................................. 88
Installing ViewNX 2 ......................................................................................................... 88
Transferring Images to the Computer ..................................................................... 91Viewing Images................................................................................................................ 93
Playback Zoom
Rotating the zoom control tog (i) or double-tapping an image in full-frame playback mode(A32) zooms in on the center of the image displayed in the monitor.
155 /111 /2012 15012 15 : 300
0004004 . JPGPG
0004 . JPG
15 / 11 / 2012 15 : 30
g (i)
Displayed area guide
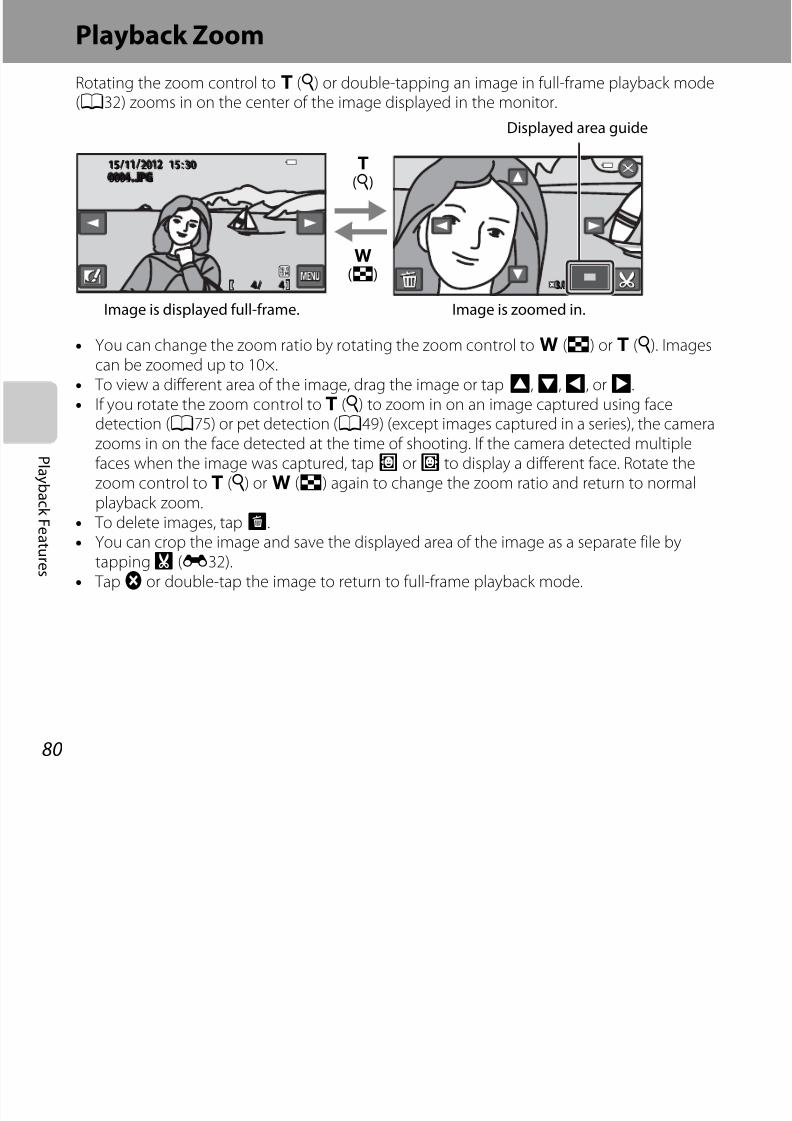
7/29/2019 Nikon s6400rm en 02
http://slidepdf.com/reader/full/nikon-s6400rm-en-02 98/280
80
P l a y b a c k F e a t ur e s
• You can change the zoom ratio by rotating the zoom control tof (h) org (i). Imagescan be zoomed up to 10×.
• To view a different area of the image, drag the image or tapA,B,C, orD.• If you rotate the zoom control tog (i) to zoom in on an image captured using face
detection (A75) or pet detection (A49) (except images captured in a series), the camera
zooms in on the face detected at the time of shooting. If the camera detected multiplefaces when the image was captured, tapM orN to display a different face. Rotate thezoom control tog (i) orf (h) again to change the zoom ratio and return to normalplayback zoom.
• To delete images, tapE.• You can crop the image and save the displayed area of the image as a separate file by
tappingG (E32).
• Tapf or double-tap the image to return to full-frame playback mode.
444/ / 3.0.03.0
f (h)
Image is zoomed in.Image is displayed full-frame.
Thumbnail Display
Rotating the zoom control tof (h) in full-frame playback mode (A32) displays images asthumbnails.
155 /111 /2012 15012 15 : 300
0004 JPG
0004 JPG
15 / 11 / 2012 15 : 30 10f (h)
Scroll bar
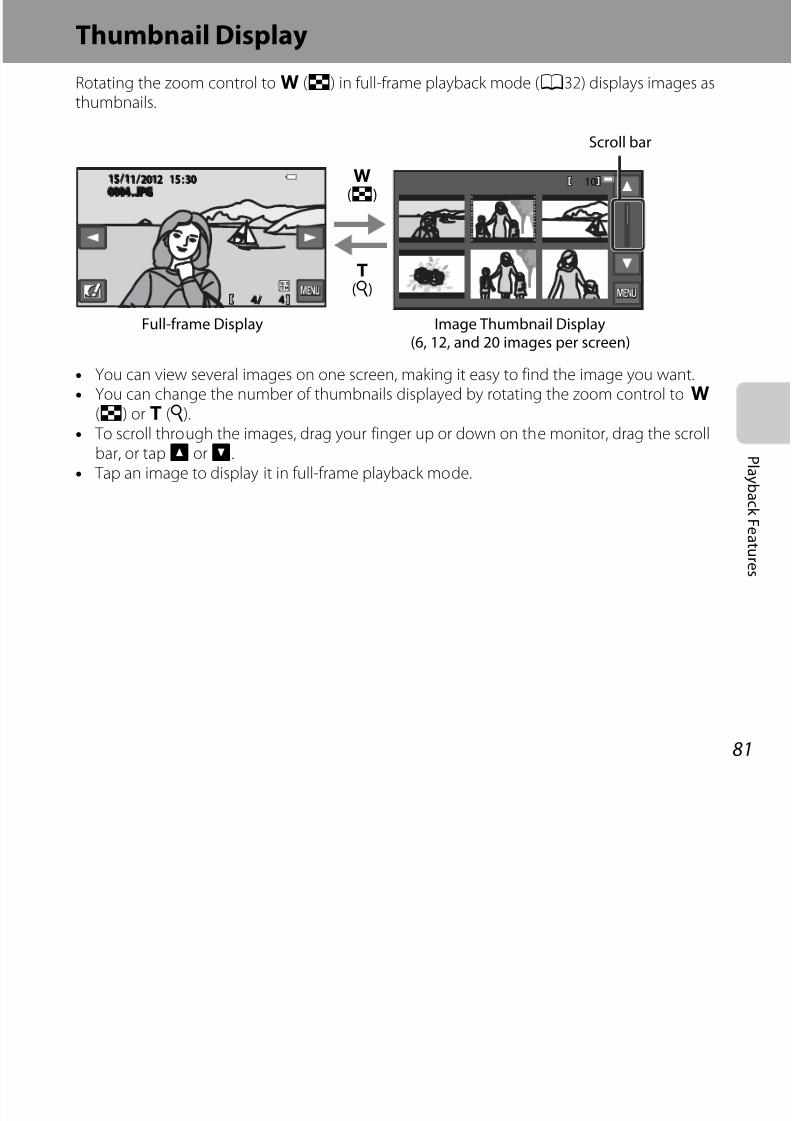
7/29/2019 Nikon s6400rm en 02
http://slidepdf.com/reader/full/nikon-s6400rm-en-02 99/280
81
P l a y b a c k F e a t ur e s
• You can view several images on one screen, making it easy to find the image you want.• You can change the number of thumbnails displayed by rotating the zoom control tof
(h) org (i).• To scroll through the images, drag your finger up or down on the monitor, drag the scroll
bar, or tapB orC.• Tap an image to display it in full-frame playback mode.
444/ /
0004004 . JPGPG0004 . JPG
Image Thumbnail Display(6, 12, and 20 images per screen)
Full-frame Display
g (i)
(h)
Selecting Certain Types of Images for Playback
You can change the playback mode according to the type of images you want to view.
Available Playback Modes
c Play A32
All images are played back. When you switch from shooting mode to playback mode, this
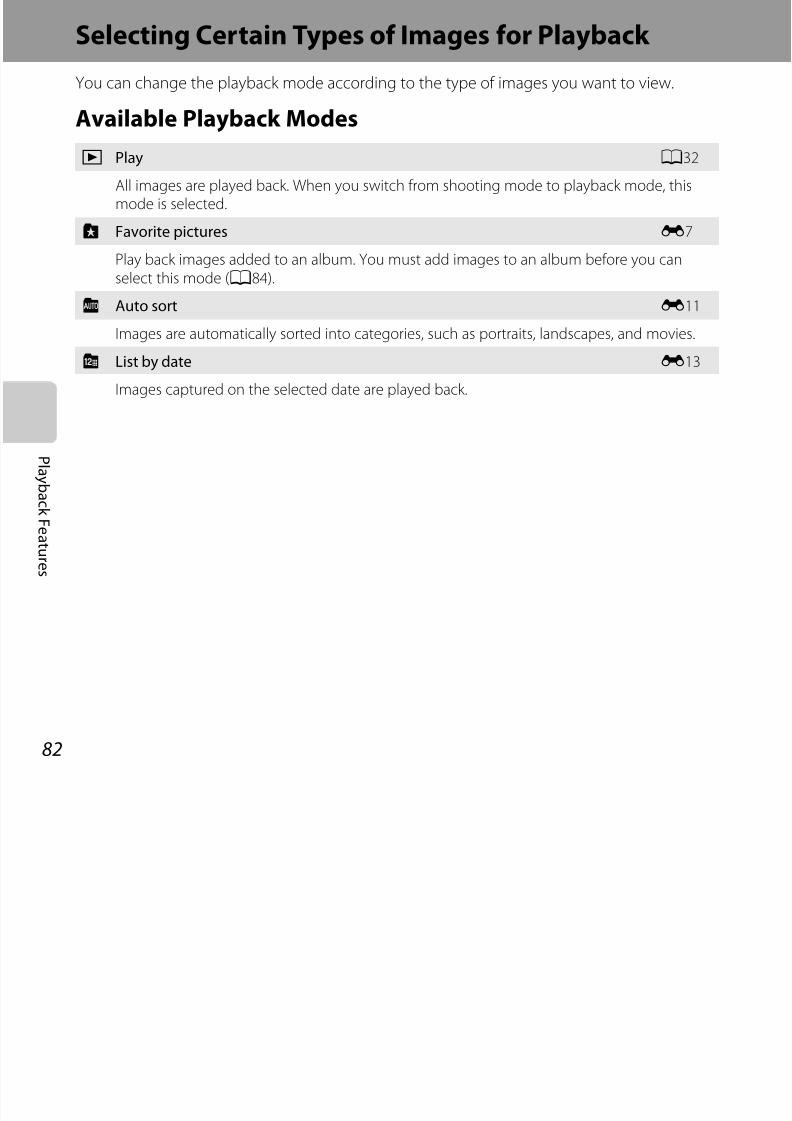
7/29/2019 Nikon s6400rm en 02
http://slidepdf.com/reader/full/nikon-s6400rm-en-02 100/280
82
P l a y b a c k F e a t ur e s
mode is selected.
h Favorite pictures E7
Play back images added to an album. You must add images to an album before you canselect this mode (A84).
F Auto sort E11Images are automatically sorted into categories, such as portraits, landscapes, and movies.
C List by date E13
Images captured on the selected date are played back.
Switching Between Playback Modes
1 When viewing images in full-frameplayback mode or thumbnailplayback mode, press thec button.• The playback mode selection menu is
displayed, from which you can select one of the available playback modes
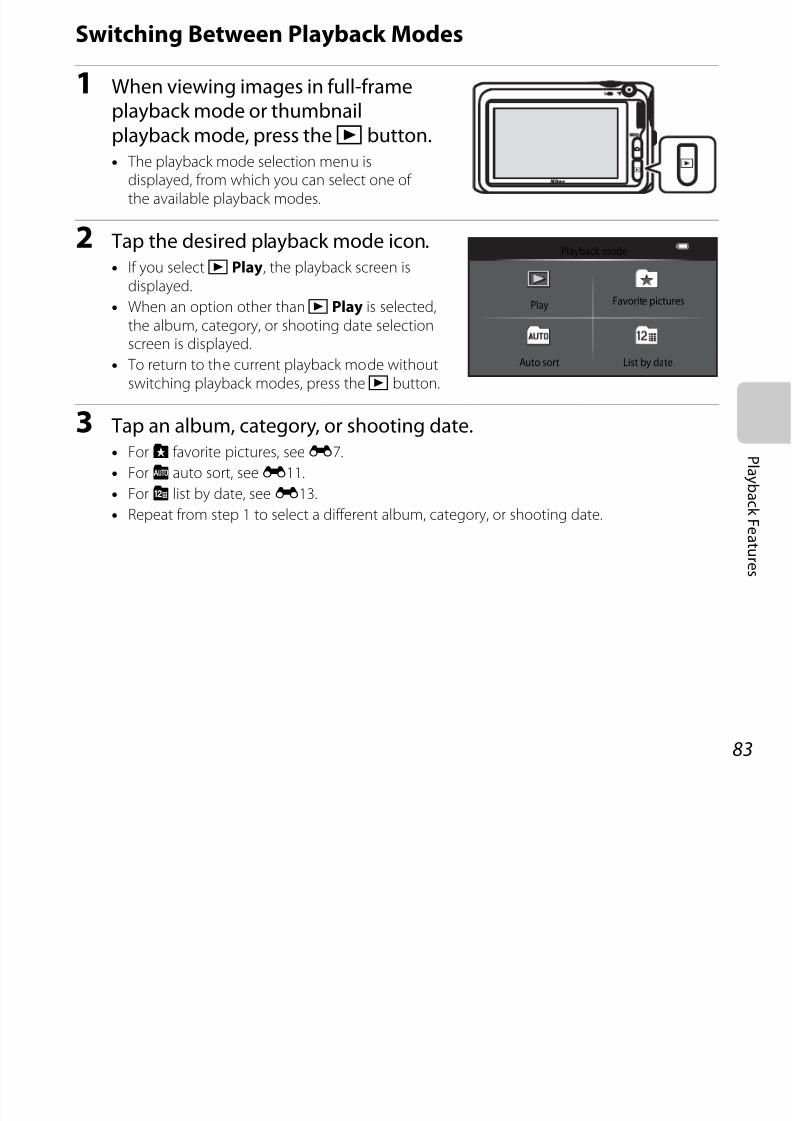
7/29/2019 Nikon s6400rm en 02
http://slidepdf.com/reader/full/nikon-s6400rm-en-02 101/280
83
P l a y b a c k F e a t ur e s
the available playback modes.
2 Tap the desired playback mode icon.• If you selectc Play, the playback screen is
displayed.
• When an option other thanc Play is selected,the album, category, or shooting date selectionscreen is displayed.
• To return to the current playback mode withoutswitching playback modes, press thec button.
3 Tap an album, category, or shooting date.
• Forh favorite pictures, seeE7.• ForF auto sort, seeE11.
• ForC list by date, seeE13.
• Repeat from step 1 to select a different album, category, or shooting date.
Playback mode
Play
Auto sort List by date
Favorite pictures
Features That Can Be Set withF (Playback Menu)
If you tapFwhen viewing images in full-frame playback mode or thumbnail playback mode,the following menu options can be used (A10).
155 /111 /2012 15012 15 : 300
0004004 . JPGPG
0004 . JPG15 / 11 / 2012 15 : 30 Playback menu
DeleteFavorite pictures Slide show
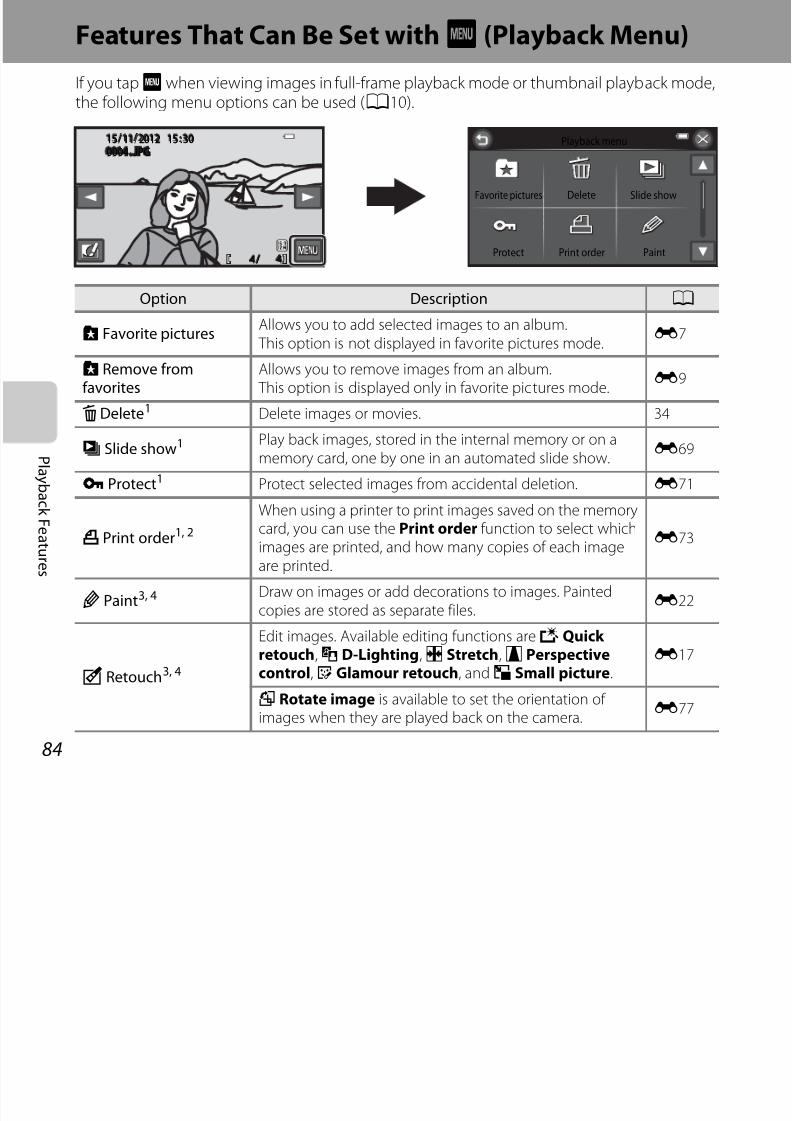
7/29/2019 Nikon s6400rm en 02
http://slidepdf.com/reader/full/nikon-s6400rm-en-02 102/280
84
P l a y b a c k F e a t ur e s
Option Description A
h Favorite picturesAllows you to add selected images to an album. This option is not displayed in favorite pictures mode.
E7
h Remove fromfavorites
Allows you to remove images from an album. This option is displayed only in favorite pictures mode.
E9
l Delete1 Delete images or movies. 34
b Slide show1Play back images, stored in the internal memory or on amemory card, one by one in an automated slide show. E69
d Protect1 Protect selected images from accidental deletion. E71
a Print order1, 2
When using a printer to print images saved on the memorycard, you can use the Print order function to select whichimages are printed, and how many copies of each imageare printed.
E73
U Paint3, 4 Draw on images or add decorations to images. Paintedcopies are stored as separate files.
E22
M Retouch3, 4
Edit images. Available editing functions arek Quick retouch,I D-Lighting,P Stretch,O Perspectivecontrol,j Glamour retouch, andg Small picture.
E17
f Rotate image is available to set the orientation of images when they are played back on the camera.
E77
444//PaintProtect Print order
p
E Voice memo4Record voice memos using the camera’s built-inmicrophone and attach them to images. Voice memo canalso be played back and deleted.
E78
h Copy1, 5 Allows you to copy images between the internal memoryand a memory card.
E80
N Choose key picture4Allows you to change the key picture for images capturedin sequence (sequence of images;A33).
E82
Option Description A
7/29/2019 Nikon s6400rm en 02
http://slidepdf.com/reader/full/nikon-s6400rm-en-02 103/280
85
P l a y b a c k F e a t ur e s
1 This function can also be performed in thumbnail playback mode.2 This function is not available for images captured in 3D photography scene mode (A50).3 The selected image is edited, and the copy is saved with a different file name, except when edited
using Rotate image. Certain restrictions apply. For example, images captured in Easypanorama (A48) or 3D photography (A50) cannot be edited and the same editing functioncannot be applied multiple times (E18,E19).
4 This function is not available when only the key pictures are displayed for sequences of images. Touse this function, tapR to display the images in a sequence individually.
5 This function cannot be selected when using favorite pictures mode, auto sort mode, or list bydate mode.
N Choose key picture This option is disabled when Sequence display options (A105) in the setup menu is set to Individual pictures.
E82
Connecting the Camera to a TV, Computer, or Printer
You can enhance your enjoyment of images and movies by connecting the camera to a TV,computer, or printer.• Before connecting the camera to an external device, make sure the remaining battery level
is sufficient and turn the camera off. For information about the connection methods andsubsequent operations, refer to the documentation included with the device in addition tothis document.
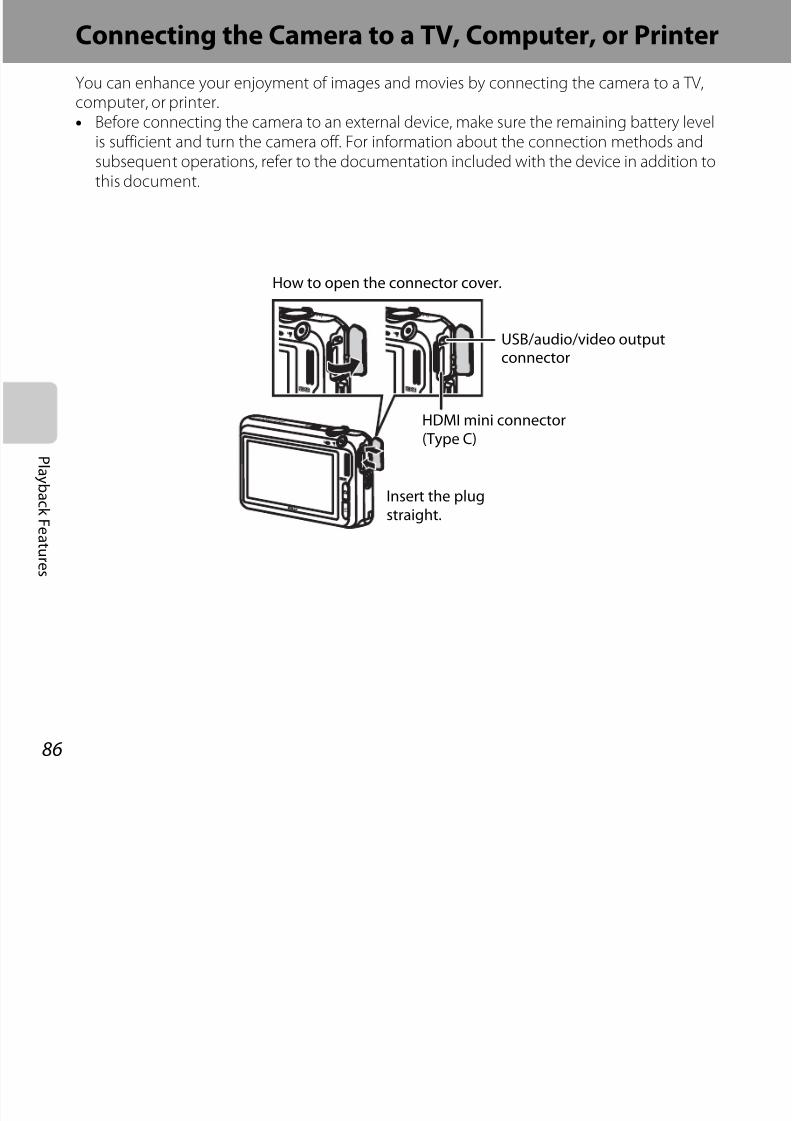
7/29/2019 Nikon s6400rm en 02
http://slidepdf.com/reader/full/nikon-s6400rm-en-02 104/280
86
P l a y b a c k F e a t ur e s
Insert the plugstraight.
USB/audio/video outputconnector
HDMI mini connector(Type C)
How to open the connector cover.
Viewing images on a TV E34
Images and movies captured with the camera can be viewed on a TV.Connection method: Connect the video and audio plugs of the includedaudio video cable to the TV’s input jacks. Alternatively, connect a commerciallyavailable HDMI cable (Type C) to the TV’s HDMI input jack.
Viewing and organizing images on a computer A88
If you transfer images to a computer, you can perform simple retouching andmanage image data in addition to playing back images and movies.

7/29/2019 Nikon s6400rm en 02
http://slidepdf.com/reader/full/nikon-s6400rm-en-02 105/280
87
P l a y b a c k F e a t ur e s
manage image data in addition to playing back images and movies.Connection method: Connect the camera to the computer’s USB port withthe included USB cable.• Before connecting to a computer, install ViewNX 2 on the computer using
the included ViewNX 2 CD-ROM. For information about using theViewNX 2 CD-ROM and transferring images to a computer, see page 88.
• If any USB devices that draw the power from the computer are connected,disconnect them from the computer before you connect the camera to it.Connecting the camera and other USB-powered devices to the samecomputer simultaneously may cause a camera malfunction or excessivepower supply from the computer, which could damage the camera ormemory card.
Printing images without using a computer E39
If you connect the camera to a PictBridge-compatible printer, you can printimages without using a computer.Connection method: Connect the camera directly to the printer’s USB portwith the included USB cable.
Using ViewNX 2ViewNX 2 is an all-in-one software package which enables you to transfer, view, edit and shareimages. Install ViewNX 2 using the included ViewNX 2 CD-ROM.
Your Imaging Toolbox ViewNX 2™
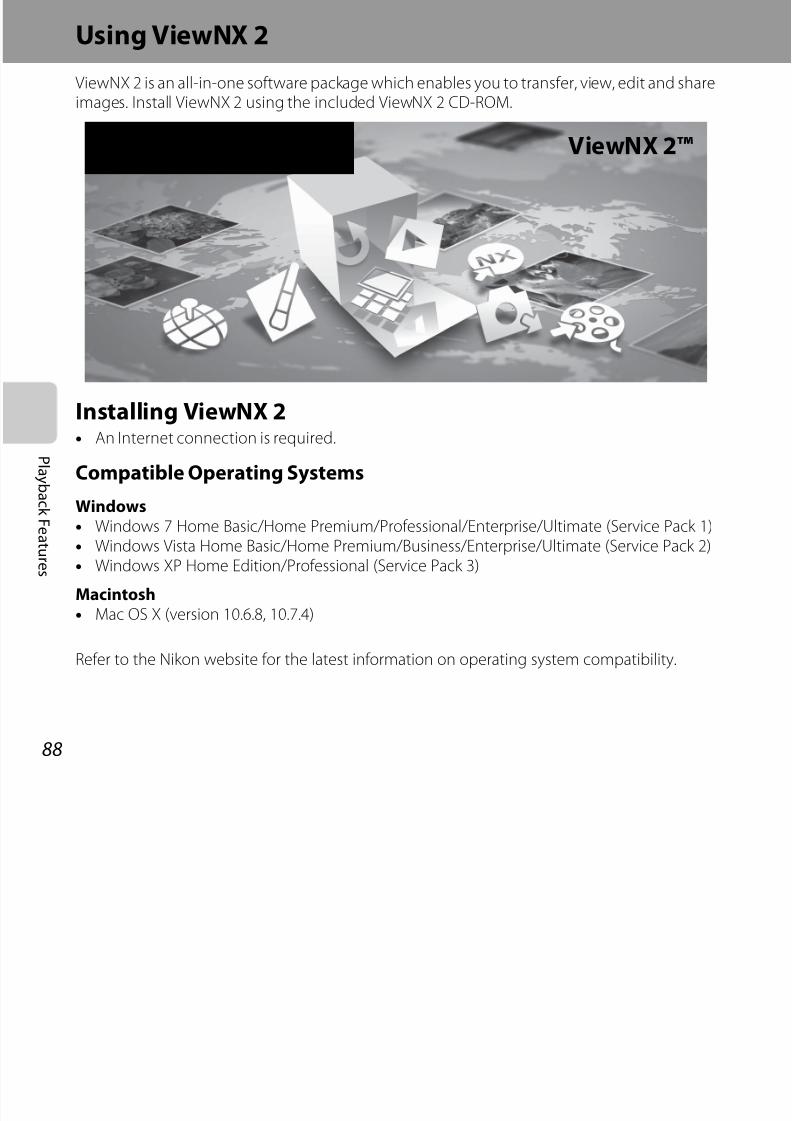
7/29/2019 Nikon s6400rm en 02
http://slidepdf.com/reader/full/nikon-s6400rm-en-02 106/280
88
P l a y b a c k F e a t ur e s
Installing ViewNX 2• An Internet connection is required.
Compatible Operating Systems
Windows• Windows 7 Home Basic/Home Premium/Professional/Enterprise/Ultimate (Service Pack 1)• Windows Vista Home Basic/Home Premium/Business/Enterprise/Ultimate (Service Pack 2)• Windows XP Home Edition/Professional (Service Pack 3)
Macintosh• Mac OS X (version 10.6.8, 10.7.4)
Refer to the Nikon website for the latest information on operating system compatibility.
1 Start the computer and insert the ViewNX 2 CD-ROM into the CD-ROMdrive.
• Mac OS: When the ViewNX 2 window is displayed, double-click the Welcome icon.
2 Select a language in the language selection dialog to open theinstallation window.• If the desired language is not available, click Region Selection to choose a different region
and then choose the desired language (the Region Selection button is not available in the
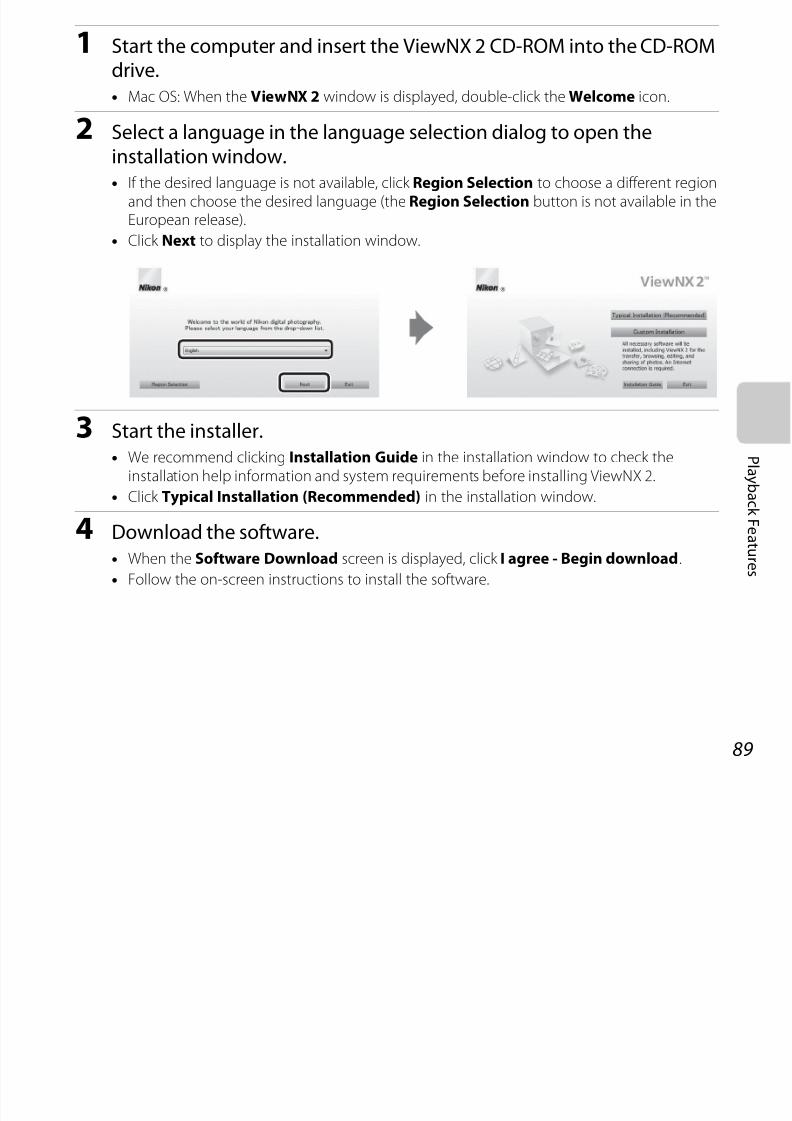
7/29/2019 Nikon s6400rm en 02
http://slidepdf.com/reader/full/nikon-s6400rm-en-02 107/280
89
P l a y b a c k F e a t ur e s
g g gEuropean release).
• Click Next to display the installation window.
3 Start the installer.
• We recommend clicking Installation Guide in the installation window to check theinstallation help information and system requirements before installing ViewNX 2.
• Click Typical Installation (Recommended) in the installation window.
4 Download the software.
• When the Software Download screen is displayed, click I agree - Begin download.
• Follow the on-screen instructions to install the software.
5 Exit the installer when the installation completion screen is displayed.• Windows: Click Yes.
• Mac OS: Click OK.
The following software is installed:
• ViewNX 2 (consisting of the three modules below)
- Nikon Transfer 2: For transferring images to the computer
- ViewNX 2: For viewing, editing, and printing transferred images
7/29/2019 Nikon s6400rm en 02
http://slidepdf.com/reader/full/nikon-s6400rm-en-02 108/280
90
P l a y b a c k F e a t ur e s
- Nikon Movie Editor: For basic editing of transferred movies
• Panorama Maker (for creating a single panorama image of a landscape, etc. from a series of images that each capture a separate portion of the subject)
6 Remove the ViewNX 2 CD-ROM from the CD-ROM drive.
Transferring Images to the Computer
1 Choose how images will be copied to the computer.
Choose one of the following methods:
• Direct USB connection: Turn the camera off and ensure that the memory card is insertedin the camera. Connect the camera to the computer using the included USB cable. The
camera automatically turns on. To transfer images that are saved in the camera’s internal memory, remove the memory cardfrom the camera before connecting it to the computer.
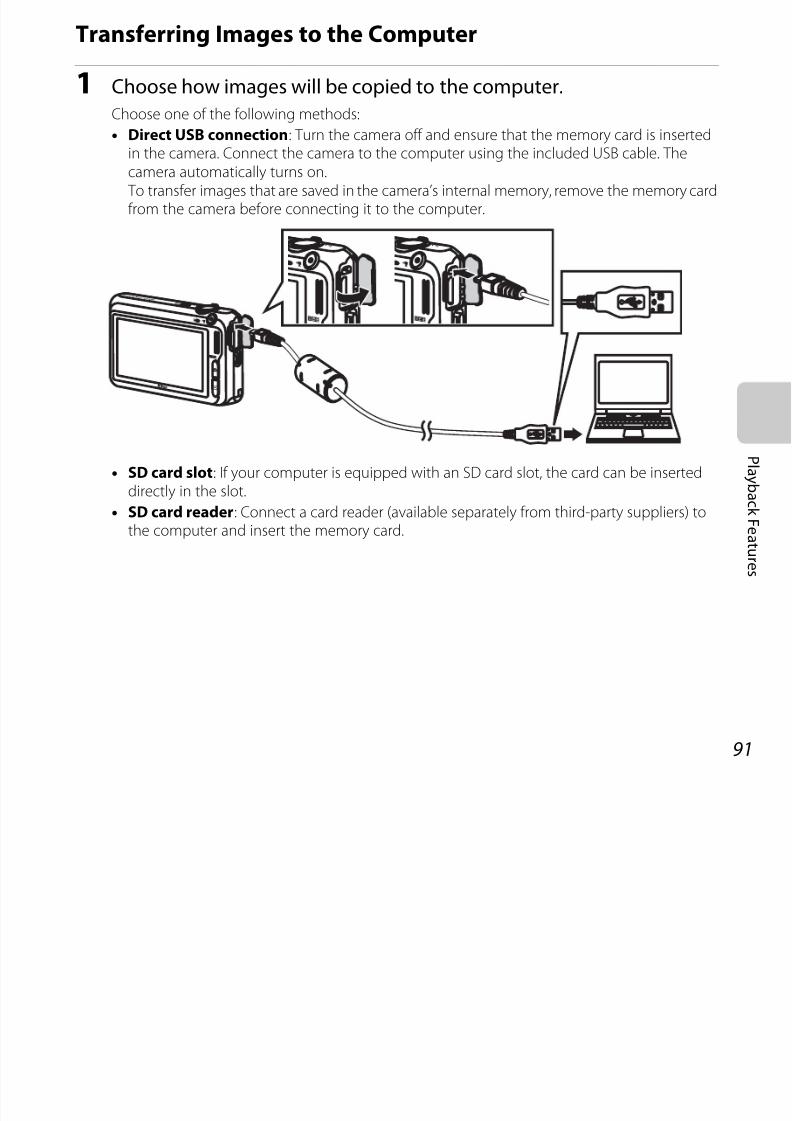
7/29/2019 Nikon s6400rm en 02
http://slidepdf.com/reader/full/nikon-s6400rm-en-02 109/280
91
P l a y b a c k F e a t ur e s
from the camera before connecting it to the computer.
• SD card slot: If your computer is equipped with an SD card slot, the card can be inserteddirectly in the slot.
• SD card reader: Connect a card reader (available separately from third-party suppliers) tothe computer and insert the memory card.
If a message is displayed prompting you to choose a program, select Nikon Transfer 2.• When using Windows 7
If the dialog shown at right is displayed,follow the steps below to selectNikon Transfer 2.
1 Under Import pictures and videos, click Change program. A program selection
dialog will be displayed; select Import Fileusing Nikon Transfer 2 and click OK.
2 Double-click Import File.
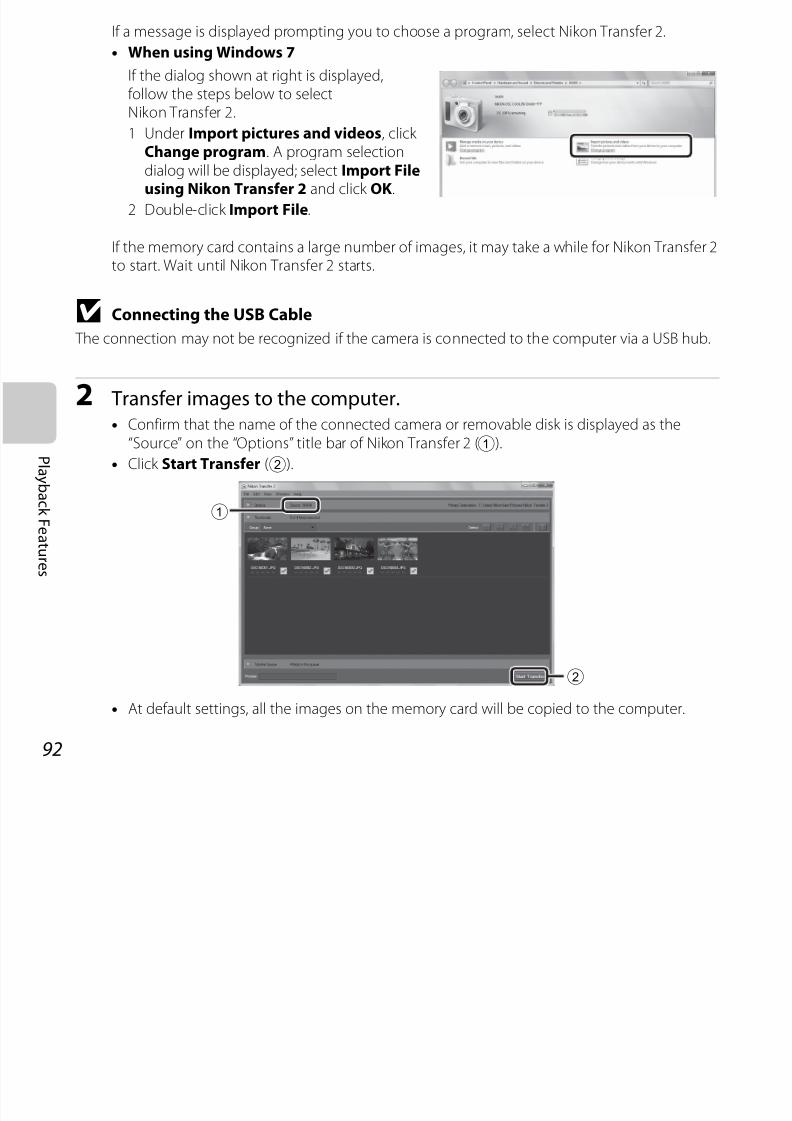
7/29/2019 Nikon s6400rm en 02
http://slidepdf.com/reader/full/nikon-s6400rm-en-02 110/280
92
P l a y b a c k F e a t ur e s
p
If the memory card contains a large number of images, it may take a while for Nikon Transfer 2to start. Wait until Nikon Transfer 2 starts.
B Connecting the USB Cable The connection may not be recognized if the camera is connected to the computer via a USB hub.
2 Transfer images to the computer.• Confirm that the name of the connected camera or removable disk is displayed as the
“Source” on the “Options” title bar of Nikon Transfer 2 (1).
• Click Start Transfer (2).
• At default settings, all the images on the memory card will be copied to the computer.
1
2
3 Terminate the connection.• If the camera is connected to the computer, turn the camera off and disconnect the USB
cable. If you are using a card reader or card slot, choose the appropriate option in thecomputer operating system to eject the removable disk corresponding to the memory cardand then remove the card from the card reader or card slot.
Viewing Images
Start ViewNX 2
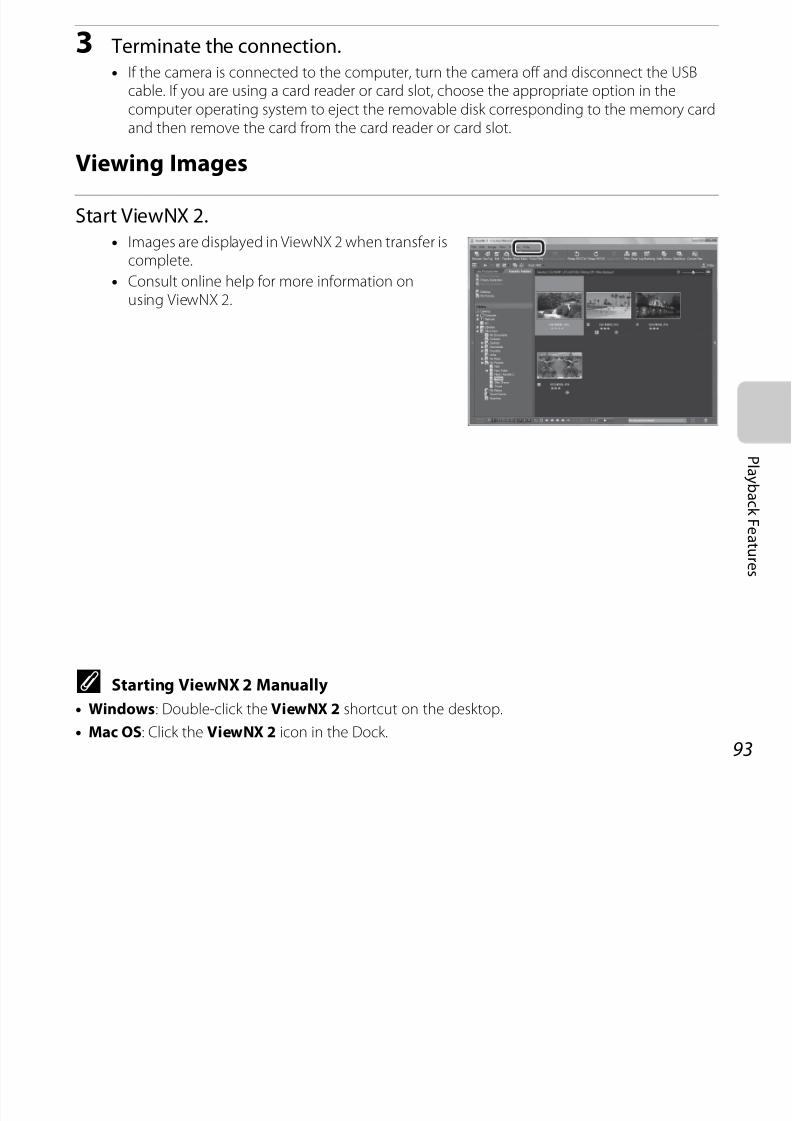
7/29/2019 Nikon s6400rm en 02
http://slidepdf.com/reader/full/nikon-s6400rm-en-02 111/280
93
P l a y b a c k F e a t ur e s
Start ViewNX 2.• Images are displayed in ViewNX 2 when transfer is
complete.
• Consult online help for more information onusing ViewNX 2.
C Starting ViewNX 2 Manually
• Windows: Double-click the ViewNX 2 shortcut on the desktop.
• Mac OS: Click the ViewNX 2 icon in the Dock.

7/29/2019 Nikon s6400rm en 02
http://slidepdf.com/reader/full/nikon-s6400rm-en-02 112/280
94
R e c
Recording and Playing Back Movies
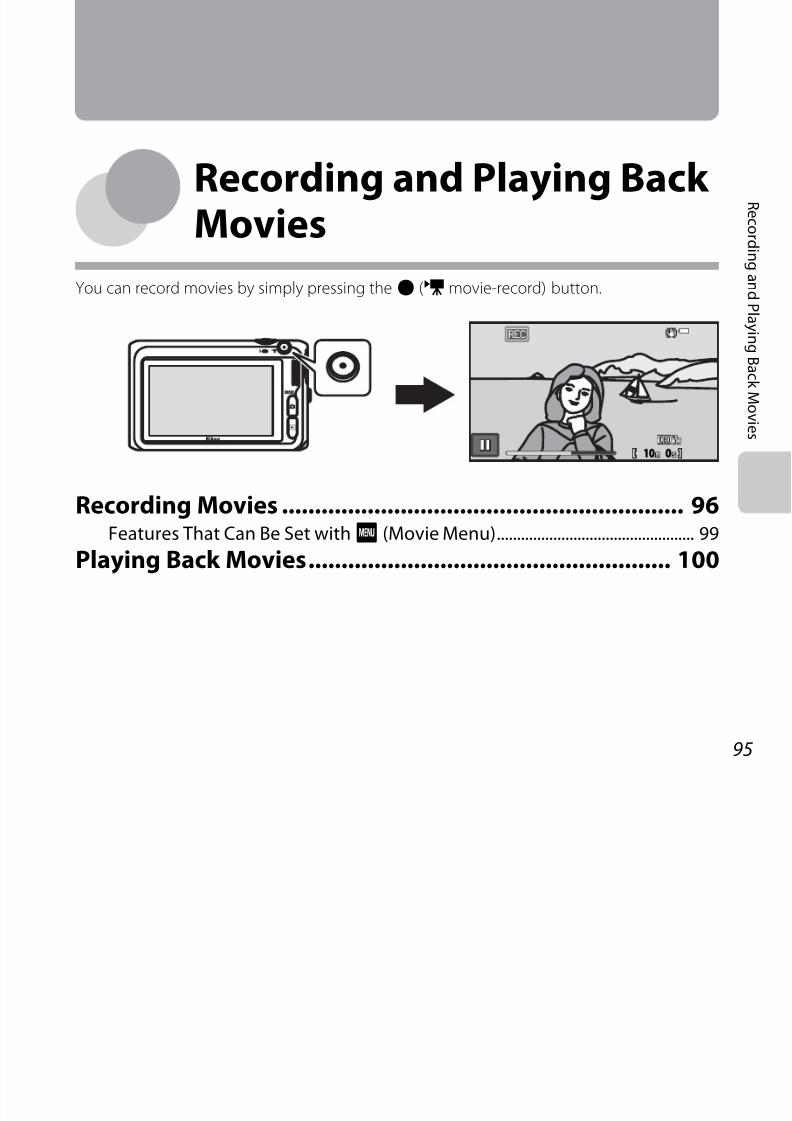
7/29/2019 Nikon s6400rm en 02
http://slidepdf.com/reader/full/nikon-s6400rm-en-02 113/280
95
c or d i n g a n d
P l a y i n g B a c k M ovi e s
Movies
You can record movies by simply pressing theb (emovie-record) button.
Recording Movies ............................................................. 96Features That Can Be Set withF (Movie Menu)................................................. 99
Playing Back Movies....................................................... 100
1010 00
R e c
Recording MoviesYou can record movies by simply pressing theb (emovie-record) button.
1 Display the shooting screen.• Movies can be recorded in any shooting mode
(A26) except Draw scene mode.
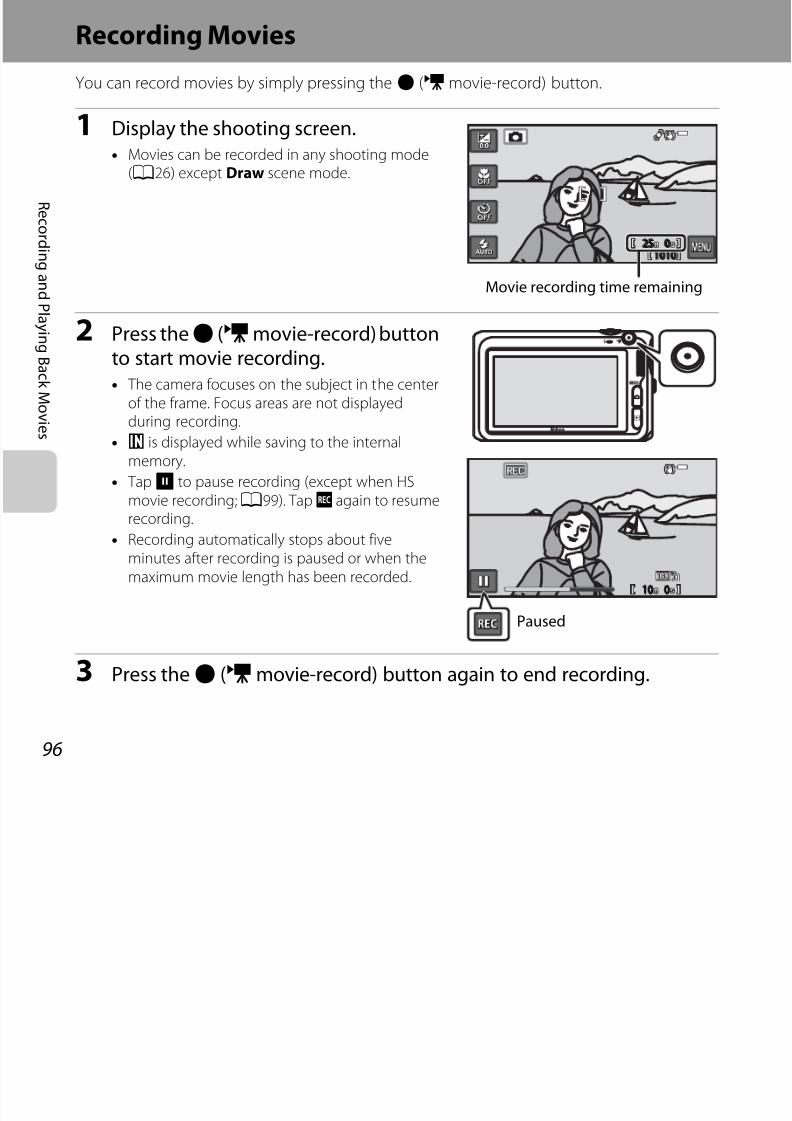
7/29/2019 Nikon s6400rm en 02
http://slidepdf.com/reader/full/nikon-s6400rm-en-02 114/280
96
c or d i n g a n d
P l a y i n g B a c k M ovi e s
2 Press theb (emovie-record) buttonto start movie recording.• The camera focuses on the subject in the center
of the frame. Focus areas are not displayedduring recording.
• C is displayed while saving to the internalmemory.
• TapQ to pause recording (except when HSmovie recording;A99). Tapo again to resumerecording.
• Recording automatically stops about fiveminutes after recording is paused or when themaximum movie length has been recorded.
3 Press theb (emovie-record) button again to end recording.
2525 00
10101010
Movie recording time remaining
1010 00
Paused
R e c
B Notes About Recording Images and Saving Movies The indicator showing the number of exposures remaining or the indicator showing the maximummovie length flashes while images are being recorded or while a movie is being saved. Do not openthe battery-chamber/memory card slot cover or remove the battery or memory card while anindicator is flashing. Doing this could result in loss of data, or in damage to the camera or thememory card.
B Notes About Movie Recording
• Memory cards with an SD Speed Class rating of 6 or faster are recommended when recordingmovies (F23). Movie recording may stop unexpectedly when memory cards with a lower SpeedClass rating are used.
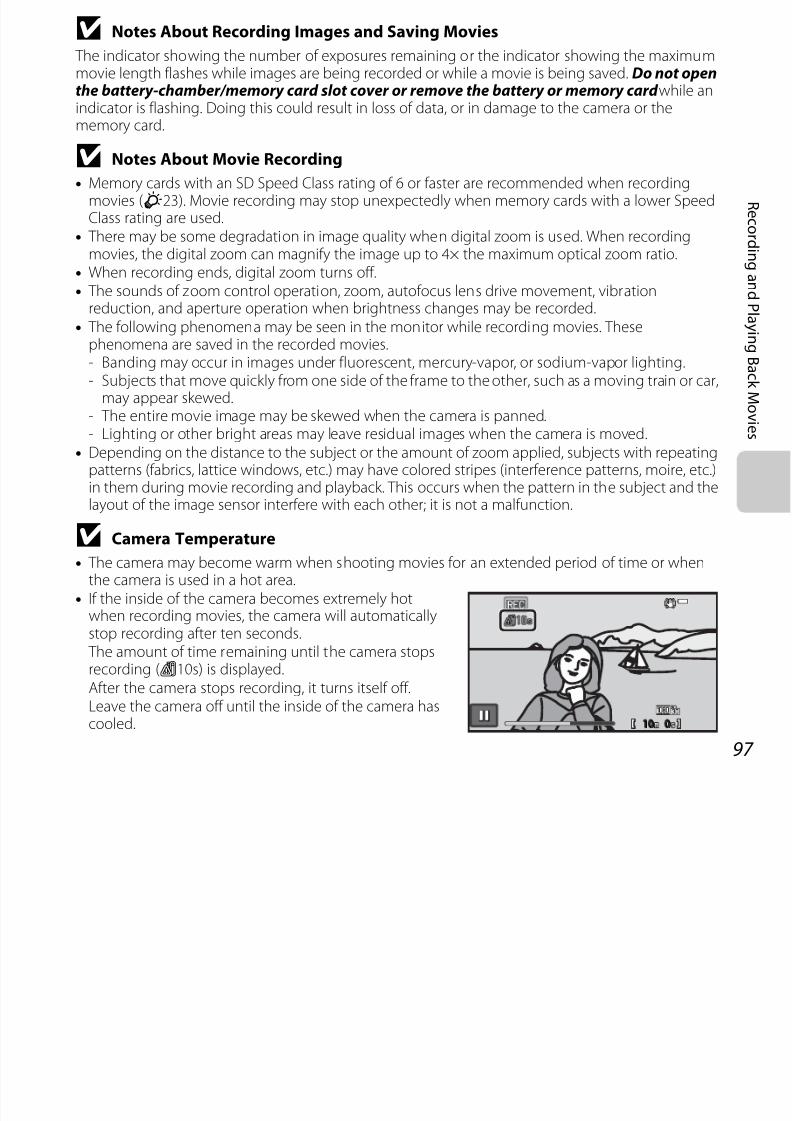
7/29/2019 Nikon s6400rm en 02
http://slidepdf.com/reader/full/nikon-s6400rm-en-02 115/280
97
or d i n g a n d P l a y i n g B a c k M ovi e s
g• There may be some degradation in image quality when digital zoom is used. When recording
movies, the digital zoom can magnify the image up to 4× the maximum optical zoom ratio.• When recording ends, digital zoom turns off.• The sounds of zoom control operation, zoom, autofocus lens drive movement, vibration
reduction, and aperture operation when brightness changes may be recorded.• The following phenomena may be seen in the monitor while recording movies. Thesephenomena are saved in the recorded movies.- Banding may occur in images under fluorescent, mercury-vapor, or sodium-vapor lighting.- Subjects that move quickly from one side of the frame to the other, such as a moving train or car,
may appear skewed.- The entire movie image may be skewed when the camera is panned.- Lighting or other bright areas may leave residual images when the camera is moved.
• Depending on the distance to the subject or the amount of zoom applied, subjects with repeatingpatterns (fabrics, lattice windows, etc.) may have colored stripes (interference patterns, moire, etc.)in them during movie recording and playback. This occurs when the pattern in the subject and thelayout of the image sensor interfere with each other; it is not a malfunction.
B Camera Temperature
• The camera may become warm when shooting movies for an extended period of time or whenthe camera is used in a hot area.
• If the inside of the camera becomes extremely hotwhen recording movies, the camera will automaticallystop recording after ten seconds. The amount of time remaining until the camera stopsrecording (B10s) is displayed.After the camera stops recording, it turns itself off.Leave the camera off until the inside of the camera has
cooled.1010 00
R e c o
B Notes About AutofocusAutofocus may not perform as expected (A77). Should this occur, try the following:
1. Set Movie AF mode (A99) in the movie menu toA Single AF (default setting) beforestarting movie recording.
2. Frame another subject—positioned at the same distance from the camera as the intendedsubject—in the center of the frame, press theb (emovie-record) button to start recording, andthen modify the composition.
C Movie Options and Maximum Movie Length
Movie options (A99) Memory card (4 GB)*
7/29/2019 Nikon s6400rm en 02
http://slidepdf.com/reader/full/nikon-s6400rm-en-02 116/280
98
or d i n g a n d P l a y i n g B a c k M ovi e s
All figures are approximate. The maximum movie length may vary depending on the make of thememory card, even among memory cards of the same capacity. Check the shooting screen for themaximum movie length when recording to the internal memory (approx. 78 MB).
* Individual movie files cannot exceed 4 GB in size or 29 minutes in length, even when there issufficient free space on the memory card for longer recording. When a battery is used to operatethe camera, the battery may run out and recording may end before either limit is reached, despite
the battery being fully charged (F19). In addition, recording may end before either limit isreached if camera temperature becomes elevated.
C Functions Available for Movie Recording
• The exposure compensation and white balance settings for the current shooting mode are alsoapplied with movie recording. The settings adjusted with the scene effect adjustment slider inscene mode (A40) and the hues specified in special effects mode (A52) are also applied tomovies. When macro mode is enabled, movies of subjects close to the camera can be recorded.Confirm settings before starting movie recording.
• The self-timer (A61) can be used. When theb (emovie-record) button is pressed after theself-timer is enabled, the camera focuses on the subject in the center of the frame and starts movierecording after the specified two or ten seconds.
• The flash will not fire.
• TapF to adjust movie menu settings before starting movie recording (A99).
• If Photo info in the Monitor settings (A104) in the setup menu is set to Movie frame+auto
info, the area that will be visible in the movie can be confirmed before movie recording starts.
Movie options (A99) Memory card (4 GB)
c HD 1080pP (1920×1080) (default setting) 25 min
d HD 1080p (1920×1080) 40 min
e HD 720p (1280×720) 50 min
R e c o
Features That Can Be Set withF (Movie Menu) TapF in shooting mode to configure the settings listed below (A10). If the movie menu isnot displayed, tapC to scroll to the bottom of the screen.
25 0
Shooting menu
Movieoptions
Wind noiseS t
MovieAF mode
Open withHS footage
AF area
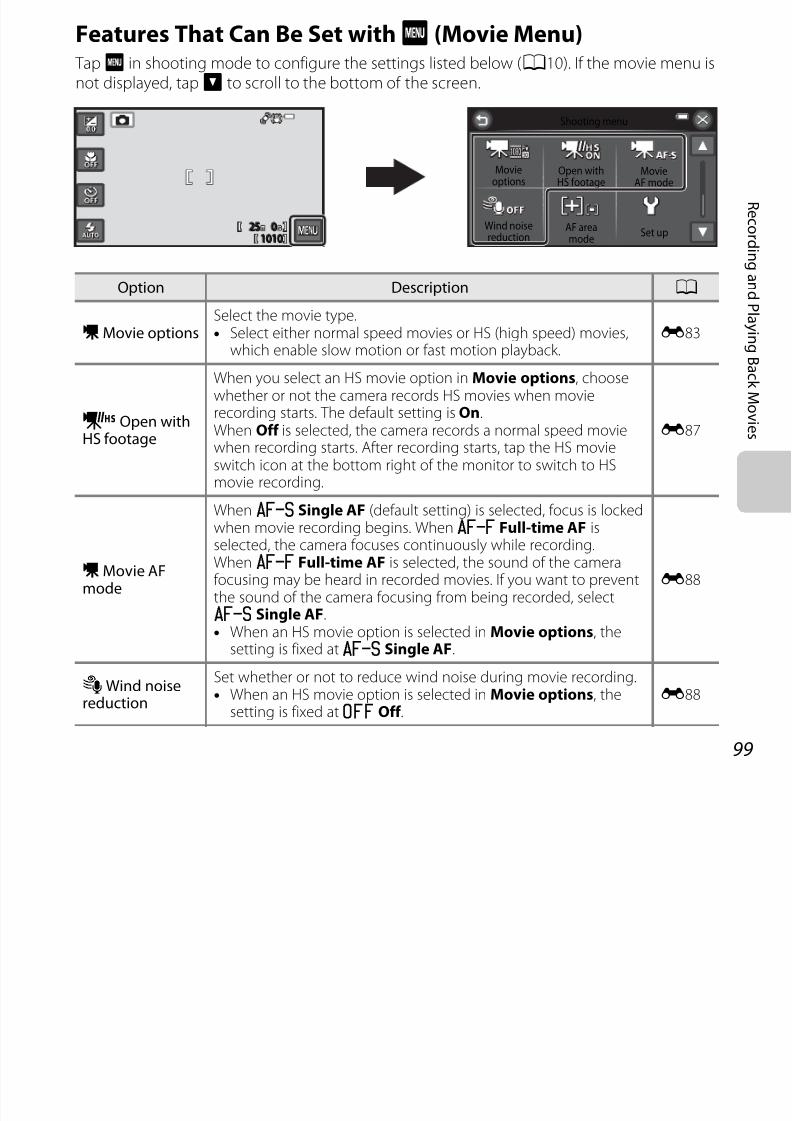
7/29/2019 Nikon s6400rm en 02
http://slidepdf.com/reader/full/nikon-s6400rm-en-02 117/280
99
or d i n g a n d P l a y i n g B a c k M ovi e s
Option Description A
D Movie optionsSelect the movie type.• Select either normal speed movies or HS (high speed) movies,
which enable slow motion or fast motion playback.E83
N Open withHS footage
When you select an HS movie option in Movie options, choosewhether or not the camera records HS movies when movierecording starts. The default setting is On.When Off is selected, the camera records a normal speed movie
when recording starts. After recording starts, tap the HS movieswitch icon at the bottom right of the monitor to switch to HSmovie recording.
E87
D Movie AF
mode
WhenA Single AF (default setting) is selected, focus is lockedwhen movie recording begins. WhenB Full-time AF isselected, the camera focuses continuously while recording.WhenB Full-time AF is selected, the sound of the camerafocusing may be heard in recorded movies. If you want to prevent
the sound of the camera focusing from being recorded, selectA Single AF.• When an HS movie option is selected in Movie options, the
setting is fixed atA Single AF.
E88
YWind noisereduction
Set whether or not to reduce wind noise during movie recording.• When an HS movie option is selected in Movie options, the
setting is fixed atk Off .E88
2525 00
10101010
Wind noisereduction Set upAF area
mode
R e c o
Playing Back MoviesPress thec button to enter playback mode.
Movies are indicated by the movie options icon(A99).
TapR to play back movies.• To adjust the volume before playback, tapF and
then tapi (A10).
155 /111 /2012 15012 15 : 300
15 / 11 / 2012 15 : 30
0 0 010
0010010 . MOVOV
0010 . MOV
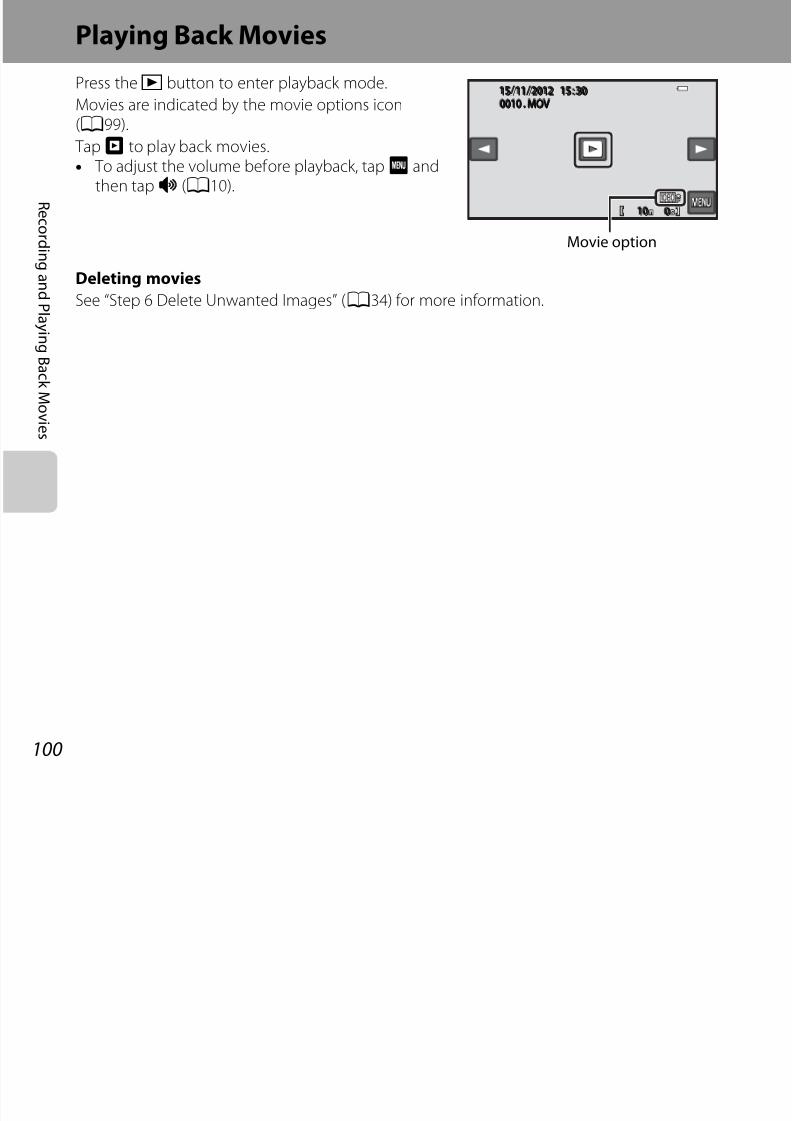
7/29/2019 Nikon s6400rm en 02
http://slidepdf.com/reader/full/nikon-s6400rm-en-02 118/280
100
or d i n g a n d P l a y i n g B a c k M ovi e s
Deleting movies
See “Step 6 Delete Unwanted Images” (A34) for more information.
Movie option
R e c o
Functions Available During Playback Tap the monitor during playback to display theplayback control panel at the bottom in the monitor.
The operations described below are available bytapping the icons in the panel.
To Use Description
Adjust volume X TapX to adjust volume.*
0 0 4

7/29/2019 Nikon s6400rm en 02
http://slidepdf.com/reader/full/nikon-s6400rm-en-02 119/280
101
or d i n g a n d P l a y i n g B a c k M ovi e s
* You can also adjust volume by rotating the zoom control tog orf during playback.
B Notes About Playing Back Movies
The COOLPIX S6400 is not able to play back movies recorded with another make or model of digital
camera.
Rewind O Tap and holdO to rewind movie.
Advance P Tap and holdP to advance movie.
Pause Q
Pause playback. The following operations can be performed while playback ispaused.
URewind movie back one frame. Tap and holdU forcontinuous frame-by-frame rewind.
VAdvance movie forward one frame. Tap and holdV forcontinuous frame-by-frame advance.
R TapR displayed at the center of the screen to resumeplayback.
G TapG to display the movie edit screen. Cut out unwantedportions of a movie and save the desired portion.
End S End movie playback and return to full-frame playback mode.

7/29/2019 Nikon s6400rm en 02
http://slidepdf.com/reader/full/nikon-s6400rm-en-02 120/280
102
General Camera Setup
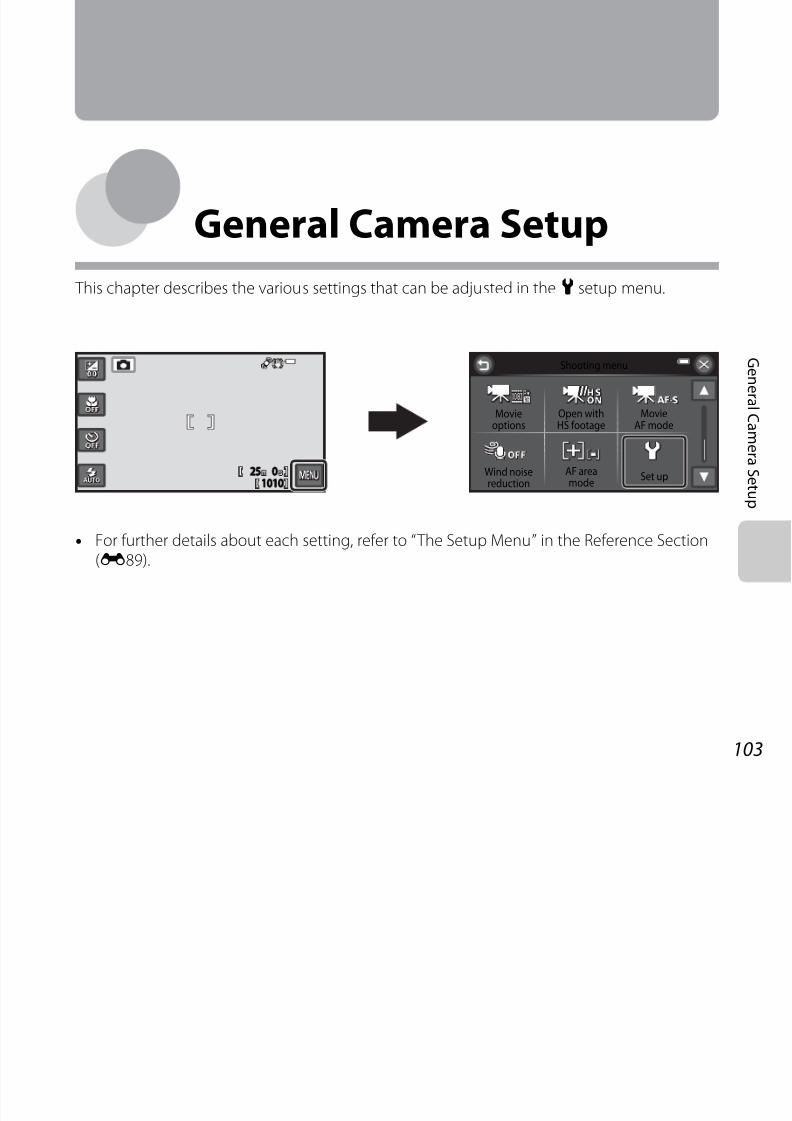
7/29/2019 Nikon s6400rm en 02
http://slidepdf.com/reader/full/nikon-s6400rm-en-02 121/280
103
G en er a l C a m
er a S e t u p
General Camera Setup
This chapter describes the various settings that can be adjusted in the z setup menu.
• For further details about each setting, refer to “ The Setup Menu” in the Reference Section(E89).
Shooting menu
Movieoptions
Wind noisereduction
Set up
MovieAF mode
Open withHS footage
AF areamode
2525 00
10101010
Features That Can Be Set withF (Setup Menu) TapF and tap z Set up to make the settings listed below (A10).
If z Set up is not displayed, tapC to scroll to the bottom the screen.
Shooting menu
Movieoptions
MovieAF mode
Open withHS footage
Set up
Welcome screen
Time zone and date
Monitor settings
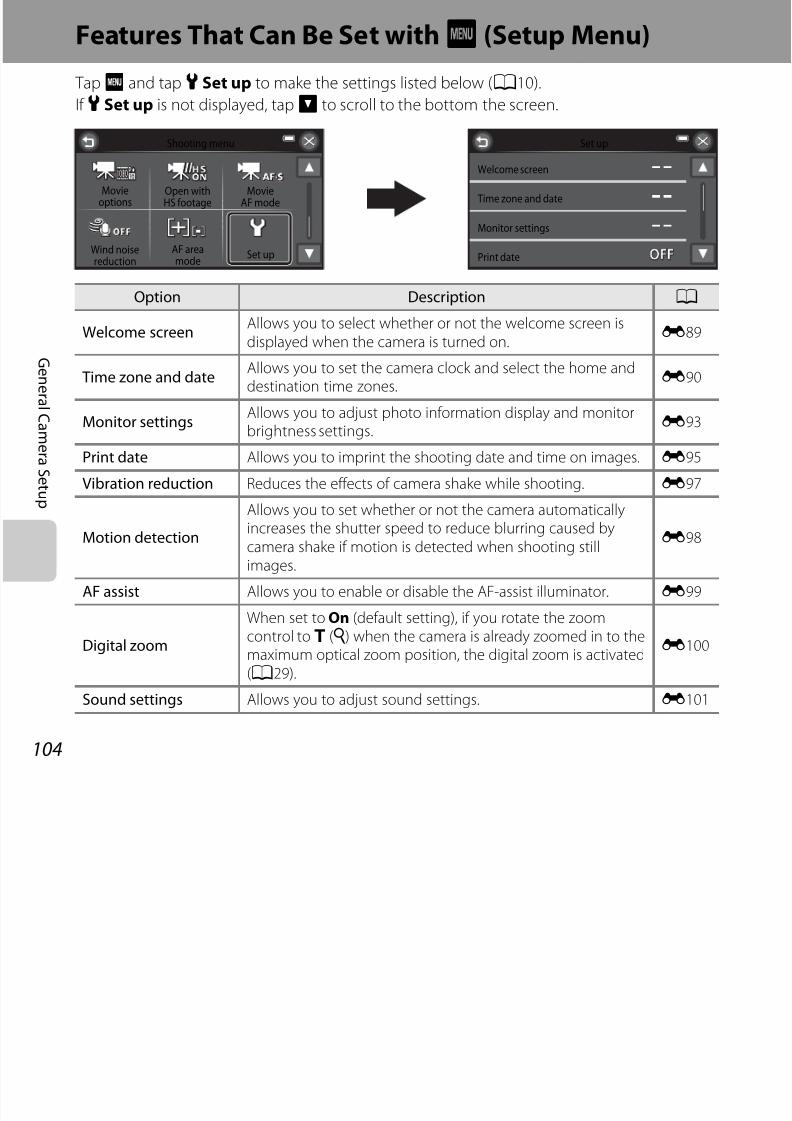
7/29/2019 Nikon s6400rm en 02
http://slidepdf.com/reader/full/nikon-s6400rm-en-02 122/280
104
G en er a l C a m er a S e t u p
Option Description A
Welcome screen Allows you to select whether or not the welcome screen isdisplayed when the camera is turned on.
E89
Time zone and dateAllows you to set the camera clock and select the home anddestination time zones.
E90
Monitor settingsAllows you to adjust photo information display and monitorbrightness settings.
E93
Print date Allows you to imprint the shooting date and time on images. E95
Vibration reduction Reduces the effects of camera shake while shooting. E97
Motion detection
Allows you to set whether or not the camera automaticallyincreases the shutter speed to reduce blurring caused bycamera shake if motion is detected when shooting stillimages.
E98
AF assist Allows you to enable or disable the AF-assist illuminator. E99
Digital zoom
When set to On (default setting), if you rotate the zoomcontrol tog (i) when the camera is already zoomed in to themaximum optical zoom position, the digital zoom is activated(A29).
E100
Sound settings Allows you to adjust sound settings. E101
Wind noisereduction
Set upAF areamode Print date
Auto off Allows you to set the amount of time that passes before themonitor turns off to save power.
E102
Format memory/Format card
Allows you to format the internal memory or the memorycard.
E103
Language Allows you to change the camera’s display language. E104
TV settings Allows you to adjust TV-connection settings. E105
When set to Auto (default setting), you can charge thecamera’s battery by connecting the camera to a computer(provided that the computer is able to supply power)
Option Description A
7/29/2019 Nikon s6400rm en 02
http://slidepdf.com/reader/full/nikon-s6400rm-en-02 123/280
105
G en er a l C a m er a S e t u p
Charge by computer(provided that the computer is able to supply power).• When charging by computer, it takes more time to charge
the battery than when using the Charging AC AdapterEH-69P.
E106
Blink warningAllows you to set whether or not closed eyes are detectedwhen taking pictures of people using face detection.
E108
Sequence displayoptions
Allows you to select whether to display only the key picturefor a sequence of images captured continuously or to displaythe sequence as individual images.
E110
Eye-Fi uploadSet whether or not to enable the function for sending images
to a computer using a commercially available Eye-Fi card.
E111
Reset allAllows you to reset the camera’s settings to their defaultvalues.
E112
Firmware version View the current camera firmware version. E116

7/29/2019 Nikon s6400rm en 02
http://slidepdf.com/reader/full/nikon-s6400rm-en-02 124/280
106
E Reference Section
The Reference Section provides detailed information and hints about using the camera.
ShootingUsing the Draw Option............................................................................................. E2Using Easy Panorama (Shooting and Playback) ..............................................E3
7/29/2019 Nikon s6400rm en 02
http://slidepdf.com/reader/full/nikon-s6400rm-en-02 125/280
E1
R ef er en c e S e c t i on
Playback
Favorite Pictures Mode............................................................................................. E7
Auto Sort Mode......................................................................................................... E11List by Date Mode .................................................................................................... E13Viewing and Deleting Images Captured Continuously (Sequence) ......E14Editing Still Images .................................................................................................. E17Connecting the Camera to a TV (Viewing Images on a TV).......................E34Connecting the Camera to a Printer (Direct Print) .......................................E38
Editing Movies ........................................................................................................... E47Menu
The Shooting Menu (for A (Auto) Mode).......................................................E49 The Smart Portrait Menu........................................................................................ E67 The Playback Menu.................................................................................................. E69 The Movie Menu ....................................................................................................... E83 The Setup Menu........................................................................................................ E89
Additional Information
File and Folder Names ......................................................................................... E117Optional Accessories............................................................................................ E119Error Messages ....................................................................................................... E120
Using the Draw OptionWrite a memo or draw a picture on the touch panel display and save it as an image. Theimage is saved at an image mode setting of l (640×480).
1 Write a memo or draw pictures.• TapI (pen) to write text or draw pictures
(E23)
Enter shooting modeM A (shooting mode) buttonM C Scene modeM A (draw)
Pen
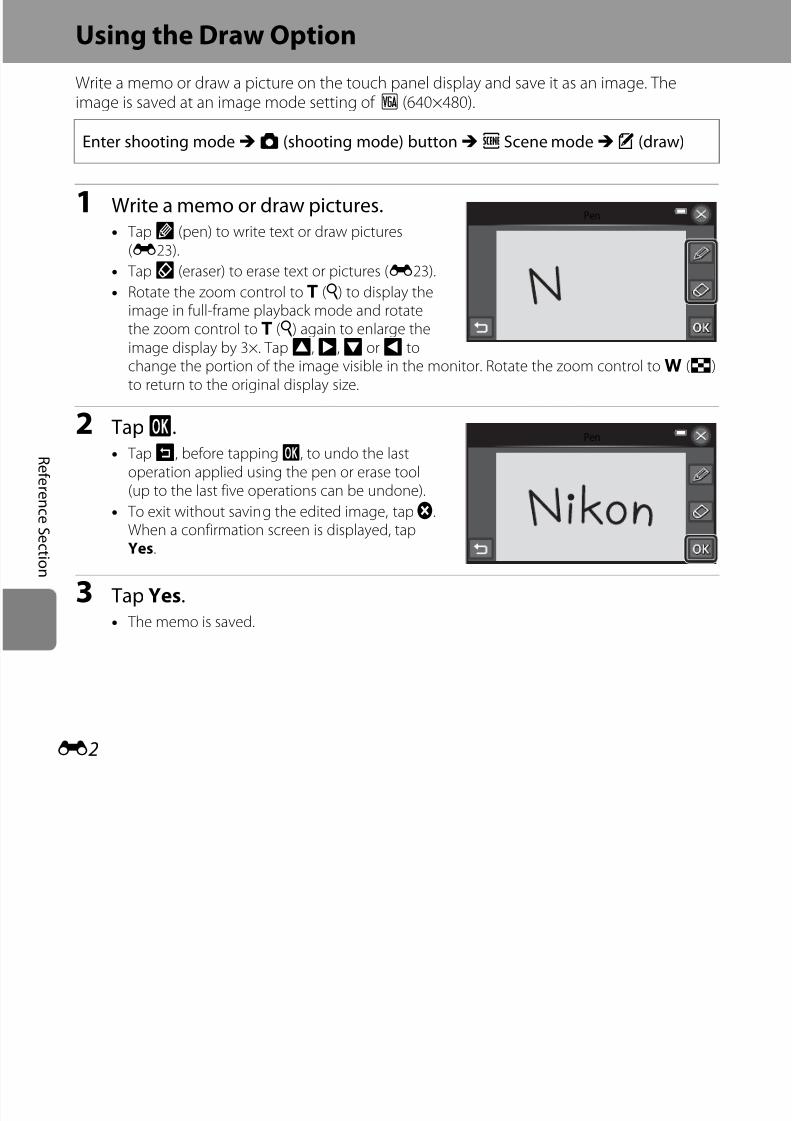
7/29/2019 Nikon s6400rm en 02
http://slidepdf.com/reader/full/nikon-s6400rm-en-02 126/280
E2
R ef er en c e S e c t i on
(E23).
• TapJ (eraser) to erase text or pictures (E23).
• Rotate the zoom control tog (i) to display theimage in full-frame playback mode and rotatethe zoom control tog (i) again to enlarge theimage display by 3×. TapA,D,B orC tochange the portion of the image visible in the monitor. Rotate the zoom control tof (h)to return to the original display size.
2 TapI.
• Tape, before tappingI, to undo the lastoperation applied using the pen or erase tool(up to the last five operations can be undone).
• To exit without saving the edited image, tapf.When a confirmation screen is displayed, tapYes.
3 Tap Yes.• The memo is saved.
Pen
Using Easy Panorama (Shooting and Playback)Shooting with Easy Panorama
You can select eitherW Normal (180°) (default setting) orX Wide (360°) as theshooting range. See “Changing Shooting Range” (E4) for more information.
Enter shooting modeM A (shooting mode) buttonM C Scene modeM
p (easy panorama)
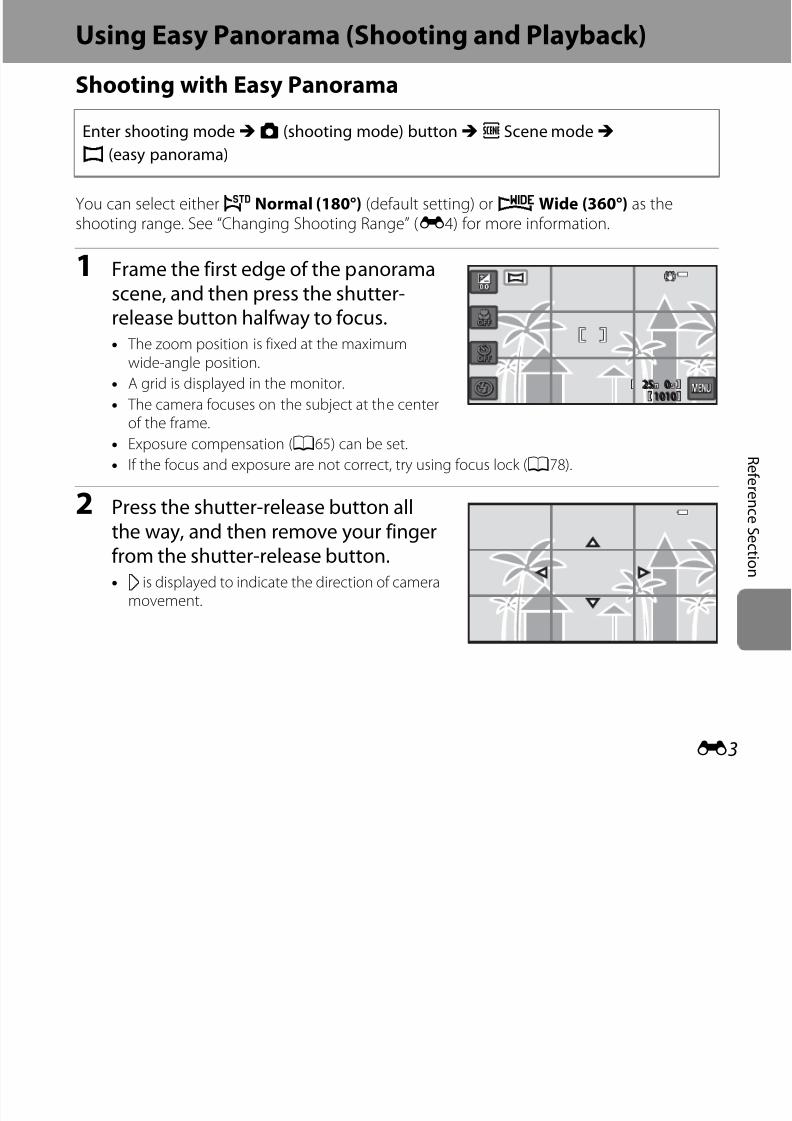
7/29/2019 Nikon s6400rm en 02
http://slidepdf.com/reader/full/nikon-s6400rm-en-02 127/280
E3
R ef er en c e S e c t i on
1 Frame the first edge of the panoramascene, and then press the shutter-
release button halfway to focus.• The zoom position is fixed at the maximum
wide-angle position.
• A grid is displayed in the monitor.
• The camera focuses on the subject at the centerof the frame.
• Exposure compensation (A65) can be set.
• If the focus and exposure are not correct, try using focus lock (A78).
2 Press the shutter-release button allthe way, and then remove your fingerfrom the shutter-release button.• I is displayed to indicate the direction of camera
movement.
2525 00
10101010
3 Move the camera slowly and straightin one of the four directions, andbegin shooting.• When the camera detects which direction it is
moving in, shooting begins.
• A guide indicating the current shooting position
is displayed.• When the shooting position guide reaches the
edge, shooting ends.Guide
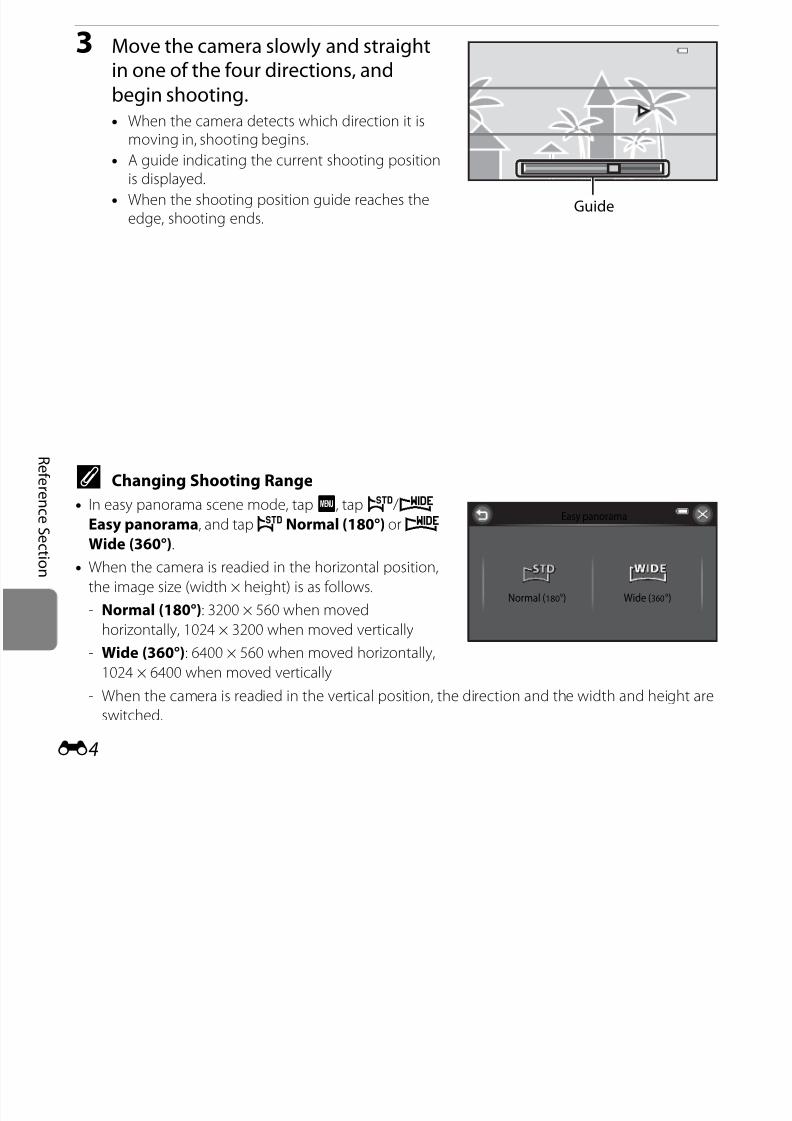
7/29/2019 Nikon s6400rm en 02
http://slidepdf.com/reader/full/nikon-s6400rm-en-02 128/280
E4
R ef er en c e S e c t i on
C Changing Shooting Range
• In easy panorama scene mode, tapF, tapW / X
Easy panorama, and tapW Normal (180°) orX
Wide (360°).
• When the camera is readied in the horizontal position,
the image size (width × height) is as follows.
- Normal (180°): 3200 × 560 when moved
horizontally, 1024 × 3200 when moved vertically
- Wide (360°): 6400 × 560 when moved horizontally,
1024 × 6400 when moved vertically
- When the camera is readied in the vertical position, the direction and the width and height are
switched.
Easy panorama
Normal (180°) Wide (360°)
Example of camera movement
• The operator, without shifting position, moves the camera horizontally or vertically in an
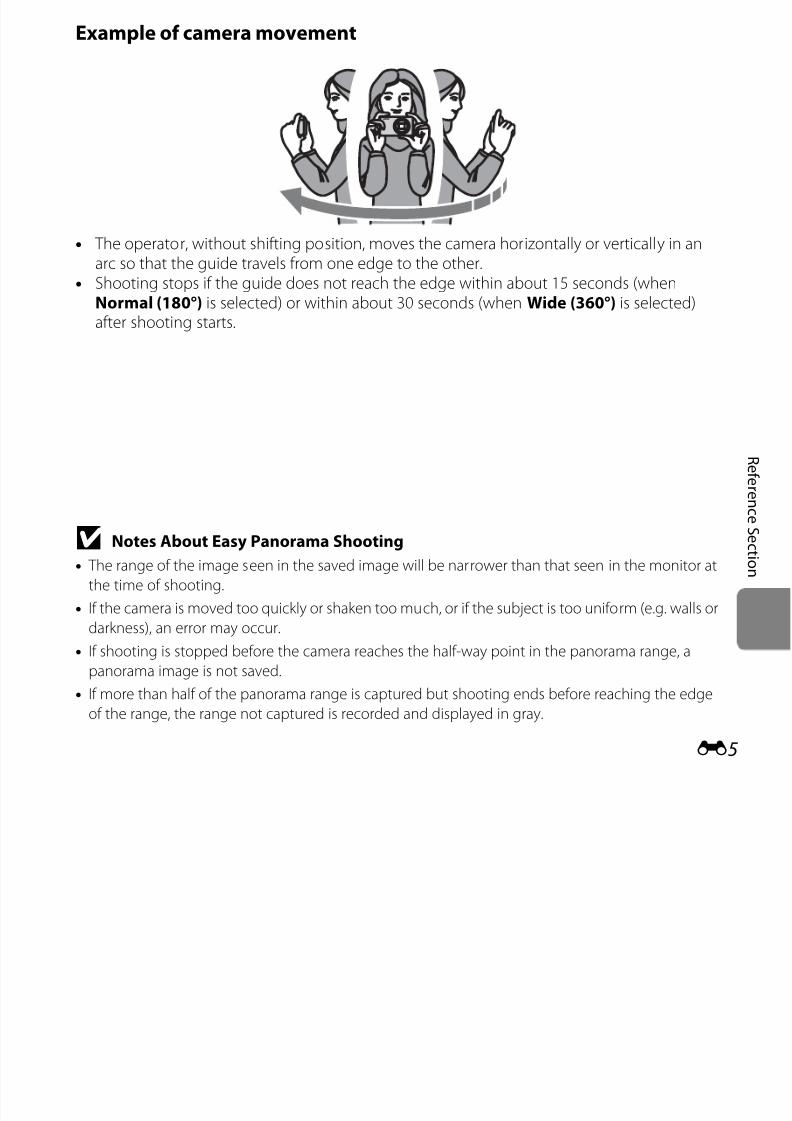
7/29/2019 Nikon s6400rm en 02
http://slidepdf.com/reader/full/nikon-s6400rm-en-02 129/280
E5
R ef er en c e S e c t i on
arc so that the guide travels from one edge to the other.• Shooting stops if the guide does not reach the edge within about 15 seconds (when
Normal (180°) is selected) or within about 30 seconds (when Wide (360°) is selected)
after shooting starts.
B Notes About Easy Panorama Shooting
• The range of the image seen in the saved image will be narrower than that seen in the monitor at
the time of shooting.
• If the camera is moved too quickly or shaken too much, or if the subject is too uniform (e.g. walls or
darkness), an error may occur.
• If shooting is stopped before the camera reaches the half-way point in the panorama range, a
panorama image is not saved.
• If more than half of the panorama range is captured but shooting ends before reaching the edge
of the range, the range not captured is recorded and displayed in gray.
Viewing Images Captured with Easy PanoramaIf you switch to playback mode (A32) and displayan image captured using easy panorama in full-frameplayback mode,R is displayed.
TapR to display the short edge of the image usingthe entire monitor and automatically move (scroll)the displayed area
155 /111 /2012 15012 15 : 300
4
44//
0004004 . JPGPG
0004 . JPG15 / 11 / 2012 15 : 30
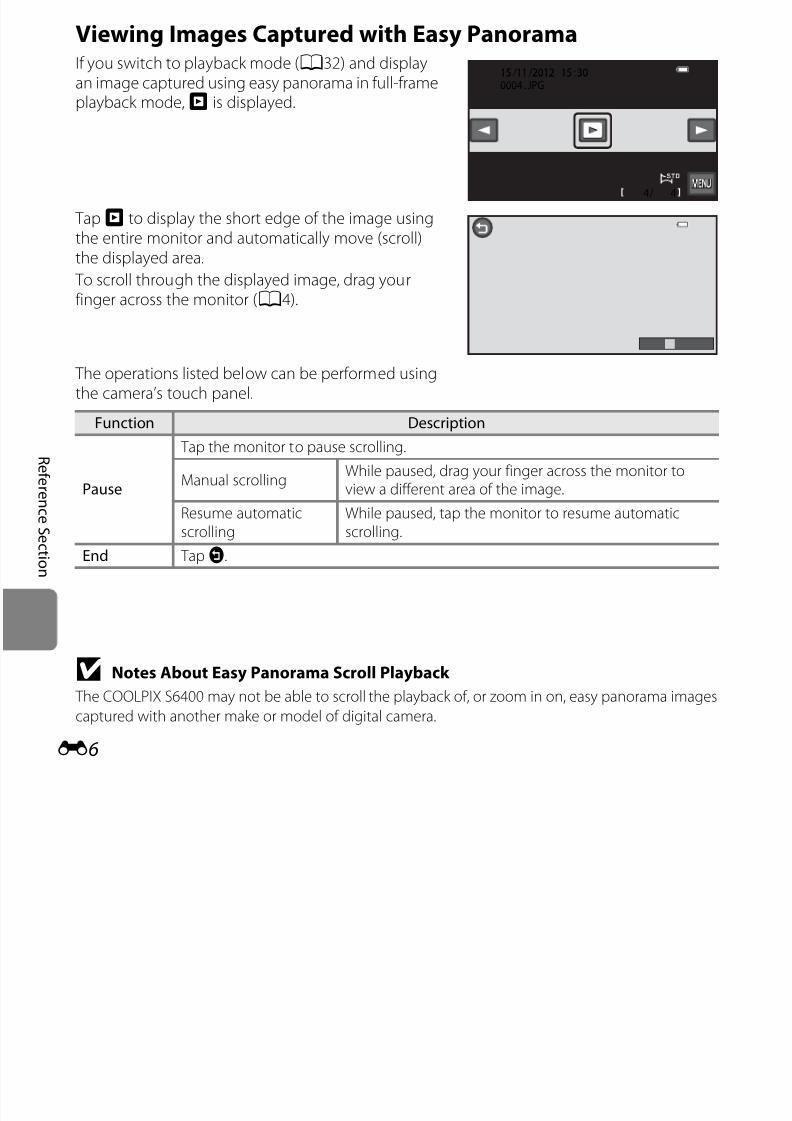
7/29/2019 Nikon s6400rm en 02
http://slidepdf.com/reader/full/nikon-s6400rm-en-02 130/280
E6
R ef er en c e S e c t i on
the displayed area.
To scroll through the displayed image, drag yourfinger across the monitor (A4).
The operations listed below can be performed usingthe camera’s touch panel.
B Notes About Easy Panorama Scroll Playback
The COOLPIX S6400 may not be able to scroll the playback of, or zoom in on, easy panorama images
captured with another make or model of digital camera.
Function Description
Pause
Tap the monitor to pause scrolling.
Manual scrollingWhile paused, drag your finger across the monitor toview a different area of the image.
Resume automaticscrolling
While paused, tap the monitor to resume automaticscrolling.
End TapJ.
Favorite Pictures ModeYou can sort your images (except movies) into nine albums and add them as favorite pictures(added images are not copied or moved).
After you add images to albums, you can choose to play back only the added images byusing favorite pictures mode.• By creating albums for certain subjects or events, you can find your favorite images easily.
• The same image can be added to multiple albums.• Up to 200 images can be added to each album.
Adding Images to Albums

7/29/2019 Nikon s6400rm en 02
http://slidepdf.com/reader/full/nikon-s6400rm-en-02 131/280
E7
R ef er en c e S e c t i on
* Images cannot be added to albums in favorite pictures playback mode.
Tap an album to which you want add the image. Theimage is added to the album and the monitor displayreturns to the album selection screen.
• You can repeatedly add the same image to otheralbums by tapping them.
• Drag the current image to change the image toadd.
• Tapf to finish adding images.
Press thec button (playback mode)*M select an imageM tapF M h Favorite
pictures
Favorite pictures
01
04
07
02
05
08
03
06
09
Playing Back Images in Albums
Tap an album to play back the images that havebeen added to the selected album.• The icon of the selected album is displayed during
playback (A8).• If you tapK, you can change the album icons
(their colors and designs) (E10).• When viewing images in full-frame playback
F
Press thec button (playback mode)M c buttonM h Favorite pictures
Favorite pictures
01
04
07
02
05
08
03
06
09
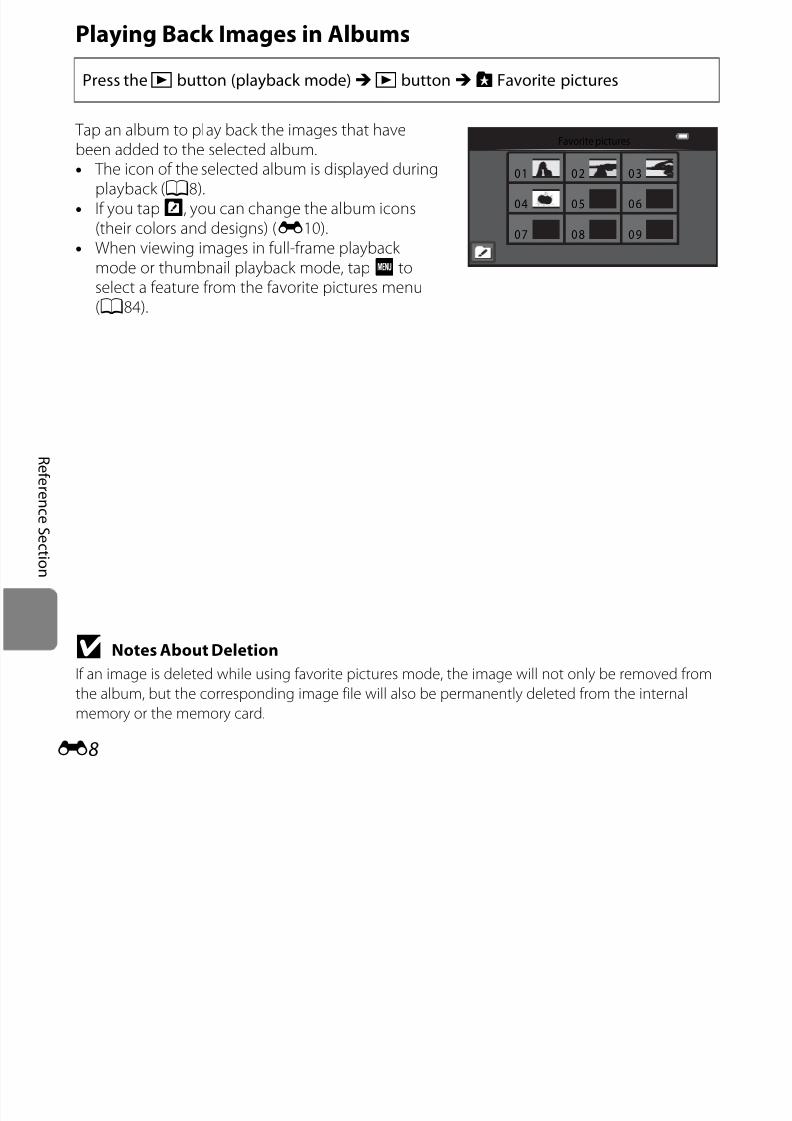
7/29/2019 Nikon s6400rm en 02
http://slidepdf.com/reader/full/nikon-s6400rm-en-02 132/280
E8
R ef er en c e S e c t i on
mode or thumbnail playback mode, tapF toselect a feature from the favorite pictures menu(A84).
B Notes About Deletion
If an image is deleted while using favorite pictures mode, the image will not only be removed from
the album, but the corresponding image file will also be permanently deleted from the internal
memory or the memory card.
Removing Images from Albums To remove an image from an album without permanently deleting it, follow the proceduredescribed below.• Select the desired image in full-frame display in
favorite pictures mode, tapF to display themenu options, and then taph. The confirmationdialog is displayed.
• Tap Yes to remove the image from the album.
Favorite pictures
Delete
PaintProtect Print order
Remove from
favoritesSlide show
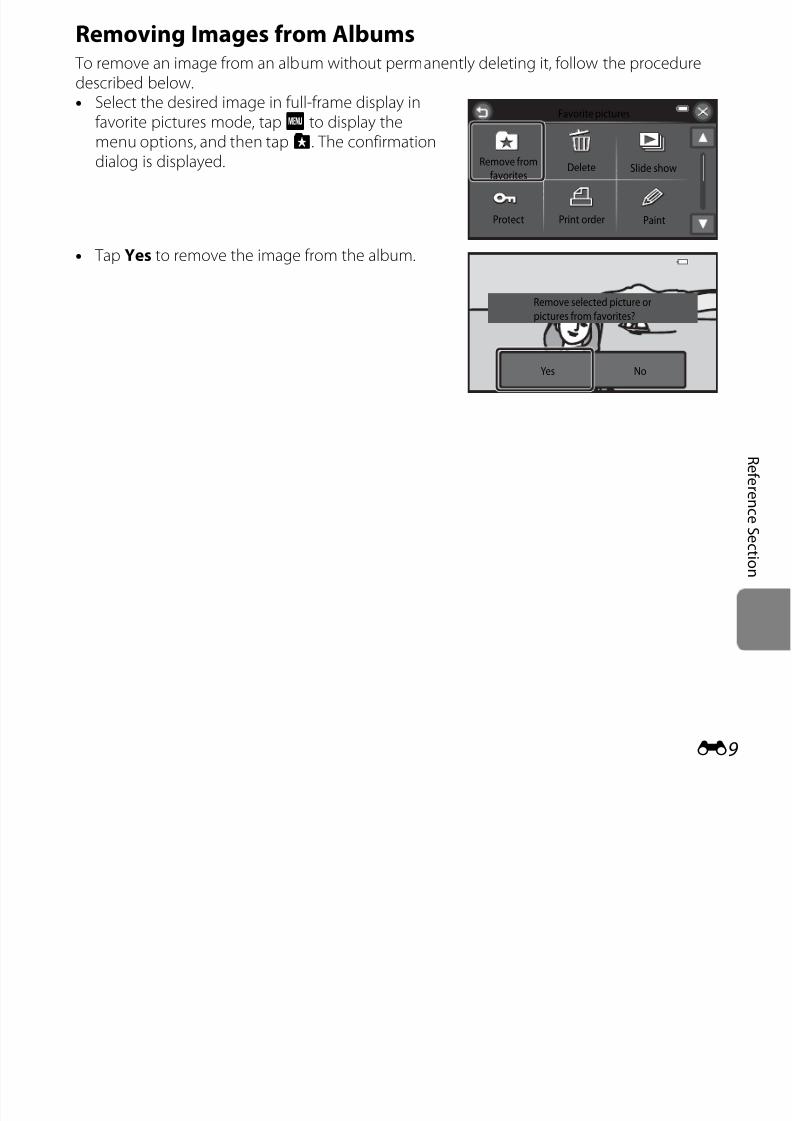
7/29/2019 Nikon s6400rm en 02
http://slidepdf.com/reader/full/nikon-s6400rm-en-02 133/280
E9
R ef er en c e S e c t i on
p g
Yes No
Remove selected picture or
pictures from favorites?
Changing the Favorites Album Icon
1 TapK.
• The album icon and icon color selection screen is
displayed.
Press thec button (playback mode)M c buttonM h Favorite pictures
Favorite pictures
01
04
07
02
05
08
03
06
09
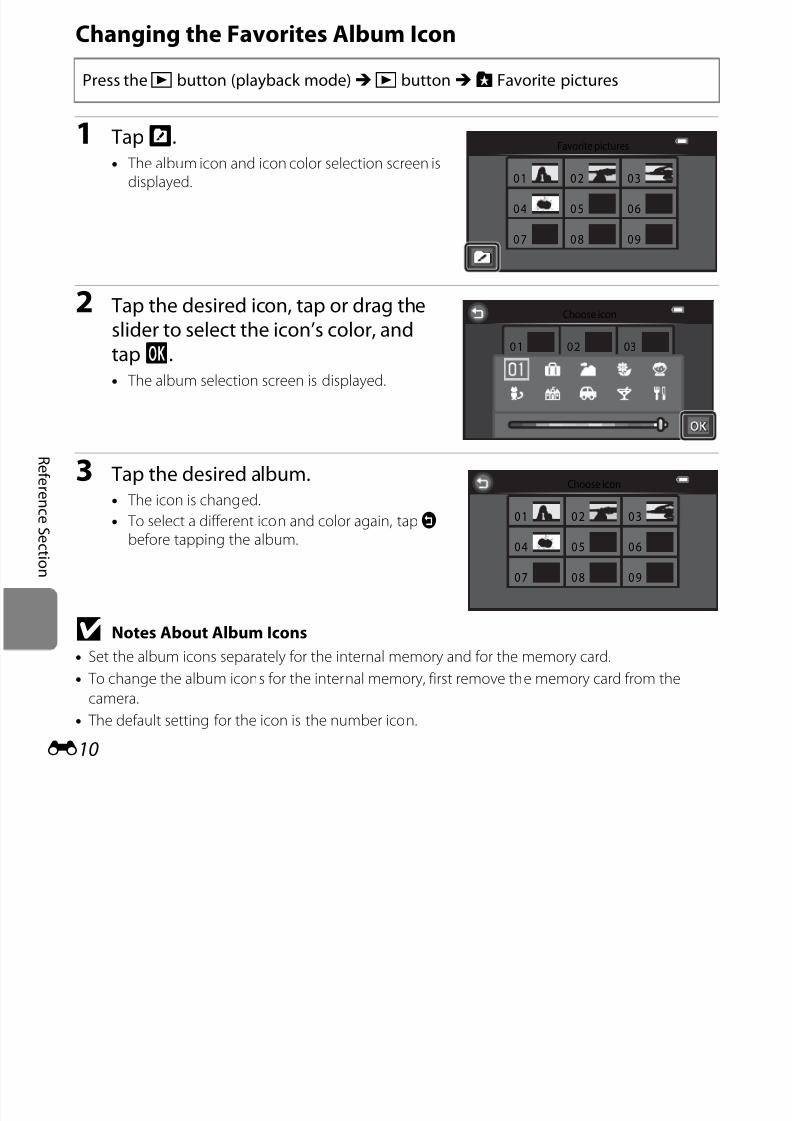
7/29/2019 Nikon s6400rm en 02
http://slidepdf.com/reader/full/nikon-s6400rm-en-02 134/280
E10
R ef er en c e S e c t i on
2 Tap the desired icon, tap or drag the
slider to select the icon’s color, andtapI.• The album selection screen is displayed.
3 Tap the desired album.• The icon is changed.
• To select a different icon and color again, tapJ before tapping the album.
B Notes About Album Icons
• Set the album icons separately for the internal memory and for the memory card.
• To change the album icons for the internal memory, first remove the memory card from the
camera.
• The default setting for the icon is the number icon.
0404
0707
0505
0808
0606
0909
Choose icon
0301 02
Choose icon
01
04
07
02
05
08
03
06
09
Auto Sort ModeImages are automatically sorted into categories, such as portraits, landscapes, and movies.
Tap a category to play back the images in the
selected category.• The icon of the selected category is displayed
during playback (A8).• When viewing images in full-frame playback
mode or thumbnail playback mode tapF to
Press thec button (playback mode)M c buttonM F Auto sort
Auto sort

7/29/2019 Nikon s6400rm en 02
http://slidepdf.com/reader/full/nikon-s6400rm-en-02 135/280
E11
R ef er en c e S e c t i on
mode or thumbnail playback mode, tapF toselect a feature from the auto sort menu (A84).
Auto Sort Mode Categories
Option Description
Z SmileImages captured in smart portrait mode (A54) with the smile timersetting set to On
D Portraits
Images captured in Portrait*, Night portrait*, Party/indoor, or
Backlighting* scene mode (A40)Images captured in smart portrait mode (A54) with the smile timersetting set to Off
u Food Images captured in Food scene mode (A40)
U Landscape Images captured in Landscape* scene mode (A40)
V Dusk to dawnImages captured in Night landscape*, Sunset, Dusk/dawn, or
Fireworks show scene mode (A40)
D Close-upsImages captured in A (auto) mode with macro mode (A63)Images captured in Close-up* scene mode (A40)
Other scenes
* Images captured in scene auto selector scene mode (A42) are also sorted into the appropriatecategories.
O Pet portrait Images captured in Pet portrait (A49) scene mode
D Movie Movies (A96).
X Retouched copies Copies created using editing functions (E17)
W Other scenesAll other images that cannot be defined by the categories describedabove
Option Description
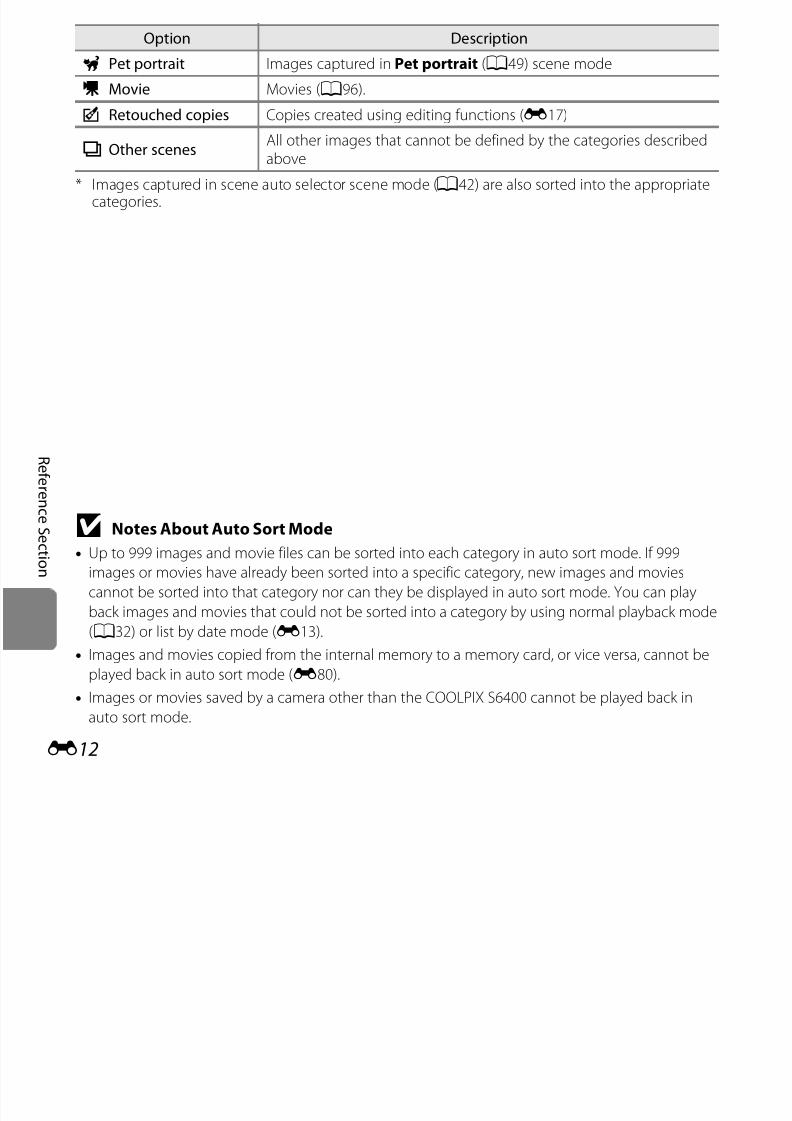
7/29/2019 Nikon s6400rm en 02
http://slidepdf.com/reader/full/nikon-s6400rm-en-02 136/280
E12
R ef er en c e S e c t i on
B Notes About Auto Sort Mode
• Up to 999 images and movie files can be sorted into each category in auto sort mode. If 999
images or movies have already been sorted into a specific category, new images and movies
cannot be sorted into that category nor can they be displayed in auto sort mode. You can playback images and movies that could not be sorted into a category by using normal playback mode
(A32) or list by date mode (E13).
• Images and movies copied from the internal memory to a memory card, or vice versa, cannot be
played back in auto sort mode (E80).
• Images or movies saved by a camera other than the COOLPIX S6400 cannot be played back in
auto sort mode.
List by Date Mode
Tap a date to play back the images captured on theselected date.
• The first image that was captured on the selecteddate is displayed.
• x is displayed during playback (A8).• To change the displayed month, tapB orC.• When viewing images in full frame playback
Press thec button (playback mode)M c buttonM C List by date
1 2
9
3
4 6 7 8 10
12 13 14 16 17
18 19
5
22 23 24
25
21
27 28 29 30
20
11
26
155
Sun Mon Tue Wed Thu Fri Sat
11
2012
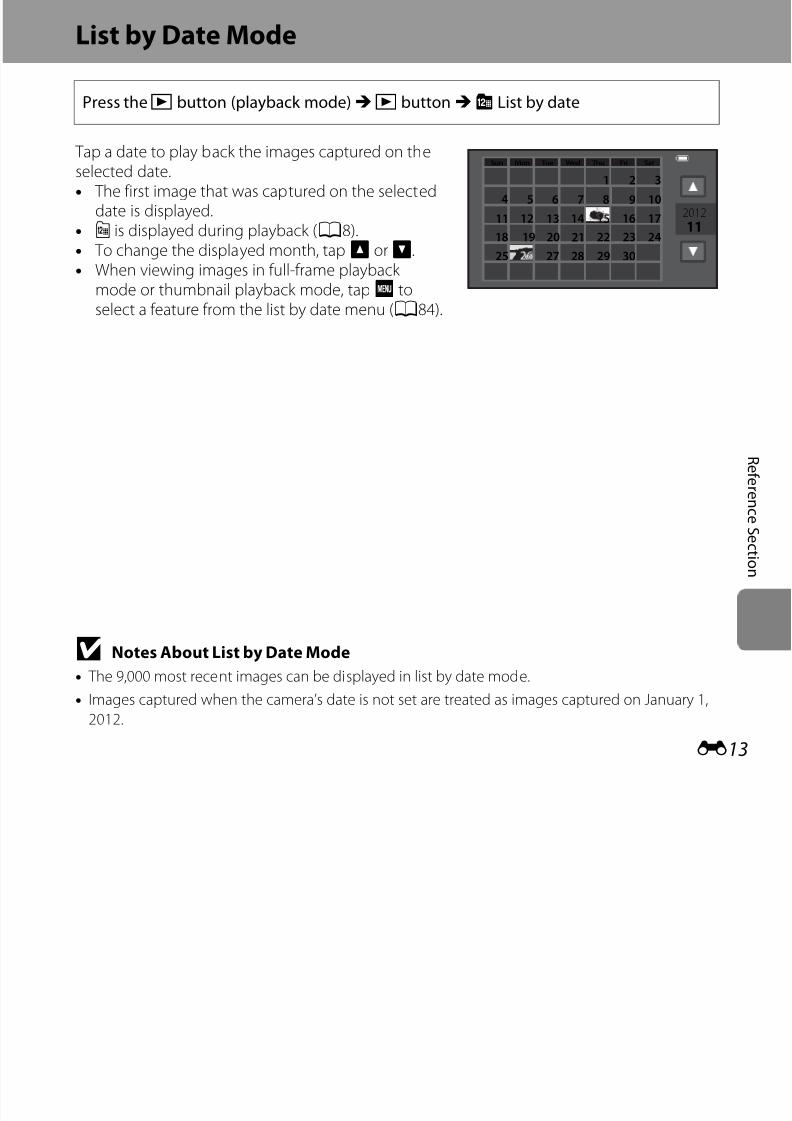
7/29/2019 Nikon s6400rm en 02
http://slidepdf.com/reader/full/nikon-s6400rm-en-02 137/280
E13
R ef er en c e S e c t i on
• When viewing images in full-frame playback mode or thumbnail playback mode, tapF toselect a feature from the list by date menu (A84).
B Notes About List by Date Mode
• The 9,000 most recent images can be displayed in list by date mode.
• Images captured when the camera’s date is not set are treated as images captured on January 1,
2012.
Viewing and Deleting Images Captured Continuously (Sequence)Viewing Images in a SequenceEach series of images captured using the following settings is saved in a sequence.
• A (auto) mode (A38) • Scene mode (A40)
- Continuous H - Sports
- Continuous L - Pet portrait (when Continuous is selected)
- Pre-shooting cache
- Continuous H: 120 fps
- Continuous H: 60 fps

7/29/2019 Nikon s6400rm en 02
http://slidepdf.com/reader/full/nikon-s6400rm-en-02 138/280
E14
R ef er en c e S e c t i on
By default, only the first image of a sequence (keypicture) is displayed to represent the images in the
sequence in full-frame playback mode or thumbnailplayback mode (A81).• When only the key picture is displayed for a
sequence, the picture cannot be zoomed in on.
When only the key picture is displayed for a
sequence, tapR to display each image in asequence individually.• To display the previous or next image, drag the
current picture to the left or right, or tapG orH.• To return to key picture only display, tapJ.• To display images in a sequence as thumbnails,
set Sequence display options to Individual
pictures in the setup menu (E110).
155 /111 /2012 15012 15 : 300
10104/ /
0004004 . JPGPG0004 . JPG
15 / 11 / 2012 15 : 30
155 /111 /2012 15012 15 : 300
551/ /
0004004 . JPGPG0004 . JPG
15 / 11 / 2012 15 : 30
B Sequence Display Options
• Select Sequence display options (E110) in the setup menu to set all sequences to be
displayed using their key pictures or to display them as individual images.
• Images captured continuously with cameras other than the COOLPIX S6400 cannot be displayed
as a sequence.
C Changing Key Picture in Sequence
A sequence’s key picture can be changed using Choose key picture (E82) in the playback menu.
C Playback Menu Options Available When Using Sequence
WhenF is tapped, the following menu operations are available for the images in that sequence.
• Favorite pictures1 (E7) • Paint2 (E22)
7/29/2019 Nikon s6400rm en 02
http://slidepdf.com/reader/full/nikon-s6400rm-en-02 139/280
E15
R ef er en c e S e c t i on
1 If F is tapped when only a key picture is displayed, the same settings can be applied to all images
in that sequence. TapF after displaying individual images to apply settings to each displayed
image.2 This operation is not available when only a key picture is displayed. Display the images in the
sequence individually and then tapF.
a o te p ctu es ( ) a t ( )
• Delete (E16) • Retouch2 (E17)
• Slide show (E69) • Voice memo2 (E78)
• Protect1 (E71) • Copy1 (E80)
• Print order1 (E73) • Choose key picture2 (E82)
Deleting Images in a SequenceIf Sequence display options (E110) in the setup menu is set to Key picture only, imagesto be deleted vary as described below. To display the screen for selecting the deletionmethod, tapF and tapl.• If only key pictures are displayed for sequences whenF is tapped:
- Current image: When a key picture is selected, all images in that sequence aredeleted.
- Select images: When a key picture is selected on the erase selected images screen(A35), all pictures in the sequence are deleted.- All images: All images are deleted, including the sequence represented by the currently
displayed key picture.• If R was tapped and each individual image in the sequence is displayed before tappingF
7/29/2019 Nikon s6400rm en 02
http://slidepdf.com/reader/full/nikon-s6400rm-en-02 140/280
E16
R ef er en c e S e c t i on
F:Deletion methods change as follows.
- Current image: The image currently displayed is deleted.- Select images: When multiple images in the sequence are selected on the eraseselected images screen (A35), the selected images are deleted.
- Entire sequence: All images in the sequence, including the image currently displayed,are deleted.
Editing Still ImagesEditing FeaturesUse the COOLPIX S6400 to edit images in-camera and save them as separate files (E117).
The editing functions described below are available.
Editing function Description
Quick effects (E20) Apply a variety of effects to images.
Paint (E22) Draw on images, or add decorations to images.
Quick retouch (E25)Easily create retouched copies in which contrast and saturation havebeen enhanced.
7/29/2019 Nikon s6400rm en 02
http://slidepdf.com/reader/full/nikon-s6400rm-en-02 141/280
E17
R ef er en c e S e c t i onFor information about the rotate image function, see pageE77.
D-Lighting (E26)Create a copy of the current image with enhanced brightness andcontrast, brightening dark portions of the image.
Stretch (E27)Stretch the current image horizontally to make the subject appearthinner or wider.
Perspective control(E28)
Adjust the perspective of pictures taken in landscape orientation.Apply perspective control similar to that available with shift lenses. This option is suited to images of buildings or architecture.
Glamour retouch (E29)Make facial skin tone softer and make faces look smaller with larger
eyes.
Small picture (E31) Create a small copy of images suitable for use as e-mail attachments.
Crop (E32)Crop a portion of the image. Use to zoom in on a subject or arrangea composition.
B Notes About Image Editing
• The editing functions of COOLPIX S6400 cannot be used for images captured with another make
or model of digital camera.
• Images captured using Easy panorama (A48) or 3D photography (A50) cannot be edited.
• If no face is detected in an image, a copy cannot be created using the glamour retouch function
(E29).
• When 999 images are already sorted into theX (retouched copies) category in auto sort mode
(E11), images cannot be edited.• Edited copies created with COOLPIX S6400 may not be displayed properly on another make or
model of digital camera. It may also be impossible to transfer them to a computer using another
make or model of digital camera.
• Editing functions are not available when there is not enough free space in the internal memory or
7/29/2019 Nikon s6400rm en 02
http://slidepdf.com/reader/full/nikon-s6400rm-en-02 142/280
E18
R ef er en c e S e c t i on
on the memory card.
• Images created in Draw scene mode (E2) can only be edited with the paint, small picture, or
crop function.
• To edit an individual image in a sequence of images (E14) when only the key picture is
displayed, perform one of the procedures described below:
- TapR to display a sequence of images as individual images and select an image in the
sequence.
- Set Sequence display options (E110) in the setup menu to Individual pictures to display
them as individual images and select an image.
C Restrictions on Image Editing
When an edited copy is further modified with another editing function, check the following
restrictions.
Editing function used Editing functions to use
Paint The paint, small picture, or crop function can be used.
Quick effects
RetouchD-Lighting
Stretch
Perspective control
The paint, small picture, glamour retouch, or crop function can beused.
Glamour retouch The editing functions other than glamour retouch can be used.
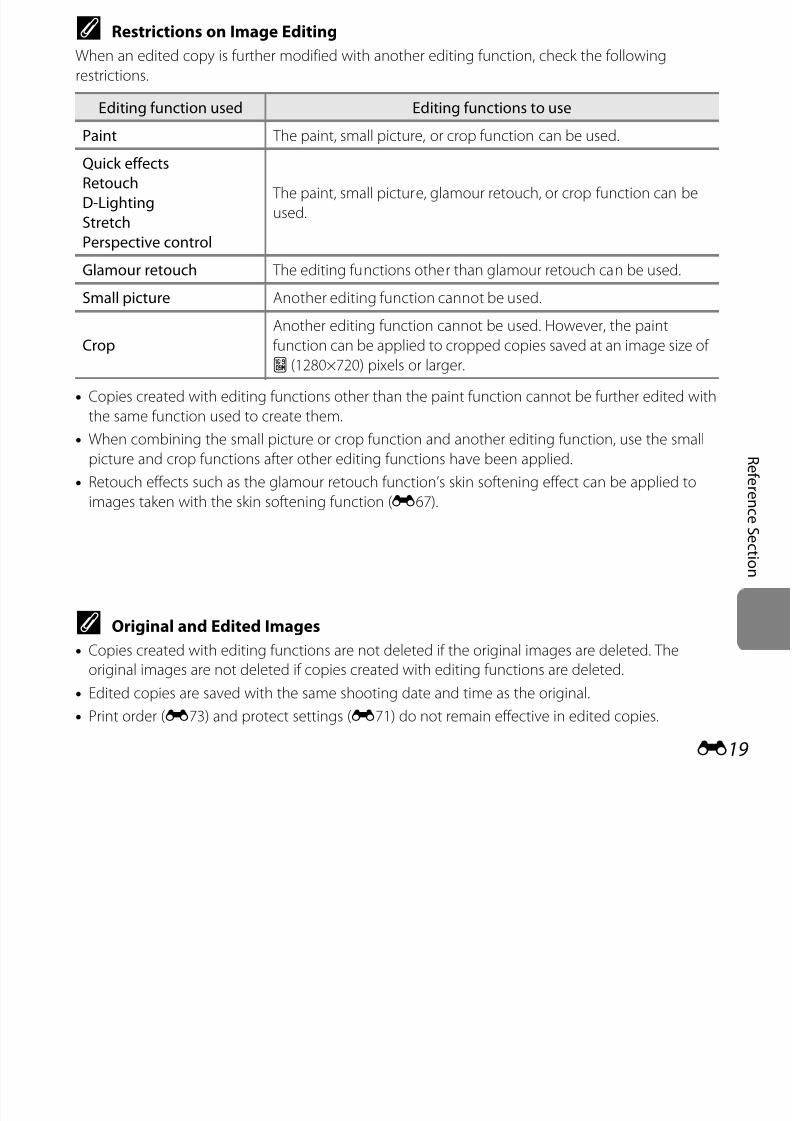
7/29/2019 Nikon s6400rm en 02
http://slidepdf.com/reader/full/nikon-s6400rm-en-02 143/280
E19
R ef er en c e S e c t i on
• Copies created with editing functions other than the paint function cannot be further edited with
the same function used to create them.
• When combining the small picture or crop function and another editing function, use the small
picture and crop functions after other editing functions have been applied.• Retouch effects such as the glamour retouch function’s skin softening effect can be applied to
images taken with the skin softening function (E67).
C Original and Edited Images
• Copies created with editing functions are not deleted if the original images are deleted. The
original images are not deleted if copies created with editing functions are deleted.
• Edited copies are saved with the same shooting date and time as the original.
• Print order (E73) and protect settings (E71) do not remain effective in edited copies.
Small picture Another editing function cannot be used.
CropAnother editing function cannot be used. However, the paintfunction can be applied to cropped copies saved at an image size of
Y (1280×720) pixels or larger.
pQuick EffectsSelect one of the 30 effects listed below. The effect results can be previewed on the screenshown in step 2 (E21).
Effect Description
Pop and Super vivid Mainly enhances the color saturation.
Painting, High key, Toy camera effect 1,
Toy camera effect 2, Low key, Crossprocess (red), Cross process (yellow),Cross process (green), and Cross process(blue)
Mainly adjusts hue and creates a different look for the image.
Soft, Fisheye, Cross screen, and Miniatureff t
Processes images with a variety of effects.
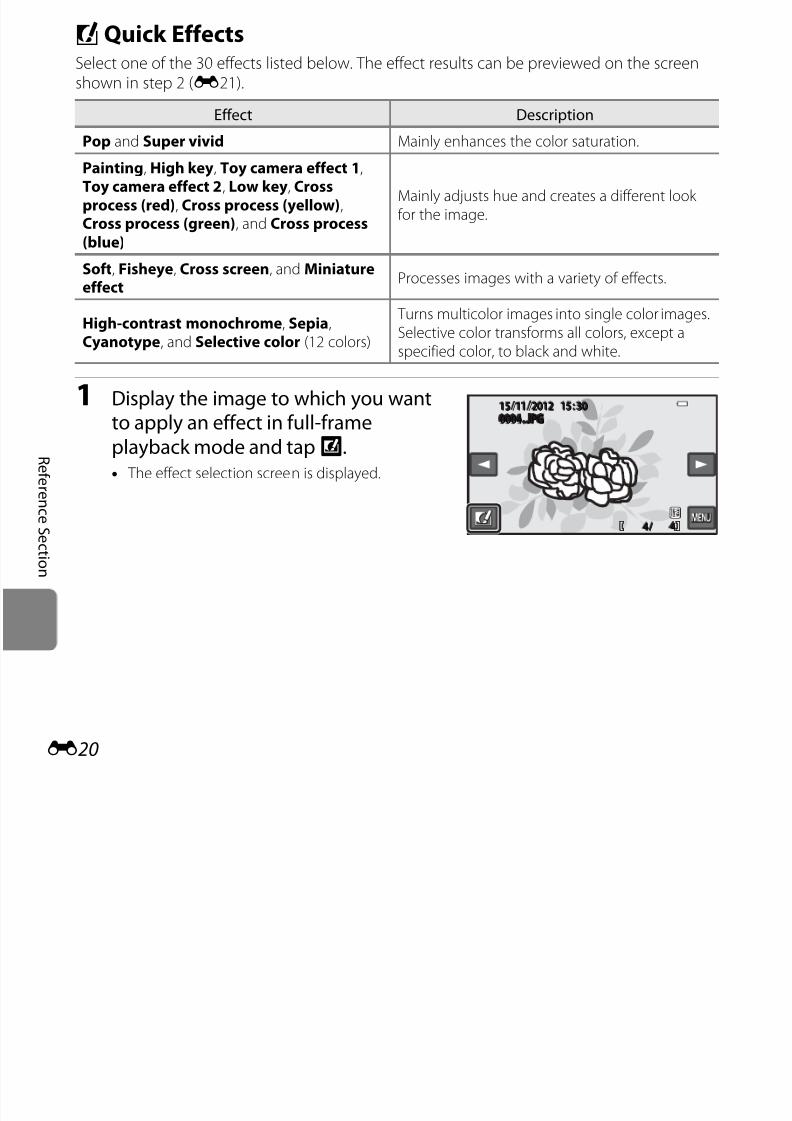
7/29/2019 Nikon s6400rm en 02
http://slidepdf.com/reader/full/nikon-s6400rm-en-02 144/280
E20
R ef er en c e S e c t i on
1 Display the image to which you wantto apply an effect in full-frameplayback mode and tapY.• The effect selection screen is displayed.
effectProcesses images with a variety of effects.
High-contrast monochrome, Sepia,Cyanotype, and Selective color (12 colors)
Turns multicolor images into single color images.Selective color transforms all colors, except aspecified color, to black and white.
155 /111 /2012 15012 15 : 300
444/ /
0004004 . JPGPG0004 . JPG
15 / 11 / 2012 15 : 30
2 Tap the desired effect.• TapB orC to scroll through the display.
3 TapI.• To exit without saving the edited image, tapf.
When a confirmation screen is displayed, tapYes.
Quick effects
Popop
Pop Super vividuper vivid
Super vivid Paintingainting
Painting
High keyigh key
High key Toy cameraeffect 1
Toy cameraeffect 1
Toy cameraeffect 1
Toy cameraeffect 2
Toy cameraeffect 2
Toy cameraeffect 2
Pop
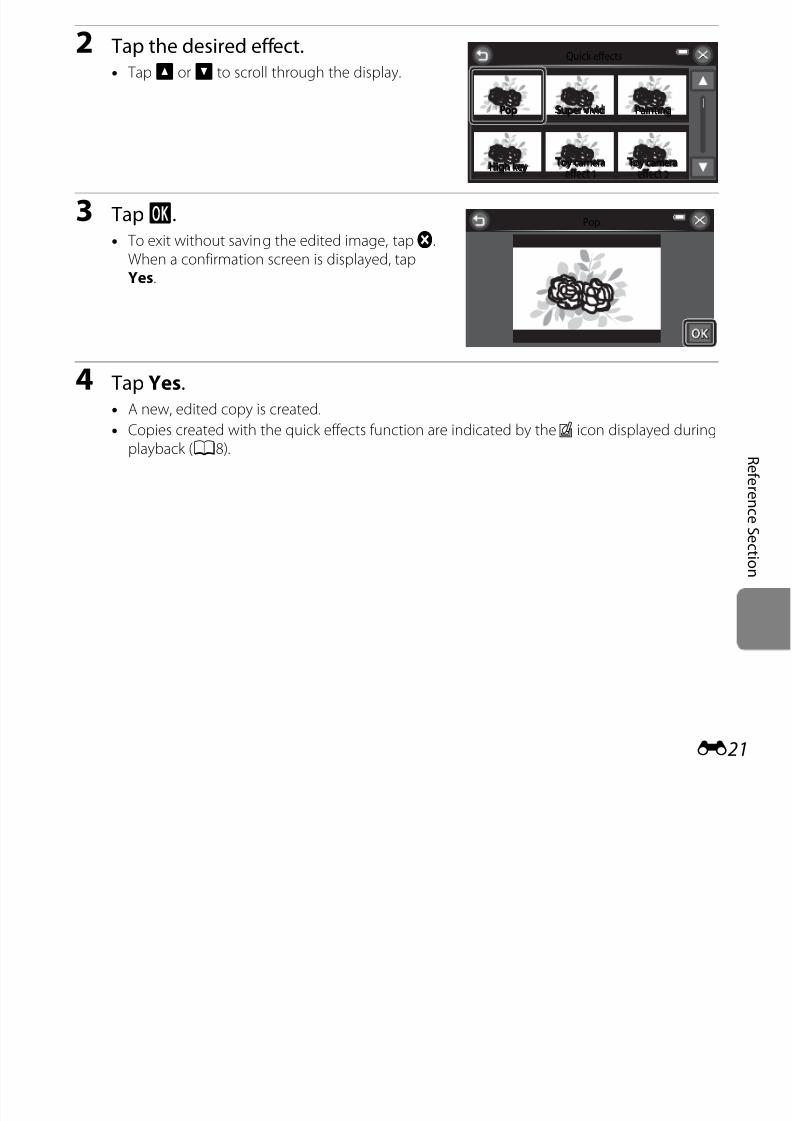
7/29/2019 Nikon s6400rm en 02
http://slidepdf.com/reader/full/nikon-s6400rm-en-02 145/280
E21
R ef er en c e S e c t i on
4 Tap Yes.• A new, edited copy is created.
• Copies created with the quick effects function are indicated by theV icon displayed duringplayback (A8).
U Paint
1 Use theI,J,K, andL tools topaint images.
• For more information about using each tool,see “Write and Draw on images” (E23).
• Rotate the zoom control to g (i) to display theimage in full-frame playback mode and rotatethe zoom control tog (i) again to enlarge theimage display by 3× TapA D B orC to
Press thec button (playback mode)M select an imageM tapF M U Paint
Pen
Undo
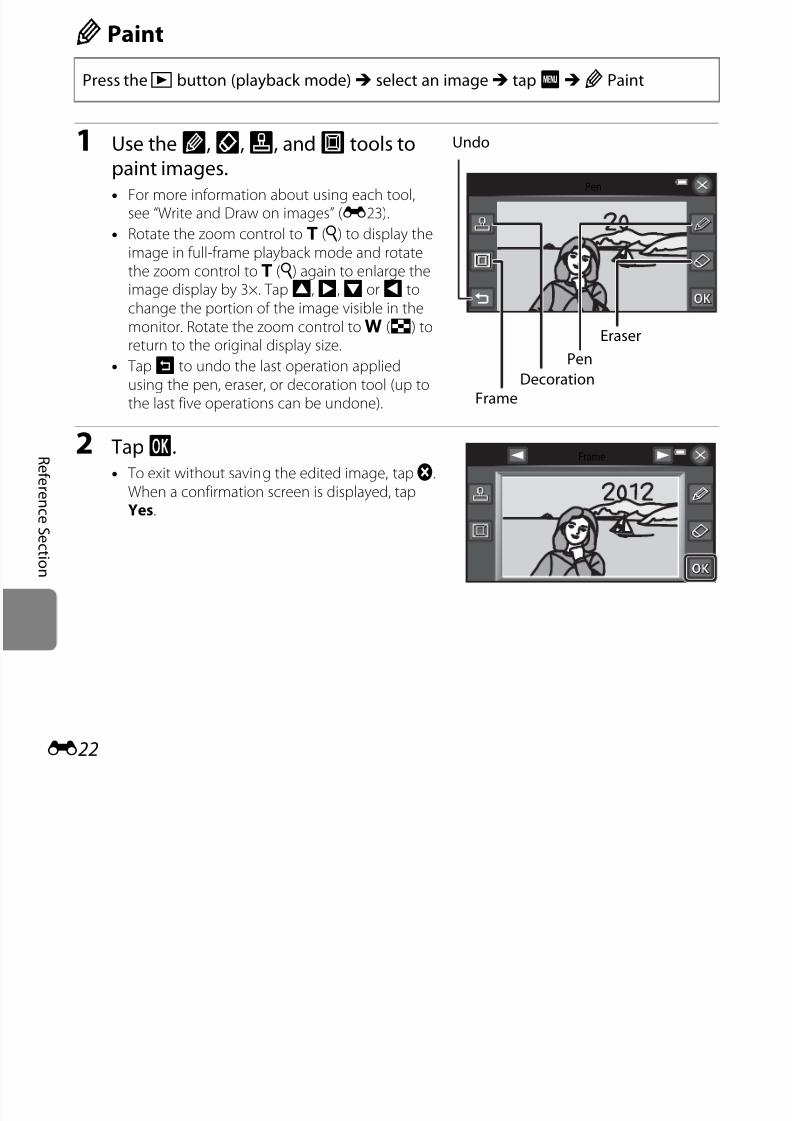
7/29/2019 Nikon s6400rm en 02
http://slidepdf.com/reader/full/nikon-s6400rm-en-02 146/280
E22
R ef er en c e S e c t i on
image display by 3×. TapA,D,B orC tochange the portion of the image visible in the
monitor. Rotate the zoom control tof (h) toreturn to the original display size.
• Tape to undo the last operation appliedusing the pen, eraser, or decoration tool (up tothe last five operations can be undone).
2 TapI.• To exit without saving the edited image, tapf.
When a confirmation screen is displayed, tapYes.
Frame
Decoration
Pen
Eraser
Frame
3 Tap Yes.• A new, painted copy is created.
• Images taken at an Image mode setting (A69) of l 4608×2592 are saved at a size of n (1920×1080). Images taken atr 2272×1704 or larger are saved at a size of f (2272×1704)and images taken atq 1600×1200 orO 640×480 are saved at a size of l (640×480).
• Painted copies are indicated by thed icon displayed during playback (A8).
Using the Paint ToolsWrite and Draw on images
TapI to write or draw on images.
You can change the color and thickness of the penusing the palette. To hide the palette, tapI or the
Pen
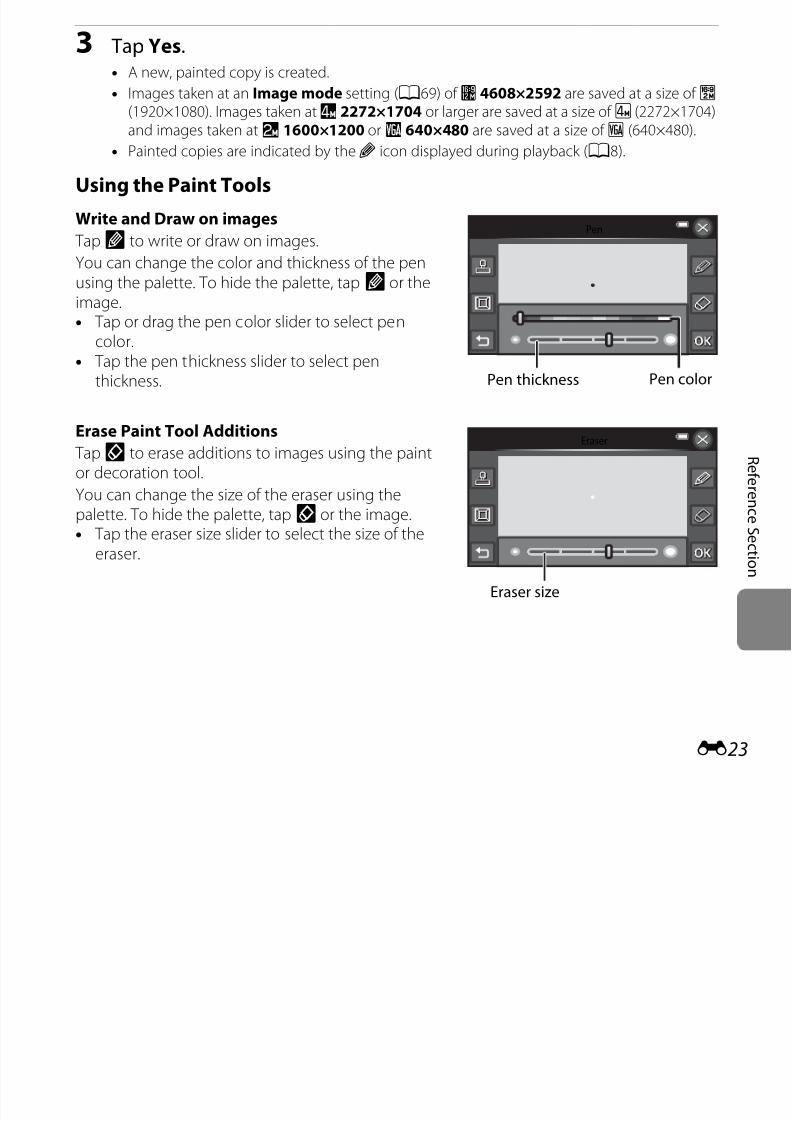
7/29/2019 Nikon s6400rm en 02
http://slidepdf.com/reader/full/nikon-s6400rm-en-02 147/280
E23
R ef er en c e S e c t i on
g p p , pIimage.
• Tap or drag the pen color slider to select pencolor.• Tap the pen thickness slider to select pen
thickness.
Erase Paint Tool Additions
TapJ to erase additions to images using the paintor decoration tool.
You can change the size of the eraser using thepalette. To hide the palette, tapJ or the image.• Tap the eraser size slider to select the size of the
eraser.
Pen colorPen thickness
Eraser
Eraser size
Add Decorations
TapK to add a decoration.You can change the decoration type or size using thepalette. To hide the palette, tapK or the image.• Decoration type can be selected from 14 types.• Tap the decoration size slider to select the
decoration size.• Whenf is selected for the decoration type,f
(day, month, year) andS (day, month, year, time)options are available.
Add a Frame
TapL to add a frame around the image.C D
Decoration
Decoration type
Decoration size
Frame
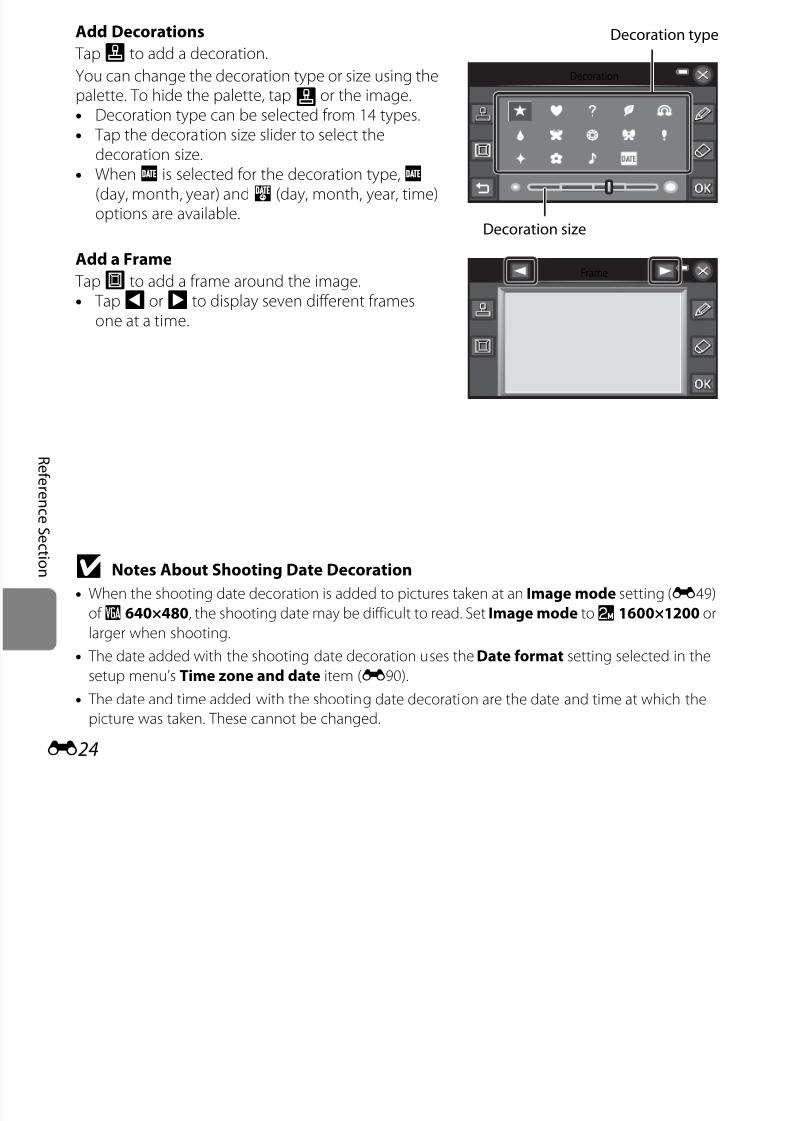
7/29/2019 Nikon s6400rm en 02
http://slidepdf.com/reader/full/nikon-s6400rm-en-02 148/280
E24
R ef er en c e S e c t i on
• TapC orD to display seven different frames
one at a time.
B Notes About Shooting Date Decoration
• When the shooting date decoration is added to pictures taken at an Image mode setting (E49)
of O 640×480, the shooting date may be difficult to read. Set Image mode toq 1600×1200 or
larger when shooting.
• The date added with the shooting date decoration uses the Date format setting selected in the
setup menu’s Time zone and date item (E90).
• The date and time added with the shooting date decoration are the date and time at which the
picture was taken. These cannot be changed.
kQuick Retouch: Enhancing Contrast and Saturation
1 Choose the degree of enhancement
and tapI.
Press thec button (playback mode)M select an imageM tapF M M RetouchM
k Quick retouch
Quick retouch
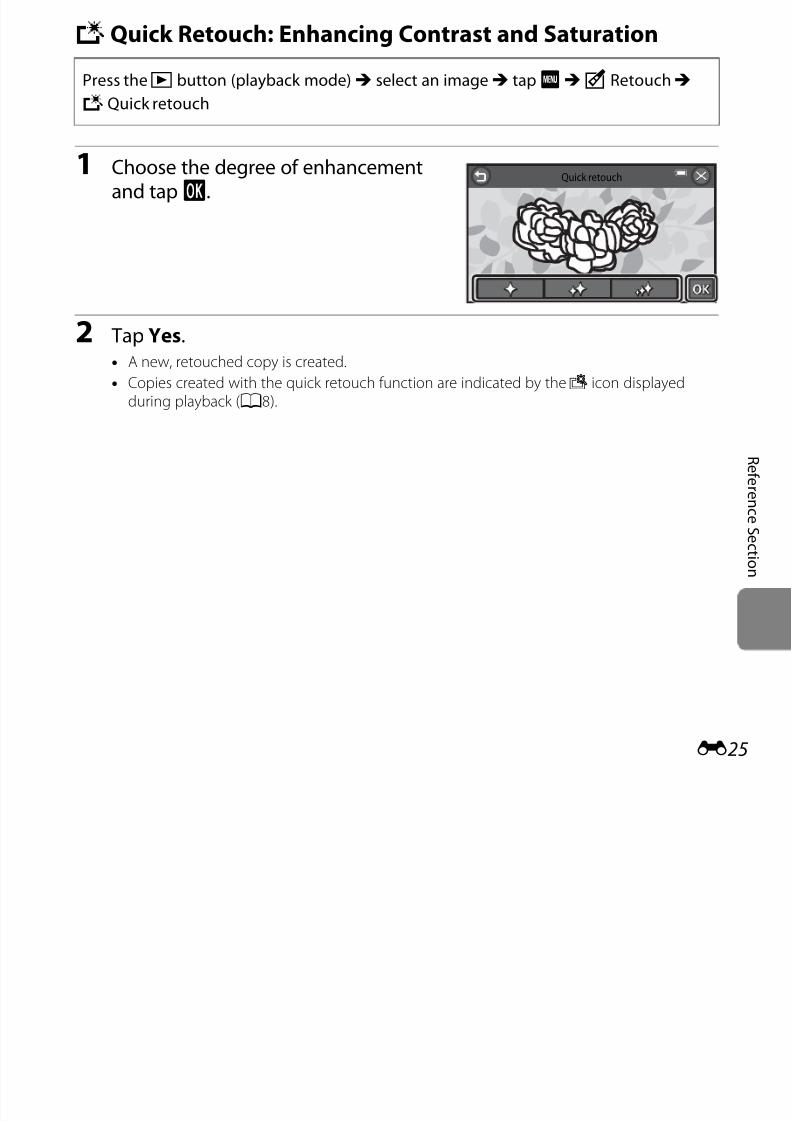
7/29/2019 Nikon s6400rm en 02
http://slidepdf.com/reader/full/nikon-s6400rm-en-02 149/280
E25
R ef er en c e S e c t i on
2 Tap Yes.• A new, retouched copy is created.
• Copies created with the quick retouch function are indicated by thes icon displayedduring playback (A8).
I D-Lighting: Enhancing Brightness and Contrast
1 TapI.
• The original version is displayed on the left andthe edited version is displayed on the right.
Press thec button (playback mode)M select an imageM tapF M M RetouchM
I D-Lighting
D-Lighting
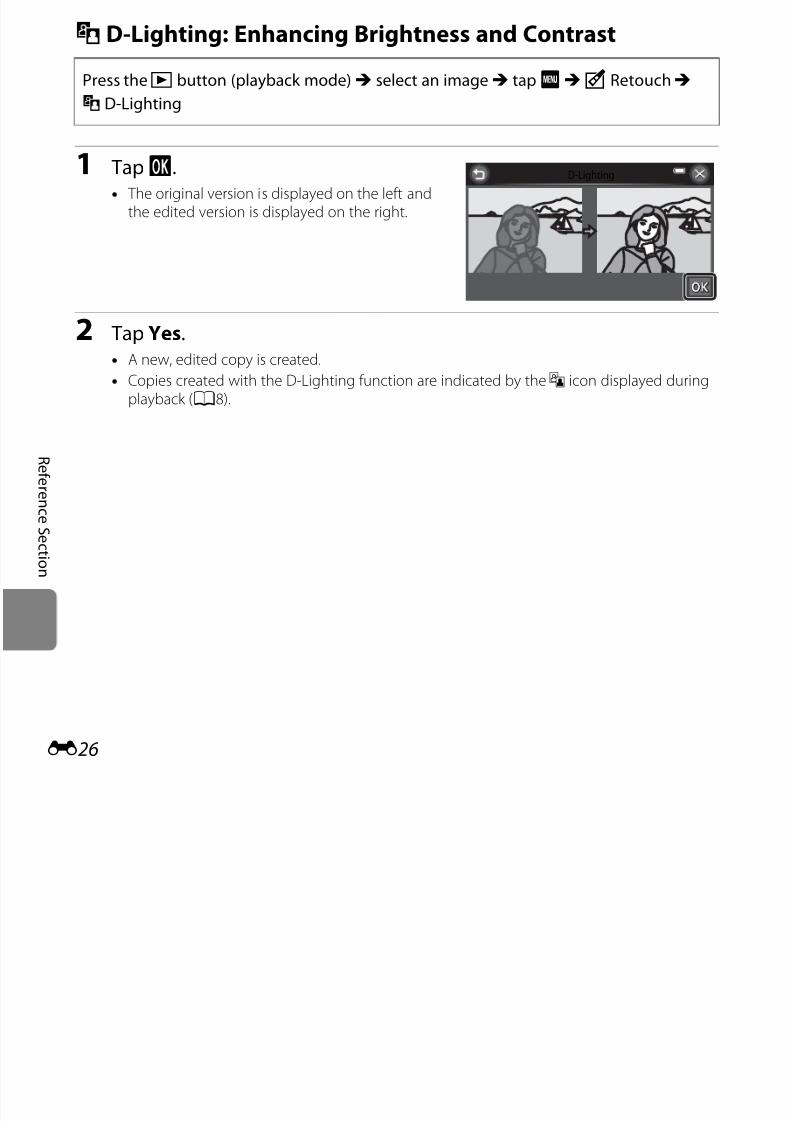
7/29/2019 Nikon s6400rm en 02
http://slidepdf.com/reader/full/nikon-s6400rm-en-02 150/280
E26
R ef er en c e S e c t i on
2 Tap Yes.• A new, edited copy is created.
• Copies created with the D-Lighting function are indicated by thec icon displayed duringplayback (A8).
P Stretch: Stretching Images
1 Tapq orr, or tap or drag the slider
at the bottom of the screen to adjuststretch effect.
Press thec button (playback mode)M select an imageM tapF M M RetouchM
P Stretch
Stretch
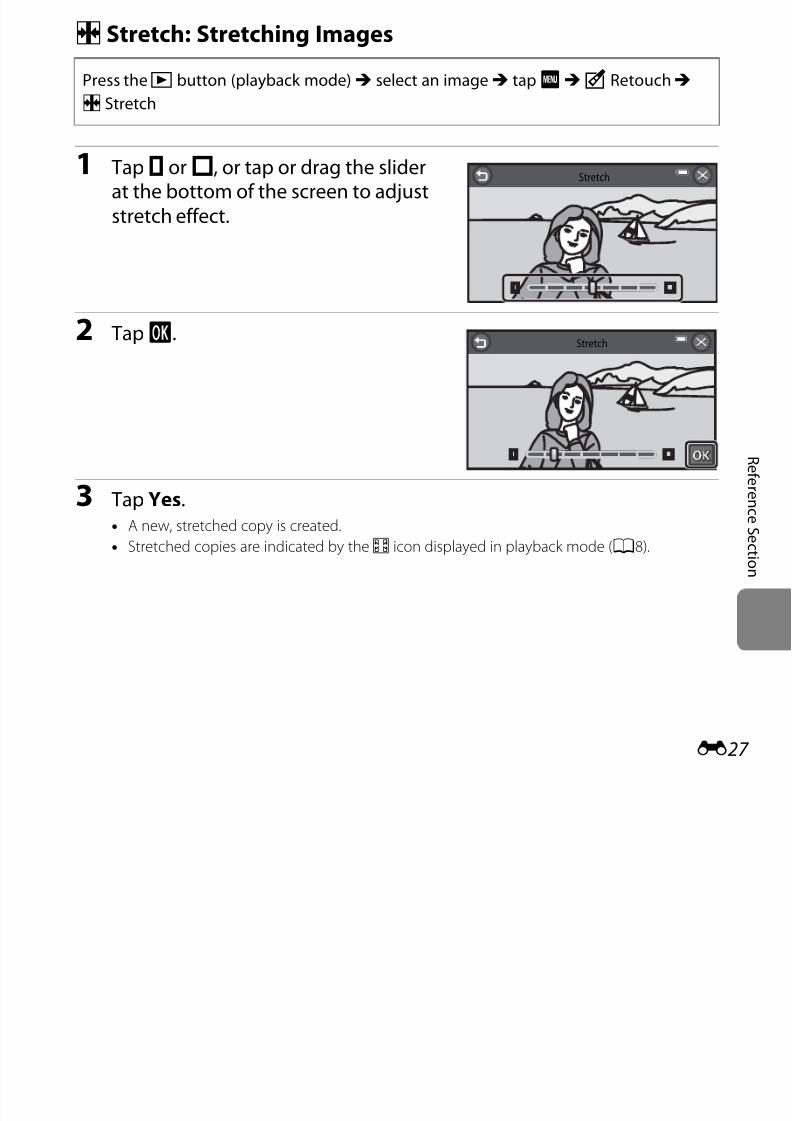
7/29/2019 Nikon s6400rm en 02
http://slidepdf.com/reader/full/nikon-s6400rm-en-02 151/280
E27
R ef er en c e S e c t i on
2 TapI.
3 Tap Yes.• A new, stretched copy is created.
• Stretched copies are indicated by ther icon displayed in playback mode (A8).
Stretch
O Perspective Control: Adjusting a Sense of Perspective
1 Tapy orz, or tap or drag the slider
at the bottom of the screen to adjustperspective control.
Press thec button (playback mode)M select an imageM tapF M M RetouchM
O Perspective control
Perspective control
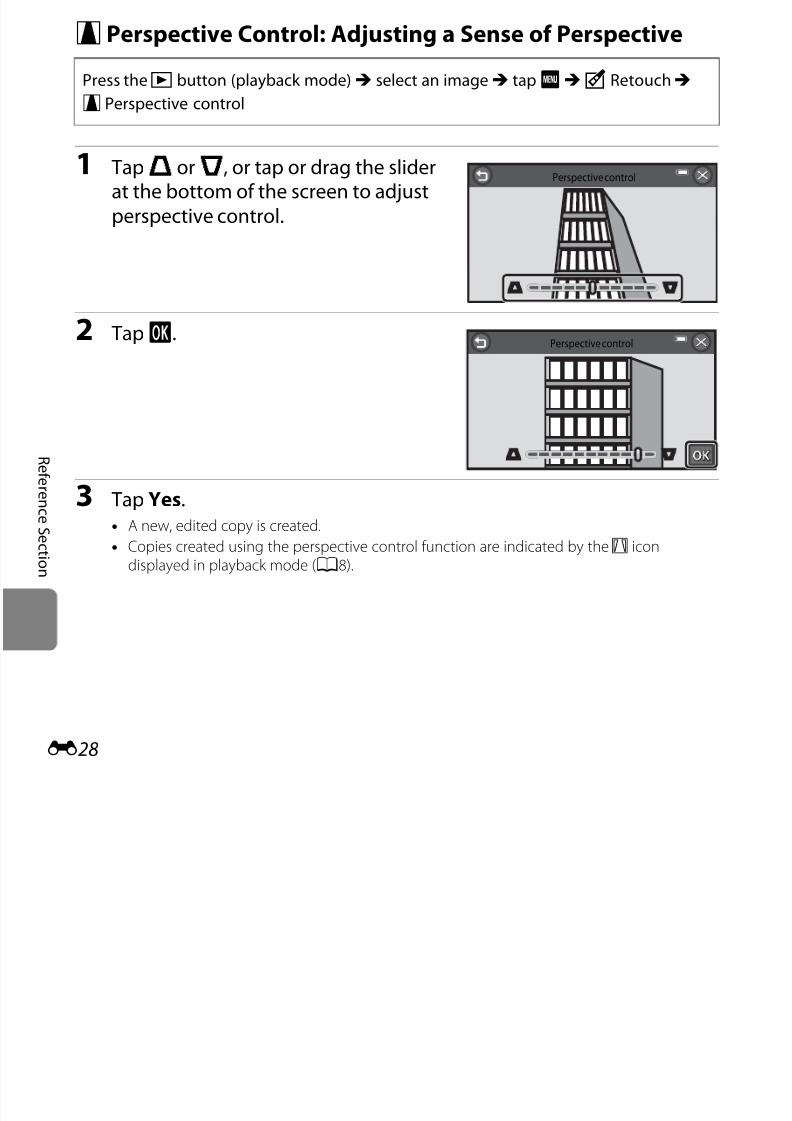
7/29/2019 Nikon s6400rm en 02
http://slidepdf.com/reader/full/nikon-s6400rm-en-02 152/280
E28
R ef er en c e S e c t i on
2 TapI.
3 Tap Yes.• A new, edited copy is created.
• Copies created using the perspective control function are indicated by theq icondisplayed in playback mode (A8).
Perspective control
j Glamour Retouch: Softening Skin and Making Faces
Looking Smaller with Larger Eyes
1 TapjAll ore Skin softening.• All: Soften facial skin tones, make faces look
smaller, and make eyes look larger.
• Skin softening: Soften facial skin tones.
• The preview screen is displayed.
Press thec button (playback mode)M select an imageM tapF M M RetouchM
j Glamour retouch
Glamour retouch
All Skin softening
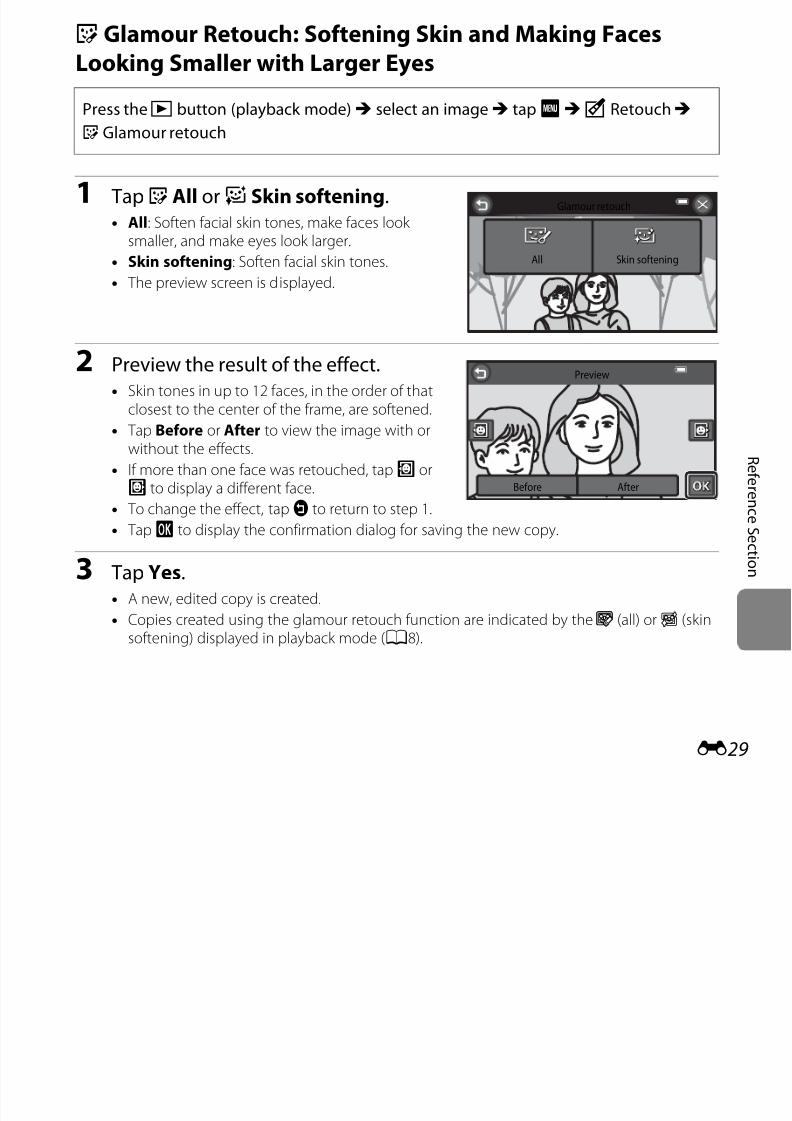
7/29/2019 Nikon s6400rm en 02
http://slidepdf.com/reader/full/nikon-s6400rm-en-02 153/280
E29
R ef er en c e S e c t i on
2 Preview the result of the effect.• Skin tones in up to 12 faces, in the order of that
closest to the center of the frame, are softened.
• Tap Before or After to view the image with orwithout the effects.
• If more than one face was retouched, tapM orN to display a different face.
• To change the effect, tapJ to return to step 1.
• TapI to display the confirmation dialog for saving the new copy.
3 Tap Yes.
• A new, edited copy is created.• Copies created using the glamour retouch function are indicated by thej (all) orE (skinsoftening) displayed in playback mode (A8).
Preview
Before After
B Notes About Glamour Retouch
• If no faces are detected in the image, the glamour retouch function cannot be used.
• The glamour retouch function may not perform as expected depending on the direction in which
the faces are looking or the brightness of the faces in the image.
7/29/2019 Nikon s6400rm en 02
http://slidepdf.com/reader/full/nikon-s6400rm-en-02 154/280
E30
R ef er en c e S e c t i on
g Small Picture: Reducing the Size of an Image
1 Tap the desired small copy size icon.
• The available settings arel 640×480,m 320×240, andn 160×120.
• Images taken at an image mode setting of l 4608×2592 are saved at 640×360 pixels.Proceed to step 2.
Press thec button (playback mode)M select an imageM tapF M M RetouchM g
Small picture
Small picture

7/29/2019 Nikon s6400rm en 02
http://slidepdf.com/reader/full/nikon-s6400rm-en-02 155/280
E31
R ef er en c e S e c t i on
2 TapI.
3 Tap Yes.• A new, small copy is created (compression ratio of approximately 1:16).
• Copies created with the small picture function are displayed at a smaller size with theC icon during playback.
Small picture
32020 ×× 24040320× 240
o Crop: Creating a Cropped CopyCreate a copy containing only the portion visible in the monitor whenG is displayed withplayback zoom (A80) enabled. Cropped copies are saved as separate files.
1 Enlarge the picture for cropping (A80).
2 Refine copy composition.
• Rotate the zoom control to g (i) orf (h) toadjust the zoom ratio.
• Drag the current image, or tapA B C, orD so that only the portion to be copied is visible inthe monitor.
2.0.0
2.0
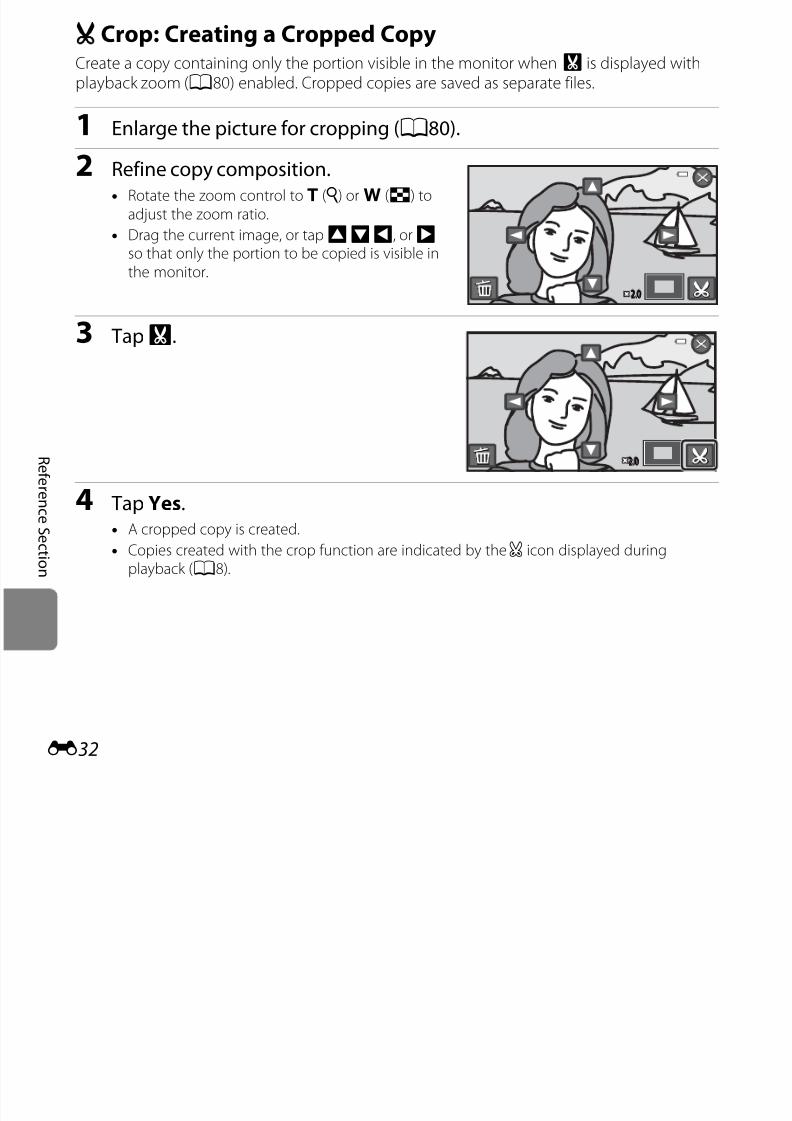
7/29/2019 Nikon s6400rm en 02
http://slidepdf.com/reader/full/nikon-s6400rm-en-02 156/280
E32
R ef er en c e S e c t i on
3 TapG.
4 Tap Yes.• A cropped copy is created.
• Copies created with the crop function are indicated by thea icon displayed duringplayback (A8).
2.0.02.0
C Image Size
• The aspect ratio of the cropped copies is 16:9. As the area to be saved is reduced, the image size(pixels) of the cropped copy is also reduced.
• When the image size of the cropped copy is 640 × 360, the image is displayed at a smaller size
during playback.
C Cropping the Image in Its Current “Tall” Orientation
Use the Rotate image option (E77) to rotate the image so that it is displayed in landscape
orientation. After cropping the image, rotate the cropped image back to “tall” orientation. The image
displayed in “tall” orientation can be cropped by zooming in on the image until the black bars
displayed on the both sides of the monitor disappear. The cropped image is displayed in landscape
orientation.
7/29/2019 Nikon s6400rm en 02
http://slidepdf.com/reader/full/nikon-s6400rm-en-02 157/280
E33
R ef er en c e S e c t i on
Connecting the Camera to a TV (Viewing Images on a TV)
Connect the camera to a TV to play back images or movies on the TV. If your TV is equippedwith an HDMI jack, a commercially available HDMI cable can be used to connect the camerato the TV.
1 Turn off the camera.
2 Connect the camera to the TV.
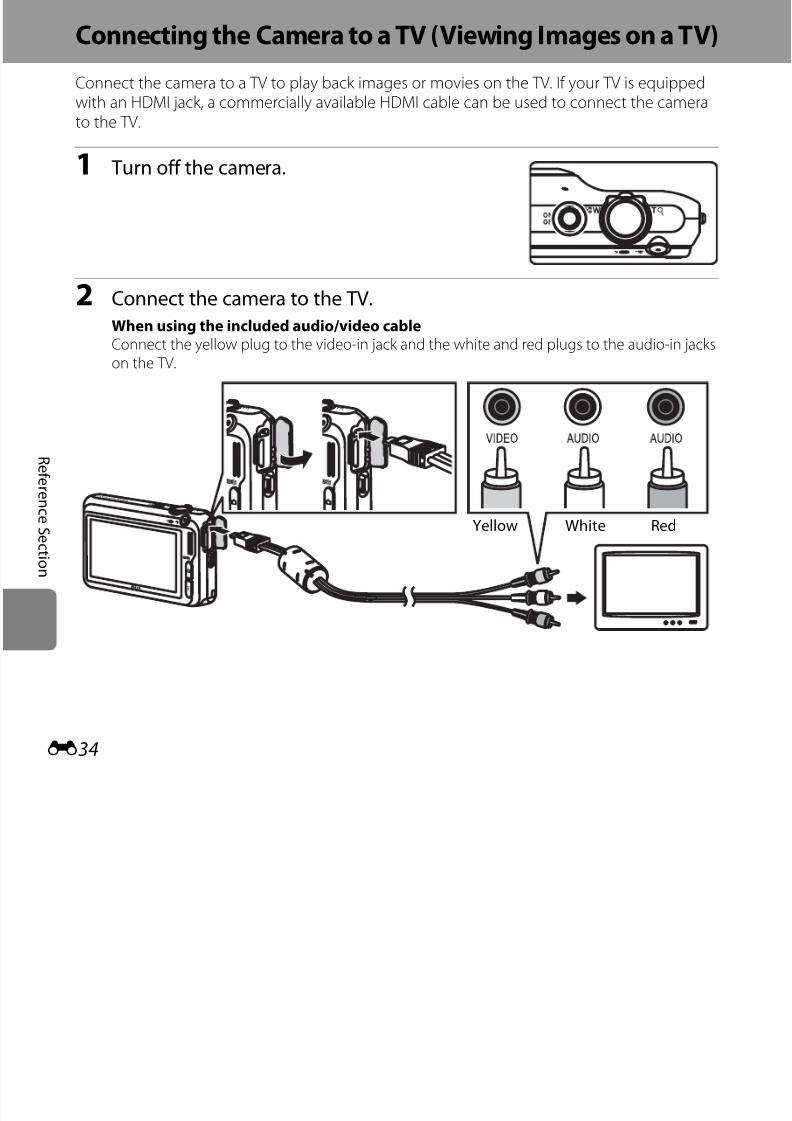
7/29/2019 Nikon s6400rm en 02
http://slidepdf.com/reader/full/nikon-s6400rm-en-02 158/280
E34
R ef er en c e S e c t i on
When using the included audio/video cableConnect the yellow plug to the video-in jack and the white and red plugs to the audio-in jackson the TV.
WhiteYellow Red
When using a commercially available HDMI cable
Connect the plug to the HDMI jack on the TV.
HDMI mini connector (Type C) to HDMI jack
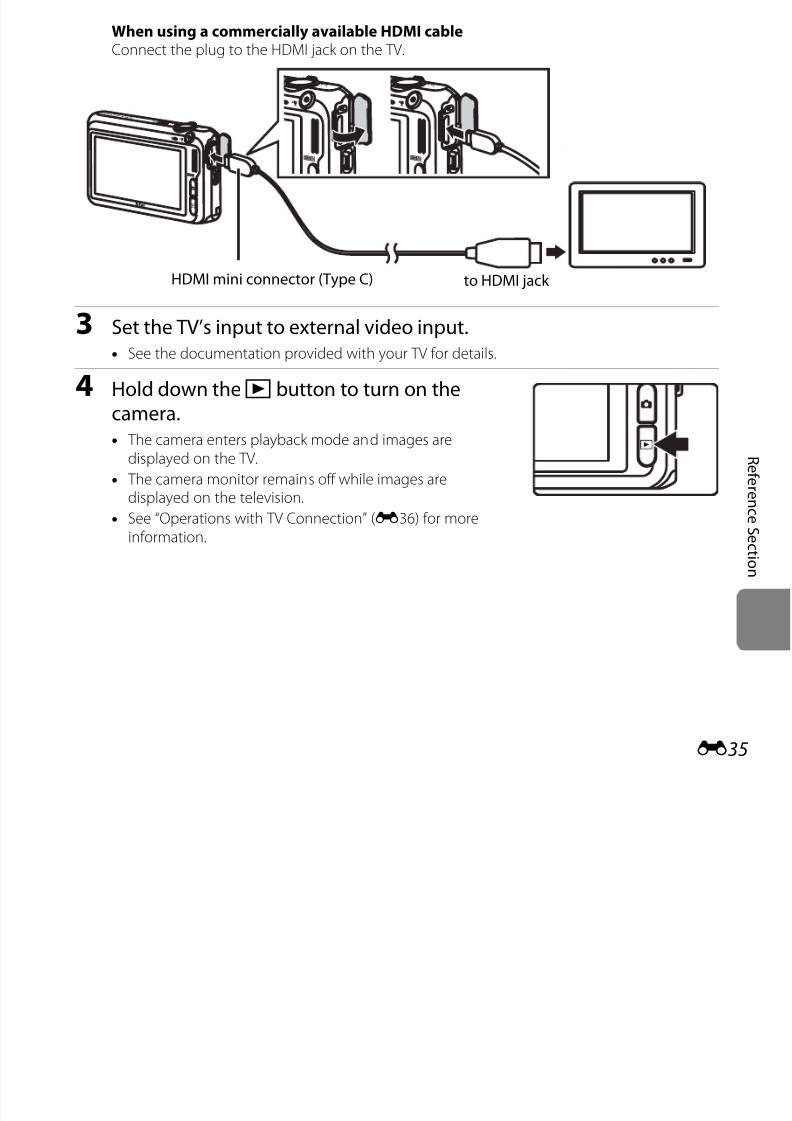
7/29/2019 Nikon s6400rm en 02
http://slidepdf.com/reader/full/nikon-s6400rm-en-02 159/280
E35
R ef er en c e S e c t i on
3 Set the TV’s input to external video input.• See the documentation provided with your TV for details.
4 Hold down thec button to turn on thecamera.• The camera enters playback mode and images are
displayed on the TV.
• The camera monitor remains off while images aredisplayed on the television.
• See “Operations with TV Connection” (E36) for moreinformation.
Operations with TV Connection
While images are displayed full-frame on the TV, the previous or next image can be viewed bydragging your finger across the camera monitor.
When the first frame of a movie is displayed, the movie can be played back by tapping thecamera monitor.• Tap the camera monitor to turn TV display off and display the image in the camera
monitor. When images are displayed in the camera monitor, tap the controls displayed tooperate the camera (only playback mode is available when connected via HDMI).
• Images will be automatically displayed on the TV in the following situations:- No operations are performed for a few seconds (except when a setting screen, such as a
menu, is displayed).- A slide show is played back.- A movie is played back.
7/29/2019 Nikon s6400rm en 02
http://slidepdf.com/reader/full/nikon-s6400rm-en-02 160/280
E36
R ef er en c e S e c t i on
B Notes About Connecting the HDMI Cable
An HDMI cable is not included. Use a commercially available HDMI cable to connect the camera to ahigh-definition TV. The output terminal on this camera is an HDMI mini connector (type C). When
purchasing an HDMI cable, be sure that the device end of the cable is an HDMI mini connector.
B Notes About Connecting the Cable
• When connecting the cable, be sure that the plug is properly oriented. Do not force the plug into
the camera. When disconnecting the cable, do not pull the plug at an angle.
• Do not connect cables to the HDMI mini connector (Type C) and to the USB/audio/video outputconnector simultaneously.
B If Images Are Not Displayed on the TV
Be sure that the camera’s video mode setting in the TV settings (E105) under the setup menu
conforms to the standard used by your TV.
7/29/2019 Nikon s6400rm en 02
http://slidepdf.com/reader/full/nikon-s6400rm-en-02 161/280
E37
R ef er en c e S e c t i on
C Using a TV Remote Control (HDMI Device Control) The remote control of an HDMI-CEC-compatible TV can be used to control playback.
It can be used instead of the camera’s touch panel to select images, start and pause movie playback,
scroll playback of images taken using easy panorama, and switch between full-screen playback
mode and six-image thumbnail display, etc.
• Set the HDMI device control setting (E105) of TV settings to On (default setting) and then
connect the camera and TV using an HDMI cable.• Aim the remote control at the TV when operating it.
• Refer to the TV’s operating instructions for information about the TV’s HDMI-CEC compatibility.
Connecting the Camera to a Printer (Direct Print)
Users of PictBridge-compatible (F22) printers can connect the camera directly to the printerand print images without using a computer.
Follow the procedures below to print images.
Take pictures
Select images for printing andnumber of copies using
Print order option (E73)
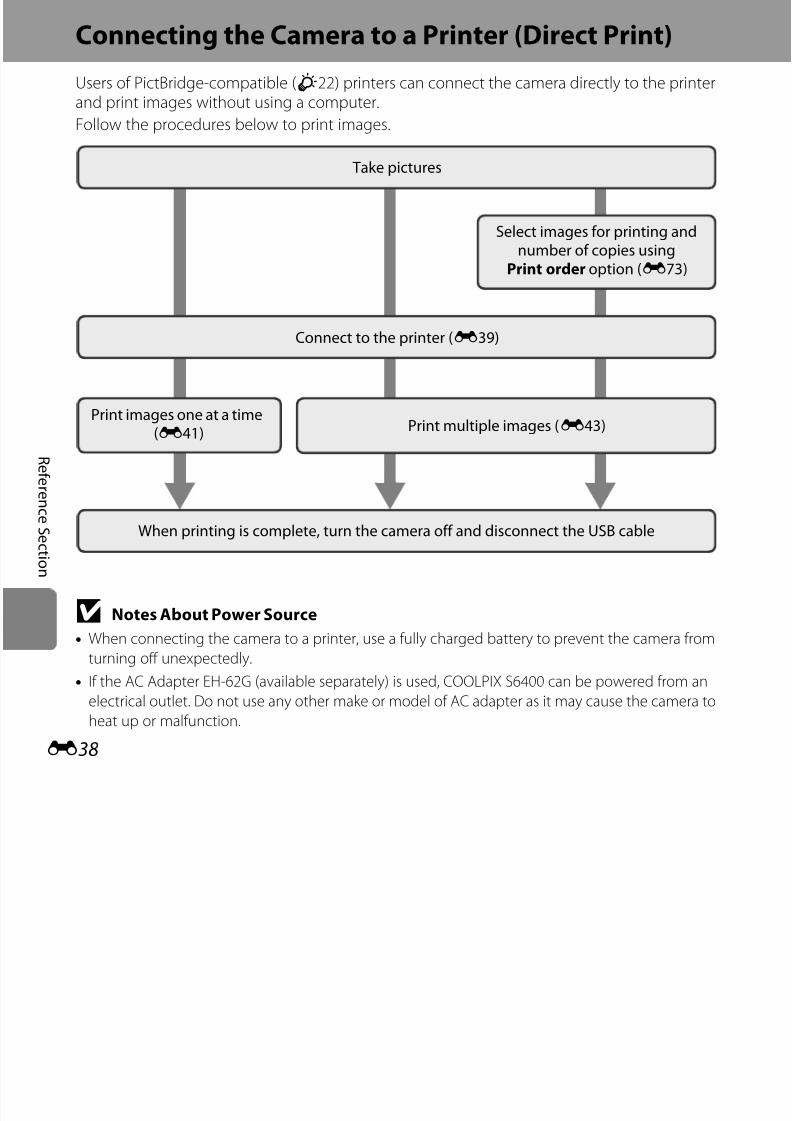
7/29/2019 Nikon s6400rm en 02
http://slidepdf.com/reader/full/nikon-s6400rm-en-02 162/280
E38
R ef er en c e S e c t i on
B Notes About Power Source
• When connecting the camera to a printer, use a fully charged battery to prevent the camera from
turning off unexpectedly.
• If the AC Adapter EH-62G (available separately) is used, COOLPIX S6400 can be powered from an
electrical outlet. Do not use any other make or model of AC adapter as it may cause the camera to
heat up or malfunction.
Connect to the printer (E39)
Print images one at a time(E41) Print multiple images (E43)
When printing is complete, turn the camera off and disconnect the USB cable
Connecting the Camera to a Printer
1 Turn off the camera.
2 Turn on the printer.
• Check printer settings.
3 Connect the camera to the printer using the included USB cable.• Be sure that plugs are properly oriented. Do not attempt to insert plugs at an angle, and do
not use force when connecting or disconnecting the plugs.

7/29/2019 Nikon s6400rm en 02
http://slidepdf.com/reader/full/nikon-s6400rm-en-02 163/280
E39
R ef er en c e S e c t i on
4 The camera is automatically turned on.• When properly connected, the PictBridge startup screen will be displayed in the cameramonitor, followed by the Print selection screen.
15/11/20125/11/2012
15/11/2012
Print selection
2020/ / 2020

7/29/2019 Nikon s6400rm en 02
http://slidepdf.com/reader/full/nikon-s6400rm-en-02 164/280
E40
R ef er en c e S e c t i on
B If the PictBridge Startup Screen Is not Displayed
Turn the camera off and disconnect the USB cable. Set the Charge by computer option (E106) in
the camera’s setup menu to Off and reconnect the cable.
C Printing Images
Images saved on a memory card can be printed by transferring the images to a computer orconnecting the camera directly to a printer. The following printing methods are also available:
• Inserting a memory card into a DPOF-compatible printer’s card slot
• Taking a memory card to a digital photo lab
For printing using these methods, specify the images and the number of prints each to the memory
card using the Print order option in the playback menu (E73).
Printing Individual ImagesAfter properly connecting the camera to the printer (E39), follow the procedures describedbelow to print an image.
1 TapB orC to choose the desiredimage and tapI.• To more easily find the desired image, rotate the
zoom control tof (h) to switch to 12-imagethumbnail display mode. Rotate the zoomcontrol to g (i) to switch to full-frame playback mode.
2 Tap Copies.
15/11/20125/11/2012
15/11/2012
Print selection
2020/ / 2020
PictBridge
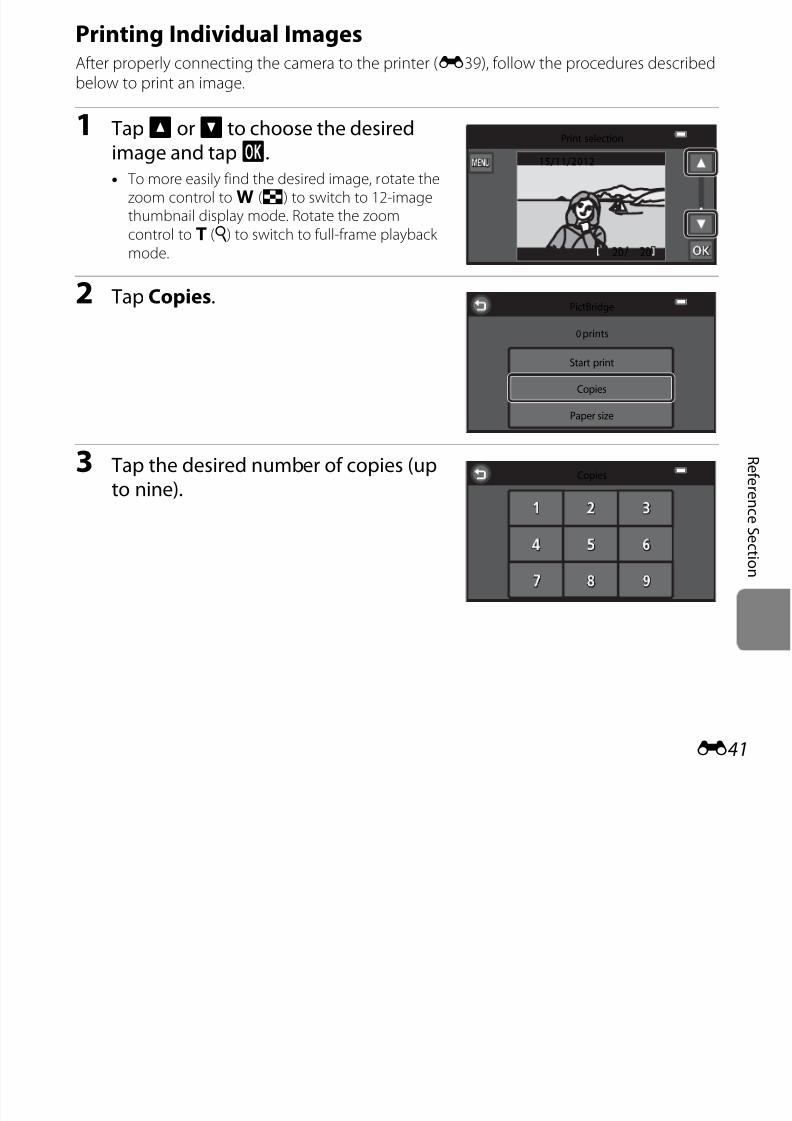
7/29/2019 Nikon s6400rm en 02
http://slidepdf.com/reader/full/nikon-s6400rm-en-02 165/280
E41
R
ef er en c e S e c t i on
3 Tap the desired number of copies (upto nine).
0 prints
Copies
Start print
Paper size
Copies
4 Tap Paper size.
5 Tap the desired paper size.• TapB orC to display the previous or next
page.
• To specify paper size using settings on theprinter, select Default in the paper size option.
PictBridge
Copies
Start print
Paper size
4 prints
Paper size
5×7 in.
3.5×5 in.
Default
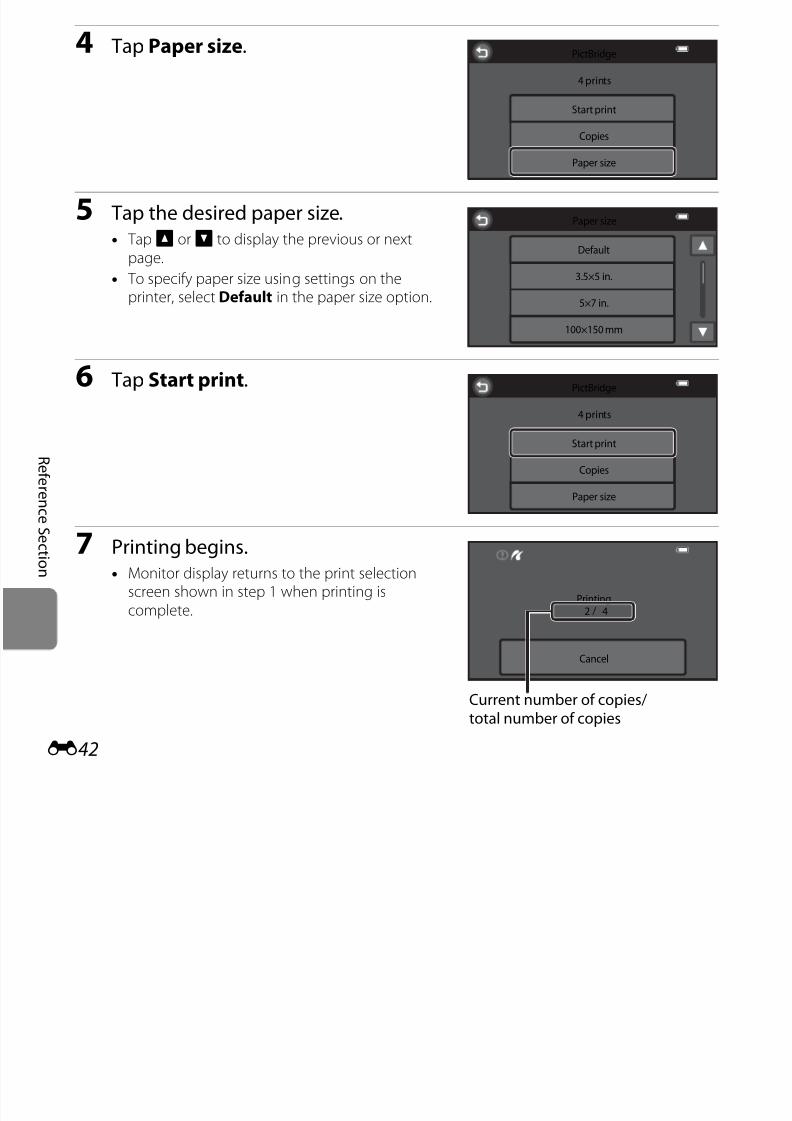
7/29/2019 Nikon s6400rm en 02
http://slidepdf.com/reader/full/nikon-s6400rm-en-02 166/280
E42
R
ef er en c e S e c t i on
6 Tap Start print.
7 Printing begins.• Monitor display returns to the print selection
screen shown in step 1 when printing is
complete.
100×150 mm
PictBridge
4 prints
Copies
Start print
Paper size
Printing
2 / 4
Cancel
Current number of copies/total number of copies
Printing Multiple ImagesAfter properly connecting the camera to the printer (E39), follow the procedures describedbelow to print multiple images.
1 When the Print selection screen isdisplayed, tapF.
2 Tap Paper size.• To exit the print menu, tapJ.
15/11/20125/11/2012
15/11/2012
Print selection
2020/ / 2020
Print menu
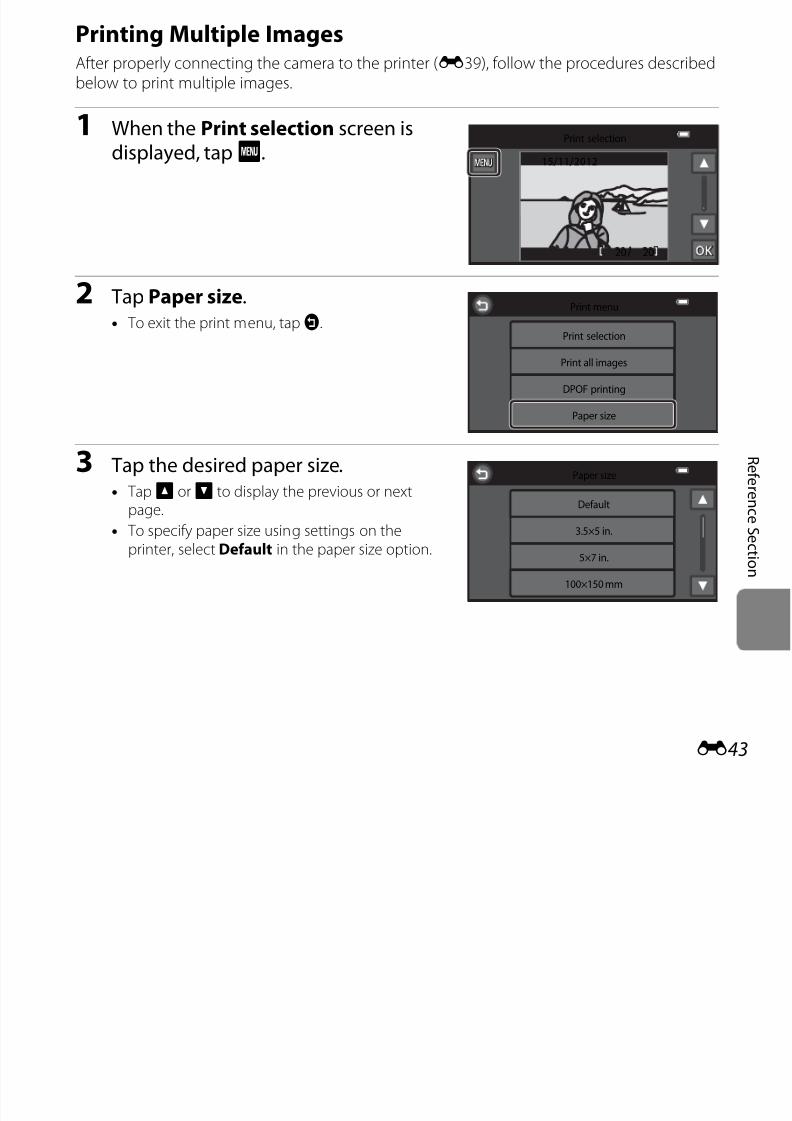
7/29/2019 Nikon s6400rm en 02
http://slidepdf.com/reader/full/nikon-s6400rm-en-02 167/280
E43
R
ef er en c e S e c t i on
p , pJ
3 Tap the desired paper size.• TapB orC to display the previous or next
page.
• To specify paper size using settings on theprinter, select Default in the paper size option.
DPOF printing
Print all images
Print selection
Paper size
Paper size
5×7 in.
3.5×5 in.
Default
100×150 mm
4 Tap Print selection, Print all images,or DPOF printing.
Print selection
Select images (up to 99 images) and thenumber of copies (up to nine) of each.• Tap the desired image and tapB orC
at the bottom left of the monitor tospecify the number of copies to be
Print menu
DPOF printing
Print all images
Print selection
Paper size
Print selection
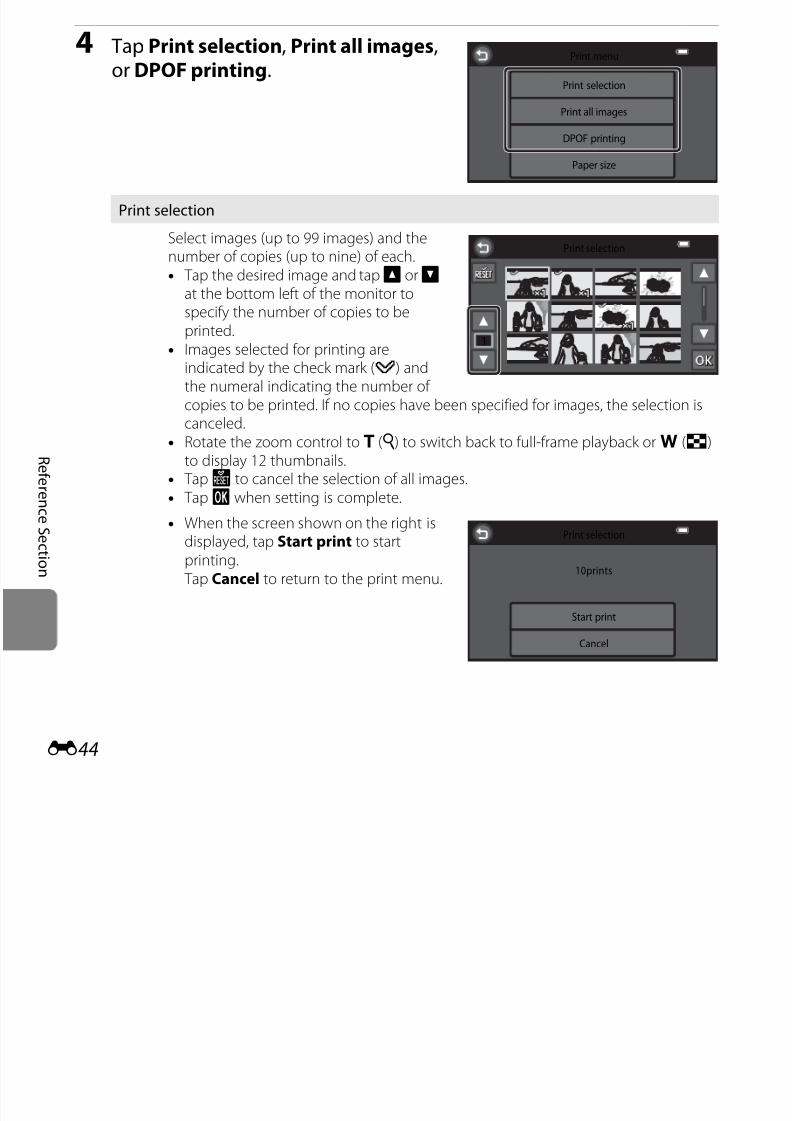
7/29/2019 Nikon s6400rm en 02
http://slidepdf.com/reader/full/nikon-s6400rm-en-02 168/280
E44
R
ef er en c e S e c t i on
printed.• Images selected for printing are
indicated by the check mark (y) andthe numeral indicating the number of copies to be printed. If no copies have been specified for images, the selection iscanceled.
• Rotate the zoom control to g (i) to switch back to full-frame playback orf (h)to display 12 thumbnails.
• Tapn to cancel the selection of all images.• TapI when setting is complete.
• When the screen shown on the right isdisplayed, tap Start print to startprinting. Tap Cancel to return to the print menu.
1
Print selection
10prints
Start print
Cancel
Print all images
One copy each of all images saved in theinternal memory, or on the memory card,is printed.• When the screen shown on the right is
displayed, tap Start print to start print. Tap Cancel to return to the print menu.
DPOF printing
Print images for which a print order wascreated using the Print order option(E73).• When the screen shown on the right is
Print all images
Start print
Cancel
20 prints
DPOF printing
20 prints
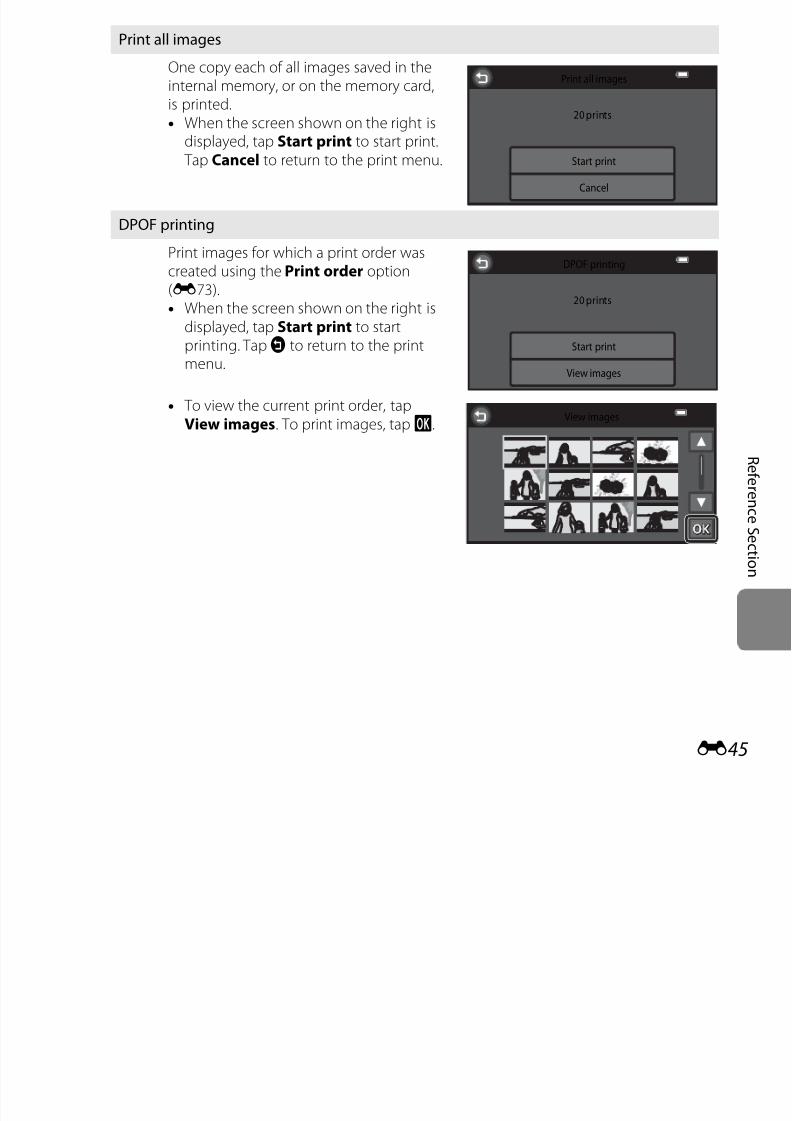
7/29/2019 Nikon s6400rm en 02
http://slidepdf.com/reader/full/nikon-s6400rm-en-02 169/280
E45
R
ef er en c e S e c t i on
displayed, tap Start print to startprinting. TapJ to return to the printmenu.
• To view the current print order, tapView images. To print images, tapI.
Start print
View images
View images
5 Printing begins.• Monitor display returns to the print menu shown
in step 2 when printing is complete.Printing
2 / 20
Cancel
Current number of copies/total number of copies
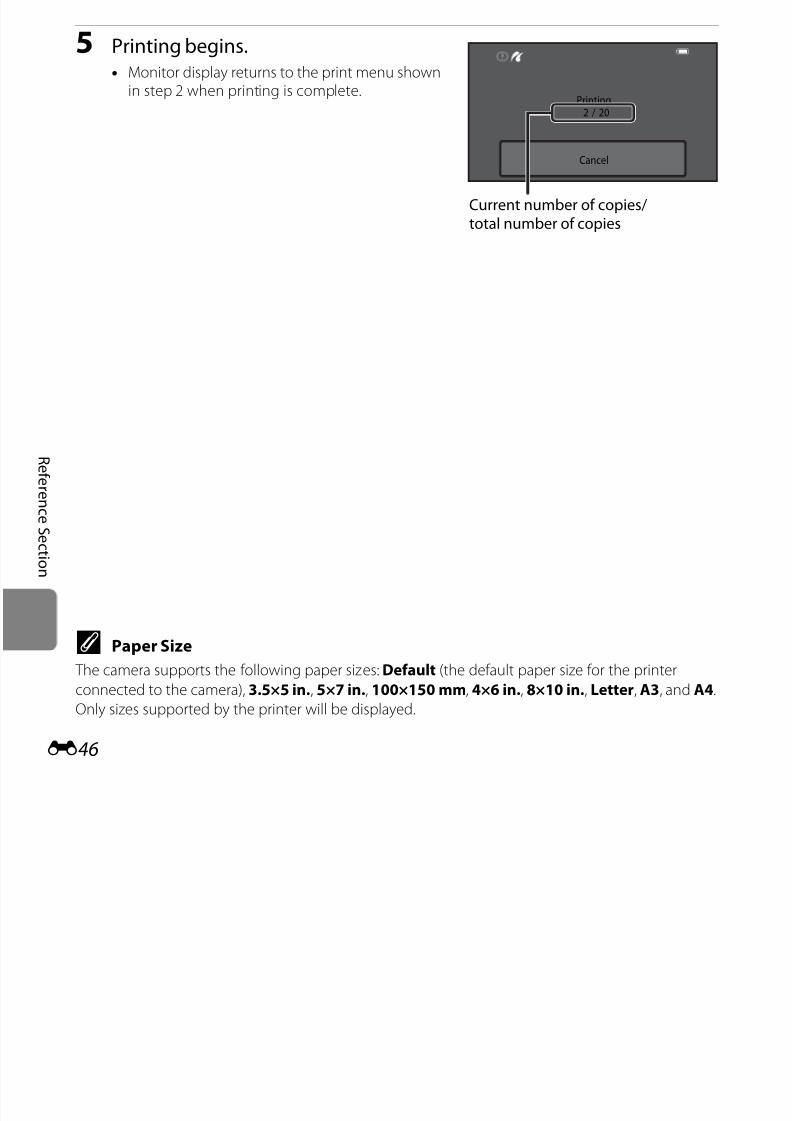
7/29/2019 Nikon s6400rm en 02
http://slidepdf.com/reader/full/nikon-s6400rm-en-02 170/280
E46
R
ef er en c e S e c t i on
C Paper Size
The camera supports the following paper sizes: Default (the default paper size for the printer
connected to the camera), 3.5×5 in., 5×7 in., 100×150 mm, 4×6 in., 8×10 in., Letter, A3, and A4.
Only sizes supported by the printer will be displayed.
Editing Movies
The desired portions of a recorded movie can be saved as a separate file.
1 Play back the desired movie and pause at the start point of the portionthat is to be extracted (A100).
2 TapG.• The movie edit screen is displayed.
11 3030
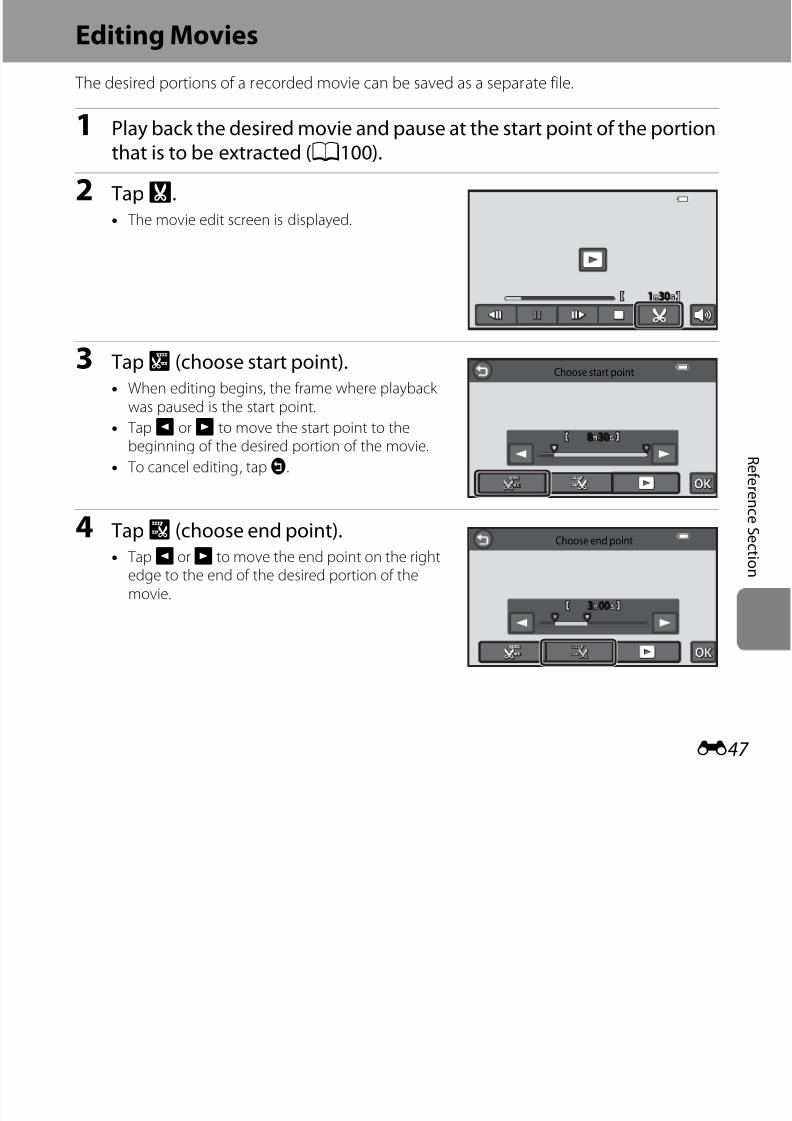
7/29/2019 Nikon s6400rm en 02
http://slidepdf.com/reader/full/nikon-s6400rm-en-02 171/280
E47
R
ef er en c e S e c t i on
3 TapW (choose start point).• When editing begins, the frame where playback
was paused is the start point.
• TapG orH to move the start point to thebeginning of the desired portion of the movie.
• To cancel editing, tapJ.
4 TapX (choose end point).• TapG orH to move the end point on the right
edge to the end of the desired portion of themovie.
Choose start point
88 3030
Choose end point
33 0000
5 When the settings are finished, tapI.• TapR (preview) before tappingI to preview
the specified portion of the movie.
• When previewing the movie, you can performthe operations listed below by tapping the iconson the control panel.
- X: Adjust volume.
- O / P: Advance or rewind.- Q / S: Pause or end playback.
6 Tap Yes.• The edited movie is saved.
Choose end point
33 0000
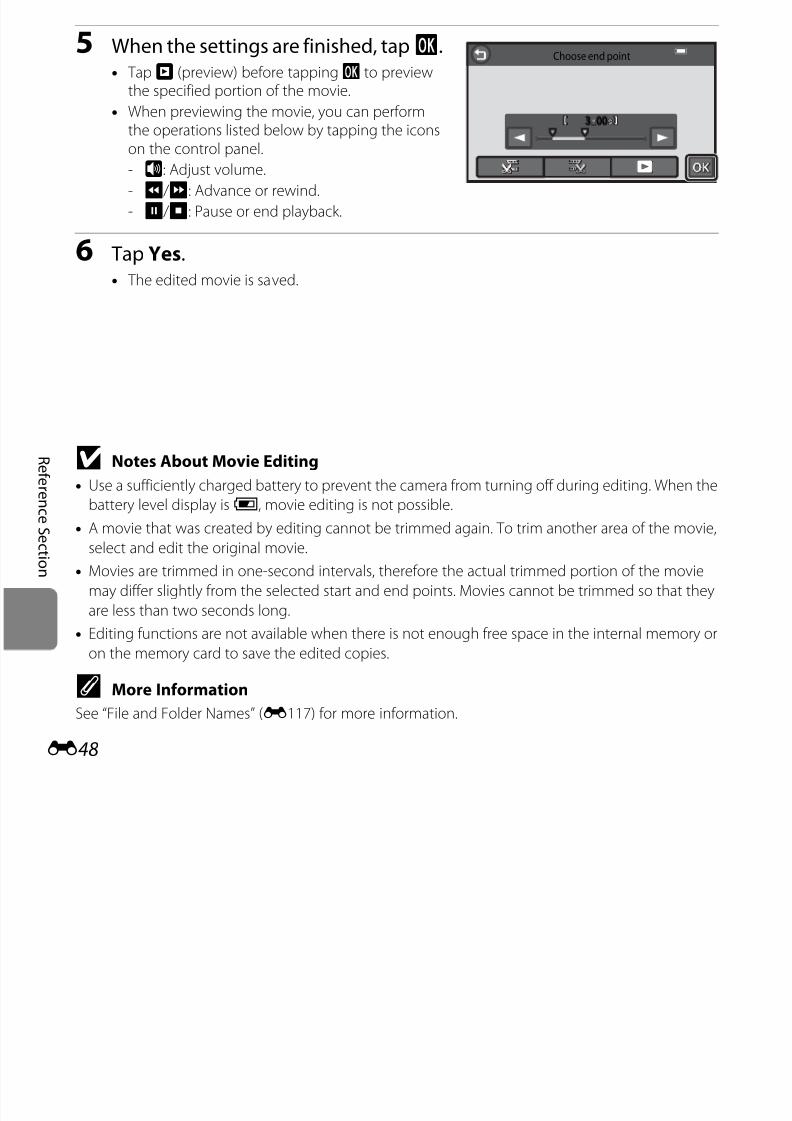
7/29/2019 Nikon s6400rm en 02
http://slidepdf.com/reader/full/nikon-s6400rm-en-02 172/280
E48
R
ef er en c e S e c t i on
B Notes About Movie Editing
• Use a sufficiently charged battery to prevent the camera from turning off during editing. When the
battery level display isB, movie editing is not possible.
• A movie that was created by editing cannot be trimmed again. To trim another area of the movie,
select and edit the original movie.
• Movies are trimmed in one-second intervals, therefore the actual trimmed portion of the movie
may differ slightly from the selected start and end points. Movies cannot be trimmed so that they
are less than two seconds long.• Editing functions are not available when there is not enough free space in the internal memory or
on the memory card to save the edited copies.
C More Information
See “File and Folder Names” (E117) for more information.
The Shooting Menu (for A (Auto) Mode)
A Image Mode (Image Size and Quality)
You can select the combination of image size and compression ratio that is used when savingimages.
Select the image mode best suited to the manner in which images will be used and thecapacity of the internal memory or memory card.
Enter shooting modeM TapF M A Image mode
Image mode* Description
Q 4608×3456PImages will be higher quality thanP. The compression ratio is
approximately 1:4
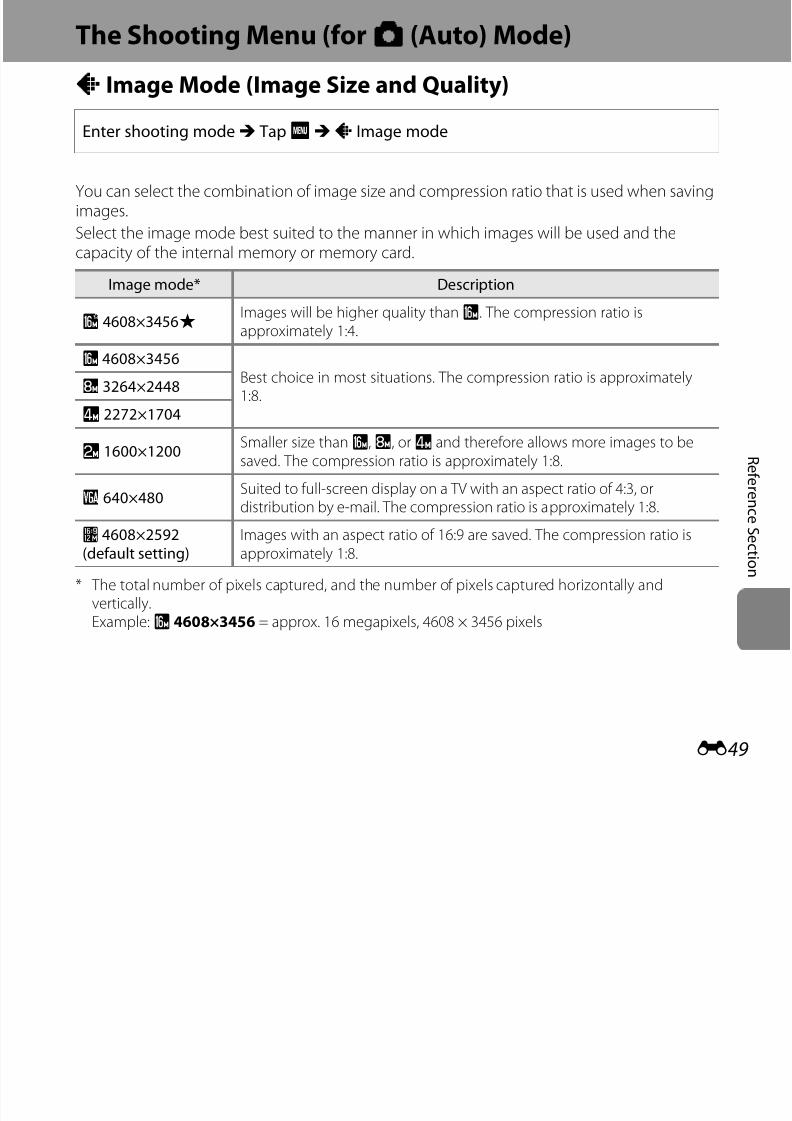
7/29/2019 Nikon s6400rm en 02
http://slidepdf.com/reader/full/nikon-s6400rm-en-02 173/280
E49
R
ef er en c e S e c t i on
* The total number of pixels captured, and the number of pixels captured horizontally andvertically.Example:P 4608×3456 = approx. 16 megapixels, 4608 × 3456 pixels
approximately 1:4.P 4608×3456
Best choice in most situations. The compression ratio is approximately1:8.
R 3264×2448
r 2272×1704
q 1600×1200Smaller size thanP,R, orr and therefore allows more images to besaved. The compression ratio is approximately 1:8.
O 640×480Suited to full-screen display on a TV with an aspect ratio of 4:3, ordistribution by e-mail. The compression ratio is approximately 1:8.
l 4608×2592(default setting)
Images with an aspect ratio of 16:9 are saved. The compression ratio isapproximately 1:8.
C Notes About Image Mode
• The setting is also applied to other shooting modes.• Some settings cannot be used with other functions (A71).
• The image mode cannot be selected in Draw, 3D photography, or Easy panorama scene
mode (A40).
C Number of Images That Can Be Saved
The following table lists the approximate number of images that can be saved on a 4 GB memory
card. Note that due to JPEG compression, the number of images that can be saved varies greatlydepending on the composition of the image. In addition, this number may vary depending on the
make of the memory card, even when the memory cards have the same specified capacity.
Check the shooting screen for the number of images that can be saved when saving to the internal
memory (approx. 78 MB).
Image mode Memory card1 (4 GB) Print size2 (cm/in.)
Q 4608 3456P 380 A 39 29/15 11 5
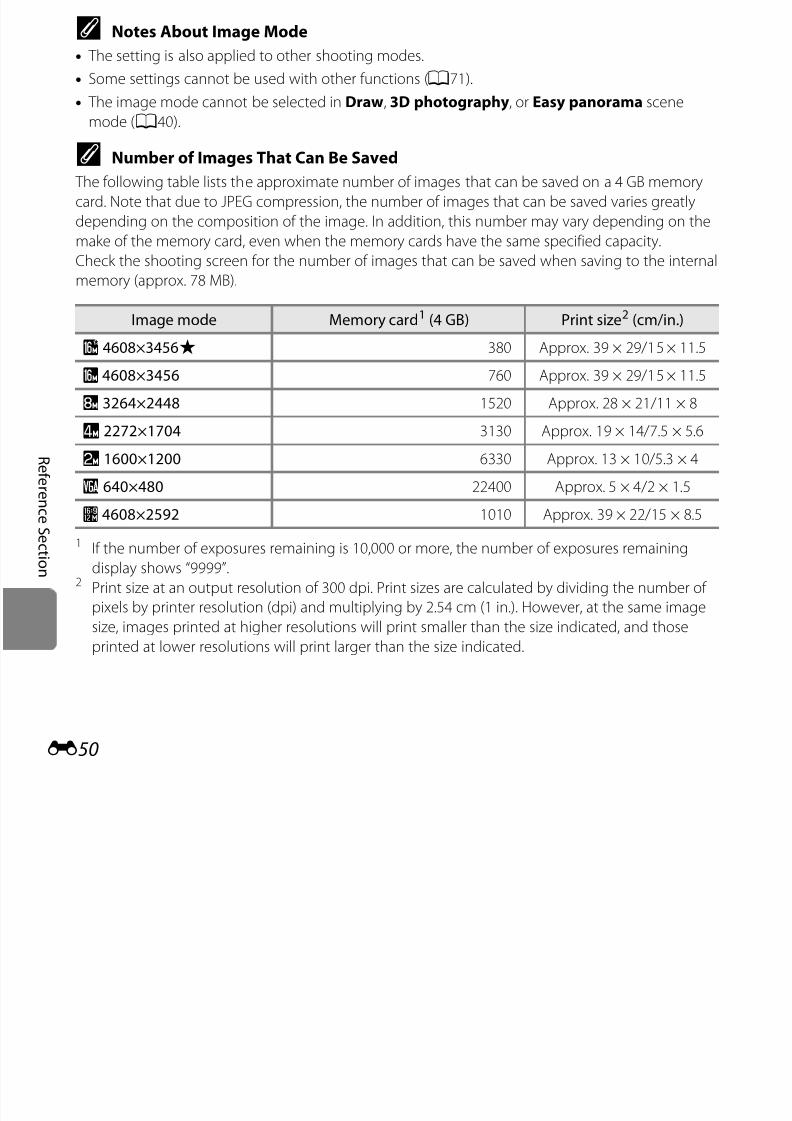
7/29/2019 Nikon s6400rm en 02
http://slidepdf.com/reader/full/nikon-s6400rm-en-02 174/280
E50
R
ef er en c e S e c t i on
1 If the number of exposures remaining is 10,000 or more, the number of exposures remaining
display shows “9999”.2 Print size at an output resolution of 300 dpi. Print sizes are calculated by dividing the number of
pixels by printer resolution (dpi) and multiplying by 2.54 cm (1 in.). However, at the same imagesize, images printed at higher resolutions will print smaller than the size indicated, and those
printed at lower resolutions will print larger than the size indicated.
Q 4608×3456P 380 Approx. 39 × 29/15 × 11.5
P 4608×3456 760 Approx. 39 × 29/15 × 11.5
R 3264×2448 1520 Approx. 28 × 21/11 × 8
r 2272×1704 3130 Approx. 19 × 14/7.5 × 5.6
q 1600×1200 6330 Approx. 13 × 10/5.3 × 4
O 640×480 22400 Approx. 5 × 4/2 × 1.5
l 4608×2592 1010 Approx. 39 × 22/15 × 8.5
q/s/r Touch Shooting
Select one of the options listed below.
* Available only in A mode
Option Description A
q Touch shutter(default setting)
Pictures can be taken by simply tapping the monitor. E53
s Subject tracking*
Use this option to take pictures of moving subjects. Tap
the subject on which the camera will focus. The focus area will automatically move to track thesubject.
E55
r Touch AF/AE Tap the monitor to set the focus area.Press the shutter-release button to take the picture withthe focus and exposure achieved with the focus area.
E57
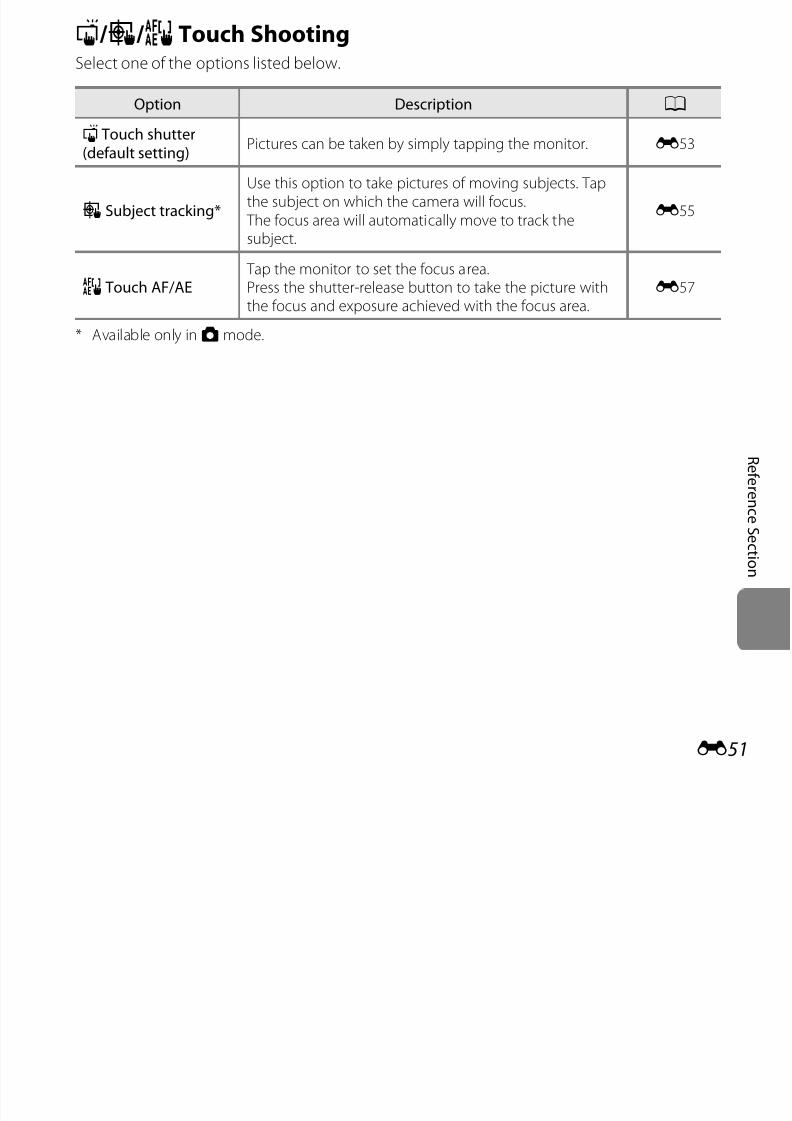
7/29/2019 Nikon s6400rm en 02
http://slidepdf.com/reader/full/nikon-s6400rm-en-02 175/280
E51
R
ef er en c e S e c t i on
Available only in A mode.
C Focus Area That Can Be Set with Touch Shutter or Touch AF/AE
The focus area that can be set by tapping the monitor when using Touch shutter or Touch AF/AE varies depending on the shooting mode as described below.
Shooting mode Available focus area
A (auto) mode (A38)
Focus area can be changed onto the subject that istapped.1
Scene auto selector, Sports, Party/
indoor, Beach, Snow, Close-up, Food,
Museum, Black and white copy,
Backlighting, and 3D photography scene
modes (A40)
Special effects mode (A52)
Portrait and Night portrait scene modes
(A40)
Only a border displayed by face detection (A75)
can be selected.1
• The shutter can be released using Touch
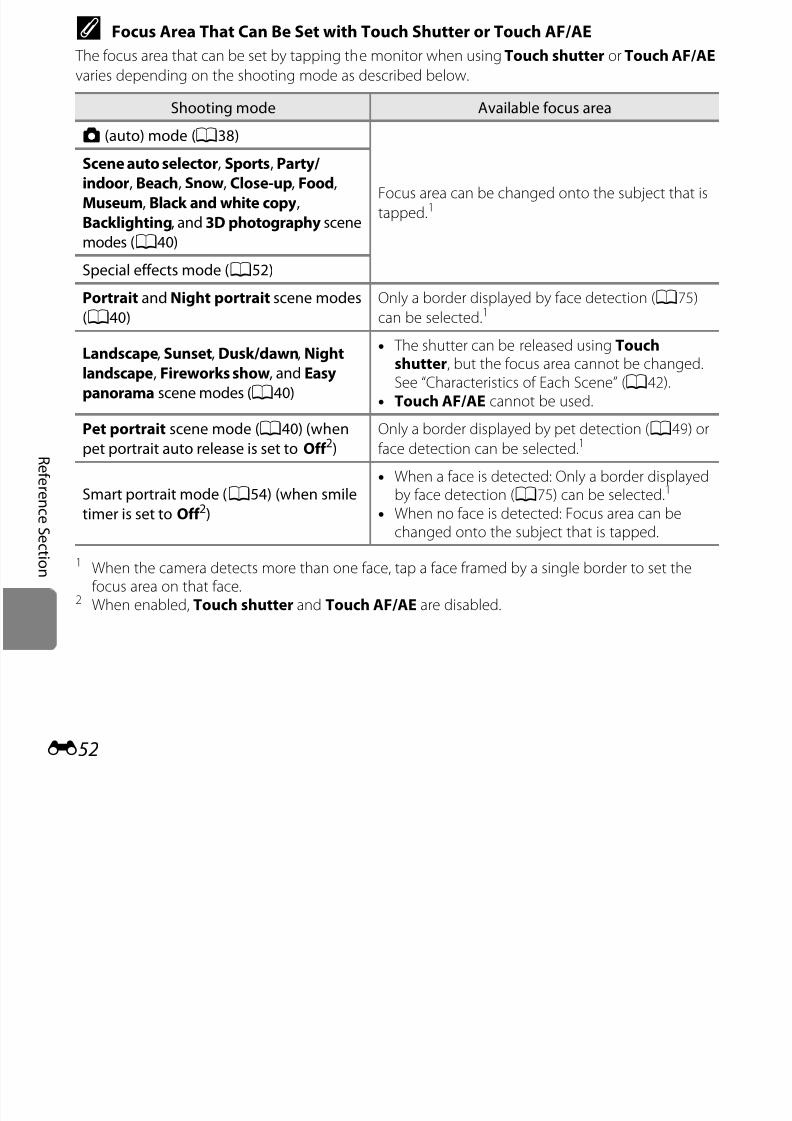
7/29/2019 Nikon s6400rm en 02
http://slidepdf.com/reader/full/nikon-s6400rm-en-02 176/280
E52
R e
f er en c e
S e c t i on 1 When the camera detects more than one face, tap a face framed by a single border to set the
focus area on that face.2 When enabled, Touch shutter and Touch AF/AE are disabled.
Landscape, Sunset, Dusk/dawn, Night
landscape, Fireworks show, and Easy
panorama scene modes (A40)
• The shutter can be released using Touchshutter, but the focus area cannot be changed.See “Characteristics of Each Scene” (A42).
• Touch AF/AE cannot be used.
Pet portrait scene mode (A40) (when
pet portrait auto release is set to Off 2)
Only a border displayed by pet detection (A49) or
face detection can be selected.1
Smart portrait mode (A54) (when smile
timer is set to Off 2)
• When a face is detected: Only a border displayedby face detection (A75) can be selected.1
• When no face is detected: Focus area can bechanged onto the subject that is tapped.
q Tapping the Monitor to Release the Shutter (Touch Shutter)
Tap the desired subject to take a picture.• Do not use force when tapping the monitor as this
may cause slight movement of the camera, resultingin blurred images.
• When digital zoom is in effect, the camera focuses onthe subject in the center of the frame.
• The shutter-release button can also be used when thetouch shutter option is selected.
• IfX is displayed when the monitor is tapped, theshutter cannot be released Tap an area withinX
Enter shooting modeM tapF M q /s /r Touch shootingM q Touch shutter
2525 0010101010
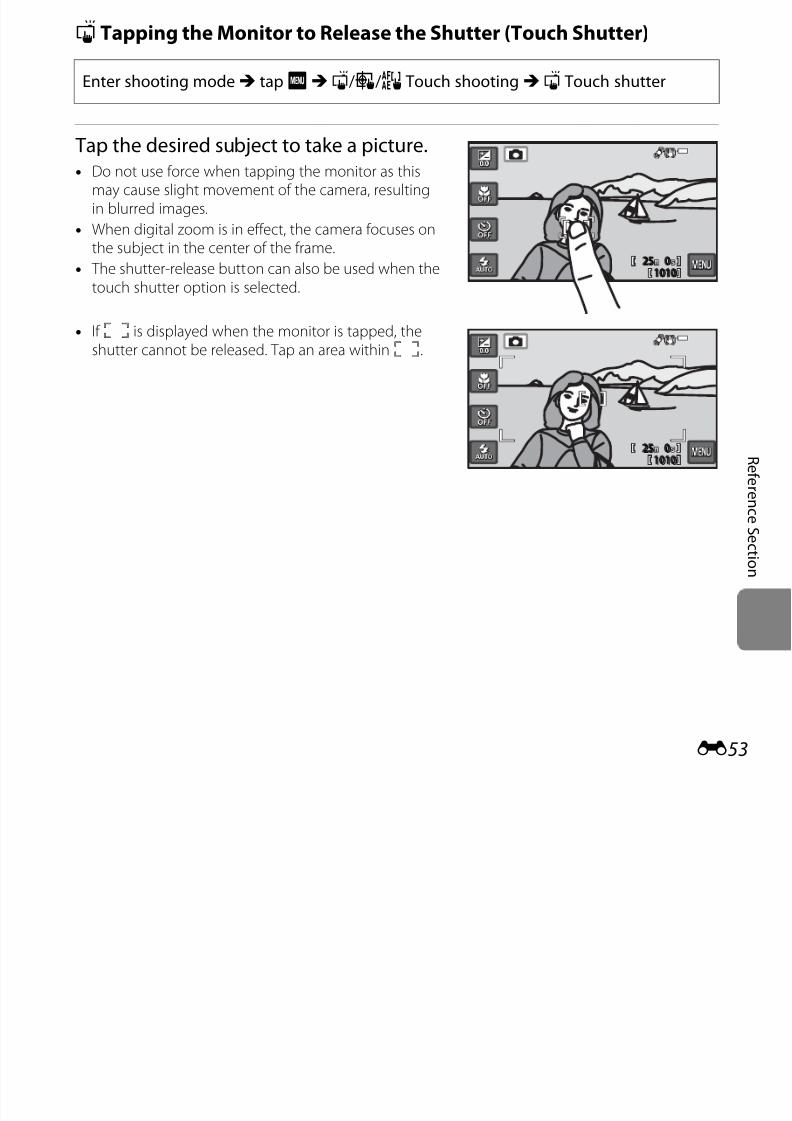
7/29/2019 Nikon s6400rm en 02
http://slidepdf.com/reader/full/nikon-s6400rm-en-02 177/280
E53
R
ef er en c e S e c t i on
If X is displayed when the monitor is tapped, theshutter cannot be released. Tap an area withinX.
2525 0010101010
B Notes About Touch Shutter
• The focus area that can be set varies depending on the shooting mode (E52).• When taking pictures with Continuous H, Continuous L, Pre-shooting cache, Continuous H:
120 fps, Continuous H: 60 fps, or BSS in Continuous setting (E59) enabled, or in Sports,
Museum, Pet portrait (when Continuous is selected) scene mode (A40), use the shutter-
release button to take pictures. Only one picture can be taken at a time using the touch shutter
function.
• Prevent shooting with accidental tapping of the monitor by changing the touch shooting setting
to Touch AF/AE (E57) (not available in some shooting modes). At this setting, the shutter is notreleased when the monitor is tapped.
• When shooting a subject that is not suitable for autofocus, the subject may not be in focus (A77).
• When a subject displayed in the monitor is tapped with the self-timer (A61) enabled, the camera
locks focus and releases the shutter after ten or two seconds.
• Some settings cannot be used with other functions (A71).
7/29/2019 Nikon s6400rm en 02
http://slidepdf.com/reader/full/nikon-s6400rm-en-02 178/280
E54
R
ef er en c e S e c t i on
s Focusing on a Moving Subject (Subject Tracking)
• s (subject tracking) is enabled only in A (auto) mode.
1 Register a subject.• Tap the desired tracking subject in the monitor.
- The subject is registered.- When the border framing the subject glows
red, the camera is unable to focus. Change thecomposition and try again.
• If the tapped area does not contain a subject thatcan be registered,X is displayed in the
monitor. Tap an area withinX.
Select A (auto) modeM tapF M q /s /r Touch shootingM s Subject tracking
2525 0010101010
7/29/2019 Nikon s6400rm en 02
http://slidepdf.com/reader/full/nikon-s6400rm-en-02 179/280
E55
R
ef er en c e S e c t i on
p X• When a subject is registered, a yellow focus area
is displayed on the subject and the camerabegins tracking the subject.
• Tap another subject to change a subject tofollow.
• To cancel the registration of the subject, tapa
on the right side of the monitor.
• If the camera can no longer track the registeredsubject, the focus area will disappear and theregistration will be canceled. Register the subject again.
2525 0010101010
2 Press the shutter-release button totake a picture.• The camera focuses on the focus area when the
shutter-release button is pressed halfway. Thefocus area will glow green and focus will belocked.
• When the camera is unable to focus, the focusarea will flash. Press the shutter-release buttonhalfway again to focus.
• If the shutter-release button is pressed halfway while the focus area is not displayed, thecamera focuses on the area in the center of the frame.
• Press the shutter-release button all the way down to release the shutter.
1//
1/ F3.13.1
F3.125050
250
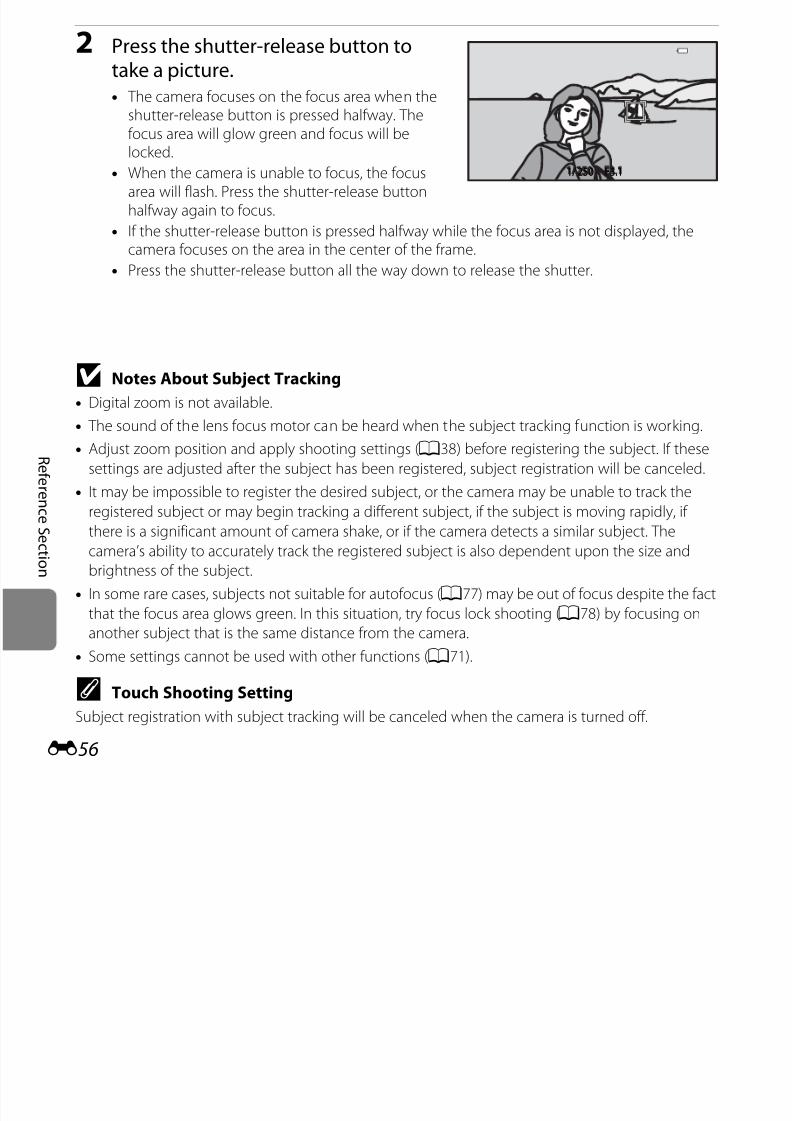
7/29/2019 Nikon s6400rm en 02
http://slidepdf.com/reader/full/nikon-s6400rm-en-02 180/280
E56
R
ef er en c e S e c t i on
B Notes About Subject Tracking
• Digital zoom is not available.
• The sound of the lens focus motor can be heard when the subject tracking function is working.
• Adjust zoom position and apply shooting settings (A38) before registering the subject. If these
settings are adjusted after the subject has been registered, subject registration will be canceled.• It may be impossible to register the desired subject, or the camera may be unable to track the
registered subject or may begin tracking a different subject, if the subject is moving rapidly, if
there is a significant amount of camera shake, or if the camera detects a similar subject. The
camera’s ability to accurately track the registered subject is also dependent upon the size and
brightness of the subject.
• In some rare cases, subjects not suitable for autofocus (A77) may be out of focus despite the fact
that the focus area glows green. In this situation, try focus lock shooting (A78) by focusing onanother subject that is the same distance from the camera.
• Some settings cannot be used with other functions (A71).
C Touch Shooting Setting
Subject registration with subject tracking will be canceled when the camera is turned off.
r Tapping the Monitor to Focus (Touch AF/AE)
1 Tap the subject on which the camerafocuses.
• u or a double border will be displayed aroundthe area tapped.
• When digital zoom is in effect, the focus areacannot be selected.
• To cancel the focus area selection, tapa on theright side of the monitor.
• If a position on which focus cannot be acquired
is tapped,X will be displayed in the monitor. Tap an area withinX.
Enter shooting modeM tapF M q /s /r Touch shootingM r Touch AF/AE
2525 0010101010
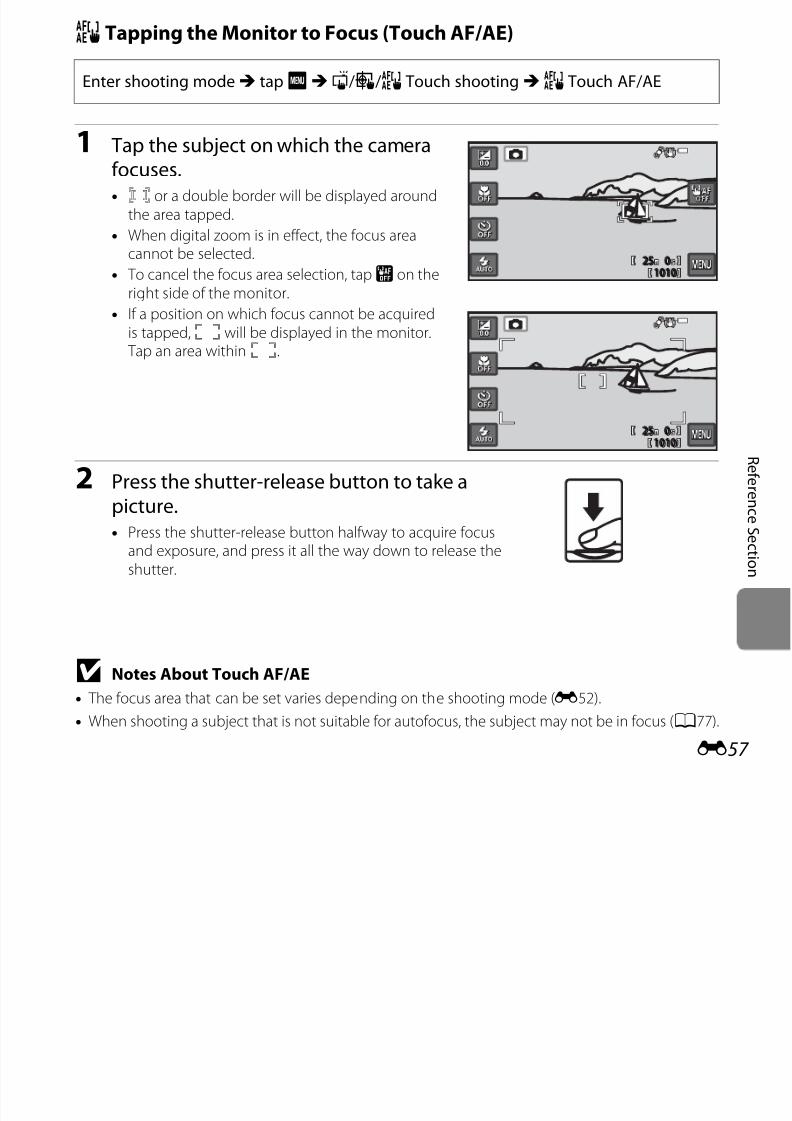
7/29/2019 Nikon s6400rm en 02
http://slidepdf.com/reader/full/nikon-s6400rm-en-02 181/280
E57
R ef er en c e S e c t i on
p X
2 Press the shutter-release button to take apicture.• Press the shutter-release button halfway to acquire focus
and exposure, and press it all the way down to release theshutter.
B Notes About Touch AF/AE
• The focus area that can be set varies depending on the shooting mode (E52).
• When shooting a subject that is not suitable for autofocus, the subject may not be in focus (A77).
2525 0010101010
E ISO Sensitivity
When ISO sensitivity is increased, less light is needed when taking pictures.
Higher ISO sensitivity allows darker subjects to be captured. Additionally, even with subjectsof similar brightness, pictures can be taken at faster shutter speeds, and blurring caused bycamera shake and subject movement can be reduced.• Although higher ISO sensitivity is effective when shooting darker subjects, shooting
without the flash, shooting while using the zoom, etc., images may contain noise.
Select A (auto) modeM tapF M E ISO sensitivity
Option Description
Auto (default setting)Sensitivity is ISO 125 when there is sufficient lighting; the cameracompensates by raising sensitivity to a maximum of ISO 1600 whenlighting is dim.
Select the range in which the camera automatically adjusts ISO
7/29/2019 Nikon s6400rm en 02
http://slidepdf.com/reader/full/nikon-s6400rm-en-02 182/280
E58
R ef er en c e S e c t i on
B Notes About ISO Sensitivity
Some settings cannot be used with other functions (A71).
Fixed range auto
Select the range in which the camera automatically adjusts ISOsensitivity, from ISO 125-400 or ISO 125-800. The camera will notincrease sensitivity beyond the maximum value in the selected range.Set the maximum value for ISO sensitivity for effective control overthe amount of “grain” that appears in images.
125, 200, 400, 800, 1600,
3200Sensitivity is locked at the specified value.
C Continuous Shooting
Change settings to continuous or BSS (Best Shot Selector).
Select A (auto) modeM tapF M C Continuous
Option Description
U Single
(default setting) One picture is taken each time the shutter-release button is pressed.
k Continuous H
While the shutter-release button is held all the way down, images arecaptured continuously at a rate of about 10 fps (when image mode isset tol 4608×2592). Shooting ends when the shutter-releasebutton is released, or 7 images have been captured.
m Continuous L
While the shutter-release button is held all the way down, up to 19
images are captured continuously at a rate of up to about 2 fps(when image mode is set tol 4608×2592). Shooting ends when
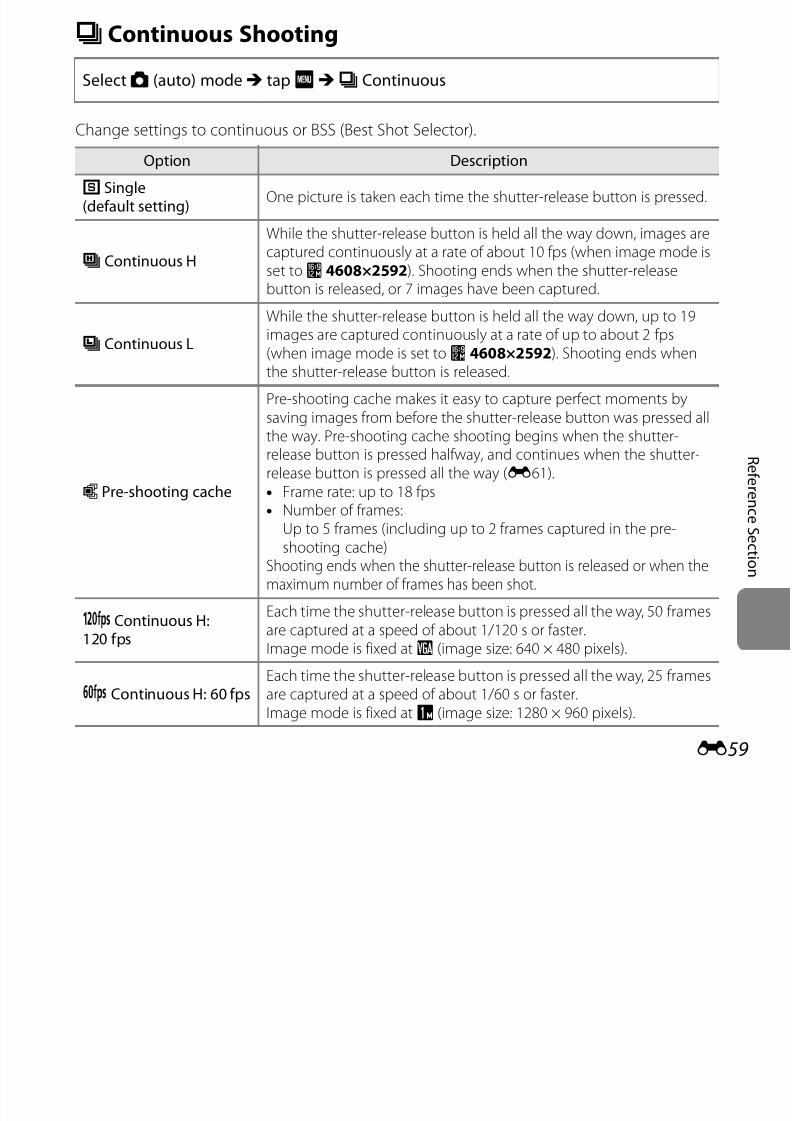
7/29/2019 Nikon s6400rm en 02
http://slidepdf.com/reader/full/nikon-s6400rm-en-02 183/280
E59
R ef er en c e S e c t i on
g gthe shutter-release button is released.
q Pre-shooting cache
Pre-shooting cache makes it easy to capture perfect moments bysaving images from before the shutter-release button was pressed allthe way. Pre-shooting cache shooting begins when the shutter-release button is pressed halfway, and continues when the shutter-
release button is pressed all the way (E61).• Frame rate: up to 18 fps• Number of frames:
Up to 5 frames (including up to 2 frames captured in the pre-shooting cache)
Shooting ends when the shutter-release button is released or when themaximum number of frames has been shot.
I Continuous H:120 fps
Each time the shutter-release button is pressed all the way, 50 framesare captured at a speed of about 1/120 s or faster.Image mode is fixed atO (image size: 640 × 480 pixels).
J Continuous H: 60 fpsEach time the shutter-release button is pressed all the way, 25 framesare captured at a speed of about 1/60 s or faster.Image mode is fixed atM (image size: 1280 × 960 pixels).
B Notes About Continuous Shooting
D BSS(Best Shot Selector)
The “Best Shot Selector” is recommended when shooting with theflash off or the camera zoomed in, or in other situations in whichinadvertent motion can result in blurred images. When BSS is on, thecamera takes up to ten pictures while the shutter-release button isheld down. The sharpest image in the series is automatically selectedand saved.
WMulti-shot 16
Each time the shutter-release button is pressed,
the camera takes 16 shots at a rate of about 30fps and arranges them in a single image.• Image mode is fixed atL (image size: 2560
× 1920 pixels).• Digital zoom cannot be used.
Option Description
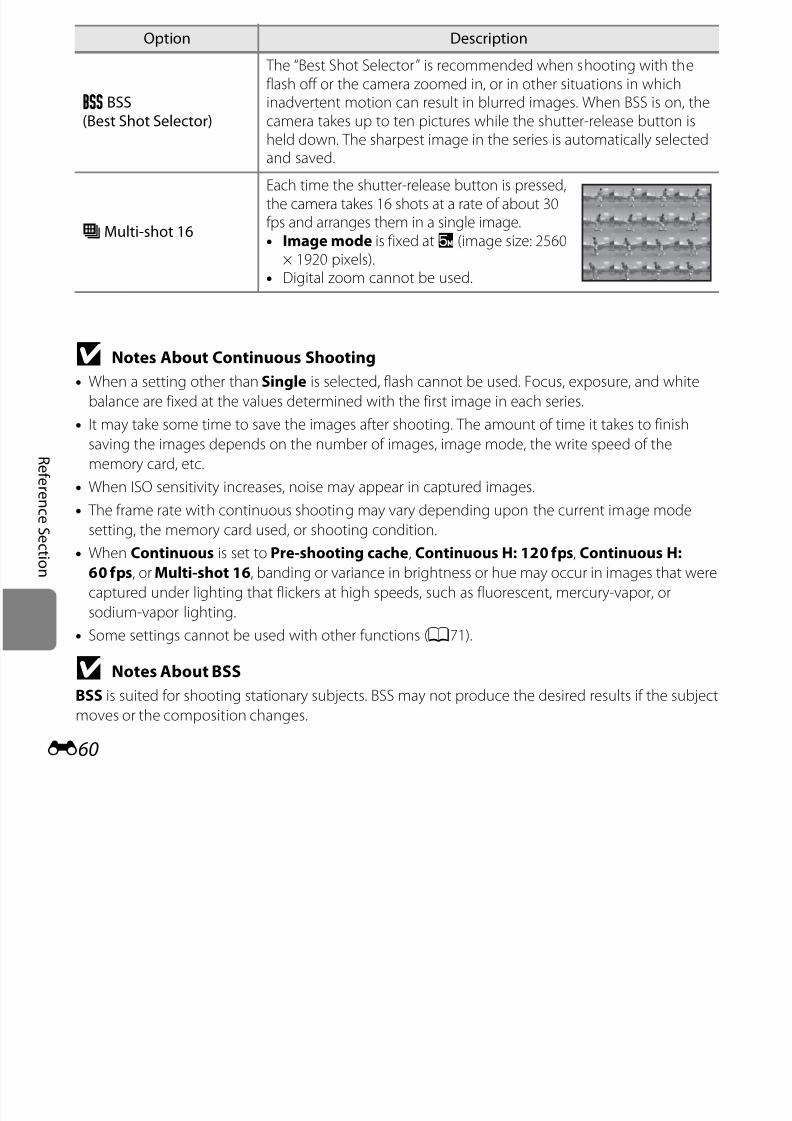
7/29/2019 Nikon s6400rm en 02
http://slidepdf.com/reader/full/nikon-s6400rm-en-02 184/280
E60
R ef er en c e S e c t i on
B Notes About Continuous Shooting
• When a setting other than Single is selected, flash cannot be used. Focus, exposure, and white
balance are fixed at the values determined with the first image in each series.
• It may take some time to save the images after shooting. The amount of time it takes to finish
saving the images depends on the number of images, image mode, the write speed of the
memory card, etc.
• When ISO sensitivity increases, noise may appear in captured images.
• The frame rate with continuous shooting may vary depending upon the current image mode
setting, the memory card used, or shooting condition.
• When Continuous is set to Pre-shooting cache, Continuous H: 120 fps, Continuous H:
60 fps, or Multi-shot 16, banding or variance in brightness or hue may occur in images that were
captured under lighting that flickers at high speeds, such as fluorescent, mercury-vapor, or
sodium-vapor lighting.• Some settings cannot be used with other functions (A71).
B Notes About BSS
BSS is suited for shooting stationary subjects. BSS may not produce the desired results if the subject
moves or the composition changes.
C Pre-shooting Cache
When Pre-shooting cache is selected, shooting begins when the shutter-release button is pressedhalfway for 0.5 seconds or longer, and images captured before the shutter-release button is pressed
all the way are saved along with images captured after the shutter-release button is pressed all the
way. Up to 2 images can be saved in the pre-shooting cache.
Press down halfway Press down all the way
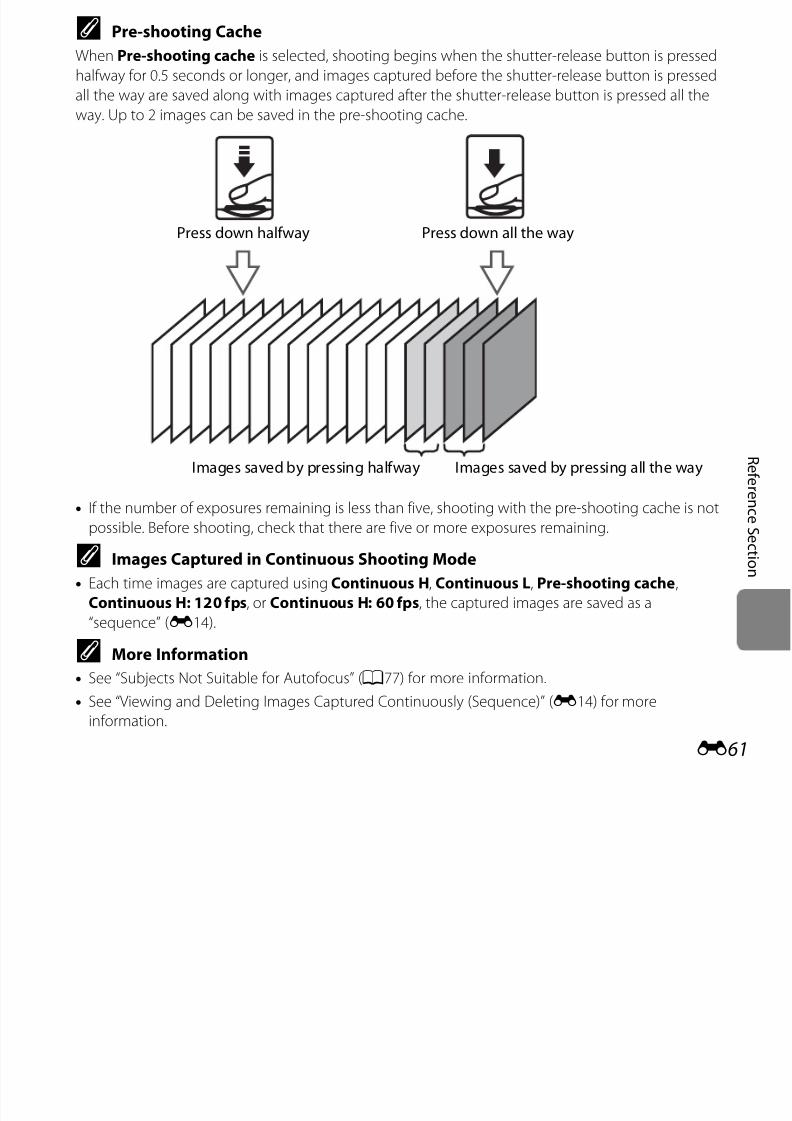
7/29/2019 Nikon s6400rm en 02
http://slidepdf.com/reader/full/nikon-s6400rm-en-02 185/280
E61
R ef er en c e S e c t i on
• If the number of exposures remaining is less than five, shooting with the pre-shooting cache is not
possible. Before shooting, check that there are five or more exposures remaining.
C Images Captured in Continuous Shooting Mode
• Each time images are captured using Continuous H, Continuous L, Pre-shooting cache,
Continuous H: 120 fps, or Continuous H: 60 fps, the captured images are saved as a
“sequence” (E14).
C More Information
• See “Subjects Not Suitable for Autofocus” (A77) for more information.
• See “Viewing and Deleting Images Captured Continuously (Sequence)” (E14) for more
information.
Images saved by pressing halfway Images saved by pressing all the way
wWhite Balance (Adjusting Hue)
The color of light reflected from an object varies with the color of the light source. The humanbrain is able to adapt to changes in the color of the light source, with the result that whiteobjects appear white whether seen in the shade, direct sunlight, or under incandescentlighting. Digital cameras can mimic this adjustment by processing images according to the
color of the light source. This is known as “white balance.” For natural colors, select a whitebalance setting that matches the light source before shooting.
Although Auto (default setting) can be used under most types of lighting, white balance canbe adjusted to suit the sky conditions or light source and achieve more natural color tones inthe image.
Select A (auto) modeM tapF M wWhite balance
Option Description
a Auto(default setting)
White balance is automatically adjusted to suit lighting conditions.

7/29/2019 Nikon s6400rm en 02
http://slidepdf.com/reader/full/nikon-s6400rm-en-02 186/280
E62
R ef er en c e S e c t i on Tap an option to select it and tapI.
(default setting)y j g g
b Preset manual Useful when shooting under unusual lighting (E63).
c Daylight White balance adjusted for direct sunlight.
d Incandes. Use under incandescent lighting.
e Fluorescent Use under fluorescent lighting.
f Cloudy Use when taking pictures under overcast skies.
g Flash Use with the flash.
Using Preset Manual
The preset manual option is used with mixed lighting or to compensate for light sources witha strong color cast when the desired effect has not been achieved with white balancesettings like Auto and Incandes. (for example, to make images shot under a lamp with a redshade look as though they had been shot under white light).
Use the procedure below to measure the white balance value under the lighting used duringshooting.
1 Place a white or gray reference object under the lighting that will beused during shooting.
2 TapF and tapw.Shooting menu
Touch shootingImage mode
ISO
sensitivity
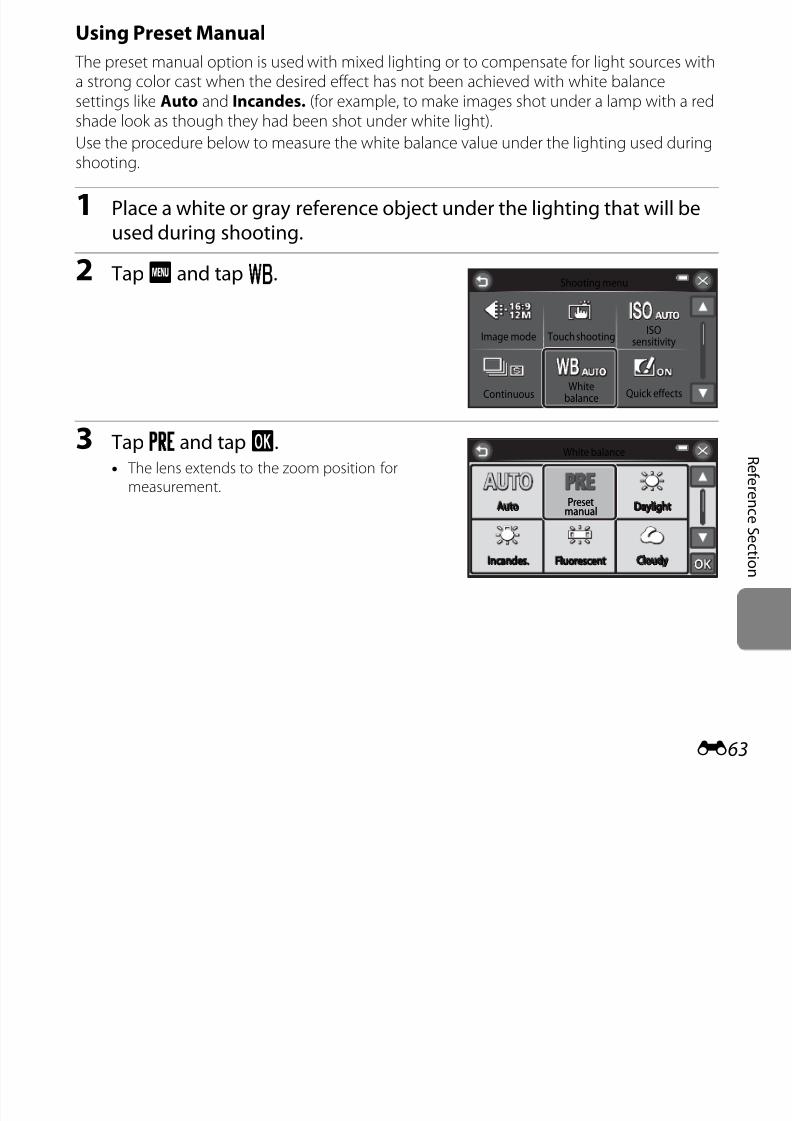
7/29/2019 Nikon s6400rm en 02
http://slidepdf.com/reader/full/nikon-s6400rm-en-02 187/280
E63
R ef er en c e S e c t i on
3 Tapb and tapI.• The lens extends to the zoom position for
measurement.
ContinuousWhite
balance Quick effects
White balance
AutoutoAuto
Incandes.ncandes.Incandes. FluorescentluorescentFluorescent
DaylightaylightDaylight
CloudyloudyCloudy
PresetmanualPreset
manual
4 Frame the white or gray reference
object in the measuring window.• To apply the most recently measured value for
preset manual instead of taking a newmeasurement, tap Cancel. The most recentlymeasured value is set for white balance, and anew measurement is not performed.
5 Tap Measure to measure a new whitebalance value.• The shutter is released and the new white
balance value for preset manual is set. No image
is saved.• When the monitor display returns to the screen
f
Preset manual
Cancel Measure
Measuring window
Preset manual
Cancel Measure
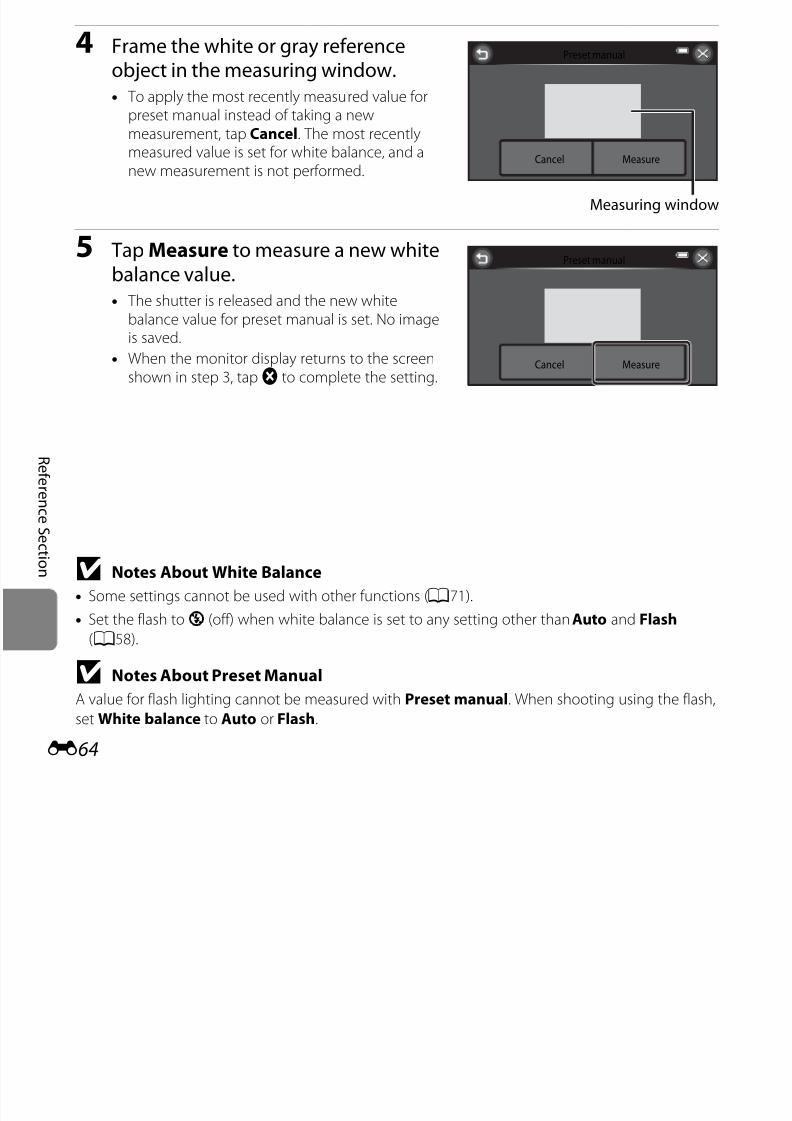
7/29/2019 Nikon s6400rm en 02
http://slidepdf.com/reader/full/nikon-s6400rm-en-02 188/280
E64
R ef er en c e S e c t i on
shown in step 3, tapf to complete the setting.
B Notes About White Balance
• Some settings cannot be used with other functions (A71).
• Set the flash to W (off) when white balance is set to any setting other than Auto and Flash (A58).
B Notes About Preset Manual
A value for flash lighting cannot be measured with Preset manual. When shooting using the flash,
set White balance to Auto or Flash.
pQuick Effects
Enable or disable the quick effects function.
Select A (auto) modeM tapF M pQuick effects
Option Description
o On (defaultsetting)
The screen shown on the right
is displayed immediately afterthe shutter is released.• Tap OK to display the effect
selection screen and enablethe quick effects function(A39).
• When you tap Cancel or
when no operations areperformed for about five seconds, the monitor display returns to theshooting screen
OK Cancel
Quick effects
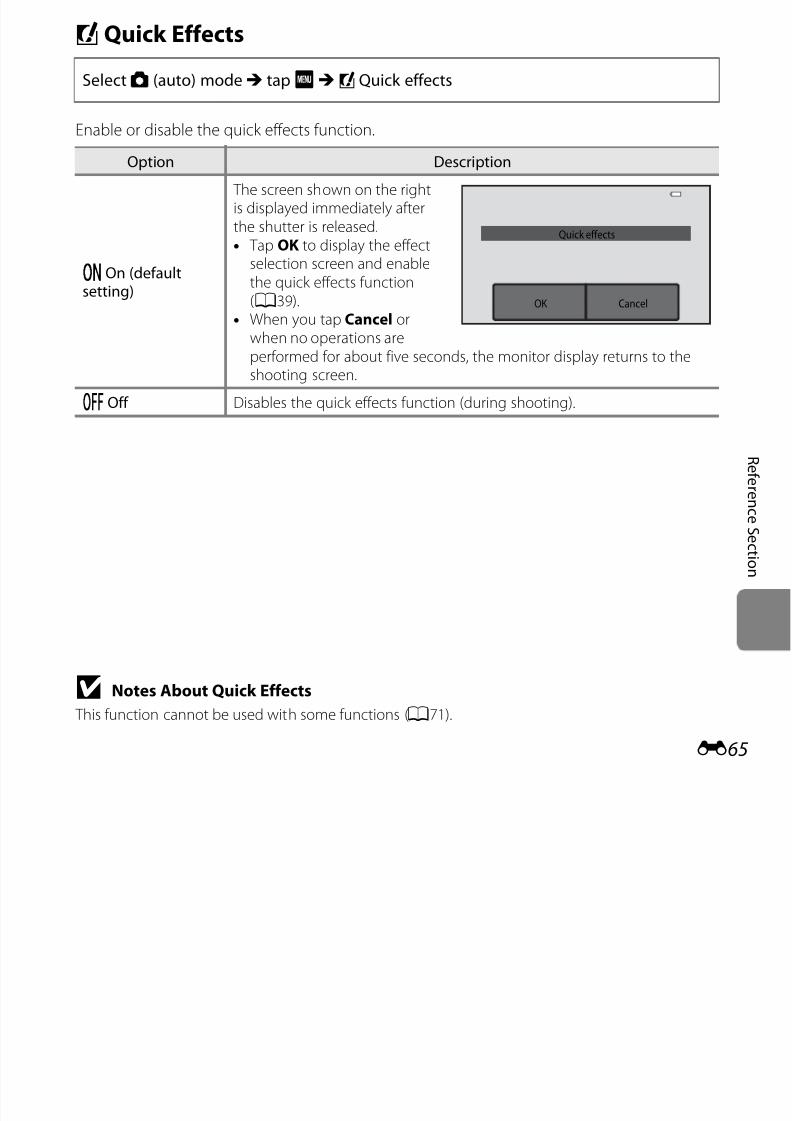
7/29/2019 Nikon s6400rm en 02
http://slidepdf.com/reader/full/nikon-s6400rm-en-02 189/280
E65
R ef er en c e S e c t i on
B Notes About Quick Effects
This function cannot be used with some functions (A71).
shooting screen.
pOff Disables the quick effects function (during shooting).
G AF Area Mode
Use this option to determine how the camera selects the focus area for autofocus.
Select A (auto) modeM tapF M G AF area mode
Option Description
y Center(default setting)
The camera focuses on the
subject in the center of theframe. The focus area is alwaysdisplayed in the center of thescreen.
2525 00
10101010
Focus area
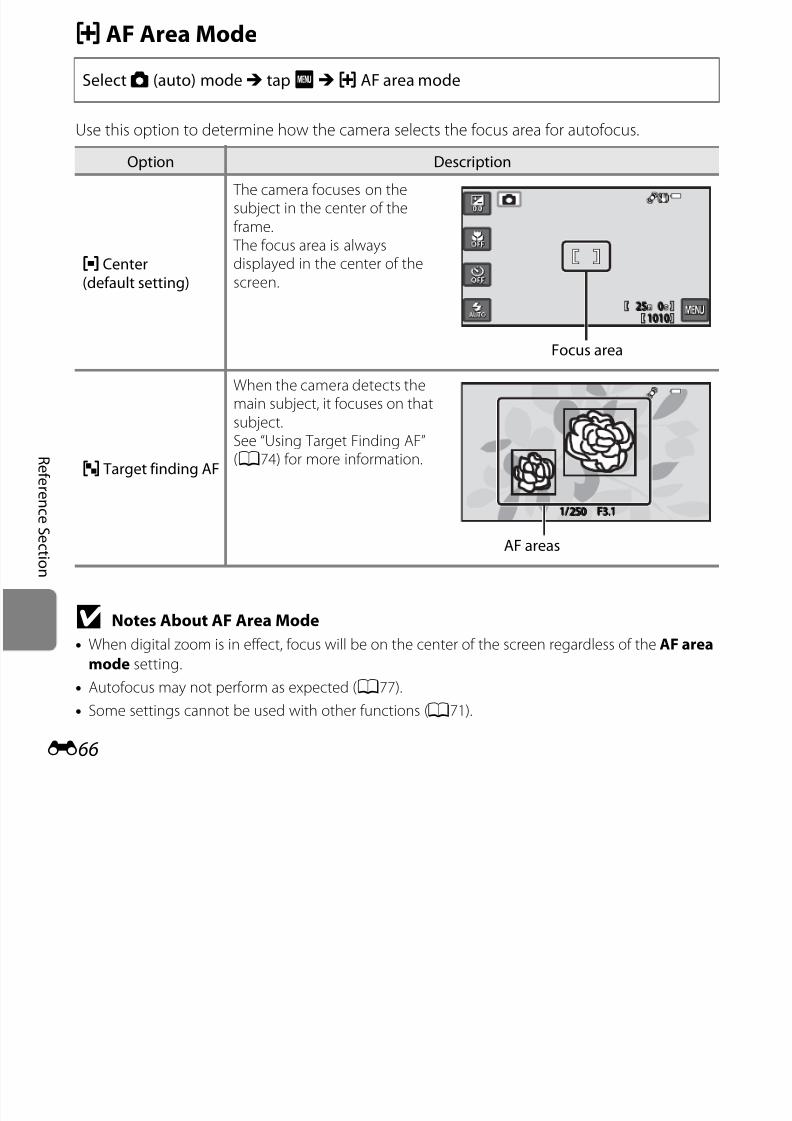
7/29/2019 Nikon s6400rm en 02
http://slidepdf.com/reader/full/nikon-s6400rm-en-02 190/280
E66
R e
f er en c e S e c t i on
B Notes About AF Area Mode• When digital zoom is in effect, focus will be on the center of the screen regardless of the AF area
mode setting.
• Autofocus may not perform as expected (A77).
• Some settings cannot be used with other functions (A71).
M Target finding AF
When the camera detects themain subject, it focuses on thatsubject.See “Using Target Finding AF”(A74) for more information.
1//1/ F3.13.1F3.125050250
AF areas
The Smart Portrait Menu
• See “The Shooting Menu (for A (Auto) Mode)” (E49) for information aboutA Imagemode andq / r Touch shooting.
e Skin Softening
Enable skin softening.
Enter shooting modeM A (shooting mode) buttonM F Smart portrait mode
M tapF M e Skin softening
Option DescriptionS High When the shutter is released, the camera detects one or more
h f ( h f ) d h
7/29/2019 Nikon s6400rm en 02
http://slidepdf.com/reader/full/nikon-s6400rm-en-02 191/280
E67
R e
f er en c e S e c t i on
The effects of skin softening are not visible when framing pictures for shooting. Check thedegree of skin softening performed in playback mode.
human faces (up to three faces), and processes the image tosoften facial skin tones before saving the image. You can selectthe amount of effect that is applied.
R Normal (default setting)
Q Low
pOff Turns skin softening off.
y Blink Proof
The camera automatically releases the shutter twice each time a picture is taken. Of the twoshots, one in which the subject’s eyes are open is saved.
Enter shooting modeM A (shooting mode) buttonM F Smart portrait mode
M tapF M y Blink proof
Option Description
oOn
Enables blink warning.Flash cannot be used whenOn is selected.If the camera saved an imagein which the subject’s eyesmay have been closed, the
dialog shown on the right isdisplayed for a few seconds.
pOff (default setting) Turns the blink warning off
A blink was detected in the
picture just taken.
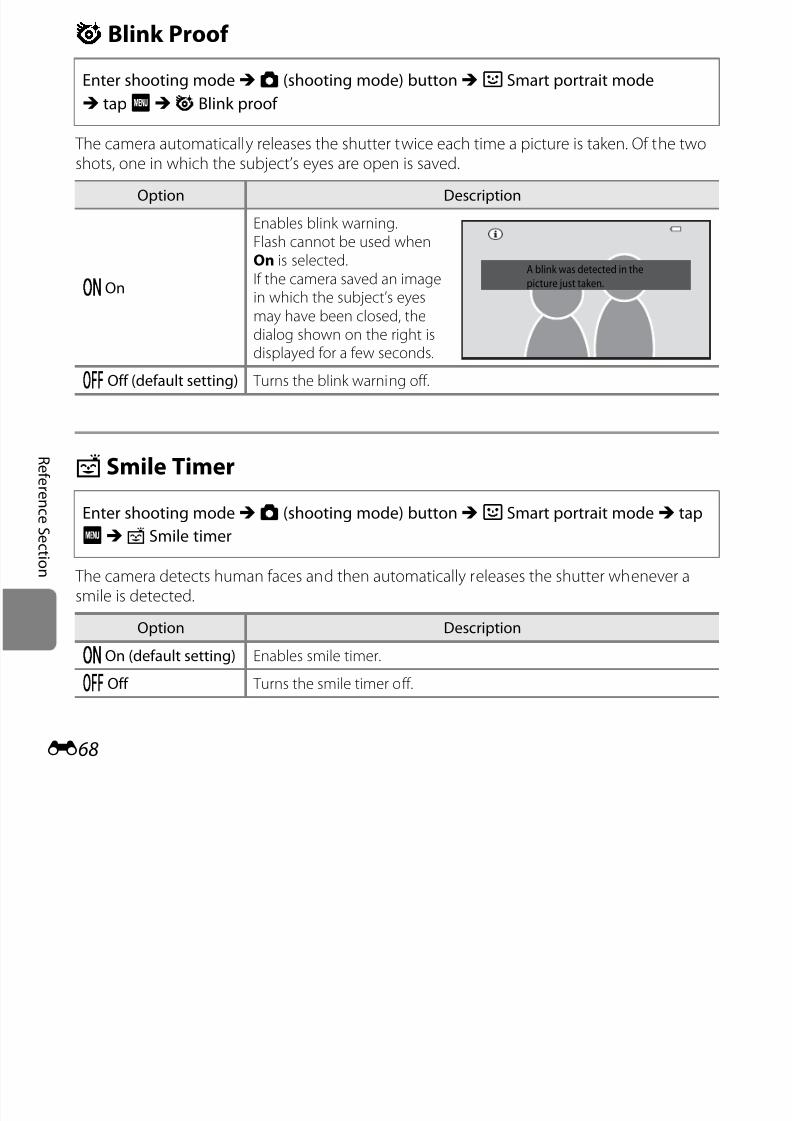
7/29/2019 Nikon s6400rm en 02
http://slidepdf.com/reader/full/nikon-s6400rm-en-02 192/280
E68
R e
f er en c e S e c t i on
a Smile Timer
The camera detects human faces and then automatically releases the shutter whenever asmile is detected.
pOff (default setting) Turns the blink warning off.
Enter shooting modeM A (shooting mode) buttonM F Smart portrait modeM tap
F M a Smile timer
Option Description
oOn (default setting) Enables smile timer.
pOff Turns the smile timer off.
The Playback Menu
• See “Favorite Pictures Mode” (E7) for information abouth Favorite pictures andh Remove from favorites.
• See “Step 6 Delete Unwanted Images” (A34) for information aboutl Delete.• See “Editing Still Images” (E17) for information aboutU Paint andM Retouch.
b Slide Show
Play back images, saved in the internal memory or on a memory card, one by one in an
automated “slide show.”
1 T St t
Press thec button (playback mode)M tapF M b Slide show
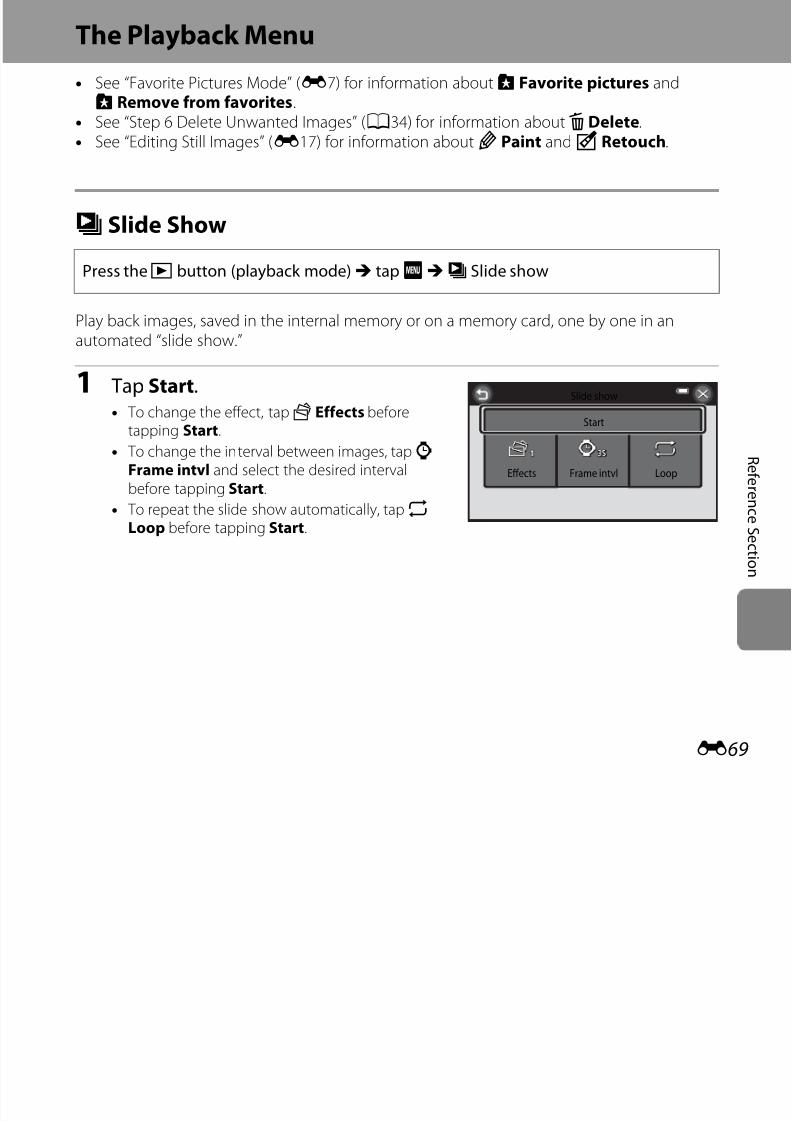
7/29/2019 Nikon s6400rm en 02
http://slidepdf.com/reader/full/nikon-s6400rm-en-02 193/280
E69
R e
f er en c e S e c t i on
1 Tap Start.• To change the effect, tapx Effects before
tapping Start.
• To change the interval between images, tapy Frame intvl and select the desired intervalbefore tapping Start.
• To repeat the slide show automatically, tapm Loop before tapping Start.
Slide show
Efects
Start
LoopFrame intvl
2 The slide show begins.
• Tap the monitor to display the operation panelat the bottom of the screen.
• The screen that appears when the slide show ispaused is displayed after the last slide is playedback.
Tap the icons in the operation panel to perform the corresponding operation. The followingoperations are available.
To Tap Description
Rewind O Tap and holdO to rewind slide show.
Advance P Tap and holdP to advance slide show.
Pause QPause playback.• To resume playback, tapR displayed at the center of the
screen
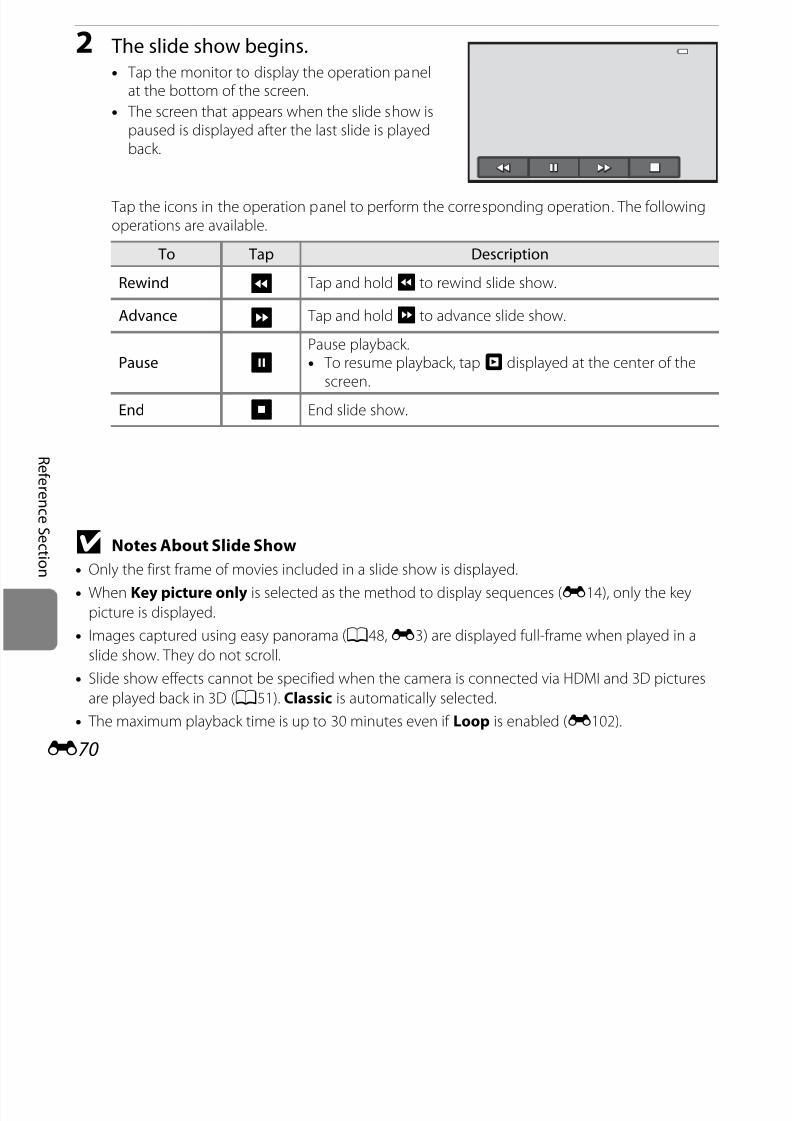
7/29/2019 Nikon s6400rm en 02
http://slidepdf.com/reader/full/nikon-s6400rm-en-02 194/280
E70
R e
f er en c e S e c t i on
B Notes About Slide Show
• Only the first frame of movies included in a slide show is displayed.
• When Key picture only is selected as the method to display sequences (E14), only the key
picture is displayed.• Images captured using easy panorama (A48,E3) are displayed full-frame when played in a
slide show. They do not scroll.
• Slide show effects cannot be specified when the camera is connected via HDMI and 3D pictures
are played back in 3D (A51). Classic is automatically selected.
• The maximum playback time is up to 30 minutes even if Loop is enabled (E102).
screen.
End S End slide show.
d Protect
Protects selected images from accidental deletion.Note that formatting the camera’s internal memory or the memory card will permanentlydelete protected files (E103).
Protected images are indicated by thes icon during playback (A8).
Protecting One Image
Tapo On.
• The selected image is protected.• To continue protecting another image, drag the
current image.• To exit without protecting images, tapJ.
Press thec button (playback mode)M select an imageM tapF M d Protect
Protect
On Of
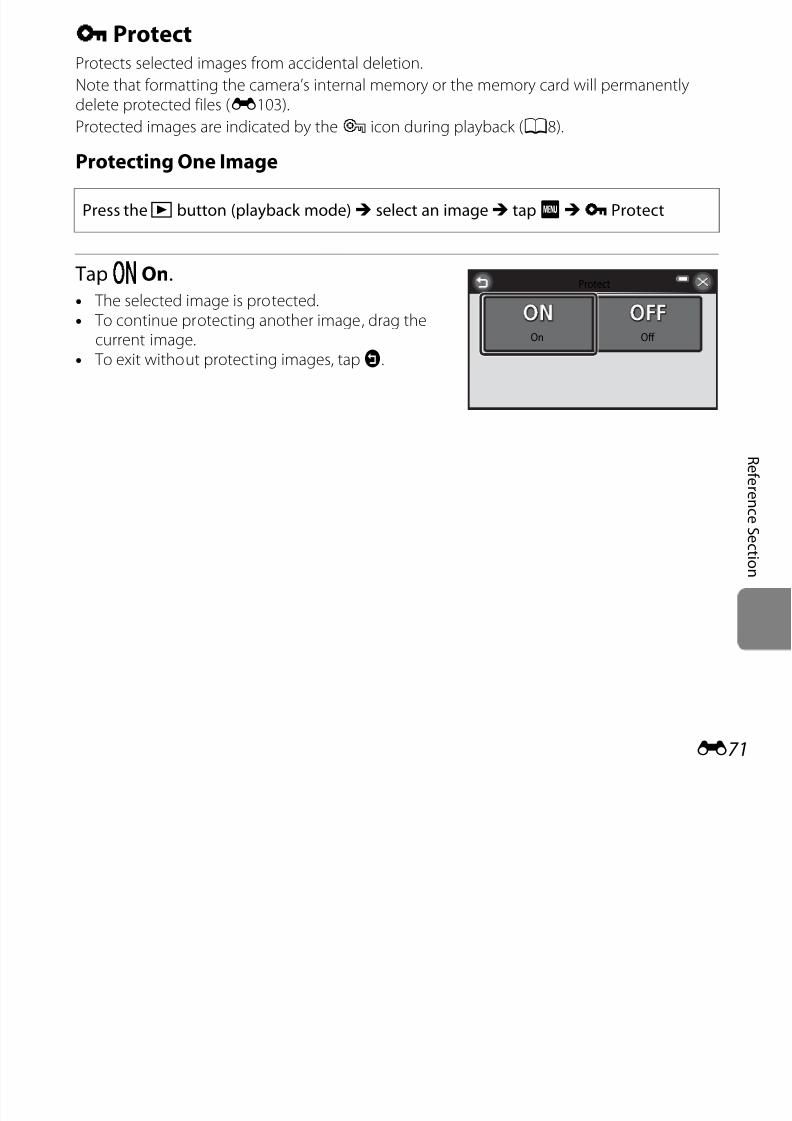
7/29/2019 Nikon s6400rm en 02
http://slidepdf.com/reader/full/nikon-s6400rm-en-02 195/280
E71
R e
f er en c e S e c t i on
Protecting Multiple Images
1 Tap the desired images to beprotected.• When an image is selected, a check mark (y) is
displayed. To cancel the selection, tap the imageagain.
• Rotate the zoom control to g (i) to switch tofull-frame playback orf (h) to switch back to12-thumbnail display.
2 TapI.
• The selected images are protected.
Press thec button (playback mode)M switch to thumbnail playback mode (A81)M
tapF M d Protect
Protect
Protect
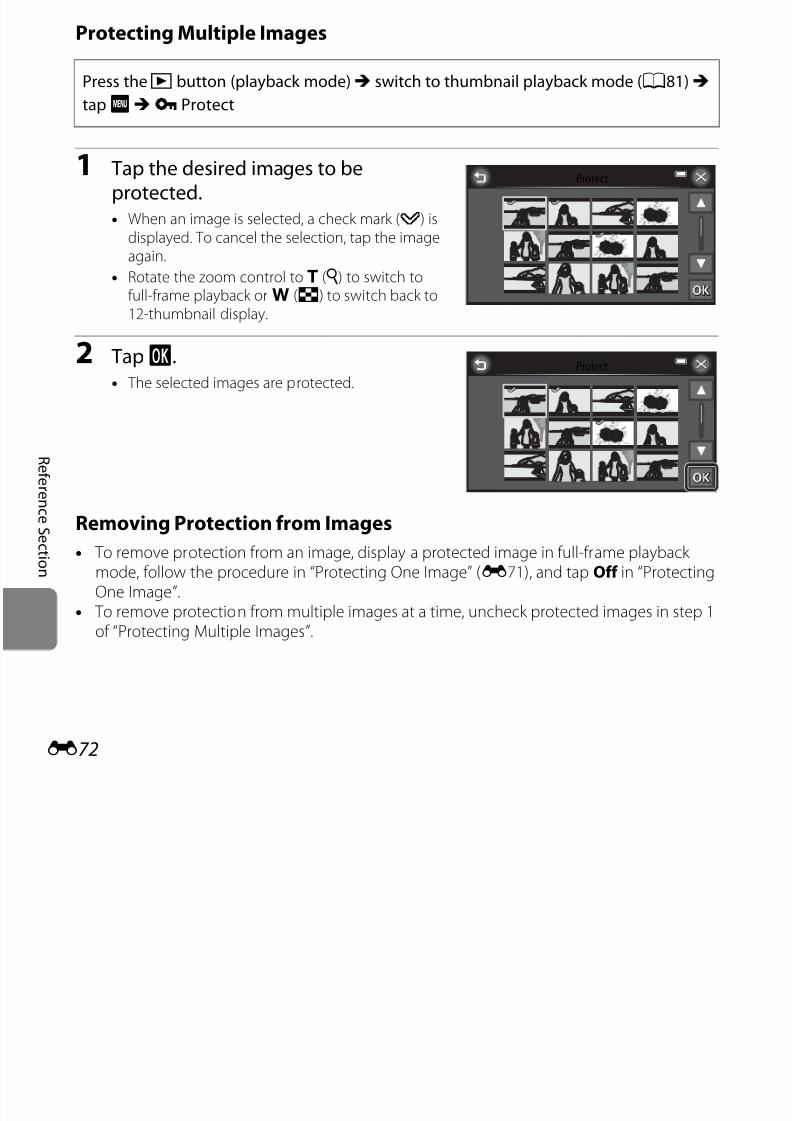
7/29/2019 Nikon s6400rm en 02
http://slidepdf.com/reader/full/nikon-s6400rm-en-02 196/280
E72
R e
f er en c e S e c t i on
The selected images are protected.
Removing Protection from Images
• To remove protection from an image, display a protected image in full-frame playback mode, follow the procedure in “Protecting One Image” (E71), and tap Off in “ProtectingOne Image”.
• To remove protection from multiple images at a time, uncheck protected images in step 1of “Protecting Multiple Images”.
a Print Order (Creating a DPOF Print Order)
When printing images saved on the memory card using any of the following methods, thePrint order option in the playback menu is used to create digital “print orders” for printingon DPOF-compatible devices.• Inserting the memory card into a DPOF-compatible (F22) printer’s card slot.• Taking the memory card to a digital photo lab.• Connecting the camera to a PictBridge-compatible (F22) printer (E38). A print order
can also be created for images saved in the internal memory if the memory card is
removed from the camera.• Images selected for printing are indicated by thew icon (A8) during playback.
Creating a Print Order for One Image
1 Tap the desired number of copies (upto nine) and tapI
Press thec button (playback mode)M select an imageM tapF M a Print order
Print order
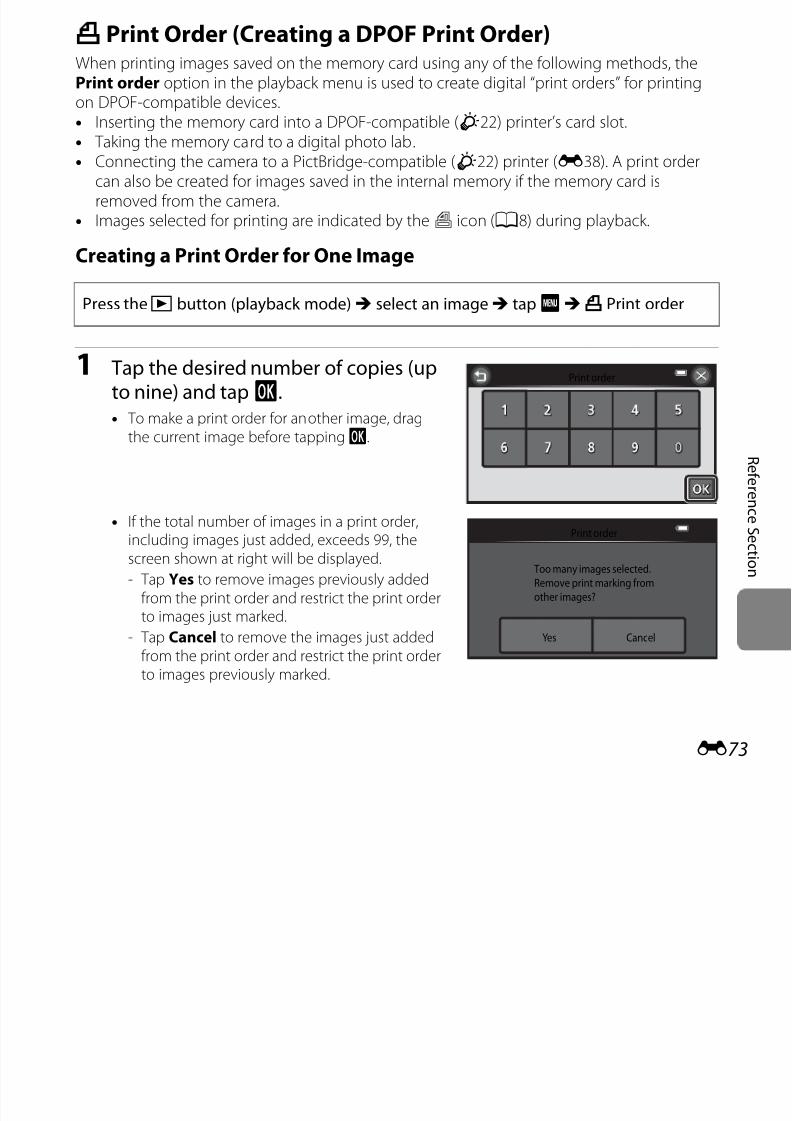
7/29/2019 Nikon s6400rm en 02
http://slidepdf.com/reader/full/nikon-s6400rm-en-02 197/280
E73
R e
f er en c e S e c t i on
to nine) and tapI.• To make a print order for another image, drag
the current image before tappingI.
• If the total number of images in a print order,including images just added, exceeds 99, thescreen shown at right will be displayed.
- Tap Yes to remove images previously addedfrom the print order and restrict the print order
to images just marked.- Tap Cancel to remove the images just added
from the print order and restrict the print orderto images previously marked.
Print order
Too many images selected.
Remove print marking from
other images?
Yes Cancel
2 Choose whether or not to print
shooting date and photo information.• TapN Date to place w in the checkbox to
imprint the shooting date on the image.
• TapM Info to place w in the checkbox toimprint the photo information (shutter speedand aperture value) on the image.
• TapI to complete the print order.
Creating a Print Order for Multiple Images
1 Tap the desired images to print (up to99 i ) d t B C t th
Press thec button (playback mode)M switch to thumbnail playback mode (A81)M
tapF M a Print order
Print order
Date Info
Print selection
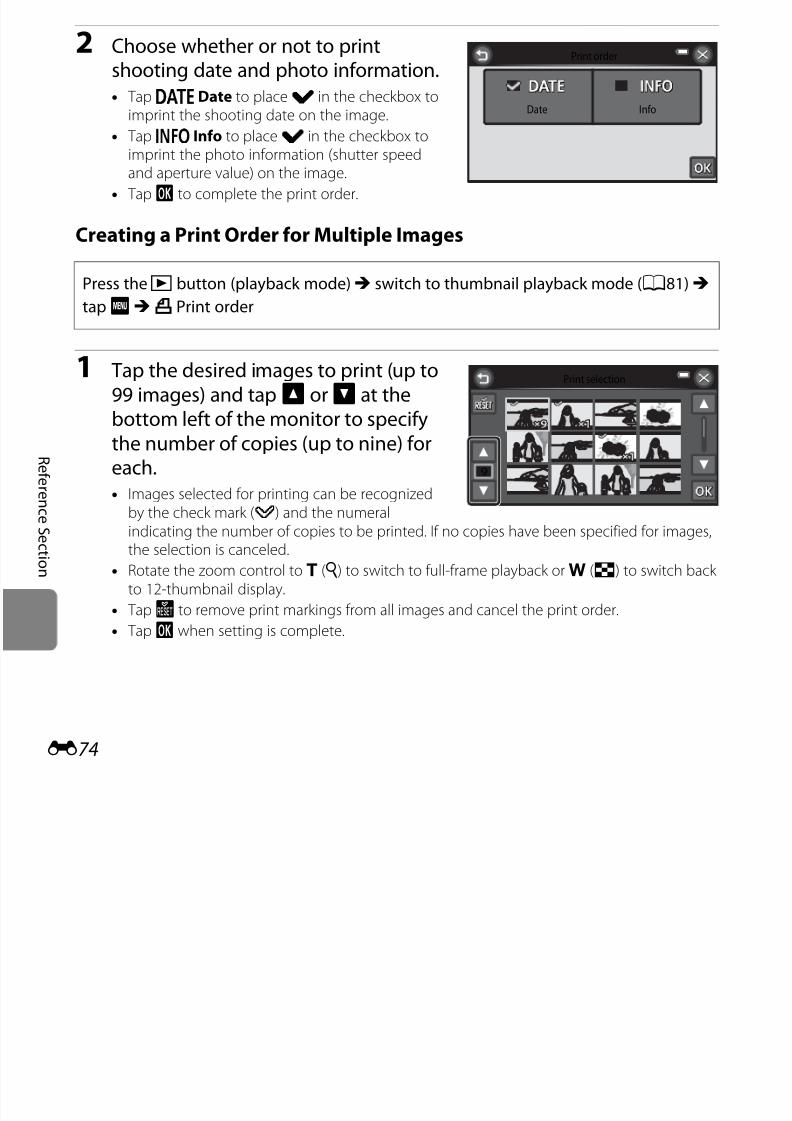
7/29/2019 Nikon s6400rm en 02
http://slidepdf.com/reader/full/nikon-s6400rm-en-02 198/280
E74
R e
f er en c e S e c t i on
99 images) and tapB orC at thebottom left of the monitor to specifythe number of copies (up to nine) foreach.• Images selected for printing can be recognized
by the check mark (y) and the numeralindicating the number of copies to be printed. If no copies have been specified for images,the selection is canceled.
• Rotate the zoom control to g (i) to switch to full-frame playback orf (h) to switch back to 12-thumbnail display.
• Tapn to remove print markings from all images and cancel the print order.
• TapI when setting is complete.
9
2 Choose whether or not to print
shooting date and photo information.• TapN Date to place w in the checkbox to
imprint the shooting date on all images in theprint order.
• TapM Info to place w in the checkbox toimprint the photo information (shutter speedand aperture value) on all images in the print
order.• TapI to complete the print order.
Canceling Print Order
• To remove a print marking from an image, display an image selected for printing in full-frame playback mode, follow the procedure in “Creating a Print Order for One Image”
(E73), and tap “0” in step 1.• To remove print markings from multiple images at a time, remove the print markings of the desired images in step 1 of “Creating a Print Order for Multiple Images” (E74). Tapn
f
Print order
Date Info
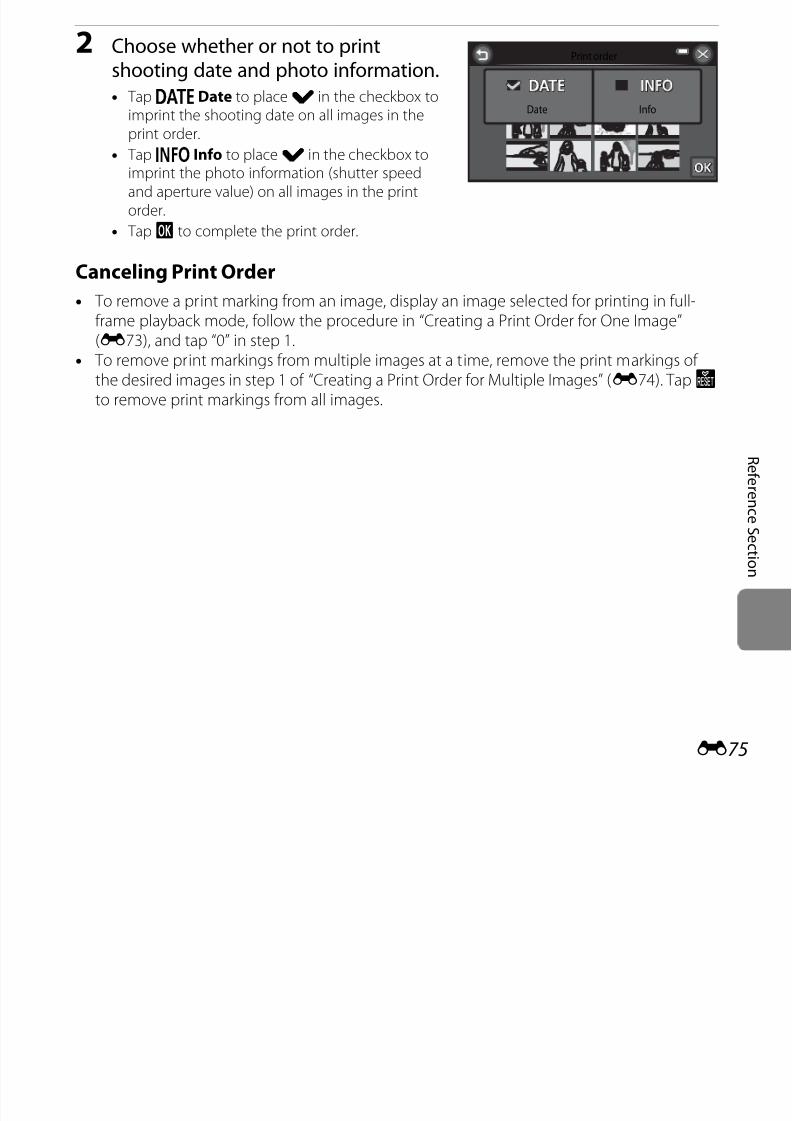
7/29/2019 Nikon s6400rm en 02
http://slidepdf.com/reader/full/nikon-s6400rm-en-02 199/280
E75
R e
f er en c e S e c t i on
to remove print markings from all images.
B Notes About Printing Shooting Date and Shooting Information
When the Date and Info settings are enabled in the print order option, shooting date and shooting
information are printed on images when a DPOF-compatible (F22) printer that supports printing
of shooting date and shooting information is used.
• Shooting information cannot be printed when the camera is connected to a DPOF-compatible
printer via the included USB cable (E45).
• Note that Date and Info settings are reset each time the Print order option is displayed.
• The date printed is that saved when the image was
captured. Changing the camera’s date using the Dateand time or Time zone in the Time zone and date
option in the setup menu after an image has been
captured has no effect on the date printed on the
image.
B Notes About Print Order
Print orders cannot be created for images captured in 3D photography scene mode.
15.11.20125 . 11 . 2012
15.11.2012
7/29/2019 Nikon s6400rm en 02
http://slidepdf.com/reader/full/nikon-s6400rm-en-02 200/280
E76
R e
f er en c e S e c t i on
C Print Date
Using the Print date option (E95) in the setup menu, shooting date and time can be imprinted
on images at the time of shooting. Images with the date imprinted on them can be printed from
printers that do not support printing of the date on images.Only the date and time imprinted on images with the print date option will be printed, even if the
Print order date option is enabled.
f Rotate Image
Specify the orientation in which saved images are displayed during playback.
Still images can be rotated 90 degrees clockwise or 90 degrees counterclockwise.• TapI orJ to rotate the image 90 degrees.
• TapI to finalize display orientation and save the orientation information with the image.
Press thec button (playback mode)M select an imageM tapF M M RetouchM
f Rotate image
Rotate image Rotate imageRotate image
Rotate 90 degreescounterclockwise Rotate 90 degreesclockwise
I
J
J
I
7/29/2019 Nikon s6400rm en 02
http://slidepdf.com/reader/full/nikon-s6400rm-en-02 201/280
E77
R e
f er en c e S e c t i on
B Notes About Image Rotation
• Images captured with another make or model of digital camera or captured with 3D
photography (A50) cannot be rotated on the COOLPIX S6400.
• Images captured in sequence cannot be rotated when only the key pictures are displayed for
them. First display the images individually, and then rotate the desired image (E14).
E Voice Memo
Use the camera’s microphone to record voice memos for images.• The voice memo recording screen is displayed for images that do not have a voice memo,
and the voice memo playback screen is displayed for images that have a voice memo (i.e.,images that displayp in full-frame playback mode).
Recording Voice Memos
• TapW to record a voice memo (up to about 20seconds).
• Do not touch the microphone during recording.• During recording,o flashes in the monitor.
Press thec button (playback mode)M select an imageM tapF M E Voice memo
20 20
7/29/2019 Nikon s6400rm en 02
http://slidepdf.com/reader/full/nikon-s6400rm-en-02 202/280
E78
R e
f er en c e S e c t i on
• TapS to end recording.• When recording ends, the voice memo playback
screen is displayed.• TapJ to return to the playback menu.
15 15
Playing Voice Memos
• TapR
to play the voice memo.• TapS to stop playback.• TapX during playback to adjust playback
volume.• f flashes during playback.• TapJ to return to the playback menu.
Deleting Voice Memos
TapE while the screen described in “Playing VoiceMemos” is displayed.
Tap Yes to delete only the voice memo.
66
Yes No
File will be deleted. OK?
7/29/2019 Nikon s6400rm en 02
http://slidepdf.com/reader/full/nikon-s6400rm-en-02 203/280
E79
R e
f er en c e S e c t i on
B Notes About Voice Memos
• When an image with a voice memo attached is deleted, both the image and its voice memo are
deleted.• You cannot delete voice memos attached to protected images (E71).
• Voice memos cannot be recorded for an image that already has a voice memo attached to it. The
current voice memo must be deleted before a new voice memo can be recorded.
• The COOLPIX S6400 cannot record voice memos for images captured with another make or
model of digital camera.
• Voice memos cannot be recorded for images captured in sequence when only the key picturesare displayed for sequences of images. First display the images individually, and then record voice
memos (E14).
C More Information
See “File and Folder Names” (E117) for more information.
h Copy (Copy Between Internal Memory and Memory Card)
Copy images between the internal memory and a memory card.
1 Tap the desired option from the copy
screen.• q Camera to card: Copy images frominternal memory to memory card.
• r Card to camera: Copy images frommemory card to internal memory.
2 Tap the desired copy option.• F Selected images: Copy images selected.
Proceed to step 3.
Press thec button (playback mode)M tapF M h Copy
Copy
Camera to card Card to camera
Camera to card
Selected All images
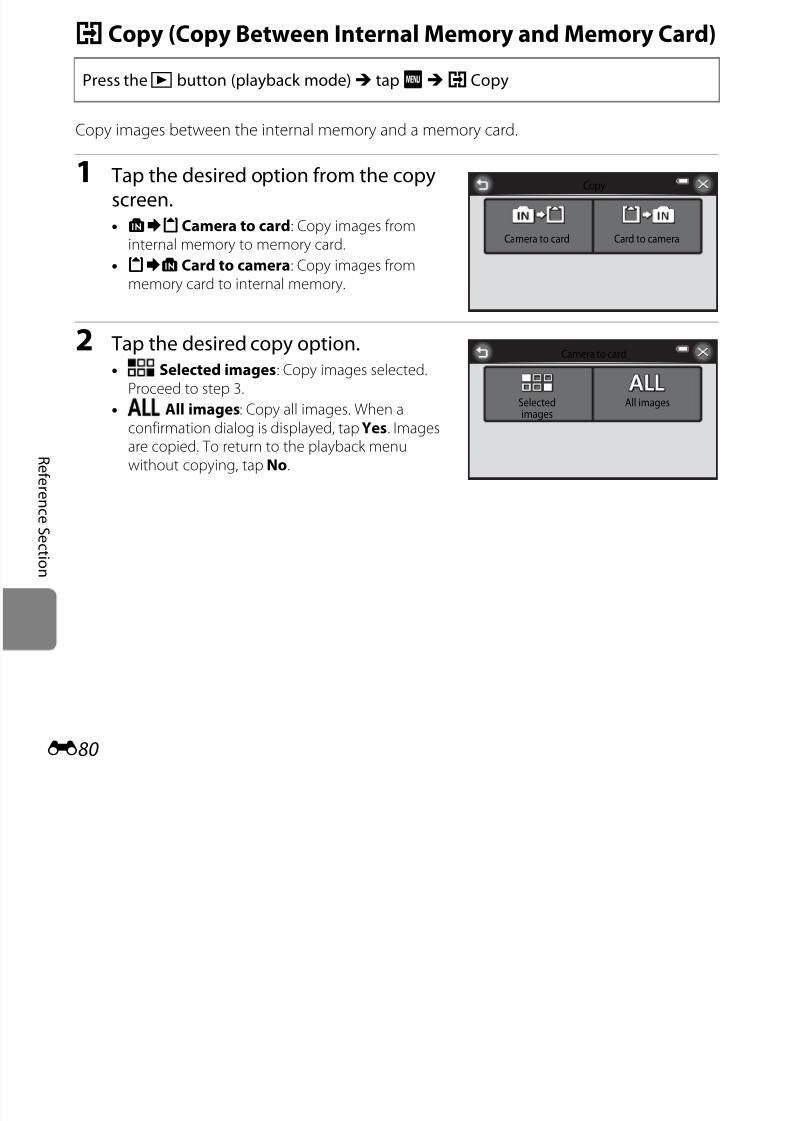
7/29/2019 Nikon s6400rm en 02
http://slidepdf.com/reader/full/nikon-s6400rm-en-02 204/280
E80
R ef er en c e S e c t i on
• H All images: Copy all images. When aconfirmation dialog is displayed, tap Yes. Imagesare copied. To return to the playback menuwithout copying, tap No.
Selectedimages
All images
3 Tap the images to be copied.
• When an image is selected, a check mark isdisplayed. To cancel the selection, tap the imageagain. A check mark is removed.
• Rotate the zoom control to g (i) to switch tofull-frame playback orf (h) to switch back to12-thumbnail display.
4 TapI.• When a confirmation dialog is displayed, tap
Yes. Images are copied. To return to theplayback menu without copying, tap No.
Copy
Copy
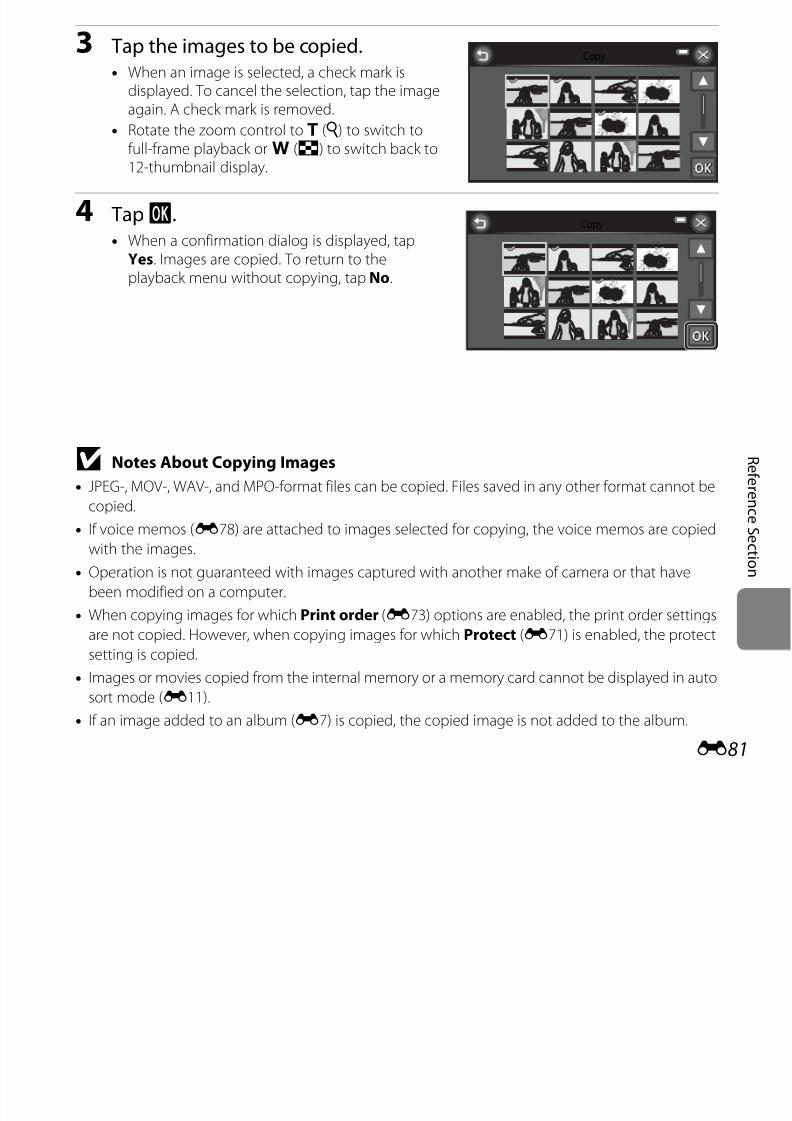
7/29/2019 Nikon s6400rm en 02
http://slidepdf.com/reader/full/nikon-s6400rm-en-02 205/280
E81
R ef er en c e S e c t i on
B Notes About Copying Images
• JPEG-, MOV-, WAV-, and MPO-format files can be copied. Files saved in any other format cannot becopied.
• If voice memos (E78) are attached to images selected for copying, the voice memos are copied
with the images.
• Operation is not guaranteed with images captured with another make of camera or that have
been modified on a computer.
• When copying images for which Print order (E73) options are enabled, the print order settings
are not copied. However, when copying images for which Protect (E71) is enabled, the protect
setting is copied.
• Images or movies copied from the internal memory or a memory card cannot be displayed in auto
sort mode (E11).
• If an image added to an album (E7) is copied, the copied image is not added to the album.
C Notes About Copying Images in a Sequence
• If you select a key picture of a sequence in Selected images when only the key picture is
displayed for the sequence (E14), all images in the sequence are copied.
• If you tapF and select Current sequence after you tapR and display images in a sequence as
individual images, all images in the sequence are copied.
• If you tapR and display images in a sequence as individual images, only Card to camera
(memory card to internal memory) image copy is available.
C If “Memory contains no images.” Is Displayed
If a memory card that contains no images is inserted into the camera, Memory contains no images.
will be displayed when the camera is switched to playback mode. TapF and taph Copy to display
the copy options screen and copy the images saved in the camera’s internal memory to the memory
card.
C More Information
See “File and Folder Names” (E117) for more information.
7/29/2019 Nikon s6400rm en 02
http://slidepdf.com/reader/full/nikon-s6400rm-en-02 206/280
E82
R ef er en c e S e c t i on
N Choose Key Picture
When Sequence display options (E110) in the setup menu is set to Key picture only,the key picture displayed in full-frame playback mode (A32) and thumbnail playback mode(A81) can be set for each sequence of images.• When the key picture selection screen is displayed, tap an image and tapI.
• The key picture cannot be changed when Sequence display options is set toIndividual pictures.
Press thec button (playback mode)M select an image in a sequenceM
tapR M tapF M N Choose key picture
The Movie Menu
D Movie Options
Select the desired movie option to record. Larger image sizes and faster movie bitrates meangreater image quality and larger movie file sizes.• The movie bitrate is the volume of movie data recorded per second. Variable bitrate (VBR)
encoding is used to automatically adjust the bitrate depending on the subject beingrecorded. When recording movies of a subject with large amounts of motion, the file sizeincreases.
• See “Movie Options and Maximum Movie Length” (A98) for information about maximummovie length.
• When recording normal speed movies, select one of the normal speed movie options(E83), and when recording HS (high speed) movies, select one of the HS movie options(E84).
N l S d M i O ti
Enter shooting modeM tapF M D Movie options
7/29/2019 Nikon s6400rm en 02
http://slidepdf.com/reader/full/nikon-s6400rm-en-02 207/280
E83
R ef er en c e S e c t i on
Normal Speed Movie Options
• The frame rate is approximately 30 fps for all options.
Type Movie bitrate Description
c HD 1080pP
(1920×1080)(default setting)
Approx. 18 Mbps Movies with an aspect ratio of 16:9 are recorded. This option is suited to playback on a widescreen TV.
d HD 1080p(1920×1080)
Approx. 12.3Mbps
Movies with an aspect ratio of 16:9 are recorded. This option is suited to playback on a widescreen TV.
e HD 720p
(1280×720)
Approx. 9 Mbps Movies with an aspect ratio of 16:9 are recorded.
HS Movie Options
* The maximum recording time shown here refers only to the portion of the movie that is recordedin slow motion or fast motion.
Recording Movies in Slow Motion and Fast Motion (HS Movie)
HS (hi h d) i b d d HS i b l d b k i l ti t
Type Movie bitrate Description
f HS 60 fps(1280×720)
Approx. 6 Mbps
1/2-speed slow motion movies with a 16:9 aspectratio are recorded.• Max. recording time*: 30 seconds (playback
time: 1 minute)
g HS 15 fps
(1920×1080) Approx. 12 Mbps
2× speed fast motion movies with a 16:9 aspectratio are recorded.• Max. recording time*: 2 minutes (playback time:
1 minute)
Enter shooting modeM tapF M DMovie options
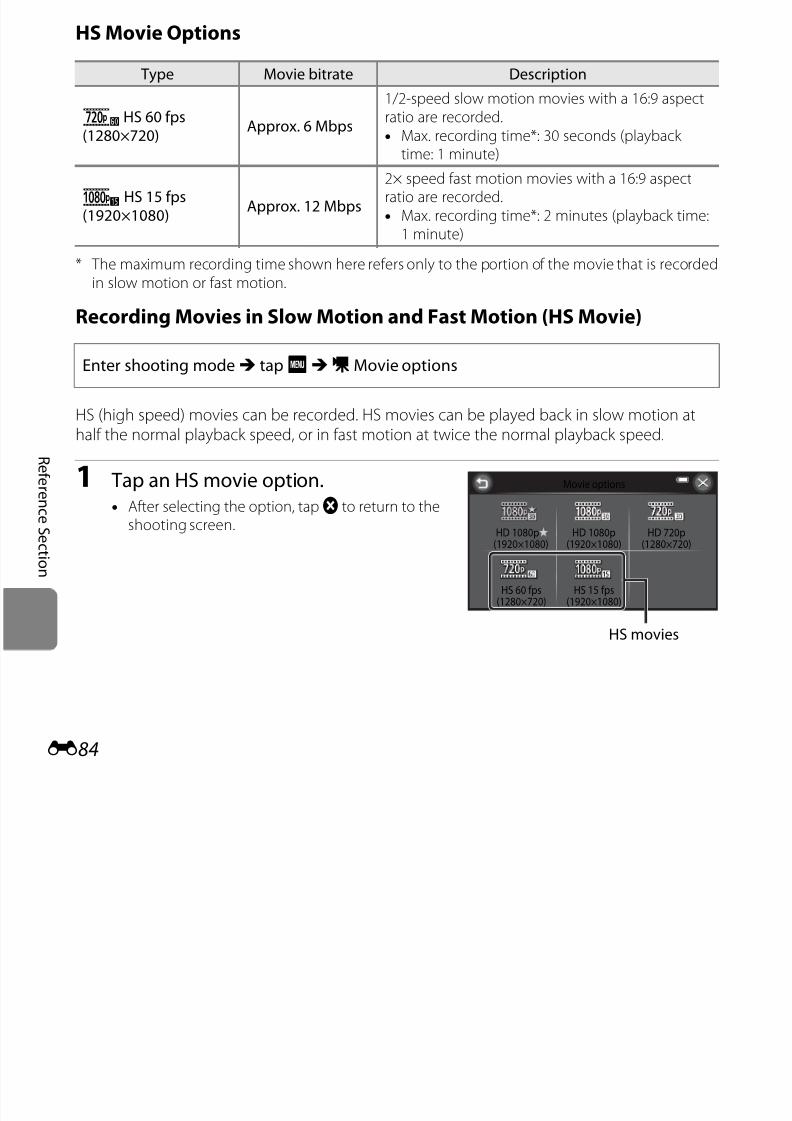
7/29/2019 Nikon s6400rm en 02
http://slidepdf.com/reader/full/nikon-s6400rm-en-02 208/280
E84
R ef er en c e
S e c t i on
HS (high speed) movies can be recorded. HS movies can be played back in slow motion athalf the normal playback speed, or in fast motion at twice the normal playback speed.
1 Tap an HS movie option.• After selecting the option, tapf to return to the
shooting screen.
Movie options
HS 15 fps(1920×1080)
HS 60 fps(1280×720)
HD 720p(1280×720)
HD 1080p(1920×1080)
HD 1080p (1920×1080)
HS movies
2 Press theb (emovie-record) button
to start recording.• Movie recording starts in HS mode when Open
with HS footage in the movie menu is set toOn.
• Movie recording starts at normal speed whenOpen with HS footage in the movie menu isset to Off . Tap the HS movie switch icon toswitch to HS movie recording at the point wherethe camera should record for slow motion or fast
motion playback.
66
When recording HS movies
HS movie switch icon
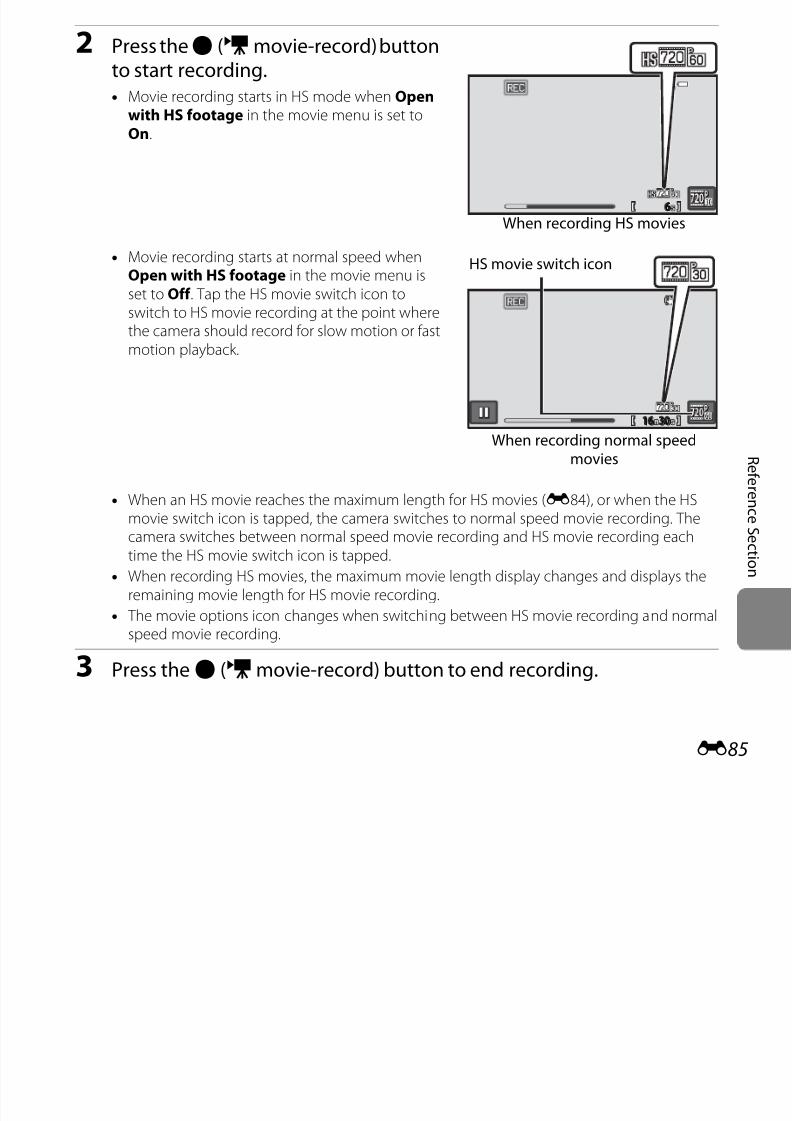
7/29/2019 Nikon s6400rm en 02
http://slidepdf.com/reader/full/nikon-s6400rm-en-02 209/280
E85
R ef er en c e S e c t i on
• When an HS movie reaches the maximum length for HS movies (E84), or when the HSmovie switch icon is tapped, the camera switches to normal speed movie recording. Thecamera switches between normal speed movie recording and HS movie recording eachtime the HS movie switch icon is tapped.
• When recording HS movies, the maximum movie length display changes and displays theremaining movie length for HS movie recording.
• The movie options icon changes when switching between HS movie recording and normalspeed movie recording.
3 Press theb (emovie-record) button to end recording.
1616 3030
When recording normal speedmovies
B Notes About HS Movie
• Sound is not recorded.
• Zoom position, focus, exposure, and white balance are locked when theb (emovie-record)
button is pressed to start HS movie recording.
C HS Movie
Recorded movies are played back at about 30 frames per second.
When Movie options (E83) in the movie menu is set tof HS 60 fps (1280×720), movies
that can be played back in slow motion can be recorded. When set tog HS 15 fps
(1920×1080), movies that can be played back in fast motion at a speed two times faster than
normal speed can be recorded.
Portions recorded atfHS 60 fps (1280×720):
High-speed recording is possible for up to 30 seconds, and the captured portion can be played back
in slow motion at a speed two times slower than normal speed.
Recording 30 s
Playback 1 min
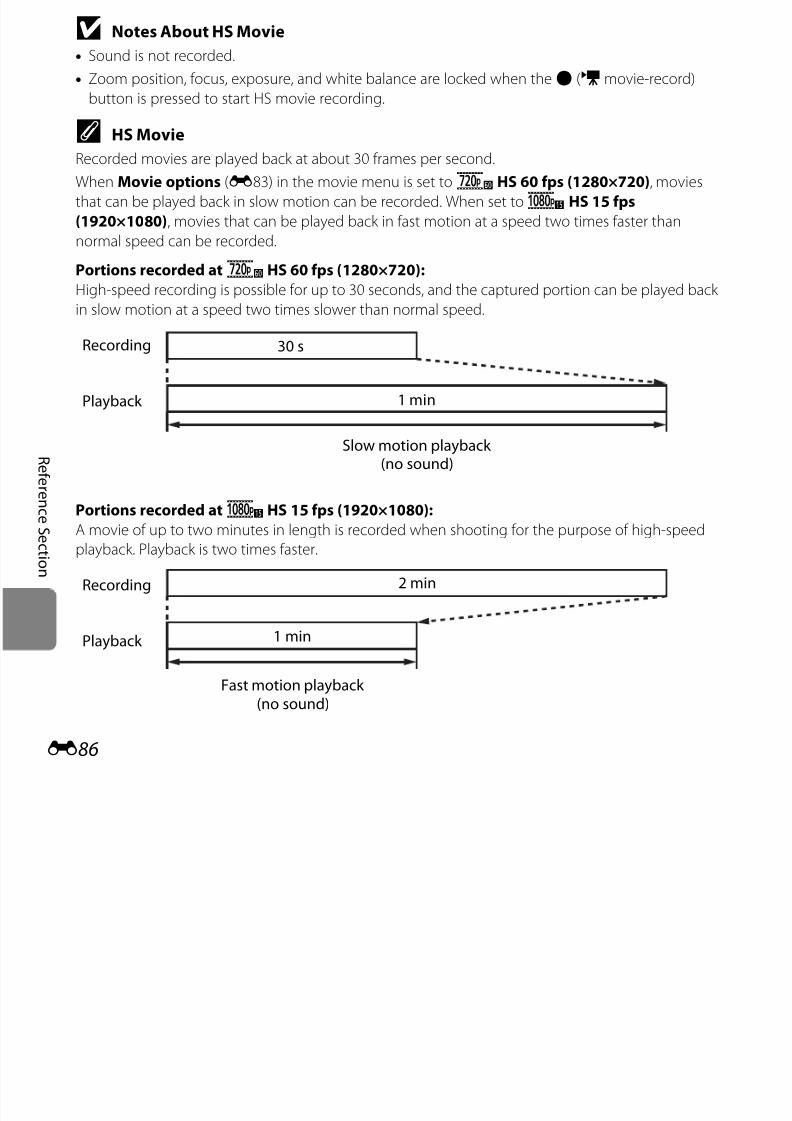
7/29/2019 Nikon s6400rm en 02
http://slidepdf.com/reader/full/nikon-s6400rm-en-02 210/280
E86
R ef er en c e S e c t i on
Portions recorded atgHS 15 fps (1920×1080):
A movie of up to two minutes in length is recorded when shooting for the purpose of high-speed
playback. Playback is two times faster.
Slow motion playback (no sound)
Recording 2 min
Fast motion playback (no sound)
Playback 1 min
NOpen with HS Footage
Select whether the camera records normal speed movies or HS movies (slow motion or fastmotion movies) when movie recording starts.
Enter shooting modeM tapF M N Open with HS footage
Option Description
oOn (default setting) Record HS movies when movie recording begins.
pOff
Record normal speed movies when movie recording begins. Tapthe HS movie switch icon (E85) to switch to HS movie recordingat the point where the camera should record for slow motion orfast motion playback.
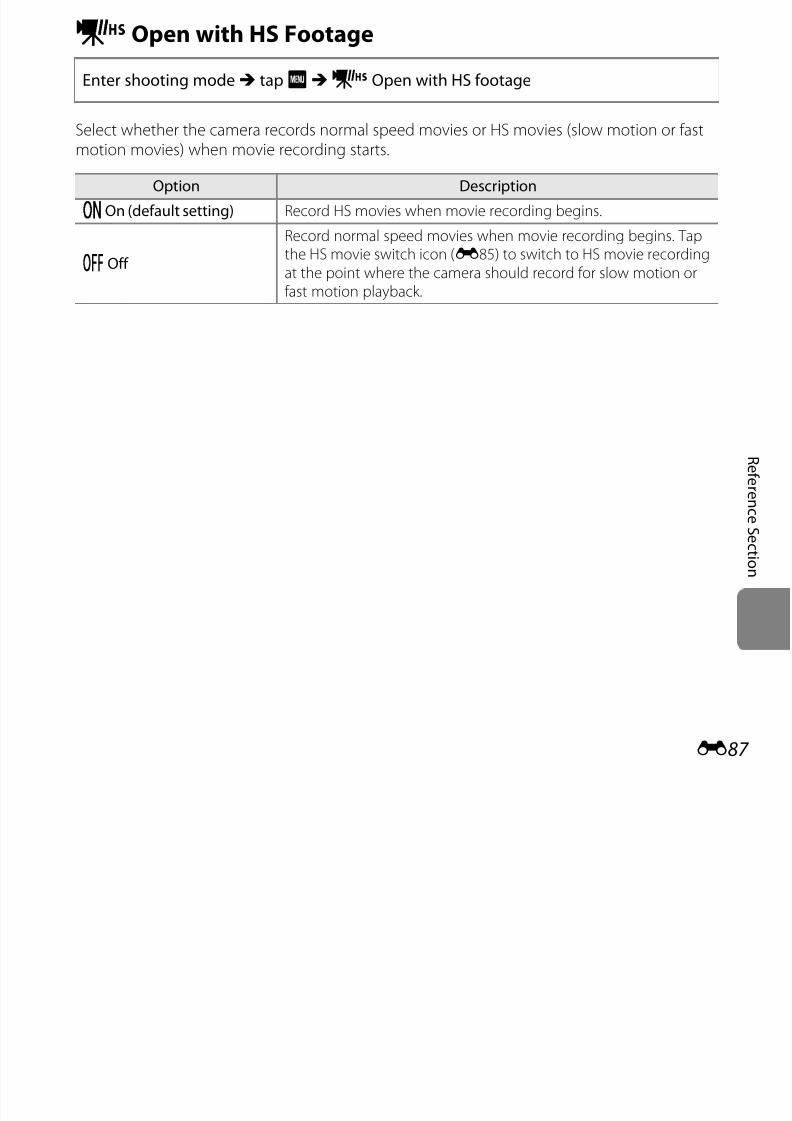
7/29/2019 Nikon s6400rm en 02
http://slidepdf.com/reader/full/nikon-s6400rm-en-02 211/280
E87
R ef er en c e S e c t i on
D Movie AF mode
Select how the camera focuses in movie mode.
• When an HS movie option is selected in Movie options, the setting is fixed at Single AF.
Enter shooting modeM tapF M D Movie AF mode
Option Description
A Single AF
(default setting)
Focus is locked when theb (emovie-record) button is pressed tostart recording.
Select this option when the distance between the camera and thesubject will remain fairly consistent.
B Full-time AF
Camera focuses continuously.Select this option when the distance between the camera andsubject will change significantly during recording. The sound of thecamera focusing may be heard in the recorded movie. Use of SingleAF is recommended to prevent the sound of the camera focusing
from interfering with recording.
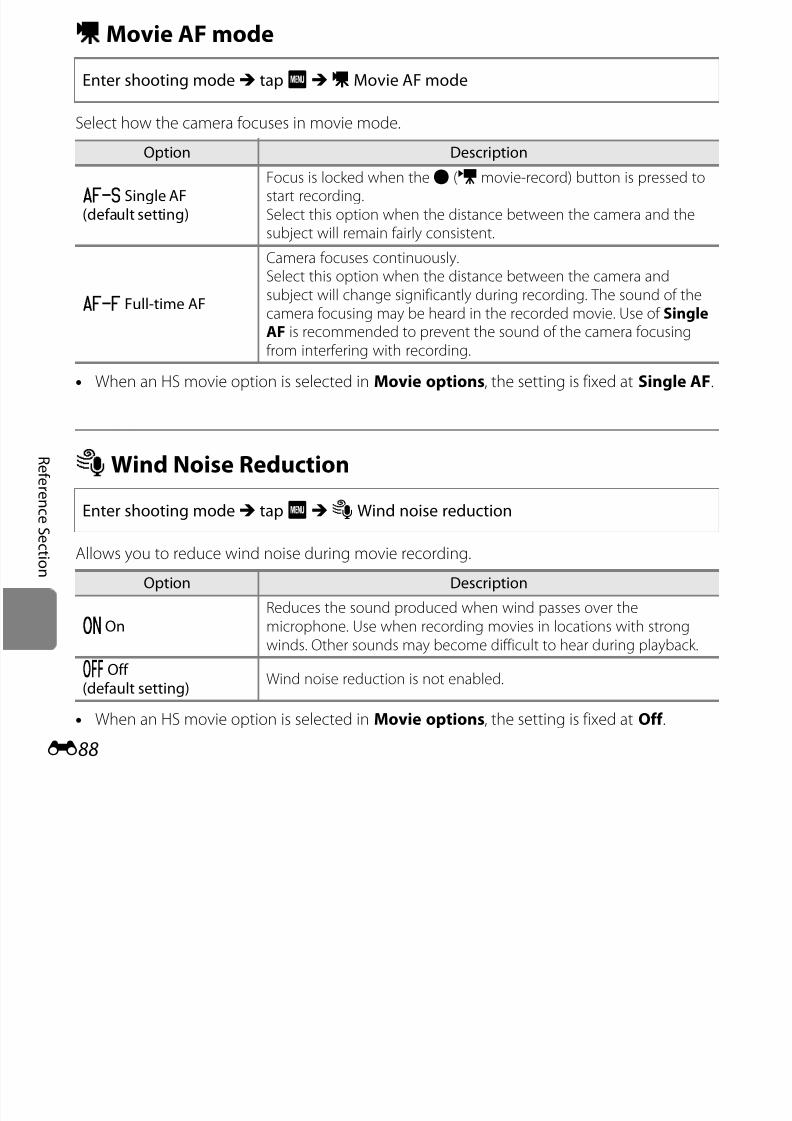
7/29/2019 Nikon s6400rm en 02
http://slidepdf.com/reader/full/nikon-s6400rm-en-02 212/280
E88
R ef er en c e S e c t i on
YWind Noise Reduction
Allows you to reduce wind noise during movie recording.
• When an HS movie option is selected in Movie options, the setting is fixed at Off .
Enter shooting modeM tapF M YWind noise reduction
Option Description
oOn
Reduces the sound produced when wind passes over the
microphone. Use when recording movies in locations with strongwinds. Other sounds may become difficult to hear during playback.
pOff (default setting)
Wind noise reduction is not enabled.
The Setup Menu
Welcome Screen
Allows you to configure the welcome screen that is displayed when you turn on the camera.
TapF M z (setup menu)MWelcome screen
Option Description
None(default setting)
The camera enters shooting or playback mode without displayingthe welcome screen.
COOLPIX The camera displays a welcome screen and enters shooting orplayback mode.
Displays an image selected for the welcome screen. When the image
selection screen is displayed, tap an image and tapI to set it as thewelcome screen.• On the image selection
screen, rotate the zooml g (i)
Select image
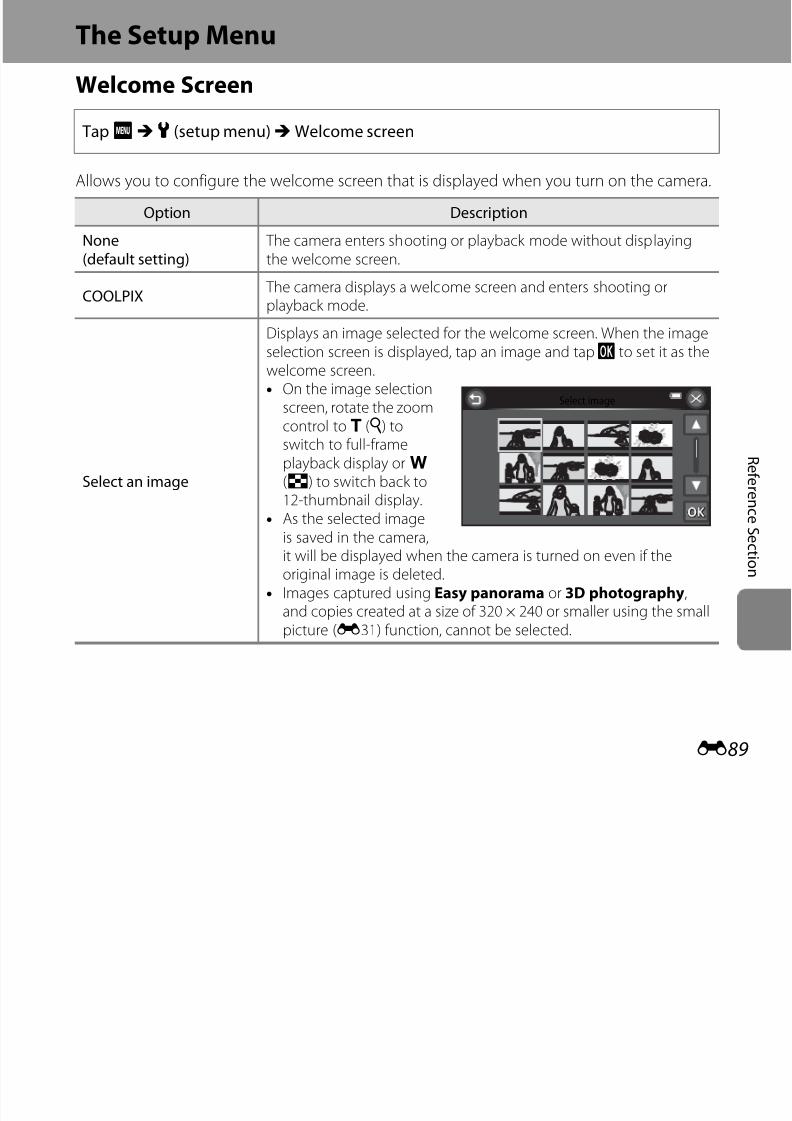
7/29/2019 Nikon s6400rm en 02
http://slidepdf.com/reader/full/nikon-s6400rm-en-02 213/280
E89
R ef
er en c e S e c t i on
Select an image
control to g (i) toswitch to full-frameplayback display orf
(h) to switch back to12-thumbnail display.• As the selected image
is saved in the camera,it will be displayed when the camera is turned on even if theoriginal image is deleted.
• Images captured using Easy panorama or 3D photography,and copies created at a size of 320 × 240 or smaller using the small
picture (E31) function, cannot be selected.
Time Zone and Date
Set the camera clock.
TapF M z (setup menu)M Time zone and date
Option Description
Date and time
Set camera clock to current date
and time. Tap the fields (day, month, year,hour, and minute) on thedisplayed screen to set the dateand time.• Select a field: Tap the desired
filed.• Edit the value: TapA orB.
• Apply the setting: TapI.
Date format The available date formats are Year/Month/Day, Month/Day/Year, andDay/Month/Year.
w
Date and time
01 01 2012 00 : 00
YMD
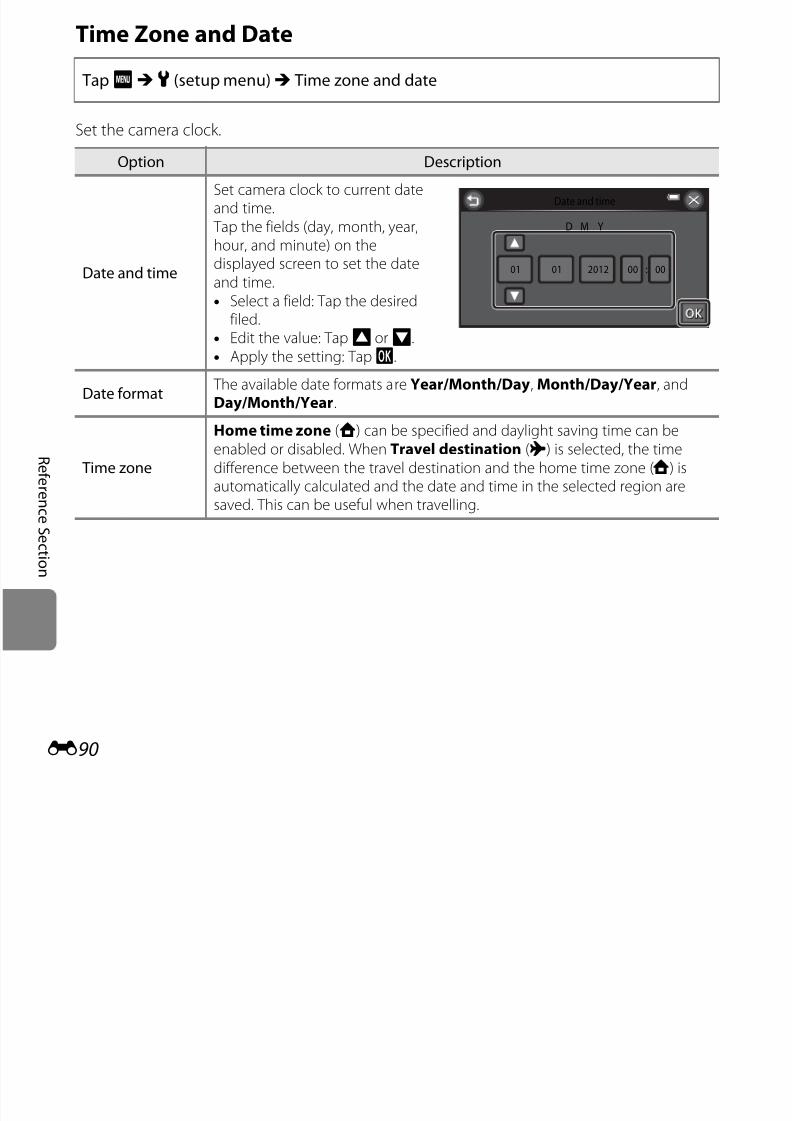
7/29/2019 Nikon s6400rm en 02
http://slidepdf.com/reader/full/nikon-s6400rm-en-02 214/280
E90
R ef
er en c e S e c t i on
Time zone
Home time zone (w) can be specified and daylight saving time can beenabled or disabled. When Travel destination (x) is selected, the timedifference between the travel destination and the home time zone (w) is
automatically calculated and the date and time in the selected region aresaved. This can be useful when travelling.
Selecting the Travel Destination Time Zone
1 Tap Time zone.
2 Tapx Travel destination.• The date and time displayed in the monitor
changes according to the region currentlyselected.
3 Tapo
Time zone and date
London, Casablanca
15/11/2012 15:30
Date format
Time zone
Date and time
Time zone
Home time zone
Travel destination
London, Casablanca
15/11/2012 15:30
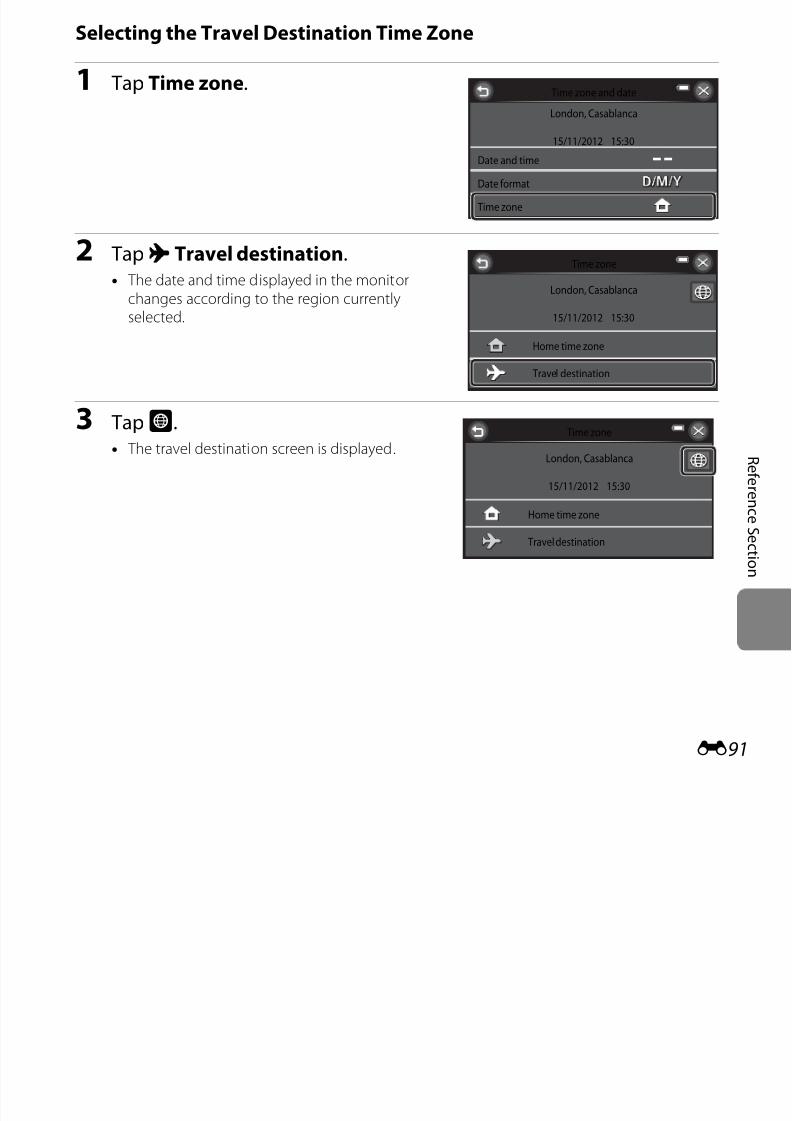
7/29/2019 Nikon s6400rm en 02
http://slidepdf.com/reader/full/nikon-s6400rm-en-02 215/280
E91
R ef
er en c e S e c t i on
3 Tapo.• The travel destination screen is displayed.
Time zone
Home time zone
Travel destination
London, Casablanca
15/11/2012 15:30
4 TapG orH to choose the travel
destination time zone and tapI.• If daylight saving time is in effect, tapp to
enable daylight saving time function.W isdisplayed at the top of the monitor and thecamera clock is advanced one hour. Tapp again to disable the daylight saving timefunction.
• If the time zone that you want to select is not available, set the appropriate time in Dateand time.
• While the travel destination time zone is selected, theZ icon will be displayed in themonitor when the camera is in shooting mode.
Travel destination
10:30 -05:00
New York
Toronto
Lima
7/29/2019 Nikon s6400rm en 02
http://slidepdf.com/reader/full/nikon-s6400rm-en-02 216/280
E92
R ef
er en c e S e c t i on
C w Home Time Zone
• To switch to the home time zone, tapw Home time zone in step 2.
• To change the home time zone, tapw Home time zone in step 2 and perform the same
procedure as forx Travel destination to set the home time zone.
C Daylight Saving Time
When daylight saving time starts or ends, turn the daylight saving time function on or off from the
time zone selection screen displayed in step 4.
C Imprinting Date on Images
Enable the Print date option (E95) in the setup menu after the date and time have been set.
When the Print date option is enabled, images will be saved with shooting date imprinted on
them.
Monitor Settings
Set the options below.
Photo Info
Select whether or not the photo information is displayed in the monitor.
TapF M z (setup menu)MMonitor settings
Option Description
Photo info Select information displayed in the monitor during shooting and playback.
Image review This setting determines whether or not the captured image is displayedimmediately after shooting. The default setting is On.
Brightness Select from five settings for monitor brightness. The default setting is 3.
Shooting mode Playback mode
155 /111 /2012 15012 15 : 300
0004004 . JPGPG
0004 . JPG
15 / 11 / 2012 15 : 30

7/29/2019 Nikon s6400rm en 02
http://slidepdf.com/reader/full/nikon-s6400rm-en-02 217/280
E93
R ef e
r en c e
S e c t i on
Show info
Auto info(default setting)
If no operations are performed for a few seconds, some of the control iconsand information are hidden. To display the control icons and information again, tapA during shooting ortap the monitor during playback.
2525 00
10101010 444/ /
Framinggrid+auto info
In addition to information shown withAuto info, a framing grid is displayedto help frame pictures. It is notdisplayed when recording movies.
The current settings or operationguide is displayed as in Auto info.
The current settings or operationguide is displayed as in Auto info.
Shooting mode Playback mode
2525 00
10101010
155 /111 /2012 15012 15 : 300
4
44/ /
0004004 . JPGPG
0004 . JPG15 / 11 / 2012 15 : 30
Movie frame
7/29/2019 Nikon s6400rm en 02
http://slidepdf.com/reader/full/nikon-s6400rm-en-02 218/280
E94
R ef er en c e S e c t i on
B Notes About Monitor Settings
When Quick effects (E65) is set to On, Image review is fixed at On.
Movieframe+auto info
In addition to information shown withAuto info, a frame is displayed beforerecording begins that represents thearea that will be captured whenrecording movies.It is not displayed when recordingmovies.
2525 00
10101010
Print Date (Imprinting Date and Time)
The shooting date and time can be imprinted on theimages when shooting, allowing the information to beprinted even from printers that do not support dateprinting (E76).
The current setting can be confirmed in the monitor when shooting (A6). No indicator isdisplayed when Off is selected.
TapF M z (setup menu)M Print date
Option Description
f Date Date is imprinted on images.
S Date and time Date and time are imprinted on images.
pOff (default setting)
Date and time are not imprinted on images.
15.11.20125 . 11 . 2012
15.11.2012
7/29/2019 Nikon s6400rm en 02
http://slidepdf.com/reader/full/nikon-s6400rm-en-02 219/280
E95
R ef er en c e S e c t i on
B Notes About Print Date
• Imprinted dates form a permanent part of image data and cannot be deleted. The date and time
cannot be imprinted on images after they have been captured.
• The date cannot be imprinted in the following situations:
- When using Night portrait (when Hand-held is selected), Night landscape (when Hand-held is selected), Backlighting (when HDR is set to On), Easy panorama, or 3Dphotography scene mode
- When the continuous shooting setting (A69) is set to Pre-shooting cache, Continuous H:120 fps, or Continuous H: 60 fps.
- When shooting movies
• Dates imprinted at an Image mode setting (E49) of O 640×480 may be difficult to read. Selectan Image mode setting of q 1600×1200 or larger when using print date.
• The date is saved using the format selected in the setup menu’s Time zone and date item(A20, E90).
C Print Date and Print Order
When printing with a DPOF-compatible printer that can print the shooting date and shooting
information, you can use the Print order option (E73) to print this information on images, even if the Print date function was set to Off at the time of shooting.
7/29/2019 Nikon s6400rm en 02
http://slidepdf.com/reader/full/nikon-s6400rm-en-02 220/280
E96
R ef er en c e S e c t i on
Vibration Reduction
Reduce the effects of camera shake while shooting. Vibration reduction effectively reducesblur, caused by slight hand movement known as camera shake, which commonly occurswhen shooting with zoom applied or at slow shutter speeds. The effects of camera shake arereduced when recording movies, in addition to when taking still pictures.
Set Vibration reduction to Off when using a tripod to stabilize the camera during shooting.
The current setting can be confirmed in the monitor when shooting (A6). No icon isdisplayed when Off is selected.
TapF M z (setup menu)M Vibration reduction
Option Description
g On(default setting)
Vibration reduction is enabled.
pOff Vibration reduction is disabled.

7/29/2019 Nikon s6400rm en 02
http://slidepdf.com/reader/full/nikon-s6400rm-en-02 221/280
E97
R ef er en c e S e c t i on
B Notes About Vibration Reduction
• After turning on the camera or after switching from playback mode to shooting mode, wait for the
shooting mode screen to be displayed completely before taking pictures.
• Due to characteristics of the vibration reduction function, images displayed in the camera’s
monitor immediately after shooting may be displayed blurry.• Vibration reduction may be unable to completely eliminate the effects of camera shake in some
situations.
• When Tripod is selected in Night landscape or Night portrait scene mode, vibration reduction
is turned off.
Motion Detection
Enable motion detection to reduce the effects of subject movement and camera shake whenshooting still images.
TapF M z (setup menu)MMotion detection
Option Description
U Auto
(default setting)
When the camera detects subject movement or camera shake, theISO sensitivity and shutter speed are automatically increased toreduce blurring.However, motion detection does not function in the followingsituations:• When the flash fires.• When Touch shooting (E51) is set to Subject tracking.• When ISO sensitivity (E58) is set to any setting other than
Auto.• When Continuous (E59) is set to any setting other than Single
or BSS.• In the following scene modes: Sports (A43), Night portrait
(A43), Dusk/dawn (A44), Night landscape (A45), Museum
7/29/2019 Nikon s6400rm en 02
http://slidepdf.com/reader/full/nikon-s6400rm-en-02 222/280
E98
R ef er en c e S e c t i on
The current setting can be confirmed in the monitor when shooting (A6). When the cameradetects camera shake or subject movement, it increases shutter speed and the motiondetection icon turns green. No icon is displayed when Off is selected.
B Notes About Motion Detection• Motion detection may be unable to completely eliminate the effects of subject movement and
camera shake in some situations.
• Motion detection may not function if the subject exhibits significant movement or is too dark.
• The images captured using motion detection may be somewhat “grainy” in appearance.
( ), ( ), g p ( ),(A46), Fireworks show (A46), Backlighting (A47), Easypanorama (A48), Pet portrait (A49), and 3D photography
(A50)pOff Motion detection is disabled.
AF Assist
Enable or disable AF-assist illuminator, which assists autofocus operation when the subject isdimly lit.
TapF M z (setup menu)M AF assist
Option Description
s Auto(default setting)
AF-assist illuminator will be used to assist the focus operation whenthe subject is dimly lit. The illuminator has a range of about 1.9 m (6 ft3 in.) at the maximum wide-angle position and about 1.5 m (4 ft11 in.) at the maximum telephoto position.Note that for some scene modes (such as Museum (A46) and Petportrait (A49)) or focus areas, the AF-assist illuminator may notlight even when Auto is selected.
pOff AF-assist illuminator does not light. The camera may be unable tofocus under dim lighting.

7/29/2019 Nikon s6400rm en 02
http://slidepdf.com/reader/full/nikon-s6400rm-en-02 223/280
E99
R ef er en c e S e c t i on
Digital Zoom
Enable or disable digital zoom.
TapF M z (setup menu)M Digital zoom
Option Description
o On
(default setting)
When the camera is zoomed in to the maximum optical zoom
position, rotating the zoom control to g (i) triggers digital zoom(A29).
pOff Digital zoom will not be activated.
7/29/2019 Nikon s6400rm en 02
http://slidepdf.com/reader/full/nikon-s6400rm-en-02 224/280
E100
R ef er en c e S e c t i on
B Notes About Digital Zoom
• When digital zoom is in effect, the camera focuses at the center of the frame.
• Digital zoom cannot be used in the following situations.
- When Touch shooting is set to Subject tracking
- When Continuous is set to Multi-shot 16
- When Scene auto selector, Portrait, Night portrait, Night landscape, Backlighting (when
HDR is set to On), Easy panorama, Pet portrait, or 3D photography is selected in scene
mode
- When smart portrait mode is selected
Sound Settings
Adjust the following sound settings.
TapF M z (setup menu)M Sound settings
Option Description
Button sound
Select On (default setting) or Off . When On is selected, a beep will
sound once when operations are completed successfully, twicewhen the camera acquires focus on the subject, and three timeswhen an error is detected. Start-up sound will also play when thecamera is turned on.
Shutter sound
Select On (default setting) or Off . The shutter sound is disabled even if On is selected, when using anycontinuous shooting settings other than Single (E59) or when
recording movies.
7/29/2019 Nikon s6400rm en 02
http://slidepdf.com/reader/full/nikon-s6400rm-en-02 225/280
E101
R ef er en c e S e c t i on
B Notes About Sound Settings
Button sounds and the shutter sound are disabled when using the Pet portrait scene mode.
Auto Off
If no operations are performed for a specified amount of time, the monitor turns off and thecamera enters standby mode (A25).
This setting determines the amount of time that passes before the camera enters standbymode. You can select 30 s, 1 min (default setting), 5 min, or 30 min.
C When the Monitor Has Turned Off to Save Power
• When the camera is in standby mode, the power-on lamp flashes.
• If no operations are performed for approximately another three minutes, the camera will turn off
TapF M z (setup menu)M Auto off
7/29/2019 Nikon s6400rm en 02
http://slidepdf.com/reader/full/nikon-s6400rm-en-02 226/280
E102
R ef e
r en c e S e c t i on
If no operations are performed for approximately another three minutes, the camera will turn off
automatically.
• When the power-on lamp is flashing, pressing any of the following buttons will turn the monitorback on:
Power switch, shutter-release button, A button,c button, orb (emovie-record) button
C Notes About Auto Off
• The time that passes before the camera enters standby mode is fixed in the following situations:
- When a menu is displayed: Three minutes minimum (or 5 min or 30 min, if these settings are
selected)- During slide show playback: Up to 30 minutes
- When the AC Adapter EH-62G is connected: 30 minutes
- When an audio video cable or HDMI cable is connected: 30 minutes
• The camera does not enter standby mode when transferring images using an Eye-Fi card.
Format Memory/Format Card
Use this option to format the internal memory or a memory card.
Formatting the internal memory or memory cards permanently deletes all data. Datathat has been deleted cannot be restored. Be sure to transfer important images to acomputer before formatting.
Formatting the Internal Memory To format the internal memory, remove the memorycard from the camera. The Format memory optionis displayed in the setup menu.
Formatting Memory Cards
When a memory card is inserted in the camera, theFormat card option is displayed in the setup menu
TapF M z (setup menu)M Format memory/Format card
Format memory
All images will
be deleted! OK?
Yes No
Format card
7/29/2019 Nikon s6400rm en 02
http://slidepdf.com/reader/full/nikon-s6400rm-en-02 227/280
E103
R ef e
r en c e S e c t i on
Format card option is displayed in the setup menu.
B Notes About Formatting Internal Memory and Memory Cards
• Album icon settings (E10) are reset to their default settings (number icons) when the internal
memory or memory card is formatted.
• Do not turn the camera off or open the battery-chamber/memory card slot cover duringformatting.
• The first time you insert a memory card that has been used in another device into this camera, be
sure to format it with this camera.
All images will
be deleted! OK?
Yes No
Language
Select one of 31 languages for display of camera menus and messages.
TapF M z (setup menu)M Language
Czech Romanian
Danish Finnish
German Swedish
(default setting) Vietnamese
Spanish Turkish
Greek Ukrainian
French Arabic
Indonesian Bengali
Italian Simplified Chinese
Hungarian Traditional Chinese
Dutch Hindi
7/29/2019 Nikon s6400rm en 02
http://slidepdf.com/reader/full/nikon-s6400rm-en-02 228/280
E104
R ef e
r en c e S e c t i on
Norwegian Japanese
Polish Korean
Brazilian Portuguese Tamil
European Portuguese Thai
Russian
TV Settings
Adjust settings for connection to a TV.
TapF M z (setup menu)M TV settings
Option Description
Video mode Select from NTSC and PAL.
HDMI
Select a resolution for HDMI output from Auto (default setting),480p, 720p, or 1080i. When Auto is selected, the option best suitedto the TV to which the camera is connected is automatically selectedfrom 480p, 720p, or 1080i.
HDMI device control
Select whether or not the camera can receive signals from a TV thatsupports the HDMI-CEC standard when it is connected to the TV viaHDMI. When On (default setting) is selected, the TV’s remote control
can be used to control the camera during playback. See “Using a TV Remote Control (HDMI Device Control)” (E37) for moreinformation.
HDMI 3D outputSet the method used to output 3D images captured with this camerato HDMI devices.
l (d f l ) l b k
7/29/2019 Nikon s6400rm en 02
http://slidepdf.com/reader/full/nikon-s6400rm-en-02 229/280
E105
R ef e
r en c e S e c t i on
C HDMI and HDMI-CEC
HDMI (High-Definition Multimedia Interface) is a multimedia interface. HDMI-CEC (HDMI-Consumer
Electronics Control) allows compatible devices to inter-operate.
Select On (default setting) to play back 3D images in 3D.
Charge by Computer
Select whether or not the battery inserted into the camera is charged when the camera isconnected to a computer via the USB cable (A86).
B Notes About Charging with Connection to a Computer
• The battery cannot be charged, nor can data be transferred, when the camera is connected to a
computer before the camera’s display language and date and time have been set (A20). If thecamera’s clock battery (A22) has been exhausted, the date and time must be reset before the
battery can be charged or images can be transferred with connection to a computer. In this case,
use the Charging AC Adapter EH-69P (A16) to charge the battery and then set the camera’s date
and time.
TapF M z (setup menu)M Charge by computer
Option Description
Auto(default setting)
When the camera is connected to a computer that is running, the
battery inserted into the camera is automatically charged usingpower supplied by the computer.
Off The battery inserted into the camera is not charged when the camerais connected to a computer.
7/29/2019 Nikon s6400rm en 02
http://slidepdf.com/reader/full/nikon-s6400rm-en-02 230/280
E106
R ef e
r en c e S e c t i on
• If the camera is turned off, charging will also stop.
• If the computer enters sleep mode while charging, charging will stop and the camera may turn off.
• When disconnecting the camera from the computer, turn the camera off and then disconnect the
USB cable.
• About 3 hours and 15 minutes are required to charge a fully exhausted battery. Charging time
increases when images are transferred while the battery is charging.
• When the camera is connected to a computer, an application installed on the computer, such as
Nikon Transfer 2, may start. If the camera was connected to the computer for the sole purpose of
charging the battery, exit the application.• The camera turns off automatically if there is no communication with the computer for 30 minutes
after the battery has finished charging.
• Depending upon computer specifications, settings, and power supply and allocation, it may be
impossible to charge the battery using a computer connection while it is inserted into the camera.
B Notes About Connecting the Camera to a Printer
• The battery cannot be charged with connection to a printer, even if the printer complies with the
PictBridge standard.• When Auto is selected for Charge by computer, it may be impossible to print images with direct
connection of the camera to some printers. If the PictBridge startup screen is not displayed in the
monitor after the camera is connected to a printer and turned on, turn the camera off and
disconnect the USB cable. Set Charge by computer to Off and reconnect the camera to the
printer.
C The Charge Lamp The following chart explains charge lamp status when the camera is connected to a computer.
Status Description
Flashes slowly (green) Battery charging.
Off
Battery not charging.
If the charge lamp changes from slow flashing (green) to off while the
power-on lamp is lit, charging is complete.
• The ambient temperature is not suited to charging. Charge the
battery indoors with an ambient temperature of 5°C to 35°C (41°F
to 95°F).
• The USB cable is not connected correctly, or the battery is faulty.

7/29/2019 Nikon s6400rm en 02
http://slidepdf.com/reader/full/nikon-s6400rm-en-02 231/280
E107
R ef e
r en c e S e c t i on
Flashes quickly (green)
The USB cable is not connected correctly, or the battery is faulty.
Make sure the USB cable is connected correctly and replace the
battery if necessary.• The computer is in sleep mode and is not supplying power. Wake
up the computer.
• The battery cannot be charged because the computer cannot
supply power to the camera due to the computer’s settings or its
specifications.
R
Blink Warning
Select whether or not the camera detects human subjects that have blinked when shootingin the following situations:• When the camera recognizes a human face as the main subject (A74) in A (auto) mode
with AF area mode set to Target finding AF.• When the camera detects a face (A75) in Scene auto selector (A42), Portrait (A42),
or Night portrait (A43) scene mode.
TapF M z (setup menu)M Blink warning
Option Description
On
When the camera detects that one or more human subjects mayhave blinked in an image captured using face detection, the Didsomeone blink? screen is displayed in the monitor. The face of the human subject that may have blinked when the
shutter was released is framed by a yellow border. Should this occur,check the image and determine whether or not another imageshould be captured.See “The Blink Warning Screen” (E109) for more information.
Off (d f l i )
Blink warning is disabled
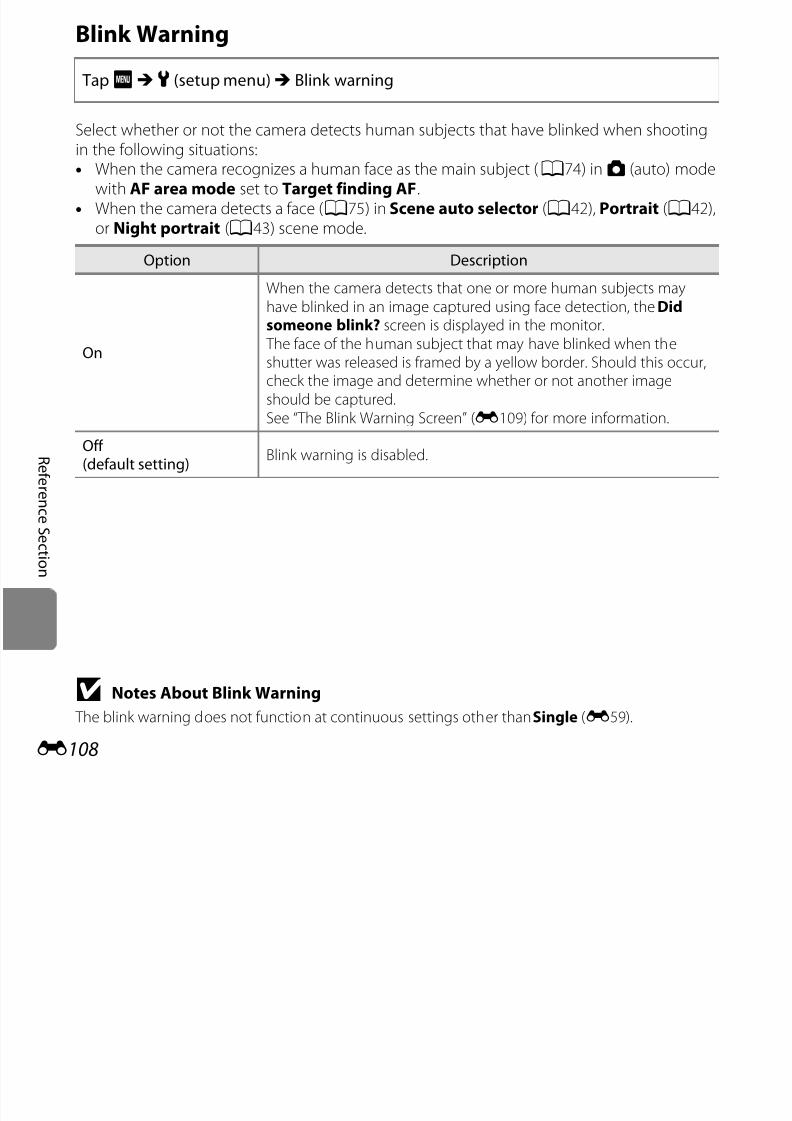
7/29/2019 Nikon s6400rm en 02
http://slidepdf.com/reader/full/nikon-s6400rm-en-02 232/280
E108
R ef e
r en c e S e c t i on
B Notes About Blink Warning
The blink warning does not function at continuous settings other than Single (E59).
(default setting)Blink warning is disabled.
R
The Blink Warning Screen
When the Did someone blink? screen shown on
the right is displayed in the monitor, the operationsdescribed below are available.
If no operations are performed within a few seconds,the camera automatically returns to shooting mode.
Function Description
Enlarge the detectedface that blinked
Rotate the zoom control to g (i).
Switch to full-frameplayback
Rotate the zoom control tof (h).
Select the face to bedisplayed
If the camera detects that more than one human subject blinked, tapM orN to switch the display to another face.
Delete the image TapE.
Switch to shootingmode
TapI or press the shutter-release button.
Did someone blink?

7/29/2019 Nikon s6400rm en 02
http://slidepdf.com/reader/full/nikon-s6400rm-en-02 233/280
E109
R ef e
r en c e S e c t i on
R
Sequence Display Options
Choose the method used to display a series of images shot continuously (sequence) (E14)when viewing them in full-frame playback mode (A32) and in thumbnail playback mode(A81).
Settings are applied to all sequences, and the setting is saved in the camera’s memory even if
the camera is turned off.
TapF M z (setup menu)M Sequence display options
Option Description
L Individual picturesSet all pictures in all sequences to be displayed individually.h isdisplayed on the playback screen (A8).
K Key picture only(default setting)
Set all sequences to be displayed using their key pictures only.
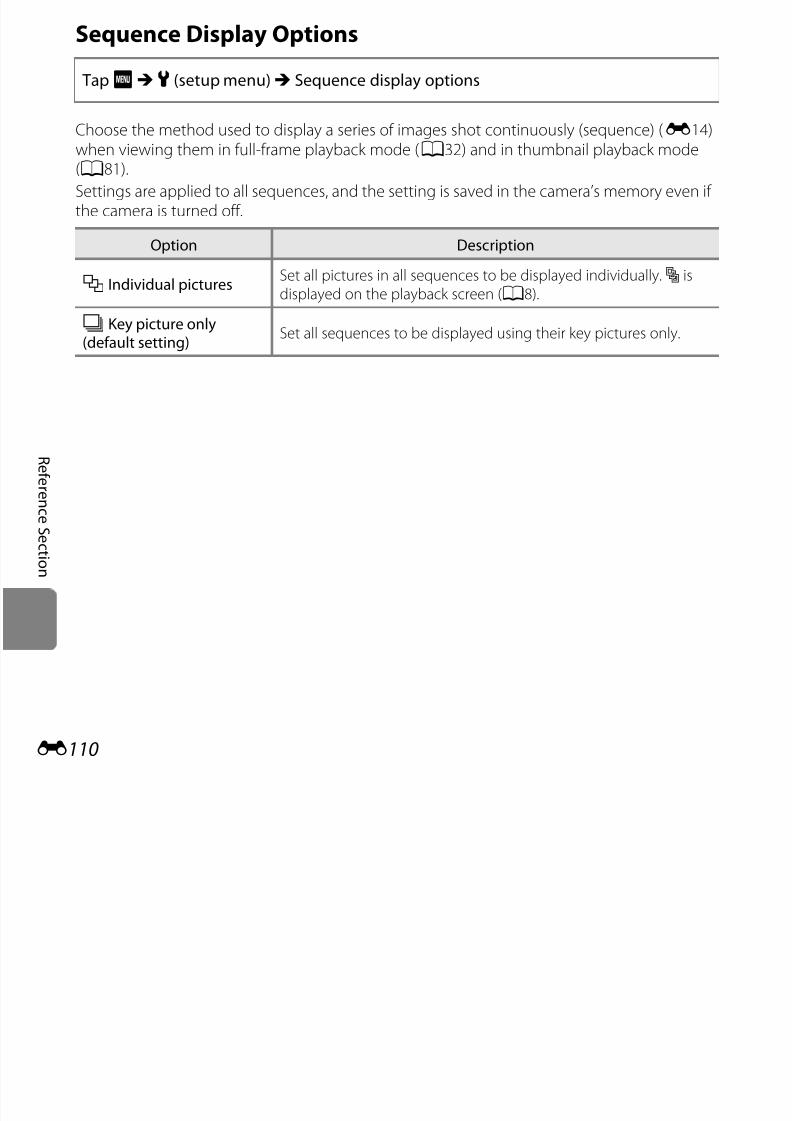
7/29/2019 Nikon s6400rm en 02
http://slidepdf.com/reader/full/nikon-s6400rm-en-02 234/280
E110
R ef e
r en c e S e c t i on
R
Eye-Fi Upload
B Notes About Eye-Fi Cards
• Note that images will not be uploaded if signal strength is insufficient even if Enable is selected.
• Select Disable where wireless devices are prohibited.
• Refer to the instruction manual of your Eye-Fi card for more information. In the event of malfunction, contact the card manufacturer.
• The camera can be used to turn Eye-Fi cards on and off, but may not support other Eye-Fi functions.
• The camera is not compatible with the endless memory function. When it is set on a computer,
disable the function. If the endless memory function is enabled, the number of pictures taken may
not be displayed correctly
TapF M z (setup menu)M Eye-Fi upload
Option Description
b Enable(default setting)
Upload images created by the camera to a preselected destination.
c Disable Images will not be uploaded.
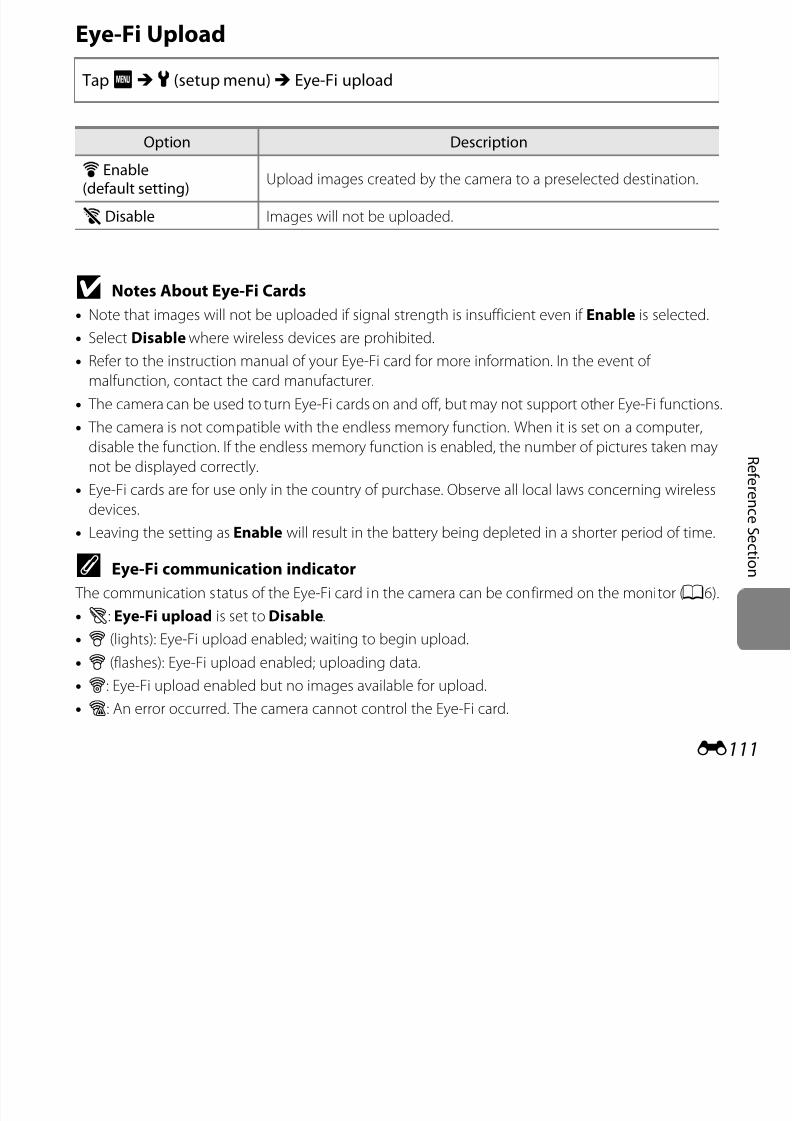
7/29/2019 Nikon s6400rm en 02
http://slidepdf.com/reader/full/nikon-s6400rm-en-02 235/280
E111
R ef e
r en c e S e c t i on
not be displayed correctly.
• Eye-Fi cards are for use only in the country of purchase. Observe all local laws concerning wirelessdevices.
• Leaving the setting as Enable will result in the battery being depleted in a shorter period of time.
C Eye-Fi communication indicator
The communication status of the Eye-Fi card in the camera can be confirmed on the monitor (A6).
• w: Eye-Fi upload is set to Disable.
• x (lights): Eye-Fi upload enabled; waiting to begin upload.
• x (flashes): Eye-Fi upload enabled; uploading data.
• y: Eye-Fi upload enabled but no images available for upload.
• z: An error occurred. The camera cannot control the Eye-Fi card.
R e
Reset All
When Reset is selected, the camera’s settings will be restored to their default values.
Basic Shooting Functions
Shooting Menu
TapF M z (setup menu)M Reset all
Option Default value
Flash mode (A58) AutoSelf-timer (A61) Off
Macro mode (A63) Off
Exposure compensation (A65) 0.0
Option Default value
Image mode (E49) l 4608×2592
Touch shooting (E51) Touch shutter
ISO sensitivity (E58) Auto
Continuous (E59) Single
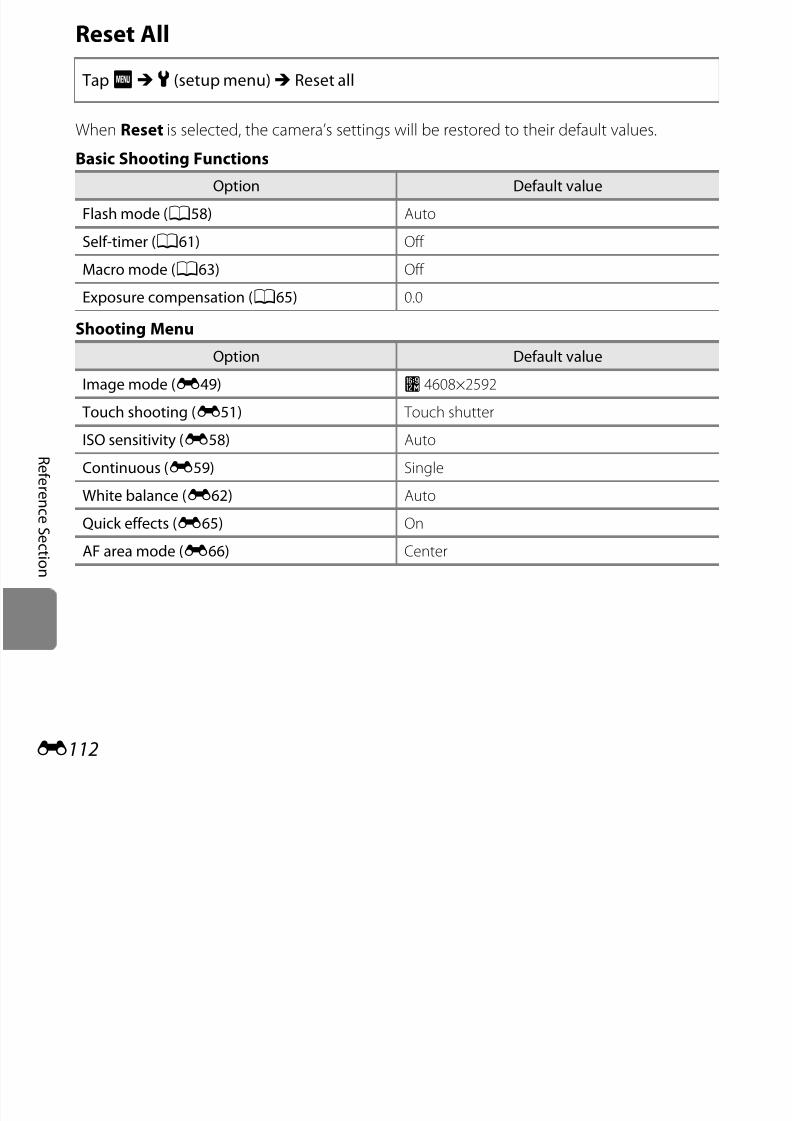
7/29/2019 Nikon s6400rm en 02
http://slidepdf.com/reader/full/nikon-s6400rm-en-02 236/280
E112
ef e
r en c e S e c t i on
Continuous (E59) Single
White balance (E62) Auto
Quick effects (E65) On
AF area mode (E66) Center
R e
Scene Mode
Special Effects Mode
S P i M
Option Default value
Scene setting in the shooting mode selectionmenu (A40)
Scene auto selector
Scene effect adjustment slider (A41) Center
Night portrait (A43) Hand-held
Night landscape (A45) Hand-held
HDR in backlighting scene mode (A47) Off Easy panorama (A48) Normal (180°)
Continuous shooting in pet portrait mode(A49)
Continuous
Pet portrait auto release in pet portrait mode(A49)
On
Option Default value
Special effects setting in the shooting modeselection menu (A52)
Soft

7/29/2019 Nikon s6400rm en 02
http://slidepdf.com/reader/full/nikon-s6400rm-en-02 237/280
E113
ef e
r en c e S e c t i on
Smart Portrait Menu
Movie Menu
Option Default value
Skin softening (E67) Normal
Blink proof (E68) Off
Smile timer (E68) On
Option Default value
Movie options (E83) HD 1080pP (1920×1080)
Open with HS footage (E87) On
R e
Setup Menu
Movie AF mode (E88) Single AF
Wind noise reduction (E88) Off
Option Default value
Welcome screen (E89) None
Photo info (E93) Auto info
Image review (E93) On
Brightness (E93) 3
Print date (E95) Off
Vibration reduction (E97) On
Motion detection (E98) Auto
AF assist (E99) Auto
Digital zoom (E100) On
Button sound (E101) On
Shutter sound (E101) On
Option Default value
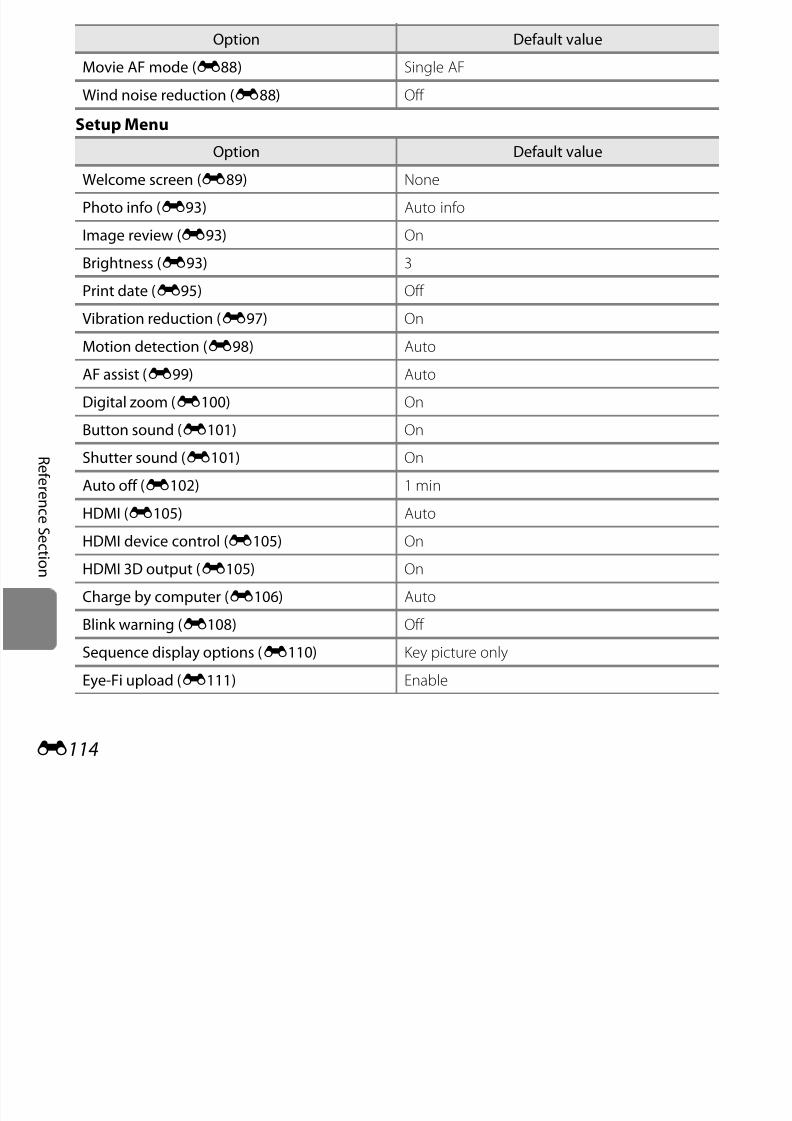
7/29/2019 Nikon s6400rm en 02
http://slidepdf.com/reader/full/nikon-s6400rm-en-02 238/280
E114
ef e
r en c e S e c t i on
Auto off (E102) 1 min
HDMI (E105) Auto
HDMI device control (E105) On
HDMI 3D output (E105) On
Charge by computer (E106) Auto
Blink warning (E108) Off
Sequence display options (E110) Key picture only
Eye-Fi upload (E111) Enable
R e
Others
• Selecting Reset all also clears the current file number (E117) from memory. Numberingwill continue from the lowest number available. To reset file numbering to “0001”, deleteall images saved in the internal memory or on the memory card (A34) before selectingReset all.
• The following menu settings will remain unaffected when menus are reset with Reset all.Shooting menu: Preset manual data (E63) acquired for White balancePlayback menu: Choose key picture (E82)Setup menu: Time zone and date (E90), Language (E104), and Video mode (E105) under TV settingsOthers: Favorite album icon (E10)
Option Default value
Paper size (E41,E43) Default
Slide show effects (E69) Classic
Frame interval for slide show (E69) 3 s
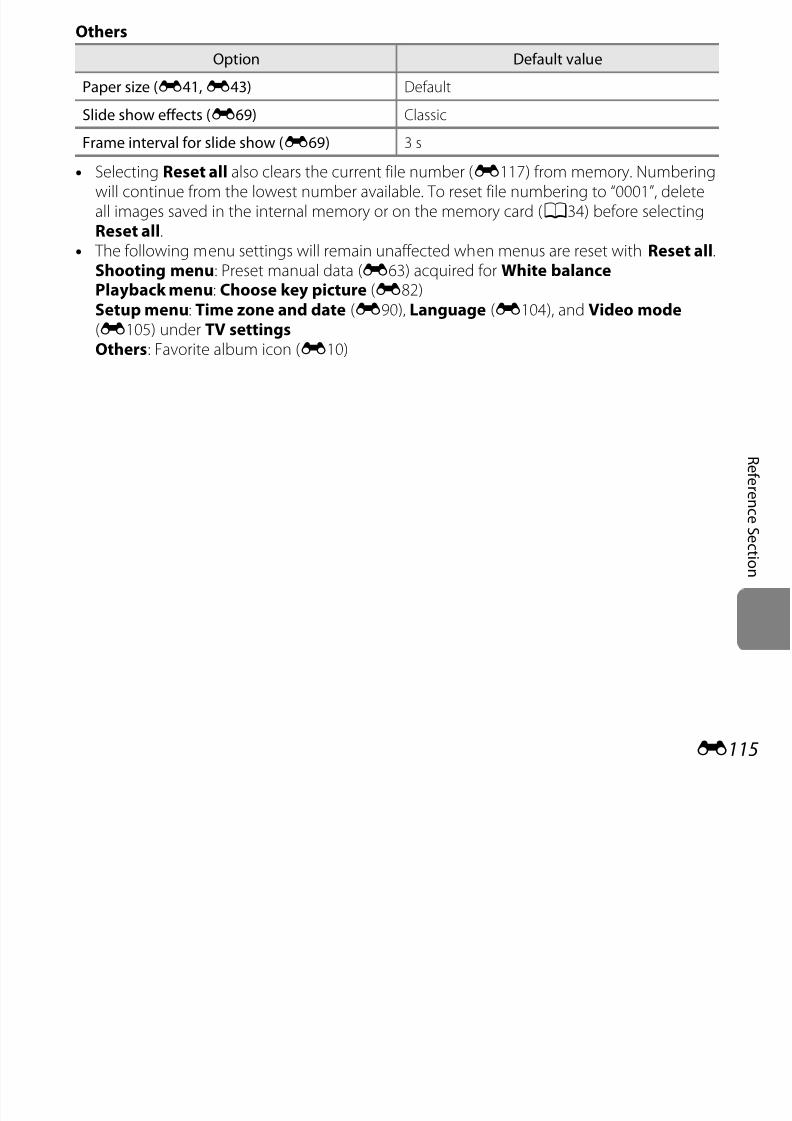
7/29/2019 Nikon s6400rm en 02
http://slidepdf.com/reader/full/nikon-s6400rm-en-02 239/280
E115
f e
r en c e S e c t i on
R ef
Firmware Version
View the current camera firmware version.
TapF M z (setup menu)M Firmware version
Firmware version
COOLPIX S6400 Ver.x.x
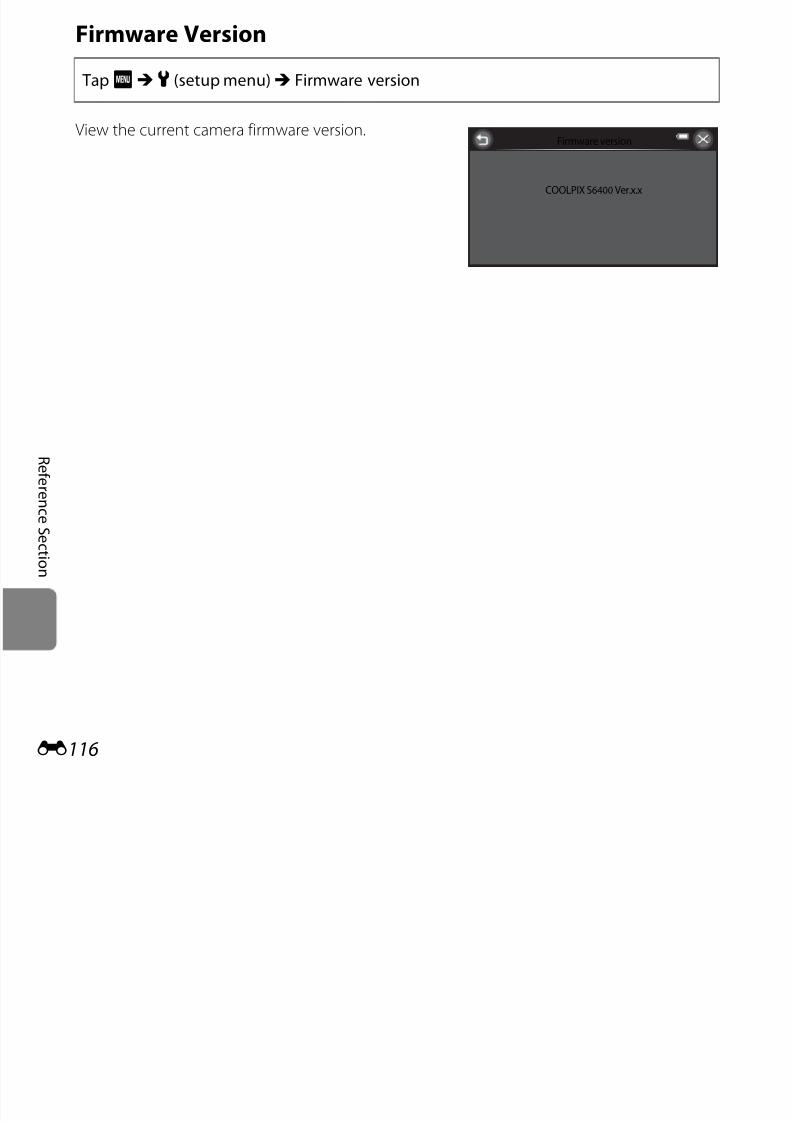
7/29/2019 Nikon s6400rm en 02
http://slidepdf.com/reader/full/nikon-s6400rm-en-02 240/280
E116
f e
r en c e S e c t i on
R ef
File and Folder Names
Images, movies, or voice memos are assigned file names as follows.
D SC N0 0 0 1 . J PG
Identifier (not shown on camera monitor)
Original still images (voicememo attachment included)
and movies
DSCN
Small copies (voice memoattachment included)
SSCN
Cropped copies (voice memoattachment included)
RSCN
Images created by an image
editing function other thansmall picture or crop* (voicememo attachment included),and movies created by themovie editing function
FSCN
Copies created in Draw sceneMSCN
Extension (indicates file format)
Still images .JPG
Movies .MOV Voice memos .WAV
3D images .MPO
File number (assigned automatically inascending order, starting with “0001”)
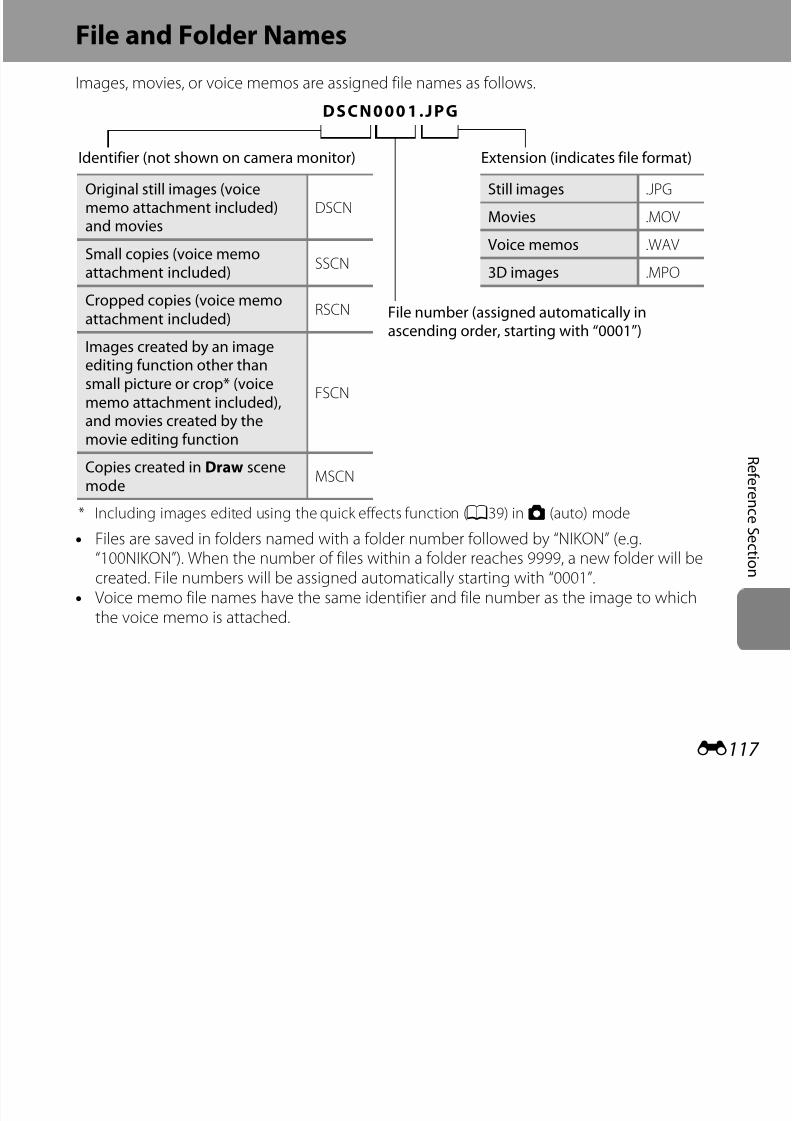
7/29/2019 Nikon s6400rm en 02
http://slidepdf.com/reader/full/nikon-s6400rm-en-02 241/280
E117
f er en c e S e c t i on
• Files are saved in folders named with a folder number followed by “NIKON” (e.g.“100NIKON”). When the number of files within a folder reaches 9999, a new folder will becreated. File numbers will be assigned automatically starting with “0001”.
• Voice memo file names have the same identifier and file number as the image to whichthe voice memo is attached.
modeMSCN
* Including images edited using the quick effects function (A39) in A (auto) mode
R ef e
• Files copied using Copy>Selected images are copied to the current folder, where theyare assigned new file numbers in ascending order starting from the largest file number inmemory. Copy>All images copies all folders from the source medium; file names do notchange but new folder numbers are assigned in ascending order, starting from the largestfolder number on the destination medium (E80).
• A single folder can hold up to 200 images; if the current folder already contains 200images, a new folder, named by adding one to the current folder name, will be created thenext time an image is captured. If the current folder is numbered 999 and contains 200images, or an image is numbered 9999, no further images can be captured until theinternal memory or memory card is formatted (E103), or a new memory card is inserted.
7/29/2019 Nikon s6400rm en 02
http://slidepdf.com/reader/full/nikon-s6400rm-en-02 242/280
E118
er en c e S e c t i on
R ef e
Optional Accessories
Battery chargerBattery Charger MH-66(Charging time when no charge remains: Approx. 1 h 50 min)
AC adapter
AC Adapter EH-62G (connect as shown)
Be sure that the power connector cord has been properly aligned inpower connector and battery chamber grooves before closing thebattery-chamber/memory card slot cover. If part of the cord runs out of the grooves, the cover or cord may be damaged when the cover is closed.
1 2 3
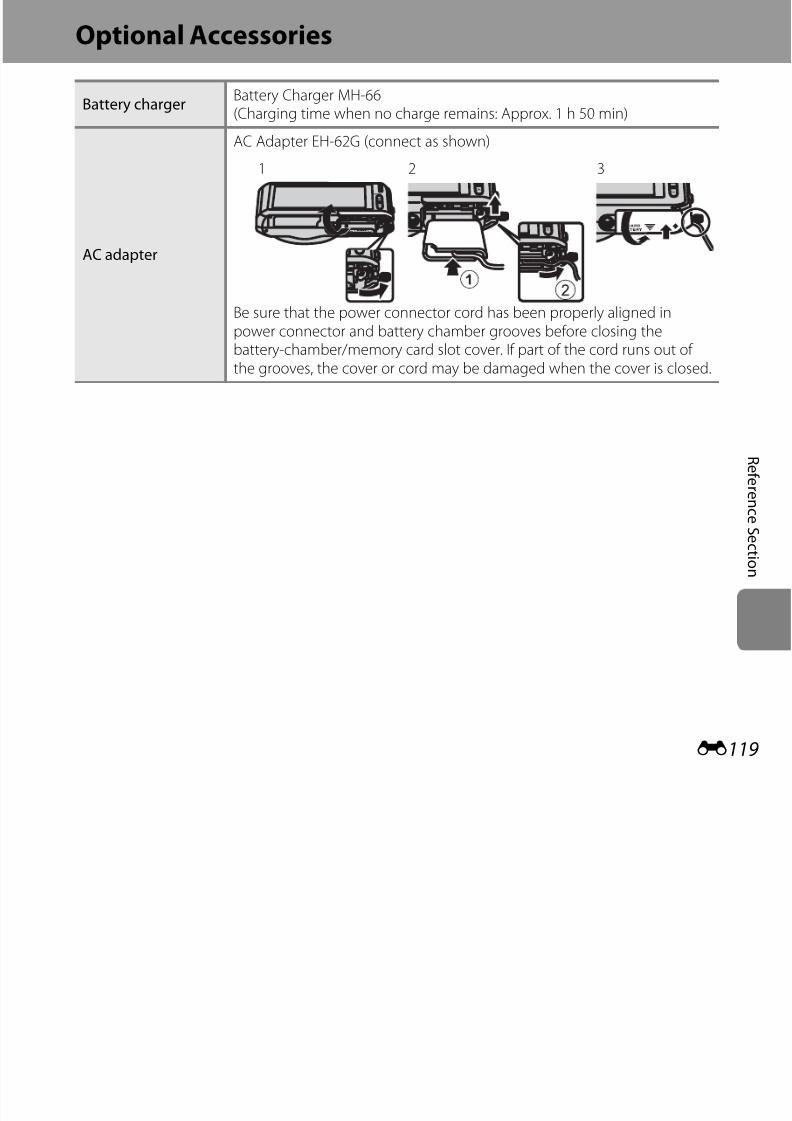
7/29/2019 Nikon s6400rm en 02
http://slidepdf.com/reader/full/nikon-s6400rm-en-02 243/280
E119
er en c e S e c t i on
R ef e
Error Messages
Display Cause/Solution A
O (flashes)Clock not set.Set date and time.
E90
Battery exhausted. Charge or replace battery. 14, 16
Battery temperaturehigh
Battery temperature is high. Turn off camera, and allow battery to cool down beforeresuming use. After five seconds, this message willdisappear, the monitor will turn off, and the power-on lampwill flash quickly. After the lamp flashes for three minutes,the camera will turn off automatically. Pressing the powerswitch also turns off the camera.
25
The camera will turn off
to prevent overheating.
Inside of the camera has become hot. Turn off camera, and allow battery to cool down beforeresuming use.
–
Q (● flashes red)Camera cannot focus.• Refocus.• Use focus lock.
30, 7778
Please wait for thet fi i h
Camera cannot perform other operations until saving iscomplete.
7/29/2019 Nikon s6400rm en 02
http://slidepdf.com/reader/full/nikon-s6400rm-en-02 244/280
E120
er en c e S e c t i on
camera to finish
recording.
complete.
Wait until message clears from display automatically whensaving is complete.
–
Memory card is writeprotected.
Write-protect switch is in “lock” position.Slide write-protect switch to “write” position.
–
Not available if Eye-Fi
card is locked.
Write-protect switch of Eye-Fi card is in “lock” position.Slide the write-protect switch to “write” position.
–
Error accessing Eye-Fi card.• Check that terminals are clean.• Confirm that Eye-Fi card is correctly inserted.
18
R ef e
This card cannot be
used.
Error accessing memory card.
• Use approved card.• Check that terminals are clean.• Confirm that memory card is correctly inserted.
18,F23 This card cannot beread.
Card is not formatted.Format card?
YesNo
Memory card has not been formatted for use in COOLPIXS6400.Formatting deletes all data saved on the memory card. If you need to keep copies of any images, make sure to tapNo and save the copies to a computer or other mediumbefore formatting the memory card. Tap Yes to format thememory card.
F5
Out of memory.
Memory card is full.• Select smaller image size.
• Delete images.• Insert new memory card.• Remove memory card and use internal memory.
69,E4934, 1001819
Error occurred while saving image.Format internal memory or memory card.
E103
Camera has run out of file numbers.Insert a new memory card or format internal memory or
E103, E117
Display Cause/Solution A

7/29/2019 Nikon s6400rm en 02
http://slidepdf.com/reader/full/nikon-s6400rm-en-02 245/280
E121
er en c e S e c t i on
Image cannot be saved.
y y
memory card.
E117
Image cannot be used for welcome screen. The following images cannot be registered as welcomescreen.• Images captured using Easy panorama and 3D
photography• Images reduced to 320 × 240 size or smaller with small
image editing
E89
Insufficient space to save a copy.Delete images from destination.
34
R ef e
Album is full. No furtherpictures can be added.
200 images have already been added to album.
• Remove some images from album.• Add to other albums.
E9E7
Sound file cannot besaved.
A voice memo cannot be attached to this file.• Voice memos cannot be attached to movies.• Select an image captured with this camera.
–E79
A blink was detected in
the picture just taken.
One or more portrait subjects may have blinked when thepicture was taken.Check the image in playback mode.
32,
E68
Image cannot bemodified.
Cannot edit selected image.• Select images that support editing function.• Movies cannot be edited.
E19–
Cannot record movie. Time out error while saving movie on the memory card.Select memory card with faster write speed.
18
Memory contains noimages.
No images in the internal memory or memory card.• Remove the memory card from the camera to play back
images saved in the camera’s internal memory.• To copy the images saved in the camera’s internal
memory to the memory card, tapF and taph Copy.
18
E80
No images have been added to the selected album.• Add images to the album E7
Display Cause/Solution A
7/29/2019 Nikon s6400rm en 02
http://slidepdf.com/reader/full/nikon-s6400rm-en-02 246/280
E122
r en c e S e c t i on
• Add images to the album.
• Select an album to which images are added.
E7
E8
No images are contained in the category selected in autosort mode.Select the category containing the sorted images.
E11
File contains no imagedata.
File not created with this camera.File cannot be viewed on this camera.
View file using a computer or the devices used to create oredit this file.
– This file cannot beplayed back.
All images are hidden. No images available for a slide show. E69
R ef er
This image cannot be
deleted.
Image is protected.
Disable protection.E71
Travel destination is inthe current time zone.
Destination in same time zone as home. –
Unable to createpanorama. Could not shoot using easy panorama.
Shooting with easy panorama may not be possible in thefollowing situations.
• When shooting does not end after a certain amount of time.• When the camera is moved too fast.• When the camera is not moved properly in the panorama
direction.
E3
Unable to createpanorama. Pan thecamera in one directiononly.
Unable to createpanorama. Pan thecamera more slowly.
Shooting failed
When taking 3D pictures, the first shot could not besuccessfully taken.
• Try shooting again.• In some shooting conditions, such as when the subject is
moving, dark, or low in contrast, shooting may not bepossible.
50
When taking 3D images, the second shot could not besuccessfully taken after the first shot.• Try shooting again After taking the first shot move the
Display Cause/Solution A
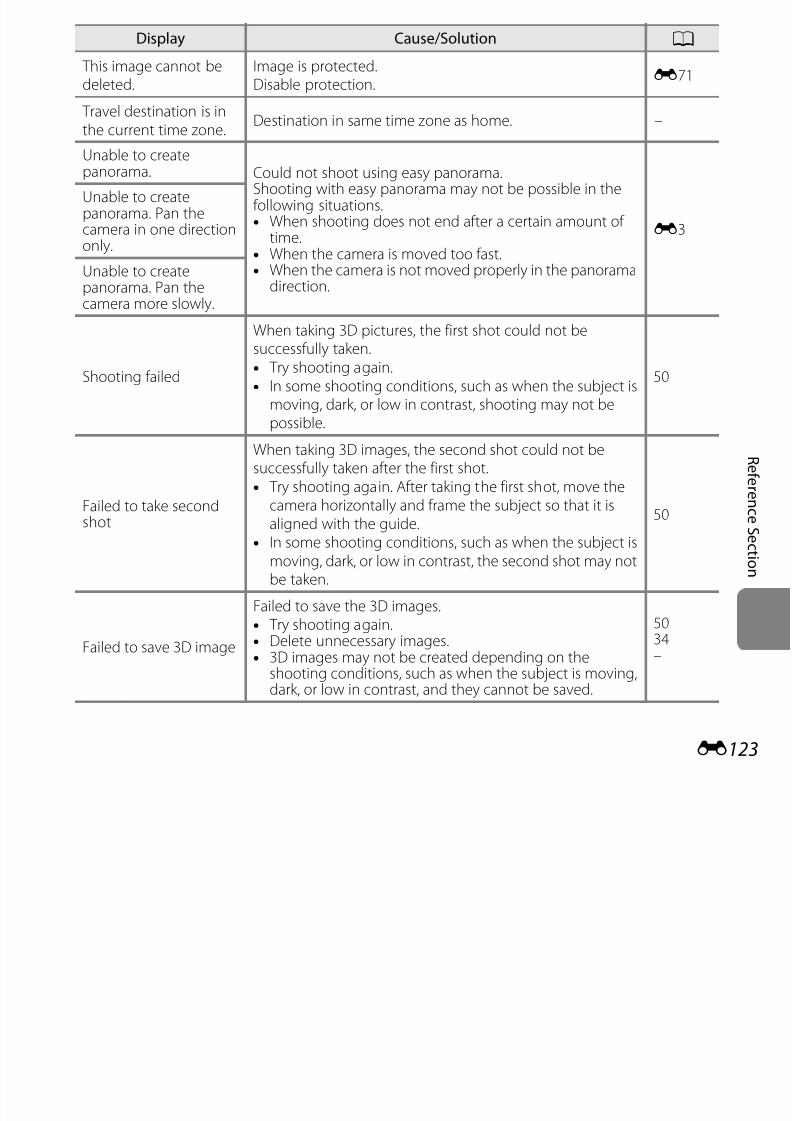
7/29/2019 Nikon s6400rm en 02
http://slidepdf.com/reader/full/nikon-s6400rm-en-02 247/280
E123
r en c e S e c t i on
Failed to take secondshot
• Try shooting again. After taking the first shot, move the
camera horizontally and frame the subject so that it isaligned with the guide.
• In some shooting conditions, such as when the subject ismoving, dark, or low in contrast, the second shot may notbe taken.
50
Failed to save 3D image
Failed to save the 3D images.• Try shooting again.
• Delete unnecessary images.• 3D images may not be created depending on the
shooting conditions, such as when the subject is moving,dark, or low in contrast, and they cannot be saved.
50
34–
R ef er
Lens error
Lens error.
Turn camera off and then on again. If error persists, contactretailer or Nikon-authorized service representative.
24
Communications errorError occurred during communication with printer. Turn camera off and reconnect USB cable.
E39
System error
Error has occurred in camera’s internal circuitry. Turn camera off, remove and reinsert battery, and turncamera on. If error persists, contact retailer or Nikon-authorized service representative.
14, 25
Printer error: check printer status.
Printer error.Check printer. After solving the problem, tap Resume toresume printing.*
–
Printer error: check paper
Specified size of paper is not loaded in printer.Load the specified paper size and tap Resume to resume
printing.*
–
Printer error: paper jamPaper has jammed in printer.Remove the jammed paper and tap Resume to resumeprinting.*
–
Printer error: out of paper
No paper is loaded in printer.Load the specified paper size and tap Resume to resumeprinting.*
–
Display Cause/Solution A
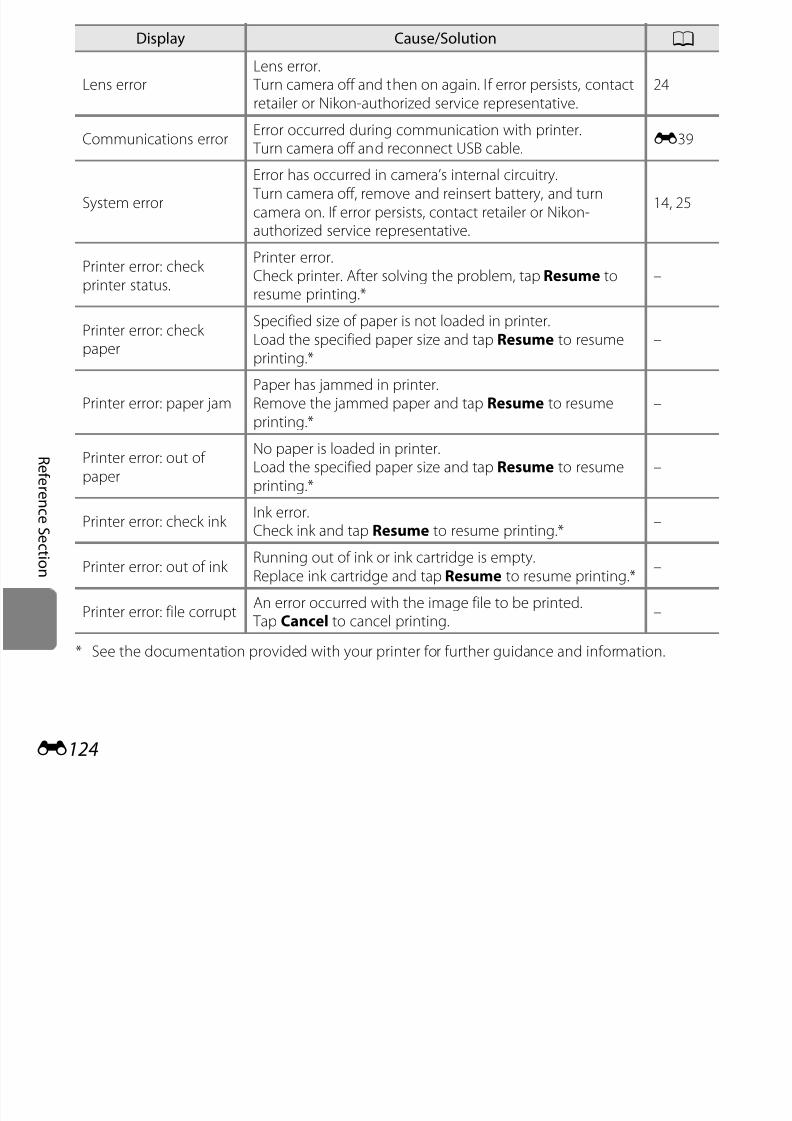
7/29/2019 Nikon s6400rm en 02
http://slidepdf.com/reader/full/nikon-s6400rm-en-02 248/280
E124
r en c e S e c t i on
* See the documentation provided with your printer for further guidance and information.
printing.
Printer error: check ink Ink error.Check ink and tap Resume to resume printing.*
–
Printer error: out of ink Running out of ink or ink cartridge is empty.Replace ink cartridge and tap Resume to resume printing.*
–
Printer error: file corruptAn error occurred with the image file to be printed. Tap Cancel to cancel printing.
–
T e c
Technical Notes and IndexMaximizing Camera Life and Performance ..................F2
The Camera..................................................................................................................... F2
The Battery ...................................................................................................................... F3
Charging AC Adapter .................................................................................................. F4Memory Cards................................................................................................................ F5
Cleaning and Storage.....................................................F6Cleaning........................................................................................................................... F6
Storage ............................................................................................................................. F6
7/29/2019 Nikon s6400rm en 02
http://slidepdf.com/reader/full/nikon-s6400rm-en-02 249/280
F1
h ni c a l N o t e s a n d I n d
ex
Troubleshooting .............................................................F7Specifications................................................................F17
Supported Standards ............................................................................................... F22
Approved Memory Cards ....................................................................................... F23
Index ..............................................................................F25

7/29/2019 Nikon s6400rm en 02
http://slidepdf.com/reader/full/nikon-s6400rm-en-02 250/280
T e c
B Do Not Point the Lens at Strong Light Sources for Extended Periods
Avoid pointing the lens at the sun or other strong light sources for extended periods when using or
storing the camera. Intense light may cause deterioration of the image sensor, producing a white
blur effect in photographs.
B Turn the Product off Before Removing or Disconnecting the Power Source
Do not remove the battery while the product is on, or while images are being saved or deleted.
Forcibly cutting power in these circumstances could result in loss of data or in damage to product
memory or internal circuitry.
B Notes About the Monitor
• Monitors and electronic viewfinders are constructed with extremely high precision; at least 99.99%
of pixels are effective, with no more than 0.01% being missing or defective. Hence while these
displays may contain pixels that are always lit (white, red, blue, or green) or always off (black), this is
not a malfunction and has no effect on images recorded with the device.
• Images in the monitor may be difficult to see under bright lighting.
• The monitor is lit by an LED backlight. Should the monitor begin to dim or flicker, contact yourNikon-authorized service representative.
The BatteryBe sure to read and follow the warnings in “For Your Safety” (Aviii-x) before use.
• Check the battery level before using the camera and replace or charge the battery if necessary. Do
not continue charging once the battery is fully charged as this will result in reduced battery
7/29/2019 Nikon s6400rm en 02
http://slidepdf.com/reader/full/nikon-s6400rm-en-02 251/280
F3
h ni c a l N o t e s a n d I n d
ex
y y y
performance. Whenever possible, carry a fully charged spare battery when taking pictures onimportant occasions.
• Do not use the battery at ambient temperatures below 0°C (32°F) or above 40°C (104°F).
• Charge the battery indoors with an ambient temperature of 5°C to 35°C (41°F to 95°F) before use.
• When charging the battery inserted into the COOLPIX S6400 using the Charging AC Adapter
EH-69P or a computer, the battery is not charged at battery temperatures below 0°C (32°F) or
above 45°C (113°F).• Note that the battery may become hot during use; wait for the battery to cool before charging.
Failure to observe these precautions could damage the battery, impair its performance, or prevent
it from charging normally.
T e c
• On cold days, the capacity of batteries tends to decrease. If an exhausted battery is used at a low
temperature, the camera will not turn on. Be sure that the battery is fully charged before heading
outside to take pictures in cold weather. Keep spare batteries in a warm place and exchange as
necessary. Once warmed, a cold battery may recover some of its charge.
• Dirt on the battery terminals can prevent the camera from functioning. Should the battery
terminals become dirty, wipe them off with a clean, dry cloth before use.
• If the battery will not be used for some time, insert it in the camera and completely exhaust it
before removing it for storage. The battery should be stored in a cool location with an ambient
temperature of 15°C to 25°C (59°F to 77°F). Do not store the battery in hot or extremely cold
locations.
• Always remove the battery from the camera or optional battery charger when it is not being used.
When inserted, minute amounts of current are drawn from the battery even when not in use. This
may result in excessive draining of the battery and complete loss of function. Turning the camera
on or off while the battery is exhausted can result in reduced battery life.
• Recharge the battery at least once every six months and completely exhaust it before returning it
to storage.
• After removing the battery from the camera or optional battery charger, put the battery in theincluded battery case and store it in a cool place.
• A marked drop in the time a fully-charged battery retains its charge, when used at room
temperature, indicates that the battery needs to be replaced. Purchase a new EN-EL19 battery.
• Replace the battery when it no longer holds a charge. Used batteries are a valuable resource.
Please recycle used batteries in accordance with local regulations.
7/29/2019 Nikon s6400rm en 02
http://slidepdf.com/reader/full/nikon-s6400rm-en-02 252/280
F4
h ni c a l N o t e s a n d I n d
ex
Charging AC AdapterBe sure to read and follow the warnings in “For Your Safety” (Aviii-x) before use.
• The Charging AC Adapter EH-69P is for use only with compatible devices. Do not use with another
make or model of device.
• The EH-69P is compatible with AC 100-240 V, 50/60 Hz electrical outlets. When using in other
countries, use a plug adapter (commercially available) as necessary. For more information about
plug adapters, consult your travel agency.• Do not, under any circumstances, use another make or model of AC adapter other than Charging
AC Adapter EH-69P or USB-AC adapter. Failure to observe this precaution could result in
overheating or in damage to the camera.
T e c
Memory Cards• Use only Secure Digital memory cards. See “Approved Memory Cards” (F23) for recommended
memory cards.• Observe the precautions noted in the documentation included with your memory card.
• Do not affix labels or stickers to the memory card.
• Do not format the memory card using a computer.
• The first time you insert a memory card that has been used in another device into this camera, be
sure to format it with this camera. We recommend formatting new memory cards with this camera
before using them with this camera.
• Note that formatting a memory card permanently deletes all images and other data on the
memory card . If there is data saved on the memory card that you wish to keep, copy that data to
a computer before formatting.
• If the message Card is not formatted. Format card? is displayed when the camera is turned on,
the memory card must be formatted. If there is data on the memory card that you do not want to
delete, tap No. Copy that data to a computer before formatting. To format the memory card, tap
Yes. The confirmation dialog will be displayed. To start formatting, tap OK.• Observe the following precautions while formatting the memory card, saving and deleting
images, and copying images to a computer, otherwise data or the memory card itself may be
damaged.
- Do not open the battery-chamber/memory card slot cover or remove the memory card or
battery.
- Do not turn off the camera.
7/29/2019 Nikon s6400rm en 02
http://slidepdf.com/reader/full/nikon-s6400rm-en-02 253/280
F5
h ni c a l N o t e s a n d I n d
ex
- Do not disconnect the AC adapter.
T e c
Cleaning and Storage
CleaningDo not use alcohol, thinner, or other volatile chemicals.
Storage Turn the camera off when not in use. Be sure that the power-on lamp is off before putting thecamera away. Remove the battery if the camera will not be used for an extended period. Do
Lens
Avoid touching glass parts with your fingers. Remove dust or lint with a blower(typically a small device with a rubber bulb attached to one end that is pumped toproduce a stream of air out the other end). To remove fingerprints or other stainsthat cannot be removed with a blower, wipe the lens with a soft cloth, using a spiral
motion that starts at the center of them and working toward the edges. If this fails,clean the lens using a cloth lightly dampened with commercial lens cleaner.
MonitorRemove dust or lint with a blower. To remove fingerprints and other stains, clean themonitor with a soft, dry cloth, being careful not to apply pressure.
Body
Use a blower to remove dust, dirt, or sand, then wipe gently with a soft, dry cloth.After using the camera at the beach or other sandy or dusty environment, wipe off
any sand, dust, or salt with a dry cloth lightly dampened with fresh water and drythoroughly. Note that foreign matter inside the camera could cause damage not covered by the warranty.
7/29/2019 Nikon s6400rm en 02
http://slidepdf.com/reader/full/nikon-s6400rm-en-02 254/280
F6
h ni c a l N o t e s a n d I n d
ex
not store the camera with naphtha or camphor moth balls, or in any of the followinglocations:• Next to equipment that produces strong electromagnetic fields, such as televisions or
radios• Exposed to temperatures below –10°C (14°F) or above 50°C (122°F)• Places that are poorly ventilated or subject to humidity of over 60%
To prevent mold or mildew, take the camera out of storage at least once a month. Turn the
camera on and release the shutter a few times before putting the camera away again.
For storing the battery, follow the precautions in “The Battery” (F3) in “Maximizing Camera
Life and Performance” (F2).
T e c
n
Troubleshooting
If the camera fails to function as expected, check the list of common problems below beforeconsulting your retailer or Nikon-authorized service representative.
Power, Display, Settings Issues
Problem Cause/Solution A
The camera is on but doesnot respond.
Wait for recording to end.
If the problem persists, turn the camera off.If the camera does not turn off, remove and reinsertthe battery or batteries or, if you are using an ACadapter, disconnect and reconnect the AC adapter.Note that although any data currently being recordedwill be lost, data that have already been recorded willnot be affected by removing or disconnecting thepower source.
25, E119
Battery inserted in the
b h d
• Confirm all connections.• Off is selected for Charge by computer in the
setup menu.• When charging by connecting the camera to a
computer, battery charging stops when the camerais turned off.
• When charging by connecting the camera to ab h i if h i
16105, E106105
105
7/29/2019 Nikon s6400rm en 02
http://slidepdf.com/reader/full/nikon-s6400rm-en-02 255/280
F7
hni c a l N o t e s a n d I n d
ex
camera cannot be charged. computer, battery charging stops if the computer issuspended (sleeping), and the camera may turn off.
• Depending upon computer specifications, settings,and status, charging the battery inserted in thecamera may not be possible via computerconnection.
–
Camera cannot be turnedon. Battery is exhausted. 24
T e c
h n
Camera turns off withoutwarning.
• Battery is exhausted.
• The camera automatically turns off to save power if no operations are performed for an extendedperiod of time.
• The camera or battery have become too cold andcannot operate properly.
• The camera turns off if the Charging AC Adapter isconnected while the camera is on.
• The camera turns off if the USB cable connecting itto a computer or printer is disconnected.Reconnect the USB cable.
• Inside of the camera has become hot. Leave thecamera off until the inside of the camera hascooled, and then try turning it on again.
24
105
F3
16
86, 91,
E39
–
Monitor is blank.
• Camera is off.• Standby mode for saving power: press the power
switch, the shutter-release button, A button,c button, orb (emovie-record) button.
• When flash lamp flashes, wait until flash hascharged.
• Camera and computer are connected via USBcable.
• Camera and TV are connected via audio/video
bl HDMI bl
252, 25
58
86, 91
86, E34
Problem Cause/Solution A
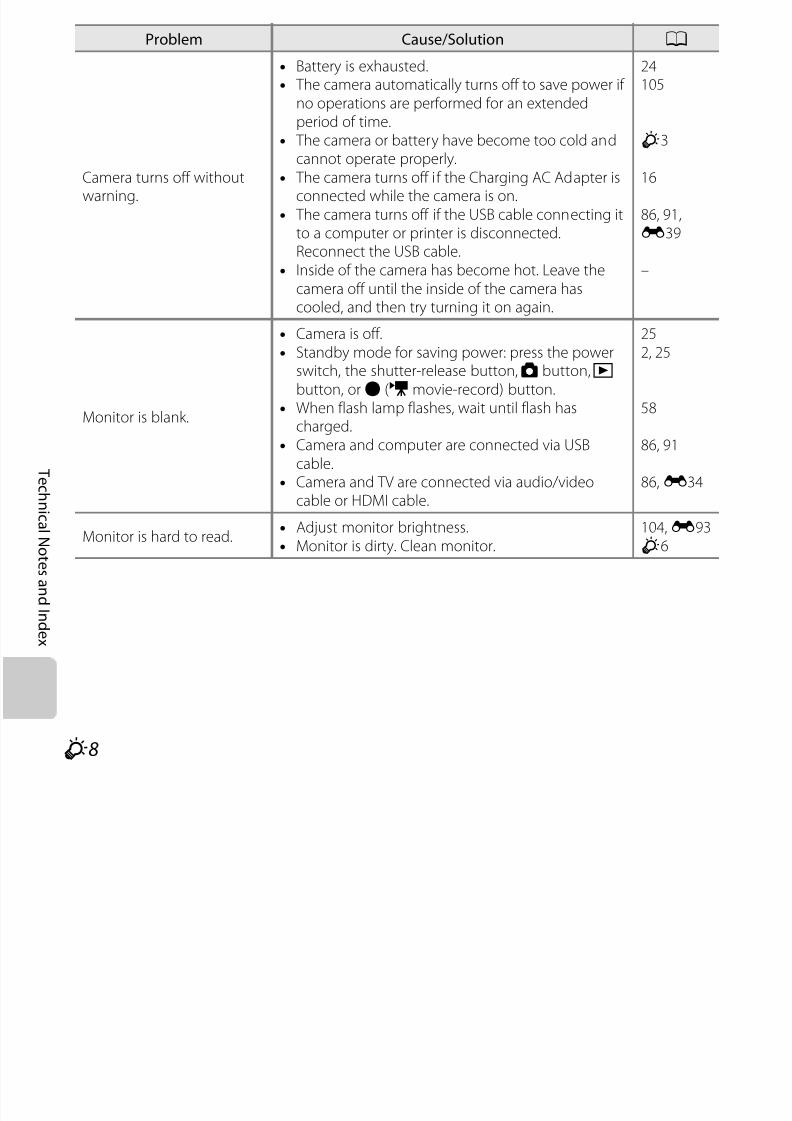
7/29/2019 Nikon s6400rm en 02
http://slidepdf.com/reader/full/nikon-s6400rm-en-02 256/280
F8
hni c a l N o t e s a n d I n d
ex
cable or HDMI cable.
Monitor is hard to read.• Adjust monitor brightness.• Monitor is dirty. Clean monitor.
104, E93F6
T e c
h n
Date and time of recordingare not correct.
• If camera clock has not been set, “Date not set”
indicator flashes during shooting and movierecording. Images and movies recorded beforeclock is set are dated “01/01/2012 00:00”. Set thecorrect time and date from the Time zone anddate option in the setup menu.
• The camera clock is not as accurate as ordinarywatches or clocks. Periodically compare the time of the camera clock with that of a more accurate
timepiece and reset as required.
20, 104,E90
No indicators displayed inmonitor.
Auto info is selected for Photo info in Monitorsettings in the setup menu.
104, E93
Print date not available.Time zone and date has not been set in the setupmenu.
20, 104,E90
Date not imprinted on
images even when Printdate is enabled.
• The current shooting mode is one that does not
support Print date.• The date cannot be imprinted on movies.
104, E95
Screen for setting time zoneand date is displayed whencamera is turned on.
Clock battery is exhausted; all settings were restoredto their default values.
20, 22
Camera settings reset.
Battery temperature is high Turn off camera and
Problem Cause/Solution A
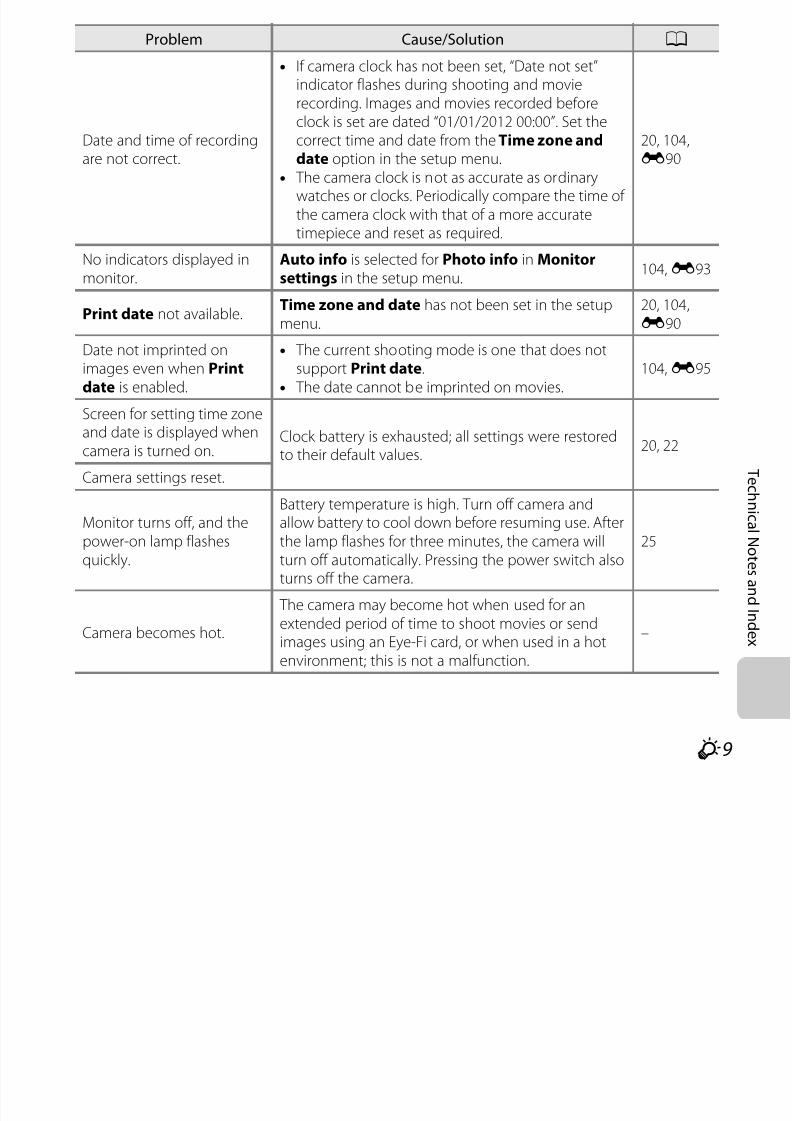
7/29/2019 Nikon s6400rm en 02
http://slidepdf.com/reader/full/nikon-s6400rm-en-02 257/280
F9
hni c a l N o t e s a n d I n d
ex
Monitor turns off, and thepower-on lamp flashesquickly.
Battery temperature is high. Turn off camera andallow battery to cool down before resuming use. Afterthe lamp flashes for three minutes, the camera willturn off automatically. Pressing the power switch alsoturns off the camera.
25
Camera becomes hot.
The camera may become hot when used for anextended period of time to shoot movies or send
images using an Eye-Fi card, or when used in a hotenvironment; this is not a malfunction.
–
T e c
h n
Shooting Issues
Problem Cause/Solution A
Cannot switch to shootingmode.
• Disconnect HDMI cable or USB cable.
• The camera cannot be switched to shooting modewhile connected to a power outlet via theCharging AC Adapter.
86, 91,E34,E3917
No image captured whenthe shutter-release button ispressed.
• When camera is in playback mode or a menu isdisplayed, press the A button, the shutter-releasebutton, or theb (emovie-record) button.
• Battery is exhausted.• When flash lamp flashes, flash is charging.
10, 32
2458
Cannot take 3D pictures.In some shooting conditions, such as when the subjectis moving, dark, or low in contrast, the second shot may
not be taken or the 3D image may not be saved.
–
Camera cannot focus.
• Subject is too close. Try shooting using macromode, or the Scene auto selector or Close-up scene mode.
• The intended subject is one with which autofocusdoes not perform well.
• Set AF assist in the setup menu to Auto.
T ff d th i
42, 45, 63
77
104, E99
25
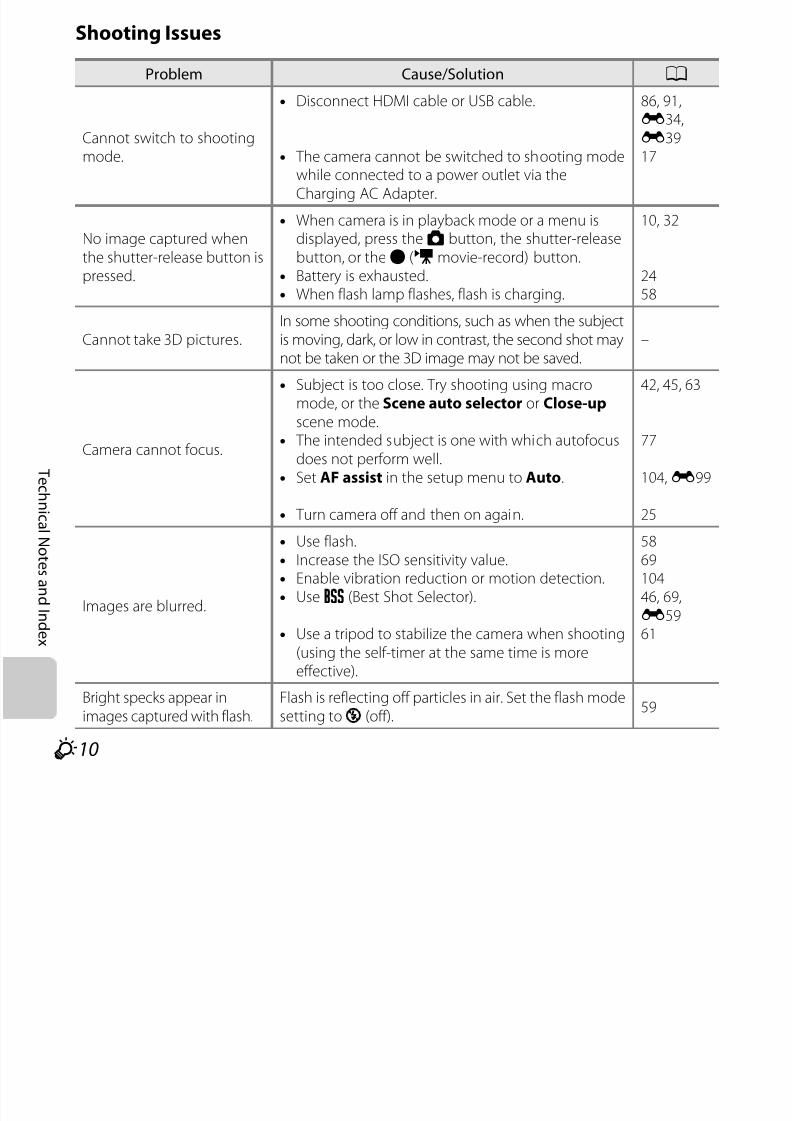
7/29/2019 Nikon s6400rm en 02
http://slidepdf.com/reader/full/nikon-s6400rm-en-02 258/280
F10
hni c a l N o t e s a n d I n d
ex
• Turn camera off and then on again. 25
Images are blurred.
• Use flash.• Increase the ISO sensitivity value.• Enable vibration reduction or motion detection.• UseD (Best Shot Selector).
• Use a tripod to stabilize the camera when shooting(using the self-timer at the same time is moreeffective).
586910446, 69,E5961
Bright specks appear inimages captured with flash.
Flash is reflecting off particles in air. Set the flash modesetting to W (off).
59
T e c h ni
Flash does not fire.
• The flash mode is set to W (off).
• Scene mode with which the flash does not fire isselected.• On is selected for Blink proof in smart portrait
menu.• Another function that restricts flash is enabled.
58
66
70
71
Digital zoom cannot beused.
• Digital zoom is set to Off in the setup menu.
• Digital zoom cannot be used in the followingsituations.- When Touch shooting in the shooting menu is
set to Subject tracking- When Continuous in the shooting menu is set
to Multi-shot 16- When Scene auto selector, Portrait, Night
portrait, Night landscape, Backlighting
(when HDR is set to On), Easy panorama, Petportrait, or 3D photography is selected inscene mode
- When smart portrait mode is selected
104, E100
69, E55
69, E59
42, 43, 49
54
Image mode not available.Another function that restricts the Image mode option is enabled.
71
N d h h i Off is selected for Sound settings > Shutter soundi N d i d d i h 104
Problem Cause/Solution A
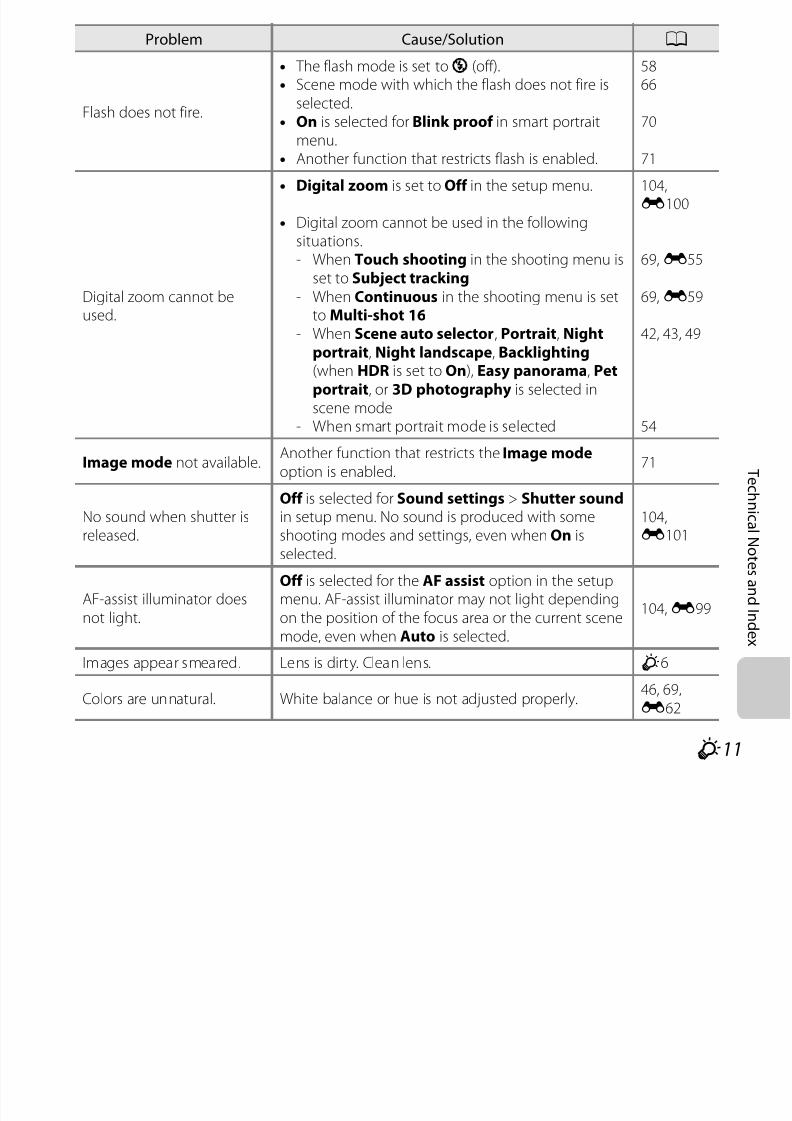
7/29/2019 Nikon s6400rm en 02
http://slidepdf.com/reader/full/nikon-s6400rm-en-02 259/280
F11
ni c a l N o t e s a n d I n d
ex
No sound when shutter isreleased.
Off is selected for Sound settings > Shutter sound in setup menu. No sound is produced with someshooting modes and settings, even when On isselected.
104, E101
AF-assist illuminator doesnot light.
Off is selected for the AF assist option in the setupmenu. AF-assist illuminator may not light dependingon the position of the focus area or the current scene
mode, even when Auto is selected.
104, E99
Images appear smeared. Lens is dirty. Clean lens. F6
Colors are unnatural. White balance or hue is not adjusted properly.46, 69,E62
T e c h ni
Randomly spaced bright
pixels (“noise”) appear inimage.
The subject is dark, so shutter speed is too slow or ISO
sensitivity is too high. Noise can be reduced by:• Using flash.• Specifying a lower ISO sensitivity setting.
5869, E58
Images are too dark (underexposed).
• The flash mode is set to W (off).• Flash window is blocked.• Subject is beyond flash range.• Adjust exposure compensation.• Increase ISO sensitivity.• Subject is backlit. Select Backlighting scene mode
or set the flash mode setting to X (fill flash).
5828586569, E5847, 58
Images are too bright(overexposed).
Adjust exposure compensation. 65
Unexpected results whenflash set to V (auto withred-eye reduction).
When taking pictures with V (auto with red-eyereduction) or fill flash with slow sync and red-eyereduction in Night portrait scene mode, In-Camera RedEye Fix may be applied to areas not affected by red-eye inrare cases. Use any scene mode other than Nightportrait, and change the flash mode to any setting otherthan V (auto with red-eye reduction) and try taking apicture again.
43, 58
Skin tones are not softened
• In some shooting conditions, facial skin tones maynot be softened.
• For images containing four or more faces try using
55
56 84
Problem Cause/Solution A
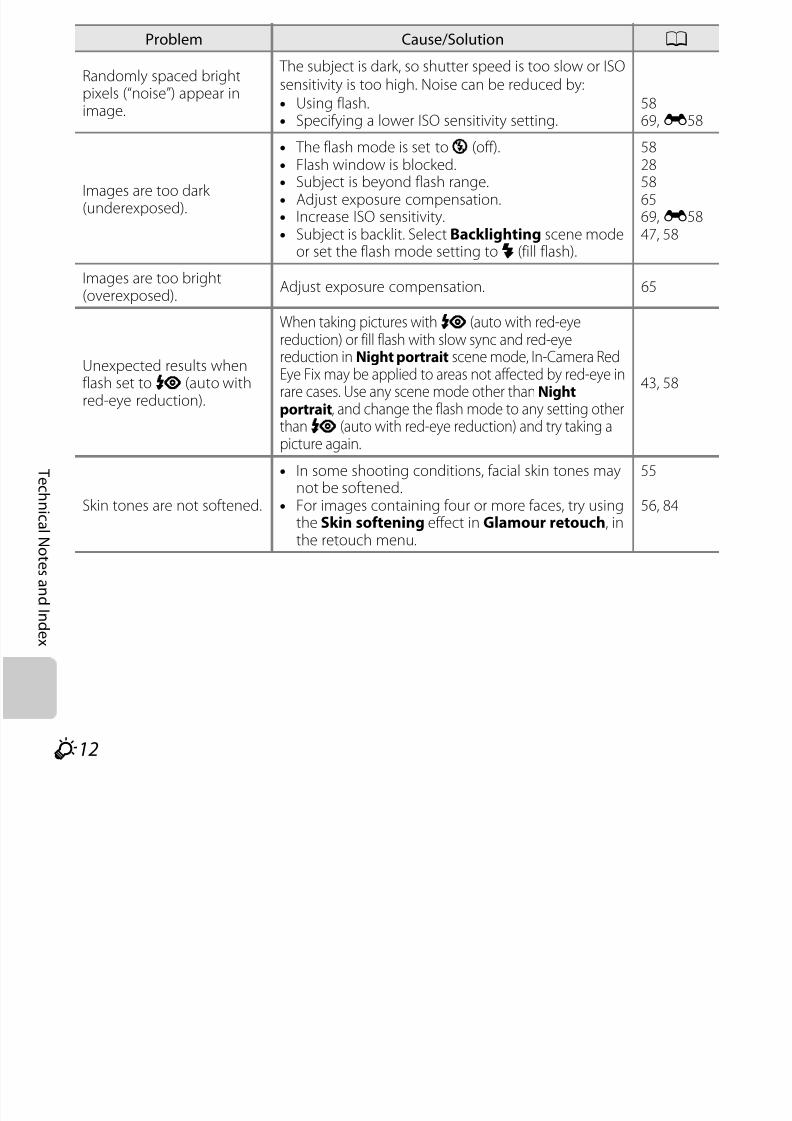
7/29/2019 Nikon s6400rm en 02
http://slidepdf.com/reader/full/nikon-s6400rm-en-02 260/280
F12
c a l N o t e s a n d I n d ex
Skin tones are not softened. • For images containing four or more faces, try usingthe Skin softening effect in Glamour retouch, inthe retouch menu.
56, 84
T e c h ni c
Saving images takes time.
It may take more time to save images in the following
situations.• When the noise reduction function is in operation,such as when shooting in a dark environment.
• When the flash mode is set to V (auto with red-eye reduction).
• When shooting in Night landscape, Nightportrait, or Backlighting (when HDR is set to On)scene mode
• When the skin softening function is applied whileshooting.• When using continuous shooting mode
–
60
43, 45, 47
42, 43, 70
69, E59
A ring-shaped belt orrainbow-colored stripeappears in the monitor orimages.
When shooting with backlighting or when a verystrong light source (such as sunlight) is in the frame, aring-shaped belt or rainbow-colored stripe (ghosting)may occur. Change the position of the light source, orframe the picture so that the light source does not
enter the frame and try again.
–
Problem Cause/Solution A
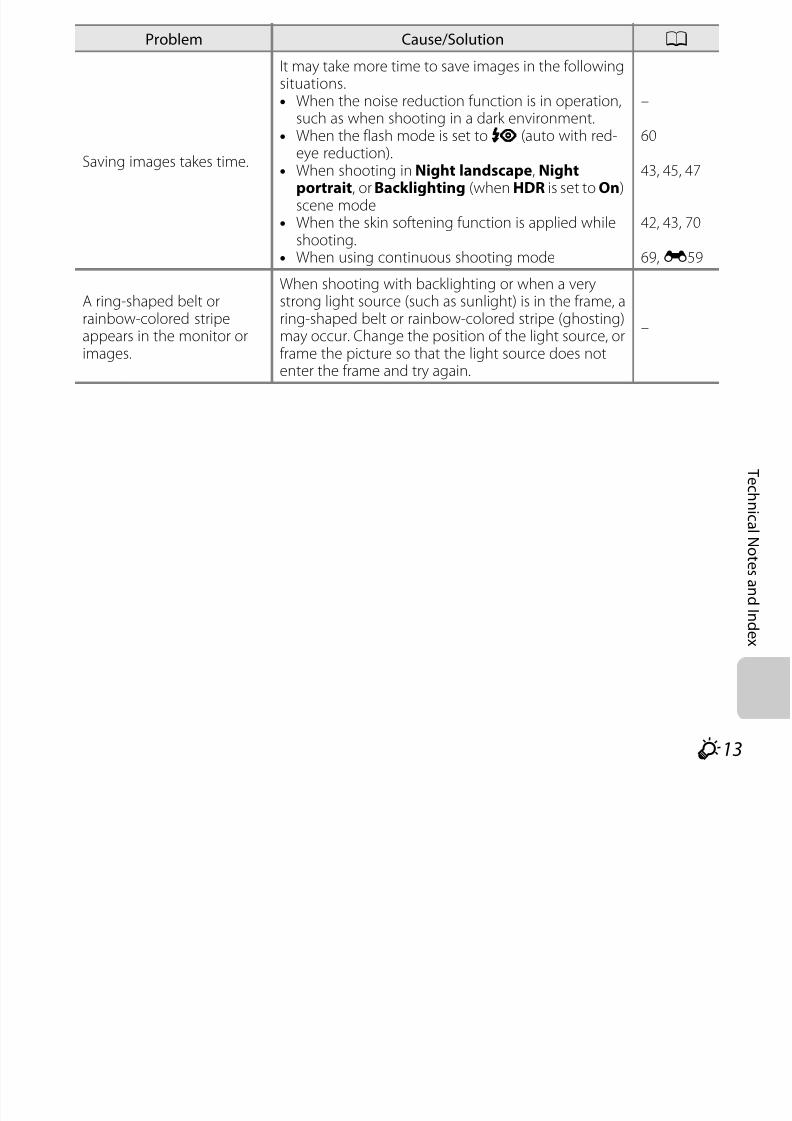
7/29/2019 Nikon s6400rm en 02
http://slidepdf.com/reader/full/nikon-s6400rm-en-02 261/280
F13
c a l N o t e s a n d I n d ex
T e c h
ni c
Playback Issues
Problem Cause/Solution A
File cannot be played back.
• File or folder was overwritten or renamed bycomputer or other make of camera.
• The COOLPIX S6400 is not able to play back moviesrecorded with another make or model of digitalcamera.
–
101
Cannot zoom in on image.
• Playback zoom cannot be used with movies, smallpictures, or images that have been cropped to asize of 640 × 360.
• 3D images cannot be enlarged when the camera isconnected via HDMI and they are played back in3D.
• The COOLPIX S6400 may not be able to zoom in onimages captured with another make or model of digital camera.
–
50
–
Cannot record voicememos.
• Voice memos cannot be attached to movies.• Voice memos cannot be attached to images
captured with other cameras. Voice memosattached to images using another camera cannotbe played back on this camera.
–85, E78
C di i
• Editing functions used for still images are notavailable for movies.
• Confirm the conditions that are required for editing
–
84,E18,
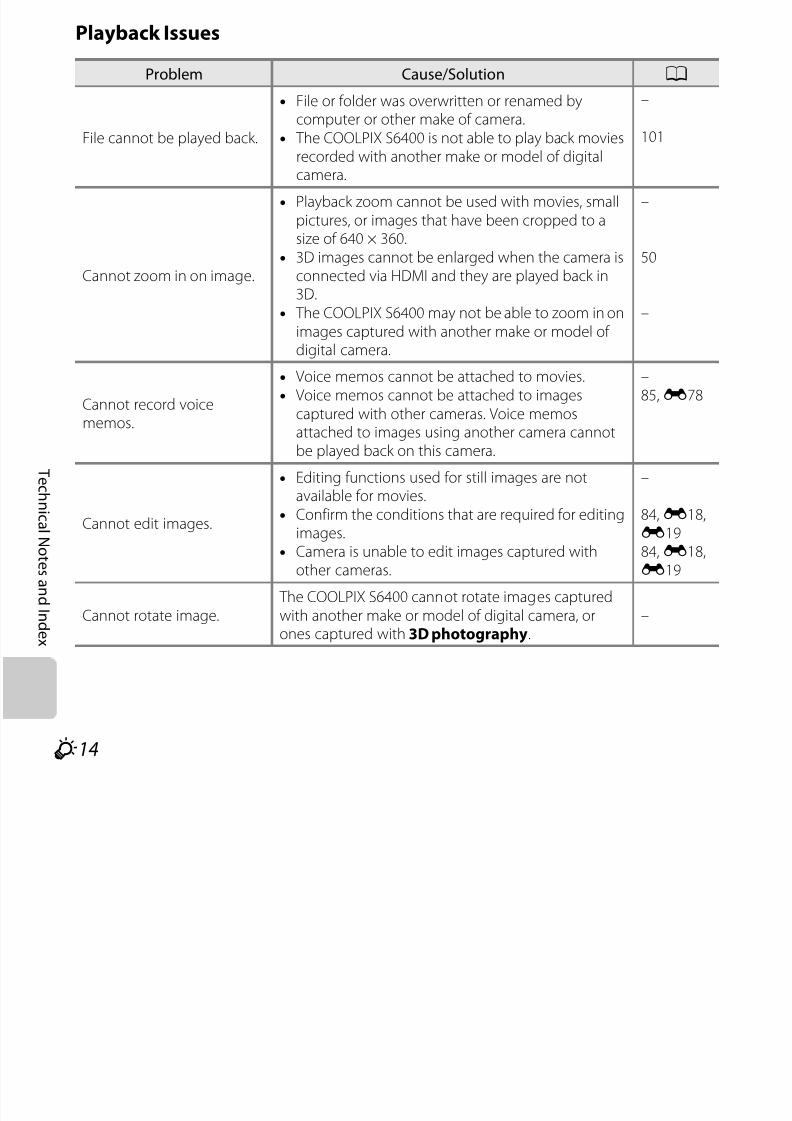
7/29/2019 Nikon s6400rm en 02
http://slidepdf.com/reader/full/nikon-s6400rm-en-02 262/280
F14
c a l N o t e s a n d
I n d e
x
Cannot edit images.Confirm the conditions that are required for editingimages.
• Camera is unable to edit images captured withother cameras.
84, E18, E1984, E18, E19
Cannot rotate image. The COOLPIX S6400 cannot rotate images capturedwith another make or model of digital camera, orones captured with 3D photography.
–
T e c h ni c
Images are not displayed on TV.
• Video mode or HDMI is not correctly set in the TV
settings setup menu.• Cables are connected to the HDMI mini connector(Type C) and to the USB/audio/video outputconnector simultaneously.
• Memory card contains no images. Replace thememory card. Remove the memory card to playback images from the internal memory.
105,
E10586, 91,E34,E3918
Album icons are reset totheir default icons, imagesadded to albums cannot bedisplayed in favoritepictures mode.
Data saved in the internal memory or on the memorycard may not be played back correctly if overwrittenby a computer.
–
The saved images are notdisplayed in auto sort mode.
• The desired image was sorted into a category otherthan the category currently displayed.
• Images saved by a camera other than the COOLPIXS6400 and images copied using the Copy optioncannot be displayed in auto sort mode.
• Images saved in the internal memory or on thememory card may not be played back correctly if overwritten by a computer.
• Up to 999 images and movies in total can be addedto each category. If the desired category already
contains 999 images or movies in total, new images
82, E11
82, E11
–
82, E11
Problem Cause/Solution A
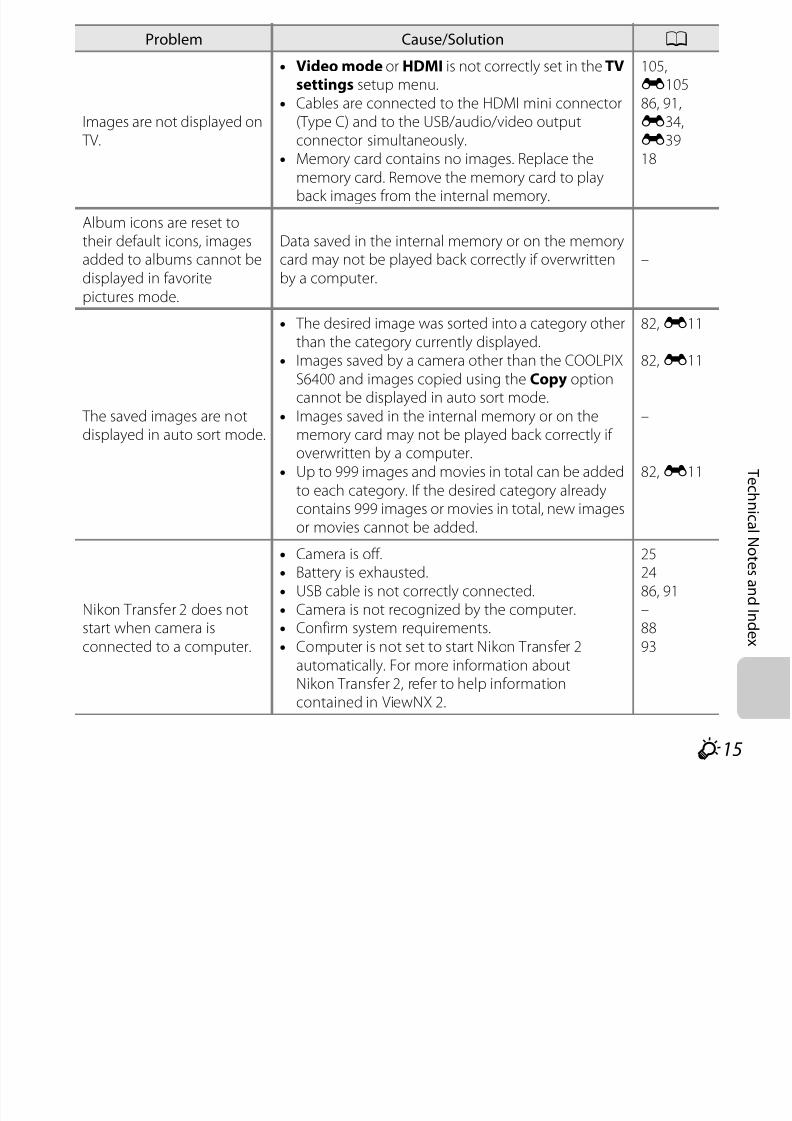
7/29/2019 Nikon s6400rm en 02
http://slidepdf.com/reader/full/nikon-s6400rm-en-02 263/280
F15
c a l N o t e s a n d I n d ex
g gor movies cannot be added.
Nikon Transfer 2 does notstart when camera is
connected to a computer.
• Camera is off.• Battery is exhausted.• USB cable is not correctly connected.• Camera is not recognized by the computer.• Confirm system requirements.
• Computer is not set to start Nikon Transfer 2automatically. For more information aboutNikon Transfer 2, refer to help informationcontained in ViewNX 2.
252486, 91–88
93
T e c h ni c a
The PictBridge startupscreen is not displayedwhen the camera isconnected to a printer.
With some PictBridge-compatible printers, the
PictBridge startup screen may not be displayed and itmay be impossible to print images when Auto isselected for the Charge by computer option in thesetup menu. Set the Charge by computer option toOff and reconnect the camera to the printer.
105, E106
Images to be printed are notdisplayed.
• Memory card contains no images. Replace thememory card.
• Remove the memory card to print images from theinternal memory.• Images captured using 3D photography cannot
be printed.
18
19
50
Cannot select paper size
with camera.
Paper size cannot be selected from the camera in thefollowing situations, even when printing from aPictBridge-compatible printer. Use the printer to
select paper size.• The printer does not support the paper sizesspecified by the camera.
• The printer automatically selects the paper size.
86, E42,E43–
Problem Cause/Solution A
7/29/2019 Nikon s6400rm en 02
http://slidepdf.com/reader/full/nikon-s6400rm-en-02 264/280
F16
al N o t e s a n d I n d ex
T e c h ni c a
Specifications
Nikon COOLPIX S6400 Digital Camera Type Compact digital camera
Number of effective pixels 16.0 million
Image sensor 1 / 2.3-in. type CMOS; approx. 16.79 million total pixels
Lens 12× optical zoom, NIKKOR lens
Focal length
4.5-54.0 mm (angle of view equivalent to that of 25-300 mm lens in
35mm [135] format)
f/-number f/3.1-6.5
Construction 8 elements in 8 groups (1 ED lens element)
Digital zoommagnification
Up to 4× (angle of view equivalent to that of approx. 1200 mm lensin 35mm [135] format)
Vibration reduction Lens shift
Motion blur reduction Motion detection (still pictures)
Autofocus (AF) Contrast-detect AF
Focus range
• [W]: Approx. 50 cm (1 ft 8 in.)–∞[T]: Approx. 1.2 m (4 ft)–∞
• Macro mode: Approx. 10 cm (4 in.)–∞(wide-angle position)(All distances measured from center of front surface of lens)
F l iFace priority, auto (9-area automatic selection), center, manualf b l d h h l b k
7/29/2019 Nikon s6400rm en 02
http://slidepdf.com/reader/full/nikon-s6400rm-en-02 265/280
F17
al N o t e s a n d I n d ex
Focus-area selection (focus area can be selected using the touch panel), subject tracking, Target finding AF
Monitor7.5 cm (3-in.), widescreen, approx. 460k-dot, TFT LCD (touch panel)with anti-reflection coating and 5-level brightness adjustment
Frame coverage(shooting mode)
Approx. 96% horizontal and 96% vertical
Frame coverage(playback mode) Approx. 96% horizontal and 96% vertical
T e c h ni c a
Storage
Media Internal memory (approx. 78 MB), SD/SDHC/SDXC memory card
File system DCF, Exif 2.3, DPOF, and MPF compliant
File formats
Still pictures: JPEG3D images: MPOSound files (Voice Memo): WAV Movies: MOV (Video: H.264/MPEG-4 AVC, Audio: AAC stereo)
Image size(pixels)
• 16M (High) [4608 × 3456P]• 16M [4608 × 3456]
• 8M [3264 × 2448]• 4M [2272 × 1704]• 2M [1600 × 1200]• VGA [640 × 480]• 16:9 [4608 × 2592]
ISO sensitivity(Standard output
sensitivity)
• ISO 125-1600• ISO 3200 (available when using Auto mode)
Exposure
Metering mode 256-segment matrix, center-weighted (digital zoom less than 2×),spot (digital zoom 2× or more)
Exposure control Programmed auto exposure and exposure compensation (–2.0 –+2.0 EV in steps of 1 / 3 EV)
Shutter Mechanical and CMOS electronic shutter• 1/2000 1 s
7/29/2019 Nikon s6400rm en 02
http://slidepdf.com/reader/full/nikon-s6400rm-en-02 266/280
F18
al N o t e s a n d I n d ex
Speed
• / 2000-1 s• 1 / 4000 s (maximum speed during high-speed continuous
shooting)• 4 s (Fireworks show scene mode)
Aperture Electronically-controlled ND filter (–2 AV) selection
Range 2 steps (f/3.1 and f/6.2 [W])
Self-timer Can be selected from 10 s and 2 s
T e c h ni c a
Flash
Range (approx.)(ISO sensitivity: Auto)
[W]: 0.5–6.2 m (1 ft 8 in.–20 ft)[T]: 1.2–2.9 m (4 ft–9 ft 6 in.)
Flash control TTL auto flash with monitor preflashes
Interface Hi-Speed USB
Data transfer protocol MTP, PTP
Video output Can be selected from NTSC and PAL
HDMI output Can be selected from Auto, 480p, 720p, and 1080i
I/O terminal Audio/video (A/V) output; digital I/O (USB)HDMI mini connector (Type C) (HDMI output)
Supported languages
Arabic, Bengali, Chinese (Simplified and Traditional), Czech, Danish,Dutch, English, Finnish, French, German, Greek, Hindi, Hungarian,Indonesian, Italian, Japanese, Korean, Norwegian, Polish,Portuguese (European and Brazilian), Romanian, Russian, Spanish,Swedish, Tamil, Thai, Turkish, Ukrainian, Vietnamese
Power sources One Rechargeable Li-ion Battery EN-EL19 (included)AC Adapter EH-62G (available separately)
Charging time Approx. 3 h (when using Charging AC Adapter EH-69P and whenno charge remains)
Battery life1
Still pictures Approx. 160 shots when using EN-EL19
Movies (actual batterylif f di )2
• HD 1080pP (1920×1080): Approx. 20 min when using EN-EL19• HD 1080p (1920×1080): Approx 20 min when using EN-EL19
7/29/2019 Nikon s6400rm en 02
http://slidepdf.com/reader/full/nikon-s6400rm-en-02 267/280
F19
al N o t e s a n d I n d ex
life for recording)2 • HD 1080p (1920×1080): Approx. 20 min when using EN EL19• HD 720p (1280×720): Approx. 25 min when using EN-EL19
Tripod socket 1/4 (ISO 1222)
Dimensions (W × H × D)Approx. 95.4 ×58.6 × 26.7 mm (3.8 × 2.4 × 1.1 in.) (excludingprojections)
Weight Approx. 150 g (5.3 oz) (including battery and SD memory card)Operating environment
Temperature 0°C–40°C (32°F–104°F)
Humidity 85% or less (no condensation)
T e c h
ni c a
• Unless otherwise stated, all figures assume a fully-charged battery and an ambienttemperature of 23 ±3°C (73.4 ±5.4°F) as specified by the Camera and Imaging ProductsAssociation (CIPA).
1
Figures based on the Camera and Imaging Products Association (CIPA) standards for measuringthe endurance of camera batteries. Performance for still pictures measured under the followingtest conditions:l 4608×2592 selected for Image mode, zoom adjusted with each shot, andflash fired with every other shot. Movie recording time assumes that HD 1080pP (1920×1080) is selected for Movie options. Figures may vary with use, the interval between shots, and thelength of time menus and images are displayed.
2 Individual movie files cannot exceed 4 GB in size or 29 minutes in length. Recording may endbefore this limit is reached if camera temperature becomes elevated.
Rechargeable Li-ion Battery EN-EL19
Charging AC Adapter EH-69P
Type Rechargeable lithium-ion battery
Rated capacity DC 3.7 V, 700 mAh
Operating temperature 0°C–40°C (32°F–104°F)
Dimensions (W × H × D) Approx. 31.5 × 39.5 × 6 mm (1.3 × 1.6 × 0.3 in.)Weight Approx. 14.5 g (0.5 oz) (excluding battery case)
Rated input AC 100-240 V, 50/60 Hz, 0.068-0.042 A
Rated output DC 5.0 V, 550 mAOperating temperature 0°C 40°C (32°F 104°F)
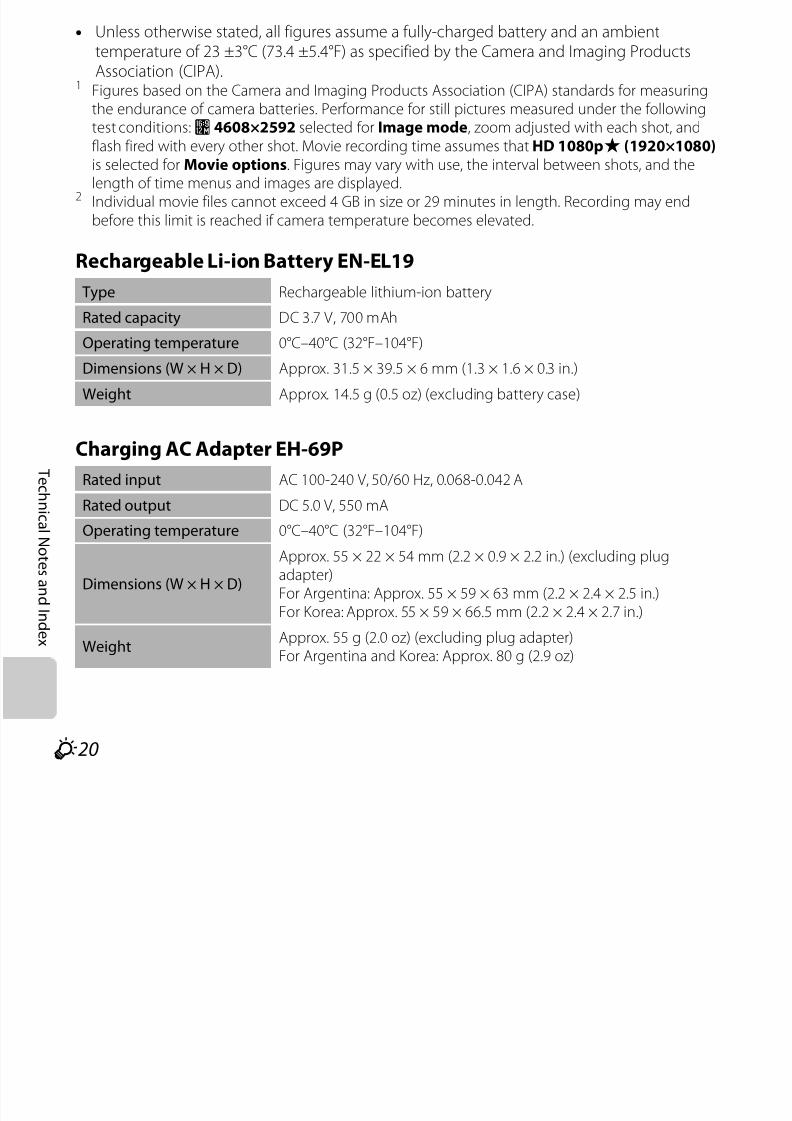
7/29/2019 Nikon s6400rm en 02
http://slidepdf.com/reader/full/nikon-s6400rm-en-02 268/280
F20
lN o t e s a n d I n d ex
Operating temperature 0 C–40 C (32 F–104 F)
Dimensions (W × H × D)
Approx. 55 × 22 × 54 mm (2.2 × 0.9 × 2.2 in.) (excluding plugadapter)For Argentina: Approx. 55 × 59 × 63 mm (2.2 × 2.4 × 2.5 in.)For Korea: Approx. 55 × 59 × 66.5 mm (2.2 × 2.4 × 2.7 in.)
WeightApprox. 55 g (2.0 oz) (excluding plug adapter)For Argentina and Korea: Approx. 80 g (2.9 oz)
T e c h
ni c a l
B Specifications
• Nikon will not be held liable for any errors this manual may contain.
• The appearance of this product and its specifications are subject to change without notice.
7/29/2019 Nikon s6400rm en 02
http://slidepdf.com/reader/full/nikon-s6400rm-en-02 269/280
F21
N o t e s a n d I n d e
x
T e c h
ni c a l
Supported Standards• DCF: Design Rule for Camera File System is a standard widely used in the digital camera
industry to ensure compatibility among different makes of camera.• DPOF: Digital Print Order Format is an industry-wide standard that allows images to be
printed from print orders saved on memory cards.• Exif version 2.3: Exchangeable image file format (Exif) version 2.3 for digital still cameras is
a standard that allows information saved with photographs to be used for optimal colorreproduction when images are output from Exif-compliant printers.
• PictBridge: A standard developed cooperatively by the digital camera and printerindustries, allowing photographs to be output directly to a printer without connecting the
camera to a computer.

7/29/2019 Nikon s6400rm en 02
http://slidepdf.com/reader/full/nikon-s6400rm-en-02 270/280
F22
N o t e s a n d I n d e
x
T e c h
ni c a l
Approved Memory Cards The following Secure Digital (SD) memory cards have been tested and approved for use inthis camera.• Memory cards with an SD Speed Class rating of 6 or faster are recommended for recording
movies. When using a memory card with a lower Speed Class rating, movie recording maystop unexpectedly.
1 If the memory card will be used with a card reader or similar device, make sure that the devicesupports 2 GB cards.
• Contact the manufacturer for details on the above cards. We cannot guarantee camera
performance when using memory cards made by other manufacturers.
SD memory card SDHC memory card2 SDXC memorycard3
SanDisk 2 GB1 4 GB, 8 GB, 16 GB, 32 GB 64 GB, 128 GB
TOSHIBA 2 GB1 4 GB, 8 GB, 16 GB, 32 GB 64 GB
Panasonic 2 GB1 4 GB, 8 GB, 16 GB, 32 GB 64 GB
Lexar – 4 GB, 8 GB, 16 GB, 32 GB 64 GB, 128 GB
2
SDHC compliant.If the memory card will be used with a card reader or similar device, make sure that thedevice supports SDHC.
3 SDXC compliant.If the memory card will be used with a card reader or similar device, make sure that thedevice supports SDXC.
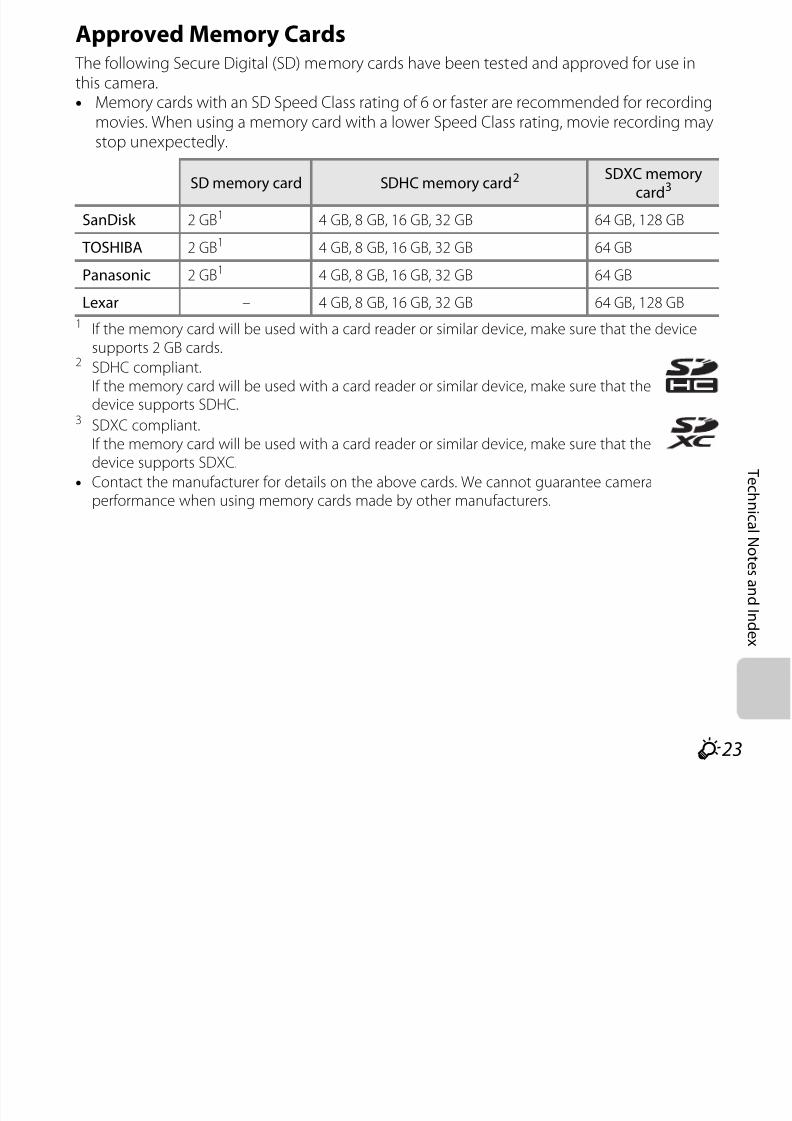
7/29/2019 Nikon s6400rm en 02
http://slidepdf.com/reader/full/nikon-s6400rm-en-02 271/280
F23
N o t e s a n d I n d e
x
T e c h
ni c a l N
AVC Patent Portfolio License
This product is licensed under the AVC Patent Portfolio License for the personal and non-
commercial use of a consumer to (i) encode video in compliance with the AVC standard
(“AVC video”) and/or (ii) decode AVC video that was encoded by a consumer engaged in
a personal and non-commercial activity and/or was obtained from a video provider
licensed to provide AVC video. No license is granted or shall be implied for any other use.
Additional information may be obtained from MPEG LA, L.L.C.
See http://www.mpegla.com .
Trademark Information• Microsoft, Windows and Windows Vista are either registered trademarks or trademarks
of Microsoft Corporation in the United States and/or other countries.
• Macintosh, Mac OS, and QuickTime are trademarks of Apple Inc., registered in the U.S.
and other countries.
• Adobe and Acrobat are registered trademarks of Adobe Systems Inc.
• SDXC, SDHC and SD Logos are trademarks of SD-3C, LLC.• PictBridge is a trademark.
• HDMI, logo and High-Definition Multimedia Interface are trademarks or
registered trademarks of HDMI Licensing LLC.
• All other trade names mentioned in this manual or the other documentation provided
with your Nikon product are trademarks or registered trademarks of their respective
holders.FreeType License (FreeType2)
7/29/2019 Nikon s6400rm en 02
http://slidepdf.com/reader/full/nikon-s6400rm-en-02 272/280
F24
N o t e s a n d I n d e
x
FreeType License (FreeType2)
• Portions of this software are copyright (c) 2012 The FreeType Project
(“www.freetype.org”). All rights reserved.
MIT License (Harfbuzz)
• Portions of this software are copyright (c) 2012 The Harfbuzz Project (“http:// www.freedesktop.org/wiki/Software/HarfBuzz”). All rights reserved.
T e c h
ni c a l N
Index
SymbolsA Auto mode ......................................... 26, 38C Scene mode................................................. 40R Special effects mode............................... 52F Smart portrait mode ............................... 54c Playback mode................................ 32, 82h
Favorite pictures mode.......... 82, E7F Auto sort mode......................... 82, E11C List by date mode................... 82, E13z Setup menu ................................................. 104g (Telephoto)...................................................... 29f (Wide-angle)................................................. 29
i Playback zoom .............................................. 80h Thumbnail display ................................... 81A Shooting mode button................. 3, 26c Playback button ................................. 3, 32b (emovie-record) button ........... 3, 96FMenu icon........ 10, 68, 84, 99, 103
f Exit icon............................................................ 10J Return icon..................................................... 10R
AF area mode .................................. 70, E66AF assist..................................... 2, 104, E99Album............................................................... E10
adding images to ................................ 84removing images from.................... 84
Aperture value .......................................... 30, 31Audio/video cable........................ 87, E34Audio/video-in jack ..................... 87, E34Auto flash............................................................... 59Auto mode............................................................ 38Auto off................................ 25, 105, E102Auto sort mode................................ 82, E11Autofocus........................................... 99, E88BBacklighting o................................................... 47Battery................................................. 14, 16, 22Battery chamber ................................................... 3Battery charger .............................. 17, E119
Battery latch.......................................................... 14Battery level indicator.................................... 24

7/29/2019 Nikon s6400rm en 02
http://slidepdf.com/reader/full/nikon-s6400rm-en-02 273/280
F25
N o t e s a n d I n d e
x
R ............................................................... 50Numerics3D photographys ........................................ 503D pictures............................................................ 50
AAC adapter ....................................... 25, E119
Battery-chamber/memory card slot cover
.................................................................... 3, 14, 18BeachZ................................................................ 44Best Shot Selector......................... 46, E60
Black and white copy n.............................. 46Blink proof.......................................... 70, E68
T e c h
ni c a l N
Blink warning.............................. 105, E108Brightness..................................................... E93BSS.......................................................... 46, E60Button sound............................................ E101CCharge by computer ............. 105, E106Charge lamp.................................................. 3, 17Charger............................................... 16, E119Charging AC Adapter ..................................... 16Choose key picture ... 85, E14, E82Close-up k .......................................................... 45Compression ratio ................................... E49Computer..................................................... 87, 91Connector cover................................................... 2Continuous ............................ 49, 69, E59Copying images............................. 85, E80Crop.................................................................. E32Cross processo .............................................. 52DDate......................................... 20, 104, E90
Date and time ...................20, 104, E90
Date format........................................ 21, E90D li ht E62
DPOF.................................................................. F22DPOF print.................................................... E45Drag.............................................................................. 4DrawA .................................................. 47, E2DSCN.............................................................. E117Dusk/dawn i.................................................... 44EEasy panorama p .......................... 48, E3Easy panorama playback............. 48, E6EH-69P.............................................................. ii, 16EN-EL19 ................................................. ii, 14, 16Exposure compensation............................... 65Extension..................................................... E117Eye-Fi upload............................... 105, E111Eyelet for camera strap..................................... 2FFace detection....... 42, 43, 49, 54, 75Favorite pictures mode ................. 82, E7File name..................................................... E117Fill flash.................................................................... 59
Fireworks showm
..........................................46
Firmware version....................... 105, E116Fi d t E58
7/29/2019 Nikon s6400rm en 02
http://slidepdf.com/reader/full/nikon-s6400rm-en-02 274/280
F26
N o t e s a n d I n d e
x
Daylight.......................................................... E62Daylight saving time......... 21, 22, E92Delete................................ 34, E16, E79Digital zoom............................... 104, E100
Direct print ........................................ 87, E38D-Lighting ......................................... 84, E26
Fixed range auto....................................... E58Flash .................................................................. 2, 58Flash lamp ..................................................... 3, 58Flash mode................................................. 58, 59
Flash off ................................................................... 59Focus.......................................... 30, 70, E66
T e c h
ni c a l N
Focus area.............................................................. 30Focus indicator...................................................... 7Focus lock .............................................................. 78Folder name.............................................. E117Food u ................................................................... 46Format internal memory..... 105, E103Format memory cards
................................................... 19, 105, E103Formatting ......................... 19, 105, E103FSCN............................................................... E117Full-frame playback ......................................... 32Full-time AF ...................................... 99, E88GGlamour retouch........................... 84, E29HHDMI .............................................................. E105HDMI 3D output ..................................... E105HDMI cable .................................................. E34HDMI device control ............................ E105HDMI mini connector........................................ 2HDR............................................................................ 47Help .......................................................................... 40High keyG 52
Image copy.................................................. E80Image mode..................................... 69, E49Image review .............................................. E93Image size.......................................... 69, E49Imprinting date and time.................... E95Internal memory................................................ 19Internal memory indicator
................................................. 7, 9, 24, 32, 96ISO sensitivity................................... 69, E58
JJPG................................................................... E117LLandscape c ..................................................... 42Language...................................... 105, E104Lens.............................................................. 2, F17Lens cover................................................................. 2List by date mode.......................... 82, E13Low keyH ........................................................... 52MMacro mode......................................................... 63
Memory capacity.............................................. 24Memory card........................................................ 18M d l t 18
7/29/2019 Nikon s6400rm en 02
http://slidepdf.com/reader/full/nikon-s6400rm-en-02 275/280
F27
N o t e s a n d I n d e
x
High keyG ........................................................... 52High-contrast monochromeF .............. 52High-speed continuous............ 69, E59HS movie ............................................ 99, E84
IIdentifier....................................................... E117
Memory card slot .............................................. 18Microphone............................................................. 2Monitor................................................. 3, 6, F6Monitor settings.......................... 104, E93
Motion detection....................... 104, E98MOV................................................................ E117
T e c h
ni c a l N
Movie AF mode.............................. 99, E88Movie editing ................................ 101, E47Movie length........................................................ 98Movie menu..................................... 99, E83Movie options ................................. 99, E83Movie playback ............................................... 100Movie recording ............................ 96, E83MPO................................................................ E117MSCN............................................................. E117Multi-shot 16............................................... E60Museum l.......................................................... 46NNight landscape j ......................................... 45Night portrait e................................................ 43Nikon Transfer 2 ...................................... 90, 92Nostalgic sepiaP ................................... 52Number of exposures remaining
.................................................................. 24, E50OOpen with HS footage ............... 99, E87Optical zoom ....................................................... 29Optional accessories ............................ E119P
Pet portrait auto release .............................. 49Pet portraitO .................................................... 49Photo info ..................................................... E93PictBridge..........................87, E38, F22Playback................................. 32, 100, E79Playback menu ............................... 84, E69Playback mode ........................................ 32, 82Playback zoom.................................................... 80Popl .................................................................. 52Portrait b ............................................................. 42Power............................................................. 24, 25Power switch .................................... 2, 24, 25Power-on lamp................................ 2, 24, 25Preset manual............................................. E63Pre-shooting cache... 69, E59, E61Pressing halfway................................................. 31Print................. 84, E41, E43, E73Print date............................... 22, 104, E95Print order.......................................... 84, E73Print order date option.............. 22, E76Printer................................................... 87, E38Protect................................................... 84, E71Q
7/29/2019 Nikon s6400rm en 02
http://slidepdf.com/reader/full/nikon-s6400rm-en-02 276/280
F28
o t e s a n d I n d e
x
PPaint....................................................... 84, E22Panorama Maker................................................ 90Paper size .................................. E42, E43
Party/indoor f ................................................. 44Perspective control...................... 84, E28
QQuick effects....... 33, 39, E20, E65Quick retouch.................................. 84, E25R
Rechargeable Li-ion battery ............. 14, 16
Recording movies......................... 96, E83
T e c h
ni c a l N o
Recording slow motion movies
.................................................................. 99, E84Red-eye reduction............................................ 59Remove from favorites ............................ E9Reset all ........................................... 105, E112Retouch.................................................................. 84Rotate image ................................... 84, E77RSCN............................................................... E117SScene auto selectord .................................. 42Scene Effect .......................................................... 41Scene mode ............................................. 40, 42Selective colorI ............................................. 52Self-timer................................................................ 61Self-timer lamp........................................... 2, 62Sequence display options
........................................... 105, E14, E110Setup menu....................................................... 104Shooting...................................................... 28, 30Shooting menu .............................. 69, E49Shooting mode .................................................. 26Shutter sound........................................... E101Shutter speed 30, 31
Slow sync ............................................................... 59Small picture..................................... 84, E31Smart portrait menu.................... 68, E67Smart portrait mode........................................ 54Smile timer ........................................ 70, E68Snowz ................................................................. 44SoftO ............................................................. 52Sound settings........................... 104, E101Speaker....................................................................... 3Special effects mode....................................... 52Sports d ................................................................. 43SSCN............................................................... E117Strap............................................................................. 4Stretch.................................................. 84, E27Stylus............................................................................ 5Subject tracking ................... 38, 69, E55Sunset h .............................................................. 44Super vividk .............................................. 52 T Tap..... ............ ............... ............ ............... ............ .......... 4 Target finding AF..... ........... 70, 74, E66 Time difference ............. ............. .... 22, E90Time zone 104, E90

7/29/2019 Nikon s6400rm en 02
http://slidepdf.com/reader/full/nikon-s6400rm-en-02 277/280
F29
o t e s a n d I n d e
x
Shutter speed............................................ 30, 31Shutter-release button .................................. 30Single.................................................... 69, E59Single AF............................................. 99, E88Skin softening....................... 56, 70, E67Slide show ......................................... 84, E69
Time zone ............. .............. ........... . 104, E90 Touch AF/AE .............. ............. ......... 69, E57 Touch shooting............. ............. ..... 69, E51 Touch shutter ............. ................ ..... 69, E53 Toy camera effect 1m.................................. 52 Toy camera effect 2n ................................. 52
T e c h
ni c a l N o
Tripod socket ............. ................ ........... . 3, F19 TV ............. .............. ............. .............. ...... 87, E34 TV settings ............. ........... ............ 105, E105
UUSB cable ................................. 86, 91, E39USB/audio/video output connector
.................................... 86, 91, E34, E39VVibration reduction................... 104, E97Video mode............................................... E105ViewNX 2 ................................................................ 88Voice memo..................................... 85, E78Volume ................................. 100, 101, E79W
WAV ................................................................ E117Welcome screen......................... 104, E89White balance ................................. 69, E62Wind noise reduction................. 99, E88ZZoom ........................................................................ 29
Zoom control .............................................. 2, 29Zoom in................................................................... 29Zoom out 29
7/29/2019 Nikon s6400rm en 02
http://slidepdf.com/reader/full/nikon-s6400rm-en-02 278/280
F30
o t e s a n d I n d e
x
Zoom out............................................................... 29

7/29/2019 Nikon s6400rm en 02
http://slidepdf.com/reader/full/nikon-s6400rm-en-02 279/280
No reproduction in any form of this manual, in whole or in part
(except for brief quotation in critical articles or reviews), may be made
without written authorization from NIKON CORPORATION.

7/29/2019 Nikon s6400rm en 02
http://slidepdf.com/reader/full/nikon-s6400rm-en-02 280/280
YP2I02(11)6MNA7811-02