nimblegen seqcapez - perkinelmer...user guide compatible with: illumina ® truseq dna sample prep v....
TRANSCRIPT
User Guide
Compatible with: Illumina® TruSeq™ DNA Sample Prep v. 2 and NimbleGen® SeqCapEZ™ Library SR v. 3.0 Sciclone® NGS hardware with Maestro® v. 6.0 Sciclone NGSx hardware with Maestro v. 6.0 or v. 6.3
W O R K S TAT I O N
SEQCAPEZN I M B L E G E N
LIBRARY PREPARATION ON THE
SCICLONE NGS

2
Introduction 3
Maestro NimbleGen® SeqCapEZ™ Workflow Overview 3
Application 1: NimbleGen® TruSeq™ Library Prep 4
Application 2: NimbleGen® Library Prep Post-PCR SPRI 5
Application 3: NimbleGen® PreCapture Normalization and Pooling 6
Application 4: NimbleGen® Hybridization Setup 7
Application 5: NimbleGen® Target Capture 7
Application 6: NimbleGen® Post-Capture Final SPRI 8
Required Materials and Reagents 9
Reagents 9
General Laboratory Equipment and Supplies 10
Sciclone NGS Workstation 10
Consumables 10
Running the Maestro NimbleGen® SeqCapEZ™ Workflow on the Sciclone NGS 11
NimbleGen® TruSeq™ Library Prep Run Preparation Steps 11
NimbleGen® Library Prep Post-PCR SPRI Run Preparation Steps 14
Quality Control and Quantification of Amplified Libraries 15
NimbleGen® Normalization and Pooling Run Preparation Steps 16
NimbleGen® Hybridization Setup Run Preparation Steps 19
NimbleGen® Target Selection Run Preparation Steps 20
NimbleGen® Post-Capture Final SPRI Run Preparation Steps 22
Quality Control and Quantification of Captured Libraries 23
Appendix A: Step-by-Step Guide to NimbleGen® TruSeq™ Library Prep Application 24
Appendix B: Step-by-Step Guide to NimbleGen® Post PCR Library SPRI Application 25
Appendix C: Step-by-Step Guide to NimbleGen® Normalization and Pooling 26
Appendix D: Step-by-Step Guide to NimbleGen® Hybridization Setup Application 26
Appendix E: Step-by-Step Guide to NimbleGen® Target Selection Application 26
Appendix F: Step-by-Step Guide to NimbleGen® Post Capture PCR SPRI Application 28
Table of Contents
NimbleGen® SeqCapEZ Library Preparation on the Sciclone NGS Workstation

www.perkinelmer.com 33
Introduction
NimbleGen® SeqCapEZ Library Preparation on the Sciclone NGS Workstation
Figure 1. Overview of the Maestro NimbleGen® SeqCapEZ Workflow.
IntroductionPreparation of DNA samples for cluster generation and sequencing on the Illumina® platform requires a series of manipulations to efficiently ligate appropriate indexed adapters onto DNA fragments to produce paired-end libraries. Selection of specific regions of the genome for sequencing requires additional steps including hybridization with capture probes, isolation of captured sequences, and enrichment of captured libraries. This process can also include pooling of samples after library construction and before hybridization. Automating the process has the advantage of avoiding sample tracking errors and reducing sample-to-sample variability while dramatically increasing throughput. The Maestro-based NimbleGen® SeqCapEZ Library Preparation Workflow from PerkinElmer provides a pre-programmed solution for the automation of the NimbleGen® SeqCapEZ protocol on the Sciclone® NGS Workstation.
Maestro NimbleGen® SeqCapEZ Workflow Overview
The Maestro Workflow for SeqCapEZ is outlined in Figure 1. Samples are processed in 96-well PCR plates, and the number of samples to process (1 to 12 columns of 8 samples each) is selected at the start of each run. Pre-set tip-tracking utilities written into the Maestro applications guide the instrument to pick up appropriate numbers of tips and refill/replace tip boxes as needed. Inheco temperature blocks installed on the Sciclone deck allow for appropriate 4 °C storage of reagents and controlled incubation temperatures for reactions. When appropriate, reaction mixes are pre-arrayed prior to addition to sample to ensure equal incubation times across the sample plate. Easy-to-follow user interfaces guide the reagent and deck setup process and prompt the user for any necessary interventions.
NimbleGen® Post PCR SPRI Application (Day 1)
NimbleGen® Normalization and Pooling Application
(Day 2)
NimbleGen® Hyb Setup Application
(Day 2)
NimbleGen® SeqCapEZ Target Capture
Application (Day 5)
Amplified Library in 100 µL PCR RXN
30 µL Library in PCR Grade water
Library QC (GX or bioanalyzer
Broadcast and addition of COT DNA/
TS-HE Oligos
Post-PCR SPRI Cleanup
30 µL Library in RSB (QC and/or store at 4 °C)
Normalization (90 min for 96 samples
Hybridization Set up
Hybridization (72 hours on thermocycler
Streptavidin Bead Capture and Washes
Library Amplification
Post-PCR SPRI Cleanup
30 µL Library in RSB (QC and/or store at 4 °C)
PCR Setup
Thermocycler step
1 ug sheared DNA in 50 µL water
A-Tailing
Adapter Ligation
100 µL PCR Reactions
PCR Setup
End Repair and SPRI cleanup
TruSeq for NimbleGen® Library Prep Application
(Day 1)
Thermocycler step
Maestro NimbleGen® SeqCapEZ Workflow Overview

4
IntroductionIntroduction
NimbleGen® SeqCapEZ Library Preparation on the Sciclone NGS Workstation
Maestro Application Set-up Time Run Time (Including thermocycler steps)
1 NimbleGen® TruSeq Library Prep Workflow 1 hour 4.5 hours
2 NimbleGen® Library Prep Post-PCR SPRI 10 min 45 min
3 NimbleGen® PreCapture Normalization and Pooling 30 minutes Up to 3 hours (depending on number of samples and pooling option)
4 NimbleGen® Hyb Setup 10 minutes 5-10 minutes
5 NimbleGen® Target Capture 30 minutes 5-6 hours
6 NimbleGen® Post-Capture Final SPRI 10 min 45 min
Six independent Maestro Applications are used in the 5-6-day NimbleGen® SeqCapEZ Workflow:
Figure 2. Application 1: NimbleGen® TruSeq Library Prep.
The Maestro “NimbleGen® TruSeq Library Prep” protocol differs from Illumina’s manual TruSeq DNA protocol in several ways.
1. An “on bead” strategy is used for library prep. AMPure® XP beads are added to the sample after the End Repair reaction and remain in the sample until the PCR setup step. For SPRI cleanup steps, DNA in the sample is driven on and off the beads via changes in PEG and NaCl concentrations.
TruSeq Library Prep
50 µL samples in 96-well Plate
Broadcast 45 µL ER Mix to 96-well plate
Add 40 µL ER mix to 50 µL sample
Incubate 30 min at 30 °C
Add 100 µL beads, SPRI Cleanup, 17.5 µL RSB
Add 15 µL A-tail mix to sample
Incubate 30 min at 37 °C
Add 2.5 µL Adapters + 5 µL Ligase to sample
Incubate 10 min at 30 °C
Add 5 µL STL
Add 12.5 µL PEG/NaCl, SPRI Cleanup, 20 µL RSB
Transfer 20 µL sample off beads to PCR Plate
Broadcast 4 µL Adapters to Q1 of 384-well plate
Broadcast 15 µL A-tail mix to Q2 of 384-well plate
Broadcast 8 µL Ligase Mix to Q4 of 384-well plate
Broadcast 8 µL STL to Q3 of 384-well plate
Prompt user to place PCR plate containing PMM (80 µL/well) on the deck

www.perkinelmer.com 5
Introduction
NimbleGen® SeqCapEZ Library Preparation on the Sciclone NGS Workstation
2. The volumes/concentrations of some reagent additions have been reduced from the Illumina recommended volumes/concentrations. These reductions allow for the necessary overage volume during automated pipeting steps without significantly affecting yields.
3. The protocol recommends 2-fold dilution of adapters with RSB (for a final concentration of 0.5 µM in the ligation reaction) to prevent excess adapter-dimer ligation. This dilution is recommended for DNA sample inputs of 500 ng or less. If using 500—1000 ng DNA input, the dilution is optional.
4. Only one SPRI cleanup is performed after ligation in library prep. The reduced adapter concentration in the ligation reactions and the specific PEG/NaCl concentration in the post-ligation SPRI allow effective removal of adapters and adapter-dimers with the single SPRI cleanup.
5. The PCR amplification after adapter ligation is modified to use a different master mix (NEB Phusion) and different reaction volume (100 µl). The PCR Master Mix is not placed on the deck at the start of the library prep. Instead, the Maestro application prompts the user to place the PCR Master Mix on the deck just prior to use.
SPRI Cleanup with AMPure XP beads is used to replace the QIAquick PCR Purification kit used in the manual NimbleGen® protocol. This application is similar to the Post-PCR SPRI method for the Illumina TruSeq DNA workflow, with the following modifications. The starting sample volume is 100 µL and the AMPure XP volume added to the sample is 100 µL. The 1:1 sample: bead ratio is optimized to minimize retention of any adapter-dimers in the sample. As specified in the NimbleGen® protocol, the elution buffer used is PCR grade water (not EB or 1X TE). Elution in water prevents concentration of salts during the evaporation of samples prior to hybridization.
Figure 3. Application 2: NimbleGen® Library Prep Post-PCR SPRI.
100 µL PCR Reaction in 96-well Plate
Wash Beads 2X with 150 µL of 80% EtOH
Mix Beads and transfer 100 µL to SPRI plate, Incubate 10 min at 22 °C
Elute in 32 µL water
Move to Magnet, incubate 10 min, remove SN to waste
Move to Magnet and transfer 30 µL to clean plate
Transfer sample from PCR plate to the SPRI Plate (a clean BioRad plate)
Move plate to 37 °C and dry 5 min
Library Prep Post-PCR SPRI
6
IntroductionIntroduction
NimbleGen® SeqCapEZ Library Preparation on the Sciclone NGS Workstation
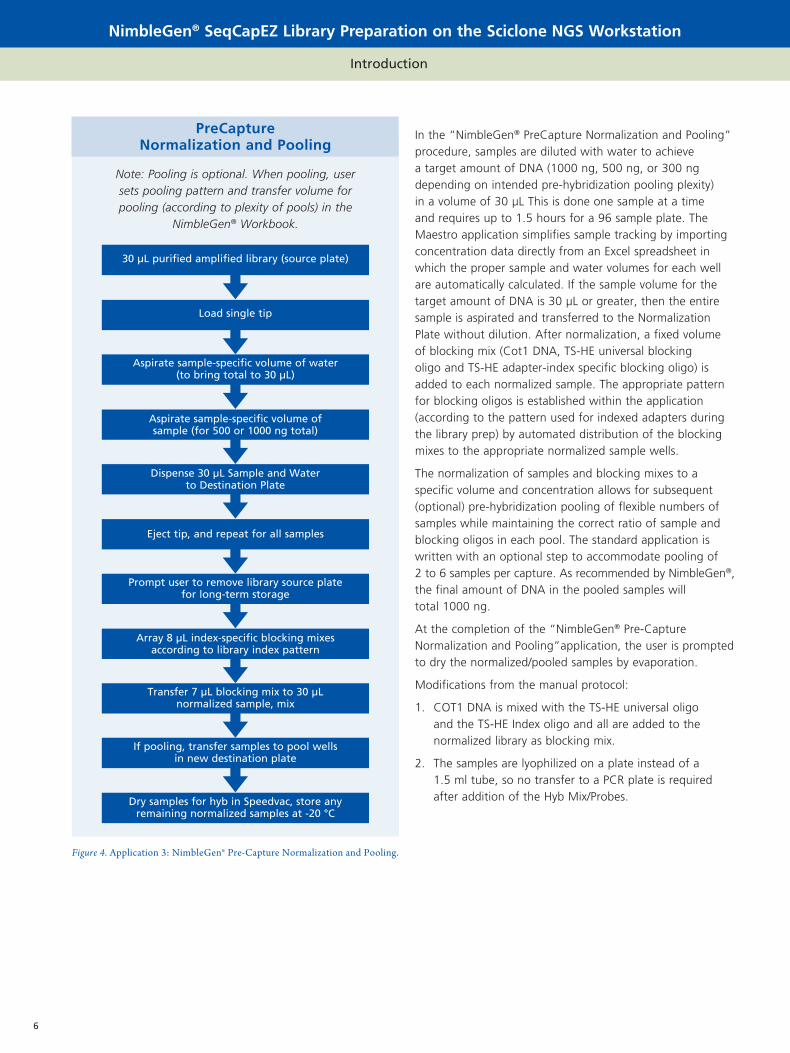
In the “NimbleGen® PreCapture Normalization and Pooling” procedure, samples are diluted with water to achieve a target amount of DNA (1000 ng, 500 ng, or 300 ng depending on intended pre-hybridization pooling plexity) in a volume of 30 µL This is done one sample at a time and requires up to 1.5 hours for a 96 sample plate. The Maestro application simplifies sample tracking by importing concentration data directly from an Excel spreadsheet in which the proper sample and water volumes for each well are automatically calculated. If the sample volume for the target amount of DNA is 30 µL or greater, then the entire sample is aspirated and transferred to the Normalization Plate without dilution. After normalization, a fixed volume of blocking mix (Cot1 DNA, TS-HE universal blocking oligo and TS-HE adapter-index specific blocking oligo) is added to each normalized sample. The appropriate pattern for blocking oligos is established within the application (according to the pattern used for indexed adapters during the library prep) by automated distribution of the blocking mixes to the appropriate normalized sample wells.
The normalization of samples and blocking mixes to a specific volume and concentration allows for subsequent (optional) pre-hybridization pooling of flexible numbers of samples while maintaining the correct ratio of sample and blocking oligos in each pool. The standard application is written with an optional step to accommodate pooling of 2 to 6 samples per capture. As recommended by NimbleGen®, the final amount of DNA in the pooled samples will total 1000 ng.
At the completion of the “NimbleGen® Pre-Capture Normalization and Pooling”application, the user is prompted to dry the normalized/pooled samples by evaporation.
Modifications from the manual protocol:
1. COT1 DNA is mixed with the TS-HE universal oligo and the TS-HE Index oligo and all are added to the normalized library as blocking mix.
2. The samples are lyophilized on a plate instead of a 1.5 ml tube, so no transfer to a PCR plate is required after addition of the Hyb Mix/Probes.
Figure 4. Application 3: NimbleGen® Pre-Capture Normalization and Pooling.
30 µL purified amplified library (source plate)
Dispense 30 µL Sample and Water to Destination Plate
Aspirate sample-specific volume of water (to bring total to 30 µL)
Prompt user to remove library source plate for long-term storage
Transfer 7 µL blocking mix to 30 µL normalized sample, mix
If pooling, transfer samples to pool wells in new destination plate
Dry samples for hyb in Speedvac, store any remaining normalized samples at -20 °C
Aspirate sample-specific volume of sample (for 500 or 1000 ng total)
Load single tip
Eject tip, and repeat for all samples
Array 8 µL index-specific blocking mixes according to library index pattern
PreCapture Normalization and Pooling
Note: Pooling is optional. When pooling, user sets pooling pattern and transfer volume for pooling (according to plexity of pools) in the
NimbleGen® Workbook.

www.perkinelmer.com 7
Target Capture
Introduction
NimbleGen® SeqCapEZ Library Preparation on the Sciclone NGS Workstation
This application has only one step: The lyophilized library plate is placed onto the deck along with the Hybridization Mix/Probes Reagent Plate. The Hybridization Mix/Probes are added to the samples 1 column at a time and the shaker is used to mix. The user is required to promptly seal and transfer the plate to a nearby thermocycler. The automated hybridization setup differs from the manual protocol in that the denaturing step is done after the probes have been added to the sample. The samples/probes are incubated at 95 °C on the thermocycler just prior to the 72 hour incubation at 47 °C.
The NimbleGen® recommended incubation time for SeqCapEZ hybridization is 64-72 hours. It is convenient to hybridize samples over a weekend with the hybridization incubation starting on a Friday followed by target selection and washing on the following Monday. The automated Target Selection application takes approximately 5 hours to complete. Thus it is recommended to complete hybridization setup no later than 11:00 am to allow sufficient time during normal working hours to complete the target capture application after the 72 hour hybridization.
Figure 6. Application 5: NimbleGen® Target Capture.
LM-PCR Setup
Note: If processing 6 or fewer columns of samples, duplicate PCR reactions are set up in the same plate. If processing greater than 6 columns of samples, duplicate PCR reactions are set up in 2 separate plates.
The automated NimbleGen® Target Capture application has the following modifications from the manual protocol:
1. Prior to the capture incubation, aliquoted Streptavidin beads are washed 2 times with 150 µL bead binding buffer instead of 3 times with 200 µL buffer. The volume used is 150 µL instead of 200 µL.
Remove supernatant from 100 µL of Dynal Beads
Wash with 150 µL of Bead Binding Buffer. Repeat
Prompt user to place hybridized samples on deck
Transfer 15 µL from Hyb Plate to prepared beads, mix, shake and incubate 45 min at 47 °C
1 30 sec Wash with 100 µL 47 °C Wash Buffer I
2 5 min Washes with 150 µL 47 °C Stringent Wash Buffer
2 min Wash with 150 µL RT Wash Buffer I
1 min Wash with 150 µL RT Wash Buffer II
30 s Wash with 150 µL RT Wash Buffer III
Re-suspend in 50 µL of water. Proceed to LM- PCR Setup
If PCR MM not pre-arrayed, broadcast 80 µL from Deep Well Plate to PCR Plate. Otherwise, place
pre-arrayed plate(s) on deck
Mix to resuspend sample and transfer 20 µL to first set of PCR wells
Mix to resuspend sample and transfer 20 µL to second set of PCR wells.
Prompt user to transfer PCR Plate(s) to thermocycler for LM PCR.
Figure 5. Application 4: NimbleGen® Hybridization Setup.
Hybridization Setup
Lyophilized library/pools
Transfer 15 µL of Hyb / Probe Mix to sample, (single column transfer)
Shake and Mix to resuspend DNA
Transfer to thermocyle 95 °C for 10 min, 47 °C for 72 hours
8
Post-Capture Final SPRI Cleanup
Duplicate 100 µL PCR Reactions in 96-well Plate
Transfer samples from PCR plate into SPRI Plate containing 100 µL Beads
Incubate 10 min at 22 °C
Move to Magnet, incubate 10 min, remove SN to waste
Wash Beads 3X with 150 µL of 80% EtOH.
Move plate to 37 °C and dry 10 min
Resuspend in 27.5 µL water. Combine duplicate samples into first set of wells, mix.
Move to Magnet and transfer 50 µL off beads to clean plate.
Duplicate 100 µL PCR Reactions in two 96-well Plates
Mix Beads and transfer 100 µL into SPRI plate
Transfer samples from 1st PCR plate into SPRI Plate
Incubate 10 min at 22 °C
Move to Magnet, incubate 10 min, remove SN to waste
Wash Beads 3X with 150 µL of 80% EtOH
Move plate to 37 °C and dry 10 min
Resuspend in 27.5 µL water.
Move to Magnet and transfer 25 µL off beads to clean plate
Combine 25 µL eluent from 2nd plate with 25 µL eluent from 1st plate
Repeat above steps with 2nd PCR plate
≤ 6 Columns > 6 Columns
Required Materials and ReagentsIntroduction
NimbleGen® SeqCapEZ Library Preparation on the Sciclone NGS Workstation
Figure 7. Application 6: NimbleGen® Post-Capture PCR Final SPRI
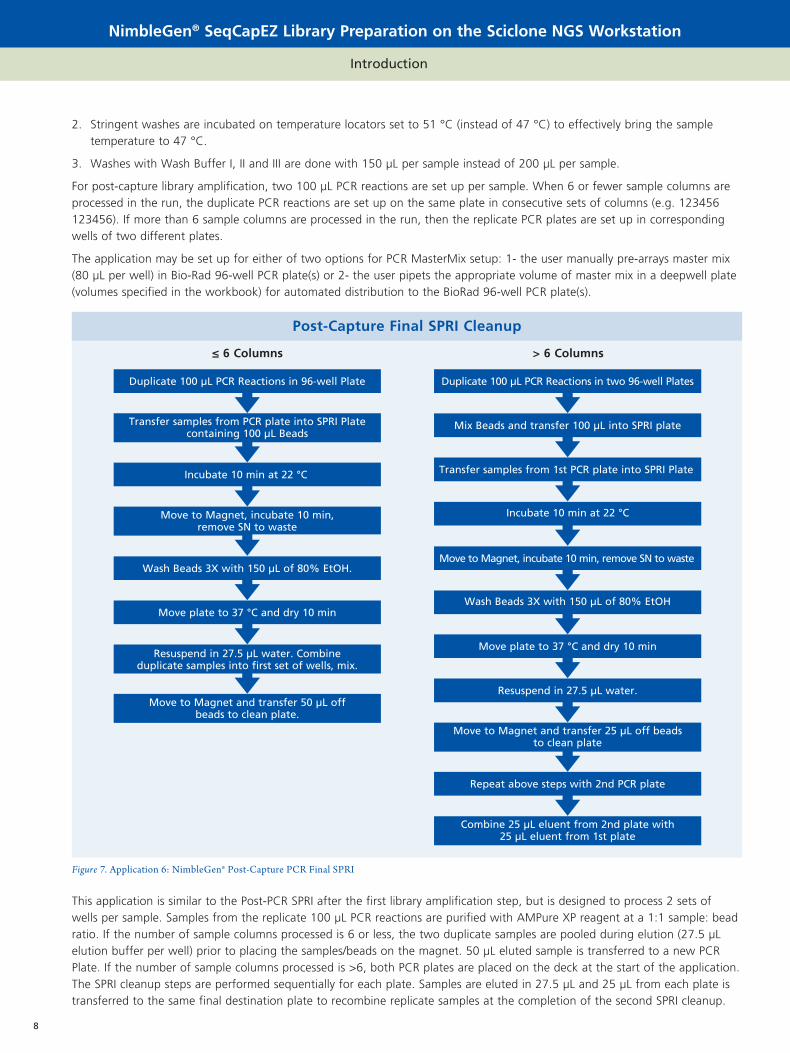
2. Stringent washes are incubated on temperature locators set to 51 °C (instead of 47 °C) to effectively bring the sample temperature to 47 °C.
3. Washes with Wash Buffer I, II and III are done with 150 µL per sample instead of 200 µL per sample.
For post-capture library amplification, two 100 µL PCR reactions are set up per sample. When 6 or fewer sample columns are processed in the run, the duplicate PCR reactions are set up on the same plate in consecutive sets of columns (e.g. 123456 123456). If more than 6 sample columns are processed in the run, then the replicate PCR plates are set up in corresponding wells of two different plates.
The application may be set up for either of two options for PCR MasterMix setup: 1- the user manually pre-arrays master mix (80 µL per well) in Bio-Rad 96-well PCR plate(s) or 2- the user pipets the appropriate volume of master mix in a deepwell plate (volumes specified in the workbook) for automated distribution to the BioRad 96-well PCR plate(s).
This application is similar to the Post-PCR SPRI after the first library amplification step, but is designed to process 2 sets of wells per sample. Samples from the replicate 100 µL PCR reactions are purified with AMPure XP reagent at a 1:1 sample: bead ratio. If the number of sample columns processed is 6 or less, the two duplicate samples are pooled during elution (27.5 µL elution buffer per well) prior to placing the samples/beads on the magnet. 50 µL eluted sample is transferred to a new PCR Plate. If the number of sample columns processed is >6, both PCR plates are placed on the deck at the start of the application. The SPRI cleanup steps are performed sequentially for each plate. Samples are eluted in 27.5 µL and 25 µL from each plate is transferred to the same final destination plate to recombine replicate samples at the completion of the second SPRI cleanup.
www.perkinelmer.com 9
Required Materials and Reagents
NimbleGen® SeqCapEZ Library Preparation on the Sciclone NGS Workstation
Reagent Vendor and Part Number
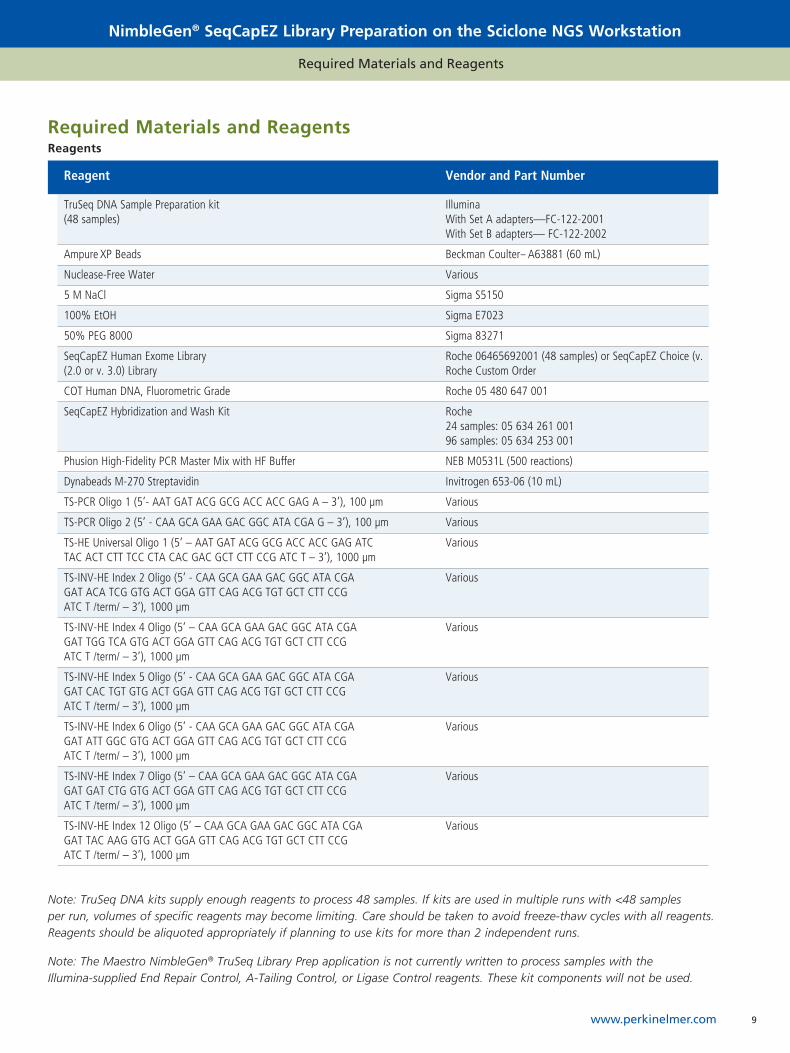
TruSeq DNA Sample Preparation kit Illumina (48 samples) With Set A adapters—FC-122-2001 With Set B adapters— FC-122-2002
Ampure XP Beads Beckman Coulter-- A63881 (60 mL)
Nuclease-Free Water Various
5 M NaCl Sigma S5150
100% EtOH Sigma E7023
50% PEG 8000 Sigma 83271
SeqCapEZ Human Exome Library Roche 06465692001 (48 samples) or SeqCapEZ Choice (v. (2.0 or v. 3.0) Library Roche Custom Order
COT Human DNA, Fluorometric Grade Roche 05 480 647 001
SeqCapEZ Hybridization and Wash Kit Roche 24 samples: 05 634 261 001 96 samples: 05 634 253 001
Phusion High-Fidelity PCR Master Mix with HF Buffer NEB M0531L (500 reactions)
Dynabeads M-270 Streptavidin Invitrogen 653-06 (10 mL)
TS-PCR Oligo 1 (5’- AAT GAT ACG GCG ACC ACC GAG A – 3’), 100 µm Various
TS-PCR Oligo 2 (5’ - CAA GCA GAA GAC GGC ATA CGA G – 3’), 100 µm Various
TS-HE Universal Oligo 1 (5’ – AAT GAT ACG GCG ACC ACC GAG ATC Various TAC ACT CTT TCC CTA CAC GAC GCT CTT CCG ATC T – 3’), 1000 µm
TS-INV-HE Index 2 Oligo (5’ - CAA GCA GAA GAC GGC ATA CGA Various GAT ACA TCG GTG ACT GGA GTT CAG ACG TGT GCT CTT CCG ATC T /term/ – 3’), 1000 µm
TS-INV-HE Index 4 Oligo (5’ – CAA GCA GAA GAC GGC ATA CGA Various GAT TGG TCA GTG ACT GGA GTT CAG ACG TGT GCT CTT CCG ATC T /term/ – 3’), 1000 µm
TS-INV-HE Index 5 Oligo (5’ - CAA GCA GAA GAC GGC ATA CGA Various GAT CAC TGT GTG ACT GGA GTT CAG ACG TGT GCT CTT CCG ATC T /term/ – 3’), 1000 µm
TS-INV-HE Index 6 Oligo (5’ - CAA GCA GAA GAC GGC ATA CGA Various GAT ATT GGC GTG ACT GGA GTT CAG ACG TGT GCT CTT CCG ATC T /term/ – 3’), 1000 µm
TS-INV-HE Index 7 Oligo (5’ – CAA GCA GAA GAC GGC ATA CGA Various GAT GAT CTG GTG ACT GGA GTT CAG ACG TGT GCT CTT CCG ATC T /term/ – 3’), 1000 µm
TS-INV-HE Index 12 Oligo (5’ – CAA GCA GAA GAC GGC ATA CGA Various GAT TAC AAG GTG ACT GGA GTT CAG ACG TGT GCT CTT CCG ATC T /term/ – 3’), 1000 µm
Required Materials and ReagentsReagents
Note: TruSeq DNA kits supply enough reagents to process 48 samples. If kits are used in multiple runs with <48 samples per run, volumes of specific reagents may become limiting. Care should be taken to avoid freeze-thaw cycles with all reagents. Reagents should be aliquoted appropriately if planning to use kits for more than 2 independent runs.
Note: The Maestro NimbleGen® TruSeq Library Prep application is not currently written to process samples with the Illumina-supplied End Repair Control, A-Tailing Control, or Ligase Control reagents. These kit components will not be used.
10
Required Materials and Reagents
NimbleGen® SeqCapEZ Library Preparation on the Sciclone NGS Workstation
Running the Maestro NimbleGen® SeqCapEZ Workflow on the Sciclone NGS
Equipment Supplier
Microfuge Various
Vortexer Various
200 µL Multichannel pipettor and appropriate barrier tips Various
1000 µL Multichannel pipettor and appropriate barrier tips Various
Microplate centrifuge Various
Thermocycler BioRad (MJ Research) DNA Engine PTC-200, or equivalent
Plate Seals Various- compatible with thermocycler and freezer storage
Lab ChipGX or Agilent Bioanalyzer 2100 with appropriate chips and reagents Various
DNA Vacuum Concentrator (96-well Plates) Various
Accessory Part Number
Agencourt 96-ring Magnet (2) CLS 128316
Spacer Assembly for Agencourt 96-ring magnet CLS 135277 (qty 4) and CLS 133514 (qty 1)
Inheco 96-well adapter/shaker with spacer CLS 100852
Inheco 96-well adapters (3) CLS 128372
Inheco 384-well adapter CLS 128373
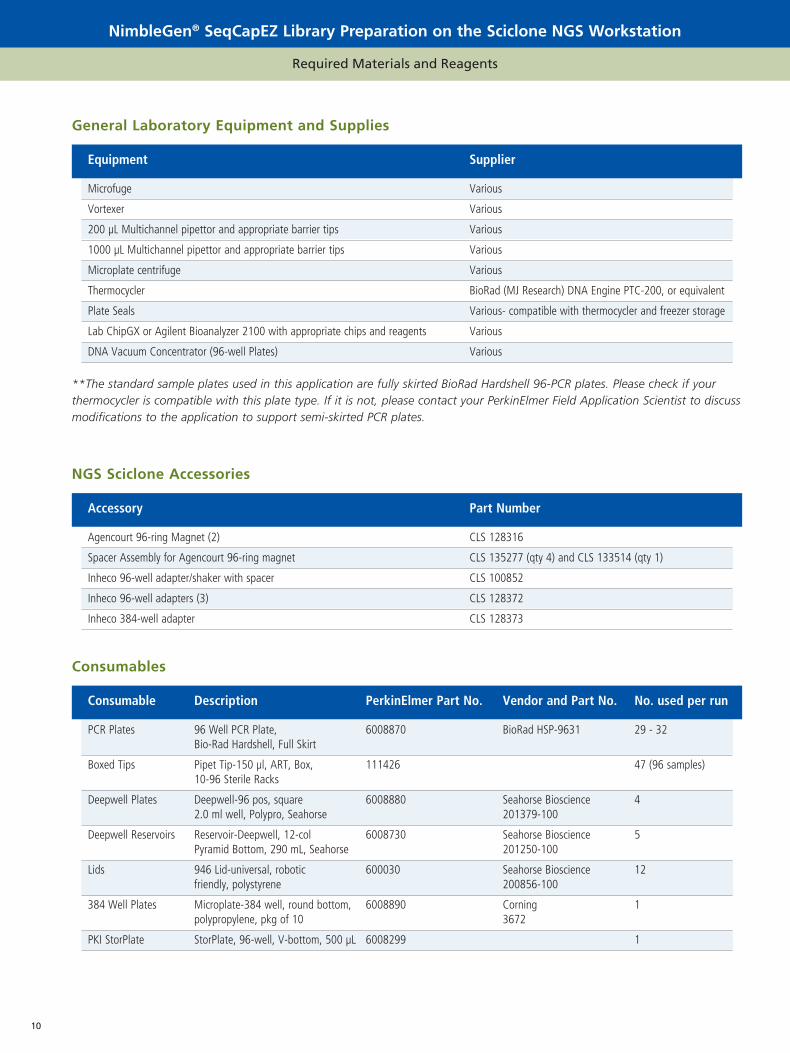
Consumable Description PerkinElmer Part No. Vendor and Part No. No. used per run
PCR Plates 96 Well PCR Plate, 6008870 BioRad HSP-9631 29 - 32 Bio-Rad Hardshell, Full Skirt
Boxed Tips Pipet Tip-150 µl, ART, Box, 111426 47 (96 samples) 10-96 Sterile Racks
Deepwell Plates Deepwell-96 pos, square 6008880 Seahorse Bioscience 4 2.0 ml well, Polypro, Seahorse 201379-100
Deepwell Reservoirs Reservoir-Deepwell, 12-col 6008730 Seahorse Bioscience 5 Pyramid Bottom, 290 mL, Seahorse 201250-100
Lids 946 Lid-universal, robotic 600030 Seahorse Bioscience 12 friendly, polystyrene 200856-100
384 Well Plates Microplate-384 well, round bottom, 6008890 Corning 1 polypropylene, pkg of 10 3672
PKI StorPlate StorPlate, 96-well, V-bottom, 500 µL 6008299 1
General Laboratory Equipment and Supplies
NGS Sciclone Accessories
Consumables
**The standard sample plates used in this application are fully skirted BioRad Hardshell 96-PCR plates. Please check if your thermocycler is compatible with this plate type. If it is not, please contact your PerkinElmer Field Application Scientist to discuss modifications to the application to support semi-skirted PCR plates.
www.perkinelmer.com 11
Required Materials and Reagents Running the Maestro NimbleGen® SeqCapEZ Workflow on the Sciclone NGS
NimbleGen® SeqCapEZ Library Preparation on the Sciclone NGS Workstation
Running the Maestro NimbleGen® SeqCapEZ Workflow on the Sciclone NGS
NimbleGen® TruSeq DNA Library Prep Run Preparation Steps
Sample preparation
Genomic DNA should be fragmented to an average size of 300-400 bp on a Covaris S2 or E210 instrument as described in the Illumina TruSeq Sample preparation guide (#15005180). Samples sheared to a smaller size will require alternative processing (see Step 4). Samples should be presented for the Maestro TruSeq run as up to 1 ug sheared genomic DNA in 50 µL 10 mM Tris pH 8.0 or Low-TE in a BioRad Hardshell 96-well PCR plate.
Note: AMPure XP beads should be warmed at Room Temperature for about 30 min before use. They may be taken out of 4 °C storage before beginning. Do not thaw TruSeq reagents until steps 1 and 2 have been completed.
If necessary, boot up the system by first starting the Sciclone and the Inheco units, then starting the PC controller.
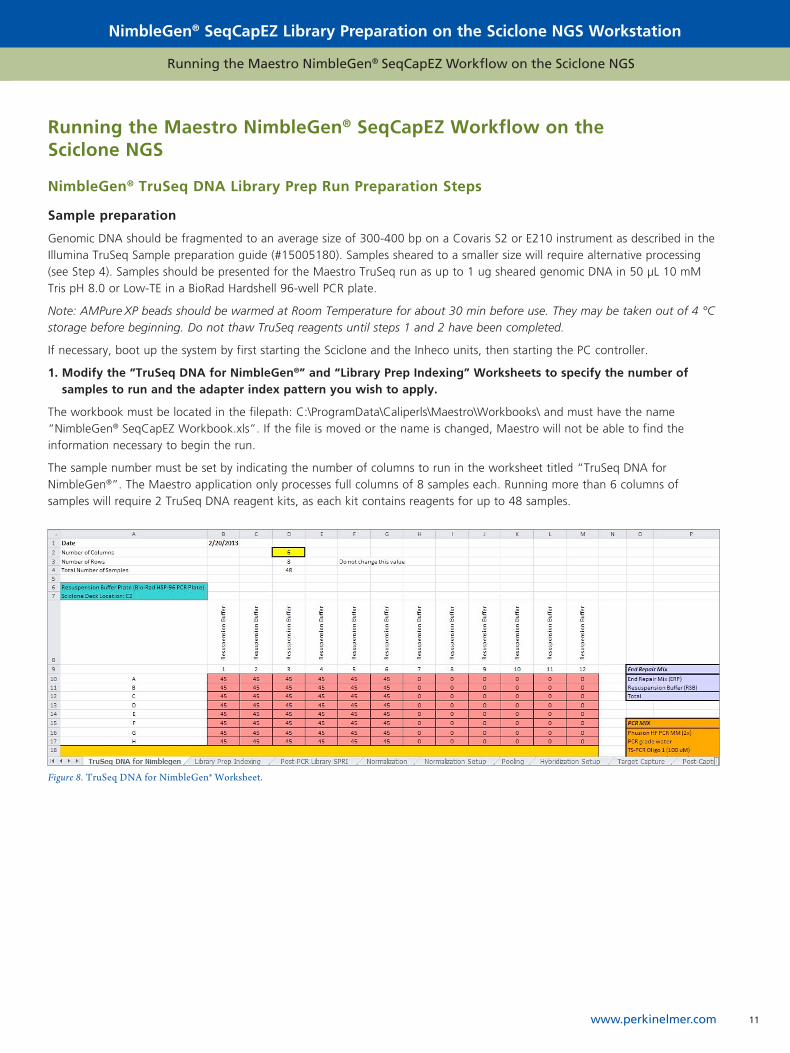
1. Modify the “TruSeq DNA for NimbleGen®” and “Library Prep Indexing” Worksheets to specify the number of samples to run and the adapter index pattern you wish to apply.
The workbook must be located in the filepath: C:\ProgramData\Caliperls\Maestro\Workbooks\ and must have the name “NimbleGen® SeqCapEZ Workbook.xls”. If the file is moved or the name is changed, Maestro will not be able to find the information necessary to begin the run.
The sample number must be set by indicating the number of columns to run in the worksheet titled “TruSeq DNA for NimbleGen®”. The Maestro application only processes full columns of 8 samples each. Running more than 6 columns of samples will require 2 TruSeq DNA reagent kits, as each kit contains reagents for up to 48 samples.
Figure 8. TruSeq DNA for NimbleGen® Worksheet.
12
Running the Maestro NimbleGen® SeqCapEZ Workflow on the Sciclone NGS
NimbleGen® SeqCapEZ Library Preparation on the Sciclone NGS Workstation
Running the Maestro NimbleGen® SeqCapEZ Workflow on the Sciclone NGS
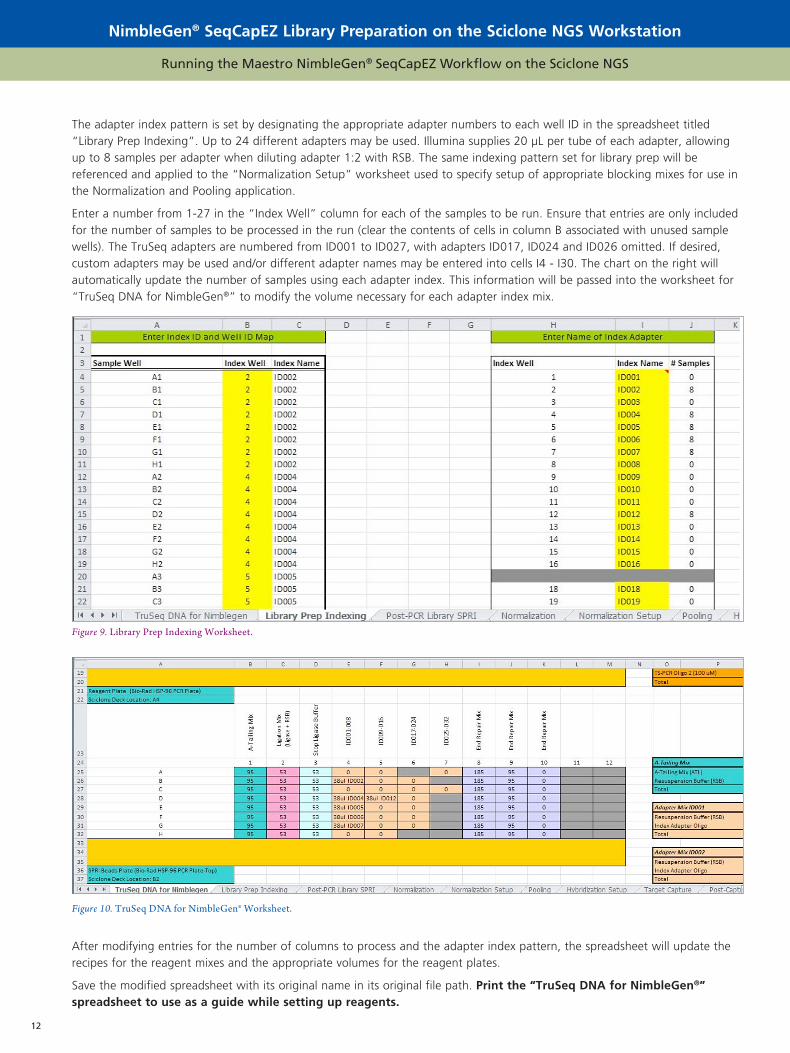
The adapter index pattern is set by designating the appropriate adapter numbers to each well ID in the spreadsheet titled “Library Prep Indexing”. Up to 24 different adapters may be used. Illumina supplies 20 µL per tube of each adapter, allowing up to 8 samples per adapter when diluting adapter 1:2 with RSB. The same indexing pattern set for library prep will be referenced and applied to the “Normalization Setup” worksheet used to specify setup of appropriate blocking mixes for use in the Normalization and Pooling application.
Enter a number from 1-27 in the “Index Well” column for each of the samples to be run. Ensure that entries are only included for the number of samples to be processed in the run (clear the contents of cells in column B associated with unused sample wells). The TruSeq adapters are numbered from ID001 to ID027, with adapters ID017, ID024 and ID026 omitted. If desired, custom adapters may be used and/or different adapter names may be entered into cells I4 - I30. The chart on the right will automatically update the number of samples using each adapter index. This information will be passed into the worksheet for “TruSeq DNA for NimbleGen®” to modify the volume necessary for each adapter index mix.
After modifying entries for the number of columns to process and the adapter index pattern, the spreadsheet will update the recipes for the reagent mixes and the appropriate volumes for the reagent plates.
Save the modified spreadsheet with its original name in its original file path. Print the “TruSeq DNA for NimbleGen®” spreadsheet to use as a guide while setting up reagents.
Figure 9. Library Prep Indexing Worksheet.
Figure 10. TruSeq DNA for NimbleGen® Worksheet.

www.perkinelmer.com 13
Running the Maestro NimbleGen® SeqCapEZ Workflow on the Sciclone NGS Running the Maestro NimbleGen® SeqCapEZ Workflow on the Sciclone NGS
NimbleGen® SeqCapEZ Library Preparation on the Sciclone NGS Workstation
2. Start the NimbleGen® TruSeq DNA Library Prep Application.
Launch the Maestro software and open the NimbleGen® TruSeq Library Prep Application. Start the run by selecting the play button. If running in Editor Mode, be sure to start the Main Method.
Note: When the run is started, the instrument will complete all initialization steps for the hardware and the specific application. The run will automatically pause and prompt the user to set up the deck and confirm proper setup prior to beginning the library preparation steps. Starting the application prior to thawing and diluting reagents ensures that the cold blocks are pre-chilled and ready for on-deck reagent storage.
Confirm that the software has correctly read the workbook and is set to run the correct number of columns. If the incorrect number of columns is indicated, modify and save the excel workbook as described in step 1, then start the application again from the Main Method.
Ensure that the Inheco units have the correct adapters for the NimbleGen® TruSeq Library Prep Application. Verify that the Inheco units for positions A3 and A4 are set to 4 °C and are cooling.
Position A3 384-well Plate Adapter
Position A4 96-well PCR Plate Adapter
Position D2 96-well PCR Plate Adapter
Position D4 96-well PCR Plate Shaker Adapter
3. Thaw the TruSeq DNA reagents and place on ice.
Care should be taken to avoid freeze-thaw cycles with all TruSeq reagents. Reagents should be aliquoted appropriately if planning to use a kit for more than 2 independent runs. It is helpful to place the tubes containing RSB and ERP in water to speed the thawing process.
4. Prepare the 80% EtOH reservoir, PEG plate, RSB plate, and AMPure XP bead plate
Make 100 mL fresh 80% EtOH solution by diluting 80 mL 100% Ethanol with 20 mL nuclease-free molecular biology grade water. Pour 100 mL fresh 80% EtOH into a Seahorse deepwell reservoir, cover with a lid and store at room temperature.
Use the “TruSeq DNA for NimbleGen®” spreadsheet as a guide for setting up the plates.
Make fresh 20% PEG/2.5M NaCl solution and 20% PEG/3M NaCl solution according to the recipes in the spreadsheet.
Using a multichannel pipettor, aliquot 30 µL 20% PEG/2.5M NaCl solution per well into a BioRad Hardshell® PCR plate for each column of samples to be run. Pipet slowly as this solution is very viscous. Label the plate, cover with a lid, and store at room temperature.
Note: If it is desired to retain smaller DNA fragments (150 to 250 bp) in the post-ER SPRI cleanup, then AMPure XP beads will need to undergo a bead buffer exchange step to substitute the existing buffer on the AMPure XP beads with an equal volume of 20% PEG/3M NaCl solution. The higher salt content in the bead buffer will allow recovery of shorter fragments (<250 bp) in the post End Repair SPRI cleanup step.
To exchange the bead buffer, thoroughly resuspend AMPure XP beads (warmed to room temperature) by inverting/rotating the bottle. Transfer the total volume of beads needed (plus 10% overage volume) to one or more 2 ml eppendorf tubes or to a 15 mL falcon tube. Pellet the beads using a magnet. Remove the buffer from the beads and replace it with an equal volume of 20% PEG/3M NaCl. Thoroughly resuspend the beads by inverting/rotating the tube(s).
Using a multichannel pipettor, aliquot 105 µL AMPure XP beads per well into a BioRad Hardshell PCR plate for each column of samples to be run. Cover the plate with a lid and store at room temperature.
Using a multichannel pipettor, aliquot 45 µL Resuspension Buffer per well into a BioRad Hardshell PCR plate for each column of samples to be run.
Inspect all plates to ensure that air has not been trapped in the wells. If necessary, spin the plates briefly to bring reagents to the bottom of the wells.
5. Make the reaction master mixes and adapter mixes.
The following mixes should be prepared according to the recipes in the “TruSeq DNA for NimbleGen®” spreadsheet: End-Repair Mix, A-Tailing Mix, Ligation Mix, Adapter Mixes (up to 24). Do not prepare the PCR master mix at this time. There will be a prompt to prepare the PCR MM during the run.
Gently mix and centrifuge each Illumina supplied reagent tube prior to use. After mixing the appropriate volumes of reagents, mix by inverting and centrifuge again to collect all liquid at the bottoms of the tubes.
Care should be taken to pipet accurately, as some reagents are viscous and minimal overage volumes are used. Keep the reaction mixes on ice.
6. Aliquot the reaction mixes into plates.
The BioRad Hardshell PCR plate should be filled with the specified volumes of A-tailing Mix, Ligase Mix, Stop Ligase Buffer, Adapter Mixes and End Repair Mix. Aliquot the reaction mixes to the reagent plate in the wells indicated on the “TruSeq DNA for NimbleGen®” spreadsheet. Keep the plates on ice while pipetting to keep the reagents cold. Pipet carefully into the bottom of the wells and avoid trapping air or creating bubbles. If necessary, spin the plates briefly in a plate centrifuge to ensure all reagents are at the bottom of the wells. Label the plate, cover with a lid and store on ice or at 4 °C.
14
Running the Maestro NimbleGen® SeqCapEZ Workflow on the Sciclone NGS
NimbleGen® SeqCapEZ Library Preparation on the Sciclone NGS Workstation
7. Set up the Sciclone deck.
Step through the pictures, placing the indicated consumables/prepared plates in the indicated locations. Place new tip boxes in the indicated locations.
8. Run Library Preparation Steps.
Confirm that the deck setup matches the final picture in the setup window. Selecting “Finished” will prompt the application to begin the library prep protocol.
The NimbleGen® TruSeq DNA Library Prep Application will automatically proceed through End Repair, A-tailing and Ligation. You will be prompted to add PCR MM to the deck after ligation is completed. While the application is running, the green light at the top of the instrument will blink. If there is a problem with the run, the light will change to yellow and an alarm will sound to indicate that user intervention is necessary. See Appendix A for a Step-by-Step guide to the Sciclone steps of the TruSeq DNA for NimbleGen® Library Prep Application.
When the PCR setup is complete, the application will pause and show a message indicating that the PCR plate should be sealed and placed on a thermocycler for the amplification step. Close the dialog box to complete the run and shut down the leg lights and Inheco temperature controls.
Note: The 80% EtOH plate may be retained for use in the Post-PCR Library SPRI cleanup.
9. PCR Enrichment.
NimbleGen® recommends the following program for amplification of libraries prepared from 1 µg input DNA. The number of cycles may need to be modified according to
the amount of input DNA in the sample. Use a heated lid to prevent condensation.
PCR: 98 °C for 30 seconds 10 cycles of: 98 °C for 10 seconds 60 °C for 30 seconds 72 °C for 30 seconds 72 °C for 5 minutes Hold at 10 °C
NimbleGen® Post-PCR SPRI Clean up Run Preparation Steps
The Post-PCR Library SPRI cleanup step is provided as a separate Maestro application. If desired, the user may designate a different liquid handler for post-PCR sample processing to avoid any possible cross-contamination of pre-amplification samples. Post-PCR SPRI cleanup applications are available for both the Sciclone NGS and the Zephyr workstations. The instructions here are for running the post-PCR SPRI cleanup on the Sciclone.
Note: AMPure beads should be warmed at Room Temperature for about 30 min before use. They may be taken out of 4 °C storage before beginning.
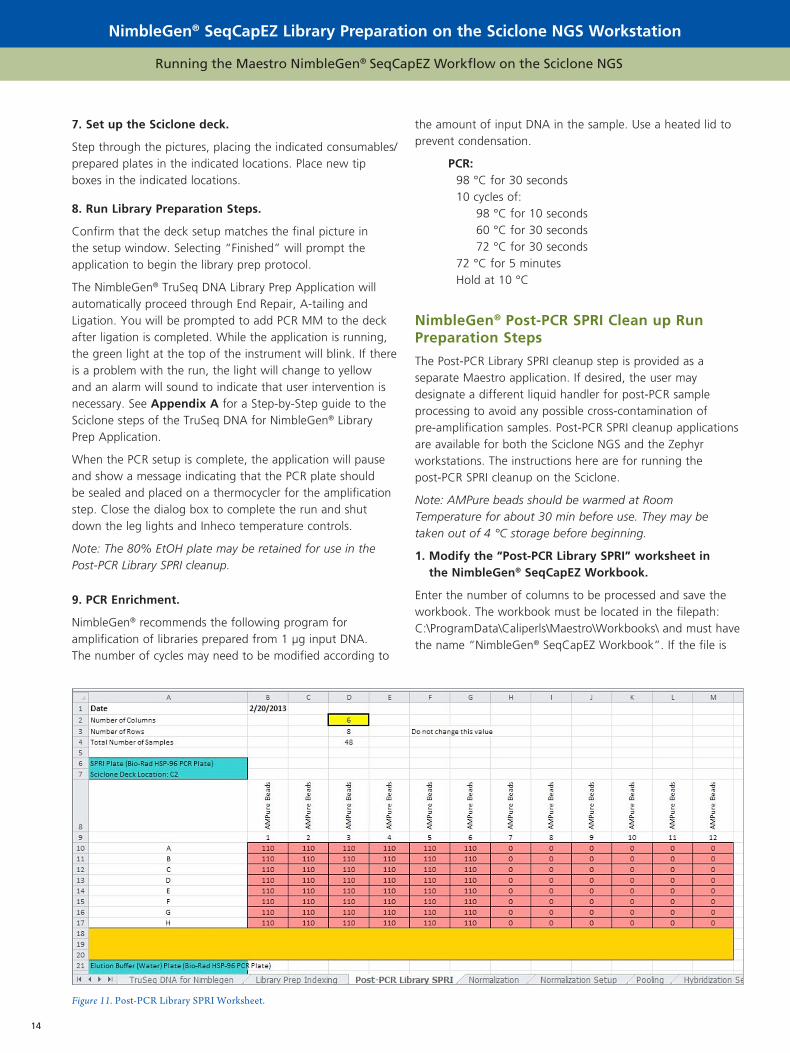
1. Modify the “Post-PCR Library SPRI” worksheet in the NimbleGen® SeqCapEZ Workbook.
Enter the number of columns to be processed and save the workbook. The workbook must be located in the filepath: C:\ProgramData\Caliperls\Maestro\Workbooks\ and must have the name “NimbleGen® SeqCapEZ Workbook”. If the file is
Figure 11. Post-PCR Library SPRI Worksheet.
www.perkinelmer.com 15
Running the Maestro NimbleGen® SeqCapEZ Workflow on the Sciclone NGS Running the Maestro NimbleGen® SeqCapEZ Workflow on the Sciclone NGS
NimbleGen® SeqCapEZ Library Preparation on the Sciclone NGS Workstation
moved or the name is changed, Maestro will not be able to find the information necessary to begin the run.
2. Start the NimbleGen® Library Prep Post PCR SPRI Application.
Launch the Maestro software and open the NimbleGen® Library Prep Post PCR SPRI Application. Start the run by selecting the play button. If running in Edit mode, be sure to start the Main Method.
Note: When the run is started, the instrument will complete all initialization steps for the hardware and the specific application. The run will automatically pause and prompt the user to set up the deck and confirm proper setup prior to beginning the library preparation steps.
Confirm that the software has correctly read the workbook and is set to run the correct number of columns.
3. Prepare the SPRI Beads Plate and Elution Buffer Plate.
Aliquot 110 µL of AMPure XP beads per well in a BioRad Hardshell PCR plate. Ensure that the beads are at room temperature and well mixed prior to pipeting.
Aliquot 55 µL of PCR grade water per well in a 96-well BioRad Hardshell PCR plate. Do not use RSB, EB buffer, or 1X TE.
4. Prepare the 80% Ethanol Reservoir.
If the 80% EtOH reservoir used in the NimbleGen® TruSeq DNA Library Prep run has been retained, it can be used for this run. Otherwise, make 50 mL fresh 80% EtOH solution by diluting 40 mL 100% Ethanol with 10 mL nuclease-free molecular biology grade water. Pour 50 mL fresh 80% EtOH into a Seahorse deepwell reservoir and cover with a lid.
5. Setup the Sciclone Deck.
Step through the pictures, placing the indicated consumables/prepared plates in the indicated locations. Place new tip boxes in the indicated locations.
Note: When the NimbleGen® Library Prep Post-PCR SPRI application is started, the variables used for tip tracking are reset. The run must be started with new, full tip boxes in the indicated positions, as Maestro will not retain tip tracking information from the library prep run.
6. Run the NimbleGen® Library Prep Post-PCR SPRI steps.
Confirm that the deck setup matches the final picture in the setup window. Selecting “Finished” will prompt the application to begin the SPRI steps. See Appendix B for a Step-by-Step guide to the Sciclone steps of the NimbleGen® Post-PCR SPRI application.
When the run is complete, the application will pause and show a message indicating that the PCR plate, containing 30 µL per well of amplified library, should be sealed and stored appropriately. Close the dialog box to complete the run and shut down the leg lights and Inheco temperature controls.
Seal the library plate and store at -20 °C for up to 7 days, or proceed directly into library QC and quantification prior to storing.
Quality Control and Quantification of Amplified Libraries
Note: It is necessary to accurately quantify libraries before continuing with the Normalization and Pooling step of the NimbleGen® SeqCapEZ workflow.
The LabChip® GX may be used to quantify and check the size distribution of fragments in the amplified libraries. For LabChip GX analysis, make a 1:25 dilution of library into molecular biology grade water in a BioRad Hardshell skirted 96-PCR plate. Mix well by pipeting up and down, and spin the plate to remove any bubbles. Run the samples on the GX using a High Sensitivity DNA chip and kit according to the standard LabChip protocol. Use the Smear Analysis function to find the concentration of DNA in the region from 200 bp to 1000 bp. Remember to correct the reported concentration for the dilution used when preparing the plate for LabChipGX analysis (ie multiply the concentration by 25 for samples diluted 1:25).
Additional/alternative validation and quantification, including qPCR or nanodrop quantification, should be done according to the user’s standard practices. Sample concentrations, in ng/µL, must be entered into the Normalization and Pooling spreadsheet of the NimbleGen® SeqCapEZ Workbook as described below.
Expected Results
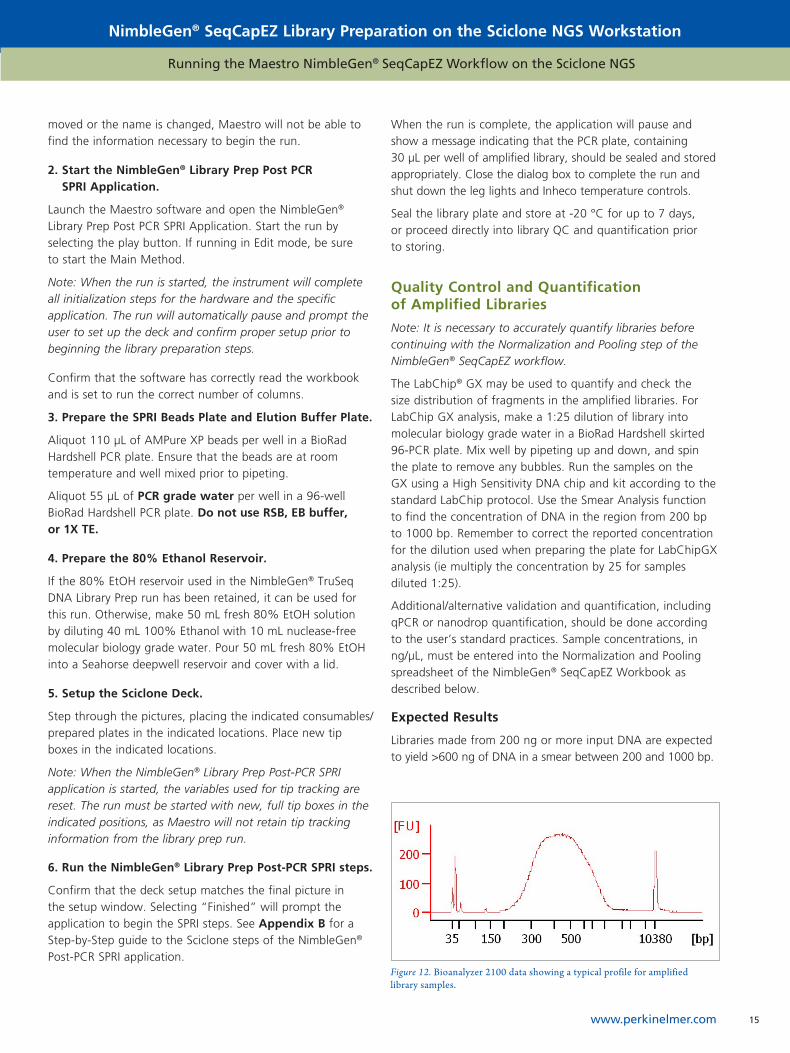
Libraries made from 200 ng or more input DNA are expected to yield >600 ng of DNA in a smear between 200 and 1000 bp.
Figure 12. Bioanalyzer 2100 data showing a typical profile for amplified library samples.

16
Running the Maestro NimbleGen® SeqCapEZ Workflow on the Sciclone NGS
NimbleGen® SeqCapEZ Library Preparation on the Sciclone NGS Workstation
NimbleGen® Normalization and Pooling Run Preparation Steps
Please read and familiarize yourself with all steps described in this section prior to beginning the run. Libraries are normalized by transferring appropriate volumes of water and sample to a clean plate, for 1000 ng total DNA (no multiplexing), 500 ng total DNA (2-3 plex hybridization) or 300 ng DNA (4-6 plex hybridization) in 30 µL total volume. For 96 samples, the normalization method will take up to 90 minutes. After normalization, blocking mixes (Cot-1 DNA pre-mixed with TS-HE Universal Oligo and appropriate TS-INV-HE Indexed Oligos) are arrayed into a clean plate in the appropriate pattern, then 8 µL blocking mix is added to all normalized samples. After addition of blocking mixes, an optional pooling step allows transfer of equal volumes of 2-6 samples to designated wells of a clean plate in a pattern specified by the user in the pooling spreadsheet.
If necessary, boot up the system by first starting the Sciclone and the Inheco units, then starting the PC controller.
1. Modify the “Normalization” spreadsheet in the “NimbleGen® SeqCapEZ Workbook” to specify the number of samples to run and the concentration of each sample.
The workbook must be located in the filepath: C:\ProgramData\CaliperLS\Maestro\Workbooks and must have the name “NimbleGen® SeqCapEZ Workbook”. If the file is moved or the name is changed, Maestro will not be able to find the information necessary to begin the run.
a. Specify the number of samples to be normalized by setting the number of columns to run in cell D2 (the application only processes full columns of 8 samples each).
b. Ensure the total volume entered in cell D6 is 30.0.
c. Fill in the “Sample”, “Source Well” and “Conc (ng/µL)” columns with information specific for the samples to be run. Information for each sample must be provided in all 3 of these columns for proper execution of the normalization method. Ensure that no entries are present in the “Sample”, “Source Well” and “Conc (ng/µL)” columns for wells that are not included in the run.
d. Save the modified spreadsheet with its original name in its original file path.
The “Volume for 1000 ng” value will be calculated by Excel based on the value for “Conc (ng/µL)”. The “Source well” location will also be the destination well location in the normalized sample plate. Columns with green headers provide additional information on the samples and will be displayed by Maestro when validating the workbook. They may be deleted if desired. Do not delete any columns highlighted in yellow.
Note: NimbleGen® recommends using a total of 1000 ng DNA in each hybridization reaction. Thus, for pooled samples, only a portion of the normalized DNA will be needed from each library. If pooling ≥ 2 samples per capture, the target amount of DNA for normalization may be reduced from 1000 ng. This may be done by changing the calculation in column C of the Normalization spreadsheet. If the target amount of DNA is reduced, care must be taken to maintain the correct ratio of library DNA to blocking DNA when blocking mixes are added to the normalized samples. This is most easily achieved by reducing the concentration of the blocking mix components by the
Figure 13. Normalization Spreadsheet.
www.perkinelmer.com 17
Running the Maestro ® SeqCapEZ Workflow on the Sciclone NGS
NimbleGen® SeqCapEZ Library Preparation on the Sciclone NGS Workstation NimbleGen® SeqCapEZ Library Preparation on the Sciclone NGS Workstation
same factor used when reducing the target amount of DNA. For instance, if targeting 500 ng of DNA per normalized library (instead of 1000 ng), the blocking mixes should be made with 0.5 mg/mL Cot-1 DNA, and 500 µM TS HE Oligos (instead of 1 mg/mL Cot-1 DNA and 1000 µM TS HE Oligos).
2. Modify the “Normalization Setup” worksheet of the “NimbleGen® SeqCapEZ Workbook” to specify the number of samples to run
Cell D2 of the “Normalization Setup” worksheet must match the entry for cell D2 of the “Normalization” worksheet. In the Normalization Setup worksheet, the appropriate Cot-1 and HE Oligo Mix well volumes and pre-mix recipes will be populated based on entries in the ‘library prep indexing’ tab of the workbook. This worksheet coordinates the distribution of index-specific blocking mixes into the correct plate locations prior to the transfer of blocking mixes to normalized samples.
Print the Normalization Setup worksheet as a guide to setting up the plates required for the Normalization and Pooling application.
3. If pooling libraries, modify the “Pooling” tab of the “NimbleGen® SeqCapEZ Workbook”.
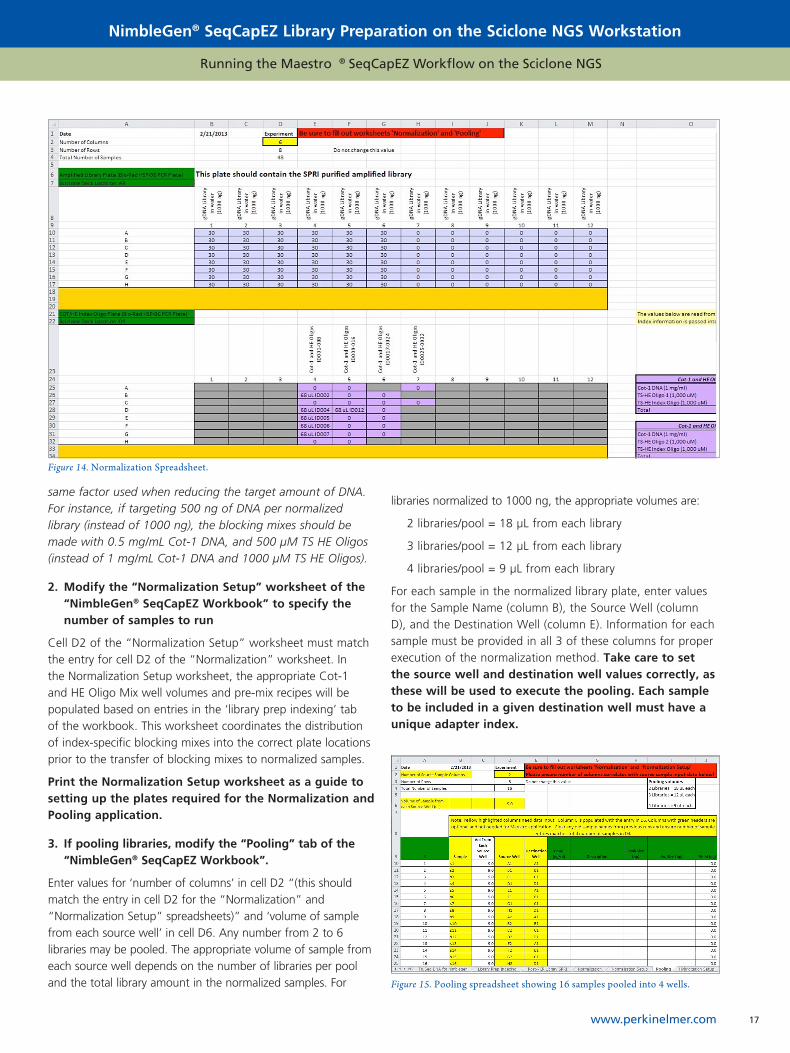
Enter values for ‘number of columns’ in cell D2 “(this should match the entry in cell D2 for the “Normalization” and “Normalization Setup” spreadsheets)” and ‘volume of sample from each source well’ in cell D6. Any number from 2 to 6 libraries may be pooled. The appropriate volume of sample from each source well depends on the number of libraries per pool and the total library amount in the normalized samples. For
libraries normalized to 1000 ng, the appropriate volumes are:
2 libraries/pool = 18 µL from each library
3 libraries/pool = 12 µL from each library
4 libraries/pool = 9 µL from each library
For each sample in the normalized library plate, enter values for the Sample Name (column B), the Source Well (column D), and the Destination Well (column E). Information for each sample must be provided in all 3 of these columns for proper execution of the normalization method. Take care to set the source well and destination well values correctly, as these will be used to execute the pooling. Each sample to be included in a given destination well must have a unique adapter index.
Figure 14. Normalization Spreadsheet.
Figure 15. Pooling spreadsheet showing 16 samples pooled into 4 wells.
18
Running the Maestro NimbleGen® SeqCapEZ Workflow on the Sciclone NGS
NimbleGen® SeqCapEZ Library Preparation on the Sciclone NGS Workstation
4. Start the Maestro NimbleGen® Pre-Capture and Pooling application.
Launch the Maestro software and open the “NimbleGen® Pre-Capture Normalization and Pooling” Application. If running in editor mode, be sure to start the Main method.
A prompt will appear to determine if libraries are to be pooled. If the box is checked to pool libraries, then the “Pooling” spreadsheet in the NimbleGen® SeqCapEZ Workbook must be filled out appropriately. If this has not yet been done, the run should be cancelled. The pooling worksheet should be updated and saved prior to restarting the normalization and pooling application from the Main method.
Confirm that the software has correctly read the normalization worksheet, is set to run the correct number of samples, and is displaying data specific for the samples to be normalized.
Ensure the Inheco units have the correct adapters for the run:
Position A3 96-well PCR Plate Adapter
Position A4 96-well PCR Plate Adapter
Position D2 96-well PCR Plate Adapter
Position D4 96-well PCR Plate Shaker Adapter
Verify that the Inheco units for positions A3, A4 and D4 are set to 4 °C and are cooling. Verify that the Inheco units for position D2 is set to 22 °C.
5. Setup the Sciclone Deck
Step through the pictures, placing the indicated consumables/tip boxes/prepared plates in the indicated locations. Take care to note whether or not a lid is needed at each location.
Note: The “buffer” reservoir for sample dilution must contain water, as no additional salts should be added to the library samples prior to the hybridization setup.
Note: When the “NimbleGen® Pre-Capture Normalization and Pooling” application is started, the variables used for tip tracking are reset. The run must be started with new, full tip boxes in the indicated positions, as Maestro will not retain tip tracking information from the previous run. An empty tip
box must be placed at position C5, as shown in the setup pictures, to facilitate single tip loading.
6. Run the “NimbleGen® Pre-Capture Normalization and Pooling” application
Normalization
The Sciclone head will transfer a single column of tips to the empty tip box at position C5, then load tips one at a time on mandrel A1. The appropriate volume of water, then the appropriate volume of sample will be aspirated. Both water and sample will be dispensed to the clean plate at position A4, and the tip will be ejected. The application will continue through the total number of samples, taking about 1 minute to process each sample.
When normalization is completed a prompt will appear to store the original library plate (position A3) for long-term storage at -20 °C. The normalized plate (position A4) should not be moved as it will be used in the next step.
Blocking Mix broadcast and transfer
When normalization of the samples is complete the application will broadcast the Cot-1/HE Oligo mixes to a clean plate based on the pattern of indexed adapters used for library construction. The application will aspirate then distribute each different Cot 1/HE oligo mix to all appropriate wells with a single tip. Once the broadcast is complete, the arrayed Cot 1/HE Oligo mixes will be transferred to the normalized library plate at A4.
Optional Pooling
If the pooling option was chosen at the beginning of the run, a prompt will appear to place a clean plate on the deck
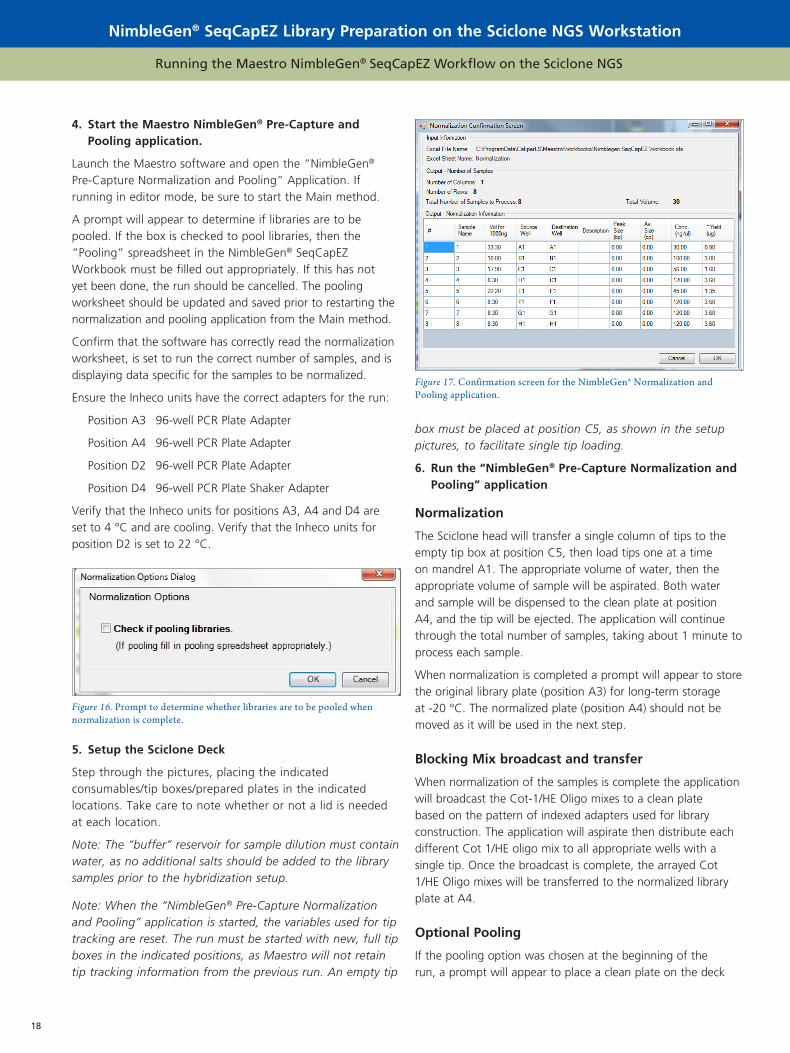
Figure 16. Prompt to determine whether libraries are to be pooled when normalization is complete.
Figure 17. Confirmation screen for the NimbleGen® Normalization and Pooling application.

www.perkinelmer.com 19
Running the Maestro NimbleGen® SeqCapEZ Workflow on the Sciclone NGS
NimbleGen® SeqCapEZ Library Preparation on the Sciclone NGS Workstation NimbleGen® SeqCapEZ Library Preparation on the Sciclone NGS Workstation
at position A3. The application will transfer libraries one at a time into the destination well designated in the “pooling” worksheet, using a new tip for each library transfer.
When prompted to do so, seal the Normalized libraries with Cot 1/HE oligos plate (position A4) for long term storage. Remove the pooled libraries (position A3) and dry them down in preparation for hybridization setup. Roche recommends using a vacuum concentrator set to 60 °C for this process.
NimbleGen® Hybridization Setup Run Preparation Steps
Please read and familiarize yourself with all steps described in this section prior to beginning the run. The recommended incubation time for NimbleGen® Hybridization is 64 - 72 hours. The subsequent target capture, washing, PCR amplification and cleanup steps require approximately 5 hours to complete. If planning to run the target capture steps 72 hours after hybridization setup, it is best to complete the “NimbleGen® Hyb Setup” Application no later than 11:00 am to allow sufficient time during normal working hours to complete the target capture steps.
The “NimbleGen® Hyb Setup” Application involves adding hybridization buffer, hybridization component A and the SeqCapEZ library to the lyophilized libraries. Actual run time for the application is about 5 minutes. When complete, the user must seal the plate and transfer it to a thermocycler for a 10 minute incubation at 95 °C followed by a 64 - 72 hour incubation at 47 °C. The thermocycler should be pre-programmed for these conditions with the lid temperature set to track at 10 °C above the incubation temperature.
Please consult the NimbleGen® protocol for information on sealing plates and testing your specific incubation conditions for the 64 - 72 hour hybridization.
Sample preparation
Samples must be presented for hybridization setup in a BioRad 96-well Hardshell PCR plate as dried DNA pellets containing Cot-1 DNA, amplified sample library, TS HE
Universal Oligo, and the appropriate TS HE Indexed Oligo.
If necessary, boot up the system by first starting the Sciclone and the Inheco units, then starting the PC controller.
1. Modify the “Hybridization Setup” spreadsheet in the “NimbleGen® SeqCapEZ Workbook” to specify the number of samples to run.
The workbook must be located in the filepath: C:\Program Files\CaliperLS\Maestro\Workbooks and must have the name “NimbleGen® SeqCapEZ Workbook”. If the file is moved or the name is changed, Maestro will not be able to find the information necessary to begin the run.
The sample number must be set by indicating the number of columns to run in the worksheet titled “Hybridization Setup”. The Maestro application only processes full columns of 8 samples each. If libraries have been pooled, the Number of Columns (cell D2) will be less than the value from the previous application runs. For example if you prepared 48 libraries and prepared pools of 3 libraries each, you will now have 2 columns to process instead of 6.
After modifying entries for the number of columns to process, the spreadsheet will update the recipes for the reagent mix and the appropriate volumes for the reagent plate. Save the modified spreadsheet with its original name in its original file path. Print the “Hybridization Setup” spreadsheet to use as a guide while setting up reagents.
2. Start the Maestro “NimbleGen® Hyb Setup” Run
Launch the Maestro software and open the “NimbleGen® Hyb Setup” Application. Start the run by selecting the play button. If running in editor mode, be sure to start the Main Method.
Confirm that the software has correctly read the workbook and is set to run the correct number of columns.
Ensure that the Inheco units have the correct adapters for the run:
Position A3 96-well PCR Plate Adapter
Position A4 96-well PCR Plate Adapter
Figure 18. Hybridization Setup spreadsheet
20
Running the Maestro NimbleGen® SeqCapEZ Workflow on the Sciclone NGS
NimbleGen® SeqCapEZ Library Preparation on the Sciclone NGS Workstation
Position D2 96-well PCR Plate Adapter
Position D4 96-well PCR Plate Shaker Adapter
Verify that all of the Inheco units are set to 22 °C.
3. Thaw the NimbleGen® hybridization reagents and place on ice
The following reagents need to be thawed at this time: 2X Hybridization Buffer, Hybridization Component A and the SeqCapEZ Library (baits).
Note: The NimbleGen® SeqCapEZ library is composed of single stranded DNA baits. To prevent degradation, be sure to handle the baits and all hybridization reagents under DNAse-free conditions. Upon first use of the SeqCapEZ library, aliquot the library appropriately to avoid multiple freeze-thaw cycles for subsequent runs.
4. Prepare the thermocycler
The thermocycler should be located in close proximity to the Sciclone NGS workstation. Program the thermocycler to heat to 95 oC for 10 minutes followed by 47 °C hold with a heated lid. Ideally the lid should track at 10 °C above the sample temperature. If this is not possible, set the lid to 100 °C.
5. Prepare the hybridization reagents
Using the “Hybridization Setup” spreadsheet as a guide, prepare the Hyb Buffer and Probes mix with the appropriate volumes of Hybridization Buffer, Hybridization Component A and SeqCapEZ Library in a DNAse free tube. Mix by inversion and spin briefly. Aliquot the Hyb Buffer and Probes mix to the 96-well PCR plate as specified on the worksheet, and store at room temperature.
6. Set up the Sciclone deck
Step through the pictures, placing the indicated consumables/prepared plates in the indicated locations. Take care to note whether or not a lid is needed at each location. Place new tip boxes in the indicated locations.
Note: When the “NimbleGen® Hyb Setup” application is started, the variables used for tip tracking are reset. The run must be started with new, full tip boxes in the indicated positions, as Maestro will not retain tip tracking information from the previous run.
7. Run the “NimbleGen® Hyb Setup” application
Note: The user is advised to attend the entire run to ensure that no delays occur during the hybridization setup steps and subsequent transfer to the thermocycler.
After adding 15 µL per well of Hyb Buffer and Probes Mix to the lyophilized library and mixing, the Sciclone NGS head will move out of the way and the user will be prompted to seal the plate. For successful hybridization, the plate must be
sealed promptly and transferred directly to the thermocycler. Note the time. Samples should hybridize from 64 to 72 hours.
8. Application Complete
Click through the dialogs in Maestro to shut down the inheco units and complete the run.
NimbleGen® Target Capture Selection Run Preparation Steps
Please read and familiarize yourself with all steps described in this section prior to beginning the run. This application will take approximately 5 hours and can be initiated before the end of the hybridization incubation. The first step in the Target Selection application involves preparing the M-270 Dynal streptavidin beads for target capture. When the bead washing step is complete, the application will prompt the user to transfer the hybridized samples directly from the thermocycler to the Sciclone NGS deck. The samples will be immediately transferred onto the streptavidin beads.
The user has the option of manually arraying PCR Master Mix into PCR plates or having the Sciclone NGS distribute the PCR Master Mix from a deepwell plate. This option is controlled by a variable within the application (g_ is prearrayed mix PCR in PCR plate) that can be set to the preferred value by your Field Applications Scientist.
If necessary, boot up the system by first starting the Sciclone and the Inheco units, then starting the PC controller.
1. Modify the “Target Capture” spreadsheet in the “NimbleGen® SeqCapEZ Workbook” to specify the number of samples to run.
The workbook must be located in the filepath: C:\Program Data\CaliperLS\Maestro\Workbooks and must have the name “NimbleGen® SeqCapEZ Workbook”. If the file is moved or the name is changed, Maestro will not be able to find the information necessary to begin the run.
The sample number must be set by indicating the number of columns to run in the spreadsheet titled “Target Capture”. The Maestro application only processes full columns of 8 samples each.
After modifying entries for the number of columns to process, the spreadsheet will update the recipes for the reagent mixes and the appropriate volumes for the reagent plates. Save the modified spreadsheet with its original name in its original file path. If necessary print the “Target Capture” worksheet to use as a guide while setting up reagents.
2. Start the Maestro NimbleGen® Target Selection Run
Launch the Maestro software and open the “NimbleGen® Target Selection” Application. Start the run by selecting the

www.perkinelmer.com 21
Running the Maestro NimbleGen® SeqCapEZ Workflow on the Sciclone NGS
NimbleGen® SeqCapEZ Library Preparation on the Sciclone NGS Workstation
play button. If running in Edit mode, be sure to start the Main Method.
Confirm that the software has correctly read the workbook and is set to run the correct number of columns.
Ensure that the Inheco units have the correct adapters for the run:
Position A3 96-well PCR Plate Adapter
Position A4 96-well PCR Plate Adapter
Position D2 96-well PCR Plate Adapter
Position D4 96-well PCR Plate Shaker Adapter
Verify that the Inheco units for positions A3, A4 and D2 are set to 22 °C. Verify that the Inheco unit for position D4 is set to 32 °C.
3. Prepare the Wash Buffer plates
Note: The NimbleGen® Wash Buffers are supplied as 10X solutions. Be sure to dilute buffers to 1X prior to distributing the buffer to plates as specified below.
Using the “Target Capture” spreadsheet as a guide, aliquot the appropriate volumes of diluted buffers into the appropriate columns of the specified plates. Bead Wash Buffer, Wash Buffer I, Stringent Wash Buffer, Wash Buffer II, and Wash Buffer III should be distributed at this time. Cover the plates with lids, inspect for bubbles, spin if necessary, and store at room temperature.
4. Prepare the Streptavidin Beads plate
Thoroughly resuspend the M-27 Dynal beads by rotating the bottle. Using the “Target Capture” spreadsheet as a guide, aliquot 100 µL of Dynal beads into the specified columns of a 96-well Bio-Rad PCR plate.
Note: Do not prepare the PCR Master Mix or PCR Master Mix plate at this time. The application will prompt the user to place the PCR Master Mix plate on the deck at the start of Step 8- Post LMPCR Plate Setup.
5. Setup the Sciclone Deck
Step through the pictures, placing the indicated consumables/prepared plates in the indicated locations. Take care to note whether or not a lid is needed at each location. Place new tip boxes in the indicated locations.
Note: When the NimbleGen® Target Selection application is started, the variables used for tip tracking are reset. The run must be started with new, full tip boxes in the indicated positions, as Maestro will not retain tip tracking information from the previous run.
6. Run the Maestro NimbleGen® Target Selection application
Confirm that the deck setup matches the final picture in the setup window. Selecting “Finished” will prompt the application to begin the target selection steps.
While the application is running, the green light at the top of the instrument will blink. If there is a problem with the run, the light will change to yellow and an alarm will sound to indicate that user intervention is necessary. The application may be set up so that an e-mail is sent if an error occurs or when additional tip boxes are needed on the deck.
The Maestro NimbleGen® Target Selection application will automatically proceed through the streptavidin bead preparation. The user will be prompted to place the hybridized samples on the deck when the instrument has finished preparing the beads. Once the user has indicated that the samples have been added to the deck, the application will continue through the DNA Capture, Wash Buffer I (47 °C), Two washes with Stringent Wash Buffer (47 °C), Wash Buffer I (room temp), Wash Buffer II and Wash Buffer III steps. At the completion of washing, the streptavidin beads will be resuspended in 50 µL PCR grade water and the user will be prompted to place the PCR Master Mix plate(s) on the deck.
Figure 19. Target Capture spreadsheet.
22
Running the Maestro NimbleGen® SeqCapEZ Workflow on the Sciclone NGS
NimbleGen® SeqCapEZ Library Preparation on the Sciclone NGS Workstation
For the PCR reaction setup, two 100 µL PCR reactions are setup per sample. When processing 6 or fewer columns, the PCR reactions are setup on the same plate (eg, 123456, 123456). If more than 6 columns are processed, then 2 replicate PCR plates are setup sequentially.
7. PCR Enrichment of the Captured Library
When PCR Setup is complete, the application will prompt the user to seal the PCR reaction plate(s) and run the appropriate program on the thermocycler.
Roche recommends the following program for enrichment of libraries prepared from 1 ug input DNA. The number of cycles may need to be modified according to the amount of input DNA in the sample. Use a heated lid to prevent condensation.
PCR: 98 °C for 30 seconds 18 cycles of: 98 °C for 10 seconds 60 °C for 30 seconds 72 °C for 30 seconds 72 °C for 5 minutes Hold at 4 °C
NimbleGen® Post-Capture Final SPRI Run Preparation Steps
The Post-Capture Final SPRI cleanup step is provided as a separate Maestro application. If desired, the user may designate a different liquid handler for post-PCR sample processing to avoid any possible cross-contamination of pre-amplification samples. Post-PCR SPRI cleanup applications are available for both the Sciclone NGS and the Zephyr® workstations. The instructions here are for running the Post-Capture Final SPRI cleanup on the Sciclone NGS.
Note: AMPure® beads should be warmed at Room Temperature for about 30 min before use. They may be
taken out of 4 °C storage before beginning.
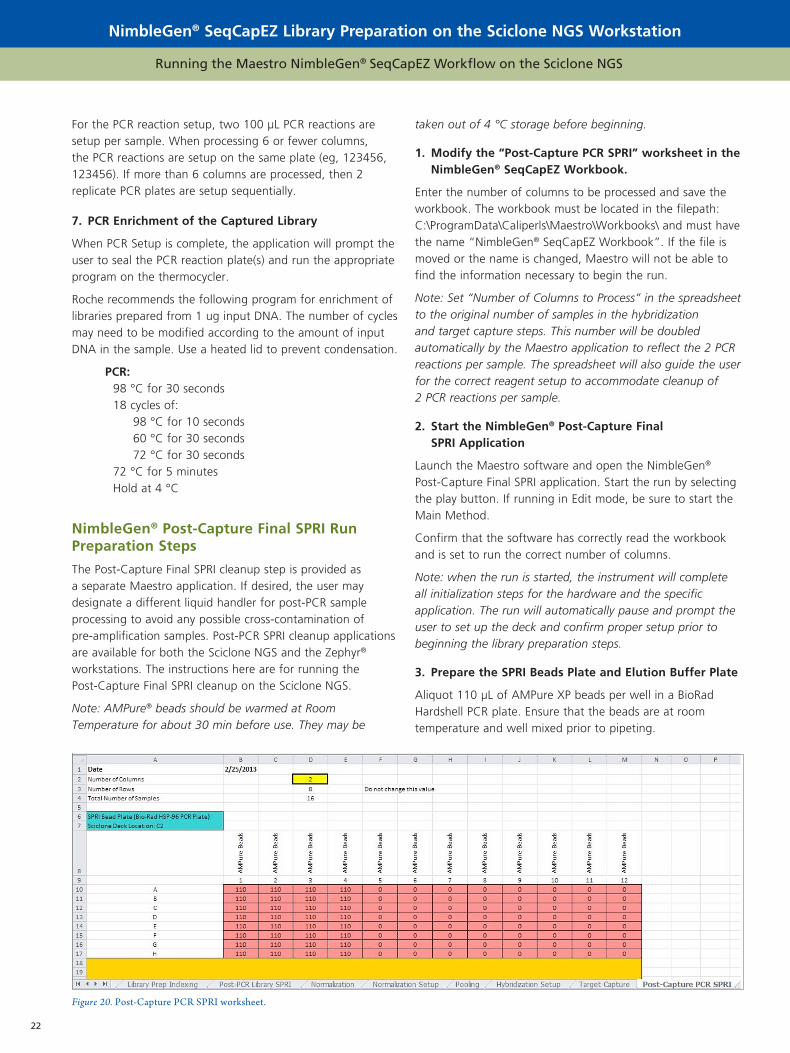
1. Modify the “Post-Capture PCR SPRI” worksheet in the NimbleGen® SeqCapEZ Workbook.
Enter the number of columns to be processed and save the workbook. The workbook must be located in the filepath: C:\ProgramData\Caliperls\Maestro\Workbooks\ and must have the name “NimbleGen® SeqCapEZ Workbook”. If the file is moved or the name is changed, Maestro will not be able to find the information necessary to begin the run.
Note: Set “Number of Columns to Process” in the spreadsheet to the original number of samples in the hybridization and target capture steps. This number will be doubled automatically by the Maestro application to reflect the 2 PCR reactions per sample. The spreadsheet will also guide the user for the correct reagent setup to accommodate cleanup of 2 PCR reactions per sample.
2. Start the NimbleGen® Post-Capture Final SPRI Application
Launch the Maestro software and open the NimbleGen® Post-Capture Final SPRI application. Start the run by selecting the play button. If running in Edit mode, be sure to start the Main Method.
Confirm that the software has correctly read the workbook and is set to run the correct number of columns.
Note: when the run is started, the instrument will complete all initialization steps for the hardware and the specific application. The run will automatically pause and prompt the user to set up the deck and confirm proper setup prior to beginning the library preparation steps.
3. Prepare the SPRI Beads Plate and Elution Buffer Plate
Aliquot 110 µL of AMPure XP beads per well in a BioRad Hardshell PCR plate. Ensure that the beads are at room temperature and well mixed prior to pipeting.
Figure 20. Post-Capture PCR SPRI worksheet.
www.perkinelmer.com 23
Running the Maestro NimbleGen® SeqCapEZ Workflow on the Sciclone NGS
NimbleGen® SeqCapEZ Library Preparation on the Sciclone NGS Workstation
Aliquot 30 µL of elution buffer (PCR- grade water, Qiagen EB, or 10 mM Tris pH 8.0) per well in a 96-well BioRad Hardshell PCR plate.
4. Prepare 80% Ethanol Reservoir
Make 50 mL fresh 80% EtOH solution by diluting 40 mL 100% Ethanol with 10 mL nuclease-free molecular biology grade water. Pour 50 mL fresh 80% EtOH into a Seahorse deepwell reservoir and cover with a lid.
5. Setup the Sciclone Deck
Step through the pictures, placing the indicated consumables/prepared plates in the indicated locations. Place new tip boxes in the indicated locations.
Note: When the NimbleGen® Post-Capture Final SPRI application is started, the variables used for tip tracking are reset. The run must be started with new, full tip boxes in the indicated positions, as Maestro will not retain tip tracking information from the library prep run.
6. Run the NimbleGen® Post-Capture Final SPRI steps
Confirm that the deck setup matches the final picture in the setup window. Selecting “Finished” will prompt the application to begin the SPRI steps. See Appendix F for a Step-by-Step guide to the Sciclone steps of the NimbleGen®
Post-Capture Final SPRI application.
7. Application Complete
When the run is complete, the application will pause and show a message indicating that the PCR plate should be sealed and stored appropriately. Close the dialog box to complete the run and shut down the leg lights and Inheco temperature controls.
Seal the library plate and store at -20 °C for up to 7 days, or proceed directly into library validation prior to storing.
Quality Control and Quantification of Captured Libraries
The LabChip GX may be used to quantify and check the size distribution of fragments in the final libraries. For LabChip GX analysis, make a 1:25 dilution of library into molecular biology grade water in a BioRad Hardshell skirted 96-PCR plate. Mix well by pipeting up and down, and spin the plate to remove any bubbles. Run the samples on the GX using a High Sensitivity DNA chip and kit according to the standard LabChip protocol. Use the Smear Analysis function to find the concentration of DNA in the region from 200 bp to 1000 bp. Remember to correct the reported concentration for the dilution used when preparing the plate for LabChip GX analysis (ie multiply the concentration by 25 for samples diluted 1:25).
Additional/alternative validation and quantification should be done according to the user’s standard practices. See the NimbleGen® SeqCapEZ protocol for specific guidelines on qPCR validation of captured libraries.
Expected Results
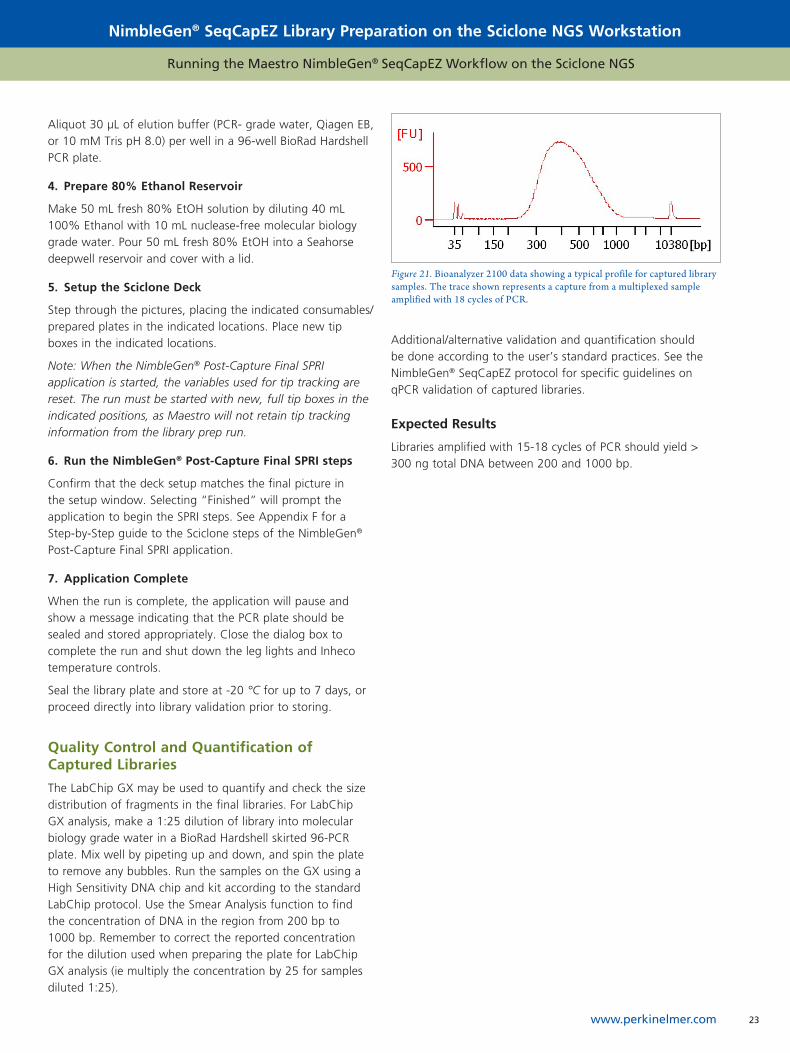
Libraries amplified with 15-18 cycles of PCR should yield > 300 ng total DNA between 200 and 1000 bp.
Figure 21. Bioanalyzer 2100 data showing a typical profile for captured library samples. The trace shown represents a capture from a multiplexed sample amplified with 18 cycles of PCR.

For a complete listing of our global offices, visit www.perkinelmer.com/ContactUs
Copyright ©2013, PerkinElmer, Inc. All rights reserved. PerkinElmer® is a registered trademark of PerkinElmer, Inc. All other trademarks are the property of their respective owners. 011022_01
PerkinElmer, Inc. 940 Winter Street Waltham, MA 02451 USA P: (800) 762-4000 or (+1) 203-925-4602www.perkinelmer.com