nios ii linux quickstart guide - ryerson universitycourses/coe718/data-sheets/rtos/linux... · nios...
TRANSCRIPT

Microtronix Nios® II Linux® Distribution
Quick Start Guide
726 Third Street London, ON Canada N5V 5J2 www.microtronix.com
Page 2 of 20
This user guide provides information regarding the Nios II Linux Distribution. The following table shows the document revision history.
Document Revision History
Date Description
May 2004 Initial Release – Version 1.0
July 2004 Version 1.1
December 2004 Version 1.2
E-mail How to Contact Microtronix Sales Information: [email protected]
Support Information: [email protected]
Website General Website: http://www.microtronix.com
Nios Forum Website: http://www.niosforum.com
Phone Numbers General: 519-690-0091
Fax: 519-690-0092
Typographic Conventions
Path/Filename A path/filename
[SOPC Builder]$ <cmd> A command that should be run from within the Cygwin Environment.
…sdk/<path> A file that is relative to the sdk directory.
Code Sample code.
Indicates that there is no break between the current line and the next line.

Nios II Linux Quickstart Guide
Table of Contents
How to Contact Microtronix ............................................................................................................. 2
E-mail ........................................................................................................................................... 2
Website ........................................................................................................................................ 2
Phone Numbers ........................................................................................................................... 2
Typographic Conventions................................................................................................................ 2
Introduction ...................................................................................................................................... 4
Before You Begin............................................................................................................................. 4
Hardware Requirements .............................................................................................................. 4
Software Requirements ............................................................................................................... 5
Starting Nios II IDE .......................................................................................................................... 5
PC Environment Notes .................................................................................................................... 5
Walkthrough – Kernel Project.......................................................................................................... 6
Creating a New Kernel Project..................................................................................................... 6
Configuration................................................................................................................................ 9
Building ...................................................................................................................................... 11
Loading the Kernel..................................................................................................................... 12
Walkthrough – Filesystem Project ................................................................................................. 13
Creating a New Filesystem Project............................................................................................ 13
Building ...................................................................................................................................... 17
Loading the Filesystem.............................................................................................................. 18
Starting up Nios II Linux............................................................................................................. 19
Miscellaneous................................................................................................................................ 19
Note ............................................................................................................................................... 20
Page 3 of 20

Nios II Linux Quickstart Guide
The Nios II Linux Distribution allows you to put together a Linux environment for your Altera® development board. This environment consists of a kernel configured for your SOPC system and a filesystem that can be mounted as the root directory. Once the environment has been created and loaded onto the development board, the users can then build applications for Nios II Linux and run them from the development board.
Introduction
A set of example applications and their source are included in the Nios II Linux Distribution. The application source code can be built within a Nios II Linux application project and then transferred over to the Nios II Linux system via FTP or included within a Nios II Linux fileystem project. Please refer to the reference guide for more information.
For a more complete list of limitations and known bugs, please refer to the readme.txt file.
The purpose of this document is to guide you through getting a Nios II Linux system up and running on a target development board. This document will walk you through the process of creating a kernel and filesystem project. After both projects are created, you can then load the binary files representing the kernel and filesystem onto your development board and log into Linux. Once things are up and running, the Microtronix Nios II Linux Distribution Reference Guide included with the Nios II Linux Distribution will help guide you through other, more specific tasks.
Hardware Requirements Before You Begin • A development board. One of:
o Altera Nios II Evaluation Kit (EP1C12 device)
o Altera Nios II Development Kit, Cyclone™ Edition (EP1C20 device)
o Altera Nios II Development Kit, Stratix™ Edition (EP1S10 or EP1S10ES device)
o Altera Nios II Development Kit, Stratix Pro Edition (EP1S40 device)
• Please ensure that the following ports are connected to your PC using the appropriate cables:
o ByteBlaster™
o Ethernet
• After hooking up the cables, apply power to the board.
Page 4 of 20
Nios II Linux Quickstart Guide
Software Requirements The Nios II Linux Distribution requires the following software packages to be installed on the host system:
• Altera Quartus® II 4.2
• Altera Nios II Development Kit 1.1
Starting Nios II IDE
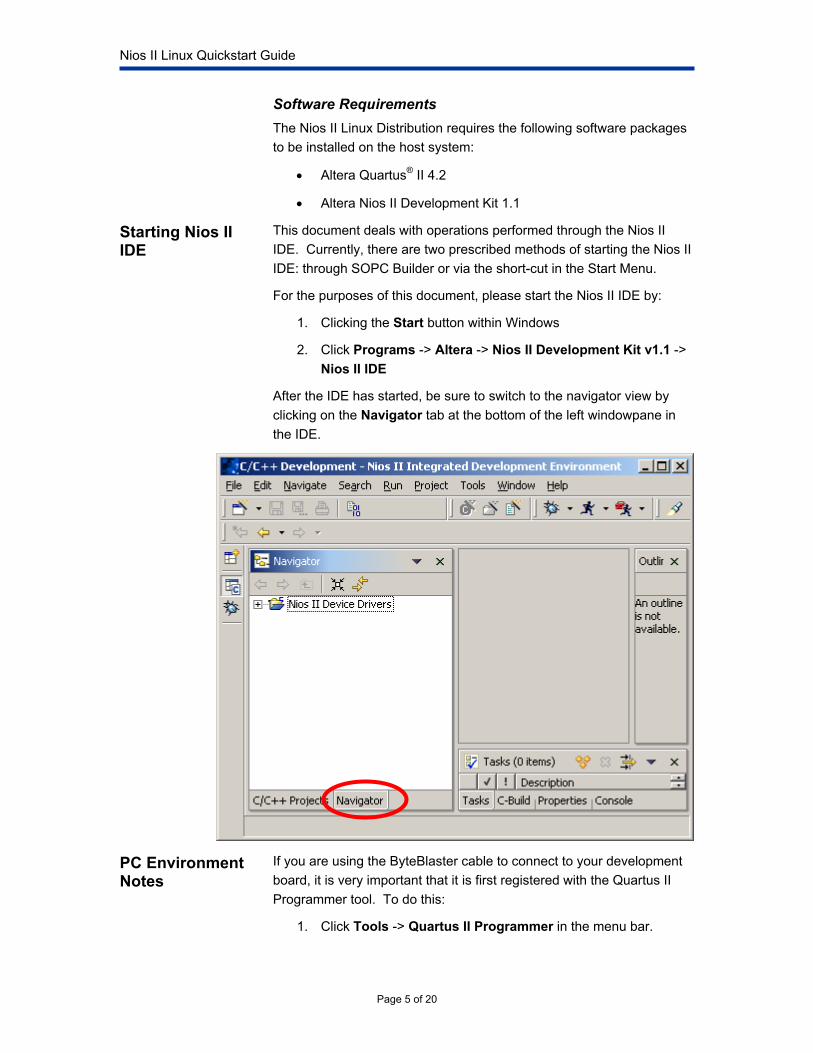
This document deals with operations performed through the Nios II IDE. Currently, there are two prescribed methods of starting the Nios II IDE: through SOPC Builder or via the short-cut in the Start Menu.
For the purposes of this document, please start the Nios II IDE by:
1. Clicking the Start button within Windows
2. Click Programs -> Altera -> Nios II Development Kit v1.1 -> Nios II IDE
After the IDE has started, be sure to switch to the navigator view by clicking on the Navigator tab at the bottom of the left windowpane in the IDE.
PC Environment Notes
If you are using the ByteBlaster cable to connect to your development board, it is very important that it is first registered with the Quartus II Programmer tool. To do this:
1. Click Tools -> Quartus II Programmer in the menu bar.
Page 5 of 20

Nios II Linux Quickstart Guide
2. When the Quartus II Programmer window appears,
a. Click Edit -> Hardware Setup from the menu bar
3. If your ByteBlaster cable is not listed under the “Available hardware items” group, then click the Add Hardware … button. Select the appropriate cable and port in the dialog that appears and click OK.
4. Click the Close button and exit Quartus II Programmer.
Creating a New Kernel Project Walkthrough – Kernel Project 1. In the pull down menus within the Nios II IDE, Click File ->
New -> Project…
2. Select the Microtronix Nios II item in the left pane
3. Select the Linux Kernel Project item in the right pane
4. Click Next
Page 6 of 20

Nios II Linux Quickstart Guide
5. Give the project a unique name
6. Click Next
Page 7 of 20

Nios II Linux Quickstart Guide
7. Click Browse…
8. Find the appropriate <system.ptf> file for your Quartus project
a. The currently supported Quartus projects for this release can be found in the …altera\kits\nios2\examples\verilog\ <board>\linux directory.
9. Click Open
10. Double check that all the drop down boxes contain the correct values. An example configuration would be as follows:
a. The CPU selected is “cpu”
b. The ”upload” device selected is “ext_flash”
c. The “execute” device selected is “sdram”
11. Click Finish
Page 8 of 20

Nios II Linux Quickstart Guide
Configuration 1. In the Navigator view, right-click the created project.
2. In the drop down menu, click Configure Kernel
3. A DOS window will appear with the “Linux menuconfig” utility (this may take a few moments)
Page 9 of 20

Nios II Linux Quickstart Guide
4. Ensure that the correct development board is selected under Processor type and features -> Platform.
5. Browse around the kernel configuration options if you like, but the defaults should be fine, unless you are using an Altera Nios II Evaluation board.
If you are using an Altera Nios II Evaluation board
Turn off:
• Device Drivers -> ATA/ATAPI/MFM/RLL support -> Enhanced IDE/MFM/RLL … support
• Device Drivers -> Networking support -> Ethernet (10 or 100Mbit) -> SMC 91111 support
Turn on:
• Device Drivers -> Networking support -> Ethernet (10 or 100Mbit) -> MoreThanIP 10_100_1000 Emac support
6. Select Exit and then yes to save your configuration
Page 10 of 20

Nios II Linux Quickstart Guide
Building 1. In the Navigator view, right-click the created project.
2. In the drop down menu, select Build Project
a. The process of building the kernel project will take a while.
Page 11 of 20

Nios II Linux Quickstart Guide
Loading the Kernel 1. Navigate to the kernel projects’s ...build/vmlinux.bin file
within the IDE
2. Right-click the file
3. In the drop down menu, select Upload
a. The upload process will also take a little while.
Page 12 of 20

Nios II Linux Quickstart Guide
Creating a New Filesystem Project Walkthrough – Filesystem Project In order to create a root filesystem image for your Linux system, you
must create a new Nios II Linux Filesystem project:
1. Under the File menu in Eclipse, click New -> Project.
2. In the New Project selection wizard page, select the category Microtronix Nios II and choose Linux Filesystem Project for the project type. Click the Next button to continue on to the next wizard page.
Page 13 of 20

Nios II Linux Quickstart Guide
3. Give the filesystem project a name, and click the Next button to continue on to the next page.
Page 14 of 20
Nios II Linux Quickstart Guide
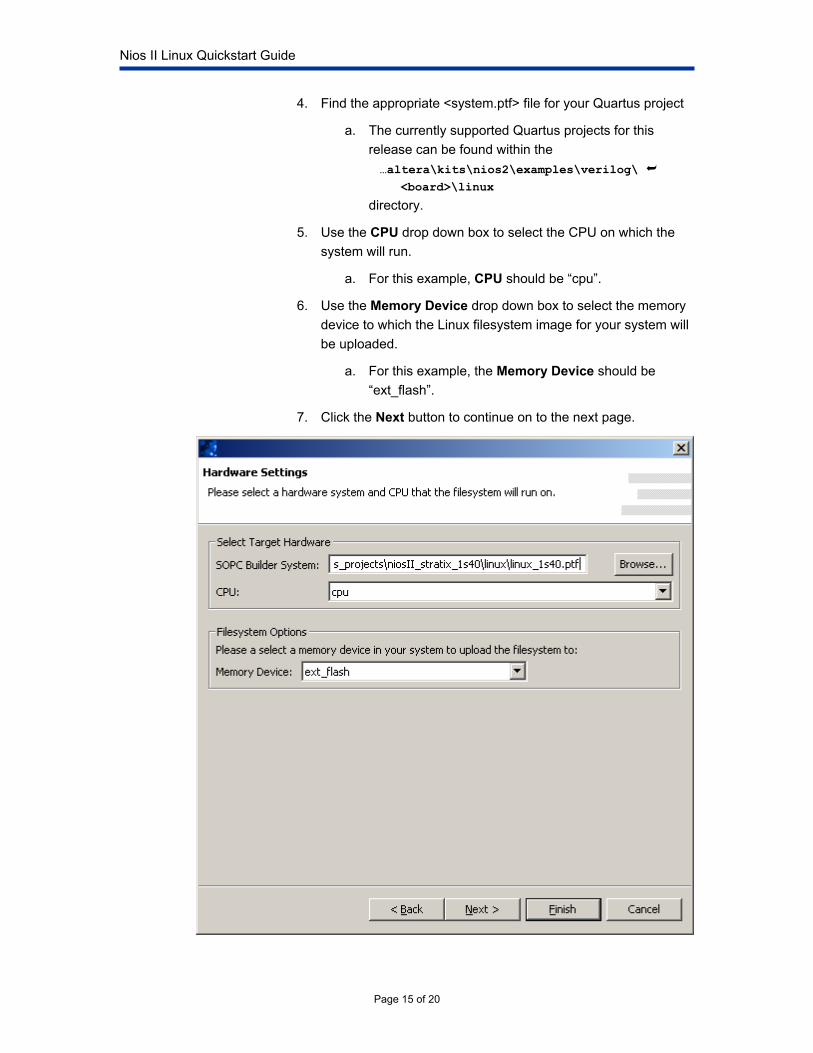
4. Find the appropriate <system.ptf> file for your Quartus project
a. The currently supported Quartus projects for this release can be found within the …altera\kits\nios2\examples\verilog\ <board>\linux directory.
5. Use the CPU drop down box to select the CPU on which the system will run.
a. For this example, CPU should be “cpu”.
6. Use the Memory Device drop down box to select the memory device to which the Linux filesystem image for your system will be uploaded.
a. For this example, the Memory Device should be “ext_flash”.
7. Click the Next button to continue on to the next page.
Page 15 of 20

Nios II Linux Quickstart Guide
8. The next wizard page allows you to select which applications are to be included in the filesystem image.
a. Applications will be listed under two categories: Pre-built Binary Packages and Installable Workspace Projects. Pre-built Binary Packages include common Linux applications that have been pre-built for a Nios II Linux system. The Installable Workspace Projects category will list custom applications that are already present in your Eclipse workspace.
b. For the purposes of this example walkthrough, click the Install Minimal button to select only the necessary packages.
c. Please also enable: agetty, boa, dhcpcd, ftpd, inetd, init, ping, route, and telnetd. These will be useful for demonstration purposes.
9. Click Finish.
Page 16 of 20

Nios II Linux Quickstart Guide
Building Once the filesystem project has been created, a …target/ directory tree will exist under the project’s folder. This directory tree reflects the structure and content of the filesystem image that will be built, and includes all the pre-built binaries and associated files you selected during the project creation process. To build a filesystem image from the target/ directory tree:
1. Right-click on the filesystem project’s name in your Eclipse Navigator and select Build Project in the context menu that appears.
2. After the project builds, a file named romfs.bin should appear under the filesystem project’s folder. This is the filesystem image file.
Page 17 of 20

Nios II Linux Quickstart Guide
Loading the Filesystem Once the filesystem project has been built, a file named romfs.bin should appear under the filesystem project’s folder. This is the filesystem image file. To load the filesystem image to the board:
1. Right-click on the romfs.bin file in your Eclipse Navigator and select Upload from the context menu that appears.
Page 18 of 20

Nios II Linux Quickstart Guide
Starting up Nios II Linux In order to start running Linux on your Nios II target board, the .sof file for a Nios II Linux compatible Quartus project must be uploaded. The following example uses the .sof included with the Nios II Linux Distribution.
1. From the menu bar, click Tools -> Quartus II Programmer
2. Ensure that your hardware is setup properly (please refer to the PC Environment Notes section of this document for more information)
3. Select Add File and locate the .sof file for the Quartus project that you have been building the kernel and filesystem against.
4. Click Open. You will get an information message from the Quartus II Programmer. Click OK.
5. Enable the Program/Configure box.
6. Click Start.
7. Once the .sof file is finished loading onto the development board, you can connect to the development board using the nios2-terminal program (which uses the JTAG UART). This can be accomplished by issuing the following command in a Nios II SDK shell: [SOPC Builder]$ nios2-terminal You can now log into the Nios II Linux system through your terminal window.
To login, use the username nios and the password uClinux (note the capitalization of the “C”, the password is case sensitive).
Miscellaneous
If you wish to enable network support you can do so either manually or with dhcp (assuming you selected the appropriate applications when you built your filesystem project).
To manually configure your IP address run the following command:
# ifconfig eth0 <IP address> netmask <netmask> where <IP address> and <netmask> are valid parameters for your local network. Alternately, if DHCP is available, you can configure your IP address by running the following commands:
# mkdir /var/dhcpc # dhcpcd –NRY &
Page 19 of 20

Nios II Linux Quickstart Guide
Page 20 of 20
If you are using DHCP to configure your IP address, use ifconfig to obtain the address assigned by the server.
The board is setup with an ftp daemon, telnet daemon, and a small webserver. Once you’ve enabled network support, you can try connecting to the board via these 3 protocols.
The mount utility included with the filesystem project is capable of NFS-mounting. To mount an NFS share run the following command:
# mount –t nfs __.__.__.__:<dir> <mount point> -n –o nolock,rsize=4096,wsize=4096 (Where __.__.__.__ is the IP address of the NFS server, <dir> is the directory of the NFS share, and <mount point> is mount point on the development board’s filesystem to use).
Please remember to review the readme.txt file included with this package for any last minute updates to the documentation.
Note
Copyright © 2004, 2005 Microtronix Datacom Ltd. All rights reserved. Altera, Nios II, and Quartus are Registered Trademarks of Altera Corporation. ByteBlaster, USB-Blaster, Cyclone and Stratix are Trademarks of Altera Corporation. Linux is a Registered Trademark of Linus Torvalds.