nissan navara nissan pathfinder - egr auto - d40 nav r51 path ll.pdf · sk569 page 3 of 8 1....
TRANSCRIPT

Place these instructions in the vehicles glovebox after installation is complete
Page 1 of 8
Installation Time: 30minApprox Nudge Bar Weight: 5KG
ISSUE : 11th November 2010
Important: Please read each step of these instructions carefully prior to commencing installation! !
Accessory Part No. NBAR0011
SK569
Important:Do not use this product in any other motor vehicle for which it is not designed.Do not use any other mounting location / method other than described in this instruction.It is advisable to seek assistance of another person when installing this product.
Do not remove the label from the Nudge Bar.
!
Do not repair or modify the Nudge Bar and / or its Mounting Bracket in any way - repairor modification may effect proper operation of the airbag resulting in serious injury.
Tools Required:
- Masking Tape- Sharp Knife / Hacksaw- Ruler / Tape Measure
- Pen- 13mm Spanner / Socket- 16mm Spanner / Socket- 17mm Spanner / Socket
- 18mm Spanner / Socket- 19mm Spanner / Socket
- 10mm Spanner / Socket
Layout - Navara D40 / Pathfinder R51 [Spanish] models only:
FORWARD SETTING
Layout - Navara D40 [Thai] models only:REARWARD SETTING
NISSAN NAVARA (D40)NISSAN PATHFINDER (R51)
(2005 Production Onwards)NUDGE BAR - LOW LOOP
INSTALLATION INSTRUCTION
Unique instruction steps on Page 7.

SK569 Page 2 of 8
NISSAN NAVARA D40 / PATHFINDER R51 - NUDGE BARAccessory Part No. NBAR0011
• To maintain your Nudge Bar properly, wash regularly with car wash detergent, hose off& chamois dry. Stubborn grime can be removed with kerosene.
• Polished surfaces can be maintained with Autosol metal polish or similar products. Use as recommended.
Care Instructions:
Parts List
IconQTY.Component name
1Nudge Bar
Item
1
1LHS Mounting Bracket2
1RHS Mounting Bracket 3
2M12x30-1.25mm (Fine) Hex Head Bolt4
2M12 Flat Washer5
1M8 U-Bolt6
2M8 Flat Washer7
2M8 Nylock Nut8
4M10x30mm Hex Head Bolt9
8M10 Flat Washer10
411
1
M10 Nylock Nut
Fitting Instructions12AUTOMOTIVE
INSTRUCTION BOOKLET
®

SK569 Page 3 of 8
1.
Diagram 1: Remove the splash guard
2.
Diagram 2: Remove the steel skid plate
NISSAN NAVARA D40 / PATHFINDER R51 - NUDGE BARAccessory Part No. NBAR0011
3.
Diagram 3: Remove the front towing eye
Remove the front towing eye on the LHS chassis rail, by undoing the 2 retaining bolts.
Detach the steel skid plate from the vehicle, by removing the 8 hex bolts, as shown.
NOTE: 2 bolts for the skid plate are partially hidden underneath the front bumper, behind the bottom lip, as shown.
Detach the plastic splash guard from the front bumper, by removing the 6 hex head bolts, as shown.
Pull the plastic guard down and rearwards to separate from the vehicle.
REMOVE EXISTING BOLTS
SPLASH GUARD
FRONT OF VEHICLE
FRONT OF VEHICLE
FRONT OF VEHICLE
RETAINING BOLTS
TOWING EYE
17mm
10mm
10mm
HIDDEN BOLTS

SK569 Page 4 of 8
NISSAN NAVARA D40 / PATHFINDER R51 - NUDGE BARAccessory Part No. NBAR0011
LHS LHS MOUNTING BRACKET
FACTORY BOLTS
4.
Diagram 4: Install LHS Mounting Bracket
Attach the LHS Mounting Bracket and the towing eye to the LHS chassis rail, using the bolts removed in step 3.
Tighten fully.
17mm
CHASSIS RAIL
FRONT OF VEHICLE
RHS MOUNTING BRACKET
5. Attach the RHS Mounting Bracket to the RHS chassis rail, using M12x30mm Hex Head Bolts and M12 Flat Washers, through the existing holes in the chassis rail.
Tighten fully.
18mm
RHS
Diagram 5: Install RHS Mounting Bracket
FRONT OF VEHICLE
M12 FLAT WASHERS
M12x30mm HEX HEAD BOLTS
For Nissan NAVARA D40 Thai production models, replace Step 5
with Step 5b, on page 8.
SK569 Page 5 of 8
NISSAN NAVARA D40 / PATHFINDER R51 - NUDGE BARAccessory Part No. NBAR0011
10mm
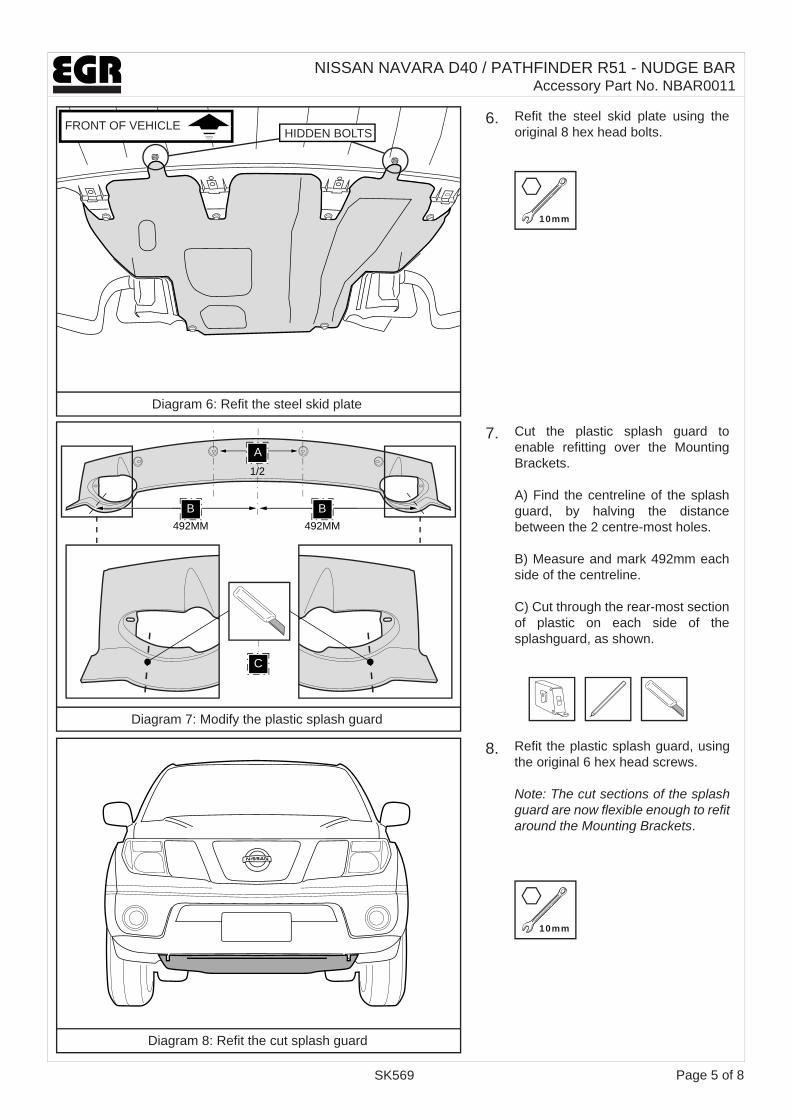
8.
Diagram 8: Refit the cut splash guard
Refit the plastic splash guard, using the original 6 hex head screws.
Note: The cut sections of the splash guard are now flexible enough to refit around the Mounting Brackets.
FRONT OF VEHICLE
10mm
6.
Diagram 6: Refit the steel skid plate
Refit the steel skid plate using the original 8 hex head bolts.HIDDEN BOLTS
7.
Diagram 7: Modify the plastic splash guard
492MMB
492MM
A1/2
Cut the plastic splash guard to enable refitting over the Mounting Brackets.
A) Find the centreline of the splash guard, by halving the distance between the 2 centre-most holes.
B) Measure and mark 492mm each side of the centreline.
C) Cut through the rear-most section of plastic on each side of the splashguard, as shown.
B
C

For Nissan NAVARA D40 Thai production models, replace Step 9
with Step 9b, on page 8.
RHS
9. Carefully break the protective pack-aging on the Nudge Bar to expose the lower mounting tabs.
Align the mounting slots on the Nudge Bar to the corresponding slots on the Mounting Brackets, ensuring that the Nudge Bar tabs sit on the outside faces of the Mounting Brackets.
Attach using M10x30mm Hex Head Bolts, M10 Flat Washers and M10 Nylock Nuts.
Do not tighten fully.
16mm 17mm
LHS
Diagram 9: Attach Nudge Bar mounting tabs to Brackets
M10x30mm HEX HEAD BOLTS
M10x30mm HEX HEAD BOLTS
RHS MOUNTING BRACKET
LHS MOUNTING BRACKET
M10 FLAT WASHERSRHS NUDGE BAR MOUNTING TAB
LHS NUDGE BAR MOUNTING TAB
M10 NYLOCK NUTS
M10 FLAT WASHERS
TOWING EYE
SK569 Page 6 of 8
NISSAN NAVARA D40 / PATHFINDER R51 - NUDGE BARAccessory Part No. NBAR0011
M10 NYLOCK NUTS

TIGHTEN MOUNTING BOLTS
16mm 17mm
SK569 Page 7 of 8
10.
NISSAN NAVARA D40 / PATHFINDER R51 - NUDGE BARAccessory Part No. NBAR0011
11.
Diagram 11: Remove protective packaging
Working from the front of the vehicle, align Nudge Bar to desired position, and fully tighten the M10x30mm Mounting Bolts.
Diagram 10: Tighten Mounting Bolts
Carefully remove the remaining protective packaging.

FRONT OF VEHICLE
RHS
LHS
BRACKET - RHS
CHASSIS RAIL
CHASSIS RAIL
CHASSIS RAIL
M8 FLAT WASHERSM8 NYLOCK NUTS
13mm
SK569 Page 8 of 8
5b.
Diagram 5b: Attach RHS Mounting Bracket
9b.
Diagram 9b: Attach Nudge Bar to Mounting Brackets
Carefully break the protective packaging on the Nudge Bar to expose the mounting tabs.
Align the Nudge Bar to the Mounting Brackets, ensuring that the Nudge Bar tabs sit on the outside faces of the Mounting Brackets.
Attach using M10x30mm Hex Head Bolts, M10 Flat Washers, and M10 Nylock Nuts.
Do not tighten fully.
Feed the M8 U-Bolt through the rear chassis rail hole, until the thread protrudes out of the front chassis hole.
Attach the RHS Mounting Bracket to the RHS chassis rail, using M8 Flat Washers, and M8 Nylock Nuts.Tighten Fully.
NOTE: Be careful not to lose the U-Bolt inside the chassis rail. Continue on with Step 6 located on Page 5.
16mm 17mm
Continue on with Step 10 located at the top of Page 7.
M10x30mmHEX HEAD BOLTS
M10x30mm HEX HEAD
BOLTS
RHS NUDGE BAR MOUNTING TAB
LHS NUDGE BAR MOUNTING TAB
M8 U-BOLT
M10 NYLOCK NUTS
M10 NYLOCK NUTS
M10 FLAT WASHERS
M10 FLAT WASHERS
Unique Instructions for Thai NISSAN NAVARA R51 - NUDGE BARAccessory Part No. NBAR0011