nm evaluation guide - communardo mobile is available on the google play store for immediate download...
TRANSCRIPT

Product Guide
© 2013 Nintex. All rights reserved. Errors and omissions excepted.
[email protected] www.nintex.com

Nintex Mobile Apps Evaluation Guide
2
Contents
Contents ............................................................................................................................................................................ 2
Introduction ...................................................................................................................................................................... 4
1 Understanding system requirements ....................................................................................................................... 5
1.1 Operating System .............................................................................................................................................. 5
1.2 Software ............................................................................................................................................................ 5
1.2.1 Microsoft SharePoint 2013 on-premises .................................................................................................. 5
1.2.2 Microsoft SharePoint 2010 On-premises .................................................................................................. 5
1.2.3 Microsoft Office 365 ................................................................................................................................. 5
2 Creating a mobile app accessible form ..................................................................................................................... 6
2.1 To create a Mobile Phone or Tablet form ......................................................................................................... 6
2.2 Best practices for Mobile App Form design ...................................................................................................... 7
3 Downloading and installing the apps ........................................................................................................................ 9
3.1 To install Nintex Mobile from the Windows Store ........................................................................................... 9
3.2 To install the Nintex Mobile App from the Apple App Store .......................................................................... 11
3.3 To install Nintex Mobile from the Windows Phone Store .............................................................................. 12
3.4 To install Nintex Mobile from the Google Play Store ..................................................................................... 13
4 Signing in to the apps .............................................................................................................................................. 15
4.1 Signing in with a Corporate Account ............................................................................................................... 15
4.2 Signing in with Microsoft Account .................................................................................................................. 15
4.3 Signing in via Office 365 .................................................................................................................................. 17
5 Accessing My Tasks and Forms ............................................................................................................................... 19
5.1 My Tasks .......................................................................................................................................................... 19
5.2 My Forms ........................................................................................................................................................ 20
5.2.1 Form Categories ...................................................................................................................................... 20
6 Submitting tasks and forms .................................................................................................................................... 21
6.1 Submitting a Task or a Form ........................................................................................................................... 21
7 Accessing additional functionality .......................................................................................................................... 24
7.1 Semantic Zoom ............................................................................................................................................... 24
7.2 Refresh the list of tasks and forms .................................................................................................................. 25
7.3 Offline Mode ................................................................................................................................................... 25
7.4 Delete Local Storage ....................................................................................................................................... 27
7.5 Pinning Form Tiles to the Start Menu ............................................................................................................. 28

Nintex Mobile Apps Evaluation Guide
3
7.6 Signing Out ...................................................................................................................................................... 29
7.7 Security ........................................................................................................................................................... 29

Nintex Mobile Apps Evaluation Guide
4
Introduction
The following evaluation guide is suitable for Nintex customers who want to evaluate the Nintex Mobile apps and
become familiar with their user interfaces and functionalities.
This guide describes the following:
1. Understanding System requirements
2. Creating a Mobile Apps Accessible Form
3. Downloading and installing the Apps
4. Signing in to the Apps
5. Accessing My tasks and Forms
6. Submitting tasks and forms
7. Accessing additional functionality
For more information on currently supported mobile platforms and requirements for using Nintex Mobile, please refer
to the Nintex Mobile product page and its FAQ online.

Nintex Mobile Apps Evaluation Guide
5
1 Understanding system requirements
1.1 Operating System
Nintex Mobile apps can be installed on devices running any of the following operating systems:
Microsoft Windows 8 for x86 platforms (32 and 64 bit) or ARM (e.g. Microsoft Surface)
Apple iOS 5 or greater for iPhone, iPad or iPod
Windows Phone 8.0 or greater
Android v4.0 or greater
1.2 Software
The Nintex Mobile apps can be connected to on-premises SharePoint farms or to Microsoft Office 365. There are
different software requirements depending on the environment you are connecting the apps to:
1.2.1 Microsoft SharePoint 2013 on-premises
If you are using Microsoft SharePoint 2013 On-premises, Nintex Mobile apps require the following minimum
versions of Nintex Workflow and Nintex Forms installed and configured.
Nintex Forms 2013 version 2.1.1.0
Nintex Workflow 2013 version 3.0.3.0
1.2.2 Microsoft SharePoint 2010 On-premises
If you are using Microsoft SharePoint 2010 On-premises, Nintex Mobile apps require the following minimum
versions of Nintex Workflow and Nintex Forms installed and configured.
Nintex Forms 2010 version 1.3
Nintex Workflow 2010 version 2.3.9
For details on the installation of Nintex Forms and Nintex Workflow, please refer to their respective installation
guides on Nintex Connect website:
Installation Guide for Nintex Forms 2013
Installation Guide for Nintex Workflow 2013
Installation Guide for Nintex Forms 2010
Installation Guide for Nintex Workflow 2010
1.2.3 Microsoft Office 365
If you are using Microsoft Office 365, use of the Nintex Mobile apps require Nintex Forms for Office 365 to be
installed and configured within your tenancy.

Nintex Mobile Apps Evaluation Guide
6
2 Creating a mobile app accessible form
2.1 To create a Mobile Phone or Tablet form
1. Create a new SharePoint Custom list (app) and call it “OHS Incident Reports – demo”.
2. Create the following columns in the custom list.
a. Title: Single line of text
b. Incident Date and Time: Date and Time
c. Location: Single line of text
d. Severity: Choice
e. Description: Single line of text
3. Click the List tab and select Nintex Forms in the Ribbon.
4. The Nintex Form designer will open and the form will have already been created. The experience of
designing a form for mobile devices using Nintex Forms remains the same.
Note: For information on which Nintex Forms controls are supported by mobile apps, please see here.
Create the Mobile App Layout
1. In the Ribbon, click on the Nintex Mobile Phone layout and then OK.
2. Click on the Nintex Mobile Tablet layout and OK.
3. The forms will look similar to the screenshots below.

Nintex Mobile Apps Evaluation Guide
7
Note: You may have to rearrange the controls to ensure they fit correctly onscreen. For more Mobile Forms
design tips, see the next section Mobile App Forms Best Practices.
4. Click Publish and ok.
5. Once you have downloaded and signed in to the Mobile App, you will be able to access the form.
2.2 Best practices for Mobile App Form design
Below is a list of some of our recommendations when optimizing forms for mobile.
Align labels and controls in a column, one beneath the other one when designing for phone view.
Save and Cancel buttons do not need to be placed on your form; the Nintex Mobile apps will do that for you
automatically, by respecting the design guidelines of the mobile platform in use.
Assign a category to your forms
a. Click on Settings in the Ribbon.
b. Expand the Nintex Mobile Settings section and specify the category of the form. Forms without an
assigned category will be displayed in the Nintex Mobile app under the “No Category” group.
Use a Yes/No control instead of a Choice control with radio buttons when you require an “either/or” answer.
Mobile devices render this type of control with a simple switch most users are familiar with, and the overall
size of the form definition is smaller, which reduces download time on a mobile device.
Use of Choice control with option buttons.
Use of Yes/No control.

Nintex Mobile Apps Evaluation Guide
8
The Choice control rendered by Nintex Mobile. The Yes/No control rendered by Nintex Mobile.
Portrait mode is recommended for longer forms that require scrolling.
Consider bandwidth when adding icons: Adding icons will increase the size of the form. Users accessing a
form over low bandwidth may experience slow performance issues.
Replace unsupported controls with a supported control. For example; the People control is not supported on
mobile forms. To preserve the users’ ability to enter this information, insert a Single Line textbox.
For more design tips and information on designing Mobile forms please refer to Getting Started with Nintex Mobile
apps.

Nintex Mobile Apps Evaluation Guide
9
3 Downloading and installing the apps The next step is to download the apps from the app store appropriate to the user device. You can access the Nintex
Mobile app from either the Windows Store, the Windows Phone Store, the Google Play Store or the Apple App
Store.
3.1 To install Nintex Mobile from the Windows Store
Nintex Mobile is available on the Windows Store for immediate download. The Windows Store is available to users
running Windows 8 or superior, or Windows RT.
To access the Windows Store from your Windows device:
1. Open the following URL to be sent directly to the App.
http://apps.microsoft.com/windows/app/nintex-mobile/61fbb9e9-06a9-4446-ae90-401bce0cdca4
2. Click on the View in Windows Store button.
Alternatively, you can search for “Nintex” in the Windows 8 Search pane.
To access the Search pane:
1. Click the Windows + F key combination on your Windows device, or activate the Charms bar, and select
Search on a touch screen.
2. In the Search options, click Store.

Nintex Mobile Apps Evaluation Guide
10
3. The Nintex Mobile app page will display within the Windows Store. Click Install to complete the installation
of the app on your Windows device.
4. Once installed, the Nintex Mobile app will be available on your Start page.
5. Locate the Nintex Mobile app icon and click/tap to launch Nintex Mobile app.

Nintex Mobile Apps Evaluation Guide
11
3.2 To install the Nintex Mobile App from the Apple App Store
The Nintex Mobile app is available on the Apple App Store for immediate download.
To access the Nintex Mobile app from your iOS device:
1. Open the following URL to be sent directly to the app.
https://itunes.apple.com/us/app/nintex-mobile/id645766307
2. Click on the Nintex Mobile app to download it.

Nintex Mobile Apps Evaluation Guide
12
Alternatively, you can also complete the installation of Nintex Mobile app directly from Apple iTunes.
1. Open Apple iTunes and search for “Nintex” in the App Store.
Note: If you are using iTunes for Mac or Windows, you will need to transfer the Nintex Mobile app from your
computer to your iPhone, iPod or iPad by syncing your iTunes library with your mobile device.
2. Once installed, the Nintex Mobile app will be available on your device. Locate the Nintex Mobile app icon
and tap on it to launch the Nintex Mobile app.
3.3 To install Nintex Mobile from the Windows Phone Store
Nintex Mobile is available on the Windows Phone Store for immediate download for users running Windows Phone
8 upwards.
To access the Nintex Mobile app from your Windows Phone device:
1. Open the following URL to be sent directly to the app.
http://www.windowsphone.com/en-us/store/app/nintex-mobile/1e657d14-61a0-4b05-ac32-bff8ee25ad9c
2. Click on the Install to download it

Nintex Mobile Apps Evaluation Guide
13
3. Once installed, the Nintex Mobile app will be available on your device. Locate the Nintex Mobile app icon
and tap on it to launch the Nintex Mobile app.
3.4 To install Nintex Mobile from the Google Play Store
Nintex Mobile is available on the Google Play Store for immediate download for users running Android 4.xx upwards.
To access the Nintex Mobile app from your Android device:
1. Open the following URL to be sent directly to the app:
https://play.google.com/store/apps/details?id=com.nintex.android
2. Click on the Install button to download it.

Nintex Mobile Apps Evaluation Guide
14
3. Once installed the Nintex Mobile app will be available on your device.

Nintex Mobile Apps Evaluation Guide
15
4 Signing in to the apps Before you can start using the Nintex Apps, you need to sign in to the environment you wish to view tasks or forms
from. There are several different options depending if you are signing into an on-premises SharePoint farm, or to an
Office 365 tenancy.
4.1 Signing in with a Corporate Account
A corporate account is used when connecting directly to your on-premises SharePoint environment over a VPN. If
you know the URL of your SharePoint server, and have a secure connection to it, you may want to use your
corporate account for signing in to the Nintex Mobile app and access the forms and tasks assigned to you.
To sign in with a corporate account, you will need to provide:
Username: Your corporate network account.
Password: The password used for connecting to your corporate account.
SharePoint URL: The protocol (http or https) and address of your SharePoint server.
Domain: This section is optional. The name of your corporate network domain.
If you do not know the above details, contact your IT Administrator.
4.2 Signing in with Microsoft Account
If you use Nintex Live as a gateway to your on-premises SharePoint server, you do not need to specify the SharePoint
URL, however, you will need a Microsoft account to sign into the Nintex Mobile app. The Nintex Mobile app uses
Nintex Live to talk to your SharePoint server over a secure connection via the Azure service bus. This is achieved
securely, and does not require a VPN connection.
Your Microsoft Account is the email address and password used to sign in to services such as Windows 8 devices, as
well as Skype, OneDrive, Windows Phone, Xbox LIVE, or Outlook.com. If you use an email address and password to
sign in to these services, you have a Microsoft Account.
If you do not have a Microsoft Account, you can sign up for a new one before signing in to the Nintex Mobile app.
Before using your Microsoft Account to sign in to the Nintex Mobile app, you must register your account with Nintex
Live.

Nintex Mobile Apps Evaluation Guide
16
To register your account with Nintex Live:
1. Sign in to your SharePoint portal.
2. Click on your SharePoint user name in the top-right hand corner and select Nintex Mobile Apps.
3. Click on Register with Nintex Live.
4. On the Register with Nintex Live page, select Sign in or register to Windows Live.
5. You will be directed to the Microsoft Account sign in page. Sign in or create a new account.
Nintex Mobile Apps Evaluation Guide
17
Once the registration is complete, use your Microsoft account for signing in to Nintex Live and access forms and
tasks assigned to you.
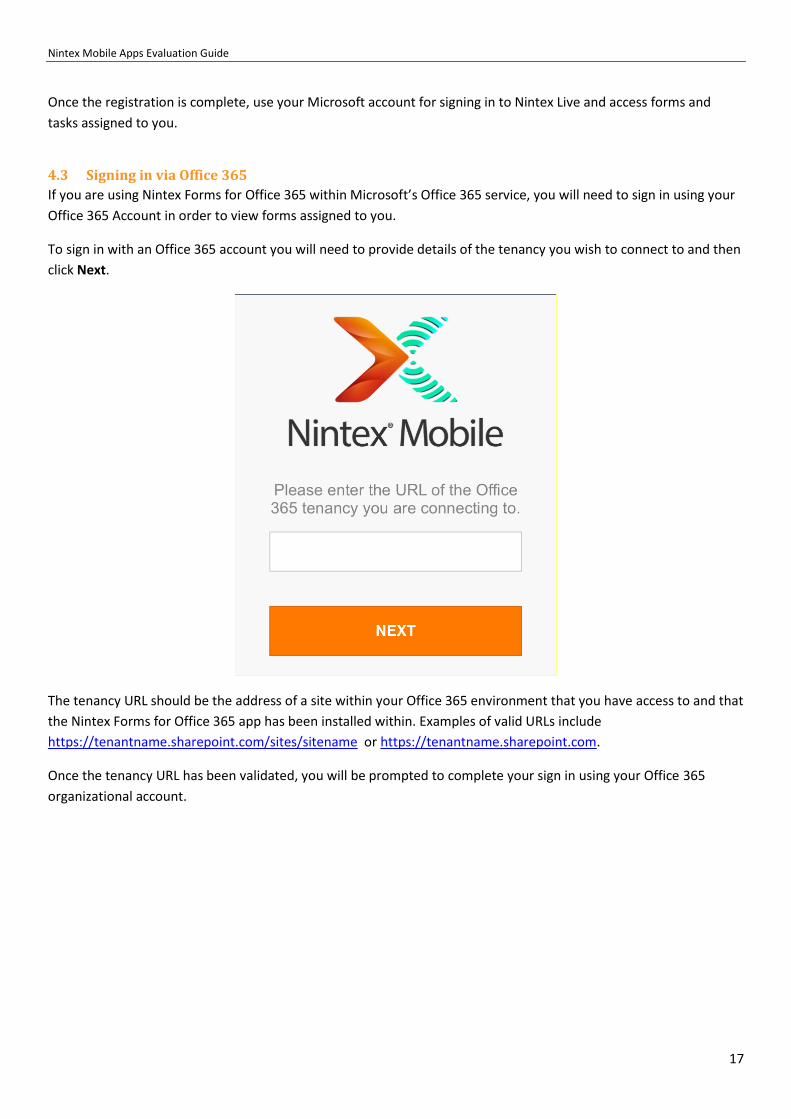
4.3 Signing in via Office 365
If you are using Nintex Forms for Office 365 within Microsoft’s Office 365 service, you will need to sign in using your
Office 365 Account in order to view forms assigned to you.
To sign in with an Office 365 account you will need to provide details of the tenancy you wish to connect to and then
click Next.
The tenancy URL should be the address of a site within your Office 365 environment that you have access to and that
the Nintex Forms for Office 365 app has been installed within. Examples of valid URLs include
https://tenantname.sharepoint.com/sites/sitename or https://tenantname.sharepoint.com.
Once the tenancy URL has been validated, you will be prompted to complete your sign in using your Office 365
organizational account.

Nintex Mobile Apps Evaluation Guide
18
If you do not know the details required, contact your IT Administrator.

Nintex Mobile Apps Evaluation Guide
19
5 Accessing My Tasks and Forms Once you have signed in the app, the next step is to access your form and tasks on your mobile device.
Please note, only list forms are available through the Nintex Mobile apps connected to a Nintex Forms for Office 365
enabled Office 365 tenancy.
5.1 My Tasks
When you first sign in and open the Nintex Mobile app, the “My Tasks” screen will display. The “My Tasks” page
displays a list of all tasks assigned to you as part of a business process workflow.
By default, tasks are sorted by the created date, however, you can change the ordering of tasks.
1. Click the Sort button in the taskbar.
2. Select one of the following options.
Workflow Name: The name you assign to the workflow in Nintex Workflow.
Task Name: The name you assign to the specific task in Nintex Workflow.
Initiator: The name of the person who initiated the workflow.
Created Date: The date when the task/s has been created (i.e. assigned to you).
Due Date: The target date when you are expected to complete your task by, as specificed in Nintex
Workflow.

Nintex Mobile Apps Evaluation Guide
20
Tasks ordered by Task Name
5.2 My Forms
The “Forms” page displays a list of all available forms created with Nintex Forms and published on the SharePoint
server to which you are connected in the Nintex Mobile app.
Forms are sorted by category, as specified in the Nintex Mobile Settings of a form, and by name within a category. If
no category is specified, forms are assigned to the fictious “No Category” and displayed before any other categorized
forms.
5.2.1 Form Categories
If you are using the Nintex Mobile app for Windows, categories are represented as separate columns, under which
forms are listed in alphabetical order. If the number of forms for each category exceeds the maximum number of
consecutive forms that is possible to display in a column, additional forms span over adjacent columns. It is also
possible to remove the grouping of categories in column format and move to an “in line” categorization of forms that
does not create visual separation of categories by column.
This option is recommended when a large number of forms is available (more than 100), as performance is greatly
improved.

Nintex Mobile Apps Evaluation Guide
21
6 Submitting tasks and forms
6.1 Submitting a Task or a Form
To submit a task or form:
1. Open and complete the form or task.
2. Click Submit.
The following screenshots depict the same form displayed on a Surface device (Windows platform) and on an iPad
device (iOS platform). Despite being similar in the sequence of fields displayed in the form, the actual layout of the
form depends on the mobile device and offers a native experience to the user.
A sample form displayed on a Microsoft Surface device (Windows platform)
The same sample form displayed on an Apple iPad device (iOS platform)
As well as submitting a form, you can also:

Nintex Mobile Apps Evaluation Guide
22
Attach: Add an attachment to the form.
Save: Save any value entered in the form’s fields; the form is saved in the Drafts page and is available for
further editing at a later time.
Delete Draft: If you are opening a saved form from your Drafts folder, you can delete the Draft by selecting
this action. Please note: All values entered in the form’s fields are lost.
Submit: Once you have entered all required values in the form’s fields, the Submit button is made available
to send the information to the SharePoint server. If you are working in offline mode, the form being
submitted is parked in the Outbox folder until you are online again (i.e. network connectivity is restored
or you exit the offline mode of the app). If you edit a form from the Outbox folder, you have to submit it
again if you want any change applied to be sent to the server.
Close: Stop editing your form at any time by closing it; if changes have been entered to any form’s field,
you will be prompted for saving or discarding them. Saved forms are listed in the Drafts page.
If you are using Nintex Mobile app for Windows, it is possible to attach any type of file from your local computer, from
your network, by searching the internet or by accessing your SkyDrive or similar remote drive, or by taking a picture
directly with the device’s camera.

Nintex Mobile Apps Evaluation Guide
23
If you are using the Nintex Mobile app for iOS, you have access to the Media Library and the camera of the mobile
device in use.

Nintex Mobile Apps Evaluation Guide
24
7 Accessing additional functionality
7.1 Semantic Zoom
Semantic zoom is available for forms. This is particulary useful when hundreds of forms are available, to provide faster
access to forms within a specific category. Semantic Zoom is a pinch-to-zoom gesture which allows you to zoom out
of a group of tiles on a single screen.
If you are using the Nintex Mobile app for Windows, it is possible to access tasks quickly from the Semantic Zoom view,
which is available for each of the sorting options.

Nintex Mobile Apps Evaluation Guide
25
7.2 Refresh the list of tasks and forms
To manually refresh the list, click/tap the Refresh button in the action bar.
To specify an automatic refresh period in the Windows App:
1. Select Settings and click Options.
2. Click the Download new items dropdown list and choose either 15, 30, or 60 minutes.
To specify an automatic refresh period in the iOS App:
1. Click on Settings and then Fetch Data.
2. Select either 15, 30 or 60 minutes
7.3 Offline Mode
The Nintex Mobile app supports working in offline mode. Reasons why you may want to work offline, even when
network connectivity is available vary. For example, if you have attached a large image or video to a form and you are
connected to a metered or slow network, you may want to submit your form but wait until you are connected to a
better network before sending it off to the server.

Nintex Mobile Apps Evaluation Guide
26
To enable offline mode in the Windows App:
1. Click Settings and select Options.
2. Select Yes for Work Offline.
To enable offline mode in the iOS App:
1. Select Settings.
2. In the Options section, click on Offline Mode.
3. Turn Offline Mode off.
When Nintex Mobile apps is operating in offline mode and you submit a form, the form will remain in the Outbox
folder until offline mode is disabled, i.e. until you are operating online again.

Nintex Mobile Apps Evaluation Guide
27
If you are using Nintex Mobile apps for Windows, a red message “Working offline” will appear in the top bar next to
the page name.
If you are using Nintex Mobile apps for iOS, offline mode is identified in the top bar of the app (colored red).
Please note: If you edit a form from the Outbox and save it without submitting (i.e. you click/tap the Save button but
not the Submit button), any changes entered in the form’s field will be saved and the form will remain in the Outbox
even after entering online mode.
If you want to send changes applied to your form to the server, you have to submit your form again by clicking/tapping
the Submit button.
If Nintex Mobile apps is operating online, submission of forms is almost immediate. Submitted forms are visible in the
item list of the relevant form on SharePoint server.
7.4 Delete Local Storage
The list of assigned tasks, available forms, form definitions, form icons and attachments are all saved locally to the
device. Although linked to your profile, and therefore inaccessible by other users, you may want to delete the local
storage, if you are sharing the device with someone else, or if you need to free up space on your device’s memory.
Unsubmitted items stored locally to your device, such as tasks and forms in the Drafts or Outbox folders, will be lost
after you delete your local storage.

Nintex Mobile Apps Evaluation Guide
28
To delete all your local storage in Windows App:
1. Click Settings and select Options.
2. Locate Delete Local Storage and select Delete.
To delete all your local storage in the iOS App:
1. Click Settings and locate Delete Local Storage.
2. Click Delete.
Please note: The list of assigned tasks and available forms, although removed from your device, is not actually deleted
on the SharePoint server, therefore, if you sign in to Nintex Mobile apps again on the same or another device, you will
be able to see your list of tasks and forms again.
Tip: Delete Locale Storage is also a useful tool for troubleshooting potential issues in the app, if any occurr.
7.5 Pinning Form Tiles to the Start Menu
From your Windows 8 device, you can pin any Form tile to your Start Menu.

Nintex Mobile Apps Evaluation Guide
29
1. Right-click on the Form tile you want to pin.
2. In the taskbar, click on Pin to Start.
3. You are given the option to rename the form, and then click Pin to Start.
4. The tile will now appear on your Start Menu. When you click on the tile, the Mobile Form will open
immediately.
7.6 Signing Out
When you sign in to Nintex Mobile apps, your credentials are remembered by the app and will automatically sign you
in the next time you launch the app.
You can sign in to Nintex Mobile apps on different devices and on different platforms. For instance, you can use the
Nintex Mobile app on your Windows 8 laptop as well as on your iPhone at the same time, using the same user
account.The Nintex Mobile app supports “roaming” of your data from one device to another one for synced items, i.e.
forms which have been submitted to the SharePoint server. Items stored locally to the device, specifically in the Drafts
and Outbox folders, are not visible across devices.
If you are sharing the mobile device you use for executing Nintex Mobile apps with someone else, or you want Nintex
Mobile apps to forget your account credentials, you may want to consider signing out of the app.
On Sign Out, Nintex Mobile apps will forget your password and sign out of the app. Your username, SharePoint URL
and Domain, if available, are retained.
7.7 Security
Form definitions are transferred from your SharePoint server to the Nintex Mobile apps over the internet using an
XML document format. If your forms contain sensitive information, it is strongly recommended to secure the
communication between the server and the apps by using the HTTPS protocol. If you are using Nintex Live as a gateway
between your SharePoint server and Nintex Mobile apps, the communication channel is already secure over HTTPS.