nord stage 2 manual
TRANSCRIPT

7/30/2019 Nord Stage 2 Manual
http://slidepdf.com/reader/full/nord-stage-2-manual 1/65
User ManualNord Stage 2 HA/SW
OS Version 1.x
Part No. 50361 Copyright Clavia DMI AB 2011
Print Edition 1.5

7/30/2019 Nord Stage 2 Manual
http://slidepdf.com/reader/full/nord-stage-2-manual 2/65

7/30/2019 Nord Stage 2 Manual
http://slidepdf.com/reader/full/nord-stage-2-manual 3/65
| 3
1 Introduction
Thank you! . . . . . . . . . . . . . . . . . . . . . . . . . . . . . . . . . . . . . 5
Features . . . . . . . . . . . . . . . . . . . . . . . . . . . . . . . . . . . . . . . . 5
About the User Manual. . . . . . . . . . . . . . . . . . . . . . . . . 5
Reading the manual in Adobe Acrobat Reader.. . . . . . . . . . .5
Nord on the Internet . . . . . . . . . . . . . . . . . . . . . . . . . . . 5
Re sto ring t he fa ctor y p res et s . . . . . . . . . . . . . . . . . . . . . . . . . 5
OS upgrades . . . . . . . . . . . . . . . . . . . . . . . . . . . . . . . . . . . . . . 5
Free sounds . . . . . . . . . . . . . . . . . . . . . . . . . . . . . . . . . . . . . . 5
Disclaimer . . . . . . . . . . . . . . . . . . . . . . . . . . . . . . . . . . . . . . . . 5
2 About the Nord Stage 2
The Organ section. . . . . . . . . . . . . . . . . . . . . . . . . . . . . . 6
Piano Library v5 . . . . . . . . . . . . . . . . . . . . . . . . . . . . . . . . 6
Small, Medium & L arge . . . . . . . . . . . . . . . . . . . . . . . . . . . . . . 6
String Resonance. . . . . . . . . . . . . . . . . . . . . . . . . . . . . . . 6
Nord Triple Pedal . . . . . . . . . . . . . . . . . . . . . . . . . . . . . . . 7
Pedal Noise. . . . . . . . . . . . . . . . . . . . . . . . . . . . . . . . . . . . . 7
The Synth Section . . . . . . . . . . . . . . . . . . . . . . . . . . . . . . 7
3 Getting Started
Hook it up . . . . . . . . . . . . . . . . . . . . . . . . . . . . . . . . . . . . . . 8
Programs . . . . . . . . . . . . . . . . . . . . . . . . . . . . . . . . . . . . . . . 8
Select a program. . . . . . . . . . . . . . . . . . . . . . . . . . . . . . . . . . . 8
The Shif t Button . . . . . . . . . . . . . . . . . . . . . . . . . . . . . . . . . . . 8
Sort Mode . . . . . . . . . . . . . . . . . . . . . . . . . . . . . . . . . . . . . . . . 9
The Knob s . . . . . . . . . . . . . . . . . . . . . . . . . . . . . . . . . . . . . . . 9
The But tons. . . . . . . . . . . . . . . . . . . . . . . . . . . . . . . . . . . . . . . 9
Edit a program . . . . . . . . . . . . . . . . . . . . . . . . . . . . . . . . . 9
Select a new piano sou nd . . . . . . . . . . . . . . . . . . . . . . . . . . . . 9
Turning the Memory Protection Off . . . . . . . . . . 10
Storing a Program . . . . . . . . . . . . . . . . . . . . . . . . . . . . . 10
Live Mode . . . . . . . . . . . . . . . . . . . . . . . . . . . . . . . . . . . . . 10
Activate an effect . . . . . . . . . . . . . . . . . . . . . . . . . . . . . 10
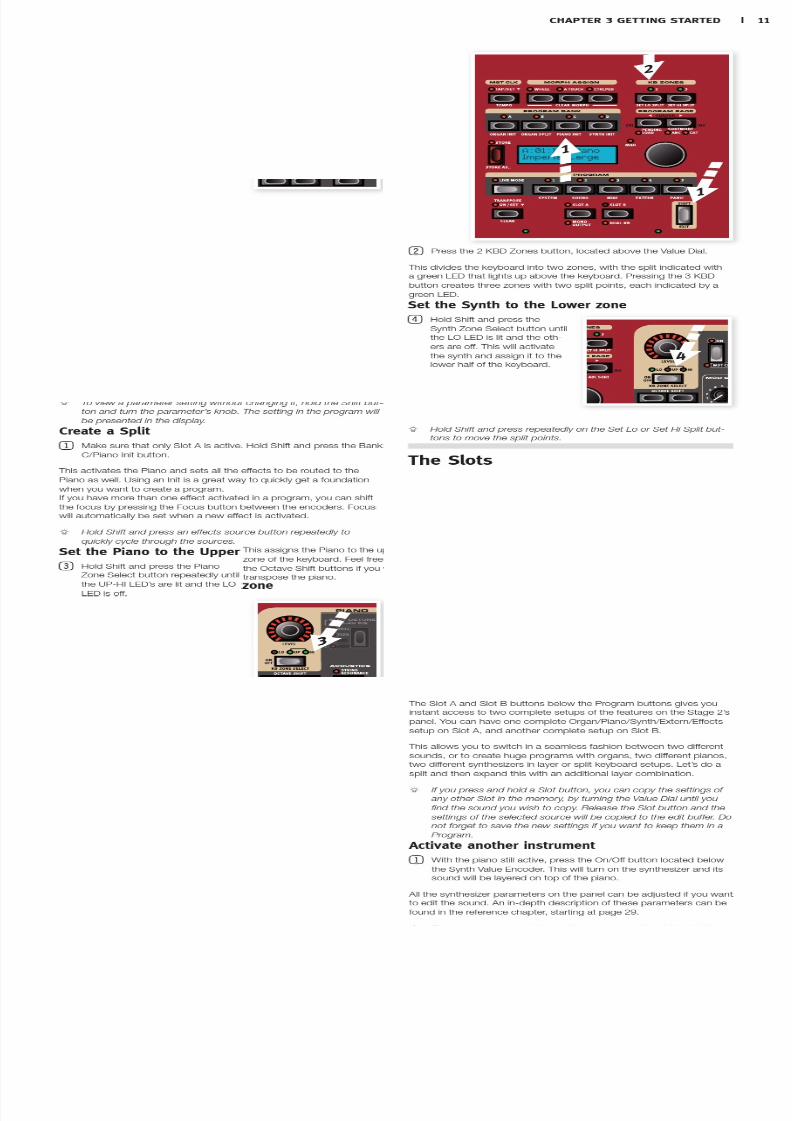
Activate ano ther inst rumen t . . . . . . . . . . . . . . . . . . . . . . . . . 11
The Slots . . . . . . . . . . . . . . . . . . . . . . . . . . . . . . . . . . . . . . 11
Create a Split . . . . . . . . . . . . . . . . . . . . . . . . . . . . . . . . . . . . 11
Set the P iano to the Upper zone . . . . . . . . . . . . . . . . . . . . . 11
Set the Syn th to the Low er zo ne . . . . . . . . . . . . . . . . . . . . . . 11
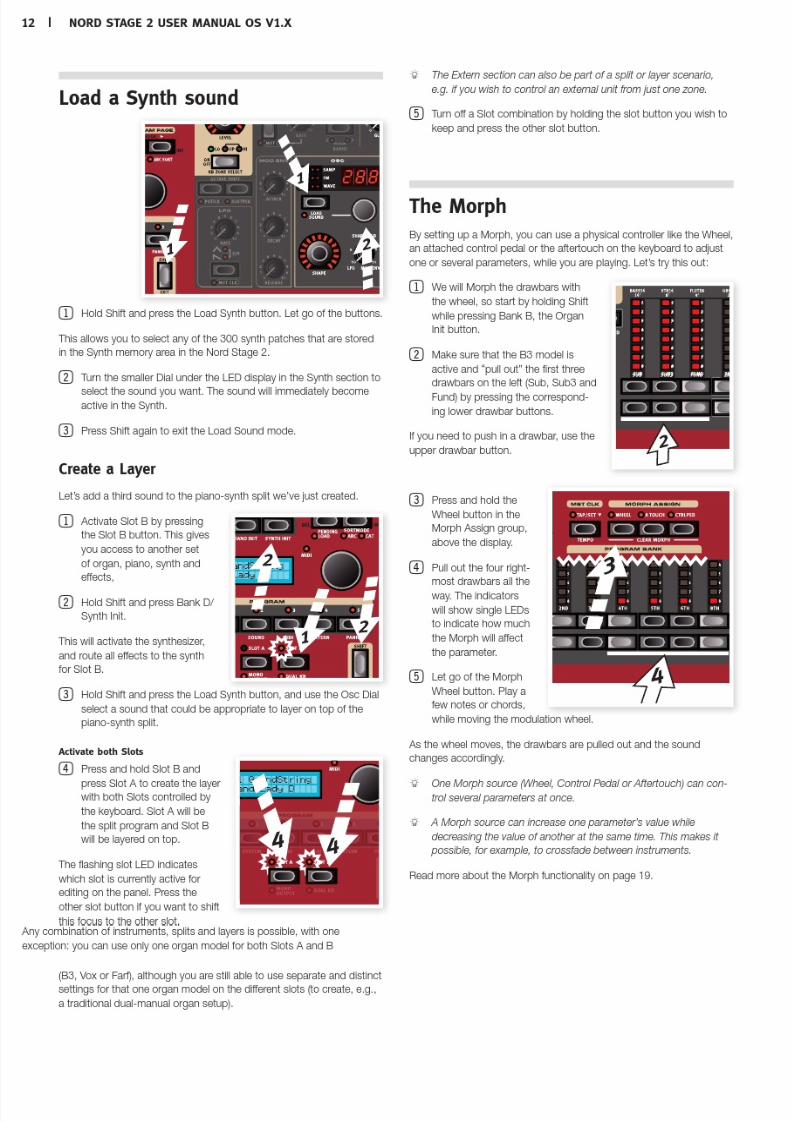
Load a Synth sound . . . . . . . . . . . . . . . . . . . . . . . . . . . 12
Create a Layer . . . . . . . . . . . . . . . . . . . . . . . . . . . . . . . . . . . . 12
The Morph. . . . . . . . . . . . . . . . . . . . . . . . . . . . . . . . . . . . . 12
The Synthesizer . . . . . . . . . . . . . . . . . . . . . . . . . . . . . . . 13
Arpeggio clinic . . . . . . . . . . . . . . . . . . . . . . . . . . . . . . . . 13
Master Clock . . . . . . . . . . . . . . . . . . . . . . . . . . . . . . . . . . 14
4 Program Section
Transpose On/Set . . . . . . . . . . . . . . . . . . . . . . . . . . . . . 15
Slot Buttons A & B . . . . . . . . . . . . . . . . . . . . . . . . . . . . 15
Mono Output. . . . . . . . . . . . . . . . . . . . . . . . . . . . . . . . . . . . . 15
Dual KB . . . . . . . . . . . . . . . . . . . . . . . . . . . . . . . . . . . . . . . . . 15
Shift / Exit button . . . . . . . . . . . . . . . . . . . . . . . . . . . . . 16
Live Mode . . . . . . . . . . . . . . . . . . . . . . . . . . . . . . . . . . . . . 16
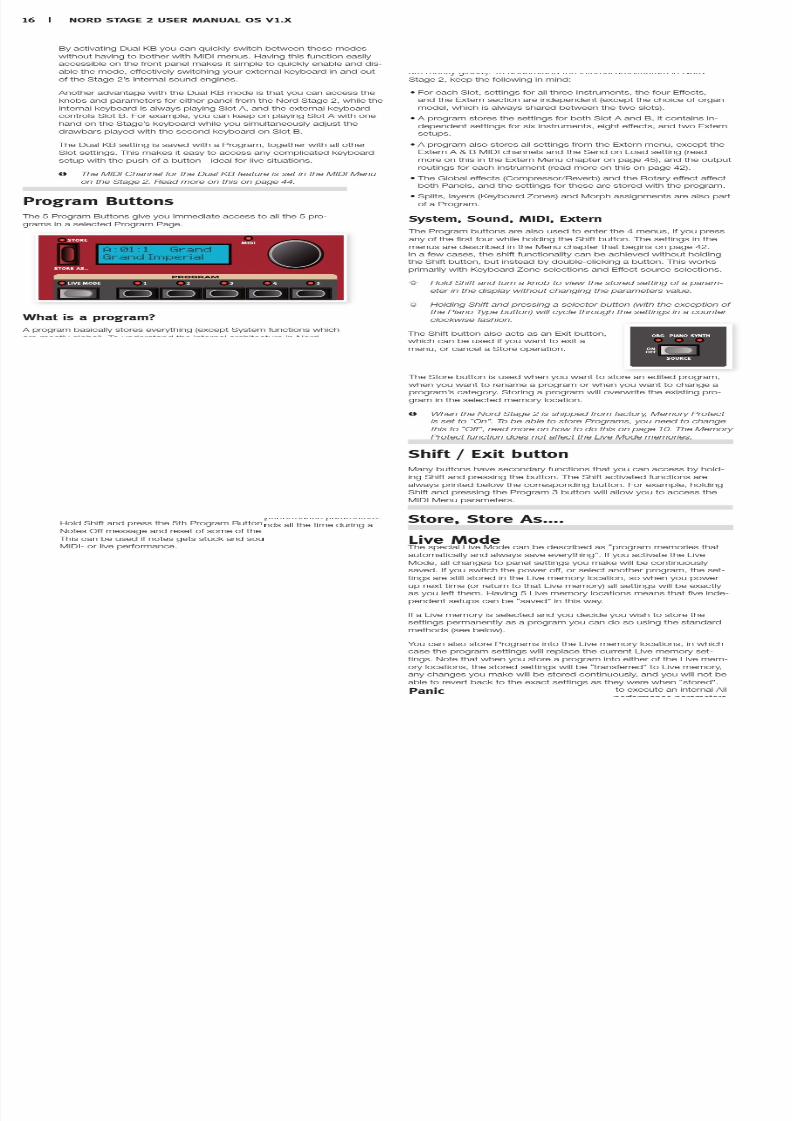
Program Buttons . . . . . . . . . . . . . . . . . . . . . . . . . . . . . . 16
What is a program? . . . . . . . . . . . . . . . . . . . . . . . . . . . . . . . . 16
Sys tem, So und, MIDI, Ex te rn . . . . . . . . . . . . . . . . . . . . . . . . 16
Panic . . . . . . . . . . . . . . . . . . . . . . . . . . . . . . . . . . . . . . . . . . . 16
Store, Store As….. . . . . . . . . . . . . . . . . . . . . . . . . . . . . . 16
Storing a Program . . . . . . . . . . . . . . . . . . . . . . . . . . . . . . . . . 17
Naming a program . . . . . . . . . . . . . . . . . . . . . . . . . . . . . . . . 17
Categories. . . . . . . . . . . . . . . . . . . . . . . . . . . . . . . . . . . . . . . 17
Value Dial . . . . . . . . . . . . . . . . . . . . . . . . . . . . . . . . . . . . . 17
MIDI Indicator . . . . . . . . . . . . . . . . . . . . . . . . . . . . . . . . . 17
Program Bank buttons . . . . . . . . . . . . . . . . . . . . . . . . 18
Organ Piano Sy nth Init . . . . . . . . . . . . . . . . . . . . . . . . . . . . . 18
Organ Split . . . . . . . . . . . . . . . . . . . . . . . . . . . . . . . . . . . . . . 18
Program Page buttons . . . . . . . . . . . . . . . . . . . . . . . . 18
Pending Load . . . . . . . . . . . . . . . . . . . . . . . . . . . . . . . . . . . . 18
Sort Mode . . . . . . . . . . . . . . . . . . . . . . . . . . . . . . . . . . . . . . . 18
Cursor, Del, Ins . . . . . . . . . . . . . . . . . . . . . . . . . . . . . . . . . . . 18
Mst Clk . . . . . . . . . . . . . . . . . . . . . . . . . . . . . . . . . . . . . . . 18
External Sync . . . . . . . . . . . . . . . . . . . . . . . . . . . . . . . . . . . . 18
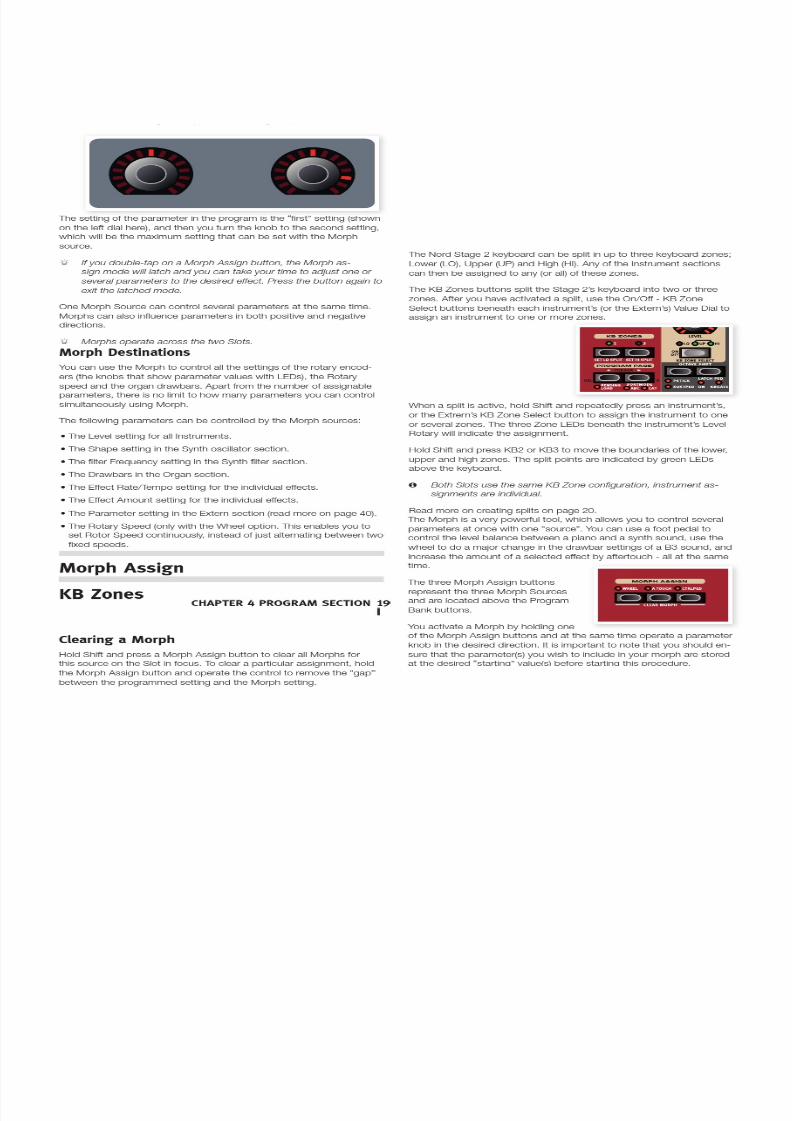
Morph Assign . . . . . . . . . . . . . . . . . . . . . . . . . . . . . . . . . 19
Morph Destinations . . . . . . . . . . . . . . . . . . . . . . . . . . . . . . . . 19
Clearing a Morph. . . . . . . . . . . . . . . . . . . . . . . . . . . . . . . . . . 19
KB Zones . . . . . . . . . . . . . . . . . . . . . . . . . . . . . . . . . . . . . . 19
5 Common features
Instrument & Extern Controls . . . . . . . . . . . . . . . . . 20
On/Off buttons . . . . . . . . . . . . . . . . . . . . . . . . . . . . . . . . . . . 20
KB Zone Select bu ttons . . . . . . . . . . . . . . . . . . . . . . . . . . . . 2 0
Creating a split . . . . . . . . . . . . . . . . . . . . . . . . . . . . . . . . . . . 20
Setting split points to change Zone ranges . . . . . . . . . . . . .21
L ayer ing instru ments . . . . . . . . . . . . . . . . . . . . . . . . . . . . . . . 2 1
Octave Shift. . . . . . . . . . . . . . . . . . . . . . . . . . . . . . . . . . . . . . 21
Note Range . . . . . . . . . . . . . . . . . . . . . . . . . . . . . . . . . . . . . . 21
L atch Ped & KB Gate . . . . . . . . . . . . . . . . . . . . . . . . . . . . . . 21
Output Routing . . . . . . . . . . . . . . . . . . . . . . . . . . . . . . . . . . . 21
Using an externa l keyboard (Dual KB). . . . . . . . . . . . . . . . . .22
Us ing m ul ti pl e keybo ar ds . . . . . . . . . . . . . . . . . . . . . . . . . . . 2 2
Master level . . . . . . . . . . . . . . . . . . . . . . . . . . . . . . . . . . . 22
6 Organ
Drawbars and buttons. . . . . . . . . . . . . . . . . . . . . . . . . 23
Sel ec ting T he O rg an M od el . . . . . . . . . . . . . . . . . . . . . . . . . 2 3
The B3 Model . . . . . . . . . . . . . . . . . . . . . . . . . . . . . . . . . 23
B3 Drawbars . . . . . . . . . . . . . . . . . . . . . . . . . . . . . . . . . . 24
Vibrato & Chorus . . . . . . . . . . . . . . . . . . . . . . . . . . . . . . 24
Percussion . . . . . . . . . . . . . . . . . . . . . . . . . . . . . . . . . . . . . 24
Key click control . . . . . . . . . . . . . . . . . . . . . . . . . . . . . . . . . . 24
Organ Preset I & II . . . . . . . . . . . . . . . . . . . . . . . . . . . . 24
The Vox Model . . . . . . . . . . . . . . . . . . . . . . . . . . . . . . . . 25
Vox Drawbars. . . . . . . . . . . . . . . . . . . . . . . . . . . . . . . . . . 25
Vibrato. . . . . . . . . . . . . . . . . . . . . . . . . . . . . . . . . . . . . . . . . 25
The Farf Model . . . . . . . . . . . . . . . . . . . . . . . . . . . . . . . . 25
Farf Registers. . . . . . . . . . . . . . . . . . . . . . . . . . . . . . . . . . 25
Vibrato. . . . . . . . . . . . . . . . . . . . . . . . . . . . . . . . . . . . . . . . . 26
Swell Control . . . . . . . . . . . . . . . . . . . . . . . . . . . . . . . . . . . . . 26
Rotary Speaker . . . . . . . . . . . . . . . . . . . . . . . . . . . . . . . . 26
7 Piano
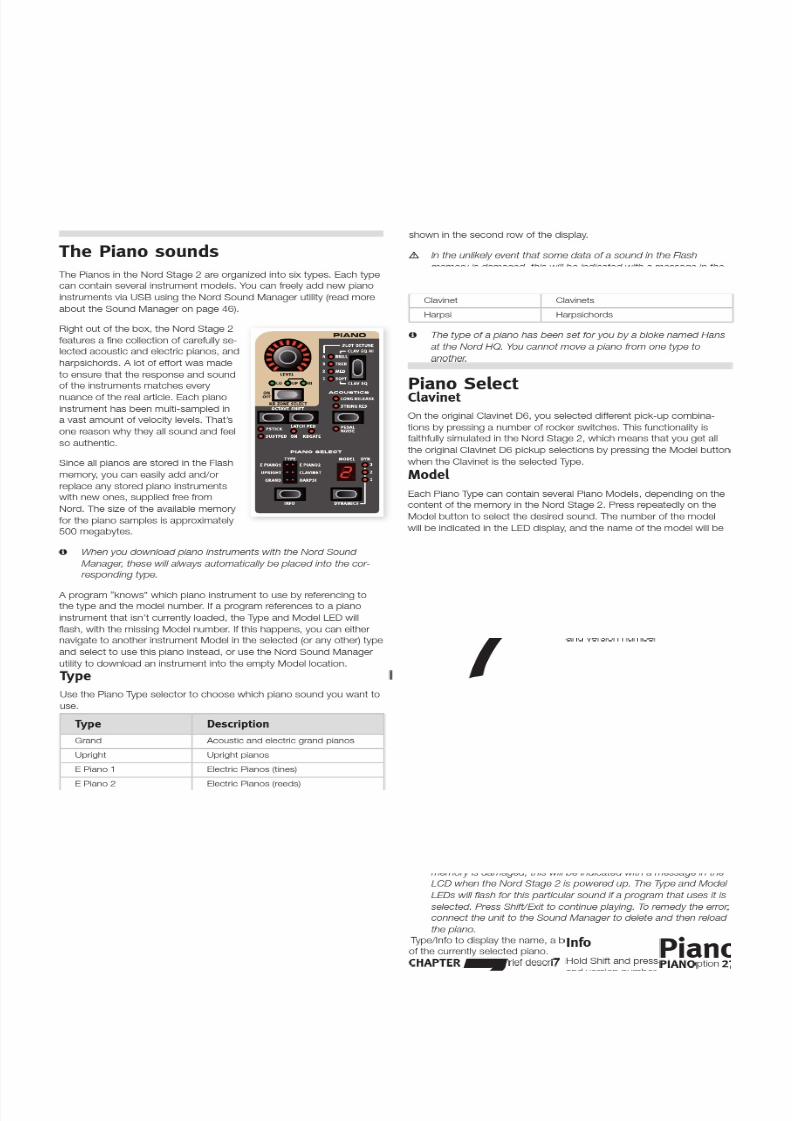
The Piano sounds . . . . . . . . . . . . . . . . . . . . . . . . . . . . . 27
Piano Select . . . . . . . . . . . . . . . . . . . . . . . . . . . . . . . . . . . 27
Type. . . . . . . . . . . . . . . . . . . . . . . . . . . . . . . . . . . . . . . . . . . . 27
Info . . . . . . . . . . . . . . . . . . . . . . . . . . . . . . . . . . . . . . . . . . . . 27
Model . . . . . . . . . . . . . . . . . . . . . . . . . . . . . . . . . . . . . . . . . . 27
Clavinet . . . . . . . . . . . . . . . . . . . . . . . . . . . . . . . . . . . . . . . . . 27
Dynamics . . . . . . . . . . . . . . . . . . . . . . . . . . . . . . . . . . . . . . . 28
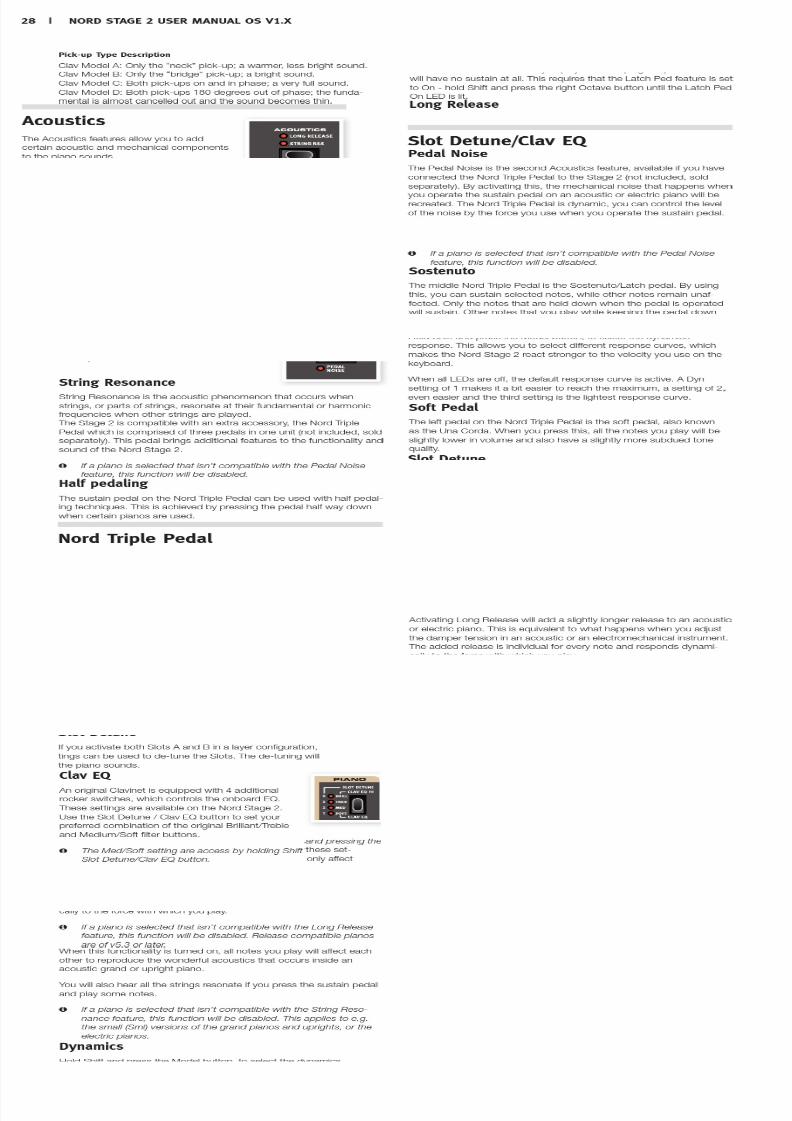
Acoustics . . . . . . . . . . . . . . . . . . . . . . . . . . . . . . . . . . . . . 28
String Resona nce . . . . . . . . . . . . . . . . . . . . . . . . . . . . . . . . . 28
Long Release . . . . . . . . . . . . . . . . . . . . . . . . . . . . . . . . . . . . 28
Pedal Noise . . . . . . . . . . . . . . . . . . . . . . . . . . . . . . . . . . . . . . 28
Nord Triple Pedal . . . . . . . . . . . . . . . . . . . . . . . . . . . . . . 28
Half pedaling . . . . . . . . . . . . . . . . . . . . . . . . . . . . . . . . . . . . . 28
Sostenuto . . . . . . . . . . . . . . . . . . . . . . . . . . . . . . . . . . . . . . . 28
Soft Pe dal . . . . . . . . . . . . . . . . . . . . . . . . . . . . . . . . . . . . . . . 28
Slot Detune/Clav EQ . . . . . . . . . . . . . . . . . . . . . . . . . . . 28
Clav EQ . . . . . . . . . . . . . . . . . . . . . . . . . . . . . . . . . . . . . . . . 28
Slot Detune . . . . . . . . . . . . . . . . . . . . . . . . . . . . . . . . . . . . . . 28
8 Synth
Basics . . . . . . . . . . . . . . . . . . . . . . . . . . . . . . . . . . . . . . . . . 29
Oscillator . . . . . . . . . . . . . . . . . . . . . . . . . . . . . . . . . . . . . 29
Shape . . . . . . . . . . . . . . . . . . . . . . . . . . . . . . . . . . . . . . . . . . 29
Shape Mod . . . . . . . . . . . . . . . . . . . . . . . . . . . . . . . . . . . . . . 30
Wavefo rm s el ec to r b ut to n. . . . . . . . . . . . . . . . . . . . . . . . . . . 3 0
Analo g style wavefo rms . . . . . . . . . . . . . . . . . . . . . . . . . . . . 30
Triangle . . . . . . . . . . . . . . . . . . . . . . . . . . . . . . . . . . . . . . . . . 30
Sawtooth. . . . . . . . . . . . . . . . . . . . . . . . . . . . . . . . . . . . . . . . 30
Pulse . . . . . . . . . . . . . . . . . . . . . . . . . . . . . . . . . . . . . . . . . . . 30
O sc il lato r Sync w ave fo rm s . . . . . . . . . . . . . . . . . . . . . . . . . . 3 0
Frequ en cy Modulation . . . . . . . . . . . . . . . . . . . . . . . . . . . . . 3 1
FM Algorithms . . . . . . . . . . . . . . . . . . . . . . . . . . . . . . . . . . . . 31
Wavetables . . . . . . . . . . . . . . . . . . . . . . . . . . . . . . . . . . . . . . 32
Samples . . . . . . . . . . . . . . . . . . . . . . . . . . . . . . . . . . . . . . . . 32Sk ip Sample Att ack. . . . . . . . . . . . . . . . . . . . . . . . . . . . . . . . 3 2
Load Sound. . . . . . . . . . . . . . . . . . . . . . . . . . . . . . . . . . . . . . 32
Filter Section . . . . . . . . . . . . . . . . . . . . . . . . . . . . . . . . . 32
Filter button . . . . . . . . . . . . . . . . . . . . . . . . . . . . . . . . . . . . . . 32
Low Pas s - L P 24 & L P 12 . . . . . . . . . . . . . . . . . . . . . . . . . . 3 2
High Pass - HP . . . . . . . . . . . . . . . . . . . . . . . . . . . . . . . . . . . 33
Band Pass - BP . . . . . . . . . . . . . . . . . . . . . . . . . . . . . . . . . . 33
Notch . . . . . . . . . . . . . . . . . . . . . . . . . . . . . . . . . . . . . . . . . . 33
Filter Frequency . . . . . . . . . . . . . . . . . . . . . . . . . . . . . . . . . . 33
KB Track . . . . . . . . . . . . . . . . . . . . . . . . . . . . . . . . . . . . . . . . 33
Resonance . . . . . . . . . . . . . . . . . . . . . . . . . . . . . . . . . . . . . . 33
Freq Mod 1 - LFO . . . . . . . . . . . . . . . . . . . . . . . . . . . . . . . . . 33
Freq Mod 2 . . . . . . . . . . . . . . . . . . . . . . . . . . . . . . . . . . . . . . 33
The Envelopes . . . . . . . . . . . . . . . . . . . . . . . . . . . . . . . . . 33
Mod Envelope . . . . . . . . . . . . . . . . . . . . . . . . . . . . . . . . . . . 33
Amp Envelo pe . . . . . . . . . . . . . . . . . . . . . . . . . . . . . . . . . . . 34
The LFO . . . . . . . . . . . . . . . . . . . . . . . . . . . . . . . . . . . . . . . 34
Velocity . . . . . . . . . . . . . . . . . . . . . . . . . . . . . . . . . . . . . . . 34
Voices section . . . . . . . . . . . . . . . . . . . . . . . . . . . . . . . . 34
Voice Mode Mono . . . . . . . . . . . . . . . . . . . . . . . . . . . . . . . . . 34
Voice Mode Leg ato . . . . . . . . . . . . . . . . . . . . . . . . . . . . . . . . 35
Glide . . . . . . . . . . . . . . . . . . . . . . . . . . . . . . . . . . . . . . . . . . . 35
Unison . . . . . . . . . . . . . . . . . . . . . . . . . . . . . . . . . . . . . . . . . 35
Vibrato . . . . . . . . . . . . . . . . . . . . . . . . . . . . . . . . . . . . . . . . . 35
Storing Sy nth Soun ds . . . . . . . . . . . . . . . . . . . . . . . . . . . . . . 3 5
Arpeggiator . . . . . . . . . . . . . . . . . . . . . . . . . . . . . . . . . . . 35
Nord Stage 2 User Manual

7/30/2019 Nord Stage 2 Manual
http://slidepdf.com/reader/full/nord-stage-2-manual 4/65
4 | NORD STAGE 2 USER MANUAL OS V1.X
9 Effects
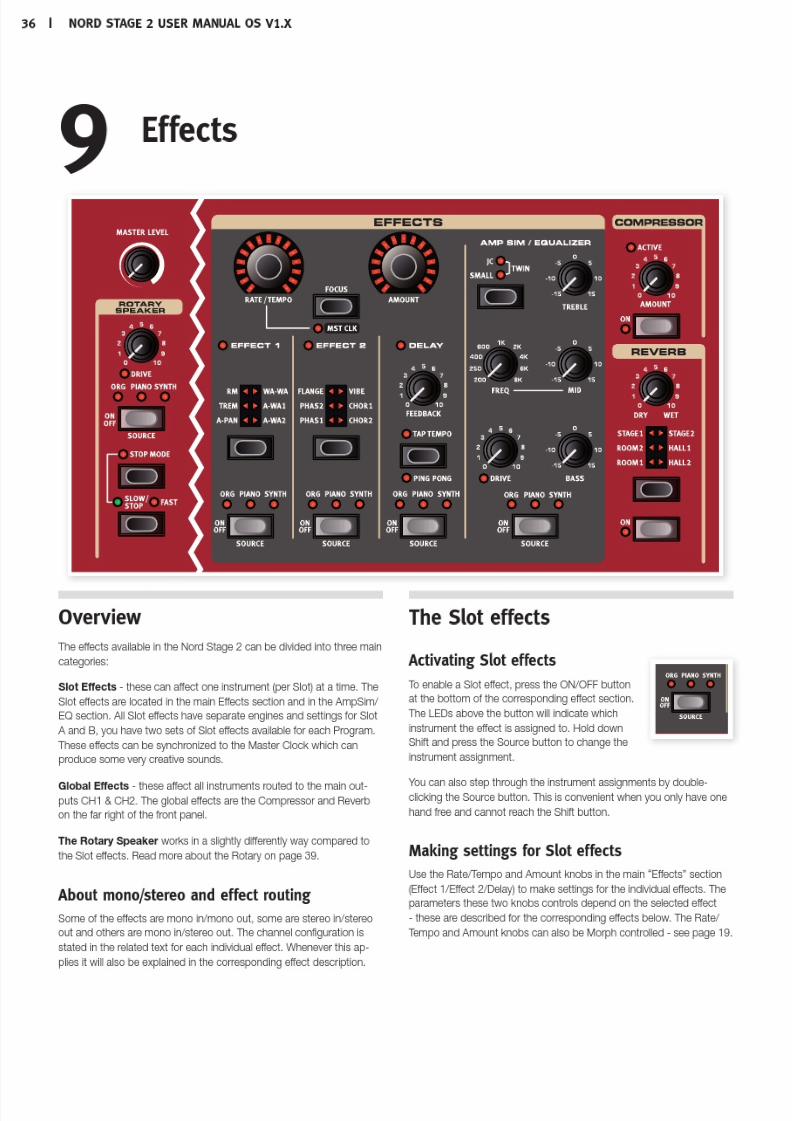
Overview . . . . . . . . . . . . . . . . . . . . . . . . . . . . . . . . . . . . . . 36
About m ono/stere o and effect r outing . . . . . . . . . . . . . . . . . 36
The Slot effects . . . . . . . . . . . . . . . . . . . . . . . . . . . . . . . 36
Activati ng Slot ef fects . . . . . . . . . . . . . . . . . . . . . . . . . . . . . . 36
Mak ing set ti ngs for S lo t e ff ec ts . . . . . . . . . . . . . . . . . . . . . . . 36
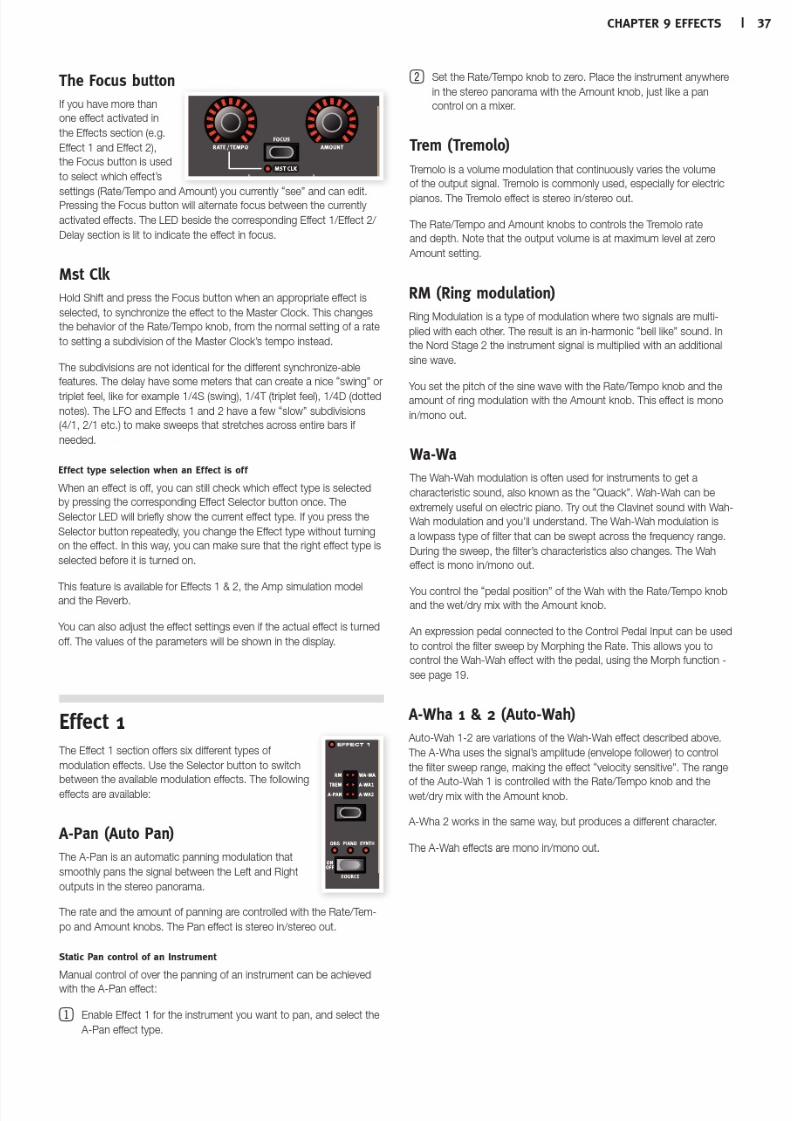
The Focus button . . . . . . . . . . . . . . . . . . . . . . . . . . . . . . . . . 37
Mst Clk . . . . . . . . . . . . . . . . . . . . . . . . . . . . . . . . . . . . . . . . . 37
Effect 1. . . . . . . . . . . . . . . . . . . . . . . . . . . . . . . . . . . . . . . . 37
A-Pan (Au to Pan). . . . . . . . . . . . . . . . . . . . . . . . . . . . . . . . . . 37
Trem (Tremolo) . . . . . . . . . . . . . . . . . . . . . . . . . . . . . . . . . . . 37
RM (Ring modu lation) . . . . . . . . . . . . . . . . . . . . . . . . . . . . . . 3 7
Wa-Wa. . . . . . . . . . . . . . . . . . . . . . . . . . . . . . . . . . . . . . . . . . 37
A-Wha 1 & 2 (Au to-Wah) . . . . . . . . . . . . . . . . . . . . . . . . . . . 37
Effect 2 . . . . . . . . . . . . . . . . . . . . . . . . . . . . . . . . . . . . . . . 38
Phaser 1 & 2 . . . . . . . . . . . . . . . . . . . . . . . . . . . . . . . . . . . . . 38
Flanger . . . . . . . . . . . . . . . . . . . . . . . . . . . . . . . . . . . . . . . . . 38
Vibe . . . . . . . . . . . . . . . . . . . . . . . . . . . . . . . . . . . . . . . . . . . . 38
Chorus 1 & 2 . . . . . . . . . . . . . . . . . . . . . . . . . . . . . . . . . . . . . 38
Delay . . . . . . . . . . . . . . . . . . . . . . . . . . . . . . . . . . . . . . . . . 38
Amp Sim/Equalizer . . . . . . . . . . . . . . . . . . . . . . . . . . . 38
Amp mode l . . . . . . . . . . . . . . . . . . . . . . . . . . . . . . . . . . . . . . 38
Drive . . . . . . . . . . . . . . . . . . . . . . . . . . . . . . . . . . . . . . . . . . . 38
EQ section. . . . . . . . . . . . . . . . . . . . . . . . . . . . . . . . . . . . . . . 39
Global Effects . . . . . . . . . . . . . . . . . . . . . . . . . . . . . . . . . 39
Compressor . . . . . . . . . . . . . . . . . . . . . . . . . . . . . . . . . . . . . 39
Reverb. . . . . . . . . . . . . . . . . . . . . . . . . . . . . . . . . . . . . . . . . . 39
Rotary Speaker . . . . . . . . . . . . . . . . . . . . . . . . . . . . . . . 39 About t he Rotar y effect’s sig nal routi ng . . . . . . . . . . . . . . . . 39
Rotar y parameter . . . . . . . . . . . . . . . . . . . . . . . . . . . . . . . . . 39
10 Extern Section
Extern section . . . . . . . . . . . . . . . . . . . . . . . . . . . . . . . . 40
Setting up . . . . . . . . . . . . . . . . . . . . . . . . . . . . . . . . . . . . . . . 40
Using the Extern section . . . . . . . . . . . . . . . . . . . . . . 40
Activati ng. . . . . . . . . . . . . . . . . . . . . . . . . . . . . . . . . . . . . . . . 40
Keyboard Zones . . . . . . . . . . . . . . . . . . . . . . . . . . . . . . . . . . 40
Octave Shift. . . . . . . . . . . . . . . . . . . . . . . . . . . . . . . . . . . . . . 40
Activati ng Pitch Sti ck/Sustain Peda l message s . . . . . . . . . . 40
Extern Parameters. . . . . . . . . . . . . . . . . . . . . . . . . . . . . 41
Volume . . . . . . . . . . . . . . . . . . . . . . . . . . . . . . . . . . . . . . . . . 41
Prog Change . . . . . . . . . . . . . . . . . . . . . . . . . . . . . . . . . . . . 41
MIDI CC . . . . . . . . . . . . . . . . . . . . . . . . . . . . . . . . . . . . . . . . 41Send On Load . . . . . . . . . . . . . . . . . . . . . . . . . . . . . . . . . . . . 41
Extern Sec tion and M ID I re- rout ing. . . . . . . . . . . . . . . . . . . . 41
11 Menus
System Menu . . . . . . . . . . . . . . . . . . . . . . . . . . . . . . . . . . 42
Global Transpose . . . . . . . . . . . . . . . . . . . . . . . . . . . . . . . . . 42
Fine Tune. . . . . . . . . . . . . . . . . . . . . . . . . . . . . . . . . . . . . . . . 42
Output Routing . . . . . . . . . . . . . . . . . . . . . . . . . . . . . . . . . . . 42
Organ Audio A/B Ou tput . . . . . . . . . . . . . . . . . . . . . . . . . . . . 42
Piano Audio A/B Ou tput . . . . . . . . . . . . . . . . . . . . . . . . . . . . 42
Sy nth Audio A /B Ou tput . . . . . . . . . . . . . . . . . . . . . . . . . . . . 42
O rg an Keybo ar d Tr ig Po in t . . . . . . . . . . . . . . . . . . . . . . . . . . 4 2
Sustain Pedal Type . . . . . . . . . . . . . . . . . . . . . . . . . . . . . . . . 4 2
Sustain Pedal Func . . . . . . . . . . . . . . . . . . . . . . . . . . . . . . . . 42
Rotor/L atch P edal Ty pe. . . . . . . . . . . . . . . . . . . . . . . . . . . . . 43
Rotor/L atch Pedal Fun c . . . . . . . . . . . . . . . . . . . . . . . . . . . . 4 3
Ctrl Pedal Type . . . . . . . . . . . . . . . . . . . . . . . . . . . . . . . . . . . 43
Contro l Pedal Func . . . . . . . . . . . . . . . . . . . . . . . . . . . . . . . .4 3
Swell Pedal Type . . . . . . . . . . . . . . . . . . . . . . . . . . . . . . . . . . 43
Swell Pedal Func . . . . . . . . . . . . . . . . . . . . . . . . . . . . . . . . . . 43
Memor y Protecti on . . . . . . . . . . . . . . . . . . . . . . . . . . . . . . . . 43
Sound Menu . . . . . . . . . . . . . . . . . . . . . . . . . . . . . . . . . . . 43
O rg an Key C li ck Level B 3 . . . . . . . . . . . . . . . . . . . . . . . . . . . 4 3
Organ Tonewh eel Mode . . . . . . . . . . . . . . . . . . . . . . . . . . . . 4 3
Pian o Pedal Noise Level . . . . . . . . . . . . . . . . . . . . . . . . . . . . 4 3
Pian o String Res Level . . . . . . . . . . . . . . . . . . . . . . . . . . . . . 43
S ynth Vibrato Rate . . . . . . . . . . . . . . . . . . . . . . . . . . . . . . . . 4 3
S ynth D ly V ibrato A mou nt . . . . . . . . . . . . . . . . . . . . . . . . . . . 43
FX Rotar y Sp ea ke r Hor n Spe ed . . . . . . . . . . . . . . . . . . . . . . 4 3
FX R otar y Spea ke r Hor n Acc . . . . . . . . . . . . . . . . . . . . . . . . 4 3
FX Rotary Speaker Rotor Speed. . . . . . . . . . . . . . . . . . . . . . 43
FX R otar y Spea ke r Ro to r Acc . . . . . . . . . . . . . . . . . . . . . . . . 4 4
F X Delay Mode . . . . . . . . . . . . . . . . . . . . . . . . . . . . . . . . . . . 44
MIDI Menu. . . . . . . . . . . . . . . . . . . . . . . . . . . . . . . . . . . . . 44
MIDI C ontrol Local . . . . . . . . . . . . . . . . . . . . . . . . . . . . . . . . 4 4
MIDI Global Ch an nel . . . . . . . . . . . . . . . . . . . . . . . . . . . . . . . 44
MIDI S lot A /B Ch an nel . . . . . . . . . . . . . . . . . . . . . . . . . . . . . 44
MIDI Organ A/B C hannel . . . . . . . . . . . . . . . . . . . . . . . . . . . 4 4
MIDI Piano A /B Chan nel . . . . . . . . . . . . . . . . . . . . . . . . . . . . 44
MIDI S ynth A /B C hannel . . . . . . . . . . . . . . . . . . . . . . . . . . . . 4 4
MIDI Dual K B Ch an nel. . . . . . . . . . . . . . . . . . . . . . . . . . . . . . 4 4
MIDI C trl Change Mo de . . . . . . . . . . . . . . . . . . . . . . . . . . . . 44
MIDI Prog Ch an ge Mode. . . . . . . . . . . . . . . . . . . . . . . . . . . . 4 4
Send MIDI Ctrl . . . . . . . . . . . . . . . . . . . . . . . . . . . . . . . . . . . . 44
Dump Program . . . . . . . . . . . . . . . . . . . . . . . . . . . . . . . . . . . 44
Dump Synth . . . . . . . . . . . . . . . . . . . . . . . . . . . . . . . . . . . . . 44Extern Menu . . . . . . . . . . . . . . . . . . . . . . . . . . . . . . . . . . . 45
Extern MIDI Mode . . . . . . . . . . . . . . . . . . . . . . . . . . . . . . . . . 45
E xtern MIDI A/B Chann el . . . . . . . . . . . . . . . . . . . . . . . . . . . 4 5
E xtern MIDI A/B Vo lume . . . . . . . . . . . . . . . . . . . . . . . . . . . . 45
E xte rn MIDI A/ B P ro g Change . . . . . . . . . . . . . . . . . . . . . . . 4 5
E xte rn MIDI A/ B B ank Sel cc 00 . . . . . . . . . . . . . . . . . . . . . . 4 5
E xte rn MIDI A/ B B ank Sel cc 32 . . . . . . . . . . . . . . . . . . . . . . 4 5
E xte rn M IDI A /B CC Num be r . . . . . . . . . . . . . . . . . . . . . . . . 4 5
E xte rn M IDI A /B CC Val ue . . . . . . . . . . . . . . . . . . . . . . . . . . 4 5
E xte rn M IDI A /B Send W hee l . . . . . . . . . . . . . . . . . . . . . . . . 4 5
E xte rn MIDI A /B Send A .To uch . . . . . . . . . . . . . . . . . . . . . . . 4 5
E xte rn MIDI A/ B Send C tr lPe d . . . . . . . . . . . . . . . . . . . . . . . 4 5
E xte rn M IDI A /B Send Swe ll . . . . . . . . . . . . . . . . . . . . . . . . . 4 5
E xte rn M IDI A /B Ve l Cur ve . . . . . . . . . . . . . . . . . . . . . . . . . . 4 5
E xte rn M IDI Send o n Loa d . . . . . . . . . . . . . . . . . . . . . . . . . . 4 5
E xtern MIDI Sof t Th ru . . . . . . . . . . . . . . . . . . . . . . . . . . . . . . 4 5
12 Nord Sound Manager
S ystem requ irements . . . . . . . . . . . . . . . . . . . . . . . . . . . . . . 46
Installation . . . . . . . . . . . . . . . . . . . . . . . . . . . . . . . . . . . . 46
USB Driver. . . . . . . . . . . . . . . . . . . . . . . . . . . . . . . . . . . . . . . 46
Sound Manager . . . . . . . . . . . . . . . . . . . . . . . . . . . . . . . . . . 46
Overview . . . . . . . . . . . . . . . . . . . . . . . . . . . . . . . . . . . . . . 46
The Toolbar . . . . . . . . . . . . . . . . . . . . . . . . . . . . . . . . . . . . . . 47
The Tabs . . . . . . . . . . . . . . . . . . . . . . . . . . . . . . . . . . . . . . . . 47
Par tit io n M emo ry I nd ica to r . . . . . . . . . . . . . . . . . . . . . . . . . . 4 7
Right-Clicking . . . . . . . . . . . . . . . . . . . . . . . . . . . . . . . . . . . . 47
File Formats. . . . . . . . . . . . . . . . . . . . . . . . . . . . . . . . . . . . . . 47
The Quick Tour . . . . . . . . . . . . . . . . . . . . . . . . . . . . . . . . 48
Transfer pian os to the Stag e 2 . . . . . . . . . . . . . . . . . . . . . . . 48
Deleting a piano . . . . . . . . . . . . . . . . . . . . . . . . . . . . . . . . . . 48
Down lo ad a new sound . . . . . . . . . . . . . . . . . . . . . . . . . . . . 48
Download Queue . . . . . . . . . . . . . . . . . . . . . . . . . . . . . . . . . 48
Upload sounds f rom the Nord Stage 2 . . . . . . . . . . . . . . . . . 48
U plo ad a c om pl ete pa rt it io n . . . . . . . . . . . . . . . . . . . . . . . . . 4 9
Download sounds to the Nord Stage 2. . . . . . . . . . . . . . . . .49Organ ize the p rogram par ti ti on. . . . . . . . . . . . . . . . . . . . . . . 49
Search Box . . . . . . . . . . . . . . . . . . . . . . . . . . . . . . . . . . . . . . 49
Auto Sele ct . . . . . . . . . . . . . . . . . . . . . . . . . . . . . . . . . . . . . . 49
Sound Manager reference . . . . . . . . . . . . . . . . . . . . . 50
Toolbar . . . . . . . . . . . . . . . . . . . . . . . . . . . . . . . . . . . . . . . . . 50
Menus . . . . . . . . . . . . . . . . . . . . . . . . . . . . . . . . . . . . . . . . . 51
File . . . . . . . . . . . . . . . . . . . . . . . . . . . . . . . . . . . . . . . . . . . . 51
Edit . . . . . . . . . . . . . . . . . . . . . . . . . . . . . . . . . . . . . . . . . . . . 51
View. . . . . . . . . . . . . . . . . . . . . . . . . . . . . . . . . . . . . . . . . . . . 51
Help. . . . . . . . . . . . . . . . . . . . . . . . . . . . . . . . . . . . . . . . . . . . 52
Tabs . . . . . . . . . . . . . . . . . . . . . . . . . . . . . . . . . . . . . . . . . . . 52
Piano – Program . . . . . . . . . . . . . . . . . . . . . . . . . . . . . . . . . . 52
Search Box . . . . . . . . . . . . . . . . . . . . . . . . . . . . . . . . . . . . . . 52
Loc - Location . . . . . . . . . . . . . . . . . . . . . . . . . . . . . . . . . . . . 52
Name. . . . . . . . . . . . . . . . . . . . . . . . . . . . . . . . . . . . . . . . . . . 52
Category . . . . . . . . . . . . . . . . . . . . . . . . . . . . . . . . . . . . . . . . 52
Size . . . . . . . . . . . . . . . . . . . . . . . . . . . . . . . . . . . . . . . . . . . . 52
Ver – Version Number . . . . . . . . . . . . . . . . . . . . . . . . . . . . . . 52
Info . . . . . . . . . . . . . . . . . . . . . . . . . . . . . . . . . . . . . . . . . . . . 52Footer Area . . . . . . . . . . . . . . . . . . . . . . . . . . . . . . . . . . . . . . 52
Par ti ti on M emo ry I nd ica to r . . . . . . . . . . . . . . . . . . . . . . . . . . 5 2
Cancel Button . . . . . . . . . . . . . . . . . . . . . . . . . . . . . . . . . . . . 52
Progress Bars . . . . . . . . . . . . . . . . . . . . . . . . . . . . . . . . . . . . 52
Message/Text Area . . . . . . . . . . . . . . . . . . . . . . . . . . . . . . . . 52
Updates and sou nds . . . . . . . . . . . . . . . . . . . . . . . . . . . . . . . 5 2
13 MIDI
Using MIDI . . . . . . . . . . . . . . . . . . . . . . . . . . . . . . . . . . . . 53
Global . . . . . . . . . . . . . . . . . . . . . . . . . . . . . . . . . . . . . . . . . . 53
Slot A/B. . . . . . . . . . . . . . . . . . . . . . . . . . . . . . . . . . . . . . . . . 53
Extern . . . . . . . . . . . . . . . . . . . . . . . . . . . . . . . . . . . . . . . . . . 53
Instrument MIDI. . . . . . . . . . . . . . . . . . . . . . . . . . . . . . . . . . . 53
Playing/Controlling outboard gear with theExtern section . . . . . . . . . . . . . . . . . . . . . . . . . . . . . . . . . 54
Controlling the Stage 2 with an external key-board or MIDI device . . . . . . . . . . . . . . . . . . . . . . . . . . 54
Dual K b . . . . . . . . . . . . . . . . . . . . . . . . . . . . . . . . . . . . . . . . . 54
Slot MIDI control . . . . . . . . . . . . . . . . . . . . . . . . . . . . . . . . . . 55
Global MIDI . . . . . . . . . . . . . . . . . . . . . . . . . . . . . . . . . . . . . . 55
External Sync . . . . . . . . . . . . . . . . . . . . . . . . . . . . . . . . . . . . 55
Extern Sect ion and M ID I re- rout ing. . . . . . . . . . . . . . . . . . . . 55
Recording a Stage 2 performance to a MIDIsequencer . . . . . . . . . . . . . . . . . . . . . . . . . . . . . . . . . . . . . 55
Program Change. . . . . . . . . . . . . . . . . . . . . . . . . . . . . . . . . . 55
Using the Stage 2 as a sound source with asequencer . . . . . . . . . . . . . . . . . . . . . . . . . . . . . . . . . . . . . 56
MIDI Inp ut Only . . . . . . . . . . . . . . . . . . . . . . . . . . . . . . . . . . . 56
Messages. . . . . . . . . . . . . . . . . . . . . . . . . . . . . . . . . . . . . . 56
Panic . . . . . . . . . . . . . . . . . . . . . . . . . . . . . . . . . . . . . . . . . . . 57
USB MIDI. . . . . . . . . . . . . . . . . . . . . . . . . . . . . . . . . . . . . . . . 57
MIDI Controller list . . . . . . . . . . . . . . . . . . . . . . . . . . . . 58
MIDI Implementation Chart . . . . . . . . . . . . . . . . . . . 59
I Appendix: Connections
Audio connections . . . . . . . . . . . . . . . . . . . . . . . . . . . . . 60
Headpho nes . . . . . . . . . . . . . . . . . . . . . . . . . . . . . . . . . . . . . 60
Audio Ou tputs 1-4. . . . . . . . . . . . . . . . . . . . . . . . . . . . . . . . .6 0
Monitor In . . . . . . . . . . . . . . . . . . . . . . . . . . . . . . . . . . . . . . . 60
USB Connection . . . . . . . . . . . . . . . . . . . . . . . . . . . . . . . 60
MIDI Connections. . . . . . . . . . . . . . . . . . . . . . . . . . . . . . 60
MIDI In . . . . . . . . . . . . . . . . . . . . . . . . . . . . . . . . . . . . . . . . . . 60
MIDI Out . . . . . . . . . . . . . . . . . . . . . . . . . . . . . . . . . . . . . . . . 60
Music Stand . . . . . . . . . . . . . . . . . . . . . . . . . . . . . . . . . . . 61
Connecting Pedals. . . . . . . . . . . . . . . . . . . . . . . . . . . . . 61
The Organ S well input . . . . . . . . . . . . . . . . . . . . . . . . . . . . . . 61
Us ing a Ro to r Spe ed p ed al . . . . . . . . . . . . . . . . . . . . . . . . . . 61
Using a L atch pedal . . . . . . . . . . . . . . . . . . . . . . . . . . . . . . . 6 1Sustain pedal . . . . . . . . . . . . . . . . . . . . . . . . . . . . . . . . . . . . 61
Nord Triple Pedal . . . . . . . . . . . . . . . . . . . . . . . . . . . . . . . . . 61
II Appendix: Factory Presets
Factory Presets and OS . . . . . . . . . . . . . . . . . . . . . . . 62
Internal memory . . . . . . . . . . . . . . . . . . . . . . . . . . . . . . . . . . 62
Factory presets . . . . . . . . . . . . . . . . . . . . . . . . . . . . . . . . . . . 62
Re sto ring the fa ctor y co nte nt . . . . . . . . . . . . . . . . . . . . . . . . 62
OS u pgrades . . . . . . . . . . . . . . . . . . . . . . . . . . . . . . . . . . . . . 62
III Index
Index . . . . . . . . . . . . . . . . . . . . . . . . . . . . . . . . . . . . . . . . . . . 63
7/30/2019 Nord Stage 2 Manual
http://slidepdf.com/reader/full/nord-stage-2-manual 5/65
Thank you!We’d first like to thank you for purchasing the Nord Stage 2! Our goal
when developing the Nord Stage 2 was to create a flagship stage
instrument encompassing the whole range of our company’s accumu-
lated expertise. Building on the success of the original Nord Stage, the
Nord Stage 2 incorporates the best emulations of electromechanical
and acoustic keyboard instruments on the market as well as a syn-
thesizer section designed for maximum ease of use, yet offering wide
sonic possibilities.
The Nord Stage 2 features outstanding classic keyboard soundswith true feel, from natural keyboard response to authentic sound. A
medium weighted hammer action 88/76 note keyboard, or a 73 note
semi-weighted waterfall keyboard makes this instrument the biggest
in the Nord range, yet it weighs only 18,5/16,5/9,7 kilos which is an
achievement in itself.
Features The Nord Stage 2 has the following main features:
• Organ section with faithful reproductions of three classic organ mod-
els; B3, Vox and Farf (Farfisa).
• Piano section with acoustic grand and upright pianos, tine-based
electric pianos, Wurlitzer electric pianos, Clavinet, and Electric Grand.
The memory capacity for the Piano section in the Stage 2 is approxi-
mately 500 megabytes.
• Synth section with sample playback, FM, analog-style and digital
waveforms in a subtractive synthesis architecture.
• Comprehensive effects section.
• A medium weighted hammer action 88/76 note keyboard with
aftertouch, or a 73 note semi-weighted waterfall keyboard with
aftertouch.• An Extern section for controlling external MIDI instruments.
• A powerful Morph feature for applying multiple parameter changes to
a sound with controllers.
• Splits and layers are easily set up by assigning instruments to Key-
board Zones.
But that’s not all. There are two independent Slots “A” and “B”, each
containing a full setup of the Stage 2 instruments. This means that you
have access to six instrument sections and two independent effect
sections! Amongst other things, this allows for “dual manual” B3 organ
emulation, and easy setup of all kinds of instrument layering and splits.
About the User Manual The manual is arranged mainly as a reference manual. In many cases
you’ll get tips on how to practically use the functions, alone and also
together with other functions.
Reading the manual in Adobe Acrobat Reader
This manual is also available in the digital PDF-file format. It can be
downloaded, free of charge, from the Nord web site at
www.nordkeyboards.com. With Adobe Acrobat Reader it is possible
to use special navigation features like hyper links. This means that youcan click with the mouse on a word or sentence and automatically get
to the location indicated by the word/sentence.
Nord on the Internet If you have access to the Internet, you’re very welcome to visit
www.nordkeyboards.com. There you will find the latest information
about the Nord Stage 2 and other Nord products. You can also down-
load new Nord Stage 2 sounds and software upgrades, free of charge.
Restoring the factory presets
The factory programs, samples and pianos are available as Nord
Sound Manager backup files for download at the Nord web site at
www.nordkeyboards.com or on the included Nord DVD.
OS upgrades
The latest OS version for Nord Stage 2 is available for download at the
www.nordkeyboards.com website. Please visit our website from time
to time, to make sure you have the latest version in your unit.
Free soundsSince the Nord Stage 2 is designed as an open system, each and
every piano and sample in the Nord Stage 2 can be replaced by you.
This is done using the Nord Sound Manager application.
The Nord Stage 2 is compatible with the continuously expanding Nord
Piano Library and the Nord Sample Library. These sounds are included
on the DVD that accompanies the Stage 2. When new sounds become
available, you can download these for free from the
www.nordkeyboards.com website.
Disclaimer
Any trademarks and brand names mentioned in this manual are theproperty of their respective owners and are not affiliated or associated
with Clavia. These trademarks and brand names are only mentioned to
describe the types of sounds reproduced by Nord Stage 2.
1 Introduction
CHAPTER 1 INTRODUCTION | 5
7/30/2019 Nord Stage 2 Manual
http://slidepdf.com/reader/full/nord-stage-2-manual 6/65
Great sounds and maximum expressiveness are two essential features
in the Nord Stage 2. To make a great tool we believe that you have to
put all the focus on a few important things and that is exactly what we
have tried to achieve. Let’s have a look at some of the key features:
The Organ section
It’s over ten years since we made our first digital model of a tonewheelorgan. The Stage 2’s dedicated organ section now uses our third gen-
eration B3 Organ model as found in the acclaimed Nord C2 Combo
Organ.
Considered by many the most accurate emulation of the B3 ever, the
Stage 2’s organ model is based on the analysis of the signals from
each of the 91 spinning discs inside several original instruments and
painstaking work on understanding exactly how all the components
interact with each other. The virtual circuitry reacts not only to the set-
tings on the panel but also during the real time performance. The Stage
2 will faithfully reproduce the important foldback and energy robbing
characteristics; the latter will produce the gentle compression effect
that makes those lovely smears absolutely wonderful. There are 3
tonewheel modes that allow you to switch from a clean, factory spec’dinstrument to a worn and battered workhorse with some 40 years
worth of touring.
We also created carefully modelled emulations of two of the most
famous transistor organs from the 1960’s, the Vox Continental and
the Farfisa Compact. Alongside the organ’s themselves, the Stage
2 features our very latest rotary speaker simulation derived from the
Nord C2. Incorporating the acoustic variations that occur as a physical
rotating spreads the sound around in a room, they bring the Stage
2’s organs to life with remarkable realism In terms of control, “Draw
buttons” and LED bar graphs have replaced the original mechanical
drawbars. This gives you the advantage of always having the correct
drawbar settings after changing preset.
Piano Library v5 The Nord Stage 2 is compatible with version 5 of the Nord Piano
Library. We have spent a lot of time and effort in creating our best piano
sounds ever, to match the features available in the Nord Stage 2.
The piano sounds are included on the DVD and are organized in cat-
egories and in some cases available in various sizes (for the acoustic
grand pianos and uprights). New sounds will be available free of charge
on the www.nordkeyboards.com website.
Small, Medium & Large
The acoustic grand pianos and uprights are available in several sizes;
X-Large, large, medium and small. The large, medium and small sizes
share the same amount of velocity layers, and the same number of
zones that are mapped across the keyboard. This means that you can
rely on a consistent quality in regards to the playability and expres-
siveness in the basic sound of every piano, no matter what size you
choose to install into your Nord Stage 2 (or any other Nord Piano
Library compatible unit).
Small (Sml) is the version that uses the least amount of space in thepiano memory, but still carry a big and powerful punch. This version
does not contain any String Resonance samples at all. If an Sml piano
is selected in the Nord Stage 2, the String Resonance feature will be
disabled.
The Medium versions have pedal-down String Resonance samples in
the important middle region of the range, but omit these in the lowest
and the highest areas. This gives you a good ratio of functionality and
size.
The Large versions have the pedal-down String Resonance samples all
across the keyboard, providing you with the fullest of sounds, but also
the largest size.
Some pianos are available in XL versions which means that they are
fully mapped across the keyboard which increases the size a bit.
String ResonanceString resonance is the acoustic phenomenon which occurs inside
every acoustic piano when strings, or parts of strings, resonate at their
fundamental or harmonic frequencies when other strings are played.
When playing any of the medium or large v5 pianos in your Stage 2
with this functionality is turned on, all notes you play will affect eachother to reproduce the wonderful acoustics that occur inside an acous-
tic grand or upright piano.
String resonance is also very noticeable when you use the sustain
pedal with the String Resonance feature enabled (again, on medium
and large acoustic pianos only). With the sustain pedal held down, any
notes you play will have a beautiful and familiar sound quality to them,
enhanced by the un-dampened strings resonating in sympathy with the
notes you are playing.
Another thing that the String Resonance produces is a crescendo
effect. If you play the same key repeatedly with the same force, the
sound will change. This is originally caused by the hammers hitting the
vibrating string in various phases, and creates a nice, gentle fluctuationin volume and timbre in the Nord Stage 2.
2 About the Nord Stage 2
6 | NORD STAGE 2 USER MANUAL OS V1.X

7/30/2019 Nord Stage 2 Manual
http://slidepdf.com/reader/full/nord-stage-2-manual 7/65
Nord Triple Pedal The Nord Stage 2 is compatible with the accessory Nord Triple Pedal
(not included, sold separately) which offers an unprecedented function-
ality. The Piano Pedal adds dynamic control of the mechanical noise
during operation, and the ability for you as a player to use half pedaling
and “release and catch again” techniques.
ƽ If you have purchased a Nord Triple Pedal, you need to select this
pedal type in the System Menu.
1 Hold Shift and press the System/Program 1 button beneath the
LCD to enter the System Menu settings.
2 Press the Program Page button above the Value Dial until you
reach the Sustain Pedal Type setting.
3 Turn the Value Dial to select “Triple”. Press Shift to exit the menu
and attach the Tripe Pedal to the Nord Stage 2.
The right pedal is the sustain pedal. If you operate this, all the notes that
you play will sustain until the pedal is released again.
The left pedal is the soft pedal, also known as the Una Corda. When
you press this pedal, all the notes you play will be slightly lower in vol-
ume and also have a slightly more subdued tone quality.
The middle pedal is the Latch/Sostenuto. In order for this functionality
to be used, it has to be activated in the instruments. Read more about
this in the section “Latch Ped & KB Gate” on page 21.
Pedal NoiseWhen the sustain pedal is operated on an acoustic grand or upright
piano, many different sounds are produced by the mechanical com-
ponents of that instrument’s pedal mechanism. Your Nord Stage 2
reproduces many of these natural sounds. When the sustain pedal is
pressed down, lifting the dampers from the strings, a beautiful sizzle
can be heard.
When the pedal is released, the dampers are returned to the strings,
which creates a different, muted type of sound. The Nord’s sustain
pedal is dynamic, allowing you to experiment with varying forces both
for pressing the pedal down and also releasing it. If you allow your
foot to “slip” off the edge of the pedal, it will spring back with full force,
creating an obvious sound.
The “floor sound” is heard when the pedal reaches the bottom of its
travel. You can experience this in isolation if you press down the pedal
completely, then lift it less than halfway back up and then press down
again.
If you lift the pedal and immediately press it down again, a very r ich
sound will be heard. Another big sound is The Stomp, which requires
you to start with your foot above the actual pedal, in order to be able to
reach the high velocity that is required to get this sound.
The Synth Section The Stage 2’s powerful synthesizer engine was built from the DNA of
the Nord Wave. Capable of classic analogue synthesis, three operator
FM synthesis, Wavetable synthesis and, crucially, compatibility with the
Nord Sample Library.
The Nord Sample Library not only gives Stage 2 owners access to the
huge free library of world-class sounds, including the famous vintage
Mellotron and Chamberlin samples previously only available to Nord
Wave and Nord Electro 3 users, but thanks to the included Nord
Sample Editor for Mac and PC, allows user-created samples to be
loaded into the instrument thus opening up a whole new creative world
of sound.
The Synth engine itself features classic analogue synthesis with dual
saw, hard sync and pulse wave modulation, three-operator FM synthe-
sis with 32 different modulation frequencies, Wavetable synthesis with
62 waveforms and Sample based synthesis. A new great sounding
multimode filter features 12 and 24 dB low pass, high pass, band pass
and notch filters. And with an Amp envelope, Modulation envelope, an
LFO, and Unison control, the Stage 2’s synth capabilities are hugely
powerful, delivering amazing on-stage sound.
The Synth section also features a new Arpeggiator which can be
synchronized to either external clock or the Stage 2’s Master Clock for
perfect timing with several elements of the Stage 2, including its effects
and the synth LFO.
CHAPTER 2 ABOUT THE NORD STAGE 2 | 7

7/30/2019 Nord Stage 2 Manual
http://slidepdf.com/reader/full/nord-stage-2-manual 8/65

7/30/2019 Nord Stage 2 Manual
http://slidepdf.com/reader/full/nord-stage-2-manual 9/65

7/30/2019 Nord Stage 2 Manual
http://slidepdf.com/reader/full/nord-stage-2-manual 10/65
7/30/2019 Nord Stage 2 Manual
http://slidepdf.com/reader/full/nord-stage-2-manual 11/65
7/30/2019 Nord Stage 2 Manual
http://slidepdf.com/reader/full/nord-stage-2-manual 12/65

7/30/2019 Nord Stage 2 Manual
http://slidepdf.com/reader/full/nord-stage-2-manual 13/65

7/30/2019 Nord Stage 2 Manual
http://slidepdf.com/reader/full/nord-stage-2-manual 14/65

7/30/2019 Nord Stage 2 Manual
http://slidepdf.com/reader/full/nord-stage-2-manual 15/65
7/30/2019 Nord Stage 2 Manual
http://slidepdf.com/reader/full/nord-stage-2-manual 16/65

7/30/2019 Nord Stage 2 Manual
http://slidepdf.com/reader/full/nord-stage-2-manual 17/65

7/30/2019 Nord Stage 2 Manual
http://slidepdf.com/reader/full/nord-stage-2-manual 18/65
7/30/2019 Nord Stage 2 Manual
http://slidepdf.com/reader/full/nord-stage-2-manual 19/65

7/30/2019 Nord Stage 2 Manual
http://slidepdf.com/reader/full/nord-stage-2-manual 20/65

7/30/2019 Nord Stage 2 Manual
http://slidepdf.com/reader/full/nord-stage-2-manual 21/65

7/30/2019 Nord Stage 2 Manual
http://slidepdf.com/reader/full/nord-stage-2-manual 22/65

7/30/2019 Nord Stage 2 Manual
http://slidepdf.com/reader/full/nord-stage-2-manual 23/65

7/30/2019 Nord Stage 2 Manual
http://slidepdf.com/reader/full/nord-stage-2-manual 24/65

7/30/2019 Nord Stage 2 Manual
http://slidepdf.com/reader/full/nord-stage-2-manual 25/65

7/30/2019 Nord Stage 2 Manual
http://slidepdf.com/reader/full/nord-stage-2-manual 26/65
7/30/2019 Nord Stage 2 Manual
http://slidepdf.com/reader/full/nord-stage-2-manual 27/65
7/30/2019 Nord Stage 2 Manual
http://slidepdf.com/reader/full/nord-stage-2-manual 28/65

7/30/2019 Nord Stage 2 Manual
http://slidepdf.com/reader/full/nord-stage-2-manual 29/65

7/30/2019 Nord Stage 2 Manual
http://slidepdf.com/reader/full/nord-stage-2-manual 30/65

7/30/2019 Nord Stage 2 Manual
http://slidepdf.com/reader/full/nord-stage-2-manual 31/65

7/30/2019 Nord Stage 2 Manual
http://slidepdf.com/reader/full/nord-stage-2-manual 32/65

7/30/2019 Nord Stage 2 Manual
http://slidepdf.com/reader/full/nord-stage-2-manual 33/65

7/30/2019 Nord Stage 2 Manual
http://slidepdf.com/reader/full/nord-stage-2-manual 34/65

7/30/2019 Nord Stage 2 Manual
http://slidepdf.com/reader/full/nord-stage-2-manual 35/65
7/30/2019 Nord Stage 2 Manual
http://slidepdf.com/reader/full/nord-stage-2-manual 36/65
7/30/2019 Nord Stage 2 Manual
http://slidepdf.com/reader/full/nord-stage-2-manual 37/65

7/30/2019 Nord Stage 2 Manual
http://slidepdf.com/reader/full/nord-stage-2-manual 38/65

7/30/2019 Nord Stage 2 Manual
http://slidepdf.com/reader/full/nord-stage-2-manual 39/65

7/30/2019 Nord Stage 2 Manual
http://slidepdf.com/reader/full/nord-stage-2-manual 40/65

7/30/2019 Nord Stage 2 Manual
http://slidepdf.com/reader/full/nord-stage-2-manual 41/65
Extern Parameters The Parameter section comprises the three buttons in the Parameter
Select section and the Parameter rotary encoder at the top. Simply put,
you select a parameter and vary the value of the selected parameter
with the Parameter encoder.
The Parameter encoder can also be Morph controlled - read more
on page 18. This allows you to change MIDI parameters during a
performance.
The following parameters can be set using the Parameter Select but-
tons:
Volume
If Volume is activated, the Parameter encoder will send MIDI Volume
CC7 messages (0-127). This allows you to control the level of the
external device. The external instrument may have to be set to receive
MIDI CC messages for this to work as expected.
Prog Change
The Prog Change option allows the Parameter encoder to send Pro-
gram Change messages (0-127), allowing you to select programs in
the external instrument. This function behaves slightly differently than
the other parameters. The Parameter encoder will in this mode send a
program Change message for each individual rotary encoder LED. To
access all 127 messages, simply continue to turn the encoder multiple
times - it will continue to send messages across the whole range.
The external instrument may have to be set to receive MIDI program
Change messages for this to work as expected.
ƽ The Stage 2 itself can transmit MIDI Program Change when you
select a Bank, Page and Program. If this occurs on the same
MIDI channel, it can lead to unwanted results on the external
units. Make sure that the Slot A and Slot B MIDI channels are not
the same as the Extern MIDI channel. The specific setting for the
“internal” Stage 2 Program Change in the MIDI Menu can also be
turned off.
If the external instrument organizes programs in Banks, there is an op-
tion to send Bank Change messages on the Extern Menu page, - see
page 45.
MIDI CC
This feature makes it possible to transmit MIDI Control Change mes-
sages to control a parameter of your choice on the external instru-
ment. First you have to decide which Controller number the Parameter
encoder should transmit, this is done in the Extern Menu:
1 Hold Shift and press the Extern button to access the Extern
menu.
2 Use the Page buttons to select the “Extern MIDI CC Number”
menu page.
3 Use the Value Dial to select a MIDI CC Number (0-119). You may
want to check the manual for the external instrument to see which
parameters are assigned to which CC numbers.
4 Press the Exit (Shift) button to exit.
Activate the MIDI CC button in the Parameter Select section, to control
the selected external parameter using the Extern’s Parameter encoder.
The external instrument may have to be set to receive MIDI CC mes-
sages for this to work as expected.
Send On Load
If the Send On Load feature is activated in the Extern Menu, Program
Change, Volume and MIDI CC messages are transmitted via MIDI when
you load a program in Nord Stage 2. If you do not want these actions
to occur, make sure “Send On Load” is set to “Off” on the Extern
menu.
Extern Section and MIDI re-routing
When an external device transmits MIDI notes to the Stage 2 and the
Extern section is activated on the Stage 2, those incoming MIDI notes
can be re-routed to the MIDI Output of the Stage 2, on the MIDI chan-
nel that is set for the Extern section.
This allows you to control one external device from another external
device. The incoming notes must be on the same MIDI channels as set
in the Stage 2 for the Dual Kb, the Slot A or Slot B MIDI channel setting
or the Global MIDI channel setting.
The Extern menu setting Soft Thru must in these cases be set to
“On”.
CHAPTER 10 EXTERN SECTION | 41

7/30/2019 Nord Stage 2 Manual
http://slidepdf.com/reader/full/nord-stage-2-manual 42/65
System MenuHold Shift and press Program 1/System to access the System menu
settings. Use the Page and buttons to navigate between the vari-
ous menu items on the System menu. The Value Dial is used to change
settings, the Slot buttons to switch between A and B where applicable.
When you are done, press Exit (Shift) to exit the menu.
Global Transpose
This setting allows you to transpose the entire Nord Stage 2 in semi-
tone steps. Any setting you make here will be added to the panel trans-
pose that may be saved with the programs.
Range: +/- 6 semitones (default value is “0”)
Fine Tune
Fine Tune can be used to fine tune the pitch of the Stage 2 in finer
increments.
Range: +/- 50 Cents (+/- half a semitone). Default value is “0”
Output Routing
The output routing of the instruments in the Nord Stage 2 can be
determined in two different ways, globally, or independently for each
program. In Program mode, the output selections will be stored in
individual programs. When “Global” is selected, the output routings will
be the same for all programs, overriding the routings stored with each
program.
Range: Global (Default), Program
Organ Audio A/B Output
This allows you to set which channel output pairs (or mono output) to
use for the Organ section. If the Output Routing (see above) is set to
“Program”, these settings will be saved with the program.
Range: “1 & 2” (Default), ”3 & 4”, ”3” ,”4”
Piano Audio A/B Output
This allows you to set which channel output pairs (or mono output) to
use for the Piano A and B sections. Use the Slot A & B buttons to ac-
cess the settings for each Slot. If the Output Routing (see above) is set
to “Program”, these settings will be saved with the program.
Range: “1 & 2” (Default), ”3 & 4”, ”3” ,”4”
Synth Audio A/B Output
This allows you to set which channel output pairs (or mono output) to
use for the Synth A and B section. Use the Slot A & B buttons to ac-
cess the settings for each Slot. If the Output Routing (see above) is set
to “Program”, these settings will be saved with the program.
Range: “1 & 2” (Default), ”3 & 4”, ”3” ,”4”
Organ Keyboard Trig Point
This allows you to change how the Nord Stage 2 keyboard triggers
Organ sounds. When “High” is selected, you will trigger organ sounds
before the key is fully depressed. This mode closely mimics the way a
original tonewheel organ works.
Range: High, Low (Default)
Sustain Pedal Type
This allows you to select the type of a connected sustain pedal, in case
the functionality of the pedal is reversed (when the pedal is up, sustain
is on and vice versa). The Auto setting can automatically determine the
pedal type.
Range: Open, Closed, Triple (Nord Triple Pedal), Auto (Default)
Sustain Pedal Func
If you have only one pedal connected at the Sustain Pedal input and
you want to use it as both a Sustain Pedal and a Rotor Speed Pedal,
this setting provides you with three alternatives - Sustain only, Sustain
and Rotor Hold (fast rotor speed only when the pedal is down) and
Sustain and Rotor Toogle (toggles between fast and slow each time the
pedal is used).
Range: Sustain (Default), Sus+RotrHld, Sus+RotrTgl
11 Menus
Any settings that you change in the System, Sound, MIDI or Extern menus will take immediate effect on a global basis, and the settings will be
stored until you change them the next time. Enter the menus by holding Shift and pressing the System, Sound, MIDI or Extern button (Program but-
tons 1 to 4). Select a function with the Page and buttons and change the setting with the Value Dial. Exit the menus by pressing the Shift/Exit
button.
⊱ There is one menu setting that doesn’t get automatically stored when you power off the Stage 2, the MIDI Local On/Off setting. This always
reverts to Local On every time the Nord Stage 2 is powered up.
42 | NORD STAGE 2 USER MANUAL OS V1.X

7/30/2019 Nord Stage 2 Manual
http://slidepdf.com/reader/full/nord-stage-2-manual 43/65
Rotor/Latch Pedal Type
This allows you to change the type/polarity of a switch pedal connect-
ed to control Rotor/Latch input, in case the functionality of a connected
pedal is reversed. The Auto setting can automatically determine the
pedal type.
Range: Open, Closed, Auto (Default)
Rotor/Latch Pedal Func
This allows you to change the functionality of a switch pedal connected
to the Rotor/Latch input on the Stage 2. Such a pedal can be used to
control the rotor speed or act as a latch/sostenuto pedal. Rotor Hold
means that the Rotor Speed is fast for as long as the pedal is down
and reverts back to slow when the pedal is released. Rotor Toggle
means that the fast/slow rotor speed is switched with each pedal
depression, like an on/off switch pedal.
Range: Latch, Rotor Hold (default), Rotor Toggle
Ctrl Pedal Type
The Stage 2 accepts many of the most commonly available control
pedals the Ctrl Pedal input. Select a setting here that matches the
pedal that you use.
If you operate a connected pedal while this option is active, a
percentage will be displayed from 0 to 100 to indicate the range
of the connected pedal. This can be used to find a suitable setting
for a pedal this isn’t directly supported.
Range: Roland EV-5, (default) , Roland EV-7, Yamaha FC-7, Korg
(EXP-2 & XVP-10), Fatar (& Studiologic VP/25)
Control Pedal Func This setting determines the functionality of a pedal that is attached to
the Control Pedal input. The three settings are: Ctrl (use this to use
the pedal with the Morph functionality), Ctrl + Swell (combines Morph
control and Organ Swell) and Ctrl + Volume (combines Morph control
and the main volume of the Stage 2).
Range: Ctrl (Default), Ctrl + Swell, Ctrl + Volume
Swell Pedal Type
This setting configure the Swell Pedal. See “Ctrl Pedal Type” above for
details.
Range: Roland EV-5, (default) , Roland EV-7, Yamaha FC-7, Korg
(EXP-2 & XVP-10), Fatar (& Studiologic VP/25)
Swell Pedal Func
This setting configure the Swell Pedal destination. Set this to Swell if
you want this pedal to act as a Swell pedal for the organ, or to Volume
if should control the volume of all the Stage 2 instruments.
Range: Swell (Default), Volume
Memory Protection
This is set to “On” when Nord Stage 2 leaves the factory, meaning thatyou cannot save any changes to Programs or Synth Sounds. Set this
to Off if you wish to store your own Programs. Menu settings and the
five Live buffers are not protected by this setting.
Range: On (default), Off
Sound MenuHold Shift and press Program 2/Sound to access the Sound menu
settings. Use the Page and buttons to navigate between the vari-
ous menu items on the Sound menu. The Value Dial is used to change
settings. When you are done, press Exit (Shift) to exit the menu.
Organ Key Click Level B3
This sets the level of the Key Click for the B3 organ model.
Range: Low, Normal (default) High
Organ Tonewheel Mode
Sets the level of tonewheel crosstalk and cable leakage artifacts of the
B3 organ model.
Range: Clean, Vintage1 (default), Vintage2
Piano Pedal Noise Level
Sets the level of the Pedal Noise that can be turned on for selected
pianos, if a Nord Triple Pedal is connected to the Stage 2.
Range: +/- 6 dB (0 dB default)
Piano String Res Level
Sets the level of the String Resonance feature that can be turned on for
selected pianos (acoustic Med, Lrg and XL sizes).
Range: +/- 6 dB (0 dB default)
Synth Vibrato Rate
This determines the rate of the Synth Vibrato.
Range: 4.00 - 8.00 Hz (Default 6.00 Hz)
Synth Dly Vibrato Amount
This determines the amount of Synth Vibrato when any of the vibrato
delay modes are used.
Range: 0-50 cent (Default value is 25 cent)
FX Rotary Speaker Horn Speed This determines the speed of the rotary speaker treble horn.
Range: Low, Normal (default) High
FX Rotary Speaker Horn Acc
This determines the acceleration and retardation time of the rotary
speaker treble horn.
Range: Low, Normal (default) High
FX Rotary Speaker Rotor Speed
This determines the speed of the rotary speaker woofer rotor.
Range: Low, Normal (default) High
CHAPTER 11 MENUS | 43

7/30/2019 Nord Stage 2 Manual
http://slidepdf.com/reader/full/nord-stage-2-manual 44/65
FX Rotary Speaker Rotor Acc
This determines the acceleration and retardation time of the rotary
speaker woofer rotor.
Range: Low, Normal (default) High
FX Delay Mode
This sets if the delay should change the pitch on sounding repeats in
the fashion of an analog delay, if the Rate/Tempo knob is adjusted, or
not. When set to Normal, the pitch does not change if the Rate/Tempo
is changed.
Range: Analog (Default), Normal
MIDI MenuHold Shift and press Program 3/MIDI to access the MIDI menu set-
tings. Use the Page and buttons to navigate between the variousmenu items on the MIDI menu. The Value Dial is used to change set-
tings, the Slot buttons to switch between A and B where applicable.
When you are done, press Exit (Shift) to exit the menu.
MIDI Control Local
MIDI Local control determines if the Nord Stage 2 keyboard and front
panel controls should control internal instruments and programs or only
transmit MIDI. Local On is the normal “play mode”. In Local Off mode,
the front panel and keyboard actions are transmitted via MIDI only and
do not control the internal sound(s) directly.
Range: On (Default), Off
⊱ Local always defaults back to Local On every time the Nord Stage
2 is powered on.
MIDI Global Channel
This sets the transmitting and receiving MIDI channel for the Global
Channel. The Global Channel transmits all keyboard, pedal and panel
actions as MIDI signals. It can also be used as a receiving channel with
full control of the entire Stage 2.
Range: MIDI 1-16, USB1-USB16, Off (Default USB 1)
MIDI Slot A/B Channel This sets the receiving MIDI channel for Slot A/B.
Range: MIDI 1-16, USB1-USB16, Off (Default Off, Slot A and B)
MIDI Organ A/B Channel
This sets the receiving MIDI channel for the Organ section A/B. If a
channel is selected here, you can assign the corresponding instrument
to no KB Zone at all, that is make it active but available only through
MIDI.
Range: MIDI 1-16, USB1-USB16, Off (Default off)
MIDI Piano A/B Channel
This sets the receiving MIDI channel for the Piano section A/B. If a
channel is selected here, you can assign the corresponding instrument
to no KB Zone at all, that is make it active but available only through
MIDI.
Range: MIDI 1-16, USB1-USB16, Off (Default off)
MIDI Synth A/B Channel
This sets the receiving MIDI channel for the Synth section A/B. If a
channel is selected here, you can assign the corresponding instrument
to no KB Zone at all, that is, make it active but available only through
MIDI.
Range: MIDI 1-16, USB1-USB16, Off (Default off)
MIDI Dual KB Channel
This sets the MIDI channel for receiving MIDI from an external keyboard
when using Dual KB mode - see page 15.
Range: MIDI 1-16, USB1-USB16 (Default MIDI 16)
MIDI Ctrl Change Mode
This allows you to set if you want Nord Stage 2 to transmit and/or
receive MIDI Controller Messages or not on the Global channel.
Range: Off, Send, Receive, Send & Receive (Default)
MIDI Prog Change Mode
This allows you to determine whether you want Nord Stage 2 totransmit and/or receive MIDI program Change Messages, or not on the
Global channel.
⊱ This applies to the “internal” Programs in the Stage 2, not the
program change messages that the Extern section can be set to
transmit.
Range: Off, Send, Receive, Send & Receive (Default)
Send MIDI Ctrl
You can perform a dump of all parameters as their MIDI Controllers for
the selected Slot. Hit Store to perform the transmission.
Range: Slot A, Slot B
Dump Program
This allows you to do a MIDI System Exclusive dump of the currently
selected Program or of all the 400 Programs of the internal memory.
The Live buffers are not included. Press the Store button to start the
transmission.
Range: One, All
Dump Synth
This allows you to do a MIDI System Exclusive dump of the currentSynth settings in the focused Slot or of all the 300 synth sounds in the
Synth memory. Press the Store button to start the transmission.
Range: Slot A/B, All
44 | NORD STAGE 2 USER MANUAL OS V1.X

7/30/2019 Nord Stage 2 Manual
http://slidepdf.com/reader/full/nord-stage-2-manual 45/65
Extern MenuHold Shift and press Program 4/Extern to access the Extern menu,
where you can find settings and functions relating to the Extern section.
Use the Page and buttons to navigate between the various menu
items on the menu and use the Value Dial to change settings. When
you are done, press Exit (Shift) to exit the menu.
⊱ Most items on the Extern menu have separate entries for Slot A
and B.
⊱ Most settings from the Extern menu are saved with a Program.
The only exceptions are the “Extern MIDI A/B Channel” if Extern
MIDI Mode is set to Global, and the “Send on Load” function
which always is global.
Extern MIDI Mode
The Extern MIDI Channel can be set in two different manners, either
globally, or independently for each program. When “Global” is selected,
the Extern MIDI A & B channels will be the same for all programs. If program is selected, the Extern MIDI A & B channel setting will be
saved with each Stage 2 program.
Range: Global, Program (default)
Extern MIDI A/B Channel
This sets the Extern section’s transmitting MIDI channels.
Range: MIDI 1-16 (MIDI 14 default for Slot A, MIDI 15 is default for
Slot B), USB1 - USB16,
Extern MIDI A/B Volume The Extern section can send MIDI Volume messages (0-127), allowing
you to control the level of an external device.
Range: Off (Default), 0-127
Extern MIDI A/B Prog Change
The Extern section can transmit MIDI program Change messages (0-
127), allowing you to change programs on external devices.
Range: Off (Default), 1-128
Extern MIDI A/B Bank Sel cc 00 This allows you to set a value for a MIDI Bank Select message on
Control Change address 00 (cc 00).
Range: Off, 0-127
Extern MIDI A/B Bank Sel cc 32
This allows you to set a value for a MIDI Bank Select message on
Control Change address 32 (cc 32).
⊱ There are many different variations between instruments in how
Banks are numbered and accessed via MIDI. Please consult your
other unit’s manual.
Range: Off (Default), 0-127
Extern MIDI A/B CC Number
This decides which MIDI Controller number the Extern section should
be transmitted when MIDI CC is activated.
Range: MIDI CC 0-119 (Default is 2)
Extern MIDI A/B CC Value
This will transmit values for the selected MIDI CC number.
Range: Off (Default), 1-127
Extern MIDI A/B Send Wheel
This setting toggles if the Stage 2’s Modulation Wheel should transmit
Mod Wheel MIDI data (CC 1) or not.
Range: Yes (Default), No
Extern MIDI A/B Send A.Touch
This setting toggles if the Stage 2’s After Touch should transmit Chan-nel Touch MIDI data or not.
Range: Yes (Default), No
Extern MIDI A/B Send CtrlPed
This setting toggles if a control pedal connected to the Stage 2’s CTRL
Pedal input should transmit Expression MIDI data (CC 11) or not.
Range: Yes (Default), No
Extern MIDI A/B Send Swell
This setting toggles if a control pedal connected to the Stage 2’s SwellPedal input should transmit Foot Controller MIDI data (CC 4) or not.
Range: Yes (Default), No
Extern MIDI A/B Vel Curve
Use this setting to adjust the velocity response curves that applies to
the Extern section.
Range: Soft , Norm, Hard
Extern MIDI Send on Load
This setting toggles if any settings for the Program Change, Volume
or MIDI CC messages in the Extern section should be automatically
transmitted from the Stage 2 when a Program is selected, or not.
Range: Off (Default), On
Extern MIDI Soft Thru
Incoming MIDI that matches the Global or Slot A/B channels can be
re-routed on the Extern channel to the Stage 2’s MIDI OUT jack or the
USB interface, if the Extern section is active on the current Program.
This setting determines if this re-routing should apply or not.
Range: Off (Default), On
CHAPTER 11 MENUS | 45

7/30/2019 Nord Stage 2 Manual
http://slidepdf.com/reader/full/nord-stage-2-manual 46/65

7/30/2019 Nord Stage 2 Manual
http://slidepdf.com/reader/full/nord-stage-2-manual 47/65

7/30/2019 Nord Stage 2 Manual
http://slidepdf.com/reader/full/nord-stage-2-manual 48/65

7/30/2019 Nord Stage 2 Manual
http://slidepdf.com/reader/full/nord-stage-2-manual 49/65

7/30/2019 Nord Stage 2 Manual
http://slidepdf.com/reader/full/nord-stage-2-manual 50/65

7/30/2019 Nord Stage 2 Manual
http://slidepdf.com/reader/full/nord-stage-2-manual 51/65

7/30/2019 Nord Stage 2 Manual
http://slidepdf.com/reader/full/nord-stage-2-manual 52/65

7/30/2019 Nord Stage 2 Manual
http://slidepdf.com/reader/full/nord-stage-2-manual 53/65
Using MIDI The Stage 2 is designed to be as flexible as possible when you use it
with its MIDI capabilities. You can use it as a master keyboard to con-
trol other hardware or software sound sources, or as a set of individual
sound engines to be played/controlled by outboard gear such as a
sequencer. If you like, you can even do both these things at the same
time.
There are four major parts in the Stage 2’s MIDI functionality: Global,
Slot, Extern and Instrument. Each of these are independently assign-
able to any of the thirty-two available MIDI channels: sixteen channels
on the standard MIDI port and sixteen more MIDI channels accessed
via USB MIDI. You can also choose to disable MIDI by selecting Off
instead of a channel number. These channels are set in the MIDI and
Extern menus, see page 44.
Global and Extern are used to transmit MIDI data to other units, while
Slot and Instrument only receive MIDI data. All settings relating to MIDI
functions are made in the MIDI Menu, except for the Extern settings
that are made in the Extern Menu.
Stage 2 MIDI IN MIDI OUT
Global
Slot A/B
Extern
Instrument
Global
The Stage 2 Global MIDI is a transmitting and receiving part at the
same time. It allows you to control every aspect of the instrument,
just as if you were playing on its own keyboard and it can transmit
keyboard, pedal- and panel actions.
Any MIDI data that enters the Stage 2 on the Global MIDI channel (or
Global USB MIDI channel) will play the instruments that are active on
the program that is selected on the Stage 2. If your program includes
layers and/or splits, those aspects will be acknowledged in the same
way as if you used the keyboard itself, when incoming MIDI “plays” the
instruments in the program.
Global will transmit both keyboard- and panel-generated MIDI data. If
you turn a knob on the synth section or use the modulation wheel, after
touch, any of the connected pedals or pitch stick, these will generate
MIDI data that is transmitted on the Global channel. This makes the
Global the preferred choice as the MIDI source from the Stage 2 to a
computer when you for example want to record panel changes in a
sequencer.
⊱ Global MIDI can be turned Off in the MIDI menu. This will disable
both transmission and reception of MIDI from the Global compo-
nent.
Slot A/B
The Slot MIDI setting is for receiving MIDI only and allows you to control
an entire Slot with instruments that are active, from external devices.
Slot A and Slot B can be set to individual MIDI channels in the Stage 2
MIDI Menu.
Extern
The Extern is the part to use when you want to integrate external MIDI
units in your performance. The Extern chapter can be found on page 40.
Look at the example on the following page.
Instrument MIDI
Each of the six instruments in the Stage 2 - Organ Slot A, Organ Slot
B, Piano A, Piano B, Synth A and Synth B - can be set to receive on
individual MIDI channels. This is done in the MIDI Menu. This can be
used to have individual control of instruments, either from a other key-
boards or by using the Stage 2 as big sound source in a sequencer/
computer environment.
Let’s have a look at a four different scenarios:
13 MIDI
CHAPTER 13 MIDI | 53

7/30/2019 Nord Stage 2 Manual
http://slidepdf.com/reader/full/nord-stage-2-manual 54/65

7/30/2019 Nord Stage 2 Manual
http://slidepdf.com/reader/full/nord-stage-2-manual 55/65

7/30/2019 Nord Stage 2 Manual
http://slidepdf.com/reader/full/nord-stage-2-manual 56/65
Using the Stage 2 as a soundsource with a sequencer
The key to this functionality is to set each of the six Instrument MIDI
channels and the Global channel to individual MIDI channels in the MIDI
menu.
1 Enter the MIDI Menu and set individual MIDI channels to all the
instruments and the Global Channel. You can mix MIDI- and USB
MIDI channels as you wish.
2 Set MIDI Local to Off, this is done in the MIDI Menu.
3 Make the sequencer tracks route back MIDI on the six different
channels that the instruments are set to.
4 Use the sequencer tracks to select which instrument to perform/
record with.
⊱ When Local is Off and the sequencer routes back the MIDI, you
may find yourself in situations where the buttons and knobs
seems to be inactive or stuck on the Stage 2 itself. This is normal
behavior, if the sequencer sends MIDI data on a MIDI channel that
the Stage 2 does not recognize. Just make sure that a sequencer
track with for example the Global MIDI channel or one of the
instrument channels is selected instead.
The effect parameters, the performance controls (pedals, Pitch Stick
etc) and the Morph will be transmitted on the Global MIDI channel,
and should be re-routed in the sequencer to the individual Instrument
channels.
Instrument MIDI will not be affected by any splits that you have set up
on the Stage 2.
The Octave Shift or Panel Transpose functionality for the instruments
will not affect incoming MIDI data to the Instrument MIDI. If you want to
transpose the Stage 2 instruments, do this on the sequencer tracks.
MIDI Input Only
When an instrument is assigned to a MIDI channel, this opens up a
powerful feature: the MIDI Input Only mode. This allows you to activate
an instrument on the Stage 2, without controlling it from the key-
board. It will only be played from incoming MIDI, but the Stage 2 panel
remains active to allow you to change any settings to the instrument’s
sound.
1 Hold the Shift button and press repeatedly on the Zone Selectbutton until all green zone LEDs go out, but the instrument’s other
LEDs are still lit.
By combining these features and scenarios, you can create very flexible
setups. You can have some Stage 2 instruments being controlled by
incoming MIDI only, and other being controlled by the Stage 2 itself.
There are no limitations to the channel settings in the MIDI menu; it is
quite possible to have more than one receptor react to the same MIDI
channel, which may (or may not) be what you want.
If you for example want to control one instrument in the Stage 2 on
MIDI channel 4, it would be a good idea to make sure that no otherpart (Global, Slot or Instrument MIDI channel) in the Stage 2 is set to
use that MIDI channel, unless you have a special reason for wanting to
do that.
You will also be able to have situations, if MIDI Local is set to Off, where
instruments are seemingly active on the Stage 2 panel, but you can’t
edit or play with these. Just make sure that the sequencer re-routes
the keyboard and panel information to the correct MIDI channels that
these instruments respond to.
Messages The following MIDI messages can be transmitted and received from
Nord Stage 2:
Note On/Off
• Note On and Note Off messages are transmitted and received.
Pitch Bend
• Pitch Bend messages are transmitted and received by Nord Stage 2.
Controllers
On the MIDI Menu (see page 44), you can select if the Nord Stage 2should transmit and/or receive Control Change messages.
• If you have an Control/Expression pedal connected to the Organ
Swell Input, this is transmitted and received as Controller 4.
• If you have an Control/Expression pedal connected to the Control
Pedal Input, this is transmitted and received as Controller 11 (Expres-
sion).
• If you have a sustain pedal connected to the Sustain Pedal Input, this
is transmitted and received as Controller 64 (Sustain Pedal).
• Almost all other controls (knobs and buttons) on the front panel are
also transmitted and received as Control Change messages. This can
be used to record your actions on the front panel into a MIDI sequenc-
er. For a full l ist of which parameters correspond to which Controller
number, look at page 58.
Keyboard Velocity
The Nord Stage 2 can transmit and receive Keyboard Velocity mes-
sages. Organ sounds will always be played back at nominal level
regardless of incoming MIDI Velocity data. Release velocity is transmit-
ted, but ignored on MIDI In.
Aftertouch
The Nord Stage 2 keyboard can transmit Aftertouch messages (some-
times called channel pressure). The player can apply more pressure on
a key while it is down; and this will generate a signal that can be used
to control parameters.
56 | NORD STAGE 2 USER MANUAL OS V1.X

7/30/2019 Nord Stage 2 Manual
http://slidepdf.com/reader/full/nord-stage-2-manual 57/65
Program Change
In the MIDI Menu, you can select if the Nord Stage 2 should send and/
or receive program Change messages on the Global channel that af-
fects its internal programs. Program Change messages with the value
0-99 selects the programs in the active bank, Program Change mes-
sages 100-104 selects the 5 Live memories.
Bank Select
The 4 Program Banks in the Stage 2 can be remotely selected via
MIDI, by transmitting a Bank Select Message that looks like this: CC 0,
value 0, CC 32 value 0, 1, 2 or 3 (for banks A, B, C and D). The Bank
Select should immediately be followed by a Program Change message,
value 0-99.
Local On/Off
Local Off can be used to “disconnect” the keyboard and the panel
on the Stage 2 from the sound engines. Turn Local Off if you experi-
ence “double-triggered” notes when you play; both from the keyboard
internally and via the MIDI “loop”. Local On/Off is set in the MIDI menu,
which is described on page 44.
Panic
If notes should hang using the Nord Stage 2 in a MIDI setup, all you
need to do is hold down the Shift button and press the Panic/Program
5 button. This will execute an internal All Notes Off, and reset incoming
CC messages.
USB MIDI
If you use a computer running Windows XP, Vista or Windows 7, you
need to install the Nord v3.x USB driver to achieve the MIDI via USB
functionality. This driver is available through Windows Update by just
connecting the computer to the Internet and attach the Nord Stage 2.
The driver can also be installed from the DVD that accompanied the
unit or downloaded from the www.nordkeyboards.com website.
⊱ Computers running Mac OSX have a native USB support for Nord
units. No driver installation is necessary.
CHAPTER 13 MIDI | 57

7/30/2019 Nord Stage 2 Manual
http://slidepdf.com/reader/full/nord-stage-2-manual 58/65
MIDI Controller list Nord Stage 2 Parameter MIDI CC #
Organ Preset II 3
Organ Swell 4
Organ Drawbar 1 9
Organ Drawbar 2 14
Organ Drawbar 3 15
Organ Drawbar 4 16
Organ Drawbar 5 17
Organ Drawbar 6 18
Organ Drawbar 7 19
Organ Drawbar 8 20
Organ Drawbar 9 21
Organ Percussion Enable 22
Organ Model 23
Organ Vibrato Type 24
Organ Vibrato Enable 25
Organ Percussion Harmonic 26
Organ Percussion Speed 27
Organ Percussion Level 28
Organ Octave Shift 99
Organ Level 100
Organ Enable 101
Piano Type 8
Piano Model 29
Piano Slot Detune 5
Clav EQ 1 30
Clav EQ 2 31
Clav Model/Type 65
Piano Dynamics 33
Piano Acoustic 98
Piano Octave Shift 105
Piano Level 106
Piano Enable 107
Piano Pedal Noise 108
Synth Octave Shift 111Synth Level 112
Synth Enable 113
Synth Glide Rate 34
Synth Arp On/Off 109
Synth Arp Mst Clk 12
Synth Arp Rate 102
Synth Arp Pattern 103
Synth Arp Range 104
Synth Voice Mode 36
Synth Unison 37
Synth Vibrato Mode 38
Synth Mod Envelope Attack 39
Synth Mod Envelope Decay 40
Synth Mod Envelope Mode 41
Synth Mod Envelope Velocity 42
Nord Stage 2 Parameter MIDI CC #
Synth LFO Rate 115
Synth LFO Waveform 116
LFO Master Clk 13
Synth Oscillator Mode 43
Synth Waveform Select 44 (0-127)
Synth Oscillator Shape 45
Synth Oscil lator Shape Mod 46
Synth Filter Frequency 48
Synth Filter Resonance 49
Synth Filter Vel/Env Mod 2
Synth Filter LFO Mod 51
Synth Filter KBT (Keyb. track) 52
Synth Filter Type 53
Synth Amp Envelope Attack 54
Synth Amp Envelope Decay 55
Synth Amp Envelope Mode 56
Synth Amp Envelope Velocity 57
Effect 1 Type 60
Effect 1 Source 61
Effect 1 Amount 62
Effect 1 Rate 63
Effect 1 Enable 69
Effect 1 Mst Clk 117
Effect 2 Type 70
Effect 2 Source 71
Effect 2 Amount 72
Effect 2 Rate 73
Effect 2 Enable 74
Effect 2 Mst Clk 118
Delay Destination 75
Delay Amount 76
Delay Rate 77
Delay Feedback 78
Delay Ping Pong on/off 79
Delay Enable 80Delay Mst Clk 119
AmpSim Type 81
AmpSim Destination 90
AmpSim Drive 83
AmpSim Bass EQ 84
AmpSim Mid amount EQ 85
AmpSim Mid Range 6
AmpSim Treble EQ 86
AmpSim Enable 87
Rotor Destination 88
Rotor Drive 89
Rotor Speed 82
Rotor Stop 91
Rotor Enable 92
Compressor Amount 93
Nord Stage 2 Parameter MIDI CC #
Compressor Enable 94
Reverb Amount 95
Reverb Size 96
Reverb Enable 97
Slot Focus 68
Pedal Sustain 64
Pedal Latch 66
Pedal Soft 67
Organ Swell Pedal 4
Ctrl Pedal 11
Rotor Speed Pedal 82
KB Gate Pedal 114
Master Level (if Swell Type is
set to Volume in System Menu)
7
58 | NORD STAGE 2 USER MANUAL OS V1.X

7/30/2019 Nord Stage 2 Manual
http://slidepdf.com/reader/full/nord-stage-2-manual 59/65
MIDI Implementation Chart
Function Transmitted Recognized Remarks
Basic Channel
Default Channel
1 - 16
1 - 16
1 - 16
1 - 16
Mode Default
Message
Altered
Mode 3
X
Mode 3
X
Note
Number True Voice
0-127 0-127
Velocity Note ON
Note Off
O, v= 1 - 127
O, v= 1 - 127
O, v= 1 - 127
O, v= 1 - 127
After Key’s
Touch Channel
X
O
X
O
Pitch Bender O O
Control Change O O
Program Change
True#
O, 0-127 O, 0-127
System Exclusive O O
System Song Pos
Common Song Sel
Tune
X
X
X
X
X
X
System Clock
Realtime Commands
X
X
O
X
Aux Local on/off
Message All notes off
Active Sense
Reset
X
X
X
X
X
X
X
X
Number True Voice
Mode 1: Omni On, Poly - Mode 2: Omni O, Mono - Mode 3: Omni Off, Poly - Mode 4: Omni Off, Mono - O = Yes - X = No
Model: Nord Stage 2 OS v1.x Date: 2011-02-01
CHAPTER 13 MIDI | 59

7/30/2019 Nord Stage 2 Manual
http://slidepdf.com/reader/full/nord-stage-2-manual 60/65

7/30/2019 Nord Stage 2 Manual
http://slidepdf.com/reader/full/nord-stage-2-manual 61/65

7/30/2019 Nord Stage 2 Manual
http://slidepdf.com/reader/full/nord-stage-2-manual 62/65
Factory Presets and OS
Internal memory
The Operating System, Programs, Pianos and Samples in the Nord
Stage 2 are stored in a Flash memory. A Flash memory keeps the data
also when the power is turned off. Another big advantage is that you
can replace data in the Flash memory at any time. This means that
you will be able to download OS upgrades and Programs to your Nord
Stage 2 from a computer or sequencer without needing to replace
or add any new hardware. Nord Stage 2 also features a USB port for
quick and easy download of new Pianos and Samples. The total ca-
pacity of the Stage 2’s Flash memory is 500 Megabytes for the Pianos
and 384 Megabytes for the Samples.
The internal sound memory of Nord Stage consists of 4 Program
Banks, each holding 20 Pages with 5 Programs each. This gives you
a total of 400 Programs. There are 5 separate Live programs, which
will continuously store any changes as they are made, and remember
these settings after the power is shut off. Furthermore, the Synth is
capable of storing 300 synthesizer sounds.
The content of Program Bank A is duplicated in Bank D. This allows
you to store any edits you make in either Bank A or D, without risking
to overwrite anything that you might want to keep.
Factory presets
Every factory Program in the Nord Stage 2 can be replaced. To make
sure you don’t accidentally overwrite Programs you want to keep, it’s
a good idea to back up your sounds regularly on a computer. This is
done with the Nord Sound Manager.
Restoring the factory content
The Nord Stage 2 factory setup is available as a Sound Manager
backup file on the DVD that was included with the unit. This file is also
available at the www.nordkeyboards.com web site. Read more on how
to use a backup file to restore the content of the Stage 2 in the Sound
Manager chapter, at “Restore” on page 50.
OS upgrades
The latest OS version for Nord Stage 2 is available for download at:
www.nordkeyboards.com. Since the operating system can be updated
to include new and/or improved functionality, please visit our web site
from time to time to check if a new OS is available.
II Appendix: Factory Presets
62 | NORD STAGE 2 USER MANUAL OS V1.X

7/30/2019 Nord Stage 2 Manual
http://slidepdf.com/reader/full/nord-stage-2-manual 63/65
III INDEX | 63
Index
III Index
A Acoustics 28
Amp Envelope 34
Amp model 38
Amp Sim 38
A-Pan 37
Arpeggiator 35
Attack 34
A-Wha 37
BB3 Model 23
B3 Vibrato 24
Backup 50, 51
Band Pass 33
Bank Down 50
Bank Download 51
Bank Up 50
Bank Upload 51
CCancel 52
Categories 17
Chorus 38Clav EQ 28
Clavinet 27
Clean Deleted Space 51
Compressor 39
Cursor 18
DDecay 34
Del 18
Delay 38
Delete 50, 51
Direction
Arpeggio 35Download 49
Drawbars 23
Drive 38
Dual KB 15, 22
Dual Slot 21
Dynamics
Piano 28
EEffects 26, 35
Equalizer 38
Exit 16, 51
External Sync 18, 55
Extern Menu 44Extern section 40
FFarfisa Model 25
Filter 32
Frequency 33
Flanger 38
FM Algorithms 31
Focus button 37
Format 51
Freq Mod 1 33
Freq Mod 2 33
Frequency Modulation 31
GGlide 35
Global MIDI 53
HHalf pedalling 58
Headphones 57
High Pass 33
IInfo
Piano 27
Ins 18
Instrument MIDI 53
Invert Selection 51
KKB Gate 21
KB Track 33
KB Zone Select 20
LLatch Ped 21
Legato mode 35
Level encoders 20
LFO 34
Live Mode 16
Load Sound 32
Loc 52
Low Pass 32
MMaster level 59
MIDI Controller list 58
MIDI Implementation Chart 59
MIDI In 57
MIDI Indicator 17
MIDI Input Only 56
MIDI Out 57
Mod Envelope 33
Monitor In 57
Mono mode 34
Mono Output 15
Morph Assign 19
Morph Clearing 19
Morph Destinations 19
Mst Clk 18, 37
NNoise 30
Notch 33
OOctave range
Arpeggio 35Octave Shift 21
On/Off buttons 20
Organ Init 18
Organ Model 23
Organ Preset 24
Organ Split 18
Oscillator
Synthesizer 29
Oscillator Sync 30
PPanic 16
Partition Memory 52Pedal Noise 28
Percussion 24
Phaser 38
Piano 27
Piano Init 18
Piano Model 27
Piano Select 27
Ping Pong 38
Program 25
Program Buttons 16
Program Change 55
Progress 52
PStick 21
Pulse 30

7/30/2019 Nord Stage 2 Manual
http://slidepdf.com/reader/full/nord-stage-2-manual 64/65
64 | NORD STAGE 2 USER MANUAL OS V1.X
Q Queue 48
RRelease 34
Piano 28
Rename 50, 51Resonance 33
Restore 50, 51
Reverb 39
RM 37
Rotary 39
SSamples 32
Sawtooth 30
Select All 51
Shape 29
Shape Mod 30
Shift 16
Size 52Skip Sample Attack 32
Slot A/B MIDI 53
Slot Buttons 15
Slot Detune 28
Slot effects 36
Sort Mode 18
Sostenuto 7, 58
Sound Down 50
Sound Init 35
Sound Menu 43
Sound Up 50
Sound Upload 51
Split Keyboard 19
Stop Mode 39
Store 16
Store As…. 16
String Resonance 28
String Resonance Level 43
Sustenuto 28
SustPed 21
Synth Init 18
System Menu 42
T Transfer 48
Transpose 15
Trem 37
Triangle 30
Triple Pedal 28
UUnison 35
Upload 48
V Value Dial 17
Velocity 34
Vibe 38
Vibrato 35
Voices 34
Vox Model 25
WWaveform selector 30
Wavetable 32
Wa-Wa 37

7/30/2019 Nord Stage 2 Manual
http://slidepdf.com/reader/full/nord-stage-2-manual 65/65