nosdb administrators’ guide - powershell€¦ · · 2017-04-257.1. add shard ... 16.1. server...
TRANSCRIPT
NosDB Administrators’ Guide - PowerShell
Version 2.0

NosDB Administrators’ Guide - PowerShell
Copyright © 2005-2017 Alachisoft | 2
Table of Contents
Introduction to NosDB .............................................................................................................................................................................. 6
Getting Started with NosDB ......................................................................................................................................................................... 7
Open Firewall TCP Port for Clients ....................................................................................................................................................... 8
2.1. Configuration Server Port ............................................................................................................................................................. 8
2.2. Management Port ............................................................................................................................................................................ 8
2.3. Distributor Port.................................................................................................................................................................................. 9
Accessing Database Cluster across Domains ................................................................................................................................. 10
3.1. Using Runas Command ............................................................................................................................................................... 10
Configuring and Using PowerShell in NosDB ................................................................................................................................ 11
4.1. Load NosDB Assembly ................................................................................................................................................................. 11
4.2. To Run Scripts .................................................................................................................................................................................. 11
4.3. Navigating in PowerShell Console .......................................................................................................................................... 12
4.3.1. Databases ..................................................................................................................................................................................... 12
4.3.2. Collections .................................................................................................................................................................................... 12
4.3.3. Indexes ........................................................................................................................................................................................... 12
4.3.4. Triggers ......................................................................................................................................................................................... 13
4.3.5. User Defined Functions ........................................................................................................................................................... 13
4.3.6. Logins ............................................................................................................................................................................................. 14
4.3.7. Users ............................................................................................................................................................................................... 14
Using NosDB Stress Test Tool .............................................................................................................................................................. 16
Database Clusters ...................................................................................................................................................................................... 17
6.1. Create Database Cluster .............................................................................................................................................................. 17
6.2. Connect to Existing Database Cluster .................................................................................................................................... 18
6.3. Disconnect from Cluster .............................................................................................................................................................. 19
6.4. Remove Database Cluster ........................................................................................................................................................... 19
Shards............................................................................................................................................................................................................. 20
7.1. Add Shard .......................................................................................................................................................................................... 20
7.2. Remove Shard .................................................................................................................................................................................. 21
7.3. Start Shard......................................................................................................................................................................................... 22
7.4. Stop Shard ......................................................................................................................................................................................... 22
7.5. Configure Shard Nodes ............................................................................................................................................................... 22
7.5.1. Add Node to Shard .................................................................................................................................................................. 23

NosDB Administrators’ Guide - PowerShell
Copyright © 2005-2017 Alachisoft | 3
7.5.2. Remove Node from Shard ..................................................................................................................................................... 23
7.5.3. Start Node on Shard ................................................................................................................................................................ 24
7.5.4. Stop Node on Shard ................................................................................................................................................................ 24
Configuring Databases .................................................................................................................................................................................. 25
Databases ..................................................................................................................................................................................................... 26
8.1. Create New Database ................................................................................................................................................................... 26
8.2. Configure Database Properties ................................................................................................................................................. 26
8.3. Drop Database ................................................................................................................................................................................. 27
Collections .................................................................................................................................................................................................... 28
9.1. Create Collection ............................................................................................................................................................................ 28
9.2. Drop Collection ............................................................................................................................................................................... 28
Indexes ..................................................................................................................................................................................................... 30
10.1. Create Index...................................................................................................................................................................................... 30
10.2. Drop Index ........................................................................................................................................................................................ 30
CLR Triggers ........................................................................................................................................................................................... 30
11.1. Create Trigger .................................................................................................................................................................................. 30
11.2. Drop Trigger ..................................................................................................................................................................................... 30
CLR Functions........................................................................................................................................................................................ 31
12.1. Create Function ............................................................................................................................................................................... 31
12.2. Drop Function .................................................................................................................................................................................. 31
Configuring Security ....................................................................................................................................................................................... 36
Data Expiration ..................................................................................................................................................................................... 32
13.1. Expiration Properties ..................................................................................................................................................................... 33
13.1.1. Expiration Types .................................................................................................................................................................... 33
13.1.2. Document Specific ............................................................................................................................................................... 33
13.2.0. Execution Preference .......................................................................................................................................................... 33
13.1.4. Monitoring .............................................................................................................................................................................. 33
13.1.5. Limitations ............................................................................................................................................................................... 34
13.2. Enabling Expiration ........................................................................................................................................................................ 34
Security Concepts ................................................................................................................................................................................ 37
14.1. Logins .................................................................................................................................................................................................. 37
14.2. Roles and Users ............................................................................................................................................................................... 37
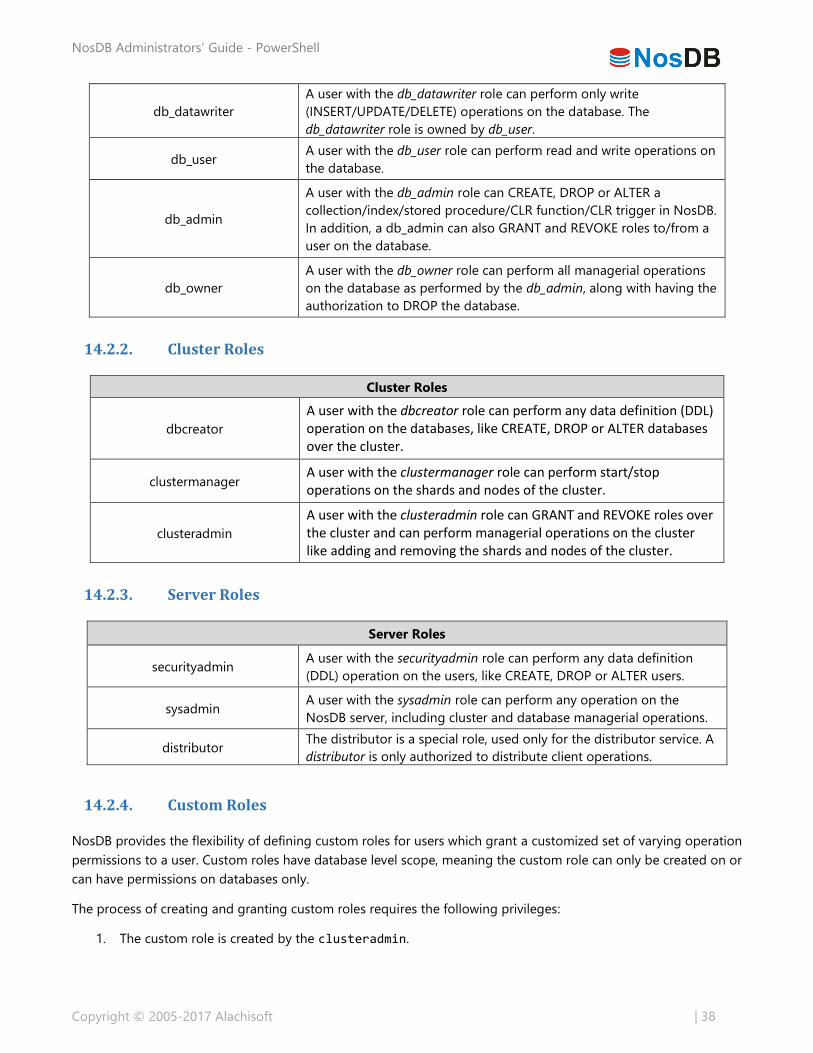
14.2.1. Database Roles ...................................................................................................................................................................... 37
14.2.2. Cluster Roles........................................................................................................................................................................... 38

NosDB Administrators’ Guide - PowerShell
Copyright © 2005-2017 Alachisoft | 4
14.2.3. Server Roles ............................................................................................................................................................................ 38
14.2.4. Custom Roles ......................................................................................................................................................................... 38
14.3. Encryption ......................................................................................................................................................................................... 39
Logins ....................................................................................................................................................................................................... 41
15.1. Add Login .......................................................................................................................................................................................... 41
15.1.1. Using Add-Login Tool ........................................................................................................................................................ 41
15.1.2. Using DDL Query .................................................................................................................................................................. 41
15.2. Drop Login ........................................................................................................................................................................................ 41
Roles and Users .................................................................................................................................................................................... 42
16.1. Server Roles ...................................................................................................................................................................................... 42
16.2. Cluster Roles ..................................................................................................................................................................................... 42
16.3. Database Roles ................................................................................................................................................................................ 43
16.4. Custom Roles ................................................................................................................................................................................... 44
Database Administration ............................................................................................................................................................................. 45
Encryption............................................................................................................................................................................................... 47
17.1. Create Master Key .......................................................................................................................................................................... 47
17.2. Configuring Encryption ................................................................................................................................................................ 47
17.3. Enabling Encryption....................................................................................................................................................................... 47
Backup Database ................................................................................................................................................................................. 48
18.1. Distributed vs. Consolidated Storage ..................................................................................................................................... 48
18.2. Backup Database ............................................................................................................................................................................ 48
Restore Database................................................................................................................................................................................. 49
Get Task Information.......................................................................................................................................................................... 49
Import Data ............................................................................................................................................................................................ 50
21.1. Import CSV Data ............................................................................................................................................................................. 50
How to create CSV data from SQL Server ....................................................................................................................................... 51
Different CSV Options ............................................................................................................................................................................. 51
21.2. Import JSON Data .......................................................................................................................................................................... 52
How to create JSON data from SQL Server..................................................................................................................................... 52
Export Data ............................................................................................................................................................................................ 53
22.1. Export CSV Data .............................................................................................................................................................................. 53
Different CSV Options ............................................................................................................................................................................. 54
22.2. Export JSON Data ........................................................................................................................................................................... 55
Export Cluster Configuration .......................................................................................................................................................... 55
NosDB Administrators’ Guide - PowerShell
Copyright © 2005-2017 Alachisoft | 5
Using SQL Queries .............................................................................................................................................................................. 56
24.1. SQL Queries in PowerShell ......................................................................................................................................................... 56
24.2. Invoking SQL Queries ................................................................................................................................................................... 56
Data Definition Language (DDL) Querying ..................................................................................................................................... 56
Data Manipulation Language (DML) Querying ............................................................................................................................. 57
24.3. Invoking SQL Scripts ..................................................................................................................................................................... 57
Deploy Providers.................................................................................................................................................................................. 58
Convert Standalone to Clustered Database .............................................................................................................................. 59
Move Collection within Shards ...................................................................................................................................................... 60
Get NosDB Version Information .................................................................................................................................................... 60
Database Monitoring ..................................................................................................................................................................................... 61
NosDB Counters ................................................................................................................................................................................... 62
Windows Performance Monitor .................................................................................................................................................... 63
Windows Event Logs .......................................................................................................................................................................... 69
NosDB Logs ........................................................................................................................................................................................... 70

NosDB Administrators’ Guide - PowerShell
Copyright © 2005-2017 Alachisoft | 6
Introduction to NosDB
Welcome to NosDB! NosDB is a schema-less and scalable NOSQL database solution to handle ad-hoc querying on
huge amounts of real-time, unstructured data. As NosDB scales out to accommodate the rapidly increasing volume
of your data, it applies robust data distribution strategies to ensure availability and fault tolerance at all times.
Keeping in mind the suitability of NosDB for Big Data applications, MapReduce and Aggregation support has also
been introduced to dramatically enhance performance due to parallel processing.
NosDB features and tools are designed to be tuned flexibly into applications of any size – from small to enterprise-
wide global installations.
Support
NosDB provides various sources of technical support. Please refer to Alachisoft’s Support page to select a support
resource you find suitable for your issue.
To request additional features in the future, or if you notice any discrepancy regarding this document, please drop
an email at [email protected].
Document Conventions
The following conventions in text have been used throughout this document:
Convention Description
bold Specifies terms of importance for the reader.
monospace Specifies inline code snippets, file, class, interface names.
monospace Specifies inline code snippets and commands.
Specifies additional and vital information for the user.
Specifies any significant step to be taken in your application.

NosDB Administrators’ Guide - PowerShell
Copyright © 2005-2017 Alachisoft | 7
Alachisoft
Getting Started with NosDB NosDB Administrators’ Guide - PowerShell

NosDB Administrators’ Guide - PowerShell
Copyright © 2005-2017 Alachisoft | 8
Open Firewall TCP Port for Clients
2.1. Configuration Server Port
If a firewall is enabled between the clients and the configuration server, then you must open a TCP port
(default 9950) in the firewall for the client to communicate with the configuration server through the connection
string.
"Data Source=127.0.0.1; Port=9950; Database=northwind; Local Instance=false;"
If you want to manually configure the Config Server Port, changes must be made on all servers running the
Configuration Service. The port can be modified in the “NosDB.ConfigurationService.exe.config" file
located in
"[InstallDir]/bin/service":
<appSettings> . . . <add key="ConfigServerPort" value="9950"/> </appSettings>
2.2. Management Port
The configuration server further communicates with the Database Service using the Management Port. The default
Management Port for the Database Service is 9960.
If you want to manually configure the Management Server Port, changes must be made on all servers running the
Configuration Service. The port can be modified in the “NosDB.ConfigurationService.exe.config" file
located in [InstallDir]/bin/service":
<appSettings> . . . <add key="ManagementServerPort" value="9960"/> </appSettings>
However, this port is being used by the database service so it also has to be modified accordingly in the
“NosDB.DatabaseService.exe.config" file located in "[InstallDir]/bin/service":
<appSettings> . . . <add key="ManagementServerPort" value="9960"/>
</appSettings>
NosDB Administrators’ Guide - PowerShell
Copyright © 2005-2017 Alachisoft | 9
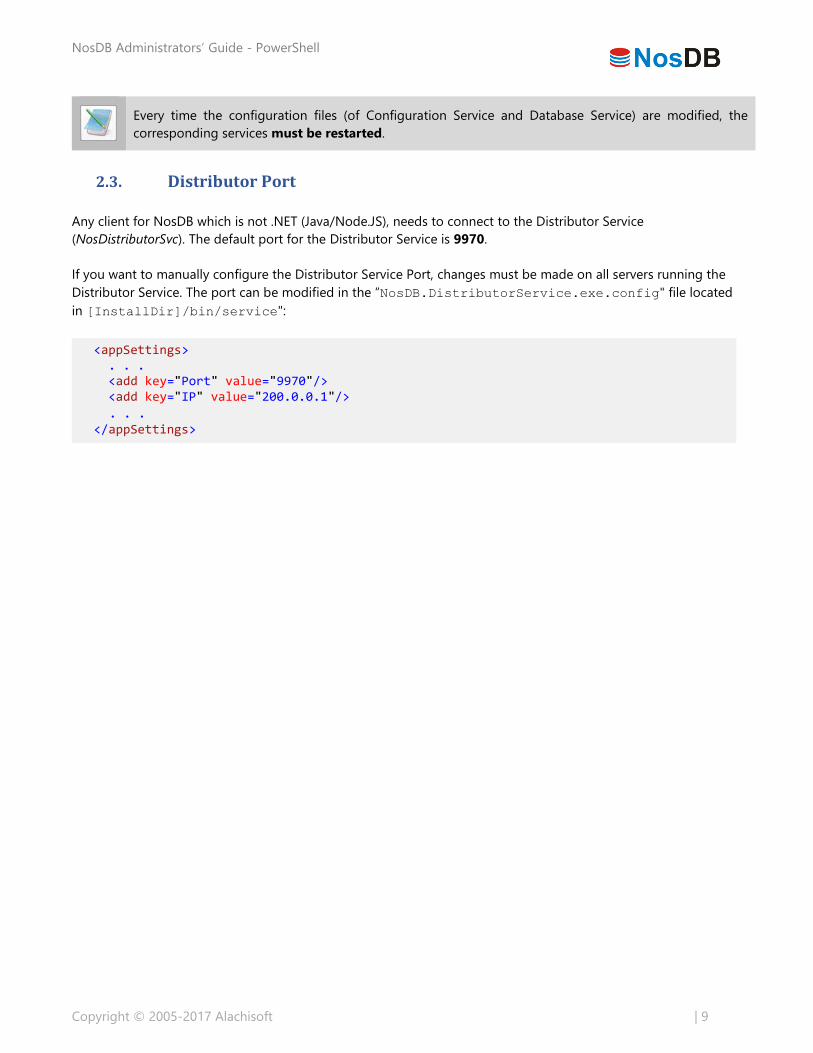
2.3. Distributor Port
Any client for NosDB which is not .NET (Java/Node.JS), needs to connect to the Distributor Service
(NosDistributorSvc). The default port for the Distributor Service is 9970.
If you want to manually configure the Distributor Service Port, changes must be made on all servers running the
Distributor Service. The port can be modified in the “NosDB.DistributorService.exe.config" file located
in [InstallDir]/bin/service":
<appSettings> . . . <add key="Port" value="9970"/> <add key="IP" value="200.0.0.1"/> . . . </appSettings>
Every time the configuration files (of Configuration Service and Database Service) are modified, the
corresponding services must be restarted.
NosDB Administrators’ Guide - PowerShell
Copyright © 2005-2017 Alachisoft | 10
Accessing Database Cluster across Domains
To access a cluster across a domain, different permissions are required respective to the domain. This can also result
in restricted access because of Windows Authentication, along with a similar limitation to view the PerfMon counters
across a different domain.
3.1. Using Runas Command
Keeping in mind the aforementioned limitations, NosDB has incorporated the Runas command-line tool by
Microsoft into its management modules so to access the cluster across domains, the management module specified
with a “(Runas)” can be launched and used with ease:
Launch psmgmt.runas.cmd from [InstallDir]\bin\tools.
Enter the User ID of the login you want to access in the format user@domain or domain\user.
Enter the password for the ID.
You can now run the commands specific to the domain with permissions granted to the user you have
logged on as.
Monitoring PerfMon Counters across Domains
Follow the steps to access a database cluster as mentioned above.
Run the following command through Command Prompt to launch PerfMon:
runas /env /netonly /user:user@domain perfmon.exe
You can now monitor PerfMon Counters for a cluster in the domain you are logged in to.

NosDB Administrators’ Guide - PowerShell
Copyright © 2005-2017 Alachisoft | 11
Configuring and Using PowerShell in NosDB
NosDB provides integration with Windows PowerShell to easily automate NosDB processes on your network. You
can manage NosDB remote tasks on your network through a single computer using PowerShell scripts.
NosDB PowerShell Provider is only compatible with PowerShell 4.0 and above.
4.1. Load NosDB Assembly
Right-click on a database name and select Launch PowerShell in NosDB Management Studio.
OR
Search for NosDB PowerShell Management and Run as Administrator.
You will be directed to NosDB’s PowerShell module, indicated by the PS at the start of the command line.
In order to work in NosDB environment through PowerShell, enable PowerShell script execution by setting
the ExecutionPolicy to RemoteSigned.
Set-ExecutionPolicy RemoteSigned
Once the NosDB environment has been set up, you can now create a new database cluster or connect to an
existing one to carry out NosDB’s tasks through PowerShell.
4.2. To Run Scripts
Once the cluster has been created, you can load an existing Northwind database provided in NosDB samples
at [InstallDir]\samples\data\json\northwind. The sample contains JSON format files against specific
collections which can be imported into the configured database to get you started with NosDB features.
The provided "NorthWind.ps1" script in the same location contains all steps - creating a database, collections and
importing the sample northwind data into them. The script is ready for execution:
Make sure you are connected to the cluster and within the context "NosDB:\$cluster$\>".
Execute either of the following commands in PowerShell, based on your accessibility:
o If you are accessing NosDB cluster from a remote client:
Connect-DatabaseCluster [–Server] -[Port]
o If you are accessing NosDB cluster from the local machine:
Connect-DatabaseCluster
Execute the following command in the context, starting with the ‘&’ sign:
NosDB Administrators’ Guide - PowerShell
Copyright © 2005-2017 Alachisoft | 12
& "[InstallDir]\NoSDB\samples\data\json\NorthWind.ps1"
4.3. Navigating in PowerShell Console
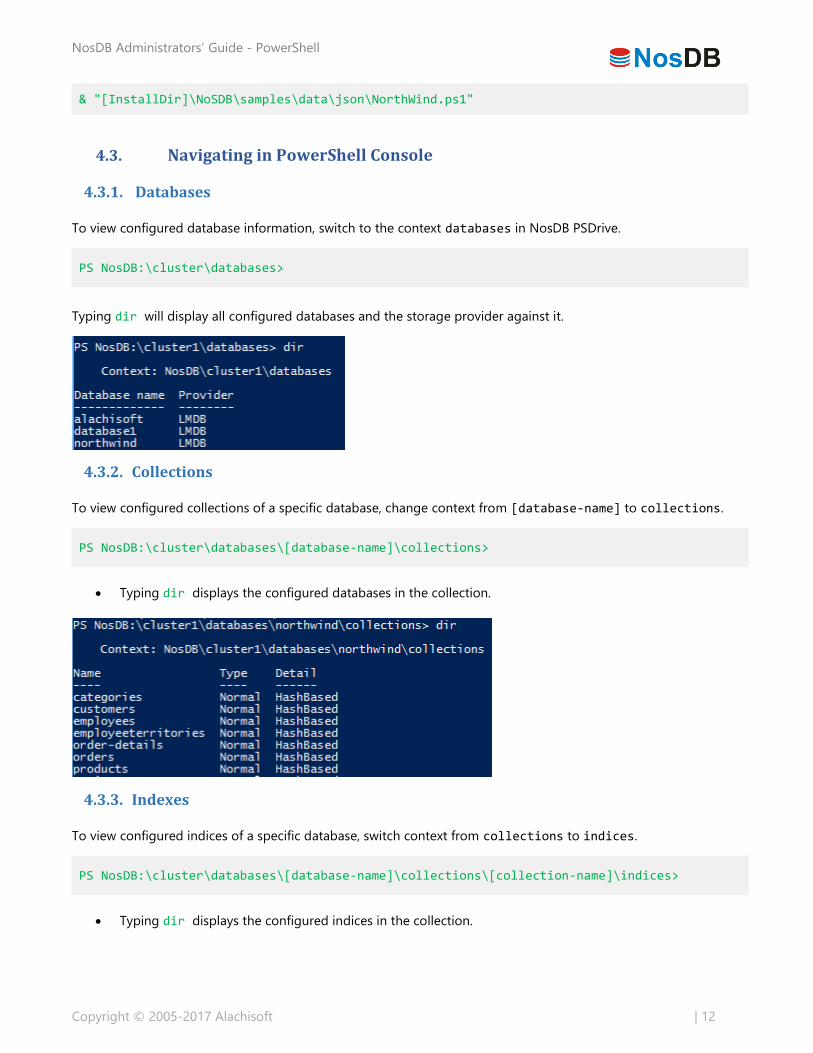
4.3.1. Databases
To view configured database information, switch to the context databases in NosDB PSDrive.
PS NosDB:\cluster\databases>
Typing dir will display all configured databases and the storage provider against it.
4.3.2. Collections
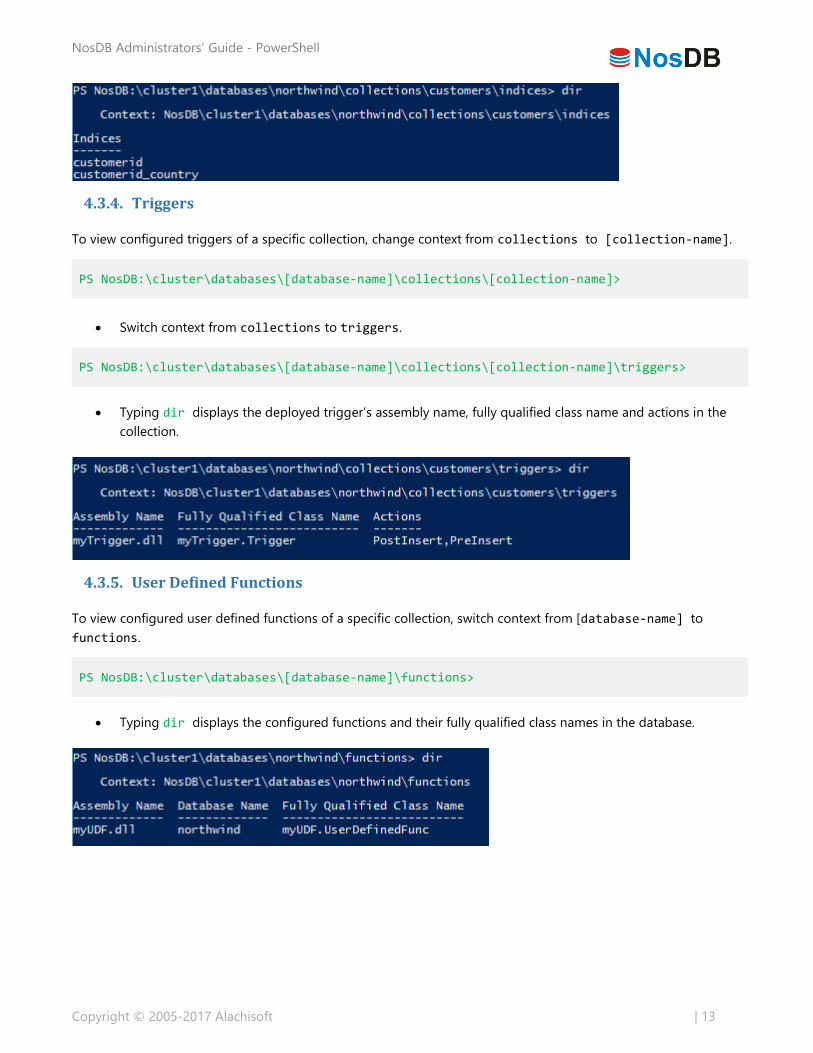
To view configured collections of a specific database, change context from [database-name] to collections.
PS NosDB:\cluster\databases\[database-name]\collections>
Typing dir displays the configured databases in the collection.
4.3.3. Indexes
To view configured indices of a specific database, switch context from collections to indices.
PS NosDB:\cluster\databases\[database-name]\collections\[collection-name]\indices>
Typing dir displays the configured indices in the collection.
NosDB Administrators’ Guide - PowerShell
Copyright © 2005-2017 Alachisoft | 13
4.3.4. Triggers
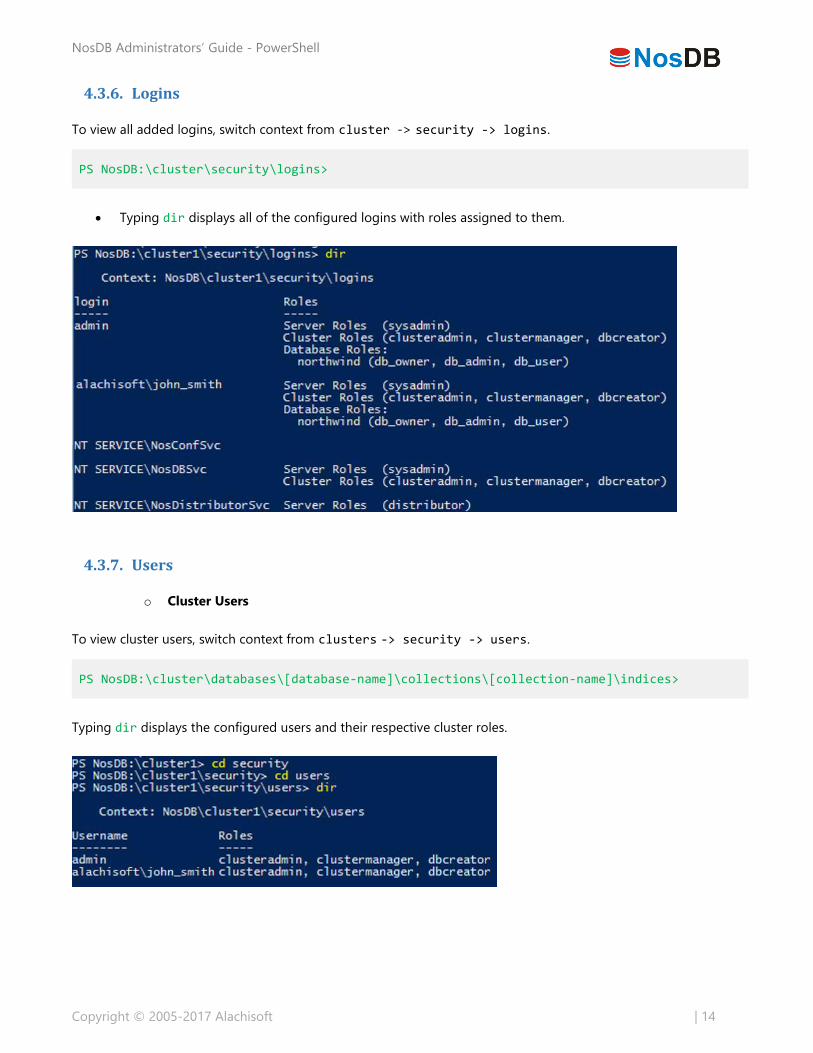
To view configured triggers of a specific collection, change context from collections to [collection-name].
PS NosDB:\cluster\databases\[database-name]\collections\[collection-name]>
Switch context from collections to triggers.
PS NosDB:\cluster\databases\[database-name]\collections\[collection-name]\triggers>
Typing dir displays the deployed trigger’s assembly name, fully qualified class name and actions in the
collection.
4.3.5. User Defined Functions
To view configured user defined functions of a specific collection, switch context from [database-name] to
functions.
PS NosDB:\cluster\databases\[database-name]\functions>
Typing dir displays the configured functions and their fully qualified class names in the database.
NosDB Administrators’ Guide - PowerShell
Copyright © 2005-2017 Alachisoft | 14
4.3.6. Logins
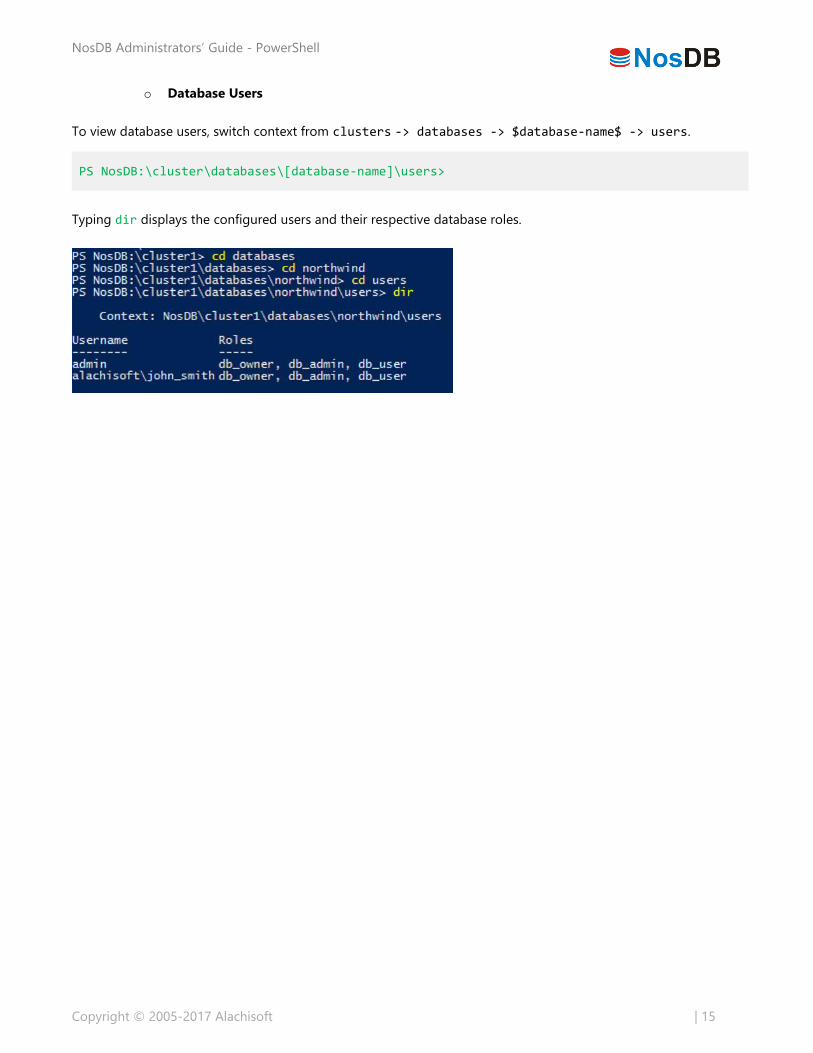
To view all added logins, switch context from cluster -> security -> logins.
PS NosDB:\cluster\security\logins>
Typing dir displays all of the configured logins with roles assigned to them.
4.3.7. Users
o Cluster Users
To view cluster users, switch context from clusters -> security -> users.
PS NosDB:\cluster\databases\[database-name]\collections\[collection-name]\indices>
Typing dir displays the configured users and their respective cluster roles.
NosDB Administrators’ Guide - PowerShell
Copyright © 2005-2017 Alachisoft | 15
o Database Users
To view database users, switch context from clusters -> databases -> $database-name$ -> users.
PS NosDB:\cluster\databases\[database-name]\users>
Typing dir displays the configured users and their respective database roles.

NosDB Administrators’ Guide - PowerShell
Copyright © 2005-2017 Alachisoft | 16
Using NosDB Stress Test Tool
Once the database has been configured, NosDB PowerShell allows testing the stress performance of the connected
database. Test-Stress creates a test collection named “nosdb_test_coll” and performs multiple Insert, Update,
Delete and Get operations on it from single or multiple clients. This command only works in the context of the
specified database.
PS NosDB:\cluster\databases\[database-name]>
To kill the Test-Stress program, enter the keyboard combination Ctrl+C.
Parameters Description
[-ThreadCount] Number of client threads
[-TestCaseIterations] Number of iterations in a test case
[-TestCaseIterationDelay] Delay between each iteration of the test case
[-GetsPerIteration] Number of Get operations in one iteration of the test case
[-UpdatesPerIteration] Number of Update operations in one iteration of the test case
[-MaxDocuments]
Maximum number of documents to perform test on. By
default, the maximum number is 10,000 and it cannot be
exceeded.
[-DeletesPerIteration] Number of Delete operations in one iteration of the test case
[-ReportingInterval] To specify the interval after which the stats are reported
[-TotalIteration] The number of times the test case is to be executed
[-DropCollection] Deletes the test collection from the database
Examples:
o This command performs stress test on northwind database with default configurations and total
iterations are infinite.
Test-Stress
o This command performs stress test on northwind database with 3 client threads and reports status
after 1000 iterations. The rest of the settings are all defaults. Total iterations are infinite.
Test-Stress -ThreadCount 3 -ReportingInterval 1000
o Database is northwind, reporting interval is 2000, number of iterations in each test case is 2. Delay
between iterations is 1 sec. Gets per iteration are 10; updates per iteration are 10; deletes per iteration
are 10; Total iterations are infinite.
Test-Stress -TestCaseIterations 2 -TestCaseIterationDelay 1 -GetsPerIteration 10 -UpdatesPerIteration 10 -DeletesPerIteration 10 -ReportingInterval 2000 -TotalIteration 200000
NosDB Administrators’ Guide - PowerShell
Copyright © 2005-2017 Alachisoft | 17
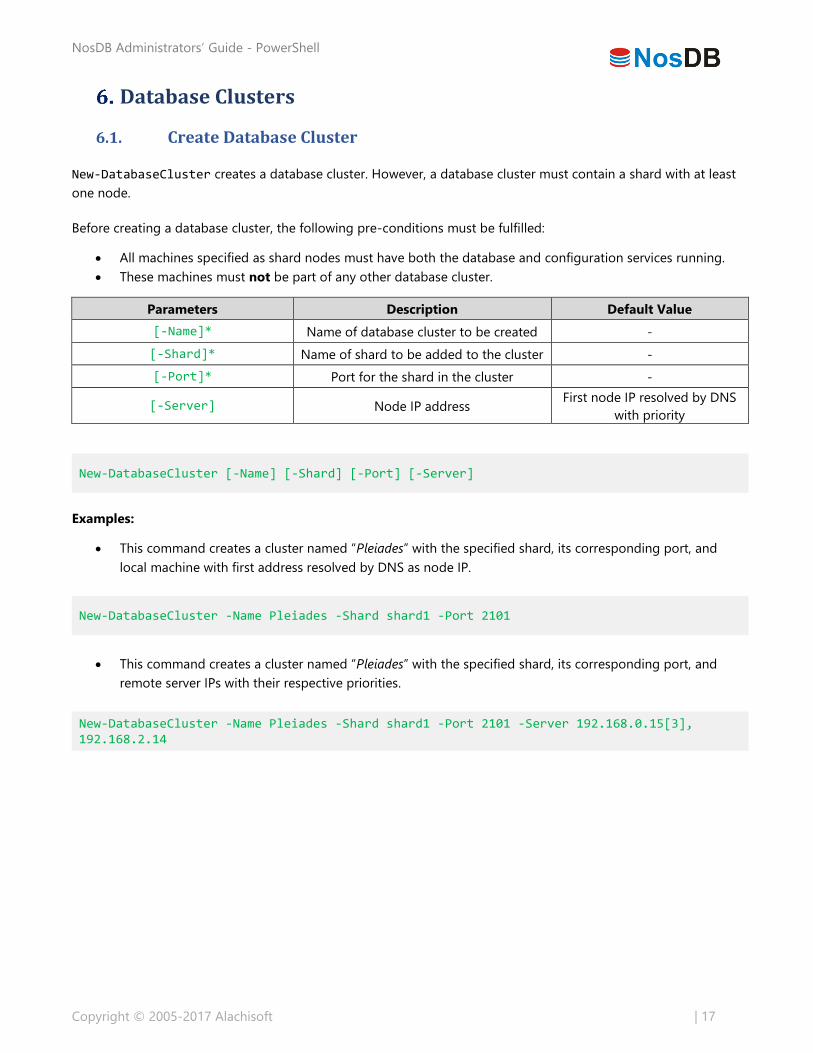
Database Clusters
6.1. Create Database Cluster
New-DatabaseCluster creates a database cluster. However, a database cluster must contain a shard with at least
one node.
Before creating a database cluster, the following pre-conditions must be fulfilled:
All machines specified as shard nodes must have both the database and configuration services running.
These machines must not be part of any other database cluster.
Parameters Description Default Value
[-Name]* Name of database cluster to be created -
[-Shard]* Name of shard to be added to the cluster -
[-Port]* Port for the shard in the cluster -
[-Server] Node IP address First node IP resolved by DNS
with priority
New-DatabaseCluster [-Name] [-Shard] [-Port] [-Server]
Examples:
This command creates a cluster named “Pleiades” with the specified shard, its corresponding port, and
local machine with first address resolved by DNS as node IP.
New-DatabaseCluster -Name Pleiades -Shard shard1 -Port 2101
This command creates a cluster named “Pleiades” with the specified shard, its corresponding port, and
remote server IPs with their respective priorities.
New-DatabaseCluster -Name Pleiades -Shard shard1 -Port 2101 -Server 192.168.0.15[3], 192.168.2.14

NosDB Administrators’ Guide - PowerShell
Copyright © 2005-2017 Alachisoft | 18
Troubleshooting
Unable to create the cluster.
This occurs if the environment variables have not been refreshed after the installation and might require a
reboot of the system.
However, if you do not want to reboot, you can import the NosDB PowerShell module (NosDBPS.dll) found
in the location: [InstallDir]\bin\nosdbps\.
Execute the following command to import the module:
Import-Module NosDBPS
6.2. Connect to Existing Database Cluster
Connect-DatabaseCluster establishes a connection with the database cluster which will manage shards, view
database details and manage database cluster nodes using the cluster.
Parameters Description Default Value
[-Server] IP of the node connecting to the
database cluster First node IP resolved by DNS
[-Port] Port of NosDB configuration service
for the cluster 9950
[-StandAlone] To specify if the database is
standalone False
Connect-DatabaseCluster [-Server] [-Port] [-StandAlone]
Examples:
This command connects to a cluster created on the local machine.
Connect-DatabaseCluster
This command connects to a cluster created on a remote machine.
Connect-DatabaseCluster -Server 192.168.1.187 -Port 2147
This command connects to standalone database created on a remote location.
Connect-DatabaseCluster -Server 192.168.1.187 -Port 2147 -StandAlone
NosDB Administrators’ Guide - PowerShell
Copyright © 2005-2017 Alachisoft | 19
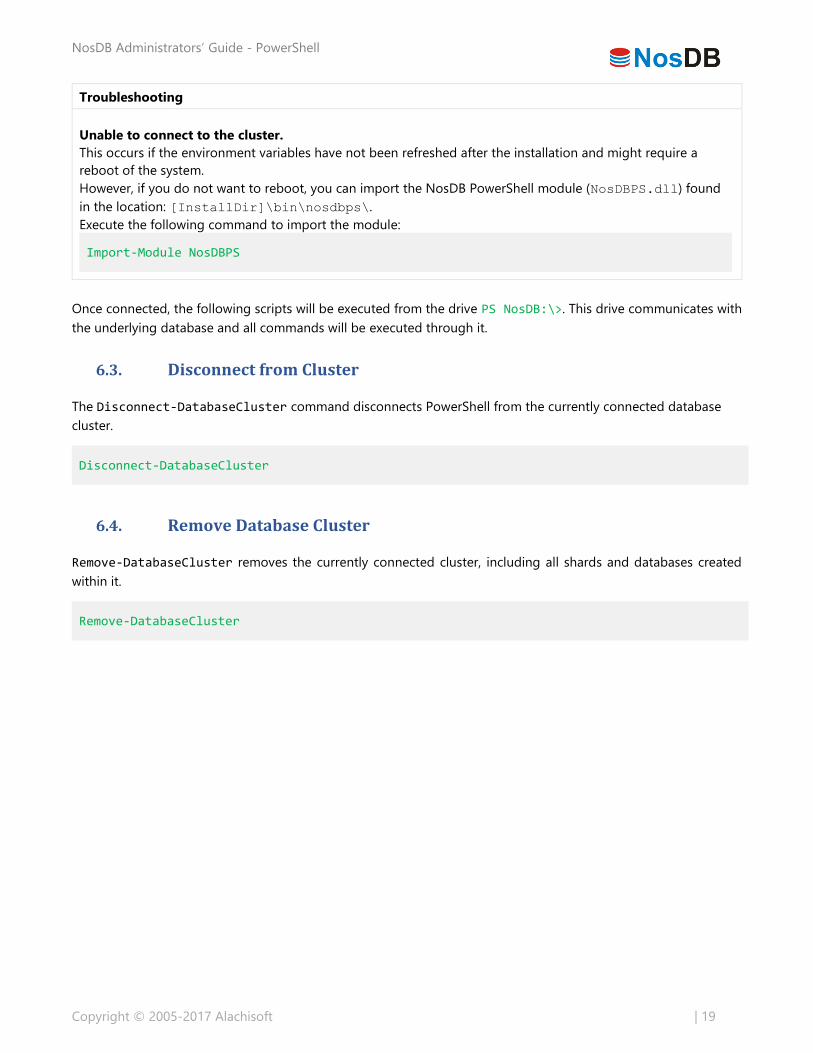
Troubleshooting
Unable to connect to the cluster.
This occurs if the environment variables have not been refreshed after the installation and might require a
reboot of the system.
However, if you do not want to reboot, you can import the NosDB PowerShell module (NosDBPS.dll) found
in the location: [InstallDir]\bin\nosdbps\.
Execute the following command to import the module:
Import-Module NosDBPS
Once connected, the following scripts will be executed from the drive PS NosDB:\>. This drive communicates with
the underlying database and all commands will be executed through it.
6.3. Disconnect from Cluster
The Disconnect-DatabaseCluster command disconnects PowerShell from the currently connected database
cluster.
Disconnect-DatabaseCluster
6.4. Remove Database Cluster
Remove-DatabaseCluster removes the currently connected cluster, including all shards and databases created
within it.
Remove-DatabaseCluster
NosDB Administrators’ Guide - PowerShell
Copyright © 2005-2017 Alachisoft | 20
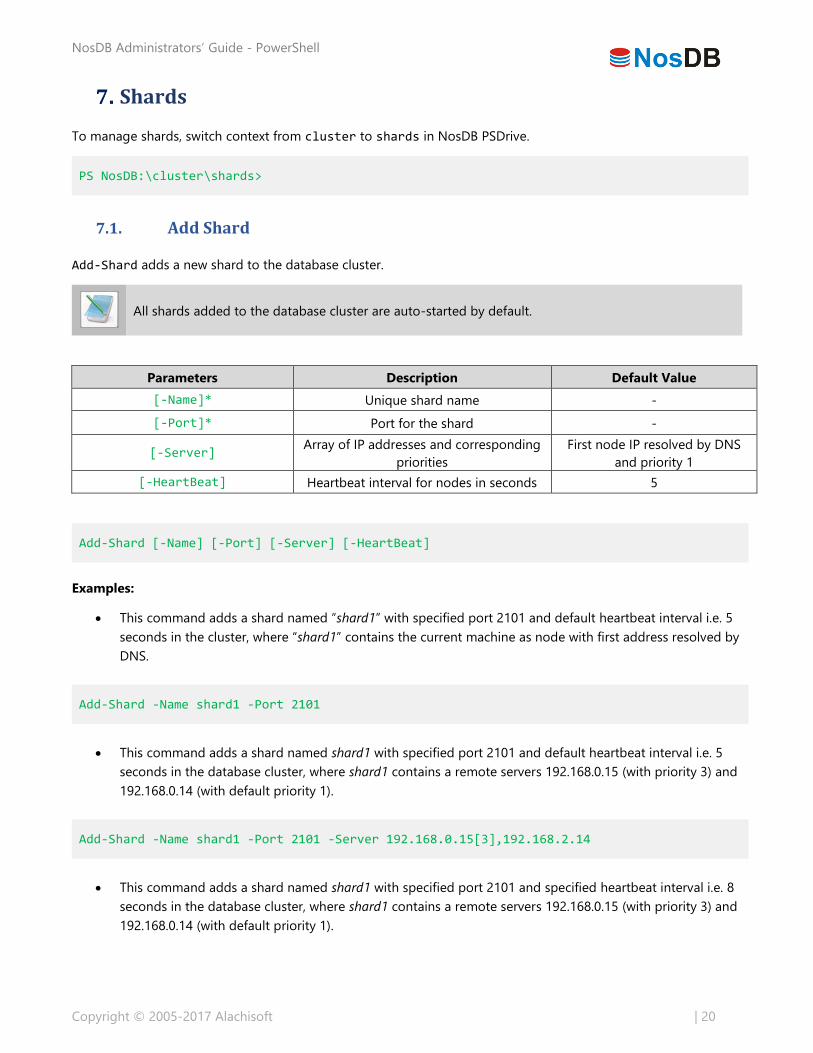
Shards
To manage shards, switch context from cluster to shards in NosDB PSDrive.
PS NosDB:\cluster\shards>
7.1. Add Shard
Add-Shard adds a new shard to the database cluster.
All shards added to the database cluster are auto-started by default.
Parameters Description Default Value
[-Name]* Unique shard name -
[-Port]* Port for the shard -
[-Server] Array of IP addresses and corresponding
priorities
First node IP resolved by DNS
and priority 1
[-HeartBeat] Heartbeat interval for nodes in seconds 5
Add-Shard [-Name] [-Port] [-Server] [-HeartBeat]
Examples:
This command adds a shard named “shard1” with specified port 2101 and default heartbeat interval i.e. 5
seconds in the cluster, where “shard1” contains the current machine as node with first address resolved by
DNS.
Add-Shard -Name shard1 -Port 2101
This command adds a shard named shard1 with specified port 2101 and default heartbeat interval i.e. 5
seconds in the database cluster, where shard1 contains a remote servers 192.168.0.15 (with priority 3) and
192.168.0.14 (with default priority 1).
Add-Shard -Name shard1 -Port 2101 -Server 192.168.0.15[3],192.168.2.14
This command adds a shard named shard1 with specified port 2101 and specified heartbeat interval i.e. 8
seconds in the database cluster, where shard1 contains a remote servers 192.168.0.15 (with priority 3) and
192.168.0.14 (with default priority 1).
NosDB Administrators’ Guide - PowerShell
Copyright © 2005-2017 Alachisoft | 21
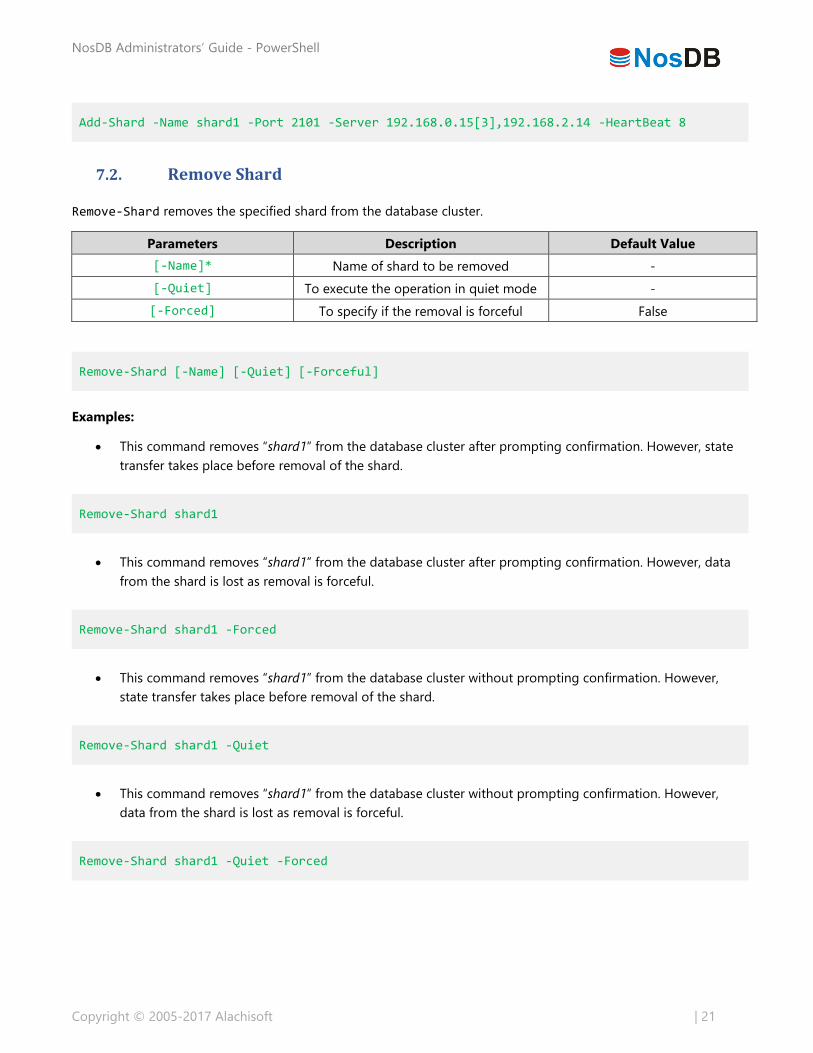
Add-Shard -Name shard1 -Port 2101 -Server 192.168.0.15[3],192.168.2.14 -HeartBeat 8
7.2. Remove Shard
Remove-Shard removes the specified shard from the database cluster.
Parameters Description Default Value
[-Name]* Name of shard to be removed -
[-Quiet] To execute the operation in quiet mode -
[-Forced] To specify if the removal is forceful False
Remove-Shard [-Name] [-Quiet] [-Forceful]
Examples:
This command removes “shard1” from the database cluster after prompting confirmation. However, state
transfer takes place before removal of the shard.
Remove-Shard shard1
This command removes “shard1” from the database cluster after prompting confirmation. However, data
from the shard is lost as removal is forceful.
Remove-Shard shard1 -Forced
This command removes “shard1” from the database cluster without prompting confirmation. However,
state transfer takes place before removal of the shard.
Remove-Shard shard1 -Quiet
This command removes “shard1” from the database cluster without prompting confirmation. However,
data from the shard is lost as removal is forceful.
Remove-Shard shard1 -Quiet -Forced

NosDB Administrators’ Guide - PowerShell
Copyright © 2005-2017 Alachisoft | 22
7.3. Start Shard
Start-Shard starts any stopped shard of the database cluster. This command works in the context of shards and
the specific shard as well.
Parameters Description
[-Name] Name of shard to be started
This command starts the specified shard from the database cluster.
PS NosDB:\cluster\shards> Start-Shard [-Name]
This command starts the shard in the context of the shard to be started.
PS NosDB:\cluster\shards\shard1> Start-Shard
7.4. Stop Shard
Stop-Shard stops the specified shard of the database cluster. This command works in the context of “shards” and
the specific shard as well.
Parameters Description
[-Name] Name of shard to be stopped
This command stops the specified shard from the database cluster.
PS NosDB:\cluster\shards> Stop-Shard [-Name]
This command stops the shard in the context of the shard to be stopped.
PS NosDB:\cluster\shards\shard1> Stop-Shard
7.5. Configure Shard Nodes
To manage nodes of a specific shard, change context from shards to [shard-name] in NosDB PSDrive.
PS NosDB:\cluster\shards\[shard-name]>

NosDB Administrators’ Guide - PowerShell
Copyright © 2005-2017 Alachisoft | 23
7.5.1. Add Node to Shard
Add-Node adds a new node to the shard of the database cluster. The NosDB database service must be installed and
running on the specified machine. Note that the node must not be part of any other NosDB database cluster,
however they can belong to various shards of the same cluster.
All nodes added to shards are auto-started by default.
Parameters Description Default Value
[-Server] IP of the node to be added First node IP resolved by DNS
[-Priority] Priority of the node being added 1
Add-Node [-Server] [-Priority]
Examples:
This command adds the local node with server IP resolved by DNS, and default priority.
Add-Node
This command adds a node with IP 192.168.0.12 and default priority, i.e. 1.
Add-Node -Server 192.168.0.12
This command adds a node with IP 192.168.0.17 and specified priority, i.e. 2.
Add-Node -Server 192.168.0.17 -Priority 2
7.5.2. Remove Node from Shard
Remove-Node removes a node from a shard in the database cluster.
Parameters Description Default Value
[-Server]* IP of the node to be added Local IP resolved by DNS
[-Quiet] To execute the operation in quiet mode False
This command removes a node with IP 192.168.0.17 with user intervention involved.
Remove-Node -Server 192.168.0.17

NosDB Administrators’ Guide - PowerShell
Copyright © 2005-2017 Alachisoft | 24
This command removes a node with IP 192.168.0.17 without any user intervention.
Remove-Node -Server 192.168.0.17 -Quiet
7.5.3. Start Node on Shard
Start-Node starts the specified node at the shard of the database cluster. This command works in the context of
a specific shard or a specific node as well.
Parameters Description
[-Server] IP of the node to be started
This command starts the specified node from the shard.
PS NosDB:\cluster\shards\shard1> Start-Node [-Server]
This command starts the node in the context of the node to be started.
PS NosDB:\cluster\shards\shard1\127.0.0.1> Start-Node
7.5.4. Stop Node on Shard
Stop-Node stops the specified node at the shard of the database cluster. This command works in the context of a
specific shard or a specific node as well.
Parameters Description
[-Server] IP of the node to be stopped
This command stops the specified node from the shard.
PS NosDB:\cluster\shards\shard1> Stop-Node [-Server]
This command starts the node in the context of the node to be started.
PS NosDB:\cluster\shards\shard1\127.0.0.1> Stop-Node
NosDB Administrators’ Guide - PowerShell
Copyright © 2005-2017 Alachisoft | 25
Alachisoft
Configuring Databases NosDB Administrators’ Guide - PowerShell

NosDB Administrators’ Guide - PowerShell
Copyright © 2005-2017 Alachisoft | 26
Databases
8.1. Create New Database
The CREATE statement in DDL allows creating a new database in NosDB through PowerShell with the Invoke-SQL
–Query command.
Invoke-SQL -Query 'CREATE DATABASE northwind'
This command creates a database northwind with default configurations. If you wish to configure the properties
for the database, refer to Configure Database Properties.
8.2. Configure Database Properties
Database properties can be configured through JSON configuration pairs according to the following DDL syntax:
CREATE DATABASE <Database> (<JSONConfigurationPair> [, <JSONConfigurationPair>]*) [;]
<Database> ::= <String>
<JSONConfigurationPair> ::= [MultiFile : <Boolean>]
| [CacheSize : <Number>]
| [MaxFileSize : <Number>]
| [MaxCollections : <Number>]
| [Journal : <JournalObject>]
| [AttachmentsEnabled : <Boolean>]
| [AttachmentsPath : <String>]
| [ExpirationInterval : <String>]
<JournalObject> ::= [ChecksumEnabled : <Boolean>]
| [CleanupInterval : <Number>]
| [FileSizeLimit : <Number>]
Examples:
This command creates a database “northwind” with single-file store, cache size 2117 MB, 100 collections
at maximum and default journaling options.
Invoke-SQL -Query 'CREATE DATABASE northwind {"MultiFile": false, "CacheSize":2117, "MaxCollections": 17}'
This command creates a database “northwind” with 100 collections at maximum, default checksum
enabled, and cleanup interval of 50 seconds with a journal file size of 10 MB.

NosDB Administrators’ Guide - PowerShell
Copyright © 2005-2017 Alachisoft | 27
Invoke-SQL -Query 'CREATE DATABASE northwind {"MaxCollections": 100, "Journal": {"CleanupInterval": 50, "FileSizeLimit": 10}}'
This command creates a database northwind with encryption provider specified and attachments enabled
Make sure that the MASTER KEY has been created before proceeding to configure and enable
encryption.
Invoke-SQL -Query 'CREATE DATABASE northwind {\"Encryption\":{\"Encryptionprovider\":\"AES_128\"}, \"AttachmentsEnabled\":true, \"AttachmentsPath\":\"E:\\Attachments\"}'
8.3. Drop Database
The DROP statement in DDL allows dropping an existing database with the Invoke-SQL –Query command.
Invoke-SQL -Query 'DROP DATABASE northwind'
This command drops the database named northwind along with all collections in it.
NosDB Administrators’ Guide - PowerShell
Copyright © 2005-2017 Alachisoft | 28
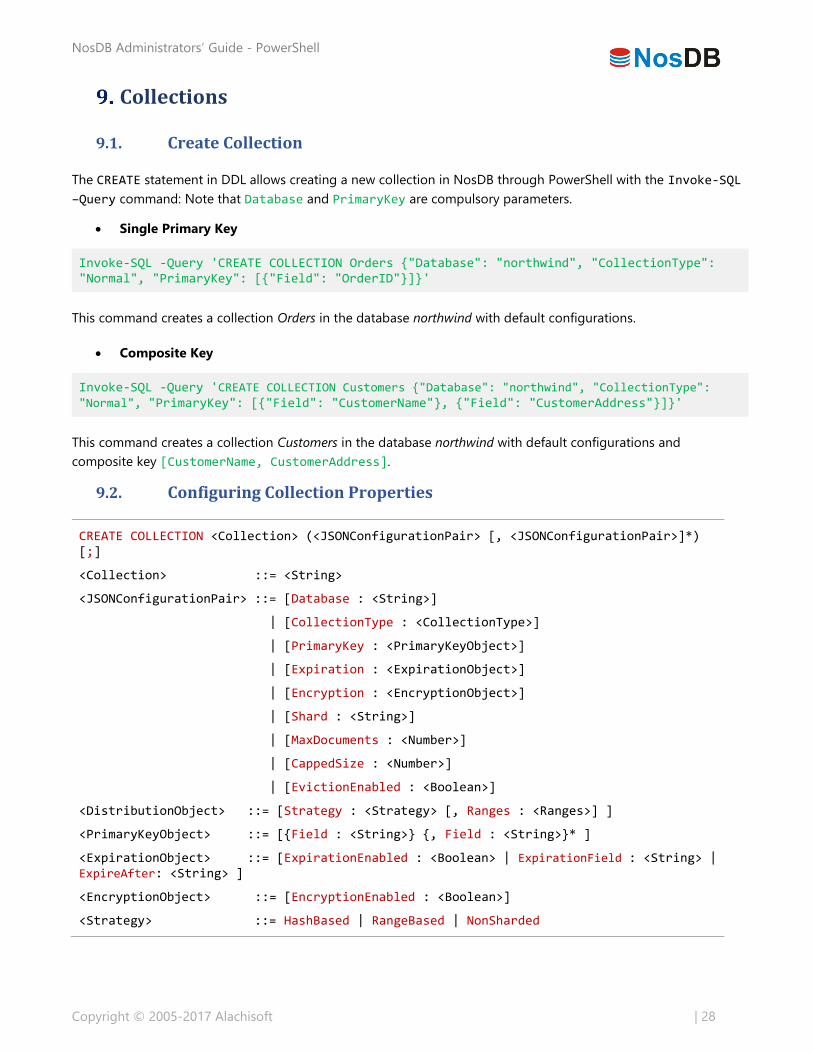
Collections
9.1. Create Collection
The CREATE statement in DDL allows creating a new collection in NosDB through PowerShell with the Invoke-SQL
–Query command: Note that Database and PrimaryKey are compulsory parameters.
Single Primary Key
Invoke-SQL -Query 'CREATE COLLECTION Orders {"Database": "northwind", "CollectionType": "Normal", "PrimaryKey": [{"Field": "OrderID"}]}'
This command creates a collection Orders in the database northwind with default configurations.
Composite Key
Invoke-SQL -Query 'CREATE COLLECTION Customers {"Database": "northwind", "CollectionType": "Normal", "PrimaryKey": [{"Field": "CustomerName"}, {"Field": "CustomerAddress"}]}'
This command creates a collection Customers in the database northwind with default configurations and
composite key [CustomerName, CustomerAddress].
9.2. Configuring Collection Properties
CREATE COLLECTION <Collection> (<JSONConfigurationPair> [, <JSONConfigurationPair>]*) [;]
<Collection> ::= <String>
<JSONConfigurationPair> ::= [Database : <String>]
| [CollectionType : <CollectionType>]
| [PrimaryKey : <PrimaryKeyObject>]
| [Expiration : <ExpirationObject>]
| [Encryption : <EncryptionObject>]
| [Shard : <String>]
| [MaxDocuments : <Number>]
| [CappedSize : <Number>]
| [EvictionEnabled : <Boolean>]
<DistributionObject> ::= [Strategy : <Strategy> [, Ranges : <Ranges>] ]
<PrimaryKeyObject> ::= [{Field : <String>} {, Field : <String>}* ]
<ExpirationObject> ::= [ExpirationEnabled : <Boolean> | ExpirationField : <String> | ExpireAfter: <String> ]
<EncryptionObject> ::= [EncryptionEnabled : <Boolean>]
<Strategy> ::= HashBased | RangeBased | NonSharded
NosDB Administrators’ Guide - PowerShell
Copyright © 2005-2017 Alachisoft | 29
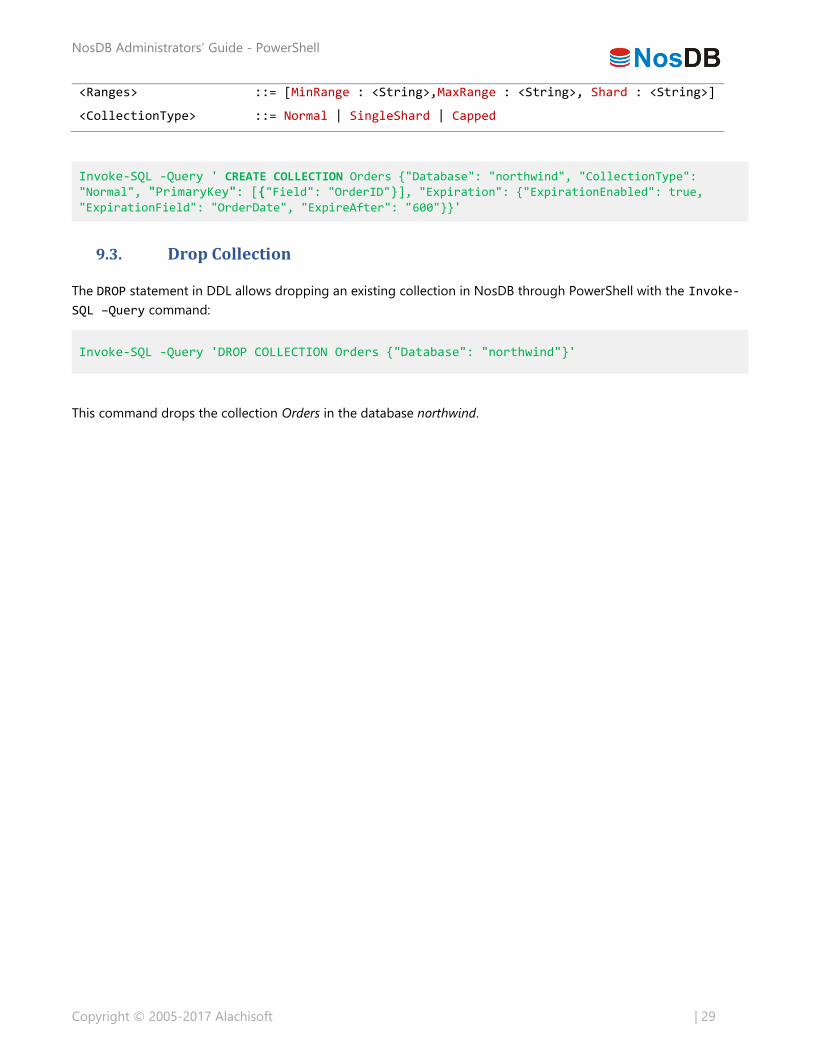
<Ranges> ::= [MinRange : <String>,MaxRange : <String>, Shard : <String>]
<CollectionType> ::= Normal | SingleShard | Capped
Invoke-SQL -Query ' CREATE COLLECTION Orders {"Database": "northwind", "CollectionType": "Normal", "PrimaryKey": [{"Field": "OrderID"}], "Expiration": {"ExpirationEnabled": true, "ExpirationField": "OrderDate", "ExpireAfter": "600"}}'
9.3. Drop Collection
The DROP statement in DDL allows dropping an existing collection in NosDB through PowerShell with the Invoke-
SQL –Query command:
Invoke-SQL -Query 'DROP COLLECTION Orders {"Database": "northwind"}'
This command drops the collection Orders in the database northwind.

NosDB Administrators’ Guide - PowerShell
Copyright © 2005-2017 Alachisoft | 30
Indexes
10.1. Create Index
Similar to collections, indexes can be created using CREATE statement.
This command creates an index ProductIndex on database northwind and collection Products, where the attribute
for the index is ProductID, sorted in ascending order.
Invoke-SQL -Query 'CREATE INDEX ProductIndex {"Database": "northwind", "Collection": "products", "Attributes": {"Attribute": "ProductID", "SortOrder": "ASC"}, "CachePolicy": "None"}'
10.2. Drop Index
This command drops the index ProductIndex from the collection Products in database northwind.
Invoke-SQL -Query 'DROP INDEX ProductIndex {"Database": "northwind", "Collection": "products"}'
CLR Triggers
Before proceeding with creating triggers, please refer to the in-depth explanation and requirements of CLR
Triggers in Conceptual Guide.
11.1. Create Trigger
Similar to collections, triggers can be created using CREATE statement. This command creates a preupdate trigger
on the collection Products in database northwind, with the specified class and assembly containing the
implementation for the trigger action.
Invoke-SQL -Query ' CREATE TRIGGER {"Database": "northwind", "Collection": "products", "DeploymentID": "myTrigger", "AssemblyFile": "F:\Projects\myTrigger\myTrigger\bin\Debug\myTrigger.dll", "ClassName": "myTrigger.Trigger", "TriggerActions": ["preupdate"]}'
11.2. Drop Trigger
This command drops any trigger in the collection products of database northwind.
Invoke-SQL -Query 'DROP TRIGGER {"Database": "northwind", "Collection": "products"}'
NosDB Administrators’ Guide - PowerShell
Copyright © 2005-2017 Alachisoft | 31
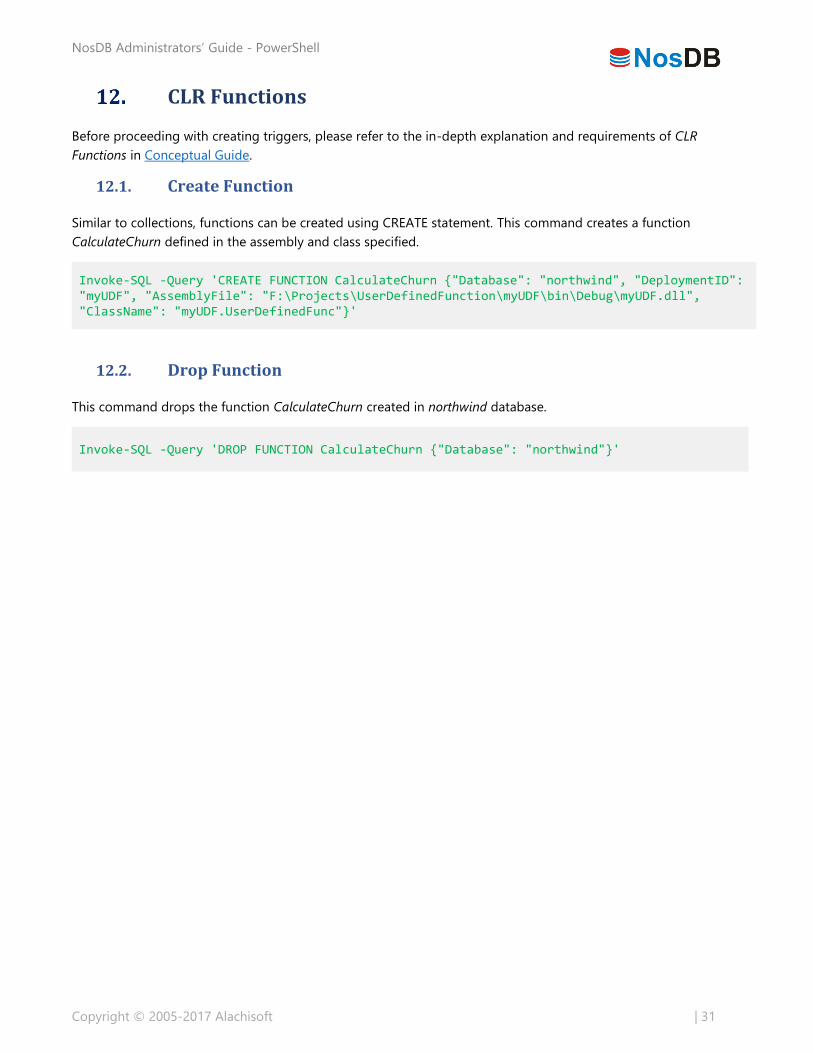
CLR Functions
Before proceeding with creating triggers, please refer to the in-depth explanation and requirements of CLR
Functions in Conceptual Guide.
12.1. Create Function
Similar to collections, functions can be created using CREATE statement. This command creates a function
CalculateChurn defined in the assembly and class specified.
Invoke-SQL -Query 'CREATE FUNCTION CalculateChurn {"Database": "northwind", "DeploymentID": "myUDF", "AssemblyFile": "F:\Projects\UserDefinedFunction\myUDF\bin\Debug\myUDF.dll", "ClassName": "myUDF.UserDefinedFunc"}'
12.2. Drop Function
This command drops the function CalculateChurn created in northwind database.
Invoke-SQL -Query 'DROP FUNCTION CalculateChurn {"Database": "northwind"}'

NosDB Administrators’ Guide - PowerShell
Copyright © 2005-2017 Alachisoft | 32
Data Expiration Enormous datasets of rapidly increasing volume often contain data that can become void or stale after a period of
time. Such nature of data requires that it is expired on a regular basis to enhance transactions of the database with
relevant data. For example, expiration aids in maintaining sessions. A session can be expired by setting expiration
on a DateTime-specific field like sessionCreated. If the difference between current time and sessionCreated is
greater than the session duration, the session can be expired.
Hence, incorporating data expiration in a large scale NoSQL database like NosDB results in optimized performance
on account of the following factors:
Network traffic is lowered as transaction load is specific to a certain time duration. For example, let’s
suppose new logs are generated with the start of any activity. There is no need to fetch the logs from the
previous activity, thus they can be expired.
Memory consumption is regulated as the stale data is removed periodically. For example, expiration can be
enabled for a system set to record video for a 5 hours duration. NosDB will then automatically remove the
data which was recorded more than 5 hours ago, freeing memory for the next batch.
Eliminates need to write code for carrying out expiration, as NosDB offers simple GUI and DDL querying
based expiration management.
Expiration Interval vs. Cleanup Interval
Note that there is difference in expiration of data and actual deletion (“clean up”) of the data from the database.
NosDB provides expiration interval at collection level and cleanup interval at database level. An index is maintained
internally on the specified field to keep track of the documents that need to be expired after every expiration interval.
Once expired, a background thread executes after a configurable interval (default is 60 seconds) that deletes expired
documents. This is the cleanup interval. There may be a delay between when a document is expired and when it is
actually removed from the database.
Cleanup Interval > Expiration Interval
While a document might be expired, there is possibility that it has not been removed from the database (cleanup
interval is greater than expiration interval). For example, expiration interval is set to 30 seconds, while the cleanup
interval is 60 seconds. Hence, 30 seconds after insertion of the document, it gets expired from the collection but
still hasn’t been cleaned up from the database. Therefore, it can still entertain retrieval operations till cleanup interval
is completed. Note that this also means that the lifespan of the document is actually [Expiration Interval +
Remaining Cleanup Interval] in the database.
Expiration Interval > Cleanup Interval
Similarly, if expiration interval is 60 seconds and cleanup interval 30 seconds, the deletion of data from the database
will only take place after the cleanup interval which succeeds the expiration interval. This can also result in an overlap,
as shown in Figure 1.

NosDB Administrators’ Guide - PowerShell
Copyright © 2005-2017 Alachisoft | 33
Figure 1. Expiration Interval vs. Cleanup Interval
13.1. Expiration Properties NosDB expiration has the following properties:
13.1.1. Expiration Types Interval Based: A time duration in minutes/seconds is specified while enabling expiration. The document will
automatically expire once the specified time has elapsed since the indexed field value.
Absolute Time: Upon specifying expiration interval as 0, the expiration strategy compares field value with
the current time and expires the document accordingly.
13.1.2. Document Specific If a document does not contain the specified field, the document will never expire.
If a specified field is an array of date field, the item will be expired based on the lowest value in array.
13.1.3. Execution Preference Expiration of documents will only take place on the primary node of a shard.
Expiration is performed by a background thread.
13.1.4. Monitoring Number of documents expired can be monitored from a PerfMon counter "Expiration Count".

NosDB Administrators’ Guide - PowerShell
Copyright © 2005-2017 Alachisoft | 34
13.1.5. Limitations
Expiration strategy cannot be configured on capped collections.
If the indexed field is not a date field, the document will never expire.
Expiration strategy can only be created on date fields (value of these fields must match a certain DateTime
format). These are single field indexes.
Supported DateTime Formats
M/d/yyyy h:mm:ss tt M/dd/yyyy hh:mm
M/d/yyyy h:mm tt dd-MM-yy
MM/dd/yyyy hh:mm:ss dd/mm/yyyy
M/d/yyyy h:mm:ss dd/MM/yyyy HH:mm:ss
M/d/yyyy hh:mm tt yyyy-MM-dd
M/d/yyyy hh tt yyyy-MM-dd HH:mm:ss
M/d/yyyy h:mm yyyy-MM-ddTHH:mm:ssK
MM/dd/yyyy hh:mm yyyy-MM-ddTHH:mm:sszzz
dd-MM-yyyy
13.2. Enabling Expiration
Create Database
Expiration Interval can be specified at database level:
CREATE COLLECTION Orders {"Database": "northwind", "CollectionType": "Normal", "PrimaryKey": [{"Field": "OrderID"}], "Expiration": {"ExpirationEnabled": true, "ExpirationField": "OrderDate", "ExpireAfter": "10min"}}
Create Collection
Expiration can be enabled through DDL querying while creating collections.
CREATE COLLECTION Orders {"Database": "northwind", "CollectionType": "Normal", "PrimaryKey": [{"Field": "OrderID"}], "Expiration": {"ExpirationEnabled": true, "ExpirationField": "OrderDate", "ExpireAfter": "10min"}}
Alter Collection
The expiration interval can be altered through the ALTER statement:
ALTER COLLECTION Orders {"Expiration": {"ExpirationEnabled": true, "ExpirationField": "OrderDate", "ExpireAfter": "5min"}}
NosDB Administrators’ Guide - PowerShell
Copyright © 2005-2017 Alachisoft | 35

NosDB Administrators’ Guide - PowerShell
Copyright © 2005-2017 Alachisoft | 36
Alachisoft
Configuring Security NosDB Administrators’ Guide - PowerShell

NosDB Administrators’ Guide - PowerShell
Copyright © 2005-2017 Alachisoft | 37
Security Concepts
In This Chapter:
Authentication
Roles
14.1. Logins
Logins facilitate authentication in a system. Authentication includes the process of validating if a user has access to
the system on the basis of an authentication mechanism. This is the first step in ensuring security in NosDB.
NosDB provides two types of authentication mechanisms:
Windows Authentication
This includes a challenge-response based model involving Microsoft Active Directory for the users of a local system,
domain or workgroup. If a user belongs to the domain and a registered login of NosDB, he/she is authenticated to
access NosDB. The following factors should be kept in mind:
For a local machine account in domain environment, the client, configuration service and database service
must be running on the same node.
For a local machine account in workgroup environment, the account must be registered.
NosDB Authentication
This is similar to the SQL Server Authentication in SQL Server, which consists of a custom username-password
authentication model. The credentials for NosDB authentication will be either passed through the connection
string, or as parameters of the API and tools in an encrypted format. By default, the user admin is created, of
which the password is specified during installation.
For any server-side deployments, make sure that NosDB authentication is used or the services
(NosDBSvc and NosConfSvc) are being run from the account which is logged on.
14.2. Roles and Users
A role is a set of operations that can be assigned to a user to define his/her responsibilities. In other words, a user
is created once a role has been granted to a registered login in NosDB. An operation is the utilization of a resource
to demonstrate certain behaviors by the user. NosDB provides a set of built-in roles with varying levels of granularity:
14.2.1. Database Roles
Database Roles
db_datareader A user with the db_datareader role can perform only read operations
on the database. The db_datareader role is owned by db_user.
NosDB Administrators’ Guide - PowerShell
Copyright © 2005-2017 Alachisoft | 38
db_datawriter
A user with the db_datawriter role can perform only write
(INSERT/UPDATE/DELETE) operations on the database. The
db_datawriter role is owned by db_user.
db_user A user with the db_user role can perform read and write operations on
the database.
db_admin
A user with the db_admin role can CREATE, DROP or ALTER a
collection/index/stored procedure/CLR function/CLR trigger in NosDB.
In addition, a db_admin can also GRANT and REVOKE roles to/from a
user on the database.
db_owner
A user with the db_owner role can perform all managerial operations
on the database as performed by the db_admin, along with having the
authorization to DROP the database.
14.2.2. Cluster Roles
Cluster Roles
dbcreator
A user with the dbcreator role can perform any data definition (DDL) operation on the databases, like CREATE, DROP or ALTER databases over the cluster.
clustermanager A user with the clustermanager role can perform start/stop operations on the shards and nodes of the cluster.
clusteradmin
A user with the clusteradmin role can GRANT and REVOKE roles over the cluster and can perform managerial operations on the cluster like adding and removing the shards and nodes of the cluster.
14.2.3. Server Roles
Server Roles
securityadmin A user with the securityadmin role can perform any data definition
(DDL) operation on the users, like CREATE, DROP or ALTER users.
sysadmin A user with the sysadmin role can perform any operation on the
NosDB server, including cluster and database managerial operations.
distributor The distributor is a special role, used only for the distributor service. A
distributor is only authorized to distribute client operations.
14.2.4. Custom Roles
NosDB provides the flexibility of defining custom roles for users which grant a customized set of varying operation
permissions to a user. Custom roles have database level scope, meaning the custom role can only be created on or
can have permissions on databases only.
The process of creating and granting custom roles requires the following privileges:
1. The custom role is created by the clusteradmin.
NosDB Administrators’ Guide - PowerShell
Copyright © 2005-2017 Alachisoft | 39
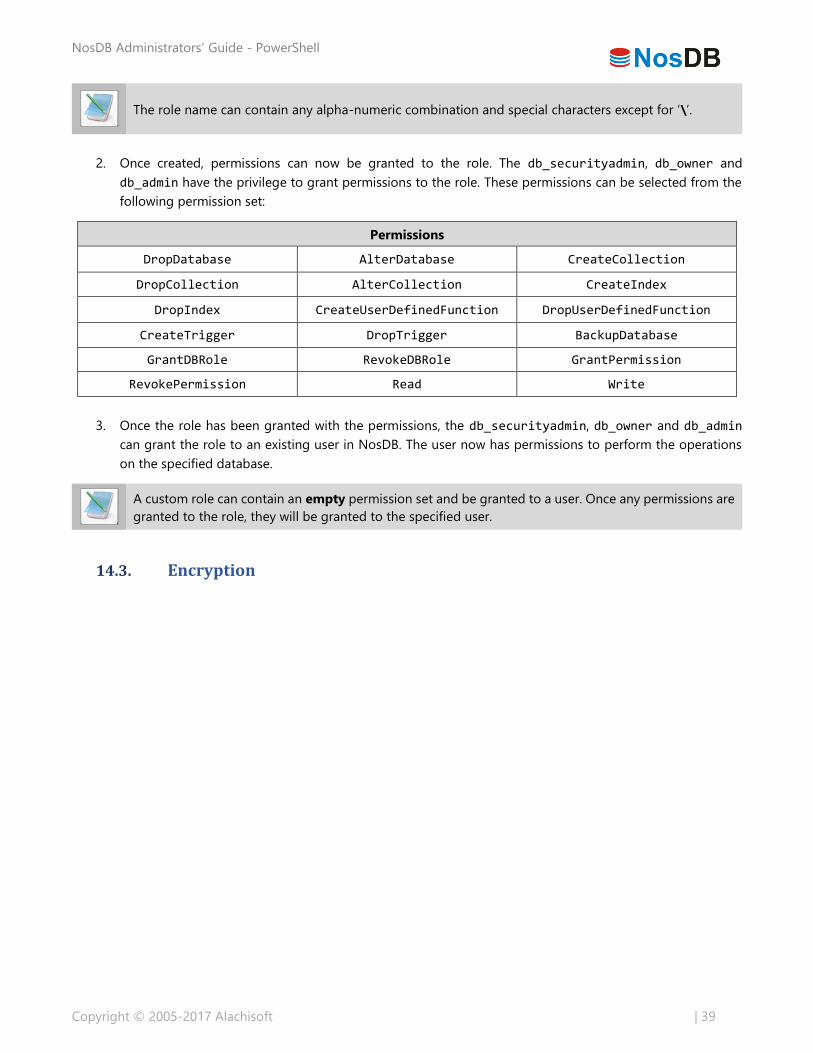
The role name can contain any alpha-numeric combination and special characters except for ‘\’.
2. Once created, permissions can now be granted to the role. The db_securityadmin, db_owner and
db_admin have the privilege to grant permissions to the role. These permissions can be selected from the
following permission set:
Permissions
DropDatabase AlterDatabase CreateCollection
DropCollection AlterCollection CreateIndex
DropIndex CreateUserDefinedFunction DropUserDefinedFunction
CreateTrigger DropTrigger BackupDatabase
GrantDBRole RevokeDBRole GrantPermission
RevokePermission Read Write
3. Once the role has been granted with the permissions, the db_securityadmin, db_owner and db_admin
can grant the role to an existing user in NosDB. The user now has permissions to perform the operations
on the specified database.
A custom role can contain an empty permission set and be granted to a user. Once any permissions are
granted to the role, they will be granted to the specified user.
14.3. Encryption

NosDB Administrators’ Guide - PowerShell
Copyright © 2005-2017 Alachisoft | 40
Encryption makes data undecipherable using a key and password to render it useless without that key. Hence NosDB
provides encryption to enhance the security of data; any data added to the database collection will be encrypted,
and will be of no use unless the key is available to decrypt.
NosDB encryption implements the Data Encryption Key (DEK) and Master Key model. The DEK is determined through
the encryption provider specified by the user. The encryption provider is an encryption standard, either 3DES or
AES. This DEK is used to encrypt the data before it is written to the store.
Moreover, further security is established by encrypting the Data Encryption Keys through the master key. To
encrypt/decrypt the DEKs, the user creates a master key for NosDB by specifying a password for the master key.
Using that password, NosDB gets a master key from DPAPI (Data Protection Application Programming Interface)
and stores it with the DEK in encrypted form in the configuration store to be later used to encrypt and decrypt the
Data Encryption Keys. The master key is encrypted through DPAPI as well.
NosDB provides the flexibility to choose from any of the built-in encryption providers to configure encryption at
database level:
3DES_128
3DES_192
AES_128
AES_192
AES_256
Encryption can be configured and enabled at runtime. However, the encryption provider cannot be reconfigured
once it is specified. Note that encryption is configured at the database level and enabled at a collection level. This
means while the provider is configured on the database, encryption will need to be enabled individually on each
desired collection.
Any existing data in the collection will not be encrypted unless it is updated after encryption is enabled.
Any data added after encryption is enabled will be encrypted by default.
NosDB supports document level encryption - complete document is encrypted.
Encryption Process
1. Using DDL query, the master key is created from a user specified password.
2. A Database Encryption Key is automatically generated when the encryption provider is configured using
NosDB Management Studio or DDL query. This DEK will be used to encrypt the data, while the master key
encrypts the key.
3. Once the encryption provider is configured, encryption can be enabled and disabled on the collection.
NosDB Administrators’ Guide - PowerShell
Copyright © 2005-2017 Alachisoft | 41
Logins
In This Chapter:
Add Login
Get Logins
Drop Login
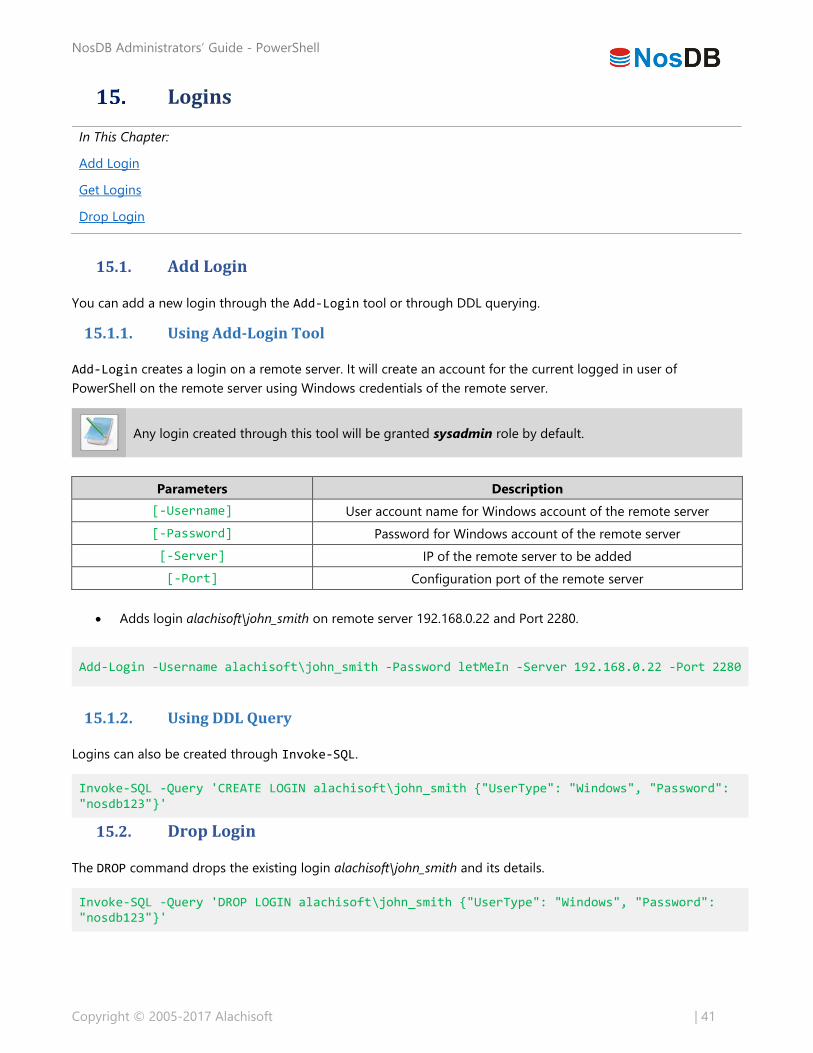
15.1. Add Login
You can add a new login through the Add-Login tool or through DDL querying.
15.1.1. Using Add-Login Tool
Add-Login creates a login on a remote server. It will create an account for the current logged in user of
PowerShell on the remote server using Windows credentials of the remote server.
Any login created through this tool will be granted sysadmin role by default.
Parameters Description
[-Username] User account name for Windows account of the remote server
[-Password] Password for Windows account of the remote server
[-Server] IP of the remote server to be added
[-Port] Configuration port of the remote server
Adds login alachisoft\john_smith on remote server 192.168.0.22 and Port 2280.
Add-Login -Username alachisoft\john_smith -Password letMeIn -Server 192.168.0.22 -Port 2280
15.1.2. Using DDL Query
Logins can also be created through Invoke-SQL.
Invoke-SQL -Query 'CREATE LOGIN alachisoft\john_smith {"UserType": "Windows", "Password": "nosdb123"}'
15.2. Drop Login
The DROP command drops the existing login alachisoft\john_smith and its details.
Invoke-SQL -Query 'DROP LOGIN alachisoft\john_smith {"UserType": "Windows", "Password": "nosdb123"}'
NosDB Administrators’ Guide - PowerShell
Copyright © 2005-2017 Alachisoft | 42
Roles and Users
In This Chapter:
Cluster Roles
Database Roles
16.1. Server Roles
Server roles offer the most privileges as they are applied across the system. These roles include DDL operations on
users and all administrative cluster and database operations. Server roles include:
1. securityadmin
2. sysadmin
3. distributor
For in-depth explanation of these roles, please refer to Server Roles in Security Concepts.
Grant Roles
This command grants a securityadmin role to the login alachisoft\john_smith registered on the system. This creates
a user with the securityadmin privileges.
Invoke-SQL -Query 'GRANT securityadmin ON system TO ''alachisoft\john_smith'''
Revoke Roles
This command revokes the role securityadmin from the login alachisoft\john_smith on the system the user is
logged on.
Invoke-SQL -Query 'REVOKE securityadmin ON cluster FROM ''alachisoft\john_smith'''
16.2. Cluster Roles
A cluster user with cluster-wide security privileges is created if a registered login is granted with cluster roles.
Cluster roles include:
dbcreator
clustermanager
clusteradmin
For in-depth explanation of these roles, please refer to Cluster Roles in Security Concepts.
Internally, the cluster name is stored as “cluster”. Hence, make sure the cluster name is “cluster” while
configuring roles.
NosDB Administrators’ Guide - PowerShell
Copyright © 2005-2017 Alachisoft | 43
Grant Roles
This command grants a clusteradmin role to the login alachisoft\john_smith registered on the cluster. This creates
a user with the clusteradmin privileges.
Invoke-SQL -Query 'GRANT clusteradmin ON cluster TO ''alachisoft\john_smith'''
Revoke Roles
This command revokes the role clusteradmin from the login alachisoft\john_smith on the cluster the user is logged
on.
Invoke-SQL -Query 'REVOKE clusteradmin ON cluster FROM ''alachisoft\john_smith'''
16.3. Database Roles
Database roles grant database wide security privileges to a user. Database roles include:
1. db_datareader
2. db_datawriter
3. db_user
4. db_admin
5. db_owner
Internally, the cluster name is stored as “cluster”. Hence, make sure the cluster name is “cluster” while
configuring roles.
Grant Roles
This command grants a db_admin role to the login alachisoft\john_smith on the database northwind, creating a
database user.
Invoke-SQL -Query 'GRANT db_admin ON cluster.northwind TO ''alachisoft\john_smith'''
Revoke Roles
This command revokes the db_admin role from the login alachisoft\john_smith on the database northwind.
Invoke-SQL -Query 'REVOKE db_admin ON cluster.northwind FROM ''alachisoft\john_smith'''

NosDB Administrators’ Guide - PowerShell
Copyright © 2005-2017 Alachisoft | 44
16.4. Custom Roles
Create Role
The CREATE statement can be used to create a role within the cluster or database context. Make sure you are
connected to the database cluster.
The role name can contain any alpha-numeric combination and special characters except for ‘\’.
The following command creates a role “CustomDropRole” which will be granted all DROP command permissions.
Invoke-SQL -Query 'CREATE ROLE CustomDropRole'
Grant Permissions To Role
Once the role is created, the db_securityadmin can grant permissions to the role from the provided permission
set. The following example grants all DROP permissions to the role like DROP DATABASE, DROP COLLECTION and
DROP INDEX. Any user granted with this role can perform drop operations.
Invoke-SQL -Query 'GRANT dropdatabase, dropcollection, dropindex ON cluster.northwind TO CustomDropRole'
Similarly, the permissions can be revoked from the role using the REVOKE statement.
Invoke-SQL -Query 'REVOKE dropdatabase, dropcollection, dropindex ON cluster.northwind FROM CustomDropRole'
Grant Role to Login
Once permissions are granted to a role, the role can be assigned to a user:
Invoke-SQL -Query 'GRANT CustomDropRole ON cluster.northwind TO ''alachisoft\john_smith'''

NosDB Administrators’ Guide - PowerShell
Copyright © 2005-2017 Alachisoft | 45
Alachisoft
Database Administration NosDB Administrators’ Guide - PowerShell

NosDB Administrators’ Guide - PowerShell
Copyright © 2005-2017 Alachisoft | 46

NosDB Administrators’ Guide - PowerShell
Copyright © 2005-2017 Alachisoft | 47
Encryption
17.1. Create Master Key
Create Master Key from the user specified password.
Invoke-SQL -Query 'CREATE MASTER KEY BY PASSWORD = ''12345678'''
17.2. Configuring Encryption
Make sure that the MASTER KEY has been created before proceeding to configure and enable
encryption.
Configure the encryption provider during database creation.
Invoke-SQL -Query 'CREATE DATABASE Northwind {"Encryption": {"Encryptionprovider": "AES_128"}}'
Or, you can specify it later by altering the database properties.
Invoke-SQL -Query 'ALTER DATABASE Northwind {"Encryption": {"Encryptionprovider": "AES_128"}}'
17.3. Enabling Encryption
Enable encryption during collection creation so that any data added to it will be encrypted from the start.
Invoke-SQL -Query 'CREATE COLLECTION Products {"Database": "Northwind", "Encryption" :{"Enabled": true}}'
If a collection already exists, encryption can be enabled/disabled on run-time as well. Any data added after
encryption is enabled will be encrypted by default.
Note that any existing data in the collection will not be encrypted, unless it is updated after encryption
is enabled.
This command enables encryption on the Products collection in Northwind database over which the
encryption provider has been already configured.
Invoke-SQL -Query 'ALTER COLLECTION Products {"Database": "Northwind", "Encryption" :{"Enabled": true}}'

NosDB Administrators’ Guide - PowerShell
Copyright © 2005-2017 Alachisoft | 48
This command disables encryption on the Products collection in Northwind database over which
encryption provider has been configured.
Invoke-SQL -Query 'ALTER COLLECTION Products {"Database": "Northwind", "Encryption" :{"Enabled": false}}'
Backup Database
Before creating backups for the database, please refer to the in-depth explanation and requirements of Backup and
Restore in Conceptual Guide.
18.1. Distributed vs. Consolidated Storage
Backups can be made to store a copy of the source database to a new location on either configuration:
Distributed: Creates backup of each shard to a specified location on the primary node of the respective
shard. For example, D:\database\NosDBbackups.
The location specified for backup must be valid for all primary nodes of each shard.
Consolidated: Creates a backup of all the shards sequentially on a shared location. For example,
//server1/backups.
Make sure that NosDB Database service (NosDBSvc) and NosDB Configuration service (NosConfSvc)
have write access on the location.
18.2. Backup Database
NosDB automatically detects whether the backup is distributed or consolidated, based on the Path provided. Make
sure that if the domain IP is being provided, it is in the format “xx-xxx-xx-xx”.
Invoke-SQL -Query 'BACKUP DATABASE northwind {"Path": "\\server1\Backups", "BackupType": "Full", "UserName": "domain1\john", "Password": "admin1234"}'
The backup is created in the specified location in a folder named with the format databasename-timestamp-status.
For example, for a complete backup made on the database northwind, the folder is created with the name
“northwind-20160621161706536-completed”.
In case the backup job fails due to any unexpected failure, there might be some shards showing the status
“completed”, while others might still be named with the status “in-progress”. This helps in distinguishing whether the
backup was fully made or not.
NosDB Administrators’ Guide - PowerShell
Copyright © 2005-2017 Alachisoft | 49
Restore Database
Before restoring the database, please refer to the in-depth explanation and requirements of Backup and Restore in
Conceptual Guide.
Similar to backup, the restoration from distributed or consolidated is determined by the path of the backed up
database provided.
Invoke-SQL -Query 'RESTORE DATABASE northwind_restored {"Path": "\\server1\Backups\northwind-20160624162210440-completed", "UserName": "domain1\john", "Password": "admin1234", "SourceDatabase": "northwind"}'
Get Task Information
This feature is only available in NosDB OpenSource Edition.
Since the backup and restore tasks are non-blocking, you can carry on other tasks while the database is backed up
or restored. Get-TaskInfo fetches and displays the current status of the backup and restore jobs being performed.
Parameters Description Default Value
[-ShowHistory] Flag to show task information for all tasks executed. false
Examples:
This command shows task information for the current running task.
Get-TaskInfo
This command shows task information for all tasks that have been executed.
Get-TaskInfo -ShowHistory
NosDB Administrators’ Guide - PowerShell
Copyright © 2005-2017 Alachisoft | 50
Import Data
In This Chapter:
Import CSV Data
Import JSON Data
NosDB PowerShell allows importing data from a JSON or CSV file to a collection. Moreover, the client has the facility
to update the data if any data with the same key exists in the collection.
Importing Data into NosDB
Import-Data imports data from the specified file into the specified collection. This command only works in the
context of the specified database. Note that for CSV Import, additional parameters are required like TextQualifier,
ColumnDelimiter and RowDelimiter, which are explained further in the section Import CSV Data.
PS NosDB:\cluster\databases\[database-name]>
Parameters Description Default Value
[-Path]* Location of the input file to be imported -
[-Format]* Format of data in the input file -
[-CollectionName]* Name of the NosDB collection into which data
is to be imported. -
[-Overwrite] Specifies whether the existing data is to be
overwritten or not. False
[-ReportCount] Report interval in terms of imported rows. No
status printed if -Verbose is not specified. 1000
21.1. Import CSV Data
Preconditions
Before importing CSV to a NosDB collection, consistency has to be ensured between the format of data in the CSV
file and JSON collection format. Hence, a CSV file import requires taking the following guidelines into consideration:
1. The header and its corresponding value should not mismatch as NosDB will populate the collection
according to the provided format.
2. The format of any date specified within the CSV should comply with ISO 8601 (YYYY-MM-DD). Any other
format of date will be treated as string.
3. Since CSV is schema-independent, the system is actually “guessing” the datatypes while importing it into
the collection. Hence, a numerical value specified as a string will be treated as string in the collection, which
might lead to inconsistency.

NosDB Administrators’ Guide - PowerShell
Copyright © 2005-2017 Alachisoft | 51
4. Any attribute named “_key” in the CSV will be treated as the document key by default. If no such attribute
exists, NosDB will generate the document key automatically.
How to create CSV data from SQL Server
NosDB allows creating CSV data from data stored in SQL Server 2012 and 2016.
Export each table in SQL Server into CSV format as explained in the SQL Server Documentation with the
following configurations:
o Text Delimiter: double-quote (“”)
o Column Delimiter: TAB
o Row Delimiter: {CR} {LF}
Import the CSV files into NosDB through Import-Data:
Import-Data -Format CSV -Path 'D:\SQLServerData\product.csv' -CollectionName "Products" –TextQualifier '"' -ColumnDelimiter TAB –RowDelimiter CRLF
Different CSV Options
Apart from the aforementioned parameters, the NosDB supports importing data with varying delimiters and
qualifiers.
Parameters Description Default Value
[-TextQualifier]
Specifies additional qualifier identifying text
fields, such as single quote (“’”) or double
quote (‘“’).
-
[-ColumnDelimiter] Delimiter for column. Possible values:
TAB, CRLF, CR, LF, “;”, “,”, “|” “,”
[-RowDelimiter] Delimiter for row. Possible values:
TAB, CRLF, CR, LF, “;”, “,”, “|” CRLF
Examples
Imports CSV file products.csv into collection Products with default reporting interval, i.e. 1000, no text
qualifier, default column delimiter (“,”), default row delimiter (CRLF) and overwriting of existing rows
disabled.
Import-Data -Format CSV -Path 'D:\Northwind\products.csv' -CollectionName "Products"
Imports CSV file products.csv into collection Products with reporting interval of 2000 rows, specified text
qualifier (‘”’), specified column delimiter (TAB), and row delimiter (CRLF). Existing rows with same
document ID will be overwritten.

NosDB Administrators’ Guide - PowerShell
Copyright © 2005-2017 Alachisoft | 52
Import-Data -Format CSV -Path 'D:\Northwind\product.csv' –TextQualifier '"' -ColumnDelimiter TAB –RowDelimiter CRLF -ReportCount 2000 -Overwrite
21.2. Import JSON Data
Since data is stored in the collection in JSON format, the data export from JSON to JSON is smooth and requires
no special limitations except that the JSON file being provided is an array of JSON documents.
Examples:
Imports JSON file products.json into collection Products with default reporting interval, i.e. 1000 and
overwriting of existing rows disabled.
Import-Data -Format JSON -Path 'D:\Northwind\products.json' -CollectionName "Products"
Imports JSON file products.json into collection Products with default reporting interval, i.e. 1000 and where
existing rows with same document ID will be overwritten.
Import-Data -Format JSON -Path 'D:\Northwind\products.json' -CollectionName "Products" -Overwrite
How to create JSON data from SQL Server
Importing Data from SQL Server 2012
For SQL Server versions 2012 and prior, JSON export is not supported. Thus, in case your source data is stored in a
SQL Server 2012 database, you can export the tables into CSV format, convert them to JSON format and then import
the JSON files into NosDB.
Export each table in SQL Server into CSV format as explained in the SQL Server Documentation with the
same configurations as explained in CSV Import.
This CSV file can now be converted to JSON format using the online converter CSVJSON.
Your SQL Server tables as JSON can now be easily imported into NosDB through Import-Data.
Import-Data -Format JSON -Path 'D:\SQLServerData\product.json' -CollectionName "Products"
Importing Data from SQL Server 2016
SQL Server 2016 allows exporting the tables directly into JSON format, which is NosDB compliant. Hence, if you
wish to import your SQL Server 2016 data into NosDB, you can do so by exporting the data into JSON format from
SQL Server, and then importing the JSON files according to the aforementioned steps.
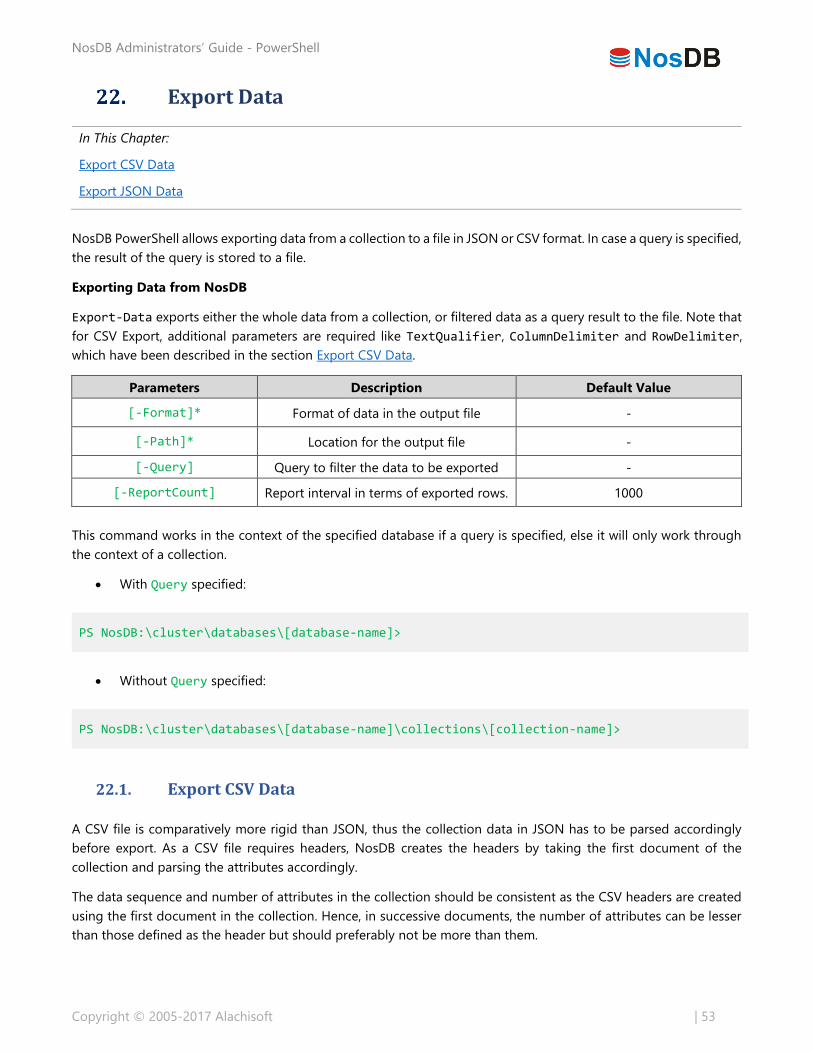
NosDB Administrators’ Guide - PowerShell
Copyright © 2005-2017 Alachisoft | 53
Export Data
In This Chapter:
Export CSV Data
Export JSON Data
NosDB PowerShell allows exporting data from a collection to a file in JSON or CSV format. In case a query is specified,
the result of the query is stored to a file.
Exporting Data from NosDB
Export-Data exports either the whole data from a collection, or filtered data as a query result to the file. Note that
for CSV Export, additional parameters are required like TextQualifier, ColumnDelimiter and RowDelimiter,
which have been described in the section Export CSV Data.
Parameters Description Default Value
[-Format]* Format of data in the output file -
[-Path]* Location for the output file -
[-Query] Query to filter the data to be exported -
[-ReportCount] Report interval in terms of exported rows. 1000
This command works in the context of the specified database if a query is specified, else it will only work through
the context of a collection.
With Query specified:
PS NosDB:\cluster\databases\[database-name]>
Without Query specified:
PS NosDB:\cluster\databases\[database-name]\collections\[collection-name]>
22.1. Export CSV Data
A CSV file is comparatively more rigid than JSON, thus the collection data in JSON has to be parsed accordingly
before export. As a CSV file requires headers, NosDB creates the headers by taking the first document of the
collection and parsing the attributes accordingly.
The data sequence and number of attributes in the collection should be consistent as the CSV headers are created
using the first document in the collection. Hence, in successive documents, the number of attributes can be lesser
than those defined as the header but should preferably not be more than them.

NosDB Administrators’ Guide - PowerShell
Copyright © 2005-2017 Alachisoft | 54
Different CSV Options
Apart from the aforementioned parameters, the NosDB supports exporting data with varying delimiters and
qualifiers.
Parameters Description Default Value
[-TextQualifier]
Specifies additional qualifier identifying
text fields, such as a single quote or
double quote
-
[-ColumnDelimiter] Delimiter for column. Possible values:
TAB, CRLF, CR, LF, “;”, “,”, “|” “,”
[-RowDelimiter] Delimiter for row. Possible values:
TAB, CRLF, CR, LF, “;”, “,”, “|” CRLF
Examples
Exports result set from the query specified on northwind database (in the context) into CSV file with
default report count, i.e. 1000 and specified text qualifier (‘”’), specified column delimiter (TAB), and row
delimiter (CRLF).
cd \cluster\databases\northwind\ Export-Data -Format CSV -Path "D:\Northwind\products.csv" –TextQualifier '"' -ColumnDelimiter TAB –RowDelimiter CRLF -Query "Select * from Products"
Exports collection products (in the context) into CSV file with default report count, i.e. 1000 and specified
text qualifier (“’”), specified column delimiter (TAB), and row delimiter (CRLF).
cd \cluster\databases\northwind\collections\products Export-Data -Format CSV -Path "D:\Northwind\products.csv" –TextQualifier "'" -ColumnDelimiter TAB –RowDelimiter CRLF

NosDB Administrators’ Guide - PowerShell
Copyright © 2005-2017 Alachisoft | 55
22.2. Export JSON Data
Since data is stored in the collection in JSON format, the data export from JSON to JSON is smooth and requires no
special limitations.
Data will be exported in the form of an array of JSON documents to the JSON file.
Examples
Exports data from collection products (in the context) into JSON file with report count set to 2000 rows.
cd \cluster\databases\northwind\collections\products Export-Data -Format JSON -Path "D:\Northwind\products.json" –ReportCount 2000 -Verbose
Exports result set from the query specified on northwind database (in the context) into JSON file with
default report count, i.e. 1000.
cd \cluster\databases\northwind\ Export-Data -Format JSON -Path "D:\Northwind\products.json" -Query "Select * from Products"
Export Cluster Configuration
NosDB PowerShell allows exporting configuration of the specified database cluster to a file in JSON format.
Export-Configuration exports the configuration to a JSON file named as clustername_timestamp.json.
Parameter Description
[-Path] Location for the output file
Export-Configuration [-Path]
Example:
Export-Data -Path ‘D:\NorthwindConfiguration’

NosDB Administrators’ Guide - PowerShell
Copyright © 2005-2017 Alachisoft | 56
Using SQL Queries
24.1. SQL Queries in PowerShell
NosDB PowerShell allows you to execute DML and DDL queries over the underlying database directly through
PowerShell. Since the DDL queries are executed through ExecuteNonQuery(), there is no result returned to the
command prompt, apart from any exceptions occurring during the execution of the query. You can perform CREATE,
DROP, ALTER, BACKUP and RESTORE queries via NosDB PowerShell. For DML queries, the result for the SELECT queries
is displayed on the console.
Commands are invoked through the Invoke-SQL command. NosDB offers two methods of executing queries
through Invoke-SQL:
Parameters Description
[-Query] Query to be executed
[-InputFile] Path of the sql file containing queries
Any parameters within the query will be passed in JSON format as explained in Programmers’ Guide.
24.2. Invoking SQL Queries
Data Definition Language (DDL) Querying
For more detail on DDL syntax and examples, refer to DDL Support in Programmers’ Guide.
1. CREATE
Invoke-SQL -Query 'CREATE DATABASE northwind {"MultiFile": false, "CacheSize":2117, "MaxCollections": 17}'
2. DROP
Invoke-SQL -Query 'DROP COLLECTION Products {"Database": "northwind"}'
3. ALTER
Invoke-SQL -Query 'ALTER DATABASE northwind {"Journal": {"FileSizeLimit": 991}}'
4. BACKUP
For Backup, NosDB automatically detects whether the backup is distributed or consolidated, based on the Path
provided. Make sure that if the domain IP is being provided, it should be in the format “xx-xxx-xx-xx”.

NosDB Administrators’ Guide - PowerShell
Copyright © 2005-2017 Alachisoft | 57
Invoke-SQL -Query 'BACKUP DATABASE northwind {"BackupType": "Full", "Path": "\\server1\Backups", "UserName": "domain1\john", "Password": "admin1234"}'
5. RESTORE
Similarly for Restore, the restoration from distributed or consolidated is determined by the path of the backed up
database provided.
Invoke-SQL -Query 'RESTORE DATABASE northwind_restored {"RestoreType": "Full", "Path": "\\server1\Backups\northwind-20160624162210440-completed", "UserName": "domain1\john", "Password": "admin1234", "SourceDatabase": "northwind"}'
Data Manipulation Language (DML) Querying
All non-query DML operations can be performed through PowerShell which include SELECT, INSERT, UPDATE
and DELETE. For more detail on DML syntax and examples, refer to DML Support in Database Programming using
NosDB .NET API.
1. SELECT
Invoke-SQL -Query 'SELECT Category.Name, Category.Description FROM Products WHERE Name = "Chai"'
2. INSERT
Invoke-SQL -Query 'INSERT INTO Products (ProductName, UnitsInStock, UnitPrice, Discontinued) VALUES ('Eggs', 23, 10.50, 'True')'
3. UPDATE
Invoke-SQL -Query 'UPDATE Orders SET "Order".OrderDetails.Discount = 1 WHERE "Order".OrderDetails.Quantity > 100'
4. DELETE
Invoke-SQL -Query 'DELETE FROM Orders WHERE $Order$.OrderDetails[0].Quantity = 100'
24.3. Invoking SQL Scripts
Invoke-SQL -inputFile "D:\SQLProjects\SQLScripts.sql"

NosDB Administrators’ Guide - PowerShell
Copyright © 2005-2017 Alachisoft | 58
Deploy Providers
NosDB PowerShell allows deploying assemblies over the server, which may include MapReduce implementations,
Triggers and UDFs.
For any server-side deployments, make sure that NosDB authentication is used or the services
(NosDBSvc and NosConfSvc) are being run from the account which is logged on.
Register-Assemblies registers the assemblies to be deployed over the server. Once registered, the assemblies
can be found in the specified folder at the location:
[InstallDir]\database\deployment.
Parameters Description
[-AssemblyPath]* File location of the assemblies to be registered
[-DependentAssemblyPath] File location of the dependent assemblies to be
registered
If there are multiple assemblies within the path, all of them will be deployed.
Register-Assemblies [–AssemblyPath] [-DependentAssemblyPath]
Example:
This command registers all assemblies located in C:\Assembly. If the dependent assemblies reside in the
same location, they will be deployed, otherwise not.
Register-Assemblies -AssemblyPath "C:\Assembly"
This command registers assemblies located in C:\Assembly and any dependent assemblies specified in
C:\Dependent.
Register-Assemblies -AssemblyPath "C:\Assembly" -DependentAssemblyPath "C:\Dependent"

NosDB Administrators’ Guide - PowerShell
Copyright © 2005-2017 Alachisoft | 59
Convert Standalone to Clustered Database
NosDB offers the flexibility of converting a standalone database into a clustered database through the Hash Based
Distribution Strategy.
Before converting a standalone database to clustered database, the following pre-conditions must be fulfilled:
The entire cluster must be running during conversion.
The standalone database must exist on a node which is the primary node of any shard in the cluster.
No client operations are to be performed during the conversion, as state transfer is taking place.
To convert a stand-alone database to clustered, switch context to the specified standalone database in NosDB
PSDrive.
PS NosDB:\standalone\databases\[database-name]>
ConvertTo-ClusteredDatabase converts the standalone database into a clustered database, given that the
aforementioned pre-conditions have been fulfilled.
Parameters Description Default Value
[-ClusterConfigServer] IP of the active node in the running service First node IP resolved by DNS
[-Port] Port of the active node in the running service 9950
[-NewDatabaseName] The database name after conversion Standalone database name
ConvertTo-ClusteredDatabase [-ClusterConfigServer] [-Port] [-NewDatabaseName]
Examples:
Converts a standalone database to the clustered database CastleBlack on the default port 9950 and first
node IP resolved by the DNS as the configuration server IP.
ConvertTo-ClusteredDatabase -NewDatabaseName CastleBlack
Converts a standalone database to the clustered database CastleBlack on the specified port 2188 and
configuration server 192.168.1.125.
ConvertTo-ClusteredDatabase -ClusterConfigServer 192.168.1.125 -Port 2188 -NewDatabaseName CastleBlack

NosDB Administrators’ Guide - PowerShell
Copyright © 2005-2017 Alachisoft | 60
Move Collection within Shards
NosDB PowerShell allows moving either single-sharded or capped collections within the shards, as they are
contained within a single shard. Normal collections are not moved as they reside on various shards.
Move-Collection moves the collection to the specified shard. This command only works in the context of a single
sharded or capped collection in NosDB PSDrive.
PS NosDB:\cluster\databases\[database-name]\collections\[collection-name]>
Parameter Description
[-NewShard] Name of shard on which the collection will be moved
Move-Collection [–NewShard]
Examples:
Moves the collection into shard1.
Move-Collection shard1
If the name of the shard includes any special characters, specify the name within single quotes.
Move-Collection ‘shard-1’
Get NosDB Version Information
Get-NosDBVersion returns details about the currently installed version of NosDB. The following is displayed:
Utility version
Copyright
Registered User details (provided during installation)
Edition
Evaluation period
Get-NosDBVersion

NosDB Administrators’ Guide - PowerShell
Copyright © 2005-2017 Alachisoft | 61
Alachisoft
Database Monitoring NosDB Administrators’ Guide - PowerShell

NosDB Administrators’ Guide - PowerShell
Copyright © 2005-2017 Alachisoft | 62
NosDB Counters
Performance counters provide valuable information about system hardware, services, networks and applications
that can be used to determine their performance. It helps in diagnosing problems, fine-tuning systems and
applications, monitoring real-time application performance and resolving bottleneck cause of system components.
Performance counters can be viewed from PerfMon and NosDB Monitor (in Enterprise Edition). The Statistics view
in NosDB Management Studio is also used to view the performance statistics of a database or a shard in Enterprise
Edition.
Performance Counters
Counter Description
Fetches/sec Number of successful Get operations per second.
Inserts/sec Number of successful Insert operations per second.
Updates/sec Number of successful Update operations per second.
Deletes/sec Number of successful Delete operations per second.
Cache Hits/sec Number of successful Get operations from cache per second.
Cache Misses/sec Number of failed Get operations from cache per second.
Cache Evictions/sec Number of documents evicted from cache per second.
Requests/sec Number of requests being processed per second.
Journaled Operations Number of the operations present in Journal.
Cache Count Number of documents in the cache.
Cache Size Size of the cache in bytes.
Average Update Time Average time in microseconds taken to complete one update operation.
Average Insert Time Average time in microseconds taken to complete one insert operation.
Average Delete Time Average time in microseconds taken to complete one delete operation.
Average Fetch Time Average time in microseconds taken to complete one fetch operation.
Average Query Execution Time Average time in microseconds taken to complete execution of a query.
Average Document Size Average size of documents in bytes.
Database Size Size of the current database in bytes.
Documents Count Number of documents in the database.
Documents Persisted/second Number of documents persisted to store per second.
Pending Replicated Documents Number of pending documents in primary node which are yet to be
replicated.
Pending Persistent Documents Number of documents which are yet to be persisted to store.
MapReduce Running Tasks Number of tasks in execution state at a time.
MapReduce Waiting Tasks Number of tasks in waiting state when the maximum running tasks limit
for execution has been reached.
MapReduce Mapped/sec Number of keys mapped per second in running tasks.

NosDB Administrators’ Guide - PowerShell
Copyright © 2005-2017 Alachisoft | 63
MapReduce Reduced/sec Number of keys reduced per second in running tasks.
MapReduce Combined/sec Number of keys combined per second in running tasks.
Expiration Count Number of documents being expired.
Debug Counters
Counter Description
State transfer/sec Number of documents the current node is either reading from other
nodes or sending to other nodes during a state transfer mode.
Data Balance/sec Number of items the current node is either reading from other nodes or
sending to other nodes during a Data Load Balancing mode.
Windows Performance Monitor
NosDB publishes cache server counters in PerfMon under category NosDB. This category has all the counters related
to the cache server. Follow the steps given below to monitor the NosDB counters through PerfMon tool:
Click on the Windows Start menu, type PerfMon and press ENTER.
PerfMon tool opens up. Click on the Performance Monitor under Monitoring Tools.
Click on the cross (X) button to remove the default counter which is already added to it.
Click on the plus (+) button to open the Add Counters dialog box.

NosDB Administrators’ Guide - PowerShell
Copyright © 2005-2017 Alachisoft | 64
Using the vertical slider of available counters list box, scroll upward to find NosDB category.
Click on the down arrow head icon to expand the NosDB category. All of its counters are listed under it.
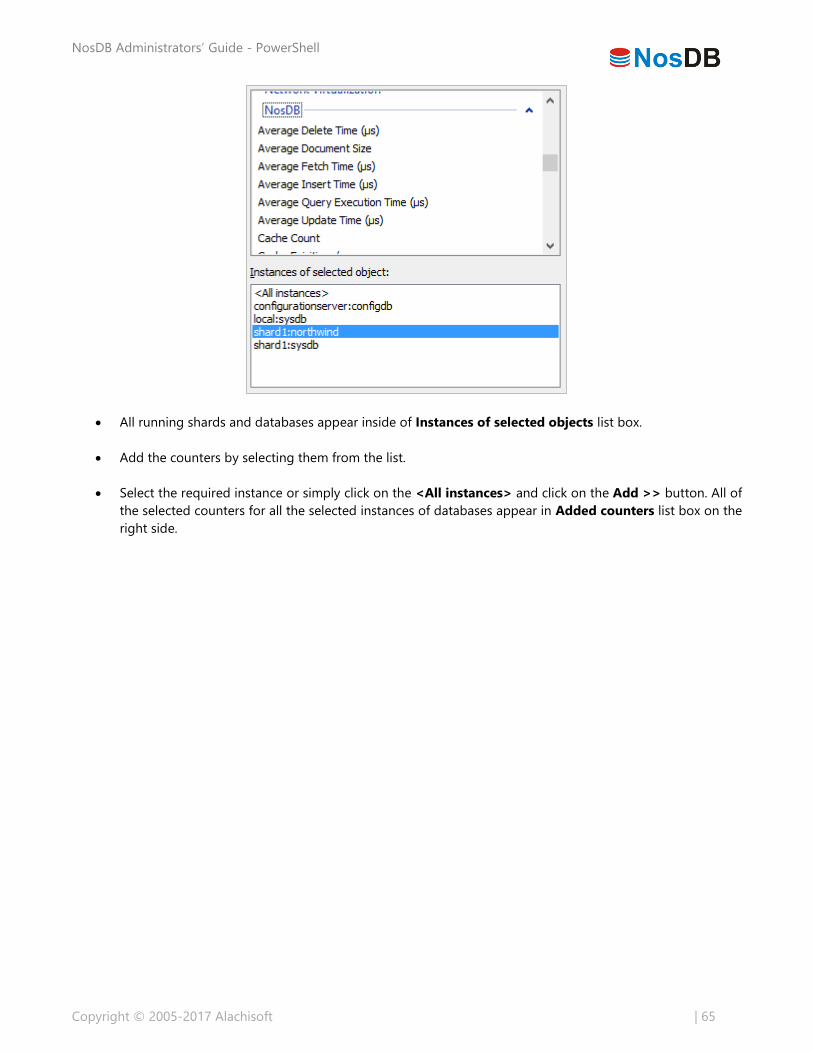
NosDB Administrators’ Guide - PowerShell
Copyright © 2005-2017 Alachisoft | 65
All running shards and databases appear inside of Instances of selected objects list box.
Add the counters by selecting them from the list.
Select the required instance or simply click on the <All instances> and click on the Add >> button. All of
the selected counters for all the selected instances of databases appear in Added counters list box on the
right side.
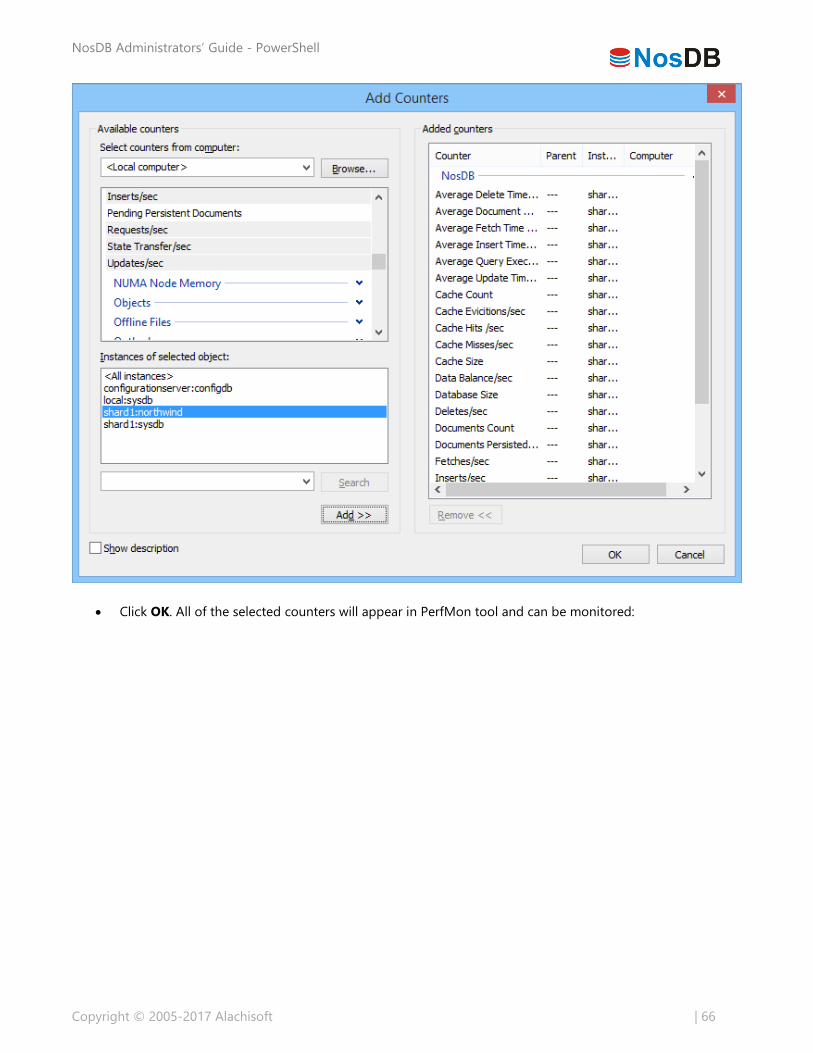
NosDB Administrators’ Guide - PowerShell
Copyright © 2005-2017 Alachisoft | 66
Click OK. All of the selected counters will appear in PerfMon tool and can be monitored:

NosDB Administrators’ Guide - PowerShell
Copyright © 2005-2017 Alachisoft | 67
You can also change the view of PerfMon from Report view to Line view:
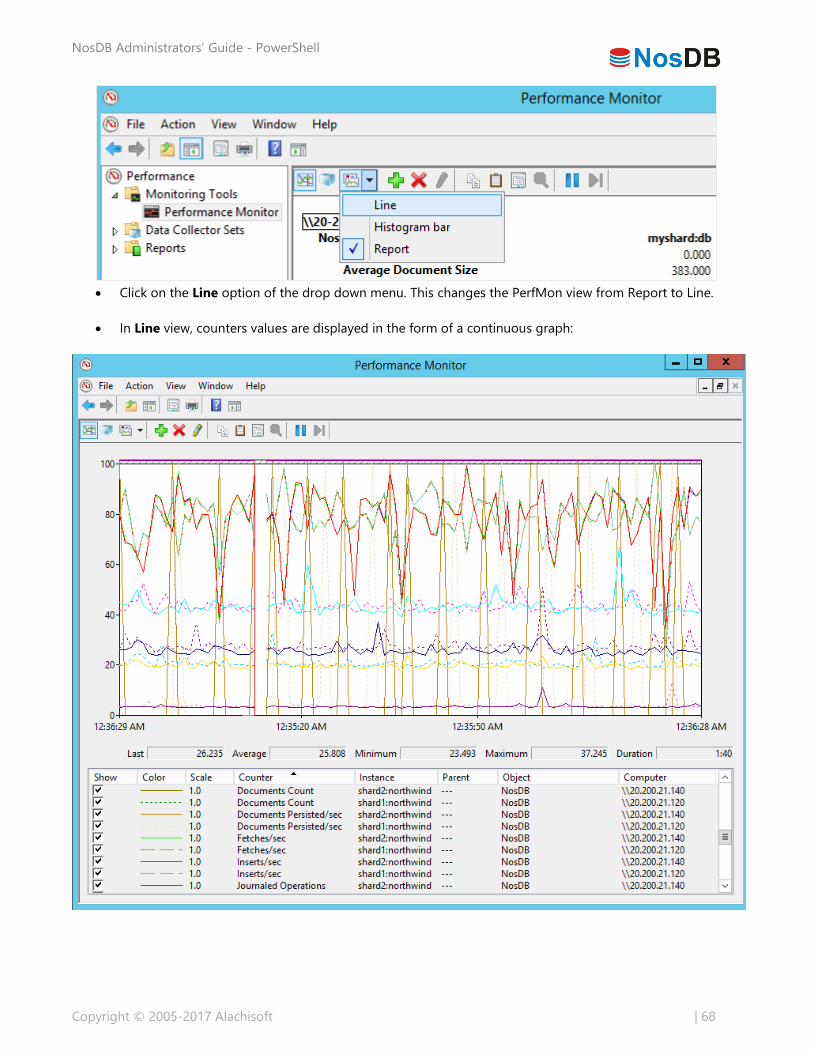
NosDB Administrators’ Guide - PowerShell
Copyright © 2005-2017 Alachisoft | 68
Click on the Line option of the drop down menu. This changes the PerfMon view from Report to Line.
In Line view, counters values are displayed in the form of a continuous graph:
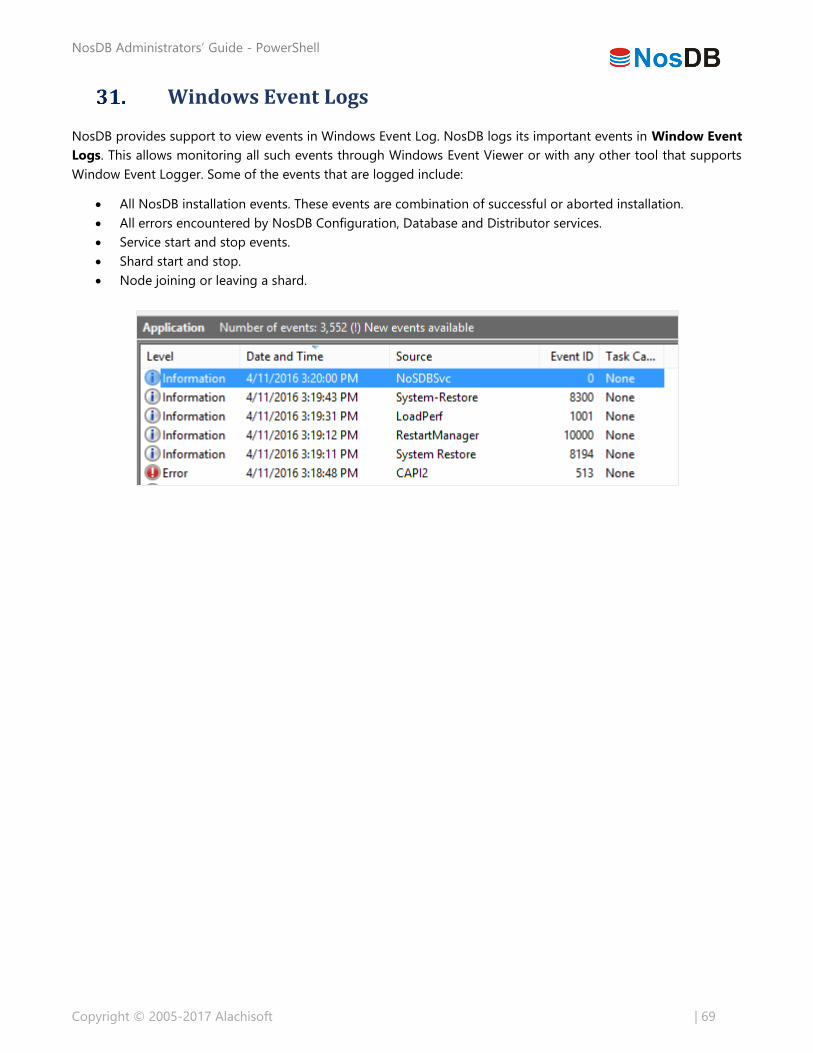
NosDB Administrators’ Guide - PowerShell
Copyright © 2005-2017 Alachisoft | 69
Windows Event Logs
NosDB provides support to view events in Windows Event Log. NosDB logs its important events in Window Event
Logs. This allows monitoring all such events through Windows Event Viewer or with any other tool that supports
Window Event Logger. Some of the events that are logged include:
All NosDB installation events. These events are combination of successful or aborted installation.
All errors encountered by NosDB Configuration, Database and Distributor services.
Service start and stop events.
Shard start and stop.
Node joining or leaving a shard.
NosDB Administrators’ Guide - PowerShell
Copyright © 2005-2017 Alachisoft | 70
NosDB Logs
NosDB provides a rich set of modules for logging and viewing run-time statistics of different components available
in NosDB. It also provides different level of logging that includes log-files, report views, statistics and events.
NosDB logs the states of the components into dedicated log files. These log files are created whenever the
component is started, and are locked until the component or its respective service is stopped. Log files encapsulate
different level of information based on logging status.
NosDB creates each log file for the particular component with specific time stamps. This time initializes as the
component or tool starts and continues until its status changes from “running” to “stopped”.
Database ([InstallDir]\logs\dblog_timestamp.log)
Configuration Server ([InstallDir]\logs\cslog_timestamp.log)
Manager ([InstallDir]\logs\manager\mgrlog_timestamp.log)
Monitor ([InstallDir]\logs\monitor\monitorlog_timestamp.log)
REST Package ([InstallDir]\logs\REST\restlog_timestamp.log)
NosDB writes the log file with the standard default format that provides the user with familiarity while reading the
file. It also logs the thread name whenever an operation is performed by any running thread. NosDB presents
different stages of logging. These logging levels are configurable and are described as follows:
INFO: Info level describes any useful information about any operation performed on database, such as
starting and stopping state of state transfer operations. Info level is disabled by default.
ERROR: This log flag provides the cause of errors that are raised during operation execution. This status log
is useful in most of troubleshooting scenarios such as during start of shard nodes, or while establishing
connection with the server.
WARNING: This flag logs the storage status of any action or operation on the database, and will be logged
once storage is about to exceed. This log information is useful to optimize database performance.
DEBUG: This flag is disabled by default but the user can configure it. This log option prints detailed
information about each operation like key and buckets during state transfer. This log information allows
analyzing any database issues in detail whenever normal debugging is not possible and lets the user to drill
down into any hidden issue. However, note that enabling debug logging is an expensive operation,
performance wise.