notes for word 2010-2011
TRANSCRIPT

8/3/2019 Notes for Word 2010-2011
http://slidepdf.com/reader/full/notes-for-word-2010-2011 1/4
Notes for Word 2010-2011.docx1
vsaylor
Name ____________________________________________________________
Block ___________________
Microsoft Word 2007 Basics
I. Icons on the Microsoft Word Screen
Icon (draw) Element Description
1 Microsoft Office ButtonIt is located in the top-left corner of Word 2007 and provides fast access to files andfrequently used commands. This replaces the File menu in Microsoft Office programs.
2 Minimize icon Reduces the current document to an icon on the taskbar.
3 Restore icon Restores the window to its previous size.
4 Maximize icon Restores the window to the full screen size.
5 Close icon Closes the document window.
II. Viewing the Microsoft Word Screen
There are five different views in Microsoft Word. Use View on the ribbon or the view buttons to change views.
1. Print Layout View—the main view;2. Full Screen Reading3. Web Layout4. Outline 1 2 3 4 5 (zoom area)5. Draft
You can change the document zoom by dragging the slider left or right (or clicking on the minus/plus signs).
There are two different ways to see a page break (the area between two pages)
1. Hide white space—you will see the page break “dark space” between two pages
2. Show white space—you will see a solid black line between two pages
Cursor--(blinking vertical line)--shows you where the text will be inserted.
End mark --( ¶ ) identifies the end of a file and cannot be deleted. (Ctrl Shift 8)
8/3/2019 Notes for Word 2010-2011
http://slidepdf.com/reader/full/notes-for-word-2010-2011 2/4
Notes for Word 2010-2011.docx2
vsaylor
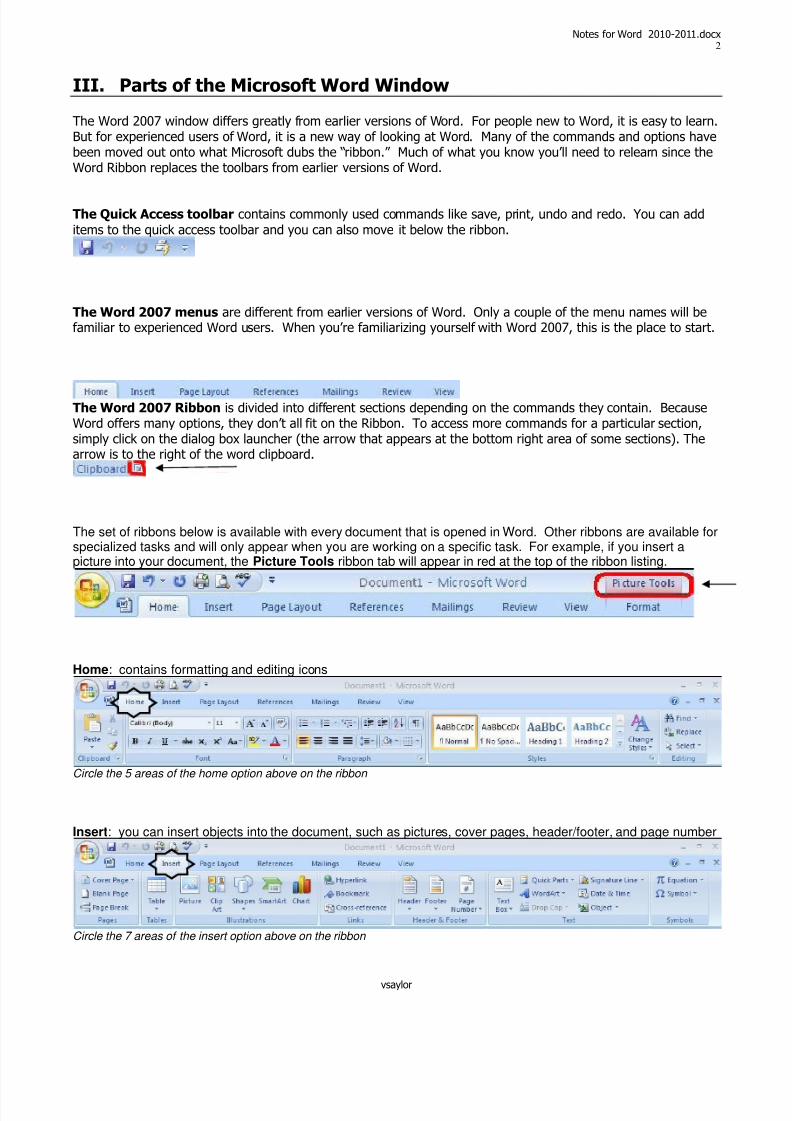
III. Parts of the Microsoft Word Window
The Word 2007 window differs greatly from earlier versions of Word. For people new to Word, it is easy to learn.But for experienced users of Word, it is a new way of looking at Word. Many of the commands and options havebeen moved out onto what Microsoft dubs the “ribbon.” Much of what you know you’ll need to relearn since theWord Ribbon replaces the toolbars from earlier versions of Word.
The Quick Access toolbar contains commonly used commands like save, print, undo and redo. You can add
items to the quick access toolbar and you can also move it below the ribbon.
The Word 2007 menus are different from earlier versions of Word. Only a couple of the menu names will befamiliar to experienced Word users. When you’re familiarizing yourself with Word 2007, this is the place to start.
The Word 2007 Ribbon is divided into different sections depending on the commands they contain. BecauseWord offers many options, they don’t all fit on the Ribbon. To access more commands for a particular section,simply click on the dialog box launcher (the arrow that appears at the bottom right area of some sections). Thearrow is to the right of the word clipboard.
The set of ribbons below is available with every document that is opened in Word. Other ribbons are available forspecialized tasks and will only appear when you are working on a specific task. For example, if you insert apicture into your document, the Picture Tools ribbon tab will appear in red at the top of the ribbon listing.
Home: contains formatting and editing icons
Circle the 5 areas of the home option above on the ribbon
Insert: you can insert objects into the document, such as pictures, cover pages, header/footer, and page number
Circle the 7 areas of the insert option above on the ribbon
8/3/2019 Notes for Word 2010-2011
http://slidepdf.com/reader/full/notes-for-word-2010-2011 3/4
Notes for Word 2010-2011.docx3
vsaylor
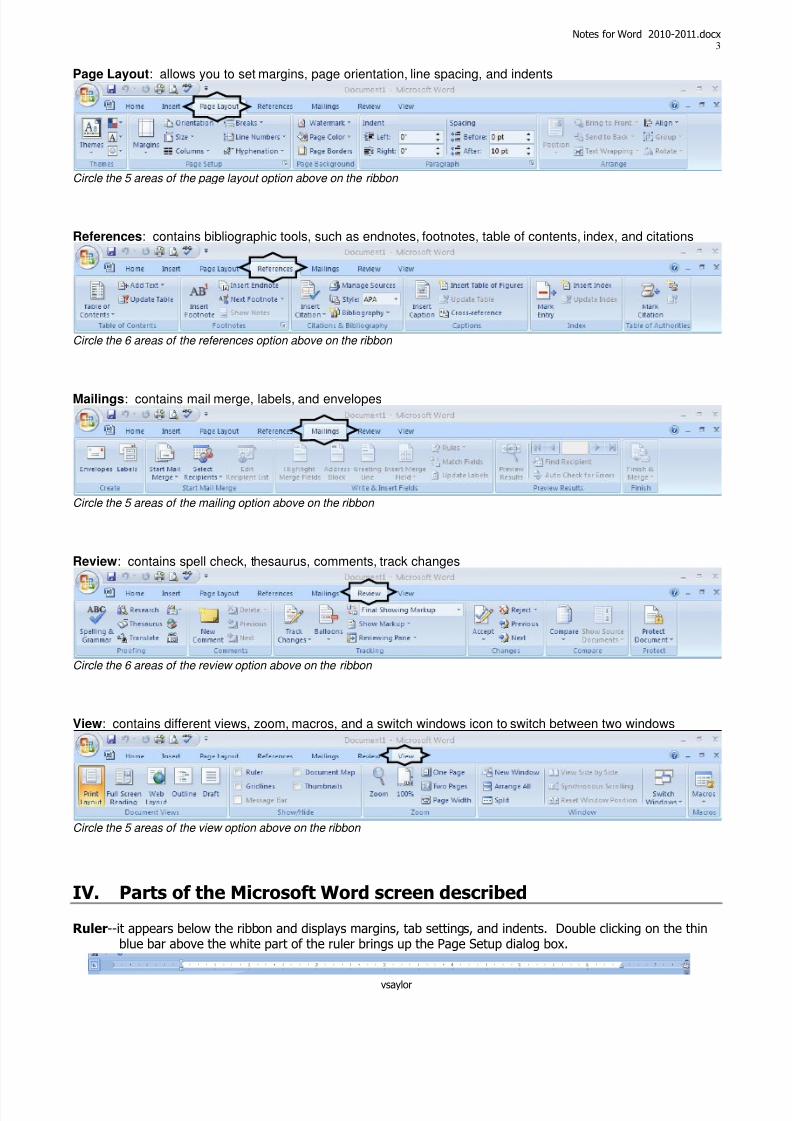
Page Layout: allows you to set margins, page orientation, line spacing, and indents
Circle the 5 areas of the page layout option above on the ribbon
References: contains bibliographic tools, such as endnotes, footnotes, table of contents, index, and citations
Circle the 6 areas of the references option above on the ribbon
Mailings: contains mail merge, labels, and envelopes
Circle the 5 areas of the mailing option above on the ribbon
Review: contains spell check, thesaurus, comments, track changes
Circle the 6 areas of the review option above on the ribbon
View: contains different views, zoom, macros, and a switch windows icon to switch between two windows
Circle the 5 areas of the view option above on the ribbon
IV. Parts of the Microsoft Word screen described
Ruler--it appears below the ribbon and displays margins, tab settings, and indents. Double clicking on the thinblue bar above the white part of the ruler brings up the Page Setup dialog box.
8/3/2019 Notes for Word 2010-2011
http://slidepdf.com/reader/full/notes-for-word-2010-2011 4/4
Notes for Word 2010-2011.docx4
vsaylor
Work area--(Document window) this is where you’ll do all your keying and editing. When the mouse pointer isin the document window, the pointer changes to an I-beam.
Status bar —appears above the task bar and below the work area. It displays the current page number, thenumber of words in a document, the views options, and the zoom command.
Scroll box--the box in the scroll bar that displays the page number when it is clicked on; the box allows you to
jump to an approximate location in your document by dragging on it.
Scroll bars--click the vertical scroll bar above or below the scroll box to page up or down one screen-length at atime; click the horizontal scroll bar to the right or left of the scroll box to page right or left one screenwidth at a time.
ToolTip--(ScreenTip) as you move the mouse pointer over an icon on a toolbar, the name of the icon—called aToolTip—and a description appears below or above the icon.
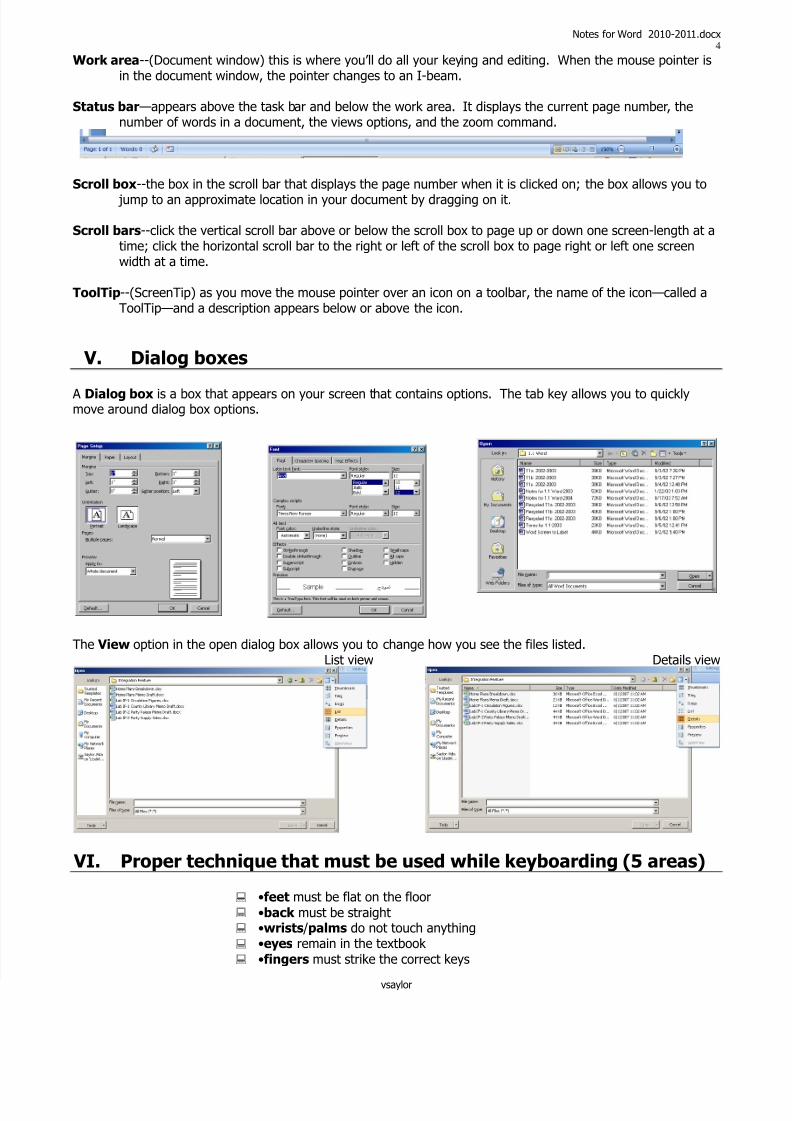
V. Dialog boxes
A Dialog box is a box that appears on your screen that contains options. The tab key allows you to quicklymove around dialog box options.
The View option in the open dialog box allows you to change how you see the files listed.List view Details view
VI. Proper technique that must be used while keyboarding (5 areas)
•feet must be flat on the floor
•back must be straight •wrists /palms do not touch anything
•eyes remain in the textbook
•fingers must strike the correct keys