notes from the owners of “raven” - san juan sailing ... · notes from the owners of “raven”...
TRANSCRIPT
Notes from the Owners of “Raven” Dear Fellow Sailors,
Welcome aboard RAVEN! We are thrilled that you’ve chosen to charter with San Juan Sailing and spend your vacation sailing in the Pacific Northwest…our all-time favorite cruising grounds. We began chartering with San Juan Sailing more than a dozen years ago and have enjoyed “borrowing” just about every boat in the fleet. In 2016 we took the plunge and added our new Jeanneau Sun Odyssey 419 to their charter list. Raven has been outfitted with the options and features we find essential for fast and comfortable cruising in the Pacific Northwest. Below are a few of our favorite things. - The Jeanneau 419 has a modern and bright feel. The cabin has plenty of natural light and
ventilation.
- Under sail Raven is lively and fast! She is also very steady in heavier breeze.
- She has a large cockpit with twin-helm steering and composite wheels. The 7-foot fold down swim platform gives easy access to the dinghy and other water toys.
- Raven has 3 large staterooms plus an option to convert the dinette into a 4th berth. She has
2 heads with an easy-to-use tank system.
- Safety features include a factory installed bow-thruster, a Max Prop feathering prop, 300ft all-chain main anchor rode, AIS and radar.
- Interior add-ons include a Webasco cabin heater, a 2nd water fresh water tank, deluxe salon
table, LED “mood” lighting, and an easy-access fridge.
- For exploring, Raven has been outfitted with a 10’2” Achilles RIB with an aluminum bottom hull. Charter guests have the option of a convenient 2HP Honda outboard or a more spirited Tohatsu 9.8HP. NEW In 2017 is a Kato engine hoist to assist with lifting the outboards.
- She has been outfitted with an Iverson dodger, bimini and connector – all with the maximum amount of “glass” to accommodate tall and short crew members.
- A cruising spinnaker with launch sock is available for guests with spinnaker experience.
Listed below are some tips on how to get the most out of Raven and her equipment. Your safety is our highest priority, and we sincerely want you to have a wonderful sailing vacation. She’s a non- smoking, non-pet boat to keep things a tidy as possible for all charter guests. We respectfully ask that you treat her as if she was your own.
If you have questions or feedback, we would love to hear from you. Happy Sailing! Laura & Brian Bolin

2
BOAT SPECS – Jeanneau 419:
Year: 2016 LOA: 40’5” LOA – with bowsprit: 41’10” Beam: 13’1” Draft: 7’ 1” Fuel: 53 gallons Fresh Water Tank #1: 87 gallons Fresh Water Tank #2: 53 gallons Holding Tanks: 2 tanks, 21 gallons each Engine: 45 HP Yanmar Diesel with folding Max Prop. Refrigerator: 48 gallons with freezer, and easy access top and front hatch doors. Berth Mattresses: V-berth: 6’11” x 6’7” 2 Aft Cabins: 6’7” x 5’2” Headroom: Salon: 6’4” Forward Cabin: 6’ Aft Cabins: 6’5”
RAVEN’s Special Nuances:
The Jeanneau 419 is one of the most popular charter sailboats in the world and you’ll find her systems easy to operate. However, there are a few things that may require special attention. Max-Prop: Raven is outfitted with a feathering Max-Prop. In reverse she responds faster than a boat with a fixed prop. She also has almost no prop walk. Just take note of this when maneuvering in tight quarters. Also, the Max Prop allows her to sail up to a full knot faster in light wind. Shift into reverse when sailing without the engine to fold the prop and keep it from spinning while underway. Engine Start and Stop / Control Panel: The 45HP Yanmar does not have an engine key. Instead it has a battery power push button on the bottom of the engine control panel. Second, you won’t hear the typical blaring alert that we all associate with starting a diesel engine. More details below in #12 below. Plumb Bow & Anchoring: Raven’s plumb bow requires extra care when anchoring to avoid dings. The basic rule is…the boat must be stationary when deploying or retrieving the first 10 feet of anchor and chain. Any forward or aft motion creates a “pendulum” action that causes the anchor to strike the bow. More details can be found in section #3 below. Phone Numbers:
- San Juan Sailing: 800-677-7245, Channel 80 during office hours. - Maintenance Pro, (Dave at Ship Shape): 360-510-5105 - Brian & Laura Bolin (Owners): 425-445-0298

3
Table of Contents
1. Emergency Equipment
2. Emergency Procedures
3. Anchors & Windlass
4. Barbecue
5. Batteries & Charging
6. Berths
7. Bow Thruster & Max Prop
8. Dinghy & Outboard
9. Dodger, Bimini, Salt & Sunscreen
10. Electrical Panel
11. Electronics & Instruments
12. Engine, and Operating Under Power
13. Entertainment
14. Galley
15. Heads & Holding Tanks
16. Heater
17. Propane Tanks
18. Refrigerator
19. Sails & Rigging
20. Showers & Sump Pumps
21. Stove
22. Swim Platform
23. Water Tanks
24. Water Heater
25. Planning Notes
26. Spinnaker

4
1. Emergency Equipment and Locations:
QUICK NOTES
- 3 Fire Extinguishers: Under companionway stairs, in forward cabin behind the door, and in the aft starboard cabin hanging locker
- Plugs are taped to all thru hull fittings. - Emergency Tiller in starboard cockpit locker - Flares/Horns/Tools: Under aft navigation seat. - Manual Bilge Pump Handle clipped inside port cockpit locker
DETAILS
Fire Extinguishers – RAVEN has three ABC rated fire extinguishers. They are located:
- Underneath the bottom companionway step. - Forward cabin just behind the cabin bulkhead door. - Aft starboard cabin locker, (closest to the galley).
Emergency Plugs – Each accessible thru hull opening located below the water line has an emergency plug taped to it. A diagram that shows these locations is included in this notebook.
Emergency Tiller – Located in the starboard cockpit locker. It fits on the rudder post which is accessed through the round cap between the helm seats. Bilge Pumps - There are two bilge pumps: The electric bilge pump’s switch in the bilge operates automatically. The bilge pump circuit should ALWAYS be “on” at the electrical panel. The manual bilge pump is in the cockpit on the port side, just in front of the port steering wheel. The handle is mounted inside the port cockpit locker.
Tools & User Manuals: Located behind the aft navigation seat cushion, below the electronic panel. Spare Parts & Supplies: Underneath the forward main salon settee cushions and under the salon floor. First Aid Kit: Located in aft head cabinet, above the sink. Emergency/Safety Equipment – Flares, air horns, and other essential safety equipment are in a mesh bag under the aft navigation table seat. 2 PDFs are stored in each of the 3 cabin hanging lockers and 2 are stored in the starboard cockpit locker. A Type IV throwable should always sit in the cockpit. A Life Sling is mounted on the stern rail.

5
2. Emergency Procedures: - Please review all emergency procedures with your crew before departure
DETAILS
Hitting a Rock, Log or Running Aground – If you strike a rock, log or run aground, immediately look for water: - In the bilge and engine compartment, - At the keel bolts where the keel attaches to the hull, or - Where hull contact took place.
Once you are sure no water is entering the hull, contact San Juan Sailing at 800-677-7245 and proceed to the nearest harbor. A professional diver must inspect the hull, keel, prop and rudder before proceeding on your trip. Leaks – Determine the source of water, either at the engine sail drive seal or at the point of contact. Note: you cannot get to the sail drive seal easily, but you should be able to see water flowing at the back of the engine. A diagram showing the location of the sail drive and through-hull fittings are in included this notebook. Wood plugs are taped to each through hull fitting, and a larger plastic plug is stored in the emergency/safety equipment bag located under the aft Nav. Settee. - Confirm the bilge pump is running. Use the manual bilge if needed. The shower sumps may
also be used to pump out water. - Get the crew on deck and into life jackets. - Use the VHF to call for assistance. Use a PAN PAN call if the situation does not appear life
threatening. Use MAYDAY if loss of life or vessel appears imminent. - In a MAYDAY situation, you may also push the red distress button on the VHF that will
transmit the ship’s name and location, but direct communication with assistance providers, (i.e.: Coast Guard) is more effective.
Crew Overboard: We practice MOB drills often. Our close friends know that the ugliest hat or dirtiest PDF is always at risk of being tossed over the side to initiate a drill. To summarize:
- Immediately throw a Type IV PDF to the crew member in the water. - Hit MOB on the chart plotter to mark where crew went overboard. - Assign a crew member to “spot” the overboard person. Point to the person and continually
communicate their position to everyone aboard. - Safely motor or sail back to the crew and use the Life Sling system mounted on the stern
pulpit to retrieve the lost crew member. - A small emergency rope ladder is stored inside the transom at the waterline. Please do not
deploy it unless there you have an emergency – it is difficult to reload. - In calm seas, the stern platform may be lowered to assist retrieving lost crew members. - Use MAYDAY if loss of life appears imminent.

6
3. Anchors & Windlass QUICK NOTES
- Primary Anchor: 44# Delta (Bruce-type) with 300’ of 5/16’ chain - 4-to-1 scope is typical - Check tide charts - Up to 12-foot tidal range - Windlass circuit breaker (yellow) located on the battery panel in the aft starboard cabin - Boat must be stationary when paying out and retrieving the last 10 ft. of anchor rode to
avoid bow damage - Engine must be running to power the windlass - Deploy a snubber line while at anchor - Unless calm, do not use the windlass to pull the boat to the anchor - When retrieving, the chain tends to pool below the windlass. Use mop handle to spread
chain around the anchor locker
DETAILS
Anchors: Raven is equipped with two anchors and sufficient rode for any Pacific NW condition. The primary bow anchor is a 44# Delta with 300 ft. of 5/16” chain. The chain is marked at 50 ft. increments, plus an “anchor warning” mark at the 10-ft. mark. The secondary anchor is a Danforth with 50 ft. of chain and 250 ft. of 5/8” nylon rode. It is stored in the port cockpit locker.
- GREEN – first 10 ft. “anchor warning” - Yellow – every 50-foot increment. - White – every 100-foot increment. - Red – Last 20 feet.
Pac NW Anchoring: Our tides, currents, and intimate coves can make anchoring a little tricky, but you’ll have no trouble if you follow the guidelines provided in the Skipper’s Meeting and the SJS Skipper’s Handbook. To highlight:
- Scope in the islands is 4-to-1 for normal conditions. (Raven draws 7ft 1”) - Raven has approx. 5 ft. of bow freeboard to add to your depth calculation. - We have a tidal range up to 12 ft. so check tide tables to determine if you are anchoring in a
rising tide, (which may require you to pay out additional chain), or a falling tide, (which may cause you to ground during the night).
- A snubber line, located in the anchor locker, is needed to take the load off the windlass drum and to avoid chain noise in the forward cabin.
- The anchor light, for overnight stays, can be turned on at the electrical panel. - For storm conditions, (sustained winds of 25+ knots), increase the scope to 5 or 6-to-1 or
more, then consider deploying the secondary Danforth in a V-type pattern.
7
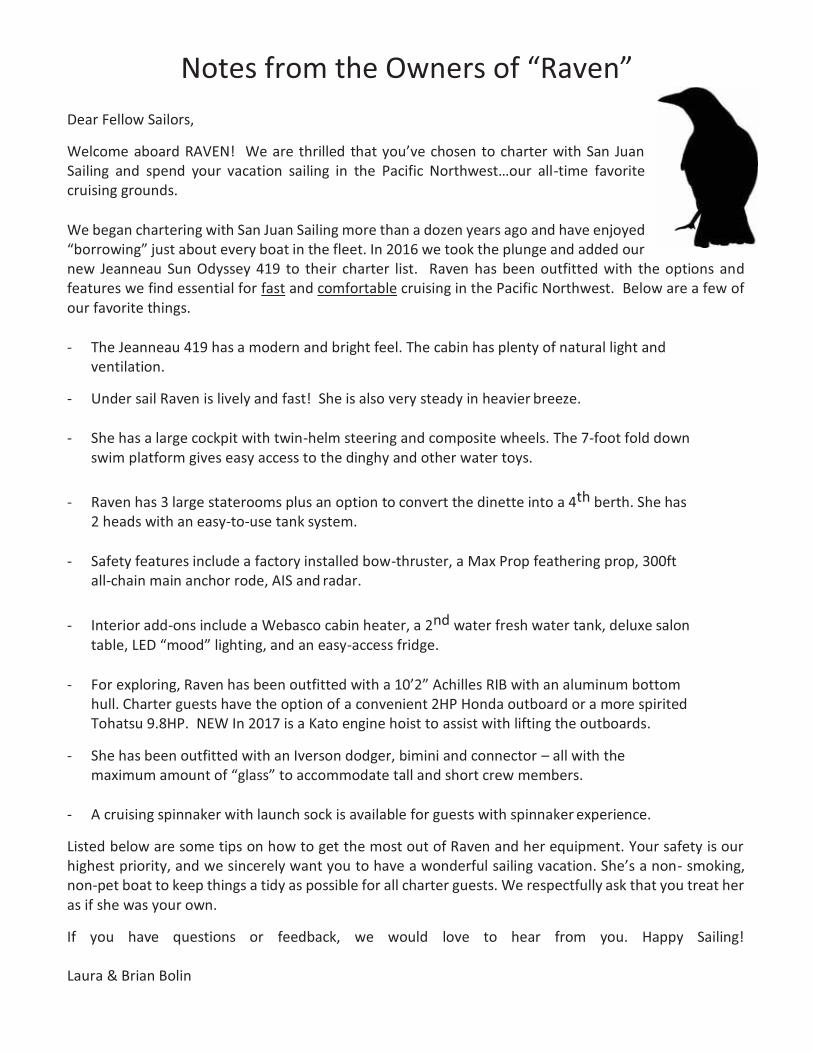
Windlass Breaker & Operations: The breaker is located in the aft starboard cabin on the battery panel, between the battery switches. The windlass is powered by a separate battery and the engine must be running to operate the windlass. Basically, the system voltage input needs to be higher than the output.
Windlass Controller: The handheld windlass controller sits in the forward anchor locker. It sits in the bracket when not in use. Deploying the Anchor: We’ve learned that Raven’s plumb bow invites bow dings, so we ask that you take a little extra care when deploying and retrieving the anchor.
- Bring the boat to a complete STOP before deploying the anchor. - Once stopped, the anchor can be lowered by the approximate “water + bow” depth. Then
the helmsperson can place the boat in reverse idle while additional chain is paid out. - We find that alternating running the windlass for a few seconds and then resting for a few
seconds eases the strain on the windlass and keeps chain from piling on itself at the bottom. - Payout the needed chain and follow all other normal anchoring procedures - To set the anchor, nudge the engine into reverse idle until you feel it catch. - To firmly set the anchor continue in reverse for 1-2 minutes, using reference points on land
or neighboring boats to ensure you are not moving. 1,000 RPM for winds to 20kts and 1,500 RMP for wind up to 30 knots.
- After the anchor is set, deploy the snubber line by placing the hook on the chain and cleating the end to a bow cleat. Release just enough chain to place tension on the snubber line and remove the load from the windlass drum.
Retrieving the Anchor: On Raven, the chain dropping into the anchor locker tends to pile up beneath the windlass so it’s necessary to redistribute the chain away from the windlass with a mop handle. It’s helpful to send a second crew member forward to help, but it’s also possible to manage with just one.
- Remove the snubber and tie it aside so it doesn’t go overboard or tangle in the windlass. - When retrieving chain, again it’s helpful to alternate between running the windlass and
pausing for a few seconds. This eases the strain on the windlass and gives you a break to spread the chain around the anchor locker.
- Unless it’s fairly calm, then windlass shouldn’t be used to pull the boat forward. - If the anchor is firmly set, you may hear the windlass slow under the load. If this happens,
stop the windlass and allow the boat to move forward to “break” the set.
Windlass Breaker Switch, shown in the “on” position

8
- The 10ft. green mark indicates that the boat should come to a complete STOP. When the anchor has no “pendulum action” retrieve the last 10 feet.
- If the anchor comes up upside down use the broom handle or boat hook to flip it 180* - Once the anchor is aboard use a small piece of line to tie the anchor to the bow. Pay out
just enough chain to remove the tension off the windlass while underway. - Replace the snubber in the anchor locker and the windlass controller in its bracket.
Stern Ties: Some of the most rewarding anchorages in the Pac NW will require you to deploy a stern tie. 600’ of polypropylene line is stored in the starboard cockpit locker. Use the mop handle to mount the spool on the stern transom pass-through. After retrieving the line allow the spool to sit out for a couple of hours for the line to dry.
4. Barbecue QUICK NOTES
- Propane tanks and valves in the aft starboard cockpit locker - Solenoid switch is located beneath the galley sink - Grill is manually lit. Lighter supplied in the galley - Store brush inside grill while underway
DETAILS
The propane tank valves can be turned on in the aft starboard cockpit locker. In addition, there is a dedicated valve that leads to the BBQ. The solenoid switch is located near the sink in the galley. All three must be turned on. This is a manual-light grill, so you’ll need a lighter. Insert the lighter into the ignition hole then turn on the gas by pushing IN the knob and turning it to “high”.
Safety Issue #1: Do not let the gas run before inserting the lighter. Safety Issue #2: Always turn the solenoid off and close the dedicated BBQ valve. Leaking propane is a major hazard on any boat.
5. Batteries & Charging
QUICK NOTES
- Leave battery breakers “ON” at all times. - Start battery is isolated from House batteries - Voltage should not fall below 12.0v before charging - Batteries charge via the engine alternator while under power or by 30AMP AC shore power

9
DETAILS
Raven has three sets of batteries:
- 1 x 110A Engine Start Battery – Breaker in the aft starboard cabin. Battery located in the
aft starboard cabin under the berth. - 2 x 50A Windlass and Bow Thruster batteries - Windlass breaker in the after starboard
cabin. Bow thruster batteries located under the forward V-berth. - 4 x 115A House Bank - Breaker located in the aft starboard cabin. Batteries located in both
the aft starboard and port cabins under berth.
Leave Battery breakers in the “ON” position. A hint from personal experience…if you have kids sleeping in the back berth, check to make sure the battery breakers aren’t accidentally switched off. The windlass breaker can be switched on and off at your discretion.
Battery Charging – Raven’s batteries charge via the engine alternator while under diesel power or by 30 AMP AC shore power. More notes about shore power below
Battery Monitor (and Water and Fuel Monitor) Battery, Water and Fuel monitors are on the electrical panel. (See photo below). The house battery voltage normally reads 13.1 volts when fully charged. Please do not allow batteries to fall below 12.0v. Anything lower than 11.8 may damage the batteries. At the 12.0v level we recommend charging on shore power overnight to bring the batteries to their full capacity. Engine power isn’t likely to fully charge the batteries during “short hops” between islands. Raven’s biggest battery “users” are navigation equipment and autohelm, (especially with radar), and the refrigerator. Normally, turning off the nav. equipment when not underway leaves us sufficient power for everything else. If we are near then 12.0 mark and no shore power is available, we’ll also shut off the fridge overnight.
“ON” is lateral.
Engine Battery Leave On
Windlass Breaker Switch
House Batteries Leave On
10
6. Berths
QUICK NOTES
- Sleeps 6 comfortably in three private cabins - Main salon table may be lowered to create a 4th berth
DETAILS
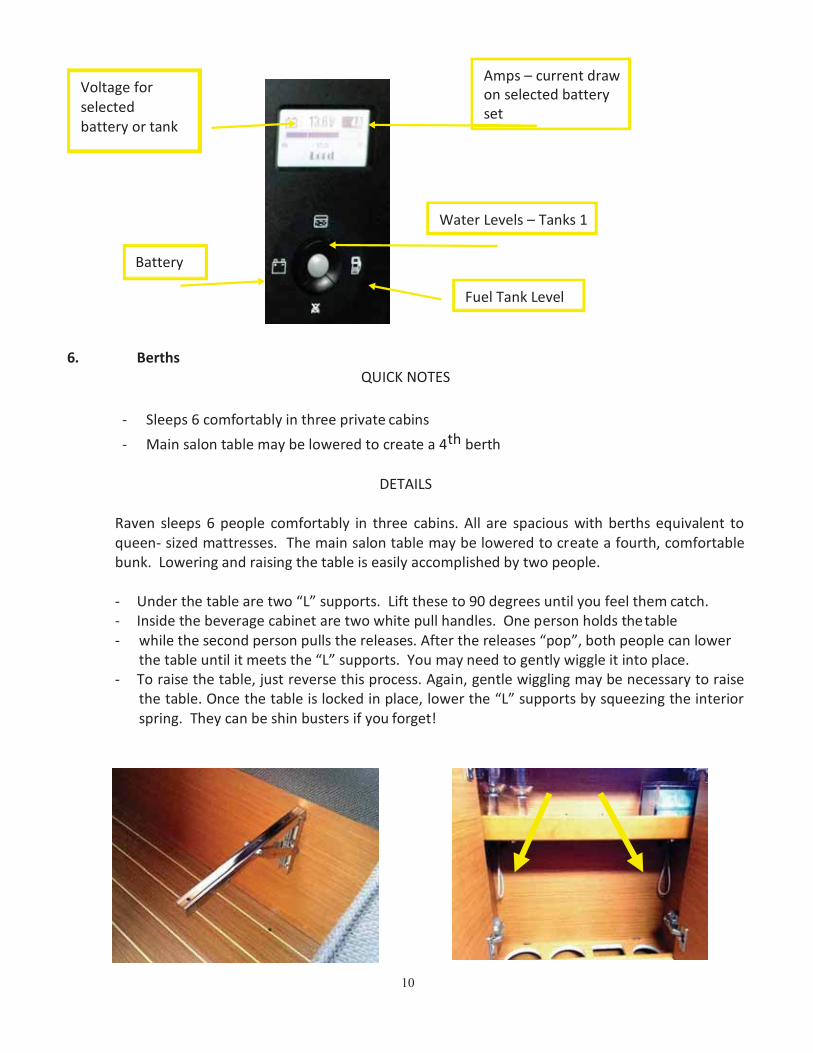
Raven sleeps 6 people comfortably in three cabins. All are spacious with berths equivalent to queen- sized mattresses. The main salon table may be lowered to create a fourth, comfortable bunk. Lowering and raising the table is easily accomplished by two people.
- Under the table are two “L” supports. Lift these to 90 degrees until you feel them catch. - Inside the beverage cabinet are two white pull handles. One person holds the table - while the second person pulls the releases. After the releases “pop”, both people can lower
the table until it meets the “L” supports. You may need to gently wiggle it into place. - To raise the table, just reverse this process. Again, gentle wiggling may be necessary to raise
the table. Once the table is locked in place, lower the “L” supports by squeezing the interior spring. They can be shin busters if you forget!
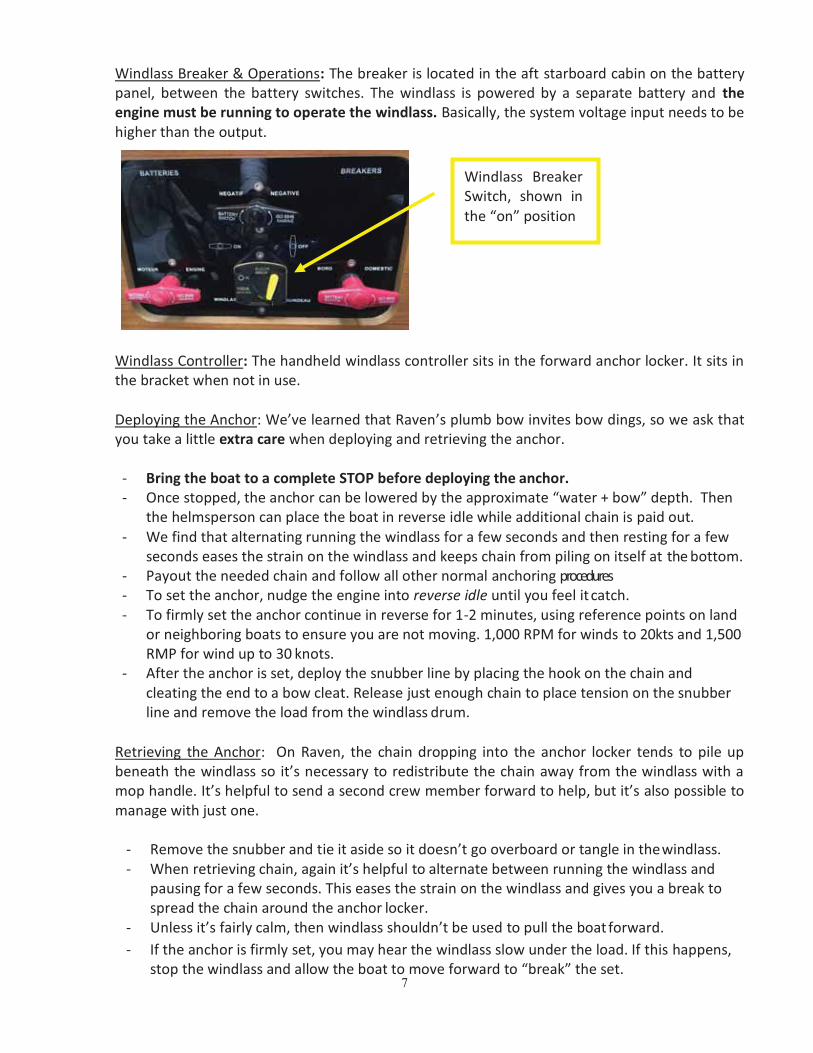
Amps – current draw on selected battery set
Voltage for selected battery or tank
Water Levels – Tanks 1
Battery
Fuel Tank Level

11
7. Bow Thruster & Max-Prop QUICK NOTES
- Bow thruster control located at the starboard helm. Turn on by pressing the red and green buttons simultaneously.
- Maxprop causes Raven to respond faster in reverse than a boat with a fixed prop - Raven has virtually no prop walk - When sailing without power, place engine & prop in the reverse position.
DETAILS
Bow-Thruster - Controls are located at the starboard helm. To activate, press the red and green buttons simultaneously. You’ll hear one short beep that will tell you the bow thruster is “awake”. The bow thruster will turn off automatically after 20 minutes of non-use. You will hear 3 quick beeps. If you haven’t used a bow-thruster previously let us share two things. First, it is very handy to complete a turn or finish docking, but it’s not capable of being the primary means of steering the boat. 90% of your docking still uses conventional steering techniques. Also, the bow thruster causes the boat to rotate on her keel. In other words, if the bow moves one way, the stern moves in the opposite direction. For instance, if you plan to use the bow thruster to get the bow off the dock, hang fenders as far aft as possible because the stern will turn into the dock. Maxprop – Raven’s Max-Prop has two great advantages. First, when you shift Raven into reverse she responds faster than a boat with a fixed prop. Also, the Max-Prop allows her to sail up to a knot faster in light wind. When sailing, shift the engine into reverse to ensure the prop folds properly and doesn’t rotate while underway. Prop Walk – Raven has virtually no prop walk to count on while docking.
8. Dinghy & Outboard Engines
- Dinghy: Two ties always - Take caution when landing on beaches. Protect the dinghy and tilt the engine. - Tow dinghy on aft starboard side away from engine exhaust while underway. - When using the cabin heater, cleat dinghy on the port side away from cabin heat exhaust - Both engines are 4-stroke. Do not add oil to gas. - Store outboards on the stern pulpit mounts while underway and at night.
DETAILS
Dinghy, Tying & Towing: Raven is equipped with a 10’6” aluminum bottom Achilles dinghy. It’s an old sailing adage, but it’s important to tie the dinghy to the boat twice. We’ve seen perfectly good dinghies go on walkabout when a single tie didn’t do the job. Plus, the Coast Guard gets concerned when they find a dinghy, (or kayak or canoe), drifting without an occupant.

12
Under normal towing conditions attach the dinghy to the aft starboard cleat away from the hot engine exhaust. It rides well about 6 – 8 feet from the stern. While docking, shorten the tie to about 3 feet to avoid fouling the prop. For longer passages or heavy seas, (such as upwind treks across the Straights of Georgia), we often hoist the dinghy onto the foredeck by attaching the spinnaker halyard to the fixed eye on the dinghy’s aluminum bow. It can be lashed to the foredeck’s flush D-rings with orange ratchet straps located in the port cockpit lockers. Dinghy & the Cabin Heater: If you use the cabin heater at night tie the dinghy to the port side to avoid the hot exhaust from the heater. Remember to move it back to the starboard side while underway. Beaching: Many Pacific NW beaches have bottom-slicing barnacles, but following San Juan Sailing’s “Land Ashore Like A Pro” instructions will help protect the dinghy and engine.
- When approaching shore, shift crew weight aft to the stern to help the boat go further
ashore - Turn off the outboard and tilt it forward to protect the propeller from rock dings. - With oars planted in the ground, one person at a time may move forward and go ashore. - With everyone ashore, use the handles to lift the dinghy above the barnacles to soft beach. - Secure the painter around a rock or large driftwood log so the dinghy won’t float away
during the Pac NW’s large tidal changes. The extra-long painter might seem a little excessive at a dock, but it is essential when securing a dinghy ashore.
Outboard Engines: Both the 2HP Honda and 9.8HP Tahatsu are four stroke engines, so do not add oil to the gasoline mixture. San Juan Sailing will ensure you have enough gas for the 2HP, but guests are responsible for fueling the 9.8HP tank. (As a courtesy to the next guest, please return it full). It’s okay to store the 2HP gas can in the dinghy, but the 9.8HP gas can should be stored in the center aft locker. It is the only locker where gas fumes will not get into the boat.
2HP Honda Outboard - Starting & Stopping the 2HP Honda:
- The fuel valve lever is located on the starboard aft corner of the outboard - Open the air vent on the top of the fuel cap by turning counter-clockwise. - Ensure the black U-shaped kill clip with the red lanyard is clipped into the red shut-off knob - Pull out the choke switch - Turn the handle throttle ¼ turn counter-clockwise to the “start” position. - Pull the rip cord until it starts. You shouldn’t have to pull it more than 5 times.
- The 2HP does not have forward/reverse so be aware that it starts in a forward gear. To go in reverse, spin it 180 degrees.
- Shut the outboard off by pushing in the red shut-off knob (where the kill clip is clipped in). Or just pull the red lanyard until the clip pops off.
Tilting the 2HP: Stop the engine before landing, then tilt the engine forward out of the water until you feel it lock into place. There is only one “up” position. When departing, unlock the tilt with the stainless-steel lever on the starboard side of the shaft.

13
Tahatsu 9.8 HP: Starting & Stopping the 9.8HP. All procedures are essential the same as the 2HP engine, with the following additions: - Attach the fuel tank hose. Open the air vent on the fuel tank and prime the hose by pumping
the bulb until firm. - Place the engine in neutral. This engine has neutral/forward/reverse. - Run the engine at idle when shifting from between neutral/forward/reverse.
Tilting the 9.8 HP – This engine has two tilt positions. The first can be used while the engine is still running, but the engine must be off when using the second and highest tilt position. To lower, pull the black lever on the starboard side of the shaft. NOTE: The engine must be in the highest position to unlock.
When Not in Use: - To keep the engines running smoothing for your trip, please follow these guidelines: - Store the engines on the stern rail motor mounts while underway and overnight. Wake or
gusts can unexpectedly flood the engines. - Raven is equipped with a KATO outboard hoist to assist raising the engines. - Close the fuel valve lever - Close the fuel tank air valve
9. Dodger, Bimini, Salt & Sunscreen
QUICK NOTES
- Touching salty “glass” with hands, rags or sponges causes permanent scratches. To clean, use a pan or bucket to flood the glass with fresh water
- Avoid “spray-on” sunscreen, or leaning on the glass with sun-screened skin.
- The connector is easily removed for sunny days, but the bimini and dodger should not be detached
DETAILS Dodger Glass: A polite plea from the Owners: The dodger’s plastic “glass” is highly vulnerable to scratching from salt crystals. Please avoid directly touching the glass with your hands, rags or sponges. It’s like rubbing the glass with sandpaper. To clean, use a generous amount of fresh water from a pan in the galley to “flood” the glass to dissolve the salt crystals. Alternatively, use a hose at dock. Thank you!!! Sunscreen & The Dodger: Be sure to pack plenty of sunscreen lotion because UV in the Pacific NW is surprisingly strong, even on a grey-ish days. However, we highly discourage the use of “spray-on” sunscreen because most spray sunscreens react chemically with plexiglass. Please ask your crew to use lotion. Also, please do not lean against the dodger with sunscreen on your back and shoulders. Once that chemical reaction takes place the glass is ruined and must be replaced at a cost of approx. $500. Canvas: Raven has an extra-large center panel that may be detached at your convenience. It’s best not to remove the dodger and bimini. They are tightly fitted and very difficult to reattach.
14
10. Electrical Panel: QUICK NOTES
- Batteries should be recharged at 12.0v. Below 11.8 damages batteries. - 30 AMP shore power. Cord in port cockpit locker. Plug located in port aft line locker. - No AC “main switch” when connecting to shore.
DETAILS
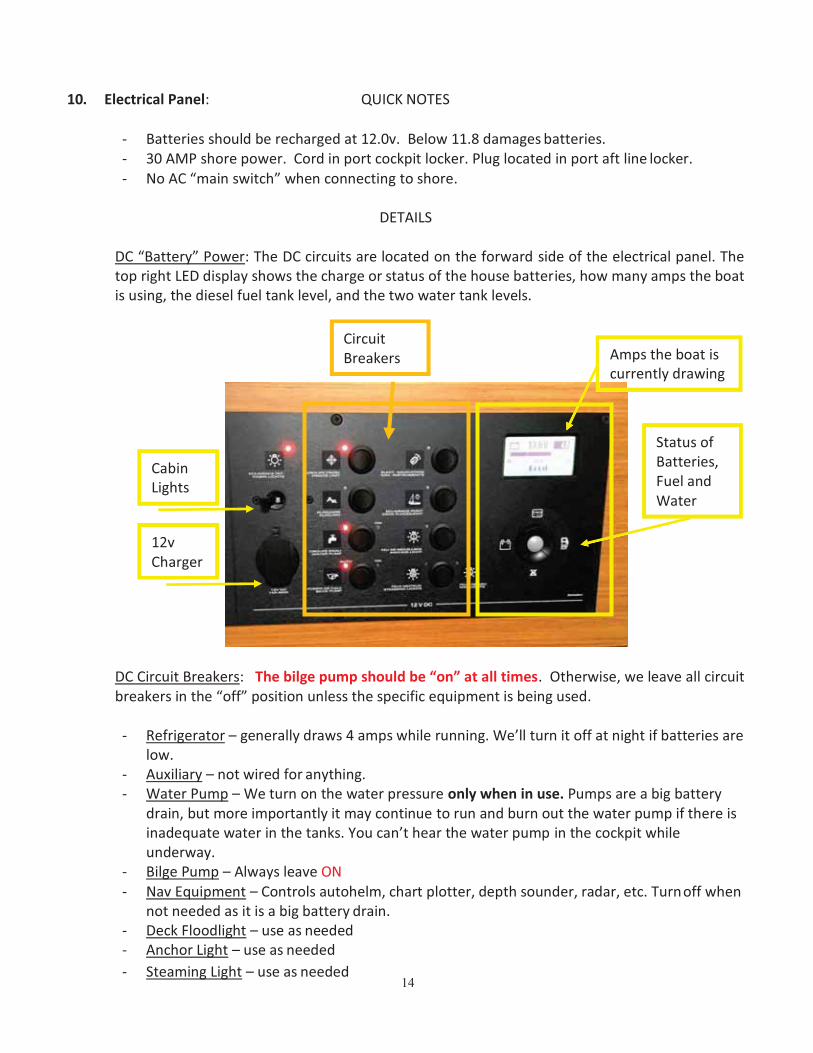
DC “Battery” Power: The DC circuits are located on the forward side of the electrical panel. The top right LED display shows the charge or status of the house batteries, how many amps the boat is using, the diesel fuel tank level, and the two water tank levels.
DC Circuit Breakers: The bilge pump should be “on” at all times. Otherwise, we leave all circuit breakers in the “off” position unless the specific equipment is being used.
- Refrigerator – generally draws 4 amps while running. We’ll turn it off at night if batteries are
low. - Auxiliary – not wired for anything. - Water Pump – We turn on the water pressure only when in use. Pumps are a big battery
drain, but more importantly it may continue to run and burn out the water pump if there is inadequate water in the tanks. You can’t hear the water pump in the cockpit while underway.
- Bilge Pump – Always leave ON - Nav Equipment – Controls autohelm, chart plotter, depth sounder, radar, etc. Turn off when
not needed as it is a big battery drain. - Deck Floodlight – use as needed - Anchor Light – use as needed - Steaming Light – use as needed
Circuit Breakers Amps the boat is
currently drawing
Status of Batteries, Fuel and Water
Cabin Lights
12v Charger

15
Battery Charger – Leave ON
Reverse Polarity Warning
Water Heater
AC Plugs
Live Shore Power: red light indicates Shore Power is “On”
12V Outlets - For cell phones and other small personal electronics, Raven has five 12v “cigarette charger” outlets that operate off the House Battery. One is located on the electrical panel, one on the port side of the cockpit table, (beneath the chart plotter), and one in each of the 3 cabins. Portable Inverter – A small 12v inverter with AC and USB plugs is located in the cabinet above the chart table. It’s small but capable of charging a cell phone or PC, or can operate the TV/DVD. AC “Shore Power” - Raven is rigged to accommodate 30amp shore power. If you are assigned a 50-amp slip, most marinas will loan you a converter. The AC electrical panel is located on the aft side of the electrical panel. The 3 AC panel circuit breakers are:
- Water Heater - Battery Charger – Always leave ON - AC Plugs
Connecting to Shore Power: The power cord is stored in the port cockpit locker. The boat-side inlet is located inside the aft port line locker and should be attached first. Then, plug the cord into the shore- side power outlet. Raven does not have a have an AC main switch located on the electrical panel, but proper shore connection is indicated by the red live AC Power Light. If the AC panel does not indicate shore power, check: 1) the AC circuit breaker located in the aft port “deep” locker, and 2) the AC circuit breaker ashore. Check the reverse polarity light and immediately disconnect shore power if the reverse polarity light is fully illuminated. One Raven quirk...the reverse polarity light sometimes lightly “glows” when it reflects the red Live Shore Power light. This faint glow is no need for concern.
NOT SHOWN: - GFI Breaker
underneath Nav Table - AC Circuit Breaker in
the aft port “deep” locker
16
AC Outlets - There are five AC outlets that operate under shore power: one under the chart table, one beside the cabin heater thermostat, and one in each of the three cabins. If you aren’t getting outlet power when properly connected to shore power, check the GFI breaker switch located beneath the chart table
11. Electronics/Instruments QUICK NOTES
- SJS recommends that the Maptech chart kits with known “killer rocks” marked in red be used
at all times. They should be in the cockpit while underway. - Quick Guide instructions for operating navigation equipment are stored under the nav station
settee - The Nav. Instruments circuit breaker is located on the DC panel above the chart table - Return handheld VHF to charging cradle each night
DETAILS
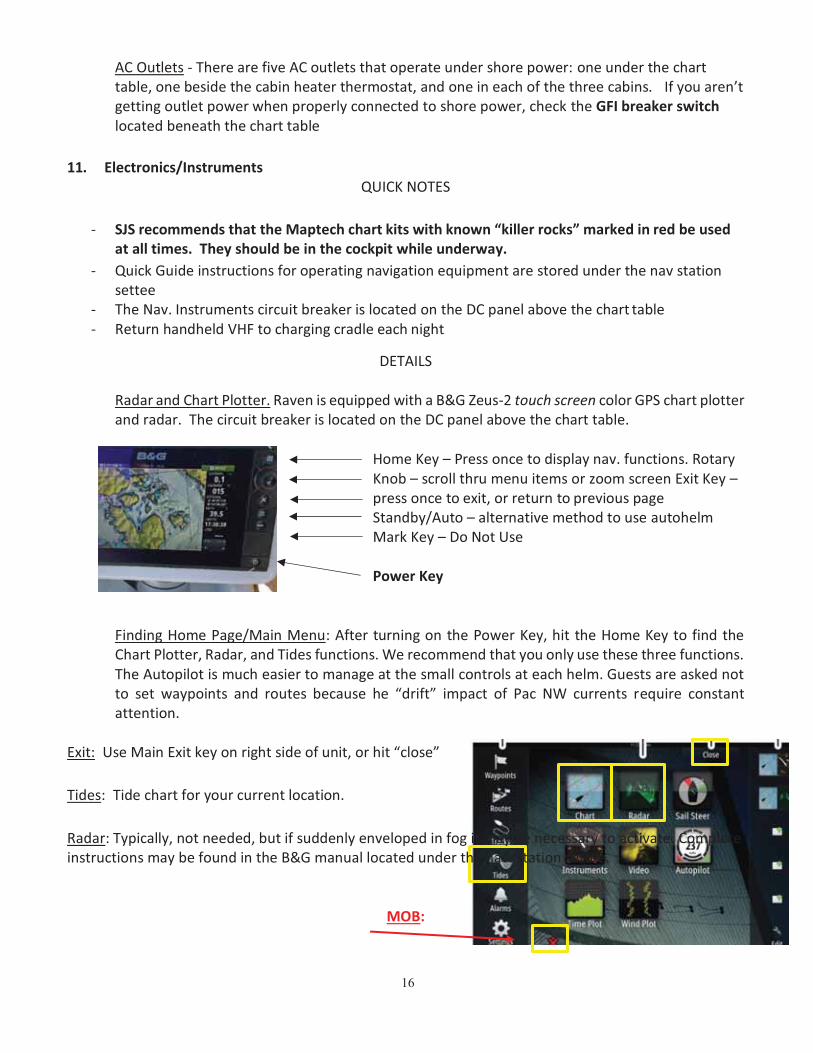
Radar and Chart Plotter. Raven is equipped with a B&G Zeus-2 touch screen color GPS chart plotter and radar. The circuit breaker is located on the DC panel above the chart table.
Home Key – Press once to display nav. functions. Rotary Knob – scroll thru menu items or zoom screen Exit Key – press once to exit, or return to previous page Standby/Auto – alternative method to use autohelm Mark Key – Do Not Use Power Key
Finding Home Page/Main Menu: After turning on the Power Key, hit the Home Key to find the Chart Plotter, Radar, and Tides functions. We recommend that you only use these three functions. The Autopilot is much easier to manage at the small controls at each helm. Guests are asked not to set waypoints and routes because he “drift” impact of Pac NW currents require constant attention.
Exit: Use Main Exit key on right side of unit, or hit “close” Tides: Tide chart for your current location. Radar: Typically, not needed, but if suddenly enveloped in fog it may be necessary to activate. Complete instructions may be found in the B&G manual located under the nav. station settee.
MOB:
17
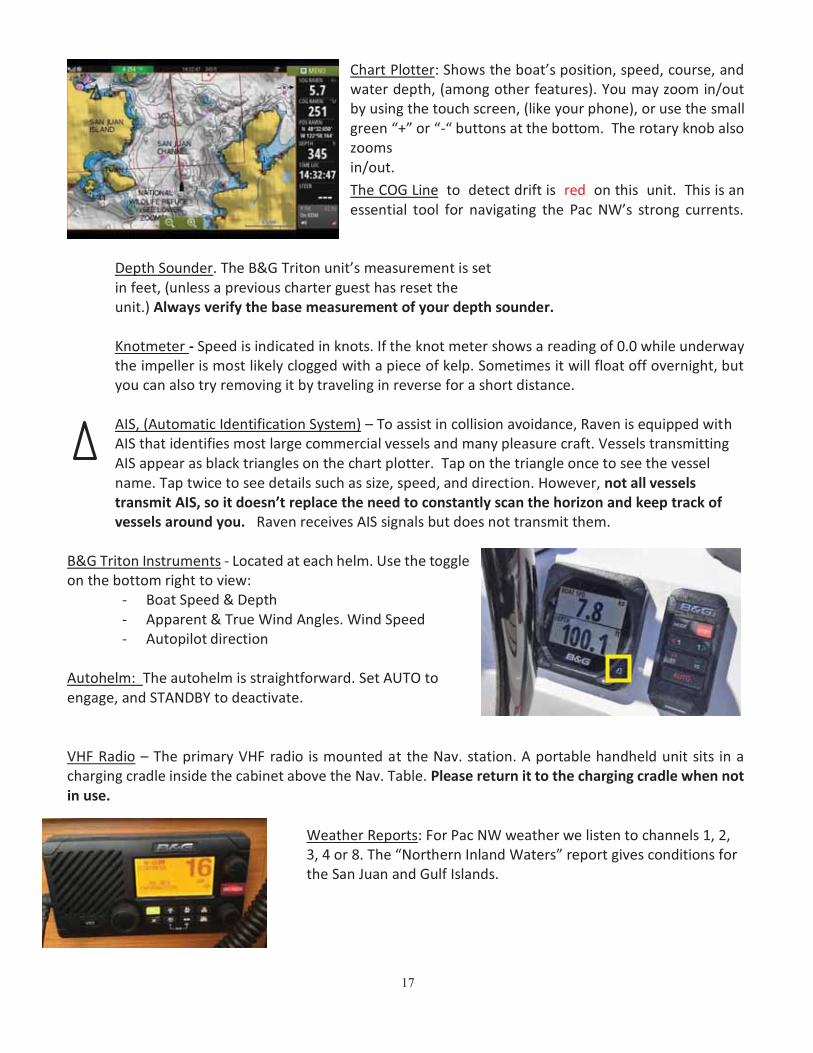
Chart Plotter: Shows the boat’s position, speed, course, and water depth, (among other features). You may zoom in/out by using the touch screen, (like your phone), or use the small green “+” or “-“ buttons at the bottom. The rotary knob also zooms in/out. The COG Line to detect drift is red on this unit. This is an essential tool for navigating the Pac NW’s strong currents.
Depth Sounder. The B&G Triton unit’s measurement is set in feet, (unless a previous charter guest has reset the unit.) Always verify the base measurement of your depth sounder. Knotmeter - Speed is indicated in knots. If the knot meter shows a reading of 0.0 while underway the impeller is most likely clogged with a piece of kelp. Sometimes it will float off overnight, but you can also try removing it by traveling in reverse for a short distance.
AIS, (Automatic Identification System) – To assist in collision avoidance, Raven is equipped with AIS that identifies most large commercial vessels and many pleasure craft. Vessels transmitting AIS appear as black triangles on the chart plotter. Tap on the triangle once to see the vessel name. Tap twice to see details such as size, speed, and direction. However, not all vessels transmit AIS, so it doesn’t replace the need to constantly scan the horizon and keep track of vessels around you. Raven receives AIS signals but does not transmit them.
B&G Triton Instruments - Located at each helm. Use the toggle on the bottom right to view:
- Boat Speed & Depth - Apparent & True Wind Angles. Wind Speed - Autopilot direction
Autohelm: The autohelm is straightforward. Set AUTO to engage, and STANDBY to deactivate. VHF Radio – The primary VHF radio is mounted at the Nav. station. A portable handheld unit sits in a charging cradle inside the cabinet above the Nav. Table. Please return it to the charging cradle when not in use.
Weather Reports: For Pac NW weather we listen to channels 1, 2, 3, 4 or 8. The “Northern Inland Waters” report gives conditions for the San Juan and Gulf Islands.

18
12. Engine Operations and Fueling
QUICK NOTES - Raven has a Power “ON/OFF” button rather than an engine key. - No blaring engine alert - Do not press the Power “ON/OFF” button while the engine is underway. It’s like turning
off a traditional engine key, which can blow the alternator. - Monitor engine temperature throughout the day and regularly check for water flowing
through the exhaust. The Islands can be quite “grassy” - Run engine between 2400 and 2800 RPM - Max temp should be 82 degrees Celsius. - Fuel Capacity = 53 gal. Fuel after approx. 30 hours of use.
DETAILS
Morning Routine: Through the companionway hatch give the diesel a quick visual inspection to look for oil or water in the bilge, or belt powder. The belts are located behind a black protective cover, but you can feel behind the cover for belt looseness. Fluid levels are checked weekly by Maintenance Pros, so there is no need to check fluid levels unless you are out for more than 1 week. Access to oil and coolant are noted below in this section. There is no need to “warm up” the engine much before casting-off in the morning. Too much idling can gunk up the engine. Using a slow speed while leaving a marina or hoisting the anchor gives the engine sufficient time to warm up. However, if the wind is dying while under sail, a little engine warm up is needed.
Starting the Engine: The “On/Off” switch is like the engine key.
- Place the gearshift into neutral (vertical) - Press the ON/OFF switch located at the bottom of the engine controls, (see below in yellow). - You will not hear the typical blaring alert. Instead you’ll hear a single “beep” and the LED - display will illuminate showing the various system alerts. - After a few seconds, press the top START switch (shown in green below). - Check for water flowing out of the exhaust, located on a port aft side of the boat.

19
Stopping the Engine: Do not hit the ON/OFF power switch while the engine is running. It’s like turning off a traditional engine key while the engine is running which can blow the alternator.
- Place the engine in idle and the gearshift in neutral. - Push the middle Stop switch, (i.e.: Engine Kill - shown in red above). - Again, you will not hear a blaring alert. - When the engine has stopped, press the bottom power switch - Place the MaxProp into reverse to help fold the prop and stop rotation
Monitoring Temperature, Hours, & Engine Alarms- The black toggle buttons beneath the LED display allow you to monitor engine temperature, hours and other alarm indicators. If a problem is detected, an indicator light on the LED screen will illuminate and an alarm will sound. (See excerpt from Yanmar User Guide below). Under normal operating conditions the indicator lights are off. The water temperature runs normally between 78 - 82 degrees Celsius. If the temperature rises above 85 degrees, you may have weed or grass in the raw water intake. At 95 degrees the alarm will sound.

20
Fueling:
The 45 HP Yanmar engine moves Raven easily at 7 knots, (wind and current notwithstanding). The engine operates best at 2400 to 2800 RPM. In this range she consumes 1.1 – 1.3 gal per hour. We’ve found that pushing the engine beyond 2800 RPM does little good for boat speed and disproportionally increases fuel consumption. The fuel tank has a 53-gallon capacity. It can be checked at the Nav Station (see image in #5 above). Please do not allow the fuel tank to fall below ¼ tank since float gauges are notoriously inaccurate. A good rule of thumb is to fuel before the engine hits 30 hours of use. The deck fitting for the diesel tank is on the port side in the stern line locker. The actual tank sits under the port aft cabin bunk and the fuel shut-off valve is located on top of the tank. The key sits in the chart table.
Troubleshooting: - Location of essential engine parts:
View from Port Aft Cabin Hatch
Raw Water Intake Strainer (Do not overtighten if opened)
Coolant Reserve
View from Starboard Aft Cabin
Dipstick Oil Fill, (only if needed)

21
Troubleshooting (cont.)
If the engine is totally unresponsive to the Power and Start button, check to see if the battery circuit breaker is on, (aft starboard cabin).
If alarm sounds while the engine is running:
- If the Coolant High Temperature alert sounds AND there is reduced or no water flowing
through the engine exhaust, you probably have grass or gunk in the raw water intake. See photo above.
o The strainer has been installed above the waterline, so you do not need to close the raw water intake through-hull seacock.
o To clean, unscrew the top of the strainer and remove the grass or gunk. Replace the lid being careful to reinsert the the O-ring correctly. Tighten to seal, but do not overtighten.
o If the engine overheats again upon restarting, check to be sure the O-ring is in place. If still overheating, call San Juan Sailing for assistance.
- If the Coolant High Temperature sounds but there IS a normal amount of water flowing through the engine exhaust, check the engine coolant level.
- For “Engine Oil Pressure” alerts, shut down the engine and check the oil level. Add oil if needed. If oil level otherwise appears normal, contact San Juan Sailing.
- For “Water in Sail Drive”, treat like a leak, head for the nearest harbor, and contact San Juan Sailing.
- For “Water in Fuel Filter”, shut down the engine and contact San Juan Sailing.
13. Entertainment QUICK NOTES
- Stereo with USB input. Indoor and outdoor speakers. - Turn outdoor speakers off when not in use - Portable 19” TV with DVD player. (Not Blu-Ray).
DETAILS
Stereo – RAVEN stereo has two sets of speakers in the cabin and cockpit. Please be courteous of neighboring boats when you adjust the volume of the cockpit speakers and be sure they are turned off when not in use. An iPod or USB source may be plugged into the stereo using the plug to the left of the stereo unit.
Press main button to adjust cockpit speaker balance

22
TV/DVD Player – A 19” portable flatscreen TV with built-in DVD player is stored in the forward cabin’s hanging locker. (Not Blu-Ray, sorry!) The remote control is stored in the chart table. The unit is not mounted so young crew may watch a movie in one of the cabins. (We’ve cruised with kids…we get it!). Since it is not mounted, please take extra care to protect it with pillows, etc. when in use.
14. Galley QUICK NOTES
- Place settings and “glassware” for 8 - Pots, pans and utensils for cooking, baking and grilling. - Extra grocery storage in salon cabinets and beneath galley floorboards - Crab Trap stored in starboard cockpit locker. 16 qt. stock pot under starboard salon settee
DETAILS
Raven has a well-equipped galley with extra thought given to boat-friendly materials, (collapsible, multi-purpose, nesting, etc). There are place settings and “glassware” for eight plus equipment for stovetop and oven cooking. We’ve left a few cabinets empty for groceries and the boat has extra storage beneath the galley floorboards. The salon table has a 4-bottle cabinet for “adult beverages”. Raven is stocked with an assortment of basic spices, condiments, oils and supplies, (aluminum foil, baggies, etc). If you use the last of something, please replace it for the next guest. There is also a variety of cleaning supplies under the sink. SJS will supply you with a coffee press, and it cannot be placed directly on the stove top. Please use the water kettle supplied in the galley to boil water to pour into the press. A recycle tub can be found outside in the center-aft cockpit locker. Beyond being environmentally friendly, (thank you!), we find that depositing bottles, cans, plastic, and paper in a separate location really reduces the amount of actual trash in the galley trash can. This will help minimize your trips ashore looking for dumpsters.
15. Heads and Holding Tanks QUICK NOTES
- Two toilets: manual pump with sea water flush - Simple, gravity flow holding tanks. - Nothing goes into the head that hasn’t been digested by your body.

23
DETAILS
Raven has a wonderfully simple sanitation system and there is little that can go wrong provided it gets a little attention.
Each toilet is manual-pump and uses sea water to flush. Each tank has a 21-gal. capacity. They do not have gauges, but you can see their fill level by just opening the large panels in each head. It helps to shine a flashlight from the side of the tank. A polite plea… don’t over fill the holding tank. Overflow is pretty gross to clean up. Plainly put, please do not put anything in the toilet that has not been eaten and digested by your body. Most cruisers we know deposit “cleanish” toilet paper in a wastebasket, not down the head.
Where allowed the tanks may be dumped while underway by opening the drain valves. The forward head’s drain valve is located under the sink. The aft head’s drain valve is located under the shower seat. These are gravity drain tanks, (no macerator), so while the boat is underway just turn the red handle counterclockwise 90 degrees. They will normally drain in less than a minute and you will hear a whoosh” as they empty. Close the valves to prevent backfill.
You may also pump out the holding tanks while in harbor. The two waste deck plates are located just above where the tanks sit in the boat. San Juan Sailing staff will discuss holding tanks and pump out on your arrival.
Aft Head Gravity Valve- under the shower seat. Forward Head Gravity Valve Under the sink.

24
16. Heater -
Quick Note: When using the cabin heater, be sure the dinghy is tied to the port side of the boat, away from the exhaust port. Raven is equipped with a Webasco forced air furnace heater. The thermostat is located on the starboard side of the main salon, just ahead of the galley. To turn it on press the small button in the upper right-hand corner. When it appears green the unit is “on”. Use the round knob to adjust the temperature. To turn it off, press the upper right-hand button again. It will appear “white”, and in a few seconds the unit will turn “off”.
17. Propane Tanks:
Raven has two propane tanks stored in the aft starboard cockpit locker. San Juan Sailing will ensure you have enough propane for your charter. If the stove or BBQ won’t light, make sure the solenoid switch is on and the tank valve is open. Switch tanks if needed. For safety’s sake we always turn the solenoid off when propane is not in use. Propane leaking in a sailboat is a major safety hazard.
18. Refrigerator
QUICK NOTES
- 48-gallon unit with top and front access - Small, very efficient freezer unit – don’t let cans come in contact with it! - Circuit Breaker located on the electrical panel
DETAILS
RAVEN is equipped with a large 48 gal. refrigerator with top and front doors. The circuit breaker is located on the electrical panel and the thermostat is inside of the refrigerator unit. We usually keep the thermostat set at “6 o’clock”. The unit can typically run 24 hrs a day without battery issues. If we plan to sail for a few days without much battery recharging time we may turn the fridge off at night. There is a small freezer unit that will keep meat frozen solid indefinitely. NOTE, (a lesson learned the hard way), anything that touches the outside of the metal freezer unit for an extended period will freeze. Take care especially with cans that may burst when frozen. Water that accumulates from melting ice drains into the bilge through a small plug in the bottom.

25
19. Sails and Rigging QUICK NOTES
- Main must be raised before unfurling the jib - The boat must be dead upwind when launching the main to keep batons from hooking on
the lazy-jack sheets - “Flatter is Faster”. Too much heel slows her down - When you first think about reefing, it’s time to reef.
DETAILS
We are absolutely thrilled with Raven’s sailing performance. She is spirited in light wind but is also comfortable in the heavy stuff. We can double-hand in all conditions.
Running Rigging - Halyards are clearly labeled and lead to the doghouse roof. All sheets run aft to the cockpit, next to the helmsman’s posts. Mainsail – Raven is rigged with a fully-battened traditional mainsail for best performance. It flakes into a “stack pack” and has two pre-rigged reefing lines. We’ve added additional mast steps to help crew manage the main, and at 5’2” Laura can easily manage the stack pack.
To raise the Main (always before the jib):
- It’s easiest to unzip the sail bag while at dock or anchor before you depart. Positioning the traveler to the starboard side will help you reach the zipper.
- When attaching the main halyard, make sure it is lead inside of the lazy-jack lines. - Unclutch the mainsheet, vang, and reefing lines, (if you are not reefing). - When hoisting, keep the boat dead upwind so that the battens don’t hook on the lazy jack
lines. - Raise the sail, applying enough tension as conditions call for. Light air = looser. Heavy air =
tighter. Don’t overtighten. - Fall off the wind and trim!
Raven is rigged with a European-style main sheet, so you can trim the main from either side of the boat. The one caveat is that too much line can accumulate on one side so adjust as needed. Reefing the Main: Raven’s reef system is simple, but it’s always best to reef just before you really need to. There are two preset reef points.
- Head the boat upwind and depower the main. - Ease the boom vang and main sheet. - Lower the main halyard so that the reefing point eye is about 24” above the boom. Clutch
the main halyard. - Pull in the reef line to tighten the sail, which will pull down the reef point eye closer to the
boom. - Adjust by balancing the amount of main halyard pulling the sail “up” with the amount of
reef line pulling it “down.”

26
Genoa: Raven has a 108 roller-furled Genoa. It should be unfurled after the Main. To deploy:
- The furling line and clutch is located just ahead of the port helmsman’s position. - Keep moderate tension while releasing the furling drum line when unfurling the sail. This
helps prevent a rat’s nest on the drum. - When furling the genoa in, keep a similar tension on the jib sheets while you pull in the furling
line to prevent “candy striping”.
Sailing Characteristics: You’ll find that Raven can take full sails up to 15 knots of wind, (depending on your crew’s comfort level, wave pattern, etc). Racers know that too much heel slows a boat down, and the same applies to Raven. We’ll allow the front 1-2ft of the main to luff, and/or move the main traveler to leeward or “travel down” to depower the sail. Moving the jib cars aft will also help flatten the jib and boat. Not only does this add speed, but it makes for a more comfortable sail.
After 12-15 knots it’s so easy to reef that we don’t hesitate to pull in a little canvas and make things more comfortable.
Have Fun!!!
20. Showers and Sump Pumps
QUICK NOTES
- Fully-enclosed shower stall in the aft head - Forward head’s sink faucet converts to a shower head - Outdoor shower head located near the swim platform - Shower sumps pump are manually activated. - Take caution using hot water. It is VERY hot!
DETAILS
Raven has three shower options. The larger, fully-enclosed shower is in the aft head. The second shower is in the forward head where the sink faucet may be mounted inside the door. An outdoor shower fixture is located on the starboard transom just aft of the storage locker. The shower sumps are manually activated with small black “push” buttons. They do not have automatic float switches. Note: shower sumps may also be used in emergency situations to remove water from the boat.

27
21. Stove QUICK NOTES
- 2 burner stove. The oven bakes and broils. - Solenoid located beneath sink - Pot restraints located in cabinet above stove
DETAILS
The stove’s propane tanks and valves are located in the stern starboard tank locker. The solenoid switch is located just below the sink. The ignitor button is on the right side of the cooking panel. Press the ignitor switch then push IN the stove knob and turn to high. When the flame lights, hold in the knob IN for an additional 3-5 seconds. To light the oven, press the ignitor button then press and turn the oven knob to high. (It’s on the left side and easy to confuse with the left-hand burner knob). The first setting is for upper broiler unit. The second setting is for the lower “bake” unit. It may be difficult to tell if the oven is lit. Look through the holes in the bottom of the oven’s metal tray. We usually need to visually confirm that the flame is lit. NOTE: the oven door must be slightly open for the broiler to operate. For safety, we keep the solenoid “off” when we’re not cooking.
22. Swim Platform: DETAILS
For safety, the swim platform must be in the “up” position before leaving dock or anchor. To lower the platform: Unclasp the pelican hook then uncleat the swim platform control line located under the port helmsman seat. The pneumatic stays will help lower the platform, but you’ll need to use the control line to gently ease the platform down. Raising the platform requires a little muscle. Pull up and cleat the swim platform control line. If you need a little extra pull, use one of the silver support lines to pull the platform up a few inches, then recleat the slack in the control line. Repeat two or three more times. Once the platform is in place, re-secure the pelican hook.
23. Water Tanks QUICK NOTES
- Two fresh water tanks for a total of 140 gallons - Monitor tanks at the electrical panel - Fill or switch tanks before they are empty - Valves to change tanks located behind starboard dinette cushion - Open only one tank at a time

28
Tank Monitor at electrical panel
DETAILS
Tanks & Filling: Raven has two fresh water tanks.
- Tank #1 holds 87 gallons and is located under the V-berth. The deck fitting to fill this tank is located on the port side, just forward of mid-ship.
- Tank #2 holds 53 gallons and is located under the aft starboard cabin berth. The deck fitting to fill this tank is located inside the starboard line locker in the cockpit. (The port deck fitting fills the diesel – please don’t confuse them!)
Water Pressure – The water pump circuit breaker is located on the electrical panel. We switch this off when not in use. Pumps are a battery burn, but more importantly it may continue to run and burn out the water pump if the tanks are empty. You can’t hear the water pump while underway from the cockpit. Monitoring Water Tanks: Tanks may be monitored at the electrical panel. Press the button to toggle through tanks #1 & #2. Float valves are notoriously inaccurate and will drop from ½ to empty quickly, so use your best judgement and fill tanks before they are completely empty. Allowing a tank to run empty risks damaging the water pump. When a Tank Empties / How to Change Tanks – You’ll know that a tank is completely empty when the water pump continues to run but no water is flowing through the faucet. To change the tanks, access the valves located behind the starboard salon settee, just ahead of the galley. Only one valve should be opened at a time. See image below for an example of “open” and “ closed” valves.
24. Water Heater:
Raven has a 10-gallon hot water tank. While underway water is heated by heat recovery from the engine cooling circuit. While on shore power you can run the hot water heater. The AC circuit breaker is on the electrical panel. Please do not switch on the water heater if water tanks are empty. Caution: the water is heated to scalding temperatures.
Example: Tank 1 valve open and Tank 2 closed. Located behind starboard. settee cushion.

29
25. Planning Notes:
If you are reading these notes before planning your trip, let us share that the San Juan Sailing itinerary offers great “tried and true” routes around the islands. We also suggest you reference the “Dreamspeaker Cruising Guides” for excellent insight into sailing the San Juans, Gulf Islands, Desolation Sound, and the Sunshine Coast. We keep copies of these guides on Raven, and you can find them at: http://www.dreamspeakerguides.com/ or at Amazon.com. These guides have led us to spectacular destinations that are often overlooked by the major publications. We sincerely hope you love cruising the Pacific Northwest as much as we do. Don’t hesitate to provide feedback on anything that you especially enjoyed, or something that could have made your trip better.
Safe Travels! Brian and Laura Bolin

30
26. Spinnaker Notes: