november 2007 - gn15 tome
TRANSCRIPT

The Gn15 TomeIssue 9 November 2007
Inside this issueMake your own decalsFeature Locomotive Inexpensive name plates
The Creative Scale
Owl Bob Taylor

Editorial
As we close in on the end of another successful year of great innovation and a lot of new faces in the world of Gn15, I am grateful for all the shared wisdom that comes from the Gn15 forum.With the coming cooler shorter days and longer nights more time will undoubtedly be spent whittling away at our respective work benches. The major push for some now will be the finishing up of the card and paper layouts that have proven to be full of very creative ideas and methods.
I am hoping to find a little more time to put into my own models this winter. I have resolved to do a small bit every week somewhere in the week to contribute to my layout no matter how little. The very act of doing even very minor bits of model work can have a rewarding effect for the builder because over time progress is seen to be achieved. There have been a few of these little bits of work that have stood out for me as gems this past year . Some that come to mind are Pat’s birds on Gerry Bullocks layout, and the epiphyte detail that Paul has included on the foliage of his trees on the Waitakere Tramline layout, I only pointed these out because they embody for me at least that progress can be made with a small amount of effort. Over time the accumulation of these small steps lead to a layout or model that provide inspiration for the rest of us.
The Growth of the Forum is resulting in more threads and more inspirational projects than I am able to keep up with, this I think is also typical of any area of interest. It is also great that so many members of the forum are willing to contribute to the Tome.
Ed.
Page 2

Page 3
Making your own Decals
Sometimes, a model in progress just seems to call out for some small added graphic detail a gauge, a warning sign or a nameplate. Even in 1/24 scale, creating such details by hand can be challenging. In my case, also impossible. I recall that somewhere, a long time ago, I had read about a method for creating your own decals. If I remembered correctly, this involved using felt markers and shellac as a sealant.
There are now several manufacturers offering waterslide decal film suitable for use with a computer printer. It's well worth experimenting with this technique if you would like to produce decal sheets of your own design and manufacture. Using this technique is also a good way of saving time and effort. I've been modelling the Karlsson loco which is preserved at the Frövi Machine & Estate Light Railway Museum in Sweden. The bodywork and chassis is an easy job using styrene sheet but I really didn't fancy the task of drilling 950 holes for the radiator panel. This is where a quick decal not only makes life easier but also looks far neater.
However, this is the age of the computer surely a better method must be available and let's face it, the big manufacturers are not likely to be producing Gn15 decals anytime soon.
By John Mitchell
The possibilities offered by decals are only limited by your imagination. Obvious candidates include signs, labels, symbols, gauges and name plates for locos plus advertisements and posters for scenic use. You will not be able to make decals which rival those provided by the big model manufacturers. You probably don't have access to their high tech graphics studios or printing facilities. Compromises have to be made and certain difficulties inherent in DIY decal production need to worked around as you progress. More about this later.

Page 4
The choice of printer is not important I use the cheapest Epson inkjet model and get good, reliable results. Most people will be using an inkjet which uses water soluble ink. If you are really lucky, you may have access to a colour laser printer. Whatever printer you have, it's important to get the decal paper which is correct for that particular type. Inkjet produced decals will need a protective coat of lacquer before use. Laser toner is fused onto the paper and is waterproof without any need for additional treatment.
This is important. You must remember that no computer printer can actually print the colour white. The colour printer uses the basic paper colour to substitute for white. Also remember that the layer of ink is very thin the colours look great on the bright computer screen but when the waterslide decal is separated from it's backing, the final appearance is greatly influenced by the colour onto which it is applied. DIY decals always work best on a light background. Red crosses on a white ambulance will look great. Red crosses on an olive drab military ambulance will look terrible.
If you're still tempted, you will need to have access to a computer and colour printer, graphics or desktop publishing software, a supply of decal film printer paper and a spray can of clear acrylic lacquer or varnish.
I was faced with this problem when adding the maker's badge to my Rapier loco. The basic colour is light olive but the decal is black on clear carrier film. It was necessary to pre-paint the area behind the decal in silver to try and get a finished product which looked like a chrome and black badge. The silver shows through the clear carrier film.
The whole process is made quicker and easier with the aid of good software. It's perfectly possible to make a decal sheet using nothing more than whatever word processor you have available, or even a basic graphics package like the “Paint” program that comes as one of the Windows accessories.
Life gets easier with a desk top publishing program, most of which allow you to treat each element of the decal sheet design as an “object” which can be moved, overlaid and resized as required.

Page 5
DTP programs often include vertical and horizontal rulers which are a great aid to making sure the scale sizes are correct. I use Microsoft “Publisher” which is easy to use and has all the features that I need, but there are many choices on the market. It's probably best to go with something with which you are comfortable and familiar.
For the sake of economy, it's good practice to plan out each sheet so as to fit on the maximum number of decals. Sketch out what you want on a sheet of scrap A4 paper to ensure that no room is wasted. Then you need to collect together the artwork for the decal sheet. This could be created in a graphics program, a digital photograph, a scanned image or something found on the internet. I tend to use the image search on Google to trawl for likely images. For example, say you want a trade sign for a workshop, search using Google images, right click on the required image and save into a folder set aside for decal making. Then you might have something like this available:
But remember the rule about white. If this design is printed onto clear decal film, the white will appear as whatever colour it has been applied to. The yellow and red could look faded. One solution is to buy white decal film, but then you might get a white carrier showing. This decal could be applied to a piece of white styrene sheet, or you could prepare just the area of application by painting it white in advance. There's no rule here. You need to adopt the best technique for the job in hand.
Once you've decided on the graphics to be included onto the decal sheet, you can go ahead and prepare it using whatever software is to hand. This is a screenshot of a sheet being created using MS Publisher.

Page 6
The sizes are yet to be finalized. Included here are some hazard warning stickers, no smoking signs, a film poster, signs for auto workshops and railway stations, and a few gauges. The Gn15 logos will go onto the T- shirts of a couple of driver figures. I've also added six Ransomes maker's plates for my Rapier loco and a few grille patterns for the front of a Swedish “Edan” loco that I'm building. Most of the graphics were saved from various internet images, then copied and re-sized as required. A DTP program has the advantage of treating each decal as an “object” which can be copied, spaced and dragged to anywhere on the sheet. The Edan grill panels were created by drawing a series of dotted lines into a text box.
Having made up the design, it's a good idea to print off a “proof” onto ordinary printer paper. Individual “decals” can be cut out and checked for scale etc. against the model. Any necessary resizing can then be done and the final version saved and printed onto the decal sheet.

Page 7
Most makers of decal sheet suggest you stick to default printer settings. I always select the best quality. It's slower but the final product is sharper and brighter at least on my Epson.
Handle the printed sheet by the edges and set it aside for at least half an hour for the ink to dry completely. If you've used an ink jet printer, it will now be necessary to seal the ink onto the paper. Failure to do this will inevitably result in the ink running when the decal is floated onto water before application. Most of the paper suppliers offer a suitable aerosol of acrylic lacquer. I tend to use Games Workshop (Citadel Colour) “Purity Seal” as this is also useful for protecting locos and stock that might be handled frequently. It's available as satin or gloss finish but the degree of shine depends on the number of coats that are applied. I spray twice with a half hour drying time between coats, making sure that the second coat is applied at right angles to the first so as to ensure total coverage. It's a good idea to leave the completed sheet for several hours (preferably overnight) for the acrylic to really harden.
The decals can now be cut out and used just like commercial items. You just need to remember that with this process, the entire sheet forms the carrier film, so some accurate cutting out of the decal shapes is required.
Continued on page 11

Page 8
This months feature Locomotive
Pictures courtesy Bob Taylor
Owl can be found at the Kirklees light Railway in Yorkshire.
Owl would seem to be similar to the climax locomotives of the California and Oregon logging railroads in that it has a V system of cylinders that are mounted almost midway between the bogies. The cylinders are 5 inches in diameter with an 8 inch stroke. Each bogie has a 1.5:1 bevel gear box that drives each axle through a chain drive More can be found about Olwl at the Kirklees website. Http://www.friendsofklr.co.uk/
Page 9
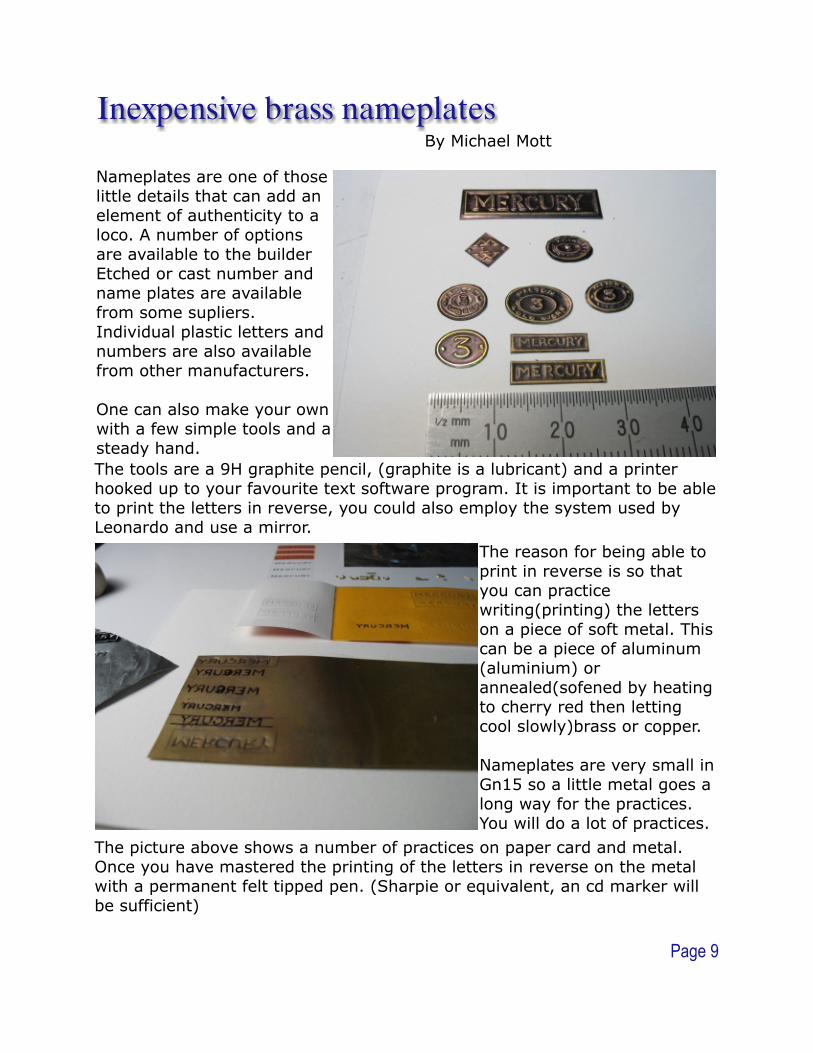
Inexpensive brass nameplatesBy Michael Mott
Nameplates are one of those little details that can add an element of authenticity to a loco. A number of options are available to the builder Etched or cast number and name plates are available from some supliers. Individual plastic letters and numbers are also available from other manufacturers.
One can also make your own with a few simple tools and a steady hand.
The tools are a 9H graphite pencil, (graphite is a lubricant) and a printer hooked up to your favourite text software program. It is important to be able to print the letters in reverse, you could also employ the system used by Leonardo and use a mirror.
The reason for being able to print in reverse is so that you can practice writing(printing) the letters on a piece of soft metal. This can be a piece of aluminum (aluminium) or annealed(sofened by heating to cherry red then letting cool slowly)brass or copper.
Nameplates are very small in Gn15 so a little metal goes a long way for the practices. You will do a lot of practices.
The picture above shows a number of practices on paper card and metal.Once you have mastered the printing of the letters in reverse on the metal with a permanent felt tipped pen. (Sharpie or equivalent, an cd marker will be sufficient)

Page 10
The pic on the left shows the practice of going over the inked letters with a ball point pen. It does take a few goes to get the feel of how much pressure to apply to get a consistent depression. I place the metal onto a piece of soft card(matt board works well)
The pic on the right shows the front side of our embossed letters the next step is to give them a coat of ink from a large black felt marker. When the ink is dry rub it gently with a soft eraser to remove the ink from the high points the last pics show the results.

Page 11
http://www.craftycomputerpaper.co.uk/
http://www.railwayshop.com/model_decals.shtml
http://www.mcgpaper.com/decals.html
http://www.beldecal.com/model_decals.cfm
http://www.lazertran.com/products/lazertran_products_inkjet.htm
Http://www.ceramic-decals.co.uk/inkjet-decal-paper.html
http://www.decalpaper.com/
http://www.themodelcatalogue.com/acatalog/Decal_Paper.html
It's likely that you will already have most of the equipment needed for decal production. For the modest outlay on some computer printer decal paper and some acrylic sealant, you could be in production within minutes. Give it a try it's fun.
There are many sources for suitable DIY decal papers. Many of the suppliers provide additional information via their websites. Here in the UK, I have used the Crafty Computer Paper Company for several years. You can order online and delivery is rapid. Lazertran in the US seems to be offering a new type of paper which it is claimed does not need coating, but I have no experience of this product. Here are a few links to decal paper suppliers: