ns3 - steljes audio | tv soundbars | digital...
TRANSCRIPT

NS3POWERED LOuDSPEAKERSFOR ALL AuDiO SOuRcES

2 Steljes Audio . NS3 user Guide

Steljes Audio . NS3 user Guide 3
Beautifully engineered & designed in Great Britain
cONTENTSimportant Safety instructions . . . . . . . . . . . . . . . . . . . . . . . . . . . . . . . . . . . . . . . . . . . 4
information . . . . . . . . . . . . . . . . . . . . . . . . . . . . . . . . . . . . . . . . . . . . . . . . . . . . . . . . . . . . . . . . . . . . . 5
connections . . . . . . . . . . . . . . . . . . . . . . . . . . . . . . . . . . . . . . . . . . . . . . . . . . . . . . . . . . . . . . . . . 6-9
Limited Warranty . . . . . . . . . . . . . . . . . . . . . . . . . . . . . . . . . . . . . . . . . . . . . . . . . . . . . . . . . . . 10
Specifications . . . . . . . . . . . . . . . . . . . . . . . . . . . . . . . . . . . . . . . . . . . . . . . . . . . . . . . . . . . . . . . . . . 11
NS3POWERED SPEAKERS

4 Steljes Audio . NS3 user Guide
ATTENTION The owner’s manual contains important operating and
maintenance instructions, for your safety, it is necessary
to refer to the manual.
DANGEROUS VOLTAGE Voltage is of sufficient magnitude to constitute a risk of
electric shock. Do not open this product unless you are a
qualified service engineer.
Important InformatIon
SAfETy INSTRUcTIONS
• Do not use this product near water or moisture
• Do not place the unit on sloped or unstable surfaces as the unit may fall off or tip over.
• clean only with a dry cloth. unplug this product from the wall outlet
• Do not attempt to service this product yourself.
• Opening or removing covers may expose you to dangerous voltages or other hazards.
• Please contact the manufacturer to be referred to an authorized service center near you.
• Place the unit on a solid surface.
• Do not block any ventilation openings.
• To prevent risk of fire or electric shock, avoid over loading wall outlets,
• Do not put it in a closed bookcase or cabinet that may keep air from flowing through its ventilation openings.
• Do not let objects or liquids enter the product.
• Protect the power cord from being walked on or pinched, particularly at plugs and the point where they exit from the product.
READ BEfORE OPERATING EQUIPMENT
Read all the instructions carefully before using the unit and keep them for future reference. check that the voltage selector is switched to the correct position for your country.

Steljes Audio . NS3 user Guide 5
cAUTION: TO REDUcE ThE RISk Of ELEcTRIc ShOck, DO NOT REMOVE cOVER (OR BAck). NO USER SERVIcEABLE PARTS INSIDE.
REfER SERVIcING TO QUALIfIED SERVIcE PERSONNEL.
CautIonrIsk of eleCtrIC shoCk do not open!
UNPAckING
• These speakers were carefully tested and inspected during production and before packaging and shipping. After unpacking please check for any damage. it is rare that a unit is damaged during shipping, but if this does happen contact your retailer immediately.
• We recommend that you keep the original carton and packing material for future shipping.
REcOMMENDED SPEAkER SETUP
• correct speaker placement has a huge impact on sound quality. There are many different theories, but all rooms and tastes are different so it’s impossible to specify a correct placement. We do suggest you experiment with a few different locations see what is best for you. For the best bass response we recommend that you keep a minimum distance of 20-25cm between the speakers and the rear wall. For height positioning the speakers with the tweeters at eye level of your most common listening position.
cONDITIONING AND BREAk-IN
• We recommend that you play between 24 to 48 hours of music through the speakers before doing any critical listening or speaker placement.
cLEANING
• We don’t recommend using any solvents or cleaners on cabinets or speaker drive units. use a soft clean cloth to wipe the speakers.

6 Steljes Audio . NS3 user Guide
remote Control
1. STANDBY BuTTON Press to enter standby mode.
2. PREViOuS TRAcK
3. BLuETOOTH iNPuT
4. RcA JAcK iNPuT
5. BASS BuTTON Press”-”,then bass will be decreased; Press”+”,then bass will be increased;
6. MuTE BuTTON
7. NEXT TRAcK
8. PLAY/PAuSE
9. OPTicAL iNPuT
10. PAiR BuTTON
11. RESET TREBLE AND BASS FROM 0dB RESET VOLuME TO Default
12. 3.5mm MiNi JAcK iNPuT
13. VOLuME BuTTON Press”-”,then volume will be decreased; Press”+”,then volume will be increased;
TREBLE BuTTON Press”-”,then treble will be decreased; Press”+”,then treble will be increased;
6
7
9
11
13
14
8
10
12
1
2
3
4
5

Steljes Audio . NS3 user Guide 7
ConneCtIons
2
3
14
56
78
9
10
11
1. Remote Reciever
2. Volume / input Select Knob
3. LED Light (Red light on standby mode,blue light on Bluetooth mode and work mode)
4. RcA iN for right/left RcA stereo plugs from cD/DVD player.
5. 3.5 iN for 3.5mm mini jackplug, from portable music device, Pc etc.
6. Sub OuT
7. Power ON/OFF
8. Power supply input
9. Digital iN / Optical iN
10. Portable music device charge socket (5V Dc)
11. Left channel output for connecting the passive NS3 speaker
fRONT AND REAR PANELS

8 Steljes Audio . NS3 user Guide
cONNEcTING yOUR SPEAkERS
• STEP 1 connect the RED(+) and BLAcK(-) terminals from the left speaker to the corresponding terminals on the right speaker using the included speaker cable. insulation on cable must be stripped on all ends, unless the cables provided are already terminated with banana plugs. if this is the case they may be directly inserted into the speaker terminals. Note: Because this system is self-powered, do not connect the speaker terminals to the speaker outputs of a stereo receiver.
• STEP 2 connect the power cord into the left speaker and the other end into the wall outlet.
ConneCtIons

Steljes Audio . NS3 user Guide 9
ConneCtIons
BLUETOOTh cONNEcTION
Paring between Bluetooth devices and Steljes Audio NS3:
1. if you have a Bluetooth audio device, such as phone, MP3, Pc, Tablet etc. you should follow the pairing procedure.
2. Power on Steljes Audio NS3 and select Bluetooth on the units’ supplied remote.
3. Enable your Bluetooth device to search for a new Bluetooth device. “Steljes Audio NS3” should appear in the list of Bluetooth devices. if prompted for a pairing code enter “1234”.
4. if pairing is successful the white LED will remain solid. The same Bluetooth device will not require pairing again and will remain on your device list - you may just need to reconnect from your device.
5. if for any reason the devices do not pair please repeat steps 1 and 2.
BLUETOOTh OPERATION
6. connect your Bluetooth device as above / or reconnect the already paired device.
7. You can navigate using your Bluetooth enabled device player.

10 Steljes Audio . NS3 user Guide
USE wITh PORTABLE MUSIc DEVIcE/MP3 PLAyER
• cONfIGURATION A (for use with portable music device): For charging your portable music device while playing, connect the 30-pin cable from the portable music device to uSB jack on the rear panel. connect the 3.5mm mini jack audio cable from portable music device headphone jack to the AuDiO iN jack on the rear panel of Steljes Audio NS3.
• cONfIGURATION B (all products with 3.5mm mini jack outputs): connect the STEREO iNPuT L/R from any audio source with RcA L/R audio outputs. connect the 3.5mm mini jack audio cable from 3.5mini jack output to the AuDiO iN jack on the rear panel.
ConneCtIons
A B

Steljes Audio . NS3 user Guide 11
ConneCtIons
cONNEcT TV, DVD, cONSOLE, Pc
• cONfIGURATION A (TV,DVD,cD-RcA stereo plugs): connect the RcA L/R to your TV,DVD etc.and the RcA L/R to the Stereo input on rear panel of the Steljes Audio NS3. Note that most newer TV remotes can control the Steljes Audio NS3 active speaker volume if connected to variable TV audio out.
• cONfIGURATION B (Pc): connect the mini jack to your Pc and the RcA L/R to the Stereo input on rear panel of the Steljes Audio NS3.
A B
ATTENTION: When connecting audio cables the power switch should be tumed OFF.
After connecting all cables the power can be tumed ON and the system is now ready to use.

12 Steljes Audio . NS3 user Guide
ConneCtIons
POWERED SUBWOOFER
cONNEcTING A SUBwOOfER
• Steljes NS3 is equipped with an RcA connector to provide output signal to a powered subwoofer. Simply connect a single RcA subwoofer cable from the SuB OuT connection on Steljes NS3 to the AuDiO iNPuT on your subwoofer. if your subwoofer has a stereo L/R RcA input, either left or right inputs will work.

Steljes Audio . NS3 user Guide 13
ATTENTION: When connecting audio cables the power switch should be tumed OFF.
After connecting all cables the power can be tumed ON and the system is now ready to use.

14 Steljes Audio . NS3 user Guide
LIMITED wARRANTy
Dear customer,
This product had been designed and manufactured to the highest quality standards; however should you encounter any problems with this product please contact your local dealer or your country distributor.
This limited warranty is valid for the original owner for a period of one years from the date of purchase, it is not transferable.
what is covered by the limited warranty:
The limited warranty covers all production and material defects of the product, except for the damages stated below.
what is not covered by the limited warranty:
Damages caused by packing and transport.
Defects caused by accidents, misuse, normal wear and tear, mis-maintenance, voltage variation and overloading.
Damages caused by incorrect installation or operation Damages caused by modification or repair by a non-authorized service centre and use of non-original spare parts.
Other damages due to conditions beyond the supplier’s control such as fire, rain, strode of lightning, war and other forces majeure events.
how to claim parts or repair under warranty:
To have your product serviced under warranty, you must contact the dealer from where you bought the product.
You will need to produce this warranty booklet completed and stamped by your dealer on the date of purchase.
Alternatively, you will need the original sales invoice or other proof of ownership and date of purchase.
The supplier is liable only to repair or replace defective parts of products and the supplier is not responsible for indirect losses or damages arising from the use of the product.
Transportation costs for servicing are not covered by the warranty.
A service repair or replacement cannot exceed the value of the product under warranty; in no event shall the supplier be responsible or liable for special, incidential, consequential or indirect damages.
lImIted Warranty
Steljes Audio . NS3 user Guide 15
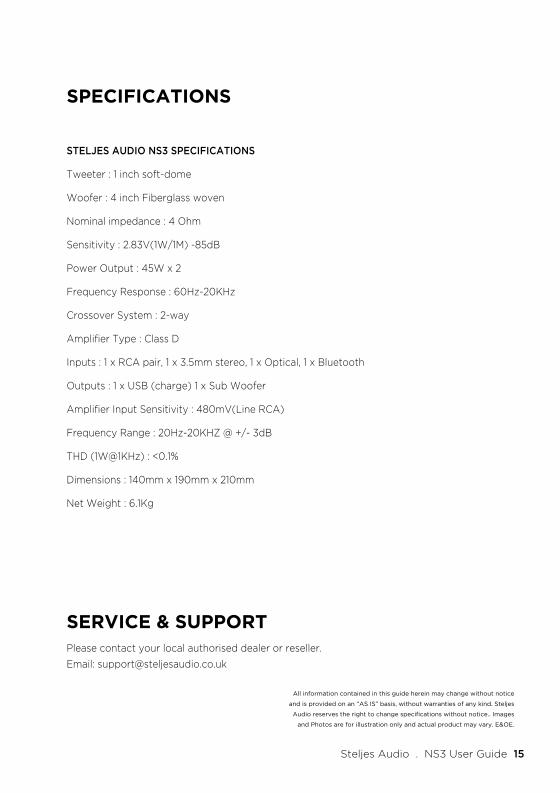
speCIfICatIons
STELjES AUDIO NS3 SPEcIfIcATIONS
Tweeter : 1 inch soft-dome
Woofer : 4 inch Fiberglass woven
Nominal impedance : 4 Ohm
Sensitivity : 2.83V(1W/1M) -85dB
Power Output : 45W x 2
Frequency Response : 60Hz-20KHz
crossover System : 2-way
Amplifier Type : class D
inputs : 1 x RcA pair, 1 x 3.5mm stereo, 1 x Optical, 1 x Bluetooth
Outputs : 1 x uSB (charge) 1 x Sub Woofer
Amplifier input Sensitivity : 480mV(Line RcA)
Frequency Range : 20Hz-20KHZ @ +/- 3dB
THD (1W@1KHz) : <0.1%
Dimensions : 140mm x 190mm x 210mm
Net Weight : 6.1Kg
servICe & supportPlease contact your local authorised dealer or reseller.Email: [email protected]
All information contained in this guide herein may change without notice
and is provided on an “AS IS” basis, without warranties of any kind. Steljes
Audio reserves the right to change specifications without notice.. Images
and Photos are for illustration only and actual product may vary. E&OE.

www.steljesaudio.co.uk