nuance management console guidelines for distributors · managing the nuance management center...
TRANSCRIPT
Nuance Management Console Guidelines for Distributors
CopyrightDragon Medical Practice Edition
Nuance ® Management Center.
2018 Nuance Communications, Inc.
This material may not include some last-minute technical changes and/or revisions to the software. Changes are periodically made to the information provided here. Future versions of this material will incorporate these changes.
No part of this manual or software may be reproduced in any form or by any means, including, without limitation, electronic or mechanical, such as photocopying or recording, or by any information storage and retrieval systems, without the express written consent of Nuance Communications, Inc. Specifications are subject to change without notice.
Copyright © 2018 Nuance Communications, Inc. All rights reserved.
Nuance, ScanSoft, the Nuance logo, the Dragon logo, Dragon, DragonBar, NaturallySpeaking, NaturallyMobile, RealSpeak, Nothing But Speech (NBS), Natural Language Technology, Select-and-Say, MouseGrid, and Vocabulary Editor are registered trademarks or trademarks of Nuance Communications, Inc. in the United States or other countries. All other names and trademarks referenced herein are trademarks of Nuance Communications or their respective owners. Designations used by third-party manufacturers and sellers to distinguish their products may be claimed as trademarks by those third-parties.
Adobe and Acrobat are registered trademarks of Adobe Systems Incorporated. AMD is a trademark of Advanced Micro Devices, Inc. America Online is a registered trademark of America Online, Inc., a division of AOL Time Warner. Corel and WordPerfect are registered trademarks of Corel Corporation. iPAQ is a registered trademark of the Hewlett-Packard Company. Lotus and Lotus Notes are registered trademarks of Lotus Development Corporation. Macromedia Flash is a trademark of Macromedia, Inc. Microsoft, Outlook, Windows, Windows NT, Visual Basic, and PowerPoint are trademarks or registered trademarks of Microsoft Corporation. Mozilla, Mozilla Firefox, and Mozilla Thunderbird are trademarks or registered trademarks of the Mozilla Foundation. Palm OS is a registered trademark of PalmSource, Inc. or its affiliates. Panasonic is a registered trademark of the Matsushita Electric Industrial Co., Ltd.
Pentium is a registered trademark of Intel Corporation. Sony and Memory Stick are registered trademarks of the Sony Corporation. Voice It, the Voice It logo, and Voice It Link are trademarks or registered trademarks of VXI Corporation.
L-3940
Disclaimer
Nuance makes no warranty, express or implied, with respect to the quality, reliability, currency, accuracy, or freedom from error of this document or the product or products referred to herein and specifically disclaims any implied warranties, including, without limitation, any implied warranty of merchantability, fitness for any particular purpose, or non-infringement.
Nuance disclaims all liability for any direct, indirect, incidental, consequential, special, or exemplary damages resulting from the use of the information in this document. Mention of any product not manufactured by Nuance does not constitute an endorsement by Nuance of that product.
Notice
Nuance Communications, Inc. is strongly committed to creating high quality voice and data management products that, when used in conjunction with your own company’s security policies and practices, deliver an efficient and secure means of managing confidential information.
Nuance believes that data security is best maintained by limiting access to various types of information to authorized users only. Although no software product can completely guarantee against security failure, Dragon software contains configurable password features that, when used properly, provide a high degree of protection.
We strongly urge current owners of Nuance products that include optional system password features to verify that these features are enabled! You can call our support line if you need assistance in setting up passwords correctly or in verifying your existing security settings.
L-3940Published by Nuance Communications, Inc., Burlington, Massachusetts, USA
Visit us on the Web at www.nuance.com.Links to our international web sites are shown there.4/13/2018
Contents
Nuance Management Console Guidelines for Distributors 1
Copyright 1
Contents i
About this guide iv
Guide overview v
Audience v
Additional resources vi
Documentation vi
Training vii
Support vii
Chapter 1: Introduction 1
About the Nuance Management Center 2
About the user interface 3
Main user interface components 3
The left navigation panel 4
User interface navigation 4
Chapter 2: Getting started 5
Nuance Management Center (NMC) console overview 6
About your installation 6
NMC console setup considerations 6
Logging in and logging out 8
Logging in 8
Logging out 8
Changing your password 9
Chapter 3: Organizations 10
About Organizations 11
Viewing Organizations 12
Viewing an organization 12
Viewing organization details 12
Managing organizations 13
Changing organization information 13
Managing password settings 13
Chapter 4: Sites 15
About sites 16
i
Contents
Viewing sites 17
Viewing a site 17
Viewing site details 17
Working with sites 18
Adding sites 18
Deleting sites 18
Managing sites 19
Changing site information 19
Chapter 5: Groups 20
About groups 21
Viewing groups 22
Viewing all groups 22
Viewing groups by site 22
Viewing group details 22
Working with groups 23
Adding groups 23
Copying groups 23
Deleting groups 24
Managing groups 25
Changing group details 25
Adding user accounts to a group 25
Removing user accounts from a group 25
Configuring group security 25
Changing PowerMic settings 26
Chapter 6: User accounts 27
About user accounts 28
Viewing user accounts 29
Viewing all user accounts 29
Viewing all user accounts in a group 29
Viewing all user accounts in a site 29
Working with user accounts 30
Adding new user accounts 30
Deleting user accounts 30
Importing user accounts 31
Managing user accounts 32
Changing user account details 32
ii
Contents
Changing user account passwords 32
Changing user account address information 32
Changing user account group membership 33
Configuring user account messaging options 33
Chapter 7: Licenses 34
About licenses 35
Viewing licenses 36
Viewing licenses 36
Viewing licensed user accounts 36
Working with licenses 37
Importing license keys 37
Allocating licenses 37
Deleting licenses 38
Chapter 8: Field descriptions 39
Organization Details page 40
Organization Details—General tab 40
Organization Details—Address tab 40
Organization Details—Products tab 40
Site page 43
Site—General tab 43
Site—Address tab 43
Group Details page 44
Group Details—Details tab 44
Group Details—Members tab 44
Group Details—Security tab 44
Group Details—Grants tab 44
User Account Details page 46
User Account Details—Details tab 46
User Account Details—Specialty tab 46
User Account Details—Address tab 47
User Account Details—Group Memberships tab 47
Appendix A: 48
Creating comma-delimited files for user account import 49
Creating XML files for user account import 50
iii
About this guide
Guide overview vAdditional resources vi
iv
NuanceManagement Center Administrator Guide
Guide overviewThe Nuance Management Center Administrator Guide provides information on configuring and managing the Nuance Management Center (NMC) console. The guide also provides a checklist to help you with your initial NMC console setup.
AudienceThis guide is intended for Dragon System Administrators who are responsible for managing centralized Dragon Medical Practice Edition installations using the Nuance Management Center (NMC) console.
v
About this guide
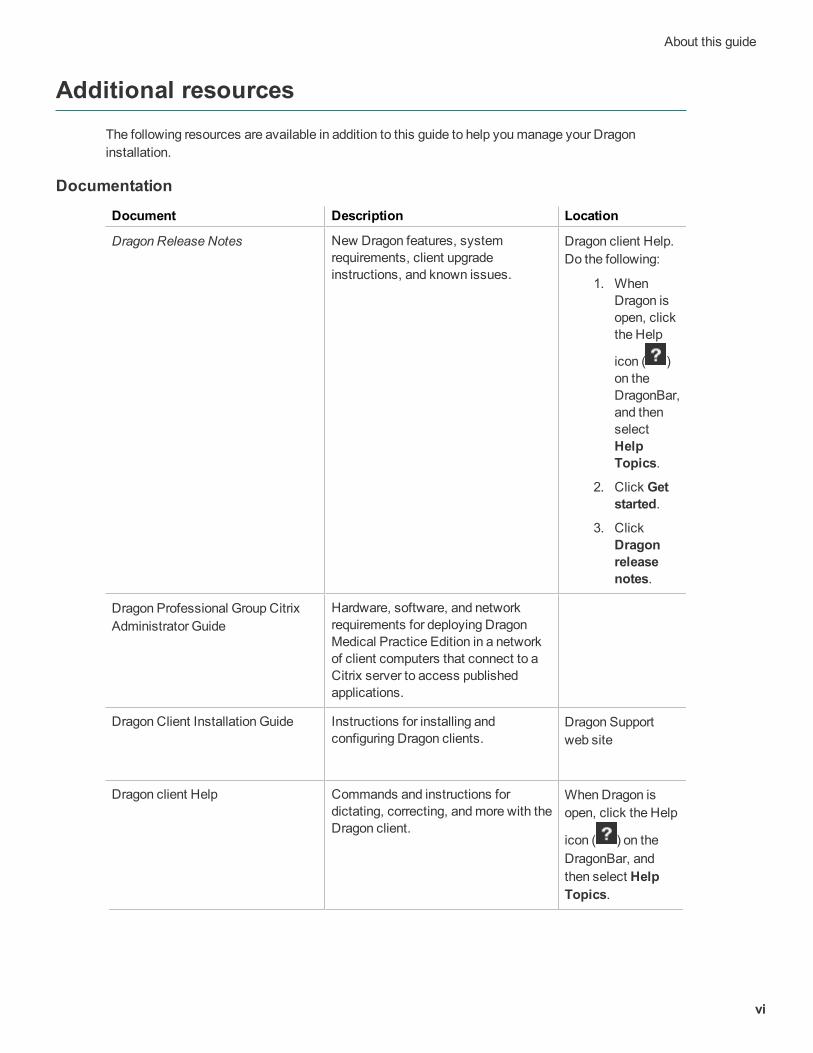
Additional resourcesThe following resources are available in addition to this guide to help you manage your Dragon installation.
Documentation
Document Description Location
Dragon Release Notes New Dragon features, system requirements, client upgrade instructions, and known issues.
Dragon client Help. Do the following:
1. When Dragon is open, click the Help
icon ( ) on the DragonBar, and then select Help Topics.
2. Click Get started.
3. Click Dragon release notes.
Dragon Professional Group Citrix Administrator Guide
Hardware, software, and network requirements for deploying Dragon Medical Practice Edition in a network of client computers that connect to a Citrix server to access published applications.
Dragon Client Installation Guide Instructions for installing and configuring Dragon clients.
Dragon Support web site
Dragon client Help Commands and instructions for dictating, correcting, and more with the Dragon client.
When Dragon is open, click the Help
icon ( ) on the DragonBar, and then select Help Topics.
vi
NuanceManagement Center Administrator Guide
TrainingNuance provides several Dragon training offerings, like webinars, demos, and Nuance University online training courses. For more information, see the Dragon Support web site.
SupportThe Dragon Support web site provides many resources to assist you with your Dragon installation, like forums and a searchable knowledgebase. For more information on Support offerings, see the Dragon Support web site at:
https://www.nuance.com/support.html
vii
Chapter 1: Introduction
About the Nuance Management Center 2About the user interface 3
1
NuanceManagement Center Administrator Guide
About the Nuance Management CenterNuance Management Center allows administrators to manage all Dragon Medical Practice Edition clients from a single central console. The console, called the Nuance Management Center (NMC) console, allows you to do the following:
l Configure password settings at the Organization level.
l Centrally manage your Dragon product licensing
2
Chapter 1: Introduction
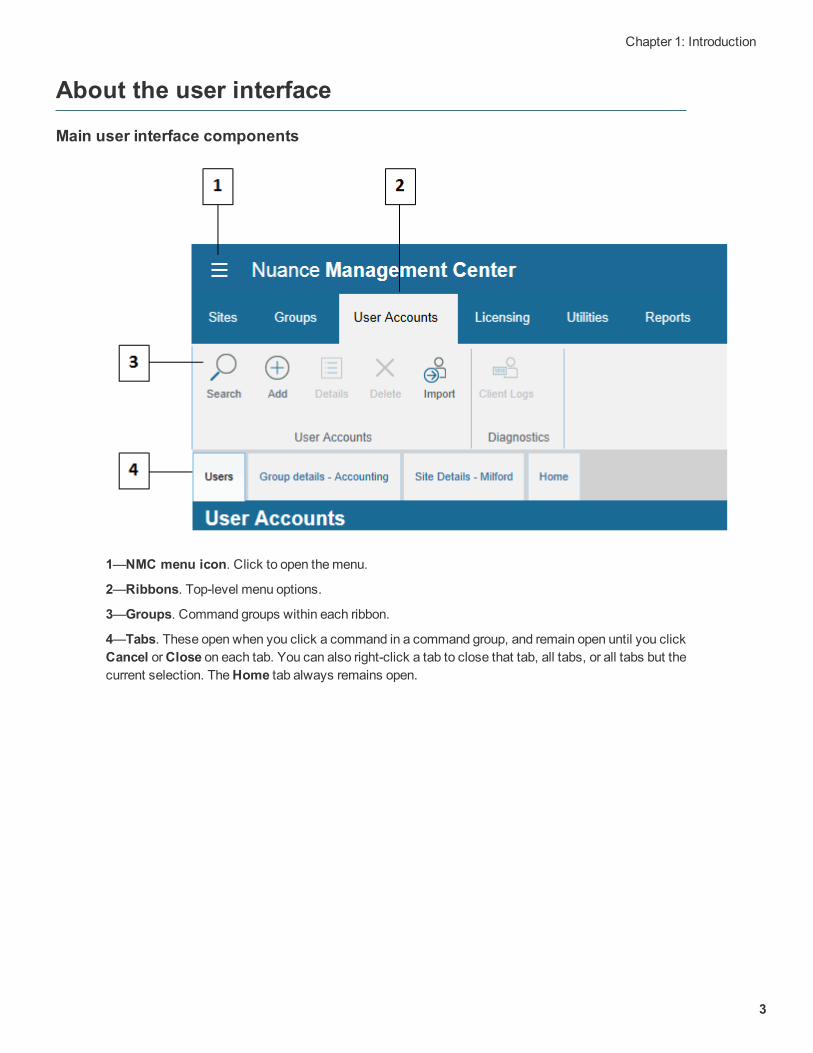
About the user interface
Main user interface components
1—NMC menu icon. Click to open the menu.
2—Ribbons. Top-level menu options.
3—Groups. Command groups within each ribbon.
4—Tabs. These open when you click a command in a command group, and remain open until you click Cancel or Close on each tab. You can also right-click a tab to close that tab, all tabs, or all tabs but the current selection. The Home tab always remains open.
3
NuanceManagement Center Administrator Guide
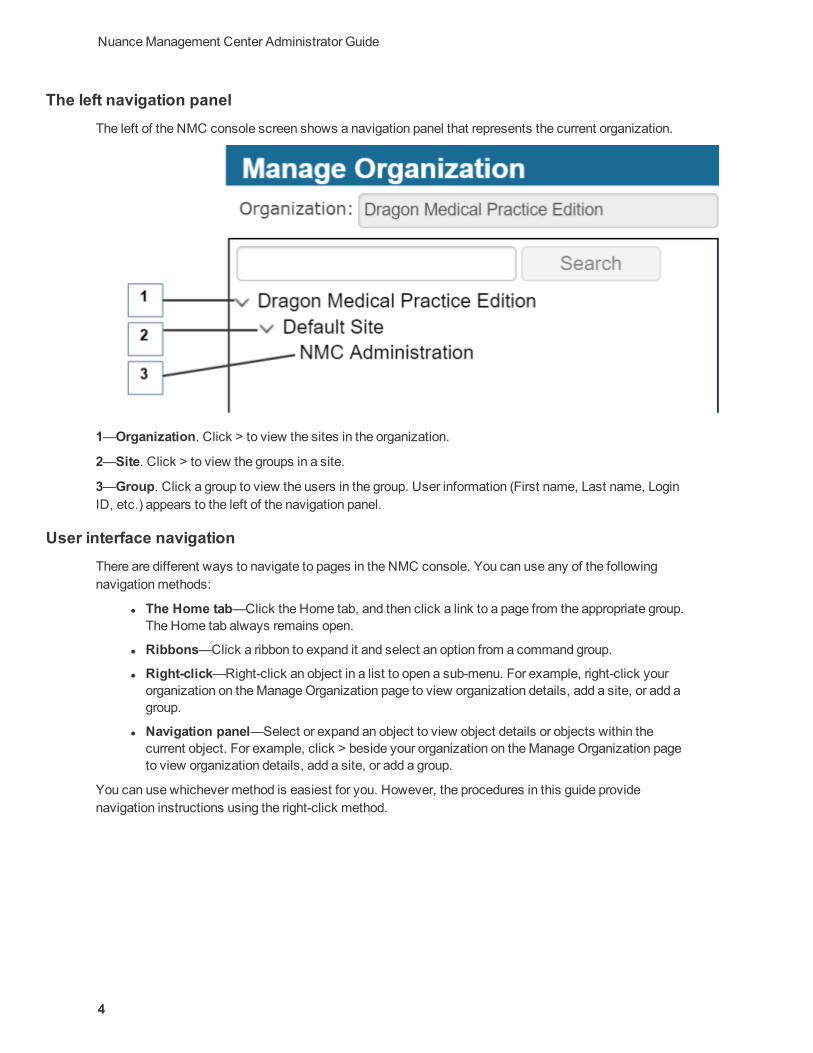
The left navigation panelThe left of the NMC console screen shows a navigation panel that represents the current organization.
1—Organization. Click > to view the sites in the organization.
2—Site. Click > to view the groups in a site.
3—Group. Click a group to view the users in the group. User information (First name, Last name, Login ID, etc.) appears to the left of the navigation panel.
User interface navigationThere are different ways to navigate to pages in the NMC console. You can use any of the following navigation methods:
l The Home tab—Click the Home tab, and then click a link to a page from the appropriate group. The Home tab always remains open.
l Ribbons—Click a ribbon to expand it and select an option from a command group.
l Right-click—Right-click an object in a list to open a sub-menu. For example, right-click your organization on the Manage Organization page to view organization details, add a site, or add a group.
l Navigation panel—Select or expand an object to view object details or objects within the current object. For example, click > beside your organization on the Manage Organization page to view organization details, add a site, or add a group.
You can use whichever method is easiest for you. However, the procedures in this guide provide navigation instructions using the right-click method.
4
Chapter 2: Getting started
Nuance Management Center (NMC) console overview 6Logging in and logging out 8Changing your password 9
5
NuanceManagement Center Administrator Guide
Nuance Management Center (NMC) console overview
About your installation
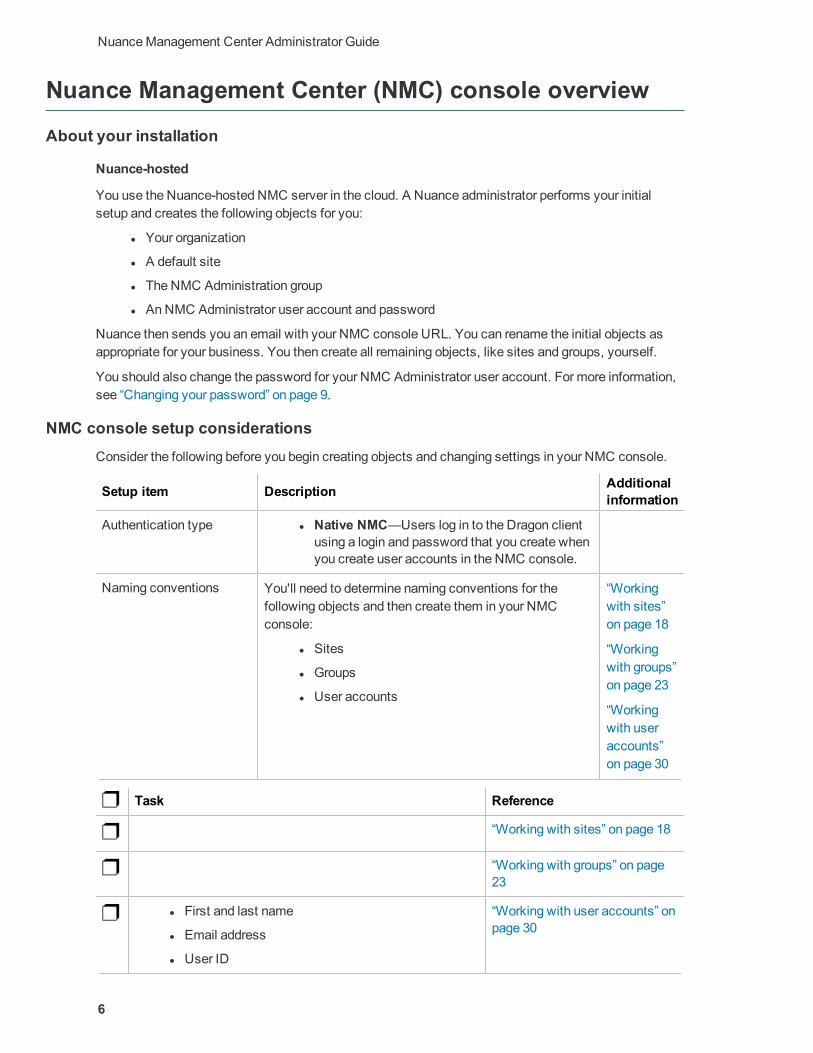
Nuance-hosted
You use the Nuance-hosted NMC server in the cloud. A Nuance administrator performs your initial setup and creates the following objects for you:
l Your organization
l A default site
l The NMC Administration group
l An NMC Administrator user account and password
Nuance then sends you an email with your NMC console URL. You can rename the initial objects as appropriate for your business. You then create all remaining objects, like sites and groups, yourself.
You should also change the password for your NMC Administrator user account. For more information, see “Changing your password” on page 9.
NMC console setup considerationsConsider the following before you begin creating objects and changing settings in your NMC console.
Setup item Description Additional information
Authentication type l Native NMC—Users log in to the Dragon client using a login and password that you create when you create user accounts in the NMC console.
Naming conventions You'll need to determine naming conventions for the following objects and then create them in your NMC console:
l Sites
l Groups
l User accounts
“Working with sites” on page 18
“Working with groups” on page 23
“Working with user accounts” on page 30
Task Reference
“Working with sites” on page 18
“Working with groups” on page 23
l First and last name
l Email address
l User ID
“Working with user accounts” on page 30
6
Chapter 2: Getting started
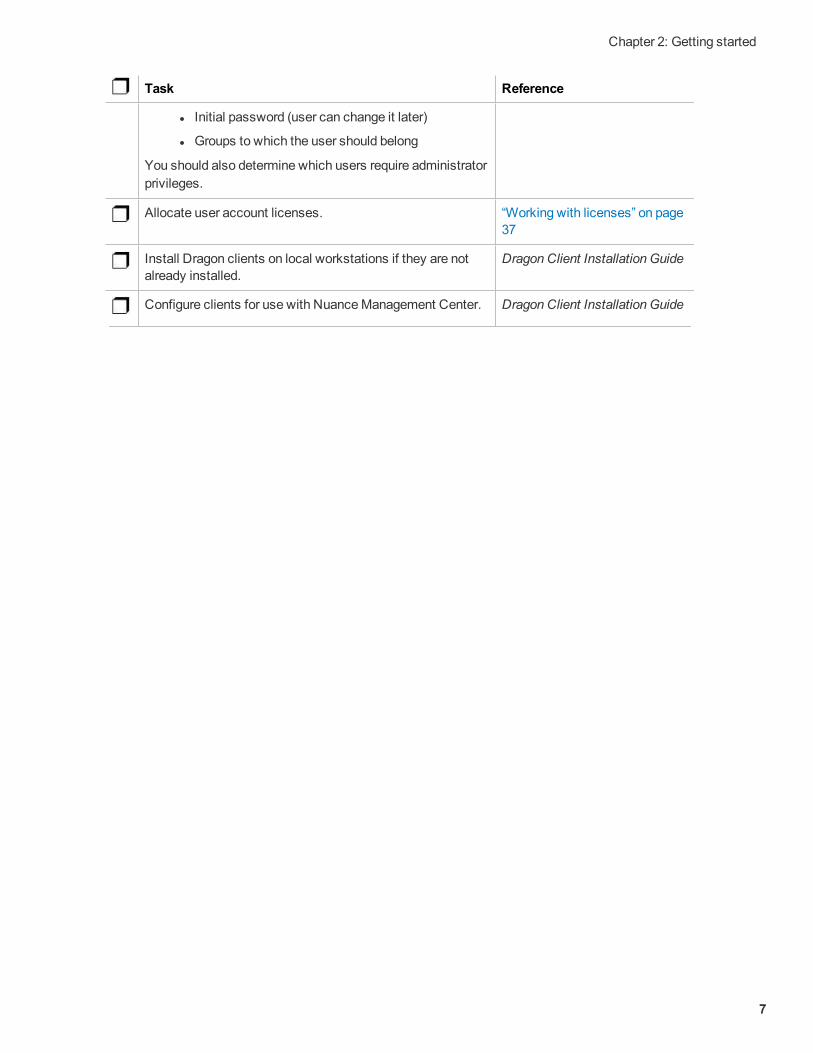
Task Reference
l Initial password (user can change it later)
l Groups to which the user should belong
You should also determine which users require administrator privileges.
Allocate user account licenses. “Working with licenses” on page 37
Install Dragon clients on local workstations if they are not already installed.
Dragon Client Installation Guide
Configure clients for use with Nuance Management Center. Dragon Client Installation Guide
7
NuanceManagement Center Administrator Guide
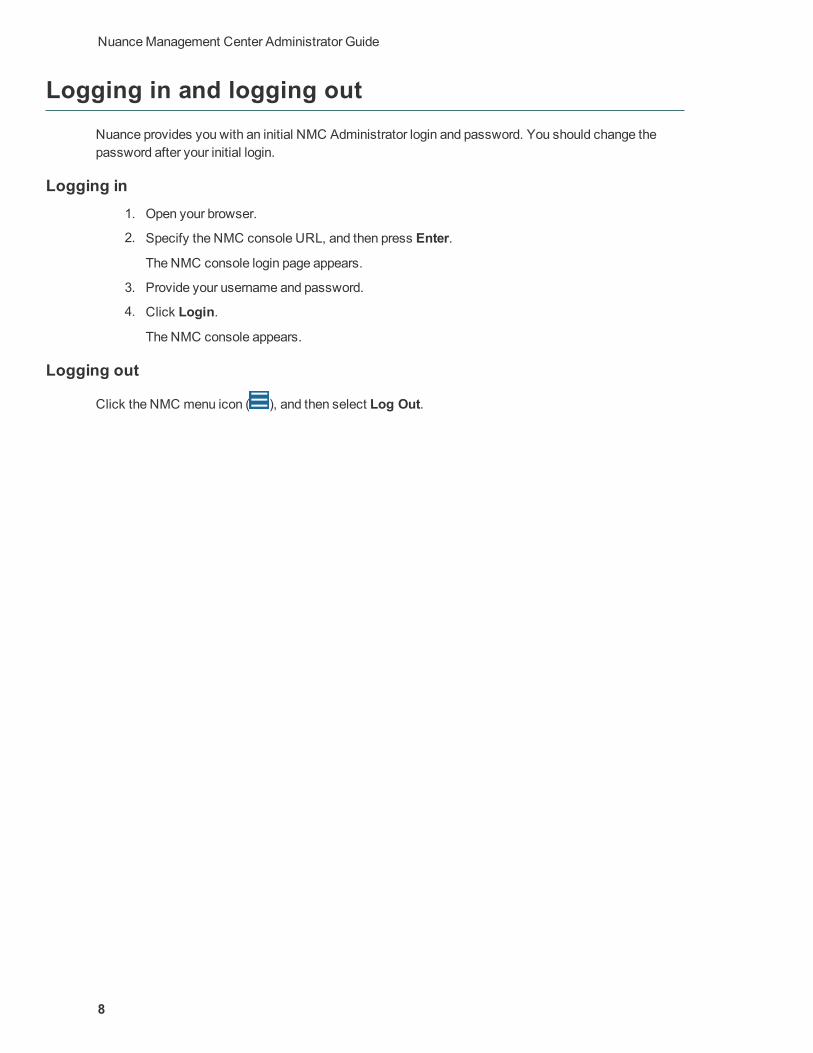
Logging in and logging outNuance provides you with an initial NMC Administrator login and password. You should change the password after your initial login.
Logging in 1. Open your browser.
2. Specify the NMC console URL, and then press Enter.
The NMC console login page appears.
3. Provide your username and password.
4. Click Login.
The NMC console appears.
Logging out
Click the NMC menu icon ( ), and then select Log Out.
8
Chapter 2: Getting started
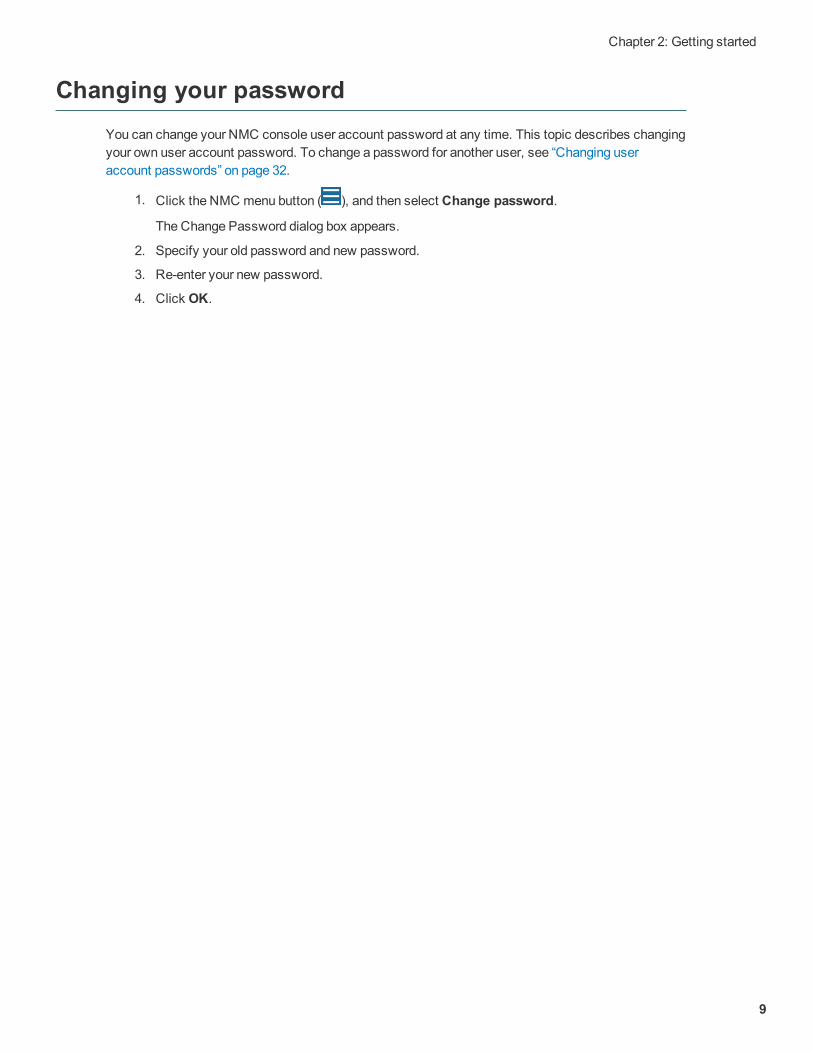
Changing your passwordYou can change your NMC console user account password at any time. This topic describes changing your own user account password. To change a password for another user, see “Changing user account passwords” on page 32.
1. Click the NMC menu button ( ), and then select Change password.
The Change Password dialog box appears.
2. Specify your old password and new password.
3. Re-enter your new password.
4. Click OK.
9
NuanceManagement Center Administrator Guide
Chapter 3: Organizations
About Organizations 11Viewing Organizations 12Managing organizations 13
10
Chapter 3: Organizations
About OrganizationsAn organization represents your company in its entirety. It is the highest level in your business structure. Under your organization, you create:
l Sites
l Groups
l User accounts
11
NuanceManagement Center Administrator Guide
Viewing Organizations
Viewing an organizationIn the Sites ribbon, click Organization Overview.
The Manage Organization page opens. Your organization is at the top, with all sites underneath it.
Viewing organization detailsFrom the Manage Organizations page, right-click an organization, and then select Organization details.
The Organization Details page appears.
12
Chapter 3: Organizations
Managing organizations
Changing organization information
To change general organization information:
1. View an organization.
The Manage Organization page appears.
For more information, see “Viewing Organizations” on page 12.
2. View organization details.
The Organization Details page appears.
For more information, see “Viewing Organizations” on page 12.
3. Edit the information as necessary.
For field descriptions, see “Organization Details—General tab” on page 40.
4. Click Save.
To change the address:
1. View an organization.
The Manage Organization page appears.
For more information, see “Viewing Organizations” on page 12.
2. View organization details.
The Organization Details page appears.
For more information, see “Viewing Organizations” on page 12.
3. Click the Address tab.
4. Edit the information as necessary.
For field descriptions, see “Organization Details—Address tab” on page 40.
5. Click Save.
Managing password settingsYou should determine a password policy for your organization by selecting from password requirements. Establishing a password policy ensures that users create strong, secure passwords.
To change password settings:
1. View an organization.
The Manage Organization page appears.
For more information, see “Viewing Organizations” on page 12.
2. View organization details.
The Organization Details page appears.
For more information, see “Viewing Organizations” on page 12.
3. Click the Products tab.
13
NuanceManagement Center Administrator Guide
4. Expand the Password Settings drop-down list.
5. Select the appropriate password settings.
For field descriptions, see “Organization Details—Products tab” on page 40.
6. Click Save.
14
Chapter 4: Sites
About sites 16Viewing sites 17Working with sites 18Managing sites 19
15
NuanceManagement Center Administrator Guide
About sitesA site is a physical location, such as an office or data center, within your organization. Sites help you define the structure of your organization. Depending on your needs, you may require several sites, or just one.
16
Chapter 4: Sites
Viewing sitesIf you are using the Nuance-hosted NMC server in the cloud, Nuance creates your initial site (Default) for you. You can rename this site, and create additional sites yourself.
Viewing a site 1. View an organization.
The Manage Organization page appears. Your organization is at the top, with all sites underneath it.
For more information, see “Viewing Organizations” on page 12.
2. Do one of the following:
l Click a site to view all users in it.
l Enter a specific site name in the Search bar at the top of the list, and then click Search.
Viewing site detailsRight-click a site, and then select Details.
17
NuanceManagement Center Administrator Guide
Working with sites
Adding sites 1. View an organization.
The Manage Organization page appears. Your organization is at the top, with all sites underneath it.
For more information, see “Viewing Organizations” on page 12.
2. Right-click your organization, and then select Add Site.
The Site page appears.
3. Add information as necessary.
For field descriptions, see “Site page” on page 43.
4. Click Save.
Deleting sitesTo delete a site, you must first delete or move all groups in the site. You can delete sites only when they are empty.
1. View an organization.
The Manage Organization page appears. Your organization is at the top, with all sites underneath it.
For more information, see “Viewing Organizations” on page 12.
2. Right-click a site, and then select Delete.
The Delete Site dialog box opens.
3. Click Yes.
18
Chapter 4: Sites
Managing sites
Changing site information
To change general site information:
1. View an organization.
The Manage Organization page appears. Your organization is at the top, with all sites underneath it.
For more information, see “Viewing Organizations” on page 12.
2. Right-click a site under your organization, and then select Details.
The Site page appears. The General tab is selected by default.
3. Edit the information as necessary.
For field descriptions, see “Site—General tab” on page 43.
4. Click Save.
To change the address:
1. View an organization.
The Manage Organization page appears. Your organization is at the top, with all sites underneath it.
For more information, see “Viewing Organizations” on page 12.
2. Right-click a site under your organization, and then select Details.
The Site page appears. The General tab is selected by default.
3. Click the Address tab.
4. Edit the information as necessary.
For field descriptions, see “Site—Address tab” on page 43.
5. Click Save.
19
Chapter 5: Groups
About groups 21Viewing groups 22Working with groups 23Managing groups 25
20
NuanceManagement Center Administrator Guide
About groupsA group is a set of similar users within a site. For example, a group could consist of users in one department, or users with similar roles. All users in a group share the same permissions, grants, and default Dragon client settings.
21
Chapter 5: Groups
Viewing groupsIf you are using the Nuance-hosted NMC server in the cloud, Nuance creates your initial group (NMC Administrators) for you. You can rename this group, and create additional groups yourself.
Viewing all groupsUse these procedures to view an alphabetical list of all groups.
1. In the Groups ribbon, click Search.
The Groups page appears.
2. Do one of the following:
l Specify search criteria, and then click Search to find a specific group.
l Leave search criteria blank and then click Search to see all groups.
Viewing groups by siteUse these procedures to view all groups in each site.
1. View an organization.
The Manage Organization page appears. Your organization is at the top, with all sites underneath it.
For more information, see “Viewing Organizations” on page 12.
2. In the site list, click the triangle ( ) next to a site to view its groups.
Viewing group detailsRight-click a group, and then select Details.
22
NuanceManagement Center Administrator Guide
Working with groups
Adding groupsDo one of the following:
1. In the Groups ribbon, click Add.
The Add Group dialog box opens.
2. Select a role for the users in the group.
3. If this is an NMC Administrator group, select a group in the Base new group on this existing group drop-down list.
4. Click OK.
The Group Details page appears.
5. Specify a group name.
6. Select the site in which to create the group.
7. Add remaining information as necessary.
For field descriptions, see “Group Details page” on page 44.
8. Click Save.
Or
1. View an organization.
The Manage Organization page appears. Your organization is at the top, with all sites underneath it.
2. Right-click a site, and then select Add Group.
The Add Group dialog box opens.
3. Select a role for the users in the group.
4. If this is an NMC Administrator group, select a group in the Base new group on this existing group drop-down list.
5. Click OK.
The Group Details page appears.
6. Specify a group name.
7. Select the site in which to create the group.
8. Add remaining information as necessary.
For field descriptions, see “Group Details page” on page 44.
9. Click Save.
Copying groups 1. View a group.
For more information, see “Viewing groups” on page 22.
2. Right-click a group, and then select Copy.
The Group Details page appears.
23
Chapter 5: Groups
3. Specify a name for the new group.
4. Select the site to which you want to copy this group from the Sites drop-down list.
5. Add remaining information as necessary.
For field descriptions, see “Group Details page” on page 44.
6. Click Save.
Deleting groupsTo delete a group, you must first move or delete all user accounts from the group. You can delete groups only when they are empty.
1. View a group.
For more information, see “Viewing groups” on page 22.
2. Right-click a group, and then select Delete.
The Delete Group dialog box opens.
3. Click Yes.
24
NuanceManagement Center Administrator Guide
Managing groups
Changing group details 1. View a group.
For more information, see “Viewing groups” on page 22.
2. Right-click a group, and then select Details.
The Group Details page appears. The Details tab is selected by default.
3. Edit the information as necessary.
For field descriptions, see “Group Details—Details tab” on page 44.
4. Click Save.
Adding user accounts to a group 1. View a group.
For more information, see “Viewing groups” on page 22.
2. Right-click a group, and then select Details.
The Group Details page appears. The Details tab is selected by default.
3. Click the Members tab.
4. Click the Add/Remove button.
The Group Members page appears.
5. Select the check box next to the user accounts that you want to include in the group.
6. Click Save.
Removing user accounts from a group 1. View a group.
For more information, see “Viewing groups” on page 22.
2. Right-click a group, and then select Details.
The Group Details page appears. The Details tab is selected by default.
3. Click the Members tab.
4. Click the Add/Remove button.
The Group Members page appears.
5. De-select the check box next to the user accounts that you want to remove from the group.
6. Click Save.
Configuring group security
To add group grants:
1. View a group.
For more information, see “Viewing groups” on page 22 .
25
Chapter 5: Groups
2. Right-click a group, and then select Details.
The Group Details page appears. The Details tab is selected by default.
3. Click the Grants tab.
4. Click the Add button.
The Add Group Grants dialog box opens.
5. Select the Object Type, Grant, and Object to which you're applying the grant.
For field descriptions, see “Group Details—Grants tab” on page 44.
6. Click Add.
To revoke grants:
1. View a group.
For more information, see “Viewing groups” on page 22.
2. Right-click a group, and then select Details.
The Group Details page appears. The Details tab is selected by default.
3. Click the Grants tab.
4. Locate the grant that you want to revoke, and hover over it.
An appears in the last column.
5. Click the to revoke the grant.
Changing PowerMic settings 1. View a group.
For more information, see Viewing groups.
2. Right-click a group, and then select Details.
The Group Details page appears. The Details tab is selected by default.
3. Click the product tab for your product.
For example, Dragon Professional or Network Edition US.
4. Expand the PowerMic section.
5. Modify the drop-down selections as necessary.
For field descriptions, see “Group Details page” on page 44.
6. Click Save.
26
NuanceManagement Center Administrator Guide
Chapter 6: User accounts
About user accounts 28Viewing user accounts 29Working with user accounts 30Managing user accounts 32
27
Chapter 6: User accounts
About user accountsYou create one user account for each NMC administrator and Dragon Medical Practice Edition user. You create user accounts to allow NMC administrators to log in to the NMC console, and to allow Dragon users to log in to the Dragon client.
After you create user accounts, you then assign them to groups. You must also assign one or more licenses to each user account to allow them to access different Nuance products.
28
NuanceManagement Center Administrator Guide
Viewing user accounts
Viewing all user accounts 1. In the User Accounts ribbon, click Search.
The User Accounts page appears.
2. Do one of the following:
l Specify search criteria, and then click Search to view specific user accounts.
l Leave search criteria blank and then click Search to see all user accounts.
Viewing all user accounts in a group 1. View a group.
For more information, see “Viewing groups” on page 22.
2. View group details.
For more information, see “Viewing groups” on page 22.
3. Click the Members tab.
All user accounts in the group are displayed.
Viewing all user accounts in a site 1. View your organization.
The Manage Organization page appears. Your organization is at the top, with all sites underneath it.
For more information, see “Viewing Organizations” on page 12.
2. Click a site.
All user accounts in all groups for that site appear.
29
Chapter 6: User accounts
Working with user accounts
Adding new user accountsDo one of the following:
1. In the User Accounts ribbon, click Add.
The User Account Details page appears.
2. Specify the user's first name, last name, and login.
3. Add remaining information as necessary.
For field descriptions, see “User Account Details page” on page 46.
4. Click Save.
Or
1. View a group by site.
The Manage Organization page appears.
For more information, see “Viewing groups” on page 22.
2. Right-click the group, and then select Add User Account.
The User Account Details page appears.
3. Specify the user's first name, last name, and login.
4. Add remaining information as necessary.
For field descriptions, see “User Account Details page” on page 46.
5. Click Save.
Deleting user accountsWhen you delete user accounts, any licenses granted to those users then become available for other users.
Do one of the following:
1. View all user accounts.
The User Accounts page appears.
For more information, see “Viewing user accounts” on page 29.
2. Right-click a user, and then select Delete User Account.
A confirmation dialog box appears.
3. Click Yes.
Or
1. View user accounts by site.
The Manage Organization page appears.
For more information, see “Viewing user accounts” on page 29.
2. Right-click a user account in a group, and then select Delete.
30
NuanceManagement Center Administrator Guide
A confirmation dialog box appears.
3. Click Yes.
Importing user accountsYou can also create new user accounts by importing them from a comma-delimited file or from an XML file. All users you import are then assigned the same license types and group memberships. You should create separate files for users who require different license types or group memberships.
For information on creating a comma-delimited text (.txt) file or an XML (.xml) file, see “Creating comma-delimited files for user account import” on page 49 and “Creating XML files for user account import” on page 50.
When you have created your import files, do the following:
1. In the User Accounts ribbon, click Import.
The Import Users dialog box opens.
2. Click Browse.
The Choose File to Upload dialog box appears.
3. Locate your import file (.txt or .xml).
4. Select the file, and then click Open.
5. Click Next.
6. Assign the imported user accounts to a group:
1. Select a site in the Site filter drop-down list.
The groups within the selected site appear in the Available Groups list.
2. Select a group, and then click the arrow button ( ) to add it to the Selected Groups list.
The new user becomes a member of any groups in the Selected Groups list.
3. Click Next.
7. Select one or more license types to assign to the user accounts.
8. Click Next.
9. Click Next again to begin the import.
10. Click Next when the import completes to view results.
11. Review the results for each user. An error may occur if:
l The user’s login already exists.
12. Click Finish.
The Import Users dialog closes.
31
Chapter 6: User accounts
Managing user accounts
Changing user account details 1. View a user account.
The User Accounts page appears.
For more information, see “Viewing user accounts” on page 29.
2. Right-click a user account, and then select User Account Details.
The User Account Details page appears. The Details tab is selected by default.
3. Edit the information as necessary.
For field descriptions, see “User Account Details—Details tab” on page 46.
4. Click Save.
Changing user account passwordsYou can change user account passwords from the NMC console. Users can also change their own passwords when they're logged in to Dragon.
1. View a user account.
The User Accounts page appears.
For more information, see “Viewing user accounts” on page 29.
2. Right-click a user account, and then select User Account Details.
The User Account Details page appears. The Details tab is selected by default.
3. Click Change Password.
The Change Password dialog box opens.
4. Specify the new password in the New password and Confirm password fields.
5. Click OK.
Changing user account address information 1. View a user account.
The User Accounts page appears.
For more information, see “Viewing user accounts” on page 29.
2. Right-click a user account, and then select User Account Details.
The User Account Details page appears. The Details tab is selected by default.
3. Click the Address tab.
4. Edit the information as necessary.
For field information, see “User Account Details—Address tab” on page 47.
5. Click Save.
32

NuanceManagement Center Administrator Guide
Changing user account group membership
To assign user accounts to groups:
1. View a user account.
The User Accounts page appears.
For more information, see “Viewing user accounts” on page 29.
2. Right-click a user account, and then select User Account Details.
The User Account Details page appears. The Details tab is selected by default.
3. Click the Group Memberships tab.
4. Select a site from the Site filter drop-down list.
5. Select a group in the Available Groups table, and then click the right arrow ( ).
The group moves to the Selected Groups table.
6. Click Save.
To unassign user accounts from groups:
1. View a user account.
The User Accounts page appears.
For more information, see “Viewing user accounts” on page 29.
2. Right-click a user account, and then select User Account Details.
The User Account Details page appears. The Details tab is selected by default.
3. Click the Group Memberships tab.
4. Select a site from the Site filter drop-down list.
5. Select a group in the Selected Groups table, and then click the left arrow ( ).
The group moves to the Available Groups table.
6. Click Save.
Configuring user account messaging options 1. View a user account.
The User Accounts page appears.
For more information, see “Viewing user accounts” on page 29.
2. Right-click a user account, and then select User Account Details.
The User Account Details page appears. The Details tab is selected by default.
3. Click the Messaging tab.
4. Edit the information as necessary.
For field descriptions, see “User Account Details page” on page 46.
5. Click Save.
33

Chapter 7: Licenses
Chapter 7: Licenses
About licenses 35Viewing licenses 36Working with licenses 37
34
NuanceManagement Center Administrator Guide
About licensesYour organization purchases a specific number of licenses for each Nuance product you use. For example, if you're using Dragon Medical Practice Edition, you purchase one license for each user who dictates with Dragon Medical Practice Edition, and one license for each administrator who requires access to the NMC console. You then assign or revoke the licenses in the NMC console.
To purchase additional licenses, contact your Nuance account representative.
35
Chapter 7: Licenses
Viewing licenses
Viewing licenses 1. In the Licensing ribbon, click View Licenses.
The License Summary page appears.
2. Do one of the following:
l Select License type All and then click Search to view all license types.
l Select a specific license type from the drop-down list and then click Search.
The License Summary page appears.
Viewing licensed user accounts 1. In the Licensing ribbon, click View Licenses.
The License Summary page appears.
2. Do one of the following:
l Select License type All and then click Search to view all license types.
l Select a specific license type from the drop-down list and then click Search.
The License Summary page appears.
3. Right-click a license, and then select List Licensed User Accounts.
The Licensed User Accounts page appears.
36
NuanceManagement Center Administrator Guide
Working with licenses
Importing license keysWhen you purchase licenses:
l If you are using an on-premise NMC server (hosted by you): Nuance sends you an email with a license key. You must import this key to make your licenses available for allocation in the NMC console.
l If you are using the NMC server hosted by Nuance: The fulfillment team uploads the licenses to your organizational account in the NMC console.
1. In the Licensing ribbon, click Import License Key.
The Import License Key dialog box appears.
2. Copy and paste the encrypted license key from your email into the License Key field.
3. Click Show Information.
The server decrypts and validates your license key.
4. Click Import.
Nuance Management Center imports your license key.
Allocating licensesWhen you create new user accounts, you must grant a license to the user. Similarly, when a user leaves your organization, you should revoke the user's license to make it available for re-allocation.
To grant licenses:
1. In the Licensing ribbon, click View Licenses.
2. Do one of the following:
l Select License type All and then click Search to view all license types.
l Select a specific license type from the drop-down list and then click Search.
The License Summary page appears.
3. Right-click a license type in the list, and then select Grant Licenses.
The Grant License page appears.
4. Optionally search for a specific user by specifying a last name, group name, or site name, and then clicking Search.
5. Select a user in the Available Users list, and then click the right arrow button ( ).
The user moves to the Selected Users list.
6. Click OK.
To revoke licenses:
1. In the Licensing ribbon, click View Licenses.
2. Do one of the following:
37
Chapter 7: Licenses
l Select License type All and then click Search to view all license types.
l Select a specific license type from the drop-down list and then click Search.
The License Summary page appears.
3. Right-click a license type in the list, and then select Revoke Licenses.
The Grant License page appears.
4. Optionally specify a user's last name, a group name, or a site name, and then click Search.
5. Select a user from the Selected Users list, and then click the left arrow button ( ).
The user moves to the Available Users list.
6. Click OK.
Deleting licensesYou can delete licenses to end a subscription or to remove an expired license from the NMC console.
Warning: Deleting a license permanently removes it from Nuance Management Center. You cannot undo this action.
1. In the Licensing ribbon, click View Licenses.
2. Do one of the following:
l Select License type All and then click Search to view all license types.
l Select a specific license type from the drop-down list and then click Search.
The License Summary page appears.
3. Right-click a license, and then select Delete Licenses.
A confirmation dialog box appears.
4. Type DELETE in the text box, and then click OK.
38
NuanceManagement Center Administrator Guide
Chapter 8: Field descriptions
Organization Details page 40Site page 43Group Details page 44User Account Details page 46
39
Chapter 8: Field descriptions
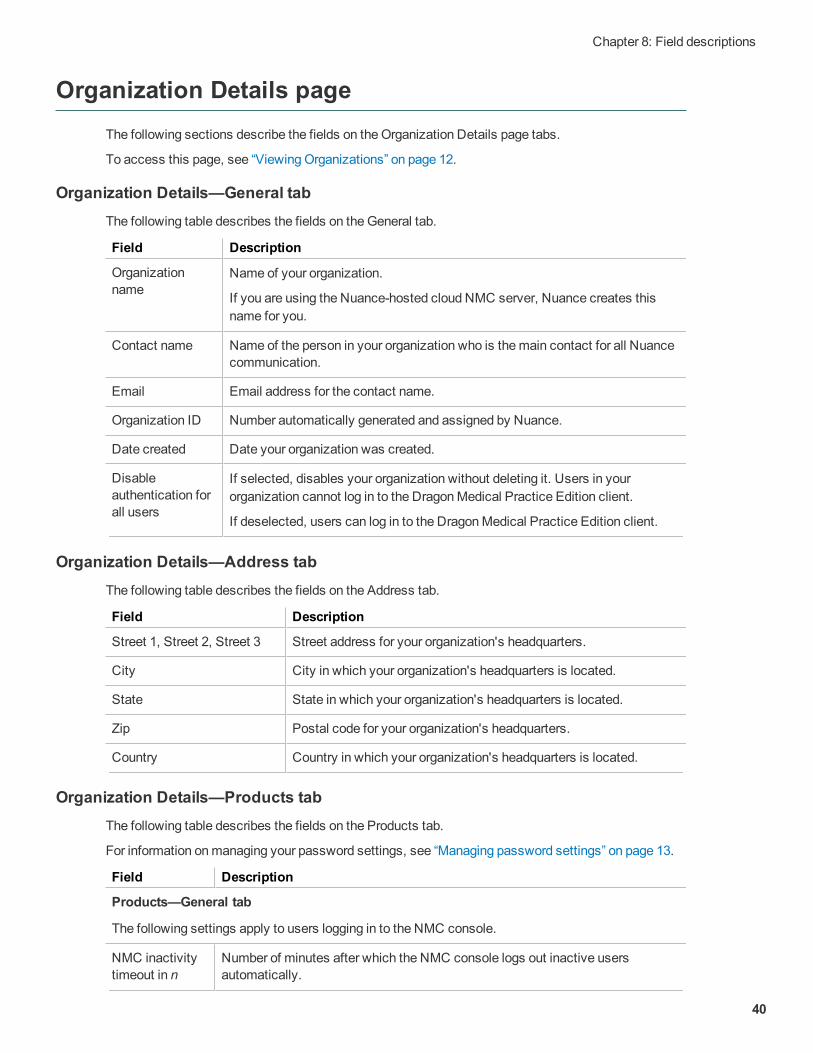
Organization Details pageThe following sections describe the fields on the Organization Details page tabs.
To access this page, see “Viewing Organizations” on page 12.
Organization Details—General tabThe following table describes the fields on the General tab.
Field Description
Organization name
Name of your organization.
If you are using the Nuance-hosted cloud NMC server, Nuance creates this name for you.
Contact name Name of the person in your organization who is the main contact for all Nuance communication.
Email Email address for the contact name.
Organization ID Number automatically generated and assigned by Nuance.
Date created Date your organization was created.
Disable authentication for all users
If selected, disables your organization without deleting it. Users in your organization cannot log in to the Dragon Medical Practice Edition client.
If deselected, users can log in to the Dragon Medical Practice Edition client.
Organization Details—Address tabThe following table describes the fields on the Address tab.
Field Description
Street 1, Street 2, Street 3 Street address for your organization's headquarters.
City City in which your organization's headquarters is located.
State State in which your organization's headquarters is located.
Zip Postal code for your organization's headquarters.
Country Country in which your organization's headquarters is located.
Organization Details—Products tabThe following table describes the fields on the Products tab.
For information on managing your password settings, see “Managing password settings” on page 13.
Field Description
Products—General tab
The following settings apply to users logging in to the NMC console.
NMC inactivity timeout in n
Number of minutes after which the NMC console logs out inactive users automatically.
40
NuanceManagement Center Administrator Guide
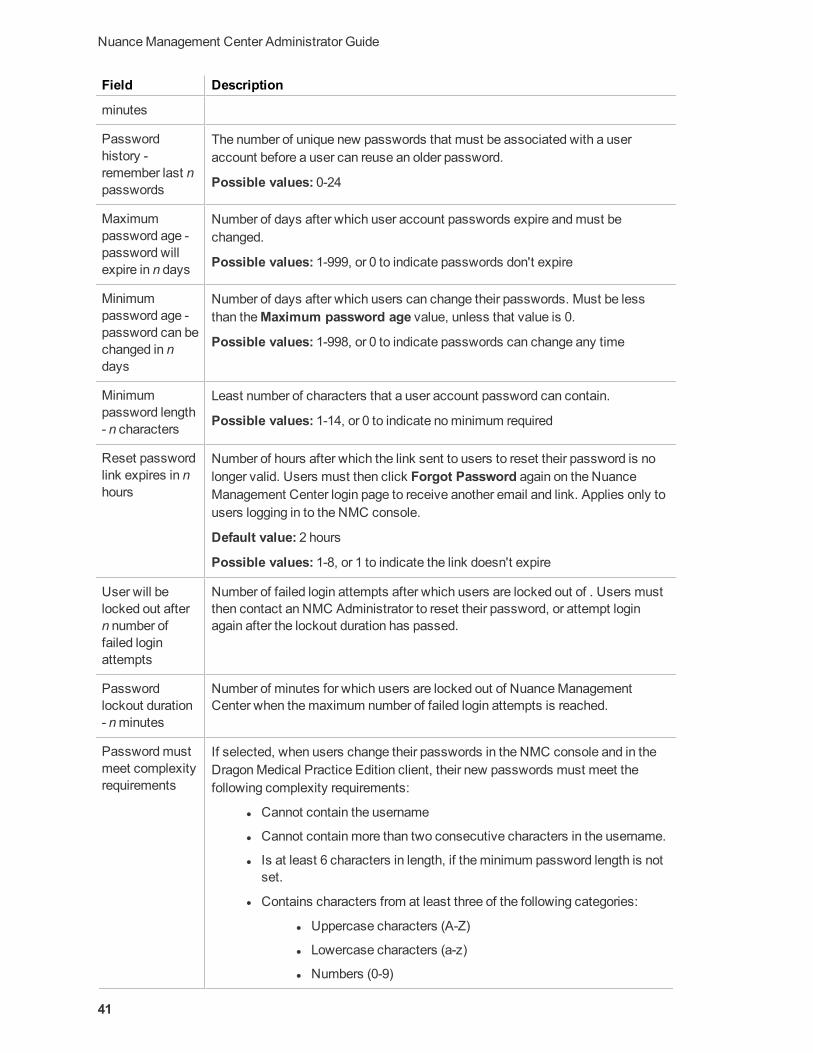
Field Description
minutes
Password history - remember last n passwords
The number of unique new passwords that must be associated with a user account before a user can reuse an older password.
Possible values: 0-24
Maximum password age - password will expire in n days
Number of days after which user account passwords expire and must be changed.
Possible values: 1-999, or 0 to indicate passwords don't expire
Minimum password age - password can be changed in n days
Number of days after which users can change their passwords. Must be less than the Maximum password age value, unless that value is 0.
Possible values: 1-998, or 0 to indicate passwords can change any time
Minimum password length - n characters
Least number of characters that a user account password can contain.
Possible values: 1-14, or 0 to indicate no minimum required
Reset password link expires in n hours
Number of hours after which the link sent to users to reset their password is no longer valid. Users must then click Forgot Password again on the Nuance Management Center login page to receive another email and link. Applies only to users logging in to the NMC console.
Default value: 2 hours
Possible values: 1-8, or 1 to indicate the link doesn't expire
User will be locked out after n number of failed login attempts
Number of failed login attempts after which users are locked out of . Users must then contact an NMC Administrator to reset their password, or attempt login again after the lockout duration has passed.
Password lockout duration - n minutes
Number of minutes for which users are locked out of Nuance Management Center when the maximum number of failed login attempts is reached.
Password must meet complexity requirements
If selected, when users change their passwords in the NMC console and in the Dragon Medical Practice Edition client, their new passwords must meet the following complexity requirements:
l Cannot contain the username
l Cannot contain more than two consecutive characters in the username.
l Is at least 6 characters in length, if the minimum password length is not set.
l Contains characters from at least three of the following categories:
l Uppercase characters (A-Z)
l Lowercase characters (a-z)
l Numbers (0-9)
41

Chapter 8: Field descriptions
Field Description
l Non-alphabetic characters (for example, !, $, #, %)
42
NuanceManagement Center Administrator Guide
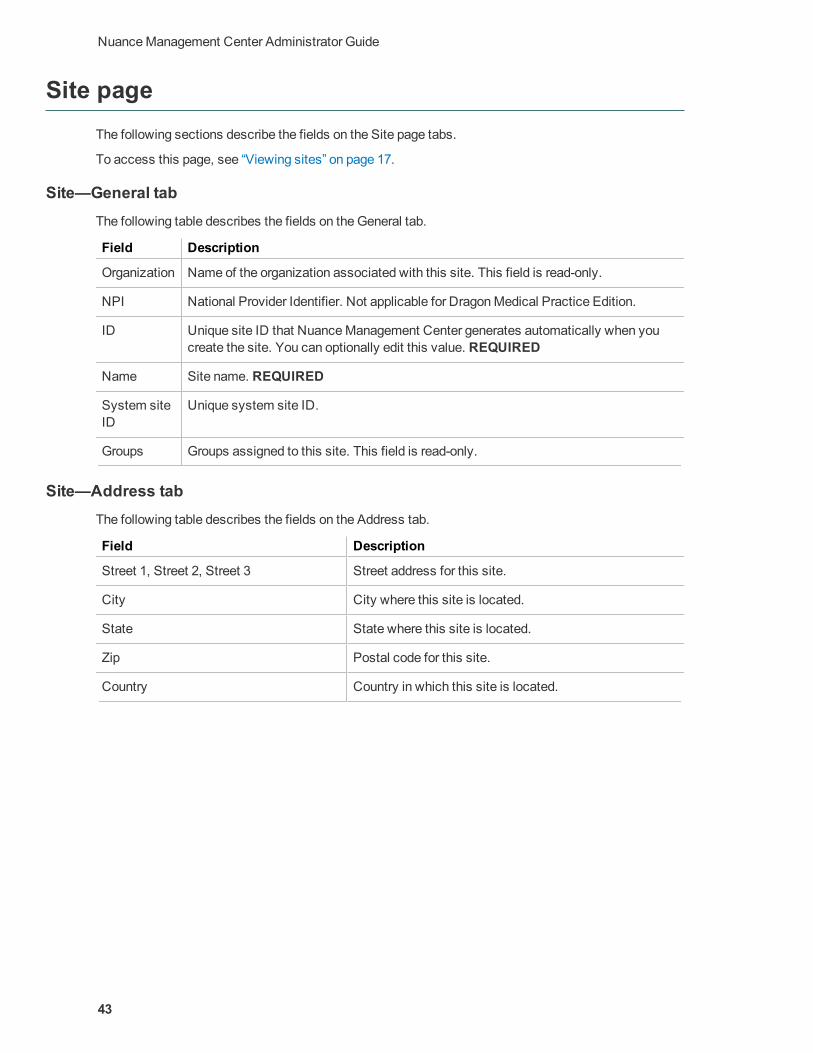
Site pageThe following sections describe the fields on the Site page tabs.
To access this page, see “Viewing sites” on page 17.
Site—General tabThe following table describes the fields on the General tab.
Field Description
Organization Name of the organization associated with this site. This field is read-only.
NPI National Provider Identifier. Not applicable for Dragon Medical Practice Edition.
ID Unique site ID that Nuance Management Center generates automatically when you create the site. You can optionally edit this value. REQUIRED
Name Site name. REQUIRED
System site ID
Unique system site ID.
Groups Groups assigned to this site. This field is read-only.
Site—Address tabThe following table describes the fields on the Address tab.
Field Description
Street 1, Street 2, Street 3 Street address for this site.
City City where this site is located.
State State where this site is located.
Zip Postal code for this site.
Country Country in which this site is located.
43
Chapter 8: Field descriptions
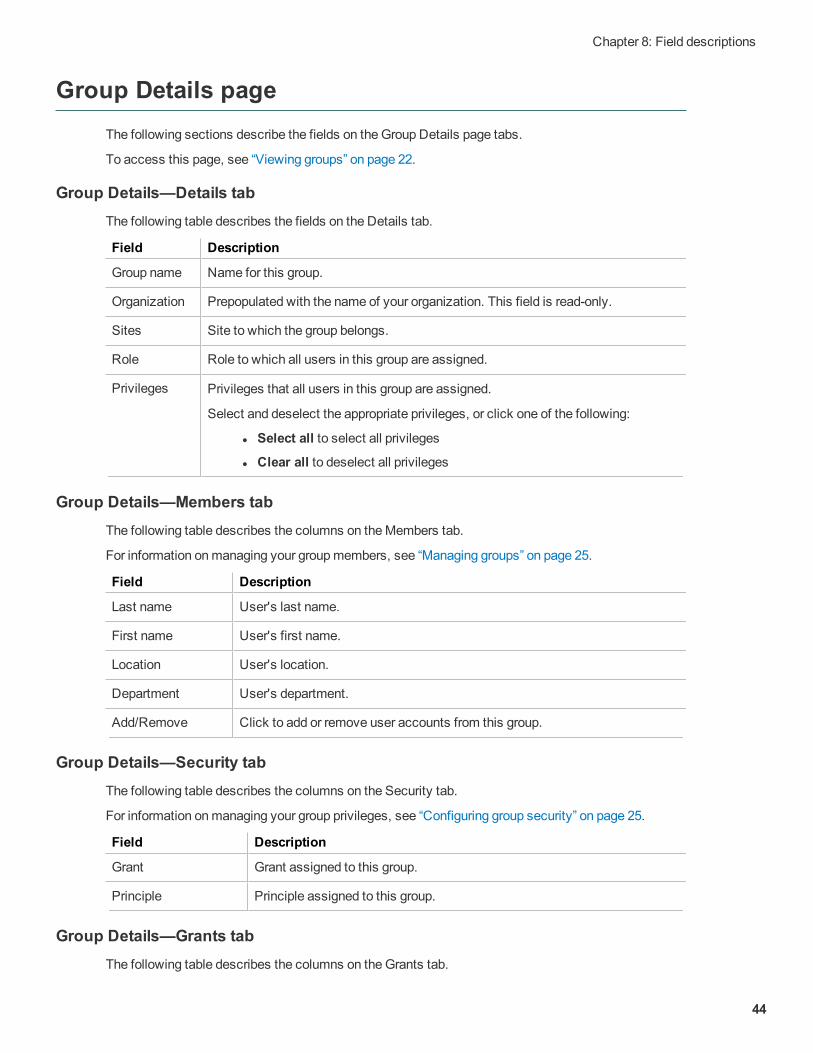
Group Details pageThe following sections describe the fields on the Group Details page tabs.
To access this page, see “Viewing groups” on page 22.
Group Details—Details tabThe following table describes the fields on the Details tab.
Field Description
Group name Name for this group.
Organization Prepopulated with the name of your organization. This field is read-only.
Sites Site to which the group belongs.
Role Role to which all users in this group are assigned.
Privileges Privileges that all users in this group are assigned.
Select and deselect the appropriate privileges, or click one of the following:
l Select all to select all privileges
l Clear all to deselect all privileges
Group Details—Members tabThe following table describes the columns on the Members tab.
For information on managing your group members, see “Managing groups” on page 25.
Field Description
Last name User's last name.
First name User's first name.
Location User's location.
Department User's department.
Add/Remove Click to add or remove user accounts from this group.
Group Details—Security tabThe following table describes the columns on the Security tab.
For information on managing your group privileges, see “Configuring group security” on page 25.
Field Description
Grant Grant assigned to this group.
Principle Principle assigned to this group.
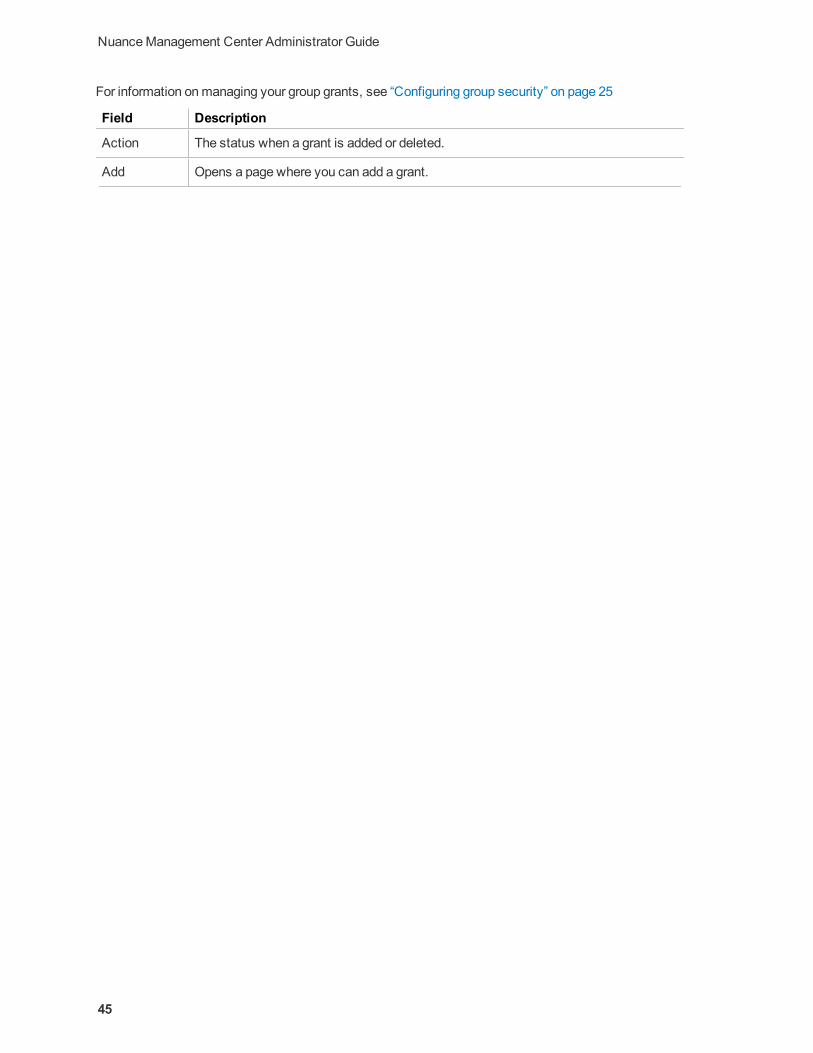
Group Details—Grants tabThe following table describes the columns on the Grants tab.
44
NuanceManagement Center Administrator Guide
For information on managing your group grants, see “Configuring group security” on page 25
Field Description
Action The status when a grant is added or deleted.
Add Opens a page where you can add a grant.
45
Chapter 8: Field descriptions
User Account Details pageThe following sections describe the fields on the User Account Details page tabs.
To access this page, see “Viewing user accounts” on page 29.
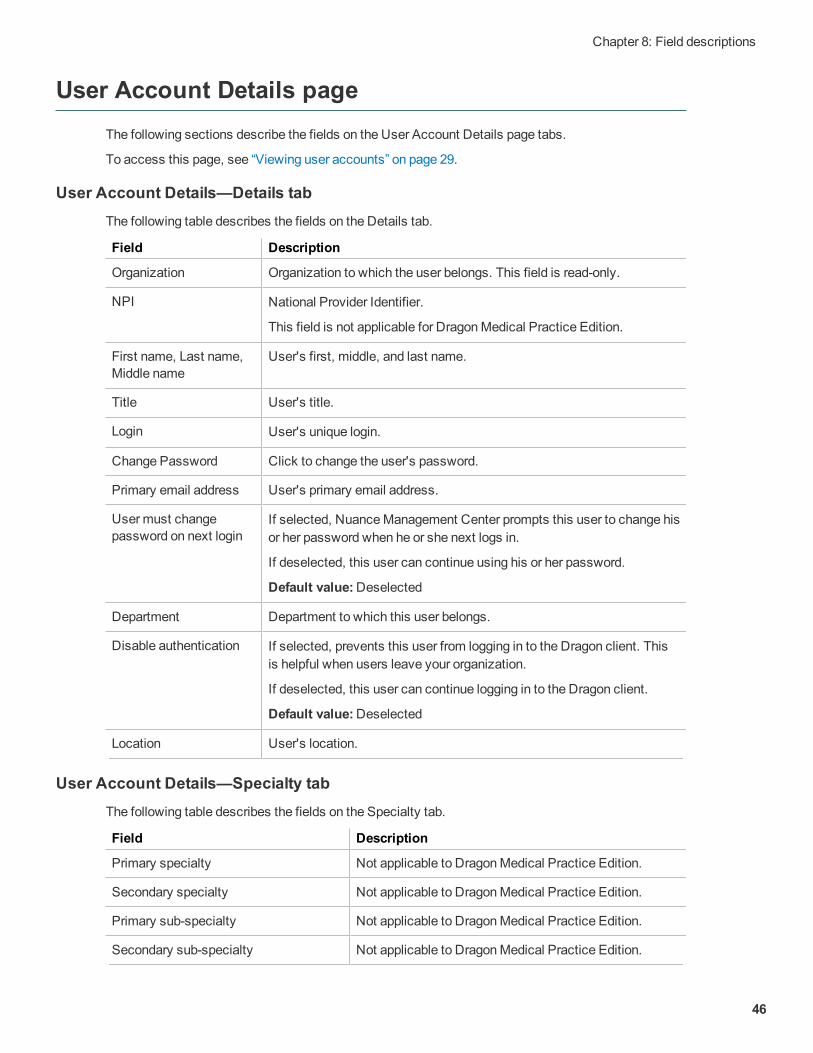
User Account Details—Details tabThe following table describes the fields on the Details tab.
Field Description
Organization Organization to which the user belongs. This field is read-only.
NPI National Provider Identifier.
This field is not applicable for Dragon Medical Practice Edition.
First name, Last name, Middle name
User's first, middle, and last name.
Title User's title.
Login User's unique login.
Change Password Click to change the user's password.
Primary email address User's primary email address.
User must change password on next login
If selected, Nuance Management Center prompts this user to change his or her password when he or she next logs in.
If deselected, this user can continue using his or her password.
Default value: Deselected
Department Department to which this user belongs.
Disable authentication If selected, prevents this user from logging in to the Dragon client. This is helpful when users leave your organization.
If deselected, this user can continue logging in to the Dragon client.
Default value: Deselected
Location User's location.
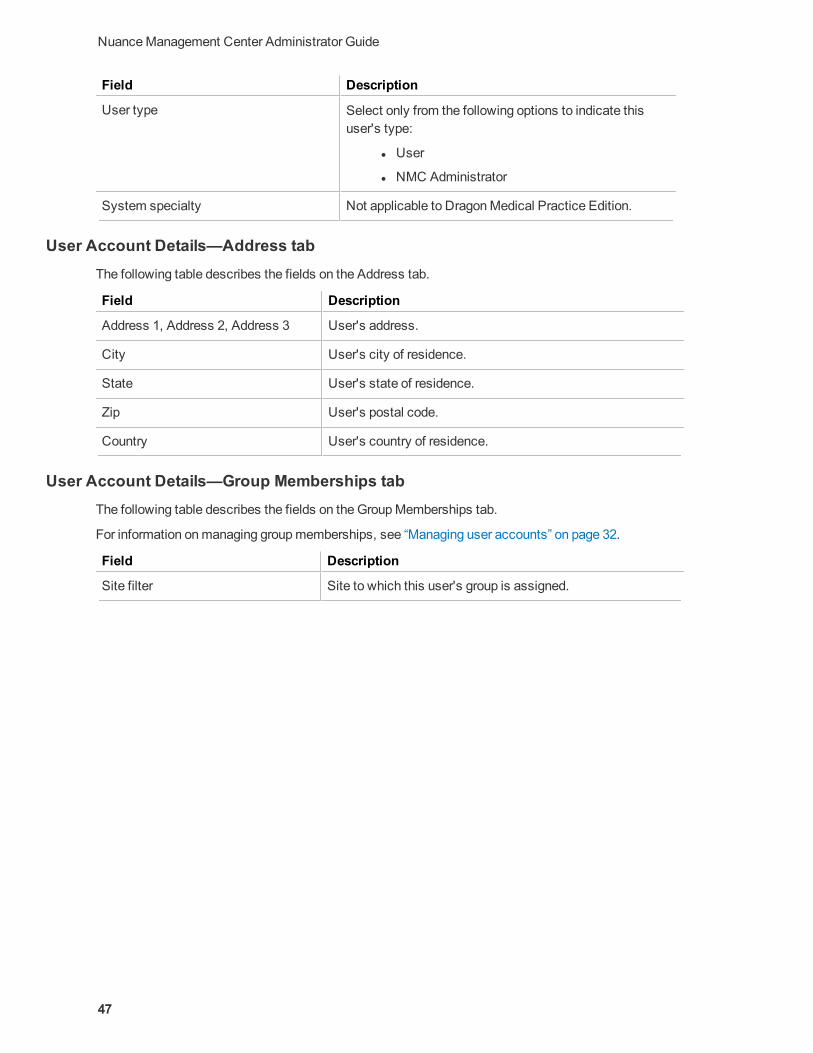
User Account Details—Specialty tabThe following table describes the fields on the Specialty tab.
Field Description
Primary specialty Not applicable to Dragon Medical Practice Edition.
Secondary specialty Not applicable to Dragon Medical Practice Edition.
Primary sub-specialty Not applicable to Dragon Medical Practice Edition.
Secondary sub-specialty Not applicable to Dragon Medical Practice Edition.
46
NuanceManagement Center Administrator Guide
Field Description
User type Select only from the following options to indicate this user's type:
l User
l NMC Administrator
System specialty Not applicable to Dragon Medical Practice Edition.
User Account Details—Address tabThe following table describes the fields on the Address tab.
Field Description
Address 1, Address 2, Address 3 User's address.
City User's city of residence.
State User's state of residence.
Zip User's postal code.
Country User's country of residence.
User Account Details—Group Memberships tabThe following table describes the fields on the Group Memberships tab.
For information on managing group memberships, see “Managing user accounts” on page 32.
Field Description
Site filter Site to which this user's group is assigned.
47
Appendix A:
Appendix A:
48
NuanceManagement Center Administrator Guide
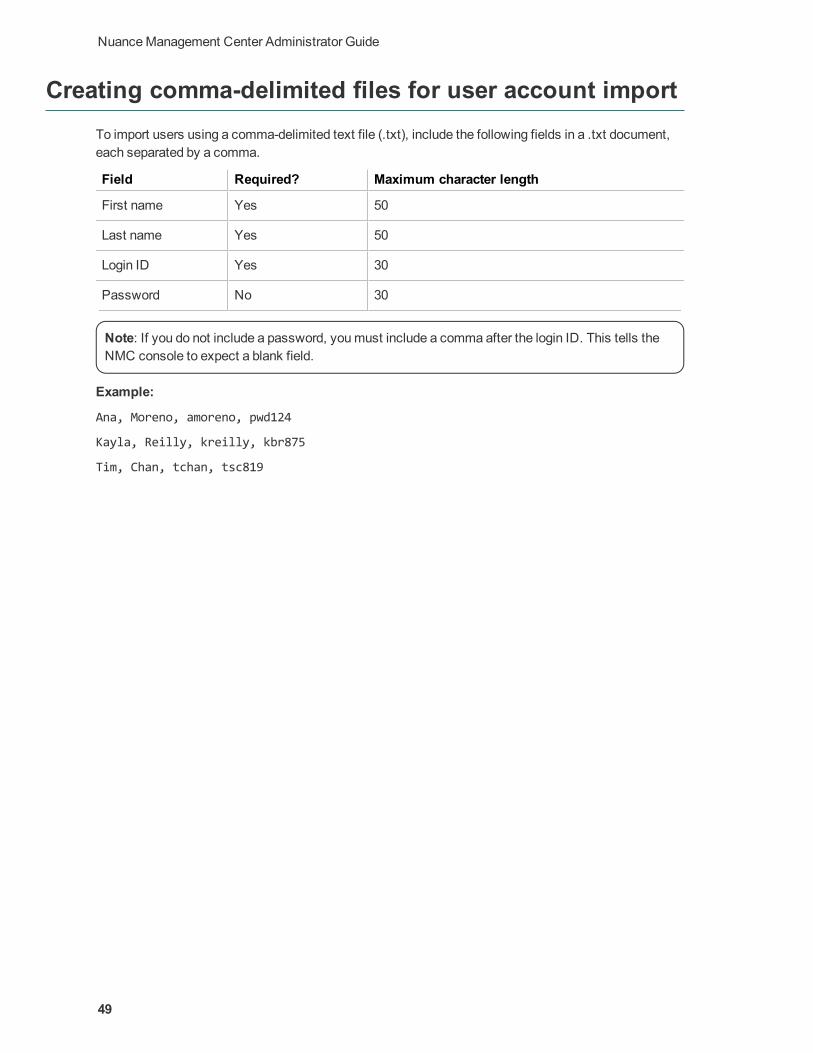
Creating comma-delimited files for user account importTo import users using a comma-delimited text file (.txt), include the following fields in a .txt document, each separated by a comma.
Field Required? Maximum character length
First name Yes 50
Last name Yes 50
Login ID Yes 30
Password No 30
Note: If you do not include a password, you must include a comma after the login ID. This tells the NMC console to expect a blank field.
Example:
Ana, Moreno, amoreno, pwd124
Kayla, Reilly, kreilly, kbr875
Tim, Chan, tchan, tsc819
49
Appendix A:
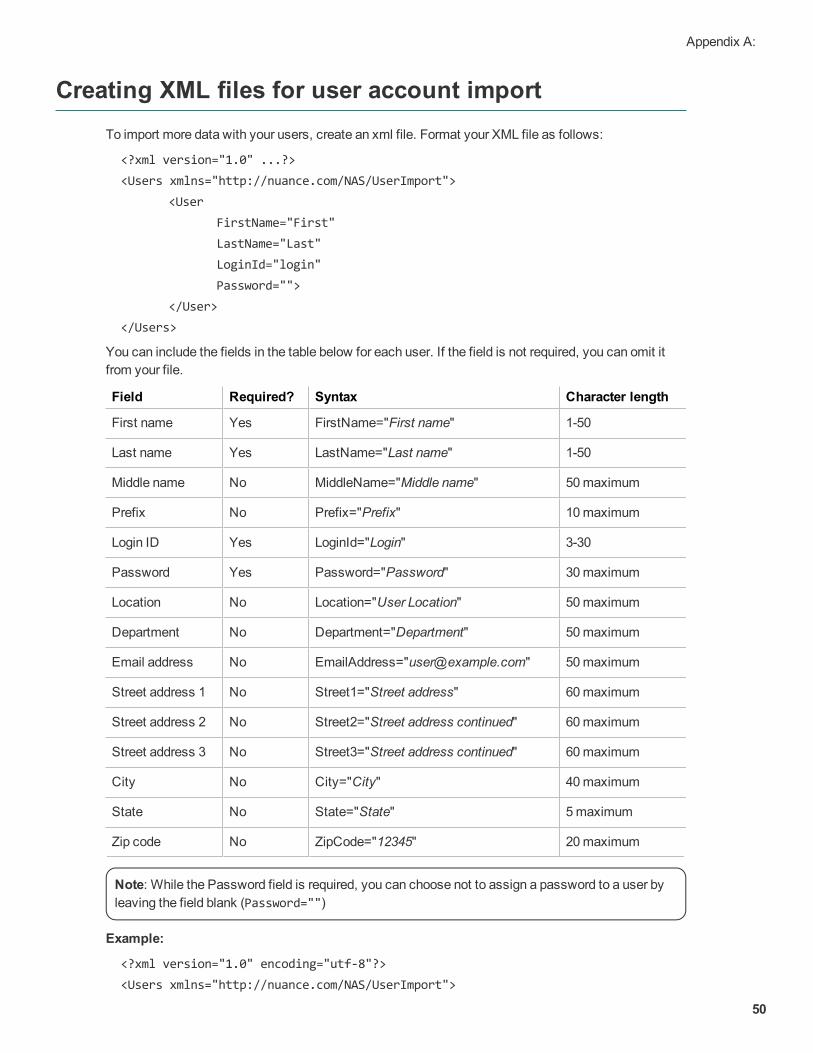
Creating XML files for user account importTo import more data with your users, create an xml file. Format your XML file as follows:
<?xml version="1.0" ...?><Users xmlns="http://nuance.com/NAS/UserImport">
<UserFirstName="First"LastName="Last"LoginId="login"Password="">
</User></Users>
You can include the fields in the table below for each user. If the field is not required, you can omit it from your file.
Field Required? Syntax Character length
First name Yes FirstName="First name" 1-50
Last name Yes LastName="Last name" 1-50
Middle name No MiddleName="Middle name" 50 maximum
Prefix No Prefix="Prefix" 10 maximum
Login ID Yes LoginId="Login" 3-30
Password Yes Password="Password" 30 maximum
Location No Location="User Location" 50 maximum
Department No Department="Department" 50 maximum
Email address No EmailAddress="[email protected]" 50 maximum
Street address 1 No Street1="Street address" 60 maximum
Street address 2 No Street2="Street address continued" 60 maximum
Street address 3 No Street3="Street address continued" 60 maximum
City No City="City" 40 maximum
State No State="State" 5 maximum
Zip code No ZipCode="12345" 20 maximum
Note: While the Password field is required, you can choose not to assign a password to a user by leaving the field blank (Password="")
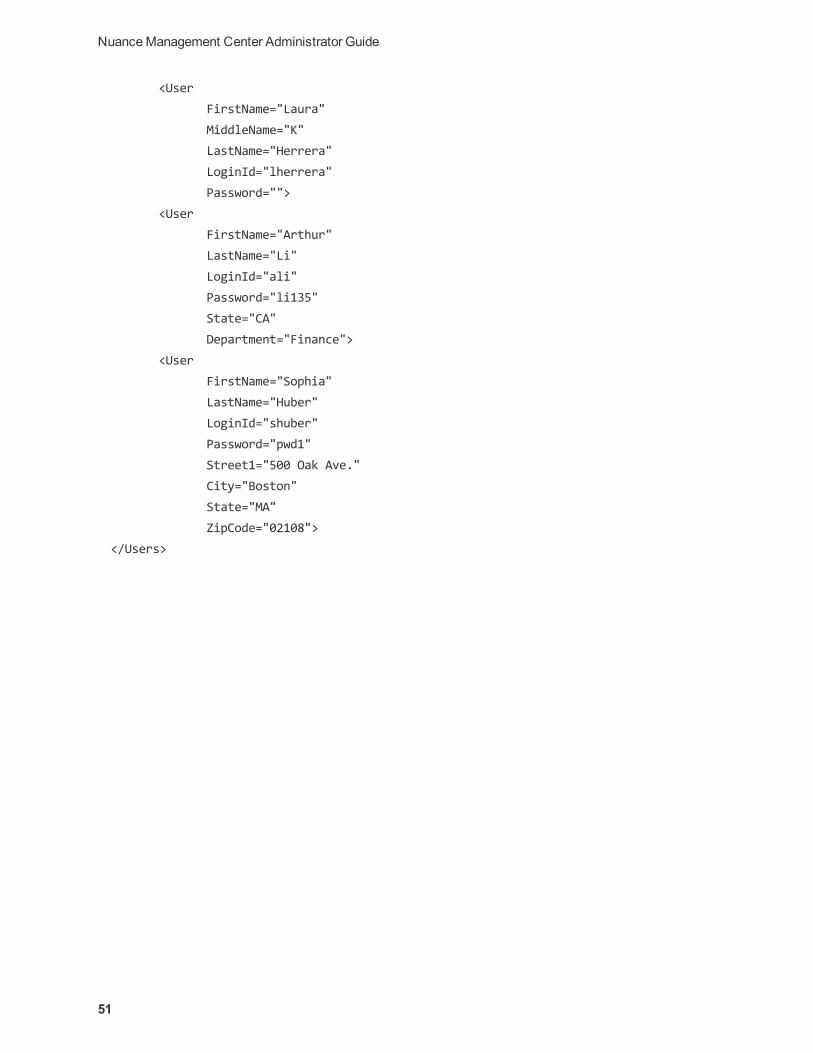
Example:
<?xml version="1.0" encoding="utf-8"?><Users xmlns="http://nuance.com/NAS/UserImport">
50
NuanceManagement Center Administrator Guide
<UserFirstName="Laura"MiddleName="K"LastName="Herrera"LoginId="lherrera"Password="">
<UserFirstName="Arthur"LastName="Li"LoginId="ali"Password="li135"State="CA"Department="Finance">
<UserFirstName="Sophia"LastName="Huber"LoginId="shuber"Password="pwd1"Street1="500 Oak Ave."City="Boston"State="MA"ZipCode="02108">
</Users>
51