nurse delegation for nursing assistants and home care aides · introduction welcome to nurse...
TRANSCRIPT

A G I N G A N D L O N G - T E R M S E R V I C E S A D M I N I S T R A T I O N
for Individual ProvidersNurse Delegation for Nursing Assistants and Home Care Aides
July 2019
Training Course for Nursing Assistants and Home Care Aides in the State of Washington
DSHS 22-1736 (Rev. 7/19)

This workbook and video project is a joint effort of Washington State Department of Social and Health Services (DSHS) Aging and Long-Term Support Administration and Developmental Disabilities Administration.
We want to thank the following individuals and agencies for their help:
Jo Lynn Abernathy, Madeline Alexander, Elaine Blum R.N.D., Bonnie Brian- Caldwell, Nancy Carter M.D., Colleen Erskine, Karen Fogarty R.N., Terry Gammage R.N., Saif Hakim, Joe Honda, Agnes Hubble R.N., Jacquie Luck, Paula Meyer R.N., Leann Riley, Catherine Rucker, Alice Santolla R.N.
Adult Family Homes of Washington State
Medicine Shoppe Pharmacy
Rochester Retirement Chalet
Division of Developmental Disabilities, DSHS
NOR ALFA
West Woods Assisted Living
South Puget Sound Community College
Washington Association of Homes and Services for the Aging
Washington State Department of Health
Washington State Nursing Care Quality Assurance Commission
Washington State Pharmacy Board
Washington State Residential Care Council
The many other reviewers who contributed to this Workbook and video project.

Table of Contents
Getting StartedIntroduction ..............................................................................................................1Introduction and Course Goals .................................................................................................. 1Completion Requirements .......................................................................................................... 2Lesson Outline & Preview ........................................................................................................... 3Lesson Process .............................................................................................................................. 4Lesson Markers or Icons. ............................................................................................................. 5Tips for Success ............................................................................................................................. 6
Lesson 1Nurse Delegation Law & Your Role in Delegation ................................................7Overview and Learning Objectives ............................................................................................ 7What is Nurse Delegation............................................................................................................ 8The Five Conditions in Nurse Delegation ................................................................................. 8Roles and Responsibilities: The Client .................................................................................... 15Roles and Responsibilities: The Delegating RN ...................................................................... 15Roles and Responsibilities: The Nursing Assistant / Home Care Aide ................................ 17Roles and Responsibilities: The Case Manager ....................................................................... 18Roles and Responsibilities: Agency Supervisor ...................................................................... 19Roles and Responsibilities: The Employer/Administrator .................................................... 19Nurse Delegation Communication Checklist ......................................................................... 20Lesson Summary ........................................................................................................................ 21Practice Exercise ......................................................................................................................... 24Practice Exercise Answer Key ................................................................................................... 26
Lesson 2Client Care and the Body Systems ........................................................................29Overview and Learning Objectives .......................................................................................... 29Client Profile ............................................................................................................................... 30Major Body Systems ................................................................................................................... 32Cardiovascular System ............................................................................................................... 33Respiratory System ..................................................................................................................... 35Integumentary System ............................................................................................................... 36Care of Skin ................................................................................................................................. 37Pressure Injuries ......................................................................................................................... 39Skin Breakdown .......................................................................................................................... 40Genito-urinary System .............................................................................................................. 41Gastrointestinal System ............................................................................................................. 43Endocrine System ....................................................................................................................... 45Additional Information Diabetes ............................................................................................. 46Nervous System .......................................................................................................................... 48Musculoskeletal System ............................................................................................................. 50Sensory System ........................................................................................................................... 52Lesson Review ............................................................................................................................. 53Practice Exercise ......................................................................................................................... 56Practice Exercise Answer Key ................................................................................................... 58

Lesson 3Medication Administration....................................................................................63Overview and Learning Objectives .......................................................................................... 63Fundamentals of Medication .................................................................................................... 64Routes of Medication Administration ..................................................................................... 68Medication Packaging and Labeling ........................................................................................ 70Medication Assistance & Medication Administration .......................................................... 71Five Rights of Medication Administration .............................................................................. 72Medication Administration Process ........................................................................................ 73What to Do When Special Situations Arise ............................................................................ 76Storage and Disposal of Medications ....................................................................................... 77Lesson Summary ........................................................................................................................ 78Practice Exercise ......................................................................................................................... 82Practice Exercise Key ................................................................................................................. 84
Lesson 4Treatments ................................................................................................................87Overview and Learning Objectives .......................................................................................... 87Ear Drops ..................................................................................................................................... 88Eye Drops or Ointments ............................................................................................................ 89Nasal Drops or Sprays ................................................................................................................ 91Oral Inhalation Therapy ............................................................................................................ 92Rectal Suppository or Cream .................................................................................................... 93Vaginal Suppository or Cream .................................................................................................. 94Non-sterile Dressing Changes .................................................................................................. 96Glucometer Testing .................................................................................................................... 98Gastrostomy Feedings ................................................................................................................ 99Ostomy Care ............................................................................................................................. 102Straight Clean Urinary Catheterization ................................................................................. 104
Practice ExamPractice Course Exam Overview ............................................................................................ 106Practice Course Exam .............................................................................................................. 107Practice Course Exam Answer Key ........................................................................................ 112
Glossary of Terms ...........................................................................................119Job Aids ................................................................................................................127Nurse Delegation Communications Checklist Medical AbbreviationsAdministering Ear Drops Administering Eye Drops or Ointments Administering Nasal Drops or Sprays Administering Oral Inhalation TherapyAdministering a Rectal Suppository or Cream Administering a Vaginal Suppository or Cream Non-sterile Dressing ChangeGlucometer Testing Gastrostomy Feedings Ostomy CareStraight Clean Urinary Catheterization

IntroductionWelcome to Nurse Delegation for Nursing Assistants & Home Care Aides. This course is designed to help prepare you to accept nurse-delegated tasks.
Your training happens in two steps. You will:
• Learn the basics of delegation, how to administer medication, and how to perform some specific health care procedures from this course.
• Receive on-site client-specific training from the delegating Registered Nurse (RN), on the specifics of how to care for an individual client.
Training Course GoalsThis course will teach you:
• What the law requires for Nurse Delegation.• Your role as a Nursing Assistant and Home Care Aide in the delegation process.• The importance of your role in client care as a partner with the delegating RN.• The basics of how to administer medication.• Medical knowledge you will need to perform specific procedures or treatments. • Characteristics you will need to provide effective client care.
Facility Training with the Delegating RNYou will receive specific instructions for delegation from the delegating RN for each individual client. The RN will teach you vital information about each client, the specific tasks being delegated, and exactly how to perform each activity.
The training you receive from the delegating RN is the most important part of this process. This instruction will occur each time you receive a delegated task from the RN. The RN also evaluates your competency to perform the delegated task.
This Nurse Delegation for Nursing Assistants & Home Care Aides: Training Course is for Washington State caregivers who:
• Work in, or will work in, community-based long-term care settings, as defined on page 14.
• Are current certified Home Care Aides (HCAs) or Nursing Assistants-Certified (NA-Cs) or Nursing Assistants-Registered (NA-Rs) or will be getting one of these certifications before accepting delegated tasks.
• Will accept and perform tasks delegated by a delegating RN
Getting Started • 1
Introduction and course
goals
Who must take this course?
Getting Started

Before starting the training, please make sure you have the following materials. When you signed up for the course, you should have received a workbook with links to training videos.
Student WorkbookThe Student Workbook is yours to keep. It contains:
• Training Lessons 1 through 4• Practice Examination (Lesson 5)• Glossary of Terms• Job Aids and Checklists
Training VideosThe training videos are companions to the workbook. You will follow a link to view these instructional videos when instructed.
In addition, you will need:
• A quiet place to work, without being interrupted• Internet access • Pencil or pen, and a highlighter• Blank paper (for your notes and questions)
Completing this course is different than being in a classroom with an instructor. This section helps you get ready to complete the course successfully. Please read this whole section before you begin the rest of the course.
To successfully complete this course, you will need to do the following after you have finished this course:
• Pass the course examination with a score of 80% or better.• Turn in your Student Evaluation to the Training Coordinator.• Present your Workbook, with the practice exercises completed, for review by the
Training Coordinator.
The lessons are designed to ensure you are fully prepared to pass the course examination. If you work through each lesson, answer the practice questions, and complete the Practice Examination in Lesson 5, you will be ready for the Course Examination.
2 • Getting Started
Materials provided to you
Materials and resources you should supply
Successfully completing this training course

Getting Started • 3
Lesson OrganizationThis training course is divided into five lessons:
Lesson 1 – Nurse Delegation Law and Your Role in Delegation
Lesson 2 – Client Care and the Body Systems
Lesson 3 – Administering Medication
Lesson 4 – Treatments
Lesson 5 – Course Summary and Practice Exam
Nurse Delegation Law and Your Role in DelegationThis lesson outlines all of the basics of Nurse Delegation and answers the core “who, what, where, when, why, and how” questions for you. You’ll learn:
• What is nurse delegation and who is involved?• Why is nurse delegation used?• Where can delegation happen?• Who can delegate a task to me and who cannot delegate to me?• When can I accept a delegated task?• What kinds of tasks can be delegated to me?• What cannot be delegated to me?• What is my role and what I am responsible for?• How does the delegation process happen?
Client Care and the Body SystemsIn this lesson, we will address your relationship with your clients. We will discuss the typical client profile to help you prepare for some of the circumstances you may encounter.
You will learn about the major systems in the body, the effects of aging that can occur, and some of the common diseases. This information will be the foundation we will build on when we discuss Medication Administration in Lesson 3 and Treatments in Lesson 4.
This background knowledge should help you confidently perform delegated tasks and provide a higher level of overall care to your clients.
Medication AdministrationYou have a very important role when administering medication to clients. You will be the key person to watch for side effects and to take action early if you see side effects occurring. You will also need to know what to do if your client will not take a medication or if you discover an error.
Lesson outline
Lesson 1 Preview
Lesson 2 Preview
Lesson 3 Preview

TreatmentsIn this lesson, you will learn the recommended ways to perform the more common treatments that may be delegated to you, such as non-sterile dressing changes, glucometer testing, and gastrostomy feeding.
You have a very important role in identifying complications that can occur from different diseases and communicating the condition of your clients to the delegating RN.
Practice ExaminationIn the final lesson, you will review everything from the course and prepare for your Final Course Examination. You will take a practice examination to become familiar with the test format and topics.
Once you have completed the practice exam, you will be well prepared to successfully complete the Final Course Examination.
Lesson ProcessYou will use the Instructional Video links and the Workbook together for each lesson. For each lesson, you will:
Read the Lesson in the Student Workbook. The Workbook will:• Present the goals for the lesson.• Present the topic, explain the concepts, and give examples.• Summarize what you have learned.• Answer some commonly asked questions.
Review examples of possible test questions that you might see on the final exam.
Watch the Lesson on the video. The Video will:• Review what you have learned in the Workbook.• Demonstrate the procedures.• Discuss issues that will come up when you apply what you have learned on the job,
and show you what to watch for.• Present situations that may come up on the job and discuss the best way to handle
them.
Review the Lesson in the Workbook.
• If you have questions after watching the video, you can go back and review that section in the Workbook. You can also make a note of the question to ask the instructor.
The video segments are a very important part of this training. You will observe a Nursing Assistant and a delegating RN talking together about common issues you will face on the job. These interactions should help you think about questions you will want to ask your delegating RN.
4 • Getting Started
Lesson 4 Preview
Lesson 5 Preview
Narrators

Getting Started • 5
Lesson Markers or IconsThe Workbook uses markers or icons to help you move through the training easily. Here is a list of the markers used.
Meaning
Stop
Stop reading the Workbook or watching the Video at this point.
Workbook
Read the next section in the Workbook.
Video
Watch the next section in the video.
Required by Law
This content is taken directly from the statutes or laws pertaining to Nurse Delegation.
Procedure
A step-by-step process you will follow to complete a specific activity. Many procedures will be included as checklists you can use back on the job to help you.
Tip for Success
A recommendation to make a process easier or to give better client care.
Ask for Help
This is a topic or issue that you should discuss with the delegating RN.
Key Word
When new words that you should remember are used for the first time, they will be defined for you. Key Words are also in the Glossary.
Report
When you need to report something to the delegating RN, your supervisor, your case manager, or the client’s doctor.
Marker/Icon

6 • Getting Started
Tips for Success• Read the Workbook section first and then watch the video of the same section. If you
still have questions after watching the video, go back and review that section in the Workbook until you understand.
• If you come to a word that you don’t understand, look in the Glossary in the back of the Workbook.
• You can stop and review the video to reinforce understanding.• Schedule time to complete each lesson when you will have the least number of
interruptions.• As you move through each lesson, take notes in the Workbook and highlight key
concepts. This will help you remember more of the information.• Write down any questions that you have after each lesson.• If your questions are not answered in the Workbook or on the video, ask the Training
Coordinator.
Stop reading the Workbook here.
Watch the Video Segment for Getting Started. Follow this link to the DSHS website. Scroll down to Nurse Delegation Core under the Course column. Click on your preferred language. Choose which video that you would like to view. www.dshs.wa.gov/altsa/training/dshs-curriculum-available.

Lesson 1 – Nurse Delegation Law & Your Role in Delegation • 7
Nurse Delegation Law & Your Role in Delegation
This lesson outlines all of the basics of Nurse Delegation, answering the core who, what, where, when, why, and how questions for you. You’ll learn:
• What is Nurse Delegation and who is involved?• Where can delegation happen?• Who can delegate a task to me, and who cannot delegate to me?• When can I accept a delegated task?• What kinds of tasks are delegated to certified Home Care Aides, Nursing Assistants-
Certified and Nursing Assistants-Registered?• What cannot be delegated to me?• What is my role and what am I responsible for?• Why is nurse delegation used?• How does the delegation process happen?
Once you complete this lesson you will be able to:
• Define nurse delegation.• List the specific places where you can work and receive nurse delegation under
the law.• List the specific tasks that cannot be delegated to you under the law.• Describe what you need to do to be qualified to accept a delegated task.• Explain who is involved in nurse delegation and what each person’s role is in the
process.• Describe your rights and responsibilities in delegation.• Determine the communication process to use where you work.
Delegation means giving or transferring a responsibility or task to a lay person.
Overview and preview
Learning objectives
Lesson 1

8 • Lesson 1 – Nurse Delegation Law & Your Role in Delegation
Defining Delegation: Five Conditions for Nurse DelegationNurse Delegation means a licensed Registered Nurse (RN) transfers the performance of a specific task for an individual client to a qualified Nursing Assistant or Home Care Aide working in community and/or home settings.
The licensed RN who delegates the task is responsible and accountable for the nursing care of the client.
Accepting a delegated task means you:
• Are willing to perform a specific action to care for a client in place of the RN.• Have been given clear and specific instruction from the delegating RN on what to do
and when to do it.• Believe you can perform the task correctly and safely.
Revised Code of Washington (RCW) 18.88A.210, RCW 18.88A.230 and RCW 18.79.260 (the law).
Washington Administrative Code (WAC) 246-840-910 through 246-840-970, WAC 246-841-405 (the rules).
There are five conditions of nurse delegation:
1. A licensed Registered Nurse transfers the performance of a task.2. The task can be delegated. There are four prohibited tasks that may not be delegated.3. A delegation must be for a specific task for one client.4. Only qualified Nursing Assistants Certified, Nursing Assistants-Registered and
certified Home Care Aides can accept delegation.5. Delegation can only happen in four community settings.
Each of these parts of the delegation must be in place for the delegation to be in accordance with the law.
NOTE: “Home care aide” means a long-term care worker who has obtained certification as a home care aide by the department of health. [RCW 74.39A.009(14) and RCW 18.88B.010(3).] Please note that caregivers may not identify themselves as a “home care aide” unless they have obtained certification from the department of health. Any reference in this manual to “home care aide” means that the caregiver has certified.
What is Nurse Delegation?
The Five Conditions
What does Home Care Aide mean?

Lesson 1 – Nurse Delegation Law & Your Role in Delegation • 9
Condition 1 – Licensed Registered Nurse (RN)Only a RN licensed in Washington State, who is the RN responsible for the client you are working with, can delegate a task to you.
So, who cannot delegate a task to you?
The facility administrator, if not the delegating RNYour supervisor or lead, if not the delegating RNA Licensed Practical Nurse (LPN)A Home Health Care Nurse, if not the delegating RNAnother RN who does not assume formal delegation responsibility for the client
Condition 2 – Specific TasksThe following are examples of the types of tasks that can be delegated to you:
Administration of medications.Non-sterile dressing changes.Urinary catheterization using clean technique.Ostomy care in established and healed condition.Blood glucose monitoring.Gastrostomy feedings in established and healed condition.
We will discuss each of the tasks above in more detail in later lessons in this course. For definitions of terms, please see the Glossary.
The following tasks cannot be delegated to you:
Injections, other than insulinSterile proceduresMaintenance of central linesAnything which requires nursing judgment
Condition 1Who can
delegate?
What cannot be delegated
to me?
Condition 2What can be
delegated?

10 • Lesson 1 – Nurse Delegation Law & Your Role in Delegation
Condition 3 – A Specific Task for One ClientDelegation is limited to the specific task for one client only. This is best explained by an example. Let’s say that the RN delegates the administration of ear drops for Mary Jones to you. This delegation covers the administration of ear drops only, for one client, Mary Jones.
Specific task - Mary also needs dressing changes for a pressure sore on her leg. Even though you are responsible for Mary’s ear drops, you are not allowed to do the dressing changes until the delegating RN does a separate delegation with complete instructions on dressing changes for Mary.
One client – Arthur Rodriguez is another of your clients. He also requires the same ear drops that you administer to Mary Jones. Even though you are responsible for Mary’s ear drops, you are not allowed to administer Arthur’s ear drops. You would be responsible for administering Arthur’s ear drops only if the RN delegates that task to you with complete instructions for Arthur’s care.
Condition 4 – Qualified Nursing Assistant or Home Care AideIt is very important to understand when you can accept a delegated task. There are four requirements you must complete before you accept a delegated task. You must:
1. Be licensed as a: i. Home Care Aide (HCA); orii. Nursing Assistant Certified (NA-C); or iii. If exempt from the home care aide certification under WAC 246-980-070, become
a Nursing Assistant Registered (NA-R) and complete the core competencies of basic training, unless the twenty-eight hours of revised fundamentals of care was already completed; or
iv. If nurse delegation is needed to implement a care plan earlier than home care aide certification can be obtained, become a nursing assistant registered (NA-R) and complete core competencies of basic training.
2. Have completed the Nurse Delegation for Nursing Assistants and Home Care Aides class and training on the specific task for the specific client.
3. Be willing to perform the specific task to be delegated.
4. Demonstrate to the delegating RN your competence to correctly perform the specific task without direct supervision.
Condition 3 What is the scope of the delegation?
Condition 4 When can I accept a delegated task?

Lesson 1 – Nurse Delegation Law & Your Role in Delegation • 11
To apply to become a certified Home Care Aide (HCA), you must complete a training program approved by the Washington State Department of Social and Health Services, apply with the Department of Health for certification, and successfully pass the Prometric examination. Credentials must be renewed annually.
Send a copy of the 75-hour certificate of completion from the training program, Training Program Certification, Application for Certification as a Home Care Aide (DOH 675-002 [Rev. 7/16]), the application fee and Prometric Examination fee to:
Department of Health Home Care Aide Credentialing P. O. Box 1099 Olympia, WA 98507-1099
For information on the application and certification process, contact DOH at:
DOH Website
http://www.doh.wa.gov/LicensesPermitsandCertificates/ProfessionsNewReneworUpdate/HomeCareAide
Home Care Aide Credentialing (360) 236-2700
To apply to become a Nursing Assistant Certified (NA-C), you must complete a training program approved by the Washington State Nursing Care Quality Assurance Commission and successfully pass the OBRA examination for certification. Credentials must be renewed annually.
Send the Training Program Certification, Application for Certification as a Nursing Assistant (DOH 667-029 [Rev. 9/16]), and application fee to:
Washington State Nursing Commission P.O. Box 1099 Olympia, WA 98507-1099
For information on the application and certification process, contact DOH at:
DOH Website
http://www.doh.wa.gov/LicensesPermitsandCertificates/ProfessionsNewReneworUpdate/NursingAssistant
DOH Customer Service (360) 236-4700
Condition 4 Part 1: License
NA-C
Condition 4Part 1: License
HCA

To register as a Nursing Assistant Registered (NA-R), you must have completed the Department of Health’s HIV/AIDS training.* Once you have taken the HIV/AIDS training, complete an Application for Registration as a Nursing Assistant (DOH 667-025[Rev. 9/16]) and mail it with the application fee and your HIV/AIDS certificate to the Washington State Nursing Commission (address above). Credentials must be renewed annually.
*Proof of completion of the HCA basic training course will fulfill the requirement for the HIV/AIDS certificate.
If your name is listed on another state registry, you may qualify for Interstate Endorsement as a Nursing Assistant Certified. Send a completed Application for Certification as a Nursing Assistant by Interstate Endorsement (DOH 667-039 [Rev. 9/16]), and verification that you are on another state’s registry to the address above.
*If you will be delegated the task of insulin injections, you must also successfully complete the Nurse Delegation for Nursing Assistants: Special Focus on Diabetes training.
For providers working in DDA certified programs, nurse delegation can only occur after the DDA core training and required in-service training is completed. Staff working in DDA certified supported living services take the DDA basic training.
Condition 4 Part 1: License NA-R
Condition 4 Part 1: License out of state
12 • Lesson 1 – Nurse Delegation Law & Your Role in Delegation
You must have successfully completed...
Nurse Delegation for Nursing Assistants & Home Care Aides*
Nurse Delegation for Nursing Assistants & Home Care Aides*
Basic Training (DSHS approved basic training) AND Nurse Delegation for Nursing Assistants & Home Care Aides*
DDA basic training (40-hour training) AND Nurse Delegation for Nursing Assistants & Home Care Aides*
PRIDE training (43-hour) Not transferable to another delegation client. If working in a child foster home, complete the Caregiver Core Training (CCT) and the 3-hour Orientation and First Aid Training.
AND
Nurse Delegation for Nursing Assistants & Home Care Aides*
If you are a...
HCA
NA-C
NA-R
NA-R Working for a Supported Living Agency
NA-R Previous foster parent for a client now receiving nurse delegation
Condition 4 Part 2: Education Requirements

Lesson 1 – Nurse Delegation Law & Your Role in Delegation • 13
You should be prepared to demonstrate to the delegating RN that you have completed the requirements above. You should be ready to present to the delegating RN:
• Your Department of Health license (HCA certification, NA-C certification or NA-R registration) document.
• NA-R only: must also provide your HCA Basic Training Certificate of Completion OR DDA core competencies of basic training certificate.
• Your Nurse Delegation for Nursing Assistants & Home Care Aides training Certificate of Completion. (You will receive your Nurse Delegation training Certificate of Completion after you pass the final examination).
Willingness to Perform The third requirement of Condition 4 is that you are willing to perform the delegated task.
If you do not feel competent to perform the task or you believe that client safety is at risk, you should not perform the task. Instead, communicate your concerns to the delegating RN, the case manager, and/or your employer or supervisor. No one can force you to perform a task that you do not believe you are competent to perform.
If you work in a facility, be sure to address the nurse delegation process and the requirements that relate to your position at the time of employment. Generally, when you accept a Nursing Assistant/Home Care Aide position that includes delegation, you are indicating that you are willing to perform delegated tasks as part of your job responsibilities.
Skills to PerformThe final part of Condition 4 is that you must have the skills to perform the delegated task. Before delegating a task to you, the RN must make sure that you can perform the task on your own without help.
For each delegation task, the RN will give you specific, written instructions on how to perform the task. The RN will then train you on the job, show you how to perform the task, and ensure that you can do it.
The RN will only delegate a task to you when he or she is satisfied that you can correctly and safely perform the task.
Condition 4 Part 3:
Willingness to perform
Documents
Condition 4 Part 4: Skills to
perform

Condition 5 – Community SettingsNurse delegation can occur in four community settings:
1. Certified community residential programs for the developmentally disabled.2. Licensed adult family homes.3. Licensed assisted living facilities.4. In the client’s home.
Here are a few additional notes on nurse delegation that will help you.
• Remember, a delegation only applies to a specific task for one client. If you have been delegated a task for one client, Mary Jones, you cannot perform multiple tasks for Mary without additional delegations from the RN. Likewise, you cannot perform the task you have been delegated for Mary for other clients.
• The delegating RN must reassess the client and supervise the delegation every 90 days.
• The client, or the client’s legal representative, must be aware that the task is being delegated to you, must agree to it, and give written consent.
• The delegation must be in writing.• The delegation is a three-way agreement between the delegating RN, the
client, and you.
14 • Lesson 1 – Nurse Delegation Law & Your Role in Delegation
Condition 5 Community settings
Additional notes

Lesson 1 – Nurse Delegation Law & Your Role in Delegation • 15
Roles and ResponsibilitiesIn the delegation process, there are five key roles that you should understand. These include the:
1. Client or client’s representative.2. Delegating RN.3. Nursing Assistant/Home Care Aide.4. Case Manager.5. Home Care Agency Supervisor or Facility Employer/ Administrator.
The following information will help you understand the roles in nurse delegation.
Roles and Responsibilities—The Client or RepresentativeThe client makes the choice on whether to receive nurse delegation. The client must be informed of care options and give written consent to nurse delegation.
For in-home settings, the client, or his or her representative, is responsible to report when a caregiver is absent or fails to perform a delegated task to the delegating RN, the case manager, or a supervisor if the caregiver works for a home care agency.
Roles and Responsibilities—The Delegating RNThe RN has five main areas of responsibility in delegation. These include:
1. Assessing the client and evaluating the appropriateness of the delegation.2. Obtaining written informed consent from the client or authorized representative for
the nurse delegation.3. Delegating the task.4. Reassessing the client and supervising the delegation.5. Rescinding (canceling) the delegation.
It is important for you to understand the requirements of the RN so you know what to expect from the delegating RN in the delegation process.
Roles
Client or representative
Delegating RN

The delegating RN performs a full systems assessment of the client to determine if the client’s condition is stable and predictable. The client’s condition must remain stable and predictable in order for the delegation to occur.
The delegating RN is required to discuss the delegation with the client, or his or her legal representative, and get his or her consent in writing.
The RN has to do the following before delegating a task to you:
• Talk to the client or his or her authorized representative and get written consent to the delegation.
• Ensure all three people involved have agreed to the delegation:– The RN.– The client or authorized representative.– You, as the NA or HCA.
• Verify that you have met the training requirements.• Teach you how to perform the task.• Verify your competence to perform the task to make sure you can do it safely and
correctly.• Provide you with written delegation instructions.
Once the delegation is in place, the RN is still accountable and responsible for the client’s care. The RN will:
• Respond to any questions you have about the client’s condition or the delegated task.• Re-evaluate the client’s condition, the outcome of the task you are performing, and
any problems that have occurred.• Decide how frequently to supervise the delegation to ensure safe and effective services
are provided.• Inform the caregiver and/or case manager of changes in the client’s condition.
In some instances, the RN responsible for the delegation will change. A new RN can take on responsibility for the delegating RN if he or she knows:
• The client’s condition through his or her own assessment.• Your skill level, as the NA or HCA performing the delegation.• The client’s plan of care.
The change of the delegating RN must be documented in the client’s record. You, the client, and the case manager must be informed of the change.
16 • Lesson 1 – Nurse Delegation Law & Your Role in Delegation
Assessing the client and obtaining consent
Delegating the task
Supervising the delegation
Lesson 1 – Nurse Delegation Law & Your Role in Delegation • 17
The RN may rescind (cancel) the delegation of the nursing task if:
• The nurse believes the client’s safety is at risk.• The client’s condition is no longer stable and predictable.• Staff turnover makes it difficult to continue delegation in the setting.• You are no longer able to perform the task safely.• You have not renewed your registration or certification on time.• The task is not being performed correctly.• The client or authorized representative requests that the delegation be cancelled.• The client goes to a nursing home (the RN may reinstate delegation when the client
returns).• The RN is not notified on repeated occasions when the client’s medical orders or
condition changes.• For licensed care settings, the facility or home care agency (as applicable) has an expired
or revoked license (the RN may reinstate delegation when shown a current license).
If the RN cancels or rescinds the delegation, the RN must coordinate a different plan to make sure the client’s care needs are met.
The delegating RN must document the reason for rescinding the delegation and the plan for continuing care.
Roles and Responsibilities—The Nursing Assistant or Home Care AideYou play a very important role in the care and well being of your clients. Once you receive a delegated task, you are responsible for five primary actions:
1. Performing the delegated task according to the specific instructions of the RN. This may include documenting the task according to instructions from the delegating RN.
2. Observing the client for changes which may indicate:– Potential side effects from medications.– Negative reactions to procedures.– Complications from the client’s disease.
3. Reporting changes in the client’s condition promptly.– If you work in a facility or home care agency, report to the delegating RN and your
supervisor according to your employer’s policy.– If you are an Individual Provider, report to the delegating RN and the case manager.
4. Reporting to the delegating RN any new or changed medications or treatments.5. Renewing your registration or certification on time so you can legally perform a
delegated task.
You can make the difference in your client’s quality of health and life by being observant and communicating quickly.
Rescinding the delegation
Nursing assistant/Home
care aide

18 • Lesson 1 – Nurse Delegation Law & Your Role in Delegation
• You cannot take an order from the physician or his or her office staff over the phone. If you receive an order by phone, contact the delegating RN and/or your supervisor.
• A faxed order signed by the physician can be used for immediate verification. You should still contact the delegating RN before making any changes.
You have a choice whether or not you will accept a nurse delegated task.
Once you have accepted a delegation, circumstances may arise in which you are no longer able to perform the specific task. According to the law, you will not be subject to any employer reprisal (punishment) or disciplinary action for refusing to perform a delegated task in the following situations:
• The client’s safety is at risk.• You did not receive adequate training to perform the task.• The client is not cooperative.• The client appears to be having an adverse reaction.• The necessary supplies are not available (gloves, dressings, etc.).• You need additional training because of changes in the client’s medications or
treatments.
Notify the delegating RN, the client’s case manager and your employer as soon as possible if any of these situations occur. It is your responsibility to ensure that client care is not compromised or interrupted.
Roles and Responsibilities—The Case ManagerThe Case Manager completes a care assessment that details a client’s needs. It is the Case Manager’s responsibility to:
• Identify the need for nurse delegation on the client’s care plan.• Assist a client in finding a qualified nurse delegation provider.• Make a referral to a contracted delegating RN or a provider that does nurse
delegation.• Authorize payment for the delegating RN.• Inform the delegating RN and/or caregiver of changes in the client’s condition.
For in-home settings, it is the Case Manager’s responsibility to:• Refer a caregiver to the Training Partnership for Nurse Delegation training.• Authorize payment to the caregiver for completing the Nurse Delegation for Nursing
Assistants and Home Care Aide training.• Provide a voucher and facilitate an Individual Provider to get registered as a NA-R, if
needed.• Arrange for skilled nursing tasks to be done until the Nursing Assistant/Home Care
Aide has been trained and meets the requirements to perform a delegated task.
Case manager

Lesson 1 – Nurse Delegation Law & Your Role in Delegation • 19
Roles and Responsibilities—The Home Care AgencyFor in-home clients, it is the home care agency’s responsibility to:
• Decide whether the agency will provide nurse delegation.• Schedule qualified caregiver(s) to meet the client’s needs.• Assist the caregiver to get the required trainings.• Assist the caregiver to get registered as a NA-R, if needed.• Inform the delegating RN and/or case manager of changes in the client’s condition.• Supervise the personal care duties.• Ensure a backup worker for client care.
Roles and Responsibilities—The Employer/AdministratorIn a facility, the Employer/Administrator is responsible to make sure that any nurse delegation that occurs in the facility has been done according to the nurse delegation rules. This includes ensuring:
• The tasks performed are not prohibited by law.• The Nursing Assistant/Home Care Aide has completed all the training and registration
requirements prior to receiving delegated tasks.• The delegation process has been completed correctly.• The tasks are performed as directed.
The Employer/Administrator is ultimately responsible for what goes on in an assisted living facility or an adult family home. They will be cited by the regulators if the delegation is not done correctly.
The Employer/Administrator is also responsible for setting and communicating the procedures to be followed in the facility. The administrator is responsible for setting policies that will provide the best client care, given the size of the facility, and the level of staffing.
Since the Administrator is ultimately responsible for client care, it is extremely important that the Administrator, the delegating RN, and the Nursing Assistant/Home Care Aide have a very clear understanding of the delegation rules and the policies of the facility or home.
After you complete this course, discuss facility policies with the Administrator. Make sure you understand the communication processes that are in place. For example, your facility may have a policy that the Nursing Assistant/Home Care Aide must always contact the administrator when contacting the delegating RN.
No matter where you work, you need to know who to call when something comes up. In the “Job Aids” section of this workbook, you will find a Nurse Delegation Communications Checklist to help you clarify who to call in specific situations.
Use this tool to discuss with the delegating RN, your supervisor/facility administrator, and/or the case manager who to call when something happens. An example of the form is on the next page.
Agency supervisor
Employer/Administrator
Setting facility policy
Ask for help
20 • Lesson 1 – Nurse Delegation Law & Your Role in Delegation
Nurse Delegation Communication ChecklistThis form will help you document and discuss specific policies and expectations regarding who to contact in different situations.
After completing this course, meet with the delegating RN, your supervisor, facility administrator, or, in certain circumstances, the case manager to discuss the items below. Record the policies and contact information in the space provided.
Who do I call if:There is an emergency
Supplies are needed
There is a change in doctor’s orders
I am unable to go to work on a day a nurse delegated task is to be done
Who do I contact if my client:Starts to get sick
Shows signs of a changing condition
Refuses the treatment or medication
General information
Checklist

Lesson 1 – Nurse Delegation Law & Your Role in Delegation • 21
There are five conditions for nurse delegation:
1. A licensed Registered Nurse transfers performance of a task.2. There are four specific tasks that may not be delegated.3. A delegation covers a specific task for one client.4. Only qualified Nursing Assistants/Home Care Aides can accept a delegation.5. Delegation can only happen in four community settings.
The following four tasks may NOT be delegated to you.
1. Injections, other than insulin.2. Sterile procedures.3. Maintenance of central lines.4. Tasks that require nursing judgment.
There are five requirements to be qualified to receive a delegation. You must:
1. Be an HCA, NA-R or a NA-C current and in good standing in Washington State.2. Have completed the educational requirements for delegation.3. Be willing to perform the specific task to be delegated.4. Demonstrate your competence to perform the specific tasks to be delegated correctly
and without direct supervision to the delegating RN.
There are four settings in which delegation can occur:
1. Certified community residential programs for the developmentally disabled.2. Licensed adult family homes.3. Licensed assisted living facilities.4. In clients’ homes.
Five conditions for nurse
delegation
Tasks that may NOT be
delegated
Qualified NA
Community settings
Lesson Summary
22 • Lesson 1 – Nurse Delegation Law & Your Role in Delegation
In the delegation process, there are five key roles that you should understand. The role of the:
1. Client2. Delegating RN3. Nursing Assistant/Home Care Aide4. Case Manager5. Home care agency supervisor or facility Administrator
The client or his/her representative must give consent for nurse delegation.
The RN has five main areas of responsibility in delegation:1. Assessing the client and evaluating the appropriateness of the delegation.2. Obtaining written informed consent from the client or authorized representative
for the delegation process.3. Delegating the task.4. Supervising the delegation.5. Rescinding (canceling) the delegation.
There are four primary actions you are responsible for in a delegation:1. Performing the delegated task according to the specific instructions of the RN.2. Observing the client for:
– Potential side effects from medications.– Negative reactions to procedures.– Complications from diseases.
3. Reporting changes in your client’s condition promptly to the delegating RN.4. Reporting new or changed medications or treatments.5. Renewing your registration or certification on time so you can legally perform a
delegated task.
Roles
Client or representative
Delegating RN
Nursing assistant home care aide
Lesson Summary

Lesson 1 – Nurse Delegation Law & Your Role in Delegation • 23
It is the Case Manager’s responsibility to:
• Identify the need for nurse delegation on the client’s care plan.• Assist a client in finding a qualified nurse delegation provider.• Make a referral to a contracted RN or nurse delegation provider.• Authorize payment to the delegating RN.
The home care agency is responsible for:
• Deciding whether the agency will provide nurse delegation.• Scheduling qualified caregiver(s) to meet client’s needs.• Supervising the personal care duties.• Ensuring there is a back-up worker for client care.
It is the employer/administrator’s responsibility to:
• Ensure all legal requirements are met.• Set the policies and procedures for the facility.
• You are not required to accept delegated tasks. You can refuse if you feel the client’s safety is at risk or that you are not competent to perform the task.
• There are three people involved in the delegation who must agree to it: the RN, the client or authorized representative, and you.
• Injections, other than insulin, sterile procedures, and central line maintenance cannot be delegated to you.
• The RN must evaluate the delegation periodically.• Nurse Delegation tasks are only for one client. You cannot perform a delegated task
for another client unless you are specifically delegated to do that task for that client.
Case manager
Supervisor agency
Employer administrator
Key points
Lesson Summary

Directions: Answer as many of the questions as you can from memory. Then look up the rest of the answers in the workbook text.
Once you have completed the exercise, check your answers in the Practice Exercise Answer Key that follows this practice exercise.
What are the five conditions that must be met for nurse delegation?
1.
2.
3.
4.
5.
There are four settings in which delegation can occur. What are they?
1.
2.
3.
4.
List the four specific tasks that cannot be delegated to you.
1.
2.
3.
4.
Insulin injections are a delegated task.
True False
24 • Lesson 1 – Nurse Delegation Law & Your Role in Delegation
Practice Exercise

List two of the five primary actions a Nursing Assistant/Home Care Aide is responsible for in a delegation.
1.
2.
You have been delegated the task of dressing changes for Barbara Jones. You have been performing this task for 30 days and are very comfortable with it. Michael Delgado, another client, has developed pressure sores and now requires dressing changes as well. Your supervisor (who is not the delegating RN) asks you to take on the dressing changes for Michael since you are doing such an effective job with Barbara. What should you do?
Lesson 1 – Nurse Delegation Law & Your Role in Delegation • 25
Practice Exercise

Review the answers below. The page number following the question is where you will find the information about this question in your workbook.
What are the five conditions that must be met for nurse delegation? (page 9)
1. A licensed Registered Nurse transfers performance.2. There are four specific tasks that may not be delegated.3. A delegation covers a specific task for one client.4. Only qualified Nursing Assistants/Home Care Aides can accept a delegation.5. Delegation can only happen in four community settings.
There are four settings in which delegation can occur. What are they? (page 14)
1. Certified community residential programs for the developmentally disabled.2. Licensed adult family homes.3. Licensed assisted living facilities.4. In clients’ homes.
List the four specific tasks that cannot be delegated to you. (page 9)
1. Injections, other than insulin2. Sterile procedures3. Maintenance of central lines4. Tasks that require nursing judgment
Insulin injections are a delegated task. (page 9)
True. Insulin injections are the only injections that can be delegated.
List two of the five primary actions a Nursing Assistant/Home Care Aide is responsible for in a delegation. (page 17)
1.
2.
26 • Lesson 1 – Nurse Delegation Law & Your Role in Delegation
Practice Exercise Answer Key

Any two of these five are correct.
1. Performing the delegated task according to the specific instructions of the RN.2. Observing the client for changes which may indicate:
– Potential side effects from medications.– Negative reactions to procedures.– Complications from diseases.
3. Reporting changes in your client’s condition promptly to the delegating RN, and your supervisor or the case manager.
4. Reporting to the delegating RN new or changed medications or treatments.5. Renewing your registration or certification on time.
You have been delegated the task of dressing changes for Barbara Jones. You have been performing this task for 30 days and are very comfortable with it. Michael Delgado, another client, has developed pressure sores and now requires dressing changes as well. Your supervisor (who is not the delegating RN) asks you to take on the dressing changes for Michael, since you are doing such an effective job with Barbara. What should you do? (Page 11)
Answer: You cannot accept the delegation of the dressing change for Michael from your supervisor because she or he is not the delegating RN.
Ask your supervisor to call the delegating RN who will determine if delegation is appropriate and complete the process according to the requirements of the law.
Stop reading the Workbook here.
Watch the Video Segment for Nurse Delegation Law & Your Role in Delegation.
Follow this link to the DSHS website. Scroll down to Nurse Delegation Core under the Course column. Click on your preferred language. Choose which video that you would like to view. www.dshs.wa.gov/altsa/training/dshs-curriculum-available.
Lesson 1 – Nurse Delegation Law & Your Role in Delegation • 27
Practice Exercise Answer Key

28 • Lesson 2 – Client Care and the Body Systems

Lesson 2
Client Care and the Body SystemsIn this lesson, we will focus on your relationship with your clients. We will describe some clients to give you an idea of the type of situations you may come across.
You will learn about the major systems in the body, the possible effects of aging, and some of the common diseases of those systems. This background knowledge will help you become a better Nursing Assistant/Home Care Aide.
Once you complete this lesson you will be able to:
1. Define nine major body systems, and identify the purpose of the major organs in each:1. Cardiovascular (heart and blood vessels)2. Respiratory (lungs)3. Integumentary (skin)4. Genitourinary (kidneys, bladder and reproductive organs)5. Gastrointestinal (digestive system and bowels)6. Endocrine (Glands)7. Nervous (Brain, spinal cord and nerves)8. Musculoskeletal (bones and muscles)9. Sensory (eyes and ears)
2. Describe the effects of aging on each body system.
3. List two or more disorders that occur in each system.
Lesson 2 – Client Care and the Body Systems • 29
Overview and Preview
Learning objectives

The Client ProfileThere is no “typical” client because each person is an individual with specific needs and ways of doing things. The two people and situations described below may be similar to what you will come across when doing delegated tasks. Remember, every situation is unique.
Sarah Goldstein lives in an adult family home with four other elderly people. She is 80 years old and has multiple sclerosis, glaucoma, high blood pressure, and heart disease. Ms. Goldstein has eye drops prescribed for her glaucoma. She needs to have her eye drops administered to her because the multiple sclerosis has weakened her hands, which makes it difficult for her to do precise things with them. She is unable to squeeze the dropper bottle and get the drop in her eyes.
The delegating RN, Jane, has Ms. Goldstein’s written permission to delegate the administration of her eye drops. Jane will now proceed to fulfill the other conditions in order to delegate the task. Jane will also check in with you periodically to make sure that you are doing the procedure correctly and that all other conditions of delegation remain the same.
You may also work with clients with developmental disabilities. A developmental disability usually has the following three characteristics:
1. Starts before age 18.2. Is expected to continue indefinitely.3. Results in a significant handicap.
Examples of developmental disabilities are:
• Intellectual disability• Cerebral Palsy• Epilepsy• Autism• Down Syndrome
There are over 200 known causes of developmental disabilities including genetic disorders, certain problems during pregnancy, poor environmental factors in early life, and brain damage.
30 • Lesson 2 – Client Care and the Body Systems
Introduction
Example 1: Adult family home client
Developmental Disabilities

Lesson 2 – Client Care and the Body Systems • 31
Intellectual Disability—is defined by score on IQ tests (usually a score of 69 or less). The person has difficulty with learning. A licensed psychologist can determine if a person has an intellectual disability.
Cerebral Palsy—affects a person’s ability to control their movements because of muscle rigidity, spasticity, or tremors. Cerebral palsy is caused by an injury to the brain. A doctor makes the diagnosis of cerebral palsy.
A person with cerebral palsy may have normal or above normal intelligence.
Epilepsy—is the misfiring of neurons in the brain causing seizures. These can often be controlled by medication. A doctor makes the diagnosis of epilepsy.
Autism—includes difficulty with communication, difficulty with social situations, and restrictions in activities of daily living. A psychiatrist or clinical psychologist makes the diagnosis of autism.
Down Syndrome—is a condition that a person is born with caused by a defect in one of the chromosomes. Down Syndrome causes a distinct facial appearance, intellectual disability, developmental delays, and may be associated with thyroid or heart disease
The following is a profile of a client with developmental disabilities who receives nurse-delegated tasks.
Belinda Greer is 38 years old and has diagnoses of epilepsy, profound intellectual disability, and fibrocystic breast disease. She takes medication for seizures, but continues to have seizures occasionally. She receives 24-hour supportive living services in a home she shares with another woman.
Ms. Greer is able to take oral pills, but she needs someone to administer ear drops due to her shakiness and to ensure she receives the correct dose. The eardrops were prescribed for wax build-up.
Ms. Greer agreed to have this task delegated to a Nursing Assistant/Home Care Aide. Staff members in the home were trained and are now delegated to administer eardrops for Ms. Greer.
Defining disabilities
Example 2: Developmentally
disabled client

32 • Lesson 2 – Client Care and the Body Systems
Major Body SystemsYour clients may experience different challenges resulting from diseases, the effects of aging, developmental disabilities, or an accident that caused a disability.
This overview of the body systems will provide helpful background knowledge you will use when administering medications or performing treatments.
At the end of this lesson is a Summary Chart that you can review to keep your knowledge fresh.
We will describe nine major body systems.
Cardiovascular – heart, blood vessels and blood
Respiratory – nose, throat (pharynx), voice box (larynx), windpipe (trachea), bronchi, and lungs
Integumentary – the natural covering of the body – skin and the glands that are embedded in it, hairs, and nails.
GenitoUrinary – organs concerned with the production and excretion of urine – kidneys, ureters, urinary bladder, urethra and the reproductive organs
Gastrointestinal – the digestive system -- stomach, small intestine, large intestine (bowels), liver, gallbladder, pancreas
Endocrine – glands that secrete hormones into the bloodstream
Nervous – brain, spinal cord, and nerves
Musculoskeletal – bones and muscles
Sensory – eyes, ears, nose, tongue, and touch sensors
For each body system, we will discuss the following:
• The major parts of the system and what they do• Normal changes of aging• Common disorders
This information is summarized in the Summary Chart at the end of this lesson.
Introduction
List of body systems
System overview

Lesson 2 – Client Care and the Body Systems • 33
Cardiovascular SystemThe cardiovascular system consists of the heart, blood vessels, and blood. The main purpose of this system is to move blood in order to deliver oxygen and remove carbon dioxide from the different parts of the body.
The heart is the organ that provides most of the power to pump the blood throughout the body.
The heart is a hollow muscle with four chambers (or buckets) that have large blood vessels leading either into or out of the chambers.
The blood vessels are a network of soft, flexible tubes of different sizes that are located in every part of the body.
Arteries carry blood, rich in oxygen, away from the heart to the body cells. Capillaries are the tiniest vessels and connect the arteries and veins. Veins carry blood with carbon dioxide back toward the heart.
The blood carries oxygen, carbon dioxide, nutrients, antibodies, and waste products to the cells.
Normal aging changesAs we age, the blood vessels lose some of their flexibility. The capillary walls also show age-related changes causing slow exchange between the blood and cells. The heart doesn’t pump as effectively. This causes less blood to be pushed through the heart with each contraction and relaxation.
Major parts of the system and what
they do
Heart
BloodVessel

34 • Lesson 2 – Client Care and the Body Systems
There are six major disorders you should understand. If your client has one of the following disorders, discuss the symptoms, treatment plan, and your specific responsibilities with the employer/administrator and delegating RN.
Definition
Too much pressure of the blood against the arterial walls.
The blood pressure is not adequate for normal blood flow and getting enough oxygen to the body tissues.
The heart is not strong enough to pump blood throughout the body. The heart pumps so weakly that blood backs up in the veins and body organs.
A blood vessel within the heart muscle closes or is blocked so that the heart muscle itself is damaged because it does not get enough oxygen.
A rupture or a blockage of a blood vessel in the brain, depriving parts of the brain of blood supply.
Heartbeat (pulse) has an irregular beat.
Disorder
1. Hypertension (High blood pressure)
Hypotension (Low blood pressure)
2. Congestive Heart Failure (CHF)
3. Heart Attack (Myocardial Infarct or MI)
4. Stroke or Cerebral Vascular Accident (CVA)
5. Heart Arrhythmia

Lesson 2 – Client Care and the Body Systems • 35
Respiratory SystemThe respiratory system is a group of organs that manage the transfer of oxygen from the air to the blood and remove carbon dioxide from the blood for transfer to the air.
The respiratory system consists of the nose, throat (pharynx), voice box (larynx), windpipe (trachea), bronchi, and lungs.
Fresh air is inhaled into the body and carried to the lungs. The oxygen from the air is carried to all parts of the body by the cardiovascular system.
As oxygen is delivered to the cells of the body, waste gases are picked up and carried back to the lungs where they are exhaled from the body. In short, oxygen is inhaled and carbon dioxide is exhaled.
Normal aging changesAs we age, the lungs lose some of their flexibility. As a result of this change, there is less breathing capacity. An older person does not breathe as deeply as someone who is younger.
Common disordersYou should be aware of four main respiratory disorders. If your client has one of the following disorders, discuss the symptoms, treatment plan, and your specific responsibilities with the delegating RN.
Major parts of the system and what
they do
Definition
URIs include the common cold, sinus problems, chronic cough, sore throat, runny nose, sinus infection, and tonsillitis. Either a bacteria or a virus can cause these infections.
An inflammation of the lungs caused by bacteria, viruses or fungi. Symptoms include fever, chills, and cough.
A progressive and irreversible condition where the person has difficulty breathing in and out due to a problem in the lungs or bronchi. Chronic Bronchitis and Pulmonary Emphysema are examples of COPD. The most common cause is smoking.
A chronic disease in which the respiratory system reacts to things in the environment like dust, mold, pollen, fumes, and sometimes foods. Asthma usually happens in “asthma attacks” where the person has difficulty breathing and wheezes.
Disorder
1. Upper Respiratory Infections (URI)
2. Pneumonia
3. Chronic Obstructive Pulmonary Disease (COPD)
4. Asthma
Lungs
Trachea(Windpipe)

36 • Lesson 2 – Client Care and the Body Systems
Integumentary SystemThe skin consists of three distinct layers: the epidermis, the dermis, and the subcutaneous layer.
The epidermis is the outer layer, made of flat, tough cells that are constantly being shed and replaced. This layer forms a barrier against bacteria getting in and moisture getting out (holding water in to keep body tissues from drying out.) If this layer is broken, bacteria may attack the deeper tissues.
The dermis is just beneath the epidermis layer. It is made up of the connective tissue with tiny blood vessels and nerve endings. It also contains several other structures:
• Hair follicles, from which the tiny hairs that cover our body grow.• Sebaceous glands (oil glands) that lubricate the hairs.• Sweat glands that help regulate body temperature.• Sense receptors that send messages to the brain when pain,
pressure, heat, cold, or touch occur.
The subcutaneous layer is a combination of fibrous and fatty connective tissues. The fibrous tissue attaches the upper skin layers to the skeletal muscles. The fatty tissue holds in body heat, acts as an insulator against cold, and is a surplus form of energy.
The epidermis becomes thinner, paler, and more translucent as we grow older. The blood supply to the dermis and subcutaneous tissue decreases.
The amount of subcutaneous fat also decreases, especially in the arms and legs, so that they become thinner. The skin becomes folded, lined, and wrinkled, and has less ability to maintain body temperature.
Nails can become dull, brittle, hard, and thick. Most nail changes are due to a decrease in blood supply to the nail bed.
Major parts of the system and what they do
Normal aging changes
Epidermis
Dermis
Subcutaneous
Cross-section of skin

Lesson 2 – Client Care and the Body Systems • 37
Keeping the skin clean and dry (but not dried out) will help keep it healthy.
You should routinely inspect your client’s skin. Look for areas that remain red after the person has changed positions and pressure has been removed.
The skin should be cleaned as soon as it is soiled. When bathing, extra care should be taken to minimize irritation and prevent overly dry skin. Use warm, not hot, water and mild soaps. To prevent dry skin, use creams or oils, and avoid cold or dry air.
If your client has bladder incontinence, use pads or briefs that absorb urine and keep moisture away from the skin. A cream or ointment could be used as a skin barrier.
Another important way to protect your client’s skin is to assist him or her to shift positions frequently. If your client is able to shift his or her own weight, he or she should move every 15 minutes.
When you assist the client in changing positions, reduce friction on his or her skin by lifting them, rather than dragging.
Do not massage the skin over bony parts of the body. Avoid use of donut-shaped (ring) cushions as this causes more pressure damage to fragile areas.
A balanced diet with high amounts of protein, calories and fluid is very important to keep skin healthy and wound healing.
If the client is unable to eat a balanced diet, nutritional supplements may be desirable. Discuss your client’s diet with the delegating RN for specific recommendations.
Care of skin
Protecting the skin from injury
Diet advice

38 • Lesson 2 – Client Care and the Body Systems
You should be aware of eight skin disorders. If your client has one of the following disorders, discuss the symptoms, treatment plan, and your specific responsibilities with the employer/administrator and delegating RN.
Common disorders
Definition
Area of the skin where lack of blood flow due to continuous pressure has caused tissue damage. Pressure injuries are preventable.
A chronically open oozing area, due to blood in the veins not getting pumped back to the heart fast enough. The skin around the injury becomes discolored brown. This occurs most often on the lower legs and feet.
Round open areas on the feet and lower leg due to lack of blood flow to the legs.
Rashes are raised, red, bumpy areas on the skin that are often itchy. Skin infections are caused by a break in the skin like a scratch where bacteria have taken hold.
Skin damage that is caused by fire, sun, chemicals, hot objects or liquids, or electricity. Burns are classified according to how deeply the skin is damaged.
1st degree burns, the skin is reddened and may be swollen and tender.
2nd degree burns usually have blisters, intense redness, pain, and swelling.
3rd degree burns are the most serious and involve all layers of the skin.
Abnormal growth on the skin. Most are little, pearly bumps or sores that bleed, scab over, but never heal up. These usually don’t spread and are treatable. A more dangerous kind of skin cancer is melanoma. Melanomas are irregularly shaped and may be described as a “strange mole” or a mole that is changing.
Surgical incisions that haven’t healed and have opened up. These need to heal slowly from the inside out.
Any abnormal tunneling that connects parts of the body that are not normally connected. Sometimes there is drainage from the fistula such as bowel contents or other body fluids.
Disorder
1. Pressure Injuries (Decubitus Ulcer or Bed Sore)
2. Stasis/Venous Ulcers
3. Arterial Ulcers (Diabetic Ulcers)
4. Rashes and Infections
5. Burns
6. Skin Cancer/Lesions
7. Dehisced Wounds
8. Fistulas

Lesson 2 – Client Care and the Body Systems • 39
The following information will give you more background on pressure injuries (bed sores) and other wounds that you may see if you are doing non-sterile dressing changes. If you have questions on this information, discuss them with the delegating RN.
A pressure injury is an area of the skin where lack of blood flow has caused tissue destruction. The skin is weakened when there is:
• Too much moisture on the skin• Dryness and cracking• Irritation by urine or feces• Friction or shearing (a combination of pressure and friction)
If your client has had pressure injuries before, there is a greater risk for developing more.
Pressure injuries form where bone causes the greatest pressure on the skin and tissue, and squeezes it against an outside surface. This may be where bony parts of the body press against other body parts, a mattress, or a chair. For clients who must stay in bed, most pressure injuries form on:
• The lower back below the waist (tailbone area)• The hip bone• The heels
For clients in chairs or wheelchairs, the exact spot where pressure injuries form depends on the sitting position. Pressure injuries can form on the knees, ankles, shoulder blades, elbows, back of the head, and spine.
Clients in bed, who are unable to move, may get pressure injuries after as little as 1–2 hours. Clients who sit in chairs, and cannot move, can get pressure injuries in even less time because the force on the skin is greater. Frequent position changes can help prevent pressure injuries.
Nerves in the skin normally “tell” the body when to move to relieve pressure on the skin. Some chronic illnesses, like diabetes, can decrease the person’s ability to feel pressure.
If your client is confined to a bed, a special mattress that contains foam, air, gel, or water helps to prevent pressure injuries.
The head of the bed should be raised as little, and for as short a time, as possible. Pillows or wedges should be used to keep knees or ankles from touching each other.
Avoid positioning a client directly on the hipbone when he or she is lying on his or her side. A position that spreads weight and pressure more evenly should be chosen. Pillows tucked behind the person’s back may also help.
If the client cannot move at all, pillows should be put under legs from midcalf to ankle to keep heels off the bed. Never place pillows directly behind the knee.
If your client is confined to a chair or wheelchair, foam, gel, or air cushions should be used to relieve pressure.
Avoid donut-shape cushions because they reduce blood flow and cause tissue to swell, which can increase the risk of getting a pressure injury.
Avoid letting the client sit without moving. Even a small amount of wiggling helps to avoid pressure spots.
Additional information
Pressure injuries (bed sores)
Risk areas
Clients who are at risk
For clients confined to a bed
For clients confined to a
chair

40 • Lesson 2 – Client Care and the Body Systems
The severity of skin breakdown is commonly described by stages. The following chart outlines the four stages of a pressure sore as described by the National Pressure Ulcer Advisory Panel (NPUAP).
Description Description• Redness of intact skin; lasting 15-30 minutes or more.• Redness and heat at a pressure point.• Damage can be reversed at this stage by relieving
pressure.
Treatment
• Relieve the pressure by helping the person to change position. Do not massage the red skin especially over bony areas.
• Use something such as a pillow, sheepskin, bed cradle, heel and elbow protectors, or flotation pad to alleviate the pressure.
Description• Partial thickness skin breakdown.• The injury is superficial looks like an abrasion/scrape,
blister, or shallow crater.
Treatment
• When this stage is identified, notify one or all of the following people: family, delegating RN, doctor, or supervisor for assistance with taking care of this injury.
• Treatment must be delegated by an RN.• Wounds need to be cleaned before a dressing is
applied. Follow general procedures for cleaning wounds as directed by the delegating RN.
Description• Full thickness skin breakdown.• All layers of skin destroyed.• May have eschar (thick, crusty, scab-like material).
Treatment• Treatment must be delegated by an RN.• Follow the same instructions as Stage 2.
Description• Full thickness skin loss with extensive destruction• Tissue is dead (necrotic), or there is damage to muscle,
bone, or supporting structures (for example, tendon or joint capsule).
Treatment
• Treatment must be delegated by an RN.• Follow the same instructions as Stage 2.
Stage
Skin breakdown

Lesson 2 – Client Care and the Body Systems • 41
Genito-Urinary SystemHealing occurs through three main processes:
1. Inflammation. The body reacts to increase blood flow (redness) and sends specialized kinds of cells to protect the area.
2. Granulation. New tissue starts to grow to replace damaged tissue.3. Epithelialization. The skin grows back to cover the open wound.
The wound must be kept moist while the skin around the wound should be dry.
Sometimes, dressings will remove dead tissue. If there is a need to remove any more dead tissue, a health care practitioner must do it.
Cleansing a wound means getting rid of dead cells and drainage, and excessive dressing materials that might be in the wound bed.
Debriding is getting rid of necrotic (dead) tissue as well as removing some healthy tissues from the wound bed. It is not the responsibility of the Nursing Assistant or Home Care Aide to debride wounds.
The genito-urinary system consists of:
• Two kidneys which produce urine by filtering blood• Two ureters, tubes that carry urine from the kidneys to the bladder• A urinary bladder, which holds the urine until it is expelled• A urethra, the tube which carries urine from the bladder to
outside the body• Male and female reproductive organs.
This system has four major functions:
1.Cleaning the blood of waste products (the kidneys process many medications)
2.Regulating the amount of water in the body3.Regulating the acid and mineral balance in the body4.Reproduction
“Genito” refers to the reproductive organs and “urinary” refers to the organs involved with making and getting rid of urine.
Wound healing process
Cleaning wounds
Male
Female

42 • Lesson 2 – Client Care and the Body Systems
As we age, the following changes occur in the genitourinary system:
• The structure of the kidneys changes, and they become less effective filters• There is less blood flow to the kidneys• The bladder has less muscle tone• The bladder can hold less urine• Some people find it harder to completely empty the bladder• Men may have enlarged prostate glands, making it difficult for them to empty their
bladders or start urination• Kidneys may need more time to process medications
All of these changes vary with each individual.
You should be aware of three urinary disorders. If your client has one of the following disorders, discuss the symptoms, treatment plan, and your specific responsibilities with the employer/administrator and delegating RN.
Normal aging changes
Common disorders
Definition
An infection of one or more parts of the urinary tract. The condition is more common in women than men and may have no symptoms.
Inability to control urination.
The prostate gland in men, which is located between the bottom of the bladder and the top of the penis, can become enlarged. When this happens it can block the flow of urine. This can make it difficult for men to start urination and to completely empty their bladders.
Disorder
1. Urinary Tract Infection (UTI)
2. Urinary Incontinence
2. Enlarged Prostate

Esophagus
StomachLiver
RectumIntestines
Lesson 2 – Client Care and the Body Systems • 43
Gastrointestinal SystemThe gastrointestinal system (sometimes called GI tract) consists primarily of the stomach and the intestine, and is supported by a number of other organs. This system digests food so all the cells of the body can use it. The parts of foods that cannot be used as fuel are excreted as waste products.
The digestive process begins the moment food is put into the mouth. Food is chewed in the mouth by the teeth and tongue into small pieces and mixed with saliva so it can easily be swallowed. It goes down the esophagus and into the stomach. Enzymes in the saliva begin to break the food down into a form that can be used by the rest of the body.
The stomach holds the food and mixes it with more enzymes to break it down into a semi-liquid that can be absorbed. Then, the food moves out of the stomach into the small intestine.
The intestinal and liver enzymes break down the food even further. The liver produces bile, which is necessary to digest fats. The bile is stored in the gallbladder. Bile enters the small intestine, digesting and absorbing fats. The small intestine is approximately 19-20 feet long. The pancreas also releases a digestive juice into the small intestine.
The digestive juices work together to break down the food into substances called nutrients that are absorbed through the walls of the small intestine. Food that cannot be absorbed remains in the small intestine, and moves on to the large intestine in a semi-liquid state.
The large intestine or colon, is about 5 feet long. In the large intestine, most of the fluid in the semi-liquid substance is reabsorbed into the body. Peristalsis (wave-like motion of the intestine) moves the remaining solid material (called feces or stool) into the lower part of the colon. When enough feces collects, it is expelled through the anus along with gases produced in the intestines. This is a bowel movement.
Major parts of the system and what
they do
As we age, there can be several changes within the digestive system. Changes vary among individuals, and may include:
• Decrease in number of taste buds• Decrease in chewing capacity (due to tooth decay or loss)• Decrease in the amount of digestive enzymes• Decrease in bowel muscle tone and sphincters (muscles at the opening of the rectum
which control the release of stool and gas)• Decreased peristalsis (muscle action in the intestine that moves food along)• Decreased nutrient absorption• Increase in stomach acids
You should be aware of the following disorders. Discuss the symptoms, treatment plan, and your specific responsibilities with your employer/administrator and delegating RN.
Definition
Failure to have regular bowel movements. Feces become hardened and dry.
Fecal impaction is prolonged collection and holding of feces (solid waste) in the lower colon. The causes of fecal impaction are:
Unresolved constipation
Dehydration
Prolonged bed rest
Medication with side effect of constipation
Client is nutritionally depleted.
These are varicose veins in the rectum. They can be internal or external. Hemorrhoids develop due to:
Straining to have a bowel movement
Constipation
Prolonged sitting
Childbirth
A gastrointestinal ulcer is a soreness or tissue breakdown in any section of the GI tract.
Bowels are very easily irritated and are abnormally active causing diarrhea.
Dehydration is excessive loss of water from the body tissue, or the body not taking in enough fluid.
Feeling of “heartburn” caused by partially digested food/acid mixture backing up into the lower esophagus.
Disorder
Constipation
Fecal Impaction
Hemorrhoids
Gastrointestinal Ulcer
Colitis (Irritable Bowel)
Dehydration
GERD (Gastro-Esophageal Reflux)
Normal aging changes
Common disorders
44 • Lesson 2 – Client Care and the Body Systems

Lesson 2 – Client Care and the Body Systems • 45
The endocrine system is made up of glands that secrete hormones into the blood stream. Hormones are chemicals that regulate and control body activities or growth. Each hormone carries a particular message as it circulates through the body. A complex feedback system controls the secretion of hormones. In healthy people, specific hormones are produced only when needed.
Some of the endocrine glands are the pituitary, thyroid and parathyroid, adrenals, pancreas, ovaries, and testes.
Changes within the endocrine system vary with each individual. Hormonal secretion rates can decrease. A common example of this is decreased production of male and female hormones in midlife (menopause in women).
Major parts of the system and what
they do
Normal aging changes
Pineal Gland
Pituitary
Thyroid
Thymus
Pancreas
Ovaries
Pineal Gland
Pituitary
Thyroid
Thymus
Pancreas
Adrenal Glands
Testes
MaleFemale
Endocrine System
Adrenal Glands

You should be aware of two primary disorders. If your client has one of the following disorders, discuss the symptoms, treatment plan, and your specific responsibilities with the employer/administrator and delegating RN.
Diabetes is a very serious health problem and can cause other problems if it is not treated properly. Some of the health problems include the following:
• High blood pressure• Heart attack• Stroke• Eye problems that can lead to blindness• Kidney disease or failure• Poor circulation and healing• Pain• Dental problems• Frequent infections• Loss of feeling and muscle weakness, especially in the feet, legs and hands.
The loss of feeling, combined with the reduced ability to fight infection, is a major cause of toe, foot, and leg amputations.
Type I is often called juvenile diabetes because it usually begins at a young age. The body does not produce any or enough insulin. The client with Diabetes Type I needs to take insulin by injection.
The causes of Type I are largely unknown but may include heredity, stress, injury, or illness.
Definition
The pancreas does not produce any or enough of a hormone called insulin. Without insulin, the body cannot properly use sugar to fuel the body’s cells. As a result sugar (glucose) stays in the bloodstream and is excreted in the urine.
The thyroid gland does not produce enough thyroid hormone. This is a fairly common condition in the elderly and is easily treated with synthetic thyroid
Disorder
1. Diabetes Mellitus
2. Hypothyroidism (Low Thyroid)
Common disorders
Diabetes – additional information
Type I Diabetes
46 • Lesson 2 – Client Care and the Body Systems

Lesson 2 – Client Care and the Body Systems • 47
The second type of Diabetes Mellitus is Type II, which usually occurs in people over the age of 40 who are overweight and have poor eating habits. Other causes are heredity and stress. Type II is generally less severe than Type I. About 90 percent of people who have diabetes have Type II.
The pancreas produces insulin, but either not enough insulin is produced or the body does not use it properly. As a result, glucose from food builds up in the blood.
People with Type II diabetes often can manage their disease for a while with a modified diet, regular blood tests, exercise, and medications. As the disease progresses, they may need to use insulin.
Blood sugars vary within each one of us. This is not a problem unless the blood sugars fall below 70 (hypoglycemia) or rise above 200 (hyperglycemia). These two extremes can be detected by the following information.
Normal blood sugar levels are considered to be between 105 and 110. Blood sugar levels between 110 and 200 are above normal but may be controlled with diet and exercise.
Hyperglycemia(High blood sugar - over 200mg/dl)
SYMPTOMS
Weakness
Blurred vision
Extreme thirst
Drowsiness
Frequent urination
Fatigue
Dry skin and mouth
Headache
Nausea
Sweet/fruity breath odor
Rapid breathing
Hypoglycemia(Low blood sugar - less than 70mg/dl)
SYMPTOMS
Confusion (often first noticed)
Dizziness, shakiness
Hunger
Weakness or fatigue
Headache
Irritability
Cold, sweaty skin
Personality change
Slurred speech
Blurred or double vision
Loss of consciousness
Type II Diabetes
Blood sugar fluctuation
Note: If client is unresponsive, call 911 immediately!

48 • Lesson 2 – Client Care and the Body Systems
The client with diabetes can do many things to keep their disease under control and decrease the other complications that might occur. You as the caregiver can support the client by knowing and understanding some of these things.
• Meals should be eaten regularly and in a moderate amount. Meals should not be skipped after taking insulin.
• A dietitian can often help design an appropriate diet based on what a person likes and dislikes. A dietitian can also advise a client on how to modify his or her diet when he or she is sick.
• Pay very close attention to the client’s skin condition, especially the legs and feet. It is best to avoid clothing that restricts circulation, like socks with tight elastic or garters.
• Be aware that physical activity influences blood sugar. When doing new or unusual physical activity, have the client carry a form of fast-acting sugar.
• A Medic Alert Diabetes bracelet or necklace could get help quicker for the client in an emergency if he or she is not able to speak for him or herself.
• Perform glucose monitoring as delegated to you by the delegating RN. Record the blood glucose level precisely.
• Low blood sugar can be a very dangerous emergency situation. The delegating RN, you, and the client should have a plan in place for what to do when the client has low blood sugar.
Nervous SystemThe nervous system coordinates the body functions, monitoring changes in the body, and in the environment This system enables the body to see, hear, smell, taste, and touch.
The brain is the master control of the nervous system.
The spinal cord relays sensory and motor nerve impulses to and from the brain.
The brain interprets these nerve impulses and decides on an appropriate set of actions, sending messages back out to nerves throughout the body.
Principles of caregiving
Major parts of the system and what they do
Brain
Spinal Cord
Nerves

Lesson 2 – Client Care and the Body Systems • 49
With normal aging there is a decrease in the number of nerve cells. The amount of cell loss varies in different parts of the brain. Some areas are resistant to cell loss, while others may lose a lot of cells quickly.
Nerves transmit signals more slowly throughout the body, including within the brain.
You should be aware of four nervous system disorders. If your client has one of the following disorders, discuss the symptoms, treatment plan, and your specific responsibilities with the employer/administrator and delegating RN.
Definition
A seizure is a sudden increase in the electrical activity in one portion of the brain. The seizure can occur in one area with specific and localized symptoms or it may spread to the entire brain, resulting in loss of consciousness and the body shaking. This sudden discharge of electrical activity can have several causes, ranging from epilepsy to head injury. There are many types of seizures.
Epilepsy is a disorder of the central nervous system which can cause seizures.
A slowly progressive disease of the central nervous system. Tremors can have other causes such as brain trauma or medication side effects.
A progressive disease caused by the destruction of brain cells. There are several causes of dementia. Alzheimer’s is the most common.
An injury to the brain from an accident, an assault, a fall, or from a lack of blood supply and oxygen like after a near-drowning or cardiac arrest.
Disorder
1. Seizures and Epilepsy
2. Parkinson’s Disease and other Tremors
3. Alzheimer’s and other Dementias
4. Traumatic Brain Injury
Normal aging changes
Common disorders

50 • Lesson 2 – Client Care and the Body Systems
Musculoskeletal SystemThe musculoskeletal system consists of the bones, muscles, ligaments, tendons, and cartilage.
This system protects the internal body organs, provides a framework for the body, maintains posture, and makes body movement possible. Bones are joined together at joints.
Some bones, like the long bones of the arms and legs, allow for large movements. Smaller bones in the hands, wrists, ankles, and toes allow for smaller movements. Flat bones, like the skull and pelvis, are protective. The bones of the spine allow for bending and protect the spinal cord.
Some muscles are attached to the bones and actually make the movements occur. Other muscles, like the heart and the intestines, work automatically.
Ligaments are tough bands that hold joints together. Tendons are also tough elastic bands that attach muscles to bones. Cartilage is another tough tissue that is found in joints at the ends of bones to allow smooth movement.
Normal aging changesAs we age, joints can stiffen and muscles may become weaker. Bones lose calcium, which weakens them and makes them more prone to breaking.
Very gradually, the spinal column shortens and a person becomes shorter.
Back view of muscles

Lesson 2 – Client Care and the Body Systems • 51
There are three major disorders you should know. If your client has one of the following disorders, discuss the symptoms, treatment plan, and your specific responsibilities with the employer/administrator and delegating RN.
Definition
With osteoporosis, the bones gradually become so weak that they can fracture (break) with something as minor as a sneeze.
Osteoporosis can also cause low back pain, stooped shoulders and the rapid loss of height. It mostly affects post-menopausal women, although men can get osteoporosis.
Arthritis is an inflammation of joints, and can be any one of several types. The major kinds of arthritis are osteoarthritis, rheumatoid arthritis, and gout.
A fracture is a break in a bone. A fracture is treated by getting the pieces of bone lined up into normal position and keeping the area stable with a cast, or by putting screws, pins, or plates into the bone. Healing of bones may take several weeks. Older people require a longer healing period.
Disorder
1. Osteoporosis
2. Arthritis
3. Fractures

Sensory SystemThe eyes and ears are two of the five senses. They allow us to see and hear. There are other sense organs in the body such as the nose for smell, skin for touch, and tongue for taste, but this lesson will focus on the eyes and ears only.
As we age, the pupils in the eyes react more slowly to changes in light, the eyelids may get droopy and not close as tightly, and the eye produces less tears.
Our ears also change in their ability to conduct sound and in the functioning of the little hair cells in the ear canal.
There are five major disorders of the eye and three major disorders of the ears that you should know. If your client has one of the following disorders, discuss the symptoms, treatment plan, and your specific responsibilities with the employer/administrator and delegating RN.
Major parts of the system and what they do
Normal aging changes
Common disorder
Disorder - EYES
1. Cataracts
2. Dry Eyes
3. Macular Degeneration
4. Glaucoma
5. Diabetic Retinopathy
Disorder - EARS
1. Hearing Loss
2. Tinnitis
3. Dizziness or Vertigo
52 • Lesson 2 – Client Care and the Body Systems
Definition
Lens of the eye becomes opaque.
The eyes don’t produce enough tears to lubricate the surface of the eye, so that it often feels like there is something in the eye like dirt or an eyelash. This can lead to scratches on the surface of the eye.
A series of changes that happen inside the eye causing decreased vision and even blindness. This is an irreversible process.
A buildup of fluid pressure inside the eye that can lead to blindness. Glaucoma can be managed with medication.
A complication of diabetes involving the retina inside the eye This can lead to decreased vision and even blindness.
Definition
A loss of ability to hear certain sounds that can be caused by a number of things including long-term exposure to loud noises.
A ringing or buzzing in the ears that has a number of causes including exposure to loud noises, infections, or side effects of some medications
A common condition in the elderly and may be due to some internal changes in the ear as well as many other causes.

Lesson 2 – Client Care and the Body Systems • 53
Body System
Cardiovascular
Respiratory
Integumentary (Skin)
Genito-urinary
What it does
Move blood in order to deliver oxygen and remove carbon dioxide from the different parts of the body
Manage the transfer of oxygen from the air to the blood, and remove carbon dioxide from the blood for transfer to the air
Epidermis – barrier against bacteria and moisture. Holds in moisture to keep body tissues from drying out
Dermis – contains hair follicles, oil glands, sweat glands that regulate body temperature, and sense receptors that identify pain, pressure, heat, cold, etc.
Subcutaneous tissue – fibrous tissue connects the upper skin layers to the skeletal muscles. Fatty tissue holds in body heat, provides insulation, and provides an energy source.
• Get rid of waste products through urine
• Regulate the amount of water in the body
• Regulate the chemical balance in the blood
• Reproduction
Parts of the system
• Heart
• Blood vessels
• Arteries, veins, and capillaries
• Blood
• Nose
• Throat (pharynx)
• Voice box (larynx)
• Windpipe (trachea)
• Bronchi
• Lungs
3 layers of skin
• Epidermis
• Dermis - Hair follicles - Oil glands - Sweat glands - Sense receptors
• Subcutaneous tissue- Fibrous tissue- Fatty tissue
• Two kidneys
• Two ureters
• Urinary bladder
• Urethra
• Male and female reproductive organs
Normal changes of aging
• Blood vessels lose flexibility
• Heart does not pump as effectively
• Less breathing capacity
• Lungs are less elastic
• The transfer of oxygen and carbon dioxide in the lungs is less efficient
• Epidermis becomes thinner and paler
• Dermis and subcutaneous tissue have less blood supply
• Subcutaneous fat decreases, especially in arms and legs
• Skin becomes folded, lined and wrinkled, and is less able to regulate body temperature
• Nails become dull, brittle, hard, and thick
• Blood flow to kidneys is less
• Less muscle tone in bladder
• Bladder can hold less urine
• Some find it difficult to completely empty the bladder
Disorders
• Hypertension
• Hypotension
• Congestive Heart Failure (CHF)
• Heart attack
• Stroke or CVA
• Heart arrhythmia
• Upper Respiratory Infections (URI)
• Pneumonia
• Chronic Obstructive Pulmonary Disease (COPD)
• Asthma
• Pressure injuries (bed sores)
• Stasis/venous ulcers
• Arterial ulcers (Diabetic)
• Rashes and infections
• Burns
• Skin cancer/lesions
• Dehisced wounds
• Fistulas
• Urinary Tract Infection (UTI)
• Incontinence
• (Urge, Stress and Overflow)
• Enlarged prostate
Lesson Review

54 • Lesson 2 – Client Care and the Body Systems
Body System
Gastronitestinal
Endocrine
Nervous
Musculo- Skeletal
What it does
• Changes food into substances that can be used by all the cells in the body
• Gets rid of waste products through feces
Produces chemicals called hormones which regulate and control body activities and growth
Coordinates body functions and monitors changes in the body and the environment
Protects the internal body organs, provides a framework for the body, maintains posture, and makes body movement possible
Parts of the system
• Mouth
• Esophagus
• Stomach
• Small Intestine
• Large Intestine (colon)
• Liver
• Gallbladder
• Pancreas
• Glands that produce hormones into the blood stream. Glands include:
• Pituitary
• Thyroid
• Parathyroid
• Adrenals
• Pancreas
• Ovaries
• Testes
• Brain
• Spinal cord
• Nerves
• Bones
• Muscles
• Ligaments
• Tendons
• Cartilage
Normal changes of aging
• Decreased number of taste buds
• Decreased chewing capacity (due to tooth decay or tooth loss)
• Decrease in amount of digestive enzymes
• Decrease in bowel muscle tone
• Decreased mobility in the intestines
• Decreased nutrient absorption
• Decrease in amount of hormone produced
• Decreased number of nerve cells
• Transmissions at the nerve endings slow down throughout the body
• Joints stiffen
• Muscles may become weaker
• Bones lose calcium and become more prone to breaking
• Spinal column shortens
Disorders
• Constipation
• Fecal Impaction
• Hemorrhoids
• Gastro-intestinal ulcer
• Colitis (Irritable Bowel)
• Dehydration
• GERD
• Diabetes Mellitus – Type I and II
• Hypothyroidism
• Seizures and Epilepsy
• Parkinson’s Disease and other tremors
• Alzheimer’s and other Dementias
• Traumatic Brain Injury (TBI)
• Osteoporosis
• Arthritis
• Fractures
Lesson Review

Lesson 2 – Client Care and the Body Systems • 55
Body System
Sensory
What it does
Gives the body information about the world around it through sight, smell, hearing, touch, and taste.
Parts of the system
• Eyes
• Ears
• Nose
• Skin
• Tongue
Normal changes of aging
Eyes:• Pupils in the eyes react
more slowly to changes in light
• Eyelids may get droopy and not close as tightly
• Amount of tears is less
Ears:• change in the ability to
conduct sound
• change in the functioning of the little hair cells in the ear canal
Disorders
Eyes:• Cataracts
• Glaucoma
• Macular Degeneration
• Diabetic Retinopathy
• Dry Eyes
Ears:• Hearing loss
• Tinnitis
• Vertigo or dizziness
Lesson Review

56 • Lesson 2 – Client Care and the Body Systems
Directions: Answer as many of the questions as you can from memory. Then look up the rest of the answers in the workbook text. Once you have completed the exercise, check your answers against the answer key in the Answer Key section of the Workbook.
Body Systems
1. For each of the body parts below, write in the body system to which it belongs. There are
more body parts listed than systems, so you can use the systems more than once if needed.
Cardiovascular Respiratory Integumentary Genitourinary SensoryGastrointestinal Endocrine Nervous Musculoskeletal
2. Pick three of the body systems above and describe its main functions.
Body SystemBody Part
Brain
Pancreas
Colon
Nose
Mouth
Sweat glands
Bones
Blood vessels
Spinal cord
Kidneys
What Does It Do?Body Part
Practice Exercise

Lesson 2 – Client Care and the Body Systems • 57
3. Choose one of the body systems and name the primary parts that make up that system.
Name of system:
Major parts:
Body SystemDisorder
Pneumonia
Urinary Tract Infection
Congestive Heart Failure
Constipation
Pressure Injuries
Diabetes
Seizures
Hypertension (High blood pressure)
Stasis Ulcers
Urinary Incontinence
Brain Attack (stroke)
Chronic Obstructive Pulmonary Disease (COPD)
4. For each disorder, list the body system in which it occurs.
5. What are some of the effects of aging on the skin.
Practice Exercise

58 • Lesson 2 – Client Care and the Body Systems
The page numbers where the answers can be found are listed.
1. For each of the body parts below, write in the body system to which it belongs. There are more body parts listed than systems, so you can use the systems more than once if needed.
Body Part
Brain
Pancreas
Colon
Nose
Mouth
Sweat glands
Bones
Blood vessels
Spinal cord
Kidneys
Body System
Nervous (page 48)
Gastrointestinal and Endocrine - this organ is part of both systems (pages 43 - 45)
Gastrointestinal (page 43)
Respiratory (page 35)
Gastrointestinal (page 43)
Integumentary/skin (page 36)
Musculoskeletal (page 50)
Cardiovascular (page 33)
Nervous (page 48)
Genito-urinary (page 41)
2. Pick three of the body systems above and describe its main functions.
Use the Lesson Review on pages 53-55 for a quick reference to see how accurate and complete your answers are.
Cardiovascular: Move blood in order to deliver oxygen and remove carbon dioxide from the different parts of the body
Endocrine: Produces chemicals called hormones which regulate and control body activities and growth
Respiratory: Manage the transfer of oxygen from the air to the blood, and remove carbon dioxide from the blood for transfer to the air.
Nervous: Coordinates body functions and monitors changes in the body and the environment
Integumentary: Epidermis – barrier against bacteria and moisture. Holds in moisture to keep body tissues from drying out. Dermis – contains hair follicles, oil glands, sweat glands that regulate body temperature, and sense receptors that identify pain, pressure, heat, cold, etc. Subcutaneous tissue – fibrous tissue connects the upper skin layers to the skeletal muscles. Fatty tissue holds in body heat, provides insulation, and provides an energy source.
Musculoskeletal: Protects the internal body organs, provides a framework for the body, maintains posture, and makes body movement possible.
Practice Exercise Answer Key

Lesson 2 – Client Care and the Body Systems • 59
Genito-Urinary: Gets rid of waste products through urine, regulates the amount of water in the body, and regulates the chemical balance in the blood. Reproduction.
Sensory: Gives the body information about the world around it through sight, smell, hearing, touch, and taste.
Gastrointestinal: Changes food into substances that can be used by all the cells in the body and gets rid of waste products through feces.
3. Choose one of the body systems and name the primary parts that make up that system.
Name of Body System
Cardiovascular
Respiratory
Integumentary (Skin)
Genitourinary
Gastrointestinal
Major Parts
Heart Blood vessels Arteries, veins, and capillaries Blood
Nose Throat (pharynx) Voice box (larynx) Windpipe (trachea) Bronchi Lungs
3 layers of skin Epidermis Dermis: • Hair follicles • Oil glands • Sweat glands • Sense receptors Subcutaneous tissue Fibrous tissue Fatty tissue
Two kidneys Two ureters Urinary bladder Urethra Male and female reproductive organs
Mouth Esophagus Stomach Small intestine Large intestine (colon) Liver Gallbladder Pancreas
(Continued on next page)
Practice Exercise Answer Key

Name of Body System
Endocrine
Nervous
Musculoskeletal
Sensory
Major Parts
Pituitary Thyroid Parathyroid Adrenals Pancreas Ovaries Testes
Brain Spinal cord Nerves
Bones Ligaments Cartilage Muscles Tendons
Eyes Nose Tongue Ears Skin
4. For each disorder, list the body system in which it occurs. Page number references are in parentheses.
Disorder
Pneumonia
Urinary Tract Infection
Congestive Heart Failure
Constipation
Pressure Injuries
Diabetes
Seizures
Hypertension (high blood pressure)
Stasis Ulcers
Urinary Incontinence
Stroke or CVA
Chronic Obstructive Pulmonary Disease (COPD)
Body System
Respiratory (page 35)
Genitourinary (pages 41)
Cardiovascular (page 33)
Gastrointestinal (page 41)
Integumentary (page 36)
Endocrine (page 45)
Nervous (page 48)
Cardiovascular ( page 33)
Integumentary (page 36)
Genitourinary (page 41)
Cardiovascular (page 41)
Respiratory (page 35)
60 • Lesson 2 – Client Care and the Body Systems
Practice Exercise Answer Key
Lesson 2 – Client Care and the Body Systems • 61
5. What are some of the effects of aging on the skin? (page 36)
The epidermis becomes thinner, paler, and more translucent as we grow older. The blood supply to the dermis and subcutaneous tissue decreases.
The amount of subcutaneous fat also decreases, especially in the arms and legs, so that they become thinner. The skin becomes folded, lined, and wrinkled, and has less ability to maintain body temperature.
Nails can become dull, brittle, hard, and thick. Most nail changes are due to a decrease in blood supply to the nail bed.
Stop reading the Workbook here.
Watch the Video Segment for Client Care and the Body Systems.
Follow this link to the DSHS website. Scroll down to Nurse Delegation Core under the Course column. Click on your preferred language. Choose which video that you would like to view. www.dshs.wa.gov/altsa/training/dshs-curriculum-available.
Practice Exercise Answer Key

62 • Lesson 3 – Medication Administration

Lesson 3
Medication AdministrationThis lesson will review the basics of working with medications from the Revised Fundamentals of Caregiving course. You will build on those concepts, learning the requirements for accepting a delegation for medication administration.
You have a very important role when administering medication to clients. You will be the key person to watch for side effects and to take action early if you see side effects occurring. You will also need to know what to do if your client will not take a medication or if you discover an error.
Once you complete this lesson you will be able to:
• Recap the fundamentals of working with medications in order to:• Define medication.• List the medication routes.• Understand the difference between medication assistance and medication
administration.• Name the six rights of medication administration.
• Explain the medication administration process, including:• Client rights in medication administration.• Good practices to use when handling medication.• How to identify side effects, when to watch for side effects, and what to do when
side effects occur.• How to document administration of medications.• Tasks that are strictly not allowed.
• Explain what to do when:• There is an omission.• The client declines a medication.• You make or discover an error.
• Describe how to store and dispose of medications.
Overview and Preview
Learning objectives
Lesson 3 – Medication Administration • 63

Fundamentals of MedicationsA medication is any compound that changes the chemical activity within the human body.
That means that a medication has an effect on or in the body by doing things as varied as making a runny nose better, soothing a rash, reducing a fever, or killing germs.
There are two types of medications:
• Legend drugs – by law, these medications can only be dispensed with a prescription.• Non-legend drugs – these are over-the-counter (OTC) medications or medications
that can be purchased without a prescription. They are used to treat conditions such as back problems, sore throats, stomach-aches, coughs, colds, constipation, and general aches and pains.
A prescription is an order for medication or treatment given by an authorized health care professional with specific instructions for use. Health care professionals who can give prescriptions include doctors, nurse practitioners, physician’s assistants, or dentists.
An important group of legend drugs are controlled substances. A controlled substance is a medication that has a high potential for abuse and addiction.
Due to the risk of abuse, there are controls placed on how often prescriptions for controlled substances can be refilled. Examples are:
• Narcotics.• Depressants.• Stimulants.• Psychotropic medications.
Controlled substances are grouped into five categories or schedules, and each schedule has its own special rules defining the limits for prescription refills. The Comprehensive Medication Abuse Prevention and Control Act of 1970 established the rules for controlled substances.
Please note: vitamins, inhaled substances, herbal remedies, naturopathic remedies, and homeopathic remedies are all medications.
Over-the-counter (OTC) may need to be delegated when used to treat a specific condition. However, when used as prevention, for example “artificial tears” used to prevent dryness of the eyes, they do not have to be delegated.
What is a medication?
Types of medications
Prescription
Controlled substances
Vitamins, supplements, and remedies
64 • Lesson 3 – Medication Administration

In an approved setting, if a client is taking any type of medication, legend (by prescription) or non-legend (over-the-counter), and cannot put the medication into his or her mouth or apply it to his or her body, OR is unaware that he or she is taking a medication, you can only administer the medication under delegation from a delegating RN.
All medications have more than one name. In most cases you should be familiar with the generic name and the product name.
• Generic name – this is the name given by the manufacturer before the Food and Drug Administration (FDA) approves the medication. It gives some information about the chemical makeup of the medication. Some examples are:1. Acetaminophen2. Ibuprofen3. Furosemide
• Product name – also known as the brand name. This is the name used by a specific manufacturer when they sell the product on the market. The name is owned by the manufacturer and cannot be used by any other company.
These are the medication names that will be most familiar to you and the general public like:1. Tylenol (acetaminophen)2. Motrin or Advil (ibuprofen)3. Lasix (furosemide)
Medications often have several product names (brand names) but only one generic name.
• It is very important that when the RN delegates medication administration to you, both of you agree on what name (generic or brand name) you will call the medication. This prevents medication errors.
• It is a good idea to have the medication name on the medication record be the same one that is found on the medication container.
Medication names
Lesson 3 – Medication Administration • 65

Medications do three main things:
1. Treat, cure, or control an illness.2. Relieve symptoms like pain.3. Prevent disease.
Medications interact with the cells in the body and change the way the cells work. Medications affect different people in different ways.
There are six personal characteristics that can cause slightly different results in individuals given the same medication. These characteristics are:
1. Age2. Size3. Sex4. Genetic inheritance5. Physical condition6. Emotional condition
Other factors that might affect the response to a medication are the:
Route of administrationTime of day the medication is givenNumber of medications givenSize of the doseEnvironmental conditions like the outdoor temperature or a noisy environment (for
example in the case of a headache)
Medications are given to a client to produce an intended positive benefit, promote health, eliminate illness, control disease or disorder, or reduce symptoms related to illness.
Medications can also have unintended effects on the body that are not part of the goal of medication therapy. These are called side effects.
The health care professional must consider possible side effects when prescribing a medication.
People who are older, or who have certain disease(s), are morelikely to have side effects.Medication interactions can also cause unwanted side effects (see page 67).
The prescribing professional needs to know all the medications the client is taking, including OTC medications, vitamins, and herbal supplements, to minimize side effects.
What do medications do?
Factors affecting medication action
Medication side effects
66 • Lesson 3 – Medication Administration

A list of some common side effects is presented below. Some of these side effects can be serious. Check with the delegating RN about which side effects to look for and report.
Common Side Effects of Medication
Anxiety or nervousness Irritability
Black (tarry) stools ItchingBlurred vision LightheadednessBreast tenderness Loss of appetiteBreathing difficulties Low blood pressureBruising Menstrual irregularitiesBurning sensation Nasal stuffinessChest pains NauseaConfusion NervousnessConstipation Palpitations (irregular/rapid heartCramps beat)Depression RashDiarrhea RestlessnessDizziness Ringing in the earsDrowsiness SweatingDryness of mouth, nose, skin TinglingEdema (swelling) TremorsFatigue or unusual tiredness TwitchingFever Upset StomachFlushing or skin getting red and warm Urinary frequencyHeadache Urine discolorationHeartburn Urine retentionHiccups Vaginal dischargeHives or skin rash WeaknessImpotence Weight gain
Common side effects
When two or more medications are given, there is a strong possibility that a medication interaction may occur.
A medication interaction occurs when one medication, given before, at the same time, or after another medication, alters the effect of one or both medications. The effect of one or both medications may be either increased or decreased. The two medications can also interact with each other causing unwanted side effects.
The greater the number of medications taken, the more likely it is that there will be a medication interaction.
An allergic reaction happens when the body’s immune system reacts to a medication causing the body to produce chemicals that cause itching, swelling, muscle spasms, and can lead to throat and airway tightening. The reaction can range from mild to life threatening.
Medication interactions
Allergic reaction
Lesson 3 – Medication Administration • 67

Routes of Medication AdministrationMedication can be administered to clients in several different ways or methods. These methods are called routes. These are the seven routes of medication administration.
1. Oral taken by mouth and swallowed2. Sublingual placed under the tongue3. Topical applied directly to the skin or mucous membranes4. Rectal inserted into the rectum5. Vaginal inserted into the vagina6. Inhalation breathed in or sprayed into the nose or throat7. Injection inserted into a muscle, under the skin or into a vein with a needle
Seven routes
68 • Lesson 3 – Medication Administration
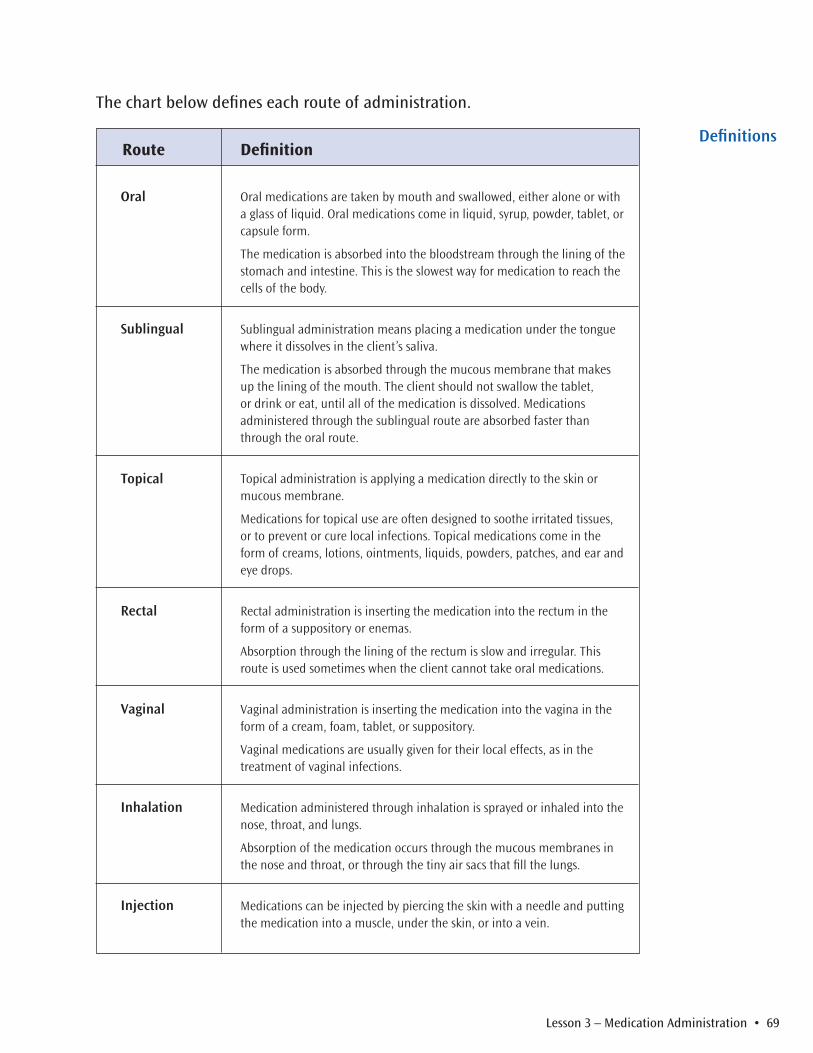
Definition
Oral medications are taken by mouth and swallowed, either alone or with a glass of liquid. Oral medications come in liquid, syrup, powder, tablet, or capsule form.
The medication is absorbed into the bloodstream through the lining of the stomach and intestine. This is the slowest way for medication to reach the cells of the body.
Sublingual administration means placing a medication under the tongue where it dissolves in the client’s saliva.
The medication is absorbed through the mucous membrane that makes up the lining of the mouth. The client should not swallow the tablet, or drink or eat, until all of the medication is dissolved. Medications administered through the sublingual route are absorbed faster than through the oral route.
Topical administration is applying a medication directly to the skin or mucous membrane.
Medications for topical use are often designed to soothe irritated tissues, or to prevent or cure local infections. Topical medications come in the form of creams, lotions, ointments, liquids, powders, patches, and ear and eye drops.
Rectal administration is inserting the medication into the rectum in the form of a suppository or enemas.
Absorption through the lining of the rectum is slow and irregular. This route is used sometimes when the client cannot take oral medications.
Vaginal administration is inserting the medication into the vagina in the form of a cream, foam, tablet, or suppository.
Vaginal medications are usually given for their local effects, as in the treatment of vaginal infections.
Medication administered through inhalation is sprayed or inhaled into the nose, throat, and lungs.
Absorption of the medication occurs through the mucous membranes in the nose and throat, or through the tiny air sacs that fill the lungs.
Medications can be injected by piercing the skin with a needle and putting the medication into a muscle, under the skin, or into a vein.
Route
Oral
Sublingual
Topical
Rectal
Vaginal
Inhalation
Injection
The chart below defines each route of administration.
Definitions
Lesson 3 – Medication Administration • 69

Medication Packaging and LabelingMedications are packaged in a variety of ways. The most common ones are:
• Vials or bottles – can be glass or plastic pill bottles, or bottles of drops.• Bubble packs – also called bingo cards, are cardboard cards that look like bingo cards
and have rows of plastic bubbles for each dose of medication.• Medication organizers – are medisets or weekly pill boxes.• Unit dose packaging – each dose of the medication is packaged separately.
No matter what kind of packaging is used, there are some important pieces of information that should always be on the medication containers. They are:
• Client name – must include first and last name.
• Medication name – can be either the generic or the brand name.
• Dose – the number of tablets, drops, etc. to be used.
• Route – how the medication is to be administered (oral, topical, etc.). If the medication is to be taken orally, this is commonly not stated on the label. See the Job Aids for the abbreviations for the different routes in the back of this Workbook.
• Schedule – how often to give the medication (such as twice a day, or every four hours).
If a client needs to take medication once a day, it can usually be taken anytime that day unless it specifies a time, like at bedtime.
Once a day medications should be given at approximately the same time of day, every day.
If a client misses a dose, do not give him or her a double dose the next time unless instructed to do so by a medical professional.
• Expiration date
Medication packaging
Medication label
70 • Lesson 3 – Medication Administration

Medication Assistance and Medication AdministrationThere is a legal difference between medication assistance and medication administration under Nurse Delegation. It is important to understand the difference between them.
In medication assistance, you help the client self-administer his or her own medication. The client must be able to complete the task for him or herself. The client must be able to put the medication in his or her mouth or on his or her skin and must be aware that it is medication he or she is taking.
Some ways that you can perform medication assistance are:
• Opening a medication container.• Handing the container to the client or use an enabler, such as a cup or bowl, to hand
the medication to the client.• Pouring an individual dose of liquid medication from a bottle to a medicine spoon,
medicine cup, or other special measuring device, to be taken at that time.• Reminding the client to take a medication.• Crushing and dissolving.
Legally, there are two conditions that must be met to be considered medication assistance. The client:
1. Must be able to perform the “last step” for him or herself, and2. Must be aware he or she is taking medication.
If the client does not meet both of these “conditions” for medication assistance, the medication must be administered under Nurse Delegation.
Administering medication under Nurse Delegation means you give medications to the client in the manner you were instructed by the delegating RN. In this case, the client may be confused, and unaware that he or she is taking medication or may be physically unable to perform the “last step.”
Some ways that you can perform medication administration under Nurse Delegation are:
• Place a medication in the client’s mouth.• Apply medicine to the client’s skin.• Give medicine via a gastrostomy tube.• Perform blood glucose testing.
The next pages will help you understand your role with the delegating RN and the client when administering medication under Nurse Delegation.
Defining assistance and administration
Lesson 3 – Medication Administration • 71

The Five Rights of Medication AdministrationMake sure you can answer “Yes” for each of the Five Rights of Medication Administration:
• Right client• Right medication• Right dose• Right route• Right time
It is very important that you always identify the client in some way. It is your responsibility to make absolutely certain you know who the client is before you give the medication. You can only administer medication to clients for whom you have received a specific delegation from the delegating RN.
Stay with a client until he or she takes the medicine so you are sure that the right client received the medication.
Make sure that you give medications only from labeled containers. Keep unit-dose packages wrapped until ready to use so the label stays with the medication. Always prepare medications just when you are ready to give them and not ahead of time. Read the label three times as you prepare the medicine as you:
1. Take it from the shelf or drawer where it is stored.2. Pour or measure the medication.3. Replace the bottle or package from which you measured or poured the medication.
It is important that you know the correct dosage symbols and abbreviations (see the Job Aid section in the back of this Workbook). Also, make sure that you use properly marked measuring containers. Be sure that the amount the client receives matches the amount ordered. Stay with each client until he or she takes the medicine.
You should always check the route on the medicine bottle, package, or medication record, and know the abbreviations.
Know the correct abbreviations for times of administration. Check the bottle, package, or medication record for the correct time to give a medication. Give the medication as close as possible to the stated time.
The Five Rights
1Right client
2Right
medication
3Right dose
4Right route
5Right time
72 • Lesson 3 – Medication Administration

The Medication Administration ProcessThere are several things you will need to remember to do before, during, and after administering medication. Your responsibilities go beyond simply giving the client medication. You:
• Will be the key person to monitor the client’s condition before and after the medication is given.
• Are the best person to watch for side effects and to take action early if you see side effects occurring.
• Need to know what to do if your client will not take a medication or if you discover an error.
It will be easy for you to remember to do all the important parts of medication administration if you follow these five simple steps:
Step 1 Evaluate the client
Step 2 Set up the medication
Step 3 Administer the medication
Step 4 Document the medication administration
Step 5 Observe the client for side effects
The first step is to evaluate the client prior to giving the medication. It is important that you contact the RN if you are uncomfortable or have any doubts about administering the medication.
Call the RN and do NOT administer the medication if:
• You observe a significant change in the client’s health.• You have any doubts about the five rights of medication administration.• You don’t understand how to administer the medication.• The medication (prescription or OTC) has not been delegated by the RN responsible
for the client.
Step by step
Step 1: Evaluate
Lesson 3 – Medication Administration • 73

Setting up medications means reading information given on the medication record and preparing an actual dose of medication for the client. The following guidelines will help you to set up medications accurately and effectively:
• Prepare yourself.– Clear your mind of all distracting thoughts and focus your attention on
administering the client’s medication. Stop all conversations. It is easy to make a mistake if you are talking to someone else and not giving all of your attention to your task.
– Wash your hands with soap and water, and dry them thoroughly.• Prepare the medication.
– Keep your working area clean and neatly arranged.– Prepare medications for only one client at a time, and only right before you are
ready to assist.– Assemble any materials or devices you will need to administer the medication.– Use the Five Rights to prepare the medication: right client, right medication, right
dose, right route, and right time.– Avoid touching the medication.– Only give medications from labeled containers.– Keep unit doses sealed until you are ready to give them.– Crush, cut, or mix medication with food only if the delegating RN gives you
instruction to do so.– Do not crush or break medications marked with the following letters, found after
the name of the medication on the medication bottle. This breaks the coating on the medication and changes how the medication works.
LA = Long ActingSR = Sustained ReleaseER = Extended ReleaseEC = Enteric Coated
• When you pour medication from a bottle, pour it on the side away from the label. Then, if there is a drip from the mouth of the bottle, it will not smudge the label.
• After removing the desired dose from the bottle, recap the bottle tightly, and place the bottle or container back in its storage place.
• If you notice anything unusual about the medication, do not give it to the client. Instead, call the delegating RN.
• If the caregiver and the delegating RN decide to use a medication organizer, like a Mediset, only the pharmacist or the delegating RN can fill the Mediset for the delegated medication administration.
Note: Medisets must be labeled with the client’s name, medication(s) name, dose, route, and the time to administer the medication.
Step 2: Set up
74 • Lesson 3 – Medication Administration

The third step is to administer the medication. Be sure to follow the written instructions for your client provided by the delegating RN. The following are a few general guidelines to consider:
• Ask the client to sit up when giving oral medications. If the client cannot sit up and is lying in bed, have him or her roll on his or her side before giving the medication.
• It is usually best to take oral medications with 4-8 ounces of water, provided the client is not on fluid restriction.
The fourth step is to document the medication administration. It is the delegating RN’s responsibility to provide you with specific, written instructions, as well as a copy for the client’s record. The instructions should include how you should document your performance of the delegated task. Always follow the specific instructions from the delegating RN.
Some general guidelines are:
• Document each time a medication is administered right after administration or as soon as possible.
• You can use initials on the medication administration record, but always sign your full name somewhere on the record.
• Document medication administration refusals.• Document medication errors, such as wrong medication, wrong person, wrong dose,
wrong route, omitted a dose, or gave extra dose.• Discuss with the delegating RN what to do if a medication administration error
occurs.• Document the reason for giving PRN medication (taken on an “as needed” basis) and
how it is working.
The last step of the medication administration process is to observe the client after you have administered the medication. It is important to watch for side effects and medication interactions.
As a part of the written delegation instructions, the delegating RN will identify which side effects to watch for and what to do if you observe those side effects.
Individuals have the right to refuse medications or treatments. Later in this lesson, you will learn more about why a person may not want to take a medication.
Individuals have the right to privacy when medications are administered. Take care to ensure their privacy. This includes privacy of medical records and health information.
Step 3: Administer
Step 4: Document
Step 5: Observe
Client rights
Lesson 3 – Medication Administration • 75

76 • Lesson 3 – Medication Administration
What To Do When Special Situations AriseYou should be prepared for these two special situations when you are delegated medication administration. You need to know what to do when:
• The client declines a medication.• You make or discover a medication error.
Sometimes a client doesn’t want to take a medication. The first thing you should do is to simply ask them why they will not take the medication.
Clients might not want to take medications for a variety of reasons, including those listed in the table below. Sometimes a client may not tell you he or she does not want to take a medication but will simply “hide” it in their cheek, under their tongue, or spit it out after you have left the room.
Review the following chart of some common reasons a client may refuse to take their medications and potential remedies.
Note: You should work with the delegating RN to have a plan in place for what you should do if your client refuses to take a medication. This is especially necessary for critical medications.
Introduction
When the client refuses medication
Remedy
• Offer the client crackers, an apple, or juices afterward to help cover up bad taste.
• Use ice to numb the taste buds for a few minutes before the client takes the medication.
• Discuss this issue with the delegating RN to see if the client could use a different form of medication or a different medication.
An example of an unpleasant side effect might be drowsiness or dry mouth. Ask the delegating RN if a different medication is a possibility or if the medication can be taken at a different time of day. If a change to the medication cannot be made, discuss how to treat the medication’s side effect.
Provide simple reminders like “This pill lowers your high blood pressure.”
You can discuss the need to take the medication with the client, but do not argue. It may help to show the client a statement written by the doctor. The client has the right to refuse medication.
Reason
Unpleasanttaste
Unpleasantside effects
Lack of understanding
Denial of need for medication

Lesson 3 – Medication Administration • 77
It is considered an error when the medication is not given according to the directions. This includes any error related to the “Five Rights.” These would include:
• Wrong time• Wrong medication• Wrong person• Wrong dose• Wrong route• Any omission
You should have an understanding of what to do when you discover an error. Your employer may have certain procedures and the delegating RN will have directions for you.
It is important that you report any errors you discover as soon as possible.
While we all try not to make errors, it sometimes happens. It is far worse failing to report errors that you discover regardless of who might have made the error.
Handling errors
Storage and Disposal of MedicationsThere are several guidelines you should be familiar with for medication storage:
• Medications should be stored in original containers with a legible, original label.• Non-refrigerated medications should be kept in a dry place, not warmer than 85°F.• Refrigerated medications should be stored at 35-50°F. It is safest to keep refrigerated
medication in a zip-lock style plastic bag or other leak-proof container.• Be sure to separate medication storage from food storage.• If you work in an adult family home or assisted living facility, follow the facility policy
regarding medication storage.
A medication needs to be disposed of when it is discontinued, it needs to be disposed of. If you work in a facility, check the policy where you work to understand what your responsibilities might be for medication disposal.
If you are responsible for disposing of medications:
• Ask the client, or their representative, how they would like you to dispose of the medication.
• If the client, or their representative, does not want the medication, then you and the client, or representative, should dispose of it.
If you work in a facility, you and a witness should complete a medication disposal form to document what was done with the medication.
• If the client or family wants to keep the medication, it is also important that you document that the family took the medication with them.
Storage
Disposal
78 • Lesson 3 – Medication Administration
• A medication is any compound that changes the chemical activity within the human body.
• There are two types of medications:– Legend drugs – can only be dispensed with a prescription– Non-legend drugs – can be purchased without a prescription, also known as OTC
medications.• A prescription is an order for medication or treatment given by an authorized health
care professional with specific instructions for use. Health care professionals who can give prescriptions include doctors, nurse practitioners, physician’s assistants, or dentists.
• Medications have two names you need to know:– Generic name– Brand name
• Scheduled medications are called controlled substances. These medications could be dangerous or have a high potential for abuse and addiction. Examples are narcotics, depressants, stimulants, and psychedelic medications.
Medications do three main things:
1. Treat, cure, or control an illness.2. Relieve symptoms like pain.3. Prevent disease.
Six personal characteristics can affect a medication’s action:
1. Age2. Size3. Sex4. Genetic Inheritance5. Physical Condition6. Emotional Condition
Other factors that might affect response to a medication are:
• Route of administration• Time of day the medication is given• Number of medications a person takes and size of dose• Environmental conditions
Lesson Summary
Medications
What do medications do?
Factors affecting medication action

Lesson 3 – Medication Administration • 79
Lesson Summary
Medication side effects are unintended effects of medications on the body that are not part of the goal of medication therapy. Examples are dizziness, headache, insomnia, nausea, and upset stomach.
A medication interaction occurs when the administration of one medication given before, at the same time, or after another medication alters the effect of one or both medications. The effect of one or both medications may be either increased or decreased.
An allergic reaction happens when the body’s immune system reacts to a medication in a way that causes the body to produce chemicals that cause itching, swelling, muscle spasms, and can lead to throat and airway tightening. The reaction can range from mild to life threatening.
Seven routes of medication administration are:
Oral Taken by mouth and swallowed
Sublingual Placed under the tongue
Topical Applied directly to skin or mucous membrane
Rectal Inserted into the rectum
Vaginal Inserted into the vagina
Inhalation Sprayed or inhaled into the nose, throat and lungs
Injection Piercing the skin with a needle and putting medication into a muscle, under the skin, or into a vein
The most common packaging types for medications are:
• Vials or bottles• Bubble packs• Medication organizers• Unit dose packaging
Medication side effects
Medication interaction
Allergic reaction
The seven routes
Medication packaging

80 • Lesson 3 – Medication Administration
Lesson Summary
All labels should contain the following information:
• Client name• Medication name• Dose• Route• Schedule• Expiration date
There is a legal difference between medication assistance and medication administration under Nurse Delegation.
In medication assistance, you are helping the client to self-administer their medication only as much as they need to complete the task for themselves. The client is aware that they are taking medication.
In medication administration under Nurse Delegation, you are administering the medication as delegated by the RN. Only HCAs, NACs and NARs under delegation can perform medication administration.
If the client cannot put the medication in his or her own mouth or apply it to his or her own body, OR is not aware that he or she is taking medication, the administration of the medication must be delegated.
Medications are given using the Five Rights of Medication Administration.
• Right client• Right medication• Right dose• Right route• Right time
There are five steps in the medication administration process:
Step 1 Evaluate the client.Step 2 Set up the medication.Step 3 Administer the medication.Step 4 Document the medication administration. Step 5 Observe the client for side effects.
Medication label
Assistance vs. administration under nurse delegation
The five rights
Medication administration process
Lesson 3 – Medication Administration • 81
Individuals have the right to refuse medications or treatments.
Individuals have the right to privacy when medications are administered. Always take care to ensure the person’s privacy. This includes privacy of medical records and health information.
Discuss the following special situations with your delegating RN so that you are prepared to handle each one:
• The client declines a medication.• You make or discover a medication error.
• Medications should be stored in original containers, with the legible, original label.• Non-refrigerated medications should be kept in a dry place, not warmer than 85°F.• Refrigerated medications should be stored at 35-50°F. It is safest to keep refrigerated
medication in a zip-lock style plastic bag or other leak-proof container such as a locking metal tackle box.
• Be sure to separate refrigerated medication storage from food storage.• If you work in a facility, follow the policy where you work regarding medication
storage.
When a medication is discontinued, it needs to be disposed of.
• Ask the client, or representative, how he or she would like you to dispose of the medication.
• If you work in a facility, always document the outcome when you dispose of medications. You and a witness must sign the Medication Disposition Form.
Lesson Summary
Client rights
Special situations
Medication storage
Disposal

82 • Lesson 3 – Medication Administration
Practice Exercise
Directions: Answer as many of the questions as you can from memory. Then look up the rest of the answers in the workbook text. Once you have completed the exercise, check your answers against the Answer Key on pages 84-85 of the workbook.
What are the two types of medications and what is the definition of each?
1.
2.
What is a medication side effect? List four examples.
A medication side effect is:
1.
2.
3.
4.
What is a medication interaction?
What are the Five Rights of medication administration?
1.
2.
3.
4.
5.
List three routes of medication administration.
1.
2.
3.

Lesson 3 – Medication Administration • 83
Practice Exercise
What are the five steps you should follow in administering medications?
1.
2.
3.
4.
5.
Carl Green is a client in your facility. You have been delegated the task of administering eye drops for Carl.
Carl has been having a very difficult time taking his medications and vitamin supplements. His wife informs you by phone that she normally crushes Carl’s medications and vitamins and places them in his food. This makes it much easier for him to take his medications consistently.
His wife asks you if you wouldn’t mind crushing his medications for him and adding them to his food. Carl has told his wife on many occasions that he trusts you and is very happy with your help with his eye drops. What should you do?
Cynthia Brown is a client. You have been delegated the task of administering her medications for gastrointestinal ulcers.
Today, Cynthia complains to you that the medication makes her stomach hurt, and she refuses to take the medication. What should you do?
84 • Lesson 3 – Medication Administration
Practice Exercise Answer Key
The answers to the questions are listed below. The page number where you can look the information up is in parentheses.
1. What are the two types of medications and what is the definition of each? (Page 64) Legend drugs – drugs that by law can only be given out or sold with a prescription. Non-legend drugs – these are OTC medications, or medications that can be
purchased with- out a prescription. They are used to treat conditions such as back problems, sore throats, stomach aches, coughs, colds, constipation, and general aches and pains.
2. What is a medication side effect? List four examples. (Page 66-67) A medication side effect is an effect on the body different from what the medication
is given for. For example, a medication given for nausea may also make a person sleepy. The sleepiness is a side effect.
3. What is a medication interaction? (Page 67) A medication interaction is when two or more medications change the effects of
one or the other. An example is some high blood pressure medications interact with cold medicines.
4. What are the Five Rights of medication administration? (Page 72) Right client Right medication Right dose Right route Right time
5. List three routes of medication administration. (Page 70) Any three of these are thecorrect answer: Oral, Sublingual, Topical, Rectal, Vaginal, Inhalation, or Injection
6. What are the five steps you should follow in administering medications? (Page 73) Evaluate the client Prepare the medication Administer the medication Document the administration Observe the client for the medication effects

Lesson 3 – Medication Administration • 85
Practice Exercise Answer Key
7. Carl Green is a client in your facility. You have been delegated the tasks of administering eye drops for Carl.
Carl has been having a very difficult time taking his medications and vitamin supplements. His wife informs you by phone that she normally crushes Carl’s medications and vitamins and places them in his food. This makes it much easier for him to take his medications consistently. His wife asks you if you wouldn’t mind crushing his medications for him and adding them to his food.
Carl has told his wife on many occasions that he trusts you and is very happy with your help with his eye drops. What should you do? You will find the answer to this under the Nurse Delegation and the Law lesson, page 10.
Answer: You should continue to administer the eye drops as you have been
delegated. You should tell Carl’s wife that you cannot administer any other of Carl’s medications unless the RN delegates this to you. You should talk with your supervisor and or the delegating RN about Carl’s wife’s concerns.
8. Cynthia Brown is a client. You have been delegated the task of administering her medications for gastrointestinal ulcers.
Today Cynthia complains to you that the medication makes her stomach hurt, and she refuses to take the medication. What should you do at this point? (Page 76)
Answer: You should see if you can get more information from Cynthia about why she doesn’t want to take the medication. Is it the medication that makes her stomach hurt or does her stomach hurt at other times? You can review with Cynthia why she takes this medication.
You should notify the delegating RN that Cynthia’s stomach is hurting and that she does not want to take her ulcer medication.
You should document that Cynthia did not take this medication. The bottom line is that the client has the right to refuse to take a medication.
Stop reading the Workbook here.
Watch the Video Segment for Medical Systems.
Follow this link to the DSHS website. Scroll down to Nurse Delegation Core under the Course column. Click on your preferred language. Choose which video that you would like to view. www.dshs.wa.gov/altsa/training/dshs-curriculum-available.

86 • Lesson 4 – Treatments

Lesson 4 – Treatments • 87
Lesson 4
TreatmentsIn this lesson, you will learn the recommended ways to perform some of the more common treatments that will be delegated to you (listed below).
You have a very important role in identifying complications that can occur from different diseases and communicating the condition of your clients to the delegating RN.
Once you complete this lesson, you will be able to describe good practices for the following treatments:
• Ear Drops• Eye Drops or Ointments• Nasal Drops or Sprays• Oral Inhalation Therapy• Rectal Suppository or Cream• Vaginal Suppository or Cream• Non-Sterile Dressing Changes• Glucometer Testing• Gastrostomy Feedings• Ostomy Care• Straight Clean Urinary Catheterization
Overview and preview
Learning objectives

Ear DropsThis section will cover the basic procedure for administering ear drops.
This is general information only. Always follow the specific instructions for each client outlined for you by the delegating RN.
Step 1: Evaluate the client• Talk with the client about the procedure.• Ask the client how he or she is doing, determine any changes he or she is experiencing such
as hearing changes, ear drainage, or pain. Document any complaints.
Step 2: Prepare for the procedure• Review the delegation instructions and the medication record.• Check the medication record against the ear drop label.• Wash your hands with soap and water, and dry thoroughly.• Put on gloves.• Prepare the necessary equipment.• Warm the medication solution close to body temperature by holding in the palm of your
hand for a few minutes before instilling.• Shake bottle if indicated.• Partially fill the ear dropper with medication.• Assist the client to a side-lying position with the ear being treated facing up. Or if the client
desires, he or she can sit with his or her head tilted so that the treated ear is facing up.
Step 3: Complete the procedure• Straighten the ear canal so that the solution can flow the entire length of the canal by gently
pulling the ear lobe upward and backward.• Instill the correct number of drops along the side of the ear canal. Dropping the medication
down the middle of the ear canal may make the medication land right on the ear drum, which is loud and sometimes painful. Do not let the dropper touch any part of the ear or ear canal.
• Ask the client to remain lying on this or her side, or sitting with his or her head tilted, for about 5 minutes after you have instilled the medication.
• You may put a cotton ball loosely in the ear to keep drops in place if indicated by the prescribing practitioner.
• Remove gloves.• Wash your hands with soap and water, and dry thoroughly.
Step 4: Document the medication administration
Step 5: Observe the client’s response to the medication and any side effects
Procedure: Ear drops
Introduction
88 • Lesson 4 – Treatments
Eye Drops or OintmentsThis section will cover the basic procedure for administering eye drops or ointments.
This is general information only. Always follow the specific instructions for each client outlined for you by the delegating RN.
Step 1: Evaluate the client• Ask the client how he or she is doing, determine any changes he or she is experiencing
including vision changes, eye redness, swelling, drainage, or any pain. Document any complaints.
• Talk with the client about the procedure. The administration of eye medication is not usually painful. Ointments are often soothing to the eye, but some liquid preparations may sting initially.
• If the client has more than one eye medication, explain to the client that two or more eye medications will be given at least five minutes apart. If the client has eye ointment and drops to be instilled, explain that the eye drops will be instilled first because the ointment forms a barrier to drops instilled after the ointment.
Step 2: Prepare for the procedure• Review the delegation instructions and the medication record.• Check the medication record against the eye drop/ointment label.• Wash your hands with soap and water, and dry thoroughly.• Put on gloves.• Prepare the necessary equipment.• Assist the client to a comfortable position, either sitting or lying. Do not administer
the medication with the client standing.• Clean the eyelid and the eyelashes before installing drops or ointment. Use a clean,
warm washcloth to clean eyes. Use a different clean area of cloth for each eye.• When cleaning the eye, wipe from the inner canthus (closest to the nose) toward the
outer canthus (away from the nose).• If ointment is used, discard the first bead. The first bead of ointment from a tube is
considered to be contaminated.
Procedure: Eye drops or
ointments
Introduction
Lesson 4 – Treatments • 89

Step 3: Complete the procedure• Give the client a dry absorbent tissue. Ask the client to look up to the ceiling. The
client is less likely to blink if looking up.• Expose the lower conjunctival sac by placing the thumb or fingers of your non-
dominant hand on the client’s cheekbone just below the eye and gently draw down the skin on the cheek.
• Encourage the client to assist if possible, have them pull down the lower lid. If the lower lid is swollen, inflamed, or tender handle it very carefully to avoid damaging it.
• Placing the fingers on the cheekbone minimizes the possibility of touching the cornea, avoids putting any pressure on the eyeball, and prevents the person from blinking or squinting.
• Approach the eye from the side and put the correct number of drops onto the outer third of the lower conjunctival sac. Hold the dropper 1 to 2 cm above the sac. The client is less likely to blink if a side approach is used. When put into the conjunctival sac, drops will not irritate the cornea. The dropper must not touch the sac or the cornea.
• If using ointment, hold the tube above the lower conjunctival sac, squeeze about 3/4 inch of ointment from the tube into the lower conjunctival sac from the inner canthus outward.
• Instruct the client to close his or her eye but not to squeeze it shut. Closing the eye spreads the medication over the eyeball. Squeezing can injure the eye and push out the medication.
• For liquid medications, press firmly or have the client press firmly on the tear duct for at least 30 seconds. Pressing on the duct prevents the medication from running out of the eye and down the duct.
• Clean the eyelids as needed. Wipe the eyelids gently from the inner to the outer canthus to collect excess medication.
• Assess the client’s response to the medication immediately after the instillation and again after the medication should have acted.
• Remove gloves and wash your hands.
Step 4: Document the medication administration
Step 5: Observe the client• Observe and report redness, drainage, pain, itching, swelling, or other discomforts or
visual disturbances.• Look for side effects as instructed by the delegating RN.
90 • Lesson 4 – Treatments

Nasal Drops or SpraysThis section will cover the basic procedure for administering nasal drops or sprays. This is general information only. Always follow the specific instructions for each client outlined by the delegating RN.
Step 1: Evaluate the client• Ask the client how he or she is doing, determine any changes he or she is experiencing
including stuffiness, drainage, ease of breathing. Document any complaints.• Talk with the client about the procedure.
Step 2: Prepare for the procedure• Review the delegation instructions and the medication record.• Check the medication record against the nasal drop or spray label.• Wash your hands with soap and water, and dry thoroughly.• Put on gloves.• Prepare the necessary equipment.• Have the client blow their nose gently to clear the nasal passage.• Instilling nose drops requires the client to either lie or sit down with their head tilted back.• If the client lies down put a pillow under their shoulders, letting the head fall over the edge of
the pillow. Some sprays recommend the client keep their head upright.
Step 3: Complete the procedure• Elevate the nostrils slightly by pressing the thumb against the tip of the nose.• Hold the dropper or spray just above the client’s nostril and direct the medication toward the
middle of the nostril. If the medication is directed toward the bottom of the nostril, it will run down the Eustachian tube.
• Do not touch the dropper or spray bottle tip to the mucous membranes of the nostrils to prevent contamination of the container.
• Ask the client to:– Inhale slowly and deeply through the nose– Hold his or her breath for several seconds– Exhale slowly– Remain in a back-lying position for 1 minute so the solution will come into contact with the
entire nasal surface.• Discard any medication remaining in the dropper before returning the dropper to the bottle.• Rinse the tip of the dropper with hot water, dry with a tissue, and recap promptly.• Remove gloves.• Wash your hands with soap and water, and dry thoroughly.
Step 4: Document the medication administration.
Step 5: Observe the client’s response to the medication and any side effects.
Procedure: Nasal drops or
sprays
Introduction
Lesson 4 – Treatments • 91

Oral Inhalation TherapyThis section will cover the basic procedure for administering oral inhalation therapy.
This is general information only. Always follow the specific instructions for each client outlined by the delegating RN.
Step 1: Evaluate the client.• Ask the client how he or she is doing, determine any changes he or she is experiencing
including ease of breathing. Document any complaints.• Talk with the client about the procedure.
Step 2: Prepare for the procedure.• Review the delegation instructions and the medication record.• Check the medication record against the inhaler or spray label.• Wash your hands with soap and water, and dry thoroughly.• Put on gloves.• Prepare the necessary equipment.
Step 3: Complete the procedure.• Shake the inhaler immediately before using it. Remove the cap from the mouthpiece.• Ask client to clear his or her throat.• Ask the client to breathe out slowly until no more air can be expelled from the lungs,
then hold his or her breath.• Place the mouthpiece in the mouth holding the inhaler upright. Ask the client to close
his or her lips tightly around the mouthpiece.• Squeeze the inhaler as the client breathes in deeply through the mouth. This is often
difficult to do.• Tell the client to hold his or her breath up to a count of 5 seconds.• Before the client breathes out, remove the inhaler from the mouth. Wait at least 2
minutes between puffs, unless there are other directions.• Repeat process if 2 puffs are ordered.• If you have two or more inhalers, always use the steroid medication last. Then rinse
the client’s mouth out with water.• Clean the mouthpiece of the inhaler frequently and dry it thoroughly.• Remove gloves.• Wash your hands with soap and water, and dry thoroughly.
Step 4: Document the medication administration.
Step 5: Observe the client’s response to the medication and any side effects.
Procedure: Oral inhalation therapy
Introduction
92 • Lesson 4 – Treatments

Rectal Suppository or CreamThis section will cover the basic procedure for administering a rectal suppository or cream.
This is general information only. Always follow the specific instructions for each client outlined for you by the delegating RN.
Step 1: Evaluate the client.• Ask the client how he or she is doing, determine any changes he or she is experiencing
including pain, itching, burning, or constipation. Document any complaints.• Talk with the client about the procedure.
Step 2: Prepare for the procedure.• Review the delegation instructions and the medication record.• Check the medication record against the suppository or cream label.• Wash your hands with soap and water, and dry thoroughly.• Put on gloves.• Prepare the necessary equipment and provide for privacy.• Remove the wrapper and lubricate the smooth rounded end, or see manufacturer’s
instructions. The rounded end is usually inserted first. Using lubricant reduces irritation of the rectal lining. If the suppository is too soft, put it in the refrigerator before removing the wrapper.
• For one-half suppository, cut the suppository lengthwise.• Encourage the client to relax by breathing through the mouth.• Have client assume a position of comfort. It’s most effective to insert suppository
while the client is lying on the left side. However, a suppository can be inserted in any lying or sitting position.
Lesson 4 – Treatments • 93
Procedure: Rectal
suppository or cream
Introduction

94 • Lesson 4 – Treatments
Step 3: Complete the procedure.• Lubricate the gloved index finger of your dominant hand.• Insert the suppository gently into the anal canal, rounded end first, or according to
the manufacturer’s instructions, along the rectal wall using the gloved index finger.
• Insert the suppository approximately 4 inches into the rectum.• Avoid embedding the suppository in feces.• Press the client’s buttocks together for a few minutes.• Ask the client to continue to lie down for at least 5 minutes to help retain the
suppository.• The suppository should be retained for at least 30 to 40 minutes or according to
manufacturer’s instructions.• For rectal cream, insert applicator tip in the rectum and gently squeeze tube to deliver
the cream.• Remove the applicator. Wash it in warm soapy water and dry well before storing.• Remove gloves.• Wash your hands with soap and water, and dry thoroughly.
Step 4: Document the medication administration.
Step 5: Observe the client’s response to the medication and any side effects.
Vaginal Suppository or CreamThis section will cover the basic procedure for administering a vaginal suppository or cream.
This is general information only. Always follow the specific instructions for each client outlined for you by the delegating RN.
Step 1: Evaluate the client.• Ask the client how she is doing, determine any changes she is experiencing including
itching, burning, or drainage. Document any complaints.• Talk with the client about the procedure and explain it is normally painless.
(Continued on next page)
Procedure: Vaginal suppository or cream
Introduction

Lesson 4 – Treatments • 95
Step 2: Prepare for the procedure.• Review the delegation instructions and the medication record.• Check the medication record against the suppository or cream label.• Wash your hands with soap and water, and dry thoroughly.• Put on gloves.• Prepare the necessary equipment.• Unwrap the suppository and put it on the opened wrapper or fill the applicator with the
prescribed cream, jelly, or foam. Directions are provided with the manufacturer’s applicator.• Provide privacy and ask the client to empty her bladder prior to the procedure. If the
bladder is empty, the client will feel less pressure during the treatment, and the possibility of injuring the vaginal lining is decreased.
• Assist the client to a back-lying position with his or her knees bent and the hips rotated outward.
• Drape the client appropriately so that only the perineal area is exposed.• Encourage the client to relax by breathing through the mouth.
Step 3: Complete the procedure• Lubricate the rounded (smooth) end of the suppository, which is inserted first.• Lubricate your dominant gloved index finger.• Expose the vaginal orifice by separating the labia with your non- dominant hand.• Insert the suppository about 3-4 inches along the back wall of the vagina.• If inserting cream, gently insert the applicator about 2 inches. Slowly push the plunger until
the applicator is empty. Remove the applicator and place on a towel. Discard the applicator if disposable or clean it according to the manufacturer’s direction.
• Remove gloves, turning them inside out. Discard appropriately.• Wash your hands with soap and water and dry thoroughly.• Ask the client to remain lying in bed for 5 to 10 minutes following the instillation.• Dry the perineum with the tissues as required. Remove the bedpan, if used.• Remove the moisture-resistant pad and the drape. Apply a clean perineal pad if there is
excessive drainage.
Step 4: Document the medication administration.
Step 5: Observe the client’s response to the medication and any side effects.

96 • Lesson 4 – Treatments
Non-Sterile Dressing ChangeThis section will cover the basic procedure for non-sterile dressing changes.
This is general information only. Each client is different so the specific steps you will need to take will vary. Always follow the specific instructions for each client outlined for you by the delegating RN.
Step 1: Evaluate the client.• Talk with the client about the procedure.• Ask the client how he or she is doing, determine any changes he or she is
experiencing. Document any complaints. Notice whether the client is eating well and drinking adequate fluids since this is important to wound healing.
Step 2: Prepare for the procedure.• Review the delegation instructions.• Wash your hands with soap and water, and dry thoroughly.• Prepare the necessary equipment.• Put on gloves.
Step 3: Complete the procedure.• Remove the old dressing and dispose of it in an appropriate container.• Remove gloves, wash hands, and put on new gloves.• Cleanse the wound as directed by the delegating RN.• Observe the wound as directed by the delegating RN.• Apply any ointment or medication as directed by the delegating RN.• Apply the new dressing as ordered by the delegating RN.• Remove gloves.• Wash your hands with soap and water, and dry thoroughly.
Step 4: Document your wound observation and the dressing change as ordered by the delegating nurse.
Step 5: Observe the client for any changes or complications.
Procedure: Non-sterile dressing changes
Introduction

Lesson 4 – Treatments • 97
Observing the Wound• When dressing is removed, check the dressing for drainage.• After wound is cleansed, observe:
– Color– Presence of odor that persists after the wound has been cleaned (some dressings will
have an odor)– Amount of drainage– Consistency of drainage
• After cleansing the wound, describe the wound edges and wound bed. Look at:– Size of wound Describe it like a “quarter” or “dime” in size. This does not need to be exact but you
should use the same kind of measurements consistently (like inches or size of a “___”).– Color of wound: red, yellow, or black?– Wound drainage If present, is it stringy, or does it have hard tissue?– Wound edges - circular or irregularly shaped?– Is there undermining (tunneling under the skin) present? (Caregivers do not measure
depth of undermined areas.)
• Cover the wound with the dressing the delegating RN showed you to use. There are many different kinds of dressings. Each has a specific purpose and should be used only as the RN has shown you.
• Document observation of wounds as often as delegating RN asks. Always notify the delegating RN if there is an unusual change in appearance of wound.
Observing the wound
Dressing the wound

Glucometer TestingThis section will cover the basic procedure for glucometer testing. A glucometer is a machine for measuring the sugar content of a person’s blood. Review the section on diabetes on page 46 for more detailed information on caring for clients with diabetes.
This glucometer testing procedure is general information only. Always follow the specific instructions for each client outlined for you by the delegating RN.
Step 1: Evaluate the client• Talk to the client about the glucometer testing.• Ask the client how he or she is doing, and determine any changes he or she is
experiencing.• Ask the client where he or she would like you to draw a drop of blood. Usually a finger
is used to obtain the blood. Do not use a swollen or injured site. It helps if the site is warm.
Step 2: Prepare for the procedure.• Review the delegation instructions.• Wash your hands with soap and water,
and dry thoroughly.• Gather the necessary equipment.• Put on gloves.
Step 3: Complete the procedure.• Puncture the body part as directed by the delegating RN. The best practice is to
change the puncture site for each test. Tip: fingertips are less sensitive on the sides of the finger.• Test according to the equipment manufacturer’s directions and the delegating RN’s
instructions.• Provide direct pressure to stop the bleeding, if needed• Remove gloves.• Wash and dry your hands.
Step 4: Document the reading with the date and time, and any other information required by the delegating RN.
• Respond to the reading per instructions from the delegation RN.
Step 5: Observe the client for irritation to the puncture site.
Procedure: Glucometer testing
Introduction
98 • Lesson 4 – Treatments

Gastrostomy FeedingsThis section will cover the basic procedure for gastrostomy feedings, along with more detailed information on ostomy care (pertaining to the gastrointestinal system).
An ostomy is an opening in the abdominal wall from usually the intestines or the urinary bladder to the outside. It is done because there is something wrong with parts of the intestine or the urinary system.
A gastrostomy is an opening from the stomach to the outside through the abdominal wall. This allows food, fluids, or medicines to be taken in through a tube when the person has difficulty with swallowing.
Always follow the specific instructions for each client outlined for you by the delegating RN.
Step 1: Evaluate the client.• Talk to the client to find out how he or she is doing, and determine any changes he or she is
experiencing.• Explain to the client what you will be doing. Ask the client to tell you if he or she is
experiencing any discomfort.
Step 2: Prepare for the procedure.• Review the delegation instructions.• Wash your hands with soap and water, and dry thoroughly.• Gather the necessary equipment.• Put on gloves.
Step 3: Complete the procedure.• Remove the dressing - never use scissors to cut it off.• Anchor the tube as instructed by the delegating RN.• Encourage the client to be in a sitting or semi-reclining position.• The delegating RN may ask you to check gastric contents by putting on gloves and
withdrawing some of the contents of the stomach with a large syringe.• Administer the formula or the medication as directed by the delegating RN.• Flush the feeding tube with 30-60 ml of water before and after each feeding and after giving
all medications.• Remove gloves.• Wash your hands.
Step 4: Document the feeding according to the instructions of the delegating RN.
Step 5: Observe the client for any complications as directed by the delegating RN.
Procedure: Gastronomy
feedings
Introduction
Lesson 4 – Treatments • 99

A feeding tube is a tube that is inserted into the stomach of a client who cannot eat or drink on his or her own without choking. This inability to eat is possibly due to stroke, cancer, MS, or coma.
There are two types of feeding tubes:
• A nasogastric (NG) tube is inserted through the nose, down the esophagus and into the stomach. This is usually temporary, following stroke or other sudden change in status.
• A gastrostomy tube is inserted surgically through the abdominal wall directly into the stomach. Some of these have different names. One kind of gastrostomy tube is called a PEG tube.
• Eventually the tube may be replaced by a “Foley type” catheter or button. It would be helpful for you to know what kind of tube the client has and how it is held in the body.
Feeding tube
100 • Lesson 4 – Treatments
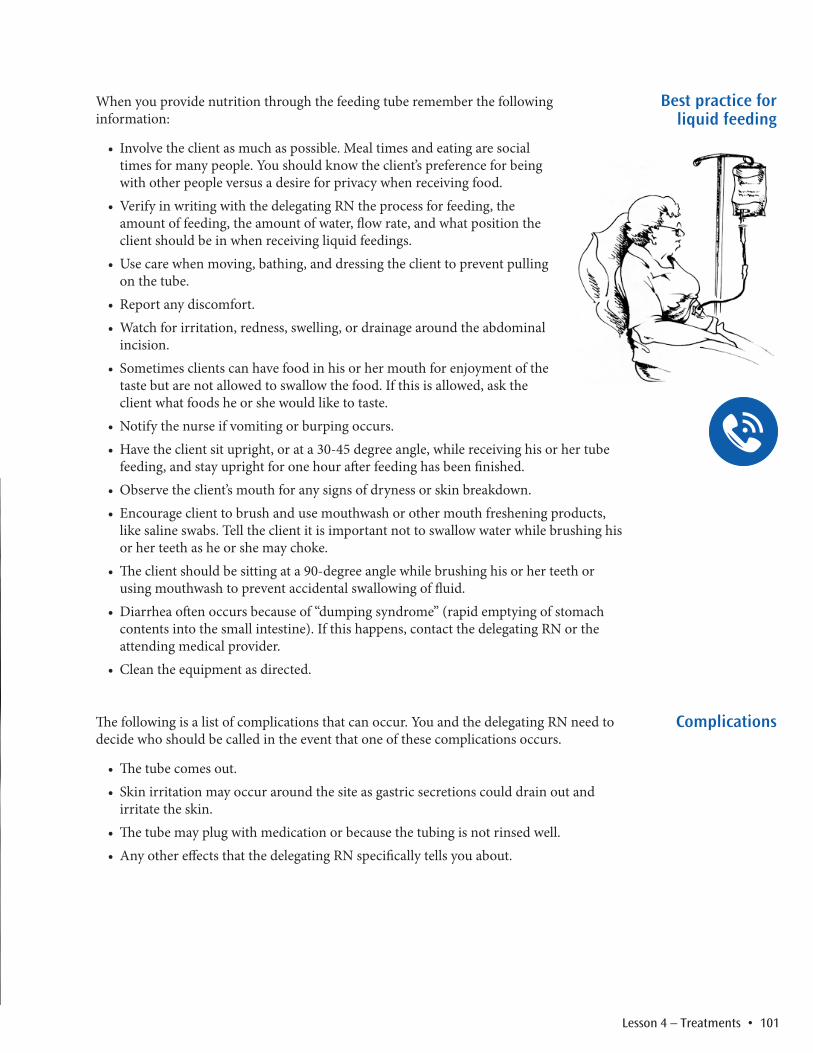
When you provide nutrition through the feeding tube remember the following information:
• Involve the client as much as possible. Meal times and eating are social times for many people. You should know the client’s preference for being with other people versus a desire for privacy when receiving food.
• Verify in writing with the delegating RN the process for feeding, the amount of feeding, the amount of water, flow rate, and what position the client should be in when receiving liquid feedings.
• Use care when moving, bathing, and dressing the client to prevent pulling on the tube.
• Report any discomfort.• Watch for irritation, redness, swelling, or drainage around the abdominal
incision.• Sometimes clients can have food in his or her mouth for enjoyment of the
taste but are not allowed to swallow the food. If this is allowed, ask the client what foods he or she would like to taste.
• Notify the nurse if vomiting or burping occurs.• Have the client sit upright, or at a 30-45 degree angle, while receiving his or her tube
feeding, and stay upright for one hour after feeding has been finished.• Observe the client’s mouth for any signs of dryness or skin breakdown.• Encourage client to brush and use mouthwash or other mouth freshening products,
like saline swabs. Tell the client it is important not to swallow water while brushing his or her teeth as he or she may choke.
• The client should be sitting at a 90-degree angle while brushing his or her teeth or using mouthwash to prevent accidental swallowing of fluid.
• Diarrhea often occurs because of “dumping syndrome” (rapid emptying of stomach contents into the small intestine). If this happens, contact the delegating RN or the attending medical provider.
• Clean the equipment as directed.
The following is a list of complications that can occur. You and the delegating RN need to decide who should be called in the event that one of these complications occurs.
• The tube comes out.• Skin irritation may occur around the site as gastric secretions could drain out and
irritate the skin.• The tube may plug with medication or because the tubing is not rinsed well.• Any other effects that the delegating RN specifically tells you about.
Best practice for liquid feeding
Complications
Lesson 4 – Treatments • 101

Ostomy CareThis section will cover the basic procedure for ostomy care.
This is general information only. Each client is different and care will vary from person to person. Always follow the specific instructions for each client outlined for you by the delegating RN.
An ostomy is an artificial opening in the abdominal wall to one of our internal organs. This is done when there is something wrong with other parts of the system. For instance, if a person has a blockage in his or her intestines due to a tumor, the surgeon can bring a portion of the bowel to an opening in the abdominal wall. This is called a colostomy.
It is also possible to create an opening into the stomach, called a gastrostomy, particularly when a person has trouble swallowing or an opening into the bladder, called a urostomy. The ostomy can be either temporary or permanent.
The place where the opening is made is called the “stoma.” Bowel or bladder waste materials can be emptied through the stoma into a pouch. You may be delegated the task of helping the client with some or all of their ostomy care.
The client may be sensitive or embarrassed about the ostomy, especially if it is fairly new. It is important that the caregiver not make any comments or otherwise make the client think that is unpleasant to assist with his or her ostomy care.
This section will describe what tasks can be performed without delegation and what tasks must be delegated related to colostomy care. If the client needs assistance to empty the colostomy bag to dispose of the waste matter or changing the bag, then this is considered personal care and no delegation is required.
Some clients may want their colostomy bag emptied of waste more often, but it should be emptied when the bag is one-third to one-half full to prevent the bag from pulling on the skin around the stoma.
Any activity related to caring for the skin around the stoma or changing the wafer or other complete unit attached to the skin around the stoma must be delegated.
The wafer or other device is changed when the seal is no longer secure due to leakage or as often as the physician’s order indicates; for example, every three days. The delegating nurse will provide direction related to these tasks when delegating for a specific client.
Considerations
Introduction
Ostomy Bag
102 • Lesson 4 – Treatments

Step 1: Evaluate the client.• Talk with the client about the procedure. Check to see where he or she would like to
have the ostomy care done. Often it is easier to do in the bathroom.• Be sure that there is privacy for the client wherever the care is done.• Ask the client how he or she is doing and document any changes he or she is
experiencing.
Step 2: Prepare for the procedure.If delegation is required, follow the delegation instructions.
• Prepare the necessary equipment.• Wash your hands with soap and water and dry thoroughly.• Put on gloves.
Step 3: Complete the procedure.• Remove the old colostomy bag and wafer, or other devices, from the stoma.• Dispose of the bag according to the delegating RN’s instructions or in a leak-proof
bag. • Gently remove any stool from around the stoma with toilet tissue. Then clean the
skin around the stoma with mild soap and water. Pat dry.• Observe the stoma and the surrounding skin for any open areas, irritation, rash,
or other features as directed by the delegating RN.• Apply any ointments as directed.• Apply the new bag as directed by the delegating RN. There are a number
of different types of bags available. The delegating RN will give you specific instructions on the bag the client uses.
• Remove gloves.• Wash your hands with soap and water, and dry thoroughly.
Step 4: Document the ostomy care as ordered by the delegating nurse.
Step 5: Observe the client for any changes or complications.
Procedure: Ostomy care
Lesson 4 – Treatments • 103
Straight clean urinary catheterizationThis section will cover the basic procedure for straight clean urinary catheterization.
A straight clean urinary catheter is a tube which is inserted into the bladder to drain urine and is then removed. This is done when the person is not able to empty their bladder without the catheter.
Always follow the specific instructions for each client outlined for you by the delegating RN.
Step 1: Evaluate the client.Talk to the client to find out how he or she is doing, and determine any changes he or she is experiencing.
Explain what you will be doing to the client. Ask the client to tell you if he or she is experiencing any discomfort or if he or she has any preferences about how you do the procedure.
Step 2: Prepare for the procedure.• Provide for the client’s privacy.• Review the delegation instructions.• Wash your hands with soap and water; dry thoroughly.• Gather the necessary equipment.• Put on gloves.
Procedure: Straight clean urinary catheterization
Introduction
104 • Lesson 4 – Treatments

Step 3: Complete the procedure.• Assist the client to a comfortable sitting or lying position.• Clean the perineal area or end of the penis as directed by the delegating nurse.• Locate and identify the opening of the urethra.• Lubricate the catheter with a water soluble lubricant like KY jelly.• Insert the catheter into the opening of the urethra and into the bladder. This will be
approximately 9 inches for men and 2½ to 3 inches for women. You will know you are in the bladder when urine begins to come out of the end of the catheter.
• Ask the client to breathe slowly and deeply. This helps the bladder opening relax. You should use gentle firm pressure when inserting the catheter.
• Hold the catheter in place until urine stops coming out.• Remove the catheter• Clean and dry the perineal area.
Step 4: Document the catheterization according to the instructions of the delegating RN.
Step 5: Observe the client for any complications as directed by the delegating nurse.
Stop reading the Workbook here.
Watch the Video Segment for Treatments. Follow this link to the DSHS website. Scroll down to
Nurse Delegation Core under the Course column. Click on your preferred language. Choose which video that you would like to view. www.dshs.wa.gov/altsa/training/dshs-curriculum-available.
Lesson 4 – Treatments • 105

In this section, you will review the information covered in the Workbook by taking a practice exam.
Use this exam as a study guide. It will help you to become familiar with how the test questions are written and what areas you need to review.
The practice exam is longer and a bit more difficult than the Final Examination. So, once you have completed the practice exam, you will be well prepared to successfully complete the final examination.
After you complete this Practice Course Examination, you are ready to take the final steps to complete the training and getting your certificate.
To complete the course, you will need to do the following:
• Contact the instructor who provided your course materials to schedule your examination.
• Pass the examination with a score of 80% or better.• Turn in your student evaluation to the instructor.• Turn in your Workbook temporarily for review (this is to review your work in the
Practice Exercises).
There are 20 questions on the final examination. There are a variety of true or false, multiple choice, matching, and fill in the blank.
To prepare for final exam:
• Review the lessons in the Workbook.• Study the Lesson Summary at the end of each lesson. The information you need to
commit to memory is in the Lesson Summaries.• Review the video for each lesson.• Take the Practice Exam in this lesson.• Review the answers in the Answer Key section of the Workbook.• Revisit any areas that were difficult for you.
After doing these steps, you will be well prepared for the final exam.
Stop reading the Workbook here.When you are ready, continue on to the Practice Course Examination on the next page. Complete the Practice Course Examination without using your Workbook.
Practice Course Overview
Overview
Course completion
What is the final exam like?
Preparing for the exam
106 • Practice Examination
1. What are the five conditions that must be met for nurse delegation?
1.
2.
3.
4.
5.
2. List the four specific tasks that cannot be delegated to you.
1.
2.
3.
4.
3. What are the four requirements to become qualified to receive a delegation?
1.
2.
3.
4.
4. There are four settings in which delegation can occur. What are they?
1.
2.
3.
4.
5. Maintenance of a central line can be delegated to a Nursing Assistant or Home Care Aide.
True False
6. A Licensed Practical Nurse (LPN) can delegate tasks to a Nursing Assistant or Home Care Aide.
True False
Practice Course ExaminationPractice Examination
Practice Examination • 107

7. List one of the things a delegating RN is responsible for in the delegating process.
1.
8. When you receive a delegation, what are two of the things you are responsible for?
1.
2.
9. The Nursing Assistant or Home Care Aide should report changes in the client’s condition promptly to the delegating RN.
True False
10. If you are unable to perform a delegated task for any reason, what should you do?
11. What are two examples of a developmental disability?
1.
2.
12. List four of the nine body systems described in the Workbook.
1.
2.
3.
4.
13. For each of the four body systems you identified above, list one common disorder.
1.
2.
3.
4.
Practice Course Examination
108 • Practice Examination

14. Diabetes Mellitus affects which body system?
15. What is a medication?
16. What are the two types of medications? List and provide a definition for each.
1.
2.
17. Scheduled medications are called controlled substances. They could be dangerous or have a high potential for abuse. One example of this type of medication is:
18. What are three factors that can affect a medication’s action?
1.
2.
3.
19. are unintended effects of medications on the body that are not part of the goal of medication therapy.
20. A occurs when the administration of one medication given before, at the same time, or after another medication alters the effect of one or both medications. The effect of one or both medications may be either increased or decreased.
21. When you have been delegated oral medication administration, you are allowed to put the pill in the client’s mouth.
True False
Practice Course Examination
Practice Examination • 109

22. A route of medication administration is the way the medication is given.
True False
23. Match each of the routes below with the correct definition by drawing a line from the route to the correct definition
Route Definition
Rectal Taken by mouth and swallowed
Sublingual Piercing the skin with a needle and putting medication into a muscle, under the skin, or into a vein
Injection Sprayed or inhaled into the nose, throat, and lungs
Oral Inserted into the rectum
Inhalation Placed under the tongue
Vaginal Applied directly to skin or mucous membrane
Topical Inserted into the vagina
24. List two of the things that should always be on a medication label.
1.
2.
25. List the five rights of medication administration.
1.
2.
3.
4.
5.
Practice Course Examination
110 • Practice Examination

26. List these five steps in the medication administration process in the right order in the numbered spaces below. (#1 is the first step, #2 is the second step, etc.)
Document the medication administration
Administer the medication
Evaluate the client
Observe the client for the effects of the medication
Set up the medication
1.
2.
3.
4.
5.
27. There are two important rights that clients have regarding medication administration.
Clients have the medications or treatments.
Clients have the when medications are administered.
28. Refrigerated medication storage should be separated from .
29. Glucometer testing measures the in a person’s blood.
The Answer Key is on the next page. Use it to review your answers and study the areas that you need to.
Give yourself a pat on the back. You have been working hard!
Practice Course Examination
Practice Examination • 111

Use this answer key to check your answers. The page number(s) following the question is where you will find the information in the workbook.
1. What are the five conditions that must be met for nurse delegation? (Page 9)
1. A licensed Registered Nurse transfers the performance of the task.
2. There are three specific tasks that may not be delegated.
3. Delegation covers a specific task for one client.
4. Only qualified Nursing Assistants or Home Care Aides can accept a delegation
5. Delegation can only happen in four community settings.
2. List the four specific tasks that cannot be delegated to you. (Page 9)
1. Injections, other than insulin
2. Sterile procedures
3. Central line maintenance
4. Tasks that require nursing judgment
3. What are the four requirements to become qualified to receive a delegation? (Page 10)
1. Be a HCA, NA-R or a NA-C in the state of Washington.
2. Have completed the education requirements for delegation.
3. Be willing to perform the specific task to be delegated.
4. Demonstrate to the delegating RN your competence to correctly perform the s pecific task without direct supervision.
4. There are four settings in which delegation can occur. What are they? (Page 14)
1. Certified community residential programs for the developmentally disabled.
2. Licensed adult family homes.
3. Licensed assisted living facilities.
4. In home.
5. Central line maintenance can be delegated to a Nursing Assistant/Home Care Aide (Page 9)
False
Practice Course Examination Answer Key
112 • Practice Examination

Practice Course Examination Answer Key
6. A Licensed Practical Nurse (LPN) can delegate tasks to a Nursing Assistant/Home Care Aide. (Page 9)
False
7. List one of the things a delegating RN is responsible for in the delegating process. (Page 15)
Any one of these is a correct answer:
Obtaining written consent from the client or authorized representative for the delegation.
Delegating the task.
Supervising the delegation.
Rescinding or canceling the delegation.
8. When you receive a delegation what are two of the things you are responsible for? (Page 17)
Any two of the following are a correct answer:
Performing the delegated task according to the instructions.
Observing the client for medication side effects, reactions to treatments, or complications from diseases.
Reporting changes in the client’s condition promptly.
Reporting to the delegating RN, or your supervisor, new or changed medications, or treatments which may require a change in the delegation instructions.
9. The Nursing Assistant or Home Care Aide should report changes in the client’s condition promptly to the delegating RN. (Page 17)
True
10. If you are unable to perform a delegated task for any reason, what should you do? (Page 18)
Notify the delegating RN and your employer as soon as possible when you are unable to complete a delegated task.
Practice Examination • 113

11. What are two examples of a developmental disability? (Page 30)
Any two of the following are correct answers:
Intellectual Disability
Cerebral Palsy
Epilepsy
Autism
Down Syndrome
12. List four of the nine body systems described in the workbook. (Page 32)
Any four of the following are correct answers:
Cardiovascular
Respiratory
Integumentary or skin
Urinary or genitourinary
Endocrine
Nervous
Musculoskeletal
Sensory
13. For each of the four body systems you identified above, list one common disorder.
Use the Lesson Review chart on pages 53-55 to check your answers. Any of the disorders listed for the body systems you chose are correct.
14. Diabetes Mellitus affects which body system? (Page 46)
Endocrine
15. What is a medication? (Page 64)
Any compound that changes the chemical activity within the human body.
Practice Course Examination Answer Key
114 • Practice Examination

16. What are the two types of medications? List and provide a definition for each. (Page 64)
Legend drugs are drugs that can only be sold or given out with a prescription. Non-legend drugs are drugs that can be purchased without a prescription.
17. Scheduled medications are called controlled substances. They could be dangerous or have a high potential for abuse. Examples of this type of medication are: (Page 64)
Any of these are correct: narcotics, depressants, stimulants, or psychotropic medications.
18. What are three of the factors that can affect a medication’s action? (Page 66)
Any three of these is correct: age, sex, size, genetic inheritance, physical condition, and emotional condition.
19. Side effects are unintended effects of medications on the body that are not part of the goal of medication therapy. (Page 66)
20. A medication interaction occurs when the administration of one medication given before, at the same time, or after another medication alters the effect of one or both medications. The effect of one or both medications may be either increased or decreased. (Page 67)
21. When you have been delegated oral medication administration, you are allowed to put the pill in the client’s mouth. (Page 71)
True
22. A route of medication administration is the way the medication is given. (Page 68 and 69)
True
Practice Course Examination Answer Key
Practice Examination • 115

23. For each of the definitions below, match it with the correct name of the route of administration. (Page 68)
Route Definition
Rectal Taken by mouth and swallowed
Sublingual Piercing the skin with a needle and putting medication into a muscle, under the skin, or into a vein
Injection Sprayed or inhaled into the nose, throat, and lungs
Oral Inserted into the rectum
Inhalation Placed under the tongue
Vaginal Applied directly to skin or mucous membrane
Topical Inserted into the vagina
24. List two of the things that should always be on a medication label. (Page 70)
Any two of the following are correct: Client name, medication name, dose, route, schedule, and expiration date.
25. List the five rights of medication administration. (Page 72)
1. Right client
2. Right medication
3. Right dose
4. Right route
5. Right time
26. List these five steps in the medication administration process in the right order using the numbered spaces below. (Page 73)
1. Evaluate the client
2. Set up the medication
3. Administer the medication
4. Document the medication administration
5. Observe the client for the effects of the medication.
116 • Practice Examination
Practice Course Examination Answer Key

27. There are two important rights that clients have regarding medication administration. (Page 75)
Clients have the right to refuse medications or treatments.
Clients have the right to privacy when medications are administered
28. Refrigerated medication storage should be separated from food storage. (Page 77)
29. Glucometer testing measures the sugar or glucose in a person’s blood. (Page 98)
Stop reading the Workbook here.
Now that you have reviewed your answers against the answer key for the practice examination, study any areas that you got wrong and any other areas where you have questions.
Once you are comfortable with your knowledge level, you are ready to schedule your Final Course Examination.
Congratulations for all of your hard work!
Practice Examination • 117
Practice Course Examination Answer Key

118 • Glossary of Terms

Glossary of Terms
Glossary of Terms • 119
Term DefinitionAllergic Reaction A reaction of the body to medications, dust, mold, pollen or other things in the
environment. The reaction can include itching, sneezing, stuffy nose, rash, and wheezing as well as other symptoms.
Alzheimer’s Disease A progressive, degenerative illness causing loss of memory and mental incapacity. Initial symptom is forgetfulness.
Ambulate To walk.
Anus Opening of the rectum through which stool is passed.
Arterial Ulcers Open sores on the feet and lower leg due to lack of blood flow from the arteries (Diabetic Ulcers) to the legs.
Arteries Blood vessels that carry blood rich in oxygen away from the heart to the body cells.
Arthritis Inflammation of the joints. The major kinds of arthritis are osteoarthritis, rheumatoid arthritis, and gout.
Asthma A disorder in which the respiratory system reacts to things in the environment like pollution, pollen, or dust. Symptoms include difficulty breathing, wheezing and coughing.
Bedsores Areas where the skin and tissue underneath have died as a result of poor circulation caused by pressure. Also called pressure sore or decubitus ulcer.
Blood Body fluid that carries oxygen, carbon dioxide, nutrients, antibodies and waste products to and from the cells. Blood contains red blood cells, white blood cells, platelets and antibodies.
Blood vessels A network of soft, flexible tubes of different sizes, located in every part of the body.
Bubble packs Also called bingo cards, these cardboard cards look like bingo cards and have rows of plastic bubbles for each dose of medication.
Burns Damage to the skin caused by fire, sun, chemicals, hot objects, hot liquids or electricity. Burns are described in categories according to how deeply the skin is damaged.
Capillaries The smallest blood vessels that connect the arteries and veins.
Cardiopulmonary Method of restarting the heart’s pumping action; special training is required to Resuscitation (CPR) perform CPR.
Cardiovascular System Consists of the heart, blood vessels, and blood. The main purpose is to circulate blood in order to deliver oxygen and remove carbon dioxide from the different parts of the body.
Cartilage Tough tissue that is found in joints at the ends of bones to allow smooth movement.

120 • Glossary of Terms
Cerebral Vascular This is a rupture or a blockage of a blood vessel in the brain, depriving parts of Accident (CVA) the brain of blood supply. Also known as a stroke.
Chronic Obstructive A progressive and irreversible condition where the lungs function poorly. The Pulmonary Disease condition may result from one of the following diseases: chronic bronchitis, (COPD) pulmonary emphysema, and asthma. The most common cause is smoking.
Colon Large intestine.
Colitis (Irritable Bowel) Inflammation of the large intestine.
Colostomy An artificial opening from the colon to the outside through the abdominal wall.
Congestive Heart The heart is not strong enough to pump blood throughout the body. The heart Failure (CHF) pumps so weakly that blood backs up in the veins and body organs.
Chronic Lasting a long time.
Conjunctival sac Area of the eye just inside the lower eyelid.
Constipation Failure to have regular bowel movements.
Contagious The condition in which an infection can be spread from one person to another.
Controlled Substances Drugs for which there are special rules because they can be addictive or easily abused. Examples are narcotics and some sleeping pills.
Cornea Clear outer covering of the eyeball.
Debriding Removing dead tissue from a wound.
Decubitus ulcer Areas where the skin and tissue underneath have died as a result of poor circulation caused by pressure. Same as a pressure sore or bed sore.
Dehisced Wounds A wound from surgery that didn’t heal right and has opened up. These will heal slowly from the inside out.
Dehydration Condition where the body does not have enough water. This can happen from too much loss of water from perspiration, diarrhea or vomiting, or not drinking enough fluid.
Delegation An RN transfers the performance of one task for one client to a qualified Nursing Assistant or Home Care Aide in a designated setting.
Dementia A progressive disease caused by the destruction of brain cells. The ability to understand, remember, or think in normal ways is lost. Alzheimer’s Disease is the most common cause of dementia.
Dermis The inner layer of skin just beneath the epidermis layer. It is made up of the connective tissue with tiny blood vessels and nerve endings. It also contains hair follicles, oil glands, sweat glands and sense receptors.
Developmental A condition that starts before the age of 18, continues indefinitely, and leaves Disability a person with a significant handicap. Includes such things as an intellectual disability, cerebral palsy, autism, and Down syndrome.
Diabetes Mellitus A disease where the pancreas does not produce any or enough insulin. Without insulin, the body cannot properly use sugar to fuel the body’s cells.
Glossary of Terms

Glossary of Terms • 121
Document The written record of what was done.
Dominant hand Hand that you usually use to write with, eat with, or do most things with.
Dose Amount of medication to be taken.
Drainage Substance that comes out of a wound or an infected or injured part of the body.
Endocrine System Includes glands that secrete hormones to regulate body functions. These glands include pancreas, pituitary, thyroid and parathyroid, adrenal glands, ovaries and testes.
Enzyme, Chemical that the digestive system produces to break food down into nutrients. digestive enzyme
Epilepsy A chronic disorder in which a person has seizures.
Epidermis The outermost layer of the skin.
Epilepsy Cells in the brain “misfire,” causing seizures.
Epithelialization Stage of wound healing when the skin is growing back.
Esophagus Throat, where food goes when you swallow.
Exudate Drainage from a wound or infected area such as an eye.
Fecal Impaction Stool that is stuck in the rectum and cannot be expelled in a bowel movement. This can happen when a person is constipated for a long time.
Fractures A break in a bone.
Gallbladder A small sack near the liver that stores the bile that the liver produces.
Gallbladder Disease Inflammation or blockage of the opening of the gallbladder, so that bile cannot get out.
Gastrointestinal (GI) Mouth, esophagus, stomach, intestines, liver, gallbladder and pancreas. These system organs process the food that we eat into useable nutrients and get rid of waste products through the bowels.
Gastrointestinal Ulcer An inflamed area or open sore in the GI tract.
Gastrostomy An opening from the stomach to the outside through the abdominal wall. This allows food, liquids or medicines to be put in through a tube when the person has difficulty with swallowing.
Generic name The medication name that tells something about the chemical makeup of the medication. Examples are Acetaminophen, Ibuprofen, and Furosemide.
Genito-urinary System Consists of kidneys, ureters, urinary bladder, urethra and the reproductive organs. These organs filter waste products out of the blood, regulate the amount of water in the body, regulate the chemical balance in the blood, and give us our male and female characteristics, including reproduction.
GERD Gastro-Esophageal Reflux Disorder; “heartburn.” This happens when the stomach contents enter the lower esophagus.
Glossary of Terms

122 • Glossary of Terms
Glucometer A machine for measuring the amount of sugar in a person’s blood.
Glucose The form of sugar that is in the blood.
Granulation Stage of wound healing when new cells are growing.
Heart Pumps blood throughout the body. It is a muscle with four chambers that have large blood vessels leading either into or out of the chambers.
Heart Arrhythmia Irregular heartbeat.
Heart Attack (Myocardial Occurs when a blood vessel within the heart muscle closes or is blocked so that Infarct or MI) the heart muscle itself does not get enough oxygen.
Hemorrhoids Hemorrhoids are varicose veins in the rectum. They can sometimes be seen as little pouches around the anus.
Hormones Chemical substances that regulate and control body activities or growth.
Hyperglycemia Too much glucose in the blood (High blood sugar)
Hypertension Too much pressure of the blood against the arterial walls. (High blood pressure)
Hypoglycemia Blood glucose is too low (Low blood sugar)
Hypotension The blood pressure is not adequate for normal blood flow and to get enough (Low blood pressure) oxygen to the body tissues.
Hypothyroidism Condition where the thyroid gland does not make enough hormone. Symptoms include fatigue, dry skin and hair, brittle nails.
Incontinence Incontinence is the inability to control urination or bowel movements.
Infection A condition where bacteria, viruses or fungi have invaded and taken hold in the body.
Inflammation The body’s response to an injury. The body sends it defenses to heal the injury.
Inhalation When medication is breathed into the nose, throat, and lungs.
Injection When medication is given by piercing the skin with a needle.
Insulin Hormone made by the pancreas that allows the body to use sugar. Many foods are broken down into sugar by digestion and need to have insulin for the body to be able to use them.
Integumentary system Consists of skin, hair, nails and glands in the skin. Provides the body with a protective covering.
Intestine Bowels. Includes the small intestine and the large intestine (colon).
Joints The places where bones are joined together. Examples are the knee, hip and wrist.
Kidneys Organs that produce urine by filtering blood.
Labia Flaps of tissue at the opening of the vagina.
Glossary of Terms

Glossary of Terms • 123
Legend drugs Prescription medications.
Ligaments Tough bands that hold joints together.
Liver Organ near the stomach which does many things including making bile for fat digestion and filtering waste products out of the blood.
Medication Any compound that changes the chemical activity within the human body.
Medication Record The paperwork that shows what medicines a person is taking, the dose, the schedule and by what route. It also shows who assisted with or administered the medications.
Medication Interaction When two or more medications change the effect of one or the other medications.
Medication organizers Medisets or weekly pill boxes.
Medication routes The way a medication is given. Includes oral (by mouth), injection, topical (put on the skin), inhalation (breathed in), vaginal, rectal, and sublingual (under the tongue).
Medication Side Effect Results from a medication that are not intended.
Muscle The body tissue that makes movement possible. There are two kinds, 1) voluntary that a person can control like in their arms and legs and 2) involuntary which are automatic, like the heart and intestines.
Musculoskeletal System Body system consists of the bones, muscles, ligaments, tendons and cartilage. This system protects the internal body organs, provides a framework for the body, maintains posture and makes body movement possible.
Nerves Part of the nervous system. They are long thin strands that send electrical messages to parts of the body from the brain and back again.
Nervous System The brain, spinal cord and nerves. Coordinates the body functions, monitoring changes in the body and in the environment. This system allows the body to see, hear, smell, taste, and touch.
Non-legend drugs Over-the-counter medications or medications that can be purchased without a prescription.
Nostrils Openings in nose, also called nares.
Nutrients Food is broken down into nutrients (proteins, fats, carbohydrates, vitamins, minerals and water) for the body to use.
Ointment A form of medication used on the skin, eyes or ears.
Oral medications Medications such as pills or liquids that are put in the mouth and swallowed, either alone or with a glass of liquid.
Osteoporosis A disease in which the bones gradually become so weak that they can fracture (break) from something as minor as a sneeze. It can also cause low back pain, stooped shoulders, and the rapid loss of height. It mostly affects women after menopause, although men can get osteoporosis.
Glossary of Terms

124 • Glossary of Terms
Ostomy An opening in the abdominal wall, usually from the intestines or the urinary bladder, to the outside. It is done to bypass parts of the intestine or the urinary system.
Pancreas Organ near the stomach that makes enzymes to digest food and insulin for processing sugars.
Parkinson’s Disease A slowly progressive disease of the central nervous system in which the person has tremors, stiffness and slowed movements.
Perineum Area on a woman’s body around the vagina.
Peristalsis Automatic wave-like muscle action of the digestive system that moves food from the mouth to the rectum.
Pneumonia An inflammation of the lungs caused by bacteria, viruses or fungi. Symptoms include fever, chills, and cough.
Prescription A prescription is an order for medication or treatment given by doctors, nurse practitioners, physician’s assistants, dentists, and other health care professionals.
Pressure Injury An area of the skin where lack of blood flow has caused tissue to die. Also called decubitus ulcer or bed sore.
PRN PRN medications (Latin for Pro Re Nata) are medications taken on an “as needed” basis.
Product name The medication’s brand such as Tylenol, Motrin, and Lasix.
Prostate Gland in men located in the penis. It can become enlarged and block the flow of urine out of the bladder.
Psychotropic Refers to a medication that has an effect on the brain.
Rash Skin condition that is often raised, red, and bumpy areas and can be itchy.
Rectum, Rectal Rectum is the last part of the large intestine where stool is stored until it is expelled as a bowel movement.
Rectal medication Inserting medication in the form of a suppository or enema into the rectum. administration
Respiratory System Consists of the nose, throat (pharynx), voice box (larynx), windpipe (trachea), bronchi, and lungs. These organs transfer oxygen from the air to the blood, and remove carbon dioxide from the blood for transfer to the air.
Seizure A misfiring of nerves in the brain. The seizure can range from mild blackouts or shaking to sudden and uncontrolled muscle movements involving the whole body.
Sensory System Ears, eyes, nose, tongue and touch sensors. Work with the nervous system to allow us to see, hear, smell, taste and feel touch.
Sphincters Ring-shaped muscles at the opening of the rectum and the urinary bladder which control the release of stool, gas and urine.
Stasis or Venous Ulcers Open sore, usually found on the lower legs and feet, caused by poor circulation from the veins.
Glossary of Terms

Glossary of Terms • 125
Stoma The place where an artificial opening is made. Bowel or bladder waste materials can be emptied through the stoma into a pouch.
Stroke The medical term is Cerebral Vascular Accident (CVA). This is a rupture or a blockage of a blood vessel in the brain, depriving parts of the brain of blood supply.
Subcutaneous layer The layer of tissue under the skin that is a combination of fibrous and fatty connective tissues.
Sublingual Medication is placed under the tongue and it dissolves in saliva. The Administration medication is absorbed through the mucous membrane that lines the mouth.
Suppository Medication inserted into the rectum or vagina. It is usually made of a solid like substance that will melt when it warms up.
Symptom A sign of a disease or condition.
Tendons Tough and elastic bands that attach muscles to bones.
Topical (medication Applying a medication directly to the skin or mucous membrane, usually for a administration) local effect.
Traumatic Brain Injury An injury to the brain from a fall, accident, assault or other situation when the brain itself is damaged.
Tremors Shaking movements, especially in the hands, that are difficult for a person to control.
Unit dose packaging Each dose of the medication is packaged separately.
Upper Respiratory Include the common cold, sinus problems, chronic cough, sore throat, runny Infections (URI) nose, sinus infection, and tonsillitis. Either a bacteria or a virus can cause these infections.
Ureters Tubes that carry urine from the kidneys to the bladder.
Urethra Tube which carries urine from the bladder to outside the body.
Urine Liquid made by the kidneys. Urine allows the body to get rid of excess water and some waste products.
Urinary Bladder Holds the urine until it is expelled.
Urinary Tract An infection of one or more parts of the urinary tract. The condition is more Infection (UTI) common in women than men and may have no symptoms.
Urostomy An artificial opening from the bladder to the outside through the abdominal wall.
Vaginal Administration Inserting medication into the vagina in the form of a cream, foam, tablet, or suppository.
Veins Blood vessels that carry blood with carbon dioxide back toward the heart.
Visual Having to do with vision or seeing.
Glossary of Terms

126 • Job Aids

Job Aids • 127
Job Aids
Nurse Delegation Communication ChecklistThis form will help you document and discuss specific policies and expectations regarding who to contact in different situations.
After completing this course, meet with the delegating RN, your supervisor, facility administrator, or the case manager to discuss the items below. Record the policies and contact information in the space provided.
Who do I call if:There is an emergency
Supplies are needed
There is a change in doctor’s orders
I am unable to go to work on a day a nurse delegated task is to be done
Who do I contact if my client:Starts to get sick
Shows signs of a changing condition
Refuses the treatment or medication
General information:
Directions

Commonly Used Abbreviations for Medications
a before
ac before meals
@ at
bid twice a day
BM bowel movement
BP blood pressure
C Centigrade
c with
cc cubic centimeter
cm centimeter
dc discontinue
elix elixir
F Fahrenheit
gm gram
gtt drop
gtts drops
hs bedtime
IM intramuscular
IU international units
IV intravenously
Kg kilogram
L liter
Mcg microgram
mEg milliequivalent
mg milligram
ml milliliter
mm millimeter
noc, noct nocturnal
NPO nothing by mouth
OD right eye
OS left eye
OU both eyes
P after
pc after meals
po by mouth
prn as needed
q every
qd every day
qid four times a day
qod every other day
q4h every 4 hours
qhs every bedtime
s without
subcu subcutaneously
2 three times a day
TPR temperature, pulse and respiration
VS vital signs, same as TPR
Commonly Used Abbreviations for Medications
128 • Job Aids

Job Aids • 129
Administering Ear DropsThis is general information only. Always follow the specific instructions for each client outlined for you by the delegating RN.
Step 1: Evaluate the client.• Talk with the client about the procedure.• Ask the client how they are doing, determine any changes they are experiencing such as
hearing changes, ear drainage, or pain. Note any complaints.
Step 2: Prepare for the procedure.• Review the delegation instructions and the medication record.• Check the medication record against the ear drop label.• Wash your hands with soap and water, and dry thoroughly.• Put on gloves.• Prepare the necessary equipment.• Warm the medication solution close to body temperature by holding in the palm of
your hand for a few minutes before instilling.• Shake bottle if indicated.• Partially fill the ear dropper with medication.• Assist the client to a side-lying position with the ear being treated uppermost. Or if the
client desires, they can sit with head tilted so that the treated ear is uppermost.
Step 3: Complete the procedure.• Straighten the ear canal so that the solution can flow the entire length of the canal by
gently pulling the ear lobe upward and backward.• Instill the correct number of drops along the side of the ear canal. Dropping the
medication down the middle of the ear canal may make the medication land right on the ear drum, which is loud and sometimes painful. Do not let the dropper touch any part of the ear or ear canal.
• Ask the client to remain lying on their side, or sitting with the head tilted for about 5 minutes after you have instilled the medication.
• You may put a cotton ball loosely in the ear to keep drops in place if indicated by the prescribing practitioner.
• Remove gloves.• Wash your hands with soap and water, and dry thoroughly.
Step 4: Document the medication administration.
Step 5: Observe the client’s response to the medication and any side effects.
Introduction
Procedure: Ear drops procedure

Administering Eye Drops or OintmentsThis is general information only. Always follow the specific instructions for each client outlined for you by the delegating RN.
Step 1: Evaluate the client.• Ask the client how they are doing, determine any changes they are experiencing
including vision changes, eye redness, swelling or drainage, or any pain. Note any complaints.
• Talk with the client about the procedure. The administration of eye medication is not usually painful. Ointments are often soothing to the eye, but some liquid preparations may sting initially.
• If the client has more than one eye medication, explain to the client that two or more eye medications will be given at least five minutes apart. If the client has eye ointment and drops to be instilled, explain that the eye drops will be instilled first because the ointment forms a barrier to drops instilled after the ointment.
Step 2: Prepare for the procedure.• Review the delegation instructions and the medication record.• Check the medication record against the eye drop/ointment label.• Wash your hands with soap and water, and dry thoroughly.• Put on gloves.• Prepare the necessary equipment.• Assist the client to a comfortable position, either sitting or lying. Do not administer
the medication with the client standing.• Clean the eyelid and the eyelashes before installing drops or ointment. Use a clean,
warm washcloth to clean eyes. Use a different clean area of cloth for each eye.• When cleaning the eye wipe from the inner canthus (closest to the nose) toward the
outer canthus (away from the nose).• If ointment is used, discard the first bead. The first bead of ointment from a tube is
considered to be contaminated.
Procedure: Eye drops or ointments
Introduction
130 • Job Aids

Step 3: Complete the procedure• Ask the client to look up to the ceiling. Give the client a dry absorbent tissue. The
client is less likely to blink if looking up.• Expose the lower conjunctival sac by placing the thumb or fingers of your
nondominant hand on the client’s cheekbone just below the eye and gently draw down the skin on the cheek.
• Encourage the client to assist if possible, have them pull down the lower lid. If the lower lid is swollen, inflamed or tender handle it very carefully to avoid damaging it.
• Placing the fingers on the cheekbone minimizes the possibility of touching the cornea, avoids putting any pressure on the eyeball, and prevents the person from blinking or squinting.
• Approach the eye from the side and put the correct number of drops onto the outer third of the lower conjunctival sac. Hold the dropper 1 to 2 cm above the sac. The client is less likely to blink if a side approach is used. When put into the conjunctival sac, drops will not irritate the cornea. The dropper must not touch the sac or the cornea.
• If using ointment, hold the tube above the lower conjunctival sac, squeeze about 3/4 inch of ointment from the tube into the lower conjunctival sac from the inner canthus outward.
• Instruct the client to close their eye but not to squeeze it shut. Closing the eye spreads the medication over the eyeball. Squeezing can injure the eye and push out the medication.
• For liquid medications, press firmly or have the client press firmly on the tear duct for at least 30 seconds. Pressing on the duct prevents the medication from running out of the eye and down the duct.
• Clean the eyelids as needed. Wipe the eyelids gently from the inner to the outer canthus to collect excess medication.
• Assess responses immediately after the instillation and again after the medication should have acted.
• Remove gloves and wash your hands.
Step 4: Document the medication administration.
Step 5: Observe the client.• Observe and report redness, drainage, pain, itching, swelling, or other discomforts or
visual disturbances.• Look for side effects as instructed by the delegating RN.
Job Aids • 131

132 • Job Aids
Administering Nasal Drops or SpraysThis is general information only. Always follow the specific instructions for each client outlined by the delegating RN.
Step 1: Evaluate the client.• Ask the client how they are doing, determine any changes they are experiencing
including stuffiness, drainage, ease of breathing. Note any complaints.• Talk with the client about the procedure.
Step 2: Prepare for the procedure.• Review the delegation instructions and the medication record.• Check the medication record against the nasal drop or spray label.• Wash your hands with soap and water, and dry thoroughly.• Put on gloves.• Prepare the necessary equipment.• Have the client blow their nose gently to clear the nasal passage.• Instilling nose drops requires the client to either lie down or sit down with their head
tilted back.• If the client lies down, put a pillow under their shoulders, letting the head fall over the
edge of the pillow. Some sprays recommend the client keep their head upright.
Step 3: Complete the procedure.• Elevate the nostrils slightly by pressing the thumb against the tip of the nose.• Hold the dropper or spray just above the client’s nostril and direct the medication
toward the middle of the nostril. If the medication is directed toward the bottom of the nostril, it will run down the Eustachian tube.
• Do not touch the dropper or spray bottle tip to the mucous membranes of the nostrils to prevent contamination of the container.
• Ask the client to inhale slowly and deeply through the nose; hold the breath for several seconds and then exhale slowly; and remain in a back-lying position for 1 minute so the solution will come into contact with the entire nasal surface.
• Discard any medication remaining in the dropper before returning the dropper to the bottle.
• Rinse the tip of the dropper with hot water, dry with tissue and recap promptly.• Remove gloves.• Wash your hands with soap and water, and dry thoroughly.
Step 4: Document the medication administration.
Step 5: Observe the client’s response to the medication and any side effects.
Procedure: Nasal drops or sprays
Introduction

Job Aids • 133
Adminstering Oral Inhalation TherapyThis is general information only. Always follow the specific instructions for each client outlined by the delegating RN.
Step 1: Evaluate the client.• Ask the client how they are doing, determine any changes they are experiencing
including ease of breathing. Note any complaints.• Talk with the client about the procedure.
Step 2: Prepare for the procedure.• Review the delegation instructions and the medication record.• Check the medication record against the inhaler or spray label.• Wash your hands with soap and water, and dry thoroughly.• Put on gloves.• Prepare the necessary equipment.
Step 3: Complete the procedure.• Shake the inhaler immediately before using it. Remove the cap from the mouthpiece.• Ask client to clear their throat.• Ask the client to breathe out slowly until no more air can be expelled from the lungs
then hold their breath.• Place the mouthpiece in the mouth holding the inhaler upright. Close the lips tightly
around the mouthpiece.• Squeeze the inhaler as client breathes in deeply through the mouth. This is often
difficult to do.• Tell client to hold breath up to a count of five seconds.• Before breathing out, remove the inhaler from the mouth. Wait at least two minutes
between puffs, unless there are other directions.• Repeat process if two puffs are ordered.
Step 3: Complete the procedure (continued)• If you have two or more inhalers always use the steroid medication last. Then rinse
mouth out with water.• Clean mouthpiece of inhalers frequently and dry it thoroughly.• Remove gloves.• Wash your hands with soap and water, and dry thoroughly.
Step 4: Document the medication administration.
Step 5: Observe the client’s response to the medication and any side effects.
Introduction
Procedure: Oral inhalation
therapy
Administering Rectal Suppository or CreamThis is general information only. Always follow the specific instructions for each client outlined for you by the delegating RN.
Step 1: Evaluate the client.• Ask the client how they are doing, determine any changes they are experiencing including
pain, itching, burning, or constipation. Note any complaints.• Talk with the client about the procedure.
Step 2: Prepare for the procedure.• Review the delegation instructions and the medication record.• Check the medication record against the suppository or cream label.• Wash your hands with soap and water, and dry thoroughly.• Put on gloves.• Prepare the necessary equipment, and provide for privacy.• Remove the wrapper and lubricate the smooth rounded end, or see manufacturer’s
instructions. The rounded end is usually inserted first, and lubricant reduces irritation of the rectal lining. If the suppository is too soft, put it in the refrigerator before removing wrapper.
• For one-half suppository, cut the suppository lengthwise.• Encourage the client to relax by breathing through the mouth.• Have client assume a position of comfort. It is most effective to insert the suppository while
the client is lying on the left side. However, a suppository can be inserted in any lying or sitting position.
Step 3: Complete the procedure.• Lubricate the gloved index finger of your dominant hand.• Insert the suppository gently into the anal canal, rounded end first, or according to the
manufacturer’s instructions, along the rectal wall using the gloved index finger.• Insert the suppository approximately 4 inches.• Avoid embedding the suppository in feces.• Press the client’s buttocks together for a few minutes.• Ask the client to continue to lie down for at least 5 minutes to help retain the suppository.• The suppository should be retained for at least 30 to 40 minutes or according to
manufacturer’s instructions. • For rectal cream insert applicator tip in rectum and gently squeeze tube to deliver cream.• Remove the applicator; wash it in warm soapy water and dry well before storing.• Remove gloves.• Wash your hands with soap and water, and dry thoroughly.
Step 4: Document the medication administration.
Step 5: Observe the client’s response to the medication and any side effects.
134 • Job Aids
Procedure: Rectal suppository or cream
Introduction
Job Aids • 135
Administering Vaginal Suppository or CreamThis is general information only. Always follow the specific instructions for each client outlined for you by the delegating RN.
Step 1: Evaluate the client.• Ask the client how they are doing, determine any changes they are experiencing
including itching, burning, or drainage. Note any complaints.• Talk with the client about the procedure and explain it is normally painless.
Step 2: Prepare for the procedure.• Review the delegation instructions and the medication record.• Check the medication record against the suppository or cream label.• Wash your hands with soap and water, and dry thoroughly.• Put on gloves.• Prepare the necessary equipment.• Unwrap the suppository and put it on the opened wrapper or;• Fill the applicator with the prescribed cream, jelly, or foam. Directions are provided with
the manufacturer’s applicator.• Provide privacy, and ask the client to empty her bladder prior to the procedure. If the
bladder is empty, the client will feel less pressure during the treatment, and the possibility of injuring the vaginal lining is decreased.
• Assist the client to a back-lying position with knees bent and the hips rotated outward.• Drape the client appropriately so that only the perineal area is exposed.• Encourage the client to relax by breathing through the mouth.
Step 3: Complete the procedure• Lubricate the rounded (smooth) end of the suppository, which is inserted first.• Lubricate your dominant gloved index finger.• Expose the vaginal orifice by separating the labia with your non- dominant hand.• Insert the suppository about 3-4 inches along the back wall of the vagina.• If inserting cream, gently insert the applicator about 2 inches. Slowly push the plunger
until the applicator is empty. Remove the applicator and place on a towel. Discard the applicator if disposable or clean it according to the manufacturer’s direction.
• Remove the gloves, turning them inside out. Discard appropriately.• Wash your hands with soap and water and dry thoroughly.• Ask the client to remain lying in bed for 5 to 10 minutes following the instillation.• Dry the perineum with the tissues as required. Remove the bedpan, if used.• Remove the moisture-resistant pad and the drape. Apply a clean perineal pad if there is
excessive drainage.
Step 4: Document the medication administration.
Step 5: Observe the client’s response to the medication and any side effects.
Introduction
Procedure: Vaginal
suppository or cream
Procedure: Non-sterile dressing
Non-sterile DressingThis is general information only. Each client is different, so the specific steps you will need to take will vary. Always follow the specific instructions for each client outlined for you by the delegating RN.
Step 1: Evaluate the client.• Talk with the client about the procedure.• Ask the client how they are doing, determine any changes they are experiencing. Note
any complaints. Notice whether the client is eating well and drinking adequate fluids since this is important to wound healing.
Step 2: Prepare for the procedure.• Review the delegation instructions.• Wash your hands with soap and water, and dry thoroughly.• Prepare the necessary equipment.• Put on gloves.
Step 3: Complete the procedure.• Remove the old dressing and dispose of it in an appropriate container.• Remove gloves, wash hands, and put on new gloves.• Cleanse the wound as directed by the delegating nurse.• Observe the wound as directed by the delegating nurse.• Apply any ointment or medication as directed by the delegating nurse.• Apply the new dressing as ordered by the delegating nurse.• Remove gloves.• Wash your hands with soap and water, and dry thoroughly.
Step 4: Document your wound observation and the dressing change as ordered by the delegating nurse.
Step 5: Observe the client for any changes or complications.
(Continued on next page)
Introduction
136 • Job Aids

Observing the Wound• When dressing is removed, check the dressing for drainage.• After wound is cleansed, observe:
– Color. – Presence of odor that persists after the wound has been cleaned (some dressings
will have an odor). – Amount of drainage. – Consistency of drainage.
• After cleansing the wound, describe the wound edges and wound bed. Look at:– Size of wound– Describe it like a “quarter” or “dime” in size. This does not need to be exact but
you should use the same kind of measurements consistently (like inches or size of a “____ ”).
– Color of wound: red, yellow, or black?– Wound drainage– If present, is it stringy, or does it have hard tissue?– Wound edges - circular or irregularly shaped?– Is there undermining (tunneling under the skin) present? (Caregivers do not
measure depth of undermined areas.)
• Cover the wound with the dressing the delegating nurse showed you to use. There are many different kinds of dressings. Each has a specific purpose and should be used only as the nurse has shown you.
• Document observation of wounds as often as delegating nurse asks. Always notify nurse if there is an unusual change in appearance of wound.
Dressing the wound
Procedure: Oral inhalation
therapy
Job Aids • 137

Glucometer TestingA glucometer is a machine for measuring the sugar content of a person’s blood. Review the section on diabetes on page 48 for more detailed information on caring for clients with diabetes.
This glucometer testing procedure is general information only. Always follow the specific instructions for each client outlined for you by the delegating RN.
Step 1: Evaluate the client• Talk to the client about the glucometer testing.• Ask the client how they are doing, and determine any changes they are experiencing.• Ask the client where they would like you to draw their drop of blood. Usually a finger
is used to obtain the blood. Do not use a swollen or injured site. It helps if the site is warm.
Step 2: Prepare for the procedure.• Review the delegation instructions.• Wash your hands with soap and water, and dry thoroughly.• Gather the necessary equipment.• Put on gloves.
Step 3: Complete the procedure.• Puncture the body part as directed by the
delegating RN. The best practice is to change the puncture site for each test.
Tip: fingertips are less sensitive on the sides of the finger.
• Test according to the equipment manufacturer’s directions and the delegating nurse’s instructions.
• Provide direct pressure to stop the bleeding if needed• Remove gloves.• Wash and dry your hands.
Step 4: Document the reading with the date and time, and any other information required by the delegating RN.
• Respond to the reading per instructions from the delegation RN.
Step 5: Observe the client for irritation to the puncture site.
Procedure: Glucometer testing
Introduction
138 • Job Aids

Gastrostomy FeedingsA gastrostomy is an opening from the stomach to the outside through the abdominal wall. This allows food, fluids, or medicines to be taken in through a tube when the person has difficulty swallowing.
Always follow the specific instructions for each client outlined for you by the delegating RN.
Step 1: Evaluate the client.• Talk to the client to find out how they are doing, and determine any changes they are
experiencing.• Explain to the client what you will be doing. Ask the client to tell you if they are
experiencing any discomfort.
Step 2: Prepare for the procedure.• Review the delegation instructions.• Wash your hands with soap and water, and dry thoroughly.• Gather the necessary equipment.• Put on gloves.
Step 3: Complete the procedure.• Remove the dressing - never use scissors to cut it off.• Anchor the tube as instructed by the delegating nurse.• Encourage the client to be in a sitting or semi-reclining position.• The delegating nurse may ask you to check gastric contents by putting on gloves and
withdrawing some of the contents of the stomach with a large syringe.• Administer the formula or the medication as directed by the delegating nurse.• Flush the feeding tube with 30-60 ml of water before and after each feeding and after
giving all medications.• Remove gloves.• Wash your hands.
Step 4: Document the feeding according to the instructions of the delegating RN.
Step 5: Observe the client for any complications as directed by the delegating RN.
Introduction
Procedure: Gastrostomy
Feedings
Job Aids • 139

When you provide nutrition through the feeding tube remember the following information:
• Involve the client as much as possible. Meal times and eating are social times for many people and you should know the client’s preference for being with other people vs. their desire for privacy when they are receiving their food.
• Verify in writing with the delegating nurse the process for feeding, the amount of feeding, the amount of water, flow rate, and what position the client should be in when receiving liquid feedings.
• Use care when moving, bathing, and dressing to prevent pulling on tube.• Report any discomfort.• Watch for irritation, redness, swelling, or drainage around abdominal incision.• Sometimes clients can have food in their mouths for enjoyment of the taste but are not
allowed to swallow the food. If this is allowed, ask the client what foods they would like to taste.
• Notify the nurse if vomiting or burping occurs.• Have the client sit upright, or at a 30-45 degree angle, while receiving their tube
feeding and stay upright for one hour after feeding has been finished.• Observe the client’s mouth for any signs of dryness or breakdown.• Encourage client to brush and use mouthwash or other mouth freshening products,
like saline swabs. Tell the client it is important not to swallow water while brushing his/her teeth as they may choke.
• The client should be sitting at a 90-degree angle while brushing their teeth or using mouthwash to prevent accidental swallowing of fluid.
• Diarrhea often occurs because of “dumping syndrome” (rapid emptying of stomach contents into the small intestine). If this happens, contact the delegating RN or the attending medical provider.
• Clean the equipment as directed.
Best practices for liquid feeding
140 • Job Aids

Job Aids • 141
Ostomy CareThis section will cover the basic procedure for ostomy care. This is general information only. Each client is different and care will vary from person to person. Always follow the specific instructions for each client outlined for you by the delegating nurse.
An ostomy is an artificial opening in the abdominal wall to one of our internal organs. This is done when there is something wrong with other parts of the system. For instance, if a person has a blockage in their intestines due to a tumor, the surgeon can bring portion of the bowel to an opening in the abdominal wall. This is called a colostomy.
It is also possible to create an opening into the stomach, called a gastrostomy, particularly when a person has trouble swallowing or an opening into the bladder, called a urostomy. The ostomy can be either temporary or permanent.
The place where the opening is made is called the “stoma.” Bowel or bladder waste materials can be emptied through the stoma into a pouch. You may be delegated the task of helping the client with some or all of their ostomy care.
The client may be sensitive or embarrassed about the ostomy, especially if it is fairly new. It is important that the caregiver not make any comments or otherwise make the client think that is unpleasant to assist with their ostomy care.
This section will describe the changing of a colostomy bag. The bag should be changed when it is one-third to one-half full to prevent pulling on the skin around the stoma.
Step 1: Evaluate the client.• Talk with the client about the procedure. Check to see where they would like to have
the ostomy care done. Often it is easier to do in the bathroom.• Be sure that there is privacy for the client wherever the care is done.• Ask the client how they are doing, determine any changes they are experiencing.
Step 2: Prepare for the procedure.• If delegation is required, follow the delegation instructions.• Prepare the necessary equipment.• Wash your hands with soap and water and dry thoroughly.• Put on gloves.
(Continued on next page)
Introduction
Procedure: Gastrostomy
Feedings
Considerations
Ostomy bag

Step 3: Complete the procedure.• Remove the old colostomy bag and wafer, or other devices, from the stoma.• Dispose of the bag according to the delegating nurse’s instructions or in a leak-proof
bag. • Gently remove any stool from around the stoma with toilet tissue. Then cleanse the
skin around the stoma with mild soap and water. Pat dry.• Observe the stoma and the surrounding skin for any open areas, irritation, rash or
other features as directed by the delegating nurse.• Apply any ointments as directed.• Apply the new bag as directed by the delegating nurse. There are a number of different
types of bags available, the delegating nurse will give you specific instructions on the bag the client uses.
• Remove gloves.• Wash your hands with soap and water, and dry thoroughly.
Step 4: Document the ostomy care as ordered by the delegating nurse.
Step 5: Observe the client for any changes or complications.
142 • Job Aids

Straight Clean Urinary CatheterizationA straight clean urinary catheter is a tube which is inserted into the bladder to drain urine and is then removed. This is done when the person is not able to empty their bladder without the catheter.
Always follow the specific instructions for each client outlined for you by the delegating RN.
Step 1: Evaluate the client.• Talk to the client to find out how they are doing, and determine any changes they are
experiencing.• Explain what you will be doing to the client. Ask the client to tell you if they are
experiencing any discomfort or if they have any preferences about how you do the procedure.
Step 2: Prepare for the procedure.• Provide for the client’s privacy.• Review the delegation instructions.• Wash your hands with soap and water; dry thoroughly.• Gather the necessary equipment.• Put on gloves.
Step 3: Complete the procedure.• Assist the client to a comfortable sitting or lying position.• Clean the perineal area or end of the penis as directed by the delegating nurse.• Locate and identify the opening of the urethra.• Lubricate the catheter with a water soluble lubricant like KY jelly.• Insert the catheter into the opening of the urethra and into the bladder. This will be
approximately 9 inches for men and 2 ½ to 3 inches for women. You will know you are in the bladder when urine begins to come out of the end of the catheter.
• Ask the client to breathe slowly and deeply. This helps the bladder opening relax. You should use gentle firm pressure when inserting the catheter.
• Hold the catheter in place until urine stops coming out.• Remove the catheter• Clean and dry the perineal area.
Step 4: Document the catheterization according to the instructions of the delegating RN.
Step 5: Observe the client for any complications as directed by the delegating nurse.
Introduction
Procedure: Straight
clean urinary catheterization
Job Aids • 143


