nuvi200_ownersmanual
TRANSCRIPT

8/13/2019 nuvi200_OwnersManual
http://slidepdf.com/reader/full/nuvi200ownersmanual 1/50
owner’s manual
nüvi®
200 and 200W Series
for use with these nüvi models:200, 200W, 250, 250W, 260, 260W, 270

8/13/2019 nuvi200_OwnersManual
http://slidepdf.com/reader/full/nuvi200ownersmanual 2/50

8/13/2019 nuvi200_OwnersManual
http://slidepdf.com/reader/full/nuvi200ownersmanual 3/50
nüvi 200 and 200W series owner’s manual i
Introduction
Introduction
Manual ConventionsWhen you are instructed to “touch”something, use your nger to touchan item on the screen.
The small arrows (>) used in thetext indicate that you should touch aseries of items. For example, if yousee “touch Where to? > Favorites”you should touch Where to?, and
then touch Favorites.On some nüvi units, some buttonsare not labeled. For example, yournüvi might have a button, butthis manual will use the word Tools.
Software on your nüvi coulddiffer from the screen shots andinstructions in this manual.
nüvi ® Tips and
ShortcutsTo quickly return to the Menu page, touch and hold Back .
Touch and to seemore choices. Touch and hold
these buttons to scroll faster.
myGarmin™ Go to http://my.garmin.com to accessthe latest services for your Garmin products:
Register your Garmin unit.
Subscribe to online services forsafety camera information (see page 32).
Unlock optional maps.
•
•
•
•
•

8/13/2019 nuvi200_OwnersManual
http://slidepdf.com/reader/full/nuvi200ownersmanual 4/50

8/13/2019 nuvi200_OwnersManual
http://slidepdf.com/reader/full/nuvi200ownersmanual 5/50
nüvi 200 and 200W series owner’s manual iii
Introduction
Picture Viewer ......................... 16
Calculator ............................... 17
Currency Converter ................. 17Unit Converter ........................ 18
World Clock ............................ 19
Customizing the nüvi ....... 20
Changing the SystemSettings ................................. 20
Adjusting the Display
Settings ................................. 21
Changing the Navigation
Settings ................................. 21Updating the Time Settings ..... 22
Setting the Languages............. 22
Changing Security Settings ..... 23
Changing the Map Settings ..... 23
Changing the Proximity PointsSettings ................................. 24
Restoring All Settings .............. 24
Appendix ........................... 25 Avoiding Theft .......................... 25
Locking Your nüvi .................... 25
Calibrating the Screen ............. 26
Resetting Your nüvi.................. 26
Updating the Software ............. 27Clearing User Data .................. 27
Battery Information ................. 28
Charging Your nüvi .................. 28
Changing the Fuse .................. 29
Removing the nüvi andMount .................................... 29
Mounting on Your
Dashboard ............................ 30
Additional Maps ....................... 30
About GPS Satellite Signals .... 31Extras and Optional
Accessories ........................... 31
Garmin Travel Guide ............... 33
Contact Garmin ....................... 33
Specications .......................... 34Declaration of Conformity ........ 36
Software License Agreement... 36
Troubleshooting ...................... 37
Index .................................. 40

8/13/2019 nuvi200_OwnersManual
http://slidepdf.com/reader/full/nuvi200ownersmanual 6/50
iv nüvi 200 and 200W series owner’s manual
Introduction
Caring for Your nüviYour nüvi contains sensitiveelectronic components that can be permanently damaged if exposedto excessive shock or vibration. Tominimize the risk of damage to yournüvi, avoid dropping your unit and
operating it in high-shock and high-vibration environments.
Cleaning the UnitThe nüvi is constructed of high-quality materials and does not
require user maintenance other thancleaning. Clean the outer casingof the unit (not the touch screen)using a cloth dampened with a milddetergent solution, and then wipe
it dry. Avoid chemical cleaners andsolvents that can damage plasticcomponents.
Cleaning the Touch ScreenClean the touch screen with a soft,
clean, lint-free cloth. Use water,isopropyl alcohol, or eyeglasscleaner, if needed. Apply the liquidto the cloth, and then gently wipe thetouch screen.
Protecting Your nüviDo not store the nüvi where prolonged exposure to extremetemperatures can occur, becauseit can cause permanent damage.
Do not expose the nüvi to water.Contact with water can cause thisunit to malfunction.
Although a PDA stylus can be used to operate the touch
screen, never attempt this whileoperating a vehicle. Never use ahard or sharp object to operatethe touch screen because damagemight result.
•
•
•

8/13/2019 nuvi200_OwnersManual
http://slidepdf.com/reader/full/nuvi200ownersmanual 7/50
nüvi 200 and 200W series owner’s manual 1
Getting Started
Getting Started
See the product documentation in the product box for product warnings and otherimportant information.
RESET Ì Ï0217W000000
N9CAN 310
Designed in USA Made in Taiwan 255w
BLK
Reset button. See page 26 .
Speaker
Mini-USB connector
Memory card
slot (equipped
for either an
SD™ card or amicroSD™ card)
Power key:
Slide to the left to turn the nüvi on/off;
slide to the right to lock the screen.
Button LocationsThe nüvi 200W series unit is shown in the image above. The nüvi 200 seriesunits have the Power key on the right. The nüvi 200W series units have thePower key on the left.
The nüvi 200 series units may have the Reset button on the left, if present. Thenüvi 200W series units may have the Reset button on the right, if present. See page 26 for more information about resetting your nüvi.

8/13/2019 nuvi200_OwnersManual
http://slidepdf.com/reader/full/nuvi200ownersmanual 8/50
2 nüvi 200 and 200W series owner’s manual
Getting Started
WARNING: This product contains a lithium-ion battery. To prevent damage, remove the unitfrom the vehicle when exiting or store it out of direct sunlight.
Before mounting the nüvi, see the product documentation for information about laws pertainingto windshield mounting.
Step 1: Mount Your nüvi1. Plug the vehicle power cable into the back of your nüvi.
2. Snap the cradle onto the suction cup arm.
3. Remove the clear plastic from the suctioncup. Clean and dry your windshield and thesuction cup with a lint-free cloth. Press thesuction cup rmly on the windshield.
4. Flip the lever back toward the windshield.
5. Fit the bottom of your nüvi into the cradle.
6. Tilt your nüvi back until it snaps into place.
7. Plug the other end of the vehicle powercable into a power outlet in your vehicle.Your unit should turn on automatically if it isplugged in and the vehicle is running.
Lever
Suction cup mount
Cradle
Lever
Suction cup mount
Cradle
Vehicle power
cable
Vehicle power
cable

8/13/2019 nuvi200_OwnersManual
http://slidepdf.com/reader/full/nuvi200ownersmanual 9/50
nüvi 200 and 200W series owner’s manual 3
Getting Started
Step 2: Confgure Your
nüviTo turn your nüvi on, slide thePower key to the left. Follow theon-screen instructions. To turn yournüvi off, slide the Power key tothe left.
Step 3: Acquire
Satellites1. Go outdoors to an open area,
away from tall buildings andtrees.
2. Turn on your nüvi.
Acquiring satellite signals can take afew minutes. The bars indicate
satellite strength. When at least oneof the bars is green, your nüvi hasacquired satellite signals. Now youcan select a destination and navigateto it.
Step 4: Use Your nüvi
NOTE: Software on your nüvicould differ from the screenshots in this manual.
➊ ➋ ➌
➍ ➎
➏ ➐
➊ GPS satellite strength
➋ Battery status
➌ Current time. Touch to changetime settings.
➍ Touch to nd a destination.
➎ Touch to view the map.➏ Touch to use the tools such as
settings and Help.
➐ Touch to adjust the volume.

8/13/2019 nuvi200_OwnersManual
http://slidepdf.com/reader/full/nuvi200ownersmanual 10/50
4 nüvi 200 and 200W series owner’s manual
Getting Started
Finding Your Your
DestinationThe Where to? menu providesseveral different categories for youto use when searching for addresses,cities, and other locations. Thedetailed maps loaded in your nüvi
contain millions of points of interest,such as restaurants, hotels, and autoservices.
1. Touch Where to?.
2. Select a category.
3. Select a subcategory.
4. Select a destination.
5. Touch Go!.
TIP: Touch and tosee more choices.

8/13/2019 nuvi200_OwnersManual
http://slidepdf.com/reader/full/nuvi200ownersmanual 11/50
nüvi 200 and 200W series owner’s manual 5
Getting Started
Adding a StopYou can add a stop (called a Via
Point) to your route. The nüvi givesyou directions to the Via Point andthen to your nal destination.
1. With a route active, touchMenu > Where to?.
2. Search for the extra stop.
3. Touch Go!.
4. Touch Add as Via Point toadd this stop before your
destination. Touch Set as newDestination to make this yournal destination.
Taking a Detour 1. With a route active, touch
Menu.
2. Touch Detour .
The nüvi attempts to get you back on your original route as
quickly as possible. If the route
you are currently taking is the onlyreasonable option, the nüvi might not
calculate a detour.
Stopping the Route1. With a route active, touch
Menu.
2. Touch Stop.
Adjusting the VolumeFrom the Menu page, touch Volume(or ). Touch and to adjust
the volume. Touch the box next toMute to mute all audio.
Locking the ScreenTo prevent accidental screen touches,
slide the Power key to the right( ). To unlock the screen, slide thePower key to the center position.

8/13/2019 nuvi200_OwnersManual
http://slidepdf.com/reader/full/nuvi200ownersmanual 12/50
6 nüvi 200 and 200W series owner’s manual
Where to?
Where to?
The Where to? menu providesseveral different categories you canuse to search for locations. To learnhow to perform a simple search, see page 4.
Go! Page Options
➊➋ ➌
➊ Touch to start navigating theroute.
➋ Touch to view this location andsurrounding areas on the map.
➌ Touch to save this location toyour Favorites.
Finding an Address1. Touch Where To? > Address.
2. Change the state, country, orprovince, if necessary.
3. Touch Spell City, enter thecity/postal code, and touchDone. Select the city/postalcode in the list. (Not all mapdata provides postal codesearching.) If you are unsureof the city, touch Search All.
4. Enter the number of the
address, and touch Done.5 Enter the street name, and
touch Done.
6. Select the correct street in thelist, if necessary.
7. Touch the address, ifnecessary.

8/13/2019 nuvi200_OwnersManual
http://slidepdf.com/reader/full/nuvi200ownersmanual 13/50
nüvi 200 and 200W series owner’s manual 7
Where to?
NOTE: Depending on theversion of the maps loaded onyour nüvi, the button namescan change and some stepscould be ordered differently.
Setting a Home
LocationSet your home location for the placeyou return to most often.
1. To set your home location,
touch Where to? > (Favorites >) Go Home.
2. Select an option:
Enter your address.
Use your current location.
Choose from a list of
recently found locations.
•
•
•
Going HomeTo navigate home after you have set
your home location, touch Whereto? > Favorites > Go Home.
Finding a Place by
Spelling the NameIf you know the name of thedestination you are looking for,you can spell it using the on-screenkeyboard. You can also enter letterscontained in the name to narrow the
search.
1. Touch Where to? > Points ofInterest > Spell Name.
2. Using the on-screen keyboard,enter letters of the name ofyour destination. Touch Done.

8/13/2019 nuvi200_OwnersManual
http://slidepdf.com/reader/full/nuvi200ownersmanual 14/50
8 nüvi 200 and 200W series owner’s manual
Where to?
Using the On-ScreenKeyboard
When an on-screen keyboardappears, touch a letter or number toenter it.
Touch to add a space. Touch
to delete a character. Touch and holdto erase the entire entry.
Touch Mode to select the keyboardlanguage mode. Touch 123 to enternumbers and special characters.
Finding Recently
Found PlacesYour nüvi stores the last 50 of yourrecent nds in the Recently Foundlist. The most-recently viewed placesappear at the top of the list. TouchWhere to? > Recently Found to
view your recently found items.
Deleting Recently FoundPlacesTo remove all places from the
Recently Found list, touch Clear >Yes.
NOTE: When you touchClear, all items in the list areremoved. This process does
not delete the actual placefrom your nüvi.

8/13/2019 nuvi200_OwnersManual
http://slidepdf.com/reader/full/nuvi200ownersmanual 15/50
nüvi 200 and 200W series owner’s manual 9
Where to?
FavoritesvoritesYou can save places in your
Favorites so you can quickly ndthem and create routes to them.Your home location is also stored inFavorites.
Saving Your Current LocationFrom the Map page, touch .
Saving Places You Find1. From the Go! page, touch
Save.
2. Touch OK. The place is savedin Favorites.
Finding Saved Places1. Touch Where to?.
2. Touch Favorites. Your savedlocations are listed.
Editing Saved Places1. Touch Where to? >
Favorites.2. Touch Edit.
3. Touch an item to edit:
Change Name—enter
a new name, and touchDone.
Change Map Symbol—
touch a new symbol used
to mark this location on the
map.Change Phone Number —
enter a phone number, and
touch Done.
Delete—touch Yes to
remove this item from the
Favorites list.
•
•
•
•

8/13/2019 nuvi200_OwnersManual
http://slidepdf.com/reader/full/nuvi200ownersmanual 16/50
10 nüvi 200 and 200W series owner’s manual
Where to?
Finding a Place Using
the MapUse the Browse Map page to viewdifferent parts of the map. TouchWhere to? > Browse Map.
Tips for Browsing the Map
Touch the map, and drag to viewdifferent parts of the map.
Touch and to zoom in andout.
Touch any object on the map.
An arrow appears pointing at theobject.
Touch Save to save this location.
Touch Go! to navigate to thelocation.
If the GPS mode is off, touch SetLoc to set your location to theselected location. (See page 20.)
•
•
•
•
•
•
Entering CoordinatesIf you know the geographic
coordinates of your destination, youcan use your nüvi to navigate to yourdestination using the latitude andlongitude coordinates. This can beespecially helpful when geocaching.
1. Touch Where to? >Coordinates.
2. Touch a box to enter acoordinate.
3. Touch Format to change thetype of coordinates. Becausedifferent maps and charts usedifferent coordinate formats,the nüvi allows you to selectthe correct coordinate format
for the type of map you areusing.
4. Enter the coordinates, andtouch Next.

8/13/2019 nuvi200_OwnersManual
http://slidepdf.com/reader/full/nuvi200ownersmanual 17/50
nüvi 200 and 200W series owner’s manual 11
Where to?
Searching Near Near
Another Location1. Touch Where to? > Near….
2. Select an option:
Where I Am Now—search
near your current location.
A Different City—searchnear the city you enter.
My Current Route—
search along your active
route.
My Destination—search
near your current
destination.
•
•
•
•
Navigating Off RoadIf you are not following roadways
as you navigate, use Off Roadmode. Touch Tools > Settings >Navigation > Route Preference >Off Road > OK .
Walking to aDestinationIf you are walking to yourdestination, use Pedestrian modeto optimize your route for walking.
Touch Tools > Settings > System >Usage Mode > Pedestrian > OK .

8/13/2019 nuvi200_OwnersManual
http://slidepdf.com/reader/full/nuvi200ownersmanual 18/50
12 nüvi 200 and 200W series owner’s manual
Using the Map
Using the Map
Your route is marked with amagenta line. As you travel, yournüvi guides you to your destinationwith voice prompts, arrows on themap, and directions at the top of themap. A checkered ag marks yourdestination.
If you depart from the original route,your nüvi recalculates the route and provides new directions.
➊
➋
➌
➍
➊ Touch to view the turn list.
➋ Touch to zoom in and zoom
out.➌ Touch to save your current
location.
➍ Touch to view the tripcomputer.

8/13/2019 nuvi200_OwnersManual
http://slidepdf.com/reader/full/nuvi200ownersmanual 19/50
nüvi 200 and 200W series owner’s manual 13
Using the Map
Trip Computer The trip computer displays your
current speed and provides helpfulstatistics about your trip.
To view the trip computer, touch theSpeed eld on the map.
If you make frequent stops, leave thenüvi turned on so it can accuratelymeasure elapsed time during the trip.
Resetting the Trip Computer Reset the trip computer before
beginning a trip. From the map,touch the Speed eld. Touch ResetTrip to reset the information on thetrip computer. Touch Reset Max toreset the maximum speed.
Turn ListWhen you are navigating a route,
the turn list displays turn-by-turninstructions for your entire route andthe distance between turns.
Touch the text bar on the top of themap to open the turn list. Touch
a turn on the list to view the nextturn page for that turn. Touch ShowMap to view the entire route on the browse map page.
Next TurnWhen you are navigating a route, thenext turn shows the turn on the mapand the distance and time left beforeyou reach the turn.
To view an upcoming turn on themap, touch any turn from the turnlist.

8/13/2019 nuvi200_OwnersManual
http://slidepdf.com/reader/full/nuvi200ownersmanual 20/50
14 nüvi 200 and 200W series owner’s manual
Managing Files
Managing Files
You can store les, such as JPEGimage les, in the internal memoryon the nüvi or on a memory card.
NOTE: The nüvi is notcompatible with Windows® 95,98, Me, or Windows NT®. It isalso not compatible with Mac® OS 10.3 and earlier. This is acommon limitation of mostUSB mass storage devices.
Supported File TypesJPEG and JPG image les: see page 16
Maps and GPX waypoint lesfrom MapSource®: see page 30
GPI custom POI les fromGarmin’s POI Loader: see page31
•
•
•
Loading FilesStep 1: Insert a Memory Card(Optional)To insert or remove the memorycard, press it in until it clicks.
Step 2: Connect the USB
CableThe USB cable is an optionalaccessory. To purchase the USBcable and other accessories, go tohttp://buy.garmin.com or contactyour Garmin dealer.
Connect the mini-USB connectorto the back of the nüvi. Connect thelarger end of the cable to an availableUSB port on your computer.
Your nüvi and memory cardappear as removable drives in MyComputer on Windows computersand as mounted volumes on Maccomputers.

8/13/2019 nuvi200_OwnersManual
http://slidepdf.com/reader/full/nuvi200ownersmanual 21/50
nüvi 200 and 200W series owner’s manual 15
Managing Files
NOTE: Some operatingsystems or computers with
multiple network drives cannot display the nüvi drives.See your operating systemHelp le to learn how to mapthe drives.
Step 3: Transfer Files to YournüviCopy and paste les from yourcomputer into the nüvi drives/volumes.
1. Browse your computer for thele you want to copy.
2. Highlight the le, and clickEdit > Copy.
3. Open the “Garmin” or memorycard drive/volume.
4. Click Edit > Paste. The leappears in the list of les inthe nüvi memory or on thememory card.
Step 4: Eject and Unplug theUSB Cable
When you are nished transferringles, click in your toolbar(system tray), or drag the volumeicon to the Trash on Maccomputers. Unplug your nüvi fromyour computer.
Deleting FilesConnect the nüvi to your computer,and open the nüvi or memory carddrive/volume. Highlight the le youwant to delete, and press the Delete key on the computer keyboard.
CAUTION: If you do notknow the purpose of a le,
do not delete it. Your nüvimemory contains importantsystem les that should not bedeleted.
8/13/2019 nuvi200_OwnersManual
http://slidepdf.com/reader/full/nuvi200ownersmanual 22/50
16 nüvi 200 and 200W series owner’s manual
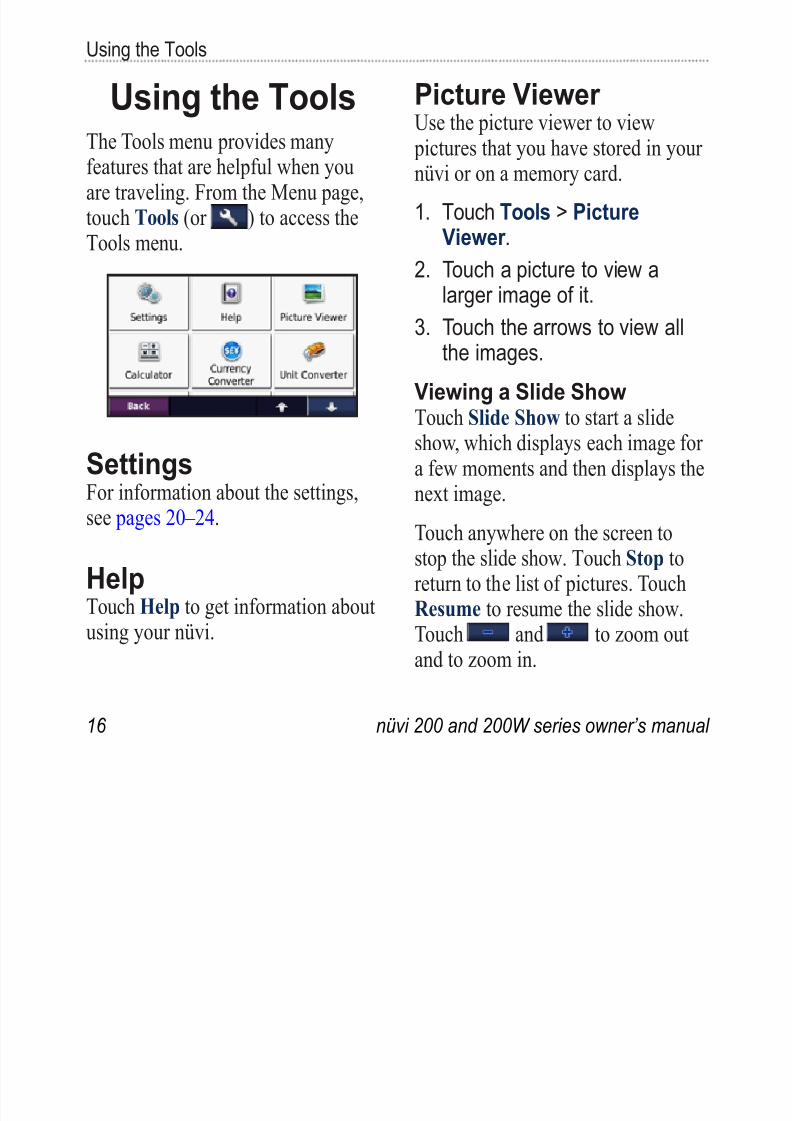
Using the Tools
Using the Tools
The Tools menu provides manyfeatures that are helpful when youare traveling. From the Menu page,touch Tools (or ) to access theTools menu.
SettingsFor information about the settings,see pages 20 –24.
HelpTouch Help to get information aboutusing your nüvi.
Picture Viewer Use the picture viewer to view
pictures that you have stored in yournüvi or on a memory card.
1. Touch Tools > PictureViewer .
2. Touch a picture to view alarger image of it.
3. Touch the arrows to view allthe images.
Viewing a Slide Show
Touch Slide Show to start a slideshow, which displays each image fora few moments and then displays thenext image.
Touch anywhere on the screen to
stop the slide show. Touch Stop toreturn to the list of pictures. TouchResume to resume the slide show.Touch and to zoom outand to zoom in.
U i h T l
8/13/2019 nuvi200_OwnersManual
http://slidepdf.com/reader/full/nuvi200ownersmanual 23/50
nüvi 200 and 200W series owner’s manual 17
Using the Tools
Calculator1. Touch Tools > Calculator .
2. Enter the rst number of yourcalculation.
3. Touch an operator (÷, ×, -, or+).
4. Enter the second number ofyour calculation.
Touch . to add a decimal.
Touch ± to make the
number negative or
positive.Touch % to make the
number a percent (0.01).
Touch C to clear the entry.
5. Touch =.6. Touch C to perform a new
calculation.
•
•
•
•
Currency Converter 1. Touch Tools > Currency
Converter .2. Touch a currency button to
change the currency.
3. Select a currency, and touchOK.
4. Touch the rectangle nextto the currency you want toconvert.
5. Enter the number. TouchDone.
6. Touch Clear to convert adifferent value.
TIP: Touch and hold toerase the entire entry.
U i th T l

8/13/2019 nuvi200_OwnersManual
http://slidepdf.com/reader/full/nuvi200ownersmanual 24/50
18 nüvi 200 and 200W series owner’s manual
Using the Tools
Updating Conversion RatesThe nüvi allows you to update the
currency conversion rates manuallyso that you are always using the mostcurrent rates.
1. Touch Tools > CurrencyConverter > Update.
2. Touch the rate you want toupdate.
3. Touch to erase the currentrate. Enter a new rate, andtouch Done.
4. Touch Save to nish.
TIP: Touch Restore to use theoriginal rate.
Unit Converter1. Touch Tools > Unit
Converter .2. Touch Conversion, select a
type of measurement, andtouch OK.
3. Touch a unit of measure that
you want to change.4. Select a unit of measure,
and touch OK. Repeat, ifnecessary.
5. Touch the blank rectangle to
enter a value.
6. Enter a value, and touchDone. The unit is converted.
7. Touch Clear to convertanother value.
Using the Tools

8/13/2019 nuvi200_OwnersManual
http://slidepdf.com/reader/full/nuvi200ownersmanual 25/50
nüvi 200 and 200W series owner’s manual 19
Using the Tools
World Clock1. Touch Tools > World Clock.
2. To change a city listed, touchthe city.
3. Select a new time zone (orcity). Touch OK when done.
4. Touch World Map to view amap.
5. Nighttime hours are shown inthe shaded area. Touch WorldClock to view the clocksagain, or Back to exit.
Customizing the nüvi

8/13/2019 nuvi200_OwnersManual
http://slidepdf.com/reader/full/nuvi200ownersmanual 26/50
20 nüvi 200 and 200W series owner’s manual
Customizing the nüvi
Customizing the
nüvi1. Touch Tools > Settings.
2. Touch the setting you want tochange.
3. Touch the button next to thesetting name to change it.
Changing the System
Settings
Touch Tools > Settings > System.GPS Simulator —turn on thesimulator to turn off the GPS modeand simulate navigation and to save battery power.
Usage Mode —specify how you will be navigating to optimize routes:
Automobile, Bicycle, or Pedestrian.Units —change units of measure toKilometers or Miles.
About —display the nüvi softwareversion number, the unit ID number,and the audio version number.You need this information whenyou update the system software or purchase additional map data (see page 30).
Restore —restore the system settings.
Customizing the nüvi

8/13/2019 nuvi200_OwnersManual
http://slidepdf.com/reader/full/nuvi200ownersmanual 27/50
nüvi 200 and 200W series owner’s manual 21
Customizing the nüvi
Adjusting the Display
SettingsTouch Tools > Settings > Display.
Color Mode —select Daytime fora light background, Nighttimefor a dark background, or Auto to
automatically switch between thetwo.
Screen Shot —turn on Screen Shotmode. Touch to take a screenshot. The picture bitmap le is saved
in the scrn folder on the nüvi drive.Brightness —adjust the backlight brightness level. Reducing the backlight brightness increases your battery life.
Restore —restore the original displaysettings.
Changing the
Navigation SettingsTouch Tools > Settings >Navigation.
Route Preference —select a preference for calculating your route:
Faster Time —to calculate routesthat are faster to drive but can belonger in distance.
Shorter Distance —to calculateroutes that are shorter in distance
but can take more time to drive.Off Road —to calculate point-to- point routes (without roads).
Avoidances —select the road typesyou want to avoid on your routes.
Restore —restore the originalnavigation settings.
•
•
•
Customizing the nüvi

8/13/2019 nuvi200_OwnersManual
http://slidepdf.com/reader/full/nuvi200ownersmanual 28/50
22 nüvi 200 and 200W series owner’s manual
Customizing the nüvi
Updating the Time
SettingsTouch Tools > Settings > Time.
Time Format —select a 12-hour,24-hour, or UTC time format.
Time Zone —select a time zone or
nearby city from the list.
Daylight Saving —set to On, Off ,or Auto, if it is available.
Restore —restore the original time
settings.
Setting the LanguagesTouch Tools > Settings > Language.
Voice —change the language forvoice prompts.
Text —change all on-screen text tothe selected language. Changing the
text language does not change thelanguage of user-entered data or mapdata, such as street names.
Keyboard —select the keyboard foryour language. You can also change
the keyboard language mode fromany keyboard by touching the Mode button.
Restore— restore the originallanguage settings.
Customizing the nüvi

8/13/2019 nuvi200_OwnersManual
http://slidepdf.com/reader/full/nuvi200ownersmanual 29/50
nüvi 200 and 200W series owner’s manual 23
Customizing the nüvi
Changing Security
SettingsTouch Tools > Settings > Security.
Garmin Lock —turn on GarminLock ™ to lock your nüvi. Entera 4-digit PIN, and set a security
location. For more information, see page 25.
Safe Mode —turn safe mode on oroff. When your vehicle is moving,safe mode disables all functions that
require signicant operator attentionand could become a distraction whiledriving.
Restore —restore the originalsecurity settings. Note that restoring
the security settings will not clearyour Garmin Lock PIN or securitylocation.
Changing the Map
SettingsTouch Tools > Settings > Map.
Map Detail —adjust the amount ofdetail shown on the map. Showingmore detail can cause the map to
redraw slower.Map View —select a map perspective.
Track Up —display the map intwo dimensions (2D) with your
direction of travel at the top.
North Up —display the map in2D with North at the top.
3D —display the map in threedimensions (3D) in Track Up.
•
•
•
Customizing the nüvi

8/13/2019 nuvi200_OwnersManual
http://slidepdf.com/reader/full/nuvi200ownersmanual 30/50
24 nüvi 200 and 200W series owner’s manual
Customizing the nüvi
Vehicle —touch Change to changethe icon used to display your position
on the map. Touch the icon youwant to use, and then touch OK .Download additional vehicle icons atwww.garmin.com/vehicles.
Map Info —view the maps and the
version of each map loaded on yournüvi. Touch a map to enable (checkmark) or disable (no check mark)that map.
Restore —restore the original map
settings.
Changing the
Proximity Points
SettingsYou must have proximity points(such as custom POIs or a safetycamera database) loaded to adjustthe proximity points settings. See page 31. Touch Tools > Settings >Proximity Points.
Proximity Alerts —turn the alertson or off when you approach customPOIs or safety cameras.
Restore —restore the proximity points settings.
Restoring All Settings1. Touch Tools > Settings.2. Touch Restore.
3. Touch Yes.
Appendix

8/13/2019 nuvi200_OwnersManual
http://slidepdf.com/reader/full/nuvi200ownersmanual 31/50
nüvi 200 and 200W series owner’s manual 25
pp
Appendix
Avoiding TheftTo avoid theft, remove the unitand mount from sight when notin use. Remove the residue lefton the windshield by the suction
cup.
Do not keep your unit in theglove compartment.
Register your product athttp://my.garmin.com.
Use the Garmin Lock feature.
•
•
•
•
Locking Your nüviGarmin Lock is a theft-deterrent
system that locks your nüvi. Eachtime you turn on the nüvi, enter thePIN or drive to the security location.
1. Touch Tools > Settings >Security.
2. Touch the button belowGarmin Lock.
3. Enter a 4-digit PIN and driveto a security location.
Your security location should be alocation you return to often, such asyour home. If the nüvi has satellitesignals and you are at the securitylocation, you do not need to enterthe PIN.
Appendix

8/13/2019 nuvi200_OwnersManual
http://slidepdf.com/reader/full/nuvi200ownersmanual 32/50
26 nüvi 200 and 200W series owner’s manual
pp
NOTE: If you forget your PINand your security location,
you must send your nüvi toGarmin to get it unlocked.You must also send a valid product registration or proof of purchase.
Calibrating the ScreenIf the touch screen is not responding properly, calibrate the touch screen.
1. Turn off the nüvi.
2. Turn on the nüvi and holdthe Power key to the left forabout 30 seconds until thecalibration screen appears(white screen with “Press
dot”).
Resetting Your nüviIf your nüvi stops responding, turn
the nüvi off, and then turn it back on.If this does not help, reset your nüvi.
Depending on your nüvi model, youcan reset your nüvi one of two ways:
Press and hold the Reset buttonon the bottom of the nüvi forseveral seconds.
CAUTION: Do not reset yournüvi with a ballpoint pen or
other sharp object, which candamage the unit or the battery.
If your nüvi does not have aReset button, slide the Power key to the left and hold it for 8
seconds.
•
•
Appendix

8/13/2019 nuvi200_OwnersManual
http://slidepdf.com/reader/full/nuvi200ownersmanual 33/50
nüvi 200 and 200W series owner’s manual 27
Updating the Software1. Go to www.garmin.com
/products/webupdater , anddownload WebUpdater to yourcomputer.
2. Connect the nüvi to yourcomputer using the mini-USB
cable.3. Run WebUpdater, and follow
the on-screen instructions.
After conrming that you want to perform an update, WebUpdater
automatically downloads the updateand installs it on your nüvi.
Clearing User Data CAUTION: This deletes alluser-entered information.
1. Hold your nger on the lower-right corner of the nüvi screenwhile turning on the nüvi.
2. Keep your nger pressed untilthe pop-up window appears.
3. Touch Yes to clear all userdata.
All original settings are restored.
Any items that you have saved areerased.
Appendix
8/13/2019 nuvi200_OwnersManual
http://slidepdf.com/reader/full/nuvi200ownersmanual 34/50
28 nüvi 200 and 200W series owner’s manual
Battery InformationTo maximize the lifetime of the
battery, do not leave your nüvi indirect sunlight, and avoid prolongedexposure to excessive heat.
The battery icon in the cornerof the Menu page indicates the status
of the nüvi battery. To increase theaccuracy of the battery gauge, fullydischarge the battery and then fullycharge it. Do not unplug the nüviuntil it is totally charged.
Charging Your nüviConnect the vehicle power cable
to the mini-USB connector onyour nüvi and to a power outletin your vehicle. The vehicle keymay need to be turned to ON/ACC for the nüvi to charge.
Connect an AC adapter (optionalaccessory) to the nüvi and a walloutlet.
Connect your nüvi to a computerusing a USB cable (optional
accessory). The computer must be on for the nüvi to charge.
•
•
•
Appendix

8/13/2019 nuvi200_OwnersManual
http://slidepdf.com/reader/full/nuvi200ownersmanual 35/50
nüvi 200 and 200W series owner’s manual 29
Changing the Fuse CAUTION: When replacingthe fuse, do not lose any of thesmall pieces and make surethey are put back in the proper place.
If your unit will not charge in yourvehicle, you might need to replacethe fuse located at the tip of thevehicle adapter.
1. Unscrew the
black, roundend piece,and removeit.
2. Remove thefuse (glassand silver cylinder), andreplace it with a 3 A fast-blowfuse.
3. Ensure that the silver tip isplaced in the black end piece.
Screw on the black end piece.
Removing the nüvi
and MountTo remove the nüvi from the cradle,
hold onto the cradle and tilt the nüviforward.
To remove the cradle from themount, turn the cradle to the right orleft. Apply pressure in that direction
until the cradle snaps off the mount.
To remove the suction cup mountfrom the windshield, ip the levertoward you. Pull the tab on thesuction cup toward you.
n
piece
Silver tip
Fuse
n
piece
Silver tip
Fuse
Appendix

8/13/2019 nuvi200_OwnersManual
http://slidepdf.com/reader/full/nuvi200ownersmanual 36/50
30 nüvi 200 and 200W series owner’s manual
Mounting on Your
DashboardUse the enclosed mounting disk tomount your unit to the dashboard andcomply with certain state regulations.
CAUTION: The permanent
mounting adhesive isextremely difcult to removeafter it is installed.
1. Clean and dry the dashboardwhere you are placing the
disk.2. Remove the backing from the
adhesive on the bottom of thedisk.
3. Place the disk on the
dashboard.4. Remove the clear plastic
cover from the top of the disk.
5. Place the suction cup mounton top of the disk. Flip the
lever down (toward the disk).
Additional MapsYou can purchase additionalMapSource map data from Garminand load the maps in your nüviinternal memory or on an optionalmemory card.
To determine the versions of themaps that are loaded on your nüvi,
open the Menu page. Touch Tools >Settings > Map > Map Info. Checkhttp://my.garmin.com/maps/updates .htm to see if an update for yourmap software is available. To enableadditional maps, you need your unit
ID (see page 20) and serial number(located near the power connector).
To load maps or waypoints in yournüvi memory or on your memorycard, select the name for your nüvi
Appendix

8/13/2019 nuvi200_OwnersManual
http://slidepdf.com/reader/full/nuvi200ownersmanual 37/50
nüvi 200 and 200W series owner’s manual 31
drive or memory card drive. Referto the MapSource Help le for more
information.
About GPS Satellite
SignalsYour nüvi must acquire GPS
(Global Positioning System) satellitesignals in order to navigate. If youare indoors, near tall buildings ortrees, or in a parking garage, yournüvi may not acquire satellites. Go
outside to an area free from tallobstructions to use your nüvi.
When your nüvi has acquiredsatellite signals, the signal strength bars on the Menu page are green
. When it loses satellitesignals, the bars turn red or clear
.
For more information about GPS, goto www.garmin.com/aboutGPS.
Extras and Optional
AccessoriesFor more information about optionalaccessor ies, go to http://buy.garmin .com or www.garmin.com/extras, orcontact your Garmin dealer.
Custom Points of InterestUse the POI Loader to load custom points of interest (POIs) onto yournüvi. POI databases are availablefrom various companies on theInternet. Some custom databases
contain alert information for points,such as safety cameras and schoolzones.
Go to www.garmin.com/extras, andclick POI Loader to install the POILoader onto your computer. Formore information, refer to the POILoader Help le. Press F1 to openthe Help le.
Appendix

8/13/2019 nuvi200_OwnersManual
http://slidepdf.com/reader/full/nuvi200ownersmanual 38/50
32 nüvi 200 and 200W series owner’s manual
To view your Custom POIs, touchWhere to? > Extras > Custom
POIs.To change the proximity alertsettings, touch Tools > Settings > Proximity Points > ProximityAlerts.
To delete the Custom POIs fromyour nüvi, connect your nüvi toyour computer. Open the Garmin\ poi folder in the nüvi drive or thememory card drive. Delete the le
titled poi.gpi.
Safety CamerasSafety camera information is
available in some locations. Checkhttp://my.garmin.com for availability.For these locations, the nüvi includesthe locations of hundreds of safetycameras. Your nüvi alerts you whenyou are approaching a safety camera
and can warn you if you are drivingtoo fast. The data is updated at leastweekly, so you always have access tothe most up-to-date information.
You can purchase a new regionor extend an existing subscriptionat any time. Each region that you purchase has its own expiration date.
CAUTION: Garmin is not
responsible for the accuracyof, or the consequences ofusing, a custom POI or safetycamera database.
Appendix

8/13/2019 nuvi200_OwnersManual
http://slidepdf.com/reader/full/nuvi200ownersmanual 39/50
nüvi 200 and 200W series owner’s manual 33
Garmin Travel GuideMuch like a paper travel guide,
the Garmin Travel Guide providesdetailed information about places,such as restaurants and hotels. To purchase an accessory, go tohttp://buy.garmin.com or contactyour Garmin dealer.
To use the travel guide, insert thememory card into your nüvi. TouchWhere to? > Extras. Touch thename of your travel guide to open it.
Contact GarminContact Garmin Product Support if
you have any questions while usingyour nüvi. In the USA, go towww.garmin.com/support, or contactGarmin USA by phone at (913) 397-8200 or (800) 800-1020.
In the UK, contact Garmin (Europe)Ltd. by phone at 0808 2380000.
In Europe, go to www.garmin.com /support and click Contact Support for in-country support information,
or contact Garmin (Europe) Ltd. by phone at +44 (0) 870.8501241.
Appendix

8/13/2019 nuvi200_OwnersManual
http://slidepdf.com/reader/full/nuvi200ownersmanual 40/50
34 nüvi 200 and 200W series owner’s manual
Specifcationsnüvi 200 Series
Physical size W × H × D: 3.8 × 2.8× 0.8 in. (97 × 71 × 20 mm)
Weight: 5.2 oz. (147.42 g)
Display: 3.5" diagonal, 320 × 240 pixels; 64K colors; bright
QVGA TFT landscape display;white backlight; touch screen
Case: Not waterproof (IPXO)
Operating temperature range:32°F–140°F (0°C–60°C)
Charging temperature range:32°F–113°F (0°C–45°C)
Data storage: Internal memory andoptional removable microSDor SD card. Data storedindenitely.
Computer interface: USB 2.0 fullspeed mass storage
Operating system: Garmin
Charge time: Approximately 4hours
Power input: Vehicle power usingincluded vehicle power cableor AC power using an optionalaccessory
Usage: 5 W max.
Battery life: Up to 4 hoursBattery type: Non-user-replaceable
rechargeable lithium-ion battery
GPS receiver: High-sensitivity
Acquisition times*:Warm: <1 secCold: <38 secFactory Reset: <45 sec
*Average acquisition times for astationary receiver with a clear view
of the sky.
Appendix

8/13/2019 nuvi200_OwnersManual
http://slidepdf.com/reader/full/nuvi200ownersmanual 41/50
nüvi 200 and 200W series owner’s manual 35
nüvi 200W SeriesPhysical size W × H × D: 4.8 × 2.9
× 0.8 in. (122 × 74 × 20 mm)Weight: 6.1 oz. (172.9 g)
Display: 4.3" diagonal, 480 × 272 pixels; 64K colors; brightWQVGA TFT landscape
display; white backlight; touchscreen
Case: Not waterproof (IPXO)
Operating temperature range:32°F–140°F (0°C–60°C)
Charging temperature range:32°F–113°F (0°C–45°C)
Data storage: Internal memory andoptional removable SD card.Data stored indenitely.
Computer interface: USB 2.0 fullspeed mass storage
Operating system: Garmin
Charge time: Approximately 4hours
Power input: Vehicle power usingincluded vehicle power cable
or AC power using an optionalaccessory
Usage: 5 W max.
Battery life: Up to 4 hours
Battery type: Non-user-replaceable
rechargeable lithium-ion batteryGPS receiver: High-sensitivity
Acquisition times*:Warm: <1 secCold: <38 sec
Factory Reset: <45 sec*Average acquisition times for astationary receiver with a clear viewof the sky.
Appendix

8/13/2019 nuvi200_OwnersManual
http://slidepdf.com/reader/full/nuvi200ownersmanual 42/50
36 nüvi 200 and 200W series owner’s manual
Declaration of
ConformityHereby, Garmin declares that thisnüvi product is in compliance withthe essential requirements and otherrelevant provisions of Directive1999/5/EC. To view the full
Declaration of Conformity, go to theWeb site for your Garmin product at www.garmin.com.
Software License
AgreementBY USING THE nüvi, YOU AGREETO BE BOUND BY THE TERMS ANDCONDITIONS OF THE FOLLOWINGSOFTWARE LICENSE AGREEMENT.PLEASE READ THIS AGREEMENT
CAREFULLY.Garmin grants you a limited license to usethe software embedded in this device (the“Software”) in binary executable form inthe normal operation of the product. Title,ownership rights, and intellectual propertyrights in and to the Software remain in
Garmin.
You acknowledge that the Software is the property of Garmin and is protected under theUnited States of America copyright laws andinternational copyright treaties. You furtheracknowledge that the structure, organization,and code of the Software are valuable tradesecrets of Garmin and that the Software insource code form remains a valuable trade
secret of Garmin. You agree not to decompile,disassemble, modify, reverse assemble,reverse engineer, or reduce to human readableform the Software or any part thereof or createany derivative works based on the Software.You agree not to export or re-export theSoftware to any country in violation of the
export control laws of the United States ofAmerica.
Appendix

8/13/2019 nuvi200_OwnersManual
http://slidepdf.com/reader/full/nuvi200ownersmanual 43/50
nüvi 200 and 200W series owner’s manual 37
TroubleshootingProblem/Question Solution/Answer
My nüvi never getssatellite signals.
Take your nüvi out of parking garages and awayfrom tall buildings and trees. Remain stationary forseveral minutes.
The suction cupwill not stay on my
windshield.
Clean the suction cup and windshield with rubbingalcohol. Dry with a clean, dry cloth. Mount the
suction cup as described on page 2.
My nüvi does notcharge in my vehicle.
Check the fuse in the vehicle power cable (see page29).
Ensure the vehicle is turned on and is supplyingpower to the power outlet.
Your nüvi can only charge between 32°F and 140°F(0°C and 60°C). If the nüvi is placed in direct sunlightor in a hot environment, it cannot charge.
My battery does notstay charged for verylong.
To maximize the time between charges, turn downthe backlight. Touch Tools > Settings > Display >Brightness.
How do I clear all myuser data?
Hold your nger on the lower-right corner of thenüvi screen while it is turning on. Keep your ngerpressed until the message appears. Touch Yes toclear all user data.
Appendix

8/13/2019 nuvi200_OwnersManual
http://slidepdf.com/reader/full/nuvi200ownersmanual 44/50
38 nüvi 200 and 200W series owner’s manual
Problem/Question Solution/Answer
My battery gauge
does not seemaccurate.
Allow the unit to fully discharge, and fully charge it
(without interrupting the charge cycle).
The touch screen isnot responding to mytouches.
Calibrate the touch screen as described on page 26.
How do I know mynüvi is in USB massstorage mode?
When your nüvi is in USB mass storage mode, apicture of a nüvi connected to a computer is shown. Also, you should see two new removable disk driveslisted in My Computer .
My computer never
senses that the nüviis connected.
1. Unplug the USB cable from your computer.
2. Turn off the nüvi.3. Plug the USB cable into a USB port onyour computer and into your nüvi. The nüviautomatically turns on and goes into USB massstorage mode. Ensure your nüvi is connected toa USB port and not a USB hub.
I cannot see any newremovable drives inmy list of drives.
If you have several network drives mapped on yourcomputer, Windows can have trouble assigningdrive letters to your nüvi drives. See your operatingsystem Help le to learn how to map or assign driveletters.
Appendix

8/13/2019 nuvi200_OwnersManual
http://slidepdf.com/reader/full/nuvi200ownersmanual 45/50
nüvi 200 and 200W series owner’s manual 39
Problem/Question Solution/Answer
How can I nd
restaurants near thehotel I will be stayingat in the future?
1. Touch Where To? > Near > A Different City
(and enter your vacation destination).2. Find the hotel, and touch Go!.3. Touch Menu > Where To? > Near > My
Destination.4. Search for a restaurant. Restaurants nearest
your hotel are listed rst.
Index
I d bro sing the map 10 deleting

8/13/2019 nuvi200_OwnersManual
http://slidepdf.com/reader/full/nuvi200ownersmanual 46/50
40 nüvi 200 and 200W series owner’s manual
Index
Symbols2-D, 3-D map view 23
Aaccessories 31, 32
additional maps 30
addresses 6
alarm clock 33
alerts
safety camera 32
anti-theft feature 23, 25
audio version 20avoiding
road types 21
theft 25
B background color 21 battery 28, 37
status 3
battery information 28
bicycle navigation 20
brightness 21
browsing the map 10
Ccalculator 17caring for your nüvi iv
charging your nüvi 28,
37
clock for the world 19
computer connection 14conguring 3
converting
currency 17
units 18
coordinates 10
currency, converting 17current location, save 9
customizing the
nüvi 20 – 24
custom POIs 32
Ddashboard disk 30
daylight savings 22
Declaration of
Conformity 36
deleting
all user data 27
character 8
custom POIs 32
Favorites 9
les 15
recent nds list 8
detail maps 24
detour 5diacritical characters 8
display settings 21
driving directions 13
Eextras 31 – 32
FFavorites 9
les 14 – 15
deleting 15
supported types 14
transferring 15
nding places 4
by address 6
by coordinates 10
Index
by name 7 K zooming 10

8/13/2019 nuvi200_OwnersManual
http://slidepdf.com/reader/full/nuvi200ownersmanual 47/50
nüvi 200 and 200W series owner’s manual 41
by name 7
near another
location 11
recent selections 8
saved places
(Favorites) 9
fuse, changing 29
GGarmin Lock 23, 25
Garmin Travel Guide 33
geocaching 10
Go! page options 6
go home 7
GPSabout GPS 3, 31
off/on 20
HHelp 16
home
setting a location 7
JJPEG image les 14
Kkeyboard 8
language mode 8, 22kilometers 20
Llanguage settings 22
lithium-ion battery 28,
34, 35locking
screen 5
the nüvi 25
M
mapadding 30
browsing 10
detail level 23
enabling detail
maps 24
Map Info button 24
settings 23
updating 30
version 24
viewing 23
zooming 10
MapSource 14, 30
max speed, reset 13
measurements,
converting 18
memory card 1, 14
Menu page 3
miles 20
mountingon dashboard 30
on windshield 37
removing from
mount 29
mute audio 5
myGarmin i
Nnavigation 12
mode 20
settings 21
next turn 13
nüvi
case 1
charging 28
cleaning iv
Index
mounting 2 30 R location 9 10

8/13/2019 nuvi200_OwnersManual
http://slidepdf.com/reader/full/nuvi200ownersmanual 48/50
42 nüvi 200 and 200W series owner’s manual
mounting 2, 30
protecting iv
resetting 26
Ooff road, routing 11, 21
on-screen keyboard 8
on-unit Help 16
output, audio 5
P pedestrian navigation
mode 11, 20
PIN
Garmin Lock 25 points of interest 7
custom 31
POI loader 14
position icon 24
proximity alerts 24
proximity points
alerts 24
settings 24
Rrecently-found
locations 8registering 25
removing the mount 29
resetting
the max speed 13
the trip data 13
your nüvi 26routes
adding a stop 5
mode 20
off road 21
preferences 21
simulating 20
stopping 5
Ssafe mode 23
safety cameradatabase 32
satellite signals 31
saving
places you nd 9
your current
location 9, 10
school zone database 31
screen
brightness 21
lock 5
screen shots 21
SD card 1
search area 11
securitysettings 23
settings 20 – 24
restoring 24
setting your location 10
simulating a route 20
software
license agreement 36
updating 27
version 20
specications
200 series 34200W series 35
storing the nüvi iv
supported le types 14
system settings 20
Index
T USB 38

8/13/2019 nuvi200_OwnersManual
http://slidepdf.com/reader/full/nuvi200ownersmanual 49/50
nüvi 200 and 200W series owner’s manual 43
Ttext language 22
time settings 22time zone 22
tools 16 – 19
touch screen
calibrating 26, 38
cleaning iv
settings 21Track Up 23
transferring les 15
trip computer 13
trip data, reset 13
troubleshooting 37
turn-by-turn
directions 13
turn list 13
U
unit ID 20units, convert 18
updating
maps 30
software 26
usage mode 20
USB 38
eject 15
mass-storage
mode 14
user data, delete 27
Vvehicle icon 24
via point, adding 5voice language 22
Wwalking route 11, 20
WebUpdater 27
Where to? 6world clock 19
Zzoom 10

8/13/2019 nuvi200_OwnersManual
http://slidepdf.com/reader/full/nuvi200ownersmanual 50/50
For the latest free software updates (excluding map data)
throughout the life of your Garmin products, visit the Garmin
Web site at www.garmin.com.
© 2008 Garmin Ltd. or its subsidiaries
Garmin International, Inc.
1200 East 151st Street, Olathe, Kansas 66062, USA
Garmin (Europe) Ltd.
Liberty House, Hounsdown Business Park, Southampton, Hampshire,
SO40 9RB UK
Garmin CorporationNo. 68, Jangshu 2nd Road, Shijr, Taipei County, Taiwan
www.garmin.com
October 2008 190-00752-10 Rev. A Printed in Taiwan