nxt constructopedia beta 2.1 (pdf) - legoengineering
TRANSCRIPT

� 2008 LEGOengineering.com & Tufts University Center for Engineering Educational Outreach
CONSTRUCTOPEDIA NXT Kit 9797
Beta Version 2.1
June 2008
� 2008 LEGOengineering.com & Tufts University Center for Engineering Educational Outreach
2
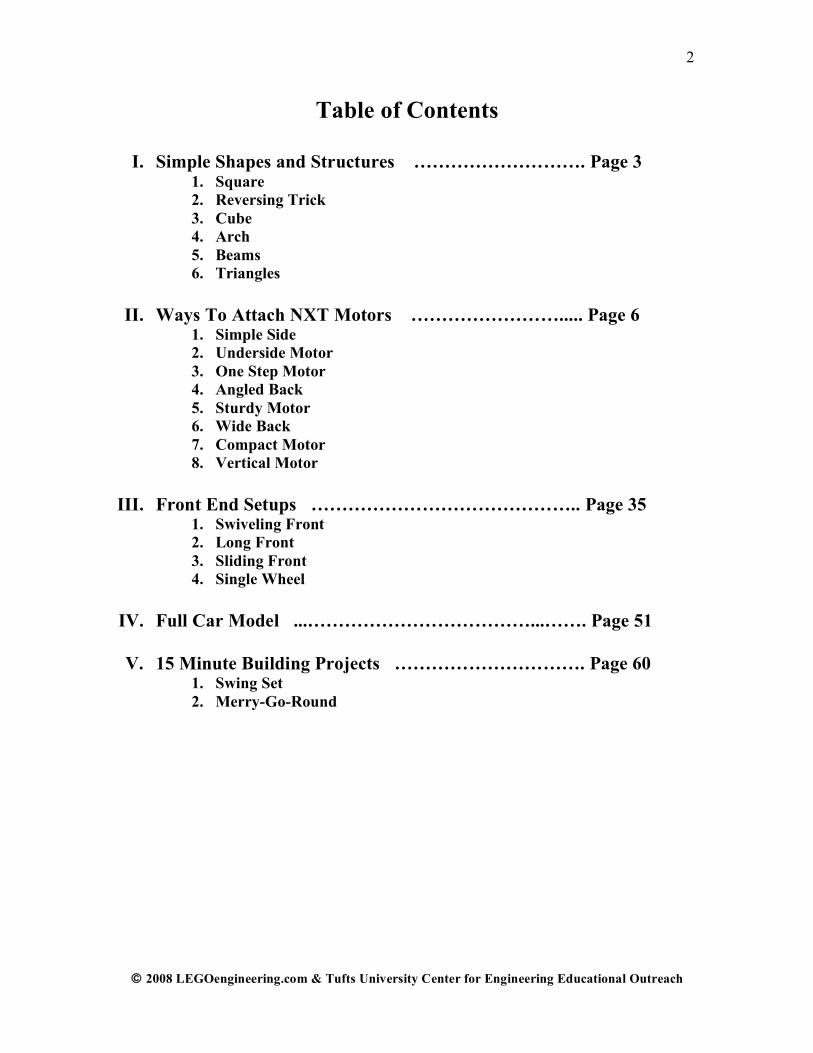
Table of Contents
I. Simple Shapes and Structures ………………………. Page 3 1. Square 2. Reversing Trick 3. Cube 4. Arch 5. Beams 6. Triangles
II. Ways To Attach NXT Motors ……………………..... Page 6
1. Simple Side 2. Underside Motor 3. One Step Motor 4. Angled Back 5. Sturdy Motor 6. Wide Back 7. Compact Motor 8. Vertical Motor
III. Front End Setups …………………………………….. Page 35
1. Swiveling Front 2. Long Front 3. Sliding Front 4. Single Wheel
IV. Full Car Model ...………………………………...……. Page 51
V. 15 Minute Building Projects …………………………. Page 60
1. Swing Set 2. Merry-Go-Round

Building Instructions: Simple Shapes and Structures
� 2008 LEGOengineering.com & Tufts University Center for Engineering Educational Outreach
3
I. Simple Shapes and Structures 1. Square
2. Reversing Trick
3. Cube

Building Instructions: Simple Shapes and Structures
� 2008 LEGOengineering.com & Tufts University Center for Engineering Educational Outreach
4
4. Arch
5. Beams

Building Instructions: Simple Shapes and Structures
� 2008 LEGOengineering.com & Tufts University Center for Engineering Educational Outreach
5
6. Triangles - Option 1
Option 2

Building Instructions: Ways to Attach NXT Motors
� 2008 LEGOengineering.com & Tufts University Center for Engineering Educational Outreach
6
II. Ways to Attach NXT Motors 1. Simple Side Attachment
Model Description: This is a motor attachment option in which the motors attach closely to the sides of the NXT.

Building Instructions: Ways to Attach NXT Motors
� 2008 LEGOengineering.com & Tufts University Center for Engineering Educational Outreach
7
These are the parts that you will need:

Building Instructions: Ways to Attach NXT Motors
� 2008 LEGOengineering.com & Tufts University Center for Engineering Educational Outreach
8
Step# 1
Attach 2 bent beams to the NXT using friction pins. The shorter portion of the beam should be sticking out from the NXT. Insert a double pin connector into this portion. Step# 2
Fasten the motors to the double pin connectors on the bent beams. Then fit a 4 pin connector into the outside mounting beam on the NXT.
Building Instructions: Ways to Attach NXT Motors
� 2008 LEGOengineering.com & Tufts University Center for Engineering Educational Outreach
9
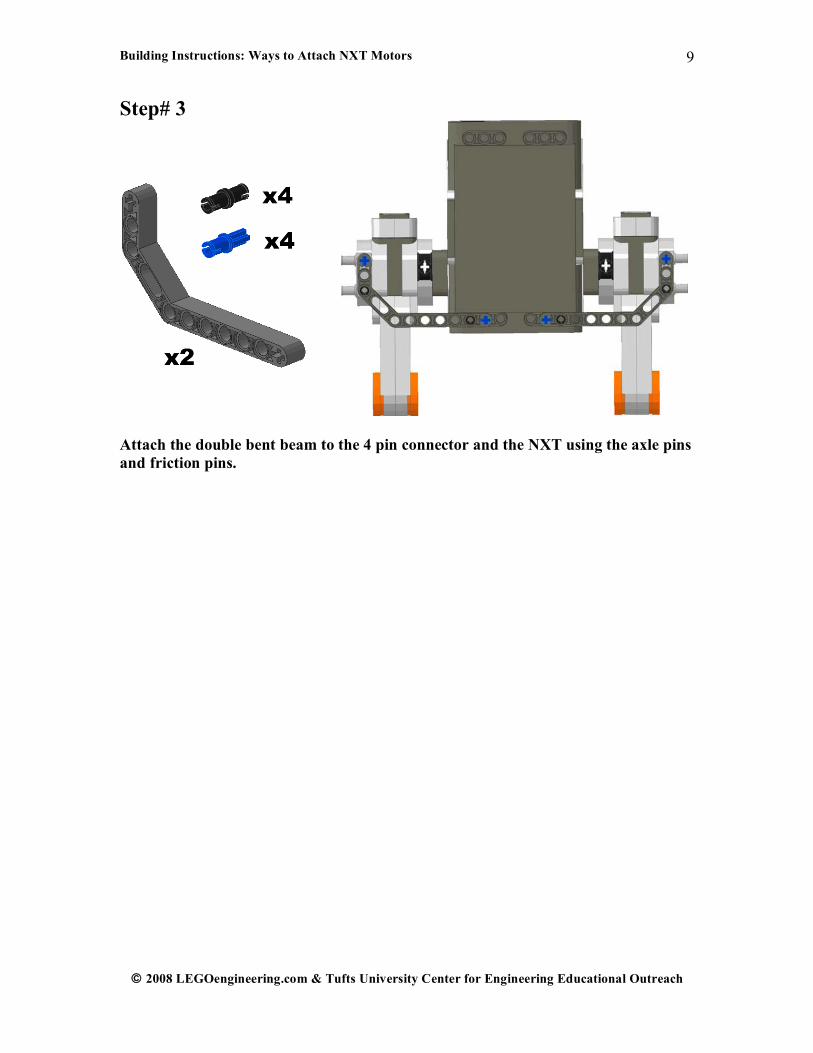
Step# 3
Attach the double bent beam to the 4 pin connector and the NXT using the axle pins and friction pins.
Building Instructions: Ways to Attach NXT Motors
� 2008 LEGOengineering.com & Tufts University Center for Engineering Educational Outreach
10
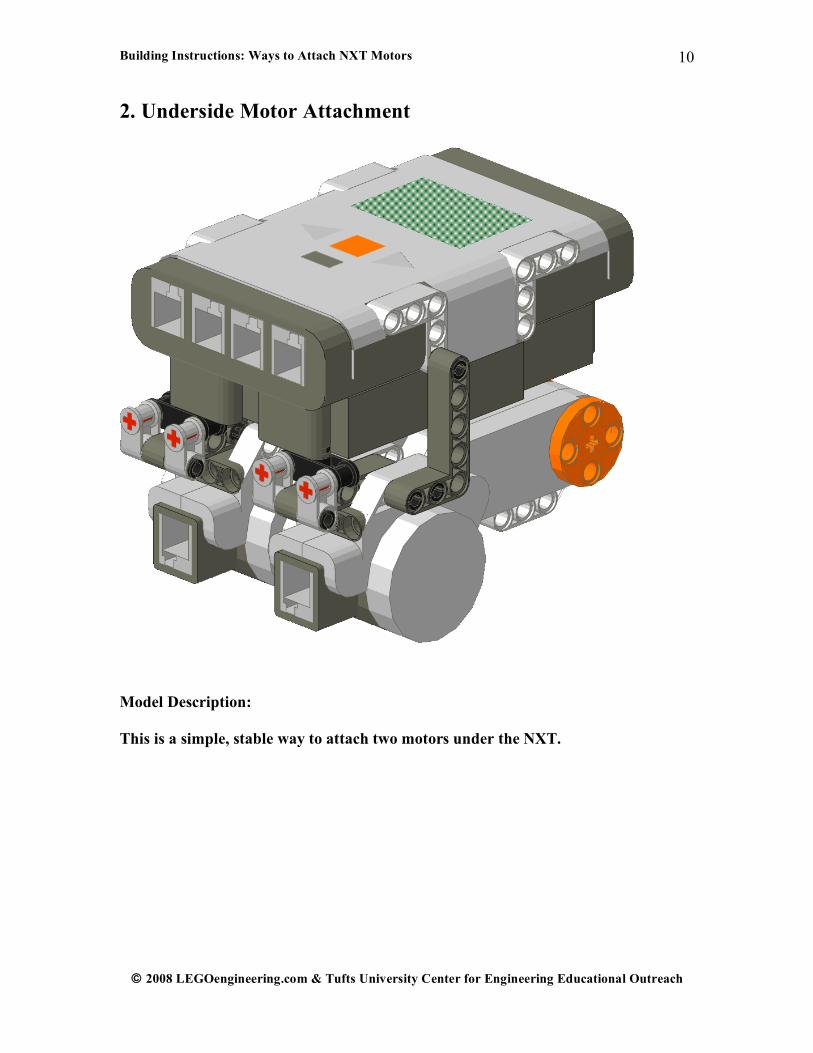
2. Underside Motor Attachment
Model Description: This is a simple, stable way to attach two motors under the NXT.

Building Instructions: Ways to Attach NXT Motors
� 2008 LEGOengineering.com & Tufts University Center for Engineering Educational Outreach
11
These are the parts that you will need:
Building Instructions: Ways to Attach NXT Motors
� 2008 LEGOengineering.com & Tufts University Center for Engineering Educational Outreach
12
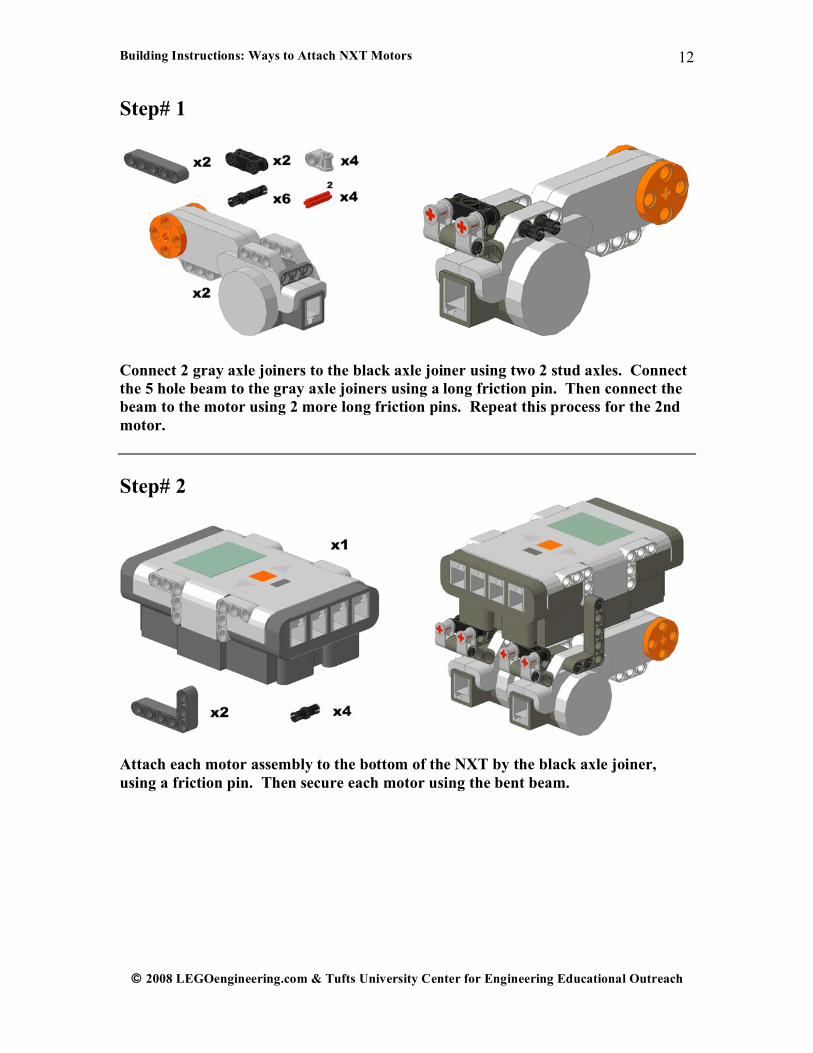
Step# 1
Connect 2 gray axle joiners to the black axle joiner using two 2 stud axles. Connect the 5 hole beam to the gray axle joiners using a long friction pin. Then connect the beam to the motor using 2 more long friction pins. Repeat this process for the 2nd motor. Step# 2
Attach each motor assembly to the bottom of the NXT by the black axle joiner, using a friction pin. Then secure each motor using the bent beam.

Building Instructions: Ways to Attach NXT Motors
� 2008 LEGOengineering.com & Tufts University Center for Engineering Educational Outreach
13
3. One Step Motor Attachment
Model Description: This is a very simple way, using few pieces, to attach motors.
Building Instructions: Ways to Attach NXT Motors
� 2008 LEGOengineering.com & Tufts University Center for Engineering Educational Outreach
14
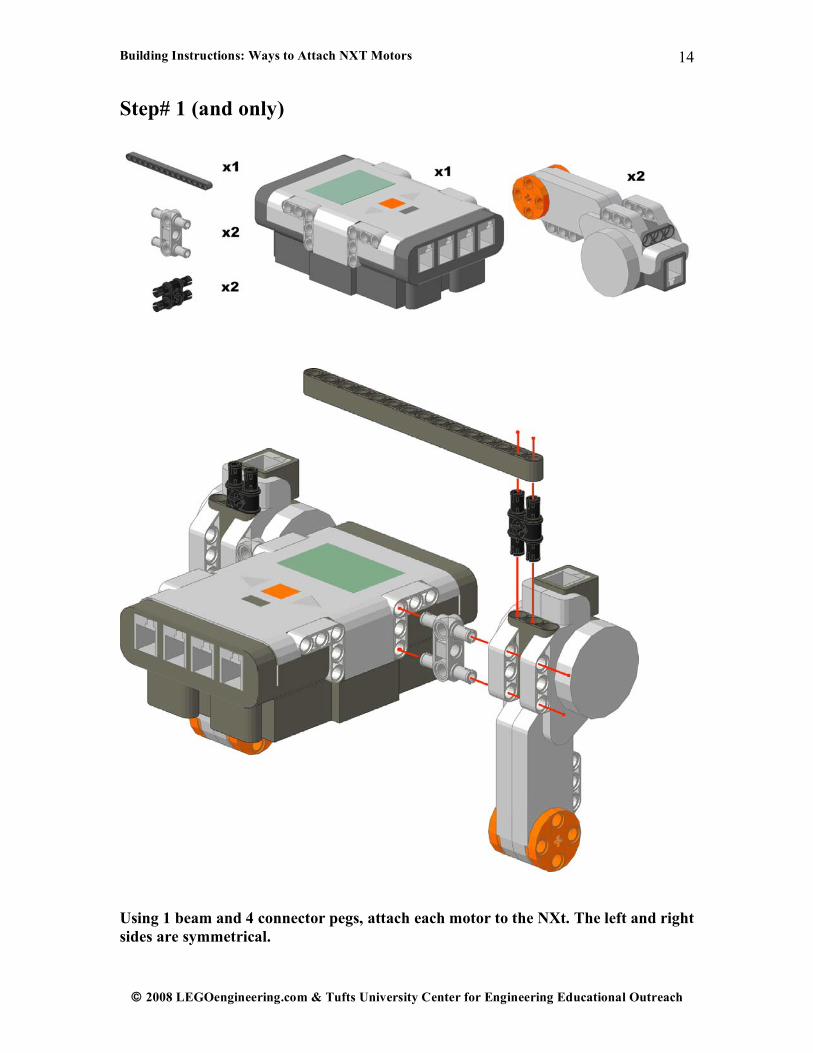
Step# 1 (and only)
Using 1 beam and 4 connector pegs, attach each motor to the NXt. The left and right sides are symmetrical.

Building Instructions: Ways to Attach NXT Motors
� 2008 LEGOengineering.com & Tufts University Center for Engineering Educational Outreach
15
4. Angled Back Attachment
Model Description: This is a motor attachment option in which the motors angle downward from the NXT.

Building Instructions: Ways to Attach NXT Motors
� 2008 LEGOengineering.com & Tufts University Center for Engineering Educational Outreach
16
These are the parts that you will need:
Building Instructions: Ways to Attach NXT Motors
� 2008 LEGOengineering.com & Tufts University Center for Engineering Educational Outreach
17
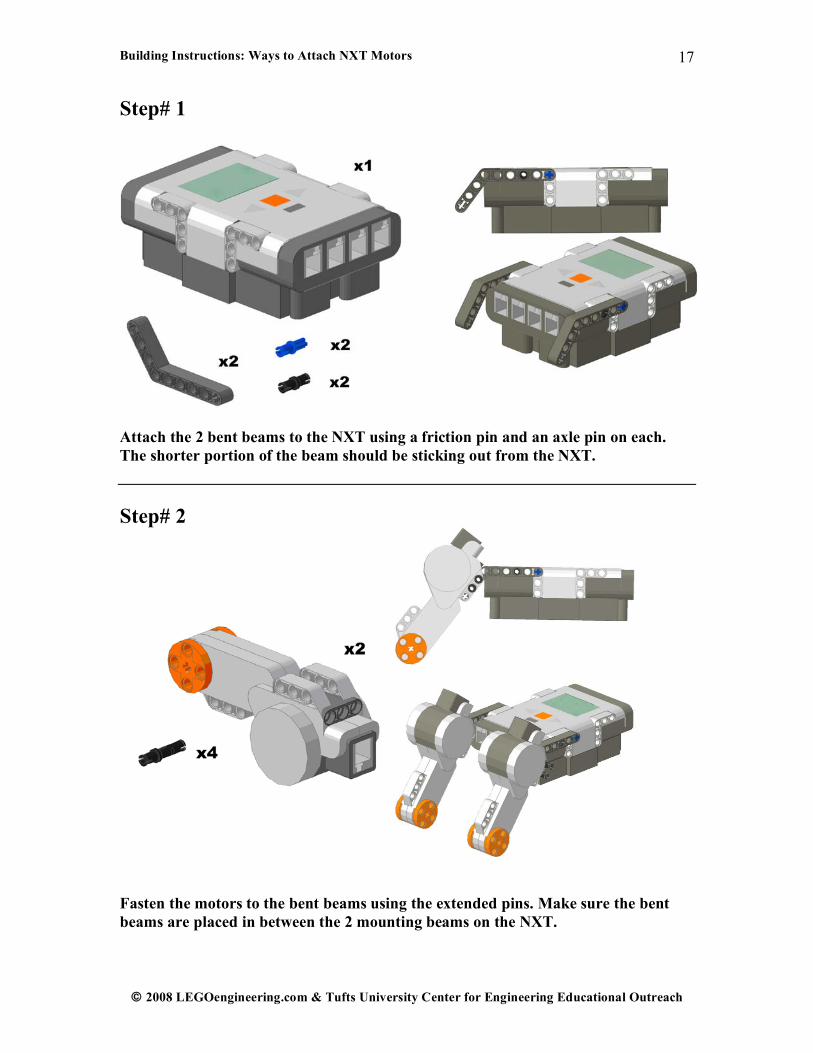
Step# 1
Attach the 2 bent beams to the NXT using a friction pin and an axle pin on each. The shorter portion of the beam should be sticking out from the NXT. Step# 2
Fasten the motors to the bent beams using the extended pins. Make sure the bent beams are placed in between the 2 mounting beams on the NXT.

Building Instructions: Ways to Attach NXT Motors
� 2008 LEGOengineering.com & Tufts University Center for Engineering Educational Outreach
18
Step# 3
Slide the 12 stud axle through the mounting beams of the motor and secure it in place with � bushings. Use the friction pins to attach the 13 hole beam across the tops of the motors.

Building Instructions: Ways to Attach NXT Motors
� 2008 LEGOengineering.com & Tufts University Center for Engineering Educational Outreach
19
5. Sturdy Motor Attachment
Model Description: This model is a compact, sturdy, way to attach NXT motors.

Building Instructions: Ways to Attach NXT Motors
� 2008 LEGOengineering.com & Tufts University Center for Engineering Educational Outreach
20
These are the parts that you will need:

Building Instructions: Ways to Attach NXT Motors
� 2008 LEGOengineering.com & Tufts University Center for Engineering Educational Outreach
21
Step# 1
Thread the two 12 stud axles through the NXT motors, beams, and bent beams. Step# 2
Attach 6 friction pins into the NXT. (3 per side)

Building Instructions: Ways to Attach NXT Motors
� 2008 LEGOengineering.com & Tufts University Center for Engineering Educational Outreach
22
Step# 3
Combine the parts from Steps #1 and #2. Attach the bent beams to the friction pins in the NXT and to the axles from step #1. Use a � bushings to hold the 3-5 bent beam to the axle. Both sides are symmetrical.
Building Instructions: Ways to Attach NXT Motors
� 2008 LEGOengineering.com & Tufts University Center for Engineering Educational Outreach
23
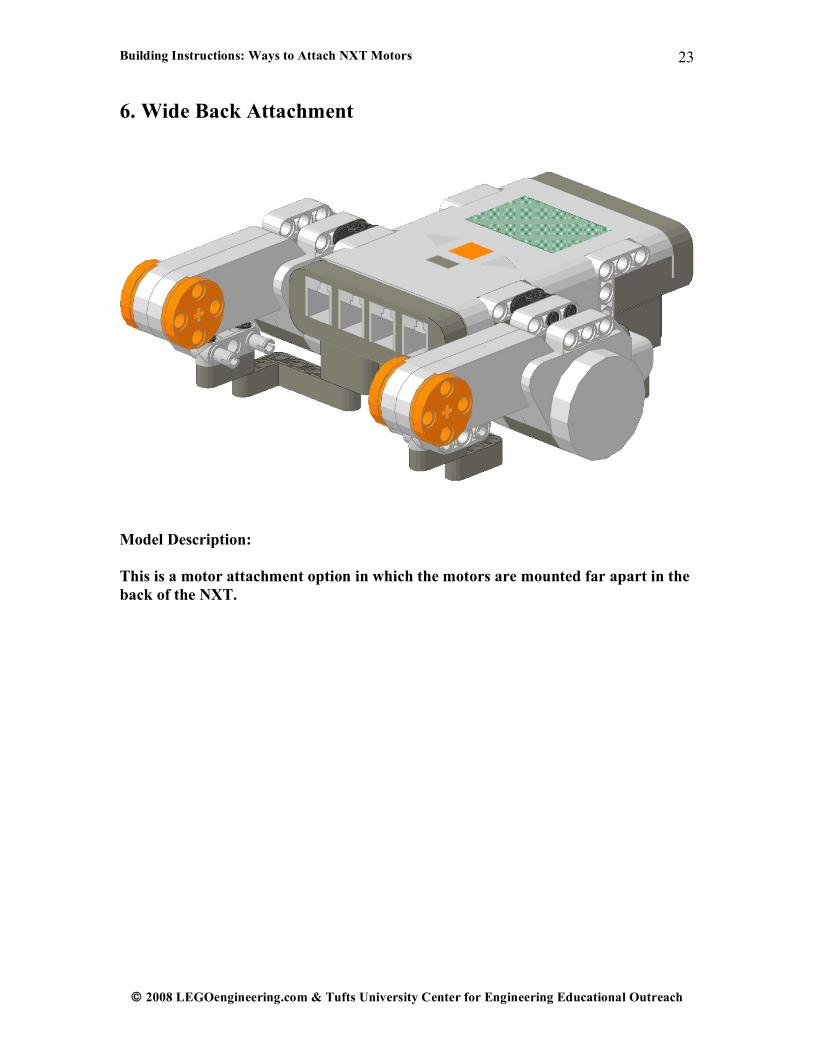
6. Wide Back Attachment
Model Description: This is a motor attachment option in which the motors are mounted far apart in the back of the NXT.
Building Instructions: Ways to Attach NXT Motors
� 2008 LEGOengineering.com & Tufts University Center for Engineering Educational Outreach
24
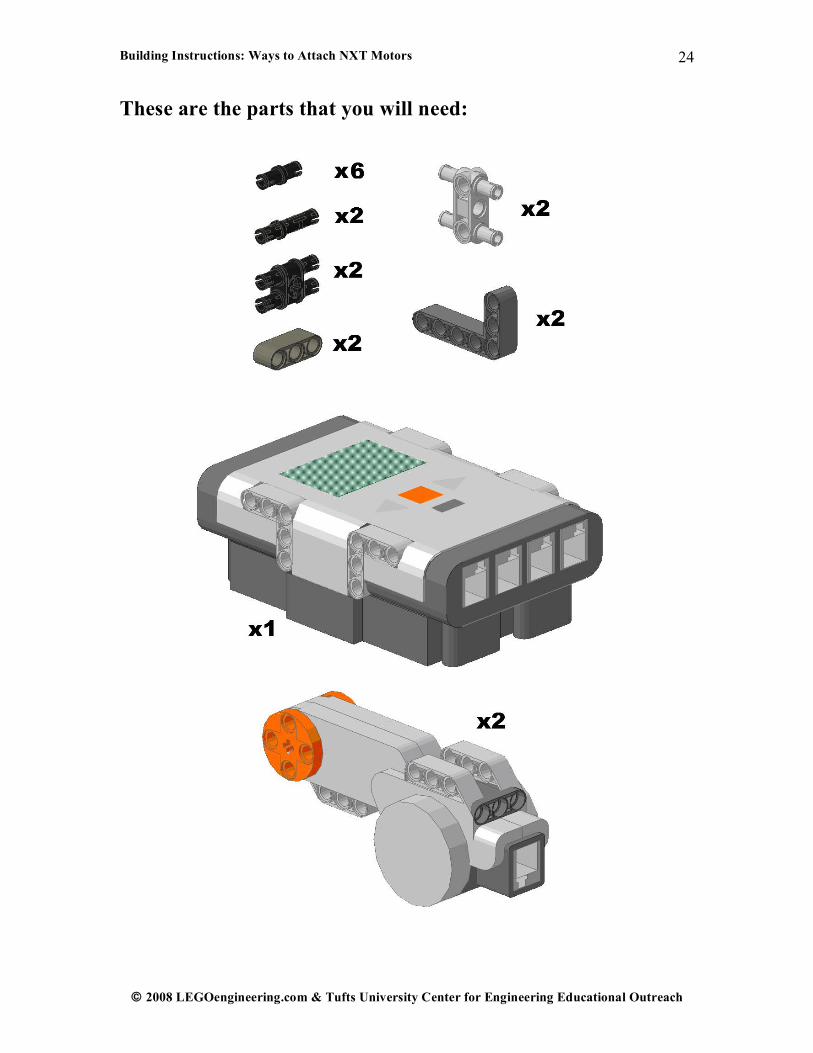
These are the parts that you will need:

Building Instructions: Ways to Attach NXT Motors
� 2008 LEGOengineering.com & Tufts University Center for Engineering Educational Outreach
25
Step# 1
Attach a double pin connector to each side of the NXT. Place 4 pins to the bottom of the NXT in the outside most holes. Step#2
Attach a four pin axle joiner to each of the NXT motors. In 1 hole of the 4 pin connector attach a pin and in the other hole attach an extended pin. Attach the short beam to both pins and the bent beam to the extended pin. Note: Each motor assembly should be a mirror image of the other.

Building Instructions: Ways to Attach NXT Motors
� 2008 LEGOengineering.com & Tufts University Center for Engineering Educational Outreach
26
Step# 3
Combine the assemblies from Steps #1 and #2. Attach the bent beams to the bottom of the NXT and the motors to the double pin connectors.
Building Instructions: Ways to Attach NXT Motors
� 2008 LEGOengineering.com & Tufts University Center for Engineering Educational Outreach
27
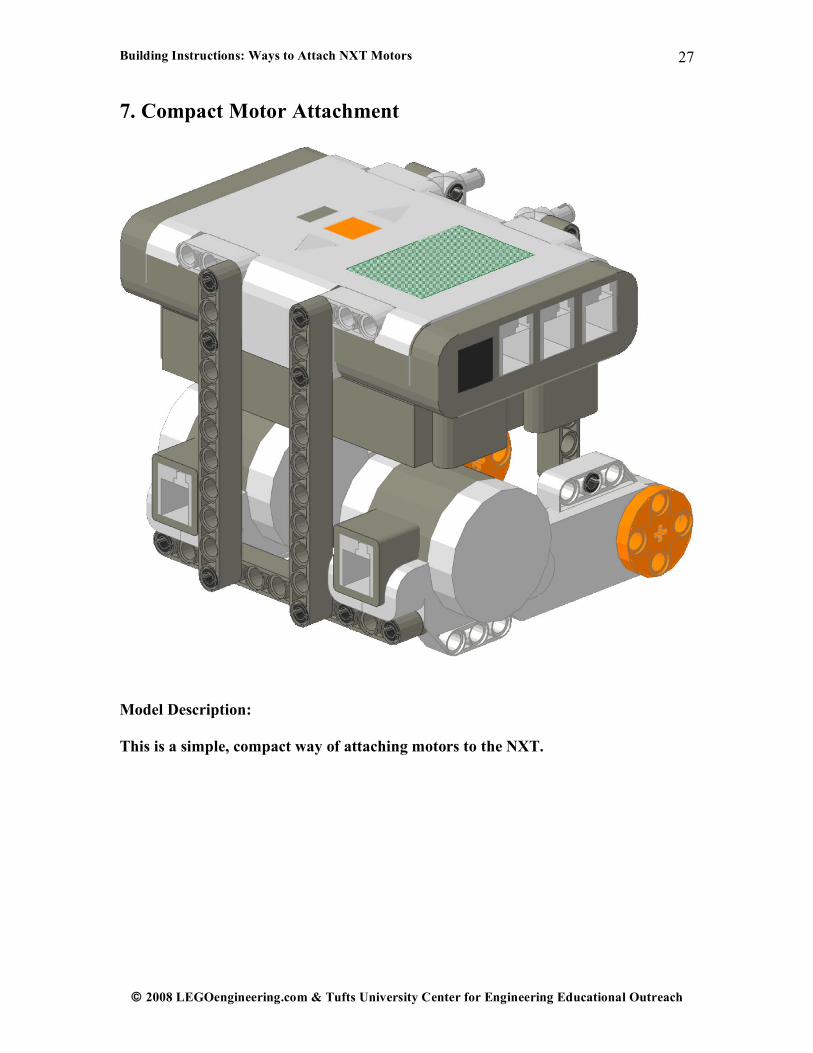
7. Compact Motor Attachment
Model Description: This is a simple, compact way of attaching motors to the NXT.
Building Instructions: Ways to Attach NXT Motors
� 2008 LEGOengineering.com & Tufts University Center for Engineering Educational Outreach
28
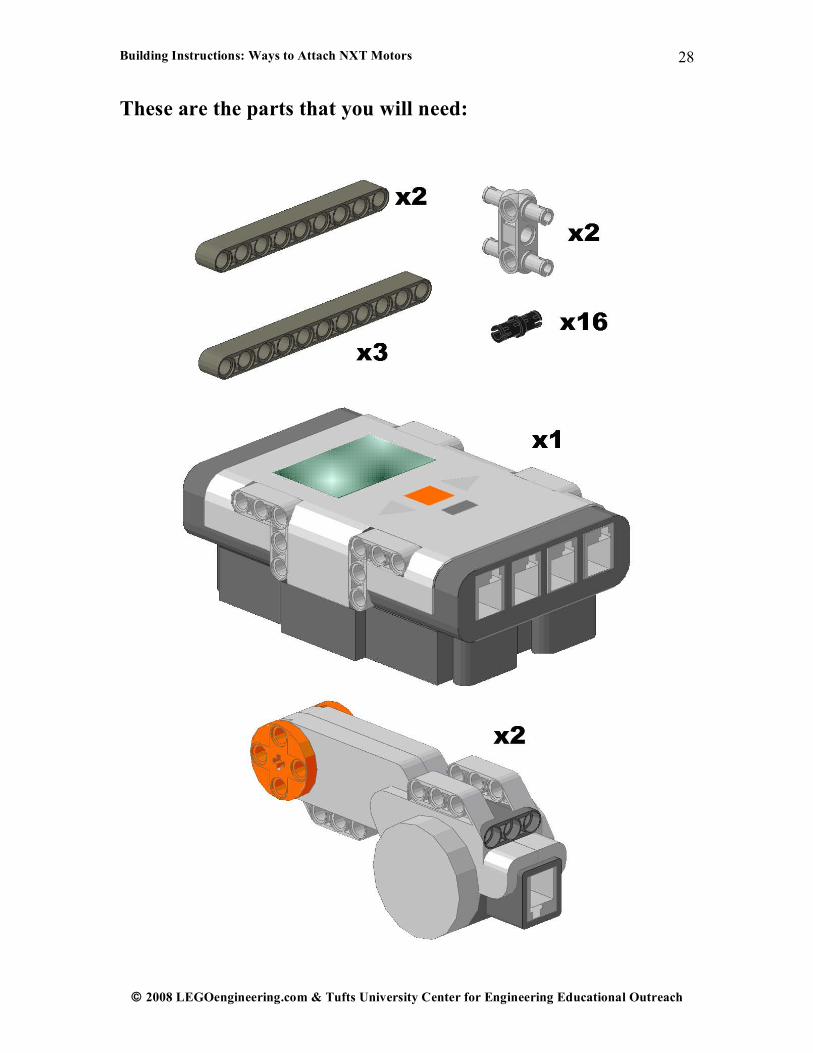
These are the parts that you will need:

Building Instructions: Ways to Attach NXT Motors
� 2008 LEGOengineering.com & Tufts University Center for Engineering Educational Outreach
29
Step# 1
Attach 2 motors to the NXT using beams and various pegs. Step# 2
Separately build a motor support using beams and pegs.

Building Instructions: Ways to Attach NXT Motors
� 2008 LEGOengineering.com & Tufts University Center for Engineering Educational Outreach
30
Step# 3
Attach the part from Step #1 to the part from Step #2 so that the beams from the first step connect to the back of the motors.
Building Instructions: Ways to Attach NXT Motors
� 2008 LEGOengineering.com & Tufts University Center for Engineering Educational Outreach
31
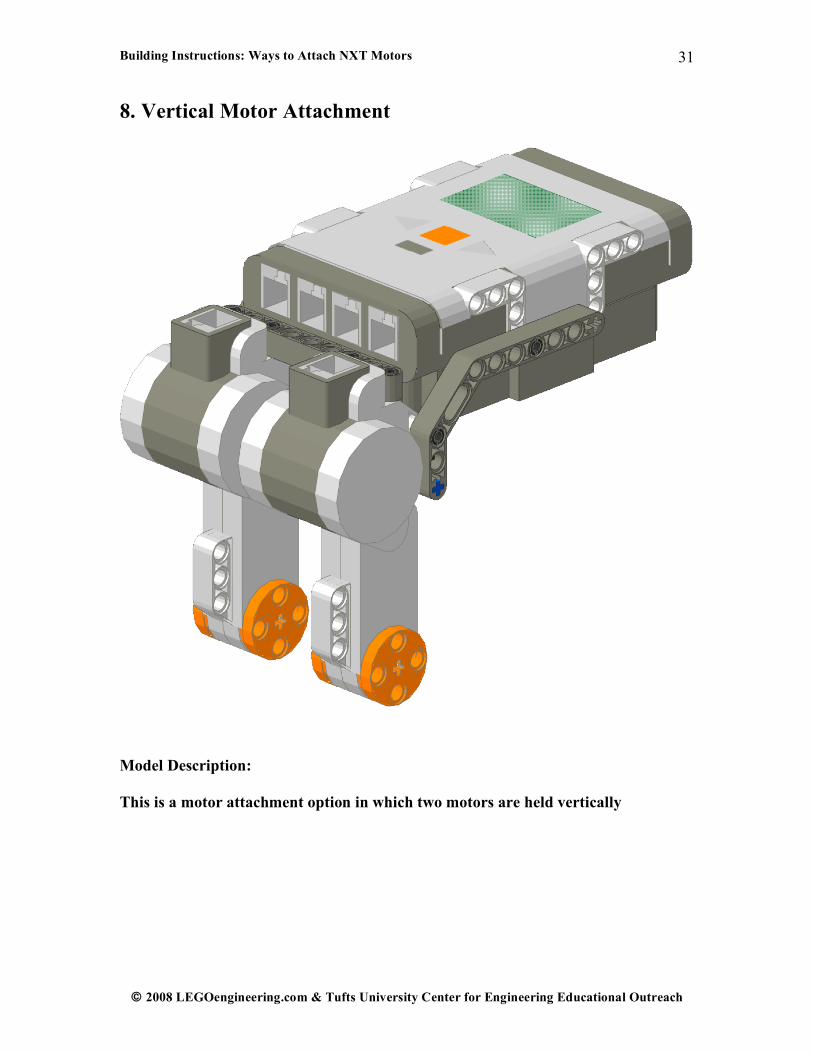
8. Vertical Motor Attachment
Model Description: This is a motor attachment option in which two motors are held vertically

Building Instructions: Ways to Attach NXT Motors
� 2008 LEGOengineering.com & Tufts University Center for Engineering Educational Outreach
32
These are the parts that you will need:

Building Instructions: Ways to Attach NXT Motors
� 2008 LEGOengineering.com & Tufts University Center for Engineering Educational Outreach
33
Step# 1
Attach 4 pins to the back of 2 motors. Also attach a pin and an axle pin to the side of each motor. Take 4 pins and attach each to a perpendicular axle joiner. Thread an axle through each motor lining up the 4 perpendicular axle joiners. Step# 2
Attach the 4 pins from the perpendicular axle joiners to the bottom of an NXT.

Building Instructions: Ways to Attach NXT Motors
� 2008 LEGOengineering.com & Tufts University Center for Engineering Educational Outreach
34
Step# 3
Attach 2 pins to the side of the NXT. Secure Step #2 by attaching a bent beam on both sides of the NXT and a straight beam on top of each motor.

Building Instructions: Front End Setups
� 2008 LEGOengineering.com & Tufts University Center for Engineering Educational Outreach
35
III. Front End Setups 1. Swiveling Front Attachment
Model Description: This is a front wheel attachment option in which one small wheel has the ability to swivel. This allows the car to turn easily.

Building Instructions: Front End Setups
� 2008 LEGOengineering.com & Tufts University Center for Engineering Educational Outreach
36
These are the parts that you will need:

Building Instructions: Front End Setups
� 2008 LEGOengineering.com & Tufts University Center for Engineering Educational Outreach
37
Step# 1
Take a 5 stud beam and slide on a half bushings, a 4-connector peg, a bushing and another half bushing. Attach the wheel to the 4-conector peg. Step# 2
Take a small L-beam and attach 2 black friction pins to the 2nd hole and the 2nd hole from the top. Attach that to the parts from Step# 1 with a bushing. Take an L-beam and attach 2 black friction pins to the 2nd and 3rd holes.

Building Instructions: Front End Setups
� 2008 LEGOengineering.com & Tufts University Center for Engineering Educational Outreach
38
Step# 3
Attach the parts from Step# 2 to the NXT at the protruding connector pegs.
Building Instructions: Front End Setups
� 2008 LEGOengineering.com & Tufts University Center for Engineering Educational Outreach
39
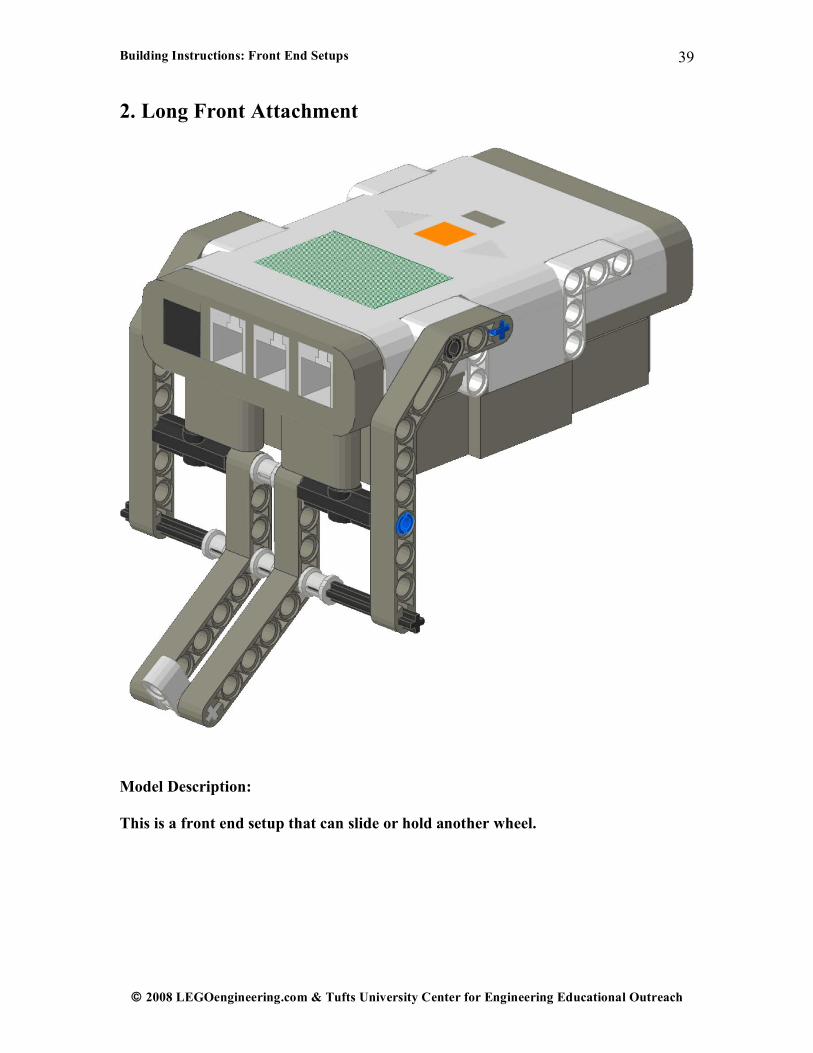
2. Long Front Attachment
Model Description: This is a front end setup that can slide or hold another wheel.

Building Instructions: Front End Setups
� 2008 LEGOengineering.com & Tufts University Center for Engineering Educational Outreach
40
These are the parts that you will need:

Building Instructions: Front End Setups
� 2008 LEGOengineering.com & Tufts University Center for Engineering Educational Outreach
41
Step# 1
Attach to the side of each angle connector an axle pin. To the top of each, connect a pin. Thread a medium axle between the angle connector placing 2 bent beams and a bushinging in between. At the bend of the beams, thread a long axle with bushingings inside and outside of the beams. At the end of the beams, thread a small axle with a perpendicular axle joiner. Step# 2
Attach Step #1 to the bottom of the NXT.
Building Instructions: Front End Setups
� 2008 LEGOengineering.com & Tufts University Center for Engineering Educational Outreach
42
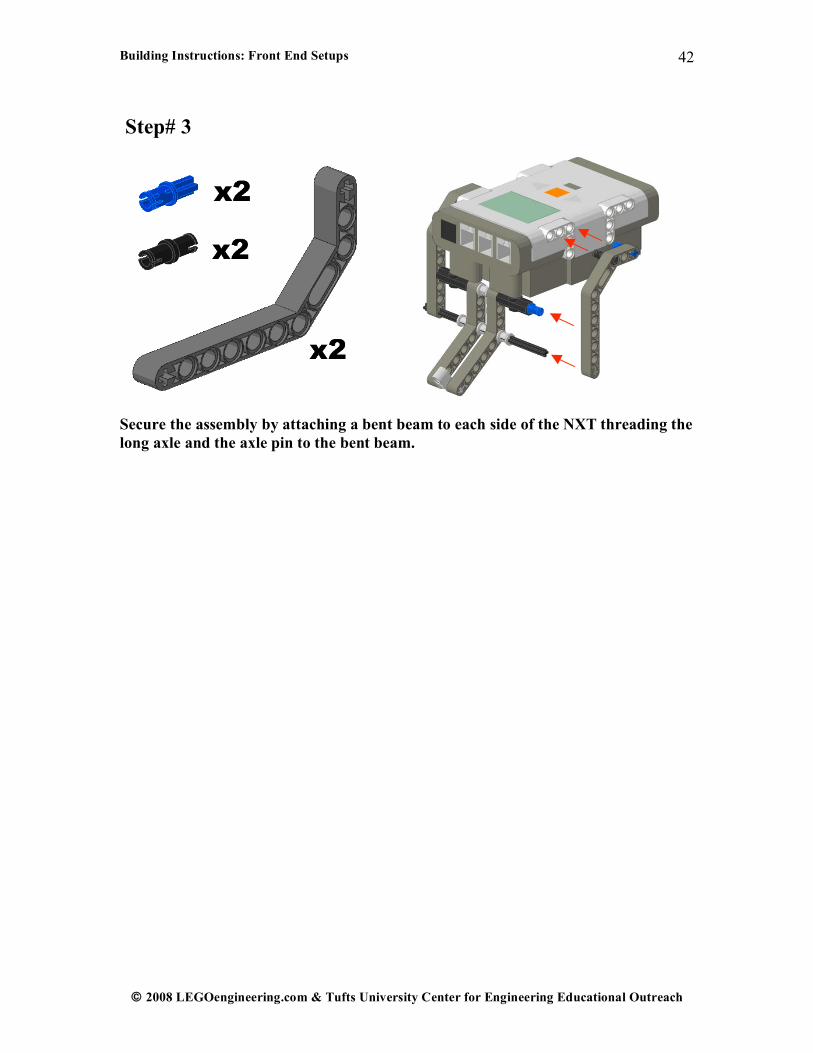
Step# 3
Secure the assembly by attaching a bent beam to each side of the NXT threading the long axle and the axle pin to the bent beam.

Building Instructions: Front End Setups
© 2008 LEGOengineering.com & Tufts University Center for Engineering Educational Outreach
43
3. Sliding Front Attachment
Model Description: This is a front wheel attachment option with skids to slide around on. This gives an NXT car the ability to turn without the use of a wheel.

Building Instructions: Front End Setups
© 2008 LEGOengineering.com & Tufts University Center for Engineering Educational Outreach
44
These are the parts that you will need:
Building Instructions: Front End Setups
© 2008 LEGOengineering.com & Tufts University Center for Engineering Educational Outreach
45
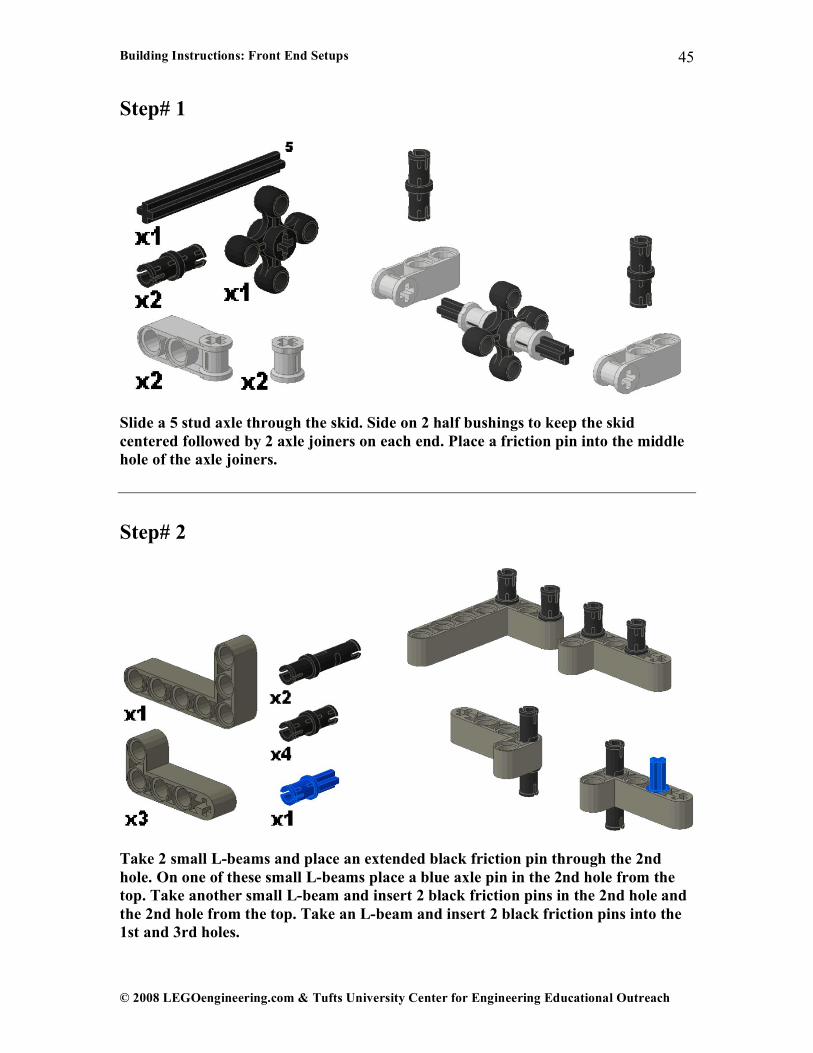
Step# 1
Slide a 5 stud axle through the skid. Side on 2 half bushings to keep the skid centered followed by 2 axle joiners on each end. Place a friction pin into the middle hole of the axle joiners. Step# 2
Take 2 small L-beams and place an extended black friction pin through the 2nd hole. On one of these small L-beams place a blue axle pin in the 2nd hole from the top. Take another small L-beam and insert 2 black friction pins in the 2nd hole and the 2nd hole from the top. Take an L-beam and insert 2 black friction pins into the 1st and 3rd holes.
Building Instructions: Front End Setups
© 2008 LEGOengineering.com & Tufts University Center for Engineering Educational Outreach
46
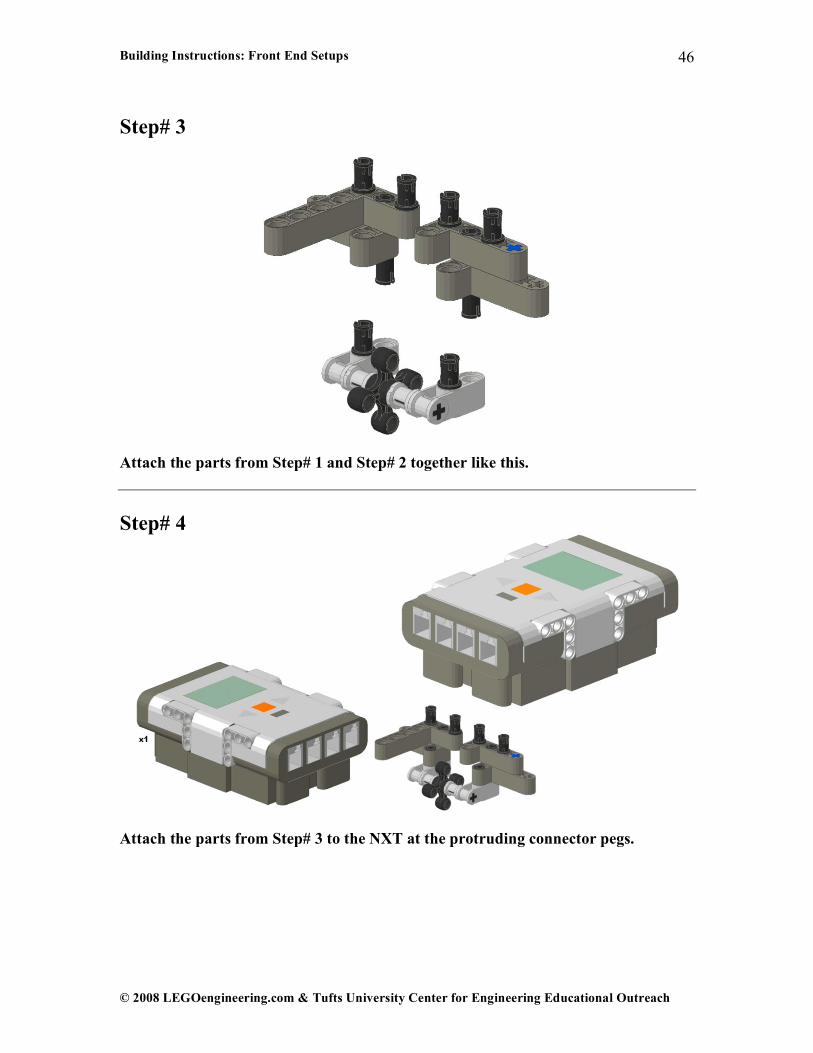
Step# 3
Attach the parts from Step# 1 and Step# 2 together like this. Step# 4
Attach the parts from Step# 3 to the NXT at the protruding connector pegs.

Building Instructions: Front End Setups
© 2008 LEGOengineering.com & Tufts University Center for Engineering Educational Outreach
47
4. Single Wheel Attachment
Model Description: This is a front wheel attachment that allows attachment of various sensors.

Building Instructions: Front End Setups
© 2008 LEGOengineering.com & Tufts University Center for Engineering Educational Outreach
48
These are the parts that you will need:
Building Instructions: Front End Setups
© 2008 LEGOengineering.com & Tufts University Center for Engineering Educational Outreach
49
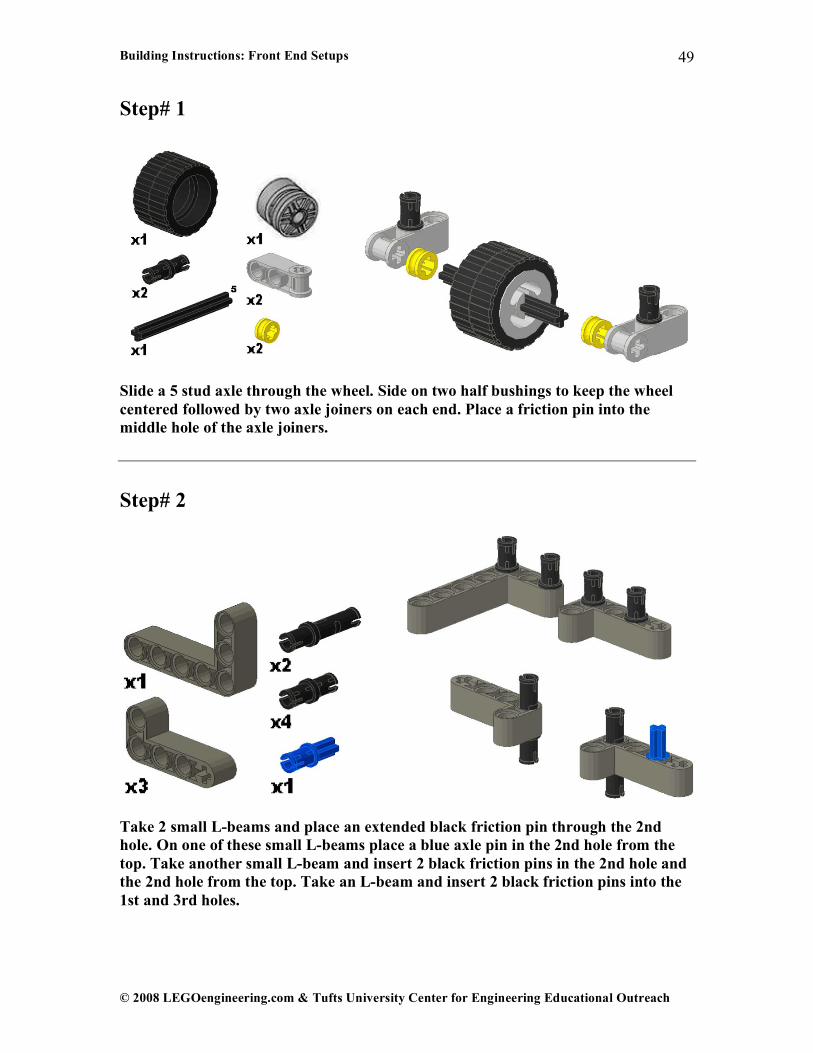
Step# 1
Slide a 5 stud axle through the wheel. Side on two half bushings to keep the wheel centered followed by two axle joiners on each end. Place a friction pin into the middle hole of the axle joiners. Step# 2
Take 2 small L-beams and place an extended black friction pin through the 2nd hole. On one of these small L-beams place a blue axle pin in the 2nd hole from the top. Take another small L-beam and insert 2 black friction pins in the 2nd hole and the 2nd hole from the top. Take an L-beam and insert 2 black friction pins into the 1st and 3rd holes.

Building Instructions: Front End Setups
© 2008 LEGOengineering.com & Tufts University Center for Engineering Educational Outreach
50
Step# 3
Attach the parts from Step# 1 and Step# 2 together like this. Step# 4
Attach the parts from Step# 3 to the NXT at the protruding connector pegs.

Building Instructions: Full Car Model
© 2008 LEGOengineering.com & Tufts University Center for Engineering Educational Outreach
51
IV. Full Car Model
Model Description: This is a simple, 2 motor car that can be built in less than 15 minutes using the NXT kit. Additionally, all front end setups (Section III) and sensor types can easily be added to this model. The following model displays the single front wheel front assembly.

Building Instructions: Full Car Model
© 2008 LEGOengineering.com & Tufts University Center for Engineering Educational Outreach
52
These are the parts that you will need:

Building Instructions: Full Car Model
© 2008 LEGOengineering.com & Tufts University Center for Engineering Educational Outreach
53
Step# 1
Side Views
Attach a double black connector peg and a single black connector peg to both sides of the NXT. Connect the double peg vertically in the top most holes. The single peg should be connected in the middle horizontal hole. Your NXT should look like the below picture before moving on to the next step.
Building Instructions: Full Car Model
© 2008 LEGOengineering.com & Tufts University Center for Engineering Educational Outreach
54
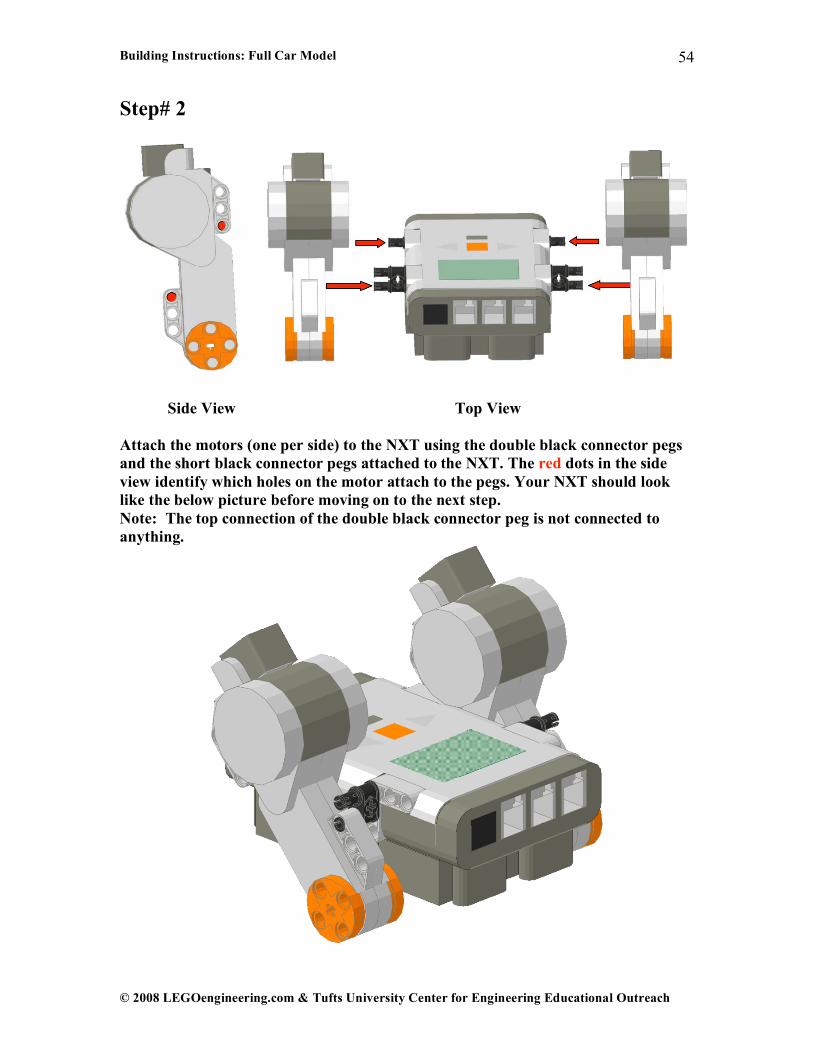
Step# 2
Side View Top View
Attach the motors (one per side) to the NXT using the double black connector pegs and the short black connector pegs attached to the NXT. The red dots in the side view identify which holes on the motor attach to the pegs. Your NXT should look like the below picture before moving on to the next step. Note: The top connection of the double black connector peg is not connected to anything.

Building Instructions: Full Car Model
© 2008 LEGOengineering.com & Tufts University Center for Engineering Educational Outreach
55
Step# 3 Take an 11-holed rounded beam and attach two short black connector pegs to the outside holes as seen in the red square. Connect the pegs to the back of each motor (as identified by the red dots) to further support the motors to the NXT. Your NXT should look like the below picture before moving on to the next step.

Building Instructions: Full Car Model
© 2008 LEGOengineering.com & Tufts University Center for Engineering Educational Outreach
56
Step# 4 Assemble 2 rear wheel assemblies using a 6 stud axle, a wheel, and a hub. Attach one to each motor as seen below.
Building Instructions: Full Car Model
© 2008 LEGOengineering.com & Tufts University Center for Engineering Educational Outreach
57
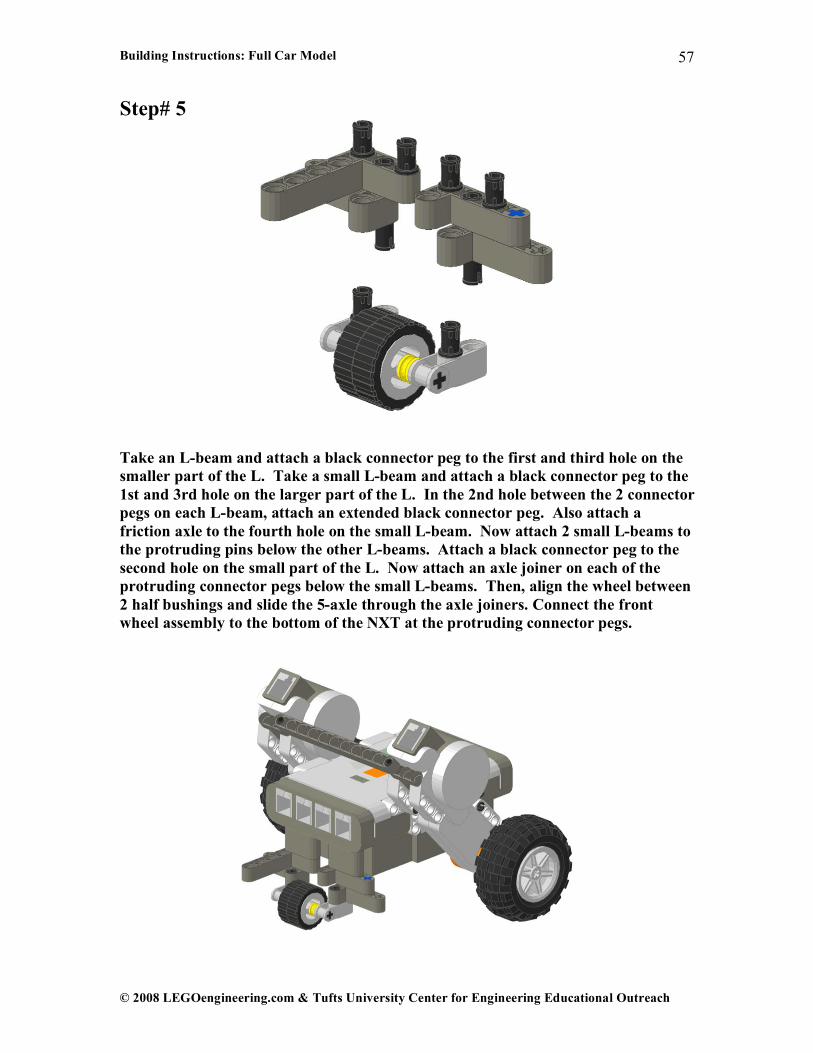
Step# 5
Take an L-beam and attach a black connector peg to the first and third hole on the smaller part of the L. Take a small L-beam and attach a black connector peg to the 1st and 3rd hole on the larger part of the L. In the 2nd hole between the 2 connector pegs on each L-beam, attach an extended black connector peg. Also attach a friction axle to the fourth hole on the small L-beam. Now attach 2 small L-beams to the protruding pins below the other L-beams. Attach a black connector peg to the second hole on the small part of the L. Now attach an axle joiner on each of the protruding connector pegs below the small L-beams. Then, align the wheel between 2 half bushings and slide the 5-axle through the axle joiners. Connect the front wheel assembly to the bottom of the NXT at the protruding connector pegs.
Building Instructions: Full Car Model
© 2008 LEGOengineering.com & Tufts University Center for Engineering Educational Outreach
58
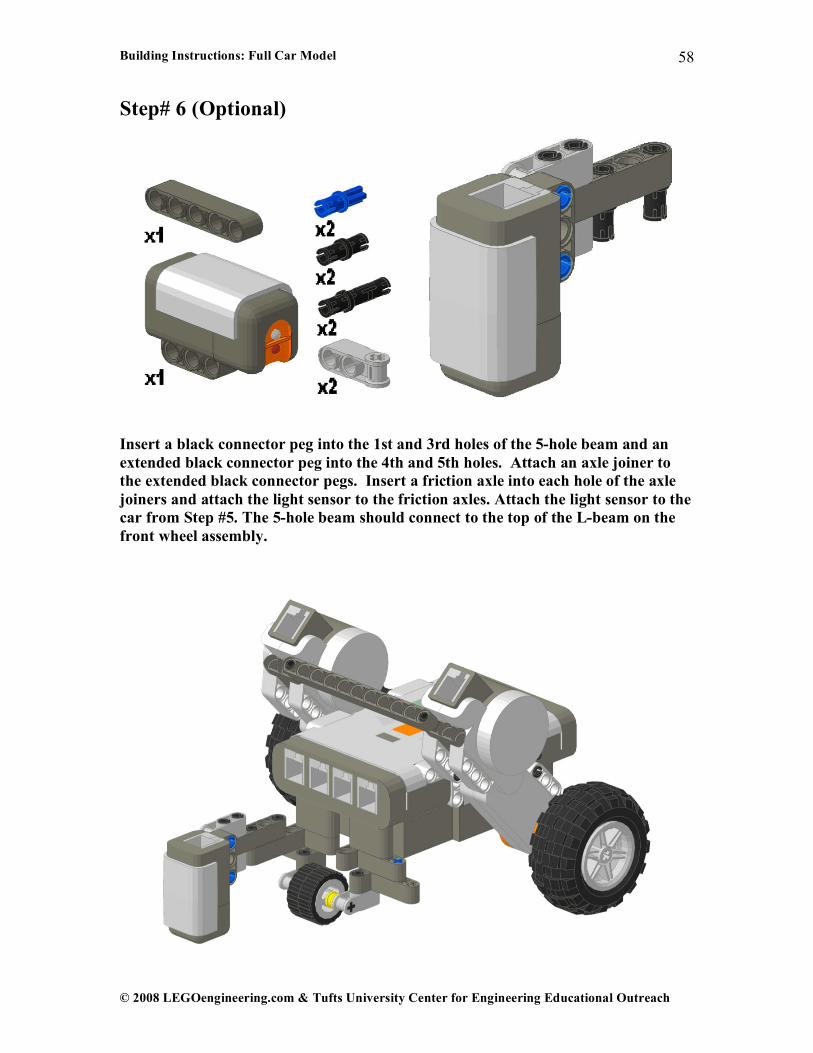
Step# 6 (Optional)
Insert a black connector peg into the 1st and 3rd holes of the 5-hole beam and an extended black connector peg into the 4th and 5th holes. Attach an axle joiner to the extended black connector pegs. Insert a friction axle into each hole of the axle joiners and attach the light sensor to the friction axles. Attach the light sensor to the car from Step #5. The 5-hole beam should connect to the top of the L-beam on the front wheel assembly.

Building Instructions: Full Car Model
© 2008 LEGOengineering.com & Tufts University Center for Engineering Educational Outreach
59
Step# 7 (Optional)
Attach the two black connector pegs to the first and third holes of the touch sensor. Attach the touch sensor assembly to the car from Step #5. The sensor should attach to the top of the L-beam on the front wheel assembly.

Building Instructions: 15 Minute Building Projects
© 2008 LEGOengineering.com & Tufts University Center for Engineering Educational Outreach
60
IV. 15 Minute Building Projects 1. Swing Set
Model Description: This is a swing set that can be programmed to move back and forth.

Building Instructions: 15 Minute Building Projects
© 2008 LEGOengineering.com & Tufts University Center for Engineering Educational Outreach
61
These are the parts that you will need:

Building Instructions: 15 Minute Building Projects
© 2008 LEGOengineering.com & Tufts University Center for Engineering Educational Outreach
62
Step# 1
Connect the 2 lift arms using 2 axle pins. Place an axle pin with friction into the top holes of the lift arms. Connect these pins to the gray axle joiners. Insert a 6 stud axle into each axle joiner. Place a gray connector on each axle. Connect the black axle joiners using the 2 stud axles. Step# 2
Slide the 10 stud axles through the gray axle joiners from the previous step, and connect them using the axle connector. Create the base by connecting the beams to the 1st and 15th hole of the studded beams using a pin and a long pin. Reinforce the base by connecting 2 more studded beams to the bottom of the frame. Slide the 10 stud axles through the ends of the beams and secure in place with one bushing and two � bushings.

Building Instructions: 15 Minute Building Projects
© 2008 LEGOengineering.com & Tufts University Center for Engineering Educational Outreach
63
Step# 3
Place 1 of the 24-tooth gears on the exposed 10-stud axle at the top of the assembly. Connect the other 24-tooth gear using the axle pin to the 4th hole from the top of the beam. Connect one of the 40-tooth gears to the 8th hole from the bottom of the beam. Connect the other 40-tooth gear to the 2nd hole from the bottom of the beam using the 6-stud axle to the motor. Secure the motor in place with a bushing.

Building Instructions: 15 Minute Building Projects
� 2008 LEGOengineering.com & Tufts University Center for Engineering Educational Outreach
64
NXT Merry-Go-Round!
Model Description: This medium building difficulty merry-go-round can rotate forever!! Wires will never get tangled up since the NXT spins with the motors.

Building Instructions: 15 Minute Building Projects
� 2008 LEGOengineering.com & Tufts University Center for Engineering Educational Outreach
65
These are the parts that you will need:

Building Instructions: 15 Minute Building Projects
� 2008 LEGOengineering.com & Tufts University Center for Engineering Educational Outreach
66
Step# 1 (repeat step twice)
Construct supports for the base of the merry-go-round. Use wheels for the bottom, axles as attachments, an assembly of beams and pegs as the supports. You will need 2 of these assemblies to create a sturdy base. Step# 2
To connect the base supports, a center console is needed. Use a turret, beams and a variety of pegs to assemble the center console.

Building Instructions: 15 Minute Building Projects
� 2008 LEGOengineering.com & Tufts University Center for Engineering Educational Outreach
67
Step# 3
Use the assemblies from Steps #1 and #2 to assemble the complete base. For added support, take a 12-beam and connect it between the 2 sides of the base. Step# 4
Build the base motor assembly. Attach to the motor a series of beams and pegs. Also thread an axle through the motor and attach a 40-tooth gear. Note: The gear will need to be removed in the next step to attach to the base.

Building Instructions: 15 Minute Building Projects
� 2008 LEGOengineering.com & Tufts University Center for Engineering Educational Outreach
68
Step# 5
Attach the base motor assembly to the base. Remove the 40-tooth gear and thread the axle through the 4 pin connector. Step# 6
Build the NXT assembly. Attach a series of beams and pegs that will allow you to attach the top portion of the merry-go-round.

Building Instructions: 15 Minute Building Projects
� 2008 LEGOengineering.com & Tufts University Center for Engineering Educational Outreach
69
Step #7
Attach the NXT assembly to the base and base motor. The NXT should attach in 3 places on the base and 4 places on the motor. Step# 8
Assemble the top motor assembly. Thread a 12-axle through the motor.

Building Instructions: 15 Minute Building Projects
� 2008 LEGOengineering.com & Tufts University Center for Engineering Educational Outreach
70
Step #9
Attach the top motor assembly to the NXT. Step #10 (repeat step twice)
Construct 2 horses for the merry-go-round.

Building Instructions: 15 Minute Building Projects
� 2008 LEGOengineering.com & Tufts University Center for Engineering Educational Outreach
71
Step# 11
Attach the 2 horses to the 12-axle of the top motor assembly. Wire the motors to the NXT outputs and your merry-go-round is complete.