nxt controller manual ip assignment in wan … · nxt controller manual ip assignment in wan ......
TRANSCRIPT

NXT Controller Manual IP Assignment in WAN EnvironmentsApplication Note
It is difficult to perform NXT controller IP address assignment and auto-configuration when controllers are on different subnets from the local PC (the PC from which the Doors.NET client is run). This is particularly true when using versions of Doors.NET prior to v3.5.1.12. In previous software revisions this process was done in one of three ways:
• Multiple NXT Gateways, one for each subnet – each NXT Gateway requiring its own local PC.• Virtual Private Network (VPN) – bridging multiple physical network segments into a single,
logical subnet.• Bench configuration of controller IP addresses – requiring a separate installation of Doors.NET to
locally replicate a remote subnet. Any fully reset controllers must be physically returned to the bench for auto-configuration.
With the v3.5.1.12 release an alternative method of controller IP assignment is now supported for WAN environments allowing auto-configuration to be done. A WAN (wide area network) is typically a computer network covering a broad area with multiple subnets routed together to make up a greater network of connected devices.
Controller IP assignment in a WAN environment is a multi-step process, done once on each controller that is not on the same subnet as the local PC with Doors.NET installed. This can be done between live networks or it can be done on a bench with appropriate equipment that physically creates a remote LAN on a remote PC for the controllers versus the local LAN for the local PC on which the Doors.NET client is run.
The instructions in this Application Note refer to two different PCs.• The Local PC is the one on which the Doors.NET program is installed. • The Remote PC is the one used for the controller manual IP assignment process.
NOTE: The Remote PC is only required for IP assignment, otherwise it is not used by Doors.NET. If you have more than two subnets then either multiple remote PCs are necessary (for each remote subnet) or one PC can be rotated between the subnets.
You must have a list of unique IP addresses to assign to the controllers being configured. Be sure to coordinate with your network administrator for the static IP addresses to be used by the controllers. There are two forms at the end of this document that will assist you in collecting the IP and network mask information needed to complete this process – one for the NXT gateway network (local PC) and one for the remote network and controllers (remote PC).
NOTE: All screen captures in this document are from a Windows XP operating system. Screen appearance in other operating systems will be slightly different.
Page 1 of 25 P/N: 01564-001 Rev. A

NXT Controller Manual IP Assignment in WAN EnvironmentsApplication Note
1.0 TelnetManual IP assignment is done using Telnet. Telnet is a network protocol that provides plain-text, command communication between devices.
The Telnet client is a standard part of a Windows XP installation, but must be enabled/installed in a Vista, Windows 7, or Windows Server installation.
1.1 Enable Telnet in Vista or Windows 7Use the Windows Features tool to enable Telnet in Vista or Windows 7.
NOTE: You must have Administrator Rights for the operating system to enable Telnet for all users.
1. Click Start and then click Control Panel.2. On the Control Panel Home page, click Programs.3. In the Programs and Features section, click Turn Windows features on or off.4. If the User Account Control dialog box appears, confirm that the action it displays is what you
want and then click Continue.5. In the Windows Features list, select Telnet Client, and then click OK.
1.2 Install Telnet in Windows ServerUse the Role Management tool to install Telnet in Windows Server.
1. Start Server Manager. Click Start, right-click Computer, and then click Manage.2. If the User Account Control dialog box appears, confirm that the action it displays is what you
want and then click Continue.3. In the Features Summary section, click Add features.4. In the Add Features Wizard, select Telnet Client and then click Next.5. On the Confirm Installation Options page, click Install.6. When installation finishes click Close.
2.0 Configure Remote PC for Access to 169.254.x.y IP Addresses
The remote PC must be configured (at least temporarily) with an IP address to communicate with a controller in the 169.254.x.y address range. This is required for the remote PC to communicate with the controller using the controller’s default IP address. Refer to your IT professional on how to configure the remote PC.
Page 2 of 25 P/N: 01564-001 Rev. A

NXT Controller Manual IP Assignment in WAN EnvironmentsApplication Note
3.0 Verify Ethernet Communication to the ControllerBefore Telnetting into the controller to set its IP address you should verify the controller and the remote PC being used in the IP assignment process are properly communicating through the local network. This is done by sending a ping command to the controller and looking for a response.
Verify the following to ensure proper communication:
• one controller is connected to the network at a time• the controller’s IP is set at its factory default IP of 169.254.1.1• the remote PC used for IP assignment can communicate with the default controller IP address –
this PC must have a compatible IP address and network mask for both the default IP address and the new IP address to be assigned
1. Connect the controller to the local PC network and power up the controller.2. Open a DOS Command prompt.
• Click Start > Run
3. Type cmd in the entry field and click OK.
Page 3 of 25 P/N: 01564-001 Rev. A

NXT Controller Manual IP Assignment in WAN EnvironmentsApplication Note
The DOS command window opens.
4. Enter the ping command at the x:\> prompt:
• x:\>ping 169.254.1.1 (Enter)
5. After a short delay the ping command results appear.
• A communicating ping command appears as:
Continue to the Telnet step.
Page 4 of 25 P/N: 01564-001 Rev. A
NXT Controller Manual IP Assignment in WAN EnvironmentsApplication Note
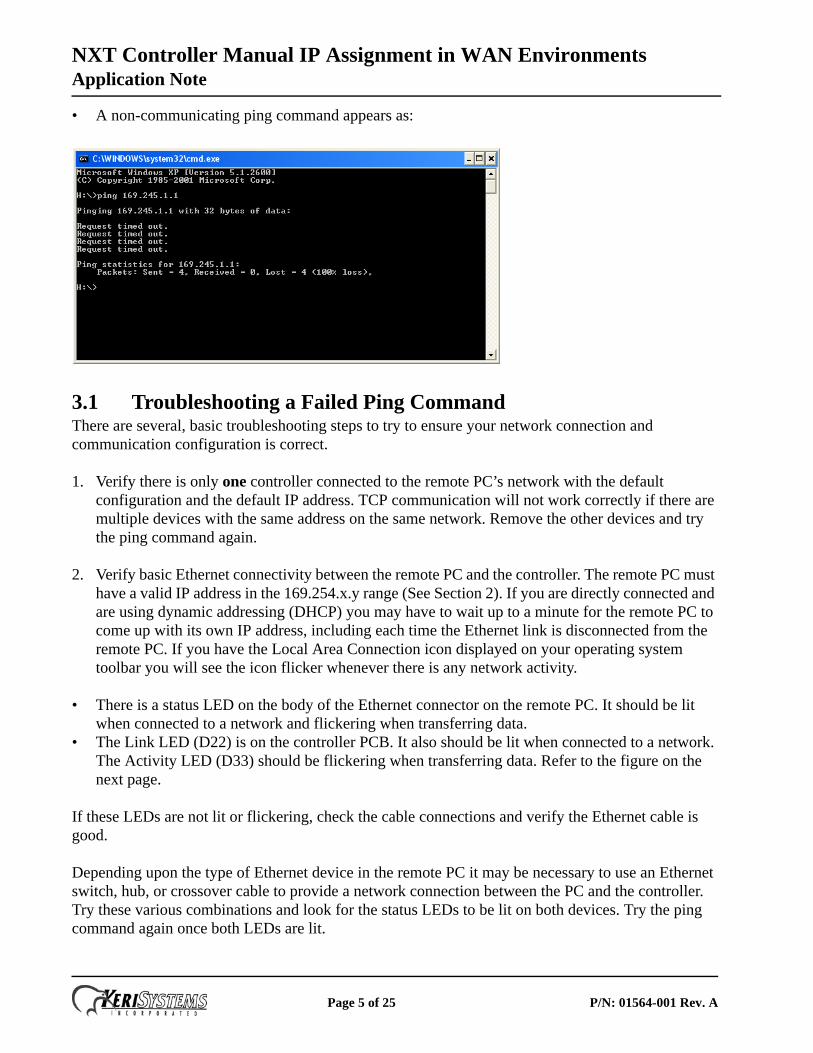
• A non-communicating ping command appears as:
3.1 Troubleshooting a Failed Ping CommandThere are several, basic troubleshooting steps to try to ensure your network connection and communication configuration is correct.
1. Verify there is only one controller connected to the remote PC’s network with the default configuration and the default IP address. TCP communication will not work correctly if there are multiple devices with the same address on the same network. Remove the other devices and try the ping command again.
2. Verify basic Ethernet connectivity between the remote PC and the controller. The remote PC must have a valid IP address in the 169.254.x.y range (See Section 2). If you are directly connected and are using dynamic addressing (DHCP) you may have to wait up to a minute for the remote PC to come up with its own IP address, including each time the Ethernet link is disconnected from the remote PC. If you have the Local Area Connection icon displayed on your operating system toolbar you will see the icon flicker whenever there is any network activity.
• There is a status LED on the body of the Ethernet connector on the remote PC. It should be lit when connected to a network and flickering when transferring data.
• The Link LED (D22) is on the controller PCB. It also should be lit when connected to a network. The Activity LED (D33) should be flickering when transferring data. Refer to the figure on the next page.
If these LEDs are not lit or flickering, check the cable connections and verify the Ethernet cable is good.
Depending upon the type of Ethernet device in the remote PC it may be necessary to use an Ethernet switch, hub, or crossover cable to provide a network connection between the PC and the controller. Try these various combinations and look for the status LEDs to be lit on both devices. Try the ping command again once both LEDs are lit.
Page 5 of 25 P/N: 01564-001 Rev. A

NXT Controller Manual IP Assignment in WAN EnvironmentsApplication Note
3. Cycle power on the controller. Try the ping command again.
4. Reset the controller. This will restore the controller to a factory default state, restoring the factory default IP address. Try the ping command again.
Perform the following to reset a controller:
• Remove power from the NXT controller.• Install a Jumper across the J3 pin header.• Press the S1 switch and hold it down while applying power. Keep the button pressed until the
Reset LED (D48) comes lit. This indicates the reset routine has begun.• DO NOT REMOVE POWER FROM THE NXT CONTROLLER
WHILE THE RESET LED IS LIT.• The Reset is complete when the Reset LED goes dark.• Cycle power on the controller.
If these steps do not resolve your communication issues your setup requires more detailed troubleshooting that cannot be covered in this document.
TB9
J2
S1
1
2
3
4
Ethernet RJ-45 Connection
J3
Reset LED
10/100 (D21)
Link (D22)
Activity (D33)
NXT Controller
Page 6 of 25 P/N: 01564-001 Rev. A

NXT Controller Manual IP Assignment in WAN EnvironmentsApplication Note
4.0 Information Collection Prior to Manual IP AssignmentThere are two blank forms at the end of this document that you can use to assist you in collecting all network communication related information necessary to perform this task. This information is used in various sections of the Manual IP Assignment procedure.
4.1 Sample NXT Gateway Network Information Form
Fill in the following information associated with the local PC and the router to which it is connected:
• IP address of the router connected to the local PC• Network Mask for that router• IP address of the local PC
You will only need to fill out one of these forms for the local PC and its router.
NXT Gateway Network Information Form
NOTE: All addresses are internal within the subnet.
Local Router IP =
Network Mask =
Local PC IP =
Router
NXTGateway
LocalPC
192 . 168 . 0 . 1
255 . 255 . 255 . 0
196 . 168 . 0 . 123
Page 7 of 25 P/N: 01564-001 Rev. A

NXT Controller Manual IP Assignment in WAN EnvironmentsApplication Note
4.2 Sample Remote Network Information Form
Fill in the following information associated with the remote PC, the router to which it is connected, and the NXT controller being assigned an IP address:
• IP address of the router connected to the remote PC• Network Mask for that router• IP address of the remote PC• Secondary IP address that allows the remote PC to connect to the local PC• IP address to be manually assigned to the controller
You will need to fill one of these forms out for each controller being assigned a new IP address.
Remote Network Information Form
NOTE: All addresses are internal within the subnet.
Remote Router IP =
Network Mask =
Controller IP =
Router
RemotePC
NXTController
& 169 . 254 . 1 . 1(default controller IP)
Remote PC IP =
& 169 . 254 . .
Controller #
110 . 10 . 10 . 10
255 . 0 . 0 . 0
10 . 1 . 2 . 310 . 10 . 12 . 34
123 45
Page 8 of 25 P/N: 01564-001 Rev. A

NXT Controller Manual IP Assignment in WAN EnvironmentsApplication Note
5.0 Telnet to the Controller and Set Its New IP AddressUsing Telnet you will send commands to the NXT controller that enter the new IP address into the controller.
1. Follow Steps 1 through 3 in Section 2 to open a DOS command prompt. If the DOS prompt from the ping command is still open you can use this DOS prompt.
2. Enter the telnet command and default IP address/port at the x:\> prompt:
x:\>telnet 169.254.1.1 2323
After a short delay the telnet login prompt appears:
NOTE: If your controller has firmware at revision 2.3.12 or earlier it will not prompt for a login or Password, but will go straight to the telnet prompt. Skip ahead to Step 6.
3. Enter the login: keri (Enter).4. Enter the Password: nxt (Enter) – type carefully as the password will not be shown as you type.
Page 9 of 25 P/N: 01564-001 Rev. A

NXT Controller Manual IP Assignment in WAN EnvironmentsApplication Note
5. If the login and password are entered correctly the telnet command prompt appears.
6. Enter the ifconfig command.
169.254.1.1#0> ifconfig eth0 inet add ip1.ip2.ip3.ip4 netmask nm1.nm2.nm3.nm4 (Enter)
• ip1 ip2 ip3 ip4 are the four elements of the IP address you wish to assign to the controller– for example, 10.1.2.3
• nm1 nm2 nm3 nm4 are the four elements of the remote network mask you wish to assign to the controller– for example, 255.0.0.0
• This example would be entered as169.254.1.1#0> ifconfig eth0 inet add 10.1.2.3 netmask 255.0.0.0 (Enter)
7. Enter the route command.
169.254.1.1#0> route set ga1.ga2.ga3.ga4 (Enter)
• ga1 ga2 ga3 ga4 are the four elements of the IP gateway address– for example, 10.10.10.10
• This example would be entered as169.254.1.1#0> route set 10.10.10.10 (Enter)
NOTE: Typically the IP gateway address is the router’s IP address that will be connecting the remote NXT controller to the local PC with Doors.NET (this is NOT the NXT gateway itself). This is the remote router's internal IP address which uses the same addressing scheme (on the same subnet) as the controller IP address.
Page 10 of 25 P/N: 01564-001 Rev. A
NXT Controller Manual IP Assignment in WAN EnvironmentsApplication Note
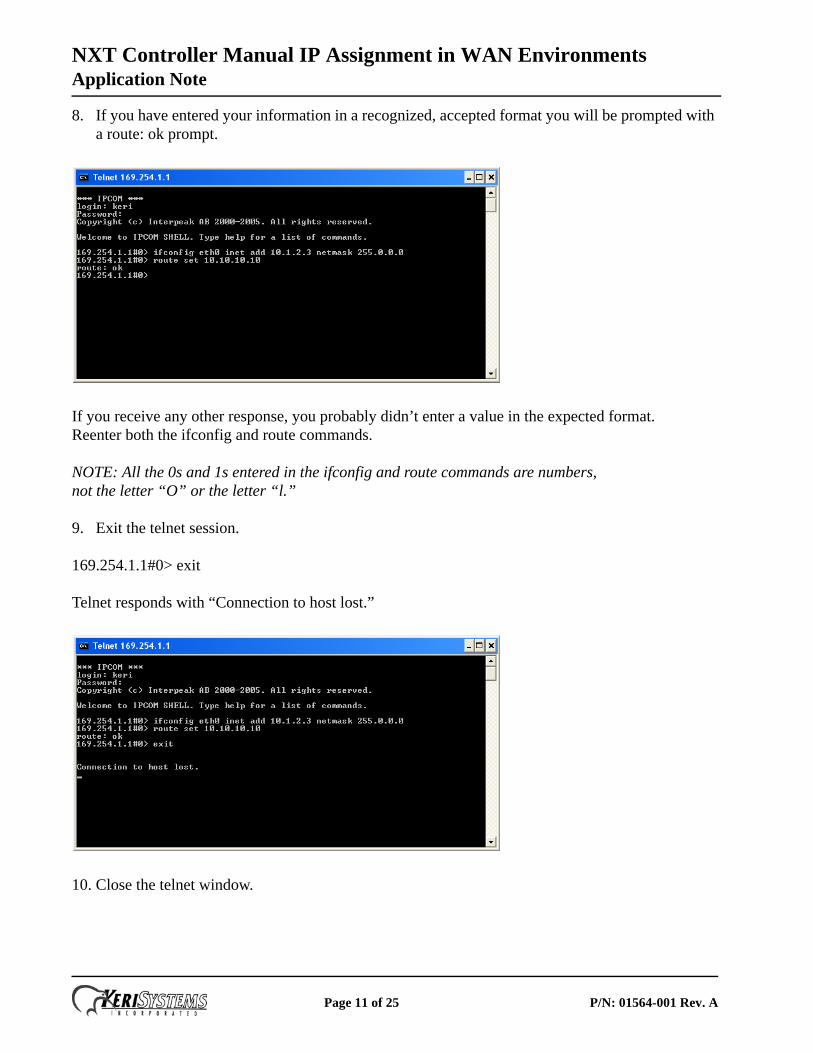
8. If you have entered your information in a recognized, accepted format you will be prompted with a route: ok prompt.
If you receive any other response, you probably didn’t enter a value in the expected format. Reenter both the ifconfig and route commands.
NOTE: All the 0s and 1s entered in the ifconfig and route commands are numbers, not the letter “O” or the letter “l.”
9. Exit the telnet session.
169.254.1.1#0> exit
Telnet responds with “Connection to host lost.”
10. Close the telnet window.
Page 11 of 25 P/N: 01564-001 Rev. A
NXT Controller Manual IP Assignment in WAN EnvironmentsApplication Note
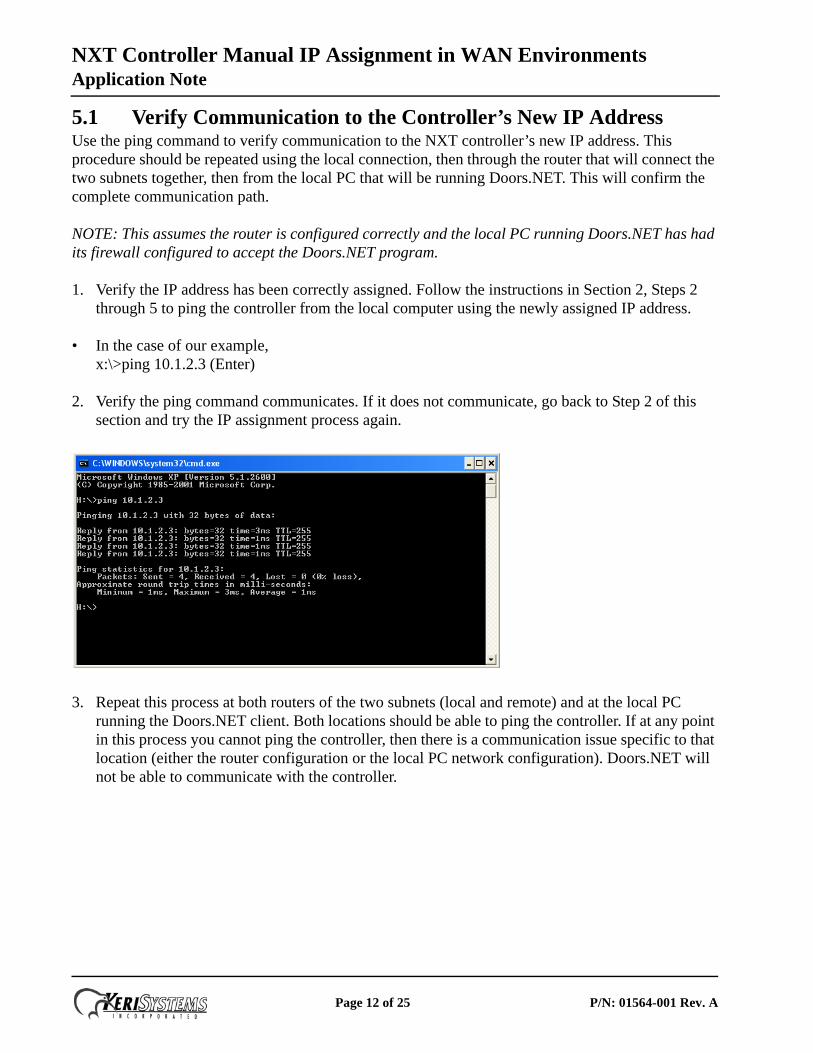
5.1 Verify Communication to the Controller’s New IP AddressUse the ping command to verify communication to the NXT controller’s new IP address. This procedure should be repeated using the local connection, then through the router that will connect the two subnets together, then from the local PC that will be running Doors.NET. This will confirm the complete communication path.
NOTE: This assumes the router is configured correctly and the local PC running Doors.NET has had its firewall configured to accept the Doors.NET program.
1. Verify the IP address has been correctly assigned. Follow the instructions in Section 2, Steps 2 through 5 to ping the controller from the local computer using the newly assigned IP address.
• In the case of our example, x:\>ping 10.1.2.3 (Enter)
2. Verify the ping command communicates. If it does not communicate, go back to Step 2 of this section and try the IP assignment process again.
3. Repeat this process at both routers of the two subnets (local and remote) and at the local PC running the Doors.NET client. Both locations should be able to ping the controller. If at any point in this process you cannot ping the controller, then there is a communication issue specific to that location (either the router configuration or the local PC network configuration). Doors.NET will not be able to communicate with the controller.
Page 12 of 25 P/N: 01564-001 Rev. A

NXT Controller Manual IP Assignment in WAN EnvironmentsApplication Note
6.0 Auto-Configuration in Doors.NET With Manually IP Assigned Controllers
Perform the following steps in preparation for Auto-Configuration.
1. Open the Doors.NET program.2. Manually add the controller to the system in the Hardware Browser.
• On the Ribbon Bar click Setup > Hardware Setup.• On the Hardware Setup pane click the All tab.• Select the desired gateway listed in the Setup pane. The Hardware Browser now opens.
• In the NXT Series field on the Ribbon click on the Add NXT 2D or Add NXT 4D icon according to your controller type.
Page 13 of 25 P/N: 01564-001 Rev. A

NXT Controller Manual IP Assignment in WAN EnvironmentsApplication Note
• Enter a description of the controller, and click Accept.
• On the Ribbon Bar click View > Advanced View.• Enter the default password of “Keri10” and click OK.
Page 14 of 25 P/N: 01564-001 Rev. A

NXT Controller Manual IP Assignment in WAN EnvironmentsApplication Note
• In the All tab click on the controller in the tree view.• In the Properties Grid click on the Advanced View icon and enable Advanced View. An additional
set of configuration options appears.
• Enter the MAC Address of the controller. For our example this is 00-14-34-0B-07-CA.• Enter the controller’s new IP address in the properties grid. For our example this is 10.1.2.3.
Page 15 of 25 P/N: 01564-001 Rev. A

NXT Controller Manual IP Assignment in WAN EnvironmentsApplication Note
• Click on the Save icon to save these entries.
Page 16 of 25 P/N: 01564-001 Rev. A

NXT Controller Manual IP Assignment in WAN EnvironmentsApplication Note
3. Prepare for the auto configuration operation.
• In the All tab click on the gateway.• In the Ribbon Bar click Auto Config.
Page 17 of 25 P/N: 01564-001 Rev. A

NXT Controller Manual IP Assignment in WAN EnvironmentsApplication Note
• If network routing and the firewall are properly configured, and the controller addresses are correct, the controller will be found.
• Verify the IP address and MAC address displayed.• Unselect the Select All check box.• Select the Take Ownership box of the desired available controller.
Page 18 of 25 P/N: 01564-001 Rev. A

NXT Controller Manual IP Assignment in WAN EnvironmentsApplication Note
4. Click Apply and confirm the task to perform the Auto Configuration.
• Wait for the Update Network Complete message in Status Messages screen (may take a minute or more).
• Open Live Events Screen, and watch for Update Network Completed event (may take another minute or more).
• The controller is added and communicating with Doors.NET. You have successfully completed these instructions.
Page 19 of 25 P/N: 01564-001 Rev. A

NXT Controller Manual IP Assignment in WAN EnvironmentsApplication Note
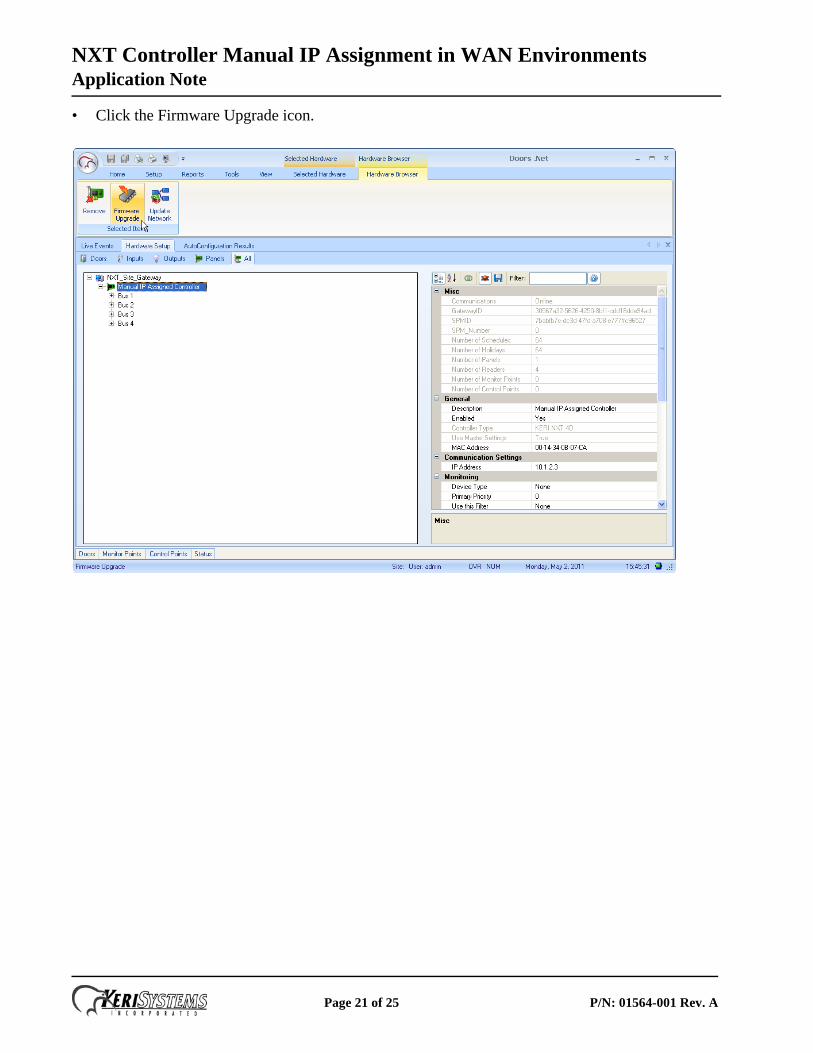
5. Following Auto-Configuration you may have to perform a Firmware Update.
• On the Ribbon Bar click the Hardware Browser tab.• Click on the controller requiring firmware update.
Page 20 of 25 P/N: 01564-001 Rev. A
NXT Controller Manual IP Assignment in WAN EnvironmentsApplication Note
• Click the Firmware Upgrade icon.
Page 21 of 25 P/N: 01564-001 Rev. A

NXT Controller Manual IP Assignment in WAN EnvironmentsApplication Note
• Select the firmware revision.
• Click Apply.• Confirm the upgrade command.• The upgrade begins. This process can take several minutes to complete and may have several
pauses during the process. You can track progress by monitoring the green Progress Bar and the Progress Percentage field.
Page 22 of 25 P/N: 01564-001 Rev. A

NXT Controller Manual IP Assignment in WAN EnvironmentsApplication Note
• When the upgrade is complete you can verify success by clicking on the Live Events tab and reviewing message status.
7.0 CaveatsIf you are configuring controllers that physically will be in different time zones the time zone applied to all controllers is the one associated with the gateway connected to the controllers.
Page 23 of 25 P/N: 01564-001 Rev. A

NXT Controller Manual IP Assignment in WAN EnvironmentsApplication Note
8.0 Remote Network Information Collection FormUse one of these forms per controller or create a table/list of your own with this information.
Remote Network Information Form
NOTE: All addresses are internal within the subnet.
Remote Router IP =
Network Mask =
Controller IP =
Router
RemotePC
NXTController
& 169 . 254 . 1 .1(default controller IP)
Remote PC IP =
& 169 . 254 . .
Controller #
Remote Network Information Form
NOTE: All addresses are internal within the subnet.
Remote Router IP =
Network Mask =
Controller IP =
Router
RemotePC
NXTController
& 169 . 254 . 1 .1(default controller IP)
Remote PC IP =
& 169 . 254 . .
Controller #
Page 24 of 25 P/N: 01564-001 Rev. A

NXT Controller Manual IP Assignment in WAN EnvironmentsApplication Note
9.0 NXT Gateway Network Information Collection Form
10.0 Contact Keri Systems
End of document.
Keri USA Keri UK, Ireland, Europe
2305 Bering DriveSan Jose, CA 95131
Unit 17 Park Farm Industrial Estate
Ermine Street Buntingford
Herts SG9 9AZ UK
Telephone: (800) 260-5265(408) 435-8400
Telephone: + 44 (0) 1763 273 243
Fax: (408) 577-1792 Fax:+ 44 (0) 1763 274 106
Web: www.kerisys.com Web:www.kerisystems.co.uk
E-mail: [email protected]@kerisys.com
E-mail:[email protected]@kerisystems.co.uk
NXT Gateway Network Information Form
NOTE: All addresses are internal within the subnet.
Local Router IP =
Network Mask =
Local PC IP =
Router
NXTGateway
LocalPC
Page 25 of 25 P/N: 01564-001 Rev. A