nysca - national alliance for youth sports€¦ · 2017-03-21 · 6 coaching youth baseball chapter...
TRANSCRIPT

NYSCAVolunteer Coach Training Program
Coaching Youth Baseball

2
CCooaacchhiinngg YYoouutthh BBaasseebbaallll
Table of Contents CHAPTER 1: INTRODUCTION ……………………………..………………………… 3
CHAPTER 2: FUNDAMENTALS ……………………………………………………... 5
CHAPTER 3: CONDITIONING PART 1 ………………………………………………. 6
CHAPTER 3: CONDITIONING PART 2 ………………………………………………. 8
CHAPTER 4: INFIELD PLAY PART 1 ………………………………………………... 9
CHAPTER 4: INFIELD PLAY PART 2 ……………………………………………….. 11
CHAPTER 5: OUTFIELD PLAY PART 1 …………………………………………….. 12
CHAPTER 5: OUTFIELD PLAY PART 2 …………………………………………….. 14
CHAPTER 6: HITTING PART 1 ………………………………………………………. 16
CHAPTER 6: HITTING PART 2 ………………………………………………………. 18
CHAPTER 7: RUNNING THE BASES PART 1 ………………………………………. 20
CHAPTER 7: RUNNING THE BASES PART 2 ………………………………………. 22
CHAPTER 8: PITCHING ………………………………………………………………. 24
CHAPTER 9: CATCHING …………………………………………………………….. 26
CHAPTER 10: PRACTICE ORGANIZATION ……………………………………….. 28
CHAPTER 11: T-BALL PART 1 ………………………………………………………. 30
CHAPTER 11: T-BALL PART 2 ………………………………………………………. 32
CHAPTER 11: T-BALL PART 3 ………………………………………………………. 34
CHAPTER 12: CONCLUSION ………………………………………………………… 36
© 2010 National Alliance for Youth Sports
3
CCooaacchhiinngg YYoouutthh BBaasseebbaallll
CHAPTER 1 - INTRODUCTION JOHN ENGH: Hey coaches. On behalf of the National Alliance for Youth Sports (NAYS), I’d like to welcome you to the National Youth Sports Coaches Association’s Coaching Youth Baseball Clinic. I’m John Engh, Chief Operating Officer for NAYS, and I’d like to thank you for taking the time to go through this program today to help enhance your baseball coaching skills. Whether you’re a veteran coach or it’s your first time taking the field with a team, I’m confident that you will find the content informative and useful as you prepare for your season. We’ve utilized the expertise of Ripken Baseball’s outstanding academy staff for this video, so as you’ll soon see, there is simply no better source for how to go about teaching the basic skills of this great game to children. Also, we are lucky enough to have one of the founders of Ripken Baseball share his thoughts on what it takes to be a successful youth baseball coach. Throughout the video, former major leaguer Bill Ripken will share his thoughts on what he and his brother Cal learned from their father, Cal Ripken Sr., about the way baseball should be taught to children – something they refer to as the “Ripken Way.” In addition, during the next 90 minutes all the basic skills and techniques of this game will be covered so that you’ll be able to fully prepare to lead your team to a fun, safe and rewarding season. A variety of drills will also be introduced along the way so that you’ll be able to use them during your practices to help your players learn and develop those key fundamental skills.
As you know, baseball is a pretty complex sport, so many of the different strategies and nuances of the game simply can’t be covered in the amount of time we have with you today. While the instruction in this clinic is comprehensive, some of you may be interested in obtaining advanced information on different aspects of the game. If so, I encourage you to check out “Coaching Baseball for Dummies,” a coaching aid written by the National Alliance for Youth Sports. It includes details on every topic covered in this video, plus it goes in depth on a number of other advanced areas of the game.

4
In addition, don’t forget to check out your NYSCA member page on our Web site. Simply log on to www.nays.org and log-in using your membership number and your last name as a password. On this site you’ll find a number of coaching helpers, in addition to valuable tips on becoming the best baseball coach you can be. Now I know you’re anxious to get started, so again, on behalf of NAYS we thank you for volunteering to coach this season and we applaud your commitment to teaching this wonderful game the right way to all of your players so that they’ll have some great memories to cherish for years to come. Have a great season. Now let’s head out to the field to get started, and remember, no matter what age or skill level you’re coaching, it’s all about the kids!
© 2010 National Alliance for Youth Sports

5
CCooaacchhiinngg YYoouutthh BBaasseebbaallll
CHAPTER 2 – FUNDAMENTALS BILL RIPKEN: First and foremost you’ve got to keep things simple. Baseball is a complicated sport and once you get up the ladder there are different complexities that could go on during the game. Being able to master the basics, like how to catch a ground ball, doesn’t change from when you’re 10 or 25. You have to do it the same way and you have to do it over and over again. It’s mastering the simple fundamentals of the game but it’s also the repetition that goes with it. You’ve got to find a way to have the kids have success. Let’s go with the smallest levels, where kids are swinging and missing a baseball. There’s nothing wrong with throwing a softball. There’s nothing wrong with throwing something even bigger to at least start to give the confidence that they can hit. There’s probably no better feeling in sports than successfully hitting a baseball and getting a base hit. No matter what level you’ve ever played this game, that is enjoyable and it is very satisfying. So, for a kid to swing and miss, swing and miss, swing and miss, that’s not fun for a kid.
© 2010 National Alliance for Youth Sports

6
CCooaacchhiinngg YYoouutthh BBaasseebbaallll
CHAPTER 3 – CONDITIONING PART 1 ANDY LEVINE: Hello, I’m Andy from Ripken Baseball and today we’re going to go over some basic drills that you guys can do at your practice to help with some of the strength and conditioning. Lunging We’re going to start with basic lunging, just to kind of get the legs warmed up.
Have your players pick up their left legs, fold it into your chest, go down into a lunge, stretch out a little bit, and then alternate. Pull the right leg in, go down, and alternate. You want to make sure you’re doing it slow because you’re working on balance and coordination. Make sure to keep the back knee off the ground. Have them go anywhere from 8 to 10 repetitions per leg.
Next have them turn around and do a backwards lunge. Remind them to keep their right leg back and their back knee off the ground. Again, you want to get 8 to 10 reps per leg.
Coaches, another important drill that you can use in practice when you’re going over strength and conditioning is the side lunge. Have the players start out in baseball position, then have them pick up the right leg, drop it down and go to the side, then switch. Then come straight up and pick up again, side to side while working on that flexibility. We’re going to do about five reps going to the right and then when you get to the end you do about five reps going to the left.
Coaches, the reason why lunges are so important is that it helps to build some of the strength in the legs while you’re stretching them out. So it’s a basic drill to begin practice with as far as practicing balance and coordination, but it really helps with warming the legs up and helping to build some strength.
Footwork Drills
This next drill is going to work on footwork. This drill is similar to high knees, but it’s going to be modified a little bit to work on foot speed as opposed to just working on regular conditioning.
Set two cones up about five to seven yards apart and have the players do as many high knees as possible between cone one and cone two, as opposed to how quick they can do it all the way through. See how many times players can lift their knees up as quickly as you can while you’re swinging your arms. The object is to work on the foot speed, not how fast they can do the drill.

7
Have the players count and see how many times they can lift their knees before they go to cone two. After the first time, have the players go again with the goal of doubling the number of times they lifted each leg. That means they have to slow themselves down and pump their feet fast. This drill is intended to keep under control, so you want to work on the foot speed as opposed to how quick they can get through the entire drill.
Another drill you guys can utilize during practice time to help work with foot speed is the modified Karioka. With most Karioka you get long strides which is good for some things, but we’re working on foot speed so want to condense that and you want to work on quick feet. Take small steps and again, it’s about the number of times they can go from point A to point B, as opposed to how fast they can do it.
Count how many steps players take from cone to cone on their first try, and then have them attempt to up that number by five.
Coaches, when you’re teaching the karioka, it’s just one foot in front of the other. Start with the right foot in front, then move the left foot behind and repeat. It can be reversed, but just make sure to emphasize proper footwork.
© 2010 National Alliance for Youth Sports

8
CCooaacchhiinngg YYoouutthh BBaasseebbaallll
CHAPTER 3 – CONDITIONING PART 2 Wind Sprints
ANDY LEVINE: At the conclusion of working on footwork you can move straight into doing wind sprints. Have the kids work on the footwork they just learned, but have them take it to a sprint. Have players get into a baseball position and work on their footwork as if they’re stealing a base.
Make sure players start with their back foot. A lot of kids at the youth level start with the lead foot and that is a wasted step. When watching players practice their pivoting make sure to watch that front foot.
Have the kids line up as if they’re taking a lead off a base, pivot their front leg, and swing the back leg around. Next have them practice their pivot move and sprint to the nearest base or cone.
Oftentimes wind sprints are the best way to end practice and you can also make into a competition as well. Make sure they’re having fun and make sure they’re learning while they’re doing everything. Bill Ripken on the “The Ripken Way” - Specialization I think it’s important for the kids’ overall grooming, overall development, the more positions they play the more they understand about the game of baseball, the better off they’ll be. Let’s just say a 10-year-old kid who might play short stop, centerfield, second base, catcher, third base, pitcher, that’s a wide variety of positions. When it comes time for a kid to specialize in the short stop or pitcher position, because he or she played some multiple positions they’re going to have a better understanding, and it’s probably going to help them when it’s time to specialize at a position. If you’re a short stop but you’ve never stepped a foot out there in right field, there’s a play that could come up in a game with a man on first and a base hit to right. The short stop is the cut off position lined up with third base. The right fielder is the one involved in this play, throwing in the direction of third base through the cut off man. If you’ve never stood out there in the right fielder’s shoes, you might not have the right perspective on how this play could develop. Once you go out there and play right field you might realize a few little things that will help you be a better short stop, like where do you get, how deep do you get, all those things can factor in to it if you see the right fielder’s perspective.
© 2010 National Alliance for Youth Sports

9
CCooaacchhiinngg YYoouutthh BBaasseebbaallll
CHAPTER 4 – INFIELD PLAY PART 1 ADAM CHRIST: Hey coaches, I’m going to talk to you a little about the fundamentals of infield play. Cal Sr. had a saying, “The game is simple. It’s played with bats, balls and gloves.” We keep it simple in the infield station also. We’re going to talk about three things while we’re here: 1 – Catching a regular groundball 2 – Catching a backhand, both the right footed backhand and the cross over backhand 3- Throwing with shuffle, throw, follow. So let’s get started with the basics of catching a groundball. Fielding a Groundball Have players line up in single file line. We’re going to discuss three different things when we talk about regular ground balls. Players should have:
A wide base stance Backside down Hands out in front
When executing a wide base stance make sure the players’ legs are a little wider than shoulder length apart. Make sure their backside is down and the hands are placed out in front. Have the players touch the tip of their glove to the ground and make sure that they don’t put their hand in front of it, if they do they may lose vision of the ball for a split second. Have the hand placed to the side of the glove like a hinge so when the ball enters the glove it will hinge shut.
Roll the ball to the player first in line three times and then have them move to the end of the line. Make sure that they keep their glove out in front of their body. If the glove is placed between the legs they may lose sight of the ball. Everything we do in baseball is in front of us, so we want to see the ball in front of us.
To make the drill a little more advanced, simply throw the ball a little harder and move through the line faster.
That’s the basics of catching a regular ground ball: wide base, backside down, hands out in front. Fielding a Backhand Groundball
Now we’re going to move into catching a backhand. It would be an easy game if every ball was hit right to us, so we’re going to work on the back hand catch for when the ball is hit to the side of a fielder.
10
Have players line up in a single file line. When the ball is coming, have players lead with the foot closest to the direction of where the ball is headed. Make sure players have wide base, backside is down and hands are out in front. When in that position have them place their glove right in front of their lead foot. For righties, roll the ball to the right of the player, have them reach for the ball by leaning with that right foot, bring the ball to their chest and then throw it back to you. For lefties, simply throw to the other side.
So far we’ve learned two things. We’ve learned how to catch a regular ground ball and how to catch a backhanded ball. Now we need to know how to throw it.
© 2010 National Alliance for Youth Sports

11
CCooaacchhiinngg YYoouutthh BBaasseebbaallll
CHAPTER 4 – INFIELD PLAY PART 2 Shuffle, Throw, Follow
ADAM CHRIST: We do a drill called shuffle, throw, follow. For this drill players need to move their feet towards the target, throw the ball and try to hit him in the chest every time.
Have the players line up at a starting point with their wide base stance, backside down and hands out in front. Whenever players throw a ball across the infield always have them use a four seam grip, where the fingers literally cross four seams, so that the ball goes straight. Two seam throws can move at the last minute.
For the second point, have the players shuffle their feet towards the target. Shuffle, throw follow. When players are done, they should be far from their starting point. After Derek Jeter fields a ball in the back of the infield and throws a ball over to first he ends up in the infield grass, because he moves his feet very well.
This is not a velocity drill, don’t try to throw it hard. You want players to use the legs. If they use their legs it will be less stressful on their arms, therefore they might not have an injury later on.
Have player get in a straight line. One at a time have them executed the shuffle, throw, follow movement.
Make sure the players don’t simply come up from the getting the ball and then throw, that’s wasted motion. You want them to move toward their target while they’re preparing to throw the ball.
Coaches, there are three things to remember with basic infield play:
1. Fielding a Groundball – wide base - backside down - hands out front 2. Right-footed Backhand – wide base - backside down - hands out front 3. Shuffle, Throw, Follow – move feet towards the target and remember it’s
important to teach your players to throw with a four-seam grip.
© 2010 National Alliance for Youth Sports

12
CCooaacchhiinngg YYoouutthh BBaasseebbaallll
CHAPTER 5 – OUTFIELD PLAY PART 1 Outfield Play ADAM CHRIST: We’ve talked about the basic fundamentals of infield. Some of the same principles apply when we go to the outfield. Fielding Outfield Groundball When a guy hits a ground ball to the outfield you really want to stress getting in front of it with a wide base, backside down, hands out front and throwing it back in to our cutoff guy.
Make sure the tip of the glove is touching the ground.
Outfield Throwing
When there is a runner on second base and a base hit to center field, the runner has earned third base but he has not earned home. We want to keep the ball from getting past the outfielder and try to throw the runner out at home plate. So we’re going to show you a couple of drills and the footwork needed to get this guy out at home.
Field the ball off the glove-foot. For right handers that would be the left foot, for a left hander it’s just the opposite. If the ball is not hit that hard take full strides to run to it, and then slow up and get your footwork right. For the purpose of the drill take baby steps, don’t roll the groundballs to your players too hard and don’t encourage them to go very fast. Have them take their steps, field the ball off their glove hand foot, step with the opposite foot, and then you’re in good throwing position. This is not a velocity drill, just work on footwork.
Coaches, it’s really important to remember, take it slow at first. Some of these concepts will be new to them, so take it slow and make sure their footwork is right before you move on to another thing.
Gaining Ground
Now that we’ve talked about the footwork when actually fielding it, I’m going to go back and talk to them about after they catch it, how they move their feet towards the target so that they can gain a little ground and won’t have as long of a throw.
We don’t believe in taking the big huge crow hop. We do believe in hopping, but we don’t want to go up, we want to go towards our target. You think about Derek Jeter and when we were in the infield station how we move our feet to the target, that shortens our throw.

13
Once players field the ball, instruct to take a hop-step forward to gain ground. Have the players start with a ball in their hand and have them begin by crouching down as if they were fielding the ball.
Coaches remember, it’s very important to gain ground. You want to move your feet towards the target, so on this drill I don’t even want to roll the ball to them. Have them practice by starting with a ball in their hand.
Big thing here coaches, do not rush. We have all the time in the world, make sure they get the fundamentals right before you move on.
Coaches, it’s very important to start with the basic fundamentals of getting the footwork right. If they can’t get the footwork right then you should not move on. Now that they’ve done that, I’m actually going to roll them the balls and see how they do with fielding it off their glove hand foot and moving their feet towards the target.
Coaches, it’s important to remember that when fielding the ball on the run you can have them raise their glove, and the same foot will be out in front. They’re just going to bring their glove down to the ground. Then, after they catch it you want them to actually gain ground. You want them to hop forward more than up. A lot of people talk about the crow hop, the thing you have to remember about the crow hop with young baseball players is that when you say “crow hop” or “hop” they think of going up. We want them to actually go out towards our target.
© 2010 National Alliance for Youth Sports

14
CCooaacchhiinngg YYoouutthh BBaasseebbaallll
CHAPTER 5 – OUTFIELD PLAY PART 2 Catching Fly Balls
ADAM CHRIST: Now that we’ve talked about fielding a ground ball, let’s move into catching a basic fly ball that comes to them. We have three things we talk about:
1. Ball 2. Glove 3. Eye
Those three things should be lined up: Ball – Glove - Eye.
We actually want to try to have them a little bit behind the ball so that when they catch it they can move towards the target. So ball – glove - eye.
Guys, I’m going to throw you a couple of ground balls and all I want you to think about is ball – glove - eye, lining them all up. I’m not going to tell you to catch it with one hand or two hands. There are players in the big leagues who catch it with one hand, as well as people who catch it with two hands – it’s all personal preference. I always catch the ball with two hands because I feel safer. Bill Ripken always caught the ball with one hand because he felt the other hand blocked his vision and he couldn’t see it as well. So you guys do what’s comfortable and I’ll see how you catch the ball and decide if you should maybe try to catch with your second hand, or what you should do. Remember, ball – glove - eye.
Coaches, it’s always important when you have a young ball player, 4, 5, 6-years-old, we use simple sayings like, “Ten fingers to the sky.” That means catch the ball with the fingers up. Also, you can tell them to catch it over their head. We don’t want to have them basket catch it or however else they want to do it. Make sure they get that glove over their head with ten fingers to the sky.
15
Now let’s remember something about the fundamentals of outfield. Remember when fielding a regular ground ball to have a wide base, backside down, hands out front. When they’re fielding the ball on the run make sure that their reaching out in front of them and are moving out towards their target after they catch it. For a regular fly ball, we talked about ball – glove - eye. Also, a good thing to tell young players is that when there is a cutoff-relay situation, say a base hit to center field, that batter has earned first base but we don’t want to let him get to second base. So tell your outfielders that when they catch the ball they come up throwing, hit their cutoff man in the chest, cut off man gets it to second, and don’t help them to advance bases – that will help them win a few ball games.
© 2010 National Alliance for Youth Sports

16
CCooaacchhiinngg YYoouutthh BBaasseebbaallll
CHAPTER 6 – HITTING PART 1 Fundamentals of Hitting ADAM CHRIST: Now we’re going to move into the fundamentals of hitting. We’re going to talk about three areas of hitting, and also what we need to do within those areas. We’re going to talk about the grip, stance and plate coverage. Grip
The first thing we’re going to talk about with the grip is lining our door knocking knuckles up. Make sure players have their door knocking knuckles lined up. Not everyone is going to have their door knocking knuckles exactly lined up, but it should be a reference point, it should be a starting point. Players should not have their knuckles faced in opposite direction because that will make them squeeze the bat too hard. Keep the knuckles lined up and keep the bat in your finger tips.
Stance
Now the second point we’re going to talk about is the stance. The stance is nothing but a starting point. We have a hard time telling a young baseball player how to stand. We look at the big leagues and we look at guys like Craig Counsell who holds the bat over his head, and we here at Ripken baseball talk about Cal. There’s a man who had at least 500 different stances in his career. So stance is nothing but a starting point.
There’s a couple of things that we look at. The batter’s head is straight looking right at the pitcher, he’s in a good athletic position, he’s balanced and it looks like he’s ready to hit. So with those fundamental things, he should be able to be a good hitter.
Plate Coverage
Now we’ll move into the third thing, which is plate coverage. Plate coverage is very important. At a young age a lot of players will not be able to cover the outside part of the plate. They don’t because they start from their front foot. Have the players practice a slow motion version of their swing and look to see if the end of the bat is reaching the outside part of the plate. So it’s important to take your first step toward the pitcher and also be close enough to the plate, or far enough away, so that the barrel is over the center of the plate.
Now those are some fundamentals of hitting. You need the grip, a stance and you need to have plate coverage.

17
Now that we’ve talked about that, let’s move on and talk about a couple of drills. Soft Toss In soft toss, what we’re going to talk about is nothing but our hands. Loose hands, quick bat. The looser the hands are the quicker the bat will be. You want players to take the sweet spot of the barrel and get it to the ball as quick as they can. If they hold the bat tight and don’t line their door knocking knuckles up, their bat is going to be slower. So line up the door knocking knuckles and think about being loose. Loose hands quick bat.
When swinging, have weight equally balanced on both feet. When preparing to swing, shift body weight to the back foot. Toss the ball right in front of the plate, and make sure the batters stay planted where they are. I’m going to come from the side. The reason that I’m going to come from the side is because it simulates a pitcher coming at. You don’t want to be behind the batter or directly to the side because in baseball we do everything out in front of you. You don’t want to hit the ball back behind the plate do you? You want to hit it out front, so that’s where we’re going to toss and that’s why I get at an angle of the players.
So now that we’ve talked about the soft toss (loose hands, quick bat) which is going to make young players’ bat get to the ball faster. You want to talk about hitting the ball in front of the plate, loose hands, quick bat and they’ll be able to do that.
© 2010 National Alliance for Youth Sports

18
CCooaacchhiinngg YYoouutthh BBaasseebbaallll
CHAPTER 6 – HITTING PART 2 Weight Shift
ADAM CHRIST: We’re going to move to talking about the tee drill. We use the tee for one simple purpose – weight shift. When we talk about weight shift, if anybody watches the Discovery Channel will see that when a snake attacks, it moves back before moving forward. That’s actually the same as a boxer. When a boxer is going to punch someone, he goes back and then forward because it gives him more power. It’s the same thing when we’re hitting a baseball.
Have players take a normal stance in front of the tee. Have their weight shift back, then forward. Every time we hit a ball we want to hit to centerfield. Make sure the tee is out in front of players a little bit. We do this for a basic drill so that we can learn about the fundamentals of hitting. If a player misses the ball it might be because they pulled their head up. So don’t try to hit home runs or anything like that, just work on the weight shift. When players are done swinging their head should still be looking at the tee.
Coaches, for individuals who don’t have a very good weight shift, we like to play a game with them. Actually have them pick their foot up like a pitcher, hold for 3 seconds, then swing. This actually gets players in the habit of going back to go forward.
That is the basic fundamentals of the tee: Go back to go forward to get a little power and to get their momentum going towards the pitcher.
Bunting Basics
Now we’re going to talk about the fundamentals of bunting. There’s a few we want to talk about when we talk about bunting: 1 – Hand placement on the bat 2 – Bat angle 3 – Feet A bunt really is nothing but a half swing. Have players take a half swing and hold the bat still once they’re in the bunt position. Have them take the top hand and move it up above the handle of the bat. Make sure players do not put their fingers all the way around the bat, we don’t want to do that and take a ball off our fingers. So you actually want players to pinch the bat. The other hand is the control hand which decides which way the bat is supposed to go. Make sure the bat angle is a little above the hands. If it is below players will pop the ball up.
19
The feet should be in the position as if they have just taken a hit. Turn the feet, bend the knees and start with the bat at the top of the strike zone. When a ball comes lower do not lower the bat, but instead bend the knees.
Those are the fundamentals of bunting. You need to remember:
1. Grip – remember to pinch the bat, not put the fingers around it 2. Keep the barrel above the bat 3. Feet should look like they’ve just taken a swing, do not step and square up with the
plate.
© 2010 National Alliance for Youth Sports

20
CCooaacchhiinngg YYoouutthh BBaasseebbaallll
CHAPTER 7 – RUNNING THE BASES PART 1 Running the Bases ADAM CHRIST: Now coaches we’re going to talk about running through first base. The most important thing is to get your kids to actually run through first base. Too many of them at the younger level will try to slow up or stop before the base. Teach them to run all the way through the base. We don’t care what foot they hit it with, we just want them to hit the inside part of the front part of the base, and then run all the way through it, break down and look for the ball in case the ball went past the first baseman. We’re going to move on and do a drill with the kids where I’m actually going to have them run through the base, break down and check for the ball. Have them run through the base with the head up, running hard. Now let’s talk about rounding the base and maybe making it to second or possibly having to come back. Couple things we’ll talk about with rounding the base is making sure that they hit the inside part of the base. We don’t want them to hit the inside corner. I’ve seen kids actually break their ankles because it’s not that stable. They want to use the base like a track block and actually push off. They’ll come off, they’ll round and try to hit the inside part of the base, and push so that they can get to second base. Alright, we’re going to practice this a little bit. Make sure if you have markers, use them. Put them out there, tell them to run towards it and that’s how to help them round the base. If you don’t, just use a coach. Have him stand there. For example, I’m going to stand here and tell them run towards me to make the round. This will help them not get too far out or too far in. It should give them the perfect practice which should hopefully help them make the perfect play. Make sure they keep their head up when they run. Those are a couple of things you want to think about when rounding first base. Sliding
After they’ve rounded, now they’re running towards second, we’re going to talk about sliding into second. There are a couple of fundamentals that you’ll want to talk about when sliding into second, sliding into third, sliding into home. We’re going to talk about the feet first slide first.
Feet First Slide
With a feet first slide, make sure players slide on your back side with their hands not up too high, about even with the chest. Don’t sit straight up but don’t sit down.

21
Coaches, Johnny did an example of a pop up slide. He slid into the base and came right up. Sometimes they can use that, sometimes with younger kids they should just slide into the base and stay. Make sure though you tell them to keep their foot on the base, keep their foot on the base, keep their foot on the base, so that they don’t get tagged out.
Coaches, have players use a hook slide when the ball is thrown on the inside part of the base. Have them slide past the base with their feet and then put their hands on the base on outside left hand corner.
Look for players to direct their foot right into the base, keeping their foot on the base at all times, with hands not too high but not too low. Remember those points when sliding feet first. Remember, don’t have the hands too high, not too low and don’t sit up too straight or lay down flat.
No Lead Leagues
When you do not have leads in your league, talk about bent knees, good athletic position, feet on the base like a starting block, and also the left foot is the one on the base – that way they can see in towards home plate. Those will be a couple of key points to emphasize when talking to your young players.
Now let’s have a couple of the players show us how to do it.
Start with the left foot on the base in a good athletic position. This way they can see home plate and the pitcher. Whenever the ball crosses the plate or leaves the pitcher’s mitt, whatever the rules in your league may be, the runner can take off. Be in a good athletic position, take off by using the base as a push off. Make sure that the left foot is on the base so that the runner can see in on home plate and when the ball actually crosses the plate.
When the runner takes off they should keep their head up and look at the next base. If a player is looking down they will not know where the base is. So when runners take off and run remember to keep the head up and look at the base.
You don’t want them to start with their lead foot too out in front because that will take them a longer time to start. Also notice coaches, when they take off they shouldn’t stand up first and then take off. That’s a wasted motion. You want them to stay down in a good athletic position and then take straight off.
© 2010 National Alliance for Youth Sports

22
CCooaacchhiinngg YYoouutthh BBaasseebbaallll
CHAPTER 7 – RUNNING THE BASES PART 2 Leading Off
ADAM CHRIST: Alright coaches, once your kids have moved up in age a little bit, now they can lead off. When they first start to lead off I like to talk about shuffling the feet to get off the base. I don’t want to talk about right and left, shuffle shuffle, or anything too complicated for them. The main thing I want to talk about with them is not crossing the feet, getting to a distance that’s comfortable for them to take a good lead where they won’t get picked off, but they have a chance to move up on a passed ball, maybe even steal a base.
Some of our kids will demonstrate how to lead off a base. We’re going to talk about just shuffling our feet and getting to a comfortable area. When on the base keep the head up and look at the pitcher in case he throws over. Shuffle the feet and take a good comfortable lead. That’s a pretty good distance at a younger age, but as players get older you may even use the reference of a step and a dive. That’s how far off you should be – you should be a step and dive away because you can get back safe from that.
Remember, keep the head up and look at the pitcher because he’s the one whose going to throw the ball over to get the runner out. Coaches, a big thing to stress is to keep an eye on the pitcher. Also, if the pitcher is going to throw over tell your base runners to watch the heel of the pitcher’s front foot because if that comes up they have to go to the plate. If it doesn’t, they’ll stay put. If a player is going to steal have them wait until that heel is up and then have them go. When they lift that front foot, that’s how we know they can steal.
Shuffle the feet, don’t cross the feet. If they cross the feet it’s going to be harder to get back. Be in a good athletic position watching the pitcher.
Now coaches, let’s talk about if your players are a little bit older now. They’ve led off for a while, they’re stealing bases. Now we don’t do the simple shuffle, now we want to gain a little bit more ground.
Watch me. My heels are on the base and I’m looking at the pitcher. I’m going to take my steps. I’m going to go left, right, shuffle, shuffle. I got a pretty good lead, I can see the pitcher and I can still dive back to the base and be safe, I’m probably about a step and a dive away.
Notice one thing: when players shuffle off they tend not to get as big a lead when they take their steps. So when they get up in age have them try and take their two steps, and then shuffle shuffle. Make sure eyes are on the pitcher, legs are in a good athletic position, and then you’re ready to steal.

23
Stealing
Now let’s talk about stealing the base once they take the lead. Key on the pitcher’s front foot. If the pitcher brings his front foot up he’s got to go to the plate, that’s when we take off, that’s our key. Be in a good athletic position and perform the crossover step and start running. The main thing to watch is that players don’t stand up first. You want players to stay low, keep their head up while looking at second base. When players take a cross over step their head should be looking at second base, and then they can take off running.
Those are a couple fundamental points about stealing a base: Make sure players are in a good athletic position and stay low when taking off. Let the player dictate where their preferred foot position is, whether it’s a little bit open or closed. Let them do this because by the time you change them to opening their foot up it can hinder them from getting back to the base and they might actually get picked off.
© 2010 National Alliance for Youth Sports
24
CCooaacchhiinngg YYoouutthh BBaasseebbaallll
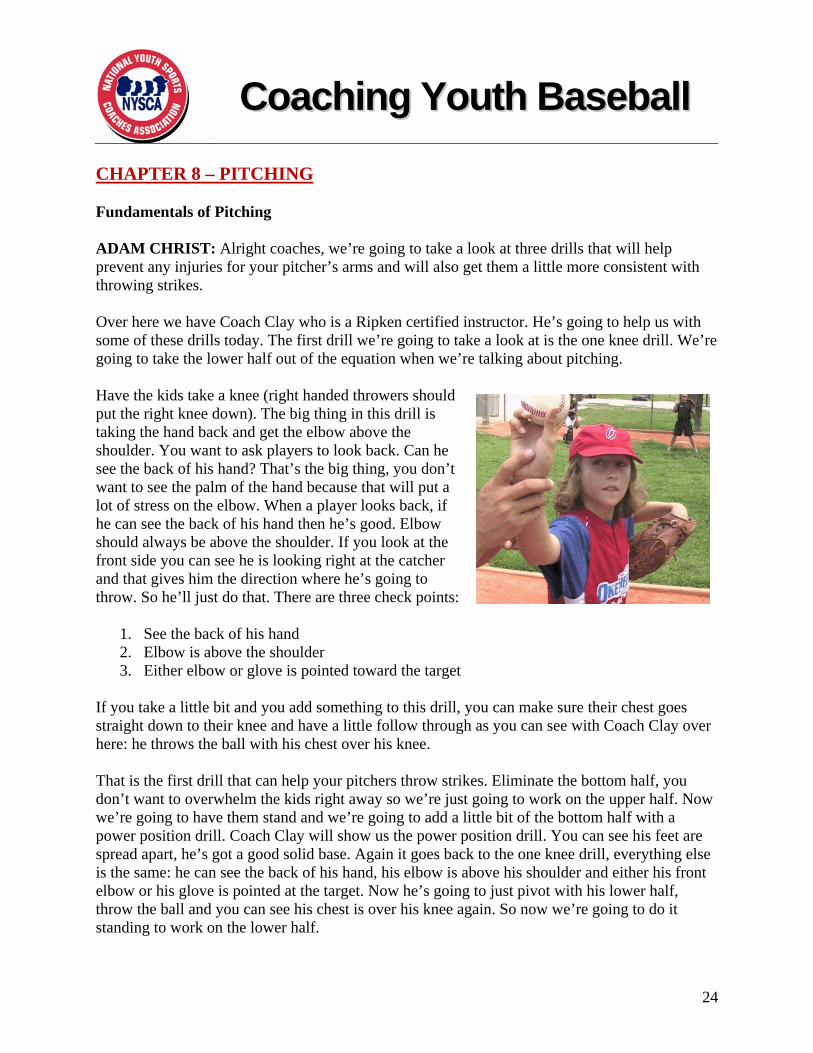
CHAPTER 8 – PITCHING Fundamentals of Pitching ADAM CHRIST: Alright coaches, we’re going to take a look at three drills that will help prevent any injuries for your pitcher’s arms and will also get them a little more consistent with throwing strikes. Over here we have Coach Clay who is a Ripken certified instructor. He’s going to help us with some of these drills today. The first drill we’re going to take a look at is the one knee drill. We’re going to take the lower half out of the equation when we’re talking about pitching. Have the kids take a knee (right handed throwers should put the right knee down). The big thing in this drill is taking the hand back and get the elbow above the shoulder. You want to ask players to look back. Can he see the back of his hand? That’s the big thing, you don’t want to see the palm of the hand because that will put a lot of stress on the elbow. When a player looks back, if he can see the back of his hand then he’s good. Elbow should always be above the shoulder. If you look at the front side you can see he is looking right at the catcher and that gives him the direction where he’s going to throw. So he’ll just do that. There are three check points:
1. See the back of his hand 2. Elbow is above the shoulder 3. Either elbow or glove is pointed toward the target
If you take a little bit and you add something to this drill, you can make sure their chest goes straight down to their knee and have a little follow through as you can see with Coach Clay over here: he throws the ball with his chest over his knee. That is the first drill that can help your pitchers throw strikes. Eliminate the bottom half, you don’t want to overwhelm the kids right away so we’re just going to work on the upper half. Now we’re going to have them stand and we’re going to add a little bit of the bottom half with a power position drill. Coach Clay will show us the power position drill. You can see his feet are spread apart, he’s got a good solid base. Again it goes back to the one knee drill, everything else is the same: he can see the back of his hand, his elbow is above his shoulder and either his front elbow or his glove is pointed at the target. Now he’s going to just pivot with his lower half, throw the ball and you can see his chest is over his knee again. So now we’re going to do it standing to work on the lower half.

25
Coach Clay is demonstrating the importance of making sure to finish, the importance of bending over and putting that chest over that knee, that’s going to allow you to get through the ball and keep the ball lower in the strike zone. That’s the second drill when we talk about pitching. Remember the first drill was the one knee drill where we eliminated the bottom half. The second one was power position where we had them stand straight up and all we concentrated on is keeping the elbow above the shoulder, looking at the back of the hand and pointing either the elbow or the glove at the target. Now we’ll go into a drill called the balance drill. As you see with Coach Clay, he’s pitched for quite a while, he has pretty good balance. Notice that he can stand there for a long time with one knee up. This is important. You want to keep your weight back, balance and gather yourself before you release the baseball. What position did he get into after that? The power position. So he’s going to do a drill called the toe tap where he taps his foot three times before throwing. This reminds him to get his weight back and stay balanced. Also, it helps him stay gathered. Now it’s important coaches to remember, when they’re putting their foot down it’s not hard. Tell the kids there is a hundred dollar bill down there and they don’t want their cleat to go through it. So it’s a soft landing so they stay back. Coaches, for the younger players, if they’re having trouble getting that balance just put your hands on their shoulders to hold them back until they get used to it. Now coaches, remember the three drills:
1. The one knee drill – eliminate the bottom half and just work on the upper body 2. The power position – get them started with standing up, but don’t put too much motion
into it. 3. Balance drill – Remember that it’s important to gather themselves before they throw.
Those are the three drills to remember and hopefully they will help you become successful coaches by helping your pitchers become better.
© 2010 National Alliance for Youth Sports
26
CCooaacchhiinngg YYoouutthh BBaasseebbaallll
CHAPTER 9 - CATCHING Fundamentals of Catching ADAM CHRIST: Coaches, we’re going to talk about three fundamental areas of catching that should help you help your catcher to receive balls, block balls, or possibility even throw runners out at second. Receiving Balls
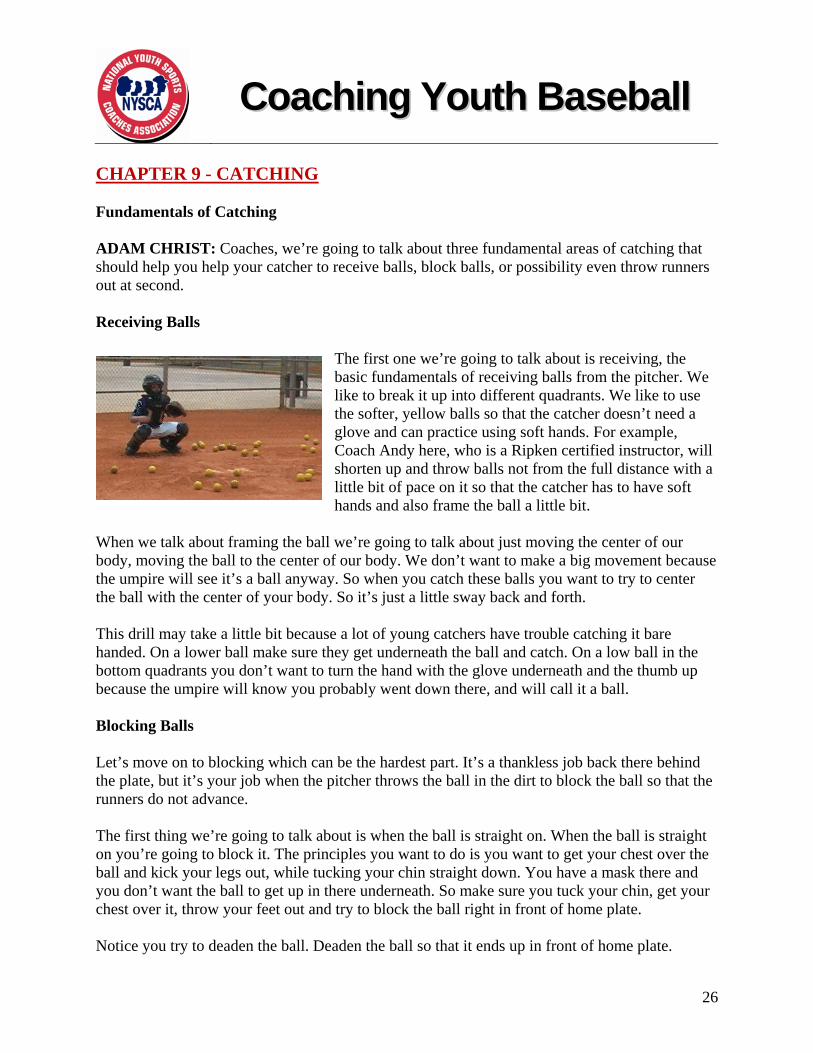
The first one we’re going to talk about is receiving, the basic fundamentals of receiving balls from the pitcher. We like to break it up into different quadrants. We like to use the softer, yellow balls so that the catcher doesn’t need a glove and can practice using soft hands. For example, Coach Andy here, who is a Ripken certified instructor, will shorten up and throw balls not from the full distance with a little bit of pace on it so that the catcher has to have soft hands and also frame the ball a little bit.
When we talk about framing the ball we’re going to talk about just moving the center of our body, moving the ball to the center of our body. We don’t want to make a big movement because the umpire will see it’s a ball anyway. So when you catch these balls you want to try to center the ball with the center of your body. So it’s just a little sway back and forth.
This drill may take a little bit because a lot of young catchers have trouble catching it bare handed. On a lower ball make sure they get underneath the ball and catch. On a low ball in the bottom quadrants you don’t want to turn the hand with the glove underneath and the thumb up because the umpire will know you probably went down there, and will call it a ball.
Blocking Balls
Let’s move on to blocking which can be the hardest part. It’s a thankless job back there behind the plate, but it’s your job when the pitcher throws the ball in the dirt to block the ball so that the runners do not advance.
The first thing we’re going to talk about is when the ball is straight on. When the ball is straight on you’re going to block it. The principles you want to do is you want to get your chest over the ball and kick your legs out, while tucking your chin straight down. You have a mask there and you don’t want the ball to get up in there underneath. So make sure you tuck your chin, get your chest over it, throw your feet out and try to block the ball right in front of home plate.
Notice you try to deaden the ball. Deaden the ball so that it ends up in front of home plate.
27
Coaches remember, it will take a little while for them to start blocking balls. It’s good to have them start with the foam ball so that they get confidence and they’re able to block it. Also, really try to make them be as quick as they can. The quicker they get to their knees, their chest over and their chin tucked, the better opportunity they’re going to have to block these balls. It’s the same thing if the ball goes to the right or the left, they’re just going to kick their knees out with their chest over, tuck their chin and try to block the ball to home plate.
Throwing to 2nd Base
The third principle we want to talk about is throwing the ball to second base. When there is a runner on first, there are a few key elements we want to remember.
Footwork is the first one and probably the biggest one. When your in position you take your right foot as if you’re going to step out and throw. Coaches, visuals are always great. If you make a “T” in the dirt and have the catcher move down the “T,” toward the plate when making the throw. Explode out and turn that leg right along the “T.”
Coaches, make sure they try and gain a little ground. We want to shorten that distance to second base so jump out a little bit to shorten the distance between home plate and second base.
Coaches, remember the three different areas of catching that you want them to work on.
1. The first one is the basic principles of receiving: soft hands, catch the ball in the
center of your body. That low pitch is going to be the toughest for the young players, really try to have them get their thumb underneath the ball.
2. Second is blocking. Make sure they throw their legs back, get their chest over the ball and get their chin tucked so that the ball doesn’t come up under the mask and get them in the throat. That’s a big thing to teach youngsters to avoid getting hit in the throat.
3. Last thing is throwing down to second base to throw a runner out. With the visual of the tee behind the plate have them explode out and get into that power position where they’re going to throw in a direct straight line to second base.
© 2010 National Alliance for Youth Sports

28
CCooaacchhiinngg YYoouutthh BBaasseebbaallll
CHAPTER 10 – PRACTICE ORGANIZATION Practice Organization ADAM CHRIST: Now we’re going to talk about practice, how to keep it interactive and how to keep all the kids moving in order to keep the practice to an hour-and-a-half to two hours. Coaches let’s take the field and let’s see some of the drills that will keep practice moving. I want to give you an overview of what a whole practice looks like. As you can see we have twelve players on this field that simulates a team. We want to put all the drills in perspective for what we’re doing. We’re going to start here around the home plate area. The key to this is keep everybody active and keep all the players involved so that there is no downtime. Baseball can be boring if you allow it to become downtime. So now let’s focus on the batter’s box here where we have a player taking short toss throws from one of my coaches. The batter should be thinking about hitting the ball up the middle or to the big part of the field toward left center or right center. We normally take about five to seven cuts and then we’ll rotate around. If you look around the field you’ll notice we have a couple of tees set up. The other players will be using the tee to practice things like going back to go forward and getting a little weight shift going before they get into the batters box for their BP. So this right here keeps three players busy. Once they take five swings, we’ll move them around. As the transition happens it’s really only a couple of seconds and you got the kids going again. The fielders didn’t really have to move and we got a new hitter here working on the approach of hitting to the big part of the field, trying to hit the ball back up the middle. You don’t have to have the most knowledgeable coaches, but you have to have guys who are able to flip the ball, can put the ball on the tee and can work with kids, that’s what’s most important. So now that you’ve seen the whole hitting station working, we’ll move out to the fielding station. Have one to two players at each position. Their first priority is taking the ground ball off the bat. If he doesn’t hit it I will have a coach back behind home plate throwing them ground balls to keep them active. First priority is the ground ball off the bat, if hitters don’t get one to them then coaches can just roll the ball. I like to take the fungo out of it at a younger age because many of the coaches can’t hit perfect fungos and the kids don’t get the reps they need. So just roll the ball, you control the speed. If you have kids that can throw it harder, or if you have kids who need work, you can slow it down to make sure they get in the good fundamental position of fielding a ground ball. As you can see, this keeps the infielders busy.

29
Now, we take another step out and look into the outfield. We have a coach out there in center behind second base. Sometimes you can put a screen in front of him to make sure he’s safe. Otherwise, you can just have him out there throwing fly balls to the kids. Again, the priority for the kids in the infield is to grab the ball off the bat, they’re dealing with the hitters. The guys behind will be taking throws from the coach out in center field. As you can see, he’s throwing the fly ball because nothing else was hit out there. So that keeps infielders, outfielders and hitters active. Once you do this all the hitters get a little repetition, you call time and bring a few more hitters in and rotate these guys out to positions. But this is a great way in about a half hour, forty-five minutes to get everybody swings, you can get them ground balls or you can get them fly balls – and keep everybody moving. Taking Infield Coaches, I want to talk to you a little about taking infield. It could be before a game, it could be at a practice, it could be a way to end practice also. I don’t like to use a fungo bat personally, just because I feel like I can roll the ball better, I can get more pace on a ball if a kid needs it, or I can slow it up a little more if the kid needs a little help getting into the fielding position. So I’ll roll the ball, it will also help me control it and get it to his backside. I know a lot of you guys will want to hit to make it realistic, but you can do just as much if you roll the ball, plus the pace is quicker and you can keep things moving a lot more. I’m going to show you a demonstration of what we do in the infield – throwing across to first, double plays, and slow rollers. So we will start with third base going across to first base. First have all the fielders throw the ball to first base, then have them practice turning double plays. Make sure if you want to hit the balls that you can control the bat well. I still like to roll the ball because I can control the pace of slow roller, a back hand or a hard hit ball up the middle. I just have more ability to do things with young players than if I have a bat in my hand. That’s a typical infield that you can take and it will take only 7-10 minutes and they can get a lot of ground balls.
© 2010 National Alliance for Youth Sports

30
CCooaacchhiinngg YYoouutthh BBaasseebbaallll
CHAPTER 11 – T-BALL PART 1 Teaching Beginners ADAM CHRIST: Alright coaches, as we deal with the younger age groups we’re going to talk about real basic fundamentals of throwing mechanics. Throwing Basics Before we start and actually throw I’m going to talk about grip a little bit for these younger players. As they get older in age they will do the normal four seam grip with two fingers on top and the thumb underneath. But with the smaller hands they may need three, possibly even four, fingers to get around the baseball.
Grab the Horseshoe
One thing we’ll talk about is grabbing the horseshoe. Look at your baseball and find the horseshoe and put your fingers across it and put the thumb underneath. This will make the ball fly straight to your partner. If you’re playing shortstop you’re going to want to throw it straight to the first baseman. You don’t want to throw it where it moves at the end where he doesn’t catch it, then we’ll have a runner on first, possibly even second base.
Make sure as they get older that they go to the four seam grip, but as they’re starting out three or four fingers across the horseshoe is good.
A big thing we want to stress is getting into the proper position, making sure that the elbow is above their shoulder and that they can see the back of their hand when they throw. Notice when you’re with the younger levels they are going to want to turn their hand over and throw with an open palm. Make sure they freeze and look at the back of their hand. Make sure their elbow or glove is pointed to their target as they throw. We’re going to try it with a few of these young players and see how they do. Coaches, make sure you are very hands on with this. Make sure you physically move their elbow up a little bit so that they get the right feel of how to throw a baseball and what position they should be in.
Now to take it one step farther coaches, make them move their feet. We’re going to talk about stepping straight to your target. A lot of young players will want to step away from it or step in. Make sure they take that lead leg and step right towards their coach.
Once we get that step down, just one step moving that front foot, we actually get them to point their front toe a little bit at their target.

31
That’s the basic drill when talking about throwing mechanics with younger players that you should use in different drills: step to the coach, elbow above the shoulder, make them look back and see the back of their hand and make sure their elbow or their glove is pointed to their coach. Coaches, I’m fortunate enough to have a group of all-stars that are pretty good for their age group. Remember that some of the first ones just starting out might not be as good. Don’t get frustrated. Physically put them in the right position so that they get the feel of it and the only way they’re going to get better is by doing it over and over again. If you master the fundamentals and repeat them the right way, these players will get better and better. If they get in the power position drill, make sure you physically move them and get them in the right position: elbow above the shoulder, looking at the back of the hand, elbow pointed towards their target. Trust me, it’s going to take a while for these young players to get it. Don’t get frustrated, have them do it over and over again.
© 2010 National Alliance for Youth Sports

32
CCooaacchhiinngg YYoouutthh BBaasseebbaallll
CHAPTER 11 – T-BALL PART 2 Catching Basics ADAM CHRIST: Coaches, we’re going to talk about the basic fundamentals of catching. When you’re dealing with younger age groups it can be very frustrating, so be patient and reinforce the basic fundamentals. There’s two things we’re going to talk about with catching, above your waist and below your waist. When they’re above the waist we’re going to talk about ten fingers up, putting your thumbs together. When it’s below the waist we’re going to talk about ten fingers down and putting their pinkies together. We use a softball starting out that gives a little cushion so the younger players will have success and they won’t feel like it’s going to hurt right away. So many coaches want to rush into putting on that baseball glove and putting that hardball into these young players’ hands, when they should be using a softer one and be mastering the basics so when they move into they don’t become afraid and don’t have the confidence anymore. 10 Fingers up
So we’re going to do a little drill here guys. We’re going to throw the ball above the waist. Put ten fingers up and your thumbs together. Coaches remember, you want to always get a good group of kids who will catch all the baseballs when they’re thrown to them. So be patient, throw a lot of them to them, get them used to it. Another thing you can do is make a game out of it, kids love games. See how many they can catch in a row, that will keep them active and interested in this.
10 Fingers down
This one is going to be a little tougher because the ball is going down. Make sure pinkies are together. When that ball is below your waist you want to put ten fingers down. We just want to see basic fundamentals done right.
Remember when you’re teaching catching, don’t rush with putting the glove on the kids’ hand or grabbing a hard baseball. Build their confidence and build the fundamentals right. Ten fingers up thumbs together, then fingers down pinkies together. If you do those things right in the beginning, your young players will become better. Catch with a Glove
Coaches, since I’m dealing with a good group of kids here that catch the ball, we’re going to move into catching with a glove and a hard baseball. Again, the principles are the same. Now they just have a glove on their hand. Ten fingers up if it’s above the waist, ten fingers down if it’s below the waist.
33
It’s the same thing with the glove as it is without.
Coaches I can’t stress enough how important it is to teach these young players the basic fundamentals before you get out on the diamond and hit ground balls to them or pop flies, any kind of baseball skill like that. They need to learn the basics before they move up. These guys did a great job of catching the ball, we moved along a little quicker. But take your time with these young players. Make sure they do it right and you’ll build them better for the future.
© 2010 National Alliance for Youth Sports

34
CCooaacchhiinngg YYoouutthh BBaasseebbaallll
CHAPTER 11 – T-BALL PART 3 Hitting Basics ADAM CHRIST: Coaches, now let’s talk about the basic fundamentals of hitting with these younger age groups, like tee-ballers. Even those a little older than tee-ballers should still be hitting off a tee. We’re going to talk about a few principles when hitting off the tee. Go Back to go Forward
We like to go back to go forward, or weight shift. If you watch a big league game, no matter what hitter is up, however they stand, however they stride they still have some kind of weight shift before they hit. We also like to use the analogy of a boxer. If I’m in the boxing ring and I’m going to punch someone, what would hurt more, if I just punched forward or if I went back with arm to then go forward? If I go back to go forward it would probably hurt more right? So that’s what we want to do on the tee, is to go back to go forward. A big thing coaches that you want to look at is make sure their front foot is lined up with the back of the tee. You don’t want to get them too close to the tee, or too far out in front. You want to get them in a good position where they can hit the ball. Remember, go back to go forward.
Coaches, this would be a good example of what to do if they don’t want to have their weight shift. Have them pick up their front leg like a pitcher. Have them pick up their leg and have them hold it for three seconds before taking a swing. Notice coaches, that will get them to keep their weight back and then move it forward. Coaches, the principle here is to go back to go forward, that’s going to provide them with more power. But if they are having trouble, have them pick their leg up like a pitcher, and count down “3-2-1 go forward.” This will make them gather their energy, come forward and hit the baseball. Those are the basic principles of hitting off a tee. Grip
Another thing we like to talk about with hitting is the grip. We like to talk about lining the door knocking knuckles up. Have the young player act like he’s knocking on a door with both hands, and then line those knuckles up. That allows us to have a looser grip, so it allow us to get the bat through the strike zone a lot quicker.

35
Stance and Stride
Another thing we like to talk about with hitting is the stance and the stride. With the stance, when they’re hitting off a tee you want to make sure their front foot is lined up with the back of the tee. You don’t want them to get too close to the tee because that won’t give them a chance to hit with power or get anything behind it. So make sure you line this foot up with the back of the tee so that they’re behind the baseball. Another thing, when they take their stride watch to make sure that they step straight to the pitcher. If they step behind or come across their body, it won’t allow them to get as much power, and also, it might hit the end of the bat or down on the bat and jam themselves. We want to try to get it so that they hit the sweet spot on the barrel.
© 2010 National Alliance for Youth Sports
36
CCooaacchhiinngg YYoouutthh BBaasseebbaallll
CHAPTER 12 - CONCLUSION John Engh: Coaches, we hope you enjoyed this introduction to coaching baseball clinic. We certainly appreciate the time you’ve taken out of your busy schedule to be here today. I want to encourage you one more time to go on www.nays.org and check out all the incredible member benefits you have as an NYSCA member. Skills and drills training is just the start of it. So go out there and have a great season.
© 2010 National Alliance for Youth Sports
