nz photographer - issue 46
DESCRIPTION
Into photography? Subscribe to NZ Photographer, the free monthly online magazine for Kiwi photography enthusiasts! www.nzphotographer.co.nzTRANSCRIPT

www.nzphotographer.co.nz 1www.nzphotographer.co.nz
Issue 46: September 2015

2 www.nzphotographer.co.nz
Hello and welcome to the latest issue. We had a good number of entries in this months ‘Black and White’ competition, so well done to everyone who made the
effort to enter. Quite a few of the entries were of animals, and at one stage, as I was downloading the entries, I started to hope for a picture of an aardvark.
I was hoping to make some quip about getting everything from an aardvark to a zebra. From the front end of a baboon to the back end of a zebra doesn’t quite sound the same somehow.
Congratulations to those who got a photo featured. For those of you who didn’t quite make it; keep trying. Remember when you were about a year old and decided to give this walking lurk a go. And promptly fell on your backside. . . multiple times! Good thing you didn’t give up eh?
Allan CoxResident JudgeNZ Photographer
ABOUT Whether you’re an enthusiastic weekend snapper or a
beginner who wants to learn more, NZ Photographer is the fun e-magazine for all Kiwi camera owners – and it’s free!
EDITOR Allan Cox, [email protected]
GROUP EDITOR Richard Liew
ART DIRECTOR Jodi Olsson
ADVERTISING ENQUIRIES Phone Jennifer Liew on 09 522 7257 or
email [email protected]
WEBSITE www.nzphotographer.co.nz
NZ Photographer is an Espire Media publication
Allan Cox

www.nzphotographer.co.nz 3
Next Month's Competition: Abstract
GET SHOOTING AND WIN!Next month’s competition is ‘Movement’. Due on 20th of September. The
following month will be ‘Dusk till Dawn’. Due on 15th of October. Any photo that has been taken after sunset, but before sunrise. City lights at night, stars
and the moon, long shutter speeds as it’s starting to get dark etc
• The winning image on the cover of the next issue
• A high quality print of your image and cover to immortalise your achievement for your grandchildren, courtesy of PCL Imaging
• $50 cash
• And of course, bragging rights and the envy of your fellow NZ Photographer fans!
Check out next month’s theme and enter at www.nzphotographer.co.nz ✸WIN!

4 www.nzphotographer.co.nz
Cory Varcoe
INSPIRING ARTIST
NZP: How would you describe your photographic style? What kind of look do you try to create?Generally speaking, I find tranquility in simplicity, which translates into my photography very strongly. A lot of my minimalist seascapes present the subject ‘floating’ in mist; I’m aiming to show the viewer a subject, not scene so to speak, every detail that is shown, gets examined.
My bodyscape photographs started out following the same thought process as my minimalist work; it has however evolved away from this now. Initially, the intent was to
isolate the human body against the darkness using light (I still love capturing this minimalist aspect). As weird as it sounds I soon however came to realise how amazing the body looks when it doesn’t look like a body. This lead to poses that skew the body and contorts the viewer’s perception of the subject. Even elements that mislead the viewer into thinking they are looking at something completely different. With my latest bodyscapes that use multiple bodies and subtle skies, I’m aiming to present the body in a way that is not seen, to make the body look like a landscape.
This month’s inspiring artist is Cory Varcoe. Cory does several styles of photography, and does them to such a level that I could have done several articles on him. He’s probably best known for his captivating nudes, which is what I thought I’d concentrate mainly on, but I couldn’t help but throw in a couple of his seascapes in as well.

www.nzphotographer.co.nz 5
NZP: What is your favorite photography accessory?I appreciate anything that works well, and that is reliable, Pocket Wizards for instance; they’ve never missed a beat.
NZP: RAW vs JPG and why?I use RAW for everything; memory is cheap compared to a missed opportunity because you couldn’t recover an underexposed file for example. In a perfect world, you’d nail every shot in camera but it doesn’t always work out that way. A lot of what I shoot can’t be bracketed to account for light fall off so having the ability to correct this with the knowledge that the RAW file has retained the quality in the highlights/shadows is very reassuring.

6 www.nzphotographer.co.nz
NZP: What ‘words of wisdom’ would you give to someone starting out in photography? And what are some common mistakes you see people making when shooting these days?I think everyone should start out on a film camera, I wish I had. The good thing about film is that you are so much more conscious and critical of every frame you take. Starting out on film you’ll never (well, shouldn’t at least) develop the mentality of “Photoshop will fix that” or “I’ll just crop that out later” or “I’ll level that horizon later”.
You’ll pay more attention to everything that is in your frame too, which is something that gets overlooked a lot. Plus, there’s something very satisfying about clicking the shutter on a film camera. Then once you’ve got the hang of things with film and learnt all the good habits then move to digital.
Decide early on who you are photographing for; meaning don’t be afraid to put your personality, your experience and your own twist on things. It’s the privilege of being an artist.
Print your work. Find a reputable printer. You can’t truly appreciate your own work on a screen. A photograph takes on new characteristics once it is printed. You get a whole new appreciation for it; then you get to know your work, compare your work – it’s a great way to see improvement.
As far as common mistakes go, the most obvious ones pop up once people start editing their photos. Digital colour filters and selective colour are too heavily used in my opinion; they have their place, of course, but only when used subtly; not when they are used to try to save a bad photo. When using HDR or even when using brushes to make adjustments you have to be so careful not to get halos around edges etc. Chromatic aberration is definitely the most common thing overlooked, though; yet it’s so easily fixed.
NZP: How did you first get into photographing the nude and what inspired you to do so?I’ve always admired the works of nude photographers and follow many great ones online (Facebook, Flickr etc.). There was this one photo that stuck in my mind, the lighting, in particular, was stunning as it really defined the model.
I was discussing nude photography with a close friend one day and the next thing I know, I had a volunteer. I initially set out with the idea to recreate the original photograph I’d seen, but it was pushed out of my mind almost immediately. Once I saw how the light was falling on the models body, I could see all these wonderful shapes and scenes. That’s really where the idea of these bodyscapes came from. They are driven by the body, and for this reason I hardly ever have poses in mind going into a shoot.
NZP: How do you go about finding your models?Initially, I asked a local photography group if they knew of any models they’d worked with, who’d be interested, and got in contact with someone who did an awesome job. From there I was able to ask friends because I had samples to show them. Modelmayhem has been helpful, although there aren’t too many local models on there. Exhibitions are a great way to advertise for interested people, and word of mouth is always great as I’m always looking for models.
NZP: Would you mind briefly sharing your 3% story and what you got from it?I believe a motivational speaker by the name of Wayne Dyer was the first to share this story: he said that when a large chain store in the US advertised for manager positions the current employees were offended and felt they should have been offered the positions first.
The company apologised and said that the current employees could have the management roles, provided they came along two nights a week for a few months for training. Then they’d be managers with bigger pay packets, company cars – the whole nine yards. Of all of the eligible employee only 3% even applied. And that’s not even how many actually completed the training. Only 3% were prepared to go the extra mile to better themselves and their life.
Yes, this is just a gross generalisation, but to me this story sums up the fact that bugger all people will take the more daunting route that leads them to a unique result, a result that hasn’t been seen before. Personally if a photograph is easily taken it’s not worth taking in the first place. If it’s easy, you’re not pushing yourself.

www.nzphotographer.co.nz 7
NZP: What is the space that you are taking your photos in? Do you have your own studio for example? And if someone wanted to give this style of photography a go what would their options be?I’m like most photographers; I’m making do with what I have. In saying that I am fortunate in the fact I have an open plan living and dining room at home that gets converted into a studio. Furniture gets stacked in a corner; black sheets get hung up over the walls
etc. I’ve shot in other locations that really made me appreciate the space I have.
You don’t really need a great deal; window light is as good as any and as far as space goes having more room to move around in grants you the freedom to use different focal lengths. It also allows more space between the model and the photographer, which is important when you are starting out.

8 www.nzphotographer.co.nz
NZP: You mentioned having studio flash and that the modeling light was of particular benefit. Care to explain?Having studio lighting with modeling lights is too awesome for words! Much like using window light, being able to see exactly how the light is falling before a photo is taken saves so much time and enables me to make slight tweaks to the model’s pose to get the most out of each photo.
NZP: What is ‘quality’ in an image? What makes an image good for you?That’s very hard to quantify, I don’t believe there is an ultimate formula. I can’t even explain what exactly makes a good image for me. It’s instinct; some photographs just work right from the time you look through the lens; you know it’s going to be amazing. I think the best gauge for the quality of a photograph is to watch the reaction of the person the photograph was intended for; whether that’s a client, the public or yourself.

www.nzphotographer.co.nz 9
NZP: How much post-processing do you do and what do you use?The amount varies a lot. My automotive work is very post-processing heavy compared to my minimalist and bodyscape work where I try keep processing to a minimum. Lightroom and Photoshop I use on a daily basis. Lightroom is brilliant for importing and organising. It can also handle basic adjustments which can easily be
synced making it ideal for motorsport, weddings, etc.
My favourite feature is being able to apply a development preset on import meaning that all my files get lens corrects, and CA fixed before I even view the photo on the computer, so I don’t need to worry about it. CA is overlooked far too often, especially as it is an easy fix, I see it all the time in magazine work, even in high-end print work and it ruins the photos.

10 www.nzphotographer.co.nz
NZP: Many photographers have one style/subject that they specialise in. Your bodyscapes are just one of at least three styles/subjects that you have taken to a very high level. What are your thoughts on specialising?That’s a tricky question, for me I photograph what I enjoy and what I am passionate about. That is key I think because when you are passionate about something you put all of yourself into it, and that shines through in your photos.
NZP: Who inspires you?I think three photographers stand out in my mind as being a cut above;
Alfred Georg Weissenegger http://www.weissenegger.name/
Belovodchenko Anton http://belovodchenko.deviantart.com/Both of these two I aspire to, they photograph the human body incredibly.
Nilgün Kara http://nilgunkara.deviantart.com/Nilgün Kara was the reason I got into long exposure photograph, her photograph “under my umbrella” was the one that inspired me.
NZP: Where would you like to see your photography go in the future?It’s evolved so much in the past year or so, it’s hard to know where it will go. I love exhibiting and want to get my work into more galleries, both local and further aboard (National and International).
NZP: Finally, where can we see more of your amazing work?I try to keep my websites up to date as much as I can; www.coryvarcoe.co.nzwww.bodyscapes.co.nzOr I always welcome a like or comment on my Facebook pageshttps://www.facebook.com/Bodyscapesbycoryvarcoe ■

www.nzphotographer.co.nz 11
LESS IS MORE NEW EOS 100D
The world’s smallest and lightest APS-C DSLR*,all performance, no compromise.
*As at 1st March 2013

12 www.nzphotographer.co.nz
The Exposure Triangle.By Scott Fowler www.scoiwi.com
Photography is about light entering the camera and hitting the film or the digital sensor. Too much light and you have an overexposed (white/
pale) image, too little and your image is underexposed (too dark). There are basically three ways to control the amount of light that enters the camera. One way to control the light is to adjust the sensitivity of the film or sensor. You could use the ISO, which is the international standard for light sensitivity.
ISO 100 is ‘slow’ meaning a low sensitivity to light, whereas ISO 3200 has a higher sensitivity to light. So the lower or slower the ISO, the more light you have to let in through the lens, the higher or faster the ISO the less light you’ll need, but the image will often get grainier or noisier in a digital capture as a result. There is a little give and take here as with the other points of the triangle.
Aperture is another way of controlling the light entering the camera. The aperture is a diaphragm in the lens that

www.nzphotographer.co.nz 13
The Exposure Triangle.That is the exposure triangle. All of the three points on the triangle work together, and where you push the camera in one direction, it requires a little pull in another.
opens and closes as you change the aperture numbers. f1.8 is a wide open aperture allowing lots of light to come into the camera whereas f22 is a very small hole letting in a small amount of light. Less light (f22) will give you a larger Depth of Field than say f1.8.
So not only are we trying to make a good exposure but we also have to choose how we make that exposure because each choice has an aesthetic consequence. In this case, how we control the light with the aperture also controls the quality of focus.
The third way is shutter speed. In most cameras the shutter is like a curtain across the front of the sensor that opens across the shutter for a determined amount of time, say 1/1000th of a second, which is fast, and will freeze the scene, or say one second for that ghostly water look in a river.
That is the exposure triangle. All of the three points on the triangle work together, and where you push the camera in one direction, it requires a little pull in another.
If your first choice is a fast shutter speed say 1/1000th of a second to freeze the scene and you want a good DOF - say F8, then you will have to compromise with the ISO by making it higher, it’s all about give and take. Take time to learn the exposure triangle. The more natural this becomes to you, the easier the decisions about your exposures become. Not many of us are creative when we are frustrated.
So the next question for you, is do you shoot Manual Mode or does the camera make the decisions for you? Be brave, try and use the Exposure Triangle and shoot Manual Mode. It opens you to more creative options… well I believe so. It won’t happen overnight but stick with it and you will enjoy the challenge, or not. ■

14 www.nzphotographer.co.nz
Photo CritiquingNOT A MISTAKE THIS MONTH, BUT AN OPPORTUNITY.

www.nzphotographer.co.nz 15
This photo from Jay Drew was in the ‘short list pile’ and as I was viewing it zoomed in, to check for sharpness, I noticed another photo within the original. As supplied, it’s a cool photo of two guys
nicely framed within the arches of a walkway. Zoomed in and we notice their round baldheads which are juxtaposed with the round head of the statue behind, and all three form a nice triangle. I think both photos work and maybe Jay had considered the tight crop but still preferred the wider view. I don’t know. Anyway, I guess what I’m trying to say is, ‘always be open to a tighter crop’.
One thing though: your photos will need to be sharp
if you are going to crop in tight. I had a few images entered this month that were soft. There is a difference in look between an image that is just sharp, as in ‘no longer soft’, and an image that is absolutely crisp. Artistically blurry photos can look amazing, but images that were intended to be sharp will look better crisp.
Unless you become your own harshest critic on this point, and start demanding crispness in your photos, your images will always lack that final one per cent. That one per cent can make the difference! Would you fly with a pilot who landed the plane safely 99 per cent of the time? ■

16 www.nzphotographer.co.nz
Exposing Back Lit Portraits
Before taking a portrait shot, I always ask myself: “What’s the story I want to tell?” Often with portraits, I try to isolate the subject from the
surroundings by using wide apertures, long focal lengths and shooting tight around the subject so as not to have much background in the composition.
There are, however, times when my story is about the location, just as much as it is about the people. In this scenario I want the background to be exposed correctly, just like the subject. Difficulties can arise when the background is brightly lit or a much lighter colour than the person in the shot. It’s not unusual to see bright backgrounds with the people in the images being cast into silhouettes or dark shadows.
This exposure is a result of the camera’s metering system evaluating the reflected light to give an average reading, which renders the scene as a mid-tone. In theory what this means is that the meter weighs up the exposure values of the shot as a whole. Taking into account highlights, mid-tones and shadows, the meter gives an exposure setting that averages these readings.
If you were to use spot metering, with the exposure being taken from a person’s face, this would result in the person’s skin tones being correctly exposed, with the likelihood of the background being over exposed.
Because of these camera limitations we need to be creative around how we correctly expose a backlit portrait. As I see it, there are two options:
The first option is to take two exposures and blend them in Photoshop. The first exposure is of the background only, shot at around F9-F11 using Evaluative/Matrix metering. Given the background is well lit, you shouldn’t need a long shutter speed, but keep your eye on it. If the shutter speed exceeds the reciprocal of the focal length of the lens (i.e., if you’re shooting handheld with a focal length of 50mm, you don’t want the shutter speed to be any slower than 1/50 sec), then increase the ISO until this is corrected, or shoot using a tripod which will allow you to use longer shutter speeds.
For the second exposure, the person is asked to step into the frame, and they are metered using spot metering off their face at the widest aperture possible.
By Paul Conroy www.paulconroyphotography.com
1/100sec, F10, ISO 100, 28mm

www.nzphotographer.co.nz 17
Using a wide aperture allows you to keep the ISO as low as possible. Again, keeping an eye on the shutter speed. The composition of the second exposure should be as near to that of the first as possible. Using a tripod in this scenario would be immensely helpful.
The post production technique in Photoshop is really another tutorial, however the essence of it is to add the two images as layers into the same file and to use a layer mask to display the person on top of the correctly exposed background. The benefits of this technique are that you don’t need to carry lighting gear around with you, the downside being the additional post-production tasks required to produce the final image.
The second option is to introduce an additional light source to illuminate the people. This could be a flash, constant video light or even a reflector. With each type of lighting comes a unique set of challenges including but not limited to, portability, light power and keeping the lighting equipment out of the frame. In this example, I’ll discuss how off camera flash can be used to fill in the shadows of people in the foreground.
Like above, the first step is to meter for the background. This should be done with the camera in Manual Mode so that the influence of any introduced light doesn’t affect the exposure of the background. If shooting with a sunrise or sunset in the background, be sure to check the exposure every couple of minutes as the exposure will change very quickly.
Also keep an eye on the shutter speed as when using flash we don’t want the shutter speed to be faster than the sync speed of the camera which is usually between 1/200 and 1/250 sec. I’d recommend that you check your camera manual to find out what the sync speed is for your camera. Bearing in mind we also don’t want the shutter speed to be slower than the reciprocal of the focal length of the lens, you’d typically be looking to achieve a shutter speed of between 1/30 and 1/200 sec. This is where a good understanding of the exposure triangle comes in handy.
For the image below, I held a flash in my left hand, and controlled the camera with my right hand. The flash was
held up as high as possible and pointed straight to the couple. Of course I could have brought a light stand, however as I was shooting on my own I decided against bringing too much equipment.
The flash was set to manual mode as I wanted to maintain complete control over the exposure. Shooting with a flash in manual mode is a bit hit and miss to start with, so I always start with my flash at half power then adjust up or down as required until I get the exposure I want. To check the exposure of their faces, I’d review the image on the back of my camera and zoom to their faces. With some experience, you can usually get to the correct exposure within 4 test shots.
The distance between the flash unit and the people in the shot also plays a vital role. Too far away and the flash may not have enough throw to sufficiently light them. Too near and you risk overexposure as well as having the flash in the shot.
The pros and cons of this shooting method are the complete opposite of the first method, namely less post production work but an increased requirement to carry additional equipment.
At the end of the day, you need to make your own decisions around how to overcome the challenges of exposing backlit portraits, and these will largely be influenced by the equipment you have available to you. Hopefully, I’ve demonstrated that there is more than one way to approach this often difficult situation. ■
1/600sec, F2.8, ISO 400, 200mm

18 www.nzphotographer.co.nz
Macro 8

www.nzphotographer.co.nz 19
Because of macro’s very shallow depth of field, we often end up with some parts of our photo in focus, and sharp, and other parts out of focus and
blurry. With this article, I would like to look at how the positioning of our camera, affects which parts of the photo are sharp or not.A lens focuses on a plane that is parallel to the sensor. We also have an area, in front of and behind that plane that appears sharp because of the depth of field.
If I photograph a flat surface, provided my sensor is parallel with that surface, I should be able to focus on the whole surface, and therefore get everything sharp. (With some lenses this plane will have a slight bulge to it, so the corners of the frame will drop slightly out of focus. Macro lenses normally don’t have this bulge.)
If, however, my sensor is not parallel to the flat surface, but at an angle to it, then my plane of focus

20 www.nzphotographer.co.nz
will cut through the surface at the same angle as my sensor is to the surface. (See first diagram.) In practice what this translates to, is that if we are photographing something that is flat like a butterfly wing, and we want the whole wing to be sharp, we need to take the photograph from a position that puts the camera sensor as close to parallel with the wing as possible.If we are trying to get only one point in focus, our camera can be at any angle to that point, and we will still be able to focus on that point.
If we want two points in focus, then our camera sensor needs to be parallel, to a line that would run through those two points. Visualise a cylinder around the line
that goes through those two points (with the radius of that cylinder being equal to the focus distance between subject and camera) and this is where we need to position our camera. (See second diagram)If we want three things sharp, then we need to visualise a plane that runs through all three points.
Our camera can be in only two possible positions to get all three sharp. Those two positions are on either side of the plane, (at the focus distance from the plane) with the sensor parallel to that plane. In the last photo, to get the ends of the three stakes in focus, my camera needs to have its sensor parallel to a plane that runs through all three points.

www.nzphotographer.co.nz 21
In the photo the Perspex represents this plane. Some people are very good at visualising three-dimensional spaces and the above will come with ease, for everyone else, a bit of practice and you will soon get it.If we want four or more things sharp, there is no guarantee we will be able to achieve our goal, unless the gods are on
our side and the points happen to fall within a plane. Sometimes this does happen, but not often.
A far more reliable approach is to trust modern technology. It’s called ‘Stacking software’ and it allows us to produce photos that once would have been impossible. This will be the topic of next months article. ■

22 www.nzphotographer.co.nz
Widow display in a Lucerne mall by Doug Humby. Widow display in a Lucerne mall caught my eye as it blended into its surroundings and almost a look alive feeling. D7100 f6.3 1/160 ISO-200

www.nzphotographer.co.nz 23
Elephant at Auckland Zoo by Gail Orgias A closeup crop of elephant highlights the texture and detail. Canon 7D, 70-200@200MM, F/5.6, 1/100 sec, ISO 320.

24 www.nzphotographer.co.nz
Reciprocity by Jay Drew I came across two donkeys that seemed to be scratching each others back. They bared teeth but it all seemed to be very mutually agreeable as it went on for some time. Nikon D800 - ISO800, 1/180, F3.3, 105mm

www.nzphotographer.co.nz 25
Red bottle by Kevin MarshallTrying motion freeze using two Speedlite 600EX-RT
flashes and a tank of water. Canon 7D; Canon EF 100, 2.8 lens; 1/160 sec; f8; ISO 100.
Gorilla at Orana Park by Yvonne Elles King Look at that face! ISO 400 1/4 F5

26 www.nzphotographer.co.nz
Keeping dry in style by Dianne WhiteheadUmbrella on display in the Devonport shops. The bright colour of the umbrella just
caught my eye. Canon 6D. Focal length 85mm, exposure 1/25s, f/4, ISO 400.
Kahikatea’s by Julia Johnson. We were given the heads up on a beautiful stand of Kahikatea’s near the Waikato River. Made extra beautiful by the floodwater lying around. Focal length 62mm exp 1/13 s f14 ISO100
www.nzphotographer.co.nz 27
Sunrise in Central by Dianne Whitehead Sunrise. Central Otago. A beautiful sunrise, worth braving the winter cold to get these magnificent colours. Canon 6D. Focal length 88mm, exposure 1/10s, f/8, ISO 100
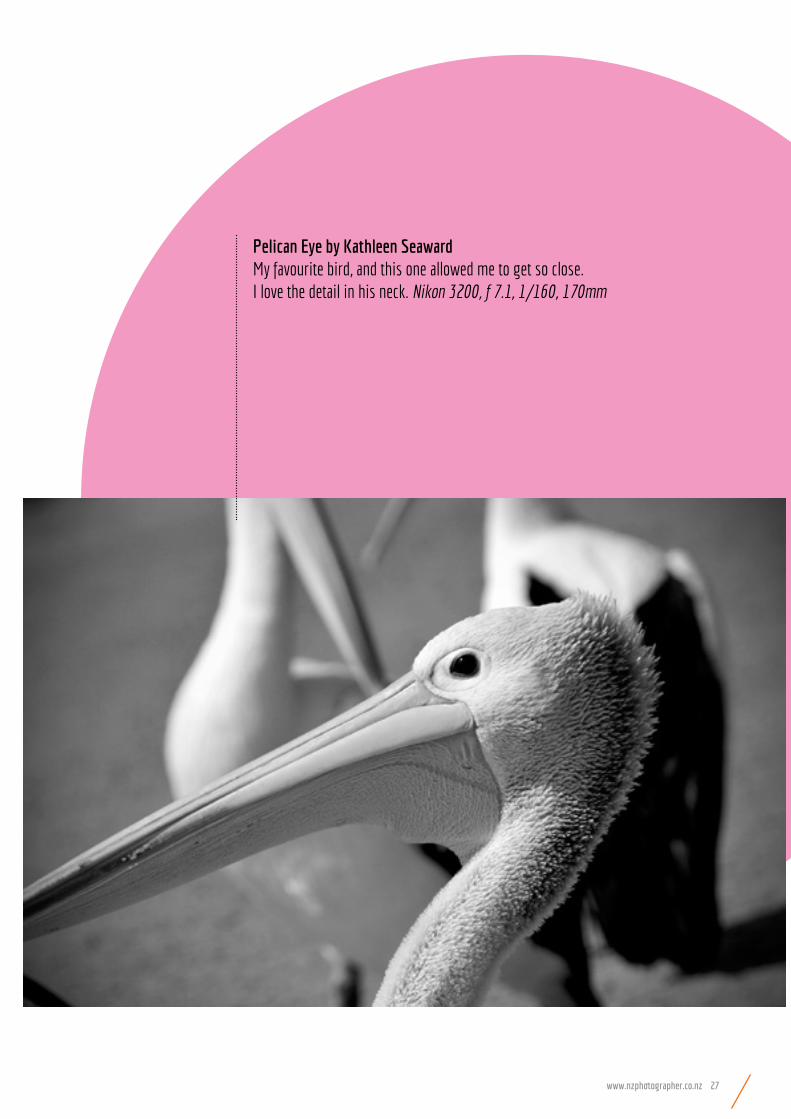
Pelican Eye by Kathleen SeawardMy favourite bird, and this one allowed me to get so close. I love the detail in his neck. Nikon 3200, f 7.1, 1/160, 170mm
28 www.nzphotographer.co.nz
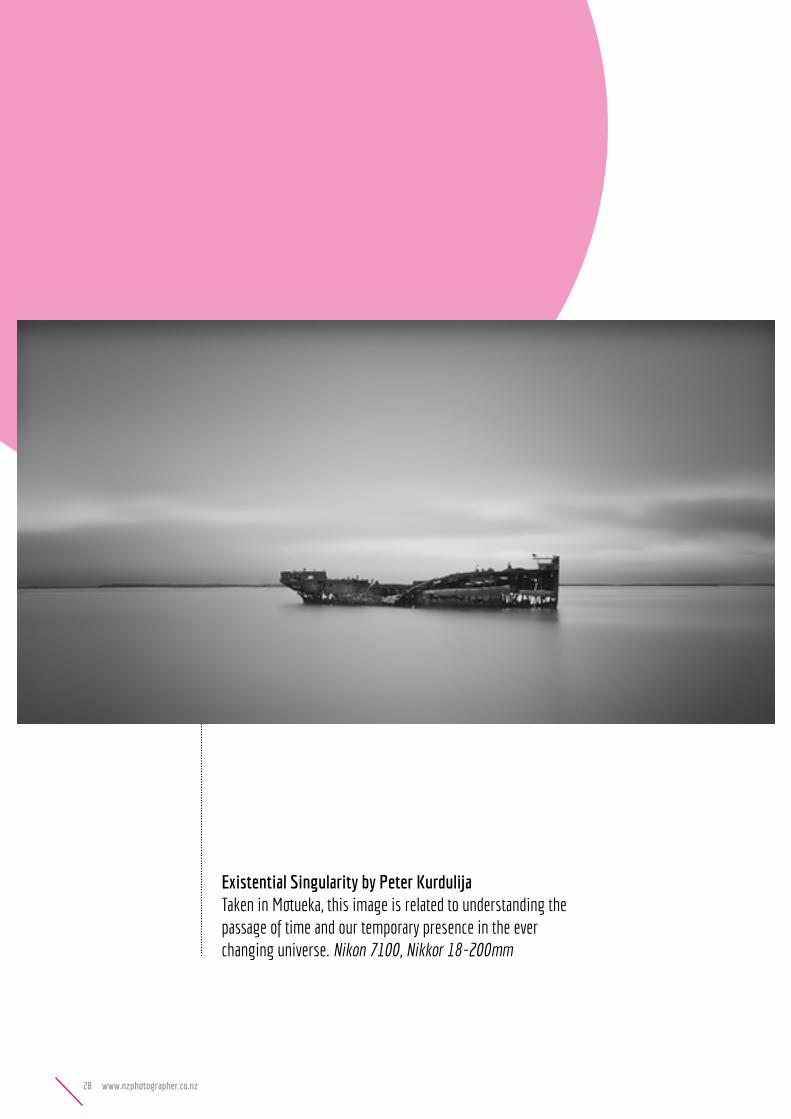
Existential Singularity by Peter Kurdulija Taken in Motueka, this image is related to understanding the passage of time and our temporary presence in the ever changing universe. Nikon 7100, Nikkor 18-200mm
www.nzphotographer.co.nz 29
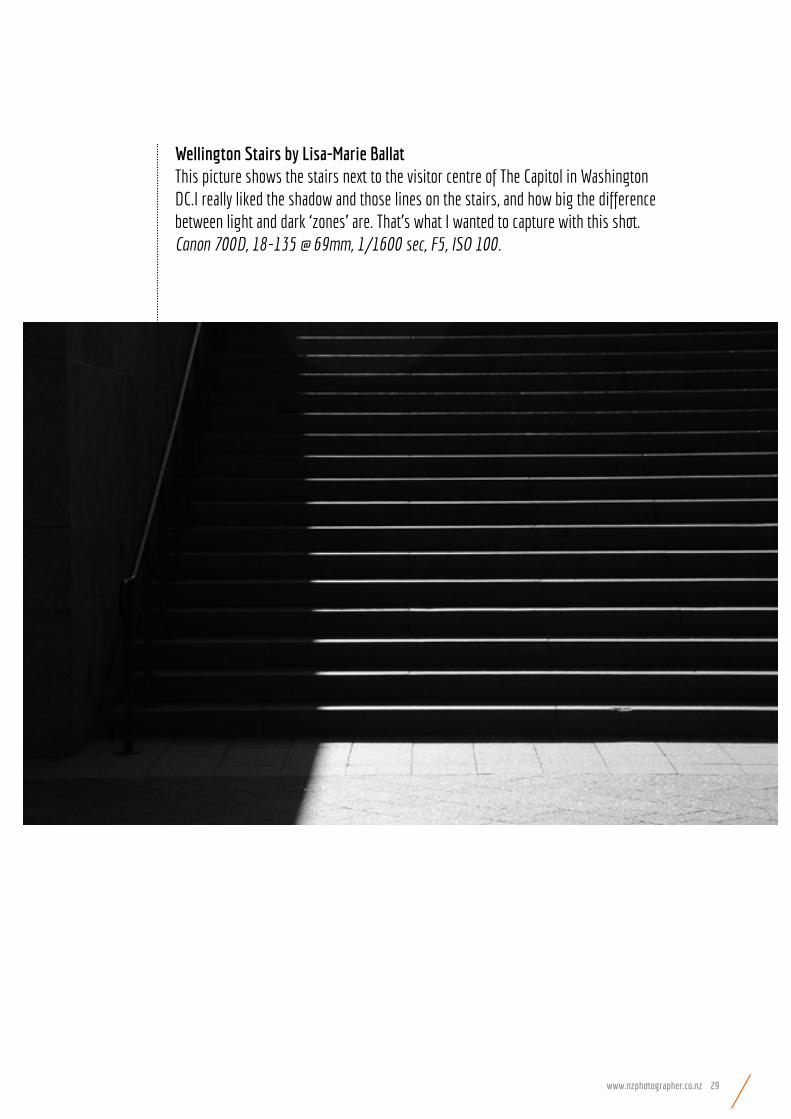
Wellington Stairs by Lisa-Marie Ballat This picture shows the stairs next to the visitor centre of The Capitol in Washington DC.I really liked the shadow and those lines on the stairs, and how big the difference between light and dark ‘zones’ are. That’s what I wanted to capture with this shot. Canon 700D, 18-135 @ 69mm, 1/1600 sec, F5, ISO 100.

30 www.nzphotographer.co.nz
Black and White Books by Debbie Ulugia. A peaceful place in one of the many Vineyards, Matakana. I like the way the natural light from the right side brings depth to the photo. Shot using my Canon EOS 650D with my 50mm lens, 1/400sec, f/3.5, ISO 800.

www.nzphotographer.co.nz 31
ASB Stadium, Parnell by Gail OrgiasLight on the empty stands creates strong shadows, lines and patterns. Canon 6D, 35mm, f/8, 1/800 sec, 1SO 1600

32 www.nzphotographer.co.nz
Surround Sound by Jay Drew. At home I noticed the shadow of the guitar and enjoyed the way it sat on the wall. Camera D800 (nikon), ISO400, 125mm, 1/500, F5.6

www.nzphotographer.co.nz 33
Zebra by Dianne Whitehead. The south end of a north facing zebra. I loved the sharpness of the stripes and the soft look of the grazing zebra in the background. Canon 6D; 1/320s exposure; f5.6 ISO 400

34 www.nzphotographer.co.nz
Baboon by Alan Michael Jonker. A male baboon, Kruger Park, South Africa. Late afternoon, getting dark gave a gloomy mood to photo, enhanced and edited in Nik Silver Efex 2. Nikon D80 with Sigma 150-500mm lens. F 6.3, 1/320, iso 100.

www.nzphotographer.co.nz 35
Chair de poule by Graeme Skinner. Photo taken in a derelict farmhouse. I liked the goose bumps on the model’s skin.
36 www.nzphotographer.co.nz
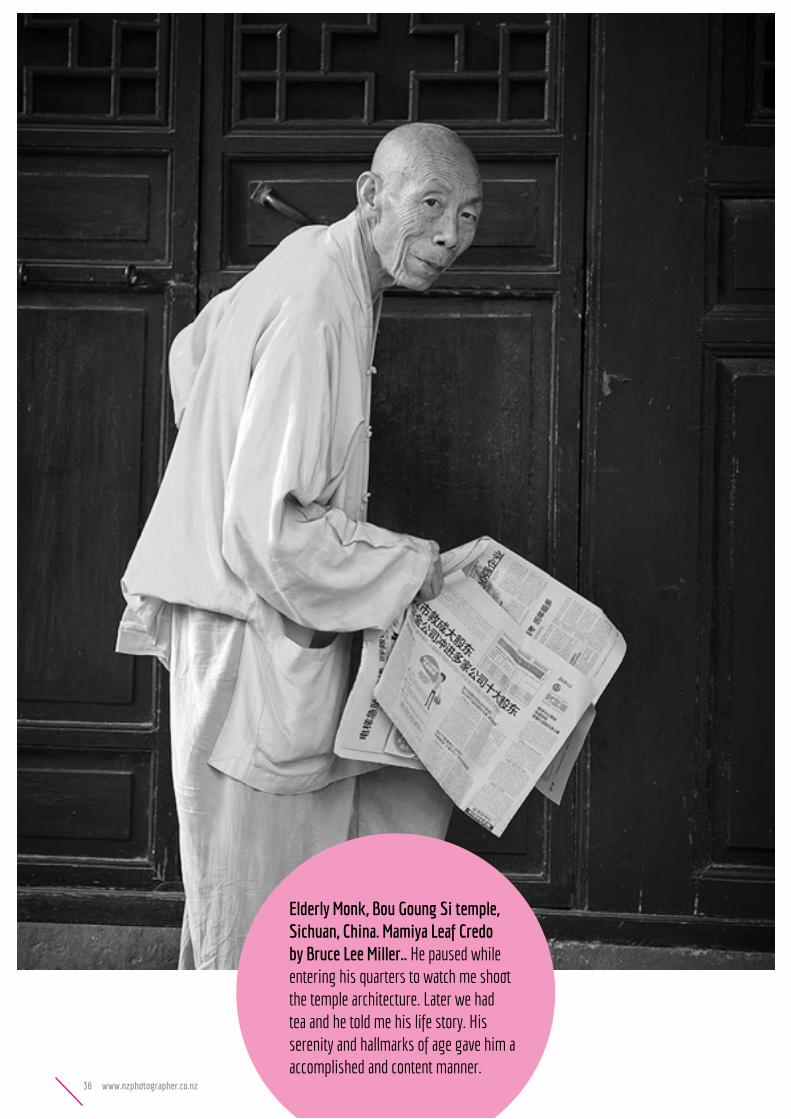
Elderly Monk, Bou Goung Si temple, Sichuan, China. Mamiya Leaf Credo by Bruce Lee Miller.. He paused while entering his quarters to watch me shoot the temple architecture. Later we had tea and he told me his life story. His serenity and hallmarks of age gave him a accomplished and content manner.

www.nzphotographer.co.nz 37
Tui by Juliet Hopkins. Tui opposite my deck- wanted to capture him all puffed up. Nikon Coolpix 600 1/60 f3.5

38 www.nzphotographer.co.nz
Doorway to an abandoned theatre by Ashley Ross

www.nzphotographer.co.nz 39
To know ahead of time what you’re looking for means you’re then only photographing your own preconceptions, which is very limiting, and often false.
- Dorothea Lange
HAVE YOU SUBSCRIBED TO NZ PHOTOGRAPHER? IT’S FREE!Simply visit www.nzphotographer.co.nz
to get a copy of NZ Photographer delivered straight to your inbox.