object oriented programming concepts-15cs45mysururoyal.org/qppdf/4cs 5 module oops notes.pdfobject...
TRANSCRIPT

Object Oriented Programming Concepts-15CS45
Chethan Raj C, Assistant Professor Dept. of CSE Page 1
Chethan Raj C
Assistant Professor
Dept. of CSE
Module 05
APPLET:
1. Introduction
2. Two types of Applets
3. Applet basics
4. Applet Architecture
5. An Applet skeleton
6. Simple Applet display methods
7. Requesting repainting;
8. Using the Status Window
9. The HTML APPLET tag
10. Passing parameters to Applets
11. getDocumentbase() and getCodebase()
12. ApletContext and showDocument()
13. The AudioClip Interface;
14. The AppletStub Interface;
15. Output to the Console.
SWINGS:
1. The origins of Swing
2. Two key Swing features
3. Components and Containers
4. The Swing Packages, A simple Swing Application
5. Create a Swing Applet
6. Jlabel and ImageIcon
7. JTextField
8. The Swing Buttons
9. JTabbedpane
10. JScrollPane
11. JList
12. JComboBox
13. JTable
Object Oriented Programming Concepts-15CS45
Chethan Raj C, Assistant Professor Dept. of CSE Page 2
The Applet Introduction
Applet is a small program that can be placed on a web page and it is executed by the web browser.
Java Applets enable user interaction with GUI elements and provides the web pages ―dynamic
content
Applet is a Java program embedded within HTML pages. Java applets is compatible with almost all
the web browsers like Mozilla Firefox, Google Chrome, Internet explorer, Netscape navigator and
others that are java enabled. Applets make a website more dynamic and are secure.
When browser loads Web page containing applet, Applet downloads into Web browser and
begins execution or applets can be executed in appletviewer.
Applets are not stand alone programs.
Applets are specified in html document by using applet tag
/* <applet code=‖MyApplet‖ width=200 height=100>
</applet> */
The applet will be executed in java enabled web browser when it encounters applet tag within
the html file.
Applet is designed to run remotely on the client browser. They cannot access system resources on
local computer. They are often used for a small internet and intranet applications.
Applet Basics:
All applets are subclasses of Applet. Thus, all applets must import java.applet. Applets must also
import java.awt. Since all applets run in a window, it is necessary to include support for that window
i.e AWT stands for the Abstract Window Toolkit .Applets are not executed by the console-based Java
run-time interpreter. Rather, they are executed by either a Web browser or an applet viewer. The
appletviewer, provided by the SDK. But user can use any applet viewer or browser.
Execution of an applet does not begin at main( ). Actually, few applets even have main( ) methods.
Instead, execution of an applet is started and controlled with an entirely different mechanism, which
will be explained shortly. Output to your applet’s window is not performed by System.out.println( ).
Rather, it is handled with various AWT methods, such as drawString( ), which outputs a string to a
specified X,Y location. Input is also handled differently than in an application.
Once an applet has been compiled, it is included in an HTML file using the APPLET tag. The applet
will be executed by a Java-enabled web browser when it encounters the APPLET tag within the
HTML file. To view and test an applet more conveniently, simply include a comment at the head of
your Java source code file that contains the APPLET tag. The user code is documented with the
necessary HTML statements needed by your applet, and you can test the compiled applet by starting
the applet viewer with your Java source code file specified as the target. Here is an example of such a
comment:
/*
<applet code="MyApplet" width=200 height=60>
</applet>
*/

Object Oriented Programming Concepts-15CS45
Chethan Raj C, Assistant Professor Dept. of CSE Page 3
This comment contains an APPLET tag that will run an applet called MyApplet in a window that is
200 pixels wide and 60 pixels high. Since the inclusion of an APPLET command makes testing
applets easier, all of the applets shown in this book will contain the appropriate APPLET tag
embedded in a comment.
Applet class
Applet class provides all necessary methods to start and stop the applet program.
It also provides methods to load and display images, and play audio clips.
Applet extends the AWT class Panel.
Panel extends Container which extends Component
User can perform event handling in AWT or Swing and also perform by using applet also.
JApplet have all the controls of swing. The JApplet class extends the Applet class.
Applet provides all necessary support for applet execution, such as starting and stopping. It also
provides methods that load and display images, and methods that load and play audio clips. Applet
extends the AWT class Panel. In turn, Panel extends Container, which extends Component. These
classes provide support for Java’s window-based, graphical interface. Thus, Applet provides all of
the necessary support for window-based activities.
Hierarchy of Applet
As displayed in the above diagram, Applet class extends Panel. Panel class extends Container which
is the subclass of Component.

Object Oriented Programming Concepts-15CS45
Chethan Raj C, Assistant Professor Dept. of CSE Page 4
An Applet has its own unique functionality
getAppletContext() returns an object which allows some
communication with browser & HTML page
getParameter(String name) returns ―value‖ of parameter with ―name‖
(or null)
getCodeBase(), getDocumentBase() return URLs of page, etc
showStatus(String msg) puts message in ―status window‖ of
browser
Applet Program Running Steps:
There are two ways to run an applet
1. By html file.
2. By appletViewer tool (for testing purpose).
Example of applet program to run applet using html
import java.applet.*;
import java.awt.*;
public class JavaApp extends Applet
{
public void paint(Graphics g)
{
Font f=new Font("Arial",Font.BOLD,30);
g.setFont(f);
setForeground(Color.red);
setBackground(Color.white);
g.drawString("Student",200,200);
}
}
Html code, myapplet.html
<html>
<title> AppletEx</Title>

Object Oriented Programming Concepts-15CS45
Chethan Raj C, Assistant Professor Dept. of CSE Page 5
<body>
<applet code="JavaApp.class"
height="70%"
width="80%">
</applet>
</body>
</html>
If applet code not run on browser then allow blocked contents.
Simple example of Applet by html file:
To execute the applet by html file, create an applet and compile it. After that create an html file and
place the applet code in html file. Now click the html file.
//First.java
import java.applet.Applet;
import java.awt.Graphics;
public class First extends Applet
{
public void paint(Graphics g)
{
g.drawString("welcome",150,150);
}
Note: class must be public because its object is created by Java Plugin software that resides on the
browser.
myapplet.html
<html>
<body>
<applet code="First.class" width="300" height="300">
</applet>
</body>

Object Oriented Programming Concepts-15CS45
Chethan Raj C, Assistant Professor Dept. of CSE Page 6
</html>
Running of applet using appletviewer
Some browser does not support <applet> tag so that Sun MicroSystem was introduced a special tool
called appletviewer to run the applet program.
In this example Java program should contain <applet> tag in the commented lines so that
appletviewer tools can run the current applet program.
Example of Applet
import java.applet.*;
import java.awt.*;
/*<applet code="LifeApp.class" height="500",width="800">
</applet>*/
public class LifeApp extends Applet
{
String s= " ";
public void init()
{
s=s+ " int ";
}
public void start()
{
s=s+ "start ";
}
public void stop()
{
s=s+ "stop ";
}
public void destroy()
{

Object Oriented Programming Concepts-15CS45
Chethan Raj C, Assistant Professor Dept. of CSE Page 7
s=s+ " destory ";
}
public void paint(Graphics g)
{
Font f=new Font("Arial",Font.BOLD,30);
setBackgroundColor(Color."red");
g.setFont(f);
g.drawString(s,200,250);
}
}
Execution of applet program
javac LifeApp.java
appletviewer LifeApp.java
Note: init() always execute only once at the time of loading applet window and also it will be
executed if the applet is restarted.
Simple example of Applet by appletviewer tool:
To execute the applet by appletviewer tool, create an applet that contains applet tag in comment and
compile it. After that run it by: appletviewer First.java. Now Html file is not required but it is for
testing purpose only.
//First.java
import java.applet.Applet;
import java.awt.Graphics;
public class First extends Applet
{
public void paint(Graphics g)
{
g.drawString("welcome to applet",150,150);
}
}

Object Oriented Programming Concepts-15CS45
Chethan Raj C, Assistant Professor Dept. of CSE Page 8
/*
<applet code="First.class" width="300" height="300">
</applet>
*/
To execute the applet by appletviewer tool, write in command prompt:
c:\>javac First.java
c:\>appletviewer First.java
Applet Architecture
An applet is a window-based program. As such, its architecture is different from the console-based
programs
1 Applets are event driven.
2 An applet waits until an event occurs.
3 The run-time system notifies the applet about an event by calling an event handler that has
been provided by the applet.
4 Once this happens, the applet must take appropriate action and then quickly return.
5 Applet must perform specific actions in response to events and then return control to the run-
time system.
6 In those situations in which your applet needs to perform a repetitive task on its own (for
example, displaying a scrolling message across its window), an additional thread of execution
must be started.
Ex: The event-driven architecture impacts the design of an applet. An applet resembles a set of
interrupt service routines. An applet waits until an event occurs. The AWT notifies the applet about
an event by calling an event handler that has been provided by the applet. Once this happens, the
Object Oriented Programming Concepts-15CS45
Chethan Raj C, Assistant Professor Dept. of CSE Page 9
applet must take appropriate action and then quickly return control to the AWT. For the most part,
user applet should not enter a ―mode‖ of operation in which it maintains control for an extended
period. Instead, it must perform specific actions in response to events and then return control to the
AWT run-time system. In those situations in which user applet needs to perform a repetitive task on
its own (for example, displaying a scrolling message across its window), user must start an additional
thread of execution.
The user interacts with the applet as he or she wants, when he or she wants. These interactions
are sent to the applet as events to which the applet must respond.
1 when the user clicks the mouse inside the applet’s window, a mouse-clicked event is
generated.
2 If the user presses a key while the applet’s window has input focus, a keypress event is
generated.
3 Applets can contain various controls, such as push buttons and check boxes. When the user
interacts with one of these controls, an event is generated.
Ex:In nonwindowed program, when the program needs input, it will prompt the user and then call
some input method, such as readLine( ). This is not the way it works in an applet. Instead, the user
interacts with the applet as he or she wants, when he or she wants. These interactions are sent to the
applet as events to which the applet must respond. For example, when the user clicks a mouse inside
the applet’s window, a mouse-clicked event is generated. If the user presses a key while the applet’s
window has input focus, a keypress event is generated. (Refer Previous examples for events)The
applets can contain various controls, such as push buttons and check boxes. When the user interacts
with one of these controls, an event is generated.
While the architecture of an applet is not as easy to understand as that of a console-based program,
Java’s AWT makes it as simple as possible. If you have written programs for Windows, you know
how intimidating that environment can be. Fortunately, Java’s AWT provides a much cleaner
approach that is more quickly mastered.
The java provides console based programming language environment and window based
programming environment. An applet is a window based programming environment. So applet
architecture is different than console base program.
Java applets are essentially java window programs that can run within a web page.Applete programs
are java classes that extend that java.applet.Applet class and are enabaled by reference with HTML
page. You can observed that when applet are combined with HTML, thet can make an interface more
dynamic and powerful than with HTML alone.
While some Applet do not more than scroll text or play movements, but by incorporating theses basic
features in webpage you can make them dynamic. These dynamic web page can be used in an
enterprise application to view or manipulate data comming from some source on the server.
The Applet and there class files are distribute through standard HTTP request and therefore can be
sent across firewall with the web page data. Applete code is referenced automatically each time the
user revisit the hosting website. Therefore keeps full application up to date on each client desktop on
which it is running.

Object Oriented Programming Concepts-15CS45
Chethan Raj C, Assistant Professor Dept. of CSE Page 10
An Applet skeleton
The applets override a set of methods that provides the basic mechanism by which the browser or
applet viewer interfaces to the applet and controls its execution.
Four of these methods—init( ), start( ), stop( ), and destroy( )—are defined by Applet. Another,
paint( ), is defined by the AWT Component class. Default implementations for all of these methods
are provided. Applets do not need to override those methods they do not use. However, only very
simple applets will not need to define all of them.
When an applet begins, the AWT calls the following methods, in this sequence:
1. init( )
2. start( )
3. paint( )
When an applet is terminated, the following sequence of method calls takes place:
1. stop( )
2. destroy( )
// An Applet skeleton.
import java.awt.*;
import java.applet.*;
/*
<applet code="AppletSkel" width=300 height=100>
</applet>
*/
public class AppletSkel extends Applet
{
// Called first.

Object Oriented Programming Concepts-15CS45
Chethan Raj C, Assistant Professor Dept. of CSE Page 11
public void init()
{
// initialization
}
/* Called second, after init(). Also called whenever
the applet is restarted. */
public void start()
{
// start or resume execution
}
// Called when the applet is stopped.
public void stop()
{
// suspends execution
}
/* Called when applet is terminated. This is the last method executed. */
public void destroy()
{
// perform shutdown activities
}
// Called when an applet's window must be restored.
public void paint(Graphics g)
{
// redisplay contents of window
}
}

Object Oriented Programming Concepts-15CS45
Chethan Raj C, Assistant Professor Dept. of CSE Page 12
All the above methods are explained in Applet Life cycle.
Fig: Applet Life Cycle
When Applet is created it under goes series of changes in its state. The applet state include.
1. Born or initialize state
2. Running state
3. Idle state
4. Dead or destroyed state
Initialization state or init()
The life cycle of an applet is begin on that time when the applet is first loaded into the browser and
called the init() method. The init() method is called only one time in the life cycle on an applet. The
init() method is basically called to read the PARAM tag in the html file. The init () method retrieve
the passed parameter through the PARAM tag of html file using get Parameter() method All the
initialization such as initialization of variables and the objects like image, sound file are loaded in the
init () method .After the initialization of the init() method user can interact with the Applet and
mostly applet contains the init() method.
Applet enters the initialization state when it is first loaded. This is achieved by overriding init()
method.
public void init()

Object Oriented Programming Concepts-15CS45
Chethan Raj C, Assistant Professor Dept. of CSE Page 13
{
}
• The init( ) method is the first method to be called.
• This is where you should initialize variables.
• This method is called only once during the run time of applet.
• With init() method following task may do.
1. Create objects needed by applet.
2. Set up initial values.
3. Load images or fonts.
4. set up colors.
Running state or start()
The start method of an applet is called after the initialization method init(). This method may be
called multiples time when the Applet needs to be started or restarted. For Example if the user wants
to return to the Applet, in this situation the start Method() of an Applet will be called by the web
browser and the user will be back on the applet. In the start method user can interact within the
applet.
An applet enters in running state when system calls the start().This is achieved by overriding start()
method.
public void start()
{
}
• The start( ) method is called after init( ).
• It is also called to restart an applet after it has been stopped. Whereasinit( ) is called once—the
first time an applet is loaded
• start( ) is called each time an applet’s HTML document is displayed onscreen. So, if a user
• leaves a web page and comes back, the applet resumes execution atstart( ).
Idle or Stopped state or stop()
The stop() method can be called multiple times in the life cycle of applet like the start () method. Or
should be called at least one time. There is only miner difference between the start() method and stop
() method. For example the stop() method is called by the web browser on that time When the user
leaves one applet to go another applet and the start() method is called on that time when the user
wants to go back into the first program or Applet.

Object Oriented Programming Concepts-15CS45
Chethan Raj C, Assistant Professor Dept. of CSE Page 14
An applet become idle when it is stopped from running. This is achieved by overriding stop()
method.
public void stop()
{
}
• The stop( ) method is called when a web browser leaves the HTML document containing the
applet—when it goes to another page, for example. When stop( ) is called, the applet is probably
running. stop( ) method is also used to suspend threads that don’t need to run.
• when the applet is not visible. It can be restarted when start( ) is called if the user returns to the
page.
Dead state or destroy()
The destroy() method is called only one time in the life cycle of Applet like init() method. This
method is called only on that time when the browser needs to Shut down.
An applet is said to be dead when it is removed from memory. This is achieved by overriding
destroy() method.
public void destroy()
{
}
• The destroy( ) method is called when the environment determines that applet
• needs to be removed completely from memory.
• this point, you should free up any resources the applet may be using.
• stop( ) method is always called before destroy( ).
• Like initialization , destroying stage occurs only once in the applet’s life cycle.
Display state or paint()
Applet moves to the display state whenever it has to perform some output operations on the screen.
This happen immediately after the applet enters into the running state. The paint method is called to
accomplish this task.
This is achieved by overriding destroy() method.
The paint( ) method is called each time your applet’s output must be redrawn. This situation can
occur for several reasons. For example, the window in which the applet is running may be
overwritten by another window and then uncovered. Or the applet window may be minimized and

Object Oriented Programming Concepts-15CS45
Chethan Raj C, Assistant Professor Dept. of CSE Page 15
then restored. paint( ) is also called when the applet begins execution. Whatever the cause, whenever
the applet must redraw its output, paint( ) is called. The paint( ) method has one parameter of type
Graphics. This parameter will contain the graphics context, which describes the graphics
environment in which the applet is running. This context is used whenever output to the applet is
required.
public void paint(Graphics g)
{
}
Overriding update( )
• AWT, defines a method called update( ). This method is called when applet has requested that a
portion of its window be redrawn.
• update( ) method simply calls paint( ).
Example
import java.applet.*;
import java.awt.*;
// public void drawString(String message,int x,int y)
/*
<applet code="AppletLifecycle" width=300 height=300>
</applet>
*/
public class AppletLifecycle extends Applet
{
String str = "";
public void init()
{
str += "init; ";
}\
public void start()
{

Object Oriented Programming Concepts-15CS45
Chethan Raj C, Assistant Professor Dept. of CSE Page 16
str += "start; ";
}
public void stop()
{
// stop
}
public void destroy()
{
//destroy
}
public void paint(Graphics g)
{
str += "Paint; ";
g.drawString(str, 10, 25);
}
}
Output:
Save source file with name : AppletLifecycle.java
Compile source file : javac AppletLifecycle.java
Open file in appletviewer : appletviewer AppletLifecycle.java

Object Oriented Programming Concepts-15CS45
Chethan Raj C, Assistant Professor Dept. of CSE Page 17
Example:
import java.awt.*;
import java.applet.*;
/* <applet code="AppletSkeleton" width=300 height=100>
</applet>
*/
public class AppletSkeleton extends Applet
{
String msg;
public void init()
{
setBackground(Color.cyan);
setForeground(Color.red);
Label l = new Label("Non Functioning Button");
add(l);
Button b = new Button("Button");
add(b);
}
public void start()

Object Oriented Programming Concepts-15CS45
Chethan Raj C, Assistant Professor Dept. of CSE Page 18
{
setBackground(Color.magenta);
setForeground(Color.pink);
msg = "Inside Start method";
System.out.println("Inside Start method");
repaint();
}
public void stop()
{
msg = "Inside Stop method";
System.out.println("Inside stop method");
repaint();
}
public void destroy()
{
msg = "Inside destroy method";
System.out.println("Applet Destroyed");
repaint();
}
public void paint(Graphics g)
{
g.drawString(msg, 100, 150);
}
}
Output:
C:users/CRC>javac AppletSkeleton.java
C:users/CRC>appletviewer AppletSkeleton.java

Object Oriented Programming Concepts-15CS45
Chethan Raj C, Assistant Professor Dept. of CSE Page 19
Advantage of Applet
1. Applets are supported by most web browsers.
2. Applets works on client side so less response time.
3. Secured: No access to the local machine and can only access the server it came from.
4. Easy to develop applet, just extends applet class.
5. To run applets, it requires the Java plug-in at client side.
6. Android, do not run Java applets.
Drawback of Applet
1. Plugin is required at client browser to execute applet.
2. Some applets require a specific JRE. If it required new JRE then it take more time to
download new JRE.
Two types of Applets
Applet is a Java program that can be transported over the internet and executed by a Java enabled
web-browser(if browser is supporting the applets) or an applet can be executed using appletviewer
utility provided with JDK. An applet is created using the Applet class, whch is a part of java.applet
package. Applet class provides several useful methods to give you a full control over execution of an
applet.
There are two types of applet -
1. Applets based on the AWT(Abstract Window Toolkit) package by extending its Applet class.
2. Applets based on the Swing package by extending its JApplet class
Note : At present, some modern versions of browsers like Google Chrome and Mozilla Firefox have
stopped supporting applets, hence applets are not displayed or viewed with these browsers although
some browsers like Internet Explorer and Safari are still supporting applets.
Types of Applets based on location: Web pages can contain two types of applets which are named
after the location at which they are stored.
1. Local Applet
2. Remote Applet

Object Oriented Programming Concepts-15CS45
Chethan Raj C, Assistant Professor Dept. of CSE Page 20
Local Applets: A local applet is the one that is stored on our own computer system. When the Web-
page has to find a local applet, it doesn't need to retrieve information from the Internet. A local
applet is specified by a path name and a file name as shown below in which the codebase attribute
specifies a path name, whereas the code attribute specifies the name of the byte-code file that
contains the applet's code.
<applet codebase="MyAppPath" code="MyApp.class" width=200 height=200> </applet>
Remote Applets: A remote applet is the one that is located on a remote computer system . This
computer system may be located in the building next door or it may be on the other side of the world.
No matter where the remote applet is located, it's downloaded onto our computer via the Internet. The
browser must be connected to the Internet at the time it needs to display the remote applet. To
reference a remote applet in Web page, we must know the applet's URL (where it's located on the
Web) and any attributes and parameters that we need to supply. A local applet is specified by a url
and a file name as shown below.
<applet codebase="http://www.apoorvacollege.com" code="MyApp.class" width=200 height=200>
</applet>
Applet basics
Applet is a predefined class in java.applet package used to design distributed application. It is a client
side technology. Applets are run on web browser.
Application vs applets
Applets are the small programs while applications are larger programs. Applets don't have the main
method while in an application execution starts with the main method. Applets can run in our
browser's window or in an appletviewer. To run the applet in an appletviewer will be an advantage
for debugging. Applets are designed for the client site programming purpose while the applications
don't have such type of criteria.
Applet are the powerful tools because it covers half of the java language picture. Java applets are the
best way of creating the programs in java. There are a less number of java programmers that have the
hands on experience on java applications. This is not the deficiency of java applications but the
global utilization of internet. It doesn't mean that the java applications don't have the place. Both
(Applets and the java applications) have the same importance at their own places. Applications are
also the platform independent as well as byte oriented just like the applets.
Applets are designed just for handling the client site problems. while the java applications are
designed to work with the client as well as server. Applications are designed to exists in a secure
area. while the applets are typically used.
Applications and applets have much of the similarity such as both have most of the same features and
share the same resources. Applets are created by extending the java.applet.Applet class while the java
applications start execution from the main method. Applications are not too small to embed into a
html page so that the user can view the application in your browser. On the other hand applet have

Object Oriented Programming Concepts-15CS45
Chethan Raj C, Assistant Professor Dept. of CSE Page 21
the accessibility criteria of the resources. The key feature is that while they have so many differences
but both can perform the same purpose.
Application are independent program (maybe fully compiled, though more likely byte-code compiled
and then interpreted)
Application have full access to host machine
normal file access (standard security constraints on file ownership)
ability to create sockets (arbitrary network connections)
(slightly restricted) access to environment variables
GUI
create Frame object as principal window
may have additional windows for dialogs, alerts etc.
Simple Applet display methods
The applets are displayed in a window and they use the AWT to perform input and output. Although
user will examine the methods, procedures, and techniques necessary to fully handle the AWT
windowed environment in subsequent chapters, a few are described here, because we will use them to
write sample applets.
Java AWT (Abstract Window Toolkit) is an API to develop GUI or window-based applications in
java.
Java AWT components are platform-dependent i.e. components are displayed according to the view
of operating system. AWT is heavyweight i.e. its components are using the resources of OS.
The java.awt package provides classes for AWT api such as TextField, Label, TextArea,
RadioButton, CheckBox, Choice, List etc.
In order to output a string to an applet, use drawString( ), which is a member of the Graphics class.
Typically, it is called from within either update( ) or paint( ). It has the following general form:
void drawString(String message, int x, int y)
Here, message is the string to be output beginning at x,y. In a Java window, the upper-left corner is
location 0,0. The drawString( ) method will not recognize newline characters. If you want to start a
line of text on another line, you must do so manually, specifying the precise X,Y location where you
want the line to begin. (As you will see in later chapters, there are techniques that make this process
easy.)
To set the background color of an applet’s window, use setBackground( ). To set the foreground
color (the color in which text is shown, for example), use setForeground( ). These methods are
defined by Component, and they have the following general forms:
void setBackground(Color newColor)

Object Oriented Programming Concepts-15CS45
Chethan Raj C, Assistant Professor Dept. of CSE Page 22
void setForeground(Color newColor)
Here, newColor specifies the new color. The class Color defines the constants shown here that can be
used to specify colors:
Color.black
Color.magenta
Color.blue
Color.orange
Color.cyan
Color.pink
Color.darkGray
Color.red
Color.gray
Color.white
Color.green
Color.yellow
Color.lightGray
For example, this sets the background color to green and the text color to red:
setBackground(Color.green);
setForeground(Color.red);
A good place to set the foreground and background colors is in the init( ) method. User can change
these colors as often as necessary during the execution of the applet. The default foreground color is
black. The default background color is light gray.
User can obtain the current settings for the background and foreground colors by calling
getBackground( ) and getForeground( ), respectively. They are also defined by Component and are
shown here:
Color getBackground( )
Color getForeground( )
Example:
import java.awt.*;

Object Oriented Programming Concepts-15CS45
Chethan Raj C, Assistant Professor Dept. of CSE Page 23
import java.applet.*;
/* <applet code="AppletSample" width=300 height=100>
</applet>
*/
public class AppletSample extends Applet
{
String msg;
// Set the foreground and background colors
public void init()
{
setBackground(Color.cyan);
setForeground(Color.red);
msg="Inside init() --";
}
//Initialize the string to be displayed
public void start()
{
msg+="Inside start()--";
}
// Display message in the applet window
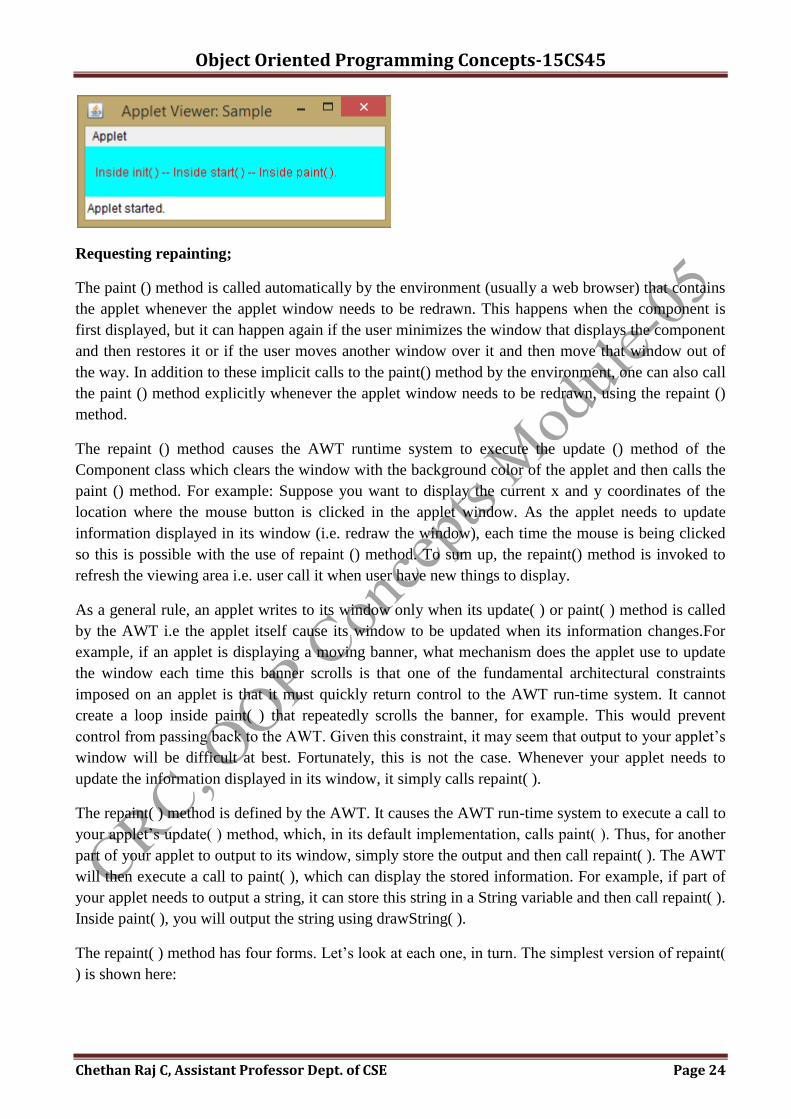
public void paint(Graphics g)
{
msg+="Inside paint().";
g.drawString(msg,10,30);
}
}
Object Oriented Programming Concepts-15CS45
Chethan Raj C, Assistant Professor Dept. of CSE Page 24
Requesting repainting;
The paint () method is called automatically by the environment (usually a web browser) that contains
the applet whenever the applet window needs to be redrawn. This happens when the component is
first displayed, but it can happen again if the user minimizes the window that displays the component
and then restores it or if the user moves another window over it and then move that window out of
the way. In addition to these implicit calls to the paint() method by the environment, one can also call
the paint () method explicitly whenever the applet window needs to be redrawn, using the repaint ()
method.
The repaint () method causes the AWT runtime system to execute the update () method of the
Component class which clears the window with the background color of the applet and then calls the
paint () method. For example: Suppose you want to display the current x and y coordinates of the
location where the mouse button is clicked in the applet window. As the applet needs to update
information displayed in its window (i.e. redraw the window), each time the mouse is being clicked
so this is possible with the use of repaint () method. To sum up, the repaint() method is invoked to
refresh the viewing area i.e. user call it when user have new things to display.
As a general rule, an applet writes to its window only when its update( ) or paint( ) method is called
by the AWT i.e the applet itself cause its window to be updated when its information changes.For
example, if an applet is displaying a moving banner, what mechanism does the applet use to update
the window each time this banner scrolls is that one of the fundamental architectural constraints
imposed on an applet is that it must quickly return control to the AWT run-time system. It cannot
create a loop inside paint( ) that repeatedly scrolls the banner, for example. This would prevent
control from passing back to the AWT. Given this constraint, it may seem that output to your applet’s
window will be difficult at best. Fortunately, this is not the case. Whenever your applet needs to
update the information displayed in its window, it simply calls repaint( ).
The repaint( ) method is defined by the AWT. It causes the AWT run-time system to execute a call to
your applet’s update( ) method, which, in its default implementation, calls paint( ). Thus, for another
part of your applet to output to its window, simply store the output and then call repaint( ). The AWT
will then execute a call to paint( ), which can display the stored information. For example, if part of
your applet needs to output a string, it can store this string in a String variable and then call repaint( ).
Inside paint( ), you will output the string using drawString( ).
The repaint( ) method has four forms. Let’s look at each one, in turn. The simplest version of repaint(
) is shown here:

Object Oriented Programming Concepts-15CS45
Chethan Raj C, Assistant Professor Dept. of CSE Page 25
void repaint( )
This version causes the entire window to be repainted. The following version specifies a region that
will be repainted:
void repaint(int left, int top, int width, int height)
Here, the coordinates of the upper-left corner of the region are specified by left and top, and the
width and height of the region are passed in width and height. These dimensions are specified in
pixels. You save time by specifying a region to repaint. Window updates are costly in terms of time.
If you need to update only a small portion of the window, it is more efficient to repaint only that
region.
Calling repaint( ) is essentially a request that your applet be repainted sometime soon. However, if
your system is slow or busy, update( ) might not be called immediately. Multiple requests for
repainting that occur within a short time can be collapsed by the AWT in a manner such that update(
) is only called sporadically. This can be a problem in many situations, including animation, in which
a consistent update time is necessary. One solution to this problem is to use the following forms of
repaint( ):
void repaint(long maxDelay)
void repaint(long maxDelay, int x, int y, int width, int height)
Here, maxDelay specifies the maximum number of milliseconds that can elapse before update( ) is
called. Beware, though. If the time elapses before update( ) can be called, it isn’t called. There’s no
return value or exception thrown, so you must be careful.
It is possible for a method other than paint( ) or update( ) to output to an applet’s window. To do so,
it must obtain a graphics context by calling getGraphics( ) (defined by Component) and then use this
context to output to the window. However, for most applications, it is better and easier to route
window output through paint( ) and to call repaint( ) when the contents of the window change.
import java.awt.*;
import java.applet.Applet;
import java.awt.event.*;
/*<applet code="RepaintJavaExample.class" width="350" height="150"> </applet>*/
public class RepaintJavaExample extends Applet implements MouseListener
{
private int mouseX, mouseY;
private boolean mouseclicked = false;
public void init()

Object Oriented Programming Concepts-15CS45
Chethan Raj C, Assistant Professor Dept. of CSE Page 26
{
setBackground(Color.CYAN);
addMouseListener(this);
}
public void mouseClicked(MouseEvent e)
{
mouseX = e.getX();
mouseY=e.getY();
mouseclicked = true;
repaint();
}
public void mouseEntered(MouseEvent e){};
public void mousePressed(MouseEvent e){};
public void mouseReleased(MouseEvent e){};
public void mouseExited(MouseEvent e){};
public void paint( Graphics g )
{
String str;
g.setColor(Color.RED);
if (mouseclicked)
{
str = "X="+ mouseX + "," + "Y="+ mouseY ;
g.drawString(str,mouseX,mouseY);
mouseclicked = false;
}
}
}

Object Oriented Programming Concepts-15CS45
Chethan Raj C, Assistant Professor Dept. of CSE Page 27
Using the Status Window
Displaying messages is of two ways in Applet. One way is displaying anywhere in the applet window
and the other way is displaying in the status bar with showStatus() method.
In addition to displaying information in its window, an applet can also output a message to the status
window of the browser or applet viewer on which it is running. To do so, call showStatus( ) with the
string that you want displayed. The status window is a good place to give the user feedback about
what is occurring in the applet, suggest options, or possibly report some types of errors. The status
window also makes an excellent debugging aid, because it gives you an easy way to output
information about your applet.
status bar
The bottom of the applet window is known as status bar. In a Browser or MS-Word, the bottom panel
is known as status bar where in the line number where the cursor exists, current page number and
total number of pages etc. are displayed.
Status bar comes at the bottom of the browser and is used by the browser to display the status of the
document opened. The applet can use this status bar to display strings (messages).
Ex:
To display the two ways, the Graphics class comes drawString() method and Applet class comes with
showStatus() method. Let us see what API says about these methods.
• void drawString(String str, int x, int y): Draws the text given by the specified string, using this
graphics context’s current font and color. The baseline of the leftmost character is at position (x, y) in
this graphics context’s coordinate system.
• void showStatus(String msg): Requests that the argument string be displayed in the "status
window". Many browsers and applet viewers provide such a window, where the application can
inform users of its current state.

Object Oriented Programming Concepts-15CS45
Chethan Raj C, Assistant Professor Dept. of CSE Page 28
The following applet draws a string in the applet window (using drawString()) and another string
message on the status bar (using showStatus() ).
HTML file: SSD.html
<applet code="ShowStatusDemo.class" width="300" height="200">
</applet>
Applet file: ShowStatusDemo.java
import java.applet.Applet;
import java.awt.Graphics;
public class ShowStatusDemo extends Applet
{
public void paint(Graphics g)
{
g.drawString("Hello World", 50, 75); // using drawString() to display in applet window
showStatus("Greetings"); // using showStatus() to display in status bar
}
}
Output
The following applet demonstrates showStatus( ):
// Using the Status Window.
import java.awt.*;
import java.applet.*;

Object Oriented Programming Concepts-15CS45
Chethan Raj C, Assistant Professor Dept. of CSE Page 29
/*
<applet code="StatusWindow" width=300 height=50>
</applet>
*/
public class StatusWindow extends Applet
{
public void init()
{
setBackground(Color.cyan);
}
// Display msg in applet window.
public void paint(Graphics g)
{
g.drawString("This is in the applet window.", 10, 20);
showStatus("This is shown in the status window.");
}
}
Applet Example: Drawing Strings and Graphics in Applets given with Screenshots in Simple terms
for a Beginner.
After practicing the earlier simple life cycle program, let us write another program that prints some
strings on applet window (not at DOS prompt as done previously). Now we use the
java.awt.Graphics object passed as parameter to paint() method.
The application includes two files – Demo.java, applet file and Demo.html, HTML file. HTML file
should be opened in a browser using File menu .
Applet Example: 1st File: Applet – Demo.java
import java.awt.*;
import java.applet.*;
public class Demo extends Applet
{

Object Oriented Programming Concepts-15CS45
Chethan Raj C, Assistant Professor Dept. of CSE Page 30
String s1, s2;
public void init()
{
s1 = "Welcome to way2java practices";
s2 = "on today " + new java.util.Date();
}
public void paint(Graphics g)
{
g.drawString(s1, 50, 50);
g.drawString(s2, 50, 70);
g.drawString("Best Wishes", 50, 90); // directly writing a string
}
public void destroy()
{
s1 = null;
s2 = null;
}
}
2nd File: HTML – Demo.html
<applet code="Demo.class" width="250" height="250">
</applet>
Execution
Compile the Demo.java file as usual at DOS prompt as in the previous program. Let us run this
program both using appletviewer and browser.
Execution using appletviewer: C:\snr\way2java\applets> appletviewer Demo.html
Execution using browser: Open the Demo.html file through File menu of browser.
Two strings are assigned with some values in init() method and used in paint() method. Graphics is
an abstract class and includes many methods of drawing. Here we use drawString() method. The
drawString() takes three parameters – the first one is a string that is to be drawn, the second and third

Object Oriented Programming Concepts-15CS45
Chethan Raj C, Assistant Professor Dept. of CSE Page 31
parameters are integer values of x and y coordinates in pixels, the position of the string on the applet
window. Remember, the left top corner of the window is 0, 0 pixels. The other methods of drawing,
we come to know in AWT Graphics
Note: All the methods of Applet class are concrete methods (not abstract). The programmer can
override what ever methods he would like and the other that are not used, are implicitly created and
called by the browser (like the default constructor in an application).
The HTML APPLET tag
HTML (Hyper Text Markup Language). It is a type of data file which is transferred to the client
machine. The HTML file gets translated and displayed on the screen if the client is using a Web
browser like Netscape Navigator, Microsoft Internet Explorer etc.
HTML File
• HTML stands for Hyper Text Markup Language.
• An HTML file is a text file containing small markup tags.
• The markup tags tell the Web browser how to display the page.
• An HTML file must have an htm or html file extension.
• An HTML file can be created using a simple text editor.
HTML provides a tag that enables the developer to "embed" the applet within the page. This tag is
known as the APPLET tag.
HTML Tags
• HTML tags are used to mark-up HTML elements
• HTML tags are surrounded by the two characters < and >
• The surrounding characters are called angle brackets
• HTML tags normally come in pairs like <b> and </b>
• The first tag in a pair is the start tag, the second tag is the end tag
• The text between the start and end tags is the element content
• HTML tags are not case sensitive, <b> means the same as <B>
HTML Elements
Recall the HTML example from the previous previous section:
<html>
<head>

Object Oriented Programming Concepts-15CS45
Chethan Raj C, Assistant Professor Dept. of CSE Page 32
<title>Title of page</title>
</head>
<body>
This is my first homepage. <b>This text is bold</b>
</body>
</html>
Applet HTML Tag
The APPLET tag can be used to start an applet from both an HTML document and from an applet
viewer.
An applet viewer will execute each APPLET tag that it finds in a separate window, while web
browsers will allow many applets on a single page.
Bracketed items are optional.
< APPLET
[CODEBASE = codebaseURL]
CODE = appletFile
[ALT = alternateText]
[NAME = appletInstanceName]
WIDTH = pixels HEIGHT = pixels
[ALIGN = alignment]
[VSPACE = pixels]
[HSPACE = pixels] >
[< PARAM NAME = AttributeName VALUE = AttributeValue>] [< PARAM NAME =
AttributeName2 VALUE =AttributeValue>]
[HTML Displayed in the absence of Java]
</APPLET>
CODEBASE
CODEBASE is an optional attribute that specifies the base URL of the applet code
The HTML document’s URL directory is used as the CODEBASE if this attribute is not specified.
CODE

Object Oriented Programming Concepts-15CS45
Chethan Raj C, Assistant Professor Dept. of CSE Page 33
CODE is a required attribute that gives the name of the file containing your applet’s compiled .class
file.
ALT
The ALT tag is an optional attribute used to specify a short text message that should be displayed if
the browser recognizes the APPLET tag but can’t currently run Java applets.
NAME
NAME is an optional attribute used to specify a name for the applet instance.
To obtain an applet by name, getApplet( ) methos is ised, which is defined by the AppletContext
interface.
WIDTH and HEIGHT
WIDTH and HEIGHT are required attributes that give the size (in pixels) of the applet display area.
ALIGN
ALIGN is an optional attribute that specifies the alignment of the applet.with values: LEFT, RIGHT,
TOP, BOTTOM, MIDDLE,
BASELINE, TEXTTOP, ABSMIDDLE, and ABSBOTTOM.
VSPACE and HSPACE
These attributes are optional.
VSPACE specifies the space, in pixels, above and below the applet.
HSPACE specifies the space, in pixels, on each side of the applet.
PARAM NAME and VALUE
The PARAM specifies applet-specific arguments in an HTML page. Applets access their attributes
with the getParameter( ) method.
Passing parameters to Applets
Java applet has the feature of retrieving the parameter values passed from the html page. So, you can
pass the parameters from your html page to the applet embedded in your page. The param
tag(<parma name="" value=""></param>) is used to pass the parameters to an applet. For the
illustration about the concept of applet and passing parameter in applet, a example is given below.
In this example, we will see what has to be done in the applet code to retrieve the value from
parameters. Value of a parameter passed to an applet can be retrieved using getParameter() function.
E.g. code:
String strParameter = this.getParameter("Message");

Object Oriented Programming Concepts-15CS45
Chethan Raj C, Assistant Professor Dept. of CSE Page 34
Printing the value:
Then in the function paint (Graphics g), we prints the parameter value to test the value passed from
html page. Applet will display "Hello! Java Applet" if no parameter is passed to the applet else it
will display the value passed as parameter. In our case applet should display "Welcome in Passing
parameter in java applet example." message.
code for the Java program :
import java.applet.*;
import java.awt.*;
public class appletParameter extends Applet
{
private String strDefault = "Hello! Java Applet.";
public void paint(Graphics g)
{
String strParameter = this.getParameter("Message");
if (strParameter == null)
strParameter = strDefault;
g.drawString(strParameter, 50, 25);
}
}
code for the html program :
<HTML>
<HEAD>
<TITLE>Passing Parameter in Java Applet</TITLE>
</HEAD>
<BODY>
This is the applet:<P>
<APPLET code="appletParameter.class" width="800" height="100">
<PARAM name="message" value="Welcome in Passing parameter in java applet example.">
</APPLET>
Object Oriented Programming Concepts-15CS45
Chethan Raj C, Assistant Professor Dept. of CSE Page 35
</BODY>
</HTML>
There is the advantage that if need to change the output then you will have to change only the value
of the param tag in html file not in java code.
Compile the program :
javac appletParameter.java
Output after running the program :
To run the program using appletviewer, go to command prompt and type appletviewer
appletParameter.html Appletviewer will run the applet for you and and it should show output like
Welcome in Passing parameter in java applet example. Alternatively you can also run this example
from your favorite java enabled browser.
Ex: The APPLET tag in HTML allows to pass parameters to applet.
To retrieve a parameter, getParameter( ) method is used.
It returns the value of the specified parameter in the form of a String object.
Thus, for numeric and boolean values,its need to convert their string representations into their
internal formats.
Here is an example that demonstrates passing parameters:
// Use Parameters
import java.awt.*;
import java.applet.*;
/* <applet code=‖ParamDemo‖ width=300 height=200>
</applet> */
public class ParamDemo extends Applet
{
String fontName;
int fontSize;
float leading;
boolean active;
// Initialize the string to be displayed.
Object Oriented Programming Concepts-15CS45
Chethan Raj C, Assistant Professor Dept. of CSE Page 36
public void start()
{
String param;
fontName = getParameter("fontName");
if(fontName == null)
fontName = "Not Found";
param = getParameter("fontSize");
try
{
if(param != null)
// if not found
fontSize = Integer.parseInt(param);
else
fontSize = 0;
}
catch(NumberFormatException e)
{
fontSize = -1;
}
param = getParameter("leading");
try
{
if(param != null)
// if not found
leading = Float.valueOf(param).floatValue();
else leading = 0;
}

Object Oriented Programming Concepts-15CS45
Chethan Raj C, Assistant Professor Dept. of CSE Page 37
catch(NumberFormatException e)
{
leading = -1;
}
param = getParameter("accountEnabled");
if(param != null)
active = Boolean.valueOf(param).booleanValue();
}
public void paint(Graphics g)
{
g.drawString("Font name: " + fontName, 0, 10);
g.drawString("Font size: " + fontSize, 0, 26);
g.drawString("Leading: " + leading, 0, 42);
g.drawString("Account Active: " + active, 0, 58);
}
conversions to numeric types must be attempted in a try statement that catches
NumberFormatException. Uncaught exceptions should never occur within an applet.
getDocumentbase() and getCodebase()
User will create applets that will need to explicitly load media and text. Java will allow the applet to
load data from the directory holding the HTML file that started the applet (the document base) and
the directory from which the applet’s class file was loaded (the code base). These directories are
returned as URL objects (described in Chapter 18) by getDocumentBase( ) and getCodeBase( ). They
can be concatenated with a string that names the file you want to load. To actually load another file,

Object Oriented Programming Concepts-15CS45
Chethan Raj C, Assistant Professor Dept. of CSE Page 38
you will use the showDocument( ) method defined by the AppletContext interface, discussed in the
next section.
The following applet illustrates these methods:
// Display code and document bases.
import java.awt.*;
import java.applet.*;
import java.net.*;
/*
<applet code="Bases" width=300 height=50>
</applet>
*/
public class Bases extends Applet
{
// Display code and document bases.
public void paint(Graphics g)
{
String msg;
URL url = getCodeBase(); // get code base
msg = "Code base: " + url.toString();
g.drawString(msg, 10, 20);
url = getDocumentBase(); // get document base
msg = "Document base: " + url.toString();
g.drawString(msg, 10, 40);
}
}
Drawing in an Applet
In an applet to load an image or draw different shapes like an oval, rectangle and a line in an applet.
To perform these operations the three methods are required:

Object Oriented Programming Concepts-15CS45
Chethan Raj C, Assistant Professor Dept. of CSE Page 39
• getCodeBase() method of Applet class.
public URL getCodeBase()
This method gives us the location of the directory in which our applet code file is located. This
location is returned to us in terms of an object of URL class. Using this object of URL class, we can
get and load any image file present in the same directory using the next two methods.
• getImage() method of Applet class.
public Image getImage(URL url, String name)
This method gets the image file in the form of Image object. This image file named name is present
in the directory location specified by url. This directory also contains the applet code.
• drawImage() method of Image class.
public drawImage(Image img, int x, int y, ImageObserver observer)
This method draws the image referred by Image object img, at the coordinates x and y in an applet's
window. We also need to pass an object of ImageObserver interface. We can do by passing this
reference of our Applet class, because it implements ImageObserver interface.
getDocumentbase() and getCodebase()
In most of the applets, it is required to load text and images explicitly. Java enables loading data from
two directories. The first one is the directory which contains the HTML file that started the applet
(known as the document base). The other one is the directory from which the class file of the applet
is loaded (known as the code base). These directories can be obtained as URL objects by using
getDocumentBase ()and getCodeBase ()methods respectively. You can concatenate these URL
objects with the string representing the name of the file that is to be loaded.
Java will allow the applet to load data from the directory holding the html file that started the applet
(the document base) and the directory from which the applet’s class file was loaded (the code base).
These directories are returned by getDocumentBase( ) and getCodeBase( ).
Ex: import java.applet.Applet;
import java.awt.Graphics;
/* <applet code="Javaapp" width=300 height=100>
</applet>
*/
public class Javaapp extends Applet
{
public void paint(Graphics g)

Object Oriented Programming Concepts-15CS45
Chethan Raj C, Assistant Professor Dept. of CSE Page 40
{
g.drawString("getCodeBase : "+getCodeBase(), 20, 20);
g.drawString("getDocumentBase : "+getDocumentBase(), 20, 40);
}
}
Ex:
/*java code for the program GetDocumentBase and getCodeBase Example :.*/
/*
<applet code="GetDocumentBase" width=350 height=250>
</applet>
*/
import java.applet.Applet;
import java.awt.Graphics;
import java.net.URL;
import java.awt.*;
import java.awt.event.*;
public class GetDocumentBase extends Applet
{
public void paint(Graphics g)
{
String message;
//getCodeBase() method gets the base URL of the directory in which contains this applet.
URL appletCodeDir=getCodeBase();
message = "Code Base : "+appletCodeDir.toString();

Object Oriented Programming Concepts-15CS45
Chethan Raj C, Assistant Professor Dept. of CSE Page 41
g.drawString(message,10,90);
// getDocumentBase() Returns an absolute URL of the Document
URL appletDocDir = getDocumentBase();
message="Document Base : "+appletDocDir.toString();
g.drawString(message,10,120);
g.drawString("http://CRC.com", 200, 250);
}
}
ApletContext and showDocument()
Java allows the applet to transfer the control to another URL by using the showDocument () Method
defined in the AppletContext interface. For this, first of all, it is needed to obtain the Context of the
currently executing applet by calling the getAppletContext () method defined by the Applet. Once the
context of the applet is obtained with in an applet, another document can be brought into view by
calling showDocument () method.
There are two showDocument () methods which are as follows:
showDocument(URL url)
showDocument(URL url,string lac)
where, url is the URL from where the document is to be brought into view. loc is the location within
the browser window where the specified document is to be displayed.
Example
import java.applet.*;
import java.awt.*;
import java.net.*;
import java.awt.event.*;
public class ShowDocument_AppletContext extends Applet implements ActionListener
Object Oriented Programming Concepts-15CS45
Chethan Raj C, Assistant Professor Dept. of CSE Page 42
{
public void init()
{
Button button = new Button("Go To Html Page");
button.addActionListener(this);
add(button);
}
public void actionPerformed(ActionEvent ae)
{
try
{
URL url = new URL(getDocumentBase(), "HtmlExample.html");
getAppletContext().showDocument(url);
}
catch (MalformedURLException e)
{
showStatus("URL not found");
}
}
}
//html code
<html>
<head>
<title>ShowDocument_AppletContext</title>
</head>
<body>
<applet code="ShowDocument_AppletContext" width="700" height="500"></applet>

Object Oriented Programming Concepts-15CS45
Chethan Raj C, Assistant Professor Dept. of CSE Page 43
</body>
</html>
The AudioClip Interface
The AudioClip class is used to load and play sound files. To load a sound file the getAudioClip ()
Method of the AudioClip class is used. The general form of the getAudioClip () method is
AudioClip getAudioClip (URL pathname, String filename)
AudioClip getAudioClip (URL pathname)
where, pathname is the address of the sound file. When the image file and the source file are in the
same directory, getCodeBase () method is used as first parameter to the method. filename is the name
of the sound file
Some of the methods of AudioClip class along with their description are listed in Table
Method and Description
void play()
used to play the sound for once
void loop()
used to play the sound in loop
void stop ()
used to stop playing the sound
Example: An applet code to demonstrate the use of AudioClip class
import java.applet.*;
import java.awt.*;

Object Oriented Programming Concepts-15CS45
Chethan Raj C, Assistant Professor Dept. of CSE Page 44
public class SoundExample extends Applet
{
private AudioClip mysound;
public void init()
{
mysound=getAudioClip(getCodeBase(), "chimes.wav");
}
public void start()
{
mysound.loop();
}
public void stop()
{
mysound.stop();
}
The HTML code for SoundExample is
<HTML>
<HEAD>
</HEAD>
<BODY>
<CENTER>
<APPLETCODE="SoundExample.class" WIDTH="200" HEIGHT="l30">
</APPLET>
</CENTER>
</BODY>
</HTML>

Object Oriented Programming Concepts-15CS45
Chethan Raj C, Assistant Professor Dept. of CSE Page 45
FEATURE APPLICATION APPLET
main()
method Present Not present
Execution Requires JRE Requires a browser like Chrome
Nature
Called as stand-alone application as
application can be executed from
command prompt
Requires some third party tool help like a
browser to execute
Restrictions
Can access any data or software available
on the system
cannot access any thing on the system
except browser’s services
Security Does not require any security
Requires highest security for the system as
they are untrusted
The AppletStub Interface;
When an applet is first created, an applet stub is attached to it using the applet's setStub method. This
stub serves as the interface between the applet and the browser environment or applet viewer
environment in which the application is running.
User code will not typically implement this interface.( public interface AppletStub)
The AppletStub interface provides a way to get information from the run-time browser environment.
The Applet class provides methods with similar names that call these methods.
Method Summary
void appletResize(int width, int height) //Called when the applet wants to be resized.
AppletContext getAppletContext() //Returns the applet's context.
URL getCodeBase() //Gets the base URL.
URL getDocumentBase()//Gets the URL of the document in which the applet is embedded.
String getParameter(String name) //Returns the value of the named parameter in the HTML tag.
boolean isActive() //Determines if the applet is active.
isActive
boolean isActive()
Determines if the applet is active. An applet is active just before its start method is called. It
becomes inactive just before its stop method is called.
Returns:
true if the applet is active; false otherwise.

Object Oriented Programming Concepts-15CS45
Chethan Raj C, Assistant Professor Dept. of CSE Page 46
getDocumentBase
URL getDocumentBase()
Gets the URL of the document in which the applet is embedded. For example, suppose an
applet is contained within the document:
http://java.sun.com/products/jdk/1.2/index.html
The document base is:
http://java.sun.com/products/jdk/1.2/index.html
Returns:
the URL of the document that contains the applet.
See Also:
getCodeBase()
getCodeBase
URL getCodeBase()
Gets the base URL. This is the URL of the directory which contains the applet.
Returns:
the base URL of the directory which contains the applet.
See Also:
getDocumentBase()
getParameter
String getParameter(String name)
Returns the value of the named parameter in the HTML tag. For example, if an applet is
specified as
<applet code="Clock" width=50 height=50>
<param name=Color value="blue">
</applet>
then a call to getParameter("Color") returns the value "blue".
Parameters:
name - a parameter name.
Returns:
the value of the named parameter, or null if not set.
getAppletContext
AppletContext getAppletContext()
Returns the applet's context.
Returns:
the applet's context.

Object Oriented Programming Concepts-15CS45
Chethan Raj C, Assistant Professor Dept. of CSE Page 47
appletResize
void appletResize(int width,
int height)
Called when the applet wants to be resized.
Parameters:
width - the new requested width for the applet.
height - the new requested height for the applet.
Output to the Console.
Although output to an applet’s window must be accomplished through AWT methods, such as
drawString( ), it is still possible to use console output in your applet—especially for debugging
purposes. In an applet, when you call a method such as System.out.println( ), the output is not sent to
your applet’s window. Instead, it appears either in the console session in which you launched the
applet viewer or in the Java console that is available in some browsers. Use of console output for
purposes other than debugging is discouraged, since it violates the design principles of the graphical
interface most users will expect.ApletContext and showDocument();
Swings
Swing, a part of Java Federation Classes (JFC) is the next generation GUI toolkit that allows us to
develop large scale enterprise applications in Java. It is a set of classes which provides many
powerful and flexible components for creating graphical user interface. Earlier, the concept of Swing
did not exist in Java and the user interfaces were built by using the Java's original GUI system, AWT.
Because of the limitations of the AWT, Swing was introduced in 1997 by the Sun Microsystems. It
provides new and improved components that enhance the look and functionality of GUIs.
With Java 1.1, Swing was used as a separate library. However, it was fully integrated into Java with
the start of Java 1.2. So, user working with Java 1.2 can easily work with Swing.
Swing is a set of classes that provides more powerful and flexible components than are possible with
the AWT.
In addition to the familiar components, such as buttons, check boxes, and labels, Swing supplies
several exciting additions, including tabbed panes, scroll panes, trees, and tables.
Even familiar components such as buttons have more capabilities in Swing. For example, a button
may have both an image and a text string associated with it. Also, the image can be changed as the
state of the button changes.
Unlike AWT components, Swing components are not implemented by platform-specific code.
Instead, they are written entirely in Java and, therefore, are platform-independent. The term
lightweight is used to describe such elements.
Swing are built on AWT.

Object Oriented Programming Concepts-15CS45
Chethan Raj C, Assistant Professor Dept. of CSE Page 48
The origins of Swing
Swing was developed to provide a more sophisticated set of GUI components than the earlier
Abstract Window Toolkit (AWT).
Swing provides a native look and feel that emulates the look and feel of several platforms, and also
supports a pluggable look and feel that allows applications to have a look and feel unrelated to the
underlying platform.
It has more powerful and flexible components than AWT. In addition to familiar components such as
buttons, check boxes and labels, Swing provides several advanced components such as tabbed panel,
scroll panes, trees, tables, and lists.
Two key Swing features
Swing has the following features :
Extensible : Swing has the feature to "plug" custom specified framework's interfaces
implementation.
Customizable : Swing allows to customize its standard components programmatically for
example, assigning specific borders, colors, backgrounds, etc.
Configurable : Swing is configurable, it allows to change in its fundamental settings at
runtime. For example, changing in the look and feel implementation at the runtime.
Light Weight UI : Swing components are light weight UI. However, all swing components
are inherited from the AWT because, the JComponent of Swing package extends the
container of AWT that uses the OS-native "heavyweight" widget but the swing uses its own
OS-agnostic over the fundamental components.
Loosely Coupled : Swing framework is designed in such a way that there is no tight coupling
between the interfaces, presentation, and controller.
MVC : Java Swing is a MVC based framework (a Software Design Pattern) that separates the
data viewed from the interface using which it is viewed.
Even the Swing provides many new features two of its popular features are:
1. Swing components are light weight
They are entirely written in java they does not map to native platform specific code. More flexible
and more efficient. Not in rectangular shapes.
Swing components are lightweight as they are written entirely in Java and do not depend on native
peers (platform specific code resources). Rather, they use simple drawing primitives to render
themselves on the screen. The look and the feel of the component is not controlled by the underlying
operating system but by Swing itself. Thus, they are not restricted to platform-specific appearance
like, rectangular or opaque shape.

Object Oriented Programming Concepts-15CS45
Chethan Raj C, Assistant Professor Dept. of CSE Page 49
Note: Most of the components are lightweight but not all.
2. Swing supports a pluggable look and feel.
It becomes possible to change the that component is rendered with out affecting any of its other
aspects. Possible to create new look and feel for any given component with out side effects. Look and
feel is simply plugged in.
The pluggable look arid feel feature allows us to tailor the look and feel of the application and applets
to the standard looks like, Windows and Motif. We can even switch to different look and feel at
runtime. Swing has the capability to support several look and feels, but at present, it provides support
for the Windows and Motif. As the look and feel of components is controlled by Swing rather than by
operating system, the feel of components can also be changed. The look and feel of a component can
be separated form the logic of the component. Thus, it is possible to "plug in" a new look and feel for
any given component without affecting the rest of the code.
Note: Default look and feel, provided by JE 1.6 is called metal, which is also called the Java look and
feel.
Components and Containers
Swing component is an independent control, such as button, label, text field, etc. They need. a
container to display themselves. Swing components are derived from JComponent class. JComponent
provides the functionality common for all components. JComponent inherits the AWT class
Container and Component. Thus, a Swing component and AWT component are compatible with each
other.
There are two types of containers namely, top-level containers and lightweight containers
Top-Level Containers
A top-level container, as the name suggests, lies at the top of the containment hierarchy. The top-
level containers are JFrame, JApplet, and JDialog. These containers do not inherit JComponent class
but inherit the AWT classes' Component and Container. These containers are heavyweight
components. The most commonly used containers are JFrame and JApplet.
Each top-level container defines a set of panes. JRootPane is a special container which extends
JComponent and manages the appearance of JApplet and JFrame objects. It contains a fixed set of
panes, namely, glass pane, content pane, and layered pane.
• Glass pane: A glass pane is a top-level pane which covers all other panes. By default, it is a
transparent instance of JPanel class. It is used to handle the mouse events affecting the entire
container.
• Layered pane: A layered pane is an instance of JLayeredPane class. It holds a container called the
content pane and an optional menu bar.
• Content pane: A content pane is a pane which is used to hold the components. All the visual
components like buttons, labels are added to content pane. By default, it is an opaque instance of

Object Oriented Programming Concepts-15CS45
Chethan Raj C, Assistant Professor Dept. of CSE Page 50
JPanel class and uses border layout. The content pane is accessed via getContentPane () method of
JApplet and JFrame classes.
Lightweight Containers
Lightweight containers lie next to the top-level containers in the containment hierarchy. They inherit.
JComponent. One of the examples of lightweight container is JPanel. As lightweight container can be
contained within another container, they can be used to organize and manage groups of related
components.
Components and containers
1. A Swing GUI consists of two key items: Components and Container
2. A term component is an independent visual control such as push button or slider.
3. A container holds group of components. Thus container is special kind of component that holds
that is designed to hold other components. Container are also called components so container can
hold other container.
Components
1. Swing components are derived from JComponent Class. Supports pluggable look and feel. It
inherits Component and Container of AWT.
Swing Components : JButton, JCheckBox, JComboBox ,JTree ,JLabel,
JTable ,JPanel ……..etc
Container
1. Swing defines two types of heavy weight container.
JFrame , JApplet
2. Others are light weight containers.
3. Top level containers should be declared first like JFrame and JApplet.
4. Light weight containers example if JPanel. This is used to manage group of related components
5. JPanel is used to create subgroups of related components that are contained with in another
container.
Examples of containers
JPanel is Swing’s version of the AWT class Panel and uses the same default layout,FlowLayout.
JPanel is descended directly from JComponent.
JFrame is Swing’s version of Frame and is descended directly from that class. The components added
to the frame are referred to as its contents; these are managed by the contentPane. To add a
component to a JFrame, we must use its contentPane instead.

Object Oriented Programming Concepts-15CS45
Chethan Raj C, Assistant Professor Dept. of CSE Page 51
JWindow is Swing’s version of Window and is descended directly from that class. LikeWindow, it
uses BorderLayout by default.
JDialog is Swing’s version of Dialog and is descended directly from that class. Like Dialog, it uses
BorderLayout by default. Like JFrame and JWindow.
Commonly used Methods of Component class. The methods of Component class are widely used in
java swing that are given below.
Method Description
public void add(Component c) add a component on another component.
public void setSize(int width,int height) sets size of the component.
public void setLayout(LayoutManager m) sets the layout manager for the component.
public void setVisible(boolean b) sets the visibility of the component. It is by
default false.
Add a component to a container
In order to add a component to a container, first create an instance of the desired component and then
call the add () method of the Container class to add it to a window. The add () method has many
forms and one of these is.
Component add (Component c)
This method adds an instance of component (i.e. c) to the container. The component added is
automatically visible whenever its parent window is displayed.
import java.awt.*;
class AddComponent
{
public static void main(String args[])
{
Frame frame = new Frame("Add Components to a Container");
Button button = new Button("OK");
frame.add(button);
frame.setSize(300,250);
frame.setVisible(true);

Object Oriented Programming Concepts-15CS45
Chethan Raj C, Assistant Professor Dept. of CSE Page 52
}
}
The Swing Packages
Some of the packages of swing components that are used as follows:
• Javax.swing
• javax.swing.event
• javax.swing.plaf.basic
• javax.swing.table
• javax.swing.border
• javax.swing.tree
The largest of the swing packages, javax.swing, contains most of the user-interface classes (these are
J classes, the classes having the prefix J). JTableHeader and JTextComponent are the exceptional
classes implemented in the packages javax.swing.table and javax.swing.text, respectively.
javax.swing.text contains two sub-packages known as javax.swing.text.html and javax.swing.text.rtf
used for HTMLcontent and for Rich Text Format content, respectively.
To define the look and feel of the swing component, the javax.swing.plaf.basic package is used.
javax.swing.border contains an interface called Border which is implemented by all the border
classes. These classes cannot be instantiated directly. They are instantiated using the factory method
(BorderFactory) defined in the javax.swing package. The javax.swing.event package contains all the
classes that are used for event handling. The javax.swing.tree package includes classes and interfaces
that are specific to the JTree component.
There are totally 16 packages in the swings packages and javax.swing is one of them. A brief
description of all the packages in swing is given below.

Object Oriented Programming Concepts-15CS45
Chethan Raj C, Assistant Professor Dept. of CSE Page 53
Packages Description
javax.swing Provides a set of "lightweight" (all-Java language) components to
the maximum degree possible, work the same on all platforms.
javax.swing.border Provides classes and interface for drawing specialized borders
around a Swing component.
javax.swi ng.colorchooser Contains classes and interfaces used by the JcolorChooser
component.
javax.swing.event Provides for events fired by Swing components
javax.swing.filechooser Contains classes and interfaces used by the JfileChooser
component.
javax.swing.plaf Provides one interface and many abstract classes that Swing uses to
provide its pluggable look-and-feel capabilities.
javax.swing.plaf.basic Provides user interface objects built according to the Basic look and
feel.
javax.swing.plaf.metal Provides user interface objects built according to the Java look and
feel (once condenamed Metal), which is the default look and feel.
javax.swi ng.plaf.mult Provides user interface objects that combine two or more look and
feels.
javax.swing.table Provides classes and interfaces for dealing with javax.swing.jtable
javax.swing.text Provides classes and interfaces that deal with editable and
noneditable text components
javax.swing.text.html Provides the class HTML Editor Kit and supporting classes for
creating HTML text editors.
javax.swing.text.html.parser Provides the default HTML parser, along with support classes.
javax.swing.text.rtf Provides a class RTF Editor Kit for creating Rich- Text-Format text
editors.
javax.swing.tree Provides classes and interfaces for dealing with javax.swing.jtree
javax.swing.undo Allows developers to provide support for undo/redo in applications
such as text editors.

Object Oriented Programming Concepts-15CS45
Chethan Raj C, Assistant Professor Dept. of CSE Page 54
Difference between java awt and swing that are given below.
No. Java AWT Java Swing
1) AWT components are platform-
dependent.
Java swing components are platform-
independent.
2) AWT components are heavyweight. Swing components are lightweight.
3) AWT doesn't support pluggable look
and feel.
Swing supports pluggable look and feel.
4) AWT provides less components than
Swing.
Swing provides more powerful
components such as tables, lists, scrollpanes,
colorchooser, tabbedpane etc.
5) AWT doesn't follows MVC(Model
View Controller) where model
represents data, view represents
presentation and controller acts as an
interface between model and view.
Swing follows MVC.
The Java Foundation Classes (JFC) are a set of GUI components which simplify the development of
desktop applications.
Fig:Java Swing API

Object Oriented Programming Concepts-15CS45
Chethan Raj C, Assistant Professor Dept. of CSE Page 55
JFrame
In a Java Swing, A JFrame is the class that represents the window in which graphics applications
running on Java. JFrame Class is the top-level container that contains content pane all visible
components contain in the content pane. The usual procedure to be used to create a new class that
inherits from JFrame. Normally JFrame's are used as primary containers, that is, not contained in
other containers.
A frame is often put a main panel from which the other elements are organized. To place this main
panel method is used.
public void setContentPane(Cantainer contentPane)
import java.awt.*;
import javax.swing.*;
public class JFrameContentPane extends JFrame
{
private final int SIZE = 200;
private Container con = getContentPane();
private JButton BtnClckIt = new JButton("Click it");
public JFrameContentPane()
{
super("JFrame ContentPane Layout in Java Swing Example");
setSize(500,500);
setVisible(true);
con.setLayout(new FlowLayout());
con.add(BtnClckIt);
}
public static void main(String[] args)
{
JFrameContentPane JFrameCP = new JFrameContentPane();
}
}

Object Oriented Programming Concepts-15CS45
Chethan Raj C, Assistant Professor Dept. of CSE Page 56
JFrame is a top-level container that is used to hold components in it. These components could be
button, textField, label etc. The default layout of JFrame by which it positions the components in it
is BoderLayout manager.
Constructors of JFrame
Constructor Description
public JFrame() Creates a JFrame window with no name.
public JFrame(String name) Creates a JFrame window with a name.
JFrame methods
Methods Description
public void add(Component comp) This method adds the component, comp, to the
container JFrame.
public void setLayout(LayoutManager object) This method sets the layout of the components in a
container, JFrame.
public void remove(Component comp) This method removes a component, comp, from
the container, JFrame.
public void setSize(int widthPixel, int
heightPixel)
This method sets the size of a JFrame in terms of
pixels.
public void
setDefaultCloseOperation(int operation)
This method sets the operation that will take place
when a a user clicks on close(x) button of this
JFrame. An operation may take any of the values-
DO_NOTHING_ON_CLOSE
HIDE_ON_CLOSE
DISPOSE_ON_CLOSE
EXIT_ON_CLOSE
public void setVisble(boolean b) This method set the visibility of JFrame using
boolean value.
BorderLayout is the default layout manager of JFrame.
The default layout of JFrame by which it positions the components in it is BoderLayout manager.
Hence, if we add components to JFrame without calling it's setLayout() method, these components
are added to the center region of by default.
Note : Remember, using the BorderLayout manager, only one component can be placed in a region,

Object Oriented Programming Concepts-15CS45
Chethan Raj C, Assistant Professor Dept. of CSE Page 57
hence if multiple elements are added to a region, only the last element will be visible.
import javax.swing.*;
//import java.awt.*;
class SwingEx implements Runnable
{
public static void main(String...ar)
{
SwingUtilities.invokeLater(new SwingEx());
}
public void run()
{
new A();
}
}
class A
{
JFrame frame;
JLabel label;
JButton button;
A()
{
frame = new JFrame("JFrame");
label = new JLabel("Hello there, how are you today? :-)");
button = new JButton("Button1");
//Adding JLabel and JButton to JFrame, which will added to BorderLayout.CENTER region of
JFrame.
frame.add(label);
frame.add(button);
frame.setDefaultCloseOperation(JFrame.EXIT_ON_CLOSE);
frame.setSize(210,250);
frame.setVisible(true);
}
}
In the last code, two components i.e JLabel and JButton are added to top-level container, JFrame,
without calling its setLayout() method. These components are added
to BorderLayout.CENTERregion of JFrame. Hence, only the last component added, i.e. JButton

Object Oriented Programming Concepts-15CS45
Chethan Raj C, Assistant Professor Dept. of CSE Page 58
will be visible. When user run the code, you are presented a window that only shown a button.
Figure 1
A simple example of JFrame with FlowLayout manager.
In the code user add two components i.e JLabel and JButtonto JFrame.
Before adding these components to JFrame, we will call setLayout() method to position components
in JFrame according to FlowLayoutManager
import javax.swing.*;
//import java.awt.*;
class SwingEx implements Runnable
{
public static void main(String...ar)
{
SwingUtilities.invokeLater(new SwingEx());
}
public void run()
{
new A();
}
}
class A
{
JFrame frame;
JLabel label;
JButton button;
A()
{
frame = new JFrame("JFrame");

Object Oriented Programming Concepts-15CS45
Chethan Raj C, Assistant Professor Dept. of CSE Page 59
label = new JLabel("Hello there, how are you today? :-)");
button = new JButton("Button1");
//Setting the layout of components in JFrame to FlowLayout
frame.setLayout(new FlowLayout());
frame.add(label);
frame.add(button);
frame.setDefaultCloseOperation(JFrame.EXIT_ON_CLOSE);
frame.setSize(210,250);
frame.setVisible(true);
}
}
When user run the code, you are presented a window that contains a top-level container, JFrame,
which includes two components that are positioned in JFrame using FlowLayout manager -
A JLabel displaying a message.
A JButton displaying a button.
Figure 2
A simple Swing Application
Swing is important to develop Java programs with a graphical user interface (GUI). There are many
components which are used for the building of GUI in Swing. The Swing Toolkit consists of many
components for the building of GUI. These components are also helpful in providinginteractivity to
Java applications. Following are components which are included in Swing toolkit:
• list controls
• buttons
• labels
• tree controls

Object Oriented Programming Concepts-15CS45
Chethan Raj C, Assistant Professor Dept. of CSE Page 60
• table controls
All AWT flexible components can be handled by the Java Swing. Swing toolkit contains far more
components than the simple component toolkit. It is unique to any other toolkit in the way that it
supports integrated internationalization, a highly customizable text package, rich undo support etc.
Not only this you can also create your own look and feel using Swing other than the ones that are
supported by it. The customized look and feel can be created usingSynth which is specially designed.
Not to forget that Swing also contains the basic user interface such as customizable painting, event
handling, drag and drop etc.
The Java Foundation Classes (JFC) which supports many more features important to a GUI program
comprises ofSwing as well. The features which are supported by Java Foundation Classes (JFC) are
the ability to create a program that can work in different languages, the ability to add rich graphics
functionality etc.
The features which are provided by Swing and the Java Foundation Classes are as follows:
Swing GUI Components
There are several components contained in Swing toolkit such as check boxes, buttons, tables, text
etc. Some very simple components also provide sophisticated functionality. For instance, text fields
provide formatted text input or password field behavior. Furthermore, the file browsers and dialogs
can be used according to one's need and can even be customized.
Ex: The basic window on the screen.
import javax.swing.JFrame;
import javax.swing.SwingUtilities;
public class Example extends JFrame
{
public Example()
{
setTitle("Simple example");
setSize(300, 200);
setLocationRelativeTo(null);
setDefaultCloseOperation(EXIT_ON_CLOSE);
}
public static void main(String[] args)
{
Example ex = new Example();
ex.setVisible(true);
}
}

Object Oriented Programming Concepts-15CS45
Chethan Raj C, Assistant Professor Dept. of CSE Page 61
While this code is very small, it can be resized, maximized, minimized. All the complexity that
comes with it has been hidden from the application programmer.
import javax.swing.JFrame;
import javax.swing.SwingUtilities;
Here we import Swing classes, that will be used in the code example.
public class Example extends JFrame
{
The Example class inherits from the JFrame widget. JFrame is a toplevel container, which is used for
placing other widgets.
setTitle("Simple example");
Here we set the title of the window using the setTitle() method.
setSize(300, 200);
This code will resize the window to be 300px wide and 200px tall.
setLocationRelativeTo(null);
This line will center the window on the screen.
setDefaultCloseOperation(EXIT_ON_CLOSE);
This method will close the window, if we click on the close button of the titlebar. By default nothing
happens.
Example ex = new Example();
ex.setVisible(true);
Create an instance of our code example and make it visible on the screen. Note that the main method
is static, so when it is called (when the program starts), there is not yet any object Example. Again,
main is like an external global method. Only when we explicitly create an instance (with new
Example()) that an object Example, thus a JFrame appears.

Object Oriented Programming Concepts-15CS45
Chethan Raj C, Assistant Professor Dept. of CSE Page 62
Figure: Simple example
Ex: When user click on the button, the application terminates.
import java.awt.event.ActionEvent;
import java.awt.event.ActionListener;
import javax.swing.JButton;
import javax.swing.JFrame;
import javax.swing.JPanel;
import javax.swing.SwingUtilities;
public class Example extends JFrame
{
public Example()
{
initUI();
}
public final void initUI()
{
JPanel panel = new JPanel();
getContentPane().add(panel);
panel.setLayout(null);
JButton quitButton = new JButton("Quit");
quitButton.setBounds(50, 60, 80, 30);
quitButton.addActionListener(new ActionListener()
{
public void actionPerformed(ActionEvent event)
{
System.exit(0);

Object Oriented Programming Concepts-15CS45
Chethan Raj C, Assistant Professor Dept. of CSE Page 63
}
}
panel.add(quitButton);
setTitle("Quit button");
setSize(300, 200);
setLocationRelativeTo(null);
setDefaultCloseOperation(EXIT_ON_CLOSE);
}
public static void main(String[] args)
{
public void run()
{
Example ex = new Example();
ex.setVisible(true);
}
}
}
We position a JButton on the window. We will add an action listener to this button.
public Example()
{
initUI();
}
It is a good programming practice to put the code that creates the GUI inside a specific method.
JPanel panel = new JPanel();
getContentPane().add(panel);
create a JPanel component. It is a generic lightweight container. We add the JPanel to the JFrame.
panel.setLayout(null);
By default, the JPanel has a FlowLayout manager. The layout manager is used to place widgets onto
the containers. If we call setLayout(null) we can position our components absolutely. For this, we use
the setBounds() method.
JButton quitButton = new JButton("Quit");
quitButton.setBounds(50, 60, 80, 30);
quitButton.addActionListener(new ActionListener()
{

Object Oriented Programming Concepts-15CS45
Chethan Raj C, Assistant Professor Dept. of CSE Page 64
public void actionPerformed(ActionEvent event)
{
System.exit(0);
}
}
User create a button by position it calling the setBounds() method. Then we add an action listener.
The action listener will be called, when we perform an action on the button. In our case, if we click
on the button. The click will terminate the application.
panel.add(quitButton);
In order to show the quit button, we must add it to the panel.
Figure: Quit button
For complex applications, it is more convenient to define an action listener that is not anonymous.
The JFrame class can itself act like one by implementing the ActionListener interface.
import javax.swing.*;
import java.awt.*;
import java.awt.event.*;
public class Example extends JFrame implements ActionListener
{
public Example()
{
initUI();
}
public final void initUI()

Object Oriented Programming Concepts-15CS45
Chethan Raj C, Assistant Professor Dept. of CSE Page 65
{
JButton button1 = new JButton("Button1");
JButton button2 = new JButton("Button2");
button1.setBounds(50, 60, 100, 30);
button2.setBounds(180, 60, 100, 30);
getContentPane().setLayout(null);
getContentPane().add(button1);
getContentPane().add(button2);
button1.addActionListener(this);
button2.addActionListener(this);
setSize(300, 200);
setLocationRelativeTo(null);
setDefaultCloseOperation(EXIT_ON_CLOSE);
}
public void actionPerformed(ActionEvent e)
{
System.out.println("Oui!");
}
public static void main(String[] args)
{
Example ex = new Example();
ex.setVisible(true);
}
}
It is also possible to define externally the action listener class as follows.
class MyActionListener implements ActionListener
{

Object Oriented Programming Concepts-15CS45
Chethan Raj C, Assistant Professor Dept. of CSE Page 66
public MyActionListener(String msg)
{
this.msg = msg;
}
public void actionPerformed(ActionEvent e)
{
System.out.println(msg);
}
String msg;
}
In the above example, user used the same action listener for two buttons. In general, an application
may contain tens of buttons, and we do not want to create a new class for each of them. In order to
distinguish the "source" of the action, modify user action Performed method by using the information
contained in the ActionEvent argument
Create a Swing Applet
User can create the applets based on AWT(Abstract Window Toolkit) by extending the Appletclass
of the awt package. Similarly user can also create applets based on the Swing package. In order to
create such applets, user must extend the JApplet class of the swing package. JApplet extends Applet
class, hence all the features of Applet class are available in JApplet as well, including JApplet's own
Swing based features. Swing applets provies easier to use user interface than AWT applets.
•When user create an AWT applet, we implement the paint(Graphics g) method to draw in it but
when we create a Swing applet, we implement paintComponent(Graphics g) method to draw in it.
•For an applet class that extends Swing's JApplet class, the way elements like textfield, buttons,
checksboxes etc are added to this applet is performed by using a default layout manager, i.e.
BorderLayout
Note:
JApplet is a top-level container class and you should never draw on it directly, instead you should
draw on the component class like JPanel and then add this JPanel to the JApplet, as shown in the
upcoming code.
Ex:Create a swing applet by extending JApplet class and we have added a JPanel to it.
•Next, create a class B, which has extended JPanel class of Swing package and have also
implemented ActionListener interace to listen to the button click event generated when buttons added
to JPanel are clicked.
Object Oriented Programming Concepts-15CS45
Chethan Raj C, Assistant Professor Dept. of CSE Page 67
import java.awt.*;
import java.applet.*;
import java.awt.event.*;
import javax.swing.*;
/*
<applet code="Applet21" width="500" height="200">
</applet>
*/
public class Applet21 extends JApplet
{
public void init()
{
add(new B()); //Adding a JPanel to this Swing applet
}
}
class B extends JPanel implements ActionListener
{
JLabel jb;
JButton Box2, box2, box3, box4;
String str;
B()
{
jb= new JLabel("Welcome, please click on any button for text information -");
Box2 = new JButton("Box2");
box2 = new JButton("Box2");
box3 = new JButton("Box3");
box4 = new JButton("Box4");

Object Oriented Programming Concepts-15CS45
Chethan Raj C, Assistant Professor Dept. of CSE Page 68
str ="";
setLayout(new FlowLayout());
add(jb);
add(Box2);
add(box2);
add(box3);
add(box4);
Box2.addActionListener(this);
box2.addActionListener(this);
box3.addActionListener(this);
box4.addActionListener(this);
}
public void actionPerformed(ActionEvent ae)
{
if(ae.getActionCommand().equals("Box2"))
{
str=" The digital revolution is far more significant than the invention of writing or even of printing.";
repaint();
}
if(ae.getActionCommand().equals("Box2"))
{
str=" Never trust a computer you can't throw out a window.";
repaint();
}
if(ae.getActionCommand().equals("Box3"))
{
str=" Man is still the most extraordinary computer of all..";

Object Oriented Programming Concepts-15CS45
Chethan Raj C, Assistant Professor Dept. of CSE Page 69
repaint();
}
if(ae.getActionCommand().equals("Box4"))
{
str=" You can’t have great software without a great team.";
repaint();
}
}
public void paintComponent(Graphics g)
{
super.paintComponent(g);
g.drawString(str, 2, 170);
}
}
In the applet shown above, four buttons are presented in the output. These buttons are added to
Bclass(which has extended JPanel). This JPanel is inturn added to our Swing applet class, Applet21.
Whenever a button is clicked, the data is presented to the user.
Jlabel and ImageIcon
A displayed label object is known as the Label. Most of the times label is used to demonstrate the
significance of the other parts of the GUI. It helps to display the functioning of the next text field. A
label is also restricted to a single line of text as a button. The example below shows the significance
of Label.
In this example, we have added two labels in the applet as shown.
import java.awt.*;
import java.applet.Applet;
public class MyLabel extends Applet
{
public void init()
{

Object Oriented Programming Concepts-15CS45
Chethan Raj C, Assistant Professor Dept. of CSE Page 70
add(new Label("label one"));
add(new Label("label two", Label.RIGHT));
}
}
output:
C:\newprgrm>javac MyLabel.java
C:\newprgrm>appletviewer MyLabel.html
Paint means draw an image and set its on the frame to the specified location according to its x
coordinate and y coordinate.
Description of program:
This program shows how to paint an image on the fame to specified location. For this user need
images that have to be set on the frame. Initially draw a rectangle and set the two images on to
rectangle. Paint the rectangle in the yellow color. All drawing process is done using the paint()
method.
Here is the code of program:
import java.awt.*;
import java.awt.event.*;
public class PaintIcon extends Frame
{
Image image;
public static void main(String[] args)
{
new PaintIcon();
}

Object Oriented Programming Concepts-15CS45
Chethan Raj C, Assistant Professor Dept. of CSE Page 71
public PaintIcon()
{
setTitle("Paint an Icon example!");
setSize(200,200);
setVisible(true);
addWindowListener(new WindowAdapter()
{
public void windowClosing(WindowEvent we)
{
System.exit(0);
}
}
}
public void paint(Graphics g)
{
Toolkit tool = Toolkit.getDefaultToolkit();
image = tool.getImage("warning.gif");
g.drawRect(20,50,100,100);
g.drawString("Draw Images:",20,40);
g.setColor(Color.yellow);
g.fillRect(20,50,100,100);
g.drawImage(image,30,85,this);
image = tool.getImage("Tom.gif");
g.drawImage(image,80,85,this);
}
}

Object Oriented Programming Concepts-15CS45
Chethan Raj C, Assistant Professor Dept. of CSE Page 72
JTextField
Java JTextField
The object of a JTextField class is a text component that allows the editing of a single line text. It
inherits JTextComponent class.
JTextField class declaration
The declaration for javax.swing.JTextField class.
1. public class JTextField extends JTextComponent implements SwingConstants
Commonly used Constructors:
Constructor Description
JTextField() Creates a new TextField
JTextField(String text) Creates a new TextField initialized with the specified
text.
JTextField(String text, int columns) Creates a new TextField initialized with the specified
text and columns.
JTextField(int columns) Creates a new empty TextField with the specified
number of columns.
Commonly used Methods:
Methods Description
void addActionListener(ActionListener l) It is used to add the specified action listener
to receive action events from this textfield.

Object Oriented Programming Concepts-15CS45
Chethan Raj C, Assistant Professor Dept. of CSE Page 73
Action getAction() It returns the currently set Action for this
ActionEvent source, or null if no Action is
set.
void setFont(Font f) It is used to set the current font.
void removeActionListener(ActionListener l) It is used to remove the specified action
listener so that it no longer receives action
events from this textfield.
Java JTextField Example
import javax.swing.*;
class TextFieldExample
{
public static void main(String args[])
{
JFrame f= new JFrame("TextField Example");
JTextField t1,t2;
t1=new JTextField("Welcome to Java");
t1.setBounds(50,100, 200,30);
t2=new JTextField("AWT Tutorial");
t2.setBounds(50,150, 200,30);
f.add(t1); f.add(t2);
f.setSize(400,400);
f.setLayout(null);
f.setVisible(true);
}
}

Object Oriented Programming Concepts-15CS45
Chethan Raj C, Assistant Professor Dept. of CSE Page 74
Output:
Java JTextField Example with ActionListener
import javax.swing.*;
import java.awt.event.*;
public class TextFieldExample implements ActionListener{
JTextField tf1,tf2,tf3;
JButton b1,b2;
TextFieldExample(){
JFrame f= new JFrame();
tf1=new JTextField();
tf1.setBounds(50,50,150,20);
tf2=new JTextField();
tf2.setBounds(50,100,150,20);
tf3=new JTextField();
tf3.setBounds(50,150,150,20);

Object Oriented Programming Concepts-15CS45
Chethan Raj C, Assistant Professor Dept. of CSE Page 75
tf3.setEditable(false);
b1=new JButton("+");
b1.setBounds(50,200,50,50);
b2=new JButton("-");
b2.setBounds(120,200,50,50);
b1.addActionListener(this);
b2.addActionListener(this);
f.add(tf1);f.add(tf2);f.add(tf3);f.add(b1);f.add(b2);
f.setSize(300,300);
f.setLayout(null);
f.setVisible(true);
}
public void actionPerformed(ActionEvent e) {
String s1=tf1.getText();
String s2=tf2.getText();
int a=Integer.parseInt(s1);
int b=Integer.parseInt(s2);
int c=0;
if(e.getSource()==b1){
c=a+b;
}else if(e.getSource()==b2){
c=a-b;
}
String result=String.valueOf(c);

Object Oriented Programming Concepts-15CS45
Chethan Raj C, Assistant Professor Dept. of CSE Page 76
tf3.setText(result);
}
public static void main(String[] args) {
new TextFieldExample();
} }
Output:
JTextField class is used to create a textfield control, which allows a user to enter a single line text
and edit it. When an enter key is pressed in a JTextField, an ActionEvent is generated. In order to
handle such event, ActionListener interface should be implemented. JTextField is a component
which extends TextComponent class, which further extends JComponent class.
Constructors of JTextField
Constructor Description
public JTextField) Creates a JTextField.
public JTextField(String text) Creates a JTextField with a specified default text.
public JTextField(int width) Creates a JTextField with a specified width.
public JTextField(String text, int
width) Creates a JTextField with a specified default text and width.

Object Oriented Programming Concepts-15CS45
Chethan Raj C, Assistant Professor Dept. of CSE Page 77
Some methods of JTextField class
Methods Description
public void setText(String text) Sets a String message on the JTextField.
public String getText() Gets a String message of JTextField.
public void setEditable(boolean
b) Sets a Sets a JTextfield to editable or uneditable.
public void setFont(Font f) Sets a font type to the JTextField
void setForeground(Color c) Sets a foreground color, i.e. color of text in JTextField.
An example of different kinds of JTextField
import javax.swing.*;
import java.awt.*;
import java.awt.event.*;
public class TextField2
{
public static void main(String args[])
{
SwingUtilities.invokeLater(new Runnable()
{
public void run()
{
new A();
}
});
}//Closing the main method
}//Closing the class A
class A //implements ActionListener
{
JButton button;
JLabel label1, label2, label3, label4, label5;
JTextField field1, field2, field3, field4, field5;
String str ="";
JFrame jf;

Object Oriented Programming Concepts-15CS45
Chethan Raj C, Assistant Professor Dept. of CSE Page 78
A()
{
jf = new JFrame("Hello");
jf.setSize(440,150);
label1= new JLabel("First Textfield");
label2= new JLabel("Second Textfield ");
label3= new JLabel("Third TextField");
label4= new JLabel("Fourth TextField");
label5= new JLabel("Fifth TextField");
field1 = new JTextField(); //calling TextField() constructor
field2 = new JTextField("World peace is important"); //calling TextField(String) Constructor
field3 = new JTextField(5); //calling TextField(int) constructor
field4 = new JTextField("Smile and spread it",15); //calling TextField(String, int) constructor
//Setting the font color to blue, in a JTextField
field2.setForeground(Color.BLUE);
field4.setEditable(false); //Making a text field uneditable
field4.setFont(new Font("Serif", Font.BOLD, 10)); //Setting a font style in a TextField
jf.setLayout(new FlowLayout());
jf.add(label1);
jf.add(field1);
jf.add(label2);
jf.add(field2);
jf.add(label3);
jf.add(field3);
jf.add(label4);
jf.add(field4);
//button.addActionListener(this);
jf.setVisible(true);
}
}
When you run the code, you are presented a window shown below -:

Object Oriented Programming Concepts-15CS45
Chethan Raj C, Assistant Professor Dept. of CSE Page 79
Figure 1
Handling JTextField events and reading from JTextField.
import javax.swing.*;
import java.awt.*;
import java.awt.event.*;
public class TextField3
{
public static void main(String args[])
{
SwingUtilities.invokeLater(new Runnable() {
public void run()
{
new A();
}
}
}//Closing the main method
}//Closing the class A
class A implements ActionListener
{
JButton button;
JLabel label1, label2, label3;
JTextField field1, field2, field3;
JFrame jf;
A()
{
jf = new JFrame("Handling TextField Event");
jf.setSize(400,150);
label1= new JLabel("Enter your name");

Object Oriented Programming Concepts-15CS45
Chethan Raj C, Assistant Professor Dept. of CSE Page 80
label2= new JLabel("Enter your city");
label3= new JLabel("Enter your age");
field1 = new JTextField(20);
field2 = new JTextField(20); //calling TextField(String)
field3 = new JTextField(20);
button = new JButton("Submit");
jf.setLayout(new FlowLayout());
jf.add(label1);
jf.add(field1);
jf.add(label2);
jf.add(field2);
jf.add(label3);
jf.add(field3);
jf.add(button);
button.addActionListener(this); //As soon as button is clicked, data from all the textfields is read
jf.setVisible(true);
}
public void actionPerformed(ActionEvent ae)
{
if(ae.getActionCommand().equals("Submit"))
{
System.out.println("Your name : " + field1.getText()+ ", Your city : " + field2.getText()+ ", Your age
:" + field3.getText());
}
}
}
When you run the code, you are presented a window shown in the Figure2 below -:
Figure 2

Object Oriented Programming Concepts-15CS45
Chethan Raj C, Assistant Professor Dept. of CSE Page 81
User may enter the data in the each textfield.
Figure 3
and this data is read and displayed on command prompt, as soon as you press Enter Key in any of
the textfield, as shown below.
Enter Key is pressed
Your name : Anuj Sobti, Your city : New York, Your age :29
The Swing Buttons
JButton class is used to create a push button control, which can generate an ActionEvent when it
is clicked. In order to handle a button click event, ActionListener interface should be implemented.
JButton is a component which extends JComponent class and it can be added to the container.
Constructors of JButton
Constructor Description
public JButton() Creates a button with no text on it..
public JButton(String text) Creates a button with a text on it.
public JButton(Icon image) Creates a button with an icon on it.
public JButton(String text, Icon
image) Creates a button with a text and and an icon on it.
Methods of JButton class
Methods Description
public void setText(String text) Sets a String message on the JButton.
public String getText() Gets a String message of JButton.
public void setIcon(Icon icon) Sets an icon or image over the JButton.

Object Oriented Programming Concepts-15CS45
Chethan Raj C, Assistant Professor Dept. of CSE Page 82
public Icon getIcon() Gets the icon or image of the JButton.
void
setHorizontalTextPosition(int
textPosition)
Sets the button message on the LEFT/RIGHT of its icon or
image .
void setVerticalTextPosition(int
textPosition)
Sets the button message on the TOP/BOTTOM of its icon or
image.
An example of JButton
import javax.swing.*;
import java.awt.*;
import java.awt.event.*;
public class Btn1
{
public static void main(String args[])
{
SwingUtilities.invokeLater(new Runnable() {
public void run()
{
new A();
}
}
}//Closing the main method
}//Closing the class A
class A //implements ActionListener
{
JFrame jf;
JButton button1, button2, button3;
A()
{
jf= new JFrame();
button1= new JButton();
button2= new JButton("Click here");
button3= new JButton();
button3.setText("Button3");

Object Oriented Programming Concepts-15CS45
Chethan Raj C, Assistant Professor Dept. of CSE Page 83
jf.add(button1);
jf.add(button2);
jf.add(button3);
jf.setLayout(new FlowLayout());
jf.setSize(300,100);
jf.setVisible(true);
}
}
When you run the code, you are presented a window shown below -:
Figure 1
Setting an image over JButton
import javax.swing.*;
import java.awt.*;
import java.awt.event.*;
import javax.swing.border.EmptyBorder;
public class Btn4
{
public static void main(String... ar)
{
SwingUtilities.invokeLater(new Runnable() {
public void run()
{
new A();
}
}
}//Closing the main method
}//Closing the class A
class A
{
JFrame jf;
JButton button1, button2, button3, button4;

Object Oriented Programming Concepts-15CS45
Chethan Raj C, Assistant Professor Dept. of CSE Page 84
A()
{
jf= new JFrame();
//Setting an image over a JButton and limited its border space, so that image fits perfectly over
JButton.
button1= new JButton(new ImageIcon("JButton1.jpg"));
button1.setBorder(new EmptyBorder(2,2,2,2));
//Setting an image over a JButton with and without text.
button2 = new JButton(new ImageIcon("Smiley3.jpg"));
button3 = new JButton("Smiley", new ImageIcon("Smiley3.jpg"));
//Setting a big image over a JButton
button4 = new JButton(new ImageIcon("Big Smiley", "BigSmiley.gif"));
button4.setHorizontalTextPosition(SwingConstants.LEFT);
jf.add(button1);
jf.add(button2);
jf.add(button3);
jf.add(button4);
jf.setLayout(new FlowLayout());
jf.setSize(300,300);
jf.setVisible(true);
}
}
When you run the code, you are presented a window shown in the Figure2 below -:
Figure 2

Object Oriented Programming Concepts-15CS45
Chethan Raj C, Assistant Professor Dept. of CSE Page 85
Handling button click events by implementing ActionListener interface
import javax.swing.*;
import java.awt.*;
import java.awt.event.*;
public class Btn5
{
public static void main(String args[])
{
SwingUtilities.invokeLater(new Runnable()
{
public void run()
{
new A();
}
}
}//Closing the main method
}//Closing the class A
class A implements ActionListener
{
JFrame jf;
JButton button1, button2;
JLabel label;
A()
{
jf= new JFrame();
button1= new JButton("Yes");
button2= new JButton("No");
label = new JLabel();
jf.add(button1);
jf.add(button2);
jf.add(label);
button1.addActionListener(this);
button2.addActionListener(this);
jf.setLayout(new FlowLayout(FlowLayout.CENTER,60,10));
jf.setSize(250,150);
jf.setVisible(true);
}

Object Oriented Programming Concepts-15CS45
Chethan Raj C, Assistant Professor Dept. of CSE Page 86
public void actionPerformed(ActionEvent ae)
{
if(ae.getActionCommand().equals("Yes"))
{
label.setText("You've clicked Yes");
jf.add(label);
jf.setVisible(true);
System.out.println("Yes button is clicked");
}
if(ae.getActionCommand().equals("No"))
{
label.setText("You've clicked No");
jf.add(label);
jf.setVisible(true);
System.out.println("No button is clicked");
}
}
}
When you run the code, you are presented a window shown in the Figure3 below -:
Figure 3
When you click on any of the buttons, you will be displayed an appropriate message, for example,
when we click on Yes button, we get such message -
Figure 4

Object Oriented Programming Concepts-15CS45
Chethan Raj C, Assistant Professor Dept. of CSE Page 87
Button class
Button class is used to create a push button control, which can generate an ActionEvent when it is
clicked. In order to handle a button click event, ActionListener interface should be implemented.
Button is a component which extends JComponent class and it can be added to the container like
Frame or a component like Panel.
Constructors of Button
Constructor Description
public Button() Creates a button with no text on it.
public Button(String text) Creates a button with a text on it.
Methods of Button class
Methods Description
public void setText(String text) Sets a String message on the Button.
public String getText() Gets a String message of Button.
public void setLabel() Sets a String text on button.
public String getLabel() Gets the String text of this button.
An example of Button
import javax.swing.*;
import java.awt.*;
import java.awt.event.*;
public class ButtonEx1
{
Frame jf;
Button button1, button2, button3;
ButtonEx1()
{
jf= new JFrame("Frame displaying buttons");
button1= new Button();
button2= new Button("Click here");
button3= new Button();
button3.setLabel("Button3");
jf.add(button1);
jf.add(button2);

Object Oriented Programming Concepts-15CS45
Chethan Raj C, Assistant Professor Dept. of CSE Page 88
jf.add(button3);
jf.setLayout(new FlowLayout());
jf.setSize(300,100);
jf.setVisible(true);
}
public static void main(String... ar)
{
new ButtonEx1();
}
}
When you run the code, you are presented a window shown below -:
Figure 1
Handling button click events by implementing ActionListener interface
import javax.swing.*;
import java.awt.*;
import java.awt.event.*;
public class ButtonEx2 implements ActionListener
{
Frame jf;
Button button1, button2;
Label label;
ButtonEx2()
{
jf= new Frame("Button click events");
button1= new Button("Yes");
button2= new Button("No");
label = new Label();
jf.add(button1);
jf.add(button2);
jf.add(label);
button1.addActionListener(this);

Object Oriented Programming Concepts-15CS45
Chethan Raj C, Assistant Professor Dept. of CSE Page 89
button2.addActionListener(this);
jf.setLayout(new FlowLayout(FlowLayout.CENTER,60,10));
jf.setSize(250,150);
jf.setVisible(true);
}
public void actionPerformed(ActionEvent ae)
{
if(ae.getActionCommand().equals("Yes"))
{
label.setText("You've clicked Yes");
jf.add(label);
jf.setVisible(true);
}
if(ae.getActionCommand().equals("No"))
{
label.setText("You've clicked No");
jf.add(label);
jf.setVisible(true);
}
}
public static void main(String... ar)
{
new ButtonEx2();
}
}
When user run the code presented a window shown in the Figure2 below -:
Figure 2
When user click on any of the buttons displayed an appropriate message, for example, when we click
on Yes button, we get such message -

Object Oriented Programming Concepts-15CS45
Chethan Raj C, Assistant Professor Dept. of CSE Page 90
Figure 3
JTabbedpane
The JTabbedPane class is used to switch between a group of components by clicking on a tab with a
given title or icon. It inherits JComponent class.
JTabbedPane class declaration
Let's see the declaration for javax.swing.JTabbedPane class.
1. public class JTabbedPane extends JComponent implements Serializable, Accessible, SwingConstan
ts
Commonly used Constructors:
Constructor Description
JTabbedPane() Creates an empty TabbedPane with a default
tab placement of JTabbedPane.Top.
JTabbedPane(int tabPlacement) Creates an empty TabbedPane with a
specified tab placement.
JTabbedPane(int tabPlacement, int
tabLayoutPolicy)
Creates an empty TabbedPane with a
specified tab placement and tab layout
policy.
Java JTabbedPane Example
import javax.swing.*;
public class TabbedPaneExample {
JFrame f;
TabbedPaneExample(){
f=new JFrame();
JTextArea ta=new JTextArea(200,200);
JPanel p1=new JPanel();
p1.add(ta);

Object Oriented Programming Concepts-15CS45
Chethan Raj C, Assistant Professor Dept. of CSE Page 91
JPanel p2=new JPanel();
JPanel p3=new JPanel();
JTabbedPane tp=new JTabbedPane();
tp.setBounds(50,50,200,200);
tp.add("main",p1);
tp.add("visit",p2);
tp.add("help",p3);
f.add(tp);
f.setSize(400,400);
f.setLayout(null);
f.setVisible(true);
}
public static void main(String[] args)
{
new TabbedPaneExample();
}
}
Output:
javax.swing.JTabbedPane provides the feature to add tabs onto the frame in Java. Using tab user can
switch to one component to another.
Example
Example to add tabs onto the frame. i.e how to add tabs into the JFrame and how to add components
on each tabs. First creata Java Class named AddJTabbedPane.java into which create a method that
describes the user interface. In this method user instantiated various Jlabel, JPanel. As well as
instantiated JTabbedPane and JFrame. These labels are created for labeling the values which will be

Object Oriented Programming Concepts-15CS45
Chethan Raj C, Assistant Professor Dept. of CSE Page 92
displayed with the associated tabs. Then created a JFrame and added two tabs named 'Fruit' and
'Vegetable' onto the JFrame.
Source Code
import javax.swing.JTabbedPane;
import javax.swing.JTextField;
import javax.swing.JLabel;
import javax.swing.JPanel;
import javax.swing.JButton;
import javax.swing.JFrame;
import java.awt.*;
import java.awt.event.*;
class AddJTabbedPane
{
JTabbedPane tp;
JLabel lab1, lab2, lab3, lab4, lab5, lab6, lab7, lab8;
JPanel fruit, vegetable;
JFrame frame;
public void createUI()
{
frame=new JFrame("JTabbedPane Example");
frame.setDefaultCloseOperation(JFrame.EXIT_ON_CLOSE);
fruit = new JPanel(new GridLayout(6,2));
lab1=new JLabel("Apple");
lab2=new JLabel("Orange");
lab3=new JLabel("Papaya");
lab4=new JLabel("Pine Apple");
fruit.add(lab1);
fruit.add(lab2);
fruit.add(lab3);
fruit.add(lab4);

Object Oriented Programming Concepts-15CS45
Chethan Raj C, Assistant Professor Dept. of CSE Page 93
vegetable = new JPanel(new GridLayout(6,2));
lab5=new JLabel("Cauliflower");
lab6=new JLabel("Brinjal");
lab7=new JLabel("Peas");
lab8=new JLabel("Lady finger");
vegetable.add(lab5);
vegetable.add(lab6);
vegetable.add(lab7);
vegetable.add(lab8);
tp=new JTabbedPane();
Container pane = frame.getContentPane();
pane.add(tp);
tp.addTab("Fruit",fruit);
tp.addTab("Vegetable",vegetable);
frame.setSize(200,200);
frame.setVisible(true);
}
public static void main(String[] args)
{
AddJTabbedPane tbp = new AddJTabbedPane();
tbp.createUI();
}
}

Object Oriented Programming Concepts-15CS45
Chethan Raj C, Assistant Professor Dept. of CSE Page 94
Output
When you will execute the above example you will get the output as follows :
And the Frame will be look like as follows :
And when you will switch to Vegetable tab then the vegetable's name will be displayed.
JScrollPane
JScrollPane provides a scrollable view of a component, where a component maybe an image,
table, tree etc. A JScrollPane can be added to a top-level container like JFrame or a component like
JPanel. JScrollPane is another lightweight component which extends JComponent class.
Constructors of JScrollPane
Constructor Description
public JScrollPane()
Creates an empty JScrollPane with no viewport, where
both the horizontal and vertical scrollbars appearing when
required.
public JScrollPane(Component view) Creates a JScrollPane that displays a component within it.

Object Oriented Programming Concepts-15CS45
Chethan Raj C, Assistant Professor Dept. of CSE Page 95
This JScrollPane also shows the horizontal and vertical
bar, only when its component's contents are larger than
the viewing area.
Methods of JScrollPane class
Methods Description
public setPreferredSize(Dimension d) Sets the preferred size of JScrollPane.
public int setLayout(LayoytManager
managaer) Sets the layout manager for JScrollPane.
An example of JScrollPane
import javax.swing.*;
import java.awt.*;
public class ScrollPane1
{
public static void main(String... ar)
{
SwingUtilities.invokeLater(new Runnable()
{
public void run()
{
new A();
}
}
}//Closing the main method
}//Closing the class Combo
class A //implements ActionListener
{
JFrame jf;
JPanel jp;
JLabel label1;
A()
{
jf = new JFrame("JScrollPane");
label1 = new JLabel("Displaying a picture ",JLabel.CENTER);
//Creating an ImageIcon object to create a JLabel with image

Object Oriented Programming Concepts-15CS45
Chethan Raj C, Assistant Professor Dept. of CSE Page 96
ImageIcon image = new ImageIcon("nature.jpg");
JLabel label = new JLabel(image, JLabel.CENTER);
//Creating a JPanel and adding JLabel that contains the image
jp = new JPanel(new BorderLayout());
jp.add( label, BorderLayout.CENTER );
//Adding JPanel to JScrollPane
JScrollPane scrollP = new JScrollPane(jp);
//Adding JLabel and JScrollPane to JFrame
jf.add(label1,BorderLayout.NORTH);
jf.add(scrollP,BorderLayout.CENTER);
jf.setSize(350,270);
jf.setVisible(true);
}
}
When you run the code, you are presented a window that shows an image with a horizontal and a
vertical scroll bar.
Figure 1
Displaying two images with their individuals JScrollPane.
In the next code, we are going to display two images within a JFrame and each of these image has a
JScrollpane attached to it.
import javax.swing.*;
import java.awt.*;
public class ScrollPane3
{
Object Oriented Programming Concepts-15CS45
Chethan Raj C, Assistant Professor Dept. of CSE Page 97
public static void main(String args[])
{
SwingUtilities.invokeLater(new Runnable()
{
public void run()
{
new A();
}
}
}//Closing the main method
}//Closing the class Combo
class A
{
Object [] index;
JFrame jf;
JPanel jp1, jp2;
JLabel label;
A()
{
jf = new JFrame("JScrollPane");
jp1 = new JPanel();
label = new JLabel("Displaying two images ",JLabel.CENTER);
ImageIcon image1 = new ImageIcon("nature.jpg");
JLabel label1= new JLabel(image1, JLabel.CENTER);
jp1 = new JPanel(new BorderLayout());
jp1.add( label1, BorderLayout.CENTER );
JScrollPane scrollP1 = new JScrollPane(jp1);
scrollP1.setPreferredSize(new Dimension(300, 190));
ImageIcon image2 = new ImageIcon("nature2.jpg");
JLabel label2 = new JLabel(image2, JLabel.CENTER);
jp2 = new JPanel(new BorderLayout());
jp2.add( label2, BorderLayout.CENTER);
JScrollPane scrollP2 = new JScrollPane(jp2);
scrollP2.setPreferredSize(new Dimension(300, 190));
jf.add(label,BorderLayout.NORTH);
jf.add(scrollP1,BorderLayout.CENTER);
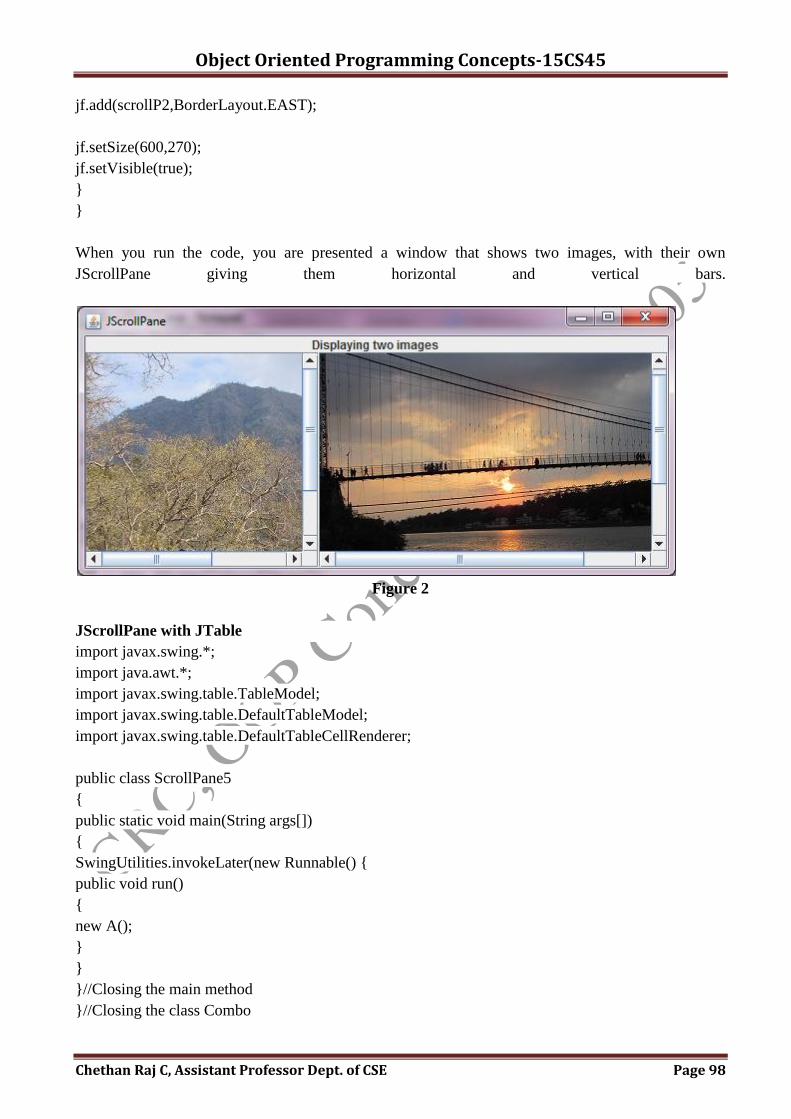
Object Oriented Programming Concepts-15CS45
Chethan Raj C, Assistant Professor Dept. of CSE Page 98
jf.add(scrollP2,BorderLayout.EAST);
jf.setSize(600,270);
jf.setVisible(true);
}
}
When you run the code, you are presented a window that shows two images, with their own
JScrollPane giving them horizontal and vertical bars.
Figure 2
JScrollPane with JTable
import javax.swing.*;
import java.awt.*;
import javax.swing.table.TableModel;
import javax.swing.table.DefaultTableModel;
import javax.swing.table.DefaultTableCellRenderer;
public class ScrollPane5
{
public static void main(String args[])
{
SwingUtilities.invokeLater(new Runnable() {
public void run()
{
new A();
}
}
}//Closing the main method
}//Closing the class Combo

Object Oriented Programming Concepts-15CS45
Chethan Raj C, Assistant Professor Dept. of CSE Page 99
class A
{
String [] index;
JFrame jf;
DefaultTableModel dTableModel;
JTable table1;
JLabel label1;
JPanel jp;
A()
{
index= new String[]{"Rank", "Country", "Forested Area(km sq)", "% of land area"};
jf= new JFrame("JScrollPane with JTable");
label1 = new JLabel("Top 10 countries with most forested area",JLabel.CENTER);
Object[][] rawData = new Object[] [] {
{"1", "Russia", "8,149,300", "49.40%"},
{"2", "Canada", "4.196,438", "49.24%"},
{"3", "Brazil", "4,777,980", "56.10%"},
{"4", "United States", "2,083,210", "33%"},
{"5", "China", "2,083,210", "21.83"},
{"6", "Congo", "1,819,326", "50%"},
{"7", "Australia", "1,147,832", "19.90%"},
{"8", "Argentina", "945,336", "34%"},
{"9", "Indonesia", "884,950", "46.46%"},
{"10", "India", "778,424", "24.68%"},
};
//creating a DeFaultTableModel object, which is subclass of TableModel
dTableModel = new DefaultTableModel(rawData, index);
//Initializing a JTable from DefaultTableModel.
table1 = new JTable(dTableModel);
//Adjusting the contents of each cell of JTable in CENTER
DefaultTableCellRenderer tableRenderer = new DefaultTableCellRenderer();
tableRenderer.setHorizontalAlignment(JLabel.CENTER); //Aligning the table data centrally.
table1.setDefaultRenderer(Object.class, tableRenderer);
//Creating a JPanel, setting it layout to BorderLayout and adding JTable to it.
jp= new JPanel(new BorderLayout());
jp.add(table1, BorderLayout.CENTER);
//Creating a JScrollPane and adding its functionalities to JPanel

Object Oriented Programming Concepts-15CS45
Chethan Raj C, Assistant Professor Dept. of CSE Page 100
JScrollPane scrollP = new JScrollPane(jp);
//Adding a JLabel and JScrollPane to JFrame.
jf.add(label1, BorderLayout.NORTH);
jf.add(scrollP,BorderLayout.CENTER);
jf.setSize(320,200);
jf.setVisible(true);
}
}
When user run the code presented a window shows us a table displaying the top 10 countries with the
maximum forested area. User created a JTable with a JScrollPane attached to it, giving it the
horizontal and vertical bars(when required).
Figure 3
JList
JList class is used to create a list with multiple values, allowing a user to select any of these
values. When a value is selected from JList, a ListSelectionEvent is generated, which is handled by
implementing ListSelectionListener interface. JList is another lightweight component which
extends JComponent class.
Constructors of JList
Constructor Description
public JList() Creates a JList with an empty, read-only, model.
public JList(E[] items) Creates a JList that is populated with the items of specfied
array.
public JList(ListModel <E>) Creates a JList that displays elements from the specified
ListModel.

Object Oriented Programming Concepts-15CS45
Chethan Raj C, Assistant Professor Dept. of CSE Page 101
Methods of JList class
Methods Description
public void
addListSelectionListener(ListSelectionListener
listener)
Gets a String message of JList.
public void clearSelection() Appends the text to the JList.
public E getSelectedValue()) Gets the total number of rows in JList.
An example of JList
import javax.swing.*;
import java.awt.*;
import java.awt.event.*;
import java.util.*;
public class List1
{
public static void main(String args[])
{
SwingUtilities.invokeLater(new Runnable() {
public void run()
{
new A();
}
}
}//Closing the main method
}//Closing the class Combo
class A
{
String [] seasons;
JFrame jf;
JList<String> list;
JLabel label1;
A()
{
seasons= new String[]{"Spring", "Summer", "Monsoon", "Autumn", "Winter"};
jf= new JFrame("JList");
list= new JList<String>(seasons);
label1 = new JLabel("Select your favorite season from the list :");

Object Oriented Programming Concepts-15CS45
Chethan Raj C, Assistant Professor Dept. of CSE Page 102
jf.add(label1);
jf.add(list);
jf.setLayout(new FlowLayout());
jf.setSize(260,200);
jf.setVisible(true);
}
}
When user run the code presented a window shown below -:
Figure 1
Creating and initializing a JList from an existing ListModel
In the given program user is handle events when a JRadioButton is checked or unchecked. In the next
code, user combined a JRadioButton with a JLabel to add an icon/image next to a radiobutton.
import javax.swing.*;
import java.awt.*;
import java.awt.event.*;
import java.util.*;
public class List2
{
public static void main(String args[])
{
SwingUtilities.invokeLater(new Runnable() {
public void run()
{
new A();
}
}
}//Closing the main method
Object Oriented Programming Concepts-15CS45
Chethan Raj C, Assistant Professor Dept. of CSE Page 103
}//Closing the class Combo
class A //implements ActionListener
{
String [] continents;
JFrame jf;
DefaultListModel<String> list1;
JList<String> list2;
JLabel label1;
A()
{
list1= new DefaultListModel<String>();
list1.addElement("Asia");
list1.addElement("Africa");
list1.addElement("North America");
list1.addElement("South America");
list1.addElement("Antarctica");
list1.addElement("Europe");
list1.addElement("Australia");
list2= new JList<String>(list1);
jf= new JFrame("JList");
label1= new JLabel("Name of all the continents in the world -");
jf.add(label1);
jf.add(list2);
jf.setLayout(new FlowLayout());
jf.setSize(300,250);
jf.setVisible(true);
}
}
When user run the code presented a window shown in the Figure2. This window displays a list
containing all the continents in our world -:

Object Oriented Programming Concepts-15CS45
Chethan Raj C, Assistant Professor Dept. of CSE Page 104
Figure 2
Handling JList events
import javax.swing.*;
import java.awt.*;
import java.awt.event.*;
import java.util.*;
import javax.swing.event.ListSelectionListener;
import javax.swing.event.ListSelectionEvent;
public class list3
{
public static void main(String args[])
{
SwingUtilities.invokeLater(new Runnable() {
public void run()
{
new A();
}
}
}//Closing the main method
}//Closing the class Combo4
class A implements ListSelectionListener
{
String [] fav;
JFrame jf;
JList<String> list;
JLabel label1, label2;
A()
{
fav = new String[]{"USA", "Switzerland", "India", "New Zealand", "Iceland"};

Object Oriented Programming Concepts-15CS45
Chethan Raj C, Assistant Professor Dept. of CSE Page 105
jf= new JFrame("JList");
list= new JList<String>();
label1 = new JLabel("Please select a country to visit");
label2 = new JLabel();
jf.add(label1);
jf.add(list);
jf.add(label2);
list.addListSelectionListener(this);
jf.setLayout(new FlowLayout());
jf.setSize(250,200);
jf.setVisible(true);
}
public void valueChanged(ListSelectionEvent e)
{
if (!e.getValueIsAdjusting())
{
label2.setText( (String)list.getSelectedValue() + " is selected from the list");
}
}
}
When user run the code presented a window shown in the Figure3. In this window user is asked to
select one of the countries in the list that user would like to visit -:
Figure 3
as soon as we clicked on the item Iceland, the window shows that we have selected the
item Icelandfrom the list, shown in the figure below-

Object Oriented Programming Concepts-15CS45
Chethan Raj C, Assistant Professor Dept. of CSE Page 106
Figure 4
List class
List class is used to create a list with multiple values, allowing a user to select any of the values.
When a value is selected from List, an ItemEvent is generated, which is handled by
implementing ItemListener interface. List is another component in AWT which
extends Componentclass.
Constructors of List
Constructor Description
public List() Creates a scrolling list.
public List(int rows) Creates a List with a number of rows.
public List(int rows,
boolean mode)
Creates a List with a number of rows, allowing us to select
multiple values from list if mode is true.
Methods of List class
Methods Description
public void add(String item) Adds the item to the end of List.
public void add(String item,
int index) Adds the item at a specific index in the list.
public void
addActionListener(ActionListener
al)
Adds a specific ActionListener to listen an Action event
generated when item is selected from this list.
public void
addItemListener(ItemListener al)
Adds a specific ItemListener to listen an Item event generated
when item is selected from this list.
public String getItem( int index) Gets an item from a specific index in the list.

Object Oriented Programming Concepts-15CS45
Chethan Raj C, Assistant Professor Dept. of CSE Page 107
public String getSelectedItem() Gets the selected item in the list.
public String[] getSelectedItems() Gets the selected item in the list.
public int getRows() Gets the total number of rows in the list.
An example of List, where you can select one item from the list.
Program to create a list of sports with 7 items, user can only select one item from the list.
import javax.swing.*;
import java.awt.*;
import java.awt.event.*;
public class ListEx1
{
String [] seasons;
Frame jf;
List list;
Label label1;
ListEx1()
{
jf= new Frame("List");
list= new List(7);
label1 = new Label("Select your favorite sports from the list :");
list.add("Badminton");
list.add("Hockey");
list.add("Tennis");
list.add("Football");
list.add("Cricket");
list.add("Formula One");
list.add("Rugby");
jf.add(label1);
jf.add(list);
jf.setLayout(new FlowLayout());
jf.setSize(260,220);
jf.setVisible(true);
}
public static void main(String... ar)
{

Object Oriented Programming Concepts-15CS45
Chethan Raj C, Assistant Professor Dept. of CSE Page 108
new ListEx1();
}
}
When user run the code presented a window displaying a list of sports, asking you to select your
favorite one from the list. We have selected Tennis from the list. -:
Figure 1
An example of List, where you can select multiple items from the list.
Program to create a list of seasons with 5 items, user can only multiple items from the list.
import javax.swing.*;
import java.awt.*;
import java.awt.event.*;
public class ListEx2
{
String [] seasons;
Frame jf;
List list;
Label label1;
ListEx2()
{
jf= new Frame("List");
//Creating a list with 5 items and boolean true allows us to select multiple items in the list.
list= new List(5, true);
label1 = new Label("Select your favorite seasons from the list :");

Object Oriented Programming Concepts-15CS45
Chethan Raj C, Assistant Professor Dept. of CSE Page 109
list.add("Spring");
list.add("Summer");
list.add("Monsoon");
list.add("Autumn");
list.add("Winter");
jf.add(label1);
jf.add(list);
jf.setLayout(new FlowLayout());
jf.setSize(260,200);
jf.setVisible(true);
}
public static void main(String... ar)
{
new ListEx2();
}
}
When user run the code presented a window displaying a list of seasons, asking you to select your
favorite seasons from the list. User as selected Spring and Monsoon from the list. -:
Figure 2
Handling List events when one item can be selected in the list
import javax.swing.*;
import java.awt.*;
import java.awt.event.*;
Object Oriented Programming Concepts-15CS45
Chethan Raj C, Assistant Professor Dept. of CSE Page 110
public class ListEx4 implements ItemListener
{
Frame jf;
List list;
Label label1, label2;
ListEx4()
{
jf= new Frame("List");
list= new List(8);
list.add("Red");
list.add("Black");
list.add("Blue");
list.add("Yellow");
list.add("Green");
list.add("Gray");
list.add("Turquoise");
list.add("Purple");
label1 = new Label("Please select your favorite color", Label.CENTER);
label2 = new Label();
jf.add(label1);
jf.add(list);
jf.add(label2);
//Registering class ListEx3 to listen to an ItemEvent, generated when an item in the list is selected.
list.addItemListener(this);
jf.setLayout(new FlowLayout());
jf.setSize(280,240);
jf.setVisible(true);
}
public void itemStateChanged(ItemEvent e)
{
List l = (List)e.getSource();
label2.setText("You have selected "+ l.getSelectedItem());
jf.setVisible(true);
}
public static void main(String... ar)
{
new ListEx4();
}

Object Oriented Programming Concepts-15CS45
Chethan Raj C, Assistant Professor Dept. of CSE Page 111
}
When user run the code presented a window shown in the Figure3. In this window you are asked to
select one of colors from the list -:
Figure 3
User has selected item Blue from the list and hence this selected item is notified to us, shown in the
figure below
Figure4
Handling List events when multiple items can be selected in the list.
import javax.swing.*;
import java.awt.*;
import java.awt.event.*;
public class ListEx4 implements ItemListener
{
Frame jf;

Object Oriented Programming Concepts-15CS45
Chethan Raj C, Assistant Professor Dept. of CSE Page 112
List list;
Label label1, label2;
ListEx5()
{
jf= new Frame("List");
list= new List(8,true);
list.add("Red");
list.add("Black");
list.add("Blue");
list.add("Yellow");
list.add("Green");
list.add("Gray");
list.add("Turquoise");
list.add("Purple");
label1 = new Label("Please select your favorite color", Label.CENTER);
label2 = new Label();
jf.add(label1);
jf.add(list);
jf.add(label2);
//Registering class ListEx4 to listen to an ItemEvent, generated when an item in the list is selected.
list.addItemListener(this);
jf.setLayout(new FlowLayout());
jf.setSize(280,240);
jf.setVisible(true);
}
public void itemStateChanged(ItemEvent e)
{
String selected="";
List l = (List)e.getSource();
String str[]= l.getSelectedItems();
for(String s: str)
selected += s + " ";
label2.setText("You have selected - "+ selected);
jf.setVisible(true);
}
public static void main(String... ar)
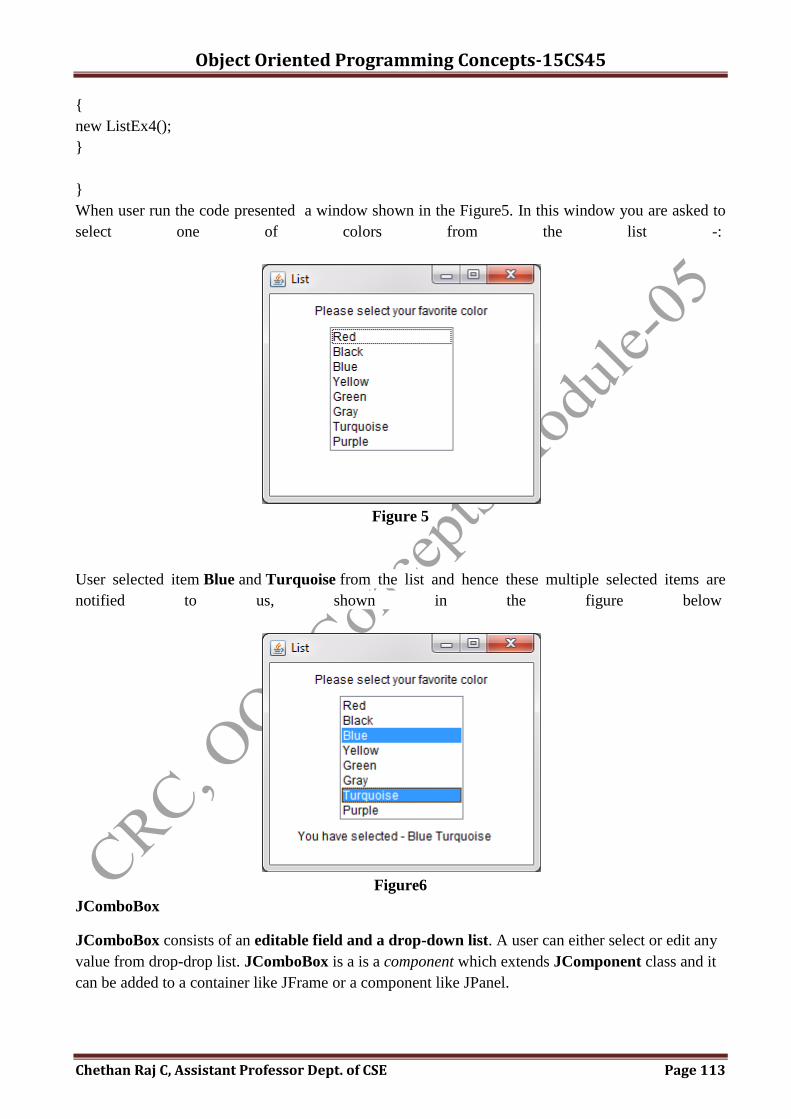
Object Oriented Programming Concepts-15CS45
Chethan Raj C, Assistant Professor Dept. of CSE Page 113
{
new ListEx4();
}
}
When user run the code presented a window shown in the Figure5. In this window you are asked to
select one of colors from the list -:
Figure 5
User selected item Blue and Turquoise from the list and hence these multiple selected items are
notified to us, shown in the figure below
Figure6
JComboBox
JComboBox consists of an editable field and a drop-down list. A user can either select or edit any
value from drop-drop list. JComboBox is a is a component which extends JComponent class and it
can be added to a container like JFrame or a component like JPanel.

Object Oriented Programming Concepts-15CS45
Chethan Raj C, Assistant Professor Dept. of CSE Page 114
Constructors of JComboBox
Constructor Description
public JComboBox() Creates a JComboBox with a default data model.
public JComboBox(E[] items) Creates a JComboBox that takes its items from an
existing array.
public JComboBox(ComboBoxModel
<E>)
Creates a JComboBox that takes its items from an
existing ComboBoxModel.
Methods of JComboBox class
Methods Description
public void addItem(E item) Adds an item to JComboBox.
public Object getSelectedItem() Gets the item selected by the user from JCombobox.
public void setEditable(boolean b) Allows to edit the option selected from the dropdown
list of items in JComboBox.
addActionListener(ActionListener a) Adds an ActionListener.
An example of JComboBox
import javax.swing.*;
import java.awt.*;
import java.awt.event.*;
import java.util.*;
public class Combo
{
public static void main(String... ar)
{
SwingUtilities.invokeLater(new Runnable() {
public void run()
{
new A();
}
}
}//Closing the main method
}//Closing the class Combo
class A //implements ActionListener
{
String [] BRICS;
JFrame jf;

Object Oriented Programming Concepts-15CS45
Chethan Raj C, Assistant Professor Dept. of CSE Page 115
JComboBox<String> combo;
A()
{
BRICS = new String[]{"Russia", "India", "South Africa", "Brazil", "China"};
jf= new JFrame("JComboBox");
combo= new JComboBox<String>(BRICS);
jf.add(combo);
jf.setLayout(new FlowLayout());
jf.setSize(300,200);
jf.setVisible(true);
}
}
When user run the code presented a window shown below -:
Figure 1
When user click on the arrow poiting down, and output are presented with a dropdown list, with its
first option "Russia" preselected
Figure 2

Object Oriented Programming Concepts-15CS45
Chethan Raj C, Assistant Professor Dept. of CSE Page 116
Remember the last JCheckbox(ch4) will not be visible because its icon has covered it, but it is still a
checkbox, just covered by its icon.
Creating and initializing a JComboBox from an existing ComboBoxModel
In the upcoming code, we are going to handle events when a JRadioButton is checked or unchecked.
In the next code, we have also combined a JRadioButton with a JLabel to add an icon/image next to a
radiobutton.
import javax.swing.*;
import java.awt.*;
import java.awt.event.*;
import java.util.*;
public class Combo2
{
public static void main(String... ar)
{
SwingUtilities.invokeLater(new Runnable() {
public void run()
{
new A();
}
}
}//Closing the main method
}//Closing the class Combo
class A //implements ActionListener
{
String [] planets;
JFrame jf;
DefaultComboBoxModel<String> combo1;
JComboBox<String> combo2;
A()
{
planets = new String[]{"Mercury", "Venus", "Earth", "Mars", "Jupiter", "Saturn", "Uranus", "Pluto"};
combo1= new DefaultComboBoxModel<String>(planets);
combo2= new JComboBox<String>(combo1);
jf= new JFrame("JComboBox");
jf.add(combo2);

Object Oriented Programming Concepts-15CS45
Chethan Raj C, Assistant Professor Dept. of CSE Page 117
jf.setLayout(new FlowLayout());
jf.setSize(300,250);
jf.setVisible(true);
}
}
When user run the code and output are presented a window shown in the Figure3 below -:
Figure 3
When user click on the arrow pointing down, you are presented with a dropdown list, with its first
option "Mercury" preselected.
Figure 4
Handling JComboBox events
import javax.swing.*;
import java.awt.*;
import java.awt.event.*;
import java.util.*;

Object Oriented Programming Concepts-15CS45
Chethan Raj C, Assistant Professor Dept. of CSE Page 118
public class Combo4
{
public static void main(String... ar)
{
SwingUtilities.invokeLater(new Runnable() {
public void run()
{
new A();
}
});
}//Closing the main method
}//Closing the class Combo4
class A implements ActionListener
{
String [] BRICS;
JFrame jf;
JComboBox<String> combo;
JLabel label1;
A()
{
BRICS = new String[]{"Russia", "India", "South Africa", "Brazil", "China"};
jf= new JFrame("JComboBox");
combo= new JComboBox<String>(BRICS);
label1 = new JLabel();
jf.add(combo);
combo.addActionListener(this);
jf.setLayout(new FlowLayout());
jf.setSize(210,200);
jf.setVisible(true);
}
public void actionPerformed(ActionEvent ae)
{
JComboBox cb = (JComboBox)ae.getSource();
label1.setText( ((String)cb.getSelectedItem()) + " is selected");
jf.add(label1);
jf.setVisible(true);
}
}

Object Oriented Programming Concepts-15CS45
Chethan Raj C, Assistant Professor Dept. of CSE Page 119
When user run the code and are presented a window shown in the Figure5 below -:
Figure 5
When user check a JComboBox an ActionEvent is fired and presented a message to display which
option of JComboBox is selected. For example, when user select the option of South Africa from
dropdown list of JComboBox, and are notified like -
Figure6
Creating an editable JComboBox
import javax.swing.*;
import java.awt.*;
import java.awt.event.*;
import java.util.*;
public class Combo5
{
public static void main(String args[])
{
SwingUtilities.invokeLater(new Runnable()
{
public void run()
{
new A();
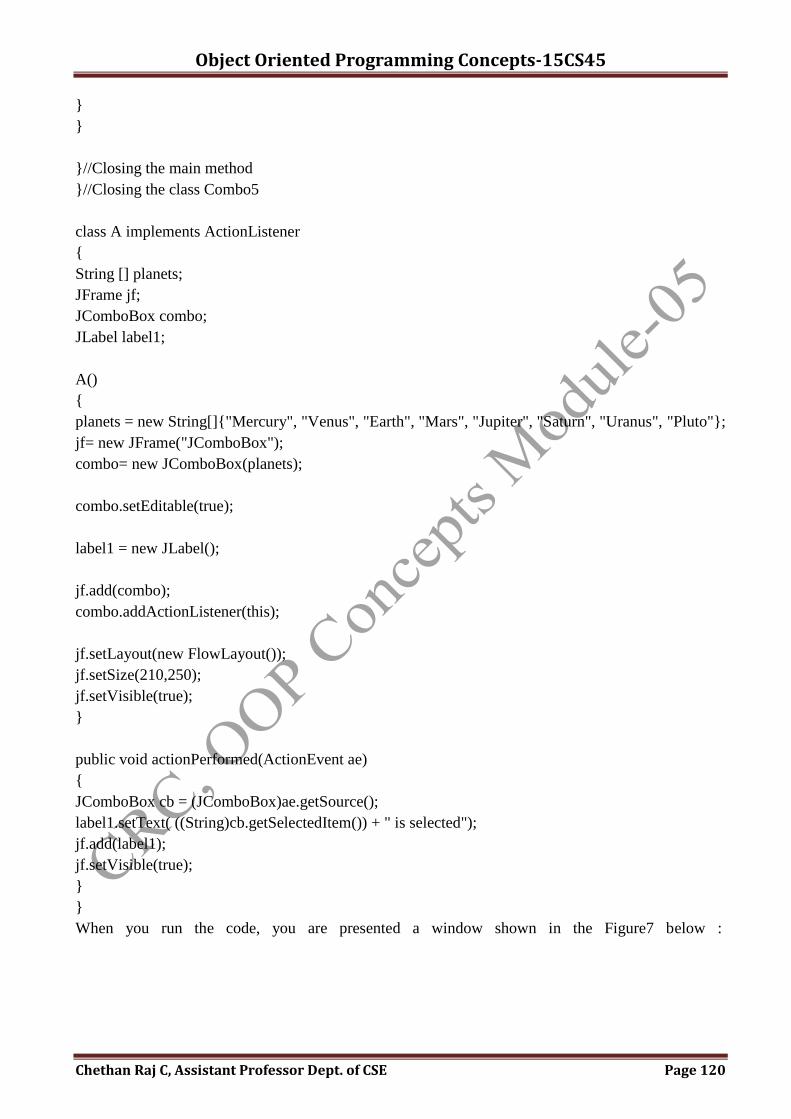
Object Oriented Programming Concepts-15CS45
Chethan Raj C, Assistant Professor Dept. of CSE Page 120
}
}
}//Closing the main method
}//Closing the class Combo5
class A implements ActionListener
{
String [] planets;
JFrame jf;
JComboBox combo;
JLabel label1;
A()
{
planets = new String[]{"Mercury", "Venus", "Earth", "Mars", "Jupiter", "Saturn", "Uranus", "Pluto"};
jf= new JFrame("JComboBox");
combo= new JComboBox(planets);
combo.setEditable(true);
label1 = new JLabel();
jf.add(combo);
combo.addActionListener(this);
jf.setLayout(new FlowLayout());
jf.setSize(210,250);
jf.setVisible(true);
}
public void actionPerformed(ActionEvent ae)
{
JComboBox cb = (JComboBox)ae.getSource();
label1.setText( ((String)cb.getSelectedItem()) + " is selected");
jf.add(label1);
jf.setVisible(true);
}
}
When you run the code, you are presented a window shown in the Figure7 below :
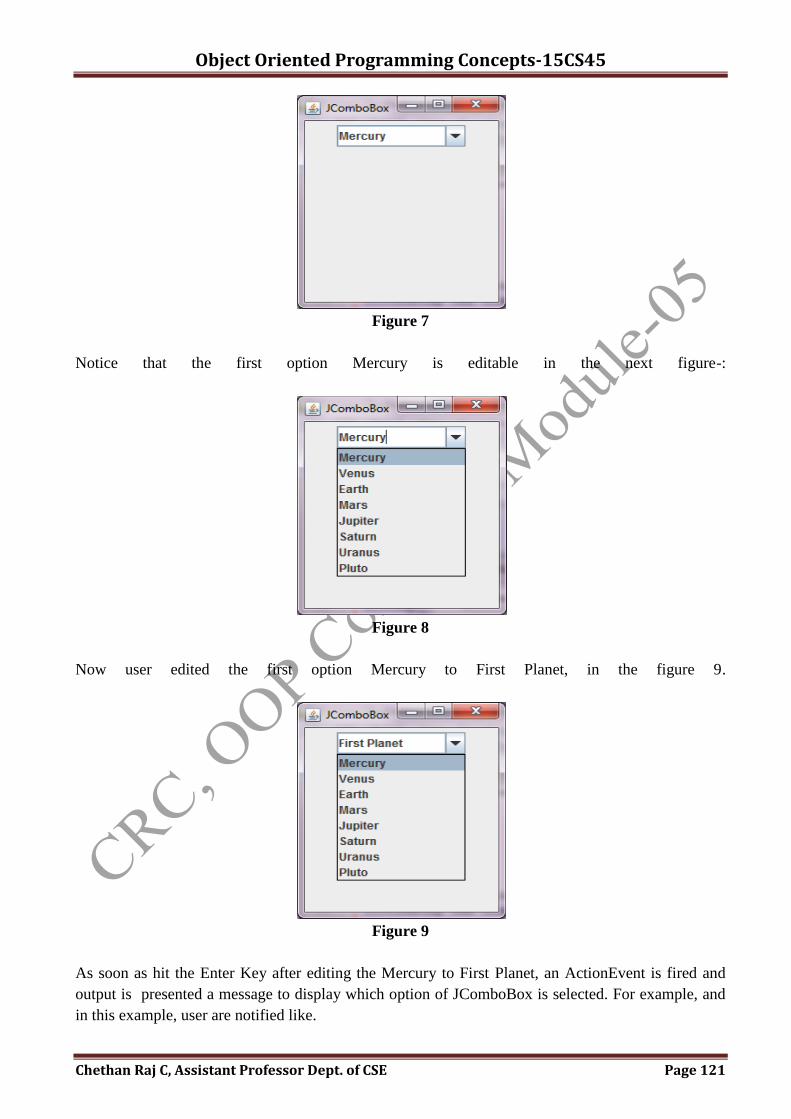
Object Oriented Programming Concepts-15CS45
Chethan Raj C, Assistant Professor Dept. of CSE Page 121
Figure 7
Notice that the first option Mercury is editable in the next figure-:
Figure 8
Now user edited the first option Mercury to First Planet, in the figure 9.
Figure 9
As soon as hit the Enter Key after editing the Mercury to First Planet, an ActionEvent is fired and
output is presented a message to display which option of JComboBox is selected. For example, and
in this example, user are notified like.

Object Oriented Programming Concepts-15CS45
Chethan Raj C, Assistant Professor Dept. of CSE Page 122
Fig: Drop-Down List by using Java AWT package.
Program Description:
The program uses the Choice class for creating a Drop-Down List. This program is also using add()
method of the Choice class for add item to the list like "R", "INDIA" and "WELCOME".
Choice():- This is the default constructor of Choice class. This creates simply a drop-down list.
Here is the code of this program:
import java.awt.*;
import java.awt.event.*;
public class ChoiceOptionExample{
public static void main(String[] args) {
Frame frame=new Frame("Choice");
Label label=new Label("What is your Choice:");
Choice choice=new Choice();
frame.add(label);
frame.add(choice);
choice.add("R");
choice.add("INDIA");
choice.add("WELCOME");
frame.setLayout(new FlowLayout());
frame.setSize(250,150);
frame.setVisible(true);

Object Oriented Programming Concepts-15CS45
Chethan Raj C, Assistant Professor Dept. of CSE Page 123
frame.addWindowListener(new WindowAdapter(){
public void windowClosing(WindowEvent e){
System.exit(0);
}
}
}
}
Output this program:
JTable
JTable class is used to create a table with information displayed in multiple rows and columns. When
a value is selected from JTable, a TableModelEvent is generated, which is handled by
implementing TableModelListener interface. JTable is another lightweight component which
extends JComponent class.
Constructors of JTable
Constructor Description
public JTable()
Constructs a default JTable that is initialized with a
default data model, a default column model, and a
default selection model.
public JTable(int rows, int columns) Creates a JTable to display the values in rows and
columns, using DefaultTableModel.
public JTable(TableModel tm)
Creates a JTable that is initialized with tm as the data
model, default column model, and a default selection
model.
Methods of JTable class
Methods Description

Object Oriented Programming Concepts-15CS45
Chethan Raj C, Assistant Professor Dept. of CSE Page 124
public TableModel getModel() Gets the TableModel whose data is displayed by
JTable.
public int getRowCount() Gets the current total number of the rows in the JTable.
public int getColumns() Gets the current total number of the columns in the
JTable.
public void setDefaultRenderer(Class <?>
class, TableCellRenderer renderer)
Sets the default cell renderer to be used to set the
values, alignment, background of a cell in JTable
An example of JTable
import javax.swing.*;
import java.awt.*;
import java.awt.event.*;
import java.util.*;
import javax.swing.table.DefaultTableCellRenderer;
public class Table1
{
public static void main(String... ar)
{
SwingUtilities.invokeLater(new Runnable() {
public void run()
{
new A();
}
});
}//Closing the main method
}//Closing the class Combo
class A //implements ActionListener
{
String [] index;
JFrame jf;
JTable table1, table2;
JLabel label1, label2;
A()
{
index= new String[]{"Rank", "Country", "GDP(millions of US$)"};
jf= new JFrame("JTable");
label1 = new JLabel("Top 10 economies in the world");

Object Oriented Programming Concepts-15CS45
Chethan Raj C, Assistant Professor Dept. of CSE Page 125
Object[][] rawData = new Object[] [] {
{"1", "USA", "$19.42 Trillion"},
{"2", "China","$11.8 Trillion"},
{"3", "Japan", "$4.84 Trillion"},
{"4", "Germany", "$3.42 Trillion"},
{"5", "United Kingdom", "$2.91 Trillion"},
{"6", "India", "$2.45 Trillion"},
{"7", "France", "$2.42 Trillion"},
{"8", "Brazil", "$2.14 Trillion"},
{"9", "Italy", "$1.81 Trillion"},
{"10", "Canada", "$1.6 Trillion"}
};
table1 = new JTable(rawData, index);
JScrollPane scrollP = new JScrollPane(table1);
DefaultTableCellRenderer tableRenderer = new DefaultTableCellRenderer();
tableRenderer.setHorizontalAlignment(JLabel.CENTER); //Aligning the table data centrally.
table1.setDefaultRenderer(Object.class, tableRenderer);
scrollP.setBorder(BorderFactory.createEmptyBorder()); //How to remove the border of JScrollPane.
scrollP.setPreferredSize(new Dimension(400, 180)); //Setting the size of JScrollPane
//Setting the label2 with message to show total number of rows and columns in JTable.
label2 = new JLabel("Rows : " + table1.getRowCount() + ", Columns : "+ table1.getColumnCount()
);
jf.add(label1);
jf.add(scrollP);
jf.add(label2);
jf.setLayout(new FlowLayout());
jf.setSize(500,280);
jf.setVisible(true);
}
}
}
When user run the code, presented a window shown below -:

Object Oriented Programming Concepts-15CS45
Chethan Raj C, Assistant Professor Dept. of CSE Page 126
Figure 1
Creating and initializing a JTable from an existing TableModel
In the code, user going to create a JTable by using its constructor that takes an object
of TableModel object. We will create table using DefaultTableModel, which has
implemented TableModelinterface and user use this table to create JTable.
import javax.swing.*;
import java.awt.*;
import javax.swing.table.TableModel;
import javax.swing.table.DefaultTableModel;
import javax.swing.table.DefaultTableCellRenderer;
public class Table4
{
public static void main(String args[])
{
SwingUtilities.invokeLater(new Runnable() {
public void run()
{
new A();
}
}
}//Closing the main method
}//Closing the class Combo
class A
{
String [] index;
JFrame jf;
DefaultTableModel dTableModel;
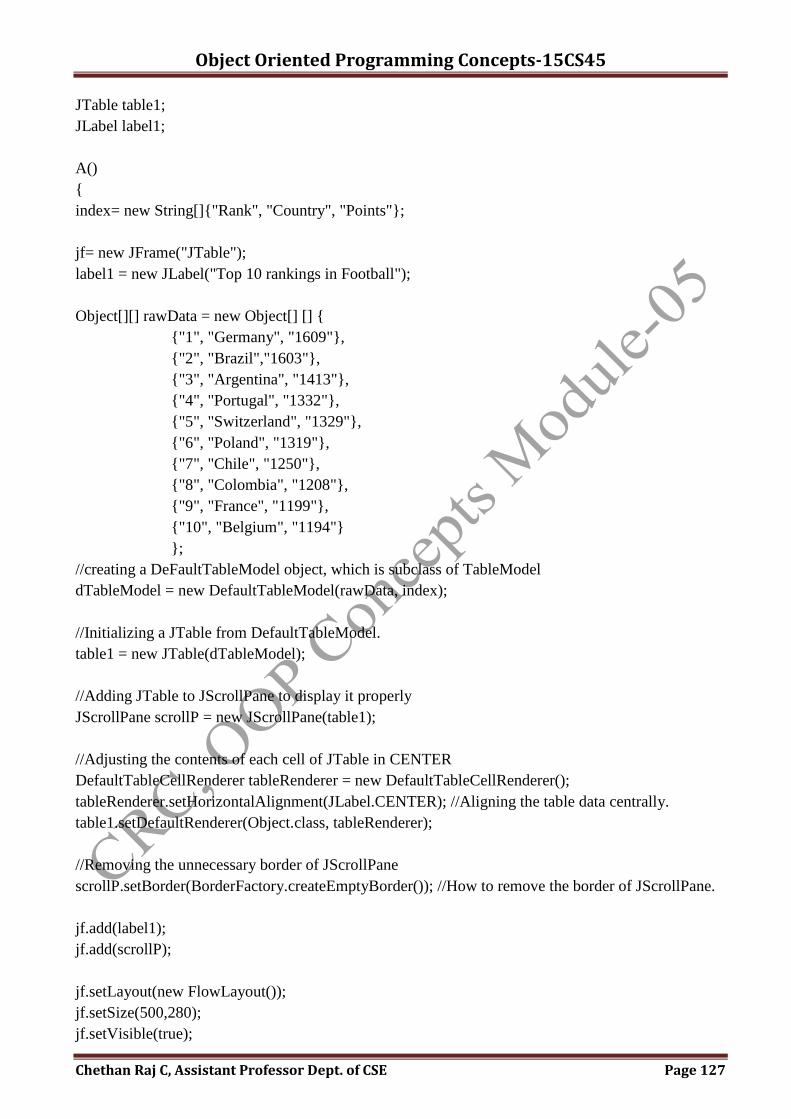
Object Oriented Programming Concepts-15CS45
Chethan Raj C, Assistant Professor Dept. of CSE Page 127
JTable table1;
JLabel label1;
A()
{
index= new String[]{"Rank", "Country", "Points"};
jf= new JFrame("JTable");
label1 = new JLabel("Top 10 rankings in Football");
Object[][] rawData = new Object[] [] {
{"1", "Germany", "1609"},
{"2", "Brazil","1603"},
{"3", "Argentina", "1413"},
{"4", "Portugal", "1332"},
{"5", "Switzerland", "1329"},
{"6", "Poland", "1319"},
{"7", "Chile", "1250"},
{"8", "Colombia", "1208"},
{"9", "France", "1199"},
{"10", "Belgium", "1194"}
};
//creating a DeFaultTableModel object, which is subclass of TableModel
dTableModel = new DefaultTableModel(rawData, index);
//Initializing a JTable from DefaultTableModel.
table1 = new JTable(dTableModel);
//Adding JTable to JScrollPane to display it properly
JScrollPane scrollP = new JScrollPane(table1);
//Adjusting the contents of each cell of JTable in CENTER
DefaultTableCellRenderer tableRenderer = new DefaultTableCellRenderer();
tableRenderer.setHorizontalAlignment(JLabel.CENTER); //Aligning the table data centrally.
table1.setDefaultRenderer(Object.class, tableRenderer);
//Removing the unnecessary border of JScrollPane
scrollP.setBorder(BorderFactory.createEmptyBorder()); //How to remove the border of JScrollPane.
jf.add(label1);
jf.add(scrollP);
jf.setLayout(new FlowLayout());
jf.setSize(500,280);
jf.setVisible(true);

Object Oriented Programming Concepts-15CS45
Chethan Raj C, Assistant Professor Dept. of CSE Page 128
}
}
When user run the code, output provides the window shown in the Figure2. This window displays a
JTable showing the top 10 world rankings in Football
Figure 2
Handling JTable events by implementing TableModelListener
To handle the events occuring when a particular cell of JTable is selected or when it's value is
changed, to handle such events, then implement TableModelListener interface and will provide
implementation of its method tablechanged().
import javax.swing.*;
import java.awt.*;
import javax.swing.table.TableModel;
import javax.swing.event.TableModelEvent;
import javax.swing.table.DefaultTableModel;
import javax.swing.event.TableModelListener;
import javax.swing.table.DefaultTableCellRenderer;
public class Table5
{
public static void main(String... ar)
{
SwingUtilities.invokeLater(new Runnable() {
public void run()
{
new A();
}
}
}//Closing the main method

Object Oriented Programming Concepts-15CS45
Chethan Raj C, Assistant Professor Dept. of CSE Page 129
}//Closing the class Combo
class A implements TableModelListener
{
String [] index;
JFrame jf;
JPanel jp;
DefaultTableModel dTableModel;
JTable table1, table2;
JLabel label1, label2;
A()
{
index= new String[]{"Rank", "Country", "Points"};
jf = new JFrame("JTable");
label1 = new JLabel("Top 10 rankings in Football");
label2 = new JLabel("");
Object[][] rawData = new Object[] [] {
{"1", "Germany", "1609"},
{"2", "Brazil","1603"},
{"3", "Argentina", "1413"},
{"4", "Portugal", "1332"},
{"5", "Switzerland", "1329"},
{"6", "Poland", "1319"},
{"7", "Chile", "1250"},
{"8", "Colombia", "1208"},
{"9", "France", "1199"},
{"10", "Belgium", "1194"}
};
//creating a DeFaultTableModel object, which is subclass of TableModel
dTableModel = new DefaultTableModel(rawData, index);
//Initializing a JTable from DefaultTableModel.
table1 = new JTable(dTableModel);
JScrollPane scrollP = new JScrollPane(table1);
DefaultTableCellRenderer tableRenderer = new DefaultTableCellRenderer();
tableRenderer.setHorizontalAlignment(JLabel.CENTER); //Aligning the table data centrally.
table1.setDefaultRenderer(Object.class, tableRenderer);
scrollP.setBorder(BorderFactory.createEmptyBorder()); //How to remove the border of JScrollPane.

Object Oriented Programming Concepts-15CS45
Chethan Raj C, Assistant Professor Dept. of CSE Page 130
scrollP.setPreferredSize(new Dimension(350, 180)); //Setting the size of JScrollPane
jf.add(label1);
jf.add(scrollP);
jf.add(label2);
//Registering our Jtable for event listening
table1.getModel().addTableModelListener(this);
jf.setLayout(new FlowLayout());
jf.setSize(400,340);
jf.setVisible(true);
}
public void tableChanged(TableModelEvent e)
{
TableModel tabModel= (TableModel)e.getSource();
int row = e.getFirstRow();
int column = e.getColumn();
//Retrieving the value a specific row,column from the JTable and setting this value to JLabel, to show
the selected or a new edited cell value.
label2.setText( (String)tabModel.getValueAt(row,column));
jf.setVisible(true);
}
}
When user run the code the output provides the window shown in the Figure 3, showing the top 10
rankings of international Football country name
\
Figure 3
Now user selected and edited Poland to Polska and as soon as finished editing it, user notifed about
the change in the window itself.

Object Oriented Programming Concepts-15CS45
Chethan Raj C, Assistant Professor Dept. of CSE Page 131
Figure 4