objective - connect · web viewyou can type the number in the box, click the field help button to...
TRANSCRIPT

Adjust InvoicesObjectiveThis document provides instruction on how to find and modify invoices using the Munis Adjust Invoices program.
OverviewThe Invoices program allows you to view and modify invoices within Munis General Billing. The Inquire option allows you to search and view invoices; Modify allows you to update information, as necessary.
PrerequisitesBefore you can successfully complete this process, you must ensure that roles granting the necessary permissions have been assigned to your user account. If the roles have not been established, contact the system administrator to have them updated or added into the Munis system.
Confirm the following: The proper settings are established in the General Billing Settings program. Adjustment codes are established in the Accounts Receivable Miscellaneous Codes
program.

ProcedureUse the following procedure to modify an invoice:
1. Open the Adjust Invoices program.General Revenues > General Billing > Invoice Processing > Adjust Invoices
2. Click Search.
3. Complete the fields, as required, using the following table as a guide.
Field Description NotesYear/Period These boxes indicate the general ledger
year and period to which these invoices posted.These boxes are not accessible when you are updating a record.
Customer This box indicates the identification or account number of the customer that received the invoice.You can type the number in the box, click the field help button to conduct a search for a customer, or click the folder button to add a customer in the Customers program.Notes: Once you add the customer number,
the program displays the address information for the customer under the Customer box. It also includes the insurance code and policy information

Field Description Notesin the Ins Code and Ins Policy boxes if this information exists on the customer record.
You can maintain customer information according to your user permissions.
Addr No This box indicates the optional address of the customer, if any.
AR Code This box indicates the accounts receivable (AR) code for the invoice.There is no access to this box during the update process.
Account This box indicates the number of the account associated with the invoice.You can type the account number in the box. The number you type must exist in the Account Numbers program.If there are fewer than 100 account number records, the Account box is not available.Note: Your ability to maintain account information is dependent upon the user permissions established for your role.There is no access to this box during the update process.
Invoice This box indicates the invoice number.Project Strings Apply
If you select this check box, it indicates that the invoice is a project accounting invoice.There is no access to this box during the update process.
Invoice Date This box indicates the date the invoice was created.Type a date in the box, click the calendar button to select the date, or leave the default invoice date.
Due Date This box indicates the date that payment is due.Type a date in the box, click the calendar button to select the date, or leave the default invoice due date.
Interest Date This box indicates the date interest begins to calculate on past due amounts.The default interest date is the date determined by adding the number of days established in the Settings program to the invoice date.Type a date in the box, click the calendar button to select the date, or leave the default invoice interest date.
Discount Code This box indicates the discount code applied to the invoice.

Field Description NotesThere is no access to this box during the update process.
Discount Percent This box indicates the discount percentage applied to the invoice.There is no access to this box during the update process.
Department This list indicates the code for the department associated with the invoice.Department codes are established in the System Administration Department Codes program.
Cash Account This box indicates the general ledger cash account associated with the invoice.There is no access to this box during the update process.
Total This box indicates the total amount on the invoice.This is a display-only value.
Bill This box indicates the original amount on the invoice.This is a display-only value.
Adj This box indicates the amount of any adjustments.This is a display-only value.
Paid This box indicates the amount paid by the customer.This is a display-only value.
Due This box indicates the amount due on the invoice. The amount due is the original bill plus any adjusted amount, minus what has already been paid.This is a display-only value.
Contract Number This box allows you to specify the contract number associated with the invoice. The folder button to the right of the field opens Contract Inquiry for the associated contract number.
Customer PO This box indicates the customer’s purchase order number.
Insurance Code This list indicates the insurance code associated with the customer account number (if available).These codes are established in the Insurance Companies program.
Insurance Policy This box indicates the insurance policy name and/or number associated with the customer account number (if available).
Parcel This box indicates the real estate parcel code associated with the invoice.

4. Click Accept to save your changes.

5. Click Detail to update specific invoice details.
6. Click Accept to save the changes.The Reason Code screen displays.
7. Select a reason code and click Accept.
8. Click Return to return to the main screen.
9. From the main screen, click Post Adjustment in the Menu group on the ribbon.

10. Click Post or Cancel. If you click Post, the following screen appears:
11. Enter a journal description.
12. Click Accept to continue processing.
If you choose to close the program, you must output the report before changes to the invoice can be posted. If you do not output the report, the program displays the following message:
If you click Yes, the program outputs the report and posts changes; if you click No, changes are not posted.

DetailTo update general information regarding the invoice, individual line item charges, and any payment activity:
1. Click Detail in the Menu group on the Invoice Adjustments screen to display the Invoice Line Adjustments screen.
2. Click Update to modify the data; refer to the Field Descriptions table for details.
Field Description NotesInvoice HeaderYear This box indicates the billing year for
the invoice. This is a display-only value.
Invoice This box indicates the invoice number. There is no access to this box.
Total Invoice This box indicates the total amount of the invoice. This is a display-only value.
Customer This box indicates the customer to whom the invoice was billed. This is a display-only value.
Invoice DetailLine This box indicates the detail line
number. This is a display-only value.

Field Description NotesCharge Code This box indicates the charge
code. This field is only accessible when adding an invoice. The AR Category must be 1, General Billing. You receive a warning if the charge code is associated with sales tax.There is no access to this box during the update process.
UOM This box indicates the unit of measure and is only available if the charge code is not for a fixed amount.Important: In this program, sales tax must be manually calculated. For example, if you modify a line that is subject to sales tax, the sales tax lines must then be calculated manually.
Quantity This box indicates the quantity to be invoiced and is only available if the charge code is not for a fixed amount.If quantity is not relevant, use Qty 1.
Price This box indicates the unit price. A negative amount is permitted. However, an invoice must contain all positive bill detail lines or all negative bill detail lines. That is, if a bill has a positive line amount, then a second line cannot be negative. Similarly, if a bill has a negative line amount, than a second line cannot be positive.Note: If a bill has just one line, and if that line is positive, you are not permitted to change it to a credit. However, if a bill has just one line, and if that line is negative, the user is permitted to change it to a positive. There is no entry to discount amount if the line is a credit.Important: In this program, sales tax must be manually calculated. For example, if you modify a line that is subject to sales tax, the sales tax lines must then be calculated manually.
Discount Amount
This box indicates the discount amount. It must be less than the Qty x Price and is subtracted from the gross price.Important: In this program, sales tax must be manually calculated. For example, if you modify a line that is

Field Description Notessubject to sales tax, the sales tax lines must then be calculated manually.
Original Amount This box indicates the original amount on the invoice before you make any changes. This is a display-only value.
Adjusted Amount
This box indicates the original amount billed, including any adjustments. This is a display-only value.
New Adjusted Amount
This box indicates the amount billed, including any adjustments that you are currently making to the invoice. This is a display-only value.
Recipient This list indicates the recipient of services purchased by a general billing customer. For example, a student is the recipient of school services. Recipients may be associated with invoice detail lines. The list displays all recipients with a Billing CID that matches the Customer. The recipient name prints after each detail line. Recipients are established in the Recipients program.
Billed This box indicates the amount billed.This is a display-only value.
Paid Amount This box indicates the amount paid on the invoice line.This is a display-only value.
Due Amount This box indicates the amount left when the paid amount is subtracted from the billed amount.This is a display-only value.
3. Click Accept to save your changes.When you make changes that affect the amount of the invoice, the program displays the Reason Code screen.
4. Select the reason for the adjustment to the invoice amount, and then click Accept.You can choose to close the program if updates are complete or continue to make adjustments to individual GL detail lines. If you choose to close the program, you must output the report before changes to the invoice can be posted.


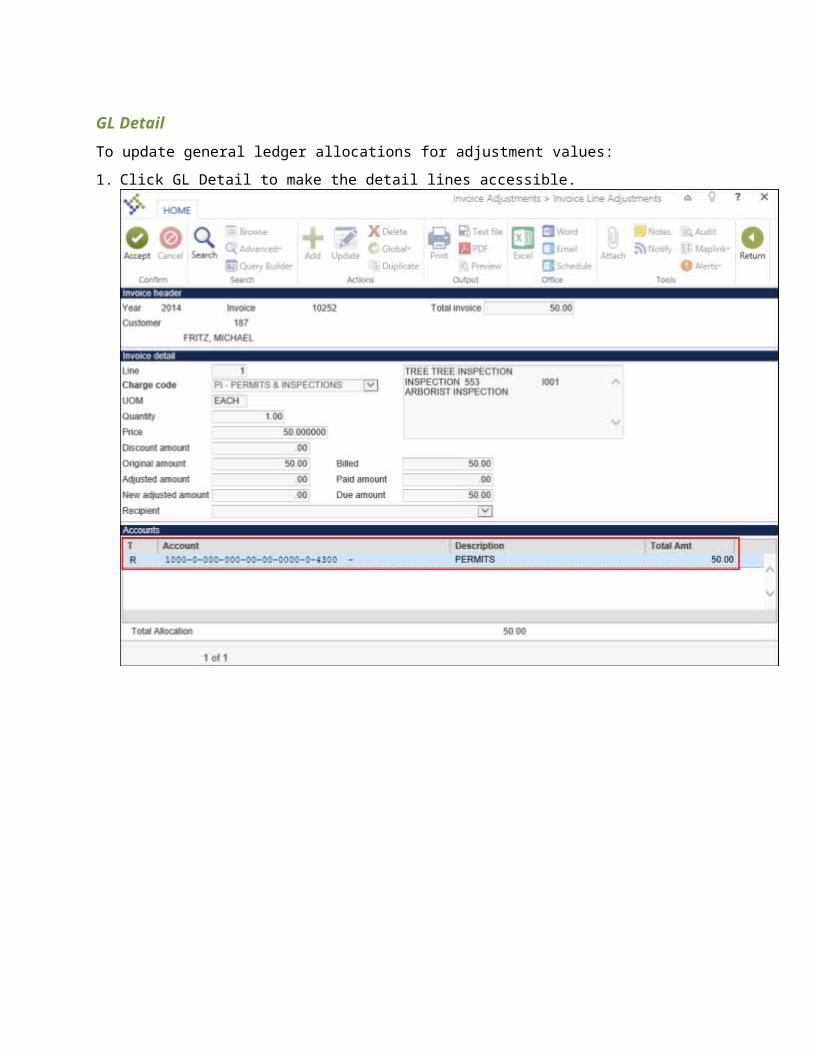
GL DetailTo update general ledger allocations for adjustment values:
1. Click GL Detail to make the detail lines accessible.

2. Double-click a line to display its details on the Invoice Line Account Adjustment screen.
3. Click Update to update the values in any of the available fields described in the following table. Field Description NotesRevenue These boxes contain the organization,
object, and projects codes for the revenue account.You can type the codes in the boxes or click a field help button to select a code from a list.
New Adj Amt This box contains the new adjusted amount for the detail line.Type a positive value to increase the invoice amount; type a negative value to decrease the invoice amount.The sum of all GL lines must equal the total amount on the invoice.
4. Click Accept to save your changes, and then close the screen to return to the Open Item Detail screen.
You can choose to close the program if updates are complete or continue to add GL detail lines to the invoice. If you choose to close the program, you must output the report before changes to the invoice can be posted.
Add GLTo add a general ledger (GL) line to the invoice:

1. Click Add GL.
The program displays the Invoice Line Account Adjustment screen again for entry of a new GL detail line as described in the table above. If you add a GL line, the sum of both GL lines needs to equal the invoice amount.
2. Click Accept to save your changes, and then close the screen to return to the Open Item Detail screen.
You can close the program if updates are complete or cancel all changes made to the invoice. If you close the program, you must output the report before changes to the invoice can be posted.
Cancel AdjustmentTo cancel all updates you made to the invoice before you close the program:
1. Click More and then Cancel AdjustmentThe program displays a warning message:
2. Click Yes to clear all changes; click No to retain updates.
Note: The Cancel Maint button and functionality is also available on the Open Item Header screen.
Line AuditTo view the adjustments you have made to the invoice:
1. Click Line Audit.The program displays the Audit Detail screen and the details of the current detail line. If you made changes to more than one detail line, the program displays all affected lines in a set of audit detail records and you can use the navigation bar at the bottom of the screen to view
subsequent or previous records.
2. Close the screen when you are finished viewing audit records for detail line adjustments.
3. Close the program if updates are complete, or add user defined informational fields to the invoice. If you close the program, you must first output the report before posting changes to the invoice.
User DefTo update user defined field labels:
1. Click User Def.The program displays the Open Items Detail User-Defined Fields screen, which shows the labels of user-defined informational fields if they have been set up to be used in the General Billing Settings program.

2. Click Update and type or update labels for the user-defined fields and select the Print check box if you want to include the field information in the invoice.Note: The User Def button and functionality is also available on the Open Item Header screen.
3. Click Accept when updates are complete and close the screen to return to the Open Item Detail screen.
4. When all updates are complete, close the Open Item Detail screen to return to the Open Item Header screen.
AuditsTo view changes that have been made to an invoice:
1. Click Audits in the Menu group on the Invoice Adjustments screen to display the Invoice Master Audit screen and the list of changes made to the invoice.
HistoryTo view payment history for the current invoice:
1. Click History to display the Payment History screen and the list of payments made to the invoice.
2. Double-click a payment history record to view its details on the Payment History Receipt Display screen. Click the buttons on the screen to view payment method, GL allocation, and

charge detail line information for a payment.
Update NameIf you have updated the customer’s name in the Customers program, that information is automatically updated for the invoice; however, you must still update the customer name in the Accounts Receivable invoice table with the name change.
To update the table:
1. Click Name Update.The program displays a message when the update is complete.
2. Click OK.
3. Close the Open Item Header screen when updates are complete to return to the Invoices screen.
ResultsInvoices have been updated with the changes made.
GL Impact After an adjustment is made and posted, the general ledger is impacted by a journal depending on the type of change made. If the change increases or decreases the invoice or account numbers are changed, a journal entry will result.

What’s Next?If there were modifications to an invoice, then next step would be to reprint the invoice with the updated information if it is needed.