octopus set ring - .net framework
TRANSCRIPT
OCTOPUS SET RING
NEVER STOP LEARNING
“I am always doing what I cannot do yet, in order to learn how to do it”
VINCENT VAN GOGH

2
MAKING THE RING BANDCALCULATING THE CORRECT LENGTH FOR A
RING BLANK
If you’re intending to make a lot of rings of different width’, you’ll want to have a few of these ring sizing sets in different widths too. The wider the ring band the larger the size will need to be in or-der to fit. For example, a customer might be a size 6 for a narrow 2mm wide band, but if the same customer were to order a 7mm wide band in a size 6, the band would be way to small.
We’ll be working with the American sizing system. However, don’t worry too much about the sizing system, the important measurement is the inside ring diameter for the size of the ring you wish to make. You can find that using one of the nifty ring sizing sets below.
Inside ring diameter
Once you’ve found the size of the ring you intend to make, by trying on the different bands in the set, we need to find its inside diameter. You can do that by measuring it with a ruler, but it’s much more accurate to measure the inside diameter with a pair of digital calipers.
Begin by closing the calipers and ensure they are zeroed. Then use the measuring jaws at the top of the calipers to measure the inside diameter of the ring - the inside diameter may already be marked on your sizing set, but it’s always a good idea to double check.

3
TO CALCULATE THE LENGTH OF METAL NEEDED FOR A RING BLANK:
(INSIDE DIAMETER OF RING + METAL THICKNESS) X 3.14
For this project, we’ll be working with 14 gauge sterling silver sheet to create the ring band, which is ideal for setting 2, 2.5 and 3mm stones (however the most important thing to note is the stone’s depth - but we’ll get to that a little later). We’ll be starting with a sheet thats approximately 2cm x 8cm, but that should be enough for at least 3 bands.
To start with, ensure the sheet that you’re working with has one perfectly flat edge. If you’re not lucky enough to be starting with a brand spanking new sheet of silver, you’ll need to file it to get it perfectly flat. To do this, I prefer to have my silver held in a vice so that I can file it easily and ensure I’m getting a perfectly flat edge. Don’t let your file rock as you work, and keep watching the reflections on the surface of the metal to make sure you’re getting that perfectly flat surface as you file.
Set your calipers to the correct width for the ring band (we’re going for 6mm here). Then line up the tips of your dividers up with the tips of your calipers. You can also scribe with your calipers, but if you’ve invested in a nice pair like I have, you might want to use your dividers and take care of your calipers.
4
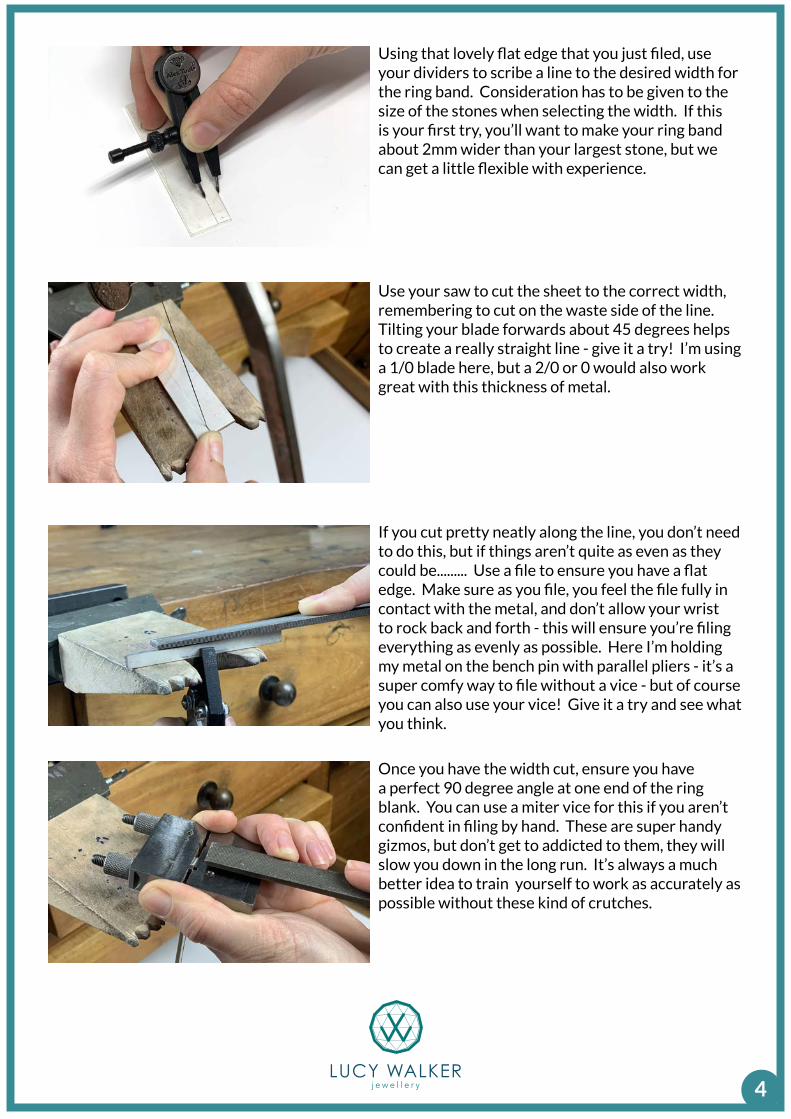
Use your saw to cut the sheet to the correct width, remembering to cut on the waste side of the line. Tilting your blade forwards about 45 degrees helps to create a really straight line - give it a try! I’m using a 1/0 blade here, but a 2/0 or 0 would also work great with this thickness of metal.
Using that lovely flat edge that you just filed, use your dividers to scribe a line to the desired width for the ring band. Consideration has to be given to the size of the stones when selecting the width. If this is your first try, you’ll want to make your ring band about 2mm wider than your largest stone, but we can get a little flexible with experience.
Once you have the width cut, ensure you have a perfect 90 degree angle at one end of the ring blank. You can use a miter vice for this if you aren’t confident in filing by hand. These are super handy gizmos, but don’t get to addicted to them, they will slow you down in the long run. It’s always a much better idea to train yourself to work as accurately as possible without these kind of crutches.
If you cut pretty neatly along the line, you don’t need to do this, but if things aren’t quite as even as they could be......... Use a file to ensure you have a flat edge. Make sure as you file, you feel the file fully in contact with the metal, and don’t allow your wrist to rock back and forth - this will ensure you’re filing everything as evenly as possible. Here I’m holding my metal on the bench pin with parallel pliers - it’s a super comfy way to file without a vice - but of course you can also use your vice! Give it a try and see what you think.

5
This formula works perfectly when making bands that are approximately the same width as your ring gauge, However, If you’re making a ring that is wider than your ring gauge, you’ll need to add on a little extra (how much extra really depends on how much wider the band is in comparison to your ring gauge). A way to ensure accuracy here is to buy yourself a set of wide band ring sizers as well as having a narrow set - they’re not overly expensive and it will make life a lot easier.
TO CALCULATE THE LENGTH OF METAL NEEDED FOR A RING:
INSIDE DIAMETERI’m making a size 6 US, which has inside diameter of 16.5mm
+ METAL THICKNESS
I’m using 14 gauge sheet which has a thickness of 1.6mm
So that’s 16.5 + 1.6 = 18.1x3.14 (π)
18.1 x 3.14 = 56.83 mm - we’ll just round that to 56.8mm
RECAP
To make your scribe lines a little easier to see, a neat trick is to use a sharpie to colour in around the point you wish to scribe.
Open up your calipers to 56.8mm and tighten the nut at the top. Now use your calipers to scribe a line using the flat edge you filed previously as a guide. I have to use my calipers here as my dividers aren’t wide enough.

6
Now simply file the edge perfectly flat and perpendicular to the length of the ring blank. You can use the miter vice here too if you need a little help filing perfectly flat.
FORMING THE RING BANDBefore forming the ring band, you’ll want to ensure your metal is fully annealed. If you aren’t 100% confident yet with soldering and annealing, please take a look at our Chunky Chain online class, where we cover these techniques in much more detail.
There are many ways to form ring bands, but for a heavier gauge such as this, I really love to use my bow closing pliers alone or in combination with my half round and flat pliers - as we do in the video. I’ve modified my bow closing pliers with a little leather, so the outside jaws don’t mark the metal. The inside jaw will still leave some marks, but as we are going to be making this into a comfort fit later on, that’s not too much of a big deal. But you can always add a little leather to the bottom jaw too - it just gets a bit difficult to manouver for my liking though.
If you are lucky enough to have a ring bender such as those available from Durston or Pepe then this is the perfect job for that! You can see those in action in the spinner ring class.
Start by placing the pliers as close to the very edge of the metal as you can. Then squeeze the pliers, move the pliers a few mm inwards then squeeze again. Keep repeating this until you get to the middle of the ring band and you have what looks like a U shape (not a C shape). If by the time you get to the middle you don’t quite have that U shape, just go back to the edge where you started and repeat the process. These pliers work just by squeezing, there is no need to try and use your wrist to bend the metal, just move the pliers along the metal and squeeze every few mm or so. They’re truly fabulous pliers!
If you do find your metal twisting as you use these pliers, a little tip is to rotate the ring and squeeze from the opposite side of the band with each bend.
7
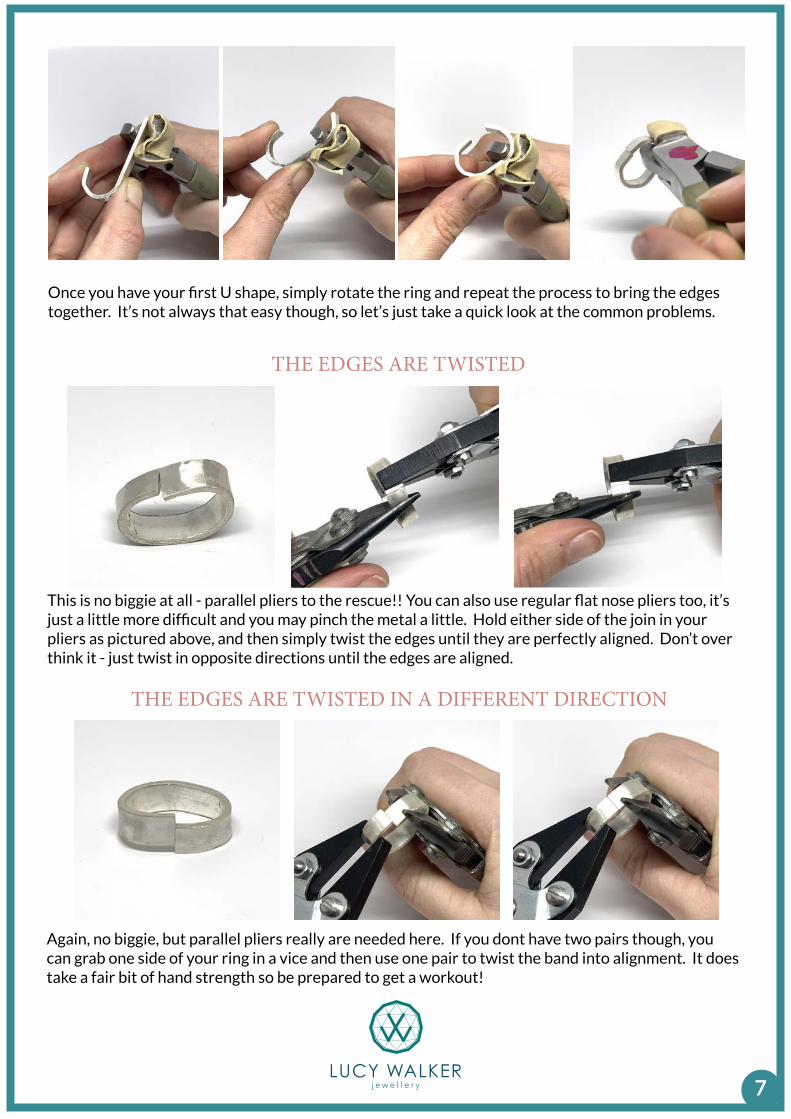
Once you have your first U shape, simply rotate the ring and repeat the process to bring the edges together. It’s not always that easy though, so let’s just take a quick look at the common problems.
THE EDGES ARE TWISTED
THE EDGES ARE TWISTED IN A DIFFERENT DIRECTION
This is no biggie at all - parallel pliers to the rescue!! You can also use regular flat nose pliers too, it’s just a little more difficult and you may pinch the metal a little. Hold either side of the join in your pliers as pictured above, and then simply twist the edges until they are perfectly aligned. Don’t over think it - just twist in opposite directions until the edges are aligned.
Again, no biggie, but parallel pliers really are needed here. If you dont have two pairs though, you can grab one side of your ring in a vice and then use one pair to twist the band into alignment. It does take a fair bit of hand strength so be prepared to get a workout!
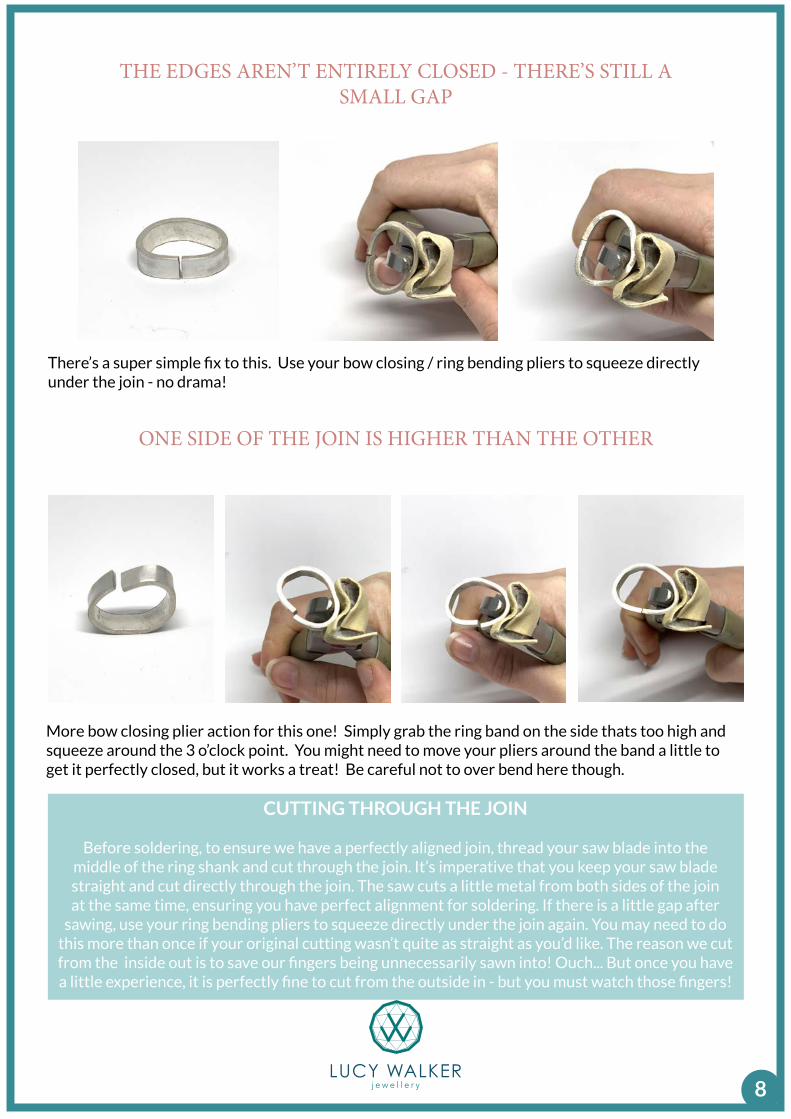
CUTTING THROUGH THE JOIN
Before soldering, to ensure we have a perfectly aligned join, thread your saw blade into the middle of the ring shank and cut through the join. It’s imperative that you keep your saw blade straight and cut directly through the join. The saw cuts a little metal from both sides of the join at the same time, ensuring you have perfect alignment for soldering. If there is a little gap after
sawing, use your ring bending pliers to squeeze directly under the join again. You may need to do this more than once if your original cutting wasn’t quite as straight as you’d like. The reason we cut from the inside out is to save our fingers being unnecessarily sawn into! Ouch... But once you have a little experience, it is perfectly fine to cut from the outside in - but you must watch those fingers!
8
THE EDGES AREN’T ENTIRELY CLOSED - THERE’S STILL A SMALL GAP
ONE SIDE OF THE JOIN IS HIGHER THAN THE OTHER
There’s a super simple fix to this. Use your bow closing / ring bending pliers to squeeze directly under the join - no drama!
More bow closing plier action for this one! Simply grab the ring band on the side thats too high and squeeze around the 3 o’clock point. You might need to move your pliers around the band a little to get it perfectly closed, but it works a treat! Be careful not to over bend here though.
9
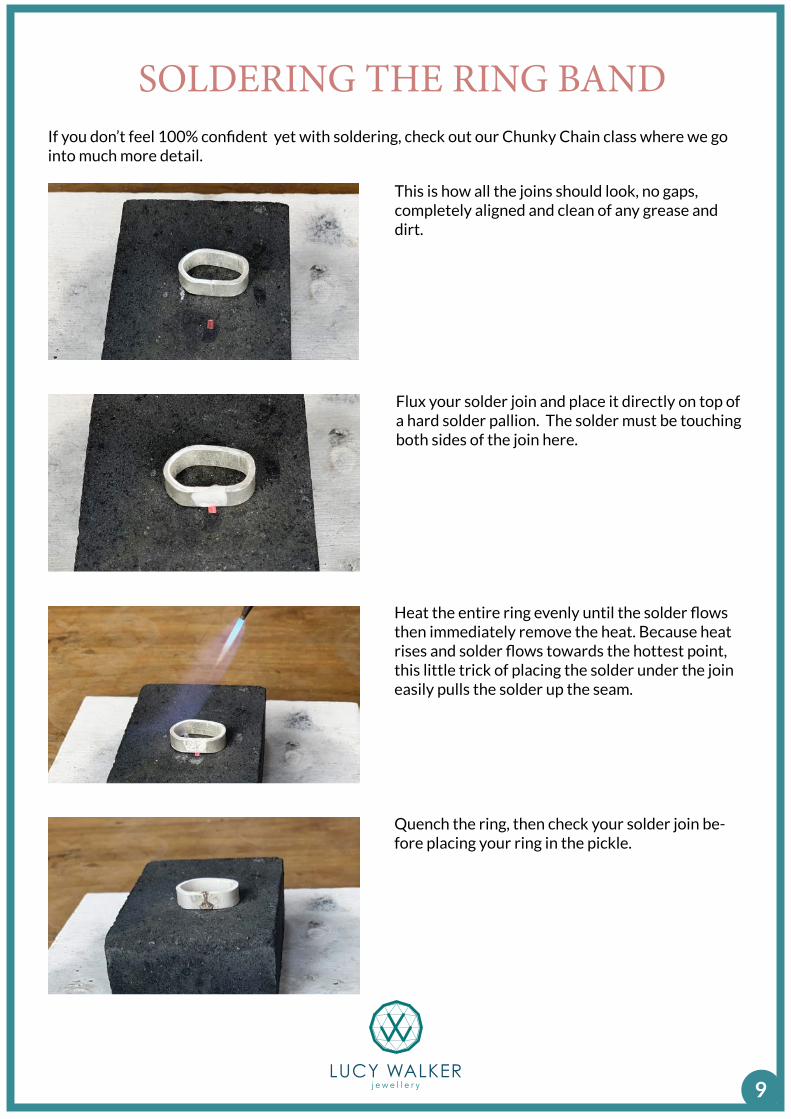
This is how all the joins should look, no gaps, completely aligned and clean of any grease and dirt.
Flux your solder join and place it directly on top of a hard solder pallion. The solder must be touching both sides of the join here.
SOLDERING THE RING BAND
Heat the entire ring evenly until the solder flows then immediately remove the heat. Because heat rises and solder flows towards the hottest point, this little trick of placing the solder under the join easily pulls the solder up the seam.
If you don’t feel 100% confident yet with soldering, check out our Chunky Chain class where we go into much more detail.
Quench the ring, then check your solder join be-fore placing your ring in the pickle.

10
ROUNDING OUT THE RING
Once the ring is soldered and out of the pickle, you’ll notice that it isn’t perhaps the nice round shape one would expect of a ring! So it’s time to change that using a ring mandrel and a chasing or planishing hammer or mallet - I find dead blow mallets work best. Place your ring onto the mandrel and tap down on the outside of the ring shank any areas that aren’t in contact with the mandrel. Then tap the ring down the ring mandrel as shown in the picture to the left - just let your hammer glide up and down the mandrel as you tap the ring down the mandrel. Flip the ring over on the mandrel and repeat. You’ll probably need to repeat this a few times to ensure the ring is perfectly round. And please note, when I say tap, with a ring this heavy, if you’re using a mallet, you’ll really have to beat the crap out of it. Hammers make much easier work of it, but they are more likely to put a ding on your metal that you’ll have to clean up later if you aren’t careful.
REFINING THE SHAPE OF THE RING
Hopefully you aligned your join up well for soldering so this step should be simple. To ensure the sides are even, use 100 grit sandpaper sticks or 100 grit sandpaper on a perfectly flat surface to sand the sides of the ring until they’re 100% flat and level. Change directions regularly or sand in a figure of 8 motion to ensure you’re sanding evenly. Keep going until the sides are perfectly level and there is no sign of the solder join. Don’t sand further than 100 grit at this stage.
TOP TIP To help see where you need to tap, hold the mandrel with the ring on it up to the light, you’ll see light coming through where the ring isn’t in contact with the mandrel. That’s where you need to whack it some more!
11
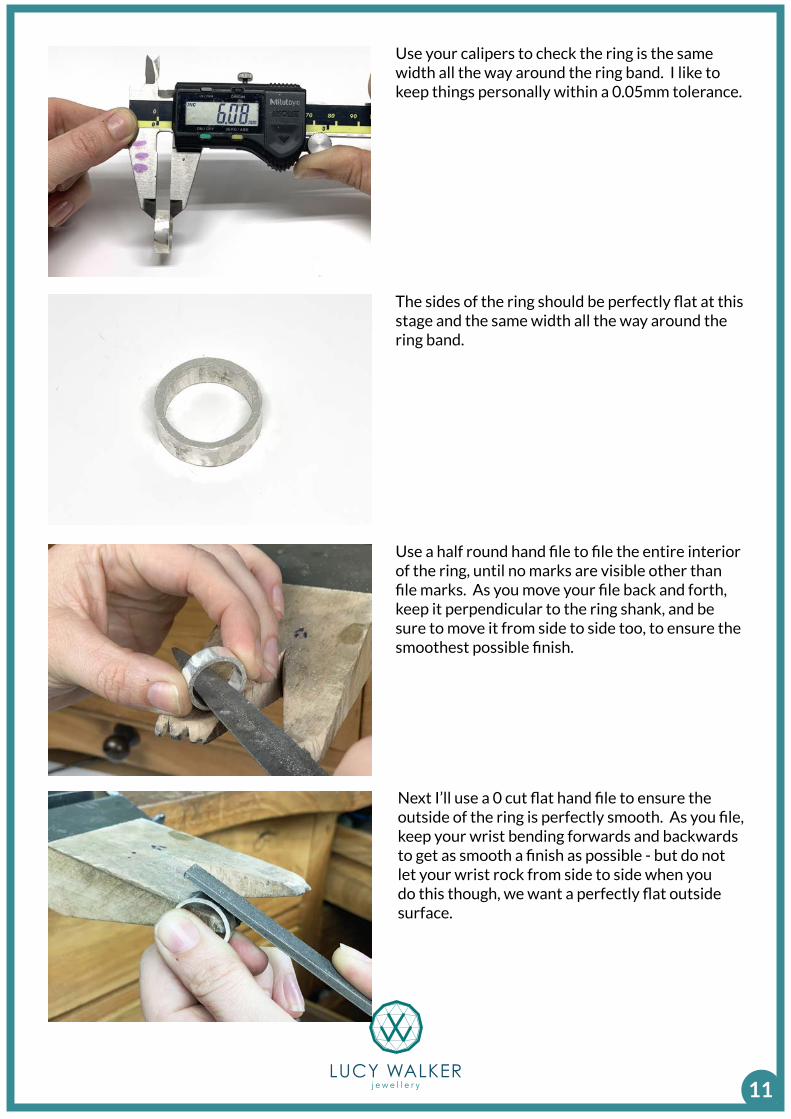
The sides of the ring should be perfectly flat at this stage and the same width all the way around the ring band.
Next I’ll use a 0 cut flat hand file to ensure the outside of the ring is perfectly smooth. As you file, keep your wrist bending forwards and backwards to get as smooth a finish as possible - but do not let your wrist rock from side to side when you do this though, we want a perfectly flat outside surface.
Use your calipers to check the ring is the same width all the way around the ring band. I like to keep things personally within a 0.05mm tolerance.
Use a half round hand file to file the entire interior of the ring, until no marks are visible other than file marks. As you move your file back and forth, keep it perpendicular to the ring shank, and be sure to move it from side to side too, to ensure the smoothest possible finish.

12
When filing the inside and the outside, always ask yourself if you’re filing evenly. You can check this by measuring the metal thickness all the way around the ring with your digital calipers. The metal should be an even thickness the entire circumference of the ring. Again, I like to work within a 0.05mm tolerance.
For metal this thick, I like my chamfer to reach half way across the thickness of the ring band. So I set my dividers to exactly that and carefully scribe a line on both sides of my ring band.
If you were to try the ring on at this stage, you’ll find that its ridiculously uncomfortable as the edges of the ring bite into your finger. And for that reason (and because it looks so much more professional), we are going to create a comfort fit on the inside of the ring band.
To help with accuracy here, colour both sides of the band with a black sharpie.
Try really hard not to slip as you do this. I prefer to keep my dividers still, and move the ring band to help keep things as crisp as possible.

13
Use your half round file at about a 45 degree angle to create a flat chamfer all the way around both sides of the ring - stop filing when you reach the line scribed previously. As when filing the inside, keep the file moving side to side as well as backwards and forwards.
SANDING THE RING BANDOnce the filing is done, it’s time to refine the inside of the ring with what’s called a sandpaper roll. You can either make sandpaper rolls yourself or buy them from any jewellery tool supplier - you’ll want to have them in various grits. I have 240, 600 and 1000 grit rolls. Start with a grit around 240 and keep rotating the sandpaper roll around the inside of the ring - keeping the roll perpendicular to the ring band. Keep sanding until any file marks are removed and the only marks you see are from your 240 grit sandpaper roll.
You’ll also need to use your sandpaper roll to clean up the chamfer too. After sanding the inside of the ring with 240 grit, move on to sanding the chamfer - remember to do both sides.
Now repeat the steps for the inside of the ring and the chamfer with 600 and 1000 grit too.45°
Just look at that bloody beautiful, even chamfer!

14
The chamfer and the inside of the ring are all sanded perfectly to 1000 grit - not a single mark to be seen, just a beautiful smooth finish. The sandpaper rolls I use say 1000 grit, but they do give a really fine finish - so I don’t find the need to take it any further than 1000 grit here.
Ok and now on to the outside. Just as you did with the file, sand the outside of the ring band with 240, 600, 800 and 1200 grit sandpaper sticks (or thereabouts). I love to use cushioned sandpaper sticks for this as I find they give a beautiful finish. Check out the Resources Section to see how to make these.
And finally for sanding, we’ll use sandpaper on a flat surface to sand the edges starting at 240 grit and then using 600, 800 and 1200 grit. Don’t sand too much here, just a few seconds per grit. We don’t want to sand off the lovely chamfer we just made.
And now we’re all ready to add the settings. It is imperative to get the ring band looking perfect at this stage as we won’t be able to achieve this level of finishing once the settings are soldered in place.
15
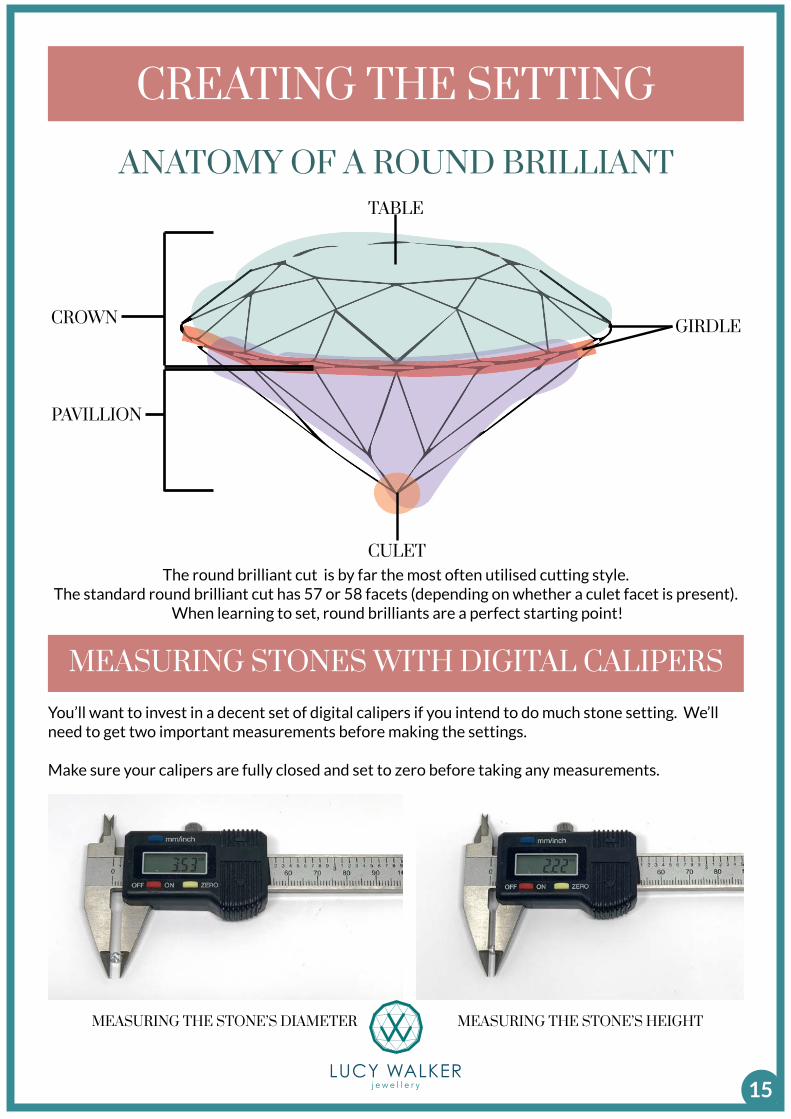
The round brilliant cut is by far the most often utilised cutting style. The standard round brilliant cut has 57 or 58 facets (depending on whether a culet facet is present).
When learning to set, round brilliants are a perfect starting point!
ANATOMY OF A ROUND BRILLIANT
MEASURING STONES WITH DIGITAL CALIPERS
You’ll want to invest in a decent set of digital calipers if you intend to do much stone setting. We’ll need to get two important measurements before making the settings.
Make sure your calipers are fully closed and set to zero before taking any measurements.
CREATING THE SETTING
MEASURING THE STONE’S DIAMETER MEASURING THE STONE’S HEIGHT
TABLE
GIRDLE
PAVILLION
CULET
CROWN

16
DESIGN CONSIDERATIONSWe are going to make the settings for these stones from jump rings. As we are going to use 18-gauge (1mm diameter) wire to make the jump rings, the ideal size will be such that the inside of the jump ring is 0.5 to 1.0mm smaller than the stone’s girdle diameter. With this setting, there is a little flexibility.
Another issue we need to consider is the fact that a gemstone’s culet is not particularly comfortable, especially if it’s digging into your finger. And so, we need to know the height of the stone from table to culet, and make sure that the thickness of the jump ring and our ring shank combined is at least 0.2mm more than the height of the stone. Under no circumstances do we want the culet of the stone to touch the wearers finger.
When placed in the jump ring, we want the girdle of the stone to sit approximately 1/4 to 1/2 way into the wire from the inside edge of the jump ring.
Inside edge of jump ring
1/4
1/2
JUMP RING SIZE GUIDESTONE SIZE INSIDE DIAMETER OF JUMP RING
2mm2.5mm3mm3.5mm4mm
1 - 1.5mm1.5 - 2mm2 - 2.5mm2.5 - 3mm3 - 3.5mm
17
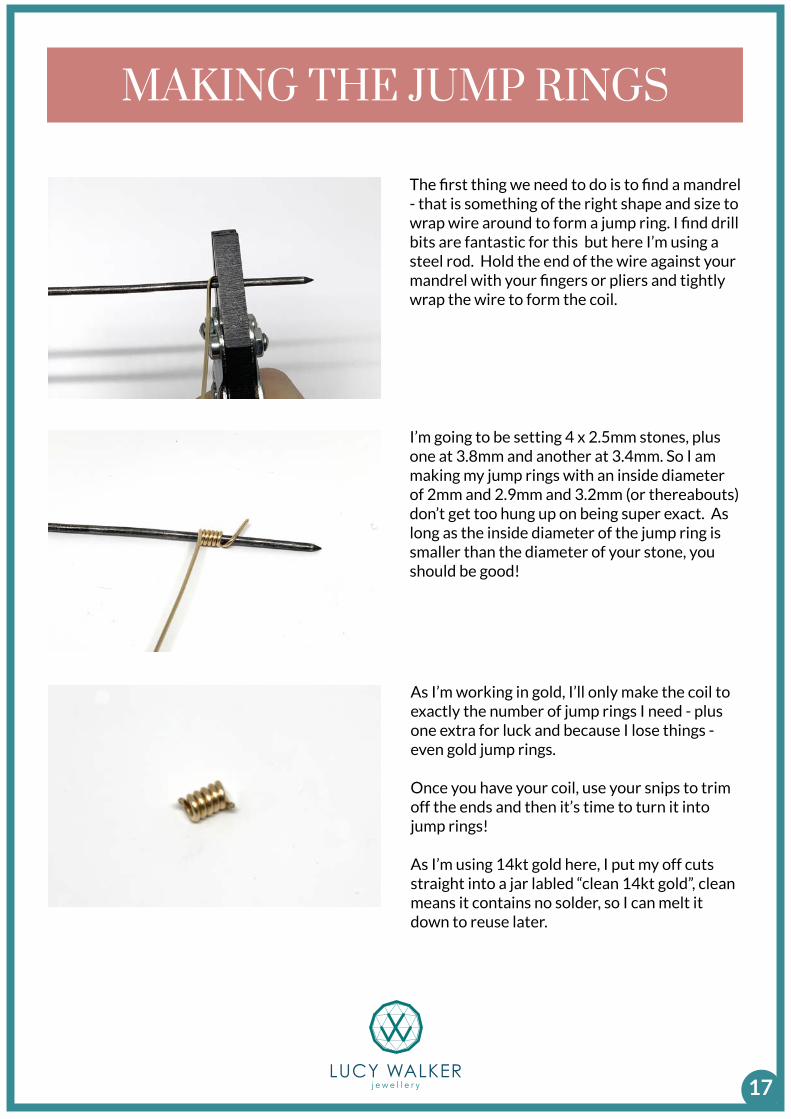
MAKING THE JUMP RINGS
The first thing we need to do is to find a mandrel - that is something of the right shape and size to wrap wire around to form a jump ring. I find drill bits are fantastic for this but here I’m using a steel rod. Hold the end of the wire against your mandrel with your fingers or pliers and tightly wrap the wire to form the coil.
As I’m working in gold, I’ll only make the coil to exactly the number of jump rings I need - plus one extra for luck and because I lose things - even gold jump rings.
Once you have your coil, use your snips to trim off the ends and then it’s time to turn it into jump rings!
As I’m using 14kt gold here, I put my off cuts straight into a jar labled “clean 14kt gold”, clean means it contains no solder, so I can melt it down to reuse later.
I’m going to be setting 4 x 2.5mm stones, plus one at 3.8mm and another at 3.4mm. So I am making my jump rings with an inside diameter of 2mm and 2.9mm and 3.2mm (or thereabouts) don’t get too hung up on being super exact. As long as the inside diameter of the jump ring is smaller than the diameter of your stone, you should be good!
18
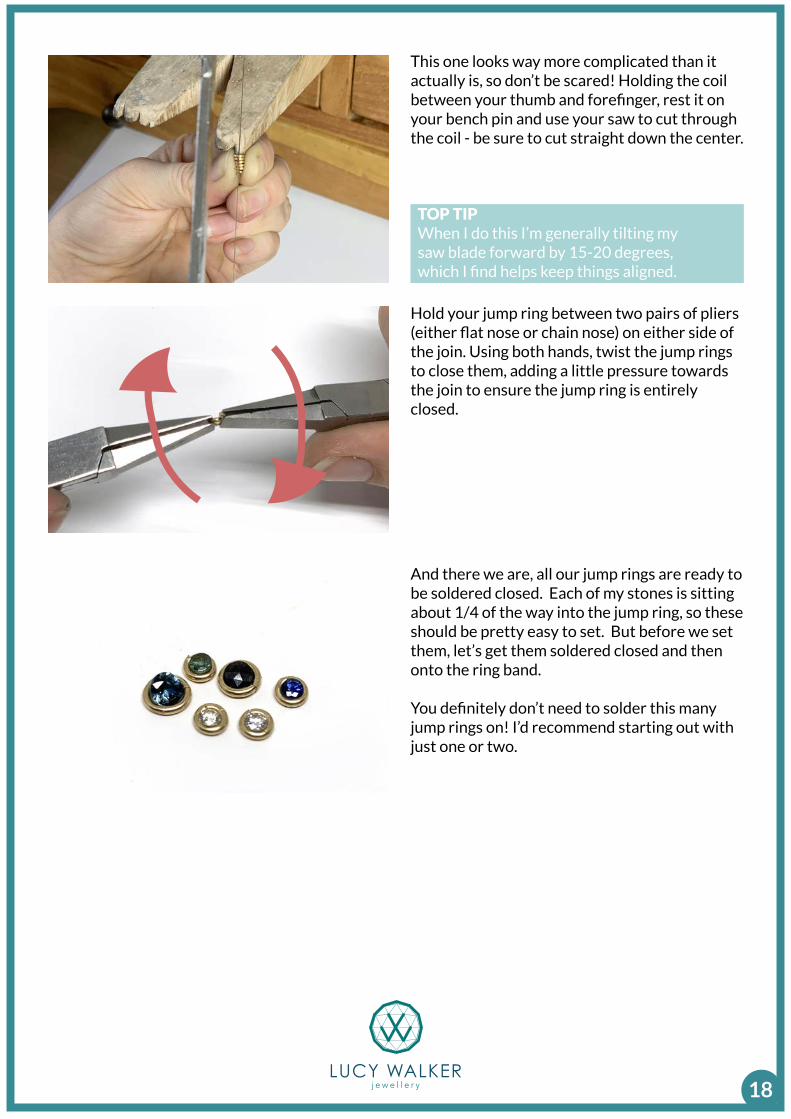
This one looks way more complicated than it actually is, so don’t be scared! Holding the coil between your thumb and forefinger, rest it on your bench pin and use your saw to cut through the coil - be sure to cut straight down the center.
TOP TIPWhen I do this I’m generally tilting my saw blade forward by 15-20 degrees, which I find helps keep things aligned.
Hold your jump ring between two pairs of pliers (either flat nose or chain nose) on either side of the join. Using both hands, twist the jump rings to close them, adding a little pressure towards the join to ensure the jump ring is entirely closed.
And there we are, all our jump rings are ready to be soldered closed. Each of my stones is sitting about 1/4 of the way into the jump ring, so these should be pretty easy to set. But before we set them, let’s get them soldered closed and then onto the ring band.
You definitely don’t need to solder this many jump rings on! I’d recommend starting out with just one or two.

19
SOLDERING THE JUMP RINGS CLOSEDI’m using 14kt yellow gold for my jump rings, so it’s important to use 14kt yellow gold solder too. We’ll be using hard solder for this.
I haven’t found gold solder in wire form, so I use sheet, which I roll through the rolling mill to get as thin as possible. Then I’ll cut lots of little strips as shown, and cut across those to get the pallions need-ed. With gold solder being so expensive, I try not to cut more solder pallions than I need for the job at hand.
I’m soldering 7 jump rings closed. So to do it quickly, I’ll solder them all in one go. I have my solder pallions lined up and I flux my jump rings before placing the join of the jump ring directly on the solder pallion.
When soldering with gold, there really is no difference to soldering silver at this size. Larger scale gold items are actually much easier to solder, because gold does not conduct heat anywhere near as quickly as silver. But for these, treat them exactly the same as silver.
Just like silver jump rings, gold jump rings are pretty easy to melt!
Rather than heat the jump rings directly, I personally find it a little easier to heat the charcoal directly around the jump ring - so the tip of the inner blue cone of my flame is aiming a couple of mm to the side of the jump rings. This way I’m much less likely to nuke the little buggers.
20
SOLDERING THE JUMP RINGS TO THE RING
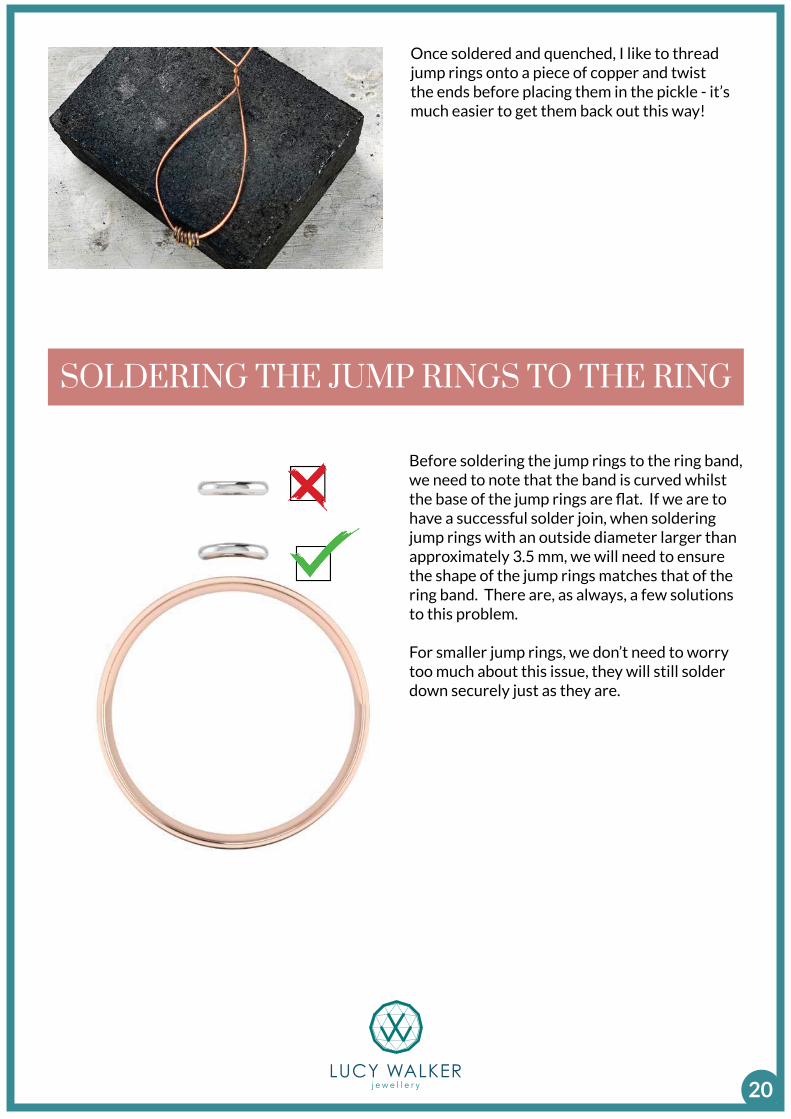
Before soldering the jump rings to the ring band, we need to note that the band is curved whilst the base of the jump rings are flat. If we are to have a successful solder join, when soldering jump rings with an outside diameter larger than approximately 3.5 mm, we will need to ensure the shape of the jump rings matches that of the ring band. There are, as always, a few solutions to this problem.
For smaller jump rings, we don’t need to worry too much about this issue, they will still solder down securely just as they are.
Once soldered and quenched, I like to thread jump rings onto a piece of copper and twist the ends before placing them in the pickle - it’s much easier to get them back out this way!
21
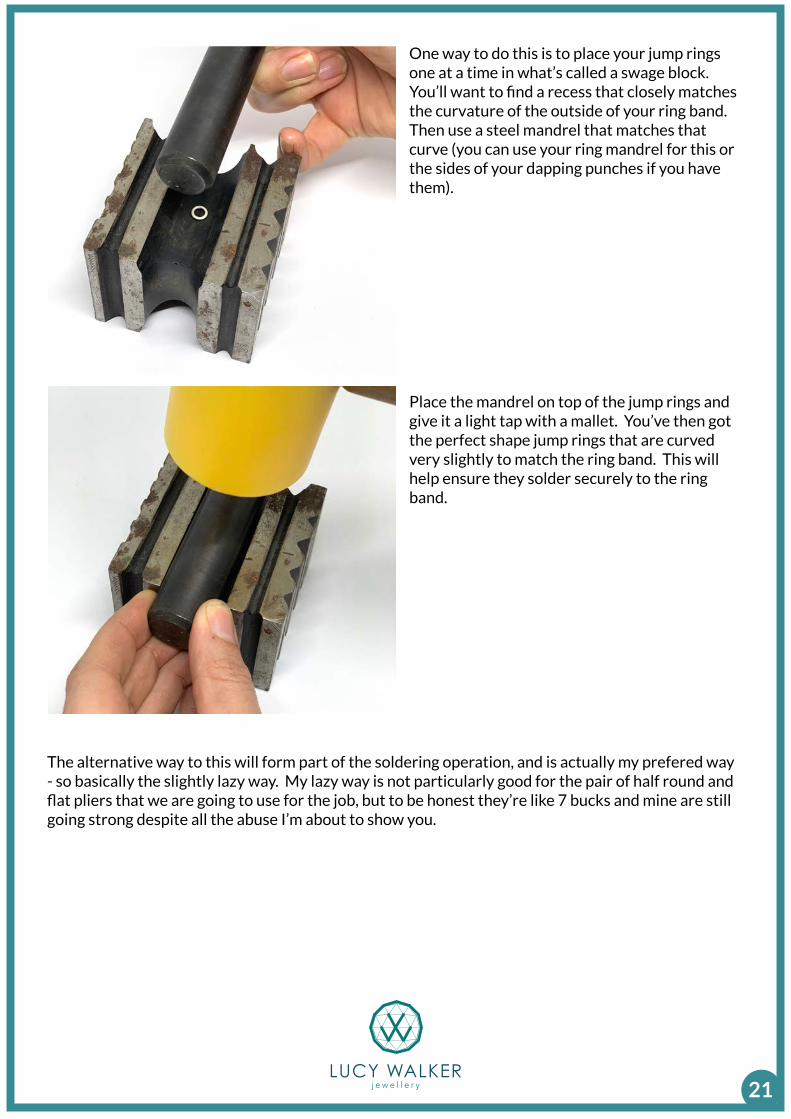
One way to do this is to place your jump rings one at a time in what’s called a swage block. You’ll want to find a recess that closely matches the curvature of the outside of your ring band. Then use a steel mandrel that matches that curve (you can use your ring mandrel for this or the sides of your dapping punches if you have them).
Place the mandrel on top of the jump rings and give it a light tap with a mallet. You’ve then got the perfect shape jump rings that are curved very slightly to match the ring band. This will help ensure they solder securely to the ring band.
The alternative way to this will form part of the soldering operation, and is actually my prefered way - so basically the slightly lazy way. My lazy way is not particularly good for the pair of half round and flat pliers that we are going to use for the job, but to be honest they’re like 7 bucks and mine are still going strong despite all the abuse I’m about to show you.

22
So let’s take a look at soldering and forming the jump rings in one.
To start with, hold the ring right at the bottom of the band next to the solder seam. Then flux the entire area where you want to solder jump rings, this is just to ensure we don’t have to pickle in between soldering on each jump ring.
Place the jump ring (here I’m placing one that hasn’t been modified with the swage block) and add a little more flux to the jump ring itself. Then heat the entire ring evenly with a medium sized neutral flame until the flux goes clear.
Use your solder pick or tweezers to place medium silver solder on the inside of the jump ring. Our jump ring here has an inside diameter of 3.5mm so we are using two solder pallions. For the much smaller jump rings, just one pallion should do it. But either way, it’s better to start with less solder and have to add a little more, than end up with a massive blob of solder.
Once the solder is in place, heat the entire ring (not the jump ring) evenly until the solder flows.
Don’t focus the flame on the jump ring itself. Focus it on the ring band...... Why I hear you ask:
- The ring band will take much longer to get up to temperature because of its size.
- The jump ring is at the highest point, and heat rises.
- The jump ring is made from gold, and so it doesn’t conduct heat as quickly as silver. It will therefore reach the soldering temperature quicker.
23
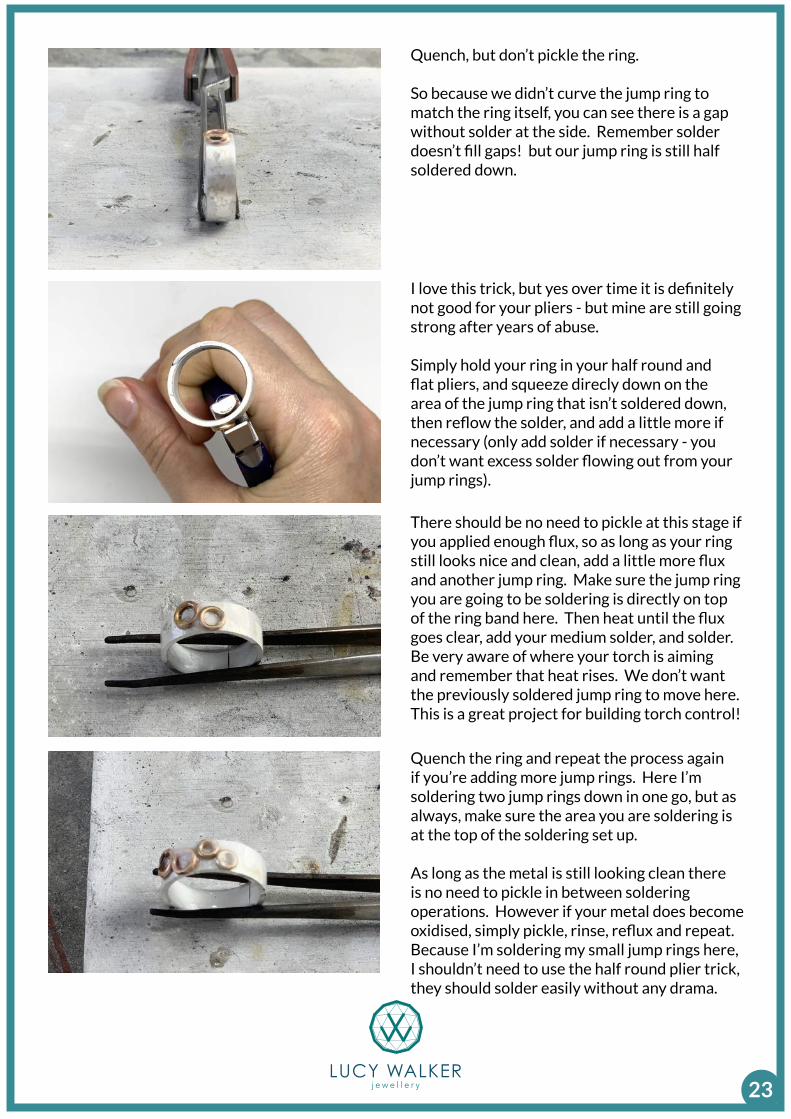
Quench, but don’t pickle the ring.
So because we didn’t curve the jump ring to match the ring itself, you can see there is a gap without solder at the side. Remember solder doesn’t fill gaps! but our jump ring is still half soldered down.
I love this trick, but yes over time it is definitely not good for your pliers - but mine are still going strong after years of abuse.
Simply hold your ring in your half round and flat pliers, and squeeze direcly down on the area of the jump ring that isn’t soldered down, then reflow the solder, and add a little more if necessary (only add solder if necessary - you don’t want excess solder flowing out from your jump rings).
There should be no need to pickle at this stage if you applied enough flux, so as long as your ring still looks nice and clean, add a little more flux and another jump ring. Make sure the jump ring you are going to be soldering is directly on top of the ring band here. Then heat until the flux goes clear, add your medium solder, and solder. Be very aware of where your torch is aiming and remember that heat rises. We don’t want the previously soldered jump ring to move here. This is a great project for building torch control!
Quench the ring and repeat the process again if you’re adding more jump rings. Here I’m soldering two jump rings down in one go, but as always, make sure the area you are soldering is at the top of the soldering set up.
As long as the metal is still looking clean there is no need to pickle in between soldering operations. However if your metal does become oxidised, simply pickle, rinse, reflux and repeat. Because I’m soldering my small jump rings here, I shouldn’t need to use the half round plier trick, they should solder easily without any drama.
24
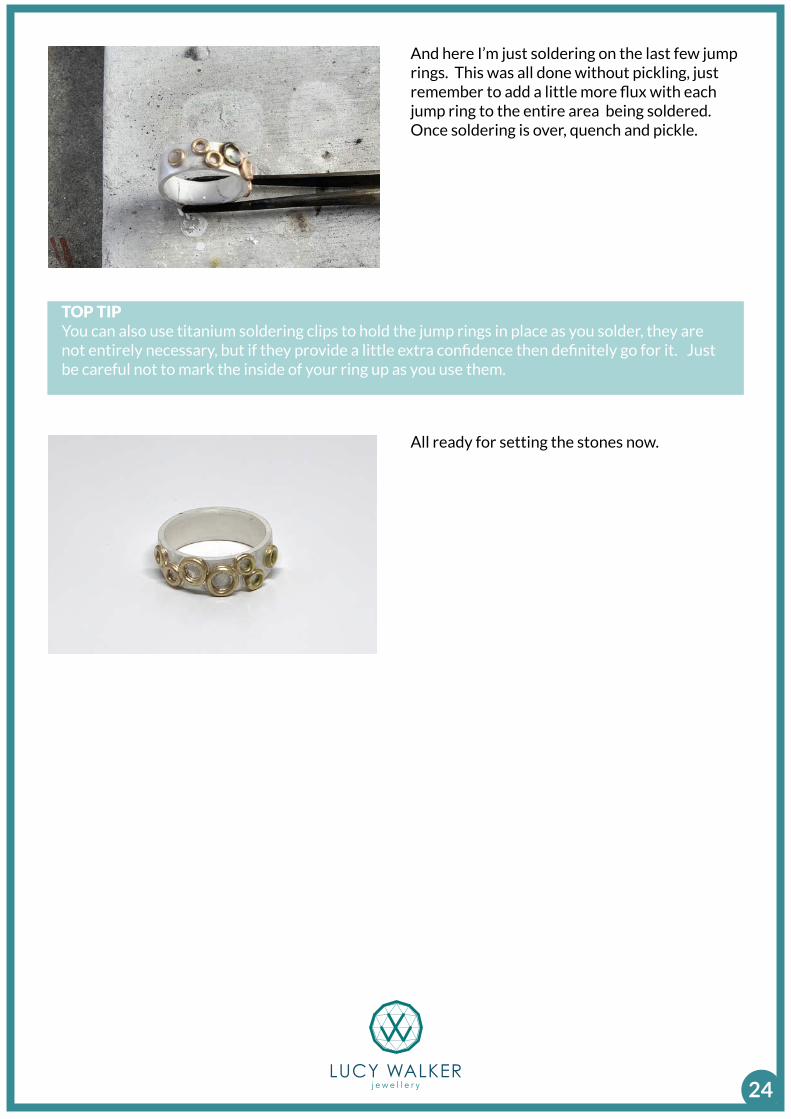
And here I’m just soldering on the last few jump rings. This was all done without pickling, just remember to add a little more flux with each jump ring to the entire area being soldered. Once soldering is over, quench and pickle.
TOP TIPYou can also use titanium soldering clips to hold the jump rings in place as you solder, they are not entirely necessary, but if they provide a little extra confidence then definitely go for it. Just be careful not to mark the inside of your ring up as you use them.
All ready for setting the stones now.

26
MEASURING YOUR STONES AND BURS
Burs are a little more difficult to measure as the measurements will appear different depending on where you measure them. For that reason, it’s important to place your bur between your digital calipers and rotate it a quarter turn...
To measure the stone, place it table down and use the tips of the caliper to measure the stone from one side of the girdle to the other.
TOP TIPYou’ll want to invest in a decent set of digital calipers if you intend to do much stone setting.
... note the size shown on the calipers after the rotation. Do not keep rotating the bur in the calipers as this will eventually dull the bur!
SETTING THE STONES

25
WHAT SIZE BURS SHOULD I USE?
SETTING A 2.0MM STONE
1.0mm drill bit + 1.3mm & 1.5mm ball bur +
2.0 - 3.0mm bud bur + 2.0mm setting bur
SETTING A 2.5MM STONE
1.0mm drill bit + 1.3mm, 1.5mm & 2.0mm ball bur +
2.5 - 3.5mm bud bur + 2.5mm setting bur
SETTING A 3.0MM STONE
1.0mm drill bit + 1.3mm, 1.7mm & 2.3mm ball bur +
3.0 - 4.0mm bud bur + 3.0mm setting bur
SETTING A 3.5MM STONE
1.0mm drill bit + 1.3mm, 1.7mm, 2.3mm & 2.6mm ball bur + 3.5 - 4.5mm bud bur + 3.5mm setting bur
Bud burs may not be required at all - if you made the inside diameter of your jump ring just 0.5mm smaller than your stone, you will not need to
use a bud bur.TOP TIPWhilst the sizes of the ball burs and bud burs can be flexible - the setting bur must be exactly the same size or smaller than your stone. You can use a bigger bud bur than your stone, just DO NOT go all the way. Keep checking the opening against the stone so you do not open the hole too much. If that happens, you’d better have a bigger stone ready.
27
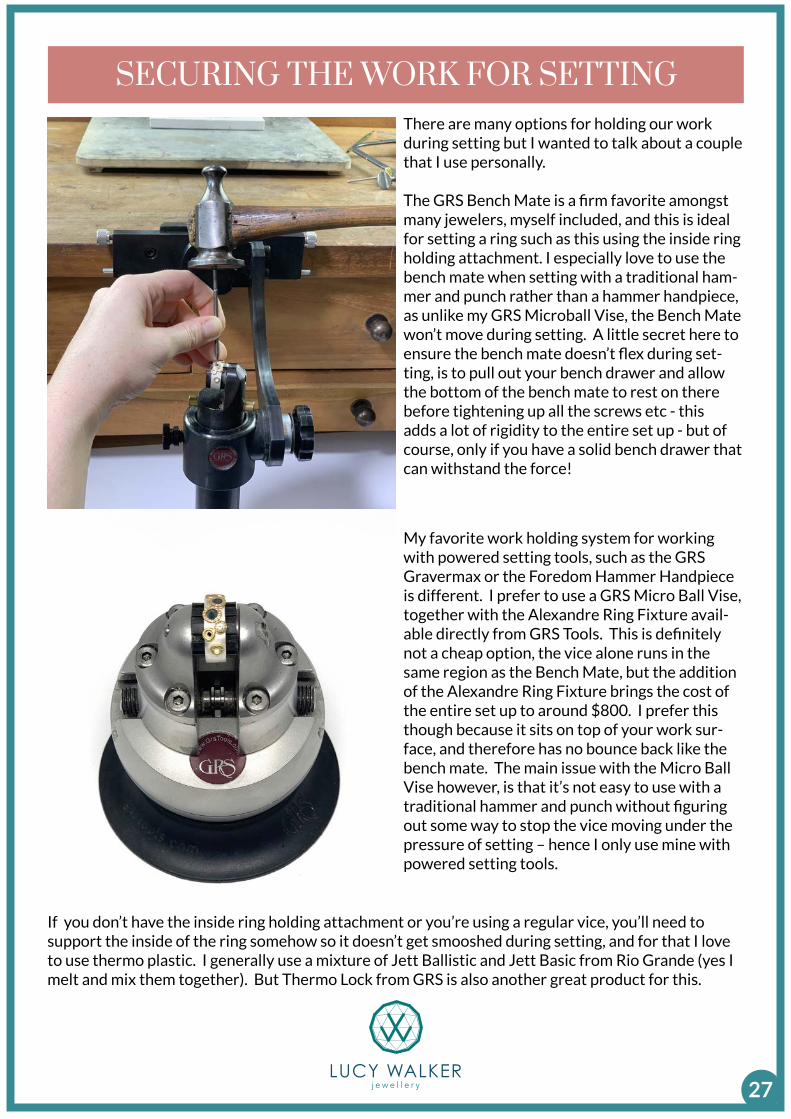
SECURING THE WORK FOR SETTINGThere are many options for holding our work during setting but I wanted to talk about a couple that I use personally.
The GRS Bench Mate is a firm favorite amongst many jewelers, myself included, and this is ideal for setting a ring such as this using the inside ring holding attachment. I especially love to use the bench mate when setting with a traditional ham-mer and punch rather than a hammer handpiece, as unlike my GRS Microball Vise, the Bench Mate won’t move during setting. A little secret here to ensure the bench mate doesn’t flex during set-ting, is to pull out your bench drawer and allow the bottom of the bench mate to rest on there before tightening up all the screws etc - this adds a lot of rigidity to the entire set up - but of course, only if you have a solid bench drawer that can withstand the force!
If you don’t have the inside ring holding attachment or you’re using a regular vice, you’ll need to support the inside of the ring somehow so it doesn’t get smooshed during setting, and for that I love to use thermo plastic. I generally use a mixture of Jett Ballistic and Jett Basic from Rio Grande (yes I melt and mix them together). But Thermo Lock from GRS is also another great product for this.
My favorite work holding system for working with powered setting tools, such as the GRS Gravermax or the Foredom Hammer Handpiece is different. I prefer to use a GRS Micro Ball Vise, together with the Alexandre Ring Fixture avail-able directly from GRS Tools. This is definitely not a cheap option, the vice alone runs in the same region as the Bench Mate, but the addition of the Alexandre Ring Fixture brings the cost of the entire set up to around $800. I prefer this though because it sits on top of your work sur-face, and therefore has no bounce back like the bench mate. The main issue with the Micro Ball Vise however, is that it’s not easy to use with a traditional hammer and punch without figuring out some way to stop the vice moving under the pressure of setting – hence I only use mine with powered setting tools.
28
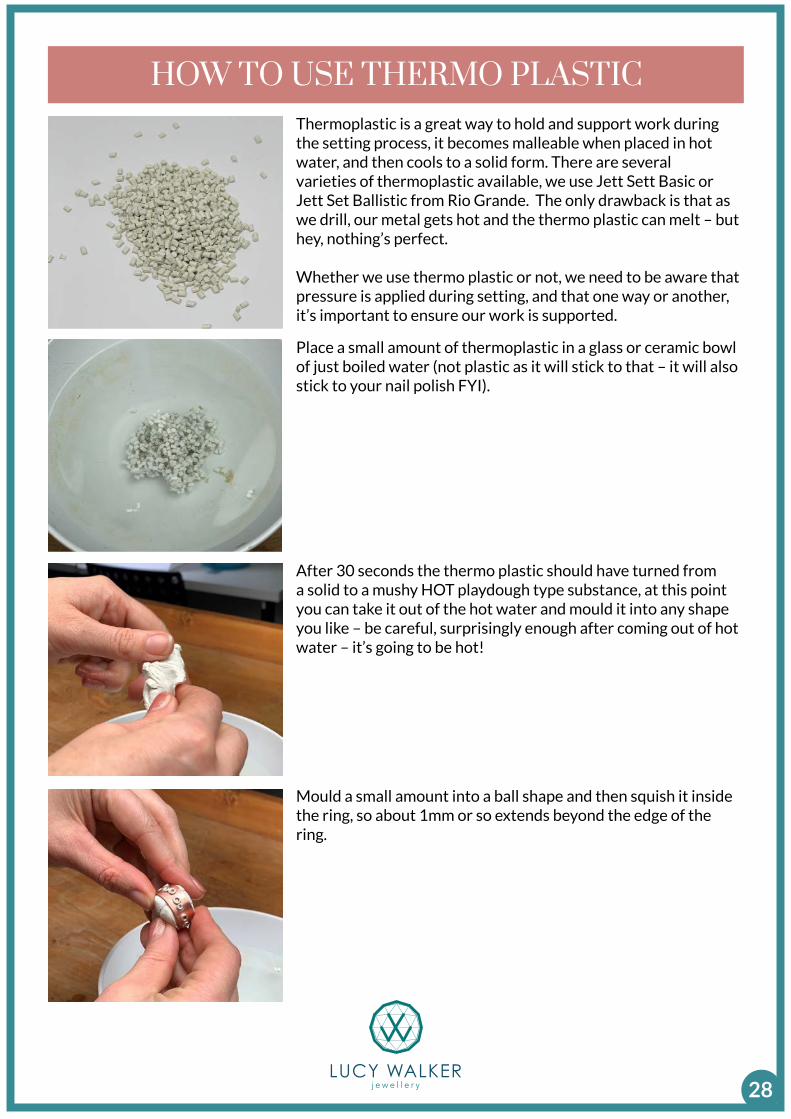
Thermoplastic is a great way to hold and support work during the setting process, it becomes malleable when placed in hot water, and then cools to a solid form. There are several varieties of thermoplastic available, we use Jett Sett Basic or Jett Set Ballistic from Rio Grande. The only drawback is that as we drill, our metal gets hot and the thermo plastic can melt – but hey, nothing’s perfect.
Whether we use thermo plastic or not, we need to be aware that pressure is applied during setting, and that one way or another, it’s important to ensure our work is supported.
HOW TO USE THERMO PLASTIC
Place a small amount of thermoplastic in a glass or ceramic bowl of just boiled water (not plastic as it will stick to that – it will also stick to your nail polish FYI).
After 30 seconds the thermo plastic should have turned from a solid to a mushy HOT playdough type substance, at this point you can take it out of the hot water and mould it into any shape you like – be careful, surprisingly enough after coming out of hot water – it’s going to be hot!
Mould a small amount into a ball shape and then squish it inside the ring, so about 1mm or so extends beyond the edge of the ring.
29
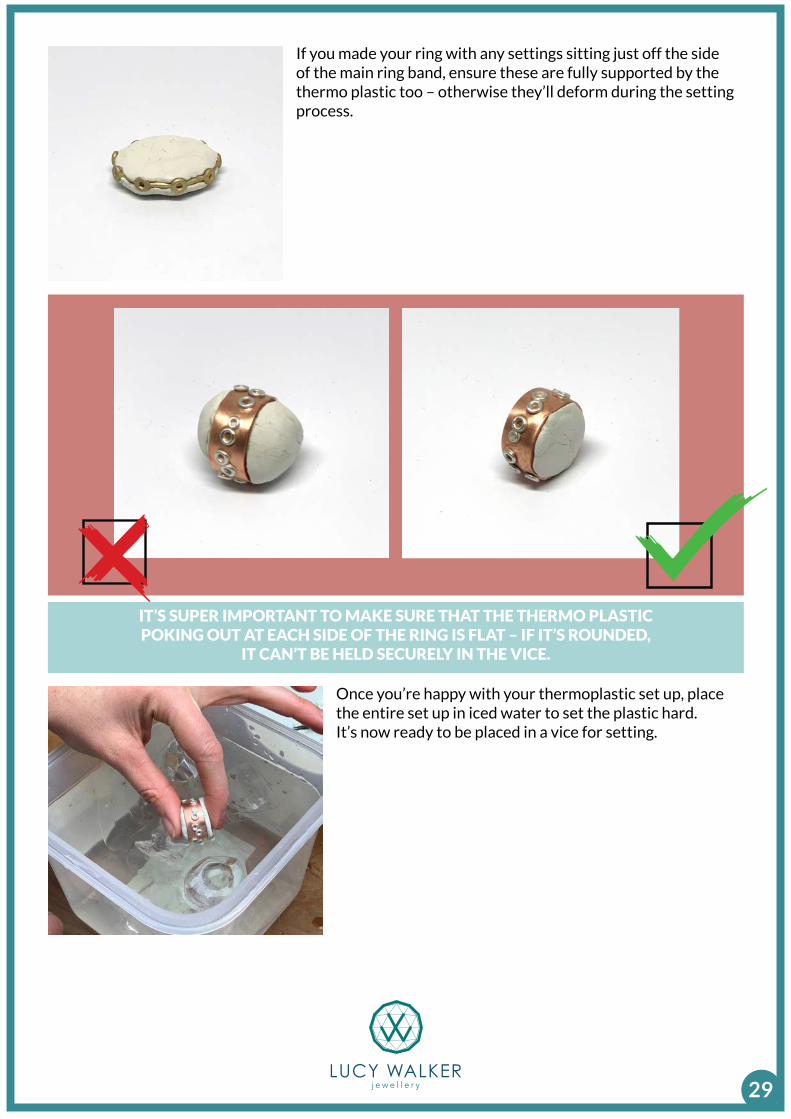
If you made your ring with any settings sitting just off the side of the main ring band, ensure these are fully supported by the thermo plastic too – otherwise they’ll deform during the setting process.
Once you’re happy with your thermoplastic set up, place the entire set up in iced water to set the plastic hard. It’s now ready to be placed in a vice for setting.
IT’S SUPER IMPORTANT TO MAKE SURE THAT THE THERMO PLASTIC POKING OUT AT EACH SIDE OF THE RING IS FLAT – IF IT’S ROUNDED,
IT CAN’T BE HELD SECURELY IN THE VICE.
30
SEATING THE STONE
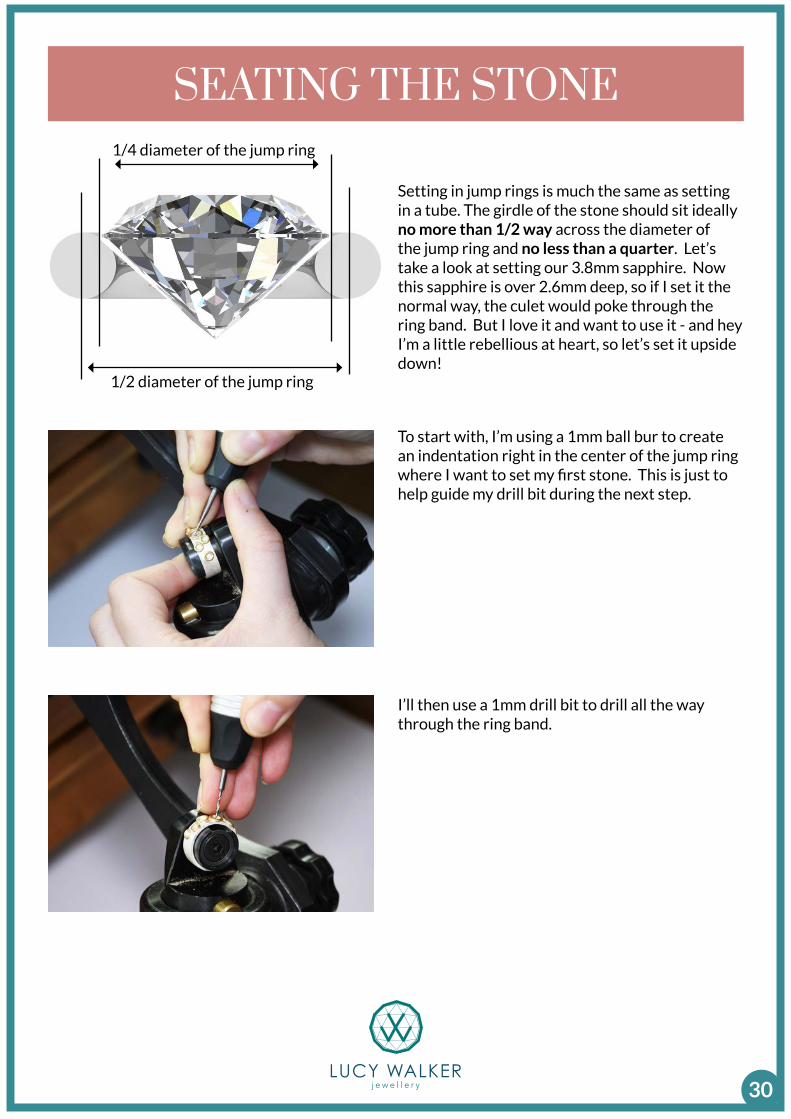
Setting in jump rings is much the same as setting in a tube. The girdle of the stone should sit ideally no more than 1/2 way across the diameter of the jump ring and no less than a quarter. Let’s take a look at setting our 3.8mm sapphire. Now this sapphire is over 2.6mm deep, so if I set it the normal way, the culet would poke through the ring band. But I love it and want to use it - and hey I’m a little rebellious at heart, so let’s set it upside down!
To start with, I’m using a 1mm ball bur to create an indentation right in the center of the jump ring where I want to set my first stone. This is just to help guide my drill bit during the next step.
I’ll then use a 1mm drill bit to drill all the way through the ring band.
1/4 diameter of the jump ring
1/2 diameter of the jump ring
31
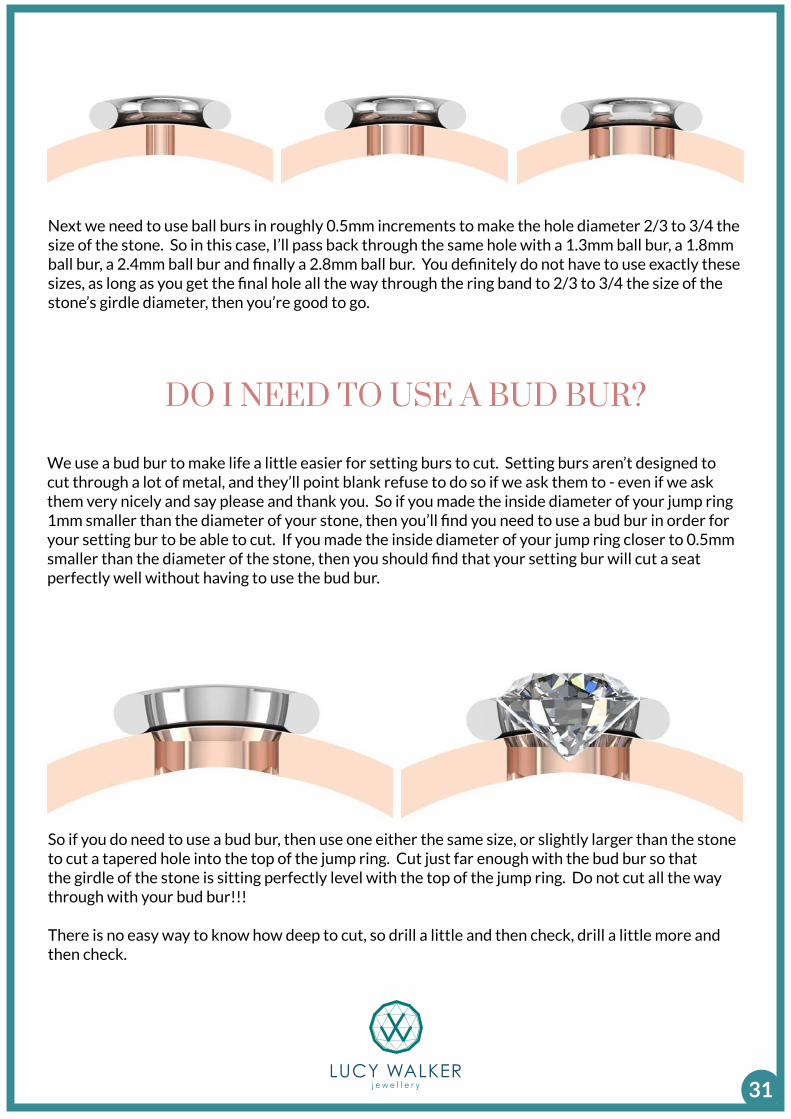
So if you do need to use a bud bur, then use one either the same size, or slightly larger than the stone to cut a tapered hole into the top of the jump ring. Cut just far enough with the bud bur so that the girdle of the stone is sitting perfectly level with the top of the jump ring. Do not cut all the way through with your bud bur!!!
There is no easy way to know how deep to cut, so drill a little and then check, drill a little more and then check.
Next we need to use ball burs in roughly 0.5mm increments to make the hole diameter 2/3 to 3/4 the size of the stone. So in this case, I’ll pass back through the same hole with a 1.3mm ball bur, a 1.8mm ball bur, a 2.4mm ball bur and finally a 2.8mm ball bur. You definitely do not have to use exactly these sizes, as long as you get the final hole all the way through the ring band to 2/3 to 3/4 the size of the stone’s girdle diameter, then you’re good to go.
DO I NEED TO USE A BUD BUR?
We use a bud bur to make life a little easier for setting burs to cut. Setting burs aren’t designed to cut through a lot of metal, and they’ll point blank refuse to do so if we ask them to - even if we ask them very nicely and say please and thank you. So if you made the inside diameter of your jump ring 1mm smaller than the diameter of your stone, then you’ll find you need to use a bud bur in order for your setting bur to be able to cut. If you made the inside diameter of your jump ring closer to 0.5mm smaller than the diameter of the stone, then you should find that your setting bur will cut a seat perfectly well without having to use the bud bur.
32
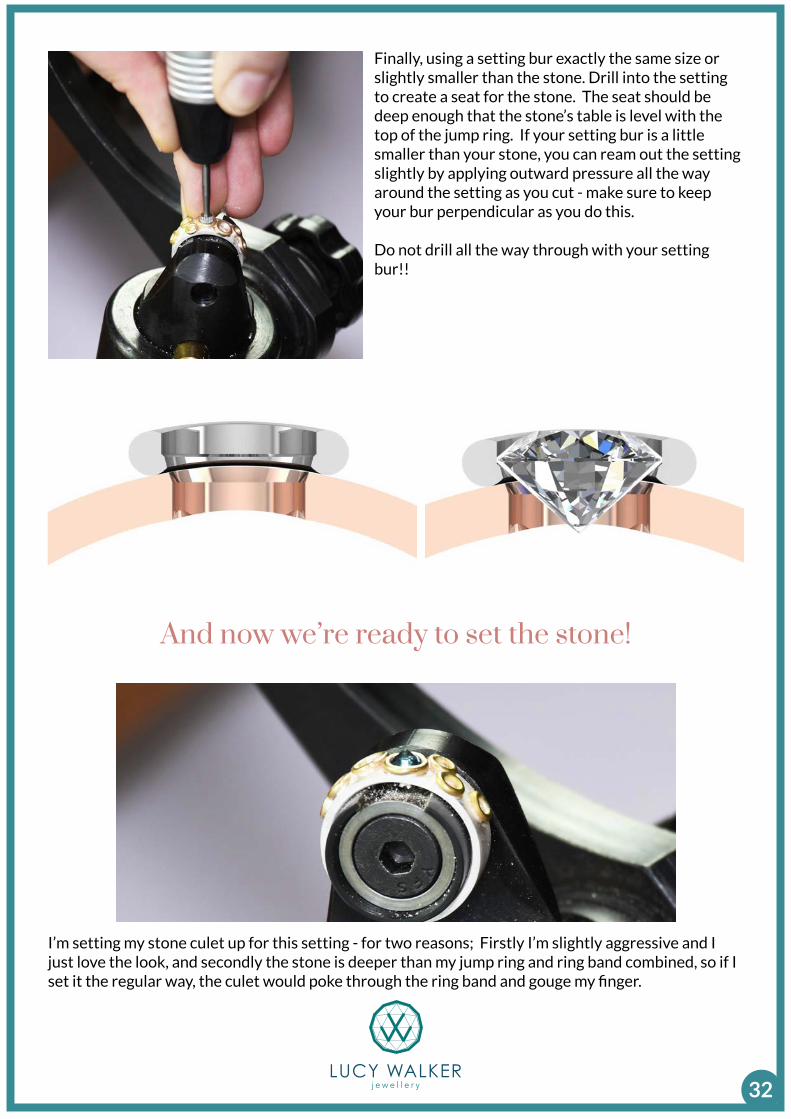
And now we’re ready to set the stone!
Finally, using a setting bur exactly the same size or slightly smaller than the stone. Drill into the setting to create a seat for the stone. The seat should be deep enough that the stone’s table is level with the top of the jump ring. If your setting bur is a little smaller than your stone, you can ream out the setting slightly by applying outward pressure all the way around the setting as you cut - make sure to keep your bur perpendicular as you do this.
Do not drill all the way through with your setting bur!!
I’m setting my stone culet up for this setting - for two reasons; Firstly I’m slightly aggressive and I just love the look, and secondly the stone is deeper than my jump ring and ring band combined, so if I set it the regular way, the culet would poke through the ring band and gouge my finger.
33
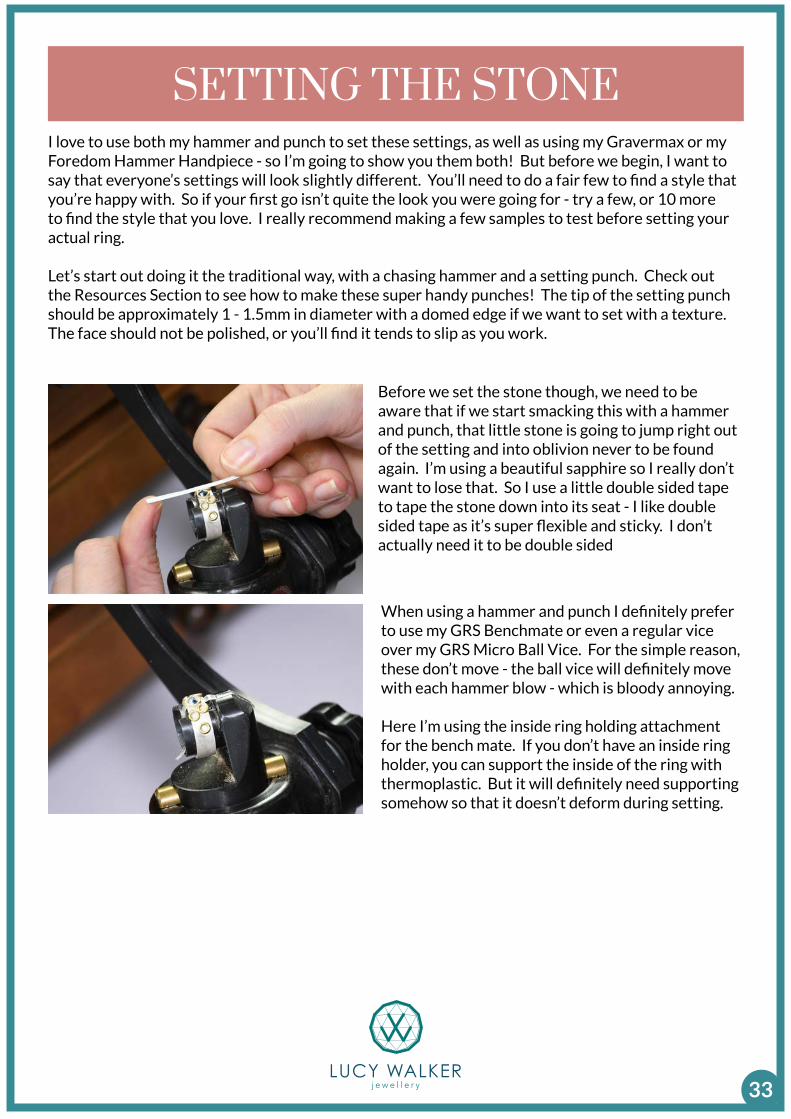
SETTING THE STONEI love to use both my hammer and punch to set these settings, as well as using my Gravermax or my Foredom Hammer Handpiece - so I’m going to show you them both! But before we begin, I want to say that everyone’s settings will look slightly different. You’ll need to do a fair few to find a style that you’re happy with. So if your first go isn’t quite the look you were going for - try a few, or 10 more to find the style that you love. I really recommend making a few samples to test before setting your actual ring.
Let’s start out doing it the traditional way, with a chasing hammer and a setting punch. Check out the Resources Section to see how to make these super handy punches! The tip of the setting punch should be approximately 1 - 1.5mm in diameter with a domed edge if we want to set with a texture. The face should not be polished, or you’ll find it tends to slip as you work.
Before we set the stone though, we need to be aware that if we start smacking this with a hammer and punch, that little stone is going to jump right out of the setting and into oblivion never to be found again. I’m using a beautiful sapphire so I really don’t want to lose that. So I use a little double sided tape to tape the stone down into its seat - I like double sided tape as it’s super flexible and sticky. I don’t actually need it to be double sided
When using a hammer and punch I definitely prefer to use my GRS Benchmate or even a regular vice over my GRS Micro Ball Vice. For the simple reason, these don’t move - the ball vice will definitely move with each hammer blow - which is bloody annoying.
Here I’m using the inside ring holding attachment for the bench mate. If you don’t have an inside ring holder, you can support the inside of the ring with thermoplastic. But it will definitely need supporting somehow so that it doesn’t deform during setting.

34
The shape of the tip of the punch really does make a difference to the texture acheived. They take only a few minutes to make, so why not make two or three punches each with slighty different shaped domed tips and see which works best. I have about 5 and I definitely have a firm favourite. Check out the Resources Section to see how we make these.
How we hold the punch is really important here. We want to have the middle finger in contact with the ring and the punch - this gives us so much stability, and when we hit the punch, we want to hit it straight on with our chasing hammer.
Place the tip of the setting punch on the jump ring tilted outwards approximately 20 degrees from vertical. The tip of the punch should be right in the middle of the jump ring. Then simply tap the end of the setting punch a few times until you see the metal move over the stone. When I do this, I am never watching the hammer but always the tip of the setting punch and the stone. I know when I’m hitting the setting punch straight on because of the sound and feel, not how it looks. If you don’t want to smash the shit out of your stone, don’t take your eyes off it for a second. And yes, just in case you were wondering - under no circumstances do you want to hit the stone with your setting punch. That is what is known in the trade as a “F*****g disaster”.
35
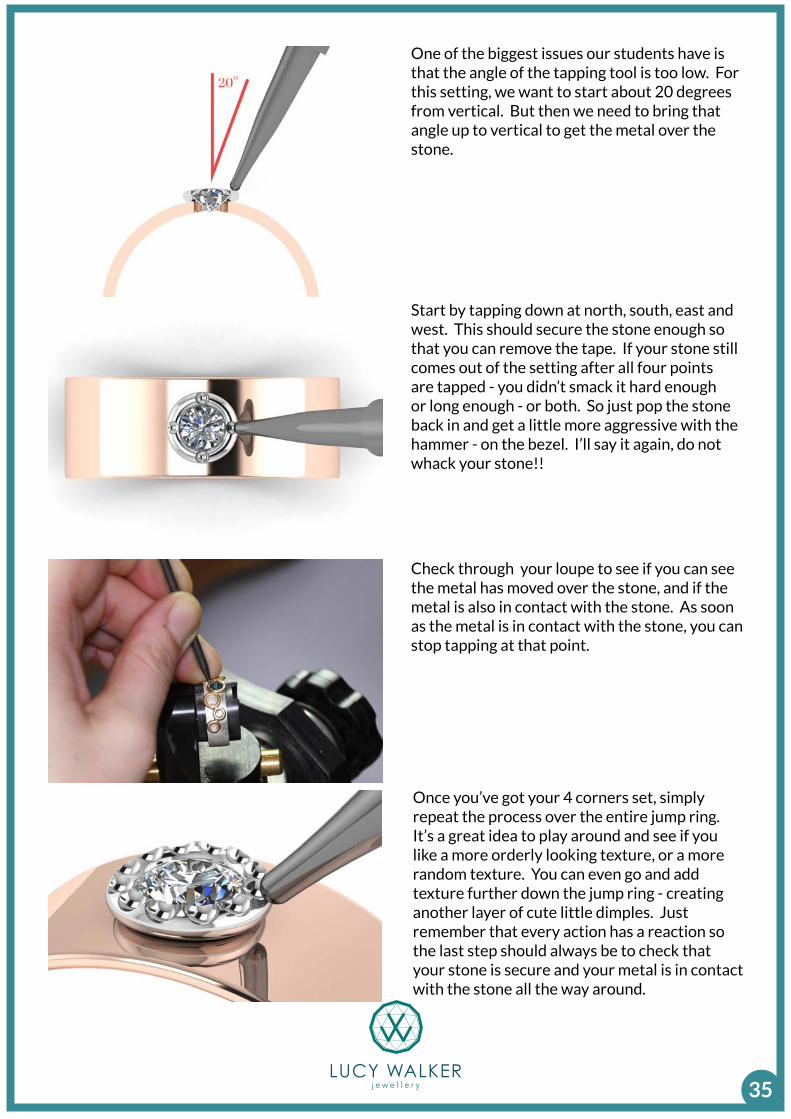
Start by tapping down at north, south, east and west. This should secure the stone enough so that you can remove the tape. If your stone still comes out of the setting after all four points are tapped - you didn’t smack it hard enough or long enough - or both. So just pop the stone back in and get a little more aggressive with the hammer - on the bezel. I’ll say it again, do not whack your stone!!
Check through your loupe to see if you can see the metal has moved over the stone, and if the metal is also in contact with the stone. As soon as the metal is in contact with the stone, you can stop tapping at that point.
One of the biggest issues our students have is that the angle of the tapping tool is too low. For this setting, we want to start about 20 degrees from vertical. But then we need to bring that angle up to vertical to get the metal over the stone.
Once you’ve got your 4 corners set, simply repeat the process over the entire jump ring. It’s a great idea to play around and see if you like a more orderly looking texture, or a more random texture. You can even go and add texture further down the jump ring - creating another layer of cute little dimples. Just remember that every action has a reaction so the last step should always be to check that your stone is secure and your metal is in contact with the stone all the way around.
36
HAMMER HANDPIECE TIMEOk, lets take a look at setting another with the foredom hammer handpiece and holding our work using a GRS Micro Ball Vice together with the Alexandre Stone Setter’s Package. I prefer to use the ball vise here, as it sits on a solid work surface, I don’t get the kind of bounce back that you can get with the bench mate. And because I’m using a hammer handpiece here, my left hand can hold the ball vice steady and keep it from moving around too much .
I’m using a Foredom hammer handpiece with a modified anvil to set the stone here. The tip of the anvil shoud be approximately 1 - 1.5mm in diameter with a domed, unpolished tip. Check out the Resources Section to see how to modify these anvils. I’ll show cutting the seat again - mainly because I just got some nice microscope pics - but cutting the seat is exactly the same regardless of how you actually set the stone.
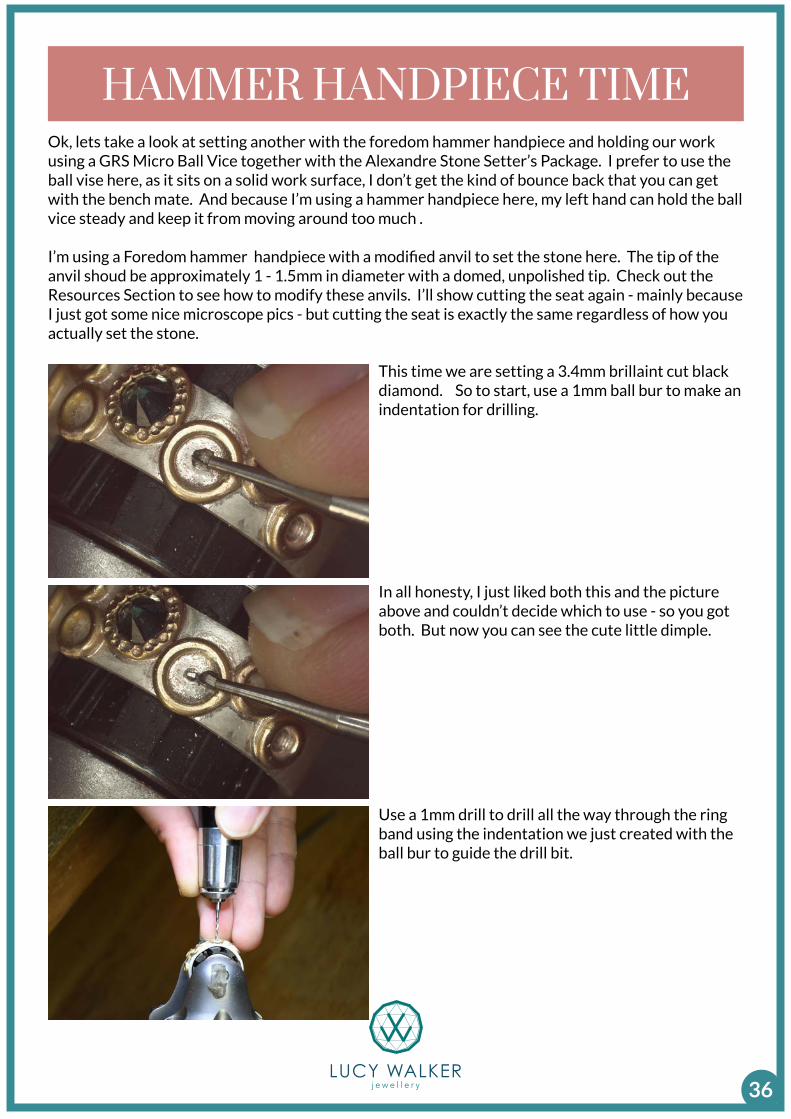
This time we are setting a 3.4mm brillaint cut black diamond. So to start, use a 1mm ball bur to make an indentation for drilling.
In all honesty, I just liked both this and the picture above and couldn’t decide which to use - so you got both. But now you can see the cute little dimple.
Use a 1mm drill to drill all the way through the ring band using the indentation we just created with the ball bur to guide the drill bit.
37
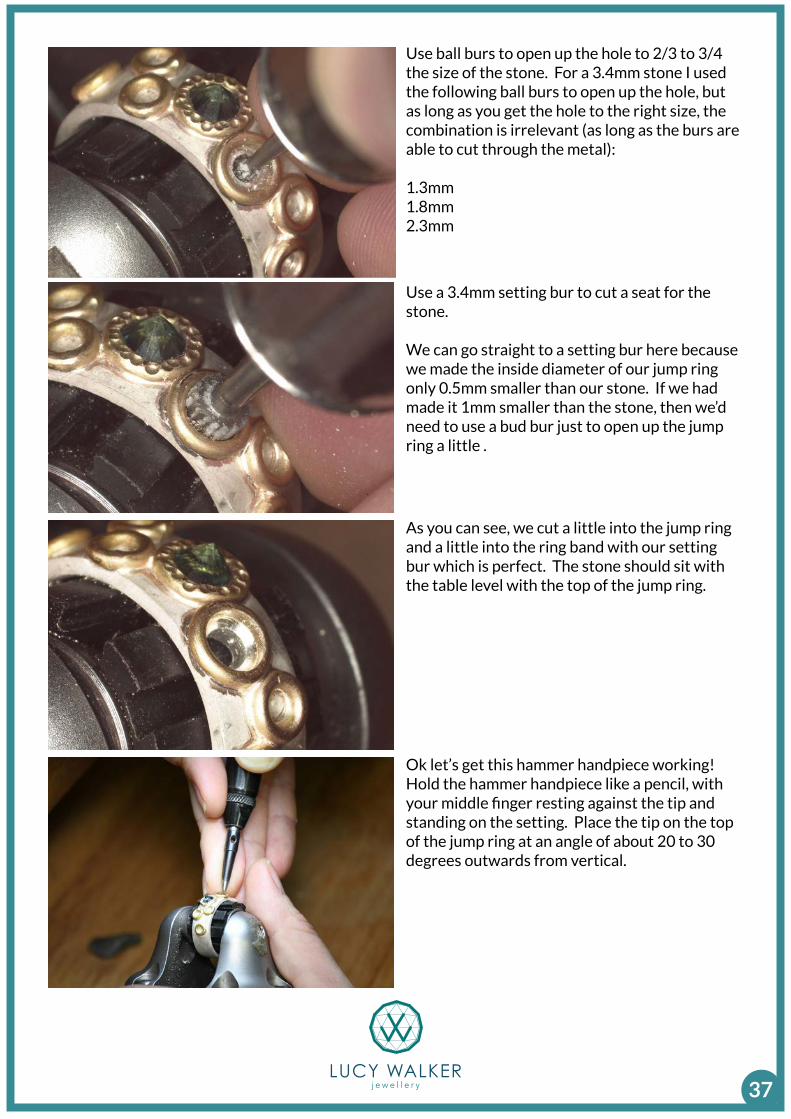
Use ball burs to open up the hole to 2/3 to 3/4 the size of the stone. For a 3.4mm stone I used the following ball burs to open up the hole, but as long as you get the hole to the right size, the combination is irrelevant (as long as the burs are able to cut through the metal):
1.3mm1.8mm2.3mm
Use a 3.4mm setting bur to cut a seat for the stone.
We can go straight to a setting bur here because we made the inside diameter of our jump ring only 0.5mm smaller than our stone. If we had made it 1mm smaller than the stone, then we’d need to use a bud bur just to open up the jump ring a little .
As you can see, we cut a little into the jump ring and a little into the ring band with our setting bur which is perfect. The stone should sit with the table level with the top of the jump ring.
Ok let’s get this hammer handpiece working! Hold the hammer handpiece like a pencil, with your middle finger resting against the tip and standing on the setting. Place the tip on the top of the jump ring at an angle of about 20 to 30 degrees outwards from vertical.

38
Rotate the work and repeat on the opposite side. Secure the stone at the north and south points first.
And then secure the stone at the east and west points.
Hold the stone with your left thumb nail, and press down SLOWLY on the foot pedal and as the hammer handpiece is running, bring the angle of your anvil up to almost vertical whilst your foot is still on the pedal. If your metal isn’t moving, wiggle that tip very slightly from side to side as you push the metal over - seriously, that makes an incredible difference - just watch that metal move! Do not run your hammer handpiece at full throttle - I run mine as slowly as I possibly can - it sounds strange, but it works faster at slow speeds!
We only get these super cute looking little dimples when the tip of our anvil is the perfect shape, you may need to play around with shaping the anvil a bit to get this.

39
And now go ahead and set the rest of the jump ring.
There’s no right or wrong here, as long as the stone is set, everything else is aesthetics - which means your opininon as the artist is the one that counts!
And that really is all there is to it! Just make sure as always to check your work through a loupe to ensure the metal is fully in contact with the stone all the way around.
A note on hammer handpieces
It can be quite difficult to control the speed of a hammer handpiece when using it with the Foredom SR Motor. Thankfully there is a product out there to help with that. The Foredom® EMX-1 Manual Dial Speed Control (Rio Grande #117814) is designed just for that. Alternatively, the Foredom LX motor works beautifully with a hammer handpiece due to
its slower speed.
40
POLISHING THE RINGBecause we sanded everything to 1200 grit before setting the stones, this should be a relatively easy affair. You can polish by hand or using a polishing motor, I’ll be doing a bit of both here!
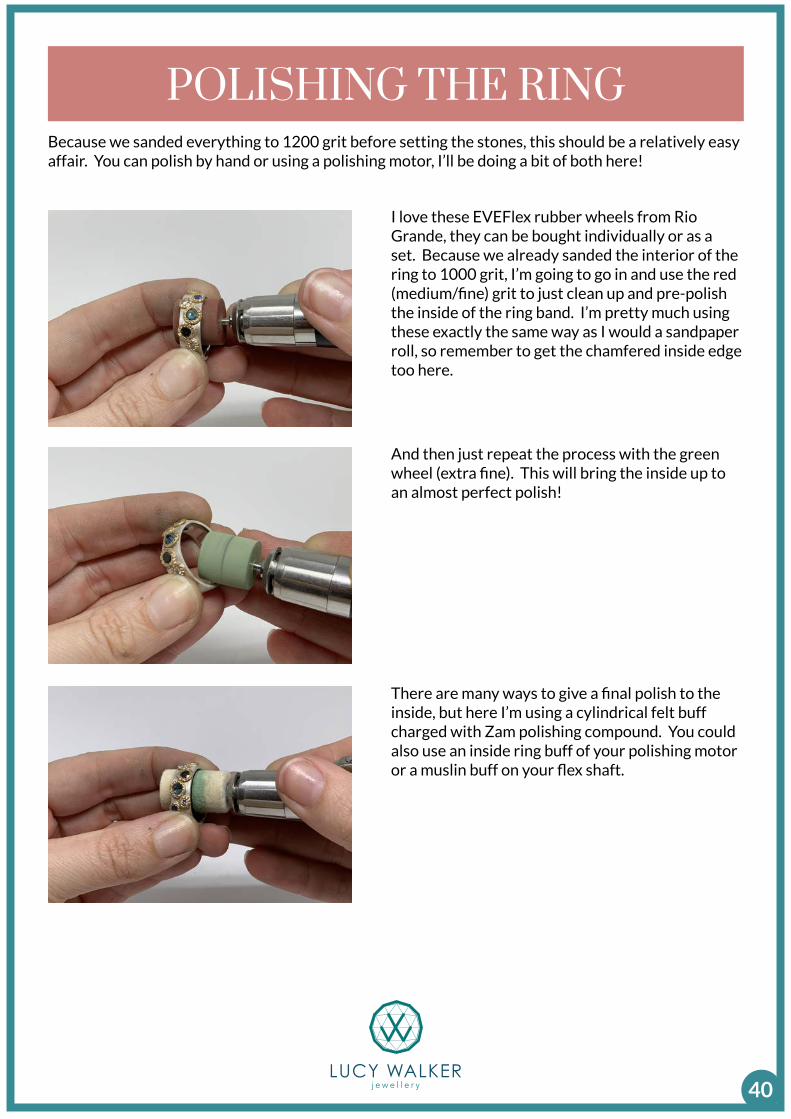
I love these EVEFlex rubber wheels from Rio Grande, they can be bought individually or as a set. Because we already sanded the interior of the ring to 1000 grit, I’m going to go in and use the red (medium/fine) grit to just clean up and pre-polish the inside of the ring band. I’m pretty much using these exactly the same way as I would a sandpaper roll, so remember to get the chamfered inside edge too here.
And then just repeat the process with the green wheel (extra fine). This will bring the inside up to an almost perfect polish!
There are many ways to give a final polish to the inside, but here I’m using a cylindrical felt buff charged with Zam polishing compound. You could also use an inside ring buff of your polishing motor or a muslin buff on your flex shaft.
41
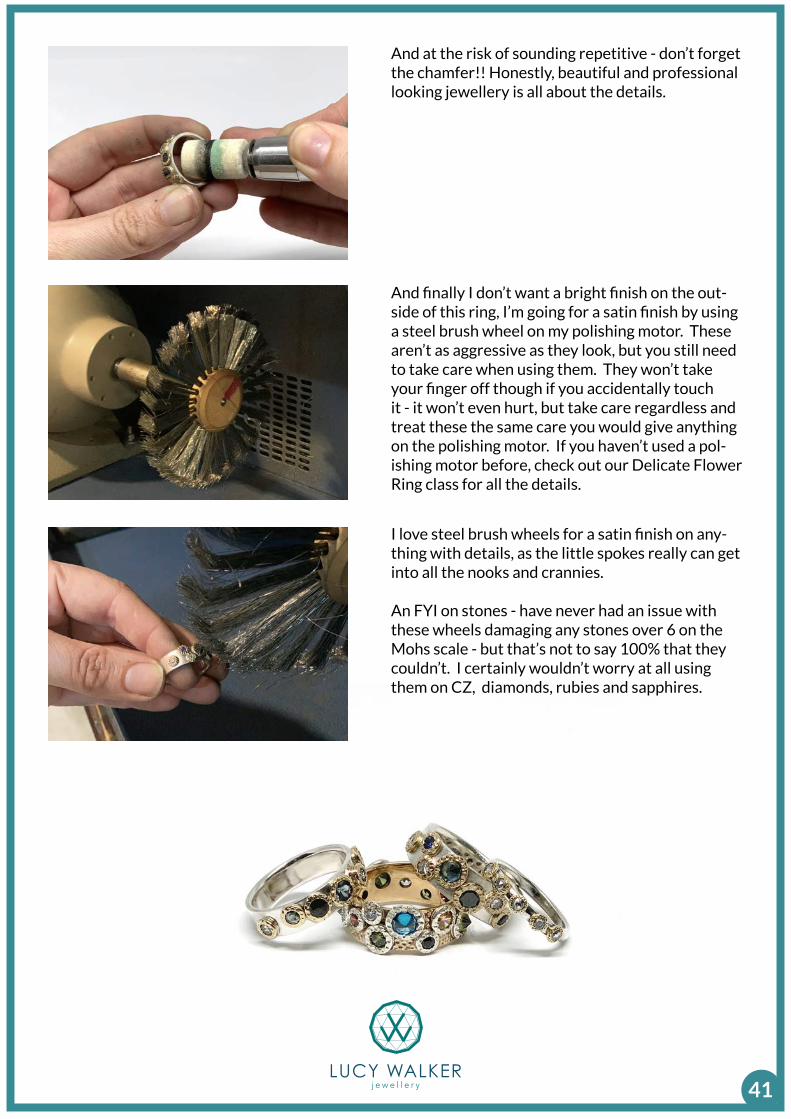
And at the risk of sounding repetitive - don’t forget the chamfer!! Honestly, beautiful and professional looking jewellery is all about the details.
And finally I don’t want a bright finish on the out-side of this ring, I’m going for a satin finish by using a steel brush wheel on my polishing motor. These aren’t as aggressive as they look, but you still need to take care when using them. They won’t take your finger off though if you accidentally touch it - it won’t even hurt, but take care regardless and treat these the same care you would give anything on the polishing motor. If you haven’t used a pol-ishing motor before, check out our Delicate Flower Ring class for all the details.
I love steel brush wheels for a satin finish on any-thing with details, as the little spokes really can get into all the nooks and crannies.
An FYI on stones - have never had an issue with these wheels damaging any stones over 6 on the Mohs scale - but that’s not to say 100% that they couldn’t. I certainly wouldn’t worry at all using them on CZ, diamonds, rubies and sapphires.