oeg service explorer getting started guide
TRANSCRIPT
Oracle Enterprise Gateway
1 / 63
An Oracle White Paper June 2011
OEG Service Explorer
Getting Started Guide
Oracle Enterprise Gateway
2 / 63
Disclaimer
The following is intended to outline our general product direction. It is intended for information purposes only, and may not be incorporated into any contract. It is not a commitment to deliver any material, code, or functionality, and should not be relied upon in making purchasing decisions. The development, release, and timing of any features or functionality described for Oracle’s products remains at the sole discretion of Oracle.

Oracle Enterprise Gateway
3 / 63
1 Introduction ........................................................................................ 5 Main features .................................................................................... 5 Quick GUI tour .................................................................................. 5
2 Testing Web Services ........................................................................ 8 Testing SOAP-based Web services .................................................. 8 Testing REST-style Web services .................................................... 10 Sending SOAP attachments ............................................................. 11 Managing requests ........................................................................... 13 Remote host settings ........................................................................ 13
3 Managing Certificates ........................................................................ 16 Creating a self-signed CA certificate ................................................. 16 Creating a test certificate .................................................................. 17 Managing certificates or keys ........................................................... 17 Keystore management ...................................................................... 17
4 Testing Web Services Security .......................................................... 19 HTTP Basic/Digest authentication .................................................... 19 WS-Security UserNameToken authentication .................................. 21 SAML assertions ............................................................................... 23 Digital signature ................................................................................ 25 XML encryption ................................................................................. 27
5 Configuring SSL ................................................................................. 30 Setting up an SSL connection to a back-end server ......................... 30 Setting up mutual SSL authentication to a back-end server ............. 32 Adding certificates to the truststore ................................................... 32 Setting a certificate for mutual SSL authentication ........................... 33 Adding certificates to the Java default keystore ............................... 34
6 Creating Test Cases and Test Suites ................................................ 35 Creating basic test cases .................................................................. 35 Creating test cases from WSDL ....................................................... 36
Oracle Enterprise Gateway
4 / 63
Creating advanced test cases ........................................................... 37
Concepts .................................................................................................. 38
Posting a message over JMS ................................................................... 39
Validating response contents ................................................................... 44 Chaining test cases ........................................................................... 47 Running test suites and cases from the command line .................... 53 Managing test suites ......................................................................... 54
7 Testing Your Services against Attacks .............................................. 55 Testing against XML attacks ............................................................. 55 Testing virus attacks ......................................................................... 57
8 Running Stress Tests ......................................................................... 58 Stress tests in OEG Service Explorer ............................................... 58 Stress tests using SR ........................................................................ 60 Example statistics output .................................................................. 63
Oracle Enterprise Gateway
5 / 63
1. Introduction
This section describes the main features of OEG Service Explorer, and gives a quick overview
of its user interface.
Main features
OEG Service Explorer is a Web services testing tool, which supports both SOAP-based and
REST-based invocation modes. It shares some of its architecture with the OEG Gateway,
especially for security features or policy creation. Using OEG Service Explorer, you can:
ñ Test Web services residing in your internal network, or provided from the Web, or in a
cloud environment. SOAP-style and REST-style services and SOAP attachments are
supported.
ñ Test Web services that require encrypted input.
ñ Test Web services that perform digital signatures validation.
ñ Test Web services that require authentication using security tokens such as WS-
Security, SAML or Kerberos tokens, simple HTTP basic authentication, or mutual SSL
authentication.
OEG Service Explorer also enables you to create test suites, composed of one or multiple test
cases. Finally, you can use OEG Service Explorer to execute stress tests. OEG Service Explorer
Console is a headless version of OEG Service Explorer, which you can use to run test cases
and test suites from the command line. Stress tests are also available on the command line
using the OEG Service Explorer SR companion tool.
Quick GUI tour
The OEG Service Explorer GUI is divided into three views:
Classic Work in this pane to do simple unit testing of a Web service operation.
Design Work in this pane to write test suites, test cases, or stress tests.
Results When you execute a test suite or stress tests, results appear in this pane.
Oracle Enterprise Gateway
6 / 63
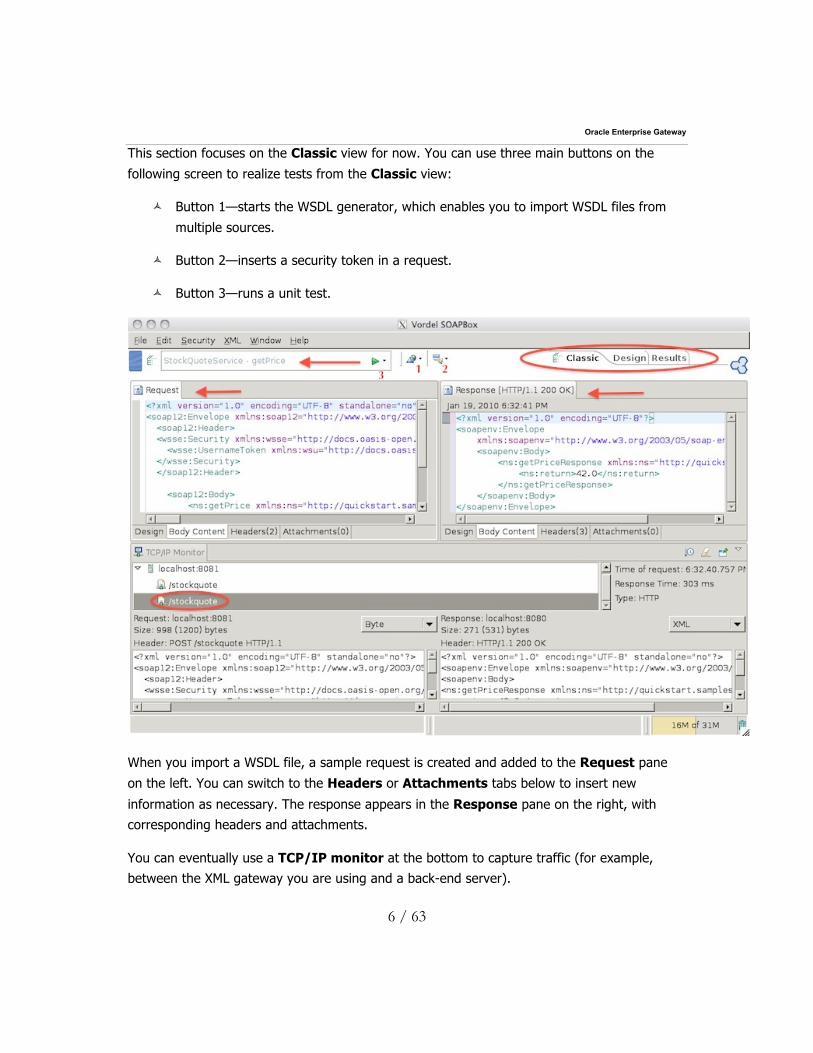
This section focuses on the Classic view for now. You can use three main buttons on the
following screen to realize tests from the Classic view:
ñ Button 1—starts the WSDL generator, which enables you to import WSDL files from
multiple sources.
ñ Button 2—inserts a security token in a request.
ñ Button 3—runs a unit test.
When you import a WSDL file, a sample request is created and added to the Request pane
on the left. You can switch to the Headers or Attachments tabs below to insert new
information as necessary. The response appears in the Response pane on the right, with
corresponding headers and attachments.
You can eventually use a TCP/IP monitor at the bottom to capture traffic (for example,
between the XML gateway you are using and a back-end server).
Oracle Enterprise Gateway
7 / 63
You can save the contents of the Request and Response panes to a file using the File
menu. You can also load a request from an XML file located on the file system from the same
menu.
Oracle Enterprise Gateway
8 / 63
2. Testing Web Services
This section shows how to test SOAP-based and REST-based services and add attachments to
a request. It uses the sample Quick Start service (StockQuote), which is shipped with the
Apache Axis2 engine for tests. All tests have been performed against version 1.5.1 of the Axis2
engine.
Testing SOAP-based Web services
To test a Web service, you most often use its description file (WSDL). OEG Service Explorer
works with description files that are stored on the file system, provided online by the Web
services engine, or stored in a registry accessible using UDDI. This example connects to an
Axis2 server to retrieve the WSDL.
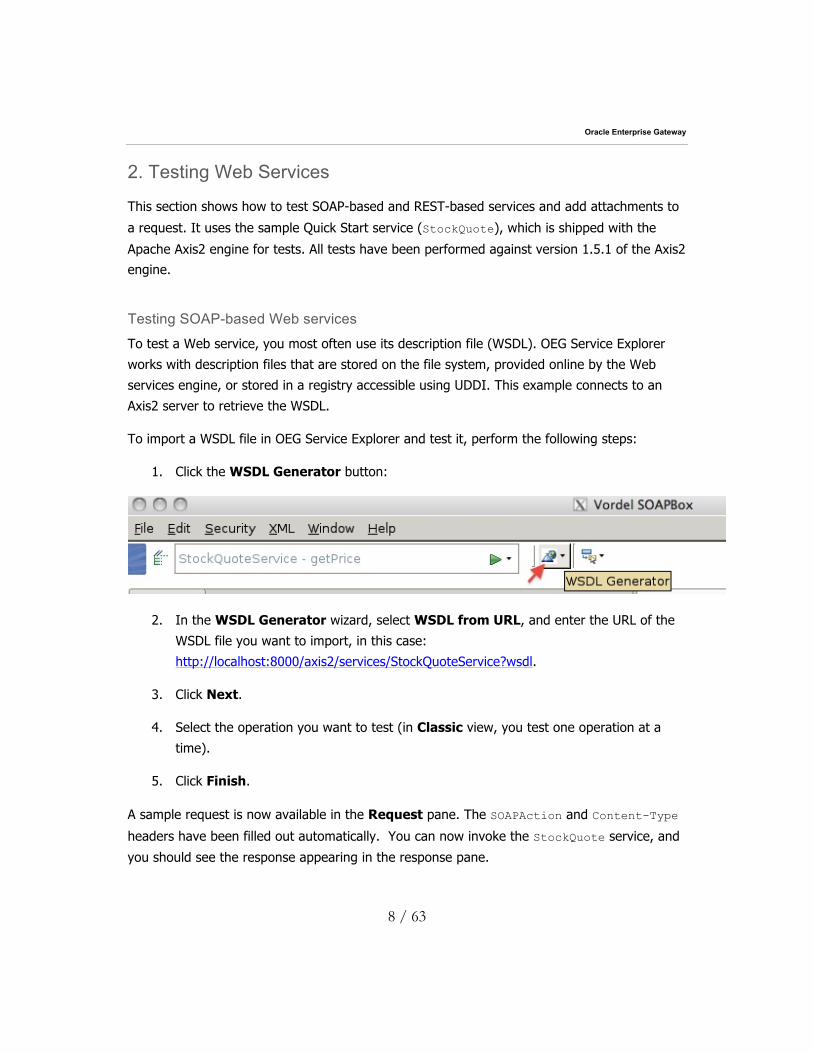
To import a WSDL file in OEG Service Explorer and test it, perform the following steps:
1. Click the WSDL Generator button:
2. In the WSDL Generator wizard, select WSDL from URL, and enter the URL of the
WSDL file you want to import, in this case:
http://localhost:8000/axis2/services/StockQuoteService?wsdl.
3. Click Next.
4. Select the operation you want to test (in Classic view, you test one operation at a
time).
5. Click Finish.
A sample request is now available in the Request pane. The SOAPAction and Content-Type
headers have been filled out automatically. You can now invoke the StockQuote service, and
you should see the response appearing in the response pane.

Oracle Enterprise Gateway
9 / 63
Note: If problems occur, they are visible in the console. To display the console, select View | Show Console in the main menu, or press Crtl-F9.
Oracle Enterprise Gateway
10 / 63
Testing REST-style Web services
You can also use OEG Service Explorer to test REST-style Web services. This section shows
how to test the Bing API (provided by Microsoft®).
To invoke a service in REST-style, you usually use the GET HTTP verb. No WSDL is used to
describe the request to be performed. In such cases, use the Request settings view to specify
the correct request syntax and parameters. You can also use this view to manage the list of
existing requests.
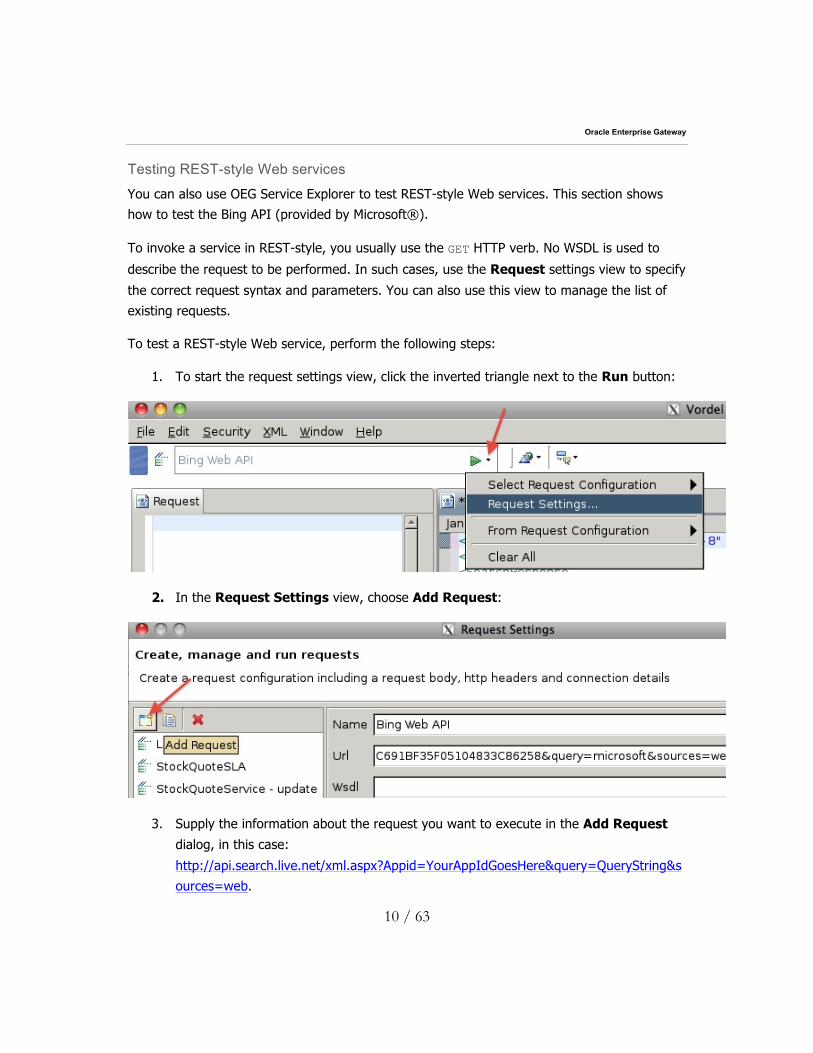
To test a REST-style Web service, perform the following steps:
1. To start the request settings view, click the inverted triangle next to the Run button:
2. In the Request Settings view, choose Add Request:
3. Supply the information about the request you want to execute in the Add Request dialog, in this case:
http://api.search.live.net/xml.aspx?Appid=YourAppIdGoesHere&query=QueryString&s
ources=web.
Oracle Enterprise Gateway
11 / 63
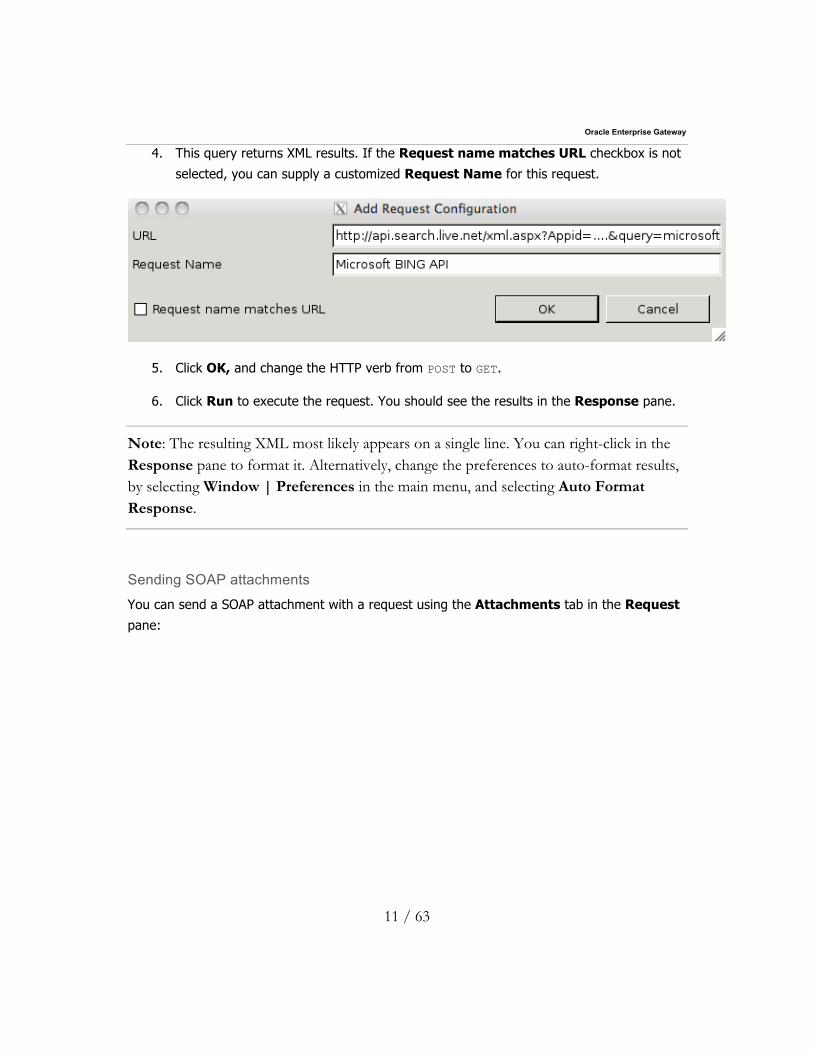
4. This query returns XML results. If the Request name matches URL checkbox is not
selected, you can supply a customized Request Name for this request.
5. Click OK, and change the HTTP verb from POST to GET.
6. Click Run to execute the request. You should see the results in the Response pane.
Note: The resulting XML most likely appears on a single line. You can right-click in the Response pane to format it. Alternatively, change the preferences to auto-format results, by selecting Window | Preferences in the main menu, and selecting Auto Format Response.
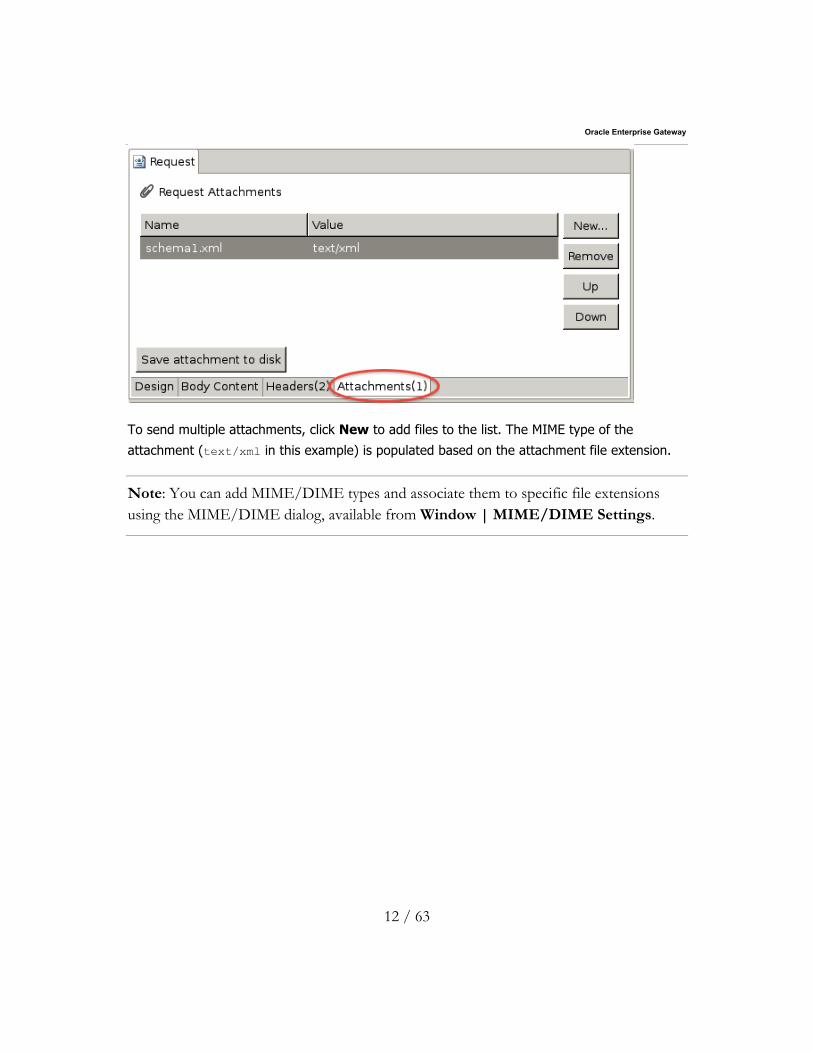
Sending SOAP attachments
You can send a SOAP attachment with a request using the Attachments tab in the Request pane:
Oracle Enterprise Gateway
12 / 63
To send multiple attachments, click New to add files to the list. The MIME type of the
attachment (text/xml in this example) is populated based on the attachment file extension.
Note: You can add MIME/DIME types and associate them to specific file extensions using the MIME/DIME dialog, available from Window | MIME/DIME Settings.
Oracle Enterprise Gateway
13 / 63
Managing requests
All the requests you create, either manually or by importing a WSDL file, are stored internally.
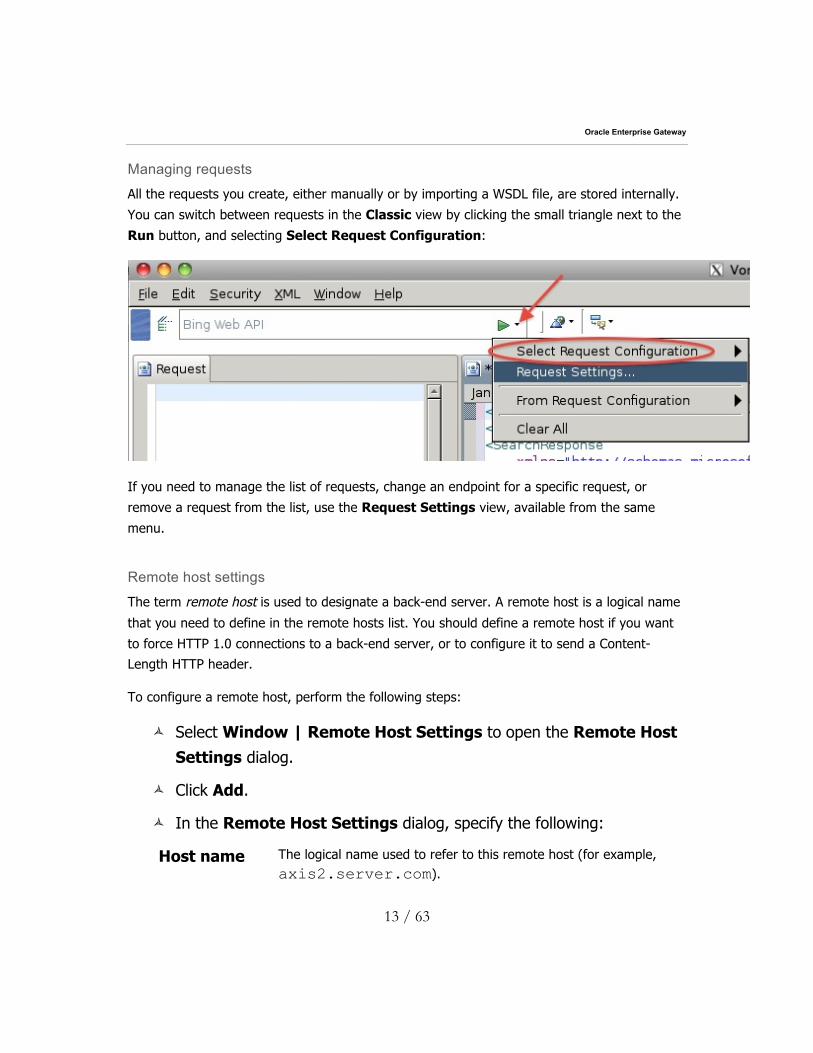
You can switch between requests in the Classic view by clicking the small triangle next to the
Run button, and selecting Select Request Configuration:
If you need to manage the list of requests, change an endpoint for a specific request, or
remove a request from the list, use the Request Settings view, available from the same
menu.
Remote host settings
The term remote host is used to designate a back-end server. A remote host is a logical name
that you need to define in the remote hosts list. You should define a remote host if you want
to force HTTP 1.0 connections to a back-end server, or to configure it to send a Content-
Length HTTP header.
To configure a remote host, perform the following steps:
ñ Select Window | Remote Host Settings to open the Remote Host Settings dialog.
ñ Click Add.
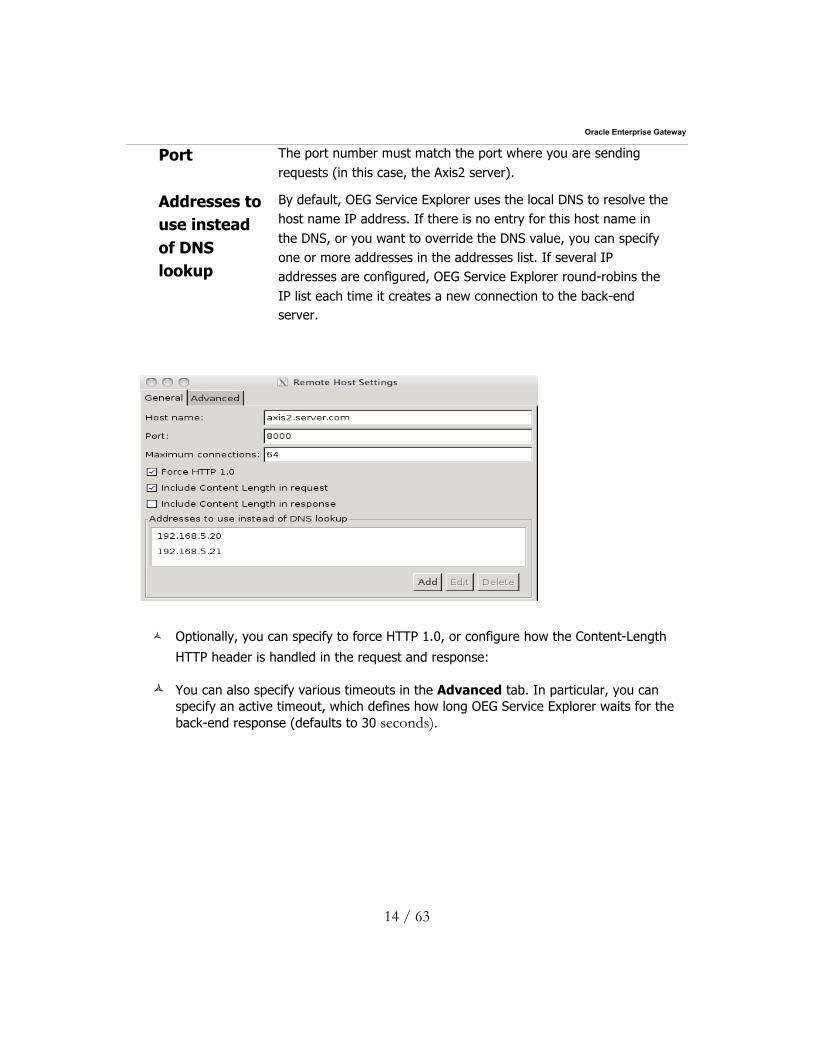
ñ In the Remote Host Settings dialog, specify the following:
Host name The logical name used to refer to this remote host (for example, axis2.server.com).
Oracle Enterprise Gateway
14 / 63
Port The port number must match the port where you are sending requests (in this case, the Axis2 server).
Addresses to use instead of DNS lookup
By default, OEG Service Explorer uses the local DNS to resolve the host name IP address. If there is no entry for this host name in the DNS, or you want to override the DNS value, you can specify one or more addresses in the addresses list. If several IP addresses are configured, OEG Service Explorer round-robins the IP list each time it creates a new connection to the back-end server.
ñ Optionally, you can specify to force HTTP 1.0, or configure how the Content-Length
HTTP header is handled in the request and response:
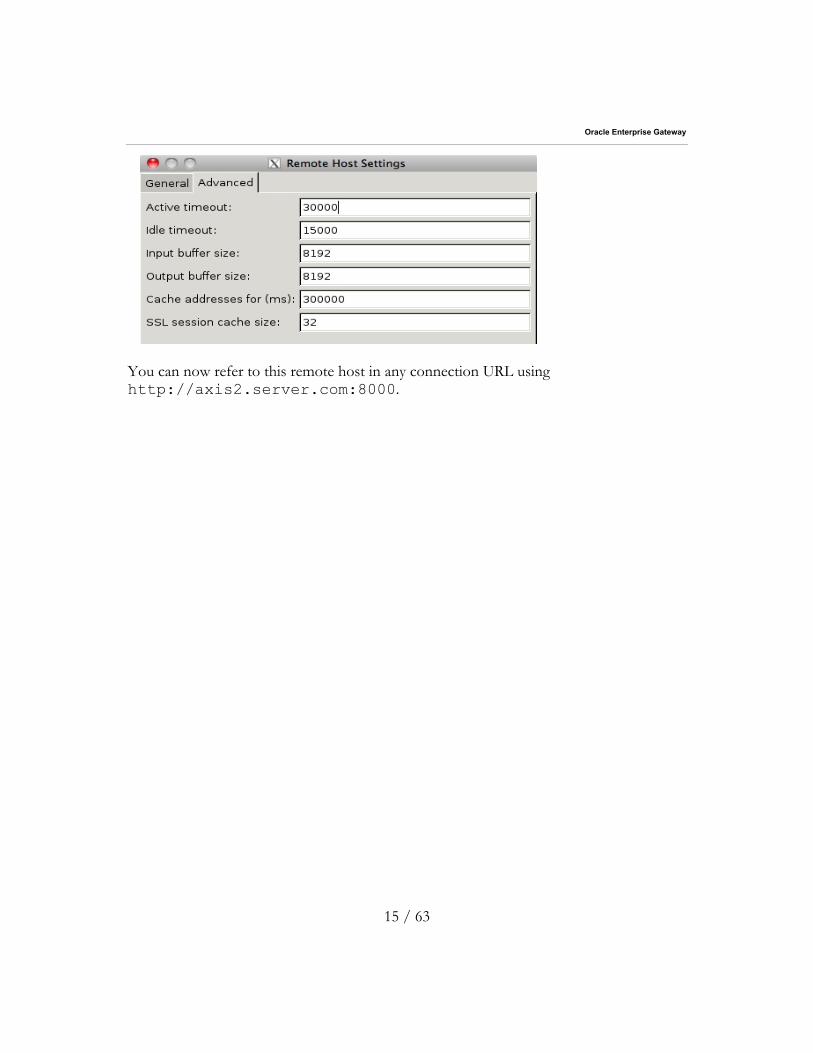
ñ You can also specify various timeouts in the Advanced tab. In particular, you can specify an active timeout, which defines how long OEG Service Explorer waits for the back-end response (defaults to 30 seconds).
Oracle Enterprise Gateway
15 / 63
You can now refer to this remote host in any connection URL using http://axis2.server.com:8000.
Oracle Enterprise Gateway
16 / 63
3. Managing Certificates
SOAP enables you to manage and create X509 certificates and keys. You can also connect to a
Java keystore to retrieve certificates or store certificates. You need to create or import
certificates for SSL connections or security tasks related to encryption or digital signatures.
This section first shows how to create a self-signed certificate to simulate a Certificate
Authority (CA), and then how to create a personal certificate signed by the CA. Finally, it adds
the CA to an existing keystore.
Creating a self-signed CA certificate
To create a new self-signed certificate for a certificate authority (CA), perform the following
steps:
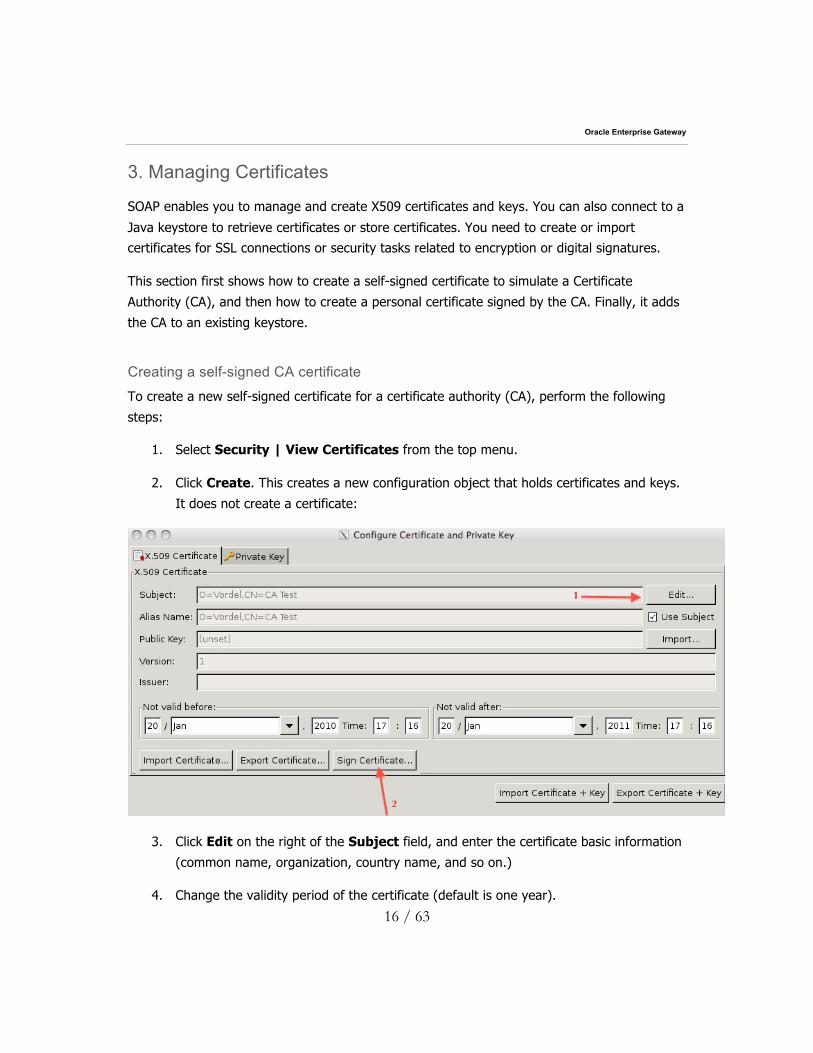
1. Select Security | View Certificates from the top menu.
2. Click Create. This creates a new configuration object that holds certificates and keys.
It does not create a certificate:
3. Click Edit on the right of the Subject field, and enter the certificate basic information
(common name, organization, country name, and so on.)
4. Change the validity period of the certificate (default is one year).

Oracle Enterprise Gateway
17 / 63
5. Click Sign Certificate. When asked if the certificate should be self-signed, select
Yes.
6. When asked to generate a public and private key pair, select Yes.
7. Specify an Alias for the certificate (can be the same as Subject).
You now have a CA certificate in the certificates store.
Creating a test certificate
The procedure to create a certificate signed by the CA is very similar to that described above,
except when you sign the certificate, you must select No when asked to self-sign the
certificate, and select the CA certificate you just created.
Managing certificates or keys
You can import existing certificates or private keys in the OEG Service Explorer certificates
store. OEG Service Explorer supports DER, PEM, and PFX formats, among others.
You can import certificates and keys individually by clicking the Import Certificate or
Import Private Key buttons. You can also import a certificate and its corresponding private
key using the Import Certificate+Key button.
Similarly, you can export certificates and keys separately, or as part of the same file (usually a
PEM file).
Keystore management
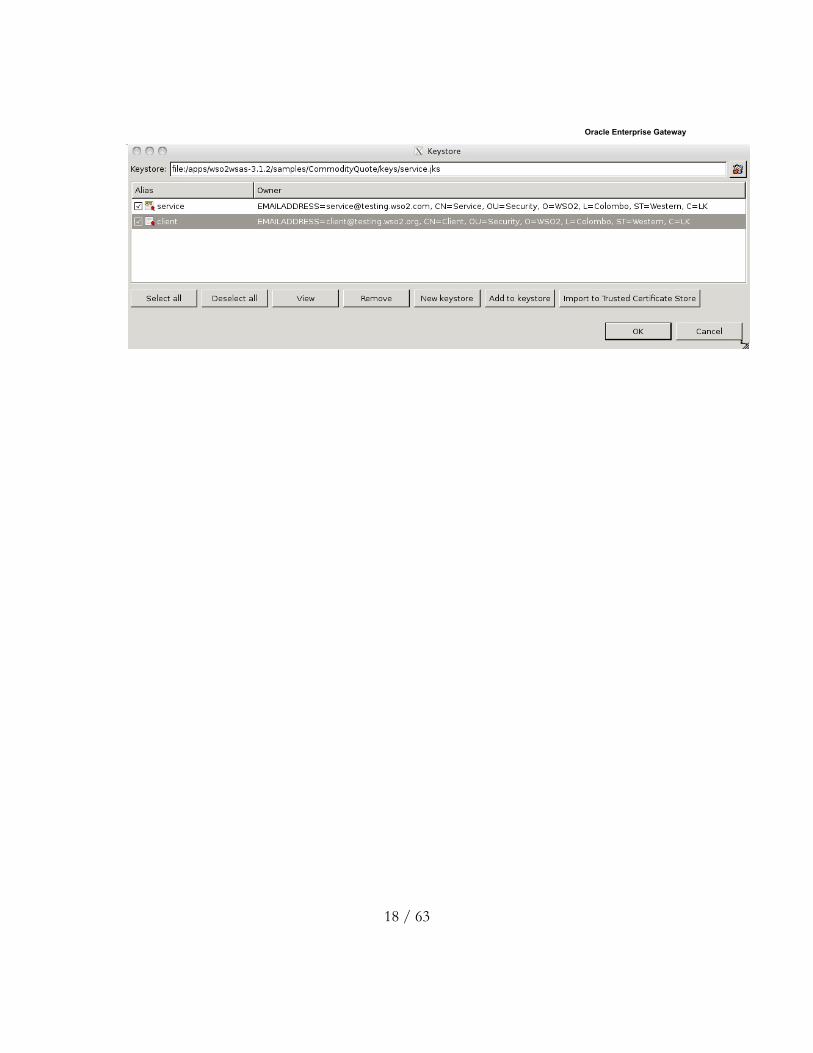
You can retrieve certificates and keys from a keystore (.jks files), or store certificate and keys
you created with OEG Service Explorer inside a keystore. To interact with a keystore, click the
Keystore button on the certificates management dialog (opened using Security | View Certificates).
The following example opens a keystore file provided with a sample Web service. You could
now import the certificates or private keys into the trusted certificate store. You could also add
entries to this keystore from the certificate store using the Add to keystore button.
Oracle Enterprise Gateway
18 / 63

Oracle Enterprise Gateway
19 / 63
4. Testing Web Services Security
This section looks at OEG Service Explorer configuration options to invoke secured Web
services. First, it shows how to setup HTTP Basic authentication, how to create WS-Security
UserNameTokens, and finally SAML assertions. Next, it shows how to digitally sign a request,
and how to encrypt a message.
HTTP Basic/Digest authentication
To supply basic authentication information, edit the current request settings as follows:
ñ Open the Request Settings view.
ñ Select the request you want to configure in the list on the left, and switch to the
Security tab:
ñ Switch to the HTTP Authentication tab, and select HTTP Basic or HTTP Digest, depending on which authentication theme you want to use.
ñ Supply a user ID and a password.

Oracle Enterprise Gateway
20 / 63
ñ Click Run to send the request.

Oracle Enterprise Gateway
21 / 63
WS-Security UserNameToken authentication
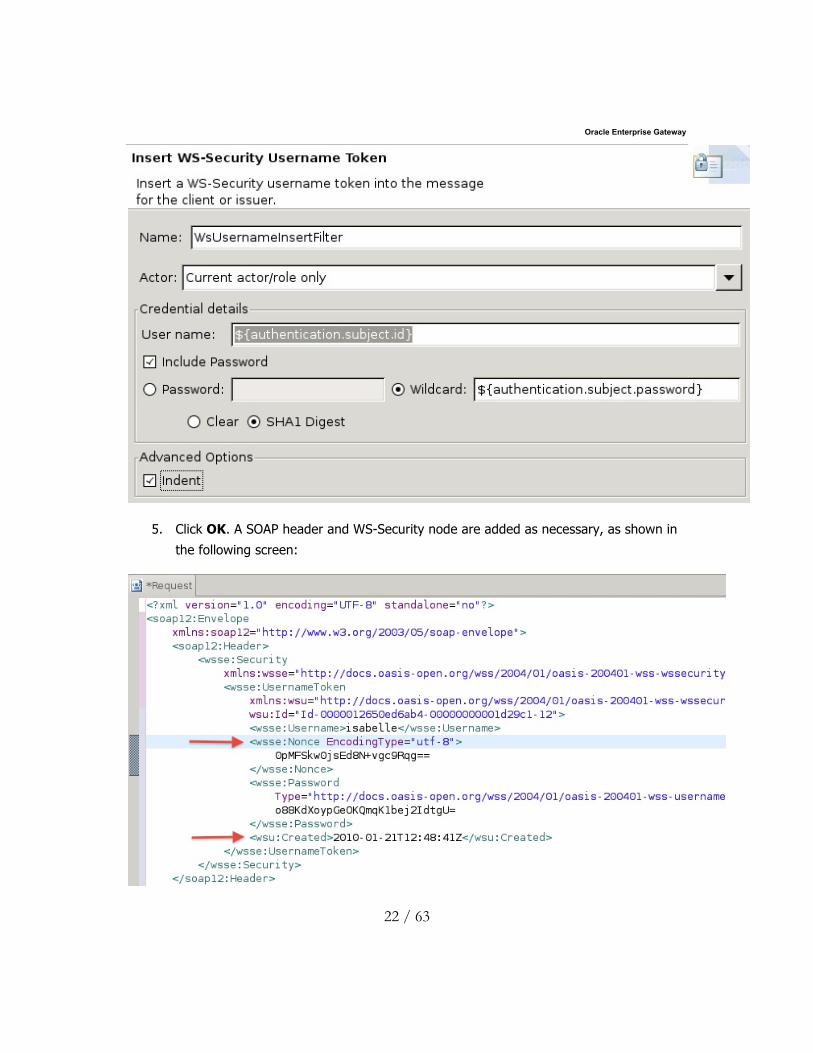
To insert a WS-Security token in a request, perform the following steps:
1. In the Classic view, click the inverted triangle next to the Security icon.
Alternatively, use the Security entry in the main menu:
2. Select Insert WS-Security UserName.
3. Provide the user name / password used to create the token.
Note: You can replace both using wildcards such as ${authentication.subject.id}. Wildcards are similar to variables. You can define default values in the OEG Service Explorer general Preferences (select Window-Preferences | Wildcards).
4. If you select the Indent checkbox, the generated XML is automatically formatted in
the Request pane.
Oracle Enterprise Gateway
22 / 63
5. Click OK. A SOAP header and WS-Security node are added as necessary, as shown in
the following screen:
Oracle Enterprise Gateway
23 / 63
The wsse:Nonce entry is created automatically when the password is set as SHA1 Digest. A
timestamp is also inserted so that your XML Gateway or Web services engine can check the
validity of the token.
Note: If you need to replace a UserNameToken with another one, delete the existing token in the Request pane, and run the wizard again.
SAML assertions
Both authentication and authorization assertions can be inserted in a request. The following
example shows how to create a SAML authentication assertion. Details about SAML options
(such as version, confirmation method, and so on) are available in the OEG Service Explorer
online help.
To inject a SAML authentication assertion into a request, perform the following steps:
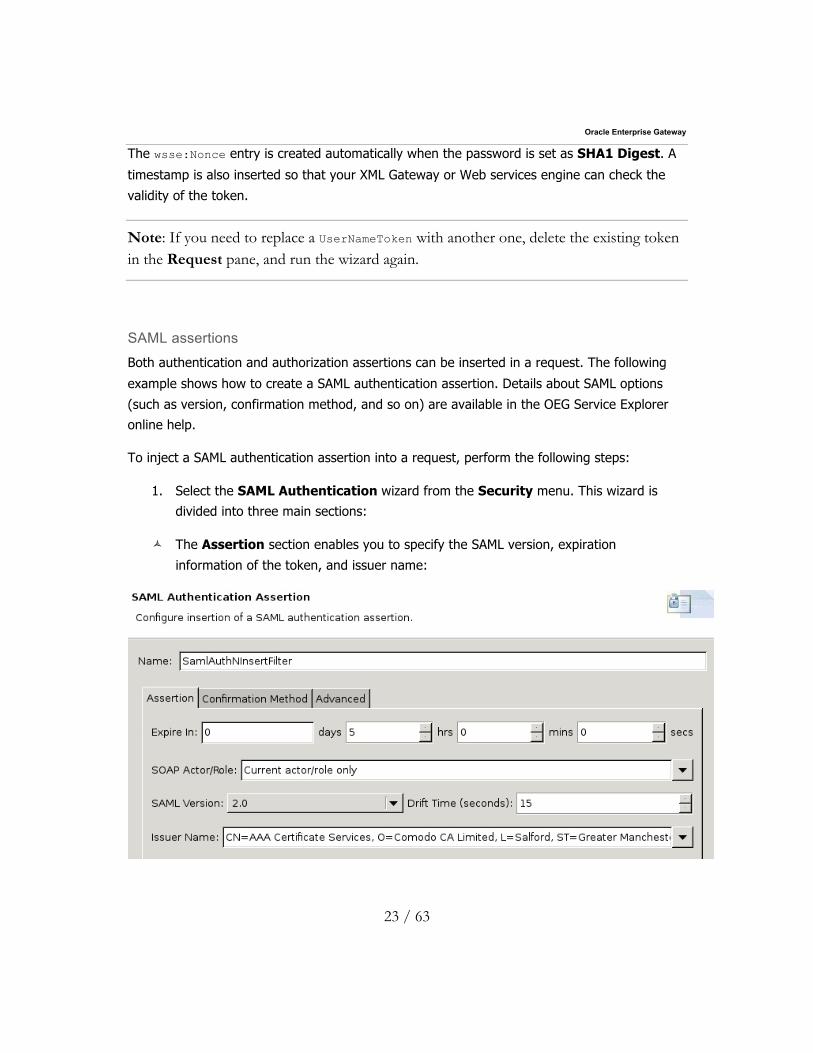
1. Select the SAML Authentication wizard from the Security menu. This wizard is
divided into three main sections:
ñ The Assertion section enables you to specify the SAML version, expiration
information of the token, and issuer name:
Oracle Enterprise Gateway
24 / 63
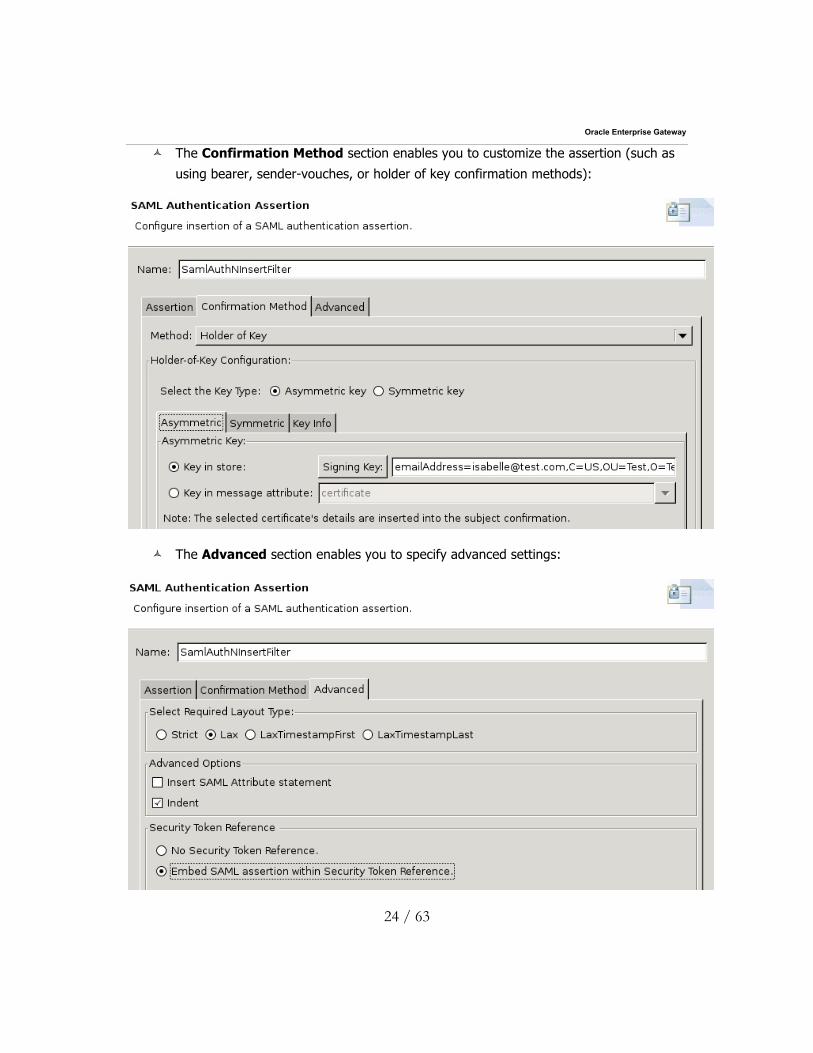
ñ The Confirmation Method section enables you to customize the assertion (such as
using bearer, sender-vouches, or holder of key confirmation methods):
ñ The Advanced section enables you to specify advanced settings:
Oracle Enterprise Gateway
25 / 63
2. Click Finish to insert the SAML authentication assertion in the request. A
wsse:Security block is created as necessary to contain the assertion.
You can follow exactly the same steps for a SAML Authorization assertion.
Digital signature
To use digital signature, you must have created or imported at least one certificate with a
private key. To digitally sign a request, or parts of a request, perform the following steps:
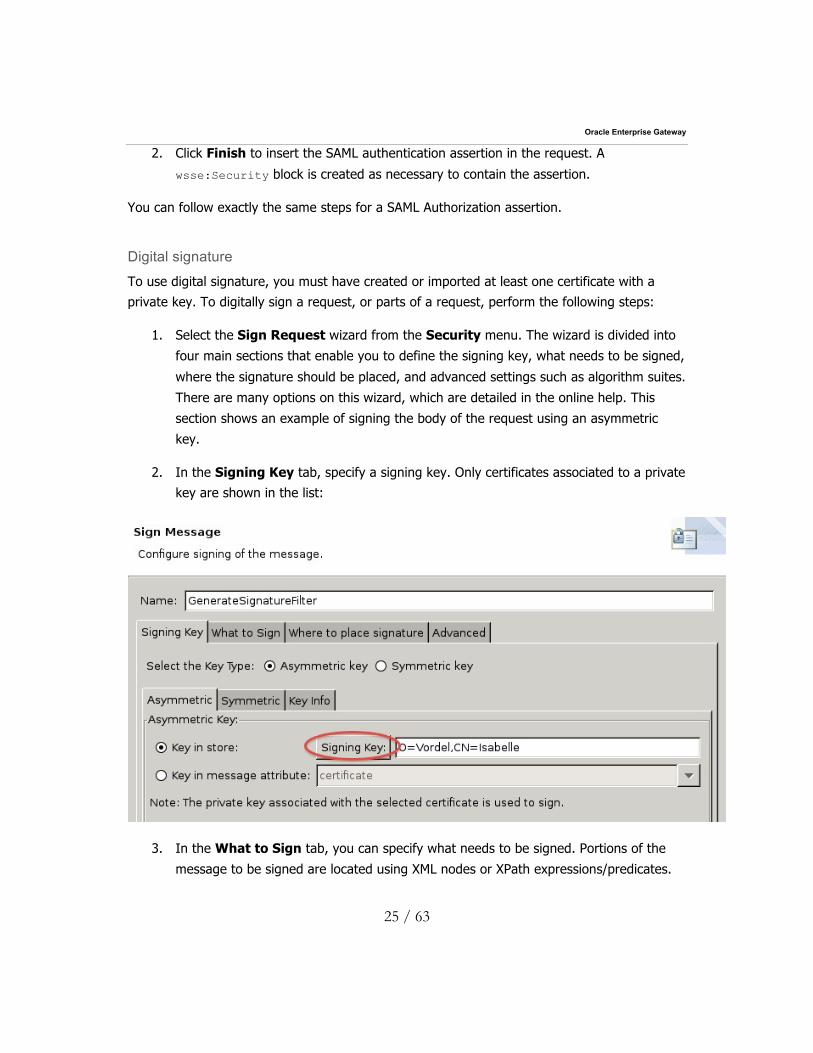
1. Select the Sign Request wizard from the Security menu. The wizard is divided into
four main sections that enable you to define the signing key, what needs to be signed,
where the signature should be placed, and advanced settings such as algorithm suites.
There are many options on this wizard, which are detailed in the online help. This
section shows an example of signing the body of the request using an asymmetric
key.
2. In the Signing Key tab, specify a signing key. Only certificates associated to a private
key are shown in the list:
3. In the What to Sign tab, you can specify what needs to be signed. Portions of the
message to be signed are located using XML nodes or XPath expressions/predicates.
Oracle Enterprise Gateway
26 / 63
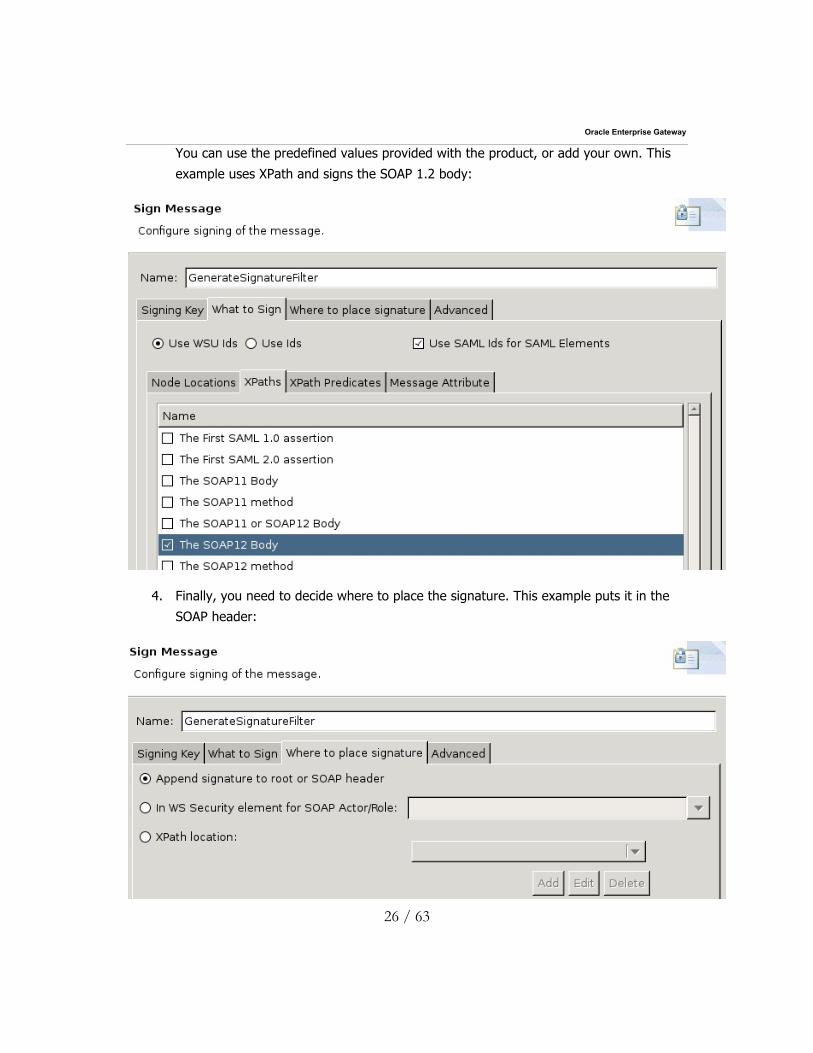
You can use the predefined values provided with the product, or add your own. This
example uses XPath and signs the SOAP 1.2 body:
4. Finally, you need to decide where to place the signature. This example puts it in the
SOAP header:
Oracle Enterprise Gateway
27 / 63
5. Click Finish to generate the signature.
Note: By default, the generated signature is not formatted, and might be difficult to read. If you want to indent the signature properly, do it before generating the signature by selecting the Indent checkbox in the Advanced tab. Do not format the message in the request window, it would invalidate the signature.
XML encryption
You can start the XML Encryption wizard from the Security menu. Using this wizard, you
can encrypt one or multiple parts of a message. You need to use a certificate (public key) to
encrypt the data, and the corresponding private key must be available to the XML gateway
that decrypts the data.
There are many options you can use to influence how encryption happens (see the online help
for a complete reference).
For example, to encrypt the body of a SOAP request, perform the following steps:
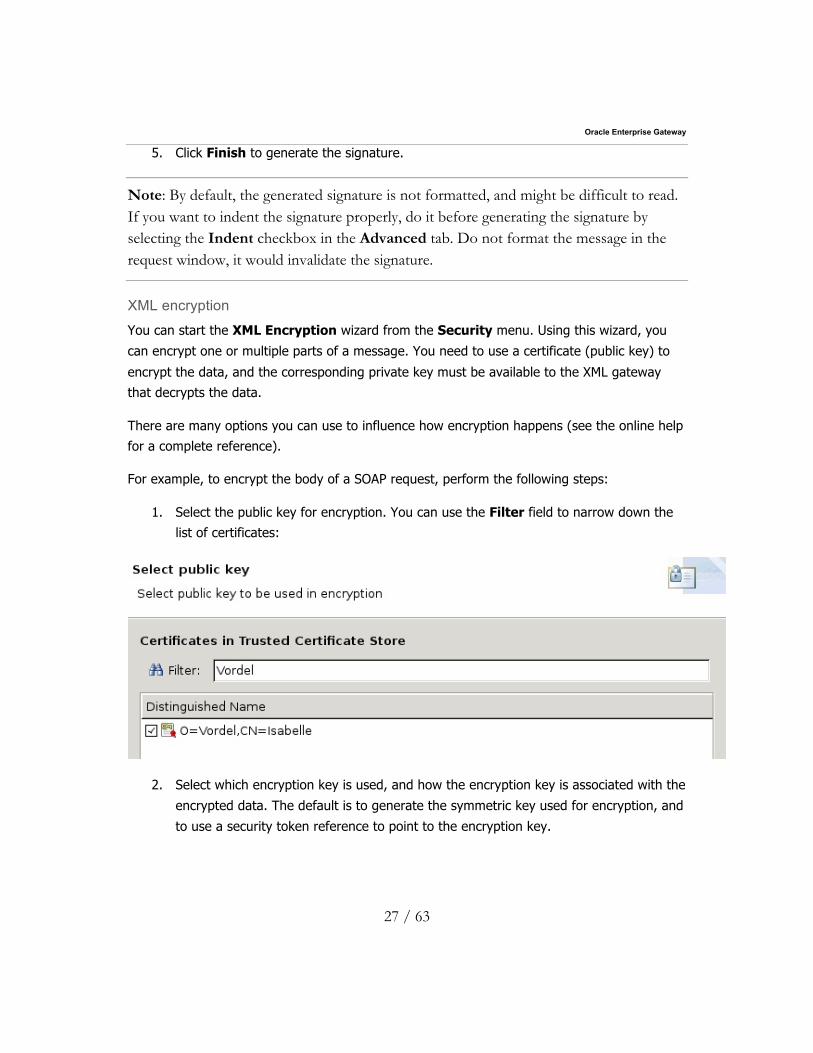
1. Select the public key for encryption. You can use the Filter field to narrow down the
list of certificates:
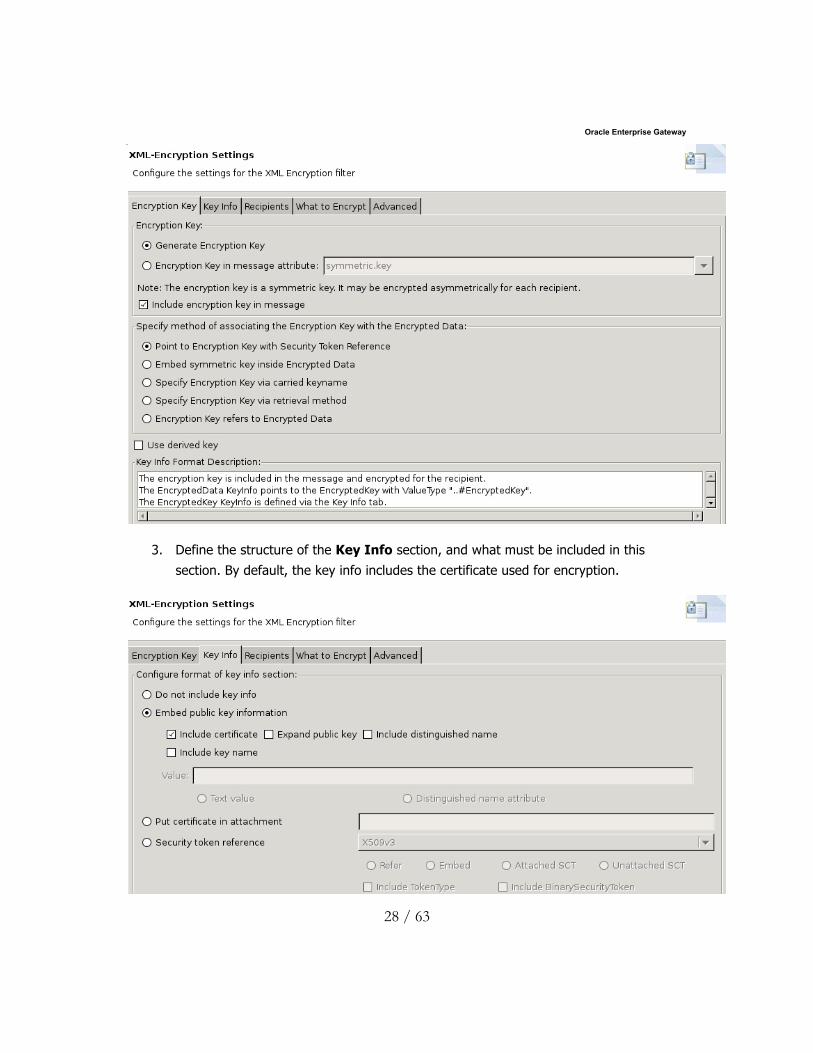
2. Select which encryption key is used, and how the encryption key is associated with the
encrypted data. The default is to generate the symmetric key used for encryption, and
to use a security token reference to point to the encryption key.
Oracle Enterprise Gateway
28 / 63
3. Define the structure of the Key Info section, and what must be included in this
section. By default, the key info includes the certificate used for encryption.
Oracle Enterprise Gateway
29 / 63
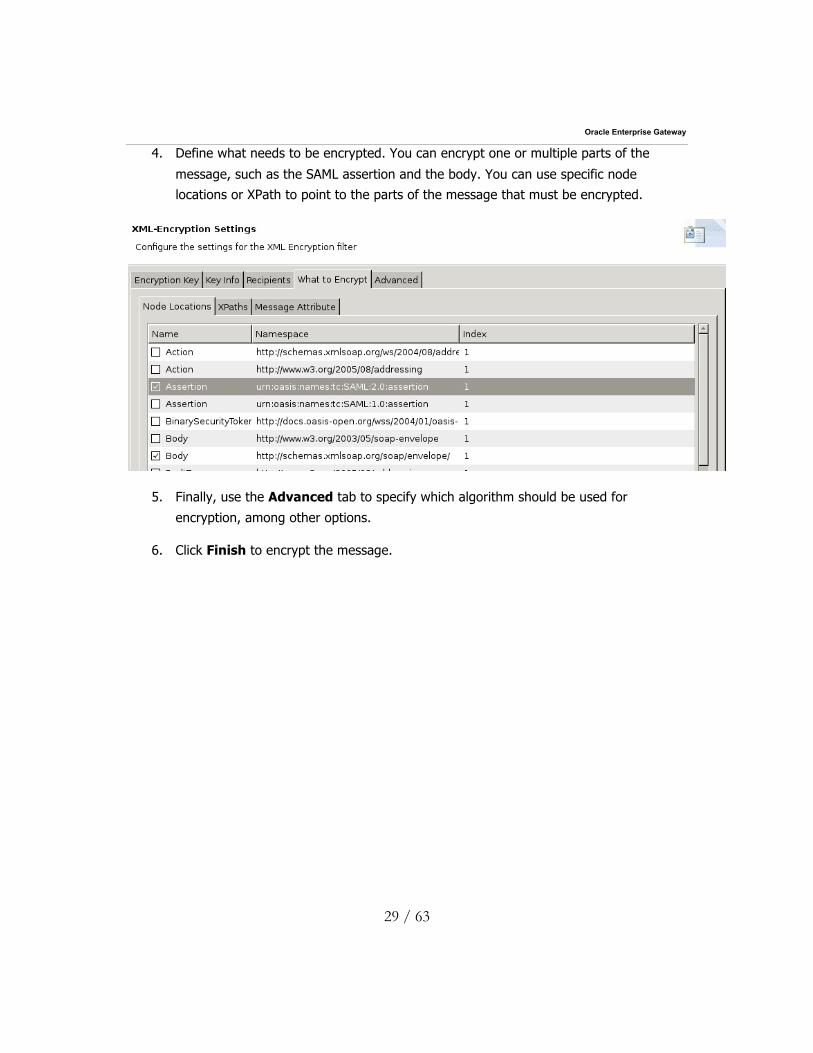
4. Define what needs to be encrypted. You can encrypt one or multiple parts of the
message, such as the SAML assertion and the body. You can use specific node
locations or XPath to point to the parts of the message that must be encrypted.
5. Finally, use the Advanced tab to specify which algorithm should be used for
encryption, among other options.
6. Click Finish to encrypt the message.
Oracle Enterprise Gateway
30 / 63
5. Configuring SSL
This section explains how to setup an SSL connection to a server, and how to enable mutual
SSL authentication.
Setting up an SSL connection to a back-end server
To connect to a server over SSL, you must establish a trust relationship with that server. In
other words, you must specify that you trust the server’s certificate, or more likely, the
certificate of the CA that signed the certificate. To do this, you must first import this certificate
into the OEG Service Explorer trust certificate store, as described in Managing Certificates.
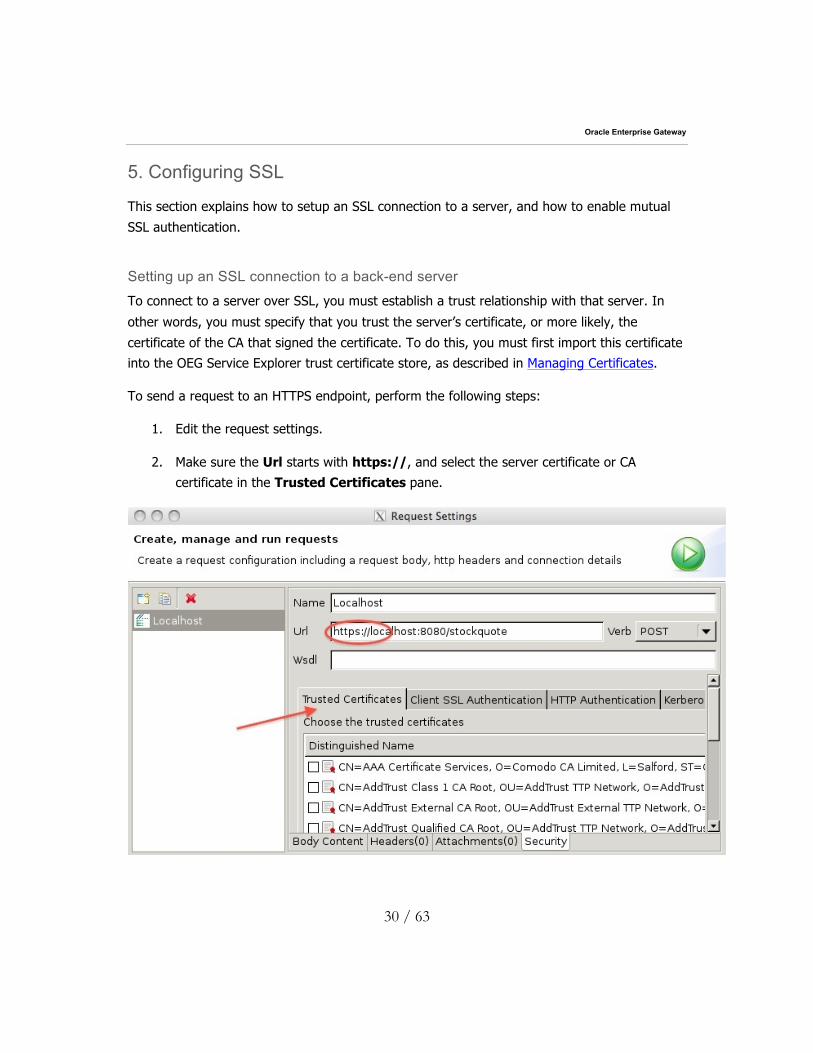
To send a request to an HTTPS endpoint, perform the following steps:
1. Edit the request settings.
2. Make sure the Url starts with https://, and select the server certificate or CA
certificate in the Trusted Certificates pane.
Oracle Enterprise Gateway
31 / 63
3. If you want to force a specific CYPHER string for the SSL connection, you can do so
from the Advanced tab (on the right of the dialog). The default is DEFAULT
(according to OpenSSL configuration).
Oracle Enterprise Gateway
32 / 63
Setting up mutual SSL authentication to a back-end server
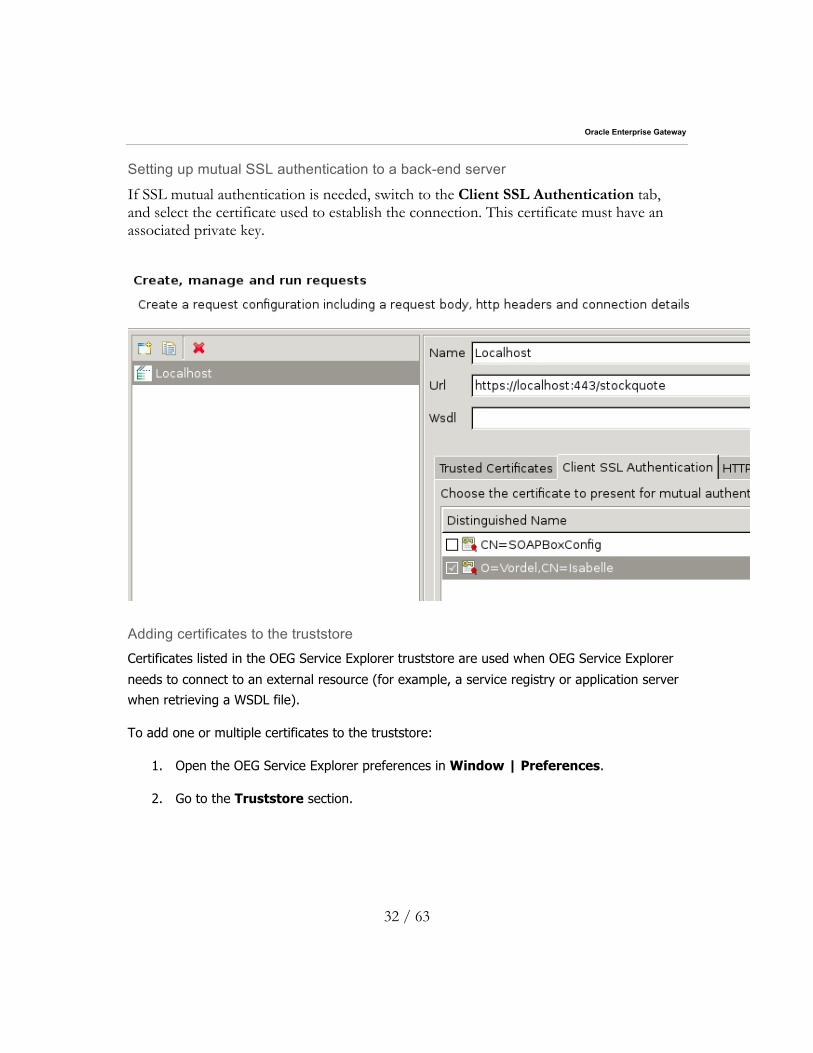
If SSL mutual authentication is needed, switch to the Client SSL Authentication tab, and select the certificate used to establish the connection. This certificate must have an associated private key.
Adding certificates to the truststore
Certificates listed in the OEG Service Explorer truststore are used when OEG Service Explorer
needs to connect to an external resource (for example, a service registry or application server
when retrieving a WSDL file).
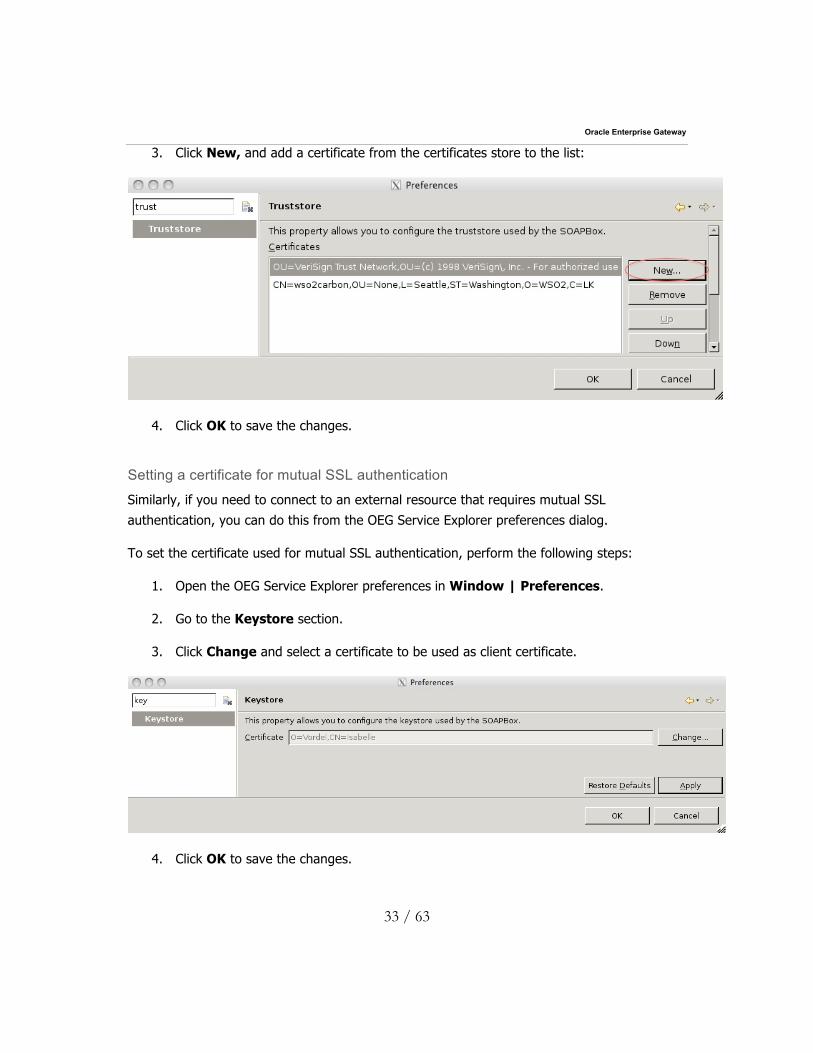
To add one or multiple certificates to the truststore:
1. Open the OEG Service Explorer preferences in Window | Preferences.
2. Go to the Truststore section.
Oracle Enterprise Gateway
33 / 63
3. Click New, and add a certificate from the certificates store to the list:
4. Click OK to save the changes.
Setting a certificate for mutual SSL authentication
Similarly, if you need to connect to an external resource that requires mutual SSL
authentication, you can do this from the OEG Service Explorer preferences dialog.
To set the certificate used for mutual SSL authentication, perform the following steps:
1. Open the OEG Service Explorer preferences in Window | Preferences.
2. Go to the Keystore section.
3. Click Change and select a certificate to be used as client certificate.
4. Click OK to save the changes.
Oracle Enterprise Gateway
34 / 63
Adding certificates to the Java default keystore
Trusted certificates are stored in the cacerts keystore file (JKS file) located in
<JDK_root>/lib/security.
You can do this in two steps:
First, import the certificate in the OEG Service Explorer certificate store as described in
Managing Certificates.
Next, perform the following steps:
1. Open the cacerts keystore from the Certificate tooling (the default password for the
cacerts file is changeit).
2. Click Add to Keystore. A dialog with the list of all certificates stored in the OEG
Service Explorer certificate store opens.
3. Select the certificate you want to import, and click OK.
4. When asked to specify an alias (short name for the certificate), you can keep the full
DN name, or specify an alias.
5. If you are adding a private key to the cacerts file, you are also asked for a pass
phrase.
The certificate is now added to the keystore file.
Oracle Enterprise Gateway
35 / 63
6. Creating Test Cases and Test Suites
The previous sections show unit testing of Web service operations, and explain how the
request message can be configured to match what your server is expecting.
You can also use OEG Service Explorer to create test cases that can be grouped into test
suites. Using test cases, you have access to a whole new set of possibilities in terms of
chaining actions before sending a request, but also to manipulate the response. You can also
use alternative ways to send a message to a server, such as JMS or SMTP (mail).
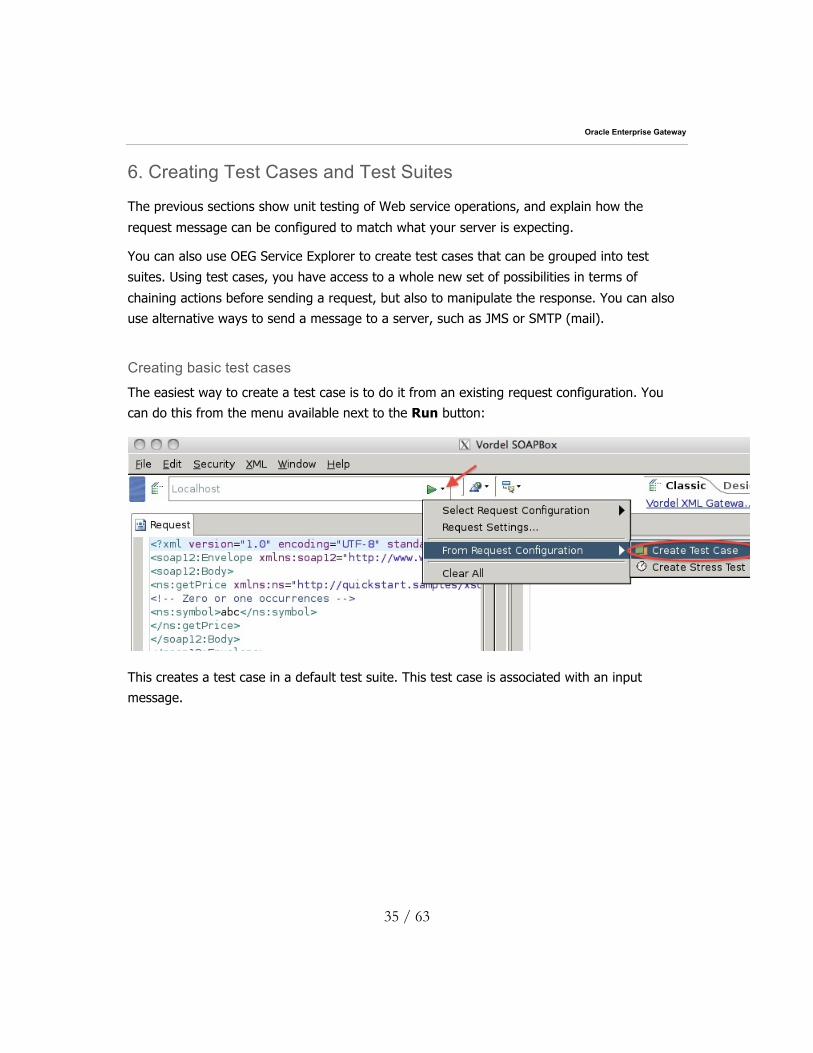
Creating basic test cases
The easiest way to create a test case is to do it from an existing request configuration. You
can do this from the menu available next to the Run button:
This creates a test case in a default test suite. This test case is associated with an input
message.
Oracle Enterprise Gateway
36 / 63
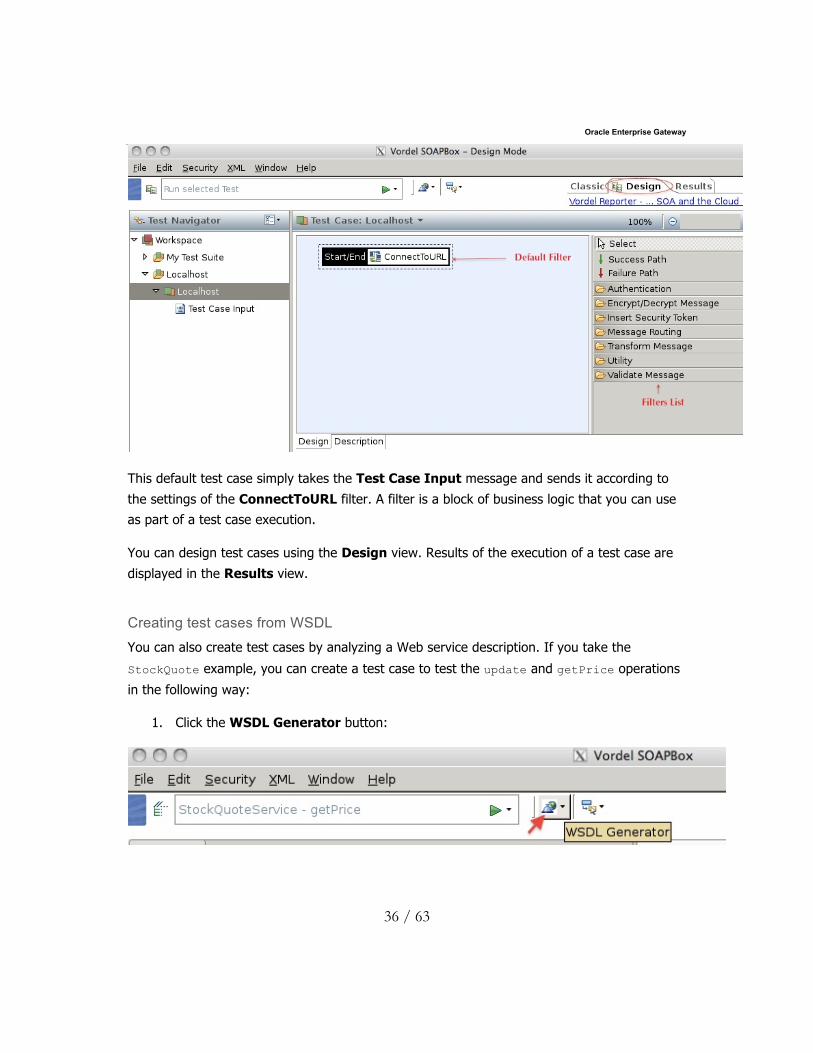
This default test case simply takes the Test Case Input message and sends it according to
the settings of the ConnectToURL filter. A filter is a block of business logic that you can use
as part of a test case execution.
You can design test cases using the Design view. Results of the execution of a test case are
displayed in the Results view.
Creating test cases from WSDL
You can also create test cases by analyzing a Web service description. If you take the
StockQuote example, you can create a test case to test the update and getPrice operations
in the following way:
1. Click the WSDL Generator button:
Oracle Enterprise Gateway
37 / 63
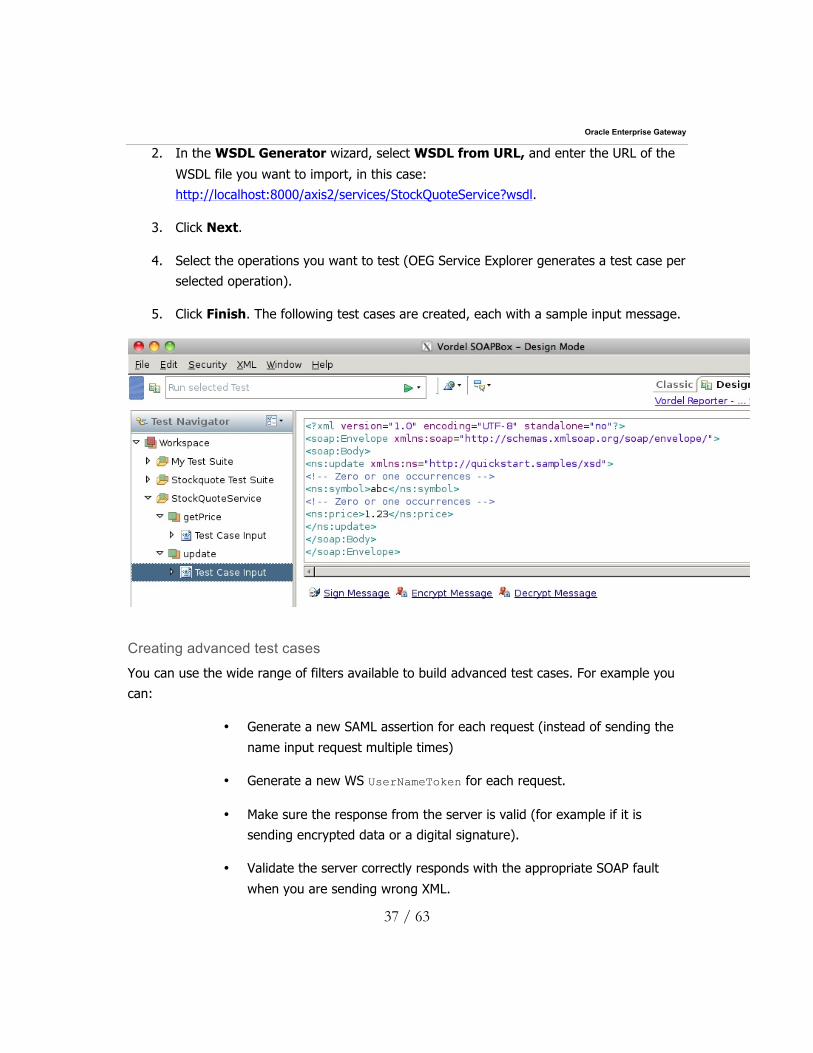
2. In the WSDL Generator wizard, select WSDL from URL, and enter the URL of the
WSDL file you want to import, in this case: http://localhost:8000/axis2/services/StockQuoteService?wsdl.
3. Click Next.
4. Select the operations you want to test (OEG Service Explorer generates a test case per
selected operation).
5. Click Finish. The following test cases are created, each with a sample input message.
Creating advanced test cases
You can use the wide range of filters available to build advanced test cases. For example you
can:
• Generate a new SAML assertion for each request (instead of sending the
name input request multiple times)
• Generate a new WS UserNameToken for each request.
• Make sure the response from the server is valid (for example if it is
sending encrypted data or a digital signature).
• Validate the server correctly responds with the appropriate SOAP fault
when you are sending wrong XML.
Oracle Enterprise Gateway
38 / 63
This section first explains some of the concepts you need to grasp to build test cases. It then
builds two typical test cases: one to post a message to a server using JMS, and another to
validate the server’s response.
Concepts
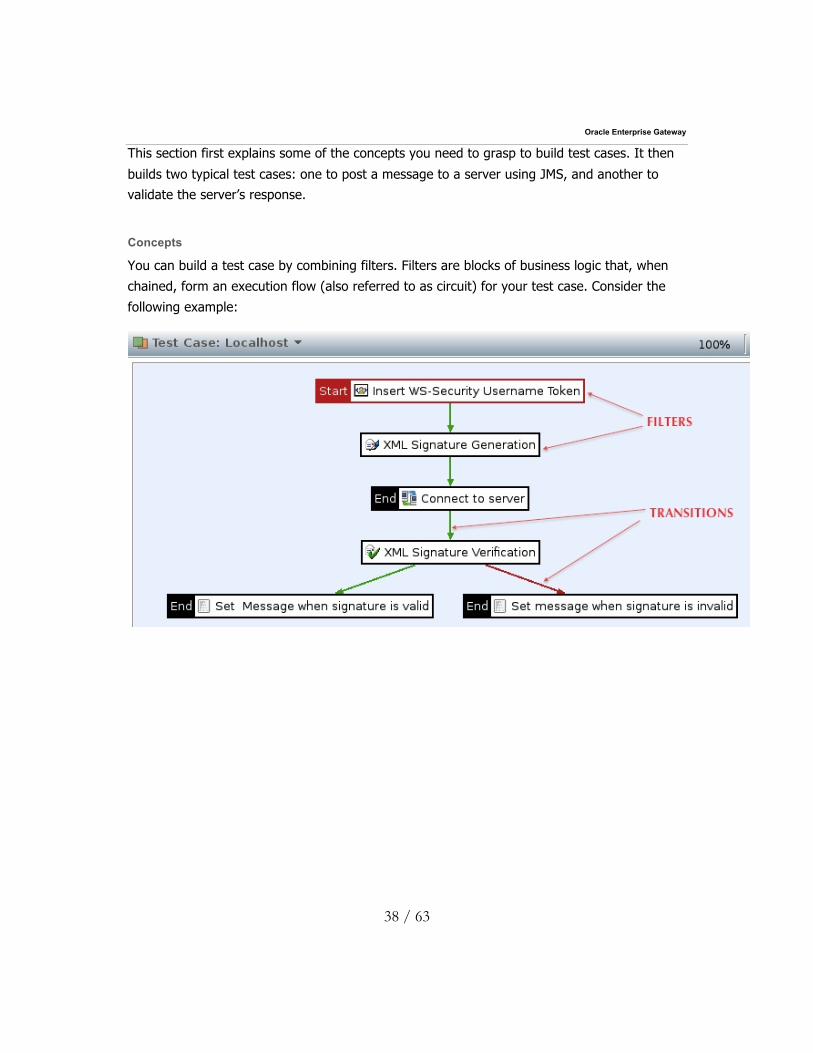
You can build a test case by combining filters. Filters are blocks of business logic that, when
chained, form an execution flow (also referred to as circuit) for your test case. Consider the
following example:
Oracle Enterprise Gateway
39 / 63
This test case first inserts a WS-Security UserNameToken in the incoming test message. Next,
it signs several parts of the message, and finally, sends it to the server. The arrows between
the filters define the condition by which this test transitions to the next step:
• Green arrows indicate it executes this transition if the previous filter executed correctly.
• Red arrows indicate what happens if the previous filter fails. This example returns
different messages for the test case if the response succeeds or fails signature validation.
To assemble test cases, you can drag and drop filters from the filters palette, and chain them
using transition arrows. Data flows across filters (along transitions) using message attributes:
the request you send is stored in a message attribute called content.body. This attribute is
used as the input to the WS-Security UserName filter, which adds the security token to it.
Important: One filter is marked with a Start tag, which indicates the beginning of the execution flow. You must always indicate which filter is the starting point.
Posting a message over JMS
To post a message over JMS, you need to:
• Gather the client JAR files needed to connect to the JMS server, and make them known to
OEG Service Explorer.
• Define a JMS service describing how to connect to the messaging server.
• Change the test case to post the request over JMS instead of HTTP.
This test uses OpenJMS1 but you can use any messaging server that provides a JMS-compliant
API.
To post a message, perform the following steps:
1. Open the OEG Service Explorer preferences dialog (Window | Preferences), and go
to the Classpath section.
1 OpenJMS can be downloaded from: http://openjms.sourceforge.net/downloads.html
Oracle Enterprise Gateway
40 / 63
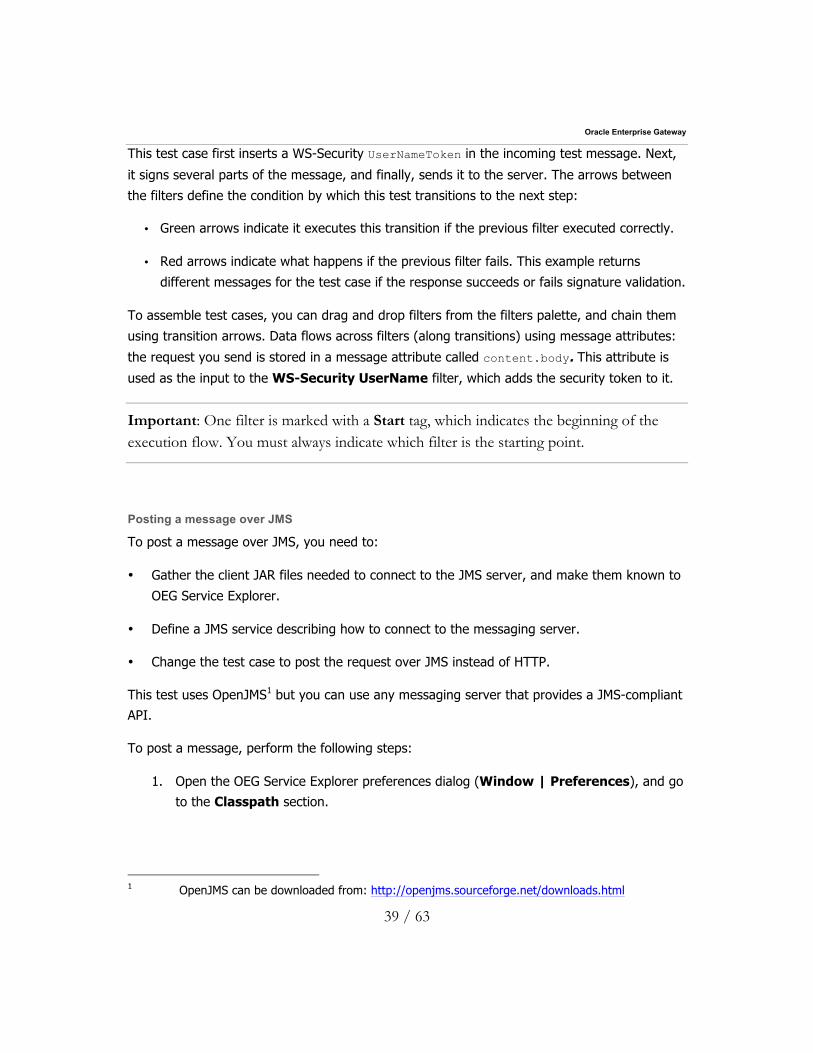
2. Click Add Jars, and add the JARs that are necessary to establish a successful
connection to the messaging server to the list. These are added to the OEG Service
Explorer classpath.
3. Click Add Package, and provide the name of the package that contains the
InitialContextFactory class, in our case org.exolab.jms.jndi. If you do not do
this, you get a ClassNotFoundException when trying to connect to the messaging
server.
4. Click OK, and restart OEG Service Explorer to activate the classpath changes.
Important: The JARs are not referenced from OEG Service Explorer but copied across. If you need to update these JAR files, remove the old JARs, and add the new ones using the Classpath preferences.
5. Open the OEG Service Explorer preferences dialog, and select the JMS section.
Oracle Enterprise Gateway
41 / 63
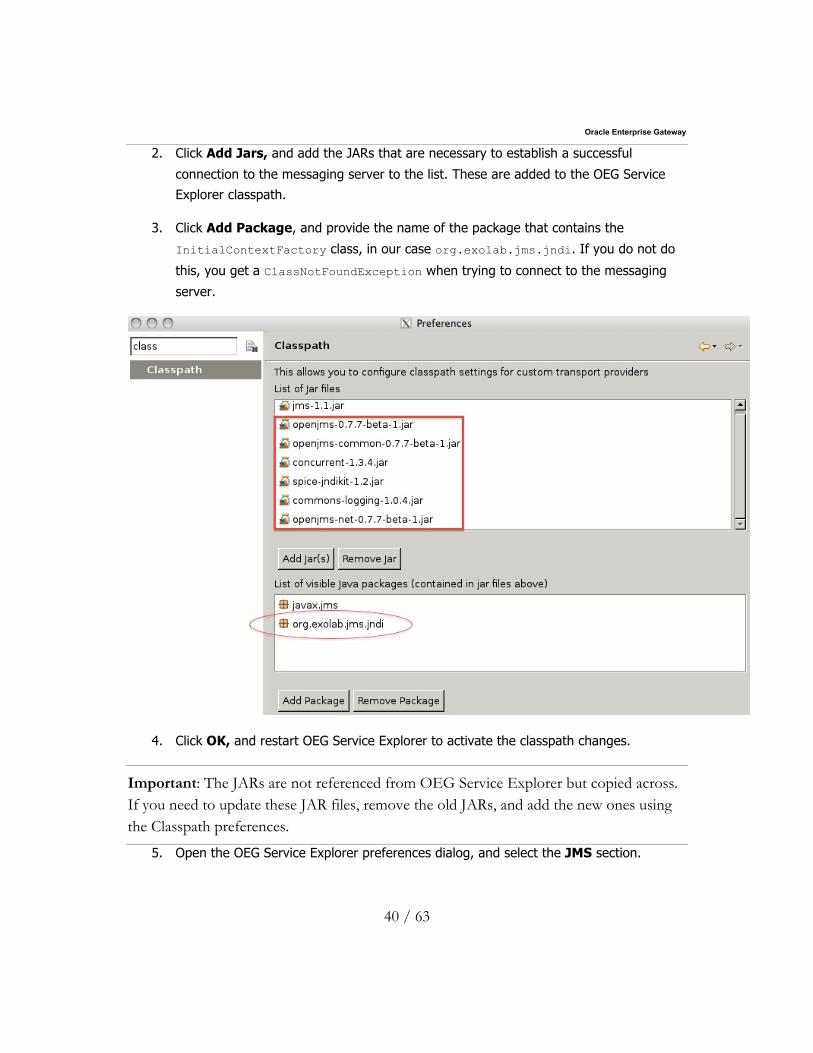
6. Click Add JMS provider and provide the information to connect to your messaging
server. This varies from one messaging server to another.
7. Apply your changes. If all goes well, you should see a message similar to this in the
console:
INFO ... JMS service: org.exolab.jms.jndi.InitialContextFactory =>
tcp://192.168.5.20:3035
INFO ... Connecting to JMS with username: isabelle with password
INFO ... starting JMS connection
8. Change to the Design view, and select the test case you created previously. This
example changes it to post the inbound message to the VORDEL_IN queue and get the
results from the VORDEL_OUT queue (this example creates a virtualized service to do
this).
9. Delete the Connect to URL filter (not needed anymore).
10. Drag a Messaging System filter from the Message Routing category on to the
canvas.
Oracle Enterprise Gateway
42 / 63
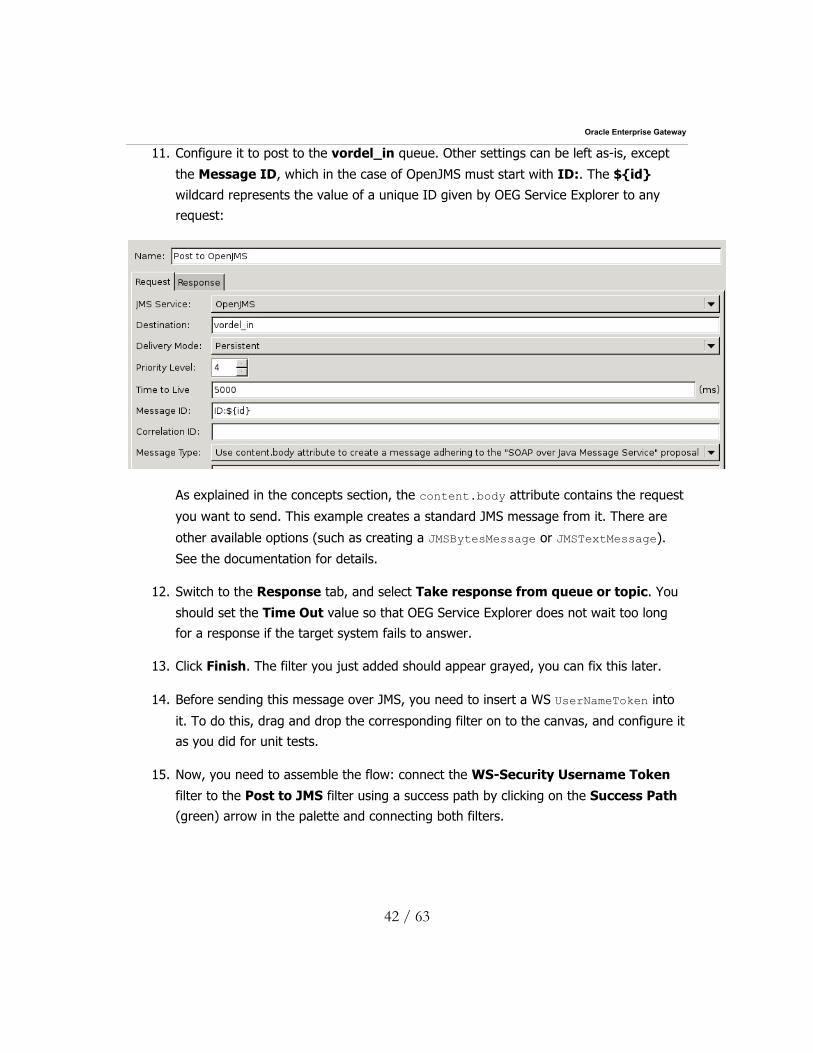
11. Configure it to post to the vordel_in queue. Other settings can be left as-is, except
the Message ID, which in the case of OpenJMS must start with ID:. The ${id}
wildcard represents the value of a unique ID given by OEG Service Explorer to any
request:
As explained in the concepts section, the content.body attribute contains the request
you want to send. This example creates a standard JMS message from it. There are
other available options (such as creating a JMSBytesMessage or JMSTextMessage).
See the documentation for details.
12. Switch to the Response tab, and select Take response from queue or topic. You
should set the Time Out value so that OEG Service Explorer does not wait too long
for a response if the target system fails to answer.
13. Click Finish. The filter you just added should appear grayed, you can fix this later.
14. Before sending this message over JMS, you need to insert a WS UserNameToken into
it. To do this, drag and drop the corresponding filter on to the canvas, and configure it
as you did for unit tests.
15. Now, you need to assemble the flow: connect the WS-Security Username Token
filter to the Post to JMS filter using a success path by clicking on the Success Path
(green) arrow in the palette and connecting both filters.
Oracle Enterprise Gateway
43 / 63
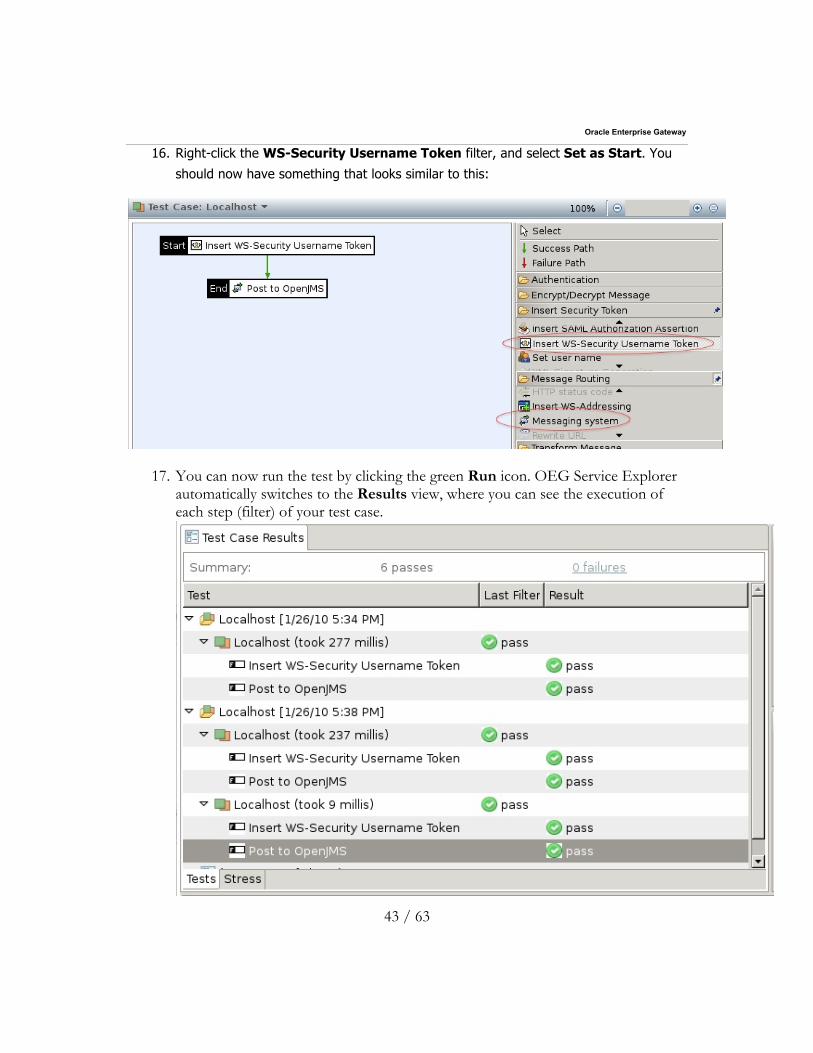
16. Right-click the WS-Security Username Token filter, and select Set as Start. You
should now have something that looks similar to this:
17. You can now run the test by clicking the green Run icon. OEG Service Explorer automatically switches to the Results view, where you can see the execution of each step (filter) of your test case.
Oracle Enterprise Gateway
44 / 63
18. If you click the test case name, you see the request and response for this test case on
the right.
Validating response contents
This example sends a message to the Web service server over HTTP and validates that the
response is valid.
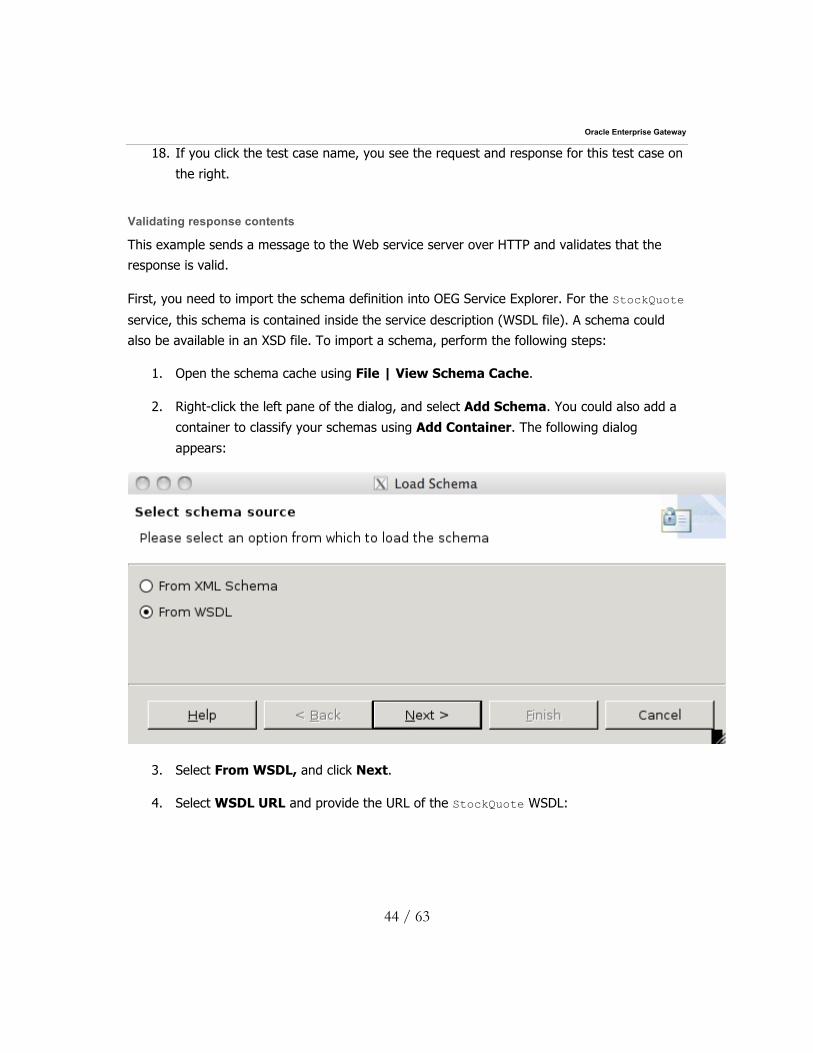
First, you need to import the schema definition into OEG Service Explorer. For the StockQuote
service, this schema is contained inside the service description (WSDL file). A schema could
also be available in an XSD file. To import a schema, perform the following steps:
1. Open the schema cache using File | View Schema Cache.
2. Right-click the left pane of the dialog, and select Add Schema. You could also add a
container to classify your schemas using Add Container. The following dialog
appears:
3. Select From WSDL, and click Next.
4. Select WSDL URL and provide the URL of the StockQuote WSDL:
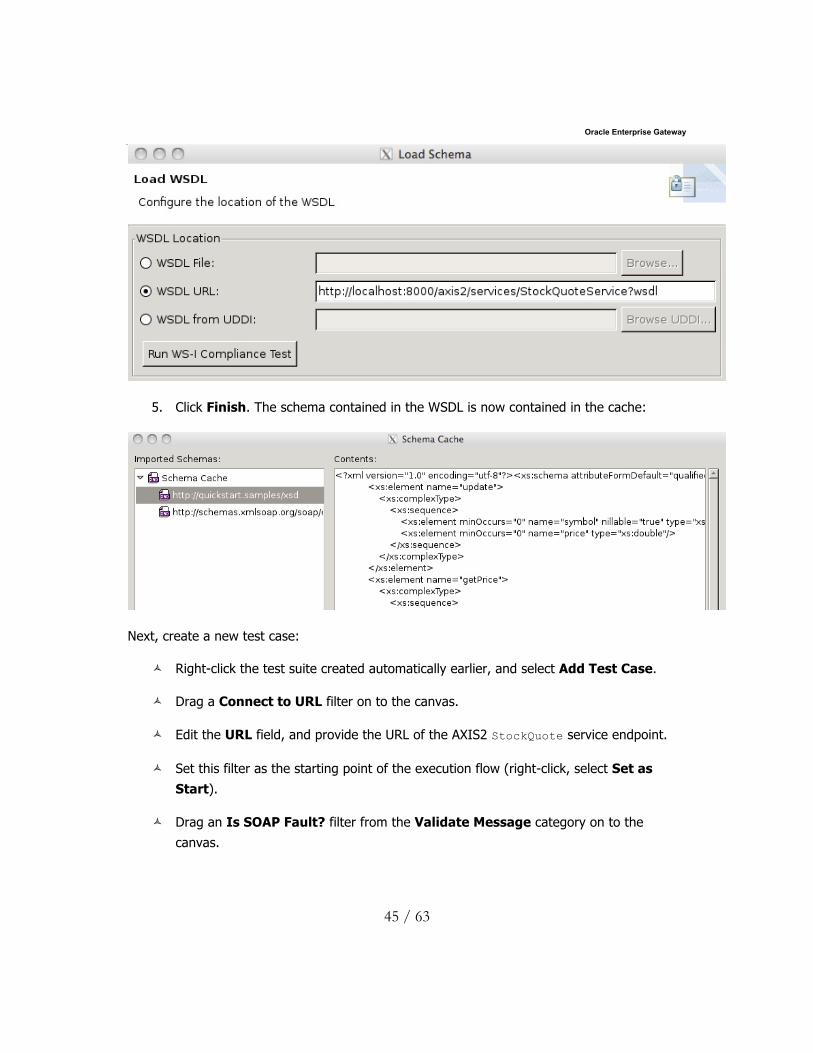
Oracle Enterprise Gateway
45 / 63
5. Click Finish. The schema contained in the WSDL is now contained in the cache:
Next, create a new test case:
ñ Right-click the test suite created automatically earlier, and select Add Test Case.
ñ Drag a Connect to URL filter on to the canvas.
ñ Edit the URL field, and provide the URL of the AXIS2 StockQuote service endpoint.
ñ Set this filter as the starting point of the execution flow (right-click, select Set as Start).
ñ Drag an Is SOAP Fault? filter from the Validate Message category on to the
canvas.
Oracle Enterprise Gateway
46 / 63
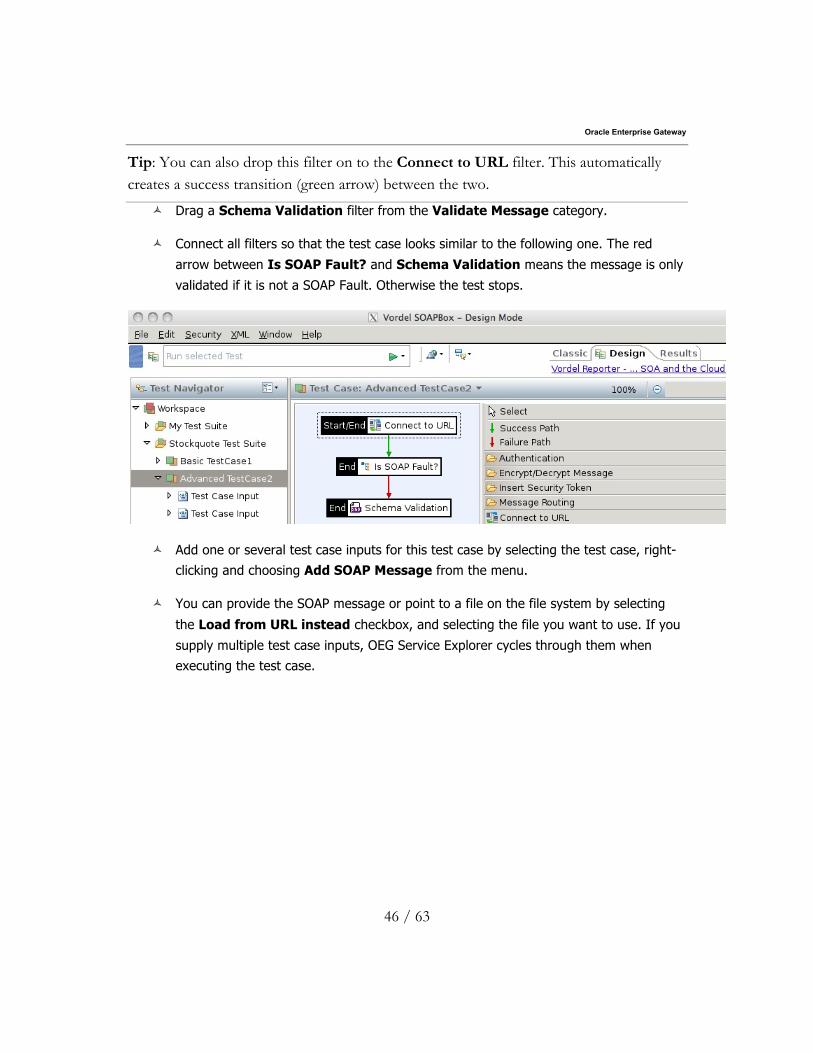
Tip: You can also drop this filter on to the Connect to URL filter. This automatically creates a success transition (green arrow) between the two.
ñ Drag a Schema Validation filter from the Validate Message category.
ñ Connect all filters so that the test case looks similar to the following one. The red
arrow between Is SOAP Fault? and Schema Validation means the message is only
validated if it is not a SOAP Fault. Otherwise the test stops.
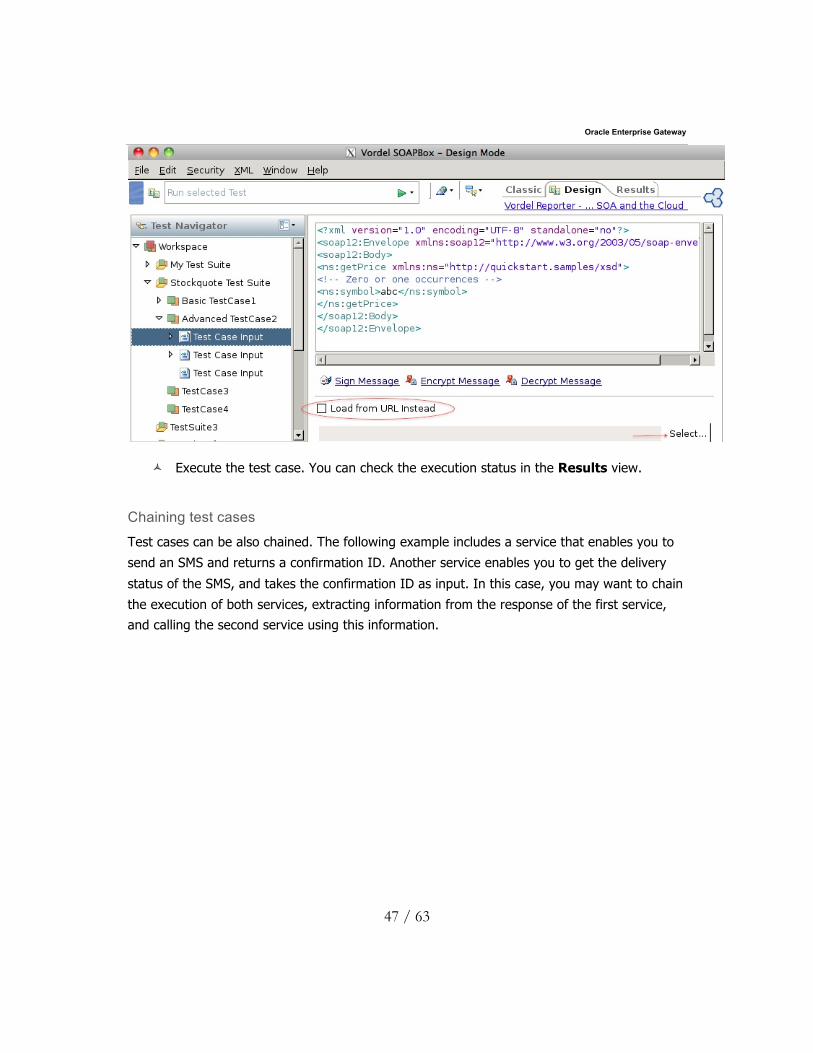
ñ Add one or several test case inputs for this test case by selecting the test case, right-
clicking and choosing Add SOAP Message from the menu.
ñ You can provide the SOAP message or point to a file on the file system by selecting
the Load from URL instead checkbox, and selecting the file you want to use. If you
supply multiple test case inputs, OEG Service Explorer cycles through them when
executing the test case.
Oracle Enterprise Gateway
47 / 63
ñ Execute the test case. You can check the execution status in the Results view.
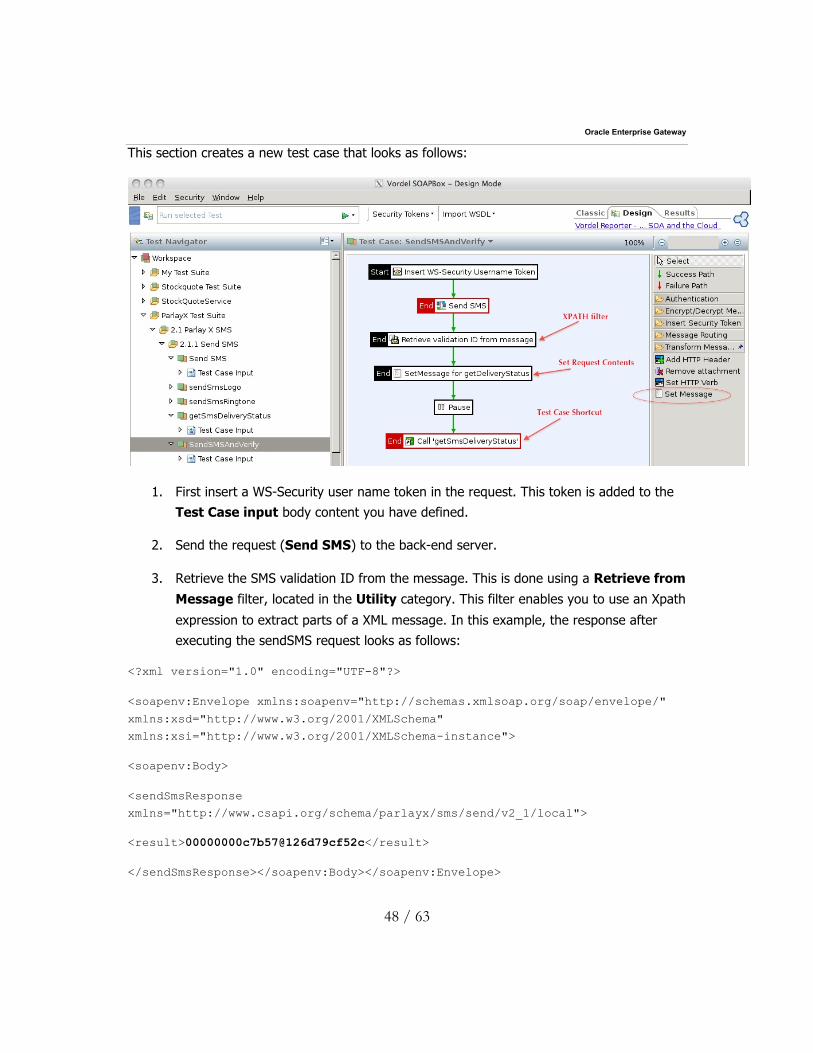
Chaining test cases
Test cases can be also chained. The following example includes a service that enables you to
send an SMS and returns a confirmation ID. Another service enables you to get the delivery
status of the SMS, and takes the confirmation ID as input. In this case, you may want to chain
the execution of both services, extracting information from the response of the first service,
and calling the second service using this information.
Oracle Enterprise Gateway
48 / 63
This section creates a new test case that looks as follows:
1. First insert a WS-Security user name token in the request. This token is added to the
Test Case input body content you have defined.
2. Send the request (Send SMS) to the back-end server.
3. Retrieve the SMS validation ID from the message. This is done using a Retrieve from Message filter, located in the Utility category. This filter enables you to use an Xpath
expression to extract parts of a XML message. In this example, the response after
executing the sendSMS request looks as follows:
<?xml version="1.0" encoding="UTF-8"?>
<soapenv:Envelope xmlns:soapenv="http://schemas.xmlsoap.org/soap/envelope/"
xmlns:xsd="http://www.w3.org/2001/XMLSchema"
xmlns:xsi="http://www.w3.org/2001/XMLSchema-instance">
<soapenv:Body>
<sendSmsResponse
xmlns="http://www.csapi.org/schema/parlayx/sms/send/v2_1/local">
<result>00000000c7b57@126d79cf52c</result>
</sendSmsResponse></soapenv:Body></soapenv:Envelope>
Oracle Enterprise Gateway
49 / 63
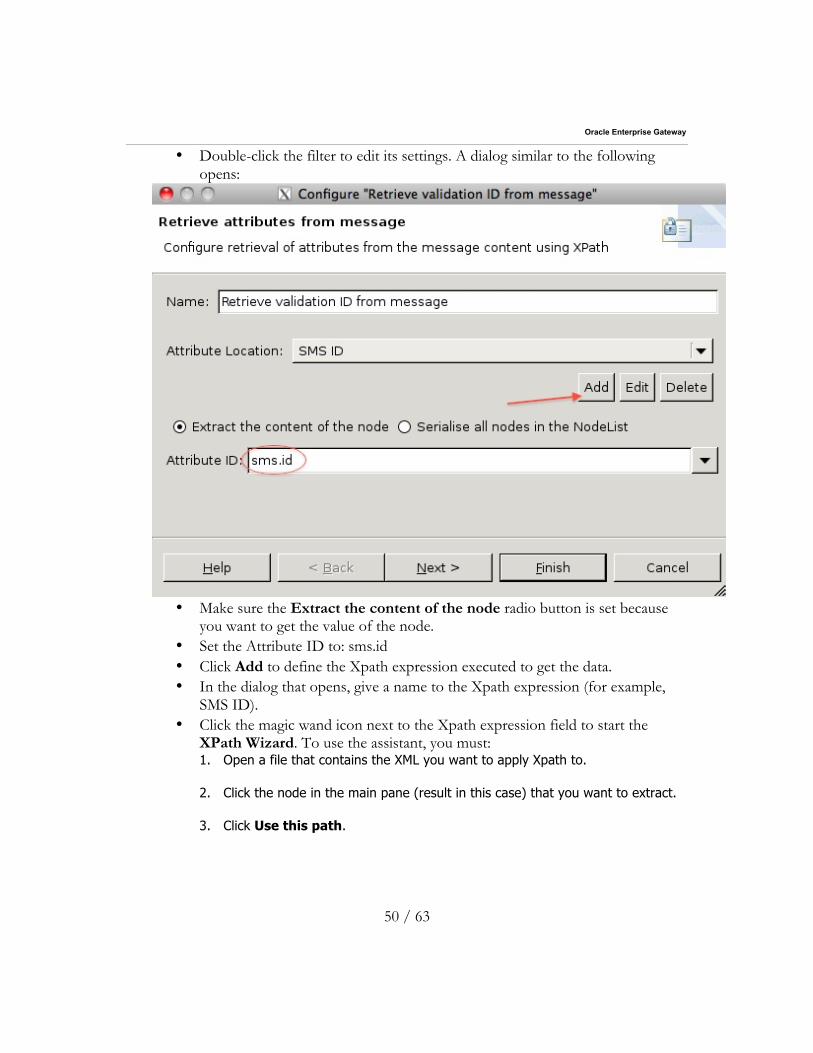
You need to extract the result node contents (in bold), and place them into a message
attribute (variable) called sms.id. To do this, configure the Retrieve from Message
filter as follows:
Oracle Enterprise Gateway
50 / 63
• Double-click the filter to edit its settings. A dialog similar to the following opens:
• Make sure the Extract the content of the node radio button is set because
you want to get the value of the node. • Set the Attribute ID to: sms.id • Click Add to define the Xpath expression executed to get the data. • In the dialog that opens, give a name to the Xpath expression (for example,
SMS ID). • Click the magic wand icon next to the Xpath expression field to start the
XPath Wizard. To use the assistant, you must: 1. Open a file that contains the XML you want to apply Xpath to.
2. Click the node in the main pane (result in this case) that you want to extract.
3. Click Use this path.
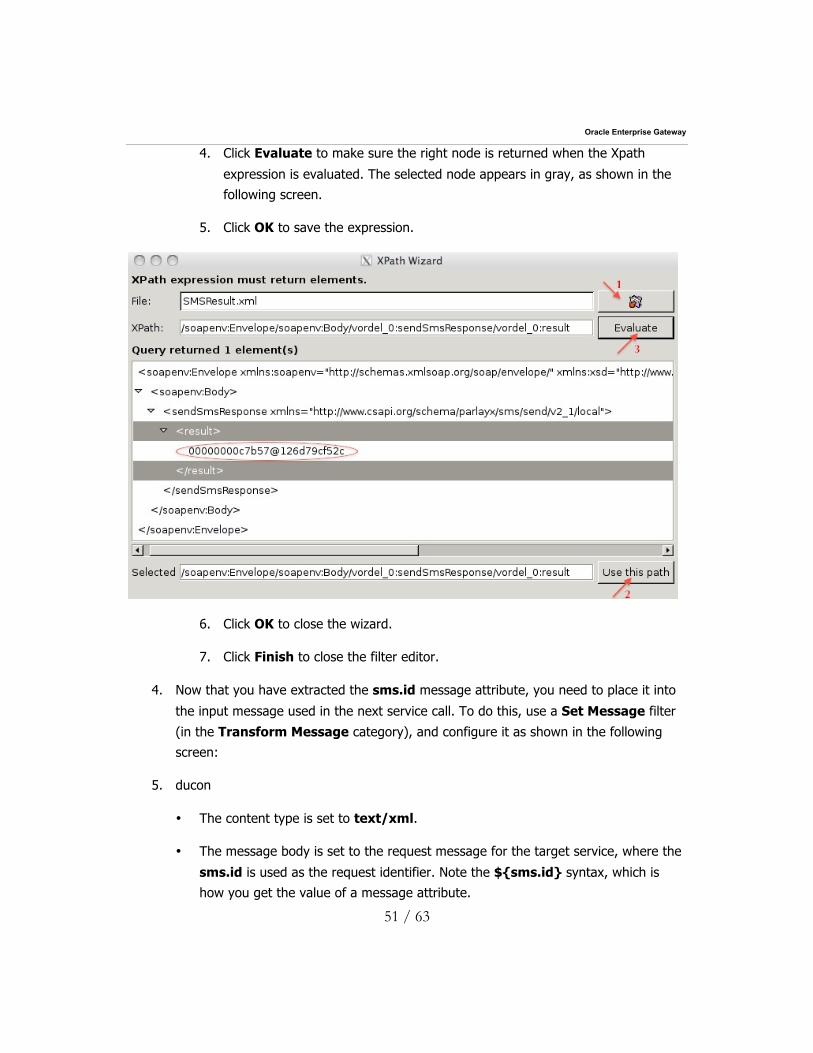
Oracle Enterprise Gateway
51 / 63
4. Click Evaluate to make sure the right node is returned when the Xpath
expression is evaluated. The selected node appears in gray, as shown in the
following screen.
5. Click OK to save the expression.
6. Click OK to close the wizard.
7. Click Finish to close the filter editor.
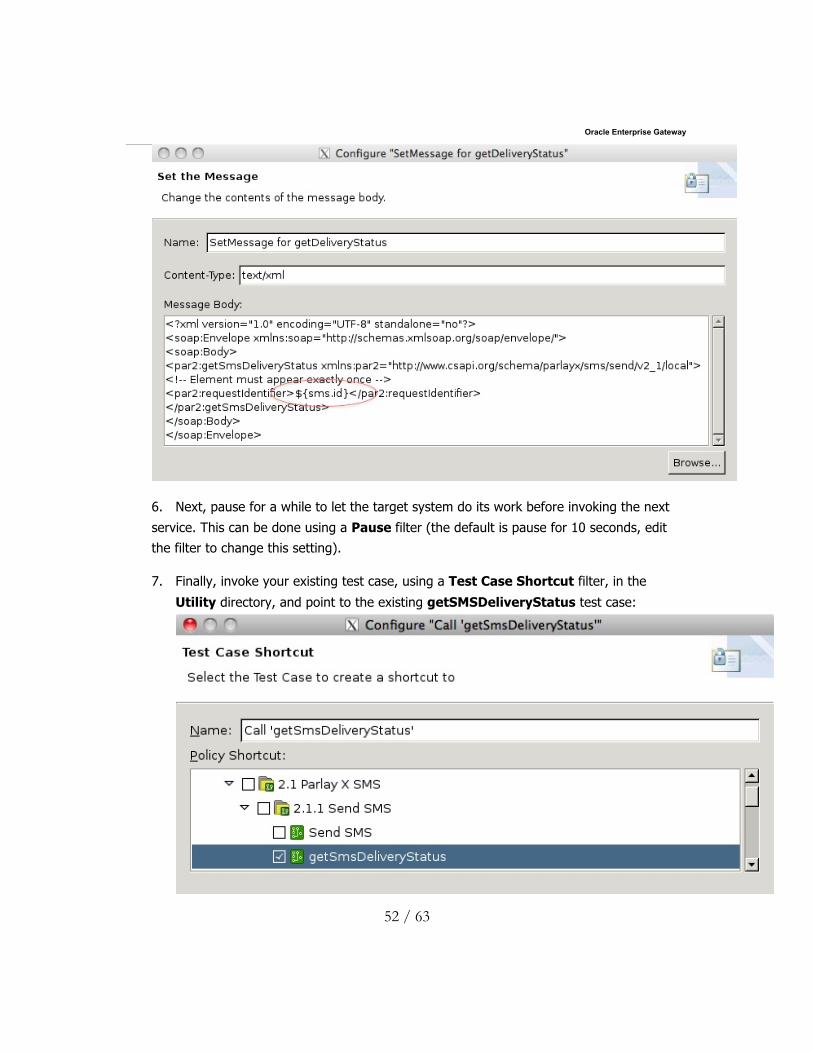
4. Now that you have extracted the sms.id message attribute, you need to place it into
the input message used in the next service call. To do this, use a Set Message filter
(in the Transform Message category), and configure it as shown in the following
screen:
5. ducon
• The content type is set to text/xml.
• The message body is set to the request message for the target service, where the
sms.id is used as the request identifier. Note the ${sms.id} syntax, which is
how you get the value of a message attribute.
Oracle Enterprise Gateway
52 / 63
6. Next, pause for a while to let the target system do its work before invoking the next
service. This can be done using a Pause filter (the default is pause for 10 seconds, edit
the filter to change this setting).
7. Finally, invoke your existing test case, using a Test Case Shortcut filter, in the
Utility directory, and point to the existing getSMSDeliveryStatus test case:
Oracle Enterprise Gateway
53 / 63
Your test case is now complete, and can be executed as shown in previous sections.
Running test suites and cases from the command line
You can use OEG Service Explorer console to execute the test suites and test cases created
using the OEG Service Explorer GUI. All information created in the GUI is saved in the OEG
Service Explorer store (for those familiar with Eclipse, this is your workspace). The default
store is located in <OEG Service Explorer_root>/store.
Here are a few commands you can use from command line:
ñ To list all test suites and test cases in the default store:
serviceexplorerconsole -list
ñ To execute a test case:
serviceexplorerconsole -run -testcase “test case name”
ñ To execute a test suite:
serviceexplorerconsole -run -testsuite “test suite name”
Managing test suites
A test suite can contain one or multiple test cases, as well as test suites. You can drag and
drop existing test cases inside a test suite object. You can also rearrange the test suite or test
case order using drag and drop.

Oracle Enterprise Gateway
54 / 63
7. Testing Your Services against Attacks
Warning: Use this functionality to test only services that you own or have been allowed to test.
One of the main features of a OEG Gateway is to protect your Web services from potential
attacks. You can use OEG Service Explorer to inject specific attacks inside a message and
check that your XML gateway stops them.
Testing against XML attacks
You can inject attacks inside a SOAP message by editing a test case. For example, OEG
Service Explorer enables you to inject SQL injection attacks inside a message out-of-the-box.
To do so, perform the following steps:
1. Select a test case.
2. Switch to the Security Vectors tab to see a window similar to the following:
3. Select an insertion point (XML node) on the right (for example, ns:symbol).
4. Select the security vector to inject from the list, and click Insert.
5. Run the test case.

Oracle Enterprise Gateway
55 / 63
Note: You can enrich the list of security vectors by clicking Edit List....
Oracle Enterprise Gateway
56 / 63
Testing virus attacks
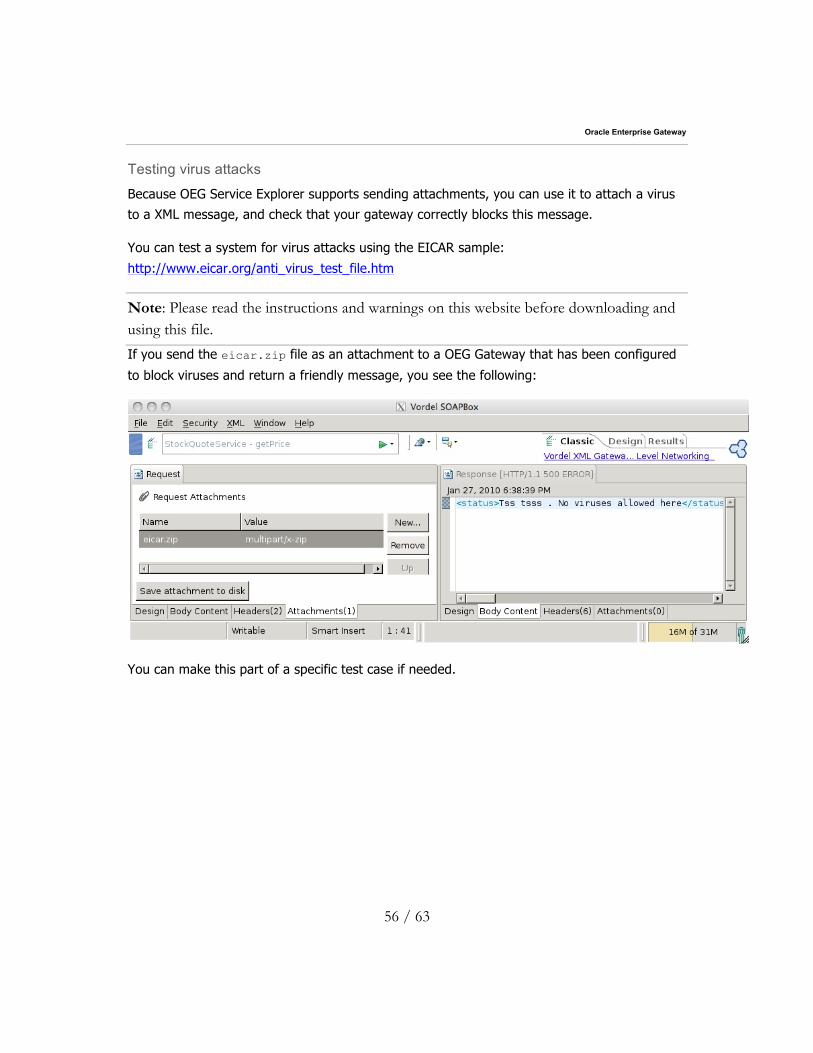
Because OEG Service Explorer supports sending attachments, you can use it to attach a virus
to a XML message, and check that your gateway correctly blocks this message.
You can test a system for virus attacks using the EICAR sample:
http://www.eicar.org/anti_virus_test_file.htm
Note: Please read the instructions and warnings on this website before downloading and using this file.
If you send the eicar.zip file as an attachment to a OEG Gateway that has been configured
to block viruses and return a friendly message, you see the following:
You can make this part of a specific test case if needed.
Oracle Enterprise Gateway
57 / 63
8. Running Stress Tests
This section explains how to run stress tests using OEG Service Explorer, and using the command line version (SR).
Stress tests in OEG Service Explorer
You can use OEG Service Explorer to perform basic to moderate stress tests. Currently, only
HTTP requests are supported inside OEG Service Explorer. If you need to test HTTPS requests,
use the command-line version (SR). You should also use the command-line version for
massive stress testing. Using the graphical version, developers can perform a simple stress
test. This is already a great start to debug a system because many problems can be
discovered with only just a few requests in parallel.
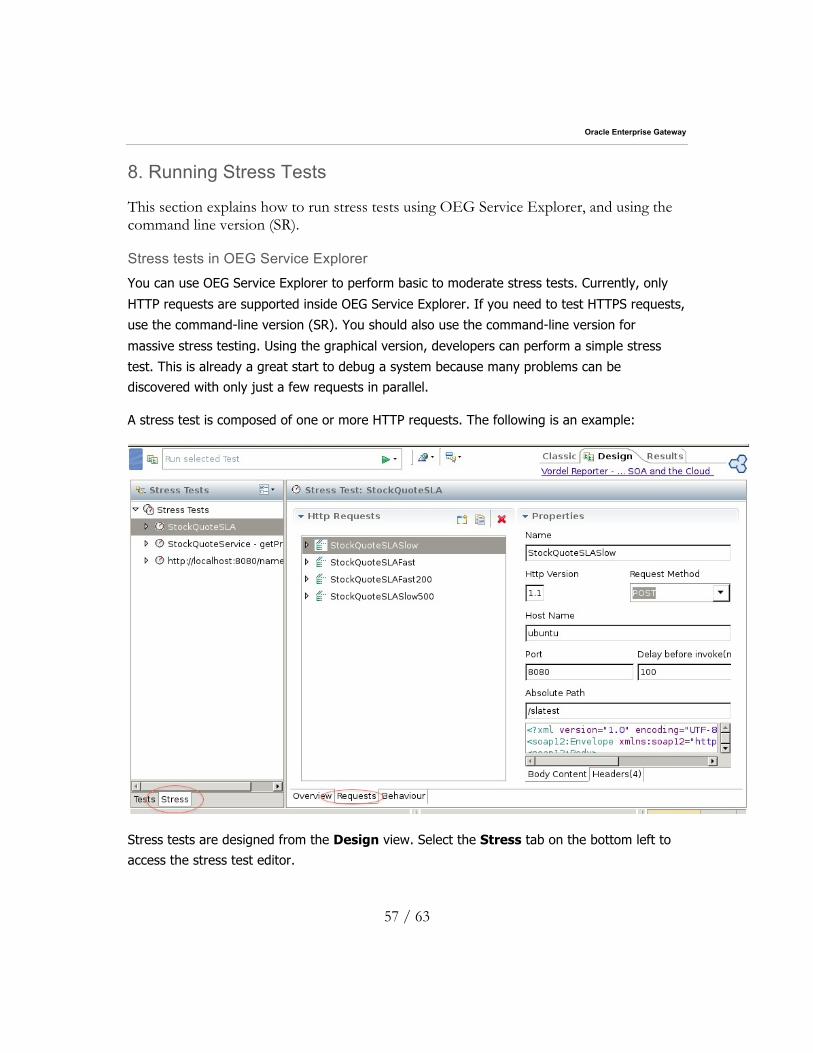
A stress test is composed of one or more HTTP requests. The following is an example:
Stress tests are designed from the Design view. Select the Stress tab on the bottom left to
access the stress test editor.
Oracle Enterprise Gateway
58 / 63
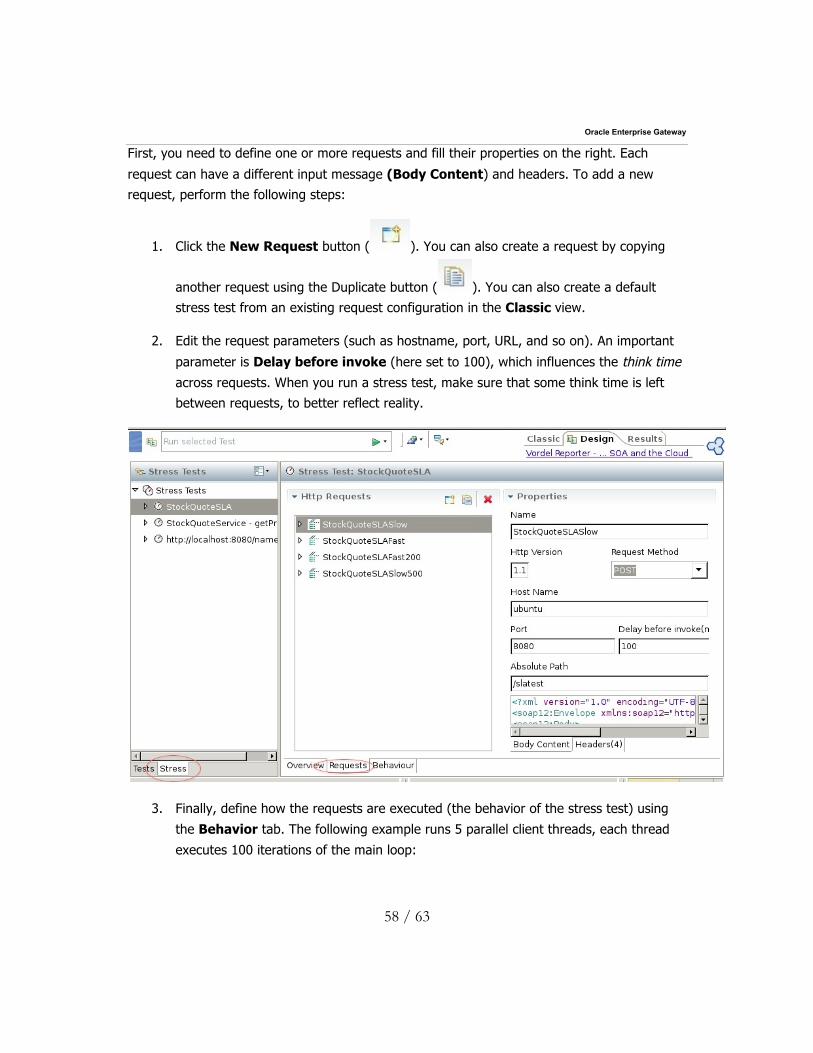
First, you need to define one or more requests and fill their properties on the right. Each
request can have a different input message (Body Content) and headers. To add a new
request, perform the following steps:
1. Click the New Request button ( ). You can also create a request by copying
another request using the Duplicate button ( ). You can also create a default
stress test from an existing request configuration in the Classic view.
2. Edit the request parameters (such as hostname, port, URL, and so on). An important
parameter is Delay before invoke (here set to 100), which influences the think time
across requests. When you run a stress test, make sure that some think time is left
between requests, to better reflect reality.
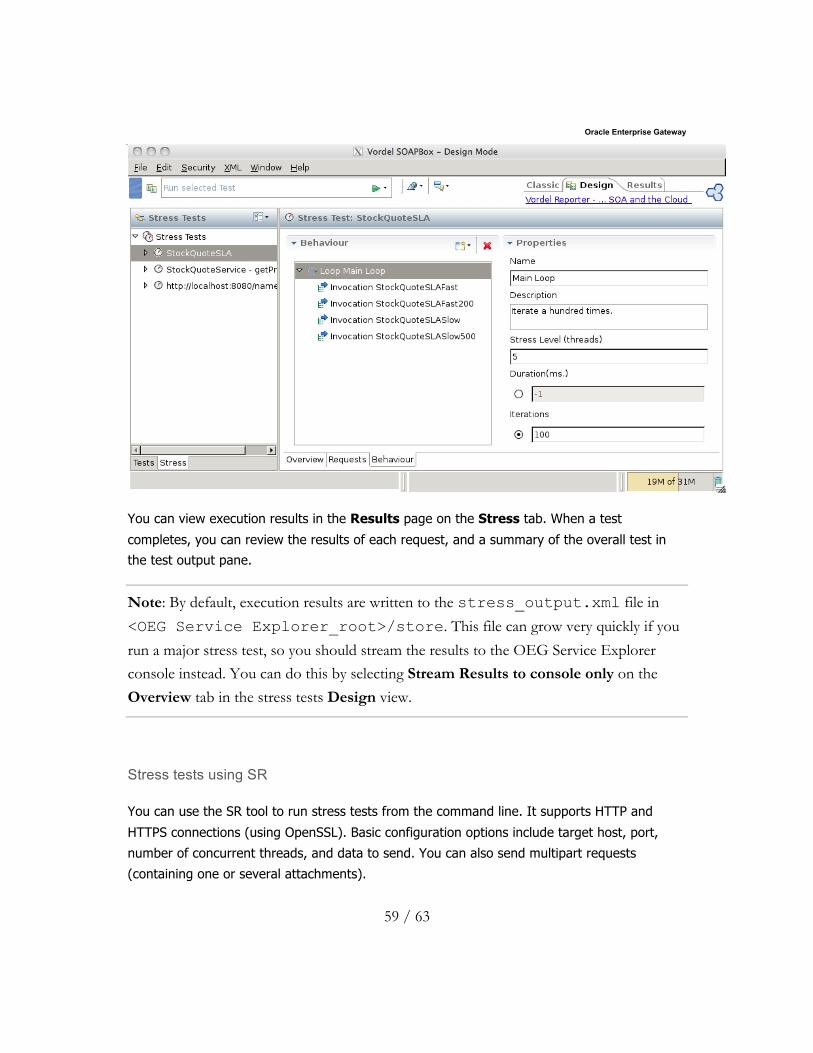
3. Finally, define how the requests are executed (the behavior of the stress test) using
the Behavior tab. The following example runs 5 parallel client threads, each thread
executes 100 iterations of the main loop:
Oracle Enterprise Gateway
59 / 63
You can view execution results in the Results page on the Stress tab. When a test
completes, you can review the results of each request, and a summary of the overall test in
the test output pane.
Note: By default, execution results are written to the stress_output.xml file in
<OEG Service Explorer_root>/store. This file can grow very quickly if you
run a major stress test, so you should stream the results to the OEG Service Explorer console instead. You can do this by selecting Stream Results to console only on the
Overview tab in the stress tests Design view.
Stress tests using SR
You can use the SR tool to run stress tests from the command line. It supports HTTP and
HTTPS connections (using OpenSSL). Basic configuration options include target host, port,
number of concurrent threads, and data to send. You can also send multipart requests
(containing one or several attachments).
Oracle Enterprise Gateway
60 / 63
The tool is located as follows:
ñ For OEG Service Explorer version 5.2.5 and later: <OEG Service Explorer_root>/sr
ñ For other OEG Service Explorer versions: <OEG Service Explorer_root>/plugins/com.vordel.native.<version.number>
Basic statistics are output every 10 seconds (running with the −d flag) and at the end of the
test run. A more detailed analysis (in XML format) can be generated using the −i flag.
The complete reference documentation is available in the online help. Version 5.2.5 also
includes a PDF version of the SR man pages. Here are a few examples of SR commands:
ñ sr -h : displays online help
ñ sr -h ubuntu -s 8080 -u /stockquote -f StockQuoteRequest.xml -A
SOAPAction:getPrice
Sends the StockQuote request XML file to http://ubuntu:8080/stockquote , passing a
SOAPAction HTTP header. By default, there is one thread running, executing one request.
ñ sr -h ubuntu -s 8080 -u /stockquote -f StockQuoteRequest.xml -A
SOAPAction:getPrice -qq
Same, but in quiet mode (-qq).
ñ sr -h ubuntu -s 8080 -u /stockquote -f StockQuoteRequest.xml -A
SOAPAction:getPrice -qq -c 10
Same, but repeated 10 times.
ñ sr -h ubuntu -s 8080 -u /stockquote -f StockQuoteRequest.xml -A
SOAPAction:getPrice -qq -c 10 -p 3
Same, but with three parallel clients. Each client executes 10 requests.
ñ sr -h ubuntu -s 8080 -u /stockquote -f StockQuoteRequest.xml -A
SOAPAction:getPrice -qq -d 10
Test lasts for 10 seconds (instead of running 10 times)
ñ sr -h ubuntu -s 8080 -u /stockquote -f StockQuoteRequest.xml -A
SOAPAction:getPrice -qq -i Stockquote-10Reqs-Stats.xml
Generates a bucket statistics file for the test (with percentile information).
Oracle Enterprise Gateway
61 / 63
ñ sr -C -h ubuntu -s 443 -u /stockquote -f StockQuoteRequest.xml -A
SOAPAction:getPrice
Use an HTTPS connection.
Oracle Enterprise Gateway
62 / 63
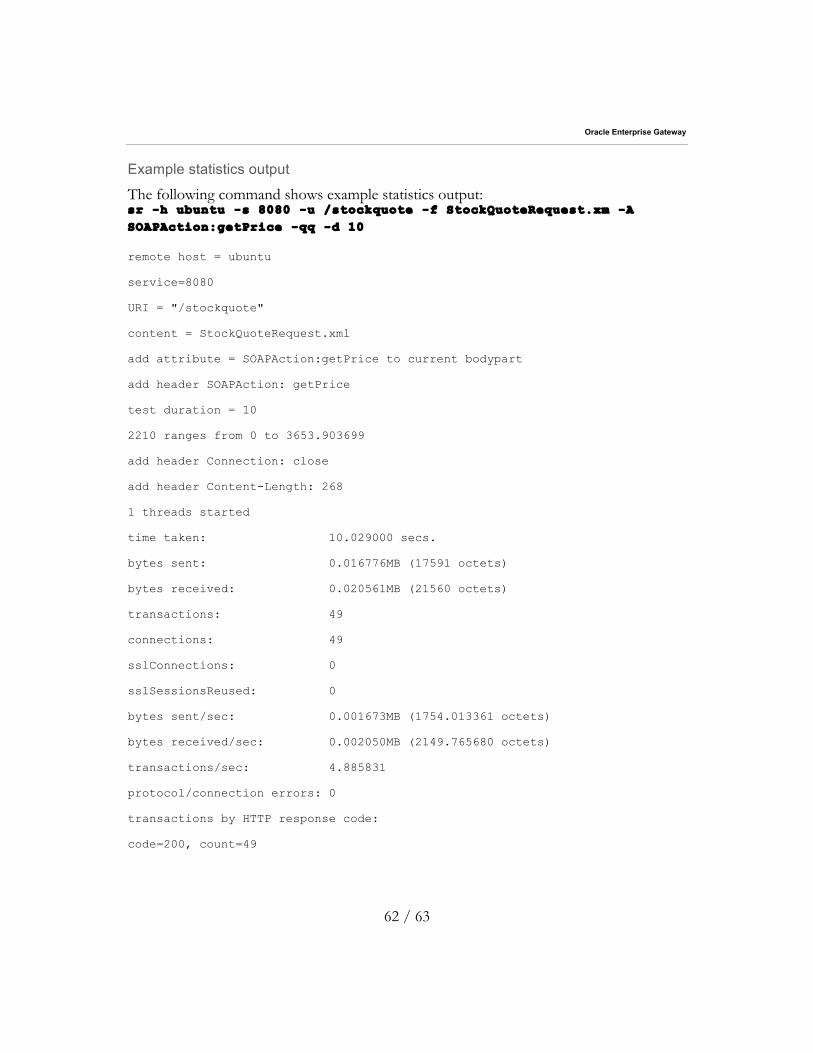
Example statistics output
The following command shows example statistics output: sr -h ubuntu -s 8080 -u /stockquote -f StockQuoteRequest.xm -A SOAPAction:getPrice -qq -d 10
remote host = ubuntu
service=8080
URI = "/stockquote"
content = StockQuoteRequest.xml
add attribute = SOAPAction:getPrice to current bodypart
add header SOAPAction: getPrice
test duration = 10
2210 ranges from 0 to 3653.903699
add header Connection: close
add header Content-Length: 268
1 threads started
time taken: 10.029000 secs.
bytes sent: 0.016776MB (17591 octets)
bytes received: 0.020561MB (21560 octets)
transactions: 49
connections: 49
sslConnections: 0
sslSessionsReused: 0
bytes sent/sec: 0.001673MB (1754.013361 octets)
bytes received/sec: 0.002050MB (2149.765680 octets)
transactions/sec: 4.885831
protocol/connection errors: 0
transactions by HTTP response code:
code=200, count=49
Oracle Enterprise Gateway
63 / 63
\
Oracle Enterprise Gateway May 2011 Author: Oracle Corporation World Headquarters 500 Oracle Parkway Redwood Shores, CA 94065 U.S.A. Worldwide Inquiries: Phone: +1.650.506.7000 Fax: +1.650.506.7200 oracle.com
Copyright © 2011, Oracle and/or its affiliates. All rights reserved. This document is provided for information purposes only and the contents hereof are subject to change without notice. This document is not warranted to be error-free, nor subject to any other warranties or conditions, whether expressed orally or implied in law, including implied warranties and conditions of merchantability or fitness for a particular purpose. We specifically disclaim any liability with respect to this document and no contractual obligations are formed either directly or indirectly by this document. This document may not be reproduced or transmitted in any form or by any means, electronic or mechanical, for any purpose, without our prior written permission. Oracle and Java are registered trademarks of Oracle and/or its affiliates. Other names may be trademarks of their respective owners. AMD, Opteron, the AMD logo, and the AMD Opteron logo are trademarks or registered trademarks of Advanced Micro Devices. Intel and Intel Xeon are trademarks or registered trademarks of Intel Corporation. All SPARC trademarks are used under license and are trademarks or registered trademarks of SPARC International, Inc. UNIX is a registered trademark licensed through X/Open Company, Ltd. 0410