oes 2 sp3: novell remote manager for linux administration guide
TRANSCRIPT

www.novell.com/documentation
Novell Remote Manager for Linux Administration Guide Open Enterprise Server 2 SP3
May 3, 2013
Legal Notices
Novell, Inc., makes no representations or warranties with respect to the contents or use of this documentation, and specifically disclaims any express or implied warranties of merchantability or fitness for any particular purpose. Further, Novell, Inc., reserves the right to revise this publication and to make changes to its content, at any time, without obligation to notify any person or entity of such revisions or changes.
Further, Novell, Inc., makes no representations or warranties with respect to any software, and specifically disclaims any express or implied warranties of merchantability or fitness for any particular purpose. Further, Novell, Inc., reserves the right to make changes to any and all parts of Novell software, at any time, without any obligation to notify any person or entity of such changes.
Any products or technical information provided under this Agreement may be subject to U.S. export controls and the trade laws of other countries. You agree to comply with all export control regulations and to obtain any required licenses or classification to export, re-export or import deliverables. You agree not to export or re-export to entities on the current U.S. export exclusion lists or to any embargoed or terrorist countries as specified in the U.S. export laws. You agree to not use deliverables for prohibited nuclear, missile, or chemical biological weaponry end uses. See the Novell International Trade Services Web page (http://www.novell.com/info/exports/) for more information on exporting Novell software. Novell assumes no responsibility for your failure to obtain any necessary export approvals.
Copyright © 2004–2013 Novell, Inc. All rights reserved. No part of this publication may be reproduced, photocopied, stored on a retrieval system, or transmitted without the express written consent of the publisher.
Novell, Inc.1800 South Novell PlaceProvo, UT 84606U.S.A.www.novell.com
Online Documentation: To access the online documentation for this and other Novell products, and to get updates, see www.novell.com/documentation.
Novell Trademarks
For a list of Novell trademarks, see the Novell Trademark List (http://www.novell.com/company/legal/trademarks/tmlist.html).
Third-Party Materials
All third-party trademarks are the property of their respective owners.This product includes code licensed from RSA Security, Inc., Some portions licensed from IBM are available at http://
oss.software.ibm.com/icu4j/.This product includes materials licensed under the Apache license, including Apache and Tomcat.

Contents
About This Guide 7
1 Overview of Novell Remote Manager for Linux 9
1.1 Benefits of Using Novell Remote Manager . . . . . . . . . . . . . . . . . . . . . . . . . . . . . . . . . . . . . . . . . . . . . 91.2 Other Management Utilities . . . . . . . . . . . . . . . . . . . . . . . . . . . . . . . . . . . . . . . . . . . . . . . . . . . . . . . . 101.3 What's Next . . . . . . . . . . . . . . . . . . . . . . . . . . . . . . . . . . . . . . . . . . . . . . . . . . . . . . . . . . . . . . . . . . . . 10
2 What's New 13
2.1 What’s New (April 2013 Patches) . . . . . . . . . . . . . . . . . . . . . . . . . . . . . . . . . . . . . . . . . . . . . . . . . . . 132.2 What’s New (January 2013 Patches) . . . . . . . . . . . . . . . . . . . . . . . . . . . . . . . . . . . . . . . . . . . . . . . . . 132.3 What’s New (May 2012 Patches) . . . . . . . . . . . . . . . . . . . . . . . . . . . . . . . . . . . . . . . . . . . . . . . . . . . . 14
2.3.1 NCP Server Plug-In: NCP Trustee Report. . . . . . . . . . . . . . . . . . . . . . . . . . . . . . . . . . . . . . 142.4 What’s New (November 2011 Patches) . . . . . . . . . . . . . . . . . . . . . . . . . . . . . . . . . . . . . . . . . . . . . . . 14
2.4.1 HttpOnly Command . . . . . . . . . . . . . . . . . . . . . . . . . . . . . . . . . . . . . . . . . . . . . . . . . . . . . . . 142.4.2 InventoryResolveNonLumOwnerName Command . . . . . . . . . . . . . . . . . . . . . . . . . . . . . . . 152.4.3 Inventory Reports . . . . . . . . . . . . . . . . . . . . . . . . . . . . . . . . . . . . . . . . . . . . . . . . . . . . . . . . 152.4.4 VNC Consoles . . . . . . . . . . . . . . . . . . . . . . . . . . . . . . . . . . . . . . . . . . . . . . . . . . . . . . . . . . . 15
2.5 What’s New (September 2011 Patches) . . . . . . . . . . . . . . . . . . . . . . . . . . . . . . . . . . . . . . . . . . . . . . 152.6 What’s New (April 2011 Patches) . . . . . . . . . . . . . . . . . . . . . . . . . . . . . . . . . . . . . . . . . . . . . . . . . . . 15
2.6.1 SSL Key Cipher Strength. . . . . . . . . . . . . . . . . . . . . . . . . . . . . . . . . . . . . . . . . . . . . . . . . . . 162.6.2 Inventory Reports . . . . . . . . . . . . . . . . . . . . . . . . . . . . . . . . . . . . . . . . . . . . . . . . . . . . . . . . 162.6.3 Open Connections . . . . . . . . . . . . . . . . . . . . . . . . . . . . . . . . . . . . . . . . . . . . . . . . . . . . . . . . 162.6.4 Salvage and Purge for NSS Volumes . . . . . . . . . . . . . . . . . . . . . . . . . . . . . . . . . . . . . . . . . 162.6.5 Share Information . . . . . . . . . . . . . . . . . . . . . . . . . . . . . . . . . . . . . . . . . . . . . . . . . . . . . . . . 162.6.6 View File System Listing . . . . . . . . . . . . . . . . . . . . . . . . . . . . . . . . . . . . . . . . . . . . . . . . . . . 17
2.7 What’s New (OES 2 SP3 Linux). . . . . . . . . . . . . . . . . . . . . . . . . . . . . . . . . . . . . . . . . . . . . . . . . . . . . 172.8 What’s New (OES 2 SP2 Linux). . . . . . . . . . . . . . . . . . . . . . . . . . . . . . . . . . . . . . . . . . . . . . . . . . . . . 172.9 What’s New (OES 2 SP1 Linux). . . . . . . . . . . . . . . . . . . . . . . . . . . . . . . . . . . . . . . . . . . . . . . . . . . . . 172.10 What’s New (OES 2 Linux) . . . . . . . . . . . . . . . . . . . . . . . . . . . . . . . . . . . . . . . . . . . . . . . . . . . . . . . . 17
2.10.1 What’s New (OES 2 Linux) . . . . . . . . . . . . . . . . . . . . . . . . . . . . . . . . . . . . . . . . . . . . . . . . . 182.10.2 What’s New (OES 1 SP2 Linux) . . . . . . . . . . . . . . . . . . . . . . . . . . . . . . . . . . . . . . . . . . . . . 182.10.3 What’s New (OES 1 SP1 Linux) . . . . . . . . . . . . . . . . . . . . . . . . . . . . . . . . . . . . . . . . . . . . . 19
3 Migrating Novell Remote Manager from OES 1 NetWare to OES 2 Linux 21
3.1 Coexistence . . . . . . . . . . . . . . . . . . . . . . . . . . . . . . . . . . . . . . . . . . . . . . . . . . . . . . . . . . . . . . . . . . . . 213.1.1 Compatibility . . . . . . . . . . . . . . . . . . . . . . . . . . . . . . . . . . . . . . . . . . . . . . . . . . . . . . . . . . . . 213.1.2 Coexistence Issues . . . . . . . . . . . . . . . . . . . . . . . . . . . . . . . . . . . . . . . . . . . . . . . . . . . . . . . 21
3.2 Migration . . . . . . . . . . . . . . . . . . . . . . . . . . . . . . . . . . . . . . . . . . . . . . . . . . . . . . . . . . . . . . . . . . . . . . 21
4 Managing a Virtualized Linux Server with Novell Remote Manager 23
5 Setting Up Novell Remote Manager for Linux 25
5.1 Installing Novell Remote Manger During the Initial Server Installation. . . . . . . . . . . . . . . . . . . . . . . . 255.2 Installing Novell Remote Manager After the Initial Server Installation . . . . . . . . . . . . . . . . . . . . . . . . 25
Contents 3
4 OES
6 Accessing Novell Remote Manager for Linux 27
6.1 System Requirements . . . . . . . . . . . . . . . . . . . . . . . . . . . . . . . . . . . . . . . . . . . . . . . . . . . . . . . . . . . . 276.2 Accessing Novell Remote Manager . . . . . . . . . . . . . . . . . . . . . . . . . . . . . . . . . . . . . . . . . . . . . . . . . . 276.3 Starting or Stopping HTTPSTKD . . . . . . . . . . . . . . . . . . . . . . . . . . . . . . . . . . . . . . . . . . . . . . . . . . . . 296.4 Understanding the Layout of Novell Remote Manager . . . . . . . . . . . . . . . . . . . . . . . . . . . . . . . . . . . 296.5 Accessing Online Help . . . . . . . . . . . . . . . . . . . . . . . . . . . . . . . . . . . . . . . . . . . . . . . . . . . . . . . . . . . . 326.6 Accessing Novell Web Pages . . . . . . . . . . . . . . . . . . . . . . . . . . . . . . . . . . . . . . . . . . . . . . . . . . . . . . 32
7 Changing the Configuration 33
7.1 Accessing and Editing the HTTPSTKD Configuration File. . . . . . . . . . . . . . . . . . . . . . . . . . . . . . . . . 347.2 Accessing and Editing the HTTPSTKD PAM Configuration File . . . . . . . . . . . . . . . . . . . . . . . . . . . . 357.3 Restarting the HTTPSTKD Daemon . . . . . . . . . . . . . . . . . . . . . . . . . . . . . . . . . . . . . . . . . . . . . . . . . 367.4 Viewing the HTTP Logs . . . . . . . . . . . . . . . . . . . . . . . . . . . . . . . . . . . . . . . . . . . . . . . . . . . . . . . . . . . 367.5 Viewing and Creating Certificates for Novell Remote Manager . . . . . . . . . . . . . . . . . . . . . . . . . . . . . 367.6 Extending the eDirectory Schema for Novell Remote Manager Group Operations . . . . . . . . . . . . . . 37
8 Diagnosing Problems 39
8.1 Monitoring Server Health . . . . . . . . . . . . . . . . . . . . . . . . . . . . . . . . . . . . . . . . . . . . . . . . . . . . . . . . . . 398.1.1 Monitoring Overall Server Health or the Health of a Specific Item . . . . . . . . . . . . . . . . . . . 398.1.2 Configuring the Items to Monitor . . . . . . . . . . . . . . . . . . . . . . . . . . . . . . . . . . . . . . . . . . . . . 428.1.3 Configuring Email Notification for Server Health Status . . . . . . . . . . . . . . . . . . . . . . . . . . . 42
8.2 Troubleshooting a Suspect or Bad Health Status . . . . . . . . . . . . . . . . . . . . . . . . . . . . . . . . . . . . . . . 42
9 Viewing File Systems 45
9.1 Viewing Mounted Devices and Performing Actions on Them . . . . . . . . . . . . . . . . . . . . . . . . . . . . . . 469.2 Browsing File Systems and Performing Actions on Them . . . . . . . . . . . . . . . . . . . . . . . . . . . . . . . . . 47
9.2.1 Viewing Details about Directories and Performing Actions on Them. . . . . . . . . . . . . . . . . . 489.2.2 Uploading a File to the Server . . . . . . . . . . . . . . . . . . . . . . . . . . . . . . . . . . . . . . . . . . . . . . . 499.2.3 Downloading a File from the Server to a Local Workstation . . . . . . . . . . . . . . . . . . . . . . . . 499.2.4 Searching for Text in Files . . . . . . . . . . . . . . . . . . . . . . . . . . . . . . . . . . . . . . . . . . . . . . . . . . 509.2.5 Viewing the Details of a File and Performing Specific Actions . . . . . . . . . . . . . . . . . . . . . . 509.2.6 Viewing Individual Files . . . . . . . . . . . . . . . . . . . . . . . . . . . . . . . . . . . . . . . . . . . . . . . . . . . . 51
9.3 Viewing Partition Information . . . . . . . . . . . . . . . . . . . . . . . . . . . . . . . . . . . . . . . . . . . . . . . . . . . . . . . 519.4 Browsing NSS Volumes and Performing Actions on Them . . . . . . . . . . . . . . . . . . . . . . . . . . . . . . . . 51
9.4.1 Viewing Information about an NSS Volume. . . . . . . . . . . . . . . . . . . . . . . . . . . . . . . . . . . . . 529.4.2 Viewing the Linux POSIX Details of an NSS Directory and Performing Specific
Actions on It . . . . . . . . . . . . . . . . . . . . . . . . . . . . . . . . . . . . . . . . . . . . . . . . . . . . . . . . . . . . . 549.4.3 Viewing the Linux POSIX Details of a File and Performing Specific Actions on It . . . . . . . . 549.4.4 Browsing an NSS Volume and Setting Rights and File System Attributes on
Directories and Files . . . . . . . . . . . . . . . . . . . . . . . . . . . . . . . . . . . . . . . . . . . . . . . . . . . . . . 559.4.5 Salvaging and Purging Deleted Files on an NSS Volume . . . . . . . . . . . . . . . . . . . . . . . . . . 599.4.6 Purging a Deleted NSS Volume . . . . . . . . . . . . . . . . . . . . . . . . . . . . . . . . . . . . . . . . . . . . . 599.4.7 Viewing Open File Information for an NSS Volume. . . . . . . . . . . . . . . . . . . . . . . . . . . . . . . 60
9.5 Generating Inventories for Directories or NCP Volumes . . . . . . . . . . . . . . . . . . . . . . . . . . . . . . . . . . 609.5.1 Generating an File Inventory Report . . . . . . . . . . . . . . . . . . . . . . . . . . . . . . . . . . . . . . . . . . 619.5.2 Generating a Volume Inventory Report . . . . . . . . . . . . . . . . . . . . . . . . . . . . . . . . . . . . . . . . 629.5.3 Viewing a Saved NCP Volume Report . . . . . . . . . . . . . . . . . . . . . . . . . . . . . . . . . . . . . . . . 639.5.4 Emailing a Saved NCP Volume Report . . . . . . . . . . . . . . . . . . . . . . . . . . . . . . . . . . . . . . . . 639.5.5 Generating a Customized Report . . . . . . . . . . . . . . . . . . . . . . . . . . . . . . . . . . . . . . . . . . . . 64
9.6 Generating and Viewing NCP Trustee Reports for NSS Volumes. . . . . . . . . . . . . . . . . . . . . . . . . . . 669.6.1 Generating an NCP Trustee Report . . . . . . . . . . . . . . . . . . . . . . . . . . . . . . . . . . . . . . . . . . 669.6.2 Viewing a Saved NCP Trustee Report . . . . . . . . . . . . . . . . . . . . . . . . . . . . . . . . . . . . . . . . 679.6.3 Emailing a Saved NCP Trustee Report . . . . . . . . . . . . . . . . . . . . . . . . . . . . . . . . . . . . . . . . 67
2 SP3: Novell Remote Manager for Linux Administration Guide
10 Managing Linux 69
10.1 Accessing VNC Consoles . . . . . . . . . . . . . . . . . . . . . . . . . . . . . . . . . . . . . . . . . . . . . . . . . . . . . . . . . 6910.2 Viewing Kernel Modules. . . . . . . . . . . . . . . . . . . . . . . . . . . . . . . . . . . . . . . . . . . . . . . . . . . . . . . . . . . 7110.3 Viewing Memory Information . . . . . . . . . . . . . . . . . . . . . . . . . . . . . . . . . . . . . . . . . . . . . . . . . . . . . . . 7210.4 Shutting Down and Restarting the Host . . . . . . . . . . . . . . . . . . . . . . . . . . . . . . . . . . . . . . . . . . . . . . . 7310.5 Managing Packages. . . . . . . . . . . . . . . . . . . . . . . . . . . . . . . . . . . . . . . . . . . . . . . . . . . . . . . . . . . . . . 7410.6 Managing Processes . . . . . . . . . . . . . . . . . . . . . . . . . . . . . . . . . . . . . . . . . . . . . . . . . . . . . . . . . . . . . 7510.7 Scheduling cron Jobs to Run on the Server. . . . . . . . . . . . . . . . . . . . . . . . . . . . . . . . . . . . . . . . . . . . 77
11 Managing Hardware 81
11.1 Viewing Processors . . . . . . . . . . . . . . . . . . . . . . . . . . . . . . . . . . . . . . . . . . . . . . . . . . . . . . . . . . . . . . 8111.2 Viewing Interrupt Information . . . . . . . . . . . . . . . . . . . . . . . . . . . . . . . . . . . . . . . . . . . . . . . . . . . . . . . 8211.3 Viewing I/O Memory Information . . . . . . . . . . . . . . . . . . . . . . . . . . . . . . . . . . . . . . . . . . . . . . . . . . . . 8311.4 Viewing I/O Port Information . . . . . . . . . . . . . . . . . . . . . . . . . . . . . . . . . . . . . . . . . . . . . . . . . . . . . . . 8411.5 Viewing SMBIOS Information. . . . . . . . . . . . . . . . . . . . . . . . . . . . . . . . . . . . . . . . . . . . . . . . . . . . . . . 85
12 Using Group Operations 87
12.1 Building and Configuring a Monitoring Group . . . . . . . . . . . . . . . . . . . . . . . . . . . . . . . . . . . . . . . . . . 8812.2 Saving a Group . . . . . . . . . . . . . . . . . . . . . . . . . . . . . . . . . . . . . . . . . . . . . . . . . . . . . . . . . . . . . . . . . 92
12.2.1 Saving the Group to the Local Server . . . . . . . . . . . . . . . . . . . . . . . . . . . . . . . . . . . . . . . . . 9212.2.2 Saving the Group and Associating It with an eDirectory Object . . . . . . . . . . . . . . . . . . . . . 93
12.3 Accessing an Existing Group . . . . . . . . . . . . . . . . . . . . . . . . . . . . . . . . . . . . . . . . . . . . . . . . . . . . . . . 9312.4 Changing an Existing Group . . . . . . . . . . . . . . . . . . . . . . . . . . . . . . . . . . . . . . . . . . . . . . . . . . . . . . . 9312.5 Deleting an Existing Group . . . . . . . . . . . . . . . . . . . . . . . . . . . . . . . . . . . . . . . . . . . . . . . . . . . . . . . . 9412.6 Generating and Viewing Server Reports . . . . . . . . . . . . . . . . . . . . . . . . . . . . . . . . . . . . . . . . . . . . . . 94
12.6.1 Compare Server Up Time Report . . . . . . . . . . . . . . . . . . . . . . . . . . . . . . . . . . . . . . . . . . . . 9412.7 Viewing Monitored Items . . . . . . . . . . . . . . . . . . . . . . . . . . . . . . . . . . . . . . . . . . . . . . . . . . . . . . . . . . 9512.8 Viewing Group Monitoring Types . . . . . . . . . . . . . . . . . . . . . . . . . . . . . . . . . . . . . . . . . . . . . . . . . . . . 9612.9 Defining or Editing Group Monitoring Types . . . . . . . . . . . . . . . . . . . . . . . . . . . . . . . . . . . . . . . . . . . 9812.10 Discovering Items on the Network to Monitor . . . . . . . . . . . . . . . . . . . . . . . . . . . . . . . . . . . . . . . . . . 98
13 Tasks Quick Reference 101
14 Security Considerations 105
14.1 Security Features . . . . . . . . . . . . . . . . . . . . . . . . . . . . . . . . . . . . . . . . . . . . . . . . . . . . . . . . . . . . . . . 10514.2 Security Characteristics . . . . . . . . . . . . . . . . . . . . . . . . . . . . . . . . . . . . . . . . . . . . . . . . . . . . . . . . . . 10714.3 Security Configuration . . . . . . . . . . . . . . . . . . . . . . . . . . . . . . . . . . . . . . . . . . . . . . . . . . . . . . . . . . . 107
A HTTPSTKD Configuration File Options 111
A.1 Address and Port Commands . . . . . . . . . . . . . . . . . . . . . . . . . . . . . . . . . . . . . . . . . . . . . . . . . . . . . 111A.2 Disable Auto LUM Command. . . . . . . . . . . . . . . . . . . . . . . . . . . . . . . . . . . . . . . . . . . . . . . . . . . . . . 112A.3 Email Notification Commands . . . . . . . . . . . . . . . . . . . . . . . . . . . . . . . . . . . . . . . . . . . . . . . . . . . . . 114A.4 Filtering Commands . . . . . . . . . . . . . . . . . . . . . . . . . . . . . . . . . . . . . . . . . . . . . . . . . . . . . . . . . . . . . 114A.5 HttpOnly Command . . . . . . . . . . . . . . . . . . . . . . . . . . . . . . . . . . . . . . . . . . . . . . . . . . . . . . . . . . . . . 115A.6 InventoryResolveNonLumOwnerName Command . . . . . . . . . . . . . . . . . . . . . . . . . . . . . . . . . . . . . 116A.7 Language Commands . . . . . . . . . . . . . . . . . . . . . . . . . . . . . . . . . . . . . . . . . . . . . . . . . . . . . . . . . . . 117A.8 Load Command . . . . . . . . . . . . . . . . . . . . . . . . . . . . . . . . . . . . . . . . . . . . . . . . . . . . . . . . . . . . . . . . 118A.9 SSL Key Cipher Strength Command . . . . . . . . . . . . . . . . . . . . . . . . . . . . . . . . . . . . . . . . . . . . . . . . 119A.10 Supervisor Only Command . . . . . . . . . . . . . . . . . . . . . . . . . . . . . . . . . . . . . . . . . . . . . . . . . . . . . . . 119
Contents 5
6 OES
B Novell Remote Manager Packages 121
C Documentation Updates 123
C.1 May 3, 2013 . . . . . . . . . . . . . . . . . . . . . . . . . . . . . . . . . . . . . . . . . . . . . . . . . . . . . . . . . . . . . . . . . . . 123C.1.1 Viewing File Systems. . . . . . . . . . . . . . . . . . . . . . . . . . . . . . . . . . . . . . . . . . . . . . . . . . . . . 124C.1.2 What’s New or Changed in Novell Remote Manager . . . . . . . . . . . . . . . . . . . . . . . . . . . . 124
C.2 January 31, 2013 . . . . . . . . . . . . . . . . . . . . . . . . . . . . . . . . . . . . . . . . . . . . . . . . . . . . . . . . . . . . . . . 124C.2.1 Accessing Novell Remote Manager for Linux . . . . . . . . . . . . . . . . . . . . . . . . . . . . . . . . . . 124C.2.2 Using Group Operations . . . . . . . . . . . . . . . . . . . . . . . . . . . . . . . . . . . . . . . . . . . . . . . . . . 125C.2.3 What’s New or Changed in Novell Remote Manager . . . . . . . . . . . . . . . . . . . . . . . . . . . . 125
C.3 August 6, 2012 . . . . . . . . . . . . . . . . . . . . . . . . . . . . . . . . . . . . . . . . . . . . . . . . . . . . . . . . . . . . . . . . . 125C.3.1 HTTPSTKD Configuration File Options . . . . . . . . . . . . . . . . . . . . . . . . . . . . . . . . . . . . . . . 125
C.4 June 21, 2012 . . . . . . . . . . . . . . . . . . . . . . . . . . . . . . . . . . . . . . . . . . . . . . . . . . . . . . . . . . . . . . . . . 125C.4.1 Viewing File Systems. . . . . . . . . . . . . . . . . . . . . . . . . . . . . . . . . . . . . . . . . . . . . . . . . . . . . 125C.4.2 What’s New . . . . . . . . . . . . . . . . . . . . . . . . . . . . . . . . . . . . . . . . . . . . . . . . . . . . . . . . . . . . 126
C.5 May 31, 2012 . . . . . . . . . . . . . . . . . . . . . . . . . . . . . . . . . . . . . . . . . . . . . . . . . . . . . . . . . . . . . . . . . . 126C.5.1 Viewing File Systems. . . . . . . . . . . . . . . . . . . . . . . . . . . . . . . . . . . . . . . . . . . . . . . . . . . . . 126C.5.2 What’s New for Novell Remote Manager. . . . . . . . . . . . . . . . . . . . . . . . . . . . . . . . . . . . . . 126
C.6 November 30, 2011 . . . . . . . . . . . . . . . . . . . . . . . . . . . . . . . . . . . . . . . . . . . . . . . . . . . . . . . . . . . . . 126C.6.1 Changing the Configuration . . . . . . . . . . . . . . . . . . . . . . . . . . . . . . . . . . . . . . . . . . . . . . . . 127C.6.2 HTTPSTKD Configuration File Options . . . . . . . . . . . . . . . . . . . . . . . . . . . . . . . . . . . . . . . 127C.6.3 Security Considerations. . . . . . . . . . . . . . . . . . . . . . . . . . . . . . . . . . . . . . . . . . . . . . . . . . . 127C.6.4 Managing Linux . . . . . . . . . . . . . . . . . . . . . . . . . . . . . . . . . . . . . . . . . . . . . . . . . . . . . . . . . 127C.6.5 Viewing File Systems. . . . . . . . . . . . . . . . . . . . . . . . . . . . . . . . . . . . . . . . . . . . . . . . . . . . . 127C.6.6 What’s New for Novell Remote Manager. . . . . . . . . . . . . . . . . . . . . . . . . . . . . . . . . . . . . . 128
C.7 April 8, 2011 . . . . . . . . . . . . . . . . . . . . . . . . . . . . . . . . . . . . . . . . . . . . . . . . . . . . . . . . . . . . . . . . . . . 128C.7.1 Changing the Configuration . . . . . . . . . . . . . . . . . . . . . . . . . . . . . . . . . . . . . . . . . . . . . . . . 128C.7.2 HTTPSTKD Configuration File Options . . . . . . . . . . . . . . . . . . . . . . . . . . . . . . . . . . . . . . . 128C.7.3 Security Considerations. . . . . . . . . . . . . . . . . . . . . . . . . . . . . . . . . . . . . . . . . . . . . . . . . . . 128C.7.4 Viewing File Systems. . . . . . . . . . . . . . . . . . . . . . . . . . . . . . . . . . . . . . . . . . . . . . . . . . . . . 129C.7.5 What’s New for Novell Remote Manager. . . . . . . . . . . . . . . . . . . . . . . . . . . . . . . . . . . . . . 129
C.8 February 11, 2011 . . . . . . . . . . . . . . . . . . . . . . . . . . . . . . . . . . . . . . . . . . . . . . . . . . . . . . . . . . . . . . 129C.9 December 2010 (OES2 SP3). . . . . . . . . . . . . . . . . . . . . . . . . . . . . . . . . . . . . . . . . . . . . . . . . . . . . . 129C.10 January 29, 2010 . . . . . . . . . . . . . . . . . . . . . . . . . . . . . . . . . . . . . . . . . . . . . . . . . . . . . . . . . . . . . . . 129
C.10.1 Accessing Novell Remote Manager for Linux . . . . . . . . . . . . . . . . . . . . . . . . . . . . . . . . . . 129C.10.2 Viewing File Systems. . . . . . . . . . . . . . . . . . . . . . . . . . . . . . . . . . . . . . . . . . . . . . . . . . . . . 130
C.11 November 9, 2009 (OES 2 SP2) . . . . . . . . . . . . . . . . . . . . . . . . . . . . . . . . . . . . . . . . . . . . . . . . . . . 130C.12 March 3, 2009 . . . . . . . . . . . . . . . . . . . . . . . . . . . . . . . . . . . . . . . . . . . . . . . . . . . . . . . . . . . . . . . . . 130
C.12.1 Managing Linux . . . . . . . . . . . . . . . . . . . . . . . . . . . . . . . . . . . . . . . . . . . . . . . . . . . . . . . . . 130C.13 December 2008 . . . . . . . . . . . . . . . . . . . . . . . . . . . . . . . . . . . . . . . . . . . . . . . . . . . . . . . . . . . . . . . . 130
C.13.1 Accessing Novell Remote Manager for Linux . . . . . . . . . . . . . . . . . . . . . . . . . . . . . . . . . . 131C.13.2 Managing Linux . . . . . . . . . . . . . . . . . . . . . . . . . . . . . . . . . . . . . . . . . . . . . . . . . . . . . . . . . 131C.13.3 Security Considerations. . . . . . . . . . . . . . . . . . . . . . . . . . . . . . . . . . . . . . . . . . . . . . . . . . . 131C.13.4 Viewing File Systems. . . . . . . . . . . . . . . . . . . . . . . . . . . . . . . . . . . . . . . . . . . . . . . . . . . . . 131
C.14 March 21, 2008 . . . . . . . . . . . . . . . . . . . . . . . . . . . . . . . . . . . . . . . . . . . . . . . . . . . . . . . . . . . . . . . . 132C.14.1 Diagnosing Problems. . . . . . . . . . . . . . . . . . . . . . . . . . . . . . . . . . . . . . . . . . . . . . . . . . . . . 132C.14.2 Managing Linux . . . . . . . . . . . . . . . . . . . . . . . . . . . . . . . . . . . . . . . . . . . . . . . . . . . . . . . . . 132
C.15 February 7, 2008 . . . . . . . . . . . . . . . . . . . . . . . . . . . . . . . . . . . . . . . . . . . . . . . . . . . . . . . . . . . . . . . 132C.15.1 Managing Hardware . . . . . . . . . . . . . . . . . . . . . . . . . . . . . . . . . . . . . . . . . . . . . . . . . . . . . 132
2 SP3: Novell Remote Manager for Linux Administration Guide

About This Guide
This guide describes how to access and use Novell Remote Manager on a host that is running the Linux operating system. This guide includes the following information:
Chapter 1, “Overview of Novell Remote Manager for Linux,” on page 9 Chapter 2, “What's New,” on page 13 Chapter 3, “Migrating Novell Remote Manager from OES 1 NetWare to OES 2 Linux,” on
page 21 Chapter 4, “Managing a Virtualized Linux Server with Novell Remote Manager,” on page 23 Chapter 5, “Setting Up Novell Remote Manager for Linux,” on page 25 Chapter 6, “Accessing Novell Remote Manager for Linux,” on page 27 Chapter 7, “Changing the Configuration,” on page 33 Chapter 8, “Diagnosing Problems,” on page 39 Chapter 9, “Viewing File Systems,” on page 45 Chapter 10, “Managing Linux,” on page 69 Chapter 11, “Managing Hardware,” on page 81 Chapter 12, “Using Group Operations,” on page 87 Chapter 13, “Tasks Quick Reference,” on page 101 Chapter 14, “Security Considerations,” on page 105 Appendix A, “HTTPSTKD Configuration File Options,” on page 111 Appendix B, “Novell Remote Manager Packages,” on page 121 Appendix C, “Documentation Updates,” on page 123
Audience
This guide is intended for network administrators.
Feedback
We want to hear your comments and suggestions about this manual and the other documentation included with this product. Please use the User Comments feature at the bottom of each page of the online documentation, or go to www.novell.com/documentation/feedback.html and enter your comments there.
Documentation Updates
For the most recent version of the Novell Remote Manager Administration Guide for Linux, visit the Open Enterprise Server online documentation Web site (http://www.novell.com/documentation/oes2/index.html?page=/documentation/oes2/mgmt_remotemgr_nw_lx/data/front.html#bktitle).
About This Guide 7

8 OES 2 SP3: Novell Remote Manager for Linux Administration Guide

1 1Overview of Novell Remote Manager for Linux
Novell Remote Manager for Linux is a browser-based utility that you can use to manage one or more Linux servers from a remote location.
You can use Novell Remote Manager to monitor your server’s health, change the configuration of your server, or perform diagnostic and debugging tasks.
The advantages of using Novell Remote Manager for server management are that:
It does not require a special client. It provides a graphical interface that makes interpreting diagnostic information much more
comprehensive and easier to manage. It provides added functionality that is not available in the other management utilities.
This section explains the following:
Section 1.1, “Benefits of Using Novell Remote Manager,” on page 9 Section 1.2, “Other Management Utilities,” on page 10 Section 1.3, “What's Next,” on page 10
1.1 Benefits of Using Novell Remote ManagerOrganizations usually don’t have a technician physically located at the server when it needs attention. Servers are frequently placed in remote or distributed locations and, in the case of service providers, at many different companies. The ability to centrally monitor, diagnose, and repair (or preventively avoid) server problems is a significant advantage. It is also a major benefit to be able to provide technical service from any location—any point in the world—across the Internet.
Novell Remote Manager provides IT staff and service providers the ability to monitor and control a complete selection of server controls and functions through a standard Web browser.
The management power and flexibility now available simplifies network administration and allows fewer staff to effectively manage more resources. Novell Remote Manager lets you do the following:
Securely access and manage a Linux server from any location. With proper login credentials and Internet access, administrators can control servers from any location.
Group servers for collective management, allowing you to manage multiple servers through the same interface and application.
Quickly locate and assess problems. An intuitive graphical user interface provides a control dashboard with indicators for server health and status.
Manage servers comprehensively. Novell Remote Manager provides control for viewing or managing Linux servers, directories, processes, and hardware.
Overview of Novell Remote Manager for Linux 9

While using Novell Remote Manager, you can perform the following major tasks:
Monitor and manage your server’s health Monitor the health status of one or more servers Build a group of servers and items to be monitored together Access server and configuration logs
Configure your server View information about all hardware adapters, hardware resources, and processor data Upload and replace files Monitor memory resources Access files Shut down or reset a server
Troubleshoot server problems Find high memory users Monitor server processes
1.2 Other Management UtilitiesNovell Remote Manager does not replace other management utilities that are available in Open Enterprise Server. For an understanding of which utilities are best for the task you need to perform, see “OES Utilities and Tools” in the OES 2 SP3: Planning and Implementation Guide.
1.3 What's NextNow that you have learned some of the benefits of using Novell Remote Manager, use the information in Table 1-1 to help you access and use it.
Table 1-1 Information About Novell Remote Manager
For Information About See
Accessing and understanding the layout of Novell Remote Manager
“Accessing Novell Remote Manager for Linux” on page 27
Determining whether Novell Remote Manager for Linux is compatible with other operating systems and how it fits in your current network
“Migrating Novell Remote Manager from OES 1 NetWare to OES 2 Linux” on page 21
Managing a virtualized OES 2 Linux server with Novell Remote Manager.
“Setting Up Novell Remote Manager for Linux” on page 25
Installing Novell Remote Manager for Linux “Setting Up Novell Remote Manager for Linux” on page 25
Changing the configuration of Novell Remote Manager
“Changing the Configuration” on page 33
10 OES 2 SP3: Novell Remote Manager for Linux Administration Guide
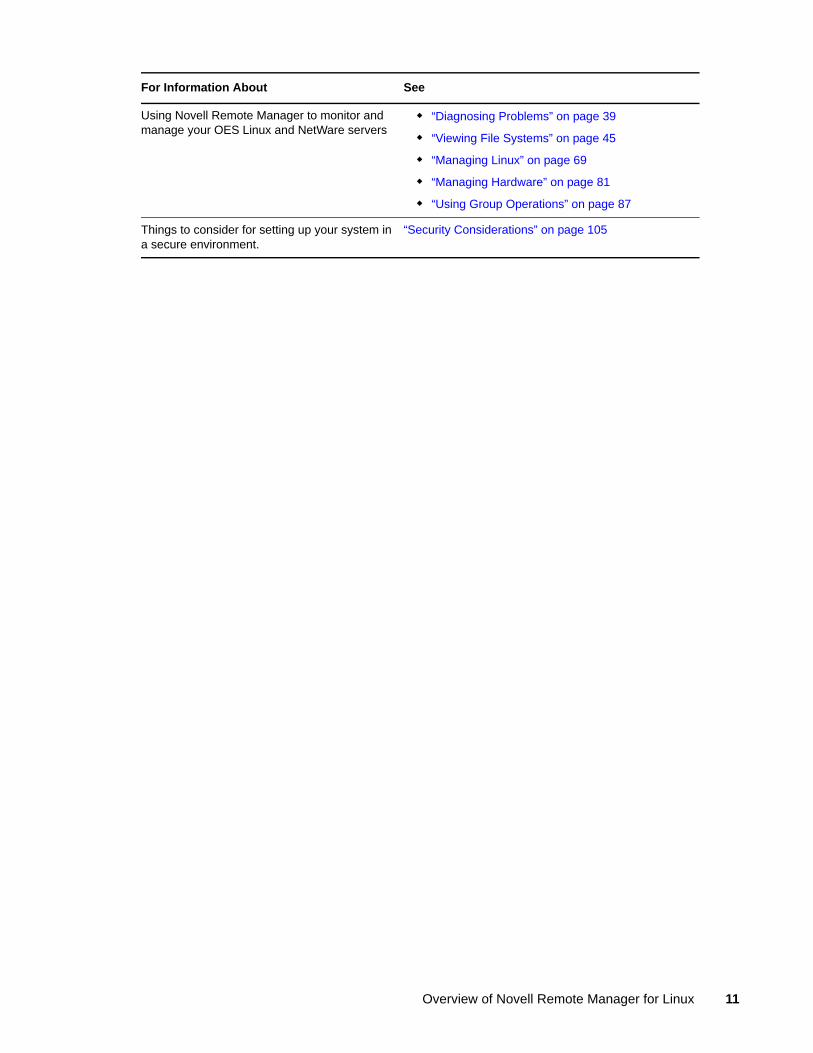
Using Novell Remote Manager to monitor and manage your OES Linux and NetWare servers
“Diagnosing Problems” on page 39
“Viewing File Systems” on page 45
“Managing Linux” on page 69
“Managing Hardware” on page 81
“Using Group Operations” on page 87
Things to consider for setting up your system in a secure environment.
“Security Considerations” on page 105
For Information About See
Overview of Novell Remote Manager for Linux 11

12 OES 2 SP3: Novell Remote Manager for Linux Administration Guide

2 2What's New
This section identifies the features that were added in Novell Remote Manager (NRM) for Linux since its release in Open Enterprise Server 2 Linux.
Section 2.1, “What’s New (April 2013 Patches),” on page 13 Section 2.2, “What’s New (January 2013 Patches),” on page 13 Section 2.3, “What’s New (May 2012 Patches),” on page 14 Section 2.4, “What’s New (November 2011 Patches),” on page 14 Section 2.5, “What’s New (September 2011 Patches),” on page 15 Section 2.6, “What’s New (April 2011 Patches),” on page 15 Section 2.7, “What’s New (OES 2 SP3 Linux),” on page 17 Section 2.8, “What’s New (OES 2 SP2 Linux),” on page 17 Section 2.9, “What’s New (OES 2 SP1 Linux),” on page 17 Section 2.10, “What’s New (OES 2 Linux),” on page 17
2.1 What’s New (April 2013 Patches)
Upgrade to eDirectory 8.8.7
An upgrade to Novell eDirectory 8.8 SP7 is available in the April 2013 Scheduled Maintenance for OES 2 SP3. For information about the eDirectory upgrade, see TID 7011599 (http://www.novell.com/support/kb/doc.php?id=7011599) in the Novell Knowledgebase.
There will be no further eDirectory 8.8 SP6 patches for the OES platform. Previous patches for Novell eDirectory 8.8 SP6 are available on Novell Patch Finder (http://download.novell.com/patch/finder/#familyId=112&productId=29503).
2.2 What’s New (January 2013 Patches)
Novell Client Support for Windows 8 and Server 2012
The January 2013 Scheduled Maintenance for OES 11 SP1 announces the availability of Novell Client 2 SP3 for Windows with support for:
Windows 8 (32-bit and 64-bit) excluding Windows 8 RT Windows Server 2012 (64-bit)
Novell Client 2 documentation links in this guide have been updated to reflect the release of SP3.
What's New 13

Novell Client 2 SP3 for Windows documentation is available on the Web (http://www.novell.com/documentation/windows_client/). Documentation for earlier versions is available under Previous Releases (http://www.novell.com/documentation/windows_client/#previous).
Support for Internet Explorer 10
Web-based access to Novell Remote Manager is supported for the Internet Explorer 10 Web browser in the desktop user interface view for Windows 7 clients and Windows 8 clients.
Support for Safari 6.0 on Mac OS X 10.8
Web-based access to Novell Remote Manager is supported for the Apple Safari 6.0 Web browser on Mac OS X 10.8 clients.
2.3 What’s New (May 2012 Patches)In addition to bug fixes, the following enhancement is available in the May 2012 Scheduled Maintenance patches for OES 2 SP3:
Section 2.3.1, “NCP Server Plug-In: NCP Trustee Report,” on page 14
2.3.1 NCP Server Plug-In: NCP Trustee Report
Under Manage NCP Services, the new NCP Trustee Report option allows you to generate a trustee report for a specified NSS volume, including Dynamic Storage Technology shadow volumes comprised of two NSS volumes. You can display the last trustee report in the Web browser, or send the report to the email addresses that you have pre-configured for Novell Remote Manager. A trustee report shows the rights settings by folder for each user or group that is a trustee on the NSS volume. For information, see Section 9.6, “Generating and Viewing NCP Trustee Reports for NSS Volumes,” on page 66.
2.4 What’s New (November 2011 Patches)In addition to bug fixes, the following changes were made to Novell Remote Manager in the OES 2 SP3 November 2011 Scheduled Maintenance patch:
Section 2.4.1, “HttpOnly Command,” on page 14 Section 2.4.2, “InventoryResolveNonLumOwnerName Command,” on page 15 Section 2.4.3, “Inventory Reports,” on page 15 Section 2.4.4, “VNC Consoles,” on page 15
2.4.1 HttpOnly Command
The HttpOnly configuration option is available in the Novell Remote Manager /etc/opt/novell/httpstkd.conf file. By default, Novell Remote Manager sets an HTTP-only cookie attribute that specifies that the cookie is not accessible through a script. This helps mitigate the risk of cross-site scripting. For information, see Appendix A, “HTTPSTKD Configuration File Options,” on page 111.
14 OES 2 SP3: Novell Remote Manager for Linux Administration Guide
2.4.2 InventoryResolveNonLumOwnerName Command
The InventoryResolveNonLumOwnerName configuration option is available in the Novell Remote Manager /etc/opt/novell/httpstkd.conf file. This allows you to choose whether the inventory of a Novell Storage Services (NSS) volume reports the names of owners as the Nobody user if their Novell eDirectory user names are not enabled with Linux User Management. By default, this option is set to false (not resolved) in order to give you faster performance for an inventory of files on an NSS volume. For information, see Section A.6, “InventoryResolveNonLumOwnerName Command,” on page 116.
2.4.3 Inventory Reports
The View File Systems > NCP Volumes Inventory option allows you to view a list of NCP volumes and generate inventories for them.
The Volume Information page for a volume provides an Inventory option to generate an inventory. This provides the same output as running View File System > General File Inventory for Linux paths and for View File Systems > NCP Volumes Inventory for NCP volumes.
An inventory report is saved when you run an inventory on an NCP volume. You can view the last saved report by going to the Manage NCP Services > Volume Inventory Reports page and clicking the View Last Report > Display option for the volume. The saved report provides the same statistics as running View File Systems > NCP Volumes Inventory. Graphics are not available in a saved report.
You can email a saved NCP volume inventory report to addresses that are configured in the /etc/opt/novell/httpstkd.conf file. To send the report, go to the Manage NCP Services > Volume Inventory Reports page and click the Email Report > Send option for the volume.
In a file inventory for NSS volumes, the File Owner Profile reports the eDirectory identity of the file owner without requiring the users to be enabled with Linux User Management (LUM). For information, see Section 9.5, “Generating Inventories for Directories or NCP Volumes,” on page 60.
2.4.4 VNC Consoles
The root user can view VNC consoles from within Novell Remote Manager. This capability requires that the HttpOnly security feature be disabled in the /etc/opt/novell/httpstkd.conf file.
2.5 What’s New (September 2011 Patches)In addition to bug fixes, Novell Cluster Services added support for OES 2 SP3 services and file systems on the SUSE Linux Enterprise Server (SLES) 10 SP4 operating system. You can upgrade to SLES 10 SP4 by using the move-to-sles10-sp4 patch in the SLES patch channel.
2.6 What’s New (April 2011 Patches)In addition to bug fixes, the following changes were made to Novell Remote Manager in the OES 2 SP3 April 2011 Scheduled Maintenance patch:
Section 2.6.1, “SSL Key Cipher Strength,” on page 16 Section 2.6.2, “Inventory Reports,” on page 16 Section 2.6.3, “Open Connections,” on page 16
What's New 15

Section 2.6.4, “Salvage and Purge for NSS Volumes,” on page 16 Section 2.6.5, “Share Information,” on page 16 Section 2.6.6, “View File System Listing,” on page 17
2.6.1 SSL Key Cipher Strength
You can set the cipher strength for the SSL Key in the /etc/opt/novell/httpstkd.conf file. For information, see Section A.9, “SSL Key Cipher Strength Command,” on page 119.
2.6.2 Inventory Reports
On the Volume Information page, the Inventory option generates a report with statistics about the files stored on the selected volume.
In a file inventory for NSS volumes, the File Owner Profile reports the eDirectory identity of the file owner without requiring the users to be enabled with Linux User Management (LUM). For information, see Section 9.5, “Generating Inventories for Directories or NCP Volumes,” on page 60.
2.6.3 Open Connections
On the Manage NCP Services > Connection Information page, the Open File Information list now links to the file and lock details for each file that is held open by connection number.
2.6.4 Salvage and Purge for NSS Volumes
The following capabilities were added for salvaging and purging deleted files for NSS volumes where the Salvage attribute is enabled:
The Salvageable File List option allows you to view a list of deleted files that are available for salvage or purge on the volume.
The Purge option allows you to purge a deleted file. The Salvage option allows you to recover a deleted file. The Purge all files allows you to purge all deleted files on a selected volume.
2.6.5 Share Information
On the Share Information page, the following capabilities were added:
The Inventory option generates a report with statistics about the files stored on a selected volume.
Additional details about the volume are displayed, such as size and namespace. The Create Subdirectory option allows you to create subdirectories on an NSS volume. The Delete Directory and Contents option allows you to recursively delete a selected folder and its
contents. The Rename Directory option allows you modify the name of a selected directory. The Compression option shows whether the Compression attribute is enabled for the NSS
volume.
16 OES 2 SP3: Novell Remote Manager for Linux Administration Guide

2.6.6 View File System Listing
On the View File System Listing page for a volume, the following capabilities were added:
The Text Search option allows you to search the content of files for a specified text string. The File Search option allows you to search for a file on the selected volume. The Inventory option generates a report with statistics about the files stored on a selected
volume. The Upload option allows you to upload a file to the selected volume.
2.7 What’s New (OES 2 SP3 Linux)There were bug fixes for the OES 2 SP3 Linux release. No new features were added.
2.8 What’s New (OES 2 SP2 Linux)There were bug fixes for the OES 2 SP2 Linux release. No new features were added.
2.9 What’s New (OES 2 SP1 Linux)The features in this section were added to Novell Remote Manager for Linux in OES 2 SP1 Linux.
2.10 What’s New (OES 2 Linux)The features in this section were added to Novell Remote Manager for Linux since its initial release in OES 1 Linux.
Section 2.10.1, “What’s New (OES 2 Linux),” on page 18 Section 2.10.2, “What’s New (OES 1 SP2 Linux),” on page 18 Section 2.10.3, “What’s New (OES 1 SP1 Linux),” on page 19
Area of Service Functionality For More Information
Root user access versus admin user access
For security reasons, while logged in to NRM as the Admin user or equivalent eDirectory user, the user’s root privileges are now limited to only those needed to manage NRM.
Section 6.2, “Accessing Novell Remote Manager,” on page 27
Section 14.1, “Security Features,” on page 105
What's New 17

2.10.1 What’s New (OES 2 Linux)
The features in this section were added to Novell Remote Manager for Linux in the initial release of OES 2 Linux:
2.10.2 What’s New (OES 1 SP2 Linux)
The features in this section were added to Novell Remote Manager for Linux in OES 1 SP2 Linux:
Area of Service Functionality For More Information
Health Monitor On the Health Monitor page, you can view the online or offline status of the services running on your OES 2 Linux server.
You can also change the online or offline status of these services.
“Monitoring Overall Server Health or the Health of a Specific Item” on page 39.
Installation When you add OES 2 to a server, Novell Remote Manager is no longer installed by default like it was in OES 1. Novell Remote Manager has its own pattern and it is selected for installation with all other OES 2 patterns.
“Setting Up Novell Remote Manager for Linux” on page 25.
Manage Linux, Scheduled Task
You can schedule a task using a cron job. “Scheduling cron Jobs to Run on the Server” on page 77.
All You can use Novell Remote Manager to access and manage virtualized OES 2 Linux servers.
“Managing a Virtualized Linux Server with Novell Remote Manager” on page 23.
Area of Service Functionality For More Information
View File System (Home)
On the home page, you can view the percent of free space available on each mounted physical devices or external file systems that have actual disk space. Available disk space on virtual file systems is not shown.
You can also view the details of the file system on the Information Page for each mounted system on the device. The Unmount button was moved to this page.
“Viewing Mounted Devices and Performing Actions on Them” on page 46.
18 OES 2 SP3: Novell Remote Manager for Linux Administration Guide
2.10.3 What’s New (OES 1 SP1 Linux)
The features in this section were added to Novell Remote Manager for Linux in OES 1 Linux SP1:
View File System
The General File Inventory link in this section provides a page where you can get an inventory of all the files from the root directory or browse to a specific subdirectory and generate a file inventory of all the files in the selected subdirectory.
This same functionality is available by clicking the Inventory link when browsing the file system from the View File System link.
The Volume Inventory link in this section provide a list of all NCP mounted volumes. When you click the volume name link from this page, an inventory report of all the files from the root of that volume is generated.
From these generated reports, you can also perform actions on the files or directories such as moving, copying, deleting, and renaming.
“Generating Inventories for Directories or NCP Volumes” on page 60.
Use Group Operation
If you want to scan the network for specific services, access the Network Discovery page and specify the host and ports that should be scanned for. After discovering the items on the network, you can click the item and add it to the current group for future monitoring.
Using this feature can help you to quickly gather the information you need to create monitoring groups.
“Discovering Items on the Network to Monitor” on page 98.
Area of Service Functionality For More Information
Area of Service Functionality For More Information, see
Configure Added configuration options for controlling which users can log in to Novell Remote Manager and specifying which languages the browser supports for Novell Remote Manager.
“Accessing and Editing the HTTPSTKD Configuration File” on page 34
“HTTPSTKD Configuration File Options” on page 111.
View File System (Home)
Left navigation frame includes collapsible categories that are remembered for the next time you log in. This lets you display the Novell Remote Manager features that you use most often and hide the ones that you don't.
“Navigation Frame” on page 31
Diagnose, Health Monitor
CPU usage process information is now reporting the correct information.
“Diagnosing Problems” on page 39
What's New 19

Access Network services now has a selection for installing the Novell Remote Manager services. This lets you install Novell Remote Manager after the server installation and performs the proper configuration steps that weren't performed if you installed the packages separately.
“Setting Up Novell Remote Manager for Linux” on page 25
Manage Linux, VNC Consoles
If VNC services are configured on the server, you can access the VNC console screens by clicking the VNC Consoles link under the Manage Linux heading in the navigation frame. Then click the 1024 X 728 button on the VNC Console Screens page.
“Accessing VNC Consoles” on page 69
Area of Service Functionality For More Information, see
20 OES 2 SP3: Novell Remote Manager for Linux Administration Guide

3 3Migrating Novell Remote Manager from OES 1 NetWare to OES 2 Linux
This section contains information about the following:
Section 3.1, “Coexistence,” on page 21 Section 3.2, “Migration,” on page 21
3.1 CoexistenceThis section provides information regarding the compatibility and coexistence of Novell Remote Manager for Linux with existing networks containing NetWare or Linux platforms.
3.1.1 Compatibility
When you create a group, you can get server health status from a NetWare server running NetWare 6.0 or later or from a Linux server running Novell Open Enterprise Server 1 or Open Enterprise Server 2.
You can access the Novell Remote Manager on Linux only on servers with OES services installed. See “System Requirements” on page 27.
3.1.2 Coexistence Issues
Monitoring on Linux servers that are not running the owcimomd module can report only an Up/Down status.
3.2 MigrationThere is no need to migrate Novell Remote Manager from NetWare to Novell Remote Manager for Linux. Novell Remote Manager is selected for installation when any pattern from Open Enterprise Server is installed.
You can combine server groups for monitoring OES NetWare and OES Linux servers. You can save the group file locally or to an eDirectory object. See “Saving a Group” on page 92 and “Accessing an Existing Group” on page 93.
Configuring Novell Remote Manager is somewhat different on an OES Linux server than an OES NetWare server. See “Changing the Configuration” on page 33.
Not all tasks that are available in Novell Remote Manager for NetWare are available on Novell Remote Manager for Linux, such as IP Address Management; however, you have the functionality to monitor the server health for individual servers or groups of servers, the ability to load and unload programs, and access console screens.
Migrating Novell Remote Manager from OES 1 NetWare to OES 2 Linux 21

22 OES 2 SP3: Novell Remote Manager for Linux Administration Guide

4 4Managing a Virtualized Linux Server with Novell Remote Manager
Using Novell Remote Manager for Linux to access and manage a virtualized OES 2 Linux server is the same in every way as accessing and managing a physical OES 2 Linux server and requires no special configuration or other changes.
To get started with virtualization, see “Introduction to Xen Virtualization” (http://www.novell.com/documentation/sles10/book_virtualization_xen/data/sec_xen_basics.html) in the Virtualization with Xen (http://www.novell.com/documentation/sles10/book_virtualization_xen/data/book_virtualization_xen.html) guide.
For information on setting up virtualized OES 2 Linux, see “Installing, Upgrading, or Updating OES on a Xen-based VM” in the OES 2 SP3: Installation Guide guide.
Managing a Virtualized Linux Server with Novell Remote Manager 23

24 OES 2 SP3: Novell Remote Manager for Linux Administration Guide
5 5Setting Up Novell Remote Manager for Linux
This section contains the following information:
Section 5.1, “Installing Novell Remote Manger During the Initial Server Installation,” on page 25 Section 5.2, “Installing Novell Remote Manager After the Initial Server Installation,” on page 25
5.1 Installing Novell Remote Manger During the Initial Server InstallationTo install Novell Remote Manager during the OES 2 installation or while adding OES 2 on an existing server, select the Novell Remote Manager (NRM) pattern to install Novell Remote Manager.
It does not require any additional configuration during the installation and does not display on the Installation Settings page. For information on changing the configuration after the installation is complete, see Chapter 7, “Changing the Configuration,” on page 33
For a list of RPMs that it installs, see Appendix B, “Novell Remote Manager Packages,” on page 121.
5.2 Installing Novell Remote Manager After the Initial Server InstallationIf you did not install Novell Remote Manager when you first installed OES 2 Linux, do the following to install and configure Novell Remote Manager:
1 Open YaST. 2 Click Open Enterprise Server > OES Install and Configuration.3 Select the Novell Remote Manager (NRM) pattern.
Selecting this pattern automatically selects the Novell Linux User Management (LUM) and Novell Backup/Storage Management Services (SMS) patterns.
4 (Conditional) If you want only the Novell Remote Manager pattern installed, deselect the Novell Linux User Management (LUM) and Novell Backup/Storage Management Services (SMS) patterns.If you have only Novell Remote Manager installed, then you can log in to Novell Remote Manager only as user root or a local Linux user. If you log in as a local Linux user, you can see only the information that the user you log in as has rights to view.
5 Click Accept.
Setting Up Novell Remote Manager for Linux 25

6 If necessary, complete any required information for other services selected on the Novell Open Enterprise Server Configuration summary page. When all the settings on the Novell Open Enterprise Server Configuration summary page are set as desired, click Next.The necessary files are installed and configuration of the services are completed.No additional configuration during the installation for Novell Remote Manager is required. For information on changing the configuration after the installation is complete, see Chapter 7, “Changing the Configuration,” on page 33.For a list of RPMs that it installs, see Appendix B, “Novell Remote Manager Packages,” on page 121.
26 OES 2 SP3: Novell Remote Manager for Linux Administration Guide
6 6Accessing Novell Remote Manager for Linux
This section includes information about the following:
Section 6.1, “System Requirements,” on page 27 Section 6.2, “Accessing Novell Remote Manager,” on page 27 Section 6.3, “Starting or Stopping HTTPSTKD,” on page 29 Section 6.4, “Understanding the Layout of Novell Remote Manager,” on page 29 Section 6.5, “Accessing Online Help,” on page 32 Section 6.6, “Accessing Novell Web Pages,” on page 32
6.1 System Requirements Supported Web browsers:
Mozilla Firefox 12 or later Microsoft Internet Explorer 8, 9, and 10 (for Windows 7 and 8 clients in the desktop view
only) KDE Konqueror 4 or later (limited functionality) Apple Safari 5 and Safari 6.0 (for Mac OS X Mountain Lion (version 10.8) clients only) Google Chrome 21 or later
The HTTPSTKD package loaded and running on the server. This package is selected for installation by the Novell Remote Manager pattern. The Novell Remote Manager (NRM) pattern is selected for installation when you install any of the Open Enterprise Server 2 patterns on Linux unless you deselect it.For information on installing Novell Remote Manager, see Chapter 5, “Setting Up Novell Remote Manager for Linux,” on page 25.For package details, see “Novell Remote Manager Packages” on page 121.
To view the graphical displays in the file system inventory report, the Sun Java 1.4.2 plug-in (java-1_4_2-sun-plugin.rpm) must be installed on the machine you use to to access Novell Remote Manager, and the browser must have Java and Javascript enabled.
6.2 Accessing Novell Remote Manager1 Open a Web browser.2 Point the browser to the URL of the server you want to manage by entering the following in the
Address (URL) field:
Accessing Novell Remote Manager for Linux 27

http://server’s_TCP/IP_address:8008
For example:http://172.16.123.11:8008If you have Domain Name Services (DNS) installed on your network for server name-to-IP address resolution, you can also enter the server’s DNS name instead of the IP address.
3 Accept the SSL certificate.You need to have SSL 2.0 and SSL 3.0 (where available) enabled in your browser. Otherwise, the browser displays an error indicating that the page cannot be displayed.
4 When the login dialog box appears, provide the required information.Log in as user root, a local Linux user, or as an eDirectory user that is Linux User Management enabled.If you have Linux User Management enabled in your tree and have it installed and configured on the local server, you can log in to Novell Remote Manager using your eDirectory credentials. For instructions on enabling Linux, see “Setting Up Linux Computers to Use eDirectory Authentication” in the OES 2 SP3: Novell Linux User Management Administration Guide.If you log in as a local Linux user or as a non-Admin eDirectory user, you can see only the information that the user you log in as has rights to view.Two specific things to remember when logging in as an eDirectory user to Novell Remote Manager: For users to log in as user Admin or equivalent, the Admin user must either be associated to
the group that has the Supervisor right for the Entry Rights property for the UNIX Workstation object or have the Supervisor right for the Entry Rights to the NCP object that represents the Linux server in the eDirectory tree.
IMPORTANT: When eDirectory users who have the Supervisor right to one of these objects are logged in to the server with their eDirectory user names, they are granted limited root user privileges so they can modify only the configuration files necessary for configuring NRM or any other files that NRM has been assigned rights to allow modifying.
If eDirectory and LUM are installed on the local server, the eDirectory user Admin can log in to Novell Remote Manager using its fully distinguished name (admin.context) because this user is enabled for Linux User Management by default in this case.
For non-Admin users to log in using eDirectory credentials, they must be users enabled for Linux User Management. Users who are enabled for Linux User Management have a Linux Profile tab on their Modify User page in iManager and an eDirectory object that is associated with the UNIX Workstation object that represents the Linux server.You can use iManager or the LUM command line utility namuseradd to enable users for Linux User Management. For instructions, see “Overview” in the OES 2 SP3: Novell Linux User Management Administration Guide.
The Admin user has limited file system rights equivalent to root that are needed to modify only the configuration files necessary for configuring NRM or any other files that NRM has been assigned rights to allow modifying. For a list of these files, see Section 14.1, “Security Features,” on page 105. The user Admin or equivalent user has access according to the Linux and LUM file rights to all other files.
After logging in, your session for Novell Remote Manager remains open until you close all your browser windows at that workstation.
28 OES 2 SP3: Novell Remote Manager for Linux Administration Guide

6.3 Starting or Stopping HTTPSTKDWhen you install and configure the Novell Remote Manager pattern on Open Enterprise Server (OES) 2 on Linux server, Novell Remote Manager is started by default.
A script for starting and stopping the Novell Remote Manager/Linux components is in /etc/init.d/novell-httpstkd. Enter the following commands at a console shell prompt to perform the desired action:
Table 6-1 Commands for Starting, Stopping, or Checking the Status of Novell Remote Manager
6.4 Understanding the Layout of Novell Remote ManagerThe Web pages for Novell Remote Manager have three main frames: the header frame (top), the navigation frame (left), and the main content frame (right). They also contain the Overall Health Indicator and online help.
Task Command
To see whether the module is running rcnovell-httpstkd status
or
/etc/init.d/novell-httpstkd status
To restart HTTPSTKD rcnovell-httpstkd restart
or
/etc/init.d/novell-httpstkd restart
To start HTTPSTKD rcnovell-httpstkd start
or
/etc/init.d/novell-httpstkd start
To stop HTTPSTKD rcnovell-httpstkd stop
or
/etc/init.d/novell-httpstkd stop
Accessing Novell Remote Manager for Linux 29

Figure 6-1 Layout of Novell Remote Manager
Header Frame
Contains general information about the server as well as links to the Health Monitor and Configuration pages and an Exit link to close the browser window. The File System Management page is considered the Home page.
HomeExit
Access Configuration Options page
Access Health Monitor page
Loginidentity Online
help
HeaderframeOverall
serverhealthstatus
NCP serverplugin
Operating systeminformation and server up time
Navigationframe
Main Content frame home page view
30 OES 2 SP3: Novell Remote Manager for Linux Administration Guide

The general information about the server includes the following:
Overall server health status as one of the following:
Green (good)
Yellow (suspect)
Red (bad)
White with black X (no connection) Server name Name of the user you are logged in to Novell Remote Manager as Version of the operating system running on the server and the amount of time the server has
been running
Navigation Frame
Lists general tasks that you can do using Novell Remote Manager as well as links to specific pages for performing those tasks. The left navigation frame includes collapsible categories that are remembered for the next time you log in. This lets you display the Novell Remote Manager features that you use most often and hide some of the ones that you do not.
The links in the navigation frame change depending on the plug-in programs that are installed on the server.
IMPORTANT: When working in Novell Remote Manager, using the browser's Back button can result in unintended actions being re-sent to the server. Ensure that you use the navigation links provided in the tool.
Main Content Frame
The information in this frame changes depending on which link you click in the header or navigation frame.
Overall Health Indicator
Shows the overall health for the server as determined by the selections on the Health Monitoring page. Clicking the Server Health icon also takes you to the Health Monitoring page where you can view or configure the specifics of the server’s health.
Online Help
When a Help icon appears in the upper right corner of a page in the main content frame, you can view help for the page that is displayed.
Accessing Novell Remote Manager for Linux 31
6.5 Accessing Online HelpOnline help, which provides detailed information and instructions for using Novell Remote Manager features, is available for most management tasks and settings.
To access the online help, click the Help icon on the upper right portion of the page or next to the specific item link.
6.6 Accessing Novell Web PagesNovell Links on the Home (File System Management) page provide quick access to the following:
Novell Support Web page (http://www.novell.com/support/supportcentral/supportcentral.do?id=m1) links directly to the Novell Support Web site, where you can get current server patch kits and updates or find troubleshooting information. You can also access this link by clicking the word Novell in the upper-right area of the header frame.
Novell Error Codes documentation Web page (http://www.novell.com/documentation/nwec/index.html) links directly to the information about Novell Error Codes, including what they mean and possible causes and actions for them.
Novell Product Documentation Web page (http://www.novell.com/documentation) links directly to the product documentation for all shipping Novell products.
Novell Developer Support Web page (http://developer.novell.com/wiki/index.php/Developer_Support) links directly to the Novell Developer Support Web site, where you can find tips and suggestions beyond the basics for managing, troubleshooting, and diagnosing your server.
32 OES 2 SP3: Novell Remote Manager for Linux Administration Guide

7 7Changing the Configuration
When Novell Remote Manager (NRM) is installed, it sets up a small Web server on your server. The interface and module is called HTTPSTKD. Its basic configuration parameters that allow it to work are set.
You might need to configure Novell Remote Manager after the initial installation for a variety of reasons. For example, you might want to bind additional IP addresses to HTTPSTKD, set up stronger security, set up mail notification for health events, or extend the eDirectory schema for Group Monitoring.
You can perform these tasks using the options on the Novell Remote Manager Configuration Options page. To access this page, click the Configure icon in the header frame.
Figure 7-1 The Novell Remote Manager Configuration Options Page
Changing the Configuration 33
On this page you can perform the following tasks:
Section 7.1, “Accessing and Editing the HTTPSTKD Configuration File,” on page 34 Section 7.2, “Accessing and Editing the HTTPSTKD PAM Configuration File,” on page 35 Section 7.3, “Restarting the HTTPSTKD Daemon,” on page 36 Section 7.4, “Viewing the HTTP Logs,” on page 36 Section 7.5, “Viewing and Creating Certificates for Novell Remote Manager,” on page 36 Section 7.6, “Extending the eDirectory Schema for Novell Remote Manager Group Operations,”
on page 37
7.1 Accessing and Editing the HTTPSTKD Configuration FileAnytime you want to change the following interactions with Novell Remote Manager, access the /etc/opt/novell/httpstkd.conf file and make the applicable changes:
Table 7-1 Information for Changing the Functionality of Novell Remote Manager
To access and edit this file:
1 Click the Configure icon in the navigation frame. 2 Click Edit Httpstkd Config File.
Functionality Information On How to Change
Which network board Novell Remote Manager is bound to or add additional IP address that it is bound to
“Address and Port Commands” on page 111
The certificates Novell Remote Manager is using for authentication
“Viewing and Creating Certificates for Novell Remote Manager” on page 36
“Address and Port Commands” on page 111
The cipher strength of the SSL key that is used to access Novell Remote Manager
“SSL Key Cipher Strength Command” on page 119
The HttpOnly attribute for cookies in a response header
“HttpOnly Command” on page 115
The InventoryResolveNonLumOwnerName option for resolving names of NSS volume file owners if their eDirectory user names are not LUM enabled
“InventoryResolveNonLumOwnerName Command” on page 116
Which plug-ins are loaded “Load Command” on page 118
Which workstations can access Novell Remote Manager
“Filtering Commands” on page 114
Whether email notification is sent for health monitoring or who receives it
“Email Notification Commands” on page 114
Which users can log in to Novell Remote Manager “Disable Auto LUM Command” on page 112
“Supervisor Only Command” on page 119
The language the browser supports “Language Commands” on page 117
34 OES 2 SP3: Novell Remote Manager for Linux Administration Guide

3 Make the changes.4 Click Save Changes.
or With an editor that saves files to a UNIX format, edit the /etc/opt/novell/httpstkd.conf file.
After making changes to this file and saving it, restart the HTTPSTKD daemon. See “Restarting the HTTPSTKD Daemon” on page 36.
7.2 Accessing and Editing the HTTPSTKD PAM Configuration FileLinux uses PAM (Pluggable Authentication Modules) in the authentication process as a layer that mediates between user and application. PAM modules are available on a system-wide basis, so they can be requested by any application.
Every program that relies on the PAM mechanism has its own configuration file in the directory /etc/pam.d/program_name. These files define the PAM modules that are used for authentication. In addition, there are global configuration files for most PAM modules under /etc/security directory, which define the exact behavior of these modules (examples are pam_env.conf, pam_pwcheck.conf, pam_unix2.conf, and time.conf). Every application that uses a PAM module actually calls a set of PAM functions, which then processes the information in the various configuration files and returns the results to the calling application.
This file controls the authentication to Novell Remote Manager on an OES Linux server. The default configuration should work. If you want to change the way your users authenticate to Novell Remote Manager, you can edit this file.
To access and edit this file:
1 Click the Configure icon in the navigation frame. 2 Click Edit Httpstkd PAM Config File.3 Make the changes.4 Click Save Changes.
or With an editor that saves files to a UNIX format, edit the /etc/pam.d/httpstkd file.
These are the lines that enable Novell Remote Manager integration with user management:
auth sufficient /lib/security/pam_nam.soaccount sufficient /lib/security/pam_nam.sospassword sufficient /lib/security/pam_nam.sosession optional /lib/security/pam_nam.so
After making changes to this file, restart the HTTPSTKD daemon. See “Restarting the HTTPSTKD Daemon” on page 36.
For more information about the PAM configuration file and the options available, see “Authentication with PAM” in the SUSE Linux Enterprise Server 10 Installation and Administration Guide (http://www.novell.com/documentation/sles10/sles_admin/data/cha_pam.html).
Changing the Configuration 35

7.3 Restarting the HTTPSTKD DaemonAfter making changes to the HTTPSTKD configuration file or the HTTPSTKD PAM configuration file, restart the HTTPSTKD daemon.
To restart the HTTPSTKD daemon, click Restart Httpstkd on the Novell Remote Manager Configuration Options page.
You can also restart it manually. See “Starting or Stopping HTTPSTKD” on page 29.
7.4 Viewing the HTTP LogsThe Novell Remote Manager Configuration Options page contains a link for all the HTTPSTK-related messages contained in the var\log\messages file.
This information is valuable for seeing who logged in through Novell Remote Manager, when they logged in, the pages being viewed, log failures, and so on.
You can view the last 100 entries of the log or the entire log.
To view this log:
1 Click the Configure icon in the navigation frame. 2 Under the HTTP Logs heading, click either View Last 100 Log Entries or View Entire Log.
The logging to this file is controlled by the Syslog options. To change these default syslog options, edit the etc/sysconf/syslog file.
7.5 Viewing and Creating Certificates for Novell Remote ManagerNovell Remote Manager uses the default certificates created during the installation to secure access through it to the server. This certificate is bound to the first network board found in the server configuration.
During the install of eDirectory on a new server installation, there is a check box to have all HTTP services use an eDirectory certificate. HTTPSTKD uses that certificate if this check box is selected or the YAST CA certificate if it is not selected. On upgrades, the check box in eDirectory is not selected, so certificates that were previously used are maintained.
You can create new certificates and modify the /etc/opt/novell/httpstkd.conf file to use any certificates other than the default certificate file for any reason. You should create a new certificate in cases such as the following:
The default certificate does not meet the level of security required by your organization The default certificate was bound to a DHCP address You have changed the server’s IP address You want to bind a new certificate to a different network board
To view the certificates being used:
1 Click the Configure icon in the navigation frame. 2 Under the Novell Remote Manager Certificate Management heading, click View Certificate(s).
36 OES 2 SP3: Novell Remote Manager for Linux Administration Guide
To create a new certificate:
1 Click the Configure icon in the navigation frame. 2 Under the Novell Remote Manager Certificate Management heading, click Create Certificate.3 On the Create a Certificate for Novell Remote Manager page, specify the required information in
the Certificate Information fields.This creates a new certificate and automatically replaces the current certificate at /etc/opt/novell/httpstkd/server.pem.If you want to create the certificate in a different location or with a different name, change the filename or path in the Certificate File field.
4 Click Create.5 (Conditional) If you changed the name of the certificate file or the path to it from the default
location, edit the /etc/opt/novell/httpstkd.conf before restarting HTTPSTKD.6 Restart HTTPSTKD by clicking the Restart Httpstkd button on the Novell Remote Manager
Configuration Options page.
To bind Novell Remote Manager to an additional IP address to or to a different certificate:
1 Click the Configure icon in the navigation frame. 2 Click Edit Httpstkd Config File.3 In the Address and Port portion of the file, specify the new IP address or certificate path and
name.For example, if you had two network boards that you wanted to bind Novell Remote Manager to, you would create or have two separate certificates and then make these entries in the /etc/opt/novell/httpstkd.conf file:
addr 192.27.1.123:8008addr 192.27.1.123:8009 keyfile=/etc/opt/novell/httpstkd/server.key certfile=/etc/opt/novell/httpstkd/server1.pem
addr 192.27.1.124:8008addr 192.27.1.124:8009 keyfile=/etc/opt/novell/httpstkd/server.key certfile=/etc/opt/novell/httpstkd/server2.pem
You can put the certificate in any location as long as the entry in the /etc/opt/novell/httpstkd.conf points to the correct location and filename.
7.6 Extending the eDirectory Schema for Novell Remote Manager Group OperationsWhen you use Group Operations and want to save the groups that you have created, Novell Remote Manager requires you to save the file on the server locally or assign it to an eDirectory object.
Before you can save it to an eDirectory object, you must extend the eDirectory schema to access the attributes for Novell Remote Manager group operations at least once in the eDirectory tree that you are saving to.
You can do this easily by clicking either the Extend the NDS Schema for NRM link on the Novell Remote Manager Configuration Options page any time before you create a group or the link in the failure error message displayed when saving the group. As with all schema extensions, you must have the necessary rights to extend the schema.
Changing the Configuration 37
The message NDS schema extension complete is displayed on this page when the operation is done. Then you can save the group.
38 OES 2 SP3: Novell Remote Manager for Linux Administration Guide

8 8Diagnosing Problems
Novell Remote Manager for Linux includes several tools to assist you in monitoring the health and status of your server. When you are familiar with the normal health and status of your server, diagnosing problems with your server becomes easier.
Performing the following tasks can help you to become familiar with the health and status of your servers:
Section 8.1, “Monitoring Server Health,” on page 39 Section 8.2, “Troubleshooting a Suspect or Bad Health Status,” on page 42
8.1 Monitoring Server HealthMonitoring the health of your server can help prevent it from getting to a state in which your users cannot access the server or the data on it. Monitoring your server’s health involves the following tasks:
Section 8.1.1, “Monitoring Overall Server Health or the Health of a Specific Item,” on page 39 Section 8.1.2, “Configuring the Items to Monitor,” on page 42 Section 8.1.3, “Configuring Email Notification for Server Health Status,” on page 42
8.1.1 Monitoring Overall Server Health or the Health of a Specific Item
Using Novell Remote Manager, you can monitor the server’s overall health and the health of a specific item.
“Health Status” on page 39 “Health Status Refresh Rate” on page 41 “Operating System Health” on page 41 “Services Health” on page 42
Health Status
The server’s overall health is indicated by the color of the circle displayed next to the Server icon in the header frame for Novell Remote Manager. The following table lists and explains each health status that might be displayed.
Diagnosing Problems 39

Table 8-1 Server Health Status
The server’s overall health is determined by items that are selected in the Include list on the detailed Server Health page as shown in Figure 8-1. By default, all items are selected.
Figure 8-1 Server Health Page
Icon Server Health Status
Explanation
Good All parameters included in the server's health configuration list are good.
Suspect The status of one or more of the parameters included in the server's health
configuration list is suspect or has a minor problem.
Bad The status of one or more of the parameters included in the server's health
configuration list is bad or has a critical problem.
Lost connection
The connection to the server from Novell Remote Manager has been lost.
40 OES 2 SP3: Novell Remote Manager for Linux Administration Guide

If the status of any item that is selected in the Include list changes to yellow (suspect) or red (bad), the health status indicator light in the header frame changes to indicate there is a problem. If more than one item changes, the worst status indicates the server’s overall status. When the status for all items returns to green (good), then the health light indicator changes back to green (good).
Health Status Refresh Rate
The server’s health status, reported by the health status indicator, is updated every five seconds, but the graphic refreshes only if the status changes.
To modify the refresh rate, select a rate from the Page Refresh Rate drop-down menu, then click Begin Refresh. The selected refresh rate applies to this page only, and persists until you modify the value.
To stop refreshing the page, select Stop Refresh. The page does not refresh until you click Begin Refresh.
To begin refreshing after stopping, select Begin Refresh. The last used refresh rate is applied automatically when it begins.
Operating System Health
The Operating System table on the Server Health page shows the health status (green/good, yellow/suspect, or red/bad) for all known components of the operating system, as well as current, peak, and maximum values. When an item is not selected in the Include list, it is not included when determining the overall server health and the values for Status, Current, Peak, and Max are not displayed.
The following items in the Operating System table are key indicators of your server’s health:
CPU Utilization (for each processor, if there is more than one) Process Count Available Memory Physical, Swap, and Virtual Memory LAN Collisions
IMPORTANT: You must click the Apply Settings button below the Operating System table to apply your changes to values in that table. If you leave the page without applying the changes, the settings return to their saved values.
In this release, you cannot change the thresholds for the Suspect and Critical values of these indicators. See the online help for each parameter to see the set thresholds.
To access the Health Monitoring page, click one of the following links:
Overall server health status indicator icon
Health Monitor icon in the header frame Diagnose > Health Monitor link in the navigation frame
Diagnosing Problems 41

Services Health
The Services table on the Server Health page also shows the health status of the services installed on the server as well as their online or offline status. When a service is offline, the health status of the service is not included in the server’s overall health whether or not it is selected in the Include list.
The mode indicates that the server is running or stopped. To change the mode of the service, click the mode link for that service. The mode page opens for the service where you can start, stop, or restart the service by clicking the applicable button.
You can modify the Include and Notify settings in the Services table by selecting and deselecting the check boxes in those columns, then clicking Apply Settings below the table.
IMPORTANT: You must click the Apply Settings button below the Services table to apply your changes to values in that table. If you leave the page without applying the changes, the settings return to their saved values.
8.1.2 Configuring the Items to Monitor
As stated in the previous section, the server’s overall health is determined by items that are selected in the Include list on the detailed Server Health page. By default, all of the items are selected.
Therefore, if you have a server that has specific parameters that you know will cause a suspect or bad status and you want to be notified only when other parameters have changed, you can remove the items with the suspect or bad parameters from the Include and Notify lists by deselecting them and clicking Apply Settings. You need to apply the settings for the Services items separately from the Operating System items.
8.1.3 Configuring Email Notification for Server Health Status
Rather than manually checking the status, you can configure Novell Remote Manager to send an email to notify you when the server’s health status changes to any value other than green (good).
1 Select the Notify check box for the item on the Server Health page.2 Specify the required information for email notification in the /etc/opt/novell/
httpstkd.conf file. You can edit this file via the link provided on the Configuration Options page.
3 After changing the /etc/opt/novell/httpstkd.conf file, restart HTTPSTKD. Click the Restart HTTPSTKD button on the Configuration Options page or execute the following command in a console shell on the Linux server: rcnovell-httpstkd restart
8.2 Troubleshooting a Suspect or Bad Health StatusWhen the health status of an item changes from good to a suspect or bad state, you can look at the specific item and check the online help for suggested remedies.
1 Access the Server Health page.2 Look for the specific health item that has changed status.
3 View the information for the item that has changed by clicking the Info icon for the item.
42 OES 2 SP3: Novell Remote Manager for Linux Administration Guide

This information outlines the specific health criteria (thresholds) for green, yellow, or red statuses in that component. It also provides suggestions in some cases for what might be going wrong in that component if a yellow or red indicator is displayed.
4 Perform the recommended or appropriate action for the health item that has changed.
Diagnosing Problems 43

44 OES 2 SP3: Novell Remote Manager for Linux Administration Guide

9 9Viewing File Systems
The Home icon and View File Systems section in Novell Remote Manager for Linux include the following links to these pages:
Table 9-1 Links for Viewing File System Information
From these pages you can perform the following tasks:
Section 9.1, “Viewing Mounted Devices and Performing Actions on Them,” on page 46 Section 9.2, “Browsing File Systems and Performing Actions on Them,” on page 47 Section 9.3, “Viewing Partition Information,” on page 51 Section 9.4, “Browsing NSS Volumes and Performing Actions on Them,” on page 51 Section 9.5, “Generating Inventories for Directories or NCP Volumes,” on page 60 Section 9.6, “Generating and Viewing NCP Trustee Reports for NSS Volumes,” on page 66
Link Page Displayed
Home icon File System Management
View File System Listing Directory Listing of / (root) directory
View Partition Information Partition Information
Viewing File Systems 45
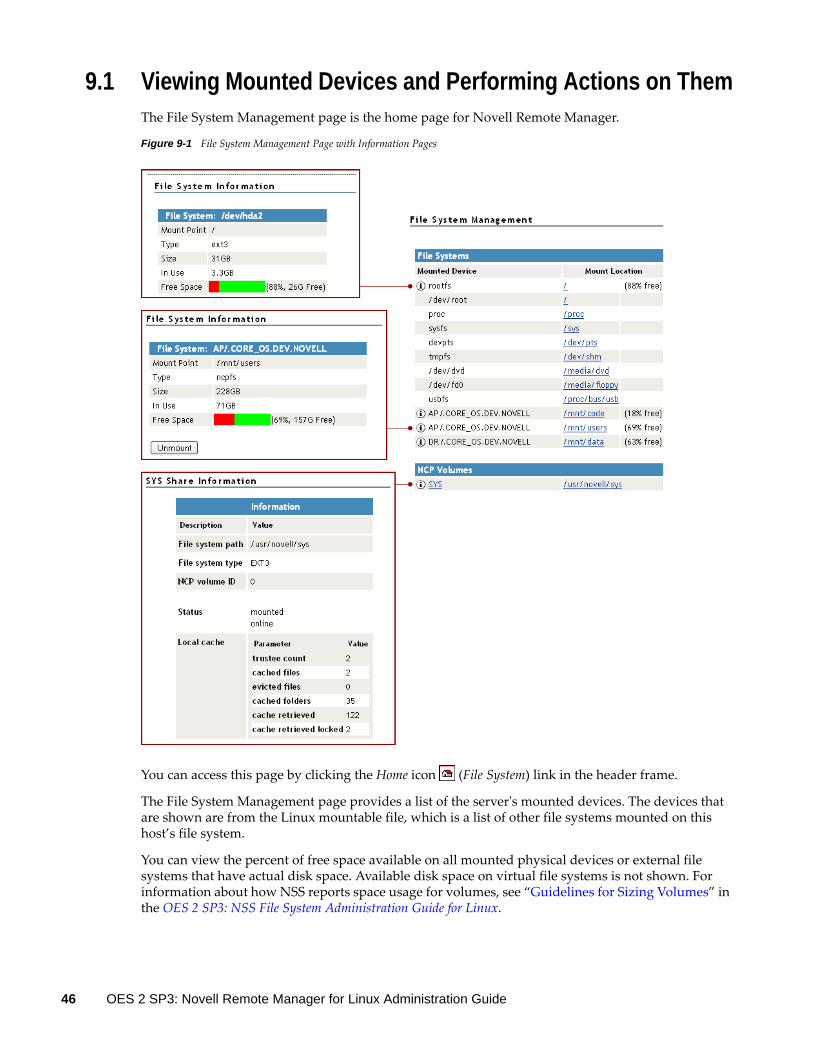
9.1 Viewing Mounted Devices and Performing Actions on ThemThe File System Management page is the home page for Novell Remote Manager.
Figure 9-1 File System Management Page with Information Pages
You can access this page by clicking the Home icon (File System) link in the header frame.
The File System Management page provides a list of the server's mounted devices. The devices that are shown are from the Linux mountable file, which is a list of other file systems mounted on this host’s file system.
You can view the percent of free space available on all mounted physical devices or external file systems that have actual disk space. Available disk space on virtual file systems is not shown. For information about how NSS reports space usage for volumes, see “Guidelines for Sizing Volumes” in the OES 2 SP3: NSS File System Administration Guide for Linux.
46 OES 2 SP3: Novell Remote Manager for Linux Administration Guide

To view specific information about each mounted physical device or external file system that has actual disk space, click the Info icon on the left. Clicking the Info icon displays one of the following types of pages:
File System Information. This page shows the mount point, the file system type, the size of the mount point and the space in use. Clicking the Unmount button on this page, unmounts the remote file system shown. The Unmount button is available only on remotely mounted file systems such as NFS, NCP, and Samba.
NCP Share Information. This page shows the volumes underlying file system type, mount point and status, and cache information.
You can browse any of these file systems by clicking the link in the Mount Location column. At this point, you can perform any of the tasks listed for browsing the servers file system. See “Browsing File Systems and Performing Actions on Them” on page 47.
9.2 Browsing File Systems and Performing Actions on ThemOn the Directory List page, you can view the Linux POSIX file system and NSS file system from mount points or local partitions; browse directories and files; view and change attributes, directories, and files; and edit, delete, or rename files.
To access this page, click View File System > View File System Listing in the navigation frame.
Figure 9-2 Directory List Page
Viewing File Systems 47

The following table describes the actions necessary to access directories, files, and file and directory attributes from the Directory List page.
Table 9-2 Directory List Page Tasks and Procedures
The Size column for a directory lists the size of all files and subdirectories in that directory.
Clicking the Attributes link opens the Directory Information page where you can view or change the attributes of the directory. For more information, see “Viewing Details about Directories and Performing Actions on Them” on page 48 and “Viewing the Details of a File and Performing Specific Actions” on page 50.
Viewing attributes on NSS volumes, directories, and files conveys the status of the NSS file system directory and file attributes: Hidden (H), Read Only (Ro), Read/Write (Rw), and Execute (X). You can view these settings in Novell Remote Manager for Linux as a combination of Read, Write, and Execute fields for the User, Group, and Other categories. Although it appears that you can control these attributes using the selections on the Directory Information page, the selections do not actually control the conventional POSIX settings for NSS directories and files.
To set directory and file attributes for NSS, use Novell Client or Novell NetStorage. For more information, see “Viewing Key NSS Directory and File Attributes as Linux POSIX Permissions” in the OES 2 SP3: File Systems Management Guide.
From the Directory Listing page, you can perform the following tasks.
Section 9.2.1, “Viewing Details about Directories and Performing Actions on Them,” on page 48 Section 9.2.2, “Uploading a File to the Server,” on page 49 Section 9.2.3, “Downloading a File from the Server to a Local Workstation,” on page 49 Section 9.2.4, “Searching for Text in Files,” on page 50 Section 9.2.5, “Viewing the Details of a File and Performing Specific Actions,” on page 50 Section 9.2.6, “Viewing Individual Files,” on page 51
9.2.1 Viewing Details about Directories and Performing Actions on Them
1 Click the View File System > View File System Listing link in the navigation frame or click a Mount_Location_name link on the Home page.
2 On the Directory list page, browse to the directory you want to search in by clicking the directory_name link.
3 From the directory listing, click the Folder Information icon to the left of the directory or subdirectory you want to view information about or change the attributes of.
Tasks Procedures
Browse to a mount point, volume, directory, or local partition
Click the link_for_the_mount_point, volume, directory, or local partition under the Name column.
Move down the directory tree Click the directory_name link.
Move up the directory tree Click the double_dots (..) link.
Re-sort the list by name, size, or date and time. Click the column heading that has a Sort icon next to it.
The default sort for this listing is by the directory or file name.
View or change the attributes of a directory Click the Attributes link.
48 OES 2 SP3: Novell Remote Manager for Linux Administration Guide

4 On the Directory Information page that is displayed, view the information or select/deselect the check box for the attributes that you want to change.
5 Click OK.6 When viewing the details of a directory from the Directory Information page, you can also
rename the directory, create a subdirectory, create a symbolic link to the selected directory, or delete the directory and its contents by completing the required information and clicking the applicable button.
9.2.2 Uploading a File to the Server
If you have rights to write to the current directory that you are viewing via Novell Remote Manager, you can use the Upload link to copy a file from your local machine or any other network directory to the currently selected directory.
You can upload only one file at a time. The file’s date and time are changed when performing this task.
To perform this task:
1 Click the View File System > View File System Listing link in the navigation frame or click a Mount_Location_name link on the Home page.
2 On the Directory list page, browse to the directory you want to upload a file to by clicking the directory_name link.
3 In the directory listing, click the Upload link at the top of the Directory listing page. 4 Browse to and select the file that you want to upload.5 Click Upload.
9.2.3 Downloading a File from the Server to a Local Workstation
When you are browsing the server’s file system via Novell Remote Manager, you can download any file to your local machine by clicking the filename and then saving the file to your local workstation.
1 Click the View File System > View File System Listing link in the navigation frame or click a Mount_Location_name link on the Home page.
2 On the Directory/File List page, browse to or search for the file that you want to download.3 Click the filename link.4 When prompted, save the target file to the desired location.
If the file opens rather than prompting you to save it, you can use the browser features to save the file.
Viewing File Systems 49

9.2.4 Searching for Text in Files
On the Directory Listing page, you can do a GREP-type search (it accepts GREP wildcard characters) through the files in the current directory as well as subdirectories to find text in a file.
1 Click the View File System > View File System Listing link in the navigation frame or click a Mount_Location_name link on the Home page.
2 On the Directory list page, browse to the directory you want to search in by clicking the directory_name link.
3 Click the Text Search link.4 Specify the content, filename, or extension you want to search for and select whether you want
to match the case.5 (Optional) If you want to search all subdirectories as well, select Search Subdirectories.6 Click Search.
If nothing is found, no files are listed under the search instructions.If the search instructions are not valid, the page showing the directory you wanted to search is returned.If the search instructions are valid, the results are displayed on a page with the search instructions.In the display results, you can Click the filename link to view or download the file.
Click the File Information icon to view information about the file; change the attributes to it; or edit (conditional), rename, or delete the file. If the file is a simple text file or a file with an extension listed in the /opt/novell/nrm/nrmedit.txt file, you can also edit the file by clicking the Edit File button.
9.2.5 Viewing the Details of a File and Performing Specific Actions
1 Click the View File System Listing link in the navigation frame or click a Mount Location name link on the Home page.
2 On the Directory list page, browse the directories to the file, then click the File icon to the left of the filename.
3 On the File Information page that is displayed, view the information or specify the information required for the applicable task, and then click the applicable button for the task you want to perform.For Attributes management, click the attributes that you want to select/deselect and then click OK.For file management, use the Edit, Delete, or Rename buttons. The Edit button is available only on simple text files or files with the extensions listed in the /opt/novell/nrm/nrmedit.txt file.If you want to save the file with an ANSI or UTF-8 encoding, select the appropriate option and click OK.
50 OES 2 SP3: Novell Remote Manager for Linux Administration Guide
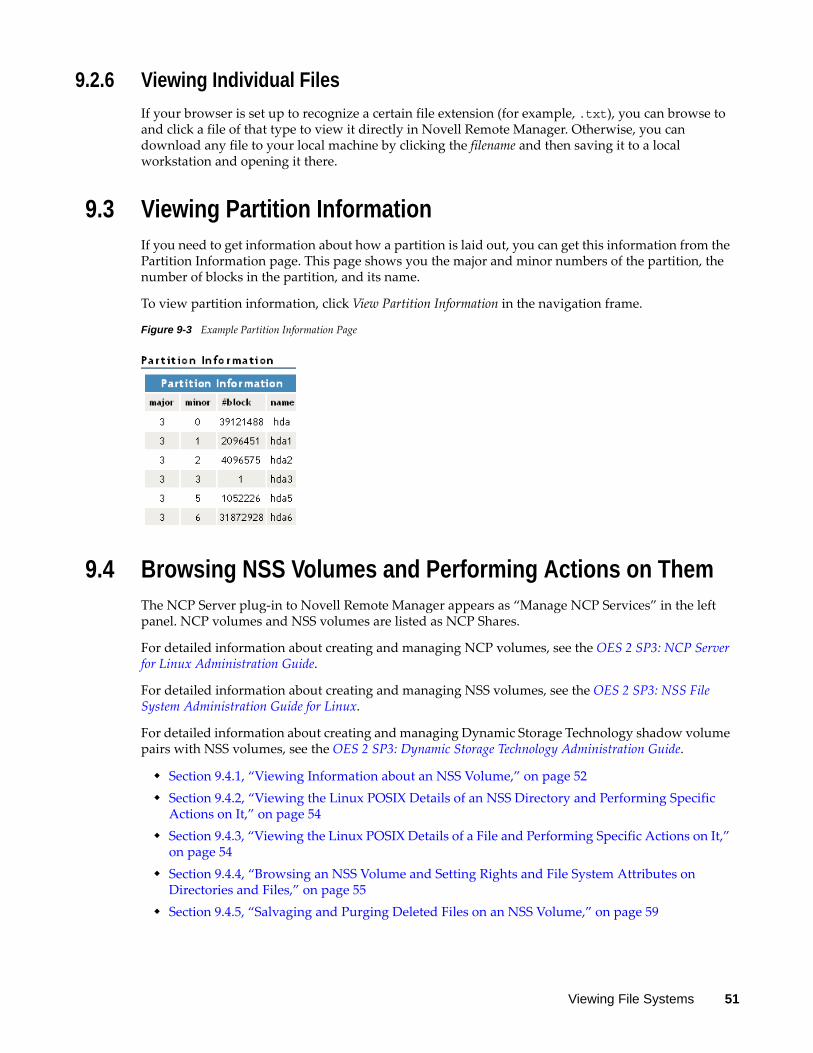
9.2.6 Viewing Individual Files
If your browser is set up to recognize a certain file extension (for example, .txt), you can browse to and click a file of that type to view it directly in Novell Remote Manager. Otherwise, you can download any file to your local machine by clicking the filename and then saving it to a local workstation and opening it there.
9.3 Viewing Partition InformationIf you need to get information about how a partition is laid out, you can get this information from the Partition Information page. This page shows you the major and minor numbers of the partition, the number of blocks in the partition, and its name.
To view partition information, click View Partition Information in the navigation frame.
Figure 9-3 Example Partition Information Page
9.4 Browsing NSS Volumes and Performing Actions on ThemThe NCP Server plug-in to Novell Remote Manager appears as “Manage NCP Services” in the left panel. NCP volumes and NSS volumes are listed as NCP Shares.
For detailed information about creating and managing NCP volumes, see the OES 2 SP3: NCP Server for Linux Administration Guide.
For detailed information about creating and managing NSS volumes, see the OES 2 SP3: NSS File System Administration Guide for Linux.
For detailed information about creating and managing Dynamic Storage Technology shadow volume pairs with NSS volumes, see the OES 2 SP3: Dynamic Storage Technology Administration Guide.
Section 9.4.1, “Viewing Information about an NSS Volume,” on page 52 Section 9.4.2, “Viewing the Linux POSIX Details of an NSS Directory and Performing Specific
Actions on It,” on page 54 Section 9.4.3, “Viewing the Linux POSIX Details of a File and Performing Specific Actions on It,”
on page 54 Section 9.4.4, “Browsing an NSS Volume and Setting Rights and File System Attributes on
Directories and Files,” on page 55 Section 9.4.5, “Salvaging and Purging Deleted Files on an NSS Volume,” on page 59
Viewing File Systems 51

Section 9.4.6, “Purging a Deleted NSS Volume,” on page 59 Section 9.4.7, “Viewing Open File Information for an NSS Volume,” on page 60
9.4.1 Viewing Information about an NSS Volume
1 In Novell Remote Manager, select Manage NCP Services > Manage Shares.2 In the right pane, view the list of mounted NSS volumes in the Active Shares list.
3 Next to the volume name, click the Information icon ( ) to go to the volume’s Share Information page.
4 In the Information table, view the following information about the NSS volume: File system path on Linux, such as /media/nss/VOLD
Click the link to browse the directories and files on the volume.
52 OES 2 SP3: Novell Remote Manager for Linux Administration Guide

File system shadow path, such as /media/nss/SH_VOLD (A path is displayed only when the specified NSS volume is the primary volume of a Dynamic Storage Technology shadow volume pair.)Click the link to browse the directories and files on the pair’s secondary volume.
Loaded name spaces, such as DOS, LONG, MAC, and UNIX File system type (NSS) NCP volume ID
The NCP volume ID is a value between 0 and 254 that is automatically assigned for standalone volumes, beginning with zero. The SYS volume is by default assigned 0, and _Admin is assigned 1. For shared volumes, the volume ID is specified in the cluster load script for shared volumes. beginning with 254 and down.
StatusIdentifies whether the volume is mounted/unmounted, online/offline, or in a cluster resource, and lists the NSS volume attributes that are enabled for the volume, such as Salvageable, User Quotas, Directory Quotas, and so on.
Sector size Sectors per cluster Capacity Used space Advanced information (Click View to view.)
Local cache Trustee count Cached files Evicted files Cached folders Cache retrieved Cache retrieved locked
Pool name Pool attributes GUID
Open File Information (Click to view.) Salvageable Files (Click to view.)
Viewing File Systems 53

9.4.2 Viewing the Linux POSIX Details of an NSS Directory and Performing Specific Actions on It
1 Click the View File System Listing link in the navigation frame or click a Mount Location name link on the Home page.
2 On the Directory list page, browse to the /media/nss/<volume_name> and through the subdirectories to the directory, then click the Directory Information icon to the left of the directory name.
3 On the Directory Information page that is displayed, view the information about the file: Directory owner Group Data modified time Last accessed time Information change time Linux POSIX read/write/execute directory attributes.
IMPORTANT: Do not use these settings for NCP and NSS volumes. Use the NCP view of the volume to set the Novell Trustee Model attributes.
4 Perform any of the following tasks:
Delete Directory and Its Contents: Click this option to delete the selected directory and the subdirectories and files in it.
Rename Directory: Specify the full Linux path to the directory including the new directory name, then click Rename Directory.
Create Subdirectory: Specify the name of the new subdirectory, then click Create Subdirectory.
Create Symbolic Link: Specify the name for the symbolic link, then click Create Symbolic Link.
9.4.3 Viewing the Linux POSIX Details of a File and Performing Specific Actions on It
1 Click the View File System Listing link in the navigation frame or click a Mount Location name link on the Home page.
2 On the Directory list page, browse to the /media/nss/<volume_name> and through the subdirectories to the file, then click the File Info icon to the left of the file name.
54 OES 2 SP3: Novell Remote Manager for Linux Administration Guide

3 On the File Information page that is displayed, view the information about the file: File owner Group Data modified time Last accessed time Information change time Linux POSIX read/write/execute file attributes.
IMPORTANT: Do not use these settings for NCP and NSS volumes. Use the NCP view of the volume to set the Novell Trustee Model attributes.
4 Perform any of the following tasks:
Edit: The Edit button is available only on simple text files or files with the extensions listed in the /opt/novell/nrm/nrmedit.txt file. If you want to save the file with an ANSI or UTF-8 encoding, select the appropriate option and click OK.
Delete: Click Delete to delete the selected file. Rename: Specify the full Linux path to the file including the new file name, then click
Rename. Create Hard Link: Specify the hard link path, then click Create Hard Link. Create Symbolic Link: Specify the symbolic link path, then click Create Symbolic Link.
9.4.4 Browsing an NSS Volume and Setting Rights and File System Attributes on Directories and Files
1 In Novell Remote Manager, select Manage NCP Services > Manage Shares.2 In the right pane, view the list of mounted NSS volumes in the Active Shares list.3 Click the volume Name link to view a folder list and to browse the files on the NSS file system.
Click the arrows in the column headings to sort the list by name, type (file extension), size, or last modified date and time.
4 Use the links above the file list to perform the following actions on the volume: Upload Text Search File Search Inventory
For information, see Section 9.5, “Generating Inventories for Directories or NCP Volumes,” on page 60.
Viewing File Systems 55

5 Click a directory’s Directory Information icon to view information about the directory. You can also create subdirectories.
Figure 9-4
Owner Creation date and time Effective rights (based on the Novell Trustee Model) Inherited rights filter (based on the Novell Trustee Model). You can click the link to modify
the rights inheritance filter settings. Salvageable files
6 Click a directory’s Attributes link to view or modify the NSS file system attributes that are set for the directory. Click OK to save your changes.
System Hidden Archive Immediate purge Do not compress Do not migrate
56 OES 2 SP3: Novell Remote Manager for Linux Administration Guide

Delete inhibit Rename inhibit Immediate compress
For information about the meaning and usage of NSS file system attributes for directories, see “Understanding Directory and File Attributes for NSS Volumes” in the OES 2 SP3: File Systems Management Guide.
7 Click a file’s File Information icon to view the following file information. You can also delete the file from this page by clicking Delete File.
Owner Last modified date and time Creation date and time Last archived date and time Effective rights (based on the Novell Trustee Model) Inherited rights filter (based on the Novell Trustee Model). You can click the link to modify
the rights inheritance filter settings. Disk space in use
Viewing File Systems 57
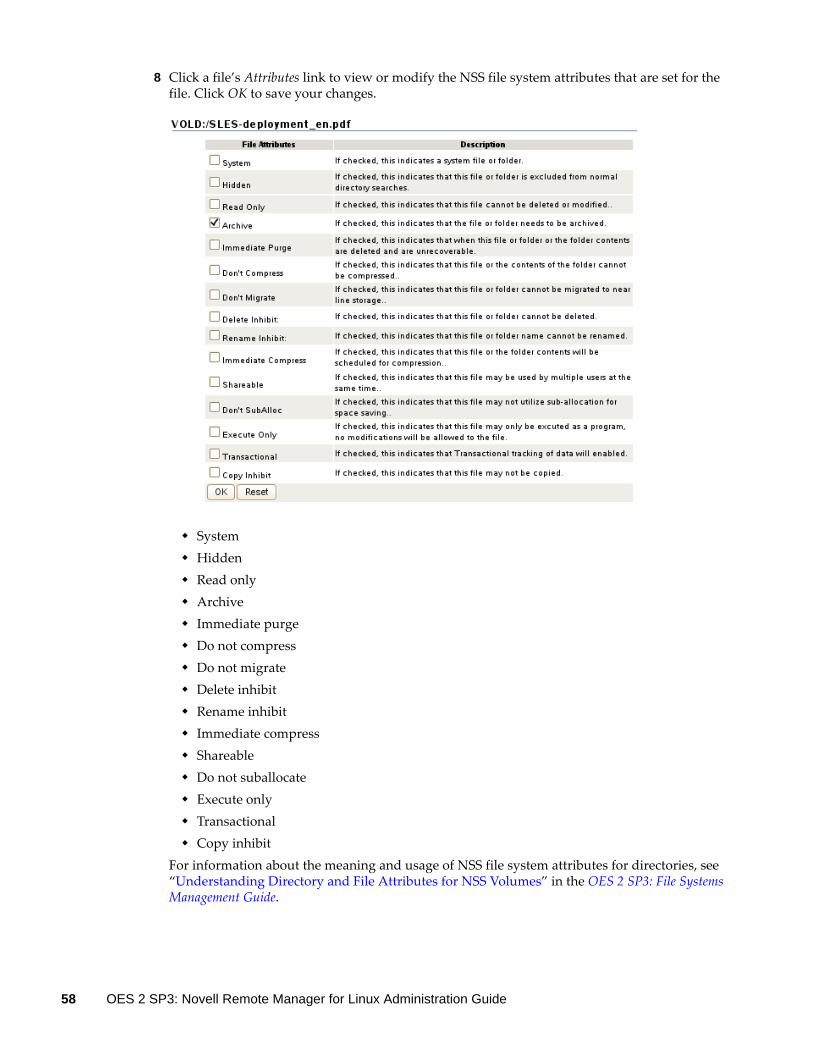
8 Click a file’s Attributes link to view or modify the NSS file system attributes that are set for the file. Click OK to save your changes.
System Hidden Read only Archive Immediate purge Do not compress Do not migrate Delete inhibit Rename inhibit Immediate compress Shareable Do not suballocate Execute only Transactional Copy inhibit
For information about the meaning and usage of NSS file system attributes for directories, see “Understanding Directory and File Attributes for NSS Volumes” in the OES 2 SP3: File Systems Management Guide.
58 OES 2 SP3: Novell Remote Manager for Linux Administration Guide

9.4.5 Salvaging and Purging Deleted Files on an NSS Volume
From an NSS volume’s Share Information page, the Salvageable File List option allows you to view a list of deleted files that are available for salvage or purge on the volume. Deleted files are available only for NSS volumes where the Salvage attribute is enabled. For information about the NSS file salvage feature, see “Volume Salvage versus File Salvage” in the OES 2 SP3: NSS File System Administration Guide for Linux.
1 In Novell Remote Manager, select Manage NCP Services > Manage Shares.2 In the right pane, view the list of mounted NSS volumes in the Active Shares list.3 Next to the volume name, click the Information icon (I) to go to the volume’s Share Information
page.4 Below the Information table, click Salvageable File List to open the Salvage File Information page.
5 Salvage or purge files in the list:If the deleted file resided in a directory that has been deleted, you must first salvage the deleted directories in the path. Salvage each lower directory in turn until you have salvaged the deleted directory that contained the file. You can then search for the deleted file in the salvaged directory. The Purge all files option allows you to purge all deleted files on the selected volume. The Salvage option allows you to recover a deleted file. The Purge option allows you to purge a deleted file.
You can also select a deleted directory and use this option to purge the deleted directory and all of the deleted subdirectories and files it contains.
9.4.6 Purging a Deleted NSS Volume
For volume salvage, the NSS volumes are automatically retained on deletion. The deleted volume can be salvaged for a period of time that is determined by the server-level Logical Volume Purge Delay setting. Administrators with the Supervisor right can salvage or purge deleted volumes at any time before the purge delay elapses. For information about the NSS volume salvage feature, see “Volume Salvage versus File Salvage” in the OES 2 SP3: NSS File System Administration Guide for Linux.
1 In Novell Remote Manager, select Manage NCP Services > Manage Shares.2 In the right pane, view the list of mounted NSS volumes in the Active Shares list.3 Next to the volume name, click the Information icon (I) to go to the volume’s Share Information
page.4 Scroll down to the Volume Tasks table, and click Purge Volume.
Viewing File Systems 59

9.4.7 Viewing Open File Information for an NSS Volume
1 In Novell Remote Manager, select Manage NCP Services > Manage Shares.2 In the right pane, view the list of mounted NSS volumes in the Active Shares list.3 Next to the volume name, click the Information icon (I) to go to the volume’s Share Information
page.4 Below the Information table, click Open File Information to open the Open File Information page.5 View the following information about files on the NSS volume:
ConnectionFor information, see “Managing Connections for NCP Volumes and NSS Volumes” in the OES 2 SP3: NCP Server for Linux Administration Guide.
User name Open file list
9.5 Generating Inventories for Directories or NCP VolumesWith this feature, you can inventory NCP mounted volumes, or general file system directories or subdirectories as well as view graphs, profiles, reports, and key statistics about each of these items, including space usage trends.
IMPORTANT: To view the graphical displays in the inventory report, the Sun Java plug-in must be installed on the browser you use to access Novell Remote Manager, and the browser must have Java and Javascript enabled.
Generating this report can take a while, depending on the number of files and folders in the specified directory path. There is no facility to view previous inventory scans as there was on NetWare.
With a few clicks, you get available space trend graphs; profiles for file types, file owner, last accessed, last modified, creation time, and file size; and links to specific reports for each of these. You can also customize the scan to look for specific file information.
The File Owner Profile gathers the ownership statistics as follows:
For OES 2 SP3 plus the latest patches, the file inventory gathers information from the NSS management interface. If the eDirectory user name is available from the NSS management interface, the file owner is reported as the eDirectory user name such as jsmith. Otherwise, the owner is reported as the nobody user. It is not required to enable the users with Linux User Management (LUM) to get the file owner’s name.
For OES 2 SP2 and earlier, the file inventory gathers file ownership information from the POSIX ownership field that the file system reports to be the file owner. If an eDirectory user name is LUM-enabled, the NSS and NCP volumes report the real user name to Linux, such as jsmith, and the POSIX ownership field reports the actual user. For non-LUM-enabled users, the file system reports the user name as either root or nobody, depending on the user’s permissions when accessing the file system. In order to effectively use the File Owner Profile feature to retrieve the eDirectory user name, you must LUM-enable the users.
This section includes the following tasks:
Section 9.5.1, “Generating an File Inventory Report,” on page 61 Section 9.5.2, “Generating a Volume Inventory Report,” on page 62 Section 9.5.3, “Viewing a Saved NCP Volume Report,” on page 63
60 OES 2 SP3: Novell Remote Manager for Linux Administration Guide
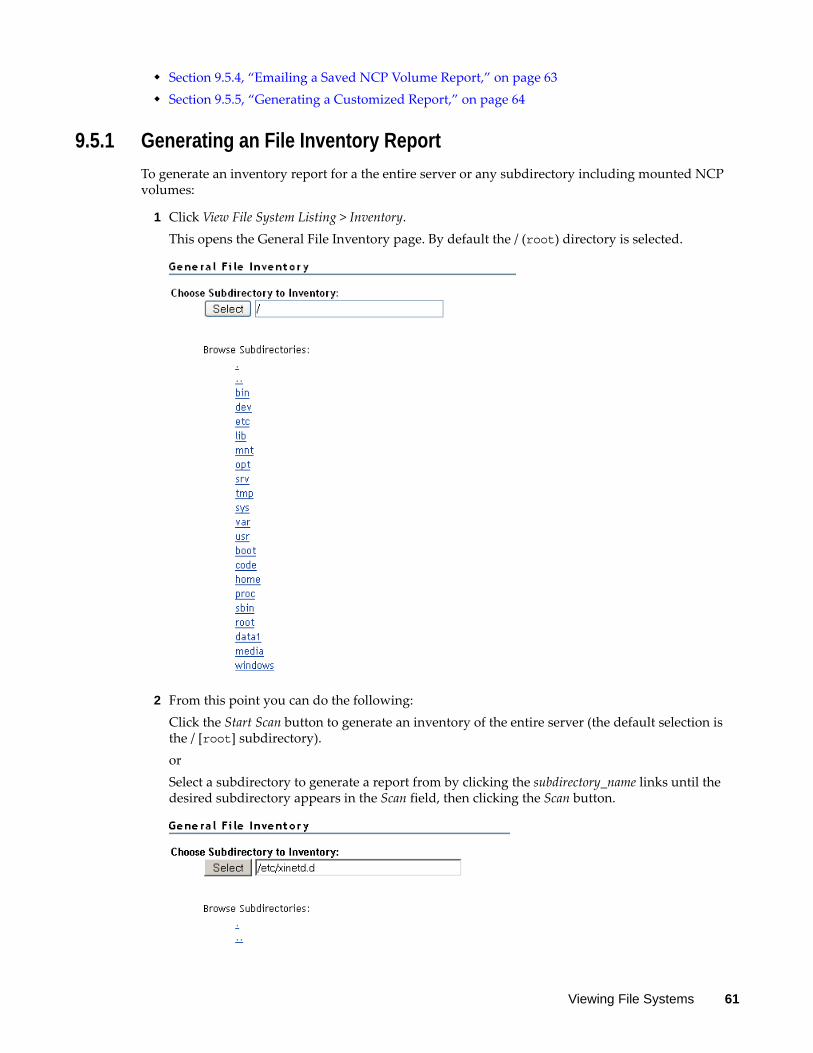
Section 9.5.4, “Emailing a Saved NCP Volume Report,” on page 63 Section 9.5.5, “Generating a Customized Report,” on page 64
9.5.1 Generating an File Inventory Report
To generate an inventory report for a the entire server or any subdirectory including mounted NCP volumes:
1 Click View File System Listing > Inventory.This opens the General File Inventory page. By default the / (root) directory is selected.
2 From this point you can do the following: Click the Start Scan button to generate an inventory of the entire server (the default selection is the / [root] subdirectory).orSelect a subdirectory to generate a report from by clicking the subdirectory_name links until the desired subdirectory appears in the Scan field, then clicking the Scan button.
Viewing File Systems 61

If you are viewing the File System Listing page for the desired directory, you can generate the same reports by clicking the Inventory link on this page.A report similar to the following is generated.
At this point, you can click any of the links to the left of the Key Statistics table to move quickly to the generated information or you can create a custom report. See “Generating a Customized Report” on page 64.
9.5.2 Generating a Volume Inventory Report
To quickly generate a inventory report for a mounted NCP volume:
1 Click View File System > NCP Volume Inventory.This opens the Volume Inventory page that shows all mounted volumes available for inventory.
2 Click the volume_name link to generate an inventory of the volume selected.
62 OES 2 SP3: Novell Remote Manager for Linux Administration Guide
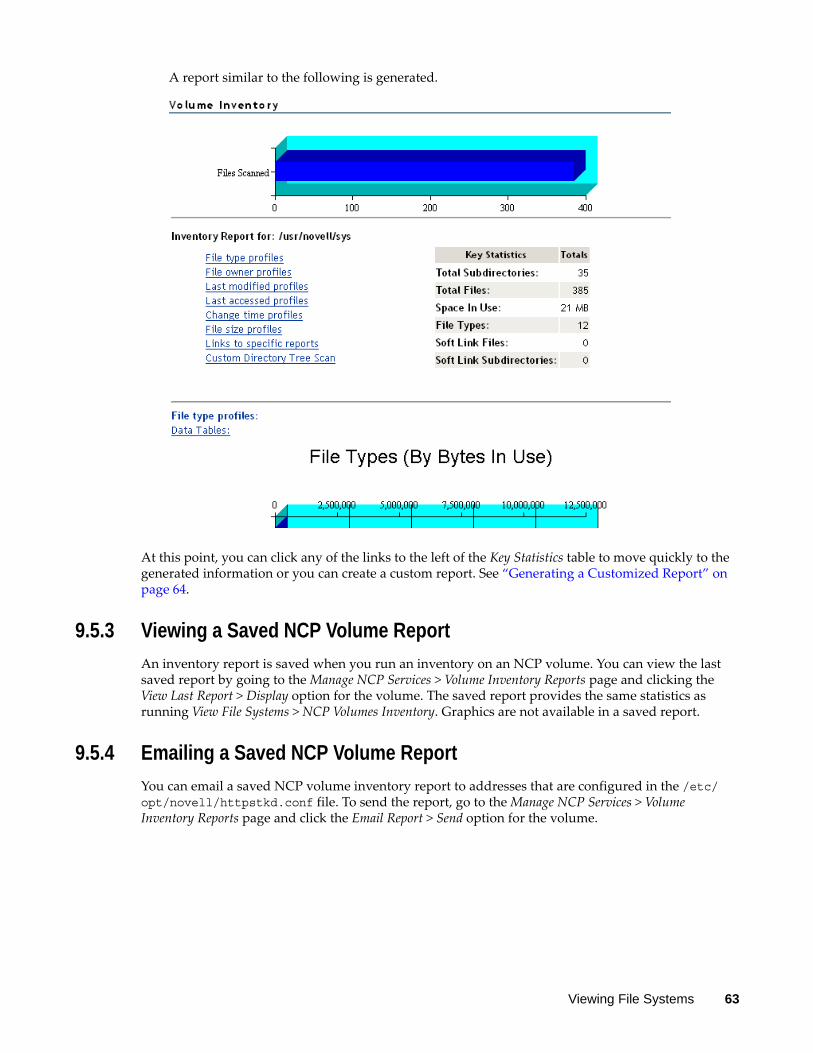
A report similar to the following is generated.
At this point, you can click any of the links to the left of the Key Statistics table to move quickly to the generated information or you can create a custom report. See “Generating a Customized Report” on page 64.
9.5.3 Viewing a Saved NCP Volume Report
An inventory report is saved when you run an inventory on an NCP volume. You can view the last saved report by going to the Manage NCP Services > Volume Inventory Reports page and clicking the View Last Report > Display option for the volume. The saved report provides the same statistics as running View File Systems > NCP Volumes Inventory. Graphics are not available in a saved report.
9.5.4 Emailing a Saved NCP Volume Report
You can email a saved NCP volume inventory report to addresses that are configured in the /etc/opt/novell/httpstkd.conf file. To send the report, go to the Manage NCP Services > Volume Inventory Reports page and click the Email Report > Send option for the volume.
Viewing File Systems 63

9.5.5 Generating a Customized Report
After generating an inventory report for a volume or directory, you can create a customized scan to report more specific information and perform additional actions on the files such as move, copy, or delete files selected in the report.
1 Create the initial report as specified in “Generating an File Inventory Report” on page 61 or 2 In the generated report, click the Custom Directory Tree Scan link.
A page similar to the following is returned.
3 Type the specific search criteria in the Search Pattern field. *.* is the default entry.
4 Select the desired settings in the File Owner Restriction drop-down box.None is the default selection.
5 Select the check boxes desired to customize the report by Time Stamp or File Size restrictions.No restrictions is the default setting.
6 Click Start Scan.
64 OES 2 SP3: Novell Remote Manager for Linux Administration Guide
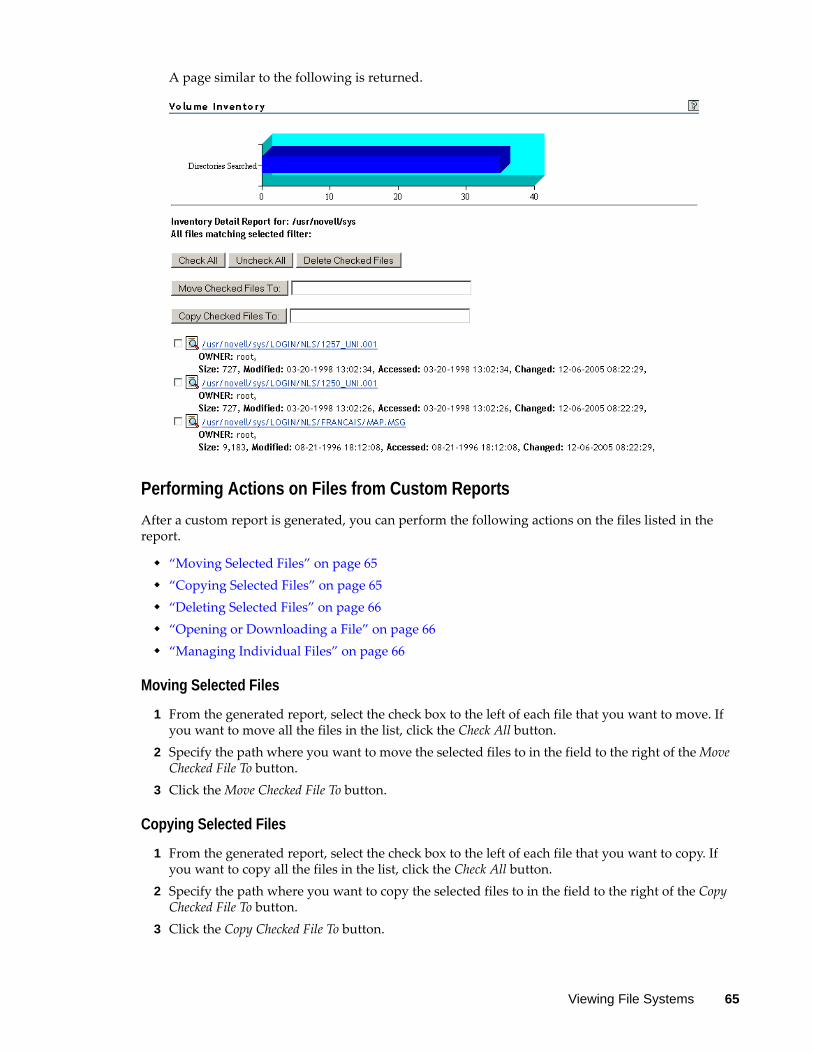
A page similar to the following is returned.
Performing Actions on Files from Custom Reports
After a custom report is generated, you can perform the following actions on the files listed in the report.
“Moving Selected Files” on page 65 “Copying Selected Files” on page 65 “Deleting Selected Files” on page 66 “Opening or Downloading a File” on page 66 “Managing Individual Files” on page 66
Moving Selected Files
1 From the generated report, select the check box to the left of each file that you want to move. If you want to move all the files in the list, click the Check All button.
2 Specify the path where you want to move the selected files to in the field to the right of the Move Checked File To button.
3 Click the Move Checked File To button.
Copying Selected Files
1 From the generated report, select the check box to the left of each file that you want to copy. If you want to copy all the files in the list, click the Check All button.
2 Specify the path where you want to copy the selected files to in the field to the right of the Copy Checked File To button.
3 Click the Copy Checked File To button.
Viewing File Systems 65

Deleting Selected Files
1 From the generated report, select the check box to the left of each file that you want to delete. If you want to delete all the files in the list, click the Check All button.
2 Click the Delete Checked Files button.
Opening or Downloading a File
1 From the generated report, select the filename link for the file you want to open or download.2 From the resulting dialog box, select Open With or Save to Disk, then click OK.
Managing Individual Files
1 From the generated report, click the File Information icon. 2 Perform the desired actions by entering the required information in the applicable field and
clicking the applicable button.
9.6 Generating and Viewing NCP Trustee Reports for NSS VolumesUnder Manage NCP Services, the new NCP Trustee Report option allows you to generate a trustee report for a specified NSS volume. This includes Dynamic Storage Technology shadow volumes that are comprised of two NSS volumes. You can display the last trustee report in the Web browser, or send the report to the e-mail addresses that you have pre-configured for Novell Remote Manager. A trustee report shows the rights settings by folder for each user or group that is a trustee on the NSS volume.
Section 9.6.1, “Generating an NCP Trustee Report,” on page 66 Section 9.6.2, “Viewing a Saved NCP Trustee Report,” on page 67 Section 9.6.3, “Emailing a Saved NCP Trustee Report,” on page 67
9.6.1 Generating an NCP Trustee Report
1 Log in to Novell Remote Manager as the root user.2 In the left navigation panel, select Manage NCP Services > NCP Trustee Report.
66 OES 2 SP3: Novell Remote Manager for Linux Administration Guide

3 On the NCP Trustee Reports page, locate the NSS volume in the list, then click its Create link in the Generate Report column.
4 View the NCP Trustee Report.A volume’s trustee report shows the rights settings by folder for each user or group that is a trustee on the NSS volume. For example, the following trustee report shows the rights for a folder in a Dynamic Storage Technology shadow volume.
9.6.2 Viewing a Saved NCP Trustee Report
You can view the last saved trustee report for an NSS volume. The saved report provides the same trustee rights information that was available when the report was created.
1 Log in to Novell Remote Manager as the root user.2 In the left navigation panel, select Manage NCP Services > NCP Trustee Report.3 Locate the NSS volume of interest in the list, then click its Display link in the View Last Report
column.
9.6.3 Emailing a Saved NCP Trustee Report
You can email an NCP volume’s trustee report to addresses that are configured in the /etc/opt/novell/httpstkd.conf file. For information about setting up email addresses for Novell Remote Manager, see Section A.3, “Email Notification Commands,” on page 114.
1 Log in to Novell Remote Manager as the root user.2 In the left navigation panel, select Manage NCP Services > NCP Trustee Report.3 Locate the NSS volume of interest in the list, then click its Send link in the Email Report column.
Viewing File Systems 67

68 OES 2 SP3: Novell Remote Manager for Linux Administration Guide

10 10Managing Linux
The Manage Linux section in Novell Remote Manager (NRM) for Linux includes the following links to these pages from which you can perform the following tasks:
Table 10-1 Manage Linux Section Tasks, Links, and Pages
10.1 Accessing VNC ConsolesIf VNC services are configured on the server, you can access the VNC consoles screens by clicking the VNC Consoles link under the Manage Linux heading in the navigation frame. Then click the 1024 X 728 button on the VNC Console Screens page.
IMPORTANT: The accessibility to the VNC consoles via Novell Remote Manager for Linux is limited to user root; it is not available to user Admin.
You must disable the HttpOnly setting in the /etc/opt/novell/httpstkd.conf file in order to enable the VNC console display.
Task Link Page Displayed For More Info, See
Access VNC Console screens
VNC Consoles VNC Consoles Screens
“Accessing VNC Consoles” on page 69
View Kernel Modules Information
View Kernel Modules Kernel Module Listing “Viewing Kernel Modules” on page 71
View Memory Information and turn swapping on and off.
View Memory Information View Memory Config “Viewing Memory Information” on page 72
Shut down and restart the host
Down/Restart Down/Reset Options “Shutting Down and Restarting the Host” on page 73
Manage packages View Package Information Package Information “Managing Packages” on page 74
Manage processes View Process Information Process Information “Managing Processes” on page 75
Schedule cron jobs to run Schedule Task Schedule Task “Scheduling cron Jobs to Run on the Server” on page 77
Managing Linux 69

If VNC services are not configured, you can configure them as follows:
1 In YaST2, log in as the root user, then click Network Services > Remote Administration.2 On the Remote Administration page, select the following options:
Allow Remote Administration Open Port in Firewall
3 Click Finish.4 Restart the display manager by entering the following command at the command line:
rcxdm restart
This form of remote administration is less secure that SSH; therefore, we recommend using this feature only in a secure environment (behind a firewall).
Clicking the VNC Consoles link opens a Java applet in a secondary browser window. The following table explains what you can do from this window.
Table 10-2 VNC Console Page Tasks and Procedures
Figure 10-1illustrates a user accessing YaST on a remote server from the user’s desktop browser. To access YaST on the remote server, the user did the following:
1 Clicked the VNC Consoles link in the navigation frame.2 Clicked the 1024 X 728 button on the VNC Consoles Screens page.3 Logged into Linux.4 Clicked N > System > YaST.
Task Procedure
Use any of the screens listed as though you were at the server console.
Use the keyboard or mouse as though you were at the server console.
Disconnect from the console. Click the Disconnect button on this page.
Change any of the VNC client options currently selected.
Click the Options button.
Access the VNC client clipboard and cut or paste any commands that you might want to execute in a active terminal shell.
Click the Clipboard button.
Restart the server. Click the Send Ctrl+Alt+Del button.
Refresh the current screen you are viewing. Click the Refresh button.
70 OES 2 SP3: Novell Remote Manager for Linux Administration Guide
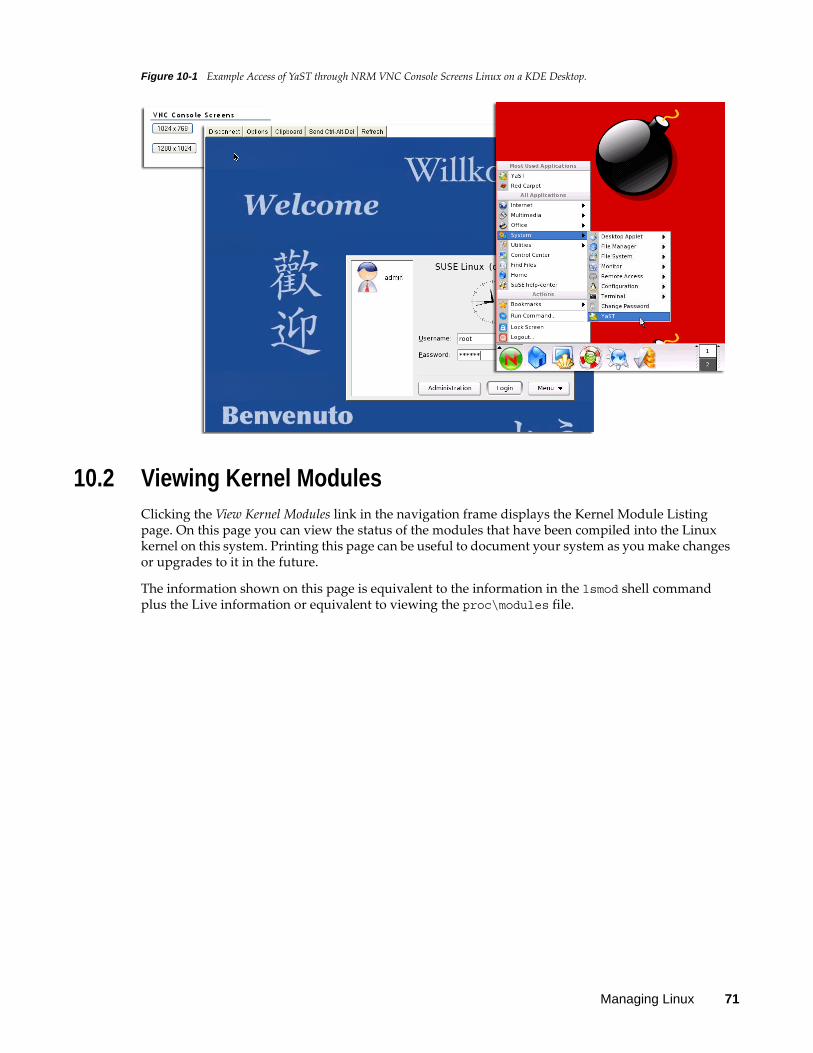
Figure 10-1 Example Access of YaST through NRM VNC Console Screens Linux on a KDE Desktop.
10.2 Viewing Kernel ModulesClicking the View Kernel Modules link in the navigation frame displays the Kernel Module Listing page. On this page you can view the status of the modules that have been compiled into the Linux kernel on this system. Printing this page can be useful to document your system as you make changes or upgrades to it in the future.
The information shown on this page is equivalent to the information in the lsmod shell command plus the Live information or equivalent to viewing the proc\modules file.
Managing Linux 71

Figure 10-2 Example Kernel Module Listing Page
10.3 Viewing Memory InformationClicking the View Memory Information link in the navigation frame displays the View Memory Config page. On this page you can view the following information about the memory in the server. The amount values are shown in bytes.
Used and unused amounts of physical memory Amount of memory in buffer cache Amount of memory used by the file system cache
This value is determined by subtracting the SwapCache from the PageCache (disk cache) amounts.
Amount of total memory that can be used by the system.This value is determined by subtracting the physical RAM from the kernel binary code.
Amount of swap space in use and available. The Total Swap File Size link goes to a Swap File Information page that provides a very quick
snapshot of every swap filename, type of swap space, and total and used sizes (in kilobytes) on the server including the following information: The Priority column is useful when multiple swap files are in use and some of them are
preferred over others, such as if they are on faster hard disks. The lower the priority, the more likely the swap file will be used.
The Active column shows a Yes or No status, indicating whether the Swap file is active or not. Clicking the link toggles swapping on or off for the listed device.
Two additional links turn swapping on or off for all devices.If you add a swap file to a device, you need to add an entry to the /etc/fstab file to make the swapon or swapoff links work correctly.
This information is also in the /proc/swaps file.
72 OES 2 SP3: Novell Remote Manager for Linux Administration Guide

Figure 10-3 Example View Memory Config Page
10.4 Shutting Down and Restarting the HostClicking the Down/Restart link in the navigation frame displays the Down/Reset Options page. You can use these options to shut down or reset the host.
The following table describes the specific actions of each option.
Table 10-3 Down/Reset Options Page Options and Actions
Using either of the options additionally forces the host to perform the following actions:
Update the cache buffers to disks Close all open files
Option Action
Down Forces the host to shut down immediately.
Reset Forces the host to shut down immediately, then warm boots the computer.
Managing Linux 73
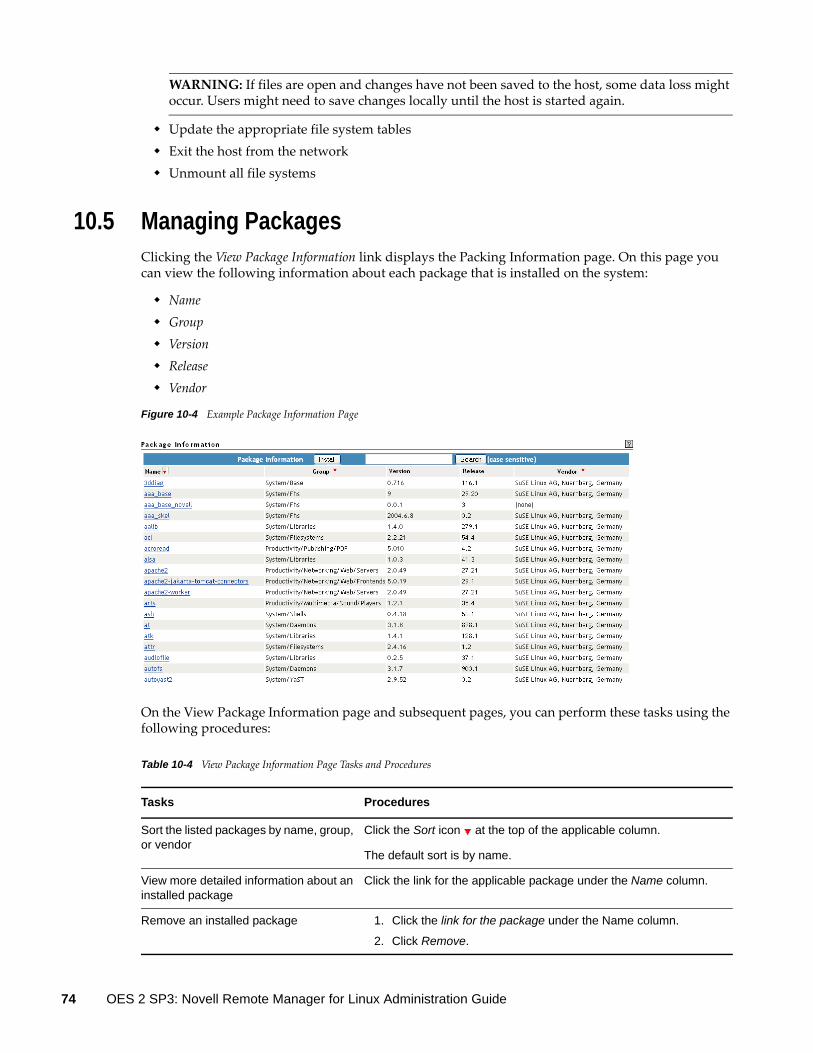
WARNING: If files are open and changes have not been saved to the host, some data loss might occur. Users might need to save changes locally until the host is started again.
Update the appropriate file system tables Exit the host from the network Unmount all file systems
10.5 Managing PackagesClicking the View Package Information link displays the Packing Information page. On this page you can view the following information about each package that is installed on the system:
Name Group Version Release Vendor
Figure 10-4 Example Package Information Page
On the View Package Information page and subsequent pages, you can perform these tasks using the following procedures:
Table 10-4 View Package Information Page Tasks and Procedures
Tasks Procedures
Sort the listed packages by name, group, or vendor
Click the Sort icon at the top of the applicable column.
The default sort is by name.
View more detailed information about an installed package
Click the link for the applicable package under the Name column.
Remove an installed package 1. Click the link for the package under the Name column.
2. Click Remove.
74 OES 2 SP3: Novell Remote Manager for Linux Administration Guide

The following figure shows a sample of the details you see when you click the package_name link.
Figure 10-5 Detailed Information Page for the 3ddiag Example Package
10.6 Managing ProcessesClicking the View Process Information link in the navigation frame displays the Process Information page. On this page, you can view a list of all the processes as well as their state in the host and perform the actions listed in the following table.
Install a new package that you have downloaded to the host
1. Click Install.
2. Browse to the location where you uploaded the package to. The browse starts at the root of the host.
3. Click Install.
The selected package’s file path is transferred to the RPM File Path field on the Package Installation page.
When the Install button is clicked on the View Package Information page, Novell Remote Manager attempts to install the specified RPM file using the Linux RPM utility.
Tasks Procedures
Managing Linux 75

Table 10-5 Process Information Page Tasks and Procedures
The process information is obtained from the stat file that is available for each process ID in the /proc directory. Process information can also be retrieved at the command line by using the Linux top command.
Table 10-6 on page 76 describes the parameters reported for each process.
Table 10-6 Process Information
Tasks Procedures
Sort the process by name (in alphabetical order by default), by process ID, by CPU Usage, or by Memory Usage
Click the Sort icon at the top of the applicable column.
View more specific information about a listed process
Click the link for the applicable process under the Name column.
Kill a process 1. Click the link for the applicable process under the Name column.
2. Click Kill.
Parameter Description
Name The process name.
Owner The process owner; the user who started the process.
ID (Status) The process ID of the task, and the current state of the task. The states are Sleep (S), Running (R), Traced (T), or Zombied (Z). These states are modified by a trailing < for a process with a negative nice value, N for a process with positive nice value, and W for a swapped-out process (this does not work correctly for kernel processes).
CPU Usage % The task's share of the CPU time since the last screen update, expressed as a percentage of total CPU time per processor.
Priority The priority of the task.
Run Time The total CPU time the task has used since it started.
Physical Memory The physical memory value is the amount of physical memory in bytes that the task is using. The value in parentheses (%) is the percentage of RAM memory that this represents. The Linux top command reports this information in kilobytes.
Virtual Memory The virtual memory is the amount of memory in bytes that the task is using to hold the code, data, and stack space memory. The Linux top command reports this information in kilobytes. Virtual Memory is the value reported by the RSS switch for the top command.
76 OES 2 SP3: Novell Remote Manager for Linux Administration Guide
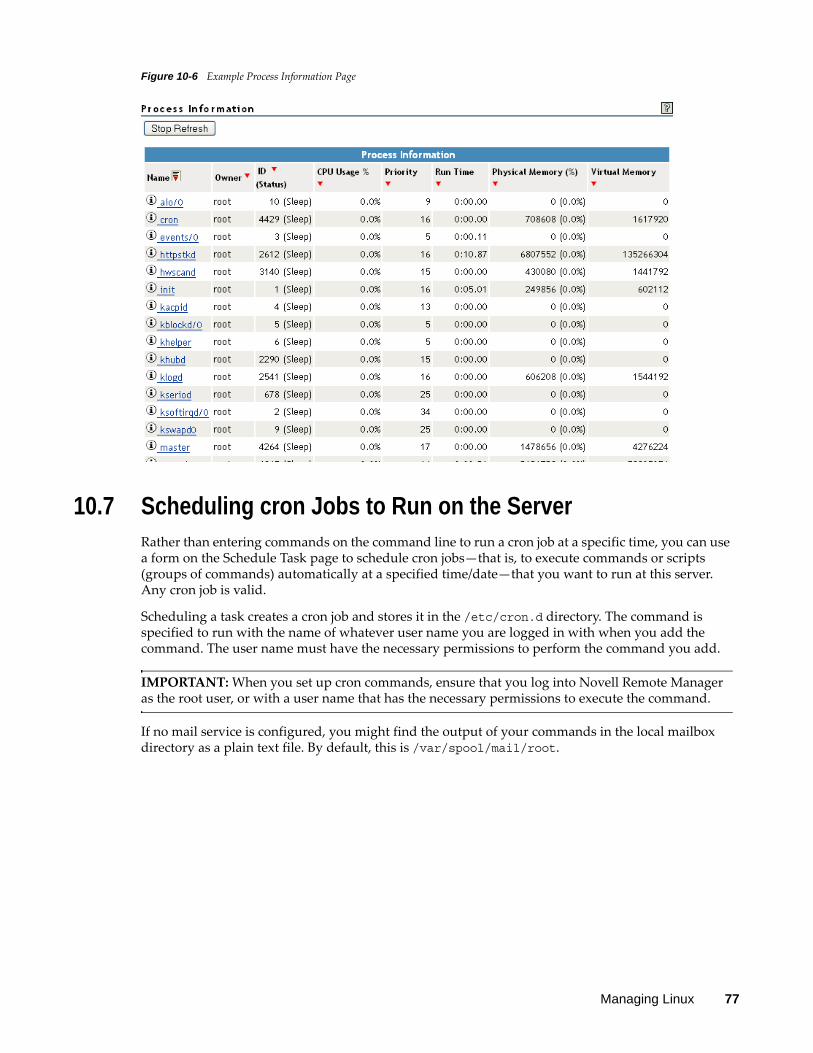
Figure 10-6 Example Process Information Page
10.7 Scheduling cron Jobs to Run on the ServerRather than entering commands on the command line to run a cron job at a specific time, you can use a form on the Schedule Task page to schedule cron jobs—that is, to execute commands or scripts (groups of commands) automatically at a specified time/date—that you want to run at this server. Any cron job is valid.
Scheduling a task creates a cron job and stores it in the /etc/cron.d directory. The command is specified to run with the name of whatever user name you are logged in with when you add the command. The user name must have the necessary permissions to perform the command you add.
IMPORTANT: When you set up cron commands, ensure that you log into Novell Remote Manager as the root user, or with a user name that has the necessary permissions to execute the command.
If no mail service is configured, you might find the output of your commands in the local mailbox directory as a plain text file. By default, this is /var/spool/mail/root.
Managing Linux 77

Figure 10-7 Schedule Task Page for Scheduling Cron Jobs
To create a new scheduled command:
1 Complete the required information on the Schedule Task page.
2 Click Submit.
After you schedule a job, it is displayed at the top of the page under the Currently Scheduled CRON Jobs heading. Jobs that your create manually also display in the list.
Field Information to Provide
Description Enter a brief description of the command you want to run.
64 character limit
Example:
Send message to log out daily at 10 p.m.
This description is displayed as the name of the scheduled job in the Currently Scheduled CRON Jobs list.
Command to Execute Type the command exactly as you would at a command line.
All cron job entry types are valid except for lists and step values.
Start Time Type the time you want the command to run.
Start Day If you want to run the command once a week, specify the day of the week, then place an asterisk * in the Month and Day fields.
If you want to run the command only once or monthly, specify a Month and Day setting, then place an asterisk * in the Day of the Week field.
If you want to run the command monthly, specify a Day setting, then place an asterisk * in the Start Day and Month fields.
If you do not want to specify a value for a field, place an asterisk * in the field.
78 OES 2 SP3: Novell Remote Manager for Linux Administration Guide

To change the schedule of a job that you have already scheduled:
1 Click the link for the job you want to change.2 Change the schedule. 3 Click Submit.
To delete the schedule of a job that you have already scheduled:
1 Click the link for the job you want to delete.2 Click Delete.
To return the settings in the fields to the default settings of the current day and time, click Reset.
Managing Linux 79

80 OES 2 SP3: Novell Remote Manager for Linux Administration Guide
11 11Managing Hardware
The Manage Hardware section in Novell Remote Manager (NRM) for Linux includes the following links to pages from which you can perform the following tasks:
Table 11-1 Manage Hardware Section Tasks, Links, and Pages
11.1 Viewing ProcessorsClicking the View Processors link under the Manage Hardware heading in the navigation frame displays the Processor Information page. On this page you can view information about each processor on this host.
Information about the processor speed as well as the local cache sizes is useful in determining how much work a processor can do.
This information is equivalent to the information you would see in the /proc/cpuinfo file.
Task Link Page Displayed For More Info, See
View Processor information View Processors Processor Information “Viewing Processors” on page 81
View Interrupt information Interrupt Information Interrupts “Viewing Interrupt Information” on page 82
View memory I/O information
IO Memory Information
I/O Memory Information
“Viewing I/O Memory Information” on page 83
View port I/O information IO Port Information IO Port Information “Viewing I/O Port Information” on page 84
View SMBIOS information SMBIOS Information SMBIOS Information “Viewing SMBIOS Information” on page 85
Managing Hardware 81

Figure 11-1 Example Processor Information Page
In a virtualized environment, the processor information is reported from the perspective of the server where you connected.
Host Server: When you connect to Novell Remote Manager by using the host server IP address, the report contains information about all processors on the system.
Guest Server: When you connect to Novell Remote Manager by using the guest server IP address, the report contains information about the physical hardware in use, but only for the number of processors you assign to the virtual machine.The guest server reports the same information about a processor as if it owned the actual hardware on the server. The Virtual Machine Monitor component of the virtualization software emulates a complete hardware environment in the virtual machine for the guest server. The guest server OS is unaware that it shares the hardware resources with other virtual machines and the host.
The actual usage statistics of the physical processors are not known by Novell Remote Manager. You could use the Virtual Machine Manager to see that type of information.
11.2 Viewing Interrupt InformationClicking the Interrupt Information link under the Manage Hardware heading in the navigation frame displays the Interrupts page, which includes the following:
Table 11-2 Interrupts Page
Category Information Displayed
Interrupt Interrupt number or name of an interrupt that might be generated.
CPU number Number of interrupts that have occurred on a given processor.
Route-Trigger Method How the interrupt is being delivered to the processor and the method of interrupting the processor.
Device Name of the device driver that is generating the interrupt.
82 OES 2 SP3: Novell Remote Manager for Linux Administration Guide

Figure 11-2 Example Interrupt Information Page
11.3 Viewing I/O Memory InformationClicking the IO Memory Information link under the Manage Hardware heading in the navigation frame displays the I/O Memory Information page, which includes the following:
Table 11-3 I/O Memory Information Page
Category Information Displayed
Memory Address I/O memory range that a given device is using.
Device Description A description of the device that is using a given I/O memory range.
Managing Hardware 83

Figure 11-3 Example I/O Memory Information Page
11.4 Viewing I/O Port InformationClicking the IO Port Information link under the Manage Hardware heading in the navigation frame displays the I/O Port Information page, which includes the following:
Table 11-4 IO Port Information Page
Category Information Displayed
IO Address Shows the I/O port range that a given device is using.
Device Description Shows the name of the device that is using a given I/O port range.
84 OES 2 SP3: Novell Remote Manager for Linux Administration Guide
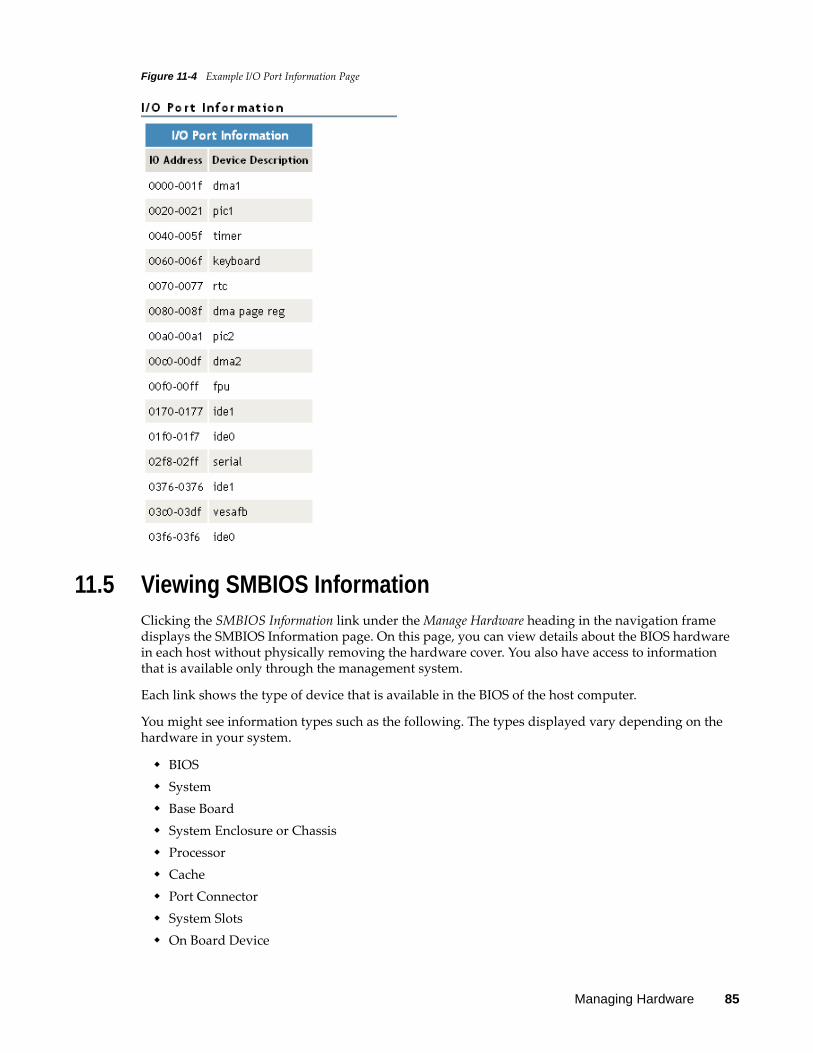
Figure 11-4 Example I/O Port Information Page
11.5 Viewing SMBIOS InformationClicking the SMBIOS Information link under the Manage Hardware heading in the navigation frame displays the SMBIOS Information page. On this page, you can view details about the BIOS hardware in each host without physically removing the hardware cover. You also have access to information that is available only through the management system.
Each link shows the type of device that is available in the BIOS of the host computer.
You might see information types such as the following. The types displayed vary depending on the hardware in your system.
BIOS System Base Board System Enclosure or Chassis Processor Cache Port Connector System Slots On Board Device
Managing Hardware 85

OEM Strings BIOS Language System Event Log Physical Memory Array Memory Device Memory Array Mapped Address Memory Device Mapped Address Hardware Security System Boot
Selecting an information type displays information contained within SMBIOS for the type selected. For example, to see all the BIOS information, click the BIOS Information link. See Figure 11-5.
Figure 11-5 Example SMBIOS and BIOS Information Pages
86 OES 2 SP3: Novell Remote Manager for Linux Administration Guide

12 12Using Group Operations
The Use Group Operations section in Novell Remote Manager (NRM) for Linux includes the following links to pages from which you can perform the following tasks:
Table 12-1 Use Group Operations Tasks, Links, and Pages
Using the group features involves performing one or more of the following tasks:
1. Building and Configuring a Monitoring Group (page 88).2. (Optional) Saving a Group (page 92).
You only need to perform this step if you want to use the group at a later time.
Task Link Page Displayed For More Information
Access an existing group Select Group Select Group “Accessing an Existing Group” on page 93
Build and configure a new monitoring group
Configure New Group Group Monitoring Operations
“Building and Configuring a Monitoring Group” on page 88
Change an existing group Select Group Select Group “Changing an Existing Group” on page 93
Define or edit Group Monitoring types
NRM Health Types Novell Remote Manager Health Monitoring Engine (NRM Health Types)
“Defining or Editing Group Monitoring Types” on page 98
Delete an existing group Select Group Select Group “Deleting an Existing Group” on page 94
Scan the network for items to monitor on the network.
Configure New Group > right-click > click Network Discovery
Network Discovery “Discovering Items on the Network to Monitor” on page 98
Generate and view server reports
Configure New Group > right-click > click Save Group
Group Monitoring Operations
“Generating and Viewing Server Reports” on page 94
Save a new group Configure New Group > right-click > click Save Group
Save Group “Saving a Group” on page 92
View group operations monitored items
View Monitored Items Novell Remote Manager Health Monitoring Engine - Monitored Items
“Viewing Monitored Items” on page 95
View group operations defined NRM health types
NRM Heath Types Novell Remote Manager Health Monitoring Engine - NRM Health Types
“Viewing Group Monitoring Types” on page 96
Using Group Operations 87

3. Generating and Viewing Server Reports (page 94).The monitoring operations start immediately. Other tasks, such as running reports require additional steps.
4. (Conditional) Accessing an Existing Group (page 93).
12.1 Building and Configuring a Monitoring GroupNovell Remote Manager lets you build and configure groups of items for monitoring Linux server or NetWare server health, as well as providing various statistics for servers running other operating systems. A few of the preconfigured monitoring item types are NRM Health Status for a single server or a group of servers, Ping to a specific port, IP connectivity, LDAP Directory Root Search, and status of connectivity to a Web page.
Monitoring items can be defined and represented by an icons on a page as shown in the following figure. The icons can represent a single item or a group of items.
Figure 12-1 NRM Server Health Example Group
To build and configure a new monitor group:
1 Click the Configure New Group link in the navigation frame.2 Right-click the Group Monitoring Operations page.
TIP: If your browser does not support right-click functionality, try double-clicking the Reports icon in the upper right corner of the page.
You should see a pop-up similar to the following:
88 OES 2 SP3: Novell Remote Manager for Linux Administration Guide

3 Click Add Item, and do the following:3a Complete the Monitoring Item Configuration form.
Using Group Operations 89
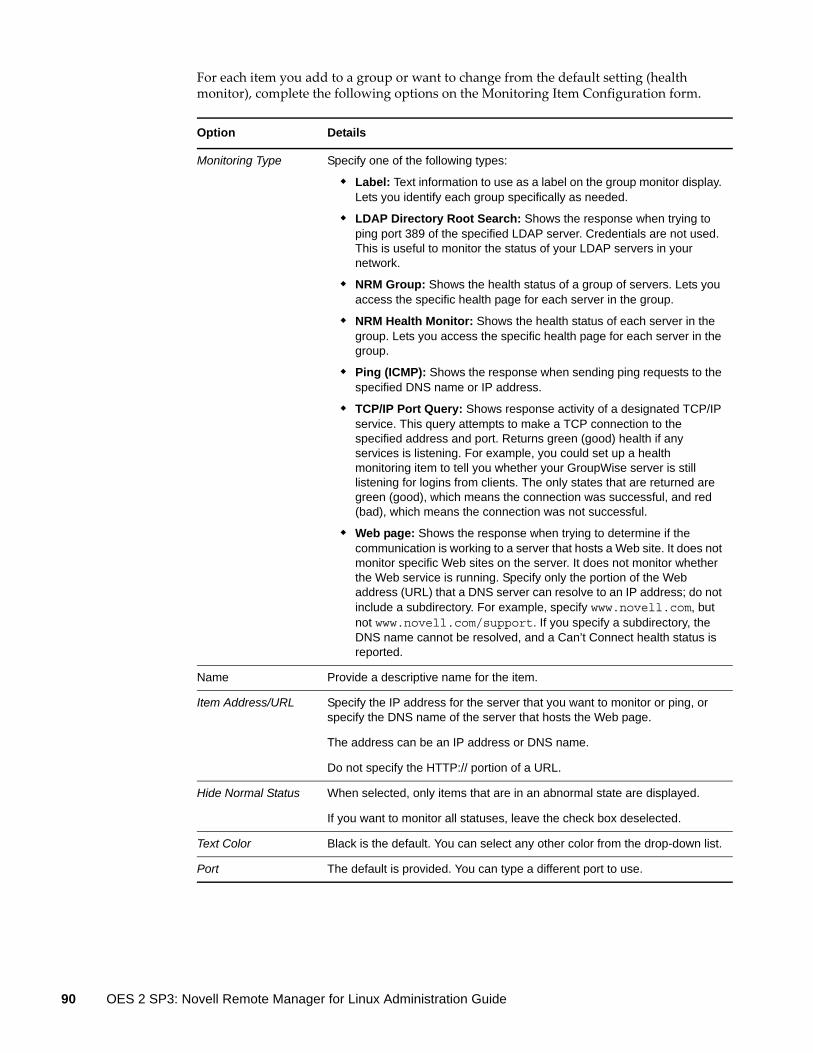
For each item you add to a group or want to change from the default setting (health monitor), complete the following options on the Monitoring Item Configuration form.
Option Details
Monitoring Type Specify one of the following types:
Label: Text information to use as a label on the group monitor display. Lets you identify each group specifically as needed.
LDAP Directory Root Search: Shows the response when trying to ping port 389 of the specified LDAP server. Credentials are not used. This is useful to monitor the status of your LDAP servers in your network.
NRM Group: Shows the health status of a group of servers. Lets you access the specific health page for each server in the group.
NRM Health Monitor: Shows the health status of each server in the group. Lets you access the specific health page for each server in the group.
Ping (ICMP): Shows the response when sending ping requests to the specified DNS name or IP address.
TCP/IP Port Query: Shows response activity of a designated TCP/IP service. This query attempts to make a TCP connection to the specified address and port. Returns green (good) health if any services is listening. For example, you could set up a health monitoring item to tell you whether your GroupWise server is still listening for logins from clients. The only states that are returned are green (good), which means the connection was successful, and red (bad), which means the connection was not successful.
Web page: Shows the response when trying to determine if the communication is working to a server that hosts a Web site. It does not monitor specific Web sites on the server. It does not monitor whether the Web service is running. Specify only the portion of the Web address (URL) that a DNS server can resolve to an IP address; do not include a subdirectory. For example, specify www.novell.com, but not www.novell.com/support. If you specify a subdirectory, the DNS name cannot be resolved, and a Can’t Connect health status is reported.
Name Provide a descriptive name for the item.
Item Address/URL Specify the IP address for the server that you want to monitor or ping, or specify the DNS name of the server that hosts the Web page.
The address can be an IP address or DNS name.
Do not specify the HTTP:// portion of a URL.
Hide Normal Status When selected, only items that are in an abnormal state are displayed.
If you want to monitor all statuses, leave the check box deselected.
Text Color Black is the default. You can select any other color from the drop-down list.
Port The default is provided. You can type a different port to use.
90 OES 2 SP3: Novell Remote Manager for Linux Administration Guide
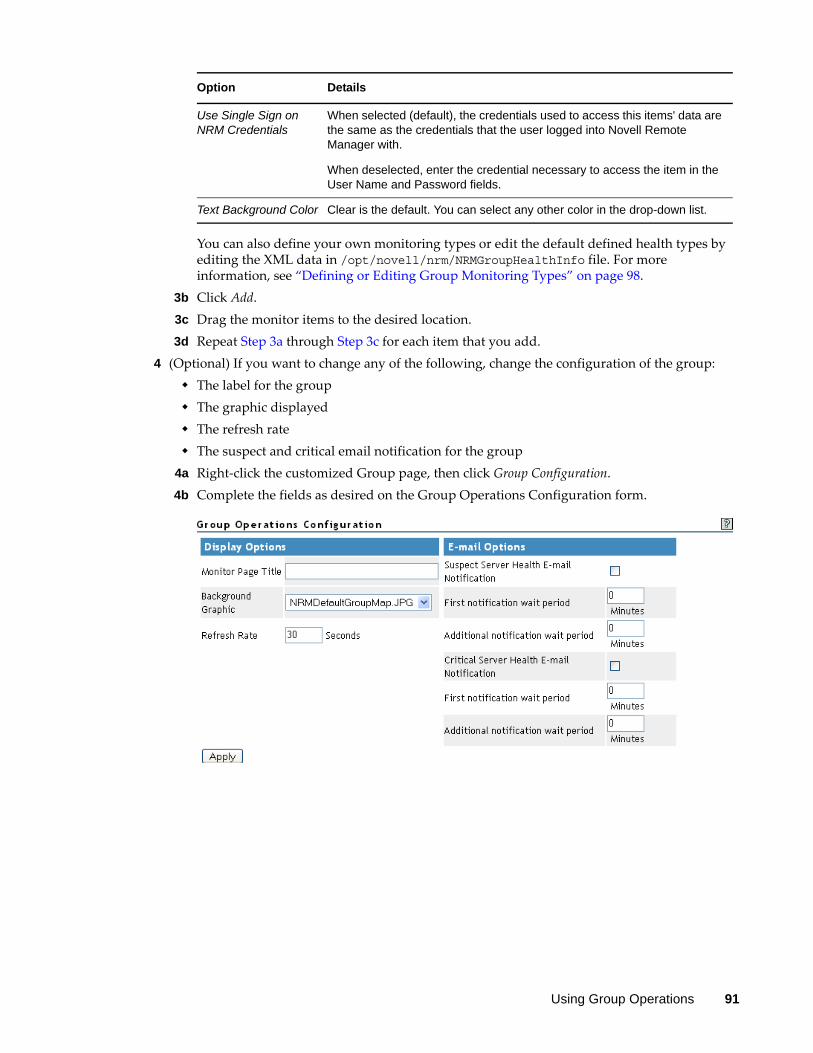
You can also define your own monitoring types or edit the default defined health types by editing the XML data in /opt/novell/nrm/NRMGroupHealthInfo file. For more information, see “Defining or Editing Group Monitoring Types” on page 98.
3b Click Add.3c Drag the monitor items to the desired location.3d Repeat Step 3a through Step 3c for each item that you add.
4 (Optional) If you want to change any of the following, change the configuration of the group: The label for the group The graphic displayed The refresh rate The suspect and critical email notification for the group
4a Right-click the customized Group page, then click Group Configuration.4b Complete the fields as desired on the Group Operations Configuration form.
Use Single Sign on NRM Credentials
When selected (default), the credentials used to access this items' data are the same as the credentials that the user logged into Novell Remote Manager with.
When deselected, enter the credential necessary to access the item in the User Name and Password fields.
Text Background Color Clear is the default. You can select any other color in the drop-down list.
Option Details
Using Group Operations 91

4c Click Apply.5 Perform the desired task, or save the group and perform the task later.
In this release, the only task you can perform on Linux servers is to compare the server up times.6 (Optional) If you want to reuse the group, save the group.
6a Right-click the customized Group page, then click Save Group.We recommend using a name that represents the group you built.
6b (Conditional) If you haven’t saved any groups, you might need to extend the schema for NRM group operations before you can save the group.Extending the schema is required only once per eDirectory tree. If the host is connected to a pre-existing NetWare 6.5 or later network, then extending the schema is not necessary.
6c Click Save Group and perform the required steps to save the group to a local server or save it and associate it with an eDirectory object. See “Saving a Group” on page 92.
12.2 Saving a GroupYou can save the configuration of the group so you can access this page again without completing the configuration options. You can save a group to the local server or associate with an eDirectory object and save it.
12.2.1 Saving the Group to the Local Server
1 While viewing the group you just created or edited, right-click the customized Group page, then click Save Group.
2 In the Group Name field, specify a name for the group or select a group name that you want to replace from the group list.We recommend using a name that represents the group you built.
Option Description
Display The display options let you control the following:
Monitor Page Title: Specify a title to be shown at the top of the monitor page in the header area when the page is built.
Refresh Rate: Specify the number of seconds between status queries to the server.
Background Graphic: Select a graphic from the drop-down list for the monitor items to be displayed on. This option can be helpful if you want to show specific locations of the item being monitored.
If you want to add a customized graphic, add it to the /opt/novell/nrm/NRMGroupMaps directory.
Email The email notification options control how and when email notifications are sent when the server health changes. Email notifications are sent to the addresses in the mail notification list using the mail servers set in the /etc/opt/novell/httpstkd.conf file.
92 OES 2 SP3: Novell Remote Manager for Linux Administration Guide

3 Click Save Group.This saves the group to a file with that name in the /opt/novell/nrm/NRMGroups directory.
12.2.2 Saving the Group and Associating It with an eDirectory Object
You can save a group and associate it with a User or Group eDirectory object. This is helpful when you want to access the configuration and you don’t want to save the configuration to a specific server (for example, if the server is down but you want it to be part of the operation or if you want to run the operation while one of the servers is not functioning properly).
Only one group can be associated to an object.
1 While viewing the group you just created or edited, right-click the customized Group page, then click Save Group.
2 In the Make This the Group Monitor for This Object field, specify a User or Group object that you want to associate this group with.You can browse to the user or group by clicking the Browse link icon or by typing the full content name of the object.
3 Click Save Group.
12.3 Accessing an Existing GroupAfter a group has been saved to the server, you can access the group again to run reports or change the attributes of the group.
1 Click the Select Group link in the navigation frame.2 On the Server Group page, select the desired group from the drop-down list.3 Click Build Group.
12.4 Changing an Existing GroupAfter accessing an existing group (see “Accessing an Existing Group” on page 93), you might want to change it using one of the following procedures.
Table 12-2 Changing an Existing Group Tasks and Procedures
If you want to Then
Change the configuration of an existing group.
1. Select the group.
2. Right-click the page, then click Group Configuration.
3. Make the desired changes in the Group Operations Configuration form.
4. Click Apply.
5. Save the group. (See “Saving a Group” on page 92.)
See the details of the server health or the monitoring type.
1. Select the group.
2. Select the item you want to see the details for.
3. Double-click the Health Status icon.
Using Group Operations 93
12.5 Deleting an Existing GroupTo delete a group:
1 Click the Select Group link in the navigation frame.2 On the Server Group page, select the desired group from the drop-down list.3 Click Delete Group.
12.6 Generating and Viewing Server ReportsRunning Server Comparison reports on a group of servers can help you in determine which servers need to be updated or have configurations changed, why operations on that server might be sluggish, or which servers are receiving the most action.
In this release, you can run only one report, the “Compare Server Up Time Report” on page 94.
12.6.1 Compare Server Up Time Report
Run this report to see which servers might need replacing or tuning to keep them running longer. This report gives you an idea how long each server in the group has been running without being restarted.
1 Build the monitor group or select a group previously saved. See “Building and Configuring a Monitoring Group” on page 88 or “Accessing an Existing Group” on page 93.
2 Right-click the customized Group page.3 Click NRM Reports & Operation.
Edit an existing item in the group. 1. Select the group.
2. Select the item you want to edit.
3. Right-click the selected item.
4. Click Edit.
Delete a server or monitor item from a group. 1. Select the group.
2. Select the item you want to delete.
3. Right-click the selected item.
4. Click Delete.
Change the display to a full screen in your browser window.
1. Select the group.
2. Right-click the page.
3. Click Full Screen
4. When you are finished viewing the group, close the browser window.
If you want to Then
94 OES 2 SP3: Novell Remote Manager for Linux Administration Guide

4 Click Compare Server Up Times.A report similar to the following is returned.
12.7 Viewing Monitored ItemsIf you have several groups defined and you want to see which items are being monitored from this server without opening each group, click View Monitored Items.
This page lists of all of the items currently being monitored by the Novell Remote Manager health monitoring engine on this server.
If an item has not been monitored for more than 3 minutes, it is removed from the list.
Table 12-3 Health Monitoring Engine Monitored Items
If this server’s utilization is high due to the monitoring occurring on this server, you might consider moving some of the monitoring to another location.
Column Description
Status Shows the health indicator icon for the item
Item Name The name assigned to the item when it was defined in a Novell Remote Manager health monitoring group.
Type The type of item being monitored, such as NRM health, ping status, web download.
Address The third column is the address that Novell Remote Manager uses to check the items health status.
Last Check Time The last time that a Novell Remote Manager group requested the health status of this item.
Monitoring Start Time The that health monitoring was started for this item.
Using Group Operations 95

12.8 Viewing Group Monitoring TypesClicking the NRM Health Types link in the navigation frame displays the Novell Remote Manager Health Monitoring Engine - NRM Health Types content. This page gives you an overview of the Group Monitoring types that are defined on the current host. The legend shows the statuses you might see when you are monitoring groups of hosts with various monitored items and is a graphical view of the items defined in the /opt/novell/nrm/NRMGroupHealthInfo file.
96 OES 2 SP3: Novell Remote Manager for Linux Administration Guide

Figure 12-2 The Default NRM Health Monitoring Engine - NRM Health Types Content Definitions
Using Group Operations 97
12.9 Defining or Editing Group Monitoring TypesIf you want to add a Group Monitoring type to the group monitoring that is not defined or change the label of any of the predefined types, you can access the /opt/novell/nrm/NRMGroupHealthInfo file and make changes to it.
Each item is defined between the beginning and ending NRM_Health_Item_Definition XML tags as shown below.
<NRM_Health_Item_Definition> <Type_Name>PING</Type_Name> <Display_Name>Ping(ICMP)</Display_Name> <Platform>Linux</Platform> <Health_Test> <Command_Line> ping -c1 -W1 %ITEM_ADDR | grep "bytes from" 1>/dev/null </Command_Line> <Result> <Value>0</Value> <Result_Icon>/sys/login/NRMcanping.gif</Result_Icon> <Return_Value>HEALTH_STATUS_UP</Return_Value> <Click_Command>ping -c4 %ITEM_ADDR</Click_Command> </Result> <Result> <!Value>0</!Value> <Return_Value>HEALTH_STATUS_CANT_CONNECT</Return_Value> <Click_Command>ping -c4 -W1 %ITEM_ADDR</Click_Command> </Result> </Health_Test></NRM_Health_Item_Definition>
12.10 Discovering Items on the Network to Monitor If you want to scan the network for specific services, you can access the Network Discovery page and specify the host and ports that should be scanned for. After discovering the items on the network, you can click the item and add it to the current group for future monitoring.
Using this feature can help you to quickly gather the information you need to create monitoring groups.
To access this page, do the following:
1 In the navigation frame, click Use Group Operations > Configure New Group or Select Group.2 Right-click the applicable group page displayed.3 Ensure that the browser you are using will accept pop-ups.4 Click Network Discovery.
98 OES 2 SP3: Novell Remote Manager for Linux Administration Guide

The Network Discovery page is displayed:
To perform the scan, do the following:
1 Access the Network Discovery page.2 Do the tasks specified in the following table:
The Network Scan Parameter fields determine which hosts or ports should be scanned. The DNS Name / IP Address field is an IP address is used with the subnet mask to determine the range of IP addresses to be scanned. These fields default to the IP address of the current Novell Remote Manager host and a class C subnet mask. For example, if you wanted to scan for all the active hosts in the class B range of 137.65 subnet, you might set the IP address to 137.65.1.1 and the subnet mask to 255.255.0.0.Instead of scanning for all hosts that respond on the network, you can scan for hosts with specific services available.
After scanning for a desired service, a Network Discovery page is displayed showing results for all hosts with the ports.
Task Procedure
Scan the network for hosts that are responding to ICMP Echo Requests in the network within a specified subnet.
1. Accept the default IP address or DNS name and subnet mask information or change it.
2. Click Subnet Scan.
Scan the network for hosts with port 80 open and listening for connections (Web Servers) within a specified subnet.
1. Accept the default IP address or DNS name and subnet mask information or change it.
2. Click Web Server Scan.
Scan the network for hosts with port 389 open and listening for connections (LDAP Servers) within a specified subnet.
1. Accept the default IP address or DNS name and subnet mask information or change it.
2. Click LDAP Server Scan.
Scan the network for hosts with port 8009 open and listening for connections (Hosts with Novell Remote Manager configured for the default ports) within a specified subnet.
1. Accept the default IP address or DNS name and subnet mask information or change it.
2. Click NRM Agent Scan.
Scan the network for hosts with user_defined_port open and listening within a specified subnet.
1. Accept the default IP address or DNS name and subnet mask information or change it.
2. Click Service Scan.
Using Group Operations 99

You can do the following task with the information returned:
Task Procedure
See more information about the scanned host.
1. Click the Web Service More Info icon for the applicable host on the Network Discovery page.
2. View information on the page returned.
Add the host to the current group.
1. Click the Add Item to Group icon for the applicable host on the Network Discovery page.
2. Complete the required information on the Add New Monitor Item page, then click Add.
Most of the information is completed by default.
100 OES 2 SP3: Novell Remote Manager for Linux Administration Guide

13 13Tasks Quick Reference
The following table provides information about specific tasks you can perform using Novell Remote Manager. These references also link to more specific information in this guide.
Table 13-1 Task Quick Reference List
Tasks Link in Navigation frame or Other Location For More Information
Build a group for monitoring Use Group Operations > Configure New Group
Building and Configuring a Monitoring Group (page 88)
Cron job, schedule Manage Linux > Schedule Task “Scheduling cron Jobs to Run on the Server” on page 77
Directory, change attributes of View File System > View File System Listing
Viewing Details about Directories and Performing Actions on Them (page 48)
Directory, edit View File System > View File System Listing
Viewing Details about Directories and Performing Actions on Them (page 48)
Directory, delete View File System > View File System Listing
Viewing Details about Directories and Performing Actions on Them (page 48)
Directory, rename View File System > View File System Listing
Viewing Details about Directories and Performing Actions on Them (page 48)
Directory, view detailed information about
View File System > View File System Listing
Viewing Details about Directories and Performing Actions on Them (page 48)
File, change attributes of View File System > View File System Listing
Viewing the Details of a File and Performing Specific Actions (page 50)
File, download View File System > View File System Listing
Downloading a File from the Server to a Local Workstation (page 49)
File, edit View File System > View File System Listing
Viewing the Details of a File and Performing Specific Actions (page 50)
File, delete View File System > View File System Listing
Viewing the Details of a File and Performing Specific Actions (page 50)
Tasks Quick Reference 101

File, rename View File System > View File System Listing
Viewing the Details of a File and Performing Specific Actions (page 50)
Files, search for text in View File System > View File System Listing
Searching for Text in Files (page 50)
File, upload View File System > View File System Listing
Uploading a File to the Server (page 49)
File, view View File System > View File System Listing
Viewing Individual Files (page 51)
File system, browse View File System > View File System Listing
Browsing File Systems and Performing Actions on Them (page 47)
File system, perform action on View File System > View File System Listing
Browsing File Systems and Performing Actions on Them (page 47)
Files, viewing details about View File System > View File System Listing
Viewing the Details of a File and Performing Specific Actions (page 50)
Group operations, access an existing group
Use Group Operations > Select Group
Accessing an Existing Group (page 93)
Group operations, build and configure a new monitoring group
Use Group Operations > Configure New Group
Building and Configuring a Monitoring Group (page 88)
Group operations, change an existing group
Use Group Operations > Select Group
Changing an Existing Group (page 93)
Group operations, define or edit Group Monitoring types
Use Group Operations > NRM Health Types
Defining or Editing Group Monitoring Types (page 98)
Group operations, delete an existing group
Use Group Operations > Select Group
Deleting an Existing Group (page 94)
Group operations, discover items to monitor on the network.
Use Group Operations > Configure New Group > right-click menu > Network Discovery
Discovering Items on the Network to Monitor (page 98)
Group operations, generate and view server reports
Use Group Operations > Configure New Group > right-click menu > Save Group
Generating and Viewing Server Reports (page 94)
Group operations, save a new group
Use Group Operations > Configure New Group > right-click menu > Save Group
Saving a Group (page 92)
Group operations, view defined health types
Use Group Operations > NRM Health Types
Viewing Group Monitoring Types (page 96)
Group operations, view monitored items
View Monitored Items Viewing Monitored Items (page 95)
Host, shut down Manage Linux > Down/Reset Options
Shutting Down and Restarting the Host (page 73)
Tasks Link in Navigation frame or Other Location For More Information
102 OES 2 SP3: Novell Remote Manager for Linux Administration Guide

Host, restart Manage Linux > Down/Reset Options
Shutting Down and Restarting the Host (page 73)
Interrupt information, view Manage Hardware > Interrupt Information
Viewing Interrupt Information (page 82)
I/O Memory information, view Manage Hardware > IO Memory Information
Viewing I/O Memory Information (page 83)
IO Port information, view Manage Hardware > IO Port Information
Viewing I/O Port Information (page 84)
Kernel modules, view Manage Linux > Kernel Module Listing
Viewing Kernel Modules (page 71)
Memory information, view Manage Linux > View Memory Information
Viewing Memory Information (page 72)
Mounted devices, perform actions on them
Home icon > Info icon Viewing Mounted Devices and Performing Actions on Them (page 46)
Mounted devices, view Home icon > Info icon Viewing Mounted Devices and Performing Actions on Them (page 46)
Packages, install Manage Linux > Package Information
Managing Packages (page 74)
Packages, remove Manage Linux > Package Information
Managing Packages (page 74)
Packages, view information about Manage Linux > Package Information
Managing Packages (page 74)
Partition information, view View File System > View Partition Information
Viewing Partition Information (page 51)
Process, kill Manage Linux > Process Information
Managing Processes (page 75)
Process, view information about Manage Linux > Process Information
Managing Processes (page 75)
Processors, view information about Manage Hardware > View Processors
Viewing Processors (page 81)
Server health, configure email notification about status
Health Monitor and Configuration Icon
Configuring Email Notification for Server Health Status (page 42)
Server health, configure item to monitor
Diagnose > Health Monitor Configuring the Items to Monitor (page 42)
Server health, monitor health of a specific item
Diagnose > Health Monitor Monitoring Overall Server Health or the Health of a Specific Item (page 39)
Server health, monitor overall health
Diagnose > Health Monitor Monitoring Overall Server Health or the Health of a Specific Item (page 39)
Tasks Link in Navigation frame or Other Location For More Information
Tasks Quick Reference 103

Server health, troubleshooting suspect or bad health status
Diagnose > Health Monitor Troubleshooting a Suspect or Bad Health Status (page 42)
Server Group, monitor overall server health
Use Group Operation > Configure New Group or Select Group
Building and Configuring a Monitoring Group (page 88)
SMBIOS information, view Manage Hardware > SMBIOS Information
Viewing SMBIOS Information (page 85)
Swap information, view Manage Linux > View Memory Information
Viewing Memory Information (page 72)
Tasks Link in Navigation frame or Other Location For More Information
104 OES 2 SP3: Novell Remote Manager for Linux Administration Guide

14 14Security Considerations
This section contains information that helps you know whether you can use this utility in a secure environment and points you to information to help you set up access to your server so you can be certain that its contents are not compromised through the use of this utility.
For additional security implementation information, see “Security” in the OES 2 SP3: Planning and Implementation Guide.
The default settings for Novell Remote Manager for OES Linux are set so your network and information cannot be compromised.If you change settings from the default, please be aware of the consequences of your actions.
Section 14.1, “Security Features,” on page 105 Section 14.2, “Security Characteristics,” on page 107 Section 14.3, “Security Configuration,” on page 107
14.1 Security FeaturesThe following table contains the security features of Novell Remote Manager on OES Linux.
Table 14-1 Security Features of Novell Remote Manager on OES Linux
Feature Yes/No Details
Users are authenticated Yes Users must log in to Novell Remote Manager.
Log in as user root, a local Linux user, or as a Novell eDirectory user that is Linux User Management enabled.
The root user is authenticated locally, not through eDirectory. This allows the root user to manage server resources even if the eDirectory services are not available.
For more information, see “Accessing Novell Remote Manager” on page 27 and “Changing the Configuration” on page 33.
Security Considerations 105
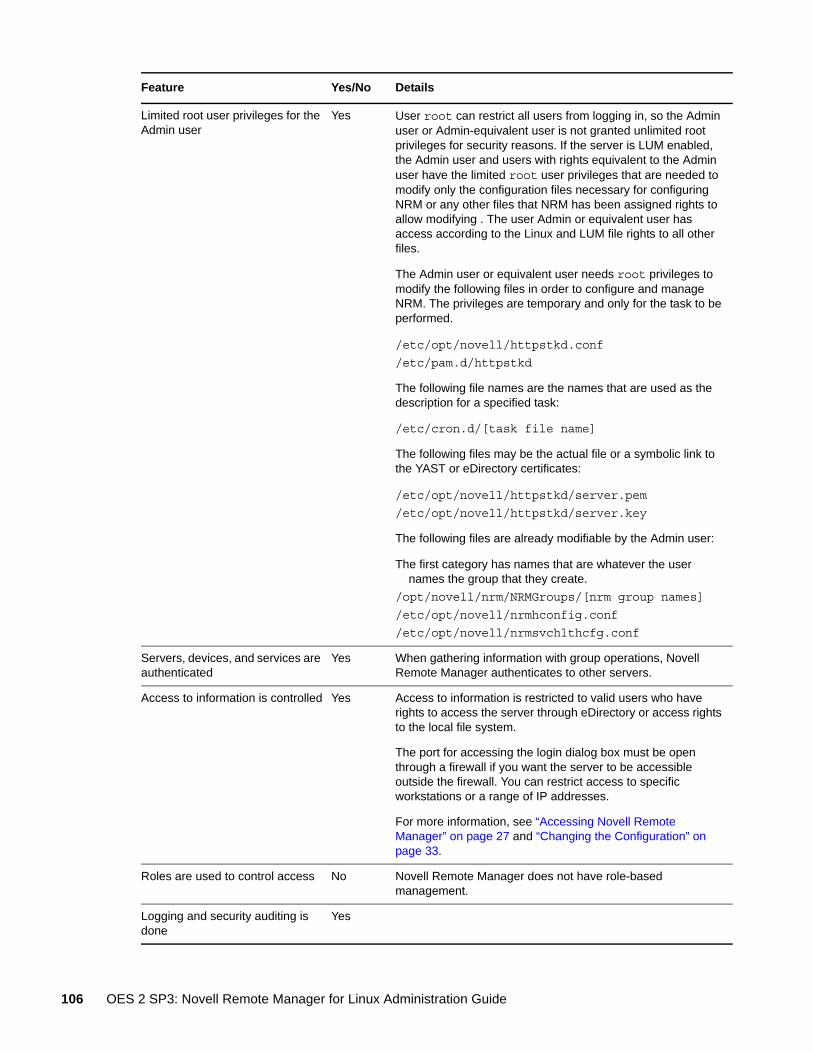
Limited root user privileges for the Admin user
Yes User root can restrict all users from logging in, so the Admin user or Admin-equivalent user is not granted unlimited root privileges for security reasons. If the server is LUM enabled, the Admin user and users with rights equivalent to the Admin user have the limited root user privileges that are needed to modify only the configuration files necessary for configuring NRM or any other files that NRM has been assigned rights to allow modifying . The user Admin or equivalent user has access according to the Linux and LUM file rights to all other files.
The Admin user or equivalent user needs root privileges to modify the following files in order to configure and manage NRM. The privileges are temporary and only for the task to be performed.
/etc/opt/novell/httpstkd.conf
/etc/pam.d/httpstkd
The following file names are the names that are used as the description for a specified task:
/etc/cron.d/[task file name]
The following files may be the actual file or a symbolic link to the YAST or eDirectory certificates:
/etc/opt/novell/httpstkd/server.pem
/etc/opt/novell/httpstkd/server.key
The following files are already modifiable by the Admin user:
The first category has names that are whatever the user names the group that they create.
/opt/novell/nrm/NRMGroups/[nrm group names]
/etc/opt/novell/nrmhconfig.conf
/etc/opt/novell/nrmsvchlthcfg.conf
Servers, devices, and services are authenticated
Yes When gathering information with group operations, Novell Remote Manager authenticates to other servers.
Access to information is controlled Yes Access to information is restricted to valid users who have rights to access the server through eDirectory or access rights to the local file system.
The port for accessing the login dialog box must be open through a firewall if you want the server to be accessible outside the firewall. You can restrict access to specific workstations or a range of IP addresses.
For more information, see “Accessing Novell Remote Manager” on page 27 and “Changing the Configuration” on page 33.
Roles are used to control access No Novell Remote Manager does not have role-based management.
Logging and security auditing is done
Yes
Feature Yes/No Details
106 OES 2 SP3: Novell Remote Manager for Linux Administration Guide
14.2 Security CharacteristicsNovell Remote Manager communicates using port 8008 and 8009. Port 8008 access the Login page, then all other communications take place through secure HTTP ports 8009. These default settings can be changed using options in the /etc/opt/novell/httpstkd.conf file.
The HTTPS communication uses SSL encryption. It uses the server certificate by default; however, you can reconfigure this setting if desired.
You can set the SSL key cipher strength by setting the cipher strength command in the /etc/opt/novell/httpstkd.conf file. We recommend that you set the cipher strength to high, which allows only 112-bit or greater encryption. By default it is set ALL, which allows any cipher strength. For information, see Section A.9, “SSL Key Cipher Strength Command,” on page 119.
By default, Novell Remote Manager sets an HttpOnly cookie attribute that specifies that the cookie is not accessible through a script. This helps mitigate the risk of cross-site scripting. For information, see Section A.5, “HttpOnly Command,” on page 115.
The Admin user and users with rights equivalent to user Admin have limited root user privileges that are needed to modify only the configuration files necessary for configuring NRM or any other files that NRM has been assigned rights to allow modifying . For a list of these files, see Section 14.1, “Security Features,” on page 105. The user Admin or equivalent user has access according to the Linux and LUM file rights to all other files.
14.3 Security ConfigurationThe following table provides a summary of the options you can change to allow or limit access to the server through Novell Remote Manager.
Table 14-2 Options for Changing or Limiting Access to a Server Through Novell Remote Manager
Data on the wire are encrypted by default
Yes The following data are encrypted on the wire:
Administration via browser UI
When logging in the administration is switching to the HTTPS protocol.
Data is stored encrypted No
Passwords, keys, and any other authentication materials are stored encrypted
Yes
Security is on by default Yes
Feature Yes/No Details
Issue/Feature Recommendation For More Information
SSL key cipher strength High (112-bit or greater encryption)
The default setting is ALL, which allows any encryption level.
Section A.9, “SSL Key Cipher Strength Command,” on page 119
Security Considerations 107

Let the root user access Novell Remote Manager with full management rights.
Let all LUM-enabled eDirectory users access file system information in Novell Remote Manager.
Deny access to all non-LUM-enabled eDirectory users.
This is the default setting. The root user is the only user with full management rights in Novell Remote Manager.
All non-local user access is controlled by eDirectory and LUM. LUM-enabled eDirectory users can log in and view the file systems that they have the eDirectory rights and file system rights to see. These users (including Admin users and Admin-equivalent users) do not have management rights in Novell Remote Manager.
The eDirectory users that are not LUM enabled cannot access the server through Novell Remote Manager.
We recommend that the root user be the only local user created on the system. However, if local users log in to Novell Remote Manager, their access is limited to viewing the file systems that they have the local rights to see. The management features are not available to non-root local users.
“Accessing Novell Remote Manager” on page 27.
Let the root user access Novell Remote Manager with full management rights.
Deny access to all LUM-enabled eDirectory users, including the Admin user and Admin-equivalent users.
Deny access to all non-LUM-enabled eDirectory users.
By default, only the root user and LUM-enabled eDirectory users can log in to Novell Remote Manager. Non-LUM-enabled eDirectory users cannot access the server through Novell Remote Manager.
Set the nolum option in the /etc/opt/novell/httpstkd.conf file and edit the /etc/pam.d/httpstkd file.
Remove these lines:
auth sufficient /lib/security/pam_nam.soaccount sufficient /lib/security/pam_nam.sopassword sufficient /lib/security/pam_nam.sosession optional /lib/security/pam_nam.so
When the nolum option is set, no LUM-enabled eDirectory user can access the server via Novell Remote Manager, including the Admin user and Admin-equivalent user. By default, non-LUM-enabled eDirectory users continue to be denied access. Only the root user has full management access to Novell Remote Manager.
“Changing the Configuration” on page 33.
“Accessing and Editing the HTTPSTKD Configuration File” on page 34.
Issue/Feature Recommendation For More Information
108 OES 2 SP3: Novell Remote Manager for Linux Administration Guide

Let the root user access Novell Remote Manager with full management rights.
Restrict access for all LUM-enabled eDirectory users, except the Admin user and users with rights equivalent to Admin.
Deny access to all non-LUM-enabled eDirectory users.
By default, only the root user and LUM-enabled eDirectory users can log in to Novell Remote Manager. Non-LUM-enabled eDirectory users cannot access the server through Novell Remote Manager.
Set the supervisoronly option in the /etc/opt/novell/httpstkd.conf file.
When the supervisoronly option is set, the Admin user and Admin-equivalent users are the only LUM-enabled eDirectory users that can log in to Novell Remote Manager. They can view the file systems that they have the eDirectory rights and file system rights to see. By default, non-LUM-enabled eDirectory users continue to be denied access. Only the root user has full management access to Novell Remote Manager.
“Changing the Configuration” on page 33.
“Accessing and Editing the HTTPSTKD Configuration File” on page 34.
Restrict access to specific workstations or a range of IP address
Set the filteraddr and filtersubnet options in the /etc/opt/novell/httpstkd.conf file.
“Changing the Configuration” on page 33.
“Accessing and Editing the HTTPSTKD Configuration File” on page 34.
Remove access to the utility for all users
Stop the HTTPSTKD daemon. “Starting or Stopping HTTPSTKD” on page 29.
Issue/Feature Recommendation For More Information
Security Considerations 109

110 OES 2 SP3: Novell Remote Manager for Linux Administration Guide
A AHTTPSTKD Configuration File Options
To control the behavior of Novell Remote Manager on Linux, you can specify the options listed in the HTTPSTKD configuration file in /etc/opt/novell/httpstkd.conf. This information is in the default configuration file when installing a new server.
If you are upgrading your server, you might need to update or add the information and settings noted if you want the applicable functionality.
To edit the file, click the Configure icon in the header frame.
The following options are available for controlling the behavior of Novell Remote Manager on Linux:
Section A.1, “Address and Port Commands,” on page 111 Section A.2, “Disable Auto LUM Command,” on page 112 Section A.3, “Email Notification Commands,” on page 114 Section A.4, “Filtering Commands,” on page 114 Section A.5, “HttpOnly Command,” on page 115 Section A.6, “InventoryResolveNonLumOwnerName Command,” on page 116 Section A.7, “Language Commands,” on page 117 Section A.8, “Load Command,” on page 118 Section A.9, “SSL Key Cipher Strength Command,” on page 119 Section A.10, “Supervisor Only Command,” on page 119
A.1 Address and Port Commands
Purpose
Specifies each address and port that HTTPSTKD opens and listens on.
Optionally, you can enable SSL on the port using the keyfile and certfile parameters.
Syntax
addr ip_address:port_number
addr ip_address:port_number keyfile:key_file_path/name certfile:certificate_file_path/name
HTTPSTKD Configuration File Options 111

Examples
addr 0.0.0.0:8008
addr 0.0.0.0:8009 keyfile=/etc/opt/novell/httpstkd/server.key certfile=/etc/opt/novell/httpstkd/server.pem
A.2 Disable Auto LUM Command
Purpose
Only the root user has full management rights in Novell Remote Manager. The root user is a local superuser, and is not an eDirectory user. This allows the server to be managed even if the eDirectory authentication service is down.
Auto LUM lets eDirectory users that are enabled with Linux User Management (LUM) log in to Novell Remote Manager by using their eDirectory user names and passwords. For example, you can log in as user Admin or as a user with rights equivalent to Admin rather than logging in as user root. When LUM-enabled eDirectory users access Novell Remote Manager, they are allowed to view only the file systems that they have the eDirectory rights and file system rights to see.
NOTE: You can use the supervisoronly option to restrict access for LUM-enabled eDirectory users to only the Admin user and users with rights equivalent to the Admin user.
By default, the eDirectory users that are not LUM-enabled cannot access the server with Novell Remote Manager. They can view their files via NCP, CIFS, or AFP.
Option Use
IP_address One of the following:
0.0.0.0
The assigned static IP address of the node
A DNS name is not allowed.
port/ One of the following for public or secure:
8008 is the default public port
8009 is the default secure port
any port not in use on the server
If you are accessing Novell Remote Manager outside a firewall, these ports must be open.
keyfile_path/name keyfile=/etc/opt/novell/httpstkd/server.key is the default path and filename on a new OES server installation.
certificate_path/name certfile=/etc/opt/novell/httpstkd/server.pem is the default path and filename on a new OES server installation.
112 OES 2 SP3: Novell Remote Manager for Linux Administration Guide
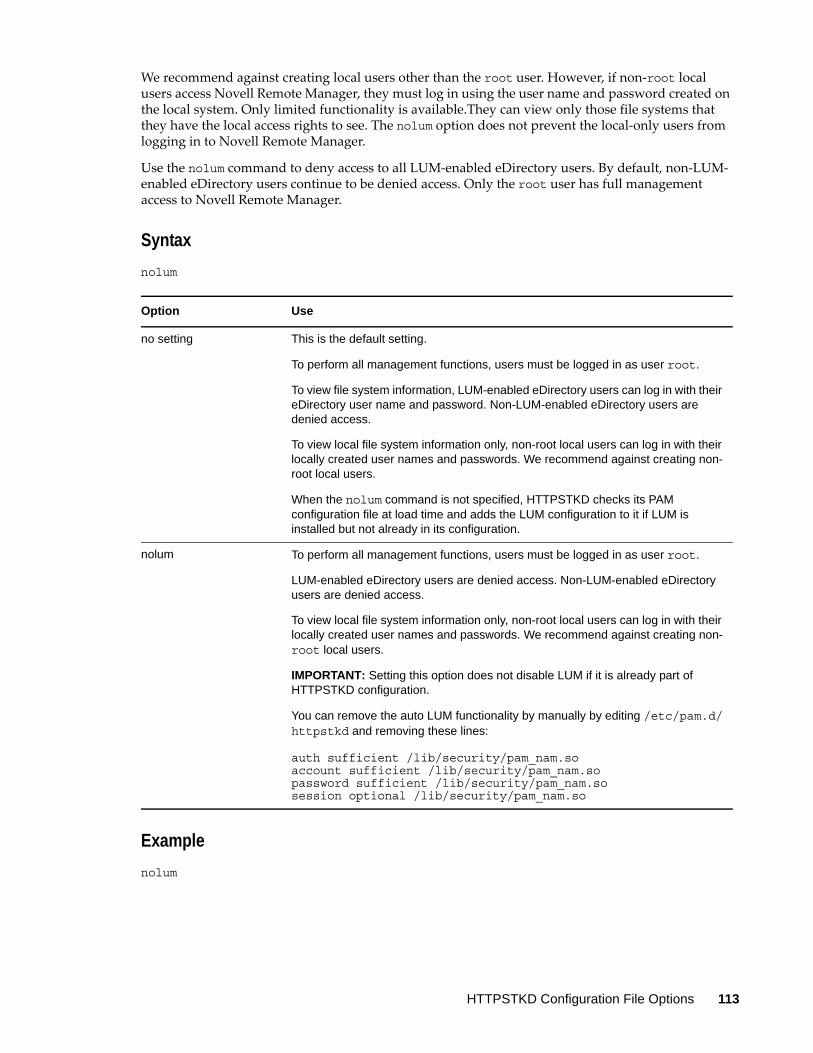
We recommend against creating local users other than the root user. However, if non-root local users access Novell Remote Manager, they must log in using the user name and password created on the local system. Only limited functionality is available.They can view only those file systems that they have the local access rights to see. The nolum option does not prevent the local-only users from logging in to Novell Remote Manager.
Use the nolum command to deny access to all LUM-enabled eDirectory users. By default, non-LUM-enabled eDirectory users continue to be denied access. Only the root user has full management access to Novell Remote Manager.
Syntax
nolum
Example
nolum
Option Use
no setting This is the default setting.
To perform all management functions, users must be logged in as user root.
To view file system information, LUM-enabled eDirectory users can log in with their eDirectory user name and password. Non-LUM-enabled eDirectory users are denied access.
To view local file system information only, non-root local users can log in with their locally created user names and passwords. We recommend against creating non-root local users.
When the nolum command is not specified, HTTPSTKD checks its PAM configuration file at load time and adds the LUM configuration to it if LUM is installed but not already in its configuration.
nolum To perform all management functions, users must be logged in as user root.
LUM-enabled eDirectory users are denied access. Non-LUM-enabled eDirectory users are denied access.
To view local file system information only, non-root local users can log in with their locally created user names and passwords. We recommend against creating non-root local users.
IMPORTANT: Setting this option does not disable LUM if it is already part of HTTPSTKD configuration.
You can remove the auto LUM functionality by manually by editing /etc/pam.d/httpstkd and removing these lines:
auth sufficient /lib/security/pam_nam.soaccount sufficient /lib/security/pam_nam.sopassword sufficient /lib/security/pam_nam.sosession optional /lib/security/pam_nam.so
HTTPSTKD Configuration File Options 113
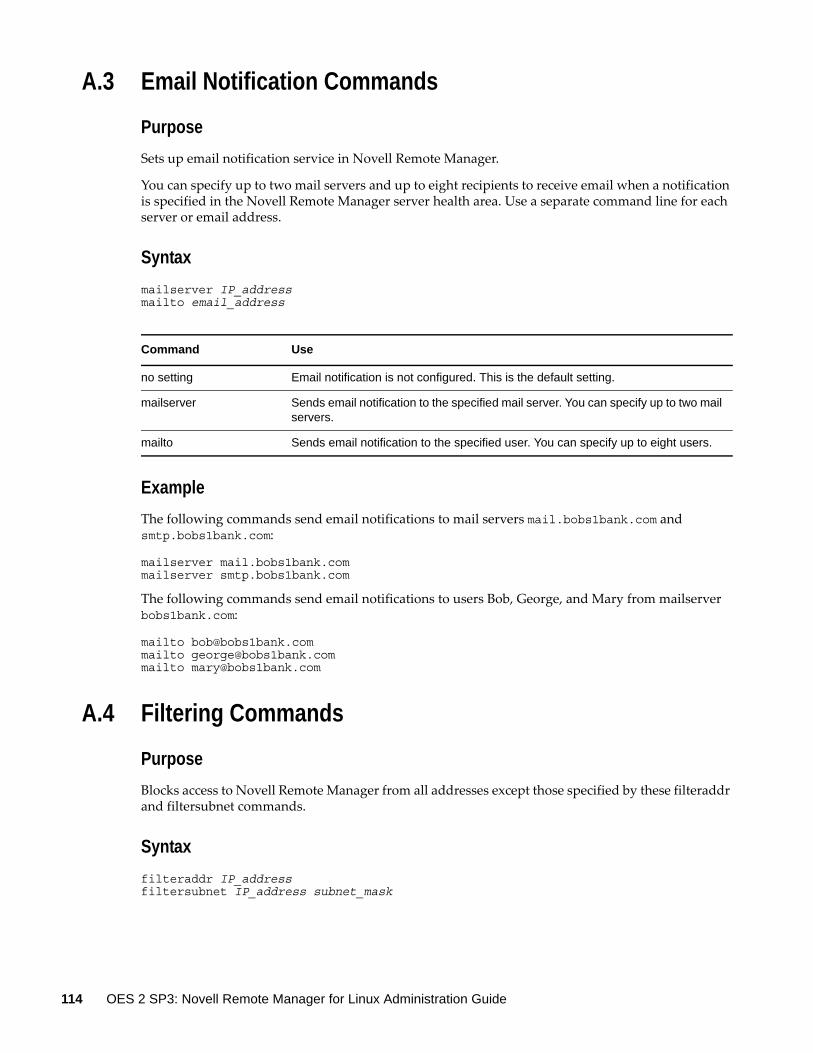
A.3 Email Notification Commands
Purpose
Sets up email notification service in Novell Remote Manager.
You can specify up to two mail servers and up to eight recipients to receive email when a notification is specified in the Novell Remote Manager server health area. Use a separate command line for each server or email address.
Syntax
mailserver IP_addressmailto email_address
Example
The following commands send email notifications to mail servers mail.bobs1bank.com and smtp.bobs1bank.com:
mailserver mail.bobs1bank.commailserver smtp.bobs1bank.com
The following commands send email notifications to users Bob, George, and Mary from mailserver bobs1bank.com:
mailto [email protected] [email protected] [email protected]
A.4 Filtering Commands
Purpose
Blocks access to Novell Remote Manager from all addresses except those specified by these filteraddr and filtersubnet commands.
Syntax
filteraddr IP_addressfiltersubnet IP_address subnet_mask
Command Use
no setting Email notification is not configured. This is the default setting.
mailserver Sends email notification to the specified mail server. You can specify up to two mail servers.
mailto Sends email notification to the specified user. You can specify up to eight users.
114 OES 2 SP3: Novell Remote Manager for Linux Administration Guide
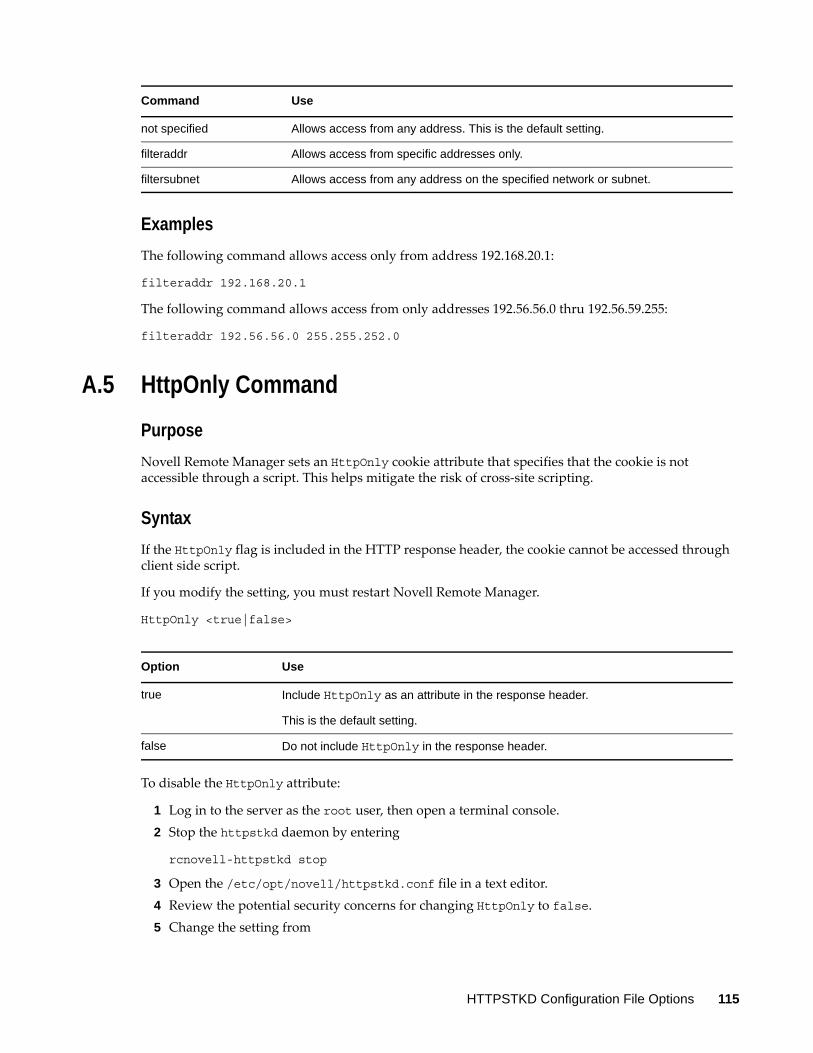
Examples
The following command allows access only from address 192.168.20.1:
filteraddr 192.168.20.1
The following command allows access from only addresses 192.56.56.0 thru 192.56.59.255:
filteraddr 192.56.56.0 255.255.252.0
A.5 HttpOnly Command
Purpose
Novell Remote Manager sets an HttpOnly cookie attribute that specifies that the cookie is not accessible through a script. This helps mitigate the risk of cross-site scripting.
Syntax
If the HttpOnly flag is included in the HTTP response header, the cookie cannot be accessed through client side script.
If you modify the setting, you must restart Novell Remote Manager.
HttpOnly <true|false>
To disable the HttpOnly attribute:
1 Log in to the server as the root user, then open a terminal console.2 Stop the httpstkd daemon by entering
rcnovell-httpstkd stop
3 Open the /etc/opt/novell/httpstkd.conf file in a text editor.4 Review the potential security concerns for changing HttpOnly to false.5 Change the setting from
Command Use
not specified Allows access from any address. This is the default setting.
filteraddr Allows access from specific addresses only.
filtersubnet Allows access from any address on the specified network or subnet.
Option Use
true Include HttpOnly as an attribute in the response header.
This is the default setting.
false Do not include HttpOnly in the response header.
HTTPSTKD Configuration File Options 115

HttpOnly true
to
HttpOnly false
6 Save the file and exit the text editor.7 Start the httpstkd daemon by entering
rcnovell-httpstkd start
Examples
HttpOnly true
HttpOnly false
A.6 InventoryResolveNonLumOwnerName Command
Purpose
The InventoryResolveNonLumOwnerName command is used when you perform an inventory of NSS volumes and the file owner UID is set to the Nobody user. The Nobody user is reported when a file is owned by a Novell eDirectory user that is not enabled with Linux User Management (LUM).
Syntax
If you modify the setting, you must restart Novell Remote Manager.
InventoryResolveNonLumOwnerName <false|true>
Examples
The following example does not resolve the user IDs of file owners that are not LUM enabled. This is the default setting. The non-LUM-enabled owners are reported as the Nobody user.
InventoryResolveNonLumOwnerName false
The following example resolves the user IDs of file owners that are not LUM enabled to the user name. The more non-LUM-enabled owners encountered, the longer the inventory can take.
InventoryResolveNonLumOwnerName true
Option Use
false The inventory does not resolve the user IDs of non-LUM-enabled file owners. The owner is reported as the Nobody user.
This is the default setting. This provides faster performance for an inventory of files on an NSS volume when eDirectory users are not LUM enabled.
true The inventory tries to resolve the user IDs of non-LUM-enabled file owners by using NSS APIs. This can result in a major performance impact for the inventory. The more non-LUM-enabled file owners the inventory encounters, the longer it takes to complete the inventory.
116 OES 2 SP3: Novell Remote Manager for Linux Administration Guide

A.7 Language Commands
Purpose
Sets up a mapping of HTTP Accept-Language header tags for Linux locales. These locales determine the languages in which the browser can view content through the Novell Remote Manager utility.
To see a list of possible locales on your Linux server, enter the following at a shell prompt:
locale -a
Syntax
lang HTTP_language_string locale_string
Command Use
lang Use the following settings:
English: en en_US.UTF8
US English: en-us en_US.UTF8
Chinese Simplified: zh-cn zh_CN.UTF8
Chinese Traditional: zh-tw zh_TW.UTF8
Czech: cs cs_CZ.UTF8
French: fr fr_FR.UTF
German: de de_DE.UTF8
Hungarian: hu hu_HU.UTF8
Italian: it it_IT.UTF8
Japanese: ja ja_JP.UTF8
Polish: pl pl_PL.UTF8
Portuguese-Brazil: pt pt_BR.UTF8
Russian: ru ru_RU.UTF8
Spanish: es es_ES.UTF8
Slovak: sk sk_SK.UTF8
These are the default settings for this release.
In this release, Novell Remote Manager supports English, Chinese Simplified, Chinese Traditional, Czech, French, German, Hungarian, Italian, Japanese, Polish, Portuguese-Brazil, Russian, Spanish, and Slovak.
HTTPSTKD Configuration File Options 117

Examples
The following commands set the browser languages for various languages such as English, French, Japanese, and Portuguese:
lang en en_US.UTF8lang en-us en_US.UTF8lang zh-cn zh_CN.UTF8lang zh-tw zh_TW.UTF8lang cs cs_CZ.UTF8lang cs-cz cs_CZ.UTF8lang fr fr_FR.UTF8lang fr-fr fr_FR.UTF8lang de de_DE.UTF8lang de-de de_DE.UTF8lang hu hu_HU.UTF8lang hu-hu hu_HU.UTF8lang it it_IT.UTF8lang it-it it_IT.UTF8lang ja ja_JP.UTF8lang ja-jp ja_JP.UTF8lang pl pl_PL.UTF8lang pl-pl pl_PL.UTF8lang pt pt_BR.UTF8lang pt-BR pt_BR.UTF8lang ru ru_RU.UTF8lang ru-ru ru_RU.UTF8lang es es_ES.UTF8lang es-es es_ES.UTF8lang sk sk_SK.UTF8lang sk-sk sk_SK.UTF8
More Information
If you are upgrading this server and you want to use this option, you need to add these parameters to the /etc/opt/novell/httpstkd.conf file for this server.
A.8 Load Command
Purpose
Loads plug-in files used by Novell Remote Manager.
Syntax
load plug-in_file_path/name
Examples
load nrm.so
load /opt/novell/lib/libnrm.so
Option Use
plug-in_file_path /opt/novell/lib/ is the default path for Novell Remote Manager plug-in files.
plug-in_filename libnrm.so is a default plug-in for Novell Remote Manager.
118 OES 2 SP3: Novell Remote Manager for Linux Administration Guide

A.9 SSL Key Cipher Strength Command
Purpose
The Cipher command sets the bit strength for the SSL key that is required to access Novell Remote Manager. If you modify the setting, you must restart NRM.
Syntax
cipher strength
Example
The following example allows access to Novell Remote Manager only with encryption that is 112-bit or greater:
cipher high
You must restart Novell Remote Manager to apply the change.
A.10 Supervisor Only Command
Purpose
Disables access to the server through Novell Remote Manager for all users except root. If Linux User Management is enabled for Novell Remote Manager, eDirectory user Admin and eDirectory users with rights equivalent to user Admin also have access to the server through Novell Remote Manager and can perform the same tasks as user root.
Syntax
supervisoronly
Option Use
all Allows any negotiated encryption level. This is the default setting.
low Allows less than 56-bit encryption.
medium Allows 56-bit up to 112-bit encryption.
high Allows 112-bit or greater encryption
HTTPSTKD Configuration File Options 119

Example
supervisoronly
More Information
If you are upgrading this server and you want to use this option, you need to add these parameters to the /etc/opt/novell/httpstkd.conf file for this server.
Option Use
no setting This is the default setting.
Local users and all LUM-enabled eDirectory users can log in to Novell Remote Manager.
The non-root and non-admin users have limited access to the server through Novell Remote Manager. They can access only the server’s file systems that they have rights to and can perform very limited tasks such as file upload and text search.
supervisoronly Lets only user root and eDirectory user Admin and users with rights equivalent to Admin have access to the server through Novell Remote Manager. LUM must be set for eDirectory user access.
120 OES 2 SP3: Novell Remote Manager for Linux Administration Guide
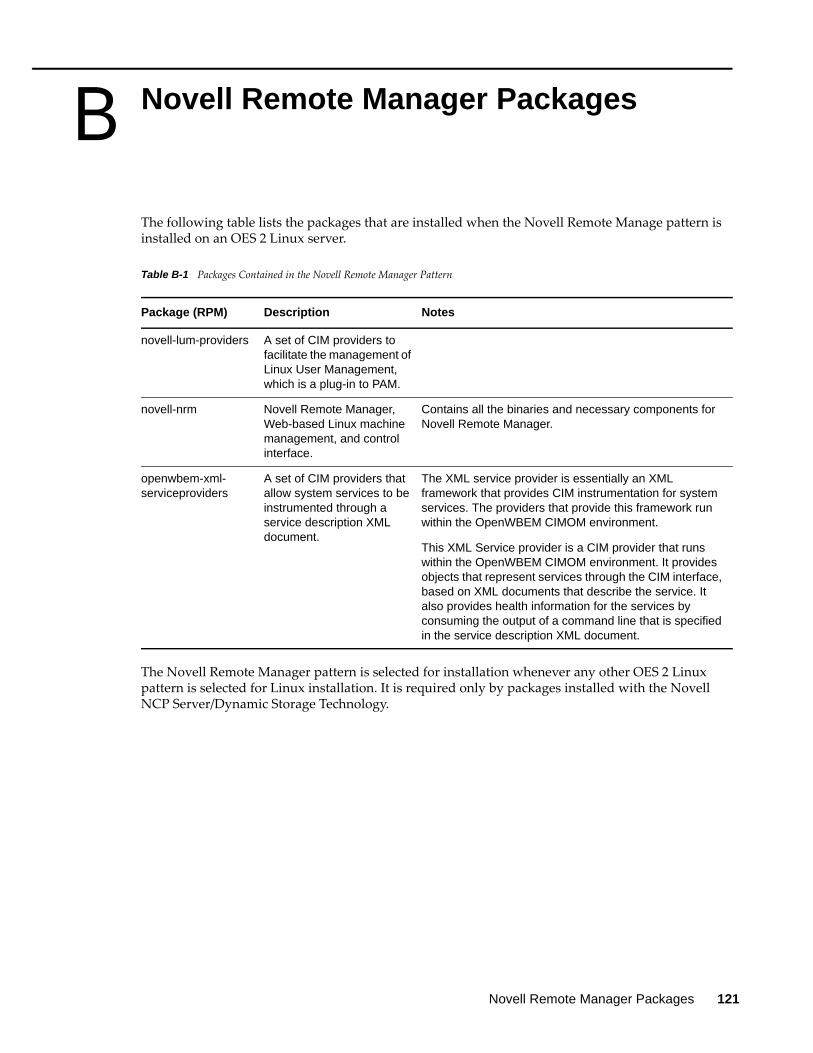
B BNovell Remote Manager Packages
The following table lists the packages that are installed when the Novell Remote Manage pattern is installed on an OES 2 Linux server.
Table B-1 Packages Contained in the Novell Remote Manager Pattern
The Novell Remote Manager pattern is selected for installation whenever any other OES 2 Linux pattern is selected for Linux installation. It is required only by packages installed with the Novell NCP Server/Dynamic Storage Technology.
Package (RPM) Description Notes
novell-lum-providers A set of CIM providers to facilitate the management of Linux User Management, which is a plug-in to PAM.
novell-nrm Novell Remote Manager, Web-based Linux machine management, and control interface.
Contains all the binaries and necessary components for Novell Remote Manager.
openwbem-xml-serviceproviders
A set of CIM providers that allow system services to be instrumented through a service description XML document.
The XML service provider is essentially an XML framework that provides CIM instrumentation for system services. The providers that provide this framework run within the OpenWBEM CIMOM environment.
This XML Service provider is a CIM provider that runs within the OpenWBEM CIMOM environment. It provides objects that represent services through the CIM interface, based on XML documents that describe the service. It also provides health information for the services by consuming the output of a command line that is specified in the service description XML document.
Novell Remote Manager Packages 121

122 OES 2 SP3: Novell Remote Manager for Linux Administration Guide

C CDocumentation Updates
To help you keep current on updates to the documentation, this section contains information on content changes that have been made in this OES 2: Novell Remote Manager for Linux Administration Guide since the initial release of Open Enterprise Server 2.
This document was updated on the following dates:
Section C.1, “May 3, 2013,” on page 123 Section C.2, “January 31, 2013,” on page 124 Section C.3, “August 6, 2012,” on page 125 Section C.4, “June 21, 2012,” on page 125 Section C.5, “May 31, 2012,” on page 126 Section C.6, “November 30, 2011,” on page 126 Section C.7, “April 8, 2011,” on page 128 Section C.8, “February 11, 2011,” on page 129 Section C.9, “December 2010 (OES2 SP3),” on page 129 Section C.10, “January 29, 2010,” on page 129 Section C.11, “November 9, 2009 (OES 2 SP2),” on page 130 Section C.12, “March 3, 2009,” on page 130 Section C.13, “December 2008,” on page 130 Section C.14, “March 21, 2008,” on page 132 Section C.15, “February 7, 2008,” on page 132
C.1 May 3, 2013Updates were made to the following sections. The changes are explained below.
Section C.1.1, “Viewing File Systems,” on page 124 Section C.1.2, “What’s New or Changed in Novell Remote Manager,” on page 124
Documentation Updates 123

C.1.1 Viewing File Systems
C.1.2 What’s New or Changed in Novell Remote Manager
C.2 January 31, 2013Updates were made to the following sections. The changes are explained below.
Section C.2.1, “Accessing Novell Remote Manager for Linux,” on page 124 Section C.2.2, “Using Group Operations,” on page 125 Section C.2.3, “What’s New or Changed in Novell Remote Manager,” on page 125
C.2.1 Accessing Novell Remote Manager for Linux
Location Change
Section 9.4.5, “Salvaging and Purging Deleted Files on an NSS Volume,” on page 59
If the deleted file resided in a directory that has been deleted, you must first salvage the deleted directories in the path. Salvage each lower directory in turn until you have salvaged the deleted directory that contained the file. You can then search for the deleted file in the salvaged directory.
You can also select a deleted directory and use the Purge option to purge the deleted directory and all of the deleted subdirectories and files it contains.
Location Change
Section 2.1, “What’s New (April 2013 Patches),” on page 13
This section is new.
Location Change
Section 6.1, “System Requirements,” on page 27
Support was added for the following Web browsers:
Internet Explorer 10 in the desktop user interface view on Windows 7 clients and Windows 8 clients
Safari 6.0 on Mac OS X Mountain Lion (version 10.8) clients
124 OES 2 SP3: Novell Remote Manager for Linux Administration Guide

C.2.2 Using Group Operations
C.2.3 What’s New or Changed in Novell Remote Manager
C.3 August 6, 2012Updates were made to the following section. The changes are explained below.
Section C.3.1, “HTTPSTKD Configuration File Options,” on page 125
C.3.1 HTTPSTKD Configuration File Options
C.4 June 21, 2012Updates were made to the following sections. The changes are explained below.
Section C.4.1, “Viewing File Systems,” on page 125 Section C.4.2, “What’s New,” on page 126
C.4.1 Viewing File Systems
Location Change
Section 12.1, “Building and Configuring a Monitoring Group,” on page 88
The Web Page monitoring option shows the response when trying to determine if the communication is working to a server that hosts a Web site.
Location Change
Section 2.2, “What’s New (January 2013 Patches),” on page 13
This section is new.
Location Change
Section A.5, “HttpOnly Command,” on page 115
The configuration file name is /etc/opt/novell/httpstkd.conf.
The command name HttpOnly is case sensitive.
Location Change
Section 9.6, “Generating and Viewing NCP Trustee Reports for NSS Volumes,” on page 66
The NCP Trustee Report feature is for NSS volumes only, including DST shadow volumes comprised of two NSS volumes.
Documentation Updates 125

C.4.2 What’s New
C.5 May 31, 2012Updates were made to the following sections. The changes are explained below.
Section C.5.1, “Viewing File Systems,” on page 126 Section C.5.2, “What’s New for Novell Remote Manager,” on page 126
C.5.1 Viewing File Systems
C.5.2 What’s New for Novell Remote Manager
C.6 November 30, 2011Updates were made to the following sections. The changes are explained below.
Section C.6.1, “Changing the Configuration,” on page 127 Section C.6.2, “HTTPSTKD Configuration File Options,” on page 127 Section C.6.3, “Security Considerations,” on page 127 Section C.6.4, “Managing Linux,” on page 127 Section C.6.5, “Viewing File Systems,” on page 127 Section C.6.6, “What’s New for Novell Remote Manager,” on page 128
Location Change
Section 2.3, “What’s New (May 2012 Patches),” on page 14
The NCP Trustee Report feature is for NSS volumes only, including DST shadow volumes comprised of two NSS volumes.
Location Change
Section 9.6, “Generating and Viewing NCP Trustee Reports for NSS Volumes,” on page 66
This section is new.
Location Change
Section 2.3, “What’s New (May 2012 Patches),” on page 14
This section is new.
126 OES 2 SP3: Novell Remote Manager for Linux Administration Guide
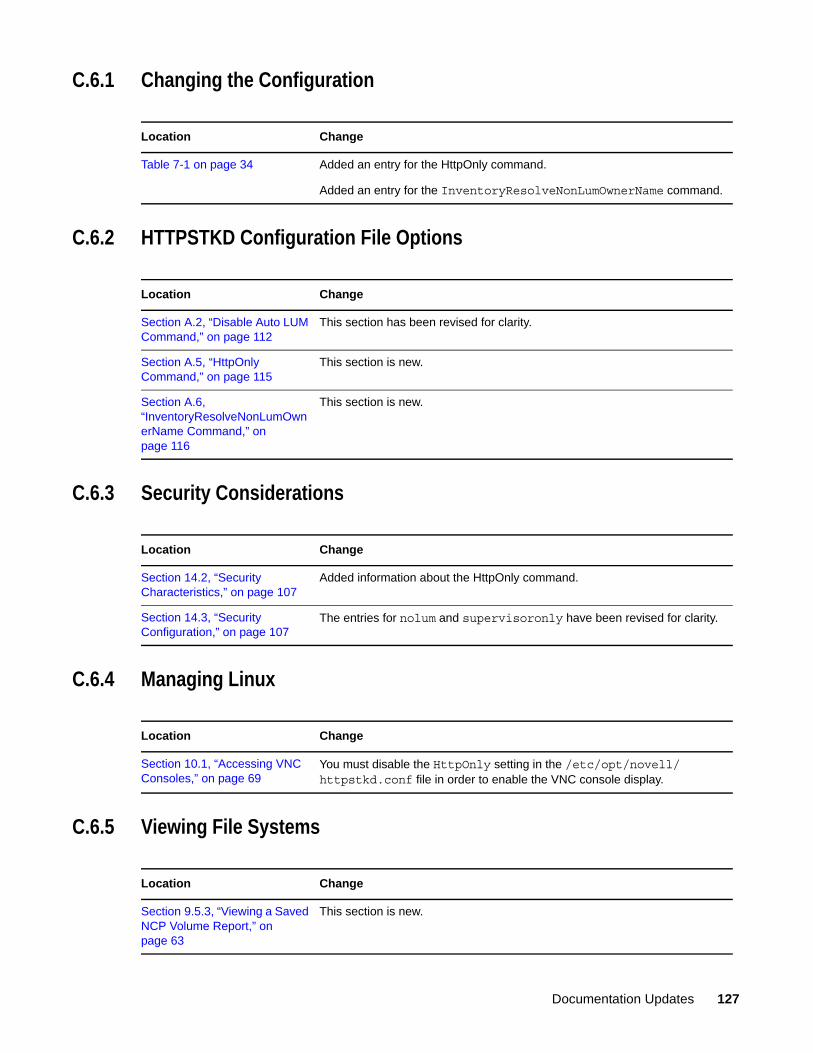
C.6.1 Changing the Configuration
C.6.2 HTTPSTKD Configuration File Options
C.6.3 Security Considerations
C.6.4 Managing Linux
C.6.5 Viewing File Systems
Location Change
Table 7-1 on page 34 Added an entry for the HttpOnly command.
Added an entry for the InventoryResolveNonLumOwnerName command.
Location Change
Section A.2, “Disable Auto LUM Command,” on page 112
This section has been revised for clarity.
Section A.5, “HttpOnly Command,” on page 115
This section is new.
Section A.6, “InventoryResolveNonLumOwnerName Command,” on page 116
This section is new.
Location Change
Section 14.2, “Security Characteristics,” on page 107
Added information about the HttpOnly command.
Section 14.3, “Security Configuration,” on page 107
The entries for nolum and supervisoronly have been revised for clarity.
Location Change
Section 10.1, “Accessing VNC Consoles,” on page 69
You must disable the HttpOnly setting in the /etc/opt/novell/httpstkd.conf file in order to enable the VNC console display.
Location Change
Section 9.5.3, “Viewing a Saved NCP Volume Report,” on page 63
This section is new.
Documentation Updates 127

C.6.6 What’s New for Novell Remote Manager
C.7 April 8, 2011Updates were made to the following sections. The changes are explained below.
Section C.7.1, “Changing the Configuration,” on page 128 Section C.7.2, “HTTPSTKD Configuration File Options,” on page 128 Section C.7.3, “Security Considerations,” on page 128 Section C.7.4, “Viewing File Systems,” on page 129 Section C.7.5, “What’s New for Novell Remote Manager,” on page 129
C.7.1 Changing the Configuration
C.7.2 HTTPSTKD Configuration File Options
C.7.3 Security Considerations
Section 9.5.4, “Emailing a Saved NCP Volume Report,” on page 63
This section is new.
Location Change
Location Change
Section 2.4, “What’s New (November 2011 Patches),” on page 14
This section is new.
Location Change
Table 7-1 on page 34 Added an entry for cipher strength.
Location Change
Section A.9, “SSL Key Cipher Strength Command,” on page 119
This section is new.
Location Change
Section 14.2, “Security Characteristics,” on page 107
Added information about the Cipher command.
128 OES 2 SP3: Novell Remote Manager for Linux Administration Guide
C.7.4 Viewing File Systems
C.7.5 What’s New for Novell Remote Manager
C.8 February 11, 2011Changes were made for the fixes mentioned in Section 2.6, “What’s New (April 2011 Patches),” on page 15.
C.9 December 2010 (OES2 SP3)This guide was updated to the Novell documentation standards for OES 2 SP3.
C.10 January 29, 2010Updates were made to the following sections. The changes are explained below.
Section C.10.1, “Accessing Novell Remote Manager for Linux,” on page 129 Section C.10.2, “Viewing File Systems,” on page 130
C.10.1 Accessing Novell Remote Manager for Linux
Location Change
Section 9.5, “Generating Inventories for Directories or NCP Volumes,” on page 60
File ownership information can now be retrieved for files on NSS volumes without needing to enable users with Linux User Management.
Location Change
Section 2.6, “What’s New (April 2011 Patches),” on page 15
This section is new.
Location Change
Section 6.1, “System Requirements,” on page 27
To view the graphical displays in the inventory report, Sun Java must be installed on the machine you use to to access Novell Remote Manager, and the browser must have Java and Javascript enabled.
Documentation Updates 129
C.10.2 Viewing File Systems
C.11 November 9, 2009 (OES 2 SP2)This guide was updated to the Novell documentation standards for OES 2 SP2.
C.12 March 3, 2009Updates were made to the following section. The changes are explained below.
C.12.1 Managing Linux
C.13 December 2008Updates were made to the following sections:
Section C.13.1, “Accessing Novell Remote Manager for Linux,” on page 131 Section C.13.2, “Managing Linux,” on page 131 Section C.13.3, “Security Considerations,” on page 131 Section C.13.4, “Viewing File Systems,” on page 131
Location Change
Section 9.5, “Generating Inventories for Directories or NCP Volumes,” on page 60
Generating this report can take a while, depending on the number of files and folders in the specified directory path. There is no facility to view previous inventory scans as there was on NetWare.
Section 9.5, “Generating Inventories for Directories or NCP Volumes,” on page 60
IMPORTANT: To view the graphical displays in the inventory report, Sun Java must be installed on the machine you use to to access Novell Remote Manager, and the browser must have Java and Javascript enabled.
Location Change
Section 10.7, “Scheduling cron Jobs to Run on the Server,” on page 77
IMPORTANT: When you set up cron commands, ensure that you log into Novell Remote Manager as the root user, or with a user name that has the necessary permissions to execute the command.
130 OES 2 SP3: Novell Remote Manager for Linux Administration Guide

C.13.1 Accessing Novell Remote Manager for Linux
C.13.2 Managing Linux
C.13.3 Security Considerations
C.13.4 Viewing File Systems
Location Change
Section 6.2, “Accessing Novell Remote Manager,” on page 27
The Admin user has limited file system rights equivalent to root that are needed to modify only the configuration files necessary for configuring NRM or any other files that NRM has been assigned rights to allow modifying. The user Admin or equivalent user has access according to the Linux and LUM file rights to all other files.
“Navigation Frame” on page 31 IMPORTANT: When working in Novell Remote Manager, using the browser's Back button can result in unintended actions being re-sent to the server. Ensure that you use the navigation links provided in the tool.
Location Change
Section 10.1, “Accessing VNC Consoles,” on page 69
IMPORTANT: The accessibility to the VNC consoles via Novell Remote Manager for Linux is limited to user root; it is not available to user Admin.
Location Change
Section 14.1, “Security Features,” on page 105
The Admin user has limited file system rights equivalent to root that are needed to modify only the configuration files necessary for configuring NRM or any other files that NRM has been assigned rights to allow modifying. The user Admin or equivalent user has access according to the Linux and LUM file rights to all other files.
Section 14.2, “Security Characteristics,” on page 107
Same change as above.
Location Change
Section 9.1, “Viewing Mounted Devices and Performing Actions on Them,” on page 46
For information about how NSS reports space usage for volumes, see “Guidelines for Sizing Volumes” in the OES 2 SP3: NSS File System Administration Guide for Linux.
Documentation Updates 131

C.14 March 21, 2008Edits were made to repair broken links. In addition, updates were made to the following sections:
Section C.14.1, “Diagnosing Problems,” on page 132 Section C.14.2, “Managing Linux,” on page 132
C.14.1 Diagnosing Problems
C.14.2 Managing Linux
C.15 February 7, 2008Edits were made to repair broken links. In addition, updates were made to the following section:
Section C.15.1, “Managing Hardware,” on page 132
C.15.1 Managing Hardware
Location Change
Section 8.1, “Monitoring Server Health,” on page 39
Information was added applying settings for the different tables, and for using the Refresh Rate feature. Information was reorganized for clarity.
Location Change
Section 10.6, “Managing Processes,” on page 75
Table 10-6 on page 76 describes the parameters that are reported on the Process Information page.
Location Change
Section 11.1, “Viewing Processors,” on page 81
Added information about processor information that is reported in a virtualized environment.
132 OES 2 SP3: Novell Remote Manager for Linux Administration Guide