office administrator guide - cisco.com · (cisco unity express configuration utility) to configure...
TRANSCRIPT

Cisco Small Business Pro
Unified Communications 500 Series
OFFICEADMINISTRATOR
GUIDE

© 2009 Cisco Systems, Inc. All rights reserved. OL-20005-01
CCDE, CCENT, CCSI, Cisco Eos, Cisco HealthPresence, Cisco Ironport, the Cisco logo, Cisco Lumin, Cisco Nexus, Cisco Nurse Connect, Cisco Stackpower,
Cisco StadiumVision, Cisco TelePresence, Cisco Unified Computing System, Cisco WebEx, DCE, Flip Channels, Flip for Good, Flip Mino, Flip Video, Flip Video
(Design), Flipshare (Design), Flip Ultra, and Welcome to the Human Network are trademarks; Changing the Way We Work, Live, Play, and Learn, Cisco Store, and
Flip Gift Card are service marks; and Access Registrar, Aironet, AsyncOS, Bringing the Meeting To You, Catalyst, CCDA, CCDP, CCIE, CCIP, CCNA, CCNP, CCSP,
CCVP, Cisco, the Cisco Certified Internetwork Expert logo, Cisco IOS, Cisco Press, Cisco Systems, Cisco Systems Capital, the Cisco Systems logo, Cisco Unity,
Collaboration Without Limitation, EtherFast, EtherSwitch, Event Center, Fast Step, Follow Me Browsing, FormShare, GigaDrive, HomeLink, Internet Quotient, IOS,
iPhone, iQuick Study, IronPort, the IronPort logo, LightStream, Linksys, MediaTone, MeetingPlace, MeetingPlace Chime Sound, MGX, Networkers, Networking
Academy, Network Registrar, PCNow, PIX, PowerPanels, ProConnect, ScriptShare, SenderBase, SMARTnet, Spectrum Expert, StackWise, The Fastest Way to
Increase Your Internet Quotient, TransPath, WebEx, and the WebEx logo are registered trademarks of Cisco Systems, Inc. and/or its affiliates in the United States
and certain other countries.
All other trademarks mentioned in this document or website are the property of their respective owners. The use of the word partner does not imply a
partnership relationship between Cisco and any other company. (0907R)

Cisco Small Business Pro Unified Communications 500 Series Administrator Guide i
Contents
Chapter 1: Introduction 1
Before You Begin 1
Connecting to the Cisco Unified 500 Series 2
Chapter 2: Configuring Users and Phones 1
Configuring Phones 1
Configuring Users 2
Configuring Extension Numbers 5
Configuring Personal Speed Dials 6
Chapter 3: Configuring the System Parameters 2
Configuring Scheduling 3
Configuring Hunt Groups 9
Configuring Directories Entries 11
Configuring a Page Extension and Group 12
Configuring an Intercom Extension 13
Configuring a Call Park Extension 14
Adding Extensions to a Pickup Group 16
Saving the System Configuration 17
Chapter 4: Configuring Auto Attendant and Voice Mail 18
Configuring the Voice Mail System Options 18
Configuring Voice Mail to Email Notifications 19
Configuring Individual User Mailboxes 23
Configuring User Groups for Shared Voice-Mail Boxes 24
Configuring a Distribution List 26
Configuring Integrated Messaging (IMAP) 28
Chapter 5: Configuring TimeCardView 29
Appendix A: Where to Go From Here 30
1
Introduction
The guide provides instructions on how to use the UC 500 Graphic User Interface
(Cisco Unity Express configuration utility) to configure a variety of voice features.
This guide is intended for Site Administrators who are responsible for controlling
the system-wide voice settings of a small company.
NOTE Cisco strongly recommends that the administrator clearly understands the needs
of each user before following any of the procedures in this document.
The configuration utility is compatible with the UC 500 software package 7.1.3 or
later. See https://www.myciscocommunity.com/docs/DOC-1437 for the latest
software pack.
For detailed information about the features the UC 500 supports, see the online
help provided with the Cisco Unity Express, or related documentation at:
http://www.cisco.com/en/US/products/sw/voicesw/ps5520/
tsd_products_support_series_home.html
Before You Begin
Before you begin the configuration, do the following:
• Verify that the UC 500 is powered on and operational.
• Gather and write down the UC 500 setup information, such as IP addresses
and passwords, before using this document. If the UC 500 is already
installed, some settings might be different.
• Make sure that you are using Microsoft Internet Explorer 6 (IE6) SPT or later.
Cisco Small Business Pro Unified Communications 500 Series Administrator Guide 1
Introduction
Connecting to the Cisco Unified 500 Series 1
NOTE The procedures described in this document assume that the UC 500 is already
configured with Cisco Configuration Assistant (CCA).
Connecting to the Cisco Unified 500 Series
STEP 1 Connect your PC to a LAN port on the UC 500 or ESW 500 switch.
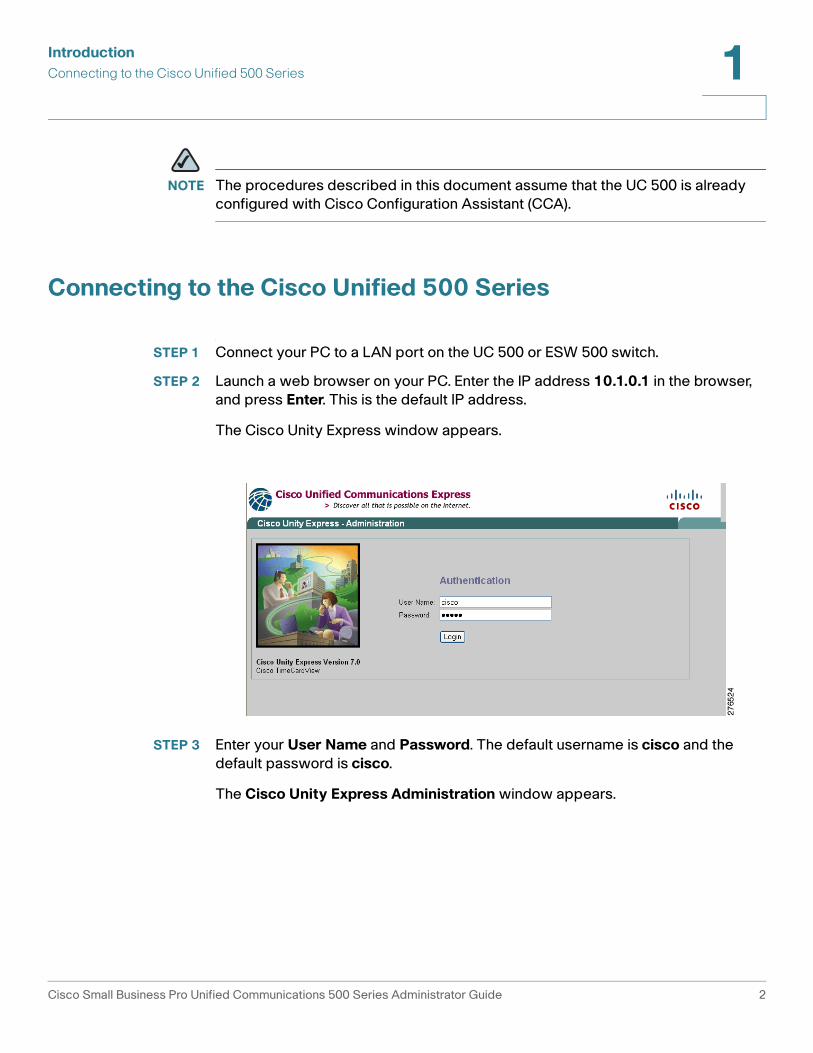
STEP 2 Launch a web browser on your PC. Enter the IP address 10.1.0.1 in the browser,
and press Enter. This is the default IP address.
The Cisco Unity Express window appears.
STEP 3 Enter your User Name and Password. The default username is cisco and the
default password is cisco.
The Cisco Unity Express Administration window appears.
Cisco Small Business Pro Unified Communications 500 Series Administrator Guide 2
Introduction
Connecting to the Cisco Unified 500 Series 1
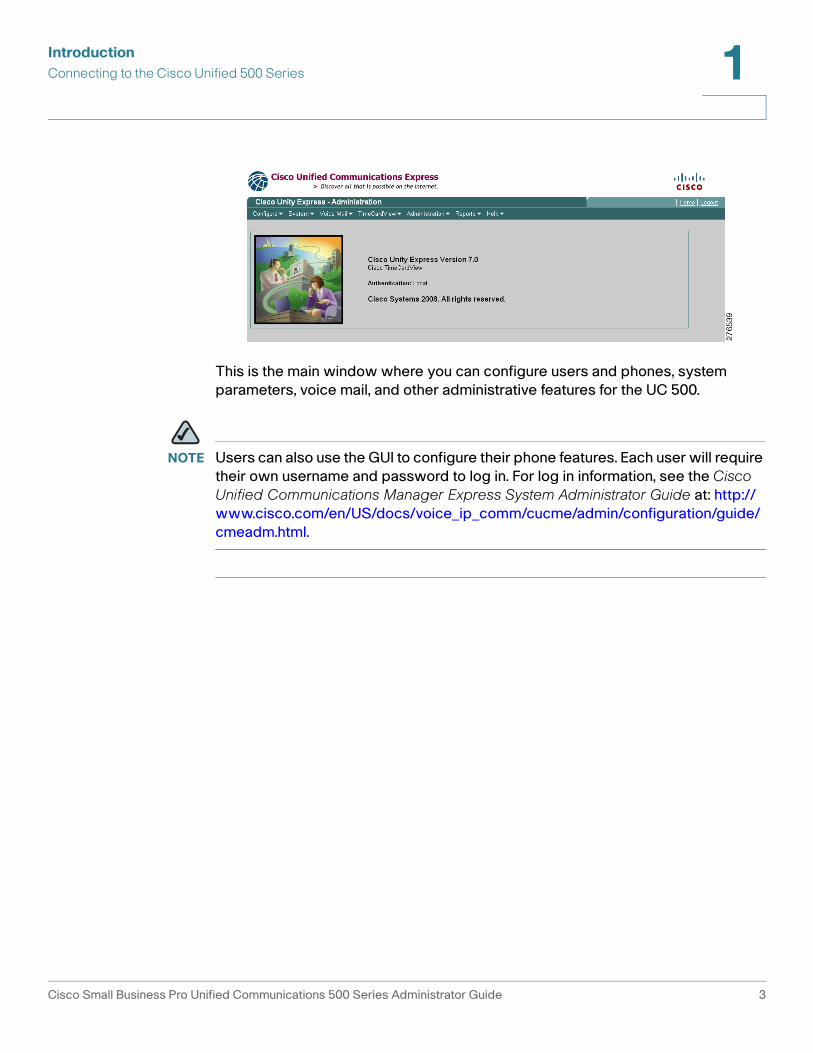
This is the main window where you can configure users and phones, system
parameters, voice mail, and other administrative features for the UC 500.
NOTE Users can also use the GUI to configure their phone features. Each user will require
their own username and password to log in. For log in information, see the Cisco
Unified Communications Manager Express System Administrator Guide at: http://
www.cisco.com/en/US/docs/voice_ip_comm/cucme/admin/configuration/guide/
cmeadm.html.
Cisco Small Business Pro Unified Communications 500 Series Administrator Guide 3
2
Configuring Users and Phones
This chapter contains information for configuring these features:
• Configuring Phones
• Configuring Users
• Configuring Extension Numbers
• Configuring Phones
• Configuring Personal Speed Dials
Configuring Phones
Use the Configure Phones window to add, delete, or modify an existing phone. You
can also reset an individual phone or all phones to update the phone firmware or
configuration files.
NOTE You must configure extensions and physically connect an IP phone to the system
before adding it to the Cisco Unity Express configuration.
Cisco Small Business Pro Unified Communications 500 Series Administrator Guide 1
Configuring Users and Phones
Configuring Users 2
To configure a phone:
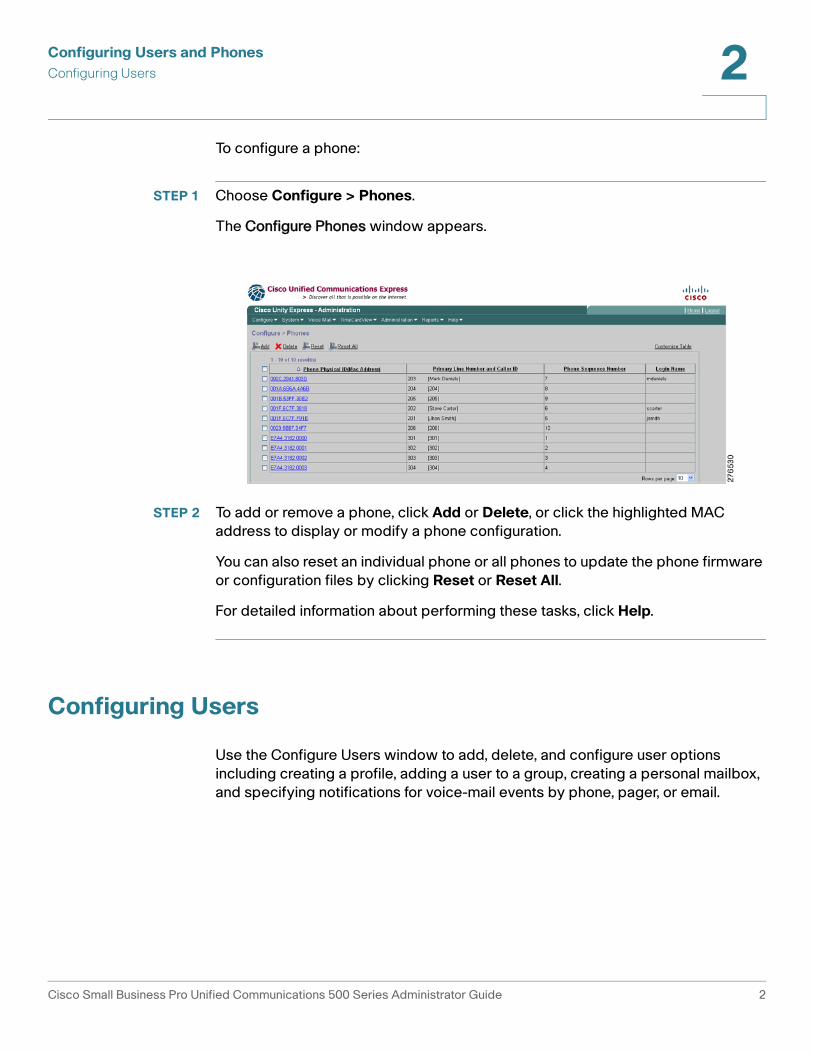
STEP 1 Choose Configure > Phones.
The Configure Phones window appears.
STEP 2 To add or remove a phone, click Add or Delete, or click the highlighted MAC
address to display or modify a phone configuration.
You can also reset an individual phone or all phones to update the phone firmware
or configuration files by clicking Reset or Reset All.
For detailed information about performing these tasks, click Help.
Configuring Users
Use the Configure Users window to add, delete, and configure user options
including creating a profile, adding a user to a group, creating a personal mailbox,
and specifying notifications for voice-mail events by phone, pager, or email.
Cisco Small Business Pro Unified Communications 500 Series Administrator Guide 2

Configuring Users and Phones
Configuring Users 2
To configure a user:
STEP 1 Choose Configure > Users.
The Configure Users window appears.
STEP 2 Select Add or Delete. To change an existing user, click the user name.
After you create a new user record, that record is associated with a specific
phone.
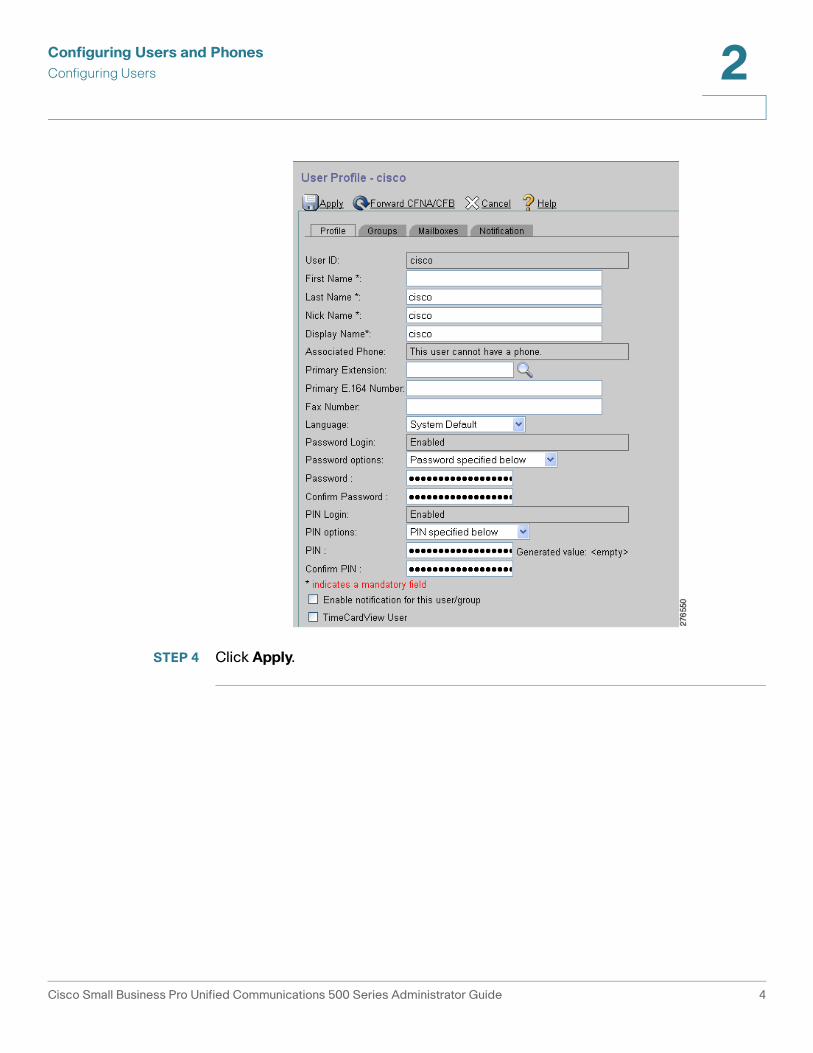
STEP 3 Configure the user options. There are four tabs:
• Profile–Specify user settings such as voice mail, password, associated
phone, full phone number and voice-mail pin.
• Groups–Add a user to a group as either members or administrators. The
group can have its own general delivery mailbox (shared voice-mail box).
• Mailboxes–Create a personal mailbox for the user.
• Notifications–Set up event notifications by phone, pager, or email.
NOTE Click Help for a detailed description of the different configuration options.
Cisco Small Business Pro Unified Communications 500 Series Administrator Guide 3
Configuring Users and Phones
Configuring Users 2
STEP 4 Click Apply.
Cisco Small Business Pro Unified Communications 500 Series Administrator Guide 4
Configuring Users and Phones
Configuring Extension Numbers 2
Configuring Extension Numbers
Use the Configure Extensions window to add, delete, or modify an existing
extension number.
To configure extensions:
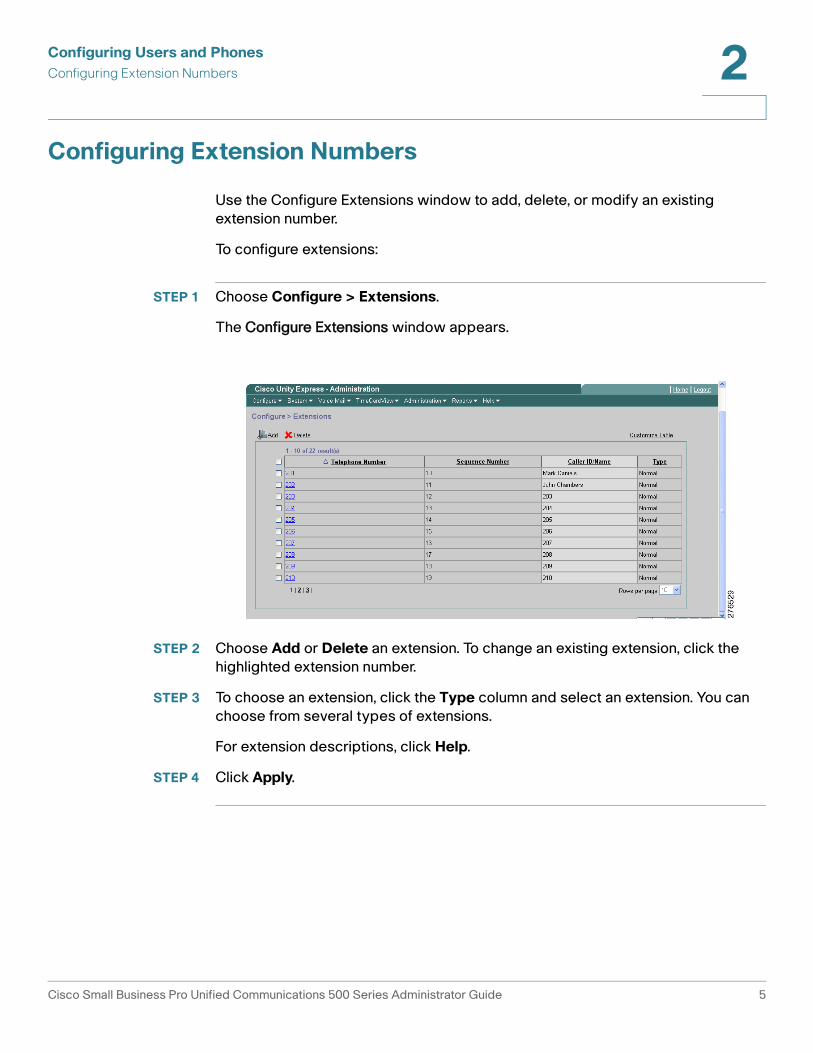
STEP 1 Choose Configure > Extensions.
The Configure Extensions window appears.
STEP 2 Choose Add or Delete an extension. To change an existing extension, click the
highlighted extension number.
STEP 3 To choose an extension, click the Type column and select an extension. You can
choose from several types of extensions.
For extension descriptions, click Help.
STEP 4 Click Apply.
Cisco Small Business Pro Unified Communications 500 Series Administrator Guide 5
Configuring Users and Phones
Configuring Personal Speed Dials 2
Configuring Personal Speed Dials
You can configure Personal Speed Dials so that a user can quickly place calls to
specified extension numbers. When you configure a speed dial, it automatically
appears on the unused line buttons on the phone. Those speed dials that do not
appear on a line button can be accessed through abbreviated dialing.
To configure personal speed dials for one or more users:
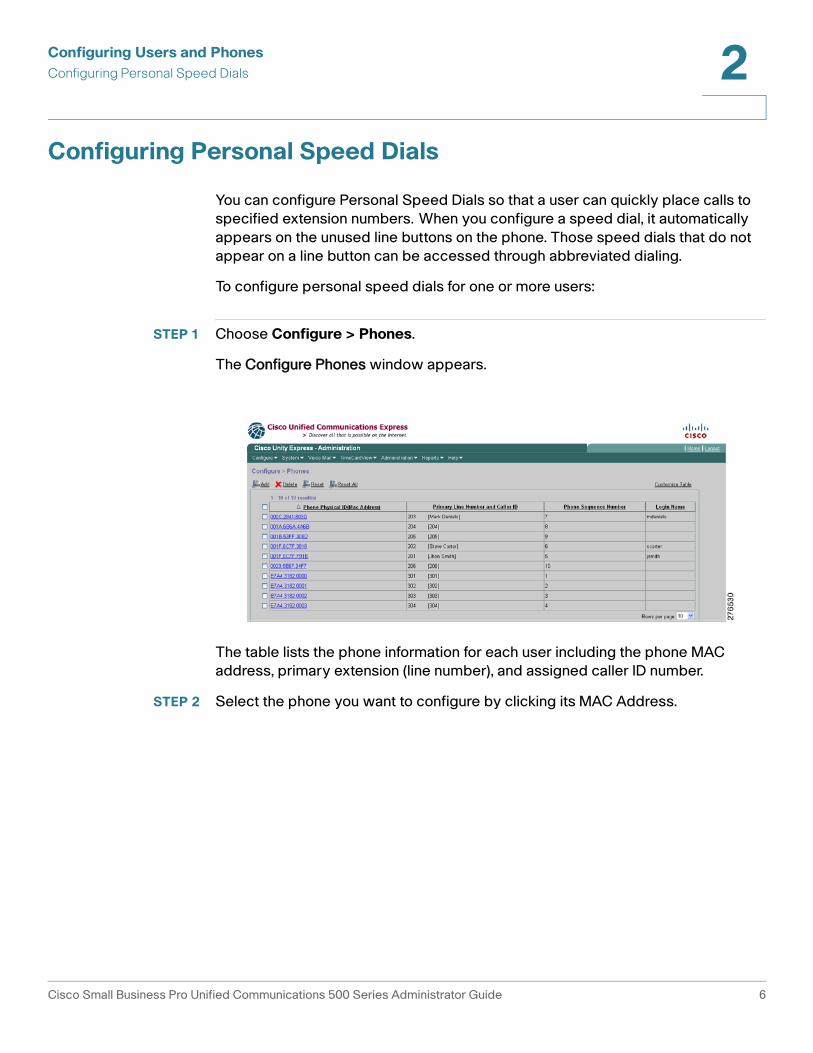
STEP 1 Choose Configure > Phones.
The Configure Phones window appears.
The table lists the phone information for each user including the phone MAC
address, primary extension (line number), and assigned caller ID number.
STEP 2 Select the phone you want to configure by clicking its MAC Address.
Cisco Small Business Pro Unified Communications 500 Series Administrator Guide 6

Configuring Users and Phones
Configuring Personal Speed Dials 2
The Change Phone window appears.
STEP 3 Click a number from the Phone Line Buttons table and specify the ring type and
extension numbers for the phone.
The user can then place a call to the specified extension by using the line button or
by entering the access code.
STEP 4 Click Save and then Change to save the settings.
Cisco Small Business Pro Unified Communications 500 Series Administrator Guide 7
Configuring Users and Phones
Configuring Personal Speed Dials 2
Configuring Password and PIN Options
When you create a user, the defaults that you set in the Configure User window
take effect. You can specify the default language and the password or PIN policy
for users. This default set of parameters is applied when a new user is created.
For information about how to perform these tasks, click Help and go to
Configuring User Defaults. You can also after change the password policy for an
individual user when adding a new user. See “Configuring Users,” on page 2.
Cisco Small Business Pro Unified Communications 500 Series Administrator Guide 8
3
Configuring the System Parameters
This chapter describes how to configure the system parameters on the UC 500. It
includes these sections:
• Configuring Scheduling
• Configuring Hunt Groups
• Configuring Directories Entries
• Configuring a Page Extension and Group
• Configuring an Intercom Extension
• Configuring a Call Park Extension
• Adding Extensions to a Pickup Group
• Saving the System Configuration
To access the System Parameters, choose Configure > System Parameters from
the Cisco Unity Express main window.
NOTE Only the most common configuration options are included in this guide. For detailed
information about these options, see: http://www.cisco.com/en/US/docs/
voice_ip_comm/unity_exp/rel3_1/online_help/gui/cmeadmin/admin/
cueadcme.pdf
Cisco Small Business Pro Unified Communications 500 Series Administrator Guide 2
Configuring the System Parameters
Configuring Scheduling 3
Configuring Scheduling
This section describes how to configure scheduling for the UC 500 and includes
these sections:
• Configuring Business Hours
• Configuring Holiday Settings
• Configuring Night Service Hours
• Configuring Night Service Bell
• Configuring Call Blocking and Call Blocking Hours
Configuring Business Hours
The Business Hours schedule defines open and closed hours. This schedule
enables the Auto Attendant to be configured to present different prompts and
perform different actions for open and closed hours. You can define up to four
different business schedules.
NOTE Business hours and holiday settings are configured for a particular script. They are
not related to the night service or call blocking settings defined later in this section.
Cisco Small Business Pro Unified Communications 500 Series Administrator Guide 3
Configuring the System Parameters
Configuring Scheduling 3
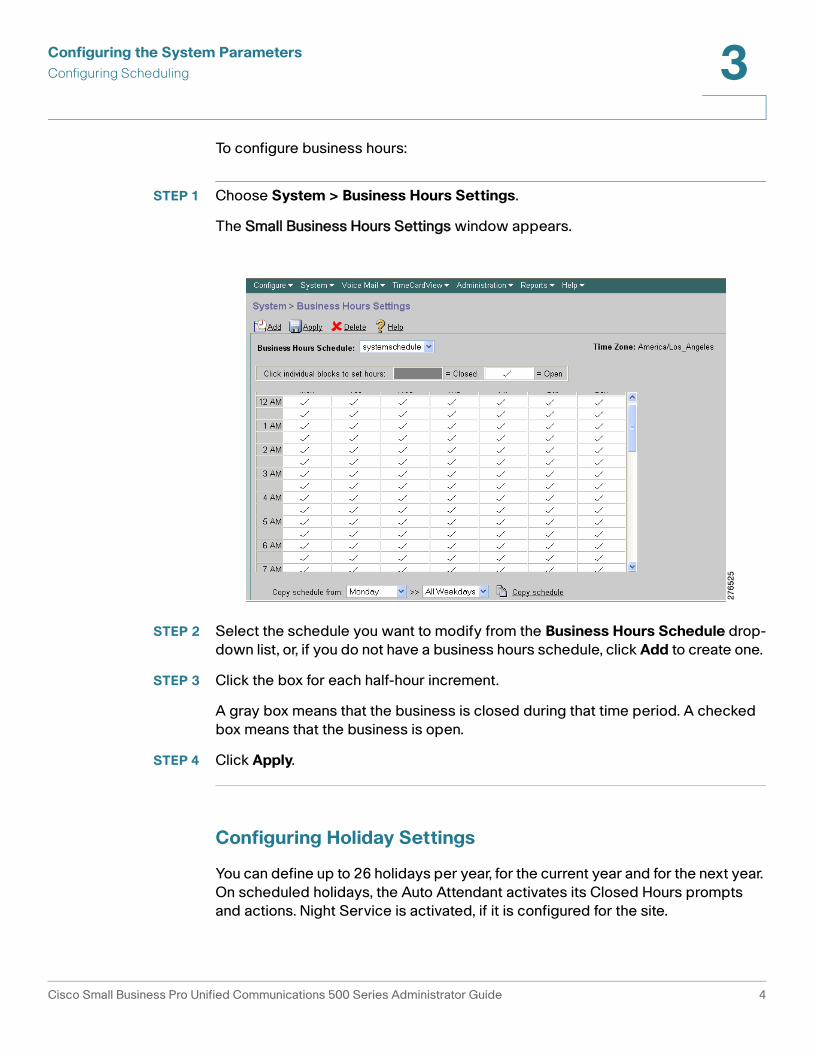
To configure business hours:
STEP 1 Choose System > Business Hours Settings.
The Small Business Hours Settings window appears.
STEP 2 Select the schedule you want to modify from the Business Hours Schedule drop-
down list, or, if you do not have a business hours schedule, click Add to create one.
STEP 3 Click the box for each half-hour increment.
A gray box means that the business is closed during that time period. A checked
box means that the business is open.
STEP 4 Click Apply.
Configuring Holiday Settings
You can define up to 26 holidays per year, for the current year and for the next year.
On scheduled holidays, the Auto Attendant activates its Closed Hours prompts
and actions. Night Service is activated, if it is configured for the site.
Cisco Small Business Pro Unified Communications 500 Series Administrator Guide 4
Configuring the System Parameters
Configuring Scheduling 3
You can also modify or delete existing holidays or copy all holidays from the
current year to the next year. When copying holidays from the current year to the
next year, if the same date appears in both years, the current year entry is used.
To configure the holiday settings:
STEP 1 Choose System > Holiday Settings.
STEP 2 Choose the year from the drop-down list.
STEP 3 Select the date by clicking on the calendar icon. Optionally, you can enter a holiday
description such as New Year's Eve.
STEP 4 Click Add.
Configuring Night Service Hours
Use the Night Service Bell Configuration window to configure the hours, days or
dates for night service.
To configure night service hours:
STEP 1 Choose Configure > System Parameters.
The Configure System Parameters window appears.
STEP 2 Click Night Service Bell Configuration.
STEP 3 From the Night Service Bell Configuration window, click the Night Service Code
link and enter the Night Service Code.
This code must start with an asterik (for example:*52), and is used to toggle the
night service for all phones that are subscribed to night service.
STEP 4 To configure the hours, days or dates for the night service, click the corresponding
links from the Configure System Parameters window.
STEP 5 Click Change to save.
Cisco Small Business Pro Unified Communications 500 Series Administrator Guide 5
Configuring the System Parameters
Configuring Scheduling 3
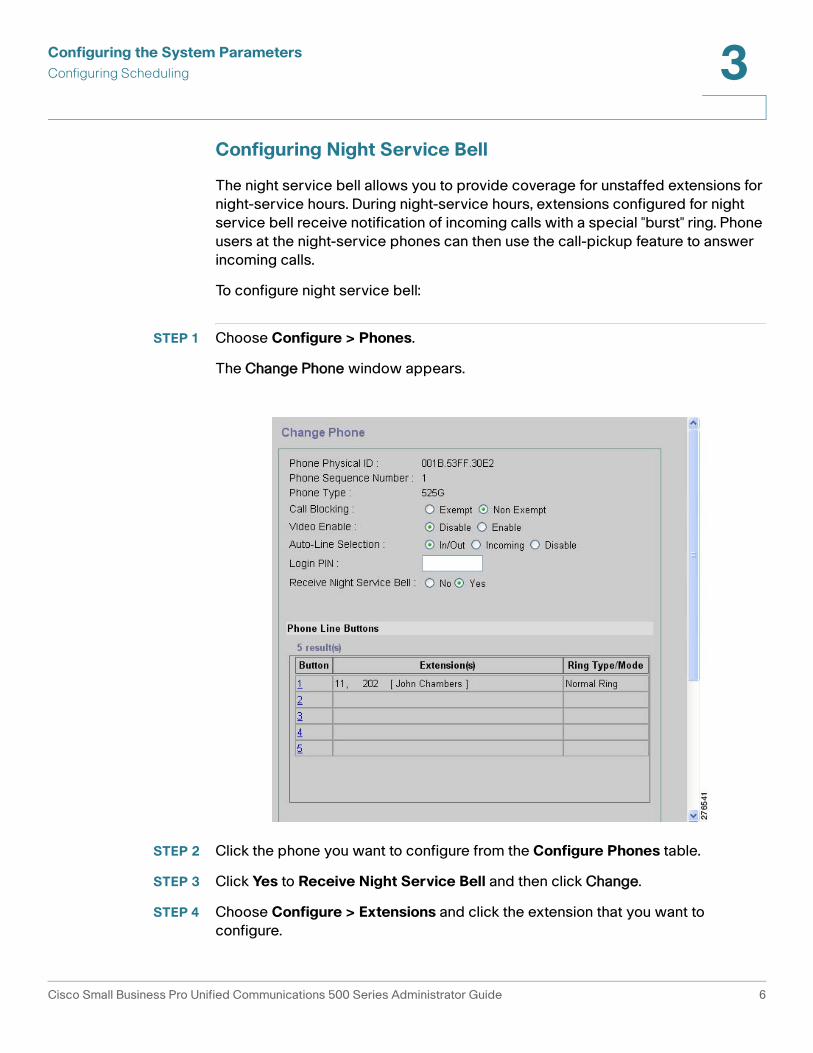
Configuring Night Service Bell
The night service bell allows you to provide coverage for unstaffed extensions for
night-service hours. During night-service hours, extensions configured for night
service bell receive notification of incoming calls with a special "burst" ring. Phone
users at the night-service phones can then use the call-pickup feature to answer
incoming calls.
To configure night service bell:
STEP 1 Choose Configure > Phones.
The Change Phone window appears.
STEP 2 Click the phone you want to configure from the Configure Phones table.
STEP 3 Click Yes to Receive Night Service Bell and then click Change.
STEP 4 Choose Configure > Extensions and click the extension that you want to
configure.
Cisco Small Business Pro Unified Communications 500 Series Administrator Guide 6
Configuring the System Parameters
Configuring Scheduling 3
STEP 5 From the Change Extension window, check Receive Night Service Bell and click
Change.
To define the night-service hours, see Configuring Night Service Hours, page 5.
Configuring Call Blocking and Call Blocking Hours
You can use call blocking to prevent access to certain call patterns. Call blocking
matches dialed numbers against a pattern of specified digits and matches the
time against the time of day, day of week, or specified date.
This section describes how to configure call blocking and call blocking hours:.
Configuring Call Blocking
You can use call blocking to prevent access to certain call patterns. Call blocking
matches dialed numbers against a pattern of specified digits and matches the
time against the time-of-day, day-of-week, or specified date.
To configure call blocking:
STEP 6 Choose Configure > Phones.
STEP 7 Click the phone you want to configure from the Configure Phones table.
Cisco Small Business Pro Unified Communications 500 Series Administrator Guide 7

Configuring the System Parameters
Configuring Scheduling 3
The Change Phone window appears.
STEP 8 Click the Exempt button for Call Blocking.
Call blocking is not applied to the phone.
Cisco Small Business Pro Unified Communications 500 Series Administrator Guide 8

Configuring the System Parameters
Configuring Hunt Groups 3
Configuring the Call Blocking Hours
You can specify the call blocking hours for the time of day, day of week, or for a
specified date.
To configure the call blocking hours:
STEP 1 Choose Configure > System Parameters.
STEP 2 Click Call Blocking Configuration. The Call Blocking Configuration window appears.
STEP 3 Enter the hours and days when call blocking is active and click OK.
Configuring Hunt Groups
Use hunt groups to route incoming calls to a pre-defined group of
extensions (members). The hunt group type determines the order in which
members of the hunt group receive calls. Up to 10 hunt groups can be configured
on the system. Each hunt group must have at least two members and can contain
up to 32 members.
To configure hunt groups:
STEP 1 Choose Configure > System Parameters.
STEP 2 Select Hunt Group Settings and click Add.
Cisco Small Business Pro Unified Communications 500 Series Administrator Guide 9

Configuring the System Parameters
Configuring Hunt Groups 3
The Add Hunt Group window appears.
STEP 3 Specify the Hunt Group number, Call Hunting Type, Internal Pilot Number (that is
called to reach the group), Secondary Phone Number and Members.
The FINAL number is the destination (operator or voice mail) where the call is
forwarded if it is not answered by a hunt group member.
STEP 4 Click Set to save.
NOTE You cannot configure a Parallel/Blast hunt group (used for shared lines) from CIsco
Unity Express.
Cisco Small Business Pro Unified Communications 500 Series Administrator Guide 10

Configuring the System Parameters
Configuring Directories Entries 3
Configuring Directories Entries
You can add up to 99 directory entries for external numbers. Use the search
facility on each phone to find and dial these numbers.
To configure directory entries:
STEP 1 Choose Configure > System Parameters.
STEP 2 Select Directory Service and click Add Entry.
The Add Directory Entry window appears.
STEP 3 Specify the directory settings.
• Seq #—Number of the entry in the system directory. Valid values are
1 to 100.
• Number—Phone number that you want to add to the directory.
• Name—Name that you want to associate with the directory number.
Cisco Small Business Pro Unified Communications 500 Series Administrator Guide 11
Configuring the System Parameters
Configuring a Page Extension and Group 3
STEP 4 Click Add to save.
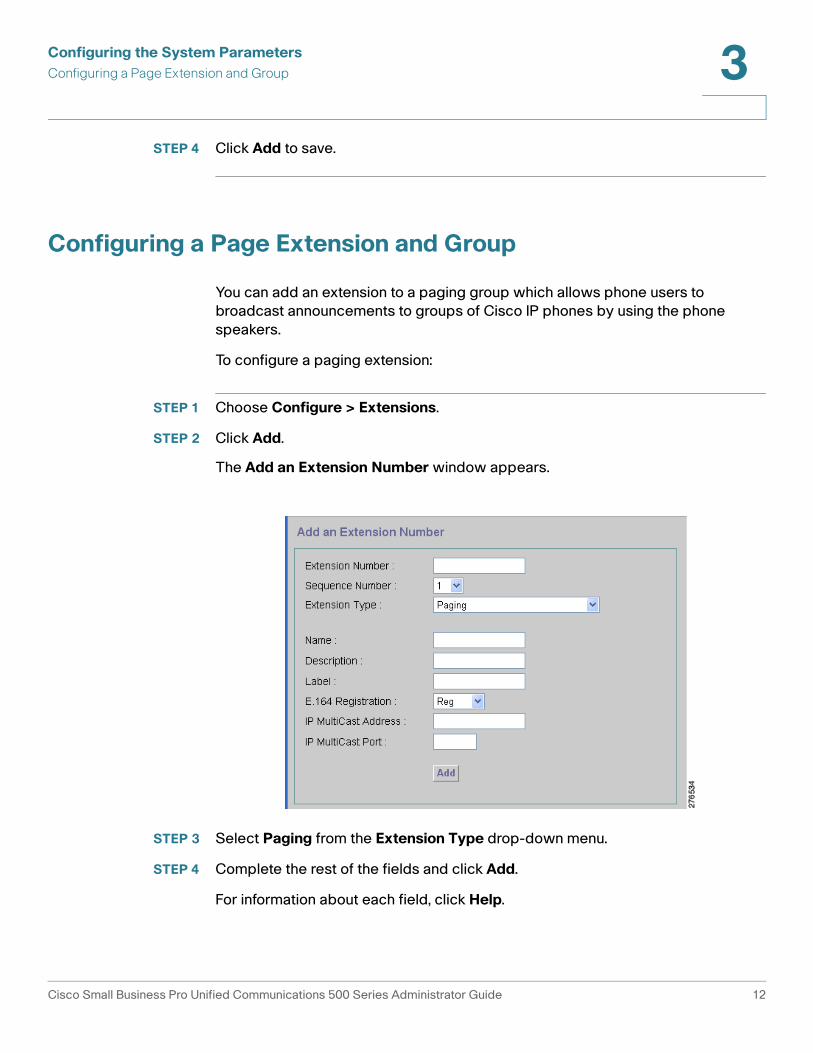
Configuring a Page Extension and Group
You can add an extension to a paging group which allows phone users to
broadcast announcements to groups of Cisco IP phones by using the phone
speakers.
To configure a paging extension:
STEP 1 Choose Configure > Extensions.
STEP 2 Click Add.
The Add an Extension Number window appears.
STEP 3 Select Paging from the Extension Type drop-down menu.
STEP 4 Complete the rest of the fields and click Add.
For information about each field, click Help.
Cisco Small Business Pro Unified Communications 500 Series Administrator Guide 12
Configuring the System Parameters
Configuring an Intercom Extension 3
STEP 5 To add a phone to a paging group that uses the Paging extension, choose
Configure > Phones.
STEP 6 Click the phone you want to add and scroll down to Paging Information.
STEP 7 Select an extension number from the drop-down menu.
STEP 8 Click Change.
Configuring an Intercom Extension
You can configure an Intercom extension to allow two-way voice communication
to an idle phone by using the phone speaker.
To configure an intercom extension:
STEP 1 Choose Configure > Extensions.
STEP 2 From the Configure Extensions window, click Add.
Cisco Small Business Pro Unified Communications 500 Series Administrator Guide 13

Configuring the System Parameters
Configuring a Call Park Extension 3
The Add an Extension Number window appears.
STEP 3 Select Intercom from the Extension Type drop-down list.
STEP 4 Complete the rest of the fields and click Add.
For information about each field, click Help.
Configuring a Call Park Extension
Call Park provides temporary holding locations for incoming calls. When a call is
parked, it is transferred to the parking slot extension and put on hold until it is
retrieved by another phone by using the Call Pickup feature.
Cisco Small Business Pro Unified Communications 500 Series Administrator Guide 14
Configuring the System Parameters
Configuring a Call Park Extension 3
To configure a Call Park slot extension:
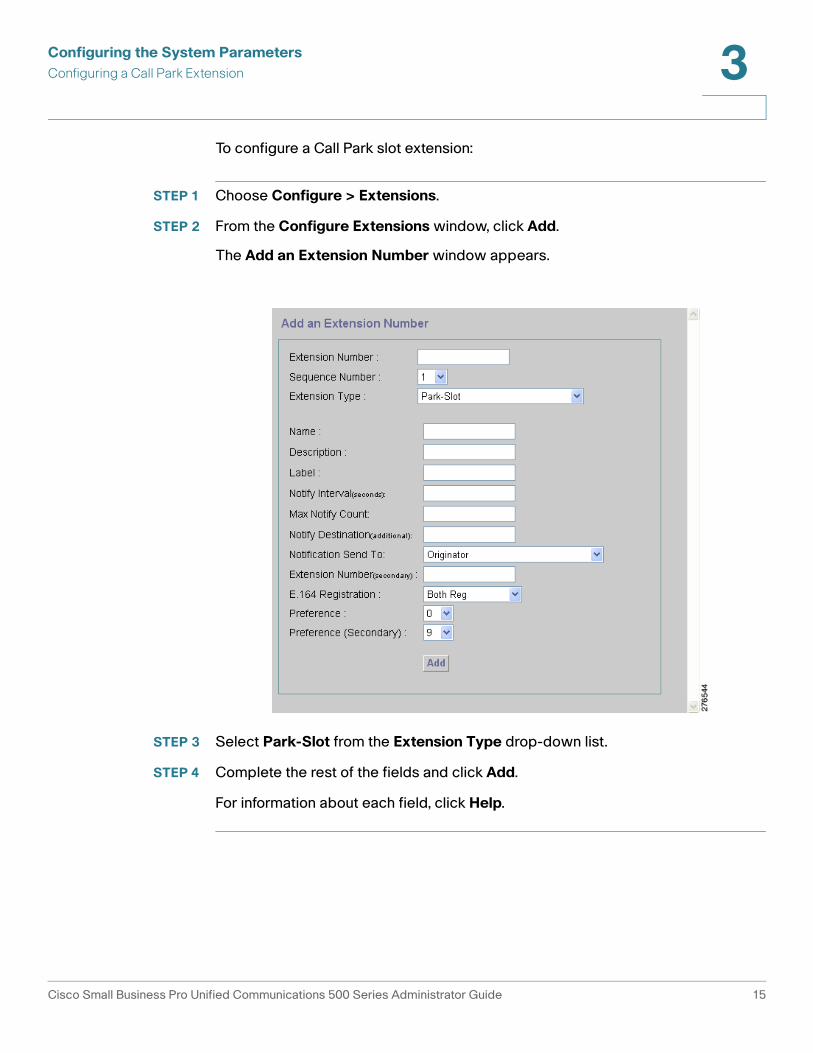
STEP 1 Choose Configure > Extensions.
STEP 2 From the Configure Extensions window, click Add.
The Add an Extension Number window appears.
STEP 3 Select Park-Slot from the Extension Type drop-down list.
STEP 4 Complete the rest of the fields and click Add.
For information about each field, click Help.
Cisco Small Business Pro Unified Communications 500 Series Administrator Guide 15
Configuring the System Parameters
Adding Extensions to a Pickup Group 3
Adding Extensions to a Pickup Group
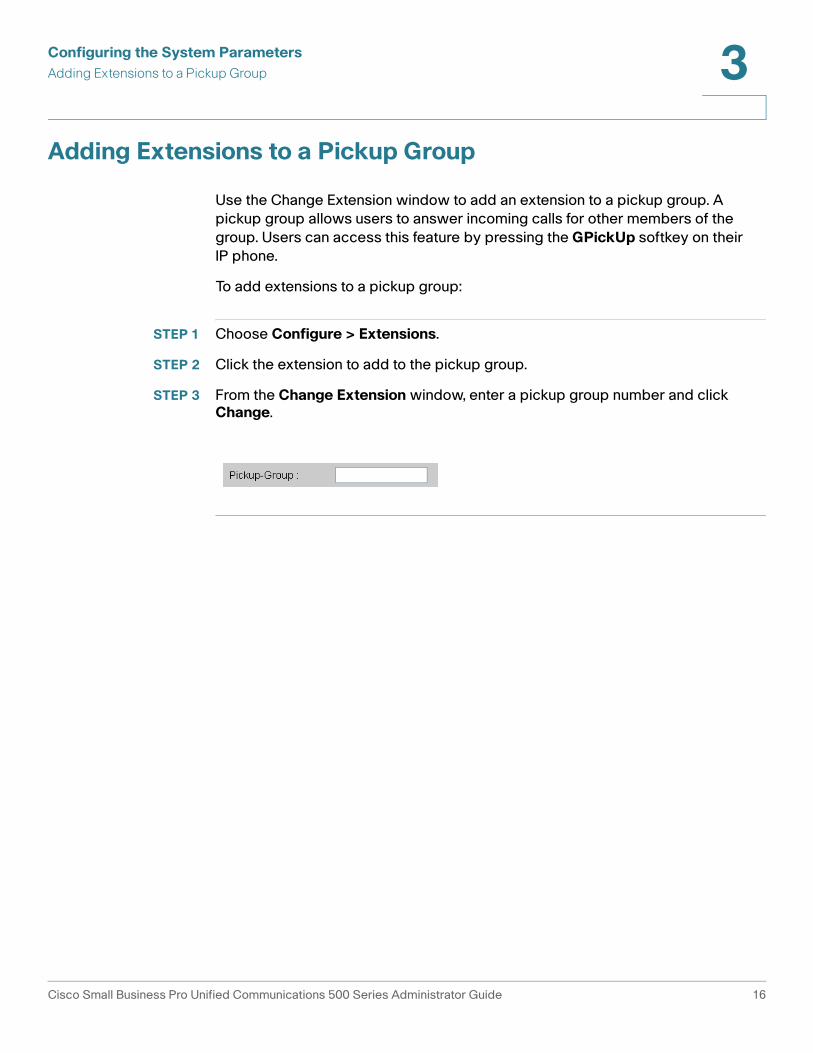
Use the Change Extension window to add an extension to a pickup group. A
pickup group allows users to answer incoming calls for other members of the
group. Users can access this feature by pressing the GPickUp softkey on their
IP phone.
To add extensions to a pickup group:
STEP 1 Choose Configure > Extensions.
STEP 2 Click the extension to add to the pickup group.
STEP 3 From the Change Extension window, enter a pickup group number and click Change.
Cisco Small Business Pro Unified Communications 500 Series Administrator Guide 16

Configuring the System Parameters
Saving the System Configuration 3
Saving the System Configuration
When you finish making changes to the Cisco Unity Express on the UC 500, you
must save the configuration.
To save the system configuration:
STEP 1 Choose Administration > Control Panel.
The Control Panel window appears.
STEP 2 Click Save Configuration.
Cisco Small Business Pro Unified Communications 500 Series Administrator Guide 17
4
Configuring Auto Attendant and Voice Mail
This chapter contains information for configuring Auto Attendant (AA) and voice-mail features for the UC 500. It includes these sections:
• Configuring the Voice Mail System Options
• Configuring Voice Mail to Email Notifications
• Configuring Individual User Mailboxes
• Configuring User Groups for Shared Voice-Mail Boxes
• Configuring a Distribution List
• Configuring Integrated Messaging (IMAP)
Configuring the Voice Mail System Options
Use the Voice Mail window to configure basic voice-mail settings for the site,
manage the amount of voice-mail storage for each mailbox, and enable or disable
mailboxes for individual users.
Cisco Small Business Pro Unified Communications 500 Series Administrator Guide 18
Configuring Auto Attendant and Voice Mail
Configuring Voice Mail to Email Notifications 4
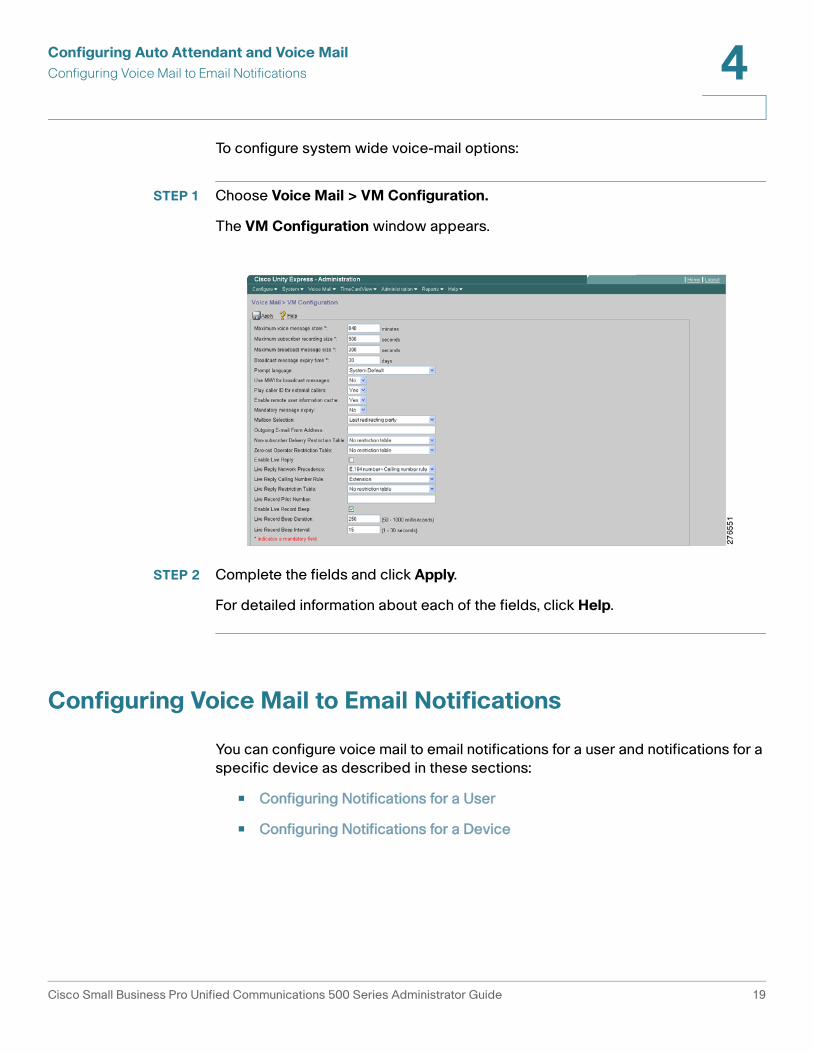
To configure system wide voice-mail options:
STEP 1 Choose Voice Mail > VM Configuration.
The VM Configuration window appears.
STEP 2 Complete the fields and click Apply.
For detailed information about each of the fields, click Help.
Configuring Voice Mail to Email Notifications
You can configure voice mail to email notifications for a user and notifications for a
specific device as described in these sections:
• Configuring Notifications for a User
• Configuring Notifications for a Device
Cisco Small Business Pro Unified Communications 500 Series Administrator Guide 19
Configuring Auto Attendant and Voice Mail
Configuring Voice Mail to Email Notifications 4
Configuring Notifications for a User
To configure notifications for a user:
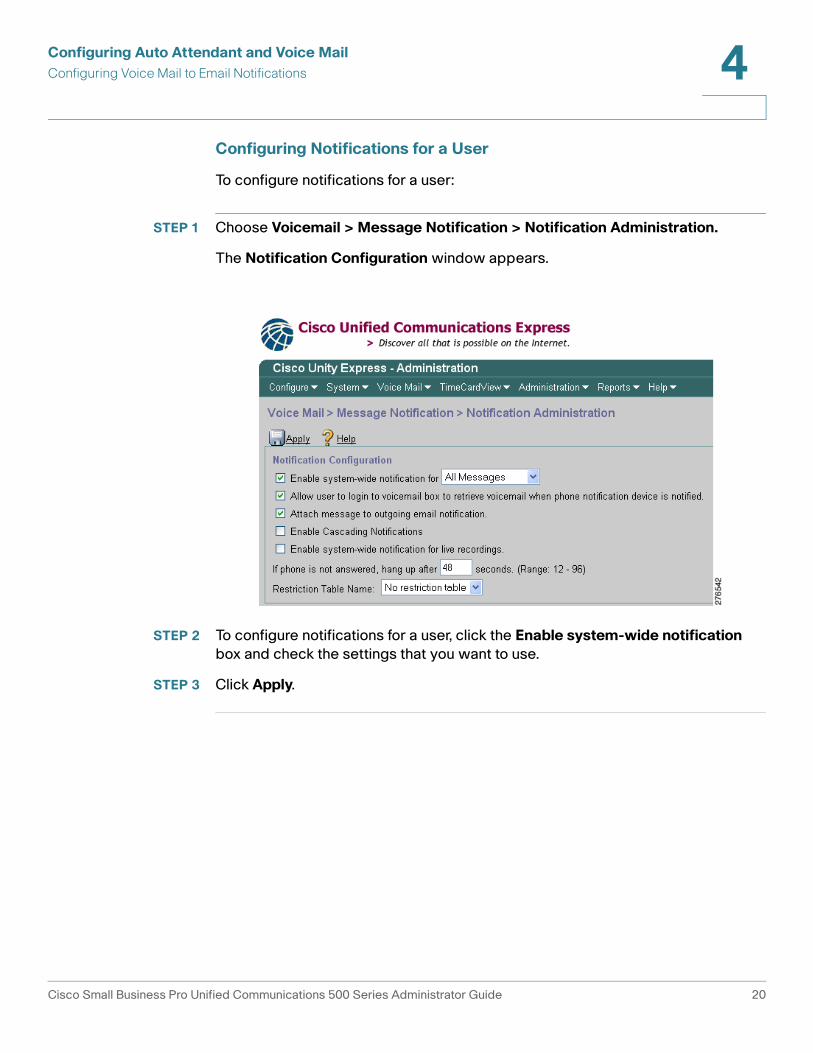
STEP 1 Choose Voicemail > Message Notification > Notification Administration.
The Notification Configuration window appears.
STEP 2 To configure notifications for a user, click the Enable system-wide notification
box and check the settings that you want to use.
STEP 3 Click Apply.
Cisco Small Business Pro Unified Communications 500 Series Administrator Guide 20

Configuring Auto Attendant and Voice Mail
Configuring Voice Mail to Email Notifications 4
Configuring Notifications for a Device
To configure notifications for a device:
STEP 1 Choose Voicemail > Message Notification > Subscriber Notification
Management.
The Subscriber Notification Management window appears.
STEP 2 Click the device to configure.
Cisco Small Business Pro Unified Communications 500 Series Administrator Guide 21
Configuring Auto Attendant and Voice Mail
Configuring Voice Mail to Email Notifications 4
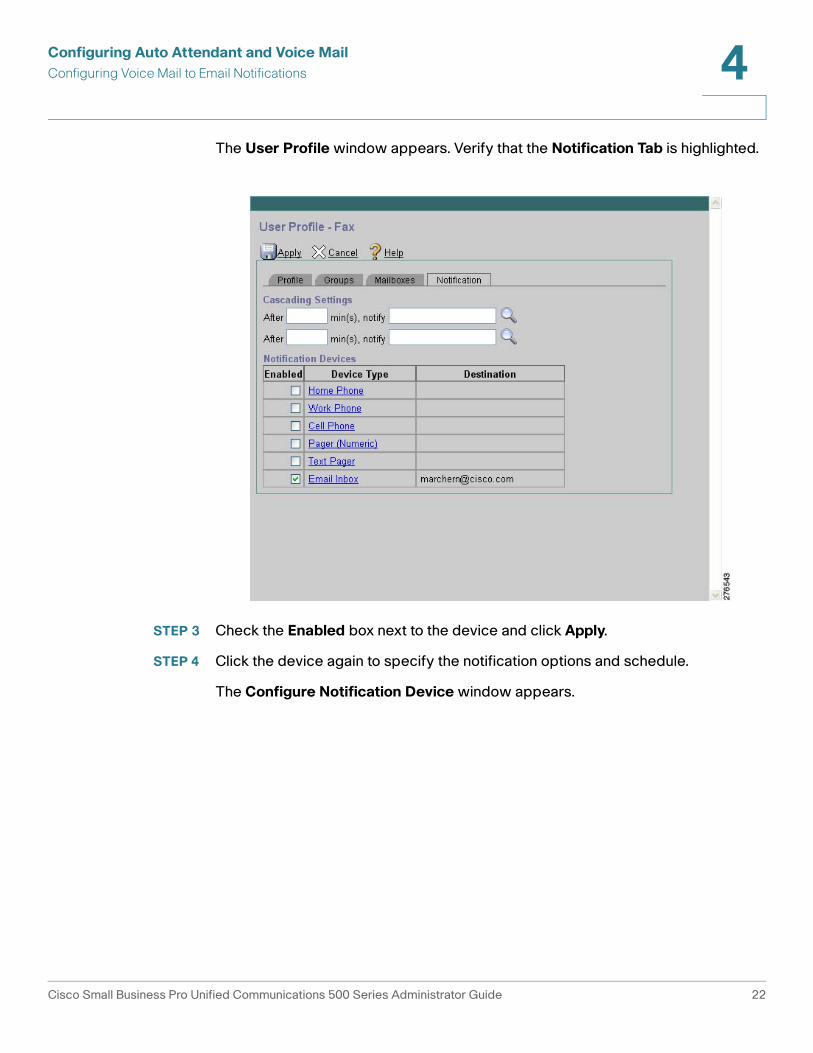
The User Profile window appears. Verify that the Notification Tab is highlighted.
STEP 3 Check the Enabled box next to the device and click Apply.
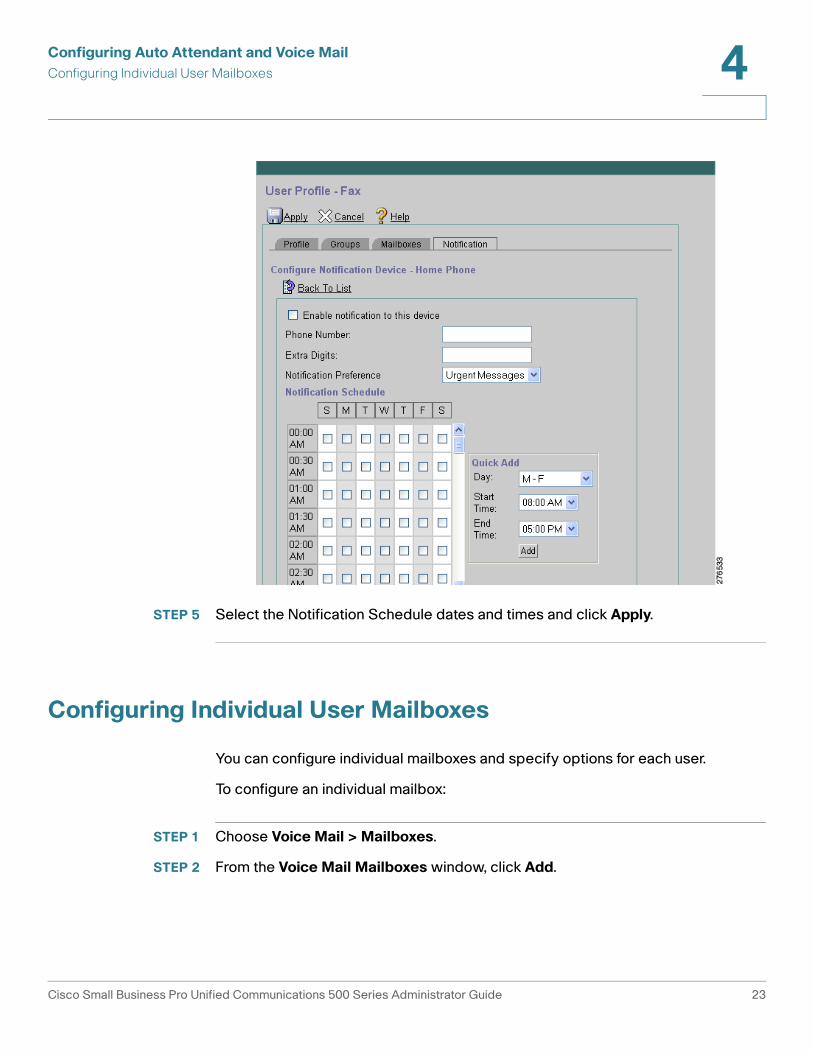
STEP 4 Click the device again to specify the notification options and schedule.
The Configure Notification Device window appears.
Cisco Small Business Pro Unified Communications 500 Series Administrator Guide 22
Configuring Auto Attendant and Voice Mail
Configuring Individual User Mailboxes 4
STEP 5 Select the Notification Schedule dates and times and click Apply.
Configuring Individual User Mailboxes
You can configure individual mailboxes and specify options for each user.
To configure an individual mailbox:
STEP 1 Choose Voice Mail > Mailboxes.
STEP 2 From the Voice Mail Mailboxes window, click Add.
Cisco Small Business Pro Unified Communications 500 Series Administrator Guide 23
Configuring Auto Attendant and Voice Mail
Configuring User Groups for Shared Voice-Mail Boxes 4
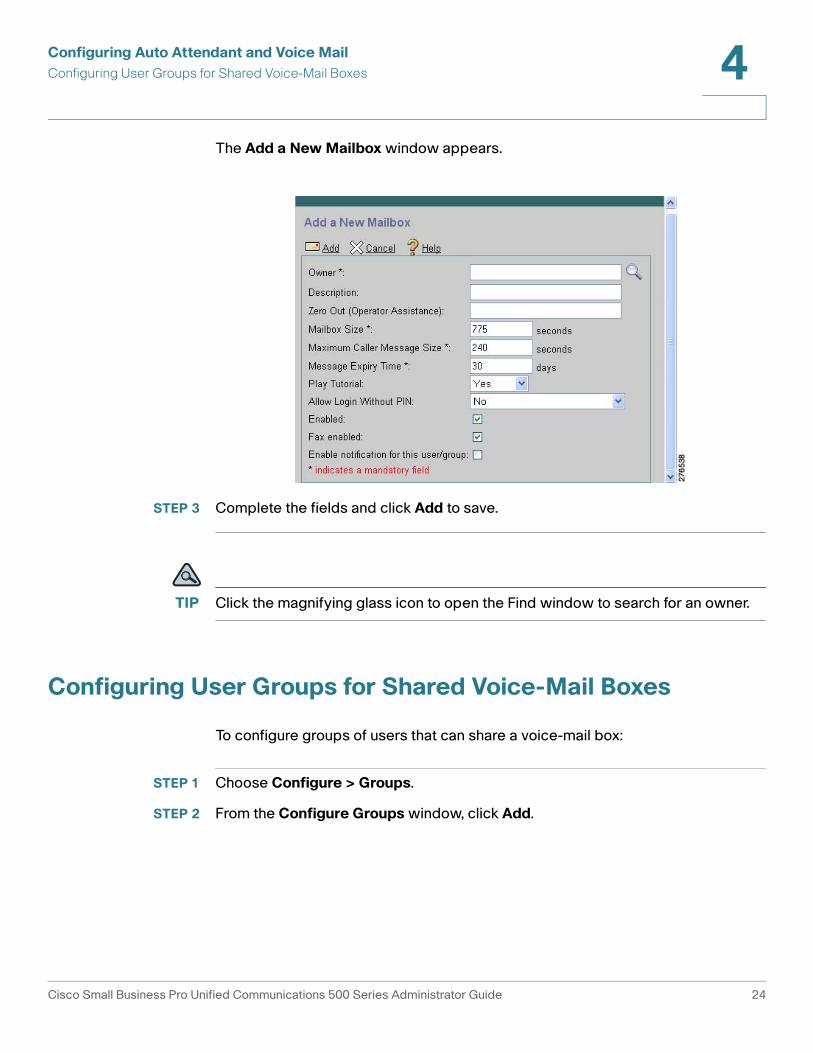
The Add a New Mailbox window appears.
STEP 3 Complete the fields and click Add to save.
TIP Click the magnifying glass icon to open the Find window to search for an owner.
Configuring User Groups for Shared Voice-Mail Boxes
To configure groups of users that can share a voice-mail box:
STEP 1 Choose Configure > Groups.
STEP 2 From the Configure Groups window, click Add.
Cisco Small Business Pro Unified Communications 500 Series Administrator Guide 24

Configuring Auto Attendant and Voice Mail
Configuring User Groups for Shared Voice-Mail Boxes 4
The Add a New Group window appears.
STEP 3 Enter the group ID, name, description, primary extension and E. 164 number, and
fax number for the new group.
STEP 4 Click Create Mailbox.
Cisco Small Business Pro Unified Communications 500 Series Administrator Guide 25

Configuring Auto Attendant and Voice Mail
Configuring a Distribution List 4
The Add a New Mailbox window appears.
STEP 5 Complete the fields for the new mailbox.
STEP 6 Click Add to save.
Configuring a Distribution List
You can configure a distribution list to send a voice-mail message to multiple users
at the same time. A list member can be an individual local user, remote user,
general-delivery mailbox, group, a public distribution list, or a blind address.
Cisco Small Business Pro Unified Communications 500 Series Administrator Guide 26

Configuring Auto Attendant and Voice Mail
Configuring a Distribution List 4
Adding a Distribution List
To add a distribution list:
STEP 1 Choose Voice Mail > Distribution Lists > Public Lists.
The Add a Public Distribution List window appears.
STEP 2 Enter the name and identification number of the new distribution list. The number
must be unique to the list of public distribution lists and cannot be longer than
fifteen digits.
STEP 3 Click Add to save.
Adding a Member to a Distribution List
NOTE Only administrators can add members to their own private distribution lists or to the
public distribution lists that they own.
To add a member to a distribution list:
STEP 1 Choose Voice Mail > Distribution Lists and select either Public Lists or My
Private Lists.
STEP 2 Click the name of the list.
STEP 3 Click the Members tab.
STEP 4 Click Add Member and do one of the following:
Cisco Small Business Pro Unified Communications 500 Series Administrator Guide 27

Configuring Auto Attendant and Voice Mail
Configuring Integrated Messaging (IMAP) 4
• Add the member by entering their voice-mail mailbox number. Enter the
exact voice-mail mailbox number and click Find.
• Search for a member by user ID, name, description, or number. Click the button next to the search criteria you want to use. A wildcard search is performed regardless of what is entered in the search criteria text field, so results are not exact matches.
Configuring Integrated Messaging (IMAP)
Integrated messaging on Cisco Unity Express is the convergence feature for voice-mail and email systems. It allows subscribers to have an integrated view of their emails and voice-mail messages from a single email client by using IMAP version 4 revision 1.
To configure integrated messaging, choose Voice Mail > Integrated Messaging.
You have the option to configure either system-wide integrated messaging or
integrated messaging sessions.
This is an example of the Integrated Messaging Service Configuration window.
For detailed IMAP information, click Help. For information about configuring IMAP
on the UC 500 see: https://www.myciscocommunity.com/docs/DOC-6494.
Cisco Small Business Pro Unified Communications 500 Series Administrator Guide 28

5
Cisco Small Business Pro Unified Communications 500 Series Administrator Guide 29
Configuring TimeCardView
TimeCardView is a time and attendance system for Cisco Unity Express users on
Cisco Unified IP phones connected to Cisco Unified Communications Manager
Express (Cisco Unified 500 Series) or Cisco Unified Communications Manager.
TimeCardView automatically tracks employees' working hours and enables
supervisors to view employees' real time status. It provides for online review and
approval of timesheets, and it can generate the reports supervisors and payroll
specialists need by using the Historical Reporting Client and export them to both
.csv and .xls file formats.
You can access TimeCardView from the Cisco Unity Express main window.
For detailed information about TimeCardVIew, click Help, or see the
TimeCard VIew GUI guide at: http://www.cisco.com/en/US/docs/voice_ip_comm/
unity_exp/rel7_0/user/guide/timecardview/GUI_Intro.html
A
Where to Go From Here
Cisco provides a wide range of resources to help you and your customer obtain
the full benefits of the Unified 500 Series product line.
Product Resources
Support
Cisco Small Business Support Community
http://www.cisco.com/go/smallbizsupport
Online Technical Support and Documentation(Login Required)
http://www.cisco.com/support
Phone Support Contacts http://www.cisco.com/en/US/support/tsd_cisco_small_business_support_center_contacts.html
Software Downloads(Login Required)
Go to http://www.cisco.com/public/sw-center/index.shtml and enter the model number in the Software Search box.
Cisco IP Phones
Cisco IP Phone SPA 500 Series http://www.cisco.com/en/US/products/ps9730/index.html
Cisco IP Phone SPA 525G Deployment Guide
http://www.cisco.com/en/US/docs/voice_ip_comm/sbcs/deployment_guides/spa525g_phone/sbcs_spa525g_wireless_deployment_guide.pdf
Cisco IP Phone QuickUser Guides
http://cisco.com/go/sbcs-docs
Cisco Small Business Pro Unified Communications 500 Series Administrator Guide 30
Where to Go From Here A
Cisco Unified IP Phones 7900 Series
http://www.cisco.com/en/US/products/hw/phones/ps379/
Cisco Small Business
Cisco Partner Central for Small Business(Partner Login Required)
http://www.cisco.com/web/partners/sell/smb
Cisco Small Business Home http://www.cisco.com/smb
Marketplace http://www.cisco.com/go/marketplace
Cisco Small Business Pro Unified Communications 500 Series Administrator Guide 31