office365 education starter manual 2013 edition
TRANSCRIPT

Office 365 Education Starter Manual: 2013 Edition
Written by: Alex Pearce
Email: [email protected]
Blog: http://www.bfcnetworks.com/ajp

1 | P a g e
© Copyright: BFC Networks Limited 2013 www.bfcnetworks.com
Contents Storage .............................................................................................................................................. 3
Subscribing to Office 365 Education .................................................................................................. 4
Adding Licenses ................................................................................................................................. 8
Changing License for Admin User..................................................................................................... 10
User Management ........................................................................................................................... 12
Add a Single User ......................................................................................................................... 12
Add Bulk Users ............................................................................................................................ 14
Create different views for your Users .............................................................................................. 16
Domain Names and DNS .................................................................................................................. 17
Office 365 Products ......................................................................................................................... 19
Exchange Online .............................................................................................................................. 20
Lync Online...................................................................................................................................... 23
SharePoint Online............................................................................................................................ 25
Create your Public Facing Site ...................................................................................................... 25
Increase your SharePoint Storage Capacity .................................................................................. 27

2 | P a g e
© Copyright: BFC Networks Limited 2013 www.bfcnetworks.com
This starter manual will give you a step by step guide to implementing Office 365 Education
for your school or college. It will include the subscription process, how to register your first
domain to some simple Exchange, Lync and SharePoint housekeeping.
If you have any queries, don't be afraid to leave a comment on the Office 365 community
support page or get in touch through the BFC Networks website.
The first thing to note with Office 365 is that there are no differences between Office 365
Education and Office 365 Enterprise other than licensing. Businesses who subscribe to the
enterprise version have to pay for all services while you as a school or college get up to A2
for free. So remember that if you are looking for some specific issue online, it should be the
same answer for education as enterprise.
So what is included in the Office 365 EducationA2 license plan?
There are 3 main products in Office 365 which are Microsoft Exchange Online, Microsoft
Lync Online and Microsoft SharePoint Online. Each of these products have different feature
sets which are split into 2 for Office 365. You can have email services with Exchange but
then you can add the additional features to help manage your mailbox archiving. Lync
comes with additional features that allow you to replace your internal phone system with
Lync while SharePoint is split into two with the standard version coming with the Office Web
Applications with the additional paid for subscriptions including Access Services and Visio
Services which you are most likely not to use in your organisations at first.
In 2013 rendition of Office 365 other services have been added which enhance the
SharePoint platform further which include Office Project Server.
Office 365 EducationA2 license which is free comes with the standard Exchange, standard
Lync and SharePoint with the additional features of Office Web Apps but don't be thinking
that Microsoft have cut down on the features to offer less as what you get for free is more
than enough for your schools requirements.
If you do want additional feature such as the Lync phone features, you have to pay for these
features which you can do through the licensing area of Office 365.
3 | P a g e
© Copyright: BFC Networks Limited 2013 www.bfcnetworks.com
There are 4 main sections in Office 365 Educationwhich are Exchange Online, Lync Online,
SharePoint Online and the Office 365 Admin Portal.
The Admin Portal is hosted at http://portal.microsoftonline.com which is the same for any
customer who subscribes to Office 365. The admin portal is where you can configure the
domains for your tenancy, licensing and create users. There are a lot more features you can
use in the Admin Portal but we will guide you through the essential features for now.
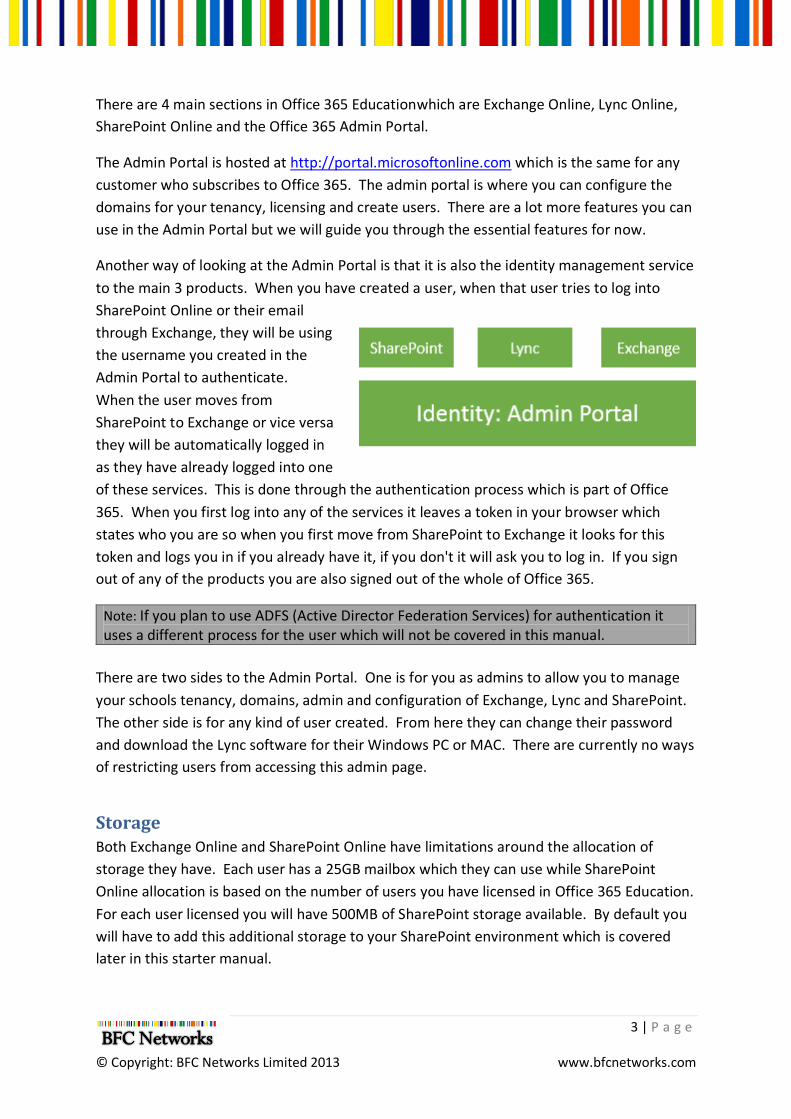
Another way of looking at the Admin Portal is that it is also the identity management service
to the main 3 products. When you have created a user, when that user tries to log into
SharePoint Online or their email
through Exchange, they will be using
the username you created in the
Admin Portal to authenticate.
When the user moves from
SharePoint to Exchange or vice versa
they will be automatically logged in
as they have already logged into one
of these services. This is done through the authentication process which is part of Office
365. When you first log into any of the services it leaves a token in your browser which
states who you are so when you first move from SharePoint to Exchange it looks for this
token and logs you in if you already have it, if you don't it will ask you to log in. If you sign
out of any of the products you are also signed out of the whole of Office 365.
Note: If you plan to use ADFS (Active Director Federation Services) for authentication it uses a different process for the user which will not be covered in this manual.
There are two sides to the Admin Portal. One is for you as admins to allow you to manage
your schools tenancy, domains, admin and configuration of Exchange, Lync and SharePoint.
The other side is for any kind of user created. From here they can change their password
and download the Lync software for their Windows PC or MAC. There are currently no ways
of restricting users from accessing this admin page.
Storage Both Exchange Online and SharePoint Online have limitations around the allocation of
storage they have. Each user has a 25GB mailbox which they can use while SharePoint
Online allocation is based on the number of users you have licensed in Office 365 Education.
For each user licensed you will have 500MB of SharePoint storage available. By default you
will have to add this additional storage to your SharePoint environment which is covered
later in this starter manual.

4 | P a g e
© Copyright: BFC Networks Limited 2013 www.bfcnetworks.com
For users with access to their SkyDrive Pro, they have a 7GB limit of their own personal
storage. After they have filled this quota limit, there is no way of increasing this.
Subscribing to Office 365 Education When subscribing to Office 365 Education you are first given a 30 day trial, so if you are thinking
about using it or not sure if you really want to, try it out first.
The process to subscribing is all completed online through a browser. Microsoft are going to ask you
for some details such as your school name, school address, your email address and a contact
telephone number. These are all used to verify that you are an academic institution.
Navigate to the Office 365 Education trial subscription page. What you will see are the 3 main plans
for the service which we have already talked about. If you want to purchase A3 or A4, you will be
asked for some credit card details.
http://www.microsoft.com/en-gb/office365/education/compare-plans.aspx
Click on the Sign up for 30-day trial image.
The free trial sign up form will appear, when we have completed this process we will then convert
the trial into a fully licensed tenancy.
Selecting the correct County or Region is very important as this is where you data will be sorted. If
you select US, all data will be sorted in a US data centre by Microsoft. By selecting your country, you
will get your data in right location (UK in an EU data centre).
5 | P a g e
© Copyright: BFC Networks Limited 2013 www.bfcnetworks.com
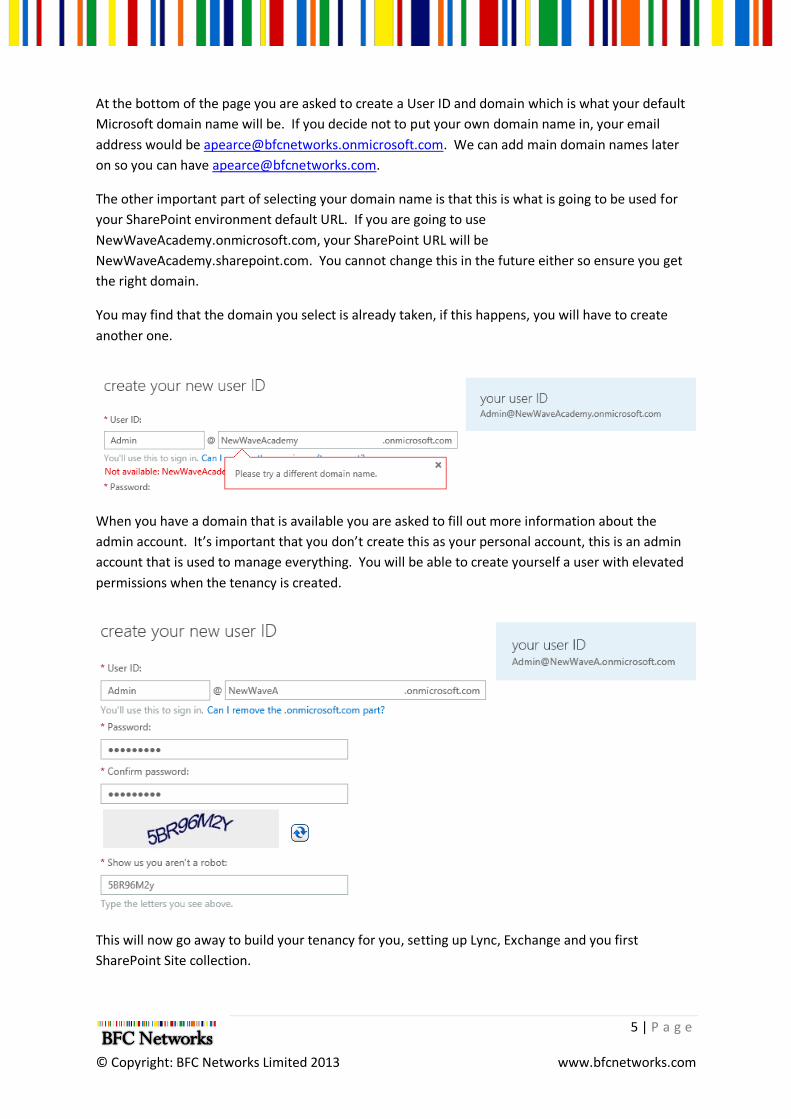
At the bottom of the page you are asked to create a User ID and domain which is what your default
Microsoft domain name will be. If you decide not to put your own domain name in, your email
address would be [email protected]. We can add main domain names later
on so you can have [email protected].
The other important part of selecting your domain name is that this is what is going to be used for
your SharePoint environment default URL. If you are going to use
NewWaveAcademy.onmicrosoft.com, your SharePoint URL will be
NewWaveAcademy.sharepoint.com. You cannot change this in the future either so ensure you get
the right domain.
You may find that the domain you select is already taken, if this happens, you will have to create
another one.
When you have a domain that is available you are asked to fill out more information about the
admin account. It’s important that you don’t create this as your personal account, this is an admin
account that is used to manage everything. You will be able to create yourself a user with elevated
permissions when the tenancy is created.
This will now go away to build your tenancy for you, setting up Lync, Exchange and you first
SharePoint Site collection.

6 | P a g e
© Copyright: BFC Networks Limited 2013 www.bfcnetworks.com
Read the terms and conditions and when you are happy click I Agree and continue at the bottom of
the page.
To manage the process of licensing for Office 365, Microsoft will validate your tenancy
before allocating you an Office 365 Education A2 license. This is to ensure that no
businesses get hold of an education license and get away with not paying for what they
should be. The first thing to do, when you have created your tenancy is to validate your
domain. Using the example of New Wave Academy, they have created their Office 365
Education tenancy and are now at the domain validation stage. The school domain name is
newwaveacademy.com which they will also want to use for all their users for email. In the
domains section of the Admin Portal you will be asked to confirm that you have the
ownership of that domain. For New Wave Academy they will have to either create a TXT
record or a MX record for the newwaveacademy.com domain. Microsoft will help you in the
Admin Portal which either of these need to be pointed to. Now it is very important to note
that you may already be using an MX record for your domain. An MX record is used
whenever anyone sends you an email. If you are emailing [email protected],
the email service will look up the MX record for that domain (@newwaveacademy.com) and
then route it accordingly to your email server.
If you already use your domain name you want to use it in Office 365 Education, make sure
you create the TXT record otherwise you may lose emails until you have either created all
your users or pointed the MX record back to your current email solution.
When the tenancy is created, you will be taken to a welcome page to verify your first domain name.
If you want to verify later you can do but remember to do this within the first 30 days otherwise you
trial will end and you may not be able to get the URL you want again.

7 | P a g e
© Copyright: BFC Networks Limited 2013 www.bfcnetworks.com
The next step is to add the domain name you want to use for mail and Lync
(@newwaveacademy.com). We can add more domains later on if you want to use different domain
names for students.

8 | P a g e
© Copyright: BFC Networks Limited 2013 www.bfcnetworks.com
You are now given the details you need to create the DNS records to verify your domain. Microsoft
give you some instructions that might help you with well-known domain hosting companies. The
TXT record will look something like this.
Note: Your TXT record will be individual to your tenancy so don’t copy from the image above.
If you selected to verify your domain later or have completed the verifying process you will have a
pop up box appear asking for some information about your admin account. Should you forget your
password and can’t access your Office 365 tenancy, Microsoft can reset your password and notify
you via text messaging and email. Add you country code and phone number. The reset process will
email your first and then send a text message to a mobile phone.
Adding Licenses As discussed earlier on, there are different type of licenses available. The standard Academic (A)
licenses are:
Code License
A1 Microsoft Exchange Free
A2 A1 + Microsoft Lync, Microsoft SharePoint, Office Web Apps Free
A3 A2 + Microsoft Office 2013 Pro, Microsoft SharePoint Online Enterprise, Microsoft Exchange/Lync Voicemail & archiving.
Chargeable
A4 A3 + Microsoft Lync Voice Chargeable
When you have created your trial license you are given 25 facility A3 and 25 student A3 licenses
which will last 30 days. As you can see from the table above, the A3 license is a chargeable license
and at the end of your 30 day trial you will be asked to enter your school details or to delete that
type of license. It’s important that you use the right license when creating your accounts however
you won’t be able to purchase the free licenses until you are verified your domain name.
In the Admin Portal, down the left navigation you will find purchase services. Click on this.

9 | P a g e
© Copyright: BFC Networks Limited 2013 www.bfcnetworks.com
You will notice that there are a lot of licensing types but the important one you are looking for is
Office 365 Education (Plan A2). You will notice that the price is £0.00.
Click on the Add next to the basket and a new window will open up. You will see the option to add
the number of licenses you want.
You may want to do some maths before entering the number of students you want.
At the end of the academic year you will be creating new student accounts before you close your
previous set as you may have your new intake year in earlier and assign them an account in the
previous term.
Example: New Wave Academy has 5 intake years of students with 200 students in each year group
making a total of 1000 students. 2 months before the new intake arrive they have a welcome day at
the schools where the students come and see the school, learn more about the grounds and also
meet their new form teacher. While they meet with the form teacher for the first time they are
given their username and password. To give them access to Office 365 Education, you will need to
make sure they have a license, meaning New Wave Academy need 1200 student licenses (remember
they are free).
Add the number of licenses you think you may need and then click Add to cart.

10 | P a g e
© Copyright: BFC Networks Limited 2013 www.bfcnetworks.com
You are taken back to Purchases page where you are asked to review your purchase. Now you can
add the licenses you need for Faculty as well.
When you have added everything you need to your basket, click on Check out from the right hand
side.
You are asked if your school address is correct or not and then click on Next. Then you are asked to
review your order. Make sure you have Plan A2 for both Faculty and Students. Click Next.
Now you have been taken to the payment area. Microsoft have a standard payment system so even
though you are getting them for free you still have to go through this section. At the top you will see
Payment Frequency, change this to Pay full year now. This will reduce the number of emails you get
in a year notifying you that your licensing bill has arrived (which will be at £0).
If you have purchased licenses at a cost, you can add your PO number if you want to. Click Next to
finish the purchase process.
You will be taken back to the Admin Portal home page. Down the left hand side click on Licenses
and you will see that your licenses have been delivered.
Changing License for Admin User By default the admin user that was created when you subscribed to Office 365 Education has one of
the A3 accounts. If you look at the image above you will see that 1 license has been assigned to the
A3 for students. As these are paid for licenses, we want to remove this license from the Admin user
and add it as an A2 for Faculty user.

11 | P a g e
© Copyright: BFC Networks Limited 2013 www.bfcnetworks.com
Log into the Admin Portal as the admin account and using the left navigation click Users and Group.
A page will load of all the users in the tenancy. Select the admin account and on the left of the page
you will see information about the user. Click the pencil which is the edit button.
The first page that loads is the licensing details of this user. You will see that the Admin User has
been allocated an A3 student license. Uncheck Microsoft Office 365 Plan A3 for Students and check
Microsoft Office 365 Plan A2 for Faculty.
Click Save at the bottom of the page and the license details will be changed.
This now means that your A3 trial licenses can expire without you having to worry about the admin
user with one of those licenses or purchasing that license.
12 | P a g e
© Copyright: BFC Networks Limited 2013 www.bfcnetworks.com
User Management This next section is going to go through the process of creating users and how we can assign these
licenses we have just purchased to staff and students.
This section is only going to cover how users can be created through the Admin Portal. If you want
users to be created automatically, you will need to look into Microsoft Online Directory
Synchronization (also known as DirSync). If you then want to look at Single Sign On, you will need to
look at Active Directory Federation Services 2.0. These aren’t covered in this starter manual,
however Microsoft provide great documentation in the Admin Portal at the top of the users page.
Add a Single User There are different types of users in your establishment, however they are all created the same way
and then you will assign the right license and settings for the user during the process of creation.
The user we are going to create now is going to be a backup admin user so there will be some special
permissions added to allow access to the Admin Portal.
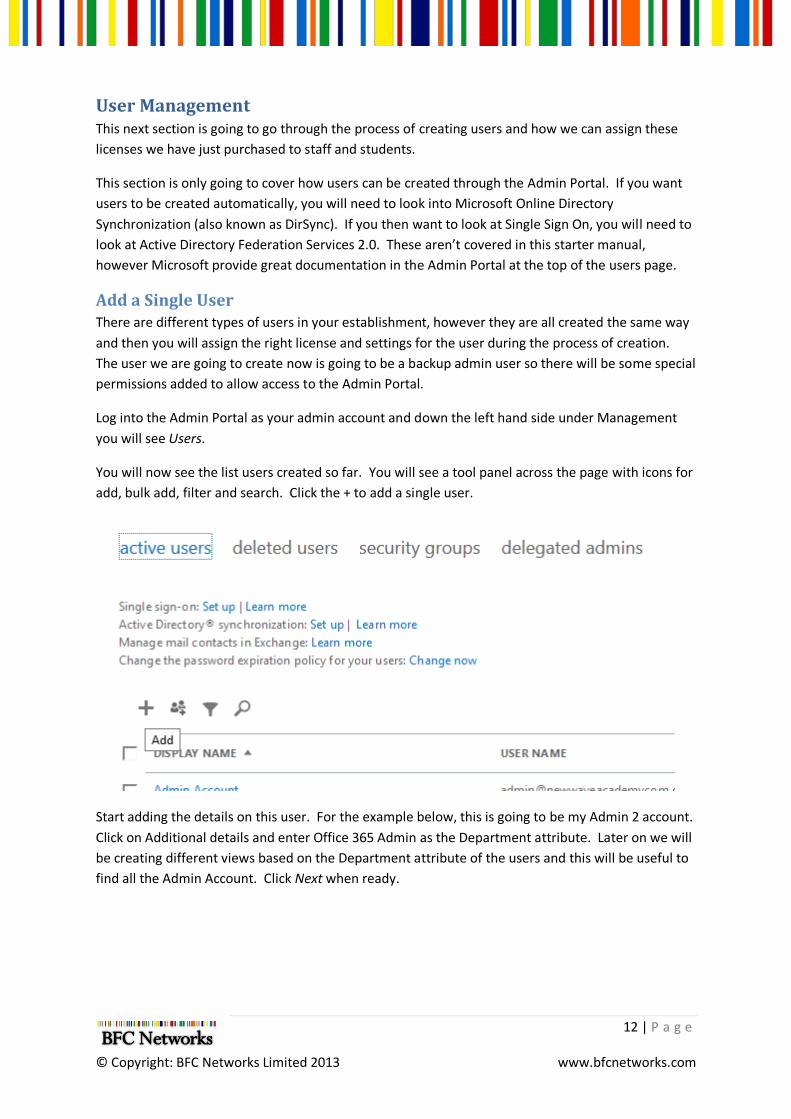
Log into the Admin Portal as your admin account and down the left hand side under Management
you will see Users.
You will now see the list users created so far. You will see a tool panel across the page with icons for
add, bulk add, filter and search. Click the + to add a single user.
Start adding the details on this user. For the example below, this is going to be my Admin 2 account.
Click on Additional details and enter Office 365 Admin as the Department attribute. Later on we will
be creating different views based on the Department attribute of the users and this will be useful to
find all the Admin Account. Click Next when ready.

13 | P a g e
© Copyright: BFC Networks Limited 2013 www.bfcnetworks.com
You are now at the Settings page and have two sections to fill out. The first is around Admin levels
to the Office 365 Admin Portal. As this is the admin account we want to give them Global
Administrator rights but if you need to give certain users permission to just reset other users
password or access billing information you can. You will not need to change this for staff or students.
As this is an elevated user, you are asked to give an email address for information to be sent to. This
might be the email address of the user you are creating but you might decide to user your email
address or a Hotmail account.
Office 365 Education is a global product and you are asked to select where this user is located.
Different parts of the world have different rules around sharing of information and collaboration
such as Video Conferencing is not allowed in some countries. Ensure you select the right country for
the user and where they are located. This information is not shared but is used to enable services
for this user.

14 | P a g e
© Copyright: BFC Networks Limited 2013 www.bfcnetworks.com
You are now asked to assign a license. Select the one you want but for this process we won’t as this
is an elevated account that only needs access to the Admin Portal. If you do want to give this admin
user email and access to Lync and SharePoint, it is recommended to give them a Facility license.
Ensure you are selecting an A2 license which are the free licenses and not one of the trial licenses.
During the process you are not given the ability to set the users password. Instead Microsoft do this
for you and the user is asked to change their password when they first log on. You are first asked
where you want the password to be emailed to (normally a Global administrator of your Office 365)
and on the next page you are also given the password.
Save this password, should you ever have problems logging in with your admin account. You now
have a backup admin account.
Add Bulk Users The bulk user process uses a CSV file to create multiple users and is uploaded to the Admin Portal to
create all the users in the file. There are certain dependences for each user to be created but the
Admin Portal has great error reporting to tell you exactly what is wrong. At the end of the process
(like creating a single user) you are emailed the passwords and presented on the screen for all the
users. You will need Microsoft Excel to help you adding the users into the CSV file.
Log into your Admin Portal and select Users and Groups from the right hand side and then select the
bulk admin icon which is the second from the left.
As you will see on this page, Microsoft have given you the blank CSV file with the correct headers
and an example CSV file.
Download the blank CSV to your desktop and open the file.

15 | P a g e
© Copyright: BFC Networks Limited 2013 www.bfcnetworks.com
When opening the file you will see several headers such as username, first name and last name. For
this CSV and Office 365 we want to fill in the following fields for each user:
Username (include the domain name ex. [email protected] or
[email protected] if you have verified your domain)
First name
Last name
Display name
Email address
Departments. Give all staff the department of Staff and students Students)
Departments is not a required field but all of these fields should be filled in for good practice.
When completed, save the file to a location on your computer that you can easily find.
Navigate to your browsers and back to the page where you downloaded the example CSV file.
Upload the CSV file and click Next.

16 | P a g e
© Copyright: BFC Networks Limited 2013 www.bfcnetworks.com
This will create the users for you and you will be asked for an email address to send the passwords
you want.
Create different views for your Users When we were creating our users earlier on, we added information to each user in the Department
attribute about the type of user they are such as staff. We are now going to use this information to
create different views. We want to create 3 different views for Staff, Students and Admins.
Log into the Admin Portal and using the left navigation click on Users and Groups.
In the tool panel, click on the filter icon (third from the left) and a new drop down will appear. Click
on New View.
Here you can filter the users you have setup. What we want to do now though is create a few views
based on the user type.

17 | P a g e
© Copyright: BFC Networks Limited 2013 www.bfcnetworks.com
From the drop down list click on New view.
This view is going to be for Admin Accounts. Give the view a name of Admin Accounts and fill in the
Department field with Admin Account. Now complete this process for the same information you
entered for staff and students.
Now you have different views so you can manage the different groups. You may decide to put the
intake year in the department attribute so you can easily remove users or change their license when
they leave the school.
Domain Names and DNS During the setup stage we only validated the domain name to show that you are the owner of it.
Now we want to setup all the DNS records so we start receiving email and use Lync with the school
domain.
It is important only to change the email MX record when you are ready to migrate email. If you
move it without creating all your accounts, emails can get lost. Plan your migration and ensure all
the email addresses are created prior to your MX change.
Using the left hand navigation click on Domains located under Management. This is where you can
add additional domain names if you want and view the DNS Setting for each registered domain. In
the list you will see 2 domain. The first is the default domain that is created in your tenancy and the
other is the registered domain from earlier on. Select your school domain name and click on View
DNS settings.

18 | P a g e
© Copyright: BFC Networks Limited 2013 www.bfcnetworks.com
You will now have a page with different DNS Records and they all point to something different.
Exchange Online
There are 3 records all together
MX
o This is how email is delivered. When an email is sent to @newwaveacademy.com it
looks at this MX record on the DNS servers and forwards it the destination server
you have set.
Autodiscover
o When you are configuring your mailbox for the first time you are asked to enter your
servers. In Microsoft Exchange you have the ability to have all this done for you so
all your users have to do is enter their email address and password. As an example
when a student is adding their email address for NewWaveAcademy.com and enter
their password the device with automatically look at the autodiscovery DNS entry
and will try and pull all the server information it requires. This is a highly
recommended setting for you as it enables your users to have a better experience
and also saves you having to send out all the server information for the users to
enter.
Note: This is not just outlook.com, so add this DNS entry
TXT
o This is not required but is recommended to be created. This will be change from
what we configured earlier on.
Microsoft Lync
SRV SIP Federation
o Federation with Lync allows users to talk to other users of Lync outside of your
organization (if you enable it in the Admin Portal). Create this record anyway and
then at least you have it ready should you want to federate with another school.
SIPDIR
o This is used to allow users to log into Lync. If you don’t have this record no users will
be able to use Lync on your school domain
Lync Discovery
o This is the same as the auto discovery in Exchange Online. This will automatically
give the users logging in with this domain the settings and server details to log in.
Remember that each tenancy is different. Don’t copy the details from the screenshot below. Each
domain you have will be different.

19 | P a g e
© Copyright: BFC Networks Limited 2013 www.bfcnetworks.com
Office 365 Products Your tenancy is now deployed ready for your users. But what about a little guidance around
Exchange Online, Lync Online and SharePoint Online?
Where ever you are in Office 365 you will have the top navigation where you currently see Outlook,
People etc but if you are an admin user you will also see Admin where you can easily navigation
between the Office 365 Admin Portal and admin areas for Exchange, Lync and SharePoint.
20 | P a g e
© Copyright: BFC Networks Limited 2013 www.bfcnetworks.com
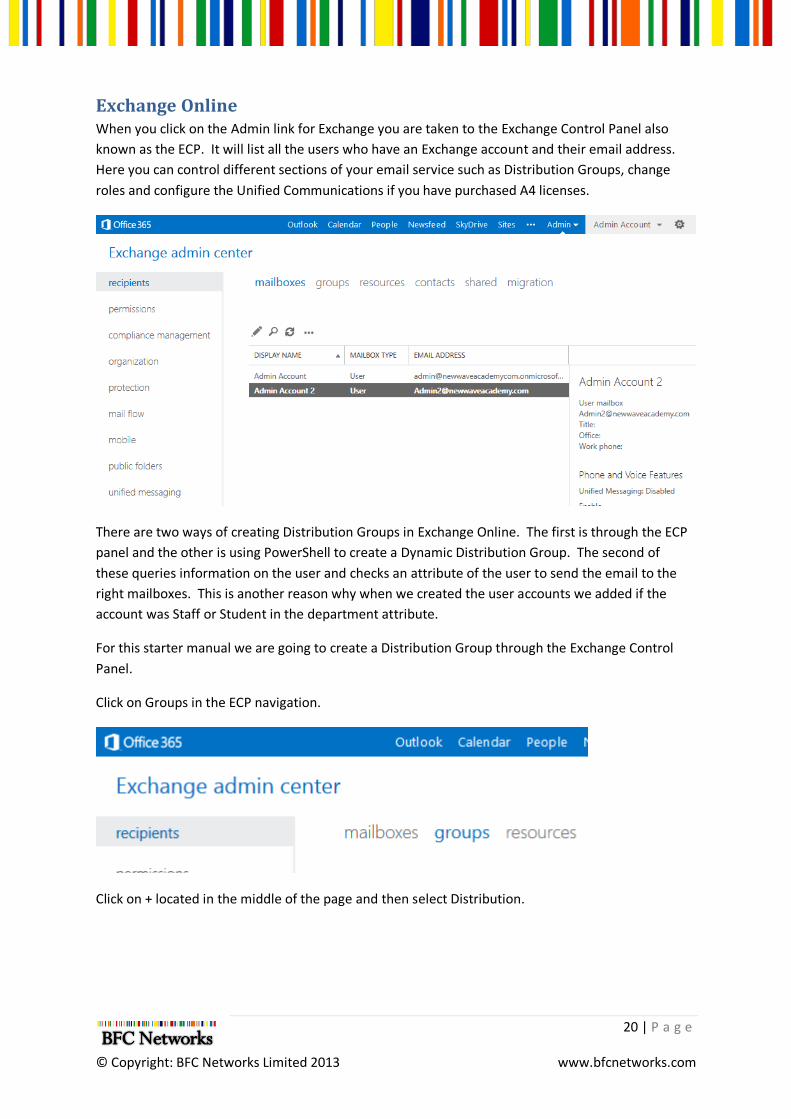
Exchange Online When you click on the Admin link for Exchange you are taken to the Exchange Control Panel also
known as the ECP. It will list all the users who have an Exchange account and their email address.
Here you can control different sections of your email service such as Distribution Groups, change
roles and configure the Unified Communications if you have purchased A4 licenses.
There are two ways of creating Distribution Groups in Exchange Online. The first is through the ECP
panel and the other is using PowerShell to create a Dynamic Distribution Group. The second of
these queries information on the user and checks an attribute of the user to send the email to the
right mailboxes. This is another reason why when we created the user accounts we added if the
account was Staff or Student in the department attribute.
For this starter manual we are going to create a Distribution Group through the Exchange Control
Panel.
Click on Groups in the ECP navigation.
Click on + located in the middle of the page and then select Distribution.

21 | P a g e
© Copyright: BFC Networks Limited 2013 www.bfcnetworks.com
A new window will open for you to fill in information about the group. There are a lot of
requirements so ensure you have filled everything in. The email address is the email address that
can be used to email this whole group.
If there are certain users in the school who you want to be able to own this group and add users
themselves, add them to the Owners area.
In the next section we are going to add the members of this group. Click on Add.
Search for the users you want and click Add. You can add multi users at a time if you want. The list
will only show users who have an Exchange Online license. You can also add other distribution
groups into this list if you wanted.
The next section is around Membership Approval. By default users can add themselves and leave
which we want to restrict as you don’t want students to be able to add themselves to the Staff
Group.

22 | P a g e
© Copyright: BFC Networks Limited 2013 www.bfcnetworks.com
Change the Join permission to Closed and the Leave permission to Closed.
When you are ready click Save which is always located at the bottom.
You will now see the group appear in the Distribution Groups list.
Create any other groups you want.
23 | P a g e
© Copyright: BFC Networks Limited 2013 www.bfcnetworks.com
Lync Online There aren’t too many configuration changes for Lync Online but there are some important changes
that can allow Lync to be used by students with Live Messenger and talk externally with anyone if
they know their email address.
Microsoft assume that you want your Lync closed to the public so you can only talk to users who are
within your Office 365 Education tenancy and with a Lync license. There are two levels of external
communication. One is to allow it to work with other external Lync users whether they have Office
365 Education or a locally installed on-premise installation. The other is around Public IM where you
can talk to users who have Live Messenger.
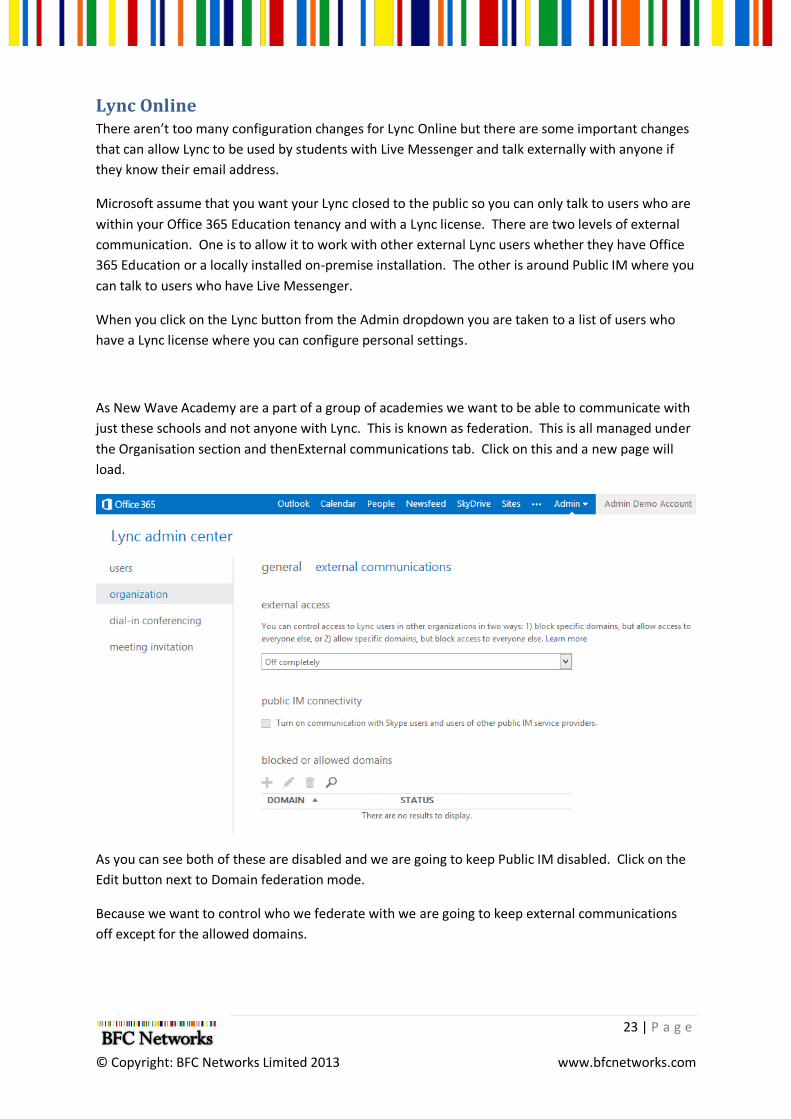
When you click on the Lync button from the Admin dropdown you are taken to a list of users who
have a Lync license where you can configure personal settings.
As New Wave Academy are a part of a group of academies we want to be able to communicate with
just these schools and not anyone with Lync. This is known as federation. This is all managed under
the Organisation section and thenExternal communications tab. Click on this and a new page will
load.
As you can see both of these are disabled and we are going to keep Public IM disabled. Click on the
Edit button next to Domain federation mode.
Because we want to control who we federate with we are going to keep external communications
off except for the allowed domains.

24 | P a g e
© Copyright: BFC Networks Limited 2013 www.bfcnetworks.com
Click Save at the bottom of the page when you have made the change.
You will notice below just under these setting you can add the domains we want to allow for
federation.
Click on add a domain and type the domain name of the school you want to federate with. It is
important that you have both created all the DNS records for this to work. If you are unsure check
the settings and if you have any problems with seeing each other’s information in the Lync client, it
is most likely that the DNS is setup incorrectly.
Click on OK when you are happy and the domains will be federated from your tenancy. To complete
the process of the two schools communicating, both tenancies must add each other’s domain into
this section.
When this is completed you will see the list of domains you are federated with.

25 | P a g e
© Copyright: BFC Networks Limited 2013 www.bfcnetworks.com
SharePoint Online The management settings for SharePoint doesn’t really need any changes but if you are thinking of
creating additional site collections, InfoPath Forms or to manage a User’s Profile you do this through
the Admin Portal.
The Administration Centre for SharePoint will load and you will see six sections which you can use to
manage any of these features by default, the site collection page is opened.
Create your Public Facing Site One of the great free features of Office 365 Education is the ability to have a free public facing
internet site based on SharePoint. You can only have 1 public facing site per tenancy.
When the page loads, click on New and the drop box will appear and select Public Website.
26 | P a g e
© Copyright: BFC Networks Limited 2013 www.bfcnetworks.com
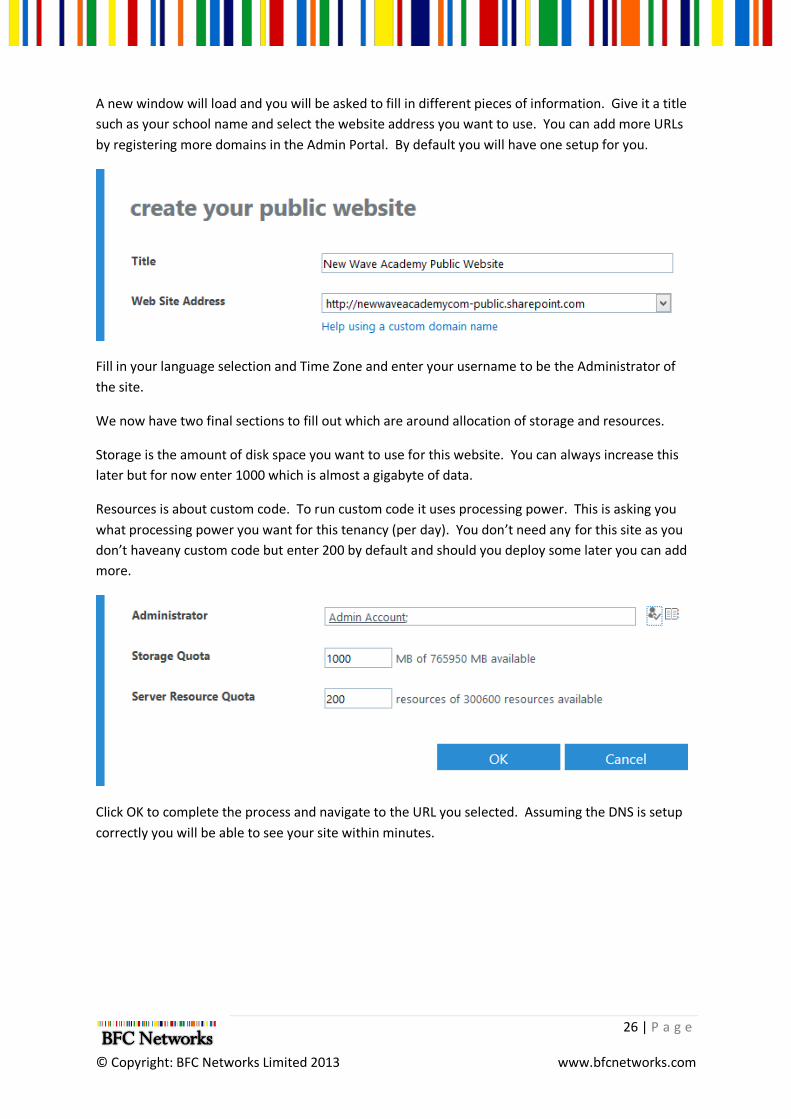
A new window will load and you will be asked to fill in different pieces of information. Give it a title
such as your school name and select the website address you want to use. You can add more URLs
by registering more domains in the Admin Portal. By default you will have one setup for you.
Fill in your language selection and Time Zone and enter your username to be the Administrator of
the site.
We now have two final sections to fill out which are around allocation of storage and resources.
Storage is the amount of disk space you want to use for this website. You can always increase this
later but for now enter 1000 which is almost a gigabyte of data.
Resources is about custom code. To run custom code it uses processing power. This is asking you
what processing power you want for this tenancy (per day). You don’t need any for this site as you
don’t haveany custom code but enter 200 by default and should you deploy some later you can add
more.
Click OK to complete the process and navigate to the URL you selected. Assuming the DNS is setup
correctly you will be able to see your site within minutes.

27 | P a g e
© Copyright: BFC Networks Limited 2013 www.bfcnetworks.com
Increase your SharePoint Storage Capacity As discussed earlier, you will be allocated 500MB per license for you to use in SharePoint but by
default you will only have 1GB set for your main SharePoint site. We need to increase the default
and set this to the highest available.
The image below has an allocation which has already been used by some site collections and as your
current environment only has 1000MB we want to increase this to the location we have for your
licenses.
Select the first site collection and select Storage Quota above it.

28 | P a g e
© Copyright: BFC Networks Limited 2013 www.bfcnetworks.com
A window will open and you need to change the quota to 100,000MB which is the highest you can
have. From the image below you can see that there is currently 8000MB of quota available and for
this site collection I’m going to set it to 7,000MB as this is all I’m current licensed for. I’m also going
to setup the notification so that the administrators of my site collection are notified to let them
know that they have reached 90% of their allocation.