officeclip reference manual - 22nd century · officeclip reference manual ix 16.5. issue tracker...
TRANSCRIPT
OfficeClip Reference Manual

OfficeClip Reference Manual

iv
Table of Contents1. General Information ........................................................................................................ 1
1.1. About this Reference Manual ................................................................................. 11.2. Conventions used in this Manual ............................................................................. 11.3. About OfficeClip .................................................................................................. 1
1.3.1. The OfficeClip Components ......................................................................... 21.3.1.1. Office Portal ................................................................................... 21.3.1.2. Desktop ......................................................................................... 21.3.1.3. Contacts ......................................................................................... 21.3.1.4. Issue Tracker .................................................................................. 21.3.1.5. Time and Expenses .......................................................................... 21.3.1.6. Projects .......................................................................................... 21.3.1.7. Extranet ......................................................................................... 3
1.3.2. Tags ........................................................................................................ 31.3.3. Scheduled Reports ...................................................................................... 3
1.4. Getting Started ..................................................................................................... 41.4.1. Logging on to OfficeClip ............................................................................ 41.4.2. OfficeClip Interface .................................................................................... 4
2. OfficeClip Setup ............................................................................................................. 62.1. Overview ........................................................................................................... 62.2. Site Management ................................................................................................ 6
2.2.1. Manage Site Information ............................................................................. 62.2.1.1. Manage Site Parameters .................................................................... 62.2.1.2. Manage Site Presentation .................................................................. 8
2.2.2. Manage Site Privileges and Applications ..................................................... 112.2.2.1. Manage Site Administrators and Users ............................................... 112.2.2.2. Manage Site Applications ................................................................ 11
2.2.3. Manage Site License ................................................................................ 122.2.3.1. License Information and Renewal ..................................................... 12
2.3. Organization Management .................................................................................... 132.3.1. Icons ...................................................................................................... 132.3.2. Manage Organization Roles and Privileges .................................................... 14
2.3.2.1. Manage Organization Roles ............................................................. 142.3.2.2. Manage Organization Applications and Access .................................... 16
2.3.3. Manage Organization Users ........................................................................ 172.3.3.1. Modify User Information ................................................................. 172.3.3.2. Reset User Password ...................................................................... 172.3.3.3. Add or Remove User from Organization ........................................... 18
2.3.4. Manage Organization Information ............................................................... 182.3.4.1. Create New Organization ................................................................ 182.3.4.2. Remove Organization ..................................................................... 192.3.4.3. Rename Organization ..................................................................... 192.3.4.4. Change Organization Timezone ........................................................ 192.3.4.5. Manage Organization Division ......................................................... 19
2.4. Personal Profile .................................................................................................. 202.4.1. Manage OfficeClip Password ...................................................................... 202.4.2. Manage Personal Preferences ...................................................................... 202.4.3. Manage Personal Detail ............................................................................. 21
2.4.3.1. Configuring the Pay Period in the Personal Detail Section ...................... 213. Accounts ..................................................................................................................... 23
3.1. Overview .......................................................................................................... 233.2. Understanding OfficeClip Accounts ....................................................................... 23

OfficeClip Reference Manual
v
3.3. Using Accounts .................................................................................................. 233.3.1. Creating a New Account ............................................................................ 233.3.2. Bulk Options ........................................................................................... 243.3.3. Editing Accounts ...................................................................................... 25
3.3.3.1. Tracking Time ............................................................................... 253.3.3.2. Permissions and Ownership of Accounts ............................................ 263.3.3.3. Using Children .............................................................................. 26
3.3.4. Searching and Filtering Accounts ................................................................ 283.3.4.1. Search and Sort ............................................................................. 283.3.4.2. Filters .......................................................................................... 29
3.3.5. Creating Reports ...................................................................................... 303.3.5.1. Pre-Defined Reports ....................................................................... 303.3.5.2. User-Defined Reports ..................................................................... 303.3.5.3. Track Time Reports ....................................................................... 30
3.3.6. Importing and Exporting Accounts .............................................................. 313.3.6.1. Import .......................................................................................... 313.3.6.2. Export .......................................................................................... 31
3.3.7. Account Tags .......................................................................................... 323.3.8. Shared Items ........................................................................................... 32
3.4. Accounts Administration ...................................................................................... 333.4.1. Icons ...................................................................................................... 333.4.2. Fixed Fields ............................................................................................ 34
3.4.2.1. Configuring List Fields ................................................................... 353.4.3. User-Defined Fields .................................................................................. 36
3.4.3.1. Field Type .................................................................................... 363.4.3.2. Mandatory Fields .......................................................................... 373.4.3.3. Restricting a Field Edit-ability by Role .............................................. 373.4.3.4. Configuring List Fields ................................................................... 37
3.4.4. Child Objects .......................................................................................... 383.4.5. Rename Sections ...................................................................................... 393.4.6. Rules ..................................................................................................... 393.4.7. Position Fields ......................................................................................... 403.4.8. Relationships ........................................................................................... 41
4. Address Book ............................................................................................................... 424.1. Overview ......................................................................................................... 424.2. Using Address Book .......................................................................................... 42
4.2.1. Accessing Address Book .......................................................................... 424.2.2. Creating Address Books ........................................................................... 424.2.3. Searching Address Book ........................................................................... 434.2.4. Import ................................................................................................... 43
4.2.4.1. Importing from CSV and vCard files ................................................. 434.2.4.2. Importing from LDAP file ............................................................... 43
4.2.5. Accessing Address List ............................................................................. 444.2.6. New Address .......................................................................................... 44
5. Announcements ............................................................................................................ 465.1. Using Announcements ......................................................................................... 46
5.1.1. Access Announcements ............................................................................. 465.1.2. Add an Announcement .............................................................................. 465.1.3. Archived Announcements .......................................................................... 47
6. Bookmarks ................................................................................................................... 486.1. Using Bookmarks ............................................................................................... 48
6.1.1. Access Bookmarks ................................................................................... 486.1.2. Add a Bookmark ...................................................................................... 48
7. Calendar ...................................................................................................................... 49

OfficeClip Reference Manual
vi
7.1. Overview .......................................................................................................... 497.2. Accessing and Using Calendar .............................................................................. 49
7.2.1. Creating Events ........................................................................................ 497.2.2. Accepting RSVP's .................................................................................... 507.2.3. Import and Export Calendar ....................................................................... 507.2.4. Shared Items ........................................................................................... 51
7.3. Administration of the Calendar .............................................................................. 517.3.1. Resource Management .............................................................................. 517.3.2. Organization Profile .................................................................................. 527.3.3. Personal Profile ........................................................................................ 52
8. Campaigns ................................................................................................................... 548.1. Overview .......................................................................................................... 548.2. Understanding OfficeClip Campaigns ..................................................................... 548.3. Using Campaigns ................................................................................................ 54
8.3.1. Creating Campaigns .................................................................................. 548.3.2. Modifying Campaigns ............................................................................... 558.3.3. Mail Merge Campaigns ............................................................................. 568.3.4. Campaign Tags ........................................................................................ 568.3.5. Relationships ........................................................................................... 56
9. Contacts ...................................................................................................................... 589.1. Overview .......................................................................................................... 589.2. Understanding OfficeClip Contacts ........................................................................ 589.3. Using Contacts ................................................................................................... 58
9.3.1. Creating a New Contact ............................................................................ 589.3.2. Bulk Options ........................................................................................... 599.3.3. Editing Contacts ....................................................................................... 60
9.3.3.1. Tracking Time ............................................................................... 609.3.3.2. Permissions and Ownership of Contacts ............................................. 619.3.3.3. Using Children .............................................................................. 61
9.3.4. Searching and Filtering Contacts ................................................................. 639.3.4.1. Search and Sort ............................................................................. 639.3.4.2. Filters .......................................................................................... 63
9.3.5. Reports ................................................................................................... 649.3.5.1. Pre-Defined Reports ....................................................................... 659.3.5.2. User-Defined Reports ..................................................................... 659.3.5.3. Track Time Reports ....................................................................... 659.3.5.4. Scheduled Reports ......................................................................... 65
9.3.6. Importing and Exporting Contacts ............................................................... 669.3.6.1. Import .......................................................................................... 669.3.6.2. Export .......................................................................................... 66
9.3.7. Contact Tags ........................................................................................... 679.3.8. Shared Items ........................................................................................... 67
9.4. Contacts Administration ....................................................................................... 689.4.1. Icons ...................................................................................................... 689.4.2. Fixed Fields ............................................................................................ 69
9.4.2.1. Configuring List Fields ................................................................... 709.4.3. User-Defined Fields .................................................................................. 70
9.4.3.1. Field Type .................................................................................... 719.4.3.2. Mandatory Fields ........................................................................... 719.4.3.3. Restricting a Field Edit-ability by Role .............................................. 719.4.3.4. Configuring List Fields ................................................................... 72
9.4.4. Child Objects .......................................................................................... 729.4.5. Rename Sections ...................................................................................... 739.4.6. Publish Input Forms ................................................................................. 74
OfficeClip Reference Manual
vii
9.4.7. Rules ..................................................................................................... 759.4.8. Position Fields ......................................................................................... 769.4.9. Relationships ........................................................................................... 769.4.10. Duplicates ............................................................................................. 77
10. Documents ................................................................................................................. 7910.1. Overview ......................................................................................................... 7910.2. Using Documents .............................................................................................. 79
10.2.1. Accessing Documents .............................................................................. 7910.2.1.1. Document Attributes ..................................................................... 79
10.2.2. Creating Folders ..................................................................................... 7910.2.3. Uploading Documents ............................................................................. 8010.2.4. Modifying Documents/Folders .................................................................. 81
10.2.4.1. Moving and Copying Documents and Folders .................................... 8110.2.5. Shared Items .......................................................................................... 81
10.2.5.1. Deleting Documents and Folders .................................................... 8210.2.5.2. Renaming Documents and Folders .................................................. 82
10.2.6. Searching Documents ............................................................................. 8310.2.7. Locking and Unlocking Documents ........................................................... 83
10.3. Administration of Documents ............................................................................. 8410.3.1. Application Documents ........................................................................... 8410.3.2. Bulk Upload ......................................................................................... 84
11. Email ........................................................................................................................ 8611.1. Overview ........................................................................................................ 8611.2. Using Email .................................................................................................... 86
11.2.1. Accessing Email .................................................................................... 8611.2.2. Composing Emails ................................................................................. 8611.2.3. Creating Email Accounts ........................................................................ 87
11.2.3.1. Working with Various Email Servers ............................................... 8711.2.4. Email Folders ....................................................................................... 8811.2.5. Searching Email .................................................................................... 8911.2.6. Email Options ....................................................................................... 89
12. Expenses .................................................................................................................... 9112.1. Overview ......................................................................................................... 9112.2. Understanding OfficeClip Expenses ...................................................................... 91
12.2.1. Currency ............................................................................................... 9112.3. Using Expense .................................................................................................. 92
12.3.1. Creating an Expense ............................................................................... 9212.3.2. Inbox/Outbox Portlet ............................................................................... 9312.3.3. Exporting Expenses ................................................................................. 9412.3.4. Generating Expense Reports ..................................................................... 94
12.3.4.1. Expense Reports .......................................................................... 9412.3.4.2. Other Reports .............................................................................. 94
12.3.5. Archiving Expenses ................................................................................ 9512.3.6. Reimbursements ..................................................................................... 9612.3.7. Shared Items .......................................................................................... 96
12.4. Expense Administration ...................................................................................... 9712.4.1. Editing Fields to Create Aliases ................................................................. 9712.4.2. Setting up Expense Profiles ...................................................................... 9712.4.3. Setting up Expense Workflow ................................................................... 9812.4.4. Adding Expense Types ............................................................................ 9912.4.5. Setting up Default Currency ..................................................................... 9912.4.6. Managing User's Expense sheets .............................................................. 100
12.4.6.1. Rerouting Expense sheets ............................................................. 10012.4.7. Allocating Projects to Users .................................................................... 101

OfficeClip Reference Manual
viii
12.4.8. Users .................................................................................................. 10113. Extranet ................................................................................................................... 103
13.1. Overview ...................................................................................................... 10313.2. Understanding Extranet ................................................................................... 103
13.2.1. Extranet Features .................................................................................. 10313.2.2. Accessing Extranet ............................................................................... 10413.2.3. Adding Extranet Users ........................................................................... 10513.2.4. Managing Extranet Users ........................................................................ 10513.2.5. Creating Extranet Items .......................................................................... 106
13.2.5.1. Sharing Group Events in Calendar ................................................. 10613.2.5.2. Sharing Documents .................................................................... 10613.2.5.3. Sharing Expense Reports ............................................................ 10713.2.5.4. Creating Knowledge Base ........................................................... 10713.2.5.5. Creating Issue Capture Form ........................................................ 10813.2.5.6. Sharing Timesheet Reports .......................................................... 10913.2.5.7. Sharing Contact Manager Reports ................................................. 10913.2.5.8. Sharing Accounts Reports ........................................................... 10913.2.5.9. Sharing Opportunities Reports ...................................................... 11013.2.5.10. Sharing Projects Reports ........................................................... 110
13.2.6. Editing Extranet List Items ..................................................................... 11113.2.7. Testing Extranet .................................................................................... 111
13.3. Administration of Extranet Options ..................................................................... 11214. Forums ..................................................................................................................... 113
14.1. Using Forums ................................................................................................. 11314.1.1. Access Forums ..................................................................................... 11314.1.2. Create a Forum ..................................................................................... 11314.1.3. Add a Topic ......................................................................................... 11314.1.4. Reply to a Topic ................................................................................... 11414.1.5. Searching Forums ................................................................................. 114
15. Home Page ............................................................................................................... 11615.1. Overview ....................................................................................................... 11615.2. Understanding OfficeClip Home Page ................................................................. 11615.3. Using Home Page ............................................................................................ 116
15.3.1. Accessing Home Page ............................................................................ 11615.3.2. Manage Portlets .................................................................................... 11615.3.3. Reset Dashboard ................................................................................... 117
16. Issue Tracker ............................................................................................................ 11816.1. Overview ....................................................................................................... 11816.2. Understanding OfficeClip Issue Tracker ............................................................... 11816.3. General Concepts ............................................................................................ 118
16.3.1. User Defined Fields ............................................................................... 11816.3.2. Rules .................................................................................................. 11916.3.3. Email Capture ...................................................................................... 119
16.4. Using Issue Tracker ......................................................................................... 12016.4.1. Creating and Editing Issues ..................................................................... 12016.4.2. Tracking Time ...................................................................................... 12116.4.3. Searching and Filtering Issues ................................................................. 122
16.4.3.1. Simple Search ............................................................................ 12216.4.3.2. Filters ....................................................................................... 122
16.4.4. Reports ............................................................................................... 12316.4.5. Import and Export ................................................................................ 124
16.4.5.1. Importing Issues from ocXML file ................................................. 12416.4.5.2. Importing Issues from a CSV file .................................................. 12416.4.5.3. Exporting Issues to XML ............................................................. 125

OfficeClip Reference Manual
ix
16.5. Issue Tracker Administration ............................................................................. 12516.5.1. Icons ................................................................................................... 12616.5.2. Creating Binders ................................................................................... 12616.5.3. Shared Items ........................................................................................ 12716.5.4. Fixed Fields ........................................................................................ 12816.5.5. Configuring List Fields ......................................................................... 12816.5.6. User-Defined Fields ............................................................................... 12916.5.7. Options ............................................................................................... 13016.5.8. Rules .................................................................................................. 13116.5.9. Bulk Processing ................................................................................... 13216.5.10. Email Capture ................................................................................... 132
17. Newsfeeds ................................................................................................................ 13417.1. Using Newsfeeds ............................................................................................. 134
17.1.1. Access Newsfeeds ................................................................................. 13417.1.2. Adding a Newsfeed ............................................................................... 13417.1.3. Edit a Newsfeed ................................................................................... 13417.1.4. Delete a Newsfeed ................................................................................ 135
18. Notes ....................................................................................................................... 13618.1. Using Notes ................................................................................................... 136
18.1.1. Access Notes ........................................................................................ 13618.1.2. Add a Note .......................................................................................... 136
19. Opportunities ............................................................................................................ 13719.1. Overview ....................................................................................................... 13719.2. Understanding OfficeClip Opportunities .............................................................. 13719.3. Using Opportunities ......................................................................................... 137
19.3.1. Creating a New Opportunity ................................................................... 13719.3.2. Bulk Options ........................................................................................ 13819.3.3. Editing Opportunities ............................................................................. 138
19.3.3.1. Permissions and Ownership of Opportunities ................................... 13919.3.3.2. Using Children ........................................................................... 140
19.3.4. Searching and Filtering Opportunities ....................................................... 14119.3.4.1. Search ...................................................................................... 14119.3.4.2. Filters ....................................................................................... 142
19.3.5. Creating Reports ................................................................................... 14319.3.5.1. Pre-Defined Reports ................................................................... 14319.3.5.2. User-Defined Reports .................................................................. 14319.3.5.3. Track Time Reports .................................................................... 143
19.3.6. Opportunity Tags .................................................................................. 14419.3.7. Shared Items ........................................................................................ 144
19.4. Opportunities Administration ............................................................................. 14519.4.1. Icons ................................................................................................... 14519.4.2. Fixed Fields ......................................................................................... 146
19.4.2.1. Configuring List Fields ................................................................ 14719.4.3. User-Defined Fields ............................................................................... 147
19.4.3.1. Field Type ................................................................................. 14819.4.3.2. Mandatory Fields ........................................................................ 14819.4.3.3. Restricting a Field Edit-ability by Role ........................................... 14919.4.3.4. Configuring List Fields ................................................................ 149
19.4.4. Child Objects ....................................................................................... 14919.4.5. Rename Sections ................................................................................... 15019.4.6. Rules ................................................................................................. 15119.4.7. Position Fields ...................................................................................... 15219.4.8. Contact Roles ....................................................................................... 15219.4.9. Relationships ........................................................................................ 153
OfficeClip Reference Manual
x
20. Photo Album ............................................................................................................. 15520.1. Using Photo Album ......................................................................................... 155
20.1.1. Access Photo Album ............................................................................. 15520.1.2. Creating an Album ................................................................................ 15520.1.3. Add Photos to an Album ........................................................................ 15520.1.4. Deleting Photos .................................................................................... 15620.1.5. Deleting an Album ................................................................................ 15620.1.6. Viewing an Album ............................................................................... 157
21. Polls ........................................................................................................................ 15821.1. Using Polls ..................................................................................................... 158
21.1.1. Access Polls ......................................................................................... 15821.1.2. Adding a Poll ....................................................................................... 15821.1.3. Vote in a Poll ....................................................................................... 15921.1.4. Archive a Poll ...................................................................................... 15921.1.5. Delete a Poll ........................................................................................ 16021.1.6. Close a Poll ......................................................................................... 160
22. Projects .................................................................................................................... 16122.1. Overview ....................................................................................................... 16122.2. Understanding OfficeClip Projects ...................................................................... 161
22.2.1. Accessing Projects ................................................................................ 16122.2.2. Creating Accounts ................................................................................. 16122.2.3. Creating Projects ................................................................................... 16222.2.4. Modifying Account Lists ........................................................................ 16222.2.5. Modifying a Project ............................................................................. 16322.2.6. Importing and Exporting Projects ............................................................. 16422.2.7. Shared Items ....................................................................................... 164
22.3. Administration of Projects ................................................................................. 16522.3.1. Allocating Projects ................................................................................ 16522.3.2. Allocating Users ................................................................................... 165
23. Punch Clock ............................................................................................................. 16723.1. Overview ....................................................................................................... 16723.2. Using Punch Clock Input Screen ........................................................................ 167
23.2.1. Viewing/Editing Punch Time .................................................................. 16723.3. Exporting Punch Clock ..................................................................................... 16723.4. Punch Clock Administration .............................................................................. 168
23.4.1. Setting Permissions ............................................................................... 16824. Tasks ....................................................................................................................... 169
24.1. Overview ....................................................................................................... 16924.2. Using Tasks ................................................................................................... 169
24.2.1. Accessing Tasks ................................................................................... 16924.2.2. Creating Tasks ...................................................................................... 16924.2.3. Filtering Tasks ...................................................................................... 17024.2.4. Tracking Time ...................................................................................... 17024.2.5. Import and Export ................................................................................. 171
25. Timesheet ................................................................................................................. 17225.1. Overview ....................................................................................................... 17225.2. Understanding OfficeClip Timesheet ................................................................... 172
25.2.1. Proxy ................................................................................................. 17225.3. Using Timesheet ............................................................................................. 173
25.3.1. Creating a Timesheet ............................................................................. 17325.3.2. Inbox/Outbox Portlet ............................................................................. 17425.3.3. Exporting Timesheet .............................................................................. 17525.3.4. Importing TrackTime ............................................................................. 17525.3.5. Reports ............................................................................................... 176

OfficeClip Reference Manual
xi
25.3.5.1. General Reports ......................................................................... 17625.3.5.2. Other Reports ............................................................................ 176
25.3.6. Shared Items ........................................................................................ 17725.4. Timesheet Administration ................................................................................. 178
25.4.1. Editing Fields to Create Aliases ............................................................... 17825.4.2. Setting up the Timesheet Profiles ............................................................. 17825.4.3. Setting up Workflow - Routing ................................................................ 17925.4.4. Adding Service Items ........................................................................... 18025.4.5. Configuring Billing Rates ...................................................................... 18125.4.6. Defining Rules for the timesheets ............................................................. 182
25.4.6.1. Combining rules ......................................................................... 18225.4.6.2. Editing rules .............................................................................. 182
25.4.7. Defining Payroll Categories ................................................................... 18325.4.8. Managing User's timesheets ................................................................... 183
25.4.8.1. Rerouting timesheets ................................................................... 18425.4.9. Allocating Projects to Users .................................................................... 18425.4.10. Users ................................................................................................. 185
26. Users ....................................................................................................................... 18626.1. Overview ...................................................................................................... 18626.2. Using Users .................................................................................................... 186
26.2.1. Accessing Users .................................................................................. 18626.2.2. Managing Users ................................................................................... 18626.2.3. Modifying User Details ......................................................................... 18726.2.4. Searching Users ................................................................................... 18726.2.5. Import and Export ................................................................................ 188
26.2.5.1. Importing Users from CSV files .................................................... 18826.2.5.2. Importing Users from vCard files .................................................. 18826.2.5.3. Importing Users from LDAP files .................................................. 18926.2.5.4. Export Users to CSV or vCard file ................................................. 189
26.2.6. Creating User Notices ............................................................................ 189
1
Chapter 1. General InformationOfficeClip is a web-based suite of applications that enables business teams to collaborate, manageemployees, customers and issues.
1.1. About this Reference ManualThis reference manual is intended for OfficeClip Suite version 8.2. It is not intended to be used for anyversion prior to 8.2, due to many feature enhancements and functional andinterface differences betweenversion 8.2 and earlier versions.
Because this manual serves as a reference, it does not provide general instruction on web-based software ingeneral. It also does not provide information on internal or back-end details about the OfficeClip software.
The OfficeClip software is constantly under development, and the reference manual is updated frequentlyas well. The software features that are added in the build releases may not be updated promptly in themanual. This means that all changes from version 8.2.1 to 8.3 will be reflected in the documentation ofversion 8.3.
1.2. Conventions used in this ManualThis manual uses certain typographic conventions:
• Text in this style is used for statements that are taken directly from another source, such asOfficeClip screens or printed documentation.
• Text in this style is used for screen buttons that the user presses to take an action.
• Text in this style is used to denote a hyperlink or a menu choice on the screen.
• Text in this style is used to denote a submenu on the screen.
• Text in this style is used to denote a screen label or field name.
• Text in this style is used to show if a particular feature is supported in an edition of the OfficeClipsoftware.
• Text in this style is used to denote user input. For example, the input that user enters in thetextbox.
1.3. About OfficeClipOfficeClip is a web-based application that provides an integrated solution for better management of youroffice setup and operations. OfficeClip facilitates information tracking and sharing in a manner that isrelevant to an organization. One of the striking features of OfficeClip is that it provides you an interface forinteracting with all the different types of people that are related to your business, both internal and external.
First, OfficeClip has a strong suite of intranet-based components that make the management of informationwithin the organization simple and straightforward. It also includes tools to plan projects and monitor theirimplementation. Second, it has a customer relationship management component, called Contacts, that canbe used to maintain records of all the organizations and individuals with whom you do business. TheExtranet component also allows you to reach out to people outside your organization.
General Information
2
1.3.1. The OfficeClip ComponentsThe OfficeClip application is made up of the following components, which centralize and organize theoffice operations:
• Office Portal
• Desktop
• Contacts
• Issue Tracker
• Time and Expenses
• Projects
• Setup
• Extranet
Each OfficeClip component works as a self-contained independent unit, offering unique features for theadministrator and the user. These components can be created and managed by the administrator/creator,who can also set permissions for other users.
1.3.1.1. Office Portal
The Portal component is used to manage your information resources. It allows you to retrieve contentupdates from Internet locations directly into OfficeClip. You can also use it to interact, communicate, andcollaborate with users of your OfficeClip organization by setting up forums, polls, and announcements.
1.3.1.2. Desktop
The Desktop component is used for managing your schedule, e-mail, and documents.
1.3.1.3. Contacts
Contacts is an important component, used for managing all your business contacts, for tracking businessopportunities, and for running e-mail campaigns targeting your contacts.
1.3.1.4. Issue Tracker
The Issue Tracker helps you increase your efficiency by allowing you to track unresolved problems withyour projects. Dynamic functionality makes the issue tracker both flexible and detailed.
1.3.1.5. Time and Expenses
The Time and Expenses component is used for tracking the attendance of the users of an organization. TheTimesheet feature is integrated with the Projects component so that users can track the time they spend onprojects. An offline component allows users who are off-site to track time and upload it to OfficeClip.
1.3.1.6. Projects
You can use the Projects component to manage all your organization's projects, including assigning usersto projects, and track their progress.

General Information
3
1.3.1.7. Extranet
The Extranet component is used to make information from your OfficeClip database available to anaudience that is not a part of OfficeClip. Just as in the other components, OfficeClip allows you to controlwho accesses the information.
See Also:
Office Portal
Desktop
Contacts
Issue Tracker
Time and Expenses
Projects
Extranet
1.3.2. TagsTags are free-form labels that can be linked with any objects (e.g. Contacts, Accounts, Opportunities, andCampaigns etc.). Tag is an important feature of many Web 2.0 services. Many websites and blogs use tagsto easy labeling articles and searching them efficiently.
OfficeClip implements a hierarchical tagging for its objects. Tag Groups are used to group similar tags.These groups provide a structure to the otherwise free-form tags that can quickly go out of control. Werecommend grouping tags wherever appropriate, although tags without groups are also supported and isequally powerful for searching and creating filters.
Administrators can limit who can create new tags and associate tags with various objects like Contacts,Accounts etc. This is because unlike in websites where users can link blogs with any arbitrary tags, someorganization might want to enforce policy on tagging various objects they own.
Tags are currently available for Contacts, Accounts, Opportunities and Campaigns. To access tags usercan go to the bottom of the summary details. Tags can also be managed (if authorized) by clicking on theTags link on the button bar.
1.3.3. Scheduled ReportsOfficeClip allows Reports to be scheduled so that they can be run in the background at regular intervalsand then emailed to the user who requested the report. To schedule a report, do the following:
1. Go to the Reports Screen.
2. Click on the icon and fill-in the time to schedule the report
3. Type the Email address to whom the report needs to be sent
4. Click on Apply.

General Information
4
1.4. Getting StartedThe OfficeClip suite works best on Microsoft Windows 2000 (Microsoft Windows NT 5.0.2195) ServicePack 4 Operating System or later. To start using the features of the application, the user must login toOfficeClip.
1.4.1. Logging on to OfficeClip1. Log on to the OfficeClip home page, through this URL- https://www.officeclip.com/OfficePortal/
homepage/homepage.aspx
The login page is displayed.
2. Type a valid username in the Username field.
3. Type the password in the Password field.
• The user can select the Save my Login id on this machine option for the machine to remember your id.
• The user can even select the Open OfficeClip in a new window (suppress browser buttons) option.
4. Click the Login button to enter the application.
On the login page, links to the OfficeClip tutorials and the OfficeClip Knowledge base are provided.
See Also:
OfficeClip Interface
1.4.2. OfficeClip InterfaceThe OfficeClip Interface is designed to provide quick accessibility to all the applications from the mainpage. After logging in to the application, the main page displays all the major components. The center ofthe screen is the work area for all the application components, surrounded by the Tool bar, Menu bar, Infobar, Left bar, and the Button bar. Let us look at each of the interface components in detail:
Menu bar: This bar displays the File, Tools, and Support buttons on the left, and Help and Log Off buttonon the right. It also displays the date and the user's name.
• The File menu allows the user to Log off the OfficeClip application. The user can even log off byclicking the Log Off button on the right of the menu bar.
• The Tools menu gives access to all the OfficeClip applications.
• The Support menu allows the user to access the help files for all the OfficeClip components. The context-sensitive help files can be accessed by clicking the Help button on the right-end of the menu bar.
Tool bar: This bar provides quick access to each of the OfficeClip applications. The user can start anapplication by clicking the appropriate button on the tool bar.
Info bar: This bar displays the current component. It has the Quick Createdrop-down menu; this providesdirect access to pages for creating an event, task, note, email, issue, or contact, and to send an SMS message.It also displays the name of the current Organization.
Left bar: The left bar displays all the applications within the current component.
General Information
5
Button bar: This bar displays the buttons available for the currents component.
See Also:
Logging on to OfficeClip

6
Chapter 2. OfficeClip Setup
2.1. Overview The OfficeClip Setup application provides the capabilities for setting up various components to manageOfficeClip suite. It includes site management, organization management, and personal profile. It can beaccessed by clicking on the Setup toolbar icon from within any OfficeClip screen. Different parts of thesetup menus are shown to each user, depending on the privileges of the user.
There are two types of administrators in OfficeClip:
• Site Administrators - A site is like an umbrella over all organizations. Users with this privilege willhave access to the Site Management functions of the OfficeClip Setup. They will be able to setup siteprivileges, site applications, templates, letterheads etc. They will also be able to manage OfficeCliplicenses.
• Organization Administrators - A single installation of OfficeClip can support multiple organizations.Each organization can be independent of any other organization in the sense that they will not haveany shared data and other resources. Users with this privilege will have access to the OrganizationManagement functions of the OfficeClip Setup.
Note
A site administrator, by default, does not have access to the organization administration underthe Organization Management section of the Setup. Similarly, an organization administrator,by default does not have access to the site administration functions that are available underthe Site Management section of the Setup.
Setup in OfficeClip consists of three main sections:
• Site Management - Allows setting and changing site-wide privileges and information.
• Organization Management - Allows setting and changing information for the current organizationsuch as role privileges, users, and application access.
• Personal Profile - Allows changing of personal preferences such as password, personal details, andmenu preferences.
2.2. Site Management
2.2.1. Manage Site Information
Site Information is separated into two categories for easier management: Manage Site Parameters andManage Site Presentation. To access this screen, click Setup on the toolbar and under the section titledSite Management, click Manage Site Information.
2.2.1.1. Manage Site Parameters
This section contains links that allow you to manage settings related to the information for the entire site.
OfficeClip Setup
7
2.2.1.1.1. Change Regional Settings
The Site Administrator can set the date and time format to match what is used in his or her geographicalarea. This information is used in OfficeClip to represent time and date throughout the site. OfficeClipprovides three types of date and time formats:
• Short Date & Time Format - is used mainly for screens where the user inputs the date and timemanually (or via a calendar interface)
• Medium Date & Time Format - is used where date and time are displayed in lists.
• Long Date & Time Format - is used for reports and at the top of the OfficeClip toolbar.
1. To change regional settings, click Setup on the toolbar, and then click Manage Site Information. Finally,click Change Regional Settings.
2. After clicking the link, the user can set the date and time format by selecting it from the drop-downmenus.
3. Once the preferred formats have been selected, click Update.
2.2.1.1.2. Manage Site Classifications
Site classifications deal with objects in OfficeClip such as a vacation, seminar, client or a meeting.Currently the site classification is only implemented in the OfficeClip Calendar application. The SiteAdministrator can set up various classifications for the objects that will then appear on the calendar. Forexample, the Site Administrator can set the site classifications for a meeting to be the color yellow and sowhenever a meeting is set on the calendar, it appears in yellow background.
1. To Manage Site Classifications, click Setup on the toolbar.
2. Click Manage Site Information in the Site Management section. Then click Manage Site Classifications.
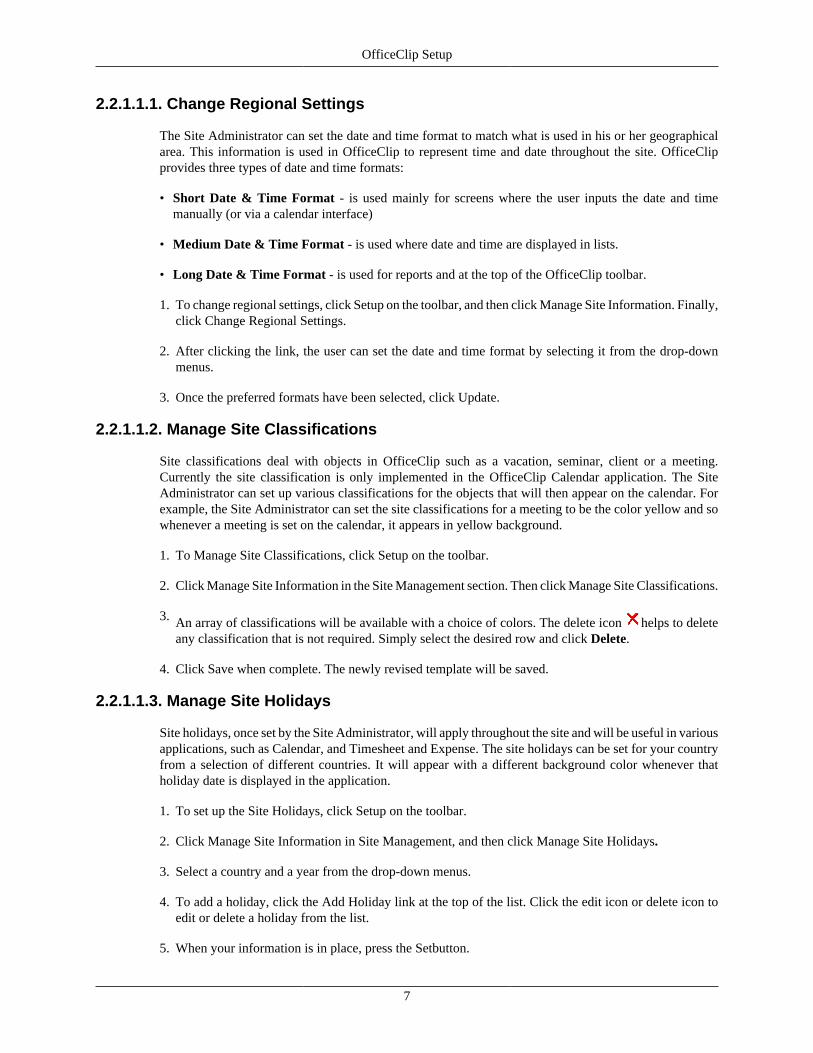
3. An array of classifications will be available with a choice of colors. The delete icon helps to deleteany classification that is not required. Simply select the desired row and click Delete.
4. Click Save when complete. The newly revised template will be saved.
2.2.1.1.3. Manage Site Holidays
Site holidays, once set by the Site Administrator, will apply throughout the site and will be useful in variousapplications, such as Calendar, and Timesheet and Expense. The site holidays can be set for your countryfrom a selection of different countries. It will appear with a different background color whenever thatholiday date is displayed in the application.
1. To set up the Site Holidays, click Setup on the toolbar.
2. Click Manage Site Information in Site Management, and then click Manage Site Holidays.
3. Select a country and a year from the drop-down menus.
4. To add a holiday, click the Add Holiday link at the top of the list. Click the edit icon or delete icon toedit or delete a holiday from the list.
5. When your information is in place, press the Setbutton.
OfficeClip Setup
8
Caution
The system comes pre-populated with known holidays in different countries. Once you haveselected the country and the year, you can change them to suit your site policy. However, ifthe country or date drop down is changed after this, all the changes made will be lost.
2.2.1.1.4. Manage Site Document Space
This feature is only available in the Installed Edition of OfficeClip.
Manage Site Document Space allows the Site Administrator to control how much document space isallocated to the OfficeClip software. It is possible to restrict the space on the user's hard disk to be usedfor OfficeClip, and also to give more space as the need arises. Document space is used in two main areasof OfficeClip:
• Document Sharing application - Increasing the space allocated to OfficeClip software will allow allusers to upload and share more documents
• Attachments - Almost all OfficeClip applications have an attachment feature to upload and attachdocuments to other OfficeClip objects.
1. To manage Site Document Space, click Setup on the toolbar.
2. Click Manage Site Information in Site Management and then click Manage Site Document Space.
3. The next screen shows the total amount of document space, as well as the amount of space used andamount of free space. From the drop down box, choose whether to add or delete space and choose theamount of document space by which you would like to adjust it. Click Save when finished.
2.2.1.1.5. Update Site IDs
This option allows site administrators to set a login ID for each OfficeClip user. This is required ifOfficeClip is used in conjunction with any LDAP server (e.g. Windows Active Directory). Each OfficeClipemail address can be associated with a unique login ID, making it easy for users to login with their ownID. When OfficeClip is being used in an Active Directory environment, the user can login to OfficeClipwith the same password as he or she does to login to Windows. The user will then have to remember onlyone password. In order to use this feature, the Site Administrator must put in the password of each user.
1. To update the site IDs, click Setup on the toolbar then click Management Site Information in SiteManagement.
2. Click Update Site IDs.
3. Enter the appropriate login ID for the users in the list shown and when finished, press Save.
2.2.1.2. Manage Site Presentation
This section contains links that allow modification of the look and feel of the entire site.
2.2.1.2.1. Setup Site Header
Note: This feature is only available in the Professional Edition of OfficeClip

OfficeClip Setup
9
The Site Header Setup feature allows the Site Administrator to place the company's own header on allthe OfficeClip screens, replacing the OfficeClip header. It is setup by inputting HTML code that showsup as the header.
Tip
If there are images embedded in the html code you are using, those images should be hostedon an external site and then the image url should be put into the HTML code.
1. To format your site header, click Setup in the toolbar.
2. Click Manage Site Information in Site Management, and then click on Setup Site Header.
3. Enter HTML code into the text box and click Update when finished
2.2.1.2.2. Login Screen Setup
Note: This feature is only available in the Professional Edition of OfficeClip
The login screen in OfficeClip can be formatted with an HTML header to personalize it with yourcompany's information, logo, etc. The Site Administrator can change not only the header but can alsoput a HTML message box in the right hand side area of the screen for the users. The message box areacould be used for information pertaining to the site. For example, letting users know when the site will beundergoing maintenance, such as backups and other housekeeping.
1. To access the Login Screen Setup, click Setup on the toolbar.
2. Click Manage Site Information in the Site Management section and then click Login Screen Setup.
3. Enter the appropriate HTML code in the Header Html text box.
4. To place a message in the message box, simply type it in the Message Html text box. You may useHTML code in this box for more formatting.
5. Press Update when finished, Reset to start over, or Cancel to return to the previous screen.
2.2.1.2.3. Manage Letterheads
Letterheads are used in OfficeClip for sending Campaigns. Letterheads have three parts: header, bodyand footer, with the Campaign text going in the body. The idea and purpose of Letterheads is similar toa stationary letterhead; you can put your company logo and colors in the header section of the templateand send it as part of the Campaign. The Site Administrator can create different Letterhead templates fordifferent campaigns as needed.
1. To create a Letterhead for your site, click Setup on the toolbar.
2. Click Manage Site Information in the Site Management section and then click Manage Letterheads.
3. You may click the Letterhead Name to edit a letterhead or click on the delete icon to remove a letterhead.In addition, you may also click New Letterhead to begin fresh a letterhead.
4. While creating a new Letterhead you may set attributes for the header, footer and body of the letterhead.Choose from the color selections. In addition, adjust the alignment as necessary.
5. Click preview to see the changes on the right. You may adjust colors multiple times and preview eachby simply clicking Preview.

OfficeClip Setup
10
6. Click Next when satisfied and click Save on the following screen to complete.
Tip
When editing a Letterhead you can take advantage of the full HTML editor to fine-tune thechanges in various sections.
2.2.1.2.4. Manage Email Templates
This feature gives the Site Administrator control to create templates for messages that are sent fromOfficeClip. If a calendar event is updated, for example, the template will enable an email to be sentto all users that are associated with the particular event. There are many templates already available inOfficeClip. The Site Administrator can change the look and feel of any of the templates that are currentlyin the site. HTML code can be used to write a new template or to change an existing template. An HTMLeditor is provided with OfficeClip for this purpose.
In the email template, you can select entities and attributes, which can be copied to the body of the templatetext. The entities and attributes will be replaced with the actual information when the emails are sent out.
Note
There are still some email clients that do not support HTML emails and for this reasonOfficeClip email templates provide a way to format the text portion of the message differentlyfrom the HTML portion. These two parts are sent simultaneously with each message. Therecipient's email client selects appropriate format for the display. While creating the textportion of the message, a feature is available for extracting the HTML message from thetext. The Site administrator can then fine-tune the text part of the message with regards toformatting.
1. To edit email templates, click Setup on the toolbar.
2. Click Manage Site Information in Site Management. Then, click Manage Email Templates.
3. An array of templates is available. From here, simply select the desired template. To preview a templateinstead of edit, click Preview.
4. You may modify the description, letterhead, and mode. Click Next to continue.
5. The HTML message will appear (if the mode is selected as HTML). Select an entity from the dropdownbox and select attributes from the next dropdown box. The concatenated entity and attribute will bedisplayed in the text box below, which you can copy and paste in the body of the template. Click Nextto continue.
6. Edit the text mail message with the necessary field and body changes. Click on Extract from Html linkto extract the text portion of the message and fine tune it.
7. Click Save when complete. The newly revised template will be saved in the main template screen.
See Also:
Manage Site Privileges and Applications
Manage Site License

OfficeClip Setup
11
2.2.2. Manage Site Privileges and Applications This section allows site administrators to change the permissions and privileges of users across theentire site. Once this is done, the Organization Administrators can fine tune the privileges for their ownorganization.
2.2.2.1. Manage Site Administrators and Users
From here you can manage the security of the site by setting users and administrators. There can bemultiple Site Administrators and multiple Organization Administrators per organization, depending onyour company's needs.
2.2.2.1.1. Manage Site Administrators
By clicking here, you can see a list of available users who are Site Administrators. You can click grantor revoke icons to give the user these privileges or remove them. When the site administrator privilegeis available to a user, they will see the Site Management section on the Setup screen and will be able toedit and modify site information.
1. To grant or revoke administrators and users from your site, click Setup on the toolbar.
2. Click Manage Site Privileges and Applications in Site Management.
3. To manage administrators, click Manage Site Administrators. Click the icon to the left of the user's
name to Grant or Revoke as necessary with relevant administrators.
2.2.2.1.2. Remove Site Users
Since a user can be a user of many organizations, it is useful to have a feature that can remove him fromall organizations at once, should it become necessary, such as when an employee leaves the company. Inthis section, the users are listed along with the organizations of which they are users and how many timesthey have logged in. Using this screen, the user can be removed from all organizations of which he isuser. This action does not, however, remove shared data of the user, which is kept in OfficeClip databasepermanently. When a user is removed, another user can be added to the same OfficeClip license.
1. To remove Site Users from your site, click Setup on the toolbar.
2. Click Manage Site Privileges and Applications in the Site Management section.
3. To remove, click Remove Site Users. Click the deleteicon beside relevant users as necessary.
4. When you have completed all your changes, click Finished.
2.2.2.2. Manage Site Applications
This section allows the site-wide control of OfficeClip applications. It also has a link to let OfficeClipengineers do a remote login and make database changes.
2.2.2.2.1. Manage Site Applications Access
The Site Administrator can manage which applications the site users will be able to access. Removingunnecessary applications reduces clutter on the users' screen so they can easily find applications they areactually using.
1. To manage site application access, click Setup on the toolbar.
OfficeClip Setup
12
2. Click Manage Site Privileges and Applications in the Site Management section.
3. To add or remove a specific application from your site, click Manage Site Application Access.
4. Check the boxes beside the application you want to show and click Save when finished.
Caution
The applications removed will not be available in any organizations.
2.2.2.2.2. Login to OfficeClip SQL Server
The purpose of this screen is to allow OfficeClip engineers to fix a problem within the customer's database.The engineer will gain access to the database by utilizing a double-key system. The Site Administrator ofthe company logs in with his or her own password- the first key- and give the OfficeClip engineer accessto this screen. The OfficeClip engineer will put in his or her own password- the second key- to continue.This is provides an added level of security for the system here.
1. To log into OfficeClip Sql server, click Setup on the toolbar.
2. Click Manage Site Privileges and Applications in Site Management.
3. Click Login to OfficeClip Sql Server.
Note
OfficeClip does not usually provide the password for these screens to its customers unlessit is requested separately from the support team. Note that changing the OfficeClip databasein an inconsistent manner may damage the database beyond repair and may also void the
support contract with OfficeClip.
See Also:
Manage Site Information
Manage Site License
2.2.3. Manage Site License Depending on which version of OfficeClip you have, Hosted or Local, you will see different informationregarding your license. If you have the Hosted Edition of OfficeClip, you will be able to renew yoursubscription, increase or decrease the number of licenses and pay by credit card. If you have the LocalEdition of OfficeClip, it will show you a screen with additional links that are described below.
2.2.3.1. License Information and Renewal
2.2.3.1.1. Show License Information
This option is only available in the Installed Version of OfficeClip
This is an informational screen that gives the details of the company's license with OfficeClip. It displaysthe version, active users and groups, the product name, which applications the company has, what modelsare installed, etc.
1. To view license information, click Setup on the toolbar.
OfficeClip Setup
13
2. Click Manage Site License in Site Management.
3. Click Show License Information. Click Done when finished viewing.
2.2.3.1.2. Request New License
To request a new license, you can select how many users and what package you want. Once you pressthe Request License button, your site directly connects with the OfficeClip license server and checksyour license information. If you are requesting a license for the first time or are changing requirements, atemporary, thirty-day license is issued and should be downloaded by following the displayed instructions.After this has been completed, it is necessary to contact OfficeClip and pay for the new license(s), afterwhich OfficeClip issues a permanent license.
1. To request a new license key, click Setup on the toolbar.
2. Click Manage Site License in the Site Management section.
3. Fill in the appropriate package and number of licenses and click Request License.
4. Follow on-screen instructions to install the license.
2.2.3.1.3. Download Latest Patches
This section is only available in the Installed Version of OfficeClip
Clicking this link brings up a window on the OfficeClip website where you can download the latest versionof OfficeClip.
1. To download the latest OfficeClip patches, click Setup on the toolbar.
2. Click Manage Site License in the Site Management section.
3. Click Download Latest Patches. Here you will find the latest downloads, as well as a variety of requiredcomponents, and additional components.
See Also:
Manage Site Information
Manage Site Privileges and Applications
2.3. Organization ManagementIn OfficeClip, organizations are independent entities that mimic real world business organizations, witheach one being independent in the sense that users from one organization cannot see any of the data withinanother organization. This kind of structure can be useful to companies with multiple divisions that areindependent of each other. This part of the setup documentation reviews the administrator's capabilitieswithin each organization.
2.3.1. IconsVarious icons are used throughout this section and they are described in more detail here:
- Allows you to edit the item

OfficeClip Setup
14
- Print the screen you are viewing easily by clicking this icon
- Easily and quickly rename a role by clicking this icon
- Click this icon to edit the privileges assigned to various roles
- Delete an item or role user by pressing this icon
- Quickly block role applications by selecting this icon
- Delete a role user without sending an email notification
See Also:
Manage Organization Roles and Privileges
Manage Organization Users
Manage Organization Information
2.3.2. Manage Organization Roles and PrivilegesThese sections allow you to create various roles in the organization and to set restrictions on those roles.This adds security to the organization to ensure that users are only given to access to the areas they need.
Important
Organization Administrators cannot have any restrictions; they are given all access to allfunctions.
2.3.2.1. Manage Organization Roles
Within an organization, there can be many administrators and also many roles, which determine the accessof a person who is a user of that organization. The administrator, in creating roles, can group the samekind of people together in one role and give them permissions in that role. This determines not only whatthey can and cannot do but also the information to which they do and do not have access.
OfficeClip has two pre-defined roles:
• Administrator- This role cannot be restricted. An Organization Administrator will have access to allthe resources in the organization-all the screens, all the data, etc.
• All Users-All the users in an organization automatically belong to this role and the administrator canrestrict privileges in this role but cannot delete it.
The administrator can create other roles based on the needs of the organization, such as a sales role inwhich he can put various users and assign privileges and restrictions based on what the users of that roleneed to do.
2.3.2.1.1. Manage User Roles
This screen allows for the management of individual roles. It also shows the names of the roles in theorganization, a description, all the users within each role and, on the far right column, various icons thatallow the administrator to manage user roles. These icons are based on the roles so that they can be edited
OfficeClip Setup
15
according to the privileges each role has. The icon, which is visible in the All Users role, gives alist of the applications and their parts, to which a user can have access. Notice that the icons are differentfor each role. This is because in some cases certain actions cannot be performed against those roles, suchas the Administrator role which cannot be deleted or have any restrictions assigned to it.
1. Click Manage Organization Roles and Privileges listed under Organization Management. Click ManageUser Roles.
2. From here, roles can be added by clicking Add New Role.
3. To delete a role, click the delete icon; to change the name of an existing role, click the rename icon andpress Update after filling in desired name.
4. To add or remove role privileges, click the Edit Role Privileges icon or click Manage Role Privileges.
5. Select the Edit Role Users icon or Manage Organization Administrators to select users for particularroles.
2.3.2.1.2. Manage Organization Administrators
This screen allows the administrator to view the Available Users for Role and Users in Role by selectingthe appropriate role from the Show Users for Role drop-down menu.
1. Click Setup on the toolbar, then select Manage Organization Roles and Privileges listed underOrganization Management. Click Manage Organization Administrators.
2. You can easily move available users into a role, such as Administrator, by clicking on each user orholding down the Ctrl key to make multiple selections and clicking the > button.
3. To remove users from a particular role, simply make the selections from the Users in Role box andclick the < button. The selected user(s) will no longer belong to that role, but will always at least belongto the All Users role.
Note
At least one user in an organization must be in the Administrator role at all times.
2.3.2.1.3. Create a New Role
An organization can have multiple roles; all created by the administrator(s), and can be useful for separatingand organizing projects and teams within your company. OfficeClip offers security through role privileges,which allow the administrator to select the applications and features of those applications that will beavailable to each role. You can access more information on this by clicking Manage Role Privileges.
1. To create a new role, click Setup on the toolbar, and then click Manage Organization Roles andPrivileges, under Organization Management. Click Create a New Role.
2. Type a name for the new role into the field and enter a description in the text box (optional).
3. Press Create when finished.
2.3.2.1.4. Manage Role Privileges
The administrator can give various privileges for each role within OfficeClip. This is a way to implementsecurity in the applications, as each role will have access only to those applications and sources of
OfficeClip Setup
16
information that are necessary for the users of that role to perform their assignments. Although users canbe in multiple roles, the most restrictive role will take precedence. This enables the administrator to restricta user without changing an existing role.
The administrator, for example, can give users in the All Users role access to Edit Content within theContact Manager application by checking the box, but can deny the privilege to another role, such asStandard Employee, by selecting the role from the drop-down menu and un-checking the box nextto Edit Content. In this scenario, no one who is a user of the Standard Employee role can edit contentwithin the Contact Manager application, even though they are granted the access as users in the AllUsers role. The more restrictive role becomes the effective role.
1. To set role privileges, click Setup on the toolbar, then Manage Organization Roles and Privileges, underOrganization Management. Select Manage Role Privileges.
2. Select a Role from the drop down menu.
3. To give access to the selected role, check the box to the application task; to place a restriction to theselected role, un-check the box beside the task.
4. Click Save when finished.
2.3.2.1.5. Manage Users for a Role
This screen allows the administrator to move users into various roles. For a step-by-step procedureon how to select or deselect users for particular roles in an organization, click Manage OrganizationAdministrators.
2.3.2.2. Manage Organization Applications and Access
2.3.2.2.1. Manage Organization Applications
This feature gives the administrator control over what applications are visible on the screens in OfficeClip.For example, if a particular organization is not using the Document Sharing application, it can be blockedso that it does not appear on the users' screens. This is also useful for security purposes as it allows theadministrator to block an organization's access to certain applications.
1. To block an application, click Setup on the toolbar, then click Manage Organization Rolesand Privileges, and finally click Manage Organization Applications under Manage OrganizationApplications and Access.
2. Select the application you want to block, or make multiple selections by holding down the Ctrl key andselecting, then click Remove. The applications will no longer be visible in OfficeClip screens.
3. To un-block applications, select them from the Additional Applications box and click Add.
4. When the selections are complete, press Finished.
2.3.2.2.2. Manage Application Access Defaults
In OfficeClip, an object refers to an individual component of the application. For example, in DocumentSharing, an object refers to one document and in Contact Manager, an object refers to one contact,etc. By default, OfficeClip applications are designed so that the organization-level default permission isRead, No Write, No Delete and No Append. The administrator and the creator of an objecthave full access to that object; other users in the organization will have access based on the defaults theadministrator sets.
OfficeClip Setup
17
1. To manage the access defaults, click Setup on the toolbar and then click Organization Roles andPrivileges under the Organization Management section. Click Manage Application Access Defaults.
2. The screen shows the application, its respective object type, the access given and the function column.To set, or change, the default access, click the edit icon.
3. To give access of objects to all the users in the organization, check the box next to each access type: read,write, append, and/ or delete. Leaving any of the boxes unchecked means that only the administratorand the creator of the object will have accessKackieK.
4. Click Save when finished.
Note
The creator of an object, for example a user who creates a contact, will always have access tohis contacts; the administrator cannot change this. The administrator, however, can restrictthis by changing the ownership of the object and fine-tuning the permission.
See Also:
Icons
Manage Organization Users
Manage Organization Information
2.3.3. Manage Organization UsersThis section relates to managing the people within an organization and gives the administrator access tochange and update a user's information, to reset a password for a user and also to add or remove a userfrom an organization.
2.3.3.1. Modify User Information
In this section, the administrator can change a user's personal information such as address and phonenumber.
1. To modify user information, click Setup on the toolbar, then click Manage Organization Users underthe section titled Organization Management.
2. Click Modify User Information and fill in the fields as necessary.
3. Click Save when finished.
2.3.3.2. Reset User Password
If an organization user needs a new password, the administrator can easily assign one in this section.OfficeClip can automatically create a new password and send it via email to the selected user or theadministrator can set the password manually and choose whether or not to have the new password emailedto the user.
1. To reset a user's password, click Setup on the toolbar, then click Manage Organization Users underOrganization Management.
2. Click Reset User Password. Choose a user from the Select User drop down menu.
OfficeClip Setup
18
3. Click the radio button to Automatically create password and email to user or, to set the passwordmanually, click the radio button next to Password and enter your own password for the selected user.
4. The box is checked by default to email the new, manually created password to the user. If you do notwant to email the new password, un-check the box.
5. When finished, press Reset.
2.3.3.3. Add or Remove User from Organization
This screen allows the administrator to add a new user to an organization or remove an existing user fromthe organization. When creating a new user, the administrator can also create a password for the new user,
either manually or automatically. When removing users, the administrators can click the icon, whichwill remove the user and send him an email alert that he has been removed. Alternatively the administrator
can click the icon, which will remove the user and send no email alert.
1. To add or remove a user, click Setup on the toolbar, and then click Manage Organization Users underOrganization Management.
2. Click Add or Remove User from Organization. The fields with an asterisk * are required.
3. Click the radio button next to your preference for creating a password for the new user, then click Add.
4. To remove an existing user, click the appropriate removal option from the Option column.
Note
The last administrator cannot be removed from the organization. There must always be atleast one administrator in an organization.
See Also:
Icons
Manage Organization Roles and Privileges
Manage Organization Information
2.3.4. Manage Organization InformationThe administrator can manage information about the organization such as creating a new organization,renaming organizations, changing the timezone, and adding divisions to organizations.
2.3.4.1. Create New Organization
The user who creates an organization is automatically given administrator privileges and will have themuntil there is at least one other user to assign as an administrator.
1. To make a new organization, click Setup on the toolbar and click Mange Organization Informationunder the section titled Organization Management.
2. Click Create New Organization. Type in a name for your organization in the field Organization Nameand select the appropriate timezone from the drop down menu.

OfficeClip Setup
19
3. Click Save when finished.
2.3.4.2. Remove Organization
Removing an organization removes all the information and data that is part of that organization. Thisincludes all contacts, all timesheets, all projects, and any other user created data. For this reason, OfficeCliphas added the step of typing in the word YES to remove the organization, as well as clicking a button, toensure the administrator is fully aware of what will be lost. The screen also displays a complete list of allthe current information within the selected organization.
1. To remove an entire organization and all its information from OfficeClip, click Setup in the toolbar.
2. Click Manage Organization Information under the section titled Organization Management and thenclick Remove Organization.
3. Type YES in the text box to show you are ready to remove the organization and aware of all theinformation that will be deleted.
4. Press Remove to permanently erase the organization.
If you remove an organization, all information associated with the organization will be deleted.
2.3.4.3. Rename Organization
This feature allows the administrator to change the name of the organization.
1. To change the organization name, click Setup on the toolbar, then click Manage OrganizationInformation under the section titled Organization Management.
2. Click Rename Organization. The Old Name is displayed and you can type the New Name into the textbox.
3. Click Save when finished.
2.3.4.4. Change Organization Timezone
This particular function is used to change the timezone of the organization and could be useful in the caseof a company relocating or opening a new location.
1. To change the timezone, click Setup in the toolbar then click Manage Organization Information underthe section Organization Management.
2. Click Change Organization Timezone. The current timezone is displayed and you can change it byselecting the desired timezone from the New timezone drop-down menu.
3. Click Save when finished.
2.3.4.5. Manage Organization Division
An organization can have multiple divisions that function like an organization but are still hierarchicalwithin the organization. These divisions are independent of one another and even the organization, andthey act as a security feature as well. A user in a division will be able to see information in that division

OfficeClip Setup
20
and the organization that the division belongs to, but he will not be able to access information in otherdivisions within the same organization. The divisions will display in the Organization drop-down menuunderneath the organization and indented slightly.
1. To maintain or add a division to an organization, select the Organization from the drop down menu,then click Setup on the toolbar
2. Click Manage Organization Information under the section Organization Management and then clickManage Organization Division.
3. Update Existing Divisions by selecting them, then changing the name in the Division Name field andclicking Update when finished.
4. Create a new division by typing in the desired name and clicking Save when finished.
Note
Divisions cannot be added to other divisions
See Also:
Icons
Manage Organization Roles and Privileges
Manage Organization Users
2.4. Personal Profile
2.4.1. Manage OfficeClip PasswordUsers can change their password in this section, which is recommended to be done at regular intervalsfor security purposes.
1. To change your user password, click on Setup on the toolbar.
2. Click Manage OfficeClip Password under the section titled Personal Profile.
3. Enter your Current Password and your New Password, then enter your new password again in the Re-enter Password field.
4. Click Save when finished.
See Also:
Manage Personal Preferences
Manage Personal Detail
2.4.2. Manage Personal PreferencesThe users can choose preferences for how they want the menu bar, tool bar and left bar to be displayedon their screens and can also choose their timezone. This feature is useful if an employee is traveling andneeds to change the time to match the location in which he or she is working.

OfficeClip Setup
21
1. To edit your personal preferences, click Setup on the toolbar and click Manage Personal Preferencesin the section titled Personal Profile.
2. Select your preferred timezone from the My Timezone drop-down menu.
3. The Left Bar can be Expanded, Collapsed or Hiddenby clicking the appropriate radio button.
4. Select Visible or Hidden to set your preference for the Tool Bar.
5. The Menu Bar can appear as either Page Menu or Popup Menu.
6. Press Save when finished.
See Also:
Manage OfficeClip Password
Manage Personal Detail
2.4.3. Manage Personal DetailIn this screen, users can update and add personal information to their profile such as email, phone number,or date of birth. Only the fields marked with asterisks * are required to be filled in.
1. To change your personal details, simply click Setup from the toolbar.
2. Click Manage Personal Details listed under the section Personal Profile.
3. Enter your relevant details and click Save.
2.4.3.1. Configuring the Pay Period in the Personal Detail Section
1. To update an individual's pay period details under Payroll, users' pay period mode can be modified toWeekly, Bi-weekly, Semi-monthly, and Monthly. See below for definitions of each.
Note
As default, the payroll is set to a weekly mode.
2. Listed below are the definitions of the pay periods.
• Weekly: Covers 7 days from the chosen start day.
• Biweekly: Covers 14 days from the chosen start day.
• Semi-monthly: Divides a month into two time periods. Dates are defined as: the first of the monththrough the date you set, and the day after the date you set through the end of the month.
• Day-range: Covers X number of days, beginning from the chosen start day.
3. Choose an applicable time and expense sheet pay period from the dropdown box. Click Save at thebottom of the page to save user detail changes.
See Also:
Manage OfficeClip Password

OfficeClip Setup
22
Manage Personal Preferences
23
Chapter 3. Accounts
3.1. OverviewOfficeClip Accounts is a full-featured account tracking and reporting application for managing accountsand tasks, appointments, issues, campaigns, documents, and time associated with an account. It providesa convenient way to track customers, clients and partners associated with your business.
To enter this application, click Contacts on the toolbar. Click the Accounts link on the left menu withinContacts.
The Account List screen displays all of the accounts that have been entered for your organization.Organization administrators can modify the fields that are displayed on this list.
3.2. Understanding OfficeClip AccountsWith OfficeClip Accounts, managing the details of your accounts is easy and efficient. Information isavailable to each user of your organization and the amount of information the users have access to can becontrolled, ensuring that all information is secure.
The following are important aspects the Accounts application:
• Accounts are added to an organization with details such as personal information, address information,Account source, etc.
• You can set permissions for various roles of an organization based on the hierarchical levels makingthe information easily accessible. You can configure all the details of your Accounts to make them assecure as needed by your organization.
• Various items such as tasks, appointments, issues, campaigns, documents, and time associated with eachAccount can be easily managed and reported.
• You can search the details of an Account using the given criteria or by creating filters to sort out detailsthat you specify.
• Reports can be exported to various formats like MS Excel, PDF etc..
• You can track the history of tasks performed and changes made to an Account.
3.3. Using AccountsThis section describes ways to use the Accounts application effectively.
3.3.1. Creating a New AccountThis screen allows you to enter all the details associated with a new Account such as address, email, phonenumber, etc. The administrator can add User-Defined Fields to show up at the bottom part of this screen,allowing for additional Account information to be entered.
1. To create a new Account, click on New Account on the button bar within Accounts.

Accounts
24
2. The New Account screen allows you to enter the details for an Account.
3. Enter the Account information. Some fields have a pick-list denoted with an icon. Depending onthe configuration, you may be forced to click this button in order to enter information. Clicking thisbutton opens a list from which to select the value. If the value isn't in the list, type it into the text field,and then click Save. You can then select the value you have just entered.
4. Click Save when you are finished entering information in the fields.
See Also:
Bulk Options
Editing Accounts
Searching and Filtering Accounts
Creating Reports
Importing and Exporting Accounts
Shared Items
Account Tags
3.3.2. Bulk OptionsThe administrator can perform bulk operations, such as deleting all accounts or checked accounts andreassigning checked or all accounts to another user.
1. In the main Accounts List screen, click the Show Bulk Options link at the bottom of the list.
2. Choose delete options by clicking the appropriate link.
3. To reassign accounts to another user, select his/her name from the drop down list and then click theappropriate link.
4. When finished, you can click the Hide Bulk Options to close the boxes.
See Also:
Creating a New Account
Editing Accounts
Searching and Filtering Accounts
Creating Reports
Importing and Exporting Accounts
Shared Items
Account Tags
Accounts
25
3.3.3. Editing AccountsFrom the main Account List, you can modify the Personal Information, Address Information, OtherInformation, User-Defined Fields and Ownership of the Account, as well as Track Time spent on anaccount.
1. To edit an Account, click Accounts on the main toolbar, then select Accounts on the left toolbar. TheAccount list is displayed.
2. Click the icon next to the Account you want to modify. Press the Modify button under the Functioncolumn to make changes to the Account. Press Save when finished, Cancel to exit or you can pressDelete to remove the Account. You will be taken back to the main Edit Account screen.
3. You can delete an Account by pressing Delete under the Function column. You can export the Accountto a vCard file by pressing the Export button, and then choosing Open or Save from the pop-up dialoguebox.
4. You can Clone an Account by pressing the Clone button in the function column. Cloning Accountsallows you to make a copy of all the account information except the Name and Email address, so youcan easily add more accounts without re-entering company information, etc.
5. Also in this screen, you can move to another Account from the list by pressing the <<Previous and>>Next buttons.
6. The Edit Account screen offers Show Children link and if it has been enabled by the administrator, clickAll, which will include: Appointments, Contacts, Opportunities, Documents, History, Email, Notes,Issues and Tasks.
7. You may also choose to show only certain children, such as only Notes in the screen. Once the childrenhave been selected, you can fill in the fields with the necessary information.
8. Press Finished when you have completed all the modifications. This will save all actions.
Note
The Track Time, Ownership and Children features are described in more detail in thefollowing sub-sections.
3.3.3.1. Tracking Time
The tracking time feature mainly serves as a tool for monitoring the time that is spent on various issues.It allows a user who is working on an Account to keep track of the amount of time he/she is spending onit. This enables management to know where project resources are being used.
1. To Track Time for an Account, click on Accounts from the tool bar.
2. Then click on an Account from the Accounts List.
3. On the Accounts Details page where you can view the item, click on the Track Time button.
4. A window will pop up, which will show the tracked time and allow you to add a new item. To addtime, go to the Add New section.
5. Enter the duration, date, and any other notes (these notes are internal in the sense that they will not beshown in the timesheet details if the time is exported to the Timesheet application).

Accounts
26
6. Press Save when finished.
7. To Edit a tracked time entry, click on the Edit icon on the Actions column and then change theinformation at the bottom and finally click on Save.
8. Your new item will appear in the Track Time list. Press the Cancel button to close the window andreturn to the screen to continue making changes to the Account.
3.3.3.2. Permissions and Ownership of Accounts
You can change the Read, Write, Append and Delete status of an Account and also change who owns theobject in the Ownership section of the Edit Account screen. By default (unless changed by an administrator)only the creator of the Account and the administrator has access to it and all other users only have Readaccess. The creator can change the kind of access other users have by changing the permissions.
1. To change the owner of an Account, click on the Account from the main Account List and then clickRe-Assign under the Ownership section of the Edit Account screen.
2. Select a user to Assign Ownership To from the drop down list and if you want to send that user an emailnotification, check the box. Press Save when finished or Cancel to exit.
3. Click Change Permissions under the Ownership section of the Edit Account screen to edit thepermissions associated with the Account.
4. In the screen that pops up, you can see the access that various users have and you can change this by
clicking the icon to the left of the user name.
5. Check the appropriate boxes based on the permissions needed and click Save when finished or Backto return to the previous screen.
6. To see the users for a particular role, click the icon next to the role you want to view.
See Also:
Creating a New Account
Bulk Options
Searching and Filtering Accounts
Creating Reports
Importing and Exporting Accounts
Shared Items
Account Tags
3.3.3.3. Using Children
This section will describe how to use the various children that are associated with the Accounts application.
3.3.3.3.1. Tasks
When the Task child is enabled, it will show at the bottom of the details screen with all the tasks associatedwith that particular account. You can filter tasks by selecting a category from the drop down list or by
Accounts
27
checking the Owned by me or Assigned to me checkboxes. To create a new Task, click the Create a NewTask link and fill in the fields. The task will be associated with the account.
3.3.3.3.2. History
Note: This feature is only available in the Professional Edition of OfficeClip
This will show any history associated with the account.
3.3.3.3.3. Contacts
The Contacts child enables you to see any contacts that are associated with the account. Create a newcontact by clicking the New link and filling in the fields as needed.
3.3.3.3.4. Issues
The Issues displayed are issues within the Issue Tracker application that are associated with the particularaccount. You can select a binder to view any issues within that binder and you can create new issues andnew binders by clicking on the respective links and then filling in the necessary fields.
3.3.3.3.5. Appointments
You can create and manage appointments associated with the account. This is useful for keeping track ofmeetings, etc. with clients and business partners. Click the New Appointment link and then fill out theinformation needed to make the appointment.
3.3.3.3.6. Emails
You can compose an email to your account and view any received emails from that account to you. ClickCompose Email to write a new email.
3.3.3.3.7. Documents
Relevant documents can be attached to an account, allowing important information to be easily accessedfrom one place. Click the Edit Attachments link and then click Browse to find the file. Click Upload toattach the document then press Finished.
3.3.3.3.8. Notes
Notes allow you to write any additional information regarding the account, any of the Children, etc. Youcan write up to 4000 characters and can spell check your note as well. Simply click on the New Note linkand write your note. Click Save when finished.
3.3.3.3.9. Opportunities
Even if you already have an account (customer, business partner, etc), you can still have more opportunitieswithin the account and they can be easily managed from this screen. To create a new opportunity, clickthe New link and fill in the information needed to create an opportunity.
3.3.3.3.10. Relationships
Note: This feature is only available in the Professional Edition of OfficeClip
OfficeClip Contact Manager provides the ability to create arbitrary relationships between various entitiesin OfficeClip. For Example:
• For Real Estate Transactions, a Broker can be a relationship between two Contacts.
Accounts
28
• An Account can be a Partner of another Account
• A Contact can be a Coordinator for an Opportunity.
To create relationships in Contact Manager, follow the steps:
7. To create relationships between the modules of the Contact Manager (Contacts, Accounts,
Opportunities and Campaigns) click on the icon of the Contact, Account, Opportunity or Campaignyou want to add a relationship to, then click Relation on the Children bar along the top.
8. Click the New Relationship link in the table. Your First Participant will be named, you can select therelationship from the drop-down menu and then select the Second Participant. Click Save.
9. The Relationship is now set up between the two participants.
See Also:
Task Application
Contacts Application
Issue Tracker Application
Calendar Application
Notes Application
Documents Application
Email Application
Account Tags
3.3.4. Searching and Filtering AccountsBy using Searches and Filters in OfficeClip, you can easily find the Accounts you are looking for, byspecifying particular words and utilizing filters. This feature allows you to search for Accounts by typing ina keyword and selecting a field, such as Description. You could search for a certain word to be in the fieldDescription and all items with this criterion would show up in the list. This is helpful for viewing items thatmay be related to a certain project, time period, user, etc. without having to search through the entire list.
Tip
On the search box you can type and between multiple words to match all the words or usecomma (,) between multiple words to match either of then. For example, John and Jillwill match all the records that have both John and Jill in them while Mary, Jeff will bringall matches for Mary and also all matches for Jeff together.
Users can create filters to better customize their searches. Filters allow the user to specify many criteriaand save them for future use. You can also remove filters if you no longer need them.
3.3.4.1. Search and Sort
To sort the entries by a particular field, click the header name (i.e., Last Name). Clicking the same headeragain toggles the results between ascending and descending order.

Accounts
29
To search for particular text associated with an Account, type a word or phrase in the Search field at the topof the main Account List. Select the field you wish to search from the drop down box and click Go. Thesearch results are displayed. To exit the search result screen and view the full list of Accounts, click Cancel.
3.3.4.2. Filters
The Filters option allows you to create a customized search based on selected criteria that you define. Aftera filter is created, it is saved for future use. Filters allow you to save time by creating a category to sortthrough your Accounts and the fields you want to filters
1. To create a filter, click the New Filter link that appears next to the filter selector dropdown. A screenwill appear. To edit a filter, select the filter then click the Edit Filter link.
2. Type a name for the filter. A good filter name is one that describes the filter, such as GeorgiaAccounts or Source-Web with Opt Out.
3. Select the scope of the filter:
a. Information Owned by Me allows you to filter the output so that only Accounts of which you arethe owner are displayed.
b. All I Can See allows you to see the Accounts owned by you, as well as Accounts you have permissionto view or edit.
4. Select filter conditions by clicking the icon on one of the filter condition sections. The ConfigureFilter window will pop up.
5. Select the field you wish to filter from the drop down list.
6. Select the operation. If the field that is selected is a text field, Greater than or Less than operation willbe based on alphabetical order. If it is a date field, the Greater than or Less than operation will be basedon the selected dates. Press Save when finished configuring the filter or press Cancel to exit without
saving. Pressing the icon will reset the row of the filter.
7. Select the fields to be shown in the list of results from the drop down lists in step 4. These fields willshow things like Name, Address, Company, etc., depending on your selections, when you filter yourAccounts.
8. Select visibility:
c. Visible to Everybody allows everyone in your group to see and use the filter.
d. Visible only to Me creates a private filter that will not be seen by anyone else in the group.
9. Click Save when finished, Cancel to exit without saving or, if you are editing a filter, Delete to remove it.
See Also:
Creating a New Account
Bulk Options
Editing Accounts
Creating Reports
Importing and Exporting Accounts
Accounts
30
Shared Items
Account Tags
3.3.5. Creating ReportsReports have a similar interface to filters, but filters display information according to selected criteria,while reports allow field information groupings, as well as numeric field summaries. Results can also besaved, printed or exported into many popular formats such as MS Word and Adobe PDF. Controls on thescreen allow users to scroll forward and backward on the page through the report results, search for anitem in the report, and zoom in and out on the report.
Click Accounts on the main toolbar, and then click Accounts from the left toolbar. To create a new report,click Reports on the button bar. Three types of reports are shown on the next screen.
3.3.5.1. Pre-Defined Reports
Click on Account Reports then choose the desired report type. The next screen will show the report andyou can export the report to a PDF, MS Excel, MS Word, or RTF file by selecting from the drop down listand clicking Export. Press Open or Save in the pop up dialogue box.
3.3.5.2. User-Defined Reports
1. Click Create New User Defined Reports. See the section on Filters for information about the next screen.When you have finished filling in the fields and making selections, press Next.
2. Select the grouping fields. For example, if you wish for the report to be grouped by City, select City.You can also select whether these groupings are displayed in ascending or descending order.
3. Select the fields to sort by within the groupings, as well as whether to display them in ascending ordescending order.
4. Add an optional report description. This description will show up on the report list screen.
5. Select the column margin width, and enter a report header and footer text, if desired. Click Save whenfinished, Cancel to exit, <<Previous to go back to the previous screen or, if you are editing a report andyou want to remove it, click Delete.
6. To view the report, click the report name on the report list screen. To edit the report, click the icon.
3.3.5.3. Track Time Reports
You can create and view relevant reports based on tracked time in the Accounts application.
1. Click the View Track Time Report link. Select the dates for which you want to report the tracked timeand select the type of file you want to export it in. Click Export and then click Open or Save on the popup dialogue box depending on what you want to do with the file.
2. You can submit the report by clicking the Submit button or you can Cancel to exit the screen withouttaking any action.
See Also:
Accounts
31
Creating a New Account
Bulk Options
Editing Accounts
Searching and Filtering Accounts
Importing and Exporting Accounts
Shared Items
Account Tags
3.3.6. Importing and Exporting Accounts
3.3.6.1. Import
This feature allows Accounts to be imported into the OfficeClip Accounts application from a CSV file.
1. Click Accounts on the main toolbar, then click Accounts from the left toolbar. To import Accounts,click Import/Export on the button bar.
2. Click the Import Accounts in comma separated (CSV) file link to import a CSV file or. In the nextscreen, click Browse to find the file to upload, then click Import or click Cancel to take no action.
3. Select the fields in the imported CSV file that will be mapped to the OfficeClip fields. This ensures thatfields in the CSV file are correctly matched to the OfficeClip fields.
4. Click Ok. The Account import results will be displayed on the next screen.
3.3.6.2. Export
The Export feature allows Accounts (or filtered Accounts) to be exported into the comma-separated values(CSV) format or all Accounts can be exported in XML format.
1. Click Accounts on the main toolbar, and then click Accounts from the left toolbar. To import Accounts,click Import/Export on the button bar.
2. To export Accounts in CSV format, click the link and on the next screen, select which fields from the
OfficeClip database you want to have in the CSV file. You can move them up and down with the icons and these fields will appear as the first row in the CSV file after being exported.
3. Click Export when finished mapping or click Cancel to exit without taking any action. Click Open orSave from the pop up dialogue box.
4. To export Accounts from a particular filter to a CSV file, click the link and, from the next screen, selectthe filter from the drop down list and click Export. Press Open or Save.
See Also:
Creating a New Account
Bulk Options
Editing Accounts
Accounts
32
Searching and Filtering Accounts
Creating Reports
Shared Items
Account Tags
3.3.7. Account TagsA General description of Tags can be found here.
Tags can be accessed by going to the Summary of the Account Detail. Users who have adequatepermission can associate existing tags with a Account or can create new Tags.
Tags can be managed using the Tags button on the AccountsButton bar. This option is visible to alladministrators and users who have privilege to manage Tags.
See Also:
Creating a New Account
Bulk Options
Editing Accounts
Searching and Filtering Accounts
Creating Reports
Shared Items
Importing and Exporting Accounts
3.3.8. Shared ItemsAccounts allows you to share items with Extranet users, who have limited access to OfficeClip. You controlfrom this screen only shared Accounts Items, making it easy to manage and make changes. (See the Helpsection in Extranet to set up users, control access, etc.)
5. To view and make changes to the Shared Items, click the Shared Items button from the button bar.
6. You can now see all items from this application that are in the Extranet list. From here, you canDeactivate any of these items, meaning they will still exist (not be deleted) but they will no longer bevisible to Extranet users. If an item has been Deactivated, you can click Activate to turn it back on again.
7. If you want to delete one or many shared items completely, click the item so the checkbox is checkedand click Remove.
8. The icons in the Actions column are used to email the item to a user and to edit the item , whichyou can also do by clicking on the item name.
9. To manage each item, simply click on it. In the next screen, you can name the item. Click Next to editthe details of the shared item. This page allows you to select what information will be shown to theExtranet user (for example, a particular report).
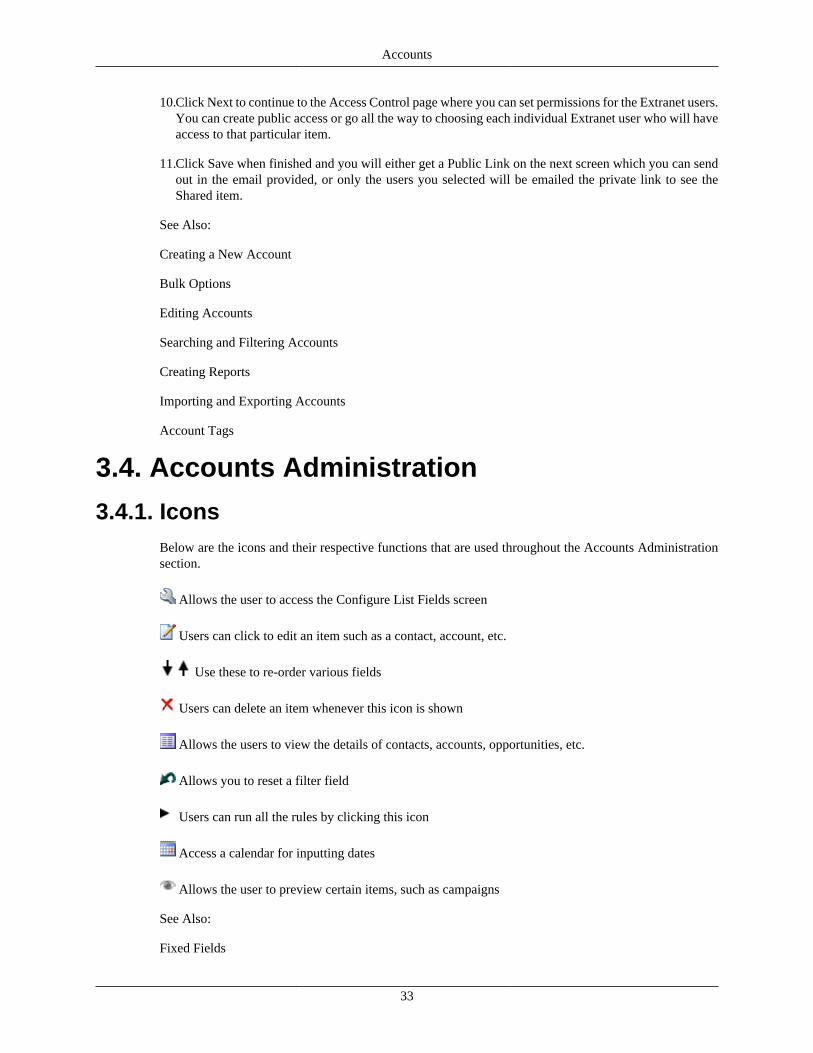
Accounts
33
10.Click Next to continue to the Access Control page where you can set permissions for the Extranet users.You can create public access or go all the way to choosing each individual Extranet user who will haveaccess to that particular item.
11.Click Save when finished and you will either get a Public Link on the next screen which you can sendout in the email provided, or only the users you selected will be emailed the private link to see theShared item.
See Also:
Creating a New Account
Bulk Options
Editing Accounts
Searching and Filtering Accounts
Creating Reports
Importing and Exporting Accounts
Account Tags
3.4. Accounts Administration
3.4.1. IconsBelow are the icons and their respective functions that are used throughout the Accounts Administrationsection.
Allows the user to access the Configure List Fields screen
Users can click to edit an item such as a contact, account, etc.
Use these to re-order various fields
Users can delete an item whenever this icon is shown
Allows the users to view the details of contacts, accounts, opportunities, etc.
Allows you to reset a filter field
Users can run all the rules by clicking this icon
Access a calendar for inputting dates
Allows the user to preview certain items, such as campaigns
See Also:
Fixed Fields

Accounts
34
User-Defined Fields
Child Objects
Rename Sections
Rules
Position Fields
Relationships
3.4.2. Fixed Fields
The Fixed Fields configuration screen enables administrators to change the names and other attributes offixed Account fields.
1. After clicking on Contacts from the main toolbar, click on Accounts from the toolbar on the left. Then,click Admin on the button bar. Click Edit Fixed Fields on the button bar of the Admin menu.
2. To edit a fixed field, click the icon in the Functions column on the right side. From this screen, theadministrator can configure the field.
3. To alter the display name, simply type the desired name into the text field.
4. The field type can not be changed in fixed fields, only in user-defined fields.
5. If you want fields to show in the main Account list screen check the box beside the Show in List Screen?Field.
6. If you wish to make certain fields mandatory when information is entered either for a new Account oran existing Account, check the field in the Mandatory column corresponding to the field you wish tomake mandatory. The fields will appear with an asterisk * next to them in the Account entry/edit screen.
7. You may wish to make certain fields editable by only certain roles in your organization. To select therole you wish to grant edit privileges, select the role in the dropdown. By default, the All Users rolehas edit privileges for each field. For more information on roles and privileges, please see Setup byclicking Setup on the toolbar.
Note
If many fields are selected to show in the main Account list, a horizontal scrollbar will appearon the Account list screen to accommodate the field.
Field Description
Account Number The number of the customer account
Account Name The name of the account
Short Account Name The short form of the account name
Parent Account Name of the parent account
Primary Contact The main contact you can approach
Relationship Type Customer's relationship with your organization
Website Customer's Web Site URL

Accounts
35
Email Address Customer Email ID
Main Phone Customer's primary contact number
Other phone Other contact numbers
Fax Fax Number
Archived Selecting the check box archives the account information
Currency Type Currency type the customer uses
Account Source Source of the account to be selected from the drop-down list
Address Line 1 First line of the customer's address
Address Line 2 Second line of the customer's address
City Name of the city
State Name of the state to be selected from the drop-down list
Zip/Postal Code Zip or postal code
Country Name of the country to be selected from the drop-down list
Industry The industry of the customer's company
Annual Revenue Annual revenue generated by the company
No. of Employees Total number of employees of the company
SIC code Standard Industry Classification code of the company
Ownership Mode of company ownership
Description Any other information that you can record for the account
3.4.2.1. Configuring List Fields
1. A List field is a dropdown box with a list of available choices relevant to the field. To edit
dropdown list items, click the icon in the Functions column on the right side. A window pops upwhich allows you to add or remove list items, select the default list item to be initially displayed andchange the order in which they appear in the list.
2. To add an item, type the name in the Add New field and click Add.
3. To delete an item, click the icon next to the field you wish to remove.
4. To change the position of an item as it appears in the list, click the icons.
5. To select a default value, select a value from the Default Value drop down list.
6. Click the Save button to save settings or Cancel to exit without saving.
See Also:
Icons
User-Defined Fields
Child Objects
Rename Sections
Rules
Accounts
36
Position Fields
Relationships
3.4.3. User-Defined FieldsA main Accounts feature, the ability to add custom fields enables users to manage more specific Accountitems than the fixed fields provide. In addition, these fields can be used in Account reports and filters thatare defined by the user.
1. Click Contacts on the main toolbar, and then click Accounts from the left toolbar. Click Admin on thebutton bar and finally, select Edit UDFs on the Admin button bar.
2. By default, no UDFs are defined for a group. If you want to edit an existing UDF, click the iconto the right of the UDF you want to modify. In order to add UDFs, click the Add UDF button on thescreen. A popup window will appear. The display name is shown on the next screen.
3. Type in the name you wish to have the UDF displayed as. The following sub-sections will describe inmore detail each of the other fields in the Add UDF screen.
4. When you have finished filling in the fields, click Save to save the UDF and have it displayed in theAccounts application.
3.4.3.1. Field Type
User-defined fields allow you to choose from a variety of field types, each of which has a different function.You can choose the field type from the drop down list. More information about the Field Types is describedas follows:
Field Description
List This provides a dropdown list for the user. List field types must be configured by anadministrator by adding list values to the list (see Configuring List Fields, below, forfurther information).
Date A date field shows up with a calendar icon. It can be clicked to select a date to insertinto the field. Dates can also be added manually to the field using the "mm/dd/yyyy"format. Date fields are validated to ensure that an actual date is entered.
DateTime A date/time field is similar to a date field, with the addition of a time selectordropdown list.
Short Text A text field that can contain up to 30 characters.
Long Text A text box that can contain up to 255 characters.
Huge Text A text box that can contain up to 5000 characters.
Number A number-only field. This field is validated upon saving to ensure that only anumeric value is added.
Float A number that contains a decimal point. This field is validated to ensure only anumeric value is entered.
Email A text field in which an email address is typed. It is validated to ensure that an emailaddress is entered.
Currency A numeric field that allows two decimal places to be entered (i.e., 120.00)
Boolean A Boolean field is displayed with a checkbox. It is a "yes/no" field.

Accounts
37
Short Text Lookup A short text lookup field displays with a (...) button next to it. Text can be directlyadded or selected from a list of values that appears when the button is clicked. Thevalues that appear come from the corresponding field of other Accounts that havebeen entered.
User List A dropdown list that contains the current OfficeClip organization users.
Owner List A list that shows owners of the object.
See Also:
Icons
Fixed Fields
Child Objects
Rename Sections
Rules
Position Fields
Relationships
3.4.3.2. Mandatory Fields
If you wish to make certain fields mandatory when information is entered either for a new Account or anexisting Account, check the box beside the Mandatory field. The fields will appear with an asterisk * nextto them in the Account entry/edit screen.
3.4.3.3. Restricting a Field Edit-ability by Role
To make certain fields editable by only certain roles in your organization, select the role you wish to grantedit privileges from the drop down list. By default, the "All Users" role has edit privileges for each field.Selecting a particular role to have edit-ability privileges means that other roles will not be able to makeany changes to that particular user-defined field. For additional information on roles and privileges, pleasesee Setup by clicking Setup on the toolbar.
3.4.3.4. Configuring List Fields
1. A List field is a dropdown box with a list of available choices relevant to the field. To edit dropdown
list items, click the icon in the Functions column on the right side. A window pops up which allowsyou to add or remove list items, select the default list item to be initially displayed and change the orderin which they appear in the list.
2. To add an item, type the name in the Add New field and click Add.
3. To delete an item, click the icon next to the field you wish to remove.
4. To change the position of an item as it appears in the list, click the icons.
5. To select a default value, select a value from the Default Value drop down list.
6. Click the Save button to save settings or Cancel to exit without saving.

Accounts
38
3.4.4. Child ObjectsEach Account can have various children associated with it. The administrator can control which of theseitems can be viewed and utilized by users. The children allow the user to more effectively managean account by making appointments for the account, attaching issues from OfficeClip Issue Tracker tothe account, uploading relevant documents, etc. The Accounts application has the following childrenassociated with it:
• Events
• Documents
• History
• Notes
• Contacts
• Issues
• Opportunities
• Tasks
1. Click on Contacts on the main toolbar, then select Accounts from the left toolbar. Click Admin on thebutton bar.
2. Click Edit Children on the button bar of the Admin menu.
3. On the screen that appears, the child objects that are currently associated with Accounts are displayed inthe Displayed Entities column on the right. All available entities are displayed in the Available Entitiesto Display column on the left.
4. By including all available associated entities, users can conveniently have access to the full array ofassociated objects.
5. Select the entities to be displayed or removed by clicking the entity. Holding down the Ctrl key allowsyou to select more than one entity. Click the > button to move the selection to the right column or the< button to move the selection to the left column. You can also use the Up and Down button to movethe children in the order they will appear in the Account.
6. Choose Save to save the changes, Save & Next to save and go to the next Admin section or Cancelto exit without saving.
See Also:
Icons
Fixed Fields
User-Defined Fields
Rename Sections
Rules

Accounts
39
Position Fields
Relationships
3.4.5. Rename Sections
When an Account is created, edited, or viewed the fields are organized according to the nature of the fieldsthe section contains. For example, all of an Account's address information is found under the AddressInformation section. Section names can be changed in this screen, although they cannot be removed oradded.
1. Click Contacts from the main toolbar, and then click Accounts from the left toolbar. Click Admin onthe button bar. Click Rename Section on the button bar of the Admin menu.
2. Change the section names as needed. Click Save when finished, Save & Next to save and go to the nextAdmin section or Cancel to exit without saving.
See Also:
Icons
Fixed Fields
User-Defined Fields
Child Objects
Rules
Position Fields
Relationships
3.4.6. RulesAdministrators can set rules for Accounts to trigger certain events based on conditions of the Accounts.Rules have the following components:
• Conditions- Certain conditions need to be satisfied to trigger a rule
• Actions- The actions are taken when a condition is satisfied
In OfficeClip Accounts, rules are used to allow or restrict access to Accounts when various conditionsare met. For example, if the administrator wants all Accounts with a certain company name to be able tobe accessed by all users, he/she can set up the condition If field Company Name value isOfficeClip, give Read, Write, Append, Delete access to the All Usersrole.
1. Click Contacts from the main toolbar, and then click Accounts from the left toolbar. Then, click Adminon the button bar. Click Ruleson the button bar of the Admin menu.
2. By default, there are no rules listed. To create a rule, click the Add Rule button. If you want to edit a
role, click the icon or to remove a rule completely, click the icon. To run a rule that is not active,
click the icon or, to run all existing rules, click the Run All Rules link.

Accounts
40
3. Clicking Add Rule brings up a new window. You can choose to add conditions by clicking the Addlink. This will bring up corresponding fields to fill in according to the conditions you need. Click Nextto continue or Cancel to exit.
4. Select the actions by checking the box. If certain conditions are met, you can give Read, Write, Append,and/or Delete access of the Accounts meeting these conditions by selecting the Role from the dropdown list. Click Next to continue, Previous to go back to the previous screen or Cancel to exit.
5. Give a name to the rule. The Enabled check box is automatically selected, which means the rule willbe active. To make the rule inactive, uncheck the box. Click Save Rule when finished, Previous to goback or Cancel to exit without saving the rule.
See Also:
Icons
Fixed Fields
User-Defined Fields
Child Objects
Rename Sections
Position Fields
Relationships
3.4.7. Position FieldsThe order of the Account fields can be adjusted to match the user's preference.
1. Click Contacts from the main toolbar, and then click Accounts from the left toolbar. Then, click Adminon the button bar. Click Position Fieldson the button bar of the Admin menu.
2. The screen that appears allows you to position the Account fields with the up and down arrows .Category headings (Access, User, Other, and Additional Information) may be repositioned. Categoryattributes (Account Name, Account Number, Est. Revenue, etc) may be repositioned as well.
3. Click Save to save your modified positioning or Cancel to exit without saving.
See Also:
Icons
Fixed Fields
User-Defined Fields
Child Objects
Rename Sections
Rules
Relationships

Accounts
41
3.4.8. RelationshipsNote: This feature is only available in the Professional Edition of OfficeClip
OfficeClip Contact Manager provides the ability to create arbitrary relationships between various entitiesin OfficeClip. For Example:
• For Real Estate Transactions, a Broker can be a relationship between two Contacts.
• An Account can be a Partner of another Account
• A Contact can be a Coordinator for an Opportunity.
To create relationships in Contact Manager, follow the steps:
1. Click Contacts from the main toolbar, and then click Accounts from the left toolbar. Then, click Adminon the button bar. Click Relationson the button bar of the Admin menu.
2. Click the Add New button and type in the name of the relationship you wish to add (such as broker,partner, etc.). The click the Insert link to insert this relationship into the application.
3. To create relationships between the modules of the Contact Manager (Contacts, Accounts,
Opportunities and Campaigns) click on the icon of the Contact, Account, Opportunity or Campaignyou want to add a relationship to, then click Relation on the Children bar along the top.
4. Click the New Relationship link in the table. Your First Participant will be named, you can select therelationship from the drop-down menu and then select the Second Participant. Click Save.
5. The Relationship is now set up between the two participants.
See Also:
Icons
Fixed Fields
User-Defined Fields
Child Objects
Rename Sections
Rules
Position Fields

42
Chapter 4. Address Book4.1. Overview
OfficeClip Address book allows users to share contacts (for sales leads, customers, vendors, etc.) withinthe organization. Address book lists can be either personal or group-based and are made simple by allowingmultiple imports to create a group or address book. The interface of the Address book is similar to thatof the User application.
4.2. Using Address Book The sections below describe ways to use the OfficeClip Address Book application effectively.
4.2.1. Accessing Address Book 1. Log in to OfficeClip
2. Click Address Book from the left menu within Desktop.
3. In order to view details, click the desired name.
See Also:
Creating Address Books
Searching Address Book
Import
Accessing Address List
New Address
4.2.2. Creating Address Books Creating address books enables you to organize and manage all your addresses.
1. To create an address book list, click on Address Book on the left menu within Desktop.
2. Click New Address Book on the button bar from the main Address Book List screen.
3. Give your address book a name by filling in the textbox and check the box if you wish to share the listwith other users of your group. Click Save when finished.
4. Your user list will appear on the Address Book List screen.
See Also:
Accessing Address Book
Searching Address Book
Import

Address Book
43
Accessing Address List
New Address
4.2.3. Searching Address Book 1. To search for a person in your Address Book, click Search on the button bar within Address Book.
2. Enter the search text and, from the drop down box, select whether to search by initials, first name, lastname, email address, or all. Click the Search button.
3. A list of entries whose information contains the search phrase will be shown. To go to it, click the entryyou would like to view.
4. The user's name will be highlighted in yellow in the Users List screen.
See Also:
Accessing Address Book
Creating Address Books
Import
Accessing Address List
New Address
4.2.4. Import
4.2.4.1. Importing from CSV and vCard files
1. Log in to OfficeClip
2. Click on Address Book from the left menu within Desktop.
3. After selecting the desired address book, click on Import on the button bar.
4. Select whether to upload from a CSV or vCard file by clicking the appropriate link.
5. Click Browse to select the file to be imported into Address Book, and then select the desired option byclicking the radio button beside it. Press Upload to import the file into OfficeClip.
6. The imported entries will be listed.
4.2.4.2. Importing from LDAP file
1. Log in to OfficeClip
2. Click on Address Book from the left menu within Desktop.
3. After selecting the desired address book, click on Import on the button bar.
4. Fill in the fields by specifying the LDAP server, typing the LDAP user account name and passwordand typing the User List's DN on the LDAP server (for example DN=Users, DC=OfficeClip, DC=Net).
Address Book
44
5. Select an upload option by selecting the radio button.
6. Click Upload to import the file into OfficeClip or Cancel to exit the screen without importing.
See Also:
Accessing Address Book
Creating Address Books
Searching Address Book
Accessing Address List
New Address
4.2.5. Accessing Address List1. Log in to OfficeClip
2. Click Address Book from the left menu within Desktop.
3. Now, in the Name column, click on the desired address books.
See Also:
Accessing Address Book
Creating Address Books
Searching Address Book
Import
New Address
4.2.6. New Address Use this feature to create new addresses within your address books.
1. Log in to OfficeClip
2. Click Address Book from the left menu within Desktop.
3. Now click on an address book name.
4. Click on the New Address link on the button bar.
5. Fill in the details in the various fields and click Save.
Note
Fields marked with an asterisk * are required in order to save the new address.
See Also:
Accessing Address Book
Address Book
45
Creating Address Books
Searching Address Book
Import
Accessing Address List
46
Chapter 5. AnnouncementsThe Announcement module can be used to convey important information to all the employees in yourorganization, and helps the organization to stay up-to-date with the latest and most crucial information. Itallows the administrator to create customized announcements, using the HTML formatting control paneland specifying the expiration details to close the announcement. To avoid duplicate creation of the sameannouncements, the user can email notifications to all other users. Announcements that have closed canbe archived or stored for future reference.
5.1. Using Announcements
5.1.1. Access Announcements1. Log in to OfficeClip click the Desktop button.
2. Click Announcements in the left menu of the Home panel.
The Announcements screen opens with the Announcements List displayed.
See Also:
Add an Announcement
Archived Announcements
5.1.2. Add an AnnouncementCustomized announcements can be created by specifying the date and time of the announcement.
1. Click New Announcement on the button bar.
The screen appears with the announcement creation template.
2. Give a suitable title to the announcement in the Title field.
3. Type the announcement in the Announcement box and format it using the options provided in the toolbar.
The user can use either the Design view or the HTML view while writing the announcement.
4. Select an Expiration option. The user can choose to close the announcement manually or automate itby setting the date and time.
5. Select the Notify Announcement creation to all users box to notify all the users by Email.
6. Click Save to send the announcement or Cancel to exit.
See Also:
Access Announcements
Archived Announcements

Announcements
47
5.1.3. Archived AnnouncementsAll the closed announcements can be archived for future reference.
1. To archive an announcement, click the checkbox beside the announcement(s) you want to archive inthe main Announcement List screen.
2. Click the Archive button at the bottom of the list to send them to the Archived Announcements.
3. Click the Archived Announcements button on the button bar to view the announcements.
Tip
Before archiving, make sure the status of the announcement is closed.
See Also:
Access Announcements
Add an Announcement
48
Chapter 6. BookmarksThe Bookmarks module can be used to store a list of favorite or important websites and their URLs. Thissaves time and ensures that all the users refer to the specified sites for important information. When addinga bookmark, a user can categorize it and test the URL to make sure it works properly.
6.1. Using Bookmarks
6.1.1. Access Bookmarks1. Log in to OfficeClip. Click Bookmarks on the left menu of the Home panel. The Bookmarks screen
opens with the Bookmark List displayed.
See Also:
Add a Bookmark
6.1.2. Add a Bookmark1. Click New Bookmark on the button bar. The screen appears with the bookmark creation template.
2. Specify the group name in the Group field.
3. Give a suitable title to the Bookmark in the Title field.
4. Type the description in the Bookmark Description field.
5. Give a URL for your bookmark in the URL field and test it by clicking Test URL.
6. Select the Bookmark Category from the drop down list or select New and type the category name.
7. Click Save to save the Bookmark in the Bookmark List, or Cancel to exit.
See Also:
Access Bookmarks
49
Chapter 7. Calendar
7.1. OverviewOfficeClip Calendar can be used to create and review group events, personal events, appointments,deadlines, and other items posted by you or other users of your organization. Group events can be viewedby all group users; personal events are marked with a red bullet and can only be seen by you. Meetingsare viewed by users, organizers and attendees. You may choose to view events for a specific group, allgroups, or your own personal events.
7.2. Accessing and Using CalendarThis section describes ways to use the OfficeClip Calendar effectively.
1. Log in to OfficeClip.
2. Click on Calendar from the left menu within the Desktop application.
3. To view a particular month, select the month and year from the drop down lists. If the calendar showsup with numerous events, you may click on the Todaylink on the far right side of the screen to bringtoday's schedule to the top of the screen.
4. To view details of an event, click on the event title within the calendar. If you are the creator of anevent, you may choose to modify or delete the event after selecting its title on the calendar screen.
7.2.1. Creating Events1. To create a new event for you, a group, or a meeting, click on the New Event button bar within the
Calendar menu.
2. Choose the Event Type from the drop down menu and then fill in the appropriate information.
3. To view a listing of all upcoming events for your selected group, choose the button bar item UpcomingEvents.
Note
Meetings are only visible to those invited. When setting a group event you can choose to askfor RSVP's. In this way, your invitees can respond if they will be attending the event, so youcan keep track of the attendance status.
4. When you create a Meeting, you can click on the Manage Attendees button that appears, allowing youto select either OfficeClip User from the drop down list or you can select External Attendee and typethe Name and Email address of the External Attendee and then click on Invite. When you are finishedinviting, click Finished.
5. You can now select the Start Time, End Time, Timezone, Recurrence and other options that correspondto the meeting event.
6. By clicking the Reminders field at the bottom, you can conveniently set the event to remind you and/or the rest of the group by email a certain amount of time before the event.
Calendar
50
7. With the Regarding field, calendar events are tied with the relevant parent entity (e.g. account, contacts,opportunities etc.). In this way, events will automatically be recorded in the Account List with thecorresponding account, or with the relevant contact if selected.
8. After filling in all the necessary information for your event, click Save.
9. A screen will verify your information.
10.Your new event will now be visible on your calendar for all pages (day, week, month, etc.).
See Also:
Accepting RSVP's
Import and Export Calendar
Shared Items
7.2.2. Accepting RSVP'sBy accepting an RSVP, you let the creator of the event know if you will be attending, which then allowsthe event to be entered in your own calendar so that you can see it.
1. Click on the Alert icon on the toolbar frame.
2. Checkmark the item and click on Accept button for the particular message you want to accept in thelist of alerts.
3. Set your appropriate status for the RSVP and click Set.
4. The icon within Calendar will now show the added RSVP.
Tip
The RSVP icon can be clicked from any calendar view to see the status of all RSVP's
See Also:
Creating Events
Import and Export Calendar
Shared Items
7.2.3. Import and Export Calendar1. Log in to OfficeClip.
2. Click on Calendar from the left menu within Desktop.
3. Click on Import/Export from the button bar.
4. You may choose to import or export calendar events.
5. To Import events from a CSV file, browse for the CSV file. Map the import data to the OfficeClipdatabase to ensure all information is imported correctly.
6. Finally, Import the data into OfficeClip.

Calendar
51
Calendar Import/Export also allows you to export calendar events into a CSV file.
See Also:
Creating Events
Accepting RSVP's
Shared Items
7.2.4. Shared ItemsCalendar allows you to share calendar items with Extranet users, who have limited access to OfficeClip.You control from this screen only shared Calendar Items, making it easy to manage and make changes.(See the Help section in Extranet to set up users, control access, etc.)
1. To view and make changes to the Shared Items, click the Shared Items button from the button bar.
2. You can now see all items from this application that are in the Extranet list. From here, you canDeactivate any of these items, meaning they will still exist (not be deleted) but they will no longer bevisible to Extranet users. If an item has been Deactivated, you can click Activate to turn it back on again.
3. If you want to delete one or many shared items completely, click the item so the checkbox is checkedand click Remove.
4. The icons in the Actions column are used to email the item to a user and to edit the item , whichyou can also do by clicking on the item name.
5. To manage each item, simply click on it. In the next screen, you can name the item. Click Next to editthe details of the shared item. This page allows you to select what information will be shown to theExtranet user (for example, a particular report).
6. Click Next to continue to the Access Control page where you can set permissions for the Extranet users.You can create public access or go all the way to choosing each individual Extranet user who will haveaccess to that particular item.
7. Click Save when finished and you will either get a Public Link on the next screen which you can sendout in the email provided, or only the users you selected will be emailed the private link to see theShared item.
See Also:
Creating Events
Accepting RSVP's
Import and Export Calendar
7.3. Administration of the CalendarThis section describes ways to effectively administer the OfficeClip Calendar.
7.3.1. Resource ManagementResources can refer to meeting rooms, a company car, a computer lab, etc. depending on the type ofcompany you have, and the administrator can manage these resources for the group.

Calendar
52
1. To manage resources, click Admin on the button bar within Calendar.
2. Under Resource Management, click Add New Resource to include new resources. Fill in the fields asapplicable and click Save when finished or Cancel to exit the screen without saving.
Note
Fields marked with an asterisk * are required to be filled in.
3. Click Maintain Resources on the Resource Management screen to update and edit current resources.
Click the icon to modify the resource or click the icon to delete the resource. From this you canalso enter a new resource by clicking the Add New Resource button.
4. Once you have finished editing the current resources, click Update or click Cancel to leave the screenand not save the changes.
5. Click Grant/Revoke Resource Access Rights for Groups on the Resource Management screen if youwish to change the access privileges for a certain resource. This is useful if you want only specifiedgroups to be able to use a certain meeting room, company vehicle, etc.
6. To give and revoke access, move the organization between the Available Organizations box to theOrganizations with Access box by clicking the < and > boxes.
7. Click Cancel to exit the screen without saving any changes.
See Also:
Organization Profile
Personal Profile
7.3.2. Organization ProfileThe administrator can set calendar preferences at the organization-level, such as the day that each weekstarts on, the start and end time of each day, work days and a default for creating new events.
1. To manage the organizational preferences, click Admin on the button bar within Calendar.
2. Under Organization Profile, click Organizational Preferences to modify preferences for the entire group.Set the preferences by selecting from the drop down lists or checking the appropriate boxes.
3. Click on Save when finished or Cancel to exit.
See Also:
Resource Management
Personal Profile
7.3.3. Personal ProfileThe administrator can set user preferences here, such as the view of the calendar in the main calendarscreen and the default status to show on the calendar.
Calendar Proxy allows you to assign other group users as proxies who can create events on your behalf.These users can view all of the events with which you are associated, including private events. This feature

Calendar
53
enables an executive to have an assistant schedule his daily activities. By granting proxy access to theCalendar, the executive gives the assistant the ability to create both private and group events and schedulemeetings on his/her behalf.
1. Click on the Admin menu within Calendar.
2. Click User Preferences under Personal Profile to adjust aspects such as Default Calendar View (Day,Month, etc), as well as Default Status.
3. Click Save when finished or Cancel to exit without saving.
4. Under Personal Profile, click Set who can use your calendar in your behalf (Proxy).
5. You can select the group user whom you wish to give responsibility for managing your calendar events.You can also select to give selected users Read Only access by checking the box.
6. Press Update when finished or press Cancel.
See Also:
Resource Management
Organization Profile

54
Chapter 8. Campaigns8.1. Overview
Campaigns are the informative and promotional mails you send to potential prospects about your productsand services. The Campaigns application helps you to manage bulk E-mailing to your existing customersand can save the time of your staff. This application allows you to create HTML, text, or MS Word basedcampaigns. You can keep track of the sent mails and the time they were received.
8.2. Understanding OfficeClip CampaignsCampaigns are an effective marketing tool, used to send periodic emails and brochures which containproduct and/or service information.
The following are some of the main features of Campaigns:
• Users can create and send html/text bulk email campaigns to all or some contacts using an on screeneditor.
• The application keeps track of campaign history and sent/read status. This feature allows you measurethe effectiveness of your campaigns.
• New campaigns can be created using a template where the user defines a specific name to the campaign,selects a custom letterhead and incorporates fields from the OfficeClip Contacts database.
• Email campaigns can be in HTML or text format, and can be sent through SMTP accounts. An HTMLeditor allows easy input of HTML campaigns. However a backup text mail is also created for thosereaders who cannot read the HTML mails. Text campaigns can be created by extracting informationfrom the HTML campaign.
• The status of the campaign for a contact can be viewed on the Contacts application detail screen.
To enter this application, click the Contactson the toolbar, and then click Campaigns on the left toolbar.
8.3. Using CampaignsThis section describes ways to use the Campaigns application effectively. Campaigns assist organizationswith their list of contacts by allowing users to create, organize, report, filter, create campaigns, etc, froma list of relevant contacts.
8.3.1. Creating CampaignsYou can create email campaigns to send to your contacts. Campaigns are often used as marketing andsales tools and can be customized to fit your needs. Letterheads, created by the administrator, can havea company's logo and/or colors in it and the actual campaign can be created with words and images,depending on your needs. You are able to select from the entire list of contacts, as well as any filtered listsof contacts that you may have created, allowing for easy organization and targeting of the campaign.
1. Click on Contacts from the main toolbar then click Campaigns on the left menu.
2. From the Campaign List screen, click New Email Campaign on the button bar within Campaigns. Setthe basic properties by filling in the Name and Description fields and selecting a letterhead, mode (text
Campaigns
55
or HTML) and a POP account (you can create a new account by clicking the New E-Mail Account link)from the drop down menus. The box is already checked to create a recurring campaign; if you do notthe campaign to occur more than once, uncheck the box.
Note
Letterheads can be set up by organization administrators in the Setup section. POP accountscan be created in OfficeClip Email application.
3. Specify the contacts to associate with the campaign. Highlight contacts by clicking them and click the> button to move the selection to the Contacts in this Campaign or the < button to move the selectionto the Available Contacts for this Campaign. Holding the Ctrl key allows you to select more thanone contact or filter at a time. You can also order the contacts using the Up and Down buttons.
4. Click Next>> to create or Cancel to exit.
5. In the next screen, select an Entity and then an Attribute from the drop down menus, which can becopied to the body of the email. The entities and attributes will be replaced with the actual informationwhen the emails are sent out.
6. Depending on your Mode selection, you can fill in the HTML mail message or the Text mail message.The text mail message will be simply text and the HTML mail message can contain images, logos,colors, etc. as well as text; you can use the Design tab to edit the message.
7. Click Next>> when you are finished editing, <<Previous to go back or Cancel to exit.
8. If you have edited an HTML message, clicking Next will take to a screen where you can edit the textmail message. Click Save when finished, <<Previous to go back or Cancel to exit without saving.
Tip
On the text message edit screen you can click on the Extract from HTML link to extract thetext part of the html message from the previous screen and then you can fine tune the format.This part will be used if the recipient's e-mail client cannot read or format html mails.
See Also:
Modifying Campaigns
Mail Merge Campaigns
Relationships
Campaign Tags
8.3.2. Modifying Campaigns1. Click on Contacts from the main toolbar, then click Campaigns on the left menu within.
2. Click the chosen campaign name or click the icon to view and modify properties and associatedcontacts.
3. Click Next to continue. Edit the campaign mail message and click Next.

Campaigns
56
4. The next screen allows you to modify the text mail message. Click Save to return to the Campaign Listscreen, <<Previous to go back a screen or to exit without saving. You may now choose to click the
relevant icons to preview , send or delete a campaign.
See Also:
Creating Campaigns
Mail Merge Campaigns
Relationships
Campaign Tags
8.3.3. Mail Merge CampaignsThis feature allows you to open a mail merge campaign in MS Word.
1. Click Contacts on the main toolbar, and then click Campaigns on the left toolbar. Select New MailMerge Campaign from the button bar and choose either Open or Save from the pop up dialogue box,depending on what you want to do.
See Also:
Creating Campaigns
Modifying Campaigns
Relationships
Campaign Tags
8.3.4. Campaign TagsA General description of Tags can be found here.
Tags can be accessed by going to the Summary of the Campaign Detail. Users who have adequatepermission can associate existing tags with a Campaign or can create new Tags.
Tags can be managed using the Tags button on the CampaignButton bar. This option is visible to alladministrators and users who have privilege to manage Tags.
See Also:
Creating Campaigns
Modifying Campaigns
Relationships
8.3.5. RelationshipsNote: This feature is only available in the Professional Edition of OfficeClip
OfficeClip Contact Manager provides the ability to create arbitrary relationships between various entitiesin OfficeClip. For Example:

Campaigns
57
• For Real Estate Transactions, a Broker can be a relationship between two Contacts.
• An Account can be a Partner of another Account
• A Contact can be a Coordinator for an Opportunity.
To create relationships in Contact Manager, follow the steps:
2. Click Contacts from the main toolbar, and then click Campaigns from the left toolbar. Then, clickAdmin on the button bar. Click Relationson the button bar of the Admin menu.
3. Click the Add New button and type in the name of the relationship you wish to add (such as broker,partner, etc.). The click the Insert link to insert this relationship into the application.
4. To create relationships between the modules of the Contact Manager (Contacts, Accounts,
Opportunities and Campaigns) click on the icon of the Contact, Account, Opportunity or Campaignyou want to add a relationship to, then click Relation on the Children bar along the top.
5. Click the New Relationship link in the table. Your First Participant will be named, you can select therelationship from the drop-down menu and then select the Second Participant. Click Save.
6. The Relationship is now set up between the two participants.
See Also:
Creating Campaigns
Modifying Campaigns
Mail Merge Campaigns
Campaign Tags
58
Chapter 9. Contacts9.1. Overview
OfficeClip Contacts application is a full-featured contact tracking and reporting application for managingthe details of customers, partners and employees as well as the time associated with a contact. It providesa convenient way to track business leads, customers, partners, and other people associated with yourbusiness. Information such as appointments, documents, history of activities associated with a contact,issues, and tasks can all be viewed and managed using the Contacts application.
9.2. Understanding OfficeClip ContactsWith OfficeClip Contacts Manager, all contact information is available to every user of your organization,but the amount of information the users have access to can be controlled, ensuring that all informationis secure.
The following are important aspects the Contacts application:
• Contacts are added to an organization with details such as personal information, address information,contact source, etc.
• You can set permissions for various roles of an organization based on groups, making the informationeasily accessible yet still secure. You can configure all the details of your contacts to make them assecure as needed by your organization.
• Various items such as tasks, appointments, issues, campaigns, documents, and time associated with eachcontact can be easily managed and reported.
• You can search the details of a contact using the given criteria or by creating filters to sort out detailsthat you specify.
• Reports can be imported or exported in CSV files or XML files.
• You can track the history of tasks performed and changes made to a contact
9.3. Using ContactsThis section describes ways to use the Contacts application effectively.
To enter the Contacts application, click the Contacts link on the toolbar, and then click Contacts on theleft menu.
The Contact List screen displays all of the contacts that have been entered for your group. Groupadministrators can modify the fields that are displayed on this list.
9.3.1. Creating a New ContactThis screen allows you to enter all the details associated with a new contact such as name, organization,address, email, phone number, etc. The administrator can add User-Defined Fields to show up at the bottompart of this screen, allowing for additional contact information to be entered.
1. To create a new contact, click on New Contact on the button bar within Contacts.

Contacts
59
2. The New Contact screen allows you to enter the details for a contact.
3. Enter the contact information. Some fields have a pick-list denoted with an icon. Depending on theconfiguration, you may be forced to click this button in order to enter information. Clicking this buttonopens a list from which you can select the value. If the value isn't in the list, type it into the text field,and then click Save. You can then select the value you have just entered.
4. Click Save when you are finished entering information in the fields.
See Also:
Bulk Options
Editing Contacts
Searching and Filtering Contacts
Creating Reports
Importing and Exporting Contacts
Shared Items
Contact Tags
9.3.2. Bulk OptionsThe administrator can perform bulk operations, such as deleting all contacts or checked contacts andreassigning checked or all contacts to another user.
1. In the main Contact List screen, click the Show Bulk Options link at the bottom of the list.
2. Choose delete options by clicking the appropriate link.
3. To reassign contacts to another user, select his/her name from the drop down list and then click theappropriate link.
4. When finished, you can click the Hide Bulk Options to close the boxes.
See Also:
Creating a New Contact
Editing Contacts
Searching and Filtering Contacts
Creating Reports
Importing and Exporting Contacts
Shared Items
Contact Tags
Contacts
60
9.3.3. Editing ContactsFrom the main Contact List, you can modify the Personal Information, Address Information, OtherInformation, User-Defined Fields and Ownership of the contact. You can Track Time spent on the contactand you can also convert the Contact to an Account, if the need arises.
1. To edit a contact, click Contacts on the main toolbar, then select Contacts on the left toolbar. TheContact List is displayed.
2. Click the icon next to the contact you want to modify. Press the Modify button under the Functioncolumn to make changes to the contact. Press Save when finished, Cancel to exit, or you can pressDelete to remove the contact. You will be taken back to the main Edit Contacts screen.
3. You can delete a contact by pressing Delete under the Function column, and you can export the contactto a vCard file by pressing the Export button and then choosing Open or Save from the pop-up dialoguebox.
4. You can Clone a Contact by pressing the Clone button in the function column. Cloning Contacts allowsyou to make a copy of all the contact information except the Name and Email address, so you can easilyadd more contacts without re-entering company information, etc.
5. Also in this screen, you can move to another contact from the list by pressing the <<Previous and>>Next buttons.
6. To change the Contact into an Account, press the Convert button under the functions column.
7. The Edit Contacts screen offers an option to Show Children; if these have been enabled by theadministrator, click All, which will include: Events, Appointments, Documents, History, Notes,Campaigns, Issues and Tasks.
8. You may also choose to show only certain children, such as only Notes in the screen. Once the childrenhave been selected, you can fill in the fields with the necessary information
9. Press Finished when you have completed all the modifications. This will save all actions.
Note
The Track Time, Ownership and Children features are described in more detail in thefollowing sub-sections.
9.3.3.1. Tracking Time
The tracking time feature mainly serves as a tool for monitoring the time that is spent on various contacts.It allows a user who is working on a contact to keep track of the amount of time he/she is spending on it.This enables management to know where project resources are being used.
1. To Track Time for a contact, click on Contacts from the tool bar.
2. Then click on a Contact from the Contact List.
3. On the Contact Details page where you can view the item, click on the Track Time button.
4. A window will pop up, which will show the tracked time and allow you to add a new item. To addtime, go to the Add New section.
5. Enter the duration, date, and any other notes (these notes are internal in the sense that they will not beshown in the timesheet details if the time is exported to the Timesheet application).

Contacts
61
6. Press Save when finished.
7. To Edit a tracked time entry, click on the Edit icon on the Actions column and then change theinformation at the bottom and finally click on Save.
8. Your new item will appear in the Track Time list. Press the Cancel button to close the window andreturn to the screen to continue making changes to the Contact.
9.3.3.2. Permissions and Ownership of Contacts
You can change the Read, Write, Append, and Delete status of a contact and also change who owns theobject in the Ownership section of the Edit Contact screen. By default (unless changed by an administrator),only the creator of the contact and the administrator have access to it; all other users only have Read access.The creator can change the kind of access other users have by changing the permissions.
1. To change the owner of a contact, click on the contact from the main Contact List and then click Re-Assign under the Ownership section of the Edit Contact screen.
2. Select a user to Assign Ownership To from the drop down list and if you want to send that user an emailnotification, check the box. Press Save when finished or Cancel to exit.
3. Click Change Permissions under the Ownership section of the Edit Contact screen to edit thepermissions associated with the contact.
4. In the screen that pops up, you can see the access that various users have and you can change this by
clicking the icon to the left of the user name.
5. Check the appropriate boxes based on the permissions needed and click Save when finished or Backto return to the previous screen.
6. To see the users for a particular role, click the icon next to the role you want to view.
See Also:
Creating a New Contact
Bulk Options
Searching and Filtering Contacts
Creating Reports
Importing and Exporting Contacts
Shared Items
Contact Tags
9.3.3.3. Using Children
This section will describe how to use the various children that are associated with the Contacts application.
9.3.3.3.1. Tasks
When the Task child is enabled, it will show at the bottom of the details screen with all the tasks associatedwith that particular contact, and you can edit it as needed. You can filter tasks by selecting a category from

Contacts
62
the drop down list or by checking the Owned by me or Assigned to me checkboxes. To create a new Task,click the Create a New Task link and fill in the fields. The task will be associated with the contact.
9.3.3.3.2. History
Note: This feature is only available in the Professional Edition of OfficeClip
This will show any history associated with the contact.
9.3.3.3.3. Campaigns
The Campaigns child enables you to see any campaigns that are associated with the contact. You can also
click the icon to see a preview of the campaign.
9.3.3.3.4. Issues
The Issues displayed are issues within the Issue Tracker application that are associated with the particularcontact. You can select a binder to view any issues within that binder, and you can create new issues andbinders by clicking on the respective links and then filling in the necessary fields.
9.3.3.3.5. Appointments
You can create and manage appointments associated with the contact. Click the New Appointment linkand then fill out the information needed to make the appointment.
9.3.3.3.6. Documents
Relevant Documents can be attached to a contact, allowing for important information to be easily accessedfrom one place. Click the Edit Attachments link and then click Browse to find the file. Click Upload toattach the document then press Finished.
9.3.3.3.7. Notes
Notes allow you to write any additional information regarding the contact, any of the Children, etc. Youcan write up to 4000 characters and can spell check your note as well. Simply click on the New Note linkand write your note. Click Save when finished.
9.3.3.3.8. Relationships
OfficeClip Contact Manager provides the ability to create arbitrary relationships between various entitiesin OfficeClip. For Example:
• For Real Estate Transactions, a Broker can be a relationship between two Contacts.
• An Account can be a Partner of another Account
• A Contact can be a Coordinator for an Opportunity.
To create relationships in Contact Manager, follow the steps:
1. To create relationships between the modules of the Contact Manager (Contacts, Accounts,
Opportunities and Campaigns) click on the icon of the Contact, Account, Opportunity or Campaignyou want to add a relationship to, then click Relation on the Children bar along the top.

Contacts
63
2. Click the New Relationship link in the table. Your First Participant will be named, you can select therelationship from the drop-down menu and then select the Second Participant. Click Save.
3. The Relationship is now set up between the two participants.
See Also:
Task Application
Campaign Application
Issue Tracker Application
Calendar Application
Notes Application
Documents Application
Contact Tags
9.3.4. Searching and Filtering ContactsBy using Search and Filter options in OfficeClip Contacts application, you can easily find the contacts youare looking for. This feature allows you to search for contacts by typing in a keyword and selecting a field,such as Description. You could search for a certain word to be in the field Description and all items thatmatch this criterion would show up in the list. This is helpful for viewing items that may be related to acertain project, time period, user, etc. without having to search through the entire list.
Tip
On the search box you can type and between multiple words to match all the words or usecomma (,) between multiple words to match either of then. For example, John and Jillwill match all the records that have both John and Jill in them while Mary, Jeff will bringall matches for Mary and also all matches for Jeff together.
Users can create filters to better customize their searches. Filters allow the user to specify many criteriaand save them for future use. You can also remove filters if you no longer need them.
9.3.4.1. Search and Sort
To sort the entries by a particular field, click the header name (e.g. Last Name). Clicking the same headeragain toggles the results between ascending and descending order.
1. To search for particular text associated with a contact, type a word or phrase in the Search field at thetop of the main Contact List. Select the field you wish to search from the drop down box and click Go.
2. The search results are displayed. To exit the search result screen and view the full list of contacts, clickCancel.
9.3.4.2. Filters
The Filters option allows you to create a customized search based on selected criteria that you define. Aftera filter is created, it is saved for future use. Filters allow you to save time by creating a category to sortthrough your contacts and the fields you want to filter
Contacts
64
1. To create a filter, click the New Filter link that appears next to the filter selector dropdown. A screenwill appear. To edit a filter, select the filter then click the Edit Filter link.
2. Type a name for the filter. A good filter name is one that describes the filter, such as GeorgiaContacts or Source-Web with Opt Out.
3. Select the scope of the filter:
a. Information Owned by Me allows you to filter the output so that only contacts of which you arethe owner are displayed.
b. All I Can See allows you to see the contacts owned by you, as well as contacts you have permissionto view or edit.
4. Select filter conditions by clicking the icon on one of the filter condition sections. The ConfigureFilter window will pop up.
5. Select the field you wish to filter from the drop down list.
6. Select the operation. If the field that is selected is a text field, Greater than or Less than operation willbe based on alphabetical order. If it is a date field, the Greater than or Less than operation will be basedon the selected dates. Press Save when finished configuring the filter or press Cancel to exit without
saving. Pressing the icon will reset the row of the filter.
7. Select the fields to be shown in the list of results from the drop down lists in section 4. These fieldswill show things like Name, Address, Company, etc., depending on your selections, when you filteryour contacts.
8. Select visibility:
a. Visible to Everybody allows everyone in your group to see and use the filter.
b. Visible only to Me creates a private filter that will not be seen by anyone else in the group.
9. Click Save when finished, Cancel to exit without saving or, if you are editing a filter, Delete to remove it.
See Also:
Creating a New Contact
Bulk Options
Editing Contacts
Creating Reports
Importing and Exporting Contacts
Shared Items
Contact Tags
9.3.5. ReportsReports have a similar interface to filters, but filters display information according to selected criteria,while reports allow field information groupings, as well as numeric field summaries. Results can also be

Contacts
65
saved or printed. The report can be exported into many popular formats such as MS Word and Adobe PDF.Controls on the screen allow users to scroll forward and backward on the page through the report results,search for an item in the report, and zoom in and out on the report.
1. Click Contacts on the main toolbar, and then click Contacts from the left toolbar. To create a new report,click Reports on the button bar. Three types of reports are shown on the next screen.
9.3.5.1. Pre-Defined Reports
1. Click on Contact Reports then choose the desired report type. The next screen will show the report andyou can export the report to a PDF, MS Excel, MS Word or RTF file by selecting the file type from thedrop down list and clicking Export. Press Open or Save in the pop up dialogue box.
9.3.5.2. User-Defined Reports
Note: This feature is only available in the Professional Edition of OfficeClip
1. Click Create New User Defined Reports. See the section on Filters for information about the next screen.When you have finished filling in the fields and making selections, press Next.
2. Select the grouping fields. For example, if you wish for the report to be grouped by City, select City.You can also select whether these groupings are displayed in ascending or descending order.
3. Select the fields to sort by within the groupings, as well as whether to display them in ascending ordescending order.
4. Add an optional report description. This description will show up on the report list screen.
5. Select the column margin width, and enter a report header and footer text, if desired. Click Save whenfinished, Cancel to exit, <<Previous to go back to the previous screen or, if you are editing a report andyou want to remove it, click Delete.
6. To view the report, click the report name on the report list screen. To edit the report, click the icon.
9.3.5.3. Track Time Reports
You can create and view relevant reports based on tracked time in the Contacts application.
1. Click the View Track Time Report link. Select the dates for which you want to report the tracked timeand select the type of file you want to export it in. Click Export and then click Open or Save on the popup dialogue box depending on what you want to do with the file.
2. You can submit the report by clicking the Submit button or you can Cancel to exit the screen withouttaking any action.
9.3.5.4. Scheduled Reports
Note: This feature is only available in the Professional Edition of OfficeClip
Reports can be scheduled so that they can be run at pre-determined times and emailed to OfficeClip Users.Click here to see how reports are scheduled.
See Also:

Contacts
66
Creating a New Contact
Bulk Options
Editing Contacts
Searching and Filtering Contacts
Importing and Exporting Contacts
Shared Items
Contact Tags
9.3.6. Importing and Exporting Contacts
9.3.6.1. Import
This feature allows contacts to be imported into the OfficeClip Contact Manager from a CSV file.
1. Click Contacts on the main toolbar, and then click Contacts from the left toolbar. To import contacts,click Import/Export on the button bar.
2. Click the Import contacts in comma separated (CSV) file link to import a CSV file or. In the next screen,click Browse to find the file to upload, then click Import or click Cancel to take no action.
3. Select the fields in the imported CSV file that will be mapped to the OfficeClip fields. This ensures thatfields in the CSV file are correctly matched to the OfficeClip fields.
4. Click Ok. The contact import results will be displayed on the next screen.
5. Click the Imports contacts via ocXML file link to import contacts from an XML file.
6. On the next screen, click Browse to choose the file you wish to import, then click Import or click Cancelto take no action.
Note
While importing contact using csv file, you can also specify what actions to take if the filebeing imported has a contact that is already present in OfficeClip. The valid actions are Skip,Merge and Delete.
9.3.6.2. Export
The Export feature allows contacts (or filtered contacts) to be exported into the comma-separated values(CSV) format or all contacts can be exported in XML format.
1. Click Contacts on the main toolbar, then click Contacts from the left toolbar. To import contacts, clickImport/Export on the button bar.
2. To export contacts in CSV format, click the link and on the next screen, select which fields from the
OfficeClip database you want to have in the CSV file. You can move them up and down with the icons. These fields will appear as the first row in the CSV file after being exported.
Contacts
67
3. Click Export when finished mapping or click Cancel to exit without taking any action. Click Open orSave from the pop up dialogue box.
4. To export contacts from a particular filter to a CSV file, click the link and, from the next screen, selectthe filter from the drop down list and click Export. Press Open or Save.
5. Click the Export all contacts in ocXML format link and then click Open or Save in the pop up dialoguebox depending on what you need to do.
See Also
Creating a New Contact
Bulk Options
Editing Contacts
Searching and Filtering Contacts
Creating Reports
Shared Items
Contact Tags
9.3.7. Contact TagsA General description of Tags can be found here.
Tags can be accessed by going to the Summary of the Contact Detail. Users who have adequatepermission can associate existing tags with a Contact or can create new Tags.
Tags can be managed using the Tags button on the Contact ManagerButton bar. This option is visibleto all administrators and users who have privilege to manage Tags.
See Also
Creating a New Contact
Bulk Options
Editing Contacts
Searching and Filtering Contacts
Creating Reports
Importing and Exporting Contacts
Shared Items
9.3.8. Shared ItemsContacts allows you to share items with Extranet users, who have limited access to OfficeClip. You controlfrom this screen only shared Contacts Items, making it easy to manage and make changes. (See the Helpsection in Extranet to set up users, control access, etc.)
1. To view and make changes to the Shared Items, click the Shared Items button from the button bar.

Contacts
68
2. You can now see all items from this application that are in the Extranet list. From here, you canDeactivate any of these items, meaning they will still exist (not be deleted) but they will no longer bevisible to Extranet users. If an item has been Deactivated, you can click Activate to turn it back on again.
3. If you want to delete one or many shared items completely, click the item so the checkbox is checkedand click Remove.
4. The icons in the Actions column are used to email the item to a user and to edit the item , whichyou can also do by clicking on the item name.
5. To manage each item, simply click on it. In the next screen, you can name the item. Click Next to editthe details of the shared item. This page allows you to select what information will be shown to theExtranet user (for example, a particular report).
6. Click Next to continue to the Access Control page where you can set permissions for the Extranet users.You can create public access or go all the way to choosing each individual Extranet user who will haveaccess to that particular item.
7. Click Save when finished and you will either get a Public Link on the next screen which you can sendout in the email provided, or only the users you selected will be emailed the private link to see theShared item.
See Also
Creating a New Contact
Bulk Options
Editing Contacts
Searching and Filtering Contacts
Creating Reports
Importing and Exporting Contacts
Contact Tags
9.4. Contacts Administration
9.4.1. IconsBelow are the icons and their respective functions that are used throughout the Contacts Administrationsection.
Allows the user to access the Configure List Fields screen
Users can click to edit an item such as a contact, account, etc.
Use these to re-order various fields
Users can delete an item whenever this icon is shown
Allows the users to view the details of contacts, accounts, opportunities, etc.

Contacts
69
Allows you to reset a filter field
Users can run all the rules by clicking this icon
Access a calendar for inputting dates
Allows the user to preview certain items, such as campaigns
See Also:
Fixed Fields
User-Defined Fields
Child Objects
Rename Sections
Publish Input Forms
Rules
Position Fields
Relationships
Duplicates
9.4.2. Fixed FieldsThe Fixed Fields configuration screen enables administrators to change the names and other attributes offixed contact fields.
1. After clicking on Contacts from the main toolbar, click on Contacts from the toolbar on the left. Then,click Admin on the button bar. Click Edit Fixed Fields on the button bar of the Admin menu.
2. To edit a fixed field, click the icon in the Functions column on the right side. From this screen, theadministrator can configure the field.
3. To alter the display name, simply type the desired name into the text field.
4. The field type can not be changed in fixed fields, only in user-defined fields.
5. If you want fields to show in the main contact list screen check the box beside the Show in List Screen?field.
6. If you wish to make certain fields mandatory when information is entered, either for a new contact oran existing contact, check the field in the Mandatory column corresponding to the field you wish tomake mandatory. The fields will appear with an asterisk * next to them in the contact entry/edit screen.
7. You may wish to make certain fields editable by only certain roles in your organization. To select therole you wish to grant edit privileges, select the role in the dropdown. By default, the All Users rolehas edit privileges for each field. For more information on roles and privileges, please see Setup byclicking Setup on the toolbar.
Contacts
70
Note
If many fields are selected to show in the main contact list, a horizontal scrollbar will appearon the contact list screen to accommodate the field.
9.4.2.1. Configuring List Fields
1. A List field is a dropdown box with a list of available choices relevant to the field. To edit dropdown
list items, click the icon in the Functions column on the right side. A window pops up which allowsyou to add or remove list items, select the default list item to be initially displayed and change the orderin which they appear in the list.
2. To add an item, type the name in the Add New field and click Add.
3. To delete an item, click the icon next to the field you wish to remove.
4. To change the position of an item as it appears in the list, click the icons.
5. To select a default value, select a value from the Default Value drop down list.
6. Click the Save button to save settings or Cancel to exit without saving.
See Also:
Icons
User-Defined Fields
Child Objects
Rename Sections
Publish Input Forms
Rules
Position Fields
Relationships
Duplicates
9.4.3. User-Defined FieldsA main Contacts feature, the ability to add custom fields enables users to manage more specific contactitems than the fixed fields provide. In addition, these User-Defined Fields (UDFs) can be used in contactreports and filters that are defined by the user.
1. Click Contacts on the main toolbar, and then click Contacts from the left toolbar. Click Admin on thebutton bar and finally, select Edit UDFs on the Admin button bar.
2. By default, no UDFs are defined for a group. If you want to edit an existing UDF, click the iconto the right of the UDF you want to modify. In order to add UDFs, click the Add UDF button on thescreen. A popup window will appear. The display name is shown on the next screen.

Contacts
71
3. Type in the name you wish to have the UDF displayed as. The following sub-sections will describe inmore detail each of the other fields in the Add UDF screen.
4. When you have finished filling in the fields, click Save to save the UDF and have it displayed in theContacts application.
9.4.3.1. Field Type
User-defined fields allow you to choose from a variety of field types, each of which has a different function.You can choose the field type from the drop down list. More information about the Field Types is describedas follows:
Field Description
List This provides a dropdown list for the user. List field types must be configured by anadministrator by adding list values to the list (see Configuring List Fields, below, forfurther information).
Date A date field shows up with a calendar icon. It can be clicked to select a date to insertinto the field. Dates can also be added manually to the field using the "mm/dd/yyyy"format. Date fields are validated to ensure that an actual date is entered.
DateTime A date/time field is similar to a date field, with the addition of a time selectordropdown list.
Short Text A text field that can contain up to 30 characters.
Long Text A text box that can contain up to 255 characters.
Huge Text A text box that can contain up to 5000 characters.
Number A number-only field. This field is validated upon saving to ensure that only a numericvalue is added.
Float A number that contains a decimal point. This field is validated to ensure only anumeric value is entered.
Email A text field in which an email address is typed. It is validated to ensure that an emailaddress is entered.
Currency A numeric field that allows two decimal places to be entered (i.e., 120.00)
Boolean A Boolean field is displayed with a checkbox. It is a "yes/no" field.
Short Text Lookup A short text lookup field displays with a (...) button next to it. Text can be directlyadded or selected from a list of values that appears when the button is clicked. Thevalues that appear come from the corresponding field of other contacts that have beenentered.
User List A dropdown list that contains the current OfficeClip group users.
Owner List A list that shows owners of the object.
9.4.3.2. Mandatory Fields
If you wish to make certain fields mandatory when information is entered either for a new contact or anexisting contact, check the box beside the Mandatory field. The fields will appear with an asterisk * nextto them in the contact entry/edit screen.
9.4.3.3. Restricting a Field Edit-ability by Role
To make certain fields editable by only certain roles in your organization, select the role you wish to grantedit privileges from the drop down list. By default, the "All Users" role has edit privileges for each field.
Contacts
72
Selecting a particular role to have edit-ability privileges means that other roles will not be able to makeany changes to that particular user-defined field. For additional information on roles and privileges, pleasesee Setup by clicking Setup on the toolbar.
9.4.3.4. Configuring List Fields
1. A list field is a dropdown box with a list of available choices relevant to the field. To edit dropdown
list items, click the icon in the Functions column on the right side. A window pops up which allowsyou to add or remove list items, select the default list item to be initially displayed, and change theorder in which they appear in the list.
2. To add an item, type the name in the Add New field and click Add.
3. To delete an item, click the icon next to the field you wish to remove.
4. To change the position of an item as it appears in the list, click the icons.
5. To select a default value, select a value from the Default Value drop down list.
6. Click the Save button to save settings or Cancel to exit without saving.
See Also:
Icons
Fixed Fields
Child Objects
Rename Sections
Publish Input Forms
Rules
Position Fields
Relationships
Duplicates
9.4.4. Child Objects
Each contact can have various children associated with it. The administrator can control which of theseitems can be viewed and utilized by users. The Contacts applications as the following children associatedwith it:
• Events
• Documents
• History
Contacts
73
• Notes
• Campaigns
• Issues
• Tasks
1. Click on Contacts on the main toolbar, then select Contacts from the left toolbar. Then, click Adminon the button bar.
2. Click Edit Children on the button bar of the Admin menu.
3. On the screen that appears, the child objects that are currently associated with contacts are displayed inthe Displayed Entities column on the right. All available entities are displayed in the Available Entitiesto Display column on the left.
4. By including all available associated entities, users can conveniently have access to the full array ofassociated objects.
5. Select the entities to be displayed or removed by clicking the entity. Holding down the Ctrl keyallows you to select more than one entity. Click the > button to move the selection to the right columnor the < button to move the selection to the left column. You can also use the Up and Down button tomove the children in the order they will appear in the contact.
6. Choose Save to save the changes, Save & Next to save and go to the next Admin section or Cancelto exit without saving.
See Also:
Icons
Fixed Fields
User-Defined Fields
Rename Sections
Publish Input Forms
Rules
Position Fields
Relationships
Duplicates
9.4.5. Rename Sections
When a contact is created, edited, or viewed the fields are organized according to the nature of the fields thesection contains. For example, all of a contact's address information is found under the Address Informationsection. Section names can be changed in this screen, although they cannot be removed or added.
1. Click Contacts from the main toolbar, and then click Contacts from the left toolbar. Click Admin onthe button bar. Click Rename Section on the button bar of the Admin menu.
Contacts
74
2. Change the section names as needed. Click Save when finished, Save & Next to save and go to the nextAdmin section or Cancel to exit without saving.
See Also:
Icons
Fixed Fields
User-Defined Fields
Child Objects
Publish Input Forms
Rules
Position Fields
Relationships
Duplicates
9.4.6. Publish Input Forms
Users are able to create an input form, which can then be put on a website. Any information input fromthis form will be entered in OfficeClip. This will allow potential customers, clients, etc. to fill out theirinformation on your website to then to be entered into OfficeClip as a Contact.
1. Click Contacts from the main toolbar, and then click Contacts from the left toolbar. Then, click Adminon the button bar. Click Publishon the button bar of the Admin menu.
2. Choose the fields to be displayed on your web page by checking items in the Display option. Choosethe fields that need to be validated by checking items in the Validate option. Validation means thatthese fields are mandatory when the user is inputting the data. If validated (mandatory) fields are leftblank when they filling in their information, users will be prompted to enter this mandatory data.
3. Specify a return asp (or aspx) page which will be automatically called after the information is saved.
4. You can generate the HTML Code by clicking on the corresponding link. A new window with HTMLcode will appear which will let you copy and publish it on your site.
Important
You need to have working experience with asp.net in order to create an aspx page to beautomatically called after the information is saved
See Also:
Icons
Fixed Fields
User-Defined Fields
Child Objects
Contacts
75
Rename Sections
Rules
Position Fields
Relationships
Duplicates
9.4.7. RulesNote: This feature is only available in the Professional Edition of OfficeClip
Administrators can set rules for contacts to trigger certain events based on conditions of the contacts. Ruleshave the following components:
1. Conditions- Certain conditions need to be satisfied to trigger a rule
2. Actions- The actions are taken when a condition is satisfied
In OfficeClip Contacts, Rules are used to allow or restrict access to contacts when various conditions aremet. For example, if the administrator wants all contacts with a certain company to be able to be accessedby all users, he/she can set up the condition If field Company Name value is OfficeClip,give Read, Write, Append, Delete access to the All Users role.
1. Click Contacts from the main toolbar, and then click Contacts from the left toolbar. Then, click Adminon the button bar. Click Ruleson the button bar of the Admin menu.
2. By default, there are no rules listed. To create a rule, click the Add Rule button. If you want to edit a
role, click the icon or to remove a rule completely, click the icon. To run a rule that is not active,
click the icon or, to run all existing rules, click the Run All Rules link.
3. Clicking Add Rule brings up a new window. You can choose to add conditions by clicking the Addlink. This will bring up corresponding fields to fill in according to the conditions you need. Click Nextto continue or Cancel to exit.
4. Select the actions by checking the box. If certain conditions are met, you can give Read, Write, Appendand/or Delete access to the contacts meeting these conditions by selecting the Role from the drop downlist. Click Next to continue, Previous to go back to the previous screen or Cancel to exit.
5. Give a name to the rule. The Enabled check box is automatically selected, which means the rule willbe active. To make the rule inactive, uncheck the box. Click Save Rule when finished, Previous to goback or Cancel to exit without saving the rule.
See Also:
Icons
Fixed Fields
User-Defined Fields
Child Objects

Contacts
76
Rename Sections
Publish Input Forms
Position Fields
Relationships
Duplicates
9.4.8. Position FieldsThe order of the contact fields can be adjusted to match the user's preference.
1. Click Contacts from the main toolbar, and then click Contacts from the left toolbar. Then, click Adminon the button bar. Click Position Fieldson the button bar of the Admin menu.
2. The screen that appears allows you to position the contact fields with the up and down arrows
. Category headings (Personal, Address, Other, and Additional Information) may be repositioned.Category attributes (Last Name, City, Contact Source, etc) may be repositioned as well.
3. Click Save to save your modified positioning or Cancel to exit without saving.
See Also:
Icons
Fixed Fields
User-Defined Fields
Child Objects
Rename Sections
Publish Input Forms
Rules
Relationships
Duplicates
9.4.9. RelationshipsNote: This feature is only available in the Professional Edition of OfficeClip
OfficeClip Contact Manager provides the ability to create arbitrary relationships between various entitiesin OfficeClip. For Example:
• For Real Estate Transactions, a Broker can be a relationship between two Contacts.
• An Account can be a Partner of another Account
• A Contact can be a Coordinator for an Opportunity.
Contacts
77
To create relationships in Contact Manager, follow the steps:
4. Click Contacts from the main toolbar, and then click Contacts from the left toolbar. Then, click Adminon the button bar. Click Relationson the button bar of the Admin menu.
5. Click the Add New button and type in the name of the relationship you wish to add (such as broker,partner, etc.). The click the Insert link to insert this relationship into the application.
6. To create relationships between the modules of the Contact Manager (Contacts, Accounts,
Opportunities and Campaigns) click on the icon of the Contact, Account, Opportunity or Campaignyou want to add a relationship to, then click Relation on the Children bar along the top.
7. Click the New Relationship link in the table. Your First Participant will be named, you can select therelationship from the drop-down menu and then select the Second Participant. Click Save.
8. The Relationship is now set up between the two participants.
See Also:
Icons
Fixed Fields
User-Defined Fields
Child Objects
Rename Sections
Publish Input Forms
Rules
Position Fields
Duplicates
9.4.10. DuplicatesNote: This feature is only available in the Professional Edition of OfficeClip
Duplicate Management allows removal and merging of duplicate contacts in OfficeClip. Following aresome of the commands that are used to manage duplicates:
• Skip: Skips the duplicate, i.e. the duplicate is kept in the system
• Merge: Merges duplicates for more than one contact.
• Delete: Removes the duplicate contact.
Follow these steps to manage duplicates:
1. Select what to look for in the duplicates (The default is Email address but you can choose your criteria)then click on the Search button.
2. A list of possible duplicates will be shown. Click on the appropriate radio button and click on Apply

Contacts
78
Important
When merging more than one contact, the first contact in the list is treated as the base contactand other contacts in the group is used to fill-in the values that are empty on the base contact.
79
Chapter 10. Documents10.1. Overview
In OfficeClip Documents application, users can store, publish, distribute and organize documents with aninterface that similar to Windows Explorer and easy to use. Users can also move and copy documentsbetween folders, search for documents and rename documents and folders.
In addition, group administrators can administer group permissions, manage and delete group documentsand perform bulk uploads.
10.2. Using DocumentsThe following sections describe efficient utilization of the OfficeClip Documents application.
10.2.1. Accessing Documents1. Log in to OfficeClip
2. Click on Documents from the left menu within Desktop.
10.2.1.1. Document Attributes
Every files and folders in OfficeClip is associated with an attribute. They are
• R=Read,
• W=Write,
• A=Append, and
• D=Delete.
These attributes can be altered by clicking the icon. This brings up a property screen. Users can thenclick on the Permissions link to provide access privileges.
See Also:
Creating Folders
Uploading Documents
Modifying Documents/Folders
Sharing Documents
Searching Documents
Locking and Unlocking Documents
10.2.2. Creating FoldersFolders help you to manage and organize your documents within OfficeClip. You can name foldersto match a project, task, etc. so that they can be easily recognized and accessed by the users of theorganization.

Documents
80
1. To create a new folder, click New Folder on the button bar within Documents. Use this option to createa new folder directly in the main root folder location. To create a new folder in a more specific location(inside an existing folder), first click on the desired folder location from the Document List screen.From the desired folder location, click New Folder to continue to step 2.
2. Enter the name of the new folder and click Save when finished or Cancel.
Note
The address above the "New Folder Name", displays the location of the new folder.
See Also:
Accessing Documents
Uploading Documents
Modifying Documents/Folders
Sharing Documents
Searching Documents
Locking and Unlocking Documents
10.2.3. Uploading DocumentsYou can upload documents of a variety of file types, such as MS Word, MS Excel, Adobe PDF, etc intoOfficeClip Documents application. All users in the organization can see the documents by default, althoughtheir access to the documents can be modified by the administrator.
1. To upload a document to OfficeClip click Upload Document from the button bar within Documents.
2. You may upload as many as six files at a time. Directly enter the desired file names or select Browse,which will open a popup window to allow you to choose the file from the location folders. Select thefile and click Open.
3. Select a destination folder by clicking Browse.
4. The selected destination will now be displayed in the Destination Folder Box.
5. Choose additional safety options. You may select the checkboxes for Warn if the document is alreadypresent in the folder, as well as If document is not locked by me, create a new version.
Note
When uploading, if an existing file version is already in the system and the checkbox markedIf Document is not locked by me, create a new version is checked, it allows multiple revisionsto be stored. Both the original version (Rev 1) and the new version (Rev 2) will be stored.
6. The storage details are also displayed at the bottom. Click Upload when finished.
See Also:
Accessing Documents

Documents
81
Creating Folders
Modifying Documents/Folders
Sharing Documents
Searching Documents
Locking and Unlocking Documents
10.2.4. Modifying Documents/Folders
10.2.4.1. Moving and Copying Documents and Folders
You can move or copy folders and documents, which can be very helpful in organizing and managingdocuments and folders for a project. Documents can be moved or copied into folders and one folder canbe easily moved or copied into another folder.
1. To move or copy a document or folder, first select the checkbox next to the relevant document namefrom the main Documents screen and the click Copy or Move button at the bottom of the document list.
2. Select the destination folder by clicking Browse. Also note the necessary checkboxes for Do notcontinue if an error or warning is found and If a file of same name exists, create a new revision options.Click Move or Copy button or press Cancel to exit the screen without taking the action.
3. You will be taken to the final Move/Copy screen, where you will be able to see the results of the fileoperation.
See Also:
Accessing Documents
Creating Folders
Uploading Documents
Sharing Documents
Searching Documents
Locking and Unlocking Documents
10.2.5. Shared ItemsDocuments module allows you to share items with Extranet users, who have limited access to OfficeClip.You control from this screen only shared Document Items, making it easy to manage and make changes.(See the Help section in Extranet to set up users, control access, etc.)
1. To view and make changes to the Shared Items, click the Shared Items button from the button bar.
2. You can now see all items from this application that are in the Extranet list. From here, you canDeactivate any of these items, meaning they will still exist (not be deleted) but they will no longer bevisible to Extranet users. If an item has been Deactivated, you can click Activate to turn it back on again.
3. If you want to delete one or many shared items completely, click the item so the checkbox is checkedand click Remove.

Documents
82
4. The icons in the Actions column are used to email the item to a user and to edit the item , whichyou can also do by clicking on the item name.
5. To manage each item, simply click on it. In the next screen, you can name the item. Click Next to editthe details of the shared item. This page allows you to select what information will be shown to theExtranet user (for example, a particular report).
6. Click Next to continue to the Access Control page where you can set permissions for the Extranet users.You can create public access or go all the way to choosing each individual Extranet user who will haveaccess to that particular item.
7. Click Save when finished and you will either get a Public Link on the next screen which you can sendout in the email provided, or only the users you selected will be emailed the private link to see theShared item.
See Also:
Accessing Documents
Creating Folders
Modifying Documents/Folders
Uploading Documents
Searching Documents
Locking and Unlocking Documents
10.2.5.1. Deleting Documents and Folders
This feature allows the user to remove files and folders from the Document application. It will delete afile/folder from the desired location, however if the file is also in another folder location, it will not beremoved from that location.
1. To delete a document or folder, select the checkbox next to the document name from the DocumentList screen and click the Delete button. Alternatively, you may first click the folder or document to seedetails and then click the Delete button.
2. A safety screen will display the content details allowing you to confirm to delete the selected documentsor folders. Click Delete to continue or Cancel to not delete. Click Finished on the final screen.
10.2.5.2. Renaming Documents and Folders
1. To change the name, keywords or description of a document, go to the Document List screen. Under
the Functions column, to the right of the document, click the icon.
2. A window will display the file name details. Enter a file name in the New Name box. Click Rename tofinish or Cancel to exit without renaming the document or folder.
Note
A file can not be renamed if it is locked. Unlock the file by clicking the icon.

Documents
83
See Also:
Accessing Documents
Creating Folders
Uploading Documents
Modifying Documents/Folders
Searching Documents
Locking and Unlocking Documents
10.2.6. Searching Documents OfficeClip allows users to easily search for and find documents based on certain criteria. You can searchby a file name, by the size of a file and created and modified dates of the document.
1. To search for specific documents, click Search on the button bar within Documents.
2. Enter any keywords or descriptions in the Text box. Select from the dropdown menu whether youwould like to search in keywords, file name, details, created by, or All. You can also limit the searchto documents of a certain file size and/or date. Click Search when finished or click Cancel to exit.
3. A list of found documents that contain the search rules will be displayed.
See Also:
Accessing Documents
Creating Folders
Uploading Documents
Modifying Documents/Folders
Sharing Documents
Locking and Unlocking Documents
10.2.7. Locking and Unlocking Documents Locking a document is useful for situations in which two or more people are working on the samedocument. If a document is locked and then downloaded by a user, any other user that downloads thedocument to make changes won't be able to upload it again with the changes until the initial users uploadsit and unlocks. This prevents one user's changes from writing over another user's changes.
1. Users can directly see the lock/unlock status of their documents from the Functions column in the mainscreen.
2. If you would like to lock a document, go to the Document List screen. Under the Functions column, to
the right of the document, click the icon to lock the document.
3. The newly locked document will show the icon, allowing you to easily unlock it by clicking theicon. If you would like to reverse the status, simply re-click the icon.
Documents
84
4. In addition, under the Functions column, you may click the corresponding documents icon. Inthe pop-up screen, you may view the document's properties and details before locking. Press Lock toproceed with locking, View/Download to view the document or Cancel to exit the pop-up screen.
Note
A file can not be renamed if it is locked. Unlock the file by clicking the icon, and then
click the icon to rename.
See Also:
Accessing Documents
Creating Folders
Uploading Documents
Modifying Documents/Folders
Sharing Documents
Searching Documents
10.3. Administration of Documents Administrators can further manage their organizations' documents by clicking Admin on the button barwithin Documents.
10.3.1. Application Documents Documents can be attached to applications such as Bulletin Board, Timesheet, Expenses, Calendaretc. These are managed by OfficeClip's Document Management, but do not appear in the documentmanagement folder structure. However, application documents can be managed from a central location.
1. Click Admin on the main Document screen. Click Application Documents.
2. The documents associated with each application appear under each application name. If no documentsare listed, users have not attached documents in other applications, such as Contact Manager.
3. To remove a document, select the checkbox next to the document name and click the Delete button.
4. Click Cancel to return to the main Documents view screen.
See Also:
Bulk Upload
10.3.2. Bulk Upload Bulk upload allows uploading multiple files and directories on the local disk to OfficeClip. The bulk uploadis a powerful process and for that reason, it must be done on your server, by the site administrator.
Documents
85
Note
This feature can only be used by the site administrator and can be run only on the serverwhere OfficeClip is installed.
1. Click Admin on the Document List screen.
2. Click Bulk Upload.
3. To upload, type the destination path in the given textbox.
4. Select a destination folder by clicking Browse. If relevant, select the checkbox option for Do not uploadif there are upload errors.
5. Click Upload.
See Also:
Application Documents
86
Chapter 11. Email11.1. Overview
OfficeClip Email application lets you access email from your POP accounts.
You can setup any number of POP accounts and check your messages in one place.With OfficeClip Email,users can:
• Setup mailing lists
• Enable email blocking and filtering
• Organize folders with configurable rules
• Create an email signature file
• Utilize reply options
11.2. Using Email This section describes ways to use OfficeClip Email effectively.
11.2.1. Accessing Email OfficeClip Email application lets you access email from your POP accounts. You can setup any numberof POP accounts and check your messages at one place. Email features include setting up mailing lists,mail blocking, organizing, setting up your signature, and customizing your reply options.
See Also:
Composing Emails
Creating Email Accounts
Email Folders
Searching Emails
Email Options
11.2.2. Composing Emails 1. To compose an email, click on Compose Email on the button bar within Email.
Note
If you have not setup an email account yet, you will be prompted to do so by clicking theSetup New Account link.
2. You can select the account which will be used to send the email. You can send html- based emails alongwith custom graphics using the advanced email editor. Click Send when finished.
87
See Also:
Accessing Email
Creating Email Accounts
Email Folders
Searching Emails
Email Options
11.2.3. Creating Email Accounts You can setup any number of POP accounts and access them in one place. For an example of howOfficeClip works with Yahoo!, see Working with Various Email Servers below.
Note
From the Account List, users can also edit and delete accounts.
.
1. To setup an account, click on the Account List from the button bar within Email. Click Setup NewAccount.
2. Enter your account name, your Incoming Mail server and Outgoing Mail server names.
3. Choose a mode of Send Only, Receive Only or Send and Receive.
4. Your user name for your external mail account is the first part of your external mail address (beforethe '@' sign).
5. Your password is what you use to access you POP email. This is not necessarily your OfficeClippassword.
6. The color scheme will let you distinguish messages retrieved from different external mail accounts.
7. Outgoing email uses your SMTP server to send mails. If you need SMTP server authentication to sendemails check the Outgoing Email server needs authentication option. You can also choose Use samesettings as incoming mail server by checking the box.
Note
If you check the Leave a copy of the message on the server option, the emails will not beremoved from the server after they are downloaded by OfficeClip. If OfficeClip emails areremoved from the Deleted Folder, these emails will again be reloaded from the server.
11.2.3.1. Working with Various Email Servers
OfficeClip email works with various POP and SMTP clients. Given below are instructions for usingOfficeClip Email application with Yahoo clients.
Yahoo! Mail Plus account

88
1. Click on Desktop toolbar and then click Email from the left menu.
2. Choose a mode from Send Only, Receive Only or Send and Receive.
3. For Incoming Mail Server (POP) type: pop.mail.yahoo.com.
4. For Outgoing Mail Server (SMTP) type: smtp.mail.yahoo.com.
5. For Login User Name (POP) type: Your Yahoo! mail id (Yahoo email address without [email protected]).
6. For Login Password (POP) type: Yahoo! account password.
7. For Reply Email Address type: Your Yahoo! email address.
8. For Server Options: check mark the box if you want the mails to be copied and not moved from theYahoo! server.
9. You may select a color scheme to distinguish which emails are from your Yahoo! account.
10.Check mark the box that says Outgoing email server needs authentication.
11.Check mark the box that says Use same settings as incoming mail server.
12.Click on the Save button.
See Also:
Accessing Email
Composing Emails
Email Folders
Searching Emails
Email Options
11.2.4. Email Folders Email folders show the list of all the folders in the current email account. These folders can be renamed orremoved by the user or new folders can be made. You can also view folder details including the numberof messages, message content size, etc. with this feature.
1. To create an email folder, log into OfficeClip, then click Email in Desktop.
2. Select Folders from the button bar and click the Create New Folder link.
3. Give the folder a name and press Save. The new folder will be displayed in the main Folders List.
See Also:
Accessing Email
Composing Emails
Creating Email Accounts

89
Searching Emails
Email Options
11.2.5. Searching Email 1. You can search your emails by clicking Search on the button bar within Email.
2. Filter conditions are provided to simplify your search. You can type in text to search for and select whichpart of the email to search for that text. You can also search by From and To email addresses,date and time, read or unread, etc.
3. Click Search or Cancel to leave the screen without searching.
4. Your search results will be displayed.
See Also:
Accessing Email
Composing Emails
Creating Email Accounts
Email Folders
Email Options
11.2.6. Email Options From here, you can set up various features of your email within OfficeClip, such as your signature, replysettings and other general options for better managing emails.
1. Users can configure several email options by clicking Options on the button bar within Email.
2. Select the General Email Options link to setup the Compose Email option, the Default Account forsending email and to save a copy of sent mail. Press Save when finished.
3. You can customize your mailing lists by clicking the Mailing List link and selecting a group of emailaddresses to correspond to a mailing list. Press Save when finished.
4. You can block senders by clicking the Block Sender link and typing in the email address to block,then pressing Save. You can un-block an email address by clicking the Remove button. Click Finishedwhen you are done.
5. You can create rules for emails and folders by clicking the Organize link. Use the Conditions andActions to process new email messages. Use the Move Up and Move Down buttons to change the orderin which the rules are applied. Click Save when done or Cancel to exit without saving.
6. You can add your signature by clicking the Signature link and then typing your signature informationin the box. Press Save when finished.
7. You can set your reply settings by clicking the Reply Settings link. This screen allows you to choosewhether to include original content when relying and if so, how it should be separated. You can alsoset a reply-to address. Press Save when finished.
See Also:
90
Accessing Email
Composing Emails
Creating Email Accounts
Email Folders
Searching Emails
91
Chapter 12. Expenses12.1. Overview
OfficeClip Expenses are records of cost incurred from work-related tasks such as travel, supplies, lodging,food etc. In the normal workflow, expenses are entered by employees, then approved by their supervisor,and finally reimbursed by the accounts. Users may also receive a cash advance that is adjusted with thepayment.
The Timesheet and Expense link shows the status of all the expenses that are submitted for your approval,pending approval, rejected etc., allowing you to quickly take action on the ones that need your attention.
Tip
In OfficeClip, Timesheet and Expense are available as two separate modules packagedtogether in one application. If your organization is interested in a single module, you caneasily disable the other module.
12.2. Understanding OfficeClip ExpensesThe OfficeClip Expenses component is used to track a user's official expenses. The expense sheet aidsin calculating the expenditure incurred for project related activities and helps in billing these activitiesaccurately. When integrated with the timesheet component, this component helps the organization get aclear income and expenditure graph, as well as the profitability graph.
The following are the important aspects of the expense sheets:
• Users enter the expenses for a project and expense type. An expense type can either be billable or non-billable.
• If the details required check box has been enabled by the administrator, then the user has to provide thedetails of the expense type selected.
• The default currency is set to ensure that all the transactions are done through a single currency type.
• Completed expenses have to be submitted for approval through the routing method selected by theadministrator. Routing rules can be configured separately for each user.
Note
For users to be able to use expenses, the projects, expense types, default currency, andcustomers need to be defined.
12.2.1. CurrencyA default currency can be set for a particular group. This helps the user to customize the expensescomponent to his/her organizational standards.
Once the default currency is set, it cannot be changed and all existing expense reports will be set to thedefault currency.

Expenses
92
12.3. Using Expense
12.3.1. Creating an ExpenseNote: The Add Receipt feature is only available in the Professional Edition of OfficeClip.
Expense types are the types of expenses incurred by a user involved in a project. OfficeClip has somedefault expense types built into the expense report template. You can customize your expense type bygiving them specific names, which are displayed in the expense type column of the New Expense screen.Types are to be specified in order to avoid double entry of an expense and to indicate if the expense isbillable or non-billable.
1. To create a new expense, select New Expense from the menu within the expense application. Each rowof the New Expense screen can be used to record expenses for a combination of Customers, Projects,and Expense Types, and expenses for a particular day can be entered in the textbox.
2. If the administrator has enabled the details required option, then the user must click the Details linkbelow the text box, and provide all the necessary information about the expense in the expense detailscreen.
Note
OfficeClip Expenses reusers the Customer, Projects and Expense Types from the last expensesheet that you filled in. This saves some of your time when you work on multiple projectsfor more than one period. Any row that is kept empty will not be remembered in the expensesheet for the next period.
3. Additional information related to the entire expense report can be entered in the Comments text box,and the text can be spell-checked before saving.
4. You can also attach documents such as bills, vouchers, and invoices to support the expenses by clickingthe Edit Attachments link and uploading a document.
Tip
Use the Additional Information field to notify the supervisor of certain things that pertainto the entire expense report. For example, you may want to notify the supervisor the reasonwhy you had to extend your stay, and submit some documental proof for this as well.
5. A history of all the comments are kept and shown with the expenses. These are preserved for auditpurposes.
Caution
Remember to double check your comments before submitting the expenses. Once submitted,the comments cannot be removed from the history.
6. Finally, the user can save the expenses by clicking on the Save button, cancel the entry by clicking onthe Cancel button, or select one of the submission buttons. If the manual workflow is set for the user(which is default), the approver can be selected from the drop down box and the expenses can be sentby clicking on the Submit button. If automated routing is set by the approver, the user cannot select theapprover, clicking on the Submit button automatically routes the expenses to the approver.
Expenses
93
7. Once the expense is submitted, it appears in the Pending state on the user's Outbox. The user will notbe able to do further editing on the timesheet. The same expense also appears on the approver's Inboxwith Submitted status allowing approval or rejection of the expense. When the approver selects atimesheet and clicks Bulk Approve, the expense is removed from the approver's Inbox and appears inthe user's Inbox with Approved status.
See Also:
Inbox/Outbox Portlet
Exporting Expenses
Generating Expense Reports
Archiving Expenses
Reimbursements
Shared Items
12.3.2. Inbox/Outbox PortletWhen you login with your credentials, you can view the email dashboard displaying the list of approved,rejected or saved expenses. Pending items are listed in the outbox. You can view the expenses belongingto all groups or for specific group.
1. To view or edit the detailed expenses, click on the view/edit icon. Approved expenses cannot beedited; only expenses with Saved status can be modified and this can be done by updating the expensedetails, comments or adding new attachments. You can view the workflow history in the edit screenif the administrator has enabled the feature. To view a printer friendly screen of the expense, click on
the printer icon.
2. You can delete expenses by selecting the checkbox of a particular item and clicking Delete. To maintaina minimum number of expense sheets in your Inbox, you can archive them by selecting them andclicking the Archive button.
3. If you are the approver of expenses, you will see the Bulk Approve button. Select the timesheets youwant to approve using the checkboxes and click the Bulk Approve button.
4. This button is not visible for users who do not have the privilege of approving. You can approve yourown expenses, if you have been given the privilege.
See Also:
Creating an Expense
Exporting Expenses
Generating Expense Reports
Archiving Expenses
Reimbursements
Shared Items

Expenses
94
12.3.3. Exporting ExpensesExpenses can be exported to MS Excel format for reporting; both individual expenses and bulk expensescan be exported.
1. From your login, select Timesheets, then Expenses, then Export.
2. If you select the Individual Expense Report link, you can generate an expense report for a given userfor a specific time period.
3. You can select the details to be included in the report. Choose the date range and select the users usingthe checkbox, and click Continue. Click Select all to select all users at a time or click Clear all toclear the selections. If there is no expense sheet, the following message is displayed There is noexpense in the system for the selected period.
4. To export expense details for multiple users to a comma separated (CSV) file, select the Bulk ExpenseExport link. Here there is a provision for exporting only approved expenses. Choose the date range,select the users, and click Continue.
5. In following screen you can rename the fields and move the fields as you wish them to appear in the
report. Click on the or button to move the fields up or down the list, which will determine theirorder in the Excel sheet. In the top section, select the checkbox if you want the column names to appearas the first row in the Excel sheet. Click Export to view or save as an Excel file.
See Also:
Creating an Expense
Inbox/Outbox Portlet
Generating Expense Reports
Archiving Expenses
Reimbursements
Shared Items
12.3.4. Generating Expense ReportsThe user can generate a variety of expense reports. They are described here:
12.3.4.1. Expense Reports
• Individual Expense Report- Generates an expense report for a given user for a given time period. Theuser can select the details of the expenses to be included in the report.
• Expense Tracking-Contains expensereports developed by OfficeClip
12.3.4.2. Other Reports
• General Reports-Contains general reports developed by OfficeClip
• Custom Reports- Contains custom reports that are created by the OfficeClip development team.
Expenses
95
Expense reports can be generated based on different parameters. Depending on the needs of the company,they can be generated based on date of a project, profitability of a project, expenditure incurred in a project,etc.
1. From your login, select Timesheets, then Expense, then Report.
2. If you select Individual Expenses Report link, you can generate an expense report for a given user for aspecific time period. Choose the date range and select the users using the checkbox, and click Continue.
In the next screen, click the icon to preview the report.
3. The Expense Tracking reports, General report, and Custom report can be generated in any of fourformats- Adobe PDF (.pdf), Microsoft Word (.doc), RTF File (.rtf), and Microsoft Excel (.xls).
4. From your login, select Timesheets, then Expense, then Report.
5. Select a report link, choose the date range and select the users. Select an output format and click Nextto preview the report.
See Also:
Creating an Expense
Inbox/Outbox Portlet
Exporting Expenses
Archiving Expenses
Reimbursements
Shared Items
12.3.5. Archiving ExpensesOfficeClip allows you to manage your inbox by giving you the convenience of working with the Archivingfeature. All the approved expenses can be archived for any future reference.
1. To archive an expense, select it from the Expense inbox and click Archive.
2. You can restore the expenses if you need to edit or modify them. To restore an expense, click Archivein the expense menu bar, select the expense, and click Restore.
See Also:
Creating an Expense
Inbox/Outbox Portlet
Exporting Expenses
Generating Expense Reports
Reimbursements
Shared Items
Expenses
96
12.3.6. ReimbursementsOnce the expenses are approved, they can be reimbursed. The user can view all the reimbursed bills andtheir details for a selected time period, under the Reimbursement tab.
See Also:
Creating an Expense
Inbox/Outbox Portlet
Exporting Expenses
Generating Expense Reports
Archiving Expenses
Shared Items
12.3.7. Shared ItemsExpense allows you to share items with Expense users, who have limited access to OfficeClip. You controlfrom this screen only shared Timesheet Items, making it easy to manage and make changes. (See the Helpsection in Extranet to set up users, control access, etc.)
1. To view and make changes to the Shared Items, click the Shared Items button from the button bar.
2. You can now see all items from this application that are in the Extranet list. From here, you canDeactivate any of these items, meaning they will still exist (not be deleted) but they will no longer bevisible to Extranet users. If an item has been Deactivated, you can click Activate to turn it back on again.
3. If you want to delete one or many shared items completely, click the item so the checkbox is checkedand click Remove.
4. The icons in the Actions column are used to email the item to a user and to edit the item , whichyou can also do by clicking on the item name.
5. To manage each item, simply click on it. In the next screen, you can name the item. Click Next to editthe details of the shared item. This page allows you to select what information will be shown to theExtranet user (for example, a particular report).
6. Click Next to continue to the Access Control page where you can set permissions for the Extranet users.You can create public access or go all the way to choosing each individual Extranet user who will haveaccess to that particular item.
7. Click Save when finished and you will either get a Public Link on the next screen which you can sendout in the email provided, or only the users you selected will be emailed the private link to see theShared item.
See Also:
Creating an Expense
Inbox/Outbox Portlet
Exporting Expenses
Expenses
97
Generating Expense Reports
Archiving Expenses
Reimbursements
12.4. Expense AdministrationThe Expense component must be configured in the same manner as timesheets. Administering the Expenseapplication includes setting up the system for the users, setting up customer accounts and projects, creatingusers and allocating them to projects, customizing the expense sheets of users based on expense types andcurrency, and so forth. For a detailed understanding of the administration pre-requisites, click TimesheetAdministration .
12.4.1. Editing Fields to Create AliasesIf you do not want accounts, projects, and service items to display their original names, you can createaliases for them. The accounts, projects, and service items will then be referred to by these aliases on allthe pages.
To create aliases, select the Edit Fields link in the Admin section of the Expense component. Type aliasesin the specified fields and click Save.
See Also:
Setting Up Expense Profiles
Setting Up Expense Workflow
Adding Expense Types
Setting up Default Currency
Manage User's Expense Sheets
Allocating Projects to Users
Users
12.4.2. Setting up Expense ProfilesEach organization can setup and customize the expense properties according to the organizationalrequirements.
1. To modify various items within the expense sheet, click Profiles on the Expense Admin button bar.
2. Select the options according to your preference from the specified drop-down lists for the followingcharacteristics:
Field Description
Expense Start Day The day which appears on the first column of aweekly expense
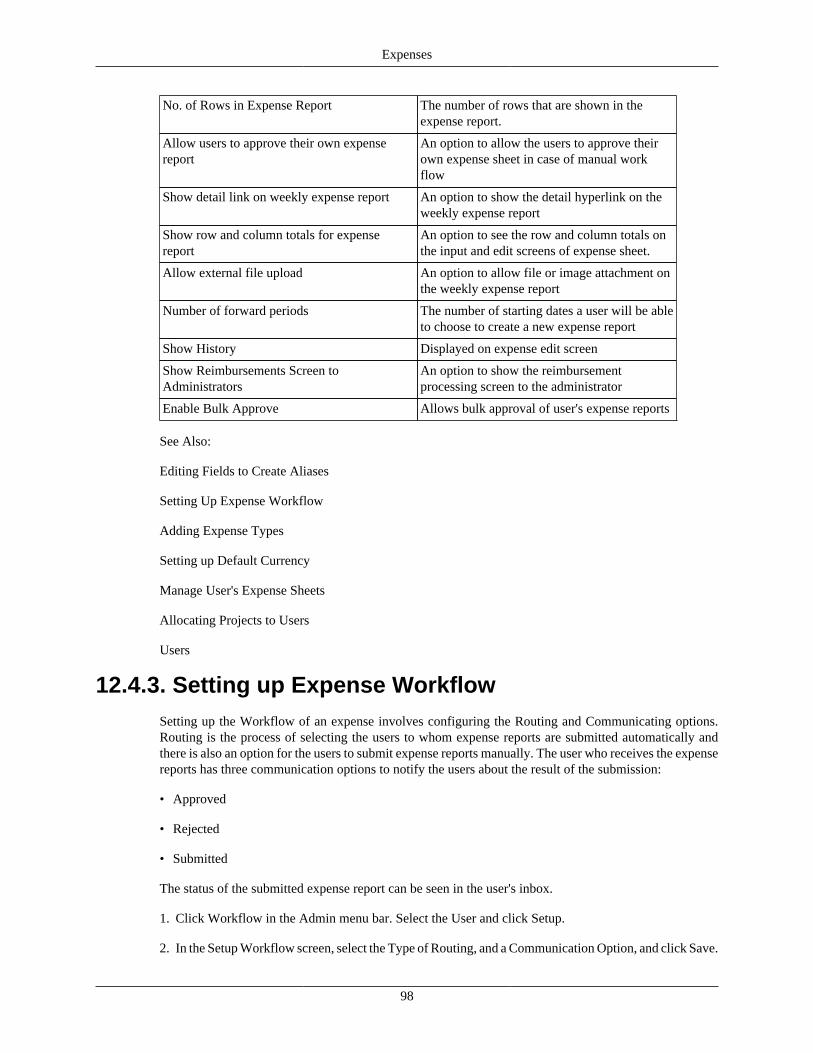
Expenses
98
No. of Rows in Expense Report The number of rows that are shown in theexpense report.
Allow users to approve their own expensereport
An option to allow the users to approve theirown expense sheet in case of manual workflow
Show detail link on weekly expense report An option to show the detail hyperlink on theweekly expense report
Show row and column totals for expensereport
An option to see the row and column totals onthe input and edit screens of expense sheet.
Allow external file upload An option to allow file or image attachment onthe weekly expense report
Number of forward periods The number of starting dates a user will be ableto choose to create a new expense report
Show History Displayed on expense edit screen
Show Reimbursements Screen toAdministrators
An option to show the reimbursementprocessing screen to the administrator
Enable Bulk Approve Allows bulk approval of user's expense reports
See Also:
Editing Fields to Create Aliases
Setting Up Expense Workflow
Adding Expense Types
Setting up Default Currency
Manage User's Expense Sheets
Allocating Projects to Users
Users
12.4.3. Setting up Expense WorkflowSetting up the Workflow of an expense involves configuring the Routing and Communicating options.Routing is the process of selecting the users to whom expense reports are submitted automatically andthere is also an option for the users to submit expense reports manually. The user who receives the expensereports has three communication options to notify the users about the result of the submission:
• Approved
• Rejected
• Submitted
The status of the submitted expense report can be seen in the user's inbox.
1. Click Workflow in the Admin menu bar. Select the User and click Setup.
2. In the Setup Workflow screen, select the Type of Routing, and a Communication Option, and click Save.
Expenses
99
See Also:
Editing Fields to Create Aliases
Setting Up Expense Profiles
Adding Expense Types
Setting up Default Currency
Manage User's Expense Sheets
Allocating Projects to Users
Users
12.4.4. Adding Expense TypesExpense types are the types of expenses incurred by a user involved in a project. You can customize yourexpense types by giving them specific names which are displayed in the expense type column of the NewExpense screen.
1. To add an expense type, click the Expense Types tab in the Admin menu bar.
2. In the template, select the Expense Type from the pre-defined types and type in the name for the expensetype in the Expense Namefield. The name appears on the new export report.
3. Select the Details Required check box, if you want the user to provide the details of the expenses in theexpense report. Select the check box in the Is Billable column, to make the expense billable. To modifyan existing expense type, select the corresponding item in the Billable Modify column.
4. If you wish to add a header and footer to your timesheet, enter the required text in the respective textboxes and click Save & Next.
See Also:
Editing Fields to Create Aliases
Setting Up Expense Profiles
Setting Up Expense Workflow
Setting up Default Currency
Manage User's Expense Sheets
Allocating Projects to Users
Users
12.4.5. Setting up Default CurrencyA default currency can be set for a particular group.
To set up a default currency, click Currency in the Admin menu bar. Choose a default currency and saveit by clicking Save Default.
Expenses
100
See Also:
Editing Fields to Create Aliases
Setting Up Expense Profiles
Setting Up Expense Workflow
Adding Expense Types
Manage User's Expense Sheets
Allocating Projects to Users
Users
12.4.6. Managing User's Expense sheetsAfter completing the above configurations, the expense report can be previewed for a final check, in thisscreen. This feature even allows you to reroute the expense for further modifications or delete an invalidexpense report.
Caution
Once the expense report is submitted, the user cannot have it returned for any modificationswhatsoever.
1. Click Manage in the Admin menu bar. Select the date range and user, and click Show Expenses to takeyou to the next screen.
2. From here, click Preview to view the expense report and Delete to erase the expense report.
12.4.6.1. Rerouting Expense sheets
1. To redirect the Expense, select the expense using the radio button and click Reroute to me.
2. The expense is then listed in the user's Outbox, so that the user can take immediate steps to modifyand resubmit the expense report.
3. Click Cancel to return to the previous screen.
See Also:
Editing Fields to Create Aliases
Setting Up Expense Profiles
Setting Up Expense Workflow
Adding Expense Types
Setting up Default Currency
Allocating Projects to Users
Users

Expenses
101
12.4.7. Allocating Projects to UsersWhen users are allocated to multiple projects, timesheets can be configured appropriately for the respectiveusers.
1. To allocate projects to users (or users to projects), click Projects on the toolbar, and select Admin fromthe menu
2. The Allocate Project link allows you to allocate one or more projects to the selected user. When youselect a user, all the projects are listed down. You can choose one or more projects and click Save toallocate them to the user.
3. The Allocate User link allows you to allocate one or more users to the selected project. When you selecta project, all the users are listed down. You can choose one or more users and click Save to allocatethem to the project.
Note
To allocate all projects/users,selectthe Check All Boxesoption. If you do not want to allocateany projects/users, select the Clear All Boxesoption.
See Also:
Editing Fields to Create Aliases
Setting Up Expense Profiles
Setting Up Expense Workflow
Adding Expense Types
Setting up Default Currency
Manage User's Expense Sheets
Users
12.4.8. UsersIf you log in as an Administrative user (for example Manager), you can view and edit the details of theusers belonging to the same group or organization and you can also set up the payroll period informationwhen configuring the user profile. There are four standard periods defined in OfficeClip: weekly, biweekly,semimonthly, and monthly.
If you set weekly period for a user, only seven days will be displayed in the users timesheet and if youselect biweekly, 15 days will be displayed in the users timesheet, and so on. To access this screen, clickAdmin on the Expense button bar, then click Users on the Admin button bar.
See Also:
Editing Fields to Create Aliases
Setting Up Expense Profiles
Setting Up Expense Workflow

Expenses
102
Adding Expense Types
Setting up Default Currency
Manage User's Expense Sheets
Allocating Projects to Users
103
Chapter 13. Extranet13.1. Overview
Extranet allows limited access to OfficeClip information for partners and service providers and can serveas a support portal for customers. Two kinds of access to the Extranet are possible:
• Public access: Allows access of OfficeClip information to anybody by providing them with a web pageURL (Universal resource Locator, i.e. the web address in this case). No password is required to viewthis information.
• Secured Access: Allows the OfficeClip organization administrators to set a login id and password for theuser that accesses the extranet. This allows secured access to a limited part of the OfficeClip information.
13.2. Understanding Extranet Extranet offers its users many features and benefits, including:
• Issue Tracker: Help Desk - It allows issue reporting via web forms. Issue Tracker features are offeredas two basic types: Public and Secure.
• The Public Feature allows the general public to create new issues for a particular binder and view thecurrent status of the issue by clicking on the link that is emailed to them. This is useful for allowingthe public to report bugs, suggest ideas, comment on company offerings or any other area of interest.
• The Secure Feature allows the logged in user to view all current issues for a binder, create newissues, add notes to the issue, or change the status of the issue.
• Issue Tracker: Knowledge Base - A knowledge base can be automatically created from an OfficeClipIssue Tracker binder to function like a support portal, through which customers can browse existingissues, resolutions etc. The knowledge base has the capability for full text search, automatic creation oftopics and subtopics, and has a feature enabling the knowledge base article to be emailed.
• Calendar - The group calendar can be exposed to the customers, partners or general users. Also, extranetusers can request an appointment that can be automatically emailed to the administrators.
• Expense Reports - OfficeClip reports can be shared with the customers in a secured manner.
• Documents - Selected documents can be shared via Extranet.
• TimesheetReports: OfficeClip Timesheet reports can be shared with customers, contractors, partners,etc. in a secured manner.
• Contact Manager: Share Contacts, Accounts and Opportunities reports securely with Extranet users.Give them limited access to this information
13.2.1. Extranet FeaturesThe following comparison table highlights the differences between the Public Extranet and the SecuredExtranet for each feature.
Feature Public Extranet Secured Extranet
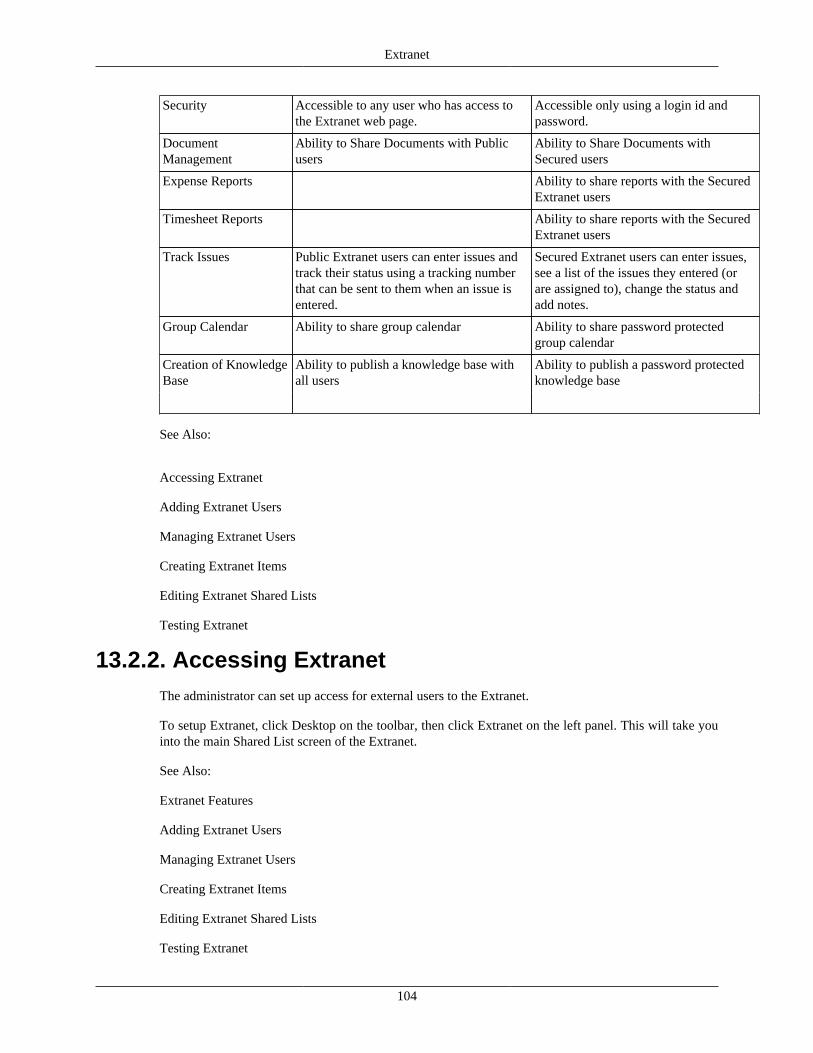
Extranet
104
Security Accessible to any user who has access tothe Extranet web page.
Accessible only using a login id andpassword.
DocumentManagement
Ability to Share Documents with Publicusers
Ability to Share Documents withSecured users
Expense Reports Ability to share reports with the SecuredExtranet users
Timesheet Reports Ability to share reports with the SecuredExtranet users
Track Issues Public Extranet users can enter issues andtrack their status using a tracking numberthat can be sent to them when an issue isentered.
Secured Extranet users can enter issues,see a list of the issues they entered (orare assigned to), change the status andadd notes.
Group Calendar Ability to share group calendar Ability to share password protectedgroup calendar
Creation of KnowledgeBase
Ability to publish a knowledge base withall users
Ability to publish a password protectedknowledge base
See Also:
Accessing Extranet
Adding Extranet Users
Managing Extranet Users
Creating Extranet Items
Editing Extranet Shared Lists
Testing Extranet
13.2.2. Accessing Extranet The administrator can set up access for external users to the Extranet.
To setup Extranet, click Desktop on the toolbar, then click Extranet on the left panel. This will take youinto the main Shared List screen of the Extranet.
See Also:
Extranet Features
Adding Extranet Users
Managing Extranet Users
Creating Extranet Items
Editing Extranet Shared Lists
Testing Extranet
Extranet
105
13.2.3. Adding Extranet UsersYou can easily and quickly add users to the OfficeClip Extranet.
1. To add a new user to your Extranet, click Extranet on the toolbar.
2. Click the New User button on the button bar.
3. Next, fill in the form to create the new user profile and click Save when finished or press Cancel toexit without saving.
Note
Fields marked with an asterisk * are required to be filled in to be saved.
See Also:
Extranet Features
Accessing Extranet
Managing Extranet Users
Creating Extranet Items
Editing Extranet Shared Lists
Testing Extranet
13.2.4. Managing Extranet UsersYou can effectively manage users for the OfficeClip Extranet by modifying their information, status and/or permission.
1. Click Extranetfrom within the Desktop.
2. Click User List on the button bar. The User List allows administrators to edit user information, changeuser status or change user permission.
3. To edit a user, click on the user name. A screen similar to that of the new user will be presented. Tochange the status of the user, select the status from the drop down menu at the top, select the usercheckbox and click on Go. This can be used to activate or deactivate the users.
4. To change the user permission, click on the icon on the right. A new permission screen will popup.Select the checkbox for the items for which the permission should be granted and click Save.
See Also:
Extranet Features
Accessing Extranet
Adding Extranet Users
Creating Extranet Items
Editing Extranet Shared Lists

Extranet
106
Testing Extranet
13.2.5. Creating Extranet ItemsThe OfficeClip Administrator is able to create new extranet items. There are several items that canbe created within various OfficeClip applications and you can access more details on them in theUnderstanding Extranet Applications section. The next sections give details on how to make New Sharesin each of the available applications.
13.2.5.1. Sharing Group Events in Calendar
The externally-published calendar ensures non-OfficeClip users can view important events and makeappointment requests. Internal administration can configure whether to show the event names andother information. The external view dynamically updates based on changes in the connected calendar.According to the configuration, external users may be able to request an event to be added to the calendar.Once an event has been requested, an email will be sent to the user when the event request is accepted.
1. Click New Share on the button bar. Click Calendar from the list and Name the item in the next screen.
2. Check or uncheck the box for Active. This makes the feature available for use; external links will notwork if they are inactive. Click Next.
3. The next screen enables the administrator to select the fields that will be published to the Extranet. Youcan select to Show Event Details by checking the box.
4. You can enable viewers to request appointments via email by checking the Enable request feature andsend email box and selecting the email address from the drop down list. Press Next to continue, Prevto go back to the previous screen or Cancel.
5. The Access Control screen determines the shared item's access permissions. Choose Public or Securedaccess by selecting the appropriate radio button. Then, if Secured Access is selected, choose whetherto allow all secured users, or only select users to have permission. Check or uncheck the box for Show.This allows the feature to be shown or not shown on the Extranet, with external links still functional.Click Save when finished, Prev to return to the previous screen, or Cancel to exit the screen withoutsaving.
6. The next screen will show you the email you can send out and the link the users are going to need toaccess the shared item.
13.2.5.2. Sharing Documents
External Extranet users can easily view folders and documents which organization administrators havecreated and organized for external access. As a safeguard, documents can be locked against accidentaloverwrite or deletion. OfficeClip users can organize folders, and securely share documents with externalextranet users.
1. Click New Share on the button bar. Choose the Document Sharing application and then name the itemon the next screen. Click Next.
2. Check or uncheck the box for Active. This makes the feature available for use; external links will notwork if they are inactive. Click Next.
3. The next screen enables the administrator to select documents that will be published to the Extranet.Press the Select button to bring up a pop up screen with all available documents. Choose the document(s)you want to publish and click the Save/Continue button or press Cancel to close the window.

Extranet
107
4. Your selected document will appear in the Select Documents box. Press Next to continue, Prev to returnto the previous screen, or Cancel to exit.
5. The Access Control screen determines the shared item's access permissions. Choose Public or Securedaccess by selecting the appropriate radio button. Then, if Secured Access is selected, choose whetherto allow all secured users, or only select users to have permission. Check or uncheck the box for Show.This allows the feature to be shown or not shown on the Extranet, with external links still functional.Click Save when finished, Prev to return to the previous screen, or Cancel to exit the screen withoutsaving.
6. Click Save when finished, Prev to return to the previous screen, or Cancel to exit the screen withoutsaving.
7. The next screen will show you the email you can send out and the link the users are going to need toaccess the shared item.
13.2.5.3. Sharing Expense Reports
External users can securely access a variety of expense reports. As a safeguard, reports cannot be sharedwith public access. Expense reports range from corporate expense reports to expense reports by binder,client, or employee. External users can choose a report from the available selection.
1. Click New Share on the button bar. Name the item and choose the Expense application andcorresponding feature from the drop down lists.
2. Check or uncheck the box for Active. This makes the feature available for use; external links will notwork if they are inactive. Click Next.
3. The next screen enables the administrator to select the fields that will be published to the Extranet.Select a report from the box and press Next to continue, Prev to return to the previous screen, or Cancel.
4. The Access Control screen determines the shared item's access permissions. Choose Public or Securedaccess by selecting the appropriate radio button. Then, if Secured Access is selected, choose whetherto allow all secured users, or only select users to have permission. Check or uncheck the box for Show.This allows the feature to be shown or not shown on the Extranet, with external links still functional.Click Save when finished, Prev to return to the previous screen, or Cancel to exit the screen withoutsaving.
5. The next screen will show you the email you can send out and the link the users are going to need toaccess the shared item.
13.2.5.4. Creating Knowledge Base
External Extranet users can view an organization's externally published issues and binders, in the form ofa Knowledge Base. Issues which have been entered in Issue Tracker will automatically be recorded onthe published Knowledge Base website without unnecessary upkeep. A wizard allows the administrator togenerate a fully-searchable knowledge base without having to know HTML programming. The knowledgebase is dynamic and automatically updated when New Shares are added.
1. Click New Share on the button bar. Choose the Knowledgebase from the Tracker application and namethe item on the next screen. Click Next.
2. Check or uncheck the box for Active. This makes the feature available for use; external links will notwork if they are inactive. Click Next.
Extranet
108
3. The next screen enables the administrator to select the fields that will be published to the Extranet.
4. Choose the project from the drop down list and choose a topic and subtopic for Knowledge Basenavigation. From here, the administrator can select the fields that will be published to the Extranet byselecting the checkboxes. Select a filter for the issues from the drop down list and type a welcomemessage for the Knowledge Base in the text box. Press Next to continue, Prev to return to the previousscreen, or Cancel.
5. The Access Control screen determines the shared item's access permissions. Choose Public or Securedaccess by selecting the appropriate radio button. Then, if Secured Access is selected, choose whetherto allow all secured users, or only select users to have permission. Check or uncheck the box for Show.This allows the feature to be shown or not shown on the Extranet, with external links still functional.Click Save when finished, Prev to return to the previous screen, or Cancel to exit the screen withoutsaving.
6. The next screen will show you the email you can send out and the link the users are going to need toaccess the shared item.
13.2.5.5. Creating Issue Capture Form
When external users access the published issue input form, certain features will be enabled depending onthe choices made while creating the form. They will be able to enter issues, whether they have public orsecured access. The data the external users enter is placed securely into the binder without allowing theuser to see any existing data. If users have secure access, they have the option of tracking the entered issuevia the web. In this way, customer service issues can be managed and tracked easily.
1. Click New Share on the button bar. Choose the Public/Secure Tracker application and name the itemon the following screen. Click Next.
2. Check or uncheck the box for Active. This makes the feature available for use; external links will notwork if they are inactive. Click Next.
3. The next screen enables the administrator to select the fields that will be published to the Extranet.Select a project from the drop down menu and then choose the fields that you want displayed on thewebsite by checking the box. Other setting options include:
• the choice of whether an email should be sent to the user when he/she enters an issue,
• who the issue will be automatically be assigned to,
• the message shown to the user after the issue is entered, and
• whether the user should be sent a tracking ticket. A tracking ticket allows the sender of the messageto click on a link and go to the detail of the case.
4. Click Next to continue, Prev to return to the previous screen, or Cancel to exit.
5. The Access Control screen determines the shared item's access permissions. Choose Public or Securedaccess by selecting the appropriate radio button. Then, if Secured Access is selected, choose whetherto allow all secured users, or only select users to have permission. Check or uncheck the box for Show.This allows the feature to be shown or not shown on the Extranet, with external links still functional.Click Save when finished, Prev to return to the previous screen, or Cancel to exit the screen withoutsaving.
6. The next screen will show you the email you can send out and the link the users are going to need toaccess the shared item.
Extranet
109
13.2.5.6. Sharing Timesheet Reports
External users can securely access a variety of timesheet reports. As a safeguard, these reports cannot beshared with public access. Timesheet reports range from administrative and billing reports, to reports byemployee hour, employee tasks and employee profitability on a project. External users can choose a reportfrom the available selection.
1. Click New Share on the button bar. Choose the Timesheet application and corresponding report fromthe expanded list.
2. Name the item and check or uncheck the box for Active. This makes the feature available for use;external links will not work if they are inactive. Click Next.
3. Select a type of report from the list based on your needs. Press Next to continue, Prev to go back orCancel to exit.
4. The Access Control screen determines the shared item's access permissions. Choose Public or Securedaccess by selecting the appropriate radio button. Then, if Secured Access is selected, choose whetherto allow all secured users, or only select users to have permission. Check or uncheck the box for Show.This allows the feature to be shown or not shown on the Extranet, with external links still functional.Click Save when finished, Prev to return to the previous screen, or Cancel to exit the screen withoutsaving.
5. The next screen will show you the email you can send out and the link the users are going to need toaccess the shared item.
13.2.5.7. Sharing Contact Manager Reports
External users can securely access a variety of contact reports. As a safeguard, these reports cannot beshared with public access. Contact reports show information about contacts and the children associatedwith those contacts.
1. Click New Share on the button bar. Choose the Contacts application.
2. Name the item and check or uncheck the box for Active. This makes the feature available for use;external links will not work if they are inactive. Click Next.
3. Select a type of report from the list based on your needs. Press Next to continue, Prev to go back orCancel to exit.
4. The Access Control screen determines the shared item's access permissions. Choose Public or Securedaccess by selecting the appropriate radio button. Then, if Secured Access is selected, choose whetherto allow all secured users, or only select users to have permission. Check or uncheck the box for Show.This allows the feature to be shown or not shown on the Extranet, with external links still functional.Click Save when finished, Prev to return to the previous screen, or Cancel to exit the screen withoutsaving.
5. The next screen will show you the email you can send out and the link the users are going to need toaccess the shared item.
13.2.5.8. Sharing Accounts Reports
External users can securely access a variety of Accounts reports. As a safeguard, these reports cannotbe shared with public access. Accounts reports show the accounts and the children associated with eachaccount.
Extranet
110
1. Click New Share on the button bar. Choose the Accounts application.
2. Name the item and check or uncheck the box for Active. This makes the feature available for use;external links will not work if they are inactive. Click Next.
3. Select a type of report from the list based on your needs. Press Next to continue, Prev to go back orCancel to exit.
4. The Access Control screen determines the shared item's access permissions. Choose Public or Securedaccess by selecting the appropriate radio button. Then, if Secured Access is selected, choose whetherto allow all secured users, or only select users to have permission. Check or uncheck the box for Show.This allows the feature to be shown or not shown on the Extranet, with external links still functional.Click Save when finished, Prev to return to the previous screen, or Cancel to exit the screen withoutsaving.
5. The next screen will show you the email you can send out and the link the users are going to need toaccess the shared item.
13.2.5.9. Sharing Opportunities Reports
External users can securely access a variety of opportunities reports. As a safeguard, these reports cannotbe shared with public access. Opportunities reports give users limited access to see the opportunities andthe children associated with it.
1. Click New Share on the button bar. Choose the Opportunities application.
2. Name the item and check or uncheck the box for Active. This makes the feature available for use;external links will not work if they are inactive. Click Next.
3. Select a type of report from the list based on your needs. Press Next to continue, Prev to go back orCancel to exit.
4. The Access Control screen determines the shared item's access permissions. Choose Public or Securedaccess by selecting the appropriate radio button. Then, if Secured Access is selected, choose whetherto allow all secured users, or only select users to have permission. Check or uncheck the box for Show.This allows the feature to be shown or not shown on the Extranet, with external links still functional.Click Save when finished, Prev to return to the previous screen, or Cancel to exit the screen withoutsaving.
5. The next screen will show you the email you can send out and the link the users are going to need toaccess the shared item.
13.2.5.10. Sharing Projects Reports
External users can securely access a variety of Project reports. As a safeguard, these reports cannot beshared with public access. Projects reports cover allocated projects and reports for project rates.
1. Click New Share on the button bar. Choose Projects.
2. Name the item and check or uncheck the box for Active. This makes the feature available for use;external links will not work if they are inactive. Click Next.
3. Select a type of report from the list based on your needs. Press Next to continue, Prev to go back orCancel to exit.
4. The Access Control screen determines the shared item's access permissions. Choose Public or Securedaccess by selecting the appropriate radio button. Then, if Secured Access is selected, choose whether

Extranet
111
to allow all secured users, or only select users to have permission. Check or uncheck the box for Show.This allows the feature to be shown or not shown on the Extranet, with external links still functional.Click Save when finished, Prev to return to the previous screen, or Cancel to exit the screen withoutsaving.
5. The next screen will show you the email you can send out and the link the users are going to need toaccess the shared item.
See Also:
Extranet Features
Accessing Extranet
Adding Extranet Users
Managing Extranet Users
Editing Extranet Shared Lists
Testing Extranet
13.2.6. Editing Extranet List ItemsExtranet List items can be edited in a tabbed interface for easy modification and updating.
1. Click Extranet on the main toolbar.
2. To edit an item, click on the item name from the main Shared List.
3. Make any changes to the Shared Item in the same way that you created this item initially. Go throughthe pages by clicking Next. See each specific Item to learn how to create it.
4. Click Save when you have finished or press Cancel to exit without saving any changes.
See Also:
Extranet Features
Accessing Extranet
Adding Extranet Users
Managing Extranet Users
Creating Extranet Items
Testing Extranet
13.2.7. Testing Extranet1. To test the settings of the Extranet, click Extranet on the toolbar within the Desktop.
2. Press the Click to Test link to the right of the URL. This allows you to see how the information willlook to the extranet user.
3. You can either view public portals by clicking the desired link that appears, or view secured portalsby entering a username and password.

Extranet
112
4. To invite a user to use the Extranet, click the Invite Public User link to the right of the URL and typehis/her email address in the text box that appears. Click Send to invite.
See Also:
Extranet Features
Accessing Extranet
Adding Extranet Users
Managing Extranet Users
Creating Extranet Items
Editing Extranet Shared Lists
13.3. Administration of Extranet OptionsThis section describes ways to effectively administer OfficeClip Extranet options. The administrator canset a timeout for the extranet session, create an HTML header, put in copyright text and a URL, as wellas give the browser a title and the homepage a title.
1. Click Desktop then click Extranet from the main toolbar buttons.
2. Click Admin on the button bar. Make the necessary changes and click Update when finished. Thiswill update the Extranet page for the user. You can press Cancel to exit this screen without saving orupdating any changes.

113
Chapter 14. ForumsThe Forums module can be used to collaborate and share ideas with your team. You can create any numberof forums and post replies through Email notification. The most recent replies are displayed first in theForum List and all the forums can be viewed by clicking the All My Groups tab in the Show Forums menu.
New topics can be added to the forums and the user can even be notified by Email when replies to thetopic are posted.
14.1. Using Forums
14.1.1. Access Forums1. Log in to OfficeClip.
2. Click Forums on the left menu of the Home panel.
The screen opens with Forums List displayed.
See Also:
Create a Forum
Add a Topic
Reply to a Topic
Searching Forums
14.1.2. Create a Forum1. Click New Forum on the button bar.
2. Give a suitable name to the forum in the Forum Name field.
3. Type the description in the Forum Description field.
4. If you wish to let all the users in the organization know about this forum, select the Inform groupmembers about this Forum checkbox.
5. Click Save to save the forum in the Forum List or click Cancel to exit.
See Also:
Access Forums
Add a Topic
Reply to a Topic
Searching Forums
14.1.3. Add a TopicYou can create new topics for the existing forums, allowing users to further share their ideas on a topic.

Forums
114
1. In the Forum List, select the forum in which you want to create a new topic.
2. Click New Topic on the button bar.
3. Type a suitable topic name in the Topic Name field.
4. Type the description to your topic in the Description field. Use the Spell Checkto identify and correctany spelling errors.
5. Select the Notify check boxes.
• You can choose to be notified by Email if anybody replies to the Topic.
• You can choose to notify the organization members about this Topic.
6. Click Save to save the topic in the Forums List or click Cancel to exit.
See Also:
Access Forums
Create a Forum
Reply to a Topic
Searching Forums
14.1.4. Reply to a TopicYou can post replies to topics of the forums.
1. In the main Forum List screen, click the topic you want to post a reply for.
2. Click the Post Reply button on the button bar.
3. Type your reply in the Message area.
4. Click Update to send your reply or Cancel to exit.
See Also:
Access Forums
Create a Forum
Add a Topic
Searching Forums
14.1.5. Searching ForumsYou can search for the forums through the Search feature by specifying the date or matching words.
5. Click Search in the button bar of the main Forum List screen.
6. In the Search screen, enter the words you want to search for, select a forum from the Search Forumdrop-down list, and select a date from the Search by Date drop down list.
Forums
115
7. Click Search to begin searching for the forum or Cancel to exit.
8. The results will be displayed
See Also:
Access Forums
Create a Forum
Add a Topic
Reply to a Topic
116
Chapter 15. Home Page15.1. Overview
OfficeClip Home Page provides applications to allow collaboration between your employees to make themmore efficient. It is the core application that can be used as the intranet in your organization. The Portalcomponent is built to provide secure access and the administrator decides the level of access.
15.2. Understanding OfficeClip Home PageThe OfficeClip Home Page consists of a dashboard representation of most OfficeClip applications. Itprovides the user a consolidated view of the entire OfficeClip suite.
The Home Page button bar gives access to the My Dashboard, My Catalog, Reset Dashboard, and Adminbuttons.
• My Dashboard displays the typical Home Page Portlet view, with a list of recently accessed Portlets.User can move the portlets by dragging and dropping them elsewhere on the page. User can also remove,minimize or edit the Portlet properties.
• My Catalog displays previously removed Portlets, so that users can access them when needed. Note thiscatalog is user specific and each user can activate different portlets in the catalog.
• Reset Dashboard resets all the portlets to the default configuration or the configuration set by theadministrator.
• Admin allows administrators to make changes to the look and feel of the Portlet that is available to allusers. Note that this may not change the individual configuration of the portlets that are set by individualusers.
15.3. Using Home Page
15.3.1. Accessing Home Page1. Log in to OfficeClip.
2. Click Home on the toolbar.
See Also:
Manage Portlets
Reset Dashboard
15.3.2. Manage PortletsThe Portlets on the Home Page can be minimized, maximized, removed, or edited, allowing you tocustomize the screen to fit your needs.
1. Drag and Drop the portlets by holding the mouse on the Portlet title bar and moving it to any locationof choice.
Home Page
117
2. To minimize/maximize a Portlet, click the minimize icon.
3. To close a Portlet, click the Close icon.
4. To edit a portlet, click the Edit icon.
Editor Zone appears on the left side of your screen once you have clicked the Edit icon at the Portlet titlebar. Here you can modify the Local Properties, Layout and Appearance of a portlet.
1. Local Properties are present based on individual Portlet design. They can be changed and persisted asper each user's settings.
2. To modify the Layout of a portlet, select the values in the Chrome State, Zone Index, and the Zonedrop-down boxes.
3. To modify the Appearance of a portlet, select the values in the Title, Chrome Type, Direction, Height,and Width drop-down boxes.
4. Click Apply to save the changes, or Cancel to erase the changes.
5. Click OK to exit Manage Portlet and return to the Home Page.
See Also:
Accessing Home Page
Reset Dashboard
15.3.3. Reset DashboardThe portlets on the Home Page can be reset to return to their default position.
1. Click Home on the toolbar.
2. Click Reset Dashboard on the Home Page button bar.
The next screen appears with a question- Are you sure you want to reset your Portletsettings?
3. Click the Reset button if you want to reset your portlet settings.
4. Click Cancel if you do not want to reset your portlet settings.
See Also:
Accessing Home Page
Manage Portlets

118
Chapter 16. Issue Tracker16.1. Overview
Issue Tracker allows you to track, assign and audit issues in your organization. Once the issue is enteredin the Issue Tracker, it can tracked, allowing mangers to see the status of issues, developers to see notesput in by other developers, etc. Issues are organized in various binders, each configured to track differenttypes of issues. For example, you can track software bugs for the development team in one binder and "to-do" lists for a group in another binder. The binders can be created with various templates; depending onwhat types of issues you will be tracking, allowing you to better organize your project and your team.
16.2. Understanding OfficeClip Issue TrackerIssue Tracker has been designed to simulate filing cabinets, which have numerous binders and each bindercan be categorized to hold different types of issues.
The following describes how OfficeClip Issue Tracker is used:
• Administrators create a binder based on a template
• Users enter issues to be tracked, add details about the issues, and can track their own time spent on eachissue.A list of issues is visible on the issue list screen. This list can be sorted and filtered.
• Issues are color-coded and style-coded (they show up in a different font style on the issue list screen)to enable the user to easily recognize issues of a particular type.
• Users can make reports of various issues based on their needs. There are detailed reports, statisticalreports, user-defined reports, and tracking time reports.
• Issues can be imported from CSV or XML file formats into Issue Tracker, and issues in Issue Trackercan be exported to file types such as MS Excel.
16.3. General Concepts
16.3.1. User Defined FieldsA main Issue Tracker feature, the ability to add custom fields, enables users to manage more specific issuedetails than the fixed fields provide. In addition, these fields can be used in issue reports and filters thatare defined by the user, and appear in the bottom part of the New Issue screen.
Many field types are available and each field type has a different functionality. They are described in moredetail in the following list:
List This provides a dropdown list for the user. List field types must be configured by anadministrator by adding list values to the list (see Configuring List Fields).
Date A date field shows up with a calendar icon. It can be clicked to select a date to insert into thefield. Dates can also be added manually to the field using the "mm/dd/yyyy" format. Date fieldsare validated to ensure that a valid date is entered.
Decimal A number-only field that can hold decimal places.
Text A text field that can contain up to 30 characters.

Issue Tracker
119
Number A number-only field. This field is validated upon saving to ensure that only a numeric value isadded.
Email A text field in which an email address is typed. It is validated to ensure that an email address isentered.
Boolean A Boolean field is displayed with a checkbox. It is a "yes/no" field.
UserList A dropdown list that contains the current OfficeClip organization users.
See Also:
Rules
Email Capture
16.3.2. RulesAdministrators can set up rules in the binder to trigger certain events based on conditions of the issues.Rules have the following components:
• Conditions- Certain conditions need to be satisfied to trigger a rule
• Actions- The actions to be taken when a condition is satisfied
Currently there are two kinds of rules supported by the Issue Tracker:
1. Notification Rules- These rules allow users to be notified by email when certain conditions in an issueare satisfied. For example, a notification rule can be whenever an issue is assigned toa user; send an email to the person who created the issue.
2. Escalation Rules- These are used to escalate an issue whenever an issue is not attended to in a timelymanner. Escalation rules allow changing the value of the field by sending an email when an escalationoccurs. For example, an escalation rule can be if an issue is currently open and thecriticality is high for the past 7 days, assign the issue to Bob andsend an email to the issue creator.
See Also:
User Defined Fields
Email Capture
16.3.3. Email CaptureThe Email Capture feature enables OfficeClip to capture issues from emails. This is useful in situationswhen you want to capture customer or partner issues that cannot be entered into OfficeClip directly. In suchcases, OfficeClip administrators can assign an email address to a binder and provide that email address toanyone who wishes to submit issues via email.
The steps below explain how Email Capture works in Issue Tracker:
1. The OfficeClip administrator sets up an email account (POP account; this information can be viewedfrom MS Outlook or another POP compatible email viewer) on his/her mail server.
2. The administrator can set the Project Defaults, which are the fields that will be automatically filled inwhen an email containing an issue is received.
Issue Tracker
120
3. OfficeClip users can send an email to all customers that want to send their issues via email.
4. The Issue Tracker checks the mailbox periodically, capturing the information from the emails and thenentering them as issues in the Issue List, based on the administrator's settings.
See Also:
User Defined Fields
Rules
16.4. Using Issue Tracker
16.4.1. Creating and Editing IssuesNote: The Document Attachment feature is only available in the Professional Edition of OfficeClip
All issues have a field called Title that is used to provide a short description of the issue. In addition, issueshave fields such as category, status, description, etc. to help further explain the issue. For example, an issuecan be tracked with High criticality and Open status, meaning in general that the issue is very importantand it has not yet been acted upon.
Note
The drop down lists for various fields can be customized to have different meaningsdepending on the type of organization.
Issues can be assigned to certain users and rules can be set to have an email sent to them, notifying themthat a new issue has been created and assigned to them. Users can also give details about the resolution ofthe issue in the Resolution text box, type any additional information in the Comments text box and writea note by clicking the New Note link. Issues can also be edited; each edit creates a history log so thatprogress on an issue can be accurately recorded.
1. To create a new issue, select the Issue Tracker application and click on a binder name to view the listof issues associated with a particular binder.
2. Click on New Issue and on the button bar, click on a particular issue to edit it or click the edit iconin the far right column.
3. Fill in the fields as applicable to your issue (See the field explanations below).
4. Click Save when finished or press Cancel to exit the screen without saving any of the information.
The following fields are presented to the user while entering issues:
Title Give the issue a title
Description Write in the details of the issue
Category Allows you to categorize an issue in ways that fit your needs
Status Select the state the issue is in from this list
Priority Assign a level of importance to the issue
Kind Select what type of issue you have

Issue Tracker
121
Regarding Choose if this issue is linked with another object like Accounts, Contacts,Opportunities or Projects etc.
Resolution Write details about the how the issue was resolved
Comments Additional details, commentary, etc. about the issue can be written here
Attachments Outside documents can be attached to the issue by clicking the Edit Attachments link.
Email Case To Send the issue to anyone by typing in their email address
Note
The field names can be changed by the administrator, who can also add an unlimited numberof user-defined fields.
Important
The required fields are shown with an asterisk * in front of them. These fields must be filledin for the issue to be saved.
See Also:
Tracking Time
Searching and Filtering Issues
Reports
Import and Export
16.4.2. Tracking TimeThe tracking time feature mainly serves as a tool for monitoring the time that is spent on various issues.It allows a user who is working on an issue to keep track of the amount of time he/she is spending on it.This enables management to know where project resources are being used.
1. To Track Time for an issue, click on Issues from the tool bar.
2. Select a binder by clicking on it on the main Binder List screen.
3. Then click on an issue from the Issue List.
4. On the Issues page where you can edit the item, click on the Track Time button.
5. A window will pop up, which will show the tracked time and allow you to add a new item. To addtime, go to the Add New section.
6. Enter the duration, date, and any other notes (these notes are internal in the sense that they will not beshown in the timesheet details if the time is exported to the Timesheet application).
7. Press Save when finished.
8. To Edit a tracked time entry, click on the Edit icon on the Actions column and then change theinformation at the bottom and finally click on Save.
9. Your new item will appear in the Track Time list. Press the Cancel button to close the window andreturn to the screen to continue making changes to the issue.

Issue Tracker
122
See Also:
Creating and Editing Issues
Searching and Filtering Issues
Reports
Import and Export
16.4.3. Searching and Filtering Issues
16.4.3.1. Simple Search
This feature allows you to search for issues by typing in a keyword and selecting a field, such asDescription. For example, you could search the Description field for the word slow and all issues withthis criterion would show up in the list. This is helpful for finding issues that may be related to a certainproject, time period, user, etc. without having to manually read through the entire issue list.
1. Click on Issues to view Binders.
2. Click on a binder name to view the Issue List.
3. To search issues, type the applicable words into the Search for text box and select a field from the AnyField drop down list.
4. Click Go. The search results will be displayed.
Note
The search result can be cancelled by clicking on the Cancel button
16.4.3.2. Filters
Users can create filters to better customize their searches. Filters allow the user to specify many criteriaand save them for future use. You can also remove filters if you no longer need them.
1. To create a filter, click New Filter.
2. Basic Filtering Options and Advanced Filtering Options are shown.Select the basic filtering optionsfrom the various drop-down lists. Some lists allow you to select more than one item from the drop-down lists by holding the Ctrl key.
3. If you have specified all the information you want to enter, click Search. However, if you want tocontinue specifying search criterion, go to Step 4.
4. Select the Advanced Filtering Options you wish to use. If you want to search for a word or phrase,select the field you wish to search from the Search Text In dropdown list. Type the applicable searchword(s) in the for String textbox, then click the Searchbutton. If you wish to save the filter, type a namein the Filter Name textbox and click Save, then click Search.
5. Your new filter will be saved for future use and the results will be displayed.
See Also:

Issue Tracker
123
Creating and Editing Issues
Tracking Time
Reports
Import and Export
16.4.4. ReportsOfficeClip Issue Tracker has a variety of reports that can be generated by the users and they are describedin more detail here:
• User Defined Report - The user can select filters, name the report and select fields to be shown on thereport. The report can also be edited later on by clicking the edit icon and changing the fields as needed.Basically, the user is able to customize this report to fit his/her needs by selecting the filters and fieldsto report certain information on certain issues.
• Detail Report - A very simple report, giving all the details of the issues, which can also be filteredto only report certain details, such as Status, Criticality, Modified By, etc. This report is particularlyuseful when all information on the issues within a binder needs to be reviewed; in this report it is alllisted in one place.
• Statistical Report - This is a simple report that can be shown in various groupings, such as Status, inwhich all the issues in a binder will be displayed according to their status, e.g. Open, Resolved, etc. Thereport can be viewed in different chart formats including a pie chart and bar graph.
• Track Time Report - All issues for which time is tracked over a period of time specified by the user.This report will show how much time has been spent by users on the issues, allowing management tosee how project resources such as labor and budget are being used to resolve project issues.
To create Reports in Issue Tracker:
1. Click on Issues in the toolbar.
2. Click on a binder name. Then click on Reports to view the different kinds of reports.
• User Defined Reports: Create a new report by allowing the user to select filter and view the report.
• Detail Reports: Review all issues for the binder in detail.
• Statistical Report: Review the statistics of issues.
• Track Time Report: View time tracked across all the items in a particular binder.
3. To create a User Defined Report, click the link and then, in the next screen, click the New Report link
(or click the icon in the report list to edit an existing report). Fill in the Report Name, select a filter,and choose the various fields that you want to be included in the report and set the visibility be clickingon the radio button. Click Next when the fields are set. The following screen allows you to set the formatof the report, such as whether the fields are in ascending or descending order, adding a description andsetting a report header and footer. Click Save when finished.
4. To make a detail report, click the Detail Report link, which will bring up the complete details of all theissues, sorted by the Created Date by default; change this by selecting your choice from the Sort Bydrop-down list. You can also narrow the scope of the detail report by doing a search within a field, suchas the word error in the Comments field, and selecting Go.
Issue Tracker
124
5. Click the Statistical Report link to go to that screen and select a grouping from the Group By drop downmenu, then choose the chart formatting from the Show As drop down menu.
Tip
If the Statistical Report does not look sharp enough to you, increase the magnification.
6. To create a Track Time Report, click the link and then choose the From and To dates for the report.Press Submit to view the report in OfficeClip or choose an outside application from the drop down listand press Export. You can open or save the exported report.
See Also:
Creating and Editing Issues
Tracking Time
Searching and Filtering Issues
Import and Export
16.4.5. Import and Export Import/Export allows you to exchange OfficeClip Issue Tracker information with other file formats. Thereare two ways to import files into OfficeClip: CSV and XML, and two ways to export files from OfficeClip:CSV and XML. Various types of import and export tasks in OfficeClip Issue Tracker are explained below.
16.4.5.1. Importing Issues from ocXML file
Importing issues into OfficeClip Issue Tracker can be done in an internal ocXML format, which isprimarily used by developers who are on other systems that have issues. They can create an ocXML file,then OfficeClip users can use this link to import the XML file. All the issues contained in the file willappear in OfficeClip.
1. Click Issues on the toolbar.
2. Click on a binder name to go to the Issue List screen.
3. Click the Import issues from ocXML files link.
Note
The ocXml format is a standardized OfficeClip Xml format. The schema for this format isavailable from OfficeClip.
16.4.5.2. Importing Issues from a CSV file
Importing a CSV file into a binder requires that certain fields be mapped to ensure the data from yourCSV file is imported correctly. The fields in the CSV file will be listed in one column, along side anothercolumn for the OfficeClip database fields. You can map the fields appropriately by choosing the field thatmost closely matches the information in your file.
1. Click Issues on the toolbar.
2. Click on a binder name to go to the Issue List screen.

Issue Tracker
125
3. Click the Import issues from comma delimited (CSV) file link.
4. Select Browse to find the file and then click Upload. Map the CSV file to match as closely as possiblethe field in the OfficeClip database.
5. Click Import when you are finished mapping. Press the OK button to be taken back to the main BinderList. From here, you can select your binder and see the newly imported issues.
16.4.5.3. Exporting Issues to XML
This will enable you to export issues from OfficeClip to an XML file.
1. Click Issues on the toolbar.
2. Click on a binder name to go to the Issue List screen.
3. Click the Export Issues to XML file link.
4. Click the Export button. The issues will be exported into an XML file.
5. Press Cancel to return to the main Import/Export screen.
16.4.5.3.1. Exporting Issues to CSV file
This feature enables the user to export issues from OfficeClip into a CSV file.
1. Click Issues on the toolbar.
2. Click on a binder name to go to the Issue List screen.
3. Click the Export Issues to CSV file link.
4. To export issues to a CSV file, choose either the current binder or All the binders belonging toorganization in which you are a user and click Export.
5. The next screen allows you to select which fields from the OfficeClip issues you want to have in yournew CSV file; you may even rename them in the CSV file if you wish. You can also move the fieldswith the up and down arrows, which affects the order in which the fields will be displayed in the firstrow of the CSV file.
6. Click Export when finished or Cancel to exit the screen.
7. Click Open or Save in the dialogue box to view the exported issues in the CSV file.
See Also:
Creating and Editing Issues
Tracking Time
Searching and Filtering Issues
Reports
16.5. Issue Tracker AdministrationThis section describes ways to administer the OfficeClip Issue Tracker effectively.

Issue Tracker
126
16.5.1. IconsIssue Tracker uses several icons throughout the application, generally appearing in the Function columnof the various Admin screens. They are explained below to help you use them effectively.
Allows you to edit the item
Print the screen you are viewing easily by clicking on this icon
Rename a binder by clicking on this icon
This appears in the binder list and enables you to archive the binder
Click this icon to change permission for the binder
Delete the entire binder by pressing this icon
Configure fields and set style and color coding by clicking this icon
See Also:
Creating Binders
Fixed Fields
Configuring List Fields
User-Defined Fields
Options
Rules
Bulk Processing
Email Capture
16.5.2. Creating BindersIssue Tracker allows you to make multiple binders, each created with a template that can track a varietyof issues.
1. To create a new binder in Issue Tracker, click on Issues in the toolbar.
2. Click on New Binder from the main Binder List screen. Enter the binder name and select the appropriatetemplate type from the list.
3. Click Create when finished.
See Also:
Icons
Shared Items

Issue Tracker
127
Fixed Fields
Configuring List Fields
User-Defined Fields
Options
Rules
Bulk Processing
Email Capture
16.5.3. Shared ItemsThe Issue Tracker allows administrators to share items with Extranet users, who have limited access toOfficeClip. Administrators control from this screen only shared Issue Tracker Items, making it easy tomanage and make changes. (See the Help section in Extranet to set up users, control access, etc.)
1. To view and make changes to the Shared Issue Tracker Items, click the Shared Items button from thebutton bar.
2. You can now see all items from this application that are in the Extranet list. From here, you canDeactivate any of these items, meaning they will still exist (not be deleted) but they will no longer bevisible to Extranet users. If an item has been Deactivated, you can click Activate to turn it back on again.
3. If you want to delete one or many shared items completely, click the item so the checkbox is checkedand click Remove.
4. The icons in the Actions column are used to email the item to a user and to edit the item , whichyou can also do by clicking on the item name.
5. To manage each item, simply click on it. In the next screen, you can name the item. Click Next to editthe details of the shared item. This page allows you to select what information will be shown to theExtranet user.
6. Click Next to continue to the Access Control page where you can set permissions for the Extranet users.You can create public access or go all the way to choosing each individual Extranet user who will haveaccess to that particular item.
7. Click Save when finished and you will either get a Public Link on the next screen which you can sendout in the email provided, or only the users you selected will be emailed the private link to see theShared item.
See Also:
Icons
Creating Binders
Fixed Fields
Configuring List Fields
User-Defined Fields
Options

Issue Tracker
128
Rules
Bulk Processing
Email Capture
16.5.4. Fixed Fields Some of the fields in Issue Tracker are fixed, meaning the type of these fields cannot be changed and thefields cannot be removed. You can, however, modify the names of the fixed fields. Some fields can also
be further configured under the functions column by clicking the Icon in the Functions column.
1. From the Issue Tracker, click one of the binders then, click Admin on the button bar. Click Edit FixedFields on the button bar of the Admin menu.
2. Certain elements of the fixed field can be edited, including: Display Name, Administrator Edit,Mandatory, Color-Coded, Style-Coded, and Functions, which will be addressed in the following steps.
3. To alter the Display Name, simply type the field names in the Display Name column of the grid.
4. You may wish to make certain fields editable by only certain roles in your group. By checking theAdministrator Edit box, only administrators will be granted edit privileges.
5. If you wish to make certain fields mandatory when information is entered either for a new issue or anexisting issue, check the field in the Mandatory column corresponding to the field you wish to require.The fields will appear with an asterisk * next to them in the issue list screen.
See Also:
Icons
Creating Binders
Shared Items
Configuring List Fields
User-Defined Fields
Options
Rules
Bulk Processing
Email Capture
16.5.5. Configuring List Fields 1. To configure a fixed field of type List, click the icon in the Functions column on the right side.
From this screen, administrators can configure the field using both checkboxes and the icons under theFunctions column.
2. Once you have clicked the icon, a window pops up which allows you to add or remove list items,select the default list item to be initially displayed, and change the order in which they appear in the list.
Issue Tracker
129
3. To add an item, type the name in the Add Item field and click Add & Save.
4. To delete an item, click the icon next to the field you wish to remove.
5. To change the position of an item as it appears in the list, click the up and down arrows.
6. To set a default value, select a value from the Default Value dropdown list.
7. Color Coding and Style Coding can be enabled by clicking the appropriate checkbox. The colors (forcolor coding) can be set by clicking on the box to the right of each color field and fonts (for style coding)can be set by checking Bold or Italics. Click Save to save these changes, close the window and returnto the main screen.
Note
Only one field can be style coded and one field color coded. Once you have selected a fieldto be ether color or style coded, the selection checkbox will be disabled for all other fields.
8. Click the Save button to save settings, click Save & Next to continue to the next section or click Cancelto exit without saving the changes on the screen.
See Also:
Icons
Creating Binders
Shared Items
Fixed Fields
User-Defined Fields
Options
Rules
Bulk Processing
Email Capture
16.5.6. User-Defined Fields1. From the Issue Tracker, click one of the binders. Then, click Admin on the button bar. Click Edit UDFs
on the button bar of the Admin menu.
2. By default, no UDFs are defined for a binder. In order to add UDFs, click the Add New button on thescreen. If UDFs are already present, click the Add More button. A popup window will appear.
3. Type in the Display Name you wish to have appear in the textbox and then choose the Field Type fromthe drop down list. (For more information on field types, see the General Concepts section).
4. If you wish to make certain fields mandatory when information is entered either for a new issue or anexisting issue, check the field in the Mandatory column. The fields will appear with a "*" next to themin the issue list screen.
Issue Tracker
130
5. You may wish to make certain fields editable by only certain roles in your group. By checking theAdministrator Edit box, administrators will be granted edit privileges.
6. Click Add when finished or press Cancel to return to the main UDFs screen without adding the newUDF.
7. For more details on configuring the list fields see the section on Configuring List Fields.
See Also:
Icons
Creating Binders
Shared Items
Fixed Fields
Configuring List Fields
Options
Rules
Bulk Processing
Email Capture
16.5.7. OptionsThe Options configuration screen enables administrators to manage the fields displayed on the Issue Listscreen. All issues are assigned a number and the administrator can set the Prefix for the issues as eitherthe user's initials or a fixed 3-letter ID. The administrator can choose the number of issues to be displayedper page and also select which fixed fields and which user defined fields will be displayed on the IssueList screen.
1. From the Issue Tracker, click the icon for a binder. Click Options on the button bar of the Adminmenu.
2. From here, the administrator can configure the main list screen. You may choose which fields to displayby checking the appropriate box, the number of issues to show per page by choosing form the dropdown list, and the system for prefix names for each issue that is entered. Click Save & Nextto saveinformation and continue to the next section.
3. Simply click Save if you have completed all admin option configurations.
See Also:
Icons
Creating Binders
Shared Items
Fixed Fields
Configuring List Fields
Issue Tracker
131
User-Defined Fields
Rules
Bulk Processing
Email Capture
16.5.8. RulesNote: This feature is only available in the Professional Edition of OfficeClip
The Rules configuration screen enables administrators to add rules by which each issue can be tracked.Rules involve taking some action based on certain events. For example, if one user assigns an issue tosomeone else; they get a notification email so they know immediately there is a new issue to work on. Foradditional information on Rules, see the General Concepts section.
1. From the Issue Tracker, click one of the binders. Then, click Admin on the button bar. Click Rules onthe button bar of the Admin menu.
2. To add rules to your binder when issues are entered, click on Add Rule.
3. A window will pop up to allow you to choose your options. Click Add under the Conditions section (youcan add more than one condition) and new fields will show up under the Current Conditions sectionwhere you can specify the appropriate field from the drop down list and what the field will be changedto in order to take an action from the second drop down list. Press Next when the fields are complete.
4. The Rule will be shown at the top of the screen. Under the Actions section, check the box next to theaction you want to execute based on the rule you have created.
5. Click Previous to go back to the previous screen and make any changes, press Cancel to close out ofthe screen completely, or press Next to go to the next step.
6. The next screen displays the new rule and new action that you have set. Now you can type the name ofthe rule in the Name textbox. The Enabled box is already checked for you, but if you do not want therule to be enabled, simply un-check it and the rule will not be in effect.
7. Click Save Rule to return to the Rules menu screen.
8. To edit an existing rule, click the icon in the Functions column. To delete a rule, click the icon.
See Also:
Icons
Creating Binders
Shared Items
Fixed Fields
Configuring List Fields
User-Defined Fields
Issue Tracker
132
Options
Bulk Processing
Email Capture
16.5.9. Bulk Processing The Bulk screen allows administrators to conveniently perform bulk operations with issues. Issues of acertain Status can be copied to another binder in OfficeClip or bulk archived so that they do not show onthe main Issue List screen. Archived issues can be deleted in bulk based on their age. Archived issues canbe seen later by selecting the binder and then selecting the filter for the Archived Issues.
Binders can also be archived by selecting the Archive icon next to the particular binder in the binder list.At the top of the Binder List, there is a link to Show Archived Binders and clicking this allows you toview all the binders that have been archived.
1. From the Issue Tracker, click one of the binders. Then, click Admin on the button bar. Click Bulk onthe button bar of the Admin menu.
2. Copy issues from one binder to another binder by selecting the fields from the drop down menu andselect Next. The screen shows the mapping of how the fields will be transferred. Press Copy to copythe issues.
3. Issues can be archived by selecting the specific status and age from the relevant dropdown boxes. Pressthe Archive button to move the issues into the archive.
4. Archived issues ranging from zero days to one year old can be deleted by selecting from the dropdownbox the desired number of days and pressing Delete.
See Also:
Icons
Creating Binders
Shared Items
Fixed Fields
Configuring List Fields
User-Defined Fields
Options
Rules
Email Capture
16.5.10. Email Capture This feature allows the OfficeClip server to capture information from customers' emails and put them intoissues that will then appear in the main Issue List. More details can be found in the General Concept section.
1. From the Issue Tracker, click one of the binders. Then, click Admin on the button bar. Click EmailCapture on the button bar of the Admin menu.
Issue Tracker
133
2. Users can enable or disable the email capture function. To enable the function, enter the POP settings,which can be viewed from Outlook or other POP email viewer. This email address will be usedspecifically to enter issues for this particular project.
3. Set up the Project Defaults by selecting the appropriate options from the drop down lists.
4. Under Additional Options, you can set how often the OfficeClip server will check for new emails andadd them as issues in the binder by selecting a time from the drop down list.
5. Click Save to finish.
Note
The project default entered will determine how issues are stored. The subject and body ofthe email will respectively form the title and description of the issue and any attachments onthe email will show up in the Attachments field in the issue.
See Also:
Icons
Creating Binders
Shared Items
Fixed Fields
Configuring List Fields
User-Defined Fields
Options
Rules
Bulk Processing
134
Chapter 17. NewsfeedsThe News Feeds module uses a syndication technology known as RSS to display headlines, along withtheir corresponding summaries, from a variety of publicly-available newsfeeds. OfficeClip's RSS feedimplementation allows you to view a selected news feed's current "headlines." When the deadline isclicked, a new window takes you to the story from the main site of the feed. New newsfeeds can be added,edited, or deleted. While adding a newsfeed, one can choose to display it as a portlet or as an active feed.
17.1. Using Newsfeeds
17.1.1. Access Newsfeeds1. Log in to OfficeClip.
2. Click Newsfeeds on the left menu of the Home.
The screen opens with the Newsfeeds list displayed. By clicking the links you can read the top headlinesof that particular feed. Clicking the headline opens the full article in a separate window.
See Also:
Adding a Newsfeed
Edit a Newsfeed
Delete a Newsfeed
17.1.2. Adding a Newsfeed1. Click Manage Newsfeeds in the button bar.
Click the Add New button below the feed links. A new field appears below the existing feed links.
2. Enter a name in the Name field.
3. Enter the URL of the feed in the RSS Content URL field.
4. Select the Is Active? and Is Portlet? boxes to make the feed active and display it in the main Portalscreen.
5. Click Update to accept the changes, or Cancel to exit.
6. Click Finished to exit and return to the Newsfeed Listscreen.
See Also:
Access Newsfeeds
Edit a Newsfeed
Delete a Newsfeed
17.1.3. Edit a Newsfeed1. Click Manage Newsfeeds in the button bar.

Newsfeeds
135
To modify the feed, click the Edit link next to the feed link. The feed link is displayed in the editablemode.
2. Enter an alternative name of the feed in the Name field.
3. Enter the new URL in the RSS Content URL field.
4. Select the Is Active? and Is Portlet? checkboxes as applicable.
5. Click Update to accept the changes, or Cancel to exit.
6. After completing the entries for the new feed, click Finished to add the feed link to the Newsfeed List.
See Also:
Access Newsfeeds
Adding a Newsfeed
Delete a Newsfeed
17.1.4. Delete a Newsfeed1. Click Manage Newsfeeds in the button bar.
2. Click Delete in the same row which contains the feed link.
See Also:
Access Newsfeeds
Adding a Newsfeed
Edit a Newsfeed
136
Chapter 18. NotesThe Notes modile is like a notepad used to write any reminders- official or personal. It can be saved andaccessed from anywhere by logging in to OfficeClip, since it is stored in the application.
A personal note can be created by simply selecting the 'Private' check box while adding a new note.
The user can even use the Spell Check feature to ensure an error-free note.
18.1. Using Notes
18.1.1. Access Notes1. Log in to OfficeClip.
2. Click Notes on the left menu of the Home panel.
The Notes screen opens with the Note List displayed. The Note List displays all the notes, starting withthe most recent ones.
See Also:
Add a Note
18.1.2. Add a Note1. Click New Note on the button bar.
The screen appears with the note creation template.
2. If you are creating a personal note, click the Private check box. In the Note List a lock icon isdisplayed beside the note, indicating that it is a personal note.
3. Type your note in the Note box and click Spell Check to identify and correct any spelling errors.
4. Click Save to save the note in the Note List, or Cancel to exit.
See Also:
Access Notes
137
Chapter 19. Opportunities19.1. Overview
The Opportunities application enables an organization to efficiently manage, update and track the progressof their opportunities. Opportunities can be modified as they change and turn into actual sales for thecompany. Potential revenue and probabilities can be assigned to each opportunity, and the opportunitiesare also tied to OfficeClip Accounts to better provide easy and accurate management.
19.2. Understanding OfficeClip OpportunitiesOfficeClip Opportunities application assists organizations with their potential client opportunities. Usingthis application, users can create, organize, report, and filter a list of relevant opportunities. These can alsobe integrated with specific accounts with relevant profit and revenue estimations.
To enter this application, click Contactson the toolbar, then Opportunities on the left menu.
• Opportunities are added to an organization with details such as Access information, User information,Ownership, etc. You can manage information such as estimated revenues, the probability of theopportunity, the stages and next steps for the opportunity, etc. in these sections.
• You can set permissions for various roles of an organization based on the hierarchical levels makingthe information easily accessible. You can configure all the details of your Opportunities to make themas secure as needed by your organization.
• Various items such as tasks, appointments, documents, and time associated with each Opportunity canbe easily managed and reported.
• You can search the details of an Opportunity using the given criteria or by creating filters to sort outdetails that you specify.
19.3. Using OpportunitiesThis section describes ways to use the Opportunities application effectively.
19.3.1. Creating a New OpportunityThis screen allows you to enter all the details associated with a new Opportunity such as the accountname, the stage the opportunity is in, the probability of the opportunity, the estimated revenue from theopportunity, etc. The administrator can add User-Defined Fields to appear at the bottom part of this screen,allowing for additional Opportunity information to be entered.
1. To create a new Opportunity, click on New Opportunity on the button bar within Opportunities.
2. The New Opportunity screen allows you to enter the details for an Opportunity.
3. Enter the Opportunity information. You can choose the Type, Account Name, Stage, and CurrencyType of the opportunity from the drop down lists. Fields with an asterisk * are required to be filled into save the opportunity.
4. Click Save when you are finished entering information in the fields.

Opportunities
138
See Also:
Bulk Options
Editing Opportunities
Searching and Filtering Opportunities
Creating Reports
Shared Items
Opportunity Tags
19.3.2. Bulk OptionsThe administrator can perform bulk operations, such as deleting all opportunities or checked opportunitiesand reassigning checked or all opportunities to another user.
1. In the main Opportunities List screen, click the Show Bulk Options link at the bottom of the list.
2. Choose delete options by clicking the appropriate link.
3. To reassign accounts to another user, select his/her name from the drop down list and then click theappropriate link.
4. When finished, you can click the Hide Bulk Options to close the boxes.
See Also:
Creating a New Opportunity
Editing Opportunities
Searching and Filtering Opportunities
Creating Reports
Shared Items
Opportunity Tags
19.3.3. Editing OpportunitiesFrom the main Opportunity List, you can modify the Access Information, User Information, OtherInformation, User-Defined Fields and Ownership of the Opportunity. The main Opportunity List shows theTitle, Account Name, Next Step, Account number, Est. Close Date, Probability, Est. Revenue and Ownerin the top row and clicking any of these links allows you to changes whether they appear in descendingor ascending order.
1. To edit an Opportunity, click Contacts on the main toolbar, then select Opportunities on the left toolbar.The Opportunity list is displayed.
2. Click the icon next to the Opportunity you want to modify. Press the Modify button under theFunction column to make changes to the Opportunity. Press Save when finished, Cancel to exit, or youcan press Delete to remove the Opportunity. You will be taken back to the main Edit Opportunity screen.

Opportunities
139
3. You can delete an Opportunity by pressing Delete under the Function column.
4. Also in this screen, you can move to another Opportunity from the list by pressing the Previous andNext buttons.
5. You can Clone an Opportunity by pressing the Clone button in the function column. CloningOpportunities allows you to make a copy of all the opportunity information except the Title, so you caneasily add more opportunities without re-entering company information, etc.
6.
7. The Edit Opportunity screen offers Show Children, and if these have been enabled by the administrator,click All, which will include: Appointments, Documents, History, Notes and Tasks.
8. You may also choose to show only certain children, such as only Notes in the screen. Once the childrenhave been selected, you can fill in the fields with the necessary information
9. Press Finished when you have completed all the modifications. This will save all actions.
Note
The Ownership and Children features are described in more detail in the following sub-section.
19.3.3.1. Permissions and Ownership of Opportunities
You can change the Read, Write, Append, and Delete status of an Opportunity, and also change who ownsthe object in the Ownership section of the Edit Opportunity screen. By default (unless changed by anadministrator) only the creator of the Opportunity and the administrator has full access to it and all otherusers only have Read access. The creator can change the kind of access other users have by changing thepermissions.
1. To change the owner of an Opportunity, click on the Opportunity from the main Opportunity List andthen click Re-Assign under the Ownership section of the Edit Opportunity screen.
2. Select a user to Assign Ownership To from the drop down list and if you want to send that user an emailnotification, check the box. Press Save when finished or Cancel to exit.
3. Click Change Permissions under the Ownership section of the Edit Opportunity screen to edit thepermissions associated with the Opportunity.
4. In the screen that pops up, you can see the access that various users have, and you can change this by
clicking the icon to the left of the user name.
5. Check the appropriate boxes based on the permissions needed and click Save when finished or Backto return to the previous screen.
6. To see the users for a particular role, click the icon next to the role you want to view.
See Also:
Creating a New Opportunity
Bulk Options
Searching and Filtering Opportunities

Opportunities
140
Creating Reports
Shared Items
Opportunity Tags
19.3.3.2. Using Children
This section will describe how to use the various children that are associated with the Opportunitiesapplication.
19.3.3.2.1. Tasks
When the Task child is enabled, it will show at the bottom of the details screen with all the tasks associatedwith that particular opportunity, and you can edit it. You can filter tasks by selecting a category from thedrop down list or by checking the Owned by me or Assigned to me checkboxes. To create a new Task,click the Create a New Task link and fill in the fields. The task will be associated with the opportunity.
19.3.3.2.2. History
Note: This feature is only available in the Professional Edition of OfficeClip
This will show any history associated with the opportunity.
19.3.3.2.3. Appointments
You can create and manage appointments associated with the opportunity. This is useful for keeping trackof meetings, etc. with potential clients. Click the New Appointment link and then fill out the informationneeded to make the appointment.
19.3.3.2.4. Documents
Relevant documents can be attached to an account, allowing for important information to be easily accessedfrom one place. Click the Edit Attachments link and then click Browse to find the file. Click Upload toattach the document then press Finished.
19.3.3.2.5. Notes
Notes allow you to write any additional information regarding the opportunity, any of the Children, etc.You can write up to 4000 characters and can spell check your note as well. Simply click on the New Notelink and write your note. Click Save when finished.
19.3.3.2.6. Relationships
Note: This feature is only available in the Professional Edition of OfficeClip
OfficeClip Contact Manager provides the ability to create arbitrary relationships between various entitiesin OfficeClip. For Example:
• For Real Estate Transactions, a Broker can be a relationship between two Contacts.
• An Account can be a Partner of another Account
Opportunities
141
• A Contact can be a Coordinator for an Opportunity.
To create relationships in Contact Manager, follow the steps:
7. To create relationships between the modules of the Contact Manager (Contacts, Accounts,
Opportunities and Campaigns) click on the icon of the Contact, Account, Opportunity or Campaignyou want to add a relationship to, then click Relation on the Children bar along the top.
8. Click the New Relationship link in the table. Your First Participant will be named, you can select therelationship from the drop-down menu and then select the Second Participant. Click Save.
9. The Relationship is now set up between the two participants.
See Also:
Task Application
Calendar Application
Notes Application
Documents Application
Shared Items
Opportunity Tags
19.3.4. Searching and Filtering OpportunitiesBy using Searches and Filters in OfficeClip, you can easily find the Opportunities you are looking for,by specifying particular words and utilizing filters. This feature allows you to search for Opportunities bytyping in a keyword and selecting a field, such as Account Name. You could search for a certain word tobe in the field Account Name and all items with this criterion would show up in the list. This is helpfulfor viewing items that may be related to a certain project, time period, user, etc. without having to searchthrough the entire list.
Tip
On the search box you can type and between multiple words to match all the words or usecomma (,) between multiple words to match either of then. For example, John and Jillwill match all the records that have both John and Jill in them while Mary, Jeff will bringall matches for Mary and also all matches for Jeff together.
Users can create filters to better customize their searches. Filters allow the user to specify many criteriaand save them for future use. You can also remove filters if you no longer need them.
19.3.4.1. Search
1. To search for particular text associated with an Opportunity, type a word or phrase in the Search fieldat the top of the main Opportunity List. Select the field you wish to search from the drop down boxand click Go.
2. The search results are displayed. To exit the search result screen and view the full list of Opportunities,click Cancel.

Opportunities
142
19.3.4.2. Filters
The Filters option allows you to create a customized search based on selected criteria that you define. Aftera filter is created, it is saved for future use. Filters allow you to save time by creating a category to sortthrough your Opportunities and the fields you want to filter
1. To create a filter, click the New Filter link that appears next to the filter selector dropdown. A screenwill appear. To edit a filter, select the filter then click the Edit Filter link.
2. Type a name for the filter. A good filter name is one that describes the filter, such as GeorgiaOpportunities or Source-Web with Opt Out.
3. Select the scope of the filter:
a. Information Owned by Me allows you to filter the output so that only Opportunities of which youare the owner are displayed.
b. All I Can See allows you to see the Opportunities owned by you, as well as Opportunities you havepermission to view or edit.
4. Select filter conditions by clicking the icon on one of the filter condition sections. The ConfigureFilter window will pop up.
5. Select the field you wish to filter from the drop down list.
6. Select the operation. If the field that is selected is a text field, the Greater than or Less than operationwill be based on alphabetical order. If it is a date field, the Greater than or Less than operation willbe based on the selected dates. Press Save when finished configuring the filter or press Cancel to exit
without saving. Pressing the icon will reset the row of the filter.
7. Select the fields to be shown in the list of results from the drop down lists in section 4. These fieldswill show things like Name, Address, Company, etc., depending on your selections, when you filteryour Opportunities.
8. Select visibility:
a. Visible to Everybody allows everyone in your group to see and use the filter.
b. Visible only to Me creates a private filter that will not be seen by anyone else in the group.
9. Click Save when finished, Cancel to exit without saving or, if you are editing a filter, Delete to remove it.
See Also:
Creating a New Opportunity
Bulk Options
Editing Opportunities
Creating Reports
Shared Items
Opportunity Tags

Opportunities
143
19.3.5. Creating ReportsReports have similar functions to filters, but filters display information according to selected criteria, whilereports allow field information groupings, as well as numeric field summaries. Results can also be savedor printed. The report can be exported into many popular formats such as MS Word and Adobe PDF.Controls on the screen allow users to scroll forward and backward on the page through the report results,search for an item in the report, and zoom in and out on the report.
Click Contacts on the main toolbar, and then click Opportunities from the left toolbar. To create a newreport, click Reports on the button bar. Three types of reports are shown on the next screen.
19.3.5.1. Pre-Defined Reports
Click on Opportunity Reports then choose the desired report type. The next screen will show the reportand you can export the report to a PDF, MS Excel, MS Word or RTF file by selecting the file type fromthe drop down list and clicking Export. Press Open or Save in the pop up dialogue box.
19.3.5.2. User-Defined Reports
1. Click Create New User Defined Reports. See the section on Filters for information about the next screen.When you have finished filling in the fields and making selections, press Next.
2. Select the grouping fields. For example, if you wish for the report to be grouped by Account Name,select Account Name. You can also select whether these groupings are displayed in ascending ordescending order.
3. Select the fields to sort by within the groupings, as well as whether to display them in ascending ordescending order.
4. Add an optional report description. This description will show up on the report list screen.
5. Select the column margin width, and enter a report header and footer text, if desired. Click Save whenfinished, Cancel to exit, Previous to go back to the previous screen or, if you are editing a report andyou want to remove it, click Delete.
6. To view the report, click the report name on the report list screen. To edit the report, click the icon.
19.3.5.3. Track Time Reports
You can create and view relevant reports based on tracked time for various accounts that pertain toopportunities.
1. Click the View Track Time Report link. Select the dates for which you want to report the tracked timeand select the type of file you want to export it in. Click Export and then click Open or Save on the popup dialogue box depending on what you want to do with the file.
2. You can submit the report by clicking the Submit button or you can Cancel to exit the screen withouttaking any action.
See Also:
Creating a New Opportunity
Bulk Options
Opportunities
144
Editing Opportunities
Searching and Filtering Opportunities
Shared Items
Opportunity Tags
19.3.6. Opportunity TagsA General description of Tags can be found here.
Tags can be accessed by going to the Summary of the Opportunities Detail. Users who haveadequate permission can associate existing tags with a Account or can create new Tags.
Tags can be managed using the Tags button on the OpportunitiesButton bar. This option is visibleto all administrators and users who have privilege to manage Tags.
See Also:
Creating a New Opportunity
Bulk Options
Editing Opportunities
Searching and Filtering Opportunities
Creating Reports
Shared Items
19.3.7. Shared ItemsOpportunities allows you to share items with Extranet users, who have limited access to OfficeClip. Youcontrol from this screen only shared Opportunities Items, making it easy to manage and make changes.(See the Help section in Extranet to set up users, control access, etc.)
1. To view and make changes to the Shared Items, click the Shared Items button from the button bar.
2. You can now see all items from this application that are in the Extranet list. From here, you canDeactivate any of these items, meaning they will still exist (not be deleted) but they will no longer bevisible to Extranet users. If an item has been Deactivated, you can click Activate to turn it back on again.
3. If you want to delete one or many shared items completely, click the item so the checkbox is checkedand click Remove.
4. The icons in the Actions column are used to email the item to a user and to edit the item , whichyou can also do by clicking on the item name.
5. To manage each item, simply click on it. In the next screen, you can name the item. Click Next to editthe details of the shared item. This page allows you to select what information will be shown to theExtranet user (for example, a particular report).
6. Click Next to continue to the Access Control page where you can set permissions for the Extranet users.You can create public access or go all the way to choosing each individual Extranet user who will haveaccess to that particular item.
Opportunities
145
7. Click Save when finished and you will either get a Public Link on the next screen which you can sendout in the email provided, or only the users you selected will be emailed the private link to see theShared item.
See Also:
Creating a New Opportunity
Bulk Options
Editing Opportunities
Searching and Filtering Opportunities
Creating Reports
Opportunity Tags
19.4. Opportunities Administration
19.4.1. IconsBelow are the icons and their respective functions that are used throughout the OpportunitiesAdministration section.
Allows the user to access the Configure List Fields screen
Users can click to edit an item such as a contact, account, etc.
Use these to re-order various fields
Users can delete an item whenever this icon is shown
Allows the users to view the details of contacts, accounts, opportunities, etc.
Allows you to reset a filter field
Users can run all the rules by clicking this icon
Access a calendar for inputting dates
Allows the user to preview certain items, such as campaigns
See Also:
Fixed Fields
User-Defined Fields
Child Objects
Rename Sections
Opportunities
146
Rules
Position Fields
Contact Roles
Relationships
19.4.2. Fixed Fields
The Fixed Fields configuration screen enables administrators to change the names and other attributes offixed Opportunity fields.
1. After clicking on Contacts from the main toolbar, click on Opportunities from the toolbar on the left.Then, click Admin on the button bar. Click Edit Fixed Fields on the button bar of the Admin menu.
2. To edit a fixed field, click the icon in the Functions column on the right side. From this screen, theadministrator can configure the field.
3. To alter the display name, simply type the desired name into the text field.
4. The field type can not be changed in fixed fields, only in user-defined fields.
5. If you want fields to show in the main Opportunity list screen check the box beside the Show in ListScreen? field.
6. If you wish to make certain fields mandatory when information is entered either for a new Opportunityor an existing Opportunity, check the field in the Mandatory column corresponding to the field youwish to make mandatory. The fields will appear with an asterisk * next to them in the Opportunitiesentry/edit screen.
7. You may wish to make certain fields editable by only certain roles in your organization. To select therole you wish to grant edit privileges, select the role in the dropdown. By default, the All Users rolehas edit privileges for each field. For more information on roles and privileges, please see Setup byclicking Setup on the toolbar.
Note
If many fields are selected to show in the main Opportunity list, a horizontal scrollbar willappear on the Opportunity list screen to accommodate the field.
Field Description
Title The main title of the opportunity
Stage The stage the opportunity is in
Account Name The account that the opportunity is tied into
Type The type of account: New or Existing
Next Step The next step to be taken
Account number The account number that the opportunity is tied into
Est. Close Date The date the opportunity is closed
Currency Type The currency of the opportunity
Amount Amount of money associated with the opportunity

Opportunities
147
Probability The probability that the opportunity will occur
Est. Revenue The estimated revenue to made from the opportunity
Created User The user who created the opportunity
Created Date The date the opportunity was created
Modified User A user who has changed any of the opportunity's information
Modified Date The date that an opportunity was modified
Owner The owner of the opportunity
Description Any other information regarding the opportunity
19.4.2.1. Configuring List Fields
8. A List field is a dropdown box with a list of available choices relevant to the field. To edit dropdown
list items, click the icon in the Functions column on the right side. A window pops up which allowsyou to add or remove list items, select the default list item to be initially displayed and change the orderin which they appear in the list.
9. To add an item, type the name in the Add New field and click Add.
10.To delete an item, click the icon next to the field you wish to remove.
11.To change the position of an item as it appears in the list, click the icons.
12.To select a default value, select a value from the Default Value drop down list.
13.Click the Save button to save settings or Cancel to exit without saving.
See Also:
Icons
User-Defined Fields
Child Objects
Rename Sections
Rules
Position Fields
Contact Roles
Relationships
19.4.3. User-Defined FieldsA main Opportunities feature, the ability to add custom fields enables users to manage more specificOpportunity items than the fixed fields provide. In addition, these fields can be used in Opportunity reportsand filters that are defined by the user.
1. Click Contacts on the main toolbar, and then click Opportunities from the left toolbar. Click Admin onthe button bar and finally, select Edit UDFs on the Admin button bar.
Opportunities
148
2. By default, no UDFs are defined for a group. If you want to edit an existing UDF, click the iconto the right of the UDF you want to modify. In order to add UDFs, click the Add UDF button on thescreen. A popup window will appear. The display name is shown on the next screen.
3. Type in the name you wish to have the UDF displayed as. The following sub-sections will describe inmore detail each of the other fields in the Add UDF screen.
4. When you have finished filling in the fields, click Save to save the UDF and have it displayed in theOpportunities application.
19.4.3.1. Field Type
User-defined fields allow you to choose from a variety of field types, each of which has a different function.You can choose the field type from the drop down list. More information about the Field Types is describedas follows:
Field Description
List This provides a dropdown list for the user. List field types must be configuredby an administrator by adding list values to the list (see Configuring List Fields,below, for further information).
Date A date field shows up with a calendar icon. It can be clicked to select a date toinsert into the field. Dates can also be added manually to the field using the "mm/dd/yyyy" format. Date fields are validated to ensure that an actual date is entered.
DateTime A date/time field is similar to a date field, with the addition of a time selectordropdown list.
Short Text A text field that can contain up to 30 characters.
Long Text A text box that can contain up to 255 characters.
Huge Text A text box that can contain up to 5000 characters.
Number A number-only field. This field is validated upon saving to ensure that only anumeric value is added.
Float A number that contains a decimal point. This field is validated to ensure only anumeric value is entered.
Email A text field in which an email address is typed. It is validated to ensure that anemail address is entered.
Currency A numeric field that allows two decimal places to be entered (i.e., 120.00)
Boolean A Boolean field is displayed with a checkbox. It is a "yes/no" field.
Short Text Lookup A short text lookup field displays with a (...) button next to it. Text can be directlyadded or selected from a list of values that appears when the button is clicked.The values that appear come from the corresponding field of other Opportunitiesthat have been entered.
User List A dropdown list that contains the current OfficeClip organization users.
Owner List A list that shows owners of the object.
19.4.3.2. Mandatory Fields
If you wish to make certain fields mandatory when information is entered either for a new Opportunity oran existing Opportunity, check the box beside the Mandatory field. The fields will appear with an asterisk* next to them in the Opportunities entry/edit screen.
Opportunities
149
19.4.3.3. Restricting a Field Edit-ability by Role
To make certain fields editable by only certain roles in your organization, select the role you wish to grantedit privileges from the drop down list. By default, the "All Users" role has edit privileges for each field.Selecting a particular role to have edit-ability privileges means that other roles will not be able to makeany changes to that particular user-defined field. For additional information on roles and privileges, pleasesee Setup by clicking Setup on the toolbar.
19.4.3.4. Configuring List Fields
1. A list ield is a dropdown box with a list of available choices relevant to the field. To edit dropdown
list items, click the icon in the Functions column on the right side. A window pops up which allowsyou to add or remove list items, select the default list item to be initially displayed, and change theorder in which they appear in the list.
2. To add an item, type the name in the Add New field and click Add.
3. To delete an item, click the icon next to the field you wish to remove.
4. To change the position of an item as it appears in the list, click the icons.
5. To select a default value, select a value from the Default Value drop down list.
6. Click the Save button to save settings or Cancel to exit without saving.
See Also:
Icons
Fixed Fields
Child Objects
Rename Sections
Rules
Position Fields
Contact Roles
Relationships
19.4.4. Child Objects
Each Opportunity can have various children associated with it. The administrator can control which ofthese items can be viewed and utilized by users. The children allow the user to more effectively manage anOpportunity by writing notes for the Opportunity, uploading relevant documents, etc. The Opportunitiesapplication has the following children associated with it:
• Events
• Documents
Opportunities
150
• History
• Notes
• Tasks
1. Click on Contacts on the main toolbar, and then select Opportunities from the left toolbar. Then, clickAdmin on the button bar.
2. Click Edit Children on the button bar of the Admin menu.
3. On the screen that appears, the child objects that are currently associated with Opportunities aredisplayed in the Displayed Entities column on the right. All available entities are displayed in theAvailable Entities to Display column on the left.
4. By including all available associated entities, users can conveniently have access to the full array ofassociated objects.
5. Select the entities to be displayed or removed by clicking the entity. Holding down the Ctrl key allowsyou to select more than one entity. Click the > button to move the selection to the right column or the< button to move the selection to the left column. You can also use the Up and Down button to movethe children in the order they will appear in the Opportunity.
6. Choose Save to save the changes, Save & Next to save and go to the next Admin section or Cancelto exit without saving.
See Also:
Icons
Fixed Fields
User-Defined Fields
Rename Sections
Rules
Position Fields
Contact Roles
Relationships
19.4.5. Rename Sections
When an Opportunity is created, edited, or viewed the fields are organized according to the nature ofthe fields the section contains. For example, all of an Opportunity's access information is found underthe Access Information section. Section names can be changed in this screen, although they cannot beremoved or added.
1. Click Contacts from the main toolbar, and then click Opportunities from the left toolbar. Click Adminon the button bar. Click Rename Section on the button bar of the Admin menu.
2. Change the section names as needed. Click Save when finished, Save & Next to save and go to the nextAdmin section or Cancel to exit without saving.
Opportunities
151
See Also:
Icons
Fixed Fields
User-Defined Fields
Child Objects
Rules
Position Fields
Contact Roles
Relationships
19.4.6. Rules Administrators can set rules for Opportunities to trigger certain events based on conditions of theOpportunities. Rules have the following components:
• Conditions- Certain conditions need to be satisfied to trigger a rule
• Actions- The actions are taken when a condition is satisfied
In OfficeClip Opportunities, Rules are used to allow or restrict access to Opportunities when variousconditions are met. For example, if the administrator wants all Opportunities in a certain stage to beable to be accessed by all users, he/she can set up the condition If field Stage value isProspecting, give Read, Write, Append, Delete access to the All Usersrole.
1. Click Contacts from the main toolbar, and then click Opportunities from the left toolbar. Then, clickAdmin on the button bar. Click Ruleson the button bar of the Admin menu.
2. By default, there are no rules listed. To create a rule, click the Add Rule button. If you want to edit a
role, click the icon or to remove a rule completely, click the icon. To run a rule that is not active,
click the icon or, to run all existing rules, click the Run All Rules link.
3. Clicking Add Rule brings up a new window. You can choose to add conditions by clicking the Addlink. This will bring up corresponding fields to fill in according to the conditions you need. Click Nextto continue or Cancel to exit.
4. Select the actions by checking the box. If certain conditions are met, you can give Read, Write, Appendand/or Delete access of the Opportunities meeting these conditions by selecting the Role from the dropdown list. Click Next to continue, Previous to go back to the previous screen or Cancel to exit.
5. Give a name to the rule. The Enabled check box is automatically selected, which means the rule willbe active. To make the rule inactive, uncheck the box. Click Save Rule when finished, Previous to goback or Cancel to exit without saving the rule.
See Also:
Icons
Opportunities
152
Fixed Fields
User-Defined Fields
Child Objects
Rename Sections
Position Fields
Contact Roles
Relationships
19.4.7. Position FieldsThe order of the Opportunity fields can be adjusted to match the user's preference.
1. Click Contacts from the main toolbar, and then click Opportunities from the left toolbar. Then, clickAdmin on the button bar. Click Position Fieldson the button bar of the Admin menu.
2. The screen that appears allows you to position the Opportunity fields with the up and down arrows
. Category headings (Personal, Address, Other, and Additional Information) may be repositioned.Category attributes (Last Name, City, Opportunity Source, etc) may be repositioned as well.
3. Click Save to save your modified positioning or Cancel to exit without saving.
See Also:
Icons
Fixed Fields
User-Defined Fields
Child Objects
Rename Sections
Rules
Contact Roles
Relationships
19.4.8. Contact RolesContact roles will allow you to associate multiple contacts with each opportunity and to give those contactsa particular role in the opportunity, such as Manager or Associate. Associated Contact roles with youropportunities will help you to better manage your opportunities and who is working on them.
1. Click Contacts from the main toolbar, and then click Opportunities from the left toolbar. Then, clickAdmin on the button bar. Click Contact Roleson the button bar of the Admin menu.
2. Type the names of the roles you want to create, such as Manager, Contractor, Assistant, etc. and thenclick Save. Then, click the Edit Children button from the top menu of the Admin Screen, select Contact
Opportunities
153
Roles from the Available Entities to Display box and move it into the Displayed Entities box. PressSave.
3. Click Opportunities from the left menu bar and then click the icon. At top are the Children, clickthe Contact Role link.
4. On the far right of the screen, click the New Contact Role link. The drop down list will display the
roles you created within the Admin section. The icon will give a list of Contacts from which youcan choose who will have that Contact Role for that opportunity.
5. If you want a Primary Contact for the opportunity, simply click the radio button beside that person.Click Save when finished.
See Also:
Icons
Fixed Fields
User-Defined Fields
Child Objects
Rename Sections
Rules
Position Fields
Relationships
19.4.9. RelationshipsNote: This feature is only available in the Professional Edition of OfficeClip
OfficeClip Contact Manager provides the ability to create arbitrary relationships between various entitiesin OfficeClip. For Example:
• For Real Estate Transactions, a Broker can be a relationship between two Contacts.
• An Account can be a Partner of another Account
• A Contact can be a Coordinator for an Opportunity.
To create relationships in Contact Manager, follow the steps:
6. Click Contacts from the main toolbar, and then click Opportunities from the left toolbar. Then, clickAdmin on the button bar. Click Relationson the button bar of the Admin menu.
7. Click the Add New button and type in the name of the relationship you wish to add (such as broker,partner, etc.). The click the Insert link to insert this relationship into the application.
8. To create relationships between the modules of the Contact Manager (Contacts, Accounts,
Opportunities and Campaigns) click on the icon of the Contact, Account, Opportunity or Campaignyou want to add a relationship to, then click Relation on the Children bar along the top.
Opportunities
154
9. Click the New Relationship link in the table. Your First Participant will be named, you can select therelationship from the drop-down menu and then select the Second Participant. Click Save.
10.The Relationship is now set up between the two participants.
See Also:
Icons
Fixed Fields
User-Defined Fields
Child Objects
Rename Sections
Rules
Position Fields
Contact Roles
155
Chapter 20. Photo AlbumThis module allows you to create and store personal and official photo albums. You can view, add, ordelete photos from the Album List and add up to 5 photos to the album at once. Photos can be viewed inlist or thumbnail form. The thumbnails are automatically created by OfficeClip and you can access the fullsize version and details of the image by clicking on the thumbnail.
20.1. Using Photo Album
20.1.1. Access Photo Album1. Log in to OfficeClip.
2. Click Photo Album in the left panel of the Home.
The Photo Album portlet opens with the Album List displayed. You can view the albums by clickingthe links in the album column.
See Also:
Creating an Album
Add Photos to an Album
Deleting Photos
Deleting an Album
Viewing an Album
20.1.2. Creating an Album1. Click New Album in the Album button bar.
2. Type the album name in the New Album Name field.
3. Click Save to add the album to the list, or Cancel to exit.
See Also:
Access Photo Album
Add Photos to an Album
Deleting Photos
Deleting an Album
Viewing an Album
20.1.3. Add Photos to an Album1. To add photos you can do one of these:
Photo Album
156
• Choose the album to which you wish to add photos from the Album List and click the icon inthe Functionscolumn.
• Click the album link in the Album column and in the next screen, click Add New Photos.
2. In the Namefield, click the Browse button to browse for the file that contains the photo.
3. Enter a title for the photo in the Title field.
4. Enter the description of the photo in the Description field.
5. You can add up to 5 images at once. After adding all images, click Upload to add the photos to thealbum or Cancel to exit.
See Also:
Access Photo Album
Creating an Album
Deleting Photos
Deleting an Album
Viewing an Album
20.1.4. Deleting Photos1. Click the album name in the Album column of the list.
2. The next screen displays thumbnail images of the photos. Click Delete below the photo you want todelete.
3. Click OK in the confirmation box.
See Also:
Access Photo Album
Creating an Album
Add Photos to an Album
Deleting an Album
Viewing an Album
20.1.5. Deleting an Album1. Click Album List in the button bar.
2. Choose the album you wish to delete and click the icon in the Functions column of the same row.
See Also:
Access Photo Album

Photo Album
157
Creating an Album
Add Photos to an Album
Deleting Photos
Viewing an Album
20.1.6. Viewing an AlbumTo view an album, click the album name in the Album column of the Album List. The screen displays thethumbnail images of all the photos of that particular album.
1. To view the full size of the image, click Detail given below the image.
The image is displayed in its full size.
2. You can add a description to the image and save it by clicking Save, or return to the Album List byclicking Back.
See Also:
Access Photo Album
Creating an Album
Add Photos to an Album
Deleting Photos
Deleting an Album
158
Chapter 21. PollsThe Polls module is a very convenient feature that allows easy resolution of issues within the organization.Decision making through consensus is conveniently achieved by using this feature effectively. The usercan add, delete, close, and archive polls as well as attaching documents to a poll. The user can createcustomized polls by allowing the members to choose single or multiple answers and he/she can furthercustomize by having an open or anonymous poll. The status of the polls is displayed; all open polls areavailable for voting and all closed polls are available for viewing results. Polls can be closed manually bythe administrator/creator, or automatically by setting expiration details date and time. Closed polls can bearchived or stored for future reference.
21.1. Using Polls
21.1.1. Access Polls1. Log in to OfficeClip.
2. Click Polls in the left menu of the Home.
The screen opens with the Poll List displaying the open and closed polls.
See Also:
Adding a Poll
Vote in a Poll
Archive a Poll
Delete a Poll
Close a Poll
21.1.2. Adding a Poll1. Click New Poll in the Polls button bar.
2. Enter the issue in the Poll Question area. The issue should not exceed 2000 characters.
3. Enter the answer choices in the Poll Choices. You can enter up to 20 choices, with at least 1 beingrequired.
4. Select the Poll Type, which allows the users to select either a single choice or multiple choices.
5. Select the Expiration option. You can choose to close it manually, or automatically by selecting anappropriate date and time.
6. Select the Anonymity option. You can opt to show voter name and their choice, or not.
7. Select the Security option. You can either display results at all times or only after the poll expires.
8. Select the Notify Poll Creation to all members check box.
9. To attach a local file or OfficeClip document to the poll, click Edit Attachments.
Polls
159
10.In the Attach Documents screen, click the Browse button to locate the file.
11.Click Upload to attach the document to the poll and click Finished to exit the Attach Document screen.
12.Click Save to view the polls in the Poll List or Cancel to exit.
See Also:
Access Polls
Vote in a Poll
Archive a Poll
Delete a Poll
Close a Poll
21.1.3. Vote in a Poll1. Choose a poll question from the Poll List and click the icon displayed in the Functions column.
The vote screen opens, displaying the answer choices.
2. Click the attachments to view the documents supporting the poll.
3. Click a choice, if it is a single choice poll or click multiple choices, if it is a multiple choice poll.
4. Click Vote to cast your vote or Cancel to exit.
5. Click Results in the vote screen to view the results of the poll. You can even view the results by clicking
on the icon in the Functions column.
See Also:
Access Polls
Adding a Poll
Archive a Poll
Delete a Poll
Close a Poll
21.1.4. Archive a Poll1. Select the check box (es) next to the polls you want to archive and click the Archive button at the
bottom of the list.
The polls are moved to the archived list.
2. Click Archived Polls on the button bar to view the archived polls.
See Also:
Access Polls
Polls
160
Adding a Poll
Vote in a Poll
Delete a Poll
Close a Poll
21.1.5. Delete a Poll
To delete a poll, click the icon in the Functions column of that particular poll.
See Also:
Access Polls
Adding a Poll
Vote in a Poll
Archive a Poll
Close a Poll
21.1.6. Close a Poll
To close a poll, click the icon in the Functions column of that particular poll.
See Also:
Access Polls
Adding a Poll
Vote in a Poll
Archive a Poll
Delete a Poll
161
Chapter 22. Projects22.1. Overview
The OfficeClip Project application allows you to create and manage projects and accounts. Accounts fromthe Account Manager application can also be tracked and managed in OfficeClip Project, and each accountcan have many projects within it. For example, a client account can have several projects associated with itand the Projects application allows the administrator to easily allocate them to various users. This enablesthe administrator to better manage and organize the project and the labor resources for the organization.
22.2. Understanding OfficeClip ProjectsOfficeClip Projects is used to effectively manage client accounts and the projects that go along with them.The following describe some of the main features and uses of the application:
• Accounts, such as a client account, are created and then projects are created within that account asneeded.
• Details are entered into accounts and projects, allowing the users to track the progress of the projectand various components of that project (such as the budget), and also view and update any accountinformation over the life of the project.
• Project information such as jobs, customers, and service items can be imported from a QuickBooksTimer file.
• The administrator can allocate an organization user to an account and project, and can also assignmultiple users to an account and project at one time.
22.2.1. Accessing Projects1. Log into OfficeClip.
2. Click on Projects in the toolbar.
See Also:
Creating Accounts
Creating Projects
Modifying Account Lists
Modifying a Project
Importing and Exporting Projects
Shared Items
22.2.2. Creating AccountsThe New Account screen allows you to enter account details for a client, such as address and companyinformation. Creating accounts allows you to create projects within that account. The administrator canalso allocate users to an account.
Projects
162
1. To create a new account in OfficeClip Projects, click the New Account button from the button bar.
2. This screen allows you to put in as many details about the account as are needed. The fields markedwith an asterisk * are required. You must give the account a Name, Number and Primary Contact inorder to save the account.
3. Click on Save when finished or press Cancel to exit without saving.
See Also:
Accessing Projects
Creating Projects
Modifying Account Lists
Modifying a Project
Importing and Exporting Projects
Shared Items
22.2.3. Creating ProjectsProjects are created within the accounts that are either made within OfficeClip Projects application orContact Manager Application. The administrator can allocate users to various projects of an account.
1. A Project List page is displayed when you click on Projects from the toolbar.
2. An account can be chosen from the Select an Account drop down list, which will list all the projectsfor that account.
3. Click on the New Project button to create a project within the selected Account.
4. Enter the detailed project information as needed; fields marked with an asterisk * are required, so theproject must be given a Name and a Screen Name (the Name can be abbreviated for entry screens).
5. Click Save when finished or press Cancel to exit without creating a new project.
See Also:
Accessing Projects
Creating Accounts
Modifying Account Lists
Modifying a Project
Importing and Exporting Projects
Shared Items
22.2.4. Modifying Account ListsModifying an account enables you to make changes to the account information of a client, keeping youraccounts organized and manageable.
Projects
163
1. To modify an existing account, click the Account List button on the button bar. Select the desiredaccount from the Account List by clicking on it.
2. Click on the Details button.
3. At the bottom of the table, you can change the ownership of the account by pressing the Re-Assign linkunder the Ownership section. Select the user whom you want to have ownership and check the box tosend him/her an email notification. Press Save when finished or Cancel.
4. Also in the Ownership section you can change the permission of the account by clicking the Change
Permission link. In the screen that pops up, click the icon to change the permission of various userswith respect to the selected account. Press Save or Cancel when finished.
5. In the Function column, click Modify to make changes to the account, Delete to remove the account,Export to open and save the account in a vCard file, or Back to return to the main Account List.
6. If you have clicked Modify, fill in the fields you want to change then press Save, Delete to remove theaccount, or Cancel to return to the main Account List without saving any modifications to the account.
See Also:
Accessing Projects
Creating Accounts
Creating Projects
Modifying a Project
Importing and Exporting Projects
Shared Items
22.2.5. Modifying a Project You can easily edit projects to keep information about the project, such as the budget and the percentcomplete, up to date and relevant.
1. Select an account from the drop down list of Accounts, which will display the projects for that account.Select the project you want to modify from the list
2. Click on the Details button to view the details of the project.
3. Under the Function column, click Modify and fill in the fields where you want to make changes. ClickSave when finished, or Cancel to exit without saving.
4. To delete a project completely, click the Remove button under the function column.
5. Press the Back button to return to the main Project List.
See Also:
Accessing Projects
Creating Accounts
Creating Projects

Projects
164
Modifying Account Lists
Importing and Exporting Projects
Shared Items
22.2.6. Importing and Exporting ProjectsIf you already have relevant account and project information in a QuickBooks file, you can upload it intoOfficeClip Projects. In QuickBooks, locate the information you want to export to OfficeClip Projects andclick File > Time > Export List for Time and save this file in a temporary directory so it can imported.
1. To import account and project information from a QuickBooks file, click on the Import/Export buttonon the button bar.
2. Next click on the Import Customers, Jobs and Service Items from the QuickBooks file link.
3. Click on the Browse button to select the file to be imported. This will import all the customers, projectsand service items from QuickBooks Timer file.
4. Press Upload to import the file or Cancel to exit without importing any information.
See Also:
Accessing Projects
Creating Accounts
Creating Projects
Modifying Account Lists
Modifying a Project
Shared Items
22.2.7. Shared Items External users can securely access a variety of Project reports. As a safeguard, these reports cannot beshared with public access. Projects reports cover allocated projects and reports for project rates. Youcontrol from this screen only shared Project Items, making it easy to manage and make changes. ChangingShared Project Items within the Projects module will change them in the main Extranet module as well.(See the Help section in Extranet to set up users, control access, etc.)
1. To view and make changes to the Shared Items, click the Shared Items button from the button bar.
2. You can now see all items from this application that are in the Extranet list. From here, you canDeactivate any of these items, meaning they will still exist (not be deleted) but they will no longer bevisible to Extranet users. If an item has been Deactivated, you can click Activate to turn it back on again.
3. If you want to delete one or many shared items completely, click the item so the checkbox is checkedand click Remove.
4. The icons in the Actions column are used to email the item to a user and to edit the item , whichyou can also do by clicking on the item name.
Projects
165
5. To manage each item, simply click on it. In the next screen, you can name the item. Click Next to editthe details of the shared item. This page allows you to select what information will be shown to theExtranet user (for example, a particular report).
6. Click Next to continue to the Access Control page where you can set permissions for the Extranet users.You can create public access or go all the way to choosing each individual Extranet user who will haveaccess to that particular item.
7. Click Save when finished and you will either get a Public Link on the next screen which you can sendout in the email provided, or only the users you selected will be emailed the private link to see theShared item.
See Also:
Accessing Projects
Creating Accounts
Creating Projects
Modifying Account Lists
Modifying a Project
Importing and Exporting Projects
22.3. Administration of ProjectsThe administrator can allocate users to various accounts and projects in the Projects application inOfficeClip. This allows the administrator, who may be, for example, the project manager, to assign usersto (or remove users from) projects and accounts quickly and easily, as needed.
22.3.1. Allocating ProjectsYou can assign projects and accounts to users in the organization.
1. Click Projects on the main screen, and then click Admin on the Projects button bar.
2. The Allocate Project screen is displayed. Select a user from the drop down list and a screen displayinga list of accounts and projects will appear.
3. Select the accounts and projects to assign the user to by clicking the appropriate checkboxes. From thisscreen you can also remove the projects assigned to a user by un-clicking the checkbox.
4. Click Save when finished or Cancel to exit the screen without saving.
See Also:
Allocating Users
22.3.2. Allocating UsersThe user of an organization can be allocated to a project.
1. Click Projects on the main screen, then click Admin on the Projects button bar.

Projects
166
2. Press the Allocate User button on the button bar.
3. Choose the Account/Project from the drop down screen. The screen displays users that can be assignedto that project.
4. Select the users to allocate to the project by clicking the checkbox. Alternatively, you can remove usersfrom a project by un-clicking the check box.
5. Press Save when finished or Cancel to exit without saving.
See Also:
Allocating Projects
167
Chapter 23. Punch Clock23.1. Overview
The OfficeClip Punch Clock component has been designed to record the daily working hours of employeesin an organization. OfficeClip makes it very easy to integrate Punch Clock with the Timesheet application,to get an optimum use of the Timesheets component. The Timesheet and Punch Clock components can beused by a group to record the time spent on a particular project assigned.
The Punch Clock component enables the employee to record his/her entry and exit timings by using thePunch In and Punch Out Time feature. The list of recorded entries aids the administrators in calculatingthe total number of working hours put in by an employee, by viewing the punch clock input screen.
23.2. Using Punch Clock Input ScreenThe Punch Clock Info screen gives a link to the Punch Clock Input screen and also the View and EditPunch Time screens. The user can either access the punch clock input screen and record punch in or punchout timings, or access the Edit Punch Time screen, to edit the punch details.
1. To view Punch Clock input screen, click the Punch Clock Input screen link given in the Punch clockinfo screen.
2. To punch in or punch out, enter the Email Addressand Password provided by the administrator andclick Punch In or Punch Out. The details are recorded in the View/Edit Punch Time screen.
3. Click Details to view the details. You can see the timings in the table and the details including day,date, hours, and the user's name under History.
4. The user can save the details sheet by clicking Save or click Cancel.
23.2.1. Viewing/Editing Punch TimeThis screen allows the user to view and edit the punch time details. The user can choose to view the detailsof any user and their corresponding work period in this screen. The screen displays a table of in time, outtime, break time, and the total time period put in by the user on a particular day. Below this table is theGrand Total of the weekly work period of the user. You can view the number of times a user has punchedin and out under the History feature.
1. To access the View/Edit Punch Time screen, click the link View / Edit Punch Time, given in the PunchClock Info screen.
2. You can edit the punch details for a particular day and save the details by clicking Save.
23.3. Exporting Punch ClockThe Export feature allows the user to export the Punch Clock report of a particular user, to the requiredlocation. The exported reports are stored in a Comma Separated Values File format and opens up as aMicrosoft Excel sheet when exported.
To export Punch Clock data, click Export in the Punch Clock menu bar, select a From and To date toselect a period, and then choose a user by checking the appropriate check box. Click Export and choosea destination to save the report.
Punch Clock
168
23.4. Punch Clock AdministrationThe administrative features allow the administrator to restrict the use of certain features of the Punch Clockcomponent.
23.4.1. Setting PermissionsBy setting permissions, the administrator can allow the users to edit the punch time and choose to showhistory on the edit screen.
To set admin permissions, click Admin on the Punch Clock menu bar. Select the option Yes to Allow Usersto edit punch times, and option Yes to Show history on the edit screen. Click Saveto set the permissionsor click Cancel to exit.

169
Chapter 24. Tasks24.1. Overview
Tasks are list of activities that are performed by OfficeClip users. Tasks are tracked in OfficeClip withrespect to task type, start date, end date, percent complete etc. Tasks differ from OfficeClip Calendarevents in that they represent personal or group activities that must be performed according to a schedule, asopposed to a multiple-user meeting or scheduled event. Recurring tasks can be created to allow a repetitiveaction to be tracked.
Administrators and task owners (creators) can control access to tasks.
24.2. Using TasksThis section describes ways to use the OfficeClip Tasks effectively.
24.2.1. Accessing Tasks1. Log in to OfficeClip
2. Click on Tasks from the left menu within Desktop.
3. View the Task List screen. Once a task is completed, it is removed from the list of due tasks and canbe reviewed on the Task List screen.
See Also:
Creating Tasks
Filtering Tasks
Tracking Time
Import and Export
24.2.2. Creating TasksUsers can create tasks, give the task a subject, enter due date, etc., assign tasks to other users, send theman email notification, add attachments and add a recurrence if the task needs to be performed frequently.Users can also link tasks with a corresponding account, contact or opportunity by using the Regardingfield. This allows the person doing the task to see who he is doing the task for and view information aboutthe contact, such as company, address, phone number, etc.
1. To create a new task, click New Task on the button bar within Tasks.
2. Fill in the required sections to create the new task. A Start Date, Due Date, and Completed Date canbe added. Users can also fill in the task's type, priority, and regarding fields. The task subject field ismandatory.
3. If the task is tied to a account, contact, or opportunity, select the corresponding entity within theRegarding field, then click on the Select button that appears to the right of the Regarding field aftermaking a selection of the object (an account, a contact, or an opportunity).
4. Tasks can be assigned a Recurrence in which the due date is set to each occurrence of the task.

Tasks
170
5. Attach documents to a task by clicking the Edit Attachment link. This will bring up a new popup.A document can be attached to the task by browsing to the file, clicking the Upload button and thenclicking Finished.
6. When the fields are filled in, click Create to create the task or click Cancel to not create the task andexit the screen.
7. The most recent tasks created are displayed in the main Task screen.
Note
In the main Task List screen you can mark tasks as complete, by selecting the tasks andpressing the Complete button. To delete tasks, select the tasks and click the Delete button.
See Also:
Accessing Tasks
Filtering Tasks
Tracking Time
Import and Export
24.2.3. Filtering TasksFiltering tasks allows you to select the tasks that show up on the main task list screen according to certaincriteria. You can choose these criteria, such as Completed Tasks, High Priority tasks, etc. and you can alsochoose to show tasks that are owned by you or assigned to you. Another option is to show tasks of allgroups that you are a user of, one particular organization or your own private tasks.
1. The Task List screen allows you to view all of your tasks. It can be filtered to show tasks with a certainstatus, such as In Progress or Completed.
2. To filter tasks, select a filter option from the drop down list on the main Task List screen. The screenwill automatically refresh with filtered tasks listed.
3. Near the button bar, users can click the applicable link according to whether they wish to view Privatetasks or Group tasks.
4. Users can also filter tasks by checking/un-checking the Owned by Me or Assigned to Me boxes.
See Also:
Accessing Tasks
Creating Tasks
Tracking Time
Import and Export
24.2.4. Tracking TimeThe tracking time feature mainly serves as a tool for monitoring the time that is spent on various tasks. Itallows a user who is working on an task to keep track of the amount of time he/she is spending on it. Thisenables management to know where project resources are being used.
Tasks
171
1. To Track Time for a task, click on Task from the tool bar.
2. Then click on a task from the Task List.
3. On the Task page where you can edit the item, click on the Track Time button.
4. A window will pop up, which will show the tracked time and allow you to add a new item. To addtime, go to the Add New section.
5. Enter the duration, date, and any other notes (these notes are internal in the sense that they will not beshown in the timesheet details if the time is exported to the Timesheet application).
6. Press Save when finished.
7. To Edit a tracked time entry, click on the Edit icon on the Actions column and then change theinformation at the bottom and finally click on Save.
8. Your new item will appear in the Track Time list. Press the Cancel button to close the window andreturn to the screen to continue making changes to the task.
See Also:
Accessing Tasks
Creating Tasks
Filtering Tasks
Import and Export
24.2.5. Import and ExportOfficeClip allows you to import or export tasks in XML file format. XML format allows tasks to berepresented in a structured format that is easy to import and export between various systems.
See Also:
Accessing Tasks
Creating Tasks
Filtering Tasks
Tracking Time

172
Chapter 25. Timesheet25.1. Overview
Web Timesheet application enables you to track the duration of your user's activities. It automates periodictime reporting with real-time processing.
Timesheets are records of the activities performed in order to complete tasks assigned to your employees.Recording a timesheet activity involves inputting the complete details of an activity such as the durationof the activity, type of activity, the date of the activity, the customer name, and the project name.
The Timesheet link shows the status of all the timesheets that are submitted for your approval, pendingapproval, rejected, and so forth, allowing you to quickly take action on the ones that needs your attention.
25.2. Understanding OfficeClip TimesheetTimesheets in OfficeClip are more than just static records of time spent by the users of your organization.OfficeClip also provides other integrated components so that this information has a direct bearing oncalculating your revenues and expenses and, ultimately, profitability.
Important features of OfficeClip Timesheets include:
• Users record time for a project and service item. A service item can either be billable or non-billable.
• Each user can also specify a payroll item. The payroll item determines if the time recorded is regularwork, overtime, or time-off. Regular items are the normal hours worked by the employee. Overtime isusually specified as paid by time multiplied by a factor (e.g., 1.5 or 2). Time-off is the record of timenot worked by the employee, whether paid unpaid. Examples of time-off are vacations and jury duty.
• Completed timesheets need to be submitted for approval to the supervisor or another designedemployee of the organization. You can set up the timesheet so that it is submitted automatically toselected users, or you can allow users to submit the timesheet manually. This feature is called ApprovalRouting. Approval rules are configured separately for each user.
• Cost and billing rates can be defined for each user and for each customer. The cost is the amountpayable to a user per hour, and the billing rate is the amount billed to the customer per hour for the samework. These rates are used in the generation of certain reports that help you calculate your profitability.OfficeClip Timesheet can track multiple cost and billing rates over a period of time. This usually happenswhen the cost or billing rates changes frequently.
• Timesheet rules can be defined to ensure that the data entered by users is valid.
Note
For users to be able to use OfficeClip timesheets, the service items, projects and customersneed to be defined in the system.
25.2.1. Proxy Proxy is a mechanism that allows a user to create, submit or approve a timesheet on behalf of another user.If the proxy feature is enabled, a drop down box appears on the first screen of the timesheet which allowsthe current user to select another user and perform the selected process on his/her behalf.

Timesheet
173
25.3. Using Timesheet
25.3.1. Creating a TimesheetNote: The document attachment feature is only available in the Professional Edition of OfficeClip.
Each row of the new Timesheet screen can be used to record time for a particular combination ofCustomers, Projects and Service Items. Time for a particular day can be entered in the textbox in decimalnotation (e.g. 5.5, meaning 5 and half hours) or in colon notation (e.g. 5:30, meaning 5 hours and 30minutes).
1. To create a new Timesheet, select New Timesheet from the menu within the timesheet application.
2. Details for the time worked can be entered by clicking on the Details link just below the Textbox. It alsoallows employee to specify if the service item is billable (this is possible only if the billable propertycan be changed for the service item).
Note
OfficeClip Timesheet reuses the Customers, Projects and Service Items from the lasttimesheet that you filled in. This saves some of your time when you work on multiple projectsfor more than one period. Any row that is kept empty will not be remembered in the timesheetfor the next period.
3. Comments can be entered for the entire timesheet by typing it in the Comment Textbox below the timeentry grid. These comments are saved with the entire timesheet rather than the individual time entries.
Tip
Use the Comment field to notify the supervisor of certain things that pertain to the entiretimesheet. For example, you may want to notify the supervisor the reason why you could notsubmit the timesheet on time, or some time needs to be adjusted later.
4. A history of all the comments are kept and shown with the timesheet. These are preserved for auditpurposes.
Caution
Remember to double check your comments before submitting the timesheet. Once submitted,the comments cannot be removed from the history.
5. Finally, the user can save the timesheet by clicking on the Save button, cancel the entry by clicking onthe Cancel button, or select one of the submission buttons.
6. If the manual workflow is set for the employee (which is default), approver can be selected from the dropdown box and the timesheet can be sent by clicking on the Submit button. If automated routing is setby the approver, the employee cannot select the approver; clicking on the Submit button automaticallyroutes the timesheet to the approver.
7. As soon as a timesheet is submitted, it appears in the Pending state on the Employee's Outbox.Employee will not be able to do further editing on the timesheet. The same timesheet also appears on the

Timesheet
174
supervisor's Inbox with Submitted status allowing approval or rejection of the timesheet. When thesupervisor selects a timesheet and clicks Bulk Approve, the timesheet is removed from the supervisor'sInbox and appears in the user's Inbox with Approved status.
See Also:
Inbox/Outbox Portlet
Exporting Timesheet
Reports
Shared Items
Importing TrackTime
25.3.2. Inbox/Outbox PortletWhen you login with your credentials and click on the timesheet application, you can view two dashboardsdisplaying your inbox and outbox.
Inbox shows the timesheet that you need to work on. These include saved, submitted and approvedtimesheets. The following items are operations that can be performed on the timesheets in the inbox:
• Saved Timesheets - These timesheets can be edited, removed or submitted by the user.
• Submitted Timesheets - These are submitted for approval by other users in the organization. User canopen the timesheet, make necessary corrections, save them, approve them, reject them or send them tothe next person in the approval path.
• Approved Timesheets - These are the timesheets that have been approved by the approver and cannotbe edited or deleted by the user. These timesheets can only be archived by the user.
Outbox shows the timesheets that you have submitted for approval and are awaiting action by the approver.These timesheets can be viewed but cannot be edited or deleted by the user.
To view or edit the detailed timesheet, click on the view/edit icon. Approved timesheets cannot beedited. You can only modify the timesheets with Saved status, allowing you to update the timesheetduration, comments or add new attachments.
You can view the workflow history in the edit screen if the administrator has enabled the feature. To view
a printer friendly screen of the timesheets, click on the printer icon.
You can delete timesheets by selecting the checkbox of the timesheet item and click Delete. If your inboxcontains a large number of timesheets, you can archive them by selecting the timesheets and clicking theArchive button.
If you are the approver of timesheets, you will see the Bulk Approve button. Select the timesheets youwant to approve using the checkboxes and click the Bulk approve button.
This button is not visible for users who do not have the privilege of approving timesheets.
You can approve your own timesheet, if you have been given the privilege.
See Also:
Timesheet
175
Creating a Timesheet
Exporting Timesheet
Reports
Shared Items
Importing TrackTime
25.3.3. Exporting TimesheetTimesheet data can be exported to MS Excel format for reporting. You can export individual timesheetsor export bulk timesheets at once.
After logging in to OfficeClip, select Timesheets from themenu, and then click Export.
If you select Individual timesheet report link, you can generate a timesheet report for a given user for aspecific time period. You can select the details to be included in the report. Choose the date range andselect the users using the checkbox, and click Continue. Click Select all to select all users at a time. ClickClear all to clear the selections. If there is no timesheet the following message is displayed: There isno timesheet in the system for the selected period.
To export timesheet details for multiple users to a comma separated (CSV) file, select the Bulk TimesheetExport link. There is a provision for exporting only approved timesheets, which you can select by checkingthe box. Choose the date range and select the users, then click Continue. In following screen you can
rename the fields and move the fields as you wish them to appear in the report. Click on the or buttonto move the fields up or down the list, determining their order on the exported Excel sheet. In the topsection, select the checkbox, if you want the column names to appear as first row in the comma separatedfile. Click Export to view or save as an Excel file.
See Also:
Creating a Timesheet
Inbox/Outbox Portlet
Reports
Shared Items
Importing TrackTime
25.3.4. Importing TrackTimeThis feature allows users to import time tracked via other applications (e.g. Issue Tracker, Tasks,Contact Manager etc.) to the OfficeClip Timesheet. Tracked Time can be imported either to anexisting timesheet or to a new timesheet. This feature can be activated by clicking on the Import TrackTimemenu button. Following are the steps:
1. Set Search Parameters: Select the application and the starting period of the timesheet where thetracked time is to be imported and then click on the Search button.
2. Select TrackTime Entries: On this section, the user selects the time to be included on the timesheet.If the entire time is not billable, the billable time can be adjusted.
Timesheet
176
3. Select Timesheet Details: Customers, Projects and Service Items can be selected here.These values will be used to enter the tracked time in the timesheet. If there are multiple projects orservice items where time needs to be tracked, they will need to be entered separately. The Includeonly billable time checkbox should be checked if only billable time should be put on the timesheet.The Include the Detail checkbox should be checked if the full detail of each item should be put on thetimesheet.
4. Select Timesheet: This section gives an option to create a new timesheet or add the tracked time toan existing timesheet.
Clicking on the Import Timesheet button imports the tracked time to the timesheet of choice and alsoallows user to import more items in the same timesheet or in a different timesheet.
See Also:
Creating a Timesheet
Inbox/Outbox Portlet
Exporting Timesheet
Reports
Shared Items
25.3.5. ReportsYou can generate a variety of reports based on timesheets. They are described here:
25.3.5.1. General Reports
• Individual Timesheet Report - Generates a timesheet report for a given time period. The user canselect the details to be included in the report.
• Timesheet Submission Status - Generates a timesheet submission status report.
• Time Tracking Reports - Contains time reports by customer, projects, and employees ordered by daterange, month, and year.
• Billing and Profitability Reports - Contains reports on billing and profitability by customer, project,and task.
• Utilization Report - Reports on how much time the employee is utilized in terms of billable and non-billable hours.
• Budget Reports - Reports on how much money is spent compared to the total budget of the project.
25.3.5.2. Other Reports
• General Reports - Contains general reports developed by OfficeClip.
• Custom Reports - Contains custom reports that are created by the OfficeClip development team.
1. To create a report, click Reports on the button bar within the Timesheet application.
Timesheet
177
2. Click the type of report you want to generate. In the next screen, select the dates for the report, theusers you want to generate the report for and the type of file you want the report to be exported into(PDF, MS Excel, etc).
3. Once you have made your selections, click Next to view the report within the Timesheet application(you can choose to Export from this page as well) or click Export to immediately have it exported intoyour chosen file type.
See Also:
Creating a Timesheet
Inbox/Outbox Portlet
Exporting a Timesheet
Shared Items
25.3.6. Shared ItemsTimesheet allows you to share items with Extranet users, who have limited access to OfficeClip. Youcontrol from this screen only shared Timesheet Items, making it easy to manage and make changes. (Seethe Help section in Extranet to set up users, control access, etc.)
1. To view and make changes to the Shared Items, click the Shared Items button from the button bar.
2. You can now see all items from this application that are in the Extranet list. From here, you canDeactivate any of these items, meaning they will still exist (not be deleted) but they will no longer bevisible to Extranet users. If an item has been Deactivated, you can click Activate to turn it back on again.
3. If you want to delete one or many shared items completely, click the item so the checkbox is checkedand click Remove.
4. The icons in the Actions column are used to email the item to a user and to edit the item , whichyou can also do by clicking on the item name.
5. To manage each item, simply click on it. In the next screen, you can name the item. Click Next to editthe details of the shared item. This page allows you to select what information will be shown to theExtranet user (for example, a particular report).
6. Click Next to continue to the Access Control page where you can set permissions for the Extranet users.You can create public access or go all the way to choosing each individual Extranet user who will haveaccess to that particular item.
7. Click Save when finished and you will either get a Public Link on the next screen which you can sendout in the email provided, or only the users you selected will be emailed the private link to see theShared item.
See Also:
Creating a Timesheet
Inbox/Outbox Portlet
Exporting a Timesheet
Reports
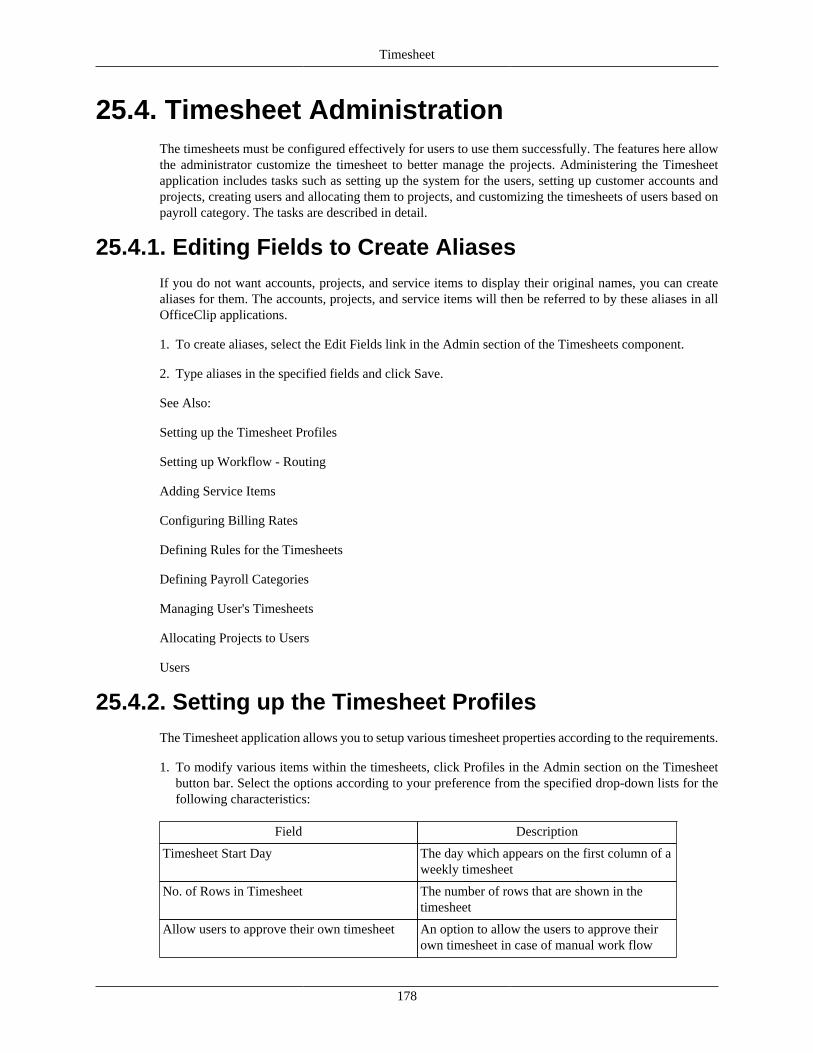
Timesheet
178
25.4. Timesheet AdministrationThe timesheets must be configured effectively for users to use them successfully. The features here allowthe administrator customize the timesheet to better manage the projects. Administering the Timesheetapplication includes tasks such as setting up the system for the users, setting up customer accounts andprojects, creating users and allocating them to projects, and customizing the timesheets of users based onpayroll category. The tasks are described in detail.
25.4.1. Editing Fields to Create AliasesIf you do not want accounts, projects, and service items to display their original names, you can createaliases for them. The accounts, projects, and service items will then be referred to by these aliases in allOfficeClip applications.
1. To create aliases, select the Edit Fields link in the Admin section of the Timesheets component.
2. Type aliases in the specified fields and click Save.
See Also:
Setting up the Timesheet Profiles
Setting up Workflow - Routing
Adding Service Items
Configuring Billing Rates
Defining Rules for the Timesheets
Defining Payroll Categories
Managing User's Timesheets
Allocating Projects to Users
Users
25.4.2. Setting up the Timesheet ProfilesThe Timesheet application allows you to setup various timesheet properties according to the requirements.
1. To modify various items within the timesheets, click Profiles in the Admin section on the Timesheetbutton bar. Select the options according to your preference from the specified drop-down lists for thefollowing characteristics:
Field Description
Timesheet Start Day The day which appears on the first column of aweekly timesheet
No. of Rows in Timesheet The number of rows that are shown in thetimesheet
Allow users to approve their own timesheet An option to allow the users to approve theirown timesheet in case of manual work flow
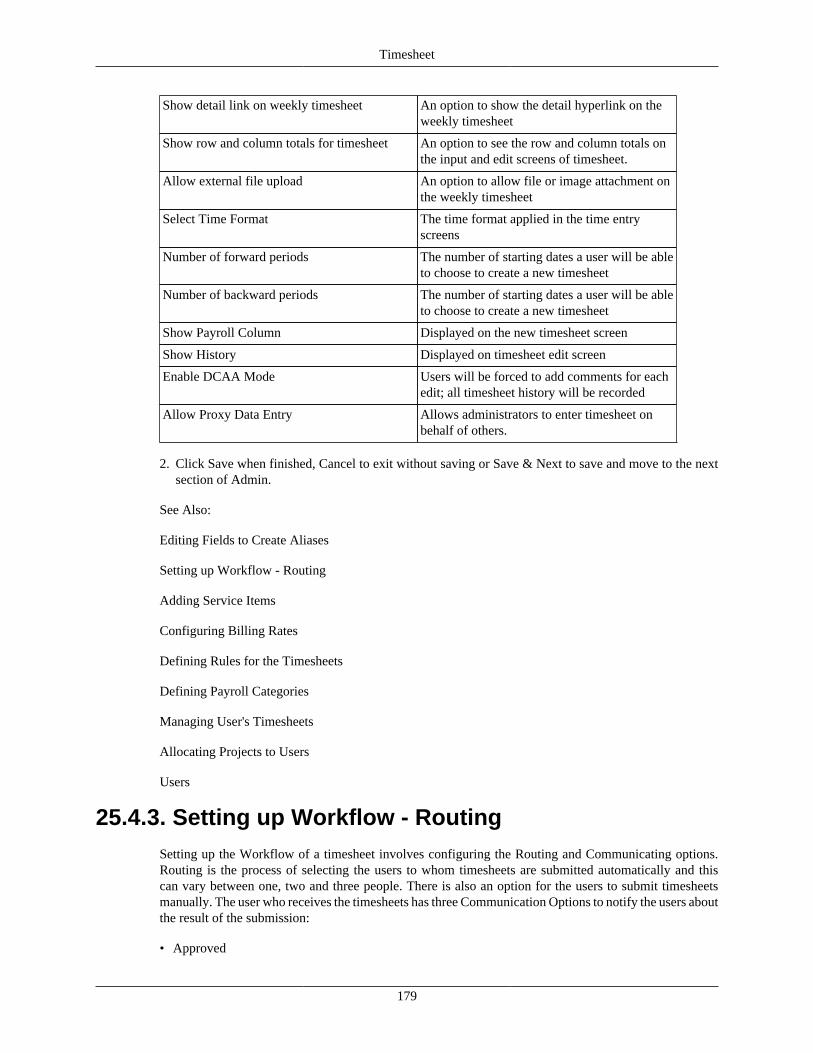
Timesheet
179
Show detail link on weekly timesheet An option to show the detail hyperlink on theweekly timesheet
Show row and column totals for timesheet An option to see the row and column totals onthe input and edit screens of timesheet.
Allow external file upload An option to allow file or image attachment onthe weekly timesheet
Select Time Format The time format applied in the time entryscreens
Number of forward periods The number of starting dates a user will be ableto choose to create a new timesheet
Number of backward periods The number of starting dates a user will be ableto choose to create a new timesheet
Show Payroll Column Displayed on the new timesheet screen
Show History Displayed on timesheet edit screen
Enable DCAA Mode Users will be forced to add comments for eachedit; all timesheet history will be recorded
Allow Proxy Data Entry Allows administrators to enter timesheet onbehalf of others.
2. Click Save when finished, Cancel to exit without saving or Save & Next to save and move to the nextsection of Admin.
See Also:
Editing Fields to Create Aliases
Setting up Workflow - Routing
Adding Service Items
Configuring Billing Rates
Defining Rules for the Timesheets
Defining Payroll Categories
Managing User's Timesheets
Allocating Projects to Users
Users
25.4.3. Setting up Workflow - RoutingSetting up the Workflow of a timesheet involves configuring the Routing and Communicating options.Routing is the process of selecting the users to whom timesheets are submitted automatically and thiscan vary between one, two and three people. There is also an option for the users to submit timesheetsmanually. The user who receives the timesheets has three Communication Options to notify the users aboutthe result of the submission:
• Approved
Timesheet
180
• Rejected
• Submitted
Administrator can set up the notification options so that users can be notified when a timesheet is approved,rejected or submitted. The following notifications are possible:
• The supervisor can be notified whenever a timesheet is submitted for approval.
• The employee can be notified whenever the timesheet is approved or rejected.
An approver can set the timesheet so that it automatically gets approved whenever the timesheet issubmitted to the user. In this scenario, the approver does not have to explicitly approve the timesheet andthe system automatically sends the timesheet to the next stage of the approval path. The timesheet historyrecords the timesheet as approved by the user. The status of the submitted timesheet can be seen in theuser's inbox.
To manage the approval process, you can create approval paths. OfficeClip Timesheet supports two kindsof approval paths:
• Manual Approval Path: In this mode when the users submits the timesheet, they can manually select(from a drop down list) who the timesheet should be sent to for approval. This method is useful insituation where approval paths cannot be determined in advance or changes frequently.
• Pre-determined Approval Path: In this mode the approval paths are created by the administrator andcan be up to three stages long. This means that the timesheet can be routed to up to three people beforebeing finally recorded in the system as approved.
1. To setup Workflow Routing, Click Workflow in the Admin menu bar. Select the User and click Setup.
2. In the Setup Workflow screen, select the Type of Routing, and one, two or all three of theCommunication Options, and click Save.
See Also:
Editing Fields to Create Aliases
Setting up the Timesheet Profiles
Adding Service Items
Configuring Billing Rates
Defining Rules for the Timesheets
Defining Payroll Categories
Managing User's Timesheets
Allocating Projects to Users
Users
25.4.4. Adding Service Items Service Items are the billable entities of a timesheet. The user can modify the service items, and make themeither billable or non-billable. These items can be customized while creating timesheet report templatesfor specific accounts or projects. Once the administrator selects the service items, the users are restricted
Timesheet
181
to submit their timesheets only for the selected items. This feature even allows you to add header andfooter to the timesheet.
1. To create Service items, Click Service Items in the Admin menu bar. In the template, enter the serviceitem code and name. Select the check box in the Is Billable column, to make the item billable.
2. To modify an existing service item, select the corresponding item in the Billable Modify column.
3. Select the corresponding Account/ Project to which the user belongs. If you wish to add header andfooter to your timesheet, enter the required text in the respective text boxes and click Save & Next.
See Also:
Editing Fields to Create Aliases
Setting up the Timesheet Profiles
Setting up Workflow - Routing
Configuring Billing Rates
Defining Rules for the Timesheets
Defining Payroll Categories
Managing User's Timesheets
Allocating Projects to Users
Users
25.4.5. Configuring Billing Rates This involves the setting up of cost and billing rates for all the users of a group. The billing rate is usedwhile billing the customer of the company, and the cost is what is paid to the user or employee. Thebilling process begins upon the date the rates are specified to start. This feature also helps in estimatingthe project cost.
1. Click Rates in the Admin menu bar. Select the User, Customer, Effective Date from when the billingbegins, Cost (per hour), and Billing rate (per hour). Click Save & Add More, to add more rates, or clickSave & Next to configure the next admin feature.
2. Below this template, the table consisting of the current cost and billing rate is also displayed for theuser's convenience. You can view only the latest records or all records by clicking the Show latest and
Show all links respectively. To delete a record, click the cross mark.
See Also:
Editing Fields to Create Aliases
Setting up the Timesheet Profiles
Setting up Workflow - Routing
Adding Service Items
Defining Rules for the Timesheets

Timesheet
182
Defining Payroll Categories
Managing User's Timesheets
Allocating Projects to Users
Users
25.4.6. Defining Rules for the timesheetsRules can be defined to regulate the entries and approvals of timesheets. Rules are a set of predefinedconditions and actions. Based on the condition, an error message or a warning is displayed. Rules can beenabled or disabled. You can save the rules for future use and you can group the rules and run the rulegroup for a single event.
The following conditions are defined in the Timesheets application. You can also use a combination ofconditions.
• Check the Total Hours of the Timesheet
• Check the Total Hours worked in a Day
• Check if one of the columns is left Empty
• Check if a Negative Time is entered on the Timesheet
Example:
ConditionsIf a negative time is entered on the timesheet.
ActionsShow the error message error to the user and do not allow timesheet entry
To define rules, Click Rules in the Admin menu bar. The screen displays the existing rules. Click AddRule, if you want to add new rules. The rule creation process follows a three-step procedure:
• Set Condition: Add by selecting one of the pre-defined conditions.
• Manage Action: Select an action, by entering an Error message or Warning.
• Confirm Rule: Save the rule by giving it a name.
25.4.6.1. Combining rules
You can combine rules for managing complex conditions. You can add a rule and add another rule tomanage a complex condition. Click on the arrow marks to modify your rule. Click the cross mark to deletethe rule. Click Next to set up the error message or warning that will be displayed to the user when theseconditions occur.
25.4.6.2. Editing rules
In the Rules display page, click on the icon, to edit the rule. Click on the cross mark to delete rules.
See Also:
Editing Fields to Create Aliases
Setting up the Timesheet Profiles
Timesheet
183
Setting up Workflow - Routing
Adding Service Items
Configuring Billing Rates
Defining Payroll Categories
Managing User's Timesheets
Allocating Projects to Users
Users
25.4.7. Defining Payroll Categories The Payroll feature helps you to configure various payroll variants such as bonuses, commissions, overtimepay, pay for holidays, and vacations. Using the Payroll feature, you can add, modify and remove payrollcategories, and track various payroll parameters.
1. To add a new payroll category, select the Payroll link in the Admin section and click Add.
2. After submitting payroll category information and tracking information, click Save.
3. To modify a payroll category, select it from the list and click Modify. To remove a payroll category,select it from the list and click Remove.
Note
To disable payroll tracking, enter 0 in the Total and Used columns.
See Also:
Editing Fields to Create Aliases
Setting up the Timesheet Profiles
Setting up Workflow - Routing
Adding Service Items
Configuring Billing Rates
Defining Rules for the Timesheets
Managing User's Timesheets
Allocating Projects to Users
Users
25.4.8. Managing User's timesheets After completing the above configurations, the timesheet report can be previewed for a final check, in thisscreen. This feature even allows you to reroute the timesheet for further modifications. You can also deletean invalid timesheet in this screen.
Timesheet
184
Caution
Once the timesheet is submitted, the user cannot have it returned for any modificationswhatsoever. Only the administrator will be able to return a previously submitted timesheetto the user.
To manage timesheets, Click Manage in the Admin menu bar. Select the date range and user, and clickPreview to view the timesheet report. This timesheet report displays the user, the selected week, numberof working hours put in by the user, status of the submitted timesheet, whether archived, the user's loginID, Comments, and Attachments, if any.
25.4.8.1. Rerouting timesheets
This feature is used in case there is a mistake in a user's timesheet and it must be modified. Only theadministrator will be able to return a previously submitted timesheet to the user. To redirect the timesheet,select the timesheet using the radio button and click Reroute to me. The timesheet is then listed in theuser's Inbox, so that the user can take immediate steps to modify and resubmit the timesheet.
To preview the timesheet, select the user and click preview. Click Cancel to return to the previous screen.To remove the timesheet record, click Delete.
See Also:
Editing Fields to Create Aliases
Setting up the Timesheet Profiles
Setting up Workflow - Routing
Adding Service Items
Configuring Billing Rates
Defining Rules for the Timesheets
Defining Payroll Categories
Allocating Projects to Users
Users
25.4.9. Allocating Projects to UsersWhen users are allocated to multiple projects, timesheets can be configured appropriately for the respectiveusers.
1. To allocate projects to users (or users to projects), click Projects on the toolbar, and select Admin fromthe menu.
2. The Allocate Project link allows you to allocate one or more projects to the selected user. When youselect a user, all the projects are listed down. You can choose one or more projects and click Save toallocate them to the user.
3. The Allocate User link allows you to allocate one or more users to the selected project. When you selecta project, all the users are listed down. You can choose one or more users and click Save to allocatethem to the project.

Timesheet
185
Note
To allocate all projects/users,selectthe Check All Boxesoption. If you do not want to allocateany projects/users, select the Clear All Boxesoption.
See Also:
Editing Fields to Create Aliases
Setting up the Timesheet Profiles
Setting up Workflow - Routing
Adding Service Items
Configuring Billing Rates
Defining Rules for the Timesheets
Defining Payroll Categories
Managing User's Timesheets
Users
25.4.10. UsersIf you log in as an Administrative user (for example Manager), you can view and edit the details of theusers belonging to the same group or organization. You can set up the payroll period information whenconfiguring the user profile. There are four standard periods defined in OfficeClip: weekly, biweekly,semimonthly, and monthly.
1. To manage users in Timesheet, click Admin on the button bar, then click Users.
2. Fill in the fields as needed, then click Save.
See Also:
Editing Fields to Create Aliases
Setting up the Timesheet Profiles
Setting up Workflow - Routing
Adding Service Items
Configuring Billing Rates
Defining Rules for the Timesheets
Defining Payroll Categories
Managing User's Timesheets
Allocating Projects to Users

186
Chapter 26. Users
26.1. Overview The OfficeClip Users application is your virtual office user directory, enabling you to manage theorganization's directory and user contact details, as well as import and export with personal informationmanagers such as MS Outlook, Lotus Organizer, Symantec ACT, Palm Computer, etc. You can also usethe notice board to post group notices, which show up as "sticky posts" next to your name.
26.2. Using UsersThe following sections describe ways to use the OfficeClip Users application effectively.
26.2.1. Accessing Users 1. Log in to OfficeClip
2. Click Users from the left menu within Desktop.
See Also:
Managing Users
Modifying User Details
Searching Users
Import and Export
Creating User Notices
26.2.2. Managing Users This screen allows you to add new users to an organization and give them a password via email, add usersof other organizations to the current organization and remove users from the current organization.
1. To manage users within OfficeClip, click Manage Users on the button bar within Users.
2. Either new users or existing users can be added. To add new users, enter the details in the fields.
3. Select whether to Automatically create password and email to user or to Set password manually byclicking the appropriate radio button. You can also email the new password to the user by checkingor un-checking the box.
4. Click Add when finished.
5. If you would like to add an existing user, choose the user from the dropdown box and click Add.
6. To remove current users, beside the user's name, click either the icon to delete a current user and
send an email notification or click the icon to remove the user without notification.

Users
187
Note
The last administrator of an organization cannot be removed.
See Also:
Accessing Users
Modifying User Details
Searching Users
Import and Export
Creating User Notices
26.2.3. Modifying User Details Any user can change their own personal details, such as their address, phone number, email, etc. and canupload a photo, etc.
1. To view or modify your personal details, click on your name from within the Users List screen.
2. Fill in the information you would like to have listed. If you would like to add a photo, click Edit Picture...
3. A window will pop up. Click Browse to select a file from your hard drive.
4. Select a .gif or .jpg file, preferably one that is 120 pixels or higher. Click Open. Click Upload to uploadthe photo to the database and press Close when finished.
5. The new photo will now be displayed. Click Save when finished or press Cancel to exit without savingchanges.
Note
An administrator can also change any user's information. In addition the administrator (andnot the user themselves) can edit the payroll information. Also, the payroll information ofone user is not visible to another non-administrator user.
See Also:
Accessing Users
Managing Users
Searching Users
Import and Export
Creating User Notices
26.2.4. Searching Users This screen allows you to search for a user, his/her telephone number, what organizations the user belongsto, etc.
Users
188
1. To search for someone within Users, click the Search button on the button bar.
2. Enter the text you want to search for and, from the dropdown box, select whether to search by initials,first name, last name, or email address. Click the Search button.
3. A list of users whose information contains the matching search criteria will be shown with eachorganization in which they are a user. To go to the User List of the organization, click Go.
See Also:
Accessing Users
Managing Users
Modifying User Details
Import and Export
Creating User Notices
26.2.5. Import and Export This screen allows you to import users into OfficeClip from external files or export users within OfficeClipto external files
26.2.5.1. Importing Users from CSV files
1. Log in to OfficeClip
2. Click on Users from the left menu within Desktop.
3. Click on Import/Export button bar.
4. Click Import User from CSV file under Import Users.
5. Export Contact Data from your Personal Information Manager (e.g., MS Outlook) to CSV format.
6. Use the Browse button to select the CSV formatted file and select the appropriate import options byclicking the radio button.
7. Make sure that the first line of the CSV file has headings.
8. Click on the Import button.
26.2.5.2. Importing Users from vCard files
1. Log in to OfficeClip
2. Click on Users from the left menu within Desktop.
3. Click on Import/Export button bar.
4. Click Import User from vCard file under Import Users.
5. Click Browse to find the file you want to upload and then select an import options by clicking the radiobutton.
Users
189
6. Press Import or Cancel to exit the screen without importing.
26.2.5.3. Importing Users from LDAP files
1. Log in to OfficeClip
2. Click on Users from the left menu within Desktop.
3. Click on Import/Export button bar.
4. Click Import User from LDAP file under Import Users.
26.2.5.4. Export Users to CSV or vCard file
1. Log in to OfficeClip
2. Click on Users from the left menu within Desktop.
3. Click on Import/Export button bar.
4. User Export allows you to export users into a CSV file or a vCard file.
5. Click Export Users to CSV or vCard file under Export Users.
6. Select which file you want to export by clicking the appropriate radio button, then click Continue.
7. Select the necessary items to include by clicking the check box beside each item, then click Export totransfer the data. Choose OK and then click Open or Save to view the exported file or Cancel to abort.
8. The exported users will be listed in an Excel spreadsheet.
See Also:
Accessing Users
Managing Users
Modifying User Details
Searching Users
Creating User Notices
26.2.6. Creating User NoticesNotices allow users to, for example, let others know when they will be out of the office, etc. and otherusers can see the notices by the "sticky note" that will appear next to your name in the main User List ofyour organization(s). This lets everyone in the organization see your notice without them sending you anemail and then getting an "out of office" reply.
To create a notice for others to see, click Notice on the button bar within Users.
1. Enter the notice and the dates you would like to have it displayed. These can be changed later ifnecessary. Click Add when finished.
2. Other users will then be able to click on the icon next to your name to see the notice.
Users
190
See Also:
Accessing Users
Managing Users
Modifying User Details
Searching Users
Import and Export