official nintendo power player's guide · pdf fileofficial nintendo power player's...
TRANSCRIPT

Nintendo of America Inc.P.O. Box 957, Redmond, WA 98073-0957 U.S.A.www.nintendo.com
PRINTED IN USA
AVAILABLE AT YOUR NEAREST RETAILER!WWW.NINTENDO.COM
OFFICIALNINTENDO POWER
PLAYER'S GUIDE
49492A INSTRUCTION BOOKLET

IMPORTANT SAFETY INFORMATION: READ THE FOLLOWING WARNINGS BEFORE YOU OR YOUR CHILD PLAY VIDEO GAMES
WARNING - Seizures
Some people (about 1 in 4000) may have seizures or blackouts triggered by light flashes, such as while watching TV or playing video games, even if they have never had a seizure before.Anyone who has had a seizure, loss of awareness, or other symptom linked to an epileptic condition should consult a doctor before playing a video game.Parents should watch when their children play video games. Stop playing and consult a doctor if you or your child have any of the following symptoms:
Convulsions Eye or muscle twitching Loss of awareness
Altered vision Involuntary movements Disorientation
To reduce the likelihood of a seizure when playing video games:
Sit or stand as far from the screen as possible.Play video games on the smallest available television screen.Do not play if you are tired or need sleep.Play in a well-lit room.Take a 10 to 15 minute break every hour.
Playing video games can make your muscles, joints or skin hurt after a few hours. Follow these instructions to avoid problems such as Tendinitis, Carpal Tunnel Syndrome or skin irritation:
Take a 10 to 15 minute break every hour, even if you don't think you need it.If your hands, wrists or arms become tired or sore while playing, stop and rest them for several hours before playing again.If you continue to have sore hands, wrists or arms during or after play, stop playing and see a doctor.
WARNING - Repetitive Motion Injuries
WARNING: PLEASE CAREFULLY READ THE PRECAUTIONS BOOKLET INCLUDED WITH THIS PRODUCT BEFORE USING YOUR NINTENDO ® HARDWARE SYSTEM, GAME DISC OR ACCESSORY. THIS BOOKLET CONTAINS IMPORTANT SAFETY INFORMATION.
1.2.3.4.5.
To avoid electric shock when you use this system:
Use only the AC adapter that comes with your system.Do not use the AC adapter if it has damaged, split or broken cords or wires.Make sure that the AC adapter cord is fully inserted into the wall outlet or extension cord.Always carefully disconnect all plugs by pulling on the plug and not on the cord. Make sure the Nintendo GameCube power switch is turned OFF before removingthe AC adapter cord from an outlet.
Playing video games can cause motion sickness. If you or your child feel dizzy or nauseous when playing video games with this system, stop playing and rest. Do not drive or engage in other demanding activity until you feel better.
The Nintendo GameCube is a Class I laser product. Do not attempt to disassemble the Nintendo GameCube. Refer servicing to qualified personnel only.
Caution - Use of controls or adjustments or procedures other than those specified herein may result in hazardous radiation exposure.
CONTROLLER NEUTRAL POSITION RESET
If the L or R Buttons are pressed or the Control Stick or C Stick are moved out of neutral position when the power is turned ON, those positions will be set as the neutral position, causing incorrect game control during game play.
To reset the controller, release all buttons and sticks to allow them to return to the correct neutral position, then hold down the X, Y and START/PAUSE Buttons simultaneously for 3 seconds.
WARNING - Electric Shock
CAUTION - Motion Sickness
CAUTION - Laser Device
L Button R Button
C StickControl
Stick


76
The Chozo... Over millennia, this bird-like race of creaturesmade incredible technological and scientific leaps. Traveling at willthrough space, they built many marvels across the universe–technologi-cal wonders of unfathomable complexity and cities unmatched in beauty.They shared their knowledge freely with more primitive cultures andlearned to respect and care for life in all its forms.
Even as their society reached its technological peak, however,the Chozo felt their spirituality wane. Their culture was steeped inprophecy and lore, and they foresaw the decline of the Chozo coincidingwith the rise of evil. Horrified by the increasing violence in the universe,they began to withdraw into themselves, forgoing technology in favor ofsimplicity. Tallon IV was one of several refuges they built–a colony bereftof technology, built of natural materials and wedded to the land and itscreatures.
The years passed, and in time a great meteor crashed intoTallon IV, sending a massive spume of matter into the atmosphere andimpregnating the land with a cancerous element known as Phazon. Thiselement immediately sank into the earth and water, poisoning life wher-ever it bloomed. Most plants and animals died, while others mutated intohideous forms.
The Chozo called upon all of their knowledge and technology tocontrol the power of the Phazon, but their efforts were doomed to fail. Allthey could do was build a temple over the crater at the impact site, sepa-rate the Phazon core, and seal it away. Believing that someday a saviorwould return to the planet, the Chozo left for an unknown destination,leaving behind nothing but engraved accounts of their time on Tallon IV.
The chozo

98
But the Space Pirates were far from finished. They immediatelysplit their survivors into two main camps. One headed to Zebes to beginrebuilding their ravaged facility and resuscitating Mother Brain, Ridley,and Kraid. The second set out in search of a planet with powerful energyresources. They didn't search far before they discovered Tallon IV, whichwas still emanating huge pulses of energy from the Phazon containedbeneath the Chozo temple. Entranced by the massive potential of thestrange mutagen, they immediately moved in, retrofitting their laborato-ries, transporters, and life-support systems into the Chozo Ruins.
As the Space Pirates mined the Phazon and experimented withit, they found that its capacity to mutate was unlike anything they'd everseen, and they promptly started combining it with indigenous life-forms.They refined their operation; powering their machinery with thermal-powered engines sunk in the molten depths of Tallon IV, they drove deepmineshafts and mined more and more Phazon, shipping it to their twomain labs in the Phendrana Drifts, where sub-zero temperatures madespecimen containment safer. Research leaped forward: by harnessingPhazon's power, they were able to create untold horrors that soonpatrolled the dark caverns below Tallon IV's crust.
The Space Pirates also transported many species to their orbiting ship forzero-G Phazon experiments, unaware that Samus Aran had finally
tracked their ship to its low orbit. As they continued with theirunnatural experiments, Samus sped toward Tallon
IV, preparing to wipe them out once and for all...
THE space Pirates
The Space Pirates were interstellar nomads, technologicallydvanced in both space travel and weaponry. When they plundered the
Metroid population that had been discovered by the Galactic Federationn SR388, they recognized in them massive military and energy resourceotential. They immediately invaded the nearby planet of Zebes, wipingut all life (including most of the indigenous Chozo) and building a mas-ve network of research facilities below the planet's surface.
Deep below the surface of Zebes, the Space Pirates researchedMetroids for many years, even as a young girl orphaned by their raid onhe neighboring planet K-2L was growing up among the Chozo. Traineds a warrior and infused with Chozo blood, Samus Aran donned a Chozo-
made Power Suit and cut a swath through the Space Pirates’ operation,estroying everything in her path, including the gargantuan mainstays ofhe Space Pirate army, Ridley and Kraid. She eventually made it to theore of their base, destroyedll the Metroids she saw,nd seemingly blew uphe Mother Brain.

1110
et your Metroid Prime Game Disc in the Nintendo GameCube and closehe Disc Cover, then turn on the POWER Button. When the title screenppears, press start to continue to the Main Menu.
the adventure begins
Getting Started
efore playing, you must first create aMetroid Prime save file. You need to have aMemory Card inserted in slot A with at least blocks of free space on it in order to create file for Metroid Prime. Please refer to the
Nintendo GameCube instruction bookletpages 18-20) for instructions on how to ormat, copy, and erase Memory Card files.
this is your first time playing, select one ofhe NEW GAME files and press the A Button.
When the words START and OPTIONS appear,elect START and press the A Button to begin. you have a previously saved game file, sim-ly choose that file to continue from your lastave point.
n order to save your progress throughMetroid Prime, you must find Save Roomsocated throughout Tallon IV's many regions.
When you find one of these rooms, enter theaving apparatus. When asked if you want toave, choose YES and press the A Button. Allf your progress up to that point will then beaved to the Memory Card in Slot A.
Erasing Files
you want to erase a file, select Erase from the bottom of the screen,hoose the file you want to erase, then press the A Button. Remember:nce you erase a file, you can never recover it, so be careful!
Progressive Scan Mode
This game can be set to display a higher resolution image on TVs thatsupport progressive scan mode (EDTV, HDTV).
In order to use the progressive scan mode, you need a TV that canaccept this type of input (see your TV operation manual) and aNintendo GameCube Component Video cable (available only throughNintendo. Visit www.nintendo.com or call 1-800-255-3700).
To activate the progressive scan mode, press and hold the B Buttonwhile the Nintendo GameCube logo is being displayed until the mes-sage "Display in Progressive Scan mode?" appears. Select YES to acti-vate the mode.
Please note that on some TVs, activating the progressive scan modewill set the format of the image to a wide-screen (16:9) format.
Options
From the pause screen, press the L Button to customize many featuresof your game-play experience. You can also access the Options screenfrom the Main Menu before you start your game.
Visor
Adjust Samus's visor opacity,her helmet opacity, and theHUD lag time.
display
Adjust the brightness and dimensions of the game playscreen.
Sound
Adjust the volume of the musicand sound effects, or selectbetween Mono, Stereo, andDolby Surround modes.
Controller
Choose to play with standardcontrol or a reversed Y-axis. Youcan also turn the Rumble featureon or off and reverse thevisor/beam configuration.
Title Screen
Main Menu
Save Room
1312
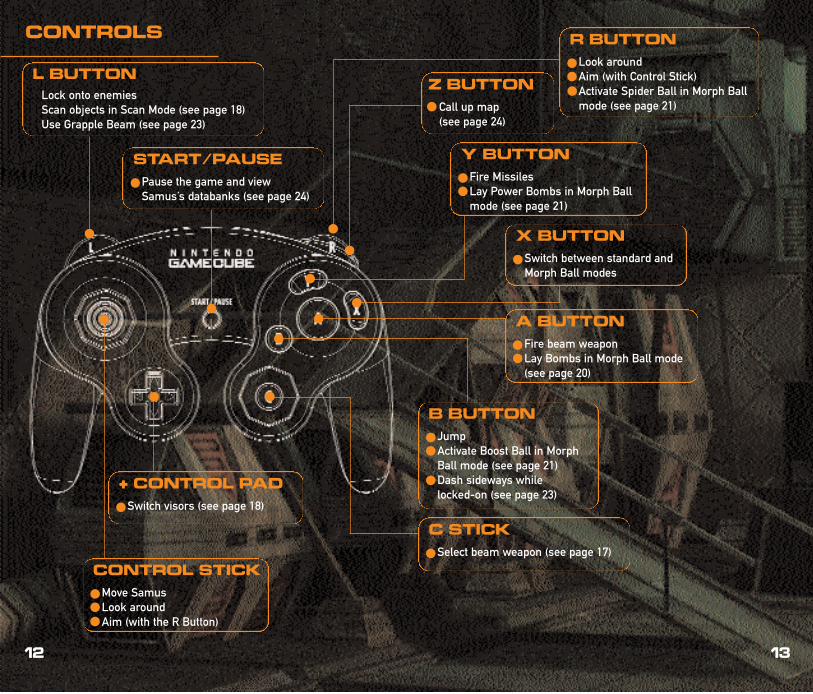
CONTROLS
Lock onto enemiesScan objects in Scan Mode (see page 18)Use Grapple Beam (see page 23)
L BUTTONLook aroundAim (with Control Stick)Activate Spider Ball in Morph Ballmode (see page 21)
R BUTTON
Pause the game and viewSamus’s databanks (see page 24)
START/PAUSEFire MissilesLay Power Bombs in Morph Ballmode (see page 21)
Y BUTTON
Switch between standard andMorph Ball modes
X BUTTON
Fire beam weaponLay Bombs in Morph Ball mode(see page 20)
A BUTTON
JumpActivate Boost Ball in MorphBall mode (see page 21)Dash sideways while locked-on (see page 23)
B BUTTON
Select beam weapon (see page 17)
C Stick
Switch visors (see page 18)
+ Control Pad
Move SamusLook aroundAim (with the R Button)
Control Stick
Call up map (see page 24)
Z BUTTON

This area shows a small section of the current map. If you press the Z Button,you'll call up the full-screen map (seepage 24).
Map
The numeric display and horizontal gaugetrack the amount of energy in Samus'sEnergy Tank. The highlighted squares abovethe main energy gauge indicate EnergyTanks that Samus has in reserve.
Energy Reserves
The wedge at the top of thecircular radar display isSamus's field of vision.Enemies within the radar'srange appear as orange dots.
radar
The vertical gauge and numeric displaytrack the number of Missiles Samus hasin reserve. When Samus's Missiles arearmed, this display glows more brightly.
Missile ReservesThis gauge warns Samus of nearbyenvironmental dangers. It rises in accordance with the proximity of thethreat—when the threat is extremelynear, the word "Warning" will appear. IfSamus is actually being injured by thehazard, the word "Damage" will appear.
Threat
assessment
The symbols here represent Samus's different beam weapons. Each one corre-sponds to a direction on the C Stick—press the C Stick in the appropriate direc-tion to select that weapon (see page 17).
Beam Weapons
The symbols here correspond to Samus'sdifferent visors. Each one is mapped to adirection on the + Control Pad—simplypress the + Control Pad in the appropriatedirection to select that visor (see page 18).
Visors
1514
POWER SUIT INTERFACE
amus's Power Suit is technologically complex, but all of itsagnostic functions are projected on the inside of the visor for
asy access. Knowing the status of the suit at all times may makehe difference between survival and failure, so it’s important to nderstand every part of the readout.
This reticule will automatically track enemies or scan points. Bypressing the L Button, you will lock onto whatever point is currentlyhighlighted. Bear in mind that the reticule will change in appearancedepending on which visor Samus is currently using (see page 18).
Targeting reticule

Plasma Beam
Plasma beam
The most powerful beam weapon in Samus'sarsenal, the short-range Plasma Beam launch-es streams of molten energy that can ignitesome enemies and melt ice. Like all beamweapons, the Plasma Beam can combine withMissiles for a high-powered combo attack onceSamus finds its combo power-up (see page 22).
1716
Armor & Armaments
s Samus delves deeper into the Space Pirates' operation, she'll findower-ups that improve both her arsenal and her suit. Every power-up shends will help her access something new in the vast regions of Tallon IV, soemember areas where she can't progress and return once she's gainedew abilities. Pay special attention to the colors of closed doors, as theyhould help you determine what weapons you need to use to open them.
Power Suit
power suit
amus's standard Power Suit was builtpecifically for her by the Chozo people. Its integrated with her body, acting as a sortf second skin—not only does it providehielding in battle and augmented physicaltrength, but its life-support systems allower to survive in water and even space
without additional equipment.
Varia suit
nce Samus finds the Varia Suit, she will beble to survive extremely high temperatureske those found in the fiery depths of
Magmoor Caverns.
Varia Suit
Gravity suit
he Gravity Suit upgrades Samus's suit evenmore. It negates the effects of water, allowingSamus to move and jump normally even whileubmerged.
Gravity Suit
Power Beam
power Beam
This is Samus's standard beam, which you canfire continuously by rapidly tapping the AButton. As with all beam weapons, the PowerBeam becomes much stronger once Samusfinds the Charge Beam power-up. Once Samushas found the Charge Beam, press and hold theA Button to charge up her shot, then releasethe A Button to fire a powerful blast.
Ice Beam
Ice Beam
The Ice Beam has a slower rate of fire than thePower Beam, but it makes up for this flaw withits ability to immobilize enemies briefly with alayer of ice. Some enemies are particularlyvulnerable to this weapon, so experiment withit. The Ice Beam may destroy weak enemiesrather than freezing them.
Wave Beam
Wave Beam
The Wave Beam fires three oscillating wavesof energy. As with the other beam weapons,the Wave Beam is especially effective againstcertain enemies and can be powered up onceSamus finds the Charge Beam. The WaveBeam also features a limited homing effect.

1918
Behind the Visors
amus's most important tool is her suit, and it can provide her with aealth of information by interfacing with various visors. Samus will start
he game with two—the standard Combat Visor and the Scan Visor—butventually she'll use four, each of which can be accessed easily by ressing different directions on the + Control Pad.
Combat Visor
his default visor is standard for battle and provides Samus with all theeneral information she needs (see pages 14-15).
Scan Visor
When Samus uses the Scan Visor, a magnifyingeticule will appear in the center of her visor.his reticule picks out anything that can becanned—from creatures to computer termi-als—and shows it as an orange or red ymbol. If you press and hold the L Button
while locked onto one of these symbols, thecan Visor will download information. Once it'sone downloading, the visor will display message.
Scan Visor
Log Book
esides using the Scan Visor to solve puzzles,nd enemies' weak spots, and unlock variousreas in the game, Samus will also frequentlyownload pieces of information that can beored in her Log Book. These can be accessedy pressing START/PAUSE during game playee page 25) and include creature morpholo-es, Space Pirate logs, Chozo literature, and
much more.
thermal Visor
Once Samus finds the Thermal Visor, she cantrack enemies using their heat signatures.Not only does this visor help locate enemieshidden in dark areas, but it can also be usedfor acquiring alternate targets on enemies. Athermal scan can often find a hidden weakspot on an otherwise difficult enemy. Not onlythat, but thermal scans show other clues thatthe naked eye can't discern; if you run into adead end, try scanning the entire area withthe Thermal Visor equipped.
Thermal Visor
x-Ray Visor
After Samus tracks down the X-Ray Visor,she'll be able to peer through walls to findhidden passages and even see invisibleobjects. This visor also helps track anyenemies that use optical camouflage torender themselves invisible to the nakedeye. As with the Thermal Visor, the X-RayVisor can often identify alternate means ofattacking foes.
Searching for Clues
X-Ray Visor
Tracking the Invisible
2120
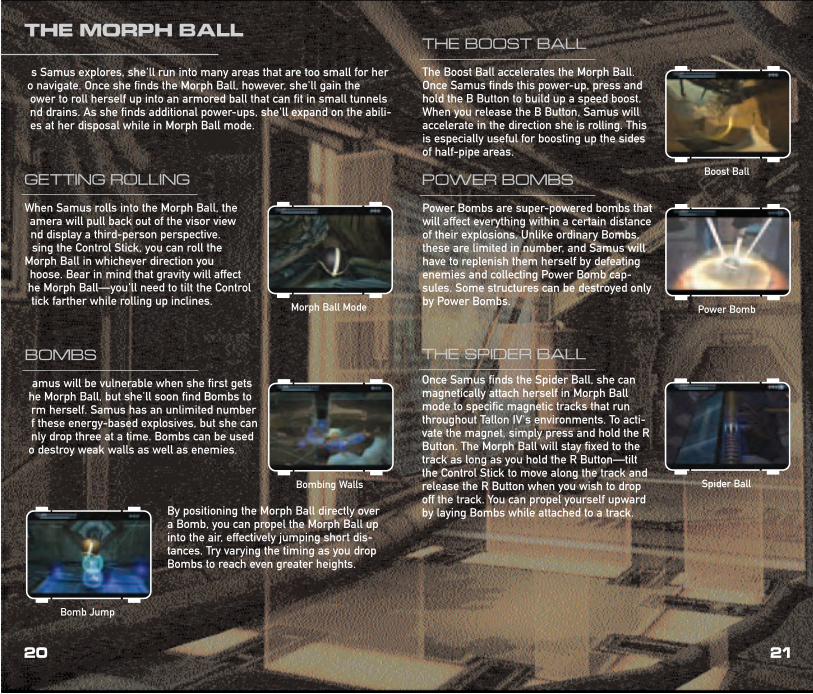
The Morph Ball
s Samus explores, she'll run into many areas that are too small for hero navigate. Once she finds the Morph Ball, however, she'll gain theower to roll herself up into an armored ball that can fit in small tunnelsnd drains. As she finds additional power-ups, she'll expand on the abili-es at her disposal while in Morph Ball mode.
Getting Rolling
When Samus rolls into the Morph Ball, theamera will pull back out of the visor viewnd display a third-person perspective.sing the Control Stick, you can roll the
Morph Ball in whichever direction youhoose. Bear in mind that gravity will affecthe Morph Ball—you'll need to tilt the Controltick farther while rolling up inclines. Morph Ball Mode
The Boost Ball
The Boost Ball accelerates the Morph Ball.Once Samus finds this power-up, press andhold the B Button to build up a speed boost.When you release the B Button, Samus willaccelerate in the direction she is rolling. Thisis especially useful for boosting up the sidesof half-pipe areas.
Boost Ball
Bombs
amus will be vulnerable when she first getshe Morph Ball, but she'll soon find Bombs torm herself. Samus has an unlimited numberf these energy-based explosives, but she cannly drop three at a time. Bombs can be usedo destroy weak walls as well as enemies.
Bombing Walls
By positioning the Morph Ball directly overa Bomb, you can propel the Morph Ball upinto the air, effectively jumping short dis-tances. Try varying the timing as you dropBombs to reach even greater heights.
Bomb Jump
Power Bombs
Power Bombs are super-powered bombs thatwill affect everything within a certain distanceof their explosions. Unlike ordinary Bombs,these are limited in number, and Samus willhave to replenish them herself by defeating enemies and collecting Power Bomb cap-sules. Some structures can be destroyed onlyby Power Bombs.
Power Bomb
The spider Ball
Once Samus finds the Spider Ball, she canmagnetically attach herself in Morph Ballmode to specific magnetic tracks that runthroughout Tallon IV's environments. To acti-vate the magnet, simply press and hold the RButton. The Morph Ball will stay fixed to thetrack as long as you hold the R Button—tiltthe Control Stick to move along the track andrelease the R Button when you wish to dropoff the track. You can propel yourself upwardby laying Bombs while attached to a track.
Spider Ball

2322
Power-ups & power moves
here are many other power-ups strewn across the world of Metroidrime, and all of them will play vital roles in Samus's quest. Scan everyoom for possible power-ups—very often, you'll need to solve a puzzle toeach a specific power-up. You'll also want to practice some advanced
moves that will help you progress through the game.
Energy Tanks
amus starts her adventure with minimalnergy reserves. For every Energy Tank sheracks down, however, her maximum energyeserve will grow by 100 units. The number ofighlighted squares above the energy gauget the top of Samus's Combat Visor display
ndicates how many full tanks she has ineserve. Energy Tank
Missiles & missile combos
Every beam weapon can be combined withMissiles to perform a super combo onceSamus has found that beam weapon'scombo power-up. To use a combo, chargeup your beam weapon all the way by press-ing and holding the A Button. Then, withoutreleasing the A Button, press the Y Button.Bear in mind that combos drain your Missilereserves. Some obstructions can bedestroyed only by specific combo attacks.
Missile
Super Missile Combo
The Space Jump
The Space Jump upgrade will activate boosterson Samus's suit, enabling her to jump a sec-ond time while airborne. Once she's found theupgrade, make Samus jump once by pressingthe B Button, then press it a second time whileshe is in the air to jump a second time and getto previously unreachable areas.
Space Jump
The Grapple Beam
After she tracks down the Grapple Beam, Samuswill be able to latch onto specific energy nodes withan energy beam from her left arm. The icon abovea node will brighten when it is in range; simplypress and hold the L Button to latch onto it with theGrapple Beam. Tilt the Control Stick to vary yourswinging angle, then release the L Button at thetop of Samus's swing to launch into the air.
AdvanceD Battle Tactics
Lock-On Orbiting
nce Samus arms herself with Missiles, firehem by pressing the Y Button. Keep an eyeut for Missile Expansions; for every one ofhese Samus finds, her Missile arsenal willrow by five. Missiles will home in on hatever Samus locks on, and they can alsoe used to blow up hatch locks and destroypecific types of impediments. To replenishamus's Missiles, collect Missile capsulesom fallen enemies and crates.
Grapple Node
Grapple Beam
Samus has a wealth of weapons and movesat her disposal, and you'll have to practicewith all of them if you hope to keep heralive. One of the most important battle tactics is using the L Button to lock onto targets. If you press and hold the L Buttonwithout targeting anything, you will be ableto strafe side-to-side by tilting the Control Stick.
However, if you press and hold the L Button while targeting anenemy, you will then circle around your lock-on point by tilting theControl Stick. Additionally, you can perform a quick dash move whileorbiting a target–simply tap the B Button while locked-on to leapsideways. Once Samus finds the Space Jump Boots, she can performa double-dash by tapping the B Button twice. Using these moves willbe key to surviving battles with the many enemies Samus will face.

2524
samus’s Databanks
amus's suit can store a huge quantity of data that will help her alonger journey. Most information, with the exception of the map, can beccessed by pressing START/PAUSE during game play. Once the
nventory screen appears, you can use the L and R Buttons to view theptions screen or the Log Book screen.
Map
y pressing the Z Button during game play, youan call up a three-dimensional map display ofhe region Samus is currently in. Unlessamus has downloaded the full map for thatarticular region by finding a Map Room, thenly areas that will appear will be ones thathe has explored already. Once she downloadshe map, however, rooms she has explored willlow orange while those yet to be explored willppear without color.
he colored dots on the map are exits–the olors indicate which weapons will open theoors. Samus herself will appear as an arrowointing in the direction she currently faces.ou can zoom in or out with the L and Ruttons, move around with the C Stick, orotate the 3-D display with the Control Stick. o view the World Map, press the A Button. o toggle the map key on and off, press the Button.
Map Download
Reading the Map
nventory
rom this screen, you can view Samus andead additional information about Samus'surrent state, from the details of her power-ps to the abilities of her weapons. Simplyelect what you want to learn about andress the A Button to bring up an
nformational display.Inventory Screen
The Log Book
As you play through the game, be sure to scananything and everything. Very often you'll learna crucial bit of information by scanning anenemy or downloading one of the manyresearch logs located around the SpacePirates' operation. To view information that youhave downloaded to your Log Book, pressSTART/PAUSE and access the Log Book bypressing the R Button. From there, select thedata you want to view and press the A Buttonto access your databanks.
Log Book Entry
Pirate Data
The Space Pirates have document-ed their research on Tallon IV, andSamus will frequently find entirelog entries that offer glimpses intothe insidious operation.
Chozo Lore
Fragments of Chozo lore arespread around the ruins of theircivilization, waiting to be translatedby Samus. Their insights may shedlight on the mystery of thePhazon...
Creatures
Whenever Samus scans an enemy,she will download valuable infor-mation regarding weak points andbehavioral patterns, as well asvisual diagnostics of the creature'sform.
Research
Many items will help Samus in herquest, and scanning them will pro-vide brief informational data forlater study.
Artifacts
This section of the Log Book trackstwelve Artifacts left behind by theChozo. Without all twelve of theseArtifacts, Samus cannot succeed inher mission.
2726
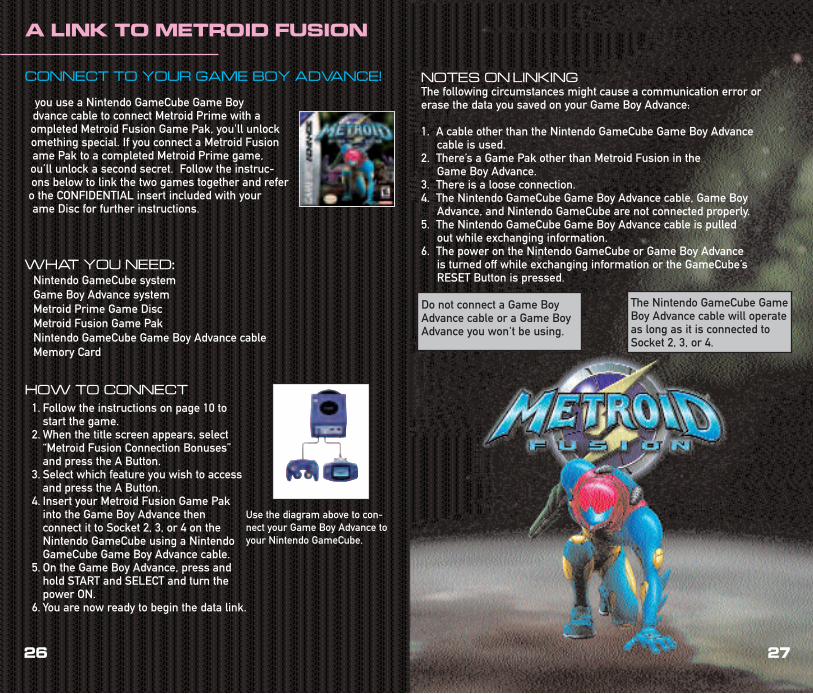
you use a Nintendo GameCube Game Boydvance cable to connect Metroid Prime with aompleted Metroid Fusion Game Pak, you'll unlockomething special. If you connect a Metroid Fusioname Pak to a completed Metroid Prime game,ou’ll unlock a second secret. Follow the instruc-ons below to link the two games together and refero the CONFIDENTIAL insert included with yourame Disc for further instructions.
What you need:
Nintendo GameCube system Game Boy Advance system Metroid Prime Game Disc Metroid Fusion Game Pak Nintendo GameCube Game Boy Advance cable Memory Card
The Nintendo GameCube GameBoy Advance cable will operate as long as it is connected to Socket 2, 3, or 4.
Use the diagram above to con-nect your Game Boy Advance toyour Nintendo GameCube.
Do not connect a Game BoyAdvance cable or a Game BoyAdvance you won't be using.
NOTES ON LINKING
The following circumstances might cause a communication error orerase the data you saved on your Game Boy Advance:
1. A cable other than the Nintendo GameCube Game Boy Advance cable is used.
2. There’s a Game Pak other than Metroid Fusion in the Game Boy Advance.
3. There is a loose connection.4. The Nintendo GameCube Game Boy Advance cable, Game Boy
Advance, and Nintendo GameCube are not connected properly.5. The Nintendo GameCube Game Boy Advance cable is pulled
out while exchanging information.6. The power on the Nintendo GameCube or Game Boy Advance
is turned off while exchanging information or the GameCube’s RESET Button is pressed.
A LINK TO Metroid FUsion
Connect to your game boy Advance!
Follow the instructions on page 10 tostart the game.When the title screen appears, select“Metroid Fusion Connection Bonuses”and press the A Button.Select which feature you wish to accessand press the A Button.Insert your Metroid Fusion Game Pakinto the Game Boy Advance then connect it to Socket 2, 3, or 4 on theNintendo GameCube using a NintendoGameCube Game Boy Advance cable.On the Game Boy Advance, press andhold START and SELECT and turn thepower ON.You are now ready to begin the data link.
1.
2.
3.
4.
5.
6.
How to connect
2928
EXECUTIVE PRODUCERSatoru Iwata
PRODUCERS Shigeru Miyamoto Kenji Miki
COPRODUCERSKensuke Tanabe Akira Otani
COORDINATION Risa Tabata
MUSIC Kenji Yamamoto
MUSIC (ASSISTANT)Kouichi Kyuuma
CONNECTIVITY PROGRAMMING Tomohiro Kawase Hideaki Shimizu
TECHNICAL SUPPORTHironobu Kakui Yoshihito IkebataYoshito Yasuda
SUPERVISOR (SAMUS MODEL)Tomoyoshi Yamane Chiharu Sakiyama
SPECIAL THANKSTakehiro Izushi Yoshio SakamotoTakahiro Harada Takao SawanoHiroyuki Kimura Masashi GotoAkiko Miyano Super Mario Club
PRODUCER (NOA)Jeff Miller
TRANSLATOR/BILINGUALCOORDINATORSTim O'Leary Kiyohiko AndoScot Ritchey
TESTING/COORDINATORMichael Leslie
EDITORLeslie Swan
WRITER/EDITORNate Bihldorff
TESTING DIRECTORMichael Kelbaugh
TESTING MANAGERKyle Hudson
TESTING SUPERVISOREric Bush
TESTING PROJECT COORDINATORThomas Hertzhog
TESTINGMarc Doyal Jason MahaffaShane Lewis Michael ChipmanKathy Huguenard Jim HoldemanTim Casey Nicko GonzalezJack Smart Melvin Forrest
TESTING TECHNICIANSChris Needham David Hunziker
SPECIAL THANKSTatsumi Kimishima Mike FukudaKamon Yoshimura Chris CampbellTom Eberspecher Jim Wornell
CREDITS
Retro Studios Ncl NOAXECUTIVE PRODUCEReve Barcia
RODUCER ichael Mann
EAD DESIGNERark Pacini
ENIOR DESIGNERSarl Deckard Mike Wikan
ESIGNERSason Behr Tony Giovanniniaul Reed Amanda Rubright
EAD ENGINEERark Johnston
ECHNICAL LEAD ENGINEERSack Mathews Andy O’Neil
ENIOR ENGINEERSark Haigh-Hutchinsonavid ‘Zoid’ Kirsch
NGINEERSd Chauviere Steve McCrea
ving Mah Kai Martinex Quinones Marco Thrush
kintunde Omitowoju
EAD ARTISTdd Keller
ENIOR ARTISTSike Sneath Chris Voellmann
ARTISTSChuck Crist Don HoganAndrew Jones Gene KohlerRyan Powell Elizabeth PughLuis Ramirez Danny RichardsonAlejandro Roura Elben SchafersLeRoy Strauss
ANIMATORSDerek Bonikowski Dax PallottaStephen Zafros
AUDIO LEADClark Wen
SOUND DESIGNERS (CONTRACTORS)Frank Bry Crispin HandsKen Kurita-Ditz Kristoffer Larson
PRODUCTION ASSISTANTRyan Harris
SPECIAL THANKSAl Artus Kerry Anne OdemGeorge Thomas Eugene KwonTian Lim Greg McBrideCarl Mueller Dante Treglia
ADDITIONAL CONTRIBUTORSScott Johnson Rick KohlerMartin L'Heureux Frank LafuenteTom Papadatos Audrey Peterson

3130
ECUTIVE PRODUCERtoru Iwata
-PRODUCERnsuke Tanabe Akira Otani
USIC nji Yamamoto
NNECTIVITY PROGRAMMING mohiro Kawase Hideaki Shimizu
PERVISOR (SAMUS MODEL)moyoshi Yamane Chiharu Sakiyama
ODUCER (NOA)ff Miller
ANSLATOR/BILINGUAL COORDINATORm O'Leary Kiyohiko Andoot Ritchey
ITORslie Swan
STING DIRECTORchael Kelbaugh
PRODUCER Shigeru Miyamoto Kenji Miki
COORDINATION Risa Tabata
MUSIC ASSISTANTKouichi Kyuuma
TECHNICAL SUPPORTHironobu Kakui Yoshihito IkebataYoshito Yasuda
SPECIAL THANKSTakehiro Izushi Yoshio SakamotoTakahiro Harada Takao SawanoHiroyuki Kimura Masashi GotoAkiko Miyano Super Mario Club
TESTING/COORDINATORMichael Leslie
WRITER/EDITORNate Bihldorff
SPECIAL THANKSTatsumi Kimishima Mike FukudaKamon Yoshimura Chris CampbellTom Eberspecher Jim Wornell
NINTENDO
Important
WARNING: Copying of any Nintendo game is illegal and is strictly prohibited by domestic and international intellectual property laws. “Back-up” or “archival” copies are not authorized and are not necessary to protect your software. Violators will be prosecuted.
This Nintendo game is not designed for use with any unauthorized copying device or any unlicensed accessory. Use of any such device will invalidate your Nintendo product warranty. Nintendo (and/or any Nintendo licensee or distributor) is not responsible for any damage or loss caused by the use of any such device. If use of such device causes your game to stop operating, disconnect the device carefully to avoid damage and resume normal game play. If your game ceases to operate and you have no device attached to it, please contact Nintendo Customer Service (see below).
The contents of this notice do not interfere with your statutory rights.
This booklet and other printed materials accompanying this game are protected by domestic and international intellectual property laws.
For further information or assistance, please contact:Nintendo Consumer Servicewww.nintendo.com or call 1-800-255-3700 (U.S. and Canada)
Warranty & Service Information
You may need only simple instructions to correct a problem with your product. Try our web site at www.nintendo.com or call our Consumer Assistance Hotline at 1-800-255-3700 rather than going to your retailer. Hours of operation are 6 a.m. to 9 p.m., Pacific Time, Monday - Saturday, and 6 a.m. to 7 p.m., Pacific Time, on Sundays (times subject to change). If the problem cannot be solved with the troubleshooting information available on-line or over the telephone, you will be offered express factory service through Nintendo or referred to the nearest NINTENDO AUTHORIZED REPAIR CENTERSM. Please do not send any products to Nintendo without contacting us first.
HARDWARE WARRANTYNintendo of America Inc. ("Nintendo") warrants to the original purchaser that the hardware product shall be free from defects in material and workmanship for twelve (12) months from the date of purchase. If a defect covered by this warranty occurs during this warranty period, Nintendo or a NINTENDO AUTHORIZED REPAIR CENTER will repair the defective hardware product or component, free of charge. The original purchaser is entitled to this warranty only if the date of purchase is registered at point of sale or the consumer can demonstrate, to Nintendo's satisfaction, that the product was purchased within the last 12 months.
GAME PAK & ACCESSORY WARRANTYNintendo warrants to the original purchaser that the product (Game Paks and accessories) shall be free from defects in material and workmanship for a period of three (3) months from the date of purchase. If a defect covered by this warranty occurs during this three (3) month warranty period, Nintendo or a NINTENDO AUTHORIZED REPAIR CENTER will repair the defective product, free of charge.
SERVICE AFTER EXPIRATION OF WARRANTYPlease try our web site at www.nintendo.com or call the Consumer Assistance Hotline at 1-800-255-3700 for troubleshooting information and/or referral to the nearest NINTENDO AUTHORIZED REPAIR CENTER. In some instances, it may be necessary for you to ship the complete product, FREIGHT PREPAID AND INSURED FOR LOSS OR DAMAGE, to the nearest service location. Please do not send any products to Nintendo without contacting us first.
WARRANTY LIMITATIONSTHIS WARRANTY SHALL NOT APPLY IF THIS PRODUCT: (a) IS USED WITH PRODUCTS NOT SOLD OR LICENSED BY NINTENDO (INCLUDING, BUT NOT LIMITED TO, NON-LICENSED GAME ENHANCEMENT AND COPIER DEVICES, ADAPTERS, AND POWER SUPPLIES); (b) IS USED FOR COMMERCIAL PURPOSES (INCLUDING RENTAL); (c) IS MODIFIED OR TAMPERED WITH; (d) IS DAMAGED BY NEGLIGENCE, ACCIDENT, UNREASONABLE USE, OR BY OTHER CAUSES UNRELATED TO DEFECTIVE MATERIALS OR WORKMANSHIP; OR (e) HAS HAD THE SERIAL NUMBER ALTERED, DEFACED OR REMOVED.
ANY APPLICABLE IMPLIED WARRANTIES, INCLUDING WARRANTIES OF MERCHANTABILITY AND FITNESS FOR A PARTICULAR PURPOSE, ARE HEREBY LIMITED IN DURATION TO THE WARRANTY PERIODS DESCRIBED ABOVE (12 MONTHS OR 3 MONTHS, AS APPLICABLE). IN NO EVENT SHALL NINTENDO BE LIABLE FOR CONSEQUENTIAL OR INCIDENTAL DAMAGES RESULTING FROM THE BREACH OF ANY IMPLIED OR EXPRESS WARRANTIES. SOME STATES DO NOT ALLOW LIMITATIONS ON HOW LONG AN IMPLIED WARRANTY LASTS OR EXCLUSION OF CONSEQUENTIAL OR INCIDENTAL DAMAGES, SO THE ABOVE LIMITATIONS MAY NOT APPLY TO YOU.
This warranty gives you specific legal rights, and you may also have other rights which vary from state to state. Nintendo's address is as set forth on the back cover of this booklet.
This warranty is only valid in the United States.
REV–C REV–M