ohio department of public safety division of …ems.ohio.gov/links/emsgrantssystemuserguide.pdf1 | p...
TRANSCRIPT
1 | P a g e EMS Grants Management User Guide
Ohio Department of Public Safety
Division of Emergency Medical Services
EMS Grants Management System
User Guide
Updated February, 2017
2 | P a g e EMS Grants Management User Guide
Overview
The Ohio Department of Public Safety, Division of Emergency Medical Services is implementing a new online EMS grants application and management system. Use of the new system will be required to apply for, receive, and process training and equipment grants applications, as well as to submit invoices for purchase reimbursement. This user guide has been developed to assist EMS Grantees in navigating the new online grants application and management system.
System Requirements and Limitations:
The new system performs best when the latest version of Google Chrome or Internet Explorer version 9 + is used. To download Google Chrome, please use this link: To download Internet Explorer, please use this link:
https://www.google.com/chrome/browser https://www.microsoft.com/en-us/download/internet-explorer.aspx
The system will support use from a cell phone or tablet, but functions best when used on a computer.
All system users must have a valid email address, and Driver’s License or State ID, in order to register for access to the system.
Establishing an Account (Identity Manager):
If you already have an account to access the Ohio Department of Public Safety, Division of Emergency Medical Services data system, e.g. an education account, you will not need to establish another account. Use the previously established email and password. However, you will still need to validate your identity.
If you have not previously established an account with the Ohio Department of Public Safety, Division of Emergency Medical Services:
o The first time a user enters the grants system, you will be required to register an account and validate identity.
o If you are requesting access to the grants management you will only need to validate your identity once.
o After an account has been registered, users must request, and receive access, to at least one agency in order to use the grants management system.

3 | P a g e EMS Grants Management User Guide
An application is not complete until the user clicks on “Submit” at the end of the application. The user will receive an email confirming the application submission.
PLEASE, do not wait until the last day of the grant submission date to register for access to the grants management system. Questions should be directed to [email protected], or by calling 800-233-0785 during normal business hours.
The remainder of this user guide is designed to walk EMS grantees, step-by-step, through establishing an account in Identity Manager, user identity validation,
requesting agency access, reimbursement requests, accessing agency grant details, and invoice submission.
4 | P a g e EMS Grants Management User Guide
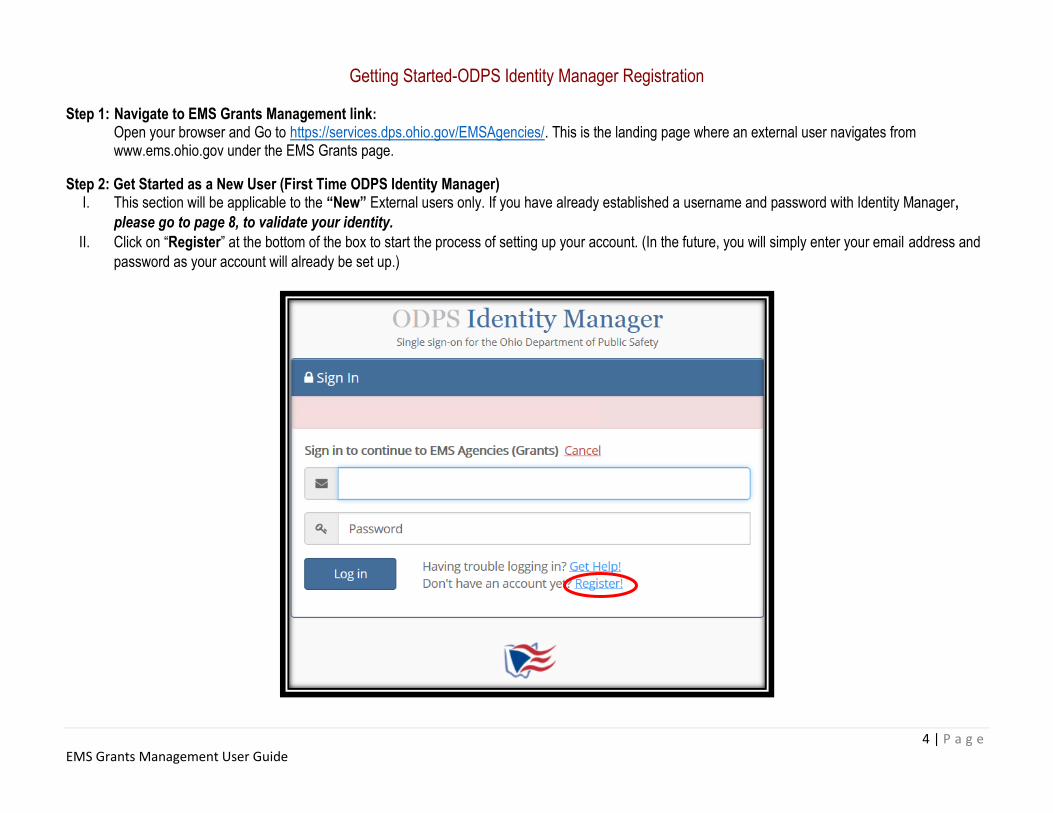
Getting Started-ODPS Identity Manager Registration Step 1: Navigate to EMS Grants Management link:
Open your browser and Go to https://services.dps.ohio.gov/EMSAgencies/. This is the landing page where an external user navigates from www.ems.ohio.gov under the EMS Grants page.
Step 2: Get Started as a New User (First Time ODPS Identity Manager) I. This section will be applicable to the “New” External users only. If you have already established a username and password with Identity Manager,
please go to page 8, to validate your identity.
II. Click on “Register” at the bottom of the box to start the process of setting up your account. (In the future, you will simply enter your email address and
password as your account will already be set up.)

5 | P a g e EMS Grants Management User Guide
Register with Identity Manager Step 3: Registering an Identity Manager account:
I. All users must register with Identity Manager to access the EMS Grants Management System.
II. Complete the registration form and select “Register”. A screen will appear that verifies an email has been sent with instruction to complete the
registration.

6 | P a g e EMS Grants Management User Guide
Identity Manager Registration Email
Step 4: Account Registration Email
Once you receive the Identity Manager email select the hyperlink to verify registration request and return to complete the registration process. *The
hyperlink will expire in 72 hours. *Open your email when you receive this message so that you may retrieve the link to continue. In most cases, the
email will appear immediately, but sometimes it could take 10-15 minutes and your email may direct it to the Junk Mail or Spam. Check the
Junk Mail and/or Spam boxes if you do not see the email in your Inbox. If you do not receive an email, call our Help Desk (614-752-6487), which is
staffed 24/7. Advise the Help Desk you need assistance with the EMS Grants Management System, as the Help Desk assists users with several
applications.
7 | P a g e EMS Grants Management User Guide
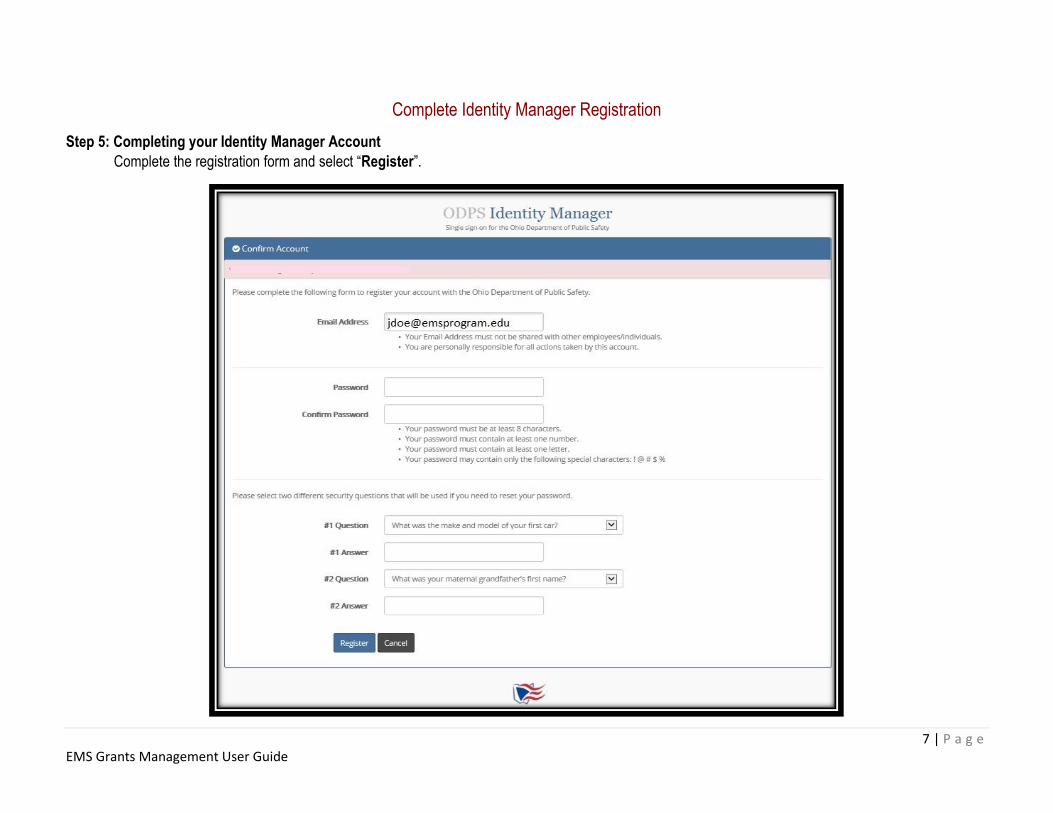
Complete Identity Manager Registration
Step 5: Completing your Identity Manager Account
Complete the registration form and select “Register”.
8 | P a g e EMS Grants Management User Guide
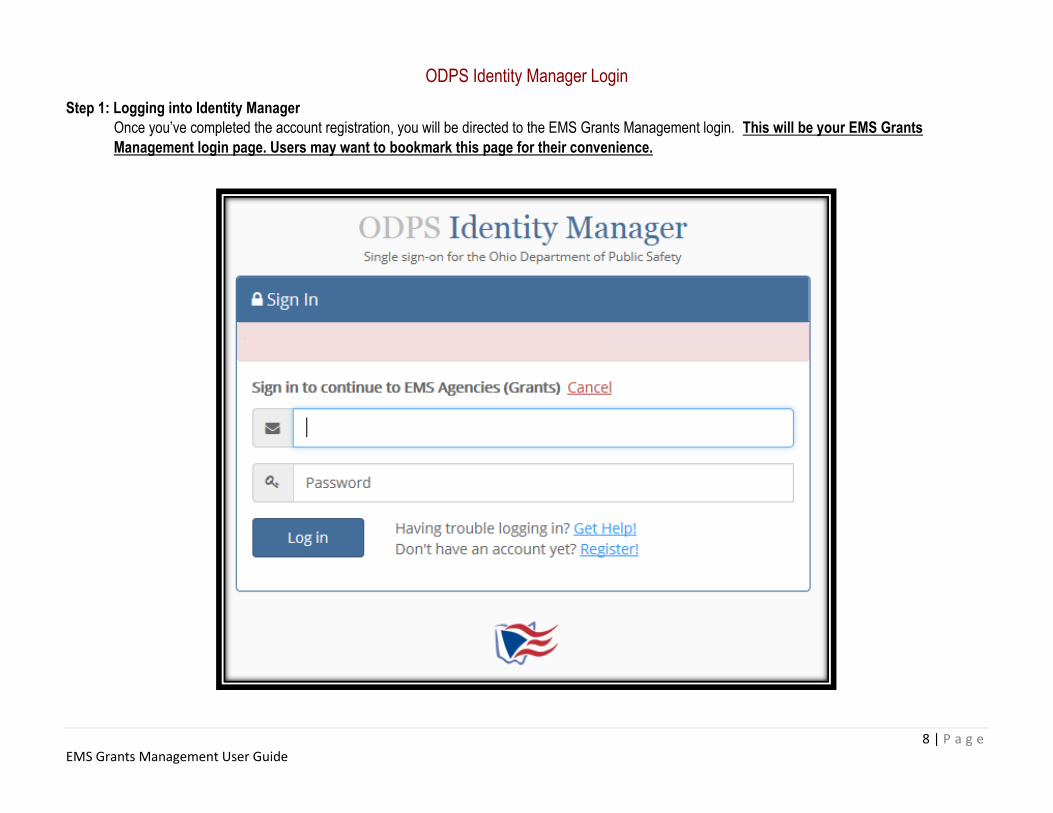
ODPS Identity Manager Login
Step 1: Logging into Identity Manager
Once you’ve completed the account registration, you will be directed to the EMS Grants Management login. This will be your EMS Grants
Management login page. Users may want to bookmark this page for their convenience.
9 | P a g e EMS Grants Management User Guide
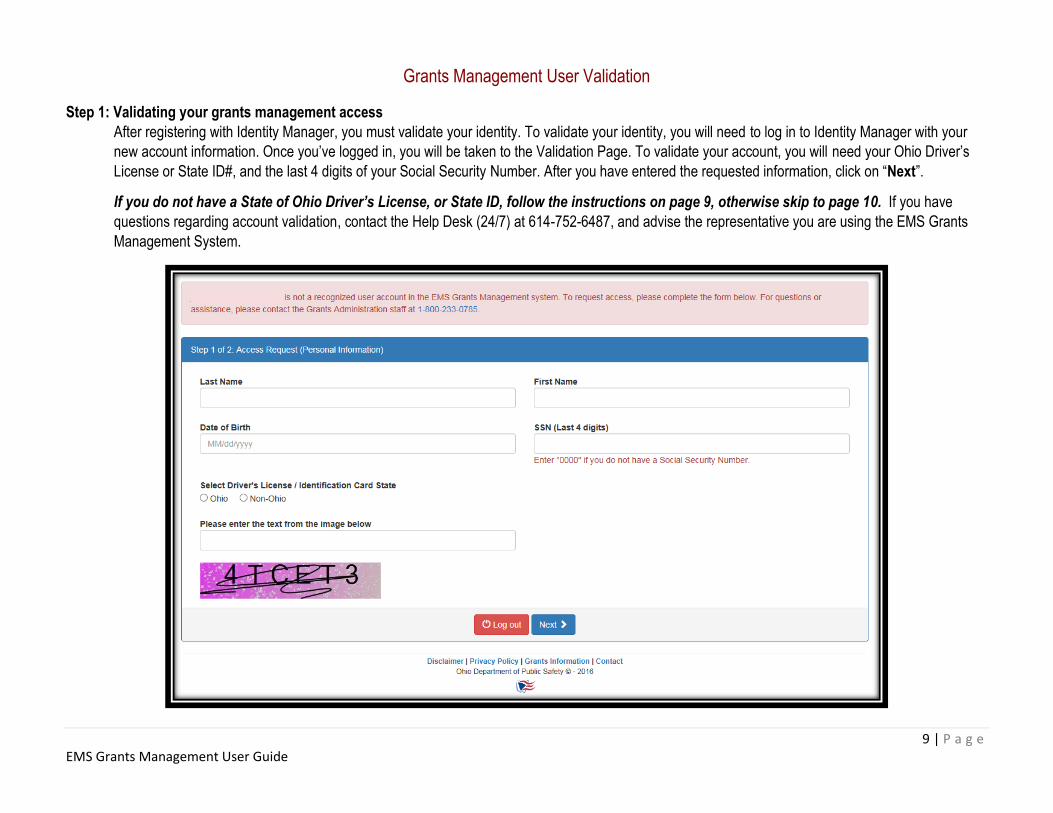
Grants Management User Validation
Step 1: Validating your grants management access
After registering with Identity Manager, you must validate your identity. To validate your identity, you will need to log in to Identity Manager with your
new account information. Once you’ve logged in, you will be taken to the Validation Page. To validate your account, you will need your Ohio Driver’s
License or State ID#, and the last 4 digits of your Social Security Number. After you have entered the requested information, click on “Next”.
If you do not have a State of Ohio Driver’s License, or State ID, follow the instructions on page 9, otherwise skip to page 10. If you have
questions regarding account validation, contact the Help Desk (24/7) at 614-752-6487, and advise the representative you are using the EMS Grants
Management System.

10 | P a g e EMS Grants Management User Guide
Non-Ohio Driver’s License/State ID Validation
Step 2: Validating without an Ohio Driver’s License/State ID
If you do not have a State of Ohio Driver’s License, or State ID #, you will need to submit a copy of your out of state Driver’s License, or State ID.
Copies can be uploaded, faxed, or emailed. Your account will not be created until the validation process occurs. If you have questions regarding
account validation, contact the Help Desk (24/7) at 614-752-6487, and advise the representative you are using the EMS Grants Management System.

11 | P a g e EMS Grants Management User Guide
Requesting Access to an EMS Agency
Step 1: Agency Access
I. To request access to an agency please select the EMS Agency using the drop down menu.
II. Verify whether you are the “Authorizing Official” for your agency.
III. Select “Request.”
The Division of EMS will take action on your access request within 72 hours of receipt.

12 | P a g e EMS Grants Management User Guide
Requesting Access to Multiple Agencies
Please note: Users will only be able to request access to one agency at a time. If you need access to multiple agencies, a new request may be submitted once
the pending request has been approved.

13 | P a g e EMS Grants Management User Guide
Request Access Emails
Step 2: Access request confirmation email
After a request for agency access has been submitted, users will receive a confirmation email
From: [email protected]
Sent: Thursday, December 8, 2016 1:09:16 PM (UTC-05:00) Eastern Time (US & Canada)
To:
Subject: [Redirected from QA] Access Request for EMS Agencies
Access Request for EMS Agencies has been submitted.
---------------------------------------------------------
Step 2: Access approved confirmation email
Users will receive a confirmation email, once the submitted agency access request has been approved.
From: [email protected]
Sent: Wednesday, December 7, 2016 8:53:26 AM (UTC-05:00) Eastern Time (US & Canada)
To:
Subject: [Redirected from ITST] EMS Grant Notification
Your access request for EMS Agencies has been reviewed and processed. Additional information can be found by logging in to your
EMS Grants Management account.
Sincerely,
EMS Grants Administration

14 | P a g e EMS Grants Management User Guide
Accessing an Agency Account
Users will only need to validate, and submit an agency request for their account one time. After validating, and receiving agency access, users will log in to
Identity Manager and be directed to their Agency Account.
Single Agency Access:
Multiple Agency Access:
If you have access to multiple agencies, select the
agency account you want to view.
If you only have access to one agency, once you log in
your screen will take you to your agency’s front page.

15 | P a g e EMS Grants Management User Guide
Navigating an Agency Account
Step 1: Navigating your EMS Agency’s Account
I. To access new and submitted grant applications, select “Applications”. II. To submit and review your agency’s reimbursement requests, select “Reimbursement Request”.
III. To request access to another agency, select “Account Management”. IV. If a user has access to multiple agencies, they can navigate between the agencies by selecting “Change Selection”.
Your Agency’s Name
16 | P a g e EMS Grants Management User Guide
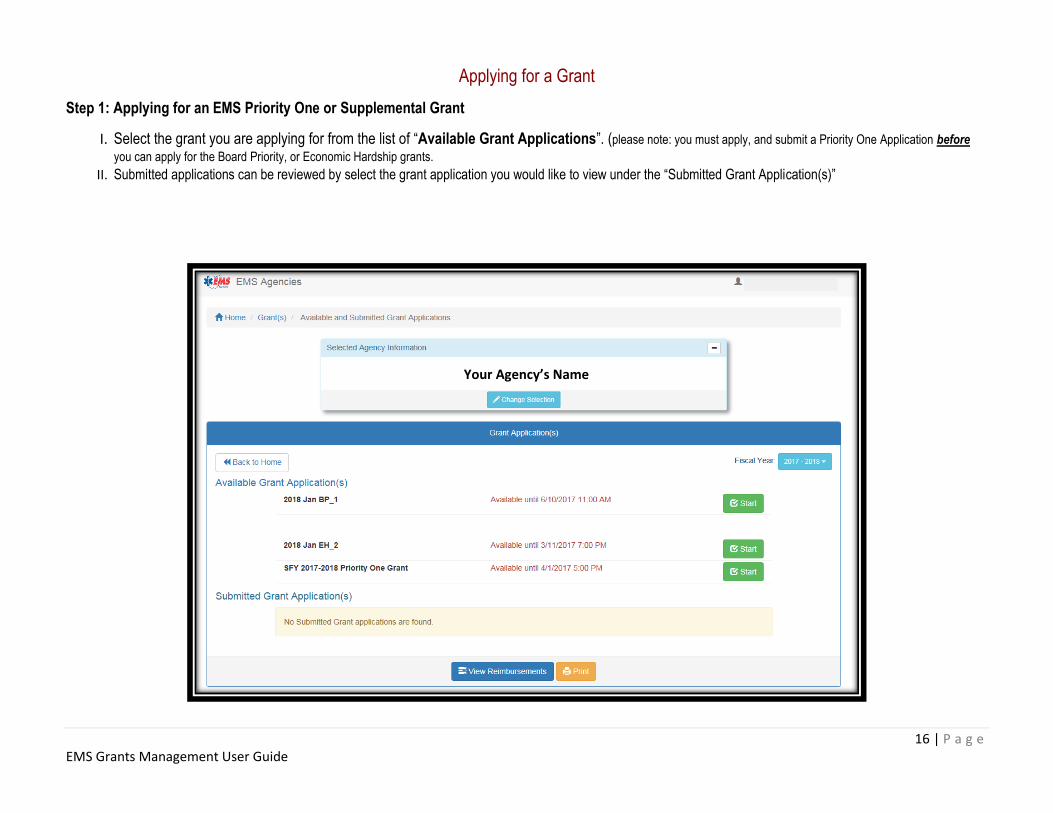
Applying for a Grant
Step 1: Applying for an EMS Priority One or Supplemental Grant
I. Select the grant you are applying for from the list of “Available Grant Applications”. (please note: you must apply, and submit a Priority One Application before
you can apply for the Board Priority, or Economic Hardship grants. II. Submitted applications can be reviewed by select the grant application you would like to view under the “Submitted Grant Application(s)”
Your Agency’s Name

17 | P a g e EMS Grants Management User Guide
Reviewing the Grant Guidance and Agreement
Step 1: Opening the Grant Guidance and Agreement Document
I. Before starting your application, agencies can review the Grant Guidance, as well as agree to the terms of the EMS Grants Agreement.
II. Select the “EMS Grants Agreement” to review the Guidance, and Agreement, select the “EMS Grants Agreement” button and the
document will open in a new window.
Your Agency’s Name
18 | P a g e EMS Grants Management User Guide
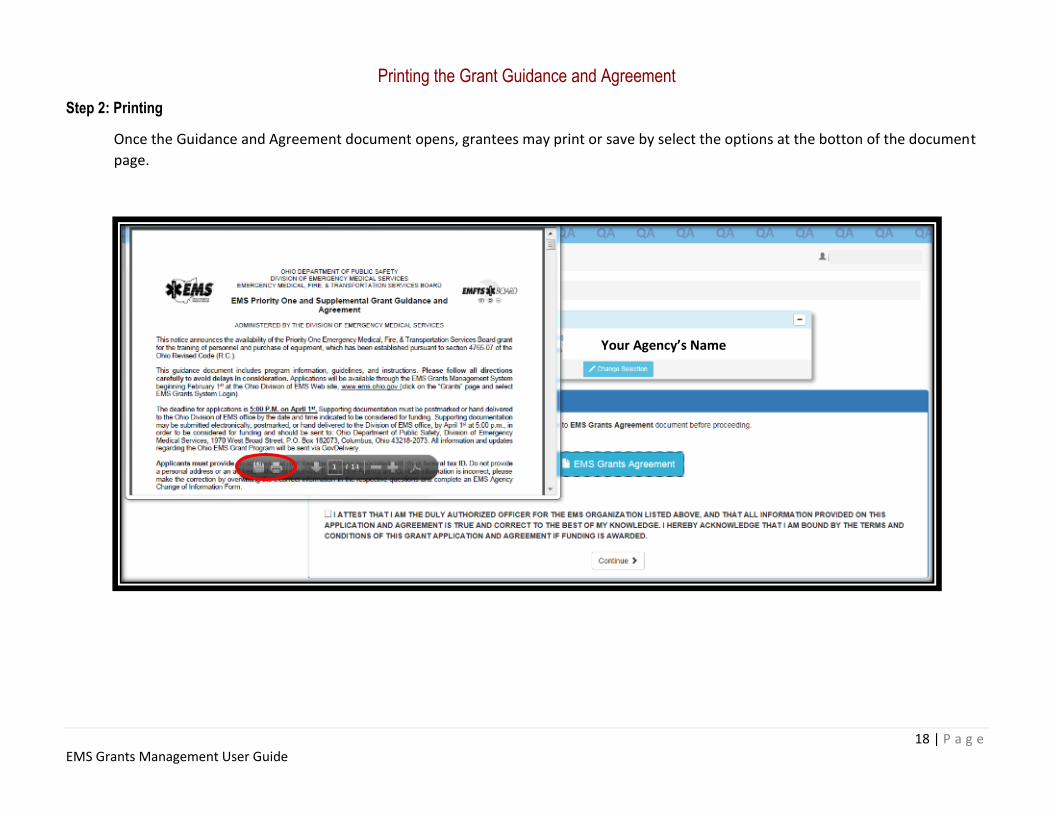
Printing the Grant Guidance and Agreement
Step 2: Printing
Once the Guidance and Agreement document opens, grantees may print or save by select the options at the botton of the document
page.
Your Agency’s Name
19 | P a g e EMS Grants Management User Guide
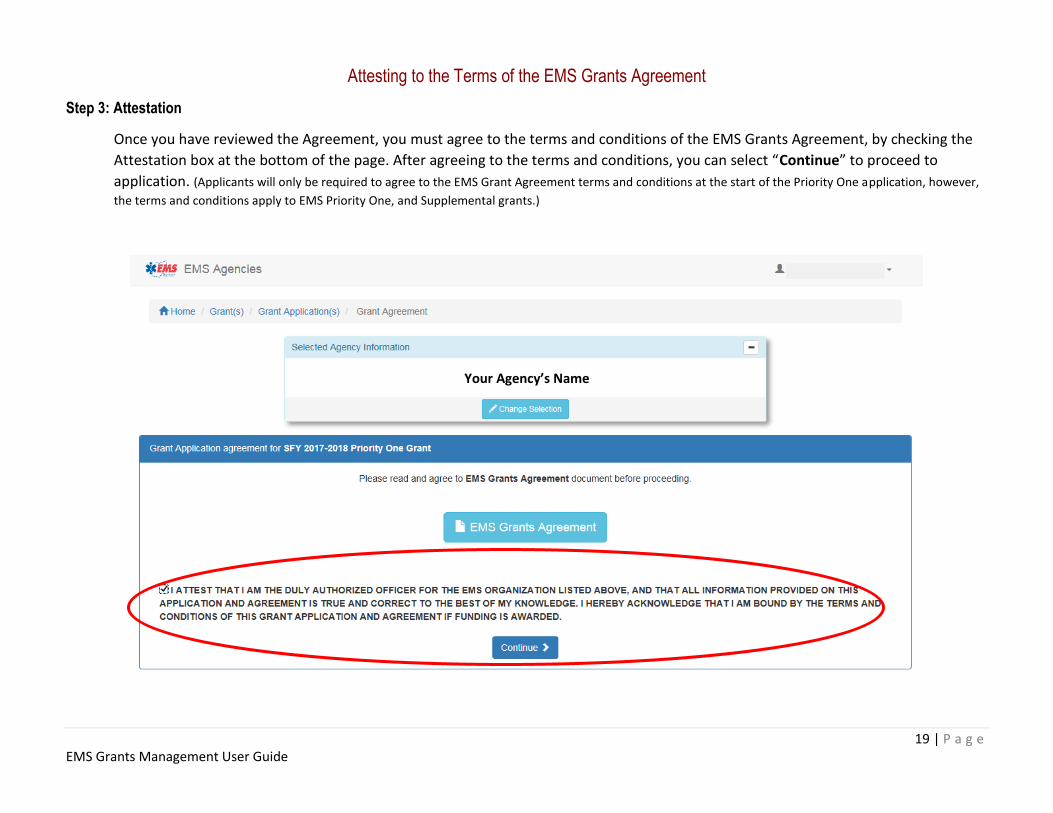
Attesting to the Terms of the EMS Grants Agreement
Step 3: Attestation
Once you have reviewed the Agreement, you must agree to the terms and conditions of the EMS Grants Agreement, by checking the
Attestation box at the bottom of the page. After agreeing to the terms and conditions, you can select “Continue” to proceed to
application. (Applicants will only be required to agree to the EMS Grant Agreement terms and conditions at the start of the Priority One application, however,
the terms and conditions apply to EMS Priority One, and Supplemental grants.)
Your Agency’s Name
20 | P a g e EMS Grants Management User Guide
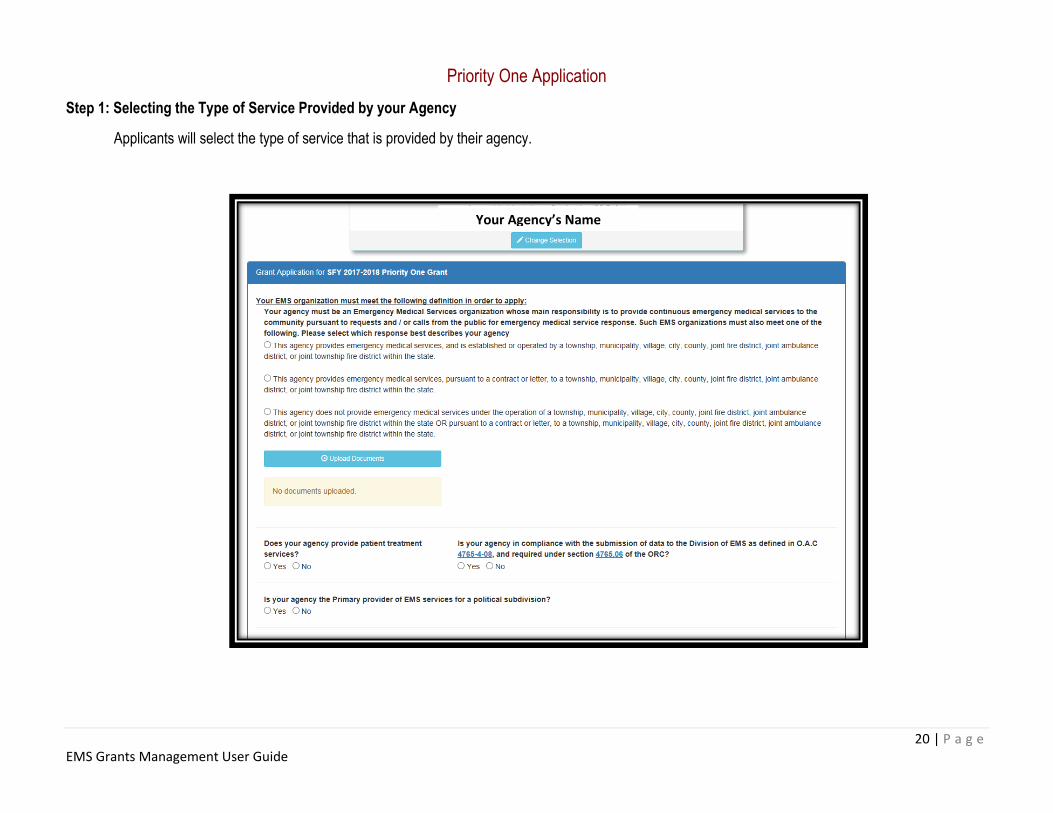
Priority One Application
Step 1: Selecting the Type of Service Provided by your Agency
Applicants will select the type of service that is provided by their agency.
Your Agency’s Name
21 | P a g e EMS Grants Management User Guide
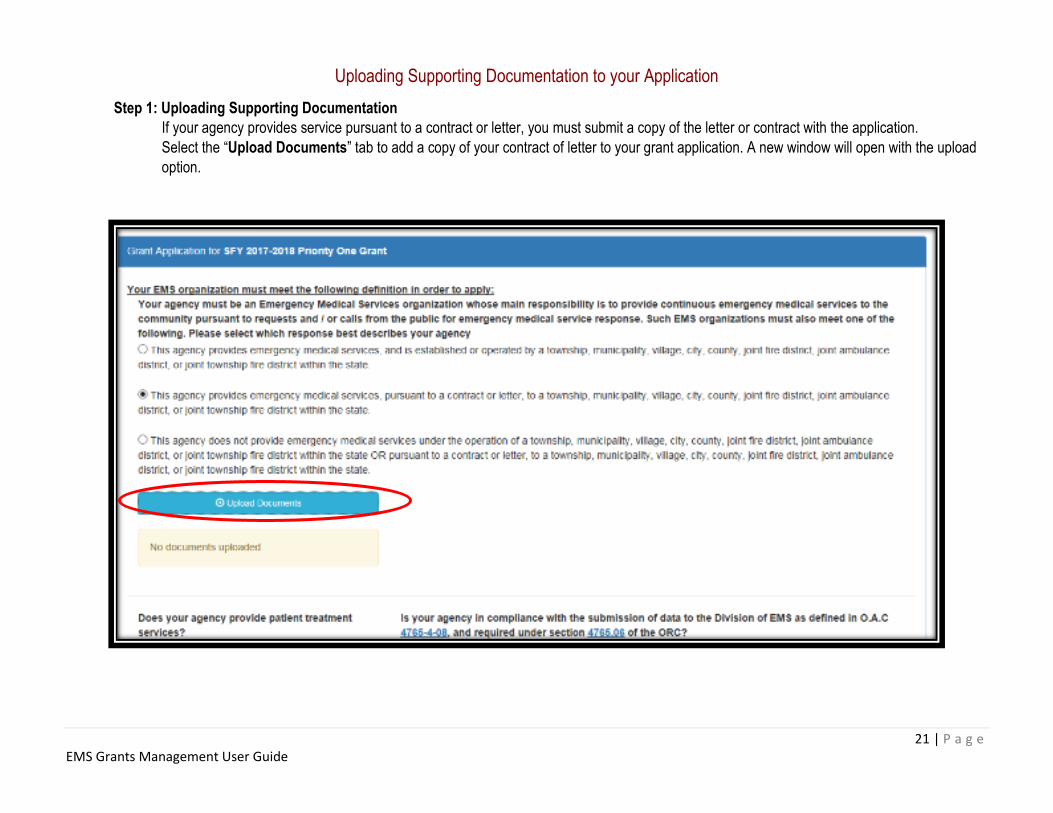
Uploading Supporting Documentation to your Application
Step 1: Uploading Supporting Documentation
If your agency provides service pursuant to a contract or letter, you must submit a copy of the letter or contract with the application.
Select the “Upload Documents” tab to add a copy of your contract of letter to your grant application. A new window will open with the upload
option.

22 | P a g e EMS Grants Management User Guide
Step 2: Selecting your Document to Upload
To upload your document, select the “Select Document” tab. A window with our computer’s documents and files will open, find and select your
document.

23 | P a g e EMS Grants Management User Guide
Step 3: Saving your Document
Once you find and select your document, the upload window will appear with the name of the document you’ve selected. Select “Upload” to save the
document to your grant application. You will be able to review and delete your document once your document is saved to your application.

24 | P a g e EMS Grants Management User Guide
Completing your Application
Step 1: Completing the Priority One Application Questions
I. Complete the Priority One questions.
II. You may review the O.A.C and O.R.C. to confirm whether or not your agency is compliant with data reporting by selecting the blue highlighted codes.
III. Review your organization’s information, if the information is incorrect, select “No”.

25 | P a g e EMS Grants Management User Guide
Step 2: Changing your Organizations Information
If you answered “No” that your agency information was incorrect, the address fields will open so you can edit your information.
26 | P a g e EMS Grants Management User Guide
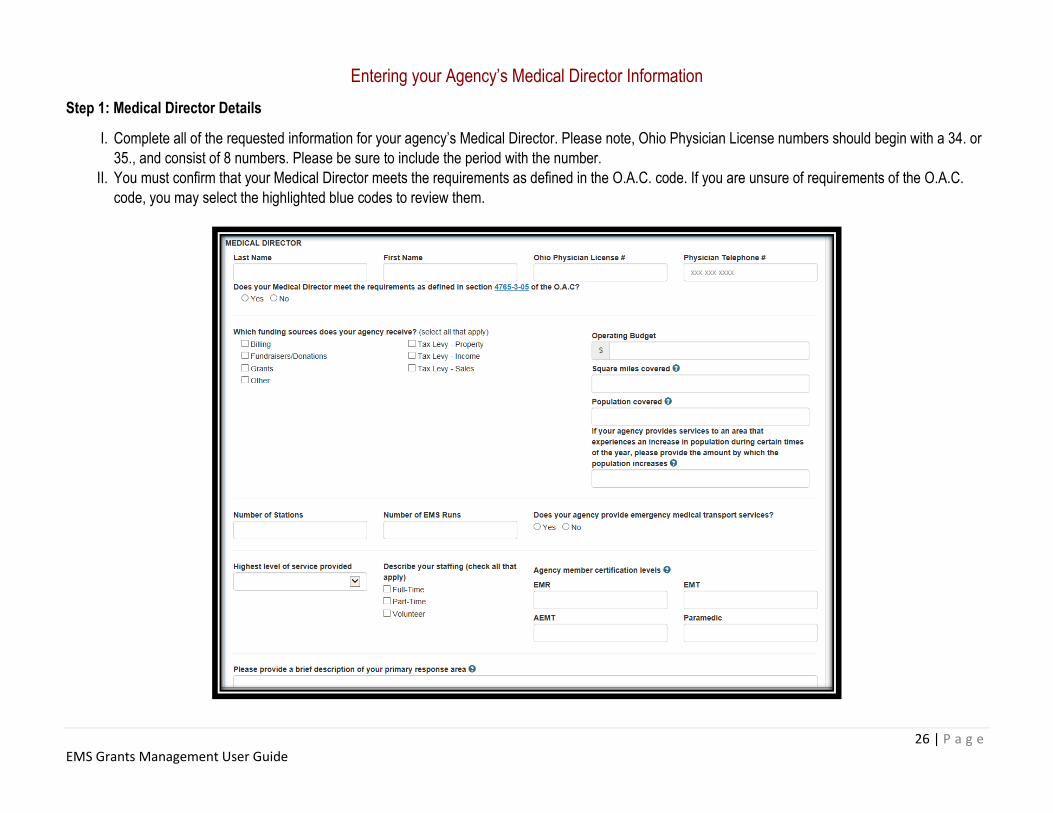
Entering your Agency’s Medical Director Information
Step 1: Medical Director Details
I. Complete all of the requested information for your agency’s Medical Director. Please note, Ohio Physician License numbers should begin with a 34. or
35., and consist of 8 numbers. Please be sure to include the period with the number.
II. You must confirm that your Medical Director meets the requirements as defined in the O.A.C. code. If you are unsure of requirements of the O.A.C.
code, you may select the highlighted blue codes to review them.
27 | P a g e EMS Grants Management User Guide
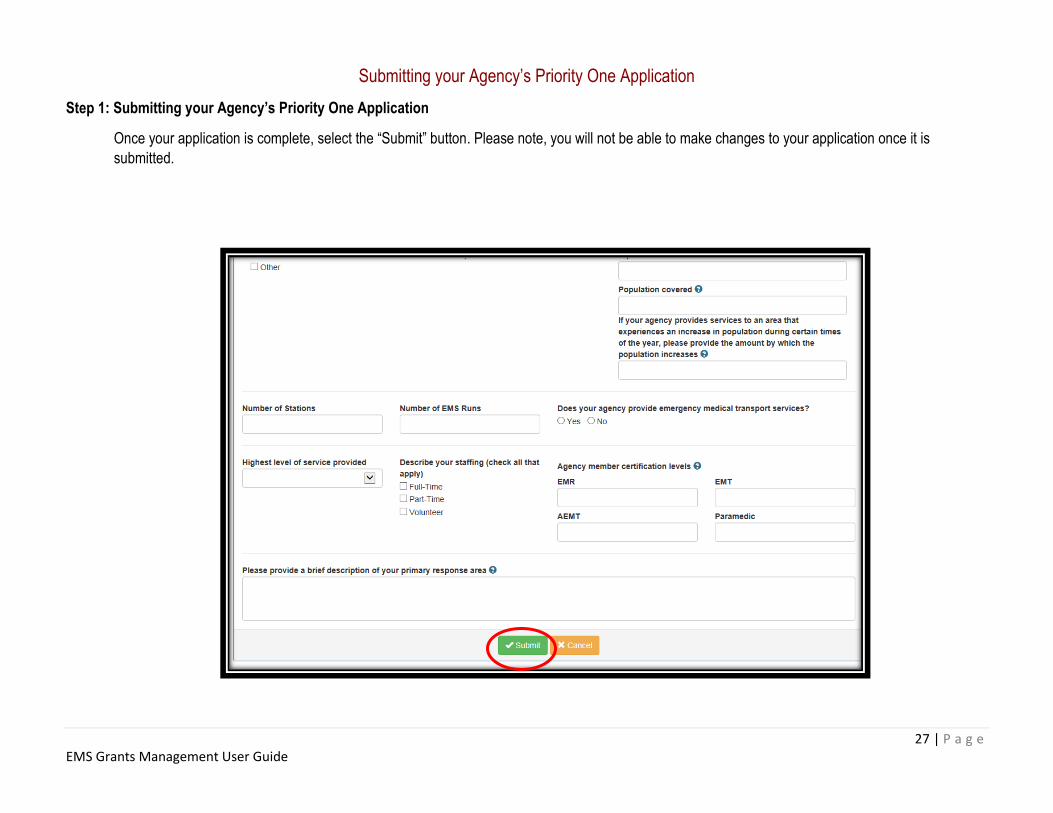
Submitting your Agency’s Priority One Application
Step 1: Submitting your Agency’s Priority One Application
Once your application is complete, select the “Submit” button. Please note, you will not be able to make changes to your application once it is
submitted.

28 | P a g e EMS Grants Management User Guide
Applying for a Board Priority or Economic Hardship Supplemental Grant
Step 1: Supplemental Grant Applications
Both Board Priority and Economic Hardship applicants must submit information regarding the agency’s vehicle detail, non-profit and private agency
status and cardiac arrest information before starting their applications.
*If your agency is non-profit, and does not operate under a government entity, you must submit a copy of your most recent I-990 in order to be
considered for the supplemental grants.
*If you are a private agency, you must submit a copy of your agency’s most recent Schedule C in order to be considered for the supplemental grants.
You may upload a copy of your documentation in the system, by selecting the “Upload Documents” button.

29 | P a g e EMS Grants Management User Guide
Applying for Board Priority Funds
Step 1: Board Priority Application
Select whether you agency is seeking funding for Training or Equipment, or Both.

30 | P a g e EMS Grants Management User Guide
Applying for Board Priority Funding
Step 1: Applying for the Board Priority Grant
I. Select “Add” to add the equipment or training item you intend to purchase if awarded funds.

31 | P a g e EMS Grants Management User Guide
Applying for Board Priority Training
Step 2: Board Priority Training
If your agency is applying for Board Priority Training, you must enter the requested details, and add them to the application. A list of some of the
training providers, and courses has been provided for grantees who may not be aware of training opportunities. Select “Available Training
Opportunities” to review those training opportunities.

32 | P a g e EMS Grants Management User Guide
Applying for Board Priority Training
Step 3: Board Priority Equipment
If your agency is applying for Board Priority Training, you must enter the requested details, and add them to the application.

33 | P a g e EMS Grants Management User Guide
Completing the Board Priority Application
Step 4: Completing your Board Priority Application
Once you have entered the details of your equipment and/or training request, you will enter the amount you are requesting for funding.
34 | P a g e EMS Grants Management User Guide
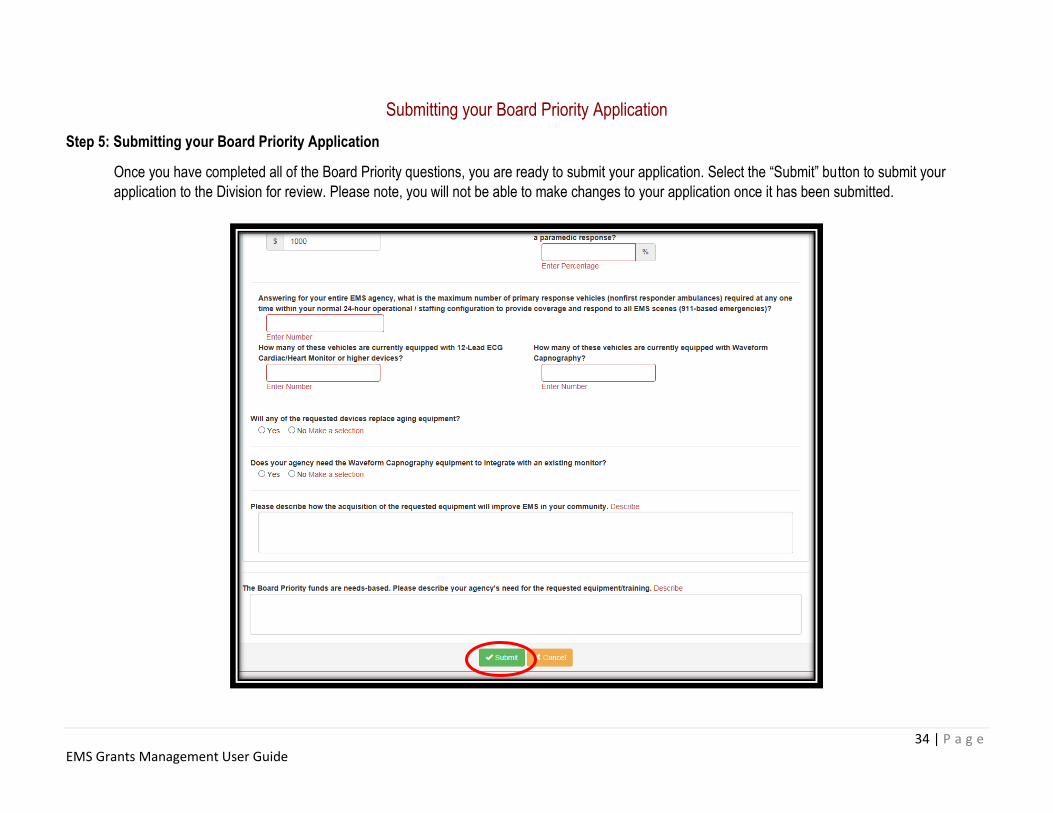
Submitting your Board Priority Application
Step 5: Submitting your Board Priority Application
Once you have completed all of the Board Priority questions, you are ready to submit your application. Select the “Submit” button to submit your
application to the Division for review. Please note, you will not be able to make changes to your application once it has been submitted.

35 | P a g e EMS Grants Management User Guide
Applying for Economic Hardship Funds
Step 1: Applying for Economic Hardship Funds
I. Enter the amount your agency is requesting for Equipment. II. Enter the amount your agency is requesting for Training.
III. Select “Add New Item” to add the equipment or training item you intend to purchase if awarded funds.
36 | P a g e EMS Grants Management User Guide
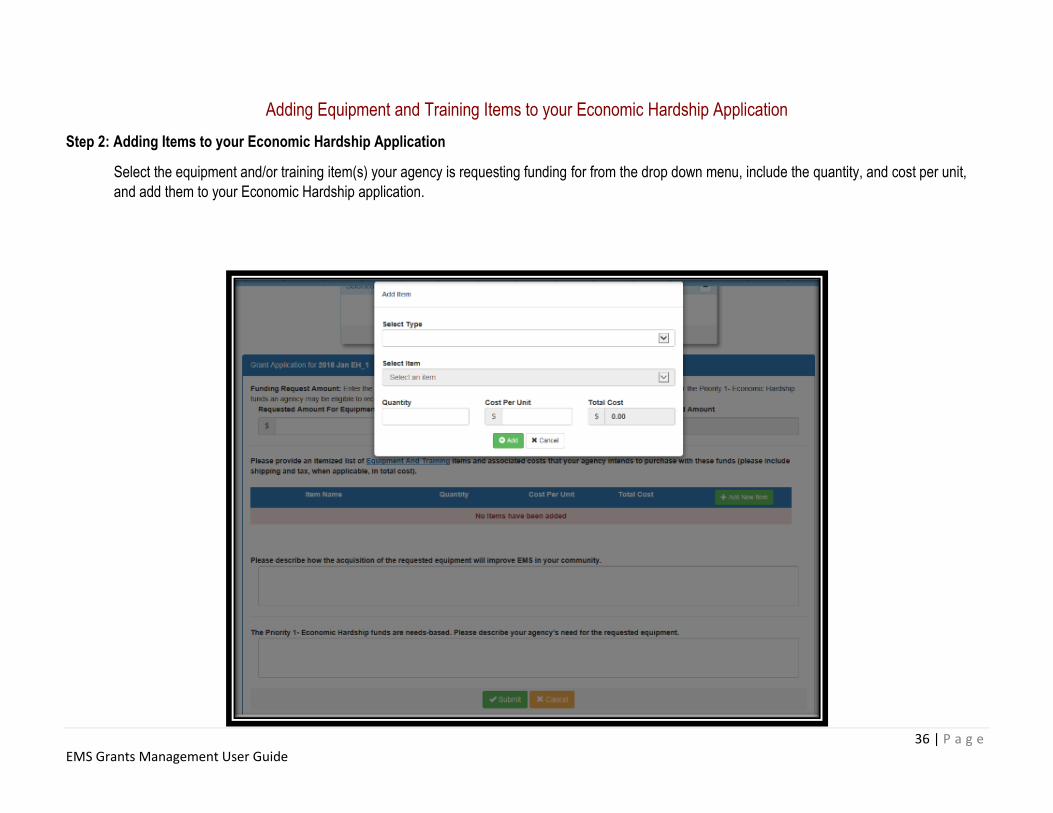
Adding Equipment and Training Items to your Economic Hardship Application
Step 2: Adding Items to your Economic Hardship Application
Select the equipment and/or training item(s) your agency is requesting funding for from the drop down menu, include the quantity, and cost per unit,
and add them to your Economic Hardship application.
37 | P a g e EMS Grants Management User Guide
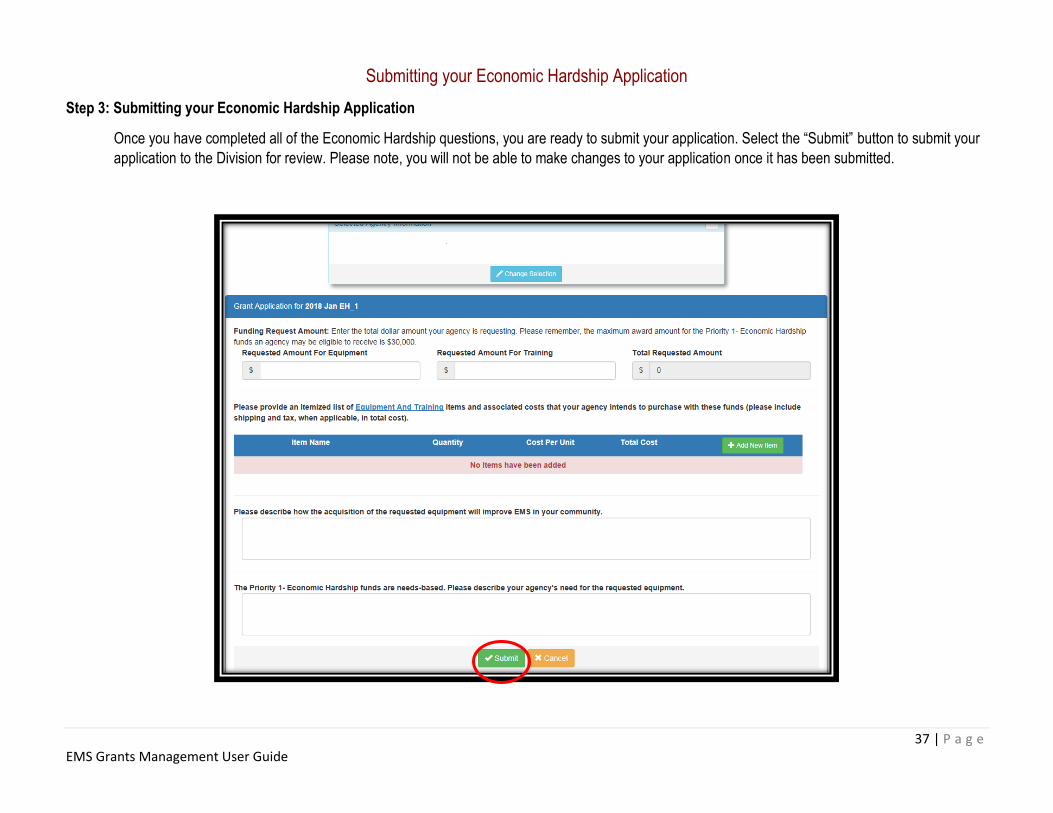
Submitting your Economic Hardship Application
Step 3: Submitting your Economic Hardship Application
Once you have completed all of the Economic Hardship questions, you are ready to submit your application. Select the “Submit” button to submit your
application to the Division for review. Please note, you will not be able to make changes to your application once it has been submitted.

38 | P a g e EMS Grants Management User Guide
Submitting a Request for Reimbursement
Step 1: Starting a Reimbursement Request
To start a request for reimbursement, select “Reimbursement Request” on the Selected Agency Information page. The agency’s awarded grants,
including any reductions or increases, can be seen by selecting the award amount of any “open” grant. Users will also be able to see the
reimbursement detail and the remaining award balance, as well as the details of all submitted requests.
Step 2: Creating a Reimbursement Request
To submit a request for reimbursement, select “Create a Reimbursement Request”.
Step 3: Selecting a grant for reimbursement I. If the agency has received more than one EMS grant award, select the grant award that will be used to submit the reimbursement request.

39 | P a g e EMS Grants Management User Guide
II. Once the correct grant has been selected, users will see the details of the award, including original award amount, amount reimbursed to date, remaining award amount, and final
purchase date.

40 | P a g e EMS Grants Management User Guide
Step 4: Adding Expenditures I. To add an expenditure item, select “Add an Expenditure Item”, and choose the equipment or training item that’s being submitting for reimbursement from the drop down list.
II. Enter quantity. III. Enter the cost per unit. Do not include Tax and Shipping. This should be added separately.
IV. Select whether the reimbursement is for the full amount, partial amount, or the remainder of the award. V. To add additional items to the reimbursement request, Repeat I.-III.

41 | P a g e EMS Grants Management User Guide
Deleting an Expenditure Item
Step 4a: Deleting items from an expenditure request I. If a user needs to delete an item from the expenditure request, select “Delete”.
II. If a user needs edit an item from the expenditure request, they must select “Delete”, and add the expenditure again.

42 | P a g e EMS Grants Management User Guide
Adding Supporting Documentation
Step 5: Adding Supoorting Documentation I. Once all of the expenditure items to be reimbursed have been entered, users can upload the supporting invoice documents. To add a document, select the “Select Document”.
II. When the file upload window pops up, find and select the file, and select “open”; this will add the document to the system.
43 | P a g e EMS Grants Management User Guide
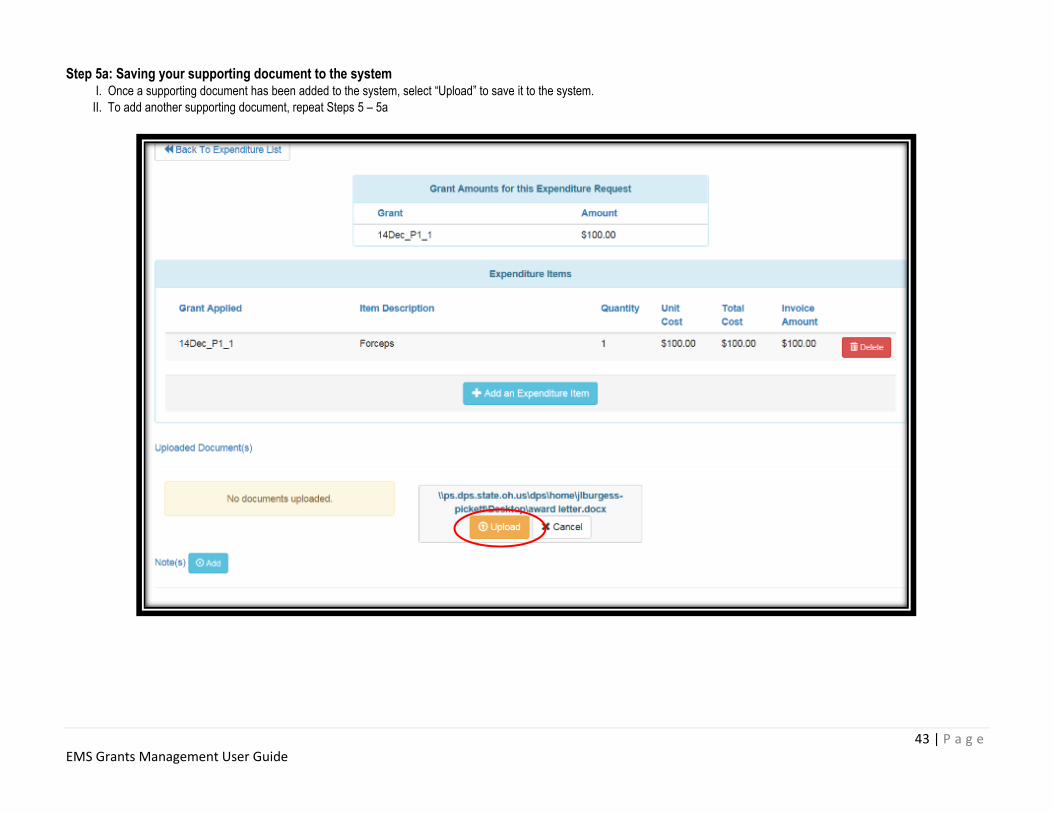
Step 5a: Saving your supporting document to the system I. Once a supporting document has been added to the system, select “Upload” to save it to the system.
II. To add another supporting document, repeat Steps 5 – 5a

44 | P a g e EMS Grants Management User Guide
Step 5b: Reviewing/Replacing your supporting documents Once a supporting document has been saved to the system, a “Document uploaded successfully” will appear at the top of the screen. Users can view and remove the uploaded
document.
45 | P a g e EMS Grants Management User Guide
Adding notes
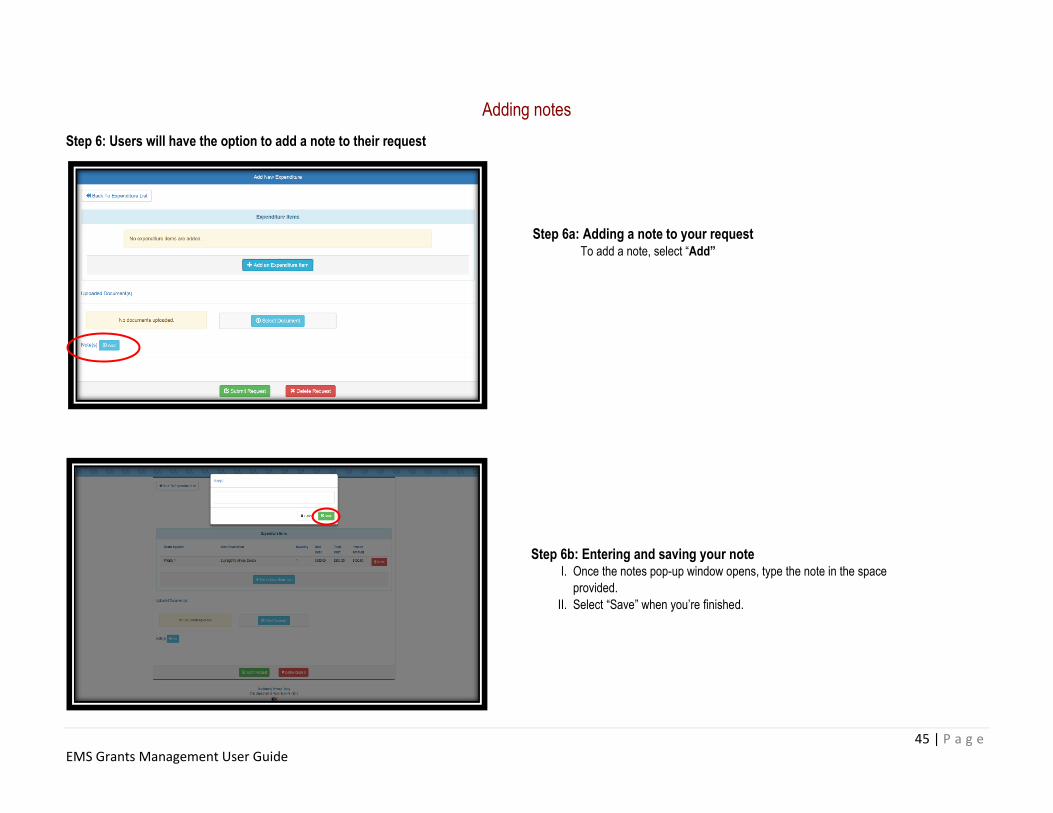
Step 6: Users will have the option to add a note to their request
Step 6a: Adding a note to your request To add a note, select “Add”
Step 6b: Entering and saving your note I. Once the notes pop-up window opens, type the note in the space
provided.
II. Select “Save” when you’re finished.

46 | P a g e EMS Grants Management User Guide
Submitting a Request
Step 7: Submitting/Deleting your request I. Once the reimbursement request is ready for submission, users will select the “Submit Request” button.
II. Users will select “Delete Request”, if they no longer want to submit the request
If a user exits the system prior to submitting or deleting the request, the request will remain in “Pending” status, and no additional requests can be created, until the status is
changed to either submitted, or deleted.
47 | P a g e EMS Grants Management User Guide
Reimbursement Request Confirmation Emails
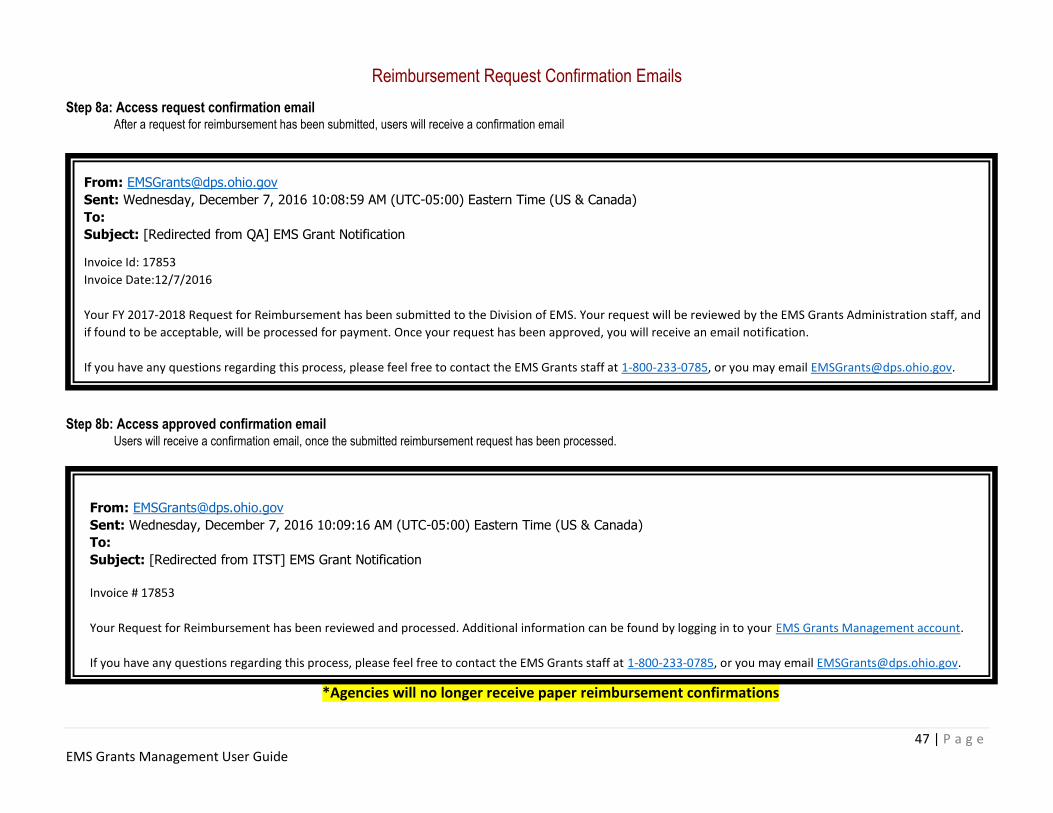
Step 8a: Access request confirmation email After a request for reimbursement has been submitted, users will receive a confirmation email
From: [email protected]
Sent: Wednesday, December 7, 2016 10:08:59 AM (UTC-05:00) Eastern Time (US & Canada)
To:
Subject: [Redirected from QA] EMS Grant Notification
Invoice Id: 17853
Invoice Date:12/7/2016
Your FY 2017-2018 Request for Reimbursement has been submitted to the Division of EMS. Your request will be reviewed by the EMS Grants Administration staff, and
if found to be acceptable, will be processed for payment. Once your request has been approved, you will receive an email notification.
If you have any questions regarding this process, please feel free to contact the EMS Grants staff at 1-800-233-0785, or you may email [email protected].
Step 8b: Access approved confirmation email Users will receive a confirmation email, once the submitted reimbursement request has been processed.
From: [email protected]
Sent: Wednesday, December 7, 2016 10:09:16 AM (UTC-05:00) Eastern Time (US & Canada)
To:
Subject: [Redirected from ITST] EMS Grant Notification
Invoice # 17853
Your Request for Reimbursement has been reviewed and processed. Additional information can be found by logging in to your EMS Grants Management account.
If you have any questions regarding this process, please feel free to contact the EMS Grants staff at 1-800-233-0785, or you may email [email protected].
*Agencies will no longer receive paper reimbursement confirmations

48 | P a g e EMS Grants Management User Guide
Reviewing Requests
Step 9: Review your agency’s submitted request status and details I. Agencies will only be able to submit one request at a time. Requests must be in a “Completed” status before new requests can be submitted.
II. Once a user has submitted a request, they will be able to review the status and details of the request when you login to the invoice page. To view the details of a submitted request
select “Details”.

49 | P a g e EMS Grants Management User Guide
Step 9a: Viewing the details of a reimbursement request Once the “Expenditure Details” page opens, users will be able to view the status of the request, and the reimbursement details.
50 | P a g e EMS Grants Management User Guide
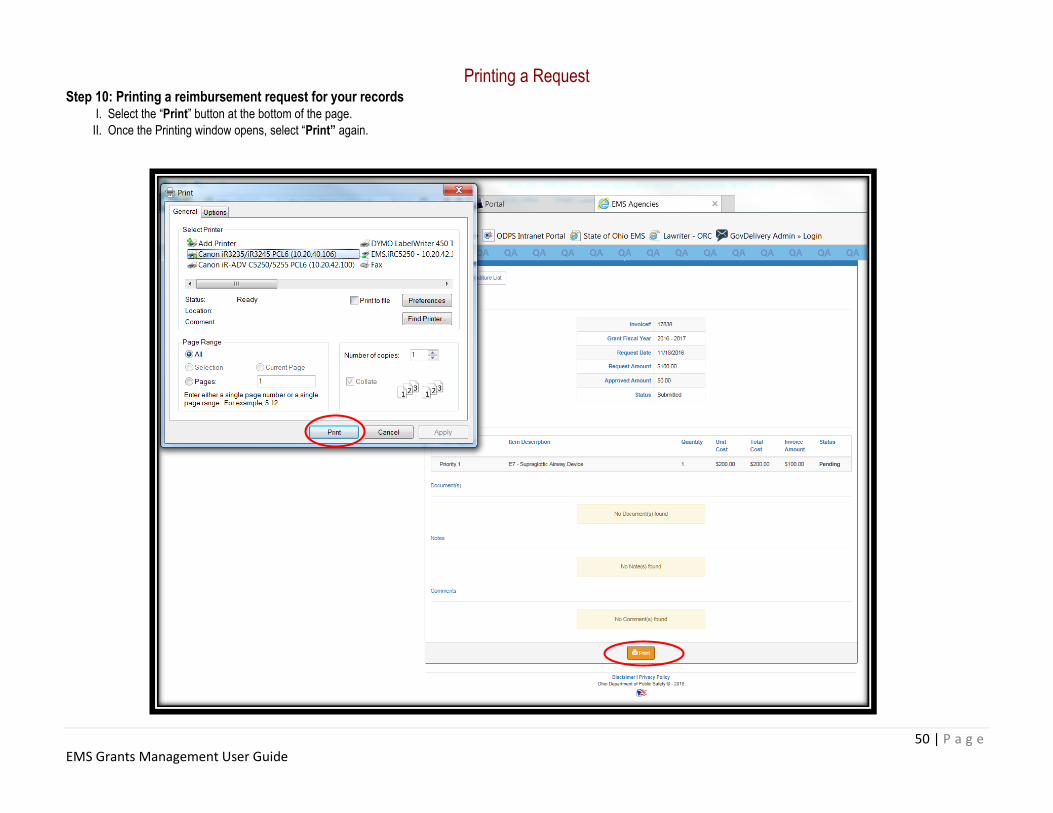
Printing a Request Step 10: Printing a reimbursement request for your records
I. Select the “Print” button at the bottom of the page.
II. Once the Printing window opens, select “Print” again.