ohio state university extension 4-h 550 state university extension embraces human diversity and is...
TRANSCRIPT

OHIO STATE UNIVERSITY EXTENSION
18 U
SC 707
Name
Age (as of January 1 of current year)
County
Club name
Advisor
4-H 550

18 U
SC 707
YOU
NG
EN
GIN
EER
S IN
SO
LAR
EN
ERG
Y
AUTHORDillon Sanders, Research Assistant, Department of Astronomy, The Ohio State University
ADVISORY TEAMKelly Denney, National Science Foundation Astronomy and Astrophysics Postdoctoral Fellow (supported by NSF grant AST-1302093) , The Ohio State UniversityRobert Horton, Extension Specialist, Educational Design and Science Education, Ohio State University Extension, 4-H Youth DevelopmentWayne Schlingman, Director, OSU Planetarium, The Ohio State University
REVIEWERSNancy Bowen-Ellzey, Community Economics Field Specialist, Ohio State University Extension, Community DevelopmentRon Cull, President, Energy Sources on Site and early solar innovator for the National Aeronautics and Space Administration and the Department of EnergyEric Romich, Energy Development Field Specialist, Ohio State University Extension, Community Development
PRODUCTION TEAMJessi Ryan, Program Assistant, Ohio State University Extension, 4-H Youth DevelopmentBrooke Sanders, Graphic Designer, Bskylldesigns.comAnnie Steel, Program Coordinator, Ohio State University Extension, 4-H Youth DevelopmentJane Wright, Curriculum Manager, Ohio State University Extension, 4-H Youth DevelopmentSusie Young, Assistant Editor, Ohio State University Extension, 4-H Youth Development
Unless otherwise indicated, images in this book are from thinkstockphotos.com.
Copyright © 2017, The Ohio State University
Ohio State University Extension embraces human diversity and is committed to ensuring that all research and related educational programs are available to clientele on a nondiscriminatory basis without regard to age, ancestry, color, disability, gender identity or expression, genetic information, HIV/AIDS status, military status, national origin, race, religion, sex, sexual orientation, or veteran status. This statement is in accordance with United States Civil Rights Laws and the USDA.
Roger Rennekamp, Associate Dean and Director, Ohio State University Extension
For Deaf and Hard of Hearing, please contact Ohio State University Extension using your preferred communication (e-mail, relay services, or video relay services). Phone 1-800-750-0750 between 8 a.m. and 5 p.m. EST Monday through Friday. Inform the operator to dial 614-292-6181.
4/17–1M–XXXXX

118 U
SC 707
YOU
NG
ENG
INEER
S IN SO
LAR
ENER
GY
CONTENTSNote to the Project Helper . . . . . . . . . . . . . . . . . . . . . . . . . . . . . . . . . . . . . . . . . . . . . . . 2Member Project Guide . . . . . . . . . . . . . . . . . . . . . . . . . . . . . . . . . . . . . . . . . . . . . . . . . . 3Life on Earth Revolves Around the Sun . . . . . . . . . . . . . . . . . . . . . . . . . . . . . . . . . . . . 7
PROJECT AREA: LIGHT FROM THE SUN
Activity 1: All the Colors of the Rainbow . . . . . . . . . . . . . . . . . . . . . . . . . . . . . . . . . . . 8Activity 2: Why Is the Sky Blue? . . . . . . . . . . . . . . . . . . . . . . . . . . . . . . . . . . . . . . . . . . 12Activity 3: Polarized Light . . . . . . . . . . . . . . . . . . . . . . . . . . . . . . . . . . . . . . . . . . . . . . . 15Activity 4: Solar Viewer . . . . . . . . . . . . . . . . . . . . . . . . . . . . . . . . . . . . . . . . . . . . . . . . . 18Talking It Over . . . . . . . . . . . . . . . . . . . . . . . . . . . . . . . . . . . . . . . . . . . . . . . . . . . . . . . . . 21
PROJECT AREA: LIGHT WE CANNOT SEE
Activity 5: Heat from the Sun . . . . . . . . . . . . . . . . . . . . . . . . . . . . . . . . . . . . . . . . . . . . 22Activity 6: Ultraviolet Radiation . . . . . . . . . . . . . . . . . . . . . . . . . . . . . . . . . . . . . . . . . . 25Talking It Over . . . . . . . . . . . . . . . . . . . . . . . . . . . . . . . . . . . . . . . . . . . . . . . . . . . . . . . . . 28
PROJECT AREA: FOLLOWING THE SUN
Activity 7: Measuring Earth’s Tilt . . . . . . . . . . . . . . . . . . . . . . . . . . . . . . . . . . . . . . . . . 29Talking It Over . . . . . . . . . . . . . . . . . . . . . . . . . . . . . . . . . . . . . . . . . . . . . . . . . . . . . . . . . 32
PROJECT AREA: SOLAR TECHNOLOGY
Activity 8: Greenhouse Gas Jars . . . . . . . . . . . . . . . . . . . . . . . . . . . . . . . . . . . . . . . . . 33Activity 9: Creating Energy . . . . . . . . . . . . . . . . . . . . . . . . . . . . . . . . . . . . . . . . . . . . . . 36Talking It Over . . . . . . . . . . . . . . . . . . . . . . . . . . . . . . . . . . . . . . . . . . . . . . . . . . . . . . . . . 39
Glossary . . . . . . . . . . . . . . . . . . . . . . . . . . . . . . . . . . . . . . . . . . . . . . . . . . . . . . . . . . . . . . . 40Materials List . . . . . . . . . . . . . . . . . . . . . . . . . . . . . . . . . . . . . . . . . . . . . . . . . . . . . . . . . . . 41Summary of Learning Outcomes . . . . . . . . . . . . . . . . . . . . . . . . . . . . . . . . . . . . . . . . . . 42Activity 1 Box Template . . . . . . . . . . . . . . . . . . . . . . . . . . . . . . . . . . . . . inside back cover

2
18 U
SC 707
YOU
NG
EN
GIN
EER
S IN
SO
LAR
EN
ERG
YCONGRATULATIONS! A 4-H member has asked you to serve as a project helper. You may be a parent, relative, project leader, friend, club advisor, or another person important in the 4-H member’s life. Your duties begin with helping the youth create and carry out a project plan, as outlined in the Member Project Guide. This is followed by helping the youth focus on each activity, providing support and feedback, and determining what was done well, what could have been done differently, and where to go next.
As a project helper, it is up to you to encourage, guide, and assist the 4-H member. How you choose to be involved helps to shape the 4-H member’s life skills and knowledge of the importance of solar energy.
YOUR ROLE AS PROJECT HELPERYour contributions are critical to delivery of the 4-H program, which is committed to providing experiences that strengthen a young person’s sense of belonging, generosity, independence, and mastery. It is essential that your interactions support positive youth development within the framework of these Eight Key Elements:
1. A positive relationship with a caring adult
2. An inclusive environment
3. A safe emotional and physical environment
4. Opportunity for mastery
5. Engagement in learning
6. Opportunity to see oneself as an active participant in the future
7. Opportunity for self-determination
8. Opportunity to value and practice service to others
For more information on the Eight Key Elements, please refer to the Advisor Handbook available online at ohio4h.org. On a practical level, your role as a project helper means you will . . .
• Guide the youth and provide support in setting goals and completing this project
• Encourage the youth to apply knowledge from this project book
• Encourage the youth to go beyond the scope of this 4-H project book to learn about solar energy
• Serve as a resource person.
WHAT YOU SHOULD KNOW ABOUT EXPERIENTIAL LEARNINGThe information and activities in this book are arranged in a unique, experiential fashion (see model). In this way, a youth is introduced to a particular practice, idea or piece of information through an opening (1) experience. The results of the activity are recorded on the accompanying pages. The member then (2) shares what he or she did with the project helper and (3) processes the experience through a series of questions that allow him or her to (4) generalize and (5) apply the new knowledge and skill.
What You Can Do• Review the Learning Outcomes (project
skill, life skill, educational standard and success indicator) for each activity to understand the learning taking place. See page 42 for the Summary of Learning Outcomes.
• Become familiar with each activity and the related background information. Stay ahead of the learner by trying out activities beforehand.
• Begin the project by helping the learner establish a plan. This is accomplished by reviewing the Member Project Guide.
• After each project area is completed, conduct a debriefing session that allows the learner to answer the review questions and share results. This important step improves understanding from an experiential learning perspective.
• Help the learner celebrate what was done well and to see what could be done differently. Allow the learner to become better at assessing his or her own work.
Pfeiffer, J.W., and J.E. Jones, Reference Guide to Handbooks and Annuals. © 1983 John Wiley & Sons, Inc. Reprinted with permission of John Wiley & Sons, Inc.
experiential learning model
1. experience
2. share
3. process
4. generalize
5. apply
NOTE TO THE PROJECT HELPER

318 U
SC 707
YOU
NG
ENG
INEER
S IN SO
LAR
ENER
GY
XXXXXX
PROJECT GUIDELINES1. Complete all nine activities and all
of the Talking it Over questions.2. Take part in at least two learning
experiences
3. Become involved in at least two leadership/citizenship activities
4. Complete a project review
WELCOME to the Young Engineers in Solar Energy project! You are going to learn more about how scientists and engineers study light and the Sun’s energy, even gathering your own data with equipment you make. Young Engineers in Solar Energy is an intermediate-level project designed for youth with some experience in science, technology, engineering, and math topics.Check your county’s project guidelines (if any) for completion requirements in addition to the ones below, especially if you plan to prepare an exhibit for the fair.
1. PROJECT ACTIVITIESComplete all nine activities and all of the Talking it Over questions. The More Challenges activities are optional. As you finish activities, review your work with your project helper. Then ask your project helper to initial and date your accomplishment.
ACTIVITYDATE
COMPLETEDPROJECT
HELPER INITIALS
Project Area: Light from the Sun
1. All the Colors of the Rainbow
2. Why Is the Sky Blue?
3. Polarized Light
4. Solar Viewer
Talking It Over
Project Area: The Light We Cannot See
5. Heat from the Sun
6. Ultraviolet Radiation
Talking It Over
Project Area: Following the Sun
7. Measuring the Earth's Tilt
Talking It Over
MEMBERPROJECT
GUIDE
18 U
SC 707
For 2017,
complete
five activities of
your choice

4
18 U
SC 707
YOU
NG
EN
GIN
EER
S IN
SO
LAR
EN
ERG
YM
EMB
ER P
RO
JEC
T G
UID
E
ACTIVITYDATE
COMPLETEDPROJECT
HELPER INITIALS
Project Area: Solar Energy
8. Greenhouse Gas Jars
9. Creating Energy
Talking It Over
2. LEARNING EXPERIENCESLearning experiences are meant to complement project activities, providing the opportunity for you to do more in subject areas that interest you. What are some learning experiences you could do to show the interesting things you are learning? Here are some ideas:
• Attend a clinic, workshop, demonstration or speech related to solar energy
• Help organize a club meeting based on this project• Go on a related field trip or tour• Prepare your own demonstration, illustrated talk, or project exhibit• Participate in county judging
Once you have a few ideas, record them here. Complete at least two learning experiences. Then, describe what you did in more detail. Ask your project helper to date and initial in the appropriate spaces below.
PLAN TO DO WHAT I DIDDATE
COMPLETED
PROJECT HELPER INITIALS
DemonstrationShowed club members the spectrum of colors in white light
5/5/YR D.S.

518 U
SC 707
YOU
NG
ENG
INEER
S IN SO
LAR
ENER
GY
MEM
BER
PR
OJEC
T GU
IDE
3. LEADERSHIP AND CITIZENSHIP ACTIVITIESChoose at least two leadership/citizenship activities from the list below (or create your own) and write them in the table below. Record your progress by asking your project helper to initial next to the date as each one is completed. You may add to or change these activities at any time. Here are some examples of leadership/ citizenship activities:
• Teach someone about solar energy.• Mentor a younger member who is taking a science-related project• Help another member prepare for his or her project judging• Host a workshop to share tips about solar energy• Encourage someone to enroll in this project• Arrange for a speaker to visit your club• Plan your own leadership/citizenship activity
LEADERSHIP/CITIZENSHIP ACTIVITIYDATE
COMPLETED
PROJECT HELPER INITIALS
Helped club member with his Science Fun With Kitchen Chemistry project
6/12/YR D.S.

6
18 U
SC 707
YOU
NG
EN
GIN
EER
S IN
SO
LAR
EN
ERG
YM
EMB
ER P
RO
JEC
T G
UID
E
4. PROJECT REVIEWAll finished? Congratulations! After you’ve completed the activities in this book you are ready for a project review. This process will help assess your personal growth and evaluate what you have learned.Use this space to write a brief summary of your project experience. Be sure to include a statement about the skills you have learned and how they may be valuable to you in the future.
NOW,set up a project
evaluation. You can do this with your project helper, club leader, or another
knowledgeable adult. It can be part of a club evaluation
or it can be part of your county’s project judging.

18 U
SC 707
YOU
NG
ENG
INEER
S IN SO
LAR
ENER
GY
7
The Sun affects many things on Earth, from weather and oceans to plants and even humans. It makes the days bright and the summers hot, affecting choices about the clothes we wear, the homes we build, and the crops farmers grow. Nuclear fusion in the Sun’s core produces light that travels through space. For thousands of years, humans have harnessed this energy from the sun. We use it to create fire, heat homes, cook food, and— within the past century—even to create electricity.Technology to create electricity from the Sun has improved because we need to find renewable energy resources. Coal and natural gas, the primary sources for electricity, are a limited natural resource. They are non-renewable. The Sun, on the other hand, has an enormous supply of energy. It creates enough energy in one second to supply power to the Earth for billions of years. To harness its energy now, we need scientists, engineers, and others who understand the properties of light and the interaction between the Sun and Earth.
Are YOU one of those people?
life on earth revolves
around the sun

8
18 U
SC 707
YOU
NG
EN
GIN
EER
S IN
SO
LAR
EN
ERG
YIN MANY WAYS light is like waves. All waves—ocean waves, sounds waves, even earthquake waves—move energy from one place to another. To do so, they have many of the same characteristics. One of them is wavelength. With light, wavelength corresponds to the light’s color.
WHAT TO DOA spectrum of light is separated into different wavelengths. You can see a light's spectrum with a spectrometer. Make your own by following these directions.
MATERIALS• CD• one sheet of black
construction paper• clear tape or masking tape• aluminum foil• small block or wad of paper
¾˝ tall• box cutter or scissors• colored pencils
DIRECTIONSEstimated time: 90 minutes
1. To make a dark cube, copy the box template from the inside back cover onto the piece of black construction paper. Make sure your lines are straight and measured correctly.
2. Use the box cutter or scissors to cut along the dotted line and make a narrow slot. The opening should be wide enough for just a bit of light, no more than 1 mm wide. To make a clean edge, line the cut in the paper with two small pieces of foil. Tape the foil in place.
3. To get a section of the CD, use a sharp scissors to make straight cuts from the edge into the center. The outer edge of the section should be no more than 3˝ wide. The piece of CD is going to act like a prism, and separate light into a spectrum.
4. Position the CD at an angle with the narrow end propped on a ¾˝ wad of paper or small block like a 2X4 LEGO. The shiny side should be up. Use tape or glue to keep it loosely in place. You may want to adjust the CD’s height or location later. This riser positions the CD on an incline, allowing you to see the complete spectrum.
5. Take the CD piece with the riser attached and tape it onto construction paper as shown on the template. This square will become the bottom of the box. Place it so the wide end is almost touching the side of the box with the dotted line.
ACTIVITY 1ALL THE COLORS OF THE RAINBOW
PROJECT AREA: Light from the Sun
LEARNING OUTCOMESProject Skill: Learning about light spectrums
Life Skill: Processing information
Educational Standard: NGSS MS.PS4.2 : Develop and use a model to describe that waves are reflected, absorbed or transmitted through various materials.
Success Indicator: Builds a spectrometer and views light from three different sources
Words in red
throughout this
book are defined
in the glossary.
TIPOn a cloudy day you cannot see the Sun’s
spectrum very well. If you are doing this activity
on a cloudy day, pick a different light source or
wait for a sunny day.

918 U
SC 707
AC
TIVITY
ON
E YO
UN
G EN
GIN
EERS IN
SOLA
R EN
ERG
Y
6. Fold the box together and use tape to keep it from falling apart.
7. Now you are ready to look at different light sources to see their spectrum! Point the slit at a light source and look at the CD through the window on the other side of the box. The separated curved lines of color are its spectrum. If the surrounding light is too bright, try cupping your hands around the window to keep excess light from getting in.
8. Look at the Sun, a light bulb, and a candle.9. Draw the different spectrums you see. Note the
different line widths of each color. Leave gaps if there are missing colors. Make a note about which colors, if any, are missing.
Light Source
Spectrum Drawing
Notes
MORE CHALLENGESUsing an inexpensive, glass, triangular optical prism, shine the light sources
you used in the activity through the prism. Compare the spectrums to the ones you found above. Do they match? What does this say about the accuracy of
your spectrometer? Share your results with your project helper.
SAFETY TIPDo NOT look directly at the Sun. You can see the solar
spectrum simply by looking at the sky near the Sun.
10
18 U
SC 707
YOU
NG
EN
GIN
EER
S IN
SO
LAR
EN
ERG
Y
AC
TIV
ITY
ON
E
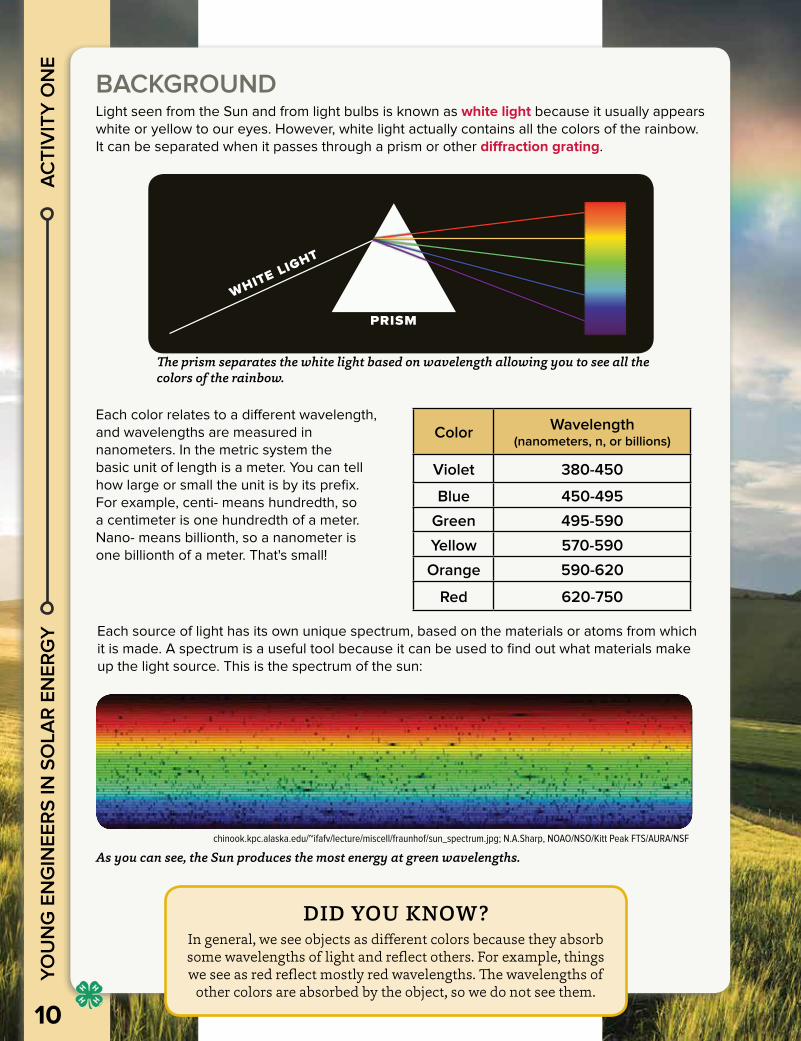
BACKGROUNDLight seen from the Sun and from light bulbs is known as white light because it usually appears white or yellow to our eyes. However, white light actually contains all the colors of the rainbow. It can be separated when it passes through a prism or other diffraction grating.
white light
prism
The prism separates the white light based on wavelength allowing you to see all the colors of the rainbow.
Each color relates to a different wavelength, and wavelengths are measured in nanometers. In the metric system the basic unit of length is a meter. You can tell how large or small the unit is by its prefix. For example, centi- means hundredth, so a centimeter is one hundredth of a meter. Nano- means billionth, so a nanometer is one billionth of a meter. That's small!
Color Wavelength(nanometers, n, or billions)
Violet 380-450
Blue 450-495
Green 495-590
Yellow 570-590
Orange 590-620
Red 620-750
Each source of light has its own unique spectrum, based on the materials or atoms from which it is made. A spectrum is a useful tool because it can be used to find out what materials make up the light source. This is the spectrum of the sun:
chinook.kpc.alaska.edu/~ifafv/lecture/miscell/fraunhof/sun_spectrum.jpg; N.A.Sharp, NOAO/NSO/Kitt Peak FTS/AURA/NSF
As you can see, the Sun produces the most energy at green wavelengths.
DID YOU KNOW?In general, we see objects as different colors because they absorb some wavelengths of light and reflect others. For example, things we see as red reflect mostly red wavelengths. The wavelengths of
other colors are absorbed by the object, so we do not see them.
1118 U
SC 707
AC
TIVITY
ON
E YO
UN
G EN
GIN
EERS IN
SOLA
R EN
ERG
Y
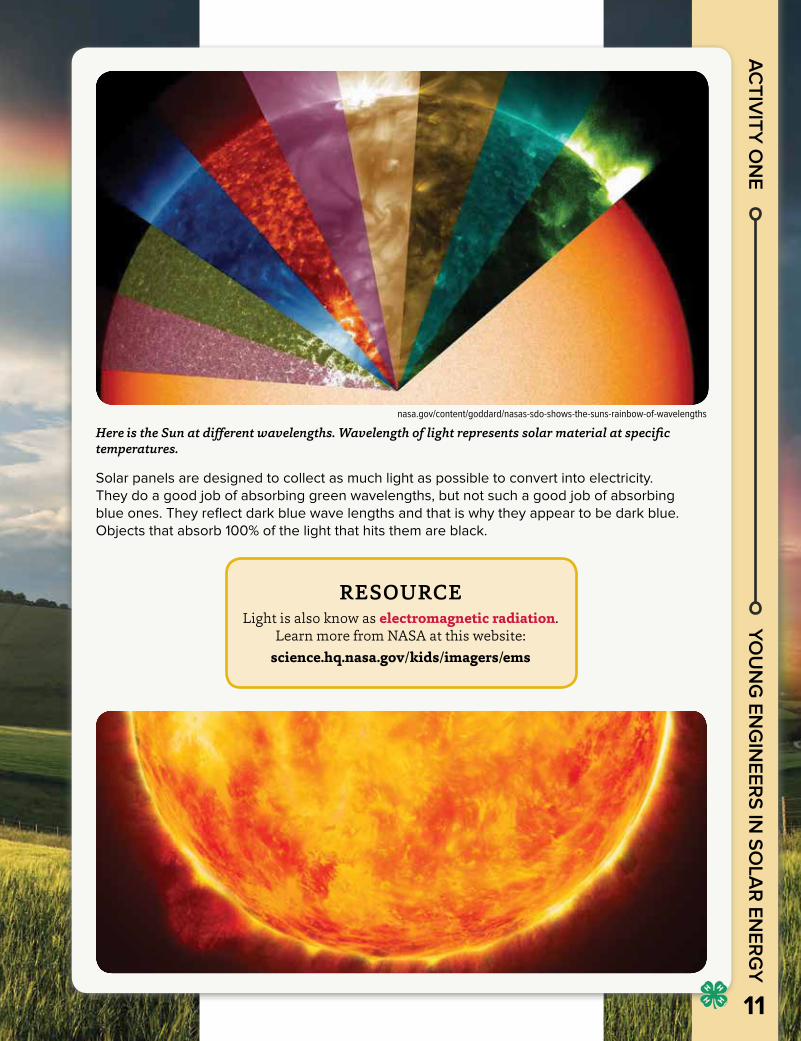
nasa.gov/content/goddard/nasas-sdo-shows-the-suns-rainbow-of-wavelengths
Here is the Sun at different wavelengths. Wavelength of light represents solar material at specific temperatures.
Solar panels are designed to collect as much light as possible to convert into electricity. They do a good job of absorbing green wavelengths, but not such a good job of absorbing blue ones. They reflect dark blue wave lengths and that is why they appear to be dark blue. Objects that absorb 100% of the light that hits them are black.
RESOURCELight is also know as electromagnetic radiation.
Learn more from NASA at this website: science.hq.nasa.gov/kids/imagers/ems

12
18 U
SC 707
YOU
NG
EN
GIN
EER
S IN
SO
LAR
EN
ERG
YPROJECT AREA: Light from the Sun
ACTIVITY 2why is the sky blue?
LEARNING OUTCOMESProject skill: Learning about the atmosphere
Life skill: Critical thinking
Educational standard: NGSS MS.PS4.2: Develop and use a model to describe that waves are reflected, absorbed, or transmitted through various materials.
Success indicator: Mixes and uses a solution of water and milk to examine light waves
LIGHT EXTINCTION occurs when light travels from its source through gas or dust, and part of the light is 1) blocked, 2) scattered, 3) refracted, or 4) reflected.Extinction makes the light less bright and takes away some energy. It occurs when light has to travel through gas or dust. The more gas or dust there is, the more extinction occurs. It is possible to almost completely block certain wavelengths of light. For example, the Earth’s atmosphere absorbs almost all the harmful, high energy light from the Sun (light with shorter wavelengths than visible light), stopping it from reaching the surface.Earth's blue sky is caused by scattered light. Here’s how.
WHAT TO DOIn this activity you are going to create a small model of the atmosphere to show how light interacts with it.
MATERIALS• a clear container that can hold 1½ cups of water,
like a 16 ounce drinking glass• liquid measuring cup• water• whole milk, small glass• teaspoon• flashlight
DIRECTIONSEstimated time: 30 minutes1. Fill the container with 1½ cups of water.2. In a darkened room, shine the flashlight through one side of
the cup. Look at the light through the opposite side and note the color of the light.
3. Pour one teaspoon of milk into the cup. Look at the light again and note any color change. Also look at a side perpendicular to where you are shining the light and note the color. Milk scatters the light going through the water the same way gas and dust particles do in the atmosphere.
4. Continue to put 1 teaspoon of milk in at a time. Each time look through the different sides of the glass and observe the light you see. Note the color changes each time.

1318 U
SC 707
AC
TIVITY
TWO
YO
UN
G EN
GIN
EERS IN
SOLA
R EN
ERG
Y
Number of Teaspoons
of Milk
Observations
Looking through the glass directly at flashlight
Looking through the side of the glass, perpendicular to flashlight beam
0
1
2
3
4
5
MORE CHALLENGESMany phenomena are caused by light passing through the
Earth’s atmosphere. The most common is a rainbow, but others include sundogs, halos around the Sun or Moon, crepuscular rays, and the green flash. Learn more about these by looking them up online so you can be on the lookout for them. Share
what you learn with your project helper.

14
18 U
SC 707
YOU
NG
EN
GIN
EER
S IN
SO
LAR
EN
ERG
Y
AC
TIV
ITY
TW
O
BACKGROUNDWith clear water in the glass, you should have seen light as white or yellow, the way we usually see light. As milk is added the water loses its transparency. The light is scattered, giving the solution a blue tint when observed from the side, the same way that light in the atmosphere makes the sky look blue. When observed directly through the glass, the solution has a red tint, like the light at sunrise and sunset. The more milk, the redder the flashlight beam and the bluer the light observed from the side. Is that what happened?Light scatters according to its wavelength. The shorter the wavelength, the more it is scattered. Blue wavelengths, which are shorter, get scattered more than red wavelengths, which are longer. During the day when the Sun is overhead, this scattering makes the blue light look like as if it is coming from everywhere in the sky and not just directly from the Sun. However, during sunrise and sunset, when the Sun is near the horizon, the sky near the Sun becomes red, yellow, and orange because the light is traveling through even more of the gas in the atmosphere. Longer wavelengths of light become scattered too. The blue light is scattered so much it is completely out of our line of sight.
Adapted from i1.wp.com/astrobob.areavoices.com/files/2012/08/Scattering-www_pingry_org-credit1.jpg?resize=400%2C228
sun’s rays in space
earth’s atmosphere
DID YOU KNOW?The sky on Mars is red because it is
95% carbon dioxide, which scatters red wavelengths more than blue.
RESOURCEThis website has great explanations for
common questions about space: spaceplace.nasa.gov/blue-sky/en
Earth’s atmosphere scattering blue light entering it during the day.
A comparison of the scattering of light during the day and at sunset/sunrise. Red shown to be scattered more during sunset/sunrise and mostly reaching the surface during midday.
midday
sunset
Adapted from thenakedscientists.com/HTML/uploads/RTEmagicC_BlueSky-Sunset.gif.

1518 U
SC 707
YOU
NG
ENG
INEER
S IN SO
LAR
ENER
GY
PROJECT AREA: Light from the SunACTIVITY 3
polarized light
LEARNING OUTCOMESProject skill: Learning properties of light
Life skill: Critical thinking
Educational standard: NGSS MS.PS4.2: Develop and use a model to describe that waves are reflected, absorbed, or transmitted through various materials.
Success indicator: Demonstrates polarization through polarized lenses or paper
LIGHT HAS many properties. In activity 1, you learned about wavelength. Some other properties of light are speed, energy, intensity, frequency, and polarization.Speed is one of light’s most famous properties. It travels in a vacuum at 186,000 miles per hour! Energy of light depends on the wavelength. Shorter wavelengths have more energy. Intensity is the brightness of light within a certain area. Frequency is the number of wave crests or troughs passing by per second as a wave travels. Polarization is a more complicated property of light. It describes the orientation, or direction, of light waves in space. When light interacts with the atmosphere or certain materials, like sunglasses, it can travel through or be reflected with a preferred orientation. Let’s see how polarization works.
WHAT TO DOMATERIALS
• bottle of light corn syrup• a clear, tall mason jar• flashlight• masking tape• polarized lenses (Use lenses from old 3D movie theater glasses
or sunglasses, or buy polarized film sheets online.)• colored pencils
DIRECTIONSEstimated time: 30 minutes
1. Make sure your lenses are polarized by placing one on top of the other and turning one of them. The lenses should get darker, blocking more of the light passing through, until you cannot see through them.
2. Tape one lens to the bottom of the jar. Tape only around the edges so you can still shine a light through it.
3. Pour some corn syrup in the jar. The exact amount is not important as long as it fills it at least two inches or so.
4. Now take the flashlight and shine it through the lens on the bottom of the jar.
5. Hold or place the other lens on the top of the jar. Look down through it. What do you see?
6. Now turn the top lens. What happens now? You should see the colors of the corn syrup change based on which way you have turned the lens. If you do not see the color change or if you have to hold the lens at an odd angle, try changing the jar or the amount of corn syrup in it.
Do this experiment with your project helper
or a friend. To shine a flashlight through the
lens at the bottom of the glass AND look from the top takes more than two
hands!

16
18 U
SC 707
YOU
NG
EN
GIN
EER
S IN
SO
LAR
EN
ERG
Y
AC
TIV
ITY
TH
REE 7. Once you are able to see the color change, turn off the lights in the room and look at the
ceiling while shining the light through the lenses and jar. This projects the colors onto the ceiling so you can see them really well.
8. Gradually turn the lens until you see a new color, usually about a 1/8 turn. Color in one section of the circle below with the colors you see. Turn the lens again, and color another section. Keep turning the lens and coloring until you have eight different views.
MORE CHALLENGESDemonstrate this activity for other club members by
projecting the colors on the ceiling as you did in step 7, or by using a traditional overhead projector.

1718 U
SC 707
AC
TIVITY
THR
EE YO
UN
G EN
GIN
EERS IN
SOLA
R EN
ERG
Y
BACKGROUNDPolarization changes the way light waves travel by making them linear or circular. Unpolarized light waves travel from the source in many directions. When polarization is linear, the light waves travel in the same direction. When it is circular, light waves rotate, traveling in a spiral.
Hewitt, Conceptual Physics, Ninth Edition. Copyright © 2002 Pearson Education, Inc., publishing as Addison Wesley. All rights reserved.
It is convenient to think of polarizers as shutters and light as a rope. The wave traveling through the rope passes easily through the shutters oriented in the same direction. But as you turn one shutter 90 degrees, the shutter straightens out the rope, which is like real polarizers reflecting light.
LINEARLY POLARIZED LIGHT LEFT HANDED CIRULARLY
POLARIZED LIGHT
upload.wikimedia.org/wikipedia/commons/thumb/0/09/Circular.Polarization.Circularly.Polarized.Light_Homogenous_Circular.Polarizer_Left.Handed.svg/2000px-Circular.Polarization.Circularly.
Polarized.Light_Homogenous_Circular.Polarizer_Left.Handed.svg.png
Many sun glasses and 3D glasses use a linear polarizer with a circular polarizer on top of it to help block more light or help separate colors to make images 3D.
In the activity, light from the flashlight was subject to a combination of linear and circular polarization. Linear polarization happened through the lenses, and circular polarization happened through the corn syrup molecules, which are shaped like spirals. Polarization depends on wavelength. Different wavelengths of light are polarized differently, causing the colors to separate like they do in a prism. That is what happens when the light from the flashlight passes through the second lens. All the light except a certain color is blocked based on how you turned the lens.
SOURCE: hyperphysics.phy-astr.gsu.edu/hbase/phyopt/polclas.html
RESOURCEWant to know more about polarized
light? Optics4Kids, a website from The Optical Society, can help:
optics4kids.org/home/content/other-resources/articles/polarized-lightBe sure to check out their web page
about celebrities in optics!
DID YOU KNOW?Windows in newer cars are polarized to help drivers see better. You can see this by wearing some polarized sunglasses,
looking at a bright patch of Sun on a surface inside the car and tilting your
head from side to side. You will see the patch get dimmer and brighter based on
which way you tilt your head.
18
18 U
SC 707
YOU
NG
EN
GIN
EER
S IN
SO
LAR
EN
ERG
YPROJECT AREA: Light from the Sun
ACTIVITY 4SOLAR VIEWER
LEARNING OUTCOMESProject skill: Observing the Sun
Life skill: Safety in scientific exploration
Educational standard: NGSS MS.PS4.2: Develop and use a model to describe that waves are reflected, absorbed, or transmitted through various materials.
Success indicator: Constructs simple solar viewer that enables safe observation of the Sun’s activities
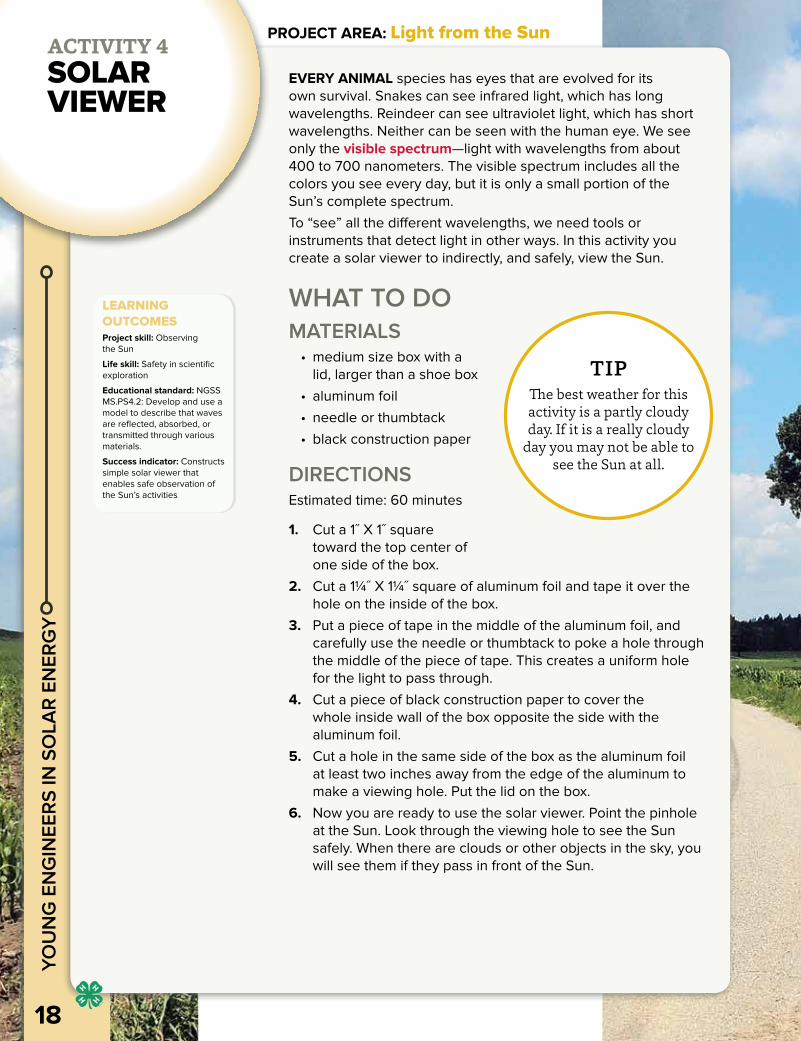
EVERY ANIMAL species has eyes that are evolved for its own survival. Snakes can see infrared light, which has long wavelengths. Reindeer can see ultraviolet light, which has short wavelengths. Neither can be seen with the human eye. We see only the visible spectrum—light with wavelengths from about 400 to 700 nanometers. The visible spectrum includes all the colors you see every day, but it is only a small portion of the Sun’s complete spectrum.To “see” all the different wavelengths, we need tools or instruments that detect light in other ways. In this activity you create a solar viewer to indirectly, and safely, view the Sun.
WHAT TO DOMATERIALS
• medium size box with a lid, larger than a shoe box
• aluminum foil• needle or thumbtack • black construction paper
DIRECTIONSEstimated time: 60 minutes
1. Cut a 1˝ X 1˝ square toward the top center of one side of the box.
2. Cut a 1¼˝ X 1¼˝ square of aluminum foil and tape it over the hole on the inside of the box.
3. Put a piece of tape in the middle of the aluminum foil, and carefully use the needle or thumbtack to poke a hole through the middle of the piece of tape. This creates a uniform hole for the light to pass through.
4. Cut a piece of black construction paper to cover the whole inside wall of the box opposite the side with the aluminum foil.
5. Cut a hole in the same side of the box as the aluminum foil at least two inches away from the edge of the aluminum to make a viewing hole. Put the lid on the box.
6. Now you are ready to use the solar viewer. Point the pinhole at the Sun. Look through the viewing hole to see the Sun safely. When there are clouds or other objects in the sky, you will see them if they pass in front of the Sun.
TIPThe best weather for this activity is a partly cloudy day. If it is a really cloudy
day you may not be able to see the Sun at all.

1918 U
SC 707
AC
TIVITY
FOU
R
YOU
NG
ENG
INEER
S IN SO
LAR
ENER
GY
Adapted from timeanddate.com/eclipse/box-pinhole-projector.html
SUNLIGHT
ALUMINIUMFOIL WITH PINHOLE
VIEWING HOLE
BLACK CONSTRUCTION PAPER TAPED TO
INSIDE END
7. Point the pinhole toward at least four objects between you and the Sun. Can you see an image of each object through your viewing hole? Pick tall objects like buildings or trees. Use the table below to draw what you see. Are there any differences between the objects and the images you see?
Draw the images you see here:Image 1 Image 2
Image 3 Image 4
DID YOU KNOW?The Sun produces the most light in the green part of the spectrum. This is why
plants appear green. They absorb light from the Sun so they can grow. The chlorophyll in the plant’s cells changes sunlight into energy by absorbing red and blue light. However, because there is so much green light, plants do not
absorb it. It is too strong and would damage their photoreceptors. Plants reflect most of the green light. As a result we see them as green.
RESOURCESWant to know how a telescope works? Check outscience.howstuffworks.com/telescope1.html
SOURCE: Activity adapted from timeanddate.com/eclipse/box-pinhole-projector.html
20
18 U
SC 707
YOU
NG
EN
GIN
EER
S IN
SO
LAR
EN
ERG
Y
AC
TIV
ITY
FO
UR
MORE CHALLENGESYou can make a pinhole camera—another device for viewing the
Sun’s activities—by building on the box you just created.
MATERIALS• black construction paper• scissors• tape• black and white
photographic paper (not the same as photo paper for printing)
1. Cover the viewing hole with a black piece of construction paper so no light can get through.
2. In a dark room take a piece of the black and white photographic paper and place it on the inside of the box on the wall opposite the aluminum. Close the lid of the box and cover the pinhole with a flap made of construction paper.
3. Take the box outside or in a brightly lit in room and point the pinhole at something you want to take a photo of. Once the camera is placed, remove the paper flap over the pinhole and leave the box in place for 30 minutes.
4. After 30 minutes you will have a negative image on the photographic paper. The image will be upside down just like images that pass through our eyes onto the retina. You can take the negative and have it processed into a black and white image.
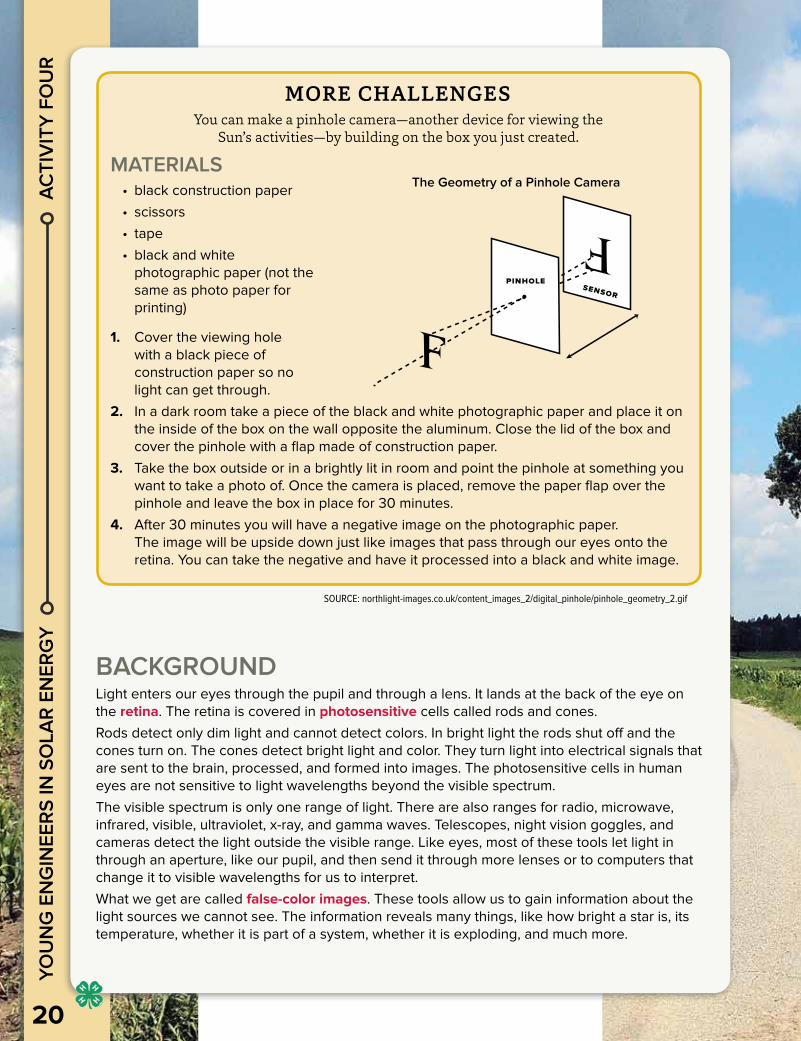
SOURCE: northlight-images.co.uk/content_images_2/digital_pinhole/pinhole_geometry_2.gif
BACKGROUNDLight enters our eyes through the pupil and through a lens. It lands at the back of the eye on the retina. The retina is covered in photosensitive cells called rods and cones. Rods detect only dim light and cannot detect colors. In bright light the rods shut off and the cones turn on. The cones detect bright light and color. They turn light into electrical signals that are sent to the brain, processed, and formed into images. The photosensitive cells in human eyes are not sensitive to light wavelengths beyond the visible spectrum. The visible spectrum is only one range of light. There are also ranges for radio, microwave, infrared, visible, ultraviolet, x-ray, and gamma waves. Telescopes, night vision goggles, and cameras detect the light outside the visible range. Like eyes, most of these tools let light in through an aperture, like our pupil, and then send it through more lenses or to computers that change it to visible wavelengths for us to interpret. What we get are called false-color images. These tools allow us to gain information about the light sources we cannot see. The information reveals many things, like how bright a star is, its temperature, whether it is part of a system, whether it is exploding, and much more.
The Geometry of a Pinhole Camera
pinholesensor
18 U
SC 707
YOU
NG
ENG
INEER
S IN SO
LAR
ENER
GY
21
PROJECT AREA: Light from the Sun
SHARE Describe what you learned about light spectrums.
RE FLE CT How did others help you build a model of the atmosphere?
G E N E RALI Z E Light travels in waves. What else travels in waves?
APPLY What would happen if snakes did not have eyes that were evolved for their own survival needs?
talking it over

22
18 U
SC 707
YOU
NG
EN
GIN
EER
S IN
SO
LAR
EN
ERG
YPROJECT AREA: Light We Cannot See
ACTIVITY 5heat from the sun
LEARNING OUTCOMESProject Skill: Purifying water
Life Skill: Critical Thinking
Educational Standard: NGSS MS.ESS2.4 : Develop a model to describe the cycling of water through Earth’s systems driven by energy from the Sun and the force of gravity.
Success Indicator: Collects data from a homemade model of the water cycle
INFRARED RADIATION is light with a wavelength between 700 nanometers and 1 millimeter. We cannot see infrared radiation, but we can feel it as heat. This heat is essential for warming the Earth.Heat from the Sun also fuels earth’s water cycle. At any temperatures above freezing, water evaporates. Heat from any source including the Sun speeds up the process. As water evaporates from oceans and other bodies of water, it goes into the atmosphere. Once there it condenses as water droplets or as ice crystals in clouds. You can easily build a model of the water cycle process.
nasa.gov/sites/default/files/jan_7_x_flare_1600-304.jpeg
The Sun viewed in the infrared shows many features not visible in visible light because they don’t show up in visible light or the Sun is too bright in visible light to see them.
WHAT TO DOMATERIALS
• liquid measuring cup• two large glass or ceramic bowls that are the same size• two small, shallow cups or bowls
(The cups must be less than half the height of the bowls.)
• water• marbles or pennies to use
as weights• table salt (4 tablespoons)• plastic wrap• tape• outdoor thermometer• stopwatch or clock
DIRECTIONSEstimated time: 6 to 8 hours
1. Use a measuring cup to fill the two cups with warm water. Record the amount of water used in the table.
TIPThis is hard to do in very cold weather because the
water might freeze or take a long time to evaporate. If it is cold outside, try placing one bowl in a sunny, south-facing
window or under a heat lamp and the other bowl elsewhere in
the house.

2318 U
SC 707
AC
TIVITY
FIVE
YOU
NG
ENG
INEER
S IN SO
LAR
ENER
GY
2. Pour the water from the cups into separate bowls. Mix two tablespoons of salt into each bowl of water until the salt completely dissolves. This is like the water in the ocean.
3. Place one cup in the middle of each bowl. If the cups float, weigh them down so they rest on the bottom of the bowls. Use the same number of marbles or pennies in each one.
4. Completely cover each bowl in plastic wrap. it should be slightly loose across the top but tightly sealed aroudn the edge. If necessary, seal the edges with tape. The plastic wrap helps trap heat and also allows you to collect the evaporated water.
5. Place a weight on top of the plastic wrap directly above each cup. This makes a depression that helps the evaporated water drip into the cup.
6. Place one bowl outdoors in direct sunlight and the other in the shade. Take and record the air temperature at each location.
7. Monitor the evaporation process in both bowls. When the water in the bowl in direct sun is completely evaporated and has dripped into the cup, bring both bowls inside. Note the time. Measure the liquid in each cup by straining it back into the measuring cup. If you used weights, don't worry about the water on them. The idea is to compare the amount of water in each.
Location Direct Sun Shade
Amount of Water Used
Air Temperature in Fahrenheit
Evaporation Time
Amount of Water Collected
Notes
MORE CHALLENGESYou can harness more of the Sun’s infrared radiation and cook your own treats in a homemade solar oven. Instructions for various versions are available on the internet. Scientific American has a good one at scientificamerican.com/
article/sunny-science-build-a-pizza-box-solar-oven. Make s’mores and share them with your club.

24
18 U
SC 707
YOU
NG
EN
GIN
EER
S IN
SO
LAR
EN
ERG
Y
AC
TIV
ITY
FIV
E
BACKGROUNDLiquids evaporate when molecules on the surface gain energy and heat up. When they heat up enough to reach their vapor point, they change into gas and move into the atmosphere. This continues until all the liquid is gone.In the activity, salt was left after all the water evaporated. Salt molecules do not gain enough energy to turn into gas. The melting point of table salt is about 1500° F, so in direct sunlight, it never turns into a liquid. Earth simply does not get that hot.The Sun’s heat helps water evaporate more quickly and also helps to move water around the Earth. As gases in the atmosphere heat up, they circulate in large atmospheric pressure cells. This movement is an important part of a region’s climate. It also causes rainstorms, sending water back to the earth’s surface where the water cycle begins again.
jwst.nasa.gov/exhibit/ir2.jpg
The man in the photo is shown in infrared. You can tell the temperature of his body based on the color. Reds, yellows, and oranges are hotter. Blues and purples are cooler. You can even see the temperature of his hand through a cloth he is holding and the temperature of his body through his clothes.
DID YOU KNOW?Farmers can use infrared light detectors to keep an eye
on the health of their crops. Healthy plants give off a lot of infrared radiation while unhealthy plants do
not. Using infrared radiation, farmers can detect early signs of stress or disease, and then work to stop it.
RESOURCESThese websites can shed some light on infrared science:science.hq.nasa.gov/kids/imagers/ems/infrared.html
missionscience.nasa.gov/ems/08_nearinfraredwaves.htmlmissionscience.nasa.gov/ems/07_infraredwaves.html

2518 U
SC 707
YOU
NG
ENG
INEER
S IN SO
LAR
ENER
GY
PROJECT AREA: Light We Cannot SeeACTIVITY 6
ultraviolet radiation
LEARNING OUTCOMESProject skill: Using available resources
Life skill: Critical thinking
Educational standard: NGSS MS.PS4.2: Develop and use a model to describe that waves are reflected, absorbed, or transmitted through various materials.
Success indicator: Controls the amount of UV radiation hitting the color bead
ULTRAVIOLET, OR UV, radiation is a wavelength between 100 and 400 nanometers. This light is useful in many ways. It helps our bodies produce vitamin D and is used to disinfect medical tools. It is also dangerous because it causes sunburn and skin cancer.One natural form of protection from UV light is the ozone layer in Earth’s atmosphere. The ozone layer blocks most of the sun’s UV light from reaching Earth’s surface. It is extremely important to life on Earth. It also explains why we need to limit the ozone-destroying chemicals we produce.How can we protect ourselves from harmful UV radiation? Find out with this activity.
WHAT TO DOMATERIALS
• UV beads (available online)• sunscreen• stopwatch• at least 2 other materials you think may block ultraviolet light
such as a shirt, a glass cup, clear or tinted plastic container
DIRECTIONSEstimated time: 45 to 60 minutes
1. Reserve some UV beads inside so they do not change colors. This is your control sample.
2. Take some UV beads outside into direct sunlight and time how long it takes them to change color.
3. Test how well the sunscreen works by coating some beads. Time how long it takes them to change color.
4. Take some more UV beads and test whether your other materials actually block UV light by placing them under the materials in direct sunlight. See whether they change color. If they do, time how long it takes.
Cover MaterialDid the beads change
color? Y/NIf yes, how long
did it take?
No Coating
Sunscreen
Test Material 1:
Test Material 2:
26
18 U
SC 707
YOU
NG
EN
GIN
EER
S IN
SO
LAR
EN
ERG
Y
AC
TIV
ITY
SIX Take the beads outside at a different time of day than you did before. Does the time of day
affect the time it takes for the beads to change color? Do you think the time of year would affect the color change time?
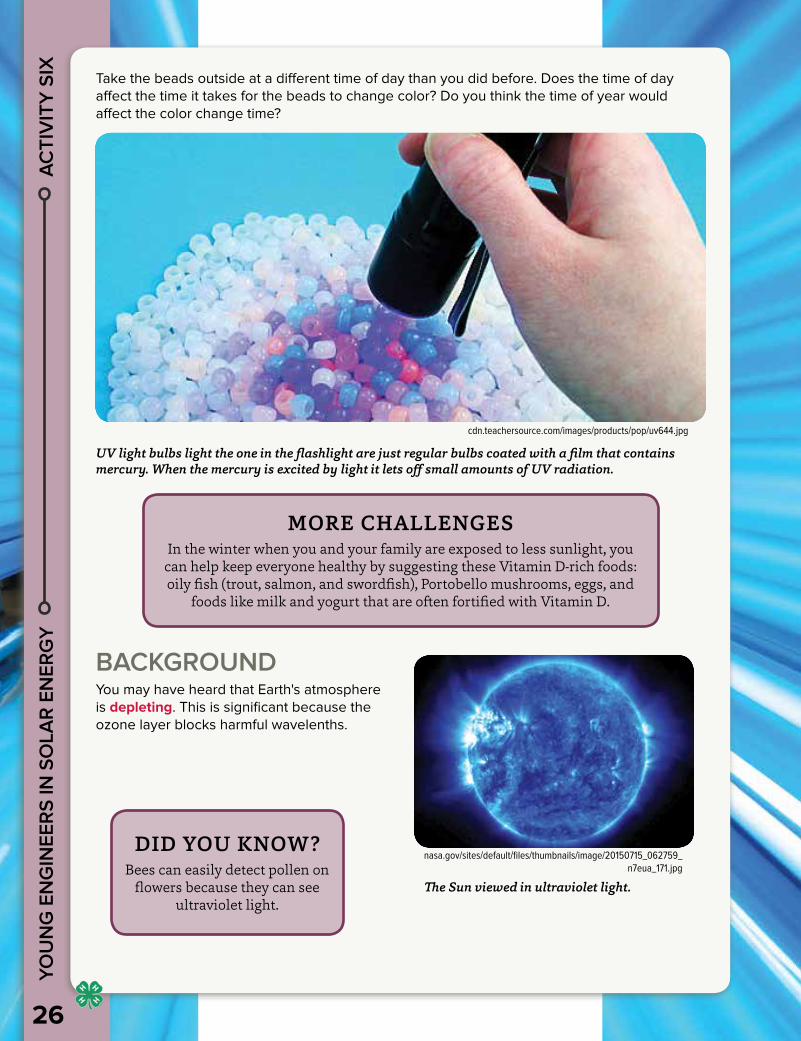
cdn.teachersource.com/images/products/pop/uv644.jpg
UV light bulbs light the one in the flashlight are just regular bulbs coated with a film that contains mercury. When the mercury is excited by light it lets off small amounts of UV radiation.
MORE CHALLENGESIn the winter when you and your family are exposed to less sunlight, you
can help keep everyone healthy by suggesting these Vitamin D-rich foods: oily fish (trout, salmon, and swordfish), Portobello mushrooms, eggs, and
foods like milk and yogurt that are often fortified with Vitamin D.
DID YOU KNOW?Bees can easily detect pollen on
flowers because they can see ultraviolet light.
BACKGROUNDYou may have heard that Earth's atmosphere is depleting. This is significant because the ozone layer blocks harmful wavelenths.
nasa.gov/sites/default/files/thumbnails/image/20150715_062759_n7eua_171.jpg
The Sun viewed in ultraviolet light.

2718 U
SC 707
AC
TIVITY
SIX
YOU
NG
ENG
INEER
S IN SO
LAR
ENER
GY
TYPES OF ULTRAVIOLET RADIATION
ozone layer
• premature aging• wrinkling of the skin• implicated in skin cancer
• skin cancer• cataracts• sunburn
• extremely dangerous• blocked by ozone layer
uva uvb uvc
wavelength
400 mm 315 mm 280 mm 100 mm
arpansa.gov.au/images/basics/uvabc.gif
The picture above shows the different wavelengths of UV light, their frequencies, and their dangers.
UVA is not blocked by the Earth’s atmosphere at all. UVB is partially blocked. Both UVA and UVB cause damage to the skin but can be blocked by different things such as sunscreen, clothing, and glass. UVC is already completely blocked by absorption or scattering in the Earth’s atmosphere.UV radiation is dangerous, but is still useful. UVB light allows Vitamin D to be made by our bodies. Vitamin D helps keep our bones and immune system healthy. Only a few minutes of midday Sun exposure is needed to increase Vitamin D production. Too much UVB light actually decreases Vitamin D levels.Another benefit of UV light is that it is used to disinfect things like hospital tools, air, water for drinking, and aquariums. Because some chemicals change when exposed to UV light, it is also used to help materials harden quickly. Some materials fluoresce, or glow in the dark, in response to UV light. In the activity, UV light caused a chemical reaction in the UV beads that changed their color. When UV light is blocked, the beads do not change color. Can you think of a practical situation in which that would be helpful?
RESOURCESYou can learn more about ultraviolet light at these kid-friendly websites:
science.hq.nasa.gov/kids/imagers/ems/uv.htmlmissionscience.nasa.gov/ems/10_ultravioletwaves.html
project area: the light we cannot see
That makes it more important than ever to understand the dangers of UV radiation. The three types of UV radiation are UVA, UVB, and UVC. They are each one kind of wavelengths within the overall range of UV wavelengths.
UVA 310-400 nanometers
UVB 280-310 nanometers
UVC 100-280 nanometers
XXXXXX
18 U
SC 707
28
YOU
NG
EN
GIN
EER
S IN
SO
LAR
EN
ERG
YPROJECT AREA: Light We Cannot See
talking it over
SHARE In activity 5, how long did it take all of the water to evaporate?
RE FLE CT What problems did you face while building your model of the water cycle process? How did you handle them?
G E N E RALI Z E What are some of the benefits of UV light?
APPLY Can you think of an example of how to protect yourself from UV light?

2918 U
SC 707
YOU
NG
ENG
INEER
S IN SO
LAR
ENER
GY
PROJECT AREA: Following the Sun ACTIVITY 7
measuring earth’s tilt
AN IMPORTANT part of solar technology is getting the device to face the Sun as the Sun moves across the sky. Solar panels collect the most energy when the sun hits them directly, not from the side. This important concept also controls the absorption of the Sun’s heat on the surface of the Earth. Because the Earth rotates and is tilted on its axis, we experience the different seasons. This tilt can be measured by tracking the Sun through the sky between equinoxes and solstices. An equinox occurs when day and night are both twelve hours. Solstices occur when the Sun is at its lowest and highest points in the sky, when the day at its shortest and longest.This activity shows you how to measure the tilt of the sun.
eoimages.gsfc.nasa.gov/images/imagerecords/52000/52248/seasons_msg_2010-2011.jpg
The images on the left show Earth at summer and winter solstices. They show the Earth tilting towards and away from the Sun depending on the time of the year. The images on the right show the Earth at the equinoxes, when it is approximately half covered in shadow.
WHAT TO DO
LEARNING OUTCOMESProject skill: Measuring and using trigonometryt
Life skill: Critical thinking
Educational standard: NGSS MS.ESS1.3: Analyze and interpret data to determine scale properties of objects in the solar system
Success indicator: Calculates the angle of the Sun
MATERIALS• yardstick• ruler or tape measure
• pencil or markers• scientific calculator
TIPThis activity needs to be done near to an equinox
or solstice. Look up exactly when they are so you can do this activity
successfully.
For 2017, choose
this activity only if
you can do it in June
and September.
30
18 U
SC 707
YOU
NG
EN
GIN
EER
S IN
SO
LAR
EN
ERG
Y
AC
TIV
ITY
SEV
EN
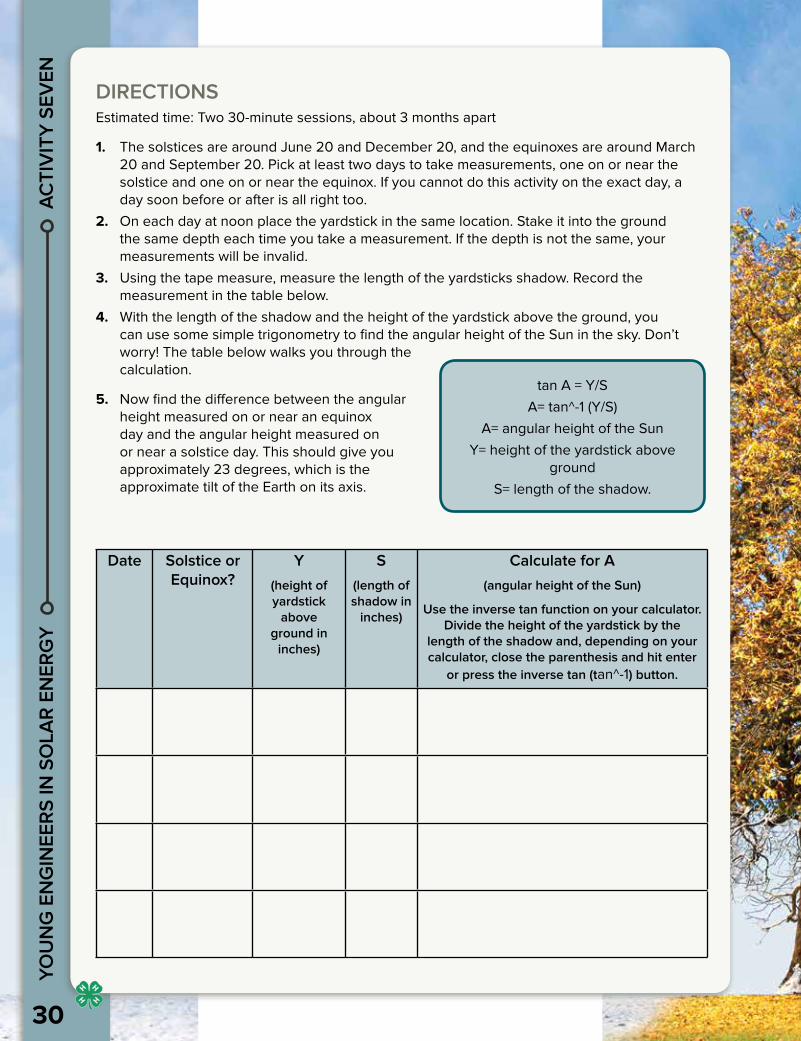
DIRECTIONS Estimated time: Two 30-minute sessions, about 3 months apart
1. The solstices are around June 20 and December 20, and the equinoxes are around March 20 and September 20. Pick at least two days to take measurements, one on or near the solstice and one on or near the equinox. If you cannot do this activity on the exact day, a day soon before or after is all right too.
2. On each day at noon place the yardstick in the same location. Stake it into the ground the same depth each time you take a measurement. If the depth is not the same, your measurements will be invalid.
3. Using the tape measure, measure the length of the yardsticks shadow. Record the measurement in the table below.
4. With the length of the shadow and the height of the yardstick above the ground, you can use some simple trigonometry to find the angular height of the Sun in the sky. Don’t worry! The table below walks you through the calculation.
5. Now find the difference between the angular height measured on or near an equinox day and the angular height measured on or near a solstice day. This should give you approximately 23 degrees, which is the approximate tilt of the Earth on its axis.
tan A = Y/SA= tan^-1 (Y/S)
A= angular height of the SunY= height of the yardstick above
groundS= length of the shadow.
Date Solstice or Equinox?
Y
(height of yardstick
above ground in
inches)
S
(length of shadow in
inches)
Calculate for A
(angular height of the Sun)
Use the inverse tan function on your calculator. Divide the height of the yardstick by the
length of the shadow and, depending on your calculator, close the parenthesis and hit enter
or press the inverse tan (tan^-1) button.

3118 U
SC 707
AC
TIVITY
SEVEN
YO
UN
G EN
GIN
EERS IN
SOLA
R EN
ERG
Y
BACKGROUNDAs the Earth orbits the Sun, the Earth’s tilt never changes. That is why the Sun is not in the same place in the sky every day, even if you look at the same time every day.If you take a picture of the Sun every day at the same time and location for a year and plot your pictures, the pattern created is a figure 8. The pattern is created by the Earth moving along its orbit through the year. Scientists call this pattern an analemma.
MORE CHALLENGESExplore the significance of the solstice and equinox in an ancient
monument such as England’s Stonehenge or in an earthwork like Ohio’s Serpent Mound. How did the people of ancient cultures measure the solstice and equinox? Share what you learn with your project helper.
DID YOU KNOW?Different celestial objects result in different
annalemmas. For example, on Mars the annalemma is shaped like a teardrop. This
is because other planets have different tilts, rotation rates (length of day), and orbit rates
(length of year) than Earth.
RESOURCESDetails about analemma are
available here:analemma.com/pages/
framespage.html
angle of elevation
Adapted from mathforum.org/mathimages/imgUpload
The height of the Sun from the horizon is measured as an angle. Astronomers use angles as measurements between objects in the sky because from Earth they appear to be on the surface of a sphere.
As the Sun appears to move through the sky, the light coming from it hits the Earth at different angles. These angles cause different light and heat intensities. In summer the strength of light is highest, resulting in more heat and higher temperatures. The opposite happens in winter when the indirect angle of the Sun in the hemisphere pointing away from it spreads out light over a larger area. This decreases the strength of the light and results in lower temperatures.These effects are important because they change the amount of energy that can be turned into electricity by solar panels. Usually, depending on where the solar panel is, there are recommendations for its placement. Some panels are attached to motors and computers that move to follow the Sun all day and all seasons.
32
18 U
SC 707
YOU
NG
EN
GIN
EER
S IN
SO
LAR
EN
ERG
YPROJECT AREA: Following the Sun
SHARE What was the difference between the angular height measure on or near an equinox day and the angular height measured on or near a solstice day?
RE FLE CT What did you learn from activity 7 that you didn’t know before?
G E N E RALI Z E How does the earth’s tilt affect the seasons?
APPLY What would happen if the earth was knocked off its tilt?
talking it over

3318 U
SC 707
YOU
NG
ENG
INEER
S IN SO
LAR
ENER
GY
PROJECT AREA: Solar TechnologyACTIVITY 8
greenhouse gas jars
EARTH’S ATMOSPHERE is composed of gases that help retain the Sun’s heat. The gases are called greenhouse gases, and they are the reason the Earth is habitable. They trap infrared radiation by absorbing it and reemitting it back to the Earth’s surface so it cannot escape into space. This process is called the greenhouse effect.Having too much of these greenhouse gases can make the Earth extremely hot, and not having enough could make the Earth extremely cold. As you can see, these gases are essential to the habitability of Earth but are also dangerous. Solar technology and other renewable energy sources can help keep these gasses in balance. In the following activity you will determine which greenhouse gas is most efficient at retaining heat.
WHAT TO DOMATERIALS
• 3 large glass jars, preferably with watertight lids like mason or other jars
• plastic wrap and rubber bands (if you don't have lids)
• tape• water• 2 effervescent (seltzer) tablets, like Alka Seltzer • 3 digital aquarium thermometers (available at pet
stores and online)
DIRECTIONSEstimated time: 4½ hours total time
1. Place a thermometer in each jar. Tape them to the side so you can read the thermometers well.
2. Pour two cups of water into each of two of the jars.3. If you do not have tight lids, use plastic wrap and tape to tightly
close the empty jar and one of the jars with water. If you do have tight lids, simply close these two jars. The jar with water will produce water vapor, a greenhouse gas, as the water evaporates.
4. In the last jar (which should have water in it already), drop in two effervescent tablets and quickly seal the top with plastic wrap and tape or with the lid. The effervescent tablets react with water to produce carbon dioxide gas (a greenhouse gas). This is what causes the fizzing you will observe.
5. Put the three jars in direct sunlight. If it is a cold day, put them below a hot lamp. Make sure they aren’t touching one another. That could affect the temperature change.
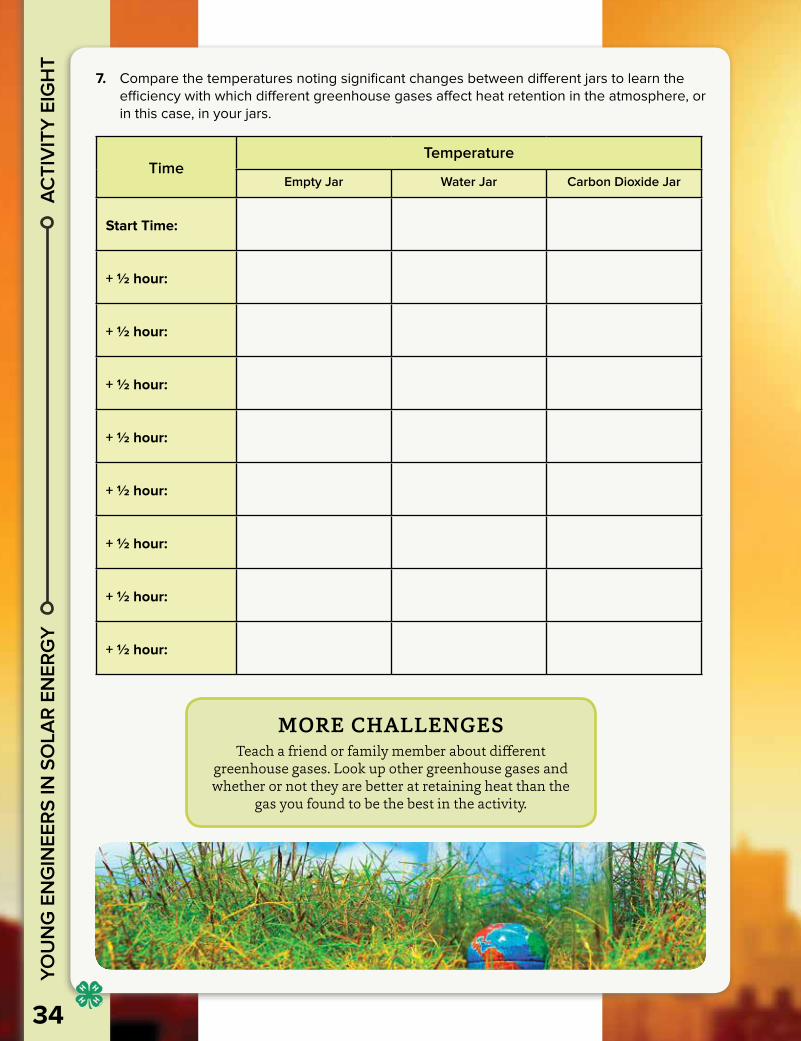
6. Every half hour for the next 4 hours record the temperature of each jar.
LEARNING OUTCOMESProject skill: Comparing heat absorbing gasses
Life skill: Data comparison
Educational standard: MS.PS3.3: Applying scientific principles to design, construct, and test a device that either minimizes or maximizes thermal energy transfer
Success indicator: Determines the relationship between temperature and carbon dioxide in the atmosphere
TIPThis activity will not work on a cloudy day or in the winter.
In these cases, place your experiment inside with a
bright lamp placed one foot away from the jars.
34
18 U
SC 707
YOU
NG
EN
GIN
EER
S IN
SO
LAR
EN
ERG
Y
AC
TIV
ITY
EIG
HT
7. Compare the temperatures noting significant changes between different jars to learn the efficiency with which different greenhouse gases affect heat retention in the atmosphere, or in this case, in your jars.
TimeTemperature
Empty Jar Water Jar Carbon Dioxide Jar
Start Time:
+ ½ hour:
+ ½ hour:
+ ½ hour:
+ ½ hour:
+ ½ hour:
+ ½ hour:
+ ½ hour:
+ ½ hour:
MORE CHALLENGESTeach a friend or family member about different
greenhouse gases. Look up other greenhouse gases and whether or not they are better at retaining heat than the
gas you found to be the best in the activity.
3518 U
SC 707
AC
TIVITY
EIGH
T YO
UN
G EN
GIN
EERS IN
SOLA
R EN
ERG
Y
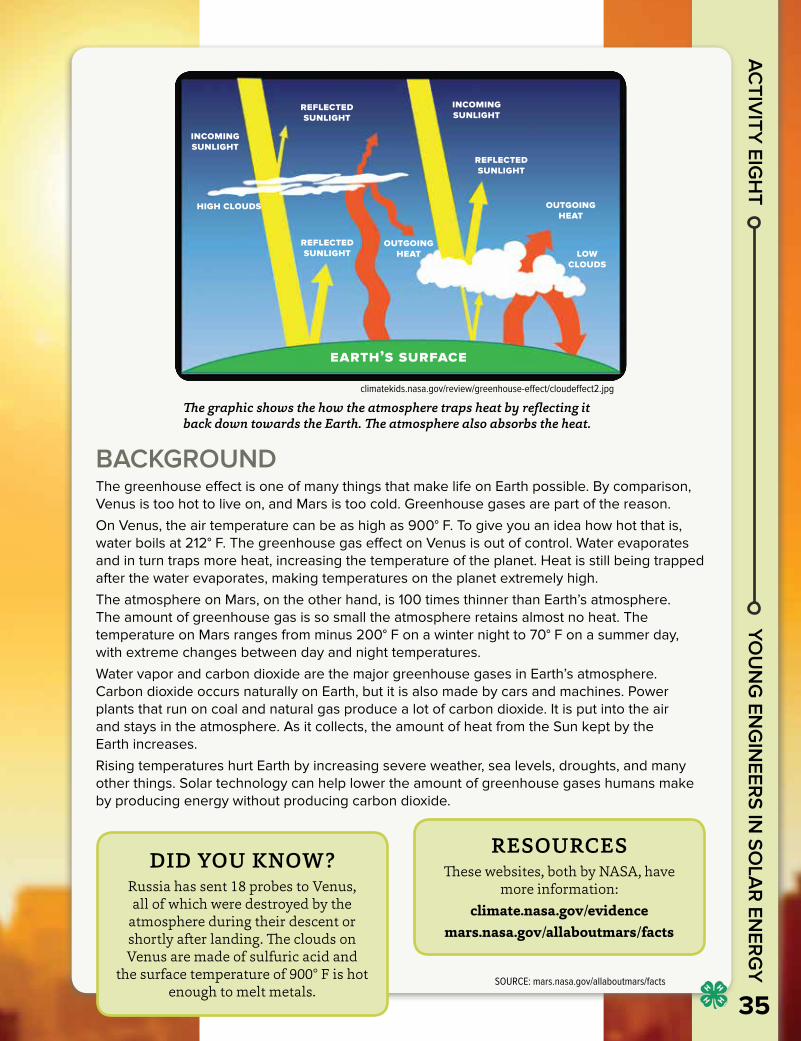
climatekids.nasa.gov/review/greenhouse-effect/cloudeffect2.jpg
The graphic shows the how the atmosphere traps heat by reflecting it back down towards the Earth. The atmosphere also absorbs the heat.
incoming sunlight
incoming sunlight
reflected sunlight
reflected sunlight
outgoing heat
earth’s surface
outgoing heat
low clouds
reflected sunlight
high clouds
BACKGROUNDThe greenhouse effect is one of many things that make life on Earth possible. By comparison, Venus is too hot to live on, and Mars is too cold. Greenhouse gases are part of the reason.On Venus, the air temperature can be as high as 900° F. To give you an idea how hot that is, water boils at 212° F. The greenhouse gas effect on Venus is out of control. Water evaporates and in turn traps more heat, increasing the temperature of the planet. Heat is still being trapped after the water evaporates, making temperatures on the planet extremely high.The atmosphere on Mars, on the other hand, is 100 times thinner than Earth’s atmosphere. The amount of greenhouse gas is so small the atmosphere retains almost no heat. The temperature on Mars ranges from minus 200° F on a winter night to 70° F on a summer day, with extreme changes between day and night temperatures.Water vapor and carbon dioxide are the major greenhouse gases in Earth’s atmosphere. Carbon dioxide occurs naturally on Earth, but it is also made by cars and machines. Power plants that run on coal and natural gas produce a lot of carbon dioxide. It is put into the air and stays in the atmosphere. As it collects, the amount of heat from the Sun kept by the Earth increases.Rising temperatures hurt Earth by increasing severe weather, sea levels, droughts, and many other things. Solar technology can help lower the amount of greenhouse gases humans make by producing energy without producing carbon dioxide.
DID YOU KNOW?Russia has sent 18 probes to Venus, all of which were destroyed by the
atmosphere during their descent or shortly after landing. The clouds on Venus are made of sulfuric acid and
the surface temperature of 900° F is hot enough to melt metals.
RESOURCESThese websites, both by NASA, have
more information:climate.nasa.gov/evidence
mars.nasa.gov/allaboutmars/facts
SOURCE: mars.nasa.gov/allaboutmars/facts

36
18 U
SC 707
YOU
NG
EN
GIN
EER
S IN
SO
LAR
EN
ERG
YPROJECT AREA: Solar Technology
ACTIVITY 9creating energy
LEARNING OUTCOMESProject Skill: Creating renewable energy
Life Skill: Problem solving
Educational Standard: NGSS MS.ETS1.4 : Develop a model to generate data for iterative testing and modification of a proposed object, tool, or process such that an optimal design can be achieved.
Success Indicator: Improves the efficiency of a photovoltaic cell
SOLAR TECHNOLOGY is in use around the world in a few different ways. Solar panels are the most common. They use photovoltaic cells (PVCs) that turn light into electricity. Solar collectors are the second most popular. They use mirrors to focus sunlight on material that retains heat extremely well. The heat is used to create steam, and the steam turns turbines to produce electricity. Solar panels and solar collectors are examples of renewable energy production.In this activity you build a photovoltaic cell and explore ways to make it more efficient.
nasa.gov/sites/default/files/images/730276main_SB_SOLAR_PANEL_FULL_IMAGE.jpg
WHAT TO DOMATERIALS
• One 5˝x7˝ sheet of copper (available in hobby stores and online), cut into quarters
• stove top• water• table salt• two-liter bottle• multi-meter or voltmeter with
alligator clips (available at some hardware stores or online)
• scissors• tape
DIRECTIONSEstimated time: 90 minutes
1. With the help of an adult, take one piece of copper and set it directly on a stove top burner. (Gas or electric burners work fine. If you have a ceramic or glass stove top, protect its surface by using a cast iron or other skillet without a non-stick coating.) Turn the burner on its highest setting. As the copper heats it will start to turn black. This is what you want. Once the copper is heated through, heat it for another 20 minutes. Remove from heat and allow it to cool for 30 minutes. Heating the copper turns it into a semiconductor.
SAFETY TIPDo this with your project helper. A small amount
of fumes result from this process. Open a vent or
window.
TIPDue to the inefficiency of this cell, you will not be able to do this on a
cloudy day outside. As an alternative, stay inside and use a bright lamp pointed directly at the
photovoltaic cell.

3718 U
SC 707
AC
TIVITY
NIN
E YO
UN
G EN
GIN
EERS IN
SOLA
R EN
ERG
Y2. While the heated copper is cooling, remove the label from the two-liter bottle and cut the
bottle in half.3. When the heated copper is completely cool, rinse it with water to remove the black crust
as best you can. You may have to gently scrub with a sponge or paper towel, but you do not need to remove all of the black oxide crust. The surface of the copper should be red speckled; this is cuprous oxide, a semiconductor.
4. Place the heated copper piece and another piece vertically into the bottle on opposite sides. It helps to bend them slightly to fit the shape of the bottle. Tape them in place to prevent them from moving and possibly touching. Make sure each one extends above the edge of the bottle by about 1/2 inch.
5. Mix 2 tablespoons of table salt into 3 cups of warm water until completely dissolved. Carefully pour the salt water into the bottle. You now have a photovoltaic cell.
6. Place your photovoltaic cell outside in direct sunlight, preferably at noon. This is when the intensity of the sunlight is greatest.
7. The cell will start producing electricity almost as soon as the sunlight hits it. Use the multi-meter to test the amount of electricity produced. Turn the setting to millivolts, attach the negative (typically black) lead to the heated copper and the positive (typically red) lead to the unheated piece. If you see a negative number just switch which piece the electrodes are attached to. Electrons in a semiconductor gain energy from light photons. When the electrons are sufficiently excited by the energy from sunlight, they escape the surface of the metal. They then flow through the salt water, which is a good conductor, into the other piece of copper.
8. This flow of electrons, or electric current, is the basis of electricity, and the meter allows you to measure the amount of potential energy stored in your “battery.” You should be measuring something between ~40 millivolts to ~100 millivolts. What happens when you move you your photovoltaic cell into the shade?
9. Think of ways you can improve the amount of volts you get from cell. Here are some suggestions:
• Make the whole cell larger. Use a large plastic container and larger pieces of copper.
• Put a reflective surface under the cell.• Use a cone made of reflective material,
such as aluminum foil, to focus more light on the cell.
• Create another cell and use some wire to attach the cells in series.
Record the Measurements of the Solar Cells You Create.
Solar Cell Type
Time of Day
Voltage Measured
Original Cell
Improved Cell

38
18 U
SC 707
YOU
NG
EN
GIN
EER
S IN
SO
LAR
EN
ERG
Y
AC
TIV
TITY
NIN
E
MORE CHALLENGESBuy a small photovoltaic cell. Inexpensive ones are available online.
Compare the voltage of the cell you bought to the one you made. Do you find a difference in strength or efficiency? Why do you think that is?
Go to the link below to learn in depth about how photovoltaic cells work.science.nasa.gov/science-news/science-at-nasa/2002/solarcells
BACKGROUNDCoal and oil, which are nonrenewable sources of energy, have always been cheaper and easier to get than renewable energy. As a result, interest in renewable energy, including solar, has been low. In the last thirty years, however, solar technology has improved and interest has grown. Photovoltaic cells that are made with better materials than the ones in this activity work better. However, even with better materials the most advanced solar cells make only 50% of the light into electricity. There is still plenty of room for improvement!How do they work? Most PVCs are made of silicon, a semiconductor like cuprous oxide. The same chemical reaction that takes place in cuprous oxide cells takes place in silicon cells. Light hits a negatively charged piece of silicon on the outside of the cell. The electron, which has a negative charge, is knocked off. It moves to a positively charged piece of silicon. This creates a flow of electricity that can be stored or used to power something directly.Some homes and buildings are run entirely on solar power. Even some countries are run almost entirely on renewable energy sources. These countries use energy from wind, hydroelectric, and geothermal sources. Thanks to advances in technology and to government support, solar power is becoming a part of what they use too.
http://www.nasa.gov/images/content/511238main_HighRes_Glory_Still04.jpg
DID YOU KNOW?NASA holds the record for flight by a non-rocket powered aircraft. Their solar-powered plane Helios
flew to a height of about 18 miles.
RESOURCESInterested in learning more about solar? These
websites are particularly good:climatekids.nasa.gov/concentrating-solar
climatekids.nasa.gov/sun-peoplescience.nasa.gov/science-newsscience-at-nasa/2002/solarcells
SOURCES: science.nasa.gov/science-news/science-at-nasa/2002/solarcells and eere.energy.gov/solar/pdfs/solar_timeline.pdf
PROJECT AREA: Solar Technology
SHARE Did your answers for activity 8 surprise you
RE FLE CT In activity 8, what was the most important/useful thing to do while comparing your data?
G E N E RALI Z E Solar energy is a kind of renewable energy. Can you think of other examples of renewable energy?
APPLY Will you act differently in the future as a result of what you have learned about solar technology? Explain.
talking it over
18 U
SC 707 39
YOU
NG
ENG
INEER
S IN SO
LAR
ENER
GY

40
18 U
SC 707
YOU
NG
EN
GIN
EER
S IN
SO
LAR
EN
ERG
Y
GLOSSARYanalemma. Pattern the Sun traces out in the sky as the Earth orbits it.
aperture. An opening.
condense. Change from gas to liquid.
control sample. An experiment yielding a known outcome used to compare results of new experiment.
depleting. Reducing in size or quantity.
diffraction grating. A piece of glass that interferes with light and separates it into its spectrum.
efficiency. How well something is done.
electromagnetic radiation. Light in all different wavelengths from gamma rays to radio waves.
energy. Amount of power stored within something.
equinox. Time of year when the day and night both last 12 hours. Happens about half way between solstices.
evaporation. Process of liquid turning to gas in which single molecules leave the surface of the liquid after gaining enough energy to reach vapor point.
extinction. Reduction or blocking of intensity of light when seen through gasses or dust.
false-color image. An image that uses colors chosen by scientists or artists to represent things we cannot see such as x-rays or infrared light.
fluoresce. Emission of light caused by absorbing UV radiation.
frequency. Number of waves passing a point per second.
greenhouse effect. Atmospheric process of trapping heat and increasing the temperature of a planet.
greenhouse gas. Gases in the atmosphere which absorb and remit infrared radiation.
habitable. Capable of hosting life.
infrared. Wavelengths longer than red in the visible spectrum; “below red.”
intensity. An amount of something you can measure such as brightness or force.
non-renewable energy. Energy from a natural source that does not replenish over time.
nuclear fusion. Particles collided at extremely high speeds, combing into one particle, and releasing an enormous amount of energy.
orientation. The direction an object is pointing.
photosensitive. Reacts to light to produces electricity or cause a chemical or physical change.
photovoltaic cell. An electronic device that turns light into electricity.
polarization. A special way in which a material can block or change the observed properties of light by affecting only certain light particles.
reflect. Partially or completely bouncing off of an object.
refract. Changing direction when entering a new material.
renewable energy. Energy from a natural source that can be replenished over time.
retina. Layer of photosensitive cells in the eye that turn light into electrical signals.
scattering. When light and a particle collide and deflect each other.
semiconductor. A partially electrically conductive material.
solstice. Time of year when the Sun is at the lowest or highest point in the sky.
spectrometer. A tool used to separate light by different wavelengths.
spectrum. Light separated into its different wavelengths; at visible wavelengths we detect this as different colors.
ultraviolet. Wavelengths shorter than violet in the visible spectrum; “above violet.”
vacuum. An area where there is nothing, not even gasses or other small particles we cannot see.
vapor point. Temperature at which a liquid turns into a gas.
4118 U
SC 707
YOU
NG
ENG
INEER
S IN SO
LAR
ENER
GY
visible spectrum. This refers to the portion of the electromagnetic spectrum that the human eyes detects as light and includes all the colors of the rainbow. Other animals can see different light ranges, e.g. the mantis shrimp.
wavelength. Distance from a wave peak to another wave peak or a wave trough to another wave trough.
MATERIALS LIST
ACTIVITY 1:• CD• one sheet of black construction paper• clear tape or masking tape• aluminum foil• small block or wad of paper ¾˝ tall• box cutter or scissors• colored pencils
ACTIVITY 2:• clear container that can hold 1½ cups of
water, like a 16 oz. drinking glass• liquid measuring cup• water• while milk, small glass• teaspoon• flashlight
ACTIVITY 3:• bottle of light corn syrup• a clear, tall mason jar• flashlight• masking tape• polarized lenses (Use lenses from old 3D
movie theater glasses or sunglasses, or buy polarized film sheets online.)
• colored pencils
ACTIVITY 4:• medium size box with a lid,
larger than a shoe box• aluminum foil• needle or thumbtack• black construction paper
ACTIVITY 5:• liquid measuring cup• two large glass or ceramic bowls that are
the same size• two small, shallow cups or bowls (The
cups must be less than half the height of the bowls.)
• water• marbles or pennies to use as weights
(see next column)
ACTIVITY 5 (cont'd):• table salt (4 tablespoons)• plastic wrap• tape• outdoor thermometer• stopwatch or clock
ACTIVITY 6:• UV beads (available online)• sunscreen• stopwatch• at least 2 other materials likely to block
ultraviolet light, like a shirt, glass cup, or clear or tinted plastic container
ACTIVITY 7:• yardstick• ruler or tape measure• pencil or markers• scientific calculator
ACTIVITY 8:• 3 large glass jars, preferably with watertight
lids like mason or other jars• plastic wrap and rubber bands (if you don't
have lids)• tape• water• 2 effervescent (seltzer) tablets, like
Alka Seltzer• 3 digital aquarium thermometer strips
(available at pet stores and online)
ACTIVITY 9:• one 5˝x7˝ sheet of copper (available in
hobby stores and online), cut into quarters• stove top• water• table salt• two-liter bottle• multimeter or voltmeter (available at some
hardware stores and online)• scissors• tape

42
18 U
SC 707
YOU
NG
EN
GIN
EER
S IN
SO
LAR
EN
ERG
Y
SUMMARY OF LEARNING OUTCOMES
Activity Project Skill Life Skill Educational Standard* Success Indicator
Project Area: Light from the Sun
1. All the Colors of the Rainbow
Learning about light spectrums
Processing information
NGSS MS.PS4.2—Develop and use a model to describe that waves are reflected, absorbed, or transmitted through various materials.
Builds a spectrometer and views light from three different sources
2. Why Is the Sky Blue
Learning about the atmosphere
Critical thinking
NGSS MS.PS4.2—Developt and use a model to describe that waves are reflected, absorbed, or transmitted through various materials.
Mixes and uses a solution of water and milk to examine light waves
3. Light Polarization
Learning properties of light
Critical thinking
NGSS MS.PS4.2—Develop and use a model to describe that waves are reflected, absorbed, or transmitted through various materials.
Demonstrates polarization through polarized lenses or paper
4. Solar Viewer Learning properties of light
Critical thinking
NGSS MS.PS4.2—Develop and use a model to describe that waves are reflected, absorbed, or transmitted through various materials.
Constructs simple solar viewer that enables safe observation of the Sun’s activities
Project Area: Light We Cannot See
5. Heat from the Sun
Purifying water Critical thinking
NGSS MS.ESS2.4—Develop a model to describe the cycling of water through Earth’s systems driven by energy from the sun and the force of gravity.
Collects data from a homemade model of the water cycle
6. Ultraviolet Radiation Testing
Using available resources
Critical thinking
NGSS MS.PS4.2—Develop and use a model to describe that waves are reflected, absorbed, or transmitted through various materials.
Controls the amount of UV radiation hitting the color beads.
Project Area: Following the Sun
7. Measuring Earth’s Tilt
Measuring and using trigonometry
Critical thinking
NGSS MS.ESS1.3—Analyze and interpret data to determine scale properties of objects in the solar system.
Calculates the angle of the sun.
Project Area: Solar Technology
8. Greenhouse Gas Jars
Measuring and using trigonometry
Critical thinking
NGSS MS.ESS1.3—Analyze and interpret data to determine scale properties of objects in the solar system.
Determines the relationship between temperature and carbon dioxide in the atmosphere
9. Creating Energy
Creating renewable energy
Problem solving
NGSS MS.ETS1.4—Develop a model to generate data for iterative testing and modification of a proposed object, tool, or process such that an optimal design can be achieved.
Improves the efficiency of a photovoltaic cell.
* The educational standards cited here are from the Next Generation Science Standards. These are available in their entirety by clicking on Next Generation Science Standards at nextgenscience.org.

2.5
IN
2 IN
2 IN
2.5
IN
2.5
IN
2.5
IN
1.66
IN
1.66
IN
3.25 IN
3.25 IN
2.33 IN 2.33 IN
2.33 IN 2.33 IN
ACTIVITY 1 BOX TEMPLATE
Cut out and trace this template or draw it with the approximate dimensions shown onto a piece of black construction paper.
Line the edges of the
Cut above with foil.
Attach CD here.

18 U
SC 707
ohio4h.org
I pledgeMy head to clearer thinking,My heart to greater loyalty,My hands to larger service, andMy health to better living,For my club, my community, my country, and my world.
Additional copies of this book and other Ohio State University Extension, 4-H Youth Development publications are available through local OSU Extension offices and online at estore.osu-extension.org. Ohio residents get the best price when they order and pick up their purchases through local Extension offices.