om-93 temperature and humidity data logger …® bluetooth ® wireless ... logger, data extraction...
TRANSCRIPT

SM
Extended Warranty Program
User’s Guide
Shop online at omega.com ®
e-mail: [email protected] For latest product manuals:
www.omegamanual.info
OM-93 OMEGA® Bluetooth® Wireless Temperature / Humidity Data
Logger
M5543/0216

omega.com [email protected]
Servicing North America:
U.S.A.: Omega Engineering, Inc., One Omega Drive, P.O. Box 4047 Stamford, CT 06907‐0047 USA Toll‐Free: 1‐800‐826‐6342 (USA & Canada only) Customer Service: 1‐800‐622‐2378 (USA & Canada only) Engineering Service: 1‐800‐872‐9436 (USA & Canada only) Tel: (203) 359‐1660 Fax: (203) 359‐7700 e‐mail: [email protected]
For Other Locations Visit omega.com/worldwide
The Bluetooth® word mark and logos are registered trademarks owned by Bluetooth SIG, Inc. and any use of such marks by Omega Engineering, Inc. is under license. Other trademarks and trade names are those of their respective owners.
iPhone®, iPad®, and iPad-mini® are trademarks of Apple, Inc. registered in the U.S. and other countries.
Windows® is a registered trademark of Microsoft Corporation in the United States and other countries.
Revision 1.0.3 Page 1
User Guide
Contents1. Document Overview ............................................................................................................... 2
2. Product Overview ................................................................................................................... 3
3. Technical Specifications .......................................................................................................... 5
4. Buttons and LED Indicators ..................................................................................................... 6
5. Packaging List ....................................................................................................................... 7
6. USB Operation ....................................................................................................................... 8
6.1. Installation of the PC Application (Windows) ....................................................................... 8
6.2. Front Page ..................................................................................................................... 9
6.3. Main Page .................................................................................................................... 10
6.4. Configuration of a OM-93 Logger (Start on Disconnection) ................................................. 11
6.5. Saving a Configuration File ............................................................................................. 13
6.6. Loading a Configuration from File .................................................................................... 14
6.7. Retrieving Logged Data .................................................................................................. 15
6.8. Viewing Logged Data from File ........................................................................................ 16
6.9. Configuration of a OM-93 Logger (Start at Specified Time) ................................................. 18
6.10. Configuration of a OM-93 Logger (Start using Button Press) ............................................... 19
6.11. Configuration of a OM-93 Logger (Real Time Logging) ....................................................... 20
6.12. Opening Excel ............................................................................................................... 21
6.13. Writing PDF reports ....................................................................................................... 22
7. iPhone® Operation ............................................................................................................... 24
7.1. Installation of the iPhone® Application ............................................................................. 24
7.2. Searching for OM-93 loggers .......................................................................................... 25
7.3. Connecting to your logger .............................................................................................. 25
7.4. Configuring the logger ................................................................................................... 27
7.5. Downloading data ......................................................................................................... 28
7.6. Viewing data graphed .................................................................................................... 29
7.7. Saving data to the iPhone .............................................................................................. 30
7.8. Opening data from the iPhone ........................................................................................ 31
7.9. Emailing data files ......................................................................................................... 33
7.10. Disconnecting from the logger ........................................................................................ 34
8. USB and iPhone® App Connection/Disconnection Behaviour ....................................................... 35
9. Mounting Guidelines ............................................................................................................. 35
10. Battery Charging .............................................................................................................. 35

Revision 1.0.3 Page 2
1. Document Overview
This guide is provided to distribute the following information:
the main features of the OM-93 logger
how to install the PC Application for the logger
how to use the PC application for configuration, data extraction and data viewing
how to install the iPhone® Application
how to use the iPhone® application for configuration, data extraction and data viewing
how to mount your OM-93 logger
how to charge the battery within your OM-93 logger
contact information should you have further technical questions

Revision 1.0.3 Page 3
2. Product Overview
The OM-93 logger is a portable wireless logger from Omega. The OM-93 logger can be connected either via a USB cable to a Windows® PC application or using Bluetooth wireless technology to your iPhone®, iPad® or iPad mini®. Both Windows® PC and iPhone® applications offer a simple means of configuring the logger, data extraction and data viewing features.
Figure 1: Introducing the Omega OM-93 Logger, PC and iPhone applications
The OM-93 logger can be used for a number of transportation applications including:
sensitive/fragile items food animal/livestock plants chemicals medicines or organs
It can also be used in situations where it is simply not convenient to make a cable connection to a Windows® PC. Suppose for example you are storing some vaccines or chemicals in some environmental chamber and would like to ensure temperature and humidity conditions are kept within acceptable levels

Revision 1.0.3 Page 4
over time. By mounting a OM-93 logger inside the chamber then one can periodically come near to the chamber, connect to the logger from an iPhone®, download the most recent data, email the recorded data and configure the logger to continue logging. This can happen wirelessly and without opening the chamber and affecting environmental conditions.
The OM-93 logger operates in an ultra low power mode even when logging temperature and humidity and can still be connected to wirelessly without any physical touching of the logger. The logger can operate in this fashion for 6 months from a fully charged battery. The rechargeable battery may be charged either by connection to USB on a computer or using a mains/USB power cable.
The OM-93 offers accurate and repeatable logging for temperature and relative humidity. Temperature is measured to an accuracy of +0.3oC over the range +5oC to +60oC. Over the full range -20oC to +60oC the accuracy is +2.0oC. Relative humidity is measured to an accuracy of +2.0% over 20% to 80% humidity range and +3.0% over 0% to 100%. Both temperature and relative humidity are logged at a user configurable logging rate which can be set in the PC application program or iPhone application.
Figure 2: OM-93 Alarm Indicators
When you would like to guarantee that conditions are within particular environmental limits then one can also set operating ranges above or below which light indicators will be activated so that the user can become aware that the desired environmental conditions have been exceeded.

Revision 1.0.3 Page 5
3. Technical Specifications
Temperature range -20oC to +60oC (-4o F to 140o F) Temperature accuracy (limited range) +0.3oC (+5oC to +60oC)
+0.5o F (41oF to 140oF) Temperature accuracy (-20oC to +60oC) see accuracy curve in figure 3 Temperature resolution 0.04oC (0.08o F)
Humidity range 0% to 100% Relative humidity accuracy (limited range) +2.0% (20% to 80%) Relative humidity accuracy (0% to 100%) see accuracy curve in figure 3 Relative humidity resolution 0.1%
Temperature alarms (minimum & maximum) Relative humidity alarms (minimum & maximum)
Battery Rechargeable LiPo Battery life 6 months (before needing recharging)
Physical size 50mm x 68mm x 20mm
PC application available on Windows XP, Vista, Windows 7,
Windows 8 and Mac
Mobile application supported on iPhone®, iPad® and iPad
mini® mobile digital devices using iOS7 and iOS8.
Wireless connection range 12 meters
Logging space 40,000 samples
Figure 3: Temperature and Humidity Accuracy

Revision 1.0.3 Page 6
4. Buttons and LED Indicators
The OM-93 logger includes one button located on the side of the logger. It is possible by configuration in the PC or iPhone® application to use this button as a way to start and stop logging. See sections 6.11 and 7.4 of this User Manual regarding configuring for button press start.
Figure 4: OM-93 Logger Start/Stop Button
The logger contains three LED indicators with the following functionality:
Status LED
When the logger starts logging then this LED pulses green once for 1 second. When logging this LED pulses green for 7 milliseconds and off for 6 seconds. When the logger stops then this LED pulses red for 1 second then off forever.
Bluetooth Connected LED
This LED is blue when the logger is connected to a mobile device.
Alarm LED
When a temperature or humidity alarm is triggered this LED pulses red for 7 milliseconds and off for 6 seconds.
When connected to USB cable this LED is red continuously when the logger is still charging and green when fully charged.
Figure 5: OM-93 LED indicators

Revision 1.0.3 Page 7
5. Packaging List
Your Omega OM-93 logger comes standard with the following items.
One OM-93 Logger unit
Figure 6: OM-93 Logger Unit
One USB cable – type A to micro-USB type B
Figure 7: USB Cable

Revision 1.0.3 Page 8
6. USB Operation
The OM-93 logger can be configured, data downloaded and further analysed by connection to a PC or Mac using a USB cable and the OM-90 Series Data Logger Software. The process for this is described in this section. The logger can similarly be configured by the iPhone® wireless device application as described in section 7.
6.1. Installation of the PC Application (Windows)
Installation of the OM-90 Series Data Logger Software is very simple. The OM-93 needs no special drivers since it is a USB HID device and such devices can make use of the standard drivers that come with Windows. The software is located on the included CD or can be downloaded from the Omega website.
The PC application is a single application that can support all OM-90 series loggers including the OM-91, OM-92 and the OM-93.

Revision 1.0.3 Page 9
6.2. Front Page
When the OM-90 Series Data Logger Software is started the welcome screen appears and gives a brief introduction to the OM-90 Series loggers and what they can be used for.
Click on the Configuration Wizard Button to start configuration of the logger. Click on the View Logged Button if you want to view data graphically. Click on the View Spreadsheet Button if you want to view logger data as a table.
Figure 8: OM-90 Series Data Logger Software

Revision 1.0.3 Page 10
6.3. Main Page
The main page of the application GUI consists of a configuration pane, a graphical pane and a spreadsheet pane. It is possible to have any of these enabled or disabled by the buttons located top left in the window. The panes will automatically start in an enabled or disabled view depending on the viewing mode select from the front page.
Figure 9: PC Application Main Page
Buttons are also included for saving/loading configuration and logged data to and from file.
There is also a button for selection between Celsius or Fahrenheit temperature scales.
A connection indication on the right hand side becomes blue when your application is connected to a OM-93 logger and is greyed-out otherwise.
Icons are provided for opening in Excel and for generating PDF reports.
Finally a home icon provides a link back to the front page.
Revision 1.0.3 Page 11
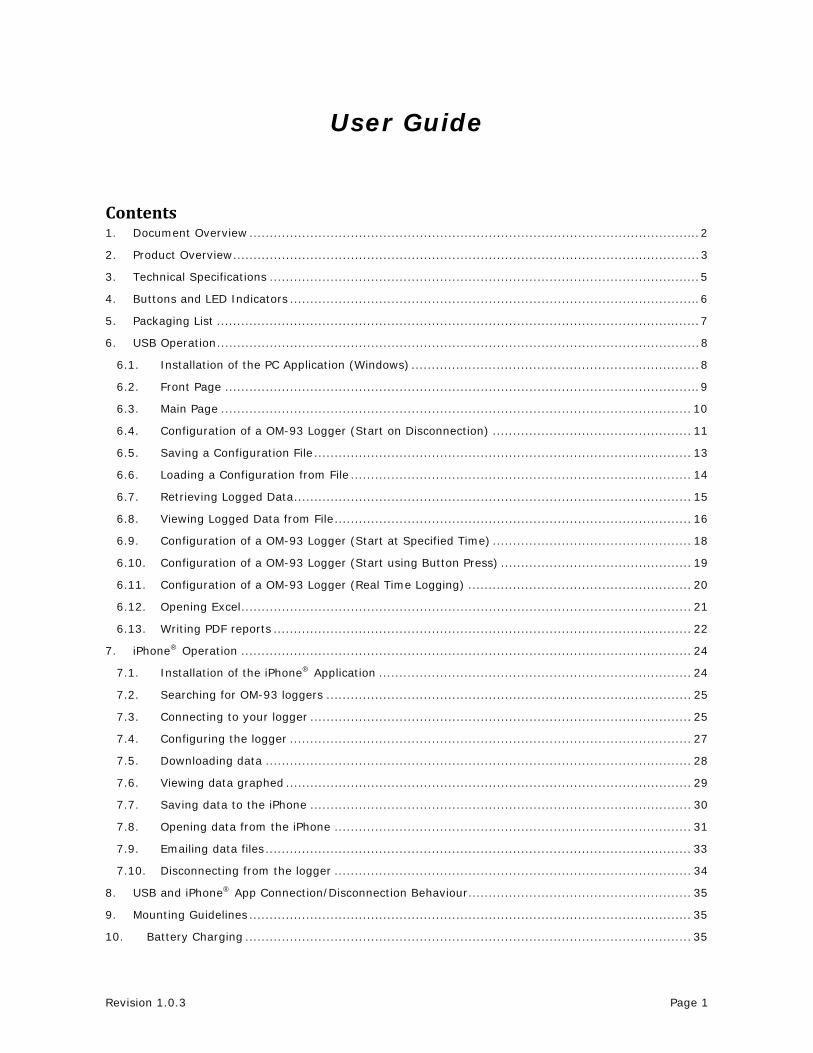
6.4. Configuration of a OM-93 Logger (Start on Disconnection)
Configuration of the OM‐93 logger starts by specifying the device name. Up to 16 characters is allowed in the name.
Figure 10: Configuration Step (Start on Disconnection) Next select the logger start to On Disconnection. There are other options (At Specified Time, Button Press and Real Time Logging) which will be discussed in later sections of this manual. Select the logging interval (this is the time between samples). For temperature logging then one needs to enable or disable the logging. In the case the temperature logging is enabled then one can also set alarm thresholds for which the alarm indication will signify that temperature limits have been exceeded.

Revision 1.0.3 Page 12
Similarly for humidity one needs to enable or disable the logging and configure the alarm limits. Finally to save the configuration setup to the OM‐93 logger, press the Configure Button.
Figure 11: Write Configuration to the Logger Once configured the PC application will show the logger time will be synchronized to the PC time. The logger firmware revision will also appear in the application. Once you disconnect the logger from the PC, logging will start automatically and at the configured logging interval. A green status LED will flash every 6 seconds to indicate that the unit is logging. The red alarm LED will flash also in the case that the temperature or humidity goes outside of the allowed limits and triggers the alarms. If the logger becomes full then all LEDs will stop flashing.

Revision 1.0.3 Page 13
6.5. Saving a Configuration File
Configurations can be saved to file so that you can use the configuration next time or if you have multiple devices with the same configuration.
Saving a configuration file is just a matter of selecting the save icon and filling out the file name. If the logger contains no logged data then it will only save the configuration settings. Configuration and logged data is stored in Comma Separated Value (CSV) format.
Figure 12: Saving a Configuration to File

Revision 1.0.3 Page 14
6.6. Loading a Configuration from File
Loading a configuration file from disk is just a matter of selecting the open icon and selecting the configuration file name. This upload presents a simple way to configure multiple loggers with the same configuration. This ensures a common configuration and saves time/effort when configuring multiple devices.
Figure 13: Loading a Configuration from File
Remember to press the configuration button if you want the configuration data held in the GUI to be written to your OM-93 logger.

Revision 1.0.3 Page 15
6.7. Retrieving Logged Data
Data can be retrieved from the logger by connecting to the logger and then pressing the read button at the bottom left of the GUI.
Both the device configuration and logged data will immediately become uploaded and viewable in the configuration, graphical and spreadsheet views.
Zooming in and out of the graphs can be achieved by the following controls: To Zoom In - Drag the left mouse button To Zoom Out - Click the right mouse button When zoomed in you can move around using the key-board arrows or the mouse scroll wheel
To write data and configuration to file, press the save icon. Data and configuration is then stored in Comma Separated Value (CSV) format which can be edited by third party software such as Microsoft Excel or read back into the OM-90 Series Data Logger Software at a later point.
Figure 14: Saving Logged Data to File

Revision 1.0.3 Page 16
6.8. Viewing Logged Data from File
It is a simple matter to read back data from file (CSV format) into the GUI and view previous logs graphically or using the spreadsheet views. Simply press the open icon and then select the file which you would like to view.
Figure 15: Retrieving Logged Data from File

Revision 1.0.3 Page 17
Figure 16: Retrieving Logged Data from File (complete)

Revision 1.0.3 Page 18
6.9. Configuration of a OM-93 Logger (Start at Specified Time)
You can configure a device so that it starts at a specific time. Configure as per section 6.4 but select At Specified Time. Fill in the exact month, day, hour, minute and seconds when you want the logging to start.
Remember to write the setup to the logger by pressing the Configure Button.
When you have disconnected the logger and the time reaches the desired start time for the logging then the logger will begin to log. This is a perfect way to have multiple loggers start logging at exactly the same time.
Figure 17: Configuration Step (Start at Specified Time)

Revision 1.0.3 Page 19
6.10. Configuration of a OM-93 Logger (Start using Button Press)
You can also configure the device so that it starts logging on a button press. Configure as per section 6.5 but select Button Press.
Remember to write the setup to the logger by pressing the Configure Button.
When you have disconnected the logger you can start logging by a simple button press. You will then see it is logging because the green light starts flashing every 6 seconds. You can also stop it using a button press – and all lights will stop flashing.
Figure 18: Configuration Step (Start using Button Press)

Revision 1.0.3 Page 20
6.11. Configuration of a OM-93 Logger (Real Time Logging)
You may also use your OM-93 Logger in Real Time Logging mode. Select the start logging to Real Time Logging with the appropriate logging interval. Next press start. You will then see the PC application take samples from the logger directly and display them on the table and graphs. This is a way to monitor temperature and humidity conditions directly from your PC instead of using the remote logging.
Figure 19: Configuration Step (Real Time Logging)

Revision 1.0.3 Page 21
6.12. Opening Excel
When the GUI has data, it is possible to press the Excel button to show the data in Microsoft® Excel. During this process the user needs to select if your version of Excel is expecting and "." or "," to represent the number decimal point.
This capability assumes that Microsoft® Excel is installed on your PC. If not, then the option will not work. This option is not available on the Mac® version of the GUI.
Figure 21: Opening Excel from the GUI

Revision 1.0.3 Page 22
6.13. Writing PDF reports
When the GUI has data, a simple one-page PDF report can be written to summarize the data in the logger by way of statistics and as a graph. The PDF can be written either in US Letter page size of A4 page size. The user can enter one’s own notes at the footer of the PDF. PDFs are written to file and can be opened by any standard PDF reader.
Figure 22: Writing a PDF report from the GUI

Revision 1.0.3 Page 23
Figure 23: A typical PDF report

Revision 1.0.3 Page 24
7. iPhone® Operation
The OM-93 logger can be configured; data can be downloaded and further analyzed through wireless connection from an iPhone®, iPad® or iPad mini® using the OM-93 iPhone® application. This process is described in this section. The logger can similarly be configured by a Windows PC as described in section 6.
7.1. Installation of the iPhone® Application
The OM-93 iPhone® Application is a free app found on Apple's App Store. Search for Omega OM-93 Application. Find it and download the application.
Figure 20: OM‐93 iPhone App on Apple’s App Store
Revision 1.0.3 Page 25
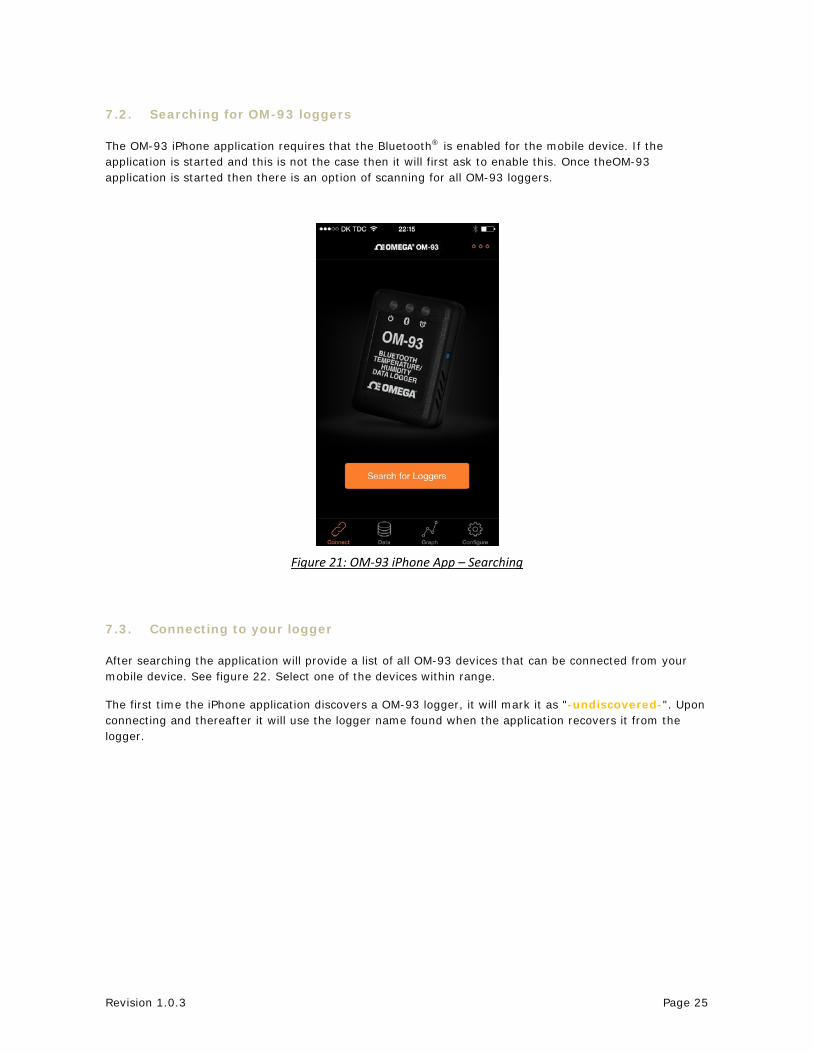
7.2. Searching for OM-93 loggers
The OM-93 iPhone application requires that the Bluetooth® is enabled for the mobile device. If the application is started and this is not the case then it will first ask to enable this. Once theOM-93 application is started then there is an option of scanning for all OM-93 loggers.
Figure 21: OM‐93 iPhone App – Searching 7.3. Connecting to your logger
After searching the application will provide a list of all OM-93 devices that can be connected from your mobile device. See figure 22. Select one of the devices within range.
The first time the iPhone application discovers a OM-93 logger, it will mark it as "-undiscovered-". Upon connecting and thereafter it will use the logger name found when the application recovers it from the logger.

Revision 1.0.3 Page 26
Figure 22: OM‐93 iPhone App – Connecting to a device
Upon successful connection the logger’s Bluetooth® Connected LED turns blue. On the application the connected icon turns green. Also the application starts showing in real time the temperature and humidity from the logger.
Figure 23: OM‐93 iPhone App – Logger Connected

Revision 1.0.3 Page 27
7.4. Configuring the logger
To configure a logger one needs to go to the Configure screen.
Figure 24: OM‐93 iPhone App – Configuration Screen
Next fill out all desired settings including:
the name of the logger
the logging start mode o on disconnection o by button press o at specified start time
the logging interval
enabling/disabling of temperature logging
enabling/disabling of humidity logging
temperature units (Fahrenheit or Celsius)
temperature alarms levels (upper and lower)
humidity alarms levels (upper and lower)
Once all configuration is as required then press send to download all settings to the logger.

Revision 1.0.3 Page 28
7.5. Downloading data
After connecting to a logger that has collected data then to download the data, select Download Logger from the Connected screen.
The application then moves to the Data screen and all data appears as a list of all sample points collected.
Figure 26: OM‐93 iPhone App – Downloading Data

Revision 1.0.3 Page 29
7.6. Viewing data graphed
Once data is read into the application it is possible to view the data graphically from the Graph screen. Zooming is controlled by finger movement (Apple’s usual pinch out to zoom in and pinch in to zoom out).
Figure 27: OM‐93 iPhone App – Graphing Data

Revision 1.0.3 Page 30
7.7. Saving data to the iPhone
Data can be saved to the iPhone from the Data screen. Select the option to the top of the application and then select Save to File. You will then be prompted for the file name.
This saves data to the phone in case there is no Wifi or Cellular connection.
Figure 28: OM‐93 iPhone App – Saving Data to the iPhone

Revision 1.0.3 Page 31
7.8. Opening data from the iPhone
You can read data back from the iPhone to the application. Select the option to the top of the application and then select Open from File.
Figure 29: OM‐93 iPhone App – Retrieving Data from the iPhone

Revision 1.0.3 Page 32
To delete from the file list swipe left on the desired file.
Figure 30: OM-93 iPhone App – Deleting a stored file

Revision 1.0.3 Page 33
7.9. Emailing data files
You can email data contained within the iPhone® application. Select the option to the top of the application and then select Send to e-mail.
Please note that in order for the application to use the emailing function your iPhone® or iPad® will need to be setup with at least one email account.
Figure 31: OM‐93 iPhone App – Emailing Data

Revision 1.0.3 Page 34
7.10. Disconnecting from the logger
To disconnect from the logger either select Disconnect on the Connected screen or just close the application. The Blue LED will turn off indicating the logger disconnected state. Having the application sent to the background is also sufficient to close connection to the logger.
Figure 32: OM‐93 iPhone App – Disconnection

Revision 1.0.3 Page 35
8. USB and iPhone® App Connection/Disconnection Behaviour
As a rule the OM-93 logger will stop logging when it is either connected to via USB or if it is connected to from the iPhone® application. Upon disconnection of either the USB or iPhone® connection the OM-93 logger will resume logging if it was previously logging at the time of the connection.
9. Mounting Guidelines
There is no particular limitation with regard to transporting your Omega OM-93 logger. The logger may be fastened to a transportation container or loosely packed.
It is recommended however to keep some air space around the ventilation slots on the logger or else the logger may take longer to track humidity and temperature changes.
10. Battery Charging
Your Omega OM-93 logger includes a Lithium Polymer (LiPo) rechargeable battery. The Battery automatically charges by connection to any USB source such as a PC or Mac.
It is also possible to charge using a USB mains charger.
Figure 24: USB Mains Charger
When running the logger while connected to USB power the logger will be charging the rechargeable battery. A consequence of this is that the logger will itself dissipate some heat and therefore affect temperature readings. For highest logger accuracy always run without USB power connected.

WARRANTY/DISCLAIMER OMEGA ENGINEERING, INC. warrants this unit to be free of defects in materials and workmanship for a period of 13 months from date of purchase. OMEGA’s WARRANTY adds an additional one (1) month grace period to the normal one (1) year product warranty to cover handling and shipping time. This ensures that OMEGA’s customers receive maximum coverage on each product. If the unit malfunctions, it must be returned to the factory for evaluation. OMEGA’s Customer Service Department will issue an Authorized Return (AR) number immediately upon phone or written request. Upon examination by OMEGA, if the unit is found to be defective, it will be repaired or replaced at no charge. OMEGA’s WARRANTY does not apply to defects resulting from any action of the purchaser, including but not limited to mishandling, improper interfacing, operation outside of design limits, improper repair, or unauthorized modification. This WARRANTY is VOID if the unit shows evidence of having been tampered with or shows evidence of having been damaged as a result of excessive corrosion; or current, heat, moisture or vibration; improper specification; misapplication; misuse or other operating conditions outside of OMEGA’s control. Components in which wear is not warranted, include but are not limited to contact points, fuses, and triacs. OMEGA is pleased to offer suggestions on the use of its various products. However, OMEGA neither assumes responsibility for any omissions or errors nor assumes liability for any damages that result from the use of its products in accordance with information provided by OMEGA, either verbal or written. OMEGA warrants only that the parts manufactured by the company will be as specified and free of defects. OMEGA MAKES NO OTHER WARRANTIES OR REPRESENTATIONS OF ANY KIND WHATSOEVER, EXPRESSED OR IMPLIED, EXCEPT THAT OF TITLE, AND ALL IMPLIED WARRANTIES INCLUDING ANY WARRANTY OF MERCHANTABILITY AND FITNESS FOR A PARTICULAR PURPOSE ARE HEREBY DISCLAIMED. LIMITATION OF LIABILITY: The remedies of purchaser set forth herein are exclusive, and the total liability of OMEGA with respect to this order, whether based on contract, warranty, negligence, indemnification, strict liability or otherwise, shall not exceed the purchase price of the component upon which liability is based. In no event shall OMEGA be liable for consequential, incidental or special damages. CONDITIONS: Equipment sold by OMEGA is not intended to be used, nor shall it be used: (1) as a “Basic Component” under 10 CFR 21 (NRC), used in or with any nuclear installation or activity; or (2) in medical applications or used on humans. Should any Product(s) be used in or with any nuclear installation or activity, medical application, used on humans, or misused in any way, OMEGA assumes no responsibility as set forth in our basic WARRANTY/DISCLAIMER language, and, additionally, purchaser will indemnify OMEGA and hold OMEGA harmless from any liability or damage whatsoever arising out of the use of the Product(s) in such a manner.
RETURN REQUESTS/INQUIRIES Direct all warranty and repair requests/inquiries to the OMEGA Customer Service Department. BEFORE RETURNING ANY PRODUCT(S) TO OMEGA, PURCHASER MUST OBTAIN AN AUTHORIZED RETURN (AR) NUMBER FROM OMEGA’S CUSTOMER SERVICE DEPARTMENT (IN ORDER TO AVOID PROCESSING DELAYS). The assigned AR number should then be marked on the outside of the return package and on any correspondence. The purchaser is responsible for shipping charges, freight, insurance and proper packaging to prevent breakage in transit.
FOR WARRANTY RETURNS, please have the following information available BEFORE contacting OMEGA: 1. Purchase Order number under which the product
was PURCHASED, 2. Model and serial number of the product under
warranty, and 3. Repair instructions and/or specific problems
relative to the product.
FOR NON-WARRANTY REPAIRS, consult OMEGA for current repair charges. Have the following information available BEFORE contacting OMEGA: 1. Purchase Order number to cover the COST
of the repair, 2. Model and serial number of the product, and 3. Repair instructions and/or specific problems
relative to the product.
OMEGA’s policy is to make running changes, not model changes, whenever an improvement is possible. This affords our customers the latest in technology and engineering.
OMEGA is a registered trademark of OMEGA ENGINEERING, INC.
© Copyright 2016 OMEGA ENGINEERING, INC. All rights reserved. This document may not be copied, photocopied, reproduced, translated, or reduced to any electronic medium or machine-readable form, in whole or in part, without the prior written consent of OMEGA ENGINEERING, INC.

Where Do I Find Everything I Need for Process Measurement and Control?
OMEGA…Of Course! Shop online at omega.comSM
TEMPERATURE Thermocouple, RTD & Thermistor Probes, Connectors, Panels & Assemblies Wire: Thermocouple, RTD & Thermistor Calibrators & Ice Point References Recorders, Controllers & Process Monitors Infrared Pyrometers
PRESSURE, STRAIN AND FORCE Transducers & Strain Gages Load Cells & Pressure Gages Displacement Transducers Instrumentation & Accessories
FLOW/LEVEL Rotameters, Gas Mass Flowmeters & Flow Computers Air Velocity Indicators Turbine/Paddlewheel Systems Totalizers & Batch Controllers
pH/CONDUCTIVITY pH Electrodes, Testers & Accessories Benchtop/Laboratory Meters Controllers, Calibrators, Simulators & Pumps Industrial pH & Conductivity Equipment
DATA ACQUISITION Data Acquisition & Engineering Software Communications‐Based Acquisition Systems Plug‐in Cards for Apple, IBM & Compatibles Data Logging Systems Recorders, Printers & Plotters
HEATERS Heating Cable Cartridge & Strip Heaters Immersion & Band Heaters Flexible Heaters Laboratory Heaters
ENVIRONMENTAL MONITORING AND CONTROL
Metering & Control Instrumentation Refractometers Pumps & Tubing Air, Soil & Water Monitors Industrial Water & Wastewater Treatment pH, Conductivity & Dissolved Oxygen Instruments
M5543/0216