omnixx™ console and trainer manualdcin.ncsbi.gov/euidocs/training/omnixxconsoletacmanual.pdf ·...
TRANSCRIPT

North Carolina State Bureau of Investigation Division of Criminal Information
in conjunction with
presents
Omnixx™ Console and Trainer Manual
August 5, 2003

Omnixx Console and Trainer Manual
2
Portions of this manual were copied with permission from the Omnixx Console Sub-agency User Administrator Training Manual and Omnixx Trainer User Guide, publications of the Datamaxx Professional Services section of Datamaxx Applied Technologies, Inc. This manual is subject to their copyright and as such may not be used for any outside purpose without their written permission. Licensed users may make copies of this document for the sole purpose of providing their employees with instructions on the operation of this software on a licensed device connected to the DCI computer network. Any use outside of this scope is unauthorized. Copyright 2002 DATAMAXX Applied Technologies, Inc. Printed in the United States of America This publication is protected by copyright. All rights are reserved and no part of it may be reproduced or transmitted by any means or in any form, (for any purpose other than the purchaser’s personal use), without prior written consent from Datamaxx Applied Technologies, Inc. Information in the manual is subject to change without notice and does not represent a commitment on the part of Datamaxx Applied Technologies, Inc. The software and/or databases may be used or copied only in accordance with the terms of the license agreement. The purchaser may make one copy of the software for back-up purposes. All brands mentioned in this book are acknowledged as trademarks of their respective holders.

Omnixx Console and Trainer Manual
3
Table of Contents
Chapter 1 – Introduction to Omnixx Console Terms to Know Before Getting Started Page 5 Installation of Omnixx Software Page 5 Logging In To Omnixx Desktop Page 11 Elements of the Console Interface Page 15
Chapter 2 – Omnixx Console User Functions
Add New User Page 17 Select User Page 21 Modify User Page 23 Delete User Page 26 User Reports Page 29
Chapter 3 – Student Enrollments
Student Enrollments Page 32 Student Cancellations Page 35
Chapter 4 – Using Omnixx Trainer
Taking a Certification Test Page 37 Submitting a Certification Test Page 40 Reports Page 43 Exiting Trainer Page 44

Omnixx Console and Trainer Manual
4
1 Welcome to Omnixx™ Console, the administrative module of the new Omnixx™ suite of products from Datamaxx Applied Technologies, Inc. Omnixx Console is an HTML based application that is designed to manage and administer Omnixx™ Force and Omnixx™ Trainer clients. Omnixx Console has been integrated along with Omnixx Force and Omnixx Trainer into one browser application that allows for easy access to all three of these applications through the Omnixx™ Desktop.
Figure 1-1 – The Omnixx Desktop
Through the Sub-agency User Administrator (TAC) authorization in the Omnixx Console, it is possible to perform the following functions, which are described in detail in Chapter 2:
� Select User � Add New User � Modify User � Delete User
Introduction to Omnixx™ Console

Omnixx Console and Trainer Manual
5
Before using the Omnixx Console, there are some terms that you will want to become familiar with. Understanding these terms will aid you in the use of this manual, as well as provide you with valuable background information that will help make your use of the Omnixx Console as efficient as possible.
� Omnixx™ - Stores all of the application programs and data needed by Omnixx Force, Omnixx Trainer, and Omnixx Console.
� Omnixx™ Console – Provides the end-user functionality needed to maintain the
application repository. It allows authorized users to update the repository’s database. It is a browser-based application that allows agency administrators to maintain database records for users and devices assigned to their own agencies.
� Omnixx™ Force – Browser-based desktop application that allows users to send
and receive text-based messages over dedicated law enforcement networks.
� Omnixx™ Trainer – A browser-based extension of Omnixx that provides on-line certification testing.
� Agency – With regard to this document, “agency” refers to the NC State Bureau
of Investigation Division of Criminal Information, which is the NCIC and NLETS Control Terminal Agency (CTA).
� Sub-agency – With regard to this document, “sub-agency” refers to an authorized
law enforcement or criminal justice agency within North Carolina that is connected to the DCI network.
� Terminal Agency Coordinator (TAC) – An individual, appointed by the agency
head of a criminal justice agency with DCI access, to act as the liaison between DCI and the criminal justice agency. With regard to this document, this term also includes Assistant Terminal Agency Coordinators.
To start the Omnixx Console application, you must first access the Omnixx Login screen. In order to do this, double-click on the browser icon located on your computer’s desktop. The icon should be for either Internet Explorer or Netscape Navigator. If the Omnixx Login is not configured as your Home Page, you will have to type the URL (web address) into the browser’s address bar. The URL for the Omnixx Login screen is http://sbi.jus.state.nc.us/omnixx/desktop/default.htm
Terms to Know Before Getting Started
Installation of Omnixx Software

Omnixx Console and Trainer Manual
6
Also, keep in mind that your computer may already be configured with a shortcut icon for the Omnixx Login screen. If this is the case, simply double-click on the shortcut to proceed.
Figure 1-2 – The Omnixx Login Screen If this is the first time you are accessing any of the Omnixx applications on a particular device, you will have to download and run the correct version of the Java Runtime Environment and the Web Start application. Click on the “Click here to install the Java Runtime” link located at the bottom of the Omnixx Login screen. You will be prompted with the following warning:
Figure 1-3 – Java Runtime Warning Screen Click the OK button to proceed. The following dialog box will appear and prompt you with directions to complete the next step of the installation process. Click OK.

Omnixx Console and Trainer Manual
7
Figure 1-4 – Java Runtime Instruction Dialog Box Make sure that you have selected “Run this program from its current location” and click the OK button to continue.
Figure 1-5 – File Download Dialog Box The following progress meter will be displayed:
Figure 1-6 – Java Progress Meter Dialog Box You will then be prompted with a Security Warning. You must click on the Yes button to continue. If you click No, the installation process will be terminated.

Omnixx Console and Trainer Manual
8
Figure 1-7 – Security Warning The Java Web Start License Agreement will then be displayed. Read the agreement and click the Accept button to continue the process. If you click Decline, the installation process will be terminated.
Figure 1-8 – Java Web Start License Agreement Next, you will be prompted to enter the path of the directory where you would like the Java Web Start application installed. You may leave the path at the default, or click the Browse button to select a different location. Then click the Next button.

Omnixx Console and Trainer Manual
9
Figure 1-9 – Java Web Start Select Installation Directory Screen The Java Web Start files will now be installed to the path specified in the previous step. The following progress dialog box will be shown to indicate the completion level of the installation.
Figure 1-10 – Java Web Start Installation Progress Meter After the Java Web Start files have been installed, the client machine will be searched to ensure that the correct version of the Java 2 Runtime Environment has been installed. If not, you will be prompted to select the path where you would like this program installed.

Omnixx Console and Trainer Manual
10
You can leave it at the default path, or click the Browse button to select an alternate directory. Next, click the OK Button.
Figure 1-11 – Java 2 Runtime Environment Installation Directory Screen You will be notified when the installation is complete and you can choose whether or not you would like to read the on-line help manual for Java. Select Yes to view the manual, or select No if you prefer to skip the manual and login to the Omnixx Desktop.
Figure 1-12 – View Java On-line Manual Selection

Omnixx Console and Trainer Manual
11
Now that both Java Web Start and the correct version of the Java Runtime Environment have been installed to the client machine, you are now ready to login to the Omnixx Desktop. If this is the first time that this computer has logged into Omnixx, your login screen should look like the screen in Figure 1-13.
Figure 1-13 – The Omnixx Login Screen On the Omnixx Login screen, you will be prompted to enter the following information. All of the information will be retained by the system, except the Password, so it will not have to be entered every time you login to the Omnixx Desktop.
� User ID – Enter your User ID. This field is not case sensitive. � Password – Enter your password. This field is not case sensitive. � Agency – Enter NCDCI0000 if not already entered. This field is not case
sensitive. � Validation Code – Enter the TID of the terminal you are using. If you are
logging in from a computer that is not a DCI terminal, leave this field blank to avoid security login errors.
Logging In To Omnixx Desktop

Omnixx Console and Trainer Manual
12
� New Password – Enter a new password if you wish to change your current password. This field is not case sensitive.
� Confirm – Re-enter your new password. This field is not case sensitive.
� Omnixx Path – Enter the letter of the drive in which you would like to install the
Omnixx directory. If someone has successfully logged into Omnixx on this computer previously, the login screen may look slightly different as indicated in Figure 1-14 below.
Figure 1-14 – The Omnixx Login Screen (Hidden Attributes)
After all the information is entered correctly, click on the “Log In” icon to begin the login process. Upon successful login from the Omnixx Login screen, the operator’s current certification status record will be displayed, indicating the modules and authorizations the operator is allowed to use.

Omnixx Console and Trainer Manual
13
Figure 1-15 – Current Certification Status Click “Close” to close the Current Certification Status window. The Omnixx Desktop will now be loaded:
Figure 1-15 – The Omnixx Desktop

Omnixx Console and Trainer Manual
14
Once you are logged into the Omnixx Desktop, you will be able to access all of the Omnixx applications you are authorized to use, without having to login to each program individually. Locate the following Omnixx Console icon and click it to access the application:
Figure 1-16 – Omnixx Console Icon

Omnixx Console and Trainer Manual
15
Figure 1-17 – The Omnixx Console Interface
A. Main Menu Area – The Main Menu Area is located on the left-hand side of the Omnixx Console Interface. It contains a tree menu of all available menu items. The menu will only contain items that the currently logged on administrator is certified to perform.
B. Summary Area – The Summary Area, which is located across the top of the interface, is divided into two parts. The left-hand side always displays the agency, sub-agency, user, and device currently selected. The right-hand side varies depending on what function has been selected.
C. Prompt Area – The Prompt Area, which is located below the Summary Area, displays instructions to the administrator that are related to the currently selected function.
D. Functionality Area - The Functionality Area, which comprises the majority of the interface, displays the currently selected function.
Elements of the Console Interface
A
B
C
D

Omnixx Console and Trainer Manual
16
2 The functions described in this chapter are used to enter and manage user accounts. The Omnixx database controls access to all Omnixx applications (Omnixx Force, Omnixx Trainer and Omnixx Console) by several security descriptors, one of which is user accounts. The functions described in this chapter include the following: Select User, Add New User, Modify User, Delete User, and Reports. To access any of these Device functions, click on the Users heading listed in the Main Menu of the Omnixx Console interface. A drop-down menu of available functions will be displayed.
Figure 2-1 – Omnixx Console Interface As a TAC, you will only be authorized to perform limited functions in the Console application. Although all Console Menu subjects are listed, you will only be able to access the Users section and subsections (such as Reports).
Omnixx Console User Functions
Users Heading
Omnixx Console and Trainer Manual
17
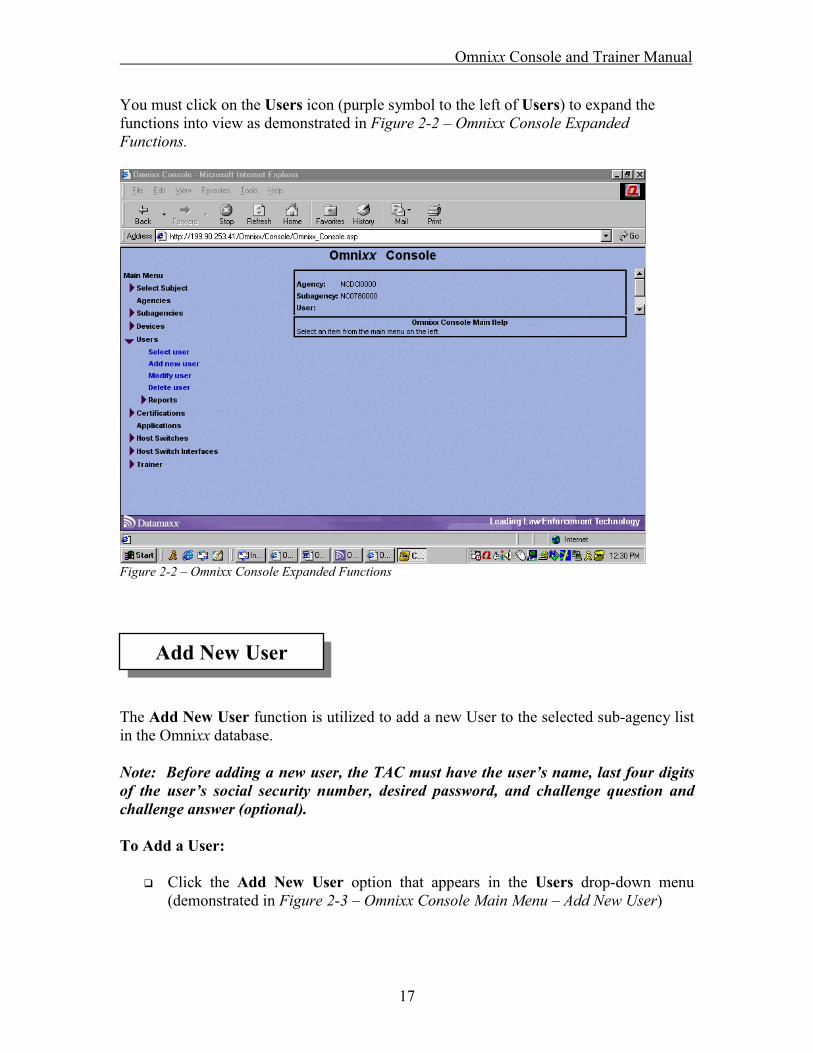
You must click on the Users icon (purple symbol to the left of Users) to expand the functions into view as demonstrated in Figure 2-2 – Omnixx Console Expanded Functions.
Figure 2-2 – Omnixx Console Expanded Functions The Add New User function is utilized to add a new User to the selected sub-agency list in the Omnixx database. Note: Before adding a new user, the TAC must have the user’s name, last four digits of the user’s social security number, desired password, and challenge question and challenge answer (optional). To Add a User:
� Click the Add New User option that appears in the Users drop-down menu (demonstrated in Figure 2-3 – Omnixx Console Main Menu – Add New User)
Add New User

Omnixx Console and Trainer Manual
18
Figure 2-3 – Omnixx Console Main Menu – Add New User
� The following Add User dialog box will appear:
Figure 2-4 – Add New User Dialog Box
� Enter the following information into the fields:
o User ID – The User ID for this user. Use upper case when entering all user information. The User ID must follow the standard DCI format (first letter of first name, last name up to 15 characters, and the last four digits of the user’s social security number). John Doe (SOC 245351234) would be entered as JDOE1234. Omnixx will not allow two users to have the same User ID.
o Status – Defines whether this user will be considered Active or Disabled. When entering a new user, be sure to choose “Active” as the user status.
o Miscellaneous – Leave this section blank.
� Click the Next button to continue. � If the User ID that you entered has already been entered into the Omnixx
database, the following error message will be displayed:

Omnixx Console and Trainer Manual
19
Figure 2-5 – User Successfully Added Confirmation � If you received the above error, click the OK button. You should then try using
another name combination. Enter the user’s middle or nickname initial instead of the user’s first name initial when calculating the Operator ID.
� If the User was successfully entered into the Omnixx database, the following
confirmation will be displayed:
Figure 2-6 – User Successfully Added Confirmation � The user’s default password is automatically set as his User ID. You will need to
change this password on the next screen. Click the OK button to continue. The User Password screen for the selected user is displayed.
Figure 2-7 – Add New User – User Password Dialogue

Omnixx Console and Trainer Manual
20
� Enter the following information into the fields:
o New Password – Defines the password associated with the new user account. The password may be alpha/numeric and must be at least 6 characters and no more than 20 characters. The password MUST be entered using uppercase!
Note: CJIN and some CAD systems limit the password to 6 alpha/numeric characters. If the operator will be using a mobile, it is recommended to create a 6-character alpha/numeric password to prevent login problems.
o Re-Enter New Password – Verifies the password associated with the new user account. The password MUST be re-entered using upper case!
NOTE: If the data entered New Password and Re-Enter New Password fields do not match, the administrator will be prompted with the following error:
Figure 2-8 – Password Error Warning
o Expiration Date – Defines an expiration date for this user’s password. This field defaults to 90 days from today’s date. Click the box to uncheck it, changing the password to non-expiring.
o Challenge Question – Allows the user to enter a question that can be used in the event that his/her password needs to be reset. The Challenge Question can be asked by a TAC to validate the user’s identity. This is an optional field, but may be beneficial to agencies with a large user population.
o Challenge Response – Allows the user to enter the answer to the Challenge Question in the event that his/her password needs to be reset. The Challenge Response will be provided to the TAC to validate the user’s identity.
� Click the Next button to continue. The User Point-of-Contact screen for the selected user is displayed.

Omnixx Console and Trainer Manual
21
Figure 2-9 – Add New User - User Point-of-Contact Information Screen
� Enter the appropriate information and click the Next button to proceed. If the
User record was successfully entered into the Omnixx database, the following confirmation will be displayed:
Figure 2-10 – Add New User - Confirmation
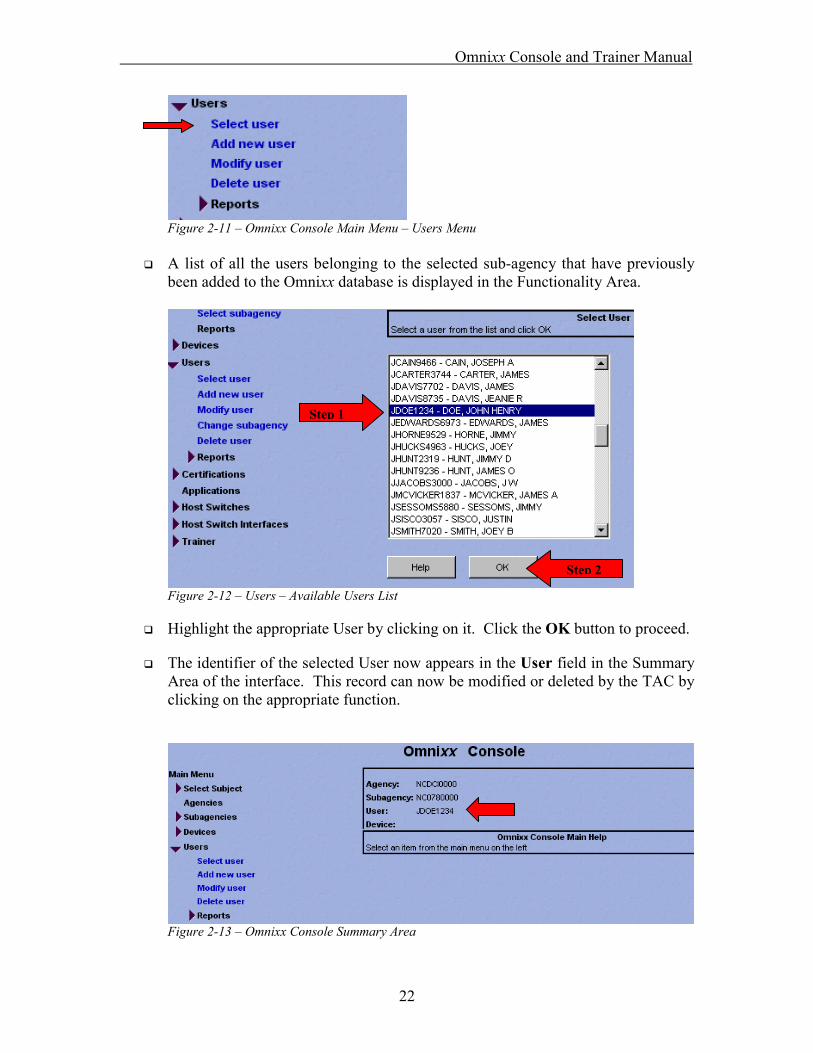
The Select User function allows a TAC to select an existing user from the Omnixx database for their sub-agency. After a user has been selected, any configuration changes that are made will pertain to this particular user, until a different user is selected. To Select a User:
� Click on the Select User option that appears in the Users drop-down menu.
Select User
Omnixx Console and Trainer Manual
22
Figure 2-11 – Omnixx Console Main Menu – Users Menu
� A list of all the users belonging to the selected sub-agency that have previously
been added to the Omnixx database is displayed in the Functionality Area.
Figure 2-12 – Users – Available Users List
� Highlight the appropriate User by clicking on it. Click the OK button to proceed.
� The identifier of the selected User now appears in the User field in the Summary Area of the interface. This record can now be modified or deleted by the TAC by clicking on the appropriate function.
Figure 2-13 – Omnixx Console Summary Area
Step 2
Step 1

Omnixx Console and Trainer Manual
23
The Modify User function allows the TAC to make changes to information that has already been added to the Omnixx database for a particular user, such as an incorrect name. It is important to note that Omnixx does not currently allow changing a User ID once it has been assigned. Note: Only DCI can move a user to another agency. If a user leaves your agency, you
should “disable” the operator and notify DCI by sending a text message to terminal PIU or contact your Training Specialist.
To Modify a User:
� Select the Modify User option that appears in the Users drop-down menu.
Figure 2-14 – Omnixx Console Main Menu – Users Functions
� If a user has already been selected (as mentioned in the previous section of this
manual), the User Identification screen is then displayed and populated with the previously entered information for the selected user. The User ID is displayed in gray text because it cannot be changed.
Note: If a user has not been selected, a list of all available users for the TAC’s
sub-agency will appear in the Functionality Area of the interface. You must now select the user to be modified by highlighting the user name and clicking the OK button.
Modify User

Omnixx Console and Trainer Manual
24
Figure 2-15 – User Identification Screen
� Make any desired changes (if any) to the current information. � Click the Next button to proceed to the next step. The User Password screen for
the user is then displayed and is populated with any previously entered information, except for the password.
Figure 2-16 – User Password Screen
� Make any desired changes (if any) to the current information. � To change the user’s password, enter a new password in the New Password field
and Re-enter New Password field.
� If disabling an operator (i.e. no longer an employee at your agency), change STATUS to Disabled by clicking the drop-down menu and selecting Disabled.

Omnixx Console and Trainer Manual
25
� Click the Next button to proceed. The user’s Point-of-Contact information screen is then displayed and populated with any previously entered information.
Figure 2-17 – User’s Point-of Contact Screen
� Make any desired changes (if any) to the current information, and click the Next
button to proceed. In the above example, the user’s middle name was changed from Henry to Harold.
Figure 2-18 – User’s Point-of Contact Screen – Confirmation of Change

Omnixx Console and Trainer Manual
26
The Delete User function allows the TAC to delete an existing user from the Omnixx database. Use this feature to delete a User ID that was entered incorrectly. Warning: Deleting a user will completely remove the user from the Omnixx database, along with his certification authorizations, test history, etc. The only time a TAC should delete a user is when a User ID was entered incorrectly and the student has not yet attended certification class or tested. Once the incorrect user has been deleted, the correct user information may be entered. To Delete a User:
� The operator to be deleted must first be selected. Follow the instructions in the “Select A User” section of this booklet.
� Once selected, click on the Delete User function that appears in the Users drop-
down menu.
Figure 2-19 – Omnixx Console Main Menu
� After clicking on the delete user function, the following form will appear:
Delete User

Omnixx Console and Trainer Manual
27
Figure 2-20 – Delete User Confirmation
� Type the word DELETE into the empty field, making sure it is in all capital letters. Click the NEXT button to continue. A second Delete Confirmation screen is then displayed.
Figure 2-21 – Second Delete Confirmation Screen
� In this box, the word DeLeTe must be typed exactly as shown, with only every
other letter being capitalized. Click on the NEXT button to complete the deletion process.
� Omnixx will generate a response indicating that the user has been deleted.

Omnixx Console and Trainer Manual
28
Figure 2-22 – Selected User Deleted Confirmation Screen
� Click OK once again. Omnixx generates a response indicating that the deletion
of the user is complete.
Figure 2-23 – Delete User Completed

Omnixx Console and Trainer Manual
29
The User Reports function is utilized to display various customizable reports on users in the Omnixx database. A TAC can only print reports on the users in the TAC’s sub-agency. These reports include:
� User Summary Use this report to: 1) Determine what applications a user is authorized to access (OFB – Force
Browser, OC – Console, OT – Trainer); all users are authorized to access Force and Trainer once they successfully complete certification class, while only TAC’s have authorization for Console.
2) Determine who at your agency is authorized as a TAC.
� User Certification Status Summary Use this report to: 1) Search for a user by name 2) Search for a user by User ID 3) Search for users who will be expiring within a given period of time (next 30-
60-90 days, 6 months, etc.) 4) Search by module certification (who is certified at an agency in a certain
module)
� User Test History Summary Use this report to:
1) Determine what tests a particular user has taken with results 2) Determine what users has taken a particular test (displays users names and/or
ID’s)
As a TAC, the most commonly used report will probably be the User Certification Status Summary report. To Build a User Certification Status Summary Report:
� Click on the Reports option that appears in the Users drop-down menu to display the Reports options.
User Reports

Omnixx Console and Trainer Manual
30
Figure 2-24 – Users Reports Option
� Click on the User Certification Status Summary Report option. The following
dialog box will appear:
Figure 2-25 – User Certification Status Summary Report
� Select which fields you want to see on the report by clicking in the Field column
check boxes. Fields which are checked will appear in the report. � The Filter column allows the report to be customized as needed. Make sure your
agency ORI is selected in the Sub-agency field.
� The Order field sets the sorting order. To see a report sorted by users’ last names, set the Order field of the Last Name to 1 and choose the Order priority for the remaining fields.

Omnixx Console and Trainer Manual
31
� If Expiration Date is set for ALL, the report will list all users and their certification status.
� You may use the Expiration Date field to display only records expiring within a
specific period of time (30 days, 60 days, 90 days, 6 months, etc.).
� Click Show Report to generate the report you selected. The report will be displayed in a new window of your Web browser.
� With the example Summary Report from figure 2-25, the following report would
be generated:
Figure 2-26 – User Certification Status Summary Report Example
� Close this Web browser window to go back to the Report page. � Click Done to close the Report page and return to the Omnixx Main Menu.
Omnixx Console and Trainer Manual
32
3
This portion of the Omnixx manual provides instructions on enrolling students for DCI classes. This process involves accessing the SBI’s Web page and completing a simple on-line form for student enrollment. This process is temporary, however. In a later release of Omnixx, Datamaxx will provide a software component that will incorporate class enrollments into the existing Omnixx software. � �
Note: Before enrolling a student in a class, the student must be entered into Console
by the agency TAC! The enrollment requires the User ID as part of the enrollment information, which is only available AFTER entry into Console. Do not attempt to guess the User ID, as that ID may already be assigned to another user!
To access the DCI class schedules:
� Go to the DCI’s Web site. The URL, which must be typed exactly as it appears,
is sbi.jus.state.nc.us
� Click on the link for class enrollments. The following page will appear:
Student Enrollments
Student Enrollments

Omnixx Console and Trainer Manual
33
Figure 3-1 – DCI Class Enrollment – State Map
� When the state map appears, click on the portion of the state (DCI district) for
which you wish to view the class schedule. This page may be printed in its entirety if needed.
Figure 3-2 – DCI Class Enrollment - Class View

Omnixx Console and Trainer Manual
34
� The class schedule will display show the following:
o Class Location – the location where class is being held o Training Dates – the days class is being held o Class Dates and Time – the day(s) and beginning time for each module
that is scheduled for that instructional period o Class Title – the modules that are scheduled during that instructional
period o Status – one of the following status types will be displayed:
� OPEN - indicating class enrollments are still being accepted � FULL – indicating class is closed to further enrollments � CANCELED – indicating the module(s) have been canceled for
that instructional period
� After choosing the class in which to enroll the student(s), click on the Enroll link beside the instructor’s name. A form will appear for the student enrollment.
Figure 3-3 – DCI Class Enrollment Form
� This form allows for the entry of up to three individuals’ information to be
entered. The form consists of the following fields which must be completed:

Omnixx Console and Trainer Manual
35
o Email Address of Person Authorizing Enrollment – this is the email address of the TAC or other authorized person who is enrolling the student(s) for class. DCI will use this to contact the agency for confirmation of enrollment or notification that the class is full.
o Class Date – this is the beginning date of the class for which the student(s) are being enrolled.
o Agency – the name of the enrolling agency. o ORI – the ORI of the enrolling agency. o Name – the name of the student being enrolled. The name should be
entered using LAST,FIRST MIDDLE format. This field appears three times on this form.
o User ID – the User ID of the student being enrolled. This field appears three times on this form.
o Module Indicator fields (M1 through M6) – these check boxes are used to indicate the module(s) for which each operator is being enrolled. Using a mouse, check the box(es) that correspond to the modules being enrolled.
o Person Authorizing Enrollment – the name of the person authorizing the student enrollment. The name should be entered using LAST,FIRST MIDDLE format.
� Once all appropriate information has been entered on this form, click the Submit
button. DCI will generate an email message to the appropriate DCI Trainer with the enrollment information.
To cancel a DCI student enrollment:
� From the DCI class enrollment state map, click on the portion of the state (DCI district) of the DCI Trainer for which the student enrollment had been previously submitted.
� Click on the Cancel link beside the instructor’s name. A form will appear for the
student cancellation.
� This form consists of the following fields which must be completed: o Email Address of Person Authorizing Cancellation – this is the email
address of the TAC or other authorized person who is canceling the student(s) enrollment. DCI will use this to contact the agency for confirmation of cancellation.
o Class Date – this is the beginning date of the class for which the student(s) was originally enrolled.
Student Cancellations

Omnixx Console and Trainer Manual
36
o Agency – the name of the canceling agency. o ORI – the ORI of the canceling agency. o Name – the name of the student being cancelled. The name should be
entered using LAST,FIRST MIDDLE format. This field appears three times on this form.
o User ID – the User ID of the student being cancelled. This field appears three times on this form.
o Module Indicator fields (M1 through M6) – these check boxes are used to indicate the module(s) for which each operator is being cancelled. Using a mouse, check the box(es) that correspond to the modules being cancelled.
o Person Authorizing Cancellation – the name of the person authorizing the student cancellation. The name should be entered using LAST,FIRST MIDDLE format.
Figure 3-4 – DCI Class Cancellation Form
� Once all appropriate information has been entered on this form, click the Submit button. DCI will generate an email message to the appropriate DCI Trainer with the cancellation information.

Omnixx Console and Trainer Manual
37
4 Once a user attends DCI class, he will be able to start a certification test from his list of available tests. This list of available tests is specific to each user and will not include any tests that he has not been granted access to. The timed test will consist of a set number of true/false and multiple-choice questions randomly generated from a pool of test questions. Upon completion of the certification test, the user will immediately receive their results, which includes a pass/fail status, as well as total score, sectional scores, and the date the test was taken. The user must successfully complete the certification test for the module(s) before he can access that module and perform transactions To take a certification test:
� The user must log in to Omnixx Desktop and then click on the Trainer icon.
� The user’s Certification Status Summary is displayed, indicating the expiration date (which is fifteen days from the last day of class) for the test authorization for each module that the user is allowed to test.
Figure 4-1 – Certification Status Summary
Using Omnixx™ Trainer
Taking A Certification Test

Omnixx Console and Trainer Manual
38
� Click Close to close the User Certification Status Summary.
� The user can see a list of certification tests available to him by clicking File and then clicking Certification Tests. A user will not be able to take a certification test until he/she has attended instructional class and has been authorized by DCI staff. The DCI Training Specialist that instructed the class performs this authorization on the last day of the student’s instruction.
Figure 4-2 – Trainer File Menu
� The user then starts the test by clicking the link for that test.
Figure 4-3 – Starting a Certification Test
� Omnixx will now download the test to the user’s computer. This process may take a couple of minutes, depending on the computer and network connection.

Omnixx Console and Trainer Manual
39
� Once the test has downloaded, the user will see an instructional page that provides general information and directions on the testing process. The user must click START in the bottom right corner of the test window to begin the test. Once the user clicks START, the timer will begin and will be displayed in the top left corner of the test window.
Figure 4-4 – Testing Instructions
� After clicking START, the first test question will appear. The test question
window will display the following items: o Test Name o Time Remaining o Question Number and total number of questions o Total Number of questions that have been answered o Submit / Cancel buttons o Test Question o Possible Answers o Navigation Bar

Omnixx Console and Trainer Manual
40
Figure 4-5 – First Test Question
� If the user clicks CANCEL once the test has started, the test is canceled and will not count, regardless of the number of questions answered. The test is not graded and cannot be resumed.
The user must submit the certification test for grading. A score of 80% or higher is required to gain certification in each module. To submit a test:
� When the test displays the last test question, the NEXT button grays out and becomes inactive. Even though the last question (number 33, for example) has been answered, the Questions Answered indicator at the top will still indicate one unanswered question (32 questions answered). This is normal.
� If the user wishes to review questions before submitting the test for grading, the
use should select either the Unanswered Questions or the All Questions option at the top of the window.
� The user should click SUBMIT after answering the last question.
Submitting A Certification Test

Omnixx Console and Trainer Manual
41
Figure 4-6 – Last Question
� If the user clicks SUBMIT and has left any questions blank, Trainer will respond
with the following message:
Figure 4-7 – Verification Prompt – Unanswered Questions
� If the user receives the message indicating there are unanswered questions, the user should click NO - RETURN TO TEST and answer the questions remaining. The user should then resubmit the test.
� If the user clicks SUBMIT and all questions have been answered, Trainer will
respond with the following message:

Omnixx Console and Trainer Manual
42
Figure 4-8 – Verification Prompt – All Questions Answered
� If the user starts a test but does not complete the test within the time period
allotted for the test, Trainer will automatically submit the test for grading.
Figure 4-9 – Automatic Submission
� When the user submits the test for grading, Trainer will transmit the test to the Omnixx server and will respond within seconds with the results.
Figure 4-10 – Certification Test Results

Omnixx Console and Trainer Manual
43
� The results page must be printed, signed by the student and the administering
TAC, and retained by the TAC for two years. A copy may be printed for the student if desired.
The Reports section is beneficial for retrieving certification test results when the printed copy has been misplaced or was not printed correctly, or Trainer encountered an error while grading the test results.
� If another results page is needed after the user has logged out of Trainer, the user can log back into Trainer, click on File then click Reports.
Figure 4-11 – Trainer Reports
� The user can now retrieve another results page by clicking the appropriate link. o Certification Status Summary - Displays all active certifications, and the
expiration date. This is the same information displayed on the Student Home Page.
o Certification Tests Passed - Displays the name and date that a specific Certification Test was passed. Clicking the Certification Test Name will display the Test Results page from that test.
o Certification Tests Failed - Displays the name and date that a specific Certification Test was failed. Clicking the Certification Test Name will display the Test Results page from that test.
Reports

Omnixx Console and Trainer Manual
44
Figure 4-12 – Reports Options
To exit Omnixx Trainer:
� The user should click File – Exit to end the user session and return to the Omnixx Desktop.
� If the user is ready to log out of Omnixx completely, they will click the Exit
image on the Omnixx Desktop.
Figure 4-13 – Exit Omnixx Desktop
� If the Exit image is chosen, the user will be prompted co confirm ending the
session of Omnixx. If the user selects Yes, he / she will be logged out of Omnixx.
Figure 4-14 – Omnixx Logoff Confirmation
Exiting Trainer