oms step-by-step guide for clients click here for english
TRANSCRIPT

OMS Step-by-step guide for clients
1
Click here for English
Cliquez ici pour la version française
Pinche aquí para la versión en español

OMS Step-by-step guide for clients
2
This guide provides instructions for clients to submit an online procurement request to the Global Drug Facility via the Order Management System (OMS).
Please scroll for step-by-step instructions or click the following links to navigate the document.
Step 1: Create a new Client Account (Skip to Step 3 if you have submitted PRFs previously)
Step 2: Complete your Client Profile (Skip to Step 3 if you have submitted PRFs previously)
Step 3.1: Generate a Procurement Request Form (PRF) for medicines
Step 3.2: Generate a Procurement Request Form (PRF) for diagnostics or medical devices
Step 4 (Optional): Print and sign your PRF
How to recall your PRF to make changes after submission
How to cancel a draft PRF
How to retrieve your password
OMS Step-by-step guide for clients
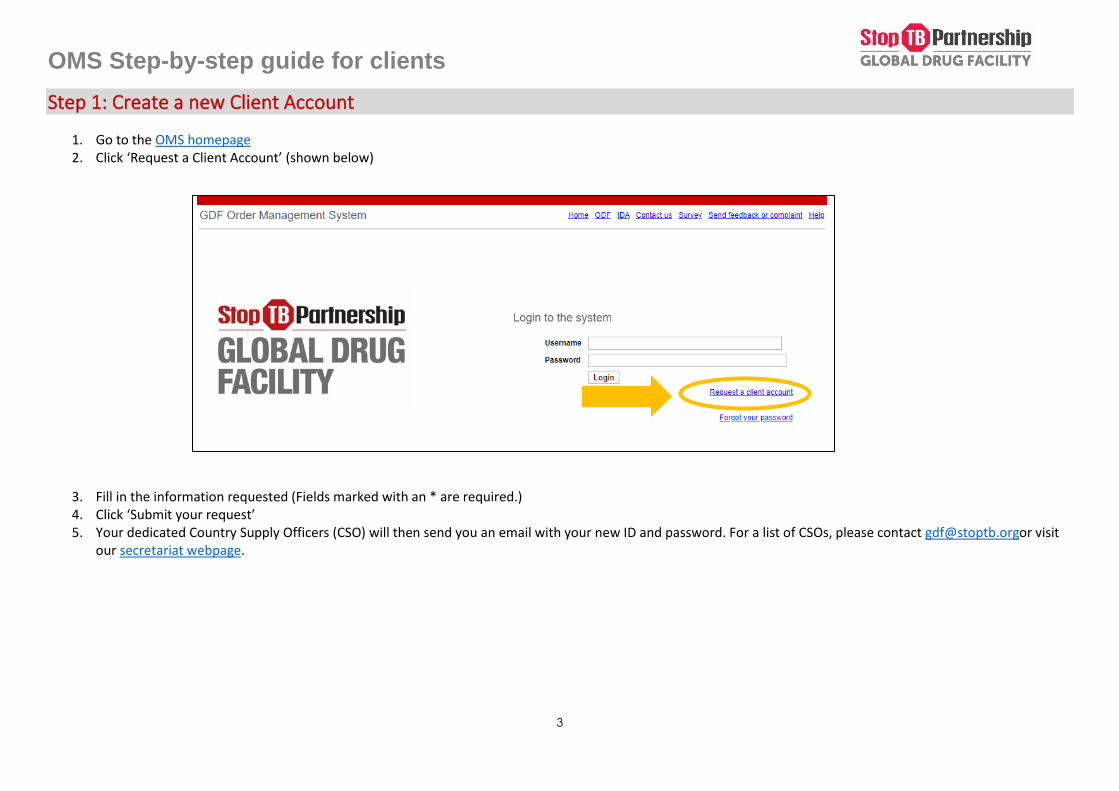
3
Step 1: Create a new Client Account
1. Go to the OMS homepage 2. Click ‘Request a Client Account’ (shown below)
3. Fill in the information requested (Fields marked with an * are required.) 4. Click ‘Submit your request’ 5. Your dedicated Country Supply Officers (CSO) will then send you an email with your new ID and password. For a list of CSOs, please contact [email protected] visit
our secretariat webpage.

OMS Step-by-step guide for clients
4
Step 2: Complete your Client Profile
1. Once you have registered and logged into your account, this will lead you to the summary information page. 2. Fill or update the required information on the first four tabs (Summary Information, Contact Details, Delivery and Importation, and Registration Details) by clicking
‘Edit this client information’ on the bottom of each tab and then submit your changes. Please ensure all information is up-to-date and relevant.

OMS Step-by-step guide for clients
5
Step 3.1: Generate a Procurement Request Form for medicines
1. To create a Procurement Request Form (PRF) for medicines, go to the Procurement Request Forms tab and click ‘Generate PRF for Medicines’.
2. Fill or update the required information on each tab up to DR-TB Products by clicking ‘Edit this PRF information’ on the bottom of each tab and then submit your
changes. Please note that some information has been automatically pre-filled from your client profile.

OMS Step-by-step guide for clients
6
3. To schedule two or more deliveries, please click ‘Add another delivery’ in the DS-TB Products or DR-TB Products tab.
4. The Documents tab is for uploading supporting documents (quantification files, etc.). Upload your documents by clicking ‘Edit this PRF information’ at the bottom.
OMS Step-by-step guide for clients
7
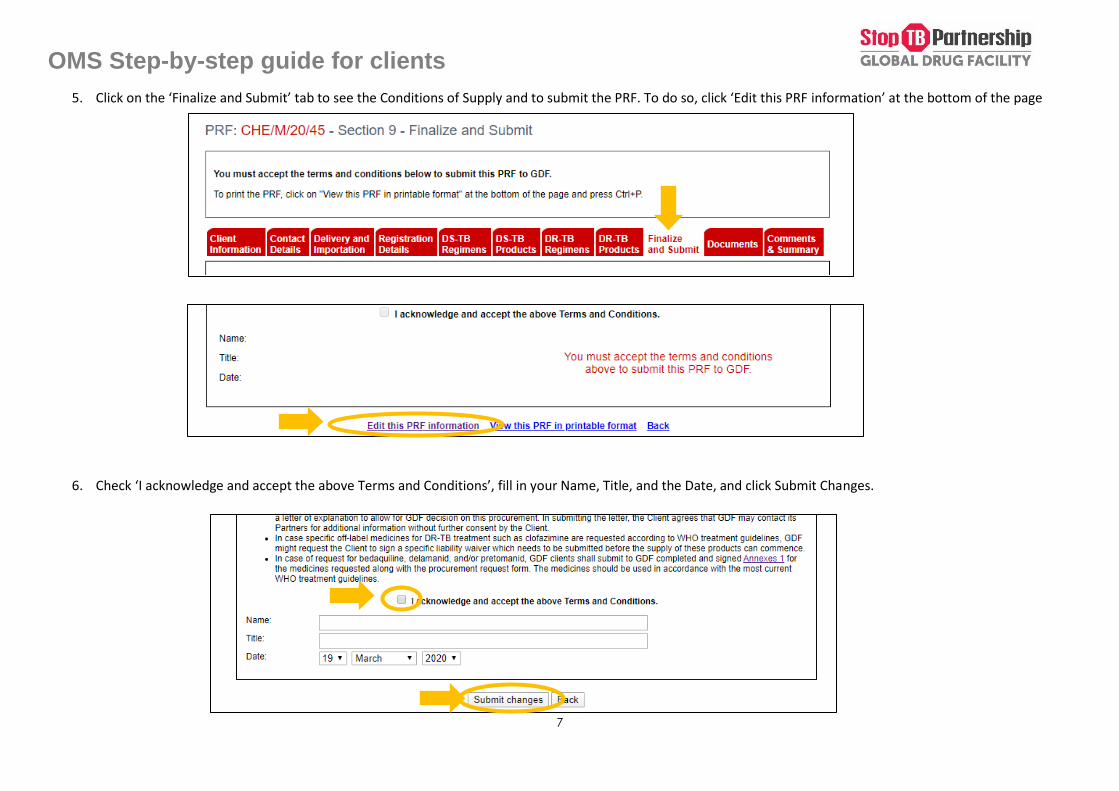
5. Click on the ‘Finalize and Submit’ tab to see the Conditions of Supply and to submit the PRF. To do so, click ‘Edit this PRF information’ at the bottom of the page
6. Check ‘I acknowledge and accept the above Terms and Conditions’, fill in your Name, Title, and the Date, and click Submit Changes.

OMS Step-by-step guide for clients
8
7. Scroll to the bottom of the page again to find the ‘Submit to GDF’ button. Click the button to submit the PRF.
8. If necessary, you can print the PRF by clicking ‘View this PRF in printable format’ at the bottom of the page. For more detailed instructions on how you can print the PRF, go to Step 4: Print your PRF.

OMS Step-by-step guide for clients
9
9. Once the PRF is submitted, the CSO will be notified and s/he will process your PRF into an order. They will contact you once the review is completed. To view the status of your order, please click the summary information under the ‘Orders’ tab in your Client Profile.

OMS Step-by-step guide for clients
10
Step 3.2: Generate a Procurement Request Form for diagnostics or medical devices
1. To create a Procurement Request Form (PRF) for diagnostics or medical devices, go to the Procurement Request Forms tab and click ‘Generate PRF for Diagnostics’.
2. Please note that to help you in your planning and budgeting or to have more information on the technical specifications of our products, you can use the Ordering
List (link below). Once completed, please upload the Ordering List in the "Documents" tab.
http://www.stoptb.org/assets/documents/gdf/drugsupply/GDF_TB_Diagnostics_Ordering_List.xls

OMS Step-by-step guide for clients
11
3. Fill or update the required information on each tab up to Products by clicking ‘Edit this PRF information’ on the bottom of each tab and then submit your changes. Please note that some information has been automatically pre-filled from your client profile.
4. To schedule two or more deliveries, please click ‘Add another delivery’ in the Products tab.
OMS Step-by-step guide for clients
12
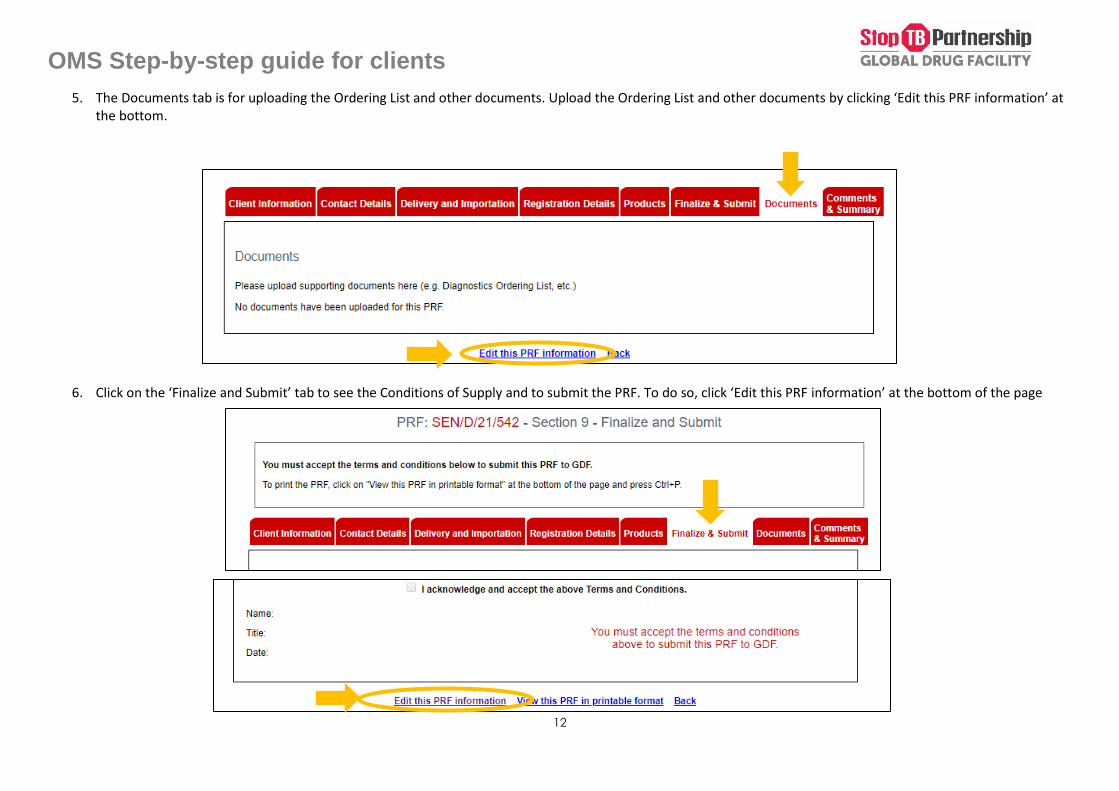
5. The Documents tab is for uploading the Ordering List and other documents. Upload the Ordering List and other documents by clicking ‘Edit this PRF information’ at the bottom.
6. Click on the ‘Finalize and Submit’ tab to see the Conditions of Supply and to submit the PRF. To do so, click ‘Edit this PRF information’ at the bottom of the page

OMS Step-by-step guide for clients
13
7. Check ‘I acknowledge and accept the above Terms and Conditions’, fill in your Name, Title, and the Date, and click Submit Changes.
8. Scroll to the bottom of the page again to find the ‘Submit to GDF’ button. Click the button to submit the PRF.

OMS Step-by-step guide for clients
14
9. If necessary, you can print the PRF by clicking ‘View this PRF in printable format’ at the bottom of the page. For more detailed instructions on how you can print the PRF, go to Step 4: Print your PRF.
10. Once the PRF is submitted, the CSO will be notified and s/he will process your PRF into an order. They will contact you once the review is completed. To view the status of your order, please click the summary information under the ‘Orders’ tab in your Client Profile.
OMS Step-by-step guide for clients
15
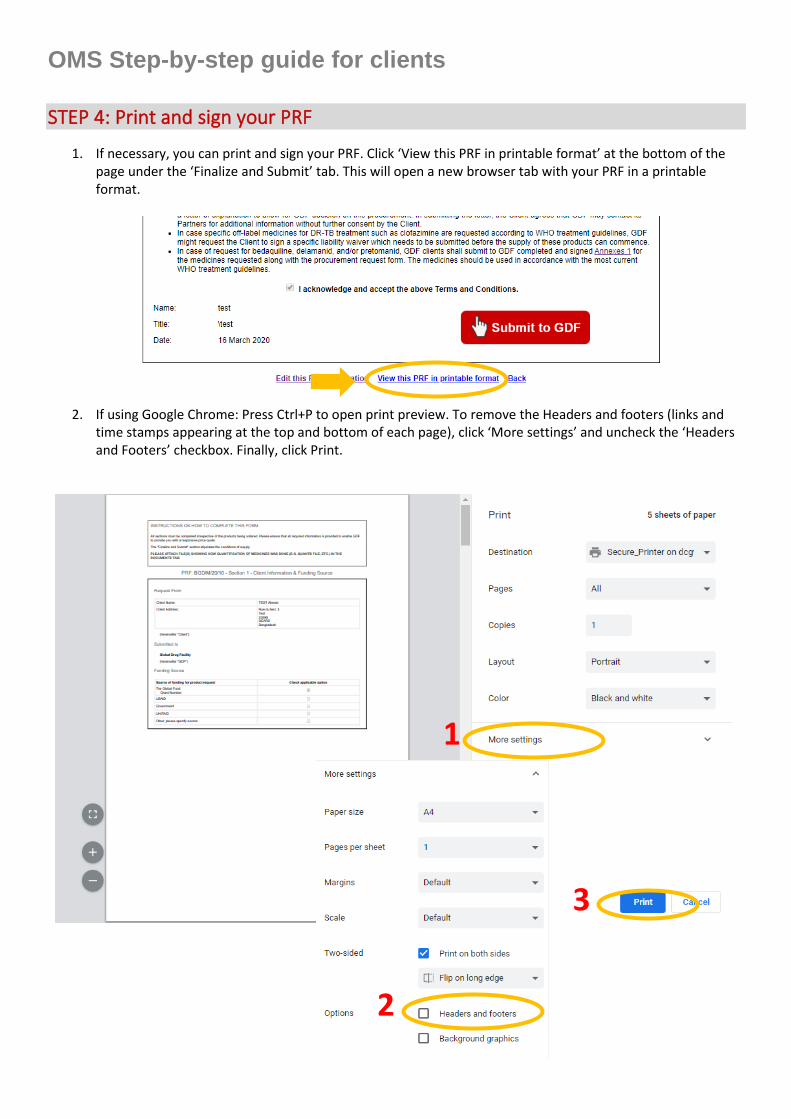
STEP 4: Print and sign your PRF
1. If necessary, you can print and sign your PRF. Click ‘View this PRF in printable format’ at the bottom of the page under the ‘Finalize and Submit’ tab. This will open a new browser tab with your PRF in a printable format.
2. If using Google Chrome: Press Ctrl+P to open print preview. To remove the Headers and footers (links and time stamps appearing at the top and bottom of each page), click ‘More settings’ and uncheck the ‘Headers and Footers’ checkbox. Finally, click Print.
1
2
3

OMS Step-by-step guide for clients
16
If using Internet Explorer, click the Gear icon on the top right of the browser to open the Settings menu. Go to Print > Print Preview. Click the Headers and Footers icon to remove the headers and footers (links and time stamps appearing at the top and bottom of each page). Finally, click the Print icon on the top left.
1 2

OMS Step-by-step guide for clients
17
If using Mozilla Firefox, click the Menu button on the top right of the browser and go to Print. Click ‘Page Setup’ to remove the headers and footers (links and time stamps appearing at the top and bottom of each page). Finally, click the Print button on the top left.
3. The printed PRF will have a place for signature in the last section (Section 9 – Finalize and Submit).
1 2

OMS Step-by-step guide for clients
18
How to recall your PRF to make changes after submission
1. PRFs that have been submitted (in ‘Submitted to GDF’ status) can be recalled in case any changes need to be made. 2. To do so, go to ‘My Procurement Request Forms’
3. Select the PRF you would like to recall and click ‘Recall this PRF’
4. Your PRF will now be returned to Draft status and you will be able to make changes and re-submit the PRF again.

OMS Step-by-step guide for clients
19
How to cancel a draft PRF
1. Only PRFs in ‘Draft’ status can be cancelled. 2. To do so, go to ‘My Procurement Request Forms’
3. Select the PRF you would like to cancel, go to the ‘Client Information’ tab and click ‘Cancel this PRF’ at the bottom of the page.
4. Your PRF is now cancelled.

OMS Step-by-step guide for clients
20
How to retrieve your password
1. Go to the OMS homepage 2. Click ‘Forgot your password’
3. Select your country and add a comment. 4. Click ‘Continue’ 5. Verify your message and click ‘Submit Your Request’ 6. Your details will be sent to you via email.

OMS Step-by-step guide for clients
21
Ce guide donne des instructions pour envoyer une demande d'achat en ligne au GDF via le Order Mangement System (OMS).
Veuillez faire défiler les instructions étape par étape ou cliquez sur les liens pour chaque rubrique.
Etape 1: Créez un Compte Client (Passez à l'étape 3 si vous avez déjà envoyé des demandes)
Etape 2: Complétez votre Profil Client (Passez à l'étape 3 si vous avez déjà envoyé des demandes)
Etape 3.1: Créez une Demande d'Approvisionnement (PRF) en Médicaments
Etape 3.2: Créez une Demande d'Approvisionnement (PRF) en Diagnostics ou Equipements Médicaux
Etape 4 (Facultatif): Imprimez et signez votre PRF
Comment rappeler votre PRF afin de faire des modifications après l’avoir envoyé
Comment annuler un PRF
Comment récupérer votre mot de passe

OMS Step-by-step guide for clients
22
Etape 1: Créez un Compte Client
1. Allez sur la page d’accueil de l’OMS. 2. Cliquez sur « Request a Client Account » (comme indiqué ci-dessous)
3. Remplissez les informations demandées (Les champs marqués d'un * sont obligatoires.) 4. Cliquez sur « Submit your request ». 5. Le Country Supply Officer (CSO) responsable de votre pays vous enverra un courriel avec votre nouvel identifiant et votre nouveau mot de passe. Pour une liste des
CSOs, veuillez contacter [email protected] ou visiter la page de notre secrétariat.

OMS Step-by-step guide for clients
23
Etape 2: Complétez votre Profil Client
1. Une fois que vous vous êtes connecté à votre compte, cela vous mènera à la page « Summary Information » (Résumé). 2. Remplissez ou mettez à jour les informations sur les quatre premiers onglets (Summary Information, Contact Details, Delivery and Importation, and Registration
Details) en cliquant sur « Edit this client information » en bas de chaque onglet, puis « Submit changes ». Veuillez assurer que toutes les informations sont à jour et pertinentes.
OMS Step-by-step guide for clients
24
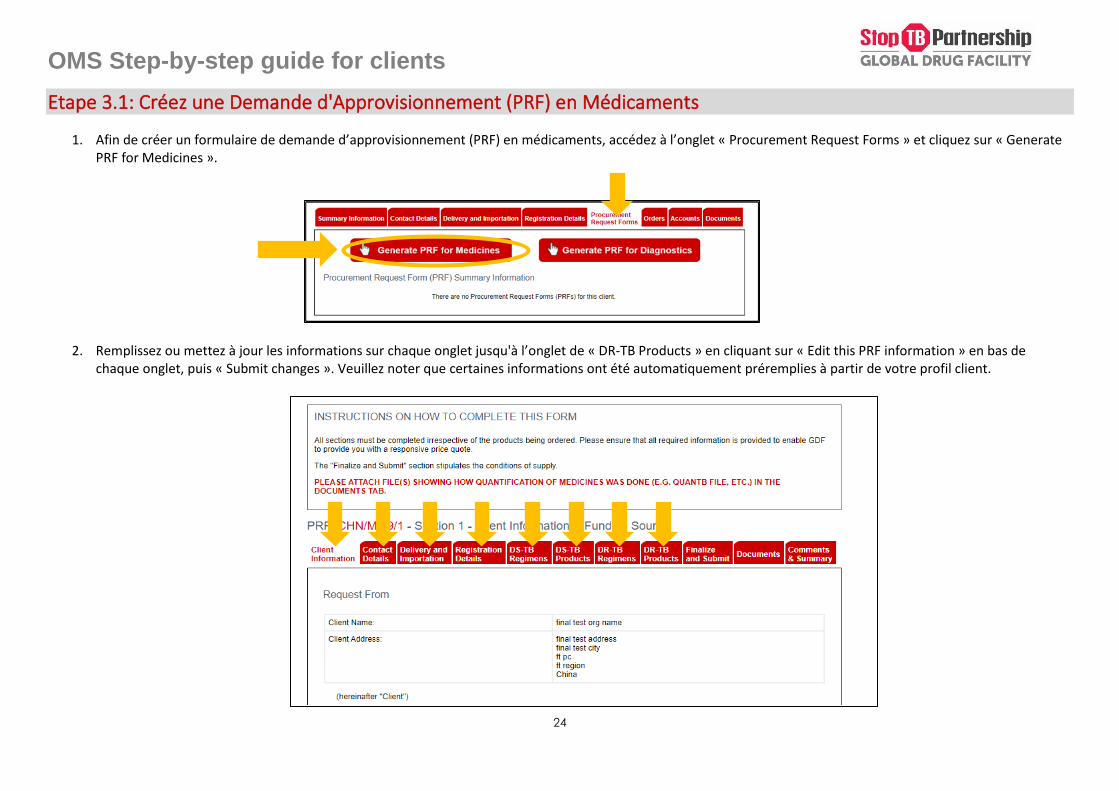
Etape 3.1: Créez une Demande d'Approvisionnement (PRF) en Médicaments
1. Afin de créer un formulaire de demande d’approvisionnement (PRF) en médicaments, accédez à l’onglet « Procurement Request Forms » et cliquez sur « Generate PRF for Medicines ».
2. Remplissez ou mettez à jour les informations sur chaque onglet jusqu'à l’onglet de « DR-TB Products » en cliquant sur « Edit this PRF information » en bas de
chaque onglet, puis « Submit changes ». Veuillez noter que certaines informations ont été automatiquement préremplies à partir de votre profil client.

OMS Step-by-step guide for clients
25
3. Pour planifier deux ou plusieurs livraisons, cliquez sur « Add another delivery » dans l'onglet « DS-TB Products » ou « DR-TB Products ».
4. L'onglet « Documents » permet de télécharger des pièces justificatives (fichiers de quantification, etc.). Téléchargez vos documents en cliquant sur « Edit this PRF
information ».

OMS Step-by-step guide for clients
26
5. Cliquez sur l'onglet « Finalize and Submit » pour voir les conditions de livraison. Afin d’envoyer le PRF au GDF, cliquez sur "Edit this PRF information”.
6. Cochez « I acknowledge and accept the above Terms and Conditions » pour accepter les conditions générales, indiquez votre nom, votre titre et la date, puis cliquez
sur « Submit Changes ».

OMS Step-by-step guide for clients
27
7. Allez vers le bas de la page de nouveau pour trouver le bouton « Submit to GDF ». Cliquez sur ce bouton pour envoyer le PRF.
8. Si nécessaire, vous pouvez imprimer le PRF en cliquant sur « View this PRF in printable format » en bas de la page. Pour des instructions plus détaillées sur la façon
dont vous pouvez imprimer le PRF, allez à Etape 4 : Imprimez votre PRF.

OMS Step-by-step guide for clients
28
9. Une fois le PRF envoyé, le CSO en sera informé et il/elle traitera votre PRF. Il/Elle vous contactera une fois la vérification terminée. Pour voir le statut de la commande, allez sur « Orders » dans votre profil client.
OMS Step-by-step guide for clients
29
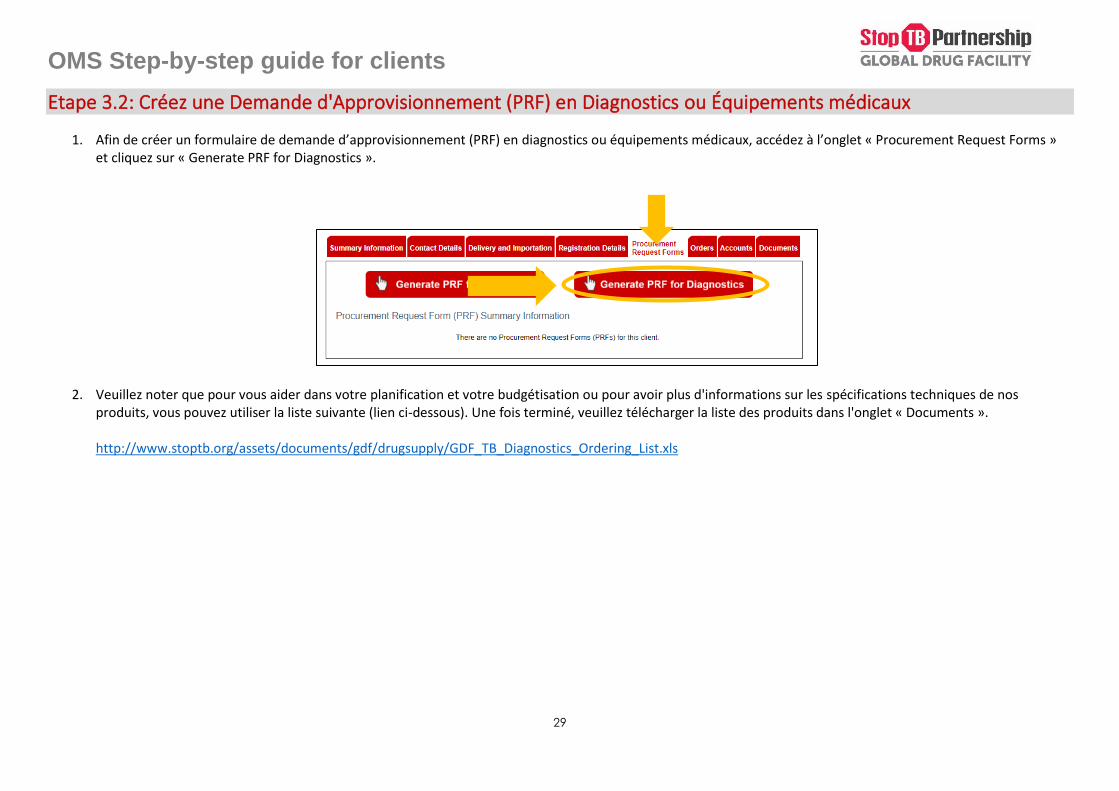
Etape 3.2: Créez une Demande d'Approvisionnement (PRF) en Diagnostics ou Équipements médicaux
1. Afin de créer un formulaire de demande d’approvisionnement (PRF) en diagnostics ou équipements médicaux, accédez à l’onglet « Procurement Request Forms » et cliquez sur « Generate PRF for Diagnostics ».
2. Veuillez noter que pour vous aider dans votre planification et votre budgétisation ou pour avoir plus d'informations sur les spécifications techniques de nos
produits, vous pouvez utiliser la liste suivante (lien ci-dessous). Une fois terminé, veuillez télécharger la liste des produits dans l'onglet « Documents ».
http://www.stoptb.org/assets/documents/gdf/drugsupply/GDF_TB_Diagnostics_Ordering_List.xls

OMS Step-by-step guide for clients
30
3. Remplissez ou mettez à jour les informations sur chaque onglet jusqu'à l’onglet de « Products » en cliquant sur « Edit this PRF information » en bas de chaque onglet, puis « Submit changes ». Veuillez noter que certaines informations ont été automatiquement préremplies à partir de votre profil client.
4. Pour planifier deux ou plusieurs livraisons, cliquez sur « Add another delivery » dans l'onglet « Products ».

OMS Step-by-step guide for clients
31
5. L’onglet « Documents » permet de télécharger des pièces justificatives (Ordering List, etc.). Téléchargez vos documents en cliquant sur « Edit this PRF information ».
6. Cliquez sur l'onglet « Finalize and Submit » pour voir les conditions de livraison. Afin d’envoyer le PRF au GDF, cliquez sur "Edit this PRF information”.

OMS Step-by-step guide for clients
32
7. Cochez « I acknowledge and accept the above Terms and Conditions » pour accepter les conditions générales, indiquez votre nom, votre titre et la date, puis cliquez sur « Submit Changes ».
8. Allez vers le bas de la page de nouveau pour trouver le bouton « Submit to GDF». Cliquez sur ce bouton pour envoyer le PRF.

OMS Step-by-step guide for clients
33
9. Si nécessaire, vous pouvez imprimer le PRF en cliquant sur « View this PRF in printable format » en bas de la page. Pour des instructions plus détaillées sur la façon dont vous pouvez imprimer le PRF, allez à Etape 4 : Imprimez votre PRF.
10. Une fois le PRF envoyé, le CSO en sera informé et il/elle traitera votre PRF. Il/Elle vous contactera une fois la vérification terminée. Pour voir le statut de la commande, allez sur « Orders » dans votre profil client.

OMS Step-by-step guide for clients
34
Etape 4: Imprimez et signez votre PRF
1. Si nécessaire, vous pouvez imprimer et signer votre PRF. Cliquez sur « View this PRF in printable format » en bas de la page de l'onglet « Finalize and Submit ». Cela ouvrira votre PRF dans un format imprimable.
2. Si vous utilisez Google Chrome : appuyez sur Ctrl + P pour ouvrir l'aperçu du PRF avant impression. Pour supprimer les en-têtes et pieds de page (liens apparaissant en haut et en bas de chaque page), cliquez sur « More Settings » et décochez la case « Headers and Footers ». Cliquez sur Imprimer.
1
2
3

OMS Step-by-step guide for clients
35
Si vous utilisez Internet Explorer : cliquez sur l'icône d'engrenage en haut à droite du navigateur pour ouvrir les Paramètres. Allez sur Print > Print Preview. Cliquez sur l'icône d’en-têtes et pieds de page pour supprimer les en-têtes et les pieds de page (liens apparaissant en haut et en bas de chaque page). Cliquez sur l'icône d’imprimeur en haut à gauche.
1 2

OMS Step-by-step guide for clients
36
Si vous utilisez Mozilla Firefox, cliquez sur le bouton Menu en haut à droite du navigateur et accédez à
Imprimer. Cliquez sur « Configuration de la page » pour supprimer les en-têtes et les pieds de page (liens et
horodatages apparaissant en haut et en bas de chaque page). Enfin, cliquez sur le bouton Imprimer en haut à
gauche.
3. Le PRF imprimé aura une place pour signature dans la dernière section (Section 9 – Finalize and Submit).
1 2

OMS Step-by-step guide for clients
37
Comment rappeler votre PRF afin de faire des modifications après l’avoir envoyé
1. Des PRFs qui ont été envoyés (en statut « Submitted to GDF ») peuvent être rappelés pour les modifier. 2. Pour ce faire, allez sur « My Procurement Request Forms ».
3. Sélectionnez le PRF que vous souhaitez retirer et cliquez sur « Recall this PRF ».
4. Votre PRF reviendra au statut « Draft » et vous pourrez le modifier et l’envoyer à nouveau.

OMS Step-by-step guide for clients
38
Comment annuler un PRF
1. Seuls les PRF en statut « Draft » peuvent être annulés. 2. Pour ce faire, allez sure « My Procurement Request Forms ».
3. Sélectionnez le PRF que vous souhaitez annuler, allez sur « Client Information » et cliquez sur « Cancel this PRF » en bas de la page.
4. Votre PRF est maintenant annulé.

OMS Step-by-step guide for clients
39
Comment récupérer votre mot de passe
1. Allez sur la page d’accueil de l’OMS. 2. Cliquez sur ‘Forgot your password’
3. Sélectionnez votre pays et ajouter un commentaire. 4. Cliquez sur ‘Continue’. 5. Vérifiez votre message et cliquez sur ‘Submit Your Request’ 6. Vos informations vous seront envoyées par courriel.

OMS Step-by-step guide for clients
40
Esta guía proporciona instrucciones para que los clientes envíen un formulario de adquisición en línea a Global Drug Facility a través del Sistema de gestión
de pedidos (OMS). Vea las instrucciones paso a paso o haga clic en los siguientes enlaces para navegar por el documento.
Paso 1: cree una nueva cuenta de cliente (vaya al paso 3 si ha enviado PRF anteriormente)
Paso 2: complete su perfil de cliente (vaya al paso 3 si ha enviado PRF anteriormente)
Paso 3.1: generar un Formulario de Solicitud de Adquisición (PRF) para medicamentos
Paso 3.2: generar un Formulario de Solicitud de Adquisición (PRF) para diagnósticos ou equipos medicos
Paso 4 (Opcional): Imprima y firme su PRF
Cómo recuperar su PRF para realizar cambios después del envío
Cómo cancelar un borrador de PRF
Cómo recuperar su contraseña

OMS Step-by-step guide for clients
41
Paso 1: Crear una nueva cuenta de Cliente
1. Vaya a la página de inicio de OMS 2. Haga clic en "Request a client account" (que se muestra a continuación).
3. Complete la información solicitada (los campos marcados con un * son obligatorios). 4. Haga clic en "Submit your request". 5. Su oficial de suministro de país (CSO) le enviarán un correo electrónico con su nueva identificación y contraseña. Para obtener una lista de CSOs, comuníquese con
[email protected] o visite la página web de nuestra secretaría.

OMS Step-by-step guide for clients
42
Paso 2: Completar tu cuenta de Cliente
1. Una vez que se haya registrado e iniciado sesión en su cuenta, esto lo llevará a la página de información resumida. 2. Complete o actualice la información requerida en las primeras cuatro pestañas (Summary information, Contact Details, Delivery and Importation, and Registration
Details) haciendo clic en "Edit this client information" en la parte inferior de cada pestaña y luego envíe sus cambios. Asegúrese de que toda la información esté actualizada y sea relevante.

OMS Step-by-step guide for clients
43
Paso 3.1: Generar el Formulario de Adquisiciones (PRF) para medicinas
1. Para crear un formulario de solicitud de adquisición (PRF) para medicamentos, vaya a la pestaña Procurement Request Forms y haga clic en "Generate PRF for Medicines".
2. Complete o actualice la información requerida en cada pestaña hasta DR-TB Productos haciendo clic en "Edit this PRF information" en la parte inferior de cada pestaña y luego envíe sus cambios. Tenga en cuenta que cierta información se ha completado automáticamente desde su perfil de cliente.

OMS Step-by-step guide for clients
44
3. Para programar dos o más entregas, haga clic en "Add another delivery" en la pestaña Productos DS-TB o Productos DR-TB.
4. La pestaña Documentos sirve para cargar documentos de respaldo (archivos de cuantificación, etc.). Suba sus documentos haciendo clic en "Edit this PRF
information" en la parte inferior.

OMS Step-by-step guide for clients
45
5. Haga clic en la pestaña "Finalize and Submit" para ver las Condiciones de suministro y enviar el PRF. Para hacerlo, haga clic en "Edit this PRF information" en la parte
inferior de la página.
6. Marque " I acknowledge and accept the above Terms and Conditions ", ingrese su nombre, cargo y fecha, y haga clic en Submit Changes.

OMS Step-by-step guide for clients
46
7. Desplácese hasta la parte inferior de la página nuevamente para encontrar el botón "Submit to GDF". Haga clic en el botón para enviar el PRF.
8. Si es necesario, puede imprimir el PRF haciendo clic en "View this PRF in printable format" en la parte inferior de la página. Para obtener instrucciones más detalladas sobre cómo imprimir el PRF, vaya al Paso 4: Imprima su PRF.
OMS Step-by-step guide for clients
47
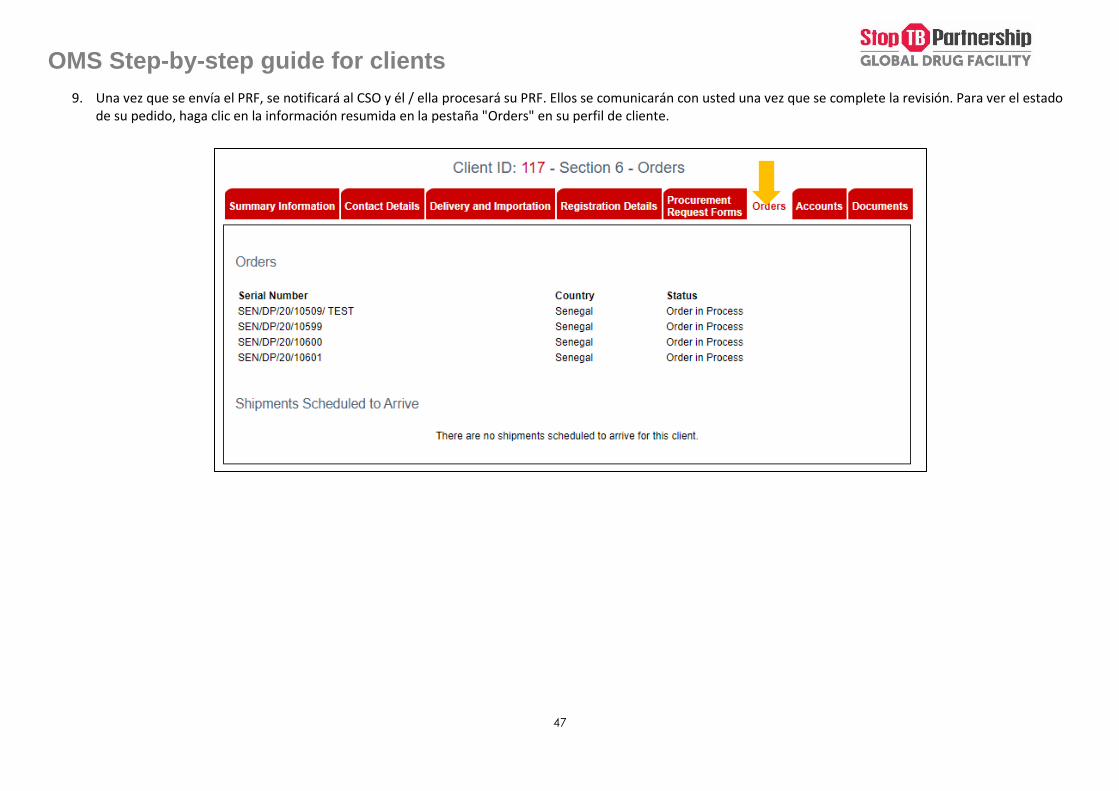
9. Una vez que se envía el PRF, se notificará al CSO y él / ella procesará su PRF. Ellos se comunicarán con usted una vez que se complete la revisión. Para ver el estado de su pedido, haga clic en la información resumida en la pestaña "Orders" en su perfil de cliente.

OMS Step-by-step guide for clients
48
Paso 3.2: Generar un Formulario de Adquiciones(PRF) para diagnosticos ou equipos medicos
1. Para crear un formulario de solicitud de adquisición (PRF) para diagnósticos ou equipos medicos, vaya a la pestaña Procurement Request Forms y haga clic en "Generate PRF for Diagnostics".
2. Tenga en cuenta que para ayudarlo en su planificación y presupuesto o para tener más información sobre las especificaciones técnicas de nuestros productos,
puede utilizar la Lista de pedidos (enlace a continuación). Una vez completado, cargue la lista de pedidos en la pestaña "Documents". http://www.stoptb.org/assets/documents/gdf/drugsupply/GDF_TB_Diagnostics_Ordering_List.xls

OMS Step-by-step guide for clients
49
3. Complete o actualice la información requerida en cada pestaña hasta Productos haciendo clic en "Edit this PRF information" en la parte inferior de cada pestaña y luego envíe sus cambios. Tenga en cuenta que cierta información se ha completado automáticamente desde su perfil de cliente.
4. Para programar dos o más entregas, haga clic en "Add another delivery".

OMS Step-by-step guide for clients
50
5. La pestaña Documents sirve para cargar la Lista de Pedidos (Ordering List). Suba la Lista de Pedidos haciendo clic en "Edit this PRF information" en la parte inferior.
6. Haga clic en la pestaña "Finalize and Submit" para ver las Condiciones de suministro y enviar el PRF. Para hacerlo, haga clic en "Edit this PRF information" en la parte
inferior de la página.

OMS Step-by-step guide for clients
51
7. Marque " I acknowledge and accept the above Terms and Conditions ", ingrese su nombre, cargo y fecha, y haga clic en Submit changes.
8. Desplácese hasta la parte inferior de la página nuevamente para encontrar el botón "Submit to GDF". Haga clic en el botón para enviar el PRF.

OMS Step-by-step guide for clients
52
9. Si es necesario, puede imprimir el PRF haciendo clic en "View this PRF in printable format" en la parte inferior de la página. Para obtener instrucciones más detalladas sobre cómo imprimir el PRF, vaya al Paso 4: Imprima su PRF.
10. Una vez que se envía el PRF, se notificará al CSO y él / ella procesará su PRF. Ellos se comunicarán con usted una vez que se complete la revisión. Para ver el estado de su pedido, haga clic en la información resumida en la pestaña "Orders" en su perfil de cliente.

OMS Step-by-step guide for clients
53
Paso 4: Imprimir y formar su Formulario de Adquisiciones (PRF)
1. Si es necesario, puede imprimir y firmar su PRF. Haga clic en "View this PRF in printable format" en la parte inferior de la página en la pestaña "Finalize and Submit". Esto abrirá una nueva pestaña del navegador con su PRF en un formato imprimible.
2. Si usa Google Chrome: presione Ctrl + P para abrir la vista previa de impresión. Para eliminar los encabezados y pies de página (enlaces y marcas de tiempo que aparecen en la parte superior e inferior de cada página), haga clic en "Más configuraciones" y desmarque la casilla de verificación "Encabezados y pies de página". Finalmente, haga clic en Imprimir.
1
2
3
OMS Step-by-step guide for clients
54
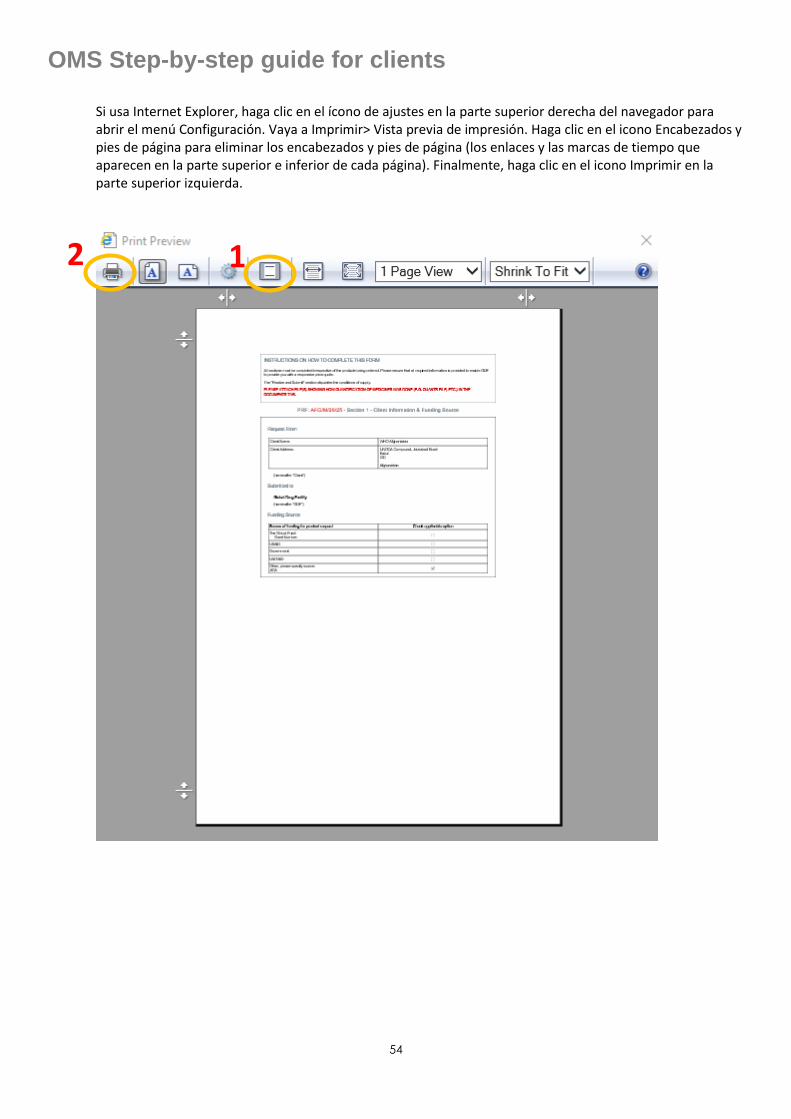
Si usa Internet Explorer, haga clic en el ícono de ajustes en la parte superior derecha del navegador para abrir el menú Configuración. Vaya a Imprimir> Vista previa de impresión. Haga clic en el icono Encabezados y pies de página para eliminar los encabezados y pies de página (los enlaces y las marcas de tiempo que aparecen en la parte superior e inferior de cada página). Finalmente, haga clic en el icono Imprimir en la parte superior izquierda.
1 2

OMS Step-by-step guide for clients
55
Si usa Mozilla Firefox, haga clic en el botón Menú en la parte superior derecha del navegador y vaya a
Imprimir. Haga clic en "Configuración de página" para eliminar los encabezados y pies de página (los enlaces
y las marcas de tiempo que aparecen en la parte superior e inferior de cada página). Finalmente, haga clic en
el botón Imprimir en la parte superior izquierda.
3. El PRF impreso tendrá un lugar para la firma en la última sección (Sección 9 – Finalize and Submit).
1 2

OMS Step-by-step guide for clients
56
Como recuperar su Formulario de Adquisiciones (PRF) despues de su envio
1. Los PRF que se han enviado (en estado "Submitted to GDF") se pueden recuperar en caso de que sea necesario realizar algún cambio. 2. Para hacerlo, vaya a "My Procurement Request Forms".
3. Seleccione el PRF que le gustaría recuperar y haga clic en "Recall this PRF"
4. Su PRF ahora volverá al estado de Borrador y podrá realizar cambios y volver a enviar el PRF nuevamente.
OMS Step-by-step guide for clients
57
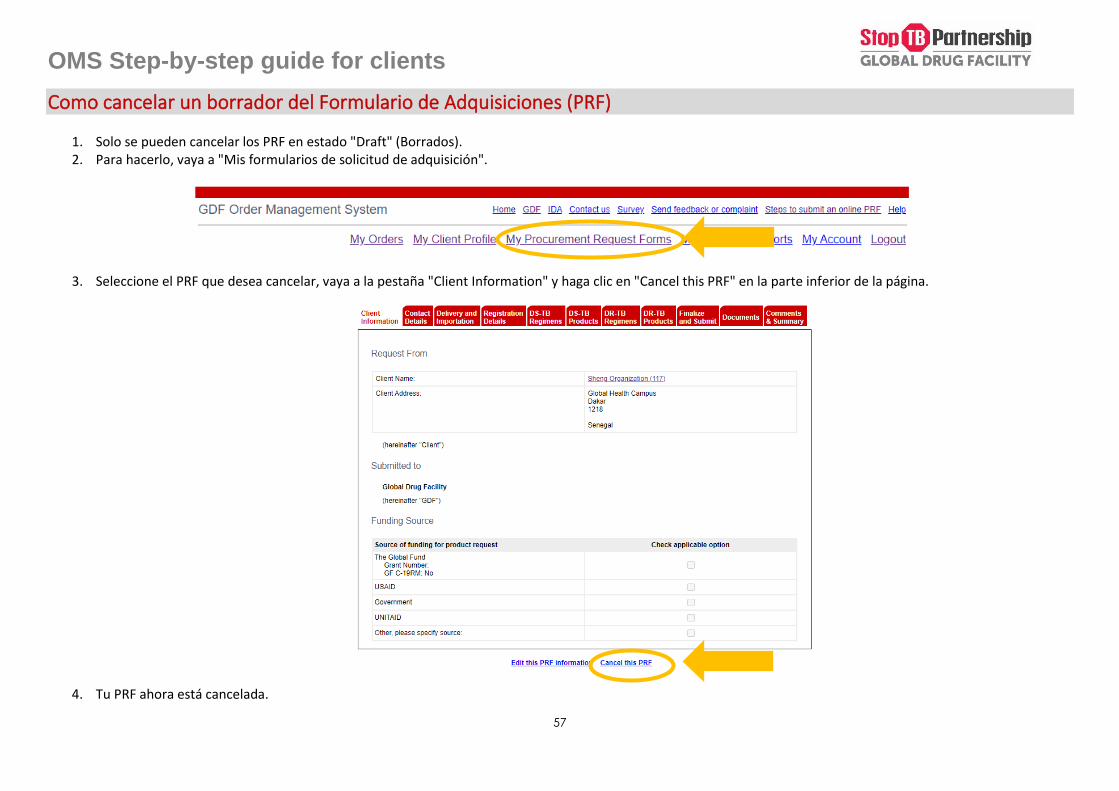
Como cancelar un borrador del Formulario de Adquisiciones (PRF)
1. Solo se pueden cancelar los PRF en estado "Draft" (Borrados). 2. Para hacerlo, vaya a "Mis formularios de solicitud de adquisición".
3. Seleccione el PRF que desea cancelar, vaya a la pestaña "Client Information" y haga clic en "Cancel this PRF" en la parte inferior de la página.
4. Tu PRF ahora está cancelada.

OMS Step-by-step guide for clients
58
Como recuperar su contraseña
1. Vaya a la página de inicio de OMS 2. Haga clic en "Forgot your password"
3. Seleccione su país y agregue un comentario. 4. Haga clic en "Continue". 5. Verifique su mensaje y haga clic en "Submit your request". 6. Se le enviarán sus datos por correo electrónico.