online bonus: 10 best table saw jigs - woodsmith books woodworking starts with a solid workbench....
TRANSCRIPT

See more plans like this at:www.PlansNOW.com
page 1 of 7 ©2006 August Home Publishing CompanyAll rights reserved
THANK YOU!You have successfully downloaded your plan.
>Go to Page 1
> Clear printer memory. If you are unable to print this document, turn off your printer for at least 15 seconds and try again. Or visit Adobe Reader Support.
Tips for Trouble-Free Printing
See More Plans Like This! www.PlansNow.com
Craftsman FurnitureBuild the same distinctivefeatures from the early1900s.
Bedroom FurnitureBeds, dressers, armoires, cribs, cradles, and more!
Workbenches & Tool StandsSound woodworking starts with a solid workbench.
Shop Jigs & TechniquesGet the most from your tools with easy-to-build shop jigs.
Entertainment CentersDisplay your TVs and stereos in a stylish cabinet.
Outdoor FurnitureEasy-to-build projects using a minimum of power tools.
Bookcases & ShelvesChoose from a variety of plans for storing books & keepsakes.
Home ImprovementSave hundreds of dollars in remodeling when you DIY.
Plans N O W®
www.Woodsmith.com

See more plans like this at:www.PlansNOW.com
page 2 of 7 ©2006 August Home Publishing CompanyAll rights reserved
T he table saw is king in my shop. It sits right in the middle where I can get at it easily. Whether it’s rough cutting a board to length or fine tuning a project's
joinery, more than likely I'll go to the table saw. But what really makes my table saw so versatile are the shop-built “helpers” I’ve accumulated through the years. I'm not talk-
ing about jigs that are difficult to build or time consuming to set up. Even the more involved jigs here can be built in just a few hours.
JUST A NOTE. Some of these accessories are designed and sized to fit my 10" contractor’s saw. But they can be adapted to fit just about any brand or size of table saw.
a.
1. PUSH BLOCKIt might seem like a pretty simple accessory, but I’ve found that using the right push block not only makes your work safer, it can also improve the quality.
The main purpose of a good push block is to keep your fingers far away from the saw blade. And the first thing you’ll notice about this push block, shown at work in the photo at right, is the comfortable “high mounted” handle. This is definitely a big plus in my book.
But the best part is that you don’t have to sacrifice when it comes to control. The forward sweep of the handle allows you to put good downward pressure on the workpiece and achieve a steady, con-trolled feed. You’ll get a clean cut while keeping your hands safe and avoiding the risk of kickback.
REPLACEABLE PARTS. Of course, a push block is going to get chewed up. That’s what they’re for. You sacrifice the push block to save your fingers. So this model is designed with a business end that can be easily replaced. When the body or the hardboard push cleat get too worn, just cut new ones and switch out the handle, see drawing below. And with the handle mounted “up above,” it will never be touched by the saw blade.
10 BESTTABLE SAW JIGS
12
www.Woodsmith.com

See more plans like this at:www.PlansNOW.com
page 3 of 7 ©2006 August Home Publishing CompanyAll rights reserved
2. ADJUSTABLE MITER GAUGE FENCEI sometimes think that even the table saw manufactur-ers would concede that the miter gauges supplied with their saws are just a starting point. That’s because every one I’ve ever seen has holes in the face for mount-ing an auxiliary fence.
The small face of the gauge just doesn’t have enough surface to provide solid support for the workpiece. It’s easy to attach a short length of 3/4"-thick stock to the face of the miter gauge to solve the problem, but I wanted a little more. I needed a fence that would provide good support right up to the cut at different angles.
ADJUSTABLE. That’s a pretty tall order. But the answer is this adjustable miter gauge fence. As you can see in the drawing below, it uses a rabbeted cleat system that allows the fence to slide toward or away from the blade depending on the angle of the cut. And just tightening a couple of screws locks the position
of the fence. This allows you to make your cuts with complete control of the workpiece.
At times I’ll even slide the fence beyond the blade so that it follows the workpiece through the blade and backs up the cut. And when the fence gets chewed up, it can easily be replaced.
3. OUTFEED ROLLERA good outfeed roller just takes the place of the friend you have to cajole into helping you rip those long boards or panels to width. So it makes life a little bit easier for both you and your friends.
I’ve tried the commercial outfeed rollers, but
I think this shop-built model has them all beat.
First, it’s cheap to build. As you can see in the drawing, all you need is some scrap lumber, a short
length of PVC pipe, a dowel, and woodscrews.
But the big plus is in the way the roller is supported. Most com-mercial outfeed rollers use a tripod system. This type has caused me grief on more than one occasion. They aren’t very stable and they seem to tip or even fall over at just the wrong time.
But this outfeed roller is designed to be clamped firmly to a sawhorse or other solid support, as in the photo above. So once you set it up, it’ll stay put and allow you to focus on the task at hand.
1 a.
b.
See more plans like this at:www.PlansNOW.com
page 4 of 7 ©2006 August Home Publishing CompanyAll rights reserved
4. ZERO-CLEARANCE BLADE INSERT
5. SLIP-0N FENCE
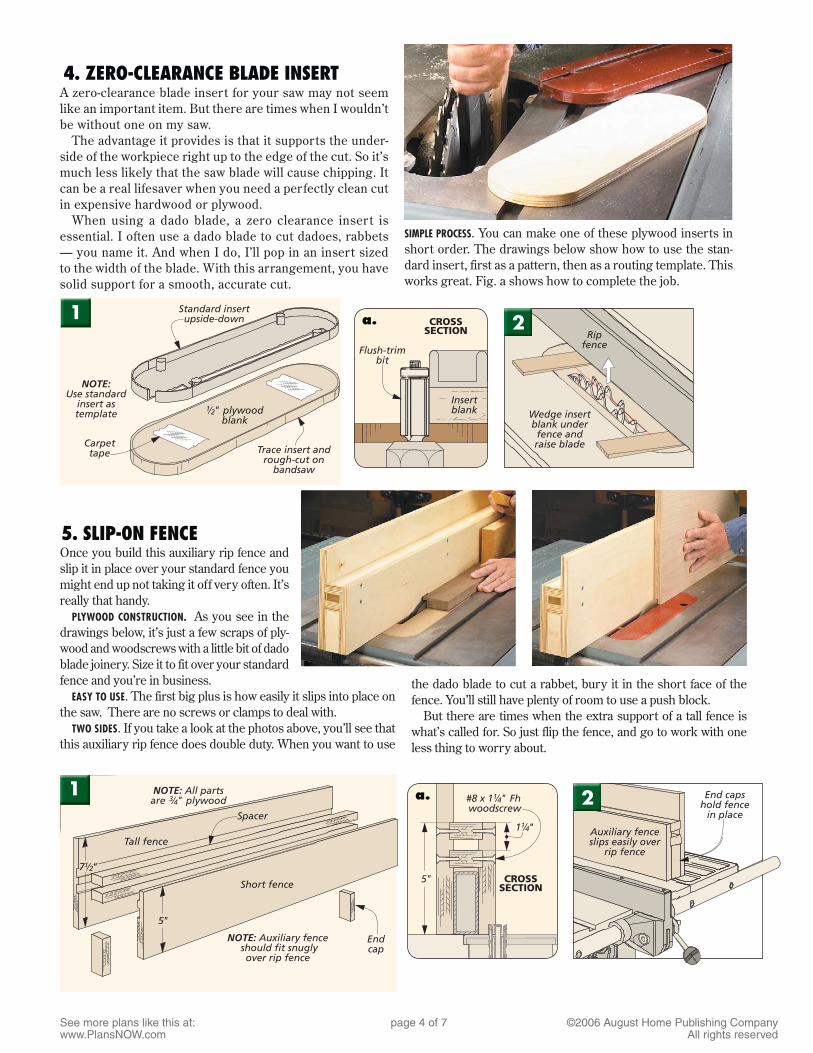
A zero-clearance blade insert for your saw may not seem like an important item. But there are times when I wouldn’t be without one on my saw.
The advantage it provides is that it supports the under-side of the workpiece right up to the edge of the cut. So it’s much less likely that the saw blade will cause chipping. It can be a real lifesaver when you need a perfectly clean cut in expensive hardwood or plywood.
When using a dado blade, a zero clearance insert is essential. I often use a dado blade to cut dadoes, rabbets — you name it. And when I do, I’ll pop in an insert sized to the width of the blade. With this arrangement, you have solid support for a smooth, accurate cut.
SIMPLE PROCESS. You can make one of these plywood inserts in short order. The drawings below show how to use the stan-dard insert, first as a pattern, then as a routing template. This works great. Fig. a shows how to complete the job.
Once you build this auxiliary rip fence and slip it in place over your standard fence you might end up not taking it off very often. It’s really that handy.
PLYWOOD CONSTRUCTION. As you see in the drawings below, it’s just a few scraps of ply-wood and woodscrews with a little bit of dado blade joinery. Size it to fit over your standard fence and you’re in business.
EASY TO USE. The first big plus is how easily it slips into place on the saw. There are no screws or clamps to deal with.
TWO SIDES. If you take a look at the photos above, you’ll see that this auxiliary rip fence does double duty. When you want to use
the dado blade to cut a rabbet, bury it in the short face of the fence. You’ll still have plenty of room to use a push block.
But there are times when the extra support of a tall fence is what’s called for. So just flip the fence, and go to work with one less thing to worry about.
a.2a.1
2a.1
See more plans like this at:www.PlansNOW.com
page 5 of 7 ©2006 August Home Publishing CompanyAll rights reserved
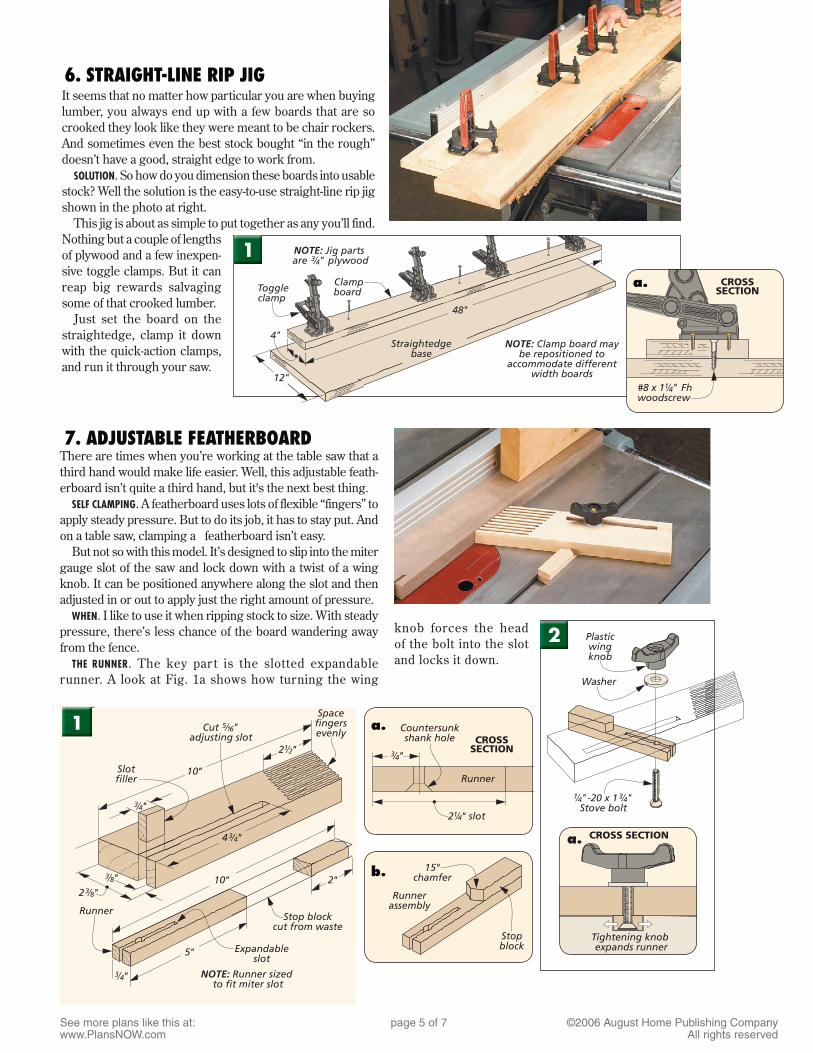
There are times when you’re working at the table saw that a third hand would make life easier. Well, this adjustable feath-erboard isn’t quite a third hand, but it's the next best thing.
SELF CLAMPING. A featherboard uses lots of flexible “fingers” to apply steady pressure. But to do its job, it has to stay put. And on a table saw, clamping a featherboard isn’t easy.
But not so with this model. It’s designed to slip into the miter gauge slot of the saw and lock down with a twist of a wing knob. It can be positioned anywhere along the slot and then adjusted in or out to apply just the right amount of pressure.
WHEN. I like to use it when ripping stock to size. With steady pressure, there’s less chance of the board wandering away from the fence.
THE RUNNER. The key par t is the slotted expandable runner. A look at Fig. 1a shows how turning the wing
knob forces the head of the bolt into the slot and locks it down.
It seems that no matter how particular you are when buying lumber, you always end up with a few boards that are so crooked they look like they were meant to be chair rockers. And sometimes even the best stock bought “in the rough” doesn’t have a good, straight edge to work from.
SOLUTION. So how do you dimension these boards into usable stock? Well the solution is the easy-to-use straight-line rip jig shown in the photo at right.
This jig is about as simple to put together as any you’ll find. Nothing but a couple of lengths of plywood and a few inexpen-sive toggle clamps. But it can reap big rewards salvaging some of that crooked lumber.
Just set the board on the straightedge, clamp it down with the quick-action clamps, and run it through your saw.
7. ADJUSTABLE FEATHERBOARD
6. STRAIGHT-LINE RIP JIG
a.
1a.
2
1 a.
b.

See more plans like this at:www.PlansNOW.com
page 6 of 7 ©2006 August Home Publishing CompanyAll rights reserved
8. CUT-OFF SLEDSometimes, after you buy a new tool or build an accessory, you wonder how you ever got along without it. And that’s the case with this cut-off sled. This accessory is really a pretty simple idea, but once you build it, you’ll find yourself using it time after time.
Think of it as just a really big miter gauge for working with wide boards and panels. A standard miter gauge with an auxiliary fence works great for cutting cabinet facings or door parts to length, but when it comes to crosscuting an 18"-wide plywood panel or a small tabletop you need a bit more control. And that’s what this sled will give you.
THE WHOLE SAW. As you can see, it’s designed to use both miter gauge slots and slide on most of the saw table. And where your miter gauge might have an 18" auxiliary fence, this cut-off sled has a 48" long fence.
It might look a little awkward to feed through the saw. But just wipe a thin coat of wax on the runners and the base and the sled glides easily across the table.
You’ll also find that you get a more accurate cut using the sled. Since all the pieces — fence, bed and workpiece are moving across the saw together, there’s almost no chance of the work-piece shifting or you losing your grip.
USER NOTE. When I make a cut, I always stand toward the left side of the sled and push with my right hand on the left top of the fence as you see in the photo above. My left hand is free to hold the workpiece flat and tightly against the fence. This makes control of the workpiece easier and the feed will be smoother.
SAFETY SHIELD
At the end of the cut, the saw blade passes through the rear fence. This was a bit of a concern to me. So to minimize any chance of an accident, I added a blade guard to the rear fence. It’s nothing more than a plywood side guard that supports a small Plexiglas shield. It still allows you to see the workpiece and the saw blade, but helps protect you from possible contact.
1
2
a.
b. a.

See more plans like this at:www.PlansNOW.com
page 7 of 7 ©2006 August Home Publishing CompanyAll rights reserved
a.
9. TENONING JIG
10. DEDICATED MITER SLED
A tenoning jig is usually one of the standard add-on accessories offered by table saw man-ufacturers. But these are usually really heavy-duty models that are going to cost a pretty fair amount of money. So I opted to build my own version with just a few bucks worth of material and a little investment of time. And I think it works just as well.
BUILD IT. Just take a look at the drawings below and you’ll see how easy this jig is to build. As you can see in the photo at right, it just slips over and slides along the rip fence of the saw. So the adjustment mechanism on the rip fence makes an easy job of lining up the cut.
USE IT. The question you might ask is why
bother with a tenoning jig when a dado blade will do the job?
Well, of course you can use this jig to quickly cut the cheeks of a tenon, but that’s not all it’ll do.
Whenever I cut an exposed bridle joint or a half-lap I turn to this jig to create the smooth cheeks and tight fit that I want.
For a bridle joint I’ll use the tenon jig to first cut the centered “groove” of the joint. I then turn around and reset the jig to cut an accurate tenon to fit. And both halves of the joint end up perfectly smooth, without the score marks or steps left by a dado blade.
To a seasoned woodworker, no joint makes a better impression than a clean, tight-fitting miter. It says “Hey, this person knows his stuff.”
The catch is that cutting an accurate 45°miter can often be a matter of trial and error, with a little luck. But this dedicated miter sled can make accurate miters a sure thing.
Since you’re only worried about one angle — a perfect 45° — that’s all this
sled does. Once it’s set up, you’ll get the same cut time after time.
ON THE MARK. And the added bonus is that you’ll know right where the cut will fall. As you can see below, you can just line up your mark with the edge of the sled. There’s no guesswork involved.
And to make the matching miter there’s no need to flip the piece over and cut from the opposite side. Just move the sled to the opposite miter slot. W
1a.
1 2