online extra jewelry chest drawer dividers
TRANSCRIPT
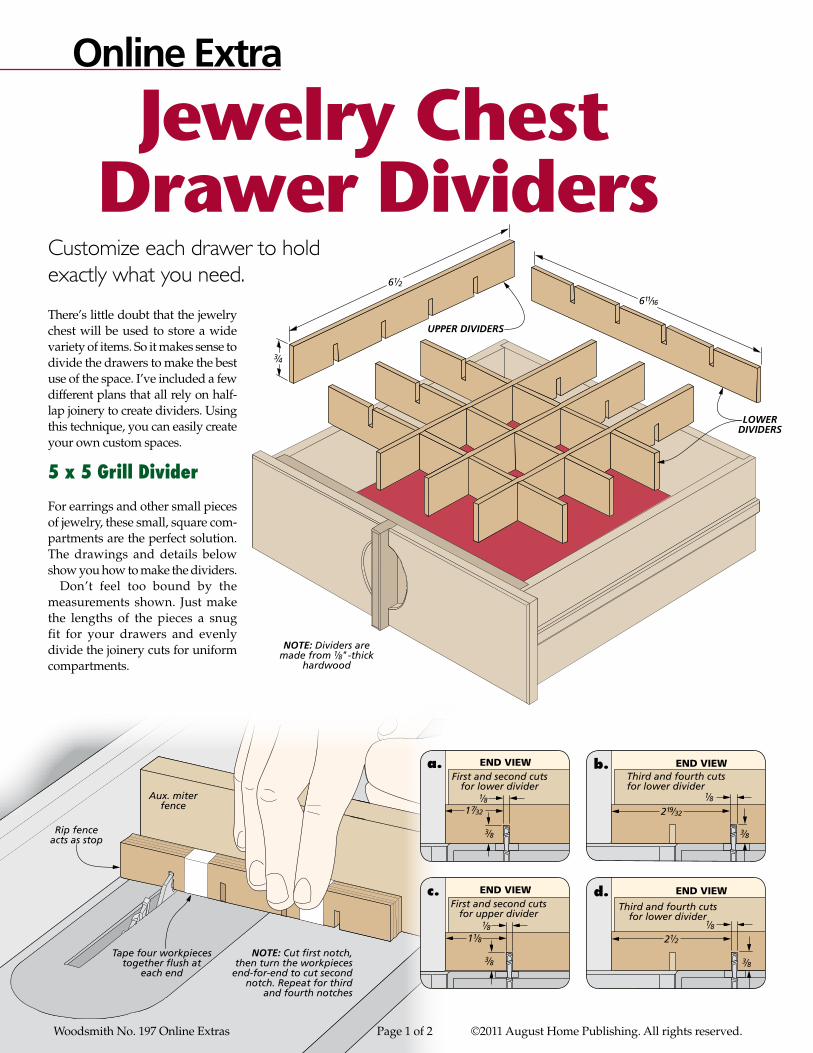
Online Extra
Jewelry Chest Drawer Dividers
G
CROSS SECTIONEND VIEW
PART NAMES
#8 x 1!/4" Fh woodscrewNOTE: This
Typical Plywoodendgrain
(#/4" shown)
Aux. miterfence
Tape four workpiecestogether flush at
each end
NOTE: Cut first notch,then turn the workpieces
end-for-end to cut secondnotch. Repeat for third
and fourth notches
Rip fenceacts as stop
G
CROSS SECTIONEND VIEW
PART NAMES
#8 x 1!/4" Fh woodscrewNOTE: This
Typical Plywoodendgrain
(#/4" shown)
!/8
2!(/32
END VIEW
#/8
Third and fourth cutsfor lower divider
b.
Woodsmith No. 197 Online Extras Page 1 of 2 ©2011 August Home Publishing. All rights reserved.
G
CROSS SECTIONEND VIEW
PART NAMES
#8 x 1!/4" Fh woodscrewNOTE: This
Typical Plywoodendgrain
(#/4" shown)
6!/2
6!!/16
UPPER DIVIDERS
LOWERDIVIDERS
#/4
NOTE: Dividers aremade from !/8"-thick
hardwood
There’s little doubt that the jewelry chest will be used to store a wide variety of items. So it makes sense to divide the drawers to make the best use of the space. I’ve included a few different plans that all rely on half-lap joinery to create dividers. Using this technique, you can easily create your own custom spaces.
For earrings and other small pieces of jewelry, these small, square com-partments are the perfect solution. The drawings and details below show you how to make the dividers.
Don’t feel too bound by the measurements shown. Just make the lengths of the pieces a snug fit for your drawers and evenly divide the joinery cuts for uniform compartments.
Customize each drawer to hold exactly what you need.
G
CROSS SECTIONEND VIEW
PART NAMES
#8 x 1!/4" Fh woodscrewNOTE: This
Typical Plywoodendgrain
(#/4" shown)
!/81&/32
END VIEW
#/8
First and second cutsfor lower divider
a.
G
CROSS SECTIONEND VIEW
PART NAMES
#8 x 1!/4" Fh woodscrewNOTE: This
Typical Plywoodendgrain
(#/4" shown)
!/8
2!/2
END VIEW
Third and fourth cutsfor lower divider
#/8
d.
G
CROSS SECTIONEND VIEW
PART NAMES
#8 x 1!/4" Fh woodscrewNOTE: This
Typical Plywoodendgrain
(#/4" shown)
!/81!/8
END VIEW
#/8
First and second cutsfor upper divider
c.
5 x 5 Grill Divider

I made these slightly larger com-partments for items like broaches or other larger items. Once again, the techniques are the same as before.
After planing your stock to 1⁄8" thick, you simply cut it to final length and width. Then, at the table saw, make the joinery cuts using an auxiliary fence on the miter gauge.
You’ll notice that I chose to make these compartments deeper than before (by making the dividers wider). I think this works out well for larger items, but you’ll have to be the judge, depending on the con-tent you intend to store.
G
CROSS SECTIONEND VIEW
PART NAMES
#8 x 1!/4" Fh woodscrewNOTE: This
Typical Plywoodendgrain
(#/4" shown)
6!/2
6!!/161!/4
UPPER DIVIDERS
LOWERDIVIDER
G
CROSS SECTIONEND VIEW
PART NAMES
#8 x 1!/4" Fh woodscrewNOTE: This
Typical Plywoodendgrain
(#/4" shown)
!/8
2!/8
END VIEW
%/8First and second cutsfor upper divider
b.
G
CROSS SECTIONEND VIEW
PART NAMES
#8 x 1!/4" Fh woodscrewNOTE: This
Typical Plywoodendgrain
(#/4" shown)
!/82%/32
END VIEW
%/8First and second cutsfor lower divider
a.
To store longer items, all you need to do is leave out the inner grid pieces. As you can see in the drawings at left, I used only two pieces to serve as end bars to hold the dividers ver-tical. Then I cut the half-lap joints on the ends of the three dividers. I didn’t use a stop to cut the ends, but you’ll want to be careful not to cut more than the thickness of the saw blade to avoid gaps in the assembly.
As I said earlier, your drawer sizes may vary slightly, so be sure to take accurate measurements of both the length and width before you begin. Then you can cut the ends and dividers for a snug fit.
G
CROSS SECTIONEND VIEW
PART NAMES
#8 x 1!/4" Fh woodscrewNOTE: This
Typical Plywoodendgrain
(#/4" shown)
#/4
6!/2
6!!/16
DIVIDERS
END BAR
END BARG
CROSS SECTIONEND VIEW
PART NAMES
#8 x 1!/4" Fh woodscrewNOTE: This
Typical Plywoodendgrain
(#/4" shown)
!/8ENDVIEW
#/8#/8
Dividerend notch
G
CROSS SECTIONEND VIEW
PART NAMES
#8 x 1!/4" Fh woodscrewNOTE: This
Typical Plywoodendgrain
(#/4" shown)
!/81(/16
END VIEW
#/8
First and second cuts for end bars
The final touch is to add a remov-able ring tray. The nice thing about this tray is the padded ring holders shown in the photo at right. They hold the rings upright and prevent them from sliding around in the drawer. You can find the details for making the padded holder in our other on-line extra.
Assembling the box is pretty straightforward. I used butt joints to attach the sides. For the bottom, I chose 1⁄8” plywood cut for a snug fit and glued in place. It’s a good idea to leave the tray a little bit shorter than the drawer so it’s easy to get in and out when you need it.
a.
b.
G
CROSS SECTIONEND VIEW
PART NAMES
#8 x 1!/4" Fh woodscrewNOTE: This
Typical Plywoodendgrain
(#/4" shown)
Trayside
Trayend
TraybottomFRONT
SECTIONVIEW
Drawerside
Drawer bottom
!/8
Woodsmith No. 197 Online Extras Page 2 of 2 ©2011 August Home Publishing. All rights reserved.
Soften top andbottom edges
G
CROSS SECTIONEND VIEW
PART NAMES
#8 x 1!/4" Fh woodscrewNOTE: This
Typical Plywoodendgrain
(#/4" shown)
6!/2
3#/4
TRAYEND
TRAYEND
(/16
TRAYSIDE
TRAYSIDE
TRAY BOTTOM(6!/4" x 3#/4"-!/8" ply.)
b.
3 x 3 Grill Dividers
4 Compartment
Ring Tray